

Page 1
user guide
Satellite Radio with MP3
Page 2
Quick Start
Contents
1. Charge battery for at least 8 hours (page 12).
2. Set up your Helix (page 20).
3. Activate your XM subscription (page 18).
4. Listen to and record live XM* (pages 26 and 33).
5. Listen to recorded content (page 37).
6. Buy songs from XM+Napster (page 55).
7. Manage your songs and playlists from
your computer (page 56).
*Hardware and required monthly subscription sold separately. Recorded music not for use in commercial establishments.
Installation cost and other fees and taxes, including a one-time activation fee, may apply. Subscription fee is consumer
only. XM products, programming, services, and fees are subject to change, at any time, without notice. Channels with
frequent explicit language are indicated with an XL. Channel blocking is available for XM radio receivers by calling
1-800-XM-RADIO. Subscriptions subject to Customer Agreement available at xmradio.com. XM service only available in
the 48 contiguous United States. ©2006 XM Satellite Radio Inc. All rights reserved.
2
Quick Start
Introduction ...................................... 4
Features .................................................... 4
Safety Instructions .................................... 7
What’s in the Box.................................... 10
Charging the Battery .............................. 12
Helix Controls.......................................... 13
Using This Guide...................................... 15
Helix Display............................................ 16
Remote .................................................... 17
Subscribing to XM........................ 18
Using Your Helix Alone ............ 20
Setup ...................................................... 20
Live XM .................................................. 26
TuneSelect™ .......................................... 29
Info Extras .............................................. 31
Recording XM ........................................ 33
Listening to Recorded XM Content
(My Music) .......................................... 37
Organizing Your Music ............................ 38
Using Helix with a PC ................ 48
System Requirements .............................. 48
Setup ...................................................... 49
Registering with XM+Napster ................ 51
What Can You Do with XM+Napster? .... 54
Exploring ................................................ 54
Purchasing Music .................................... 55
Organizing Your Music ............................ 56
Disconnecting Your Helix from the PC .... 60
Listening to XM Radio Online (XMRO).... 61
Using Your CDs or MP3/WMA Files ........ 62
Updating Helix Firmware ........ 64
Using XM+Napster.................................. 64
Using the Update Tool ............................ 65
Using the Web..........................................65
Settings .............................................. 66
FM Modulator ........................................ 66
Aiming the Antenna ................................ 69
Audio ...................................................... 70
Display .................................................... 71
Channel Access ...................................... 73
Clock and Sleep Timer ............................ 75
Vehicle Mode............................................76
Memory Partition .................................... 77
Restoring Factory Defaults ...................... 78
Customer Support........................ 80
Troubleshooting ...................................... 80
Specifications .......................................... 83
Patent Information ..................................85
FCC Statement ........................................86
Warranty ................................................ 88
Contents
ENG
3
Page 3
Introduction
Introduction
Features
Congratulations on your purchase of the Samsung Helix™. It’s the next-generation XM2go
radio, with an XM receiver, built-in antenna, and storage for XM, MP3, or WMA music files in
one portable device.
Enjoy XM’s 170 channels from coast to coast, with over 80,000 hours of entertainment each
month. XM offers musical choice, variety, and discovery – worlds beyond your own collection
– plus a wide range of news, sports, talk, comedy, kids, and entertainment channels. Hear XM
live, or save XM programming on your Helix to listen at your leisure.
We’ve also teamed up with Napster, a leading provider of online music. Imagine discovering
a new artist on XM and then, with just a few clicks of a mouse, buying high-fidelity tracks
and albums by that artist and similar artists. It’s that simple.
Manage all your music – XM tracks, songs you purchase from Napster, and MP3/WMA files
you rip from your CDs – with the easy-to-use XM+Napster program on your Microsoft
Windows®PC.
One device, all the music you could ever hope for, and the easiest way to find the music you
want – now that’s a music experience!
4
Introduction
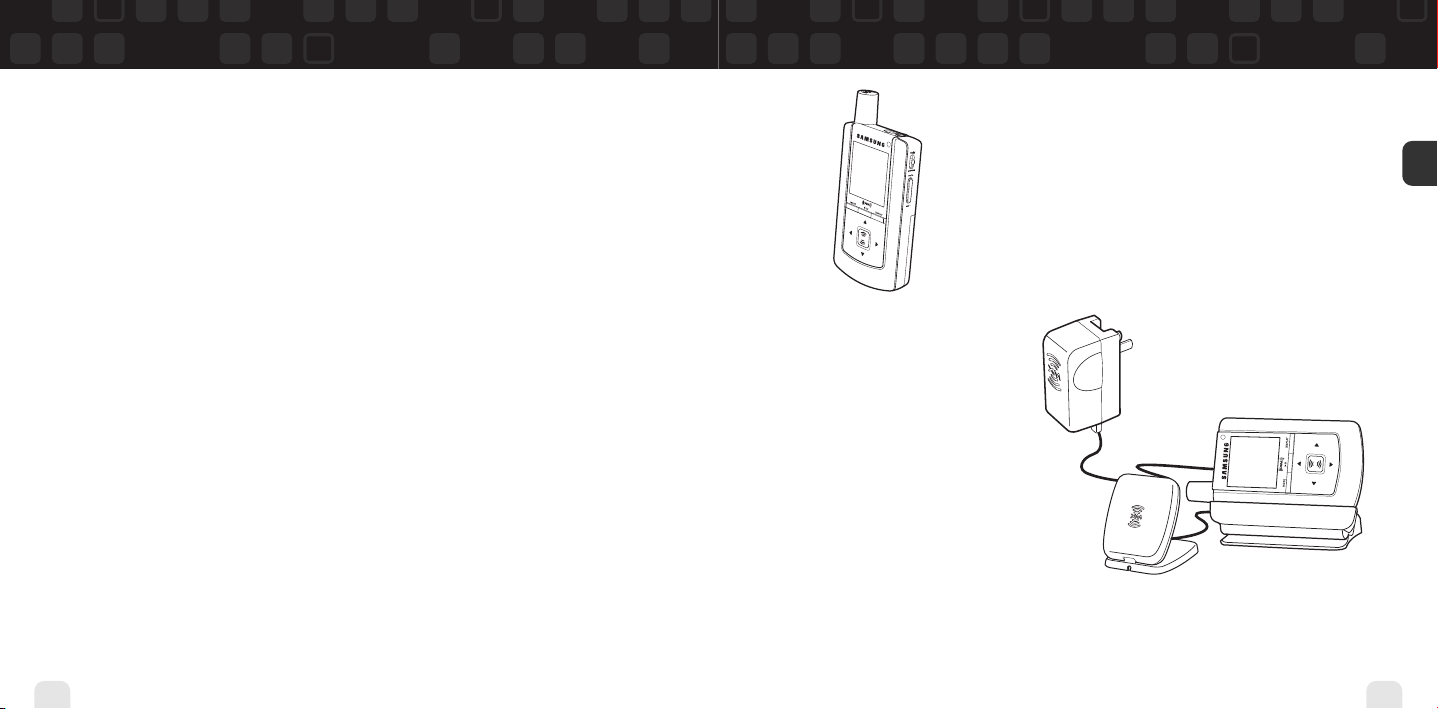
Helix, Undocked
®
Listen to live and recorded XM* content
Play MP3 and WMA files
Manage your tracks, favorite channels, and playlists
Listen on the go
ENG
Helix + Cradle + Antenna
Listen to live and recorded
XM* content
®
Play MP3 and WMA files
Manage your tracks, favorite
channels, and playlists
Listen in your car or home
*Hardware and required monthly subscription sold separately. Recorded music not for use in commercial establishments.
Installation cost and other fees and taxes, including a one-time activation fee, may apply. Subscription fee is consumer
only. XM products, programming, services, and fees are subject to change, at any time, without notice. Channels with
frequent explicit language are indicated with an XL. Channel blocking is available for XM radio receivers by calling
1-800-XM-RADIO. Subscriptions subject to Customer Agreement available at xmradio.com. XM service only available in
the 48 contiguous United States. ©2006 XM Satellite Radio Inc. All rights reserved.
Introduction
5
Page 4
Introduction
Introduction
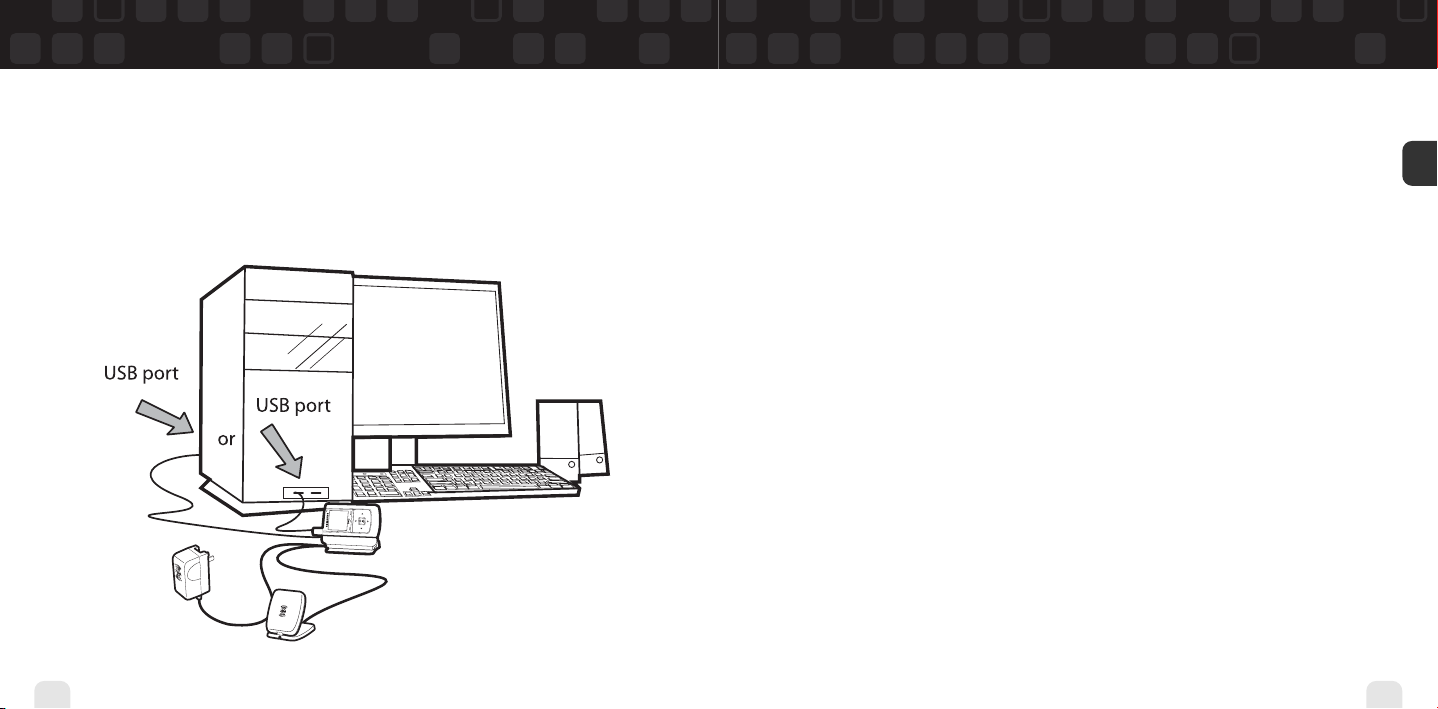
Helix + Cradle + Antenna + PC
Manage content using Helix or your PC
Listen to XM Radio Online
Purchase music from XM+Napster and upload it to your Helix
6
Introduction
Safety Instructions
Please read and understand all the instructions to avoid injury to yourself
and/or damage to your Helix.
Helix Digital Audio Player
Do not expose to extreme temperatures (above 140°F or below -4°F, or above 60°C or below
-20°C).
Do not expose to moisture. Do not use Helix near water.
Do not let any foreign matter spill into Helix.
Do not expose to chemicals such as benzene and thinners. Do not use liquid or aerosol
cleaners. Clean with a soft damp cloth only.
Do not expose to direct sunlight or heat sources for a prolonged period.
Do not try to disassemble and/or repair Helix yourself.
Do not subject Helix to severe impact.
Do not place heavy objects on Helix.
Do not subject Helix to excessive pressure.
Do not touch the charger with wet hands.
Do not store in dusty areas.
Please be aware that Samsung claims no responsibility for damage from
data loss due to breakdown, repair, or other causes.
Introduction
ENG
7
Page 5
Introduction
Introduction
Earbuds and Headphones
To avoid damaging your hearing:
Using earbuds or headphones for an extended time can cause serious damage to your
hearing.
If you are exposed to a sound louder than 85 dB for an extended time, your hearing may
be adversely affected. The louder the sound, the more seriously your hearing may be
impaired. Ordinary conversations are about 50-60 dB; road noise levels are about 80 dB.
We strongly advise you to set the volume level to medium, which is usually less than 2/3 of
the maximum.
If you hear ringing in your ear(s), lower the volume or stop using the earbuds or
headphones.
To avoid risk of traffic accidents:
Do not use earbuds or headphones while operating a bicycle, automobile, or motorcycle.
Not only is it dangerous, it may be prohibited by law in some areas.
Pay attention! Using earbuds or headphones while crossing traffic can lead to serious
accidents.
For your safety, make sure the earbud or headphone cable does not get in the way of your
arm or other surrounding objects while you’re walking or exercising.
Environmental Information
Follow local guidelines for waste disposal when discarding packaging, batteries, and
electronic appliances.
Your player is packaged with cardboard, polyethylene, etc., and does not contain any
unnecessary materials.
8
Introduction
Battery Charger Safety
Caution: Opening the case may result in electric shock.
Caution: The uninsulated parts inside the power adapter and cradle may cause electric
shock or fire. For your safety, please do not open these components. Do not let metallic
objects, such as necklaces or coins, come into contact with the power adapter plugs or
battery terminal.
Caution: To avoid electric shock, use the power adapter only with an outlet that matches
the shape of the adapter’s plug.
Caution: Make sure that you insert the adapter’s plug all the way into the outlet.
Caution: Do not plug several devices into the same electrical outlet.
Important: Always read and understand the user guide to prevent problems.
Warning: Use the power adapter and cradle away from water sources to avoid fire or
electric shock.
Introduction
ENG
9
Page 6
Introduction
Introduction
What s in the Box
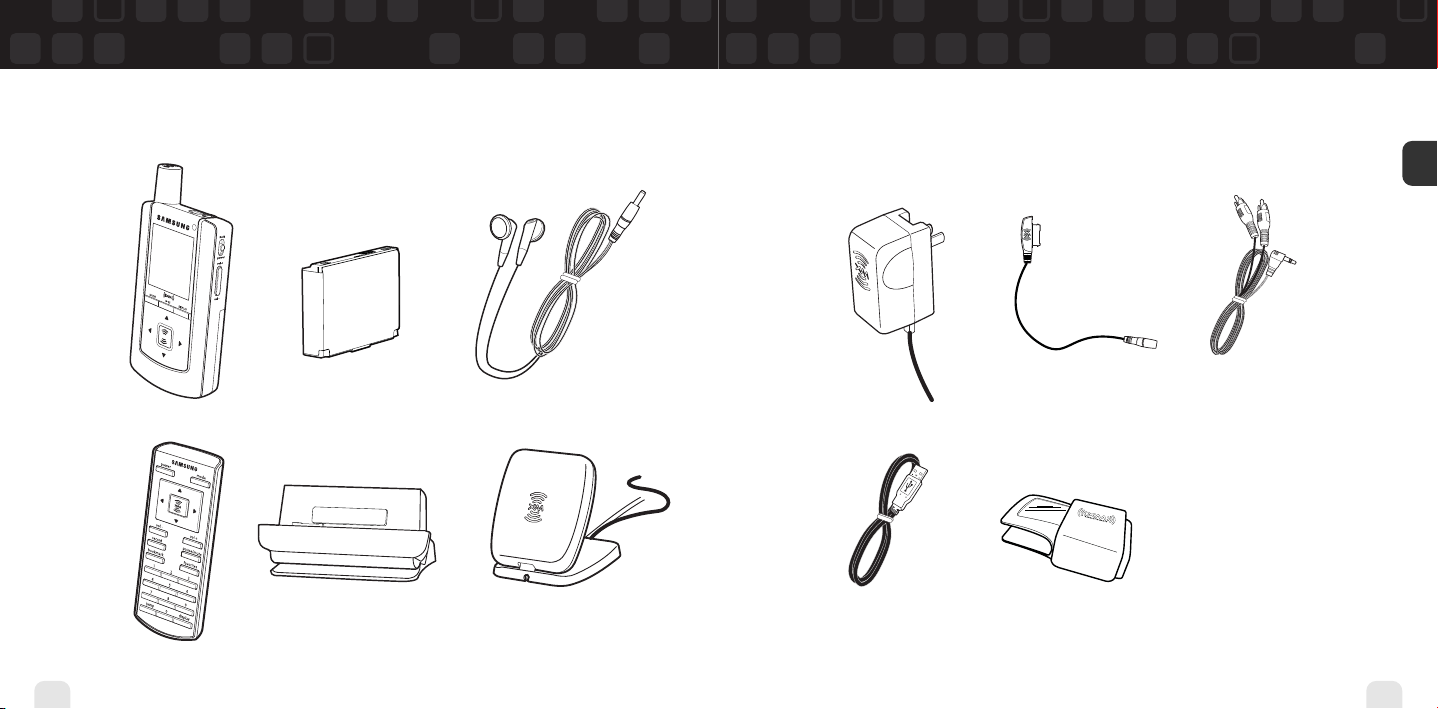
Helix
(YX-M1)
Remote
(YA-RC100)
10
Introduction
Battery
(AH43-00007A)
Home dock/cradle
(YA-CD100)
Earbuds
(EP-360)
Home XM antenna
(AH42-00024A)
What s in the Box
AC power
adapter
(AH61-02211A)
USB cable
(AH39-00902A)
Travel power
cable
(AH61-02212A)
Carrying
case/holster
(AH61-02213A)
RCA audio cable
(AH39-00901A)
Also included:
User guide
(AH81-02210A)
XM+Napster install CD
(AH59-01733A)
Introduction
ENG
11
Page 7
Introduction
Introduction
Charging the Battery
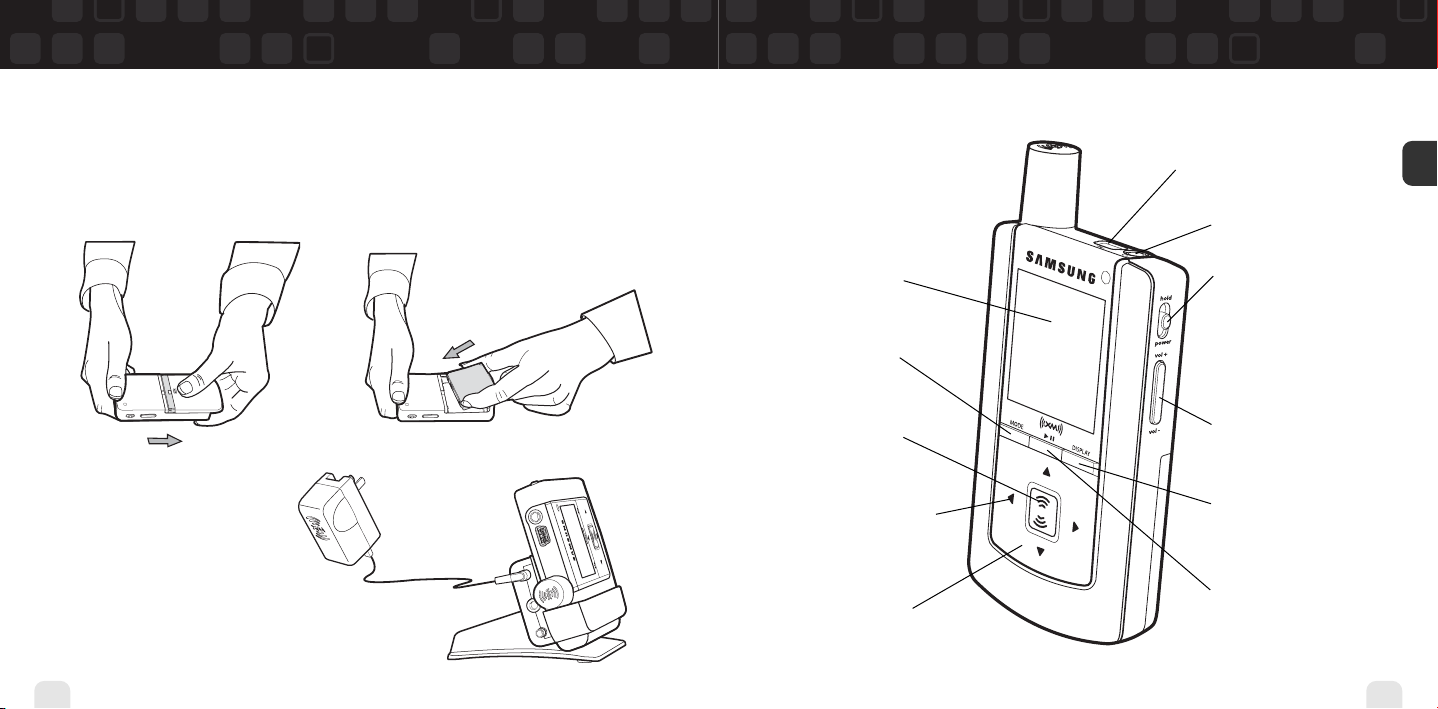
Charge the battery for at least 8 hours before using Helix for the first time,
or if you have not used it for several months. Be sure to charge the battery
in a place where the temperature is between 32°F and 113°F (0°C to 45°C).
2. Insert battery into player.
1. Open battery compartment.
3. Plug adapter into cradle and
wall socket.When you insert
Helix into a cradle, wait for
the beep before powering on.
12
Introduction
Helix Controls
Display
Mode – Switch
between “Live XM”
or “My Music”
(recorded content).
XM button –
Start here; press to
access channels,
playlists, menus, and
confirm selections.
Left arrow button –
Pressing the left arrow button
allows you to “back out” of
or exit most menus.
Arrow buttons –
Select menu entries,
change channels.
USB jack
Earbud jack
Power button – Slide
down to turn power on
or off. Slide up to “hold”
controls, preventing you
from accidentally pressing
a button.
Volume
Display button –
Change what’s showing
on the display.
Play/Pause
Introduction
ENG
13
Page 8
Introduction
Introduction
Helix Controls
14
Introduction
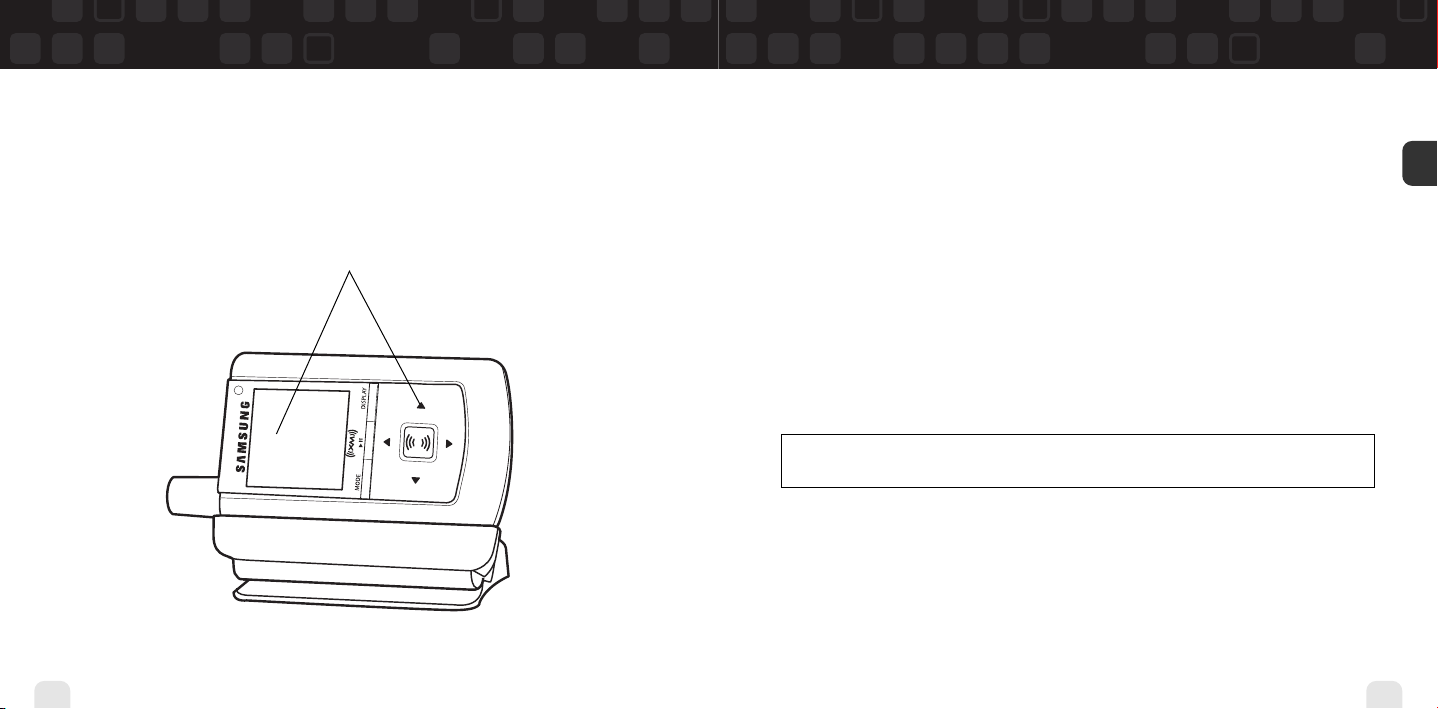
When you dock Helix in its home cradle,
both the display and arrow buttons rotate
by 90° so that “up” really points up!
Using This Guide
Throughout this guide, you will see instructions such as “Select XM Settings Setup
Antenna Aiming.” This tells you to perform the following actions:
1. Press the XM button.
2. You will see a menu whose last option is “Settings.” Press the down arrow button several
times to highlight “Settings,” then press the XM button to select it.
3. You will see another menu whose third option is “Setup.”Again, press the down arrow
button to highlight “Setup,” and press the XM button to select it.
4. You will see another menu; one of the options is “Antenna Aiming.” Press the down arrow
button to highlight “Antenna Aiming,” and press the XM button to select it.
Not all of the menu items described in this guide may appear on your Helix display. For
example, if you have not created any playlists, you will not see “Playlists” if you press the
XM button while listening to “My Music.”
NOTE: In most instances, pressing the left arrow button allows you to “back out” of
any menu.
Introduction
ENG
15
Page 9
Introduction
Introduction
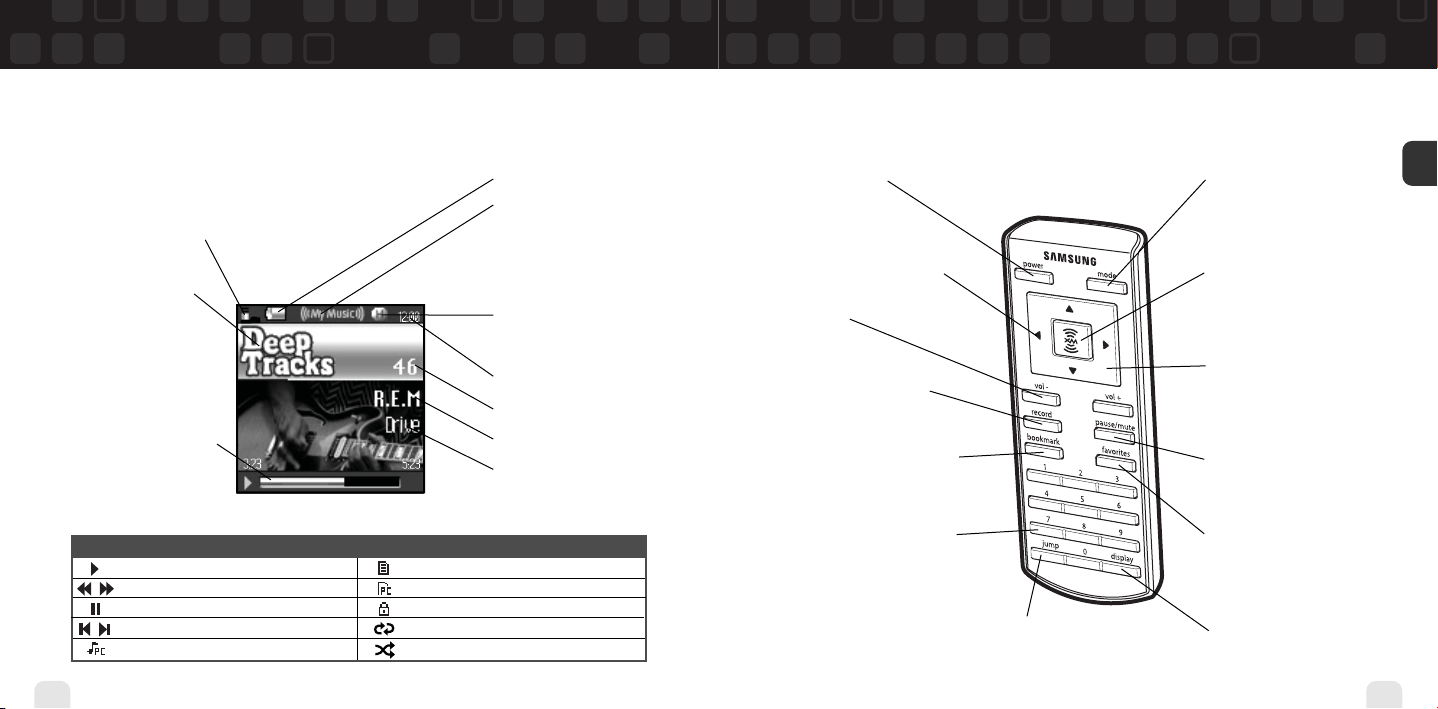
Helix Display
Available memory or signal strength –
Green portion indicates amount of storage taken up
by locked XM songs (page 40). In “Live XM” mode,
you will see a signal strength indicator instead.
Indicates XM channel,
playlist, or MP3 genre.
Progress bar – Shows
total track length and current location within a track
while playing songs in
“My Music.”
Additional symbols:
play
reverse or fast-forward through track
pause
skip to previous or next track
PC track (MP3 or WMA file)
16
Introduction
Battery charge
Mode – (((XM))) shows
you’re listening to live XM.
(((My Music))) shows
you’re listening to stored
XM content or MP3/WMA
tracks.
H – ”H” indicates that the
power switch is set in the
“hold” position.
Clock
Channel number
Artist name
Song title
track assigned to a playlist
PC track assigned to a playlist
XM track is locked
repeat track
play tracks randomly
Remote
Power button
Left arrow button –
Pressing the left arrow button
allows you to “back out” of
or exit most menus.
Volume
Record – Record a song
or channel.
Bookmark – Tag interesting
songs or tracks.
Numeric keypad – Select
XM channels by channel
number.
Jump – Switch to previous
channel you listened to.
Mode – “Live XM” or
“My Music” (recorded
content).
XM button – Access
menus and confirm
selections.
Arrow buttons –
Select menu entries, change
channels.
Pause/Mute – Pause
playback or mute live XM.
Favorites – Go to
favorite channels.
Display – Change what’s
showing on the display.
Introduction
ENG
17
Page 10
Subscribing to XM
Before you can listen to or record XM content, you must activate your Helix.
1. Set up your Helix, cradle, power adapter, and antenna (page 20 or page 22). Make sure
Helix can receive the XM signal.
2. Place Helix in the “Live XM” mode (page 26).
3. Find the 8-character XM Radio ID, which is printed on the package or in the battery compartment underneath the battery. Or select XM channel 0 to view the Radio ID. Record the
Radio ID here for reference:
The XM Radio ID does not use the letters I, O, S, or F.
4. Activate your XM Satellite Radio service online at http://activate.xmradio.com or by calling
1-800-XM-RADIO (1-800-967-2346). You will need a major credit card.
XM will send a signal from the satellites to activate the full channel lineup.Activation normally
takes 10 to 15 minutes, but during peak busy periods you may need to keep your player on
for up to an hour. When you can access the full channel lineup on your Helix, you’re done!
ENG
18
Subscribing to XM
Subscribing to XM
19
Page 11
Using Your Helix Alone
Using Your Helix Alone
Setup
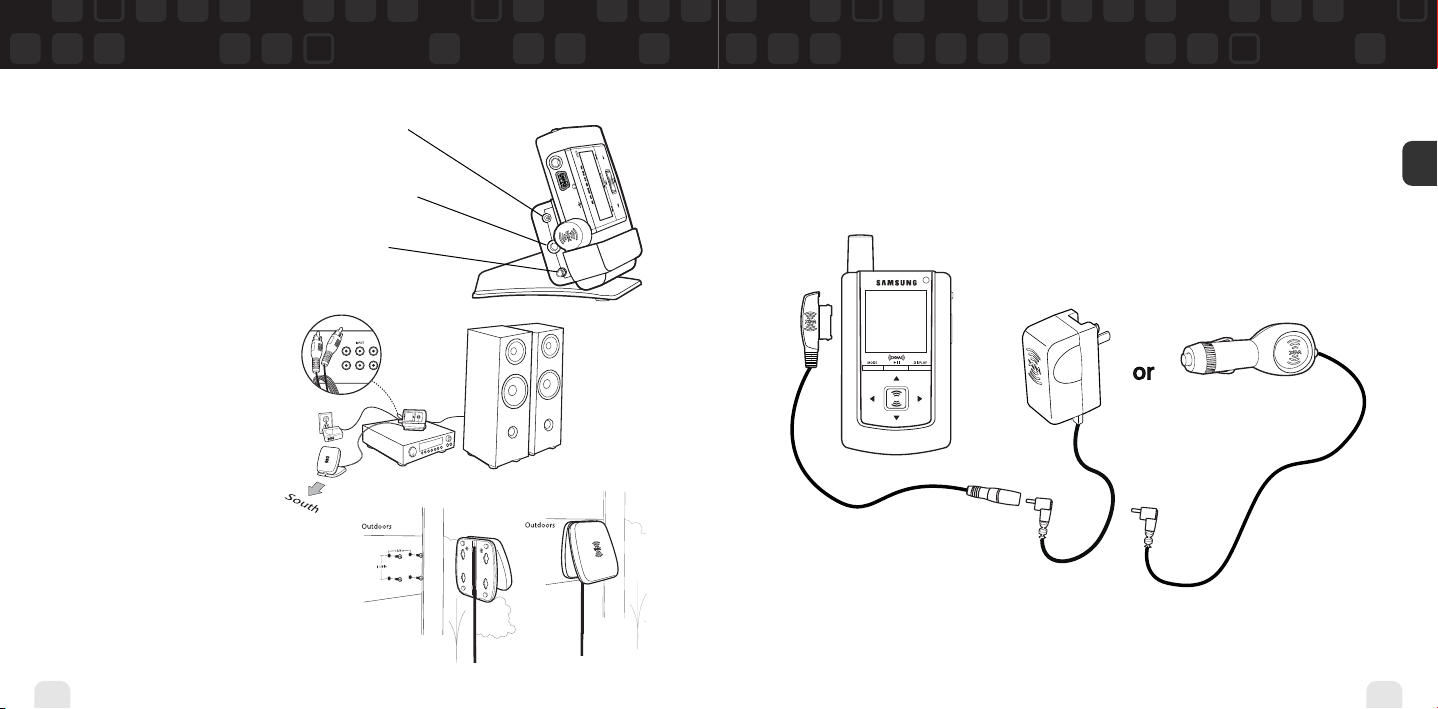
At Home
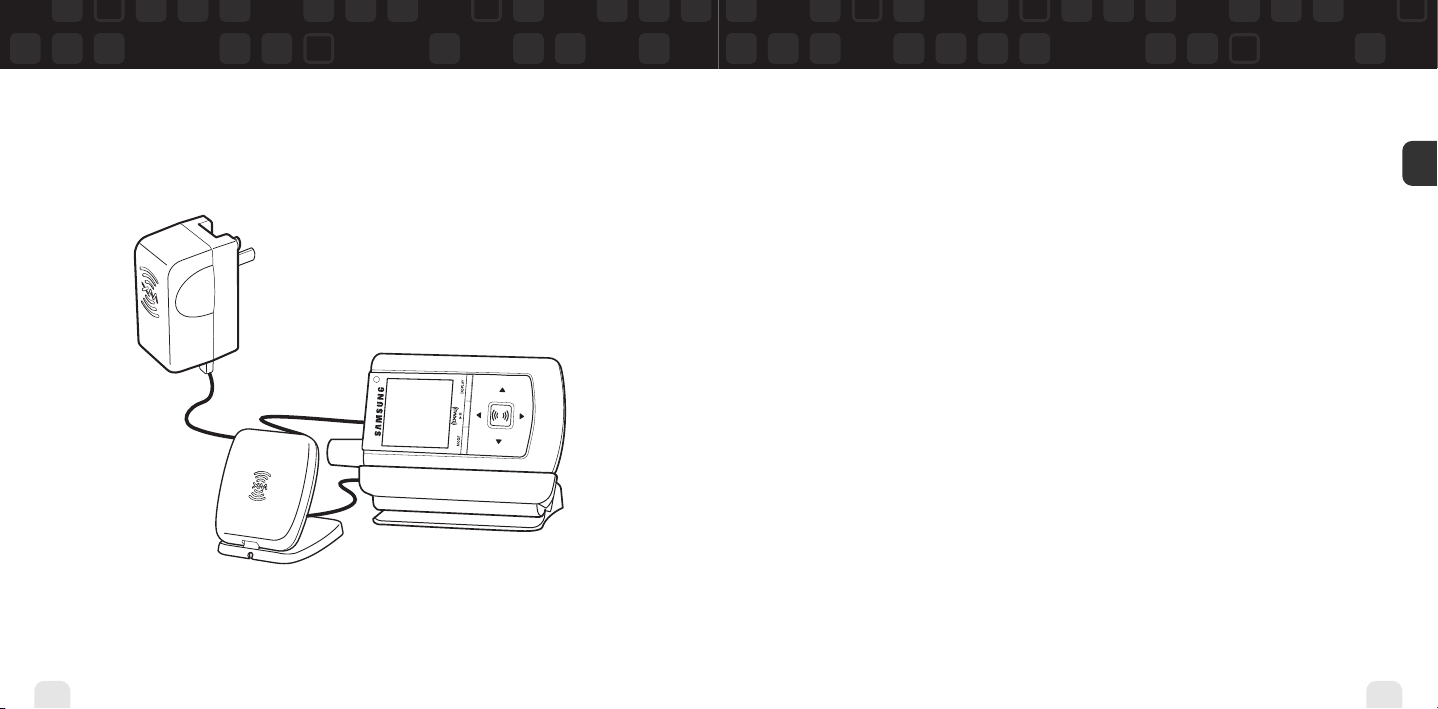
1. Insert Helix into home
cradle.
2. Connect Helix to your
audio system as shown.
Connect power adapter
and home antenna. Point
antenna toward the southern sky through a window.
3. To optimize signal reception, you may mount the
home antenna outdoors,
facing south. Make sure
the antenna is not blocked
by buildings or trees.
20
Using Your Helix Alone
To AC power adapter
To your audio system’s
line input or AUX input
To home antenna
While Traveling
If you’re traveling, you can connect the power adapter directly to Helix
using the travel power cable.
Y
A
L
ISP
D
E
D
O
M
Using Your Helix Alone
ENG
21
Page 12
Using Your Helix Alone
Using Your Helix Alone
Setup
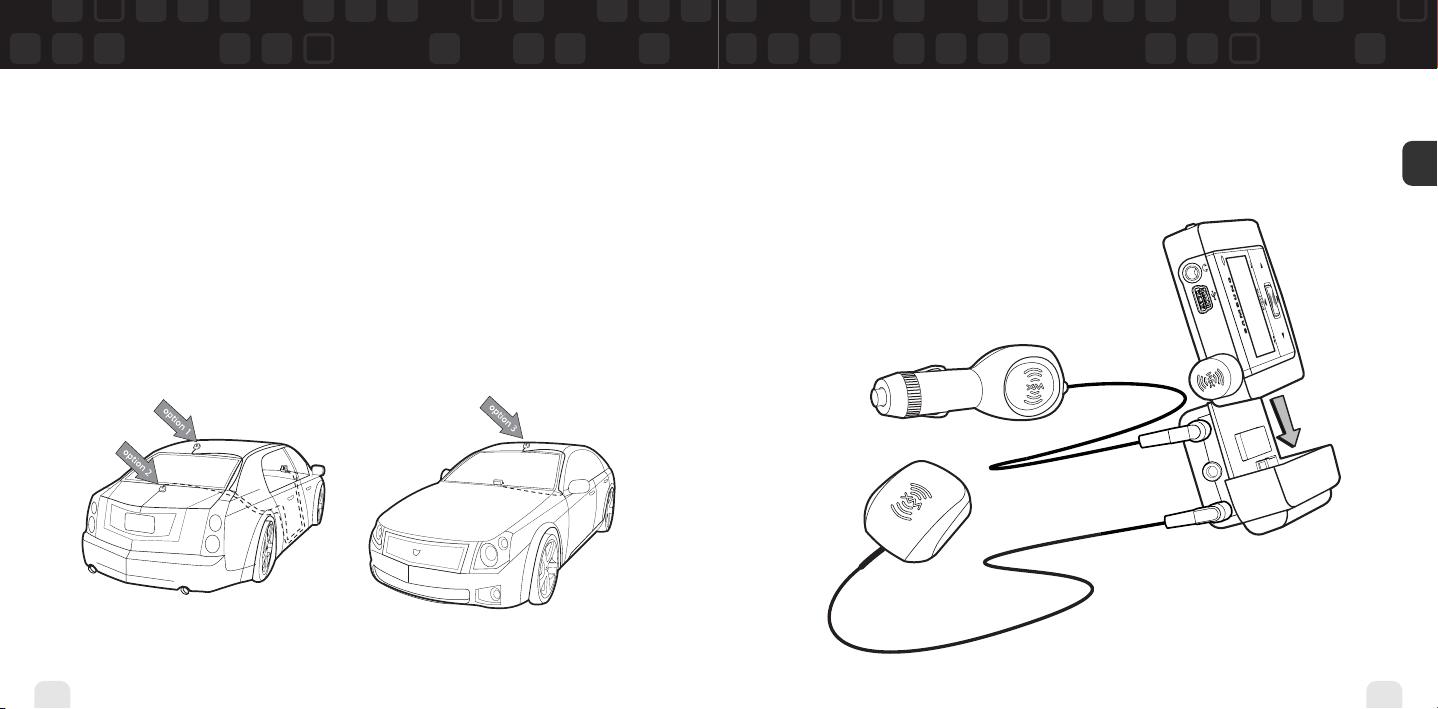
In a Vehicle
(requires Car Accessory Kit YA-CP100, sold separately)
Every vehicle is different; for your safety, follow all instructions carefully.
Consult a professional installer if you have questions.
You can listen to your Helix through your car stereo by using Helix’s built-in FM transmitter.
Simply find an unused FM frequency on the stereo and set Helix to transmit on that same
frequency.
1. Mount antenna to the roof or trunk of the vehicle. During installation, make sure you are
outdoors and the antenna is not obstructed by tall buildings.
22
Using Your Helix Alone
2. Insert Helix into car cradle.
3. Connect car cradle to antenna cable and power adapter.
Using Your Helix Alone
ENG
23
Page 13
Using Your Helix Alone
Using Your Helix Alone
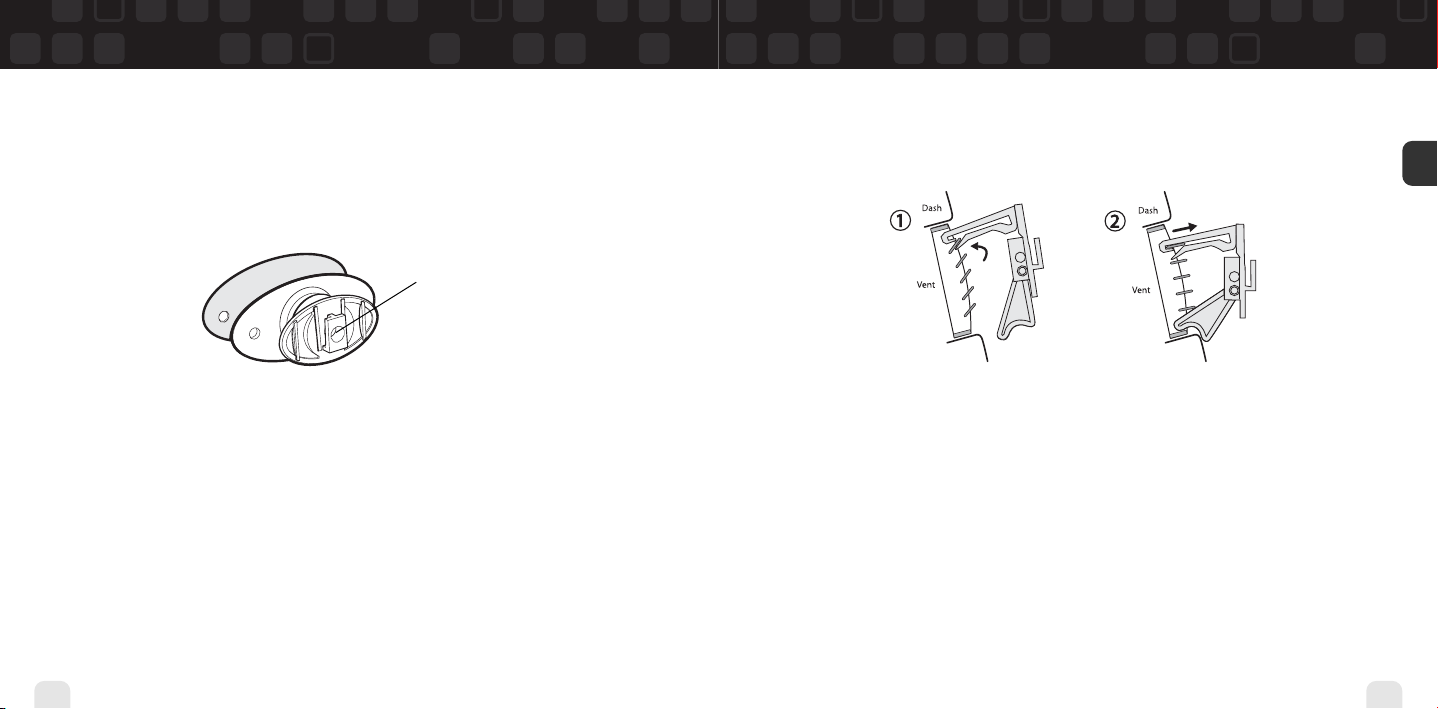
4. To install the swivel mount, first find a suitable location.The swivel mount’s adhesive is
very strong and may be difficult to remove. Do not install this mount on leather surfaces,
and make sure the air temperature is at least 60°F (15°C).
Clean the mounting surfaces with the surface preparation kit. Peel away the adhesive liner
and firmly press the swivel mount to the surface for 30 seconds. Allow 24 hours before
using the mount.
You can adjust the tension of
the mount with a screwdriver.
If you need to remove the mount, carefully lift the adhesive pad with your fingers or a
spoon. Warming with a hair dryer for several minutes will help soften the adhesive.
24
Using Your Helix Alone
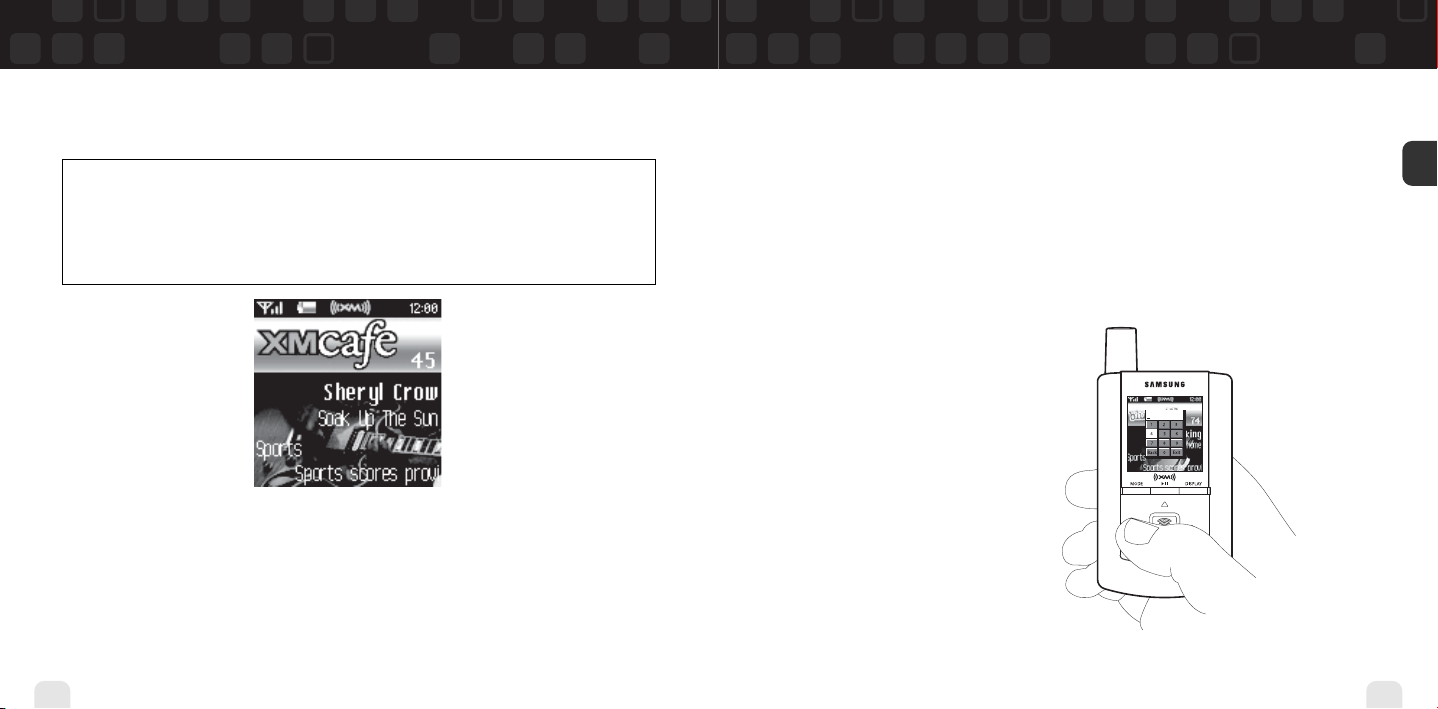
5. To install the vent mount, find a horizontal vent that is strong enough to hold your Helix
and its cradle. To remove the vent mount, push it into the vent and lift upward slightly to
release the mount’s hooks from the vent vane.
6. Find an unused FM frequency on your car stereo.
7. Set your Helix to the same FM frequency. (Refer to the section marked “Settings,” “FM
Frequency.”)
8. Tune Helix to XM channel 1. You should be able to hear XM through your car stereo.
Using Your Helix Alone
ENG
25
Page 14
Using Your Helix Alone
Using Your Helix Alone
Live XM
NOTE: You must receive a live XM signal for at least 8 hours a month (which may be
split over several listening sessions). This authenticates your XM subscription and ensures
that you can continue to enjoy your recorded XM content and live XM programming. If you
do not dock your Helix as described, you will lose access to your recorded content and live
XM programming.
Turn on your Helix. Subscribe to XM (page 18) if you haven’t done so already.
If you see “XM” at the top of the display, you’re listening to XM content that is currently
being broadcast from the satellites.
If you see “My Music” on the display, you’re listening to recorded XM or MP3/WMA tracks.
Press the MODE button to switch to “Live XM.”
26
Using Your Helix Alone
Selecting Channels
Press the up or down arrow buttons to scroll through the list of channels.
– OR –
Press the number keys on the remote that correspond to the channel number.
– OR –
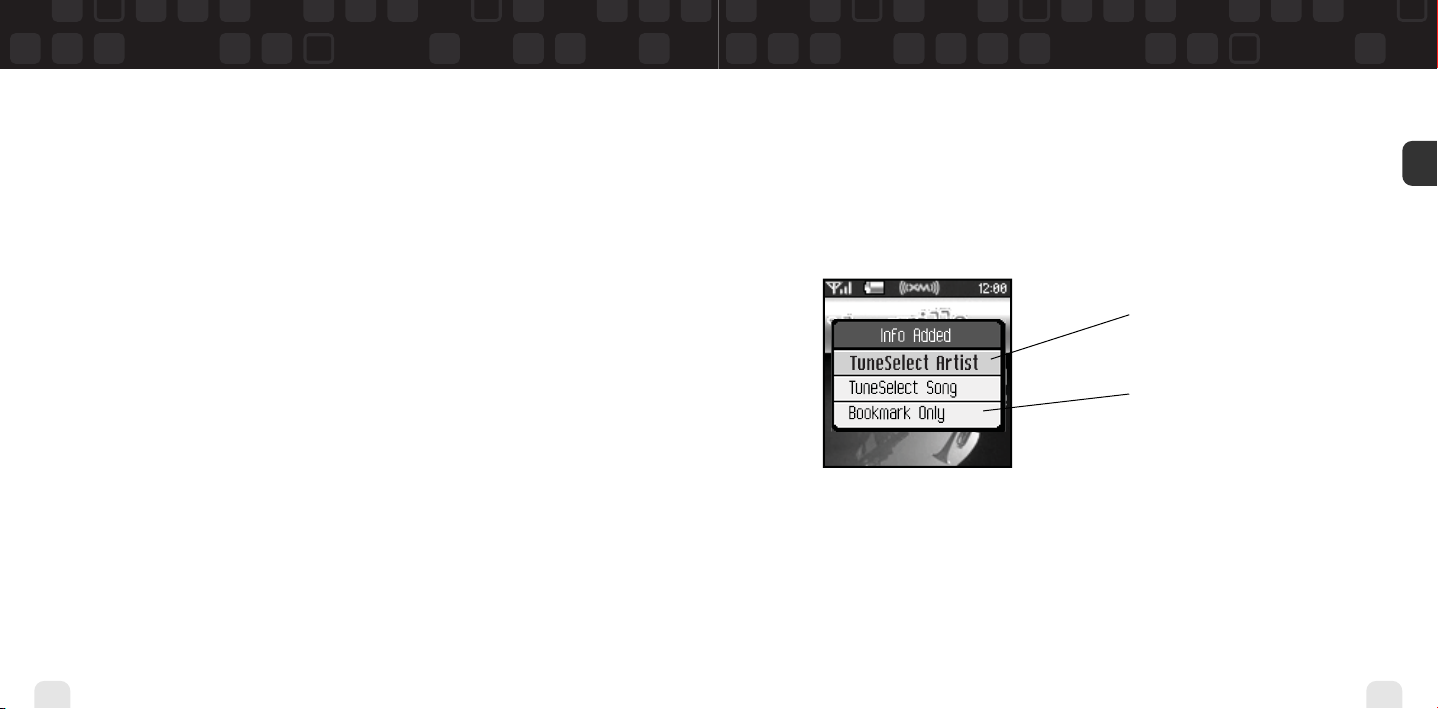
1. Press the left arrow button on your Helix. You will see a virtual keypad on the display.
2. Use the arrow buttons to select the
digits corresponding to the channel
number. Press the XM button after
highlighting each digit.
3. When you’ve entered a valid channel
number, your Helix will tune to that
channel within 2 seconds.
Using Your Helix Alone
ENG
27
Page 15
Using Your Helix Alone
Using Your Helix Alone
Favorite Channels
You can save your favorite channels in an easily accessible list.
1. While you’re tuned to a channel, press the XM button.
2. Select Favorites Add Channel.
3. Once you’ve saved your favorites, you can quickly access the list. From the “Live XM”
screen, simply press the right arrow button to see your “Favorites” list. Press the up and
down arrow buttons, then the XM button to select the desired channel.
4. To remove a channel from the “Favorites” list, select XM Favorites Edit
Channels (channel name) Remove Channel.
Categories
XM channels are organized into categories, or genres, such as “Rock,” “Jazz,” or “News.”
To find a channel by category:
1. Press the right arrow button one or more times. The category name appears in the
display.“Favorites” is your first category if you have designated any channel as a
“favorite channel.”
2. When you’ve found the category you want, press the up or down arrow buttons to select
a channel.
3. Press the XM button to tune to that channel.
28
Using Your Helix Alone
TuneSelect
TuneSelect™ finds your favorite artist or song whenever they’re currently being played on any
XM channel.
1. When you hear one of your favorite songs, select XM Bookmark.
2. You should see the following menu:
Select either “TuneSelect Artist” or
“TuneSelect Song” to add the artist or
song to your TuneSelect list.
What’s a “bookmark”? See page 45.
3. When any song or artist on your TuneSelect list is currently playing on any other XM channel, Helix will beep and flash “Artist/Song Found” on the display. Switch to that channel by
pressing the XM button.
4. To edit the TuneSelect list, select XM Settings Preferences TuneSelect
Edit List. Choose song or artist and follow the directions on the display.
5. To turn TuneSelect on or off, select XM Settings Preferences TuneSelect
Alert and choose the desired setting.
Using Your Helix Alone
ENG
29
Page 16

Using Your Helix Alone
Using Your Helix Alone
TuneSelect also allows you to type an artist name or song title even if the song isn’t currently
playing on your Helix.
1. Select XM Settings Preferences TuneSelect Edit List Add
TuneSelect.
2. Press the up or down arrow buttons to choose the artist or song title field.
3. Press the XM button. You will see a virtual keyboard. Type in the artist name or song title.
4. Select “Enter” when you’re finished, or select “Exit” to cancel.
5. Select “Accept” to add that name or title to your TuneSelect list.You can also select
“Change” or “Cancel.”
NOTE: The artist name and song title fields are case-sensitive.
30
Using Your Helix Alone
Info Extras
XM Satellite Radio broadcasts information such as sports scores, stocks, and other features
from time to time.
To choose sports or teams:
1. Select XM Settings Preferences Info Extras Sports.
2. Use the arrow buttons to highlight (in yellow) a sport or team.
3. Press the XM button to select that sport or team. The name of the sport or team will turn
green.
4. You may select more than one sport or team to display. Your chosen selections are shown
in blue. To remove a selection, go to that entry and press the XM button; the entry will
change color from blue to gray.
5. When you’re finished, press the left arrow button repeatedly until you return to the normal
display. Or just wait several seconds for Helix to return to its home screen automatically.
To select stocks*:
1. Select XM Settings Preferences Info Extras Stock Ticker Add
Stocks.
2. You will see a virtual keyboard that will allow you to enter a stock
symbol.
3. Use the arrow buttons to highlight the first letter in the stock symbol. Choose that letter by pressing the XM button.
*Quotes are provided by ComStock, Inc. and cover most stocks listed on the NYSE,
AMEX, or NASDAQ. Market information is delayed by approximately 25 minutes.
Using Your Helix Alone
ENG
31
Page 17
Using Your Helix Alone
Using Your Helix Alone
4. Continue selecting letters by using the arrow and XM buttons.
5. Select “Enter” when you’ve entered the entire stock symbol. Your Helix is smart enough to
automatically complete some stock symbols.
6. You can track up to 20 stock symbols.When you’ve entered all your desired stock symbols,
select “Exit.”
7. Press the left arrow button repeatedly (or simply wait a few seconds) until your Helix
returns to normal operation.
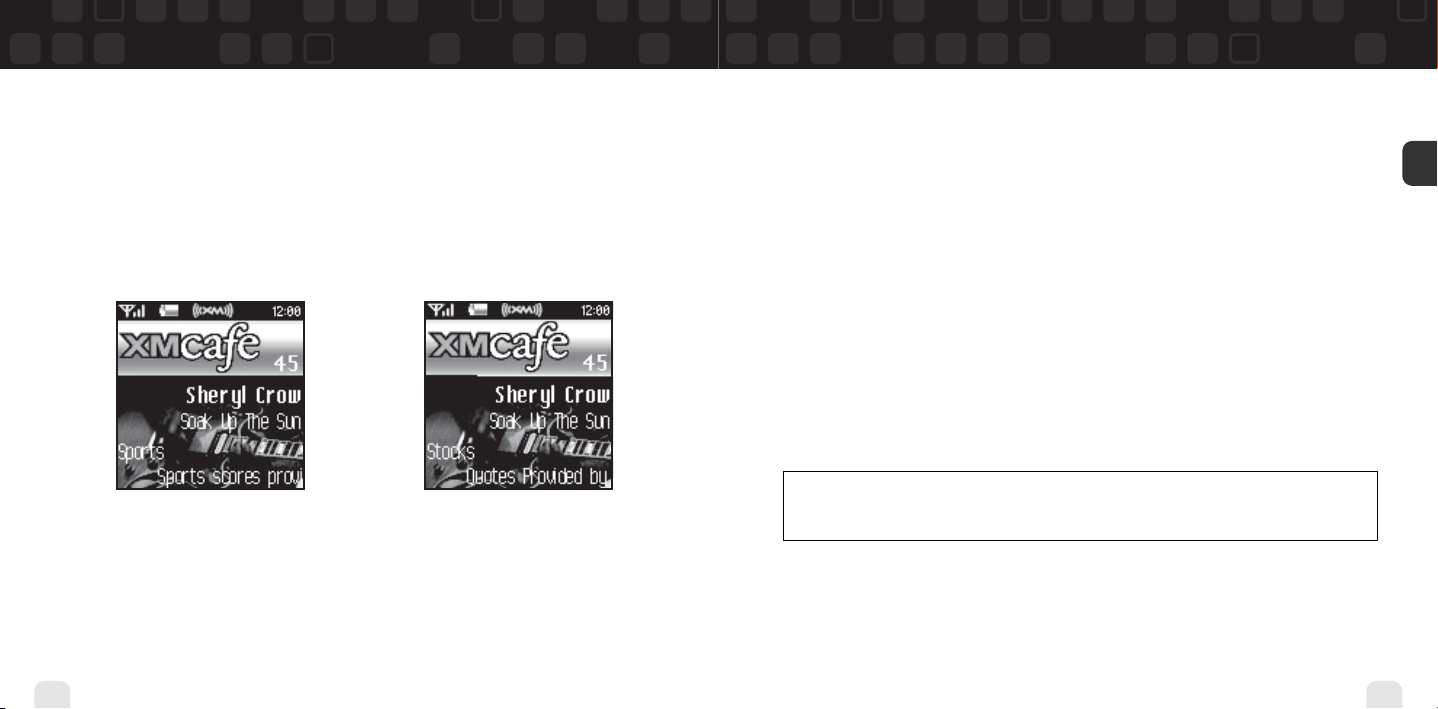
To display Info Extras, press the DISPLAY button several times until you see sports scores or
a stock ticker at the bottom of the display.
32
Using Your Helix Alone
Recording XM
Your Helix enables you to record XM content for personal, non-commercial use. You may
record XM content while listening to live XM or by scheduling a recording session. You can
then listen to recorded XM content on the go. You can also personalize your XM content by
creating playlists for every mood and occasion.*
Recording a Single Song
1. While you’re listening to live XM, select XM Record Record Song. Don’t worry
if you miss the beginning of the song; your Helix captures the entire song even if you start
up to 10 minutes after the song begins, as long as you’re already tuned to that channel.
By selecting “Record Song,” you instruct your Helix to stop recording at the end of the
song.
2. You can continue recording the channel you’re listening to by selecting XM Record
Rec Channel.
3. To stop recording at any time, select XM Record Stop Recording. If you
change channels, Helix automatically stops recording.
SHORTCUT: To immediately start recording at any time, press and hold the XM button
until you see the “Recording …” message appear on the display.
*XM content cannot be exported from the Helix digital audio player. If you wish to own a complete, high-fidelity
version of digital content on demand, you should purchase content from XM+Napster. This may allow you to store the
content on multiple devices depending upon the digital rights management of such content.
Using Your Helix Alone
ENG
33
Page 18
Using Your Helix Alone
Using Your Helix Alone
Recording a Channel
1. While you’re listening to live XM, select XM Record Rec Channel. You will record
the channel you’re currently listening to.
2. To stop recording at any time, select XM Record Stop Recording. If you change
channels, Helix automatically stops recording.
3. You can choose to stop recording at the end of the song you’re currently listening to by
selecting XM Record Record Song.
34
Using Your Helix Alone
Scheduling a Recording Session
You can set Helix to record XM at a later time. When you schedule a recording session,
remember that Helix must be able to receive a live XM signal when the session begins.
1. To schedule a recording session, select XM Record Schedule Rec New
Session. Make sure the time shown on your Helix is correct; otherwise the recording session may not start. If the time is not correct, set the time zone for your location (page 75)
and wait until the XM signal updates Helix’s clock.
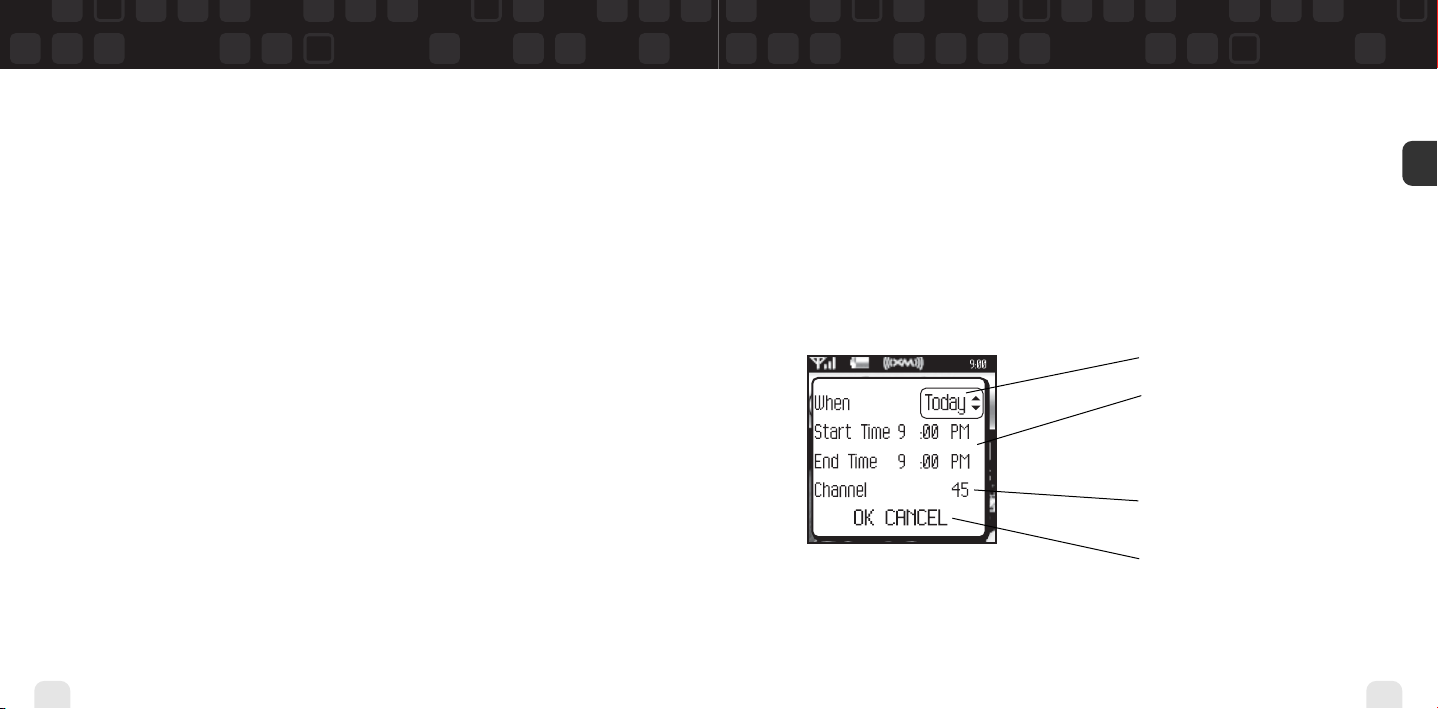
2. The “Scheduled Rec” display allows you to set various options. Use the up and down arrow
buttons to adjust each entry. Press the left or right arrow buttons to move to the previous
or next option.
You can choose to schedule a session for
“Today,” ”Everyday,” or a specific “Date.”
Set start and stop times using the up and
down arrow buttons. If the session length
exceeds the available memory, you will
record over the oldest XM tracks in the
memory, so you’ll always have the latest
content.
Choose the channel you want recorded.
You can enter the channel number using
the remote’s numeric keys.
Choose “OK” to save the session or
“CANCEL” to start over.
Helix informs you if there is a scheduling conflict such as overlapping sessions.
Using Your Helix Alone
ENG
35
Page 19
Using Your Helix Alone
Using Your Helix Alone
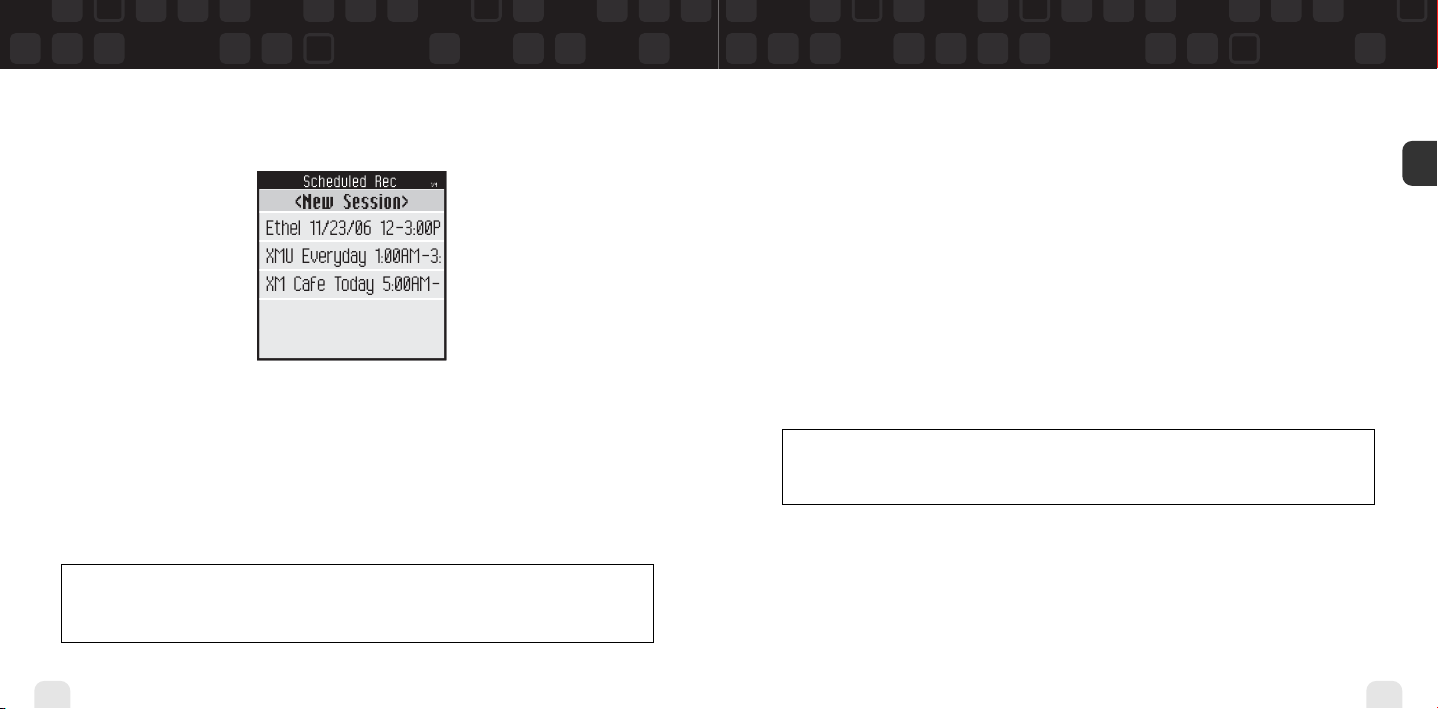
3. To edit an existing session, select XM Record Schedule Recording. You will see
a list of sessions. Highlight the session you wish to edit.
You may not see all the sessions that you scheduled in the past. Sessions that have expired
are automatically removed from the list.
4. Choose Edit Session to change the session’s options.
5. To delete a session, choose Cancel Session.
At the scheduled time, your recording session will begin and change channels if needed.
Remember that when you schedule a recording session, you are instructing Helix to switch to
the desired channel.
NOTE: Scheduled recording sessions will begin only if Helix is docked in a home cradle or in
a boombox with AC power. Your Helix can be powered off or on. Make sure your Helix can
receive a strong XM signal!
36
Using Your Helix Alone
Listening to Recorded XM Content
(My Music)
When you see “My Music” at the top of the display, you’re listening to XM content that you
have recorded and any MP3/WMA files you have transferred to your Helix.
1. To switch to “My Music” from “Live XM,” press the MODE button.
2. Press the up and down arrow buttons to view a list of songs that you have stored on Helix.
Highlight the song you want to listen to, then press XM Play to start playing from
that song.
3. You can press the right arrow button to skip to the next song. Press the left arrow button
to skip to the previous song.
4. While you’re listening to a song, you can also press and hold the right arrow button to
fast-forward through that song. Press and hold the left arrow button to reverse through
the song.
NOTE: In order to access your XM content you have recorded on Helix, you must (1)
maintain an active XM Satellite Radio subscription, and (2) receive the live XM signal at least
8 hours a month.
Using Your Helix Alone
ENG
37
Page 20
Using Your Helix Alone
Using Your Helix Alone
Organizing Your Music
Finding Your Music
All songs and tracks that are stored in your Helix are normally played in the order that they
were recorded or transferred into your Helix. You can also sort the selections by artist,
category, or channel.
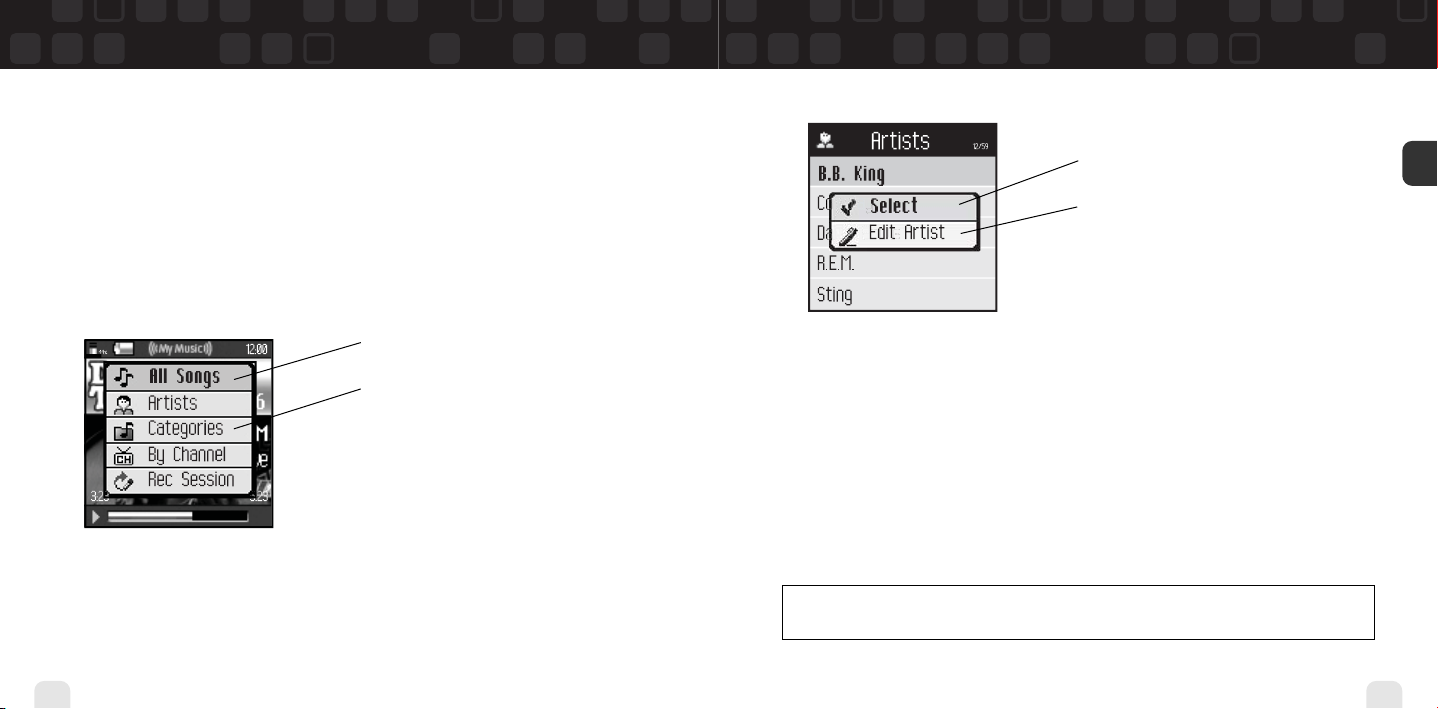
1. While listening to recorded tracks in “My Music,” select XM Find.
2. Choose how to view your stored music. For example, to sort your stored music by artist,
select Artists.
View all songs on your Helix.
You can also sort songs by artists, by categories,
by channels, or by recording sessions.
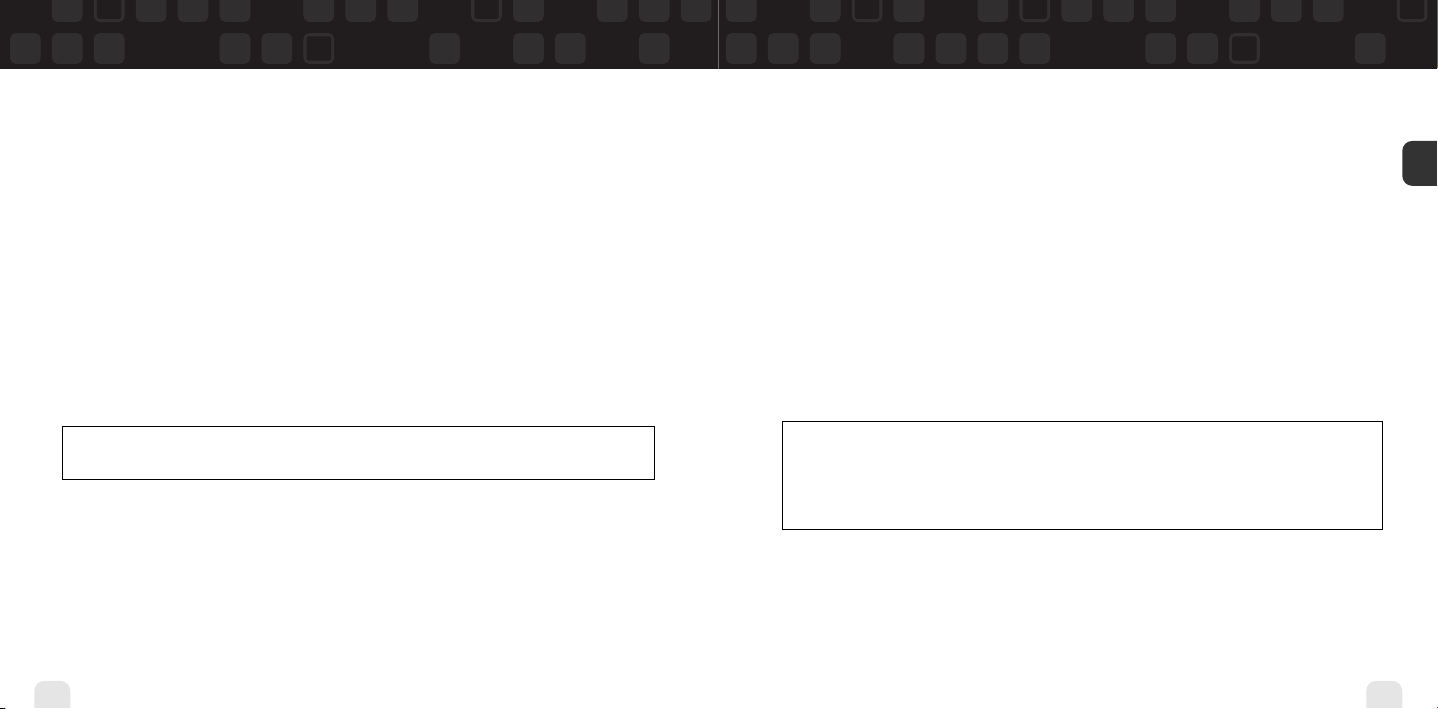
3. Press the up or down arrow buttons to scroll through the list of artists. Press the XM
button to select an artist.
38
Using Your Helix Alone
Shows the artist’s songs in the order they
were recorded.
Opens the Edit window, allowing you to add an
artist to a playlist, lock or unlock all the artist’s
songs, or delete all the artist’s songs.
4. Once you’ve selected an artist, you will see a list of songs by that artist that you have
recorded.
5. Select the song you want to hear using the arrow and XM buttons. Select XM Play to
begin playing that song.
6. To return to the list of artists, select XM Find Artists and select another artist as
in steps 3 and 4.
7. You can also sort your tracks by categories or by channels. WMA and MP3 songs show the
category or genre that they are assigned to using their ID3 tags, which may or may not be
the same as the XM category.WMA and MP3 songs are also assigned to a channel named
“MP3/WMA.”
8. To view all the songs stored in your Helix, select XM Find All Songs.
SHORTCUT: As soon as you’ve highlighted a song, simply press the right arrow button to start
playback.
Using Your Helix Alone
ENG
39
Page 21
Using Your Helix Alone
Using Your Helix Alone
Locking and Unlocking XM Content
When you record XM, your Helix records over the oldest XM tracks first. This ensures that you
always hear the latest XM content. You can “lock” a song or track to prevent Helix from
recording over it. Locked songs occupy memory on your Helix and reduce your available
recording time. Remember that you can buy high-fidelity songs or albums from XM+Napster
that can be stored either on your Helix or on your PC.
1. While you’re listening to a song in “My Music,” press the up or down arrow buttons to
view the list of songs.
2. Highlight the song you want to lock.
3. Select XM Edit Song Lock Song.
4. The locked song is indicated with a padlock symbol to the left of the song title.
5. To unlock a song, highlight the song in the list and select XM Edit Song Unlock
Song.
SHORTCUT: To lock the song you’re currently listening to, press and hold the XM button,
then select Lock Song.
You can also lock all songs by an artist, in a category, or in a channel.To lock all songs by an
artist:
1. Select XM Organize Artists (artist name) Lock Artist.
2. All songs by this artist are displayed with a padlock symbol to the left of the song title.
If you add a song to a playlist, that song is automatically locked.
40
Using Your Helix Alone
Playlists – Adding Songs
You can create one or more custom lists, called playlists. Each playlist is an index of songs
that play in a certain order. You can create a “morning drive” playlist, a “workout” playlist, a
“best of” playlist, and more.
1. To add a song to a playlist, first select a song using the up or down arrow buttons. The
song may be a recorded XM track, an MP3 track, or a WMA track, including songs purchased through XM+Napster.
2. Select XM Edit Song Add to Playlist.
3. You can choose to add the song to an existing playlist or to create a new playlist. To
choose an existing playlist, simply highlight and select the playlist name.To create a new
playlist, choose New Playlist and use the virtual keyboard to name that playlist.
4. The display confirms by showing “(playlist name) (song title) Added.”
5. Adding a song to a playlist automatically locks that song.
SHORTCUT: When you’re in “My Music,” you can add the recorded XM song that you’re
currently hearing to a playlist by pressing and holding the XM button, then selecting Add
to Playlist.
You can add a song to more than one playlist or a song to the same playlist more than once.
You can also add all songs by an artist to a playlist: select XM Organize Artists
(artist name) Add to Playlist. You can also add all songs in a particular XM channel
or category to a playlist.
Using Your Helix Alone
ENG
41
Page 22
Using Your Helix Alone
Using Your Helix Alone
Playlists – Removing Entries
You can remove entries from a playlist. Remember that removing a song from one playlist
does not remove it from any other playlist, and does not delete that song from Helix.
To remove one or more songs from a playlist:
1. Select XM Playlists (playlist name) Edit Playlist Remove Songs.
2. Use the up and down arrow buttons to highlight a song.
3. Press XM Select. The song’s name will change to green.
4. Use the up and down arrow buttons to highlight another song, and press the XM button
to select that song. Do this for all the songs you want to remove; these songs are
displayed in blue.
5. Select XM Remove Song(s) Ye s.
6. Helix confirms by displaying “Songs Removed.”
SHORTCUT: Instead of steps 3 and 4, press the right arrow button to select the song you want
to remove.
42
Using Your Helix Alone
Playlists – Playing
1. Select XM Playlists (playlist name) Select.
2. Choose a song you want to hear and press the XM button.
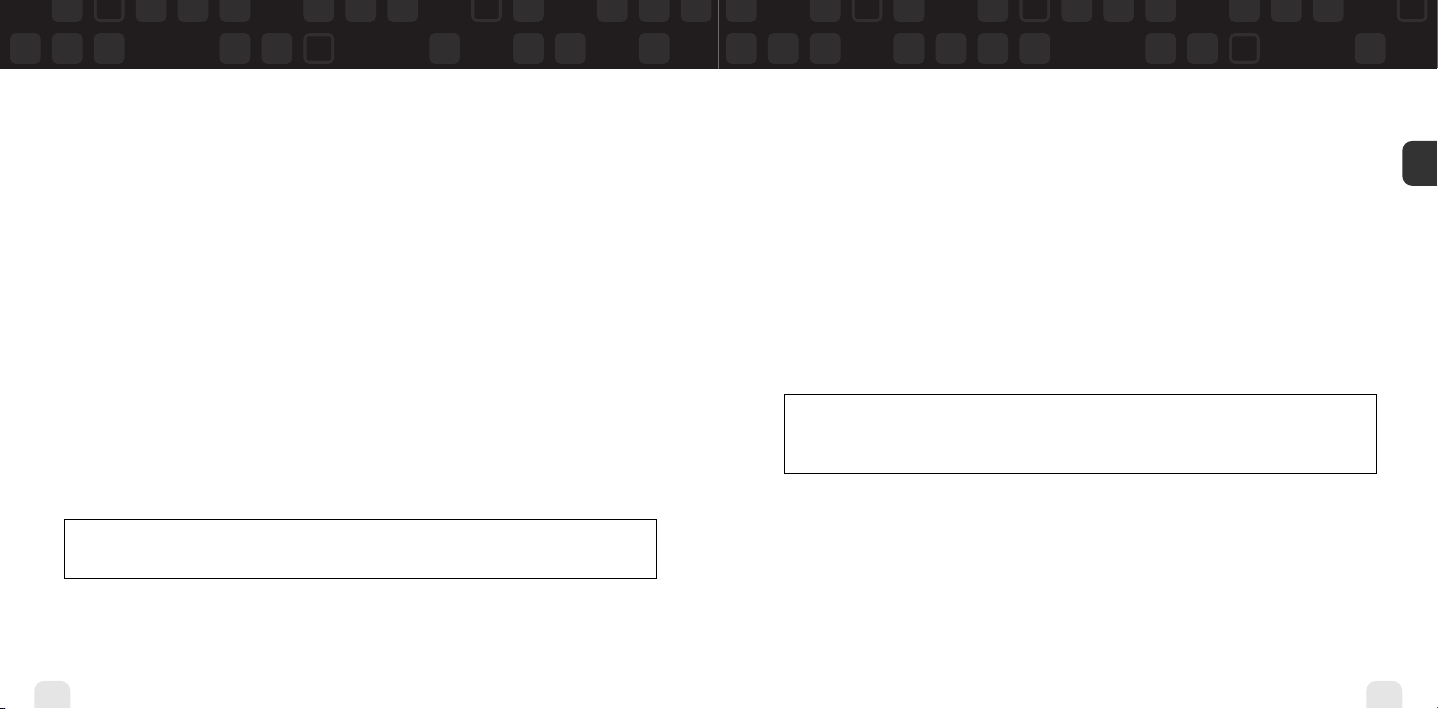
3. You will see the following options:
Play songs in the order listed in the
playlist, starting from the selected song.
Play songs in random order, starting from
the selected song. To cancel random play,
select a song but choose “Play” instead
of “Random.”
Repeat the selected song. To cancel
repeat play, select a song but choose
“Play” instead of “Repeat Song.”
4. To exit a playlist and return to all songs, select XM Find All Songs.
Using Your Helix Alone
ENG
43
Page 23
Using Your Helix Alone
Using Your Helix Alone
Playlists – Other Options
Normally, the songs in a playlist appear in the order that they were added.
To rearrange the songs in a playlist:
1. Select XM Playlists (playlist name) Edit Playlist Arrange Songs.
2. Use the up and down arrow buttons to highlight a song.
3. “Pick up” that song by pressing the XM button. The song title changes to green.
4. Move the song using the up and down arrow buttons.
5. “Put down” the song by pressing the XM button. The song title changes back to yellow.
6. Repeat steps 2-5 for any song you want to move. When you’re finished, press the left
arrow button repeatedly until you return to normal operation.
To rename a playlist:
1. Select XM Playlists (playlist name) Edit Playlist Rename Playlist.
2. Use the virtual keyboard to change the name of the playlist.
3. Select “Enter” when you’re finished, or “Exit” if you don’t want to save your changes.
NOTE: You can also manage the playlists on your Helix by using the XM+Napster application
on your PC.
44
Using Your Helix Alone
Bookmarking Songs
“Bookmarks” are a great way to remember interesting songs. You can view all your bookmarks through the XM+Napster application, look up information about the artist or album, or
purchase a complete, high-fidelity version of the song that you may play on multiple devices
through XM+Napster. You may also purchase songs by the same artist (or similar artists)
through XM+Napster.
To bookmark a song in “My Music”:
1. Press the up or down arrow buttons until you highlight the song you want to
bookmark.
2. Select XM Edit Song Bookmark Song.
3. Helix confirms by displaying “Info Added.”
SHORTCUT: To bookmark the song that you’re currently listening to in “My Music,” press
and hold the XM button, then select Bookmark Song.You can only bookmark live or
recorded XM tracks, not MP3 or WMA tracks.
To bookmark a song in “Live XM”:
1. Select XM Bookmark Bookmark Only.
2. Helix confirms by displaying “Info Added.”
Using Your Helix Alone
ENG
45
Page 24
Using Your Helix Alone
Using Your Helix Alone
Deleting Songs
When you’re no longer interested in a song or track, you can delete it from your Helix.
“Deleting” a song permanently erases it from memory, and is different from “removing” a
song from a playlist.
To delete one song from “My Music”:
1. Press the up or down arrow buttons until you highlight the song you want to delete.
2. Select XM Edit Song Delete Ye s.
3. Helix confirms the song is erased by displaying “Song Deleted.”
SHORTCUT: To delete the song you’re currently listening to, press and hold the XM button,
then select Delete.
46
Using Your Helix Alone
To delete multiple songs from “My Music”:
1. Select XM Organize Songs.
2. Use the up and down arrow buttons to highlight a song.
3. Select XM Select Song. The song’s name will be displayed in green.
4. Use the up and down arrow buttons to highlight another song, and press the XM button
to select that song. Do this for all the songs you want to remove.
5. Select XM Delete Ye s.
6. Helix confirms that the songs are erased by displaying “Songs Deleted.”
SHORTCUT: Instead of steps 3 and 4, press the right arrow button to select the song you
want to delete.
Using Your Helix Alone
ENG
47
Page 25
Using Helix with a PC
Using Helix with a PC
System Requirements
The PC system must meet the following requirements:
®
Intel
Pentium®-class CPU
Microsoft Windows XP Home,Windows XP Professional, or Windows 2000 operating system*
At least 64 MB of RAM
At least 13 MB of available hard disk space for XM+Napster application
Internet Explorer 5.1 or higher
Windows Media Player 9 or higher; Windows Media Player 10 recommended for Windows XP
Active Internet connection; we recommend a broadband (cable, DSL, or fiber) connection for
optimal performance
*The following operating systems are not supported: Windows 95, Windows 98, Windows NT, Windows Me, and Mac OS.
48
Using Helix with a PC
Setup
To connect your Helix to your PC:
1. If you haven’t done so already, disconnect your Helix and its cradle from your PC.
2. Insert the XM+Napster CD into your computer’s CD or DVD drive.
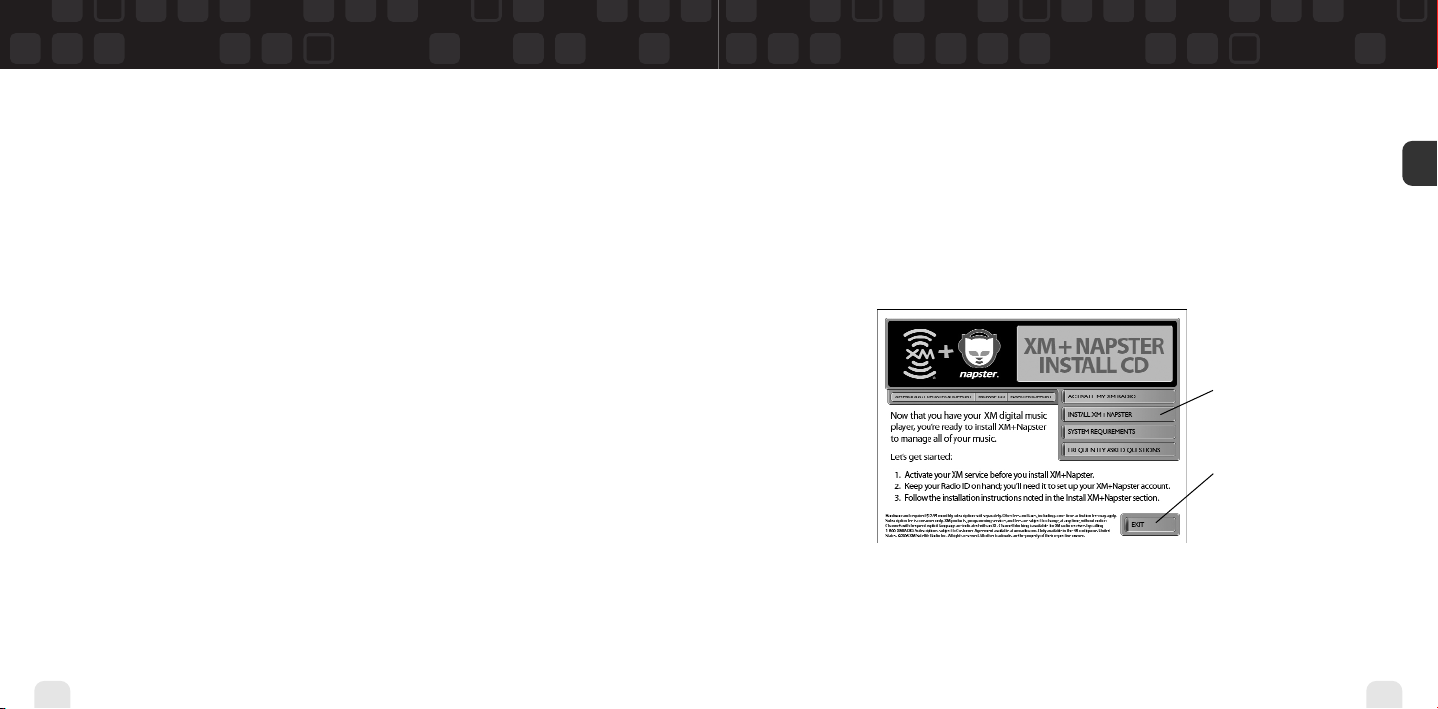
3. The software should start automatically. You should see the following screen on your PC:
Click here to begin the
installation.
Click here when you’re
finished with the
installation procedure.
Follow the directions indicated on the screen. If you have any questions about the
XM+Napster software, see the XM+Napster FAQs at http://napster.xmradio.com.
Using Helix with a PC
ENG
49
Page 26
Using Helix with a PC
Using Helix with a PC
4. Reboot your PC if necessary, then launch the XM+Napster program from the shortcut on
your desktop.
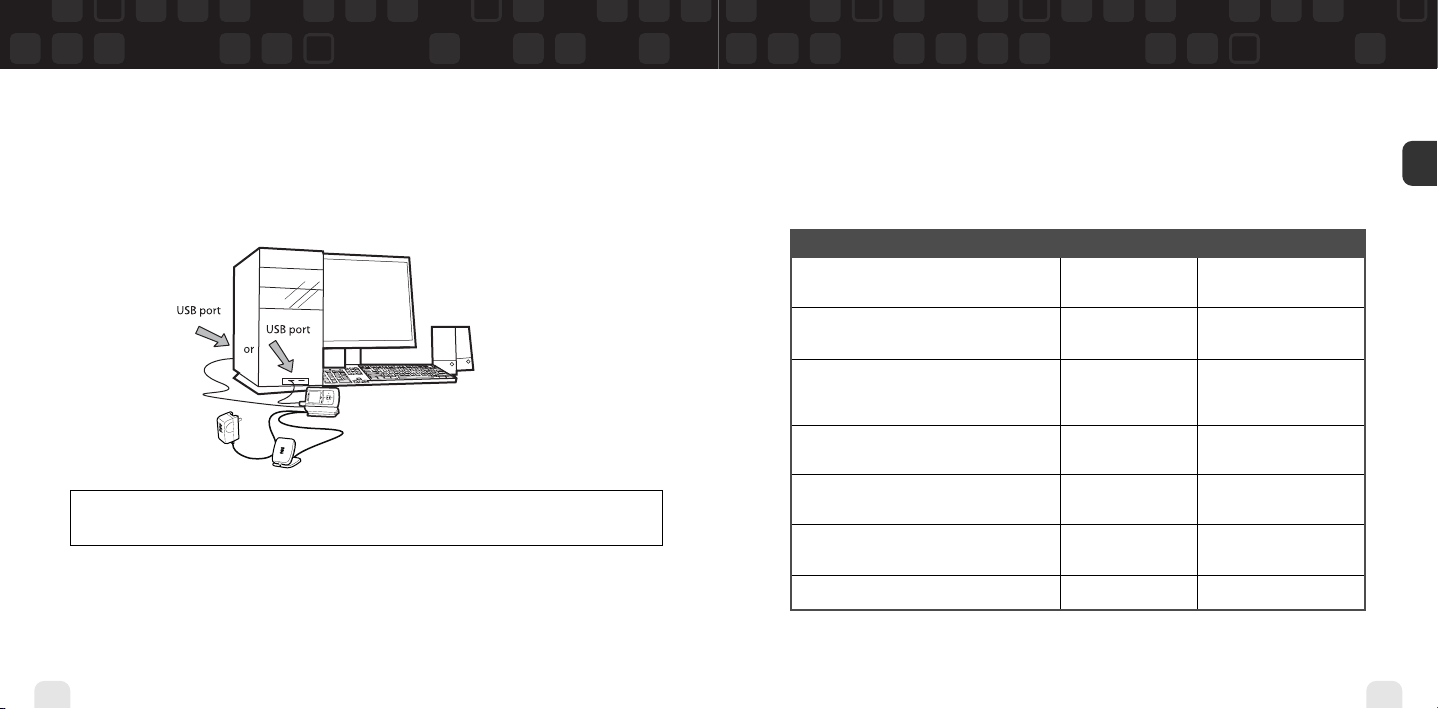
5. Set up Helix as shown and plug the USB cable into the PC. You can also connect the USB
cable directly between your PC and Helix without using the home cradle, home antenna,
and AC power adapter.
WARNING: Only use the USB cable supplied in the package. Other USB cables may not allow
your Helix to charge its battery or communicate with your PC.
6. Your PC should recognize Helix. Close any file folders that appear on your screen. You can
manage the contents of Helix entirely by using the XM+Napster program.
7. When taking your Helix with you, you must disconnect Helix from the PC by following the
procedure described in “Disconnecting Your Helix from the PC” (page 60).
50
Using Helix with a PC
Registering with XM+Napster
Choose either the XM+Napster Light service or the XM+Napster service. XM+Napster Light
allows you to buy individual songs or albums whenever you want. XM+Napster lets you
stream music to your PC for an additional monthly subscription.
XM+Napster XM+Napster Light
Manage XM content and MP3/WMA
files on your Helix
Transfer MP3/WMA files from your PC
to your Helix
Buy individual songs or albums to keep
forever, burn to CD, and transfer onto
your Helix
Additional monthly subscription with
XM+Napster required
Download and listen to all the Napster
music you want on your PC
Listen to 75+ XM channels on your PC
from XM Radio Online
Community and music discovery tools
Using Helix with a PC
ENG
51
Page 27
Using Helix with a PC
Using Helix with a PC
To register, follow these steps:
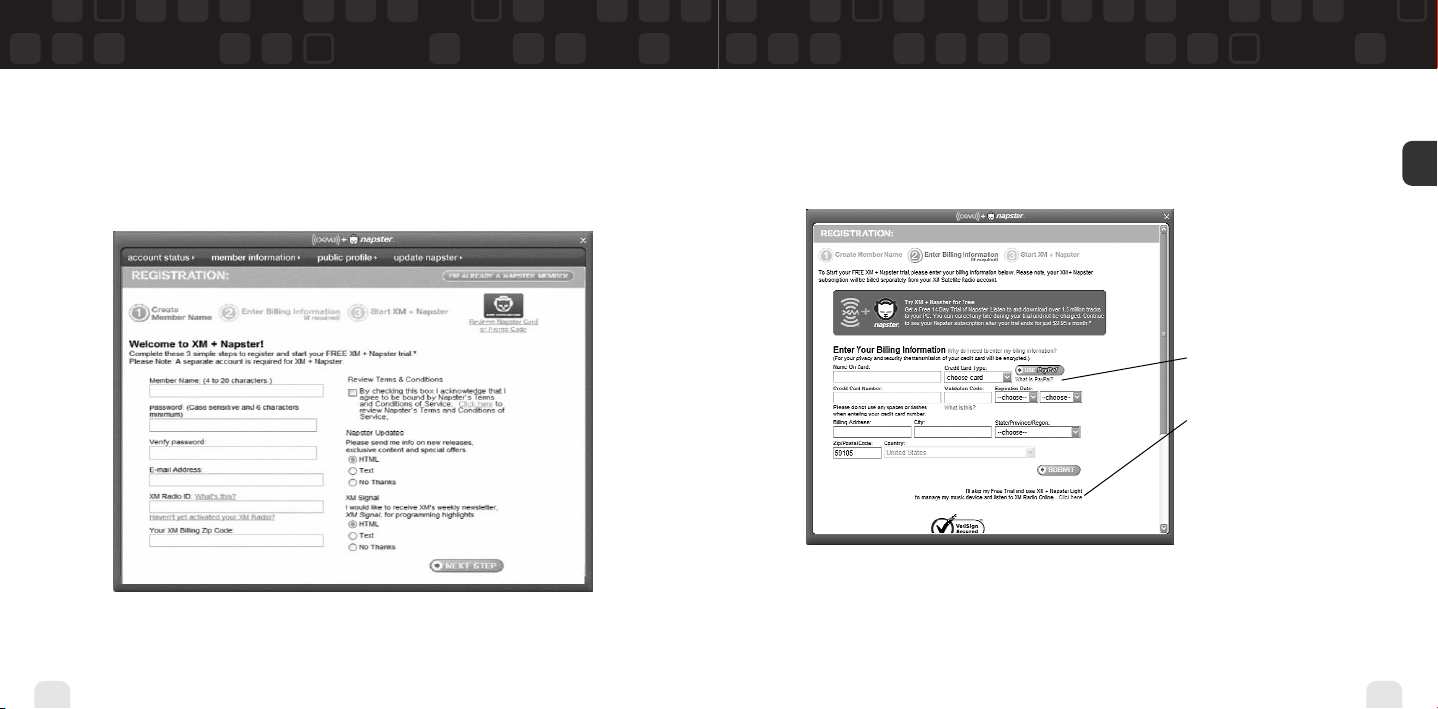
1. Click File/Sign In on the XM+Napster application. Click on the link for new members.
2. Follow the directions indicated on the registration screen.You must provide your active XM
Radio ID and billing ZIP code to register.
52
Using Helix with a PC
3. If you choose XM+Napster, you must provide a valid credit card. Registering for
XM+Napster Light does not require a credit card; you only need one when you purchase
individual songs or albums. Simply select “Start XM+Napster Light” instead of entering
your billing information.
For XM+Napster, enter your
credit card information.
For XM+Napster Light, simply
click here.
4. The next time you use XM+Napster, sign in with your user name and password to access
the XM+Napster service. You can also use the XM+Napster software offline, without
signing in, and still retain the ability to manage your Helix.
Using Helix with a PC
ENG
53
Page 28

Using Helix with a PC
Using Helix with a PC
What Can You Do with XM+Napster?
Using XM+Napster, you can:
Manage songs, playlists, and recording sessions on your Helix
Transfer MP3 and WMA files between Helix and your PC
Explore and purchase music from XM+Napster’s enormous online store
Listen to XM Radio Online
Exploring
Explore XM+Napster’s online store and community,
with over 1.5 million songs, 100,000 albums, and
80,000 artists.
54
Using Helix with a PC
Search by entering an artist
name, song title, or album.
Drag and drop
tracks or albums
onto the
“playlist/radio”
pane to play
them on your PC.
Purchasing Music
The XM+Napster store allows you to stream, download, or buy songs or albums.
Stream – Listen to a song while your PC is connected to the Internet.
Download – Store music on your PC. You can listen to these songs any time,
even if your PC is offline.
Buy – Purchase the track or album. You can transfer these songs to your
Helix at any time.
“buy only” – Only available to buy, or to
sample a 30-second clip from XM+Napster
“download” – Available to buy,
download, or stream from XM+Napster
Using Helix with a PC
ENG
55
Page 29
Using Helix with a PC
Using Helix with a PC
Organizing Your Music
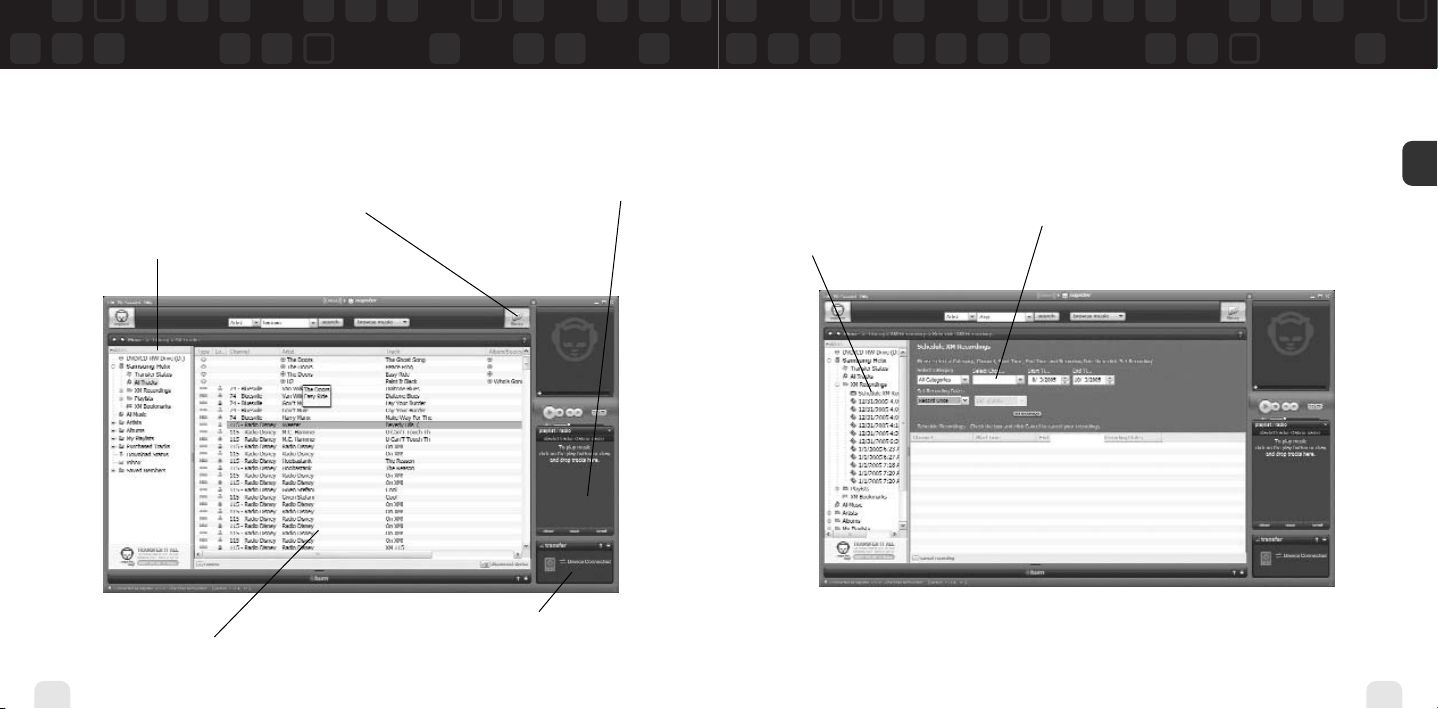
The “Folder” pane lets you view the
tracks stored on Helix or on your
PC, playlists, recording sessions,
bookmarks, and more. Click on the
desired folder to see its contents on
the main pane.
The main pane shows the
contents of a folder.
56
Using Helix with a PC
View and manage all the XM
content you recorded, WMA,
and MP3 tracks on your Helix
and your PC.
Drag and drop tracks or albums
onto the “playlist/radio” pane
to play them on your PC.
Drag and drop purchased tracks into the “transfer” pane to
move them from your PC to your Helix.
Recording Sessions
View and edit your Helix recording sessions by selecting Library/Helix/XM Recordings
on the XM+Napster application.
Create a new recording session or
choose an existing session.
Enter the options for the recording session.
Using Helix with a PC
ENG
57
Page 30
Using Helix with a PC
Using Helix with a PC
Playlists
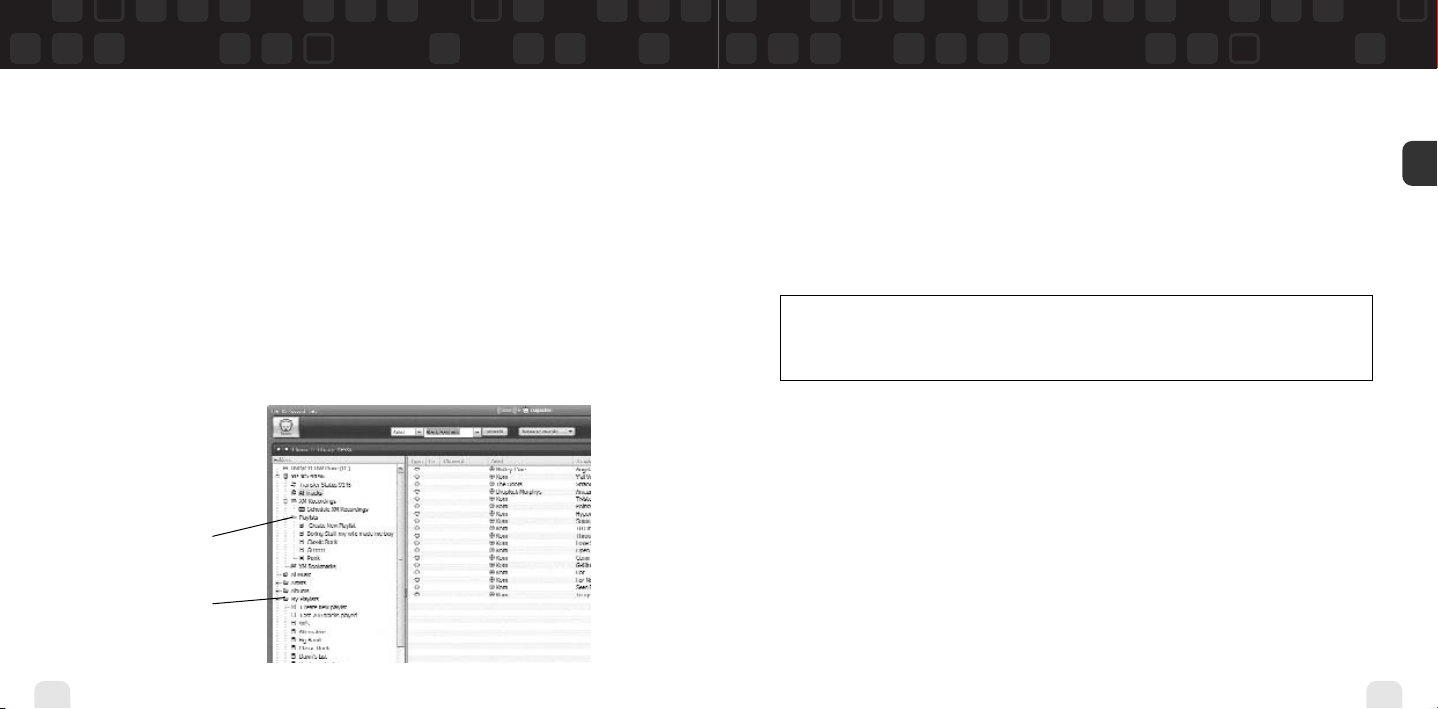
You can manage your Helix playlists using XM+Napster. Simply dock your Helix, then select
Library/Helix/Playlists. You can create new playlists, or edit or delete any playlists that
are stored in your Helix.
You can also create and manage playlists for any music content stored on your PC. Select
Library/My Playlists.
To add a track to any playlist, select that track on the main pane and drag it to the playlist
name in the “Folder” pane. Alternatively, right-click on the track name, then select the playlist
you want to add the track to.
You can move a PC playlist onto your Helix by dragging that playlist name into the
Library/Helix/Playlists line.When you move tracks and playlists onto your Helix, you may
have to purchase that content from XM+Napster, if you have not done so already.
Helix playlists
PC playlists
58
Using Helix with a PC
Transferring Between PC and Helix
To transfer a track or playlist from your PC to your Helix, drag and drop the track or playlist
into the “transfer” pane on the lower right-hand side of the XM+Napster application.
You can only transfer songs that you have purchased from XM+Napster or songs that you
have ripped from your audio CDs. Helix only recognizes file names that use single-byte characters; double-byte and multi-byte character sets (Asian languages such as Chinese, Korean,
or Japanese) are not supported.
WARNING: Though you can transfer non-MP3/WMA files to your Helix using Windows, those
files cannot be played as audio files. Furthermore, do not attempt to format the Helix storage;
doing so may cause damage to the device.
Using Helix with a PC
ENG
59
Page 31

Using Helix with a PC
Using Helix with a PC
Disconnecting Your Helix from the PC
Before you remove your Helix from its dock or unplug the USB cable from the dock or the PC,
you must disconnect using one of the following methods:
In Windows: right-click on the Safely Remove Hardware icon , which is on the
right side of the Windows taskbar. Select “USB Mass Storage Device,” and click on Stop.
On XM+Napster: click on the Disconnect Device icon
or select File/Disconnect portable device.
If you want to connect Helix to your PC again, re-insert Helix into its cradle.
60
Using Helix with a PC
Listening to XM Radio Online (XMRO)
XM Radio Online gives you access to over 75 channels of the same amazing programming
you hear on XM Satellite Radio, plus 10 select AOL Radio channels for even more choice.
To access XM Radio Online, click on Home/Radio/XM Radio Online. Then simply choose
your desired channel from the channel list.
Save favorite channels in the preset buttons (at the top of the screen) by dragging a channel
onto the desired button. Note that these presets are not the same as the “Favorite Channels”
on your Helix.
You can enjoy XM Radio Online anywhere you have a PC and a high-speed connection.
Remember that you cannot save or transfer XMRO programming onto your Helix.
Using Helix with a PC
ENG
61
Page 32
Using Helix with a PC
Using Helix with a PC
Using Your CDs or MP3/WMA Files
Ripping Your CDs
Use the XM+Napster application to rip tracks from a CD into your Napster library.
1. Insert an audio CD into your PC’s CD drive.
2. Click on Library, then click on the CD icon in the “Folders” pane. You will see a listing of
the CD tracks in the main pane.
3. Click the Rip icon on the bottom of the main pane. By default, the tracks will be
encoded into the WMA format at 128 kbps. You can change this setting by clicking
File/Options/CD Options.
Importing Tracks into XM+Napster
If you have already created MP3 or WMA files in your computer, you can import them into
your Napster library.
1. Click File/Import Tracks to My Library … .
2. Follow the directions on the screen.
62
Using Helix with a PC
Burning CDs
Transfer MP3 and WMA files onto a recordable CD or DVD. Please note that the content
recorded from XM cannot be burned onto a CD or DVD or otherwise transferred off your
Helix.
1. Insert a recordable CD or DVD into your PC’s CD/DVD drive.
2. Click Library.
3. Pull up the Burn screen at the bottom of the main pane.
4. Drag and drop tracks into the “Burn” pane.
5. When you’ve finished selecting tracks, click Burn Disc.
For more information, please see the XM+Napster FAQs at http://napster.xmradio.com.
Using Helix with a PC
ENG
63
Page 33
Updating Helix Firmware
Updating Helix Firmware
Occasionally we make improvements to the Helix firmware, which is the software that makes
your Helix work. Updating the firmware is a quick and easy process.
Remember that:
Your Helix must be docked in its cradle with a power adapter and must be connected to
your PC. You cannot update the firmware if Helix is not docked and powered.
Your PC must be connected to the Internet.
Using XM+Napster
If you have installed and use XM+Napster, it automatically checks the firmware when you
connect Helix to your PC. XM+Napster notifies you when it’s necessary to update the
firmware. Simply follow the instructions.
Don’t worry if you miss a firmware update. XM+Napster will always check whether your Helix
needs an update or not.
64
Updating Helix Firmware
Using the Update Tool
If you don’t use XM+Napster, you can
update the Helix firmware manually.
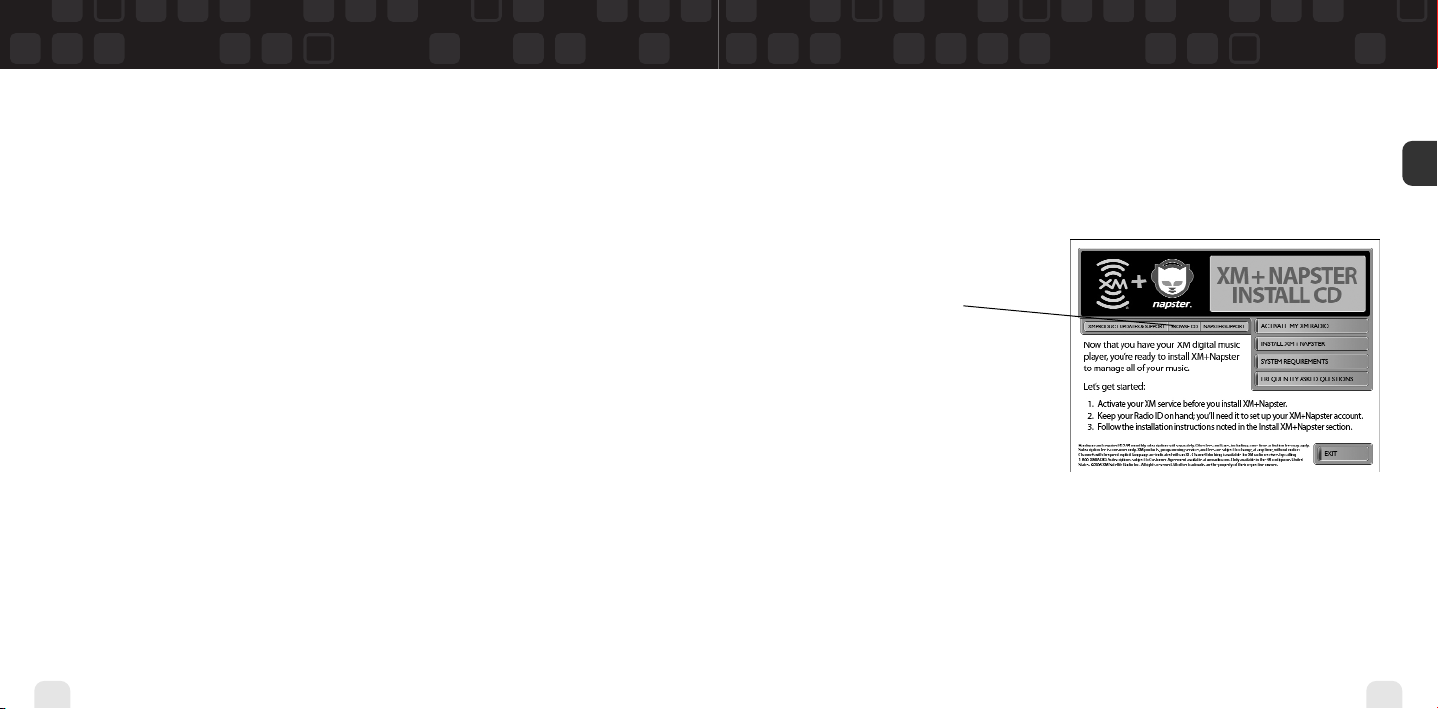
1. Insert the XM+Napster CD in your PC’s
CD-ROM or DVD drive. The XM+Napster
software should start automatically.
2. Click on Browse CD.
3. Click on Utils, then click on
XMFirmwareUpdateClient.
4. Follow the instructions on the PC
screen.
You can run this firmware update tool at
any time. If the firmware needs to be
updated, the tool will install it automatically. If the firmware is already up-to-date,
nothing happens.
Using the Web
Point your Web browser to http://fwupdt.xmradio.com and follow directions.
Updating Helix Firmware
ENG
65
Page 34
Settings
Settings
FM Modulator
(For use with optional Car Accessory Kit YA-CP100, sold separately)
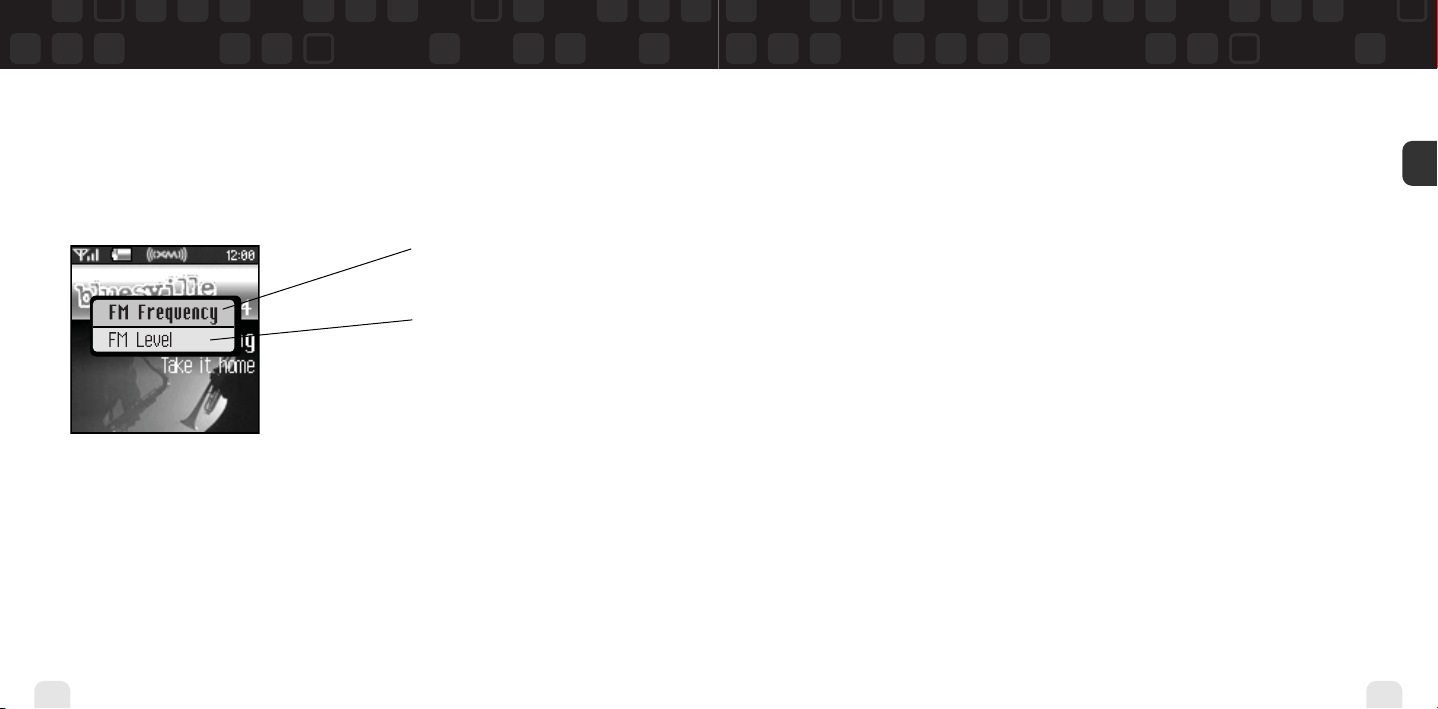
Set the FM frequency on which
Helix transmits.
Adjust the volume level of the
FM transmission.
66
Settings
FM Frequency (for use with optional Car Accessory Kit YA-CP100,
sold separately)
Your Helix contains a built-in FM modulator (or FM transmitter) that allows you to listen to
whatever your Helix is playing using a car FM radio. All you have to do is set your Helix and
the FM radio in your car to the same frequency.
1. Dock Helix to the car cradle.
2. Find an unused FM frequency on your FM radio. Note that FM frequency.
3. Select XM Settings FM Modulator FM Frequency.
4. Use the up and down arrow buttons to choose the same FM frequency as in step 2. You
should hear XM programming over your FM radio when your Helix and radio frequencies
match.
5. Press the XM button to confirm your selection.
Settings
ENG
67
Page 35
Settings
Settings
FM Level
When listening to your Helix using the FM modulator, you can adjust its volume level to
match other audio sources (your CD player, other FM stations, or MP3 player).
1. Select XM Settings FM Modulator FM Level.
2. Press the left arrow button to decrease the volume level or the right arrow button to
increase the volume level.
3. Press the XM button to confirm your selection.
68
Settings
Aiming the Antenna
For optimal reception of XM’s live satellite signal, your Helix antenna should have an
unobstructed view of the XM satellites in the southern sky. In large cities, XM also has a
network of ground repeaters to help increase the signal coverage.
Your Helix can help you aim the home antenna to pull in the strongest possible signal.
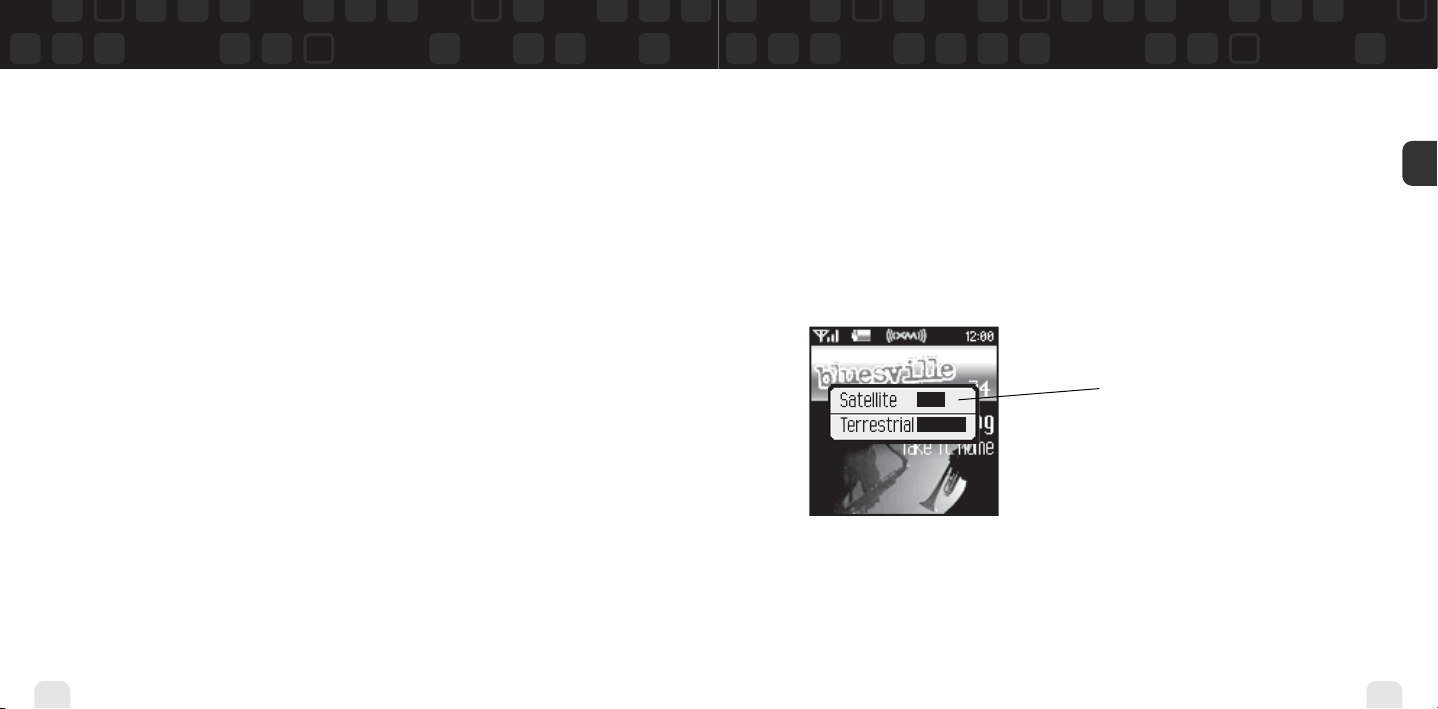
1. Select XM Settings Setup Antenna Aiming.
2. Slowly turn and tilt the antenna. The signal bars on the display will change.
Move the antenna around until
either “Satellite” or “Terrestrial” is
at least half strength.
3. The antenna aiming screen remains as long as it’s needed to help you position the antenna. When you’ve found the best position, press the left arrow button repeatedly to exit
the Settings menu.
4. Select XM channel 1. You should be able to listen to the XM Preview Channel.
Settings
ENG
69
Page 36
Settings
Settings
Audio
Tone
You can adjust the audio tone quality to suit the kind of music you’re listening to.
1. Select XM Settings Preferences Set Tone.
2. Press the up or down arrow buttons to select either “Bass” or “Treble.” Adjust the tone
settings by pressing the left or right arrows.
3. Press the XM button to save your setting and exit the tone control menu.Then press the
left arrow button repeatedly until you return to normal operation.
Line Out Level
If you connect Helix to another stereo system, you can adjust Helix’s audio level to match
other audio sources. This is not a volume control; use the volume control on your stereo
instead.
1. Select XM Settings Setup Line Out Level.
2. Use the left or right arrow buttons to decrease or increase the audio level.
3. Press the XM button to confirm your selection.Then press the left arrow button repeatedly
until you return to normal operation.
70
Settings
Display
Brightness and Contrast
To change the screen’s brightness and contrast:
1. Select XM Settings Preferences Change Display Brightness.
2. Press the left or right arrow buttons to adjust brightness.
3. Press the XM button to confirm your selection.Then press the left arrow button repeatedly
until you return to normal operation.
Backlight Timer
Your Helix screen remains lit for a short time after you press a button.To adjust this time period:
1. Select XM Settings Preferences Change Display Backlight Timer.
2. Press the up and down arrow buttons to select the desired time period.
3. Press the XM button to confirm your selection.
Settings
ENG
71
Page 37
Settings
Settings
Stock Ticker
If you created a stock ticker, you will see stock symbols and their prices displayed at the
bottom of Helix’s display. You can control the way the ticker is displayed.
1. Select XM Settings Preferences Change Display Display
Appearance Stock Ticker.
2. Select Scrolling to see the ticker move across the screen from right to left. Select By
Pages to view the ticker as if you’re flipping pages of a book.
3. Press the XM button to confirm your selection.
Info Extras
If you choose sports or other Info Extras features, you will see sports scores and other information displayed at the bottom of Helix’s display. You can control the way this information is
displayed.
1. Select XM Settings Preferences Change Display Display
Appearance Info Extras.
2. Select Scrolling to see the ticker move across the screen from right to left. Select By
Pages to view the ticker as if you’re flipping pages of a book.
3. Press the XM button to confirm your selection.
72
Settings
Channel Access
Direct Tune
Normally, as you scroll through live XM channels using the up and down arrow buttons, you
can preview the channel list before selecting one channel. Helix does not switch to that
channel until you push the XM button. You can change this so that Helix automatically
tunes to the channel that you’re previewing.
1. Select XM Settings Preferences Channel Access Direct Tune.
2. Select Direct Tune On.
3. Press the XM button to confirm your selection.Then press the left arrow button repeatedly
until you return to normal operation.
To return Helix to its default behavior, select Direct Tune Off.
Settings
ENG
73
Page 38
Settings
Settings
Channel Skip/Add
You can simplify the list of channels that you see when you press the up and down arrow
buttons. To skip a channel:
1. Select XM Settings Preferences Channel Access Channel
Skip/Add.
2. You will see a list of channels. Press the XM button to skip a channel. You’ll see the
Channel Skip icon displayed beside the channel name.You can choose to skip more
than one channel.
3. To add a channel that has been skipped, highlight that channel then press the XM button.
4. Press the left arrow button when you’re finished.
5. Helix confirms by displaying “Channel List Updated.”
You can still tune to a channel directly by using the virtual keypad to enter its channel number.
Channel skip/add should not be used as a form of parental control. To completely block
access to an XM channel, contact XM Listener Care at 1-800-XM-RADIO (1-800-967-2346).
74
Settings
Clock and Sleep Timer
Time
1. The time is automatically set using the XM signal. Select XM Settings Setup
Set Time Set Clock Select Time Zone to set the correct time zone for your
location.
2. Your Helix automatically adjusts for Daylight Savings Time.To turn this feature off,
select XM Settings Setup Set Time Set Clock Daylight Savings
Time No.
3. To display time in 12- or 24-hour format, select the desired format through XM
Settings Setup Set Time Set Clock 12/24 Hour Mode.
Sleep Timer
Your Helix has a sleep timer that can automatically shut off the unit after a period of time.
1. Select XM Settings Setup Set Time Sleep Timer.
2. Select the desired time period.
3. Press the XM button to confirm the selection.Your Helix will remember this setting the
next time you turn on your Helix.
The sleep timer resets to “Off” every time you turn Helix off.
Settings
ENG
75
Page 39
Settings
Settings
Vehicle Mode
If you listen to your Helix in a vehicle, you’ve probably plugged the power adapter into the
cigarette lighter socket. In some vehicles, the cigarette lighter is turned on or off with the
ignition key; in other vehicles, the cigarette lighter is powered all the time.To prevent your
battery from being drained, choose one of the following settings:
1. Select XM Settings Setup Set Time Vehicle Mode.
2. Choose one of the following settings:
OFF Choose this option if the cigarette lighter
Auto ON/OFF on or off using its own power switch.
ON Choose this option if the ignition key
Delayed Power Off OFF or Another option if the cigarette lighter is
3. The setting is saved even if you turn Helix off.The vehicle mode setting is only active when
you use the car cradle.
76
Settings
60-180 minutes always powered: Helix automatically turns
is always powered. You must turn Helix
switches the cigarette lighter on and off.
off 60 to 180 minutes after you turn it on.
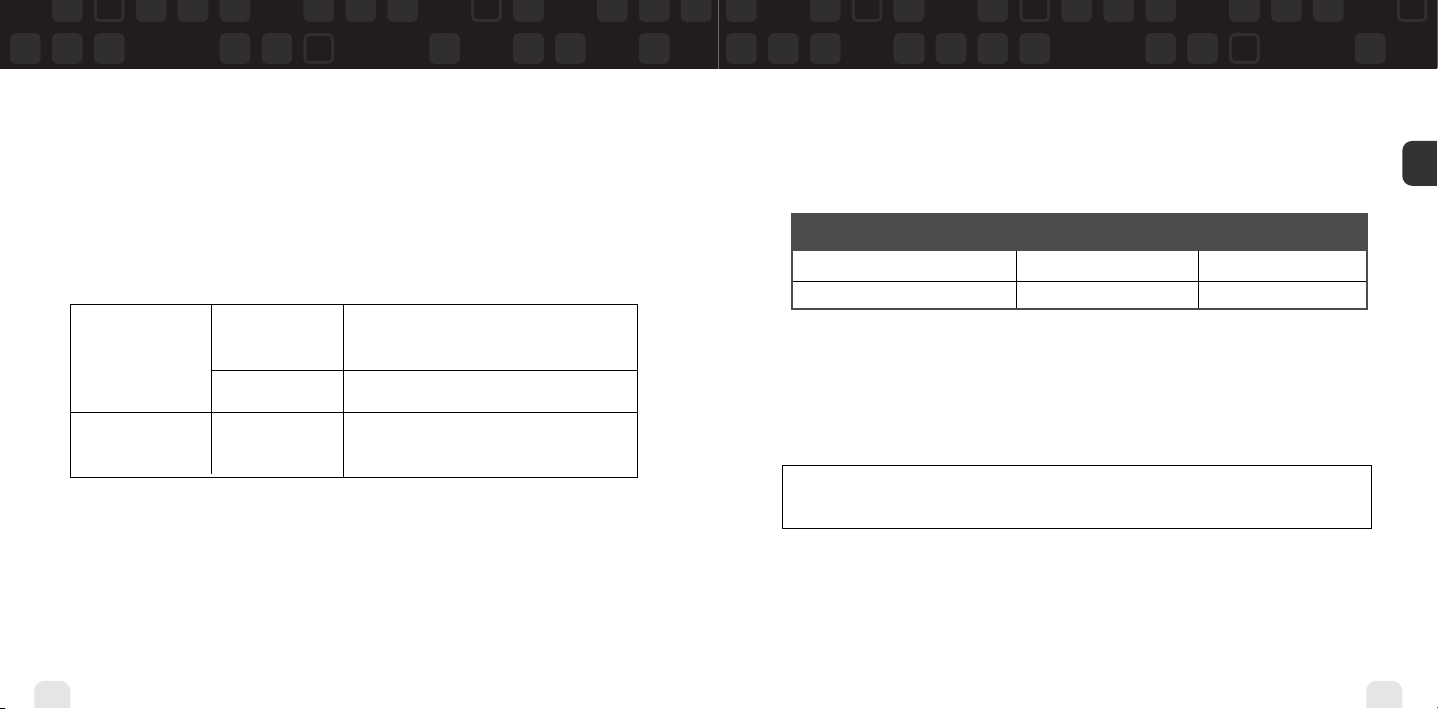
Memory Partition
The internal storage in Helix can store recorded XM content and MP3/WMA files. By default,
the storage is divided 50/50, but you can select different memory partitions:
setting typical storage for content typical storage for PC
recorded from XM (MP3 and WMA) tracks
50/50 XM/PC files 25 hours 8 hours
100% XM 50 hours 0 hours
To change the memory partition:
1. Dock your Helix into the home cradle and connect the AC power adapter.
2. Select XM Settings Setup Memory Partition.
3. Highlight the desired setting and press the XM button.
4. Confirm by selecting Yes , or cancel by selecting No.
CAUTION: When you change the memory partition, you will erase all your stored XM content
and MP3/WMA tracks from your Helix.
Settings
ENG
77
Page 40
Settings
Restoring Factory Defaults
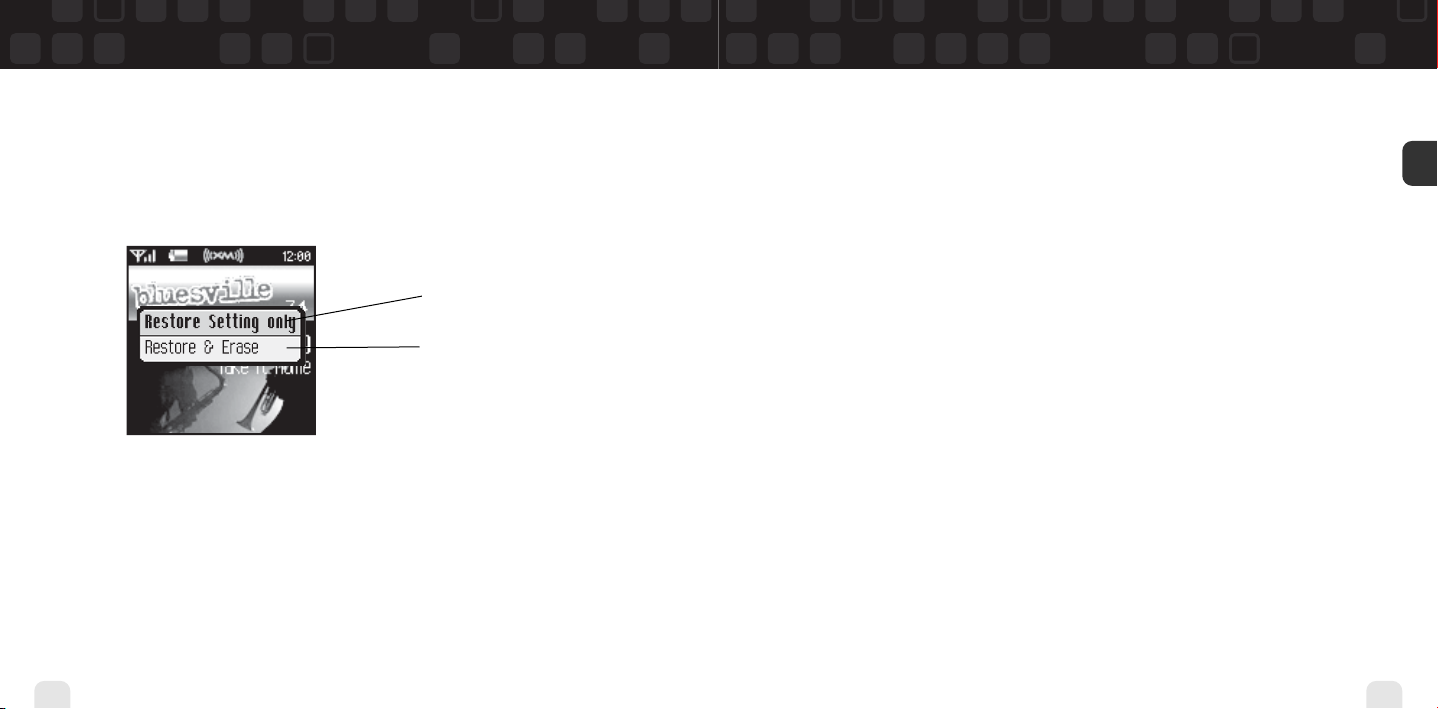
To restore all Helix settings and preferences to a “factory fresh” state:
1. Select XM Settings Setup Factory Defaults.
Restore just the settings to
factory defaults.
Restore settings to factory
defaults and erase all music.
2. You should see this display:
3. Confirm by selecting Yes, or cancel by selecting No.
ENG
78
Settings
Settings
79
Page 41
Customer Support
Customer Support
Troubleshooting
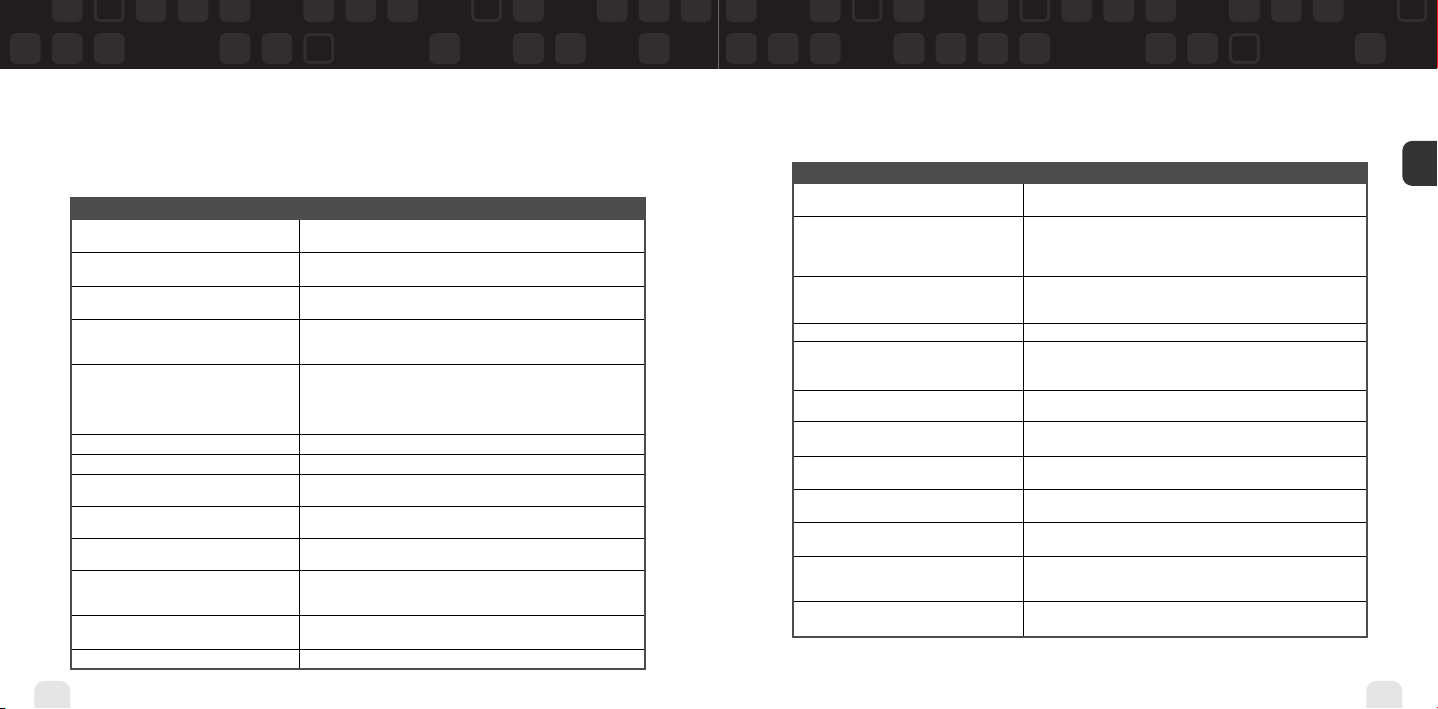
If your Helix does not work the way you expect, first consult this troubleshooting guide. To
reset your Helix, remove the battery then re-insert it.
If you see this on the display: You should:
No Signal Something is blocking the XM signal. Move your Helix away
Antenna Plug the antenna into the home or vehicle cradle.
Off Air The channel you’ve selected is not currently broadcasting.
Loading Your Helix is acquiring audio or program information from the XM
Updating XM is updating your Helix with the latest encryption code. Simply wait
--- (no artist or title) No program information, such as artist name or song title, exists.
Channel You are attempting to tune to a channel that is not available.
All Recording Features Not Available Activate your XM subscription to enable you to store XM
This Channel Not Available for Recording Some programming cannot be recorded due to restrictions placed by
This Program Not Available for Recording Some programming cannot be recorded due to restrictions placed by
Connect to XM Antenna Within ## Days You must receive a live XM signal for at least 8 hours a month. This
to Avoid Interruption in Listening to authenticates your XM subscription and ensures that you can
XM Recordings continue to enjoy your recorded XM content and live XM programming.
Please connect to XM Antenna to Select “Live XM” and make sure you get a strong signal.
Confirm Valid Subscription
Activation required for playback Activate your XM subscription.
80
Customer Support
from the obstructed area (e.g., an underground garage).
Make sure the antenna wire is not bent or broken.
Tune to another channel.
signal. This message should disappear in a few seconds in good signal
conditions.
a few seconds until the update is done. – OR – You may be attempting
to tune to a channel that is blocked or that you cannot receive with
your subscription package. To receive that channel, contact XM Satellite
Radio at 1-800-967-2346.
programming on your Helix.
the content owners.
the content owners.
Troubleshooting
If this happens: You should:
There is no power or your Helix shuts Your Helix battery may be low. Charge the battery by docking your
off quickly. Helix in the cradle and plugging in the AC adapter.
Helix shuts off unexpectedly. Check whether you set the sleep timer, and set it to “Off” if desired.
You do not receive all the XM channels you Check that you have not skipped any channels (page 74). If you still do
have subscribed to. not receive all channels, your Helix may not be activated. Contact XM
No audio. Check all connections between your Helix and your stereo system.
No song title or artist name is displayed. Nothing is wrong with your Helix. That information may be in the
No audio when listening to Helix through Check that your Helix and your radio are tuned to the same FM
an FM radio. frequency.
Audio fades or has static when listening You might be hearing interference from another FM station. Set your
through an FM radio. Helix and your radio to a different FM frequency.
Audio sounds too soft or is distorted when Raise or lower the FM audio level until the sound quality improves.
listening to an FM radio.
XM Instant Traffic and Weather channels Nothing is wrong with your Helix. These channels use a different
sound different from other channels. audio technology than the other XM channels.
Controls do not respond. Check whether the power switch is in the “hold” position.
The controls still refuse to respond, the display Reset your Helix by removing and re-inserting the battery.
does not change, or the backlight does not
turn on or off.
Battery level meter does not match the Fully charge the battery, then use your Helix until the battery is
expected charge or playback time. exhausted. This calibrates the battery level meter.
Check whether “Vehicle Mode/Delayed Power Off” is set, and set it to
“Off” if desired. Helix remembers the “Vehicle Mode” setting even
when you turn the device off.
Satellite Radio.
process of being updated. Some channels, such as news and sports,
may not have such information.
If so, slide it to the center position to unlock the controls.
Customer Support
ENG
81
Page 42
Customer Support
Customer Support
Troubleshooting
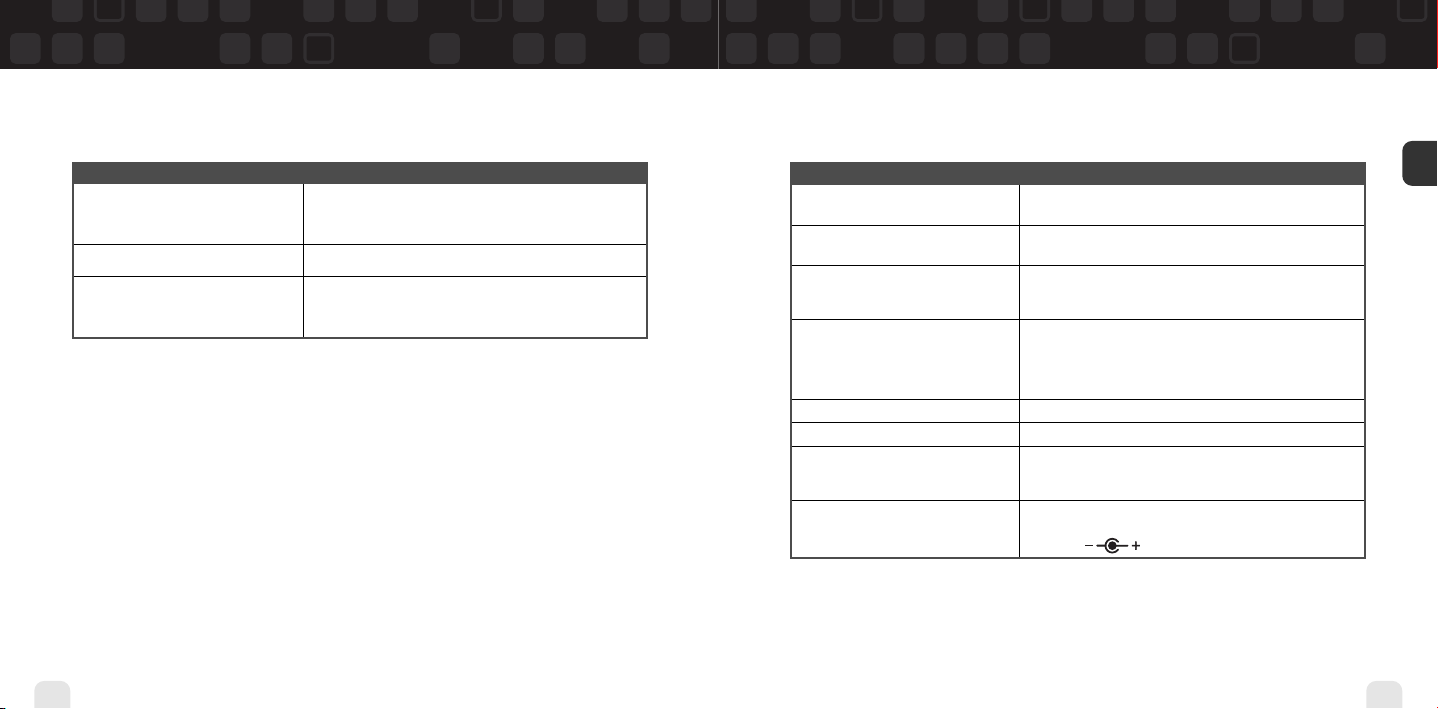
If this happens: You should:
Helix does not communicate with your PC. Check the power and USB connections between the cradle and your PC.
Artist and song title information does not Helix may not correctly show the artist and song information
display correctly. (ID3 tags) of certain foreign songs.
You cannot transfer songs that you Helix is not compatible with the Napster To Go monthly subscription
downloaded with Napster To Go™ into Helix. service. To transfer songs from your PC to your Helix, you must
82
Customer Support
Be sure to use the supplied USB cable; any others may prevent your
Helix from charging or communicating properly with your PC.
Remove your Helix from its cradle, then re-insert.
purchase individual songs or albums from XM+Napster Light or
XM+Napster.
Specifications
Helix Player
Dimensions 56 mm (W) x 94 mm (H) x 16 mm (D)
2.2 in (W) x 3.7 in (H) x 0.6 in (D)
Weight 128 g
4.5 oz
Storage capacity 1 GB (The capacity of the built-in memory may be less than
indicated; a portion of the memory is used by the Helix
firmware.)
Music file formats MP3 and WMA fixed bitrates:
32, 48, 64, 96, 128, 160, 192, 256, 320 kbps
MP3 and WMA variable bitrates:
64-128, 128-256, 160-320 kbps
Audio output 3.5 mm mini-stereo jack
Antenna connector (home and car cradles) RF SMB
Battery Type: lithium ion
Voltage: 3.7 V
Capacity: 1750 mAh
External power Voltage: 5 V DC
Current: 2000 mA
Polarity:
Customer Support
ENG
83
Page 43

Customer Support
Customer Support
Specifications
Remote
Dimensions 39 mm (W) x 95 mm (H) x 12 mm (D)
Weight 40 g
Battery Type: CR2032
Model Numbers
Helix player YX-M1
Remote YA-RC100
Home kit YA-CD100
Car accessory kit YA-CP100
Battery AH43-00007A
Earbuds EP-360
Home antenna AH42-00024A
AC adapter AH61-02211A
Travel power cable AH61-02212A
RCA audio cable AH39-00901A
USB cable AH39-00902A
Carrying case/holster AH61-02213A
CD-ROM AH59-01733A
User guide AH81-02210A
84
Customer Support
1.5 in (W) x 3.7 in (H) x 0.47 in (D)
1.4 oz
Voltage: 3 V
Patent Information
Technology. It is prohibited to copy, decompile, disassemble, reverse engineer, hack,
manipulate, or otherwise make available any technology incorporated in receivers compatible
with the XM Satellite Radio System or that support the XM website, the Online Service or any
of its content. Furthermore, the AMBE®voice compression software included in this product is
protected by intellectual property rights including patent rights, copyrights, and trade secrets
of Digital Voice Systems, Inc.You also agree not to upload, post, transmit or otherwise make
available any material that contains software viruses or any other computer code, files, or programs designed to interrupt, disable, or limit the functionality of the XM website or the Online
Service. Furthermore, the music, talk, news, entertainment, data, and other content on the
Services are protected by copyright and other intellectual property laws and all ownership
rights remain with the respective content and data service providers. You are prohibited from
any export of the data (or derivative thereof) except in compliance with applicable export
laws, rules, and regulations.The user of this or any other software contained in an XM Radio
or the XM website and all software used in connection with either is explicitly prohibited from
attempting to copy, decompile, reverse engineer, or disassemble the object code, or in any
other way convert the object code into human-readable form. The software is licensed solely
for use within this product.
The product unit accompanying this user guide is licensed under certain intellectual property
rights of certain third parties. In particular, this product is licensed under the following U.S.
patents: 5,991,715, 5,740,317, 4,972,484, 5,214,678, 5,323,396, 5,539,829, 5,606,618,
5,530,655, 5,777,992, 6,289,308, 5,610,985, 5,481,643, 5,544,247, 5,960,037, 6,023,490,
5,878,080, and under U.S. Published Patent Application No. 2001-44713-A1.
This license is limited to private non-commercial use by end-user consumers for licensed contents. No rights are granted for commercial use. The license does not cover any product unit
other than this product unit and the license does not extend to any unlicensed product unit or
process conforming to ISO/IEC 11172-3 or ISO/IEC 13818-3 used or sold in combination with
this product unit. The license only covers the use of this product unit to encode and/or decode
audio files conforming to the ISO/IEC 11172-3 or ISO/IEC 13818-3. No rights are granted
under this license for product features or functions that do not conform to the ISO/IEC 11172-3
or ISO/IEC 13818-3.
Customer Support
ENG
85
Page 44
Customer Support
Customer Support
FCC Statement
This device complies with part 15 of the FCC Rules. Operation is subject to
the following two conditions:
1. This device may not cause harmful interference, and
2. This device must accept any interference received, including interference
that may cause undesired operation.
CAUTION: Any changes or modifications in construction of this device which are not expressly
approved by the party responsible for compliance could void the user’s authority to operate the
equipment.
NOTE: This equipment has been tested and found to comply with the limits for a Class B
86
Customer Support
digital device, pursuant to part 15 of the FCC Rules. These limits are designed to provide
reasonable protection against harmful interference in a residential installation. This equipment
generates, uses, and can radiate radio frequency energy and, if not installed and used in accordance with the instructions, may cause harmful interference to radio communications. However,
there is no guarantee that interference will not occur in a particular installation.
If this equipment does cause harmful interference to radio or television reception, which can be
determined by turning the equipment off and on, the user is encouraged to try to correct the
interference by one or more of the following measures:
Reorient or relocate the receiving antenna.
Increase the separation between the equipment and receiver.
Connect the equipment to an outlet on a circuit different from that to
which the receiver is connected.
Consult the dealer or an experienced radio/TV technician for help.
Customer Support
ENG
87
Page 45

Customer Support
Customer Support
Warranty
Samsung warrants MP3 players to be free of defects in material and workmanship for
a period of twelve (12) months from the original date of purchase by the consumer. If during
the period of warranty this product proves defective under normal use and service, you should
return the product to the retailer from whom it was originally purchased, or to any Samsung
Authorized Dealer or Authorized Service Center, if outside the time limit for returns imposed
by the retailer. The liability of Samsung and its appointed maintenance company is limited to
the cost of repair and/or replacement of the unit under warranty.
For further information relating to the Authorized Service Centers, contact 1-800-SAMSUNG
(1-800-726-7864).
88
Customer Support
Warranty Conditions
1. The warranty is only valid upon presentation of the proof of purchase consisting of original
invoice or sales slip confirmation, indicating the date of purchase, retailer’s name, model,
serial number, and product number. Samsung reserves the right to refuse warranty service if
this information has been removed or changed after the original purchase of the product
from the retailer.
2. Samsung’s sole obligations are to the repair of the defective part, or at its discretion, replacement of the product (service exchange unit).
3. Warranty repairs must be carried out by an Authorized Samsung Dealer/Service Center. No
reimbursement will be made for repairs carried out by non-Samsung Centers, and warranty
coverage will not be valid for any repairs or damage caused by such repairs.
4. Repair or replacement under the terms of this warranty does not give right to extension to
or a new starting of the period of warranty. Repair or direct replacement under the terms of
this warranty may be fulfilled with functionally equivalent service exchange units.
5. The warranty is not applicable in cases other than defects in material and workmanship.
The warranty does not cover the following:
a. Periodic checks, maintenance, repair, and replacement of parts due to normal
wear and tear.
b. Abuse or misuse, including but not solely limited to the failure to use this product for its
normal purpose in accordance with Samsung’s instructions for usage and maintenance.
c. Use of the product in conjunction with accessories not approved by Samsung for use
with this product.
d. Failure of or damage to the product arising from incorrect installation or use inconsistent
with technical or safety standards, or failure to comply with product manual instructions.
Customer Support
ENG
89
Page 46
Customer Support
e. Accidents, acts of God, lightning, water, fire, public disturbances, improper ventilation or
any cause beyond the control of Samsung.
f. Unauthorized modifications carried out for the product to comply with local or national
technical standards in countries for which the Samsung product was not originally
designed.
g. Repairs performed by non-authorized service centers such as opening of the product by
a non-authorized person.
h. Products that have had model numbers, serial numbers, or product number on the
product altered, deleted, removed, or made illegible.
6. This warranty does not affect the consumer’s statutory rights nor the consumer’s rights
to return the product to the retailer under the retailer’s return policy.
Customer Support
ENG
90
Customer Support
Customer Support
91
Page 47
Samsung Electronics America, Inc.
400 Valley Road
Mount Arlington, NJ 07856
1-800-SAMSUNG (1-800-726-7864)
www.samsung.com
AH81-02210A
XM respects copyrights. This device is for personal use only. XM
Programming stored on the device cannot be transferred off the
unit. Download legally. Buy digital music from XM+Napster.
The XM name, related logo, TuneSelect, and Helix are trademarks
of XM Satellite Radio Inc. All rights reserved.
YX-M1
 Loading...