


 Loading...
YP-VX1
Voice Recorder
user manual
imagine the possibilities
Thank you for purchasing this Samsung product. To receive a more complete service, please register your product at
www.samsung.com/register

 Using this manual
•Some of the contents in this manual may differ from your recorder depending on the firmware installed. Some of the contents may be changed without prior notice.
•Your recorder and screens may differ from the illustrations in this manual.
•To view the special features of your recorder, see "Special features of your recorder" on page 3.
•To view troubleshooting, see "Troubleshooting" on page 40.
 Icons used in this manual
Icon |
Description |
|||
|
|
|
|
Notes, usage tips, or additional information |
|
Note |
|||
|
|
|
|
|
|
|
|
Safety warnings and precautions |
|
|
Caution |
|||
|
|
|
|
|
< |
> |
|
|
Menu names or text on the screen ; |
|
|
for example: <Yes> |
||
|
|
|
|
|
[ |
] |
|
|
Buttons; for example: [ ] (represents the |
|
|
Back button) |
||
|
|
|
|
|
Safety information
This manual describes how to properly use your new voice recorder. Read it carefully to avoid damaging the recorder and injuring yourself. Pay particular attention to the following serious warnings.
1
PROTECT YOURSELF
• Do not disassemble, repair, or modify this product on your own.
• Do not get the product wet or drop it in water. If the product gets wet, do not switch it on because you could get an electric shock.
•Do not use the product during a thunderstorm, as it may cause malfunction or a risk of electric shock.
•Do not use the earphones while you are driving a bicycle, automobile or
motorcycle.
It can cause a serious accident, and furthermore, is prohibited by law in some areas.
Using the earphones while walking or jogging on a road, in particular, on a crosswalk can lead to a serious accident.
•For your safety, make sure the earphone cable does not get in the way of your arm or other surrounding objects while you are taking exercise or a walking.
•Do not place the product in damp, dusty, or sooty areas because these
environments could lead to fire or electric shock.
• Do not use the product if the screen is cracked or broken. Broken glass or acrylic could cause injury to your hand or face. Bring the product to a
Samsung service centre to replace the screen. Damage caused by careless handling will void the warranty.
Safety information
PROTECT YOURSELF
• Using earphones or headphones for an extended time may cause serious damage to your hearing. If you are exposed to sound louder than 85db for an extended time, you may adversely affect your hearing. The louder the sound is, the more seriously damaged your hearing may be (an ordinary conversation is between 50 to 60 db and road noise is approximately 80 db).
You are strongly advised to set the volume level to medium (the medium level is usually less than 2/3 of the maximum).
•If you feel a ringing in your ear(s), lower the volume or stop using the earphones or headphones.
•Battery shall not be exposed to excessive heat
such as sunshine, fire or the like.
2
PROTECT YOUR RECORDER
• Do not leave the recorder in temperatures above 35° C (95° F), such as a sauna or a parked car.
•Do not cause excessive impact on the recorder by dropping it.
•Do not place heavy objects on top of the recorder.
•Prevent any foreign particles or dust from entering into the product.
•Do not place the product near magnetic objects.
•Be sure to backup important data. Samsung is not
responsible for data loss.
•Use only accessories provided by or approved by Samsung.
•Do not spray water on the product. Never clean the
product with chemical substances such as benzene or thinner, as it may cause fire, electric shock or deteriorate the surface.
•Do not remove the batteries during the recording. Otherwise, it may cause serious damage not only to data but also to the system.
•Failure to follow these instructions may lead to physical injuries or damage to the recorder.
•When printing this user manual, we recommend that you print in color and check “Fit to Page” in the print option for better viewing.

 Special features of your recorder
Extended recording time |
|
|
Customizable |
|
|
|
microphone function |
||
in different recording |
|
|
||
|
|
according to various |
||
qualities |
|
|
||
|
|
environments |
||
|
|
|
|
|
|
|
|
|
|
x 2 0
x1.0
x0 5
Adjustable playback speed with original sound quality!
Powerful sound with a high performance built-in speaker
Listen to true threedimensional sound with the Samsung Digital Natural Sound engine (DNSe™)
YP-VX1
 Contents
6 |
Use basic functions |
7 |
What's included |
8 |
Your voice recorder |
10 |
Inserting the batteries |
11 |
Connect to a PC |
12 |
Turn your recorder on and lock |
13 |
the buttons |
Access menus from the main |
|
|
menu screen |
14 |
Manage files |
15 |
Download files |
15 |
Recommended PC requirements |
15 |
Installing EmoDio |
16 |
Download files with EmoDio |
17 |
Download files using your recorder as |
18 |
a removable disk |
Disconnect your recorder from a PC |
20 |
Voice Recording and |
|
Playback |
21 |
Voice Recording |
21 |
To record voice |
23Use the voice recording options
24Listen to my recordings and
music
24 Listen to a desired file
26Insert a bookmark
27Play a playlist
28Use the playback options
29Microphone mode settings
19 Manage files

 Contents
30 |
FM Radio |
|
38 |
Appendix |
|
31 |
FM Radio |
39 |
Maintenance of your recorder |
||
31 |
Listen to the FM radio |
40 |
Troubleshooting |
||
32 |
Save radio stations |
42 |
Specifications |
||
33 |
Use the FM radio options |
||||
43 |
Correct disposal of this product |
||||
|
|
||||
|
|
|
|
(Waste Electrical & Electronic |
|
35 |
|
43 |
Equipment) |
||
Customise settings |
Correct disposal of batteries in |
||||
|
|
|
|
this product |
|
|
|
|
|
||
36 Settings |
44 |
|
45 |
License
Contact Samsung World Wide

Use basic functions |
|
Learn to perform basic operations with your recorder. |
|
What's included ................................................................. |
7 |
Your voice recorder ............................................................ |
8 |
Inserting the batteries......................................................... |
10 |
Connect to a PC ................................................................ |
11 |
Turn your recorder on and lock the buttons ...................... |
12 |
Access menus from the main menu screen...................... |
13 |
What's included
7
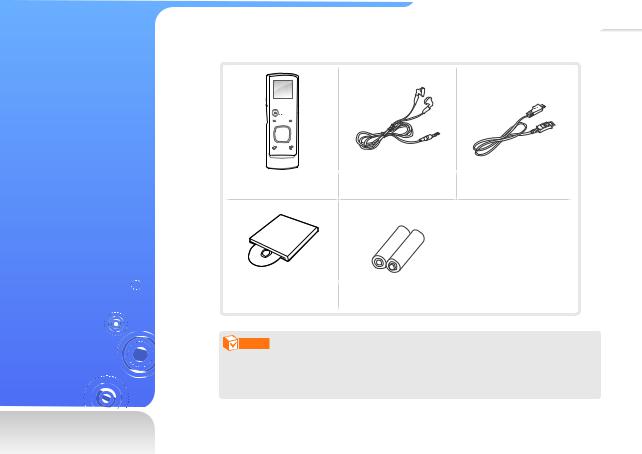
Check your product box for the following items:
Voice Recorder |
Earphones |
USB cable |
Installation CD |
AAA /LR03 Batteries |
|
Note |
|
|
•The items supplied with your recorder may appear different from the illustrations in this manual.
•You can obtain additional accessories from your local Samsung dealer.
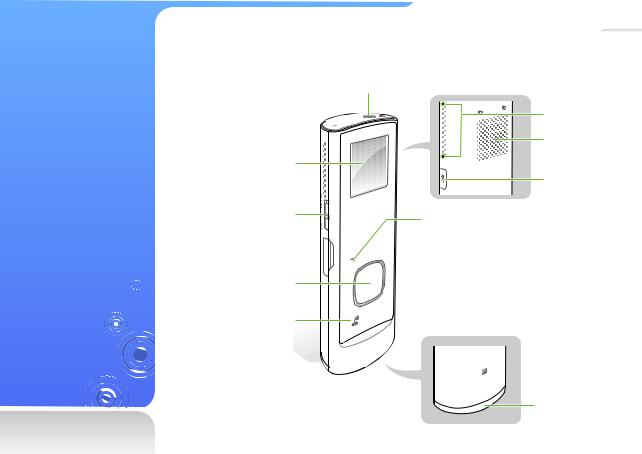
Your voice recorder
8
Earphone connection jack
Microphone  connection jack
Display
Microphone mode switch
Recording button 

 USB connection port

n Navigation/ Selection button
Section repeat/
Deletion button
Built-in
Microphone
Speaker
Power/lock button
Back button

 Menu button

 Folder/Bookmark button
 Accessories hook
Battery cover
Use basic functions > Your voice recorder |
9 |
Button functions
|
Button |
Function |
|
|
||||||
|
|
|
|
|
Recording |
• |
Start voice recording (press and hold) |
|||
|
|
|
|
|
• |
Stop voice recording |
||||
|
|
|
|
|
|
|||||
|
|
|
|
|
|
|
|
|||
|
|
|
|
|
|
• |
Return to the previous screen |
|||
|
|
|
|
|
Back |
• |
Return to the main menu screen |
|||
|
|
|
|
|
|
|
(press and hold) |
|||
|
|
|
|
|
Menu |
Open a list of options available in the current |
||||
|
|
|
|
|
menu |
|
|
|||
|
|
|
|
|
|
|
|
|||
|
|
|
|
|
Section |
• |
Repeat a section |
|||
|
|
|
|
|
repeat/ |
|||||
|
|
|
|
|
• |
Delete the selected file (press and hold) |
||||
|
|
|
|
|
Deletion |
|||||
|
|
|
|
|
|
|
|
|
||
|
|
|
|
|
|
|
|
|||
|
|
|
|
|
Folder/ |
• |
Select a folder to save voice files |
|||
|
|
|
|
|
Bookmark |
• |
Add a bookmark (press and hold) |
|||
|
|
|
|
|
|
n |
Scroll up, down, left, or right on the |
|||
|
|
|
|
|
|
screen |
||||
|
|
|
|
|
|
|
|
|||
|
|
|
|
|
|
o |
• |
Select the highlighted menu or |
||
|
|
|
|
|
|
|
option |
|||
|
|
|
|
|
|
(Centre) |
|
|||
n Navigation/ |
• |
Begin or pause playback |
||||||||
|
|
|||||||||
a |
|
|
||||||||
|
|
|
|
|
Selection |
Adjust the volume |
||||
|
|
|
|
|
|
(Up/Down) |
||||
|
|
|
|
|
|
|
|
|||
|
|
|
|
|
|
|
|
|
|
|
|
|
|
|
|
|
b |
• |
Skip to the previous/next file |
||
|
|
|
|
|
|
• |
Search backward/forward |
|||
|
|
|
|
|
|
(Left/Right) |
||||
|
|
|
|
|
|
|
(press and hold) |
|||
|
|
|
|
|
|
|
|
|
||
|
|
|
|
|
|
|
|
|
|
|
Button Function
Interview Slide up to run the interview mode mode
Meeting
Slide down to run the meeting mode
mode
Power/lock |
• |
Turn your recorder on and off (press and hold) |
|
• |
Lock the buttons |
|
|
|
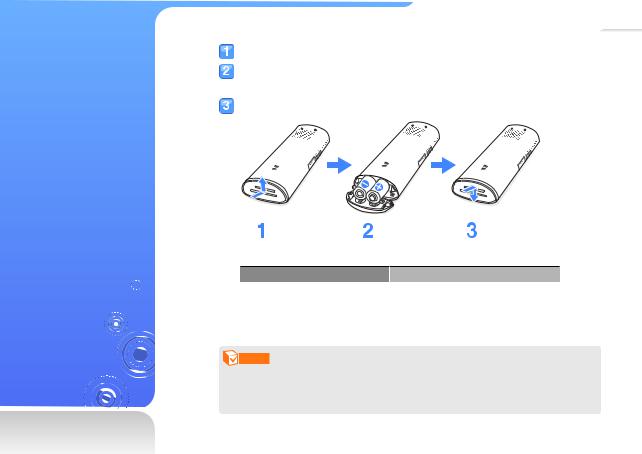
Inserting the batteries
10
Slide open the battery cover in the arrow direction.
Insert batteries with correct polarity.
■ Be careful not to reverse the poles of the batteries.
Slide close the battery cover in the arrow direction.
Battery Life (AAA/LR03 type alkaline batteries)
Mode |
Time |
||
Voice Recording Mode |
A maximum of 20 hours |
||
|
|
|
|
Play Mode |
(Using the earphones) |
A maximum of 50 hours |
|
(Using the speaker) |
A maximum of 20 hours |
||
|
|||
|
|
|
|
Note
•When you do not use the recorder for a long time, remove the batteries.
•Actual battery time may vary according to the use conditions including the battery type, your settings and volume.
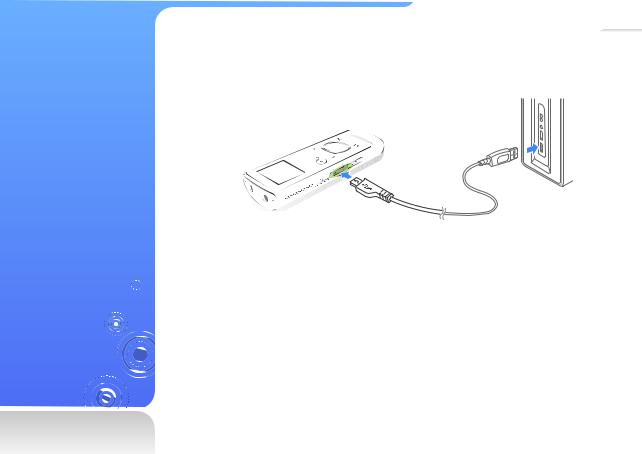
Connect to a PC
11
 Connect the smaller end of the USB cable to the USB connection port of your recorder.
 Connect the larger end of the USB cable to the USB port of a PC.

Turn your recorder on and lock the buttons
12
Turn your recorder on or off
Press and hold [ ] to turn your recorder on or off.
Note
If you do not use your recorder for 5 minutes, it will automatically turn off.
Lock or unlock the buttons
Lock the buttons to prevent any unwanted operations while recording voice or playing files. Press [ ] to lock or unlock the buttons.
Note
When the buttons are locked,  will appear at the top of the screen.

Access menus from the main menu screen
Select menus from the main menu screen.
13
When you turn on your recorder, the main menu screen appears and you can access menus or functions from the main menu screen.
▲ Main menu screen
 In the main menu, use [b] to scroll to a menu you want and press [o].
 Use the menu you select.
 Press [
 ] to return to the previous screen.
■ Press and hold [ ] to return to the main menu screen.
Loading...