

Samsung YP-T7X-XAA User Manual
Samsung Electronics America, Inc.
400 Valley Road, Suite 201 Mount Arlington, NJ 07856
1-800-SAMSUNG (1-800-726-7864)
www.samsung.com
AH68-01629L (Rev 0.0)
- 65,000 Color LCD
- MP3, WMA, Audio ASF,
Ogg Playback
- Removable Storage Device
- Text and Image Viewer
- Direct MP3 Recording
- FM Reception
- SRS WOW Surround Sound
- USB 2.0 High Speed Data Transfer
- Upgradable
- Built-in Rechargeable Li-polymer Battery
- Voice Recording Function
Secure WMA
and

I Preparations I Additional Usage
Safety Instructions................................................................................................................................................4
Battery Charger Safety ........................................................................................................................................6
Charging the battery ............................................................................................................................................7
Features ..............................................................................................................................................................8
Components ......................................................................................................................................................11
Location of Controls............................................................................................................................................12
I Connection to Computer
Connecting the player to PC ..............................................................................................................................14
Manual installation of the USB Driver ................................................................................................................18
Using the removable storage(PC) ......................................................................................................................22
● Formatting on your PC ..................................................................................................................................22
● Downloading/Uploading files ........................................................................................................................22
● Disconnecting the USB cable ........................................................................................................................23
● Transferring music files using Windows Media ............................................................................................24
Installing Music Studio........................................................................................................................................26
Using Music Studio ............................................................................................................................................27
To View Help on Music Studio............................................................................................................................31
Installing Multimedia Studio................................................................................................................................32
Using Multimedia Studio ....................................................................................................................................34
To View Help on Multimedia Studio....................................................................................................................39
I Basic Usage
Playing Music and Turning Off the Device ........................................................................................................40
HOLD Function ..................................................................................................................................................41
Recording Voice ................................................................................................................................................41
Recording MP3s ................................................................................................................................................42
Searching for Music/Voice Files ........................................................................................................................43
Loop Repeating ..................................................................................................................................................44
MENU Options....................................................................................................................................................45
2
Using Navigation ................................................................................................................................................45
Setting Playlist....................................................................................................................................................49
FM Radio Settings..............................................................................................................................................50
FM Recording ....................................................................................................................................................54
Viewing Image ..................................................................................................................................................55
Viewing Text ......................................................................................................................................................56
Setting the Advanced Functions ........................................................................................................................57
Selecting the Play mode ....................................................................................................................................58
Sound Settings ..................................................................................................................................................59
Display Settings..................................................................................................................................................62
Record Settings..................................................................................................................................................65
Time Settings......................................................................................................................................................66
Play Speed Settings ..........................................................................................................................................68
Deleting File........................................................................................................................................................69
Setting the System ............................................................................................................................................70
I Appendix
MENU Table ......................................................................................................................................................72
I Customer Support
Troubleshooting..................................................................................................................................................73
Specifications ....................................................................................................................................................75
Safety Information ..............................................................................................................................................76
Warranty ............................................................................................................................................................78
ContentsContents
3

Read and understand all the instructions to avoid injury to yourself and damage to the
equipment.
Do not expose to extreme
temperatures (above 95°F
or below 23°F). Do not
expose to moisture.
Do not let any foreign
matter spill into the
device.
Do not subject the player to
severe impact.
Do not place heavy objects
on the player.
Safety InstructionsSafety Instructions
I Earphones
Follow Traffic Safety Instructions
● Do not use the earphones while driving an automobile or riding a bicycle.
It’s not only dangerous, but also against the law.
● To avoid an accident, do not turn up the volume of the earphones too high while walking.
Protect your ears
● Do not turn up the volume too high. Doctors warn against prolonged exposure to high volume.
● Stop using the device or turn the volume down if you have ringing in your ears.
ENG
Do not expose to
chemicals such as
benzene and thinners.
Do not expose to direct
sunlight or heat sources.
Do not try to disassemble
and repair the device
yourself.
✽
Please be aware that we claim no responsibility
for damage from data loss
due to breakdown, repair or other causes.
Do not touch the charger with
wet hands.
Do not store in dusty areas.
4
I Ambient operating conditions
● Ambient temperature : 5°C ~ 35°C (41°F ~ 95°F)
Humidity : 10 ~ 75%
I Environmental Information
● Follow local guidelines for waste disposal when discarding packages, batteries,
and old electronic appliances.
● Your player is packaged with cardboard, polyethylene etc., and does not use any unnecessary materials.
5
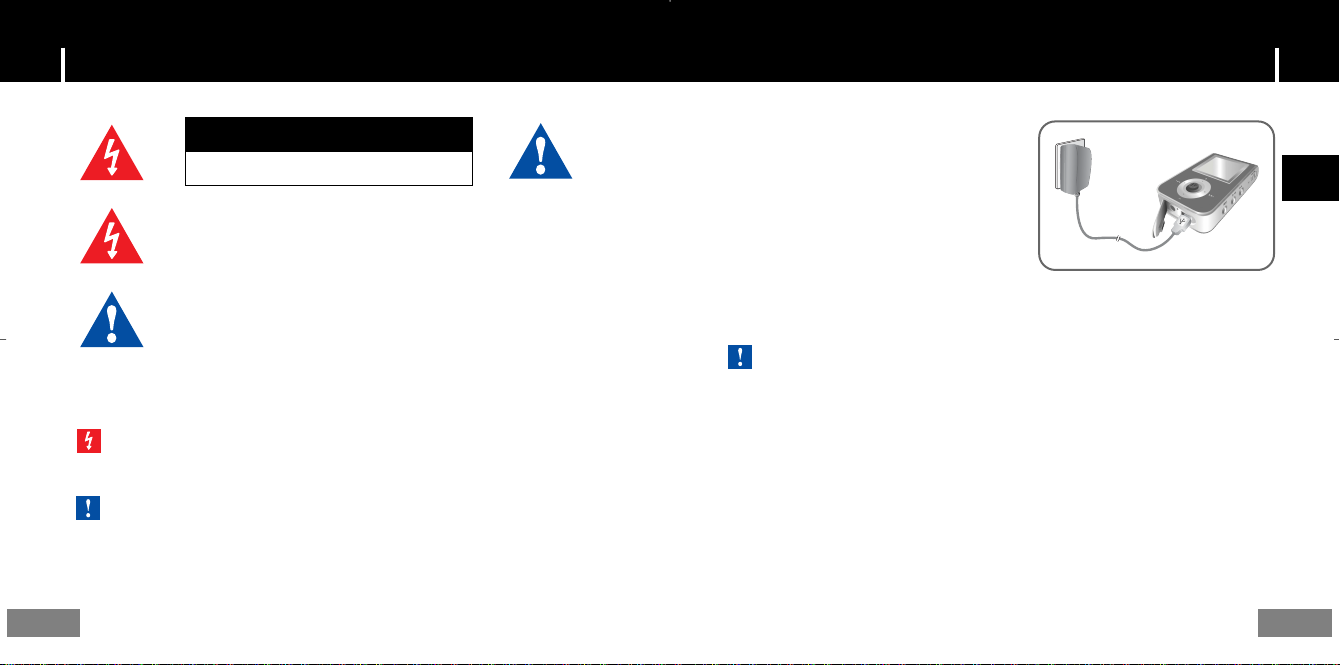
Charging the battery Battery Charger Safety
CAUTION
Opening the case may result in electric shock.
The uninsulated parts inside the charger may
cause electric shock. Please do not open the
charger case for your safety.
Read the user manual to prevent problems
while using the charger.
g
WWaarrnniinng
- Use the charger away from water sources to avoid fire or electric shock.
nn
CCCCaaaauuuuttttiiiioooonn
- To avoid electric shock, use the charger only with a power outlet that matches the shape of the
converter's plug.
- Make sure that the charger's plug is inserted all the way into the outlet.
6
The charger is supplied with your player.
Plug the charger into a wall outlet.
❈ When recharging is complete,
“FULLY CHARGED” is shown in the
display window.
❈ The unit can also be charged at low speed
using the power supplied from your computer
through the USB cable.
❈ Battery recharge time in normal operation is
approximately 2 hours.
nn
CCCCaaaauuuuttttiiiioooonn
- To avoid the risk of fire, do not charge longer than 12 hours.
- Do not plug several devices into the same outlet.
- Do not use a rechargeable battery or charger that is defective.
- When using the rechargeable battery for the first time or after several months of
non-use, fully charge it first.
- Overcharging will reduce the battery life.
- The rechargeable battery is a consumable item and its capacity will decrease gradually.
- To prolong the life of your battery, use the fully charged battery until it is completely discharged,
and then fully charge it again before use. If you charge the battery that is not completely drained,
the battery operating time will decrease. In this case, fully cycle (fully charge and then fully discharge)
the battery several times.
- Do not let metallic objects, such as necklaces or coins, come into contact with the terminals
(metallic parts) of the charger and the built-in rechargeable battery.
A fire or electric shock may result.
- Do not touch the charger with wet hands.
7
ENG

FeaturesFeatures
65,000 Color LCD
● The 65,000 color LCD allows color display of image files.
MP3, WMA, Audio ASF, Secure WMA and
Ogg Playback
● The player supports playback of MP3, WMA, Audio ASF,Secure WMA and Ogg(Ogg
Vorbis)
❉ OGG is a new audio compression format that is free, open and unpatented.
For more info, see www.vorbis.com
Removable Storage Device
● You can easily copy and paste files to the player using Windows Explorer.
Text and Image Viewer
● The player can be used as a text and image viewer to view saved e-books or pictures.
8
Direct MP3 Recording
● You can convert music from CDs, cassettes, and radio into
MP3 files without a PC.
FM Reception
● Listening to an FM program is made easy with Auto Search and
Frequency Memory functions.
SRS WOW Surround Sound
● The 3D surround(SRS) feature adds spaciousness to the sound.
USB 2.0 High Speed Data Transfer
● Maximum data speed transfer of 70 Mbps
ENG
9
Features
Upgradable
● You can upgrade the built-in programs when available.
Please check the home page (www.samsung.com) for upgrades.
Built-in Rechargeable Li-polymer Battery
● The built-in rechargeable lithium battery provides up to 10 hours of play time.
❉ Time may vary depending on usage pattern.
Voice Recording Function
● You can make high quality voice recordings.
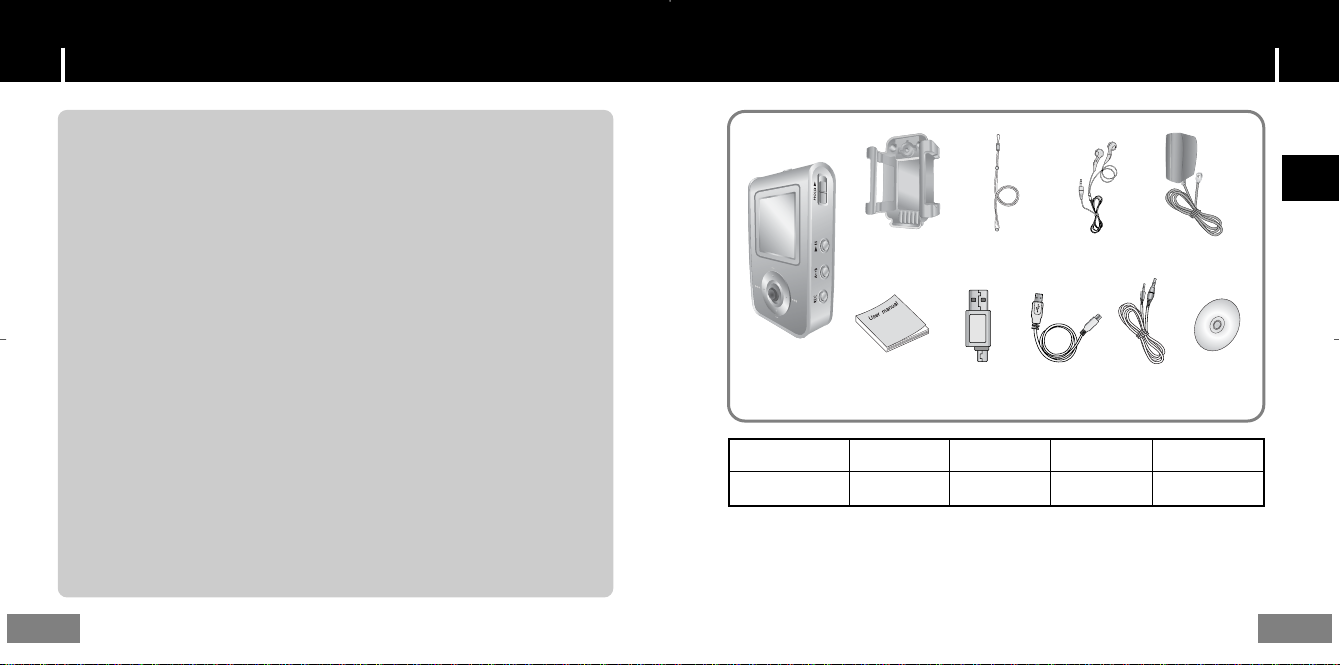
Components
ENG
Belt Clip
AH61-01914A
Player
Model
Built-in memory
● The capacity of the useable built-in memory is less than indicated as the internal firmware
uses part of the memory as well.
● The accessories' design is subject to change for the purpose of improvement, without notice.
User manual
AH68-01629L
YP-T7 H
128MB
Neck Strap
AH61-01414B
Direct Connect
USB Adapter
AH39-00590B
YP-T7 V
256MB
Earphone
AH30-00075D
USB Cable
AH39-00692A
YP-T7 X
512MB
Line In Cable
AH39-00488A
Charger
AH44-00050B
Installation CD
AH80-00082B
YP-T7 Z
1GB
10
11
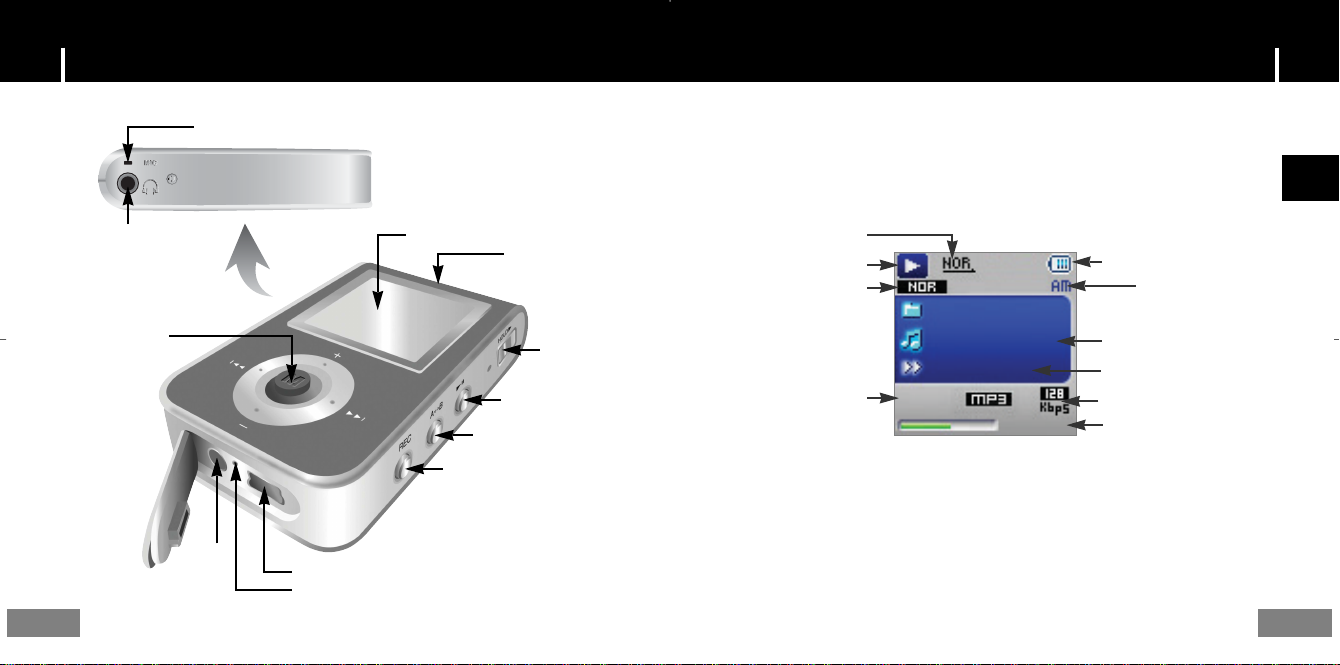
Microphone
Location of ControlsLocation of Controls
I Display
ENG
Earphone Jack
MENU, Navigation button/
Move to Track/
Speed Search/
Volume Button
12
ENC Jack
Display
USB Cable Connection Port
RESET Hole
Neck strap Hook
Play/Pause Button
Loop Repeating Button
Recording Button
Hold Switch
Play mode indicator
Play/Stop/Pause indicator
Equalizer, SRS indicator
Track Number indicator
ROOT
Building Bridges
Anyone of us
006/011
01:07
- 00:58:03
Remaining Battery Power indicator
time indicator
Current song
Next song
Bitrates indicator
Playtime indicator
13
System Requirements.
The PC system must meet the
following specifications:
● Pentium 200MHz or greater
● Windows 98 SE/ME/2000/XP
● 40MB of available hard disk space
● CD-ROM drive
(double speed or greater)
● USB port (2.0) supported
● VGA graphic
● DirectX 8.0 or greater
ee
NNNNoooottttee
- Log into your PC as an administrator
(Main User) and install the supplied
software (Music / Multimedia Studio) for
Windows 2000 or XP. Otherwise, the
software may not install properly.
For Windows 98/98SE, install the USB driver prior to
connecting the player to PC.
I Installing software
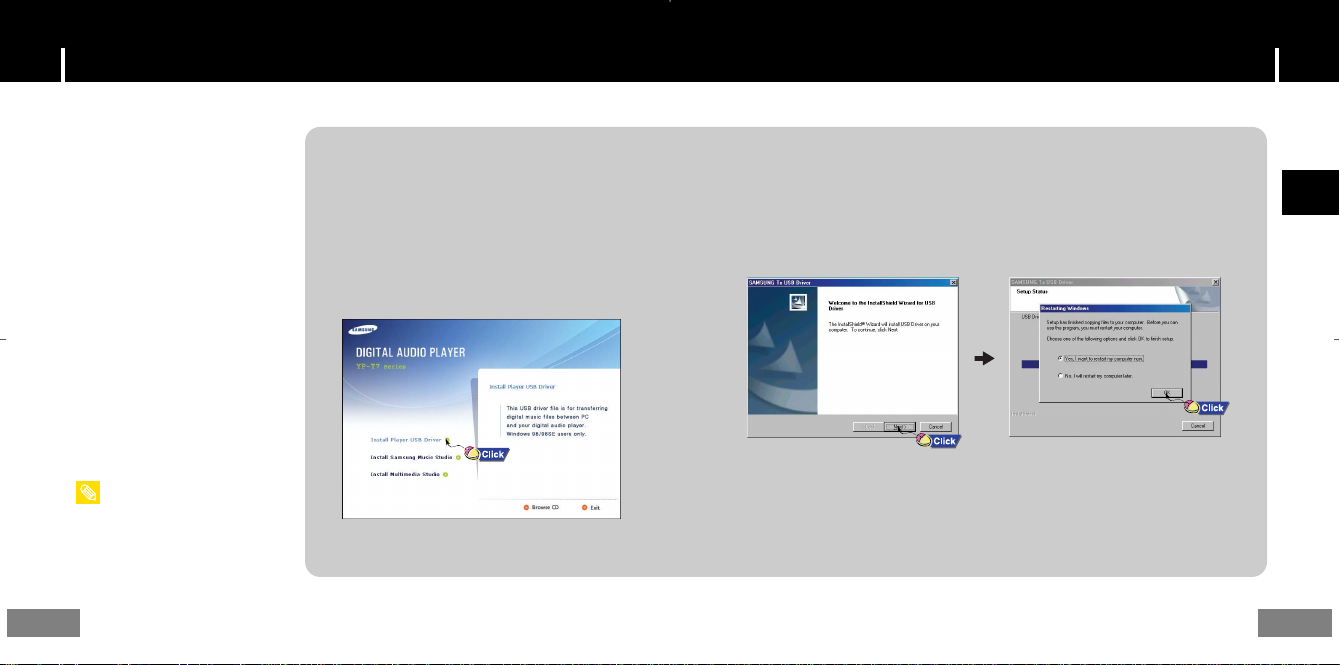
1Insert the Installation CD into the
CD-ROM drive.
Select [Install Player USB Driver].
Connecting the player to your PCConnecting the player to your PC
ENG
2 Follow the instructions in the window to complete the installation.
Continued...
14
15

I Connecting the player to your PC with the USB cable
1 Connect the USB cable to the USB port on your computer.
2 Connect the other end of the USB cable to the USB cable connection port on the
bottom of the player.
● If you disconnect the USB cable from your PC while implementing a
command or initializing during USB driver installation, your PC may not
function correctly.
ee
NNNNoooottttee
- You can also connect the player to your PC with the Direct connect USB adapter.
3 The USB driver is installed with a message saying that it is searching for a new
device. You may not see the display screen during installation.
Go to the device manager to check that installation has been successfully
completed.
Connecting the player to your PCConnecting the player to your PC
4 Upon installation of the USB driver "SAMSUNG YP-T7 USB Device" will appear
in the [System Properties] ➝ [Device Manager].
How to check if USB driver is properly installed
How to check if USB driver is properly installed
Windows 98:
Control Panel ➝ System ➝ Device Manager ➝ Disk Drives ➝ SAMSUNG YP-T7
Windows 2000/XP:
Start ➝ Settings ➝ Control Panel ➝ System ➝ Hardware ➝ Device Manager ➝ Disk Drives ➝
SAMSUNG YP-T7 USB Device
ENG
16
17

Manual installation of the USB DriverManual installation of the USB Driver
1If the driver does not install automatically, follow the instructions below to
install the USB driver manually.
The USB driver is located in
C:\WINDOWS\INF\MUSBA2.inf.
if the driver does not appear,
click on Browse to locate it.
18
2Select [Control Panel] ➝ [System] ➝ [Device Manager].
3Click [YP-T7].
ENG
19

4Click [Reinstall Driver].
Manual installation of the USB DriverManual installation of the USB Driver
20
The USB driver is located in
C:\WINDOWS\INF\DISKDRV.inf.
if the driver does not appear,
click on Browse to locate it.
ENG
21
Using the removable storage(PC)Using the removable storage(PC)
Before formatting can begin, you must connect your YP-T7 to your PC using the USB cable
(see page 16).
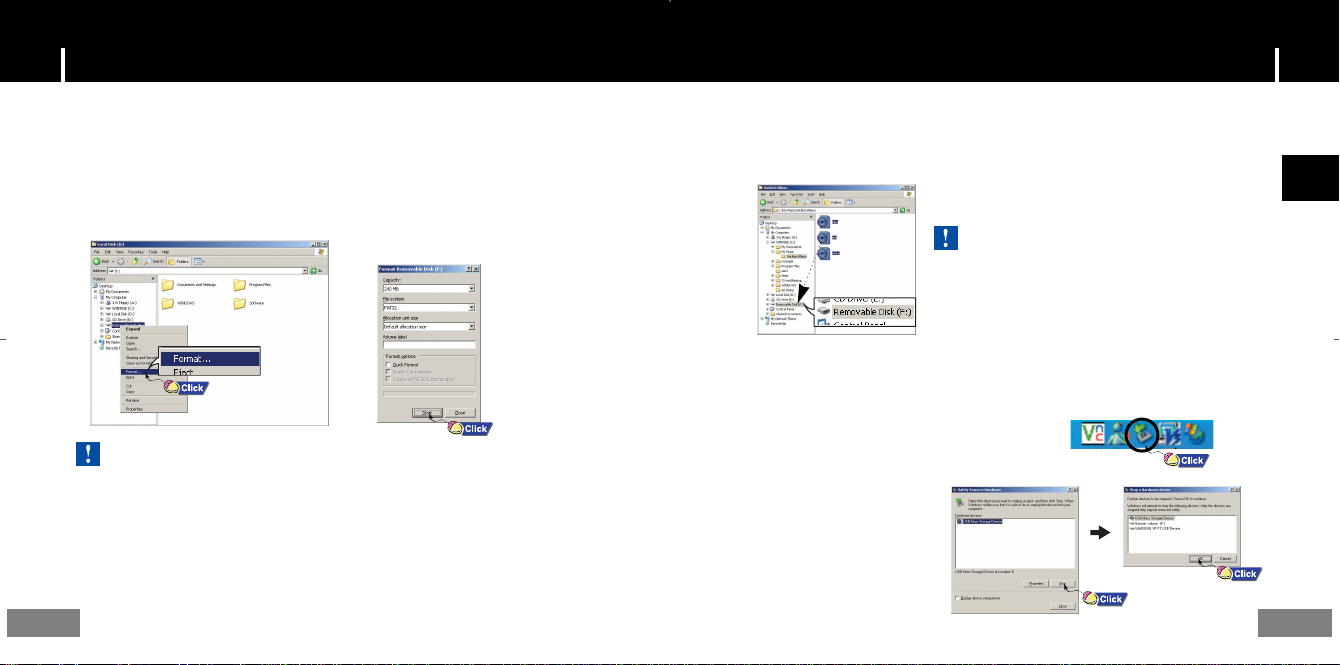
I Formatting on your PC
1Select the removable disc icon
and click the right mouse button
to select [Format].
ee
NNNNoooottttiiiiccccee
- Care must be taken as formatted files can not be recovered.
2Press the [Start] button.
● All saved files will be formatted.
● You can change the name of removable
disc by selecting [Volume label].
I Downloading/Uploading files
1Connect the player to your PC with the supplied USB cable.
2Open Windows Explorer on PC.
● Removable Disc is displayed in Windows Explorer.
22
3Select the files to save. Drag and drop them into respective folders in the
removable disc.
● Place music files in the removable disc, text files in the TEXT folder,
and image files in the IMAGE folder.
ee
NNNNoooottttiiiiccccee
- Disconnecting the USB cable while downloading or
uploading files may cause malfunction of the player.
- The music file order displayed in Windows Explorer
may differ from the play order on your player.
I Disconnecting the USB cable
After completing the file transfer, you must disconnect the cable in the following way:
1Double-click on the green arrow in the taskbar
on the bottom right of the window.
2When the [Stop a Hardware
device] message appears,
press the [OK] button and
disconnect the USB cable.
ENG
23
Transferring music files using Windows MediaTransferring music files using Windows Media
I Downloading Secure WMA Files
Make sure to download the Secure WMA file you purchased from a
through Windows Media Player Version 9 or above and save it to a folder on your PC.
✻
pay site :
www.walmart.com, www.buymusic.com, www.musicnow.com, www.napster.com, etc.
✻
pay site
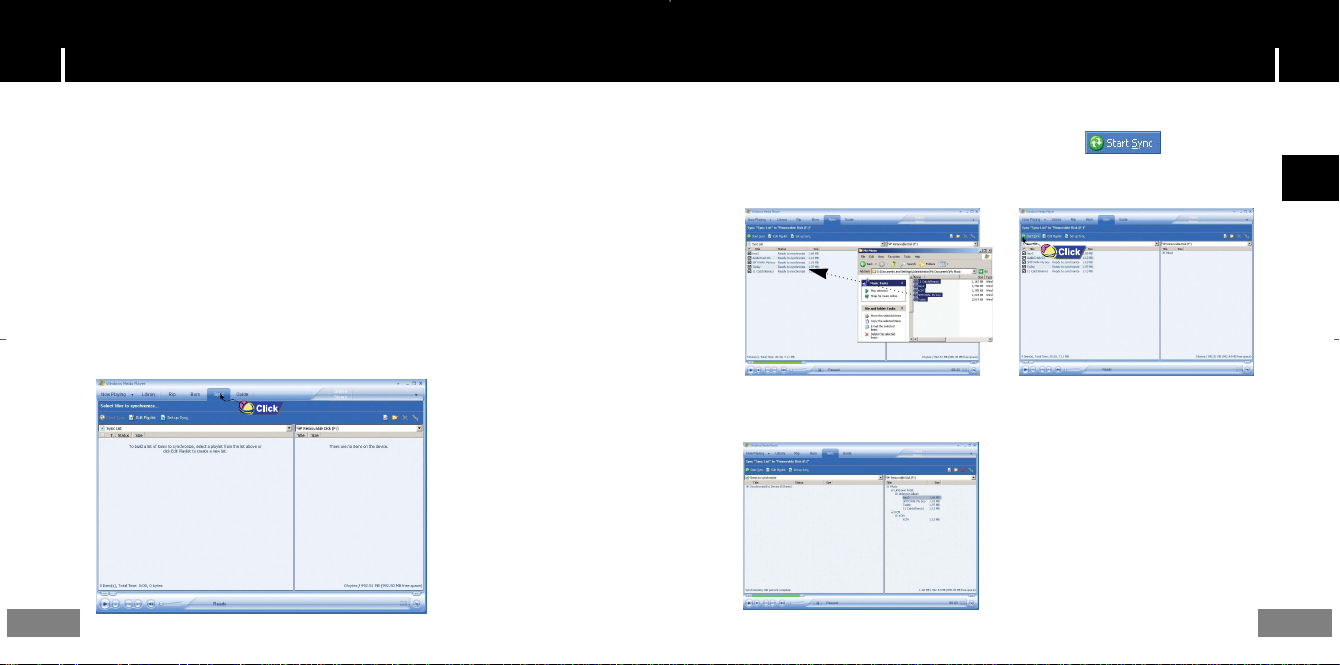
1Connect the player to PC.
2Run the Windows Media Player10.
● Select [Start]→[Programs]→[Accessories]→[Entertainment]
[Windows Media Player10] in the desktop.
→
3Select [Sync].
24
4When the [Sync] window appears,
select the file on your PC you want to
transfer to the player using Windows
Explorer. Drag and drop the file to the
left [Sync List] window
6You can check the transferred file in
the right window.
5Press the [Start Sync]
button on the main screen.
ENG
25
 Loading...