

Page 1
Washer
User manual
WF45R6100A*
Untitled-17 1 2019-01-23 3:27:44
Page 2

Contents
Contents
Safety information 4
What you need to know about the safety instructions 4
Important safety symbols 4
Important safety precautions 5
CALIFORNIA PROPOSITION 65 WARNING 6
Critical installation warnings 6
Installation cautions 8
Critical usage warnings 8
Usage cautions 10
Critical cleaning warnings 13
Installation 14
Unpacking your washer 14
What’s included 15
Installation requirements 17
Step-by-step installation 21
Before you start 26
Initial settings 26
Laundry guidelines 26
Detergent drawer guidelines 28
Operations 31
Control panel 31
Simple steps to start 34
Cycle overview 35
Cycle chart 36
Special features 38
English2
Untitled-17 2 2019-01-23 3:27:44
Page 3

Maintenance 40
Self Clean 40
Smart Care 41
Emergency drain 42
Cleaning 43
Recovery from freezing 46
Care for an extended period of non-use 47
Cleaning the exterior 47
Cleaning the interior 47
Troubleshooting 48
Checkpoints 48
Information codes 52
Specications 54
Fabric care chart 54
Protecting the environment 55
Declaration of conformity 55
Specication sheet 56
Contents
English 3
Untitled-17 3 2019-01-23 3:27:44
Page 4

SAVE THESE INSTRUCTIONS
Safety information
Congratulations on your new Samsung washer. This manual contains important
information on the installation, use and care of your appliance. Please take some time to
read this manual to take full advantage of your washer’s many benets and features.
What you need to know about the safety instructions
Please read this manual thoroughly to ensure that you know how to safely and efciently
Safety information
operate the extensive features and functions of your new appliance. Please store the
manual in a safe location close to the appliance for future reference. Use this appliance
only for its intended purpose as described in this instruction manual.
Warnings and Important Safety Instructions in this manual do not cover all possible
conditions and situations that may occur. It is your responsibility to use common sense,
caution and care when installing, maintaining and operating your washer.
Because the following operating instructions cover various models, the characteristics of
your washer may differ slightly from those described in this manual and not all warning
signs may be applicable. If you have any questions or concerns, contact your nearest
service center or nd help and information online at www.samsung.com.
Important safety symbols
What the icons and signs in this user manual mean:
WARNING
Hazards or unsafe practices that may result in severe personal injury, death and/or
property damage.
CAUTION
Hazards or unsafe practices that may result in personal injury and/or property damage.
NOTE
Indicates that a risk of personal injury or material damage exists.
These warning signs are here to prevent injury to yourself and others.
Please follow them explicitly.
After reading this manual, store it in a safe place for future reference.
Read all instructions before using the appliance.
As with any equipment that uses electricity and moving parts, potential hazards exist.
To safely operate this appliance, familiarize yourself with its operation and exercise care
when using it.
English4
Untitled-17 4 2019-01-23 3:27:46
Page 5

SAVE THESE INSTRUCTIONS
Important safety precautions
WARNING
To reduce the risk of re, electric shock, or injury to persons
when using your appliance, follow basic precautions, including the
following:
1. Read all instructions before using the appliance.
2. Do not wash or dry articles that have been previously cleaned in, washed in, soaked
in, or spotted with gasoline, dry-cleaning solvents, other ammable or explosive
substances as they give off vapors that could ignite or explode.
3. Do not allow children to play on or in the appliance. Close supervision of children is
necessary when the appliance is used near children.
4. Before the appliance is removed from service or discarded, remove the door to the
washing or drying compartment.
5. Do not reach into the appliance if the drum is moving.
6. Do not install or store this appliance where it will be exposed to the weather.
7. Do not tamper with controls.
8. Do not repair or replace any part of the appliance or attempt any servicing unless
specically recommended in the user-maintenance instructions or in published user
repair instructions that you understand and have the skills to carry out.
9. Do not add gasoline, dry-cleaning solvents, or other ammable or explosive substances
to the wash water. These substances give off vapors that could ignite or explode.
10. Under certain conditions, hydrogen gas may be produced in a hot water system
that has not been used for 2 weeks or more. HYDROGEN GAS IS EXPLOSIVE. If the
hot water system has not been used for such a period, before using a washer or
combination washer-dryer, turn on all hot water faucets and let the water ow from
each for several minutes. This will release any accumulated hydrogen gas. As the gas is
ammable, do not smoke or use an open ame during this time.
Safety information
English 5
Untitled-17 5 2019-01-23 3:27:46
Page 6

SAVE THESE INSTRUCTIONS
Safety information
CALIFORNIA PROPOSITION 65 WARNING
WARNING
Cancer and Reproductive Harm - www.P65Warnings.ca.gov.
Safety information
Critical installation warnings
WARNING
The installation of this appliance must be performed by a qualied technician or service
company.
• Failure to do so may result in electric shock, re, an explosion, problems with the
product, or injury.
The appliance is heavy, therefore take care when lifting it.
Plug the power cord into a wall socket that meets local electrical specications. Use the
socket for this appliance only, and do not use an extension cord.
• Sharing a wall socket with other appliances, using a power strip, or extending the
power cord may result in electric shock or re.
• Ensure that the voltage, frequency, and current supplied to the washer matches those
listed in the product specications. Failure to do so may result in electric shock or re.
Plug the power plug into the wall socket rmly.
Remove all foreign substances such as dust or water from the power plug terminals and
contact points using a dry cloth on a regular basis.
• Unplug the power plug and clean it with a dry cloth.
• Failure to do so may result in electric shock or re.
Plug the power plug into the wall socket so that the cord is running towards the oor.
• If you plug the power plug into the socket in the opposite direction, the electric wires
within the cable may be damaged and this may result in electric shock or re.
Keep all packaging materials out of the reach of children as these may be dangerous.
• If a child places a plastic bag over his or her head, he or she can suffocate.
If the appliance, power plug, or power cord is damaged, contact your nearest service
center.
This appliance must be properly grounded.
English6
Untitled-17 6 2019-01-23 3:27:46
Page 7

SAVE THESE INSTRUCTIONS
Do not ground the appliance to a gas pipe, plastic water pipe, or telephone line.
• This may result in electric shock, re, an explosion, or problems with the product.
• Never plug the power cord into a socket that is not grounded correctly. Make sure that
the socket is in accord with local and national regulations.
Do not install this appliance near a heater or any ammable material.
Do not install this appliance in a humid, oily or dusty location, or in a location exposed to
direct sunlight or water (rain drops).
Do not install this appliance in a location exposed to low temperatures.
• Frost may cause the tubes to burst.
Do not install this appliance in a location where gas may leak.
• This may result in electric shock or re.
Do not use an electric transformer to power the washer.
• This may result in electric shock or re.
Do not use a damaged power plug, damaged power cord, or loose wall socket.
• This may result in electric shock or re.
Do not pull or bend the power cord excessively.
Do not twist or tie the power cord.
Safety information
Do not hook the power cord over a metal object, place a heavy object on the power cord,
insert the power cord between objects, or push the power cord into the space behind the
appliance.
• This may result in electric shock or re.
Do not pull the power cord when unplugging the power plug.
• Unplug the power plug by pulling the plug.
• Failure to do so may result in electric shock or re.
This appliance should be positioned so that the power plug, the water supply taps, and the
drain pipes are accessible.
English 7
Untitled-17 7 2019-01-23 3:27:46
Page 8

SAVE THESE INSTRUCTIONS
Safety information
Installation cautions
CAUTION
This appliance should be positioned in such a way that the power plug is easily accessible.
• Failure to do so may result in electric shock or re due to electric leakage.
Safety information
Install your appliance on a solid, level oor that can support its weight.
• Failure to do so may result in abnormal vibrations, movement, noise, or problems with
the product.
Critical usage warnings
WARNING
If the appliance is ooded, turn off the water & power supplies immediately and contact
your nearest service center.
• Do not touch the power plug with wet hands.
• Failure to do so may result in electric shock.
If the appliance generates a strange noise, a burning smell, or smoke, unplug the power
plug immediately and contact your nearest service center.
• Failure to do so may result in electric shock or re.
In the event of a gas leak (such as propane gas, LP gas, etc.), ventilate immediately
without touching the power plug. Do not touch the appliance or power cord.
• Do not use a ventilating fan.
• A spark may result in an explosion or re.
Do not let children play in or on the washer. In addition, when disposing of the appliance,
remove the washer door lever.
• Children can suffocate to death if trapped inside the product.
Make sure to remove the packaging (sponge, styrofoam) attached to the bottom of the
washer before using it.
Do not wash items contaminated with gasoline, kerosene, benzene, paint thinner, alcohol,
or other inammable or explosive substances in the washer.
• This may result in electric shock, re, or an explosion.
Do not open the washer door by force while it is operating (high-temperature washing/
drying/spinning).
English8
Untitled-17 8 2019-01-23 3:27:46
Page 9

SAVE THESE INSTRUCTIONS
• Water owing out of the washer may result in burns or cause the oor to be slippery.
This may result in injury.
• Opening the door by force may result in damage to the product or injury.
Do not insert your hand under the washer while an operation is in progress.
• This may result in injury.
Do not touch the power plug with wet hands.
• This may result in electric shock.
Do not turn the appliance off by unplugging the power plug while an operation is in
progress.
• Plugging the power plug into the wall socket again may cause a spark and result in
electric shock or re.
Do not let children or the inrm use this washer without proper supervision. Do not let
children climb in or onto the appliance.
• This may result in electric shock, burns, or injury.
Do not insert your hand or a metal object under the washer while it is operating.
• This may result in injury.
Do not unplug the appliance by pulling the power cord. Always grip the plug rmly and
pull it straight out of the outlet.
• Damage to the power cord may cause a short-circuit, re, and/or electric shock.
Safety information
Do not attempt to repair, disassemble, or modify the appliance yourself.
• Do not use a fuse (such as copper, steel wire, etc.) other than a standard fuse.
• When the appliance needs to be repaired or reinstalled, contact your nearest service
center.
• Failure to do so may result in electric shock, re, problems with the product, or injury.
If the water supply hose comes loose from the faucet and oods the appliance, unplug the
power plug.
• Failure to do so may result in electric shock or re.
Unplug the power plug when the appliance is not being used for long periods of time or
during a thunder or lightning storm.
• Failure to do so may result in electric shock or re.
If any foreign substance enters the appliance, unplug the power plug and contact your
nearest Samsung Customer Service.
English 9
Untitled-17 9 2019-01-23 3:27:46
Page 10

SAVE THESE INSTRUCTIONS
Safety information
• This may result in electric shock or re.
Do not let children (or pets) play in or on your washer. The washer door does not open
easily from the inside and children may be seriously injured if trapped inside.
Safety information
Usage cautions
CAUTION
If the washer is contaminated by a foreign substance such as detergent, dirt, food waste,
etc., unplug the power plug and clean the washer using a damp, soft cloth.
• Failure to do so may result in discoloration, deformation, damage, or rust.
The front glass may be broken by a strong impact. Take care when using the washer.
• If the glass is broken, it may result in injury.
After a water supply failure or when reconnecting the water supply hose, open the faucet
slowly.
Open the faucet slowly after a long period of non-use.
• The air pressure in the water supply hose or the water pipe may damage a product
part or result in a water leak.
If a draining error occurs during an operation, check if there is a draining problem.
• If the washer is used when it is ooded because of a draining problem, it may result in
electric shock or re.
Insert the laundry into the washer completely so that the laundry does not get caught in
the door.
• If laundry gets caught in the door, it may result in damage to the laundry or the
washer, or result in a water leak.
Turn the water supply off when the washer is not being used.
• Ensure that the water supply hose connectors are properly tightened.
Ensure that the rubber seal and front door glass are not contaminated by a foreign
substance (e.g. waste, thread, hair, etc.).
• If a foreign substance is caught in the door or the door is not completely closed, it may
cause a water leak.
Open the faucet and check if the water supply hose connectors are rmly tightened and
that there are no water leaks before using the product.
English10
Untitled-17 10 2019-01-23 3:27:46
Page 11

SAVE THESE INSTRUCTIONS
• If the connectors on the water supply hoses are loose, it may result in a water leak.
The product you have purchased is designed for domestic use only.
Using the product for business purposes qualies as a product misuse. If the product is
used for business purposes, it will not be covered by the standard warranty provided by
Samsung and no responsibility can be attributed to Samsung for malfunctions or damages
resulting from such misuse.
Do not stand on the appliance or place objects (such as laundry, lighted candles, lighted
cigarettes, dishes, chemicals, metal objects, etc.) on the appliance.
• This may result in electric shock, re, problems with the product, or injury.
Do not spray volatile material such as insecticide onto the surface of the appliance.
• As well as being harmful to humans, this may result in electric shock, re, or problems
with the product.
Do not place objects that generate electromagnetic elds near the washer.
• This may result in injury due to a malfunction.
Water drained during a high-temperature wash or drying cycle is hot. Do not touch the
water.
• This may result in burns or injury.
Do not wash, spin, or dry water-proof seats, mats, or clothing (*) unless your appliance has
a special cycle for washing these items.
Safety information
(*): Woolen bedding, rain covers, shing vests, ski pants, sleeping bags, diaper covers,
sweat suits, and bicycle, motor cycle and car covers, etc.
• Do not wash thick or hard mats even if the washer mark is on the care label. This may
result in injury or damage to the washer, walls, oor, or clothing due to abnormal
vibrations.
• Do not wash throw rugs or doormats with rubber backing. The rubber backing may
come off and stick to inside the drum, and this may result in malfunction such as a
drainage error.
Do not operate the washer when the detergent drawer is removed.
• This may result in electric shock or injury due to a water leak.
Do not touch the insides of the drum during or just after drying as it is hot.
• This may result in burns.
Do not insert your hand into the detergent drawer.
English 11
Untitled-17 11 2019-01-23 3:27:46
Page 12

SAVE THESE INSTRUCTIONS
Safety information
• This may result in injury as your hand may be caught by the detergent input device.
• Do not use the liquid detergent container (on applicable models only) for powdered
detergent. Remove the container and put powdered detergent directly into the Main
wash compartment.
Do not place any objects (such as shoes, food waste, animals) other than laundry into the
Safety information
washer.
• This may result in damage to the washer, or injury and death in the case of pets, due to
the abnormal vibrations.
Do not press the buttons using sharp objects such as pins, knifes, ngernails, etc.
• This may result in electric shock or injury.
Do not wash laundry contaminated by oils, creams, or lotions usually found in skincare
shops or massage clinics.
• This may cause the rubber seal to become deformed and result in a water leak.
Do not leave metal objects such as safety pins, hair pins or bleach in the drum for long
periods of time.
• Doing either may cause the drum to rust.
• If rust starts appearing on the surface of the drum, apply a (neutral) cleansing agent to
the surface and use a sponge to clean it. Never use a metal brush.
Do not use dry cleaning detergent directly and do not wash, rinse, or spin laundry
contaminated by dry cleaning detergent.
• This may result in spontaneous combustion or ignition due to the heat from the
oxidation of the oil.
Do not use water from water cooling/heating devices.
• This may result in problems with the washer.
Do not use natural hand-washing soap for the washer.
• If it hardens and accumulates inside the washer, it may result in problems with the
product, discoloration, rust, or bad odors.
Place socks and brassieres in a washing net and wash them with the other laundry.
Do not wash large laundry items such as bedding in the washing net.
• Failure to do so may result in injury due to abnormal vibrations.
Do not use hardened detergent.
• If it accumulates inside the washer, it may result in a water leak.
English12
Untitled-17 12 2019-01-23 3:27:46
Page 13

SAVE THESE INSTRUCTIONS
Make sure that the pockets of all the clothing items to be washed are empty.
• Hard, sharp objects such as coins, safety pins, nails, screws, or stones can cause
extensive damage to the appliance.
Do not wash clothing with large buckles, buttons, or other heavy metal objects in the
washer.
Sort the laundry by color on the basis of its colorfastness and select the recommended
cycle, water temperature, and additional functions.
• Failure to do this may result in discoloration or fabric damage.
Take care that children’s ngers are not caught in the door when you close it.
• Failure to do so may result in injury.
Critical cleaning warnings
WARNING
Do not clean the appliance by spraying water directly onto it.
Do not use a strong acidic cleaning agent.
Do not use benzene, thinner, or alcohol to clean the appliance.
• This may result in discoloration, deformation, damage, electric shock, or re.
Safety information
Before cleaning or performing maintenance, unplug the appliance from the wall socket.
• Failure to do so may result in electric shock or re.
English 13
Untitled-17 13 2019-01-23 3:27:46
Page 14
Installation
Follow these instructions carefully to ensure proper installation of your washer and to
prevent accidents when doing laundry.
Certain internal parts are intentionally not grounded and may present a risk of electric
shock only during servicing. Service personnel – Do not contact the following parts while
the appliance is energized: Control board, heat sink, motor, inlet valve and pump.
Unpacking your washer
Unpack your washer and inspect it for shipping damage. Make sure you have received all
the items shown on the next page. If your washer was damaged during shipping, or you
Installation
do not have all of the items, call 1-800-SAMSUNG (1-800-726-7864). To prevent personal
injury or strain, wear protective gloves whenever lifting or carrying the unit.
Packing materials can be dangerous to children; Keep all packing material (plastic bags,
polystyrene, etc.) well out of children’s reach.
WARNING
WARNING
CAUTION
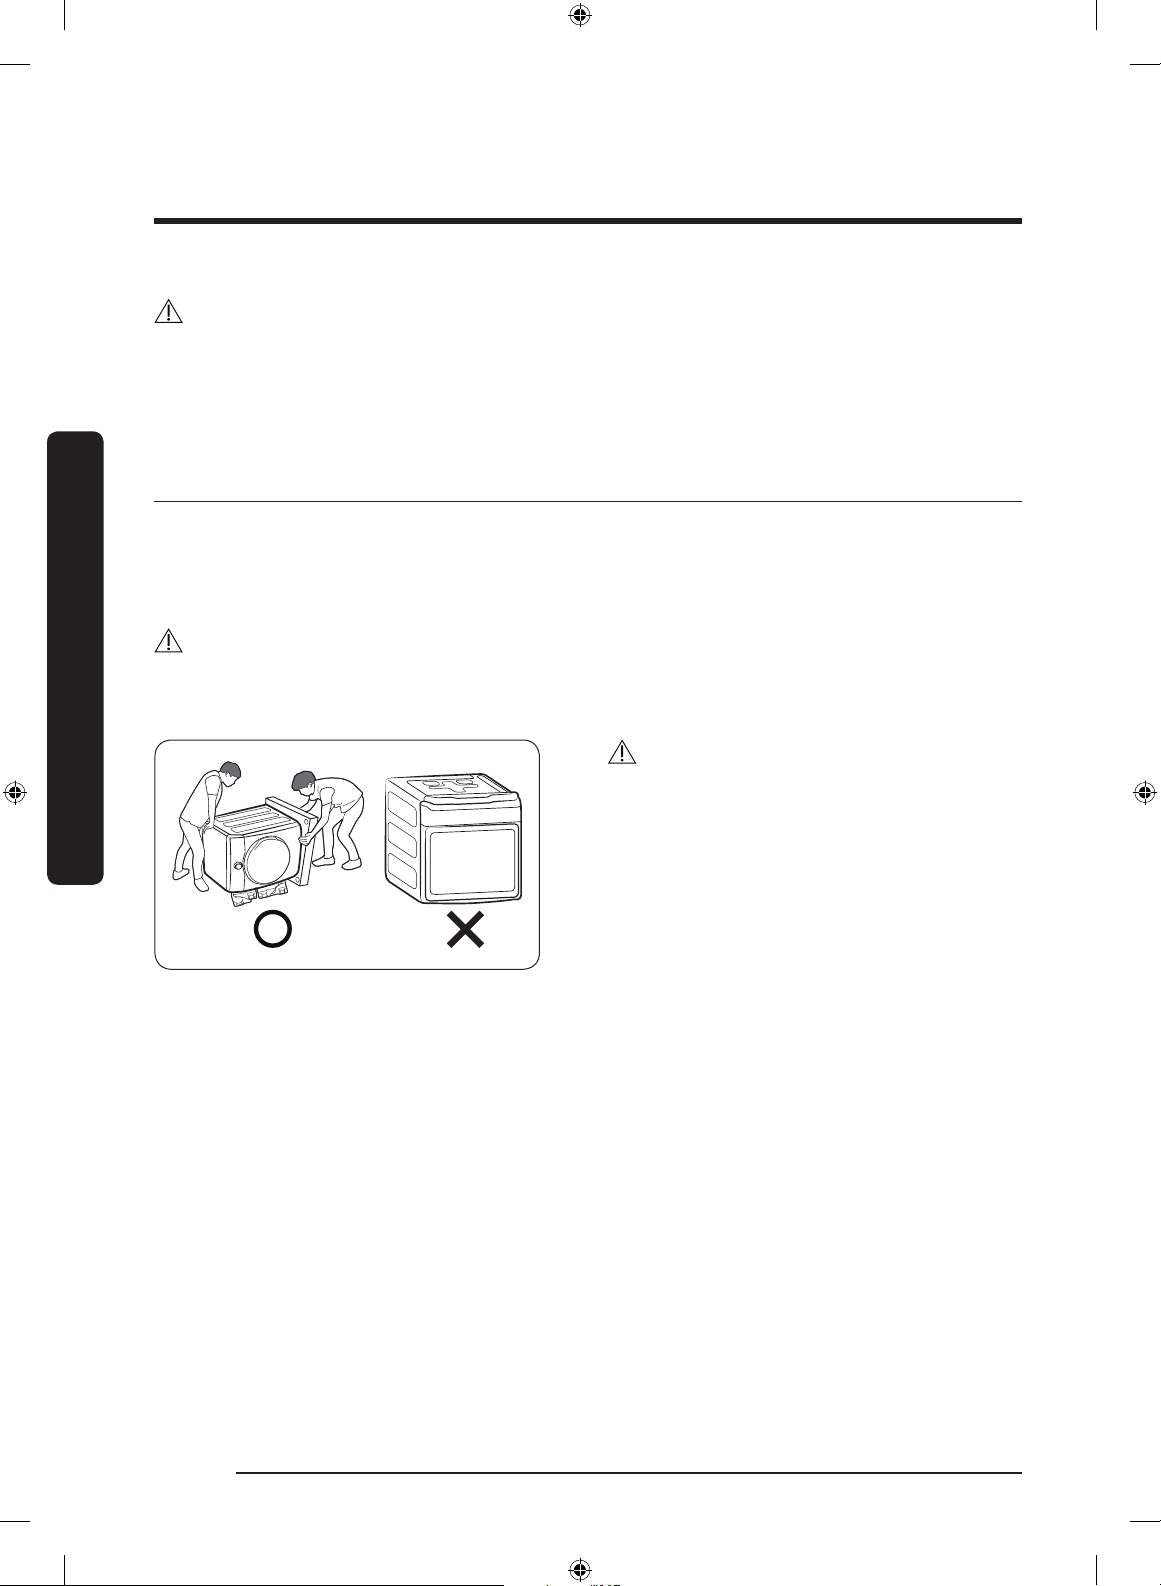
You must have at least 2 people unpack
the washer. To remove the cushion bottom
of the packing materials, do not tip the
washer over on its front side.
When you lay the washer down to remove
the carton base, protect the side of the
washer and lay it down carefully. Never
lay your washer on its back or front.
English14
Untitled-17 14 2019-01-23 3:27:47
Page 15
What’s included
Make sure all the parts are included in the product package. If you have a problem with
the washer or the parts, contact the Samsung customer care center at 1-800-SAMSUNG
(1-800-726-7864) or your retailer.
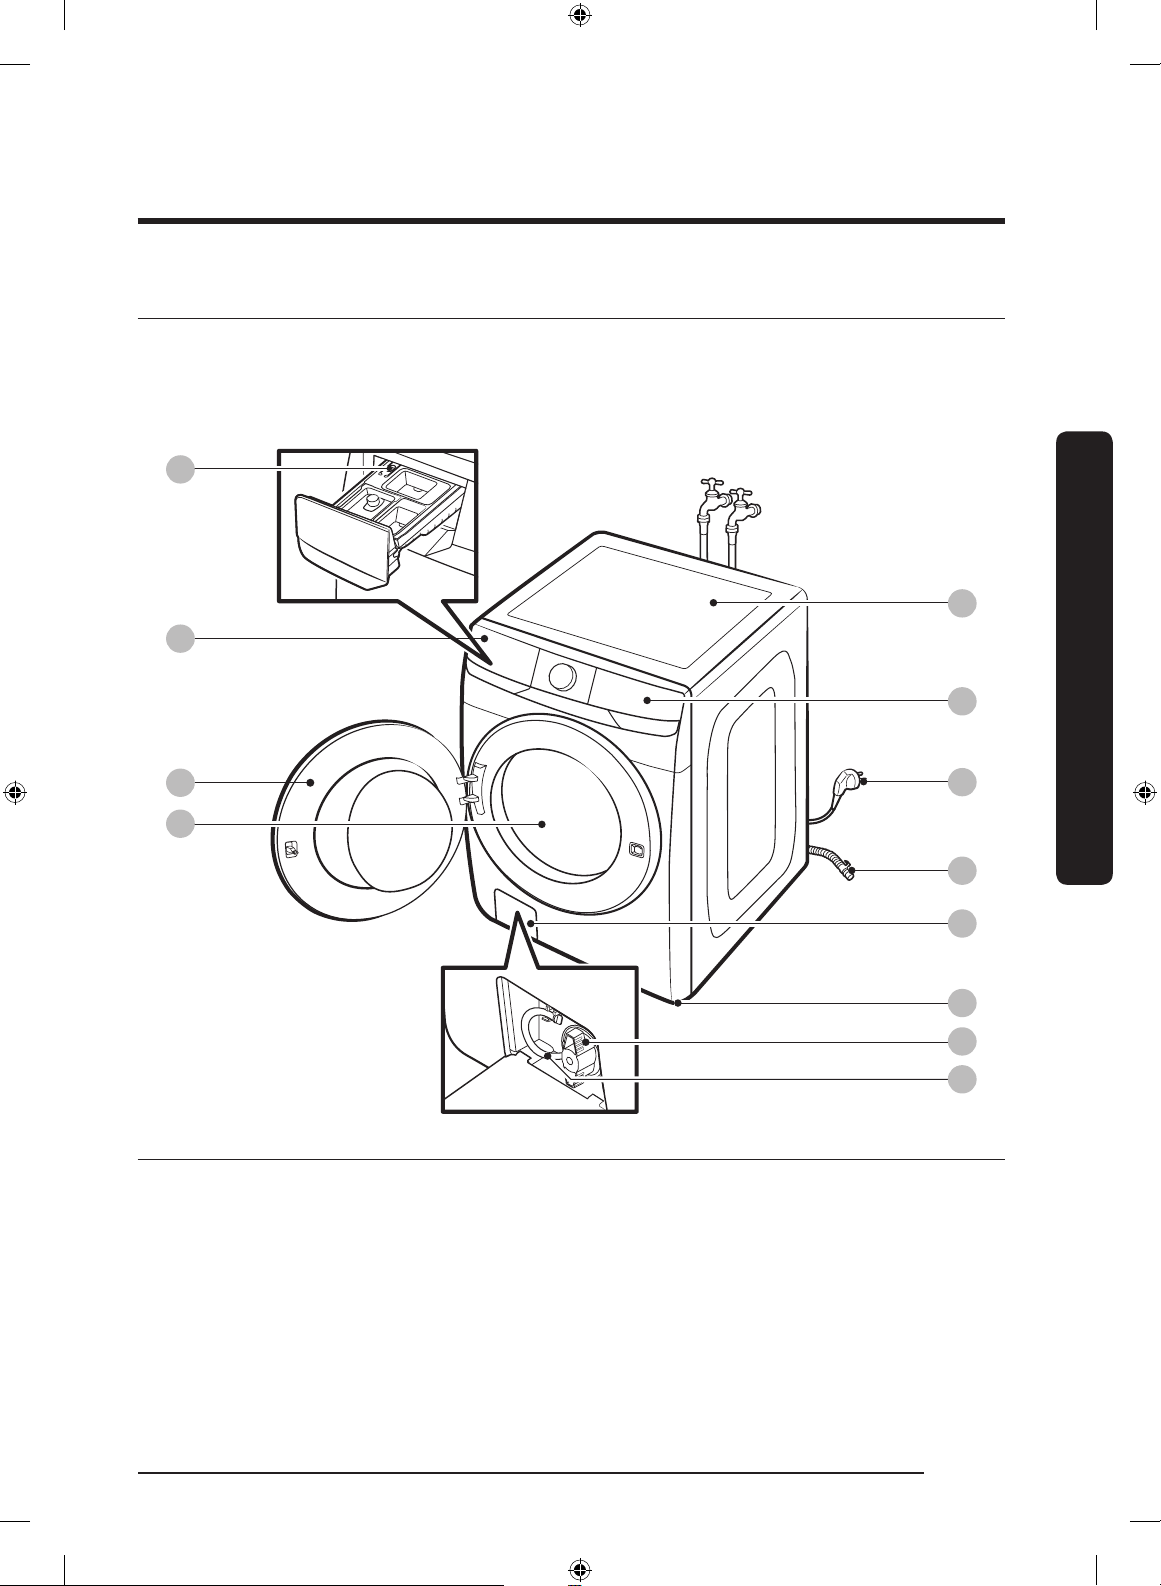
01
02
03
04
05
06
07
08
09
10
11
12
Installation
01 Release lever 02 Detergent drawer 03 Door
04 Drum 05 Worktop 06 Control panel
07 Power plug 08 Drain hose 09 Filter cover
10 Leveling feet 11 Pump lter 12 Emergency drain tube
English 15
Untitled-17 15 2019-01-23 3:27:48
Page 16
Installation
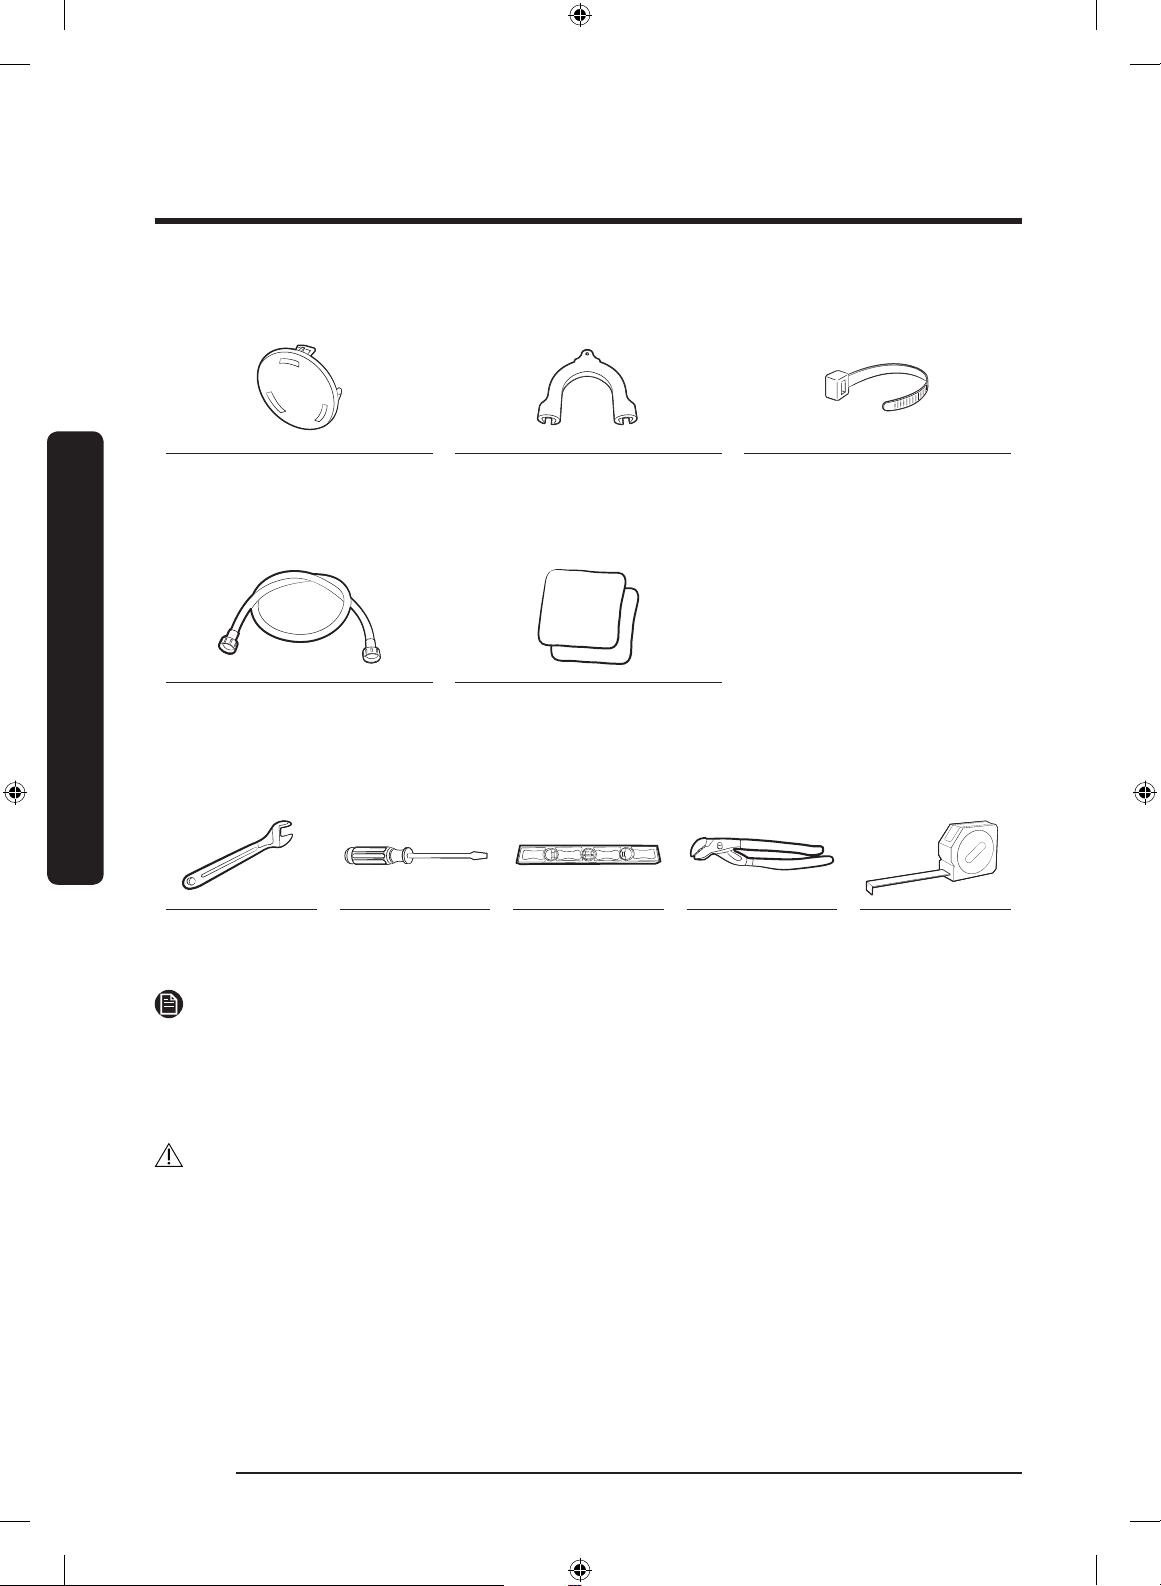
Parts supplied
Parts not supplied
Installation
Bolt caps Hose guide Cable tie
Water hoses (sold
separately)
Anti-slip pads (sold
separately)
Tools needed for installation
Wrench Phillips
screwdriver
NOTE
• Bolt caps: The number (3 to 6) of bolt caps provided depends on the model.
• The appearance of the washer and provided accessories may differ with the model.
• To purchase an accessory or lost part, contact a local Samsung service center or the
retailer.
CAUTION
• Do not reuse old water hoses, which may leak or burst, causing ooding and/or
property damage.
• Make sure rubber washers are inserted in each coupling of both water hoses.
Level Adjustable
pliers
Measuring tape
English16
Untitled-17 16 2019-01-23 3:27:54
Page 17

Installation requirements
Electrical supply and grounding
• AC 120 V / 60 Hz fuse or circuit breaker is required.
• Use an individual branch circuit. Connect only the washer to the circuit.
To ensure proper grounding, the washer comes with a power cord featuring a three-prong
grounding plug for use in a properly installed and grounded outlet.
Check with a qualied electrician or service person if you are not sure about the
grounding.
Do not modify the provided plug. If it does not t the outlet, call a qualied electrician to
install a proper outlet.
WARNING
• Do NOT use an extension cord.
• Use only the power cord that comes with the washer.
• Do NOT connect the ground wire to plastic plumbing, gas lines, or hot water pipes.
• Improperly connected grounding conductors may cause electric shock.
• To prevent unnecessary risk of re, electrical shock, or personal injury, all wiring
and grounding must be done in accordance with local codes, or in the absence of
local codes, in accordance with the National Electrical Code, ANSI/NFPA No. 70-Latest
Revision (for the U.S.) or the Canadian Electrical Code CSA C22.1 – Latest Revisions
and local codes and ordinances. It is your responsibility to provide adequate electrical
service for your washer.
Installation
Water supply
Proper water pressure for this washer is between 20-116 psi (137-800 kPa). Water
pressure less than 20 psi (137 kPa) may cause the water valve not to close completely.
Or, it may take longer to ll the drum, causing the washer to turn off. Water taps must be
within 4 ft. (122 cm) from the rear of the washer so that the provided inlet hoses reach
the washer.
To reduce the risk of leaks:
• Make sure water taps are easily accessible.
• Turn off the taps when the washer is not in use.
• Check for any leaks at the water inlet hose ttings on a regular basis.
CAUTION
Before using the washer for the rst time, check all connections at the water valve and
taps for any leaks.
English 17
Untitled-17 17 2019-01-23 3:27:54
Page 18
Installation
9
Drain
Samsung recommends a standpipe 18 in. (460 mm) high. The drain hose must be
connected through the hose clip to the standpipe, and the standpipe must fully cover the
drain hose.
Flooring
For best performance, the washer must be installed on a solid oor. Wood oors may
need to be reinforced to minimize vibration and/or unbalanced loads. Carpeting and soft
tile surfaces do not provide good resistance to vibrations and may cause the washer to
move slightly during the spin cycle.
Installation
Do NOT install the washer on a platform or a poorly supported structure.
Water temperature
Do not install the washer in areas where water may freeze as the washer always retains
some water in its water valves, pumps, and/or hoses. Frozen water can cause damage to
belts, the pump, and other components of the washer.
CAUTION
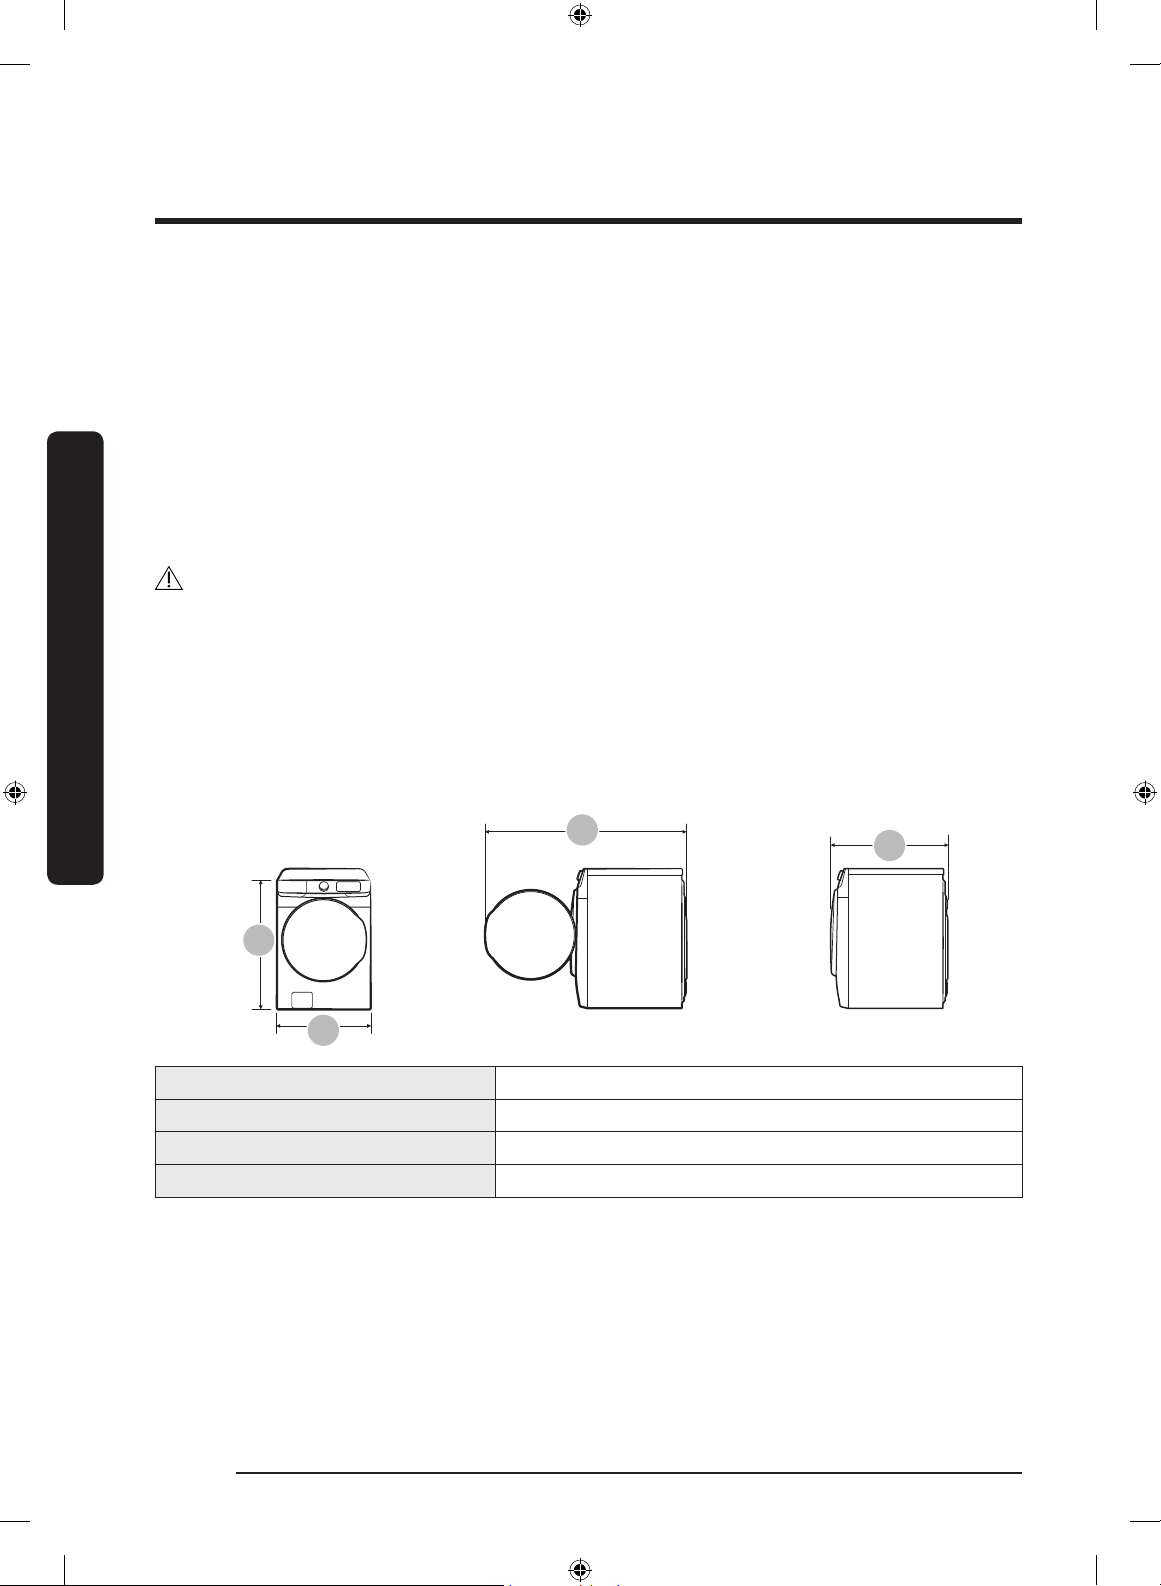
Dimensions
A
A. Overall height 38.7 in. (984 mm)
B. Width 27 in. (686 mm)
C. Depth with door open 52.6 in. (1337 mm)
D. Depth 31.3 in (796 mm)
U
English18
Untitled-17 18 2019-01-23 3:27:55
Page 19
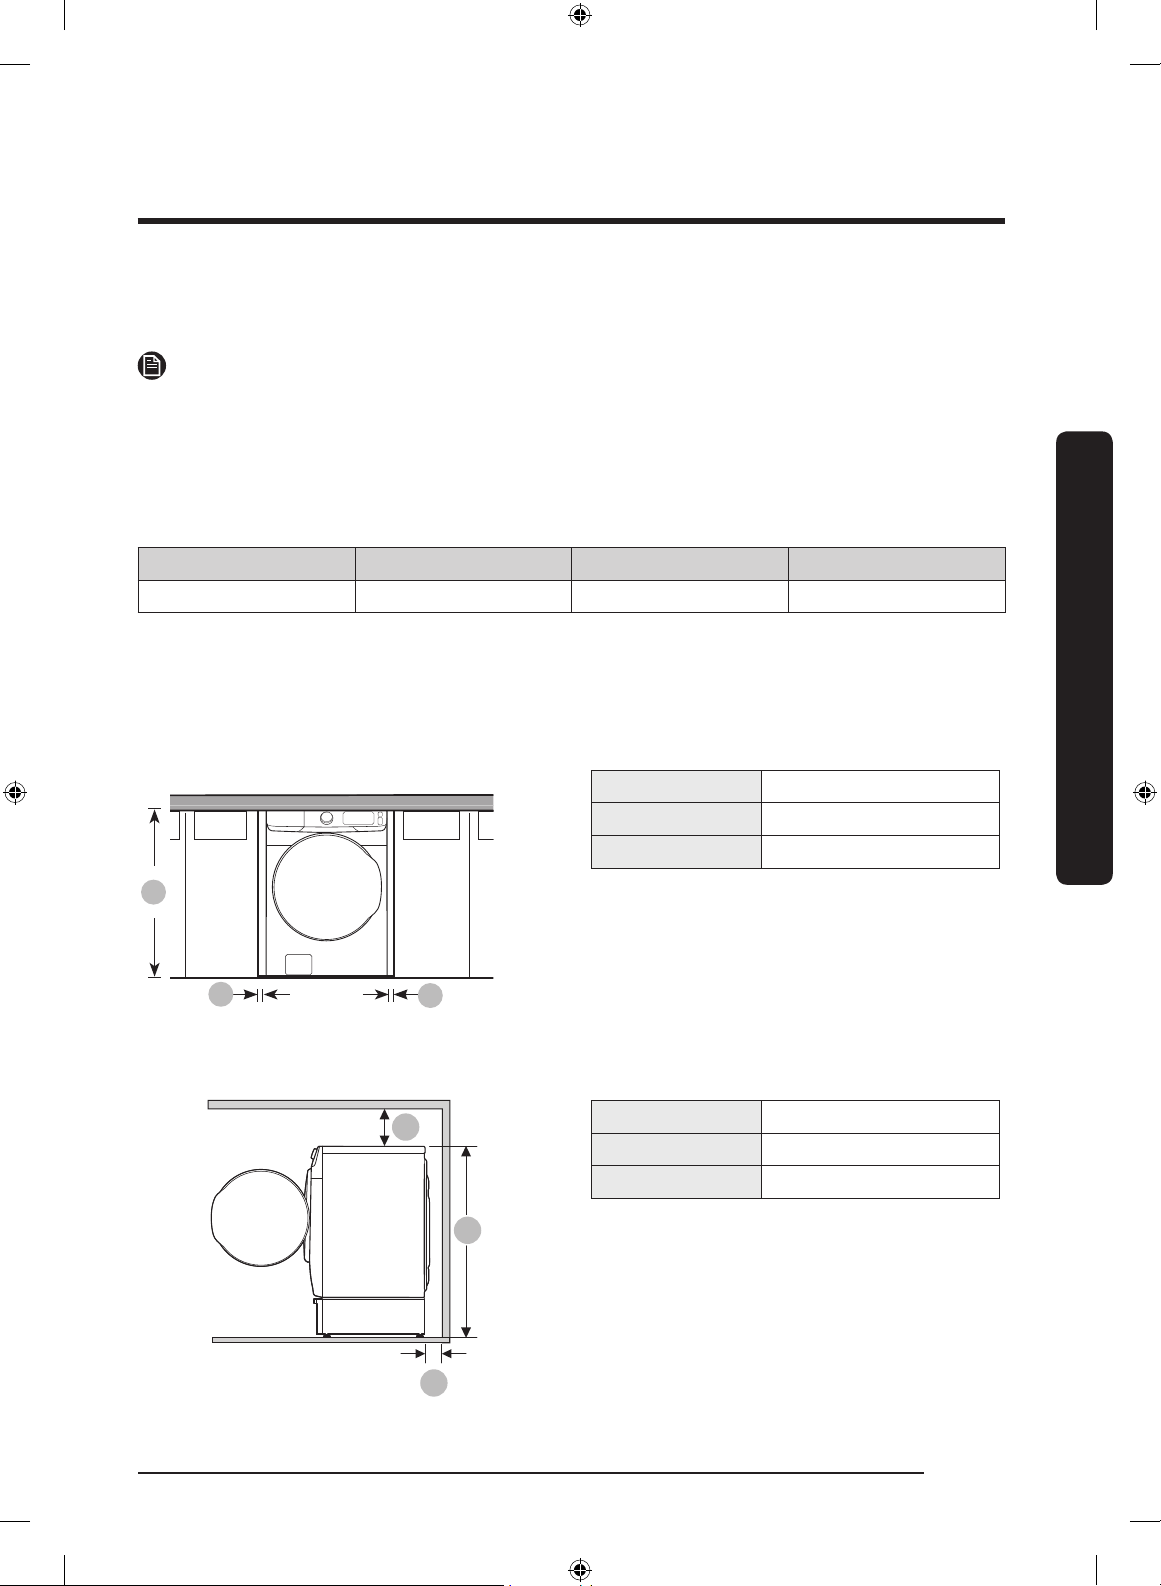
Clearance requirement
This clearance requirement is applicable for washers only.
NOTE
• For dryer’s clearance requirement, see the dryer’s user manual.
• If the washer and dryer have different clearance requirements, use the one with the
larger value.
Alcove or closet installations
Minimum clearance for stable operation:
Sides Top Rear Front
1 in. (25 mm) 1 in. (25 mm) 5 in. (127 mm) 1 in. (25 mm)
If both the washer and a dryer are installed in the same location, the front of the alcove
or closet must have two unobstructed air openings for a combined minimum total area of
72 in.2 (465 cm2).
Undercounter installation
A 39.6 in. (1006 mm)
B 1 in. (25 mm)
C 1 in. (25 mm)
Installation
A
B
Pedestal installation
C
9
A 5 in. (127 mm)
B 6 in. (152 mm)
C 52.0 in. (1320 mm)
A
English 19
Untitled-17 19 2019-01-23 3:27:57
Page 20
Installation
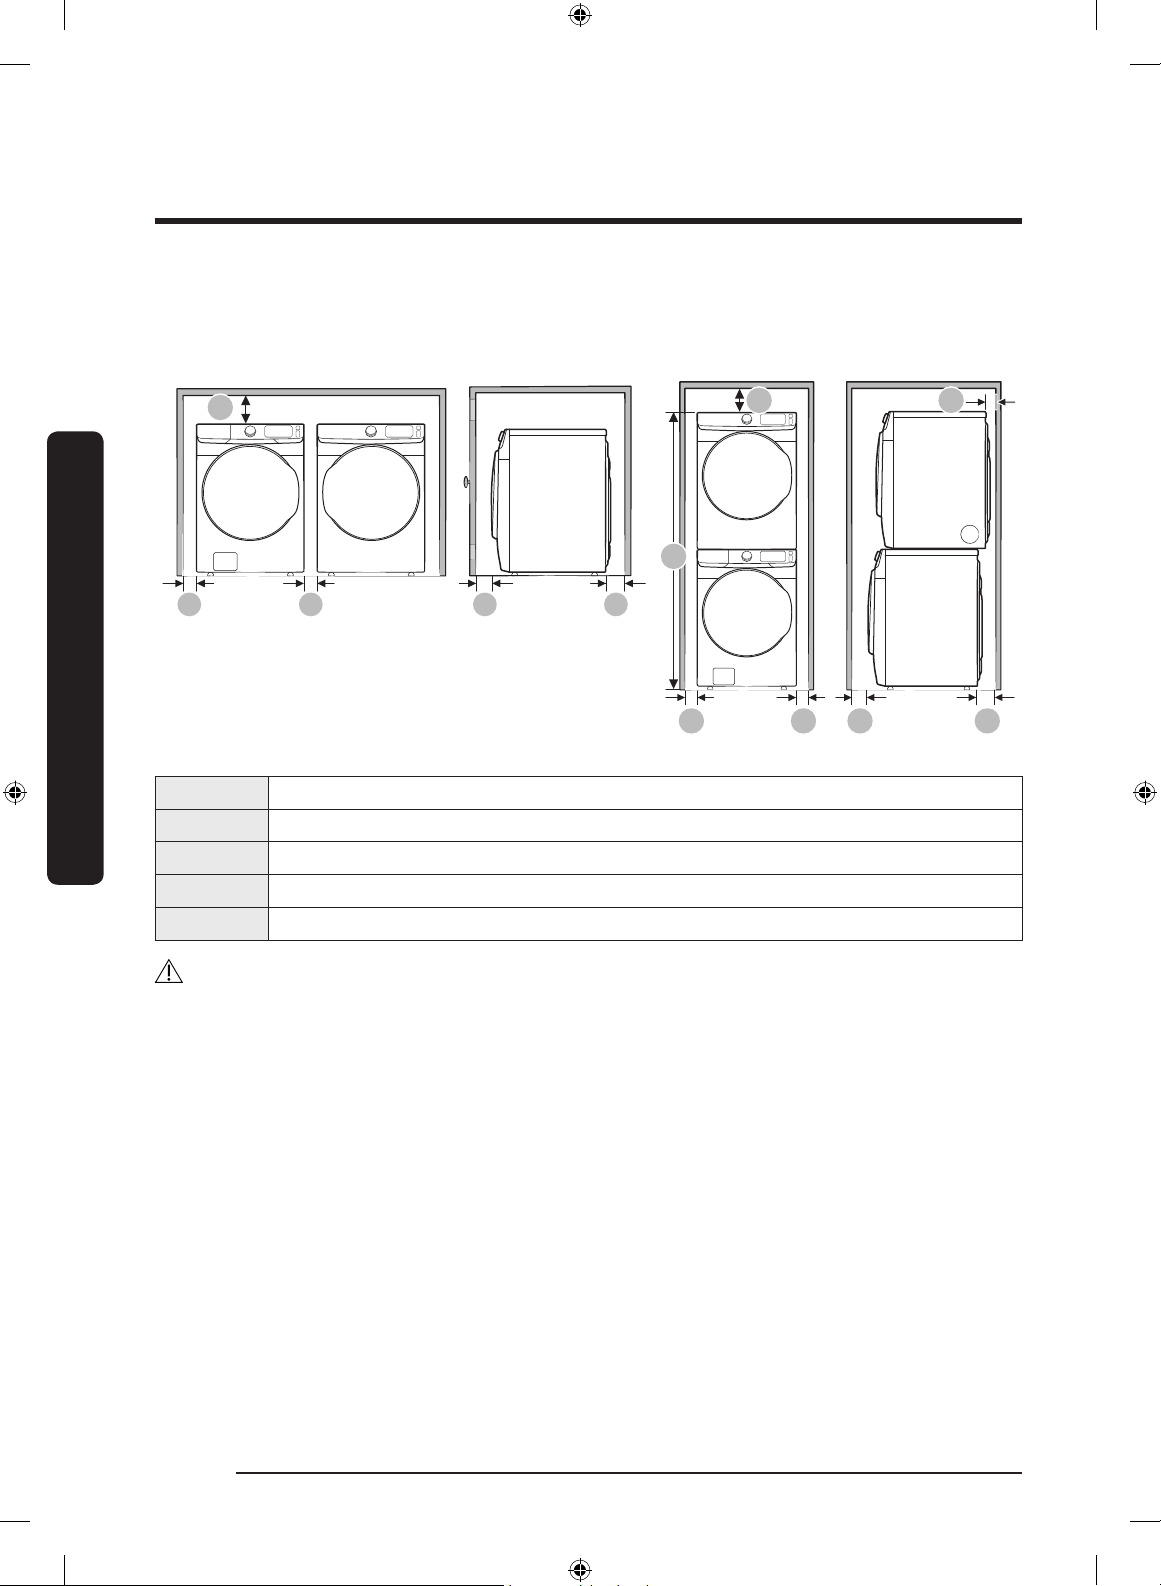
This clearance requirement is applicable for washer and dryer pair installation.
Side by side installation Stacked installation (Model: SKK-7A)
Installation
• Samsung’s washers and dryers can be stacked to maximize usable space.
• The dryer feet need to be removed to stack the washer and dryer. You can purchase an
9
A 1 in. (25 mm)
B 5.9 in. (150 mm)
C 7.1 in. (180 mm)
D 6 in. (152 mm)
E 78.5 in. (1994 mm)
WARNING
optional stacking kit from your Samsung retailer.
U
k
9
A
English20
Untitled-17 20 2019-01-23 3:27:58
Page 21
Step-by-step installation
STEP 1 Select a location
Location requirements:
• A solid, level surface without carpeting or ooring that may obstruct ventilation
• No direct sunlight
• Adequate room for ventilation and wiring
• Ambient temperature always higher than the freezing point (32 °F / 0 °C)
• Away from heat sources
STEP 2 Remove the shipping bolts
Unpack the product package and remove
all shipping bolts.
1. Loosen all shipping bolts on the rear of
the machine using the spanner.
NOTE
An adjustable wrench or 10 mm openend wrench is required for removing the
shipping bolts.
2. Fill the holes with the supplied plastic
bolt caps.
Keep the shipping bolts for future use.
WARNING
Packaging materials can be dangerous to children. Dispose all packaging material (plastic
bags, polystyrene, etc.) out of children’s reach.
Installation
English 21
Untitled-17 21 2019-01-23 3:28:00
Page 22
Installation
B
A
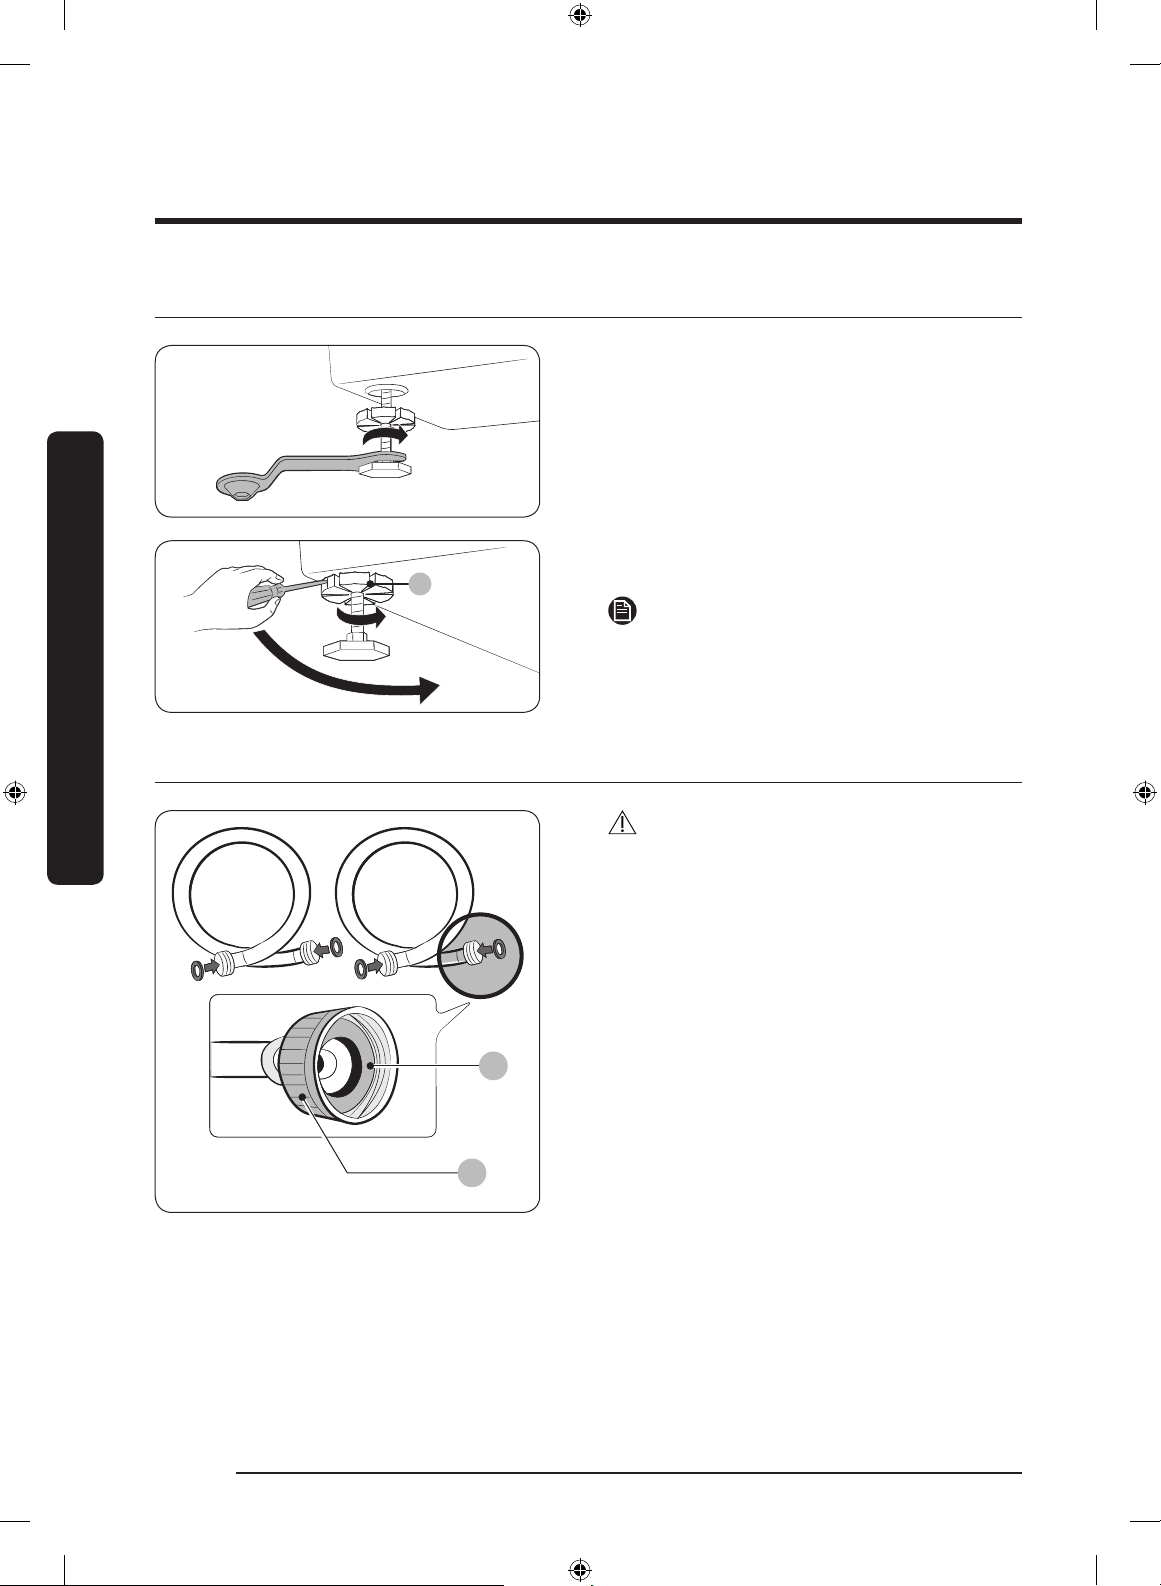
STEP 3 Adjust the leveling feet
Installation
STEP 4 Connect the water hose
1. Gently slide the washer into position.
Excessive force may damage the
leveling feet.
2. Using a wrench, turn the leveling feet
clockwise or counterclockwise to adjust
the height until the washer is level.
3. Using a athead screwdriver, tighten
the locking nuts (A).
NOTE
An adjustable wrench or 17 mm open-end
wrench is required to adjust the leveling
feet.
CAUTION
• Make sure to use new water hoses and
that rubber gaskets (B) are inside the
couplings (A) at both ends of the hoses.
Water hoses without the gaskets may
leak.
• Allow 5 in. (127 mm) of space between
the back of the washer and the wall to
prevent water hoses from being kinked.
Kinked hoses may cause water leaks.
• If there is a water leak, stop using the
washer and contact a local Samsung
service center. A water leak may cause
electric shock.
• Do not stretch the water hoses by force.
If a hose is too short, replace the hose
with a longer hose.
English22
Untitled-17 22 2019-01-23 3:28:02
Page 23
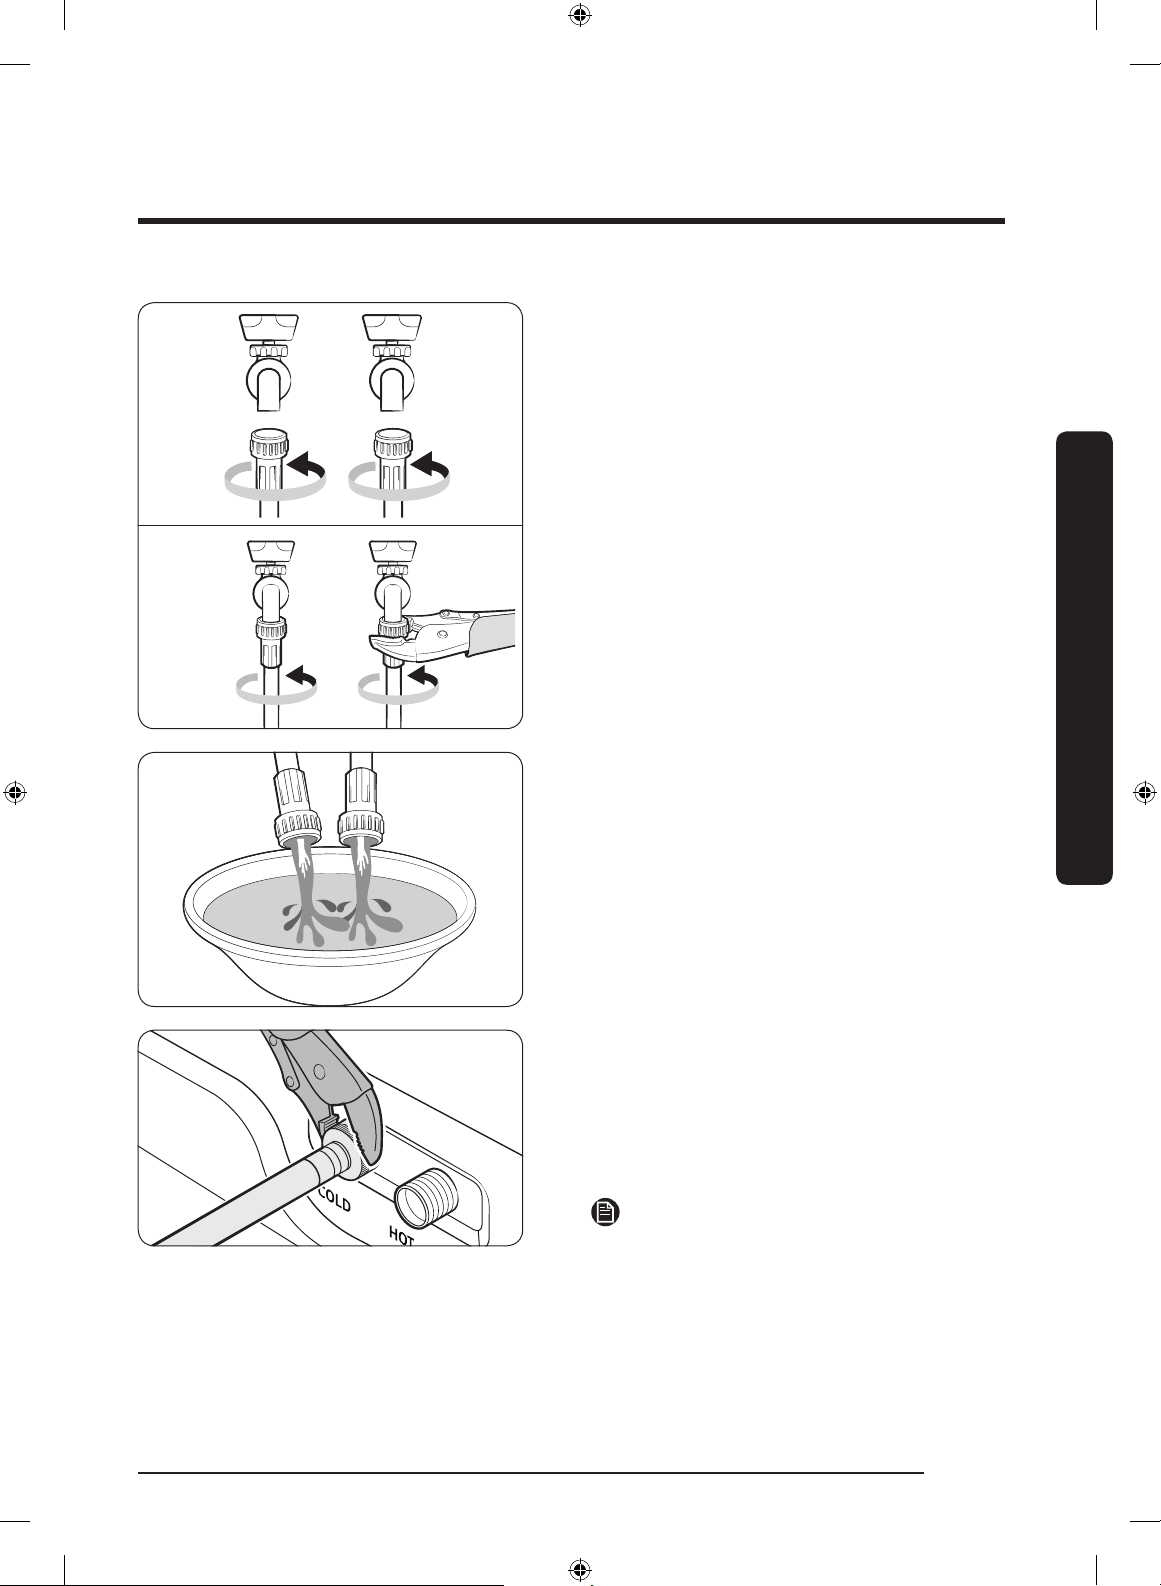
1. Attach the water hoses to the hot and
cold water taps, and then hand tighten
the water hose ttings until they are
tight. Then, use pliers to tighten the
ttings by an additional two-thirds of a
turn. To avoid damaging the ttings, do
not overtighten them.
2. Pull the water hoses to check if they
are rmly connected.
3. Put the other ends of the hoses into
a bucket, and then open the water
taps for 10 - 15 seconds to remove
impurities. When done, close the taps.
Installation
4. Attach the water hoses to the hot and
cold water inlets on the back of the
washer, and then hand tighten the
water hose ttings until they are tight.
Then, use pliers to tighten the ttings
by an additional two-thirds of a turn.
NOTE
If you do not want to use the hot water
supply hose, attach the water intake cap to
the hot water supply intake. When you do
a wash, press Temp. to select Cold.
English 23
Untitled-17 23 2019-01-23 3:28:04
Page 24
Installation
9
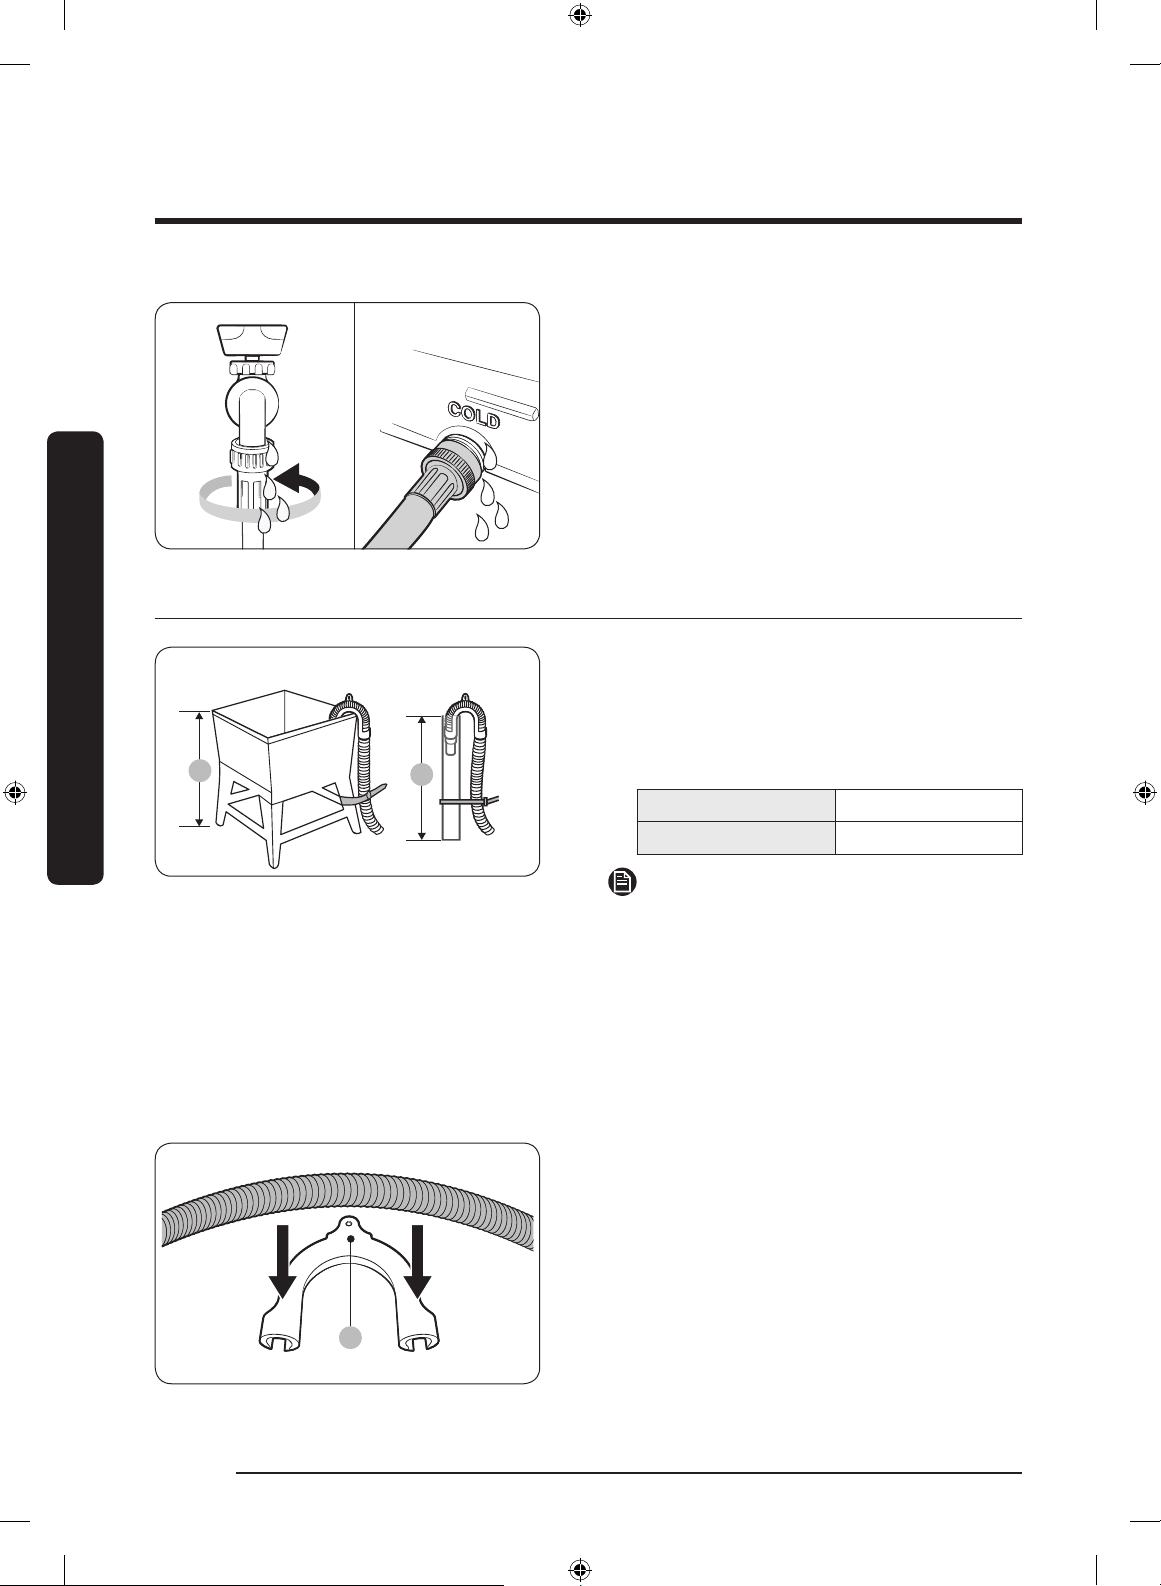
5. Open the water taps, and check for
leaks.
Installation
STEP 5 Connect the drain hose
To a Laundry Tub or Drain Pipe
1. Check the height (A) of your drain
system and make sure the minimum
and maximum heights shown below are
met.
Minimum 18 in. (46 cm)
Maximum 96 in. (245 cm)
NOTE
• Make sure to measure the height from
the oor where the washer is placed.
• Draining efciency may be reduced if
the drain system is at the maximum
height.
• To prevent the washer from siphoning
water, do not use a drain system below
the minimum height.
2. Attach the drain hose to the plastic
hose guide (B).
Untitled-17 24 2019-01-23 3:28:06
English24
Page 25
*
A
(*): Min. 6 in. (152 mm), Max. 8 in.
AA
B
(203 mm)
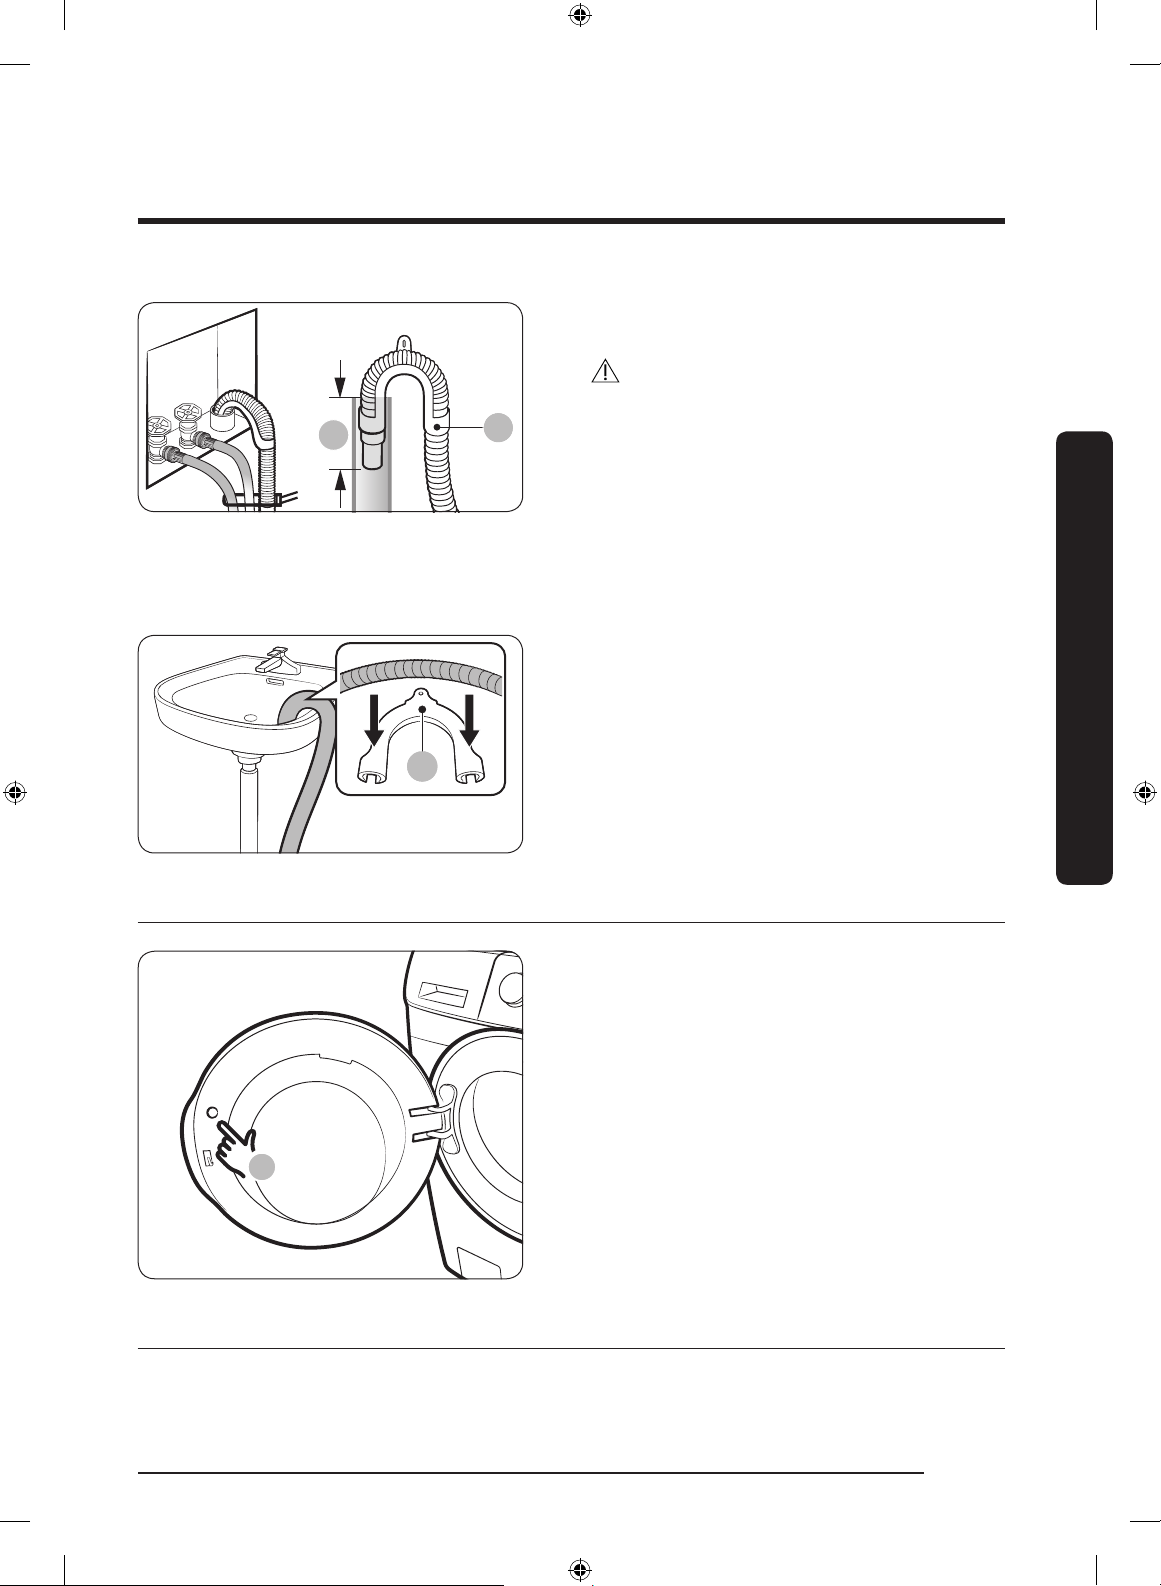
3. Route the drain hose to the drain
system.
CAUTION
• If using a standpipe, make sure the
standpipe and drain hose connection is
not airtight.
• If using a standpipe, make sure the
drain hose is inserted at least 6 in.
(152 mm) but no more than 8 in.
(203 mm) into the standpipe.
4. Secure the drain hose with cable ties.
Over the edge of a wash basin
The drain hose must be placed no lower
than 24 in. (60 cm) and no higher than
35 in. (90 cm) from the oor. To keep
the spout of the drain hose bent, use the
supplied plastic hose guide (A). Secure the
guide to the wall using a hook to ensure
stable drainage.
Installation
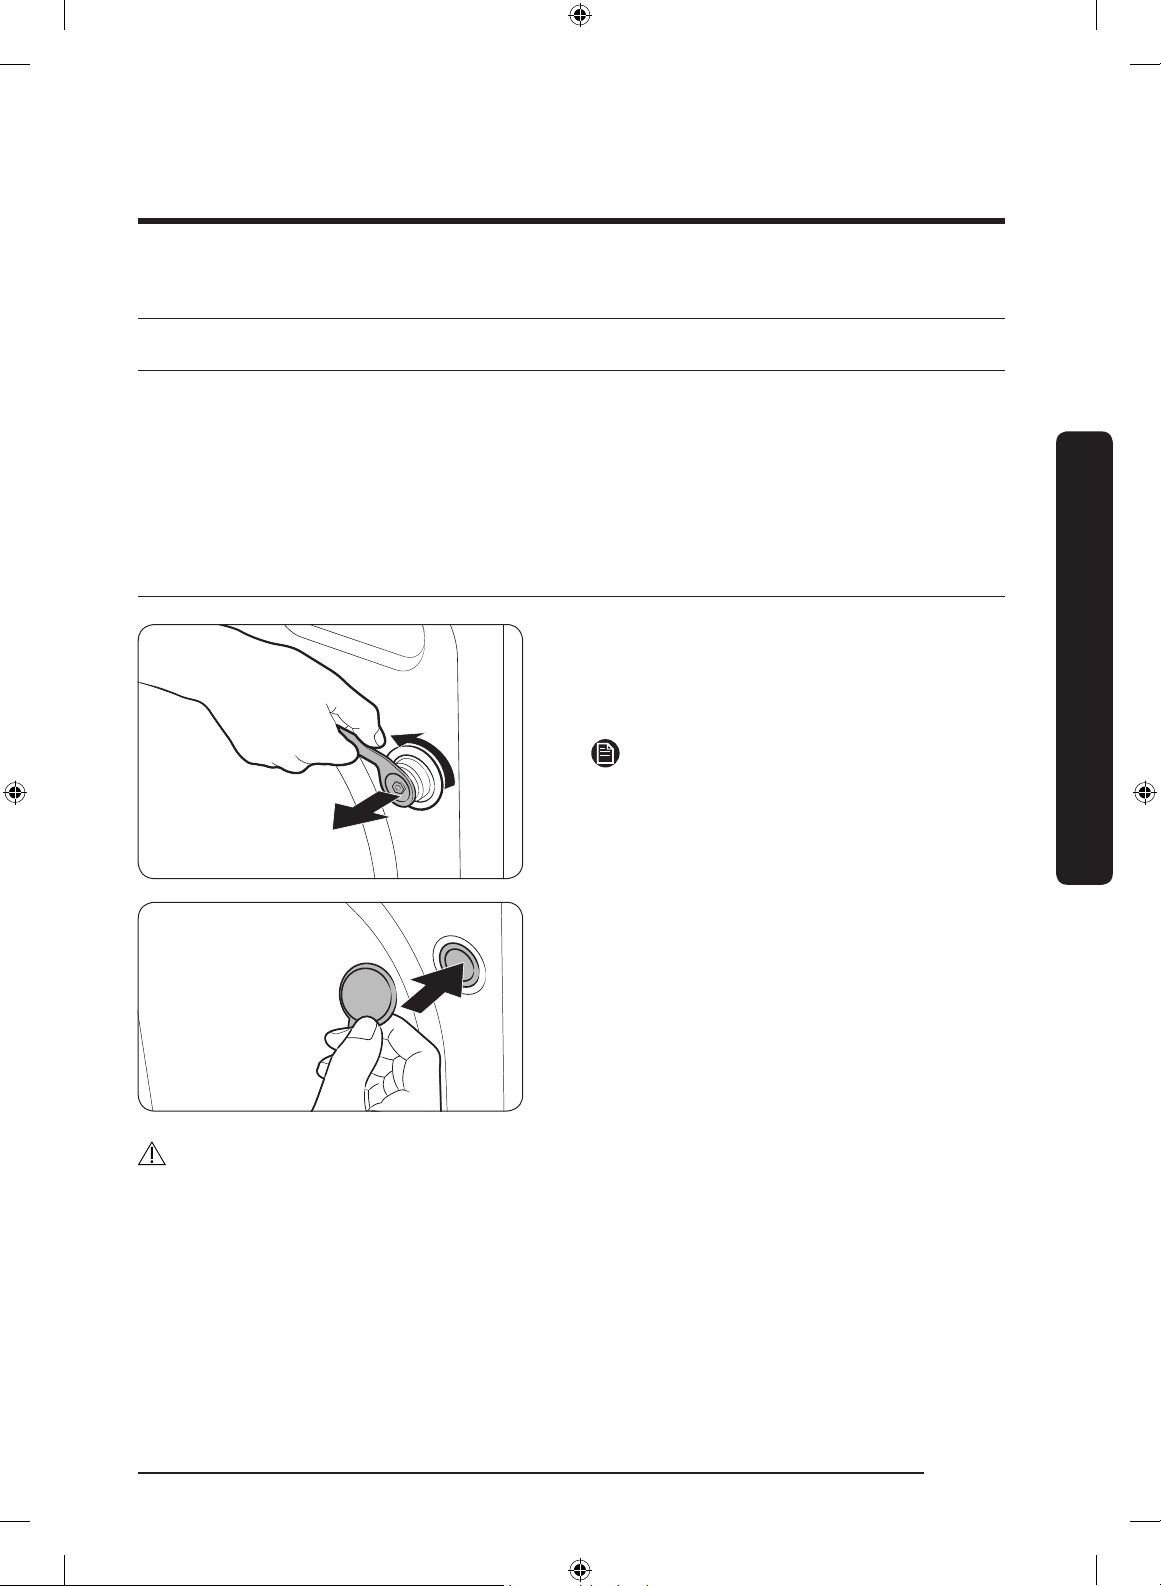
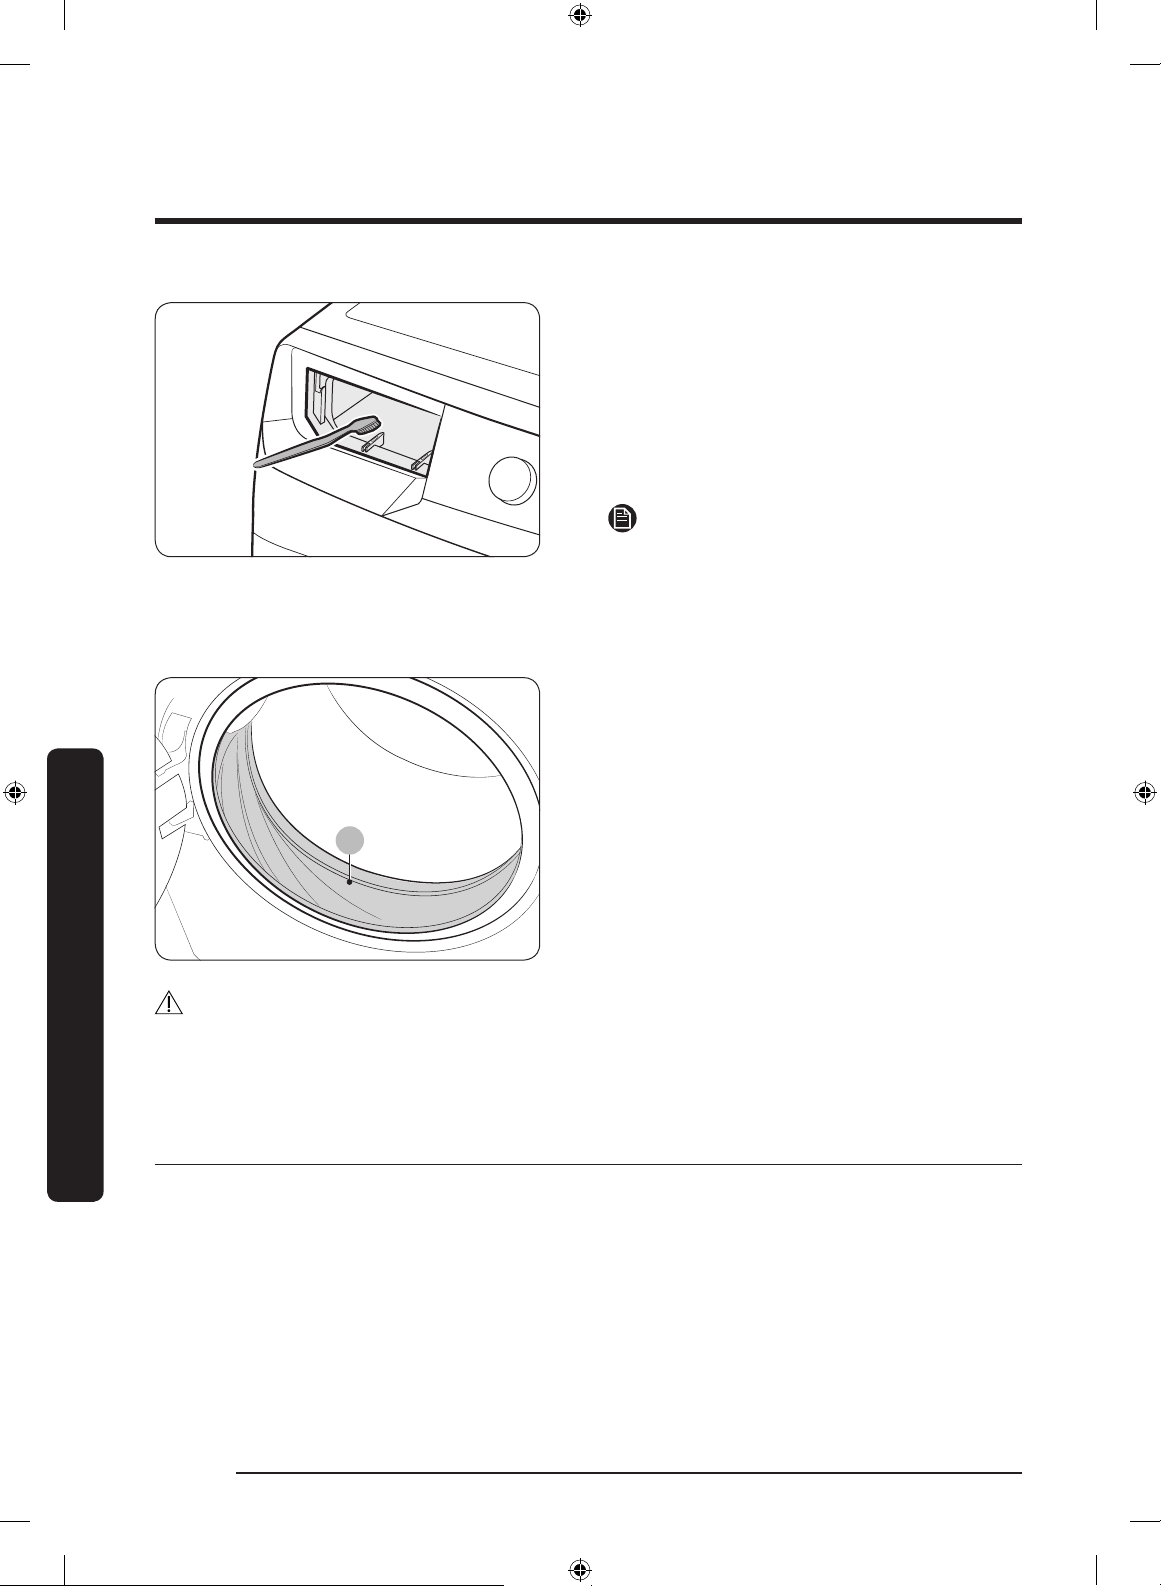
STEP 6 Remove the lm inside the door
Remove the small circle of lm (B) above
the door latch before use.
STEP 7 Power on
Plug the power cord into an AC 120 V / 60 Hz approved electrical outlet protected by a
fuse or circuit breaker. Then, press Power to turn on the washer.
English 25
Untitled-17 25 2019-01-23 3:28:08
Page 26

Before you start
Initial settings
Run Calibration (recommended)
Calibration ensures accurate weight detection by the washer. Make sure the drum is
empty before running Calibration.
1. Press Power to turn on the washer.
2. Press and hold Temp. and Delay End simultaneously for 3 seconds.
3. Press and hold Start/Pause (Hold to Start) to start Calibration.
- The door is locked during the operation.
- The drum keeps rotating clockwise and counterclockwise for several minutes.
4. When complete, the washer turns off automatically.
Before you start
Laundry guidelines
STEP 1 Sort
Sort the laundry according to these criteria:
• Care Label: Sort the laundry into cottons, mixed bers, synthetics, silks, wools, and
rayon.
• Color: Separate whites from colors.
• Size: Mixing different sized items together in the drum improves the washing
performance.
• Sensitivity: Wash delicate items separately. For pure, new woolen items, curtains, and
silk items, check the labels on the items.
NOTE
Make sure to check the care label on all clothing, and sort clothing accordingly before
starting the wash.
STEP 2 Empty pockets
Empty all the pockets of your laundry items
• Metal objects such as coins, pins, and buckles on clothing may damage other laundry
items as well as the drum.
Turn clothing with buttons and embroideries inside out
• If pants or jacket zippers are open while washing, the drum may be damaged. Zippers
should be closed and xed with a string.
• Clothing with long strings may become entangled with other clothes. Make sure to tie
the strings before starting the wash.
English26
Untitled-17 26 2019-01-23 3:28:09
Page 27

STEP 3 Use a laundry net
• Brassieres (water washable) must be placed in a laundry net. Metal parts of the
brassieres may break through and tear other laundry items.
• Small, light clothing such as socks, gloves, stockings, and handkerchiefs may become
caught around the door. Place them inside a ne laundry net.
• Do not wash the laundry net by itself without other laundry. This may cause abnormal
vibrations that could move the washer and result in injury.
STEP 4 Determine the load capacity
Do not overload the washer. Overloading may cause the washer to wash improperly.
NOTE
When washing bedding or bedding covers, the wash time may be lengthened or the spin
efciency may be reduced.
For bedding or bedding covers, the recommended maximum spin level is Level 2 or Level
3, and the load capacity is 3.0 kg or less.
CAUTION
If the laundry is unbalanced and the “UB” information code is displayed, redistribute the
load. Unbalanced laundry may reduce spinning performance.
STEP 5 Add the correct detergent type
Before you start
The type of detergent you use - general purpose, specically for woolens, etc. - depends
on the type of fabric (cotton, synthetic, delicate items, wool), color, wash temperature, and
degree of soiling. Regardless of the specic type of detergent you use, always use “low
suds” HE laundry detergent which is designed for automatic washers.
NOTE
• Follow the detergent manufacturer’s recommendations based on the weight of the
laundry, the degree of soiling, and the hardness of the water in your local area. If you
are not sure about the water hardness, contact your local water authority.
• Do not use detergent that tends to harden or solidify. This detergent may remain after
the rinse cycle, blocking the drain outlet.
CAUTION
When washing wool using the WOOL cycle, use only a neutral liquid detergent. Powdered
detergent used with the WOOL cycle can remain on the laundry and discolor it.
English 27
Untitled-17 27 2019-01-23 3:28:09
Page 28
Before you start
9
A
Use HE detergent only
Before you start
Your washer is designed to use high
efciency (HE) detergents.
• For the best cleaning results, use a high
efciency detergent such as Tide HE,
Wisk HE, Cheer HE or Gain HE*. High
efciency detergents contain suds
suppressors that reduce or eliminate
suds. When fewer suds are produced,
the load tumbles more efciently and
cleaning is maximized. (* Brand names
are trademarks of their respective
manufacturers.)
WARNING
Regular detergent is not recommended.
Use HE detergents only.
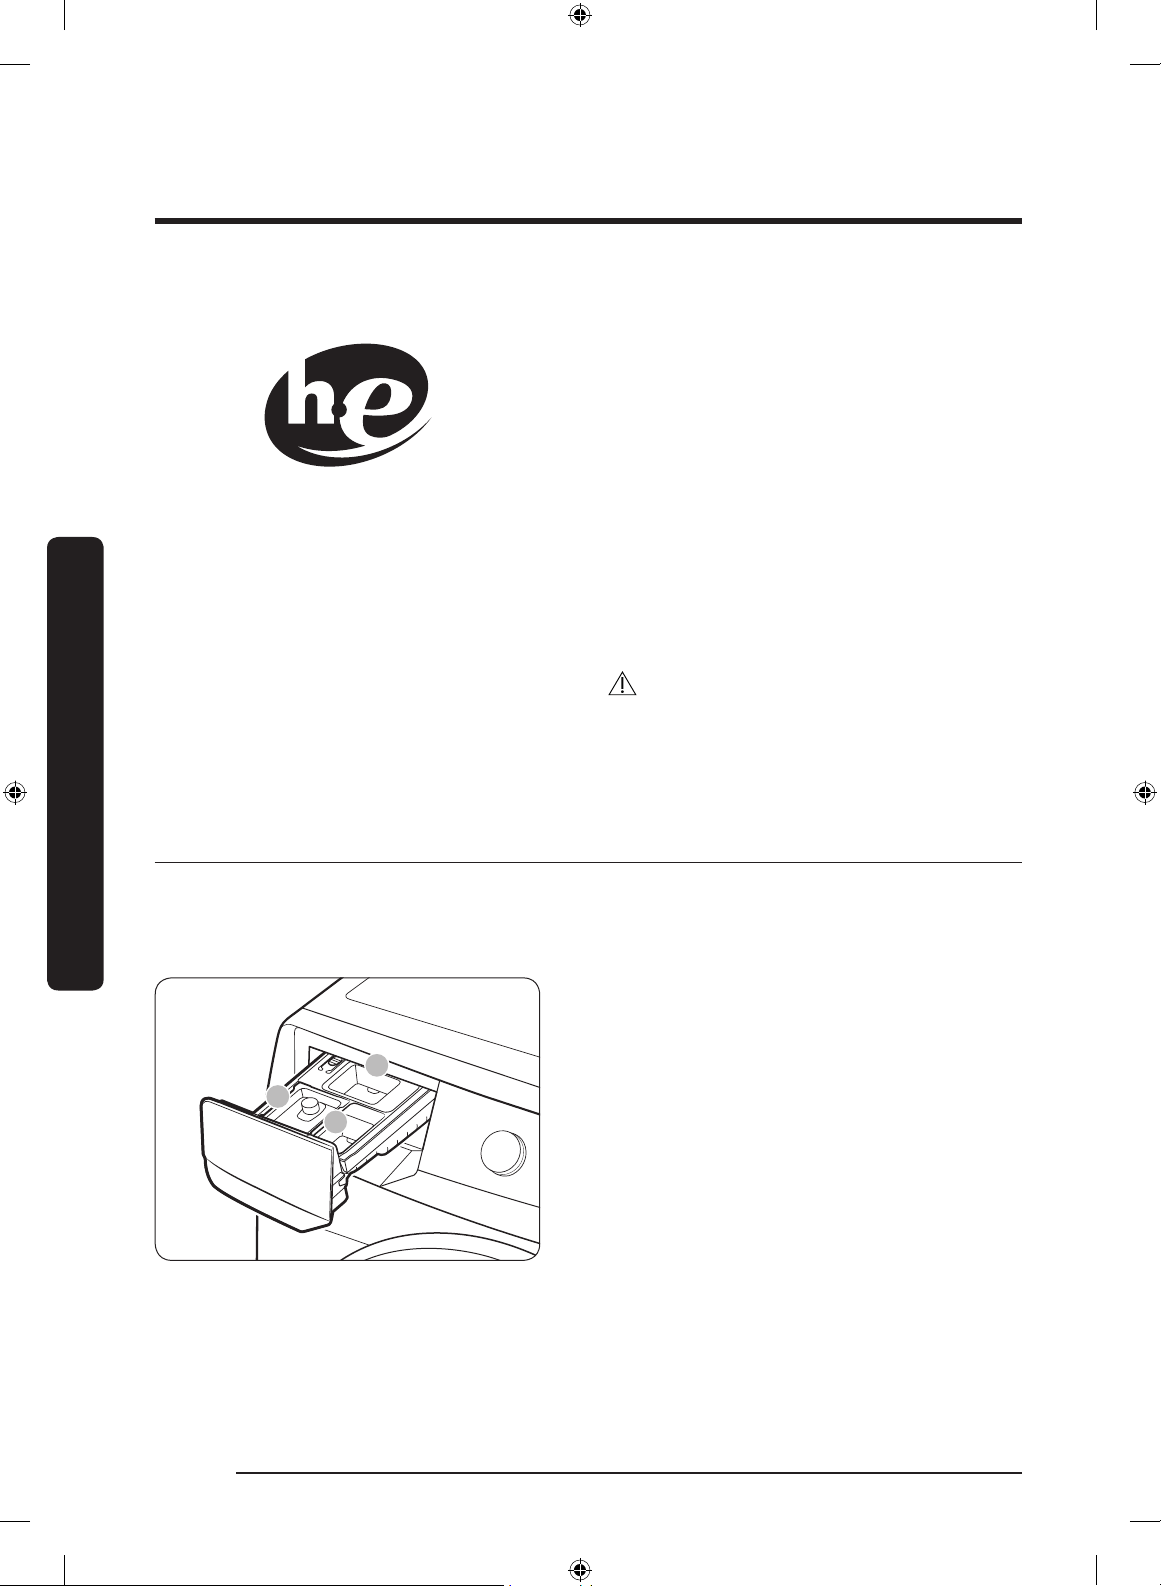
Detergent drawer guidelines
The washer provides a three-compartment dispenser: the front-left compartment for the
main wash, the front-right for fabric softeners, and the rear-right for the liquid chlorine
bleach.
A. Main-wash compartment: Add main-
wash detergent, water softener,
soaking detergent, color–safe, and/or
stain removers.
B. Softener compartment: Add fabric
softener. Do not exceed the max line.
C. Bleach compartment: Add liquid
chlorine bleach. Do not exceed the
max line.
English28
Untitled-17 28 2019-01-23 3:28:10
Page 29
CAUTION
9
• Do not open the detergent drawer while the washer is operating.
• Do not use the following types of detergent:
- Tablet or capsule types
- Ball or net types
• To prevent the compartment from clogging, concentrated or highly-enriched agents
(fabric softener or detergent) must be diluted with water before being added.
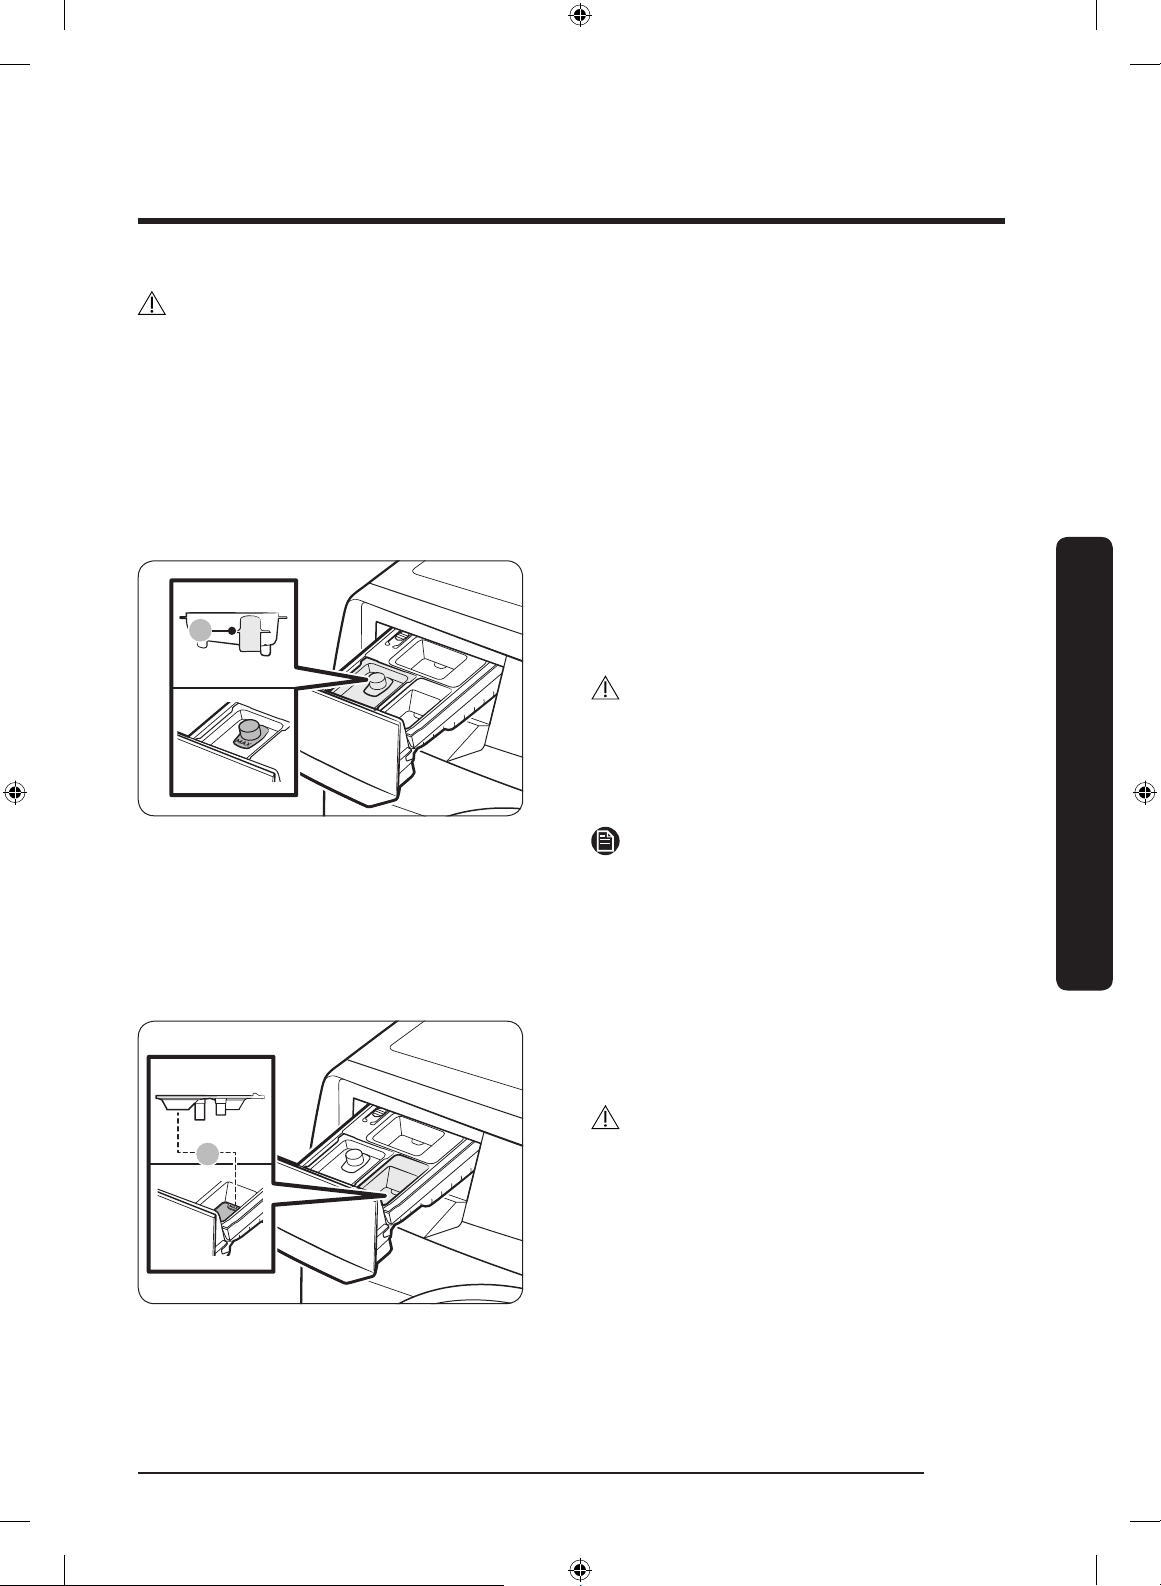
To add washing agents to the detergent drawer
1. Slide open the detergent drawer.
2. Add liquid laundry detergent to the
liquid detergent container in the main
wash compartment.
CAUTION
• Make sure the liquid detergent
container is inserted in the main wash
compartment.
• Do not exceed the marked max line (A).
NOTE
• Do not add powdered laundry
detergent or other powdered laundry
agents to the liquid laundry container.
• To use powdered detergent, see page
30.
Before you start
3. Add fabric softener to the softener
compartment. Do not exceed the max
line (B).
CAUTION
• Powdered fabric softener is not
recommended. Use liquid fabric
softener only.
• Concentrated fabric softener must be
diluted with water before being added.
• Do not add main-wash detergent to the
softener compartment.
4. Close the detergent drawer.
English 29
Untitled-17 29 2019-01-23 3:28:12
Page 30
Before you start
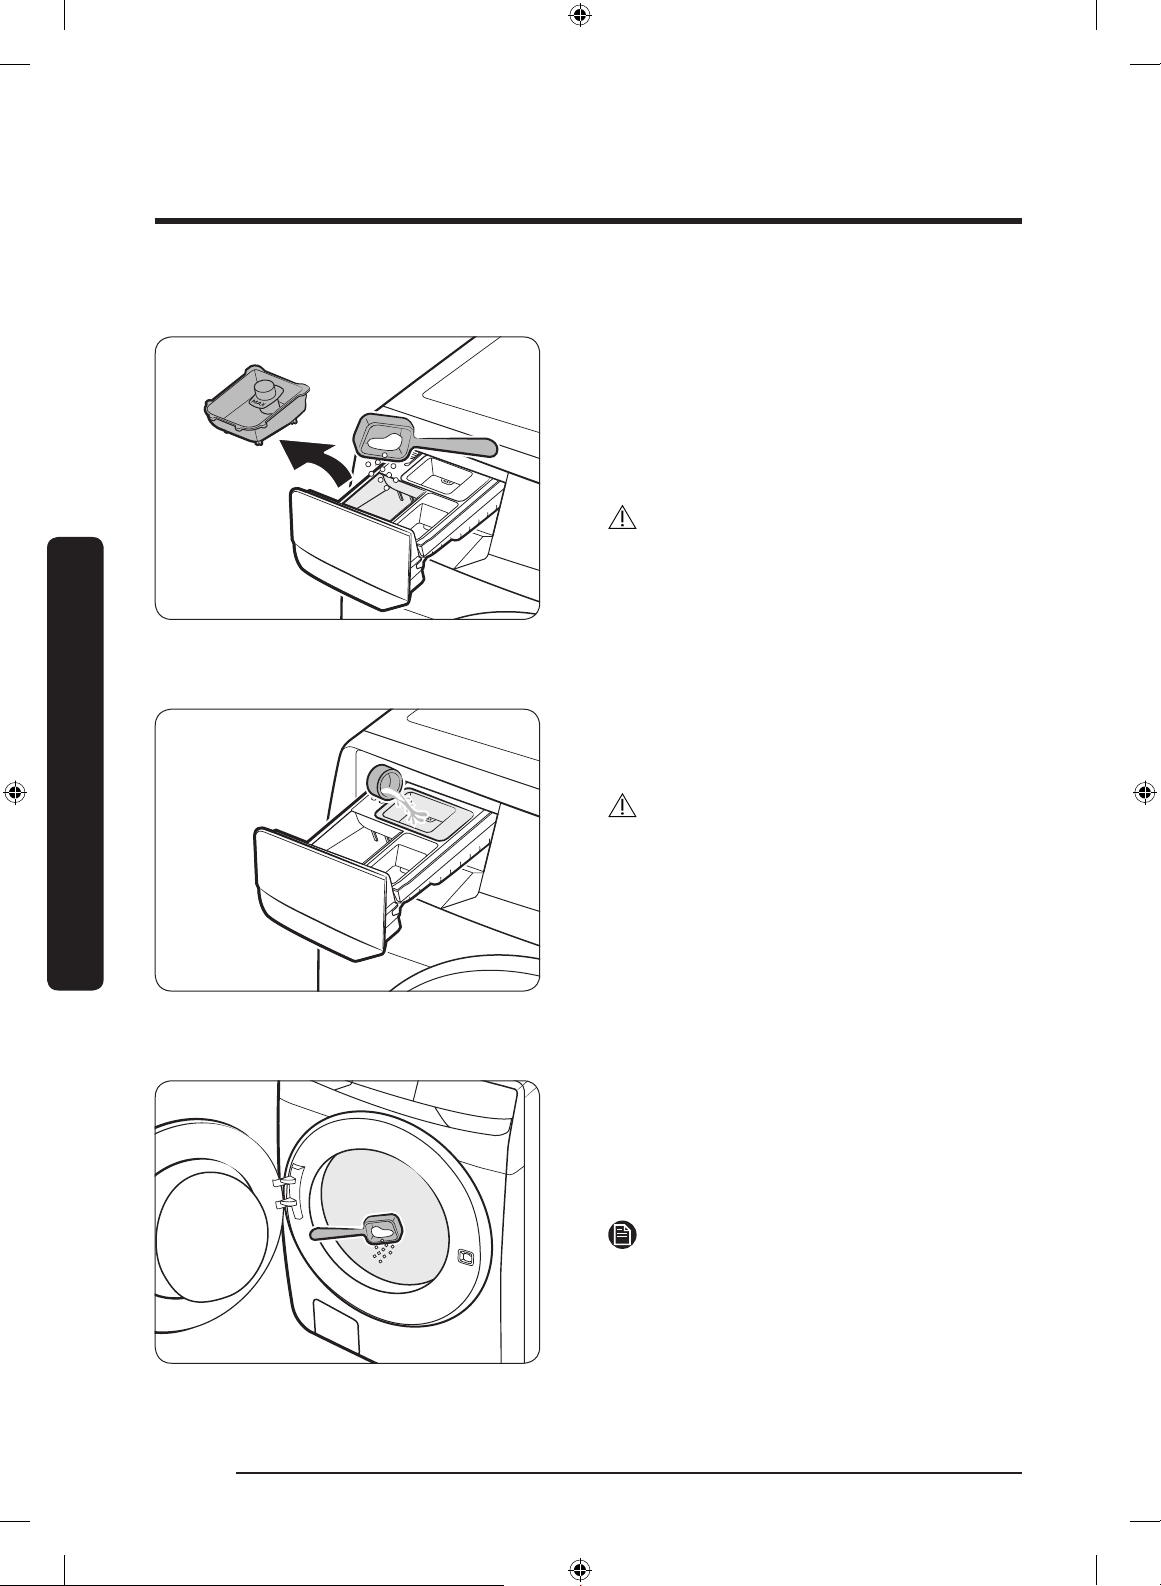
To use powdered detergent
First, remove the provided liquid
detergent container from the main-
wash compartment. Then, add powdered
detergent to the main-wash compartment
according to the detergent manufacturer’s
instructions.
CAUTION
Do not add powdered detergent to the
liquid detergent container.
Before you start
To use the bleach compartment
To use oxygen boosters or color-safe bleach
Add only liquid chlorine bleach to the
bleach compartment. Do not exceed the
max line.
CAUTION
Do not add undiluted liquid chlorine bleach
directly to the load or to the drum. It is a
powerful chemical and can cause fabric
damage, such as weakening of the bers
or color loss if not used properly.
Oxygen boosters or color-safe bleach can
increase washing performance. Make sure
to add the oxygen booster or color-safe
bleach after putting the laundry into the
drum.
NOTE
To use both powdered detergent and
powdered oxygen booster or powdered
color-safe bleach, it is more effective to
put them together into the drum before
loading the laundry.
English30
Untitled-17 30 2019-01-23 3:28:14
Page 31

Operations
01
02
03 04 05 06
0907
08
10
12
11
WARNING
To reduce the risk of re, electric shock, or injury to persons, read the Safety information
before operating this appliance.
Control panel
01 Cycle Selector
02 Display
03 Temp.
04 Rinse
Turn the dial to select a cycle. (For more information about wash
cycles, see page 35.)
The display shows current cycle information and estimated time
remaining, or an information code if the washer needs to be
checked.
Press to change the water temperature for the current cycle.
• Hot (Level 5): Heavily soiled, colorfast items. Only available
with NORMAL, HEAVY DUTY, SANITIZE and SELF CLEAN .
• (Level 4): Whites and heavily soiled, colorfast items.
• (Level 3): Colorfast items.
• (Level 2): Brightly colored, very lightly soiled items.
• Cold (Level 1): Uses only cold water without utilizing the
washer's heater. No warm water is supplied.
Press to change the rinse count for the current cycle.
• You can select 1 to 5 rinses.
Operations
Untitled-17 31 2019-01-23 3:28:15
English 31
Page 32

Operations
05 Spin
Operations
06 Soil
07 Pre Soak
08 Steam
09 Delay End
10 Alarm Off
Press to change the spinning speed for the current cycle.
• High (Level 5): Extends the spinning process to effectively
remove moisture from the load. This level uses a stronger
spinning process to remove moisture, so it is not suitable for
wrinkle-free or non-iron fabrics, or overloads.
• (Level 4): Underwear, t-shirts, jeans, and sturdy cottons.
• (Level 3): Jeans, wrinkle-free or wash-and-wear items, and
synthetics.
• (Level 2): Delicate items that require a lower spinning speed.
• No Spin (Level 1): The drum does not spin after the nal drain
process.
Rinse hold (All indicators are off): The nal rinse process is
suspended so that the laundry remains in the water. To unload the
laundry, run a drain or spin process.
NOTE
Spin Only: To perform the spin process only, press and hold Spin
for 3 seconds. With the cycle time on the display, press Spin
repeatedly until a desired spinning speed is selected. Then, press
and hold Start/Pause (Hold to Start) to start.
Press to change the soil level for the current cycle.
• Heavy (Level 5): For extremely soiled loads.
• (Level 4): For heavily soiled loads.
• (Level 3): For moderately soiled loads. This setting is best for
most loads.
• (Level 2): For lightly soiled loads.
• Light (Level 1): For barely soiled loads.
Press to add 30 minutes of soaking time at the start of the wash
cycle for better stain removal.
Press to use the Steam function. The Steam function is available
with NORMAL, HEAVY DUTY, WHITES, BEDDING, and SANITIZE.
For heavily soiled, colorfast items, this function improves stain
treatment and uses less water.
Set the washer to nish your wash automatically at later time.
Choose a delay of between 1 to 24 hours (in 1 hour increments).
(For more information about Delay End, see page 38.)
Press to turn the alarm sound on or off. When the alarm is off, the
cycle completion melody and the power-off beep will not sound.
However, button and alert sounds will remain on.
English32
Untitled-17 32 2019-01-23 3:28:15
Page 33

11 Power Press to turn the washer on or off.
12 Start/Pause
(Hold to Start)
Press and hold to start operation or press to stop operation
temporarily.
Icon description
• This icon indicates you can add or take out items after a cycle
has started.
Garment+
• To add or take out items, press Start/Pause (Hold to Start) to
pause the cycle, and then open the door. To resume the cycle,
close the door, and then press and hold Start/Pause (Hold to
Start).
• This icon indicates the door is locked and cannot be opened.
Door Lock
• The door locks automatically during a cycle and this indicator
turns on.
• You can open the door when this icon disappears.
• This icon indicates that you should clean the drum using the
SELF CLEAN cycle.
SELF CLEAN
reminder
• After every 40 cycles, this icon appears for an hour and
then turns off automatically. The icon will appear for 6 more
cycles, turn off, and then will not appear for another 40
cycles.
Child Lock
Alarm Off
• This icon indicates that Child Lock is on.
• For more information on Child Lock, see page 39.
• This icon indicates that the alarm is off.
• For more information on Alarm Off, see page 39.
Operations
English 33
Untitled-17 33 2019-01-23 3:28:18
Page 34

Operations
1
2
3
5
4
Simple steps to start
1. Press Power to turn on the washer.
2. Turn the Cycle Selector to select a cycle.
3. Change the cycle settings (Temp., Rinse, Spin, and Soil) as necessary.
4. Select desired options as necessary.
5. Press and hold Start/Pause (Hold to Start).
To change the cycle during operation
Operations
1. Press Start/Pause (Hold to Start) to stop operation.
2. Select a different cycle.
3. Press and hold Start/Pause (Hold to Start) again to start the new cycle.
Do not place anything on top of your washer while it is running.
WARNING
English34
Untitled-17 34 2019-01-23 3:28:19
Page 35

Cycle overview
Standard Cycles
Cycle Description
QUICK WASH
DELICATES
PERM PRESS
RINSE+SPIN
SELF CLEAN
Steam Cycles
• For lightly soiled items that you want to nish washing
quickly.
• For best performance, recommended load is 4 lb or lower.
• For sheer fabrics, bras, lingerie (silk), and other handwashonly fabrics.
• For best performance, use liquid detergent.
• For wash-and-wear, synthetic fabrics, and lightly to normally
soiled items.
• Features an additional rinse process after fabric softener is
applied to the laundry.
• Cleans the drum by removing dirt and bacteria from the
drum.
• Perform once every 40 washes.
• Make sure the drum is empty.
Operations
Cycle Description
• For cottons, bed linens, table linens, underwear, towels,
NORMAL
or shirts. The washing time and the number of rinses are
automatically adjusted according to the load.
HEAVY DUTY • For sturdy, colorfast fabrics and heavily soiled items.
WHITES • For white items. You can wash with or without bleach.
• For bulky items such as comforters, blankets, and sheets.
BEDDING
• For best results, wash only 1 type of bedding.
• For bulky items, use liquid detergent and do not roll the
items in the drum because they might get stuck in the drum.
• For heavily soiled, colorfast items. This cycle heats the water
to 150 °F (65 °C) to eliminate bacteria.
SANITIZE
NOTE
If you press Start/Pause (Hold to Start) during the heating
portion of the SANITIZE cycle, your washer door will remain
locked for your safety.
English 35
Untitled-17 35 2019-01-23 3:28:19
Page 36

Operations
Cycle chart
Use this chart to set the best cycle and options for your laundry.
Operations
NOTE
Setting Temp. Rinse Spin Soil
: factory setting 5 : Hot (Level 5) 5 : 5 times (Level 5) 5 : High (Level 5) 5 : Heavy (Level 5)
: can be selected 4 : (Level 4) 4 : (Level 4) 4 : (Level 4) 4 : (Level 4)
3 : (Level 3) 3 : (Level 3) 3 : (Level 3) 3 : (Level 3)
2 : (Level 2) 2 : (Level 2) 2 : (Level 2) 2 : (Level 2)
1 : Cold (Level 1) 1 : 1 time (Level 1) 1 : No spin (Level 1) 1 : Light (Level 1)
Functions
Cycle
5 4 3 2 1 5 4 3 2 1
NORMAL
HEAVY DUTY
WHITES
BEDDING
SANITIZE
QUICK WASH
DELICATES
PERM PRESS
RINSE+SPIN
SELF CLEAN
Temp. Rinse
English36
Untitled-17 36 2019-01-23 3:28:19
Page 37

Functions
Cycle
5 4 3 2 1 5 4 3 2 1
NORMAL
HEAVY DUTY
WHITES
BEDDING
SANITIZE
QUICK WASH
DELICATES
PERM PRESS
RINSE+SPIN
SELF CLEAN
Spin Soil
Cycle
NORMAL
HEAVY DUTY
WHITES
BEDDING
SANITIZE
QUICK WASH
DELICATES
PERM PRESS
RINSE+SPIN
SELF CLEAN
Pre Soak Steam Delay End
Options
Operations
English 37
Untitled-17 37 2019-01-23 3:28:20
Page 38

Operations
Special features
Delay End
You can set the washer to nish your wash automatically at a later time by choosing a
delay of between 1 to 24 hours (in 1 hour increments). The hour displayed indicates the
time the wash will nish.
1. Select a cycle. Then, change the cycle settings if necessary.
2. Press Delay End repeatedly until a desired end time is set.
3. Press and hold Start/Pause (Hold to Start).
4. To cancel Delay End, restart the washer by pressing Power.
Real-life case
You want to nish a two-hour cycle 3 hours from now. To do this, you add the Delay End
option to the current cycle with a 3-hour setting, and then press and hold Start/Pause
(Hold to Start) at 2:00 pm. The washer starts operating at 3:00 pm and ends at 5:00 pm.
Provided below is the time line for this example.
Operations
ATC (Auto Temperature Control)
ATC enables the washer to control water temperatures in each washing cycle using the
internal thermistor. It is designed to maintain certain washing temperatures for best
results.
• If you select NORMAL or HEAVY DUTY, you may notice the washer supplying cold
• To wash clothes at a specic temperature, you must choose a different cycle rst.
2:00 pm
Set Delay End to 3 hours
3:00 pm
Start
5:00 pm
End
NOTE
water. This is normal because the machine is designed to reduce power consumption. In
these cycles, the water temperature for Level 5 is similar to bath-water temperatures,
and Level 3 is similar to comfortable swimming pool temperatures.
English38
Untitled-17 38 2019-01-23 3:28:21
Page 39

Child Lock
The Child Lock function locks the washer door to prevent children from climbing into and
suffocating inside the drum.
To activate Child Lock
• Press and hold both Temp. and Rinse for 3 seconds. Then, press and hold Start/Pause
(Hold to Start) to activate. The door locks, and the Child Lock indicator turns on.
To deactivate Child Lock temporarily
• You can deactivate Child Lock temporarily for 1 minute. To do this, press and hold both
Temp. and Rinse for 3 seconds. The door is unlocked for 1 minute and the Child Lock
indicator blinks.
NOTE
• If you open the door 1 minute after deactivating Child Lock, an alarm sounds for up to
2 minutes.
• If you close the door within 2 minutes, the door locks and Child Lock is reactivated. If
you do not close the door or the door is not properly closed, the alarm keeps sounding
for 2 minutes.
• To add laundry after activating Child Lock, deactivate Child Lock or restart the washer.
To cancel Child Lock
• Press and hold both Temp. and Rinse for 6 seconds. The door unlocks, and the Child
Lock indicator turns off.
Operations
Alarm Off
You can turn the alarm sound on or off. When the alarm is off, the cycle completion
melody and the power-off beep will not sound. However, the other sounds stay active.
• Press Alarm Off to turn the alarm on or off.
• Your setting will be kept even after you turn off and then restart the appliance.
English 39
Untitled-17 39 2019-01-23 3:28:21
Page 40

Maintenance
Keep the washer clean for best performance and to lengthen its life cycle.
WARNING
Certain internal parts are intentionally not grounded and may present a risk of electric
shock only during servicing. Service personnel – Do not contact the following parts while
the appliance is energized: Control board, heat sink, motor, inlet valve and pump.
Self Clean
Certain usage and environmental conditions may result in some residue build-up or odor
in the washer drum. To prevent this build-up of residue or odor causing bacteria and keep
your washer drum fresh and clean, perform the SELF CLEAN cycle at least once a month
or every 40 cycles. Perform the recommended procedure below when using the SELF
CLEAN cycle.
1. Remove all items from the washer drum and ensure the drum is empty. Laundry left in
the drum during the SELF CLEAN cycle may be damaged.
2. Press Power to turn on the washer.
3. Turn the Cycle Selector to SELF CLEAN .
4. Press and hold Start/Pause (Hold to Start).
• The water temperature for SELF CLEAN is defaulted to Hot. This temperature cannot
be changed.
• In the case where residue is present in the washer drum, add liquid chlorine bleach to
Maintenance
the MAX level line in the main-wash compartment before starting the SELF CLEAN
cycle. Do not add the liquid chlorine bleach to the bleach compartment (This is only the
case for SELF CLEAN cycle).
• Do not exceed the max line. Do not use or mix any other detergent or chemicals during
the SELF CLEAN cycle. If necessary, run a RINSE+SPIN cycle after the SELF CLEAN
cycle has completed to help remove any remaining residue.
If there is chlorine bleach left in the washer drum for an extended period of time, rust can
occur.
SELF CLEAN reminder ( )
• After 40 washing cycles, the SELF CLEAN LED reminder icon and the SELF CLEAN
cycle LED will blink on the control panel for an hour and then turn off automatically.
• The reminder will appear on the control panel for 5 additional consecutive cycles
before turning off. The next reminder will not appear until another 40 cycles have been
completed.
NOTE
CAUTION
English40
Untitled-17 40 2019-01-23 3:28:21
Page 41

Smart Care
To enable this function, you must rst download the Samsung Laundry app from the Play
Store or the App Store and install it on a mobile device that has a camera function. The
Smart Care function has been optimized for Galaxy and iPhone mobile devices (applicable
models only).
1. When the washer detects an issue to check, an information code appears on the
display. To enter Smart Care mode, press and hold Soil for 3 seconds.
2. The washer starts the self-diagnosis procedure and displays an information code if a
problem is detected.
3. Run the Samsung Laundry app on your mobile device, and then tap Smart Care.
4. Put the mobile device close to the washer’s display so that the smartphone camera and
the washer face each other. The information code will be recognized automatically by
the app.
5. When the information code is recognized correctly, the app provides detailed
information about the problem with applicable solutions.
NOTE
• The function name, Smart Care, may differ depending on the language.
• If the washer's display reects light, the app may fail to recognize the information
code.
• If the app fails to recognize the information code, you can enter the code manually on
the app.
Maintenance
English 41
Untitled-17 41 2019-01-23 3:28:21
Page 42

Maintenance
9
Emergency drain
In case of a power failure, drain the water inside the drum before taking out the laundry.
1. Turn off the washer, and then unplug
the power cord.
2. Gently press the top area of the lter
cover to open.
3. Put an empty, spacious container
around the cover, and stretch the
emergency drain tube to the container
while holding the tube cap (A).
Maintenance
English42
4. Open the tube cap and let water in the
Emergency drain tube (B) ow into the
container.
5. When done, close the tube cap, and
reinsert the tube. Then, close the lter
cover.
NOTE
Use a spacious container because the
water in the drum may be more than
expected.
Untitled-17 42 2019-01-23 3:28:24
Page 43

Cleaning
Surface of the washer
Use a soft cloth with a nonabrasive household cleaner. Do not spray water onto the
washer.
Mesh lter
Clean the mesh lter of the water hose once or twice a year.
1. Turn off the washer, and then unplug
the power cord.
2. Close the water tap.
3. Loosen and disconnect the water hoses
from the back of the washer. Cover the
each hose with a cloth to prevent water
from gushing out.
4. Use pliers to pull out the mesh lter
from the inlet valves.
5. Thoroughly clean the mesh lters in
water.
6. Completely dry the mesh lters. Do not
dry in direct sunlight.
7. Reinsert the mesh lters, and then
reconnect the water hoses.
8. Open the water taps.
Maintenance
NOTE
If a mesh lter is clogged, the “4C” information code appears on the washer’s display
screen.
English 43
Untitled-17 43 2019-01-23 3:28:26
Page 44

Maintenance
Pump lter
You should clean the pump lter 5 or 6 times a year to prevent it from clogging. A
clogged pump lter may reduce the bubble effect.
1. Turn off the washer, and then unplug
the power cord.
2. Gently press the top area of the lter
cover to open.
3. Drain the remaining water inside the
drum. See the Emergency drain section
on page 42.
4. Turn the pump lter knob (A)
counterclockwise, and then drain the
remaining water.
5. Clean the pump lter using a soft brush.
Make sure the drain pump propeller
inside the lter is not clogged.
6. Reinsert the pump lter, and then turn
the lter knob clockwise.
7. Close the lter cover.
Maintenance
English44
NOTE
• Some pump lters feature a safety
knob that is designed to prevent
children from accidentally opening the
lter compartment. To open the safety
knob of the pump lter, push in and
turn it counterclockwise. The spring
mechanism of the safety knob helps
open the lter.
• To close the safety knob of the pump
lter, turn it clockwise. The spring
makes a rattling sound, which is normal.
• Before closing the lter cover, make
sure the pump lter is properly
inserted.
Untitled-17 44 2019-01-23 3:28:28
Page 45
NOTE
If the pump lter is clogged, the “5C” information code appears on the washer’s display
screen.
CAUTION
• Make sure the lter knob is closed properly after cleaning the lter. Otherwise, this
may cause a leak.
• Make sure the lter is inserted properly after cleaning it. Otherwise, this may cause an
operational failure or a leak.
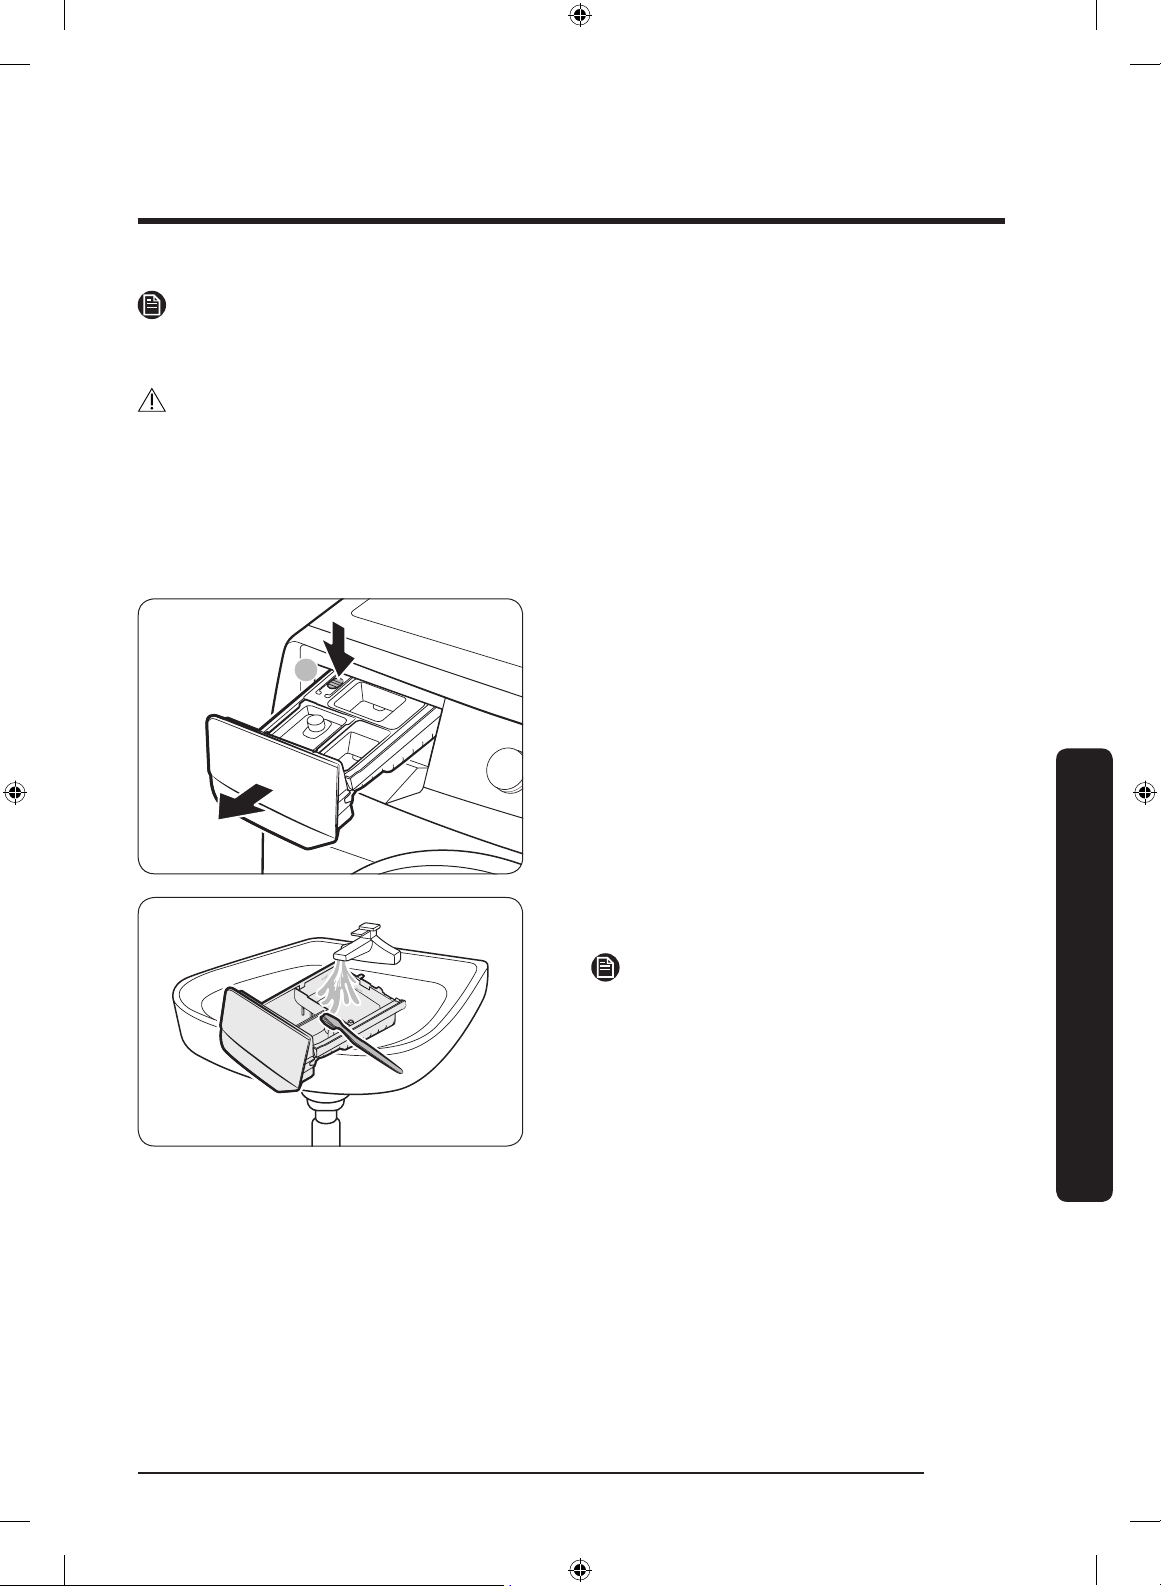
Detergent drawer
1. Open the drawer.
2. While holding down the release lever
(A), remove the drawer.
3. Remove the liquid detergent container
from the drawer.
4. Clean the drawer components in
Maintenance
running water using a soft brush.
NOTE
Other parts of the drawer can also be
removed. They can fall out if you hold the
drawer upside down.
English 45
Untitled-17 45 2019-01-23 3:28:29
Page 46
Maintenance
A
Door diaphragm
Maintenance
5. Clean the drawer recess using a soft
brush.
6. Reinsert the liquid detergent container
into the detergent drawer.
7. Slide the drawer into the drawer recess,
and then push it inward until it is fully
closed.
NOTE
To remove remaining detergent, run the
RINSE+SPIN cycle with the drum empty.
1. Open the door, and then empty the
drum.
2. Combine 3/4 cups of liquid chlorine
bleach and 1 gallon of warm tap water.
3. Wearing rubber gloves, use a soft, clean
cloth dipped in the water and bleach
solution to clean the diaphragm.
4. Let stand 5 minutes, and then wipe up
and dry well.
CAUTION
Use bleach carefully and be sure to follow the bleach manufacturer’s use and care
instructions.
Recovery from freezing
The washer may freeze when the temperature in its location drops below 32 °F (0 °C).
1. Turn off the washer, and then unplug the power cord.
2. Pour warm water over the water tap to loosen the water hose.
3. Disconnect the water hose, and then soak it in warm water.
4. Pour warm water into the drum and leave it for about 10 minutes.
5. Reconnect the water hose to the water tap.
English46
Untitled-17 46 2019-01-23 3:28:31
Page 47

NOTE
If the washer still doesn’t operate normally, repeat the steps above.
Care for an extended period of non-use
Avoid leaving the washer unused for an extended time. However, if you intend to leave
the washer unused for a long period of time, follow the directions below:
1. Press Power, and then turn the Cycle Selector to RINSE+SPIN.
2. Empty the drum, and then press and hold Start/Pause (Hold to Start).
3. When the cycle is complete, close the water taps and disconnect the water hoses.
4. Turn off the washer, and then unplug the power cord.
5. Open the door to let air circulate through the drum.
Cleaning the exterior
1. Turn off the water taps after nishing the day’s washing.
This will shut off the water supply to your washer and prevent the unlikely possibility
of damage from escaping water. Leave the door open to allow the inside of your
washer to dry out.
2. Use a soft cloth to wipe up all detergent, bleach, or other spills as they occur. Clean the
following as recommended below:
- Control Panel – Clean with a soft, damp cloth. Do not use abrasive powders or
cleaning pads. Do not spray cleaners directly on the panel.
- Cabinet – Clean with soap and water.
Maintenance
Cleaning the interior
Clean the interior of your washer periodically to remove any dirt, soil, odor, mold, mildew,
or bacterial residue that may remain in your washer as a result of washing clothes.
CAUTION
Failure to follow these instructions may result in unpleasant conditions, including odors
and/or permanent stains on your washer or laundry.
NOTE
Hard water deposits may be removed, if needed. Use a cleaner labeled “Washer safe”.
English 47
Untitled-17 47 2019-01-23 3:28:31
Page 48

Troubleshooting
Checkpoints
If you encounter a problem with the washer, rst check the table below and try the
suggestions.
Does not start.
Water supply is
insufcient, or no
water is supplied.
After a cycle,
detergent remains
in the detergent
drawer.
Troubleshooting
Excessive vibrations
or makes noise.
Problem Action
• Make sure the washer is plugged in.
• Make sure the door is properly closed.
• Make sure the faucets are open.
• Make sure to press or tap Start/Pause (Hold to Start) to start
the washer.
• Make sure Child Lock is not activated.
• Before the washer starts to ll, it will make a series of
clicking noises to check the door lock and does a quick drain.
• Check the fuse or reset the circuit breaker.
• Fully open the faucet.
• Make sure the door is properly closed.
• Make sure the water supply hose is not frozen.
• Make sure the water supply hose is not kinked or clogged.
• Make sure there is sufcient water pressure.
• Make sure the washer is running with sufcient water
pressure.
• Make sure you add liquid detergent to the liquid detergent
container. Make sure to remove the liquid detergent container
if you are using powdered detergent.
• Clean the detergent drawer.
• Make sure the washer is installed on a level, solid oor that
is not slippery. If the oor is not level, use the leveling feet to
adjust the height of the washer.
• Make sure the shipping bolts are removed.
• Make sure the washer is not contacting any other object.
• Make sure the laundry load is balanced.
• The motor can cause noise during normal operation.
• Overalls or metal-decorated clothes can cause noise while
being washed. This is normal.
• Metal objects such as coins can cause noise. After washing,
remove these objects from the drum or lter case.
English48
Untitled-17 48 2019-01-23 3:28:31
Page 49

Problem Action
Does not drain and/
or spin.
The door does not
open.
Excessive suds.
Cannot add additional
detergent.
• Make sure the drain hose is neither kinked nor obstructed all
the way to the drain system. If there is a drain restriction, call
for service.
• Make sure the debris lter is not clogged.
• Close the door and press or tap Start/Pause (Hold to Start).
For your safety, the washer will not tumble or spin unless the
door is closed.
• Make sure the drain hose is not frozen or clogged.
• Make sure the drain hose is connected to a drain system that
is not clogged.
• If the washer is not supplied with sufcient power, the
washer temporarily will not drain or spin. As soon as the
washer regains sufcient power, it will operate normally.
• Press or tap Start/Pause (Hold to Start) to stop the washer.
• It may take a few moments for the door lock mechanism to
disengage.
• The door will not open until 3 minutes after the washer has
stopped or the power turned off.
• Make sure all the water in the drum is drained.
• The door may not open if water remains in the drum. Drain
the drum and open the door manually.
• Make sure the door lock light is off. The door lock light turns
off after the washer has drained.
• If the washer is paused after the water is supplied, the door
cannot be opened until one minute has passed.
• Make sure you use the recommended types and amounts of
detergent.
• Use high efciency (HE) detergent to prevent oversudsing.
• Reduce the detergent amount for soft water, small loads, or
lightly soiled loads.
• Don't use Non-HE detergent.
• Make sure the remaining amount of detergent and fabric
softener is not over the limit.
Troubleshooting
English 49
Untitled-17 49 2019-01-23 3:28:31
Page 50

Troubleshooting
The washer stops.
Fills with the wrong
temperature water.
Troubleshooting
The load is wet at the
end of a cycle.
Problem Action
• Plug the power cord into a live electrical outlet.
• Check the fuse or reset the circuit breaker.
• Close the door and press Start/Pause (Hold to Start) to start
the washer. For your safety, the washer will not tumble or
spin unless the door is closed.
• Before the washer starts to ll, it will make a series of
clicking noises to check the door lock and does a quick drain.
• There may be a pause or soak period in the cycle. Wait briey
and the washer may start.
• Make sure the mesh lter of the water supply hose at the
faucets is not clogged. Periodically clean the mesh lter.
• If the washer is not supplied with sufcient power, the
washer temporarily will not drain or spin. As soon as the
washer regains sufcient power, it will operate normally.
• Fully open both taps.
• Make sure the temperature selection is correct.
• Make sure the hoses are connected to the correct taps. Flush
water lines.
• Make sure your water heater is set to supply hot water with a
minimum temperature of 120 °F (49 °C) at the tap. Also, check
the water heater capacity and recovery rate.
• Disconnect the hoses and clean the mesh lters. The mesh
lters may be clogged.
• While the washer lls, the water temperature may change as
the automatic temperature control feature checks incoming
water temperature. This is normal.
• While the washer lls, you may notice just hot and/or just
cold water going through the dispenser when cold or warm
temperatures are selected. This is a normal function of
the automatic temperature control feature as the washer
determines the water temperature.
• Use the High or Extra High spin speed.
• Use high efciency (HE) detergent to reduce oversudsing.
• The load is too small. Small loads (one or two items) may
become unbalanced and not spin completely.
• Make sure the drain hose is not kinked or clogged.
English50
Untitled-17 50 2019-01-23 3:28:31
Page 51

Problem Action
• Make sure the door is properly closed.
• Make sure all hose connections are tight.
Leaks water.
• Make sure the end of the drain hose is correctly inserted and
secured to the drain system.
• Avoid overloading.
• Use high efciency (HE) detergent to prevent oversudsing.
• Excessive suds collect in recesses and can cause foul odors.
Has odors.
• Run cleansing cycles to sanitize periodically.
• Clean the door seal (diaphragm).
• Dry the washer interior after a cycle has nished.
After a cycle, washer
is not off and/or the
door does not open.
• If the Remaining Laundry Notication is on, press Power to
turn the power off, and then remove the items.
• If the SELF CLEAN indicator is on, remove all items from the
drum, and then run the SELF CLEAN cycle.
If a problem persists, contact a local Samsung service center.
English 51
Untitled-17 51 2019-01-23 3:28:31
Troubleshooting
Page 52

Troubleshooting
Information codes
If the washer fails to operate, you may see an information code on the screen. Check the
table below and try the suggestions.
Code Action
DC1
Troubleshooting
4C2
1C
DC
LC
4C
5C
Check the water level sensor.
• Power the washer off. Wait 2-3 minutes, power the washer on, and
then try again.
• Depending on the model, the drain system drains water
automatically. The Power and Start/Pause (Hold to Start) buttons
may be disabled during this process.
The door is open.
• Close the door and press Start/Pause (Hold to Start) to resume
operation.
Check the door switch.
• Power the washer off. Wait 2-3 minutes, power the washer on, and
then try again.
Check for water leaks.
• Power the washer off, and then check the drain system for any
leaks. Once the leak issue is resolved, power the washer on.
• Depending on the model, the drain system may drain water
automatically. The Power and Start/Pause (Hold to Start) buttons
may be disabled during this process.
Check the water supply line.
• Check the connection to the water lines (including water taps).
• Power the washer off. Wait 2-3 minutes, power the washer on, and
then try again.
• Depending on the model, the drain system may drain water
automatically. The Power and Start/Pause (Hold to Start) buttons
may be disabled during this process.
Laundry needs protection because the water being supplied is too hot.
• Make sure the cold and hot water taps are properly connected.
• Power the washer off. Wait 2-3 minutes, power the washer on, and
then try again.
Check the drain system.
• Make sure the drain lter is not clogged.
• If the drain lter is clogged, clean the lter, and then restart the
washer.
English52
Untitled-17 52 2019-01-23 3:28:31
Page 53

Code Action
HC
Check the washing heater.
• Power off the washer, and then contact a Samsung service center.
Check the spinning process.
• The load may not be balanced inside the drum. Check the drum and
UB
make sure the load is balanced.
• Press Start/Pause (Hold to Start) to resume operation or power the
washer off, wait 2-3 minutes, power the washer on, and then try
again.
Check the MEMS sensor.
8C, 8C1, 8C2
• Power the washer off. Wait 2-3 minutes, power the washer on, and
then try again.
OC
Water may overow.
• Close the water valve and call for service.
Check the motor.
3C
• Power the washer off. Wait 2-3 minutes, power the washer on, and
then try again.
Check the PBA communication status.
AC6
• Power the washer off. Wait 2-3 minutes, power the washer on, and
then try again.
The electronic control needs to be checked.
9C1, 9C2
• Check if power is supplied properly.
• If the information code remains, contact a Samsung service center.
SF
System failed.
• Power off the washer, and then contact a Samsung service center.
Troubleshooting
If any information code keeps appearing on the screen, contact a local Samsung service
center.
English 53
Untitled-17 53 2019-01-23 3:28:31
Page 54

Specications
Fabric care chart
Specications
The following symbols provide garment
care direction. The clothing care labels
include symbols for drying, bleaching,
drying and ironing, or dry cleaning when
necessary. The use of symbols ensures
consistency among garment manufacturers
of domestic and imported items. Follow
care label directions to optimize garment
life and reduce laundering problems.
Wash cycle
Normal
Permanent press/Wrinkle
resistant/Wrinkle control
Gentle/Delicates
Hand wash
Water temperature
Hot
Warm
Cold
NOTE
The temperature range for Hot is 135 °F
(57 °C) or below, 95 °F (35 °C) or below
for Warm, and 68 °F (20 °C) or below for
Cold. Wash water temperature must be a
minimum of 60 °F (16 °C) for detergent
activation and effective cleaning.
Bleach
Any bleach (when needed)
Only non-chlorine (color-safe)
bleach (when needed)
Tumble dry
Normal
Permanent press/Wrinkle
resistant/Wrinkle control
Gentle/Delicates
Special instructions
Line dry/Hang to dry
Drip dry
Dry at
Heat setting
High
Medium
Low
Any heat
No heat / Air
Iron dry or steam temperatures
High
Medium
Low
English54
Untitled-17 54 2019-01-23 3:28:46
Page 55

Warning symbols for laundering
Dry-clean
Do not wash
Do not wring
Do not bleach
Do not tumble dry
No steam (added to iron)
Do not iron
Protecting the environment
• This appliance is manufactured from
recyclable materials. If you decide to
dispose of it, please observe local waste
disposal regulations. Cut off the power
cord so that the appliance cannot be
connected to a power source. Remove
the lid so that animals and small
children cannot get trapped inside the
appliance.
Dry-clean
Do not dry-clean
Line dry / Hang to dry
Drip dry
Dry at
• Do not exceed the detergent quantities
recommended in the detergent
manufacturers’ instructions.
• Use stain removal products and
bleaches before the wash cycle only
when necessary.
• Save water and electricity by only
washing full loads (the exact amount
depends upon the program used).
Declaration of conformity
This appliance complies with UL2157.
Specications
English 55
Untitled-17 55 2019-01-23 3:28:53
Page 56

Specications
Specication sheet
Power
consumption
Type
Water pressure (psi (kPa)) 20-116 (137-800)
NET weight (lb (kg)) 200 (91.0)
Spin revolution 1200 rpm
Heating Rating 900 W
Washing
Washing and
Heating
Spin 550 W
Drain 80 W
120 V
Front loading washer
WF45R6100A*
200 W
1150 W
Specications
English56
Untitled-17 56 2019-01-23 3:28:53
Page 57

LIMITED WARRANTY (U.S.A.)
SAMSUNG WASHER
LIMITED WARRANTY TO ORIGINAL CONSUMER PURCHASER WITH PROOF OF
PURCHASE
This SAMSUNG brand product, as supplied and distributed by SAMSUNG ELECTRONICS
AMERICA, INC. (SAMSUNG) and delivered new, in the original carton to the original
consumer purchaser, is warranted by SAMSUNG against manufacturing defects in
materials or workmanship for the limited warranty period, starting from the date of
original purchase, of:
One (1) year parts and labor,
Three (3) years stainless tub part (Part Only),
Ten (10) years washing DD motor part (Part Only)
This limited warranty is valid only on products purchased and used in the United States
that have been installed, operated, and maintained according to the instructions attached
to or furnished with the product. To receive warranty service, the purchaser must contact
SAMSUNG at the address or phone number provided below for problem determination and
service procedures. Warranty service can only be performed by a SAMSUNG authorized
service center. The original dated bill of sale must be presented upon request as proof
of purchase to SAMSUNG or SAMSUNG’s authorized service center to receive warranty
service.
SAMSUNG will provide in-home service within the contiguous United States during the
warranty period at no charge, subject to availability of SAMSUNG authorized servicers
within the customer’s geographic area. If in-home service is not available, SAMSUNG may
elect, at its option, to provide transportation of the product to and from an authorized
service center. If the product is located in an area where service by a SAMSUNG
authorized servicer is not available, you may be responsible for a trip charge or required
to bring the product to a SAMSUNG authorized service center for service.
To receive in-home service, product must be unobstructed and accessible to the service
agent.
During the applicable warranty period, a product will be repaired, replaced, or the
purchase price refunded, at the sole option of SAMSUNG. SAMSUNG may use new
or reconditioned parts in repairing a product, or replace the product with a new or
reconditioned product. Replacement parts and products are warranted for the remaining
portion of the original product’s warranty or ninety (90) days, whichever is longer. All
replaced parts and products are the property of SAMSUNG and you must return them to
SAMSUNG.
English 57
Untitled-17 57 2019-01-23 3:28:53
Page 58

LIMITED WARRANTY (U.S.A.)
This limited warranty covers manufacturing defects in materials or workmanship
encountered in normal household, noncommercial use of this product and shall not
cover the following: damage that occurs in shipment, delivery, installation, and uses
for which this product was not intended; damage caused by unauthorized modication
or alteration of the product; product where the original factory serial numbers have
been removed, defaced, changed in any way, or cannot be readily determined; cosmetic
damage including scratches, dents, chips, and other damage to the product’s nishes;
damage caused by abuse, misuse, pest infestations, accident, re, oods, or other acts
of nature or God; damage caused by use of equipment, utilities, services, parts, supplies,
accessories, applications, installations, repairs, external wiring or connectors not supplied
or authorized by SAMSUNG; damage caused by incorrect electrical line current, voltage,
uctuations and surges; damage caused by failure to operate and maintain the product
according to instructions; in-home instruction on how to use your product; and service
to correct installation not in accordance with electrical or plumbing codes or correction
of household electrical or plumbing (i.e., house wiring, fuses, or water inlet hoses). The
cost of repair or replacement under these excluded circumstances shall be the customer’s
responsibility.
Visits by an authorized servicer to explain product functions, maintenance or installation
are not covered by this limited warranty. Please contact SAMSUNG at the number below
for assistance with any of these issues.
EXCLUSION OF IMPLIED WARRANTIES
IMPLIED WARRANTIES, INCLUDING THE IMPLIED WARRANTIES OF MERCHANTABILITY
OR FITNESS FOR A PARTICULAR PURPOSE, ARE LIMITED TO ONE YEAR OR THE SHORTEST
PERIOD ALLOWED BY LAW. Some states do not allow limitations on how long an implied
warranty lasts, so the above limitations or exclusions may not apply to you. This warranty
gives you specic rights, and you may also have other rights, which vary from state to
state.
English58
Untitled-17 58 2019-01-23 3:28:53
Page 59

LIMITATION OF REMEDIES
YOUR SOLE AND EXCLUSIVE REMEDY IS PRODUCT REPAIR, PRODUCT REPLACEMENT,
OR REFUND OF THE PURCHASE PRICE AT SAMSUNG’S OPTION, AS PROVIDED IN THIS
LIMITED WARRANTY. SAMSUNG SHALL NOT BE LIABLE FOR SPECIAL, INCIDENTAL OR
CONSEQUENTIAL DAMAGES, INCLUDING BUT NOT LIMITED TO TIME AWAY FROM WORK,
HOTELS AND/OR RESTAURANT MEALS, REMODELING EXPENSES, LOSS OF REVENUE OR
PROFITS, FAILURE TO REALIZE SAVINGS OR OTHER BENEFITS REGARDLESS OF THE LEGAL
THEORY ON WHICH THE CLAIM IS BASED, AND EVEN IF SAMSUNG HAS BEEN ADVISED OF
THE POSSIBILITY OF SUCH DAMAGES. Some states do not allow exclusion or limitation of
incidental or consequential damages, so the above limitations or exclusions may not apply
to you. This warranty gives you specic rights, and you may also have other rights, which
vary from state to state.
SAMSUNG does not warrant uninterrupted or error-free operation of the product. No
warranty or guarantee given by any other person, rm, or corporation with respect to this
product shall be binding on SAMSUNG.
To obtain warranty service, please contact SAMSUNG at:
Samsung Electronics America, Inc.
85 Challenger Road
Ridgeeld Park, NJ 07660
1-800-SAMSUNG (726-7864)
www.samsung.com/us/support
English 59
Untitled-17 59 2019-01-23 3:28:53
Page 60

Scan this with your smartphone
QUESTIONS OR COMMENTS?
COUNTRY CALL OR VISIT US ONLINE AT
U.S.A
1-800-SAMSUNG (726-7864)
1-844-SAM-PAYS (726-7297)
www.samsung.com/us/support
DC68-04006A-01
Untitled-17 60 2019-01-23 3:28:55
Page 61

Lavadora
Manual del usuario
WF45R6100A*
Untitled-5 1 2019-01-23 11:22:48
Page 62

Contenido
Información sobre seguridad 4
Lo que necesita saber sobre las instrucciones de seguridad 4
Símbolos de seguridad importantes 4
Contenido
Precauciones de seguridad importantes 5
PROPOSICIÓN 65 DE CALIFORNIA: ADVERTENCIA 6
Advertencias fundamentales para la instalación 6
Precauciones para la instalación 8
Advertencias fundamentales para el uso 8
Precauciones de uso 10
Advertencias fundamentales para la limpieza 13
Instalación 14
Desempaque de la lavadora 14
Componentes 15
Requisitos de instalación 17
Instalación paso a paso 21
Antes de comenzar 26
Conguración inicial 26
Pautas de lavado 26
Pautas para el cajón para detergente 28
Funcionamiento 31
Panel de control 31
Sencillos pasos para comenzar 35
Descripción de los ciclos 36
Tabla de ciclos 38
Funciones especiales 40
Español2
Untitled-5 2 2019-01-23 11:22:48
Page 63

Mantenimiento 42
Autolimpieza 42
Smart Care 43
Drenaje de emergencia 44
Limpieza 45
Recuperación de un congelamiento 48
Mantenimiento luego de un período prolongado sin utilizar la lavadora 48
Limpieza del exterior 49
Limpieza del interior 49
Solución de problemas 50
Vericaciones 50
Códigos de información 54
Especicaciones 56
Tabla de indicaciones sobre telas 56
Protección del medio ambiente 57
Declaración de conformidad 57
Hoja de especicaciones 58
Contenido
Español 3
Untitled-5 3 2019-01-23 11:22:49
Page 64

CONSERVE ESTAS INSTRUCCIONES
Información sobre seguridad
Felicitaciones por la compra de la nueva lavadora Samsung. Este manual contiene información importante
acerca de la instalación, el uso y el cuidado del electrodoméstico. Lea detenidamente estas instrucciones a
n de aprovechar al máximo los múltiples benecios y funciones de la lavadora.
Lo que necesita saber sobre las instrucciones de seguridad
Información sobre seguridad
Lea este manual detenidamente para aprender a utilizar con seguridad y ecacia todas las características
y funciones de su nuevo electrodoméstico. Conserve el manual en un lugar seguro cerca del
electrodoméstico para consultas futuras. Utilice este electrodoméstico solo para el propósito para el que
fue destinado como se describe en este manual.
Las advertencias y las instrucciones de seguridad importantes de este manual no cubren todas las posibles
condiciones y situaciones que pueden ocurrir. Es su responsabilidad actuar con sentido común, precaución
y cuidado cuando instale, realice el mantenimiento y ponga en funcionamiento la lavadora.
Puesto que las siguientes instrucciones de funcionamiento sirven para varios modelos, las características
de su lavadora pueden diferir ligeramente de las que se describen en este manual y es posible que no
todos los signos de advertencia sean aplicables. Si tiene alguna consulta o duda, comuníquese con el
centro de servicio más cercano o busque ayuda e información en línea en www.samsung.com.
Símbolos de seguridad importantes
Los iconos y las señales incluidas en este manual del usuario signican lo siguiente:
ADVERTENCIA
Peligros o prácticas inseguras que podrían causar lesiones físicas graves, la muerte y/o daños materiales.
PRECAUCIÓN
Peligros o prácticas inseguras que podrían causar lesiones físicas y/o daños materiales.
NOTA
Indica que existe el riesgo de lesiones físicas o daños materiales.
Estas señales de advertencia están aquí para evitar que usted u otras personas sufran lesiones.
Siga las instrucciones completamente.
Después de leer este manual, guárdelo en un lugar seguro para consultas futuras.
Lea todas las instrucciones antes de usar el electrodoméstico.
Al igual que con cualquier equipo que usa electricidad y contiene piezas móviles, existen riesgos
potenciales. Para usar este electrodoméstico en forma segura, familiarícese con su funcionamiento y úselo
con cuidado.
Español4
Untitled-5 4 2019-01-23 11:22:50
Page 65

CONSERVE ESTAS INSTRUCCIONES
Precauciones de seguridad importantes
ADVERTENCIA
Para reducir el riesgo de incendio, descarga eléctrica o lesiones físicas cuando usa
este electrodoméstico, siga las instrucciones de seguridad básicas que guran a
continuación:
1. Lea todas las instrucciones antes de usar el electrodoméstico.
2. No lave ni seque prendas que se han limpiado, lavado, remojado o salpicado previamente con gasolina,
solventes de limpieza en seco u otras sustancias inamables o explosivas, ya que emiten vapores que
pueden encenderse o explotar.
3. No permita que los niños jueguen sobre el electrodoméstico ni dentro de él. Se requiere de supervisión
cuando el electrodoméstico es utilizado cerca de los niños.
4. Antes de descartar el electrodoméstico o de trasladarlo para que se le efectúe el servicio técnico, retire
la puerta del compartimiento de lavado o secado.
5. No introduzca la mano en el electrodoméstico si el tambor está en movimiento.
6. No instale ni almacene este electrodoméstico donde quede expuesto a los factores climáticos.
7. No modique los controles.
8. No repare, reemplace ni intente realizar el mantenimiento de ninguna pieza del electrodoméstico salvo
que esté recomendado especícamente en las instrucciones de mantenimiento del usuario o en las
instrucciones de reparación para el usuario publicadas y que, a su juicio, usted tenga la habilidad para
llevarlas a cabo.
9. No agregue gasolina, solventes de limpieza en seco u otras sustancias inamables o explosivas al agua
del lavado. Estas sustancias emiten vapores que pueden encenderse o explotar.
10. Es posible que, en ciertas circunstancias, se produzca gas hidrógeno en un sistema de agua caliente
que no se ha usado durante 2 semanas o más. EL GAS HIDRÓGENO ES EXPLOSIVO. Si el sistema de
agua caliente no fue utilizado durante dicho período, antes de usar la lavadora o la lavadora y la
secadora combinadas, abra todas las llaves de agua caliente y deje correr el agua por varios minutos.
De esta manera, se eliminará el gas hidrógeno acumulado. Dado que el gas es inamable, no fume ni
use una llama abierta en ese momento.
Información sobre seguridad
Español 5
Untitled-5 5 2019-01-23 11:22:50
Page 66

CONSERVE ESTAS INSTRUCCIONES
Información sobre seguridad
PROPOSICIÓN 65 DE CALIFORNIA: ADVERTENCIA
ADVERTENCIA
Cáncer y afecciones reproductivas - www.P65Warnings.ca.gov.
Información sobre seguridad
Advertencias fundamentales para la instalación
ADVERTENCIA
La instalación de este electrodoméstico la debe efectuar un técnico calicado o una empresa de servicios.
• De lo contrario, pueden producirse descargas eléctricas, incendios, explosiones, problemas con el
producto o lesiones.
El electrodoméstico es pesado, tenga cuidado cuando lo levante.
Enchufe el cable de alimentación a un tomacorriente de pared que cumpla las especicaciones eléctricas
locales. Utilice el tomacorriente solo con este electrodoméstico y no use un cable prolongador.
• Compartir el tomacorriente de pared con otros electrodomésticos, utilizando un multicontacto o
prolongando el cable de alimentación, puede provocar una descarga eléctrica o un incendio.
• Asegúrese de que el voltaje, la frecuencia y la corriente suministrados a la lavadora coincidan con
los indicados en las especicaciones del producto. De lo contrario, se puede producir una descarga
eléctrica o un incendio. Enchufe el cable de alimentación rmemente en el tomacorriente de pared.
Retire regularmente todas las sustancias extrañas, como polvo o agua, de los terminales y los puntos de
contacto de la alimentación con un paño seco.
• Desenchufe el cable de alimentación y límpielo con un paño seco.
• De lo contrario, se puede producir una descarga eléctrica o un incendio.
Enchufe el cable de alimentación en un tomacorriente de pared de manera que el cable baje hacia el piso.
• Si enchufa el cable de alimentación en el tomacorriente en la dirección opuesta, los cables eléctricos
del interior del cable pueden dañarse y provocar una descarga eléctrica o un incendio.
Mantenga los materiales de empaque fuera del alcance de los niños, ya que son peligrosos para ellos.
• Si un niño mete la cabeza en una bolsa de plástico, se puede asxiar.
Si el electrodoméstico, el enchufe o el cable de alimentación están dañados, comuníquese con el centro de
servicio más cercano.
Este electrodoméstico debe conectarse a tierra correctamente.
Español6
Untitled-5 6 2019-01-23 11:22:50
Page 67

CONSERVE ESTAS INSTRUCCIONES
La conexión a tierra no debe hacerse a una tubería de gas, una tubería de agua de plástico, ni a la línea
telefónica.
• Puede provocar una descarga eléctrica, un incendio, una explosión o problemas con el producto.
• Nunca enchufe el cable de alimentación en un tomacorriente que no esté conectado a tierra
correctamente. Asegúrese de que el tomacorriente cumpla con las normativas locales y nacionales.
No instale este electrodoméstico cerca de un calefactor o de materiales inamables.
No instale este electrodoméstico en un lugar húmedo, grasiento o cubierto de polvo, ni lo exponga a la luz
directa del sol o al agua (gotas de lluvia).
No instale este electrodoméstico en un lugar donde se registren bajas temperaturas.
• El hielo puede reventar los tubos.
No instale este electrodoméstico en un lugar donde pueda haber fugas de gas.
• Puede provocar una descarga eléctrica o un incendio.
No utilice transformadores eléctricos para alimentar la lavadora.
• Puede provocar una descarga eléctrica o un incendio.
No utilice un cable de alimentación o un enchufe dañado ni un tomacorriente de pared que esté ojo.
• Puede provocar una descarga eléctrica o un incendio.
No jale el cable de alimentación ni lo doble excesivamente.
Información sobre seguridad
No tuerza ni ate el cable de alimentación.
No cuelgue el cable de alimentación de un objeto metálico, no coloque objetos pesados sobre él, no inserte
el cable de alimentación entre objetos ni lo empuje en un espacio detrás del electrodoméstico.
• Puede provocar una descarga eléctrica o un incendio.
No jale el cable de alimentación para desenchufarlo.
• Para desenchufar el cable de alimentación, jálelo sujetándolo por el enchufe.
• De lo contrario, se puede producir una descarga eléctrica o un incendio.
El electrodoméstico debe colocarse en una posición en la que el tomacorriente, las llaves de suministro de
agua y los tubos de drenaje sean accesibles.
Español 7
Untitled-5 7 2019-01-23 11:22:50
Page 68

CONSERVE ESTAS INSTRUCCIONES
Información sobre seguridad
Precauciones para la instalación
PRECAUCIÓN
Este electrodoméstico debe estar ubicado de manera tal que se pueda acceder fácilmente al enchufe.
Información sobre seguridad
• De lo contrario, se puede producir un incendio o una descarga debido a las fugas eléctricas.
Instale el electrodoméstico sobre una supercie sólida y nivelada que pueda soportar su peso.
• De lo contrario, pueden producirse vibraciones anormales, movimientos, ruidos o problemas con el
producto.
Advertencias fundamentales para el uso
ADVERTENCIA
Si el electrodoméstico se inunda, corte inmediatamente el suministro de agua y la alimentación y
comuníquese con el centro de servicio más cercano.
• No toque el enchufe con las manos mojadas.
• Se puede producir una descarga eléctrica.
Si el electrodoméstico genera ruidos extraños, olor a quemado o humo, desconéctelo inmediatamente y
llame al centro de servicio más cercano.
• De lo contrario, se puede producir una descarga eléctrica o un incendio.
En caso de fugas de gas (como propano, LP, etc.), ventile inmediatamente sin tocar el enchufe. No toque el
electrodoméstico ni el cable de alimentación.
• No utilice un ventilador.
• Una chispa puede provocar un incendio o una explosión.
No permita que los niños jueguen sobre la lavadora o dentro de ella. Además, cuando se deshaga del
electrodoméstico, quite el cierre de la puerta de la lavadora.
• Los niños pueden asxiarse y morir si quedan atrapados dentro del producto.
Asegúrese de quitar el empaque (goma espuma, poli estireno) del fondo de la lavadora antes de utilizarla.
No utilice la lavadora para lavar prendas contaminadas con gasolina, queroseno, benceno, disolventes de
pinturas, alcohol u otras sustancias inamables o explosivas.
• Puede provocar una descarga eléctrica, un incendio o una explosión.
No abra la puerta de la lavadora por la fuerza mientras esté en funcionamiento (lavado a alta
temperatura/secado/centrifugado).
Español8
Untitled-5 8 2019-01-23 11:22:50
Page 69

CONSERVE ESTAS INSTRUCCIONES
• El agua que sale de la lavadora puede causar quemaduras o hacer que el suelo se vuelva resbaladizo.
Puede provocar lesiones.
• Abrir la puerta por la fuerza puede dañar el producto o causar lesiones personales.
No introduzca las manos bajo la lavadora cuando esté en funcionamiento.
• Puede provocar lesiones.
No toque el enchufe con las manos mojadas.
• Puede provocar una descarga eléctrica.
No apague el electrodoméstico desenchufándolo mientras esté en funcionamiento.
• Si vuelve a enchufar el electrodoméstico en el tomacorriente puede originar una chispa y causar una
descarga eléctrica o un incendio.
No deje que los niños ni las personas discapacitadas utilicen la lavadora sin la supervisión adecuada. No
permita que los niños se suban al electrodoméstico.
• Esto puede provocar una descarga eléctrica, quemaduras o lesiones personales.
No introduzca la mano ni objetos de metal bajo la lavadora mientras esté en funcionamiento.
• Puede provocar lesiones.
No desenchufe el electrodoméstico jalando el cable de alimentación. Sujete siempre el enchufe rmemente
y extráigalo en línea recta.
• Un cable de alimentación dañado puede provocar un cortocircuito, un incendio o una descarga
eléctrica.
Información sobre seguridad
No trate de reparar, desensamblar ni modicar el electrodoméstico usted mismo.
• No utilice un fusible (de cobre, cable de acero, etc.) que no sea el estándar.
• Cuando deba reparar o volver a instalar el electrodoméstico, comuníquese con el centro de servicio
más cercano.
• De lo contrario, se puede provocar una descarga eléctrica, un incendio, problemas con el producto o
lesiones.
Si se aoja la manguera de suministro de agua de la llave de agua y se inunda el electrodoméstico,
desenchufe el cable de alimentación.
• De lo contrario, se puede producir una descarga eléctrica o un incendio.
Desenchufe el electrodoméstico si no lo va a utilizar durante un período prolongado o durante una
tormenta eléctrica.
• De lo contrario, se puede producir una descarga eléctrica o un incendio.
Español 9
Untitled-5 9 2019-01-23 11:22:50
Page 70

CONSERVE ESTAS INSTRUCCIONES
Información sobre seguridad
Si entra alguna sustancia extraña en el electrodoméstico, desenchufe el cable de alimentación y
comuníquese con el centro de atención al cliente de Samsung más cercano.
• Puede provocar una descarga eléctrica o un incendio.
No permita que los niños (ni las mascotas) jueguen encima o dentro de la lavadora. La puerta de la
Información sobre seguridad
lavadora no se abre con facilidad desde el interior, y los niños podrían lastimarse gravemente si quedaran
atrapados adentro.
Precauciones de uso
PRECAUCIÓN
Si la lavadora está contaminada por sustancias extrañas, tales como detergente, tierra, restos de alimentos,
etc., desenchufe el cable de alimentación y limpie la lavadora con un paño suave humedecido.
• De lo contrario, se puede producir decoloración, deformación, daños u óxido.
El vidrio frontal se puede romper con un impacto fuerte. Tenga cuidado cuando utilice la lavadora.
• La rotura del vidrio puede causar lesiones.
Tras una falla del suministro de agua o cuando se vuelve a conectar la manguera de suministro, abra
lentamente la llave de agua.
Abra lentamente la llave de agua tras un período prolongado de falta de uso.
• La presión de aire en la manguera de suministro de agua o en la tubería de agua puede dañar una
pieza o provocar fugas de agua.
Si durante el funcionamiento hay una falla en el drenaje, revise el drenaje.
• Si se utiliza la lavadora inundada por una falla en el drenaje, se puede producir una descarga eléctrica
o un incendio.
Introduzca completamente la ropa en la lavadora para que no pueda quedar atrapada por la puerta.
• Si la ropa queda atrapada por la puerta, puede dañarse la ropa o la lavadora, o puede provocar fugas
de agua.
Cierre el suministro de agua cuando la lavadora no esté en uso.
• Asegúrese de que los conectores de la manguera de suministro de agua estén correctamente ajustados.
Asegúrese de que la arandela de goma y el vidrio de la puerta frontal no estén contaminados por
sustancias extrañas (como restos, hilos, cabellos, etc.)
• Si una sustancia extraña queda atrapada en la puerta o si la puerta no está bien cerrada, se puede
producir una fuga de agua.
Español10
Untitled-5 10 2019-01-23 11:22:50
Page 71

CONSERVE ESTAS INSTRUCCIONES
Antes de utilizar el producto, abra la llave del agua y verique que los conectores de la manguera de
suministro estén bien ajustados y que no haya fugas de agua.
• Si los conectores de la manguera de suministro de agua están ojos, puede haber fugas de agua.
El producto adquirido está diseñado exclusivamente para uso doméstico.
El uso del producto con nes comerciales se considera un uso incorrecto del producto. Si se hace un uso
comercial del producto, este no quedará cubierto por la garantía estándar que ofrece Samsung y no se
podrá atribuir a Samsung ninguna responsabilidad por el mal funcionamiento o los daños resultantes de
este uso incorrecto.
No se pare encima del electrodoméstico ni coloque objetos (como ropa, velas o cigarrillos encendidos,
platos, productos químicos, objetos metálicos, etc.) encima de este.
• Puede provocar una descarga eléctrica, un incendio, problemas con el producto o lesiones.
No rocíe materiales volátiles, como insecticidas, en la supercie del electrodoméstico.
• Además de ser perjudiciales para las personas, también pueden provocar una descarga eléctrica, un
incendio o problemas con el producto.
No coloque objetos que generen campos electromagnéticos cerca de la lavadora.
• Puede causar lesiones por un mal funcionamiento.
El agua que se drena durante el lavado a alta temperatura o durante el ciclo de secado está caliente. No
toque el agua.
• Puede causar lesiones personales o quemaduras.
Información sobre seguridad
No lave, centrifugue ni seque asientos, alfombrillas o prendas impermeables (*) a menos que su
electrodoméstico tenga un ciclo especial para lavar estos artículos.
(*): Ropa de cama de lana, fundas de lluvia, chalecos de pesca, pantalones de esquí, bolsas de dormir,
cubiertas de pañales, chándales, cubiertas de bicicletas, motos y automóviles, etc.
• No lave alfombrillas gruesas o rígidas aunque lleven la marca de lavado en la etiqueta. Se pueden
producir lesiones o daños a la lavadora, las paredes, el piso o la ropa debido a las vibraciones
anormales.
• No lave alfombras ni felpudos con forro de goma. El forro de goma se puede desprender y adherirse al
tambor, lo que puede resultar en un funcionamiento anómalo, por ejemplo una falla en el drenaje.
No haga funcionar la lavadora sin el cajón para detergente.
• Se puede provocar una descarga eléctrica o lesiones debido a fugas de agua.
No toque el interior del tambor durante o inmediatamente después del secado, ya que está caliente.
• Podría quemarse.
Español 11
Untitled-5 11 2019-01-23 11:22:50
Page 72

CONSERVE ESTAS INSTRUCCIONES
Información sobre seguridad
No introduzca las manos en el cajón para detergente.
• Se puede dañar la mano ya que ésta puede quedar atrapada por el dispositivo de introducción del
detergente.
• No utilice detergente en polvo en el compartimiento para detergente líquido (únicamente para los
Información sobre seguridad
modelos aplicables). Retire el compartimiento y coloque el detergente en polvo directamente en el
compartimiento de lavado principal.
No introduzca ningún objeto (como zapatos, restos de comida, animales) que no sea ropa en la lavadora.
• De lo contrario, las vibraciones anormales podrían dañar la lavadora, o bien, causar lesiones o la
muerte en el caso de las mascotas.
No presione los botones con objetos alados, como alleres, cuchillos, uñas, etc.
• Puede provocar una descarga eléctrica o lesiones personales.
No lave ropa contaminada por aceites, cremas o lociones que se utilizan normalmente en los
establecimientos para el cuidado de la piel o en las clínicas de masajes.
• Se puede deformar la arandela de goma y provocar fugas de agua.
No deje objetos de metal (tales como clips, horquillas, etc.) ni blanqueador en el tambor durante períodos
prolongados.
• Estas dos acciones pueden oxidar el tambor.
• Si comienza a aparecer óxido en la supercie del tambor, aplique un agente limpiador (neutro) sobre la
supercie y utilice una esponja para limpiarla. Nunca utilice un cepillo de metal.
No utilice detergentes de limpieza en seco directamente ni lave, enjuague ni centrifugue ropa contaminada
por detergentes de limpieza en seco.
• Se puede producir una combustión espontánea o un incendio por el calor de la oxidación del aceite.
No utilice agua de los dispositivos de calentamiento o enfriamiento del agua.
• Podría causar problemas en la lavadora.
No utilice jabón natural para lavado a mano en la lavadora.
• Si se endurece y se acumula en el interior de la lavadora, puede causar problemas en el producto,
como decoloración, óxido y malos olores.
Coloque medias y sostenes en una red para ropa y lávelos junto con otra ropa.
No lave prendas grandes como ropa de cama dentro de una red.
• De lo contrario, se pueden producir lesiones personales por las vibraciones anormales.
No utilice detergente endurecido.
• Si se acumula en el interior de la lavadora, puede provocar fugas de agua.
Español12
Untitled-5 12 2019-01-23 11:22:50
Page 73

CONSERVE ESTAS INSTRUCCIONES
Asegúrese de que los bolsillos de las prendas que vaya a lavar estén vacíos.
• Los objetos duros o alados, tales como monedas, clips, clavos, tornillos o piedras pueden causar daños
considerables en el electrodoméstico.
No utilice la lavadora para lavar ropa que contenga hebillas o botones grandes u otros objetos de metal
pesados.
Clasique las prendas según la solidez del color y seleccione el ciclo, la temperatura del agua y las
funciones adicionales recomendadas.
• De lo contrario, se pueden decolorar o dañar las telas.
Al cerrar la puerta tenga cuidado de no atrapar los dedos de los niños.
• De lo contrario, se pueden producir lesiones personales.
Advertencias fundamentales para la limpieza
ADVERTENCIA
No limpie el electrodoméstico rociando directamente agua dentro de él.
No utilice un agente limpiador muy ácido.
No utilice benceno, disolventes ni alcohol para limpiar el electrodoméstico.
• Puede provocar decoloración, deformación, daños, incendio o descarga eléctrica.
Información sobre seguridad
Antes de la limpieza o las tareas de mantenimiento, desenchufe el electrodoméstico del tomacorriente de
la pared.
• De lo contrario, se puede producir una descarga eléctrica o un incendio.
Español 13
Untitled-5 13 2019-01-23 11:22:50
Page 74

Instalación
Siga detenidamente estas instrucciones para asegurar una adecuada instalación de la lavadora y evitar
accidentes al lavar la ropa.
Algunas piezas internas no están conectadas a tierra intencionalmente y pueden presentar riesgo de
descarga eléctrica únicamente durante el servicio técnico. Personal del servicio técnico - No toque las
siguientes piezas mientras el electrodoméstico está recibiendo electricidad: Panel de control, disipador
térmico, motor, válvula de entrada y bomba.
Desempaque de la lavadora
Desempaque la lavadora e inspecciónela para controlar que no se hayan producido daños durante el
transporte. Asegúrese de haber recibido todos los elementos que se muestran a continuación. Si la
Instalación
lavadora sufrió daños durante el transporte, o si falta algún elemento, llame al 1-800-SAMSUNG (1-800726-7864). Para evitar lesiones físicas o distensiones musculares, use guantes protectores cada vez que
levante o transporte la unidad.
Los materiales de empaque pueden ser peligrosos para los niños. Mantenga todos los materiales de
empaque (bolsas de plástico, poli estireno, etc.) fuera del alcance de los niños.
ADVERTENCIA
ADVERTENCIA
PRECAUCIÓN
Se necesitan 2 personas para desempacar la
lavadora como mínimo. No incline la lavadora
hacia adelante al retirar la protección de la parte
inferior de los materiales de empaque.
Cuando recline la lavadora para retirar la base de
cartón, proteja el lateral y deposítela con cuidado.
Nunca apoye la lavadora sobre la parte frontal ni
posterior.
Español14
Untitled-5 14 2019-01-23 11:22:51
Page 75

Componentes
Asegúrese de que todos los componentes estén incluidos en el paquete. Si tiene algún problema con la
lavadora o las piezas, comuníquese con un centro de atención al cliente de Samsung o con el vendedor.
01
05
02
06
Instalación
03
04
01 Palanca de seguridad 02 Cajón para detergente 03 Puerta
04 Tambor 05 Encimera 06 Panel de control
07 Enchufe 08 Manguera de drenaje 09 Cubierta del ltro
10 Patas niveladoras 11 Filtro de la bomba
12 Tubo de drenaje de
emergencia
07
08
09
10
11
12
Español 15
Untitled-5 15 2019-01-23 11:22:52
Page 76

Instalación
Partes suministradas
Partes no suministradas
Instalación
Tapas de los tornillos Guía de la manguera Sujetacables
Mangueras de agua (se venden
por separado)
Almohadillas antideslizantes (se
venden por separado)
Herramientas necesarias para la instalación
Llave inglesa Destornillador
Phillips
NOTA
• Tapas de los tornillos: La cantidad de tapas para tornillos (3 a 6) provista depende del modelo.
• El aspecto de la lavadora y los accesorios provistos puede diferir dependiendo del modelo.
• Para comprar accesorios o piezas perdidas, comuníquese con un centro de servicios Samsung o con el
vendedor.
PRECAUCIÓN
• No vuelva a utilizar las mangueras viejas, ya que pueden tener fugas o se pueden reventar y provocar
inundaciones o daños materiales.
• Asegúrese de que las arandelas de goma estén insertadas en cada unión de las dos mangueras de
agua.
Nivelador Pinzas ajustables Cinta de medir
Español16
Untitled-5 16 2019-01-23 11:22:59
Page 77

Requisitos de instalación
Suministro eléctrico y conexión a tierra
• Fusible o interruptor de 120 V CA/60 Hz requerido.
• Utilice un circuito derivado individual. Conecte solo la lavadora al circuito.
Para asegurar una conexión a tierra adecuada, la lavadora está equipada con un cable de alimentación que
cuenta con un enchufe de tres pines con conexión a tierra para utilizar en un tomacorriente con conexión
a tierra correctamente instalado.
Si tiene dudas sobre la correcta conexión a tierra, consulte con un electricista o un técnico de servicio
acreditados.
No modique el enchufe provisto. Si no entra en el tomacorriente, solicite a un electricista calicado que
instale el tomacorriente apropiado.
ADVERTENCIA
• NO utilice un cable prolongador.
• Utilice únicamente el cable de alimentación que viene con la lavadora.
• NO conecte el cable a tierra a las tuberías de plástico, las tuberías de gas o a las cañerías de agua
caliente.
• La conexión no adecuada de los conductores de descarga a tierra puede generar una descarga
eléctrica.
• Para evitar el riesgo innecesario de incendio, descarga eléctrica o lesiones físicas, todo el cableado y
la conexión a tierra deben realizarse de conformidad con los códigos locales o, en ausencia de ellos, de
conformidad con el Código Eléctrico Nacional, ANSI/NFPA Nro. 70, su última revisión (para EE.UU.) o el
Código Eléctrico Canadiense CSA C22.1, sus últimas revisiones y los códigos y ordenanzas locales. Es
su responsabilidad proveer el servicio eléctrico adecuado para su lavadora.
Instalación
Suministro de agua
La presión de agua adecuada para esta lavadora es de 20-116 psi (137-800 kPa). Una presión de agua
inferior a 20 psi (137 kPa) puede impedir que la válvula de agua se cierre completamente. También puede
hacer que el tambor demore demasiado en llenarse y se apague la lavadora. Las llaves del agua deben
estar colocadas dentro de los 4 pies (122 cm) de la parte posterior de la lavadora para que las mangueras
de entrada provistas puedan llegar a la lavadora.
Para reducir el riesgo de fugas:
• Asegúrese de que las llaves de agua se encuentren en una posición accesible.
• Cierre las llaves cuando la lavadora no esté en uso.
• Revise periódicamente que no haya pérdidas de agua en los accesorios de la manguera de entrada de
agua.
PRECAUCIÓN
Antes de utilizar la lavadora por primera vez, controle que todas las conexiones de la válvula y de la llave
del agua no presenten pérdidas.
Español 17
Untitled-5 17 2019-01-23 11:22:59
Page 78

Instalación
9
Drenaje
Samsung recomienda una toma de agua de 18 in (460 mm) de altura. La manguera de drenaje debe
conectarse a la toma de agua a través del gancho, y la toma de agua debe cubrir totalmente la manguera
de drenaje.
Piso
Para un mejor desempeño, la lavadora debe estar instalada sobre un piso sólido. Posiblemente los pisos de
madera necesiten reforzarse para minimizar la vibración y/o el desequilibrio de la carga. Las supercies
alfombradas o con revestimiento sintético no ofrecen una buena resistencia a las vibraciones y pueden
causar que la lavadora se desplace levemente durante el ciclo de centrifugado.
Instalación
NO instale la lavadora sobre una plataforma o sobre una estructura con soportes poco resistentes.
Temperatura del agua
No instale la lavadora en áreas donde el agua se congele, dado que la lavadora siempre retiene algo de
agua en las válvulas de agua, la bomba y las mangueras. El agua congelada dentro de los conductos puede
dañar las correas, la bomba y otros componentes de la lavadora.
PRECAUCIÓN
Dimensiones
A
A. Altura total 38.7 in (984 mm)
B. Ancho 27 in (686 mm)
C. Profundidad con la puerta abierta 52.6 in (1337 mm)
D. Profundidad 31.3 in (796 mm)
U
Español18
Untitled-5 18 2019-01-23 11:22:59
Page 79

Requisito de espacio libre
Este requisito de espacio libre solo se aplica a las lavadoras.
NOTA
• Para el requisito de espacio libre para secadoras, consulte el manual del usuario de la secadora.
• Si la lavadora y la secadora tienen distintos requisitos de espacio libre, utilice el valor mayor.
Instalaciones del electrodoméstico en un gabinete o en un hueco
Espacio libre mínimo para un funcionamiento estable:
Laterales Arriba Posterior Frente
1 in (25 mm) 1 in (25 mm) 5 in (127 mm) 1 in (25 mm)
Si se instalan una lavadora y una secadora en la misma ubicación, el frente del gabinete o hueco debe
tener dos aberturas de aire sin obstrucciones que combinadas sean de al menos 72 in2 (465 cm2).
Instalación debajo de mostrador
A 39.6 in (1006 mm)
B 1 in (25 mm)
C 1 in (25 mm)
A
B
C
Instalación en pedestal
9
A 5 in (127 mm)
B 6 in (152 mm)
C 52.0 in (1320 mm)
A
Instalación
Español 19
Untitled-5 19 2019-01-23 11:23:01
Page 80

Instalación
Este requisito de espacio libre aplica para la instalación de lavadora y secadora en conjunto.
Instalación lado a lado Instalación apilada (Modelo: SKK-7A)
Instalación
• Las lavadoras y las secadoras Samsung pueden apilarse para maximizar el espacio utilizable.
• Deben retirarse las patas de la secadora para apilar la lavadora y la secadora. Puede adquirir un kit de
k
9
U
A 1 in (25 mm)
B 5.9 in (150 mm)
C 7.1 in (180 mm)
D 6 in (152 mm)
E 78.5 in (1994 mm)
ADVERTENCIA
apilamiento opcional en su comercio minorista de productos Samsung.
9
A
Español20
Untitled-5 20 2019-01-23 11:23:02
Page 81

Instalación paso a paso
PASO 1 Seleccionar una ubicación
Requisitos de la ubicación:
• Una supercie sólida y nivelada sin alfombras ni revestimientos para pisos que puedan obstruir la
ventilación
• No expuesta a la luz directa del sol
• Espacio suciente para la ventilación y el cableado
• La temperatura ambiente debe ser siempre superior al punto de congelación (32 °F/0 °C)
• Alejada de fuentes de calor
PASO 2 Retirar los tornillos de transporte
Desempaque el producto y retire todos los
tornillos de transporte.
1. Aoje todos los tornillos de transporte de la
parte posterior de la máquina con la llave.
NOTA
Es necesaria una llave ajustable o una llave
española de 10 mm para retirar los tornillos de
transporte.
2. Cubra los oricios con las tapas de plástico
para tornillos provistas.
Conserve los tornillos de transporte en caso de
que los necesite en el futuro.
ADVERTENCIA
Los materiales de empaque pueden ser peligrosos para los niños. Deseche todos los materiales de
empaque (bolsas de plástico, poliestireno, etc.) lejos del alcance de los niños.
Instalación
Español 21
Untitled-5 21 2019-01-23 11:23:04
Page 82

Instalación
B
A
PASO 3 Ajustar las patas niveladoras
Instalación
1. Deslice con cuidado la lavadora hasta dejarla
en su lugar. Una fuerza excesiva puede dañar
las patas niveladoras.
2. Gire las patas niveladoras en el sentido de las
agujas del reloj o en el sentido contrario al de
las agujas del reloj con una llave para ajustar la
altura hasta que la lavadora quede nivelada.
3. Con un destornillador para tornillos de cabeza
plana, ajuste las tuercas de jación (A).
NOTA
Es necesaria una llave ajustable o una llave
española de 17 mm para ajustar las patas
niveladoras.
PASO 4 Conectar la manguera de agua
PRECAUCIÓN
• Asegúrese de usar mangueras de agua
nuevas, y de que las juntas de goma (B) estén
dentro de los acoplamientos (A) en ambos
extremos de las mangueras. Es posible que
las mangueras de agua que no tengan juntas
pierdan.
• Deje 5 in (127 mm) de espacio libre entre
la parte posterior de la lavadora y la pared
para impedir que se enrosquen las mangueras
de agua. Las mangueras enroscadas pueden
presentar pérdidas de agua.
• Si hay una fuga de agua, deje de utilizar la
lavadora y comuníquese con un centro de
servicio local de Samsung. Una fuga de agua
puede provocar una descarga eléctrica.
• No estire a la fuerza las mangueras de agua.
Si una manguera resulta demasiado corta,
reemplácela por otra manguera más larga.
Español22
Untitled-5 22 2019-01-23 11:23:06
Page 83
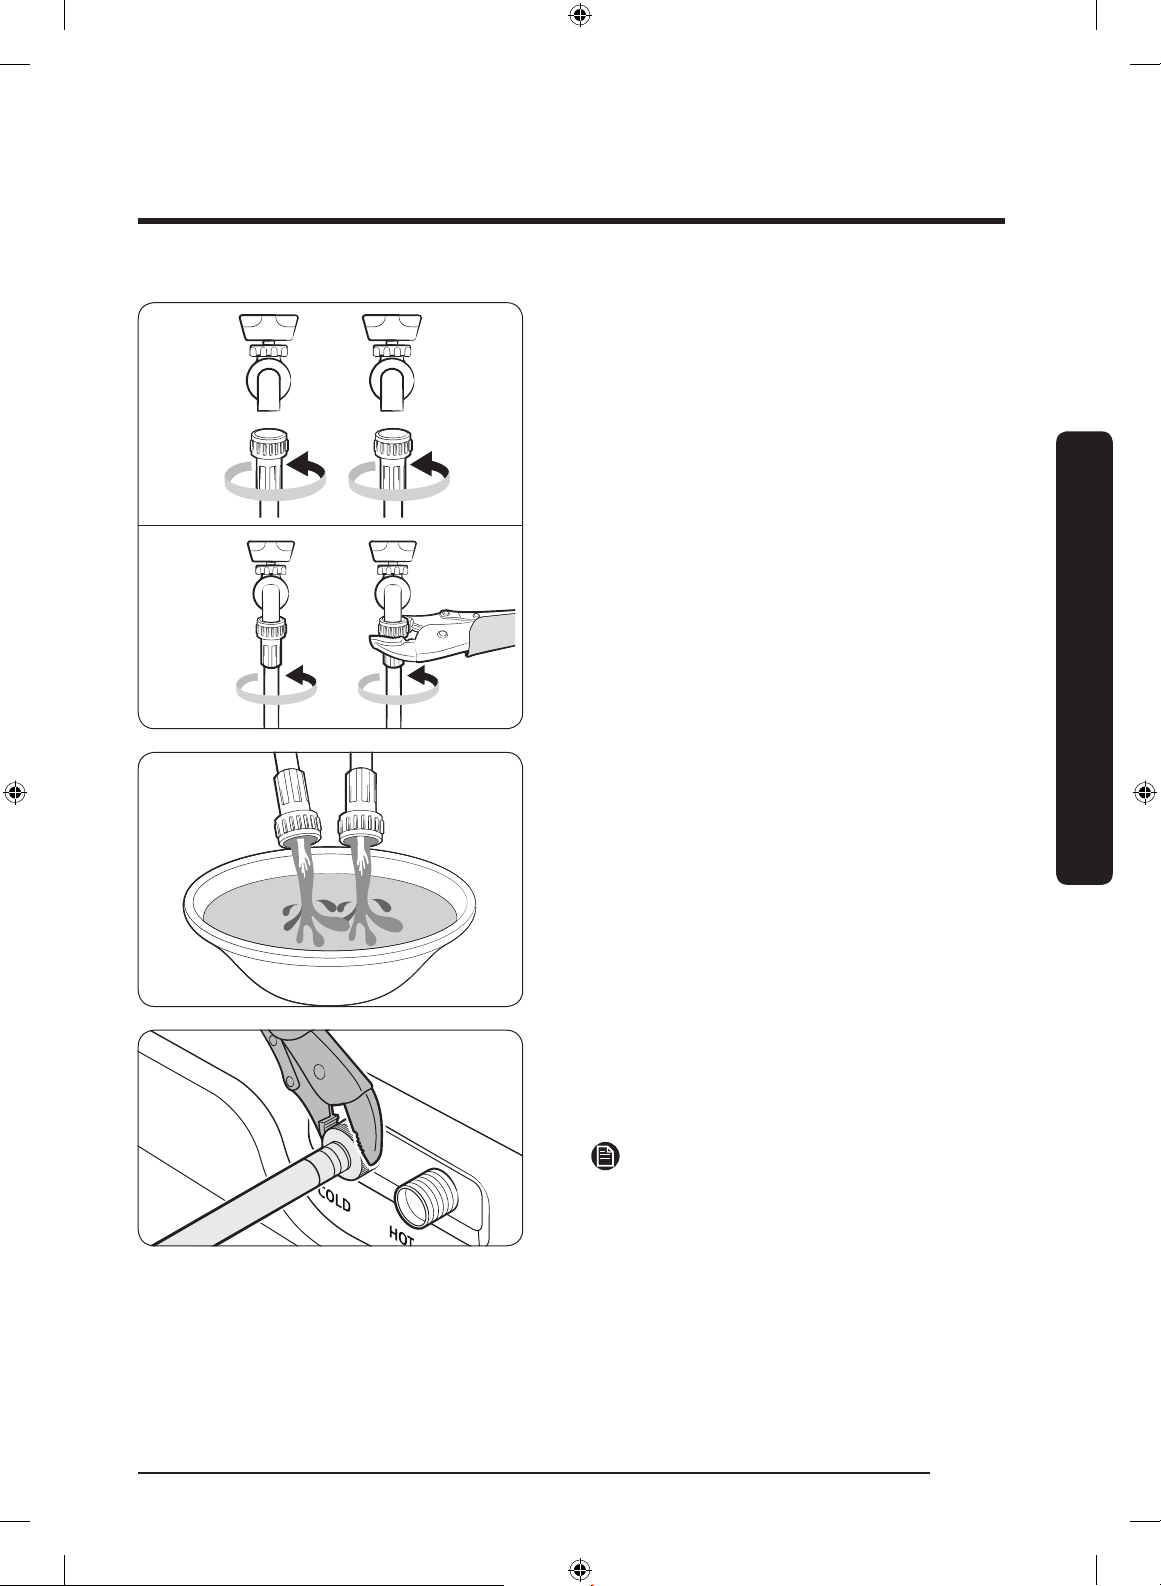
1. Ajuste las mangueras de agua a las llaves de
agua fría y caliente con la mano hasta que
estén bien apretadas. Luego, utilice pinzas para
ajustar dos tercios de un giro más. No ajuste
los accesorios de más para evitar dañarlos.
2. Jale las mangueras de agua para vericar que
estén bien conectadas.
3. Coloque los otros extremos de las mangueras
en una cubeta y abra las llaves de agua
durante 10 a 15 segundos para eliminar las
impurezas. Cuando haya terminado, cierre las
llaves de agua.
Instalación
4. Ajuste las mangueras de agua a las entradas
de agua fría y caliente con la mano hasta que
estén bien apretadas. Luego, utilice pinzas para
ajustar dos tercios de un giro más.
NOTA
Si no desea usar la manguera de suministro de
agua caliente, inserte el tapón de la entrada de
agua en la entrada de suministro del agua caliente.
Luego, presione Temp. (Temperatura) para
seleccionar Fría.
Español 23
Untitled-5 23 2019-01-23 11:23:08
Page 84

Instalación
9
5. Abra las llaves de agua y verique que no
haya pérdidas.
Instalación
PASO 5 Conectar la manguera de drenaje
1. Verique la altura (A) de su sistema de drenaje
y asegúrese de que se cumplan las alturas
mínimas y máximas.
Mínimo 18 in (46 cm)
Máximo 96 in (245 cm)
NOTA
• Asegúrese de medir la altura desde el piso
donde se apoya la lavadora.
• Es posible que la ecacia del drenaje sea
menor si el sistema está a la altura máxima.
• Para evitar el trasvase de agua de la lavadora,
no utilice un sistema de drenaje cuya altura
sea inferior a la mínima indicada.
2. Coloque la manguera de drenaje en la guía
para manguera de plástico (B).
Untitled-5 24 2019-01-23 11:23:10
Español24
Page 85

*
A
(*): Mín. 6 in (152 mm), Máx. 8 in (203 mm)
AA
B
3. Direccione la manguera de drenaje hacia el
sistema de drenaje.
PRECAUCIÓN
• En caso de utilizar una toma de agua,
asegúrese de que la conexión de la toma
de agua y la manguera de drenaje no esté
hermetizada.
• Si se utiliza una toma de agua, asegúrese de
que la manguera de drenaje esté entre 6 in
(152 mm) y 8 in (203 mm) dentro de la toma
de agua.
4. Fije la manguera de drenaje con uniones de
cable.
Sobre el borde de un lavamanos
La manguera de drenaje debe colocarse a una
altura entre 24 in (60 cm) y 35 in (90 cm) del piso.
Para mantener doblado el extremo de salida de
la manguera, utilice la guía de la manguera (A) de
plástico suministrada. Fije la guía a la pared con
un gancho para asegurar la estabilidad durante el
drenaje.
Instalación
PASO 6 Retirar la protección de la puerta
Retire el pequeño círculo protector (B) arriba de la
traba de la puerta antes de usar la lavadora.
PASO 7 Encendido
Enchufe el cable de alimentación a un tomacorriente de 120 V CA/60 Hz aprobado y protegido por un
disyuntor o fusible. Luego, presione Encender/Apagar para encender la lavadora.
Español 25
Untitled-5 25 2019-01-23 11:23:12
Page 86

Antes de comenzar
Conguración inicial
Ejecutar la calibración (recomendado)
La Calibración asegura que la lavadora detecte el peso con precisión. Asegúrese de que el tambor esté
vacío antes de ejecutar la Calibración.
1. Presione Encender/Apagar para poner en funcionamiento la lavadora.
2. Mantenga presionados simultáneamente Temp. (Temperatura) y Delay End (Final Diferido) durante 3
segundos.
3. Mantenga presionado Inicio/Pausa (Hold to Start (Mantenga presionado para iniciar)) para iniciar el
nuevo ciclo.
- La puerta permanece bloqueada durante el funcionamiento.
- El tambor sigue girando hacia la derecha y hacia la izquierda durante varios minutos.
4. Cuando naliza, la lavadora se apaga automáticamente.
Antes de comenzar
Pautas de lavado
PASO 1 Clasicar
Clasique las prendas de acuerdo con los siguientes criterios:
• Etiqueta de indicaciones: Clasique la ropa según su composición: algodón, mezclas, sintética, seda,
lana y rayón.
• Color: Separe la ropa blanca de la de color.
• Tamaño: Mezclar prendas de distintos tamaños en el tambor mejora el desempeño del lavado.
• Sensibilidad: Lave las prendas delicadas por separado. Para las prendas nuevas de lana pura, cortinas y
prendas de seda, verique las etiquetas de las prendas.
NOTA
Antes de iniciar el lavado, lea las etiquetas de cuidado de la ropa y clasique los artículos en consecuencia.
PASO 2 Vaciar los bolsillos
Vacíe los bolsillos de todas las prendas.
• Los objetos metálicos como monedas, clips y hebillas pueden dañar las otras prendas y el tambor.
Dé vuelta las prendas con botones o bordados
• Si los cierres de los pantalones o las chaquetas están abiertos durante el lavado, el tambor puede
dañarse. Los cierres deben cerrarse y ajustarse con un cordón.
• Las prendas con cordones largos pueden enredarse con otras prendas. Asegúrese de sujetar los
cordones antes de comenzar el lavado.
Español26
Untitled-5 26 2019-01-23 11:23:12
Page 87

PASO 3 Utilizar una red para ropa
• Los sostenes (lavables con agua) se deben colocar dentro de una red para ropa. Las partes metálicas de
los sostenes pueden atravesar la tela y dañar otras prendas.
• Las prendas pequeñas y livianas como las medias, los guantes, las medias de nylon y los pañuelos
pueden trabarse en la puerta. Colóquelas dentro de una red para ropa.
• No lave la red sin ropa dentro de ella. Se podrían producir vibraciones anormales que podrían
desplazar la lavadora y causar lesiones personales.
PASO 4 Calcular la capacidad de carga
No sobrecargue la lavadora. Si sobrecarga la lavadora, la ropa puede no lavarse correctamente.
NOTA
Cuando se lave ropa de cama o cobertores, el tiempo de lavado se puede alargar o la ecacia del
centrifugado puede reducirse.
Para ropa de cama o cobertores, el nivel máximo de centrifugado recomendado es el Nivel 2 o Nivel 3 y la
capacidad de carga es de 3.0 kg o menos.
PRECAUCIÓN
Si la carga está desequilibrada y el código de información “UB” se muestra en la pantalla, redistribuya la
carga. Una carga desequilibrada puede disminuir el desempeño del centrifugado.
PASO 5 Agregar el tipo de detergente adecuado
Antes de comenzar
El tipo de detergente adecuado depende del tipo de tejido (algodón, sintético, prendas delicadas, lana),
color, temperatura de lavado y grado de suciedad. Use siempre detergente de alta ecacia (HE) y "baja
espuma", diseñado para las lavadoras automáticas.
NOTA
• Siga las recomendaciones del fabricante del detergente en función del peso de la ropa, el grado de
suciedad y la dureza del agua en su zona. Si desconoce la dureza del agua de su zona, comuníquese
con las autoridades locales.
• No utilice un detergente que tenga tendencia a endurecerse o solidicarse. Este detergente puede
permanecer durante el ciclo de enjuague y bloquear la salida de drenaje.
PRECAUCIÓN
Cuando lave prendas de lana con el ciclo WOOL (LANA), utilice exclusivamente un detergente líquido
neutro. El detergente en polvo utilizado con el ciclo WOOL (LANA) puede permanecer sobre las prendas y
decolorarlas.
Español 27
Untitled-5 27 2019-01-23 11:23:12
Page 88

Antes de comenzar
9
A
Utilice solo detergente de alta ecacia (HE)
Antes de comenzar
La lavadora fue diseñada para usar detergentes de
alta ecacia (HE, por su sigla en inglés).
• Para obtener un lavado de óptima calidad, use
un detergente de alta ecacia, por ejemplo:
Tide HE, Wisk HE, Cheer HE o Gain HE*.
Los detergentes de alta ecacia contienen
supresores que reducen o eliminan la espuma.
Cuando se produce menos espuma, la carga
se mueve con mayor ecacia y el lavado
se maximiza. (* Los nombres de las marcas
son marcas comerciales de sus respectivos
fabricantes).
ADVERTENCIA
No se recomienda un detergente convencional.
Utilice solo detergentes de alta ecacia (HE).
Pautas para el cajón para detergente
La lavadora tiene un dispensador con tres compartimientos: el delantero izquierdo para el lavado
principal, el delantero derecho para el suavizante y el trasero derecho para el blanqueador líquido.
A. Compartimiento para el lavado principal:
Agregue detergente para lavado principal,
ablandador de agua, detergente para remojo,
protector para ropa de color y/o productos
quitamanchas.
B. Compartimiento para el suavizante: Agregue
suavizante de telas. No sobrepase la línea
máxima.
C. Compartimiento para el blanqueador:
Agregue blanqueador líquido. No sobrepase
la línea máxima.
Español28
Untitled-5 28 2019-01-23 11:23:14
Page 89

PRECAUCIÓN
9
• No abra el cajón para detergente mientras la lavadora se encuentra en funcionamiento.
• No use los siguientes tipos de detergente:
- En pastillas o cápsulas
- En bola o en red
• Para impedir que el compartimiento se obstruya, diluya los productos concentrados o muy densos
(suavizantes o detergentes) en agua antes de agregarlos.
Para agregar productos de lavado en el cajón para detergente
1. Abra el cajón para detergente.
2. Agregue el detergente líquido al
compartimiento para el lavado principal.
Asegúrese de que el contenedor para
detergente líquido esté colocado y no
sobrepase la línea máxima (A) marcada.
NOTA
• No agregue detergente en polvo ni otros
productos de lavado en polvo al contenedor
para detergente líquido.
• Para utilizar detergente en polvo, consulte la
página 30.
Antes de comenzar
3. Agregue suavizante en el compartimiento para
el suavizante. No sobrepase la línea máxima
(B).
PRECAUCIÓN
• No se recomienda el suavizante en polvo.
Utilice solo suavizante líquido.
• Antes de agregar suavizante concentrado, es
necesario diluirlo.
• No agregue detergente para lavado principal
en el compartimiento para el suavizante.
4. Cierre el cajón para detergente.
Español 29
Untitled-5 29 2019-01-23 11:23:15
Page 90

Antes de comenzar
Para utilizar detergente en polvo
Primero retire el contenedor para detergente
líquido provisto del compartimiento para el lavado
principal. Luego, agregue detergente en polvo
en el compartimiento para el lavado principal
siguiendo las instrucciones del fabricante de
detergente.
PRECAUCIÓN
No agregue detergente en polvo en el contenedor
para detergente líquido.
Antes de comenzar
Para utilizar el compartimiento para el blanqueador
Para utilizar potenciador de lavado o blanqueador con protección para ropa de color
Agregue solo blanqueador líquido con cloro en el
compartimiento para blanqueador. No sobrepase
la línea máxima.
PRECAUCIÓN
No agregue un blanqueador líquido que contenga
cloro sin diluir directamente sobre la carga o
dentro del tambor. Se trata de un químico potente
y, si no se usa correctamente, puede ser perjudicial
para la tela, por ejemplo desgastando las bras o
causando decoloración.
Los potenciadores de lavado o blanqueadores con
protección para ropa de color pueden mejorar
el desempeño del lavado. Asegúrese de agregar
el potenciador de lavado o el blanqueador con
protección para ropa de color después de colocar
la ropa en el tambor.
NOTA
Para usar detergente en polvo y potenciador de
lavado o blanqueador con protección para ropa de
color, resulta más efectivo colocarlos juntos en el
tambor antes de cargar la ropa.
Español30
Untitled-5 30 2019-01-23 11:23:17
Page 91

Funcionamiento
01
02
03 04 05 06
0907
08
10
12
11
ADVERTENCIA
Para reducir el riesgo de incendio, descarga eléctrica o lesiones personales, lea la Información de
seguridad antes de poner en funcionamiento el electrodoméstico.
Panel de control
01 Selector de ciclos
02 Display
03 Temp.
(Temperatura)
04 Rinse (Enjuagar)
Gire el disco para seleccionar un ciclo. (Para obtener más información sobre
los ciclos de lavado, consulte la página 36.)
El display muestra información y tiempo restante del ciclo que se está
ejecutando, o un código de información si la lavadora necesita revisión.
Presione para cambiar la temperatura del ciclo que se está ejecutando.
• Hot (Caliente) (Nivel 5): Prendas muy sucias y que no destiñen. Solo
disponible con los siguientes ciclos: NORMAL, HEAVY DUTY (CARGA
PESADA), SANITIZE (ESTERILIZAR) y SELF CLEAN (AUTOLIMPIEZA)
(AUTOLIMPIEZA).
• (Nivel 4): Ropa blanca y prendas muy sucias de colores sólidos.
• (Nivel 3): Prendas que no destiñen.
• (Nivel 2): Prendas de colores vivos, ligeramente sucias.
• Cold (Fría) (Nivel 1): Usa solo agua fría sin encender el calentador. No se
suministra agua tibia.
Presione para cambiar el número de enjuagues del ciclo que se está
ejecutando.
• Puede seleccionar de 1 a 5 enjuagues.
Funcionamiento
Untitled-5 31 2019-01-23 11:23:18
Español 31
Page 92
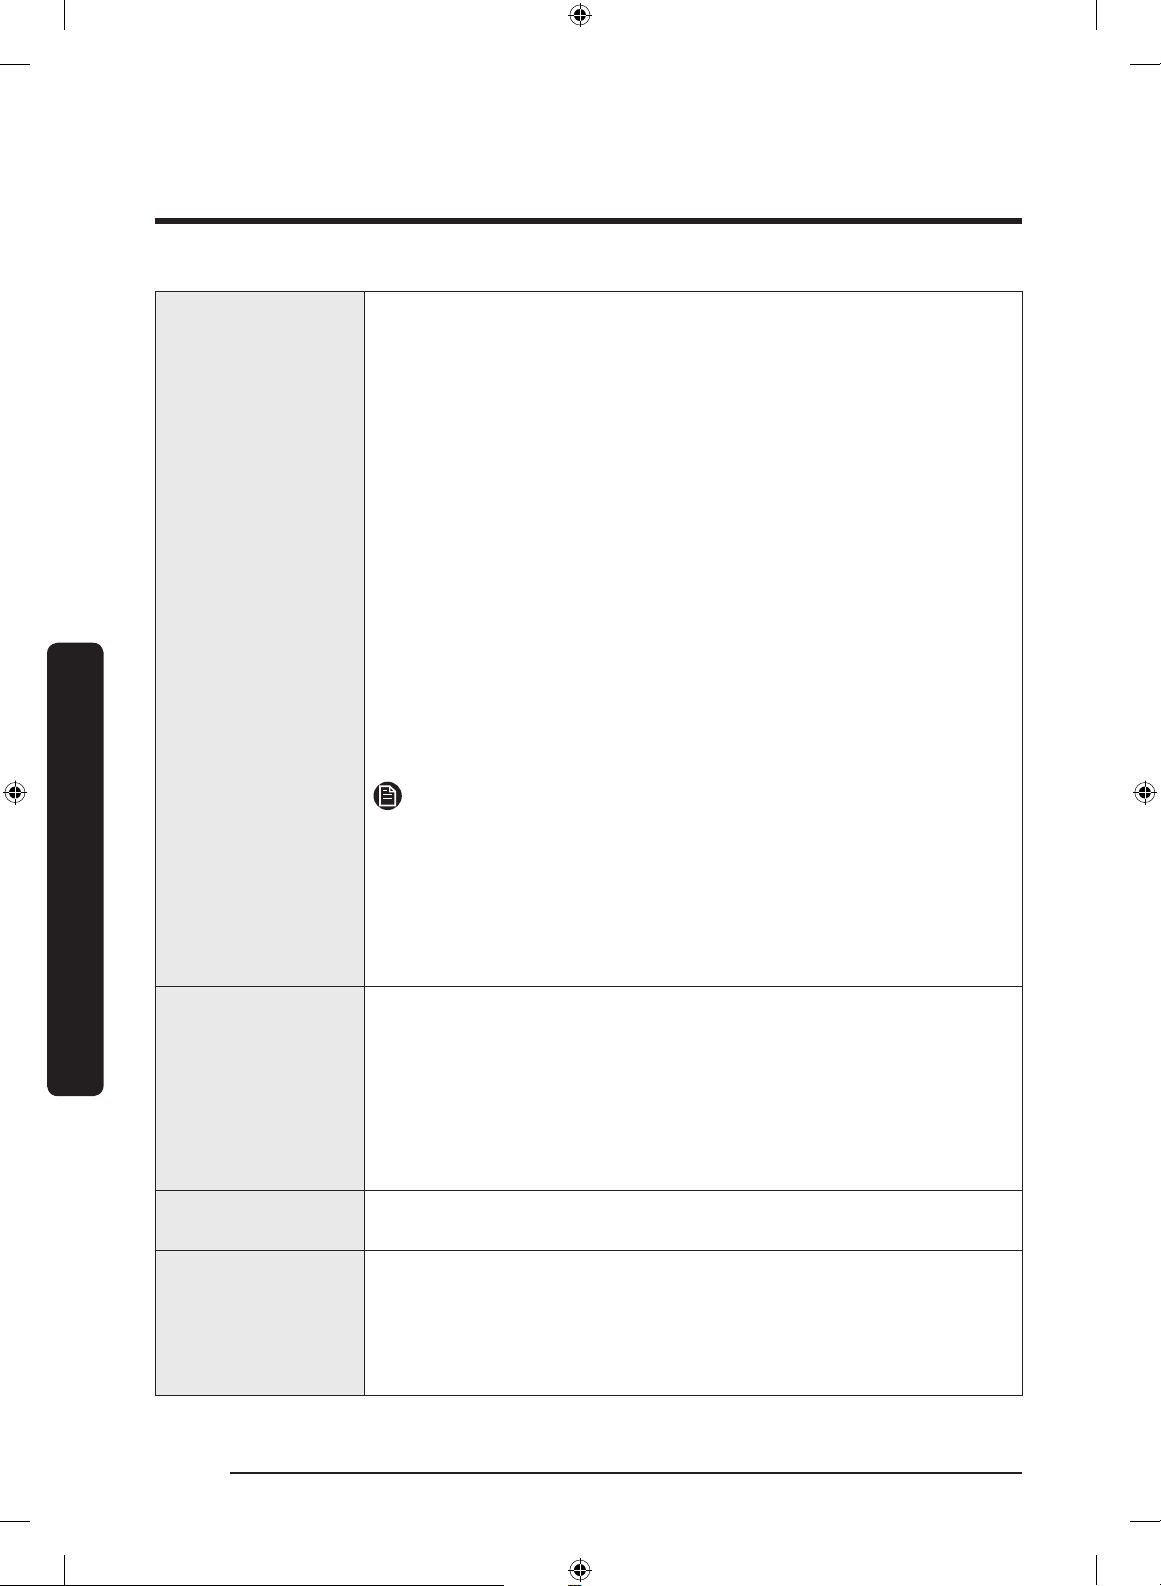
Funcionamiento
05 Spin (Centrifugar)
Funcionamiento
06 Soil (Suciedad)
07 Pre Soak
(Prerremojo)
08 Steam (Vapor)
Presione para cambiar la velocidad de centrifugado del ciclo que se está
ejecutando.
• High (Alta) (Nivel 5): Extiende el proceso de centrifugado para eliminar
con ecacia la humedad de la carga. Este nivel utiliza un proceso de
centrifugado más fuerte que elimina la humedad, por lo que no es
adecuado para telas sin arrugas y que no necesitan planchado ni para
sobrecargas.
• (Nivel 4): Ropa interior, camisetas, jeans y algodones resistentes.
• (Nivel 3): Jeans, prendas sin arrugas o que no necesitan planchado y telas
sintéticas.
• (Nivel 2): Prendas delicadas que necesitan una velocidad baja de
centrifugado.
• No Spin (Sin centrifugado) (Nivel 1): El tambor no centrifuga después del
proceso de drenaje nal.
Enjuague en espera (Todos los indicadores apagados): El proceso de enjuague
nal se interrumpe para que la carga permanezca en el agua. Para sacar la
ropa, ejecute el proceso de drenaje o de centrifugado.
NOTA
Spin Only (Solo Centrifugar): Para realizar solo el proceso de centrifugado,
mantenga presionado Spin (Centrifugar) durante 3 segundos. Con el tiempo
del ciclo en el display, presione Spin (Centrifugar) repetidamente hasta que se
seleccione la velocidad de centrifugado deseada. Luego, mantenga presionado
Inicio/Pausa (Hold to Start (Mantenga presionado para iniciar)) para iniciar el
ciclo.
Presione para cambiar el nivel de suciedad del ciclo actual.
• Heavy (Muy sucia) (Nivel 5): Para prendas extremadamente sucias.
• (Nivel 4): Para prendas muy sucias.
• (Nivel 3): Para prendas moderadamente sucias. Esta opción es la mejor
para la mayoría de las cargas.
• (Nivel 2): Para prendas ligeramente sucias.
• Light (Poco sucia) (Nivel 1): Para prendas apenas sucias.
Presione para agregar 30 minutos de tiempo de remojo al inicio del ciclo de
lavado para una mejor remoción de manchas.
Presione para usar la función de vapor. La función de vapor está disponible
con los ciclos NORMAL, HEAVY DUTY (CARGA PESADA), WHITES (ROPA
BLANCA), BEDDING (ROPA DE CAMA) y SANITIZE (ESTERILIZAR). Para prendas
muy sucias de colores sólidos, esta función mejora el tratamiento de las
manchas y emplea menos agua.
Español32
Untitled-5 32 2019-01-23 11:23:18
Page 93

Congure la lavadora para que nalice el lavado automáticamente en otro
09 Delay End (Final
Diferido)
momento. Puede elegir un tiempo de retardo de entre 1 y 24 horas (en
incrementos de 1 hora). (Para obtener más información sobre la función Final
Diferido, consulte la página 40.)
10 Alarm Off (Alarma
apagada)
Presione para encender o apagar el sonido de la alarma. Cuando la alarma está
apagada, la melodía de nalización de ciclo y el pitido de apagado no suenan.
No obstante, los sonidos de los botones y alertas seguirán encendidos.
11 Encender/Apagar Presione para encender o apagar la lavadora.
12 Inicio/Pausa (Hold
to Start (Mantenga
presionado para
Mantenga presionado para iniciar el funcionamiento o presione para detenerlo
temporalmente.
iniciar))
Funcionamiento
Español 33
Untitled-5 33 2019-01-23 11:23:19
Page 94
Funcionamiento
Descripción de íconos
Funcionamiento
Más prendas
Seguro de puerta
Recordatorio de
AUTOLIMPIEZA
Seguro para niños
Alarma apagada
• Este ícono indica que puede agregar o quitar prendas luego de que
un ciclo ha comenzado.
• Para agregar o quitar prendas, presione Inicio/Pausa (Hold to
Start (Mantenga presionado para iniciar)) para pausar el ciclo y,
luego, abra la puerta. Para reanudar el ciclo, cierre la puerta y,
luego, mantenga presionado Inicio/Pausa (Hold to Start (Mantenga
presionado para iniciar)) .
• Este ícono indica que la puerta está trabada y no puede abrirse.
• La puerta se traba automáticamente durante un ciclo y se enciende
este indicador.
• Cuando este ícono desaparece, puede abrir la puerta.
• Este ícono indica que el tambor debe limpiarse con el ciclo
AUTOLIMPIEZA .
• Este ícono aparece durante una hora cada 40 ciclos y luego se apaga
automáticamente. El ícono aparecerá durante 6 ciclos más y no
volverá a aparecer hasta pasados otros 40 ciclos.
• Este ícono indica que la función Seguro para niños está activada.
• (Para obtener más información sobre la función Seguro para niños,
consulte la página 41).
• Este ícono indica que la alarma está apagada.
• (Para obtener más información sobre la función Alarma apagada,
consulte la página 41).
Español34
Untitled-5 34 2019-01-23 11:23:22
Page 95

Sencillos pasos para comenzar
1
2
3
5
4
1. Presione Encender/Apagar para poner en funcionamiento la lavadora.
2. Gire el selector de ciclos para seleccionar el ciclo deseado.
3. Cambie los ajustes del ciclo (Temp. (Temperatura), Rinse (Enjuagar), Spin (Centrifugar) y Soil (Suciedad))
según sea necesario.
4. Seleccione las opciones deseadas según sea necesario.
5. Mantenga presionado Inicio/Pausa (Hold to Start (Mantenga presionado para iniciar)) .
Para cambiar el ciclo durante el funcionamiento
1. Presione Inicio/Pausa (Hold to Start (Mantenga presionado para iniciar)) para detener el
funcionamiento.
2. Seleccione otro ciclo.
3. Mantenga presionado Inicio/Pausa (Hold to Start (Mantenga presionado para iniciar)) nuevamente
para iniciar el nuevo ciclo.
ADVERTENCIA
No coloque ningún objeto en la parte superior de la lavadora cuando esté en funcionamiento.
Funcionamiento
Español 35
Untitled-5 35 2019-01-23 11:23:23
Page 96

Funcionamiento
Descripción de los ciclos
Ciclos normales
Ciclo Descripción
QUICK WASH (LAVADO
RÁPIDO)
DELICATES (DELICADAS)
PERM PRESS (PLANCHA
PERMANENTE)
RINSE+SPIN
(ENJUAGAR+CENTRIFUGAR)
SELF CLEAN
(AUTOLIMPIEZA)
• Para prendas ligeramente sucias que desea que se laven rápidamente.
• Para un mejor rendimiento, se recomienda una carga de 4 lb o menos.
• Para telas nas, sostenes, lencería (seda) y otras telas que deben
lavarse únicamente a mano.
• Para obtener mejor desempeño, use detergente líquido.
• Para telas sintéticas que no necesitan planchado y prendas ligera o
moderadamente sucias.
• Efectúa un ciclo de enjuague adicional después de agregar suavizante
de telas a la ropa.
• Limpia el tambor al eliminar la suciedad y las bacterias presentes.
• Ejecútelo una vez cada 40 lavados.
• Asegúrese de que el tambor esté vacío.
Funcionamiento
Español36
Untitled-5 36 2019-01-23 11:23:23
Page 97

Ciclos de vapor
Ciclo Descripción
• Para ropa de algodón, de cama y de mesa, ropa interior, toallas o
NORMAL
HEAVY DUTY (CARGA
PESADA)
WHITES (ROPA BLANCA) • Para prendas blancas. Se puede lavar con o sin blanqueador.
BEDDING (ROPA DE
CAMA)
camisas. La duración del lavado y el número de enjuagues se ajustan
automáticamente de acuerdo con la carga.
• Para telas resistentes de colores sólidos y prendas muy sucias.
• Para prendas voluminosas como edredones, cobijas y sábanas.
• Para obtener mejores resultados, lave solo un tipo de ropa de cama.
• Para prendas voluminosas, use detergente líquido y no enrolle las
prendas en el tambor ya que pueden atascarse.
• Para prendas muy sucias de colores sólidos. Este ciclo calienta el agua a
150 °F (65 °C) para eliminar las bacterias.
SANITIZE (ESTERILIZAR)
NOTA
Si presiona Inicio/Pausa (Hold to Start (Mantenga presionado para iniciar))
durante la fase de calentamiento del ciclo ESTERILIZAR, la puerta de la
lavadora permanecerá trabada por su seguridad.
Funcionamiento
Español 37
Untitled-5 37 2019-01-23 11:23:23
Page 98

Funcionamiento
Tabla de ciclos
Use esta tabla para congurar el mejor ciclo y las opciones para su lavadora.
NOTA
: conguración de
: se puede seleccionar 4: (Nivel 4) 4: (Nivel 4) 4: (Nivel 4) 4: (Nivel 4)
Funcionamiento
HEAVY DUTY (CARGA PESADA)
BEDDING (ROPA DE CAMA)
QUICK WASH (LAVADO RÁPIDO)
PERM PRESS (PLANCHA PERMANENTE)
RINSE+SPIN (ENJUAGAR+CENTRIFUGAR)
SELF CLEAN (AUTOLIMPIEZA)
Ajuste Temp. (Temperatura) Rinse (Enjuagar) Spin (Centrifugar) Soil (Suciedad)
5: Hot (Caliente)
fábrica
Ciclo
NORMAL
WHITES (ROPA BLANCA)
SANITIZE (ESTERILIZAR)
DELICATES (DELICADAS)
(Nivel 5)
3: (Nivel 3) 3: (Nivel 3) 3: (Nivel 3) 3: (Nivel 3)
2: (Nivel 2) 2: (Nivel 2) 2: (Nivel 2) 2: (Nivel 2)
1: Cold (Fría) (Nivel 1)
5: 5 times (5 veces)
(Nivel 5)
1: 1 time (1 vez)
(Nivel 1)
Temp. (Temperatura) Rinse (Enjuagar)
5 4 3 2 1 5 4 3 2 1
5: High (Alta) (Nivel 5)
1: No Spin (Sin
centrifugado) (Nivel 1)
Funciones
5: Heavy (Muy sucia)
(Nivel 5)
1: Light (Poco sucia)
(Nivel 1)
Español38
Untitled-5 38 2019-01-23 11:23:24
Page 99

Funciones
Ciclo
5 4 3 2 1 5 4 3 2 1
NORMAL
HEAVY DUTY (CARGA PESADA)
WHITES (ROPA BLANCA)
BEDDING (ROPA DE CAMA)
SANITIZE (ESTERILIZAR)
QUICK WASH (LAVADO RÁPIDO)
DELICATES (DELICADAS)
PERM PRESS (PLANCHA PERMANENTE)
RINSE+SPIN (ENJUAGAR+CENTRIFUGAR)
SELF CLEAN (AUTOLIMPIEZA)
Spin (Centrifugar) Soil (Suciedad)
Ciclo
NORMAL
HEAVY DUTY (CARGA PESADA)
WHITES (ROPA BLANCA)
BEDDING (ROPA DE CAMA)
SANITIZE (ESTERILIZAR)
QUICK WASH (LAVADO RÁPIDO)
DELICATES (DELICADAS)
PERM PRESS (PLANCHA PERMANENTE)
RINSE+SPIN (ENJUAGAR+CENTRIFUGAR)
SELF CLEAN (AUTOLIMPIEZA)
Pre Soak (Prerremojo) Steam (Vapor) Delay End (Final Diferido)
Opciones
Funcionamiento
Español 39
Untitled-5 39 2019-01-23 11:23:24
Page 100

Funcionamiento
Funciones especiales
Final Diferido
Puede hacer que la lavadora nalice automáticamente el lavado más tarde al seleccionar un tiempo de
retardo de entre 1 y 24 horas (en incrementos de 1 hora). La pantalla indica la hora a la que nalizará el
lavado.
1. Seleccione un ciclo. Luego, cambie los ajustes del ciclo si es necesario.
2. Presione Delay End (Final Diferido) repetidamente hasta establecer la hora de nalización deseada.
3. Mantenga presionado Inicio/Pausa (Hold to Start (Mantenga presionado para iniciar)) .
4. Para cancelar Final Diferido, reinicie la lavadora presionando Encender/Apagar.
Ejemplo
Desea que un ciclo que dura 2 horas nalice dentro de 3 horas. Para ello, agregue la opción Final Diferido
al ciclo que se está ejecutando con un ajuste de 3 horas y presione el botón Inicio/Pausa (Hold to Start
(Mantenga presionado para iniciar)) a las 2:00 p.m. La lavadora comienza a funcionar a las 3:00 p.m. y se
detiene a las 5:00 p.m. A continuación se proporcionan los tiempos para este ejemplo.
Funcionamiento
2:00 pm
Congure Término retardado a las 3 h
ATC (control automático de la temperatura)
La función ATC permite a la lavadora controlar la temperatura del agua en cada ciclo de lavado mediante
el termistor interno. Está diseñada para mantener ciertas temperaturas de lavado a n de obtener los
mejores resultados.
NOTA
• Si selecciona NORMAL o HEAVY DUTY (CARGA PESADA), es posible que advierta que la lavadora
suministra agua fría. Esto es normal, ya que la máquina está diseñada para reducir el consumo
energético. En dichos ciclos, la temperatura del agua para el Nivel 5 es similar a una temperatura de
agua de ducha y el Nivel 3 es similar a la temperatura agradable de una piscina.
• Para lavar prendas a una temperatura especíca, primero debe elegir un ciclo diferente.
3:00 pm
Inicio
5:00 pm
Fin
Español40
Untitled-5 40 2019-01-23 11:23:25
 Loading...