

Page 1

Washer
user manual
WF231*
imagine the possibilities
Thank you for purchasing this Samsung product.
To receive more complete service or accessory
parts, please register your product at or contact
www.samsung.com/register
1-800-SAMSUNG (726-7864)
WF231ANW-02832D_EN.indd 1WF231ANW-02832D_EN.indd 1 2011-04-18 10:37:382011-04-18 10:37:38
Page 2
features of your new washer
1. Extra Large Capacity
Even bulky garments and blankets get super clean. The large capacity leaves enough room
for a more thorough, cleaner wash.
2. VRT™ (Vibration Reduction Technology)
This Samsung washer performs smoothly at top spin speeds, minimizing noise and vibration.
3. Direct Drive Inverter Motor
The power to handle anything! Our direct-drive inverter motor delivers power right to the
washer tub from a variable speed, reversible motor. A beltless direct-drive motor generates
a higher spin speed of 1,150rpms for more effective, quiet operation. The washer also has
fewer moving parts, meaning fewer repairs.
4. Woolmark Certifi ed
The machine wash wool cycle on the Samsung machines has been tested and passed the
required Woolmark Company specifi cation for machine washable wool products. Fabrics
should be washed according to the instructions on the garment label as specifi ed by
Woolmark and Samsung.
5. Sanitize
When selecting this cycle, the water heats to an extra high temperature to remove 99.9% of
certain bacteria typically found on clothing, bedding, or towels. This certifi cation is conducted
by NSF International, an independent third-party testing and certifi cation organization.
Please check garment care label to avoid garment damage.
Only sanitizing cycles have been designed to meet the requirements of this protocol for
sanitization effi cacy.
NSF Protocol P172
Sanitization Performance of Residential and
Commercial, Family-Sized Clothes Washers
6. Pure Cycle
Using the Pure Cycle drum cleaning process helps to keep your washing machine clean even
without any chemical detergent or bleach. Keep your drum cleansed and odourless with this
specialized cleaning program.
TM
7. Child Lock
The Child Lock function ensures that curious little hands are kept out of your washing
machine.
This safety feature stops your children from playing with the operation of the washing
machine, and alerts you when it is activated.
8. Delay Start
Delay a cycle for up to 19 hours in one-hour increments and increase the convenience of
using your washing machine especially when you have to go out.
2_ features of your new washer
WF231ANW-02832D_EN.indd Sec9:2WF231ANW-02832D_EN.indd Sec9:2 2011-04-18 10:37:552011-04-18 10:37:55
Page 3
9.
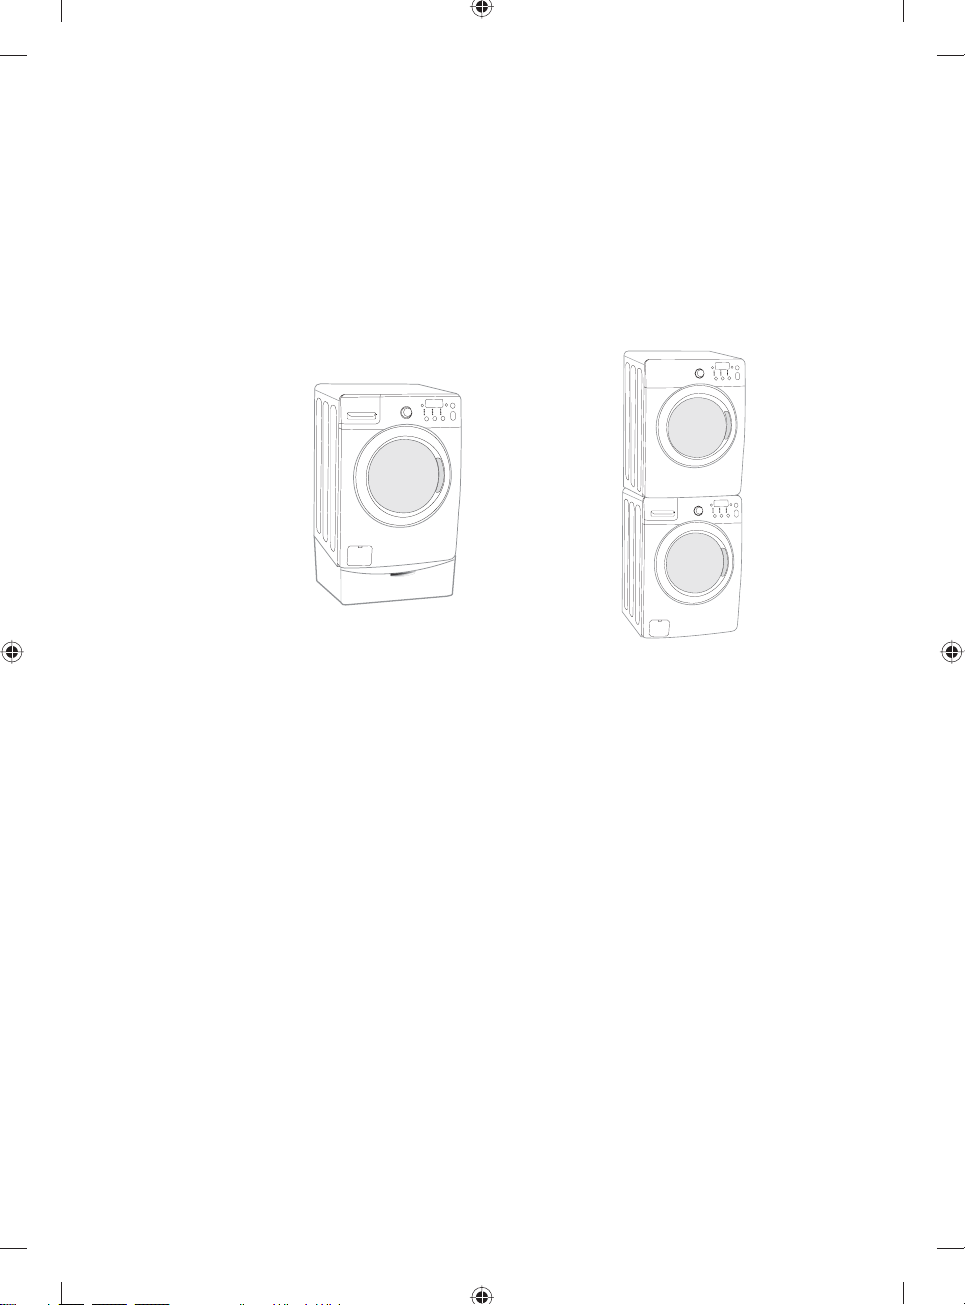
Pedestal with Storage Drawers (Model No : WE357*)
An optional 15” pedestal is available to raise the washer for easier loading and unloading.
The pedestal also offers a built-in storage drawer that can hold a 100 oz. bottle of detergent.
10. Stacking (Model No : SK-3A1/XAA , SK-4A/XAA , SK-5A/XAA)
Samsung washers and dryers can be stacked to maximize usable space. An optional
stacking kit is available for purchase from your Samsung retailer.
<Pedestal with Storage Drawers> <Stacking>
features of your new washer _3
WF231ANW-02832D_EN.indd Sec9:3WF231ANW-02832D_EN.indd Sec9:3 2011-04-18 10:37:562011-04-18 10:37:56
Page 4
safety information
Congratulations on your new Samsung ActivFresh™ washer. This manual
contains important information on the installation, use and care of your
appliance. Please take time to read this manual to take full advantage of your
washer’s many benefi ts and features.
WHAT YOU NEED TO KNOW ABOUT SAFETY INSTRUCTIONS
Warnings and Important Safety Instructions in this manual do not cover all possible conditions and
situations that may occur. It is your responsibility to use common sense, caution, and care when installing,
maintaining, and operating your washer.
IMPORTANT SAFETY SYMBOLS AND PRECAUTIONS
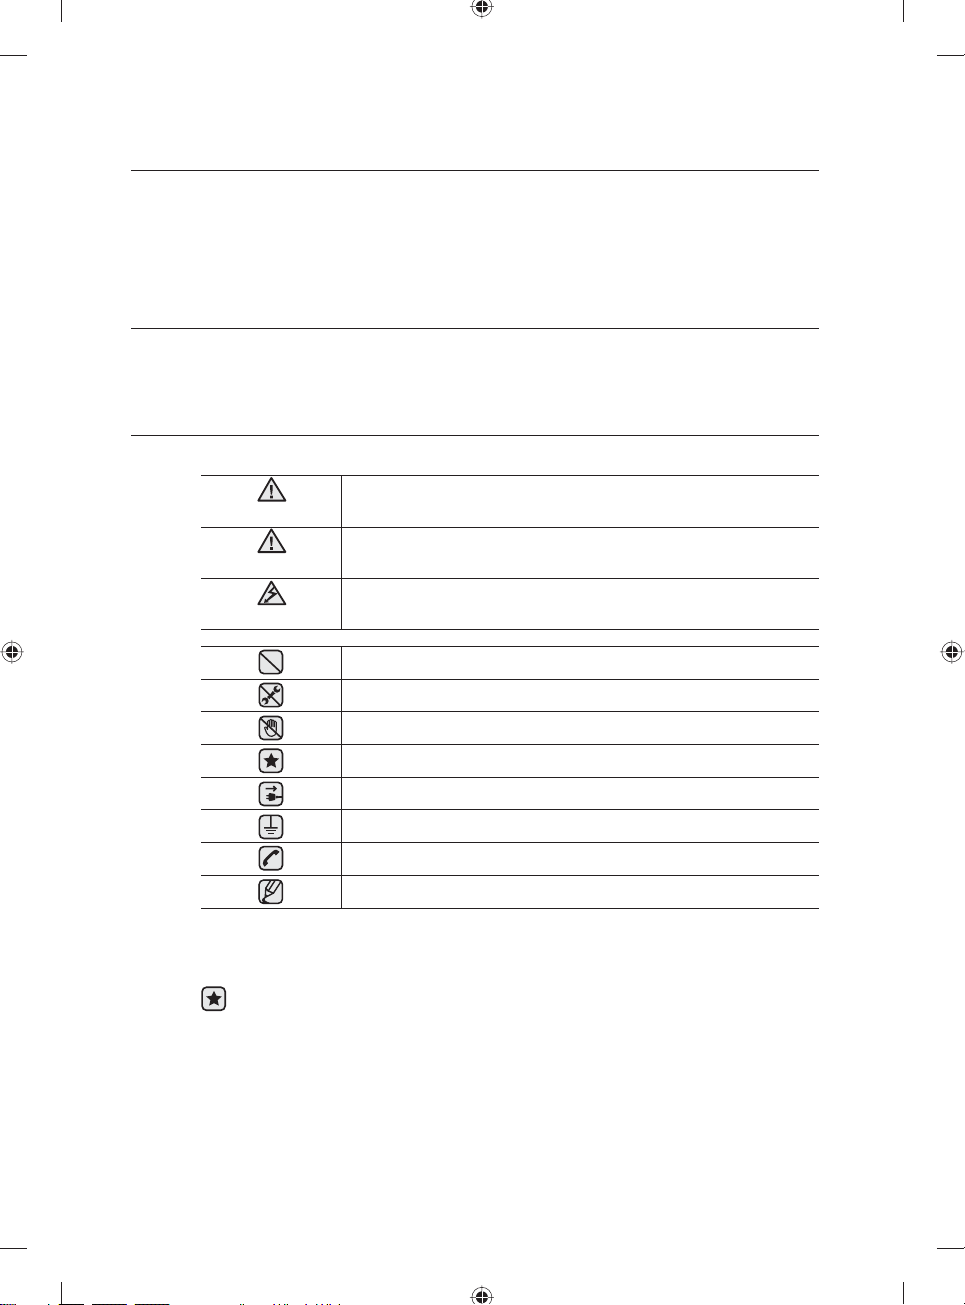
What the icons and signs in this user manual mean:
Hazards or unsafe practices that may result in severe personal injury
WARNING
CAUTION
CAUTION
These warning signs are here to prevent injury to you and others.
Please follow them explicitly.
After reading this section, keep it in a safe place for future reference.
Read all instructions before using the appliance.
or death.
Hazards or unsafe practices that may result in minor personal injury or
property damage.
To reduce the risk of fi re, explosion, electric shock, or personal injury
when using your washer, follow these basic safety precautions:
Do NOT attempt.
Do NOT disassemble.
Do NOT touch.
Follow directions explicitly.
Unplug the power plug from the wall socket.
Make sure the machine is grounded to prevent electric shock.
Call the service center for help.
Note
SAVE THESE INSTRUCTIONS
4_ safety information
WF231ANW-02832D_EN.indd Sec1:4WF231ANW-02832D_EN.indd Sec1:4 2011-04-18 10:37:582011-04-18 10:37:58
Page 5

WARNING: To reduce the risk of fi re, electric shock, or injury to persons when using your
appliance, follow basic precautions, including the following:
WARNING
1. Read all instructions before using the appliance.
2. Do not wash or dry articles that have been previously cleaned in, washed in, soaked in,
or spotted with gasoline, dry-cleaning solvents, other fl ammable or explosive substances
as they give off vapors that could ignite or explode.
3. Do not allow children to play on or in the appliance. Close supervision of children is
necessary when the appliance is used near children.
4. Before the appliance is removed from service or discarded, remove the door to the
washing or drying compartment.
5. Do not reach into the appliance if the drum is moving.
6. Do not install or store this appliance where it will be exposed to the weather.
7. Do not tamper with controls.
8. Do not repair or replace any part of the appliance or attempt any servicing unless
specifi cally recommended in the user-maintenance instructions or in published userrepair instructions that you understand and have the skills to carry out.
9. Do not add gasoline, dry-cleaning solvents, or other fl ammable or explosive substances
to the wash water. These substances give off vapors that could ignite or explode.
10.Under certain conditions, hydrogen gas may be produced in a hot water system
that has not been used for 2 weeks or more. HYDROGEN GAS IS EXPLOSIVE. If
the hot water system has not been used for such a period, before using a washer or
combination washer-dryer, turn on all hot water faucets and let the water fl ow from
each for several minutes. This will release any accumulated hydrogen gas. As the gas is
fl ammable, do not smoke or use an open fl ame during this time.
SAVE THESE INSTRUCTIONS
safety information _5
WF231ANW-02832D_EN.indd Sec1:5WF231ANW-02832D_EN.indd Sec1:5 2011-04-18 10:37:582011-04-18 10:37:58
Page 6

safety information
SEVERE WARNING SIGNS FOR INSTALLATION
WARNING
Plug the power cord into an AC 120V/60Hz/15A wall socket or higher and use the socket
for this appliance only. In addition, do not use an extension cord.
- Sharing a wall socket with other appliances using a power strip or extending the power
cord may result in electric shock or fi re.
- Do not use an electric transformer. It may result in electric shock or fi re.
- Ensure that the power voltage, frequency and current are the same as those listed in the
product specifi cations. Failing to do so may result in electric shock or fi re.
The installation of this appliance must be performed by a qualifi ed technician or service
company.
- Failing to do so may result in electric shock, fi re, an explosion, problems with the
product, or injury.
Remove all foreign substances such as dust or water from the power plug terminals and
contact points using a dry cloth on a regular basis.
- Unplug the power plug and clean it with a dry cloth.
- Failing to do so may result in electric shock or fi re.
Plug the power plug into the wall socket in the right direction so that the cord runs towards
the fl oor.
- If you plug the power plug into the socket in the opposite direction, the electric wires
within the cable may be damaged and this may result in electric shock or fi re.
This appliance must be properly grounded.
Do not ground the appliance to a gas pipe, plastic water pipe, or telephone line.
- Failure to ground properly may result in electric shock, fi re, an explosion, or problems
with the product
- Never plug the power cord into a socket that is not grounded correctly. Make sure the
outlet is in compliance with local and national codes.
Do not install this appliance near a heater, infl ammable material.
Do not install this appliance in a humid, oily or dusty location, or in a location exposed to
direct sunlight and water (rain drops).
Do not install this appliance in a location where gas may leak.
- This may result in electric shock or fi re.
Plug the power plug into the wall socket fi rmly. Do not use a damaged power plug,
damaged power cord, or loose wall socket.
- This may result in electric shock or fi re.
Do not pull or excessively bend the power cord.
Do not twist or tie the power cord.
Do not hook the power cord over a metal object, place a heavy object on the power cord,
insert the power cord between objects, or push the power cord into the space behind the
appliance.
- This may result in electric shock or fi re.
Do not pull the power cord when unplugging the power plug.
- Unplug the power plug by holding the plug.
- Failing to do so may result in electric shock or fi re.
If the power plug or power cord is damaged, contact your nearest service center.
6_ safety information
WF231ANW-02832D_EN.indd Sec1:6WF231ANW-02832D_EN.indd Sec1:6 2011-04-18 10:37:582011-04-18 10:37:58
Page 7
CAUTION SIGNS FOR INSTALLATION
CAUTION
This appliance should be positioned in such a way that it is accessible to the power plug.
- Failing to do so may result in electric shock or fi re due to electric leakage.
Install your appliance on a level and hard fl oor that can support its weight.
- Failing to do so may result in abnormal vibrations, noise, or problems with the product.
Unplug the power plug when the appliance is not being used for long periods of time or
during a thunder/lightning storm.
- Failing to do so may result in electric shock or fi re.
SEVERE WARNING SIGNS FOR USING
WARNING
If the appliance is fl ooded, cut the power immediately and contact your nearest service
center.
If the appliance generates a strange noise, a burning smell or smoke, unplug the power
plug immediately and contact your nearest service center.
- Failing to do so may result in electric shock or fi re.
In the event of a gas leak (such as propane gas, LP gas, etc.), ventilate immediately without
touching the power plug. Do not touch the appliance or power cord.
- Do not use a ventilating fan.
- A spark may result in an explosion or fi re.
Do not wash items contaminated with gasoline, kerosene, benzene, paint thinner, alcohol or
other fl ammable or explosive substances.
- This may result in electric shock, fi re or an explosion.
Do not open the washer door by force while it is operating (high-temperature washing/
drying/spinning).
- Water fl owing out of the washer may result in burns or cause the fl oor to be slippery.
This may result in injury.
- Opening the door by force may result in damage to the product or injury.
Make sure to remove the packaging (sponge, styrofoam) attached to the bottom of the
washer before using it.
Do not insert your hand under the washer.
- This may result in injury.
safety information _7
WF231ANW-02832D_EN.indd Sec1:7WF231ANW-02832D_EN.indd Sec1:7 2011-04-18 10:37:582011-04-18 10:37:58
Page 8

safety information
Do not touch the power plug with wet hands.
- This may result in electric shock.
Do not turn the appliance off by unplugging the power plug while an operation is in
progress.
- Plugging the power plug into the wall socket again may cause a spark and result in
electric shock or fi re.
Keep all packaging materials well out of the reach of children, as packaging materials can
be dangerous to children.
- If a child places a bag over its head, it may result in suffocation.
Do not let children or infi rm persons use this washer unsupervised.
- Failing to do so may result in electric shock, burns or injury.
Do not insert your hand or a metal object under the washer while it is operating.
- This may result in injury.
Make sure the detergent drawer is closed before you put laundry into the washer or remove
laundry from the washer.
- If the detergent drawer is open, you could strike the drawer with your head and injure yourself.
Do not attempt to repair, disassemble, or modify the appliance yourself.
- Do not use any fuse(such as cooper, steel wire, etc.) other than the standard fuse.
- When repairing or reinstalling the appliance is required, contact your nearest service
center.
- Failing to do so may result in electric shock, fi re, problems with the product, or injury.
If any foreign substance such as water has entered the appliance, unplug the power plug
and contact your nearest service center.
- Failing to do so may result in electric shock or fi re.
When the water supply hose comes loose from the faucet and fl oods the appliance, unplug
the power plug.
- Failing to do so may result in electric shock or fi re.
CAUTION
CAUTION SIGNS FOR USING
When the washer is contaminated by a foreign substance such as detergent, dirt, food
waste, etc., unplug the power plug and clean the washer using a damp and soft cloth.
- Failing to do so may result in discoloration, deformation, damage or rust.
The front glass may be broken by a strong impact. Take care when using the washer.
- When the glass is broken, it may result in injury.
After a water supply failure or when reconnecting the water supply hose, open the faucet
slowly.
Open the faucet slowly after a long period of non-use.
- The air pressure in the water supply hose or the water pipe may result in damage to a
part or in water leakage.
If a drain error occurs during an operation, check if there is a draining problem.
- If the washer is used when it is fl ooded because of a draining problem, it may result in
electric shock or fi re due to electric leakage.
8_ safety information
WF231ANW-02832D_EN.indd Sec1:8WF231ANW-02832D_EN.indd Sec1:8 2011-04-18 10:37:582011-04-18 10:37:58
Page 9

Insert the laundry into the washer completely so that laundry does not get caught in the
door.
- If laundry gets caught in the door, it may result in damage to the laundry or the washer,
or result in water leakage.
Ensure that the faucet is turned off when the washer is not being used.
- Ensure that the screw on the water supply hose connector is properly tightened.
- Failing to do so may result in property damage or injury.
Check if the rubber seal is not contaminated by foreign substances (waste, thread, etc).
- If the door is not closed completely, it may result in water leakage.
Open the faucet and check if the water supply hose connector is fi rmly tightened and that
there is no water leaking before using the product.
- If the screws or the water supply hose connector are loose, it may result in water
leakage.
Do not stand on top of the appliance or place objects (such as laundry, lighted candles,
lighted cigarettes, dishes, chemicals, metal objects, etc.) on the appliance.
- This may result in electric shock, fi re, problems with the product, or injury.
Do not operate the appliance with wet hands.
- This may result in electric shock.
Do not spray volatile material such as insecticide onto the surface of the appliance.
- As well as being harmful to humans, it may also result in electric shock, fi re or problems
with the product.
Do not place an object that generates a electromagnetic fi eld near the washer.
- This may result in injury due to a malfunction.
Since the water drained during a high-temperature wash or drying cycle is hot, do not
touch the water.
- This may result in burns or injury.
Do not wash, spin or dry water-proof seats, mats or clothing (*).
- Do not wash thick, hard mats even if the washer mark is on the care label.
- This may result in injury or damage to the washer, walls, fl oor or clothing due to
abnormal vibrations.
* Woolen bedding, rain covers, fi shing vests, ski pants, sleeping bags, diaper covers,
sweat suits, and bicycle, motor cycle, car covers, etc.
Do not operate the washer when the detergent box is removed.
- This may result in electric shock or injury due to water leakage.
Do not touch the inside of the tub during or just after drying as it is hot.
- This may result in burns.
Do not insert your hand into the detergent box after opening it.
- This may result in injury as your hand may be caught by the detergent input device.
safety information _9
WF231ANW-02832D_EN.indd Sec1:9WF231ANW-02832D_EN.indd Sec1:9 2011-04-18 10:37:582011-04-18 10:37:58
Page 10

safety information
Do not place any objects (such as shoes, food waste, animals) other than laundry into the
washer.
- This may result in damage to the washer, or injury and death in the case of pets due to
the abnormal vibrations.
Do not press the buttons using sharp objects such as pins, knifes, fi ngernails, etc.
- This may result in electric shock or injury.
Do not wash laundry contaminated by oils, creams or lotions usually found in skincare
shops or massage clinics.
- This may result in the rubber seal becoming deformed and water leakage.
Do not leave metal objects such as a safety pin or hair pin, or bleach in the tub for long
periods of time.
- This may cause the tub to rust.
- If rust starts appearing on the surface of the tub, apply a cleansing agent (neutral) to the
surface and use a sponge to clean it. Never use a metal brush.
Do not use dry cleaning detergent directly and do not wash, rinse, or spin laundry
contaminated by dry cleaning detergent.
- This may result in spontaneous combustion or ignition due to the heat of the oxidation of
the oil.
Do not use hot water from water cooling/heating devices.
- This may result in problems with the washer.
Do not use natural hand-washing soap for the washer.
- If it hardens and accumulates inside the washer, it may result in problems with the
product, discoloration, rust or bad odors.
Do not wash large laundry items such as bedding in the washing net.
- Place socks and brassieres into the washing net and wash them with the other laundry.
- Failing to do so may result in injury due to abnormal vibrations.
Do not use hardened detergent.
- If it accumulates inside the washer, it may result in water leakage.
Do not wash throw rug or doormat.
- If you wash throw rug or doormat, the sand will accumulate inside the washer. It may
result in error such as not draining.
SEVERE WARNING SIGNS FOR CLEANING
WARNING
Do not clean the appliance by spraying water directly onto it.
Do not use benzene, thinner or alcohol to clean the appliance.
- This may result in discoloration, deformation, damage, electric shock or fi re.
Before cleaning or performing maintenance, unplug the appliance from the wall socket.
- Failing to do so may result in electric shock or fi re.
10_ safety information
WF231ANW-02832D_EN.indd Sec1:10WF231ANW-02832D_EN.indd Sec1:10 2011-04-18 10:37:582011-04-18 10:37:58
Page 11

contents
SETTING UP YOUR WASHER
12
WASHING A LOAD OF LAUNDRY
18
CLEANING AND MAINTAINING YOUR
WASHER
25
12 Checking the parts
13 Meeting installation requirements
13 Electrical supply
13 Grounding
13 Water
13 Drain facility
14 Flooring
14 Location consideration
14 Alcove or closet installation
14 Undercounter installation(washer only)
15 With optional pedestal base or stacking kit
16 Installing your washer
18 Loading your washer
18 Getting started
19 Overview of the control panel
21 Child Lock
22 Spin Only
22 Garment+
23 Detergent use
23 Features
25 Cleaning the exterior
25 Cleaning the interior
25 Cleaning the dispensers
25 Storing your washer
26 Cleaning the debris fi lter
27 Cleaning the door seal/bellow
27 Preserving the top cover and the front frame
TROUBLESHOOTING AND
INFORMATION CODES
28 Check these points if your washer…
30 Information codes
28
APPENDIX
32
WARRANTY
32 Fabric care chart
33 Helping the environment
33 Declaration of conformity
33 Specifi cations
34 Cycle chart
35 Warranty
35
contents _11
WF231ANW-02832D_EN.indd Sec2:11WF231ANW-02832D_EN.indd Sec2:11 2011-04-18 10:37:582011-04-18 10:37:58
Page 12
setting up your washer
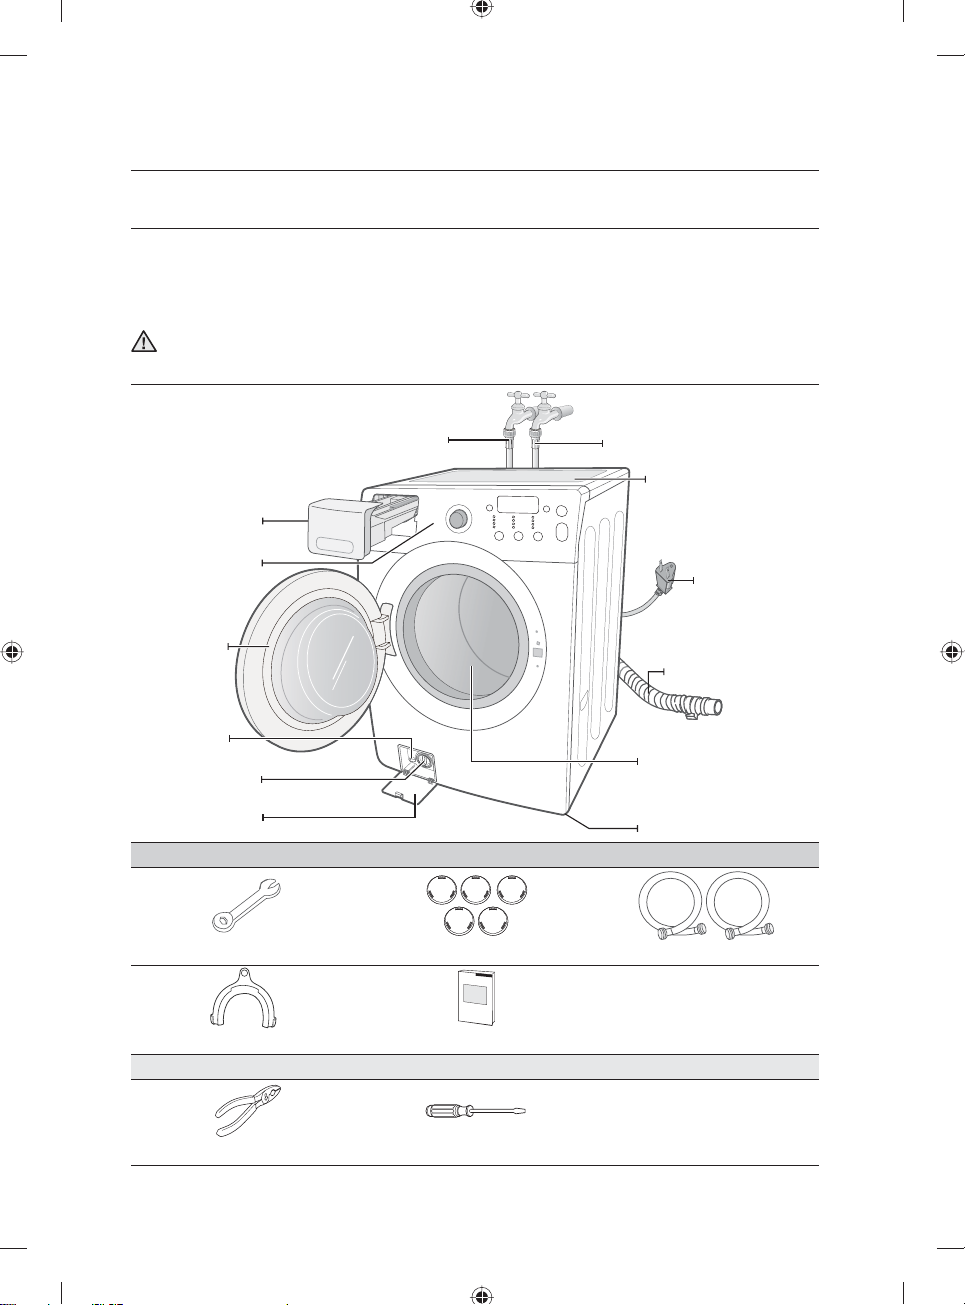
CHECKING THE PARTS
Unpack your Washer and inspect it for shipping damage. Make sure you have received all of the items
shown below. If your Washer was damaged during shipping, or you do not have all of the items, contact
1-800-SAMSUNG(7267864).
To prevent personal injury or strain, wear protective gloves whenever lifting or carrying the unit.
Keep all packaging materials well out of the reach of children, as packaging materials can be
dangerous to children.
WARNING
- If a child places a bag over his or her head, the child may suffocate.
Detergent drawer
Control panel
Door
Emergency
drain tube
Debris fi lter
Filter Cover
Parts supplied
Hot water supply hose
Wrench Bolt hole covers Water supply hoses
Cold water supply hose
Work top
Plug
Drain Hose
Tub
Adjustable legs
Hose guide Manual book
Tools needed
Pliers Flat screwdriver
12_ setting up your washer
WF231ANW-02832D_EN.indd Sec5:12WF231ANW-02832D_EN.indd Sec5:12 2011-04-18 10:37:592011-04-18 10:37:59
Page 13
MEETING INSTALLATION REQUIREMENTS
Electrical supply
• 120 Volt 60 Hz 15 AMP fuse or circuit breaker
• Individual branch circuit serving only your Washer is recommended.
• Your Washer is equipped with a power cord.
Never use an extension cord.
CAUTION
Grounding
ELECTRICAL GROUNDING IS REQUIRED FOR THIS APPLIANCE.
This appliance must be grounded. In the event of malfunction or breakdown, grounding will
reduce the risk of electric shock by providing a path of least resistance for electric current.
This appliance is equipped with a power cord having a three-prong grounding plug for use in a
properly installed and grounded outlet.
Improper connection of the equipment-grounding conductor can result in a risk of electrical
shock. Check with a qualifi ed electrician or serviceman if you are in doubt as to whether
WARNING
the appliance is properly grounded. Do not modify the plug provided with the appliance. If it
does not fi t the outlet, have a proper outlet installed by a qualifi ed electrician.
IMPORTANT SAFETY PRECAUTIONS
• To prevent unnecessary risk of fi re, electrical shock or personal injury, all wiring and
grounding must be done in accordance with the National Electrical Code ANSI/FNPA, No.
70 Latest Revision and local codes and ordinances. It is the personal responsibility of the
appliance owner to provide adequate electrical service for this appliance.
Never connect ground wire to plastic plumbing lines, gas lines, or hot water pipes.
CAUTION
Water
To correctly fi ll your washer in the proper amount of time, water pressure of 20-116psi (137800kPa) is required.
Water pressure less than 20 psi (137kPa) may cause water valve failure, or may not allow the
water valve to shut off completely. Or, it may extend the fi ll time beyond what your washer
controls allow, resulting in your washer turning off. A time limit is built into the controls in the
event of an internal hose becoming loose and fl ooding your home.
The water faucets must be within 4 ft.(122cm) of the back of your washer for the inlet hoses
provided with your washer.
Accessory inlet hoses are available in various lengths up to 10 ft.(305cm) for faucets that
are further away from the back of your washer.
To avoid the possibility of water damage:
• Have water faucets easily accessible.
• Turn off faucets when the washer is not in use.
• Periodically check that there is no leakage from the water inlet hose fi ttings.
Check all connections at the water valve and faucet for leaks.
WARNING
Drain facility
The recommended height of the standpipe is 18 in (46 cm). The drain hose must be routed
through the drain hose clip to the standpipe. The standpipe must be large enough to accept the
outside diameter of the drain hose. The drain hose is attached at the factory.
01 SETTING UP YOUR WASHER
setting up your washer _13
WF231ANW-02832D_EN.indd Sec5:13WF231ANW-02832D_EN.indd Sec5:13 2011-04-18 10:38:052011-04-18 10:38:05
Page 14
setting up your washer
Flooring
For best performance, your washer must be installed on a solidly constructed fl oor. Wood fl oor
may need to be reinforced to minimize vibration and/or unbalanced load situations. Carpeting
and soft tile surfaces are contributing factors in vibration and may cause your washer to move
slightly during the spin cycle.
Never install your washer on a platform or weakly supported structure.
CAUTION
Location consideration
Do not install your washer in areas where water may freeze, since your washer will always
maintain some water in its water valve, pump, and hose areas. This can cause damage the
pump, hoses and other components.
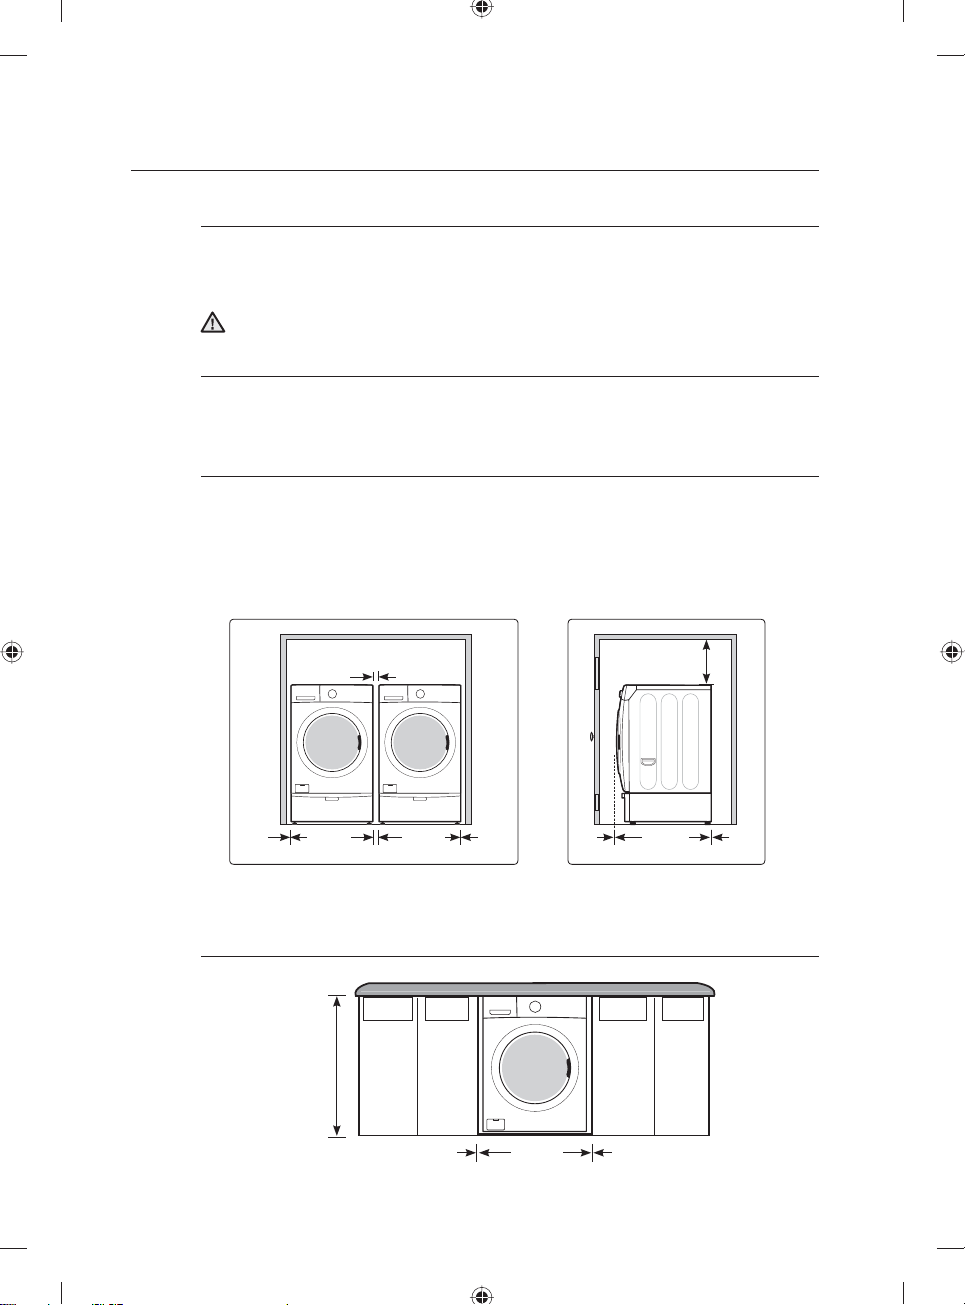
Alcove or closet installation
MINIMUM CLEARANCES FOR CLOSET AND ALCOVE INSTALLATIONS:
Sides - 1 In.(2.5 cm)
Rear - 4 In. (10.2 cm)
If the washer and dryer are installed together, the closet front must have at least a 72 in²
(465cm²) unobstructed air opening. Your washer alone does not require a specifi c air opening.
Top - 17 In.(43.2 cm)
Closet Front - 2 In. (5.1 cm)
A
1 in.
(2.5 cm)
27 in.
(68.6 cm)
1 in.
(2.5 cm)
27 in.
(68.6 cm)
1 in.
(2.5 cm)
A. Recessed area
B. Side view - closet or confi ned area
Undercounter installation(washer only)
39 in.
(99 cm)
1 in.
(2.5 cm)
27 in.
(68.6 cm)
B
2 in.
(5 cm)
1 in.
(2.5 cm)
17 in.
(43.2 cm)
31,1 in.
(80 cm)
4 in.
(10.2 cm)
14_ setting up your washer
WF231ANW-02832D_EN.indd Sec5:14WF231ANW-02832D_EN.indd Sec5:14 2011-04-18 10:38:052011-04-18 10:38:05
Page 15
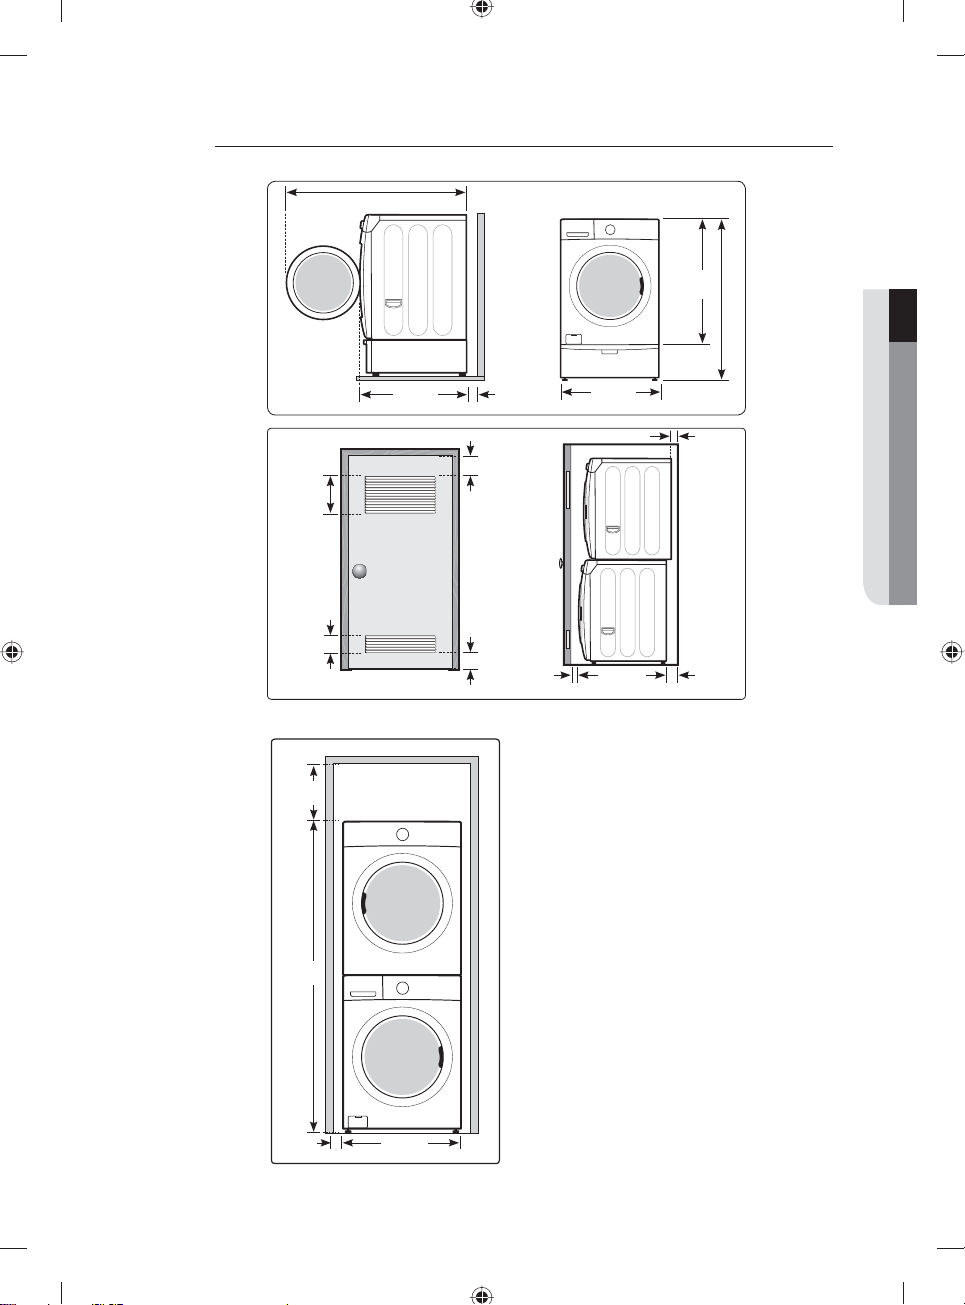
With optional pedestal base or stacking kit
Required Dimensions for Installation With Pedestal
50.8 in. (129 cm) to clear open door
31.1 in.
(80 cm)
48 in.² *
(310 cm²)
24 in.² *
(155 cm²)
Closet or Door
Required Dimensions for Installation With Stacking Kit
4 in.
(10 cm)
3 in.
(7.6 cm)
3 in.
(7.6 cm)
1 in.
(2.5 cm)
27 in.
(68.6 cm)
31.1 in.
(80 cm)
38 in.
(96.5 cm)
53 in.
(134.6 cm)
2.5 in.
(6.3 cm)
5.5 in.**
(14 cm)
01 SETTING UP YOUR WASHER
6 in. *
(15.2 cm)
76 in.
(193 cm)
1 in.
(2.5 cm)
27 in.
(68.6 cm)
* Required spacing
** External exhaust elbow requires additional space.
setting up your washer _15
WF231ANW-02832D_EN.indd Sec5:15WF231ANW-02832D_EN.indd Sec5:15 2011-04-18 10:38:082011-04-18 10:38:08
Page 16
setting up your washer
INSTALLING YOUR WASHER
STEP 1
Selecting a location
Before you install the washer, make sure the location:
• Has a hard, level surface without carpeting or fl ooring that may obstruct ventilation.
• Has no dust, oil and detergent etc.
• Is away from direct sunlight.
• Has adequate ventilation.
• Will not be freezing (below 32 ˚F or 0 ˚C).
• Is away from heat sources such as oil or gas.
• Has enough space so that the washer doesn’t stand on its power cord.
STEP 2
Removing the Shipping Bolts
Before using your Washer, you must remove the four
shipping bolts from the back of the unit.
1. Loosen all the bolts with the supplied wrench.
2. Slide the bolt and spacer up and remove the bolt with
the spacer through the hole in the rear wall of your
washer. Repeat for each bolt.
3. Fill the holes with the supplied plastic covers.
4. Keep the shipping bolts and spacers for future use.
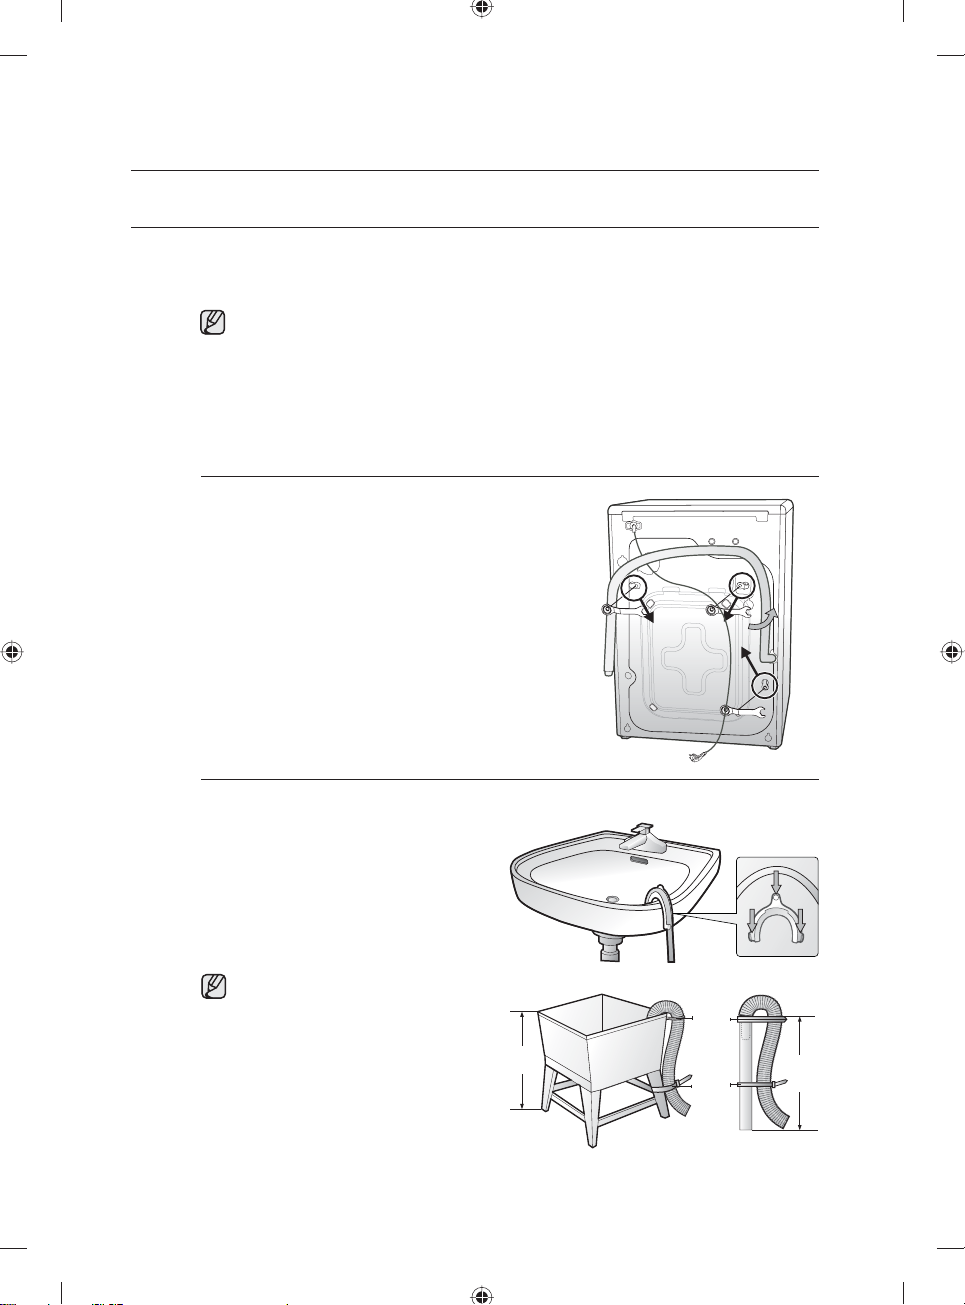
STEP 3
Installing your Washer
1. Place the drain hose in the drain facility (tub,
sink, or standpipe.) If you connect the drain
hose to a standpipe, be sure an airtight
connection is NOT made between the drain
hose and the standpipe. The standpipe
must be at least 18 inches or 46 cm high
and no higher than 96 inches.
Caution must always be exercised to
avoid collapsing or damaging the drain
hose. For best results, the drain hose
should not be restricted in any way – by
elbows, couplings, or excessive lengths.
For situations where the drain hose
cannot be conveniently elevated to at
least 18 in or 46 cm, the drain hose must
be supported.
16_ setting up your washer
WF231ANW-02832D_EN.indd Sec5:16WF231ANW-02832D_EN.indd Sec5:16 2011-04-18 10:38:122011-04-18 10:38:12
Laundry tub Stand pipe
96” Max
18” Min
Hose
retainer
Tie strap
96” Max
18” Min
Page 17
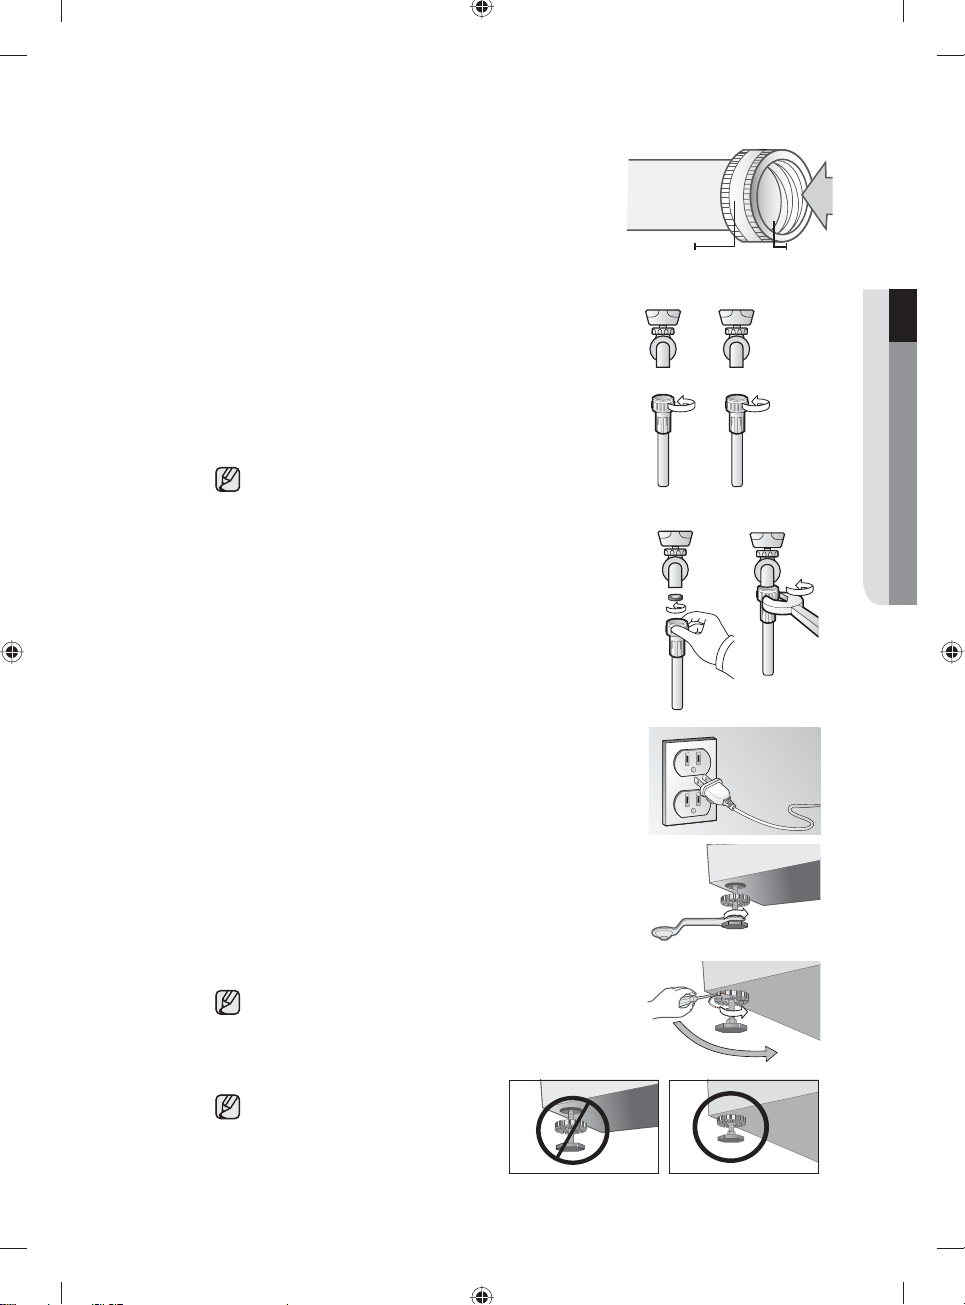
2. Before connect the inlet hoses to water faucets, check to
ensure a washer is inside each coupling on both ends.
3. Check the inlet hose to ensure a washer is inside each fi ll
hose coupling.
Thread the inlet hoses to the HOT and COLD faucet
connections on the washer.
On the other end of the hose, check for one rubber washer
per hose and attach each fi ll hose to the water valve. Make
sure the hose with the Hot printed line is attached to the
HOT faucet. Tighten by hand until snug, then two-thirds of a
turn with pliers.
For correct water use, connect both HOT and COLD water
valves. If either or both are not connected, an “nF” (no fi ll)
error can occur.
4. Turn on the HOT and COLD water supply and check all
connections at the water valve and the faucet for leaks.
5. Plug the power cord into a 3-prong, well grounded 120 volt
60 Hz approved electrical outlet protected by a 15-amp fuse
or comparable circuit breaker.
Your washer is grounded through the third prong of the power
cord when plugged into a three-prong grounded receptacle.
Coupling
Cold Hot
Cold printed Hot printed
Rubber
Washer
01 SETTING UP YOUR WASHER
6. Slide your washer into position.
7. Level your washer by turning the leveling legs in or out as
necessary by hand or by using the wrench included with your
washer.
When your washer is level, tighten the locking nuts using the
wrench or (-) fl athead screwdriver.
Your washer must be leveled on all four sides. A carpenter’s
level should be used on all four corners of your washer. It’s
the best to recheck after the fi rst dozen washes.
Avoid damage to the legs. Do not
move the washer unless the lockingnuts are fastened to the bottom of the
washer.
setting up your washer _17
WF231ANW-02832D_EN.indd Sec5:17WF231ANW-02832D_EN.indd Sec5:17 2011-04-18 10:38:142011-04-18 10:38:14
Page 18

washing a load of laundry
LOADING YOUR WASHER
• You can fi ll the tub with dry, unfolded clothes, but DO NOT OVERLOAD the tub.
• Overloading may reduce washing effi ciency, cause excess wear, and possibly cause creasing or
wrinkling of the load.
• Wash delicate items such as bras, hosiery, and other lingerie in the Delicates cycle with similar
lightweight items.
• When washing big bulky items or a few smaller items that don’t fi ll the tub completely – a rug, a pillow, stuffed
toys, or one or two sweaters, for example – add a few towels to improve tumbling and spin performance.
During the spin cycle, the washer may add additional water to redistribute any excess unbalance
inside the drum.
• When washing heavily soiled loads, not overloading your Washer is very important to assure good
cleaning results.
• To add a forgotten item:
1. Press the Power button.
2. Press the Start/Pause Button.
3. Wait for the Door Lock light to go out (5 seconds).
4. Add the item, close the door, and press the Start/Pause Button.
After a 10-second pause, the cycle resumes.
To ensure thorough cleaning, add items within fi ve minutes of starting the wash cycle.
GETTING STARTED
1. Load your Washer.
2. Close the door.
3. Press the Power button.
4. Add detergent and additives to the dispenser (see pages 20~21).
5. Select the appropriate cycle and options for the load (see pages 18~19).
6. Press the Start/Pause Button.
7. The Wash Indicator light illuminates.
8. The estimated cycle time appears in the display.
The time may fl uctuate to better indicate the time remaining in the cycle.
The actual time required for a cycle may differ from the estimated time in the display depending on the
water pressure, water temperature, detergent, and laundry.
9. Before your washer starts to fi ll, it will make a series of clicking noises to check the door lock and do a
quick drain.
• When the cycle is complete, the Door Lock light goes out and “End” appears in the display.
• DO NOT attempt to open the door until the Door Lock light is off. To add a forgotten item, see
“Loading your Washer” section. (page 19)
• When your Washer is restarted after a pause, expect a delay of up to 15 seconds before the cycle
continues.
• Pressing Power cancels the cycle and stops your washer.
• The Wash, Rinse and Spin indicator lights illuminate during those portions of the cycle.
Do not place anything on top of your washer while it is running.
WARNING
18_ washing a load of laundry
WF231ANW-02832D_EN.indd Sec3:18WF231ANW-02832D_EN.indd Sec3:18 2011-04-18 10:38:192011-04-18 10:38:19
Page 19
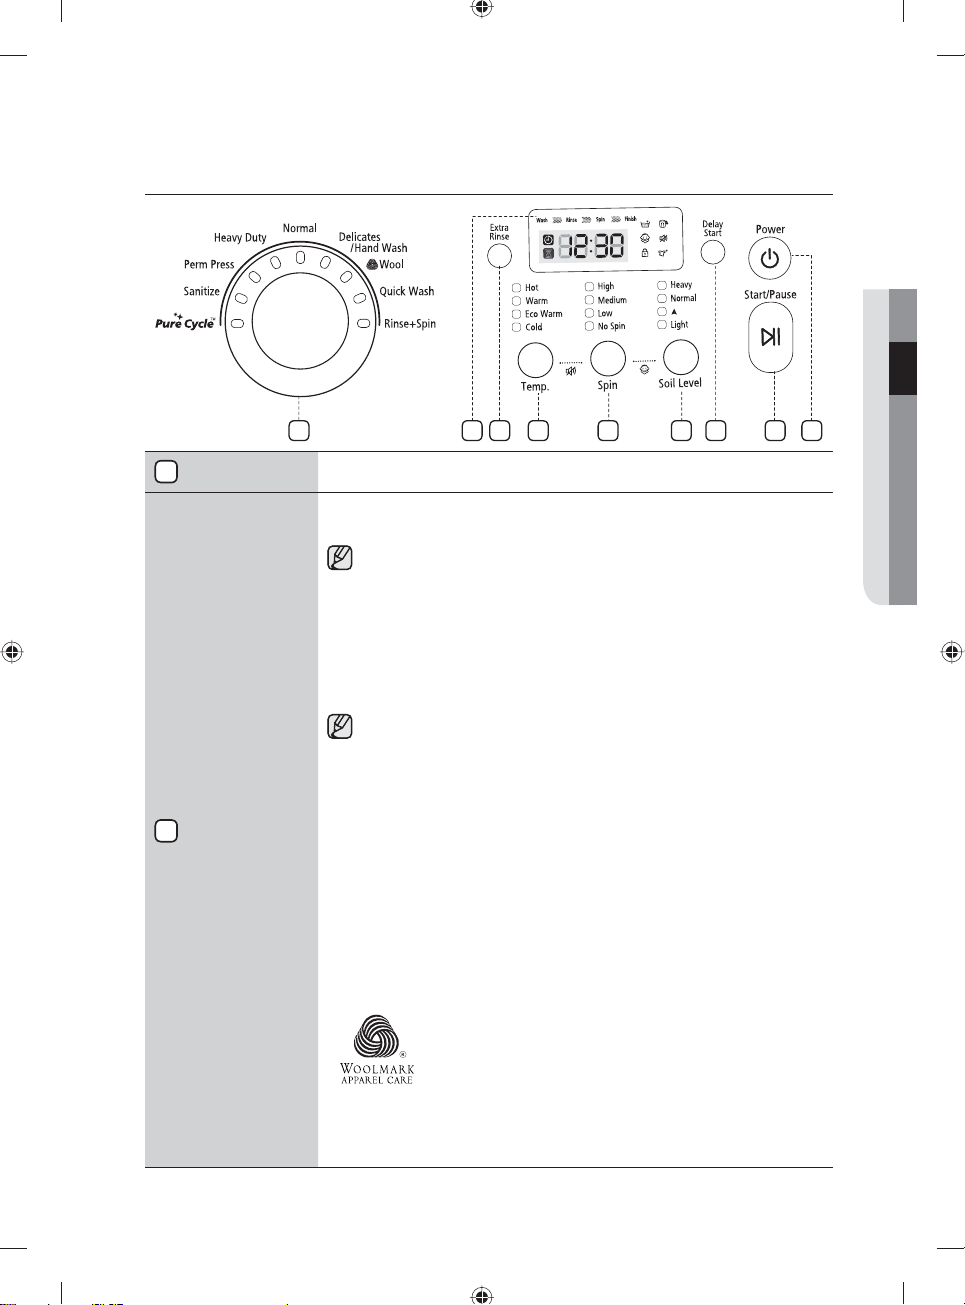
OVERVIEW OF THE CONTROL PANEL
Digital graphic
1
display
2
Cycle Selector
1
Displays the remaining cycle time, all cycle information, and error messages.
Select the appropriate cycle for the type of load.
This will determine the tumble pattern and spin speed for the cycle.
To minimize wrinkling of laundry, select the Perm Press cycle.
Normal - For most fabrics including cottons, linens, and normally soiled garments.
Heavy Duty - For sturdy, colorfast fabrics, and heavily soiled garments.
Perm Press - For wash-and-wear, synthetic fabrics, and lightly to normally
soiled garments.
Sanitize - For heavily soiled, colorfast garments. This cycle heats the water to
150°F to eliminate bacteria.
If Pause is selected during the heating portion of the Sanitize Cycle, your
Washer door will remain locked for your safety.
Pure Cycle
TM
Regular use (after every 40 washes) is recommended. No detergent or bleach
needed.
Delicates/Hand Wash - For sheer fabrics, bras, lingerie silk, and other
handwash-only fabrics. For best results, use liquid detergent.
Wool - For machine-washable wool. Loads should be under 8 pounds. For
best resultes we recommend a load of 4.4 pounds or less.
• The Wool cycle washes laundry by moving the wash drum horizontally
to maintain the characteristics of the wool fi bers and to prevent damage
to the cloth. It then stops for a while to allow the laundry to soak in the
water. This pause in the operation of the Wool cycle is normal.
• We recommend you use a neutral detergent to prevent damage to the
cloth and to improve the washing results.
The wool wash cycle of this machine has been approved
Quick Wash - For lightly soiled garments needed quickly.
Rinse + Spin - Use for loads that need rinsing only or to add rinse-added
fabric softener to a load.
2 4
- Use for drum cleaning. It cleanses drum of dirt and bacteria.
by Woolmark for the washing of machine washable
Woolmark products provided that the products are washed
according to the instructions on the garment label and
those issued by the manufacturer of this washing machine,
M0914(Woolmark approval number).
02 WASHING A LOAD OF LAUNDRY
6
5
73 8
9
washing a load of laundry _19
WF231ANW-02832D_EN.indd Sec3:19WF231ANW-02832D_EN.indd Sec3:19 2011-04-18 10:38:192011-04-18 10:38:19
Page 20
washing a load of laundry
Extra Rinse
3
button
Temperature
4
selection button
Spin selection
5
button
Soil Level
6
selection button
Delay Start
7
button
Start/Pause
8
selection button
Power button
9
Add an additional rinse at the end of the cycle to more thoroughly remove
laundry additives and perfumes.
Press the button repeatedly to cycle through the different water temperature options.
Hot - Whites and heavily soiled, colorfast items.
Warm - Colorfast items. When warm rinse is selected, only the fi nal rinse will be warm.
The other rinses will be cold to conserve energy.
Eco Warm - Moderately soiled, colorfast items; most wrinkle-free items.
Cold- Brightly colored, very lightly soiled items.
Press the button repeatedly to cycle through the different spin speed options.
High - Use for underwear, t-shirts, jeans, and sturdy cottons.
Medium Low - Use for delicate items needing a slow spin speed.
No Spin - Drains your Washer without spinning. Use for extremely delicate
items that cannot tolerate any spin.
Spin Only – Only the spin cycle is performed.
Press the button to select the Soil Level/washing time.
Heavy - For heavily soiled loads.
Normal - For moderately soiled loads. This setting is best for most loads.
S
Light - For lightly soiled loads.
Any cycle can be delayed for up to 19 hours in one-hour i
Displayed hour indicates the time at which the wash will be started.
Press to pause and restart programs.
Press once to turn your washer on. Press again to turn your washer off. If
the washer is left on for more than 10 minutes without any buttons being
touched, the power automatically turns off.
Use for jeans, wrinkle-free or wash-and-wear items, and synthetics.
ncrements.
20_ washing a load of laundry
WF231ANW-02832D_EN.indd Sec3:20WF231ANW-02832D_EN.indd Sec3:20 2011-04-18 10:38:202011-04-18 10:38:20
Page 21

Child Lock
This function prevents children from playing with your washer.
Activating the Child Lock function
Press and hold both the Spin and Soil Level buttons simultaneously for approximately 3 seconds.
• When you activate the Child Lock function, the door locks and the “Child Lock [
]” lamp
illuminates.
• If you press the Start/Pause button after you have activated the Child Lock function , none
of the buttons will work except for the Power button.
• If you press a button when the buttons are locked, the “Child Lock [
]” lamp blinks.
Pausing the Child Lock function
When the door is locked or the buttons are locked by the Child Lock function, you can pause the
Child Lock operation for 1 minute by pressing and holding both the Spin and Soil Level buttons
simultaneously for approximately 3 seconds.
• If you pause the Child Lock mode temporarily, the door lock is released for 1 minute for user
convenience. During this period, the “Child Lock [
]” lamp blinks.
• If you open the door after the minute is over, an alarm sounds for up to 2 minutes.
• If you close the door within the 2 minutes, the door is locked and the Child Lock function is
reactivated. If you close the door after the 2 minutes, the door is not locked automatically
and no alarm sounds.
Deactivating the Child Lock function
Press and hold both the Spin and Soil Level buttons simultaneously for approximately 6
seconds.
• When you deactivate the Child Lock function, the door is unlocked and the “Child Lock [
is turned off.
• The Child Lock function prevents children or the infi rm from accidently operating the
WARNING
CAUTION
washer and injuring themselves.
• If a child enters the washing machine, the child may become trapped and suffocate.
• Once you have activated the Child Lock function, it continues working even if the power
is turned off.
• Opening the door by force can result in injury due to damage to the product.
To add laundry after you have activated the Child Lock function, you must fi rst pause or
deactivate the Child Lock function.
If you want to open the door of the washing machine when the Child Lock function is
activated:
• Pause or deactivate the Child Lock function.
• Turn the washing machine off and then on again.
02 WASHING A LOAD OF LAUNDRY
]”
washing a load of laundry _21
WF231ANW-02832D_EN.indd Sec3:21WF231ANW-02832D_EN.indd Sec3:21 2011-04-18 10:38:202011-04-18 10:38:20
Page 22
washing a load of laundry
Spin Only
If you press the Power button and then press and hold the Spin button for 2 seconds, the spin
time will be displayed on the display panel.
Then, press the Spin button repeatedly until the required spin level is selected, and then press
the Start/Pause button.
Before pressing the Spin Only button to use the Spin Only function, you can select a cycle
with the Cycle Selector. If you have selected a cycle, you can only select the spin level
corresponding to the selected cycle.
Garment+
You can add or take out laundry items even after the wash has started, as long as the
“Garment+ ” light is turned on. Pressing the Start/Pause button unlocks the door, unless the
water is too hot or if there is too much water in your washer. If you are able to unlock the door
and wish to continue the wash cycle, close the door, and then press the Start/Pause button.
22_ washing a load of laundry
WF231ANW-02832D_EN.indd Sec3:22WF231ANW-02832D_EN.indd Sec3:22 2011-04-18 10:38:202011-04-18 10:38:20
Page 23
DETERGENT USE
Your Washer is designed to use high effi ciency (HE) detergents.
• For best cleaning results, effi ciency detergents such as Tide HE, Wisk
HE, Cheer HE or Gain HE*. High effi ciency detergents contain suds
suppressors that reduce or eliminate suds. When fewer suds are
produced, the load tumbles more effi ciently and cleaning is maximized.
Regular detergent is NOT recommended. Please use only HE
detergents.
WARNING
Reducing the amount of detergent may reduce the quality of cleaning. It is important to pre–treat
stains, sort carefully by color and soil level, and avoid overloading.
* Brand names are trademarks of their respective manufacturers.
FEATURES
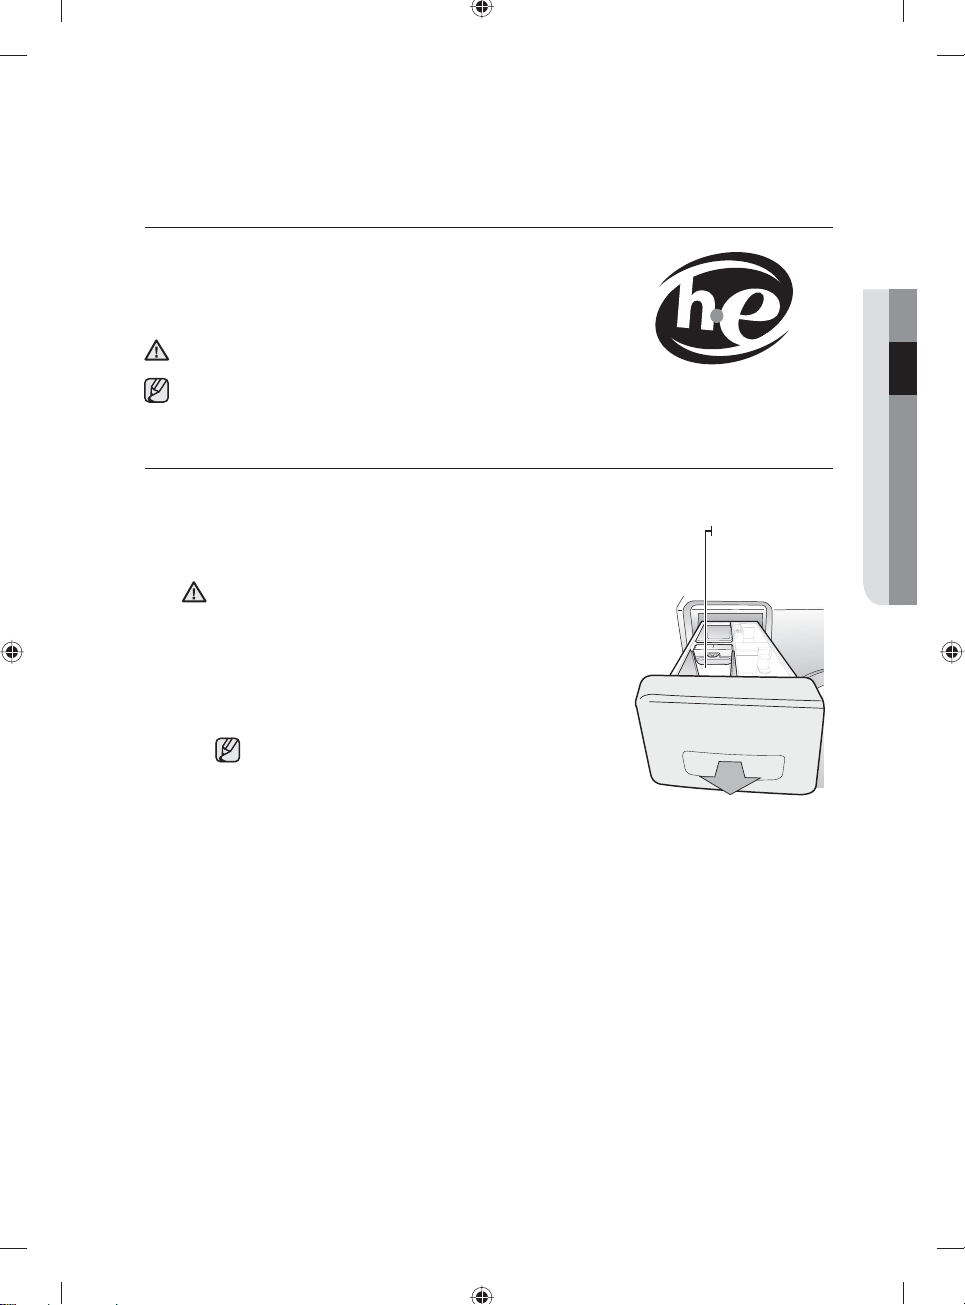
Automatic dispenser
Your Washer has separate compartments for dispensing
detergent and color-safe bleach, chlorine bleach, and
fabric softener. Add all laundry additives to their respective
compartments before starting your Washer.
The automatic dispenser MUST ALWAYS be in place before
starting your Washer.
CAUTION
DO NOT open the automatic dispenser when your washer is running.
To use:
• Never exceed the manufacturer’s recommendations when
adding detergent.
• This compartment holds liquid detergent for the main wash
cycle, which is added to the load at beginning of cycle.
When using powdered detergent, remove the liquid
detergent compartment from the detergent drawer. The
washer will not dispense powdered detergent from the
liquid detergent compartment.
Liquid detergent
compartment
02 WASHING A LOAD OF LAUNDRY
washing a load of laundry _23
WF231ANW-02832D_EN.indd Sec3:23WF231ANW-02832D_EN.indd Sec3:23 2011-04-18 10:38:222011-04-18 10:38:22
Page 24

washing a load of laundry
Detergent compartment
1. Pour the recommended amount of laundry detergent directly into the detergent compartment
before starting your Washer.
2. If you are using color-safe bleach, add it with the detergent to the detergent compartment.
When adding color-safe bleach with detergent, it is best if both laundry products are in the
same form – granular or liquid.
Bleach compartment
(Liquid chlorine bleach only)
1. Add chlorine bleach to the bleach compartment.
DO NOT exceed the MAX FILL line.
2. Avoid splashing or over–fi lling the compartment.
3. Your Washer automatically dispenses bleach into the tub
at the appropriate time.
4. The dispenser automatically dilutes liquid chlorine bleach
before it reaches the wash load.
• Never pour undiluted liquid chlorine bleach directly
onto the load or into the tub. It is a powerful
chemical and can cause fabric damage, such as
weakening of the fi bers or color loss, if not used
properly.
• If you prefer to use color–safe, non–chlorine bleach,
add it to the appropriate detergent compartment.
DO NOT pour color–safe bleach into the Bleach
compartment.
Fabric Softener
compartment
Bleach
compartment
Fabric softener compartment
1. Pour the recommended amount of liquid fabric softener into the softener compartment.
For smaller loads, use less than one capful.
2. The dispenser automatically releases liquid fabric softener at the proper time during the rinse
cycle.
• Use the softener compartment ONLY for liquid fabric softeners.
• If the Fabric Softener is highly concentrated, (thick) it could remain in the Fabric Softener
compartment after the wash cycle is completed. If the Fabric Softener being used is
highly concentrated, it is recommended to dilute it with water. Then add the diluted
mixture to the MAX FILL line in the Fabric Softener compartment.
• DO NOT use the Downy Ball* in the fabric softener compartment with this Washer. It will
not add fabric softener at the appropriate time.
Use the detergent Compartment.
• It is not recommended using liquid fabric softener that is too sticky as it may not mix
with the water suffi ciently.
* Brand names are trademarks of their respective manufacturers.
24_ washing a load of laundry
WF231ANW-02832D_EN.indd Sec3:24WF231ANW-02832D_EN.indd Sec3:24 2011-04-18 10:38:232011-04-18 10:38:23
Page 25

cleaning and maintaining your
washer
Keeping your washer clean improves its performance, wards off unnecessary
repairs, and lengthens its life.
CLEANING THE EXTERIOR
Turn off the water faucets after fi nishing the day’s washing.
This will shut off the water supply to your Washer and prevent the unlikely possibility of damage from
escaping water. Leave the door open to allow the inside of your Washer to dry out.
Use a soft cloth to wipe up all detergent, bleach, or other spills as they occur.
Clean the following as recommended:
Control Panel – Clean with a soft, damp cloth. Do not use abrasive powders or cleaning pads. Do not spray
cleaners directly on the panel.
Cabinet – Clean with soap and water.
CLEANING THE INTERIOR
Clean the interior of your Washer periodically to remove any dirt, soil, odor, mold, mildew, or bacterial
residue that may remain in your Washer as a result of washing clothes.
Failure to follow these instructions may result in unpleasant conditions, including odors and/or permanent
stains on your Washer or laundry.
Hard water deposits may be removed, if needed. Use a cleaner labeled “Washer safe”.
CLEANING THE DISPENSERS
The Automatic Dispenser may need to be cleaned periodically due to laundry additive buildup.
1. Pull the detergent liquid holder out of the detergent compartment.
2. Remove the Siphon Cap from the fabric softener and bleach
compartments.
3. Wash all of the parts under running water.
4. Clean the dispenser recess with a soft brush.
5. Reinsert the Siphon Cap, and push it fi rmly into place.
6. Push the dispenser back into place.
7. Run a Rinse + Spin cycle without any load in your Washer.
1
2
Siphon cap
03 CLEANING AND MAINTAINING
STORING YOUR WASHER
Washers can be damaged if water is not removed from hoses and internal components before storage.
Prepare your washer for storage as follows:
• Select the Quick Wash cycle and add bleach to the automatic dispenser. Run your washer through the
cycle without a load.
• Turn the water faucets off and disconnect the inlet hoses.
• Unplug your washer from the electrical outlet and leave your washer door open to let air circulate inside
the tumbler.
• If your washer has been stored in below–freezing temperatures, allow time for any leftover water in your
washer to thaw out before use.
cleaning and maintaining your washer _25
WF231ANW-02832D_EN.indd Sec7:25WF231ANW-02832D_EN.indd Sec7:25 2011-04-18 10:38:242011-04-18 10:38:24
Page 26

cleaning and maintaining your
washer
CLEANING THE DEBRIS FILTER
We recommend cleaning the debris fi lter when water does not drain well or the “nd” error message is displayed.
1. Open the fi lter cover by pressing and pulling the handle
of the fi lter cover with your fi nger.
Filter cover
2. Holding the drain cap, pull the drain tube that
is hooked on the guide hook to the front.Do
not pull the drain tube with excessive force.
3. Place a bowl under the washing machine
to catch any remaining water. Then, hold
the drain tube with one hand, and turn the
emergency drain cap counter clockwise with
the other hand to separate it from the drain
tube.
4. Drain the remaining water completely.
5. Pull out the debris cap and debris fi lter assembly.
Debris fi lter cap
6. Wash any dirt or other material from the
debris fi lter. Make sure the drain pump
propeller behind the debris fi lter is not
blocked.
7. When you have fi nished cleaning the fi lter, insert the debris
cap and fi lter assembly back into the washer. Turn the
debris fi lter cap clockwise until the indicator on the debris
fi lter cap is in the 12 o’clock position, pointing to the
indicator on the washer.
8. Re-attach the emergency drain cap to the drain tube, and
then hook the tube to the hook guide.
9. Re-install the fi lter cover.
Drain cap
Debris fi lter
cap
Step 2Step 1
Debris fi lter
26_ cleaning and maintaining your washer
WF231ANW-02832D_EN.indd Sec7:26WF231ANW-02832D_EN.indd Sec7:26 2011-04-18 10:38:262011-04-18 10:38:26
Page 27

CLEANING THE DOOR SEAL/BELLOW
1. Open the washer door and remove any clothing or items from the washer.
2. Inspect the gray colored seal/bellow between the door
opening and the basket for stained areas. Pull back the
seal/bellow to inspect all areas under the seal/bellow and to
check for foreign objects.
seal/bellow
3. If stained areas are found, wipe down these areas of the seal/bellow, using the procedure
that follows.
a) Mix a dilute solution containing ¾ cup (177 mL) of liquid chlorine bleach and 1 gal. (3.8
L) of warm tap water.
b) Wipe the seal/bellow area with the dilute solution using a damp cloth.
c) Let stand 5 minutes.
d) Wipe down area thoroughly with a dry cloth and let the washer interior air dry with the
door open.
IMPORTANT:
• Wear rubber gloves when cleaning for prolonged periods.
• Refer to the bleach manufacturer’s instructions for proper use.
PRESERVING THE TOP COVER AND THE FRONT FRAME
Do not place any heavy or sharp objects or a detergent box on the washer. Keep them on the purchased
pedestal or in a separate storage box.
03 CLEANING AND MAINTAINING
The object may scratch or damage the top cover or fall off the washer.
CAUTION
Since the entire washer has a high-gloss fi nish, the surface can be scratched or damaged. Avoid
scratching or damaging the surface when using the washer.
cleaning and maintaining your washer _27
WF231ANW-02832D_EN.indd Sec7:27WF231ANW-02832D_EN.indd Sec7:27 2011-04-18 10:38:292011-04-18 10:38:29
Page 28

troubleshooting and
information codes
CHECK THESE POINTS IF YOUR WASHER…
PROBLEM SOLUTION
will not start..
has no water or not enough
water..
has detergent remains in
the automatic dispenser
after the wash cycle is
complete.
vibrates or is too noisy.
stops
• Make sure the door is fi rmly closed.
• Make sure your Washer is plugged in.
• Make sure the water source faucets are open.
• Make sure to press the Start/Pause Button to start your Washer.
• Make sure the Child Lock is not activated. See page 14.
• Before your Washer starts to fi ll, it will make a series of clicking noises
to check the door lock and do a quick drain.
• Check the fuse or reset the circuit breaker
• Turn both faucets on fully.
• Make sure the door is tightly closed.
• Straighten the water inlet hoses.
Disconnect hoses and clean screens. Hose fi lter screens may be plugged.
•
• Open and close the door, then press the Start/Pause Button.
• Make sure your Washer is running with suffi cient water pressure.
• Make sure the Detergent Selector dial is in the upper position when
using granular detergent.
• Make sure your Washer is set on a level surface. If the surface is not
level, adjust your Washer feet to level the appliance.
• Make sure that the shipping bolts are removed.
• Make sure your Washer is not touching any other object.
• Make sure the laundry load is balanced.
• Plug the power cord into a live electrical outlet.
• Check the fuse or reset the circuit breaker.
• Close the door and press the Start/Pause Button to start your
Washer.
For your safety, your Washer will not tumble or spin unless the door is
closed.
• Before your Washer starts to fi ll, it will make a series of clicking noises
to check the door lock and do a quick drain.
• There may be a pause or soak period in the cycle. Wait briefl y and it
may start.
• Check the screens on the inlet hoses at the faucets for obstructions.
Clean the screens periodically.
28_ troubleshooting and information codes
WF231ANW-02832D_EN.indd Sec10:28WF231ANW-02832D_EN.indd Sec10:28 2011-04-18 10:38:292011-04-18 10:38:29
Page 29

fi lls with the wrong
temperature water.
door locked or will not
open.
does not drain and/or spin.
load is too wet at the end of
the cycle.
leaks water.
has excessive suds.
There appears to be an
insuffi cient amount of
water.
• Turn both faucets on fully.
• Make sure the temperature selection is correct.
• Make sure the hoses are connected to the correct faucets.
Flush water lines.
• Check the water heater. It should be set to deliver a minimum 120° F
(49° C) hot water at the tap. Also check the water heater capacity and
recovery rate.
• Disconnect the hoses and clean the screens. The hose fi lter screens
may be plugged.
• As your Washer is fi lling, the water temperature may change as
the automatic temperature control feature checks incoming water
temperature. This is normal.
• While your Washer is fi lling, you may notice just hot and/or just
cold water going through the dispenser when cold or warm wash
temperatures are selected. This is a normal function of the automatic
temperature control feature as your Washer determines the
temperature of the water.
• Press the Start/Pause Button to stop your Washer.
• Your Washer door will remain locked during the heating portion of the
Sanitize Cycle
• It may take a few moments for the door lock mechanism to disengage.
• Check the fuse or reset the circuit breaker.
• Straighten the drain hoses. Eliminate kinked hoses. If there is a drain
restriction, call for service.
• Close the door and press the Start/Pause Button. For your safety,
your Washer will not tumble or spin unless the door is closed.
• Make sure the debris fi lter is not clogged.
• Use the High or Extra High spin speed.
• Use high effi ciency detergent to reduce over–sudsing.
• Load is too small. Very small loads (one or two items) may become
unbalanced and not spin out completely.
• Make sure the door is fi rmly closed.
• Make sure all hose connections are tight.
• Make sure the end of the drain hose is correctly inserted and secured
to the drainage system.
• Avoid overloading.
• Use high effi ciency detergent to prevent over–sudsing.
• Use high effi ciency detergent to prevent over-sudsing.
• Reduce the detergent amount for soft water, small or lightly soiled loads.
• Non-HE detergent is NOT recommended.
• The Front Loading Washer provides maximum performance using a
small amount of water.
• Since the water supply is not completed at the beginning of the wash,
the amount of water may appear to be small.
• Because the amount of time that water is supplied for differs depending
on the type of laundry, the amount of water may seem small.
• Since water is supplied from the bottom of the tub and the supplied
water is absorbed by the laundry, the amount of water may seem small.
04 TROUBLESHOOTING
troubleshooting and information codes _29
WF231ANW-02832D_EN.indd Sec10:29WF231ANW-02832D_EN.indd Sec10:29 2011-04-18 10:38:302011-04-18 10:38:30
Page 30

troubleshooting and
information codes
INFORMATION CODES
Information codes may be displayed to help you better understand what is occurring with your Washer.
CODE SYMBOL MEANING SOLUTION
Unbalanced load prevented your
Washer from spinning.
Door is open when Washer is
running.
Your Washer failed to lock the
door.
Water temperature control
problem.
(Heater Control problem)
Your Washer has tried to fi ll but
has not reached the proper water
level.
The door will not unlock. Make sure the door is fi rmly closed.
Motor not running properly. Restart the cycle pressing the Start/Pause
Your washer is not draining.
It can also mean that the unit
senses a small clog while draining.
Your Washer has tried to fi ll but
was unsuccessful.
Check if the hot water supply
hose is connected.
The hot/cold water hose
connection is not correct.
Electric service was lost when
Washer was running.
Redistribute the load, press the Start/Pause
Button.
Close the door tightly and restart the cycle.
If the code reappears, call for service.
Close the door tightly and restart the cycle.
If the code reappears, call for service.
Call for service.
Call for service.
Push the Power button to turn off your Washer,
then turn it on again. If the code reappears, call
for service.
Button. If the code reappears, call for service.
First of all, clean up the drain fi lter. Then
check the following.
1) Turn off the unit and turn it on again.
2) Select only the Spin Cycle.
3) Press the Start/Pause to drain the water.
Clean the debris fi lter.
If it still does not drain, call for service.
Make sure the water faucets are open all the
way. Check for kinked hoses.
Check the inlet screens on the fi ll hoses.
If you use a Flood Safety Device, then please
remove the device and connect the water hoses
directly to the unit.
You must connect the hot water supply hose
because hot water is supplied by the Auto
Temperature Control (A.T.C.) function if the
temperature of the cold water is lower than 59°F.
Please connect the hot/cold water hose
connection correctly.
Restart the cycle by pressing the Start/Pause
Button.
30_ troubleshooting and information codes
WF231ANW-02832D_EN.indd Sec10:30WF231ANW-02832D_EN.indd Sec10:30 2011-04-18 10:38:302011-04-18 10:38:30
Page 31

A fault is detected in the water
Call for service
level sensor.
Jammed Key. Call for service
Motor speed sensor problem. Restart the cycle.
If the code reappears, call for service.
Temperature sensor problem. Restart the cycle.
If the code reappears, call for service.
High current detected. Restart the cycle.
If the code reappears, call for service.
High/Low voltage detected. Restart the cycle.
If the code reappears, call for service.
Too many suds are detected
To prevent, reduce the amount of detergent.
during the washing session.
The unit is put on hold until the
suds are reduced. Then, the unit
will go back to the operation.
When it fi nishes washing, End and
Sd codes will blink in turn.
For any codes not listed above, call 1–800–726–7864 (1–800–SAMSUNG)
04 TROUBLESHOOTING
troubleshooting and information codes _31
WF231ANW-02832D_EN.indd Sec10:31WF231ANW-02832D_EN.indd Sec10:31 2011-04-18 10:38:322011-04-18 10:38:32
Page 32

appendix
FABRIC CARE CHART
The following symbols provide garment care direction. The clothing care labels include symbols for washing,
bleaching, drying and ironing, or dry cleaning when necessary. The use of symbols ensures consistency
among garment manufacturers of domestic and imported items. Follow care label directions to maximize
garment life and reduce laundering problems.
Wash Cycle Special Instructions
Normal Line Dry/ Hang to Dry Do Not Wash
Permanent Press /
Wrinkle Resistant /
Wrinkle Control
Gentle/Delicates Dry Flat Do Not Bleach
Hand Wash
Water Temperature**
Hot Medium Do Not Iron
Warm Low
Cold Any Heat Dry Clean
Bleach
Any Bleach (when
needed)
Only Non-Chlorine
(color-safe)
Bleach (when needed)
Tumble Dry Cycle Medium Dry Flat
Normal
Permanent Press/
Wrinkle Resistant/
Wrinkle Control
Gentle/ Delicates
Drip Dry Do Not Wring
Heat Setting
High
No Heat/Air Do Not Dry Clean
Iron-Dry or Steam
Temperatures
High Drip Dry
Low
Warning Symbols for
Laundering
Dryclean
Do Not Tumble Dry
No Steam (added to
iron)
Line Dry/ Hang to Dry
For machine-washable
wool. Loads should be
under 8 pounds.
** The dot symbols represent appropriate wash water temperatures for various items. The temperature
range for Hot is 105° - 125° F/ 41° - 52°C, for Warm 85° - 105° F/29° - 41° C and for Cold 60° - 85° F/16°
- 29° C. (Wash water temperature must be a minimum of 60° F/16°C for detergent activation and effective
cleaning.) The clothes Washer may not ensure these temperatures because the actual water temperatures
entering your Washer are dependent on water heater settings and regional water supply temperatures. For
example, cold water entering the home in the northern states during winter may be 40° F/4° C which is
too cold for effective cleaning. The water temperature in this situation will need to be adjusted by selecting
a warm setting, adding some hot water to the MAX FILL line or using your Washer’s heating option, if
available.
32_ appendix
WF231ANW-02832D_EN.indd Sec4:32WF231ANW-02832D_EN.indd Sec4:32 2011-04-18 10:38:352011-04-18 10:38:35
Page 33

HELPING THE ENVIRONMENT
• Your Washer is manufactured from recyclable materials. If you decide to dispose of it, please observe
local waste disposal regulations. Cut off the power cord so that the appliance cannot be connected
to a power source. Remove the door so that animals and small children cannot get trapped inside the
appliance.
• Do not exceed the detergent quantities recommended in the detergent manufacturers’ instructions.
• Use stain removal products and bleaches before the wash cycle only when necessary.
• Save water and electricity by only washing full loads (the exact amount depends upon the program used).
DECLARATION OF CONFORMITY
This appliance complies with UL2157.
SPECIFICATIONS
TYPE FRONT LOADING WASHER
DIMENSIONS
A.
Height-Overall
B. Width
C. Depth with door open 90°
D. Depth
Div Inches (cm)
38” (96.5)
27” (68.6)
50.8’’ (129)
31.1” (80)
C
D
A
05 APPENDIX
B
WATER PRESSURE
WEIGHT
HEATER RATING
POWER
CONSUMPTION
SPIN REVOLUTION
WASHING
WASHING AND HEATING
SPIN
DRAIN
WF210*/WF220*
20-116 psi (137 kPa ~ 800 kPa)
183lbs (83 kg)
900 W
120 V 140 W
120 V 960 W
120 V 430 W
120 V 80 W
1100 rpm
appendix _33
WF231ANW-02832D_EN.indd Sec4:33WF231ANW-02832D_EN.indd Sec4:33 2011-04-18 10:38:352011-04-18 10:38:35
Page 34

appendix
CYCLE CHART
Use this chart to set the best cycle and option for you laundry.
FUNCTIONS OPTIONS
Temp Spin Soil Level
H W EW C H M L NS H N L
Normal
Heavy Duty
Perm Press
Sanitize
Delicates/Hand
Wash
Wool
Quick Wash
Rinse + Spin
Temp Spin Soil Level
H: Hot
W: Warm
EW: Eco Warm
C: Cold
• •••••••••••
•••••••••••••
••••••••••••
• ••• • ••
••• •••••••
•• •• • ••
•••••••••••••
••••• ••
H: High
M: Medium
L: Low
NS: No Spin
H: Heavy
N: Normal
L: Light
Delay
Start
Extra
Rinse
Pure
Cycle
Time
(mins)
54
95
47
117
41
59
38
20
34_ appendix
WF231ANW-02832D_EN.indd Sec4:34WF231ANW-02832D_EN.indd Sec4:34 2011-04-18 10:38:362011-04-18 10:38:36
Page 35

warranty
WARRANTY
SAMSUNG WASHER
LIMITED WARRANTY TO ORIGINAL PURCHASER
This SAMSUNG brand product, as supplied and distributed by SAMSUNG ELECTRONICS AMERICA, INC.
(SAMSUNG) and delivered new, in the original carton to the original consumer purchaser, is warranted by
SAMSUNG against manufacturing defects in materials and workmanship for a limited warranty period of:
One (1) Year parts & Labor
Two (2) years control board (part)
Three (3) years stainless tub part
Ten(10) years motor part
This limited warranty begins on the original date of purchase, and is valid only on products purchased and
used in the United States. To receive warranty service, the purchaser must contact SAMSUNG for problem
determination and service procedures. Warranty service can only be performed by a SAMSUNG authorized
service center. The original dated bill of sale must be presented upon request as proof of purchase to
SAMSUNG or SAMSUNG’s authorized service center. SAMSUNG will provide in-home service during the
warranty period at no charge, subject to availability within the contiguous United States. In-home service is
not available in all areas.
To receive in-home service, product must be unobstructed and accessible to the service agent. If service
is not available, SAMSUNG may elect to provide transportation of the product to and from an authorized
service center.
SAMSUNG will repair, replace, or refund this product at our option and at no charge as stipulated herein,
with new or reconditioned parts or products if found to be defective during the limited warranty period
specifi ed above. All replaced parts and products become the property of SAMSUNG and must be returned
to SAMSUNG. Replacement parts and products assume the remaining original warranty, or ninety (90)
days, whichever is longer.This limited warranty covers manufacturing defects in materials and workmanship
encountered in normal, noncommercial use of this product and shall not apply to the following: damage
that occurs in shipment; delivery and installation; applications and uses for which this product was not
intended; altered product or serial numbers; cosmetic damage or exterior fi nish; accidents, abuse, neglect,
fi re, water, lightning, or other acts of nature or God; use of products, equipment, systems, utilities, services,
parts, supplies, accessories, applications, installations, repairs, external wiring or connectors not supplied
or authorized by SAMSUNG that damage this product or result in service problems; incorrect electrical
line voltage, fl uctuations and surges; customer adjustments and failure to follow operating instructions,
maintenance and environmental instructions that are covered and prescribed in the instruction book;
product removal and reinstallation; problems caused by pest infestations. This limited warranty does not
cover problems resulting from incorrect electric current, voltage or supply, light bulbs, house fuses, house
wiring, cost of a service call for instructions, or fi xing installation errors. SAMSUNG does not warrant
uninterrupted or error-free operation of the product.
warranty _35
WF231ANW-02832D_EN.indd Sec11:35WF231ANW-02832D_EN.indd Sec11:35 2011-04-18 10:38:362011-04-18 10:38:36
Page 36

warranty
EXCEPT AS SET FORTH HEREIN, THERE ARE NO WARRANTIES ON THIS PRODUCT EITHER EXPRESS
OR IMPLIED, AND SAMSUNG DISCLAIMS ALL WARRANTIES INCLUDING, BUT NOT LIMITED TO, ANY
IMPLIED WARRANTIES OF MERCHANTABILITY, INFRINGEMENT OR FITNESS FOR A PARTICULAR
PURPOSE.
NO WARRANTY OR GUARANTEE GIVEN BY ANY PERSON, FIRM, OR CORPORATION WITH RESPECT
TO THIS PRODUCT SHALL BE BINDING ON SAMSUNG. SAMSUNG SHALL NOT BE LIABLE FOR LOSS
OF REVENUE OR PROFITS, FAILURE TO REALIZE SAVINGS OR OTHER BENEFITS, OR ANY OTHER
SPECIAL, INCIDENTAL OR CONSEQUENTIAL DAMAGES CAUSED BY THE USE, MISUSE, OR INABILITY
TO USE THIS PRODUCT, REGARDLESS OF THE LEGAL THEORY ON WHICH THE CLAIM IS BASED,
AND EVEN IF SAMSUNG HAS BEEN ADVISED OF THE POSSIBILITY OF SUCH DAMAGES.
NOR SHALL RECOVERY OF ANY KIND AGAINST SAMSUNG BE GREATER IN AMOUNT THAN THE
PURCHASE PRICE OF THE PRODUCT SOLD BY SAMSUNG AND CAUSING THE ALLEGED DAMAGE.
WITHOUT LIMITING THE FOREGOING, PURCHASER ASSUMES ALL RISK AND LIABILITY FOR LOSS,
DAMAGE, OR INJURY TO PURCHASER AND PURCHASER’S PROPERTY AND TO OTHERS AND THEIR
PROPERTY ARISING OUT OF THE USE, MISUSE, OR INABILITY TO USE THIS PRODUCT. THIS LIMITED
WARRANTY SHALL NOT EXTEND TO ANYONE OTHER THAN THE ORIGINAL PURCHASER OF THIS
PRODUCT, IS NONTRANSFERABLE AND STATES YOUR EXCLUSIVE REMEDY.
Some states do not allow limitations on how long an implied warranty lasts, or the exclusion or limitation
of incidental or consequential damages, so the above limitations or exclusions may not apply to you. This
warranty gives you specifi c rights, and you may also have other rights, which vary from state to state.
To obtain warranty service, please contact SAMSUNG at:
Samsung Electronics America, Inc.
85 Challenger Road Ridgefi eld Park, NJ 07660
1-800-SAMSUNG (726-7864)
www.samsung.com
WF231ANW-02832D_EN.indd Sec11:36WF231ANW-02832D_EN.indd Sec11:36 2011-04-18 10:38:362011-04-18 10:38:36
Page 37

memo
WF231ANW-02832D_EN.indd Sec11:37WF231ANW-02832D_EN.indd Sec11:37 2011-04-18 10:38:362011-04-18 10:38:36
Page 38

QUESTIONS OR COMMENTS?
Country CALL OR VISIT US ONLINE AT
U.S.A 1-800-SAMSUNG(726-7864) www.samsung.com
MEXICO 01-800-SAMSUNG(726-7864) www.samsung.com
Code No. DC68-02832D_EN
WF231ANW-02832D_EN.indd Sec11:38WF231ANW-02832D_EN.indd Sec11:38 2011-04-18 10:38:362011-04-18 10:38:36
Page 39

Lavadora
Manual del usuario
WF231*
imagina las posibilidades
Gracias por adquirir este producto Samsung.
Para recibir un servicio más completo,
registre su producto en
www.samsung.com/register
1-800-SAMSUNG (726-7864)
WF231ANW-02832D_MES.indd 1WF231ANW-02832D_MES.indd 1 2011-04-18 10:39:082011-04-18 10:39:08
Page 40

características de su nueva
lavadora
1. Capacidad extra grande
Aun las prendas y mantas voluminosas quedan superlimpias. La gran capacidad deja
sufi ciente espacio para un lavado más profundo y limpio.
2. VRT™ (Tecnología de Reducción de la Vibración)
Esta lavadora Samsung funciona con suavidad durante el centrifugado a velocidad máxima,
minimizando el ruido y las vibraciones.
3. Motor inversor de accionamiento directo
¡El poder de manejarlo todo! El motor inversor de accionamiento directo suministra energía
al tambor de la lavadora desde un motor reversible de velocidad variable. Un motor de
accionamiento directo sin correa genera una velocidad de centrifugado más alta de 1.150
rpm para un funcionamiento más efi ciente y silencioso. La lavadora también posee menos
piezas movibles, lo cual se traduce en menos reparaciones.
4. Certifi cado Woolmark
El ciclo de lavado de lana en las máquinas Samsung ha sido probado y cumplió con la
especifi cación de Woolmark Company requerida para productos de lana lavables en
lavadora. Las prendas deben lavarse de acuerdo con las instrucciones que fi guran en sus
etiquetas, tal como lo establecen Woolmark y Samsung.
5. Desinfección
Al seleccionar este ciclo, el agua se calienta a una temperatura extremadamente alta para
eliminar el 99,9% de las bacterias que suelen alojarse en prendas, ropa de cama o toallas.
La presente certifi cación ha sido realizada por NSF International, una organización privada
de evaluación y certifi cación.
Lea la etiqueta de la prenda para evitar daños a la misma.
Únicamente los ciclos de desinfección fueron diseñados para cumplir con los requisitos de
este protocolo para una desinfección efi caz.
NSF Protocol P172
Desinfección en lavadoras comerciales,
residenciales y familiares
6. Pure Cycle
Usar el proceso de limpieza del tambor pure cycle ayuda a mantener su lavadora limpia
incluso sin ningún detergente químico ni blanqueador. Mantenga su tambor limpio y sin olor
con este programa de limpieza especializado.
TM
7. Seguro para niños
La función Seguro para niños asegura que las manitos curiosas se mantengan alejadas de
la lavadora.
Esta función de seguridad evita que sus hijos jueguen con el funcionamiento de la lavadora
y le advierte cuando ésta se activa.
8. Inicio Retardado
Demore un ciclo por hasta 19 horas en incrementos de a una hora y aumente su
comodidad al utilizar su lavadora especialmente cuando tenga que salir.
2_ características de su nueva lavadora
WF231ANW-02832D_MES.indd Sec9:2WF231ANW-02832D_MES.indd Sec9:2 2011-04-18 10:39:172011-04-18 10:39:17
Page 41

9.
Pedestal con cajones de almacenamiento (Modelo N.°: WE357*)
Tiene una base de 15” opcional a disposición para elevar la lavadora y lograr así una carga
y descarga más sencilla.
El pedestal también ofrece un cajón de almacenamiento incorporado que puede sostener
una botella de detergente de 100 oz.
10. Apilamiento
(Modelo N.°: SK-3A1/XAA, SK-4A/XAA, SK-5A/XAA)
Las lavadoras y las secadoras Samsung pueden apilarse para maximizar el espacio
aprovechable. Puede adquirir un kit de apilamiento opcional en su comercio minorista de
productos Samsung.
<Pedestal con cajones de almacenamiento> <Apilamiento>
características de su nueva lavadora _3
WF231ANW-02832D_MES.indd Sec9:3WF231ANW-02832D_MES.indd Sec9:3 2011-04-18 10:39:172011-04-18 10:39:17
Page 42

información sobre seguridad
Felicitaciones por la compra de la nueva lavadora ActivFresh™ de Samsung.
Este manual contiene información importante acerca de la instalación, el uso y
el cuidado del electrodoméstico. Lea detenidamente estas instrucciones a fi n de
aprovechar al máximo los múltiples benefi cios y funciones de la lavadora.
LO QUE NECESITA SABER SOBRE LAS INSTRUCCIONES DE
SEGURIDAD
Las advertencias y las instrucciones de seguridad importantes de este manual no cubren todas las posibles
condiciones y situaciones que pueden ocurrir. Es su responsabilidad actuar con sentido común, precaución
y cuidado cuando instale, realice el mantenimiento y ponga en funcionamiento la lavadora.
SÍMBOLOS Y PRECAUCIONES DE SEGURIDAD IMPORTANTES
Los íconos y las señales incluidas en este manual del usuario
signifi can lo siguiente:
Peligros o prácticas inseguras que pueden causar lesiones físicas
ADVERTENCIA
PRECAUCIÓN
PRECAUCIÓN
Estas señales de advertencia están aquí para evitar que usted u otras personas sufran
daños.
Siga las instrucciones completamente.
Después de leer esta sección, guárdela en un lugar seguro para consultas futuras.
Lea todas las instrucciones antes de usar el electrodoméstico.
graves o la muerte.
Peligros o prácticas inseguras que pueden causar lesiones físicas
leves o daños materiales.
Para reducir el riesgo de incendio, explosión, descargas eléctricas o
lesiones físicas cuando usa esta lavadora, siga estas instrucciones de
seguridad básicas:
NO intente hacer nada.
NO desarme.
NO toque.
Siga las instrucciones completamente.
Desenchufe el cable de alimentación eléctrica del tomacorriente de
pared.
Asegúrese de que la máquina tenga buena conexión a tierra para evitar
descargas eléctricas.
Llame al centro de servicio técnico para obtener asistencia.
Nota
CONSERVE ESTAS INSTRUCCIONES
4_ información sobre seguridad
WF231ANW-02832D_MES.indd Sec1:4WF231ANW-02832D_MES.indd Sec1:4 2011-04-18 10:39:182011-04-18 10:39:18
Page 43

ADVERTENCIA:Para reducir el riesgo de incendio, descargas eléctricas o lesiones físicas
cuando usa este electrodoméstico, siga las instrucciones de seguridad básicas que fi guran
ADVERTENCIA
a continuación:
1. Lea todas las instrucciones antes de usar el electrodoméstico.
2. No lave o seque prendas que han sido previamente limpiadas, lavadas, remojadas o
salpicadas con gasolina, solventes de limpieza en seco u otras sustancias infl amables o
explosivas, ya que emiten vapores que pueden prenderse fuego o explotar.
3. No permita que los niños jueguen sobre la lavadora o dentro de ella. Se requiere de
supervisión cuando el electrodoméstico es utilizado cerca de los niños.
4. Antes de descartar el aparato o de trasladarlo para que se le efectúe el servicio técnico,
retire la puerta del compartimiento de la lavadora o la secadora.
5. No introduzca la mano en el electrodoméstico si el tambor está en movimiento.
6. No instale o guarde este electrodoméstico donde quede expuesto a factores climáticos.
7. No modifi que los controles.
8. No repare, reemplace ni intente realizar el mantenimiento de cualquier pieza del
electrodoméstico salvo que esté recomendado específi camente en las instrucciones
de mantenimiento del usuario o en las instrucciones de reparación para el usuario
publicadas y que, a su juicio, usted tenga la habilidad para llevarlas a cabo.
9. No agregue gasolina, solventes de limpieza en seco u otras sustancias infl amables o
explosivas al agua del lavado. Estas sustancias emiten vapores que se pueden prender
fuego o explotar.
10. En ciertas circunstancias, se puede producir gas hidrógeno en un sistema de agua
caliente que no se ha usado durante 2 semanas o más. EL GAS HIDRÓGENO ES
EXPLOSIVO. Si el sistema de agua caliente no fue utilizado durante dicho período, antes
de usar la lavadora o la lavadora y la secadora combinadas, abra las llaves de agua
caliente y deje correr el agua por varios minutos. De esta manera, se eliminará el gas
hidrógeno acumulado. Dado que el gas es infl amable, no fume ni use una llama abierta
en ese momento.
CONSERVE ESTAS INSTRUCCIONES
información sobre seguridad _5
WF231ANW-02832D_MES.indd Sec1:5WF231ANW-02832D_MES.indd Sec1:5 2011-04-18 10:39:182011-04-18 10:39:18
Page 44

información sobre seguridad
SEÑALES DE ADVERTENCIA IMPORTANTES PARA LA
ADVERTENCIA
INSTALACIÓN
Enchufe el cable de alimentación en un tomacorriente de pared de 120 V/60 Hz/15 A CA o superior y
utilice el tomacorriente sólo con este electrodoméstico. No use un cable prolongador.
- Compartir el tomacorriente mural con otros electrodomésticos utilizando un multicontacto o
prolongando el cable de alimentación puede provocar un incendio o una descarga eléctrica.
- No utilice un transformador eléctrico. Puede provocar un incendio o una descarga eléctrica.
- Asegúrese de que el voltaje, la frecuencia y la corriente son los mismos que los relacionados en las
especifi caciones del producto. Si no lo hace puede provocar un incendio o una descarga eléctrica.
La instalación de este electrodoméstico la debe efectuar un técnico cualifi cado o una empresa de
servicios.
- Si no lo hace, puede provocar una descarga eléctrica, un incendio, una explosión, problemas con el
producto o lesiones.
Retire regularmente todas las sustancias extrañas, como polvo o agua, de los terminales y los puntos
de contacto de la alimentación con un paño seco.
- Desenchufe el cable de alimentación y límpielo con un paño seco.
- Si no lo hace puede provocar un incendio o una descarga eléctrica.
Enchufe el cable de alimentación en un tomacorriente de pared en la dirección adecuada de manera
que el cable baje hacia el suelo.
- Si enchufa el cable de alimentación en el tomacorriente en la dirección opuesta, los cables eléctricos
del interior del cable se pueden dañar y se puede provocar un incendio o una descarga eléctrica.
Este electrodoméstico debe conectarse a tierra correctamente.
La toma de tierra no se ha de conectar a una conducción de gas o de agua ni a la línea telefónica.
- Un conexión a tierra incorrecta puede provocar una descarga eléctrica, un incendio, una explosión o
problemas con el producto.
- Nunca enchufe el cable de alimentación en un tomacorriente que no esté conectado a tierra
correctamente. Asegúrese de que la toma guarde conformidad con los códigos locales y nacionales.
No instale este electrodoméstico cerca de un calefactor o materiales infl amables.
No instale este electrodoméstico en un lugar húmedo, con aceites o polvo, ni expuesto a la luz directa
del sol o al agua (gotas de lluvia).
No instale este electrodoméstico en un lugar donde pueda haber fugas de gas.
- Puede provocar un incendio o una descarga eléctrica.
Enchufe el cable de alimentación fi rmemente en el tomacorriente de pared. No utilice un cable de
alimentación dañado ni un tomacorriente que esté fl ojo.
- Puede provocar un incendio o una descarga eléctrica.
No tire del cable de alimentación ni lo doble excesivamente.
No tuerza ni ate el cable de alimentación.
No cuelgue el cable de alimentación de un objeto metálico, no coloque objetos pesados sobre él, no
inserte el cable de alimentación entre objetos ni lo empuje en un espacio detrás del electrodoméstico.
- Puede provocar un incendio o una descarga eléctrica.
No tire del cable de alimentación para desenchufarlo.
- Desenchufe el cable de alimentación sujetándolo por el enchufe.
- Si no lo hace puede provocar un incendio o una descarga eléctrica.
Si el enchufe o el cable de alimentación están dañados, comuníquese con el centro de servicio más
cercano.
6_ información sobre seguridad
WF231ANW-02832D_MES.indd Sec1:6WF231ANW-02832D_MES.indd Sec1:6 2011-04-18 10:39:192011-04-18 10:39:19
Page 45

SEÑALES DE PRECAUCIÓN PARA LA INSTALACIÓN
PRECAUCIÓN
Este electrodoméstico debe estar ubicado de manera tal que se pueda acceder al enchufe.
- Si no lo hace puede provocar un incendio o una descarga causados por fugas
eléctricas.
Instale el electrodoméstico sobre una superfi cie nivelada que pueda soportar su peso.
- Si no lo hace pueden producirse vibraciones anormales, ruidos o problemas con el
producto.
Desenchufe el electrodoméstico si no lo va a utilizar durante un período prolongado o
durante una tormenta con aparato eléctrico.
- Si no lo hace puede provocar un incendio o una descarga eléctrica.
SEÑALES DE ADVERTENCIA IMPORTANTES DURANTE EL USO
ADVERTENCIA
Si el electrodoméstico se inunda, desconéctelo inmediatamente y llame al centro de
servicio más cercano.
Si el electrodoméstico genera ruidos extraños, olores de quemado o humo, desconéctelo
inmediatamente y llame al centro de servicio más cercano.
- Si no lo hace puede provocar un incendio o una descarga eléctrica.
En caso de fugas de gas (como propano, LP, etc.), ventile inmediatamente sin tocar el
enchufe. No toque el electrodoméstico ni el cable de alimentación.
- No utilice un ventilador.
- Una chispa puede provocar un incendio o una explosión.
No lave prendas contaminadas con gasolina, queroseno, benceno, disolventes de pinturas,
alcohol u otras sustancias infl amables o explosivas.
- Puede provocar una descarga eléctrica, un incendio o una explosión.
No abra la puerta de la lavadora por la fuerza mientras esté en funcionamiento (lavado a
alta temperatura/secado/centrifugado).
- El agua que salga de la lavadora puede causar quemaduras o convertir el suelo en
resbaladizo.
Puede causar lesiones personales.
- Abrir la puerta por la fuerza puede dañar el producto o causar lesiones personales.
Asegúrese de quitar el embalaje (goma espuma, poliestireno) del fondo de la lavadora antes
de utilizar ésta.
No introduzca las manos bajo la lavadora.
- Puede causar lesiones personales.
información sobre seguridad _7
WF231ANW-02832D_MES.indd Sec1:7WF231ANW-02832D_MES.indd Sec1:7 2011-04-18 10:39:192011-04-18 10:39:19
Page 46

información sobre seguridad
No toque el enchufe con las manos mojadas.
- Puede causar lesiones personales.
No apague el electrodoméstico desenchufándolo mientras esté en funcionamiento.
- Si vuelve a enchufar el electrodoméstico en el tomacorriente puede originar una chispa y
causar una descarga eléctrica o un incendio.
Mantenga los materiales del embalaje fuera del alcance de los niños, ya que son peligrosos
para éstos.
- Si un niño introduce la cabeza en una bolsa se puede asfi xiar.
No permita que los niños o las personas inestables utilicen la lavadora sin supervisión.
- Si lo hace puede provocar una descarga eléctrica, quemaduras o lesiones.
No introduzca la mano ni objetos de metal bajo la lavadora mientras ésta esté en
funcionamiento.
- Se puede causar lesiones personales.
Antes de poner la ropa a lavar o de sacar la ropa limpia, compruebe que el cajón para
detergente esté cerrado.
- Si el cajón para detergente está abierto, se podría golpear la cabeza con él y lesionarse.
No trate de reparar, desensamblar ni modifi car la lavadora usted mismo.
- No utilice un fusible (de cobre, cable de acero, etc) que no esté normalizado.
- Para reparar o volver a instalar el electrodoméstico comuníquese con el centro de
servicio más cercano.
- Si no lo hace puede provocar una descarga eléctrica, un incendio, problemas con el
producto o lesiones.
Si alguna sustancia extraña, como agua, se introduce en el electrodoméstico, desenchufe
el cable de alimentación y comuníquese con el centro de servicio más cercano.
- Si no lo hace puede provocar un incendio o una descarga eléctrica.
Si se afl oja la manguera de suministro de agua del grifo y se inunda el electrodoméstico,
desenchufe el cable de alimentación.
- Si no lo hace puede provocar un incendio o una descarga eléctrica.
SEÑALES DE PRECAUCIÓN DURANTE EL USO
PRECAUCIÓN
Si la lavadora está contaminada por sustancias extrañas, como detergente, tierra, restos
de alimentos, etc. desenchufe el cable de alimentación y limpie la lavadora con un paño
suave humedecido.
- Si no lo hace se puede producir decoloración, deformación, daños u óxido.
El cristal frontal se puede romper con un impacto fuerte. Sea cuidadoso cuando utilice la
lavadora.
- La rotura del cristal puede causar lesiones.
Ante una falla de suministro de agua o cuando se vuelve a conectar la manguera de
suministro, abra lentamente la llave del agua.
Abra lentamente la llave del agua tras un periodo prolongado de falta de uso.
- La presión del aire de la manguera de suministro o de la conducción de agua puede
dañar una pieza o provocar fugas de agua.
Si durante el funcionamiento hay una falla en el drenaje, compruebe éste.
- Si se utiliza la lavadora inundada por una falla en el drenaje, se puede provocar una
descarga eléctrica o un incendio.
8_ información sobre seguridad
WF231ANW-02832D_MES.indd Sec1:8WF231ANW-02832D_MES.indd Sec1:8 2011-04-18 10:39:192011-04-18 10:39:19
Page 47

Introduzca completamente la ropa en la lavadora para que no pueda quedar atrapada por
la puerta.
- Si la ropa queda atrapada por la puerta, se puede dañar la ropa o la lavadora, o puede
haber fugas de agua.
Asegúrese de que la llave del agua esté cerrada cuando la lavadora no se utiliza.
- Asegúrese de que el tornillo del conector de la manguera de suministro del agua esté
correctamente apretado.
- Si no lo hace puede provocar daños materiales o lesiones.
Compruebe si la junta de goma está contaminada por sustancias extrañas (suciedad, hilos,
etc.).
- Si la puerta no cierra completamente, se pueden producir fugas de agua.
Antes de utilizar el producto, abra la llave del agua y compruebe si el conector de la
manguera de suministro del agua está fi rmemente asegurado y que no haya fugas de agua.
- Si los tornillos o el conector de la manguera de suministro del agua están fl ojos, puede
haber fugas de agua.
No se suba encima del electrodoméstico ni coloque encima de éste objetos (como ropa,
velas o cigarrillos encendidos, platos, productos químicos, objetos metálicos, etc.)
- Puede provocar una descarga eléctrica, un incendio, problemas con el producto o
lesiones.
No haga funcionar el electrodoméstico con las manos mojadas.
- Puede causar lesiones personales.
No rocíe materiales volátiles, como insecticidas, en la superfi cie del electrodoméstico.
- Además de ser perjudiciales para las personas, también pueden provocar una descarga
eléctrica, un incendio o problemas con el producto.
No coloque objetos que generen campos electromagnéticos cerca de la lavadora.
- Puede causar lesiones por un malfuncionamiento.
No toque el agua que se drena durante el lavado a alta temperatura o durante el ciclo de
secado ya que está caliente.
- Puede causar lesiones personales o quemaduras.
No lave, centrifugue ni seque alfombrillas o prendas impermeables(*).
- No lave alfombrillas gruesas y espesas aunque lleven la marca de lavado en la etiqueta.
- Se pueden causar lesiones o dañar la lavadora, las paredes, el suelo o la ropa debido a
vibraciones anormales.
* Ropa de cama de lana, fundas de lluvia, ropa para pescar, pantalones de esquí,
bolsas de dormir, cubiertas de pañales, chándales, cubiertas de bicicletas, motos y
automóviles, etc.
No haga funcionar la lavadora sin el cajón del detergente.
- Se puede provocar una descarga eléctrica o lesiones debido a fugas de agua.
No toque el interior de la tina durante o inmediatamente después del secado, ya que está
caliente.
- Puede causar quemaduras.
No introduzca las manos en el cajón del detergente después de abrirlo.
- Se puede dañar la mano ya que ésta puede quedar atrapada por el dispositivo de
introducción del detergente.
información sobre seguridad _9
WF231ANW-02832D_MES.indd Sec1:9WF231ANW-02832D_MES.indd Sec1:9 2011-04-18 10:39:192011-04-18 10:39:19
Page 48

información sobre seguridad
No introduzca ningún objeto (como zapatos, restos de comida, animales) que no sea ropa
en la lavadora.
- Se puede dañar la lavadora, causar lesiones o la muerte en caso de mascotas por
vibraciones anormales.
No presione los botones con objetos afi lados, como alfi leres, cuchillos, las uñas, etc.
- Puede provocar una descarga eléctrica o lesiones personales.
No lave ropa contaminada por aceites, cremas o lociones que se utilizan normalmente en
los establecimientos para el cuidado de la piel o en las clínicas de masajes.
- Se puede deformar la junta de goma y provocar fugas de agua.
No deje objetos de metal, como horquillas o clips, ni blanqueador en la tina durante
periodos prolongados de tiempo.
- Se puede oxidar la tina.
- Si comienza a aparecer óxido en la superfi cie de la tina, aplique un agente limpiador
(neutro) sobre la superfi cie y utilice una esponja para limpiarla. Nunca utilice un cepillo de
metal.
No utilice detergentes de limpieza en seco directamente ni lave, enjuague ni centrifugue
ropa contaminada por detergentes de limpieza en seco.
- Se puede producir una combustión espontánea o un incendio por el calor de la
oxidación del aceite.
No utilice agua caliente de los dispositivos de calentamiento o enfriamiento del agua.
- Podría tener problemas con la lavadora.
No utilice jabón natural para lavado a mano en la lavadora.
- Si se endurece y se acumula en el interior de la lavadora, puede causar problemas en el
producto, como decoloración, óxido y malos olores.
No lave prendas grandes como ropa de cama dentro de una red.
- Coloque medias y sujetadores en una red y lávelos junto con otra ropa.
- De no hacerlo se pueden producir lesiones personales por las vibraciones anormales.
No utilice detergente endurecido.
- Si se acumula en el interior de la lavadora, puede provocar fugas de agua.
No lave alfombras ni felpudos.
- Si lava una alfombra o felpudo, se acumulará arena en el interior de la lavadora. Puede
provocar errores como la falta de drenaje.
SEÑALES DE ADVERTENCIA IMPORTANTES DURANTE LA
ADVERTENCIA
LIMPIEZA
No limpie el electrodoméstico rociando directamente agua dentro de él.
No utilice benceno, disolventes ni alcohol para limpiar el electrodoméstico.
- Puede provocar decoloración, deformación, daños, incendio o descarga eléctrica.
Antes de la limpieza o las tareas de mantenimiento, desenchufe el electrodoméstico del
tomacorriente de la pared.
- Si no lo hace puede provocar un incendio o una descarga eléctrica.
10_ información sobre seguridad
WF231ANW-02832D_MES.indd Sec1:10WF231ANW-02832D_MES.indd Sec1:10 2011-04-18 10:39:192011-04-18 10:39:19
Page 49

contenido
INSTALACIÓN DE SU LAVADORA
12
LAVADO DE UNA CARGA DE ROPA
18
LIMPIEZA Y MANTENIMIENTO DE SU
LAVADORA
25
SOLUCIÓN DE PROBLEMAS Y
CÓDIGOS DE INFORMACIÓN
12 Comprobación de las partes
13 Cumplir con los requisitos de instalación
13 Suministro eléctrico
13 Conexión a tierra
13 Agua
13 Drenaje
14 Piso
14 Consideraciones acerca de la ubicación
14 Instalación del electrodoméstico en un
gabinete o en un hueco
14 Instalación bajo mostrador (sólo lavadora)
15 Con pedestal o kit de apilamiento
opcionales
16 Instalación de la lavadora
18 Cómo cargar la lavadora
18 Cómo comenzar
19 Descripción general del panel de control
21 Seguro para niños
22 Sólo centrifugado
22 Más prendas
23 Uso del detergente
23 Características
25 Limpieza del exterior
25 Limpieza del interior
25 Limpieza de los dosifi cadores
25 Cómo guardar la lavadora
26 Limpieza del fi ltro de residuos
27 Limpieza del sello/fuelle de la puerta
27 Mantenimiento de la cubierta superior y del
marco frontal
28 Controle estos puntos si su lavadora...
30 Códigos de información
28
APÉNDICE
32
GARANTÍA
32 Tabla de indicaciones sobre la tela
33 Ayuda al medioambiente
33 Declaración de conformidad
33 Especifi caciones
34 Tabla de ciclos
35 Garantía
35
contenido _11
WF231ANW-02832D_MES.indd Sec2:11WF231ANW-02832D_MES.indd Sec2:11 2011-04-18 10:39:192011-04-18 10:39:19
Page 50

instalación de su lavadora
COMPROBACIÓN DE LAS PARTES
Desempaque la lavadora e inspecciónela para controlar que no se hayan producido daños durante el transporte.
Compruebe que haya recibido todos los elementos que se muestran a continuación. Si la lavadora sufrió daños
durante el transporte, o si falta algún elemento, comuníquese con el 1-800-SAMSUNG(7267864).
Para evitar lesiones físicas o tirones, use guantes protectores cada vez que levante o transporte la unidad.
Mantenga los materiales del embalaje fuera del alcance de los niños, ya que son peligrosos para éstos.
- Si un niño mete la cabeza en una bolsa se puede asfi xiar.
ADVERTENCIA
Cajón para
detergente
Panel de control
Puerta
Tubo de
desagüe de
emergencia
Filtro de residuos
Cubierta del fi ltro
Partes suministradas
Llave inglesa
Manguera de suministro
de agua caliente
Tapones para los orifi cios de los
tornillos
Manguera de suministro
de agua fría
Tapa
Enchufe
Manguera
de drenaje
Tambor
Patas ajustables
Mangueras de suministro de agua
Guía de la manguera Manual de instrucciones
Herramientas necesarias
Pinzas Destornillador plano
12_ instalación de su lavadora
WF231ANW-02832D_MES.indd Sec5:12WF231ANW-02832D_MES.indd Sec5:12 2011-04-18 10:39:192011-04-18 10:39:19
Page 51

CUMPLIR CON LOS REQUISITOS DE INSTALACIÓN
Suministro eléctrico
• Fusible o disyuntor de 120 voltios, 60 Hz, 15 A
• Se recomienda contar con un circuito derivado individual destinado únicamente a la lavadora.
• La lavadora está equipada con un cable de alimentación.
Nunca utilice un cable prolongador.
PRECAUCIÓN
Conexión a tierra
ES PRECISO QUE ESTE ELECTRODOMÉSTICO ESTÉ CONECTADO A TIERRA.
Este electrodoméstico debe conectarse a tierra. En caso de que el electrodoméstico funcione
mal o se descomponga, la conexión a tierra reducirá el riesgo de descarga eléctrica al ofrecer
una vía de menos resistencia a la corriente eléctrica.
Este electrodoméstico está equipado con un cable de alimentación que cuenta con un enchufe
de tres pines con conexión a tierra para utilizar en un tomacorriente con conexión a tierra.
La conexión inadecuada del conductor de conexión a tierra del equipo puede dar como
resultado un riesgo de descarga eléctrica. Consulte a un electricista o técnico califi cado si
ADVERTENCIA
le surgen dudas acerca de si la conexión a tierra del electrodoméstico es adecuada. No
modifi que el enchufe provisto con el aparato. Si no entra en el tomacorriente, solicite a un
electricista califi cado que instale el tomacorriente adecuado.
PRECAUCIONES DE SEGURIDAD IMPORTANTES
• Para evitar el riesgo de incendio, descarga eléctrica o lesiones físicas innecesarias, todo
el cableado y la conexión a tierra deben realizarse en conformidad con el Código Eléctrico
Nacional, ANSI/FNPA, Nro. 70, la revisión más reciente, y los códigos y ordenanzas locales.
Es exclusiva responsabilidad del propietario del electrodoméstico proveer los servicios
eléctricos adecuados para este electrodoméstico.
Nunca conecte el cable a tierra a las tuberías de plástico, las tuberías de gas o a las
cañerías de agua caliente.
PRECAUCIÓN
Agua
Para llenar correctamente la lavadora en el tiempo correcto, se requiere una presión de agua de 20 a 116
psi (137-800 kPa).
Una presión de agua inferior a 20 psi (137 kPa) puede ocasionar fallas en la válvula de agua o impedir
que la válvula de agua se cierre completamente. O puede prolongar el tiempo de llenado más allá de lo
permitido por los controles de la lavadora y que, como resultado, la lavadora se apague. En los controles
se establece un límite de tiempo en caso de que una manguera interna se afl oje y se inunde la casa.
Las llaves de agua deben estar colocadas dentro de los 4 pies (122 cm) de distancia de la parte posterior
de la lavadora para las mangueras de entrada provistas con ella.
Las mangueras de entrada accesorias están disponibles en varias longitudes hasta 10 pies (305 cm)
para llaves que se encuentren alejadas de la parte posterior de la lavadora.
Para evitar la posibilidad de que se produzcan daños a causa del agua:
• Las llaves de agua deben ser de fácil acceso.
• Cierre las llaves cuando no use la lavadora.
• Verifi que periódicamente que no haya pérdidas de agua que provengan de los accesorios de la
manguera de entrada de agua.
Controle que todas las conexiones de la válvula y de la llave de agua no presenten pérdidas.
ADVERTENCIA
01 IINSTALACIÓN DE SU LAVADORA
Drenaje
La altura recomendada de la toma de agua es de 18 pulg. (46 cm). La manguera de drenaje debe ajustarse
por medio del gancho de la manguera de drenaje al tubo vertical. La toma de agua debe tener la sufi ciente
longitud como para aceptar el diámetro exterior de la manguera de drenaje. La manguera de drenaje viene
conectada de fábrica.
instalación de su lavadora _13
WF231ANW-02832D_MES.indd Sec5:13WF231ANW-02832D_MES.indd Sec5:13 2011-04-18 10:39:202011-04-18 10:39:20
Page 52

instalación de su lavadora
Piso
Para un mejor desempeño, la lavadora debe estar instalada sobre un piso de construcción sólida.
Posiblemente los pisos de madera necesiten reforzarse para minimizar la vibración y/o los desequilibrios
de la carga. Las superfi cies alfombradas o con revestimiento sintético son factores que contribuyen a la
vibración y pueden provocar que la lavadora se mueva levemente durante el ciclo de centrifugado.
Nunca instale la lavadora sobre una plataforma o sobre una estructura con soportes poco resistentes.
PRECAUCIÓN
Consideraciones acerca de la ubicación
No instale la lavadora en áreas donde el agua se congele, dado que la lavadora siempre
mantendrá algo de agua en el área de la válvula de agua, la bomba y la manguera. Esto puede
ocasionar daños a la bomba, las mangueras y demás componentes.
Instalación del electrodoméstico en un gabinete o en un hueco
DEJE UN ESPACIO LIBRE MÍNIMO CUANDO INSTALE EL
ELECTRODOMÉSTICO EN UN GABINETE O EN UN HUECO:
Laterales - 1 pulg. (2,5 cm)
Parte posterior - 4 pulg. (10,2 cm)
Si la lavadora y la secadora se instalan una junto a la otra, el frente del gabinete debe contar por lo menos
con una abertura de aire sin obstrucciones de 72 pulg² (465 cm²). La lavadora sola no requiere una
abertura de aire específi ca.
Parte superior - 17 pulg. (43,2 cm)
Frente del gabinete - 2 pulg. (5,1 cm)
A
1 in.
(2,5 cm)
A. Área empotrada
B. Vista lateral – gabinete o área empotrada
27 in.
(68,6 cm)
Instalación bajo mostrador (sólo lavadora)
39 in.
(99 cm)
14_ instalación de su lavadora
1 in.
(2,5 cm)
27 in.
(68,6 cm)
1 in.
(2.5 cm)
1 in.
(2,5 cm)
27 in.
(68.6 cm)
B
2 in.
(5 cm)
1 in.
(2.5 cm)
17 in.
(43,2 cm)
31,1 in.
(80 cm)
4 in.
(10,2 cm)
WF231ANW-02832D_MES.indd Sec5:14WF231ANW-02832D_MES.indd Sec5:14 2011-04-18 10:39:212011-04-18 10:39:21
Page 53

Con pedestal o kit de apilamiento opcionales
Dimensiones requeridas de la instalación con pedestal
50,8 pulg. (129 cm) para poder abrir la puerta
(96.5 cm)
(134.6 cm)
27 in.
(68.6 cm)
31.1 in.
(80 cm)
48 in.² *
(310 cm²)
24 in.² *
(155 cm²)
31.1 in.
(80 cm)
Gabinete o puerta
4 in.
(10 cm)
3 in.
(7.6 cm)
3 in.
(7.6 cm)
1 in.
(2.5 cm)
Dimensiones requeridas de la instalación con kit de apilamiento
6 in. *
(15.2 cm)
38 in.
53 in.
2.5 in.
(6.3 cm)
5.5 in.**
(14 cm)
01 IINSTALACIÓN DE SU LAVADORA
76 in.
(193 cm)
1 in.
(2.5 cm)
27 in.
(68.6 cm)
* Espacio necesario
** El codo del drenaje externo requiere espacio adicional.
instalación de su lavadora _15
WF231ANW-02832D_MES.indd Sec5:15WF231ANW-02832D_MES.indd Sec5:15 2011-04-18 10:39:212011-04-18 10:39:21
Page 54

instalación de su lavadora
INSTALACIÓN DE LA LAVADORA
PASO 1
Seleccionar una ubicación
Antes de instalar la lavadora, asegúrese de que la ubicación:
• Tenga una superfi cie resistente y nivelada sin alfombras ni revestimientos para pisos que
puedan obstruir los orifi cios de ventilación.
• No tenga polvo ni sustancias extrañas.
• Esté alejada de la luz solar directa.
• Tenga una ventilación adecuada.
• No corra riesgos de congelamiento (menos de 32 ˚F o 0 ˚C).
• Esté alejada de las fuentes de calor, tales como el aceite o el gas.
• Tenga sufi ciente espacio como para que la lavadora no quede apoyada sobre su cable
de alimentación.
PASO 2
Retirar los tornillos de transporte
Antes de utilizar la lavadora, debe quitar los cuatro tornillos
de transporte de la parte posterior de la unidad.
1. Afl oje todos los tornillos con la llave provista.
2. Deslice el tornillo y el separador hacia arriba y retire el
tornillo con la arandela a través del orifi cio de la parte
posterior de la lavadora. Repita el proceso para cada
tornillo.
3. Cubra los orifi cios con los tapones de plástico
suministrados.
4. Conserve los tornillos de transporte y las arandelas en
caso de que los necesite en el futuro.
PASO 3
Instalación de la lavadora
1. Coloque la manguera de drenaje en el drenaje
(tina, fregadero, toma de agua). Si conecta la
manguera de drenaje a una toma de agua,
asegúrese de que NO haya una conexión
hermética entre la manguera de drenaje y la
toma de agua. La toma de agua debe estar
a una altura de 18 pulgadas o 46 cm como
mínimo y a no más de 96 pulgadas.
Siempre se debe tener la precaución de evitar
plegar o dañar la manguera de drenaje. Para
obtener mejores resultados, la manguera de
drenaje no debe presentar obstrucciones
de ninguna índole: codos, acoplamientos
o longitudes excesivas. En caso de que no
se pueda colocar la manguera de drenaje
convenientemente a una altura de 18 pulg. o
46 cm., colóquele un soporte.
16_ instalación de su lavadora
WF231ANW-02832D_MES.indd Sec5:16WF231ANW-02832D_MES.indd Sec5:16 2011-04-18 10:39:232011-04-18 10:39:23
Tambor de lavado Toma de agua
Dispositivo
para sujetar la
manguera
96” Máx.
18” mín.
Correa de
sujeción
96” Máx.
18” mín.
Page 55

2. Antes de conectar las mangueras de entrada en las tomas
de agua, compruebe las uniones interiores en ambos
extremos.
3. Controle la manguera de entrada para asegurarse de que
haya una arandela dentro de cada manguera de carga.
Enrosque las mangueras de entrada a las conexiones de
las llaves de agua CALIENTE y FRÍA. En el otro extremo
de la manguera, verifi que que haya una arandela de goma
por manguera y conecte cada manguera de carga a la
válvula de agua. Asegúrese de conectar la manguera con
la leyenda impresa que dice “HOT” (Caliente) a la llave de
agua CALIENTE. Ajuste a mano hasta que quede ceñido, a
continuación, dé dos tercios de giro con la pinza.
Para usar el agua correctamente, conecte tanto la válvula de agua
CALIENTE como la de agua FRÍA. Si alguna de ellas o ambas
están desconectadas, aparecerá el error “nF” (no hay carga).
4. Abra el suministro de agua CALIENTE y FRÍA y controle todas
las conexiones a la válvula y a la llave de agua para verifi car si
hay pérdidas.
5. Enchufe el cable de alimentación a un tomacorriente aprobado de
tres pines, correctamente conectado a tierra, de 120 voltios y 60 Hz,
protegido por un fusible o un disyuntor de 15 A. La lavadora está
conectada a tierra a través del tercer pin del cable de alimentación cuando
se lo enchufa a un tomacorriente de tres pines con conexión a tierra.
Unión
Leyenda
impresa
“Fría”
Arandela de
goma
Fría Caliente
Leyenda
impresa
“Caliente”
01 IINSTALACIÓN DE SU LAVADORA
6. Deslice la lavadora hasta dejarla en su lugar.
7. Nivele la lavadora girando manualmente las patas niveladoras
hacia adentro o hacia afuera según sea necesario o para ello
use la llave incluida con la lavadora.
Cuando la lavadora esté nivelada, ajuste las tuercas usando la
llave o un destornillador de cabeza plana (-).
Las cuatro caras de la lavadora deben quedar niveladas. Se
debe usar un nivelador de carpintero en las cuatro esquinas
de la lavadora. Se ha de comprobar tras una docena de
lavados.
Evite el daño de las patas. No mueva
la lavadora a menos que las tuercas de
bloqueo se encuentren sujetas a la parte
inferior de la misma.
instalación de su lavadora _17
WF231ANW-02832D_MES.indd Sec5:17WF231ANW-02832D_MES.indd Sec5:17 2011-04-18 10:39:242011-04-18 10:39:24
Page 56

lavado de una carga de ropa
CÓMO CARGAR LA LAVADORA
• Puede cargar el tambor con ropa seca, sin doblar, pero NO LO SOBRECARGUE.
• La sobrecarga puede reducir la efi cacia del lavado, causar desgaste adicional y posiblemente causar
pliegues o arrugas en las prendas.
• Lave prendas delicadas, tales como los brassieres, los calcetines y demás lencería, en el ciclo Delicates
(Ropa delicada) con prendas livianas similares.
• Cuando lave artículos voluminosos o algunos artículos más pequeños, no cargue el tambor
completamente; coloque, por ejemplo, un tapete, una almohada, muñecos de peluche, o uno o dos
suéteres, agregue algunas toallas para que el lavado y el centrifugado resulten más efi caces.
Durante el ciclo de centrifugado, la lavadora puede agregar agua adicional para redistribuir el
desequilibrio excesivo dentro del tambor.
• Cuando lava cargas muy sucias, no sobrecargar la lavadora es muy importante para garantizar un
lavado de óptima calidad.
• Para agregar una prenda que se había olvidado:
1. Presione el botón Power (Encendido).
2. Presione el botón Start/Pause (Inicio/Pausa).
3. Espere hasta que la luz de la traba de la puerta se apague (5 segundos).
4. Agregue la prenda, cierre la puerta y presione el botón Start/Pause (Inicio/Pausa).
Después de una pausa de 10 segundos, se reanudará el ciclo.
Para garantizar un lavado a fondo, agregue la prenda dentro de los cinco minutos posteriores al
comienzo del ciclo de lavado.
CÓMO COMENZAR
1. Cargue la lavadora.
2. Cierre la puerta.
3. Presione el botón Power (Encendido).
4. Vierta detergente y aditivos en el dosifi cador (consulte las páginas 20~21).
5. Seleccione el ciclo apropiado y las opciones para la carga (consulte las páginas 18~19).
6. Presione el botón Start/Pause (Inicio/Pausa).
7. Se iluminará la luz del indicador Wash (lavado).
8. El tiempo del ciclo calculado aparecerá en la pantalla.
Es posible que el tiempo fl uctúe para indicar mejor el tiempo restante en el ciclo.
El tiempo real requerido para un ciclo puede diferir del estimado en la pantalla dependiendo de la
presión y la temperatura del agua, el detergente y la ropa.
9. Antes de que la lavadora comience a llenarse, se escuchará una serie de sonidos semejantes a un “clic”
para controlar la traba de la puerta y que se efectúe un drenaje rápido.
• Cuando fi naliza el ciclo, la luz de la Traba de la puerta se apaga y la palabra “End” (Fin) aparece en la pantalla.
• NO intente abrir la puerta hasta que la luz de la traba de la puerta se haya apagado. Para agregar
una prenda que se haya olvidado, consulte la sección “Cómo cargar la lavadora”. (página 19)
• Cuando la lavadora reinicia el funcionamiento después de una pausa, espere a que produzca una
demora de hasta 15 segundos antes de que el ciclo continúe.
• Si presiona Power (Encendido), se cancelará el ciclo y la lavadora se detendrá.
• Las luces del indicador Wash (Lavado), Rinse (Enjuague) y Spin (Centrifugado) se iluminan durante
dichas fases del ciclo.
No coloque ningún objeto en la parte superior de la lavadora cuando está en funcionamiento.
ADVERTENCIA
18_ lavado de una carga de ropa
WF231ANW-02832D_MES.indd Sec3:18WF231ANW-02832D_MES.indd Sec3:18 2011-04-18 10:39:262011-04-18 10:39:26
Page 57

DESCRIPCIÓN GENERAL DEL PANEL DE CONTROL
5
Pantalla gráfi ca
1
digital
2
Selector de ciclos
1
2 4
Muestra el tiempo restante del ciclo, toda la información del ciclo y los mensajes de error.
Seleccione el ciclo apropiado para el tipo de carga.
Esto determinará el patrón de giro y la velocidad de centrifugado del ciclo.
Para minimizar la formación de arrugas de la ropa, seleccione el ciclo
Perm Press (Plancha permanente).
Normal - Para la mayor parte de las telas, entre ellas, el algodón, el lino y las
prendas moderadamente sucias.
Heavy Duty (Servicio pesado) - para telas resistentes que no destiñen y
prendas muy sucias.
Perm Press (Planchado permanente) - para telas sintéticas que no
necesitan planchado y prendas ligeramente a moderadamente sucias.
Sanitize (Desinfección) - Para prendas muy sucias y que no destiñen. Este
ciclo calienta el agua a 150 °F (65 °C) para eliminar las bacterias.
Si selecciona Pause (Pausa) durante la fase de calentamiento del ciclo Sanitize
(Desinfección), la puerta de la lavadora permanecerá trabada por su seguridad.
Pure CycleTM - Úselo para limpiar el tambor. Limpia la suciedad y bacterias
del tambor. Se recomienda el uso regular (después de 40 lavados). No es
necesario detergente ni blanqueador.
Delicates/Hand Wash (Ropa delicada/Lavado a mano) - para telas
fi nas, brassieres, lencería de seda y otras telas para ser lavadas a mano
únicamente. Para obtener mejores resultados, use detergente líquido.
Wool (Lana) - Para lana que se pueda lavar en lavadora. Las cargas deben
tener un peso inferior a las 8 libras (3,62 kg). Para obtener los mejores
resultados se recomiendan cargas de 4,4 lb (2,0kg) o menos.
• El ciclo de Lana lava la ropa moviendo el tambor horizontalmente para
mantener las características de las fi bras de lana y no dañar la ropa. Se
detiene durante algún tiempo para permitir que la ropa se remoje. Esta
pausa en el ciclo de Lana es normal.
• Se aconseja utilizar detergente neutro para no dañar la ropa y mejorar el lavado.
El ciclo de lavado de lana de este artefacto ha sido aprobado por
Woolmark para el lavado de productos Woolmark lavables en lavadora
siempre y cuando los productos se laven conforme a las instrucciones
de la etiqueta de la prenda y aquellas del fabricante de la lavadora,
M0914 (número de aprobación de Woolmark).
Quick Wash (Lavado rápido) - Para prendas ligeramente sucias que se necesitan con urgencia.
Rinse + Spin (Enjuagado + Centrifugado) - Úselo para cargas que necesitan únicamente
enjuague o para agregar a la carga suavizante de telas que se añade durante el enjuague.
6
73 8
02 LAVADO DE UNA CARGA DE ROPA
9
lavado de una carga de ropa _19
WF231ANW-02832D_MES.indd Sec3:19WF231ANW-02832D_MES.indd Sec3:19 2011-04-18 10:39:272011-04-18 10:39:27
Page 58

lavado de una carga de ropa
Enjuague extra
3
botón
Botón de selección
4
Temperatura
Botón de selección
5
Centrifugado
Botón de selección
6
Nivel suciedad
Inicio retardado
7
botón
Botón de selección
8
Inicio/Pausa
Botón Encendido
9
Agregue un enjuague adicional al fi nal del ciclo para remover los aditivos y perfumes del
lavado con mayor efi cacia.
Presione este botón repetidamente para rotar entre las distintas opciones disponibles de
temperatura del agua.
Hot (Caliente) - Ropa blanca y prendas muy sucias que no destiñen.
Warm (Tibia) - Prendas que no destiñen. Cuando se selecciona enjuagar con agua tibia,
sólo el enjuague fi nal se realizará con agua tibia.
Los demás enjuagues se efectuarán con agua fría para preservar la energía.
Eco Warm (Eco Tibia) - Prendas moderadamentesucias, que no destiñen; la mayoría de
las prendas sin arrugas.
Cold (Fría) - Prendas de colores vivos, ligeramente sucias.
Presione este botón repetidamente para rotar entre las distintas opciones de velocidad de
centrifugado.
High (Alta) - Use para la ropa interior, las camisetas, los jeans y los algodones resistentes.
Medium (Mediana) - Use para jeans, prendas sin arrugas o que no necesitan planchado y
telas sintéticas.
Low (Baja) - Use para las prendas delicadas que necesitan un centrifugado a velocidad
lenta.
No Spin (Sin centrifugado) - drena la lavadora sin centrifugar. Utilícela para prendas
extremadamente delicadas que no puedan tolerar el centrifugado.
Spin Only (Sólo centrifugado) – Sólo se ejecuta el ciclo de centrifugado.
Presione el botón para seleccionar el nivel de suciedad y el tiempo de lavado.
Heavy (Muy sucia) - Para prendas muy sucias.
Normal (Normal) - Para prendas moderadamente sucias. Esta opción es la mejor para la
mayoría de las cargas.
S
Light (Ligeramente sucia) - Para prendas ligeramente sucias.
Cualquier ciclo puede retardarse hasta 19 horas en incrementos de una hora. La hora en
pantalla indica el tiempo en el cual comenzará el lavado.
Presiónelo para detener y reiniciar los programas.
Presiónelo una vez para encender la lavadora. Vuelva a presionarlo para apagar la lavadora.
Si la lavadora permanece encendida durante más de 10 minutos sin que se toque ninguno
de los botones, se apagará automáticamente.
20_ lavado de una carga de ropa
WF231ANW-02832D_MES.indd Sec3:20WF231ANW-02832D_MES.indd Sec3:20 2011-04-18 10:39:272011-04-18 10:39:27
Page 59

Seguro para niños
Esta función evita que los niños jueguen con la lavadora.
Activación de la función Seguro para niños
Mantenga presionados simultáneamente los botones Spin (Centrifugado) y Soil Level (Nivel
suciedad) durante aproximadamente 3 segundos.
• Cuando se activa la función Seguro para niños, la puerta se bloquea y se enciende la
lámpara Seguro para niños [
]”.
• Si se presiona el botón Start/Pause (Inicio/Pausa) después de activar la función de Seguro
para niños, no funciona ningún botón, excepto Power (Encendido).
• Si se presiona un botón cuando los botones están bloqueados, la lámpara de “Seguro para
niños [
]” parpadea.
Pausa en la función Seguro para niños
Cuando la puerta está bloqueada o los botones están bloqueados por la función Seguro para
niños, puede hacer una pausa en la función de seguro para niños durante 1 minuto al mantener
presionados simultáneamente los botones Spin (Centrifugado) y Soil Level (Nivel suciedad)
durante aproximadamente 3 segundos.
• Si pone en pausa el modo de Seguro para niños, el bloqueo de la puerta se libera durante 1
minuto para comodidad del usuario. Durante este tiempo, la lámpara de “Seguro para niños
[
]” parpadea.
• Si se abre la puerta transcurrido el minuto, suena una alarma durante 2 minutos.
• Si se cierra la puerta antes de transcurrir los 2 minutos, ésta se bloquea y la función Seguro
para niños se reactiva. Si se cierra la puerta después de transcurrir los 2 minutos, ésta no se
bloquea automáticamente y la alarma no suena.
Desactivación de la función Seguro para niños
Mantenga presionados simultáneamente los botones Spin (Centrifugado) y Soil Level (Nivel
suciedad) durante aproximadamente 6 segundos.
• Si se desactiva la función Seguro para niños, la puerta se desbloquea y la lámpara de
“Seguro para niños [
• La función Seguro para niños impide que los niños o las personas discapacitadas
ADVERTENCIA
pongan en funcionamiento la lavadora accidentalmente y se lesionen.
• Si un niño entra a la lavadora, puede quedar atrapado y asfi xiarse.
• Una vez activada la función Seguro para niños, ésta continúa funcionando aunque la
PRECAUCIÓN
lavadora esté apagada.
• Abrir la puerta por la fuerza puede dañar el producto y causar lesiones personales.
Para agregar ropa cuando la función Seguro para niños está activada, primero se debe
poner en pausa o desactivar dicha función.
Si desea abrir la puerta de la lavadora cuando la función Seguro para niños está activada:
• Ponga en pausa o desactive la función Seguro para niños.
• Apague la lavadora y enciéndala de nuevo.
]” se apaga.
02 LAVADO DE UNA CARGA DE ROPA
lavado de una carga de ropa _21
WF231ANW-02832D_MES.indd Sec3:21WF231ANW-02832D_MES.indd Sec3:21 2011-04-18 10:39:272011-04-18 10:39:27
Page 60

lavado de una carga de ropa
Sólo centrifugado
Si presiona el botón Power (Encendido) y luego mantiene presionado el botón Spin
(Centrifugado) durante 2 segundos, se indica el tiempo de centrifugado en la pantalla.
Luego vuelva a presionar el botón Spin (Centrifugado) hasta que se seleccione el nivel de
centrifugado requerido y presione el botón Start/Pause (Inicio/Pausa).
Antes de pulsar el botón Spin Only (Sólo centrifugado) para utilizar esta función, puede
seleccionar un ciclo con el Selector de ciclos. Si ya ha seleccionado un ciclo, sólo puede
seleccionar el nivel de centrifugado correspondiente al ciclo seleccionado.
Más prendas
Puede agregar o retirar prendas para lavar incluso después de que haya comenzado el lavado,
siempre y cuando esté encendida la luz de “Garment+ (Más prendas) ”. Al presionar el botón
Start/Pause (Inicio/Pausa) se destraba la puerta, salvo que el agua esté demasiado caliente o
que no haya mucha agua en la lavadora. Si puede destrabar la puerta y desea continuar el ciclo
de lavado, cierre la puerta y presione el botón Start/Pause (Inicio/Pausa).
22_ lavado de una carga de ropa
WF231ANW-02832D_MES.indd Sec3:22WF231ANW-02832D_MES.indd Sec3:22 2011-04-18 10:39:282011-04-18 10:39:28
Page 61

USO DEL DETERGENTE
La lavadora fue diseñada para usar detergentes de alta efi cacia (HE, por su sigla en inglés).
• Para obtener un lavado de óptima calidad, use detergentes efi caces,
por ejemplo: Tide HE, Wisk HE, Cheer HE o Gain HE*. Los detergentes
de alta efi cacia contienen supresores de la espuma que reducen o
eliminan la espuma. Cuando se produce menos espuma, la carga se
mueve con mayor efi cacia y el lavado se maximiza.
NO se recomienda un detergente convencional. Use únicamente
detergentes de alta efi cacia.
ADVERTENCIA
Reducir la cantidad de detergente puede reducir la calidad del lavado. Es importante tratar las
manchas previamente, clasifi car las prendas con cuidado por color y nivel de suciedad, y evitar
sobrecargar la lavadora.
* Los nombres de las marcas son marcas comerciales de sus respectivos fabricantes.
CARACTERÍSTICAS
Dosifi cador automático
La lavadora cuenta con compartimientos separados para
dosifi car el detergente y la blanqueador con protección
para ropa de color, la blanqueador que contenga cloro y el
suavizante de telas. Coloque todos los aditivos de lavado en su
compartimiento respectivo antes de encender la lavadora.
El dosifi cador automático SIEMPRE DEBE estar en su sitio
antes de encender la lavadora.
PRECAUCIÓN
NO abra el dosifi cador automático cuando la lavadora está en
funcionamiento.
Para usar:
• Cuando vierta detergente nunca sobrepase las
recomendaciones del fabricante de la lavadora.
• Este compartimiento contiene el detergente líquido durante
el ciclo de lavado principal, que se vierte a la carga al inicio
del ciclo.
Cuado utilice detergente en polvo, quite el compartimiento
del detergente líquido del cajón para detergente. La lavadora no dosifi ca detergente en
polvo desde el compartimiento para el detergente líquido.
Compartimiento para
el detergente líquido
02 LAVADO DE UNA CARGA DE ROPA
lavado de una carga de ropa _23
WF231ANW-02832D_MES.indd Sec3:23WF231ANW-02832D_MES.indd Sec3:23 2011-04-18 10:39:282011-04-18 10:39:28
Page 62

lavado de una carga de ropa
Compartimiento para el detergente
1. Vierta la cantidad recomendada de detergente para ropa directamente en el compartimiento
para el detergente antes de encender la lavadora.
2. Si se usa blanqueador con protección para ropa de color, debe agregarse con el detergente
en el compartimiento para el detergente.
Cuando agregue blanqueador con protección para ropa de color junto con el detergente, lo
mejor es que ambos productos tengan la misma consistencia: granulada o líquida.
Compartimiento para la blanqueador
(Sólo blanqueador líquida que contenga cloro)
1. Agregue blanqueador que contenga cloro en el
compartimiento para la blanqueador.
NO exceda la línea MAX FILL (Llenado máximo).
2. Evite salpicar o rebasar el compartimiento.
3. La lavadora dosifi cará automáticamente la blanqueador
dentro del tambor en el momento apropiado.
4. El dosifi cador diluye automáticamente la blanqueador
líquida que contenga cloro antes de que llegue a la
carga para lavar.
• Nunca vierta blanqueador líquida que contenga
cloro sin diluir directamente sobre la carga o
dentro del tambor. Se trata de un químico potente
y puede ser perjudicial para la tela, por ejemplo,
puede desgastar las fi bras o causar decoloración,
si no se lo usa correctamente.
• Si prefi ere usar blanqueador sin cloro, con protección para ropa de color, agréguela al
compartimiento para el detergente apropiado.
NO vierta blanqueador con protección para ropa de color directamente en el
compartimiento para la blanqueador.
Compartimiento
para el suavizante
de telas
Compartimiento
para la
blanqueador
Compartimiento para el suavizante de telas
1. Vierta la cantidad recomendada de suavizante de telas líquido en el compartimiento para el
suavizante.
Para cargas más pequeñas, use menos del contenido de una tapa.
2. El dosifi cador libera automáticamente el suavizante de telas líquido en el momento correcto
durante el ciclo de enjuague.
• Use el compartimiento para el suavizante SÓLO para suavizantes de telas líquidos.
• Si se utiliza detergente de enjuague concentrado, después del lavado pueden quedar
restos de detergente en el compartimiento. Si desea utilizar detergente de enjuague
concentrado, deberá diluirlo en agua y agregarlo así al compartimiento del detergente
hasta la línea MAX FILL (Llenado máximo).
• NO use un dosifi cador Downy Ball* en el compartimiento para el suavizante de telas de
esta lavadora. No agregará el suavizante de telas en el momento correcto.
Use el compartimiento para el detergente.
• NO es aconsejable utilizar suavizante de telas líquido ya que es demasiado pegajoso y
quizás no se mezclaría con el agua sufi cientemente.
* Los nombres de las marcas son marcas comerciales de sus respectivos fabricantes.
24_ lavado de una carga de ropa
WF231ANW-02832D_MES.indd Sec3:24WF231ANW-02832D_MES.indd Sec3:24 2011-04-18 10:39:292011-04-18 10:39:29
Page 63

limpieza y mantenimiento de
su lavadora
Mantener su lavadora limpia mejora su desempeño, la protege contra
reparaciones innecesarias y prolonga su vida útil.
LIMPIEZA DEL EXTERIOR
Cierre las llaves de agua después de fi nalizar el lavado del día.
Esto cerrará el suministro de agua a la lavadora y evitará la improbable posibilidad de que se produzcan daños a
causa del derrame de agua. Deje la puerta abierta para permitir que el interior de la lavadora se seque.
Use un paño suave para limpiar todo el detergente, la blanqueador u otros derrames a medida que ocurran.
Limpie lo siguiente tal como se recomienda:
Panel de control: limpie con un paño suave y húmedo. No use polvos abrasivos ni paños de limpieza. No rocíe el
panel directamente con limpiadores en aerosol.
Gabinete: lave con agua y jabón.
LIMPIEZA DEL INTERIOR
Limpie el interior de la lavadora periódicamente para eliminar todo vestigio de suciedad, polvo, olor, moho,
hongos o bacterias que pueda permanecer en la lavadora como consecuencia del lavado de ropa.
El incumplimiento de estas instrucciones puede dar como resultado situaciones poco satisfactorias, tales como
olores y/o manchas permanentes en la lavadora o en la ropa para lavar.
Se pueden retirar los depósitos de agua dura si fuera necesario. Use un limpiador con el rótulo “Washer safe”
(Seguro para lavadoras).
LIMPIEZA DE LOS DOSIFICADORES
Posiblemente, el dosifi cador automático necesite una limpieza periódica debido a la acumulación de aditivos del lavado.
1.
Extraiga el recipiente para el detergente líquido del compartimiento del
detergente.
2. Retire la tapa del sifón de los compartimientos para el suavizante de telas y la
blanqueador.
3. Lave todas las partes con agua corriente.
4. Limpie el hueco del dosifi cador con un cepillo suave.
5. Vuelva a colocar la tapa del sifón y ajústela con fi rmeza.
6. Introduzca de nuevo el dosifi cador en su sitio.
7. Ejecute un ciclo de Enjuagado + Centrifugado sin ninguna carga en la lavadora.
1
Tapa del sifón
2
03 LIMPIEZA Y MANTENIMIENTO
CÓMO GUARDAR LA LAVADORA
Las lavadoras se pueden dañar si no se extrae el agua de las mangueras y de los componentes internos antes de
guardarla. Prepare la lavadora para guardar de la siguiente manera:
• Seleccione el ciclo Quick Wash (Lavado rápido) y agregue blanqueador al dosifi cador automático. Ejecute ese
ciclo en la lavadora sin carga.
• Cierre las llaves de agua y desconecte las mangueras de entrada.
• Desenchufe la lavadora del tomacorriente y deje la puerta de la lavadora abierta para que circule aire por el tambor.
• Si su lavadora ha estado guardada en lugares con temperaturas por debajo del punto de congelación, deje
transcurrir un tiempo para que los restos de agua se derritan antes de usarla.
limpieza y mantenimiento de su lavadora _25
WF231ANW-02832D_MES.indd Sec6:25WF231ANW-02832D_MES.indd Sec6:25 2011-04-18 10:39:292011-04-18 10:39:29
Page 64

limpieza y mantenimiento de
su lavadora
LIMPIEZA DEL FILTRO DE RESIDUOS
Recomendamos limpiar el fi ltro de residuos cuando el agua no drena correctamente o cuando aparece en la
pantalla el mensaje de error “nd”.
1. Abra la tapa del fi ltro presionando y tirando de la tapa
del fi ltro con los dedos.
Tapa del fi ltro
2. Tire del tubo de drenaje que está conectado al
gancho guía en el frente, sosteniendo la tapa
del drenaje. No tire del tubo de drenaje con
demasiada fuerza.
3. Coloque un recipiente debajo de la lavadora
para recuperar cualquier agua restante.
Sostenga el tubo de drenaje con una mano
y con la otra gire el tapón de drenaje de
emergencia hacia la izquierda y sepárelo.
4. Drene el resto de agua por completo.
5. Saque el tapón y el conjunto del fi ltro de residuos.
Tapón del fi ltro
6. Limpie la suciedad u otros materiales
que hubieran quedado en el fi ltro de
residuos. Asegúrese de que no esté
bloqueada la bomba de drenaje ubicada
detrás del fi ltro de residuos.
Tapón del fi ltro
7. Una vez realizada la limpieza del fi ltro, inserte de nuevo el
tapón y el conjunto del fi ltro de residuos en la lavadora.
Gire el tapón del fi ltro de residuos en el sentido de las
agujas del reloj hasta que el indicador del tapón del fi ltro
de residuos se sitúe en la posición de las 12 horas; el
indicador debe apuntar a la lavadora.
8. Vuelva a montar el tapón del desagüe de emergencia en el
tubo de drenaje y cuelgue el tubo en el gancho guía.
9. Vuelva a colocar la tapa del fi ltro.
Tapa de
drenaje
de residuos
de residuos
Paso 2Paso 1
Filtro de
residuos
26_ limpieza y mantenimiento de su lavadora
WF231ANW-02832D_MES.indd Sec6:26WF231ANW-02832D_MES.indd Sec6:26 2011-04-18 10:39:292011-04-18 10:39:29
Page 65

LIMPIEZA DEL SELLO/FUELLE DE LA PUERTA
1. Abra la puerta de la lavadora y saque la ropa o cualquier otro objeto.
2. Inspeccione el sello/fuelle de color gris entre la apertura de
la puerta y la canasta para buscar zonas manchadas. Retire
el sello/fuelle para inspeccionar todas las áreas debajo del
sello/fuelle y comprobar si hay objetos extraños.
sello/fuelle
3. Si hay manchas en el área del sello/fuelle, límpielas siguiendo este procedimiento.
a) Mezcle una solución diluida de ¾ de taza (177 ml) de blanqueador líquido con cloro y 1
gal. (3,8 L) de agua corriente caliente.
b) Limpie el área del sello/fuelle con esta solución mediante un paño húmedo.
c) Deje reposar durante 5 minutos.
d) Limpie meticulosamente el área con un paño seco y deje la puerta abierta para que se
seque el interior de la lavadora.
IMPORTANTE:
• Póngase guantes de goma cuando vaya a realizar una limpieza prolongada.
• Consulte las instrucciones del fabricante del blanqueador para un uso adecuado.
MANTENIMIENTO DE LA CUBIERTA SUPERIOR Y DEL MARCO
FRONTAL
No coloque objetos pesados ni afi lados ni tampoco el paquete de detergente sobre la lavadora.
Manténgalos apartados sobre el pedestal o en una caja de almacenaje, que puede adquirir por separado.
03 LIMPIEZA Y MANTENIMIENTO
El objeto puede rayar o dañar la cubierta superior o caerse de la lavadora.
PRECAUCIÓN
Ya que toda la lavadora tiene un acabado brillante, la superfi cie se puede rayar o dañar fácilmente.
Evite rayar o dañar la superfi cie cuando use la lavadora.
limpieza y mantenimiento de su lavadora _27
WF231ANW-02832D_MES.indd Sec6:27WF231ANW-02832D_MES.indd Sec6:27 2011-04-18 10:39:312011-04-18 10:39:31
Page 66

solución de problemas y
códigos de información
CONTROLE ESTOS PUNTOS SI SU LAVADORA...
PROBLEMA SOLUCIÓN
no enciende...
no tiene agua o no tiene
sufi ciente agua...
tiene restos de detergente
en el dosifi cador automático
después de que ha fi nalizado
el ciclo de lavado.
vibra o hace demasiado ruido.
se detiene
• Asegúrese de que la puerta esté bien cerrada.
• Verifi que que la lavadora esté enchufada.
• Asegúrese de que las llaves de agua estén abiertas.
• Asegúrese de presionar el botón Start/Pause (Inicio/Pausa) para encender la
lavadora.
• Asegúrese de que la función Seguro para niños no esté activada. Consulte la
página 14.
• Antes de que la lavadora comience a llenarse, se escuchará una serie de
sonidos semejantes a un “clic” para controlar la traba de la puerta y que se
efectúe un drenaje rápido.
• Controle el fusible o reinicie el disyuntor.
• Abra las dos llaves completamente.
• Asegúrese de que la puerta esté bien cerrada.
• Enderece las mangueras de entrada de agua.
• Desconecte las mangueras y limpie los fi ltros. Posiblemente los fi ltros de las
mangueras estén tapados.
• Abra y cierre la puerta y, a continuación, presione el botón Start/Pause (Inicio/
Pausa).
• Asegúrese de que la lavadora funcione con sufi ciente presión de agua.
• Asegúrese de que el disco selector de detergente se encuentre en la
posición superior cuando usa detergente granulado.
• Compruebe que la lavadora esté ubicada sobre una superfi cie nivelada. Si
la superfi cie no está nivelada, ajuste las patas de la lavadora para nivelar el
electrodoméstico.
• Asegúrese de que se hayan retirado los tornillos de transporte.
• Asegúrese de que la lavadora no toque ningún otro objeto.
• Verifi que que la carga de ropa sea equilibrada.
• Enchufe el cable de alimentación a un tomacorriente que funcione.
• Controle el fusible o reinicie el disyuntor.
• Cierre la puerta y presione el botón Start/Pause (Inicio/Pausa) para hacer
funcionar la lavadora.
Por su seguridad, la lavadora no lavará ni centrifugará salvo que la puerta
esté cerrada.
• Antes de que la lavadora comience a llenarse, se escuchará una serie de
sonidos semejantes a un “clic” para controlar la traba de la puerta y que se
efectúe un drenaje rápido.
• Es posible que se produzcauna pausa o que haya un período de remojo en el
ciclo. Espere un instante para ver si comienza a funcionar.
• Controle que los fi ltros de las mangueras de entrada a la altura de las llaves
no presenten obstrucciones.
Limpie los fi ltros periódicamente.
28_ solución de problemas y códigos de información
WF231ANW-02832D_MES.indd Sec4:28WF231ANW-02832D_MES.indd Sec4:28 2011-04-18 10:39:322011-04-18 10:39:32
Page 67

se llena con agua a una
temperatura incorrecta.
tiene la puerta trabada o no
se abre.
no drena y/o no centrifuga.
deja la carga demasiado
húmeda al fi nalizar el ciclo.
pierde agua.
tiene espuma en exceso.
Parece que hay una cantidad
insufi ciente de agua.
• Abra las dos llaves completamente.
• Asegúrese de que la selección de temperatura sea la correcta.
• Asegúrese de que las mangueras estén conectadas a las llaves correctas.
Purgue las cañerías.
• Controle el calentador de agua. Debería estar confi gurado para proveer agua
caliente en la salida de agua a una temperatura mínima de 120 °F (49 °C).
Asimismo, verifi que la capacidad del calentador de agua y la velocidad de
recuperación.
• Desconecte las mangueras y limpie los fi ltros. Posiblemente, los fi ltros de las
mangueras estén tapados.
• A medida que la lavadora se llena, la temperatura del agua puede variar
debido a que la función automática de control de la temperaturacontrola la
temperatura del agua que ingresa. Esto es normal.
• Mientras la lavadora se llena, es posible que observe que por el dosifi cador pasa
sólo agua caliente y/o sólo agua fría cuando se seleccionan las temperaturas
de lavado fría o tibia. Ésta es una función normal que cumple el control de
temperatura automático dado que la lavadora determina la temperatura del agua.
• Presione el botón Start/Pause (Inicio/Pausa) para detener la lavadora.
• La puerta de la lavadora permanecerá trabada durante la fase de
calentamiento del ciclo Sanitize (Desinfección).
• Puede llevar algunos minutos que el mecanismo de cierre de la puerta se
desconecte.
• Controle el fusible o reinicie el disyuntor.
• Enderece las mangueras de drenaje. Elimine las mangueras enroscadas. Si existe
alguna restricción en cuanto al drenaje, comuníquese con el servicio técnico.
• Cierre la puerta y presione el botón Start/Pause (Inicio/Pausa). Por su seguridad,
la lavadora no lavará ni centrifugará salvo que la puerta esté cerrada.
• Compruebe que el fi ltro de residuos no esté obstruido.
• Use la velocidad de centrifugado Alta o Muy alta.
• Use un detergente de alta efi cacia para reducir la formación de espuma en exceso.
• Tiene una carga demasiado pequeña. Las cargas muy pequeñas (una o dos
prendas) se pueden desequilibrar y no centrifugarse en absoluto.
• Asegúrese de que la puerta esté bien cerrada.
• Asegúrese de que todas las conexiones de las mangueras estén ajustadas.
• Asegúrese de que el extremo de la manguera de drenaje esté correctamente
conectado y asegurado al sistema de drenaje.
• Evite sobrecargar la lavadora.
• Use un detergente de alta efi cacia para evitar la formación de espuma en exceso.
• Use un detergente de alta efi cacia para evitar la formación de espuma en exceso.
• Reduzca la cantidad de detergente para el agua blanda, las cargas
ligeramente sucias o pequeñas.
• NO se recomienda un detergente de baja efi cacia.
• La lavadora de carga frontal proporciona un desempeño máximo con poca
cantidad de agua.
• Dado que el suministro de agua no se ha completado al iniciar el lavado,
puede parecer que hay poca cantidad de agua.
• Ya que el tiempo de suministro de agua puede diferir según el tipo de colada,
la cantidad de agua puede parecer pequeña.
• Dado que el agua se suministra desde la parte inferior del tambor y la ropa
absorbe el agua suministrada, la cantidad de agua puede parecer pequeña.
04 SOLUCIÓN DE PROBLEMAS
solución de problemas y códigos de información _29
WF231ANW-02832D_MES.indd Sec10:29WF231ANW-02832D_MES.indd Sec10:29 2011-04-18 10:39:322011-04-18 10:39:32
Page 68

solución de problemas y
códigos de información
CÓDIGOS DE INFORMACIÓN
Pueden aparecer códigos de información para ayudarle a comprender mejor qué ocurre con la lavadora.
SÍMBOLO DEL
CÓDIGO
SIGNIFICADO SOLUCIÓN
Un desequilibrio en la carga
impidió que la lavadora
centrifugara.
La puerta está abierta cuando la
lavadora está en funcionamiento.
No se logra cerrar la puerta de la
lavadora.
Problema con el control de la
temperatura del agua.
(Problema con el control del
calentador.)
La lavadora intentó llenarse,
pero no alcanzó el nivel de agua
adecuado.
La puerta no se puede abrir. Asegúrese de que la puerta esté bien cerrada.
El motor no funciona
correctamente.
La lavadora no está drenando.
También puede signifi car que
la unidad percibe una pequeña
obstrucción mientras drena.
Redistribuya la carga y presione el botón Start/
Pause (Inicio/Pausa).
Cierre la puerta fi rmemente y reinicie el ciclo.
Si el código vuelve a aparecer, comuníquese con
el servicio técnico.
Cierre la puerta fi rmemente y reinicie el ciclo.
Si el código vuelve a aparecer, comuníquese con
el servicio técnico.
Solicite servicio técnico.
Solicite servicio técnico.
Presione el botón Power (Encendido) para
apagar la lavadora y, a continuación, vuélvala
a encender. Si el código vuelve a aparecer,
comuníquese con el servicio técnico.
Reinicie el ciclo presionando el botón Start/
Pause (Inicio/Pausa). Si el código vuelve a
aparecer, comuníquese con el servicio técnico.
En primer lugar, limpie el fi ltro de drenaje y,
a continuación, verifi que lo siguiente.
1) Apague la unidad y vuélvala a encender.
2) Seleccione sólo el ciclo Spin (Centrifugado).
3) Presione Start/Pause (Inicio/Pausa) para que
el agua drene.
Limpie el fi ltro de residuos.
Si no drena, comuníquese con el servicio
técnico.
30_ solución de problemas y códigos de información
WF231ANW-02832D_MES.indd Sec10:30WF231ANW-02832D_MES.indd Sec10:30 2011-04-18 10:39:322011-04-18 10:39:32
Page 69

SÍMBOLO DEL
CÓDIGO
SIGNIFICADO SOLUCIÓN
La lavadora intentó llenarse pero
no lo logró.
Asegúrese de que las llaves de agua estén
completamente abiertas. Controle que no haya
mangueras enroscadas.
Controle los fi ltros interiores de las mangueras
de carga.
Si utiliza un dispositivo de seguridad contra
inundación, retírelo y conecte la manguera del agua
directamente en la unidad.
Verifi que si la manguera de
suministro de agua caliente está
conectada.
Se debe conectar la manguera de suministro de
agua caliente ya que si la temperatura del agua fría
es inferior a 59 ºF la función de control automático
de la temperatura (A.T.C) suministra agua caliente.
La conexión de la manguera de
agua caliente/fría no es correcta.
El servicio eléctrico se interrumpió
cuando la lavadora estaba en
Conecte la manguera de agua caliente/fría
correctamente.
Reinicie el ciclo presionando el botón Start/
Pause (Inicio/Pausa).
funcionamiento.
Se detecta una falla en el sensor
Comuníquese con el servicio técnico.
del nivel de agua.
Tecla atascada. Comuníquese con el servicio técnico.
04 SOLUCIÓN DE PROBLEMAS
Problema con el sensor de la
velocidad del motor.
Reinicie el ciclo.
Si el código vuelve a aparecer, comuníquese con
el servicio técnico..
Problema con el sensor de
temperatura.
Reinicie el ciclo.
Si el código vuelve a aparecer, comuníquese con
el servicio técnico.
Se detectó alta corriente. Reinicie el ciclo.
Si el código vuelve a aparecer, comuníquese con
el servicio técnico..
Se detectó alto/bajo voltaje. Reinicie el ciclo.
Si el código vuelve a aparecer, comuníquese con
el servicio técnico..
Se detectó demasiada espuma
durante la sesión de lavado.
Como prevención, reduzca la cantidad de
detergente.
La unidad ingresará en estado de
espera hasta que disminuya la
espuma. A continuación, la unidad
volverá a funcionar.
Cuando termine el lavado, por su
parte, los códigos End y Sd se
iluminarán.
Para los códigos que no fi guran más arriba, llame al 1–800–726–7864 (1–800–SAMSUNG).
solución de problemas y códigos de información _31
WF231ANW-02832D_MES.indd Sec10:31WF231ANW-02832D_MES.indd Sec10:31 2011-04-18 10:39:352011-04-18 10:39:35
Page 70

apéndice
TABLA DE INDICACIONES SOBRE LA TELA
Los siguientes símbolos ofrecen indicaciones acerca de las prendas. La etiqueta de indicaciones de la prenda
incluye símbolos para lavado, blanqueado, secado y planchado, o limpieza a seco cuando sea necesaria. El
uso de símbolos garantiza la consistencia entre los fabricantes textiles de artículos nacionales e importados.
Siga las indicaciones de la etiqueta para prolongar la vida útil de la prenda y reducir los problemas del lavado.
Ciclo de lavado Instrucciones especiales
Normal Secar colgado/tender No lavar
Planchado permanente /
Antiarrugas / Control de arrugas
Prendas suaves /
delicadas
Lavado a mano
Temperatura del agua**
Hot Mediana No planchar
Tibia Baja
Fría Cualquier calor Limpiar en seco
blanqueador
Cualquier blanqueador
(cuando sea necesaria)
Sólo blanqueador sin cloro
(con protección para ropa de
color)
(cuando sea necesaria)
Ciclo de secado en
secadora
Normal
Planchado permanente /
Antiarrugas / Control de
arrugas
Prendas suaves /
delicadas
** Los símbolos con punto representan las temperaturas del agua del lavado apropiadas para diversas prendas. El rango de
temperatura para Caliente es de 41 °C a 52 °C (105 °F a 125 °F), para Tibia es de 29 °C a 41 °C (de 85 °F a 105 °F) y para
Fría es de 16 °C a 29 °C (de 60 °F a 85 °F). (La temperatura del agua del lavado debe alcanzar un mínimo de 16 °C (60 °F)
para que se active el detergente y se logre un lavado efi caz). Posiblemente la lavadora no garantice estas temperaturas porque
las temperaturas reales del agua que ingresa en la lavadora dependen de la confi guración del calentador de agua y de las
temperaturas del suministro de agua regional. Por ejemplo, el agua fría que ingresa en las casas de los Estados del Norte
durante el invierno puede ser de 4 °C (40 °F), la cual es demasiado fría para que se logre un lavado efi caz. En este caso, será
preciso ajustar la temperatura del agua seleccionando la opción de temperatura cálida, agregando algo de agua caliente a la
Colgar para que escurra No retorcer
Secar en posición
horizontal
Secado con calor
Alta
Sin calor / aire No limpiar en seco
Temperaturas de secado con
plancha o vapor
Alta Colgar para que escurra
Mediana
Baja
Símbolos de advertencia para
el lavado
No usar blanqueador
No secar en secadora
Sin vapor (agregado a la
plancha)
Limpiar en seco
Secar colgado/tender
Secar en posición
horizontal
Para lanas que se puedan
lavar en lavadora. Las
cargas deben tener un
peso inferior a las 8 lb.
32_ apéndice
WF231ANW-02832D_MES.indd Sec11:32WF231ANW-02832D_MES.indd Sec11:32 2011-04-18 10:39:382011-04-18 10:39:38
Page 71

AYUDA AL MEDIOAMBIENTE
• Esta lavadora se fabrica con materiales reciclables. Si decide deshacerse de ella, siga la normativa
local relacionada con la eliminación de desechos. Corte el cable de alimentación para que el
electrodoméstico no pueda conectarse a una fuente de alimentación. Quite la puerta para que los
animales y los niños pequeños no puedan quedar atrapados dentro del electrodoméstico.
• No utilice cantidades de detergente mayores a las recomendadas por el fabricante del detergente.
• Utilice productos quitamanchas y lejías antes del ciclo de lavado y sólo cuando sea necesario.
• Ahorre agua y electricidad utilizando la capacidad total de la lavadora (la cantidad exacta depende del
programa que se utilice).
DECLARACIÓN DE CONFORMIDAD
Este electrodoméstico cumple con la norma UL2157.
ESPECIFICACIONES
TIPO LAVADORA DE CARGA FRONTAL
DIMENSIONES
A.
Altura-General
B. Ancho
C. Profundidad con la puerta
abierta 90°
D. Profundidad
Div Pulgadas (cm.)
38” (96,5)
27” (68,6)
50.8’’ (129)
31.1” (80)
C
D
05 APÉNDICE
A
B
PRESIÓN DEL AGUA
PESO
POTENCIA DEL CALENTADOR
CONSUMO DE
ENERGÍA
REVOLUCIÓN DEL
CENTRIFUGADO
LAVADO
LAVADO Y CALENTAMIENTO
CENTRIFUGADO
DRENAJE
WF210*/WF220*
20-116 psi (137 kPa ~ 800 kPa)
183 lbs (83 kg)
900 W
120 V 140 W
120 V 960 W
120 V 430 W
120 V 80 W
1100 rpm
apéndice _33
WF231ANW-02832D_MES.indd Sec7:33WF231ANW-02832D_MES.indd Sec7:33 2011-04-18 10:39:382011-04-18 10:39:38
Page 72

apéndice
TABLA DE CICLOS
Use esta tabla para confi gurar el mejor ciclo y opción para su lavadora.
FUNCIONES OPCIONES
Temperatura Centrifugado Nivel suciedad
H W EW C H M L NS H N L
Normal
Heavy Duty
(Servicio
pesado)
Perm Press
(Plancha
permanente)
Sanitize
(Desinfección)
Delicates/Hand
Wash
(Ropa delicada/
Lavado a mano)
Wool (Lana)
Quick Wash
(Lavado rápido)
Rinse + Spin
(Enjuagado +
Centrifugado)
• •••••••••••
•••••••••••••
••••••••••••
• ••• • ••
••• •••••••
•• •• • ••
•••••••••••••
••••• ••
Temperatura Centrifugado Nivel suciedad
H (C): Caliente
W (T): Tibia
EW (ET): Tibia
C: Fría
H (MS): Alta
M (M): Mediana
L (LS): Baja
NS (SC): Sin centrifugado
H (MS): Muy sucia
N (N): Normal
L (LS): Ligeramente sucia
Inicio
retardado
Enjuague
extra
Pure
Cycle
Tiem-
po
(min.)
54
95
47
117
41
59
38
20
34_ garantía
WF231ANW-02832D_MES.indd Sec12:34WF231ANW-02832D_MES.indd Sec12:34 2011-04-18 10:39:392011-04-18 10:39:39
Page 73

garantía
GARANTÍA
LAVADORA SAMSUNG
GARANTÍA LIMITADA PARA EL COMPRADOR ORIGINAL
El presente producto de la marca SAMSUNG, tal como lo provee y distribuye SAMSUNG ELECTRONICS
AMERICA, INC. (SAMSUNG) y lo entrega nuevo, en su embalaje de cartón original al comprador o
consumidor original, está garantizado por SAMSUNG contra defectos de fabricación de los materiales y la
mano de obra durante el período limitado de la garantía de:
Un (1) año para las piezas y la mano de obra
Dos (2) años para el panel de control (piezas)
Tres (3) años para las piezas del tambor inoxidable
Diez (10) años para las piezas del motor
La presente garantía limitada comienza en la fecha original de compra y es válida únicamente para
productos comprados y usados en los Estados Unidos. Para recibir el servicio técnico de la garantía,
el comprador debe comunicarse con SAMSUNG con el fi n de que se determine el problema y los
procedimientos del servicio. El servicio técnico de la garantía sólo puede ser prestado por un centro de
servicio técnico autorizado de SAMSUNG. Se debe presentar la factura de compra original como prueba
de compra a SAMSUNG o al servicio técnico autorizado de SAMSUNG. SAMSUNG prestará servicio
técnico a domicilio durante el período de la garantía sin costo, sujeto a la disponibilidad dentro de los
Estados Unidos contiguos. El servicio técnico a domicilio no está disponible en todas las áreas.
Para recibir el servicio técnico a domicilio, el producto no debe presentar obstrucciones y debe ser
accesible para el agente del servicio técnico. Si el servicio técnico no está disponible, SAMSUNG puede
optar por transportar el producto hasta y desde el servicio técnico autorizado.
SAMSUNG reparará, reemplazará el producto u ofrecerá un reembolso a su criterio y sin cargo adicional,
tal como se establece en la presente garantía, con piezas o productos nuevos o reacondicionados si se
comprueba que es defectuoso durante el período limitado de la garantía especifi cado anteriormente. Todas
las piezas y los productos reemplazados pasan a ser propiedad de SAMSUNG y deben ser devueltos a
SAMSUNG. Las piezas y los productos reemplazados asumen la garantía original que resta, o noventa (90)
días, el período que sea el más prolongado. La presente garantía limitada cubre defectos de fabricación
de los materiales y la mano de obra encontrados durante el uso normal y doméstico de este producto y
no será válida para lo siguiente: daños que ocurran durante el envío; entrega e instalación; aplicaciones
y usos para los cuales el presente producto no fue destinado; números de serie o producto alterados;
daño cosmético o acabado exterior; accidentes, abuso, descuido, incendio, inundación, caída de rayos, u
otros casos fortuitos o de fuerza mayor; uso de productos, equipo, sistemas, utilidades, servicios, piezas,
suministros, accesorios, aplicaciones, instalaciones, reparaciones, cableado externo o conectores no
provistos ni autorizados por SAMSUNG que dañen este producto o que acarreen problemas en el servicio;
voltaje de la línea eléctrica incorrecto, fl uctuaciones y sobretensión; ajustes del cliente e incumplimiento
de lo establecido en el manual de instrucciones, instrucciones de mantenimiento y ambientales que están
cubiertas y recomendadas en el manual de instrucciones; traslado y reinstalación del producto; problemas
causados por plagas. La presente garantía limitada no cubre problemas derivados de la corriente, el voltaje
o el suministro eléctrico incorrectos, las bombillas de luz, los fusibles de la casa, el cableado de la casa,
el costo del servicio técnico para recibir instrucciones o corregir errores en la instalación. SAMSUNG no
garantiza el funcionamiento ininterrumpido o sin errores del producto.
garantía _35
WF231ANW-02832D_MES.indd Sec12:35WF231ANW-02832D_MES.indd Sec12:35 2011-04-18 10:39:392011-04-18 10:39:39
Page 74

garantía
EXCEPTO LO ESTABLECIDO EN EL PRESENTE, NO EXISTEN GARANTÍAS SOBRE ESTE PRODUCTO,
YA SEAN EXPRESAS O TÁCITAS, Y SAMSUNG DESCONOCE TODAS LAS GARANTÍAS QUE INCLUYEN,
AUNQUE NO EN CARÁCTER TAXATIVO, CUALQUIER GARANTÍA TÁCITA DE QUE EL PRODUCTO SE
ENCUENTRA EN CONDICIONES APTAS PARA LA VENTA, DE DEFRAUDACIÓN DE DERECHOS O DE
QUE EL PRODUCTO SE ADECUA A LOS FINES ESPECÍFICOS PARA LOS CUALES SE ADQUIERE.
NINGÚN AVAL O GARANTÍA OTORGADOS POR PERSONA, COMPAÑÍA O CORPORACIÓN
ALGUNA CON RESPECTO AL PRESENTE PRODUCTO REVESTIRÁ CARÁCTER VINCULANTE PARA
SAMSUNG. SAMSUNG NO SERÁ RESPONSABLE POR PÉRDIDA DE INGRESOS O LUCRO CESANTE,
IMPOSIBILIDAD DE GENERAR AHORROS U OBTENER OTROS BENEFICIOS, O CUALQUIER DAÑO
DERIVADO DE CIRCUNSTANCIAS ESPECIALES, DAÑO IMPREVISTO O DERIVADO CAUSADO
POR EL USO, USO INCORRECTO, O INCAPACIDAD PARA USAR EL PRESENTE PRODUCTO,
INDEPENDIENTEMENTE DE LA TEORÍA LEGAL EN QUE SE FUNDE EL RECLAMO Y AUN CUANDO SE
LE HAYA NOTIFICADO A SAMSUNG DE LA POSIBILIDAD DE TALES DAÑOS.
NINGÚN RESARCIMIENTO DE NINGUNA ÍNDOLE CONTRA SAMSUNG SUPERARÁ EL PRECIO DE
COMPRA DEL PRODUCTO VENDIDO POR SAMSUNG Y CAUSANTE DEL PRESUNTO DAÑO. SIN
LIMITAR LO PRECEDENTE, EL COMPRADOR ASUME TODO EL RIESGO Y LA RESPONSABILIDAD POR
PÉRDIDA, DAÑO O LESIÓN AL COMPRADOR Y A LOS BIENES DEL COMPRADOR Y A TERCEROS Y A
SUS BIENES DERIVADOS DEL USO, USO INCORRECTO O INCAPACIDAD PARA USAR EL PRESENTE
PRODUCTO. LA PRESENTE GARANTÍA LIMITADA NO SE EXTENDERÁ A NINGUNA PERSONA DISTINTA
DEL COMPRADOR ORIGINAL DEL PRESENTE PRODUCTO, ES INTRANSFERIBLE Y ESTABLECE SU
EXCLUSIVA REPARACIÓN.
Algunos estados no permiten limitaciones en cuanto al plazo de una garantía implícita, o la exclusión o
limitación de daños imprevistos o derivados, por lo tanto las limitaciones o exclusiones antedichas pueden
no aplicarse en su caso. Esta garantía le otorga derechos específi cos, y además puede tener otros
derechos que varían según el estado en el que se encuentre.
Para recibir servicio técnico de garantía, comuníquese con SAMSUNG a:
Samsung Electronics America, Inc.
85 Challenger Road Ridgefi eld Park, NJ 07660
1-800-SAMSUNG (726-7864)
www.samsung.com
36_ garantía
WF231ANW-02832D_MES.indd Sec12:36WF231ANW-02832D_MES.indd Sec12:36 2011-04-18 10:39:392011-04-18 10:39:39
Page 75

memo
WF231ANW-02832D_MES.indd Sec12:37WF231ANW-02832D_MES.indd Sec12:37 2011-04-18 10:39:392011-04-18 10:39:39
Page 76

¿TIENE PREGUNTAS O COMENTARIOS?
País LLAME AL O VISÍTENOS EN LÍNEA EN
U.S.A 1-800-SAMSUNG(726-7864) www.samsung.com
MEXICO 01-800-SAMSUNG (726-7864) www.samsung.com
N.º de código: DC68-02832D_MES
WF231ANW-02832D_MES.indd Sec12:38WF231ANW-02832D_MES.indd Sec12:38 2011-04-18 10:39:392011-04-18 10:39:39
 Loading...