

Samsung WF221ANG, WF221ANS User Manual
WASHING MACHINE
Technical Information
• Due to possibility of personal injury or property damage, always contact an authorized
technician for servicing or repair of this unit.
• Refer to Service Manual for detailed installation, operating, testing, troubleshooting, and
disassembly instructions.
CAUTION
All safety information must be followed as provided in Service Manual.
WARNING
To avoid risk of electrical shock, personal injury or death; disconnect power to washer
before servicing, unless testing requires power.
Code No. : DC68-02830D_EN
1
ALIGNMENT AND ADJUSTMENTS
WARNING
To avoid risk of electrical shock, personal injury or death; disconnect power to washer
before servicing, unless testing requires power.
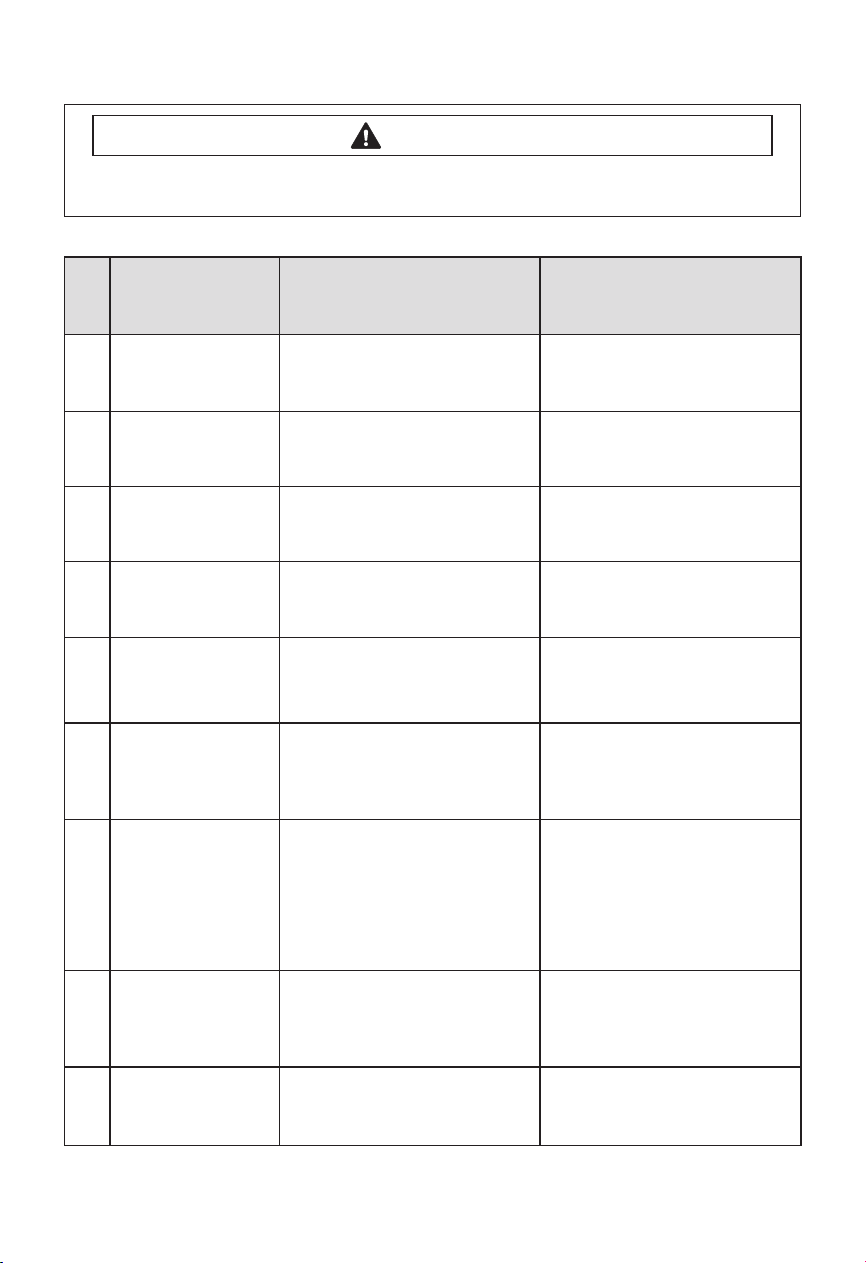
GENERAL ERROR FUNCTION
Error Code
NO
(Diagnostic Code
Error Image)
Description Corrective Action
1 nd
2 LO
3 nF
4 FL
5 LE
6 1E
7 OE
8 dc
9 E2
The water level fails to drop below the
Reset Water Level within 15 minutes.
Door fails to Unlock After 7 attempts.
When the lling Continues for more
than 40 minutes or there is no change
of water level for 6 minutes.
Door fails to lock after 7 attempts.
A water level lower than the Reset
water level is detected for 5 seconds
during the Wash/Rinse cycle.
Water Level Sensor Trouble. (When
the input signal from the water level
sensor is out of range, the unit will
send out beeping sounds and halts
the cycle.)
A fault is detected in the water level
sensor. Data (frequency) shows the
water level is at or above the overow
water level. (When this condition
is detected, the machine will
automatically starts draining water
until the water level falls below the
reset water level)
Unbalance or cabinet bump is
detected during nal spin, which
prevents the drum from spinning over
150 rpm. (Never exceeds 150 RPM due
to unbalanced load)
Jammed Key.(When key input signals
are coming out for more than 30
seconds, it is regarded as a jam.)
Go to “ Will Not Drain” Troubleshooting
Section.
Go to “ Will Not Unlock”
Troubleshooting Section.
Go to “ No Water Fill” Troubleshooting
Section.
Go to “ Will Not Lock” Troubleshooting
Section.
Go to “No Water Fill” Troubleshooting
Section.
Go to “No Water Fill”
Troubleshooting Section
First check to see that all of water
valves are not stuck. If water valves
are OK, check water level.
Go to “Wet Clothes” Troubleshooting
Section.
Check all of keys. If A key is sensed
to be pressed, all keys will do not
respond.
2
ALIGNMENT AND ADJUSTMENTS
WARNING
To avoid risk of electrical shock, personal injury or death; disconnect power to washer
before servicing, unless testing requires power.
Error Code
NO
(Diagnostic Code
Error Image)
Description Corrective Action
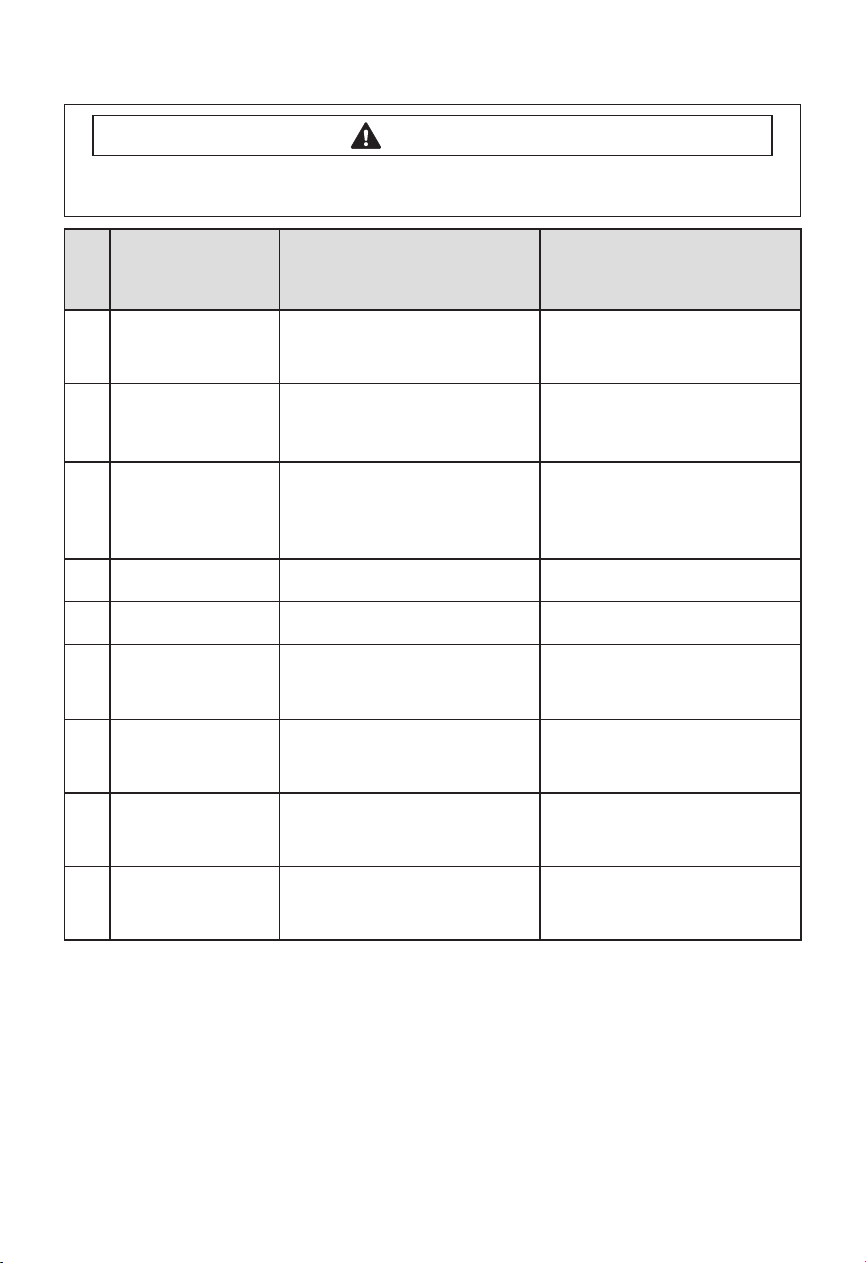
10 ds
11 tE
12
13
14
15
16
17
18
3E
Hr
nF1
2E
SUd
AE
SF
Door is detected as open while it is
trying to lock the door.
Abnormal high/low temperature or
resistance (Thermal sensor or PBA
resistance).
MICOM is attempting to drive the motor
but is not getting any response signals
from the hall sensor. Visual check shows
motor is not running. (Locked, Defective
Hall Sensor or Overload)
Heater Relay Failure (No Heater Relay
Check Signal)
The hot/cold water hose connection is
not correct.
Voltage for motor control bus is over
or under specied limit.
Suds is detected during the washing
session. (“SUdS” is not an error. If the
washer is in suds period, “SUdS” will
light up instead of remaining time.)
Communication error between SUB
PBA and MAIN PBA
System Error Replace PCB
Go to “Quick Test Mode” and then do
Door Lock/Unlock Test
Go to “ Board Input Test” and check
Water Temperature. Check loose
or pinched wires. Replace PCB or
thermistor.
Evaluate wire harness for loose or
unhooked connections. Go to “ Quick
Test Mode” and test Motor.
Replace PCB
Please connect the hot/cold water
hose connection correctly.
Replace PCB
Guide a user to reduce amount of
detergent usage.
Check Main PBA, SUB PBA & Wireharness. Replace PCB
3
ALIGNMENT AND ADJUSTMENTS
WARNING
To avoid risk of electrical shock, personal injury or death; disconnect power to washer
before servicing, unless testing requires power.
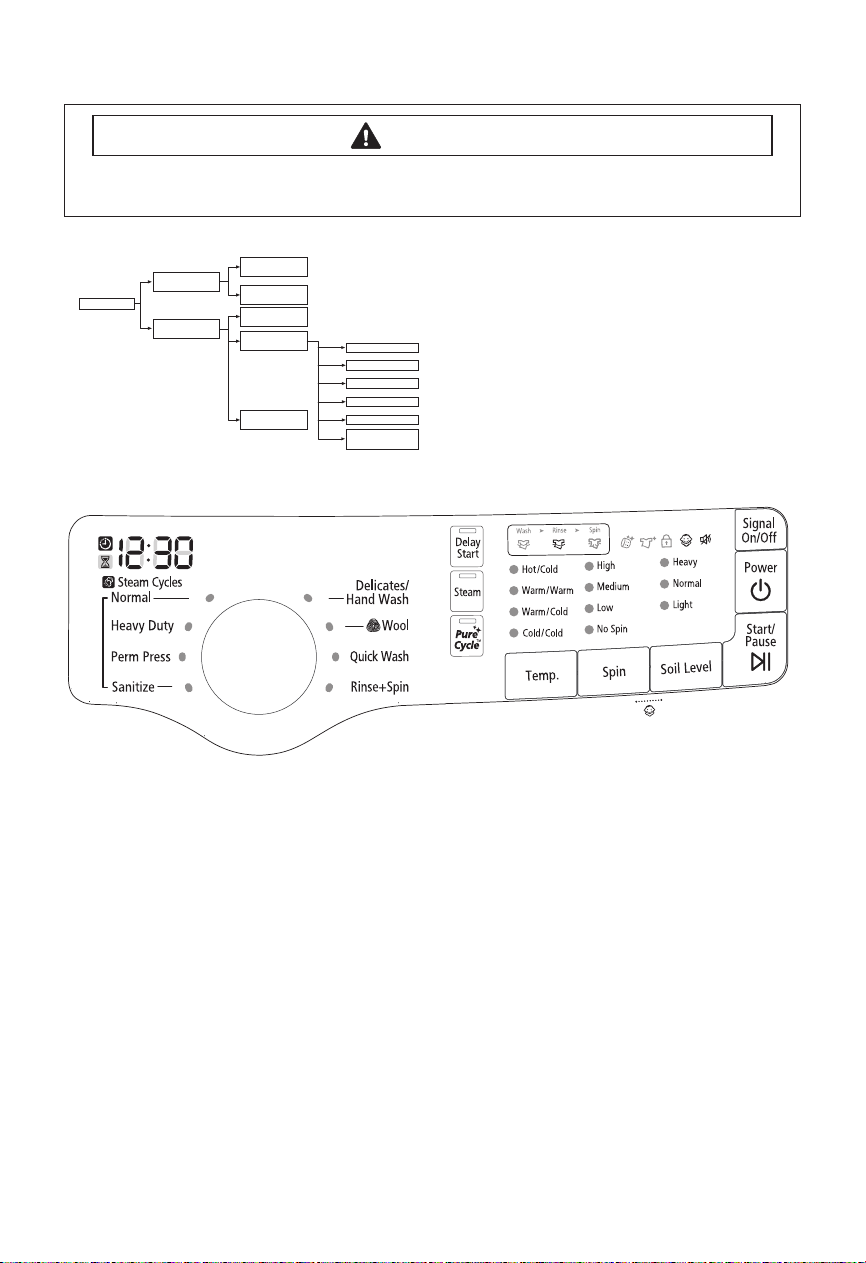
TEST MODE
Power Off State
Special Test Mode
Power On State
(Normal User Mode)
Quick Test Mode
Quick Test Mode
EEPROM Clear
Mode
Continuous Cycle
Mode
Service Mode
Demo Mode
Quick Spin Test Mode
Cycle Count Check Mode
S/W Version Check Mode
Fast Time Down Test Mode
Board Input Test Mode
Diagnostic Code
CheckMode
Test Mode:
Each Test Mode for the BIGBANG is as follows in
the coming pages. The test modes indicated by
the red arrows are modes unable to get an access
once the washing cycle has started due to safety
resons.
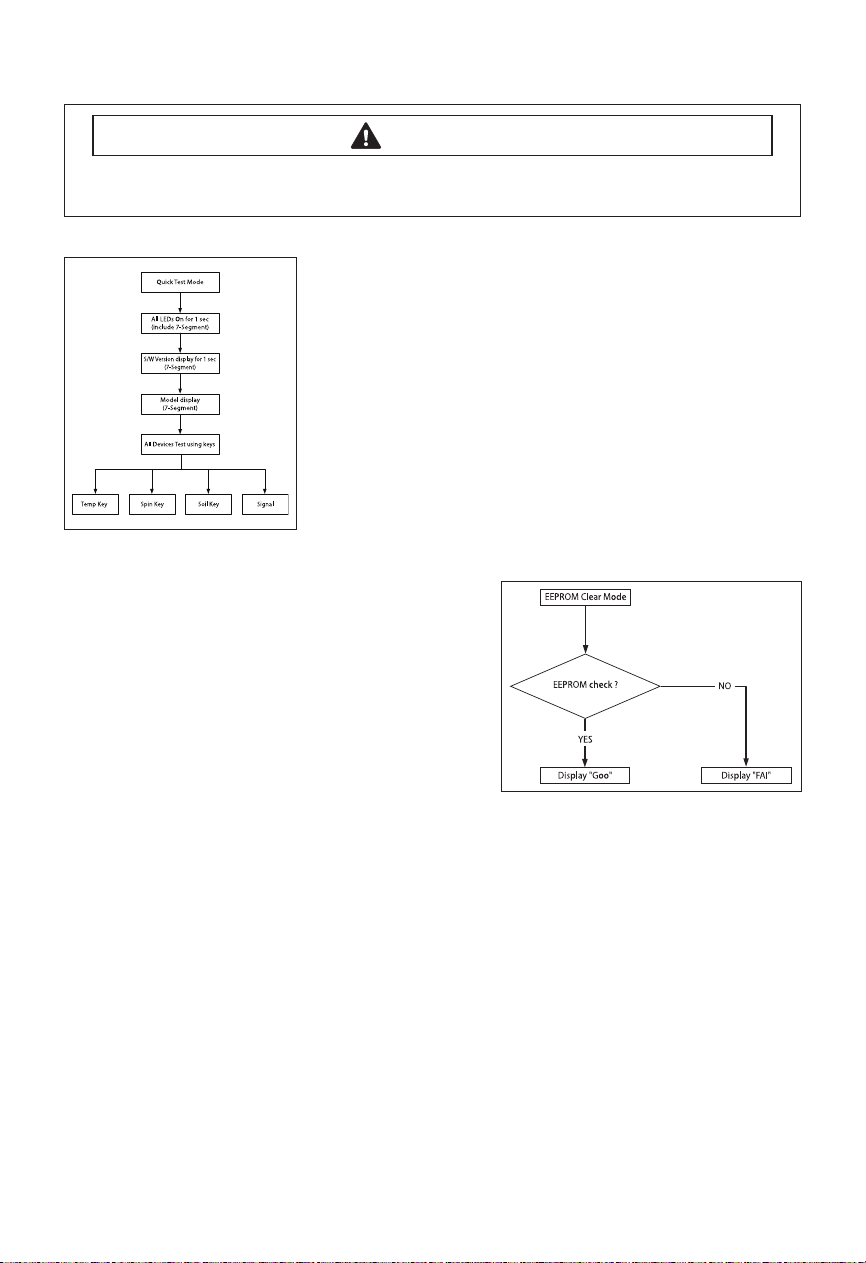
Denition of Quick Test Mode:
- Check operation of all LED’s (Verify faulty LED).
- Check model and software version.
- Check dierent operating modes (e.g. water valve, motor, door, drain pump, etc.).
How to Enter:
- Plug in the unit.
- Press Soil Key, Spin Key and Power Key at the same Time.
4
ALIGNMENT AND ADJUSTMENTS
WARNING
To avoid risk of electrical shock, personal injury or death; disconnect power to washer
before servicing, unless testing requires power.
Quick Test Mode:
1. All LED’s light up and it sends out Beep Sound when it
enters into the Quick Test Mode. (Including 7-Segment)
2. Displays software version for a sec and Clear EEprom. (Ex. If
S/W Version is 49, 7-Segment will display dE49)
3. When the version is displayed, turn the Jog-Dial so that
the version disappears. Press the following keys to test the
various components.
- Temp Key : Water Valve Test
- Spin Key : Door Lock/Unlock Test
- Soil Key : Water Heater Test
- Signal : Drain Pump Test
EEPROM Clear Check
Denition of EEPROM Clear Mode:
- EEPROM initialization.
- All course/option settings are to be reset to default
values after EEPROM initialization.
- When Service arises and it needs PCB replacement,
EEPROM should be reset.
How to Enter:
- The unit needs to be on.
- Press Delay Start Key, and Power Key at the same
time.
5
ALIGNMENT AND ADJUSTMENTS
WARNING
To avoid risk of electrical shock, personal injury or death; disconnect power to washer
before servicing, unless testing requires power.
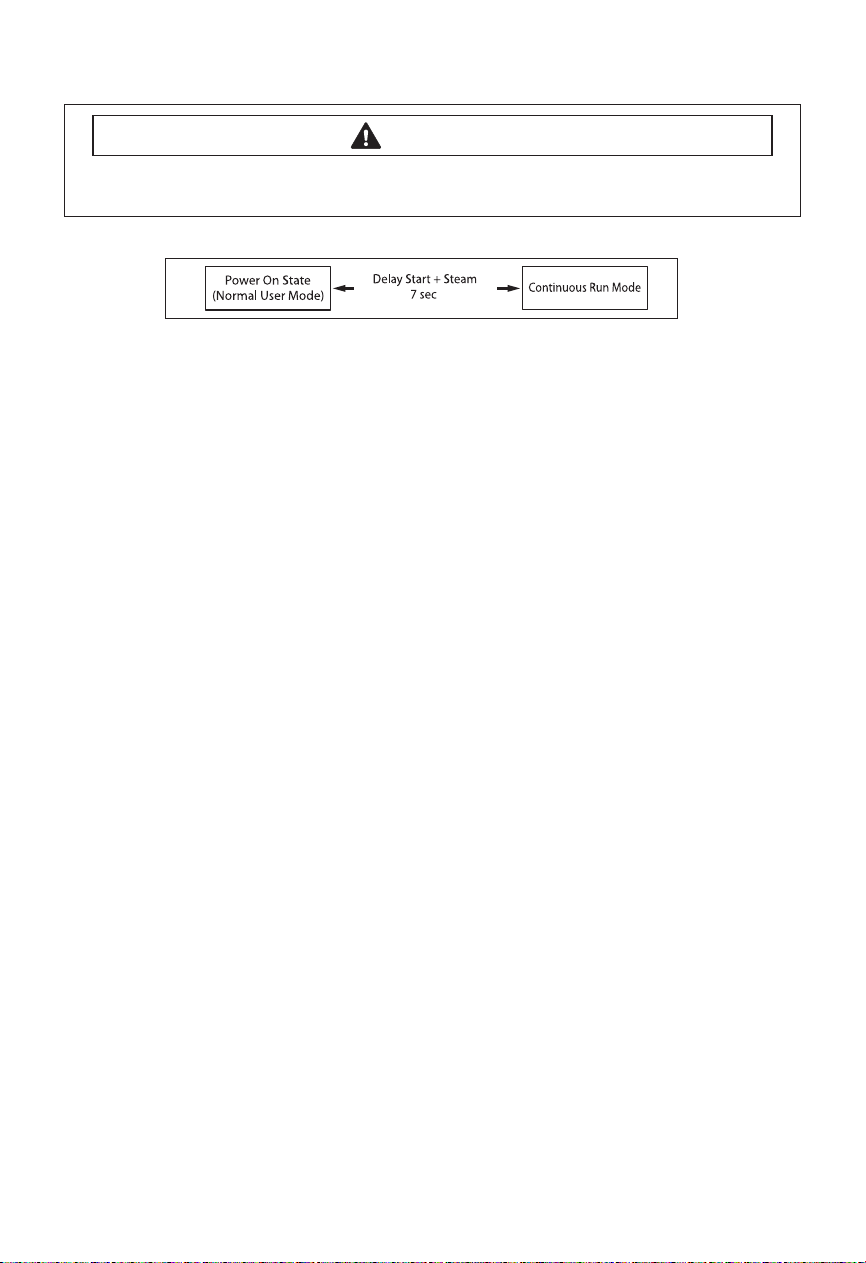
Continuous Run Mode
Denition of Continuous Run Mode:
- Will continuously repeat the current cycle until the Continuous Run Mode is cancelled.
How to Enter:
- Press Delay Start Key and Steam Key together for 7 sec.
Continuous Run Mode:
1. Press
2.
3. The Continuous Run Mode will repeat the previous cycle until continuous run mode is cancelled.
4.
5. If you exit Service Mode after entering it from Continuous Mode, the washing machine returns
6. If power is lost in Continuous Run Mode (that is, when the power plug is disconnected or the
Delay Start
Once in Continuous Run Mode, The seven segments will no longer display “0000” and will alternate
between displaying the number of cycles of the completed course and the remaining time of the course.
During Continuous Run Mode, press Delay Start
mode. The seven segments will no longer display the number of cycles and will display the
maintenance time only.
to Continuous Mode.
Power key is pressed turning the washing machine o), the mode is released when the washing
machine is turned on again.
+ Steam Key for 7 sec during Power On State (Normal User Mode) .
+ Steam
Key for 7 sec to return to normal user
Service Mode
Denition of Service Mode:
- Service Mode enables service technicians to verify the operation of the washing machine and
do troubleshooting.
- Service Mode can be entered during all washing cycle without interrupting the cycle except
some of test modes.
- Various tests can be done with Service Mode. So, troubleshooting can be done based on the
resulting diagnostic codes.
How to Enter:
- To enter the Service Mode, press the Signal and Steam Keys for 3 seconds or until the unit sends
out beeping sounds.
6
 Loading...