

Samsung GALAXY S8 ACTIVE, Verizon Galaxy S8 User Manual

SMARTPHONE
User Manual
Please read this manual before operating
your device and keep it for future reference.

Table of Contents
Special Features ..............................1
Bixby ........................................2
Edge Screen .................................2
Flexible Security .............................2
Water and Dust Resistance ....................3
Getting Started .............................. 4
Set Up Your Device .............................5
Assemble Your Device ........................6
Start Using Your Device ......................10
Set Up Your Device ..........................11
Learn About YourDevice
Front View ..................................16
Back View ..................................18
Home Screen ...............................19
Notification Panel .......................... 22
Customize Your Home Screen ............... 25
Bixby ......................................29
Navigation ................................30
Entering Text .............................. 32
Face Recognition ........................... 35
Fingerprint Scanner ........................36
CKT_G950U_EN_UM_TN_QC9_033117_FINAL
.......................15

Iris Scanner
Multi Window ..............................40
Emergency Mode .......................... 42
Edge Screen ...............................44
................................ 37
Apps .........................................48
Using Apps ................................ 49
Applications Settings ...................... 52
Calculator .................................54
Calendar .................................. 56
Camera and Video .......................... 59
Clock ..................................... 66
Contacts ..................................69
Cricket Apps ................................75
Email ......................................76
Galaxy Apps ............................... 79
...................................80
Gallery
Google Apps ............................... 85
Internet ...................................88
Messages ................................. 92
My Files ................................... 97
Phone ..................................... 99
Samsung Connect ......................... 108
Samsung Gear ............................108
Samsung Health .......................... 109
SamsungNotes ............................111
SamsungPay ..............................113
Samsung+ .................................116
Secure Folder ..............................116
Smart Switch ..............................116
iii Table of Contents

Settings .....................................117
How to Use Settings .......................118
Connections .................................119
Wi-Fi ..................................... 120
Bluetooth ................................ 123
Phone Visibility ........................... 125
Data Usage ............................... 125
Airplane Mode .............................127
NFC and Payment ......................... 128
Mobile Hotspot ........................... 129
Tethering ..................................132
Mobile Networks ...........................132
Location .................................. 133
Nearby Device Scanning ................... 134
Printing .................................. 134
MirrorLink
Virtual Private Networks (VPN) ............ 135
Reset Network Settings ....................137
Ethernet ..................................137
Sounds and Vibration ........................ 138
Sound Mode .............................. 139
Easy Mute ................................ 139
Vibrations ................................ 139
Volume ..................................140
Ringtone ................................. 142
Notification Sounds ....................... 142
Do Not Disturb ............................ 143
System Sounds ........................... 143
Key-Tap Feedback ......................... 144
Sound Quality and Effects ................. 144
iv Table of Contents
................................ 135

Separate App Sound
Notifications ............................... 146
Block App Notifications .....................147
Customize App Notifications ................147
Display ..................................... 148
Screen Brightness ......................... 149
Blue Light Filter ...........................149
Screen Mode ..............................150
Screen Resolution ......................... 150
Screen Zoom and Font ......................151
Full Screen Apps ...........................151
Easy Mode .................................152
Icon Frames ...............................152
LED Indicator ............................. 153
Status Bar ................................ 153
....................... 145
Navigation Bar ............................ 153
Screen Timeout ........................... 154
Keep Screen Turned Off. . . . . . . . . . . . . . . . . . . . 154
Screen Saver .............................. 154
Wallpapers and Themes ..................... 156
Wallpapers ................................157
Themes ...................................157
Icons ..................................... 158
Always On Displays (AODs) ................ 158
Device Maintenance ......................... 159
Quick Optimization ........................160
Battery ...................................160
Performance Mode .........................161
Storage ...................................161
Memory .................................. 163
v Table of Contents

Language and Input
Date and Time .............................167
Report Diagnostic Information ..............167
Reset ....................................168
Factory Data Reset ........................168
Software Update .......................... 170
Lock Screen andSecurity .....................171
Set a Screen Lock ..........................172
Always On Display Settings .................173
Lock Screen and AOD Settings ..............173
Samsung Pass .............................174
Find My Mobile ............................174
Unknown Sources ..........................175
Secure Folder ..............................175
Secure Startup .............................175
....................... 164
Encrypt SD Card ...........................176
Factory Data Reset Password ...............176
Set Up SIM Card Lock .......................176
View Passwords ............................176
Security Update Service ....................177
Device Administration ......................177
Credential Storage .........................178
Advanced Security Settings .................178
Accounts ................................... 180
Samsung Cloud ............................181
My Profile ................................ 182
Add an Account ........................... 182
Backup and Restore .......................184
GoogleSettings ........................... 185
vi Table of Contents

Accessibility
Vision .................................... 188
Hearing .................................. 189
Dexterity and Interaction .................. 190
More Accessibility Settings .................191
Accessibility Services .......................191
Other Settings ...............................192
Manage Game Features ................... 193
Device Assistance App ..................... 193
About Phone ............................. 194
.................................187
Getting Help ...............................195
Videos ................................... 196
Simulators ............................... 196
Tips ...................................... 196
Samsung Support ......................... 196
Legal ........................................ 197
Legal Information ......................... 198
vii Table of Contents

Special Features
Learn about your mobile
device’s special features.

Bixby
Bixby allows you to quickly set reminders, create voice
dictation, and search and access content on your phone
and on the Internet.
For more information, see “Bixby” on page29.
Edge Screen
The Edge screen provides a variety of useful tools for
notifications, information feeds, and timekeeping.
For more information see “Edge Screen” on page44.
Flexible Security
Use your face, fingerprint, or iris to unlock your device.
Face Recognition
Configure facial recognition security to add an extra
layer of security when using your phone.
For more information, see “Face Recognition” on
page35.
Fingerprint Scanner
Use your fingerprint as an alternative to entering
passwords in certain apps. You can also use your
fingerprint to verify your identity when logging in to
your Samsung account.
For more information, see “Fingerprint Scanner” on
page36.
Iris Scanner
Use iris recognition as an alternative to entering
passwords in certain apps. You can also use your eyes
to verify your identity when logging in to your Samsung
account.
For more information, see “Iris Scanner” on page37.
2Special Features

Water and Dust Resistance
This device is rated IP68 using the Ingress Protection
rating system.
For more information, see “Maintaining Water and Dust
Resistance” on page202.
3Special Features

Getting Started
Learn about your mobile
device hardware, assembly
procedures, and how to get
started usingyour new device.

Set Up Your Device
Learn how to set up your device for the firsttime.
Assemble Your Device
This section helps you to assemble your device.
Install the SIM Card and a
MemoryCard
When you subscribe to a cellular network, you are
provided with a plug-in SIM card. During activation,
your SIM card is loaded with your subscription details,
such as your Personal Identification Number (PIN),
available optional services, and other features.
Warning: Please be careful when handling the SIMcard
to avoid damaging it. Keep all SIM cards outof reach of
small children.
You can also install an optional microSD™, microSDHC™,
or microSDXC™ memory card (notincluded) to add more
memory space to yourdevice. A memory card can be
installed at any time. It is not necessary to install it
prior to using the device.
Set Up Your Device 6
Caution: Exercise care when using the removal tool to
eject the internal SIM card/Memory card tray.
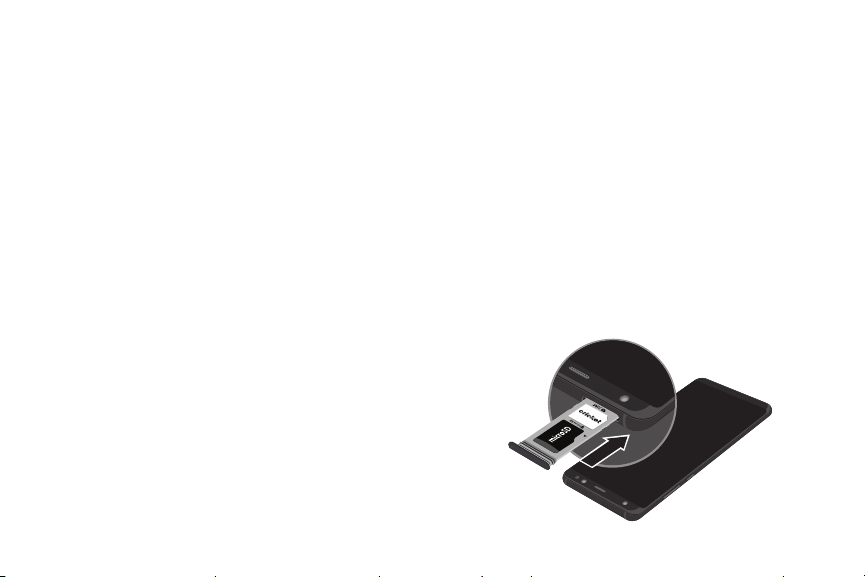
1. Insert the removal tool into the hole on the
SIMcard/Memory card tray, and then push until the
tray pops out.
2. Place the SIM card on the tray.
Make sure that the card’s gold contacts face
•
down into the device and that the card is
positioned as shown.
3. Place the memory card on the tray with the gold
contacts facing down.

4. Slide the SIM card/Memory card tray back into the
slot.
Note: Your device is IP68 rated for dust and water
resistance. To maintain the water-resistant and
dust‑resistant features of your device, make sure
that the SIM card/Memory card tray openings are
maintained free of dust and water, and the tray is
securely inserted prior to any exposure to liquids. For
more information, refer to “Maintaining Water and Dust
Resistance” on page202.
Set Up Your Device 7
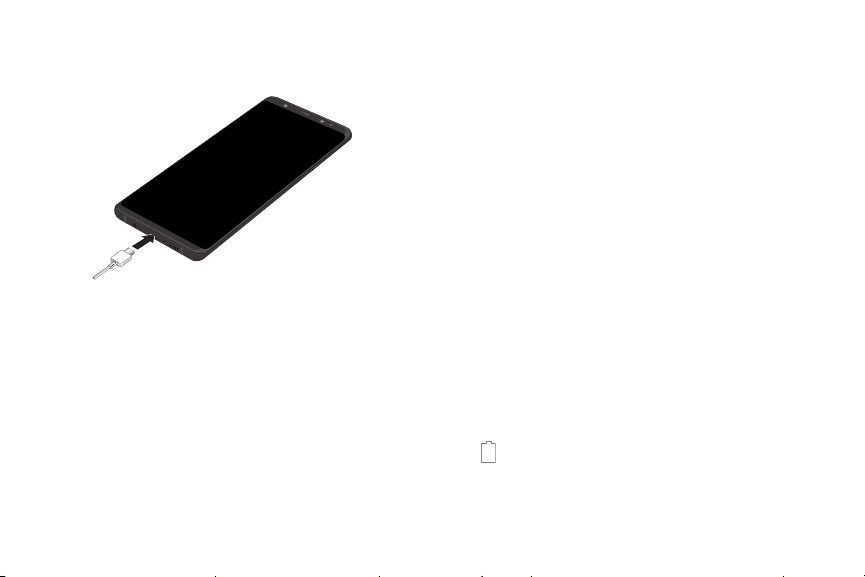
Charge the Battery
Note: You should dry the inside of the charging port
before inserting a power connector to charge your
device. If the charging port is not fully dry, your device
may operate abnormally. For example, it may charge
more slowly or overheat. For more information, refer to
“Maintaining Water and Dust Resistance” on page202.
Your device is powered by a rechargeable, standard
Li-Ion battery. A USB charger (charging head and USB
cable) is included with the device for charging the
battery from any standard outlet.
The battery comes partially charged. You can use the
device while charging.
Note: For fastest charging times, use the Adaptive
Fast Charger that came with your device. This charger
provides faster charging only when connected to
devices that support Adaptive Fast Charging.
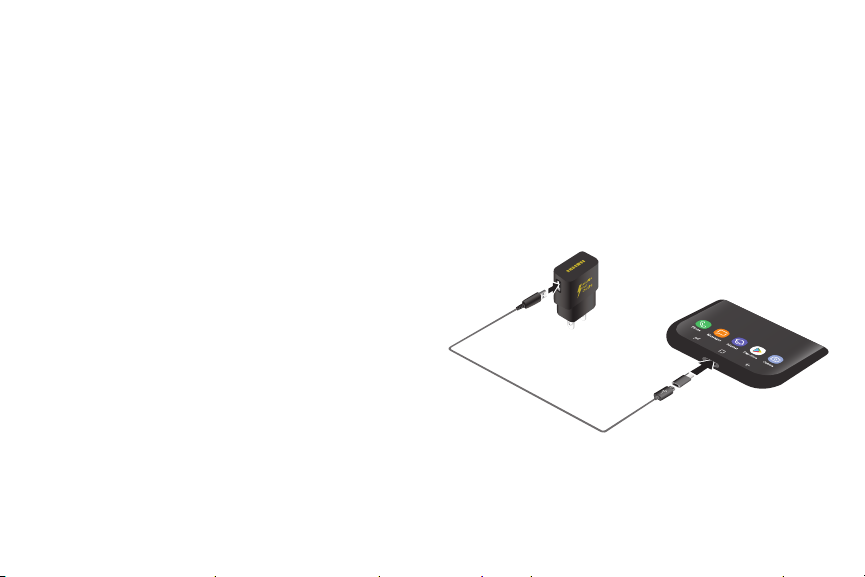
1. Insert the USB cable into the USB charger/
Accessory port.
Caution: Use only charging devices and batteries
approved by Samsung. Samsung accessories are
designed for your device to maximize battery life. Using
other accessories may invalidate your warranty and
may cause damage.
2. Connect the USB cable to the charging head, and
then plug the charging head into a standard outlet.
Set Up Your Device 8
3. Unplug the charging head from the outlet and
remove the USB cable from the device when
charging is complete.
Note: This device is also compatible with wireless
charging devices approved by Samsung, which are
soldseparately.
When to Charge the Battery
When the battery is low and only a few minutes of
operation remain, the device sounds a warning tone
at regular intervals. In this condition, your device
conserves its remaining battery power by dimming the
screen. When the battery level becomes too low, the
device automatically turns off.
For a quick check of your battery level:
► View the battery charge indicator located in the top
right corner of your device’s display. Asolid color
( ) indicates a full charge.
While charging, the device and the charger may
become hot when using wireless charging or fast
charging. This does not affect the device’s lifespan or
performance and is in the device’s normal range of
operation.
The charger may stop charging if the battery becomes
too hot.
If the device heats up while charging the battery:
1. Disconnect the charger from the device and close
any running apps.
2. Wait for the device to cool down, and then begin
charging the device again.
If the lower part of the device overheats,
•
check for damage to the connected USB cable.
Replace the damaged USB cable with a new
Samsung-approved cable.
If using a wireless charger, do not place foreign
materials between the device and the wireless charger.
Set Up Your Device 9
Micro-USB Connector
You can use the included Micro-USB connector to
connect a Micro-USB cable (such as from your old
device) to your new device for charging with the
charging head, or for connecting to a computer.
Note: The Micro-USB connector does not support
On‑the‑Go (OTG) devices such as memory sticks,
external hard drives, or keyboard and mouse
accessories.

Reverse Charging
The included USB connector allows you to charge
another device through a USB cable.
Youcan also use the USB connector for transferring
contacts, photos, and other content from an old device.
For more information, see “Transfer Data from Your Old
Device” on page14.
Start Using Your Device
To turn the device off:
1. Press and hold the Power key until the
Deviceoptions menu is displayed.
2. Tap Power off, and confirm if prompted.
Lock or Unlock Your Device
Use your device’s screen lock features to secure your
device. By default, the device locks automatically when
the screen times out.
Turn Your Device On or Off
The instructions below explain how to turn your device
on or off.
To turn the device on:
► Press and hold the Power key until the device
turnson.
Set Up Your Device 10
To lock the device:
► Press the Power key.
The default Screen lock on your device is Swipe.
Tochoose a more secure screen lock, see “Set a Screen
Lock” on page172.
To unlock the device:
► Press the Power key or double‑tap Home, and
then drag your finger across the screen.

Restart the Device
If your device stops responding to taps or finger
gestures and you are unable to turn it off, youcan
restart your device.
► Press and hold the Power key and the
Volumedown key at the same time for more
thanseven seconds.
Set Up Your Device
Use the Set Up Wizard
The first time you turn your device on, a Welcome
screen is displayed. It guides you through the basics of
setting up your device.
Follow the prompts to choose a default language,
connect to a Wi-Fi® network, set up accounts, choose
location services, learn about your device’s features,
and more.
Set Up Your Device 11
Voice Assistant provides voice prompts and
descriptions of items on the screen to improve
accessibility.
Google Account
Your new device uses your Google™ Account to fully
utilize its Android™ features, including Gmail™,
GoogleDuo, and the Google Play™ store.
When you turn on your device for the first time, set
up your existing Google Account or create a new
GoogleAccount.
– or –
To create a new Google Account or set up your
GoogleAccount on your device at any time, use
Accounts settings.
1. From a Home screen, swipe up to access Apps.
2. Tap Settings > Cloud and accounts > Accounts.
3. Tap Addaccount > Google.

Factory Reset Protection
When you sign in to a Google Account on your device,
Factory Reset Protection is activated. Factory Reset
Protection (FRP) prevents other people from using
your device if it is reset to factory settings without your
permission. For example, if your device is lost or stolen
and a factory data reset is performed, only someone
with your Google Account username and password can
use the device.
You will not be able to access the device after a factory
data reset if you do not have your GoogleAccount
username and password. For more information, see
“Factory Data Reset” on page168.
Caution: Before shipping your device back to Samsung
or taking it to your nearest Samsung‑authorized service
center, you should remove your Google Account before
resetting the device back to factory settings. For more
information, visit: samsung.com/us/support/frp.
Set Up Your Device 12
Enable Factory Reset Protection
Adding a Google Account to your device automatically
activates the Factory Reset Protection (FRP) security
feature.
Disable Factory Reset Protection
To disable FRP, remove all Google Accounts from the
device.
1. From a Home screen, swipe up to access Apps.
2. Tap Settings > Cloud and accounts > Accounts>
Google.
If you have more than one Google Account set
•
up on your device, tap the Google Account you
want to remove.
3. Tap Moreoptions > Remove account.

Samsung Account
Create a Samsung account for access to Samsung
content and apps on your device. When you turn on
your device for the first time, set up your existing
Samsung account or create a new Samsung account.
– or –
To create a new Samsung account or set up your
Samsung account on your device at any time, use
Accounts settings.
1. From a Home screen, swipe up to access Apps.
2. Tap Settings > Cloud and accounts > Accounts.
3. Tap Addaccount > Samsungaccount.
Set Up Your Device 13
Add an Email Account
Use the Email app to view and manage all your email
accounts in oneapp.
When you turn on your device for the first time, set
up your existing email account or create a new email
account.
– or –
To create a new email account or set up your email
account on your device at any time, use Accounts
settings.
1. From a Home screen, swipe up to access Apps.
2. Tap Settings > Cloud and accounts > Accounts.
3. Tap Addaccount > Email.
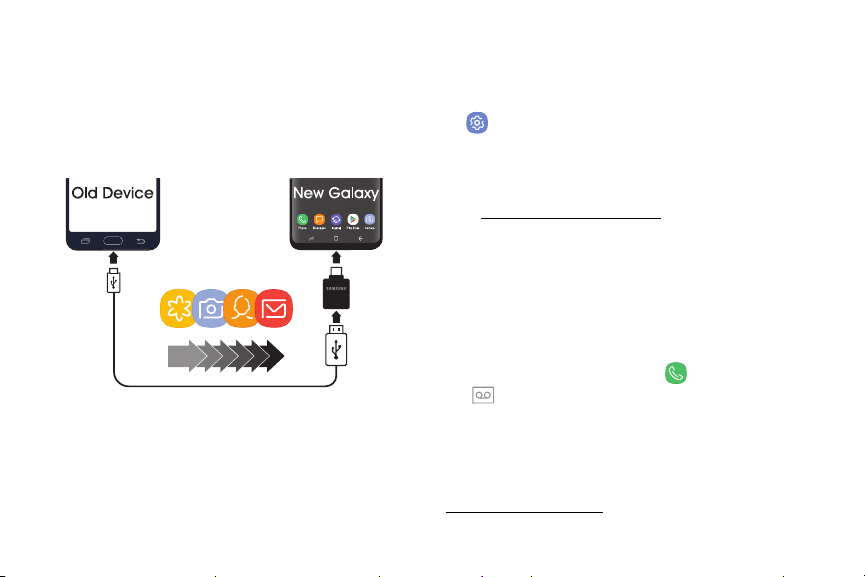
Transfer Data from Your Old Device
Use Smart Switch™ to transfer contacts, photos, and
other content from your old device. You can also use
the included USB connector to copy content quickly
and easily from your old device, without installing the
Smart Switch app.
Note: The USB option must be set to Media device
(MTP) on the other device. Transferring content with
a USB cable may increase battery consumption. Make
sure your battery is fully charged.
Set Up Your Device 14
1. Select Smart Switch during setup.
– or –
From a Home screen, swipe up to access Apps >
Settings> Cloud and accounts > SmartSwitch.
2. Follow the prompts and select the content to
transfer.
Visit samsung.com/smartswitch for more information
and to learn how to use the USB connector to transfer
content faster.
Set Up Your Voicemail
You can access your voicemail from a Home screen.
1. From the Home screen, tap Phone >
Voicemail.
2. Follow the tutorial to create a password, record a
greeting, and record your name.
For more information on voicemail, see
“Voicemail” on page106.

Learn About Your Device
Learn some of the key features of your mobile
device, including the screens and icons, as well as
how to navigate the device and enter text using the
keyboard.
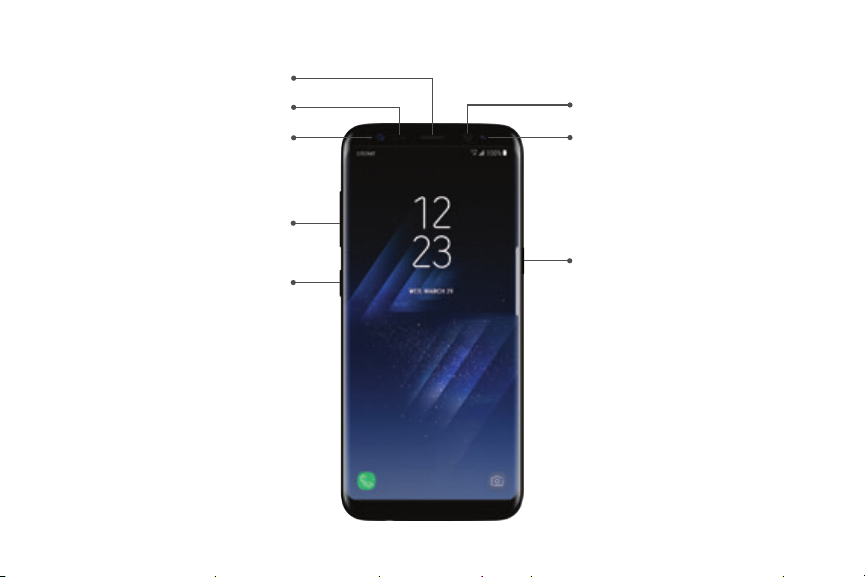
Front View
Proximity sensors
Iris detection LED
Earpiece
Front camera
Iris scanner
Volume keys
Bixby key
Learn About YourDevice 16
Power key

Proximity sensor
•
Turns off the screen and disables touch
-
functionality when the device is in close
proximity to the human body.
Turns the screen back on and enables touch
-
functionality when the device is outside a
specific range to the human body.
Power key
•
Briefly press to turn on or off the screen.
-
Press and hold to select a power control option.
-
Press twice quickly to launch the camera.
-
Learn About YourDevice 17
Volume keys
•
Adjust the volume for ringtones, calls,
-
notifications, and system sounds.
In the camera app, press a volume key to take a
-
photo.
Bixby key
•
Launch the Hello Bixby voice assistant. For more
-
information, see “Bixby” on page29.
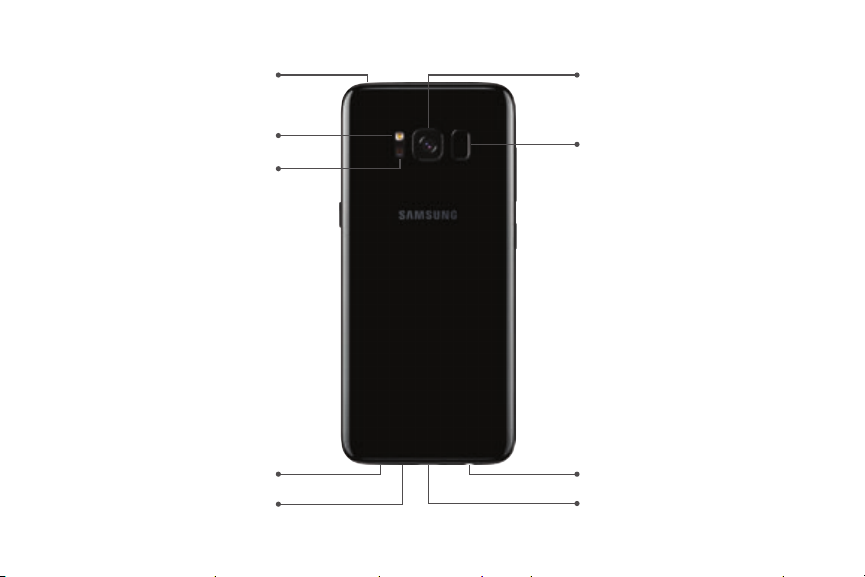
Back View
Microphone
Rear camera
Flash
Heart rate sensor
Speaker
Microphone
Learn About YourDevice 18
Fingerprint sensor
Headset jack
USB charger/Accessory port
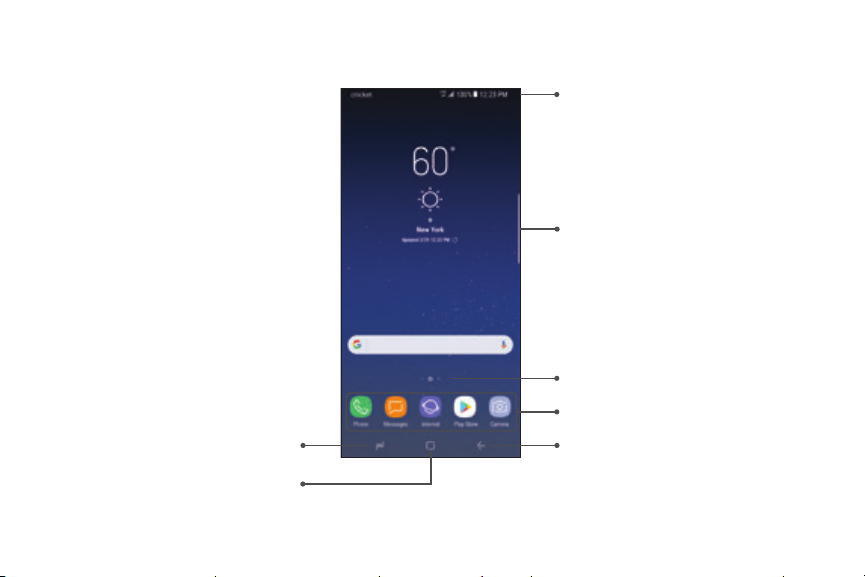
Home Screen
Recent apps
Home
Learn About YourDevice 19
Status bar
Edge screen
Home screen indicator
App shortcuts
Back
Status Bar
The Status bar at the top of the Home screen provides
device information (such as network status, battery
charge, and time) on the right side and notification
alerts on the left.
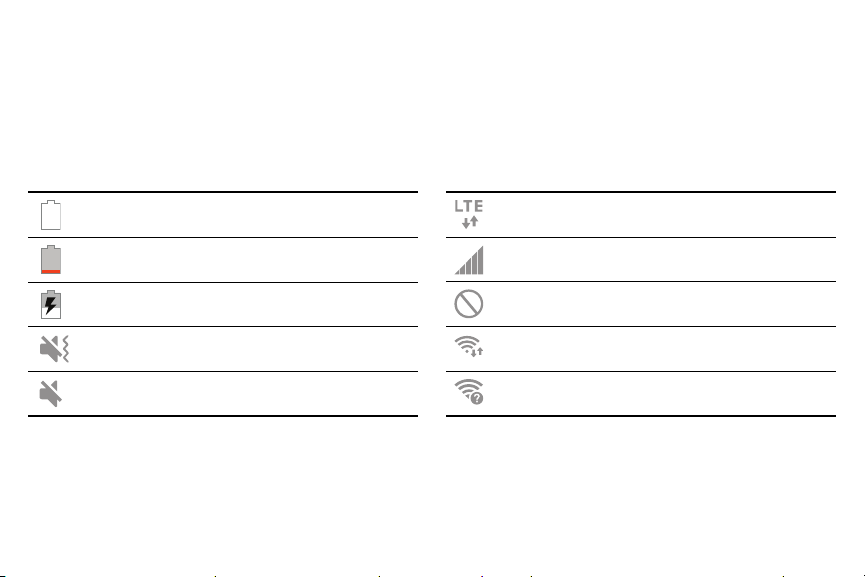
Status Icons
Battery full
Battery low
Battery charging
Vibrate mode
Mute mode
Learn About YourDevice 20
4G LTE™ active
Signal strength
Network not available
Wi-Fi active
Wi-Fi available
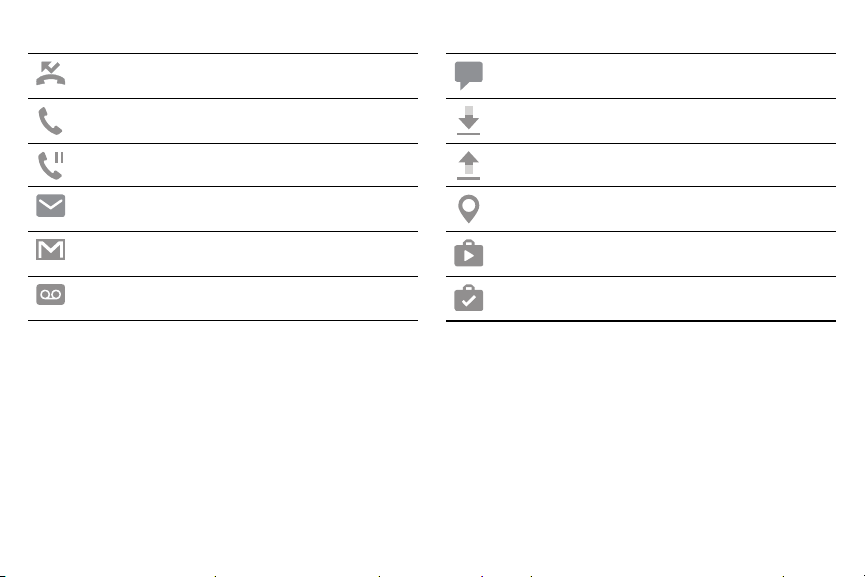
Notification Icons
Missed call
Call in progress
Call on hold
New email
New Gmail
New voicemail
Learn About YourDevice 21
New message
File download in progress
File upload in progress
GPS active
App updates available
App updates complete
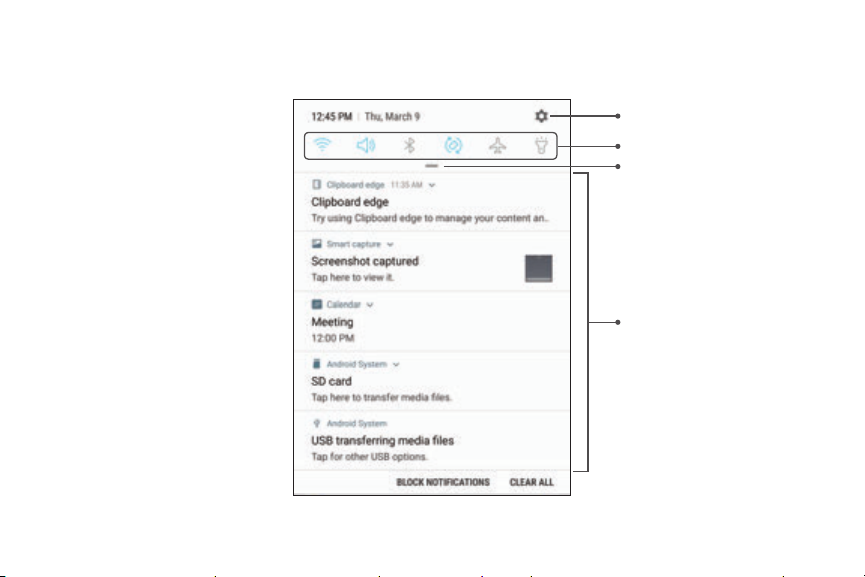
Notification Panel
Learn About YourDevice 22
Settings
Quick settings
View all
Notification cards

View the Notification Panel
You can access the Notification panel from any Home
screen.
1. Drag the Status bar down to display the Notification
panel.
2. Swipe down the list to see notification details.
To open an item, tap it.
•
To clear a single notification, drag the
•
notification left or right.
To clear all notifications, tap Clear all.
•
3. Drag upward from the bottom of the screen or tap
Back to close the Notification panel.
Learn About YourDevice 23
You can also open or close the Notification panel by
swiping up or down on the fingerprint sensor.
To open using the Fingerprint scanner:
1. From a Home screen, swipe up to access Apps.
2. Tap Settings > Advanced features >
Fingersensor gestures.
3. Tap On/Off to enable this feature.
 Loading...