

Page 1
VCDC12**
VCDC20**
Elektrik Süpürgesi
kullanıcı el kitabı
Bu üniteyi çalıştırmadan önce, lütfen talimatları dikkatli bir şekilde okuyun.
✻
Yalnızca iç mekan kullanımı içindir.
✻
Bir Samsung ürünü satın aldığınız için teşekkür ederiz.
Daha eksiksiz bir servis almak için,
lütfen aşağıdaki adresten ürününüzü kaydedin:
Türkçe
www.samsung.com/register
Page 2
güvenlik bilgileri
GÜVENLİK BİLGİLERİ
• Cihazı çalıştırmadan önce, lütfen bu el kitabını dikkatlice okuyun ve referans
UYARI
UYARI
KULLANILAN DİKKAT/UYARI SEMBOLLERİ
olarak başvurmak üzere saklayın.
• Aşağıdaki çalıştırma talimatları çeşitli modelleri içerdiği için, elektrik
süpürgenizin özellikleri bu el kitabında açıklanandan küçük farklılıklar
gösterebilir.
Bir ölüm veya ağır yaralanma tehlikesi olduğunu gösterir.
UYARI
Kişisel bir yaralanma veya maddi hasar riski olduğunu gösterir.
DİKKAT
KULLANILAN DİĞER SEMBOLLER
YAPMAMANIZ gereken bir durumu gösterir.
Uymanız gereken bir şeyi gösterir.
Fişi prizden çıkarmanız gerektiğini gösterir.
02_ güvenlik bilgileri
Page 3

güvenlik bilgileri
ÖNEMLİ UYARILAR
1. Tüm talimatları dikkatli bir şekilde okuyun. Açmadan
önce, elektrik şebekenizin voltajının elektrik süpürgesinin
altındaki anma plakasında belirtilen değerle aynı
olduğundan emin olun.
2. UYARI: Halı veya zemin ıslakken, elektrik süpürgesini
kullanmayın.
Suyu çekmek için kullanmayın.
3. Toz haznesi olmayan elektrik süpürgesini kullanmayın.
En iyi verimliliği sağlamak için, toz haznesini dolmadan
boşaltın.
4. Fişi prize takmadan önce, Durdurma (veya Min)
konumuna kaydırın.
5. Elektrik süpürgesini kibritleri, ateş olan külleri veya sigara
izmaritlerini toplamak için kullanmayın.
Elektrik süpürgesini sobalardan veya diğer ısı
kaynaklarından uzak tutun. Isı, ünitenin plastik
parçalarının deforme olmasına ve renk değiştirmesine
neden olabilir.
6. Temizleyici parçalarına hasar verebileceği için, sert,
keskin nesneleri elektrik süpürgesi ile toplamaktan
kaçının. Hortum düzeneğinin üzerine basmayın.
Hortumun üzerine ağırlık koymayın.
Emiş ya da çıkış ağzını tıkamayın.
güvenlik bilgileri _03
Page 4

7. Fişi prizden çekmeden önce, elektrik süpürgesini makine
gövdesi üzerinde kapatın. Toz torbasını veya toz kabını
değiştirmeden önce, fişi prizden çıkarın. Hasarı önlemek
için, lütfen fişi kabloyu çekerek değil, fişi tutarak çıkarın.
8. Bu cihaz, 8 yaşın üzerindeki çocuklar ve fiziksel, algılama
veya zihinsel becerileri yeterli olmayan veya deneyimli
ve bilgili olmayan kişiler tarafından, gözetim altında
veya cihazın güvenli kullanımıyla ilgili talimatlar verildiği
ve tehlikelerin anlaşılmasının sağlandığı koşullarda
kullanılabilir.
9. Çocuklar cihazla oynamamalıdırlar. Temizlik ve
kullanıcı bakımı gözetim olmadan çocuklar tarafından
yapılmamalıdır.
10. Makineyi temizlemeden ya da bakımını yapmadan önce,
fiş prizden çıkarılmış olmalıdır.
11. Uzatma kablosunun kullanılması önerilmez.
12. Elektrik süpürgesi düzgün şekilde çalışmıyorsa, güç
kaynağını kapatın ve yetkili bir servis acentesine
başvurun.
13. Güç kablosu hasar görmüşse, bir tehlikeyi önlemek
için üretici veya servis acentesi tarafından veya benzer
kalifiye bir kişi tarafından değiştirilmelidir.
14. Elektrik süpürgesini hortumdan tutarak taşımayın.
Elektrik süpürgesi setindeki kolu kullanın.
15. Kullanılmadığı zamanlarda elektrik süpürgesinin fişini
çıkarın. Fişi prizden çıkarmadan önce, güç düğmesini
kapatın.
04_ güvenlik bilgileri
Page 5

içindekiler
ELEKTRIK SÜPÜRGESINI
TAKMA
06
ELEKTRIK SÜPÜRGESINI
ÇALIŞTIRMA
07
ARAÇLARIN VE FILTRENIN
BAKIMI
09
SORUN GIDERME
15
07 ON/OFF (açma/kapatma) düğmesi
07 Güç kablosu
08 Güç Kontrolü
09 Aksesuar kullanma
10 Zemin araçları bakımı
11 Toz haznesini boşaltma
12 Toz paketi ne zaman temizlenir
13 Toz paketinin temizlenmesi
14 Çıkış fi ltresinin temizlenmesi
14 Pili değiştirme (isteğe bağlı)
içindekiler _05
Page 6
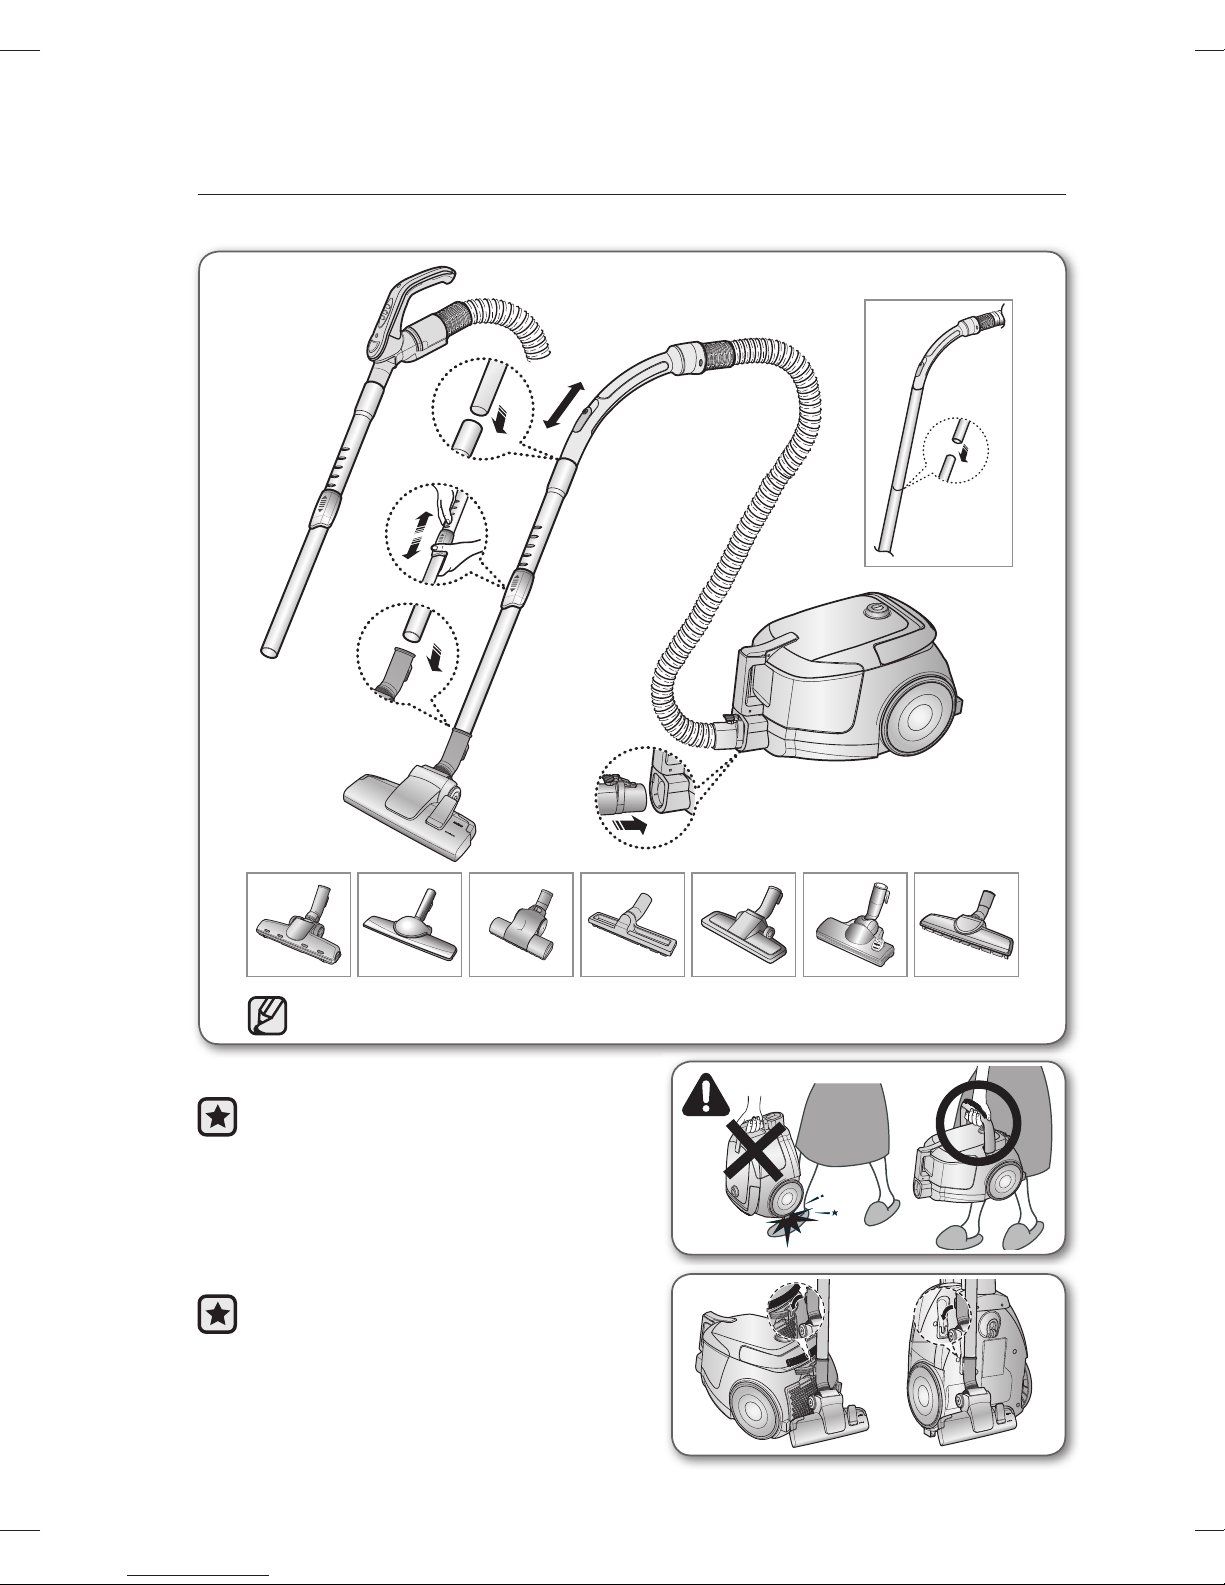
elektrik süpürgesini takma
SEÇENEK
• Özellikler modele bağlı olarak değişebilir.
• Makineyi taşırken, toz haznesi
kolunun düğmesine lütfen basmayın.
• Saklama için, zemin başlığını yuvasına
yerleştirin.
SEÇENEK
06_ takma
Page 7
elektrik süpürgesini çalıştırma
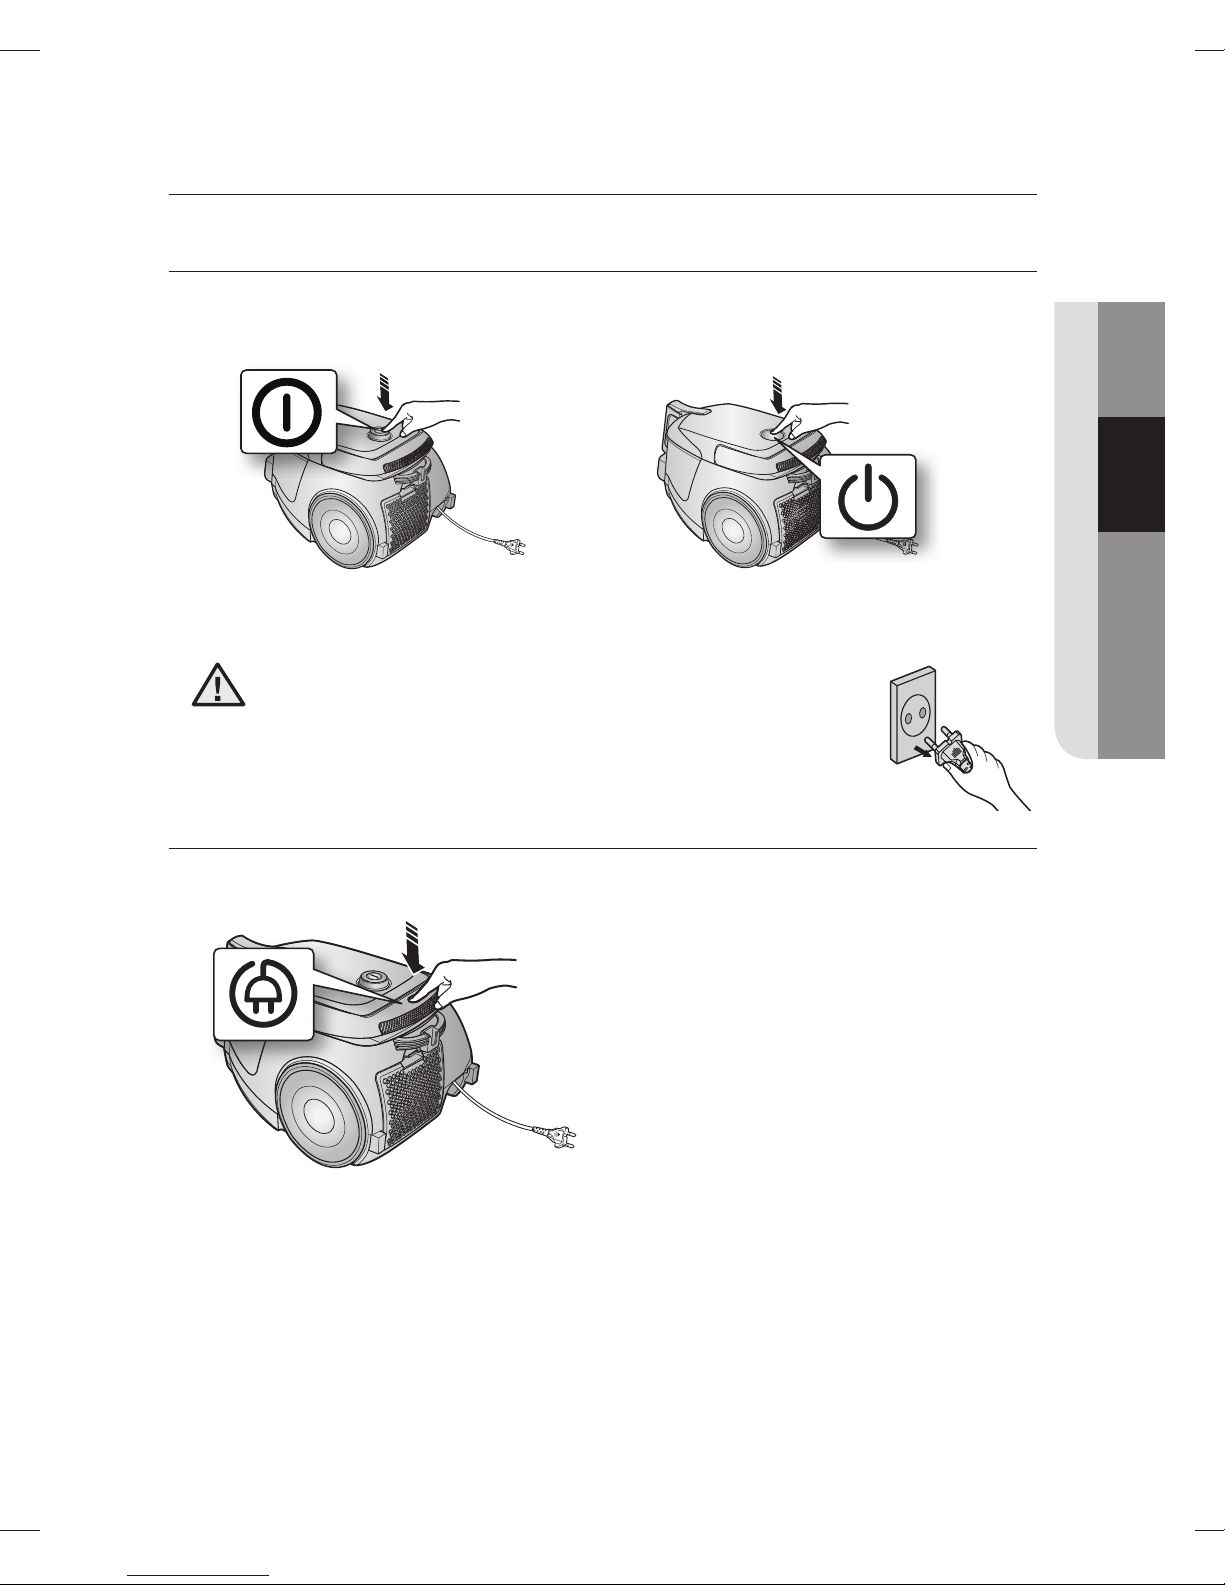
ON/OFF (AÇMA/KAPATMA) DÜĞMESİ
02 ÇALIŞTIRMA
1) GÖVDEDEN KONTROLLÜ TÜR 2) SAPTAN KONTROLLÜ TÜR
• Fişi prizden çıkarırken, kabloyu değil, fişi tutun.
DİKKAT
GÜÇ KABLOSU
çalıştırma _07
Page 8

GÜÇ KONTROLÜ
gönderici
GÖVDEDEN KONTROLLÜ TÜR / ON/OFF (AÇMA/KAPAMA) TÜRÜ
• HORTUM
Kumaşlar, küçük paspaslar ve diğer
hafif kumaşlar üzerinde emiş gücünü
azaltmak için, delik açılıncaya kadar
hava kapağını çekin.
• GÖVDE (SADECE GÖVDEDEN
KONTROLLÜ TÜR)
MIN (MİN) = Hassas kumaşlar için,
örn. tüller.
MAX (MAKS) = Sert zeminler ve aşırı
kirlenmiş halılar için.
SAPTAN KONTROLLÜ TÜR
• HORTUM
Elektrik süpürgesi MODU (MIN/
MID,MAX) (MIN/ORTA,MAKS)
Doğru modu seçmek için MODE
(MOD) düğmesine sürekli olarak
basın.
(ON) (AÇIK) MIN (MIN) → MID (ORTA)
→ MAX (MAKS)
08_ çalıştırma
gönderici
Saptan Kontrol
Elektrik süpürgesi kızılötesi
sinyaller kullanılarak kontrol
edilir.
Page 9
araçların ve fi ltrenin bakımı
AKSESUAR KULLANMA
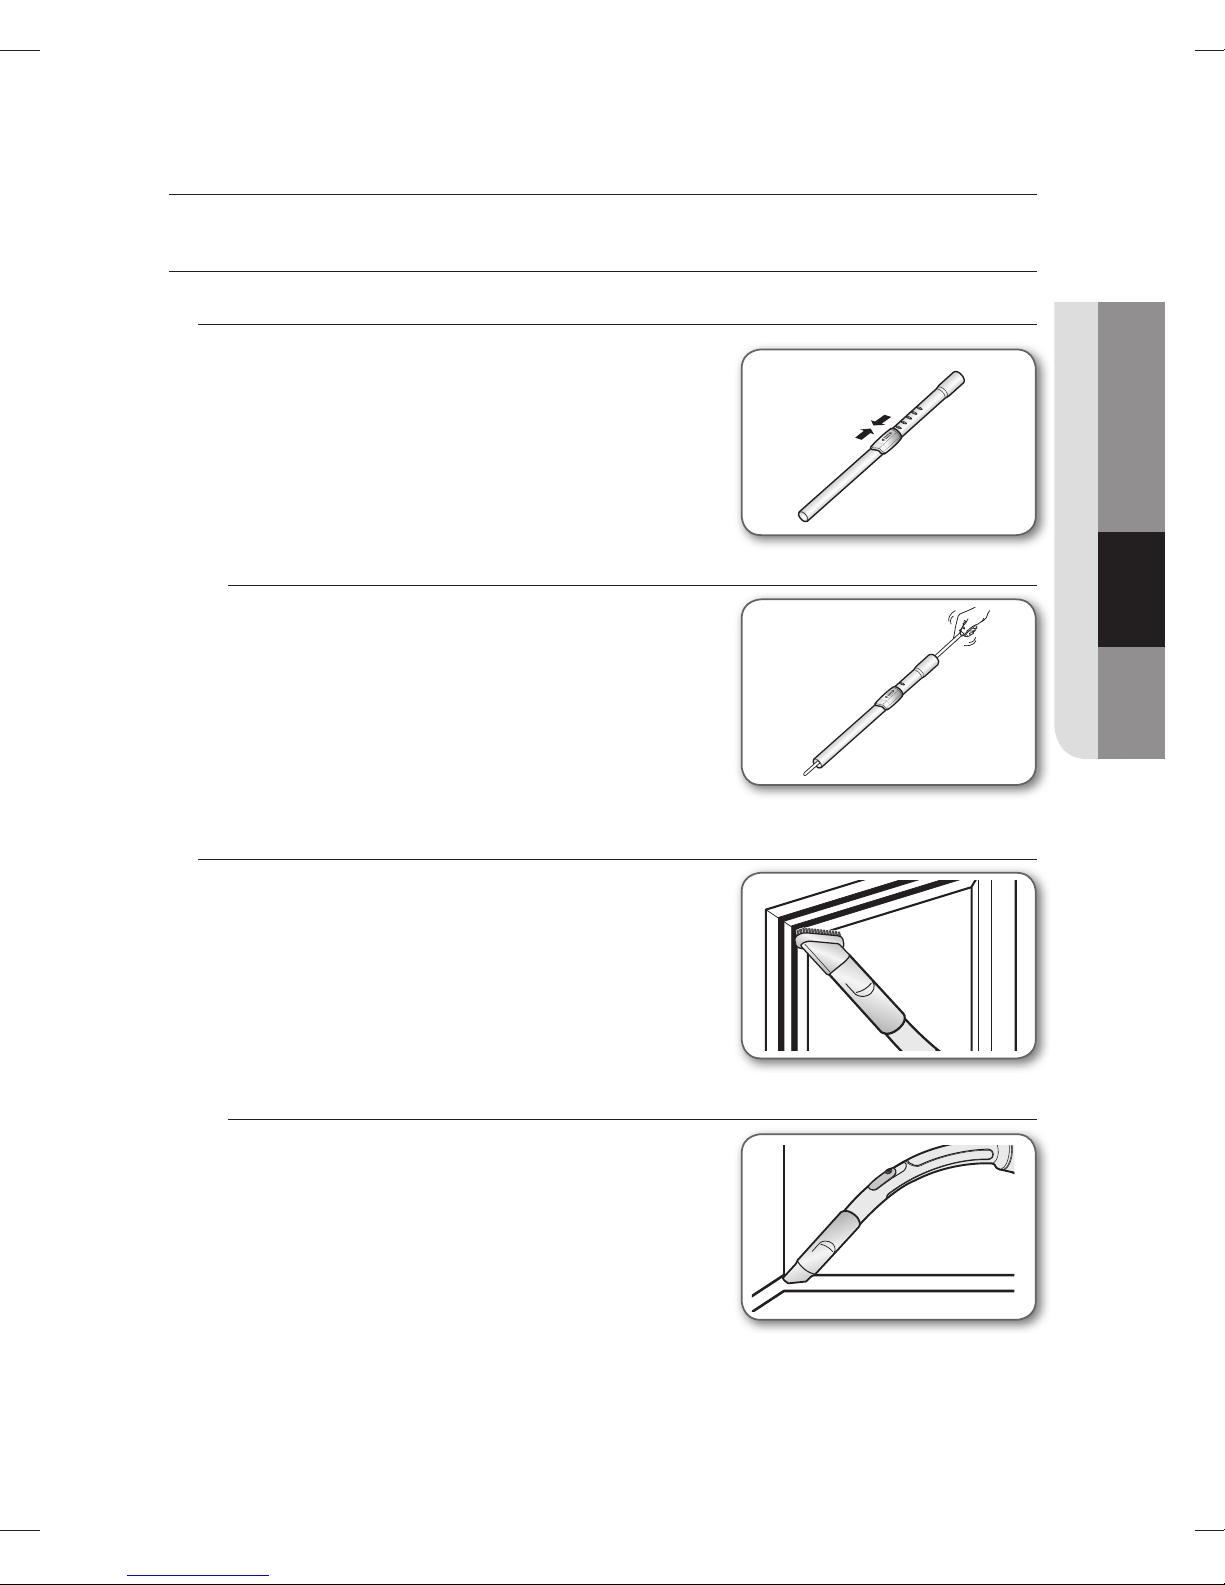
Boru (Seçenek)
• Teleskopik borunun ortasında bulunan uzunluk
kontrol düğmesini ileri ve geri kaydırarak
teleskopik borunun uzunluğunu ayarlayın.
• Tıkanmaları kontrol etmek için, teleskopik
boruyu ayırın ve kısaltmak için ayarlayın. Bu
boruda tıkanan atığın daha kolay çıkarılmasını
sağlar.
Aksesuar
03 BAKIM
• Mobilyalar, rafl ar, kitaplar, vb için toz alma
fırçası.
• Radyatörler, oluklar, köşeler ve yastık araları
için oluk başlığı.
bakım _09
Page 10
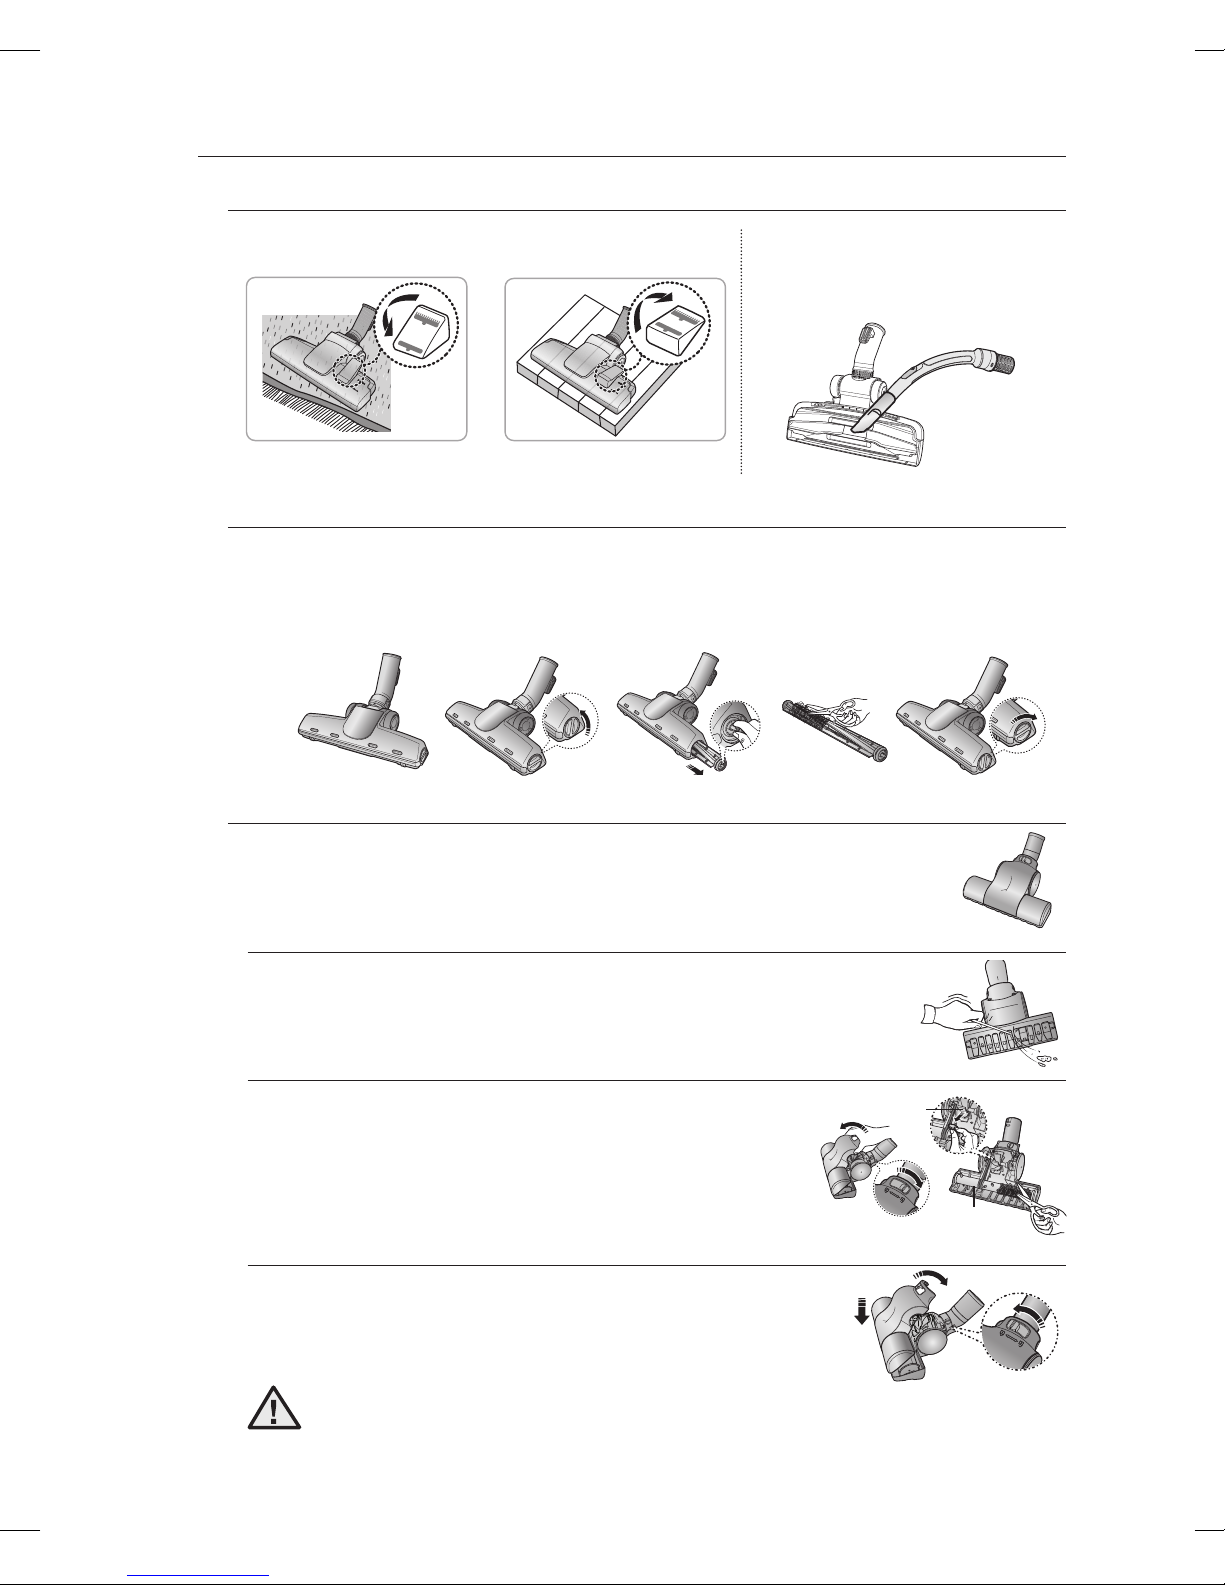
ZEMİN ARAÇLARI BAKIMI
Halı Temizleme
Zemin Temizleme
Türbin
Fırça
2 Adımlı Fırça (Seçenek)
• Giriş kolunu zemin yüzeyine göre ayarlayın. • Giriş tıkalıysa, atık maddeyi
tamamen çıkarın.
Halı Temizleme
Zemin Temizleme
Evcil Hayvan Fırçası (Seçenek)
Halı üzerindeki hayvan kılını ve fiberi daha iyi toplamak için.
Sık sık saç ve hayvan tüyünün çekilmesi durumunda, tambura dolanan bu maddeler
dönüşün başarısız olmasına neden olabilir. Bu durumda, tamburu dikkatli bir şekilde
temizleyin.
Battaniye fırçası (Seçenek)
Türbin içindeki tıkanmalar fırçanın dönmesini engeller, bu nedenle
aşağıda olduğu gibi tıkanıklığı giderin. Döşeme ve nevresim takımı
üzerindeki hayvan kılını ve fiberi toplamak için.
Giriş tıkalıysa, atık maddeyi tamamen çıkarın.
Kilitleme düğmesini ‘UNLOCK’ (KİLİT AÇIK) durumuna
getirin ve atık maddeyi çıkarın.
Yeniden takmak için, kapağı ana gövdenin önüyle hizalayın
ve kapatın. Kapağı kapattıktan sonra, kilitleme düğmesinin
'KİLİTLİ' konumda olduğundan emin olun.
Yalnızca nevresim takımları için kullanın. Tıkanıklığı giderme sırasında
UYARI
fırçanın hasar görmemesine dikkat edin.
10_ bakım
Türbin
Fırça
Page 11

araçların ve filtrenin bakımı
klik
TOZ HAZNESİNİ BOŞALTMA
03 BAKIM
1. Toz, MAX (MAKSİMUM)
işaretine ulaştığında
veya temizlik sırasında
emiş farkedilir biçimde
azaldığında toz haznesini
boşaltın.
4. Haznedeki tozu atın. 5. Toz haznesi kapağını
- Plastik bir torbaya boşaltın
(astım/alerji hastaları için
önerilir)
2. Düğmeye basarak toz
haznesini dışarı alın.
kapatın.
3. Toz haznesi kapağını
ayırın.
klik
6. Kullanmadan önce,
toz haznesi elektrik
süpürgesinin ana
gövdesine doğru "klik" sesi
duyuluncaya kadar itin.
Toz haznesini soğuk su ile yıkayabilirsiniz.
bakım _11
Page 12

TOZ PAKETİ NE ZAMAN TEMİZLENİR
SAPTAN KONTROLLÜ TÜR
GÖVDEDEN KONTROLLÜ
TÜR
- Temizlik sırasında emiş belirgin düzeyde azaldıysa, lütfen toz paketini aşağıda
gösterildiği gibi kontrol edin.
Vakum gücünü
‘MAX’ (MAKS)
konumuna
getirin.
SAPTAN KONTROLLÜ TÜR
GÖVDEDEN KONTROLLÜ
TÜR
Giriş akışı düz zemin üzerinde 10 cm iken, emiş belirgin bir
şekilde azalmışsa, temizleyin.
Emiş gücü belirgin şekilde sürekli olarak düşüyorsa lütfen Toz Paketini resimde
gösterildiği gibi temizleyin.
12_ bakım
Page 13

TOZ PAKETİNİN TEMİZLENMESİ
1. Toz haznesini ve toz paketini gösterildiği gibi
çıkarın.
2. Süngeri ve filtreyi toz paketinden çıkarın.
3. Süngeri ve toz paketinin filtresini suyla yıkayın.
03 BAKIM
4. Süngerin ve filtrenin 12 saatten daha uzun bir süre
gölge bir alanda kurumasını sağlayın.
5. Süngeri ve filtreyi tekrar toz paketine yerleştirin.
6. Takılan toz paketini ana gövdeye yerleştirin.
Tekrar elektrik süpürgesine
yerleştirmeden önce, filtrenin tamamen
kurumuş olduğundan emin olun.
Kuruması için 12 saat bekleyin.
bakım _13
Page 14
araçların ve filtrenin bakımı
PİL TÜRÜ: AA Boyutu
ÇIKIŞ FİLTRESİNİN TEMİZLENMESİ
SEÇENEK - MİKRO FİLTRE
Çıkarmak için ana gövdenin
arkasındaki sabit çerçeve
parçasına basın.
Yedek filtreler, yerel Samsung bayinizde
mevcuttur.
Tıkalı çıkış filtresini çıkarın ve değiştirin.
PİLİ DEĞİŞTİRME (İSTEĞE BAĞLI)
1. Elektrik süpürgesi çalışmıyorsa, pilleri değiştirin.
Sorun devam ederse, lütfen yetkili temsilci ile
temasa geçin.
2. AA boyutunda 2 adet pil kullanın.
SEÇENEK
1. Pilleri kesinlikle parçalarına ayırmayın veya yeniden
şarj etmeyin.
UYARI
14_ bakım
2. Pilleri kesinlikle ısıtmayın veya ateşe atmayın.
3. Kutupları (+), (-) değiştirmeyin
4. Pilleri düzgün bir şekilde atın.
PİL TÜRÜ: AA Boyutu
Page 15

sorun giderme
SORUN ÇÖZÜM
Motor çalışmıyor.
Emme gücü yavaş yavaş
azalıyor.
Kablo tamamen geri sarmıyor.
Elektrik süpürgesi kiri
toplamıyor.
Düşük veya azalan emme
Gövde aşırı ısınıyor
• Kabloyu, fişi ve prizi kontrol edin.
• Soğuması için bekleyin.
• Tıkanma bakımından kontrol edin ve tıkanmayı
giderin.
• Kabloyu 2-3m dışarı doğru çekin ve kablo geri
sarma düğmesine basın.
• Hortumu kontrol edin ve gerekirse değiştirin.
• Lütfen filtreyi kontrol edin, gerekirse
talimatlarda gösterildiği gibi temizleyin. Filtreler
kullanılamayacak durumdaysa, yenileriyle
değiştirin.
• Lütfen filtreleri kontrol edin, gerekirse talimatta
belirtildiği şekilde temizleyin.
04 SORUN GİDERME
Statik elektrik boşalması • Lütfen emiş gücünü azaltın.
Bu Elektrik süpürgesi aşağıdakiler bakımından onaylıdır.
EMC Direktifi: 2004/108/EEC
Alçak Voltaj Direktifi: 2006/95/EC
Kullanım ömrü 10 yıldır.
Teknik Özellikler
MODEL NOBoyutlari
(E*B*Y)
VCDC20AH 272 x 398 x 233 4.6kg 2000W 1800W 380W 2.0lt Hayir teleskobik
VCDC20AV 272 x 398 x 233 4.6kg 2000W 1800W 380W 2.0lt Hayir teleskobik
Net ağirlik
Maximum
güç
Nominal
güç
Emiş
gücü
Toz
hacmi
Siklon
Filtre
Boru Tipi
sorun giderme _15
Page 16

Page 17

Vacuum Cleaner
VCDC12**
VCDC20**
user manual
Before operating this unit, please read the instructions carefully.
✻
For indoor use only.
✻
imagine the possibilities
Thank you for purchasing a Samsung product.
To receive a more complete service,
please register your product at
English
www.samsung.com/register
Page 18

safety information
SAFETY INFORMATION
• Before operating the appliance, please read this manual thoroughly and
WARNING
WARNING
CAUTION/WARNING SYMBOLS USED
WARNING
CAUTION
retain it for your reference.
• Because these following operating instructions cover various models,
the characteristics of your vacuum cleaner may differ slightly from those
described in this manual.
Indicates that a danger of death or serious injury exists.
Indicates that a risk of personal injury or material damage exists.
OTHER SYMBOLS USED
Represents something you must NOT do.
Represents something you must follow.
Indicates that you must disconnect the power plug from the socket.
02_ safety information
Page 19

safety information
IMPORTANT SAFEGUARDS
1. Read all instructions carefully. Before switching on, make
sure that the voltage of your electricity supply is the same
as that indicated on the rating plate on the bottom of the
cleaner.
2. WARNING : Do not use the vacuum cleaner when rug or
fl oor is wet.
Do not use to suck up water.
3. Do not use the vacuum cleaner without a dust bin.
Empty the dust bin before it is full in order to maintain the
best effi ciency.
4. Slide to the Stop(or Min)position before inserting a plug
into the electrical outlet.
5. Do not use the vacuum cleaner to pick up matches, live
ashes or cigarette butts.
Keep the vacuum cleaner away from stoves and other
heat sources. Heat can deform and discolour the plastic
parts of the unit.
6. Avoid picking up hard, sharp objects with the vacuum
cleaner as they may damage the cleaner parts. Do not
stand on the hose assembly. Do not put weight on the
hose.
Do not block the suction or the exhaust port.
7. Switch the vacuum cleaner off on the body of the machine
before unplugging from the electrical outlet. Disconnect
safety information _03
Page 20

the plug from the electrical outlet before changing the
dust bag or dust container. To avoid damage, please
remove the plug by grasping the plug itself, not by pulling
on the cord.
8. This appliance can be used by children aged from 8
years and above and persons with reduced physical,
sensory or mental capabilities or lack of experience
and knowledge if they have been given supervision or
instruction concerning use of the appliance in a safe way
and understand the hazards involved.
9. Children shall not play with the appliance. Cleaning
and user maintenance shall not be made by children
withoutsupervision.
10. The plug must be removed from the socket outlet before
cleaning or maintaining the appliance.
11. The use of an extension cord is not recommended.
12. If your vacuum cleaner is not operating correctly, switch
off the power supply and consult an authorized service
agent.
13. If the supply cord is damaged, it must be replaced by the
manufacturer or its service agent or a similarly qualifi ed
person in order to avoid a hazard.
14. Don’t carry the vacuum cleaner by holding the hose.
Use the handle on the vacuum cleaner set.
15. Unplug the cleaner when not in use. Turn off the power
switch before unplugging.
04_ safety information
Page 21

contents
ASSEMBLING THE CLEANER
06
OPERATING THE CLEANER
07
MAINTAIN TOOLS AND FILTER
09
TROUBLESHOOTING
15
07 ON/OFF Switch
07 Power Cord
08 Power-Control
09 Using accessory
10 Maintain fl oor tools
11 Emptying the dust bin
12 When to clean the dust pack
13 Cleaning the dust pack
14 Cleaning the outlet fi lter
14 Change the battery (option)
contents _05
Page 22

assembling the cleaner
OPTION
• Features may vary according to model.
• Please do not press the button
of dust bin handle when carrying
machine.
• For storage, park the fl oor nozzle.
OPTION
06_ assembling
Page 23

operating the cleaner
ON/OFF SWITCH
1) BODY CONTROL TYPE 2) HANDLE CONTROL TYPE
• When removing the plug from the electrical outlet, grasp
the plug, not the cord.
CAUTION
02 OPERATING
POWER CORD
operating _07
Page 24

POWER-CONTROL
sender
BODY-CONTROL TYPE / ON/OFF TYPE
• HOSE
To reduce suction for cleaning draperies,
small rugs, and other light fabrics, pull
the tap air until the hole is open.
• BODY (BODY-CONTROL TYPE ONLY)
MIN = For delicate surface e.g. net
curtains.
MAX = For hard fl oors and heavily soiled
carpets.
HANDLE CONTROL TYPE
• HOSE
Vacuum cleaner MODE (MIN/MID,MAX)
Press the MODE button repeatedly
to select the correct mode.
(ON) MIN → MID → MAX
sender
Handle Control
The cleaner is controlled by
using infrared signals.
08_ operating
Page 25

maintain tools and fi lter
USING ACCESSORY
Pipe (Option)
• Adjust the length of the telescopic pipe by
sliding the length control button located in the
center of the telescopic pipe back and forth.
• To check for blockages, separate the
telescopic pipe and adjust to shorten. This
allows for easier removal of waste clogging the
tube.
03 MAINTAIN
Accessory
• Dusting brush for furniture. shelves, books,
etc.
• Crevice tool for radiators, crevices, corners,
between cushions.
maintain _09
Page 26

MAINTAIN FLOOR TOOLS
Carpet Cleaning
Floor Cleaning
Turbine
Brush
2-Step Brush (Option)
• Adjust the inlet lever according to the fl oor
surface.
• Remove waste matter
completely if the inlet is
blocked.
Carpet Cleaning
Floor Cleaning
Pet Brush (Option)
For improved pick-up of pet hair and fi bre on carpets.
Frequent vacuuming of hair or pet fur may cause a falling-off of the rotation due to
matters tangled around the drum. In this case, clean the drum with care.
Blanket brush (Option)
Clogs on turbine keep brush from turning, thus need to be unclogged
as follows. For picking up pet hair and fi bre on upholstery and bed
linen.
Remove waste matter completely when inlet is blocked.
Turn the lock button to ‘UNLOCK’, and remove waste
matter.
To reassemble, align the cover to the front of the main
body and close. After closing the cover, ensure that the
lock button is turned to the ‘LOCK’ position.
Use for bedclothes only. Be cautious not to damage brush during
unclogging.
WARNING
10_ maintain
Turbine
Brush
Page 27

maintain tools and fi lter
click
EMPTYING THE DUST BIN
03 MAINTAIN
1. Once dust reaches the
dust full mark, or sution
is noticeably reduced
during cleaning, empty
the dust bin.
4. Throw away dust into
the bin.
- Empty into a plastic bag
(recommended for asthma/
allergy sufferers)
2. Take the dust bin out
by pressing the button.
5. Close the dust bin
cover.
3. Separate the dust bin
cover.
click
6. Before use, push the
dust bin into the main
body of the vacuum
cleaner until you hear
the “click” sound.
You may rinse the dust bin with cold water.
maintain _11
Page 28

WHEN TO CLEAN THE DUST PACK
HANDLE CONTROL TYPE
BODY CONTROL TYPE
- If suction is noticeably reduced during cleaning, please check the dust pack as
indicated below.
Turn the
vacuum power
to ‘MAX’.
HANDLE CONTROL TYPE
If suction is noticeably reduced with the inlet fl oating 10cm
above fl at fl oor, clean it.
When suction is noticeably reduced continuously, please cleaning the Dust Pack as
shown in the following illustration.
BODY CONTROL TYPE
12_ maintain
Page 29

CLEANING THE DUST PACK
1. Remove the dust bin and dust pack as
shown.
2. Remove the sponge and fi lter from the dust pack.
3. Wash the sponge and the fi lter of the dust pack with
water.
03 MAINTAIN
4. Let the sponge and fi lter dry in the shade for more
than 12 hours.
5. Put the sponge and fi lter into the dust pack.
6. Put the assembled dust pack into the main
body.
Make sure the fi lter is completely dry
before putting it back into the vacuum
cleaner. Allow 12 hours for it to dry.
maintain _13
Page 30

maintain tools and fi lter
BATTERY TYPE : AA
Size
CLEANING THE OUTLET FILTER
OPTION - MICRO FILTER
Press the fi xed frame part at
the back of the main body to
remove.
Replacement fi lters are available at your local
Samsung distributor.
Remove and replace the blocked
outlet fi lter.
CHANGE THE BATTERY (OPTION)
1. When the vacuum cleaner dows not work, replace
the batteries. If the problem persists, please contact
our authorized dealer.
2. Use 2 batteries of size AA.
OPTION
1. Never disassemble or recharge the batteries.
2. Never heat up the batteries or throw them into fi re.
WARNING
14_ maintain
3. Do not reverse (+), (-) poles
4. Dispose of the batteries property.
BATTERY TYPE : AA
Size
Page 31

troubleshooting
PROBLEM SOLUTION
04 TROUBLESHOOTING
Motor dows not start.
Suction force is gradually
decreasing.
Cord does not rewind fully.
Vacuum cleaner dows not pick
up dirt.
Low or decreasing suction
Body overheating
Static electicity discharge • Please decrease power suction.
• Check cable, pulg and socket.
• Leave to cool.
• Check for blockage and remove.
• Pull the cord out 2-3m and push down the cord
rewind button.
• Check hose and replace if required.
• Please check fi lter and, if required, clean as
illustrated in the instructions. if fi lters are out of
condition change them to new ones.
• Please check fi lters, If required clean as
illustrated in the instruction.
This Vacuum cleaner is approved the following.
EMC Directive : 2004/108/EEC
Low Voltage Directive : 2006/95/EC
troubleshooting _15
Page 32

SAMSUNG Electronics İstanbul Pazarlama ve Ticaret LTD.ŞTİ.
Bina No: 78, Kat:3, No: B3, 34050, Eyüp, İstanbul /Türkiye
Flatofis İstanbul İş Merkezi,Otakçılar Cad.
Code No. DJ68-00665L REV(0.0)
 Loading...