

SAMSUNG UE40KU6100W, UE49KU6100W, UE55KU6100W, UE65KU6100W, UN49KU6490F Service manual & schematics
...Page 1
UHD TV
Chassis : UKU6300G
Model : UE40KU6100W
UE49KU6100W
UE55KU6100W
UE65KU6100W
SERVICE
UHD TV Contents
1. Precautions
2. Product specications
3. Disassembly and Reassembly
4. Troubleshooting
5. Wiring Diagram
Manual
UE**KU6100W
Page 2

Contents
1. Precautions ...................................................................................................................1-1
1-1. Safety Precautions ..............................................................................................................1-1
1-1-1. Warnings ...................................................................................................................1-1
1-1-2. Servicing the LED TV ...............................................................................................1-1
1-1-3. Fire and Shock Hazard .............................................................................................1-1
1-1-4. Product Safety Notices ............................................................................................. 1-2
1-2. Servicing Precautions ..........................................................................................................1-3
1-2-1. General Servicing Precautions ................................................................................. 1-3
1-3. Static Electricity Precautions ...............................................................................................1-4
1-4. Installation Precautions .......................................................................................................1-5
2. Product Specications.................................................................................................2-1
2-1. Product information .............................................................................................................2-1
2-2. Detail Specication ..............................................................................................................2-2
2-3. NEW Key Features ............................................................................................................2-14
2-3-1. 16" New UI ..............................................................................................................2-14
2-4. Remote Control .................................................................................................................2-15
2-4-1. 123 Key ..................................................................................................................2-16
2-4-2. EXTRA Key .............................................................................................................2-16
2-5. HDMI Color ........................................................................................................................2-17
2-5-1. HDMI UHD Color ....................................................................................................2-17
2-5-2. HDMI Black Level ...................................................................................................2-17
2-6. Supported Formats ............................................................................................................2-18
2-6-1. Supported image formats and resolutions ..............................................................2-18
2-6-2. Supported music formats and codecs ....................................................................2-18
2-6-3. Supported video codecs ......................................................................................... 2-19
2-7. Accessories .......................................................................................................................2-20
3. Disassembly and Reassembly ....................................................................................3-1
3-1. Disassembly and Reassembly ............................................................................................3-1
3-1-1. 40KU6179 ................................................................................................................. 3-1
3-1-2. 49KU6179 ................................................................................................................. 3-5
3-1-3. 55KU6179 ............................................................................................................... 3-10
3-1-4. 65KU6179 ............................................................................................................... 3-14
4. Troubleshooting ...........................................................................................................4-1
4-1. How to Check Fault Symptom .............................................................................................4-1
4-1-1. Power .......................................................................................................................4-1
4-1-2. Video .........................................................................................................................4-5
4-1-3. Audio .........................................................................................................................4-8
4-1-4. Network.....................................................................................................................4-9
4-1-5. Smart Hub ..............................................................................................................4-10
4-1-6. WiFi Module ............................................................................................................ 4-12
Page 3

4-2. Factory Mode Adjustments ................................................................................................4-14
4-2-1. Entering Factory Mode ...........................................................................................4-14
4-2-2. Detail Factory Option ..............................................................................................4-16
4-3-3. Factory Data ...........................................................................................................4-20
4-3. AV Control Tabe .................................................................................................................4-33
4-4. Updating the TV’s Software ...............................................................................................4-41
5. Wiring Diagram .............................................................................................................5-1
5-1. Layout ..................................................................................................................................5-1
5-2. Wiring Diagram ....................................................................................................................5-2
5-3. Connector ............................................................................................................................5-3
ANNEX. Exploded View & Part List [UE40KU6100WXXH FA01] ........................ ANNEX-1
1-1. Exploded View .......................................................................................................... ANNEX-1
1-1-1. Parts List ........................................................................................................ ANNEX-1
2-1. Electrical Parts List ................................................................................................... ANNEX-2
ANNEX. Exploded View & Part List [UE49KU6100WXXH FA01] ........................ ANNEX-1
1-1. Exploded View .......................................................................................................... ANNEX-1
1-1-1. Parts List ........................................................................................................ ANNEX-1
2-1. Electrical Parts List ................................................................................................... ANNEX-2
ANNEX. Exploded View & Part List [UE55KU6100WXXH AA01] ....................... ANNEX-1
1-1. Exploded View .......................................................................................................... ANNEX-1
1-1-1. Parts List ........................................................................................................ ANNEX-1
2-1. Electrical Parts List ................................................................................................... ANNEX-2
ANNEX. Exploded View & Part List [UE65KU6100WXXH AA01] ....................... ANNEX-1
1-1. Exploded View .......................................................................................................... ANNEX-1
1-1-1. Parts List ........................................................................................................ ANNEX-1
2-1. Electrical Parts List ................................................................................................... ANNEX-2
Page 4

This Service Manual is a property of Samsung Electronics Co.,Ltd.
Any unauthorized use of Manual can be punished under applicable
International and/or domestic law.
© 2016 Samsung Electronics Co.,Ltd.
All rights reserved.
Printed in Korea
Page 5
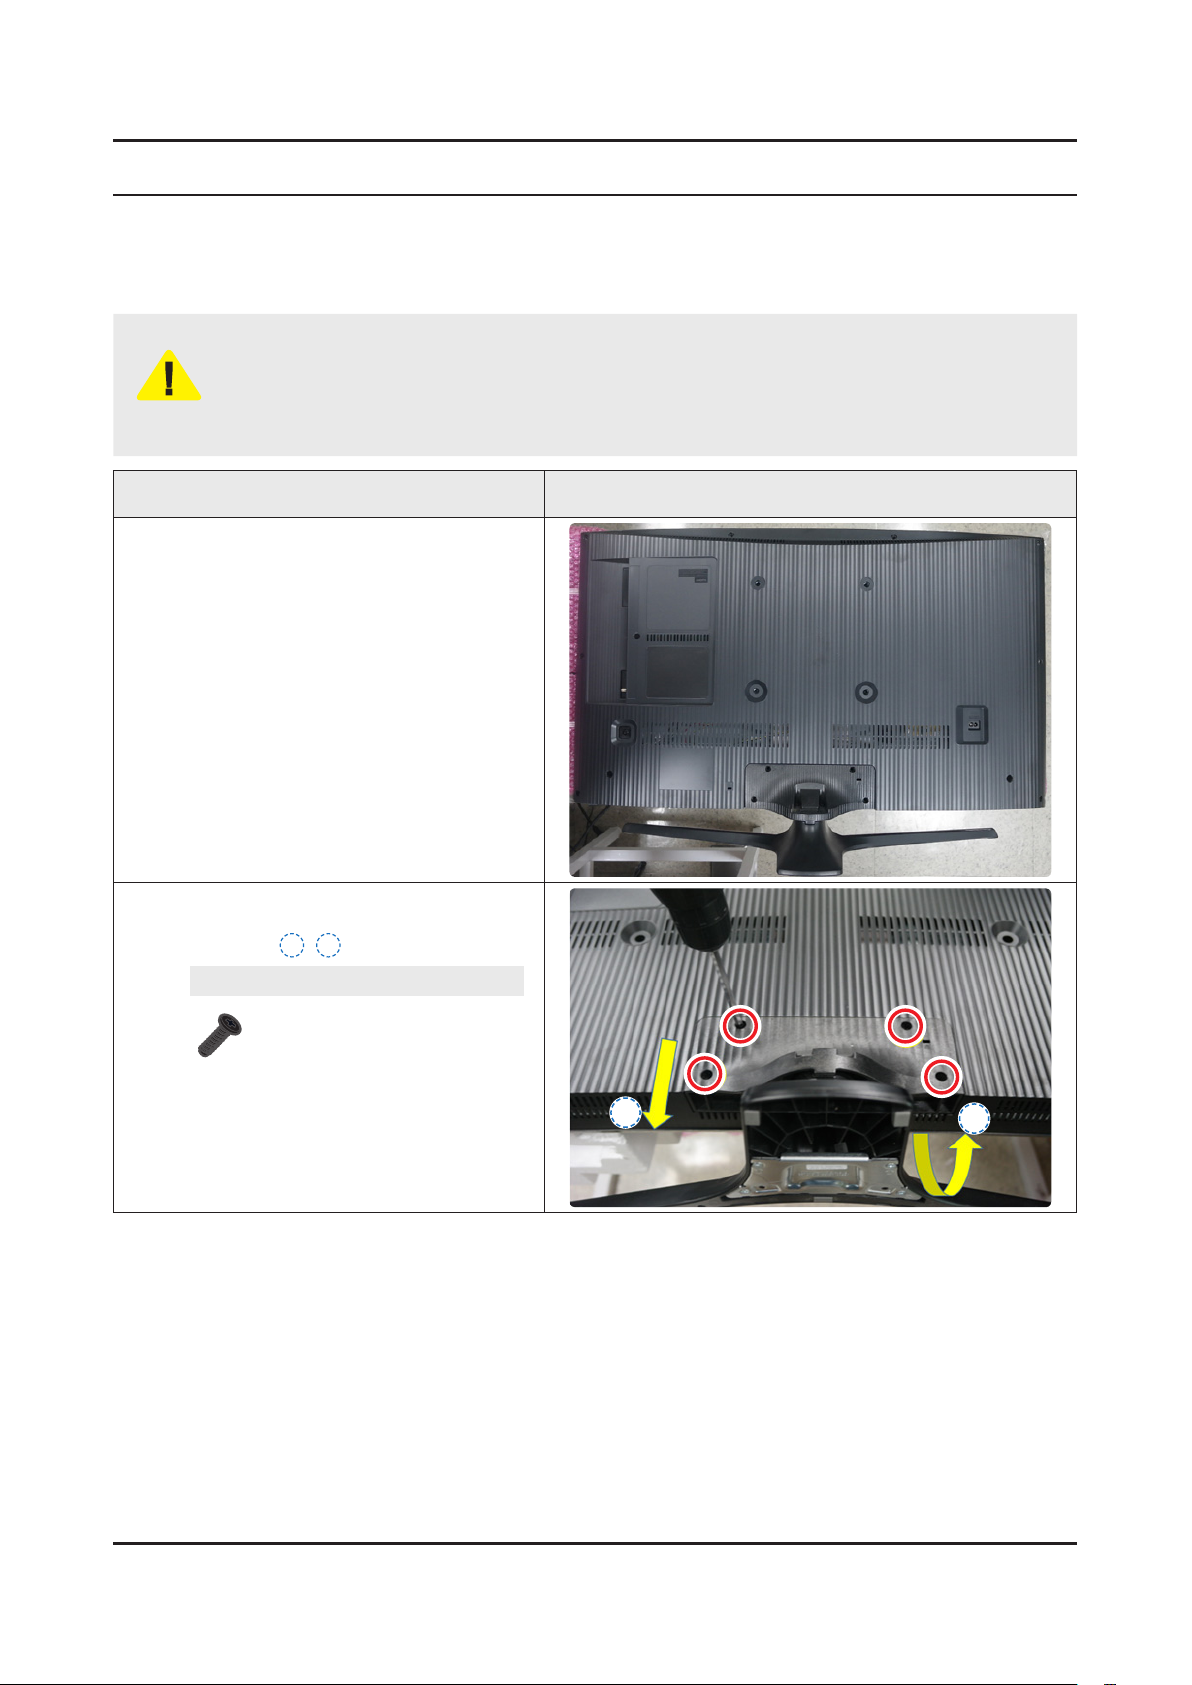
3. Disassembly and Reassembly
3-1. Disassembly and Reassembly
3-1-1. 40KU6179
Disconnect the LED TV from the power source before disassembly.1.
Follow these directions carefully; never use metal instruments to pry apart the cabinet.2.
CAUTION
Carefully place the TV on the Curved
1
Cushion (or any material that will prevent
damage to the screen) so that the screen is
facing downwards.
Recommend Torque : 22.0 ~ 26.5lbf -
A strength of Torque can be changed depending on the situation.•
Description Picture Description
3. Disassembly and Reassemble
Remove 4 Screws on the TV Stand Guide,
2
and then remove the Stand in the order
marked as 1~2.
Screws
BN61-09494D (M4,L14)
x 4EA
TORQUE : 22.0 ~ 26.5lbf
2
1
3-1
Page 6
3-2
3. Disassembly and Reassemble
Description Picture Description
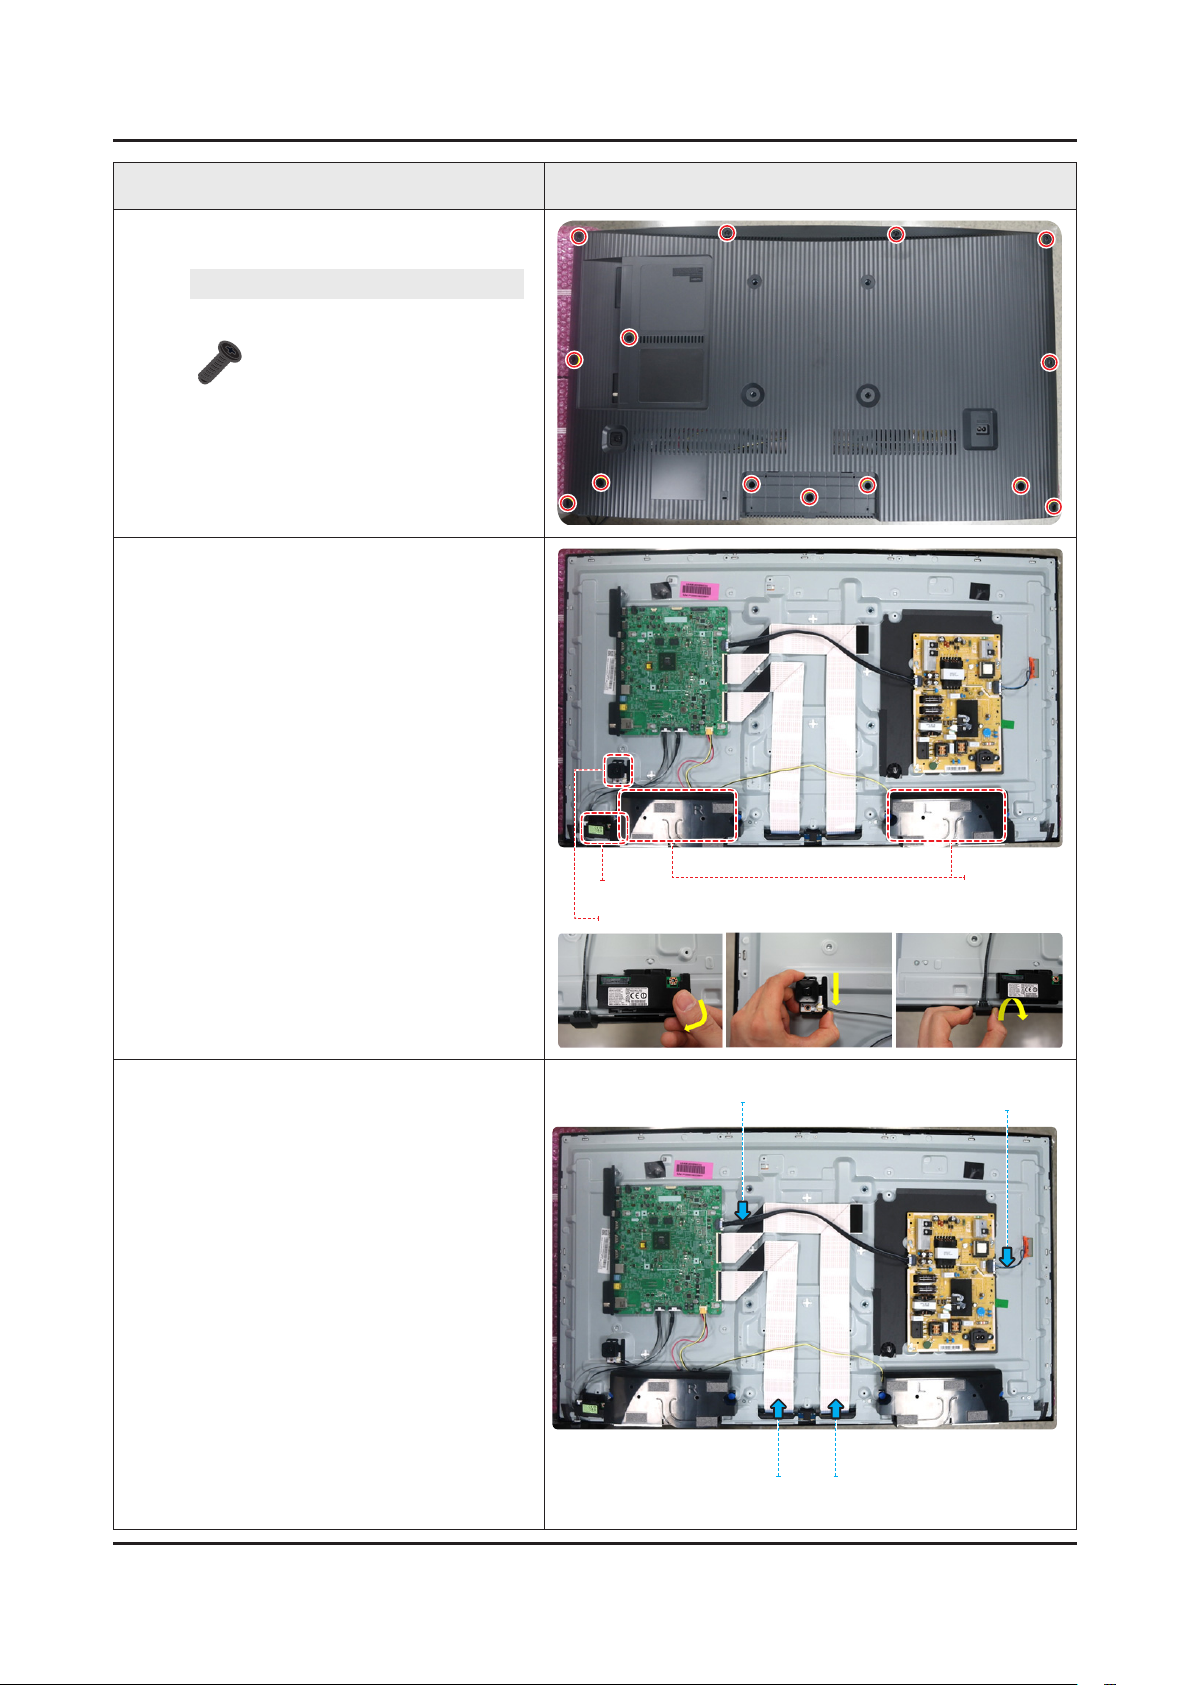
Remove the screws for the Rear Cover.
3
Then carefully remove it.
Screws
6001-002755 (M3,L6)
x 14 EA
- C/R+PANEL: 13EA
- C/R+MAIN: 1EA
TORQUE : 22.0 ~ 26.5lbf
Remove the Speakers and Speaker Cable.
4
AlsoRemovetheBT/Wimodule,Function
module and Cable of each module.
emove the Harness Cable (Main B'd
5
Power), (BLU Power) and the FFC Cable
(Main-Source B'd).
BT/Wimodule
Function module
(Main B'd Power)
Harness Cable
Speaker
Harness Cable
(BLU Power)
FFC Cable
(Main-Source B'd)
Page 7
3-3
3. Disassembly and Reassemble
Description Picture Description
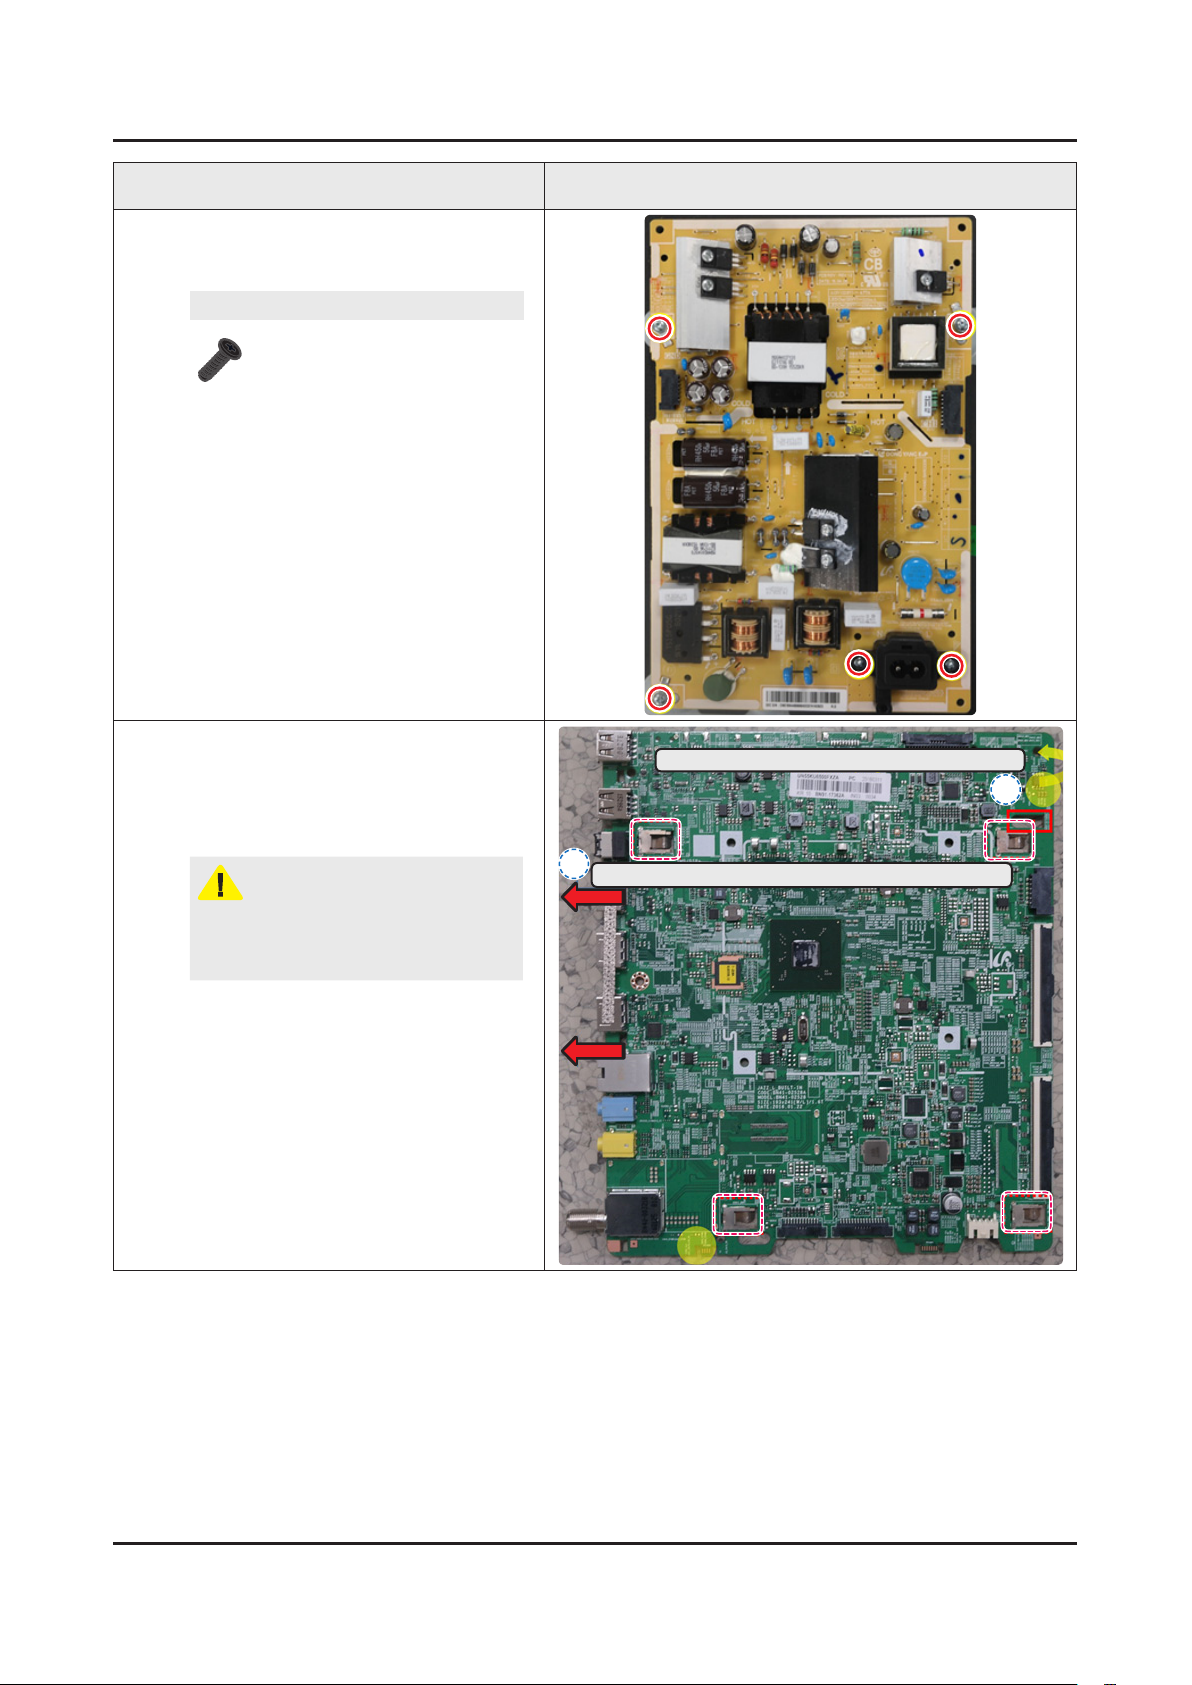
Remove 5 Screws on SMPS Board, and
6
then remove the board. (Power Cables
were already removed.)
Screws
6001-003016 5EA
TORQUE : 22.0 ~ 26.5lbf
Removing Main board.
7
Gently lift the top right corner of the •
board out to release the lock.
Use both hands to hold the board and •
slide to the left to release it.
CAUTION
When installing the Main board, verify
the board is properly positioned in all 4
mounting slots.
Lift out of locks (top right corners) to release
2
Slide it out toward the left side to remove the board
1
Page 8
3-4
3. Disassembly and Reassemble
Description Picture Description
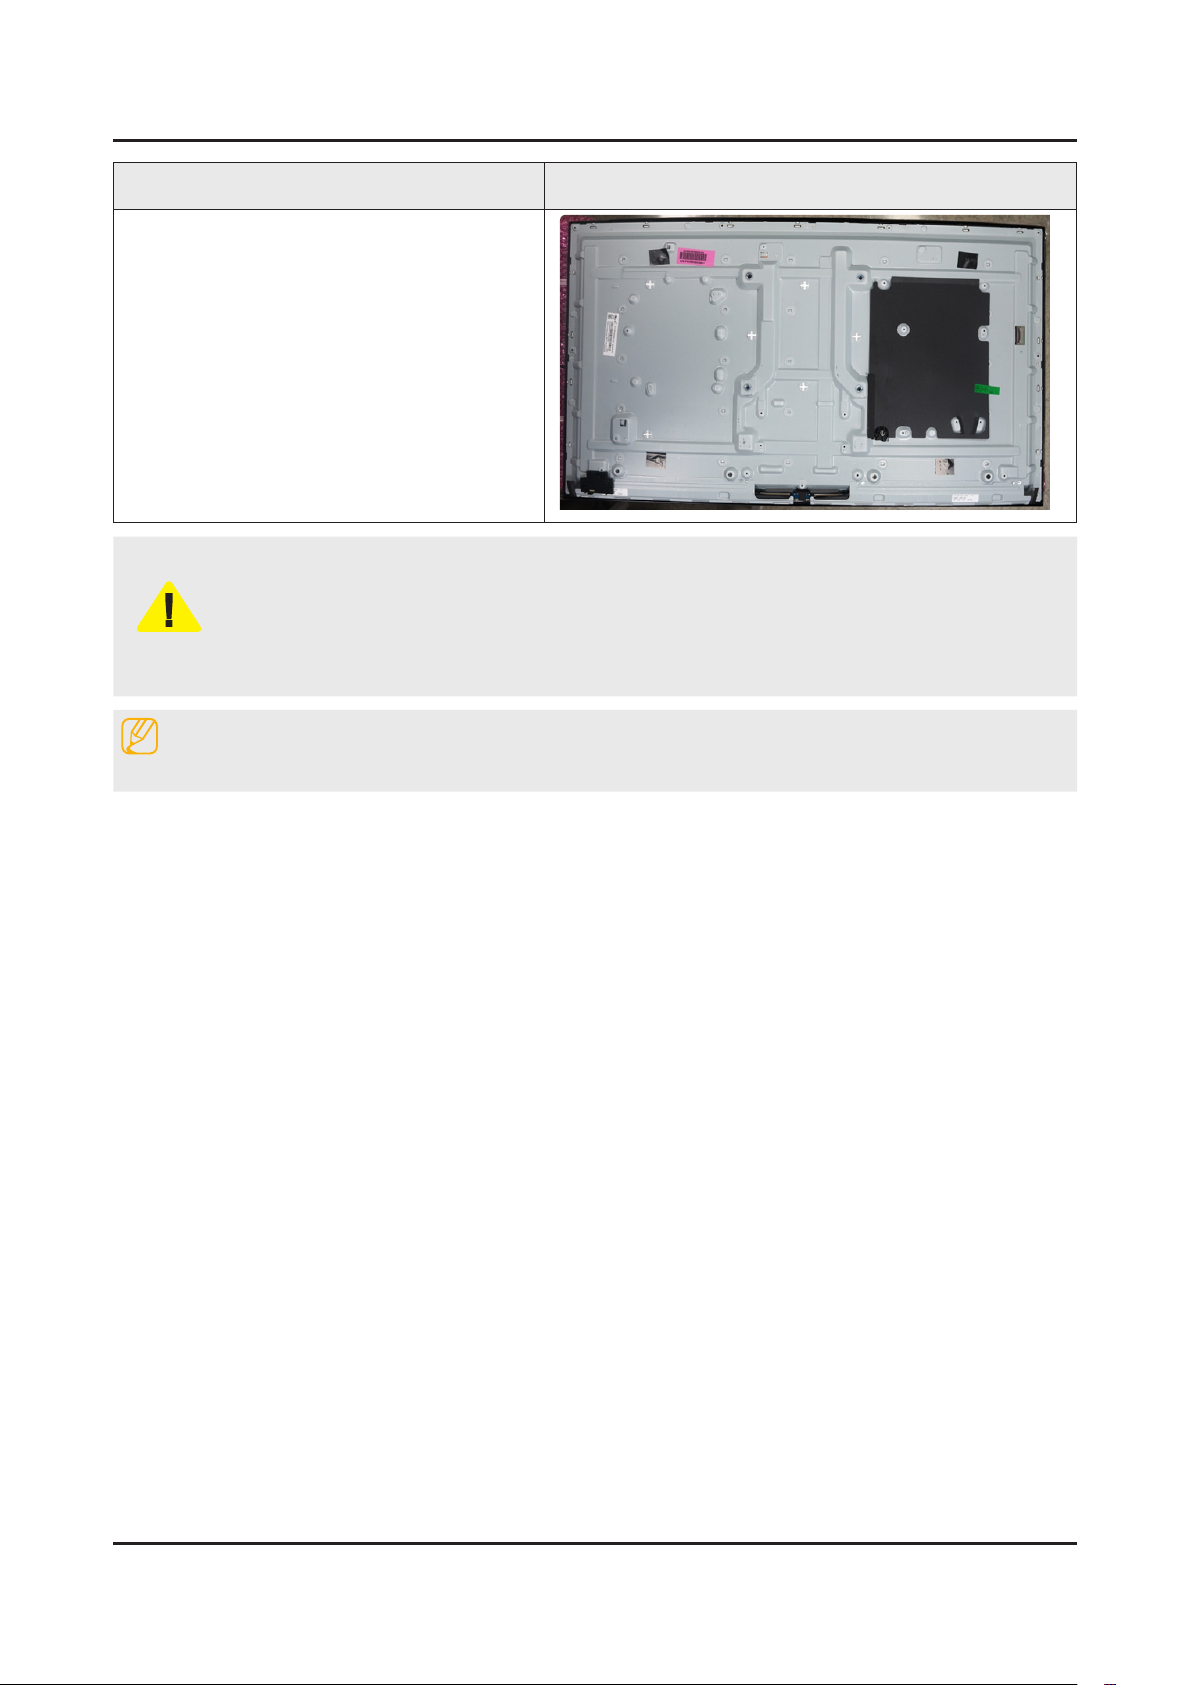
* Panel
- Rear Side
Always remember to disconnect the Power Cord before assembling or disassembling the LED TV.1.
Always take precautions and follow the steps properly. Remember to take a picture before 2.
disassembling if possible.
CAUTION
Recommeded screwdriver torque : 22.0 ~ 26.5lbf3.
The torque may need to be adjusted accordingly. -
NOTE
Reassembly procedures are in the reverse order of disassembly procedures.
Page 9
3-5
3. Disassembly and Reassemble
3-1-2. 49KU6179
Disconnect the LED TV from the power source before disassembly.1.
Follow these directions carefully; never use metal instruments to pry apart the cabinet.2.
CAUTION
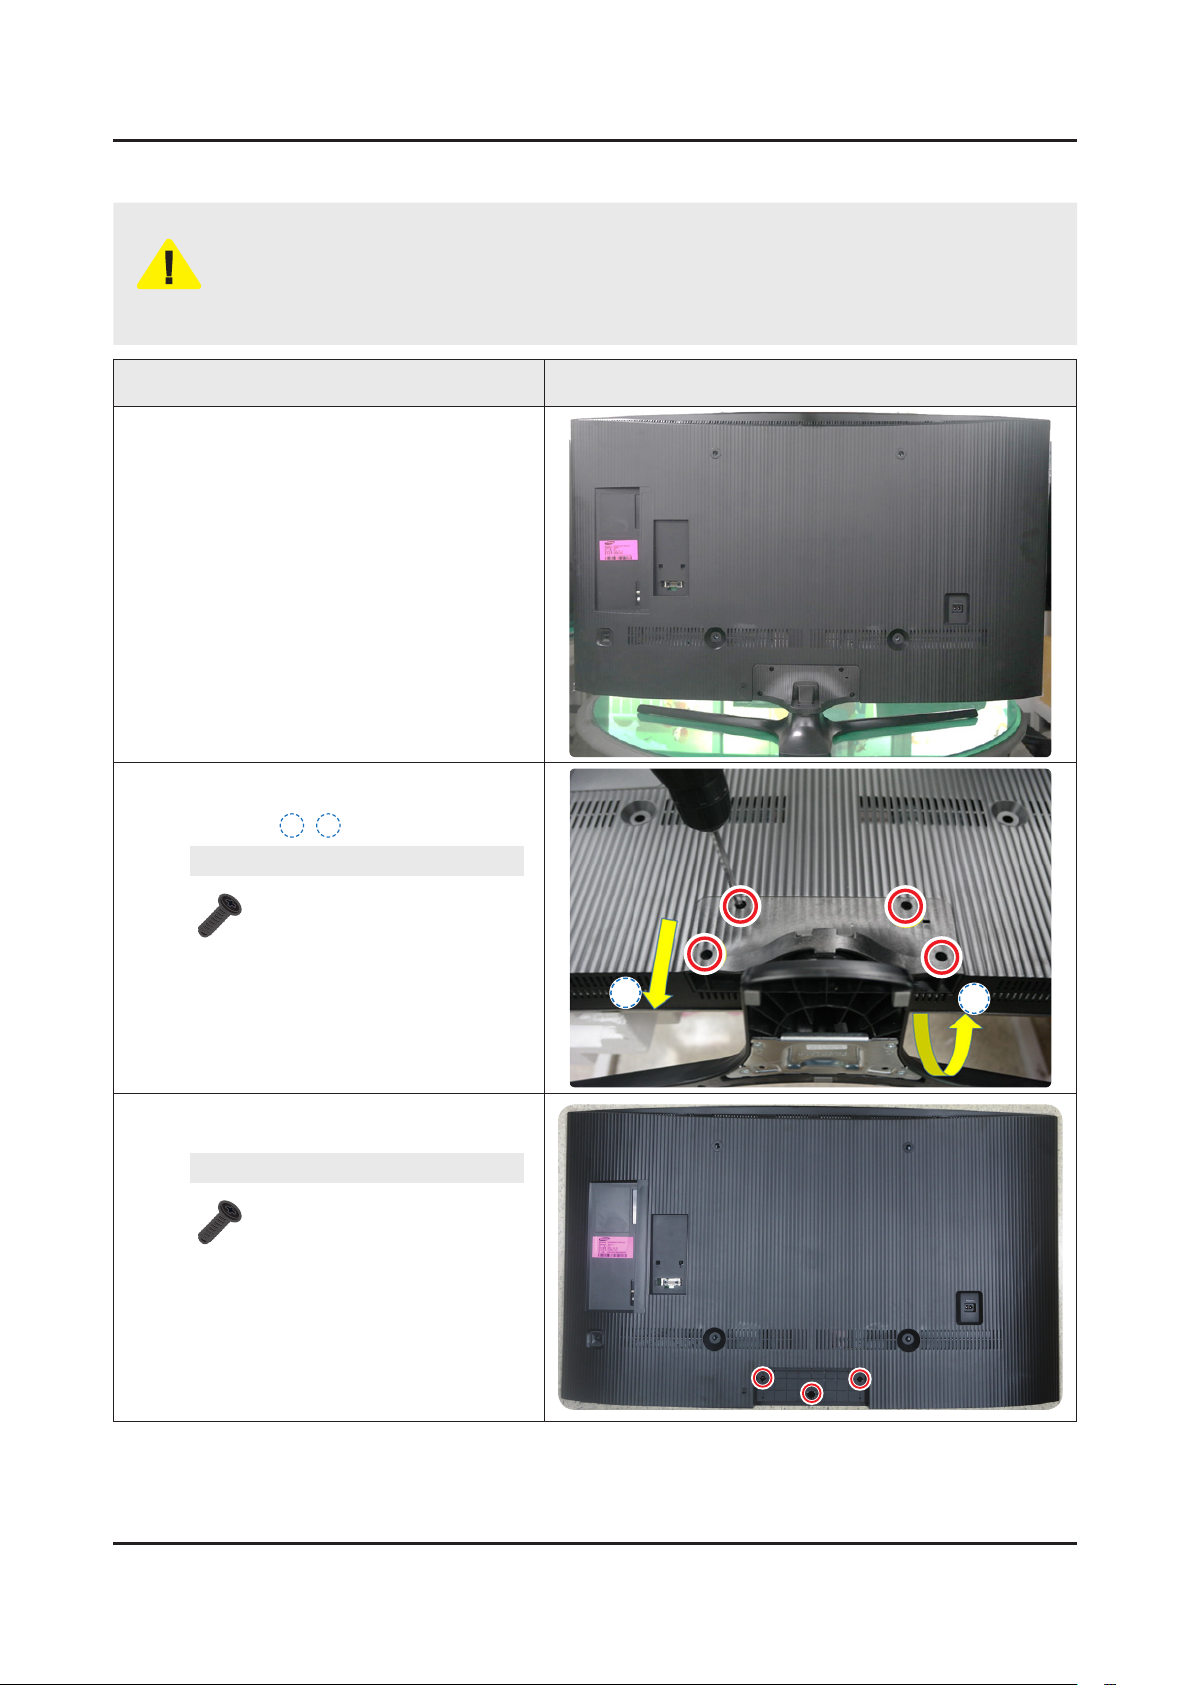
Carefully place the TV on the Curved
1
Cushion (or any material that will prevent
damage to the screen) so that the screen is
facing downwards.
Recommend Torque : 22.0 ~ 26.5lbf -
Description Picture Description
A strength of Torque can be changed depending on the situation.•
Remove 4 Screws on the TV Stand Guide,
2
and then remove the Stand in the order
marked as 1~2.
Screws
BN61-09494D (M4,L14)
x 4EA
TORQUE : 22.0 ~ 26.5lbf
Remove the 3 screws on the bottom center
3
of the Rear Cover.
Screws
6001-002755 (M3,L6)
x 3EA
TORQUE : 22.0 ~ 26.5lbf
2
1
Page 10
3-6
3. Disassembly and Reassemble
Description Picture Description
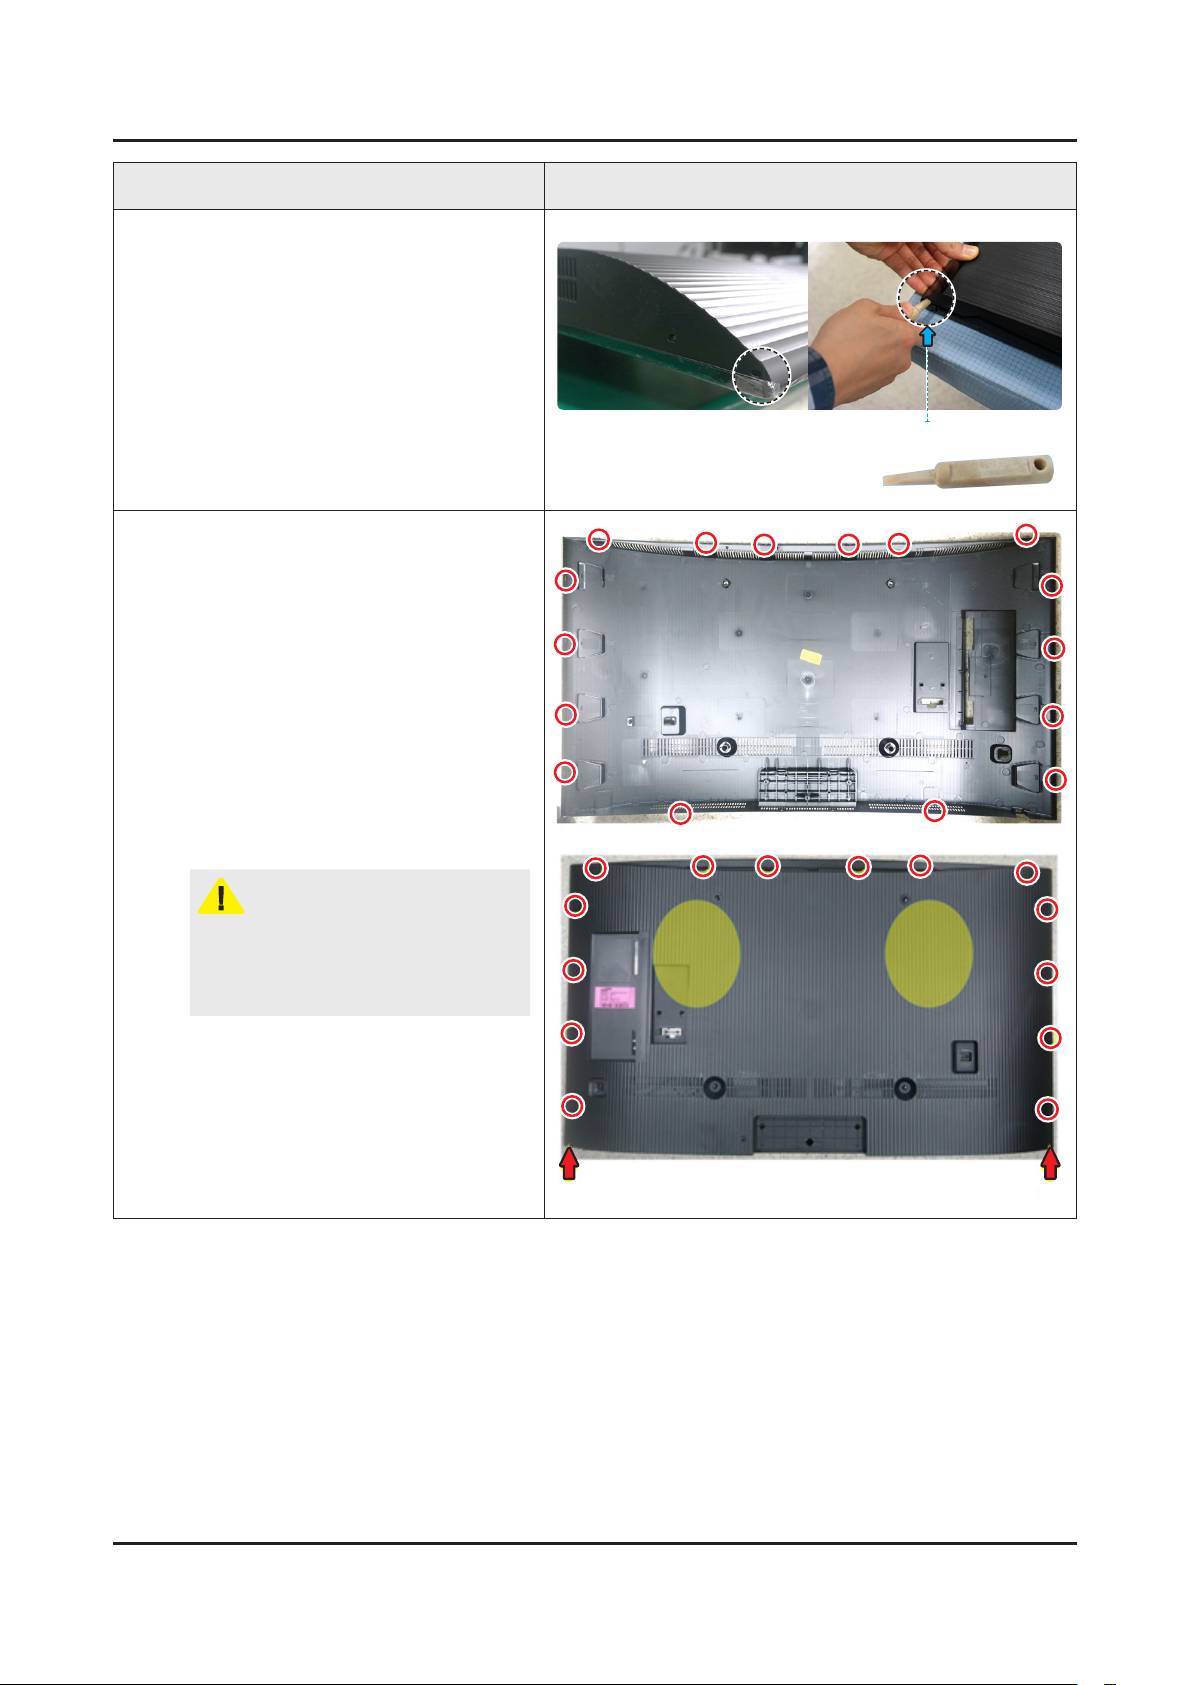
Insert the Samsung Service Jig at the
4
indicated positions (Holes) to release
bottom corners of the rear cover.
After pushing on coloured points of the
5
rear cover (in weight less than 10kg) and
inserting a Samsung service jig at holes
of Rear cover's bottom corners, lift up the
rear cover from bottom corners using the
service jig to release the hooks along both
sides of the rear cover.
Then, holding both sides of the rear cover
by hand and releasing the rest hooks on
the upper side of the rear cover, remove it.
All hooks' locations are indicated by Yellow
Circles in the picture.
(Side:8 points / Top:6 points
Example
BN81-12884A (SVC-JIG)
CAUTION
When you remove the rear cover, hooks
on the upper side of the Chassis Front
can be released. you should check it
before reassembling.
Jig Jig
Page 11
3-7
3. Disassembly and Reassemble
Description Picture Description
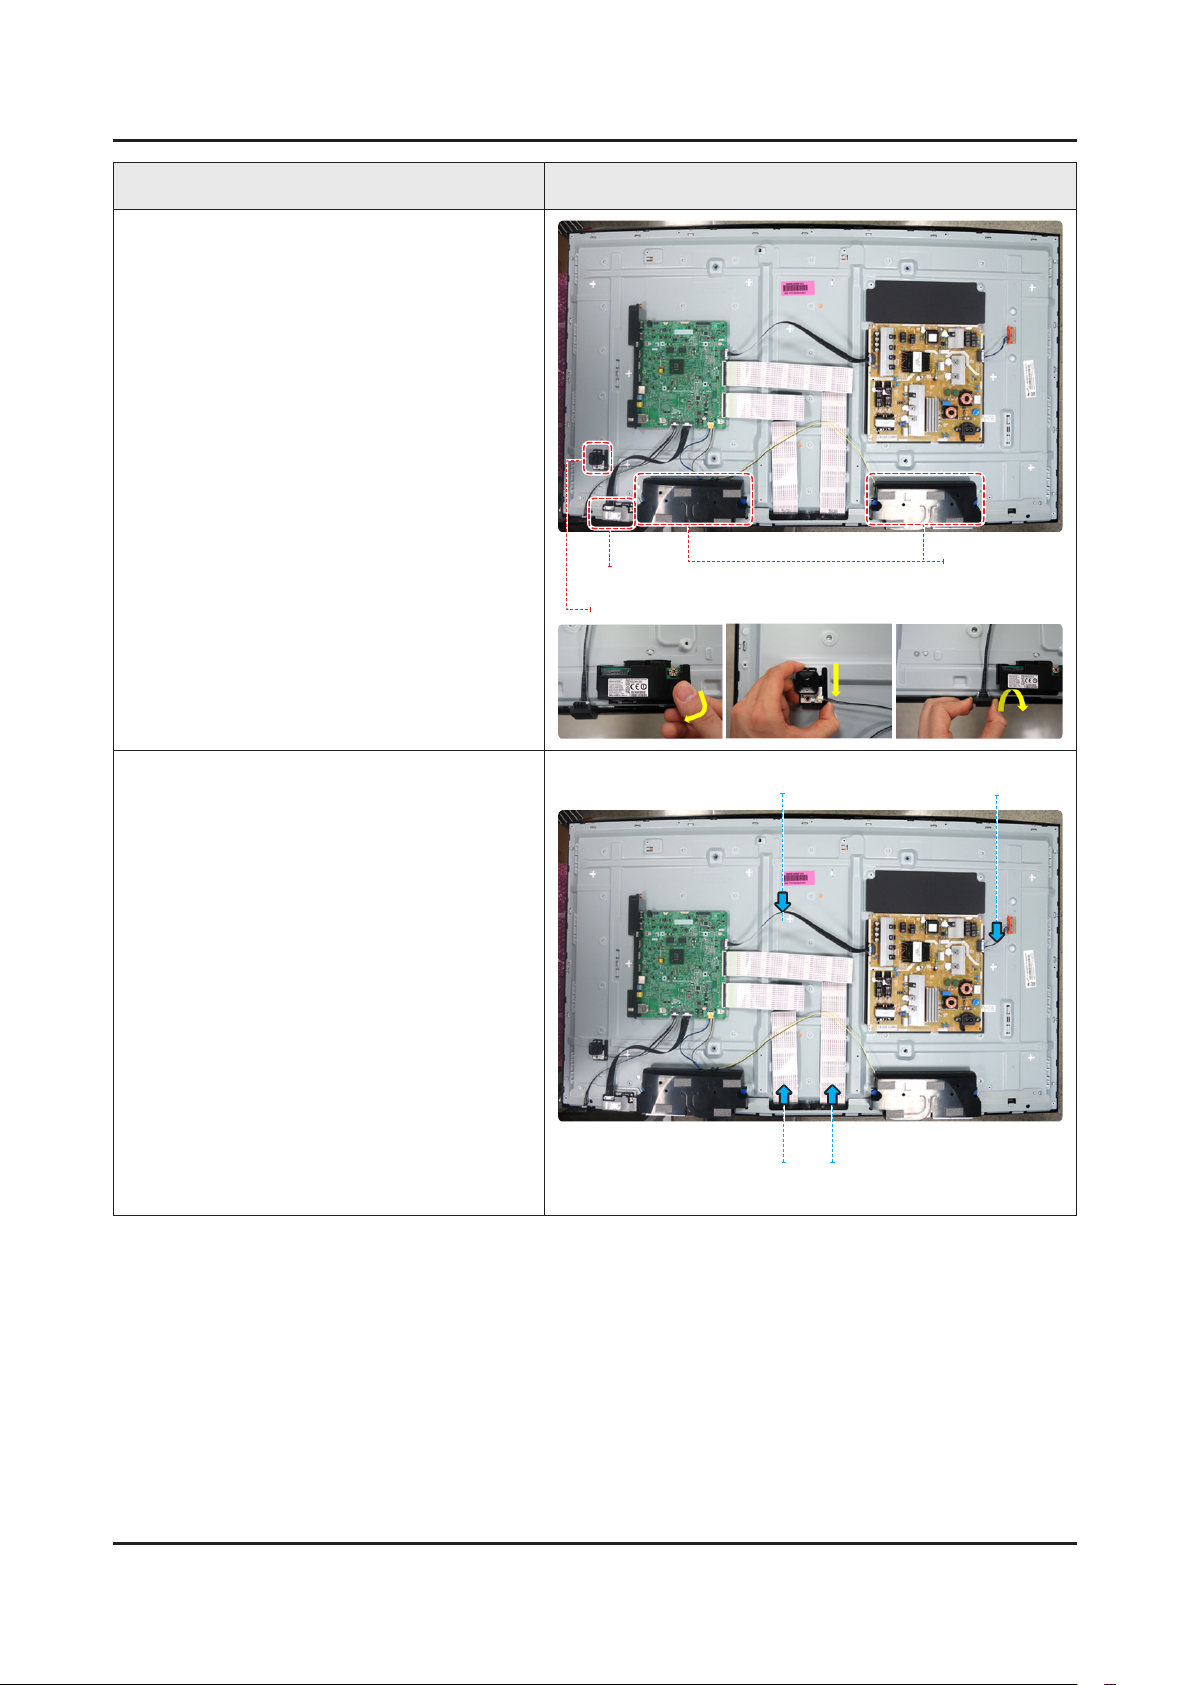
Remove the Speakers and Speaker Cable.
6
AlsoRemovetheBT/Wimodule,Function
module and Cable of each module.
emove the Harness Cable (Main B'd
7
Power), (BLU Power) and the FFC Cable
(Main-Source B'd).
BT/Wimodule
Function module
Harness Cable
(Main B'd Power)
Speaker
Harness Cable
(BLU Power)
FFC Cable
(Main-Source B'd)
Page 12
3-8
3. Disassembly and Reassemble
Description Picture Description
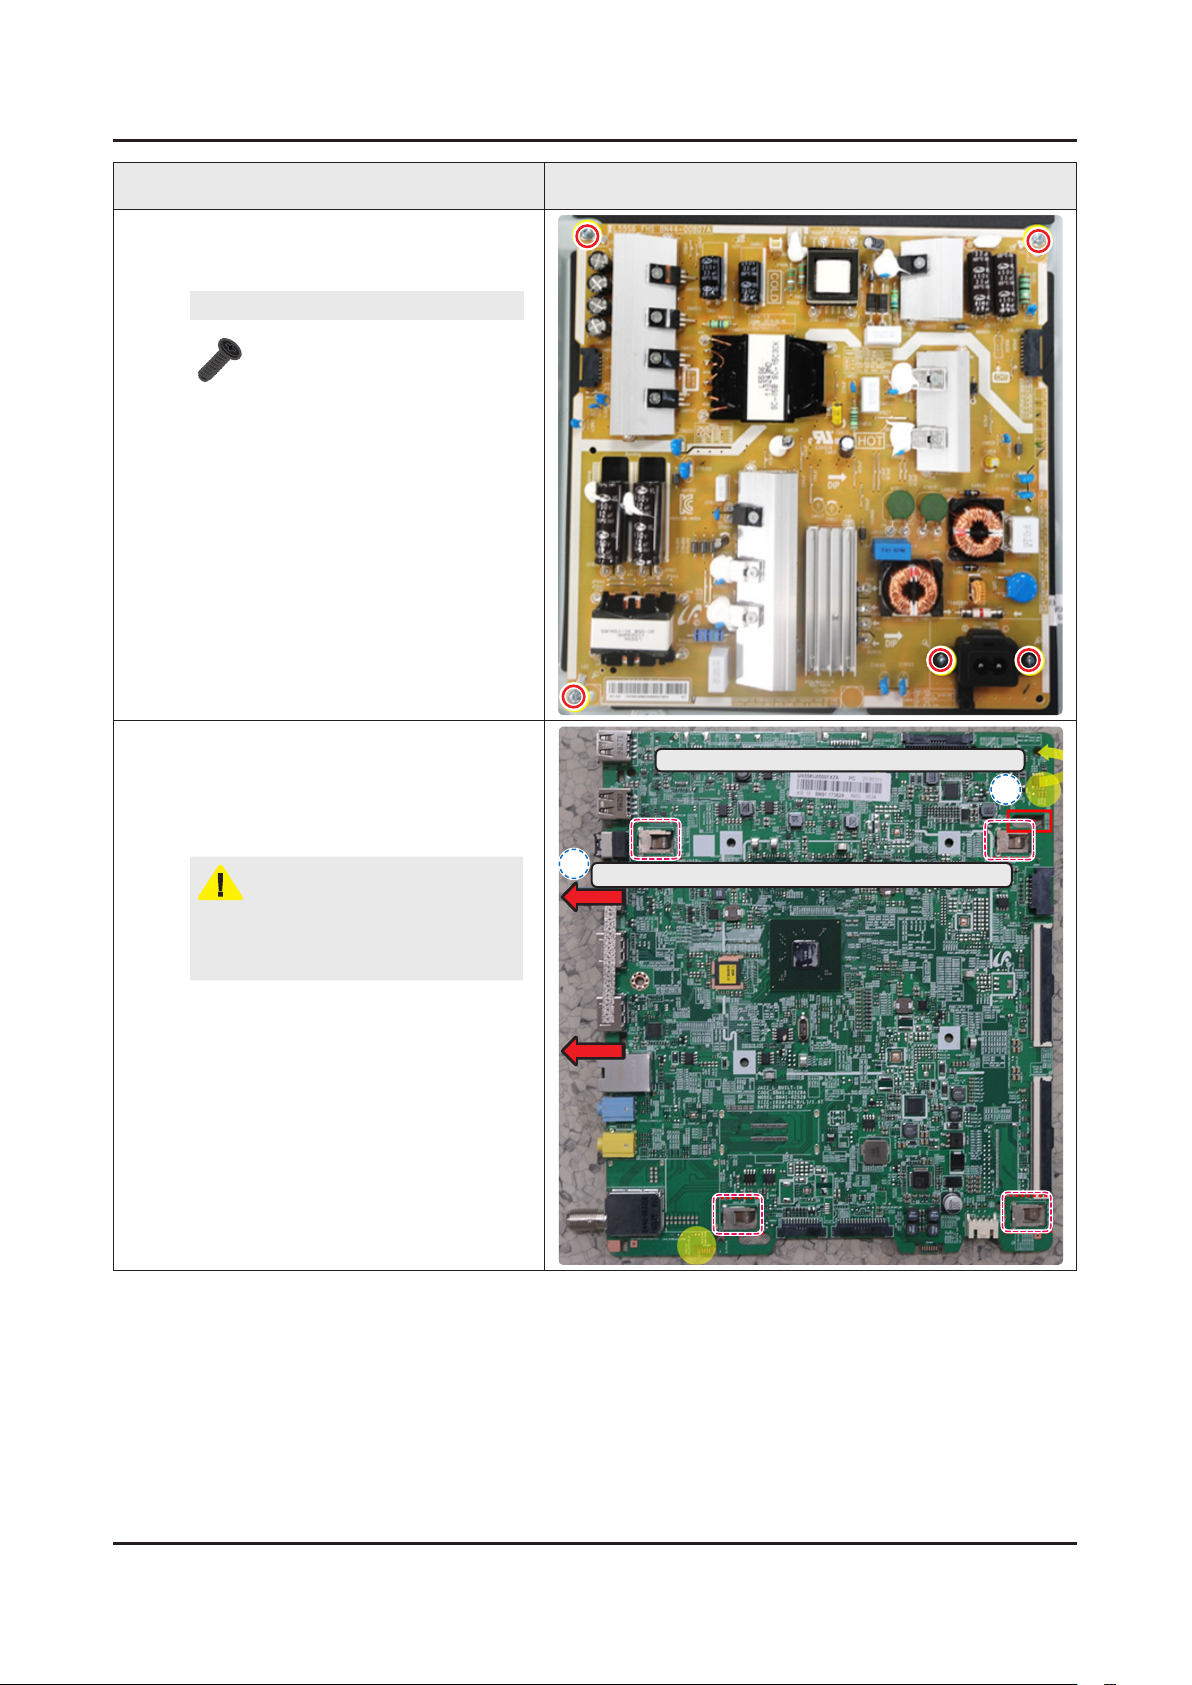
Remove 5 Screws on SMPS Board, and
8
then remove the board. (Power Cables
were already removed.)
Screws
6001-003016 5EA
TORQUE : 22.0 ~ 26.5lbf
Removing Main board.
9
Gently lift the top right corner of the •
board out to release the lock.
Use both hands to hold the board and •
slide to the left to release it.
CAUTION
When installing the Main board, verify
the board is properly positioned in all 4
mounting slots
Lift out of locks (top right corners) to release
2
Slide it out toward the left side to remove the board
1
Page 13
3-9
3. Disassembly and Reassemble
Description Picture Description
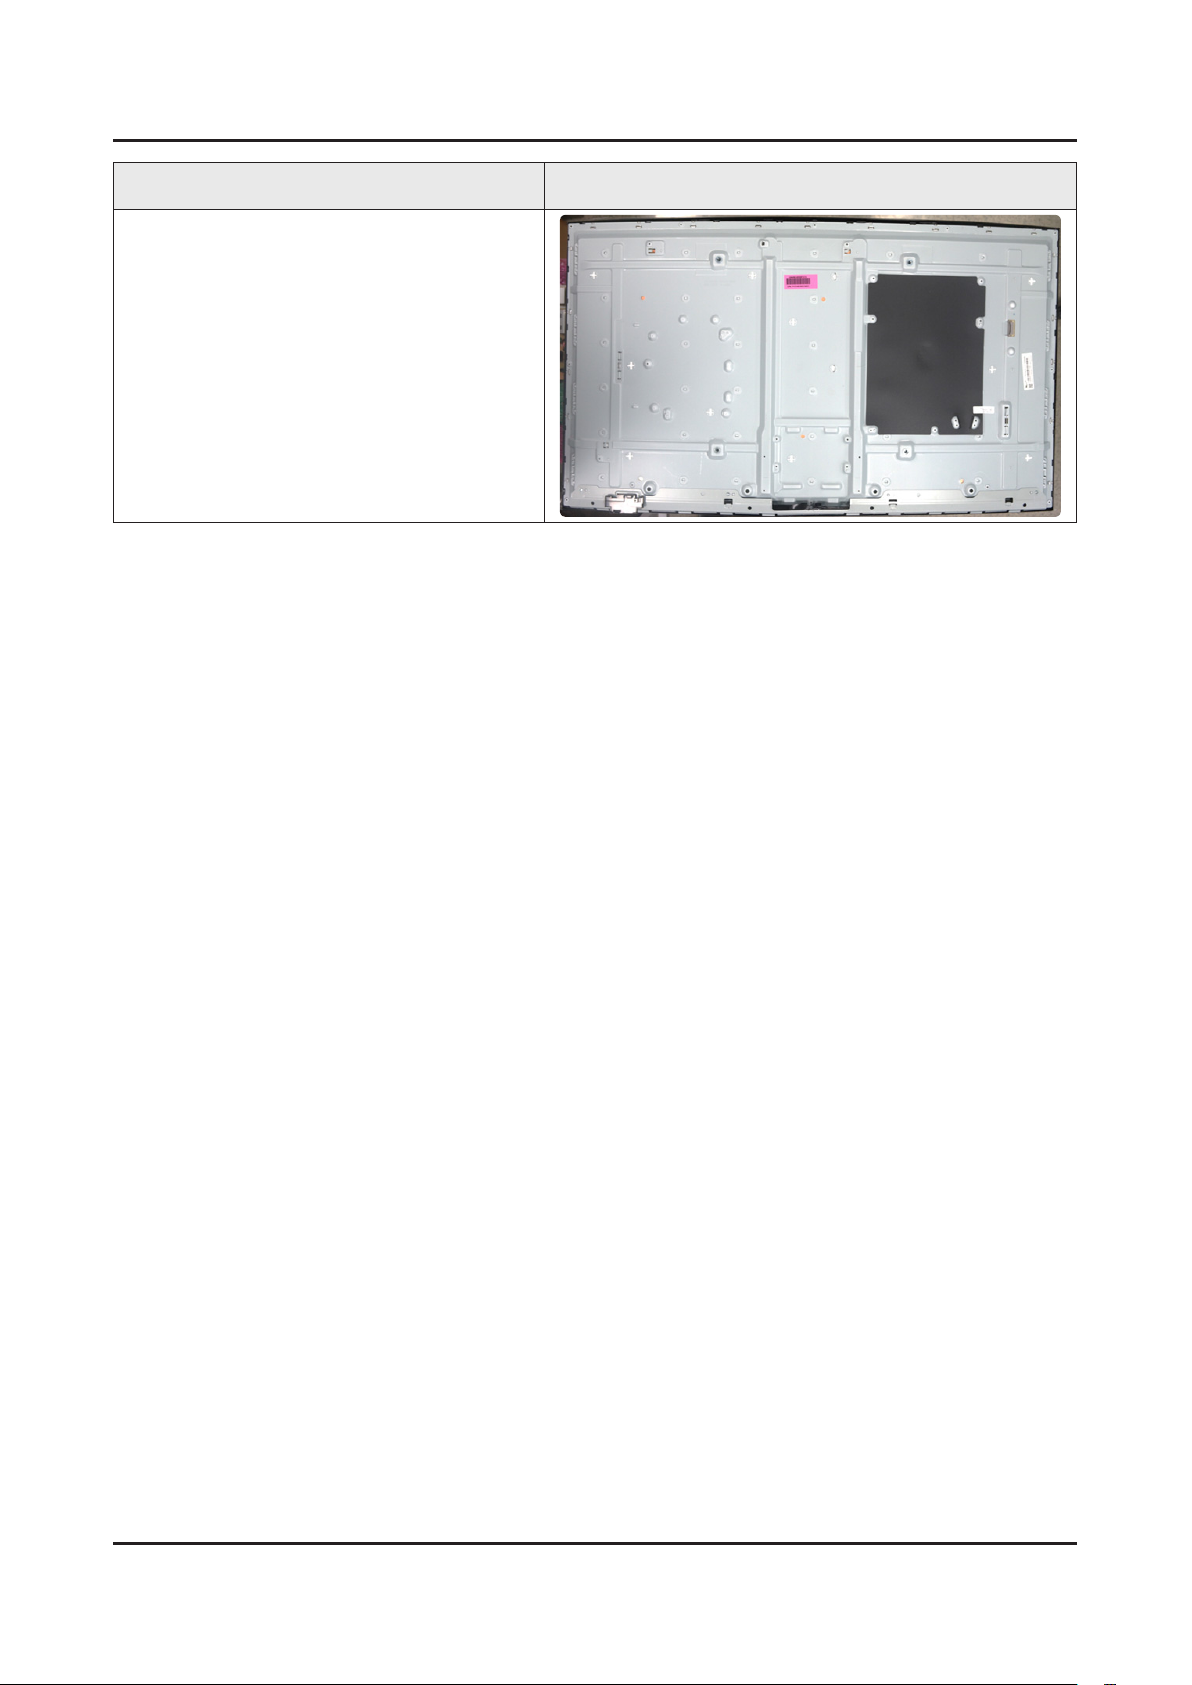
* Panel
- Rear Side
Page 14
3-10
3. Disassembly and Reassemble
3-1-3. 55KU6179
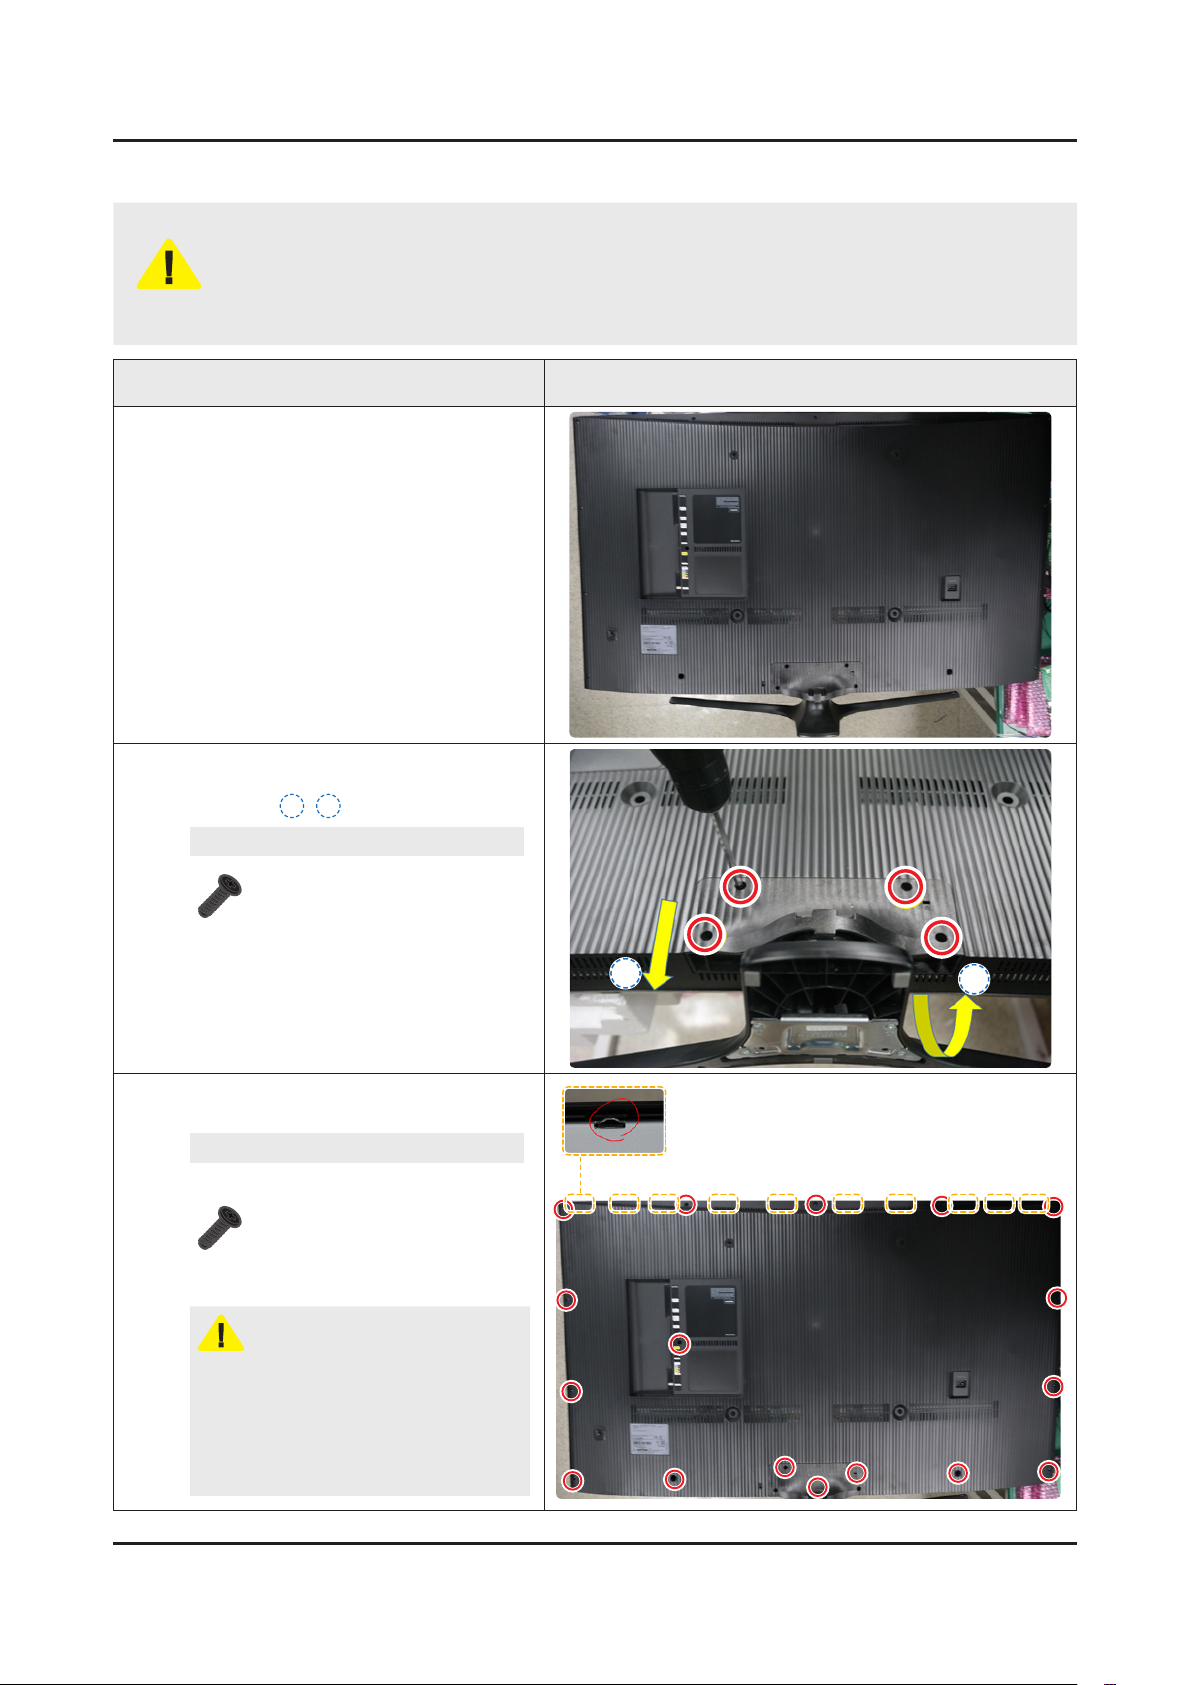
Disconnect the LED TV from the power source before disassembly.1.
Follow these directions carefully; never use metal instruments to pry apart the cabinet.2.
CAUTION
Carefully place the TV on the Curved
1
Cushion (or any material that will prevent
damage to the screen) so that the screen is
facing downwards.
Recommend Torque : 22.0 ~ 26.5lbf -
A strength of Torque can be changed depending on the situation.•
Description Picture Description
Remove 4 Screws on the TV Stand Guide,
2
and then remove the Stand in the order
marked as 1~2.
Screws
BN61-09494D (M4,L14)
x 4EA
TORQUE : 22.0 ~ 26.5lbf
Remove the screws for the Rear Cover.
3
Then carefully remove it.
Screws
6001-002755 (M3,L6)
x 17EA
C/R+PANEL: 16EA
C/R+MAIN: 1EA
TORQUE : 22.0 ~ 26.5lbf
CAUTION
2
1
When opening the cabinet, hooks at
the upper side of Front Chassis can be
released easily! If it is released after
removing the rear cover, you should
hook it to the bottom chassis before
closing.
Page 15
3-11
3. Disassembly and Reassemble
Description Picture Description
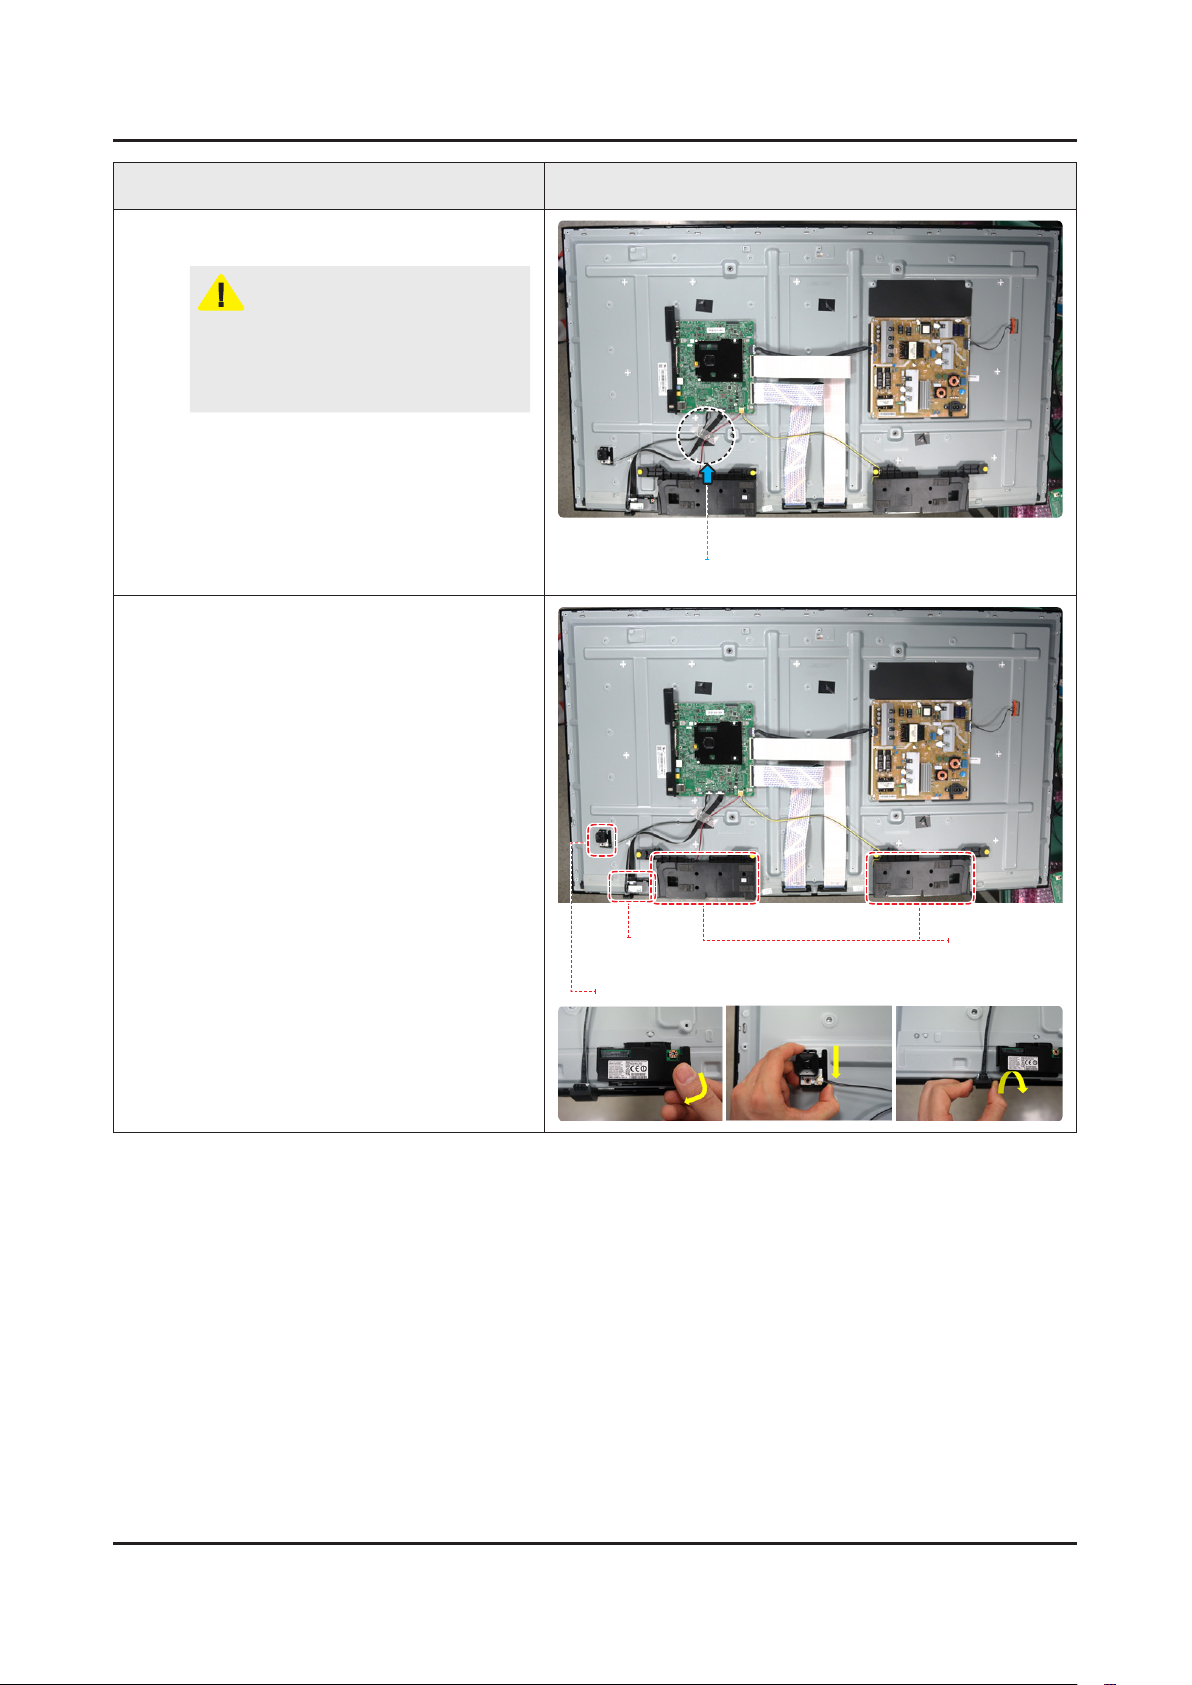
Remove the Filament tape shown on the
4
image.
CAUTION
WhenassemblingtheTV,thelament
tape must be applied on the same
location. Please remember where the
tapewasrstapplied.
Remove the Speakers and Speaker Cable.
5
AlsoRemovetheBT/Wimodule,Function
module and Cable of each module.
Filament tape
BT/Wimodule
Function module
Speaker
Page 16
3-12
3. Disassembly and Reassemble
Description Picture Description
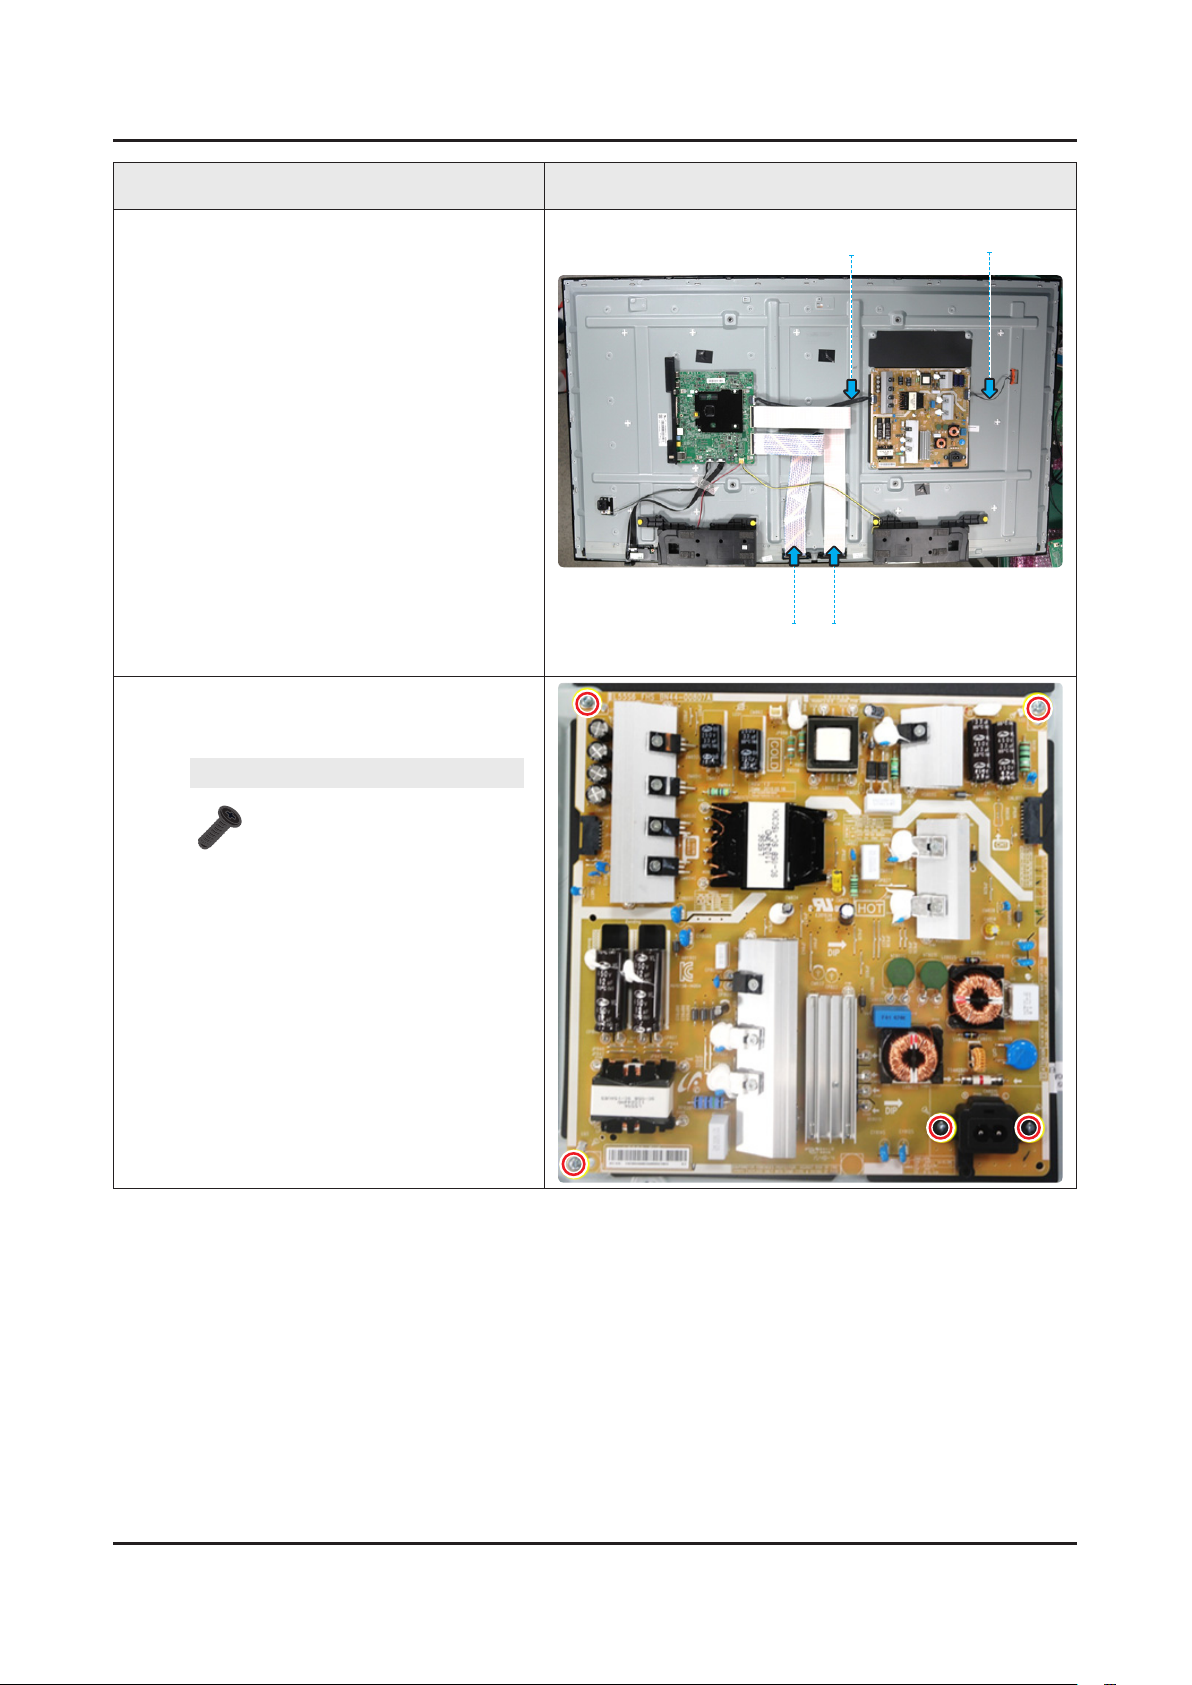
emove the Harness Cable (Main B'd
6
Power), (BLU Power) and the FFC Cable
(Main-Source B'd).
Remove 5 Screws on SMPS Board, and
7
then remove the board. (Power Cables
were already removed.)
Screws
Harness Cable
(Main B'd Power)
FFC Cable
(Main-Source B'd)
Harness Cable
(BLU Power)
6001-003016 5EA
TORQUE : 22.0 ~ 26.5lbf
Page 17
3-13
3. Disassembly and Reassemble
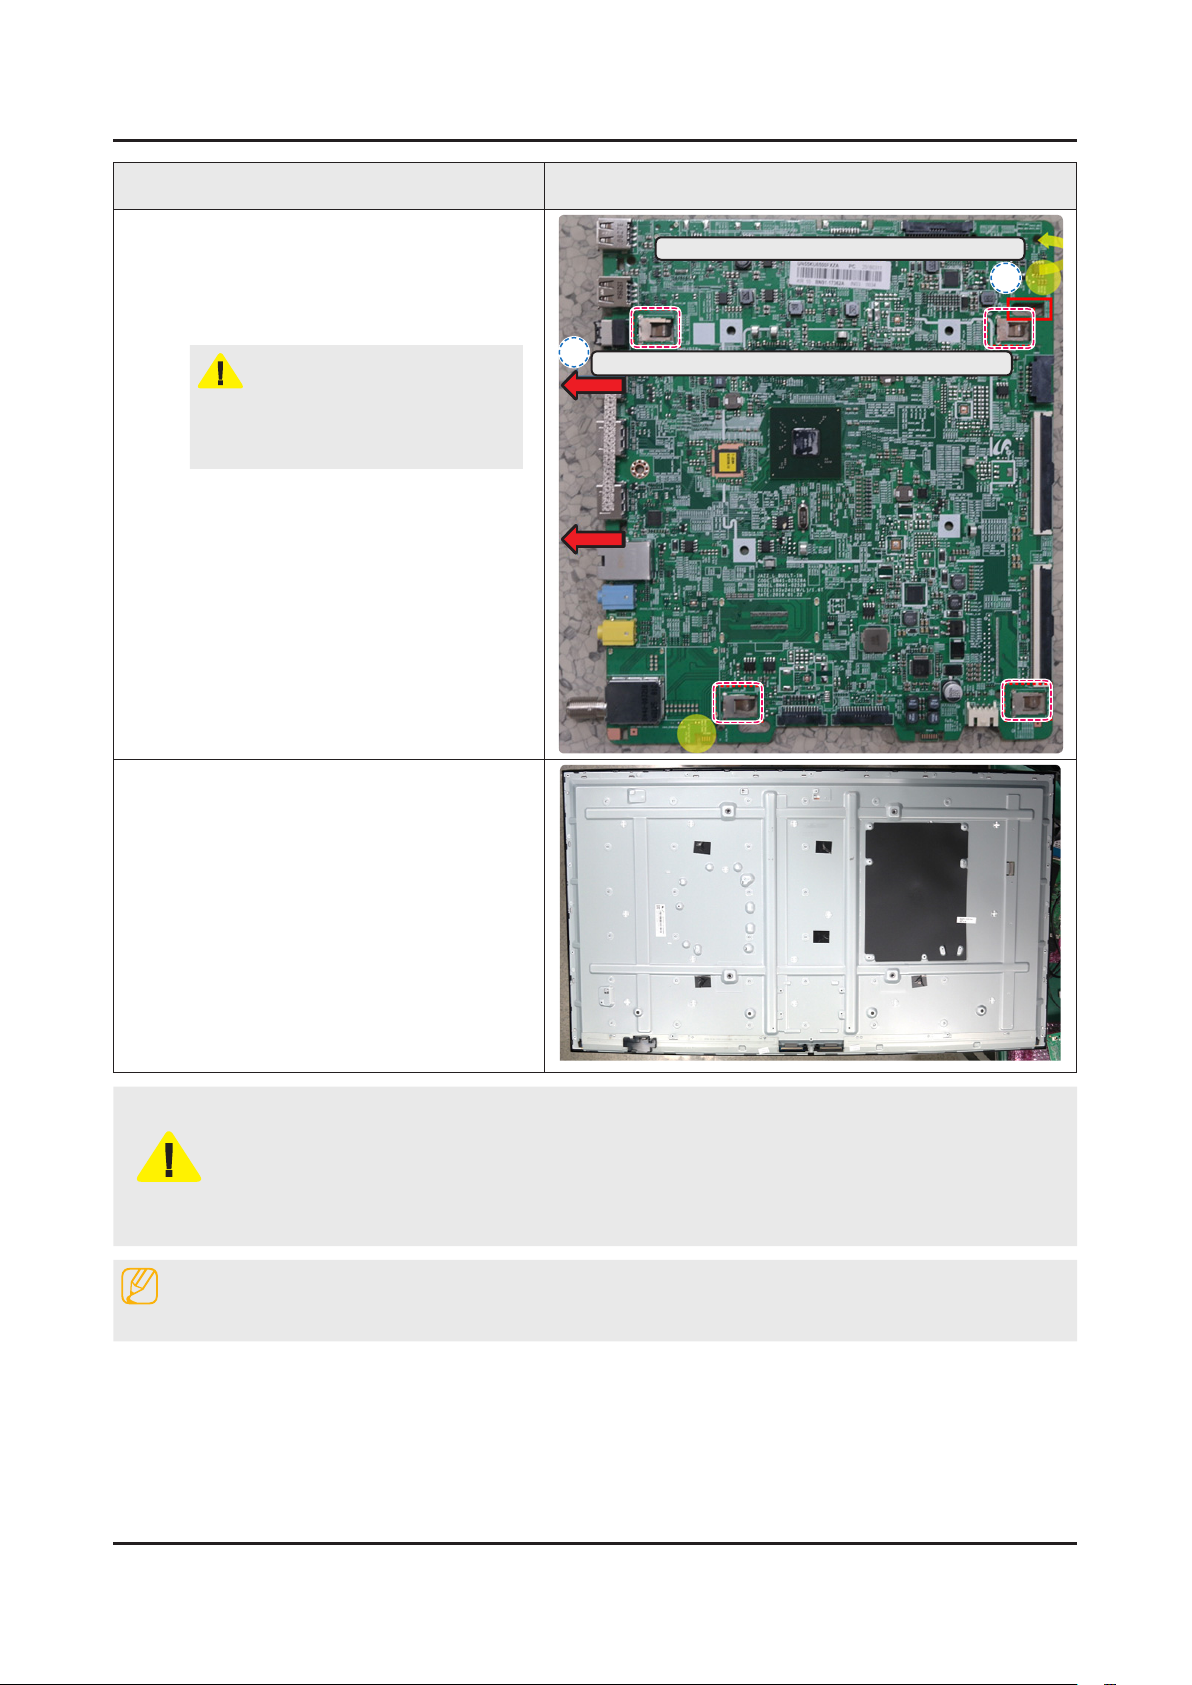
Removing Main board.
8
Gently lift the top right corner of the •
board out to release the lock.
Use both hands to hold the board and •
slide to the left to release it.
CAUTION
When installing the Main board, verify
the board is properly positioned in all 4
mounting slots
Description Picture Description
Lift out of locks (top right corners) to release
2
Slide it out toward the left side to remove the board
1
* Panel
- Rear Side
Always remember to disconnect the Power Cord before assembling or disassembling the LED TV.1.
Always take precautions and follow the steps properly. Remember to take a picture before 2.
disassembling if possible.
CAUTION
NOTE
Reassembly procedures are in the reverse order of disassembly procedures.
Recommeded screwdriver torque : 22.0 ~ 26.5lbf3.
The torque may need to be adjusted accordingly. -
Page 18
3-14
3. Disassembly and Reassemble
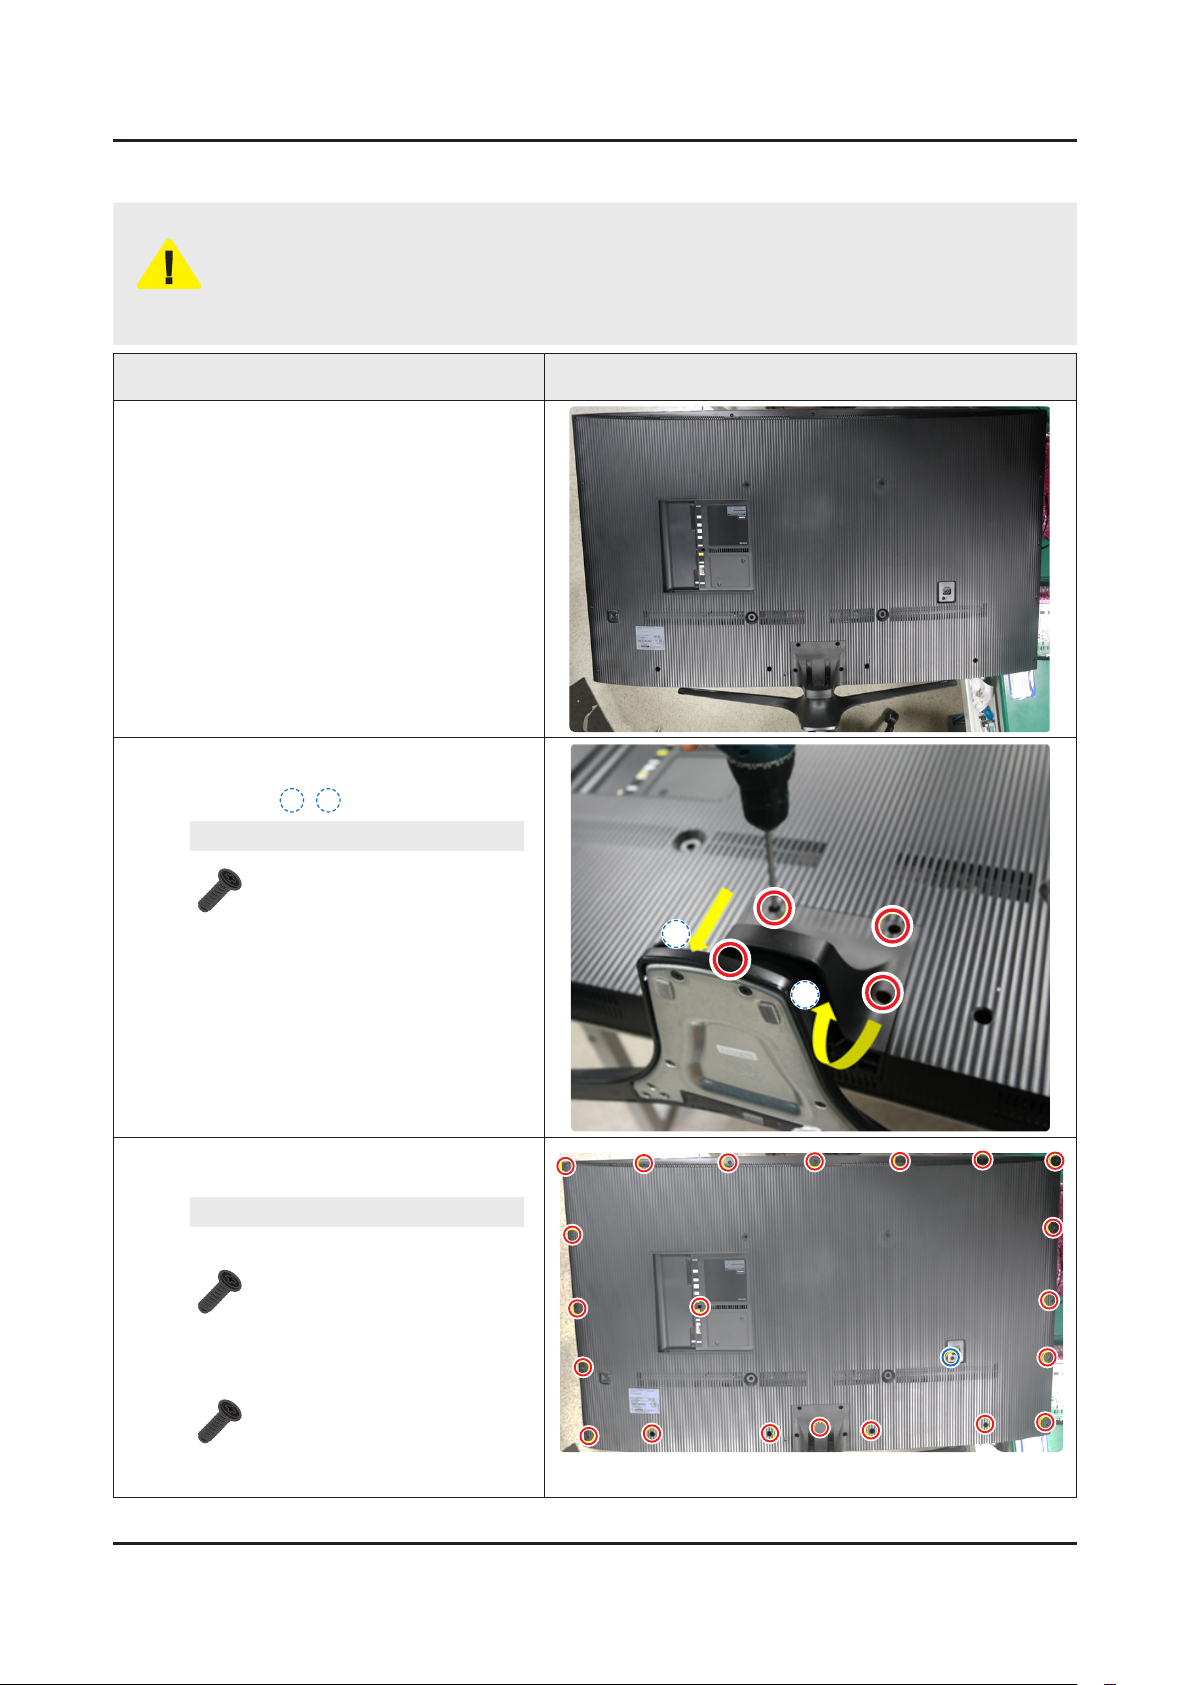
3-1-4. 65KU6179
Disconnect the LED TV from the power source before disassembly.1.
Follow these directions carefully; never use metal instruments to pry apart the cabinet.2.
CAUTION
Carefully place the TV on the Curved
1
Cushion (or any material that will prevent
damage to the screen) so that the screen is
facing downwards.
Recommend Torque : 22.0 ~ 26.5lbf -
A strength of Torque can be changed depending on the situation.•
Description Picture Description
Remove 4 Screws on the TV Stand Guide,
2
and then remove the Stand in the order
marked as 1~2.
Screws
BN61-09494D (M4,L14)
x 4EA
TORQUE : 22.0 ~ 26.5lbf
Remove the screws for the Rear Cover.
3
Then carefully remove it.
Screws
6001-002755 (M3,L6)
x 21EA
C/R+PANEL: 20EA
C/R+MAIN: 1EA
TORQUE : 22.0 ~ 26.5lbf
2
1
6003-000003 (M4,L10)
x 1EA
C/R+SMPS: 1EA
TORQUE : 22.0 ~ 26.5lbf
Page 19
3-15
3. Disassembly and Reassemble
Description Picture Description
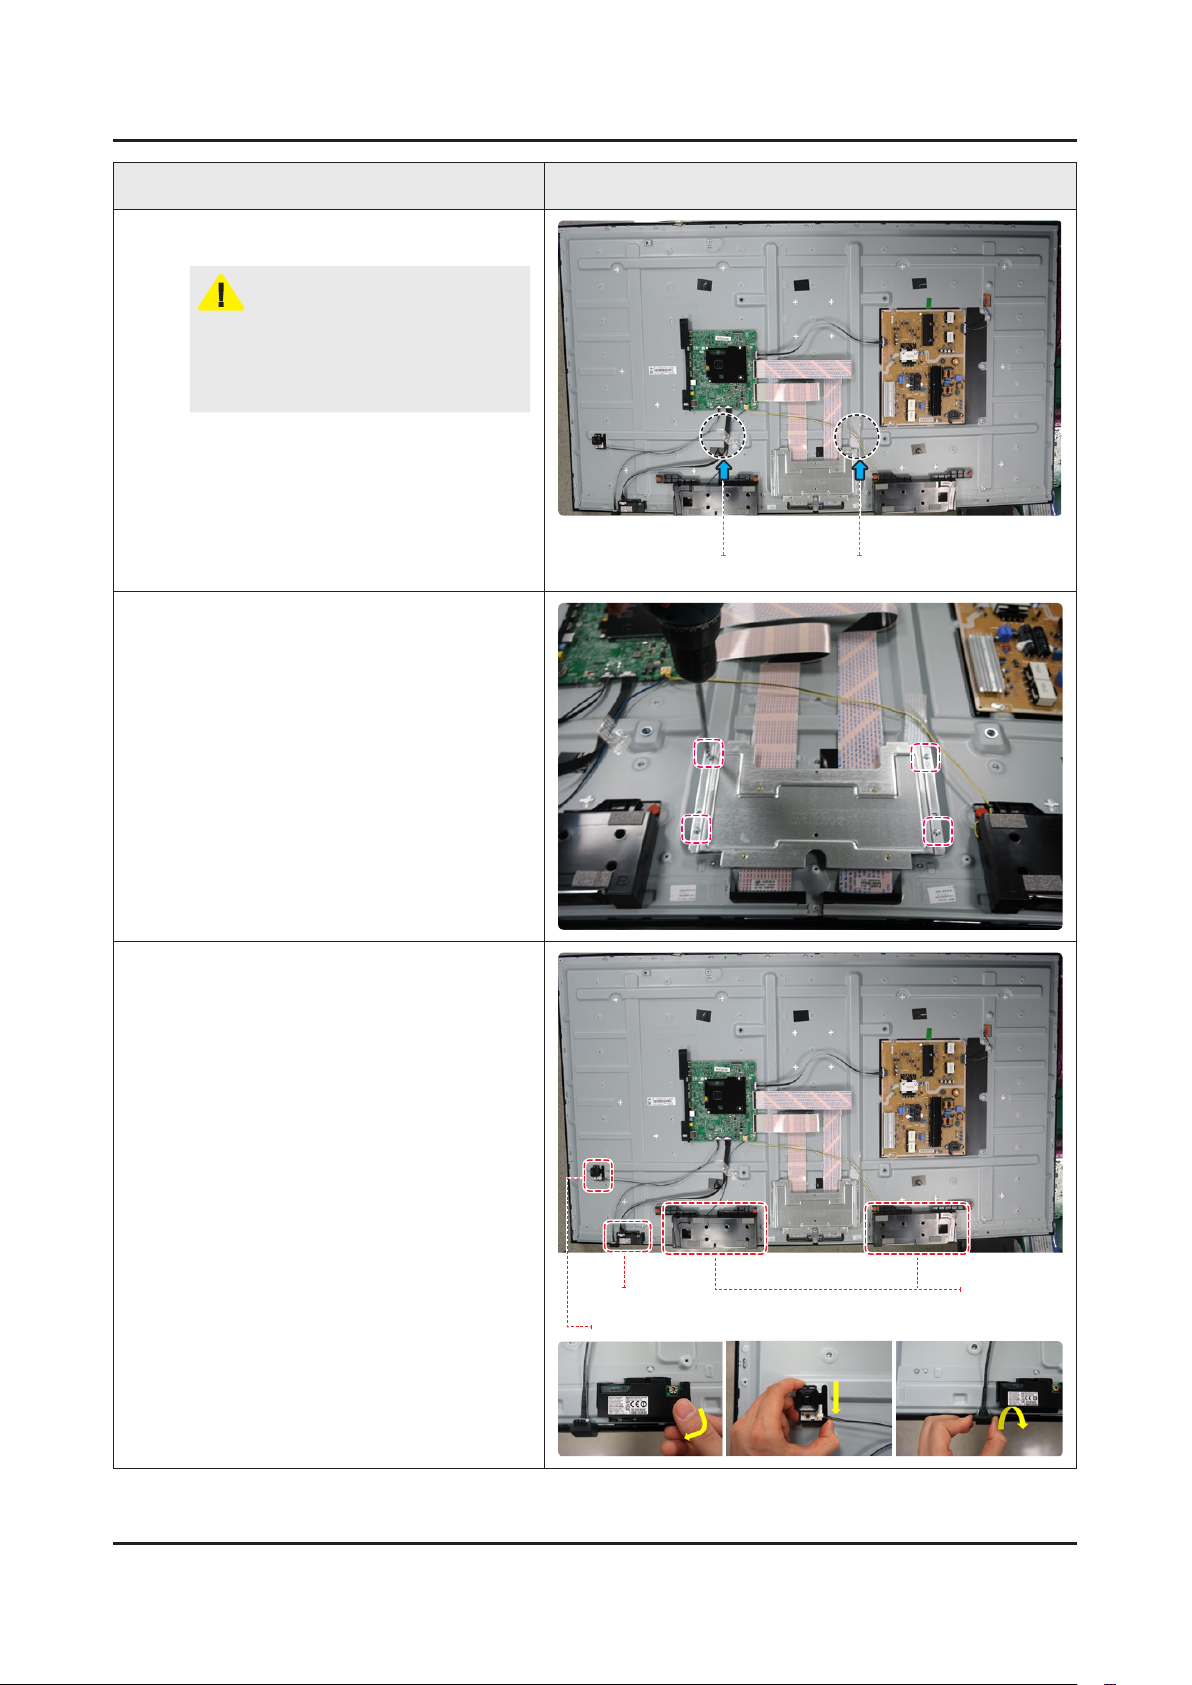
Remove the Filament tape shown on the
4
image.
CAUTION
WhenassemblingtheTV,thelament
tape must be applied on the same
location. Please remember where the
tapewasrstapplied.
Remove 4 Screws on the Bracket (Stand
5
Link), and then remove it.
Filament tape Filament tape
Remove the Speakers and Speaker Cable.
6
AlsoRemovetheBT/Wimodule,Function
module and Cable of each module.
BT/Wimodule
Function module
Speaker
Page 20
3-16
3. Disassembly and Reassemble
Description Picture Description
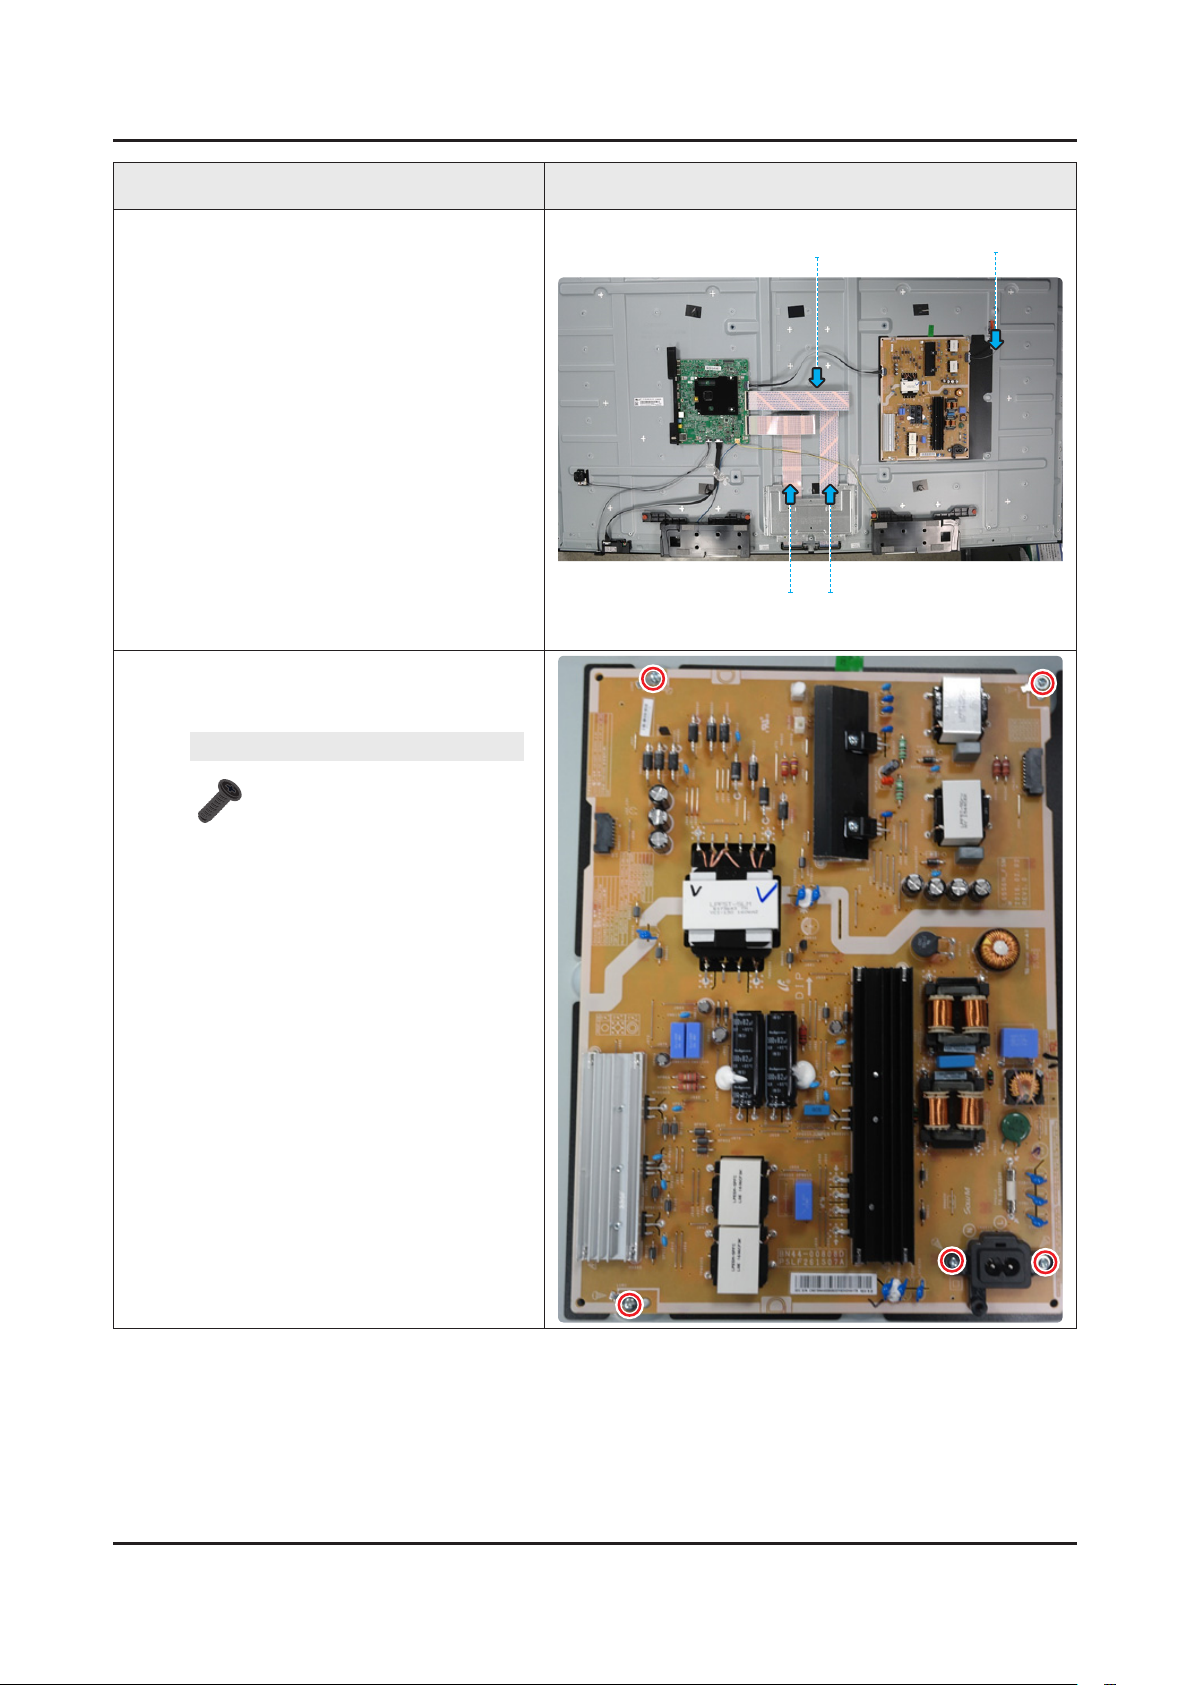
emove the Harness Cable (Main B'd
7
Power), (BLU Power) and the FFC Cable
(Main-Source B'd).
Remove 5 Screws on SMPS Board, and
8
then remove the board. (Power Cables
were already removed.)
Screws
6001-003016 5EA
TORQUE : 22.0 ~ 26.5lbf
Harness Cable
(Main B'd Power)
FFC Cable
(Main-Source B'd)
Harness Cable
(BLU Power)
Page 21
3-17
3. Disassembly and Reassemble
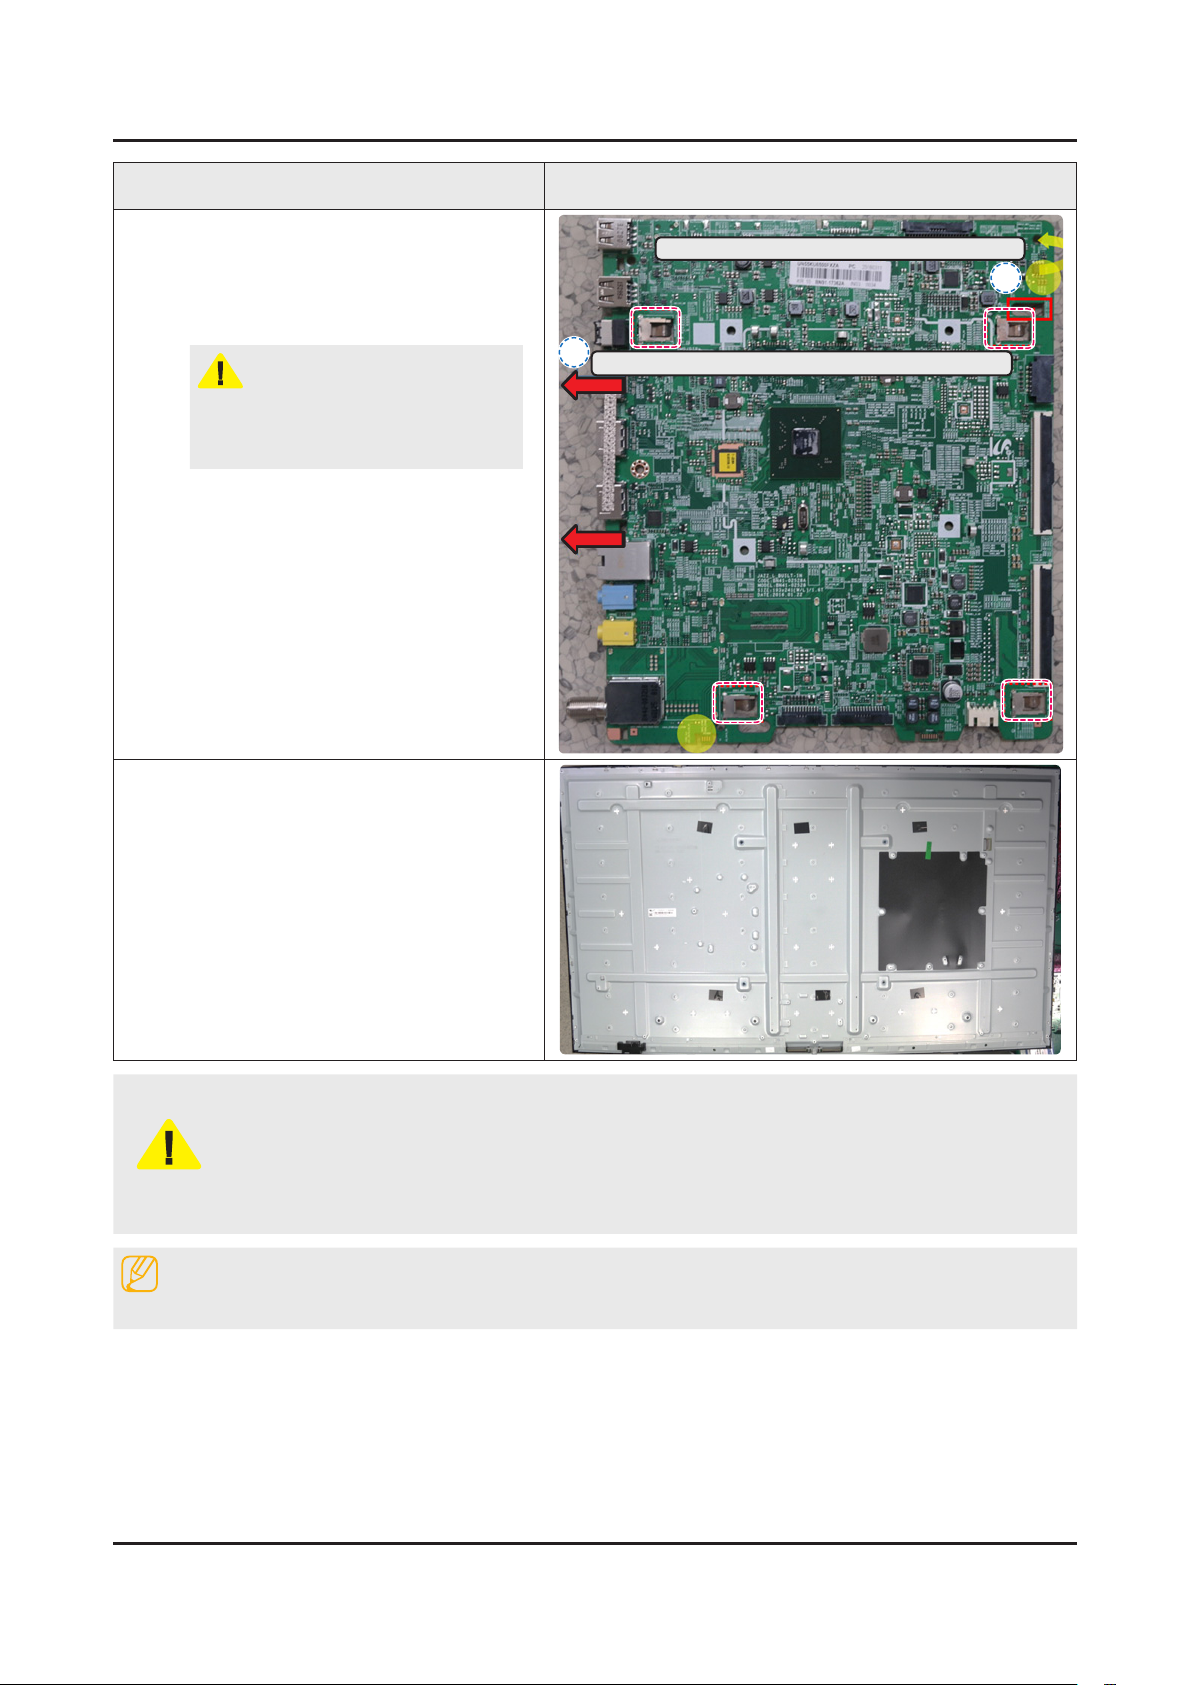
Removing Main board.
9
Gently lift the top right corner of the •
board out to release the lock.
Use both hands to hold the board and •
slide to the left to release it.
CAUTION
When installing the Main board, verify
the board is properly positioned in all 4
mounting slots
Description Picture Description
Lift out of locks (top right corners) to release
2
Slide it out toward the left side to remove the board
1
* Panel
- Rear Side
Always remember to disconnect the Power Cord before assembling or disassembling the LED TV.1.
Always take precautions and follow the steps properly. Remember to take a picture before 2.
disassembling if possible.
CAUTION
NOTE
Reassembly procedures are in the reverse order of disassembly procedures.
Recommeded screwdriver torque : 22.0 ~ 26.5lbf3.
The torque may need to be adjusted accordingly. -
Page 22
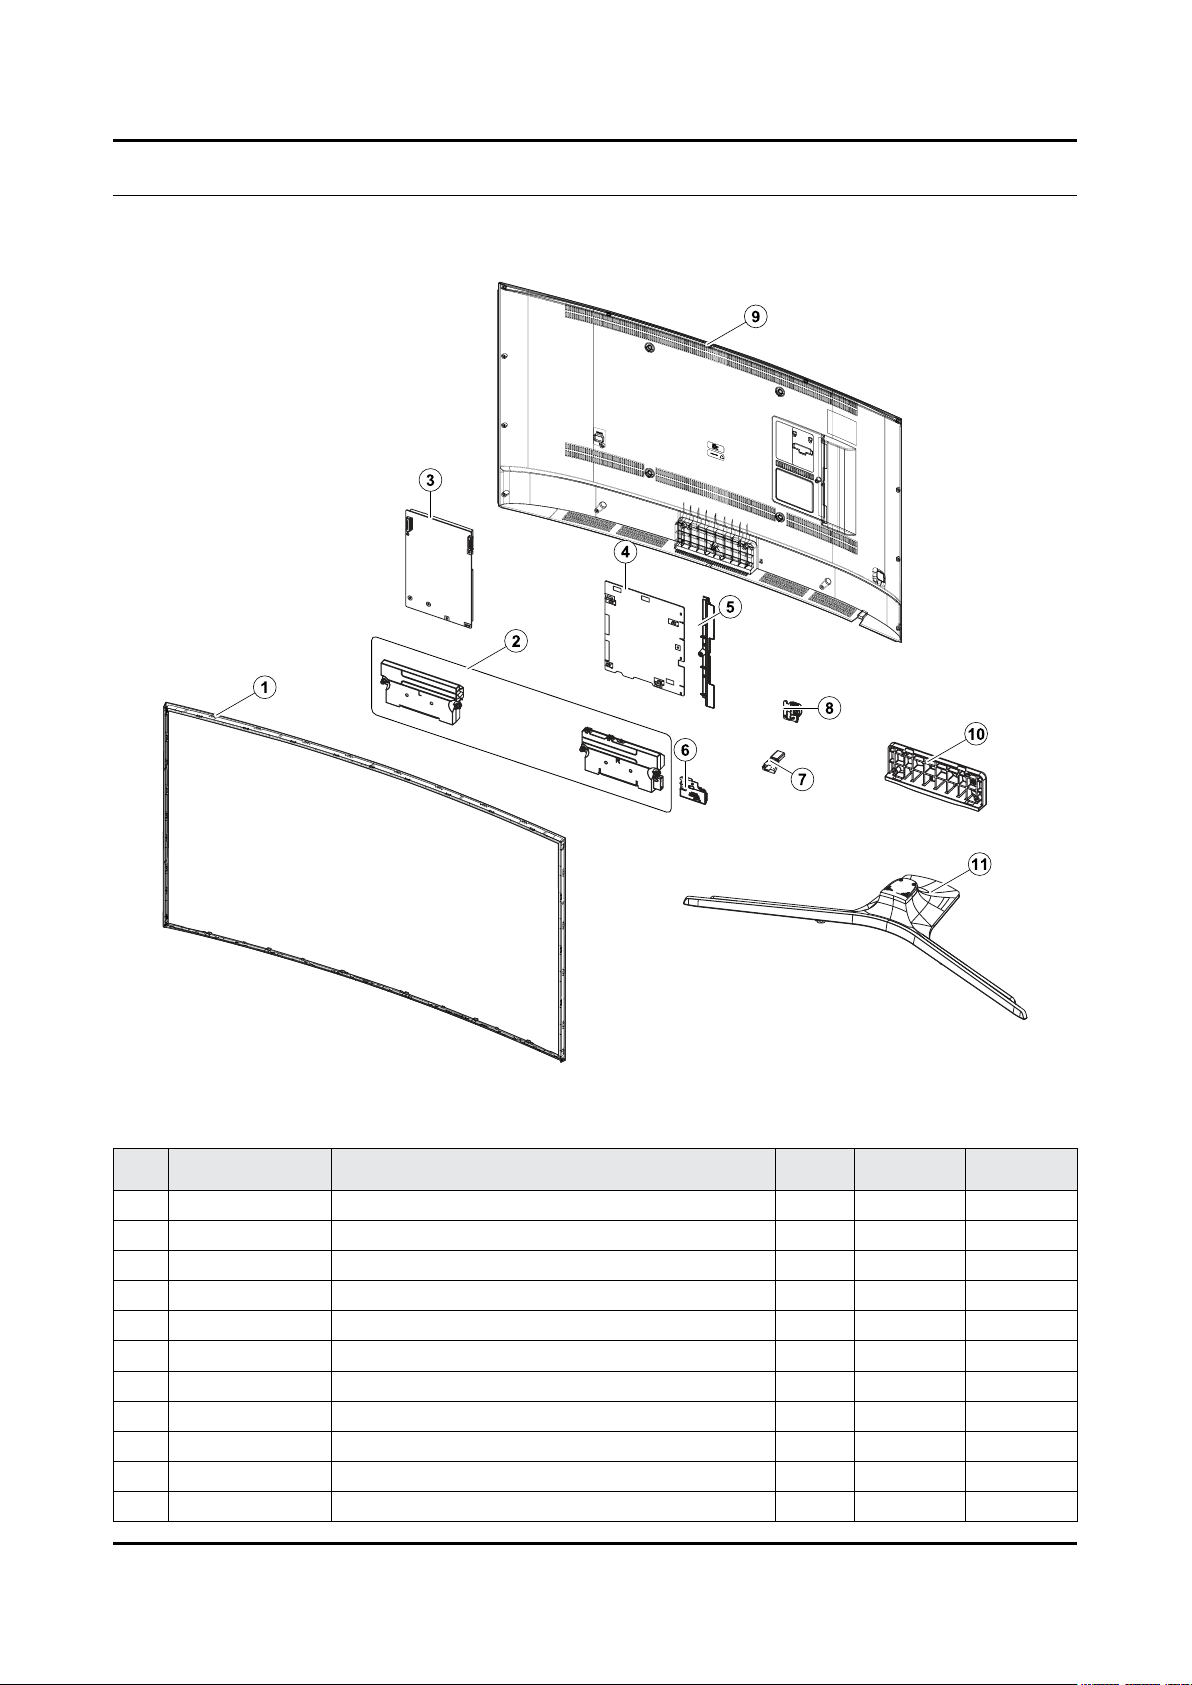
ANNEX. Exploded View & Part List
ANNEX. Exploded View & Part List [UE40KU6100WXXH FA01]
1-1. Exploded View
1-1-1. Parts List
No. Code No. Description & Specication Q’ty SA/SNA Remark
1 BN95-02921A PRODUCT LCD-SDC; CY-WK040HGLV1V,KU6300,B 1 SA
2 BN96-35009A ASSY SPEAKER P-FRONT; TV-SPK,JU6700,6ohm, 1 SA
3 BN44-00806A DC VSS-PD BOARD; L40S6_FDY,AC/DC,139W,100 1 SA
4 BN94-10769G ASSY PCB MAIN; LED 6K TV 1 SA
5 BN63-15236A COVER-TERMINAL SIDE; 55KU6000,HIPS,MOLD,H 1 SA
6 BN59-01174D NETWORK-WLAN CLIENT; WIDT30Q,58x31.45x8.5 1 SA
7 BN96-39955B ASSY BOARD P-IR; KU6300,IR ASSY_KU6300 1 SA
8 BN96-35345B ASSY BOARD P-FUNCTION JOG; JU7500,CT15SE 1 SA
9 BN96-35780L ASSY CHASSIS FRONT P; 40KU6300,PC+ABS+MF 1 SA
10 BN96-36255G ASSY GUIDE P-STAND; JU6670,V STAND,HIPS,B 1 SA
11 BN96-35224A ASSY STAND P-BOTTOM; J5500 40",PC+ABS+GF2 1 SA
ANNEX-1
Page 23
ANNEX-2
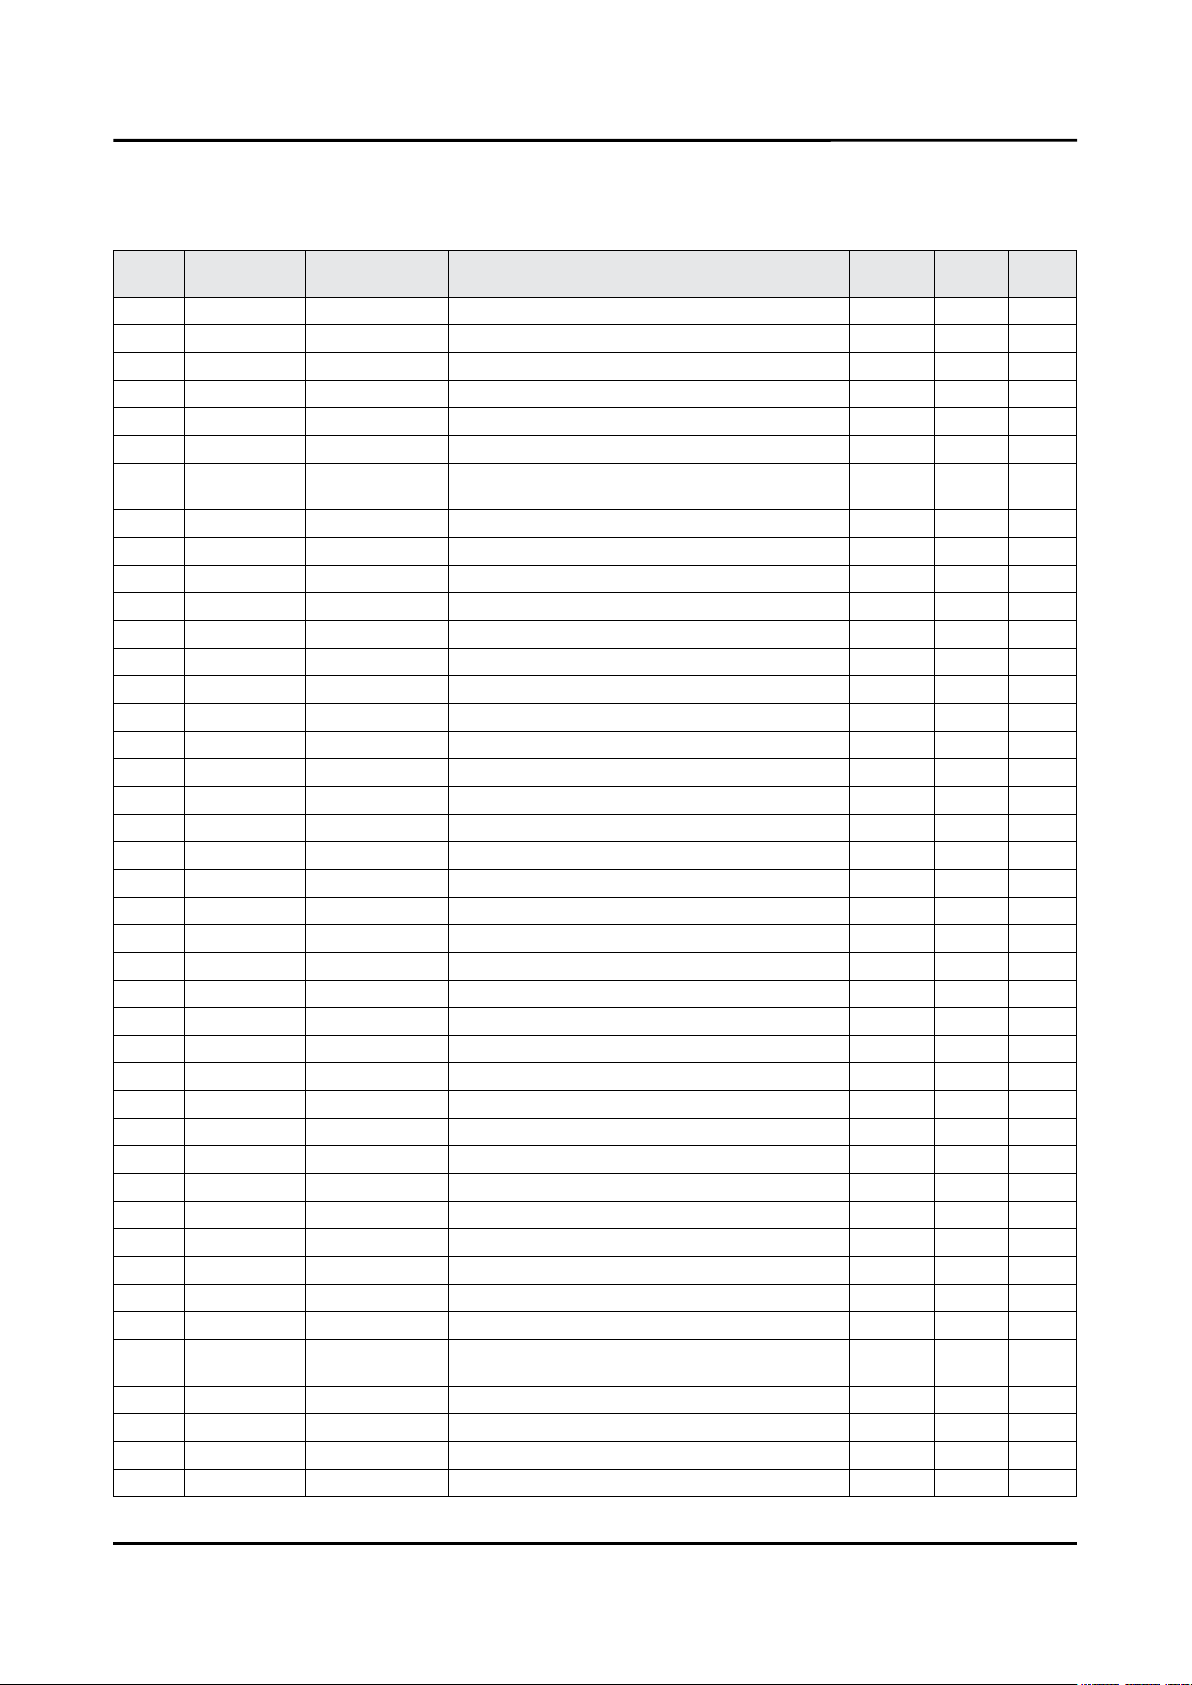
ANNEX. Exploded View & Part List
2-1. Electrical Parts List
Service Bom (SA: SERVICE AVAILABLE, SNA: SERVICE NOT AVAILABLE)
Level Location No. Code No. Description & Specication Q’ty SA/SNA Remark
UE40KU6100WXXH (FA01)
1 S001A BN90-06542K ASSY STAND;LED_J6K 1 SNA
0.2 SB04A BN96-35224A ASSY STAND P-BOTTOM;J5500 40",PC+ABS+GF2 1 SA
..3 0203-001499 TAPE-OPP;OPP,T0.04,W15,L50M,CLEAR,ROLL 0 SNA
..3 SCREW 6003-001001 SCREW-TAPTYPE;FH,+,-,B,M3,L8,ZPC(BLK),SW 2 SA
..3 BN61-07463B TAPE-DOUBLE FACE;ACRYL,T0.25,W7,CLEAR 0 SNA
..3
..3 BN61-11430A BRACKET-STAND BODY;HGI,T1.6,NATURAL,12.7 1 SNA
..3 AS080 BN63-04755H SHEET-PROTECTION COVER;52LC530,PE,T0.05, 1 SNA
..3 AS080 BN63-04755L SHEET-PROTECTION COVER;22LC350,PE,T0.05, 1 SNA
..3 BN63-13128E SHEET-PROTECTION COVER;LED,AL,T0.05,W13, 1 SNA
..3 BN63-13258A COVER-STAND TOP;Y15 F-LED J5100/5500 40" 1 SNA
...4 0103-009946 RESIN PC ABS;HM-1200,BLACK,BK0007,V-1 360 SNA
...4 BN68-00513D LABEL-RESIN;resin,-,ART,-,W10,L25,-,-,-, 2 SNA
..3 RF01 BN67-00398L FOOT-RUBBER;UH6K,Si,GRAY,W8,L15.5,T2 3 SNA
..3 RF01 BN67-00398P FOOT-RUBBER;UH6K,Si,GRAY,W8,L15.5,T2.5 4 SNA
..3 BN95-02140A ASSY COVER STAND SMT;J5500 STAND,40,LIGH 1 SNA
...4 0203-001269 TAPE-OPP;#301,T0.06,W75,L50000,NTR 0 SNA
...4 0204-007315 COATING;UVICHEM CVM92000(VOC),13~15,CLEA 0 SNA
...4 AA69-05637R PAD-DP SHEET;JUPITER,CB,W775,L505 1 SNA
...4 AA69-07416G MASTER BOX-DP;CB,DW,W325,H540 1 SNA
...4 AA69-07495E PAD-DP SHEET;CTV,CB,DW5,W775,L320,YEL 1 SNA
...4 AA69-07510A PAD-DP BOTTOM EPP;CTV,CB,W773,L506 1 SNA
...4 BN01-00337A TARGET-ALUMINIUM CY;Al,99.9%,1924mm, 132 0 SNA
...4 BN01-00340A TARGET-CHROMIUM CY;Cr,99.5%,1924mm, 132d 0 SNA
...4 BN63-13262A COVER-STAND DECORATION;J5100/5500 40",PC 1 SNA
....5 0103-005041 RESIN PC ABS;FR3200TV,901408,BK0008,1.2m 77 SNA
....5 BN63-07556C SHEET-PROTECTION COVER;TOC,PO,T0.068,W50 1 SNA
...4 BN68-03920A LABEL BOX;ALL,ART PAPER,W100,L75,W/W,100 1 SNA
...4 BN69-10617B PACKING SHEET;32" UH6300,HDPE/PE FOAM,PE 1 SNA
..3 T0382 BP61-00495C TAPE PET;ACRYL,PJT,ACRYL FOAM,T0.25,W30, 0 SNA
0.2 SG01A BN96-36255G ASSY GUIDE P-STAND;JU6670,V STAND,HIPS,B 1 SA
..3 SG03 BN61-11965A GUIDE-STAND;JU6740,PC+GF20%,MOLD,V-2,BK0 1 SA
...4 0103-007285 RESIN PC;HF3200H,K21294,BK0007,V-2 250 SNA
..3 BN68-05603A LABEL-E PASS;ART PAPER 90G,W/W 3 SNA
..3 BN96-35528A ASSY ACCESSORY-SCREW;JU7500,40 1 SNA
...4 6902-002474 BAG SCREW;LDPE,T0.05*,W70,L90,TRP,RECYCL 1 SNA
...4
1 R001A BN90-08089B ASSY COVER REAR;LED TV 6K 1 SNA
0.2 SCREW 6001-003074 SCREW-MACHINE;BH,+,M3,L6,ZPC(BLK),SWRCH1 14 SA
0.2 R001A BN96-37105R ASSY COVER P-REAR;40KU6300,PC+ABS,V-1,BK 1 SA
..3 R001 BN63-15769D COVER-REAR;40KU6300,PC+ABS,MOLD,V-1,BK00 1 SNA
HOLDER-
BOLT
HOLDER-
BOLT
BN61-09494D HOLDER-BOLT;KU6500,SWRCH18A,BLK,PRESS,B 2 SA
BN61-09494D HOLDER-BOLT;KU6500,SWRCH18A,BLK,PRESS,B 8 SA
Page 24
ANNEX-3
ANNEX. Exploded View & Part List
Level Location No. Code No. Description & Specication Q’ty SA/SNA Remark
...4 0103-005041 RESIN PC ABS;FR3200TV,901408,BK0008,1.2m 1805 SNA
..3 BN68-03518R LABEL-WARNING;55KU6000,PET,T0.125,W66.5, 1 SNA
..3 BN68-07838A INLAY-TERMINAL SIDE;55KU6000,PET,T0.125, 1 SNA
1 BN90-08339A ASSY W/I;UKU6300G 1 SNA
0.2 BN81-08159Z A/S PART SET-ELEC W/I;LED TV ELEC spec-C 1 SNA
0.2 BN81-11259U A/S PART SET-MECH W/I;UKU6300G,U40KG* 1 SNA
1 M0017 BN91-17245G ASSY CHASSIS;LED TV 6K 1 SNA
0.2 M0014 BN94-10769G ASSY PCB MAIN;LED 6K TV 1 SA
..3 AH63-02994A GASKET;DA-E750,Conductive Fabric,1,10,15 1 SNA
..3 BN62-00817A HEAT SINK-PS;55KU6000,A1050,T1.5,W115,L1 1 SNA
..3 BN63-15236A COVER-TERMINAL SIDE;55KU6000,HIPS,MOLD,H 1 SA
..3 BN97-10916A ASSY DRM;JAZZ-L,DVB,NagSam, MAC, HDCP, C 1 SNA
...4 BN46-00109H KEY CODE-CERTIFICATION;MAC,TV/AV,General 1 SNA
...4 BN46-00110P KEY CODE-CERTIFICATION;MIRACAST(HDCP2.2) 1 SNA
...4 BN46-00500A KEY CODE-CERTIFICATION;JAZZ-L,Nagra CSC 1 SNA
...4 BN46-00514A KEY CODE-CERTIFICATION;CI PLUS,Jazz M, J 1 SNA
..3 BN97-10959F ASSY SMD;LED 6K 1 SNA
...4 0202-001899 SOLDER-CREAM;M705-GRN360-K2-VT,20-38um,S 5 SNA
...4 DS01A 0401-001056 DIODE-SWITCHING;MMBD4148SE,100V,200mA,SO 1 SA
...4 0403-001164 DIODE-ZENER;MMSZ5232B,5.32~5.88V,500mW,S 1 SA
...4 0403-001783 DIODE-ZENER;BZB84-C6V2,5.8~6.6V,300mW,SO 3 SNA
...4 0403-001831 DIODE-ZENER;KDZ12B,12~13.5V,1000mW,SOD-1 1 SA
...4 0403-002014 DIODE-ZENER;KDZ16B,16.2~18.3V,1000mW,SOD 2 SNA
...4 0404-001307 DIODE-SCHOTTKY;SSC54,40V,5000mA,DO-214AB 1 SA
...4 0404-001404 DIODE-SCHOTTKY;BAT721C,40V,200mA,SOT-23, 4 SA
...4 0404-001640
...4 0404-001881 DIODE-SCHOTTKY;SS3040-HE,40V,3000mA,SOD- 1 SA
...4 0404-001953 DIODE-SCHOTTKY;MBRA340F-HAF,40V,3000mA,S 3 SA
...4 0406-001200 DIODE-TVS;RClamp0504F,6V,1MAV,TP 2 SA
...4 0406-001628 DIODE-TVS;AOZ8804ADI,6V,1MAV,5A,TP 1 SA
...4 0406-001635 DIODE-TVS;SMF5.0A,6.4V,6.7V,7V,200MAV,20 1 SA
...4 0406-001643 DIODE-TVS;1SMA33AT3G,36.7V,38.65V,40.6V, 1 SNA
...4 0501-000002 TR-SMALL SIGNAL;KSA812,PNP,150mW,SOT-23, 1 SNA
...4 0501-000445 TR-SMALL SIGNAL;KTC3875S-Y,NPN,150mW,SOT 7 SC
...4 0504-000126 TR-DIGITAL;KSR1101,NPN,200mW,4.7K/4.7K,S 1 SA
...4 0505-001844 FET-SILICON;SI4435DDY-T1-GE3,P,30V,-11.4 1 SA
...4 0505-002560 FET-SILICON;AO6415,P,20V,-3.3A,0.15ohm,1 1 SA
...4 0505-002598 FET-SILICON;AP2317GN,P,20V,-4.2A,0.052oh 1 SA
...4 0505-002660 FET-SILICON;Si2308BDS,N,60V,2.3A,0.156oh 1 SNA
...4 0505-002893 FET-SILICON;AO4801AS,P,30V,-5A,2W,SOIC-8 2 SA
...4 0505-003205 FET-SILICON;DMG4435SSS-13,P,30V,-7.3A,1. 1 SA
...4 0505-003391 FET-SILICON;AOD2922,N,100V,8A,140Mohm,18 1 SA
...4 0505-003397 FET-SILICON;2N7002K,N,60V,0.38A,1.19ohm, 1 SA
...4 0505-003507 FET-SILICON;AO3424,N,30V,3.8A,1.4W,SOT-2 5 SA
...4 0801-003603 IC-CMOS LOGIC;MC74LCX244MN2TWG,Octal buf 1 SA
...4 1001-001998 IC-ANALOG MULTIPLEX;NX3DV221GM,USB switc 2 SA
DIODE-SCHOTTKY;SS1060HEWS,60V,1000mA,S
OD
1 SA
Page 25
ANNEX-4
ANNEX. Exploded View & Part List
Level Location No. Code No. Description & Specication Q’ty SA/SNA Remark
...4 1103-001564 IC-EEPROM;S-24C512CI-J800,512Kbit,64Kx8, 1 SA
...4 1105-002704
...4 1201-000166 IC-OP AMP;LM358,SOP,ST,8P,150MIL,DUAL,10 1 SA
...4 1201-003690 IC-AUDIO AMP;TAS5747PHPR,QFP,48P,DUAL,PL 1 SA
...4 1203-004364 IC-VOL. DETECTOR;RT9818C-42PV,SOT-23,3P, 1 SA
...4 1203-008102 IC-POSI.FIXED REG.;S-13A1D12-E800,HSOP,8 1 SNA
...4 1203-008104 IC-POSI.FIXED REG.;S-13A1D18-E800,HSOP,8 1 SNA
...4 1203-008105 IC-POSI.FIXED REG.;S-13A1D33-E800,HSOP,8 1 SNA
...4 1203-008391 IC-DC/DC CONVERTER;AOZ1269QI-02,QFN-23L, 1 SA
...4 1203-008392 IC-VOL. DETECTOR;S-6414AAB-L800X,TSOT-23 1 SA
...4 1203-008454 IC-DC/DC CONVERTER;TPS56528,HSOP8,8,4,89 2 SA
...4 1203-008522 IC-DC/DC CONVERTER;SN1501019DDCR,SOT-23, 2 SNA
...4 1203-008551 IC-DC/DC CONVERTER;BM81244,QFN,40P,6x6mm 1 SNA
...4 1203-008655 IC-DC/DC CONVERTER;BM81249MWW,QFN,56,7x7 1 SA
...4 1203-008732 IC-DC/DC CONVERTER;SYD104ADC,TSOT-23,6,3 1 SA
...4 1203-008733 IC-DC/DC CONVERTER;AOZ1236QI-02,QFN,23,4 2 SA
...4 1204-003697 IC-DECODER;SDP1531,FCPBGA,1046P,31x31,GL 1 SA
...4 1205-004822 IC-SWITCH;TPS22965DSGR,SON,8P,2x2x0.75mm 3 SNA
...4 1205-005325 IC-REPEATER;PS8409QFN48GTR2-A1,QFN,48P,6 1 SA
...4 1205-005519 IC-SWITCH;ET20163,SOT23-5,5P,2.95x3.02mm 3 SA
...4 1404-001731 THERMISTOR-NTC;33Kohm,4050K,1mW/C,TP,1.6 2 SNA
...4 1405-001232 VARISTOR;6.4V,5.6Vdc,30A,1.6x0.8mm,TP,19 2 SNA
...4 1405-001271 VARISTOR;35V,20VDC,5A,1.0x0.5mm,TP,100V, 15 SA
...4 1405-001381 VARISTOR;11V,8VDC,30A,1.6x0.8mm,TP,25V,5 2 SA
...4 1405-001382 VARISTOR;24.5V,16VDC,120A,2.0x1.25mm,TP, 2 SA
...4 2007-000039 R-CHIP;0ohm,1%,1/10W,TP,1608 8 SA
...4 2007-000052 R-CHIP;10Kohm,1%,1/10W,TP,1608 2 SA
...4 2007-000070 R-CHIP;0ohm,5%,1/10W,TP,1608 12 SA
...4 2007-000084 R-CHIP;4.7Kohm,5%,1/10W,TP,1608 1 SA
...4 2007-000143 R-CHIP;4.7Kohm,5%,1/16W,TP,1005 17 SNA
...4 2007-000171 R-CHIP;0ohm,5%,1/16W,TP,1005 23 SNA
...4 2007-000173 R-CHIP;22ohm,5%,1/16W,TP,1005 3 SNA
...4 2007-000683 R-CHIP;3.3Kohm,1%,1/10W,TP,1608 1 SA
...4 2007-000701 R-CHIP;3.6Kohm,1%,1/10W,TP,1608 1 SNA
...4 2007-000736 R-CHIP;30Kohm,1%,1/10W,TP,1608 1 SA
...4 2007-000779 R-CHIP;33ohm,1%,1/10W,TP,1608 2 SA
...4 2007-000910 R-CHIP;43Kohm,1%,1/10W,TP,1608 1 SA
...4 2007-000932 R-CHIP;470ohm,5%,1/16W,TP,1005 3 SNA
...4 2007-001125 R-CHIP;68Kohm,1%,1/10W,TP,1608 2 SA
...4 2007-001288 R-CHIP;18ohm,5%,1/16W,TP,1005 4 SA
...4 2007-001292 R-CHIP;33ohm,5%,1/16W,TP,1005 28 SNA
...4 2007-001298 R-CHIP;51ohm,5%,1/16W,TP,1005 11 SNA
...4 2007-002899 R-CHIP;10ohm,1%,1/10W,TP,1608 10 SA
...4 2007-007107 R-CHIP;100Kohm,1%,1/16W,TP,1005 14 SNA
...4 2007-007131 R-CHIP;13Kohm,1%,1/16W,TP,1005 4 SA
...4 2007-007132 R-CHIP;15Kohm,1%,1/16W,TP,1005 2 SA
IC-DDR4 SDRAM;K4F8E304HB-MGCH,LPDDR4-
SDR
2 SA
Page 26
ANNEX-5
ANNEX. Exploded View & Part List
Level Location No. Code No. Description & Specication Q’ty SA/SNA Remark
...4 2007-007136 R-CHIP;4.7Kohm,1%,1/16W,TP,1005 66 SNA
...4 2007-007137 R-CHIP;1.2Kohm,1%,1/16W,TP,1005 3 SA
...4 2007-007138 R-CHIP;27Kohm,1%,1/16W,TP,1005 3 SNA
...4 2007-007139 R-CHIP;47Kohm,1%,1/16W,TP,1005,T0.35 13 SA
...4 2007-007142 R-CHIP;10Kohm,1%,1/16W,TP,1005 34 SNA
...4 2007-007231 R-CHIP;110Kohm,1%,1/10W,TP,1608 1 SA
...4 2007-007306 R-CHIP;100ohm,1%,1/16W,TP,1005 29 SNA
...4 2007-007309 R-CHIP;12Kohm,1%,1/16W,TP,1005,T0.35 1 SA
...4 2007-007310 R-CHIP;8.2Kohm,1%,1/16W,TP,1005 1 SA
...4 2007-007312 R-CHIP;20Kohm,1%,1/16W,TP,1005 11 SA
...4 2007-007313 R-CHIP;6.8Kohm,1%,1/16W,TP,1005 3 SA
...4 2007-007318 R-CHIP;1Kohm,1%,1/16W,TP,1005 13 SNA
...4 2007-007334 R-CHIP;200Kohm,1%,1/16W,TP,1005 5 SNA
...4 2007-007488 R-CHIP;75Kohm,1%,1/16W,TP,1005 5 SNA
...4 2007-007517 R-CHIP;240ohm,1%,1/16W,TP,1005 6 SNA
...4 2007-007520 R-CHIP;20ohm,1%,1/10W,TP,1608 9 SA
...4 2007-007528 R-CHIP;1.5Kohm,1%,1/16W,TP,1005 5 SA
...4 2007-007720 R-CHIP;300Kohm,1%,1/10W,TP,1608 1 SA
...4 2007-007723 R-CHIP;75Kohm,1%,1/10W,TP,1608 2 SA
...4 2007-007766 R-CHIP;2Kohm,1%,1/16W,TP,1005 22 SNA
...4 2007-007767 R-CHIP;200ohm,1%,1/16W,TP,1005 7 SA
...4 2007-007798 R-CHIP;10ohm,1%,1/16W,TP,1005 8 SA
...4 2007-007830 R-CHIP;14Kohm,1%,1/10W,TP,1608 1 SA
...4 2007-007847 R-CHIP;16Kohm,1%,1/10W,TP,1608 5 SA
...4 2007-007942 R-CHIP;1Mohm,1%,1/16W,TP,1005 1 SNA
...4 2007-007981 R-CHIP;180Kohm,1%,1/16W,TP,1005 1 SNA
...4 2007-008015 R-CHIP;75ohm,1%,1/16W,TP,1005 9 SNA
...4 2007-008263 R-CHIP;3Kohm,1%,1/16W,TP,1005 2 SA
...4 2007-008269 R-CHIP;51Kohm,1%,1/16W,TP,1005 3 SA
...4 2007-008298 R-CHIP;49.9ohm,1%,1/16W,TP,1005 4 SA
...4 2007-008391 R-CHIP;6.34Kohm,1%,1/16W,TP,1005 2 SA
...4 2007-008596 R-CHIP;0.1ohm,1%,1/4W,TP,3216 3 SC
...4 2007-008779 R-CHIP;0ohm,1%,1/16W,TP,1005 3 SA
...4 2007-009117 R-CHIP;49.9Kohm,1%,1/16W,TP,1005 1 SA
...4 2007-009322 R-CHIP;1.3Kohm,1%,1/16W,TP,1005 2 SA
...4 2007-009777 R-CHIP;4.99Kohm,1%,1/16W,TP,1005 2 SA
...4 2011-001261 R-NETWORK;33ohm,5%,1/16W,L,CHIP,8P,TP,2. 6 SA
...4 2011-001264 R-NETWORK;10ohm,5%,1/16W,L,CHIP,8P,TP,2. 8 SNA
...4 2011-001344 R-NETWORK;100ohm,5%,1/16W,L,CHIP,8P,TP,2 6 SA
...4 AD480 2203-000233 C-CER,CHIP;0.1nF,5%,50V,C0G,TP,1005 4 SA
...4 AD480 2203-000254 C-CER,CHIP;10nF,10%,16V,X7R,TP,1005 5 SA
...4 AD480 2203-000278 C-CER,CHIP;0.01nF,0.5pF,50V,C0G,TP,1005 2 SA
...4 AD480 2203-000359 C-CER,CHIP;0.15nF,5%,50V,C0G,TP,1005,0.5 3 SNA
...4 AD480 2203-000386 C-CER,CHIP;0.015nF,5%,50V,C0G,TP,1005 3 SA
...4 AD480 2203-000438 C-CER,CHIP;1nF,10%,50V,X7R,TP,1005 12 SA
...4 AD480 2203-000489 C-CER,CHIP;2.2nF,10%,50V,X7R,TP,1005 2 SA
...4 AD480 2203-000585 C-CER,CHIP;0.22nF,10%,50V,X7R,TP,1005 3 SA
Page 27
ANNEX-6
ANNEX. Exploded View & Part List
Level Location No. Code No. Description & Specication Q’ty SA/SNA Remark
...4 AD480 2203-000812 C-CER,CHIP;0.033nF,5%,50V,C0G,TP,1005 5 SA
...4 AD480 2203-000940 C-CER,CHIP;0.47nF,10%,50V,X7R,TP,1005 1 SA
...4 AD480 2203-002285 C-CER,CHIP;10nF,10%,50V,X7R,TP,1005 5 SNA
...4 AD480 2203-002398 C-CER,CHIP;22nF,10%,50V,X7R,TP,1608 1 SNA
...4 AD480 2203-005054 C-CER,CHIP;0.0047nF,0.25pF,50V,NP0,TP,10 2 SA
...4 AD480 2203-005083 C-CER,CHIP;220nF,10%,50V,X7R,TP,1608,0.8 6 SA
...4 AD480 2203-005249 C-CER,CHIP;100nF,10%,50V,X7R,TP,1608 4 SNA
...4 AD480 2203-005968 C-CER,CHIP;4.7nF,10%,50V,X7R,TP,1005,0.5 2 SNA
...4 AD480 2203-006048 C-CER,CHIP;100nF,10%,10V,X7R,TP,1005 8 SA
...4 AD480 2203-006126 C-CER,CHIP;47nF,10%,16V,X7R,TP,1005 3 SNA
...4 AD480 2203-006158 C-CER,CHIP;100nF,10%,16V,X7R,TP,1005,T0. 107 SNA
...4 AD480 2203-006324 C-CER,CHIP;2200nF,10%,10V,X5R,TP,1608 16 SA
...4 AD480 2203-006348 C-CER,CHIP;1000nF,10%,25V,X5R,TP,1608,0. 1 SA
...4 AD480 2203-006562 C-CER,CHIP;1000nF,10%,10V,X5R,TP,1005 27 SNA
...4 AD480 2203-006698 C-CER,CHIP;1000nF,10%,25V,X7R,TP,1608,0. 6 SNA
...4 AD480 2203-006824 C-CER,CHIP;4700nF,10%,10V,X5R,TP,1608 5 SNA
...4 AD480 2203-006838 C-CER,CHIP;2200nF,10%,6.3V,X5R,TP,1005 9 SA
...4 AD480 2203-006844 C-CER,CHIP;470nF,10%,10V,X5R,TP,1005 2 SA
...4 AD480 2203-006890 C-CER,CHIP;10000nF,20%,6.3V,X5R,TP,1608 29 SNA
...4 AD480 2203-007176 C-CER,CHIP;10000nF,10%,16V,X5R,TP,2012,1 19 SNA
...4 AD480 2203-007240 C-CER,CHIP;22000nF,20%,6.3V,X5R,TP,1608( 72 SA
...4 AD480 2203-007269 C-CER,CHIP;22000nF,20%,10V,X5R,TP,2012(2 13 SA
...4 AD480 2203-007270 C-CER,CHIP;10000nF,10%,10V,X5R,TP,1608,0 22 SNA
...4 AD480 2203-007306 C-CER,CHIP;10000nF,10%,25V,X5R,TP,2012,1 42 SNA
...4 AD480 2203-007544 C-CER,CHIP;100nF,10%,50V,X7R,TP,1005,T0. 37 SA
...4 AD480 2203-008315 C-CER,CHIP;22000nF,20%,25V,X5R,TP,2012,T 4 SA
...4 2402-001268 C-AL,SMD;100uF,20%,25V,WT,TP,8x6.3mm 1 SA
...4 2409-001240 C-ORGANIC,SMD;33uF,20%,25V,LR,TP,7343(1. 1 SA
...4 2409-001338 C-POLYMER ,CHIP;47uF,20%,6.3V,TP,3.2x1.6 1 SA
...4 2703-000213 INDUCTOR-SMD;470nH,10%,1.35Ohm,35mA,15,M 1 SA
...4 2703-001938 INDUCTOR-SMD;56nH,5%,1005,1.5Ohm,200mA,1 3 SA
...4 2703-003149 INDUCTOR-SMD;2.2uH,20%,0.055Ohm,3000mA,W 1 SA
...4 2703-003747 INDUCTOR-SMD;22uH,20%,6060,0.135ohm,1300 2 SA
...4 2703-003862 INDUCTOR-SMD;10uH,20%,6060,0.065ohm,1900 3 SA
...4 2703-003913 INDUCTOR-SMD;2.2uH,20%,2520,1.2T,0.116Oh 1 SNA
...4 2703-003937 INDUCTOR-SMD;1uH,20%,7.0x6.47x3.0mm,0.00 3 SA
...4 2703-004630 INDUCTOR-SMD;2.2uH,20%,5.0T,0.0025Ohm,66 1 SNA
...4 2703-004724 INDUCTOR-SMD;8.2uH,20%,4T,0.072Ohm,2300m 4 SA
...4 2703-005191 INDUCTOR-SMD;1.5uH,20%,6060,T4.5,0.02Ohm 1 SA
...4 2703-005193 INDUCTOR-SMD;2.2uH,20%,4.5,0.024Ohm,5100 2 SA
...4 2703-005376 INDUCTOR-SMD;10uH,20%,10x10.7mm,4.0T,0.0 1 SA
...4 2801-004021 CRYSTAL-SMD;24.576MHz,20ppm,28-AAN,12pF, 1 SA
...4 3301-001364 BEAD-SMD;1000ohm,1608,TP,1085ohm/108MHz, 4 SNA
...4 3301-002039 BEAD-SMD;26ohm,1608,TP 32 SA
...4 3601-001374 FUSE-SURFACE MOUNT;32V,5A,FAST-ACTING,PL 3 SA
...4 3601-001376 FUSE-SURFACE MOUNT;32V,3A,FAST-ACTING,Hi 2 SNA
...4 3701-001967 CONNECTOR-HDMI;19P,A,FEMALE,AU,0.5mm,BLK 3 SA
Page 28
ANNEX-7
ANNEX. Exploded View & Part List
Level Location No. Code No. Description & Specication Q’ty SA/SNA Remark
...4 3707-001103 CONNECTOR-OPTICAL;ANGLE,SPDIF,2.5PI 1 SA
...4 3708-003241 CONNECTOR-FPC/FFC/PIC;96P,0.5mm,SMD-A,AU 2 SNA
...4 3710-003908 CONNECTOR-SOCKET;64P,2R,0.5mm,SMD-S,AU,B 1 SA
...4 EH01 3711-007803 HEADER-BOARD TO CABLE;BOX,12P,1R,1.25mm, 1 SA
...4 EH01 3711-008131 HEADER-BOARD TO CABLE;BOX,4P,1R,2.5mm,AN 1 SA
...4 EH01 3711-008859 HEADER-BOARD TO CABLE;BOX,12P,2R,2mm,ANG 1 SA
...4 3711-009090 CONNECTOR-HEADER;BOX,16P,1R,1.25mm,SMD-A 1 SA
...4 3722-003199 JACK-MODULAR;8P/8C,Y,ANGLE,NONE,AU,1PORT 1 SA
...4 3722-003457 JACK-USB;4P/1C,NI,BLK,ANGLE,A,2.0,13.1x1 2 SA
...4 3722-003814 JACK-PHONE;1P/7C,NI/SN,YEL,ANGLE,3.5PI,1 1 SA
...4 JACK 3722-003873 JACK-PHONE;1P/7C,AU/SN,BLU,ANGLE,3.5PI,1 1 SA
...4 6302-001376 GASKET-SMD;,,CONDUCTIVE FABRIC,T14,W43,L 7 SNA
...4 BN40-00322C TUNER-DTV AIR CABLE;CDT-933T322-93,DVB-T 1 SA
...4 BN41-02528A PCB-MAIN;KU6000,FR-4,4L,1.6T,193x241mm,1 1 SNA
...4 CB07 BN61-13312B BRACKET-PCB;55KS8000,SK5,T0.3,13.7,11.4, 4 SNA
...4 BN97-10863B
....5 1107-002226 IC-NOR FLASH;W25Q40CLSSIP,4Mbit,SOIC,8P, 1 SA
...4 BN97-10865A ASSY MICOM-MAIN;T-JZL6DEUC,UWP60,KLM4G1F 1 SNA
....5 1107-002374 IC-EMMC;KLM4G1FEPD-B031,4Gbyte,BGA,153P, 1 SNA
...4 BN97-10918A ASSY MICOM;TCON,KU6k,W25Q80DVSSIG,1107-0 1 SNA
....5 1107-002339 IC-NOR FLASH;W25Q80DV,8Mbit,SOP,5.28x5.2 1 SNA
....5 BN46-00515A S/W MICOM;Jazz M-L,TCON F/W 1 SNA
..3 BN97-11364A ASSY MICOM;TCON DATA,KU6k,40-SDC-Curved, 1 SNA
...4 BN46-00544A S/W MICOM;K40A6U0C,SDC,40A6AU*WK,Curved 1 SNA
1 BN91-17319A ASSY SHIELD;LED TV 6K 1 SNA
0.2 SCREW 6001-003081
0.2 BN02-00102B TAPE-FILAMENT;FILAMENT,#8917,T0.15,W25,L 0 SNA
0.2 12P BN39-02025A
0.2 BN39-02030E LEAD CONNECTOR-BLU;BLU,UL21016,16P,80mm, 1 SA
0.2 EC13 BN39-02218A LEAD CONNECTOR-SUB ASSY;50KU6000,UL21016 1 SA
0.2 BN39-02220B LEAD CONNECTOR-SUB ASSY;50KU6300,UL21016 1 SA
0.2 P001A BN44-00806A DC VSS-PD BOARD;L40S6_FDY,AC/DC,139W,100 1 SA
0.2 WIFI BN59-01174D NETWORK-WLAN CLIENT;WIDT30Q,58x31.45x8.5 1 SA
0.2 BN61-14083A HOLDER-WIFI;40KU6300,ABS,MOLD,BK0007,HB 1 SNA
0.2 SP01A BN96-35009A ASSY SPEAKER P-FRONT;TV-SPK,JU6700,6ohm, 1 SA
0.2 JOG BN96-35345B ASSY BOARD P-FUNCTION JOG;JU7500,CT15SE8 1 SA
..3 AH240 BN61-11584A HOLDER-BUTTON;JU7500,ABS,MOLD,BK0007,HB 1 SNA
...4 0103-004609 RESIN ABS;HF-0680U,K21294,BK0007,HB,High 8 SNA
..3 AH297 BN63-11231B HOLDER-KNOB;HU7000,ABS,MOLD,BLACK,HB 1 SNA
..3 FK04 BN64-02406B BUTTON-FUNCTION;LED_HU7000,ABS,HB,BLACK, 1 SNA
0.2 FB10A BN96-39955B ASSY BOARD P-IR;KU6300,IR ASSY_KU6300 1 SA
0.2 BN96-40835A FFC CABLE;LED_KU6300,Fold,L700,96P,16Y M 1 SA
0.2 BN96-40836A FFC CABLE;LED_KU6300,Fold,L500,96P,16Y M 1 SA
1 BN92-19785F ASSY BOX;LED TV 6K 1 SNA
0.2 BH68-00662A LABEL BOX;ALL,ART PAPER,W60,L110,WHT,NO 1 SNA
ASSY MICOM-SUB;JMMICOM_EU_
TV,UWP60,W25Q4
SCREW-MACHINE;PWH,+,M3,L5,ZPC(WHT),SWR
CH
LEAD CONNECTOR-
POWER;UN40JU6400AFXZA,UL2
1 SNA
5 SA
1 SA
Page 29
ANNEX-8
ANNEX. Exploded View & Part List
Level Location No. Code No. Description & Specication Q’ty SA/SNA Remark
0.2 BN68-05640A LABEL BOX;ALL,ART PAPER,W110,L130,EUROPE 1 SNA
0.2 BN69-14074E BOX UNIT;40KU6100,CB,SW4,F1,L1126,W160,H 1 SNA
1 BN92-19809A ASSY P/MATERIAL;LED TV 6K 1 SNA
0.2 6902-001956 BAG ROLL;HDPE/PE FOAM,HDPE T0.018mm,T0.2 2 SNA
0.2 6902-002233 BAG AIR;LDPE,-,T0.2,W900,L1850,TRP,-,-,- 1 SNA
0.2 6922-000003 BAND;PP,T0.8,W18,L1650M,TRP,DA69-90145A 1 SNA
0.2 BN02-00319B TAPE-OPP;OPP,T0.05,W75,L800M,CLEAR,ROLL 3 SNA
0.2 BN68-02422B LABEL WARNING;ALL,ART PAPER,T0.05,W240,L 1 SNA
0.2 BN69-03982N PACKING ANGLE;ALL,PAPER,-,-,-,-,-,-,- 1 SNA
0.2 BN69-05418N WRAP;T0.017,750,2000000,2000000,750 0 SNA
0.2 BN69-06640E PAD-PACKING;TRUCK PAD,CB,-,,W410,L2500,, 1 SNA
0.2 BN69-06641A PAD-DP SHEET;PAD,CB,SW4,,W1130,L1060,,,, 1 SNA
0.2 BN69-11601A CUSHION-SET;JU6640,EPS,16.7g/l,WHT,40", 1 SNA
..3 0103-005099 RESIN EPS;BASF303,Natural,Natural 513 SNA
0.2 BN69-12198R PALLET-DP WOODEN;UE40J6300,WOOD,-,W1200, 1 SNA
1 BN92-20019B ASSY LABEL POP;LED TV 6K 1 SNA
0.2 BN68-07971A LABEL POP-HIGHLIGHT;KU6500,PET,T0.1,W90, 1 SNA
1 ACCE1 BN92-20192H ASSY ACCESSORY;LEDTV 6K 1 SNA
0.2 ACCE2 BN96-35677B ASSY ACCESSORY-CABLE;LED_J6K 1 SNA
..3 3709-001791 CONNECTOR-CARD SLOT;64P,0.5mm,SMD-A,AU,P 1 SA
..3 T0268 3903-001118 CBF-POWER CORD;DT,EU,Angle,2P(C7),250V,2 1 SA
..3 4301-000121 BATTERY-MN;1.5V,R03,10.5x44.5m,7.5g,AAA 2 SNA
..3 6902-001965 BAG PE;LDPE,BIOBASED,T0.05,W200,L300,TRP 1 SNA
..3 EC03 BN39-02189A GENDER CABLE;DC to RCA Cable,3P,L100,UL2 1 SA
..3 EC03 BN39-02190A GENDER CABLE;DC to RCA Cable,2P,L100,UL2 1 SA
..3 BN59-01247A REMOCON-TV;2016 TV,Samsung,44KEY,3V,KU60 1 SA
..3 T0527 BN68-00513A LABEL-E PASS;ALL MODEL,WW,YUPO,W50,L15,W 2 SNA
..3 EH03A BN96-36071D ASSY HOLDER P-RING;LED JU6700,JU650,W/W, 1 SNA
...4 6902-002497 BAG ZIPPER;LDPE,T0.05,W100,L250,TRP,RECY 1 SNA
...4 AH365 BN61-11938A HOLDER-WALL RING;Y15 JU6510,ABS,MOLD,BK0 4 SNA
....5 0103-004609 RESIN ABS;HF-0680U,K21294,BK0007,HB,High 40 SNA
0.2 ACCE4 BN96-35701G ASSY ACCESSORY-MANUAL;LED_KU6300 1 SNA
..3 6902-001964 BAG PE;LDPE,BIOBASED,T0.03,W200,L300,TRP 1 SNA
..3 BN68-03548J LEAFLET-WARRANTY;comm,Samsung,17Lang,Mid 1 SNA
..3 BN68-04972E
..3 BN68-07598A LEAFLET-FICHE;ALL,W/P,0 1 SNA
..3 BN68-07990E MANUAL USERS;KU6300,XH,W/P,EURO B5 1 SNA
1 BN92-20198J ASSY LABEL;LEDTV 6K 1 SNA
0.2 0203-001598 TAPE-FILAMENT;FILAMENT,#8915,T0.15,W12,L 0 SNA
0.2 BN68-06708G LABEL-RATING;Monitor,WW,PP,T0.161,W93,L7 1 SNA
0.2 BN68-07519A LABEL-ENERGY;ALL JORDAN,WW,PP,T0.135,W60 1 SNA
0.2 BN68-07991T LEAFLET-QUICK SETUP GUIDE;KU6300,EU,W/P, 1 SNA
1 BN95-02921A PRODUCT LCD-SDC;CY-WK040HGLV1V,KU6300,Ba 1 SA
0.2 SCREW 6001-003075 SCREW-MACHINE;BH,+,M3,L4,ZPC(WHT),SWRCH1 4 SA
0.2 SCREW 6001-003079 SCREW-MACHINE;CH,+,M3,L6,ZPC(BLK),SWRCH1 2 SA
0.2 AS080 BN63-07229A SHEET-PROTECTION COVER;rose70",PET,T0.05 1 SNA
LEAFLET-REGULATORY
GUIDE;ALL,SAMSUNG,W/W
1 SNA
Page 30
ANNEX-9
ANNEX. Exploded View & Part List
Level Location No. Code No. Description & Specication Q’ty SA/SNA Remark
0.2 BN68-05722A LABEL-E PASS;POLYPROPYLENE,NON-COATING 1 SNA
0.2 BN90-08263A ASSY MISC-BLU;Y16,LCM 1 SNA
..3 BN61-12158A DIFFUSER PLATE;15Y_J6.3K 40INCH_DIFFUSER 1 SNA
..3 BN61-13702A FRAME-MIDDLE TOP;40KU6300,TPV,HB,BK0008, 1 SNA
..3 BN61-13707A FRAME-MIDDLE LEFT RIGHT;40KU6300,TPV,HB, 2 SNA
..3 BN61-13712A FRAME-MIDDLE BOTTOM;40KU6300,TPV,HB,BK00 1 SNA
..3 BN61-14014A OPTICAL SHEET-REFLECTOR;CY-WK040HGLV1V,P 1 SNA
..3 BN63-14903A OPTICAL SHEET-COMPLEX;15Y_JU6.7K_40inch_ 1 SNA
..3 BN63-14909A OPTICAL SHEET-PROTECTION;15Y_JU6.7K_40in 1 SNA
..3 BN96-34791A ASSY LED BAR P;40" UHD_L_SDC,CEM3,view 5 SA
..3 BN96-34792A ASSY LED BAR P;40" UHD_R_SDC,CEM3,view 5 SA
..3 BN96-35764C ASSY CHASSIS REAR P;40KU6300,EGI-SECC 1 SNA
...4 0203-006897 TAPE-DOUBLE FACE;Si,T1,W10,L50,WHITE 1 SNA
...4 SCREW 6001-003075 SCREW-MACHINE;BH,+,M3,L4,ZPC(WHT),SWRCH1 1 SA
...4 BN02-00040C TAPE DOUBLE FACE;F-LED ALL,PET,T0.3,W3,L 2 SNA
...4 BN02-00102B TAPE-FILAMENT;FILAMENT,#8917,T0.15,W25,L 0 SNA
...4 BN02-00173C TAPE-POLY;PET,T0.05,W40,BLACK 0 SNA
...4 BN61-11508A SUPPORT-PLATE;Y15 LED,PC,V-2,CLEAR,OD-19 8 SNA
...4 BN61-11509A
...4 BN61-11553A FRAME-CHASSIS REAR LEFT RIGHT;Y15 7.5K S 2 SNA
...4 BN61-11554A FRAME-CHASSIS REAR TOP;Y15 7.5K SDC 40", 1 SNA
...4 BN61-11770A FRAME-CHASSIS REAR BOTTOM;Y15 7.5K SDC 4 1 SNA
...4 BN62-00690A INSULATOR-SMPS;JU7500,PC,BLACK,L226.6,W2 1 SNA
...4 BN63-14967A GASKET-EMI;GASKET,FABRIC,T8,W23,L25,BLAC 3 SNA
...4 CC04 BN64-02915B CHASSIS-REAR;40KU6300,EGI-SECC,PRESS,T0. 1 SNA
....5 CB20 BN61-11982B BRACKET-WALL;55KS7000,CR-SPCC,EXTRUSION, 4 SNA
...4 BN67-00338D SUPPORT-SOURCE PCB;SILICON,GRAY,T7,W10,L 2 SNA
...4 T0527 BN68-00513A LABEL-E PASS;ALL MODEL,WW,YUPO,W50,L15,W 1 SNA
...4 BN74-00053J TAPE-PAPER;PAPER,3M2307,T0.14,W25,L50M,W 0 SNA
...4 BN96-34707A ASSY PCB P-LED INTERFACE BOARD;40JU6400, 1 SNA
0.2 BN96-35608B ASSY COVER P-SOURCE PCB LEFT;40KU6300,EG 1 SNA
..3 BN60-00554R SPACER-SILICONE;Y15 VD,Si,L10,ID3,BLACK, 6 SNA
..3 BN62-00721B INSULATOR-SOURCE PCB;Y15 U7.5K,PC,BLACK, 2 SNA
..3 BN62-00722B INSULATOR-SOURCE PCB COVER LEFT;40KU6300 1 SNA
..3 BN63-13372A COVER-SOURCE PCB LEFT;Y15 LED 40",EGI-SE 1 SNA
0.2 BN96-35613B ASSY COVER P-SOURCE PCB RIGHT;40KU6300,E 1 SNA
..3 BN62-00721D
..3 BN63-13371A COVER-SOURCE PCB RIGHT;Y15 LED 40",EGI-S 1 SNA
...4 BN01-00130A STEEL;EGI-SECC,L62,0.6mm,440mm,62,SECC,A 278 SNA
0.2 BN96-35780L ASSY CHASSIS FRONT P;40KU6300,PC+ABS+MF1 1 SA
..3 BN60-01319B SPACER-CONDUCTIVE;CONDUCTIVE FABRIC,L17, 3 SNA
..3 BN60-01321A SPACER-CONDUCTIVE;Y15_LED,PE FOAM,L895,G 2 SNA
..3 BN60-01322A SPACER-CONDUCTIVE;Y15_LED,PE FOAM,L495,G 2 SNA
..3 CCM1 BN63-02183B SHEET-PROTECTION COVER;Rhcm,PE,T0.04,W15 3 SNA
..3 BN63-14373G SHEET-PROTECTION COVER;LED_JU7000,PO,T0. 1 SNA
..3 BN63-14373J SHEET-PROTECTION COVER;LED_JU7000,PO,T0. 1 SNA
HOLDER-SOURCE PCB;Y15
LED,ABS,MOLD,BLACK
INSULATOR-SOURCE PCB COVER
RIGHT;40KU630
6 SNA
1 SNA
Page 31
ANNEX. Exploded View & Part List
Level Location No. Code No. Description & Specication Q’ty SA/SNA Remark
..3 BN63-14373K SHEET-PROTECTION COVER;LED_JU7000,PO,T0. 1 SNA
..3 AC155 BN64-03026L CHASSIS-FRONT;40KU6300,PC+ABS+MF15%,V-1, 1 SNA
0.2 BN96-39247A ASSY OPEN CELL;LSF400FN06-L,16:9,0.4T 1 SNA
..3 BN81-12946A A/S-ADHESIVE ACF;ADHESIVE ACF,0201-00232 1 SNA
..3 BN81-12952A A/S-ADHESIVE SIL;ADHESIVE SIL,0201-00237 1 SNA
..3 BN81-12953A A/S-IC DRIVER SOURCE;IC DRIVER SOURCE,LJ 1 SNA
..3 BN81-13042A A/S-POLARIZER CF;POLARIZER CF,LJ01-10786 1 SNA
..3 BN81-13043A A/S-POLARIZER TFT;POLARIZER TFT,LJ01-107 1 SNA
..3 BN81-13046A A/S-SOURCE PCB LEFT;SOURCE PCB LEFT,LJ94 1 SNA
..3 BN81-13047A A/S-SOURCE PCB RIGHT;SOURCE PCB RIGHT,LJ 1 SNA
ANNEX-10
Page 32
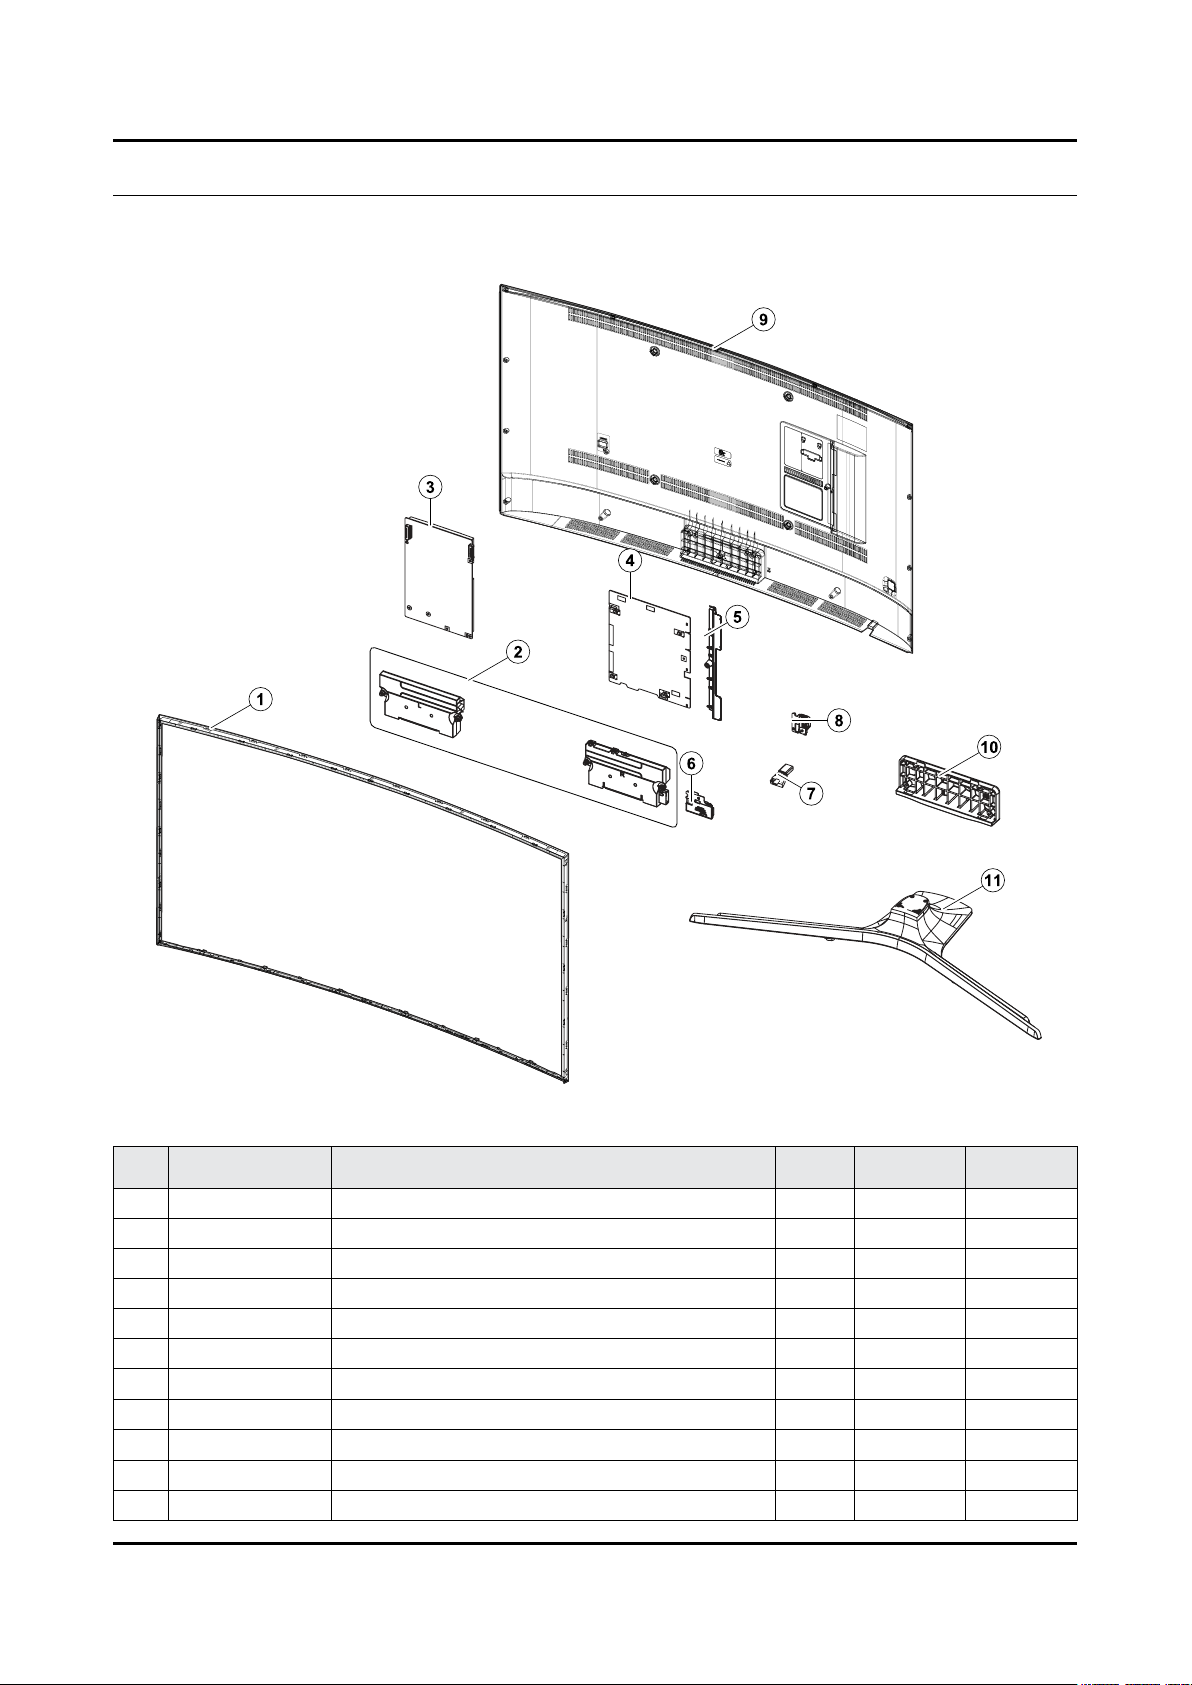
ANNEX. Exploded View & Part List
ANNEX. Exploded View & Part List [UE55KU6100WXXH AA01]
1-1. Exploded View
1-1-1. Parts List
No. Code No. Description & Specication Q’ty SA/SNA Remark
1 BN96-40434D ASSY COVER P-REAR; 55KU6300,PC+ABS+GF15 1 SA
2 BN96-35008A ASSY SPEAKER P-FRONT; TV-SPK,JU6700,6ohm, 1 SA
3 BN44-00807A DC VSS-PD BOARD; L55S6_FHS,AC/DC,203W,100 1 SA
4 BN94-10827E ASSY PCB MAIN; LED 6K TV 1 SA
5 BN63-15236A COVER-TERMINAL SIDE; 55KU6000,HIPS,MOLD,H 1 SA
6 BN59-01174D NETWORK-WLAN CLIENT; WIDT30Q,58x31.45x8.5 1 SA
7 BN96-39955B ASSY BOARD P-IR; KU6300,IR ASSY_KU6300 1 SA
8 BN96-35345B ASSY BOARD P-FUNCTION JOG; JU7500,CT15S 1 SA
9 BN96-35782G ASSY CHASSIS FRONT P; 55KU6300,PC+ABS+MF 1 SA
10 BN96-36255G ASSY GUIDE P-STAND; JU6670,V STAND,HIPS,B 1 SA
11 BN96-38964A ASSY STAND P-BOTTOM; J5500 48,PC+ABS+GF20 1 SA
ANNEX-1
Page 33
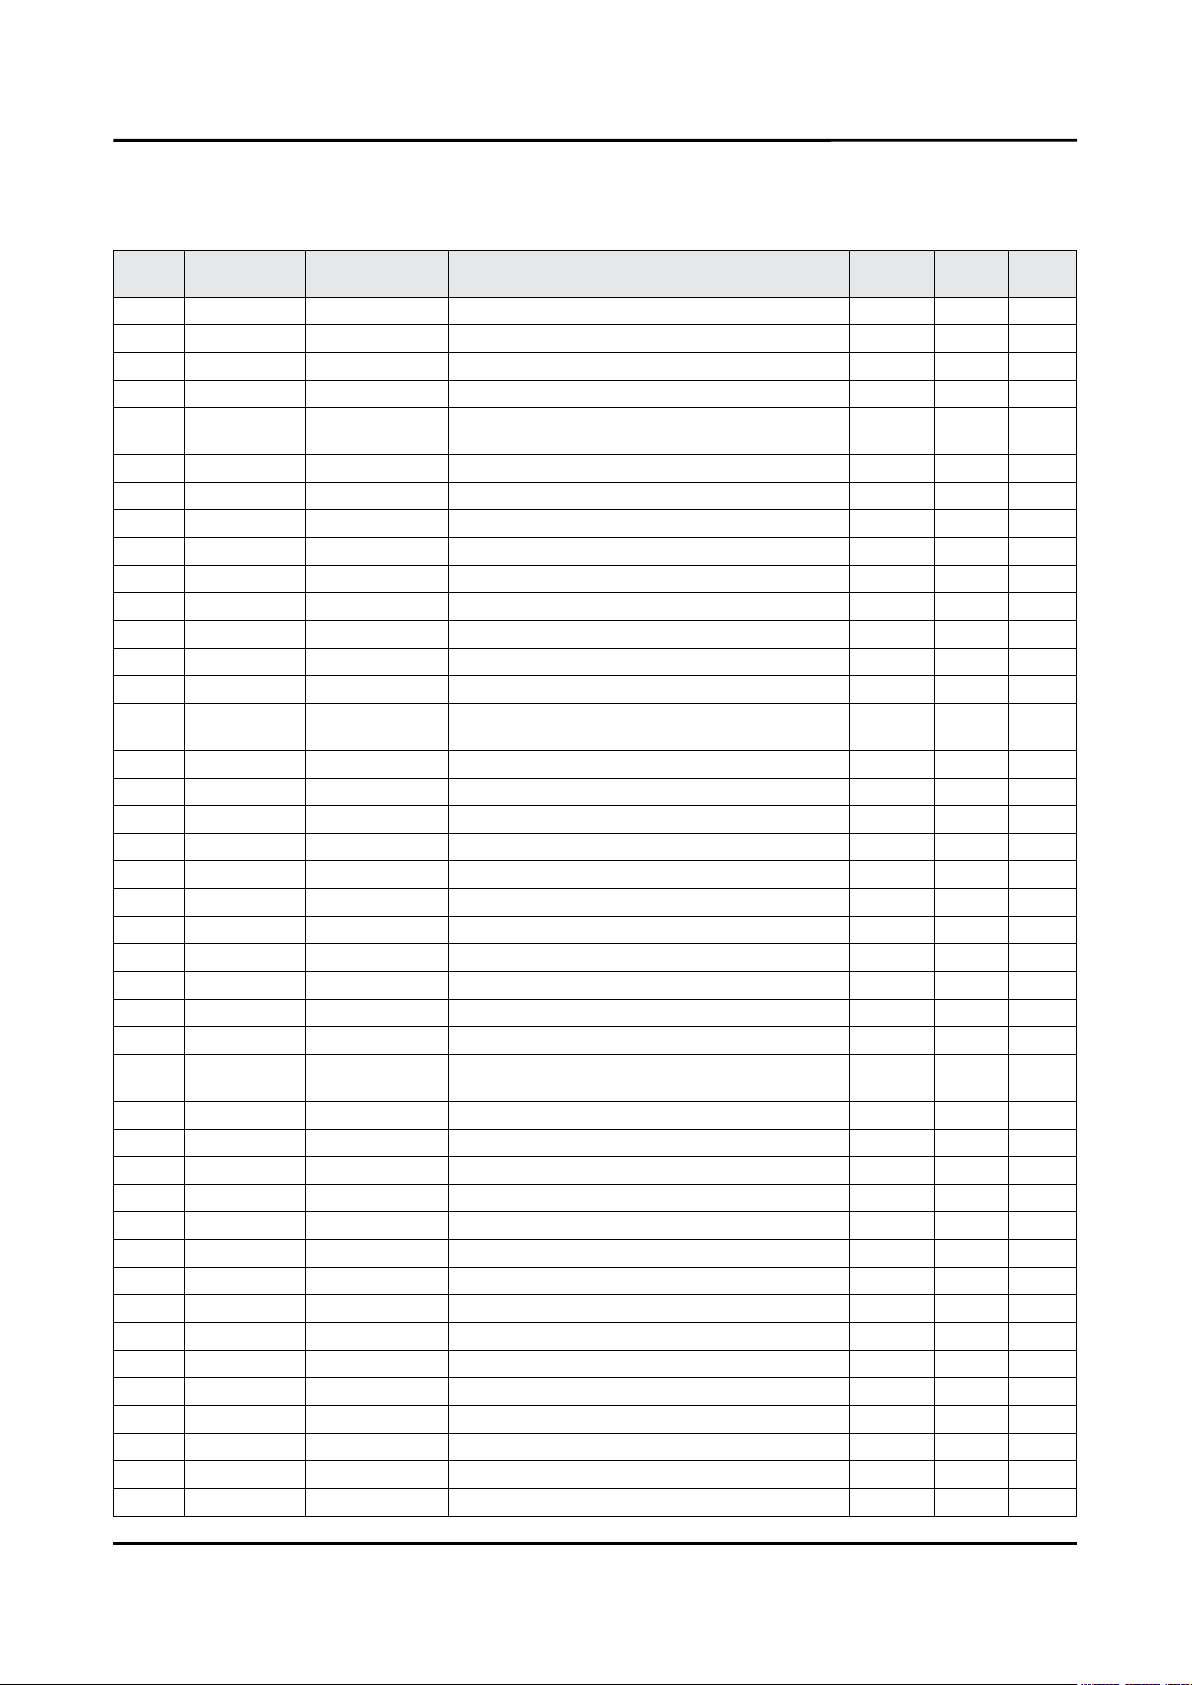
ANNEX-2
ANNEX. Exploded View & Part List
2-1. Electrical Parts List
Service Bom (SA: SERVICE AVAILABLE, SNA: SERVICE NOT AVAILABLE)
Level Location No. Code No. Description & Specication Q’ty SA/SNA Remark
UE55KU6100WXXH (AA01)
1 R001A BN90-08282C ASSY COVER REAR;LEDTV 6K 1 SNA
0.2 SCREW 6001-003074 SCREW-MACHINE;BH,+,M3,L6,ZPC(BLK),SWRCH1 17 SA
0.2 R001A BN96-40434D ASSY COVER P-REAR;55KU6300,PC+ABS+GF15%, 1 SA
..3 R001 BN63-15774A
...4 0103-010275 RESIN PC ABS;235GNH15/6919H,Black,BK0007 3287 SNA
..3 BN68-03518R LABEL-STICKER CI SLOT;55KU6000,PET,T0.12 1 SNA
..3 BN68-07838A INLAY-TERMINAL SIDE;55KU6000,PET,T0.125, 1 SNA
1 S001A BN90-08286A ASSY STAND;LEDTV 6K 1 SNA
0.2 SG01A BN96-36255G ASSY GUIDE P-STAND;JU6670,V STAND,HIPS,B 1 SA
..3 SG03 BN61-11965A GUIDE-STAND;JU6740,PC+GF20%,MOLD,V-2,BK0 1 SA
...4 0103-007285 RESIN PC;HF3200H,K21294,BK0007,V-2 250 SNA
..3 BN96-35528A ASSY ACCESSORY-SCREW;JU7500,40 1 SNA
...4 6902-002474 BAG SCREW;LDPE,T0.05*,W70,L90,TRP,RECYCL 1 SNA
...4
0.2 SB04A BN96-38964A ASSY STAND P-BOTTOM;J5500 48,PC+ABS+GF20 1 SA
..3 0203-001499 TAPE-OPP;OPP,T0.04,W15,N/A,CLEAR,ROLL 0 SNA
..3 SCREW 6003-001001 SCREW-TAPTYPE;FH,+,-,B,M3,L8,ZPC(BLK),SW 2 SA
..3 SCREW 6003-001239 SCREW-TAPTYPE;FH,+,B,M4,L10,ZPC(WHT),SWR 4 SA
..3 SCREW 6003-001315 SCREW-TAPTYPE;BH,+,B,M4,L20,ZPC(WHT),SWR 4 SNA
..3 BN61-07463B TAPE-DOUBLE FACE;ACRYL,T0.25,W7,CLEAR 0 SNA
..3 BN61-11431B BRACKET-STAND BODY;Y15 F-LED J5100/5500 1 SNA
..3 BN61-13134A BRACKET-STAND BOTTOM;48J5500,HGI,T2 1 SNA
..3 AS080 BN63-04755H SHEET-PROTECTION COVER;52LC530,PE,T0.05, 1 SNA
..3 AS080 BN63-04755L SHEET-PROTECTION COVER;22LC350,PE,T0.05, 1 SNA
..3 BN63-13128E SHEET-PROTECTION COVER;LED,AL,T0.05,W13, 1 SNA
..3 BN63-13259E
...4 0103-009946 RESIN PC ABS;HM-1200,BLACK,BK0007,V-1 360 SNA
...4 BN68-00513D LABEL-RESIN;resin,-,ART,-,W10,L25,-,-,-, 2 SNA
..3 RF01 BN67-00327M FOOT-RUBBER;STAND,Si,GRAY,W10,L10,T1.5 2 SNA
..3 RF01 BN67-00398P FOOT-RUBBER;UH6K,Si,GRAY,W8,L15.5,T2.5 5 SNA
..3 BN68-05603A LABEL-E PASS;ART PAPER 90G,W/W 3 SNA
..3 BN95-02141A ASSY COVER STAND SMT;J5500 STAND,48",LIG 1 SA
...4 0203-001269 TAPE-OPP;OPP,#301,T0.06,W75,L50M,CLEAR 0 SNA
...4 0204-007315 COATING;UVICHEM CVM92000(VOC),13~15,CLEA 0 SNA
...4 AA69-07323C PACKING-SHEET SMT;HDPE,PE FOAM,T0.015,T1 1 SNA
...4 AA69-07325Q PAD-DP SHEET;CTV,CB,DW,W860,L520,YEL 1 SNA
...4 AA69-07416E MASTER BOX-DP;CB,DW,W325,H550 1 SNA
...4 AA69-07495D PAD-DP SHEET;CTV,CB,DW5,W860,L320,YEL 1 SNA
...4 AA69-07509A PAD-DP BOTTOM EPP;CTV,CB,W859,L520 1 SNA
...4 BN01-00337A TARGET-ALUMINIUM CY;Al,99.9%,1924mm, 132 0 SNA
...4 BN01-00340A TARGET-CHROMIUM CY;Cr,99.5%,1924mm, 132d 0 SNA
HOLDER-
BOLT
BN61-09494D HOLDER-BOLT;KU6500,SWRCH18A,BLK,PRESS,B 8 SA
COVER-REAR;55KU6300,PC+ABS+GF15%,MOLD
,V-
COVER-STAND TOP;LED_
J5500,PC+ABS+GF20%,M
1 SNA
1 SNA
Page 34
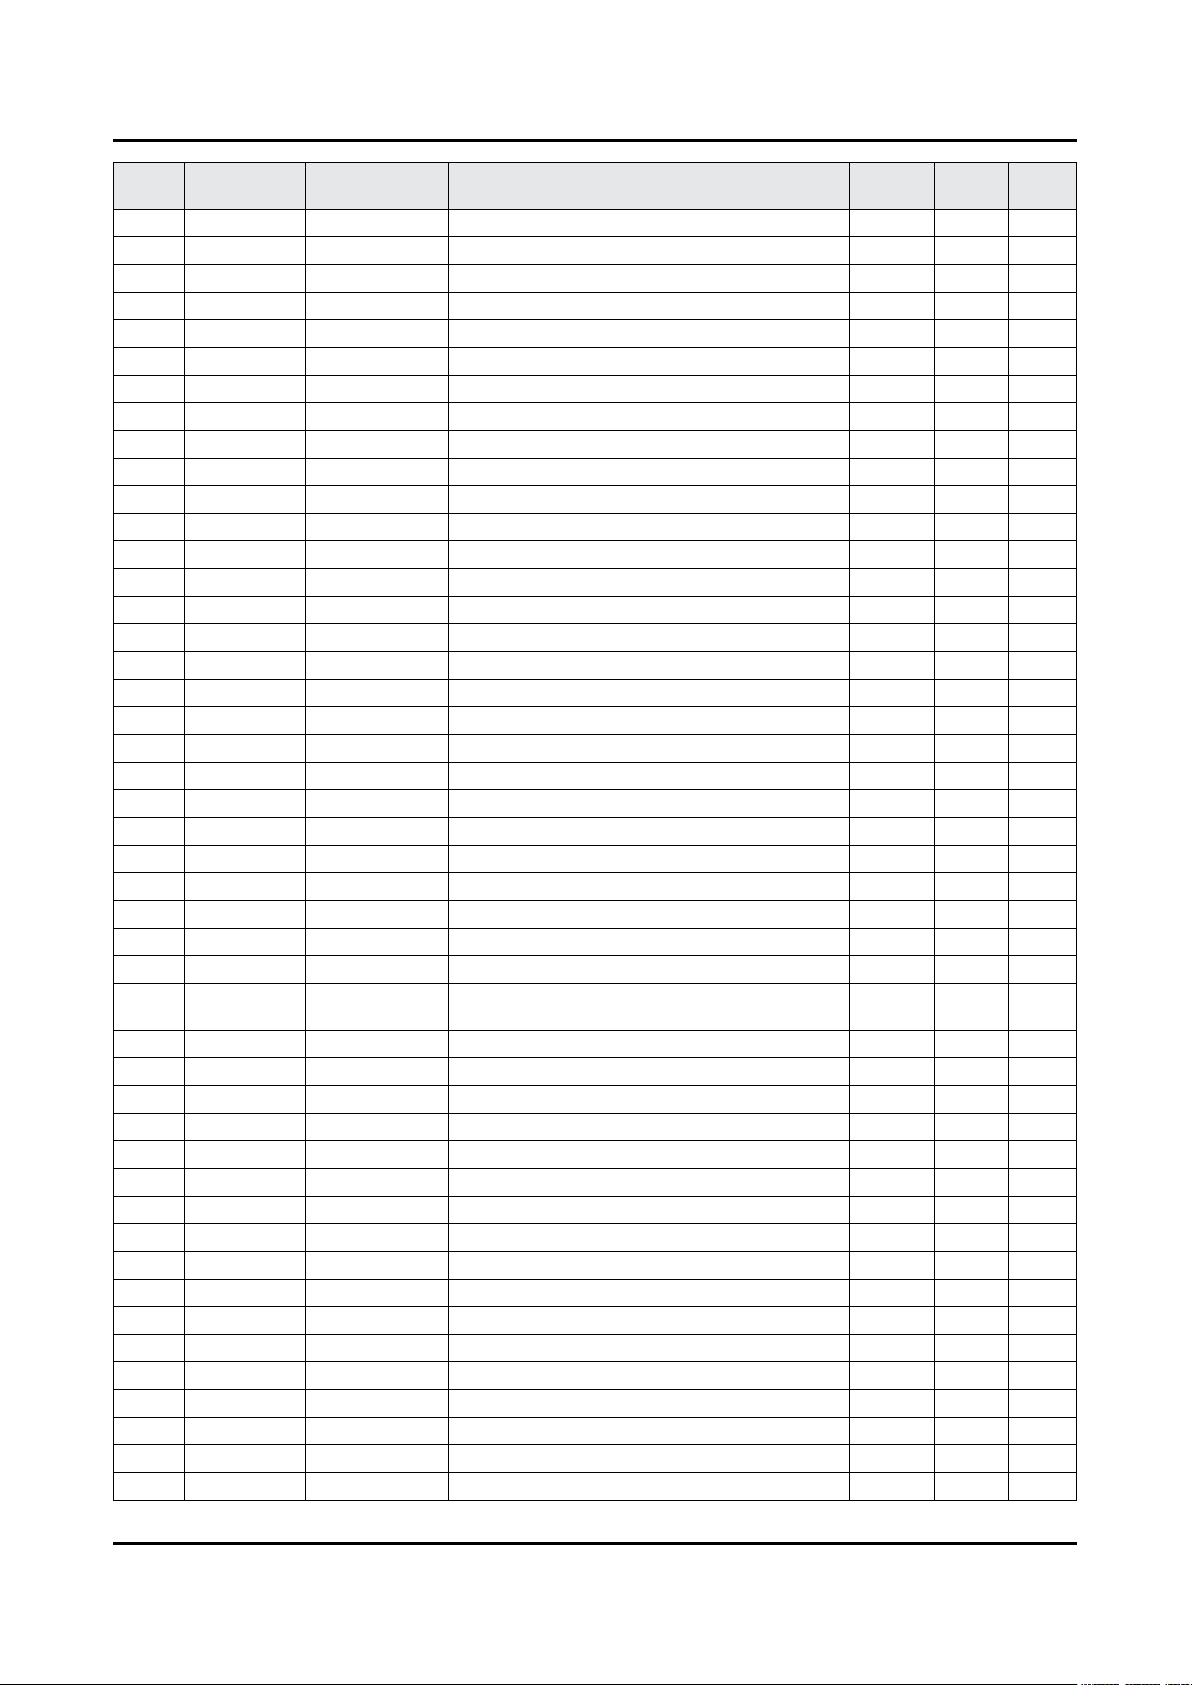
ANNEX-3
ANNEX. Exploded View & Part List
Level Location No. Code No. Description & Specication Q’ty SA/SNA Remark
...4 BN63-13263A COVER-STAND DECORATION;J5100/5500 48",PC 1 SNA
....5 0103-005041 RESIN PC ABS;FR3200TV,901408,BK0008,1.2m 85 SNA
....5 BN63-07556C SHEET-PROTECTION COVER;TOC,PO,T0.068,W50 1 SNA
...4 BN68-03920A LABEL BOX;ALL,ART PAPER,W100,L75,W/W,100 1 SNA
..3 T0382 BP61-00495C TAPE SINGLE FACE;ACRYL,PJT,ACRYL FOAM,T0 0 SNA
1 BN90-08338A ASSY W/I;UKU6300G 1 SNA
0.2 BN81-08159Z A/S PART SET-ELEC W/I;LED TV ELEC spec-C 1 SNA
0.2 BN81-11259X A/S PART SET-MECH W/I;UKU6300G,U55KG* 1 SNA
1 M0017 BN91-17362E ASSY CHASSIS;LED TV 6K 1 SNA
0.2 M0014 BN94-10827E ASSY PCB MAIN;LED 6K TV 1 SA
..3 AH63-02994A GASKET;DA-E750,Conductive Fabric,1,10,15 1 SNA
..3 BN62-00817A HEAT SINK-PS;55KU6000,A1050,T1.5,W115,L1 1 SNA
..3 BN63-15236A COVER-TERMINAL SIDE;55KU6000,HIPS,MOLD,H 1 SA
..3 BN97-10916A ASSY DRM;JAZZ-L,DVB,NagSam, MAC, HDCP, C 1 SNA
...4 BN46-00109H KEY CODE-CERTIFICATION;MAC,TV/AV,General 1 SNA
...4 BN46-00110P KEY CODE-CERTIFICATION;MIRACAST(HDCP2.2) 1 SNA
...4 BN46-00500A KEY CODE-CERTIFICATION;JAZZ-L,Nagra CSC 1 SNA
...4 BN46-00514A KEY CODE-CERTIFICATION;CI PLUS,Jazz M, J 1 SNA
..3 BN97-10984E ASSY SMD;LED 6K 1 SNA
...4 0202-001899 SOLDER-CREAM;M705-GRN360-K2-VT,20-38um,S 5 SNA
...4 DS01A 0401-001056 DIODE-SWITCHING;MMBD4148SE,100V,200mA,SO 1 SA
...4 0402-000511 DIODE-SCHOTTKY;SS14,40V,1000mA,DO-214AC, 1 SNA
...4 0403-001164 DIODE-ZENER;MMSZ5232B,5.32~5.88V,500mW,S 1 SA
...4 0403-001783 DIODE-ZENER;BZB84-C6V2,5.8~6.6V,300mW,SO 3 SNA
...4 0403-001831 DIODE-ZENER;KDZ12B,12~13.5V,1000mW,SOD-1 1 SA
...4 0403-002014 DIODE-ZENER;KDZ16B,16.2~18.3V,1000mW,SOD 2 SNA
...4 0404-001307 DIODE-SCHOTTKY;SSC54,40V,5000mA,DO-214AB 1 SA
...4 0404-001404 DIODE-SCHOTTKY;BAT721C,40V,200mA,SOT-23, 4 SA
...4 0404-001640
...4 0404-001881 DIODE-SCHOTTKY;SS3040-HE,40V,3000mA,SOD- 1 SA
...4 0404-001953 DIODE-SCHOTTKY;MBRA340F-HAF,40V,3000mA,S 3 SA
...4 0406-001200 DIODE-TVS;RClamp0504F,6V,1MAV,TP 2 SA
...4 0406-001628 DIODE-TVS;AOZ8804ADI,6V,1MAV,5A,TP 1 SA
...4 0406-001635 DIODE-TVS;SMF5.0A,6.4V,6.7V,7V,200MAV,20 1 SA
...4 0406-001643 DIODE-TVS;1SMA33AT3G,36.7V,38.65V,40.6V, 1 SNA
...4 0406-001718 DIODE-TVS;SMF36A,40V,44.2V,3.8MAV,1.25VP 2 SA
...4 0501-000002 TR-SMALL SIGNAL;KSA812,PNP,150mW,SOT-23, 1 SNA
...4 0501-000445 TR-SMALL SIGNAL;KTC3875S-Y,NPN,150mW,SOT 7 SC
...4 0504-000126 TR-DIGITAL;KSR1101,NPN,200mW,4.7K/4.7K,S 1 SA
...4 0505-001844 FET-SILICON;SI4435DDY-T1-GE3,P,30V,-11.4 1 SA
...4 0505-002560 FET-SILICON;AO6415,P,20V,-3.3A,0.15ohm,1 1 SA
...4 0505-002598 FET-SILICON;AP2317GN,P,20V,-4.2A,0.052oh 1 SA
...4 0505-002660 FET-SILICON;Si2308BDS,N,60V,2.3A,0.156oh 1 SNA
...4 0505-002790 FET-SILICON;ZXMP6A17G,P,60V,-4.3A,0.190o 1 SA
...4 0505-002893 FET-SILICON;AO4801AS,P,30V,-5A,2W,SOIC-8 2 SA
...4 0505-003205 FET-SILICON;DMG4435SSS-13,P,30V,-7.3A,1. 1 SA
DIODE-SCHOTTKY;SS1060HEWS,60V,1000mA,S
OD
1 SA
Page 35
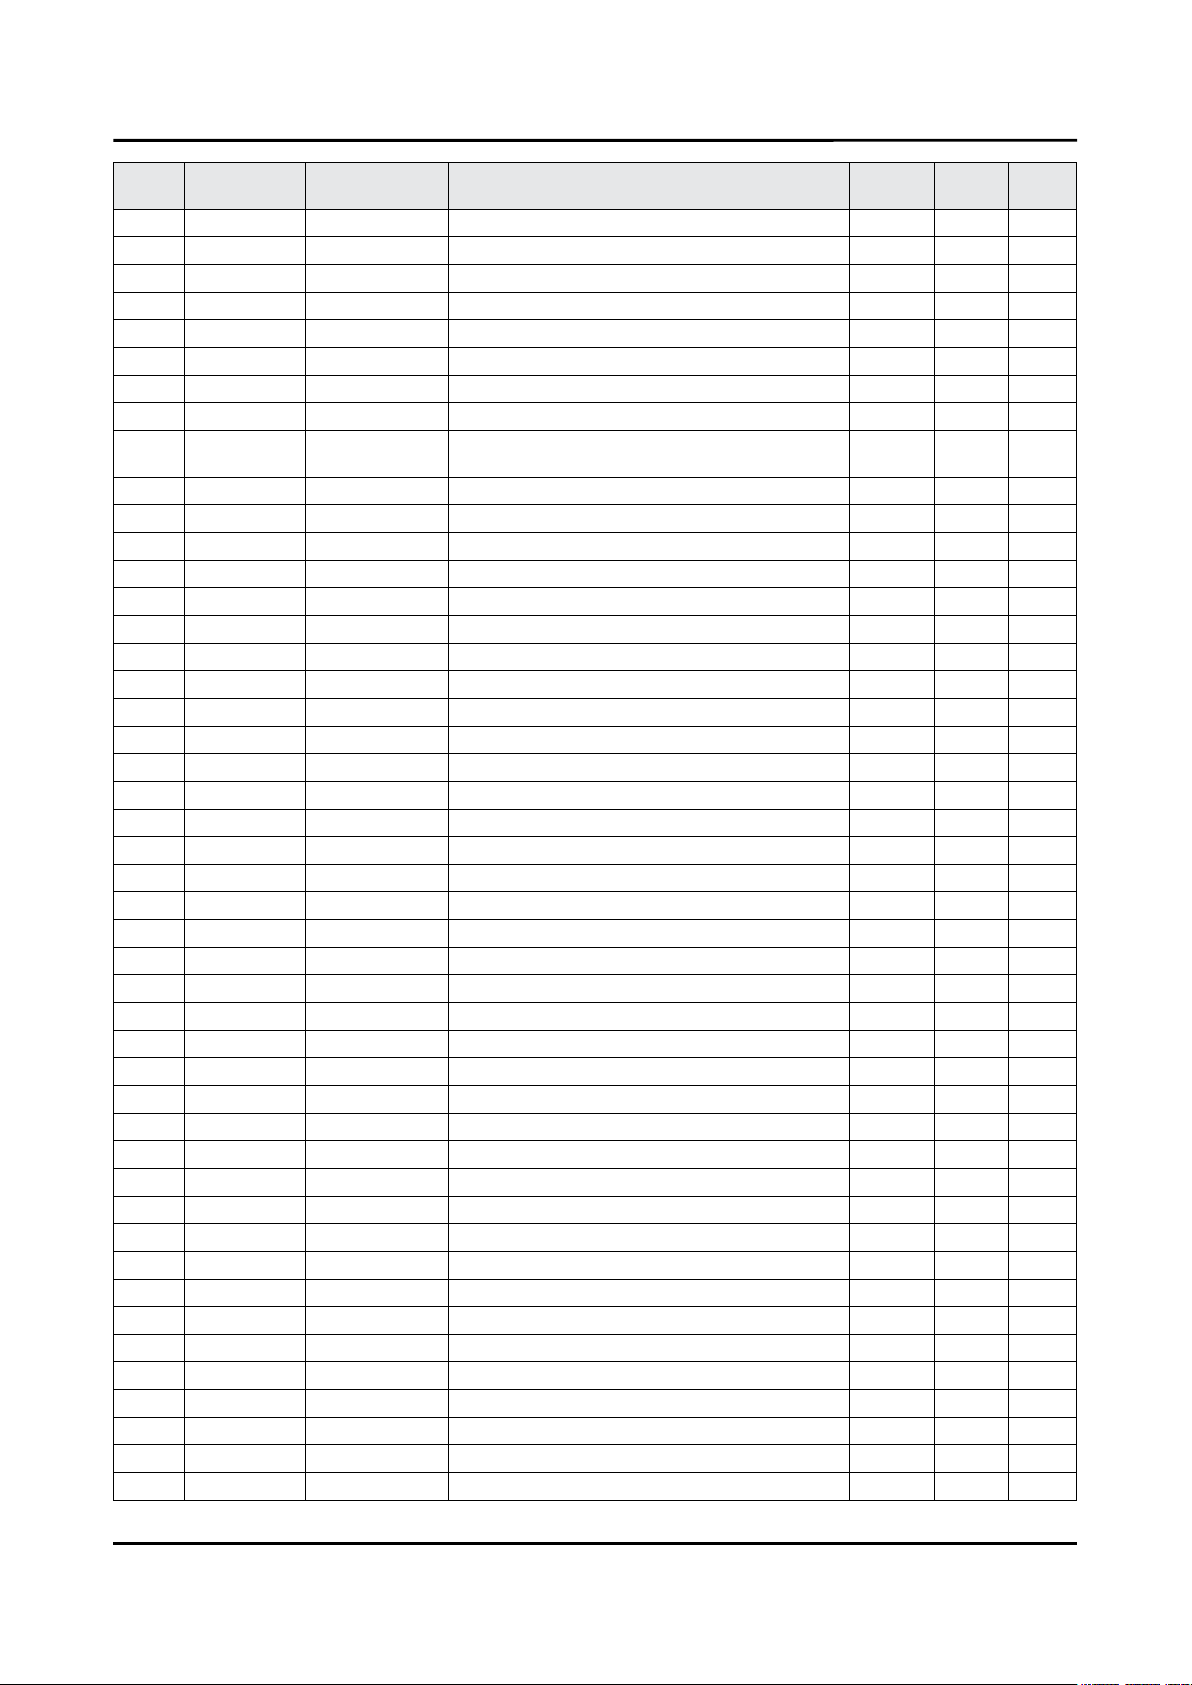
ANNEX-4
ANNEX. Exploded View & Part List
Level Location No. Code No. Description & Specication Q’ty SA/SNA Remark
...4 0505-003224 FET-SILICON;AO6405,P,30V,-5A,0.052ohm,2W 1 SA
...4 0505-003391 FET-SILICON;AOD2922,N,100V,8A,140Mohm,18 1 SA
...4 0505-003397 FET-SILICON;2N7002K,N,60V,0.38A,1.19ohm, 1 SA
...4 0505-003507 FET-SILICON;AO3424,N,30V,3.8A,1.4W,SOT-2 5 SA
...4 0801-003603 IC-CMOS LOGIC;MC74LCX244MN2TWG,Octal buf 1 SA
...4 1001-001998 IC-ANALOG MULTIPLEX;NX3DV221GM,USB switc 2 SA
...4 1003-002786 IC-LEVEL DRIVER;AUO-S302.19,TQFN,32P,4mm 1 SA
...4 1103-001564 IC-EEPROM;S-24C512CI-J800,512Kbit,64Kx8, 1 SA
...4 1105-002704
...4 1201-000166 IC-OP AMP;LM358,SOP,ST,8P,150MIL,DUAL,10 1 SA
...4 1201-003690 IC-AUDIO AMP;TAS5747PHPR,QFP,48P,DUAL,PL 1 SA
...4 1203-004364 IC-VOL. DETECTOR;RT9818C-42PV,SOT-23,3P, 1 SA
...4 1203-008102 IC-POSI.FIXED REG.;S-13A1D12-E800,HSOP,8 1 SNA
...4 1203-008104 IC-POSI.FIXED REG.;S-13A1D18-E800,HSOP,8 1 SNA
...4 1203-008105 IC-POSI.FIXED REG.;S-13A1D33-E800,HSOP,8 1 SNA
...4 1203-008391 IC-DC/DC CONVERTER;AOZ1269QI-02,QFN-23L, 1 SA
...4 1203-008392 IC-VOL. DETECTOR;S-6414AAB-L800X,TSOT-23 1 SA
...4 1203-008454 IC-DC/DC CONVERTER;TPS56528,HSOP8,8,4,89 2 SA
...4 1203-008522 IC-DC/DC CONVERTER;SN1501019DDCR,SOT-23, 2 SNA
...4 1203-008551 IC-DC/DC CONVERTER;BM81244,QFN,40P,6x6mm 1 SNA
...4 1203-008655 IC-DC/DC CONVERTER;BM81249MWW,QFN,56,7x7 1 SA
...4 1203-008725 IC-POSI.ADJUST REG.;SC4508A,MLPQ,12,4x4m 1 SA
...4 1203-008732 IC-DC/DC CONVERTER;SYD104ADC,TSOT-23,6,3 1 SA
...4 1203-008733 IC-DC/DC CONVERTER;AOZ1236QI-02,QFN,23,4 2 SA
...4 1204-003697 IC-DECODER;SDP1531,FCPBGA,1046P,31x31,GL 1 SA
...4 1205-004822 IC-SWITCH;TPS22965DSGR,SON,8P,2x2x0.75mm 3 SNA
...4 1205-005325 IC-REPEATER;PS8409QFN48GTR2-A1,QFN,48P,6 1 SA
...4 1205-005519 IC-SWITCH;ET20163,SOT23-5,5P,2.95x3.02mm 3 SA
...4 1404-001731 THERMISTOR-NTC;33Kohm,4050K,1mW/C,TP,1.6 2 SNA
...4 1405-001232 VARISTOR;6.4V,5.6VDC,30A,1608,TP,19V,200 2 SNA
...4 1405-001271 VARISTOR;35V,20VDC,5A,1005,TP,100V,10pF 15 SA
...4 1405-001381 VARISTOR;11V,8VDC,30A,1608,TP,25V,500pF 2 SA
...4 1405-001382 VARISTOR;24.5V,16VDC,120A,2012,TP,42V,40 2 SA
...4 2007-000029 R-CHIP;0ohm,5%,1/8W,TP,2012 1 SC
...4 2007-000033 R-CHIP;0ohm,5%,1/4W,TP,3216 1 SA
...4 2007-000039 R-CHIP;0ohm,1%,1/10W,TP,1608 8 SA
...4 2007-000043 R-CHIP;1Kohm,1%,1/10W,TP,1608 1 SA
...4 2007-000052 R-CHIP;10Kohm,1%,1/10W,TP,1608 2 SA
...4 2007-000066 R-CHIP;20Kohm,1%,1/10W,TP,1608 1 SNA
...4 2007-000070 R-CHIP;0ohm,5%,1/10W,TP,1608 12 SA
...4 2007-000084 R-CHIP;4.7Kohm,5%,1/10W,TP,1608 1 SA
...4 2007-000090 R-CHIP;10Kohm,5%,1/10W,TP,1608 1 SA
...4 2007-000143 R-CHIP;4.7Kohm,5%,1/16W,TP,1005 17 SNA
...4 2007-000171 R-CHIP;0ohm,5%,1/16W,TP,1005 21 SNA
...4 2007-000173 R-CHIP;22ohm,5%,1/16W,TP,1005 3 SNA
...4 2007-000219 R-CHIP;1.2Kohm,1%,1/10W,TP,1608 1 SA
IC-DDR4 SDRAM;K4F8E304HB-MGCH,LPDDR4-
SDR
2 SA
Page 36
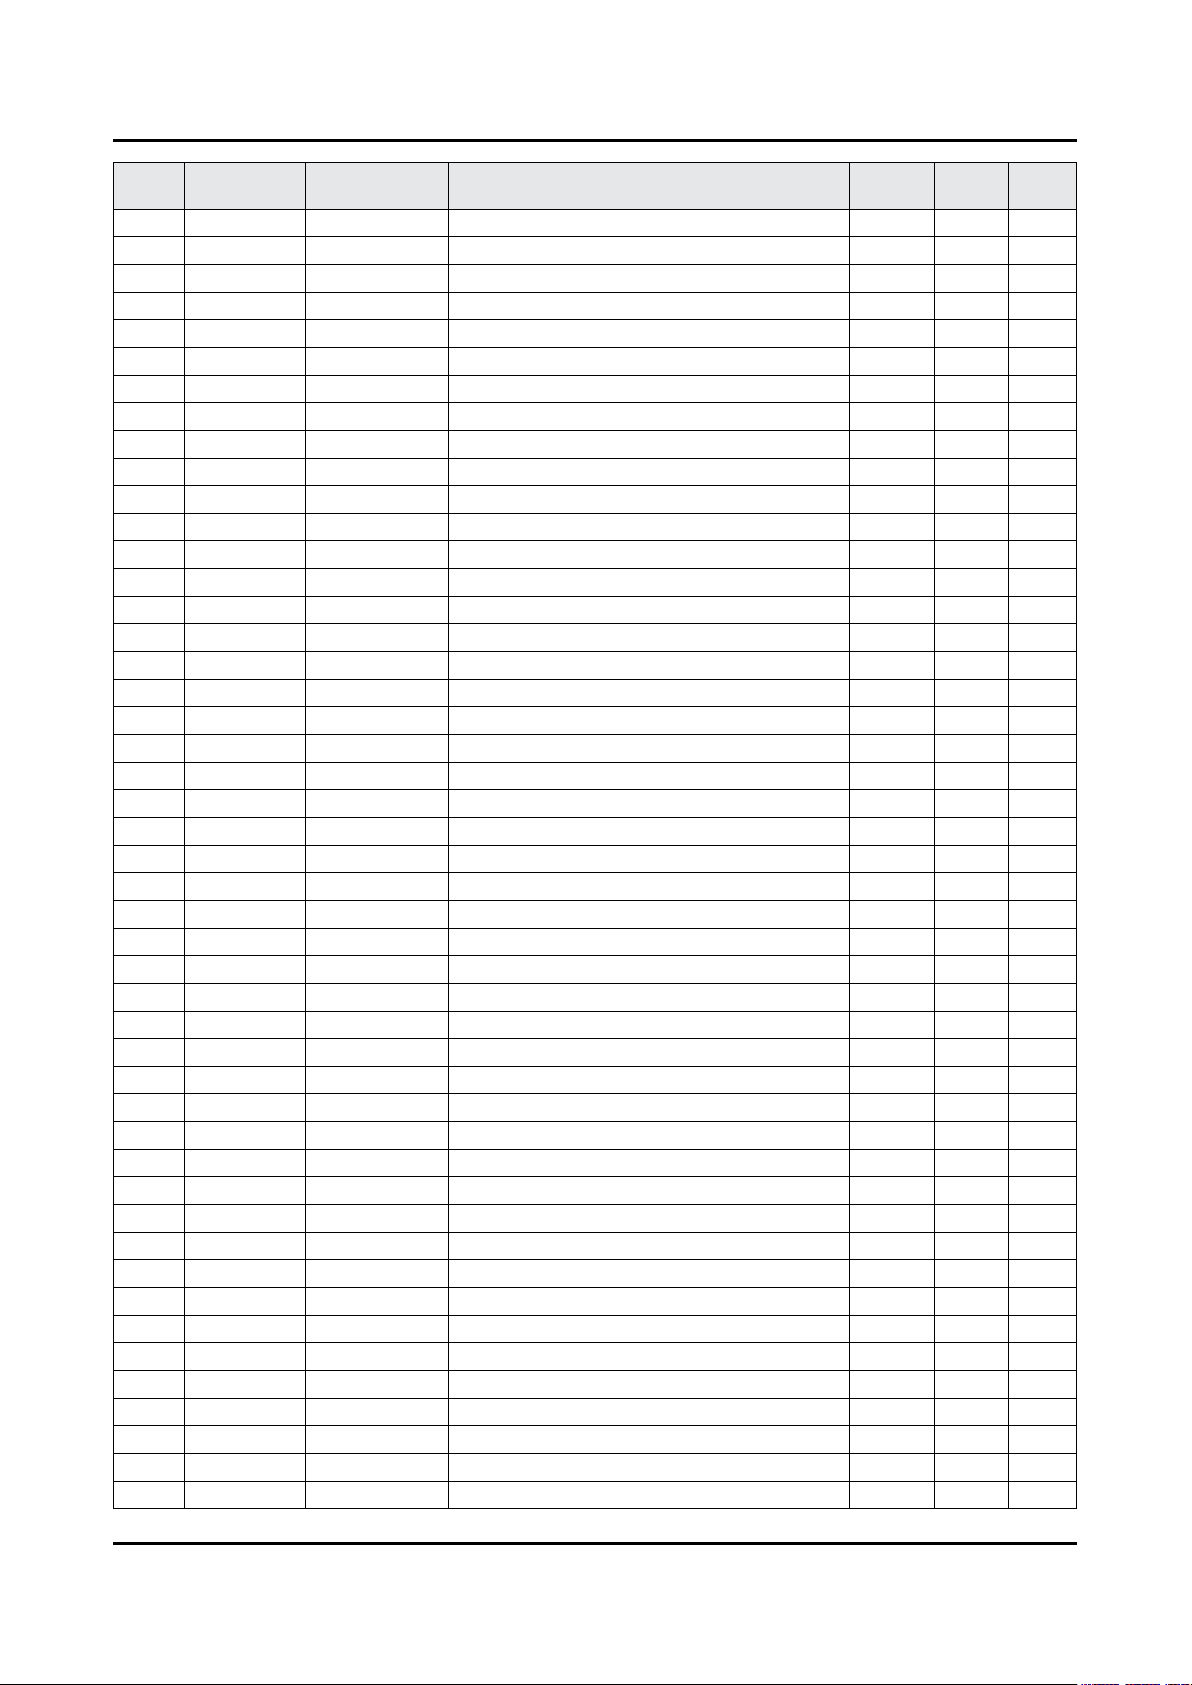
ANNEX-5
ANNEX. Exploded View & Part List
Level Location No. Code No. Description & Specication Q’ty SA/SNA Remark
...4 2007-000265 R-CHIP;1.8Kohm,1%,1/10W,TP,1608 1 SA
...4 2007-000308 R-CHIP;10ohm,5%,1/8W,TP,2012 4 SA
...4 2007-000309 R-CHIP;10ohm,5%,1/10W,TP,1608 3 SA
...4 2007-000516 R-CHIP;2.7Kohm,1%,1/10W,TP,1608 1 SNA
...4 2007-000683 R-CHIP;3.3Kohm,1%,1/10W,TP,1608 8 SA
...4 2007-000701 R-CHIP;3.6Kohm,1%,1/10W,TP,1608 1 SNA
...4 2007-000736 R-CHIP;30Kohm,1%,1/10W,TP,1608 2 SA
...4 2007-000779 R-CHIP;33ohm,1%,1/10W,TP,1608 2 SA
...4 2007-000816 R-CHIP;390Kohm,1%,1/10W,TP,1608 1 SNA
...4 2007-000881 R-CHIP;4.7ohm,5%,1/8W,TP,2012 16 SNA
...4 2007-000932 R-CHIP;470ohm,5%,1/16W,TP,1005 3 SNA
...4 2007-001125 R-CHIP;68Kohm,1%,1/10W,TP,1608 2 SA
...4 2007-001139 R-CHIP;7.5Kohm,1%,1/10W,TP,1608 2 SA
...4 2007-001288 R-CHIP;18ohm,5%,1/16W,TP,1005 4 SA
...4 2007-001292 R-CHIP;33ohm,5%,1/16W,TP,1005 28 SNA
...4 2007-001298 R-CHIP;51ohm,5%,1/16W,TP,1005 15 SNA
...4 2007-002899 R-CHIP;10ohm,1%,1/10W,TP,1608 1 SA
...4 2007-007107 R-CHIP;100Kohm,1%,1/16W,TP,1005 14 SNA
...4 2007-007131 R-CHIP;13Kohm,1%,1/16W,TP,1005 4 SA
...4 2007-007132 R-CHIP;15Kohm,1%,1/16W,TP,1005 2 SA
...4 2007-007136 R-CHIP;4.7Kohm,1%,1/16W,TP,1005 66 SNA
...4 2007-007137 R-CHIP;1.2Kohm,1%,1/16W,TP,1005 3 SA
...4 2007-007138 R-CHIP;27Kohm,1%,1/16W,TP,1005 3 SNA
...4 2007-007139 R-CHIP;47Kohm,1%,1/16W,TP,1005,T0.35 13 SA
...4 2007-007142 R-CHIP;10Kohm,1%,1/16W,TP,1005 35 SNA
...4 2007-007306 R-CHIP;100ohm,1%,1/16W,TP,1005 29 SNA
...4 2007-007309 R-CHIP;12Kohm,1%,1/16W,TP,1005,T0.35 1 SA
...4 2007-007310 R-CHIP;8.2Kohm,1%,1/16W,TP,1005 2 SA
...4 2007-007312 R-CHIP;20Kohm,1%,1/16W,TP,1005 11 SA
...4 2007-007313 R-CHIP;6.8Kohm,1%,1/16W,TP,1005 3 SA
...4 2007-007318 R-CHIP;1Kohm,1%,1/16W,TP,1005 13 SNA
...4 2007-007334 R-CHIP;200Kohm,1%,1/16W,TP,1005 5 SNA
...4 2007-007488 R-CHIP;75Kohm,1%,1/16W,TP,1005 5 SNA
...4 2007-007517 R-CHIP;240ohm,1%,1/16W,TP,1005 6 SNA
...4 2007-007528 R-CHIP;1.5Kohm,1%,1/16W,TP,1005 5 SA
...4 2007-007643 R-CHIP;2Mohm,1%,1/10W,TP,1608 1 SA
...4 2007-007720 R-CHIP;300Kohm,1%,1/10W,TP,1608 1 SA
...4 2007-007723 R-CHIP;75Kohm,1%,1/10W,TP,1608 3 SA
...4 2007-007766 R-CHIP;2Kohm,1%,1/16W,TP,1005 22 SNA
...4 2007-007767 R-CHIP;200ohm,1%,1/16W,TP,1005 7 SA
...4 2007-007798 R-CHIP;10ohm,1%,1/16W,TP,1005 8 SA
...4 2007-007830 R-CHIP;14Kohm,1%,1/10W,TP,1608 1 SA
...4 2007-007847 R-CHIP;16Kohm,1%,1/10W,TP,1608 5 SA
...4 2007-007942 R-CHIP;1Mohm,1%,1/16W,TP,1005 1 SNA
...4 2007-007981 R-CHIP;180Kohm,1%,1/16W,TP,1005 1 SNA
...4 2007-008015 R-CHIP;75ohm,1%,1/16W,TP,1005 9 SNA
...4 2007-008263 R-CHIP;3Kohm,1%,1/16W,TP,1005 2 SA
Page 37
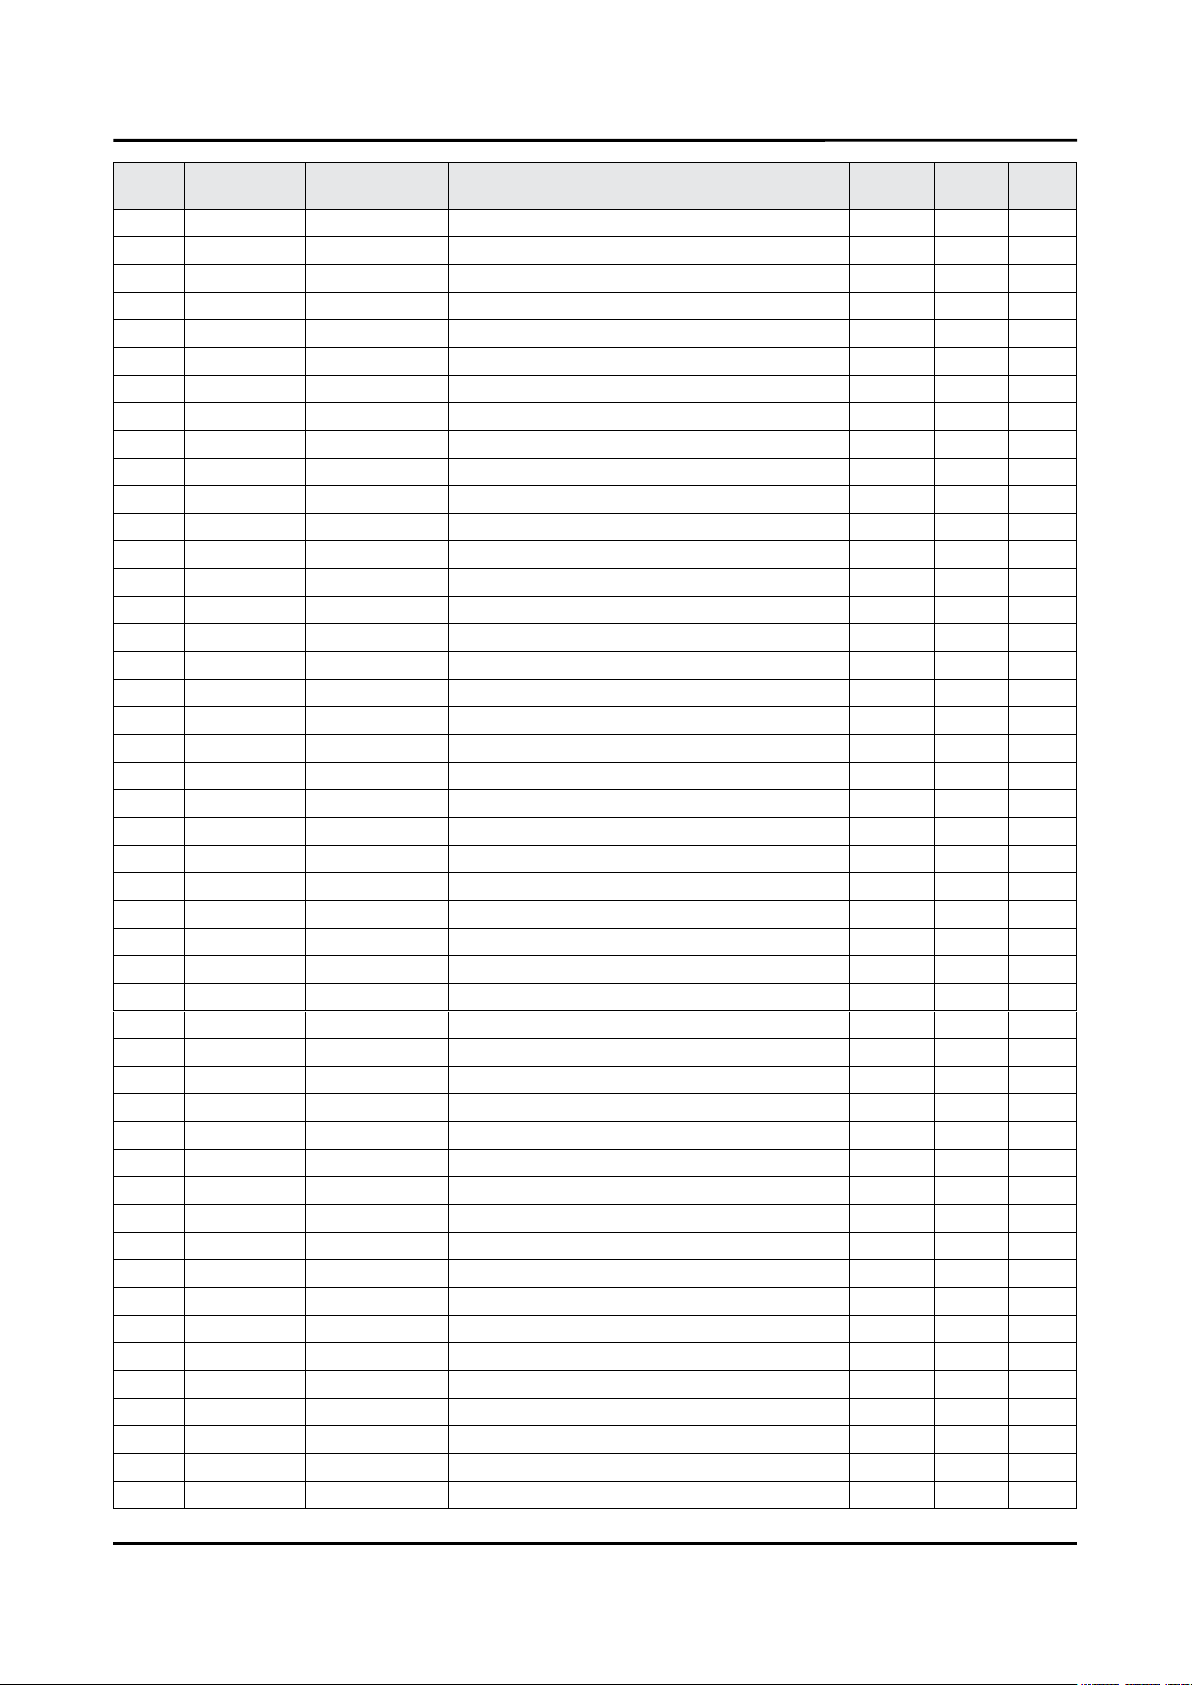
ANNEX-6
ANNEX. Exploded View & Part List
Level Location No. Code No. Description & Specication Q’ty SA/SNA Remark
...4 2007-008269 R-CHIP;51Kohm,1%,1/16W,TP,1005 3 SA
...4 2007-008298 R-CHIP;49.9ohm,1%,1/16W,TP,1005 4 SA
...4 2007-008391 R-CHIP;6.34Kohm,1%,1/16W,TP,1005 2 SA
...4 2007-008596 R-CHIP;0.1ohm,1%,1/4W,TP,3216 2 SC
...4 2007-008779 R-CHIP;0ohm,1%,1/16W,TP,1005 3 SA
...4 2007-009117 R-CHIP;49.9Kohm,1%,1/16W,TP,1005 1 SA
...4 2007-009322 R-CHIP;1.3Kohm,1%,1/16W,TP,1005 2 SA
...4 2007-009777 R-CHIP;4.99Kohm,1%,1/16W,TP,1005 2 SA
...4 2011-001261 R-NETWORK;33ohm,5%,1/16W,L,CHIP,8P,TP,2. 6 SA
...4 2011-001264 R-NETWORK;10ohm,5%,1/16W,L,CHIP,8P,TP,2. 8 SNA
...4 2011-001344 R-NETWORK;100ohm,5%,1/16W,L,CHIP,8P,TP,2 6 SA
...4 AD480 2203-000233 C-CER,CHIP;0.1nF,5%,50V,C0G,TP,1005 4 SA
...4 AD480 2203-000254 C-CER,CHIP;10nF,10%,16V,X7R,TP,1005 5 SA
...4 AD480 2203-000278 C-CER,CHIP;0.01nF,0.5pF,50V,C0G,TP,1005 3 SA
...4 AD480 2203-000359 C-CER,CHIP;0.15nF,5%,50V,C0G,TP,1005,0.5 3 SNA
...4 AD480 2203-000386 C-CER,CHIP;0.015nF,5%,50V,C0G,TP,1005 3 SA
...4 AD480 2203-000438 C-CER,CHIP;1nF,10%,50V,X7R,TP,1005 13 SA
...4 AD480 2203-000489 C-CER,CHIP;2.2nF,10%,50V,X7R,TP,1005 2 SA
...4 AD480 2203-000585 C-CER,CHIP;0.22nF,10%,50V,X7R,TP,1005 3 SA
...4 AD480 2203-000812 C-CER,CHIP;0.033nF,5%,50V,C0G,TP,1005 5 SA
...4 AD480 2203-000940 C-CER,CHIP;0.47nF,10%,50V,X7R,TP,1005 1 SA
...4 AD480 2203-001428 C-CER,CHIP;470nF,10%,50V,X7R,TP,2012 1 SNA
...4 AD480 2203-002285 C-CER,CHIP;10nF,10%,50V,X7R,TP,1005 5 SNA
...4 AD480 2203-002398 C-CER,CHIP;22nF,10%,50V,X7R,TP,1608 1 SNA
...4 AD480 2203-002494 C-CER,CHIP;470nF,10%,16V,X7R,TP,2012 1 SNA
...4 AD480 2203-002525 C-CER,CHIP;0.56nF,10%,50V,X7R,TP,1005 1 SNA
...4 AD480 2203-005054 C-CER,CHIP;0.0047nF,0.25pF,50V,NP0,TP,10 2 SA
...4 AD480 2203-005083 C-CER,CHIP;220nF,10%,50V,X7R,TP,1608,0.8 6 SA
...4 AD480 2203-005249 C-CER,CHIP;100nF,10%,50V,X7R,TP,1608 7 SNA
...4 AD480 2203-005968 C-CER,CHIP;4.7nF,10%,50V,X7R,TP,1005,0.5 2 SNA
...4 AD480 2203-006048 C-CER,CHIP;100nF,10%,10V,X7R,TP,1005 8 SA
...4 AD480 2203-006088 C-CER,CHIP;330nF,10%,10V,X7R,TP,1608 1 SA
...4 AD480 2203-006126 C-CER,CHIP;47nF,10%,16V,X7R,TP,1005 3 SNA
...4 AD480 2203-006158 C-CER,CHIP;100nF,10%,16V,X7R,TP,1005,T0. 107 SNA
...4 AD480 2203-006324 C-CER,CHIP;2200nF,10%,10V,X5R,TP,1608 16 SA
...4 AD480 2203-006348 C-CER,CHIP;1000nF,10%,25V,X5R,TP,1608,0. 2 SA
...4 AD480 2203-006562 C-CER,CHIP;1000nF,10%,10V,X5R,TP,1005 27 SNA
...4 AD480 2203-006698 C-CER,CHIP;1000nF,10%,25V,X7R,TP,1608,0. 3 SNA
...4 AD480 2203-006824 C-CER,CHIP;4700nF,10%,10V,X5R,TP,1608 5 SNA
...4 AD480 2203-006838 C-CER,CHIP;2200nF,10%,6.3V,X5R,TP,1005 9 SA
...4 AD480 2203-006844 C-CER,CHIP;470nF,10%,10V,X5R,TP,1005 2 SA
...4 AD480 2203-006890 C-CER,CHIP;10000nF,20%,6.3V,X5R,TP,1608 29 SNA
...4 AD480 2203-007176 C-CER,CHIP;10000nF,10%,16V,X5R,TP,2012,1 20 SNA
...4 AD480 2203-007240 C-CER,CHIP;22000nF,20%,6.3V,X5R,TP,1608( 72 SA
...4 AD480 2203-007269 C-CER,CHIP;22000nF,20%,10V,X5R,TP,2012(2 13 SA
...4 AD480 2203-007270 C-CER,CHIP;10000nF,10%,10V,X5R,TP,1608,0 24 SNA
...4 AD480 2203-007306 C-CER,CHIP;10000nF,10%,25V,X5R,TP,2012,1 48 SNA
Page 38
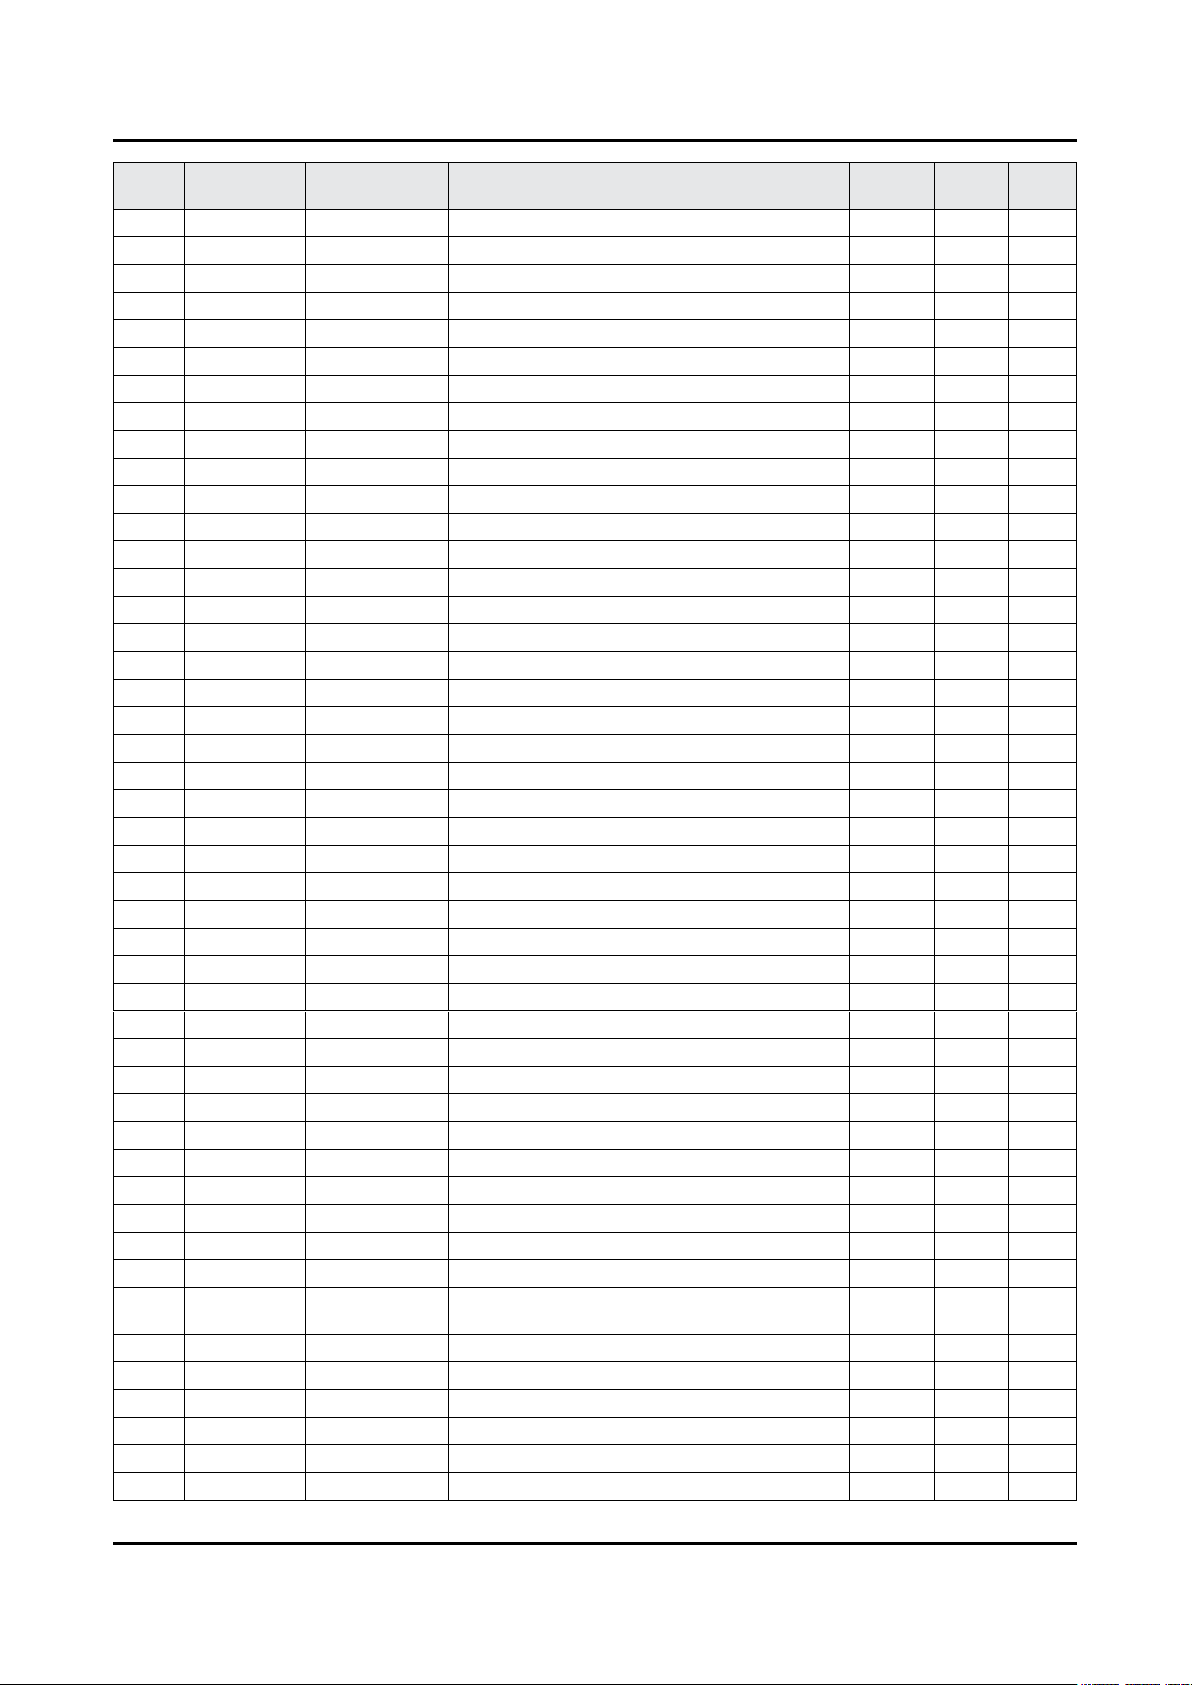
ANNEX-7
ANNEX. Exploded View & Part List
Level Location No. Code No. Description & Specication Q’ty SA/SNA Remark
...4 AD480 2203-007544 C-CER,CHIP;100nF,10%,50V,X7R,TP,1005,T0. 37 SA
...4 AD480 2203-008315 C-CER,CHIP;22000nF,20%,25V,X5R,TP,2012,T 13 SA
...4 2402-001268 C-AL,SMD;100uF,20%,25V,WT,TP,8x6.3mm 1 SA
...4 2409-001240 C-ORGANIC,SMD;33uF,20%,25V,LR,TP,7343(1. 1 SA
...4 2409-001338 C-POLYMER ,CHIP;47uF,20%,6.3V,TP,3.2x1.6 1 SA
...4 2703-000213 INDUCTOR-SMD;470nH,10%,1.35Ohm,35mA,15,M 1 SA
...4 2703-001938 INDUCTOR-SMD;56nH,5%,1005,1.5Ohm,200mA,1 3 SA
...4 2703-003149 INDUCTOR-SMD;2.2uH,20%,0.055Ohm,3000mA,W 1 SA
...4 2703-003747 INDUCTOR-SMD;22uH,20%,6060,0.135ohm,1300 2 SA
...4 2703-003862 INDUCTOR-SMD;10uH,20%,6060,0.065ohm,1900 3 SA
...4 2703-003913 INDUCTOR-SMD;2.2uH,20%,2520,1.2T,0.116Oh 1 SNA
...4 2703-003937 INDUCTOR-SMD;1uH,20%,7.0x6.47x3.0mm,0.00 3 SA
...4 2703-004586 INDUCTOR-SMD;3.3uH,20%,5050,2T,0.063Ohm, 1 SA
...4 2703-004630 INDUCTOR-SMD;2.2uH,20%,5.0T,0.0025Ohm,66 1 SNA
...4 2703-004724 INDUCTOR-SMD;8.2uH,20%,4T,0.072Ohm,2300m 4 SA
...4 2703-005191 INDUCTOR-SMD;1.5uH,20%,6060,T4.5,0.02Ohm 1 SA
...4 2703-005193 INDUCTOR-SMD;2.2uH,20%,4.5,0.024Ohm,5100 2 SA
...4 2703-005376 INDUCTOR-SMD;10uH,20%,10x10.7mm,4.0T,0.0 1 SA
...4 2801-004021 CRYSTAL-SMD;24.576MHz,20ppm,28-AAN,12pF, 1 SA
...4 3301-001364 BEAD-SMD;1000ohm,1608,TP,1085ohm/108MHz, 4 SNA
...4 3301-002039 BEAD-SMD;26ohm,1608,TP 33 SA
...4 3601-001374 FUSE-SURFACE MOUNT;32V,5A,FAST-ACTING,PL 3 SA
...4 3601-001376 FUSE-SURFACE MOUNT;32V,3A,FAST-ACTING,Hi 2 SNA
...4 3701-001967 CONNECTOR-HDMI;19P,A,FEMALE,AU,0.5mm,BLK 3 SA
...4 3707-001103 CONNECTOR-OPTICAL;ANGLE,SPDIF,2.5PI 1 SA
...4 3708-003241 CONNECTOR-FPC/FFC/PIC;96P,0.5mm,SMD-A,AU 2 SNA
...4 3710-003908 CONNECTOR-SOCKET;64P,2R,0.5mm,SMD-S,AU,B 1 SA
...4 EH01 3711-007803 HEADER-BOARD TO CABLE;BOX,12P,1R,1.25mm, 1 SA
...4 EH01 3711-008131 HEADER-BOARD TO CABLE;BOX,4P,1R,2.5mm,AN 1 SA
...4 EH01 3711-008859 HEADER-BOARD TO CABLE;BOX,12P,2R,2mm,ANG 1 SA
...4 3711-009090 CONNECTOR-HEADER;BOX,16P,1R,1.25mm,SMD-A 1 SA
...4 3722-003199 JACK-MODULAR;8P/8C,Y,ANGLE,NONE,AU,1PORT 1 SA
...4 3722-003457 JACK-USB;4P/1C,NI,BLK,ANGLE,A,2.0,13.1x1 2 SA
...4 3722-003814 JACK-PHONE;1P/7C,NI/SN,YEL,ANGLE,3.5PI,1 1 SA
...4 JACK 3722-003873 JACK-PHONE;1P/7C,AU/SN,BLU,ANGLE,3.5PI,1 1 SA
...4 6302-001376 GASKET-SMD;,,CONDUCTIVE FABRIC,T14,W43,L 7 SNA
...4 BN40-00322C TUNER-DTV AIR CABLE;CDT-933T322-93,DVB-T 1 SA
...4 BN41-02528A PCB-MAIN;KU6000,FR-4,4L,1.6T,193x241mm,1 1 SNA
...4 CB07 BN61-13312B BRACKET-SCREWLESS PCB;55KS8000,SK5,T0.3, 4 SNA
...4 BN97-10863B
....5 1107-002226 IC-NOR FLASH;W25Q40CLSSIP,4Mbit,SOIC,8P, 1 SA
...4 BN97-10865A ASSY MICOM-MAIN;T-JZL6DEUC,UWP60,KLM4G1F 1 SNA
....5 1107-002374 IC-EMMC;KLM4G1FEPD-B031,4Gbyte,BGA,153P, 1 SNA
...4 BN97-10918A ASSY MICOM;TCON,KU6k,W25Q80DVSSIG,1107-0 1 SNA
....5 1107-002339 IC-NOR FLASH;W25Q80DV,8Mbit,SOP,5.28x5.2 1 SNA
....5 BN46-00515A S/W MICOM;Jazz M-L,TCON F/W 1 SNA
ASSY MICOM-SUB;JMMICOM_EU_
TV,UWP60,W25Q4
1 SNA
Page 39
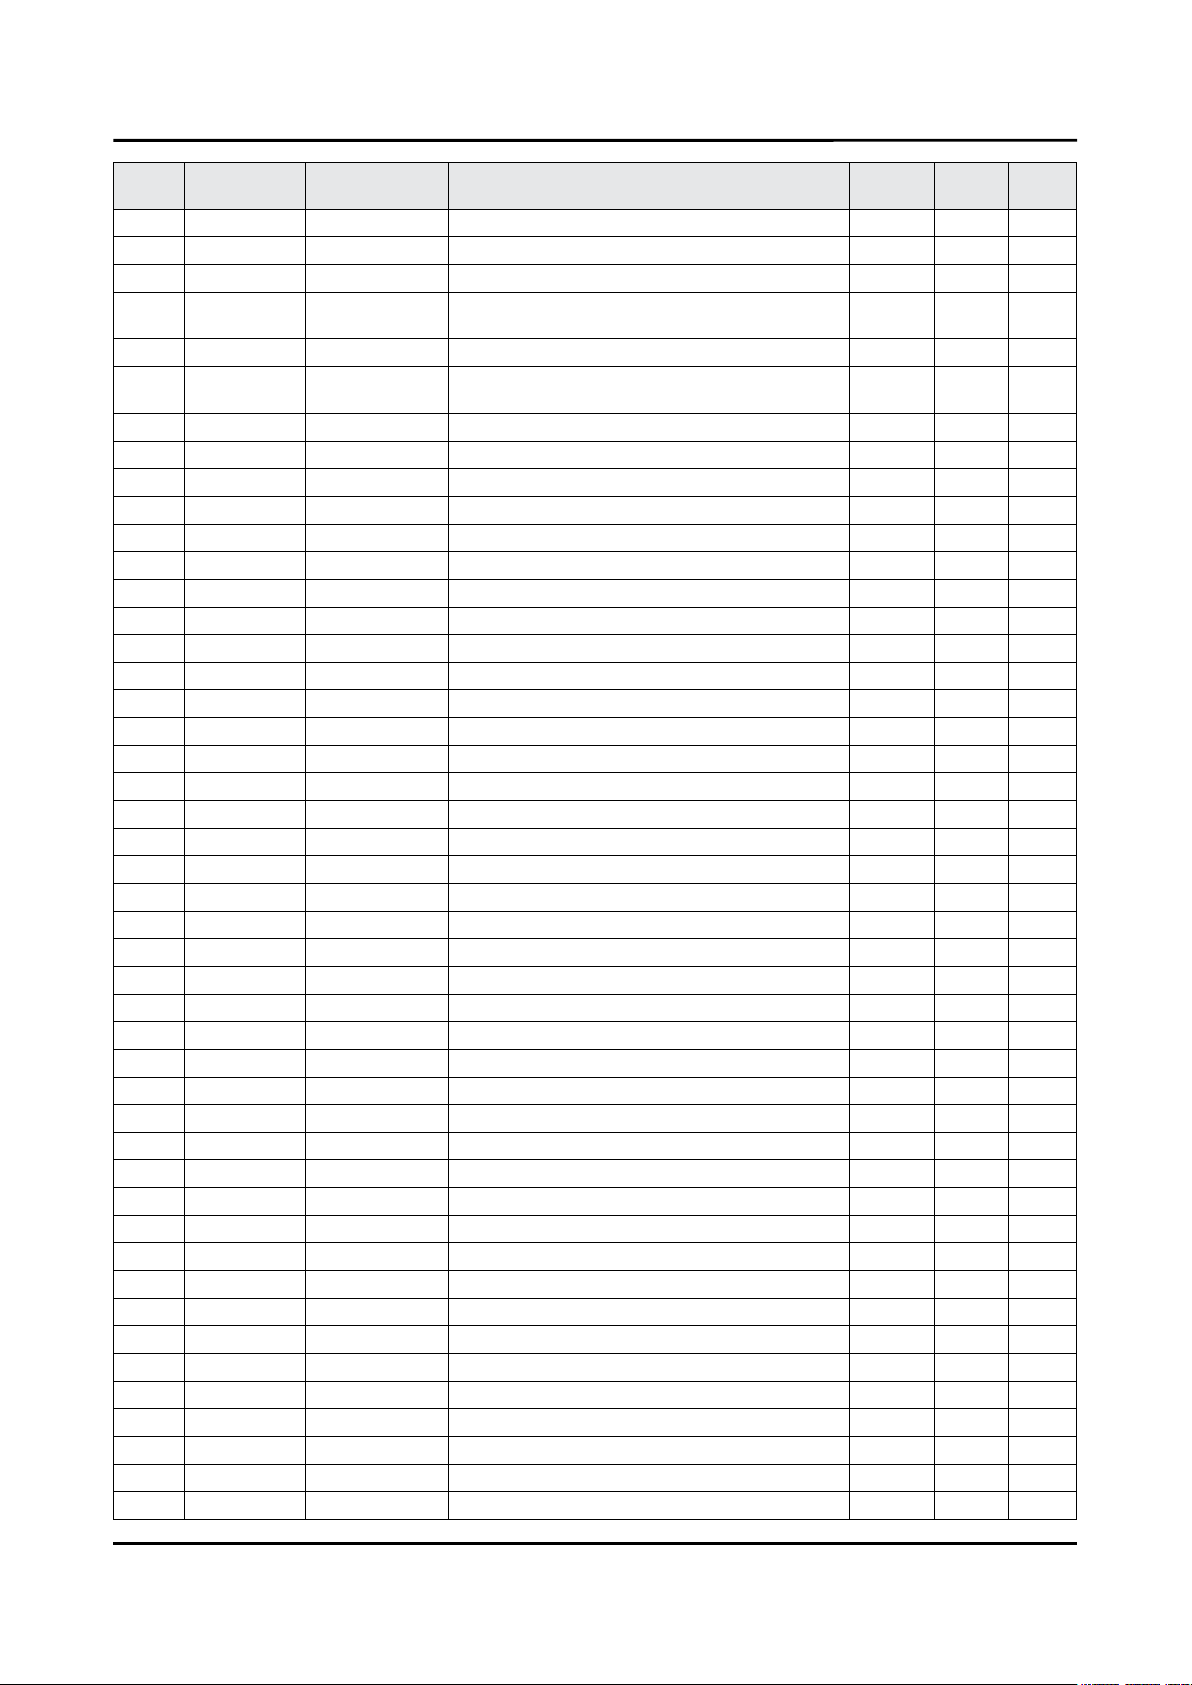
ANNEX-8
ANNEX. Exploded View & Part List
Level Location No. Code No. Description & Specication Q’ty SA/SNA Remark
..3 BN97-11342A ASSY MICOM;TCON DATA,KU6k,55-AUO-Curved, 1 SNA
...4 BN46-00539A S/W MICOM;K55L6U0C,AUO,55L6AU*RK,Curved 1 SNA
1 BN91-17378C ASSY SHIELD;LED TV 6K 1 SNA
0.2 SCREW 6001-003081
0.2 BN02-00102B TAPE-SINGLE FACE;FILAMENT,#8917,T0.15,W2 0 SNA
0.2 12P BN39-02025D
0.2 16P BN39-02030C LEAD CONNECTOR-BLU;BLU,UL21016,16P,150mm 1 SA
0.2 EC13 BN39-02218B LEAD CONNECTOR-SUB ASSY;55KU6000, 60KU60 1 SA
0.2 BN39-02220C LEAD CONNECTOR-SUB ASSY;55KU6300,UL21016 1 SA
0.2 P001A BN44-00807A DC VSS-PD BOARD;L55S6_FHS,AC/DC,203W,100 1 SA
0.2 WIFI BN59-01174D NETWORK-WLAN CLIENT;WIDT30Q,58x31.45x8.5 1 SA
0.2 BN61-10073B HOLDER-WIFI;55KU6000,ABS,MOLD,BK0007,HB 1 SNA
0.2 SP01A BN96-35008A ASSY SPEAKER P-FRONT;TV-SPK,JU6700,6ohm, 1 SA
0.2 JOG BN96-35345B ASSY BOARD P-FUNCTION JOG;JU7500,CT15SE8 1 SA
..3 AH240 BN61-11584A HOLDER-BUTTON;JU7500,ABS,MOLD,BK0007,HB 1 SNA
..3 AH297 BN63-11231B HOLDER-KNOB;HU7000,ABS,MOLD,BLACK,HB 1 SNA
..3 FK04 BN64-02406B BUTTON-FUNCTION;LED_HU7000,ABS,HB,BLACK, 1 SNA
...4 0103-004609 RESIN ABS;HF-0680U,K21294,BK0007,HB,High 8 SNA
0.2 BN96-39820D FFC CABLE;55KS7500,Fold,L500,96P 1 SA
0.2 BN96-39903B FFC CABLE;65KU6500,Fold,L650,96P 1 SA
0.2 FB10A BN96-39955B ASSY BOARD P-IR;KU6300,IR ASSY_KU6300 1 SA
1 BN92-20019B ASSY LABEL POP;LED TV 6K 1 SNA
0.2 BN68-07971A LABEL POP-HIGHLIGHT;KU6500,PET,T0.1,W90, 1 SNA
1 BN92-20182J ASSY BOX;LEDTV 6K 1 SNA
0.2 BH68-00662A LABEL BOX;ALL,ART PAPER,W60,L110,WHT,NO 1 SNA
0.2 BN68-05640A LABEL BOX;ALL,ART PAPER,W110,L130,EUROPE 1 SNA
0.2 BN69-14076F BOX UNIT;55KU6100,CB,DW3,F1,L1412,W180,H 1 SNA
1 BN92-20187A ASSY P/MATERIAL;LEDTV 6K 1 SNA
0.2 6902-001957 BAG ROLL;HDPE/PE FOAM,HDPE T0.018mm,T0.2 3 SNA
0.2 6902-002233 BAG AIR;LDPE,-,T0.2,W900,L1850,TRP,-,-,- 1 SNA
0.2 6922-000003 BAND;PP,T0.8,W18,L1650M,TRP,DA69-90145A 1 SNA
0.2 BN02-00319B TAPE-SINGLE FACE;OPP,T0.05,W75,L800M,CLE 3 SNA
0.2 BN68-02422B LABEL WARNING;ALL,ART PAPER,T0.05,W240,L 1 SNA
0.2 BN69-03982P PACKING ANGLE;ALL,PAPER,-,-,-,-,-,-,- 1 SNA
0.2 BN69-05418N WRAP;T0.017,750,2000000,2000000,750 25 SNA
0.2 BN69-06640E PAD-PACKING;TRUCK PAD,CB,-,,W410,L2500,, 1 SNA
0.2 BN69-06642A PAD-DP SHEET;PAD,CB,SW4,,W1300,L1050,,,, 1 SNA
0.2 BN69-13468A CUSHION-SET SIDE;55KU6300,EPS,16.7g/l,WH 1 SNA
0.2 BN69-13478A CUSHION-SET;55KU6300,EPS,16.7g/l,WHT,V-S 1 SNA
..3 0103-005099 RESIN EPS;BASF303,Natural,Natural 914 SNA
0.2 BN69-13622B PAD-CUSHION FRONT;55KS7500,CB,DW2+EPE,W6 1 SNA
0.2 BN69-14429S PALLET;55" KU6100,WOOD,-,1170,1420,H144, 1 SNA
1 ACCE1 BN92-20192H ASSY ACCESSORY;LEDTV 6K 1 SNA
0.2 ACCE2 BN96-35677B ASSY ACCESSORY-CABLE;UE55KU6170UXXC 1 SNA
..3 3709-001791 CONNECTOR-CARD SLOT;64P,0.5mm,SMD-A,AU,P 1 SA
..3 T0268 3903-001118 CBF-POWER CORD;DT,EU,Angle,2P(C7),250V,2 1 SA
SCREW-MACHINE;PWH,+,M3,L5,ZPC(WHT),SWR
CH
LEAD CONNECTOR-
POWER;UN55JU6700AFXZA,UL2
5 SA
1 SA
Page 40
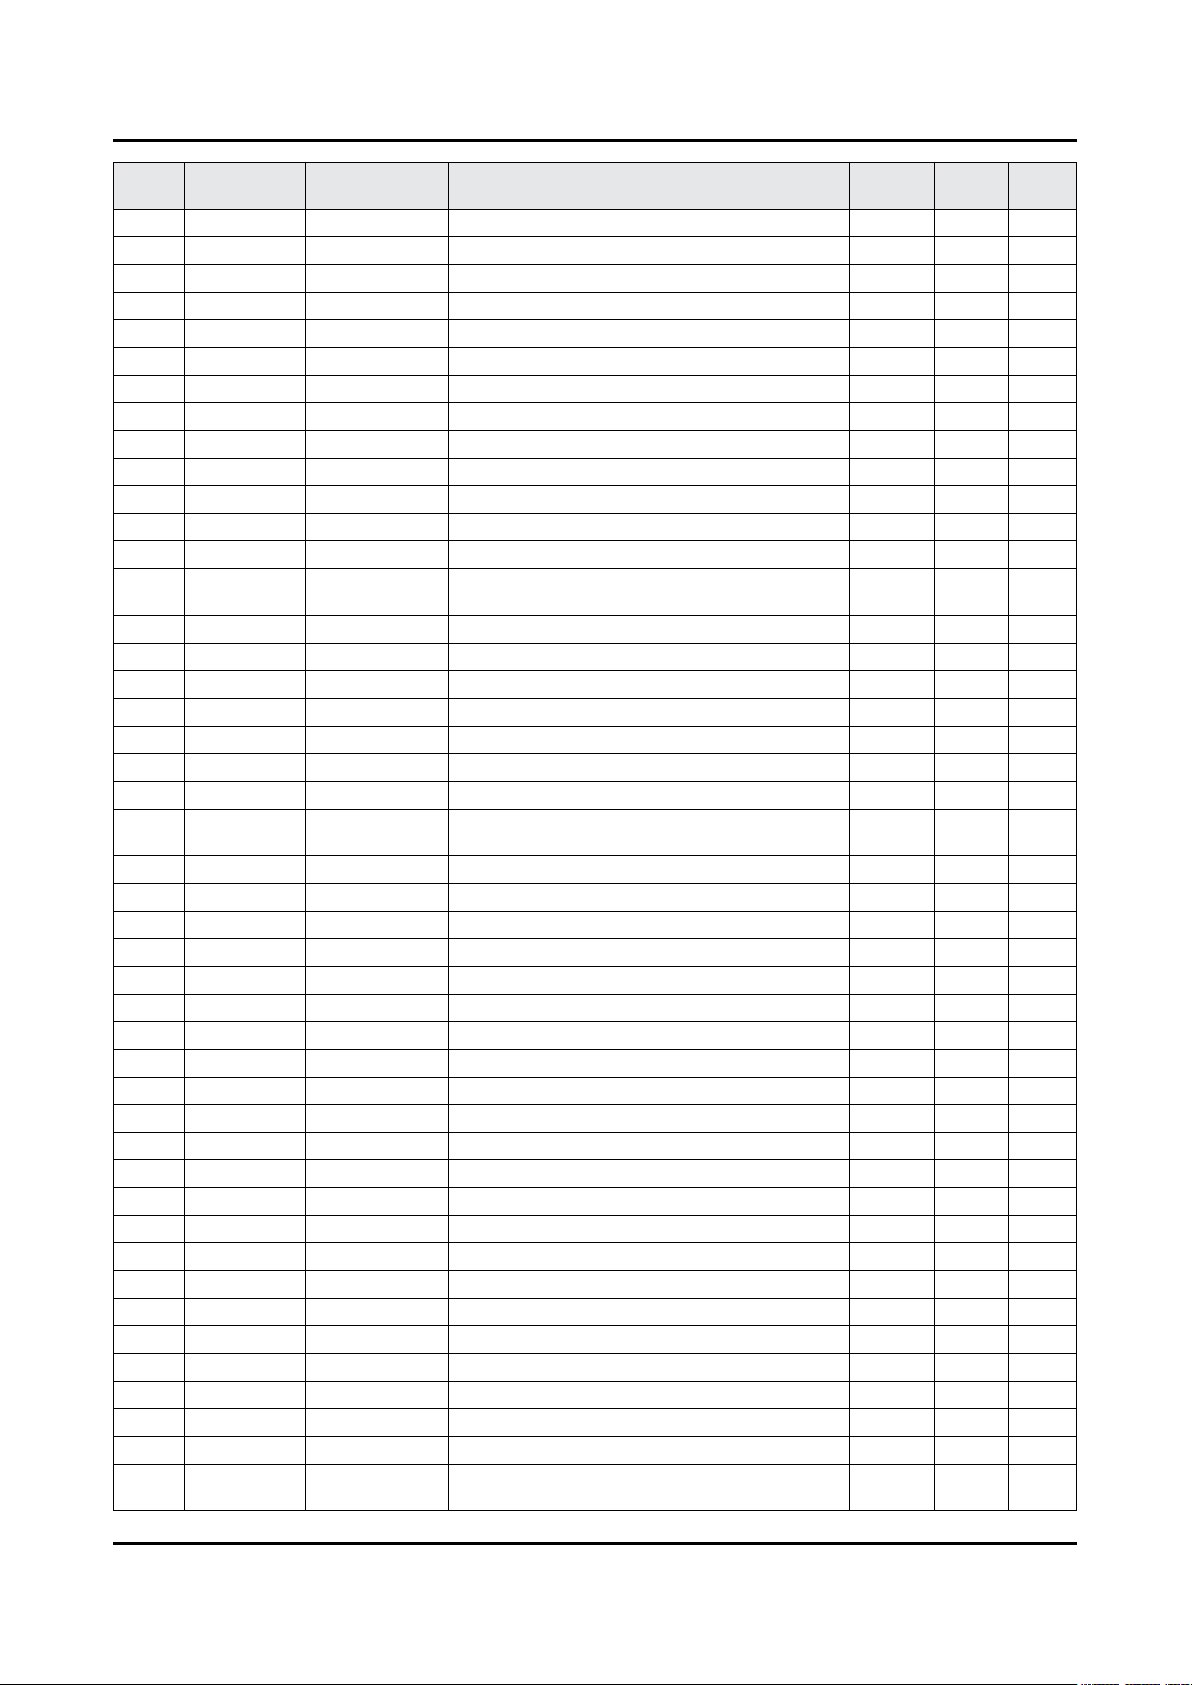
ANNEX-9
ANNEX. Exploded View & Part List
Level Location No. Code No. Description & Specication Q’ty SA/SNA Remark
..3 4301-000121 BATTERY-MN;1.5V,R03,10.5x44.5m,7.5g,AAA 2 SNA
..3 6902-001965 BAG PE;LDPE,BIOBASED,T0.05,W200,L300,TRP 1 SNA
..3 EC03 BN39-02189A GENDER CABLE;DC to RCA Cable,3P,L100,UL2 1 SA
..3 EC03 BN39-02190A GENDER CABLE;DC to RCA Cable,2P,L100,UL2 1 SA
..3 BN59-01247A REMOCON-TV;2016 TV,Samsung,44KEY,3V,KU60 1 SA
..3 EH03A BN96-36071D ASSY HOLDER P-RING;LED JU6700,JU650,W/W, 1 SNA
...4 6902-002497 BAG ZIPPER;LDPE,T0.05,W100,L250,TRP,RECY 1 SNA
...4 AH365 BN61-11938A HOLDER-WALL RING;Y15 JU6510,ABS,MOLD,BK0 4 SNA
....5 0103-004609 RESIN ABS;HF-0680U,K21294,BK0007,HB,High 40 SNA
0.2 ACCE4 BN96-35701G ASSY ACCESSORY-MANUAL;UE49KU6100WXXH 1 SNA
..3 6902-001964 BAG PE;LDPE,BIOBASED,T0.03,W200,L300,TRP 1 SNA
..3 T0527 BN68-00513A LABEL-E PASS;ALL MODEL,WW,YUPO,W50,L15,W 2 SNA
..3 BN68-03548J LEAFLET-WARRANTY;comm,Samsung,17Lang,Mid 1 SNA
..3 BN68-04972E
..3 BN68-07598A LEAFLET-FICHE;ALL,W/P,0 1 SNA
..3 BN68-07990E MANUAL USERS;KU6300,XH,W/P,EURO B5 1 SNA
1 BN92-20198J ASSY LABEL;LEDTV 6K 1 SNA
0.2 0203-001598 TAPE-SINGLE FACE;FILAMENT,#8915,T0.15,W1 0 SNA
0.2 BN68-06708G LABEL-RATING;Monitor,WW,PP,T0.161,W93,L7 1 SNA
0.2 BN68-07519A LABEL-ENERGY;ALL JORDAN,WW,PP,T0.135,W60 1 SNA
0.2 BN68-07991T LEAFLET-QUICK SETUP GUIDE;KU6300,EU,W/P, 1 SNA
1 PANEL BN95-02924A
0.2 SCREW 6001-003075 SCREW-MACHINE;BH,+,M3,L4,ZPC(WHT),SWRCH1 4 SA
0.2 SCREW 6001-003079 SCREW-MACHINE;CH,+,M3,L6,ZPC(BLK),SWRCH1 4 SA
0.2 AS080 BN63-07229A SHEET-PROTECTION COVER;rose70",PET,T0.05 1 SNA
0.2 BN68-05722A LABEL-E PASS;POLYPROPYLENE,NON-COATING 1 SNA
0.2 BN90-08266A ASSY MISC-BLU;Y16,LCM 1 SNA
..3 BN61-11745A DIFFUSER PLATE;15Y_J7.5K 55INCH_DIFFUSER 1 SNA
..3 BN61-13704A FRAME-MIDDLE TOP;55KU6300,TPV,HB,BK0008, 1 SNA
..3 BN61-13709A FRAME-MIDDLE LEFT RIGHT;55KU6300,TPV,HB, 2 SNA
..3 BN61-13714A FRAME-MIDDLE BOTTOM;55KU6300,TPV,HB,BK00 1 SNA
..3 BN63-13489A OPTICAL SHEET-REFLECTOR;15Y JU7.5K 55inc 1 SNA
..3 BN63-14901A OPTICAL SHEET-COMPLEX;15Y_JU6.7K_55inch_ 1 SNA
..3 BN63-14907A OPTICAL SHEET-MLS;15Y_JU6.7K_55inch_PTD8 1 SNA
..3 BN96-35766E ASSY CHASSIS REAR P;55KU6300,EGI-SECC,EG 1 SNA
...4 0203-006897 TAPE-DOUBLE FACE;Si,T1,W10,L50,WHITE 1 SNA
...4 SCREW 6001-003075 SCREW-MACHINE;BH,+,M3,L4,ZPC(WHT),SWRCH1 1 SA
...4 BN02-00040C TAPE DOUBLE FACE;F-LED ALL,PET,T0.3,W3,L 6 SNA
...4 BN02-00102B TAPE-SINGLE FACE;FILAMENT,#8917,T0.15,W2 0 SNA
...4 BN02-00173C TAPE-SINGLE FACE;PET,T0.05,W40,BLACK 0 SNA
...4 BN02-00383A TAPE SINGLE FACE;Y15 JU8K,PET,T0.5,W60,L 2 SNA
...4 BN61-11506A FRAME-CHASSIS REAR LEFT RIGHT;Y15 7.5K S 2 SNA
...4 BN61-11507A FRAME-CHASSIS REAR TOP;Y15 7.5K SDC 55", 1 SNA
...4 BN61-11508A SUPPORT-PLATE;Y15 LED,PC,V-2,CLEAR,OD-19 18 SNA
...4 BN61-11509A
LEAFLET-REGULATORY
GUIDE;ALL,SAMSUNG,W/W
PRODUCT LCD-AUO;CY-
WK055HGAV1V,KU6300,Ba
HOLDER-SOURCE PCB;Y15
LED,ABS,MOLD,BLACK
1 SNA
1 SA
8 SNA
Page 41
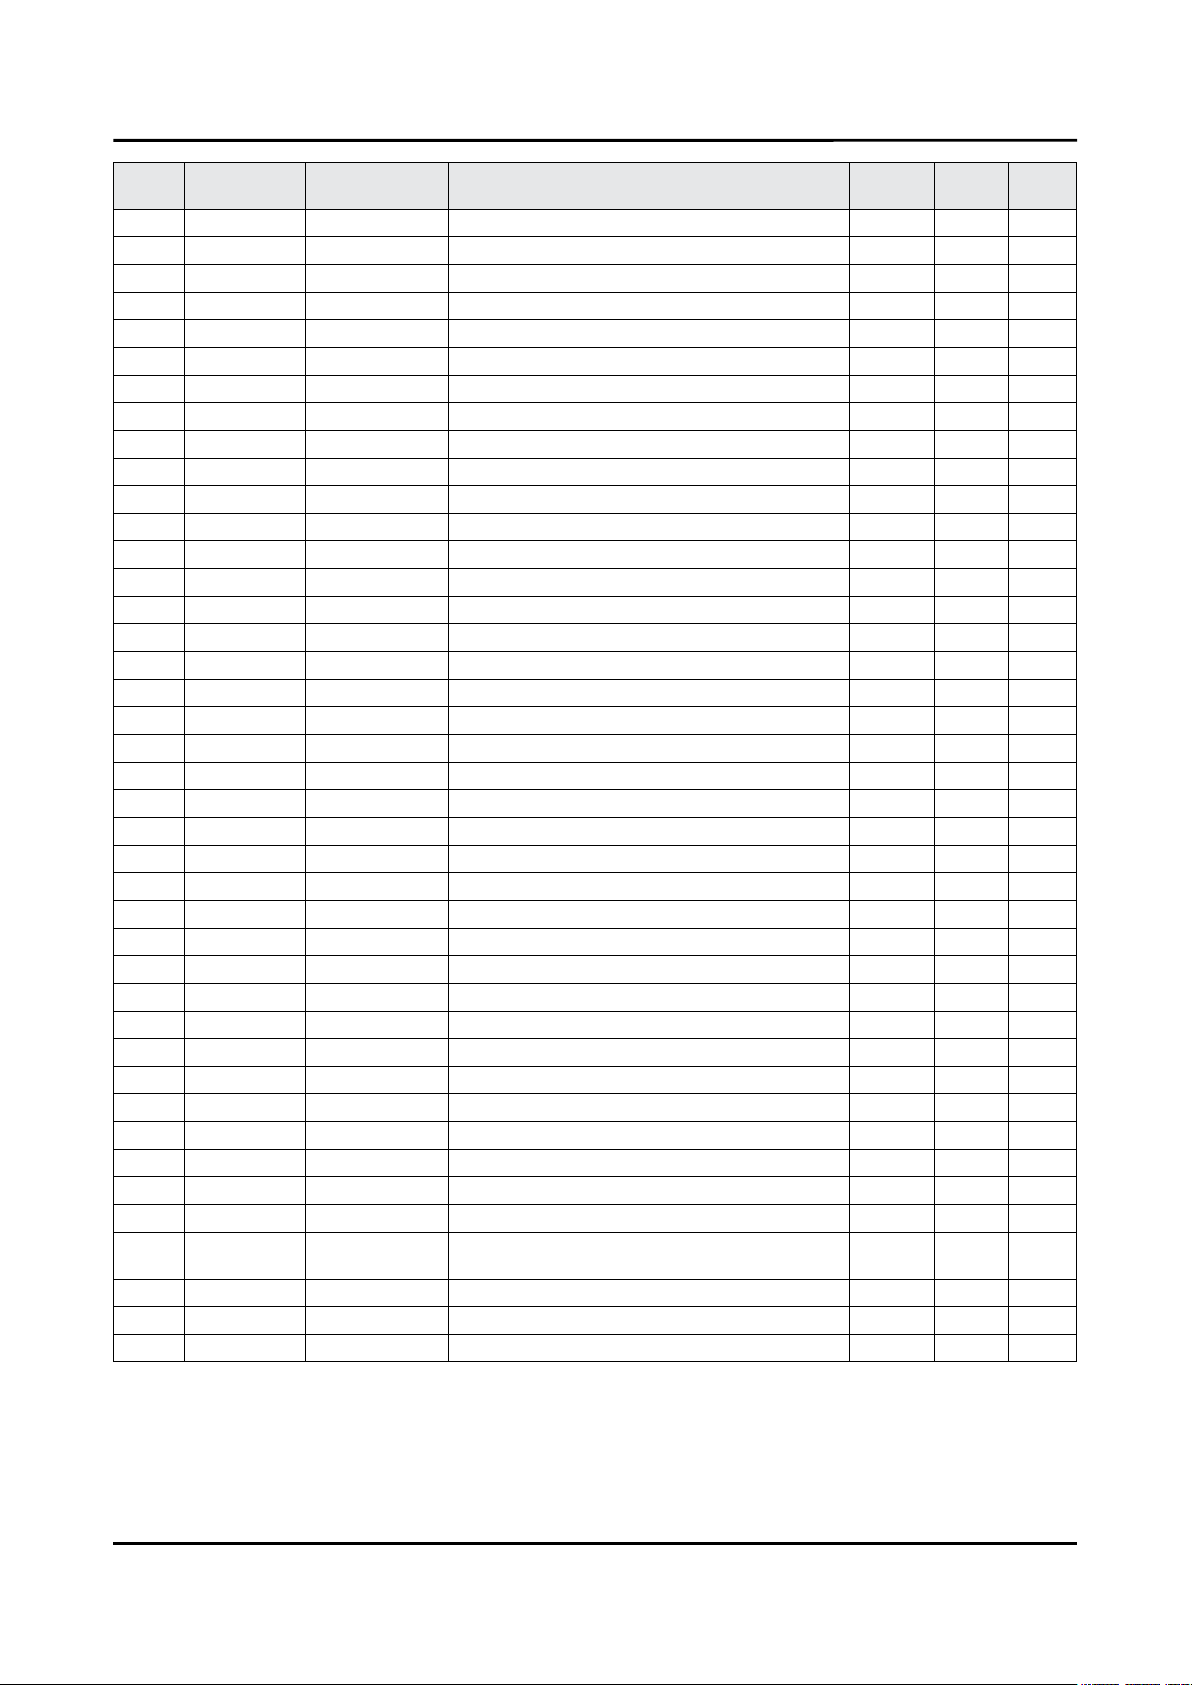
ANNEX. Exploded View & Part List
Level Location No. Code No. Description & Specication Q’ty SA/SNA Remark
...4 BN61-11773A FRAME-CHASSIS REAR BOTTOM;Y15 7.5K SDC 5 1 SNA
....5 0103-010237 RESIN PC;LS-3104G/W95265,White,WT0044,V- 398 SNA
...4 BN62-00690B INSULATOR-SMPS;JU7500,PC,BLACK,L340,W255 1 SNA
...4 BN63-14962A GASKET-EMI;GASKET,FABRIC,T8,W15,L5,BLACK 2 SNA
...4 BN63-14966A GASKET-EMI;GASKET,FABRIC,T8,W20,L15,BLAC 2 SNA
...4 BN63-14967A GASKET-EMI;GASKET,FABRIC,T8,W23,L25,BLAC 2 SNA
...4 CC04 BN64-02907B CHASSIS-REAR;55KU6300,EGI-SECC,PRESS,T0. 1 SNA
....5 CB20 BN61-11982B BRACKET-WALL;55KS7000,CR-SPCC,EXTRUSION, 4 SNA
...4 BN67-00338D SUPPORT-SOURCE PCB;SILICON,GRAY,T7,W10,L 2 SNA
...4 T0527 BN68-00513A LABEL-E PASS;ALL MODEL,WW,YUPO,W50,L15,W 1 SNA
...4 BN74-00053J TAPE-SINGLE FACE;PAPER,3M2307,T0.14,W25, 0 SNA
...4 BN96-34710A ASSY PCB P-LED INTERFACE BOARD;55JU6400, 1 SNA
..3 BN96-40097A ASSY LED BAR P;55inch_KU6000_AUO_L,CEM3, 6 SNA
..3 BN96-40098A ASSY LED BAR P;55inch_KU6000_AUO_R,CEM3, 6 SNA
0.2 BN96-35610A ASSY COVER P-SOURCE PCB LEFT;JU7500,EGI- 1 SNA
..3 BN62-00722A INSULATOR-SOURCE PCB LEFT;Y15 U7.5K,PC,B 1 SNA
..3 BN63-13311A COVER-SOURCE PCB LEFT;Y15 LED 55",EGI-SE 1 SNA
0.2 BN96-35615A ASSY COVER P-SOURCE PCB RIGHT;JU7500,EGI 1 SNA
..3 BN60-00554R SPACER-SILICONE;Y15 VD,Si,L10,ID3,BLACK, 8 SNA
..3 BN62-00721A INSULATOR-SOURCE PCB RIGHT;Y15 U7.5K,PC, 1 SNA
..3 BN63-13312A COVER-SOURCE PCB RIGHT;Y15 LED 55",EGI-S 1 SNA
..3 BN74-00053J TAPE-SINGLE FACE;PAPER,3M2307,T0.14,W25, 0 SNA
0.2 BN96-35782G ASSY CHASSIS FRONT P;55KU6300,PC+ABS+MF1 1 SA
..3 BN02-00352H TAPE SINGLE FACE;49"MEGA 2,PET,T0.05,W15 1 SNA
..3 BN60-01319B SPACER-CONDUCTIVE;CONDUCTIVE FABRIC,L17, 3 SNA
..3 BN60-01327A SPACER-CONDUCTIVE;Y15_LED,PE FOAM,L1215, 2 SNA
..3 BN60-01328A SPACER-CONDUCTIVE;Y15_LED,PE FOAM,L680,G 2 SNA
..3 BN63-14373G SHEET-PROTECTION COVER;LED_JU7000,PO,T0. 1 SNA
..3 BN63-14373J SHEET-PROTECTION COVER;LED_JU7000,PO,T0. 1 SNA
..3 BN63-14373K SHEET-PROTECTION COVER;LED_JU7000,PO,T0. 1 SNA
..3 AC155 BN64-03028M CHASSIS-FRONT;55KU6300,PC+ABS+MF15%,V-1, 1 SNA
0.2 BN96-39236A ASSY OPEN CELL;T550QVR06.0,16:9,12 1 SNA
..3 BN81-12963A A/S-ADHESIVE ACF;ADHESIVE ACF,47.COF21.0 1 SNA
..3 BN81-12964A A/S-ADHESIVE SIL;ADHESIVE SIL,47.23T01.0 1 SNA
..3 BN81-12970A A/S-IC DRIVER SOURCE;IC DRIVER SOURCE,46 1 SNA
..3 BN81-12971A A/S-POLARIZER CF;POLARIZER CF,66.C4U57.3 1 SNA
..3 BN81-12972A A/S-POLARIZER TFT;POLARIZER TFT,66.T4U58 1 SNA
..3 BN81-12973A
..3 BN81-12974A A/S-SOURCE PCB FRONT RIGHT;SOURCE PCB FR 1 SNA
..3 BN81-12975A A/S-SOURCE PCB BACK LEFT;SOURCE PCB BACK 1 SNA
..3 BN81-12976A A/S-SOURCE PCB BACK RIGHT;SOURCE PCB BAC 1 SNA
A/S-SOURCE PCB FRONT LEFT;SOURCE PCB
FRO
1 SNA
ANNEX-10
Page 42
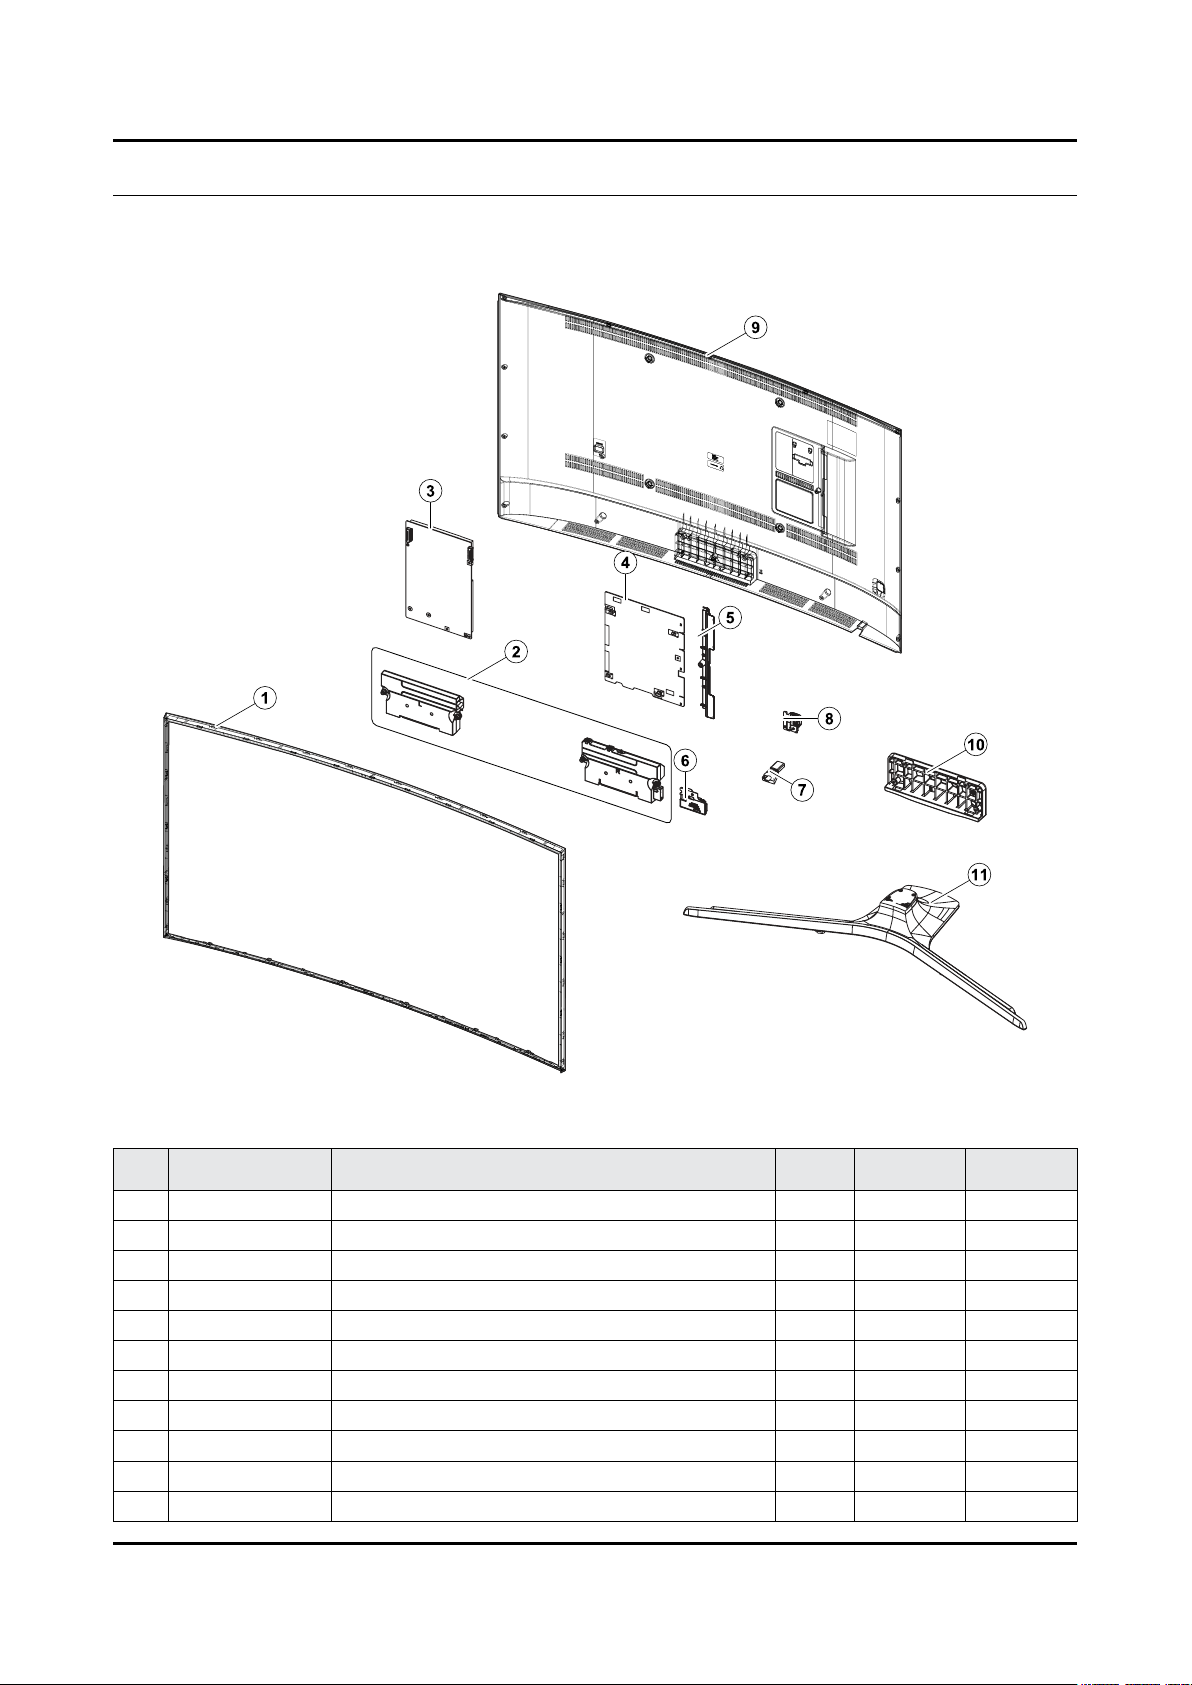
ANNEX. Exploded View & Part List
ANNEX. Exploded View & Part List [UE65KU6100WXXH AA01]
1-1. Exploded View
1-1-1. Parts List
No. Code No. Description & Specication Q’ty SA/SNA Remark
1 BN95-02926A PRODUCT LCD-AUO; CY-WK065HGAV1V,KU6300, 1 SA
2 BN96-35008B ASSY SPEAKER P-FRONT; TV-SPK,JU6700,6ohm, 1 SA
3 BN44-00808D DC VSS-PD BOARD; L65S6N_FSM W,AC/DC,262W, 1 SA
4 BN94-10828D ASSY PCB MAIN; LED 6K TV 1 SA
5 BN63-15236A COVER-TERMINAL SIDE; 55KU6000,HIPS,MOLD,H 1 SA
6 BN59-01174D NETWORK-WLAN CLIENT; WIDT30Q,58x31.45x8.5 1 SA
7 BN96-39955B ASSY BOARD P-IR; KU6300,IR ASSY_KU6300 1 SA
8 BN96-35345B ASSY BOARD P-FUNCTION JOG; JU7500,CT15SE 1 SA
9 BN96-37582G ASSY CHASSIS FRONT P; 65KU6300,PC+ABS+MF 1 SA
10 BN96-40565A ASSY GUIDE P-STAND; 65KU6300,PC+GF20%,BK0 1 SA
11 BN96-37971A ASSY STAND P-BOTTOM; Y15 J6200 60",PC+ABS 1 SA
ANNEX-1
Page 43
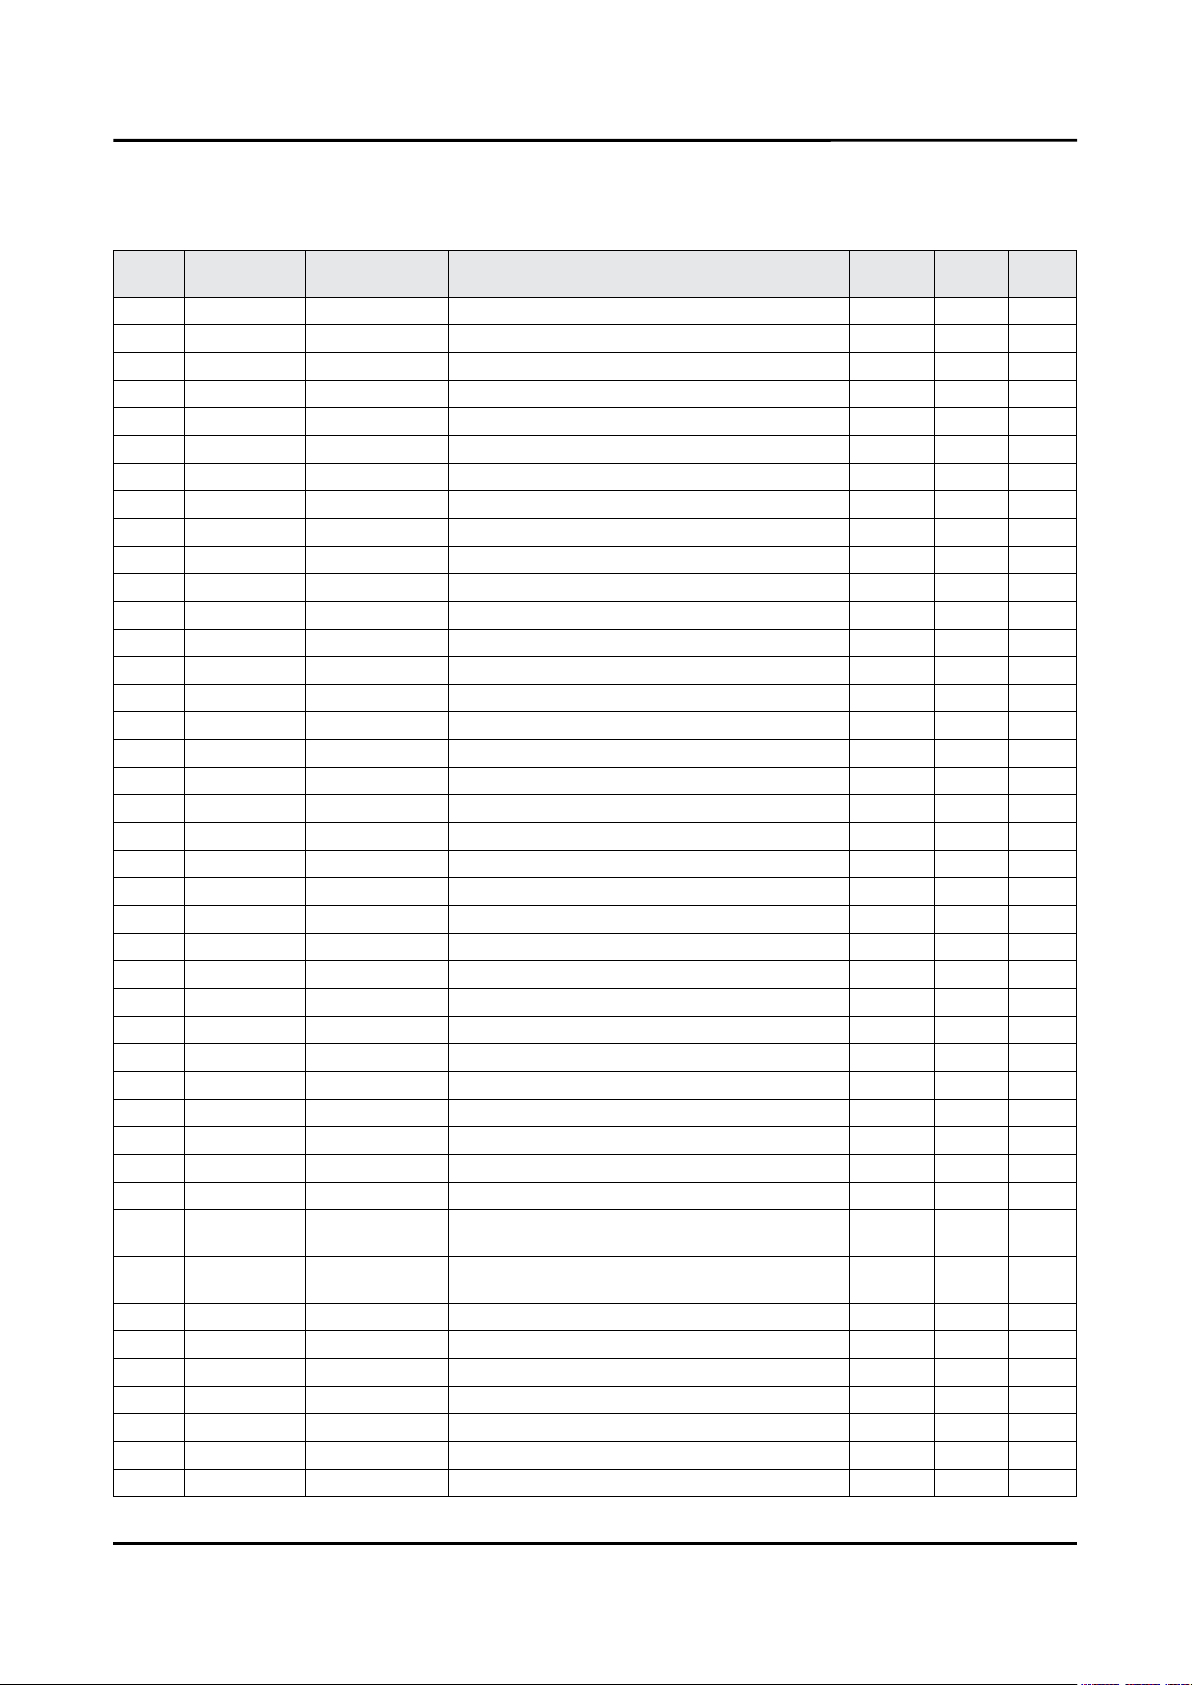
ANNEX-2
ANNEX. Exploded View & Part List
2-1. Electrical Parts List
Service Bom (SA: SERVICE AVAILABLE, SNA: SERVICE NOT AVAILABLE)
Level Location No. Code No. Description & Specication Q’ty SA/SNA Remark
UE65KU6100WXXH (AA01)
1 S001A BN90-07960C ASSY STAND;UJ6K 1 SNA
0.2 SB04A BN96-37971A ASSY STAND P-BOTTOM;Y15 J6200 60",PC+ABS 1 SA
..3 SCREW 6003-001001 SCREW-TAPTYPE;FH,+,-,B,M3,L8,ZPC(BLK),SW 2 SA
..3 AS080 BN63-04755H SHEET-PROTECTION COVER;52LC530,PE,T0.05, 1 SNA
..3 AS080 BN63-04755L SHEET-PROTECTION COVER;22LC350,PE,T0.05, 1 SNA
..3 RF01 BN67-00398P FOOT-RUBBER;UH6K,Si,GRAY,W8,L15.5,T2.5 2 SNA
..3 BN95-02371B ASSY COVER STAND SMT;J6200,60,LIGHT TITA 1 SNA
...4 0203-001269 TAPE-OPP;#301,T0.06,W75,L50000,NTR 0 SNA
...4 0204-007315 COATING;UVICHEM CVM92000(VOC),13~15,CLEA 0 SNA
...4 AA69-07494X PAD-DP SHEET;CTV,CB,DW,W990,L515,YEL 1 SNA
...4 AA69-07610E PAD-DP SHEET;CTV,CB,DW5,W515,L310 1 SNA
...4 AA69-07629P MASTER BOX-DP;CB,DW,L315,W525,H1020 1 SNA
...4 AA69-07707A PAD-DP BOTTOM EPP;CTV,CB,DW,W515,L35 1 SNA
...4 BN01-00337A TARGET-ALUMINIUM CY;Al,99.9%,1924mm, 132 0 SNA
...4 BN01-00340A TARGET-CHROMIUM CY;Cr,99.5%,1924mm, 132d 0 SNA
...4 BN63-14512A COVER-STAND DECORATION;15Y J6200 60",PC+ 1 SNA
....5 0103-005041 RESIN PC ABS;FR3200TV,901408,BK0008,1.2m 85 SNA
....5 BN63-07556C SHEET-PROTECTION COVER;TOC,PO,T0.068,W50 1 SNA
...4 BN68-03920A LABEL BOX;ALL,ART PAPER,W100,L75,W/W,100 1 SNA
...4 BN69-10617S PACKING SHEET;48" 6500 INHOUSE,HDPE/PE F 1 SNA
..3 SB02A BN96-38154A ASSY STAND P-BOTTOM;J6200 60",PC+ABS+GF2 1 SNA
...4 SCREW 6003-001119 SCREW-TAPTYPE;FH,+,S,M4,L10,ZPC(BLK),SWR 10 SA
...4 SCREW 6003-001355 SCREW-TAPTYPE;BH,+,S,M4,L20,ZPC(BLK),SWR 2 SNA
...4 BN61-12727A BRACKET-STAND BOTTOM;HGI,T3,NATURAL 1 SNA
...4 BN61-12728A BRACKET-STAND BODY;HGI,T1.9,NATURAL 1 SNA
...4 BN63-14511A COVER-STAND TOP;15Y J6200 60",PC+ABS+GF2 1 SNA
...4 RF01 BN67-00398P FOOT-RUBBER;UH6K,Si,GRAY,W8,L15.5,T2.5 3 SNA
...4 BN68-05603A LABEL-E PASS;ART PAPER 90G,W/W 1 SNA
0.2 SG01A BN96-40565A ASSY GUIDE P-STAND;65KU6300,PC+GF20%,BK0 1 SA
..3 SG03 BN61-13775A GUIDE-STAND;65KU6300,PC+GF20%,MOLD,V-2,B 1 SNA
..3 BN68-05603A LABEL-E PASS;ART PAPER 90G,W/W 1 SNA
..3 BN69-08751A PACKING SHRINKAGE;STAND,PLASTIC OTHERS,P 0 SNA
..3 BN96-32380B
...4
...4 BN69-10588A BAG SCREW;LDPE,0.05,70,90,TRP,LED TV,LDP 1 SNA
..3 BN96-38693A ASSY ACCESSORY-SCREW;JS7200 1 SNA
...4 6902-002601 BAG SCREW;LDPE,T0.05*,W70,90,TRP,RECYCLE 1 SNA
...4 SCREW BN61-09494B SCREW-TAPTYPE;BH,+,S,M4,L14,ZPC(BLK),SWR 4 SA
1 R001A BN90-08283B ASSY COVER REAR;LEDTV 6K 1 SNA
0.2 SCREW 6001-003074 SCREW-MACHINE;BH,+,M3,L6,ZPC(BLK),SWRCH1 21 SA
0.2 SCREW 6003-000003 SCREW-TAPTYPE;BH,+,-,B,M4,L10,ZPC(BLK),S 1 SA
HOLDER-
BOLT
BN61-09494D HOLDER-BOLT;KU6500,SWRCH18A,BLK,PRESS,B 4 SA
ASSY ACCESSORY-SCREW;LED_H5000,BN69-
1058
1 SNA
Page 44
ANNEX-3
ANNEX. Exploded View & Part List
Level Location No. Code No. Description & Specication Q’ty SA/SNA Remark
0.2 R001A BN96-40430D ASSY COVER P-REAR;65KU6300,PC+ABS+GF15%, 1 SA
..3 R001 BN63-13773V
..3 BN68-03518R LABEL-WARNING;55KU6000,PET,T0.125,W66.5, 1 SNA
..3 BN68-07838A INLAY-TERMINAL SIDE;55KU6000,PET,T0.125, 1 SNA
1 BN90-08341A ASSY W/I;UKU6300G 1 SNA
0.2 BN81-08159Z A/S PART SET-ELEC W/I;LED TV ELEC spec-C 1 SNA
0.2 BN81-11259Y A/S PART SET-MECH W/I;UKU6300G,U65KG* 1 SNA
1 M0017 BN91-17363D ASSY CHASSIS;LED TV 6K 1 SNA
0.2 M0014 BN94-10828D ASSY PCB MAIN;LED 6K TV 1 SA
..3 AH63-02994A GASKET;DA-E750,Conductive Fabric,1,10,15 1 SNA
..3 BN62-00817A HEAT SINK-PS;55KU6000,A1050,T1.5,W115,L1 1 SNA
..3 BN63-15236A COVER-TERMINAL SIDE;55KU6000,HIPS,MOLD,H 1 SA
..3 BN97-10916A ASSY DRM;JAZZ-L,DVB,NagSam, MAC, HDCP, C 1 SNA
...4 BN46-00109H KEY CODE-CERTIFICATION;MAC,TV/AV,General 1 SNA
...4 BN46-00110P KEY CODE-CERTIFICATION;MIRACAST(HDCP2.2) 1 SNA
...4 BN46-00500A KEY CODE-CERTIFICATION;JAZZ-L,Nagra CSC 1 SNA
...4 BN46-00514A KEY CODE-CERTIFICATION;CI PLUS,Jazz M, J 1 SNA
..3 BN97-10985D ASSY SMD;LED 6K 1 SNA
...4 0202-001899 SOLDER-CREAM;M705-GRN360-K2-VT,20-38um,S 5 SNA
...4 DS01A 0401-001056 DIODE-SWITCHING;MMBD4148SE,100V,200mA,SO 1 SA
...4 0402-000511 DIODE-SCHOTTKY;SS14,40V,1000mA,DO-214AC, 1 SNA
...4 0403-001164 DIODE-ZENER;MMSZ5232B,5.32~5.88V,500mW,S 1 SA
...4 0403-001783 DIODE-ZENER;BZB84-C6V2,5.8~6.6V,300mW,SO 3 SNA
...4 0403-001831 DIODE-ZENER;KDZ12B,12~13.5V,1000mW,SOD-1 1 SA
...4 0403-002014 DIODE-ZENER;KDZ16B,16.2~18.3V,1000mW,SOD 2 SNA
...4 0404-001307 DIODE-SCHOTTKY;SSC54,40V,5000mA,DO-214AB 1 SA
...4 0404-001404 DIODE-SCHOTTKY;BAT721C,40V,200mA,SOT-23, 4 SA
...4 0404-001640
...4 0404-001881 DIODE-SCHOTTKY;SS3040-HE,40V,3000mA,SOD- 1 SA
...4 0404-001953 DIODE-SCHOTTKY;MBRA340F-HAF,40V,3000mA,S 3 SA
...4 0406-001200 DIODE-TVS;RClamp0504F,6V,1MAV,TP 2 SA
...4 0406-001628 DIODE-TVS;AOZ8804ADI,6V,1MAV,5A,TP 1 SA
...4 0406-001635 DIODE-TVS;SMF5.0A,6.4V,6.7V,7V,200MAV,20 1 SA
...4 0406-001643 DIODE-TVS;1SMA33AT3G,36.7V,38.65V,40.6V, 1 SNA
...4 0406-001718 DIODE-TVS;SMF36A,40V,44.2V,3.8MAV,1.25VP 2 SA
...4 0501-000002 TR-SMALL SIGNAL;KSA812,PNP,150mW,SOT-23, 1 SNA
...4 0501-000445 TR-SMALL SIGNAL;KTC3875S-Y,NPN,150mW,SOT 7 SC
...4 0504-000126 TR-DIGITAL;KSR1101,NPN,200mW,4.7K/4.7K,S 1 SA
...4 0505-001844 FET-SILICON;SI4435DDY-T1-GE3,P,30V,-11.4 1 SA
...4 0505-002560 FET-SILICON;AO6415,P,20V,-3.3A,0.15ohm,1 1 SA
...4 0505-002598 FET-SILICON;AP2317GN,P,20V,-4.2A,0.052oh 1 SA
...4 0505-002660 FET-SILICON;Si2308BDS,N,60V,2.3A,0.156oh 1 SNA
...4 0505-002790 FET-SILICON;ZXMP6A17G,P,60V,-4.3A,0.190o 1 SA
...4 0505-002893 FET-SILICON;AO4801AS,P,30V,-5A,2W,SOIC-8 2 SA
...4 0505-003205 FET-SILICON;DMG4435SSS-13,P,30V,-7.3A,1. 1 SA
...4 0505-003224 FET-SILICON;AO6405,P,30V,-5A,0.052ohm,2W 1 SA
COVER-REAR;65KU6300,PC+ABS+GF15%,MOLD
,V-
DIODE-SCHOTTKY;SS1060HEWS,60V,1000mA,S
OD
1 SNA
1 SA
Page 45
ANNEX-4
ANNEX. Exploded View & Part List
Level Location No. Code No. Description & Specication Q’ty SA/SNA Remark
...4 0505-003391 FET-SILICON;AOD2922,N,100V,8A,140Mohm,18 1 SA
...4 0505-003397 FET-SILICON;2N7002K,N,60V,0.38A,1.19ohm, 1 SA
...4 0505-003507 FET-SILICON;AO3424,N,30V,3.8A,1.4W,SOT-2 5 SA
...4 0801-003603 IC-CMOS LOGIC;MC74LCX244MN2TWG,Octal buf 1 SA
...4 1001-001998 IC-ANALOG MULTIPLEX;NX3DV221GM,USB switc 2 SA
...4 1003-002786 IC-LEVEL DRIVER;AUO-S302.19,TQFN,32P,4mm 1 SA
...4 1103-001564 IC-EEPROM;S-24C512CI-J800,512Kbit,64Kx8, 1 SA
...4 1105-002704
...4 1201-000166 IC-OP AMP;LM358,SOP,ST,8P,150MIL,DUAL,10 1 SA
...4 1201-003690 IC-AUDIO AMP;TAS5747PHPR,QFP,48P,DUAL,PL 1 SA
...4 1203-004364 IC-VOL. DETECTOR;RT9818C-42PV,SOT-23,3P, 1 SA
...4 1203-008102 IC-POSI.FIXED REG.;S-13A1D12-E800,HSOP,8 1 SNA
...4 1203-008104 IC-POSI.FIXED REG.;S-13A1D18-E800,HSOP,8 1 SNA
...4 1203-008105 IC-POSI.FIXED REG.;S-13A1D33-E800,HSOP,8 1 SNA
...4 1203-008391 IC-DC/DC CONVERTER;AOZ1269QI-02,QFN-23L, 1 SA
...4 1203-008392 IC-VOL. DETECTOR;S-6414AAB-L800X,TSOT-23 1 SA
...4 1203-008454 IC-DC/DC CONVERTER;TPS56528,HSOP8,8,4,89 2 SA
...4 1203-008522 IC-DC/DC CONVERTER;SN1501019DDCR,SOT-23, 2 SNA
...4 1203-008551 IC-DC/DC CONVERTER;BM81244,QFN,40P,6x6mm 1 SNA
...4 1203-008655 IC-DC/DC CONVERTER;BM81249MWW,QFN,56,7x7 1 SA
...4 1203-008725 IC-POSI.ADJUST REG.;SC4508A,MLPQ,12,4x4m 1 SA
...4 1203-008732 IC-DC/DC CONVERTER;SYD104ADC,TSOT-23,6,3 1 SA
...4 1203-008733 IC-DC/DC CONVERTER;AOZ1236QI-02,QFN,23,4 2 SA
...4 1204-003697 IC-DECODER;SDP1531,FCPBGA,1046P,31x31,GL 1 SA
...4 1205-004822 IC-SWITCH;TPS22965DSGR,SON,8P,2x2x0.75mm 3 SNA
...4 1205-005325 IC-REPEATER;PS8409QFN48GTR2-A1,QFN,48P,6 1 SNA
...4 1205-005519 IC-SWITCH;ET20163,SOT23-5,5P,2.95x3.02mm 3 SA
...4 1404-001731 THERMISTOR-NTC;33Kohm,4050K,1mW/C,TP,1.6 2 SNA
...4 1405-001232 VARISTOR;6.4V,5.6Vdc,30A,1.6x0.8mm,TP,19 2 SNA
...4 1405-001271 VARISTOR;35V,20VDC,5A,1.0x0.5mm,TP,100V, 15 SA
...4 1405-001381 VARISTOR;11V,8VDC,30A,1.6x0.8mm,TP,25V,5 2 SA
...4 1405-001382 VARISTOR;24.5V,16VDC,120A,2.0x1.25mm,TP, 2 SA
...4 2007-000029 R-CHIP;0ohm,5%,1/8W,TP,2012 1 SC
...4 2007-000033 R-CHIP;0ohm,5%,1/4W,TP,3216 1 SA
...4 2007-000039 R-CHIP;0ohm,1%,1/10W,TP,1608 8 SA
...4 2007-000043 R-CHIP;1Kohm,1%,1/10W,TP,1608 1 SA
...4 2007-000052 R-CHIP;10Kohm,1%,1/10W,TP,1608 2 SA
...4 2007-000066 R-CHIP;20Kohm,1%,1/10W,TP,1608 1 SNA
...4 2007-000070 R-CHIP;0ohm,5%,1/10W,TP,1608 12 SA
...4 2007-000084 R-CHIP;4.7Kohm,5%,1/10W,TP,1608 1 SA
...4 2007-000090 R-CHIP;10Kohm,5%,1/10W,TP,1608 1 SA
...4 2007-000143 R-CHIP;4.7Kohm,5%,1/16W,TP,1005 17 SNA
...4 2007-000171 R-CHIP;0ohm,5%,1/16W,TP,1005 21 SNA
...4 2007-000173 R-CHIP;22ohm,5%,1/16W,TP,1005 3 SNA
...4 2007-000219 R-CHIP;1.2Kohm,1%,1/10W,TP,1608 1 SA
...4 2007-000265 R-CHIP;1.8Kohm,1%,1/10W,TP,1608 1 SA
IC-DDR4 SDRAM;K4F8E304HB-MGCH,LPDDR4-
SDR
2 SA
Page 46
ANNEX-5
ANNEX. Exploded View & Part List
Level Location No. Code No. Description & Specication Q’ty SA/SNA Remark
...4 2007-000308 R-CHIP;10ohm,5%,1/8W,TP,2012 4 SA
...4 2007-000309 R-CHIP;10ohm,5%,1/10W,TP,1608 3 SA
...4 2007-000516 R-CHIP;2.7Kohm,1%,1/10W,TP,1608 1 SNA
...4 2007-000683 R-CHIP;3.3Kohm,1%,1/10W,TP,1608 8 SA
...4 2007-000701 R-CHIP;3.6Kohm,1%,1/10W,TP,1608 1 SNA
...4 2007-000736 R-CHIP;30Kohm,1%,1/10W,TP,1608 2 SA
...4 2007-000779 R-CHIP;33ohm,1%,1/10W,TP,1608 2 SA
...4 2007-000816 R-CHIP;390Kohm,1%,1/10W,TP,1608 1 SNA
...4 2007-000881 R-CHIP;4.7ohm,5%,1/8W,TP,2012 16 SNA
...4 2007-000932 R-CHIP;470ohm,5%,1/16W,TP,1005 3 SNA
...4 2007-001125 R-CHIP;68Kohm,1%,1/10W,TP,1608 2 SA
...4 2007-001139 R-CHIP;7.5Kohm,1%,1/10W,TP,1608 2 SA
...4 2007-001288 R-CHIP;18ohm,5%,1/16W,TP,1005 4 SA
...4 2007-001292 R-CHIP;33ohm,5%,1/16W,TP,1005 28 SNA
...4 2007-001298 R-CHIP;51ohm,5%,1/16W,TP,1005 15 SNA
...4 2007-002899 R-CHIP;10ohm,1%,1/10W,TP,1608 1 SA
...4 2007-007107 R-CHIP;100Kohm,1%,1/16W,TP,1005 14 SNA
...4 2007-007131 R-CHIP;13Kohm,1%,1/16W,TP,1005 4 SA
...4 2007-007132 R-CHIP;15Kohm,1%,1/16W,TP,1005 2 SA
...4 2007-007136 R-CHIP;4.7Kohm,1%,1/16W,TP,1005 66 SNA
...4 2007-007137 R-CHIP;1.2Kohm,1%,1/16W,TP,1005 3 SA
...4 2007-007138 R-CHIP;27Kohm,1%,1/16W,TP,1005 3 SNA
...4 2007-007139 R-CHIP;47Kohm,1%,1/16W,TP,1005,T0.35 13 SA
...4 2007-007142 R-CHIP;10Kohm,1%,1/16W,TP,1005 35 SNA
...4 2007-007306 R-CHIP;100ohm,1%,1/16W,TP,1005 29 SNA
...4 2007-007309 R-CHIP;12Kohm,1%,1/16W,TP,1005,T0.35 1 SA
...4 2007-007310 R-CHIP;8.2Kohm,1%,1/16W,TP,1005 2 SA
...4 2007-007312 R-CHIP;20Kohm,1%,1/16W,TP,1005 11 SA
...4 2007-007313 R-CHIP;6.8Kohm,1%,1/16W,TP,1005 3 SA
...4 2007-007318 R-CHIP;1Kohm,1%,1/16W,TP,1005 13 SNA
...4 2007-007334 R-CHIP;200Kohm,1%,1/16W,TP,1005 5 SNA
...4 2007-007488 R-CHIP;75Kohm,1%,1/16W,TP,1005 5 SNA
...4 2007-007517 R-CHIP;240ohm,1%,1/16W,TP,1005 6 SNA
...4 2007-007528 R-CHIP;1.5Kohm,1%,1/16W,TP,1005 5 SA
...4 2007-007643 R-CHIP;2Mohm,1%,1/10W,TP,1608 1 SA
...4 2007-007720 R-CHIP;300Kohm,1%,1/10W,TP,1608 1 SA
...4 2007-007723 R-CHIP;75Kohm,1%,1/10W,TP,1608 3 SA
...4 2007-007766 R-CHIP;2Kohm,1%,1/16W,TP,1005 22 SNA
...4 2007-007767 R-CHIP;200ohm,1%,1/16W,TP,1005 7 SA
...4 2007-007798 R-CHIP;10ohm,1%,1/16W,TP,1005 8 SA
...4 2007-007830 R-CHIP;14Kohm,1%,1/10W,TP,1608 1 SA
...4 2007-007847 R-CHIP;16Kohm,1%,1/10W,TP,1608 5 SA
...4 2007-007942 R-CHIP;1Mohm,1%,1/16W,TP,1005 1 SNA
...4 2007-007981 R-CHIP;180Kohm,1%,1/16W,TP,1005 1 SNA
...4 2007-008015 R-CHIP;75ohm,1%,1/16W,TP,1005 9 SNA
...4 2007-008263 R-CHIP;3Kohm,1%,1/16W,TP,1005 2 SA
...4 2007-008269 R-CHIP;51Kohm,1%,1/16W,TP,1005 3 SA
Page 47
ANNEX-6
ANNEX. Exploded View & Part List
Level Location No. Code No. Description & Specication Q’ty SA/SNA Remark
...4 2007-008298 R-CHIP;49.9ohm,1%,1/16W,TP,1005 4 SA
...4 2007-008391 R-CHIP;6.34Kohm,1%,1/16W,TP,1005 2 SA
...4 2007-008596 R-CHIP;0.1ohm,1%,1/4W,TP,3216 2 SC
...4 2007-008779 R-CHIP;0ohm,1%,1/16W,TP,1005 3 SA
...4 2007-009117 R-CHIP;49.9Kohm,1%,1/16W,TP,1005 1 SA
...4 2007-009322 R-CHIP;1.3Kohm,1%,1/16W,TP,1005 2 SA
...4 2007-009777 R-CHIP;4.99Kohm,1%,1/16W,TP,1005 2 SA
...4 2011-001261 R-NETWORK;33ohm,5%,1/16W,L,CHIP,8P,TP,2. 6 SA
...4 2011-001264 R-NETWORK;10ohm,5%,1/16W,L,CHIP,8P,TP,2. 8 SNA
...4 2011-001344 R-NETWORK;100ohm,5%,1/16W,L,CHIP,8P,TP,2 6 SA
...4 AD480 2203-000233 C-CER,CHIP;0.1nF,5%,50V,C0G,TP,1005 4 SA
...4 AD480 2203-000254 C-CER,CHIP;10nF,10%,16V,X7R,TP,1005 5 SA
...4 AD480 2203-000278 C-CER,CHIP;0.01nF,0.5pF,50V,C0G,TP,1005 3 SA
...4 AD480 2203-000359 C-CER,CHIP;0.15nF,5%,50V,C0G,TP,1005,0.5 3 SNA
...4 AD480 2203-000386 C-CER,CHIP;0.015nF,5%,50V,C0G,TP,1005 3 SA
...4 AD480 2203-000438 C-CER,CHIP;1nF,10%,50V,X7R,TP,1005 13 SA
...4 AD480 2203-000489 C-CER,CHIP;2.2nF,10%,50V,X7R,TP,1005 2 SA
...4 AD480 2203-000585 C-CER,CHIP;0.22nF,10%,50V,X7R,TP,1005 3 SA
...4 AD480 2203-000812 C-CER,CHIP;0.033nF,5%,50V,C0G,TP,1005 5 SA
...4 AD480 2203-000940 C-CER,CHIP;0.47nF,10%,50V,X7R,TP,1005 1 SA
...4 AD480 2203-001428 C-CER,CHIP;470nF,10%,50V,X7R,TP,2012 1 SNA
...4 AD480 2203-002285 C-CER,CHIP;10nF,10%,50V,X7R,TP,1005 5 SNA
...4 AD480 2203-002398 C-CER,CHIP;22nF,10%,50V,X7R,TP,1608 1 SNA
...4 AD480 2203-002494 C-CER,CHIP;470nF,10%,16V,X7R,TP,2012 1 SNA
...4 AD480 2203-002525 C-CER,CHIP;0.56nF,10%,50V,X7R,TP,1005 1 SNA
...4 AD480 2203-005054 C-CER,CHIP;0.0047nF,0.25pF,50V,NP0,TP,10 2 SA
...4 AD480 2203-005083 C-CER,CHIP;220nF,10%,50V,X7R,TP,1608,0.8 6 SA
...4 AD480 2203-005249 C-CER,CHIP;100nF,10%,50V,X7R,TP,1608 7 SNA
...4 AD480 2203-005968 C-CER,CHIP;4.7nF,10%,50V,X7R,TP,1005,0.5 2 SNA
...4 AD480 2203-006048 C-CER,CHIP;100nF,10%,10V,X7R,TP,1005 8 SA
...4 AD480 2203-006088 C-CER,CHIP;330nF,10%,10V,X7R,TP,1608 1 SA
...4 AD480 2203-006126 C-CER,CHIP;47nF,10%,16V,X7R,TP,1005 3 SNA
...4 AD480 2203-006158 C-CER,CHIP;100nF,10%,16V,X7R,TP,1005,T0. 107 SNA
...4 AD480 2203-006324 C-CER,CHIP;2200nF,10%,10V,X5R,TP,1608 16 SA
...4 AD480 2203-006348 C-CER,CHIP;1000nF,10%,25V,X5R,TP,1608,0. 2 SA
...4 AD480 2203-006562 C-CER,CHIP;1000nF,10%,10V,X5R,TP,1005 27 SNA
...4 AD480 2203-006698 C-CER,CHIP;1000nF,10%,25V,X7R,TP,1608,0. 3 SNA
...4 AD480 2203-006824 C-CER,CHIP;4700nF,10%,10V,X5R,TP,1608 5 SNA
...4 AD480 2203-006838 C-CER,CHIP;2200nF,10%,6.3V,X5R,TP,1005 9 SA
...4 AD480 2203-006844 C-CER,CHIP;470nF,10%,10V,X5R,TP,1005 2 SA
...4 AD480 2203-006890 C-CER,CHIP;10000nF,20%,6.3V,X5R,TP,1608 29 SNA
...4 AD480 2203-007176 C-CER,CHIP;10000nF,10%,16V,X5R,TP,2012,1 20 SNA
...4 AD480 2203-007240 C-CER,CHIP;22000nF,20%,6.3V,X5R,TP,1608( 72 SA
...4 AD480 2203-007269 C-CER,CHIP;22000nF,20%,10V,X5R,TP,2012(2 13 SA
...4 AD480 2203-007270 C-CER,CHIP;10000nF,10%,10V,X5R,TP,1608,0 24 SNA
...4 AD480 2203-007306 C-CER,CHIP;10000nF,10%,25V,X5R,TP,2012,1 48 SNA
...4 AD480 2203-007544 C-CER,CHIP;100nF,10%,50V,X7R,TP,1005,0.5 37 SA
Page 48
ANNEX-7
ANNEX. Exploded View & Part List
Level Location No. Code No. Description & Specication Q’ty SA/SNA Remark
...4 AD480 2203-008315 C-CER,CHIP;22000nF,20%,25V,X5R,TP,2012,T 13 SA
...4 2402-001268 C-AL,SMD;100uF,20%,25V,WT,TP,8x6.3mm 1 SA
...4 2409-001240 C-ORGANIC,SMD;33uF,20%,25V,LR,TP,7343(1. 1 SA
...4 2409-001338 C-POLYMER ,CHIP;47uF,20%,6.3V,TP,3.2x1.6 1 SA
...4 2703-000213 INDUCTOR-SMD;470nH,10%,1.35Ohm,35mA,15,M 1 SA
...4 2703-001938 INDUCTOR-SMD;56nH,5%,1005,1.5Ohm,200mA,1 3 SA
...4 2703-003149 INDUCTOR-SMD;2.2uH,20%,0.055Ohm,3000mA,W 1 SA
...4 2703-003747 INDUCTOR-SMD;22uH,20%,6060,0.135ohm,1300 2 SA
...4 2703-003862 INDUCTOR-SMD;10uH,20%,6060,0.065ohm,1900 3 SA
...4 2703-003913 INDUCTOR-SMD;2.2uH,20%,2520,1.2T,0.116Oh 1 SNA
...4 2703-003937 INDUCTOR-SMD;1uH,20%,7.0x6.47x3.0mm,0.00 3 SA
...4 2703-004586 INDUCTOR-SMD;3.3uH,20%,5050,2T,0.063Ohm, 1 SA
...4 2703-004630 INDUCTOR-SMD;2.2uH,20%,5.0T,0.0025Ohm,66 1 SNA
...4 2703-004724 INDUCTOR-SMD;8.2uH,20%,4T,0.072Ohm,2300m 4 SA
...4 2703-005191 INDUCTOR-SMD;1.5uH,20%,4.5,0.02Ohm,5300m 1 SA
...4 2703-005193 INDUCTOR-SMD;2.2uH,20%,4.5,0.024Ohm,5100 2 SA
...4 2703-005376 INDUCTOR-SMD;10uH,20%,10x10.7mm,4.0T,0.0 1 SA
...4 2801-004021 CRYSTAL-SMD;24.576MHz,20ppm,28-AAN,12pF, 1 SA
...4 3301-001364 BEAD-SMD;1000ohm,1608,TP,1085ohm/108MHz, 4 SNA
...4 3301-002039 BEAD-SMD;26ohm,1608,TP 33 SA
...4 3601-001374 FUSE-SURFACE MOUNT;32V,5A,FAST-ACTING,PL 3 SA
...4 3601-001376 FUSE-SURFACE MOUNT;32V,3A,FAST-ACTING,Hi 2 SNA
...4 3701-001967 CONNECTOR-HDMI;19P,A,FEMALE,AU,0.5mm,BLK 3 SA
...4 3707-001103 CONNECTOR-OPTICAL;ANGLE,SPDIF,2.5PI 1 SA
...4 3708-003241 CONNECTOR-FPC/FFC/PIC;96P,0.5mm,SMD-A,AU 2 SNA
...4 3710-003908 CONNECTOR-SOCKET;64P,2R,0.5mm,SMD-S,AU,B 1 SA
...4 EH01 3711-007803 HEADER-BOARD TO CABLE;BOX,12P,1R,1.25mm, 1 SA
...4 EH01 3711-008131 HEADER-BOARD TO CABLE;BOX,4P,1R,2.5mm,AN 1 SA
...4 EH01 3711-008859 HEADER-BOARD TO CABLE;BOX,12P,2R,2mm,ANG 1 SA
...4 3711-009090 CONNECTOR-HEADER;BOX,16P,1R,1.25mm,SMD-A 1 SA
...4 3722-003199 JACK-MODULAR;8P/8C,Y,ANGLE,NONE,AU,1PORT 1 SA
...4 3722-003457 JACK-USB;4P/1C,NI,BLK,ANGLE,A,2.0,13.1x1 2 SA
...4 3722-003814 JACK-PHONE;1P/7C,NI/SN,YEL,ANGLE,3.5PI,1 1 SA
...4 JACK 3722-003873 JACK-PHONE;1P/7C,AU/SN,BLU,ANGLE,3.5PI,1 1 SA
...4 6302-001376 GASKET-SMD;,,CONDUCTIVE FABRIC,T14,W43,L 7 SNA
...4 BN40-00322C TUNER-DTV AIR CABLE;CDT-933T322-93,DVB-T 1 SA
...4 BN41-02528A PCB-MAIN;KU6000,FR-4,4L,1.6T,193x241mm,1 1 SNA
...4 CB07 BN61-13312B BRACKET-PCB;55KS8000,SK5,T0.3,13.7,11.4, 4 SNA
...4 BN97-10863B
....5 1107-002226 IC-NOR FLASH;W25Q40CLSSIP,4Mbit,SOIC,8P, 1 SA
...4 BN97-10865A ASSY MICOM-MAIN;T-JZL6DEUC,UWP60,KLM4G1F 1 SNA
....5 1107-002374 IC-EMMC;KLM4G1FEPD-B031,4Gbyte,BGA,153P, 1 SNA
...4 BN97-10918A ASSY MICOM;TCON,KU6k,W25Q80DVSSIG,1107-0 1 SNA
....5 1107-002339 IC-NOR FLASH;W25Q80DV,8Mbit,SOP,5.28x5.2 1 SNA
....5 BN46-00515A S/W MICOM;Jazz M-L,TCON F/W 1 SNA
..3 BN97-11343A ASSY MICOM;TCON DATA,KU6k,65-AUO-Curved, 1 SNA
ASSY MICOM-SUB;JMMICOM_EU_
TV,UWP60,W25Q4
1 SNA
Page 49
ANNEX-8
ANNEX. Exploded View & Part List
Level Location No. Code No. Description & Specication Q’ty SA/SNA Remark
...4 BN46-00540A S/W MICOM;K65L6U0C,AUO,65L6AU*RK,Curved 1 SNA
1 BN91-17379G ASSY SHIELD;LED TV 6K 1 SNA
0.2 SCREW 6001-003081
0.2 BN02-00102B TAPE-FILAMENT;FILAMENT,#8917,T0.15,W25,L 0 SNA
0.2 BN39-02025G LEAD CONNECTOR-POWER;UN65KU6000,Flat Con 1 SA
0.2 16P BN39-02030C LEAD CONNECTOR-BLU;BLU,UL21016,16P,150mm 1 SA
0.2 BN39-02218C LEAD CONNECTOR-SUB ASSY;65KU6000,UL21016 1 SA
0.2 BN39-02220D LEAD CONNECTOR-SUB ASSY;65KU6300,UL21016 1 SA
0.2 BN44-00808D DC VSS-PD BOARD;L65S6N_FSM W,AC/DC,262W, 1 SA
0.2 WIFI BN59-01174D NETWORK-WLAN CLIENT;WIDT30Q,58x31.45x8.5 1 SA
0.2 BN61-10073B HOLDER-WIFI;55KU6000,ABS,MOLD,BK0007,HB 1 SNA
0.2 CB18 BN61-11517A BRACKET-STAND LINK;HGI-SGHC,T2,NATURAL 1 SA
..3 BN61-09605A STUD-PEM;LED TV F6100,SUM24L,L8,PRESS 4 SNA
0.2 SP01A BN96-35008B ASSY SPEAKER P-FRONT;TV-SPK,JU6700,6ohm, 1 SA
0.2 JOG BN96-35345B ASSY BOARD P-FUNCTION JOG;JU7500,CT15SE8 1 SA
..3 AH240 BN61-11584A HOLDER-BUTTON;JU7500,ABS,MOLD,BK0007,HB 1 SNA
..3 AH297 BN63-11231B HOLDER-KNOB;HU7000,ABS,MOLD,BLACK,HB 1 SNA
..3 FK04 BN64-02406B BUTTON-FUNCTION;LED_HU7000,ABS,HB,BLACK, 1 SNA
...4 0103-004609 RESIN ABS;HF-0680U,K21294,BK0007,HB,High 8 SNA
0.2 BN96-39823B FFC CABLE;65KS7500,Fold,L600,96P 1 SA
0.2 BN96-39902A FFC CABLE;65KU6000,Fold,L750,96P 1 SA
0.2 FB10A BN96-39955B ASSY BOARD P-IR;KU6300,IR ASSY_KU6300 1 SA
1 BN92-20019B ASSY LABEL POP;LED TV 6K 1 SNA
0.2 BN68-07971A LABEL POP-HIGHLIGHT;KU6500,PET,T0.1,W90, 1 SNA
1 BN92-20183H ASSY BOX;LEDTV 6K 1 SNA
0.2 BH68-00662A LABEL BOX;ALL,ART PAPER,W60,L110,WHT,NO 1 SNA
0.2 BN68-05640A LABEL BOX;ALL,ART PAPER,W110,L130,EUROPE 1 SNA
0.2 BN69-14071F BOX UNIT;65KU6100,CB,DW4,F1,L1620,W215,H 1 SNA
1 BN92-20188A ASSY P/MATERIAL;LEDTV 6K 1 SNA
0.2 6902-001954 BAG ROLL;HDPE/PE FOAM,HDPE T0.018mm,T0.2 3 SNA
0.2 6902-002233 BAG AIR;LDPE,-,T0.2,W900,L1850,TRP,-,-,- 1 SNA
0.2 6922-000003 BAND;PP,T0.8,W18,L1650M,TRP,DA69-90145A 1 SNA
0.2 BN02-00319B TAPE-OPP;OPP,T0.05,W75,L800M,CLEAR,ROLL 3 SNA
0.2 BN68-02422B LABEL WARNING;ALL,ART PAPER,T0.05,W240,L 1 SNA
0.2 BN69-03982J PACKING ANGLE;ALL,PAPER,-,-,-,-,-,-,- 1 SNA
0.2 BN69-05418M WRAP;T0.017,500,2000000,2000000,500 0 SNA
0.2 BN69-06640E PAD-PACKING;TRUCK PAD,CB,-,,W410,L2500,, 1 SNA
0.2 BN69-06642B PAD-DP SHEET;PAD,CB,SW4,,W1500,L1100,,,, 1 SNA
0.2 BN69-13470A CUSHION-SET SIDE;65KU6300,EPS,16.7g/l,WH 1 SNA
0.2 BN69-13480A CUSHION-SET;65KU6300,EPS,16.7g/l,WHT,V-S 1 SNA
..3 0103-005099 RESIN EPS;BASF303,Natural,Natural 1468 SNA
0.2 BN69-13942X PALLET-WOODEN;65" KU6100,WOOD,-,W1150,L1 1 SNA
0.2 BN69-14366B PAD-CUSHION FRONT;65KS9800,CB,DW2+EPS,W7 1 SNA
1 ACCE1 BN92-20193D ASSY ACCESSORY;LEDTV 6K 1 SNA
0.2 ACCE2 BN96-35677G ASSY ACCESSORY-CABLE;LED_J6K 1 SNA
..3 3709-001791 CONNECTOR-CARD SLOT;64P,0.5mm,SMD-A,AU,P 1 SA
SCREW-MACHINE;PWH,+,M3,L5,ZPC(WHT),SWR
CH
9 SA
Page 50
ANNEX-9
ANNEX. Exploded View & Part List
Level Location No. Code No. Description & Specication Q’ty SA/SNA Remark
..3 T0268 3903-001118 CBF-POWER CORD;DT,EU,Angle,2P(C7),250V,2 1 SA
..3 4301-000121 BATTERY-MN;1.5V,R03,10.5x44.5m,7.5g,AAA 2 SNA
..3 6902-001965 BAG PE;LDPE,BIOBASED,T0.05,W200,L300,TRP 1 SNA
..3 EC03 BN39-02189A GENDER CABLE;DC to RCA Cable,3P,L100,UL2 1 SA
..3 EC03 BN39-02190A GENDER CABLE;DC to RCA Cable,2P,L100,UL2 1 SA
..3 BN59-01247A REMOCON-TV;2016 TV,Samsung,44KEY,3V,KU60 1 SA
..3 EH03A BN96-36071D ASSY HOLDER P-RING;LED JU6700,JU650,W/W, 1 SNA
...4 6902-002497 BAG ZIPPER;LDPE,T0.05,W100,L250,TRP,RECY 1 SNA
...4 AH365 BN61-11938A HOLDER-WALL RING;Y15 JU6510,ABS,MOLD,BK0 4 SNA
....5 0103-004609 RESIN ABS;HF-0680U,K21294,BK0007,HB,High 40 SNA
0.2 ACCE4 BN96-39501H ASSY ACCESSORY-MANUAL;LED_KU6300 1 SNA
..3 6902-001964 BAG PE;LDPE,BIOBASED,T0.03,W200,L300,TRP 1 SNA
..3 T0527 BN68-00513A LABEL-E PASS;ALL MODEL,WW,YUPO,W50,L15,W 2 SNA
..3 BN68-03548J LEAFLET-WARRANTY;comm,Samsung,17Lang,Mid 1 SNA
..3 BN68-04972E
..3 BN68-07598A LEAFLET-FICHE;ALL,W/P,0 1 SNA
..3 BN68-07990E MANUAL USERS;KU6300,XH,W/P,EURO B5 1 SNA
1 BN92-20198J ASSY LABEL;LEDTV 6K 1 SNA
0.2 0203-001598 TAPE-FILAMENT;FILAMENT,#8915,T0.15,W12,L 0 SNA
0.2 BN68-06708G LABEL-RATING;Monitor,WW,PP,T0.161,W93,L7 1 SNA
0.2 BN68-07519A LABEL-ENERGY;ALL JORDAN,WW,PP,T0.135,W60 1 SNA
0.2 BN68-07991T LEAFLET-QUICK SETUP GUIDE;KU6300,EU,W/P, 1 SNA
1 PANEL BN95-02926A
0.2 SCREW 6001-003075 SCREW-MACHINE;BH,+,M3,L4,ZPC(WHT),SWRCH1 6 SA
0.2 SCREW 6001-003079 SCREW-MACHINE;CH,+,M3,L6,ZPC(BLK),SWRCH1 8 SA
0.2 BN68-05722A LABEL-E PASS;POLYPROPYLENE,NON-COATING 1 SNA
0.2 BN90-08328A ASSY MISC-BLU;2016_LCM_BLU 1 SNA
..3 BN61-11746A DIFFUSER PLATE;15Y_J7.5K 65INCH_DIFFUSER 1 SNA
..3 BN61-13706A FRAME-MIDDLE TOP;65KU6300,TPV,HB,BK0008, 1 SNA
..3 BN61-13711A FRAME-MIDDLE LEFT RIGHT;65KU6300,TPV,HB, 2 SNA
..3 BN61-13716A FRAME-MIDDLE BOTTOM;65KU6300,TPV,HB,BK00 1 SNA
..3 BN63-13490A OPTICAL SHEET-REFLECTOR;15Y JU7.5K 65inc 1 SNA
..3 BN63-14900A OPTICAL SHEET-COMPLEX;15Y_JU6.7K_65inch_ 1 SNA
..3 BN63-14906A OPTICAL SHEET-MLS;15Y_JU6.7K_65inch_PTD8 1 SNA
..3 BN96-34807A ASSY LED BAR P;65" UHD_L_SDC,CEM3,view 8 SNA
..3 BN96-34808A ASSY LED BAR P;65" UHD_R_SDC,CEM3,view 8 SNA
..3 BN96-37583C ASSY CHASSIS REAR P;65KU6300,EGI-SECC 1 SNA
...4 0203-006897 TAPE-DOUBLE FACE;Si,T1,W10,L50,WHITE 1 SNA
...4 SCREW 6001-003075 SCREW-MACHINE;BH,+,M3,L4,ZPC(WHT),SWRCH1 1 SA
...4 BN02-00040C TAPE DOUBLE FACE;F-LED ALL,PET,T0.3,W3,L 8 SNA
...4 BN02-00173C TAPE-POLY;PET,T0.05,W40,BLACK 0 SNA
...4 BN61-11508A SUPPORT-PLATE;Y15 LED,PC,V-2,CLEAR,OD-19 26 SNA
...4 BN61-11757A FRAME-CHASSIS REAR TOP;Y15 7.5K AUO 65", 1 SNA
...4 BN61-11758A FRAME-CHASSIS REAR BOTTOM;Y15 7.5K AUO 6 1 SNA
...4 BN61-11759A FRAME-CHASSIS REAR LEFT RIGHT;Y15 7.5K A 2 SNA
....5 0103-007683 RESIN PC;LS-3104G,W9225,WT0034,3.0mm V-2 493 SNA
LEAFLET-REGULATORY
GUIDE;ALL,SAMSUNG,W/W
PRODUCT LCD-AUO;CY-
WK065HGAV1V,KU6300,Ba
1 SNA
1 SA
Page 51
ANNEX. Exploded View & Part List
Level Location No. Code No. Description & Specication Q’ty SA/SNA Remark
...4 BN61-11793A HOLDER-SOURCE PCB;Y15 7.5K 65" AUO,ABS,M 2 SNA
....5 0103-004618 RESIN ABS;HF-0680U,W91902,WT0034,1.5mm H 2 SNA
...4 BN61-14348A
...4 BN62-00690C INSULATOR-SMPS;JU7500,PC,BLACK,L405,W255 1 SNA
...4 BN63-14962A GASKET-EMI;GASKET,FABRIC,T8,W15,L5,BLACK 2 SNA
...4 BN63-15006A GASKET-ESD;GASKET,FABRIC,T7,W15,L15,BLAC 2 SNA
...4 BN63-15009A GASKET-ESD;GASKET,FABRIC,T9,W15,L25,BLAC 2 SNA
...4 CC04 BN64-02977B CHASSIS-REAR;65KU6300,EGI-SECC,PRESS,T1, 1 SNA
....5 CB20 BN61-11982B BRACKET-WALL;55KS7000,CR-SPCC,EXTRUSION, 4 SNA
...4 RF01 BN67-00474B FOOT-RUBBER;PE400,Si,GRAY,W8,L30,T5 2 SNA
...4 T0527 BN68-00513A LABEL-E PASS;ALL MODEL,WW,YUPO,W50,L15,W 1 SNA
...4 BN96-34712A ASSY PCB P-LED INTERFACE BOARD;65JU6400, 1 SNA
0.2 BN96-35625B ASSY COVER P-SOURCE PCB RIGHT;65KU6300,E 1 SNA
..3 BN02-00352A TAPE PET;Y12 F-LED,PET,T0.05,W30,L40,BLA 1 SNA
..3 BN62-00721A INSULATOR-SOURCE PCB RIGHT;Y15 U7.5K,PC, 1 SNA
..3 BN63-13592B COVER-SOURCE PCB RIGHT;65KU6300,EGI-SECC 1 SNA
0.2 BN96-35626B ASSY COVER P-SOURCE PCB LEFT;65KU6300,EG 1 SNA
..3 BN60-00554R SPACER-SILICONE;Y15 VD,Si,L10,ID3,BLACK, 6 SNA
..3 BN62-00722A INSULATOR-SOURCE PCB LEFT;Y15 U7.5K,PC,B 1 SNA
..3 BN63-13591B COVER-SOURCE PCB LEFT;65KU6300,EGI-SECC, 1 SNA
0.2 BN96-37582G ASSY CHASSIS FRONT P;65KU6300,PC+ABS+MF1 1 SA
..3 BN60-01319B SPACER-CONDUCTIVE;CONDUCTIVE FABRIC,L17, 3 SNA
..3 BN60-01329A SPACER-CONDUCTIVE;Y15_LED,PE FOAM,L1435, 2 SNA
..3 BN60-01330A SPACER-CONDUCTIVE;Y15_LED,PE FOAM,L805,G 2 SNA
..3 BN63-14373H SHEET-PROTECTION COVER;LED_JU7000,PO,T0. 1 SNA
..3 BN63-14373J SHEET-PROTECTION COVER;LED_JU7000,PO,T0. 2 SNA
..3 BN63-14373L SHEET-PROTECTION COVER;LED_JU7000,PO,T0. 1 SNA
..3 AC155 BN64-03217G CHASSIS-FRONT;65KU6300,PC+ABS+MF15%,V-1, 1 SNA
0.2 BN96-39238A ASSY OPEN CELL;T650QVR05.1,16:9,16 1 SNA
..3 BN81-12963A A/S-ADHESIVE ACF;ADHESIVE ACF,47.COF21.0 1 SNA
..3 BN81-12964A A/S-ADHESIVE SIL;ADHESIVE SIL,47.23T01.0 1 SNA
..3 BN81-13127A A/S-IC DRIVER SOURCE;IC DRIVER SOURCE,46 1 SNA
..3 BN81-13128A A/S-POLARIZER CF;POLARIZER CF,66.C4U57.3 1 SNA
..3 BN81-13129A A/S-POLARIZER TFT;POLARIZER TFT,66.T4U58 1 SNA
..3 BN81-13130A
..3 BN81-13131A A/S-SOURCE PCB FRONT RIGHT;SOURCE PCB FR 1 SNA
..3 BN81-13132A A/S-SOURCE PCB BACK LEFT;SOURCE PCB BACK 1 SNA
..3 BN81-13133A A/S-SOURCE PCB BACK RIGHT;SOURCE PCB BAC 1 SNA
A/S-SOURCE PCB FRONT LEFT;SOURCE PCB
HOLDER-SOURCE
PCB;65KU6300,ABS,MOLD,GY00
FRO
6 SNA
1 SNA
ANNEX-10
Page 52
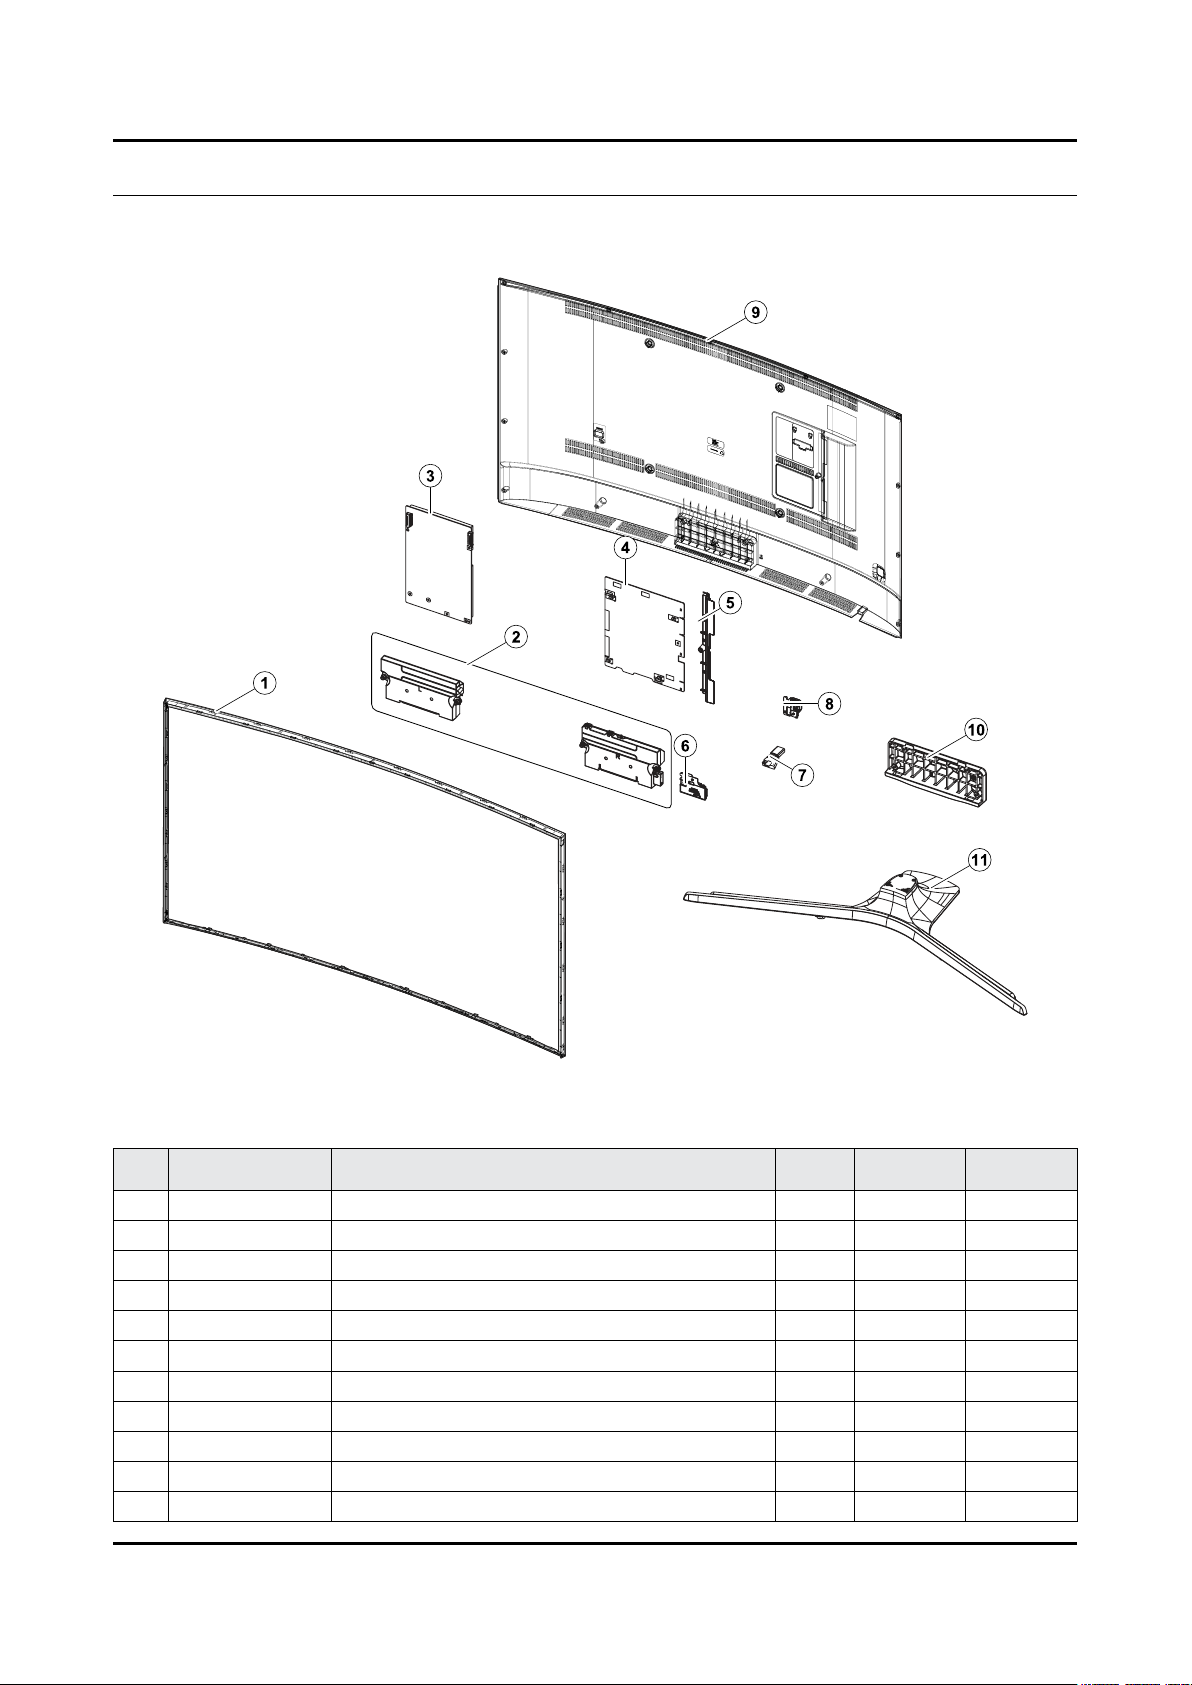
ANNEX. Exploded View & Part List
ANNEX. Exploded View & Part List [UE49KU6100WXXH FA01]
1-1. Exploded View
1-1-1. Parts List
No. Code No. Description & Specication Q’ty SA/SNA Remark
1 BN95-02922A PRODUCT LCD-SDC; CY-WK049HGLV1V,KU6300,B 1 SA
2 BN96-35009B ASSY SPEAKER P-FRONT; TV-SPK,JU6700,6ohm, 1 SA
3 BN44-00807A DC VSS-PD BOARD; L55S6_FHS,AC/DC,203W,100 1 SA
4 BN94-10826K ASSY PCB MAIN; LED 6K TV 1 SA
5 BN63-15236A COVER-TERMINAL SIDE; 55KU6000,HIPS,MOLD,H 1 SA
6 BN59-01174D NETWORK-WLAN CLIENT; WIDT30Q,58x31.45x8.5 1 SA
7 BN96-39955B ASSY BOARD P-IR; KU6300,IR ASSY_KU6300 1 SA
8 BN96-35345B ASSY BOARD P-FUNCTION JOG; JU7500,CT15SE 1 SA
9 BN96-40740A ASSY CHASSIS FRONT P; 49KU6300,PC+ABS+ED 1 SA
10 BN96-36255G ASSY GUIDE P-STAND; JU6670,V STAND,HIPS,B 1 SA
11 BN96-38964A ASSY STAND P-BOTTOM; J5500 48,PC+ABS+GF20 1 SA
ANNEX-1
Page 53
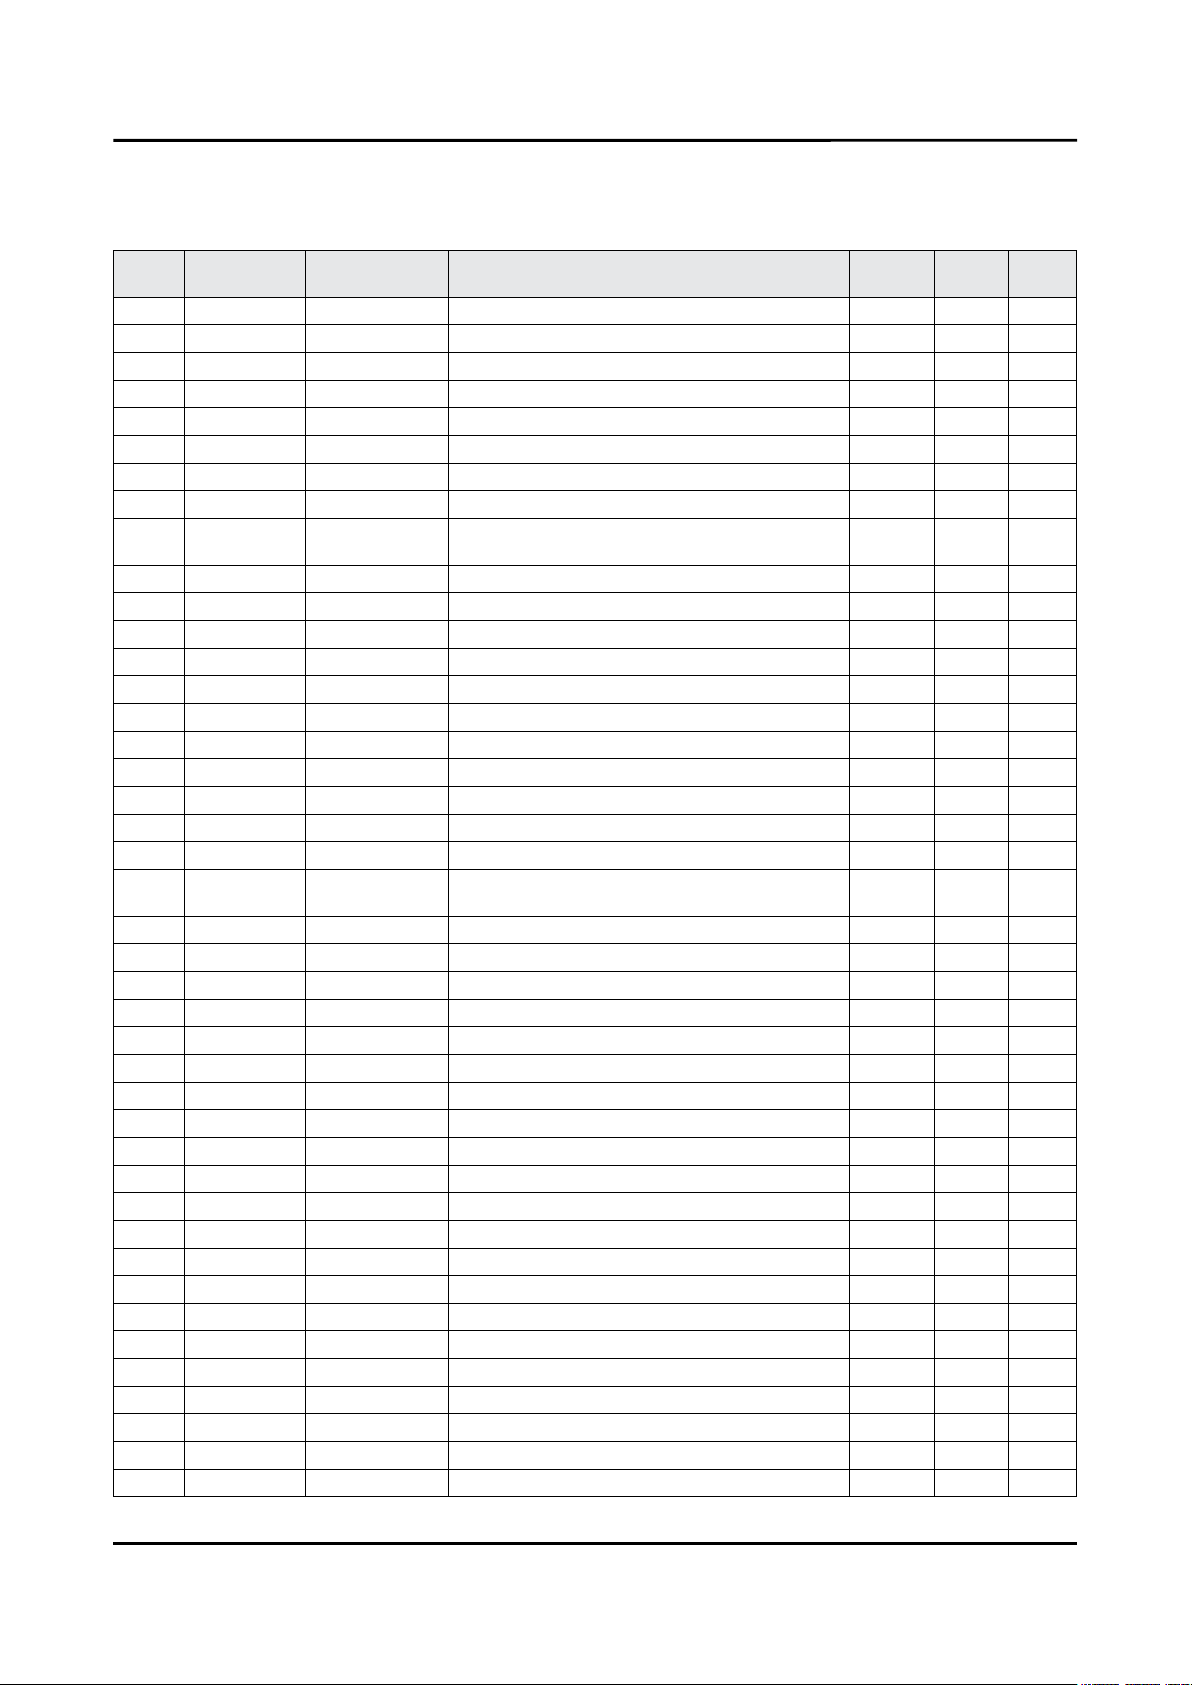
ANNEX-2
ANNEX. Exploded View & Part List
2-1. Electrical Parts List
Service Bom (SA: SERVICE AVAILABLE, SNA: SERVICE NOT AVAILABLE)
Level Location No. Code No. Description & Specication Q’ty SA/SNA Remark
UE49KU6100WXXH (FA01)
1 S001A BN90-07341A ASSY STAND;UJ8X 1 SNA
0.2 SG01A BN96-36255G ASSY GUIDE P-STAND;JU6670,V STAND,HIPS,B 1 SA
..3 SG03 BN61-11965A GUIDE-STAND;JU6740,PC+GF20%,MOLD,V-2,BK0 1 SA
...4 0103-007285 RESIN PC;HF3200H,K21294,BK0007,V-2 250 SNA
...4 BN68-00513D LABEL-RESIN;resin,-,ART,-,W10,L25,-,-,-, 2 SNA
..3 BN96-35528A ASSY ACCESSORY-SCREW;JU7500,40 1 SNA
...4 6902-002474 BAG SCREW;LDPE,T0.05*,W70,L90,TRP,RECYCL 1 SNA
...4
0.2 SB04A BN96-38964A ASSY STAND P-BOTTOM;J5500 48,PC+ABS+GF20 1 SA
..3 0203-001499 TAPE-OPP;OPP,T0.04,W15,N/A,CLEAR,ROLL 0 SNA
..3 SCREW 6003-001001 SCREW-TAPTYPE;FH,+,-,B,M3,L8,ZPC(BLK),SW 2 SA
..3 SCREW 6003-001239 SCREW-TAPTYPE;FH,+,B,M4,L10,ZPC(WHT),SWR 4 SA
..3 SCREW 6003-001315 SCREW-TAPTYPE;BH,+,B,M4,L20,ZPC(WHT),SWR 4 SNA
..3 BN61-07463B TAPE-DOUBLE FACE;ACRYL,T0.25,W7,CLEAR 0 SNA
..3 BN61-11431B BRACKET-STAND BODY;Y15 F-LED J5100/5500 1 SNA
..3 BN61-13134A BRACKET-STAND BOTTOM;48J5500,HGI,T2 1 SNA
..3 AS080 BN63-04755H SHEET-PROTECTION COVER;52LC530,PE,T0.05, 1 SNA
..3 AS080 BN63-04755L SHEET-PROTECTION COVER;22LC350,PE,T0.05, 1 SNA
..3 BN63-13128E SHEET-PROTECTION COVER;LED,AL,T0.05,W13, 1 SNA
..3 BN63-13259E
...4 0103-009946 RESIN PC ABS;HM-1200,BLACK,BK0007,V-1 360 SNA
..3 RF01 BN67-00327M FOOT-RUBBER;STAND,Si,GRAY,W10,L10,T1.5 2 SNA
..3 RF01 BN67-00398P FOOT-RUBBER;UH6K,Si,GRAY,W8,L15.5,T2.5 5 SNA
..3 BN95-02141A ASSY COVER STAND SMT;J5500 STAND,48",LIG 1 SA
...4 0203-001269 TAPE-OPP;OPP,#301,T0.06,W75,L50M,CLEAR 0 SNA
...4 0204-007315 COATING;UVICHEM CVM92000(VOC),13~15,CLEA 0 SNA
...4 AA69-07323C PACKING-SHEET SMT;HDPE,PE FOAM,T0.015,T1 1 SNA
...4 AA69-07325Q PAD-DP SHEET;CTV,CB,DW,W860,L520,YEL 1 SNA
...4 AA69-07416E MASTER BOX-DP;CB,DW,W325,H550 1 SNA
...4 AA69-07495D PAD-DP SHEET;CTV,CB,DW5,W860,L320,YEL 1 SNA
...4 AA69-07509A PAD-DP BOTTOM EPP;CTV,CB,W859,L520 1 SNA
...4 BN01-00337A TARGET-ALUMINIUM CY;Al,99.9%,1924mm, 132 0 SNA
...4 BN01-00340A TARGET-CHROMIUM CY;Cr,99.5%,1924mm, 132d 0 SNA
...4 BN63-13263A COVER-STAND DECORATION;J5100/5500 48",PC 1 SNA
....5 0103-005041 RESIN PC ABS;FR3200TV,901408,BK0008,1.2m 85 SNA
....5 BN63-07556C SHEET-PROTECTION COVER;TOC,PO,T0.068,W50 1 SNA
...4 BN68-03920A LABEL BOX;ALL,ART PAPER,W100,L75,W/W,100 1 SNA
..3 T0382 BP61-00495C TAPE SINGLE FACE;ACRYL,PJT,ACRYL FOAM,T0 0 SNA
1 R001A BN90-08281E ASSY COVER REAR;LEDTV 6K 1 SNA
0.2 SCREW 6001-003074 SCREW-MACHINE;BH,+,M3,L6,ZPC(BLK),SWRCH1 3 SA
0.2 R001A BN96-40433E ASSY COVER P-REAR;49KU6300,PC+ABS+ED20%, 1 SA
HOLDER-
BOLT
BN61-09494D HOLDER-BOLT;KU6500,SWRCH18A,BLK,PRESS,B 8 SA
COVER-STAND TOP;LED_
J5500,PC+ABS+GF20%,M
1 SNA
Page 54
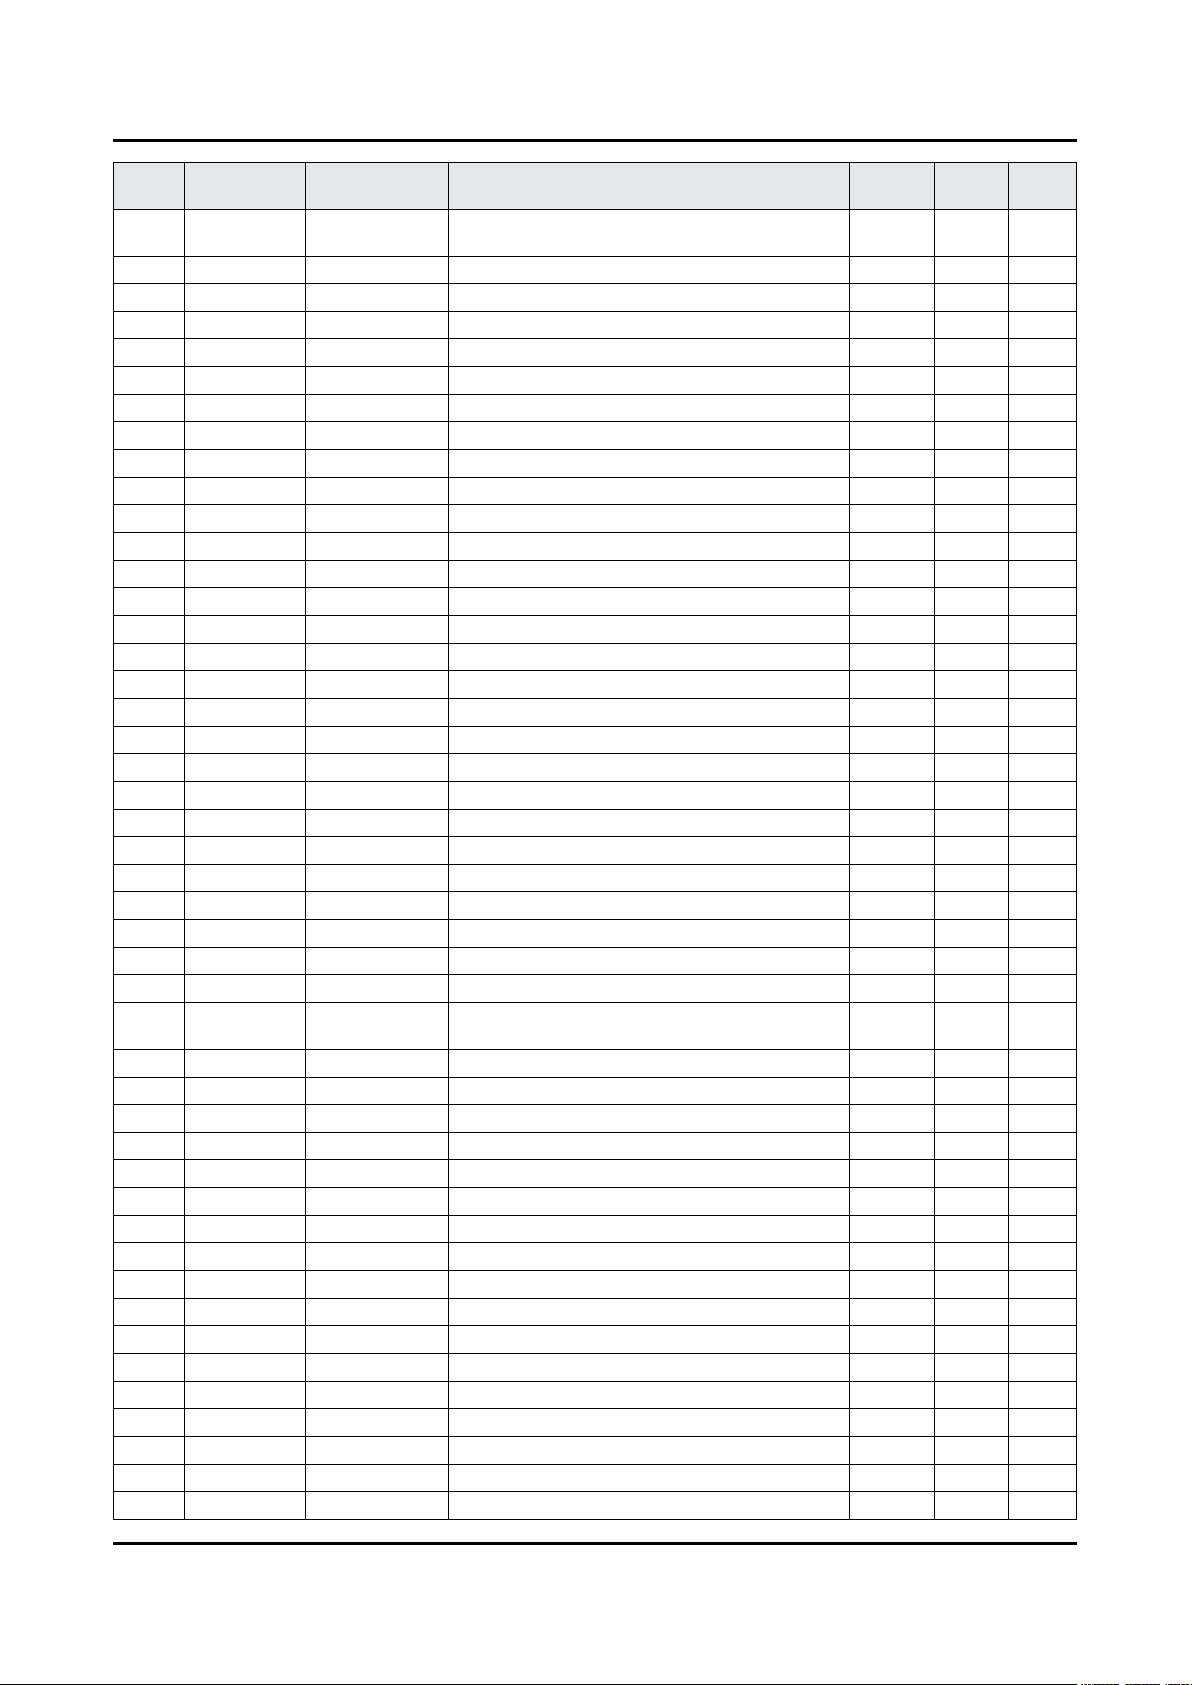
ANNEX-3
ANNEX. Exploded View & Part List
Level Location No. Code No. Description & Specication Q’ty SA/SNA Remark
..3 R001 BN63-15552D
...4 0103-010818 RESIN PC ABS;CM20G/BK00749,BLACK,BK0007, 2900 SNA
..3 BN64-03529J INLAY-TERMINAL SIDE;55KU6500,PET,T0.125, 1 SNA
..3 BN68-03518H LABEL-STICKER CI SLOT;WW,ALL,PET,T0.1,W1 1 SNA
..3 BN68-05603A LABEL-E PASS;ART PAPER 90G,W/W 3 SNA
..3 BN68-07835C LABEL-STICKER LICENSE;40K5500,PET,T0.125 1 SNA
1 BN90-08340A ASSY W/I;UKU6300G 1 SNA
0.2 BN81-08159Z A/S PART SET-ELEC W/I;LED TV ELEC spec-C 1 SNA
0.2 BN81-11259W A/S PART SET-MECH W/I;UKU6300G,U49KG* 1 SNA
1 M0017 BN91-17361K ASSY CHASSIS;LED TV 6K 1 SNA
0.2 M0014 BN94-10826K ASSY PCB MAIN;LED 6K TV 1 SA
..3 AH63-02994A GASKET;DA-E750,Conductive Fabric,1,10,15 1 SNA
..3 BN62-00817A HEAT SINK-PS;55KU6000,A1050,T1.5,W115,L1 1 SNA
..3 BN63-15236A COVER-TERMINAL SIDE;55KU6000,HIPS,MOLD,H 1 SA
..3 BN97-10916A ASSY DRM;JAZZ-L,DVB,NagSam, MAC, HDCP, C 1 SNA
...4 BN46-00109H KEY CODE-CERTIFICATION;MAC,TV/AV,General 1 SNA
...4 BN46-00110P KEY CODE-CERTIFICATION;MIRACAST(HDCP2.2) 1 SNA
...4 BN46-00500A KEY CODE-CERTIFICATION;JAZZ-L,Nagra CSC 1 SNA
...4 BN46-00514A KEY CODE-CERTIFICATION;CI PLUS,Jazz M, J 1 SNA
..3 BN97-10983E ASSY SMD;LED 6K 1 SNA
...4 0202-001899 SOLDER-CREAM;M705-GRN360-K2-VT,20-38um,S 5 SNA
...4 DS01A 0401-001056 DIODE-SWITCHING;MMBD4148SE,100V,200mA,SO 1 SA
...4 0403-001164 DIODE-ZENER;MMSZ5232B,5.32~5.88V,500mW,S 1 SA
...4 0403-001783 DIODE-ZENER;BZB84-C6V2,5.8~6.6V,300mW,SO 3 SNA
...4 0403-001831 DIODE-ZENER;KDZ12B,12~13.5V,1000mW,SOD-1 1 SA
...4 0403-002014 DIODE-ZENER;KDZ16B,16.2~18.3V,1000mW,SOD 2 SNA
...4 0404-001307 DIODE-SCHOTTKY;SSC54,40V,5000mA,DO-214AB 1 SA
...4 0404-001404 DIODE-SCHOTTKY;BAT721C,40V,200mA,SOT-23, 4 SA
...4 0404-001640
...4 0404-001881 DIODE-SCHOTTKY;SS3040-HE,40V,3000mA,SOD- 1 SA
...4 0404-001953 DIODE-SCHOTTKY;MBRA340F-HAF,40V,3000mA,S 3 SA
...4 0406-001200 DIODE-TVS;RClamp0504F,6V,1MAV,TP 2 SA
...4 0406-001628 DIODE-TVS;AOZ8804ADI,6V,1MAV,5A,TP 1 SA
...4 0406-001635 DIODE-TVS;SMF5.0A,6.4V,6.7V,7V,200MAV,20 1 SA
...4 0406-001643 DIODE-TVS;1SMA33AT3G,36.7V,38.65V,40.6V, 1 SNA
...4 0501-000002 TR-SMALL SIGNAL;KSA812,PNP,150mW,SOT-23, 1 SNA
...4 0501-000445 TR-SMALL SIGNAL;KTC3875S-Y,NPN,150mW,SOT 7 SC
...4 0504-000126 TR-DIGITAL;KSR1101,NPN,200mW,4.7K/4.7K,S 1 SA
...4 0505-001844 FET-SILICON;SI4435DDY-T1-GE3,P,30V,-11.4 1 SA
...4 0505-002560 FET-SILICON;AO6415,P,20V,-3.3A,0.15ohm,1 1 SA
...4 0505-002598 FET-SILICON;AP2317GN,P,20V,-4.2A,0.052oh 1 SA
...4 0505-002660 FET-SILICON;Si2308BDS,N,60V,2.3A,0.156oh 1 SNA
...4 0505-002893 FET-SILICON;AO4801AS,P,30V,-5A,2W,SOIC-8 2 SA
...4 0505-003205 FET-SILICON;DMG4435SSS-13,P,30V,-7.3A,1. 1 SA
...4 0505-003391 FET-SILICON;AOD2922,N,100V,8A,140Mohm,18 1 SA
...4 0505-003397 FET-SILICON;2N7002K,N,60V,0.38A,1.19ohm, 1 SA
COVER-REAR;49KU6300,PC+ABS+ED20%,MOLD
,V-
DIODE-SCHOTTKY;SS1060HEWS,60V,1000mA,S
OD
1 SNA
1 SA
Page 55
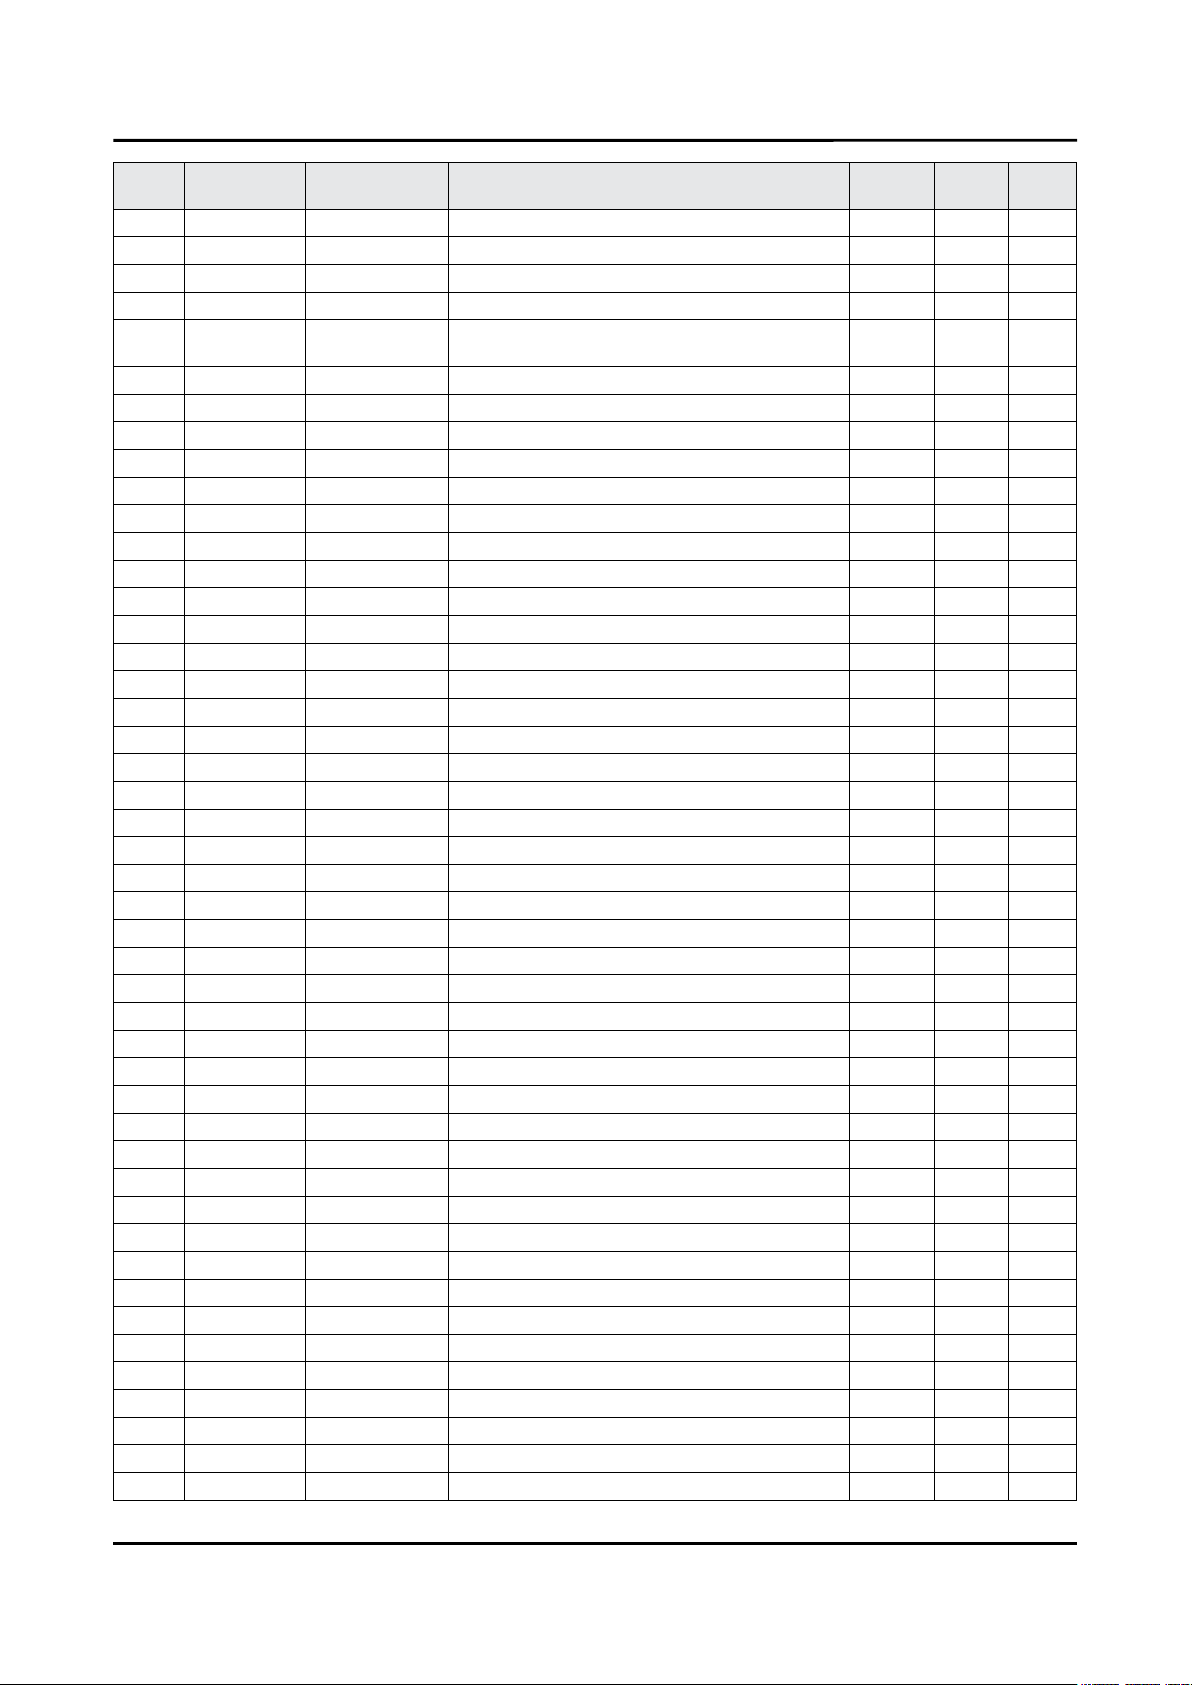
ANNEX-4
ANNEX. Exploded View & Part List
Level Location No. Code No. Description & Specication Q’ty SA/SNA Remark
...4 0505-003507 FET-SILICON;AO3424,N,30V,3.8A,1.4W,SOT-2 5 SA
...4 0801-003603 IC-CMOS LOGIC;MC74LCX244MN2TWG,Octal buf 1 SA
...4 1001-001998 IC-ANALOG MULTIPLEX;NX3DV221GM,USB switc 2 SA
...4 1103-001564 IC-EEPROM;S-24C512CI-J800,512Kbit,64Kx8, 1 SA
...4 1105-002704
...4 1201-000166 IC-OP AMP;LM358,SOP,ST,8P,150MIL,DUAL,10 1 SA
...4 1201-003690 IC-AUDIO AMP;TAS5747PHPR,QFP,48P,DUAL,PL 1 SA
...4 1203-004364 IC-VOL. DETECTOR;RT9818C-42PV,SOT-23,3P, 1 SA
...4 1203-008102 IC-POSI.FIXED REG.;S-13A1D12-E800,HSOP,8 1 SNA
...4 1203-008104 IC-POSI.FIXED REG.;S-13A1D18-E800,HSOP,8 1 SNA
...4 1203-008105 IC-POSI.FIXED REG.;S-13A1D33-E800,HSOP,8 1 SNA
...4 1203-008391 IC-DC/DC CONVERTER;AOZ1269QI-02,QFN-23L, 1 SA
...4 1203-008392 IC-VOL. DETECTOR;S-6414AAB-L800X,TSOT-23 1 SA
...4 1203-008454 IC-DC/DC CONVERTER;TPS56528,HSOP8,8,4,89 2 SA
...4 1203-008522 IC-DC/DC CONVERTER;SN1501019DDCR,SOT-23, 2 SNA
...4 1203-008551 IC-DC/DC CONVERTER;BM81244,QFN,40P,6x6mm 1 SNA
...4 1203-008655 IC-DC/DC CONVERTER;BM81249MWW,QFN,56,7x7 1 SA
...4 1203-008732 IC-DC/DC CONVERTER;SYD104ADC,TSOT-23,6,3 1 SA
...4 1203-008733 IC-DC/DC CONVERTER;AOZ1236QI-02,QFN,23,4 2 SA
...4 1204-003697 IC-DECODER;SDP1531,FCPBGA,1046P,31x31,GL 1 SA
...4 1205-004822 IC-SWITCH;TPS22965DSGR,SON,8P,2x2x0.75mm 3 SNA
...4 1205-005325 IC-REPEATER;PS8409QFN48GTR2-A1,QFN,48P,6 1 SA
...4 1205-005519 IC-SWITCH;ET20163,SOT23-5,5P,2.95x3.02mm 3 SA
...4 1404-001731 THERMISTOR-NTC;33Kohm,4050K,1mW/C,TP,1.6 2 SNA
...4 1405-001232 VARISTOR;6.4V,5.6VDC,30A,1608,TP,19V,200 2 SNA
...4 1405-001271 VARISTOR;35V,20VDC,5A,1005,TP,100V,10pF 15 SA
...4 1405-001381 VARISTOR;11V,8VDC,30A,1608,TP,25V,500pF 2 SA
...4 1405-001382 VARISTOR;24.5V,16VDC,120A,2012,TP,42V,40 2 SA
...4 2007-000039 R-CHIP;0ohm,1%,1/10W,TP,1608 8 SA
...4 2007-000052 R-CHIP;10Kohm,1%,1/10W,TP,1608 2 SA
...4 2007-000070 R-CHIP;0ohm,5%,1/10W,TP,1608 12 SA
...4 2007-000084 R-CHIP;4.7Kohm,5%,1/10W,TP,1608 1 SA
...4 2007-000143 R-CHIP;4.7Kohm,5%,1/16W,TP,1005 17 SNA
...4 2007-000171 R-CHIP;0ohm,5%,1/16W,TP,1005 23 SNA
...4 2007-000173 R-CHIP;22ohm,5%,1/16W,TP,1005 3 SNA
...4 2007-000683 R-CHIP;3.3Kohm,1%,1/10W,TP,1608 1 SA
...4 2007-000701 R-CHIP;3.6Kohm,1%,1/10W,TP,1608 1 SNA
...4 2007-000736 R-CHIP;30Kohm,1%,1/10W,TP,1608 1 SA
...4 2007-000779 R-CHIP;33ohm,1%,1/10W,TP,1608 2 SA
...4 2007-000910 R-CHIP;43Kohm,1%,1/10W,TP,1608 1 SA
...4 2007-000932 R-CHIP;470ohm,5%,1/16W,TP,1005 3 SNA
...4 2007-001125 R-CHIP;68Kohm,1%,1/10W,TP,1608 2 SA
...4 2007-001288 R-CHIP;18ohm,5%,1/16W,TP,1005 4 SA
...4 2007-001292 R-CHIP;33ohm,5%,1/16W,TP,1005 28 SNA
...4 2007-001298 R-CHIP;51ohm,5%,1/16W,TP,1005 11 SNA
...4 2007-002899 R-CHIP;10ohm,1%,1/10W,TP,1608 10 SA
IC-DDR4 SDRAM;K4F8E304HB-MGCH,LPDDR4-
SDR
2 SA
Page 56
ANNEX-5
ANNEX. Exploded View & Part List
Level Location No. Code No. Description & Specication Q’ty SA/SNA Remark
...4 2007-007107 R-CHIP;100Kohm,1%,1/16W,TP,1005 14 SNA
...4 2007-007131 R-CHIP;13Kohm,1%,1/16W,TP,1005 4 SA
...4 2007-007132 R-CHIP;15Kohm,1%,1/16W,TP,1005 2 SA
...4 2007-007136 R-CHIP;4.7Kohm,1%,1/16W,TP,1005 66 SNA
...4 2007-007137 R-CHIP;1.2Kohm,1%,1/16W,TP,1005 3 SA
...4 2007-007138 R-CHIP;27Kohm,1%,1/16W,TP,1005 3 SNA
...4 2007-007139 R-CHIP;47Kohm,1%,1/16W,TP,1005,T0.35 13 SA
...4 2007-007142 R-CHIP;10Kohm,1%,1/16W,TP,1005 34 SNA
...4 2007-007231 R-CHIP;110Kohm,1%,1/10W,TP,1608 1 SA
...4 2007-007306 R-CHIP;100ohm,1%,1/16W,TP,1005 29 SNA
...4 2007-007309 R-CHIP;12Kohm,1%,1/16W,TP,1005,T0.35 1 SA
...4 2007-007310 R-CHIP;8.2Kohm,1%,1/16W,TP,1005 1 SA
...4 2007-007312 R-CHIP;20Kohm,1%,1/16W,TP,1005 11 SA
...4 2007-007313 R-CHIP;6.8Kohm,1%,1/16W,TP,1005 3 SA
...4 2007-007318 R-CHIP;1Kohm,1%,1/16W,TP,1005 13 SNA
...4 2007-007334 R-CHIP;200Kohm,1%,1/16W,TP,1005 5 SNA
...4 2007-007488 R-CHIP;75Kohm,1%,1/16W,TP,1005 5 SNA
...4 2007-007517 R-CHIP;240ohm,1%,1/16W,TP,1005 6 SNA
...4 2007-007520 R-CHIP;20ohm,1%,1/10W,TP,1608 9 SA
...4 2007-007528 R-CHIP;1.5Kohm,1%,1/16W,TP,1005 5 SA
...4 2007-007720 R-CHIP;300Kohm,1%,1/10W,TP,1608 1 SA
...4 2007-007723 R-CHIP;75Kohm,1%,1/10W,TP,1608 2 SA
...4 2007-007766 R-CHIP;2Kohm,1%,1/16W,TP,1005 22 SNA
...4 2007-007767 R-CHIP;200ohm,1%,1/16W,TP,1005 7 SA
...4 2007-007798 R-CHIP;10ohm,1%,1/16W,TP,1005 8 SA
...4 2007-007830 R-CHIP;14Kohm,1%,1/10W,TP,1608 1 SA
...4 2007-007847 R-CHIP;16Kohm,1%,1/10W,TP,1608 5 SA
...4 2007-007942 R-CHIP;1Mohm,1%,1/16W,TP,1005 1 SNA
...4 2007-007981 R-CHIP;180Kohm,1%,1/16W,TP,1005 1 SNA
...4 2007-008015 R-CHIP;75ohm,1%,1/16W,TP,1005 9 SNA
...4 2007-008263 R-CHIP;3Kohm,1%,1/16W,TP,1005 2 SA
...4 2007-008269 R-CHIP;51Kohm,1%,1/16W,TP,1005 3 SA
...4 2007-008298 R-CHIP;49.9ohm,1%,1/16W,TP,1005 4 SA
...4 2007-008391 R-CHIP;6.34Kohm,1%,1/16W,TP,1005 2 SA
...4 2007-008596 R-CHIP;0.1ohm,1%,1/4W,TP,3216 3 SC
...4 2007-008779 R-CHIP;0ohm,1%,1/16W,TP,1005 3 SA
...4 2007-009117 R-CHIP;49.9Kohm,1%,1/16W,TP,1005 1 SA
...4 2007-009322 R-CHIP;1.3Kohm,1%,1/16W,TP,1005 2 SA
...4 2007-009777 R-CHIP;4.99Kohm,1%,1/16W,TP,1005 2 SA
...4 2011-001261 R-NETWORK;33ohm,5%,1/16W,L,CHIP,8P,TP,2. 6 SA
...4 2011-001264 R-NETWORK;10ohm,5%,1/16W,L,CHIP,8P,TP,2. 8 SNA
...4 2011-001344 R-NETWORK;100ohm,5%,1/16W,L,CHIP,8P,TP,2 6 SA
...4 AD480 2203-000233 C-CER,CHIP;0.1nF,5%,50V,C0G,TP,1005 4 SA
...4 AD480 2203-000254 C-CER,CHIP;10nF,10%,16V,X7R,TP,1005 5 SA
...4 AD480 2203-000278 C-CER,CHIP;0.01nF,0.5pF,50V,C0G,TP,1005 2 SA
...4 AD480 2203-000359 C-CER,CHIP;0.15nF,5%,50V,C0G,TP,1005,0.5 3 SNA
...4 AD480 2203-000386 C-CER,CHIP;0.015nF,5%,50V,C0G,TP,1005 3 SA
Page 57
ANNEX-6
ANNEX. Exploded View & Part List
Level Location No. Code No. Description & Specication Q’ty SA/SNA Remark
...4 AD480 2203-000438 C-CER,CHIP;1nF,10%,50V,X7R,TP,1005 12 SA
...4 AD480 2203-000489 C-CER,CHIP;2.2nF,10%,50V,X7R,TP,1005 2 SA
...4 AD480 2203-000585 C-CER,CHIP;0.22nF,10%,50V,X7R,TP,1005 3 SA
...4 AD480 2203-000812 C-CER,CHIP;0.033nF,5%,50V,C0G,TP,1005 5 SA
...4 AD480 2203-000940 C-CER,CHIP;0.47nF,10%,50V,X7R,TP,1005 1 SA
...4 AD480 2203-002285 C-CER,CHIP;10nF,10%,50V,X7R,TP,1005 5 SNA
...4 AD480 2203-002398 C-CER,CHIP;22nF,10%,50V,X7R,TP,1608 1 SNA
...4 AD480 2203-005054 C-CER,CHIP;0.0047nF,0.25pF,50V,NP0,TP,10 2 SA
...4 AD480 2203-005083 C-CER,CHIP;220nF,10%,50V,X7R,TP,1608,0.8 6 SA
...4 AD480 2203-005249 C-CER,CHIP;100nF,10%,50V,X7R,TP,1608 4 SNA
...4 AD480 2203-005968 C-CER,CHIP;4.7nF,10%,50V,X7R,TP,1005,0.5 2 SNA
...4 AD480 2203-006048 C-CER,CHIP;100nF,10%,10V,X7R,TP,1005 8 SA
...4 AD480 2203-006126 C-CER,CHIP;47nF,10%,16V,X7R,TP,1005 3 SNA
...4 AD480 2203-006158 C-CER,CHIP;100nF,10%,16V,X7R,TP,1005,T0. 107 SNA
...4 AD480 2203-006324 C-CER,CHIP;2200nF,10%,10V,X5R,TP,1608 16 SA
...4 AD480 2203-006348 C-CER,CHIP;1000nF,10%,25V,X5R,TP,1608,0. 1 SA
...4 AD480 2203-006562 C-CER,CHIP;1000nF,10%,10V,X5R,TP,1005 27 SNA
...4 AD480 2203-006698 C-CER,CHIP;1000nF,10%,25V,X7R,TP,1608,T0 6 SNA
...4 AD480 2203-006824 C-CER,CHIP;4700nF,10%,10V,X5R,TP,1608 5 SNA
...4 AD480 2203-006838 C-CER,CHIP;2200nF,10%,6.3V,X5R,TP,1005 9 SA
...4 AD480 2203-006844 C-CER,CHIP;470nF,10%,10V,X5R,TP,1005 2 SA
...4 AD480 2203-006890 C-CER,CHIP;10000nF,20%,6.3V,X5R,TP,1608 29 SNA
...4 AD480 2203-007176 C-CER,CHIP;10000nF,10%,16V,X5R,TP,2012,1 19 SNA
...4 AD480 2203-007240 C-CER,CHIP;22000nF,20%,6.3V,X5R,TP,1608( 72 SA
...4 AD480 2203-007269 C-CER,CHIP;22000nF,20%,10V,X5R,TP,2012(2 13 SA
...4 AD480 2203-007270 C-CER,CHIP;10000nF,10%,10V,X5R,TP,1608,0 22 SNA
...4 AD480 2203-007306 C-CER,CHIP;10000nF,10%,25V,X5R,TP,2012,1 42 SNA
...4 AD480 2203-007544 C-CER,CHIP;100nF,10%,50V,X7R,TP,1005,T0. 37 SA
...4 AD480 2203-008315 C-CER,CHIP;22000nF,20%,25V,X5R,TP,2012,T 4 SA
...4 2402-001268 C-AL,SMD;100uF,20%,25V,WT,TP,8x6.3mm 1 SA
...4 2409-001240 C-ORGANIC,SMD;33uF,20%,25V,LR,TP,7343(1. 1 SA
...4 2409-001338 C-POLYMER ,CHIP;47uF,20%,6.3V,TP,3.2x1.6 1 SA
...4 2703-000213 INDUCTOR-SMD;470nH,10%,1.35Ohm,35mA,15,M 1 SA
...4 2703-001938 INDUCTOR-SMD;56nH,5%,1005,1.5Ohm,200mA,1 3 SA
...4 2703-003149 INDUCTOR-SMD;2.2uH,20%,0.055Ohm,3000mA,W 1 SA
...4 2703-003747 INDUCTOR-SMD;22uH,20%,6060,0.135ohm,1300 2 SA
...4 2703-003862 INDUCTOR-SMD;10uH,20%,6060,0.065ohm,1900 3 SA
...4 2703-003913 INDUCTOR-SMD;2.2uH,20%,2520,1.2T,0.116Oh 1 SNA
...4 2703-003937 INDUCTOR-SMD;1uH,20%,7.0x6.47x3.0mm,0.00 3 SA
...4 2703-004630 INDUCTOR-SMD;2.2uH,20%,5.0T,0.0025Ohm,66 1 SNA
...4 2703-004724 INDUCTOR-SMD;8.2uH,20%,4T,0.072Ohm,2300m 4 SA
...4 2703-005191 INDUCTOR-SMD;1.5uH,20%,6060,T4.5,0.02Ohm 1 SA
...4 2703-005193 INDUCTOR-SMD;2.2uH,20%,4.5,0.024Ohm,5100 2 SA
...4 2703-005376 INDUCTOR-SMD;10uH,20%,10x10.7mm,4.0T,0.0 1 SA
...4 2801-004021 CRYSTAL-SMD;24.576MHz,20ppm,28-AAN,12pF, 1 SA
...4 3301-001364 BEAD-SMD;1000ohm,1608,TP,1085ohm/108MHz, 4 SNA
...4 3301-002039 BEAD-SMD;26ohm,1608,TP 32 SA
Page 58
ANNEX-7
ANNEX. Exploded View & Part List
Level Location No. Code No. Description & Specication Q’ty SA/SNA Remark
...4 3601-001374 FUSE-SURFACE MOUNT;32V,5A,FAST-ACTING,PL 3 SA
...4 3601-001376 FUSE-SURFACE MOUNT;32V,3A,FAST-ACTING,Hi 2 SNA
...4 3701-001967 CONNECTOR-HDMI;19P,A,FEMALE,AU,0.5mm,BLK 3 SA
...4 3707-001103 CONNECTOR-OPTICAL;ANGLE,SPDIF,2.5PI 1 SA
...4 3708-003241 CONNECTOR-FPC/FFC/PIC;96P,0.5mm,SMD-A,AU 2 SNA
...4 3710-003908 CONNECTOR-SOCKET;64P,2R,0.5mm,SMD-S,AU,B 1 SA
...4 EH01 3711-007803 HEADER-BOARD TO CABLE;BOX,12P,1R,1.25mm, 1 SA
...4 EH01 3711-008131 HEADER-BOARD TO CABLE;BOX,4P,1R,2.5mm,AN 1 SA
...4 EH01 3711-008859 HEADER-BOARD TO CABLE;BOX,12P,2R,2mm,ANG 1 SA
...4 3711-009090 CONNECTOR-HEADER;BOX,16P,1R,1.25mm,SMD-A 1 SA
...4 3722-003199 JACK-MODULAR;8P/8C,Y,ANGLE,NONE,AU,1PORT 1 SA
...4 3722-003457 JACK-USB;4P/1C,NI,BLK,ANGLE,A,2.0,13.1x1 2 SA
...4 3722-003814 JACK-PHONE;1P/7C,NI/SN,YEL,ANGLE,3.5PI,1 1 SA
...4 JACK 3722-003873 JACK-PHONE;1P/7C,AU/SN,BLU,ANGLE,3.5PI,1 1 SA
...4 6302-001376 GASKET-SMD;,,CONDUCTIVE FABRIC,T14,W43,L 7 SNA
...4 BN40-00322C TUNER-DTV AIR CABLE;CDT-933T322-93,DVB-T 1 SA
...4 BN41-02528A PCB-MAIN;KU6000,FR-4,4L,1.6T,193x241mm,1 1 SNA
...4 CB07 BN61-13312B BRACKET-SCREWLESS PCB;55KS8000,SK5,T0.3, 4 SNA
...4 BN97-10863B
....5 1107-002226 IC-NOR FLASH;W25Q40CLSSIP,4Mbit,SOIC,8P, 1 SA
...4 BN97-10865A ASSY MICOM-MAIN;T-JZL6DEUC,UWP60,KLM4G1F 1 SNA
....5 1107-002374 IC-EMMC;KLM4G1FEPD-B031,4Gbyte,BGA,153P, 1 SNA
...4 BN97-10918A ASSY MICOM;TCON,KU6k,W25Q80DVSSIG,1107-0 1 SNA
....5 1107-002339 IC-NOR FLASH;W25Q80DV,8Mbit,SOP,5.28x5.2 1 SNA
....5 BN46-00515A S/W MICOM;Jazz M-L,TCON F/W 1 SNA
..3 BN97-11337A ASSY MICOM;TCON DATA,KU6k,49-SDC-Curved, 1 SNA
...4 BN46-00534A S/W MICOM;K49A6U0C,SDC,49A6AU*RK,Curved 1 SNA
1 BN91-17377C ASSY SHIELD;LED TV 6K 1 SNA
0.2 SCREW 6001-003081
0.2 BN02-00102B TAPE-SINGLE FACE;FILAMENT,#8917,T0.15,W2 0 SNA
0.2 12P BN39-02025A
0.2 BN39-02030E LEAD CONNECTOR-BLU;BLU,UL21016,16P,80mm, 1 SA
0.2 EC13 BN39-02218A LEAD CONNECTOR-SUB ASSY;50KU6000,UL21016 1 SA
0.2 BN39-02220B LEAD CONNECTOR-SUB ASSY;50KU6300,UL21016 1 SA
0.2 P001A BN44-00807A DC VSS-PD BOARD;L55S6_FHS,AC/DC,203W,100 1 SA
0.2 WIFI BN59-01174D NETWORK-WLAN CLIENT;WIDT30Q,58x31.45x8.5 1 SA
0.2 BN61-10073B HOLDER-WIFI;55KU6000,ABS,MOLD,BK0007,HB 1 SNA
0.2 SP01A BN96-35009B ASSY SPEAKER P-FRONT;TV-SPK,JU6700,6ohm, 1 SA
0.2 JOG BN96-35345B ASSY BOARD P-FUNCTION JOG;JU7500,CT15SE8 1 SA
..3 AH240 BN61-11584A HOLDER-BUTTON;JU7500,ABS,MOLD,BK0007,HB 1 SNA
...4 0103-004609 RESIN ABS;HF-0680U,K21294,BK0007,HB,High 8 SNA
..3 AH297 BN63-11231B HOLDER-KNOB;HU7000,ABS,MOLD,BLACK,HB 1 SNA
..3 FK04 BN64-02406B BUTTON-FUNCTION;LED_HU7000,ABS,HB,BLACK, 1 SNA
0.2 BN96-39822E FFC CABLE;55KU6500,Fold,L450,96P 1 SA
0.2 BN96-39823C FFC CABLE;40KU6000,43KU6000,Fold,L600,96 1 SA
ASSY MICOM-SUB;JMMICOM_EU_
TV,UWP60,W25Q4
SCREW-MACHINE;PWH,+,M3,L5,ZPC(WHT),SWR
CH
LEAD CONNECTOR-
POWER;UN40JU6400AFXZA,UL2
1 SNA
5 SA
1 SA
Page 59
ANNEX-8
ANNEX. Exploded View & Part List
Level Location No. Code No. Description & Specication Q’ty SA/SNA Remark
0.2 FB10A BN96-39955B ASSY BOARD P-IR;KU6300,IR ASSY_KU6300 1 SA
1 BN92-20019B ASSY LABEL POP;LED TV 6K 1 SNA
0.2 BN68-07971A LABEL POP-HIGHLIGHT;KU6500,PET,T0.1,W90, 1 SNA
1 BN92-20181L ASSY BOX;LEDTV 6K 1 SNA
0.2 BH68-00662A LABEL BOX;ALL,ART PAPER,W60,L110,WHT,NO 1 SNA
0.2 BN68-05640A LABEL BOX;ALL,ART PAPER,W110,L130,EUROPE 1 SNA
0.2 BN69-14203S BOX UNIT;49KU6100,CB,DW2,F1,L1300,W184,H 1 SNA
1 BN92-20186A ASSY P/MATERIAL;LEDTV 6K 1 SNA
0.2 0203-001598 TAPE-SINGLE FACE;FILAMENT,#8915,T0.15,W1 0 SNA
0.2 6902-001956 BAG ROLL;HDPE/PE FOAM,HDPE T0.018mm,T0.2 3 SNA
0.2 6902-002233 BAG AIR;LDPE,-,T0.2,W900,L1850,TRP,-,-,- 1 SNA
0.2 6922-000003 BAND;PP,T0.8,W18,L1650M,TRP,DA69-90145A 1 SNA
0.2 BN02-00319B TAPE-SINGLE FACE;OPP,T0.05,W75,L800M,CLE 3 SNA
0.2 BN68-02422B LABEL WARNING;ALL,ART PAPER,T0.05,W240,L 1 SNA
0.2 BN69-03982L PACKING ANGLE;ALL,PAPER,-,-,-,-,-,-,- 1 SNA
0.2 BN69-05418N WRAP;T0.017,750,2000000,2000000,750 24 SNA
0.2 BN69-06640E PAD-PACKING;TRUCK PAD,CB,-,,W410,L2500,, 1 SNA
0.2 BN69-06642A PAD-DP SHEET;PAD,CB,SW4,,W1300,L1050,,,, 1 SNA
0.2 BN69-12145L PALLET-DP WOODEN;UE48J5500,WOOD,-,W1160, 1 SNA
0.2 BN69-13466A CUSHION-SET SIDE;49KU6300,EPS,16.7g/l,WH 1 SNA
0.2 BN69-13476A CUSHION-SET;49KU6300,EPS,16.7g/l,WHT,V-S 1 SNA
..3 0103-005099 RESIN EPS;BASF303,Natural,Natural 741 SNA
0.2 BN69-13622D PAD-CUSHION FRONT;49K6200,CB,DW2+EPE,W60 1 SNA
1 ACCE1 BN92-20192H ASSY ACCESSORY;LEDTV 6K 1 SNA
0.2 ACCE2 BN96-35677B ASSY ACCESSORY-CABLE;UE55KU6170UXXC 1 SNA
..3 3709-001791 CONNECTOR-CARD SLOT;64P,0.5mm,SMD-A,AU,P 1 SA
..3 T0268 3903-001118 CBF-POWER CORD;DT,EU,Angle,2P(C7),250V,2 1 SA
..3 4301-000121 BATTERY-MN;1.5V,R03,10.5x44.5m,7.5g,AAA 2 SNA
..3 6902-001965 BAG PE;LDPE,BIOBASED,T0.05,W200,L300,TRP 1 SNA
..3 EC03 BN39-02189A GENDER CABLE;DC to RCA Cable,3P,L100,UL2 1 SA
..3 EC03 BN39-02190A GENDER CABLE;DC to RCA Cable,2P,L100,UL2 1 SA
..3 BN59-01247A REMOCON-TV;2016 TV,Samsung,44KEY,3V,KU60 1 SA
..3 EH03A BN96-36071D ASSY HOLDER P-RING;LED JU6700,JU650,W/W, 1 SNA
...4 6902-002497 BAG ZIPPER;LDPE,T0.05,W100,L250,TRP,RECY 1 SNA
...4 AH365 BN61-11938A HOLDER-WALL RING;Y15 JU6510,ABS,MOLD,BK0 4 SNA
....5 0103-004609 RESIN ABS;HF-0680U,K21294,BK0007,HB,High 40 SNA
0.2 ACCE4 BN96-35701G ASSY ACCESSORY-MANUAL;UE49KU6100WXXH 1 SNA
..3 6902-001964 BAG PE;LDPE,BIOBASED,T0.03,W200,L300,TRP 1 SNA
..3 T0527 BN68-00513A LABEL-E PASS;ALL MODEL,WW,YUPO,W50,L15,W 2 SNA
..3 BN68-03548J LEAFLET-WARRANTY;comm,Samsung,17Lang,Mid 1 SNA
..3 BN68-04972E
..3 BN68-07598A LEAFLET-FICHE;ALL,W/P,0 1 SNA
..3 BN68-07990E MANUAL USERS;KU6300,XH,W/P,EURO B5 1 SNA
1 BN92-20198J ASSY LABEL;LEDTV 6K 1 SNA
0.2 BN68-06708G LABEL-RATING;Monitor,WW,PP,T0.161,W93,L7 1 SNA
0.2 BN68-07519A LABEL-ENERGY;ALL JORDAN,WW,PP,T0.135,W60 1 SNA
LEAFLET-REGULATORY
GUIDE;ALL,SAMSUNG,W/W
1 SNA
Page 60
ANNEX-9
ANNEX. Exploded View & Part List
Level Location No. Code No. Description & Specication Q’ty SA/SNA Remark
0.2 BN68-07991T LEAFLET-QUICK SETUP GUIDE;KU6300,EU,W/P, 1 SNA
1 BN95-02922A PRODUCT LCD-SDC;CY-WK049HGLV1V,KU6300,Ba 1 SA
0.2 SCREW 6001-003075 SCREW-MACHINE;BH,+,M3,L4,ZPC(WHT),SWRCH1 4 SA
0.2 SCREW 6001-003079 SCREW-MACHINE;CH,+,M3,L6,ZPC(BLK),SWRCH1 2 SA
0.2 AS080 BN63-07229A SHEET-PROTECTION COVER;rose70",PET,T0.05 1 SNA
0.2 BN68-05722A LABEL-E PASS;POLYPROPYLENE,NON-COATING 1 SNA
0.2 BN74-00053E TAPE-SINGLE FACE;PAPER,3M2307,T0.14,W20, 0 SNA
0.2 BN90-08328P ASSY MISC-BLU;2016_LCM_BLU 1 SNA
..3 BN61-13703A FRAME-MIDDLE TOP;49KU6300,TPV,HB,BK0008, 1 SNA
...4 0103-010669 RESIN TPE;5402PV/5409H,Black,BK0008,HB,T 115 SNA
..3 BN61-13708A FRAME-MIDDLE LEFT RIGHT;49KU6300,TPV,HB, 2 SNA
..3 BN61-13713A FRAME-MIDDLE BOTTOM;49KU6300,TPV,HB,BK00 1 SNA
..3 BN61-14032A DIFFUSER PLATE;CY-WK049HGLV1V,PS,KU6.3K 1 SNA
..3 BN61-14033A
..3 BN61-14034A OPTICAL SHEET-MLS;CY-WK049HGLV1V,PET,KU6 1 SNA
..3 BN61-14035A OPTICAL SHEET-REFLECTOR;CY-WK049HGLV1V,P 1 SNA
..3 BN96-40242A ASSY CHASSIS REAR P;49KU6300,EGI-SECC 1 SNA
...4 0203-006897 TAPE-DOUBLE FACE;Si,T1,W10,L50,WHITE 1 SNA
...4 SCREW 6001-003075 SCREW-MACHINE;BH,+,M3,L4,ZPC(WHT),SWRCH1 1 SA
...4 BN02-00040C TAPE DOUBLE FACE;F-LED ALL,PET,T0.3,W3,L 2 SNA
...4 BN02-00102B TAPE-SINGLE FACE;FILAMENT,#8917,T0.15,W2 0 SNA
...4 BN02-00173C TAPE-SINGLE FACE;PET,T0.05,W40,BLACK 0 SNA
...4 BN02-00383A TAPE SINGLE FACE;Y15 JU8K,PET,T0.5,W60,L 2 SNA
...4 BN61-11508A SUPPORT-PLATE;Y15 LED,PC,V-2,CLEAR,OD-19 12 SNA
...4 BN61-11509A
...4 BN61-13557A BRACKET-WIRE;55KS7000,SW-C,T1,60,SILVER 2 SA
...4 BN61-13830A
...4 BN61-13831A
...4 BN61-13832A FRAME-CHASSIS REAR LEFT RIGHT;49KU6300,P 2 SNA
...4 BN62-00690B INSULATOR-SMPS;JU7500,PC,BLACK,L340,W255 1 SNA
...4 BN63-14966A GASKET-EMI;GASKET,FABRIC,T8,W20,L15,BLAC 2 SNA
...4 CC04 BN64-03530A CHASSIS-REAR;49KU6300,EGI-SECC,PRESS,T0. 1 SNA
....5 BN01-00417A STEEL;49KU6300,EGI-SECC,0.6,685,AG 3791 SNA
....5 CB20 BN61-11982B BRACKET-WALL;55KS7000,CR-SPCC,EXTRUSION, 4 SNA
...4 T0527 BN68-00513A LABEL-E PASS;ALL MODEL,WW,YUPO,W50,L15,W 1 SNA
...4 BN96-40782A ASSY PCB P-LED INTERFACE BOARD;49KU6300, 1 SNA
..3 BN96-40632A ASSY LED BAR P;49KU6300_SDC_L,CEM3 6 SNA
..3 BN96-40633A ASSY LED BAR P;49KU6300_SDC_R,CEM3 6 SNA
0.2 BN96-39041A ASSY OPEN CELL;LSF490FN01-L,16:9,UHD 60H 1 SNA
..3 BN81-12946A A/S-ADHESIVE ACF;ADHESIVE ACF,0201-00232 1 SNA
..3 BN81-12952A A/S-ADHESIVE SIL;ADHESIVE SIL,0201-00237 1 SNA
..3 BN81-12953A A/S-IC DRIVER SOURCE;IC DRIVER SOURCE,LJ 1 SNA
..3 BN81-13048A A/S-POLARIZER CF;POLARIZER CF,LJ01-10722 1 SNA
..3 BN81-13049A A/S-POLARIZER TFT;POLARIZER TFT,LJ01-107 1 SNA
OPTICAL SHEET-COMPLEX;CY-
WK049HGLV1V,PET
HOLDER-SOURCE PCB;Y15
LED,ABS,MOLD,BLACK
FRAME-CHASSIS REAR
TOP;49KU6300,PC+GF10%
FRAME-CHASSIS REAR
BOTTOM;49KU6300,PC+GF
1 SNA
8 SNA
1 SNA
1 SNA
Page 61
ANNEX. Exploded View & Part List
Level Location No. Code No. Description & Specication Q’ty SA/SNA Remark
..3 BN81-13052A A/S-SOURCE PCB LEFT;SOURCE PCB LEFT,LJ94 1 SNA
..3 BN81-13053A A/S-SOURCE PCB RIGHT;SOURCE PCB RIGHT,LJ 1 SNA
0.2 BN96-40642A ASSY COVER P-SOURCE PCB;49KU6300,EGI-SEC 1 SNA
..3 BN63-15569A COVER-SOURCE PCB;49KU6300,EGI-SECC,T0.6, 1 SNA
..3 BN63-15963A
..3 BN63-15963B INSULATOR-SOURCE PCB COVER LEFT;49KU6300 1 SNA
0.2 BN96-40740A ASSY CHASSIS FRONT P;49KU6300,PC+ABS+ED1 1 SA
..3 BN60-01319B SPACER-CONDUCTIVE;CONDUCTIVE FABRIC,L17, 3 SNA
..3 BN60-01323B
..3 BN60-01323C
..3 BN63-14373G SHEET-PROTECTION COVER;LED_JU7000,PO,T0. 1 SNA
..3 BN63-14373J SHEET-PROTECTION COVER;LED_JU7000,PO,T0. 1 SNA
..3 BN63-14373K SHEET-PROTECTION COVER;LED_JU7000,PO,T0. 1 SNA
..3 AC155 BN64-03531A CHASSIS-FRONT;49KU6300,PC+ABS+ED18%,V-1, 1 SNA
INSULATOR-SOURCE PCB COVER
RIGHT;49KU630
SPACER-CONDUCTIVE;49KU6300,CONDUCTIVE
FA
SPACER-CONDUCTIVE;49KU6300,CONDUCTIVE
FA
1 SNA
2 SNA
2 SNA
ANNEX-10
Page 62
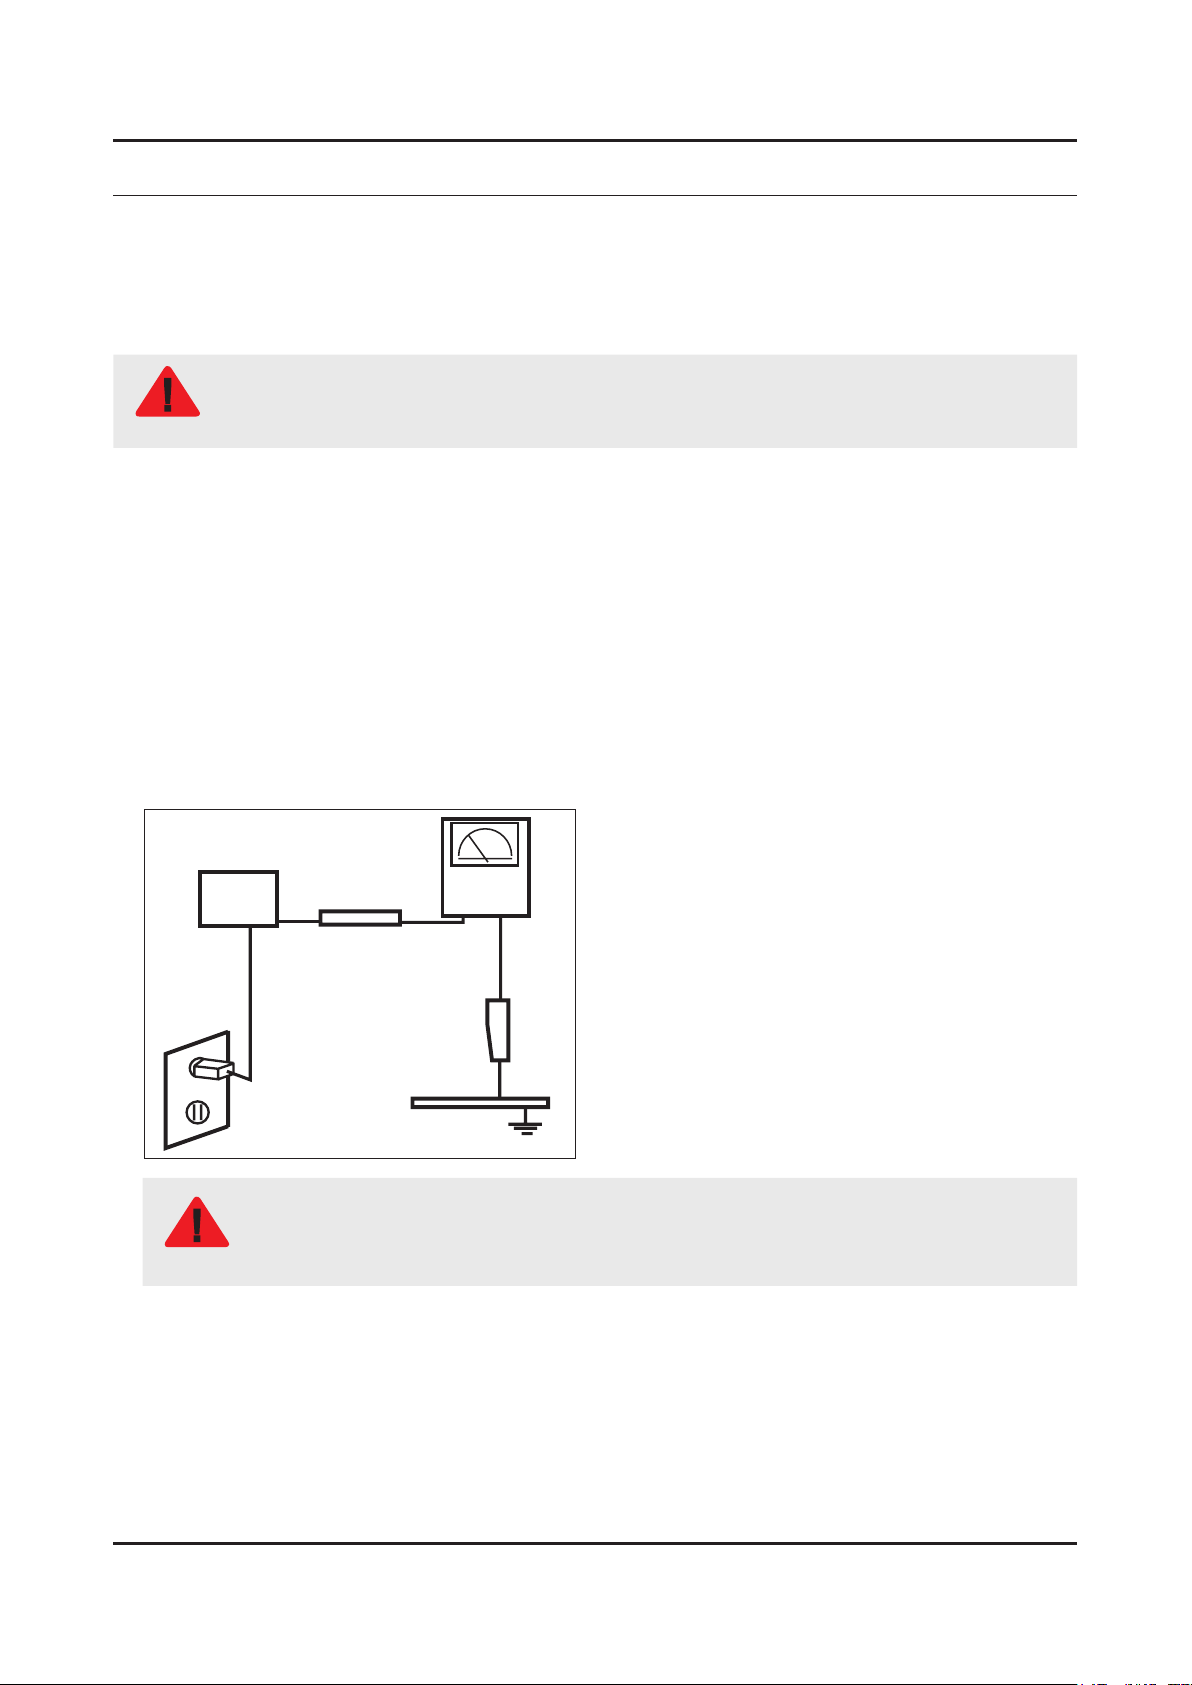
1. Precautions
1. Precautions
1-1. Safety Precautions
Follow these safety, servicing and ESD precautions to prevent damage and to protect against potential hazards such as
electrical shock.
1-1-1. Warnings
For continued safety, do not attempt to modify the circuit board.
WARNING
1-1-2. Servicing the LED TV
When servicing the LED TV, Disconnect the AC line cord from the AC outlet.1.
It is essential that service technicians have an accurate voltage meter available at all times. Check the calibration of this 2.
meter periodically.
1-1-3. Fire and Shock Hazard
Before returning the monitor to the user, perform the following safety checks:
Inspect each lead dress to make certain that the leads are not pinched or that hardware is not lodged between the 1.
chassis and other metal parts in the monitor.
Inspect all protective devices such as nonmetallic control knobs, insulating materials, cabinet backs, adjustment and 2.
compartment covers or shields, isolation resistorcapacitor networks, mechanical insulators, etc.
Leakage Current Hot Check:3.
Disconnect the AC power and DC power jack before servicing.
(READING SHOULD)
DEVICE
UNDER
TEST
ALSO TEST WITH
PLUG REVERSED
(USING AC ADAPTER
PLUG AS REQUIRED)
NOT BE ABOVE 0.5mA
2-WIRE CORD
TEST ALL
EXPOSED METAL
SURFACES
LEAKAGE
CURRENT
TESTER
EARTH
GROUND
Do not use an isolation transformer during this test.
Use a leakage current tester or a metering system that complies with American National Standards
WARNING
Institute (ANSI C101.1, Leakage Current for Appliances), and Underwriters Laboratories (UL
Publication UL1410, 59.7).
With the unit completely reassembled, plug the AC line cord directly into a 120V AC outlet. With the unit’s AC switch rst 4.
in the ON position and then OFF, measure the current between a known earth ground (metal water pipe, conduit, etc.)
and all exposed metal parts, including: metal cabinets, screwheads and control shafts.
The current measured should not exceed 0.5 milliamp.
Reverse the power-plug prongs in the AC outlet and repeat the test.
1-1
Page 63

1-2
1. Precautions
1-1-4. Product Safety Notices
Some electrical and mechanical parts have special safetyrelated characteristics which are often not evident from visual
inspection. The protection they give may not be obtained by replacing them with components rated for higher voltage,
wattage, etc. Parts that have special safety characteristics are identied by on schematics and parts lists. A substitute
replacement that does not have the same safety characteristics as the recommended replacement part might create
shock, re and/or other hazards. Product safety is under review continuously and new instructions are issued whenever
appropriate.
Page 64

1-3
1. Precautions
1-2. Servicing Precautions
An electrolytic capacitor installed with the wrong polarity might explode.
WARNING
Before servicing units covered by this service manual, read and follow the Safety Precautions section of
CAUTION
NOTE
1-2-1. General Servicing Precautions
Always unplug the unit’s AC power cord from the AC power source and disconnect the DC Power Jack before 1.
attempting to: (a) remove or reinstall any component or assembly, (b) disconnect PCB plugs or connectors, (c) connect
a test component in parallel with an electrolytic capacitor.
Some components are raised above the printed circuit board for safety. An insulation tube or tape is sometimes used. 2.
The internal wiring is sometimes clamped to prevent contact with thermally hot components. Reinstall all such elements
to their original position.
After servicing, always check that the screws, components and wiring have been correctly reinstalled. Make sure that 3.
the area around the serviced part has not been damaged.
Check the insulation between the blades of the AC plug and accessible conductive parts (examples: metal panels, input 4.
terminals and earphone jacks).
Insulation Checking Procedure: Disconnect the power cord from the AC source and turn the power switch ON. Connect 5.
an insulation resistance meter (500 V) to theblades of the AC plug. The insulation resistance between each blade of the
AC plug and accessible conductive parts (see above) should be greater than 1 megohm.
Always connect a test instrument’s ground lead to the instrument chassis ground before connecting the positive lead; 6.
always remove the instrument’s ground lead last.
this manual.
If unforeseen circumstances create conict between the following servicing precautions and any of the
safety precautions, always follow the safety precautions.
Page 65

1-4
1. Precautions
1-3. Static Electricity Precautions
Some semiconductor (solid state) devices can be easily damaged by static electricity. Such components are commonly
called Electrostatically Sensitive Devices (ESD). Examples of typical ESD are integrated circuits and some eld-effect
transistors. The following techniques will reduce the incidence of component damage caused by static electricity.
Immediately before handling any semiconductor components or assemblies, drain the electrostatic charge from your 1.
body by touching a known earth ground. Alternatively, wear a discharging wrist-strap device. To avoid a shock hazard,
be sure to remove the wrist strap before applying power to the monitor.
After removing an ESD-equipped assembly, place it on a conductive surface such as aluminum foil to prevent 2.
accumulation of an electrostatic charge.
Do not use freon-propelled chemicals. These can generate electrical charges sufcient to damage ESDs.3.
Use only a grounded-tip soldering iron to solder or desolder ESDs.4.
Use only an anti-static solder removal device. Some solder removal devices not classied as “anti-static” can generate 5.
electrical charges sufcient to damage ESDs.
Do not remove a replacement ESD from its protective package until you are ready to install it. Most replacement ESDs 6.
are packaged with leads that are electrically shorted together by conductive foam, aluminum foil or other conductive
materials.
Immediately before removing the protective material from the leads of a replacement ESD, touch the protective material 7.
to the chassis or circuit assembly into which the device will be installed.
Be sure no power is applied to the chassis or circuit and observe all other safety precautions.
CAUTION
Minimize body motions when handling unpackaged replacement ESDs. Motions such as brushing clothes together, or 8.
lifting your foot from a carpeted oor can generate enough static electricity to damage an ESD.
Page 66

1-5
1. Precautions
1-4. Installation Precautions
For safety reasons, more than a people are required for carrying the product.1.
Keep the power cord away from any heat emitting devices, as a melted covering may cause re or electric shock.2.
Do not place the product in areas with poor ventilation such as a bookshelf or closet. The increased internal temperature 3.
may cause re.
Bend the external antenna cable when connecting it to the product. This is a measure to protect it from being exposed 4.
to moisture. Otherwise, it may cause a re or electric shock.
Make sure to turn the power off and unplug the power cord from the outlet before repositioning the product. Also check 5.
the antenna cable or the external connectors if they are fully unplugged. Damage to the cord may cause re or electric
shock.
Keep the antenna far away from any high-voltage cables and install it rmly. Contact with the highvoltage cable or the 6.
antenna falling over may cause re or electric shock.
When installing the product, leave enough space (0.4m) between the product and the wall for ventilation purposes. 7.
A rise in temperature within the product may cause re.
If an equipment is provided with a replaceable battery, and if replacement by an incorrect type could result in an 8.
explosion (for example, with some lithium batteries), the following applies:
Risk of explosion if battery is replaced by an incorrect type dispose of used batteries according to •
the instructions.
Do not dispose of batteries in a re.•
Do not short circuit, disassemble or overheat the batteries.•
CAUTION
Danger of explosion if battery is incorrectly replaced. Replace only with the same or equivalent •
type.
Do not be exposed to excessive heat such as sunshine, re or the like.•
Page 67
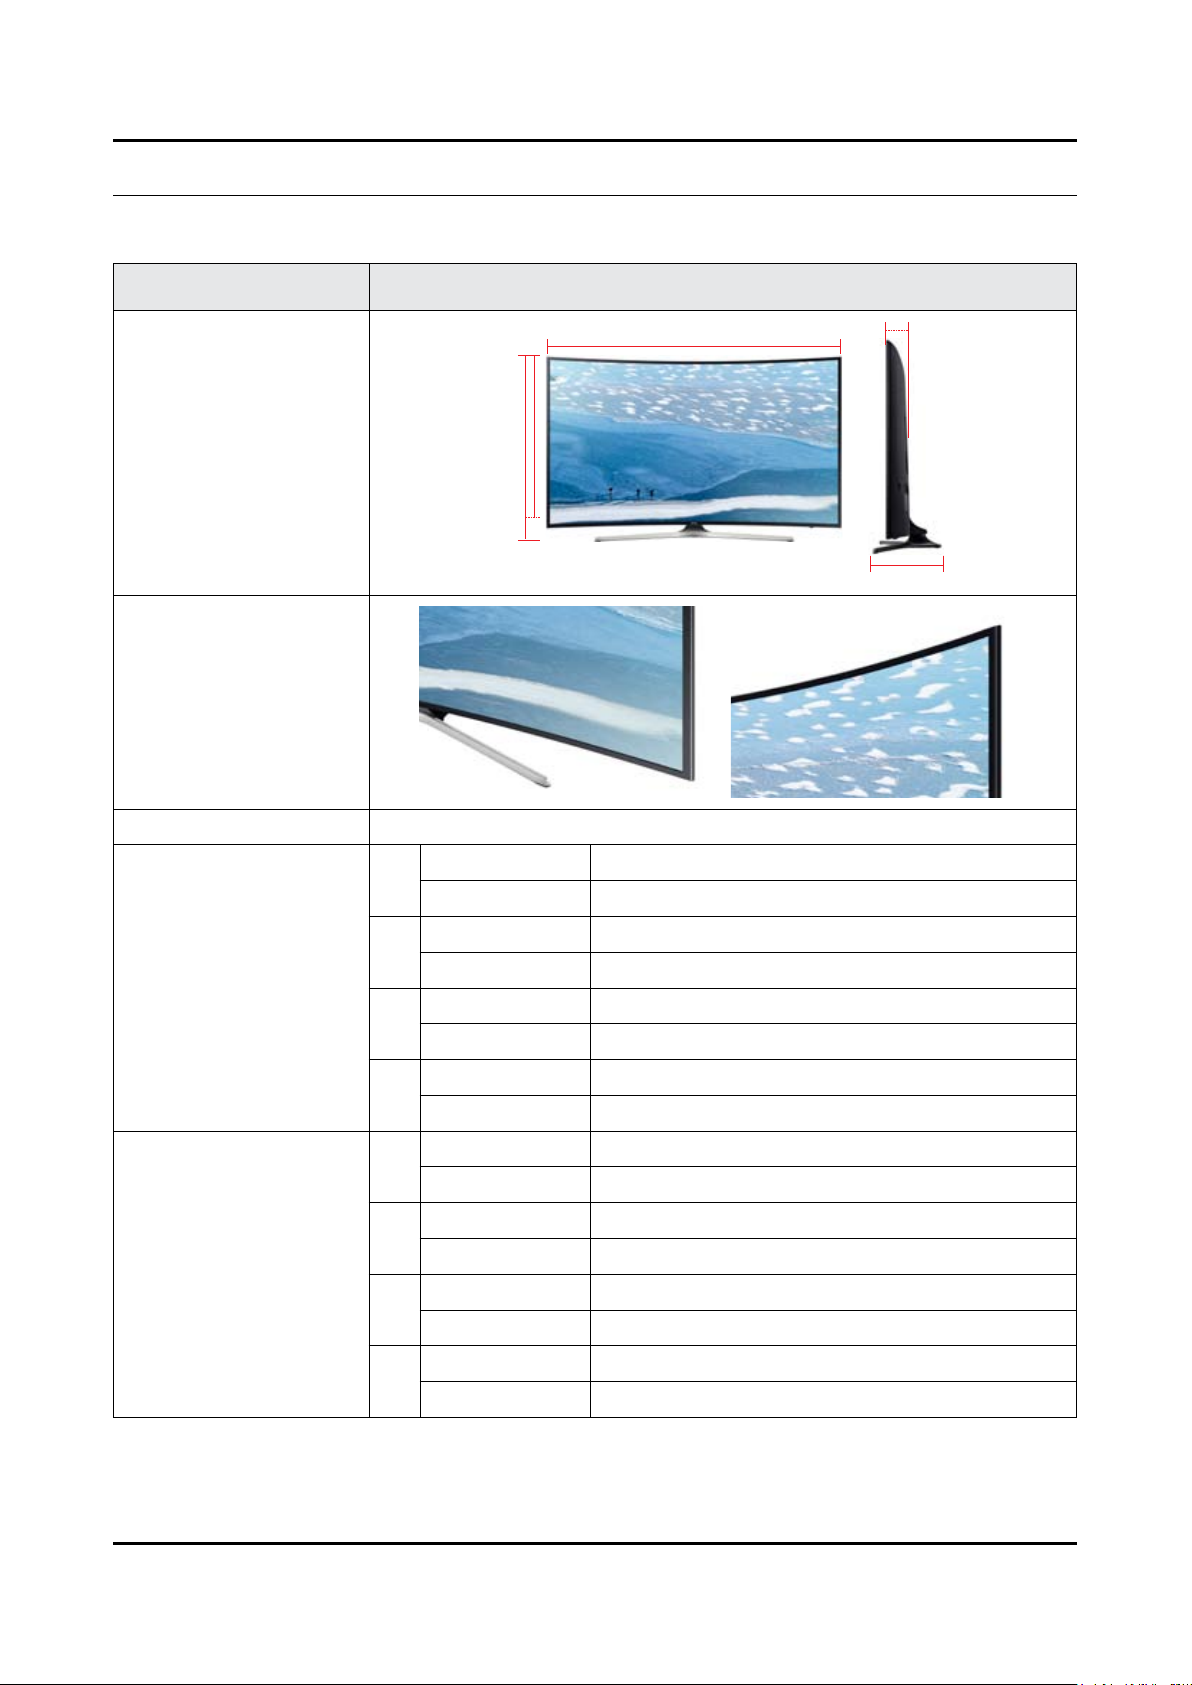
2. Product Specications
2-1. Product information
Model UE**KU6100W
2. Product specications
W
Front View
Detail View
Front Color Front Color : Black / Stand Type : V-Shape (Silver SMT)
40"
49"
Dimension (WxHxD)
55"
H
* W : Width H : High D : Depth
Body 918.5 x 536.4 x 104.2 mm
With stand 918.5 x 599.5 x 288.0 mm
Body 1104.1 x 639.9 x 119.1 mm
With stand 1104.1 x 701.0 x 310.2 mm
Body 1241.7 x 718.6 x 111.9 mm
With stand 1241.7 x 779.3 x 310.5 mm
D
Weight
65"
Body 1460.3 x 845.8 x 131.1 mm
With stand 1460.3 x 907.2 x 369.1 mm
Without Stand 8.1 kg
40"
With Stand 9 kg
Without Stand 12.3 kg
49"
With Stand 13.5 kg
Without Stand 16.2 kg
55"
With Stand 17.2 kg
Without Stand 25.5 kg
65"
With Stand 28.1 kg
2-1
Page 68
2-2
2. Product specications
2-2. Detail Specication
Item UE40KU6100WXXH
General Information
Display
Video
Product LED
Series 6
Country HUNGARY
Platform(TV) SoC | Jazz-L
Screen Size 40"
Screen Size (cm) 101 cm
Resolution 3,840 × 2,160
Quantum Dot Display N/A
Ultra Black N/A
Screen Curvature 3000R
10 bit Support N/A
Picture Engine UHD Up-Scaling
Motion Rate N/A
PQI (Picture Quality Index) 1400
HDR (High Dynamic Range) HDR
Dynamic Contrast Ratio Mega Contrast
Micro Dimming UHD Dimming
Audio
Precision Black (Local Dimming) N/A
Quantum Dot Color N/A
Active Crystal Color N/A
Wide Color Enhancer (Plus) N/A
PurColor Yes
Auto Depth Enhancer Yes
Contrast Enhancer N/A
Auto Motion Plus Yes
Film Mode Yes
Peak Illuminator N/A
Dolby Digital Plus Yes
DTS Codec Yes
Sound Output (RMS) 20W
Speaker Type 2CH(Down Firing w/Bass Reex)
Woofer N/A
Wallmount Sound Mode Yes
Multiroom Link Yes
TV SoundConnect N/A
BT Headset Support N/A
Page 69
2-3
2. Product specications
Item UE40KU6100WXXH
Smart TV
Smart Interaction
Convergence
IoT Service
Tuner/Broadcasting
Samsung SMART TV Yes
Apps Yes
Games N/A
Cloud Game Yes(NL,BE,LU,PL,HU)
Billing Yes(NL,BE,LU,PL,HU,GR,RO,BG)
Automated Content Recognition (ACR) N/A
Web Browser Yes
Voice Recognition N/A
TV to Mobile - Mirroring Yes
Mobile to TV - Mirroring, DLNA Yes
Samsung SMART View Yes
Bluetooth Low Energy N/A
RVU N/A
WiFi Direct Yes
TV as Hub Support N/A
TV as Things Support N/A
IoT Client Application N/A
Digital Broadcasting DVB-TC(T2 Ready)
Connectivity
Analog Tuner Yes
2 Tuner N/A
CI (Common Interface) CI+(1.3)
Data Broadcasting
HDMI 3
USB 2
Component In (Y/Pb/Pr) 1
Composite In (AV) 1(Common Use for Component Y)
Ethernet (LAN) Yes
Headphone N/A
Audio Out (Mini Jack) N/A
Digital Audio Out (Optical) 1
RF In (Terrestrial / Cable input / Satellite input) 1/1(Common Use for Terrestrial)/0
Ex-Link ( RS-232C ) N/A
CI Slot 1
Scart N/A
HDMI A / Return Ch. Support Yes
HDMI Quick Switch Yes
Wireless LAN Adapter Support N/A
Wireless LAN Built-in Yes
Anynet+ (HDMI-CEC) Yes
Page 70
2-4
2. Product specications
Item UE40KU6100WXXH
Design
Additional Feature
Design JU6700
Bezel Type VNB
Slim Type Slim
Front Color Black
Light Effect (Deco) N/A
Stand Type V-Shape (Silver SMT)
Swivel (Left/Right) N/A
Instant On Yes
Processor Quad-Core
Accessibility
Digital Clean View Yes
One Connect (Jack) N/A
Auto Channel Search Yes
Auto Power Off Yes
BD Wise Plus N/A
Caption (Subtitle) Yes
Channel List USB-Clone Yes
Voice guide(EU 17 countries)/ Enlarge/
High contrast
Eco Feature
Connect Share™ (HDD) Yes
ConnectShare™ (USB 2.0) Yes
Embeded POP Yes
EPG Yes
Extended PVR Yes
Game Mode Yes
OSD Language 27 European Languages
Picture-In-Picture Yes
BT HID Built-in N/A
USB HID Support Yes
Time Shift Yes
MBR Support N/A
Ultra Clean View Yes
Eco Sensor Yes
Energy Efciency Class A
Page 71
2-5
2. Product specications
Item UE49KU6100WXXH
General Information
Display
Video
Product LED
Series 6
Country HUNGARY
Platform(TV) SoC | Jazz-L
Screen Size 49"
Screen Size (cm) 123 cm
Resolution 3,840 × 2,160
Quantum Dot Display N/A
Ultra Black N/A
Screen Curvature 3000R
10 bit Support N/A
Picture Engine UHD Up-Scaling
Motion Rate N/A
PQI (Picture Quality Index) 1400
HDR (High Dynamic Range) HDR
Dynamic Contrast Ratio Mega Contrast
Micro Dimming UHD Dimming
Audio
Precision Black (Local Dimming) N/A
Quantum Dot Color N/A
Active Crystal Color N/A
Wide Color Enhancer (Plus) N/A
PurColor Yes
Auto Depth Enhancer Yes
Contrast Enhancer N/A
Auto Motion Plus Yes
Film Mode Yes
Peak Illuminator N/A
Dolby Digital Plus Yes
DTS Codec Yes
Sound Output (RMS) 20W
Speaker Type 2CH(Down Firing w/Bass Reex)
Woofer N/A
Wallmount Sound Mode Yes
Multiroom Link Yes
TV SoundConnect N/A
BT Headset Support N/A
Page 72
2-6
2. Product specications
Item UE49KU6100WXXH
Smart TV
Smart Interaction
Convergence
IoT Service
Tuner/Broadcasting
Samsung SMART TV Yes
Apps Yes
Games N/A
Cloud Game Yes(NL,BE,LU,PL,HU)
Billing Yes(NL,BE,LU,PL,HU,GR,RO,BG)
Automated Content Recognition (ACR) N/A
Web Browser Yes
Voice Recognition N/A
TV to Mobile - Mirroring Yes
Mobile to TV - Mirroring, DLNA Yes
Samsung SMART View Yes
Bluetooth Low Energy N/A
RVU N/A
WiFi Direct Yes
TV as Hub Support N/A
TV as Things Support N/A
IoT Client Application N/A
Digital Broadcasting DVB-TC(T2 Ready)
Connectivity
Analog Tuner Yes
2 Tuner N/A
CI (Common Interface) CI+(1.3)
Data Broadcasting
HDMI 3
USB 2
Component In (Y/Pb/Pr) 1
Composite In (AV) 1(Common Use for Component Y)
Ethernet (LAN) Yes
Headphone N/A
Audio Out (Mini Jack) N/A
Digital Audio Out (Optical) 1
RF In (Terrestrial / Cable input / Satellite input) 1/1(Common Use for Terrestrial)/0
Ex-Link ( RS-232C ) N/A
CI Slot 1
Scart N/A
HDMI A / Return Ch. Support Yes
HDMI Quick Switch Yes
Wireless LAN Adapter Support N/A
Wireless LAN Built-in Yes
Anynet+ (HDMI-CEC) Yes
Page 73
2-7
2. Product specications
Item UE49KU6100WXXH
Design
Additional Feature
Design JU6700
Bezel Type VNB
Slim Type Slim
Front Color Black
Light Effect (Deco) N/A
Stand Type V-Shape (Silver SMT)
Swivel (Left/Right) N/A
Instant On Yes
Processor Quad-Core
Accessibility
Digital Clean View Yes
One Connect (Jack) N/A
Auto Channel Search Yes
Auto Power Off Yes
BD Wise Plus N/A
Caption (Subtitle) Yes
Channel List USB-Clone Yes
Voice guide(EU 17 countries)/ Enlarge/
High contrast
Eco Feature
Connect Share™ (HDD) Yes
ConnectShare™ (USB 2.0) Yes
Embeded POP Yes
EPG Yes
Extended PVR Yes
Game Mode Yes
OSD Language 27 European Languages
Picture-In-Picture Yes
BT HID Built-in N/A
USB HID Support Yes
Time Shift Yes
MBR Support N/A
Ultra Clean View Yes
Eco Sensor Yes
Energy Efciency Class A
Page 74
2-8
2. Product specications
Item UE55KU6100WXXH
General Information
Display
Video
Product LED
Series 6
Country HUNGARY
Platform(TV) SoC | Jazz-L
Screen Size 55"
Screen Size (cm) 138 cm
Resolution 3,840 × 2,160
Quantum Dot Display N/A
Ultra Black N/A
Screen Curvature 4200R
10 bit Support N/A
Picture Engine UHD Up-Scaling
Motion Rate N/A
PQI (Picture Quality Index) 1400
HDR (High Dynamic Range) HDR
Dynamic Contrast Ratio Mega Contrast
Micro Dimming UHD Dimming
Audio
Precision Black (Local Dimming) N/A
Quantum Dot Color N/A
Active Crystal Color N/A
Wide Color Enhancer (Plus) N/A
PurColor Yes
Auto Depth Enhancer Yes
Contrast Enhancer N/A
Auto Motion Plus Yes
Film Mode Yes
Peak Illuminator N/A
Dolby Digital Plus Yes
DTS Codec Yes
Sound Output (RMS) 20W
Speaker Type 2CH(Down Firing w/Bass Reex)
Woofer N/A
Wallmount Sound Mode Yes
Multiroom Link Yes
TV SoundConnect N/A
BT Headset Support N/A
Page 75
2-9
2. Product specications
Item UE55KU6100WXXH
Smart TV
Smart Interaction
Convergence
IoT Service
Tuner/Broadcasting
Samsung SMART TV Yes
Apps Yes
Games N/A
Cloud Game Yes(NL,BE,LU,PL,HU)
Billing Yes(NL,BE,LU,PL,HU,GR,RO,BG)
Automated Content Recognition (ACR) N/A
Web Browser Yes
Voice Recognition N/A
TV to Mobile - Mirroring Yes
Mobile to TV - Mirroring, DLNA Yes
Samsung SMART View Yes
Bluetooth Low Energy N/A
RVU N/A
WiFi Direct Yes
TV as Hub Support N/A
TV as Things Support N/A
IoT Client Application N/A
Digital Broadcasting DVB-TC(T2 Ready)
Connectivity
Analog Tuner Yes
2 Tuner N/A
CI (Common Interface) CI+(1.3)
Data Broadcasting
HDMI 3
USB 2
Component In (Y/Pb/Pr) 1
Composite In (AV) 1(Common Use for Component Y)
Ethernet (LAN) Yes
Headphone N/A
Audio Out (Mini Jack) N/A
Digital Audio Out (Optical) 1
RF In (Terrestrial / Cable input / Satellite input) 1/1(Common Use for Terrestrial)/0
Ex-Link ( RS-232C ) N/A
CI Slot 1
Scart N/A
HDMI A / Return Ch. Support Yes
HDMI Quick Switch Yes
Wireless LAN Adapter Support N/A
Wireless LAN Built-in Yes
Anynet+ (HDMI-CEC) Yes
Page 76
2-10
2. Product specications
Item UE55KU6100WXXH
Design
Additional Feature
Design JU6700
Bezel Type VNB
Slim Type Slim
Front Color Black
Light Effect (Deco) N/A
Stand Type V-Shape (Silver SMT)
Swivel (Left/Right) N/A
Instant On Yes
Processor Quad-Core
Accessibility
Digital Clean View Yes
One Connect (Jack) N/A
Auto Channel Search Yes
Auto Power Off Yes
BD Wise Plus N/A
Caption (Subtitle) Yes
Channel List USB-Clone Yes
Voice guide(EU 17 countries)/ Enlarge/
High contrast
Eco Feature
Connect Share™ (HDD) Yes
ConnectShare™ (USB 2.0) Yes
Embeded POP Yes
EPG Yes
Extended PVR Yes
Game Mode Yes
OSD Language 27 European Languages
Picture-In-Picture Yes
BT HID Built-in N/A
USB HID Support Yes
Time Shift Yes
MBR Support N/A
Ultra Clean View Yes
Eco Sensor Yes
Energy Efciency Class A
Page 77
2-11
2. Product specications
Item UE65KU6100WXXH
General Information
Display
Video
Product LED
Series 6
Country HUNGARY
Platform(TV) SoC | Jazz-L
Screen Size 65"
Screen Size (cm) 163 cm
Resolution 3,840 × 2,160
Quantum Dot Display N/A
Ultra Black N/A
Screen Curvature 4200R
10 bit Support N/A
Picture Engine UHD Up-Scaling
Motion Rate N/A
PQI (Picture Quality Index) 1400
HDR (High Dynamic Range) HDR
Dynamic Contrast Ratio Mega Contrast
Micro Dimming UHD Dimming
Audio
Precision Black (Local Dimming) N/A
Quantum Dot Color N/A
Active Crystal Color N/A
Wide Color Enhancer (Plus) N/A
PurColor Yes
Auto Depth Enhancer Yes
Contrast Enhancer N/A
Auto Motion Plus Yes
Film Mode Yes
Peak Illuminator N/A
Dolby Digital Plus Yes
DTS Codec Yes
Sound Output (RMS) 20W
Speaker Type 2CH(Down Firing w/Bass Reex)
Woofer N/A
Wallmount Sound Mode Yes
Multiroom Link Yes
TV SoundConnect N/A
BT Headset Support N/A
Page 78
2-12
2. Product specications
Item UE65KU6100WXXH
Smart TV
Smart Interaction
Convergence
IoT Service
Tuner/Broadcasting
Samsung SMART TV Yes
Apps Yes
Games N/A
Cloud Game Yes(NL,BE,LU,PL,HU)
Billing Yes(NL,BE,LU,PL,HU,GR,RO,BG)
Automated Content Recognition (ACR) N/A
Web Browser Yes
Voice Recognition N/A
TV to Mobile - Mirroring Yes
Mobile to TV - Mirroring, DLNA Yes
Samsung SMART View Yes
Bluetooth Low Energy N/A
RVU N/A
WiFi Direct Yes
TV as Hub Support N/A
TV as Things Support N/A
IoT Client Application N/A
Digital Broadcasting DVB-TC(T2 Ready)
Connectivity
Analog Tuner Yes
2 Tuner N/A
CI (Common Interface) CI+(1.3)
Data Broadcasting
HDMI 3
USB 2
Component In (Y/Pb/Pr) 1
Composite In (AV) 1(Common Use for Component Y)
Ethernet (LAN) Yes
Headphone N/A
Audio Out (Mini Jack) N/A
Digital Audio Out (Optical) 1
RF In (Terrestrial / Cable input / Satellite input) 1/1(Common Use for Terrestrial)/0
Ex-Link ( RS-232C ) N/A
CI Slot 1
Scart N/A
HDMI A / Return Ch. Support Yes
HDMI Quick Switch Yes
Wireless LAN Adapter Support N/A
Wireless LAN Built-in Yes
Anynet+ (HDMI-CEC) Yes
Page 79
2-13
2. Product specications
Item UE65KU6100WXXH
Design
Additional Feature
Design JU6700
Bezel Type VNB
Slim Type Slim
Front Color Black
Light Effect (Deco) N/A
Stand Type V-Shape (Silver SMT)
Swivel (Left/Right) N/A
Instant On Yes
Processor Quad-Core
Accessibility
Digital Clean View Yes
One Connect (Jack) N/A
Auto Channel Search Yes
Auto Power Off Yes
BD Wise Plus N/A
Caption (Subtitle) Yes
Channel List USB-Clone Yes
Voice guide(EU 17 countries)/ Enlarge/
High contrast
Eco Feature
Connect Share™ (HDD) Yes
ConnectShare™ (USB 2.0) Yes
Embeded POP Yes
EPG Yes
Extended PVR Yes
Game Mode Yes
OSD Language 27 European Languages
Picture-In-Picture Yes
BT HID Built-in N/A
USB HID Support Yes
Time Shift Yes
MBR Support N/A
Ultra Clean View Yes
Eco Sensor Yes
Energy Efciency Class A
Page 80
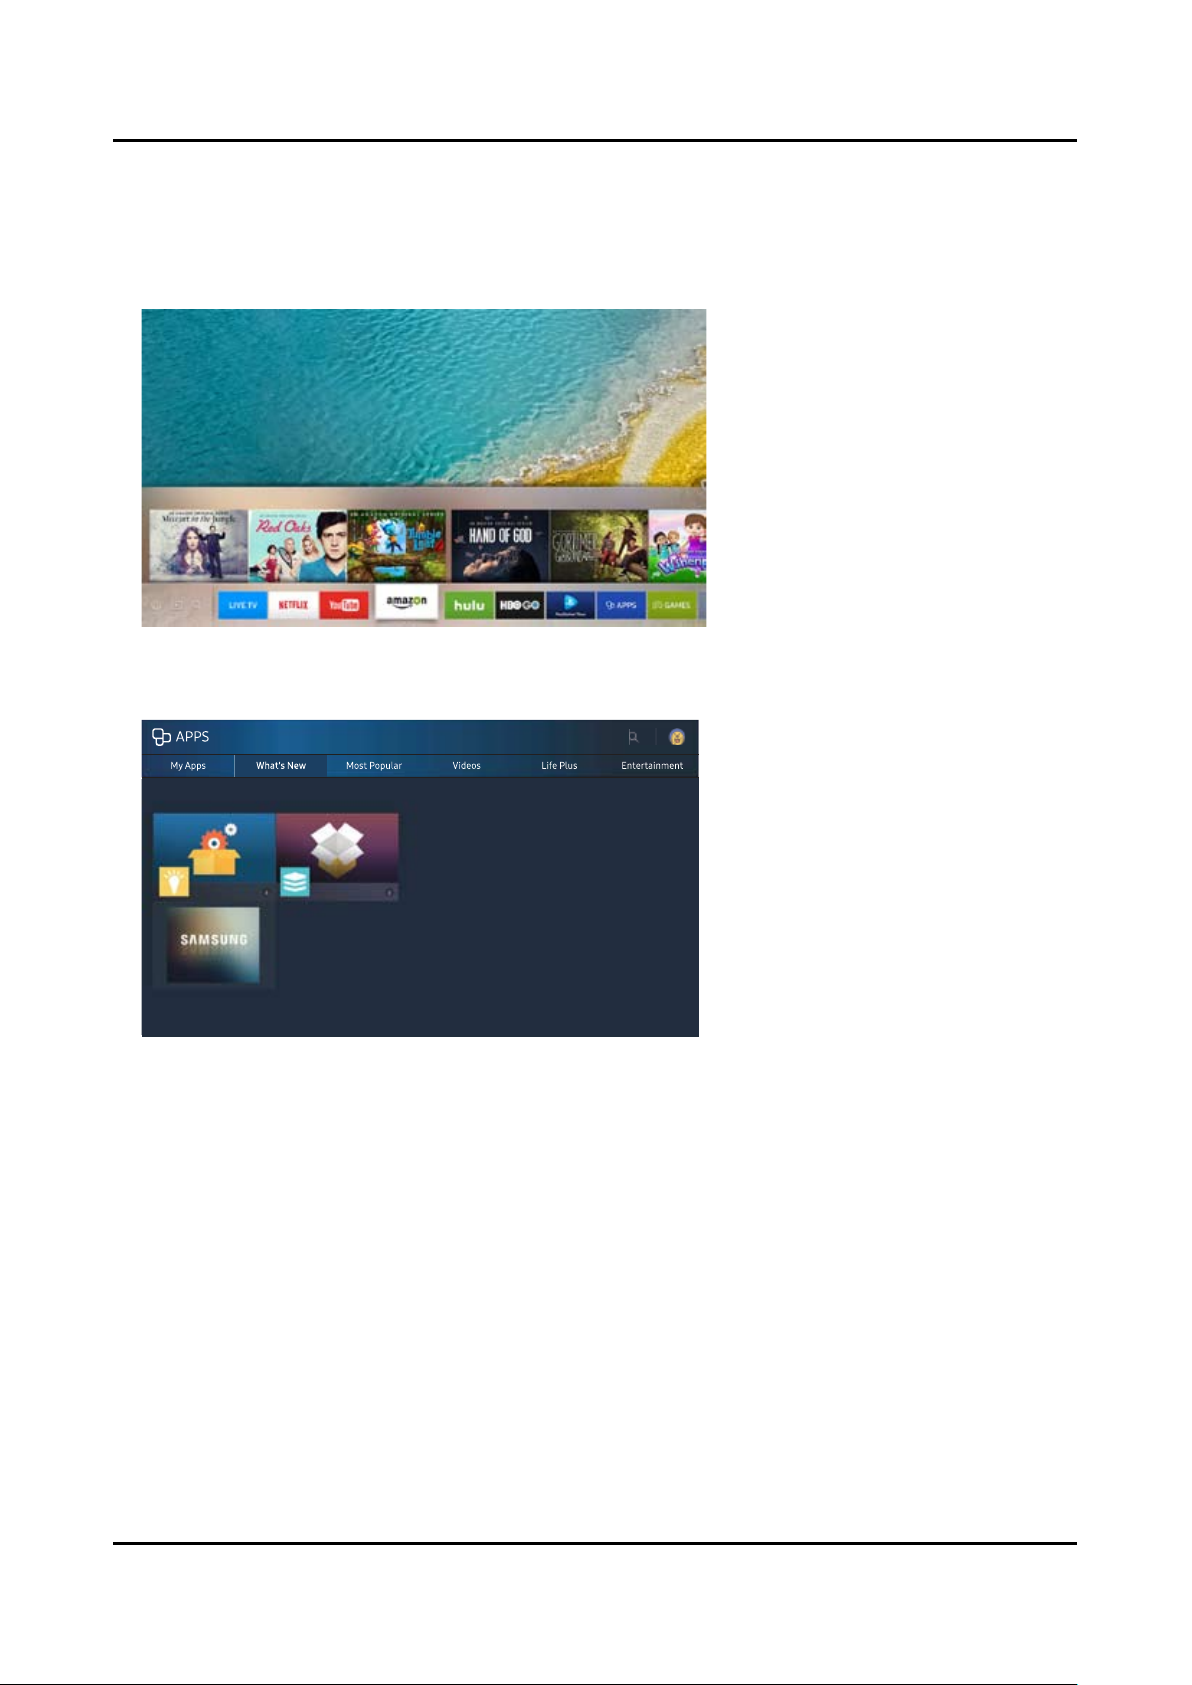
2-14
2. Product specications
2-3. NEW Key Features
2-3-1. 16" New UI
Smart Hub
APPS Service
Page 81
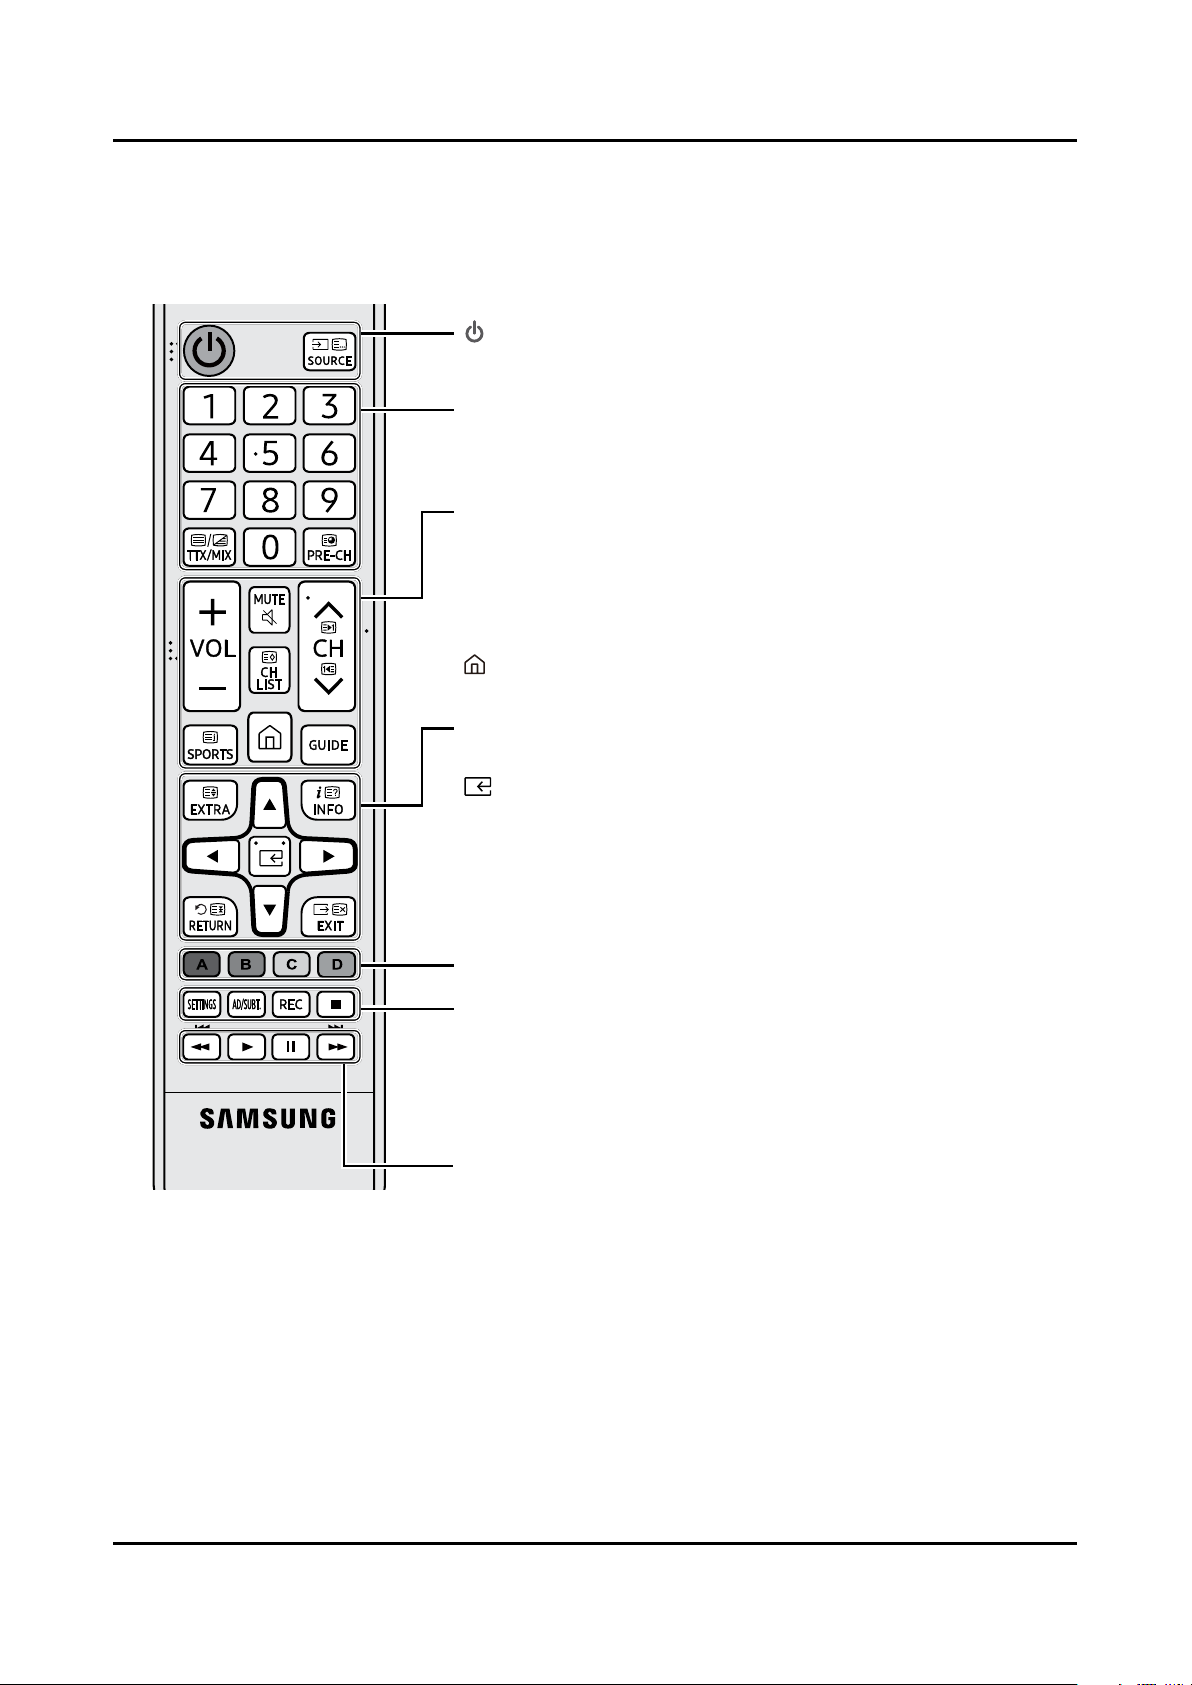
2-15
2. Product specications
2-4. Remote Control
The Remote Control
- This remote control has Braille points on the Power, Channel, Volume and Enter buttons and can be used by visually
impaired persons.
y
: Adjusts the volume.
MUTE: Turns the sound on/off.
z
: Changes the current channel.
CH LIST: Launches the Channel List.
SPORTS: Turns the Sports Mode on or off.
(Smart Hub): Launches Home Screen.
GUIDE: Displays the Electronic Programme Guide (EPG).
Number: Gives direct access to channels.
TTX/MIX: Alternately selects Teletext ON, Double, Mix or OFF.
PRE-CH: Returns to the previous channel.
Use these buttons according to the directions on the TV screen.
EXTRA: Displays related information about the current programme.
INFO: Displays information about the current programme or content.
(Enter): Selects or runs a focused item.
u d l r
: Moves the cursor, selects the on-screen menu items, and changes the
values seen on the TV's menu.
RETURN: Returns to the previous menu or channel.
EXIT: Exits the menu.
(Power): Turns the TV on and off.
SOURCE: Displays and selects available video sources.
SETTINGS: Sets the Quick Settings the menu on the Settings of the home screen.
AD/SUBT.: Displays the Accessibility Shortcuts.
REC: Records whatever you are currently watching.
'
: Stops playing content.
Use these buttons with specific features. Use these buttons according to the
directions on the TV screen.
- The button names above may be differ from the actual names.
English
Page 82
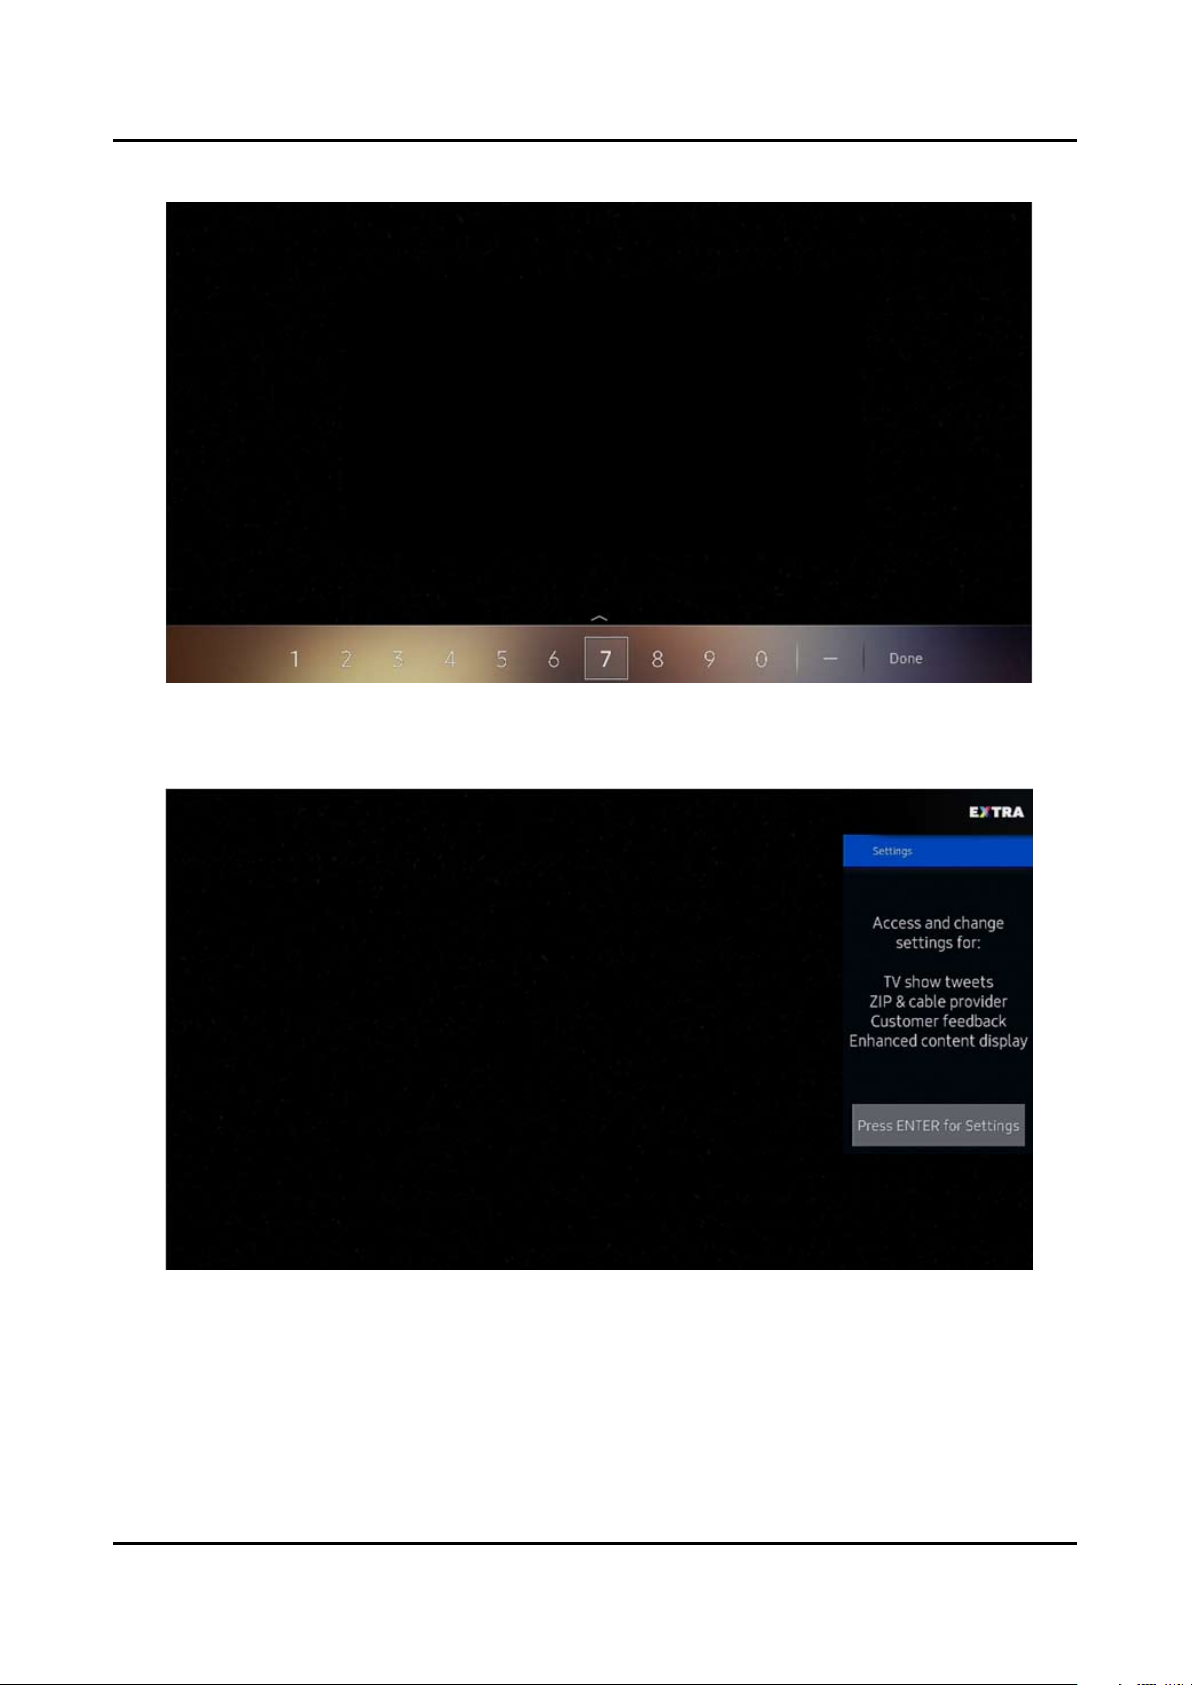
2-16
2. Product specications
2-4-1. 123 Key
2-4-2. EXTRA Key
Page 83

2-17
2. Product specications
2-5. HDMI Color
2-5-1. HDMI UHD Color
When you set the HDMI connection to On, the TV turns off and then on automatically.•
The HDMI connection with HDMI UHD Color set to Off supports up to UHD 50P/60P 4:2:0 input signals, while the •
HDMI connection with HDMI UHD Color set to On supports up to UHD 50P/60P 4:4:4 and 4:2:2 input signals. For
more information, refer to "Supported Resolutions for UHD Input Signals."
For the SUHD models, each HDMI connection can be individually optimized for HDMI UHD Color. For the UHD •
models, make sure to connect to the HDMI IN 1 port of the TV.
When you connect the TV to an external device that supports only the UHD 24 or 30 Hz frequency or any FHD •
frequency, the HDMI UHD Color function may not be available. In this case, set HDMI UHD Color to Off.
2-5-2. HDMI Black Level
This function is only available when the input signal, connected to the TV via an HDMI connector, is set to RGB444.•
Page 84
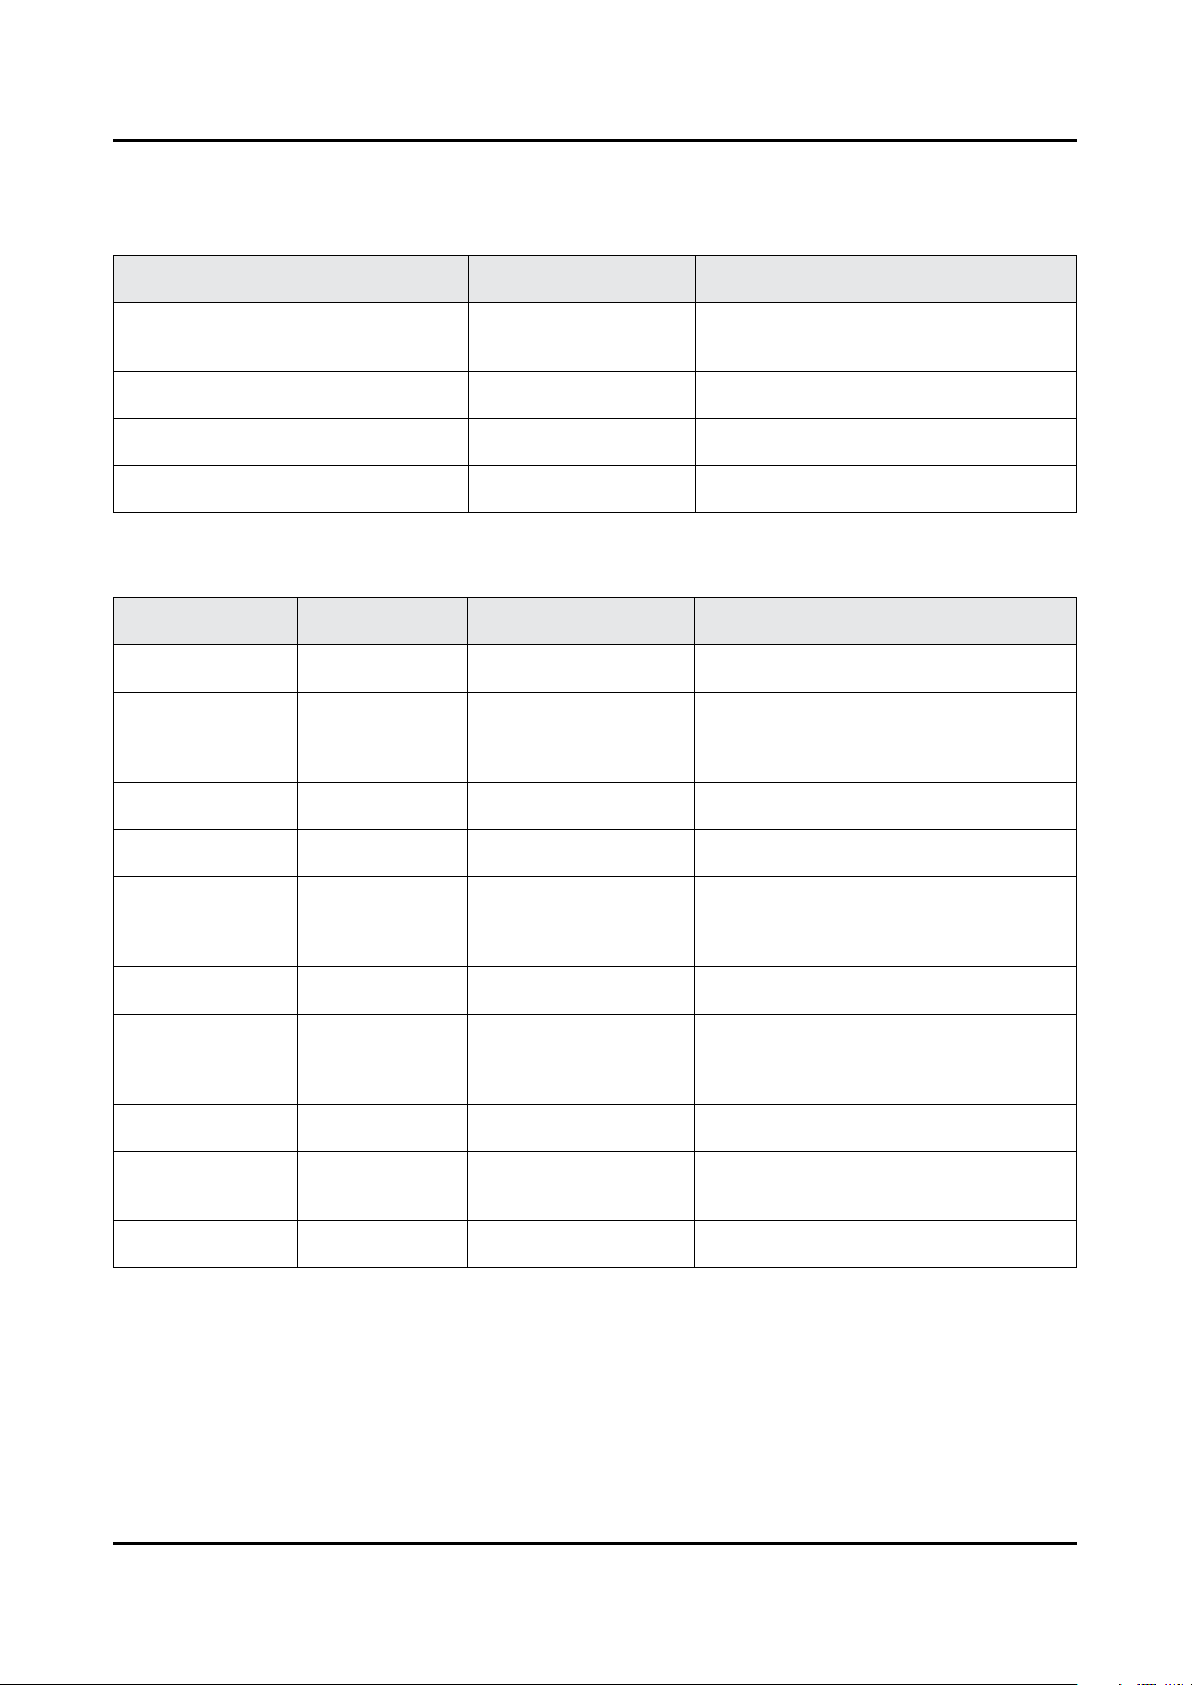
2-18
2. Product specications
2-6. Supported Formats
2-6-1. Supported image formats and resolutions
File Extension Type Resolution
*.jpg
*.jpeg
*.png PNG 4096x4096
*.bmp BMP 4096x4096
*.mpo MPO 15360x8640
JPEG 15360x8640
2-6-2. Supported music formats and codecs
File Extension Type Codec Note
*.mp3 MPEG MPEG1 Audio Layer 3 -
*.m4a
*.mpa
*.aac
*.ac FLAC FLAC Supports up to two channels.
*.ogg OGG Vorbis Supports up to two channels.
*.wma WMA WMA
MPEG4 AAC
WMA 10 Pro supports up to 5.1 channels.
WMA lossless audio is not supported.
Supports up to M2 prole.
*.wav wav wav
*.mid
*.midi
*.ape ape ape
*.aif
*.aiff
*.m4a ALAC ALAC
midi midi
AIFF AIFF
Supports type 0 and type 1.
Seek is not supported.
Supports USB device only.
Page 85
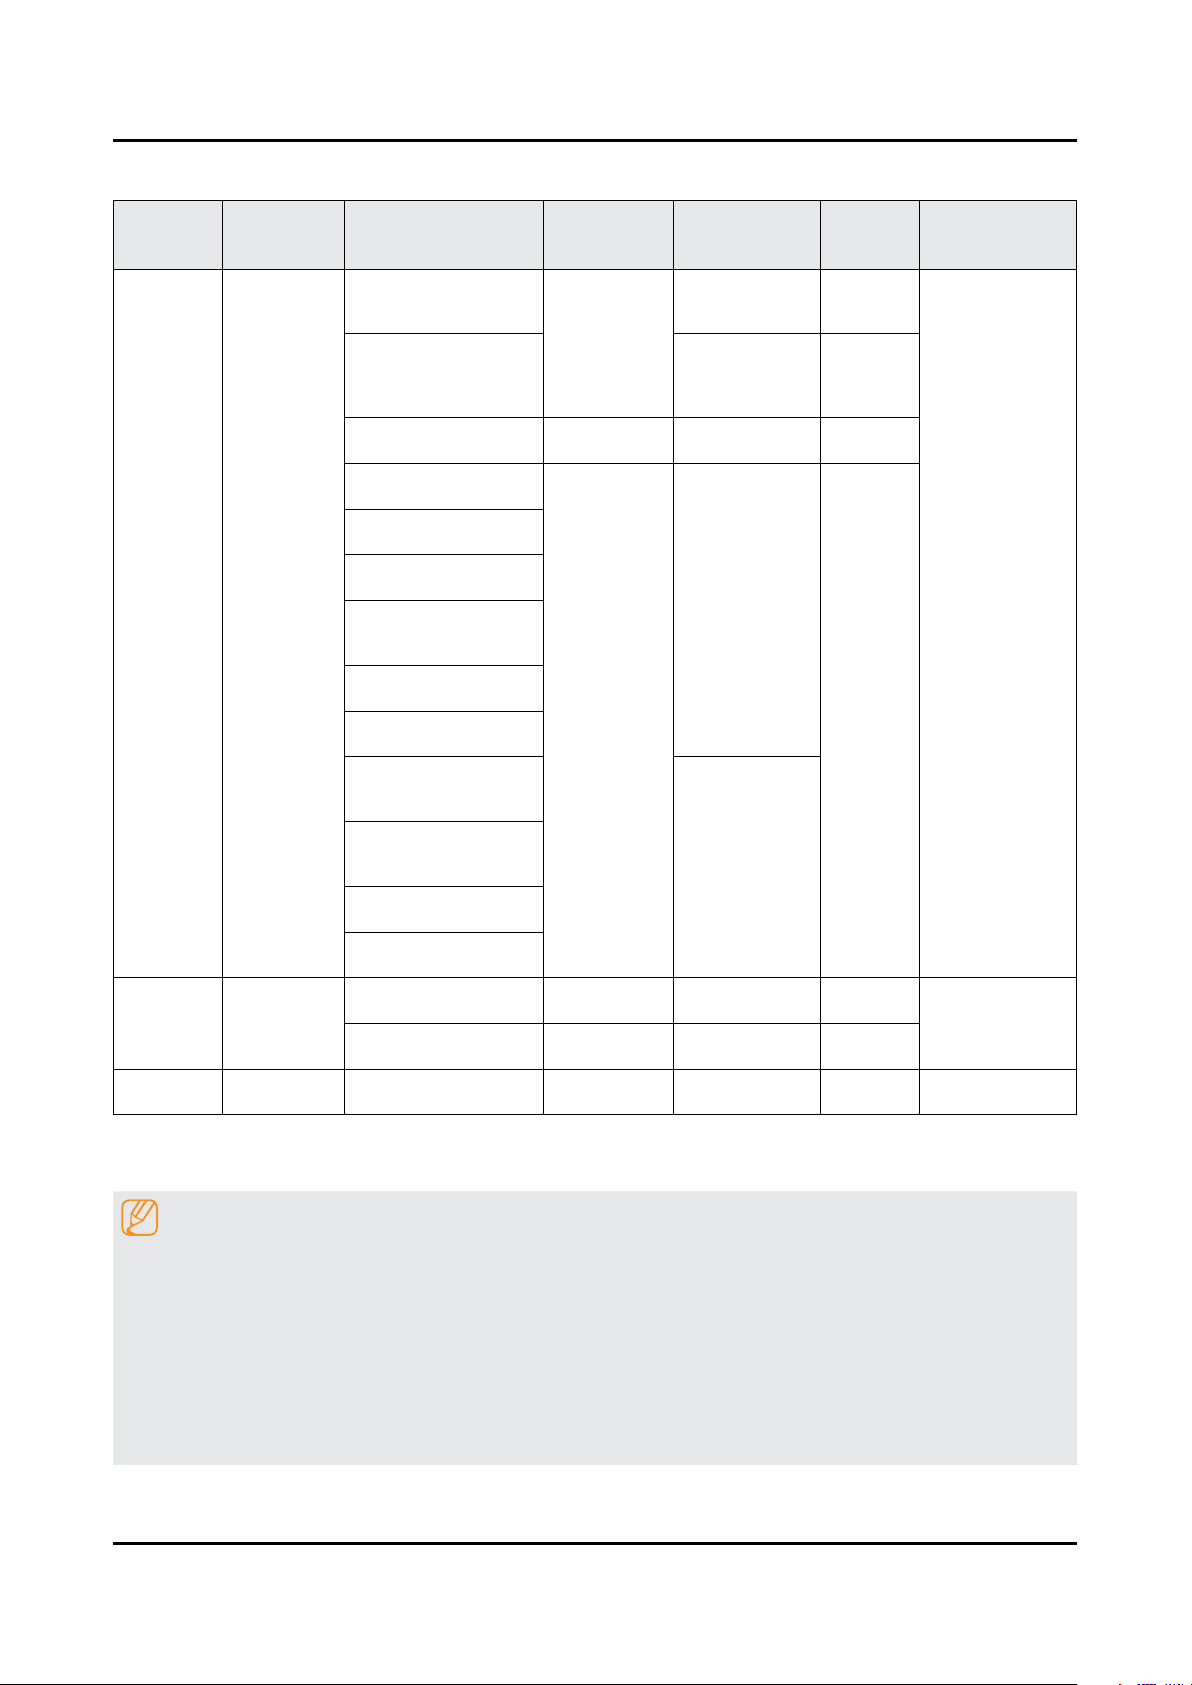
2-19
2. Product specications
2-6-3. Supported video codecs
File
Formats
*.avi
*.mkv
*.asf
*.wmv
*.mp4
*.mov
*.3gp
*.vro
*.mpg
*.mpeg
*.ts
*.tp
*.trp
*.mov
*.v
*.vob
*.svi
*.m2ts
*.mts
*.divx
Container Video Codecs Resolution
H.264 BP/MP/HP
4096 x 2160
1920x1080
AVI
MKV
ASF
MP4
3GP
MOV
FLV
VRO
VOB
PS
TS
SVAF
HEVC (H.265 - Main,
Main10,
Main4:2:2 10)
Motion JPEG 3584 x 2160 30 80
MVC
DivX 3.11 / 4 / 5 / 6
MPEG4 SP/ASP
Window Media Video v9
(VC1)
MPEG2
MPEG1
Microsoft MPEG-4 v1,
v2, v3
Frame rate
(fps)
4096 x 2160: 30
3840 x 2160: 60
60 80
60
Bit rate
(Mbps)
60
20
Audio Codec
Dolby Digital
LPCM
ADPCM(IMA, MS)
AAC
HE-AAC
WMA
Dolby Digital Plus
MPEG(MP3)
DTS(Core, LBR)
G.711(A-Law,
μ-Law)
Window Media Video v7
(WMV1), v8 (WMV2)
H.263 Sorrenson
VP6
VP8 1920 x 1080 60 20
*.webm WebM
VP9 4096 x 2160 4096 x 2160: 60 40
*.rmvb RMVB RV8/9/10 (RV30/40) 1920x1080 60 20 RealAudio 6
30
Vorbis
Other Restrictions
NOTE
Codecs may not function properly if there is a problem with the content data.•
Video content does not play or does not correctly if there is an error in the content or container.•
Sound or video may not work if they have standard bit rates/frame rates above the TV's compatibility.ratings•
If the Index Table is wrong, the Seek(Jump) function does not work.•
When playing video over a network connection, the video may not play smoothly because of datatransmission •
speeds.
Some USB/digital camera devices may not be compatible with the player.•
HEVC codec is only available in MKV / MP4 / TS containers.•
Page 86
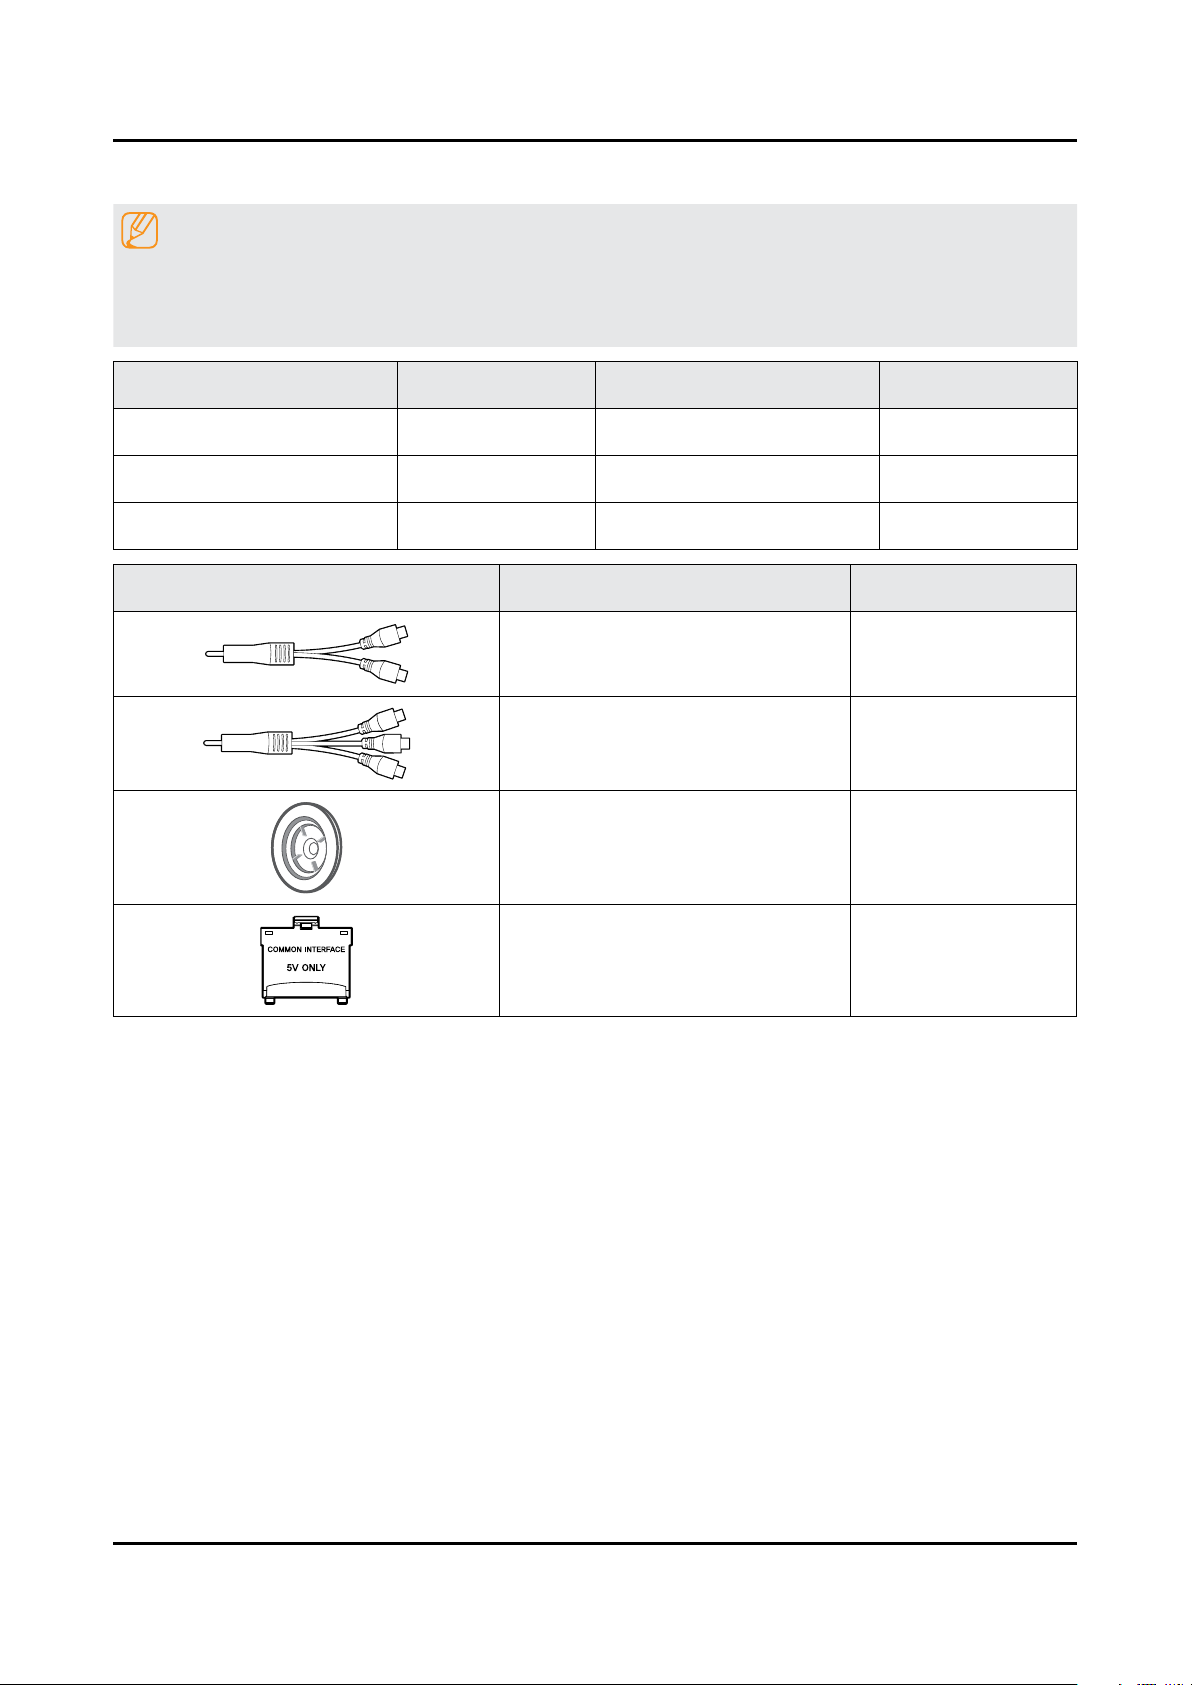
2. Product specications
2-7. Accessories
NOTE
The items’ colors and shapes may vary depending on the model.•
Cables not included in the package contents can be purchased separately.•
The part code for some accessories may differ depending on your region.•
Product Code. No Product Code. No
Remote Control• BN59-01247A User Manual• BN68-07990E
Batteries (AAA x 2)• 4301-000121 Regulatory Guide• BN68-04972E
Power Cord• 3903-001118 Warranty Card• BN68-03548J
Image Product Code. No
Component In• BN39-02190A
AV IN Adapter• BN39-02189A
Wall mount Adapter x 4ea• BN61-11938A
CI Card Adapter• 3709-001791
2-20
Page 87

4. Troubleshooting
4-1. How to Check Fault Symptom
4-1-1. Power
TV POWER STANDBY
TV in Standby1.
Standby LED Indicator √
If Not Lit:2.
AC 120Vac Line √
If missing:3.
120Vac Source and Power Cord √
If OK:4.
Resistance on SMPS √ Fuse after rst removing AC power cord.
If fusses are open replace SMPS.5.
If fuses are OK:6.
√ Standby: A13V (Always On) to Main Board. Should all be approx. 9 VDC
If any missing remove the SMPS connector to Main Board .7.
Standby A13V again for 9VDC. √
If OK replace - Main Board.
If still missing replace - SMPS.
4. Troubleshooting
4-1
Page 88
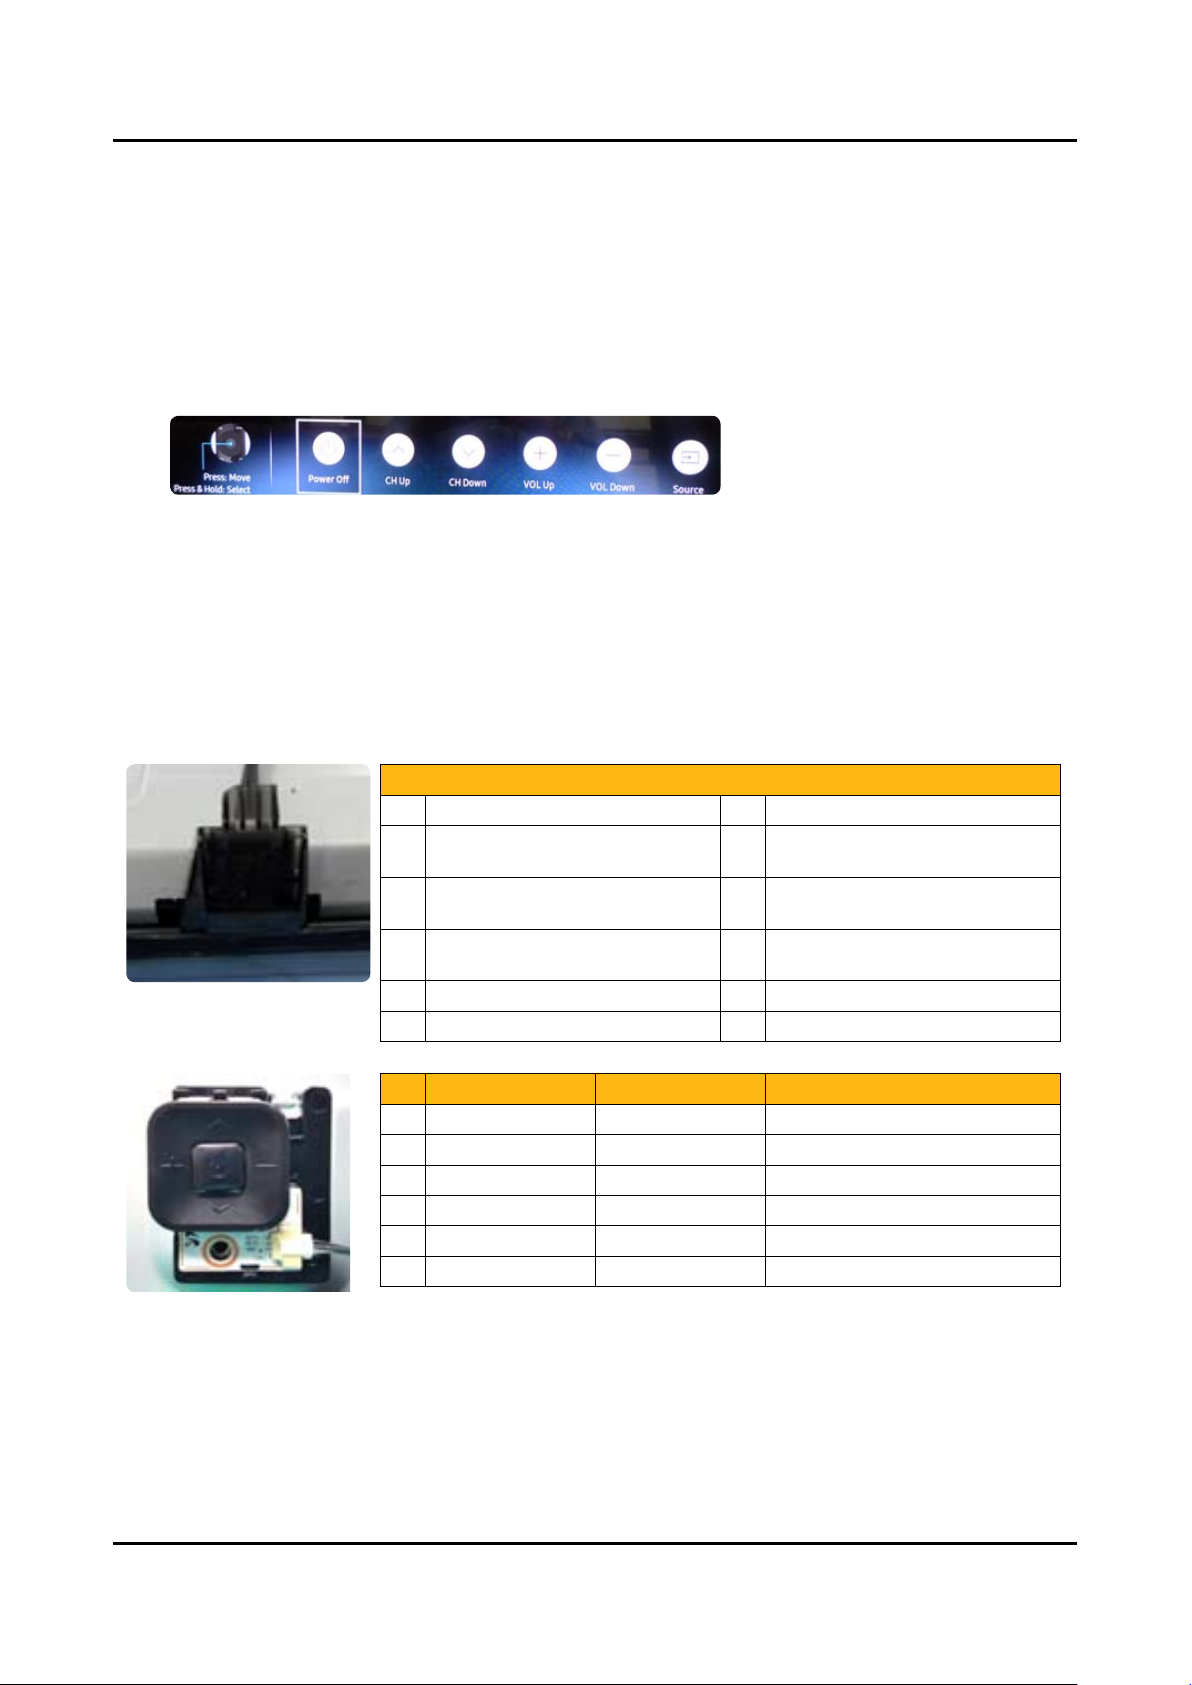
4-2
4. Troubleshooting
FUNCTION/IR Control
TV in Standby 1.
LED Status √
If 2. LED is OFF
LED 1.7Vdc (pin 8)and VCC for 3.3Vdc √
If missing suspect Function Assy/Cable/Main board.•
If 3. LED is ON
Switch Operation activates on screen display. √
<On Screen Selections with Function Control>
If missing:
Check the STBY voltage from SMPS to Main Board. If STBY is OK suspect 1. Main Board.
Check Jog Shuttle 5 SW Operation (2. Key 1 & Key 2) for command changes. If incorrect suspect a stuck Jog switch
which also holds data to Main preventing operation.
Check 3. SDA, SCL for effective 3.3Vdc (after power on)
Check 4. IR with Standard Remote command changes. (3.3V to 2.5V effective DC)
<Function/IR>
<Jog Function Switch>
CN1101 (FUNCTION/IR)
1 IR 3.3Vdc to 2.5Vdc (Effective DC) 2 GND
3 A3.3V_PW 4
AMP_SDA_I2C 3.3 Vdc (effective
5
KEY_INPUT2 1.8Vdc to command
7
9 N/C 10 N/C
11 N/C 12 N/C
P CMD Signal DC Voltage
1 Center Key 1 1.8V to 0 Vdc
2 Vol+ Key 2 1.8V to 1.0 Vdc
2 Vol- Key 2 1.8V to 1.5 Vdc
2 CH+ Key 2 1.8V to 0 Vdc
2 CH- Key 2 1.8V to 0.6 Vdc
3 GND
DC)
Voltage
AMP_SCL_I2C 3.3Vdc (effective
DC)
KEY_INPUT1 1.8dc to 0V with
6
8 LED_STB_OUT 1.7Vdc STBY
PWR On command
Page 89
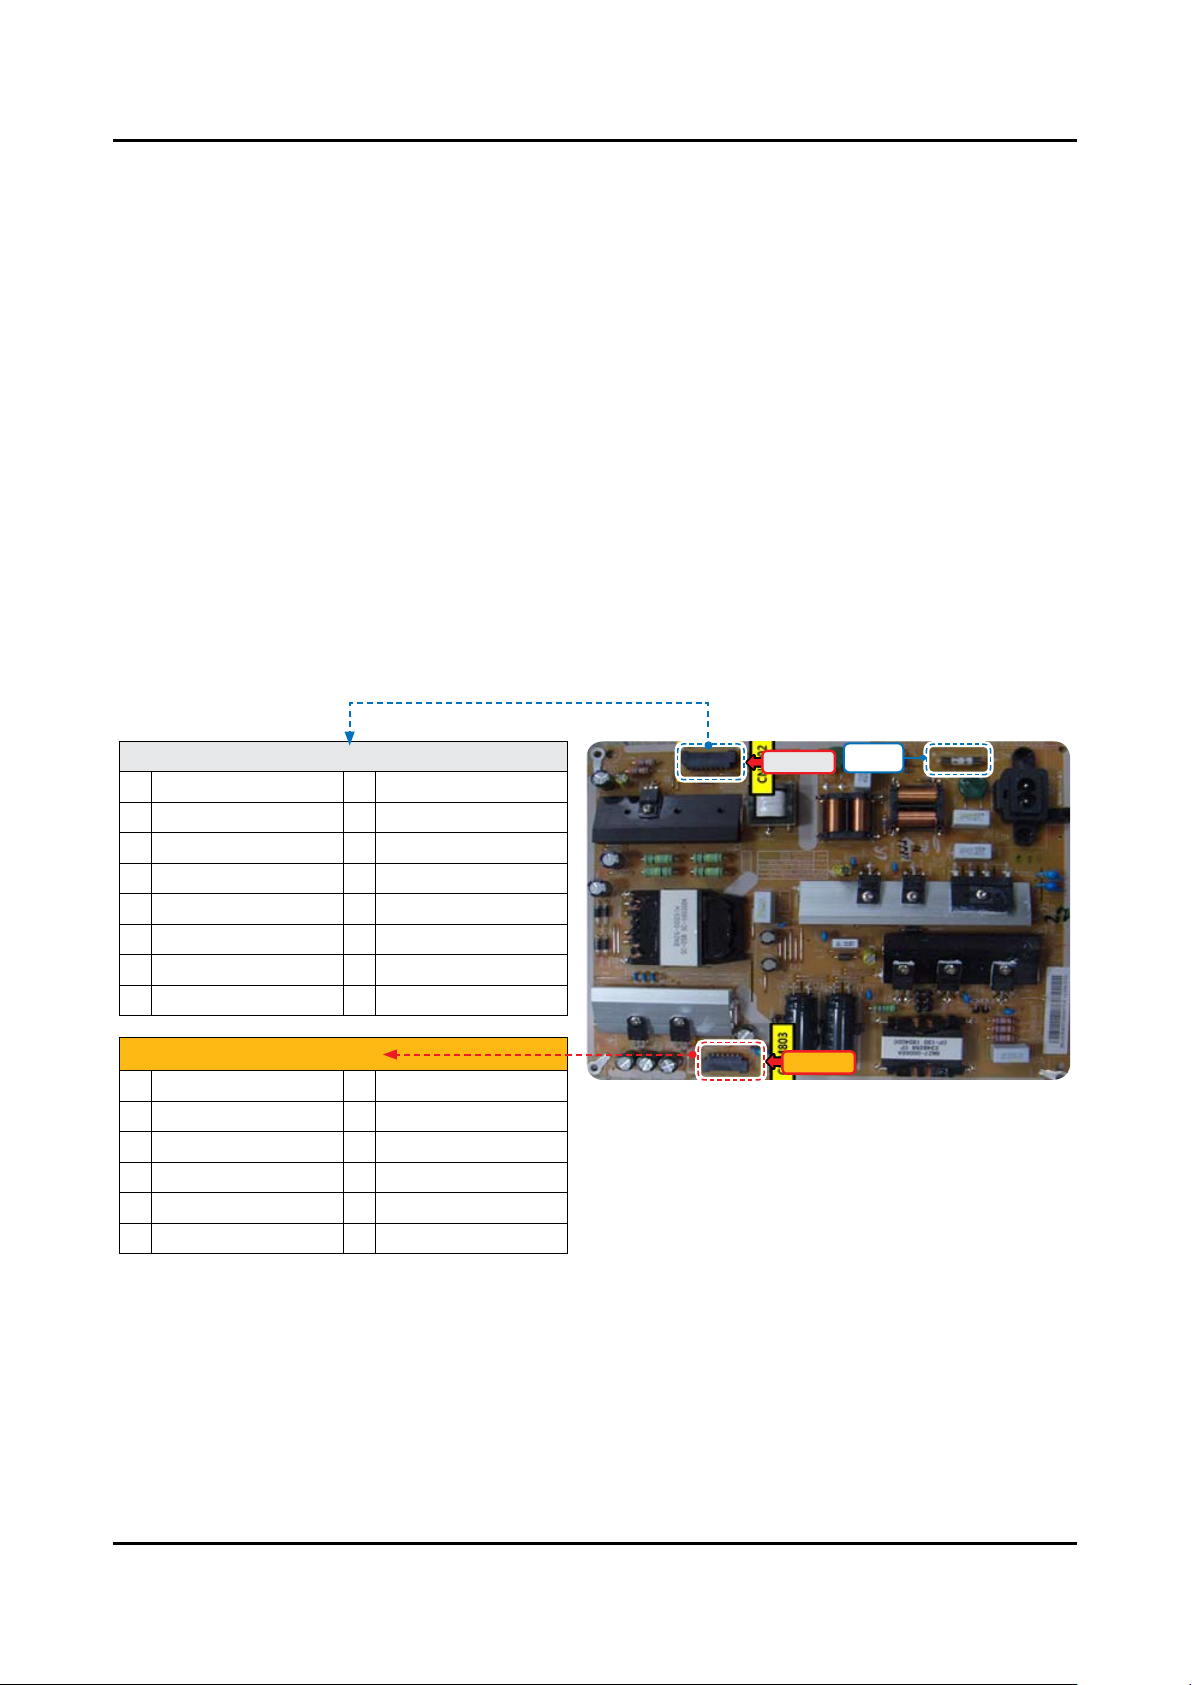
SMPS POWER
4-3
4. Troubleshooting
Power TV On.1.
PS_ON √ . 2Vdc (when off) changes to 3.3Vdc (on)
May already be On if IoT USB is loaded or TV Smart Things Hub mode is active. -
if voltage error or no change.2.
Jog Function Control Test. √
If OK replace Main Board.3.
All √ A13V supplies to full voltage level 12.7VDC.
If any wrong voltage, remove the SMPS connector to Main Board.4.
A13V again for 12.7VDC. √
If OK replace Main Board.5.
If still wrong voltage replace SMPS.6.
OD √ (Over Voltage Detect) : 3.3Vdc (Operating Normal)
If 0V or changing, an SMPS or Panel error exists. Perform Backlight Test.7.
BLU_PWM √ 0V- Off to approx 1 – 3.3 V pending Backlight dim level
If missing/error replace √ Main Board.
CNL802
1 2+ 9 1+
2 NC 10 NC
3 NC 11 NC
4 2- 12 1-
5 NC 13 NC
6 NC 14 NC
7 NC 15 IF2
8 NC 16 IF1
CNM803
1 Fail Count 7 A13V
2 ANA-DIM 8 POWER_ON/OFF
3 A13V 9 A13V
4 OD_ON/OFF 10 GND
5 A13V 11 GND
6 BLU_PWM 12 GND
CNL802
CNM803
Fuse
Page 90
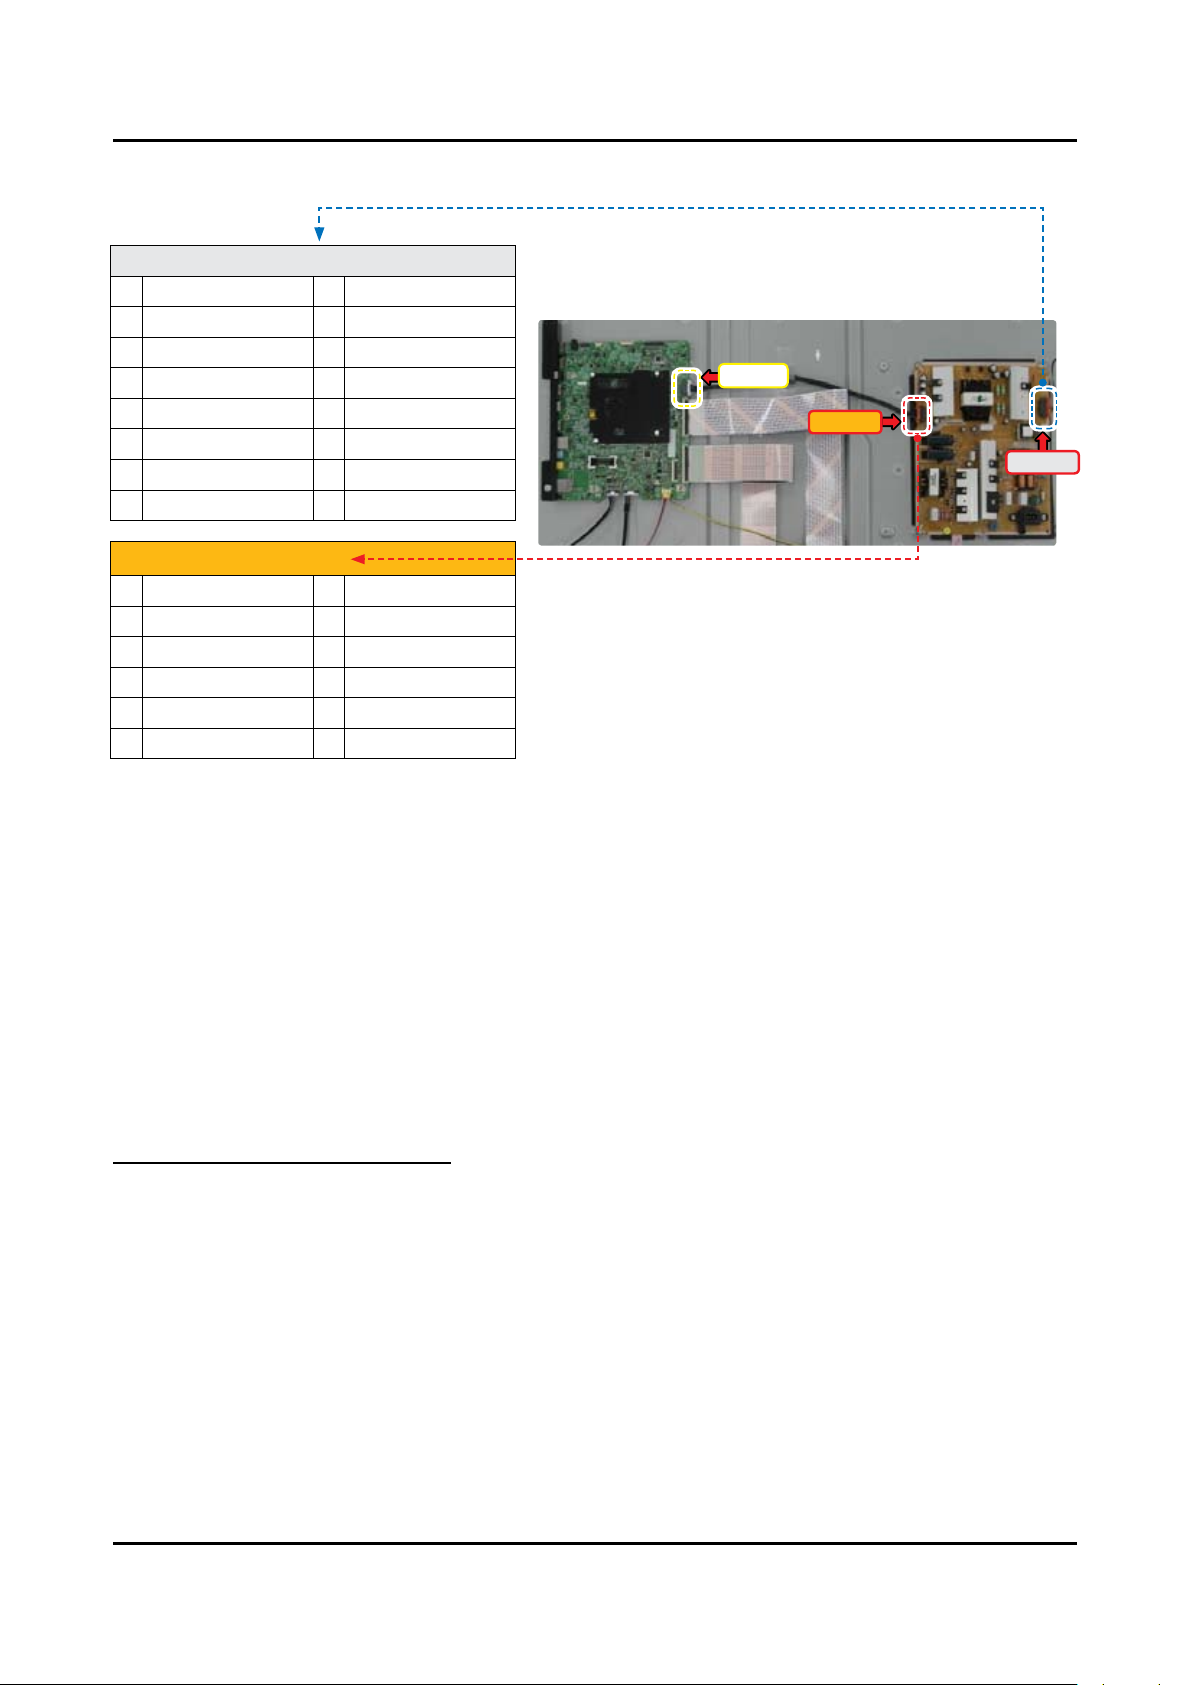
4-4
4. Troubleshooting
BACKLIGHTS
CNL802
1 2+ 9 1+
2 NC 10 NC
3 NC 11 NC
4 2- 12 1-
5 NC 13 NC
6 NC 14 NC
7 NC 15 IF2
8 NC 16 IF1
CNM803
1 Fail Count 7 A13V
2 ANA-DIM 8 POWER_ON/OFF
3 A13V 9 A13V
4 OD_ON/OFF 10 GND
5 A13V 11 GND
6 BLU_PWM 12 GND
CN202
CNM803
CNL802
Activate Backlights Test1. :
Disconnect Lead Cable from Main Board to Power Supply. (CN202) -
TV Screen for active backlight LEDs. √
If NO BACKLIGHTS2.
Plus (+) & Minus (-) pin voltages on the Panel Connector. √
If no pin voltages replace SMPS. -
If voltages exist but no backlight: -
The highest pin voltage (BL Drive Supply ) √
Remove Panel connector and measure again to compare. -
If the voltage was high and stays the same high reading a string of Panel LEDs are open. Replace the Panel. -
If the v - oltage was low and remains low the SMPS is defective.
If the voltage was low and goes high a string of panel LEDs are shorted replace the - Panel.
For BACKLIGHT DIMMING PROBLEMS:
Go to • Menu → Picture → Backlight and vary level (0 – 20)
If no backlight changes observed:•
Panel Connector pin voltages and BLU_PWM voltages (CNM803) while changing backlight level. √
If Panel voltages don’t change, and BLU_PWM changes, replace • SMPS.
If BLU_PWM doesn’t change replace • Main/T-Con Board.
Page 91
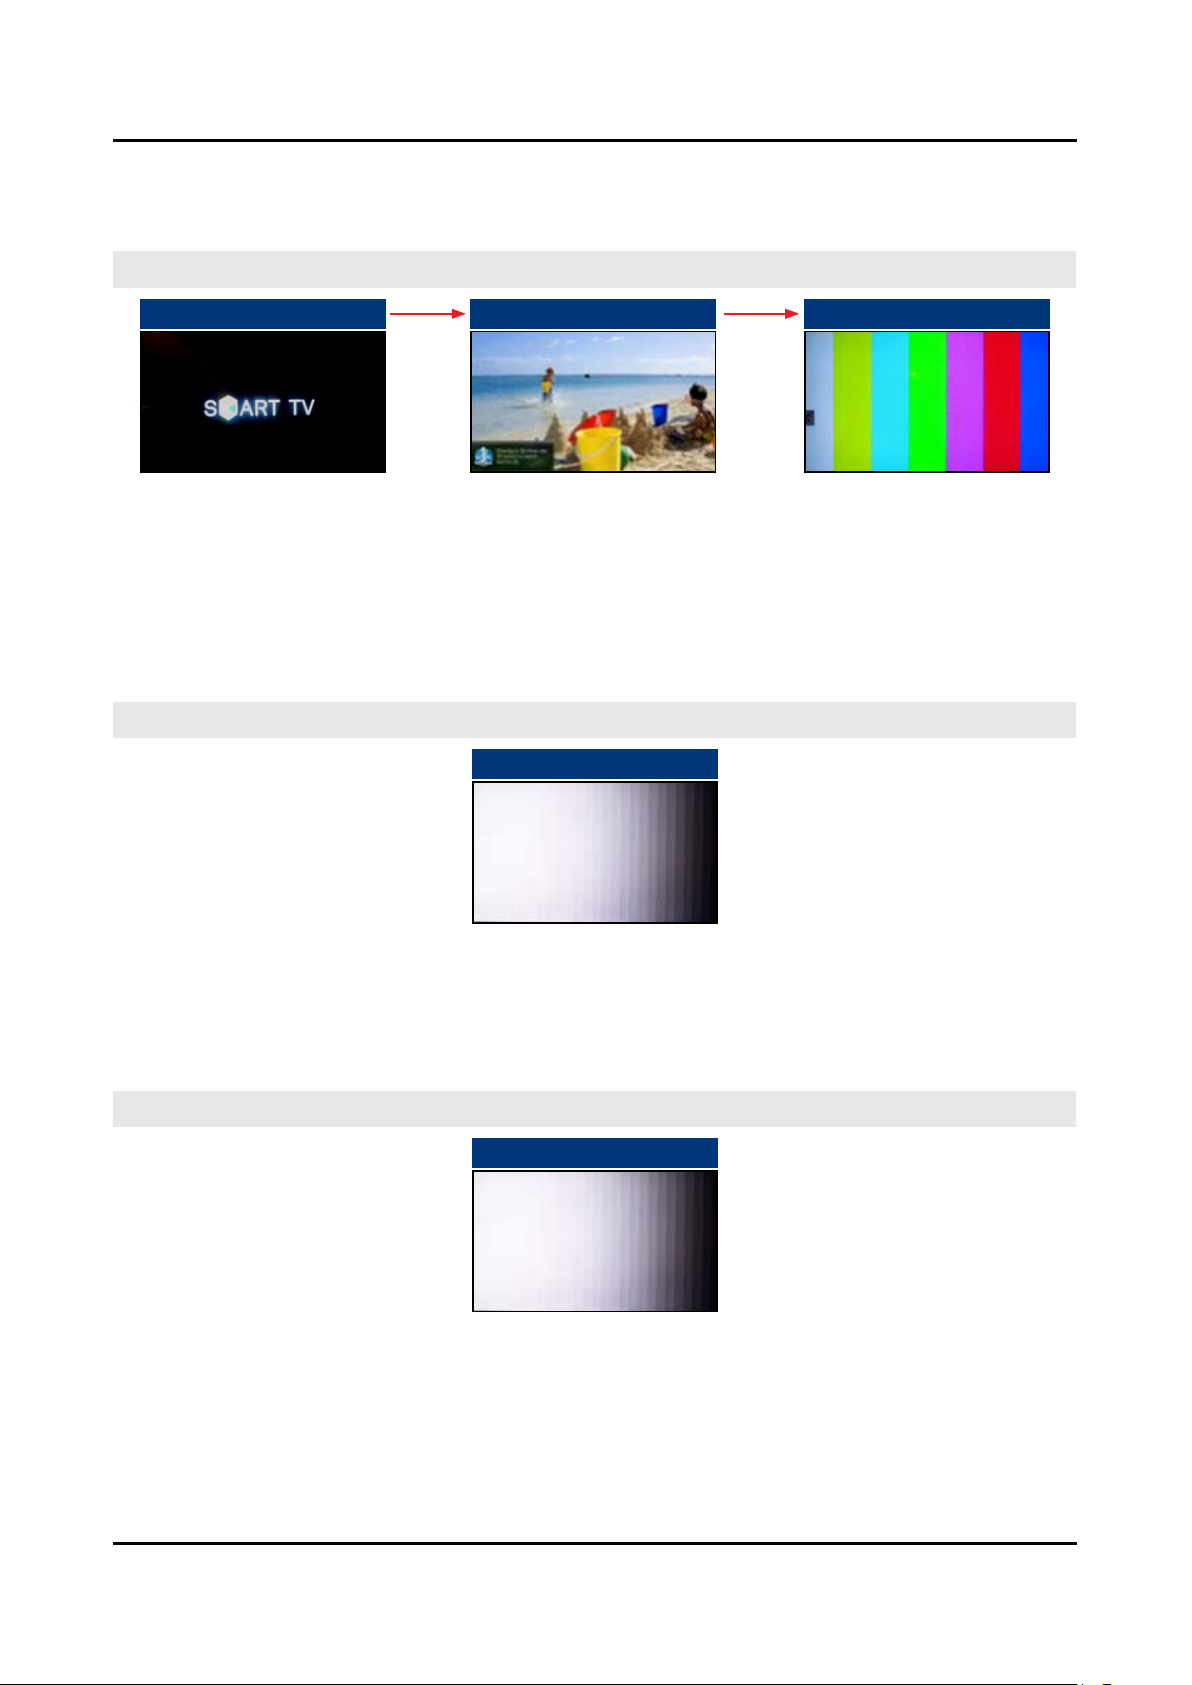
4-1-2. Video
4-5
4. Troubleshooting
MAIN / T-CON Board
Main Board Section1.
1 Start Up Logo 2 Customer Picture Test 1 3 Mute - 147 - Mute
Video Operation : Generated on Main Section.
If OK:1.
Source & Input Cables. √
Other inputs. √
One Connect Cable/Box. √
If Noisy:2.
T-CON Section Test Patterns. √
PRE FRC of T-CON Section2.
Customer Picture Test 2
Video Operation : Generated at Pre FRC, of T-CON Section.
If OK:1.
Main Section. √
If Noisy:2.
Post FRC Pattern. √
POST FRC of T-CON Section3.
Customer Picture Test 3
Video Operation : Generated at Post FRC of T-CON Section.
If OK:1.
Main / T-CON Board (defective). √
If Noisy:2.
Mute - 369 - Mute. √
Page 92
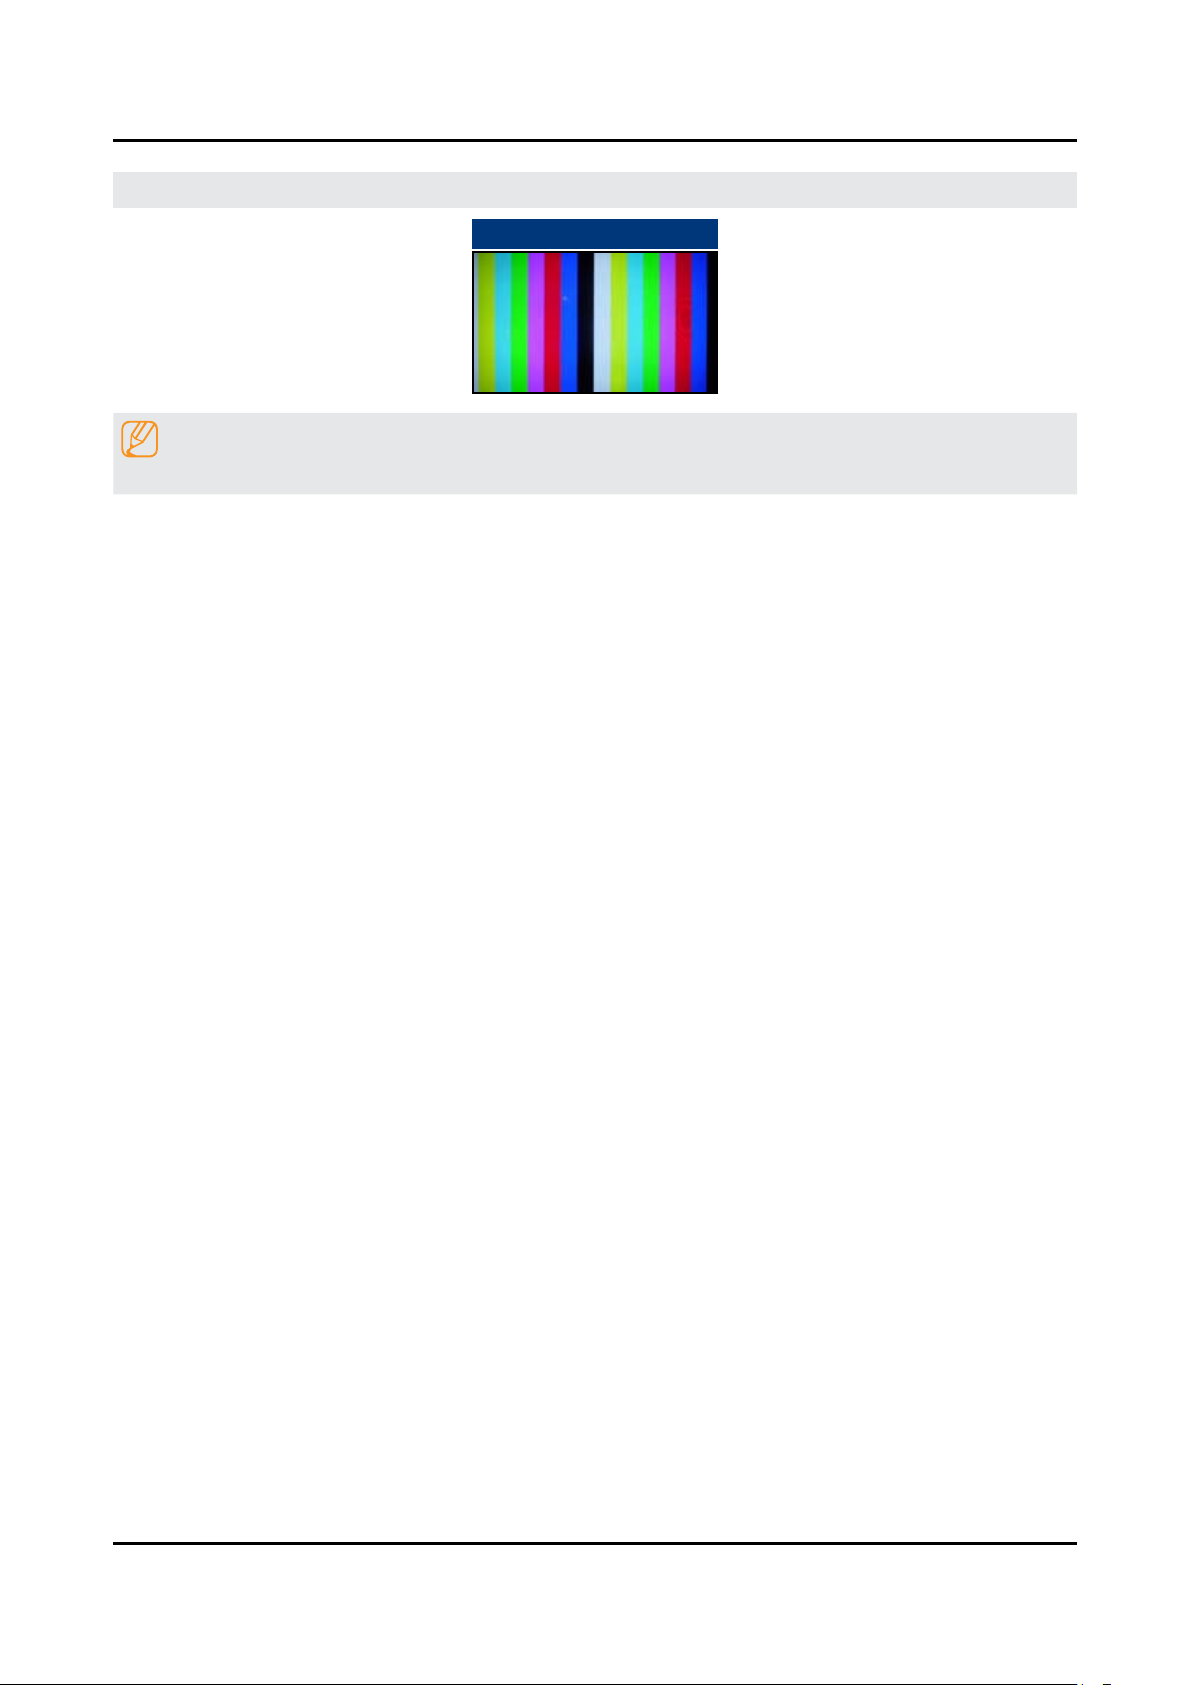
4-6
4. Troubleshooting
T-CON Section4.
Mute - 369 - Mute
NOTE
May not be available for Larger models over 70 inches.
Video Operation : Generated at T-CON Section.
If OK:1.
Main / T-CON Board (defective). √
If Noisy:2.
Main / T-CON Board. √
Page 93

4-7
4. Troubleshooting
PANEL
If Noisy:1.
Panel (defective). √
Page 94

4-8
4. Troubleshooting
4-1-3. Audio
AUDIO
Source
No TV Sound•
Menu → Audio → Speaker Settings set to √ TV Speaker
Noisy / Distorted TV Audio•
Customer Menu → Support → √ Sound Test
If • Sound Test FAILS : (Missing / Noisy Audio)
Speakers (compare resistance/quality) √
Compare audio level out to speakers with multi meter.•
Replace defective Speakers or Main Board or Cable. √
IF • Sound Test OK :
Audio Source & External Cables. √
With external Audio Generator (device or App). √
Other Inputs. √
One Connect Mini. √
Optical Digital Out Errors•
Red light from Optical Digital Out. √
If missing replace One Connect Mini•
No HDMI Audio •
Source / HDMI Cable & One Connect Mini Connectors. √
Swap with other HDMI Inputs/Sources.•
Perform • EDID Write in Factory Mode (Can restore missing HDMI Audio).
Bulletins and Latest rmware on TV. √
If not restored replace One Connect Mini/Main.•
Check Audio Format PCM/Dolby based on external Receiver.•
ARC Issues•
HDMI Cable is input to the ARC Designated HDMI port. √
ARC (HDMI Control) is enabled on the external Receiver. √
Bluetooth Audio "• Sound Share" Connection Issues
Sound Bar is in TV Mode. √
To Connect, Press & Hold Play Button until Sound Bar pairing mode begins. •
Page 95
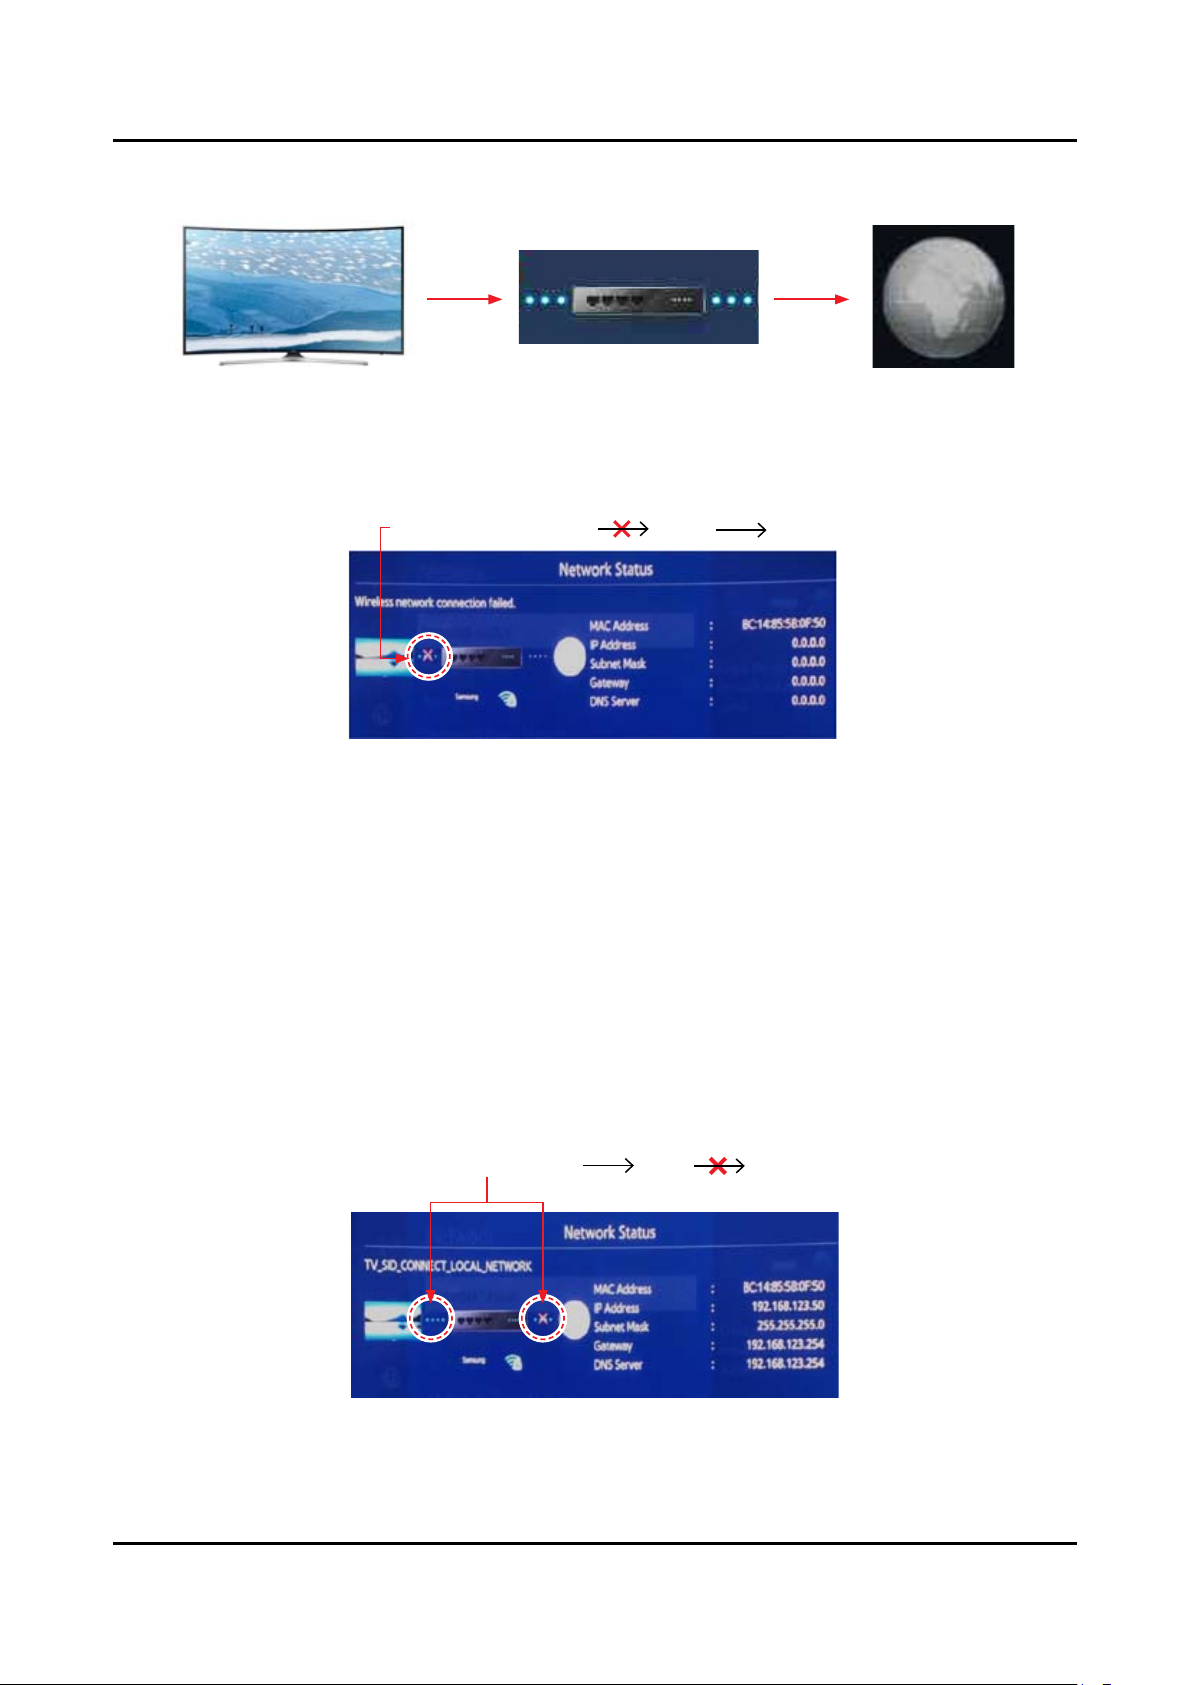
4-1-4. Network
4-9
4. Troubleshooting
<TV> <Router> <Internet>
TV to Router "Failure"
Check Network Status (TV Router Internet)
Wired & Wireless MAC Address• in Customer Support Menu.
No Wired MAC Address √ : Replace Main Board.
No Wireless MAC Address √ : Module cabling & voltages from Main Board.
If operating voltages are OK but signal missing. √
Replace WiFi Module (WiFi/Bluetooth Module).•
Proper • security passcode
Check Wi-Fi signal strength at TV (use WiFi Analyzer or similar App). √
Try another source (Hot spot or Test Router).•
Check related Bulletins. √
Check √ Factory Mode → SVC → Info → WiFi Error Count (replace module for high error counts).
Router to Network "Failure"
Check Network Status (TV Router Internet)
Instruct the customer the TV has proper connection to the router and is likely OK.•
Check other devices using network are OK. If they test OK this does not mean the TV should be working. √
Try another source (Hotspot) to test/show TV Network operation. •
Page 96
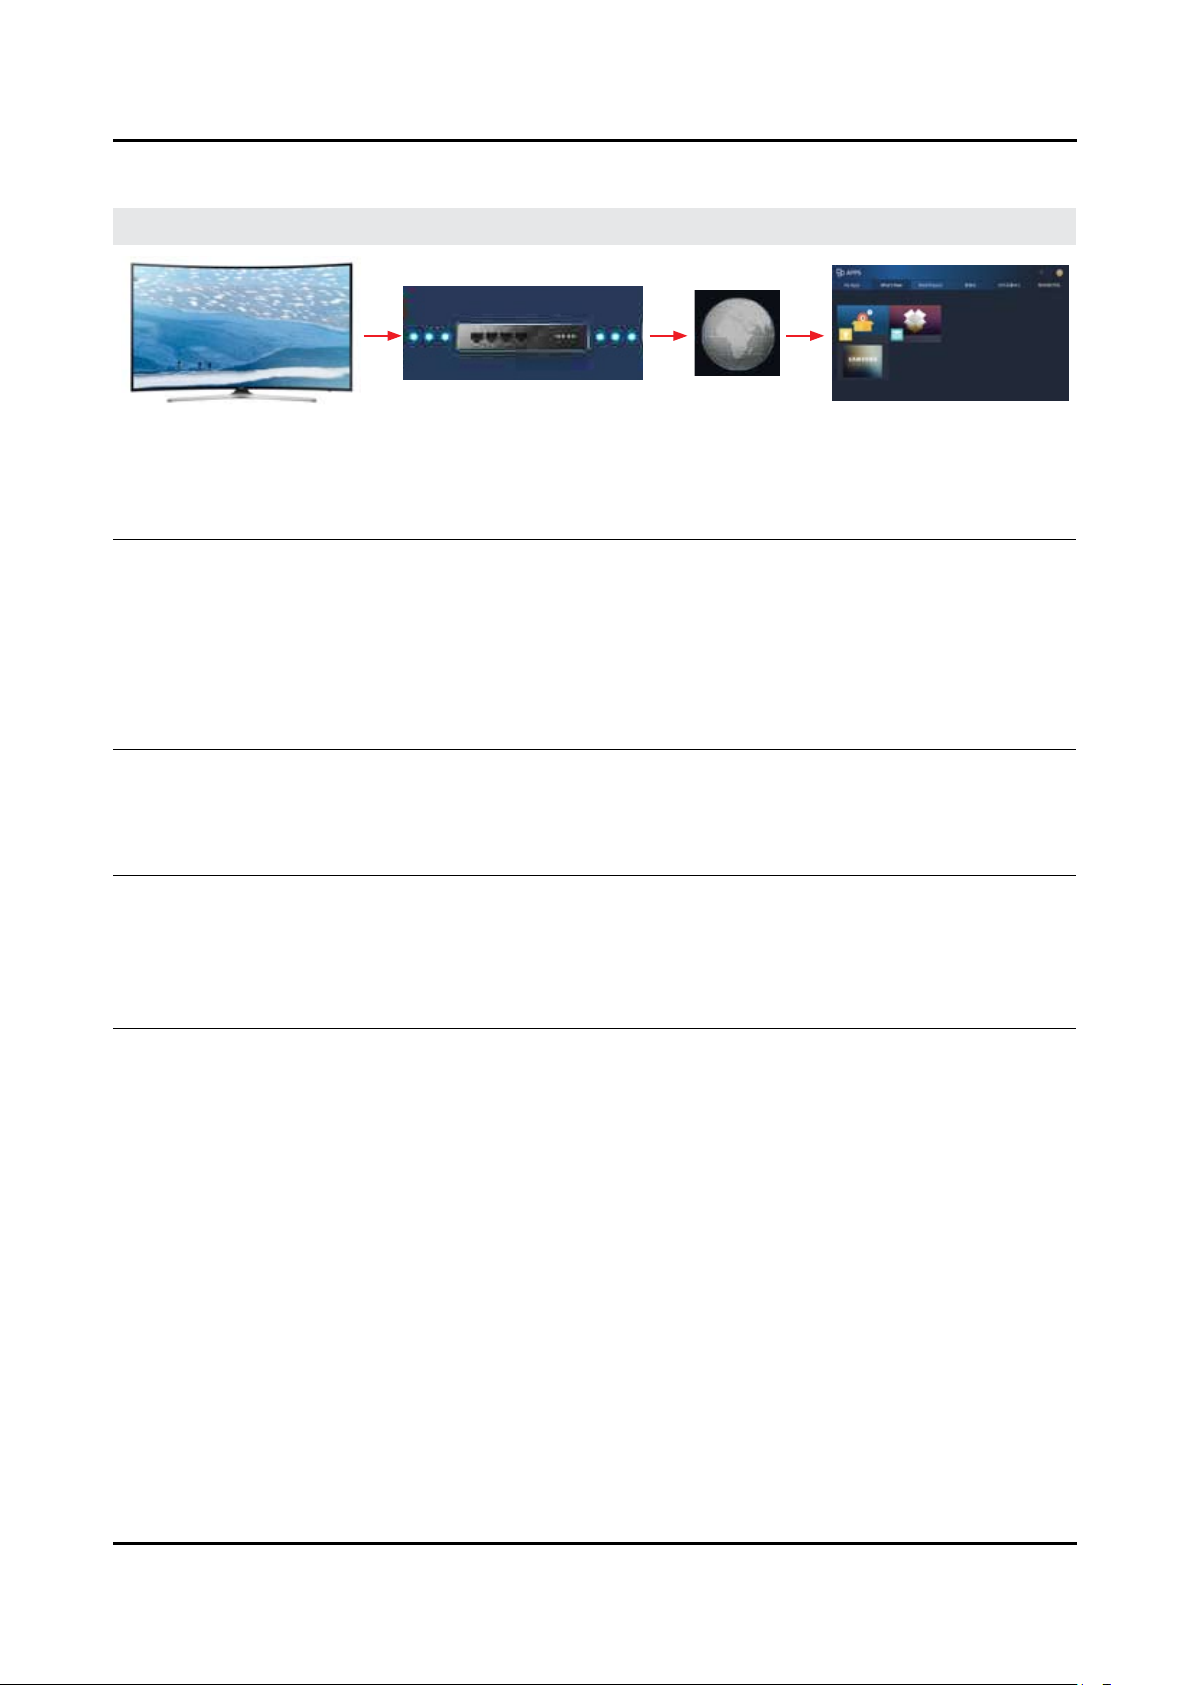
4-10
4. Troubleshooting
4-1-5. Smart Hub
Go to Menu > Support > Self Diagnosis > Smart Hub Connection Test
<TV> <Samsung Server><Router> <Internet>
Network / Gateway 1. If it Fails:•
TV to Router Connection Test in " √ Network Trouble shooting"
DNS Test2. If it Fails:•
DNS setting in " √ Network Settings"
If DNS is set manually:•
Settings are correct (may be set to 8.8.8.8 to prevent Netix issues) √
If it still fails:•
DNS Test with setting to Auto Mode √
If it fails both Manual & Auto problem is ISP or Router.•
ISP Blocking3. If it Fails:•
Samsung Server Test4. If it Fails:•
Samsung Apps5. If it Fails:•
Internet Service Provider is Active. √
With DNS setting at 8888. √
With Hot Spot. √
Network Status. √
If OK:•
Reset Smart Hub. √
Terms of Agreement are accepted. √
Reset Smart Hub. √
Samsung Apps load correctly. √
Perform " √ Apps Reset" in Factory Mode.
Go to Smart Hub and complete Terms of Agreement and set up information. √
Samsung Apps load correctly. √
Before selecting an App, allow Apps to load or failure wilre-occur. √
Page 97

For Netix Operation/Connection Issues:
4-11
4. Troubleshooting
Check Certicate & Netix ESN Status in Factory Mode.•
If Certicate and ESN exists, " - CO", "NfO", change the DNS to 8.8.8.8
If Certicate is missing, " - C/" replace the TV’s Main Board.
If ESN number is missing: - NF/ do not replace the Main Board.
Reset TV Clock and check for correct Time & Date. Netix relies on correct settings.•
Reset Smart Hub. / Reset Apps In Factory Mode.•
For Streaming Issues:
Go to TV Web Browser / Go to speedof.me / testmy.net•
Check Speed √ for at least 5 Mbps(HD streaming) / 25 Mbps (4K Streaming).
Check Latency √ for less than 50ms.
Page 98
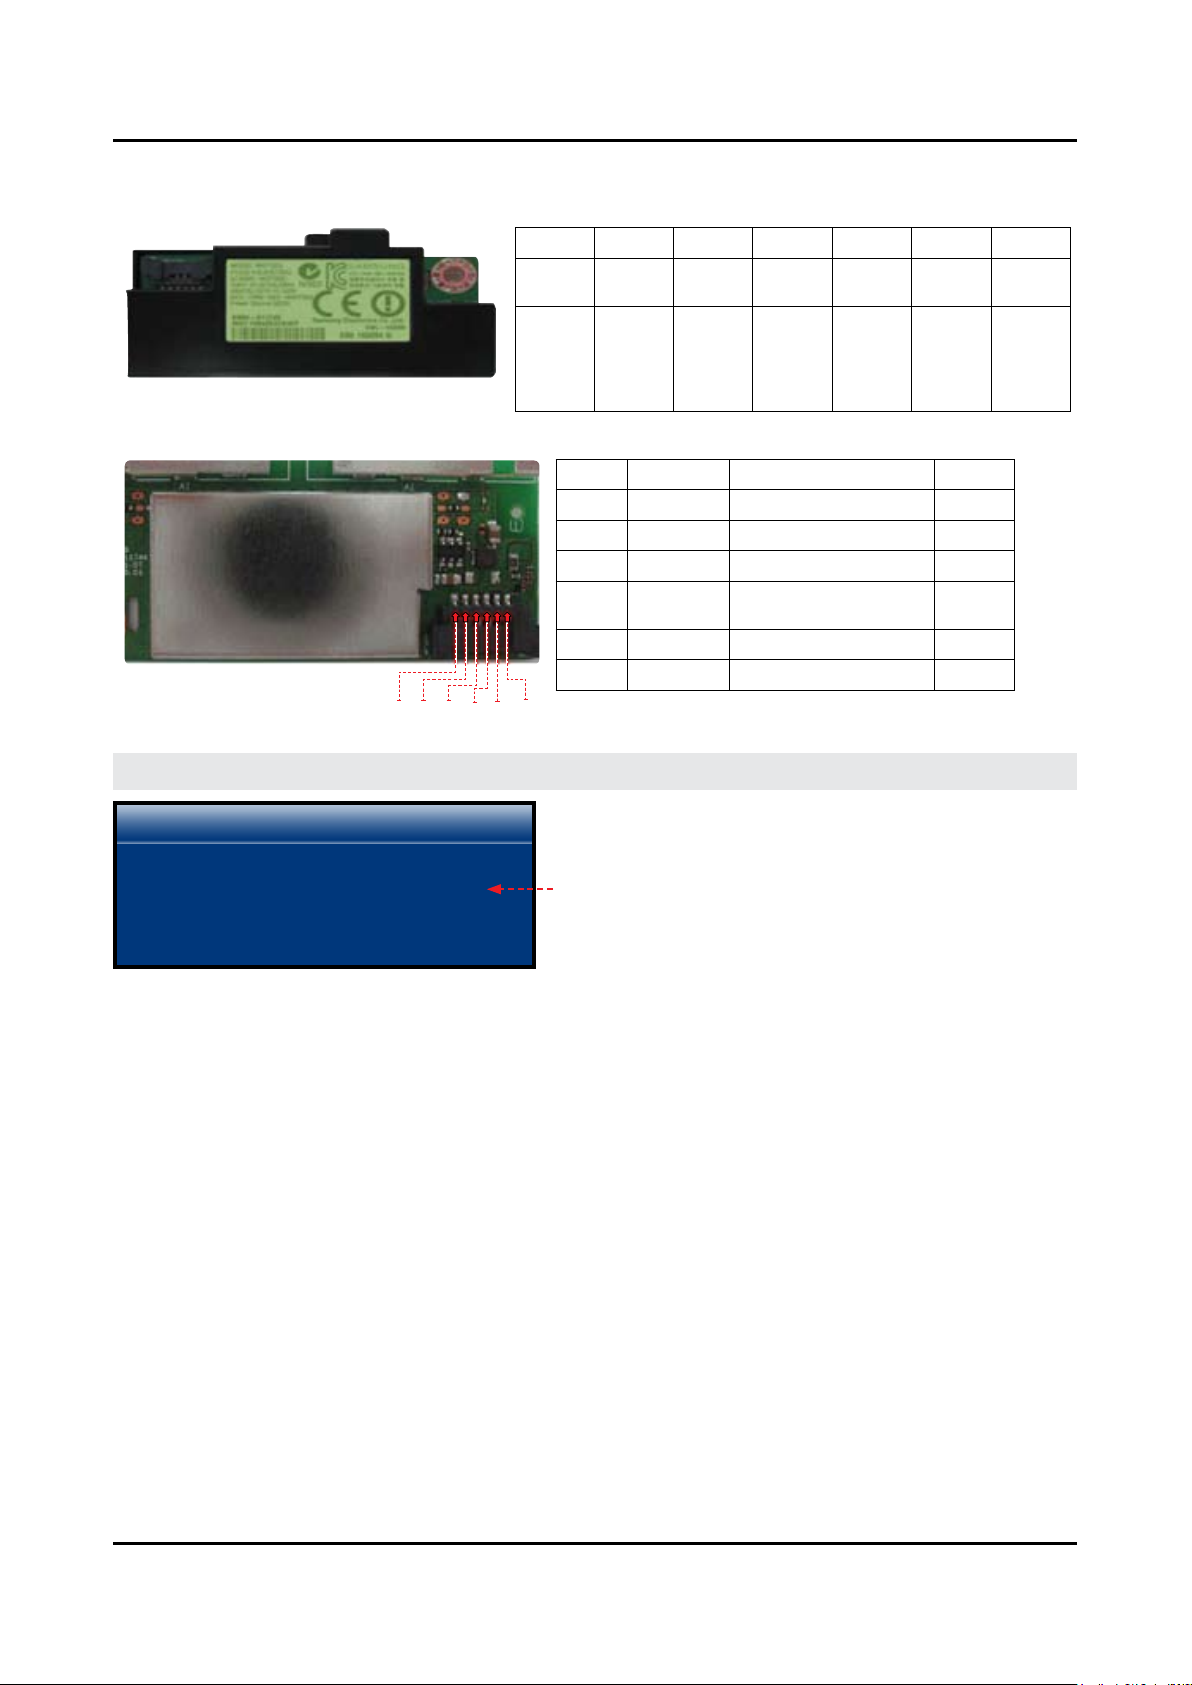
4-12
4. Troubleshooting
4-1-6. WiFi Module
Pins 1 2 3 4 5 6
Standby 0 3Vdc 0
Power
ON
0.02V
0
eff.dc
Wi Sig.
(DP)
0.5Vp-p
0.02V
eff.dc
Wi Sig.
(DM)
0.5Vp-p
5Vdc
VCC
5Vdc
VCC
3.3Vdc N.C
3.3Vdc
Pins # Pin Name Description Type
1
2
3
4
5
6
GND Ground G
USB_DP USB Interface I/O
USB_DN USB Interface I/O
B+_5V
Wake up Sleep/OFF to ON I/O
NC - -
+5V DC power supply for
SWL-R55
V
1 2 3 4 5 6
Go to Menu > Support > Contact Samsung
Contact Samsung
<
- Wired MAC Address : xx:xx:xx:xx:xx:xx
- Wireless MAC Address : xx:xx:xx:xx:xx:xx
- Bluetooth Address : xx:xx:xx:xx:xx:xx
Wired MAC Address (Missing or Error : Replace • Main Board.
Wireless MAC Address•
Bluetooth Address•
If • Bluetooth Address or Wireless MAC Address are missing or errors exist.
BT & Wi-Fi Connector Voltages• .
If Voltages are OK but no BT or Wi-Fi Signals voltage(s), replace defective Module. -
Page 99
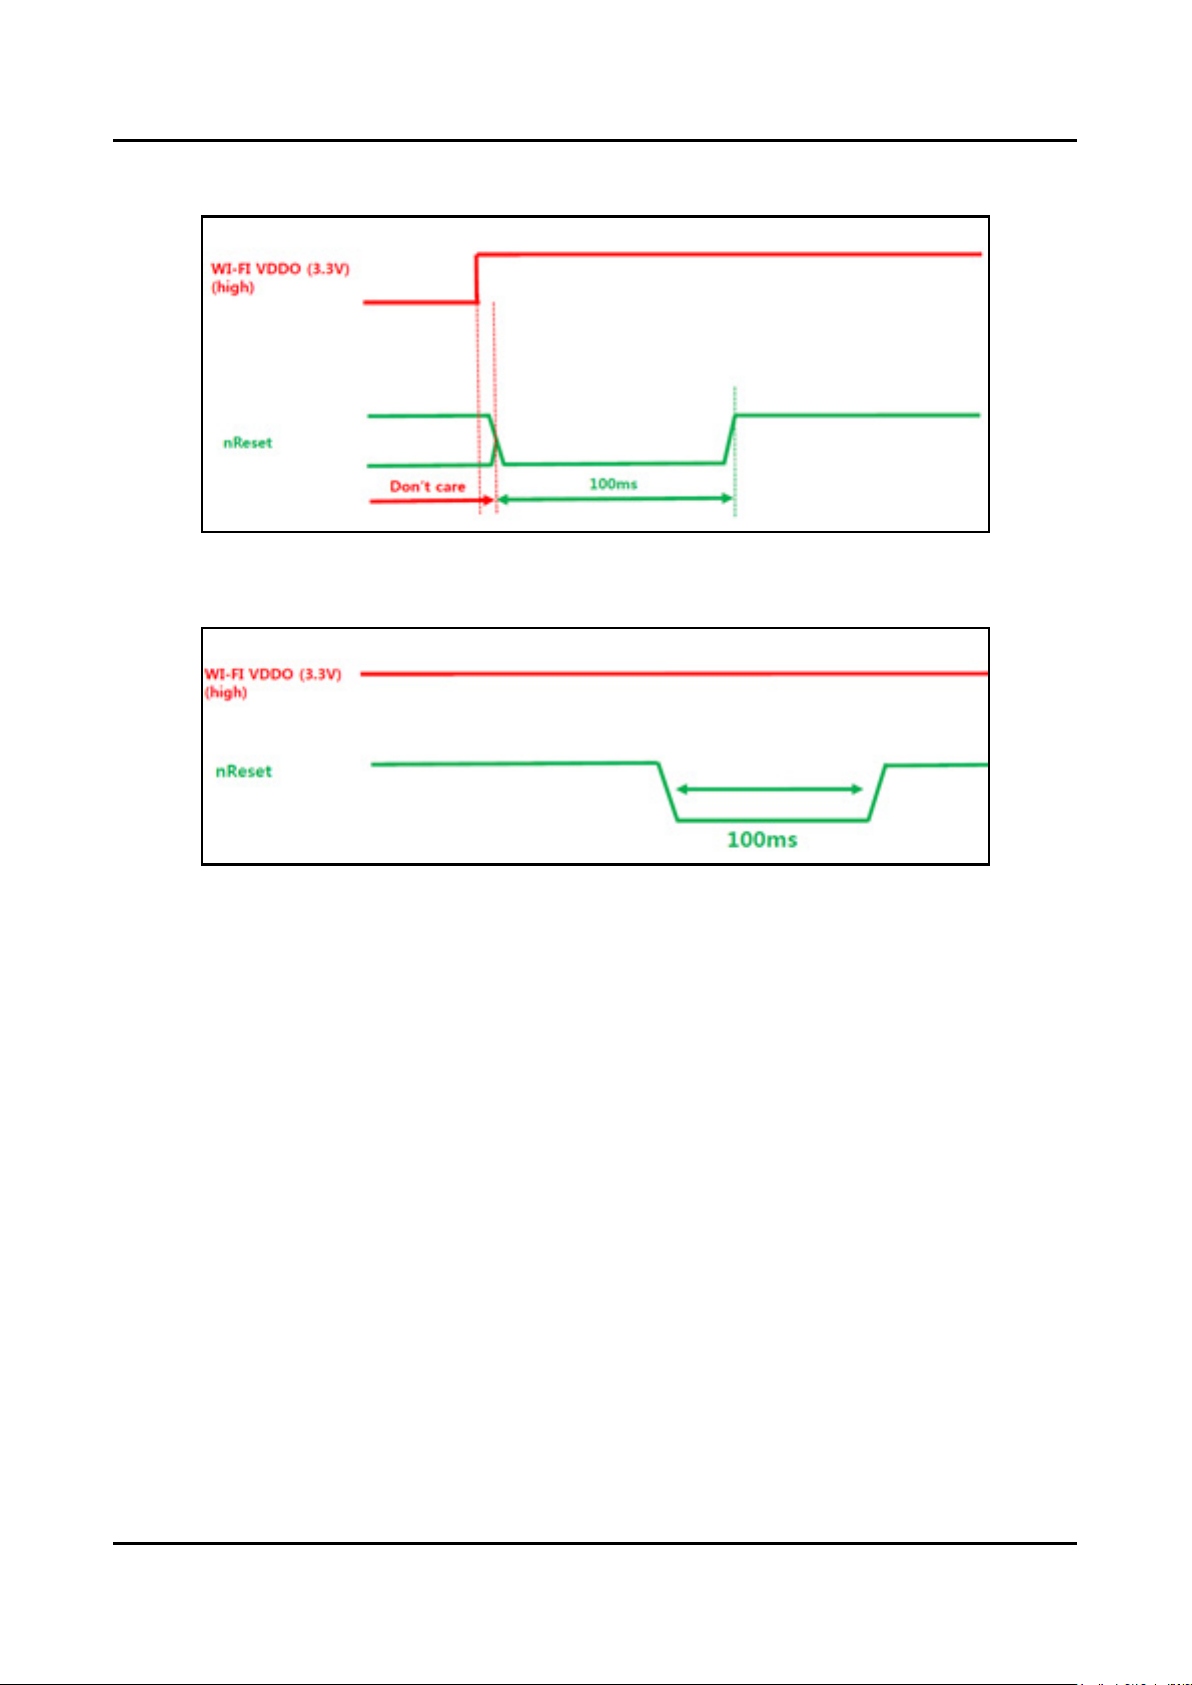
WI-FI VDDO OFF/ON reset timing
4-13
4. Troubleshooting
WI-FI VDD33 ON reset timing
Page 100

4-14
4. Troubleshooting
4-2. Factory Mode Adjustments
4-2-1. Entering Factory Mode
To enter ‘Service Mode’ Press the remote-control keys in this sequence :
Factory Remote
Power TV ON.1.
Select TV Source.2.
Info3. → Factory.
Use 4. MENU for return.
Samsung IR Remote (Limited Operation)
TV Power Standby.1.
Press as follows. 2.
Remote Button :• Power OFF INFO MENU MUTE Power ON
Option• (must set Option Bytes when replacing Main Board.)
Option → • Factory Reset (returns TV to out of box condition. Does not reset Apps.)
SVC → • Test Patterns
SVC → Info → • ER Count (Important to check for errors.)
Resets to 0 with Factory Reset. -
 Loading...