

SAMSUNG UE40KU6000W, UE43KU6000W, UE50KU6000W, UE55KU6000W, UE60KU6000W Service manual & schematics
...Page 1
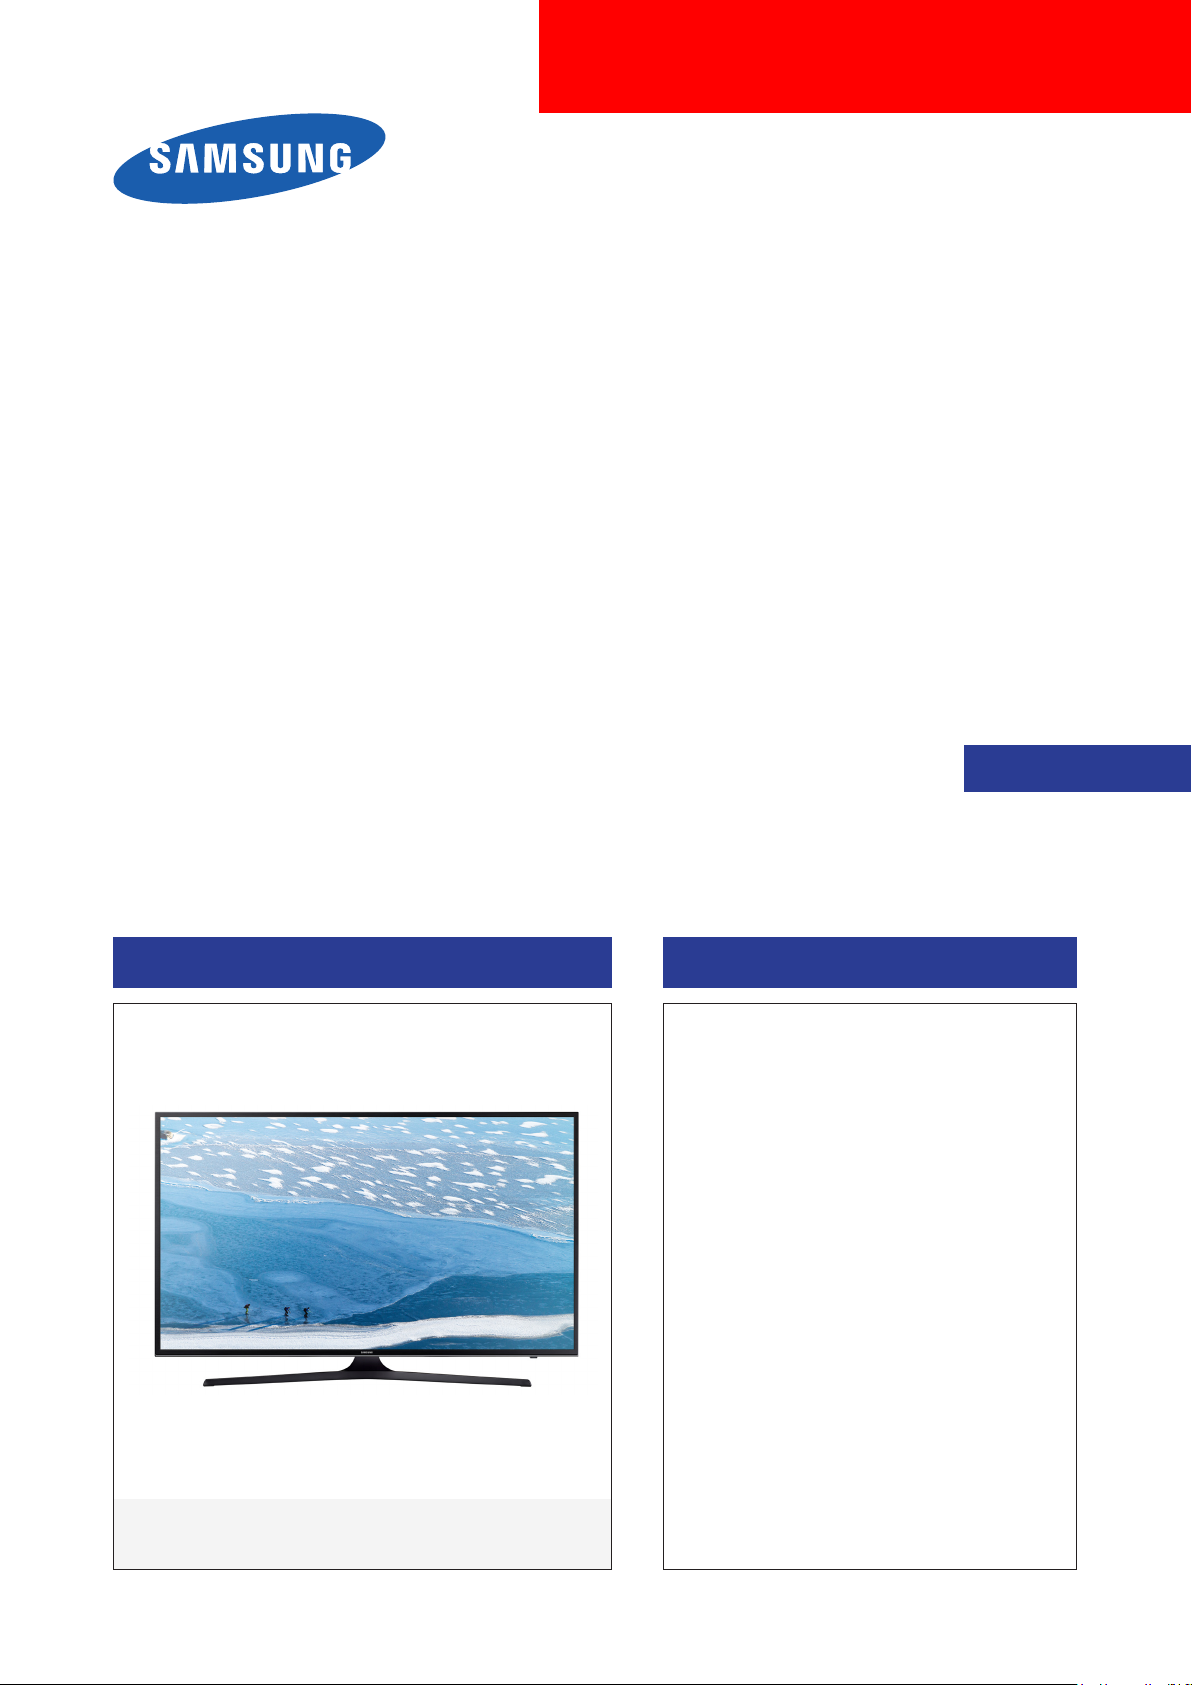
UHD TV
Chassis : UKU6000P
Model : UN40KU630DF
UN43KU630DF
UN50KU630DF
UN55KU630DF
UN60KU630DF
UN65KU630DF
UN70KU630DF
SERVICE
UHD TV Contents
1. Precautions
2. Product specications
3. Disassembly and Reassembly
4. Troubleshooting
5. Wiring Diagram
Manual
UN**KU630DF
Page 2

Contents
1. Precautions ...................................................................................................................1-1
1-1. Safety Precautions ..............................................................................................................1-1
1-1-1. Warnings ...................................................................................................................1-1
1-1-2. Servicing the LED TV ...............................................................................................1-1
1-1-3. Fire and Shock Hazard .............................................................................................1-1
1-1-4. Product Safety Notices .............................................................................................1-2
1-2. Servicing Precautions ..........................................................................................................1-3
1-2-1. General Servicing Precautions ................................................................................. 1-3
1-3. Static Electricity Precautions ...............................................................................................1-4
1-4. Installation Precautions .......................................................................................................1-5
2. Product Specications.................................................................................................2-1
2-1. Product information .............................................................................................................2-1
2-2. Detail Specication ..............................................................................................................2-3
2-3. NEW Key Features ............................................................................................................2-31
2-3-1. 16" New UI ..............................................................................................................2-31
2-4. Smart Control ....................................................................................................................2-32
2-4-1. 123 Key ..................................................................................................................2-33
2-4-2. EXTRA Key .............................................................................................................2-33
2-6. HDMI Color ........................................................................................................................2-34
2-6-1. HDMI UHD Color ....................................................................................................2-34
2-6-2. HDMI Black Level ...................................................................................................2-34
2-7. Supported Formats ............................................................................................................2-35
2-7-1. Supported image formats and resolutions ..............................................................2-35
2-7-2. Supported music formats and codecs .................................................................... 2-35
2-7-3. Supported video codecs ......................................................................................... 2-36
2-8. Accessories .......................................................................................................................2-37
3. Disassembly and Reassembly ....................................................................................3-1
3-1. Disassembly and Reassembly ............................................................................................3-1
4. Troubleshooting ...........................................................................................................4-1
4-1. Previous Check ..................................................................................................................4-1
4-2. How to Check Fault Symptom .............................................................................................4-2
4-2-1. Power .......................................................................................................................4-2
4-2-2. Video .........................................................................................................................4-6
4-2-3. Audio .......................................................................................................................4-10
4-2-4. Network................................................................................................................... 4-11
4-2-5. Smart Hub ..............................................................................................................4-12
4-2-6. Bluetooth / WiFi Module .........................................................................................4-14
4-3. Factory Mode Adjustments ................................................................................................4-15
4-3-1. Entering Factory Mode ........................................................................................... 4-15
4-3-2. Detail Factory Option ..............................................................................................4-17
4-3-3. Factory Data ...........................................................................................................4-24
4-4. RS-232C ............................................................................................................................4-37
4-4-1. RS232C Control .....................................................................................................4-37
4-5. AV Control Tabe ................................................................................................................. 4-38
4-6. Updating the TV’s Software ...............................................................................................4-46
Page 3

5. Wiring Diagram .............................................................................................................5-1
5-1. Layout ..................................................................................................................................5-1
5-2. Wiring Diagram ....................................................................................................................5-2
5-3. Connector ............................................................................................................................5-3
5-3-1. Main Board ............................................................................................................... 5-3
5-3-2. SMPS Board .............................................................................................................5-8
ANNEX. Exploded View & Part List [UN43KU630DFXZA AA01] ........................ ANNEX-1
1-1. Exploded View .......................................................................................................... ANNEX-1
1-1-1. Parts List ........................................................................................................ ANNEX-1
2-1. Electrical Parts List ................................................................................................... ANNEX-2
ANNEX. Exploded View & Part List [UN50KU630DFXZA DA01] ........................ ANNEX-1
1-1. Exploded View .......................................................................................................... ANNEX-1
1-1-1. Parts List ........................................................................................................ ANNEX-1
2-1. Electrical Parts List ................................................................................................... ANNEX-2
ANNEX. Exploded View & Part List [UN55KU630DFXZA FA01] ........................ANNEX-1
1-1. Exploded View .......................................................................................................... ANNEX-1
1-1-1. Parts List ........................................................................................................ ANNEX-1
2-1. Electrical Parts List ................................................................................................... ANNEX-2
ANNEX. Exploded View & Part List [UN60KU630DFXZA EA01] ........................ ANNEX-1
1-1. Exploded View .......................................................................................................... ANNEX-1
1-1-1. Parts List ........................................................................................................ ANNEX-1
2-1. Electrical Parts List ................................................................................................... ANNEX-2
ANNEX. Exploded View & Part List [UN65KU630DFXZA FA01] ........................ANNEX-1
1-1. Exploded View .......................................................................................................... ANNEX-1
1-1-1. Parts List ........................................................................................................ ANNEX-1
2-1. Electrical Parts List ................................................................................................... ANNEX-2
ANNEX. Exploded View & Part List [UN70KU630DFXZA EA01] ........................ ANNEX-1
1-1. Exploded View .......................................................................................................... ANNEX-1
1-1-1. Parts List ........................................................................................................ ANNEX-1
2-1. Electrical Parts List ................................................................................................... ANNEX-2
Page 4
This Service Manual is a property of Samsung Electronics Co.,Ltd.
Any unauthorized use of Manual can be punished under applicable
International and/or domestic law.
© 2016 Samsung Electronics Co.,Ltd.
All rights reserved.
Printed in Korea
Page 5
1. Precautions
1. Precautions
1-1. Safety Precautions
Follow these safety, servicing and ESD precautions to prevent damage and to protect against potential hazards such as
electrical shock.
1-1-1. Warnings
For continued safety, do not attempt to modify the circuit board.
WARNING
1-1-2. Servicing the LED TV
When servicing the LED TV, Disconnect the AC line cord from the AC outlet.1.
It is essential that service technicians have an accurate voltage meter available at all times. Check the calibration of this 2.
meter periodically.
1-1-3. Fire and Shock Hazard
Before returning the monitor to the user, perform the following safety checks:
Inspect each lead dress to make certain that the leads are not pinched or that hardware is not lodged between the 1.
chassis and other metal parts in the monitor.
Inspect all protective devices such as nonmetallic control knobs, insulating materials, cabinet backs, adjustment and 2.
compartment covers or shields, isolation resistorcapacitor networks, mechanical insulators, etc.
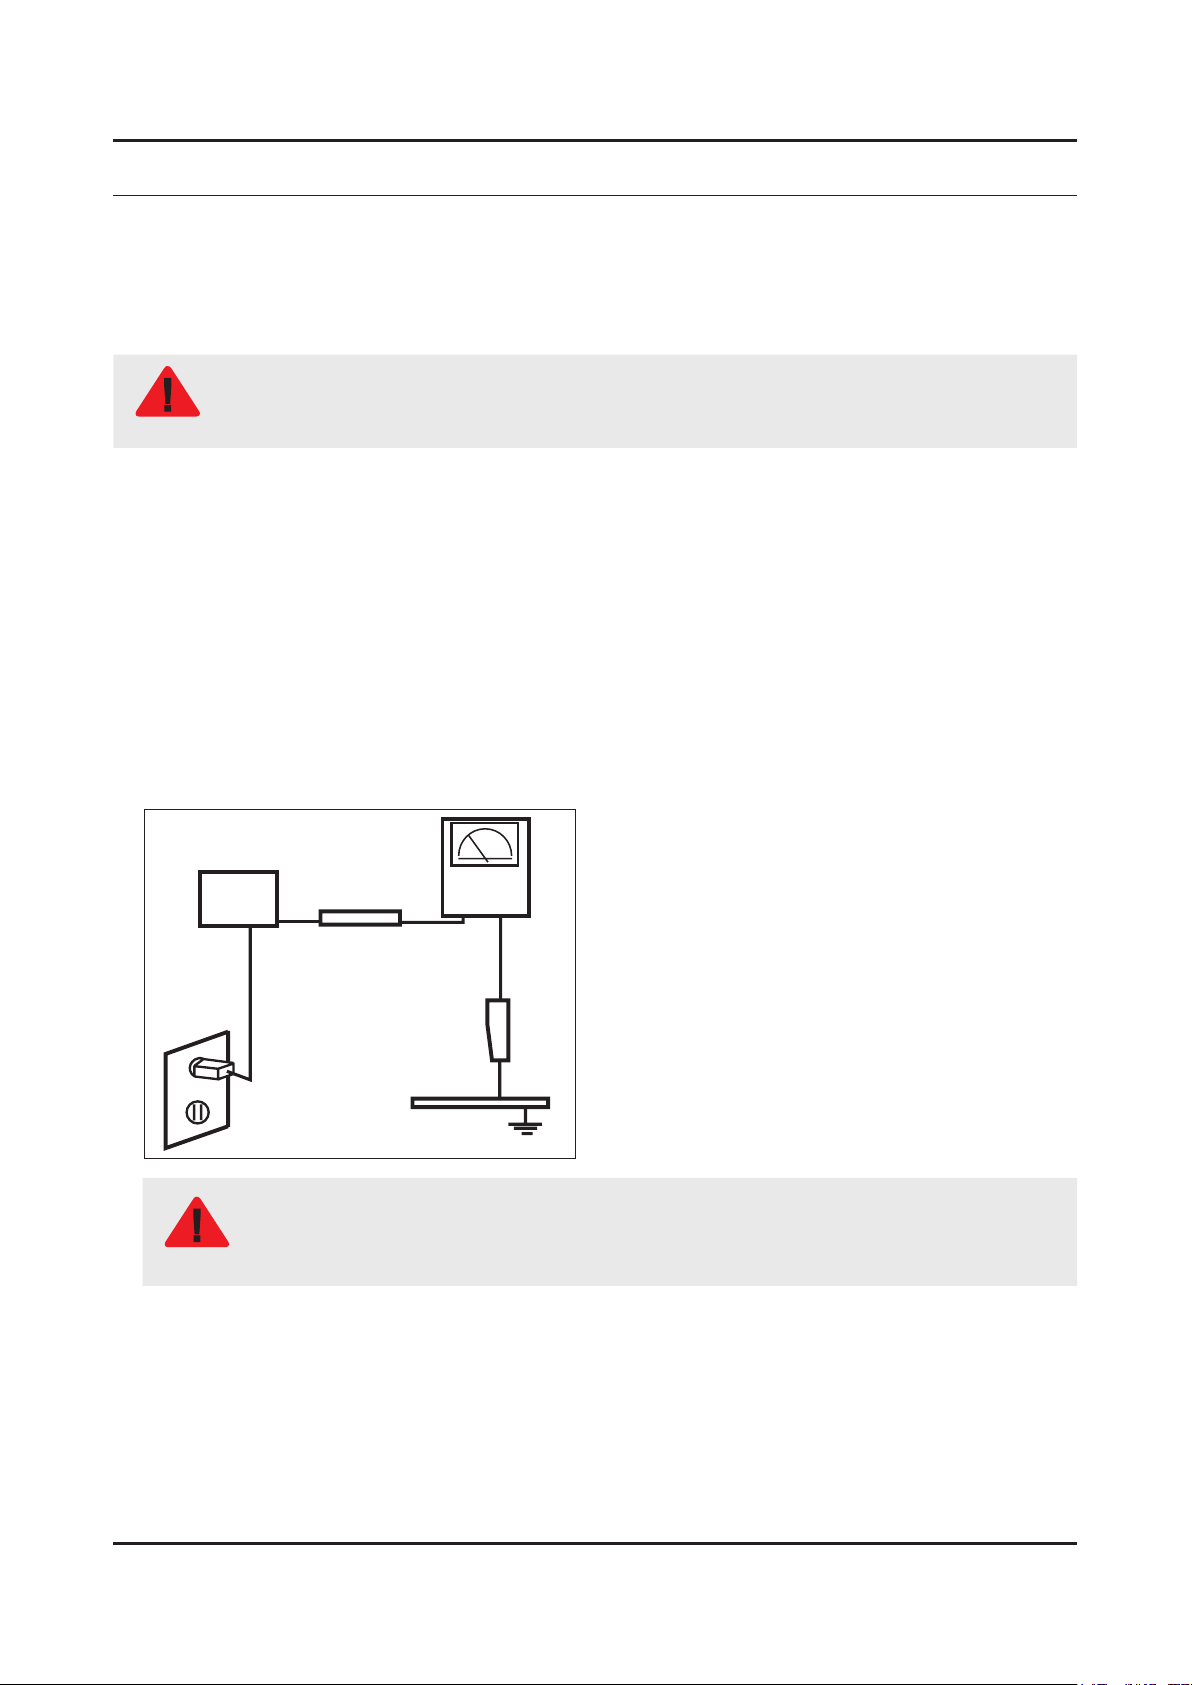
Leakage Current Hot Check:3.
Disconnect the AC power and DC power jack before servicing.
(READING SHOULD)
DEVICE
UNDER
TEST
ALSO TEST WITH
PLUG REVERSED
(USING AC ADAPTER
PLUG AS REQUIRED)
NOT BE ABOVE 0.5mA
2-WIRE CORD
TEST ALL
EXPOSED METAL
SURFACES
LEAKAGE
CURRENT
TESTER
EARTH
GROUND
Do not use an isolation transformer during this test.
Use a leakage current tester or a metering system that complies with American National Standards
WARNING
Institute (ANSI C101.1, Leakage Current for Appliances), and Underwriters Laboratories (UL
Publication UL1410, 59.7).
With the unit completely reassembled, plug the AC line cord directly into a 120V AC outlet. With the unit’s AC switch rst 4.
in the ON position and then OFF, measure the current between a known earth ground (metal water pipe, conduit, etc.)
and all exposed metal parts, including: metal cabinets, screwheads and control shafts.
The current measured should not exceed 0.5 milliamp.
Reverse the power-plug prongs in the AC outlet and repeat the test.
1-1
Page 6

1-2
1. Precautions
1-1-4. Product Safety Notices
Some electrical and mechanical parts have special safetyrelated characteristics which are often not evident from visual
inspection. The protection they give may not be obtained by replacing them with components rated for higher voltage,
wattage, etc. Parts that have special safety characteristics are identied by on schematics and parts lists. A substitute
replacement that does not have the same safety characteristics as the recommended replacement part might create
shock, re and/or other hazards. Product safety is under review continuously and new instructions are issued whenever
appropriate.
Page 7

1-3
1. Precautions
1-2. Servicing Precautions
An electrolytic capacitor installed with the wrong polarity might explode.
WARNING
Before servicing units covered by this service manual, read and follow the Safety Precautions section of
CAUTION
NOTE
1-2-1. General Servicing Precautions
Always unplug the unit’s AC power cord from the AC power source and disconnect the DC Power Jack before 1.
attempting to: (a) remove or reinstall any component or assembly, (b) disconnect PCB plugs or connectors, (c) connect
a test component in parallel with an electrolytic capacitor.
Some components are raised above the printed circuit board for safety. An insulation tube or tape is sometimes used. 2.
The internal wiring is sometimes clamped to prevent contact with thermally hot components. Reinstall all such elements
to their original position.
After servicing, always check that the screws, components and wiring have been correctly reinstalled. Make sure that 3.
the area around the serviced part has not been damaged.
Check the insulation between the blades of the AC plug and accessible conductive parts (examples: metal panels, input 4.
terminals and earphone jacks).
Insulation Checking Procedure: Disconnect the power cord from the AC source and turn the power switch ON. Connect 5.
an insulation resistance meter (500 V) to theblades of the AC plug. The insulation resistance between each blade of the
AC plug and accessible conductive parts (see above) should be greater than 1 megohm.
Always connect a test instrument’s ground lead to the instrument chassis ground before connecting the positive lead; 6.
always remove the instrument’s ground lead last.
this manual.
If unforeseen circumstances create conict between the following servicing precautions and any of the
safety precautions, always follow the safety precautions.
Page 8

1-4
1. Precautions
1-3. Static Electricity Precautions
Some semiconductor (solid state) devices can be easily damaged by static electricity. Such components are commonly
called Electrostatically Sensitive Devices (ESD). Examples of typical ESD are integrated circuits and some eld-effect
transistors. The following techniques will reduce the incidence of component damage caused by static electricity.
Immediately before handling any semiconductor components or assemblies, drain the electrostatic charge from your 1.
body by touching a known earth ground. Alternatively, wear a discharging wrist-strap device. To avoid a shock hazard,
be sure to remove the wrist strap before applying power to the monitor.
After removing an ESD-equipped assembly, place it on a conductive surface such as aluminum foil to prevent 2.
accumulation of an electrostatic charge.
Do not use freon-propelled chemicals. These can generate electrical charges sufcient to damage ESDs.3.
Use only a grounded-tip soldering iron to solder or desolder ESDs.4.
Use only an anti-static solder removal device. Some solder removal devices not classied as “anti-static” can generate 5.
electrical charges sufcient to damage ESDs.
Do not remove a replacement ESD from its protective package until you are ready to install it. Most replacement ESDs 6.
are packaged with leads that are electrically shorted together by conductive foam, aluminum foil or other conductive
materials.
Immediately before removing the protective material from the leads of a replacement ESD, touch the protective material 7.
to the chassis or circuit assembly into which the device will be installed.
Be sure no power is applied to the chassis or circuit and observe all other safety precautions.
CAUTION
Minimize body motions when handling unpackaged replacement ESDs. Motions such as brushing clothes together, or 8.
lifting your foot from a carpeted oor can generate enough static electricity to damage an ESD.
Page 9

1-5
1. Precautions
1-4. Installation Precautions
For safety reasons, more than a people are required for carrying the product.1.
Keep the power cord away from any heat emitting devices, as a melted covering may cause re or electric shock.2.
Do not place the product in areas with poor ventilation such as a bookshelf or closet. The increased internal temperature 3.
may cause re.
Bend the external antenna cable when connecting it to the product. This is a measure to protect it from being exposed 4.
to moisture. Otherwise, it may cause a re or electric shock.
Make sure to turn the power off and unplug the power cord from the outlet before repositioning the product. Also check 5.
the antenna cable or the external connectors if they are fully unplugged. Damage to the cord may cause re or electric
shock.
Keep the antenna far away from any high-voltage cables and install it rmly. Contact with the highvoltage cable or the 6.
antenna falling over may cause re or electric shock.
When installing the product, leave enough space (0.4m) between the product and the wall for ventilation purposes. 7.
A rise in temperature within the product may cause re.
If an equipment is provided with a replaceable battery, and if replacement by an incorrect type could result in an 8.
explosion (for example, with some lithium batteries), the following applies:
Risk of explosion if battery is replaced by an incorrect type dispose of used batteries according to •
the instructions.
Do not dispose of batteries in a re.•
Do not short circuit, disassemble or overheat the batteries.•
CAUTION
Danger of explosion if battery is incorrectly replaced. Replace only with the same or equivalent •
type.
Do not be exposed to excessive heat such as sunshine, re or the like.•
Page 10
2. Product Specications
2-1. Product information
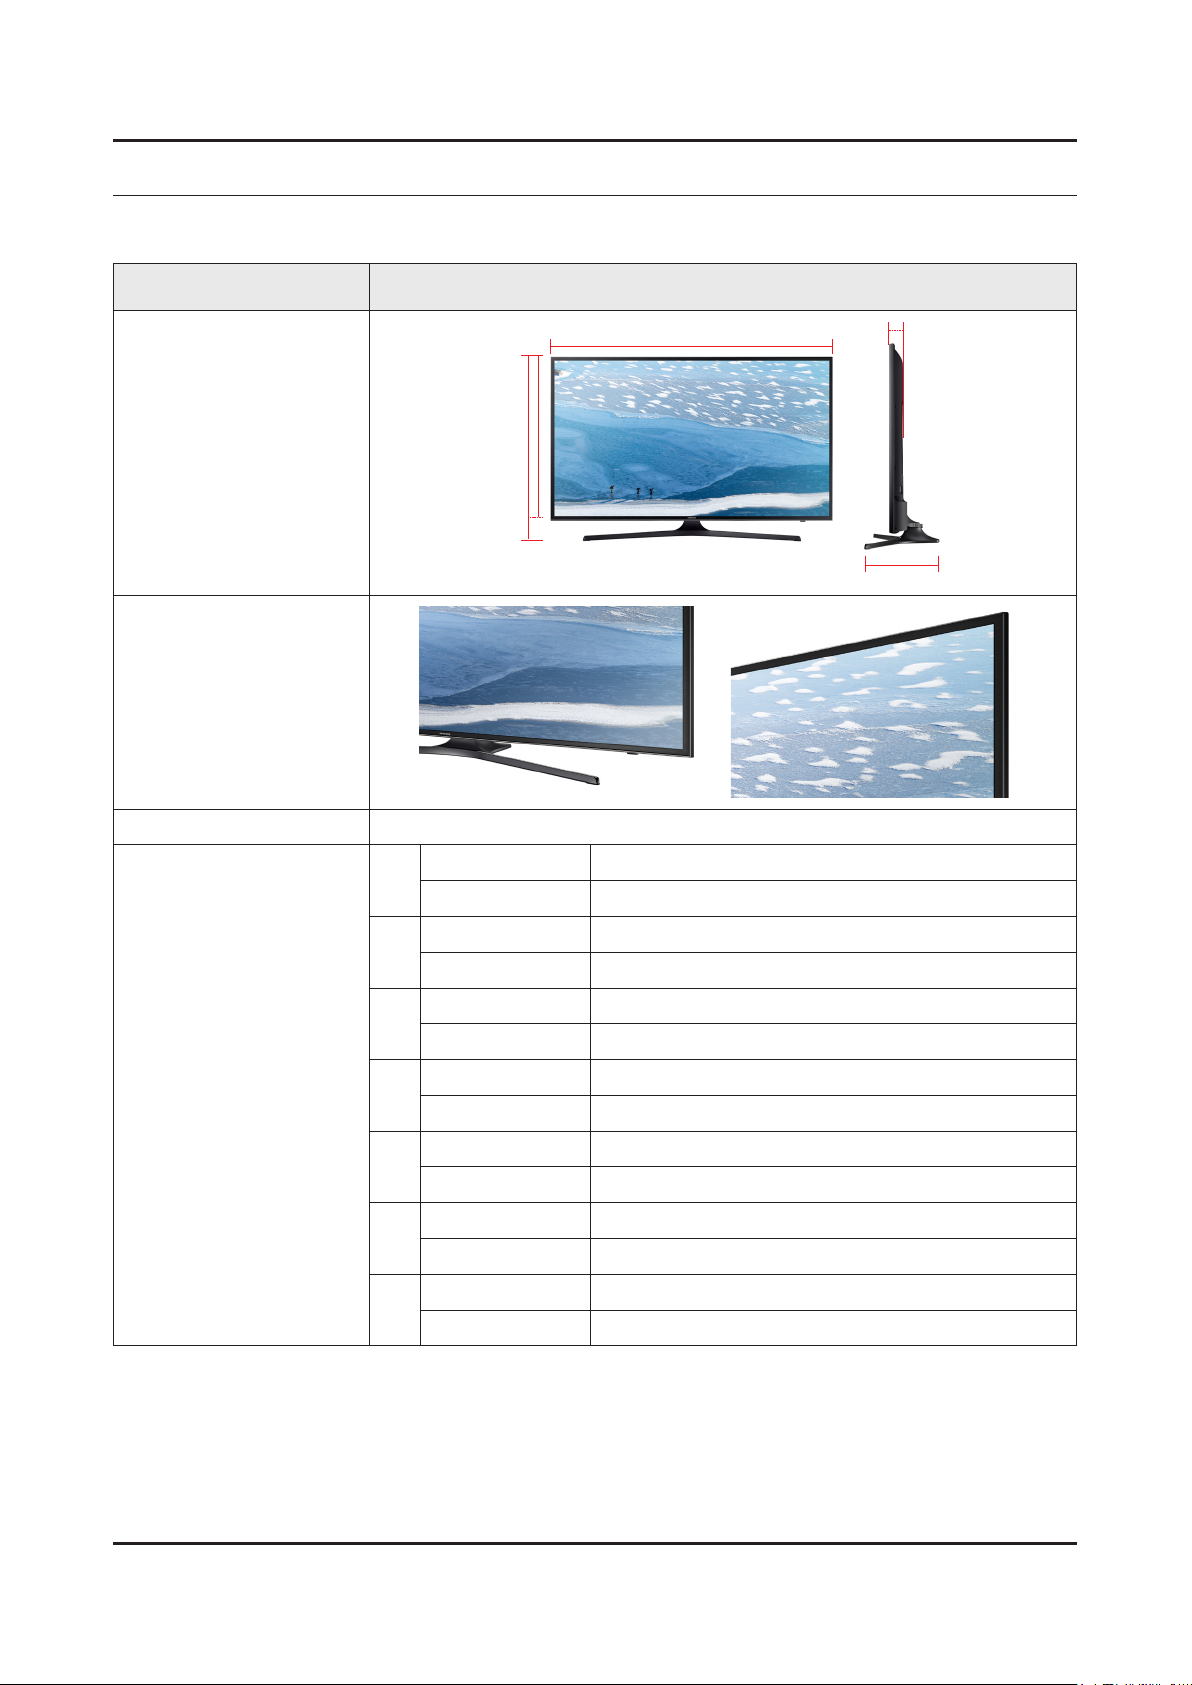
Model UN**KU630DF
2. Product specications
W
Front View
Detail View
Front Color Black
40"
43"
50"
H
* W : Width H : High D : Depth
Body 36.1 x 21.1 x 2.5 inches (917.7 x 535.7 x 62.6 mm)
With stand 36.1 x 23.5 x 11.3 inches (917.7 x 596.5 x 288.1 mm)
Body 38.4 x 22.4 x 2.5 inches (975.8 x 569.0 x 62.6 mm)
With stand
Body 44.4 x 25.8 x 2.5 inches (1128.9 x 654.4 x 63.2 mm)
With stand 44.4 x 28.5 x 12.2 inches (1128.9 x 723.7 x 310.5 mm)
38.4 x 25.1 x 11.3 inches (975.8 x 637.0 x 288.1 mm)
D
Dimension (WxHxD)
55"
60"
65"
70"
Body
With stand 48.9 x 31.0 x 12.2 inches (1242.6 x 787.5 x 310.5 mm)
Body 53.7 x 31.1 x 2.5 inches (1363.6 x 789.5 x 64.0 mm)
With stand 53.7 x 33.6 x 14.5 inches (1363.6 x 852.8 x 369.4 mm)
Body 57.6 x 33.2 x 2.5 inches (1463.5 x 844.5 x 64.6 mm)
With stand 57.6 x 35.7 x 14.5 inches (1463.5 x 907.6 x 369.4 mm)
Body 61.9 x 35.8 x 2.5 inches (1572.3 x 908.4 x 63.7 mm)
With stand
48.9 x 28.3 x 2.5 inches (1242.6 x 718.4 x 63.2 mm)
61.9 x 39.0 x 14.9 inches (1572.3 x 990.3 x 378.3 mm)
2-1
Page 11
2-2
2. Product specications
Model UN**KU630DF
Weight
40"
43"
50"
55"
60"
65"
70"
Without Stand
With stand 19.0 lbs (8.6 kg)
Without Stand 19.4 lbs (8.8 kg)
With stand 21.4 lbs (9.7 kg)
Without Stand 26.9 lbs (12.2 kg)
With stand 29.1 lbs (13.2 kg)
Without Stand 33.1 lbs (15 kg)
With stand 35.3 lbs (16 kg)
Without Stand
With stand 50.5 lbs (22.9 kg)
Without Stand 52.2 lbs (23.7 kg)
With stand
Without Stand 60.8 lbs (27.6 kg)
With stand 68.6 lbs (31.1 kg)
17.0 lbs (7.7 kg)
46.1 lbs (20.9 kg)
56.9 lbs (25.8 kg)
Page 12
2-3
2. Product specications
2-2. Detail Specication
Item UN40KU630DFXZA
General Information
Display
Video
Product LED
Series 6
Country UNITED STATES
Platform(TV) SoC | Jazz-L
Screen Size 40"
Resolution 3,840 × 2,160
Ultra Black N/A
Quantum Dot Display N/A
Ultra Clear Panel Ultra Clear
Screen Curvature N/A
10 bit Support N/A
Picture Engine UHD Up-Scaling
Motion Rate 120
PQI (Picture Quality Index) 1300
HDR (High Dynamic Range) HDR Pro
Dynamic Contrast Ratio Mega Contrast
Micro Dimming UHD Dimming
Audio
Precision Black (Local Dimming) N/A
Quantum Dot Color N/A
Active Crystal Color N/A
Wide Color Enhancer (Plus) N/A
PurColor Yes
Auto Depth Enhancer N/A
Contrast Enhancer Yes
Auto Motion Plus Yes
Film Mode Yes
Natural Mode Support Yes
Peak Illuminator N/A
Dolby Digital Plus Yes
DTS Codec Yes
Sound Output (RMS) 20W
Speaker Type 2CH(Down Firing w/Bass Reex)
Woofer N/A
Wallmount Sound Mode Yes
Multiroom Link Yes
TV SoundConnect Yes
BT Headset Support Yes
Page 13
2-4
2. Product specications
Item UN40KU630DFXZA
Smart TV
Smart Interaction
Convergence
Samsung SMART TV Yes
Apps Yes
Games N/A
Cloud Game Yes
Billing Yes
EXTRA Yes
TV Plus N/A
Automated Content Recognition (ACR) Yes
Skype™ on Samsung TV N/A
Web Browser Yes
Voice Recognition N/A
TV to Mobile - Mirroring Yes
Mobile to TV - Mirroring, DLNA Yes
Family Square with S-Cloud N/A
Together Play N/A
Easy Setup Yes
Samsung SMART View Yes
IoT Service
Tuner/Broadcasting
Connectivity
App Casting Yes
Wireless TV On - Samsung WOL Yes
Wired TV On - Samsung WOL Yes
Bluetooth Low Energy Yes
Brieng On TV Yes
RVU Yes
WiDi N/A
WiFi Direct Yes
TV as Hub Support N/A
TV as Things Support Yes
IoT Client Application N/A
Digital Broadcasting ATSC
Analog Tuner Yes
HDMI 3
USB 2
Component In (Y/Pb/Pr) 1
Composite In (AV) 1(Common Use for Component Y)
Ethernet (LAN) Yes
Headphone N/A
Audio Out (Mini Jack) N/A
Digital Audio Out (Optical) 1
Page 14
2-5
2. Product specications
Item UN40KU630DFXZA
Connectivity
Design
Additional Feature
RF In (Terrestrial / Cable input / Satellite input) 1/1(Common Use for Terrestrial)/0
Ex-Link ( RS-232C ) N/A
CI Slot N/A
Scart N/A
MHL N/A
HDMI A / Return Ch. Support Yes
HDMI Quick Switch Yes
Wireless LAN Adapter Support N/A
Wireless LAN Built-in Yes
Anynet+ (HDMI-CEC) Yes
Design JU6000
Bezel Type VNB
Slim Type Slim
Front Color Black
Light Effect (Deco) N/A
Stand Type V-Shape
Swivel (Left/Right) N/A
Samsung 3D N/A
Instant On Yes
Processor Quad-Core
SCSA Support N/A
Accessibility Voice Guide/Enlarge/High Contrast
Digital Clean View Yes
One Connect (Jack) N/A
Auto Channel Search Yes
Auto Power Off Yes
BD Wise Plus N/A
Caption (Subtitle) Yes
Channel List USB-Clone N/A
Connect Share™ (HDD) Yes
ConnectShare™ (USB 2.0) Yes
Embeded POP Yes
EPG Yes
Extended PVR N/A
Game Mode Yes
OSD Language English, Spanish, French
BT HID Built-in Yes
USB HID Support Yes
Page 15
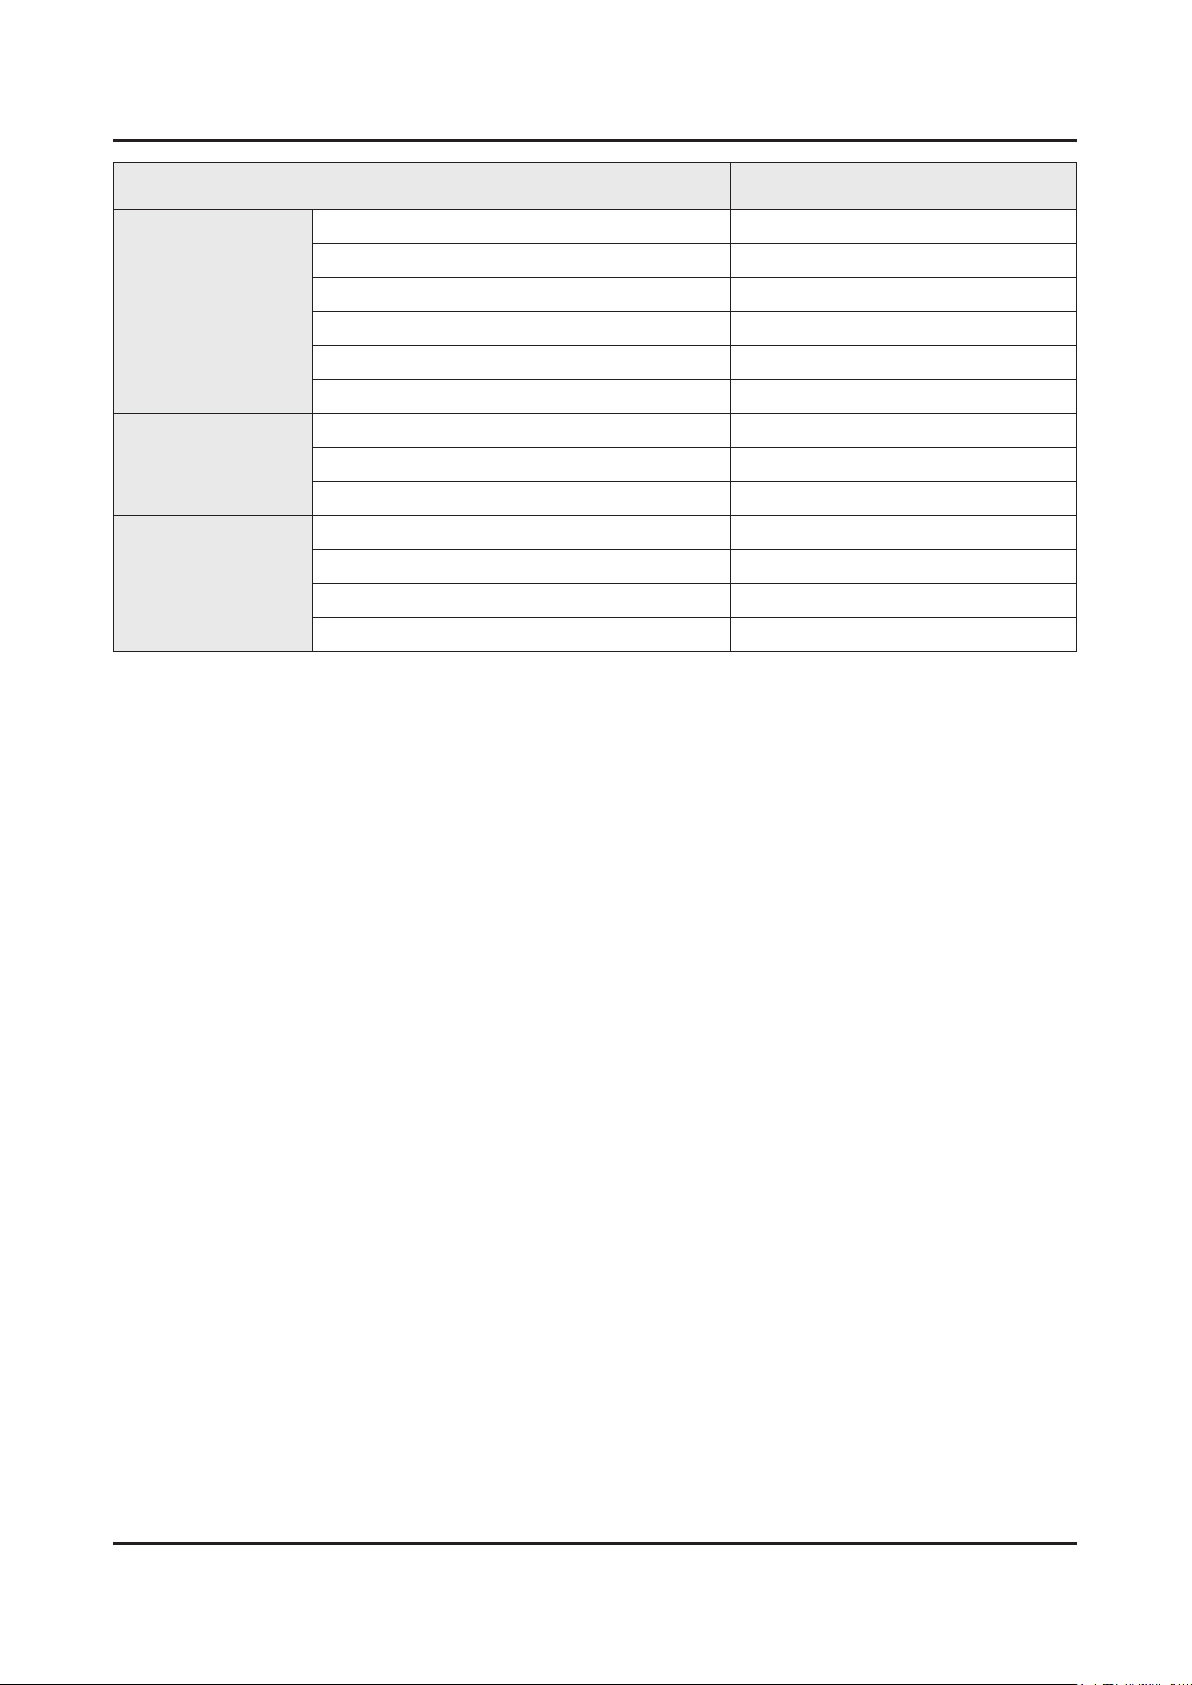
2-6
2. Product specications
Item UN40KU630DFXZA
Additional Feature
Eco Feature
Power
Smart Evolution Support N/A
Teletext (TTX) N/A
Time Shift N/A
V-Chip Yes
MBR Support Yes
Ultra Clean View Yes
Energy Star Yes
Eco Sensor Yes
Energy Efciency Class N/A
Power Supply AC110-120V 60Hz
Power Consumption (Max) 115 W
Power Consumption (Stand-by) 0.3 W
Power Consumption (Typical) 45 W
Page 16
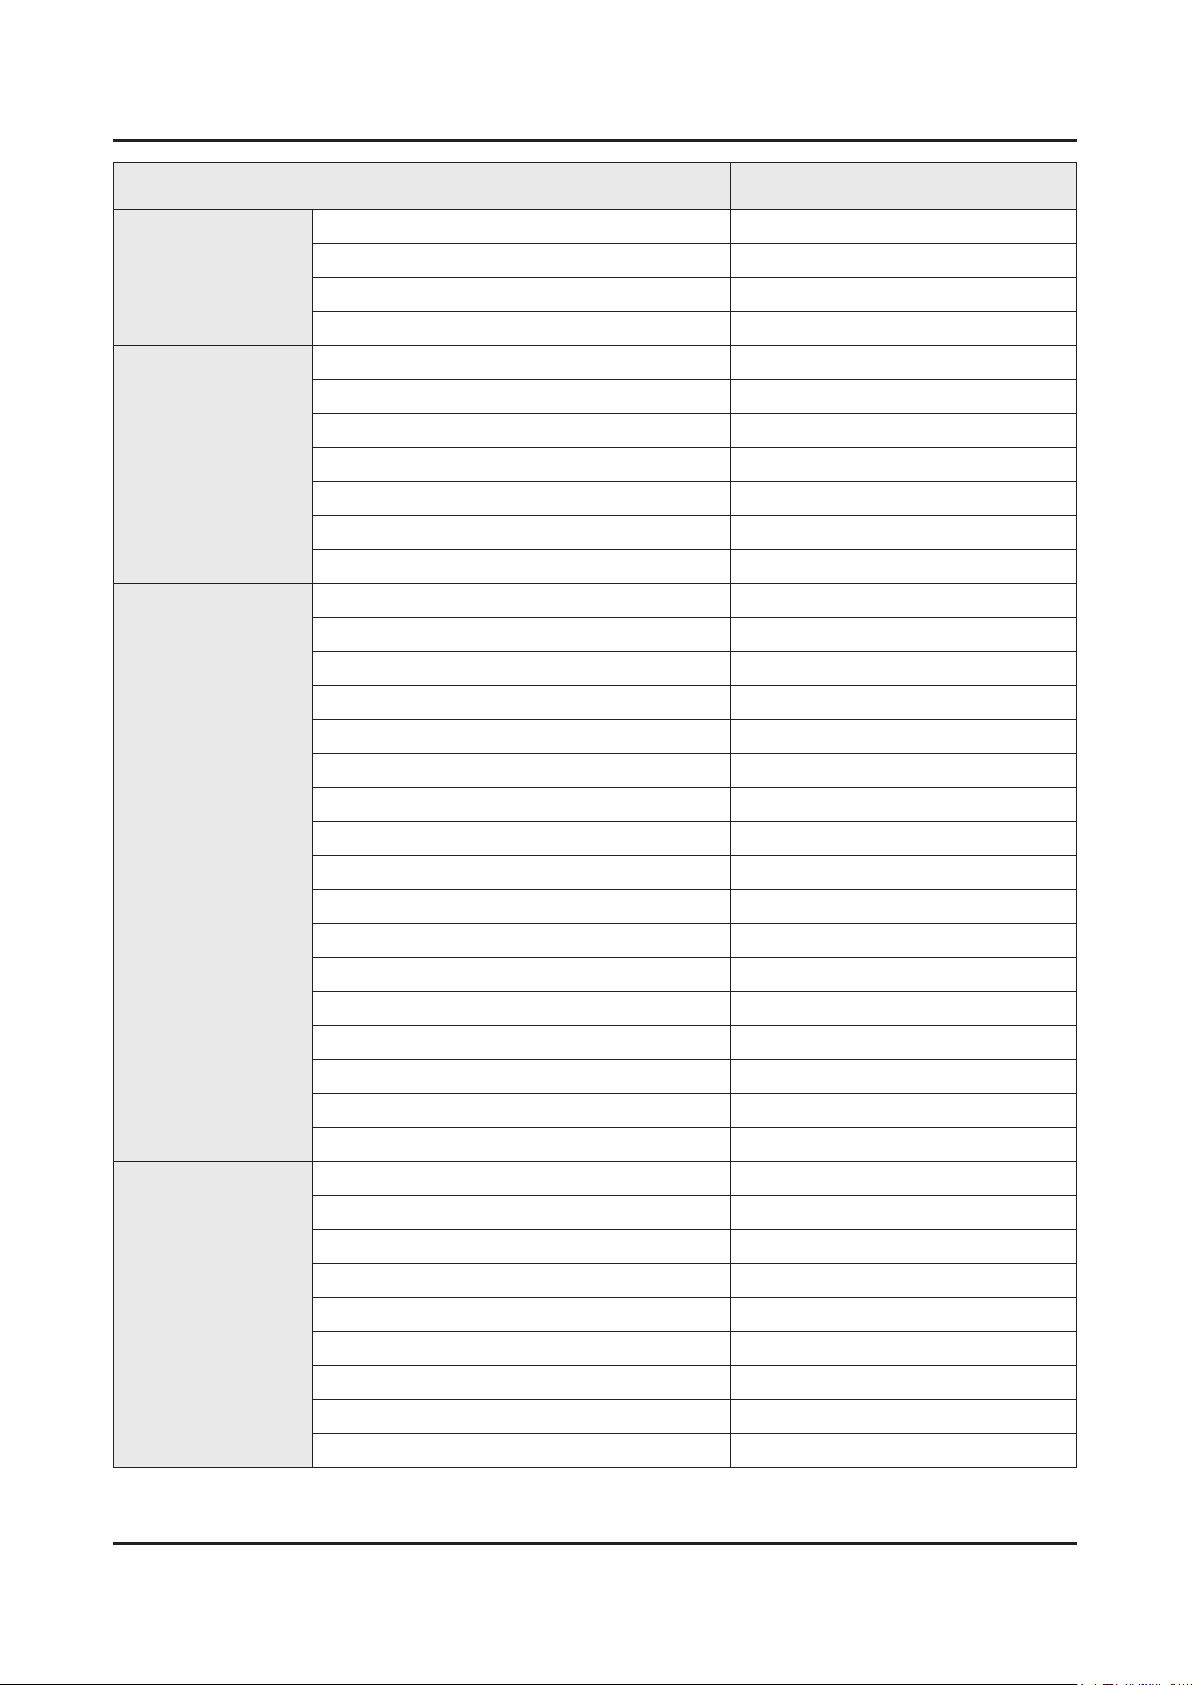
2-7
2. Product specications
Item UN43KU630DFXZA
General Information
Display
Video
Product LED
Series 6
Country UNITED STATES
Platform(TV) SoC | Jazz-L
Screen Size 43"
Resolution 3,840 × 2,160
Ultra Black N/A
Quantum Dot Display N/A
Ultra Clear Panel Ultra Clear
Screen Curvature N/A
10 bit Support N/A
Picture Engine UHD Up-Scaling
Motion Rate MR 120
PQI (Picture Quality Index) N/A
HDR (High Dynamic Range) HDR Premium
Dynamic Contrast Ratio Mega Contrast
Micro Dimming UHD Dimming
Audio
Precision Black (Local Dimming) N/A
Quantum Dot Color N/A
Active Crystal Color N/A
Wide Color Enhancer (Plus) N/A
PurColor Yes
Auto Depth Enhancer N/A
Contrast Enhancer Yes
Auto Motion Plus Yes
Film Mode Yes
Natural Mode Support Yes
Peak Illuminator N/A
Dolby Digital Plus Yes
DTS Codec Yes
Sound Output (RMS) 20W
Speaker Type 2CH(Down Firing w/Bass Reex)
Woofer N/A
Wallmount Sound Mode Yes
Multiroom Link Yes
TV SoundConnect Yes
BT Headset Support Yes
Page 17
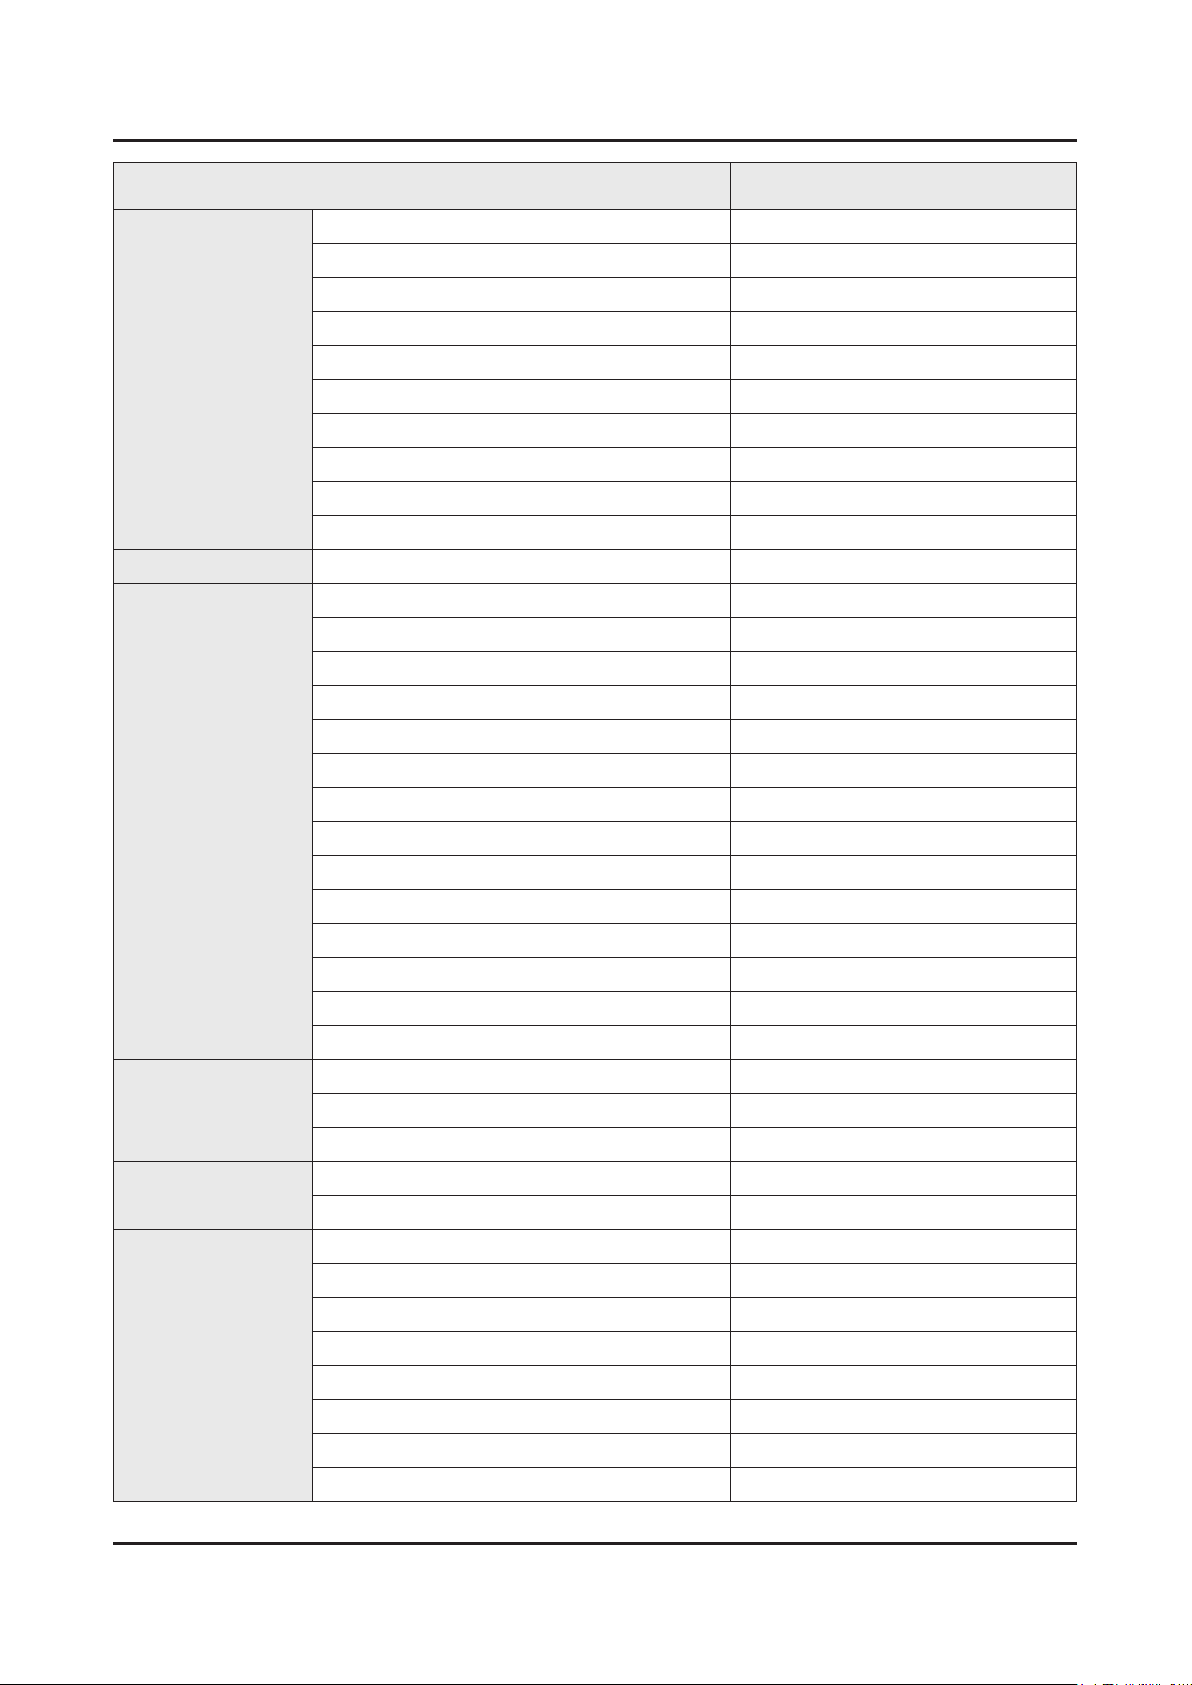
2-8
2. Product specications
Item UN43KU630DFXZA
Smart TV
Smart Interaction
Convergence
Samsung SMART TV Yes
Apps Yes
Games N/A
Cloud Game Yes
Billing Yes
EXTRA Yes
TV Plus N/A
Automated Content Recognition (ACR) Yes
Skype™ on Samsung TV N/A
Web Browser Yes
Voice Recognition N/A
TV to Mobile - Mirroring Yes
Mobile to TV - Mirroring, DLNA Yes
Family Square with S-Cloud N/A
Together Play N/A
Easy Setup N/A
Samsung SMART View Yes
IoT Service
Tuner/Broadcasting
Connectivity
App Casting Yes
Wireless TV On - Samsung WOL Yes
Wired TV On - Samsung WOL Yes
Bluetooth Low Energy Yes
Brieng On TV Yes
RVU Yes
WiDi N/A
WiFi Direct Yes
TV as Hub Support N/A
TV as Things Support Yes
IoT Client Application N/A
Digital Broadcasting ATSC
Analog Tuner Yes
HDMI 3
USB 2
Component In (Y/Pb/Pr) 1
Composite In (AV) 1(Common Use for Component Y)
Ethernet (LAN) Yes
Headphone N/A
Audio Out (Mini Jack) N/A
Digital Audio Out (Optical) 1
Page 18
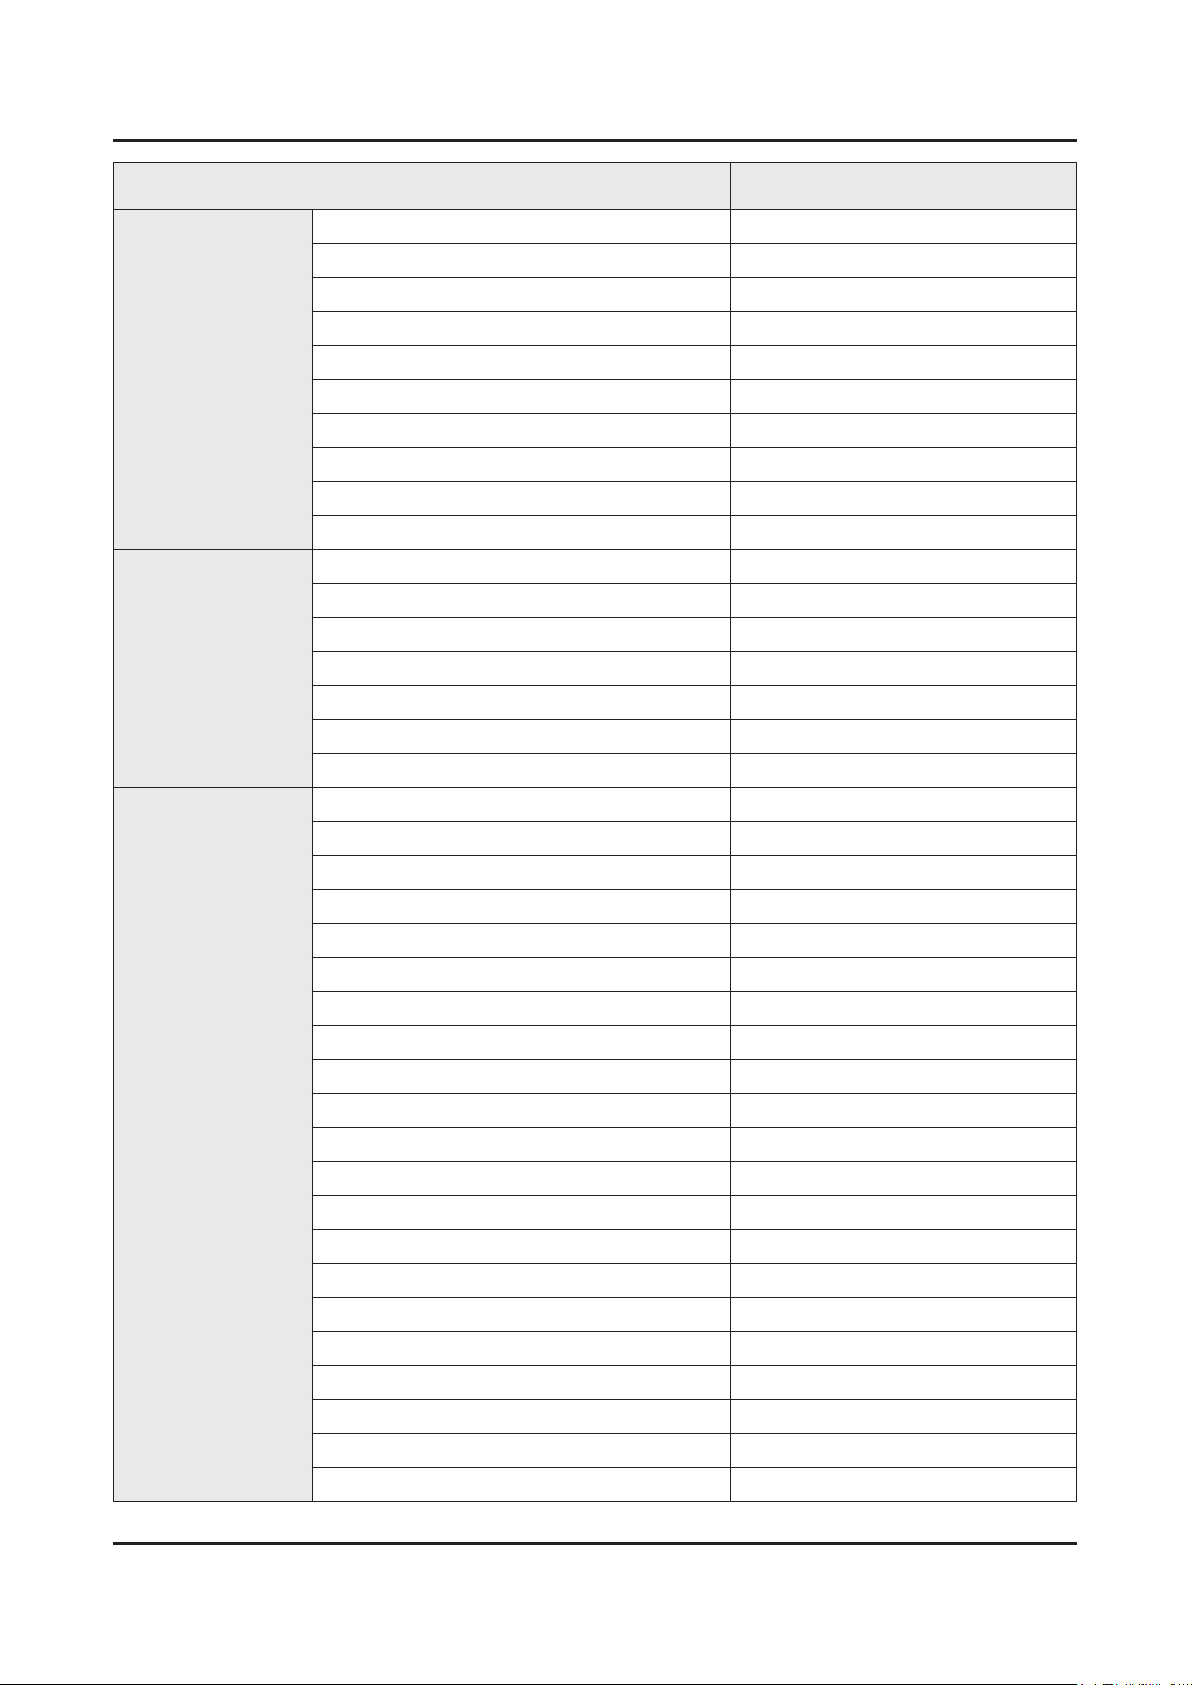
2-9
2. Product specications
Item UN43KU630DFXZA
Connectivity
Design
Additional Feature
RF In (Terrestrial / Cable input / Satellite input) 1/1(Common Use for Terrestrial)/0
Ex-Link ( RS-232C ) N/A
CI Slot N/A
Scart N/A
MHL N/A
HDMI A / Return Ch. Support Yes
HDMI Quick Switch Yes
Wireless LAN Adapter Support N/A
Wireless LAN Built-in Yes
Anynet+ (HDMI-CEC) Yes
Design JU6400 Vari.
Bezel Type VNB
Slim Type Slim
Front Color Black
Light Effect (Deco) N/A
Stand Type V feet-JS7000 (Dark Titan)
Swivel (Left/Right) N/A
Samsung 3D N/A
Instant On Yes
Processor Quad-Core
SCSA Support N/A
Accessibility Voice Guide/Enlarge/High Contrast
Digital Clean View Yes
One Connect (Jack) N/A
Auto Channel Search Yes
Auto Power Off Yes
BD Wise Plus N/A
Caption (Subtitle) Yes
Channel List USB-Clone N/A
Connect Share™ (HDD) Yes
ConnectShare™ (USB 2.0) Yes
Embeded POP Yes
EPG Yes
Extended PVR N/A
Game Mode Yes
OSD Language English, Spanish, French
BT HID Built-in Yes
USB HID Support Yes
Page 19
2-10
2. Product specications
Item UN43KU630DFXZA
Additional Feature
Eco Feature
Smart Evolution Support N/A
Teletext (TTX) N/A
Time Shift N/A
V-Chip Yes
MBR Support Yes
Ultra Clean View Yes
Energy Star TBD
Eco Sensor Yes
Energy Efciency Class N/A
Page 20
2-11
2. Product specications
Item UN50KU630DFXZA
General Information
Display
Video
Product LED
Series 6
Country UNITED STATES
Platform(TV) SoC | Jazz-L
Screen Size 50"
Resolution 3,840 × 2,160
Ultra Black N/A
Quantum Dot Display N/A
Ultra Clear Panel Ultra Clear
Screen Curvature N/A
10 bit Support N/A
Picture Engine UHD Up-Scaling
Motion Rate MR 120
PQI (Picture Quality Index) N/A
HDR (High Dynamic Range) HDR Premium
Dynamic Contrast Ratio Mega Contrast
Micro Dimming UHD Dimming
Audio
Precision Black (Local Dimming) N/A
Quantum Dot Color N/A
Active Crystal Color N/A
Wide Color Enhancer (Plus) N/A
PurColor Yes
Auto Depth Enhancer N/A
Contrast Enhancer Yes
Auto Motion Plus Yes
Film Mode Yes
Natural Mode Support Yes
Peak Illuminator N/A
Dolby Digital Plus Yes
DTS Codec Yes
Sound Output (RMS) 20W
Speaker Type 2CH(Down Firing w/Bass Reex)
Woofer N/A
Wallmount Sound Mode Yes
Multiroom Link Yes
TV SoundConnect Yes
BT Headset Support Yes
Page 21
2-12
2. Product specications
Item UN50KU630DFXZA
Smart TV
Smart Interaction
Convergence
Samsung SMART TV Yes
Apps Yes
Games N/A
Cloud Game Yes
Billing Yes
EXTRA Yes
TV Plus N/A
Automated Content Recognition (ACR) Yes
Skype™ on Samsung TV N/A
Web Browser Yes
Voice Recognition N/A
TV to Mobile - Mirroring Yes
Mobile to TV - Mirroring, DLNA Yes
Family Square with S-Cloud N/A
Together Play N/A
Easy Setup N/A
Samsung SMART View Yes
IoT Service
Tuner/Broadcasting
Connectivity
App Casting Yes
Wireless TV On - Samsung WOL Yes
Wired TV On - Samsung WOL Yes
Bluetooth Low Energy Yes
Brieng On TV Yes
RVU Yes
WiDi N/A
WiFi Direct Yes
TV as Hub Support N/A
TV as Things Support Yes
IoT Client Application N/A
Digital Broadcasting ATSC
Analog Tuner Yes
HDMI 3
USB 2
Component In (Y/Pb/Pr) 1
Composite In (AV) 1(Common Use for Component Y)
Ethernet (LAN) Yes
Headphone N/A
Audio Out (Mini Jack) N/A
Digital Audio Out (Optical) 1
Page 22
2-13
2. Product specications
Item UN50KU630DFXZA
Connectivity
Design
Additional Feature
RF In (Terrestrial / Cable input / Satellite input) 1/1(Common Use for Terrestrial)/0
Ex-Link ( RS-232C ) N/A
CI Slot N/A
Scart N/A
MHL N/A
HDMI A / Return Ch. Support Yes
HDMI Quick Switch Yes
Wireless LAN Adapter Support N/A
Wireless LAN Built-in Yes
Anynet+ (HDMI-CEC) Yes
Design JU6400 Vari.
Bezel Type VNB
Slim Type Slim
Front Color Black
Light Effect (Deco) N/A
Stand Type V feet-JS7000 (Dark Titan)
Swivel (Left/Right) N/A
Samsung 3D N/A
Instant On Yes
Processor Quad-Core
SCSA Support N/A
Accessibility Voice Guide/Enlarge/High Contrast
Digital Clean View Yes
One Connect (Jack) N/A
Auto Channel Search Yes
Auto Power Off Yes
BD Wise Plus N/A
Caption (Subtitle) Yes
Channel List USB-Clone N/A
Connect Share™ (HDD) Yes
ConnectShare™ (USB 2.0) Yes
Embeded POP Yes
EPG Yes
Extended PVR N/A
Game Mode Yes
OSD Language English, Spanish, French
BT HID Built-in Yes
USB HID Support Yes
Page 23
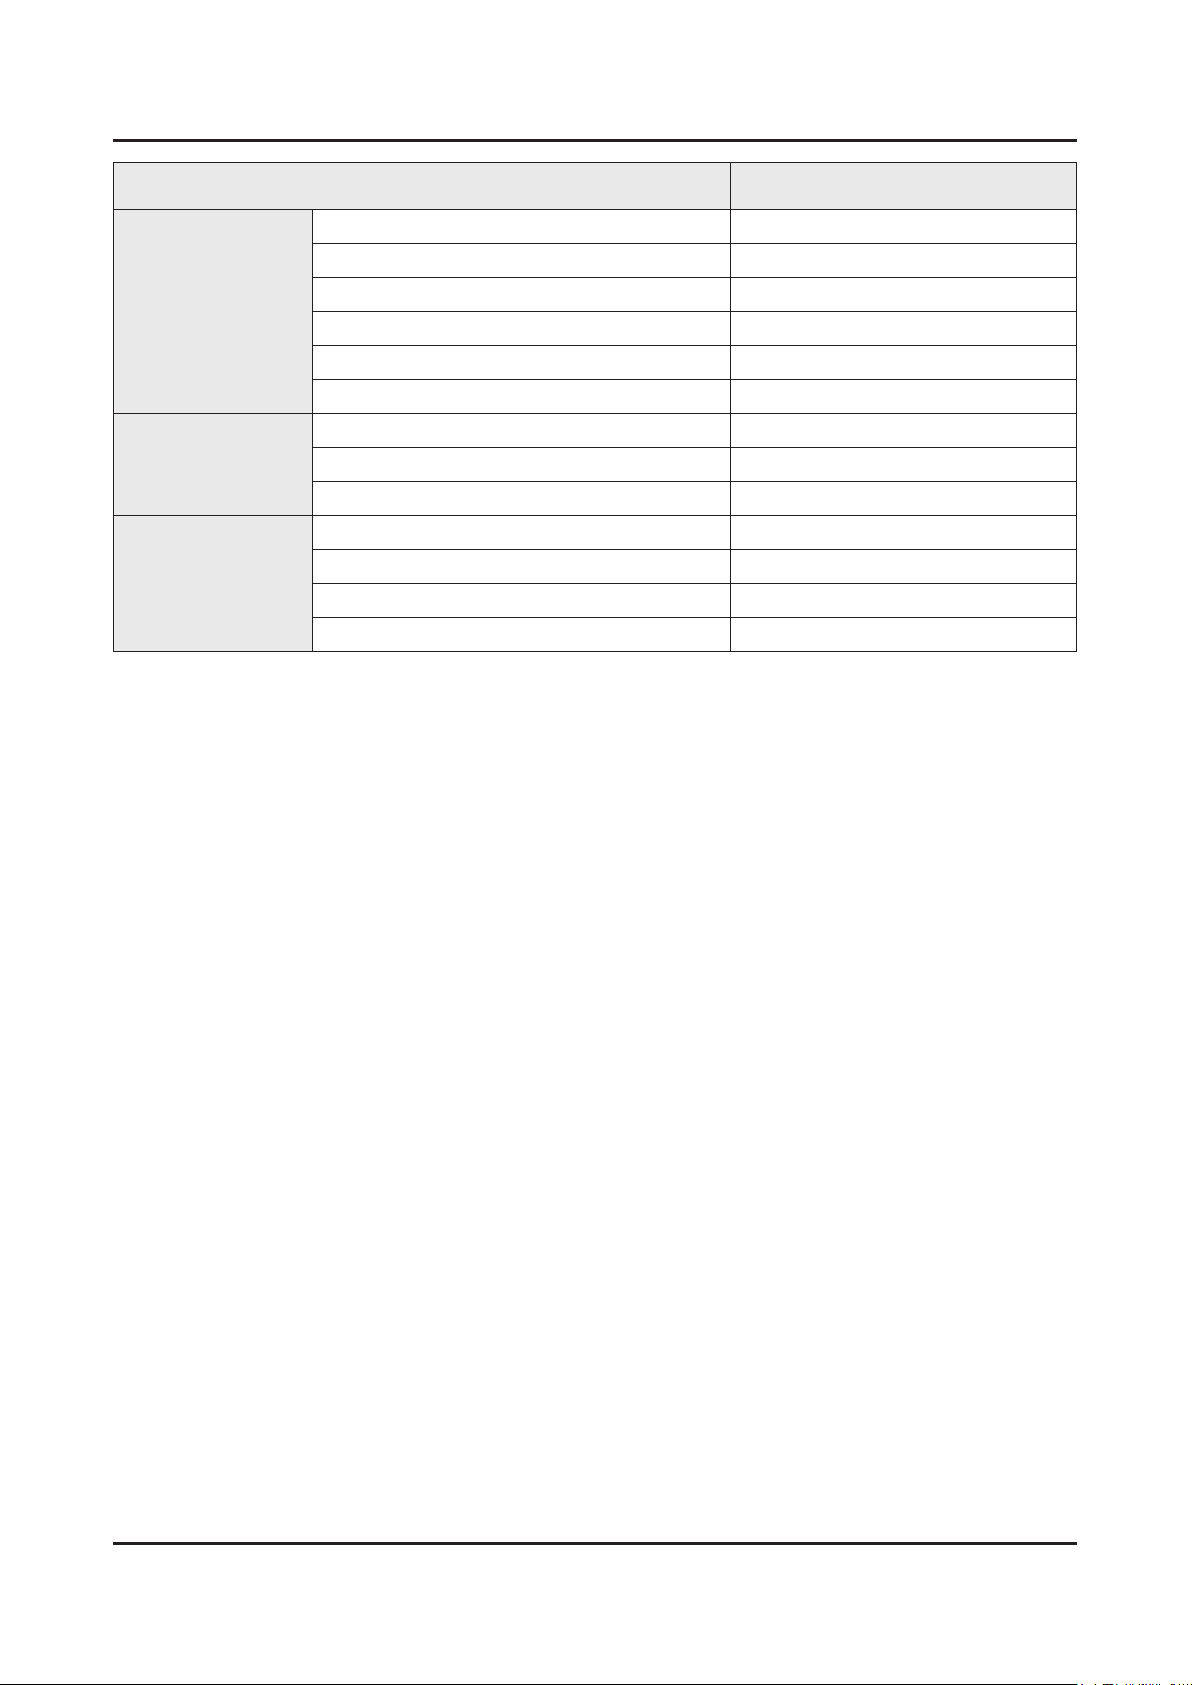
2-14
2. Product specications
Item UN50KU630DFXZA
Additional Feature
Eco Feature
Power
Smart Evolution Support N/A
Teletext (TTX) N/A
Time Shift N/A
V-Chip Yes
MBR Support Yes
Ultra Clean View Yes
Energy Star Yes
Eco Sensor Yes
Energy Efciency Class N/A
Power Supply AC110-120V 50/60Hz
Power Consumption (Max) 180 W
Power Consumption (Stand-by) 0.3 W
Power Consumption (Typical) 58 W
Page 24
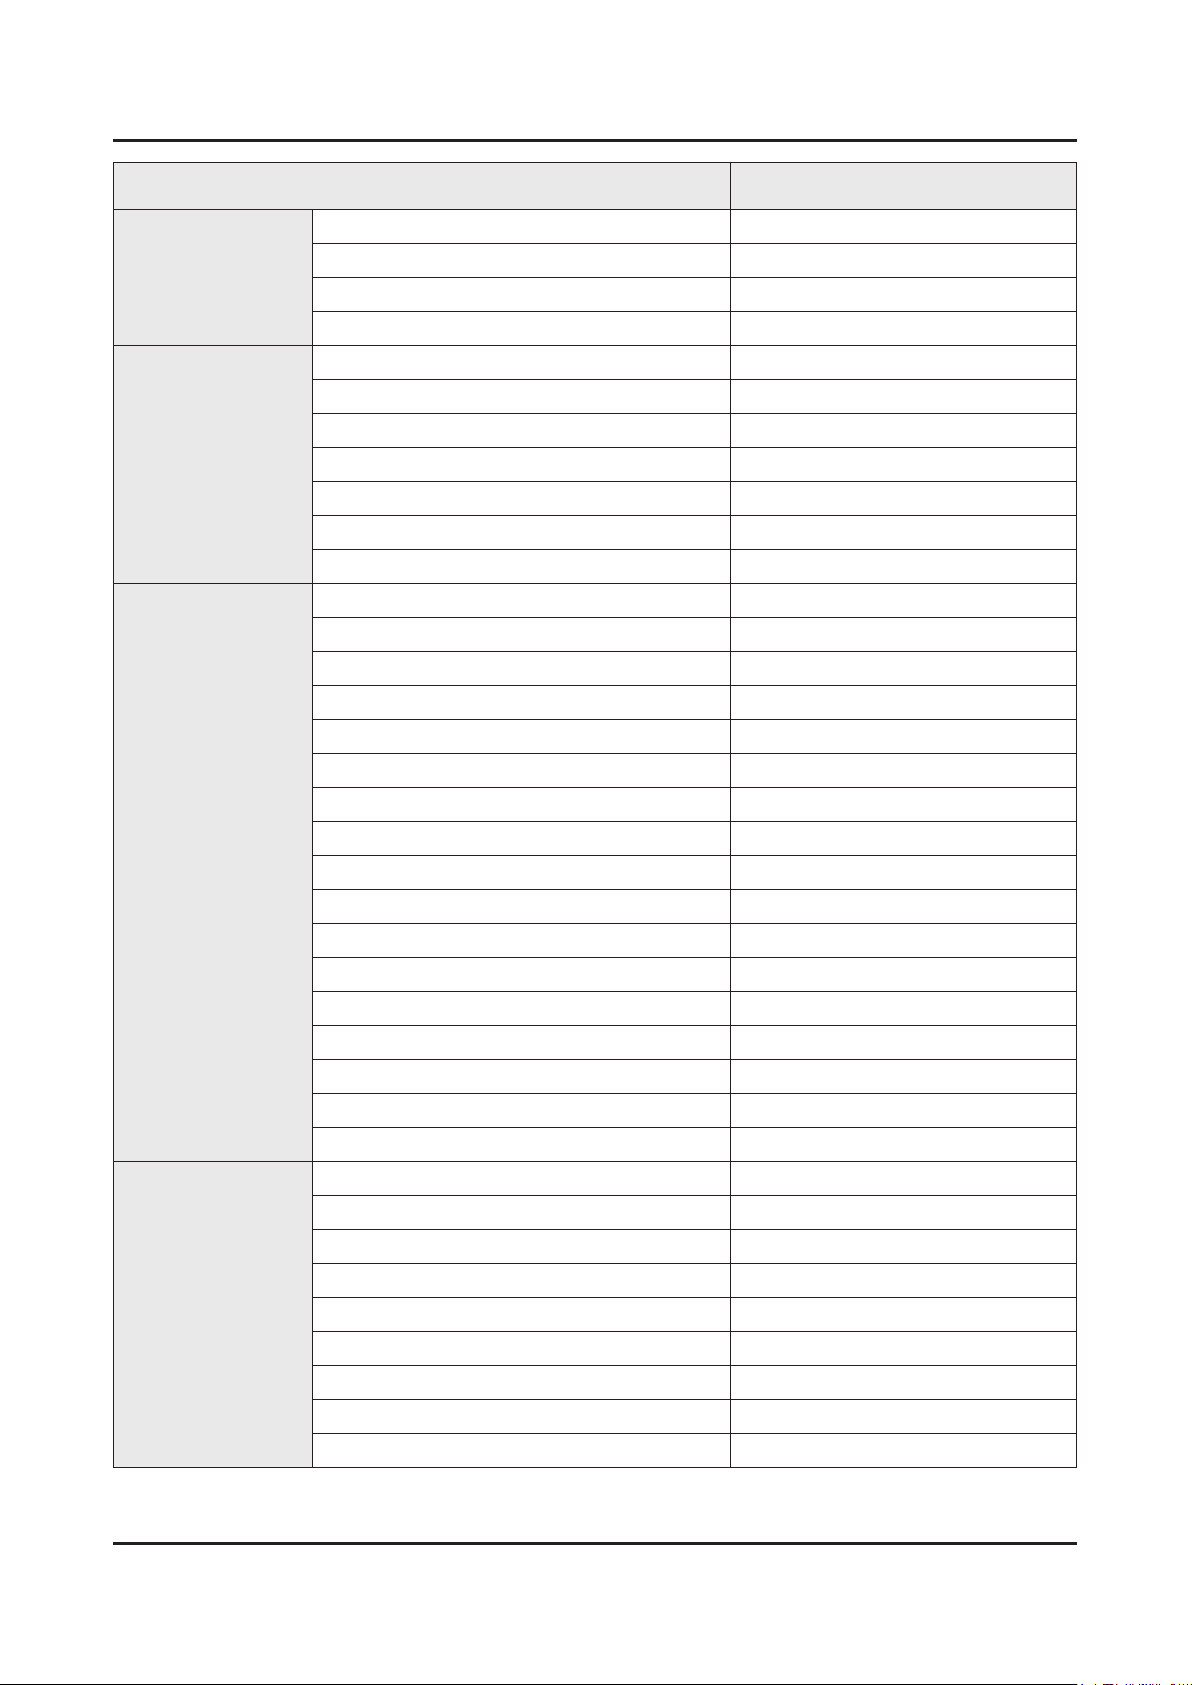
2-15
2. Product specications
Item UN55KU630DFXZA
General Information
Display
Video
Product LED
Series 6
Country UNITED STATES
Platform(TV) SoC | Jazz-L
Screen Size 55"
Resolution 3,840 × 2,160
Ultra Black N/A
Quantum Dot Display N/A
Ultra Clear Panel Ultra Clear
Screen Curvature N/A
10 bit Support N/A
Picture Engine UHD Up-Scaling
Motion Rate MR 120
PQI (Picture Quality Index) N/A
HDR (High Dynamic Range) HDR Premium
Dynamic Contrast Ratio Mega Contrast
Micro Dimming UHD Dimming
Audio
Precision Black (Local Dimming) N/A
Quantum Dot Color N/A
Active Crystal Color N/A
Wide Color Enhancer (Plus) N/A
PurColor Yes
Auto Depth Enhancer N/A
Contrast Enhancer Yes
Auto Motion Plus Yes
Film Mode Yes
Natural Mode Support Yes
Peak Illuminator N/A
Dolby Digital Plus Yes
DTS Codec Yes
Sound Output (RMS) 20W
Speaker Type 2CH(Down Firing w/Bass Reex)
Woofer N/A
Wallmount Sound Mode Yes
Multiroom Link Yes
TV SoundConnect Yes
BT Headset Support Yes
Page 25
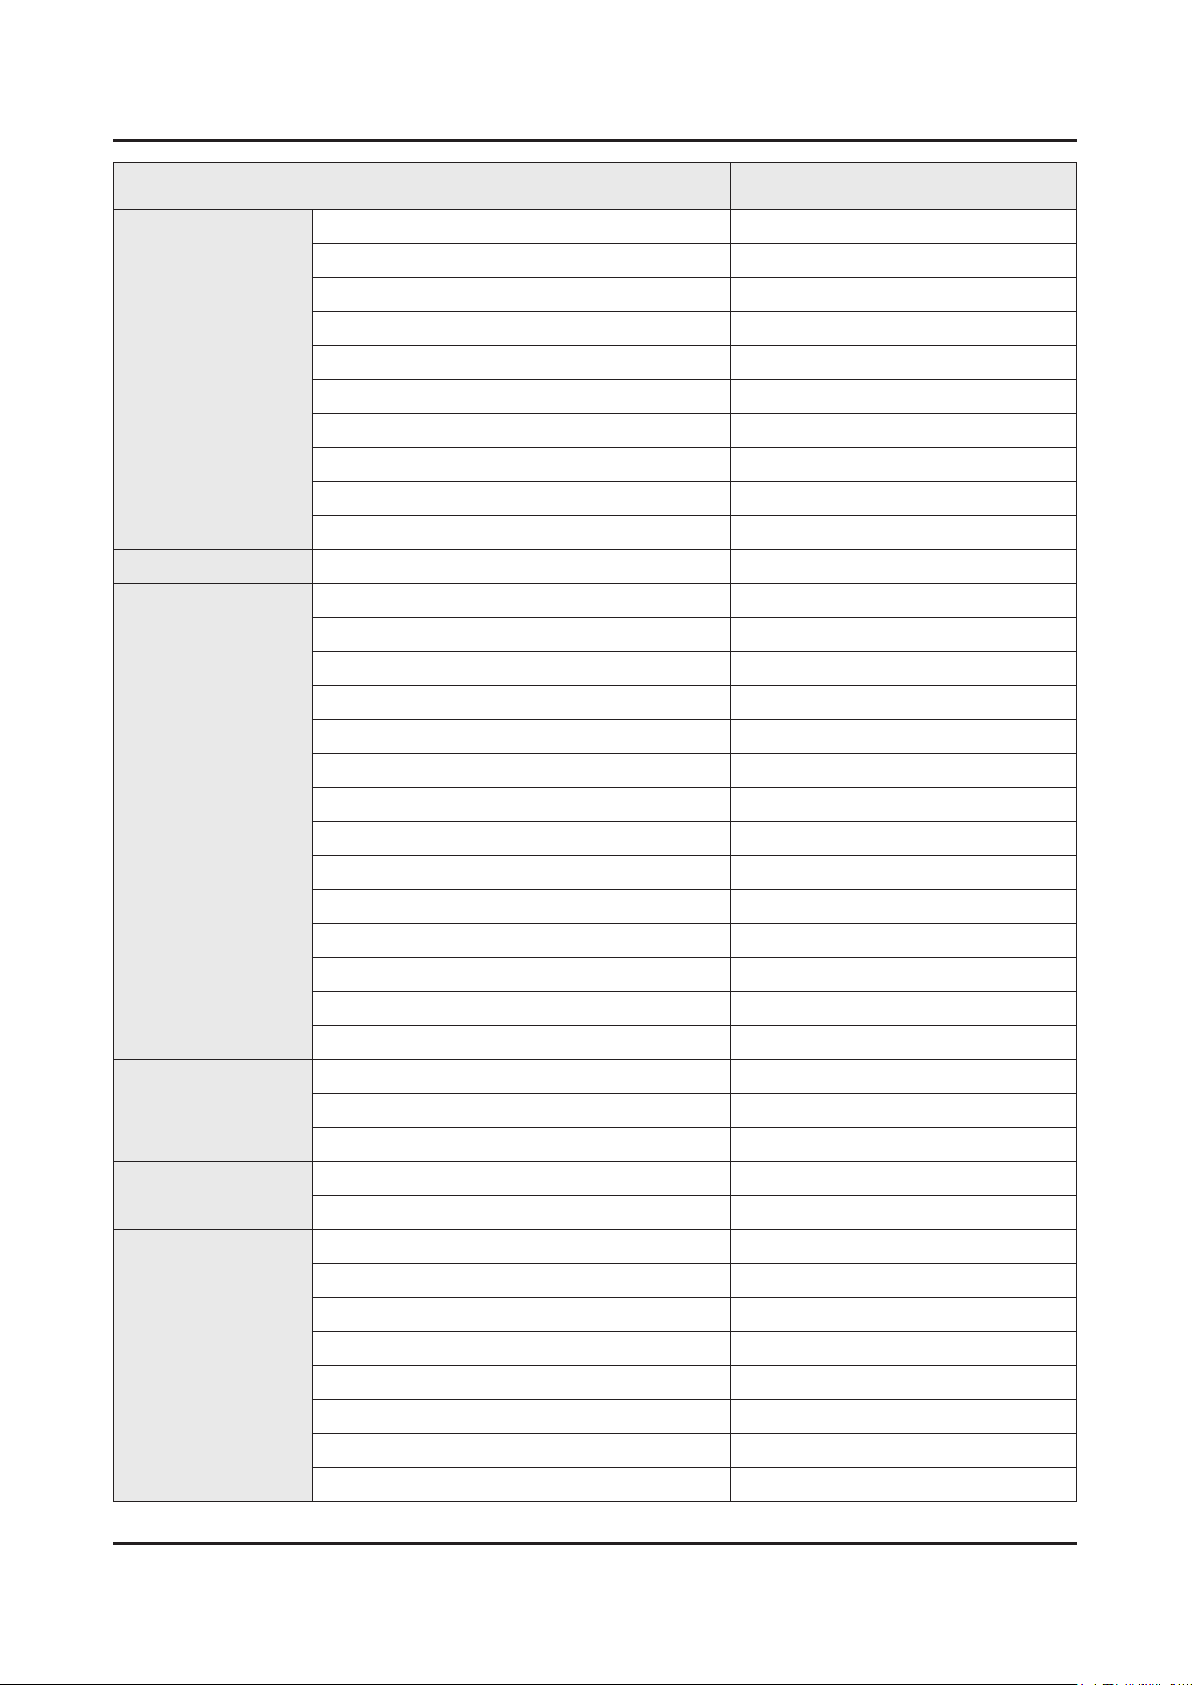
2-16
2. Product specications
Item UN55KU630DFXZA
Smart TV
Smart Interaction
Convergence
Samsung SMART TV Yes
Apps Yes
Games N/A
Cloud Game Yes
Billing Yes
EXTRA Yes
TV Plus N/A
Automated Content Recognition (ACR) Yes
Skype™ on Samsung TV N/A
Web Browser Yes
Voice Recognition N/A
TV to Mobile - Mirroring Yes
Mobile to TV - Mirroring, DLNA Yes
Family Square with S-Cloud N/A
Together Play N/A
Easy Setup N/A
Samsung SMART View Yes
IoT Service
Tuner/Broadcasting
Connectivity
App Casting Yes
Wireless TV On - Samsung WOL Yes
Wired TV On - Samsung WOL Yes
Bluetooth Low Energy Yes
Brieng On TV Yes
RVU Yes
WiDi N/A
WiFi Direct Yes
TV as Hub Support N/A
TV as Things Support Yes
IoT Client Application N/A
Digital Broadcasting ATSC
Analog Tuner Yes
HDMI 3
USB 2
Component In (Y/Pb/Pr) 1
Composite In (AV) 1(Common Use for Component Y)
Ethernet (LAN) Yes
Headphone N/A
Audio Out (Mini Jack) N/A
Digital Audio Out (Optical) 1
Page 26
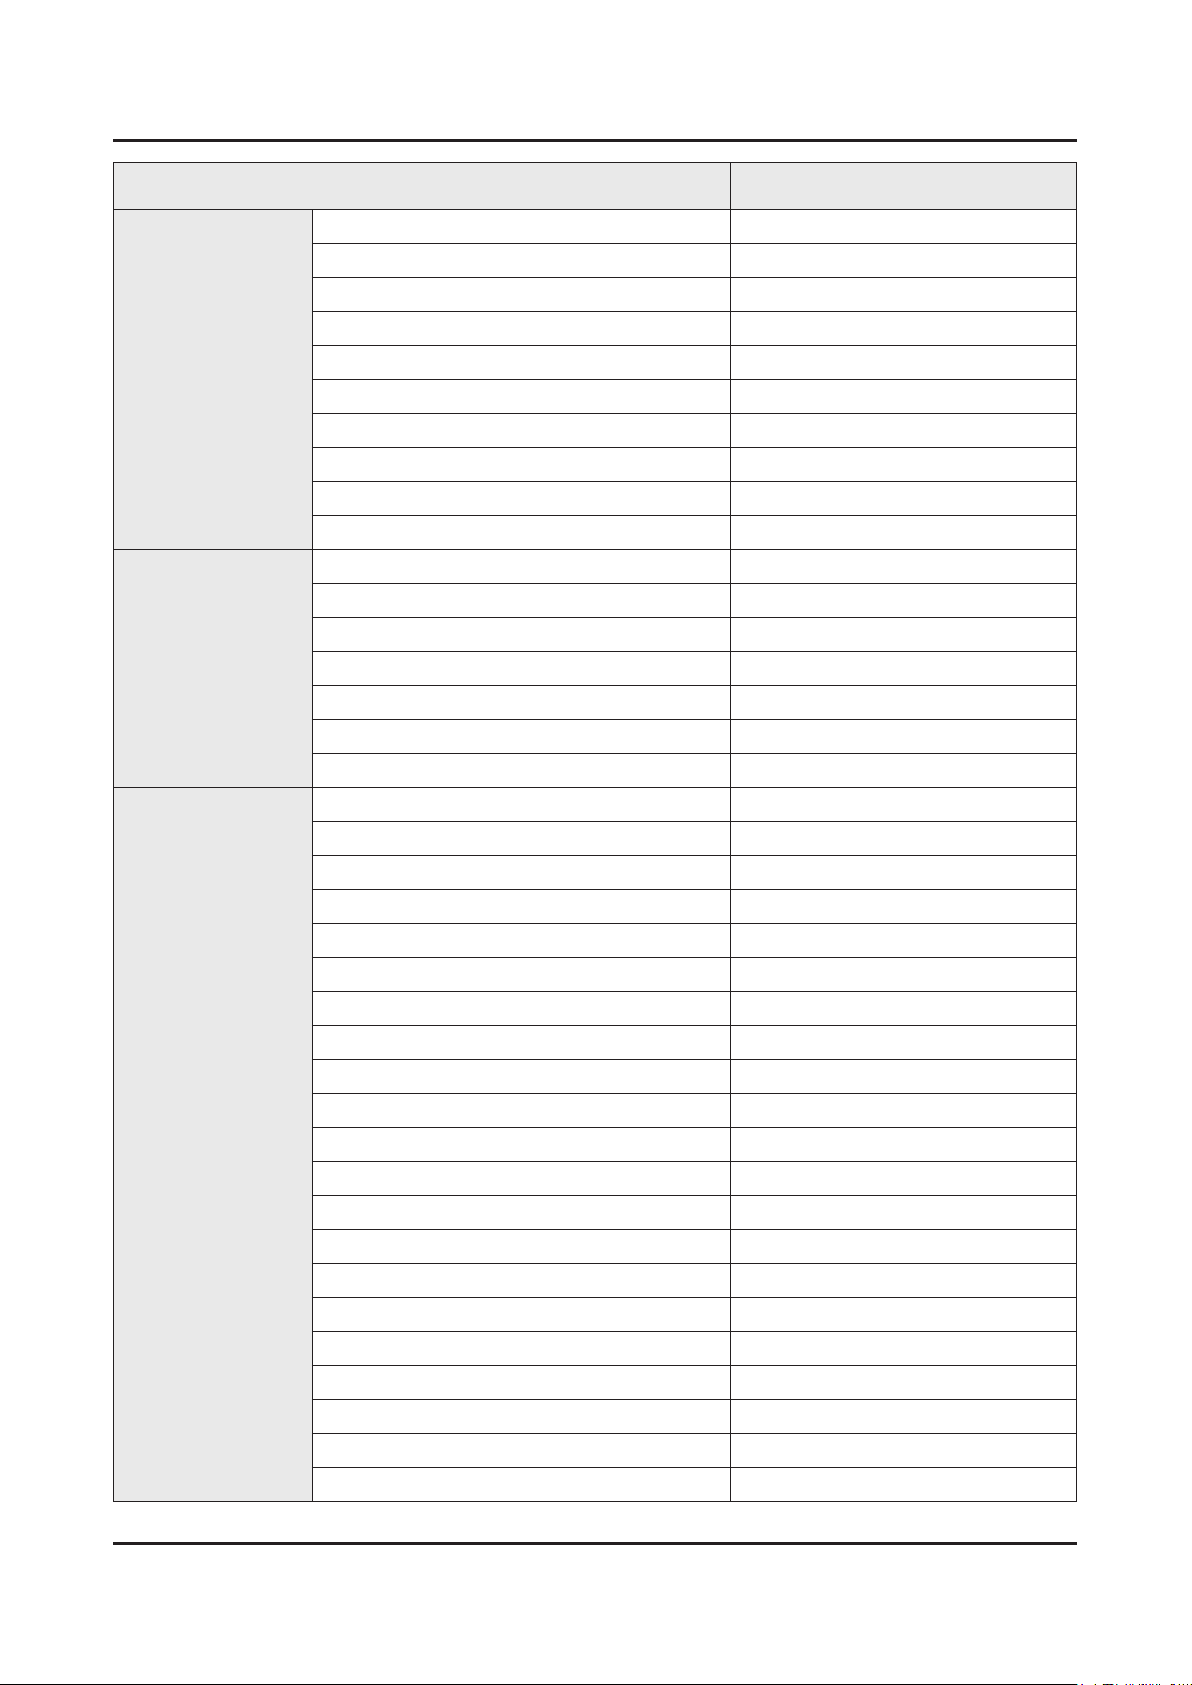
2-17
2. Product specications
Item UN55KU630DFXZA
Connectivity
Design
Additional Feature
RF In (Terrestrial / Cable input / Satellite input) 1/1(Common Use for Terrestrial)/0
Ex-Link ( RS-232C ) N/A
CI Slot N/A
Scart N/A
MHL N/A
HDMI A / Return Ch. Support Yes
HDMI Quick Switch Yes
Wireless LAN Adapter Support N/A
Wireless LAN Built-in Yes
Anynet+ (HDMI-CEC) Yes
Design JU6400 Vari.
Bezel Type VNB
Slim Type Slim
Front Color Black
Light Effect (Deco) N/A
Stand Type V feet-JS7000 (Dark Titan)
Swivel (Left/Right) N/A
Samsung 3D N/A
Instant On Yes
Processor Quad-Core
SCSA Support N/A
Accessibility Voice Guide/Enlarge/High Contrast
Digital Clean View Yes
One Connect (Jack) N/A
Auto Channel Search Yes
Auto Power Off Yes
BD Wise Plus N/A
Caption (Subtitle) Yes
Channel List USB-Clone N/A
Connect Share™ (HDD) Yes
ConnectShare™ (USB 2.0) Yes
Embeded POP Yes
EPG Yes
Extended PVR N/A
Game Mode Yes
OSD Language English, Spanish, French
BT HID Built-in Yes
USB HID Support Yes
Page 27
2-18
2. Product specications
Item UN55KU630DFXZA
Additional Feature
Eco Feature
Power
Smart Evolution Support N/A
Teletext (TTX) N/A
Time Shift N/A
V-Chip Yes
MBR Support Yes
Ultra Clean View Yes
Energy Star Yes
Eco Sensor Yes
Energy Efciency Class N/A
Power Supply AC110-120V 50/60Hz
Power Consumption (Max) 190 W
Power Consumption (Stand-by) 0.3 W
Power Consumption (Typical) 60 W
Page 28
2-19
2. Product specications
Item UN60KU630DFXZA
General Information
Display
Video
Product LED
Series 6
Country UNITED STATES
Platform(TV) SoC | Jazz-L
Screen Size 60"
Resolution 3,840 × 2,160
Ultra Black N/A
Quantum Dot Display N/A
Ultra Clear Panel Ultra Clear
Screen Curvature N/A
10 bit Support N/A
Picture Engine UHD Up-Scaling
Motion Rate MR 120
PQI (Picture Quality Index) N/A
HDR (High Dynamic Range) HDR Premium
Dynamic Contrast Ratio Mega Contrast
Micro Dimming UHD Dimming
Audio
Precision Black (Local Dimming) N/A
Quantum Dot Color N/A
Active Crystal Color N/A
Wide Color Enhancer (Plus) N/A
PurColor Yes
Auto Depth Enhancer N/A
Contrast Enhancer Yes
Auto Motion Plus Yes
Film Mode Yes
Natural Mode Support Yes
Peak Illuminator N/A
Dolby Digital Plus Yes
DTS Codec Yes
Sound Output (RMS) 20W
Speaker Type 2CH(Down Firing w/Bass Reex)
Woofer N/A
Wallmount Sound Mode Yes
Multiroom Link Yes
TV SoundConnect Yes
BT Headset Support Yes
Page 29
2-20
2. Product specications
Item UN60KU630DFXZA
Smart TV
Smart Interaction
Convergence
Samsung SMART TV Yes
Apps Yes
Games N/A
Cloud Game Yes
Billing Yes
EXTRA Yes
TV Plus N/A
Automated Content Recognition (ACR) Yes
Skype™ on Samsung TV N/A
Web Browser Yes
Voice Recognition N/A
TV to Mobile - Mirroring Yes
Mobile to TV - Mirroring, DLNA Yes
Family Square with S-Cloud N/A
Together Play N/A
Easy Setup N/A
Samsung SMART View Yes
IoT Service
Tuner/Broadcasting
Connectivity
App Casting Yes
Wireless TV On - Samsung WOL Yes
Wired TV On - Samsung WOL Yes
Bluetooth Low Energy Yes
Brieng On TV Yes
RVU Yes
WiDi N/A
WiFi Direct Yes
TV as Hub Support N/A
TV as Things Support Yes
IoT Client Application N/A
Digital Broadcasting ATSC
Analog Tuner Yes
HDMI 3
USB 2
Component In (Y/Pb/Pr) 1
Composite In (AV) 1(Common Use for Component Y)
Ethernet (LAN) Yes
Headphone N/A
Audio Out (Mini Jack) N/A
Digital Audio Out (Optical) 1
Page 30
2-21
2. Product specications
Item UN60KU630DFXZA
Connectivity
Design
Additional Feature
RF In (Terrestrial / Cable input / Satellite input) 1/1(Common Use for Terrestrial)/0
Ex-Link ( RS-232C ) N/A
CI Slot N/A
Scart N/A
MHL N/A
HDMI A / Return Ch. Support Yes
HDMI Quick Switch Yes
Wireless LAN Adapter Support N/A
Wireless LAN Built-in Yes
Anynet+ (HDMI-CEC) Yes
Design JU6400 Vari.
Bezel Type VNB
Slim Type Slim
Front Color Black
Light Effect (Deco) N/A
Stand Type V feet-JS7000 (Dark Titan)
Swivel (Left/Right) N/A
Samsung 3D N/A
Instant On Yes
Processor Quad-Core
SCSA Support N/A
Accessibility Voice Guide/Enlarge/High Contrast
Digital Clean View Yes
One Connect (Jack) N/A
Auto Channel Search Yes
Auto Power Off Yes
BD Wise Plus N/A
Caption (Subtitle) Yes
Channel List USB-Clone N/A
Connect Share™ (HDD) Yes
ConnectShare™ (USB 2.0) Yes
Embeded POP Yes
EPG Yes
Extended PVR N/A
Game Mode Yes
OSD Language English, Spanish, French
BT HID Built-in Yes
USB HID Support Yes
Page 31
2-22
2. Product specications
Item UN60KU630DFXZA
Additional Feature
Eco Feature
Power
Smart Evolution Support N/A
Teletext (TTX) N/A
Time Shift N/A
V-Chip Yes
MBR Support Yes
Ultra Clean View Yes
Energy Star Yes
Eco Sensor Yes
Energy Efciency Class N/A
Power Supply AC110-120V 50/60Hz
Power Consumption (Max) 240 W
Power Consumption (Stand-by) 0.3 W
Power Consumption (Typical) 70 W
Page 32
2-23
2. Product specications
Item UN65KU630DFXZA
General Information
Display
Video
Product LED
Series 6
Country UNITED STATES
Platform(TV) SoC | Jazz-L
Screen Size 65"
Resolution 3,840 × 2,160
Ultra Black N/A
Quantum Dot Display N/A
Ultra Clear Panel Ultra Clear
Screen Curvature N/A
10 bit Support N/A
Picture Engine UHD Up-Scaling
Motion Rate MR 120
PQI (Picture Quality Index) N/A
HDR (High Dynamic Range) HDR Premium
Dynamic Contrast Ratio Mega Contrast
Micro Dimming UHD Dimming
Audio
Precision Black (Local Dimming) N/A
Quantum Dot Color N/A
Active Crystal Color N/A
Wide Color Enhancer (Plus) N/A
PurColor Yes
Auto Depth Enhancer N/A
Contrast Enhancer Yes
Auto Motion Plus Yes
Film Mode Yes
Natural Mode Support Yes
Peak Illuminator N/A
Dolby Digital Plus Yes
DTS Codec Yes
Sound Output (RMS) 20W
Speaker Type 2CH(Down Firing w/Bass Reex)
Woofer N/A
Wallmount Sound Mode Yes
Multiroom Link Yes
TV SoundConnect Yes
BT Headset Support Yes
Page 33
2-24
2. Product specications
Item UN65KU630DFXZA
Smart TV
Smart Interaction
Convergence
Samsung SMART TV Yes
Apps Yes
Games N/A
Cloud Game Yes
Billing Yes
EXTRA Yes
TV Plus N/A
Automated Content Recognition (ACR) Yes
Skype™ on Samsung TV N/A
Web Browser Yes
Voice Recognition N/A
TV to Mobile - Mirroring Yes
Mobile to TV - Mirroring, DLNA Yes
Family Square with S-Cloud N/A
Together Play N/A
Easy Setup N/A
Samsung SMART View Yes
IoT Service
Tuner/Broadcasting
Connectivity
App Casting Yes
Wireless TV On - Samsung WOL Yes
Wired TV On - Samsung WOL Yes
Bluetooth Low Energy Yes
Brieng On TV Yes
RVU Yes
WiDi N/A
WiFi Direct Yes
TV as Hub Support N/A
TV as Things Support Yes
IoT Client Application N/A
Digital Broadcasting ATSC
Analog Tuner Yes
HDMI 3
USB 2
Component In (Y/Pb/Pr) 1
Composite In (AV) 1(Common Use for Component Y)
Ethernet (LAN) Yes
Headphone N/A
Audio Out (Mini Jack) N/A
Digital Audio Out (Optical) 1
Page 34
2-25
2. Product specications
Item UN65KU630DFXZA
Connectivity
Design
Additional Feature
RF In (Terrestrial / Cable input / Satellite input) 1/1(Common Use for Terrestrial)/0
Ex-Link ( RS-232C ) N/A
CI Slot N/A
Scart N/A
MHL N/A
HDMI A / Return Ch. Support Yes
HDMI Quick Switch Yes
Wireless LAN Adapter Support N/A
Wireless LAN Built-in Yes
Anynet+ (HDMI-CEC) Yes
Design JU6400 Vari.
Bezel Type VNB
Slim Type Slim
Front Color Black
Light Effect (Deco) N/A
Stand Type V feet-JS7000 (Dark Titan)
Swivel (Left/Right) N/A
Samsung 3D N/A
Instant On Yes
Processor Quad-Core
SCSA Support N/A
Accessibility Voice Guide/Enlarge/High Contrast
Digital Clean View Yes
One Connect (Jack) N/A
Auto Channel Search Yes
Auto Power Off Yes
BD Wise Plus N/A
Caption (Subtitle) Yes
Channel List USB-Clone N/A
Connect Share™ (HDD) Yes
ConnectShare™ (USB 2.0) Yes
Embeded POP Yes
EPG Yes
Extended PVR N/A
Game Mode Yes
OSD Language English, Spanish, French
BT HID Built-in Yes
USB HID Support Yes
Page 35
2-26
2. Product specications
Item UN65KU630DFXZA
Additional Feature
Eco Feature
Power
Smart Evolution Support N/A
Teletext (TTX) N/A
Time Shift N/A
V-Chip Yes
MBR Support Yes
Ultra Clean View Yes
Energy Star Yes
Eco Sensor Yes
Energy Efciency Class N/A
Power Supply AC110-120V 50/60Hz
Power Consumption (Max) 250 W
Power Consumption (Stand-by) 0.3 W
Power Consumption (Typical) 75 W
Page 36
2-27
2. Product specications
Item UN70KU630DFXZA
General Information
Display
Video
Product LED
Series 6
Country UNITED STATES
Platform(TV) SoC | Jazz-L
Screen Size 70"
Resolution 3,840 × 2,160
Ultra Black N/A
Quantum Dot Display N/A
Ultra Clear Panel Yes
Screen Curvature N/A
10 bit Support N/A
Picture Engine UHD Up-Scaling
Motion Rate 120
PQI (Picture Quality Index) 1300
HDR (High Dynamic Range) HDR Premium
Dynamic Contrast Ratio Mega Contrast
Micro Dimming UHD Dimming
Audio
Precision Black (Local Dimming) N/A
Quantum Dot Color N/A
Active Crystal Color N/A
Wide Color Enhancer (Plus) N/A
PurColor Yes
Auto Depth Enhancer N/A
Contrast Enhancer Yes
Auto Motion Plus Yes
Film Mode Yes
Natural Mode Support Yes
Peak Illuminator N/A
Dolby Digital Plus Yes
DTS Codec Yes
Sound Output (RMS) 20W
Speaker Type 2CH(Down Firing w/Bass Reex)
Woofer N/A
Wallmount Sound Mode Yes
Multiroom Link Yes
TV SoundConnect Yes
BT Headset Support Yes
Page 37
2-28
2. Product specications
Item UN70KU630DFXZA
Smart TV
Smart Interaction
Convergence
Samsung SMART TV Yes
Apps Yes
Games Yes
Cloud Game Yes
Billing Yes
EXTRA Yes
TV Plus N/A
Automated Content Recognition (ACR) Yes
Skype™ on Samsung TV N/A
Web Browser Yes
Voice Recognition N/A
TV to Mobile - Mirroring Yes
Mobile to TV - Mirroring, DLNA Yes
Family Square with S-Cloud N/A
Together Play N/A
Easy Setup Yes
Samsung SMART View Yes
IoT Service
Tuner/Broadcasting
Connectivity
App Casting Yes
Wireless TV On - Samsung WOL Yes
Wired TV On - Samsung WOL Yes
Bluetooth Low Energy Yes
Brieng On TV Yes
RVU Yes
WiDi N/A
WiFi Direct Yes
TV as Hub Support N/A
TV as Things Support Yes
IoT Client Application N/A
Digital Broadcasting ATSC
Analog Tuner Yes
HDMI 3
USB 2
Component In (Y/Pb/Pr) 1
Composite In (AV) 1(Common Use for Component Y)
Ethernet (LAN) Yes
Headphone N/A
Audio Out (Mini Jack) N/A
Digital Audio Out (Optical) 1
Page 38
2-29
2. Product specications
Item UN70KU630DFXZA
Connectivity
Design
Additional Feature
RF In (Terrestrial / Cable input / Satellite input) 1/1(Common Use for Terrestrial)/0
Ex-Link ( RS-232C ) N/A
CI Slot N/A
Scart N/A
MHL N/A
HDMI A / Return Ch. Support Yes
HDMI Quick Switch Yes
Wireless LAN Adapter Support N/A
Wireless LAN Built-in Yes
Anynet+ (HDMI-CEC) Yes
Design JU6000 Concept modied
Bezel Type VNB
Slim Type Slim
Front Color Dark Titan
Light Effect (Deco) N/A
Stand Type Y-Shape
Swivel (Left/Right) N/A
Samsung 3D N/A
Instant On Yes
Processor Quad-Core
SCSA Support N/A
Accessibility Voice Guide/Enlarge/High Contrast
Digital Clean View Yes
One Connect (Jack) N/A
Auto Channel Search Yes
Auto Power Off Yes
BD Wise Plus N/A
Caption (Subtitle) Yes
Channel List USB-Clone N/A
Connect Share™ (HDD) Yes
ConnectShare™ (USB 2.0) Yes
Embeded POP Yes
EPG Yes
Extended PVR N/A
Game Mode Yes
OSD Language English, Spanish, French
BT HID Built-in Yes
USB HID Support Yes
Page 39
2-30
2. Product specications
Item UN70KU630DFXZA
Additional Feature
Eco Feature
Power
Smart Evolution Support N/A
Teletext (TTX) N/A
Time Shift N/A
V-Chip Yes
MBR Support Yes
Ultra Clean View Yes
Energy Star Yes
Eco Sensor Yes
Energy Efciency Class N/A
Power Supply AC110-120V 50/60Hz
Power Consumption (Max) 285 W
Power Consumption (Stand-by) 0.3 W
Power Consumption (Typical) 95 W
Page 40
2-31
2. Product specications
2-3. NEW Key Features
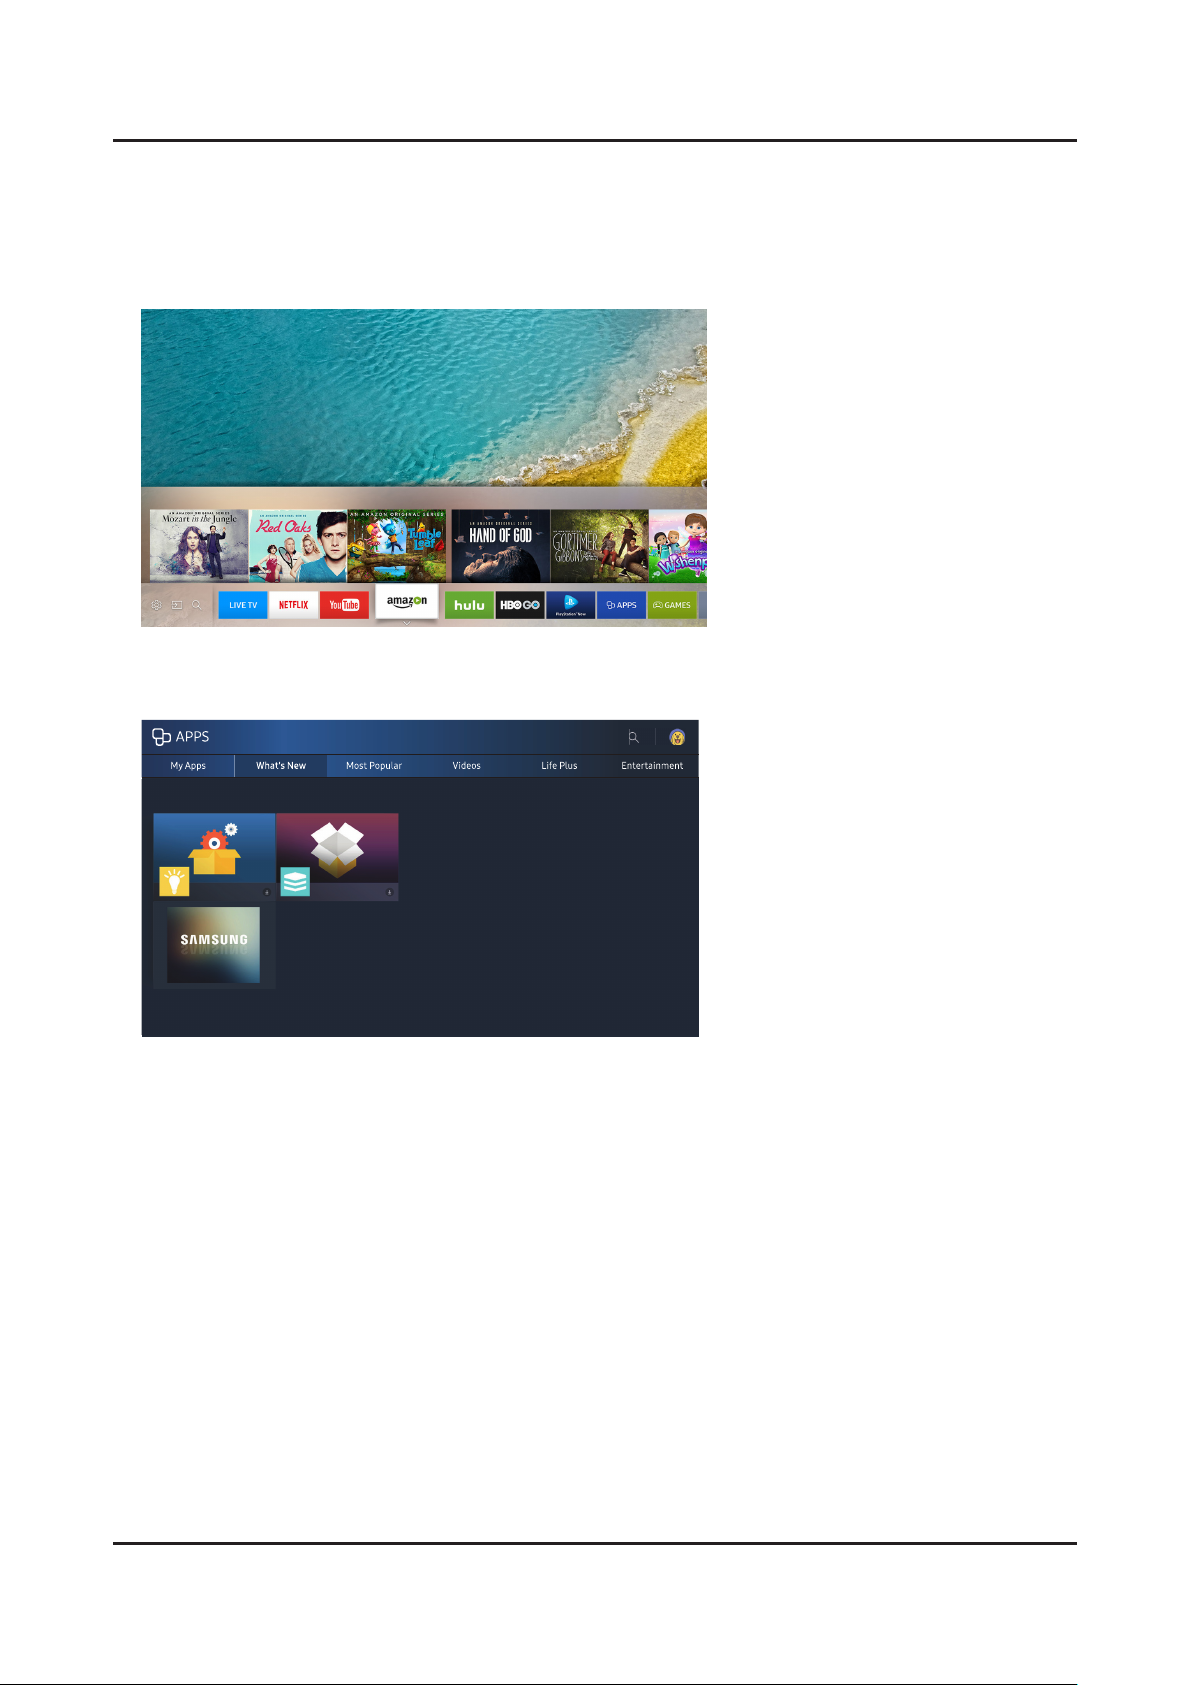
2-3-1. 16" New UI
Smart Hub
APPS Service
Page 41
2-32
2. Product specications
G
2-4. Smart Control
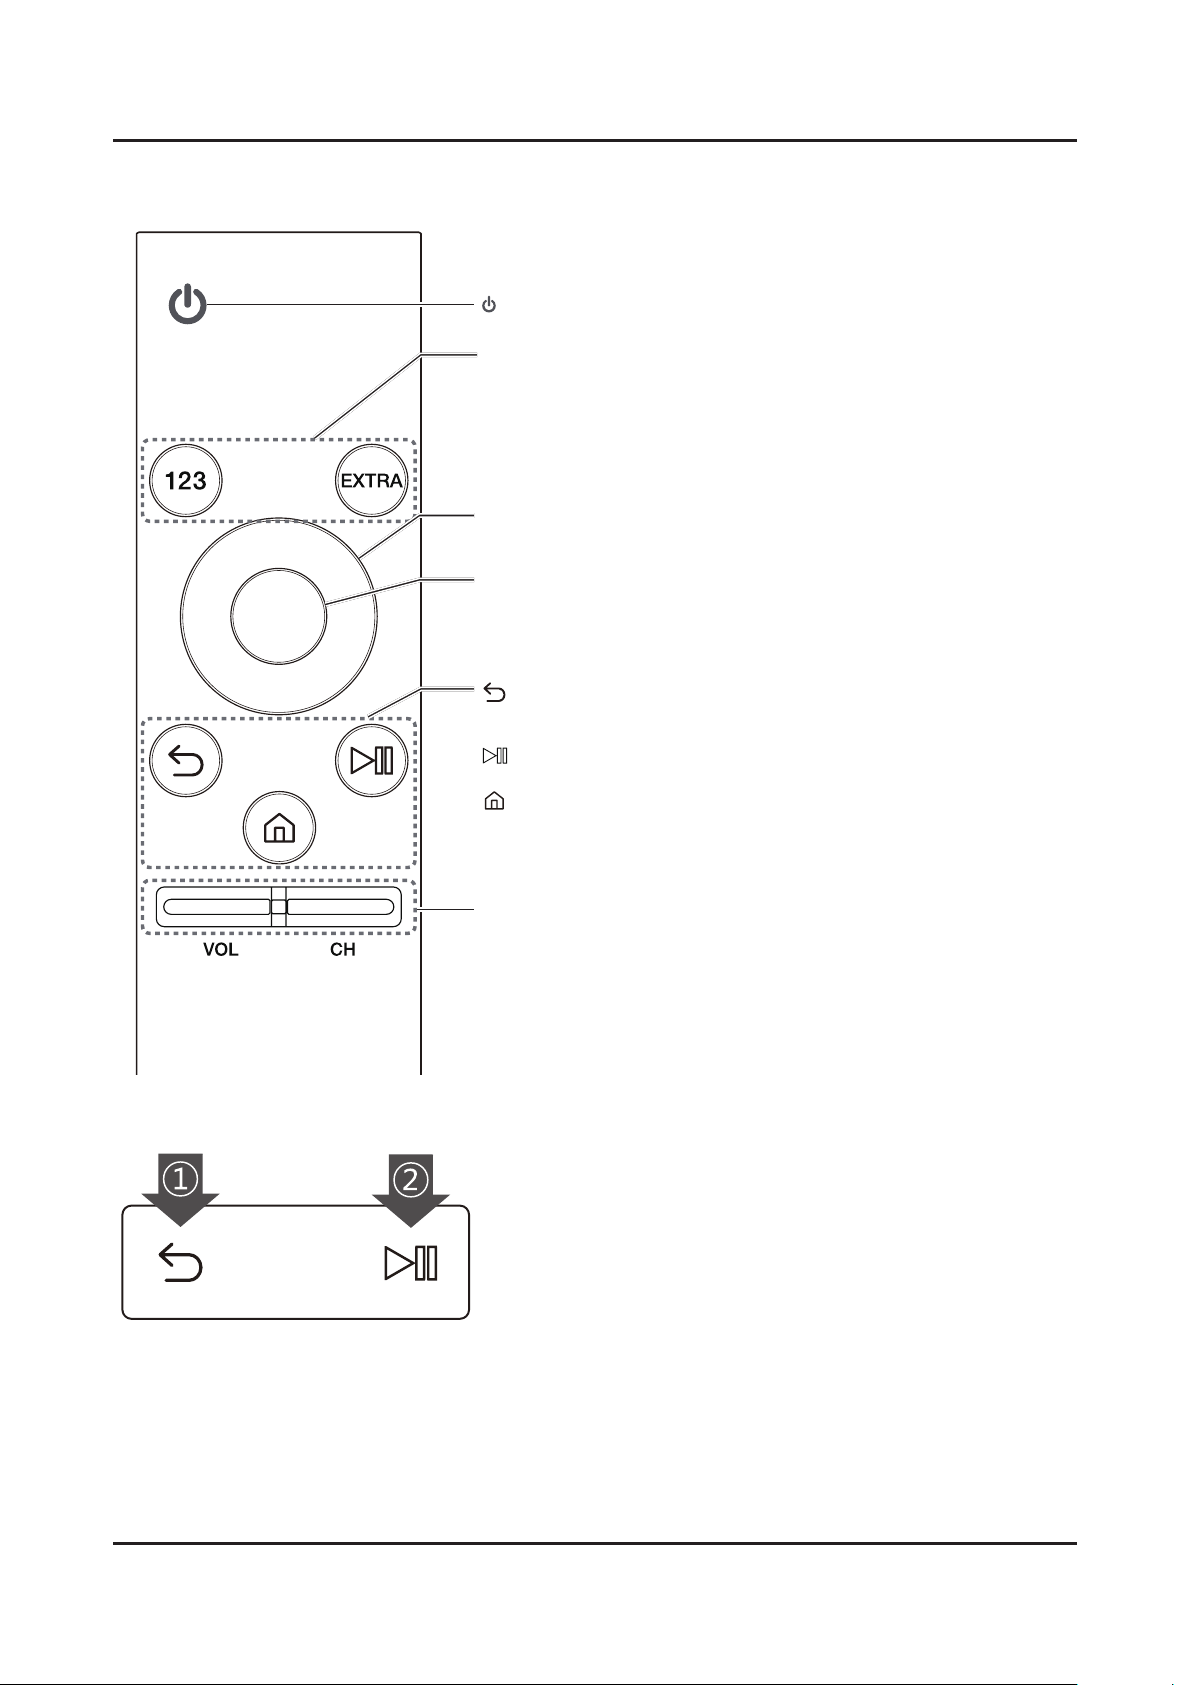
(Power): Press to turn the TV on or off.
123
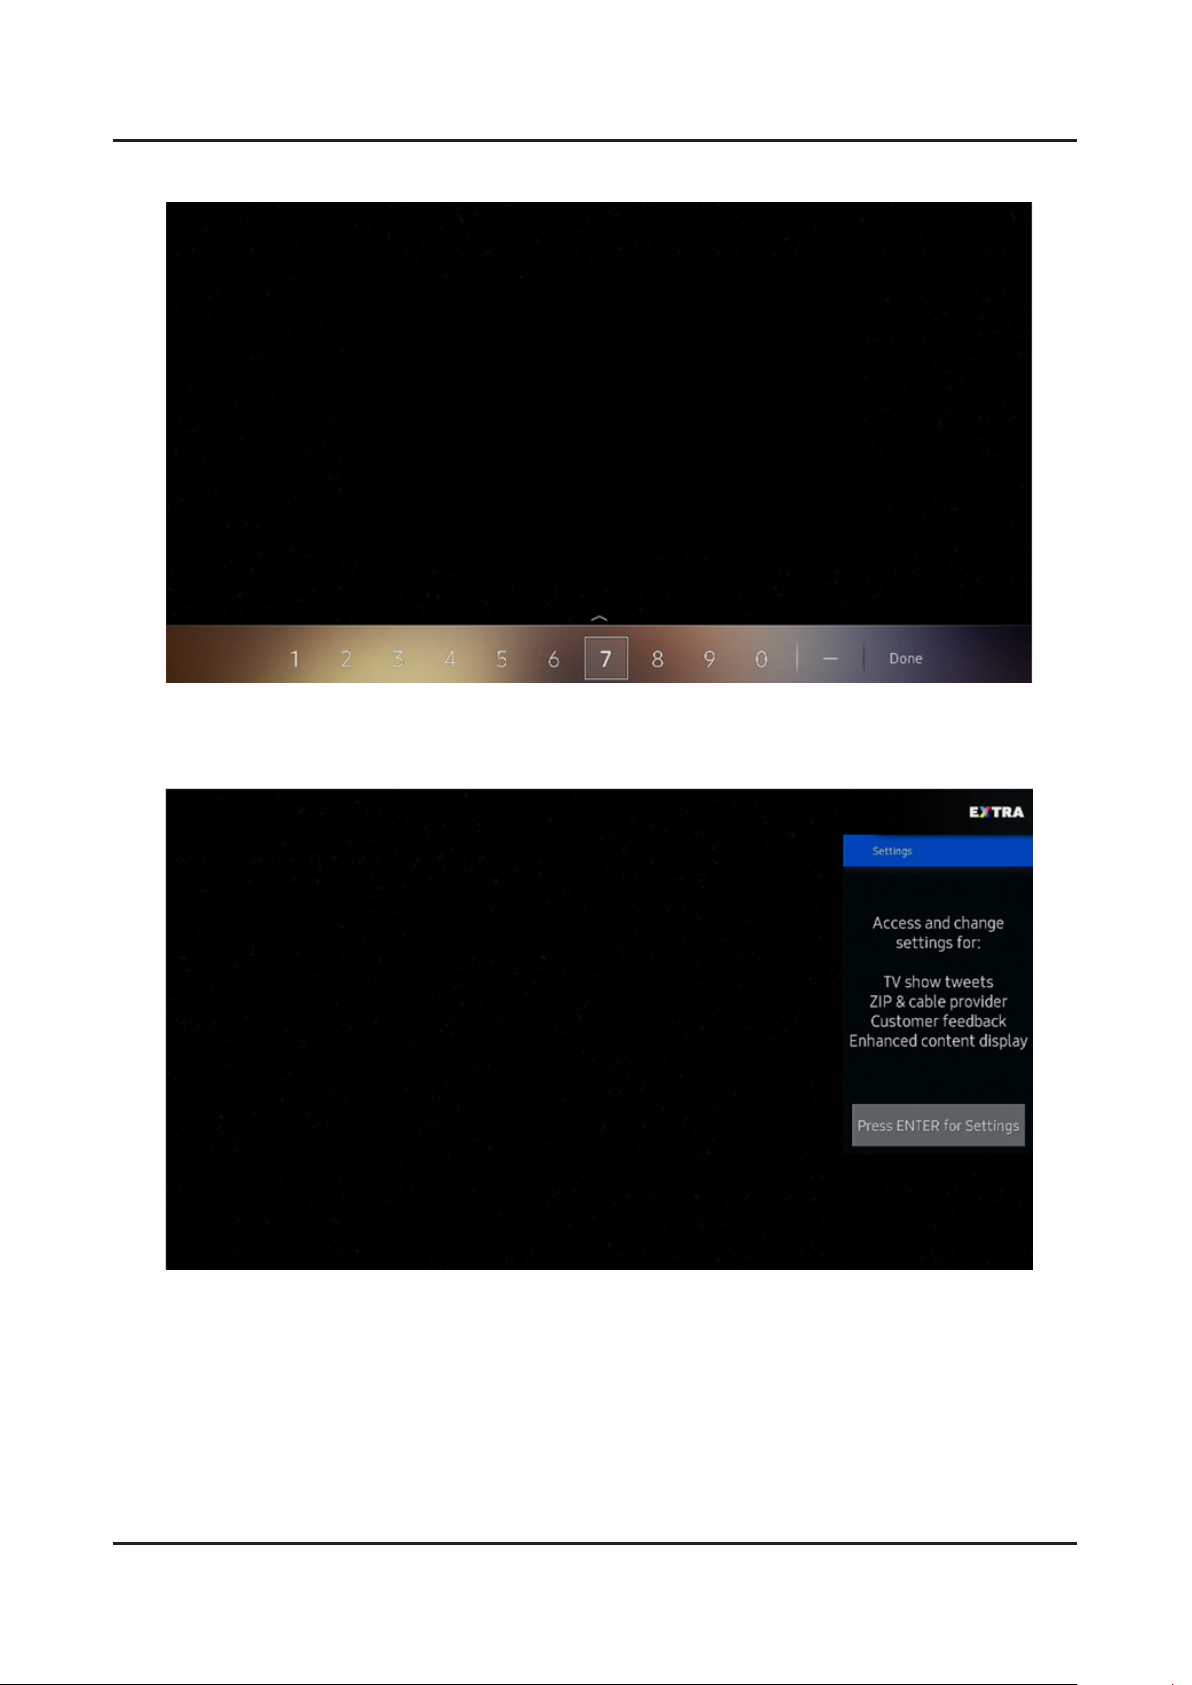
(Number pad): When pressed, a number strip appears on the bottom of the screen.
Select numbers and then select Done to enter a numeric value. Use to change the
channel, enter a PIN, enter a ZIP code, etc.
EXTRA
provider.
: While watching content, press to display extra information from the content
Directional pad (up/down/left/right): Moves the focus and changes the
values seen on the TV's menu.
Select: Selects or runs a focused item. When pressed while you are
watching content, detailed program information appears. When pressed
again, you can select or run any of the functions displayed.
(Return): Returns to the previous menu. When pressed for 1 second or more, the
running function is terminated. When pressed while you are watching a program, the
previous channel appears.
(Play/pause): When pressed, the playback controls appear. Using these controls,
you can control the media content that is playing.
(Smart hub): Returns to the Home Screen.
VOL
(Volume): Move the button up or down to adjust the volume. To mute the sound,
press the button. When pressed for 1 second or more, the Accessibility Shortcuts menu
appears.
CH
(Channel): Move the button up or down to change the channel. To see the Guide
screen, press the button.
Pairing the TV to the Samsung Smart Control
When you turn on the TV for the rst time, the Samsung Smart Control
pairs to the TV automatically. If the Samsung Smart Control does not pair
to the TV automatically, point it at the remote control sensor of the TV,
and then press and hold the buttons labeled 1 and 2 in the gure on the
left simultaneously for 3 seconds or more.
Page 42
2-33
2. Product specications
2-4-1. 123 Key
2-4-2. EXTRA Key
Page 43

2-34
2. Product specications
2-6. HDMI Color
2-6-1. HDMI UHD Color
When you set the HDMI connection to On, the TV turns off and then on automatically.•
The HDMI connection with HDMI UHD Color set to Off supports up to UHD 50P/60P 4:2:0 input signals, while the •
HDMI connection with HDMI UHD Color set to On supports up to UHD 50P/60P 4:4:4 and 4:2:2 input signals. For
more information, refer to "Supported Resolutions for UHD Input Signals.
Each HDMI connection can be individually optimized for HDMI UHD Color. When you connect the TV to an external •
device that supports only the UHD 24 or 30 Hz frequency or any FHD frequency, the HDMI UHD Color function may
not be available. In this case, set HDMI UHD Color to Off.
2-6-2. HDMI Black Level
This function is only available when the input signal, connected to the TV via an HDMI connector, is set to RGB444.•
Page 44
2-35
2. Product specications
2-7. Supported Formats
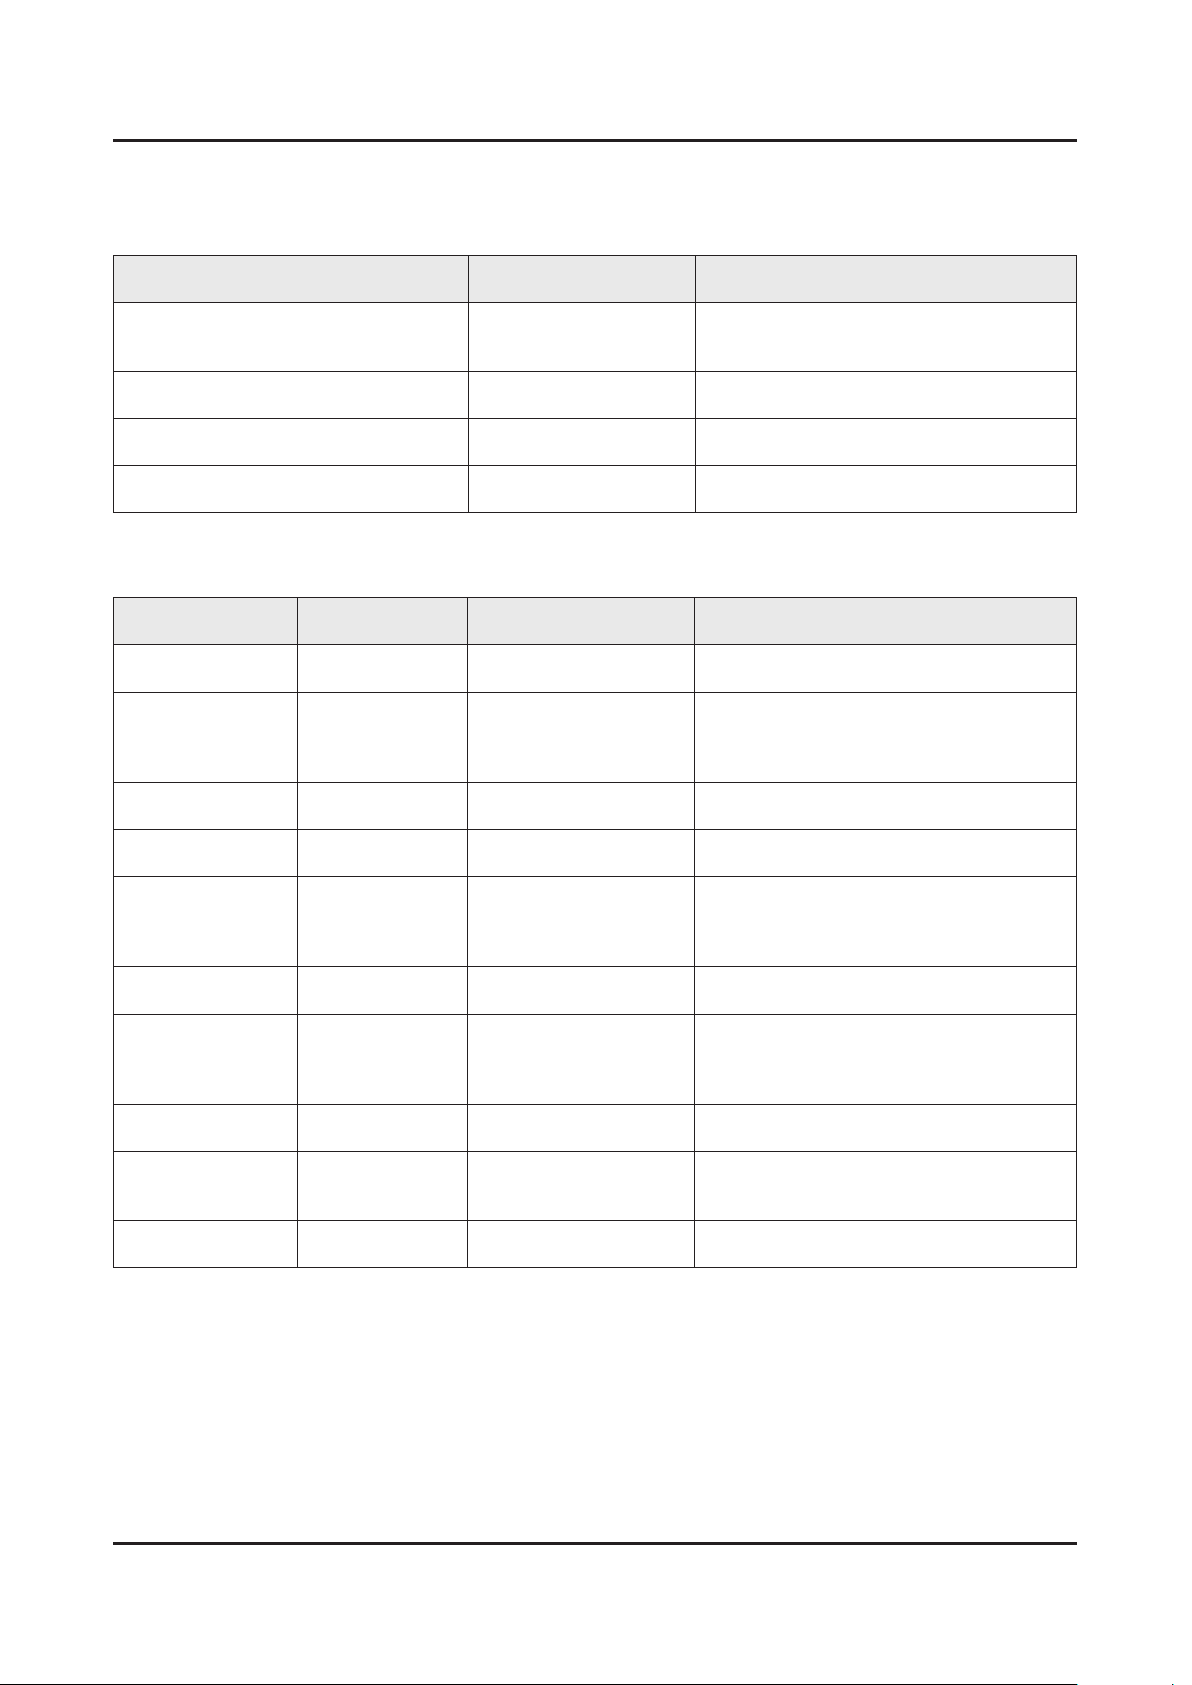
2-7-1. Supported image formats and resolutions
File Extension Type Resolution
*.jpg
*.jpeg
*.png PNG 4096x4096
*.bmp BMP 4096x4096
*.mpo MPO 15360x8640
JPEG 15360x8640
2-7-2. Supported music formats and codecs
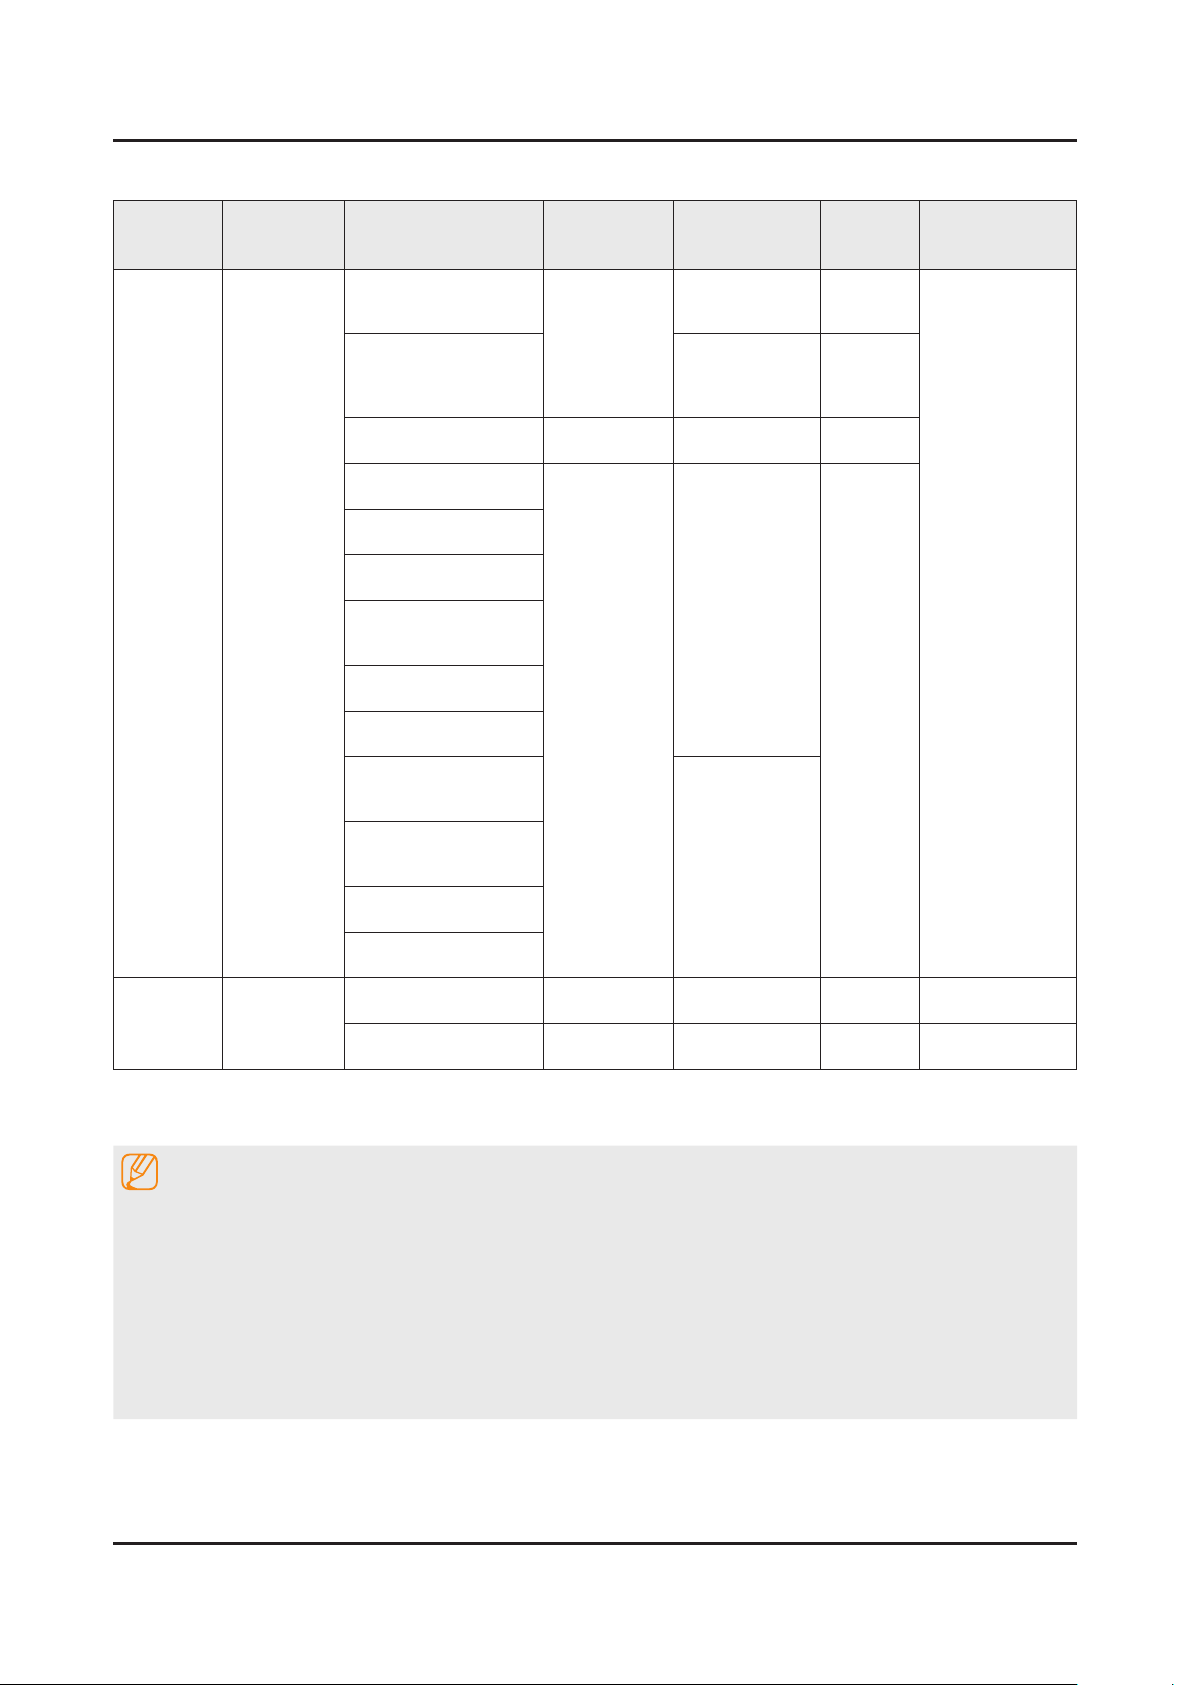
File Extension Type Codec Note
*.mp3 MPEG MPEG1 Audio Layer 3 -
*.m4a
*.mpa
*.aac
*.ac FLAC FLAC Supports up to two channels.
*.ogg OGG Vorbis Supports up to two channels.
*.wma WMA WMA
MPEG4 AAC
WMA 10 Pro supports up to 5.1 channels.
WMA lossless audio is not supported.
Supports up to M2 prole.
*.wav wav wav
*.mid
*.midi
*.ape ape ape
*.aif
*.aiff
*.m4a ALAC ALAC
midi midi
AIFF AIFF
Supports type 0 and type 1.
Seek is not supported.
Supports USB device only.
Page 45
2-36
2. Product specications
2-7-3. Supported video codecs
File
Formats
*.avi
*.mkv
*.asf
*.wmv
*.mp4
*.mov
*.3gp
*.vro
*.mpg
*.mpeg
*.ts
*.tp
*.trp
*.mov
*.v
*.vob
*.svi
*.m2ts
*.mts
*.divx
Container Video Codecs Resolution
H.264 BP/MP/HP
4096 x 2160
1920x1080
AVI
MKV
ASF
MP4
3GP
MOV
FLV
VRO
VOB
PS
TS
SVAF
HEVC (H.265 - Main,
Main10,
Main4:2:2 10)
Motion JPEG 3584 x 2160 30 80
MVC
DivX 3.11 / 4 / 5 / 6
MPEG4 SP/ASP
Window Media Video v9
(VC1)
MPEG2
MPEG1
Microsoft MPEG-4 v1,
v2, v3
Frame rate
(fps)
4096 x 2160: 30
3840 x 2160: 60
60 80
60
Bit rate
(Mbps)
60
20
Audio Codec
Dolby Digital
LPCM
ADPCM(IMA, MS)
AAC
HE-AAC
WMA
Dolby Digital Plus
MPEG(MP3)
DTS(Core, LBR)
G.711(A-Law,
μ-Law)
*.webm WebM
Other Restrictions
NOTE
Codecs may not function properly if there is a problem with the content data.•
Video content does not play or does not correctly if there is an error in the content or container.•
Sound or video may not work if they have standard bit rates/frame rates above the TV's compatibility.ratings•
If the Index Table is wrong, the Seek(Jump) function does not work.•
When playing video over a network connection, the video may not play smoothly because of datatransmission •
speeds.
Some USB/digital camera devices may not be compatible with the player.•
HEVC codec is only available in MKV / MP4 / TS containers.•
Window Media Video v7
(WMV1), v8 (WMV2)
H.263 Sorrenson
VP6
VP8 1920 x 1080 60 20 Vorbis
VP9 4096 x 2160 4096 x 2160: 60 40
30
Page 46
2-37
2. Product specications
2-8. Accessories
NOTE
The items’ colors and shapes may vary depending on the model.•
Cables not included in the package contents can be purchased separately.•
The part code for some accessories may differ depending on your region.•
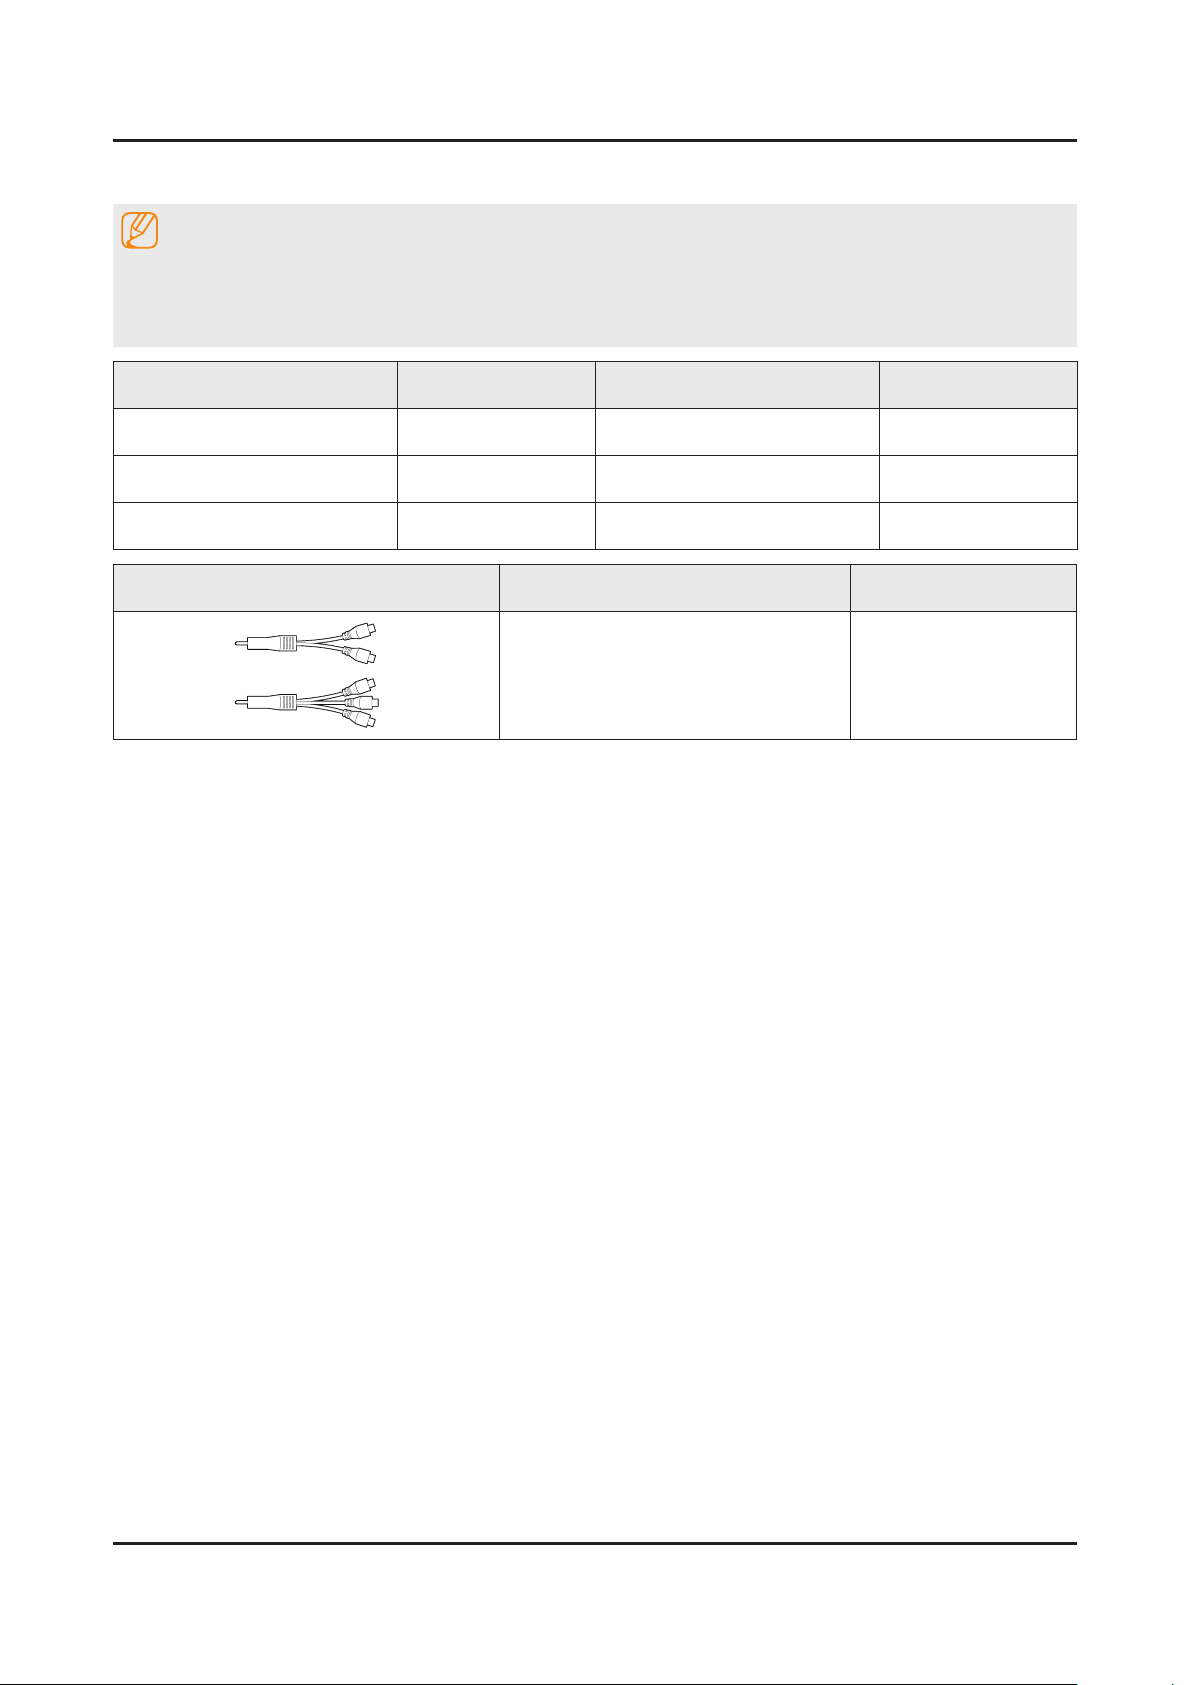
Product Code. No Product Code. No
Smart Touch Control• BN59-01260A User Manual• BN68-07842E
Batteries (AA x 2)• 4301-000101 Regulatory Guide• BN68-04972E
Power Cord• 3903-001117
Image Product Code. No
COMPONENT IN / AV IN Adapter•
BN39-02189A
BN39-02190A
Page 47
3. Disassembly and Reassembly
Disconnect the LED TV from the power source before disassembly.1.
Follow these directions carefully; never use metal instruments to pry apart the cabinet.2.
CAUTION
3-1. Disassembly and Reassembly
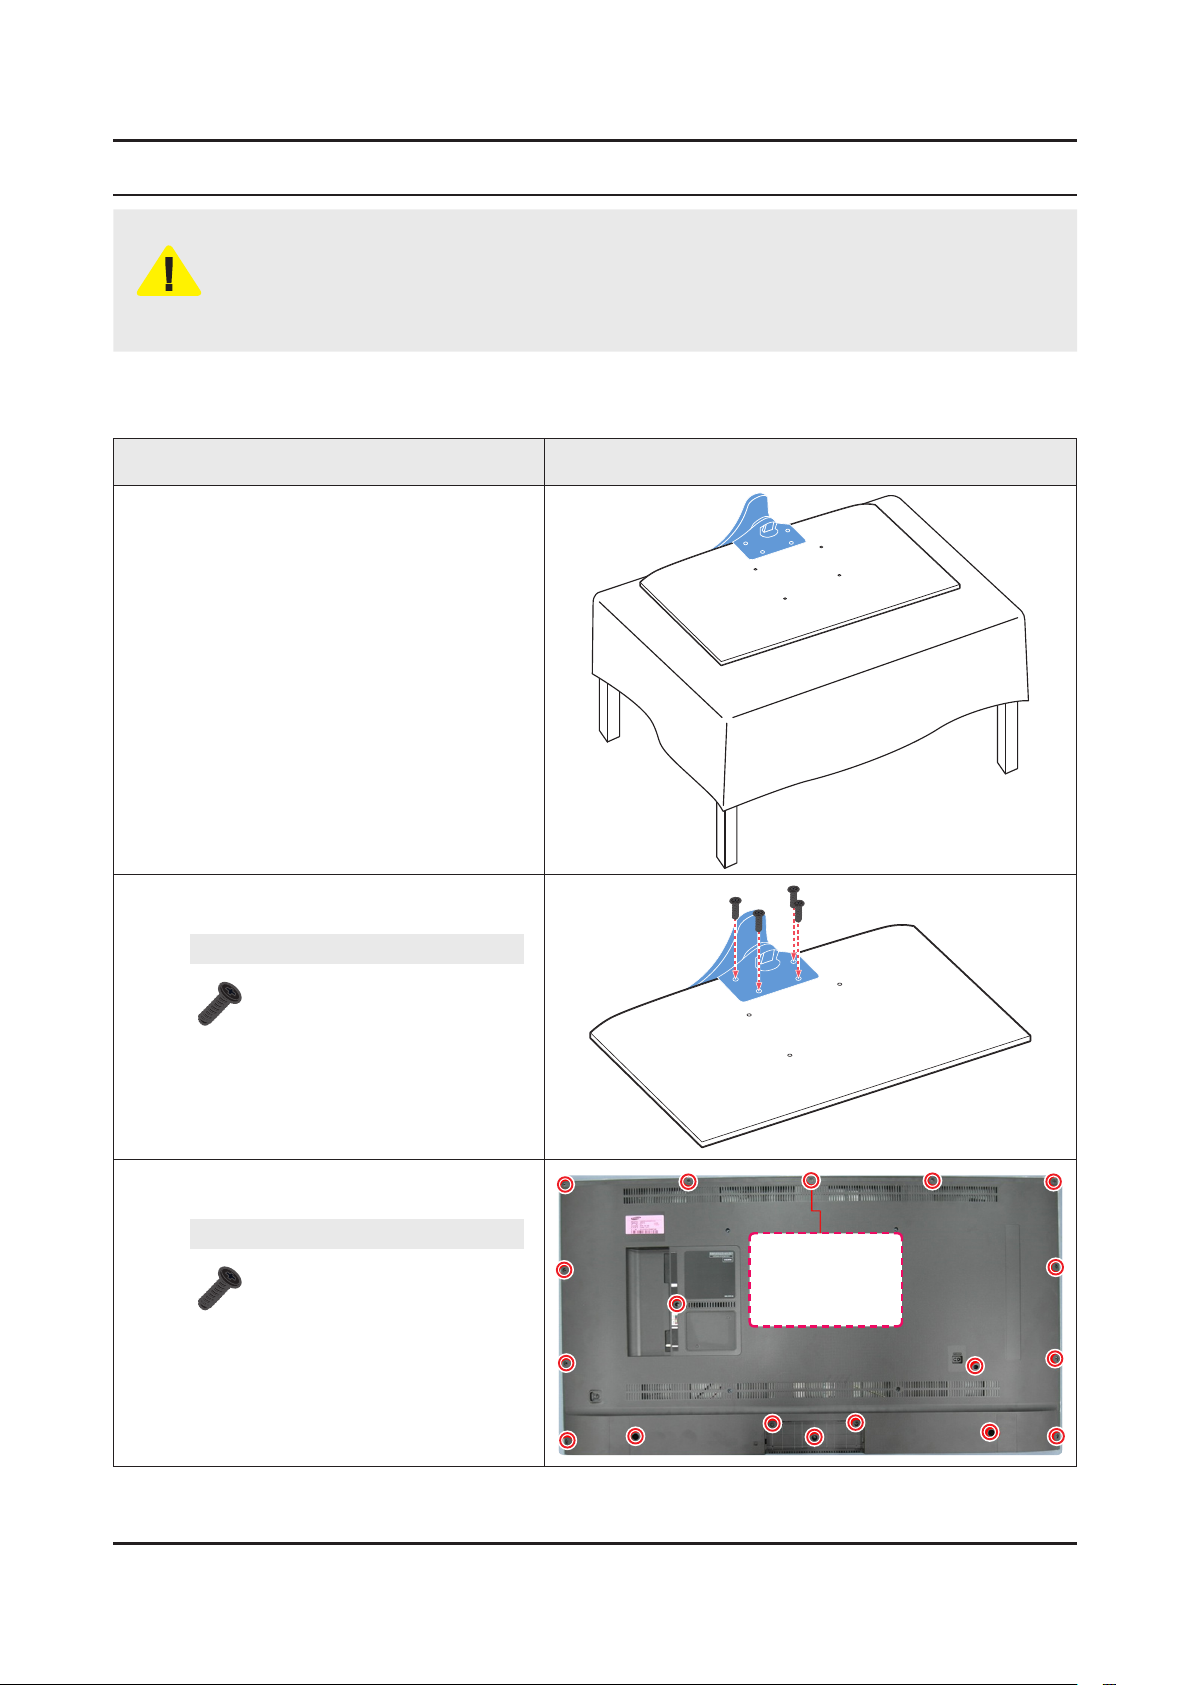
Carefully position the TV so that the screen
1
is facing downwards. Make sure to place
the TV upon a soft cushion or any material
that will prevent damage to the screen.
Recommend Torque : 22.0 ~ 26.5lbf -
A strength of Torque can be changed depending on the situation.•
Description Picture Description
3. Disassembly and Reassemble
Remove the screws connecting the stand
2
to the TV. Then carefully remove the stand.
Screws
6902-002474 x 4EA
TORQUE : 22.0 ~ 26.5lbf
Remove the screws for the 'Rear Cover'.
3
Then carefully remove the 'Rear Cover'.
Screws
6001-002755 x 17EA
TORQUE : 22.0 ~ 26.5lbf
6003-001782 x 1EA
TORQUE : 22.0 ~ 26.5lbf
C/R+PANEL : 16EA
C/R+MAIN : 1EA
C/R+SMPS : 1EA
TORQUE : 22.0~26.5 lbf
3-1
Page 48
3-2
3. Disassembly and Reassemble
Description Picture Description
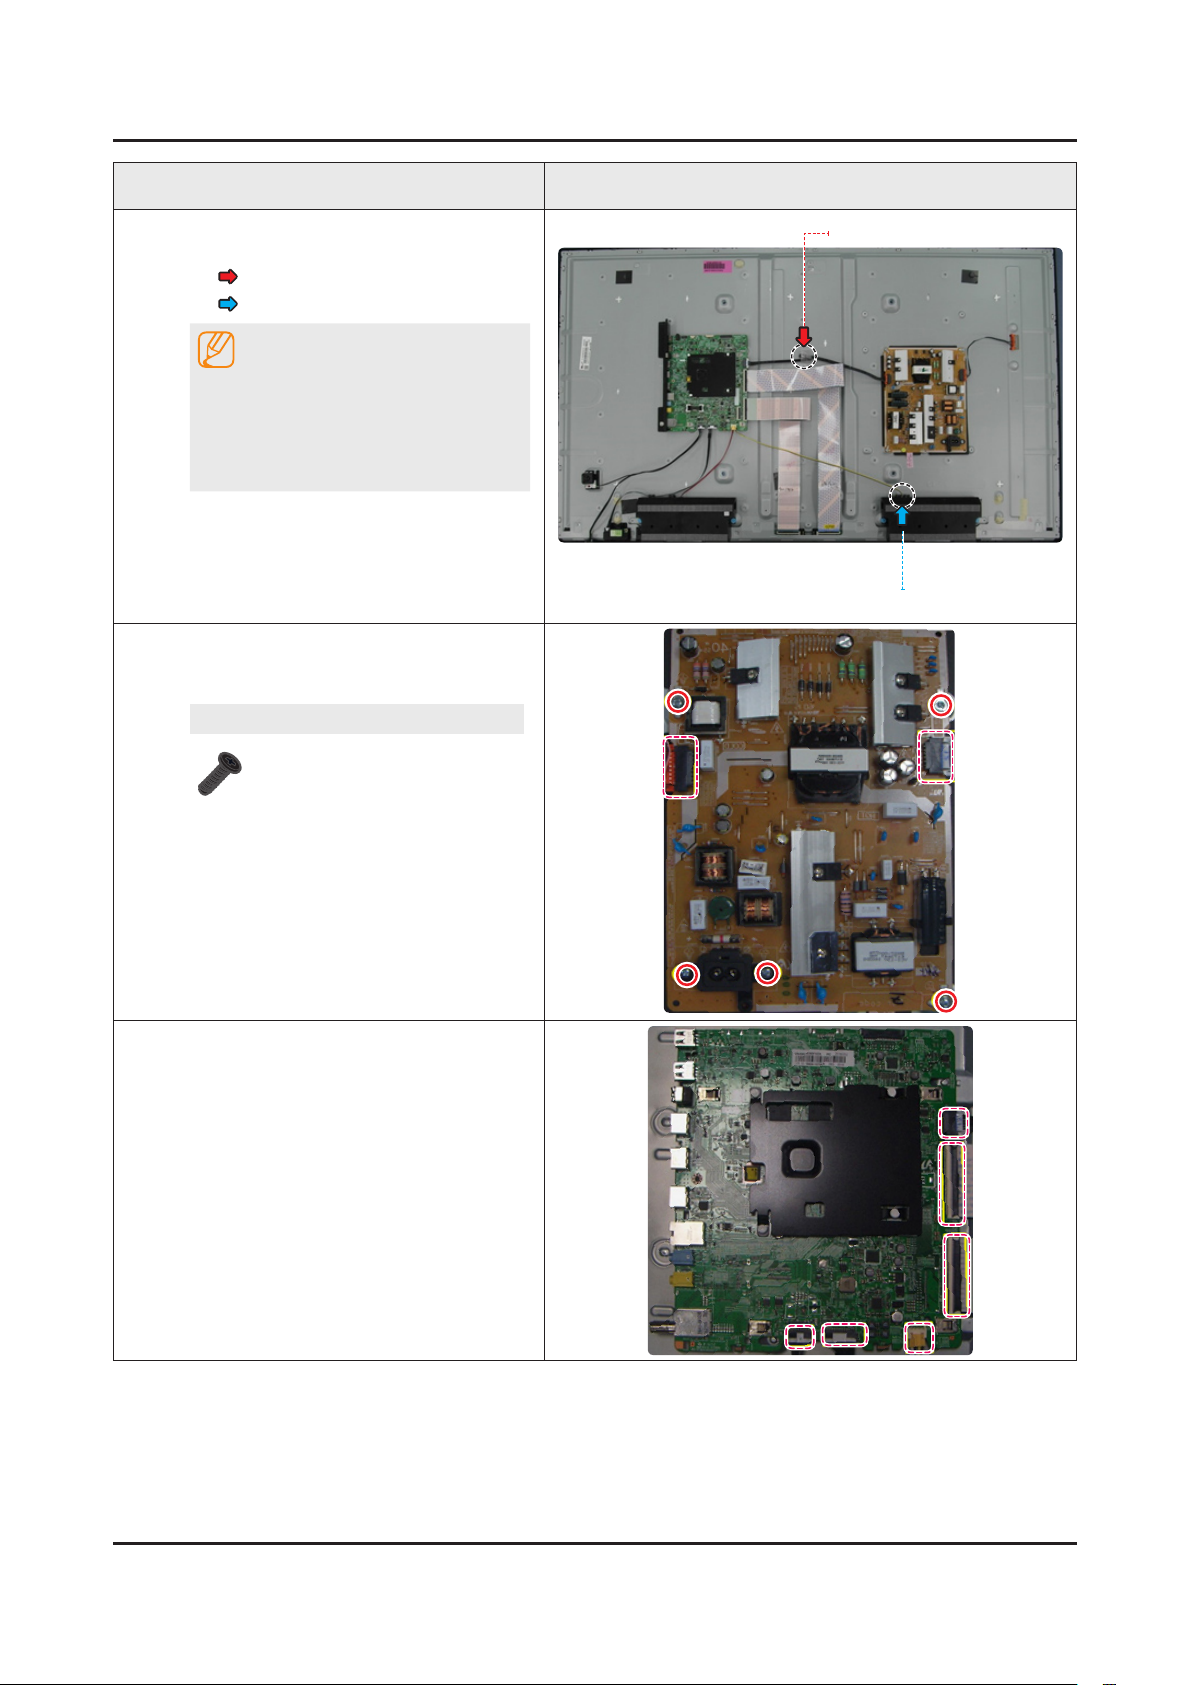
Remove the Electric tapes shown on the
4
images.
• Filament Tape
• Dressing
NOTE
When assembling the TV, the electric
tapes must be applied on the same
locations. Please remember to take a
pictureofwherethetapeswererst
applied.
Remove the 'Lead Connectors' and screws
5
from the SMPS unit Then carefully remove
the SMPS unit.
Screws
6001-003016 5EA
TORQUE : 22.0 ~ 26.5lbf
Filament Tape
Dressing
Remove the cables from the 'TV Board'.
6
Page 49
3-3
3. Disassembly and Reassemble
Description Picture Description
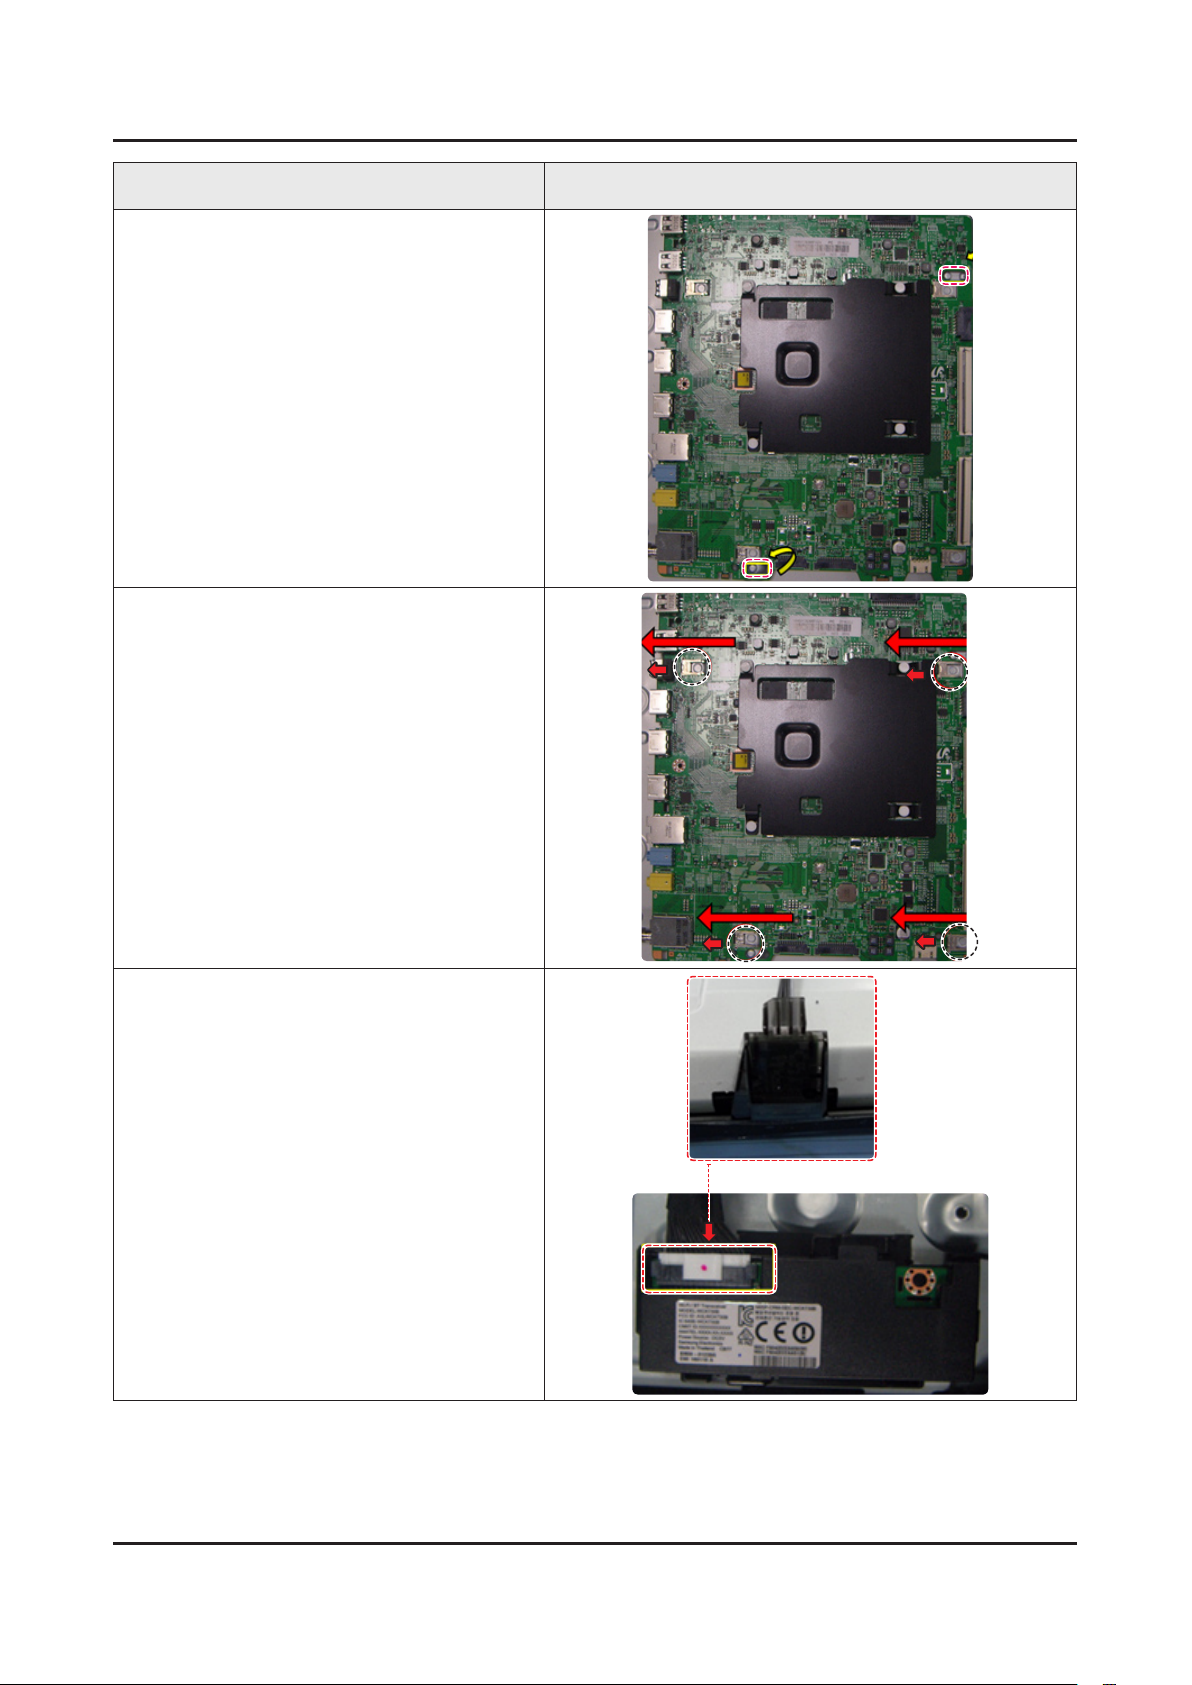
Use both hands to hold the 'Main Board'
7
and gently lift up 2 point marked.
Slide the board to the Left side to release
8
the board.
Then carefully remove the 'TV Board'.
Remove the BT/WIFI and IR unit.
9
Page 50
3. Disassembly and Reassemble
Description Picture Description
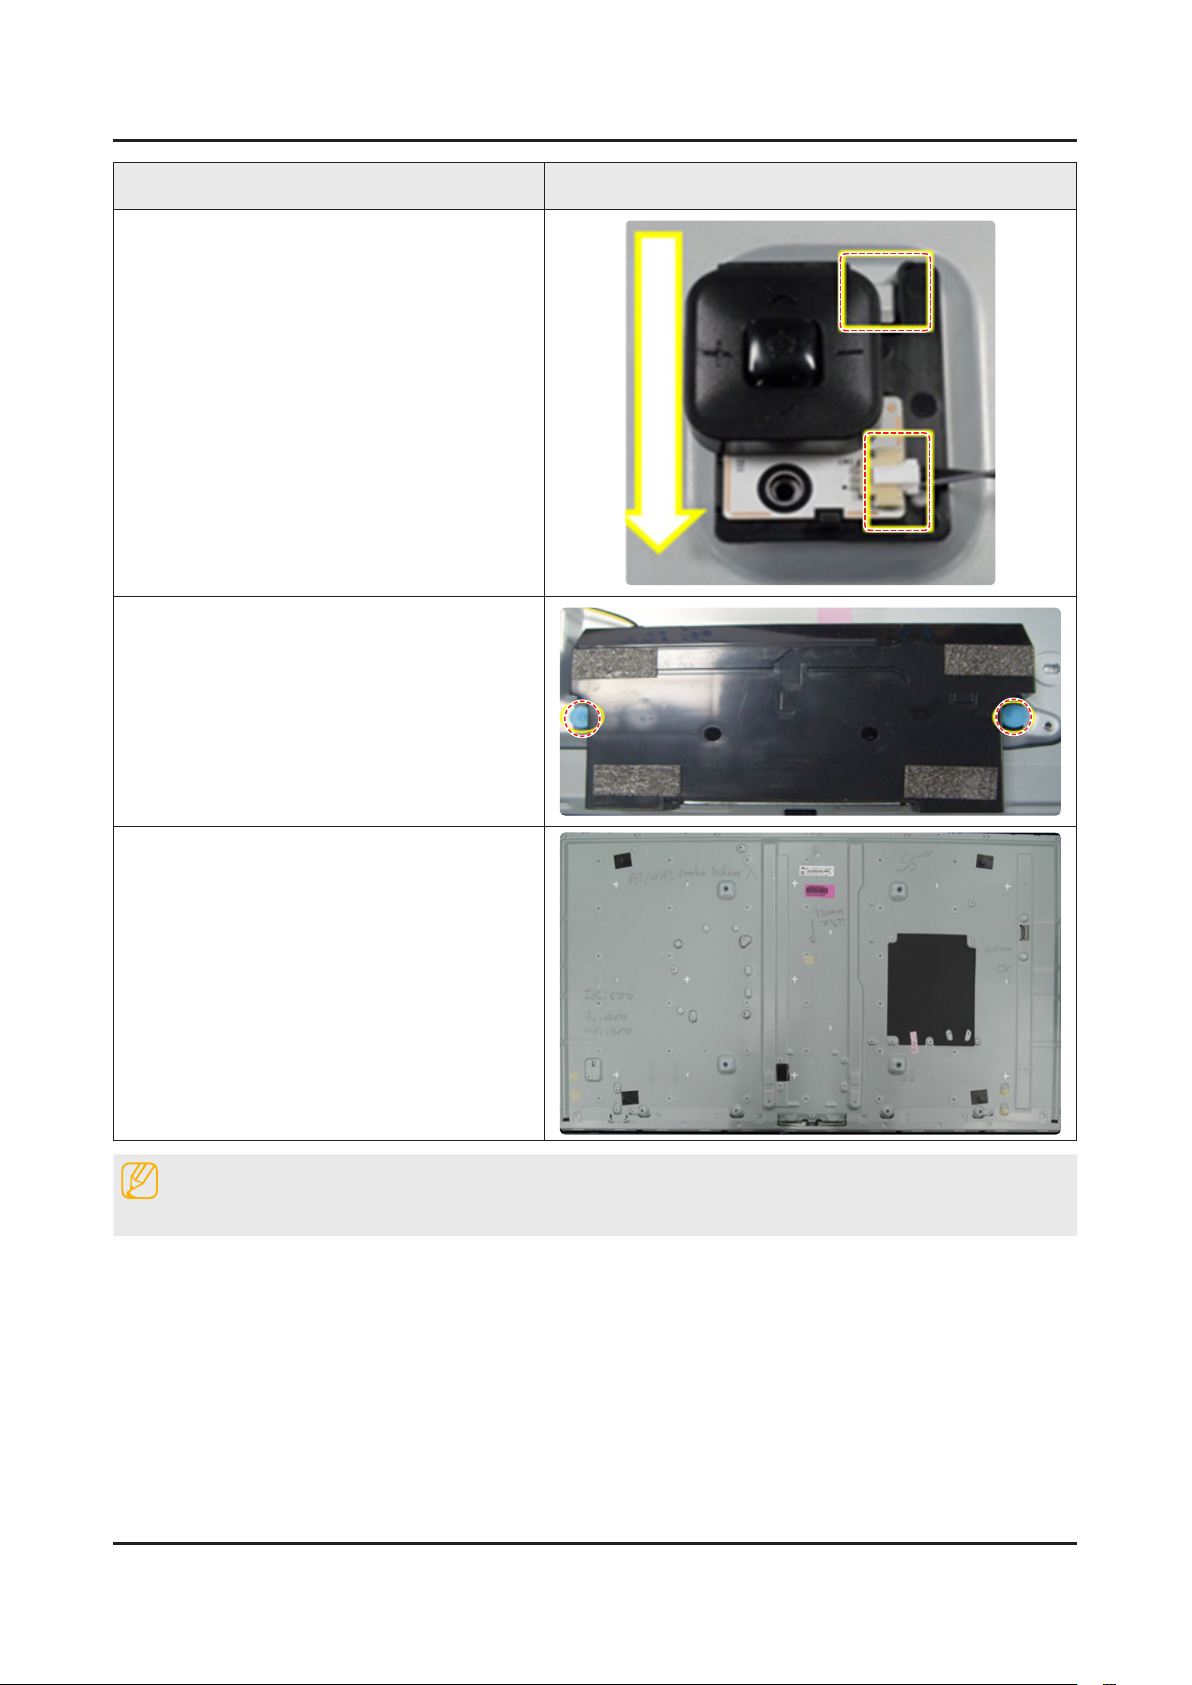
10
11
Remove the JOG unit.
Lastly, remove the speakers on both side.
* Panel
- Rear Side
NOTE
Reassembly procedures are in the reverse order of disassembly procedures.
3-4
Page 51
4. Troubleshooting
4-1. Previous Check
Check list for initial operation
Check the various cable connections rst.1.
Check to see if there is a burnt or damaged cable. Check to see if there is a disconnected or loose cable connection. -
Check to see if the cables are connected according to the connection diagram. Check the power input to the Main Board.2.
How to distinguish if the problem is caused by Main Board or T-CON Board.3.
No Video -
4. Troubleshooting
Symptom
Check Points Replace the T-CON Board.•
Distorted Picture : -
Check Points Check the inner patterns.•
I f the problem is No Video but BLU is on and Indication LED is blinking repeatedly and faster
than nomal booting.
4-1
Page 52

4-2
4. Troubleshooting
4-2. How to Check Fault Symptom
4-2-1. Power
TV POWER STANDBY
TV in Standby1.
Standby LED Indicator √
If Not Lit:2.
AC 120Vac Line √
If missing:3.
120Vac Source and Power Cord √
If OK:4.
Resistance on SMPS √ Fuse after rst removing AC power cord.
If fusses are open replace SMPS.5.
If fuses are OK:6.
√ Standby: A13V (Always On) to Main Board. Should all be approx. 9 VDC
If any missing remove the SMPS connector to Main Board .7.
Standby A13V again for 9VDC. √
If OK replace - Main Board.
If still missing replace - SMPS.
Page 53
4-3
4. Troubleshooting
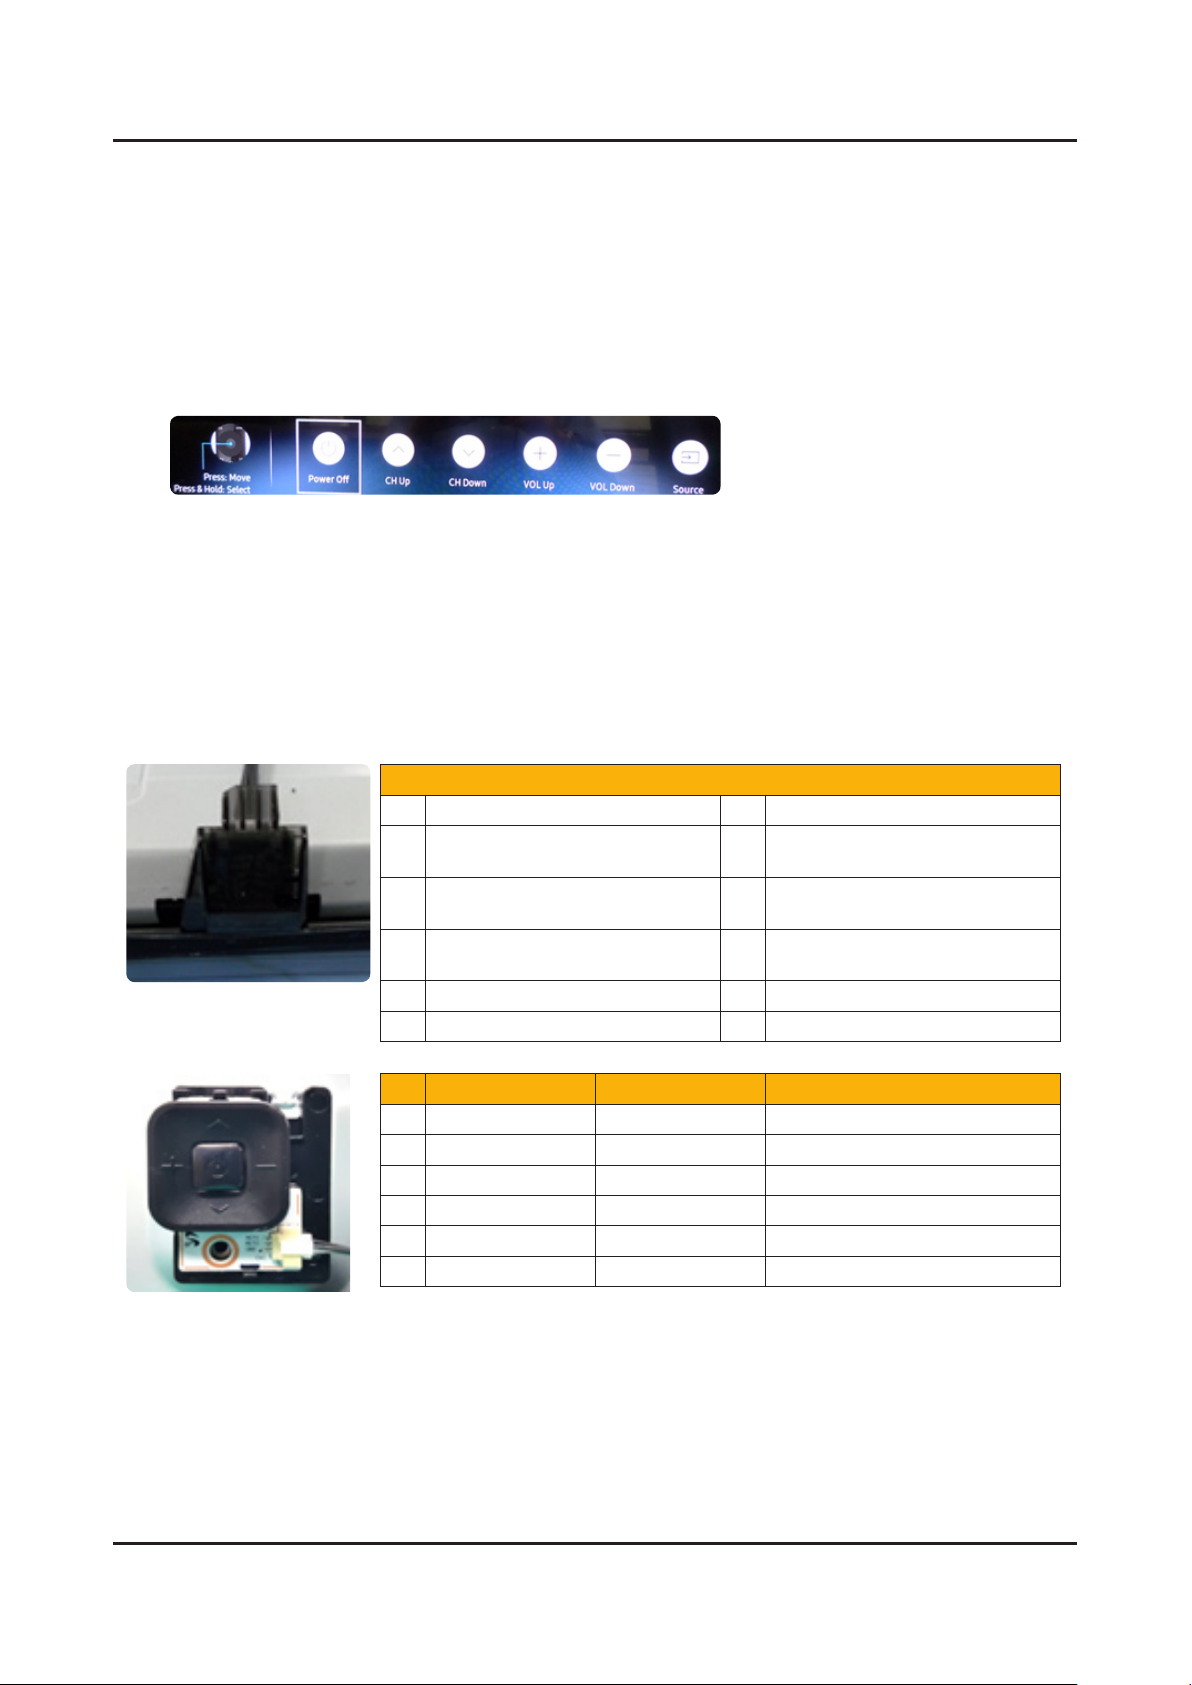
FUNCTION/IR Control
TV in Standby 1.
LED Status √
If 2. LED is OFF
LED 1.7Vdc (pin 8)and VCC for 3.3Vdc √
If missing suspect Function Assy/Cable/Main board.•
If 3. LED is ON
Switch Operation activates on screen display. √
<On Screen Selections with Function Control>
If missing:
Check the STBY voltage from SMPS to Main Board. If STBY is OK suspect 1. Main Board.
Check Jog Shuttle 5 SW Operation (2. Key 1 & Key 2) for command changes. If incorrect suspect a stuck Jog switch
which also holds data to Main preventing operation.
Check 3. SDA, SCL for effective 3.3Vdc (after power on)
Check 4. IR with Standard Remote command changes. (3.3V to 2.5V effective DC)
<Function/IR>
<Jog Function Switch>
CN1101 (FUNCTION/IR)
1 IR 3.3Vdc to 2.5Vdc (Effective DC) 2 GND
3 A3.3V_PW 4
AMP_SDA_I2C 3.3 Vdc (effective
5
KEY_INPUT2 1.8Vdc to command
7
9 N/C 10 N/C
11 N/C 12 N/C
P CMD Signal DC Voltage
1 Center Key 1 1.8V to 0 Vdc
2 Vol+ Key 2 1.8V to 1.0 Vdc
2 Vol- Key 2 1.8V to 1.5 Vdc
2 CH+ Key 2 1.8V to 0 Vdc
2 CH- Key 2 1.8V to 0.6 Vdc
3 GND
DC)
Voltage
AMP_SCL_I2C 3.3Vdc (effective
DC)
KEY_INPUT1 1.8dc to 0V with
6
8 LED_STB_OUT 1.7Vdc STBY
PWR On command
Page 54
4-4
4. Troubleshooting
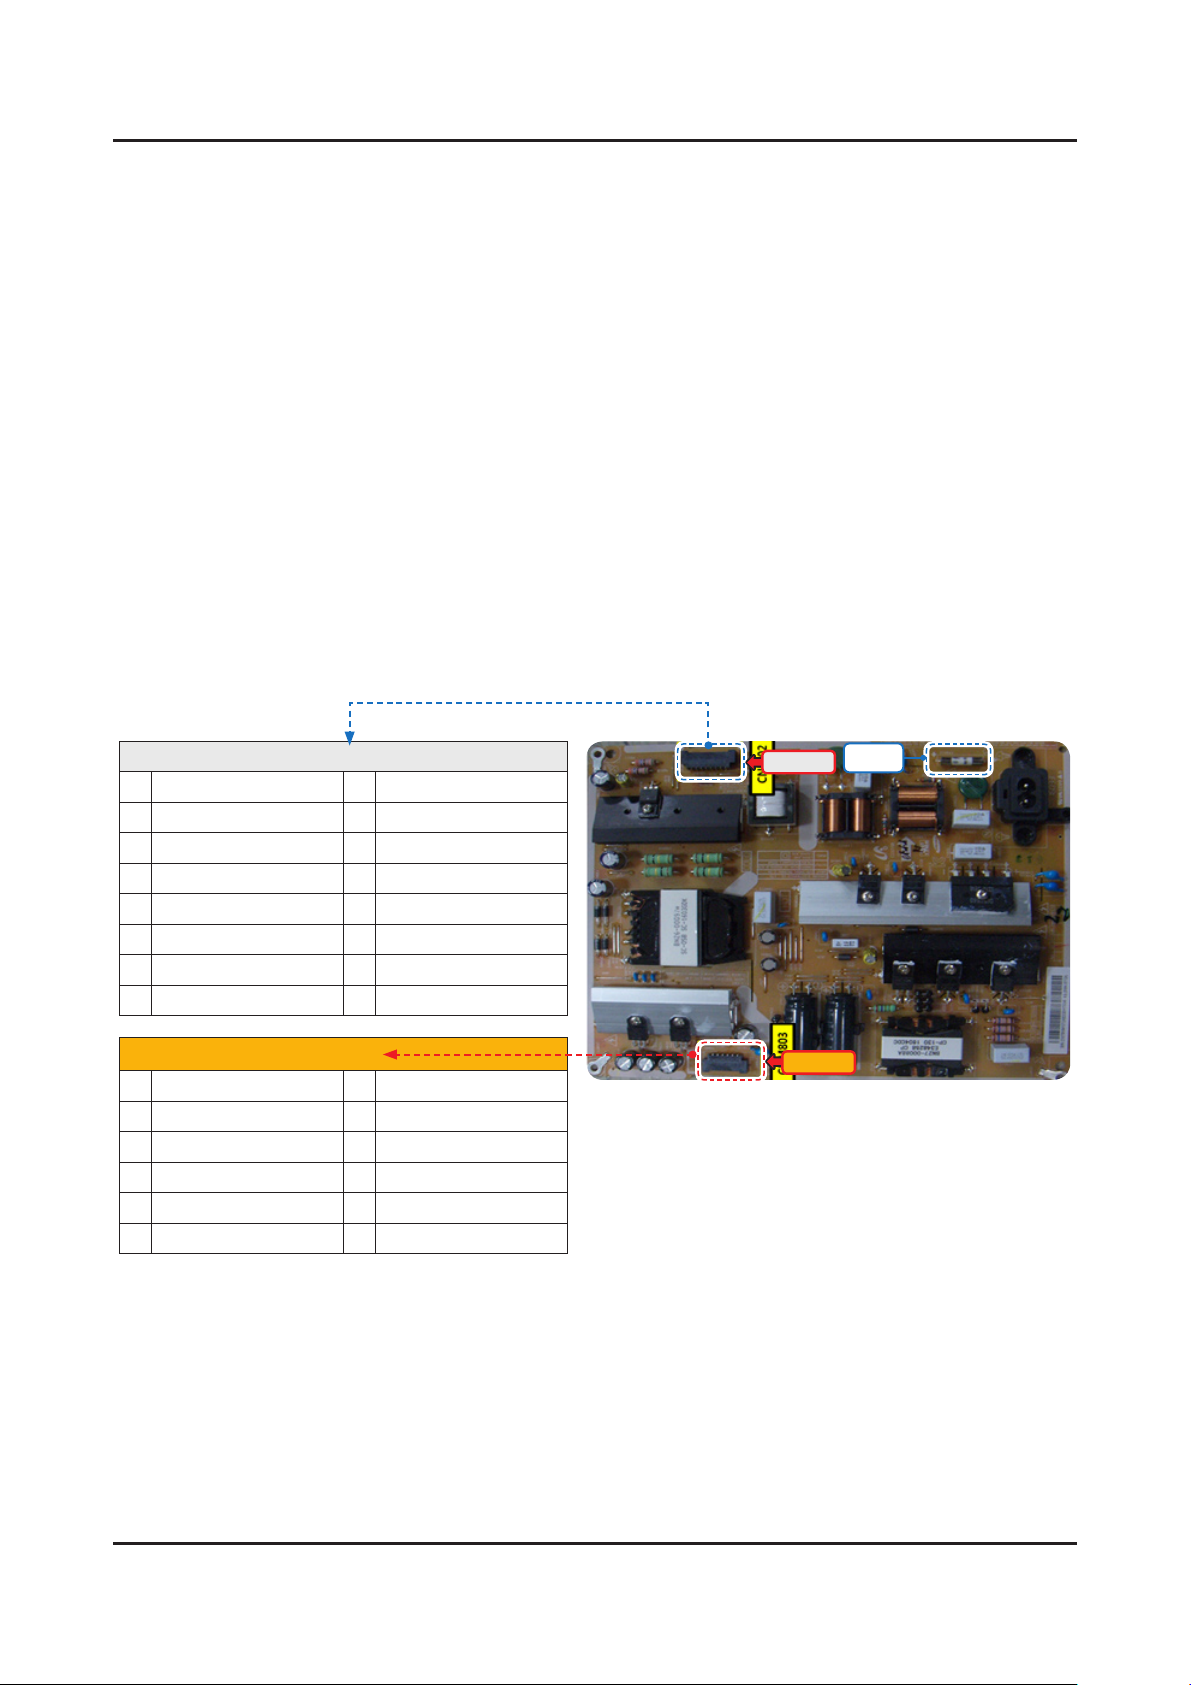
SMPS POWER
Power TV On.1.
PS_ON √ . 2Vdc (when off) changes to 3.3Vdc (on)
May already be On if IoT USB is loaded or TV Smart Things Hub mode is active. if voltage error or no change.2.
Jog Function Control Test. √
If OK replace Main Board.3.
All √ A13V supplies to full voltage level 12.7VDC.
If any wrong voltage, remove the SMPS connector to Main Board.4.
A13V again for 12.7VDC. √
If OK replace Main Board.5.
If still wrong voltage replace SMPS.6.
OD √ (Over Voltage Detect) : 3.3Vdc (Operating Normal)
If 0V or changing, an SMPS or Panel error exists. Perform Backlight Test.7.
BLU_PWM √ 0V- Off to approx 1 – 3.3 V pending Backlight dim level
If missing/error replace √ Main Board.
CNL802
1 2+ 9 1+
2 NC 10 NC
3 NC 11 NC
4 2- 12 1-
5 NC 13 NC
6 NC 14 NC
7 NC 15 IF2
8 NC 16 IF1
CNM803
1 Fail Count 7 A13V
2 ANA-DIM 8 POWER_ON/OFF
3 A13V 9 A13V
4 OD_ON/OFF 10 GND
5 A13V 11 GND
6 BLU_PWM 12 GND
CNL802
CNM803
Fuse
Page 55

BACKLIGHTS
4-5
4. Troubleshooting
Activate Backlights Test1. :
Disconnect Lead Cable from Main Board to Power Supply. (CN202) -
TV Screen for active backlight LEDs. √
If NO BACKLIGHTS2.
Plus (+) & Minus (-) pin voltages on the Panel Connector. √
If no pin voltages replace SMPS. -
If voltages exist but no backlight: -
The highest pin voltage (BL Drive Supply ) √
Remove Panel connector and measure again to compare. -
If the voltage was high and stays the same high reading a string of Panel LEDs are open. Replace the Panel. -
If the v - oltage was low and remains low the SMPS is defective.
If the voltage was low and goes high a string of panel LEDs are shorted replace the - Panel.
For BACKLIGHT DIMMING PROBLEMS:
Go to • Menu → Picture → Backlight and vary level (0 – 20)
If no backlight changes observed:•
Panel Connector pin voltages and BLU_PWM voltages (CNM801) while changing backlight level. √
If Panel voltages don’t change, and BLU_PWM changes, replace • SMPS.
If BLU_PWM doesn’t change replace • Main/T-Con Board.
Page 56
4-6
4. Troubleshooting
4-2-2. Video
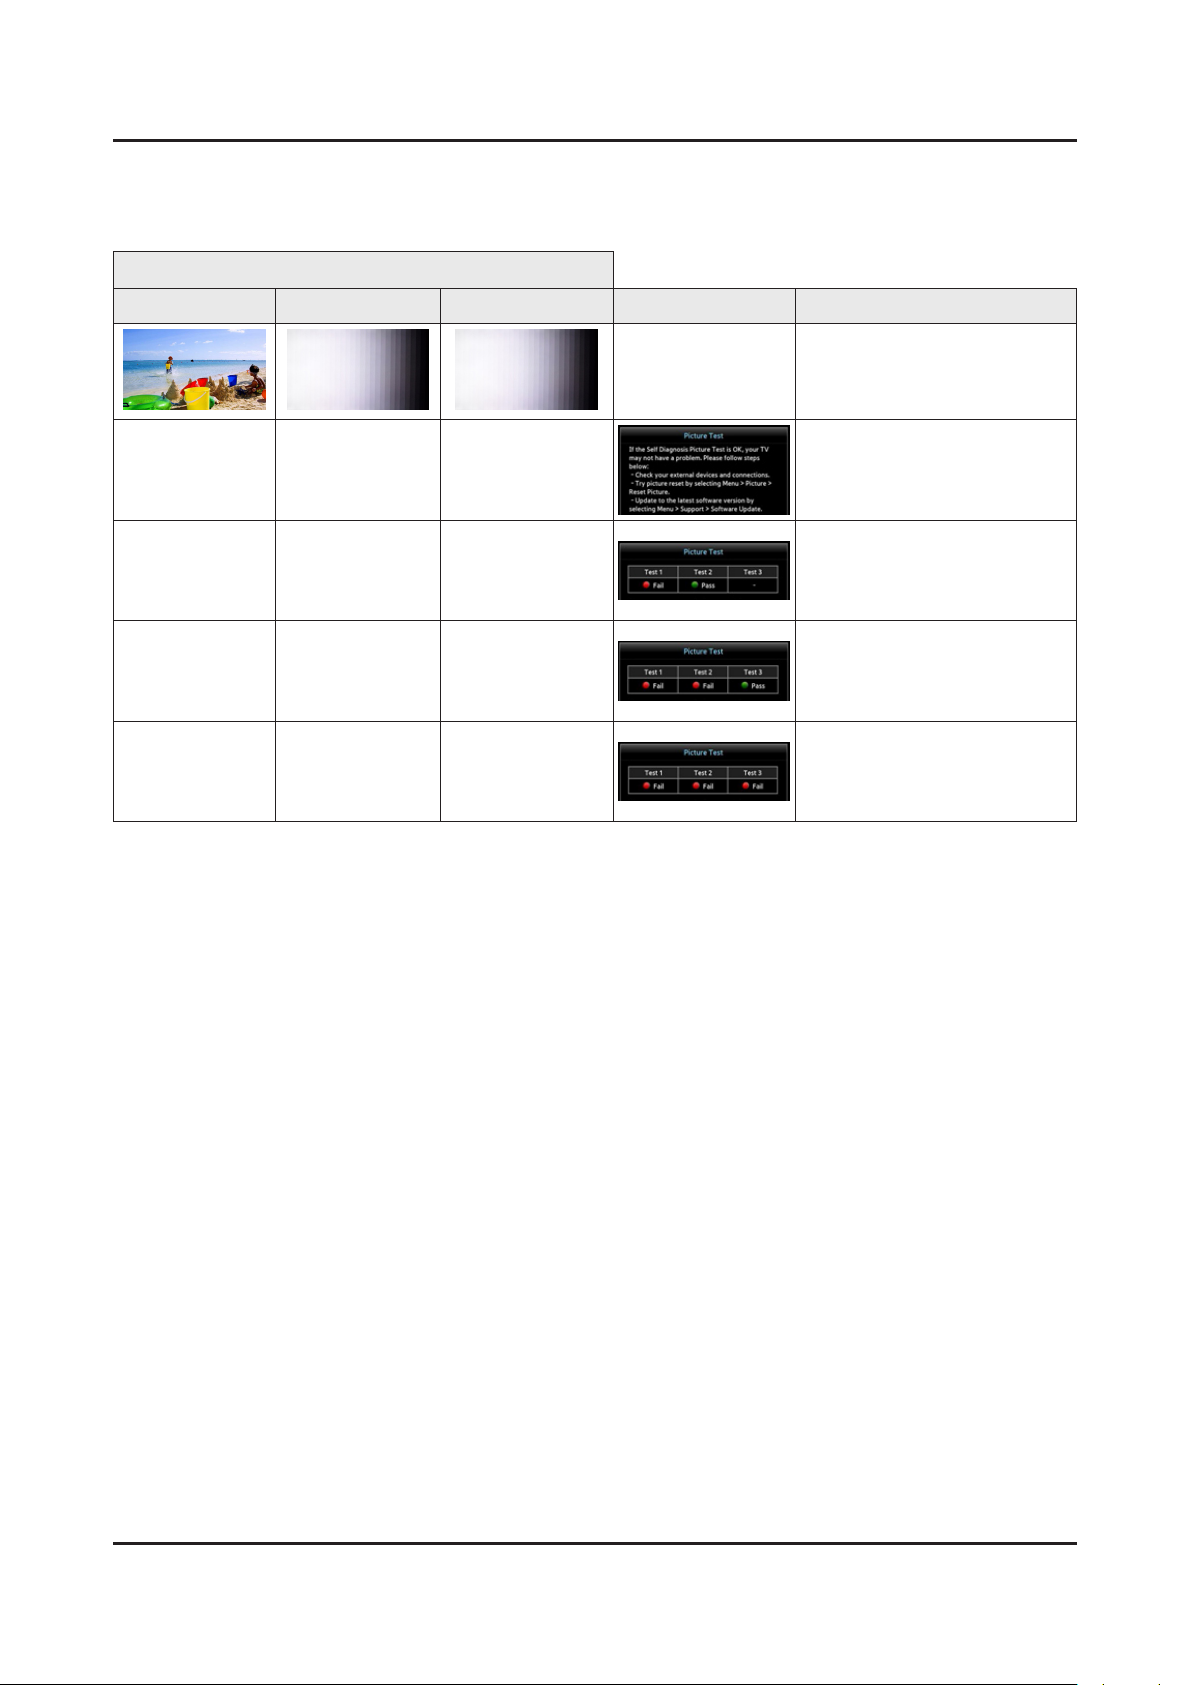
Customer Picture Test
MAIN/TCON BOARD
Main Section Pre- FRC (T-CON) Post FRC ( T-CON) Test Result Problem
Pass Pass Pass
Fail Pass Pass Replace Main/T-CON Board
Fail Fail Pass Replace Main/T-CON Board
Fail Fail Fail
Check Signal Source and other
inputs to One Connect
Replace Main/T-CON Board or
Panel
Page 57
MAIN / T-CON Board
4-7
4. Troubleshooting
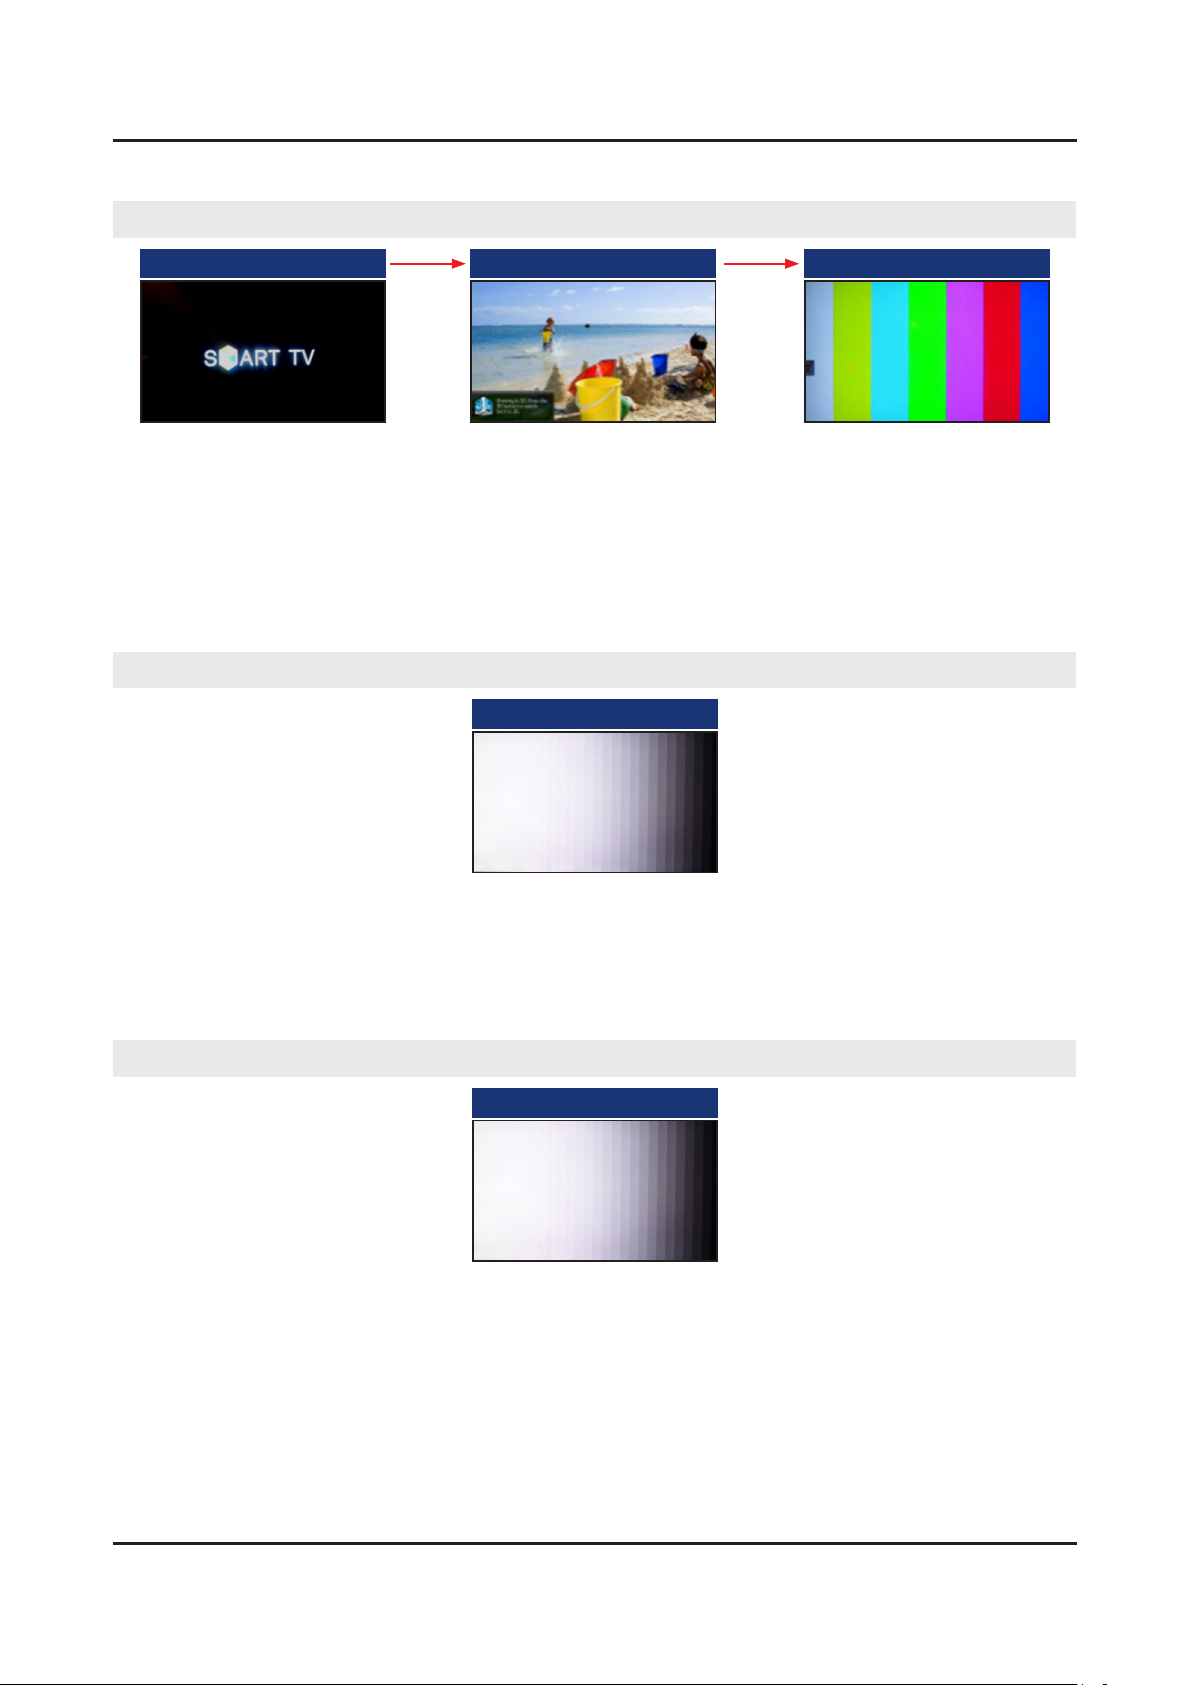
Main Board Section1.
1 Start Up Logo 2 Customer Picture Test 1 3 Mute - 147 - Mute
Video Operation : Generated on Main Section.
If OK:1.
Source & Input Cables. √
Other inputs. √
One Connect Cable/Box. √
If Noisy:2.
T-CON Section Test Patterns. √
PRE FRC of T-CON Section2.
Customer Picture Test 2
Video Operation : Generated at Pre FRC, of T-CON Section.
If OK:1.
Main Section. √
If Noisy:2.
Post FRC Pattern. √
POST FRC of T-CON Section3.
Customer Picture Test 3
Video Operation : Generated at Post FRC of T-CON Section.
If OK:1.
Main / T-CON Board (defective). √
If Noisy:2.
Mute - 369 - Mute. √
Page 58

4-8
4. Troubleshooting
T-CON Section4.
Mute - 369 - Mute
NOTE
May not be available for Larger models over 70 inches.
Video Operation : Generated at T-CON Section.
If OK:1.
Main / T-CON Board (defective). √
If Noisy:2.
Main / T-CON Board. √
Page 59

4-9
4. Troubleshooting
PANEL
If Noisy:1.
Panel (defective). √
Page 60

4-10
4. Troubleshooting
4-2-3. Audio
AUDIO
Source
No TV Sound•
Menu → Audio → Speaker Settings set to √ TV Speaker
Noisy / Distorted TV Audio•
Customer Menu → Support → √ Sound Test
If • Sound Test FAILS : (Missing / Noisy Audio)
Speakers (compare resistance/quality) √
Compare audio level out to speakers with multi meter.•
Replace defective Speakers or Main Board or Cable. √
IF • Sound Test OK :
Audio Source & External Cables. √
With external Audio Generator (device or App). √
Other Inputs. √
One Connect Mini. √
Optical Digital Out Errors•
Red light from Optical Digital Out. √
If missing replace One Connect Mini•
No HDMI Audio •
Source / HDMI Cable & One Connect Mini Connectors. √
Swap with other HDMI Inputs/Sources.•
Perform • EDID Write in Factory Mode (Can restore missing HDMI Audio).
Bulletins and Latest rmware on TV. √
If not restored replace One Connect Mini/Main.•
Check Audio Format PCM/Dolby based on external Receiver.•
ARC Issues•
HDMI Cable is input to the ARC Designated HDMI port. √
ARC (HDMI Control) is enabled on the external Receiver. √
Bluetooth Audio "• Sound Share" Connection Issues
Sound Bar is in TV Mode. √
To Connect, Press & Hold Play Button until Sound Bar pairing mode begins. •
Page 61
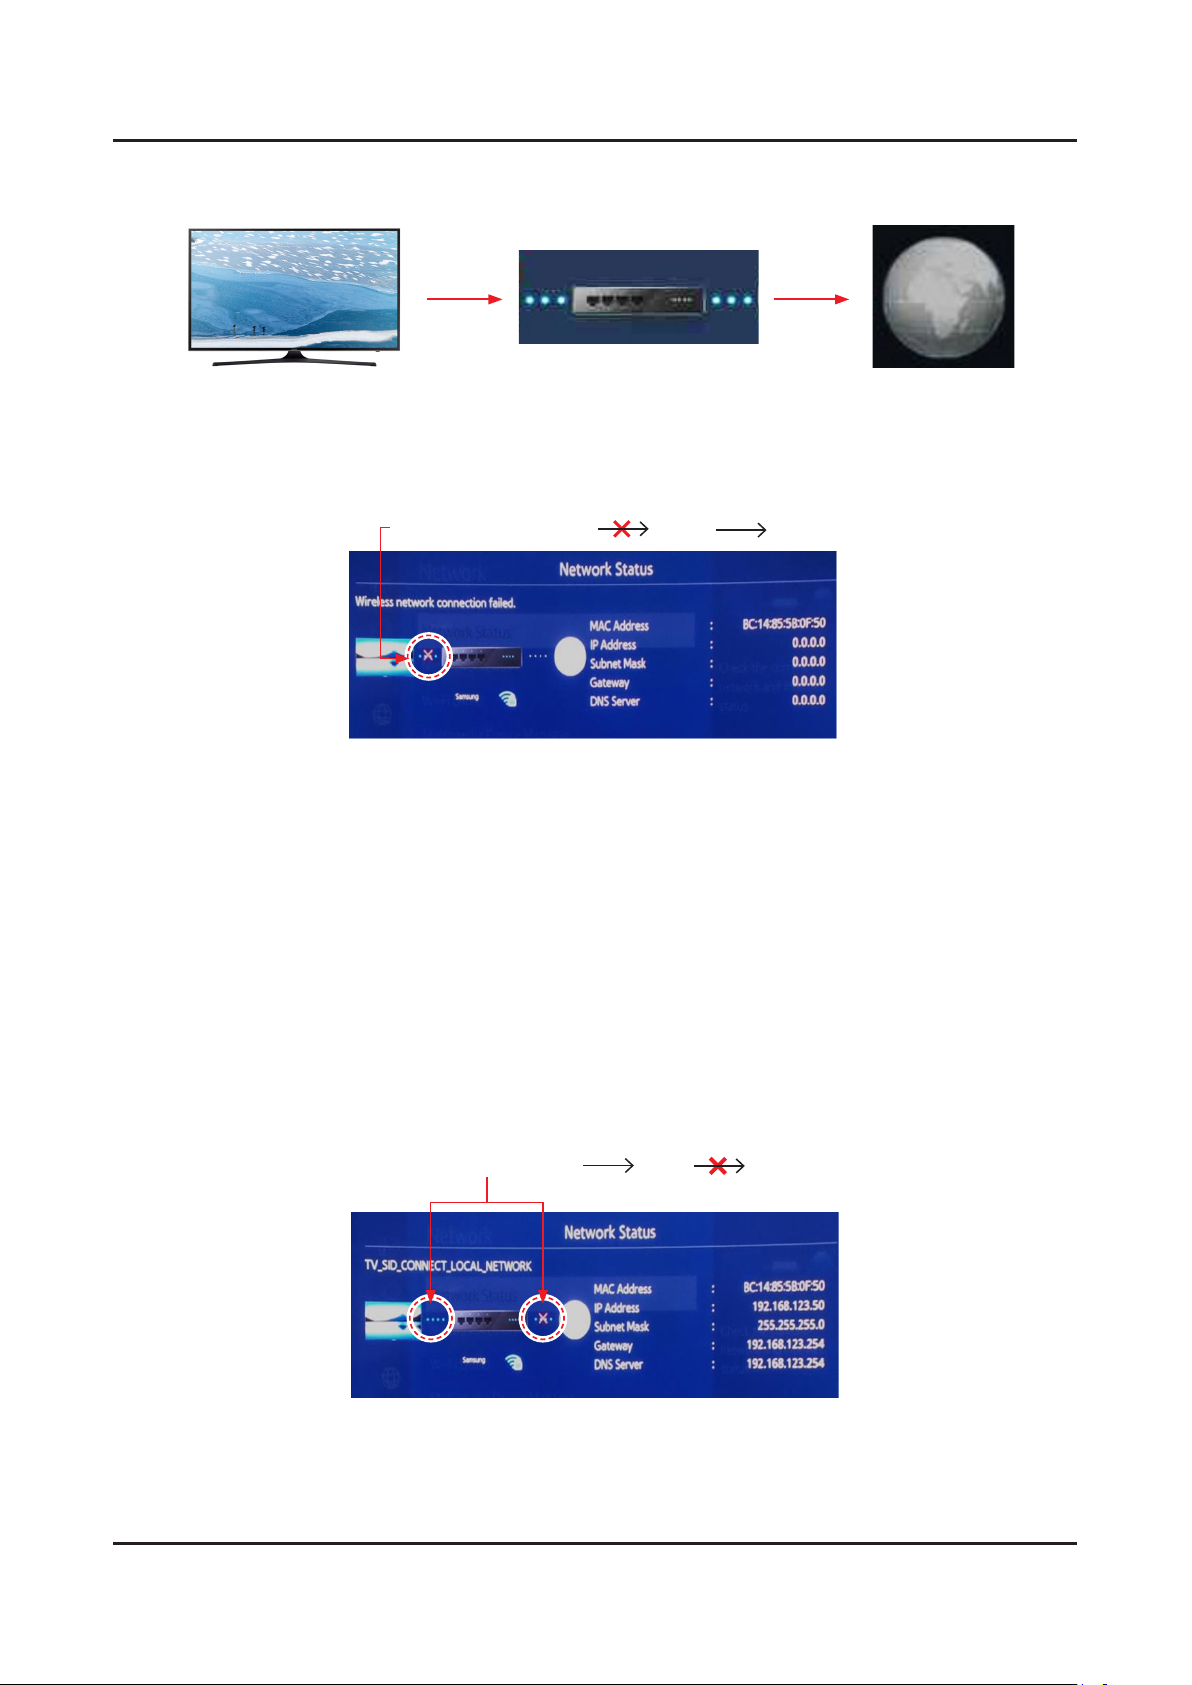
4-2-4. Network
4-11
4. Troubleshooting
<TV> <Router> <Internet>
TV to Router "Failure"
Check Network Status (TV Router Internet)
Wired & Wireless MAC Address• in Customer Support Menu.
No Wired MAC Address √ : Replace Main Board.
No Wireless MAC Address √ : Module cabling & voltages from Main Board.
If operating voltages are OK but signal missing. √
Replace WiFi Module (WiFi/Bluetooth Module).•
Proper • security passcode
Check Wi-Fi signal strength at TV (use WiFi Analyzer or similar App). √
Try another source (Hot spot or Test Router).•
Check related Bulletins. √
Check √ Factory Mode → SVC → Info → WiFi Error Count (replace module for high error counts).
Router to Network "Failure"
Check Network Status (TV Router Internet)
Instruct the customer the TV has proper connection to the router and is likely OK.•
Check other devices using network are OK. If they test OK this does not mean the TV should be working. √
Try another source (Hotspot) to test/show TV Network operation. •
Page 62
4-12
4. Troubleshooting
4-2-5. Smart Hub
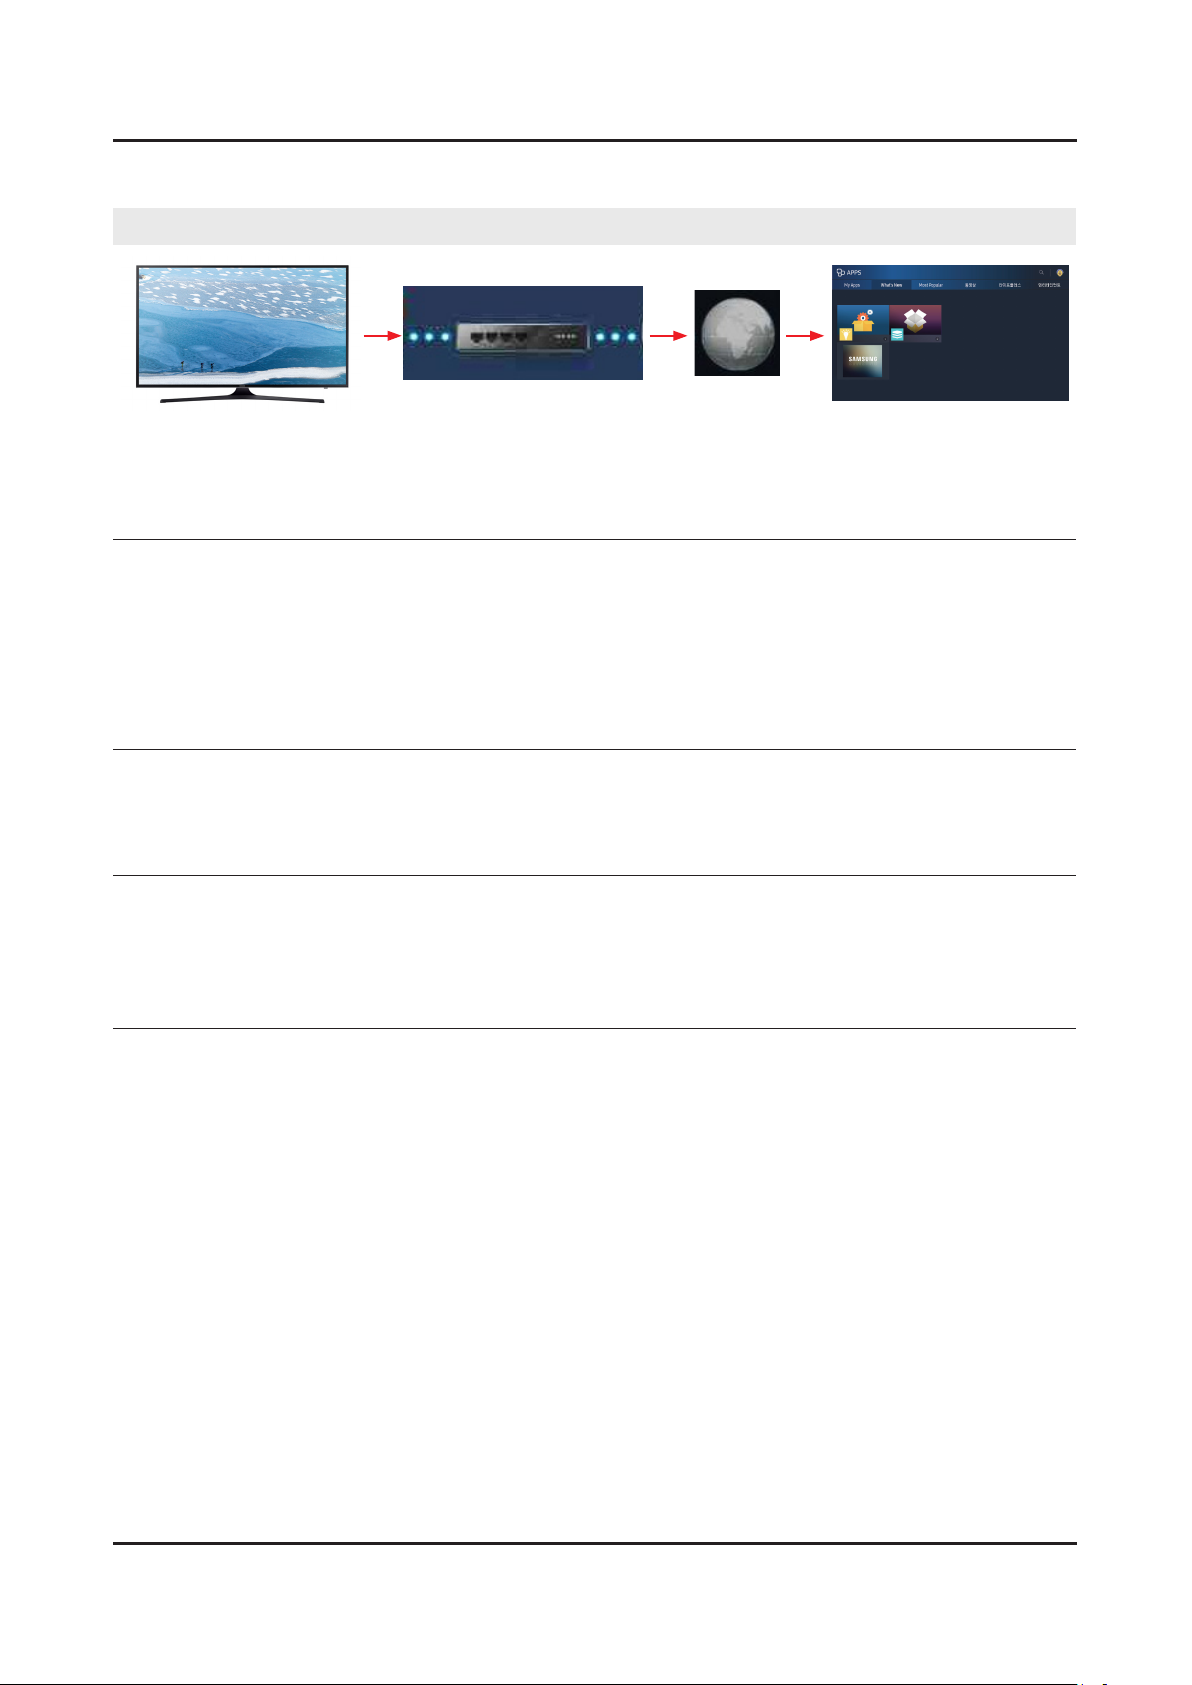
Go to Menu > Support > Self Diagnosis > Smart Hub Connection Test
<TV> <Samsung Server><Router> <Internet>
Network / Gateway 1. If it Fails:•
TV to Router Connection Test in " √ Network Trouble shooting"
DNS Test2. If it Fails:•
DNS setting in " √ Network Settings"
If DNS is set manually:•
Settings are correct (may be set to 8.8.8.8 to prevent Netix issues) √
If it still fails:•
DNS Test with setting to Auto Mode √
If it fails both Manual & Auto problem is ISP or Router.•
ISP Blocking3. If it Fails:•
Samsung Server Test4. If it Fails:•
Samsung Apps5. If it Fails:•
Internet Service Provider is Active. √
With DNS setting at 8888. √
With Hot Spot. √
Network Status. √
If OK:•
Reset Smart Hub. √
Terms of Agreement are accepted. √
Reset Smart Hub. √
Samsung Apps load correctly. √
Perform " √ Apps Reset" in Factory Mode.
Go to Smart Hub and complete Terms of Agreement and set up information. √
Samsung Apps load correctly. √
Before selecting an App, allow Apps to load or failure wilre-occur. √
Page 63

For Netix Operation/Connection Issues:
4-13
4. Troubleshooting
Check Certicate & Netix ESN Status in Factory Mode.•
If Certicate and ESN exists, " - CO", "NfO", change the DNS to 8.8.8.8
If Certicate is missing, " - C/" replace the TV’s Main Board.
If ESN number is missing: - NF/ do not replace the Main Board.
Reset TV Clock and check for correct Time & Date. Netix relies on correct settings.•
Reset Smart Hub. / Reset Apps In Factory Mode.•
For Streaming Issues:
Go to TV Web Browser / Go to speedof.me / testmy.net•
Check Speed √ for at least 5 Mbps(HD streaming) / 25 Mbps (4K Streaming).
Check Latency √ for less than 50ms.
Page 64
4-14
4. Troubleshooting
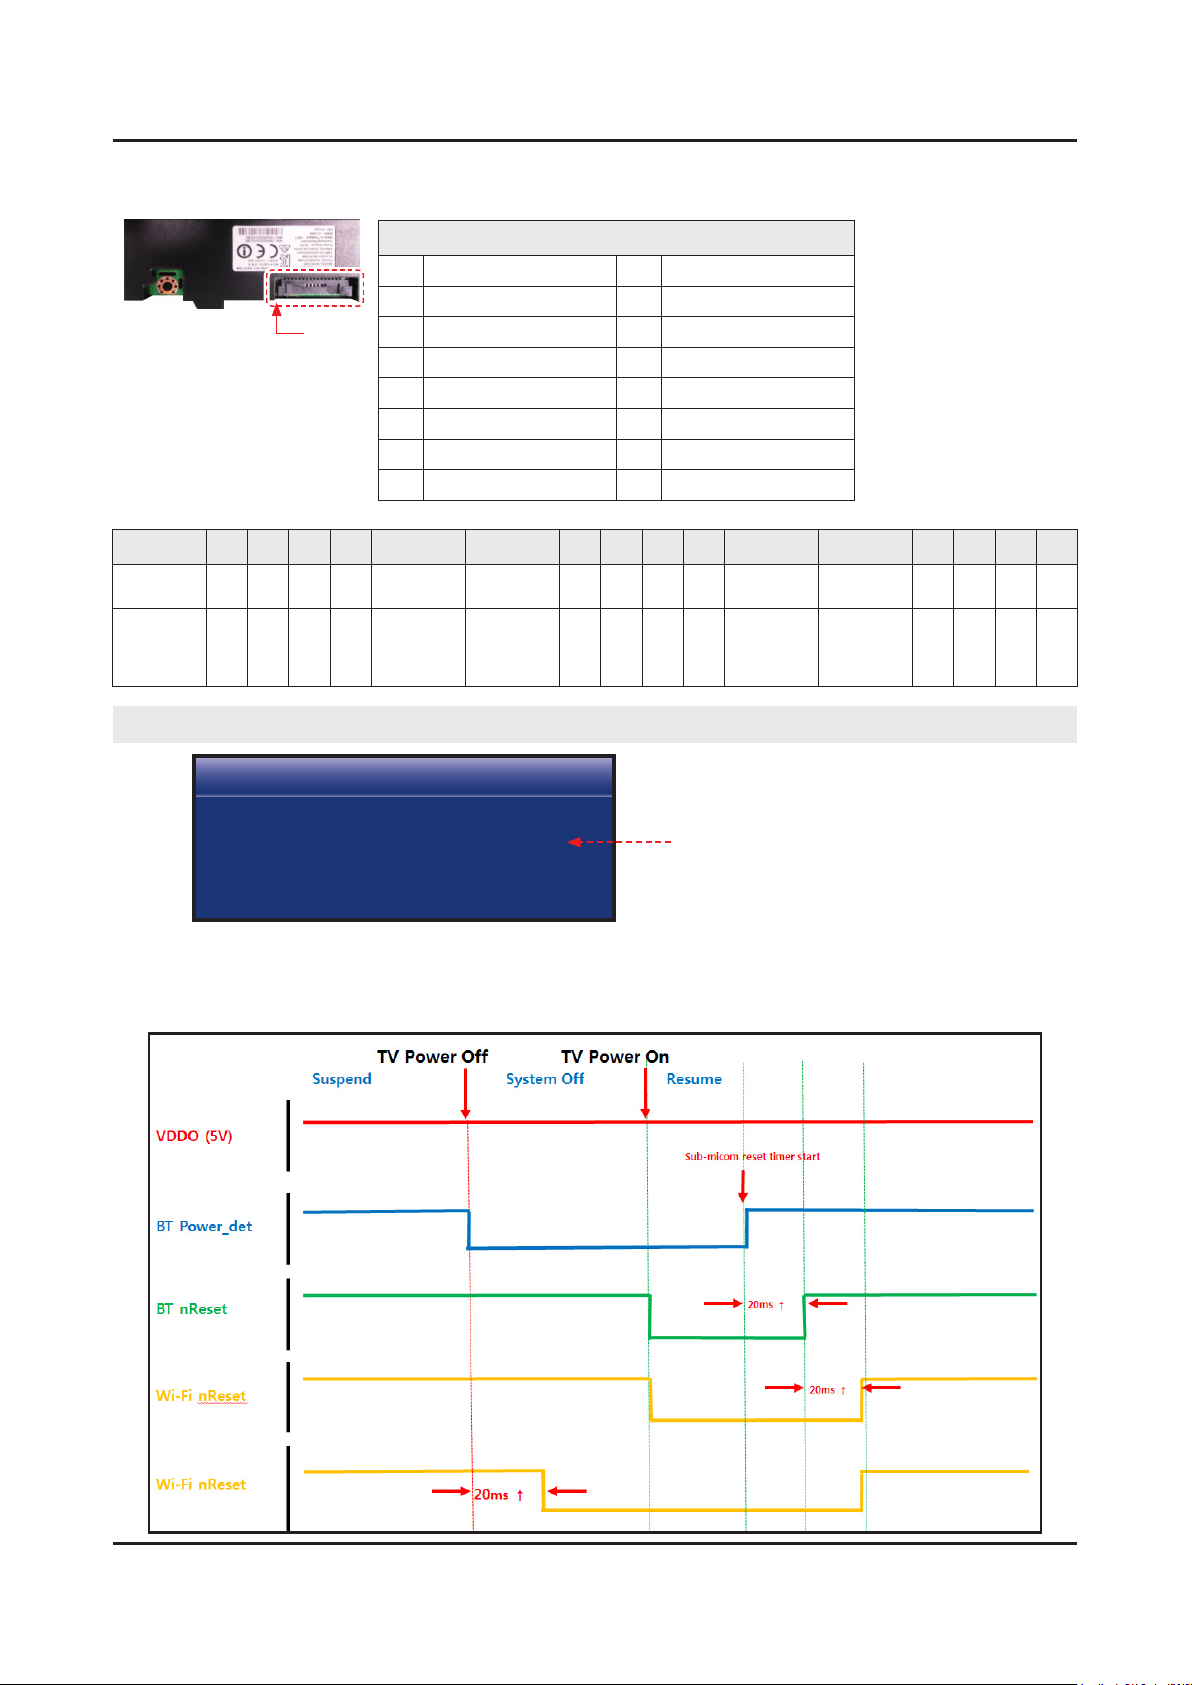
4-2-6. Bluetooth / WiFi Module
BT / WIFI
1 BT_NRESET 2 BT_POWER_DET
3 BT_WAKE 4 -
Pin1
Pins 1 2 3 4 5 6 7 8 9 10 11 12 13 14 15 16
Standby
Power
ON
3.3
Vdc
3.3
Vdc
0
3.3
Vdc
3.3
Vdc
3.3
Vdc
5 BT_D-_USB 6 BT_D+_USB
7 - 8 BT_WELCOME
9 WIFI_PHY_ON 10 -
11 WIFI_D+_USB 12 WIFI_D-_USB
13 - 14 WIFI_5V
15 WIFI_WOL 16 WIFI_NRESET
NC 0 0 0 0V 0V 0 3 Vdc 0 0 5 Vdc
0.7V eff.dc
BT Sig
(DM)
4V p-p
2.5V eff.dc
BT Sig
(DM)
4V p-p
0 0V
3.3
Vdc
0
2.5V eff.dc
WIFI Sig
(DP)
0.5V p-p
2.5V eff.dc
WIFI Sig
(DM)
0.5V p-p
0 5 Vdc
3.3
Vdc
3.3
Vdc
3.3
Vdc
3.3
Vdc
Go to Menu > Support > Contact Samsung
Contact Samsung
<
- Wired MAC Address : xx:xx:xx:xx:xx:xx
Missing or Error : Replace Main Board.
- Wireless MAC Address : xx:xx:xx:xx:xx:xx
- Bluetooth Address : xx:xx:xx:xx:xx:xx
If • Bluetooth Address or Wireless MAC Address are missing or errors exist.
BT & Wi-Fi Connector Voltages.•
If Voltages are OK but no BT or Wi-Fi Signals voltage(s), replace defective Module. -
Page 65

4-3. Factory Mode Adjustments
4-15
4. Troubleshooting
4-3-1. Entering Factory Mode
To enter ‘Service Mode’ Press the remote-control keys in this sequence :
Factory Remote
Power TV ON.1.
Select TV Source.2.
Info3. → Factory.
Use 4. MENU for return.
Samsung IR Remote (Limited Operation)
TV Power Standby.1.
Press as follows. 2.
Remote Button :• MUTE 1 8 2 Power
Option• (must set Option Bytes when replacing Main Board.)
Option → • Factory Reset (returns TV to out of box condition. Does not reset Apps.)
SVC → • Test Patterns
SVC → Info → • ER Count (Important to check for errors.)
Resets to 0 with Factory Reset. -
Page 66
4-16
4. Troubleshooting
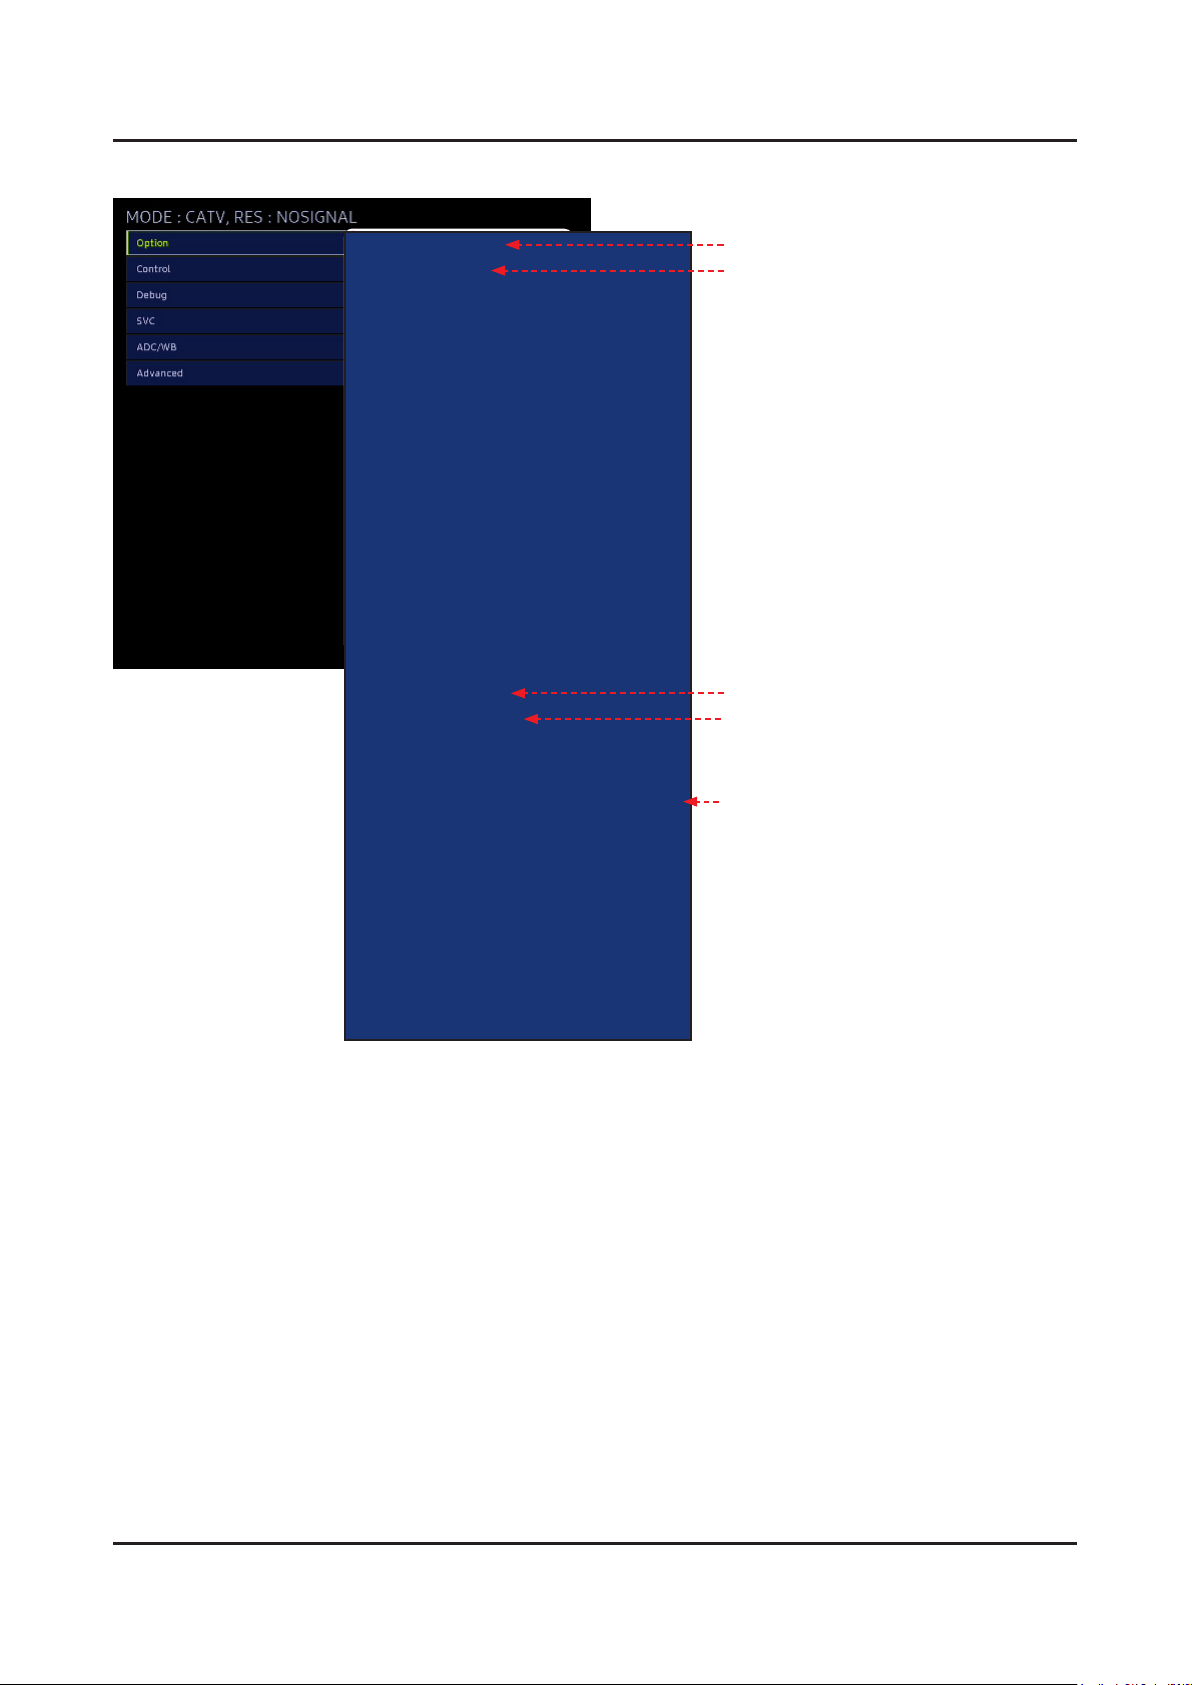
First Screen Appearing in Factory Mode (SAMPLE)
Testing Items
√
T-JZL6AKUC-XXXX.XX
T-JZMAKUS-XXXX
tztv-X.X.-main2016-jazz-L__XXXXXXXX.X
BT Version : BLUETOOTH-VER-XXXX
E-Manual:----
CAMERA:****
Blaster Version : Not support
E-POP Version : JAZZLUHD-XXXX.X
EDID SUCCESS
HDCP SUCCESS
CALIB : AV/COMP/PC/HDMI/
Option : NONE_16,NONE,6000,NONE
DTCP Not Support
FRC-[JAZZ-L/?][NON FRC][HW:0x00]
TCON Version:----
Model : UN**KU630DF
Wired MAC SUCCESS
Wireless MAC SUCCESS
WIFI Version : BCM43569_16210_WLC_E_
STATUS_ABORT
CO NfO WO MO D/ HX P/ AO O S/ N/ RO SC/ SiO(P)
NS//
Factory Data Ver : XXX / Fixed Ver : XX
EERC Version : 75 / WB Ver : 8
CPLD/LD : N/A
SmartControl : 0
Board Info : 2015/12/29/PV/12/BN41-02528A
Factory Reset In Production : ----
SID : ----
Date of purchase : --/--/----
Main SW Version √
Sub √
Wired MAC (Status) √
Wireless MAC (Wi-Fi Module) √
CO NFO WO. etc. √
Certicate•
Netx•
Wide Vine•
etc. Status•
SW Version
Page 67
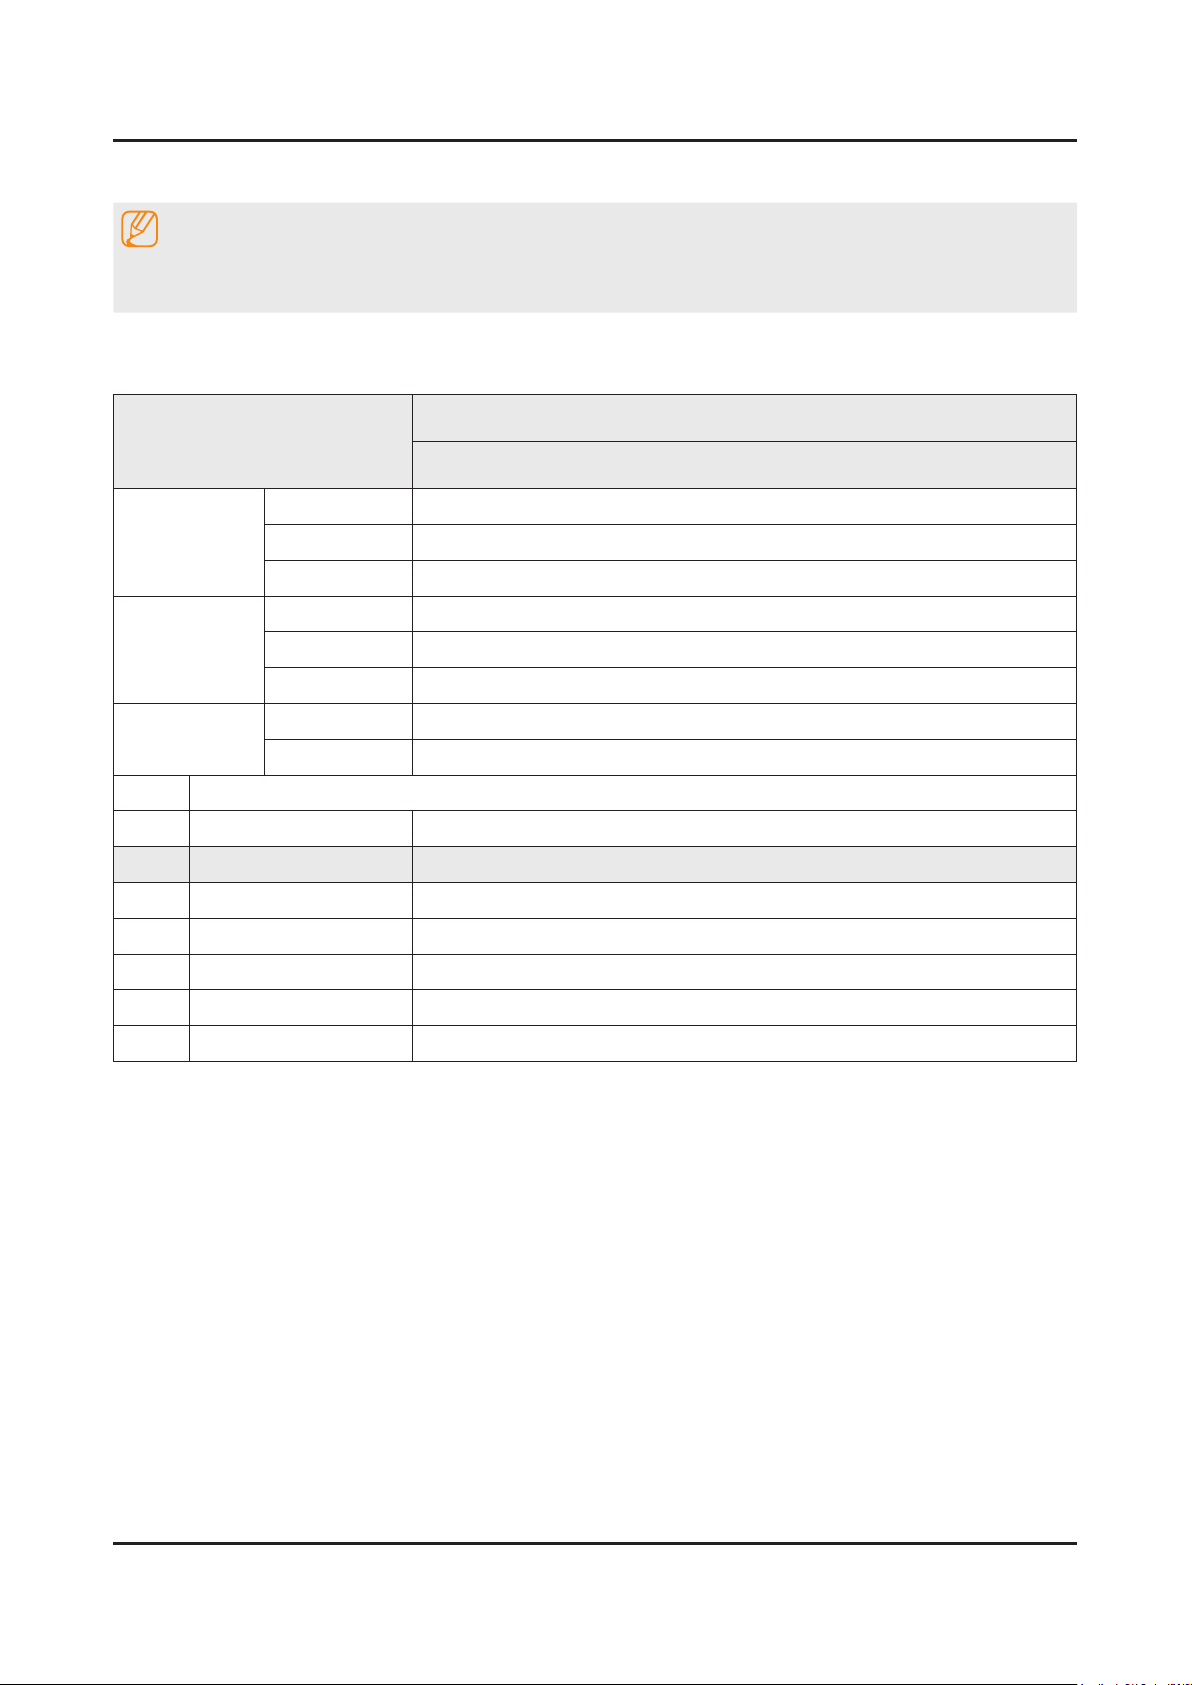
4-3-2. Detail Factory Option
4-17
4. Troubleshooting
NOTE
If you replace the main board with new one, please change the factory option as well.
The options you must change are "Type".
UN40KU630DFXZA
40"
Inches
FA01
Vendor SDC
PANEL
SMPS BOARD
MAIN BOARD
Byte Item
0 Factory Reset -
1 Type 40A6AU0VK
2 Local set US
3 SW Model UKU6000
4 BOM Model 630D
5 Tuner S_T2C
6 Ch table NONE
Code BN95-02634A
Spec. CY-GK040HGLV1V
Vendor SANSUI
Code BN94-10711A
Spec. L40S5_KVD
Chassis Ass'y BN91-17275W
PBA Ass'y BN94-10798X
Page 68
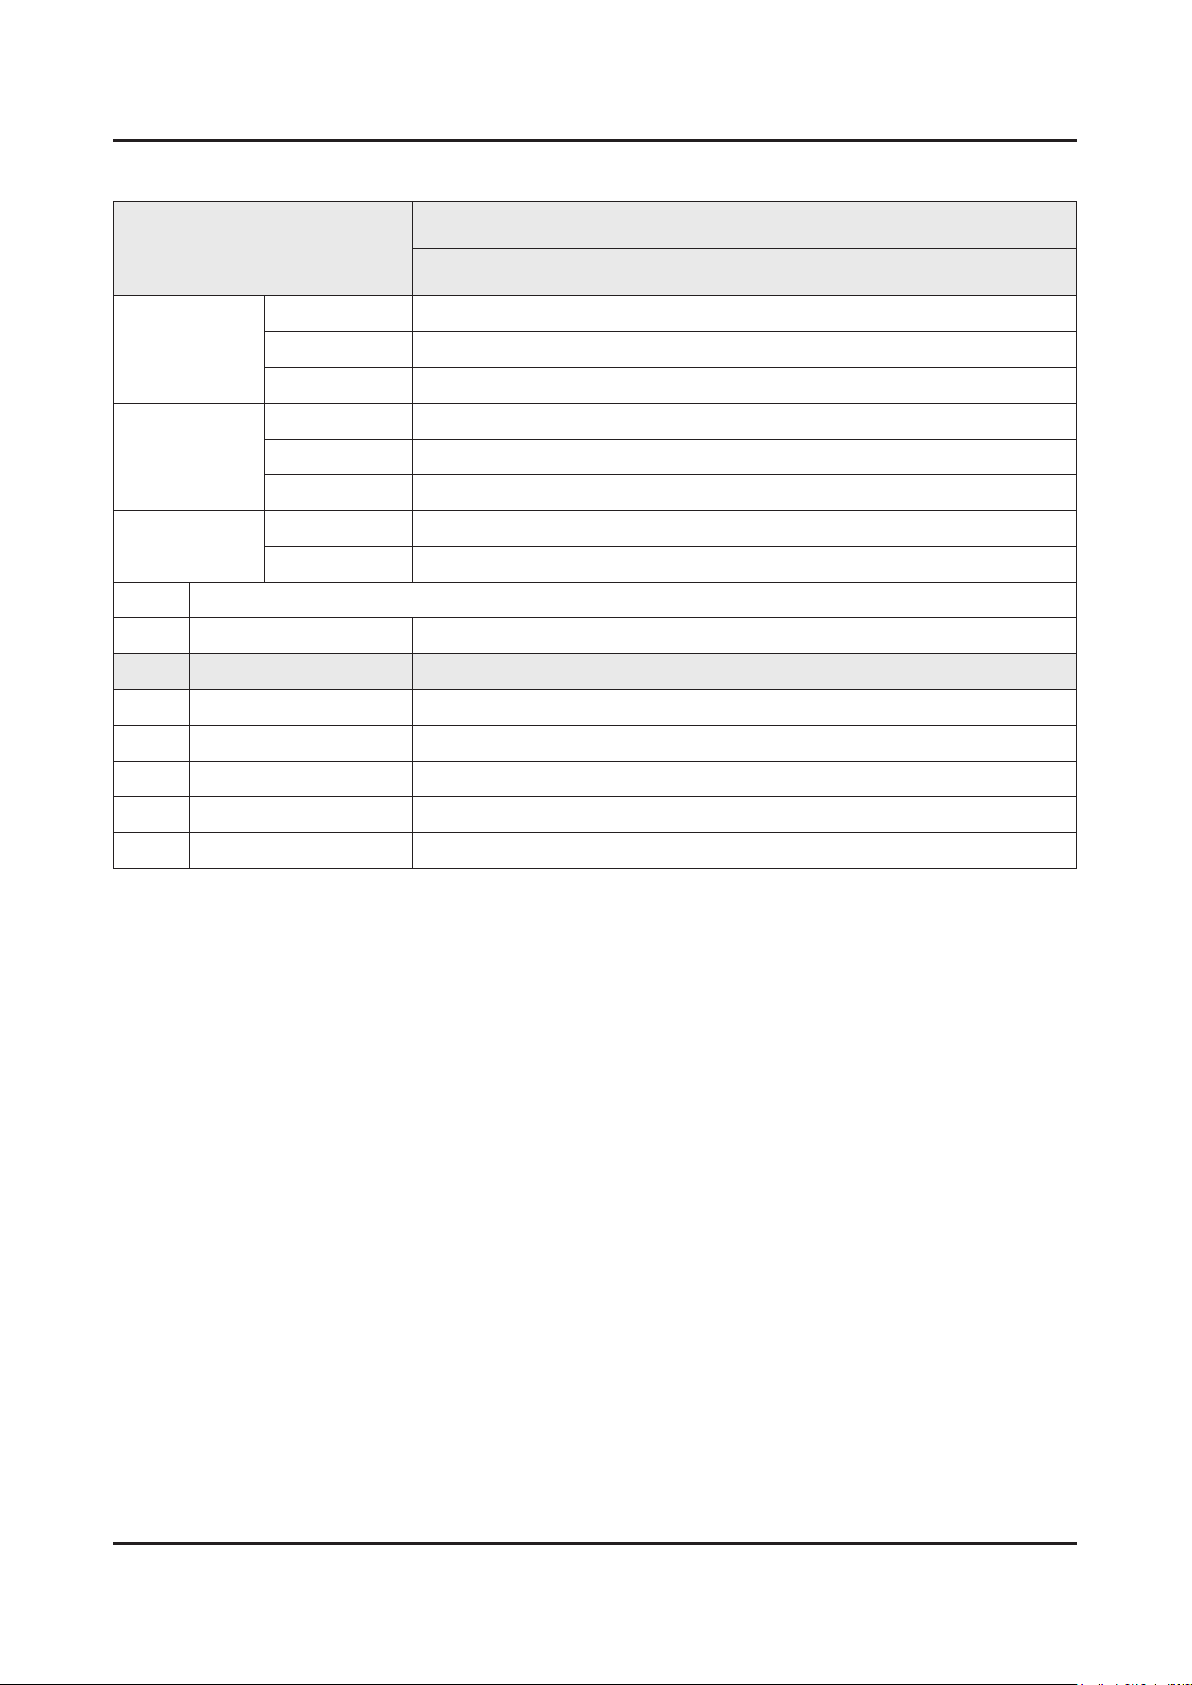
4-18
4. Troubleshooting
UN43KU630DFXZA
Inches
43"
AA01
Vendor AUO
PANEL
SMPS BOARD
MAIN BOARD
Byte Item
0 Factory Reset -
1 Type 43L6AU0VK
2 Local set US
3 SW Model UKU6000
4 BOM Model 630D
5 Tuner S_T2C
6 Ch table NONE
Code BN95-02635A
Spec. CY-GK043HGAV1V/H
Vendor SANSUI
Code BN94-10711A
Spec. L40S5_KVD
Chassis Ass'y BN91-17276L
PBA Ass'y BN94-10799L
Page 69
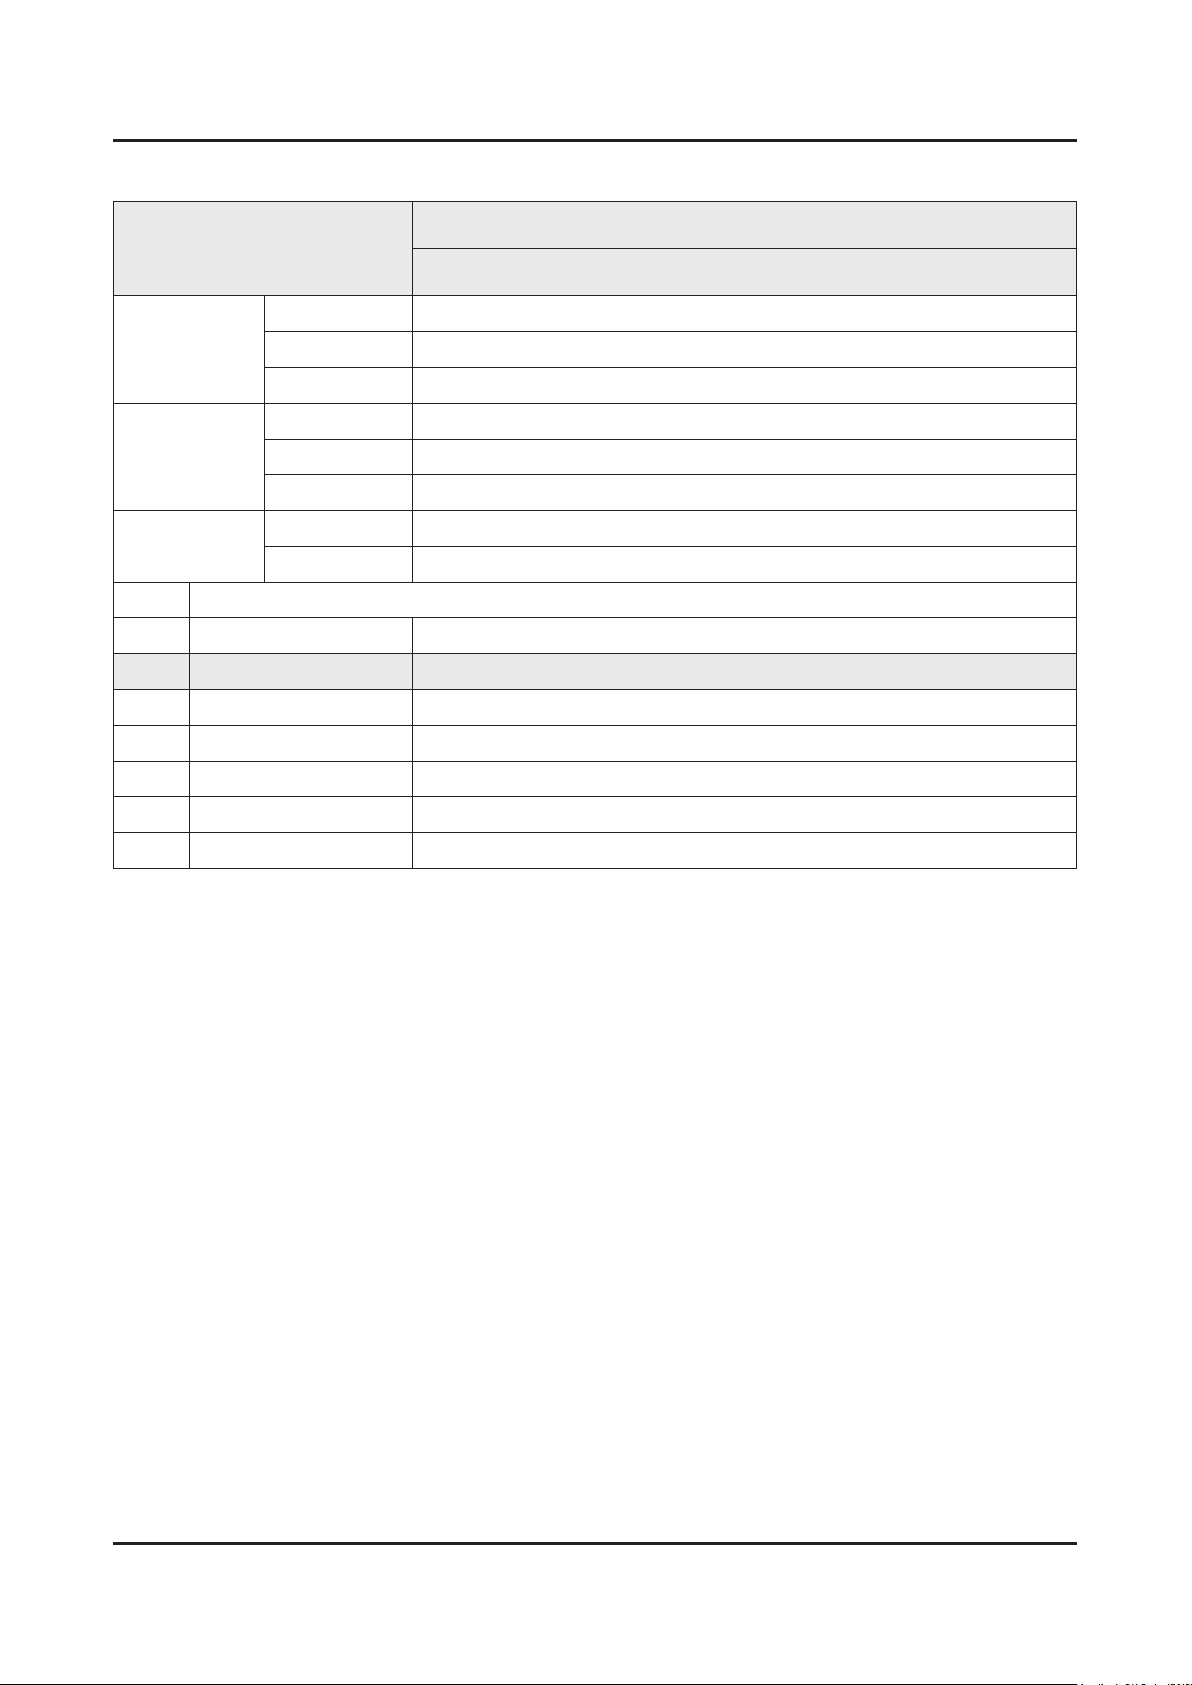
4-19
4. Troubleshooting
UN50KU630DFXZA
50"
Inches
DA01
Vendor INX
PANEL
SMPS BOARD
MAIN BOARD
Byte Item
0 Factory Reset -
1 Type 50D6AU0VK
2 Local set US
3 SW Model UKU6000
4 BOM Model 630D
5 Tuner S_T2C
6 Ch table NONE
Code BN95-02636A
Spec. CY-GK050HGNV1V/H
Vendor SEC
Code BN94-10712A
Spec. L55S5_KVD
Chassis Ass'y BN91-17277Z
PBA Ass'y BN94-10800Z
Page 70
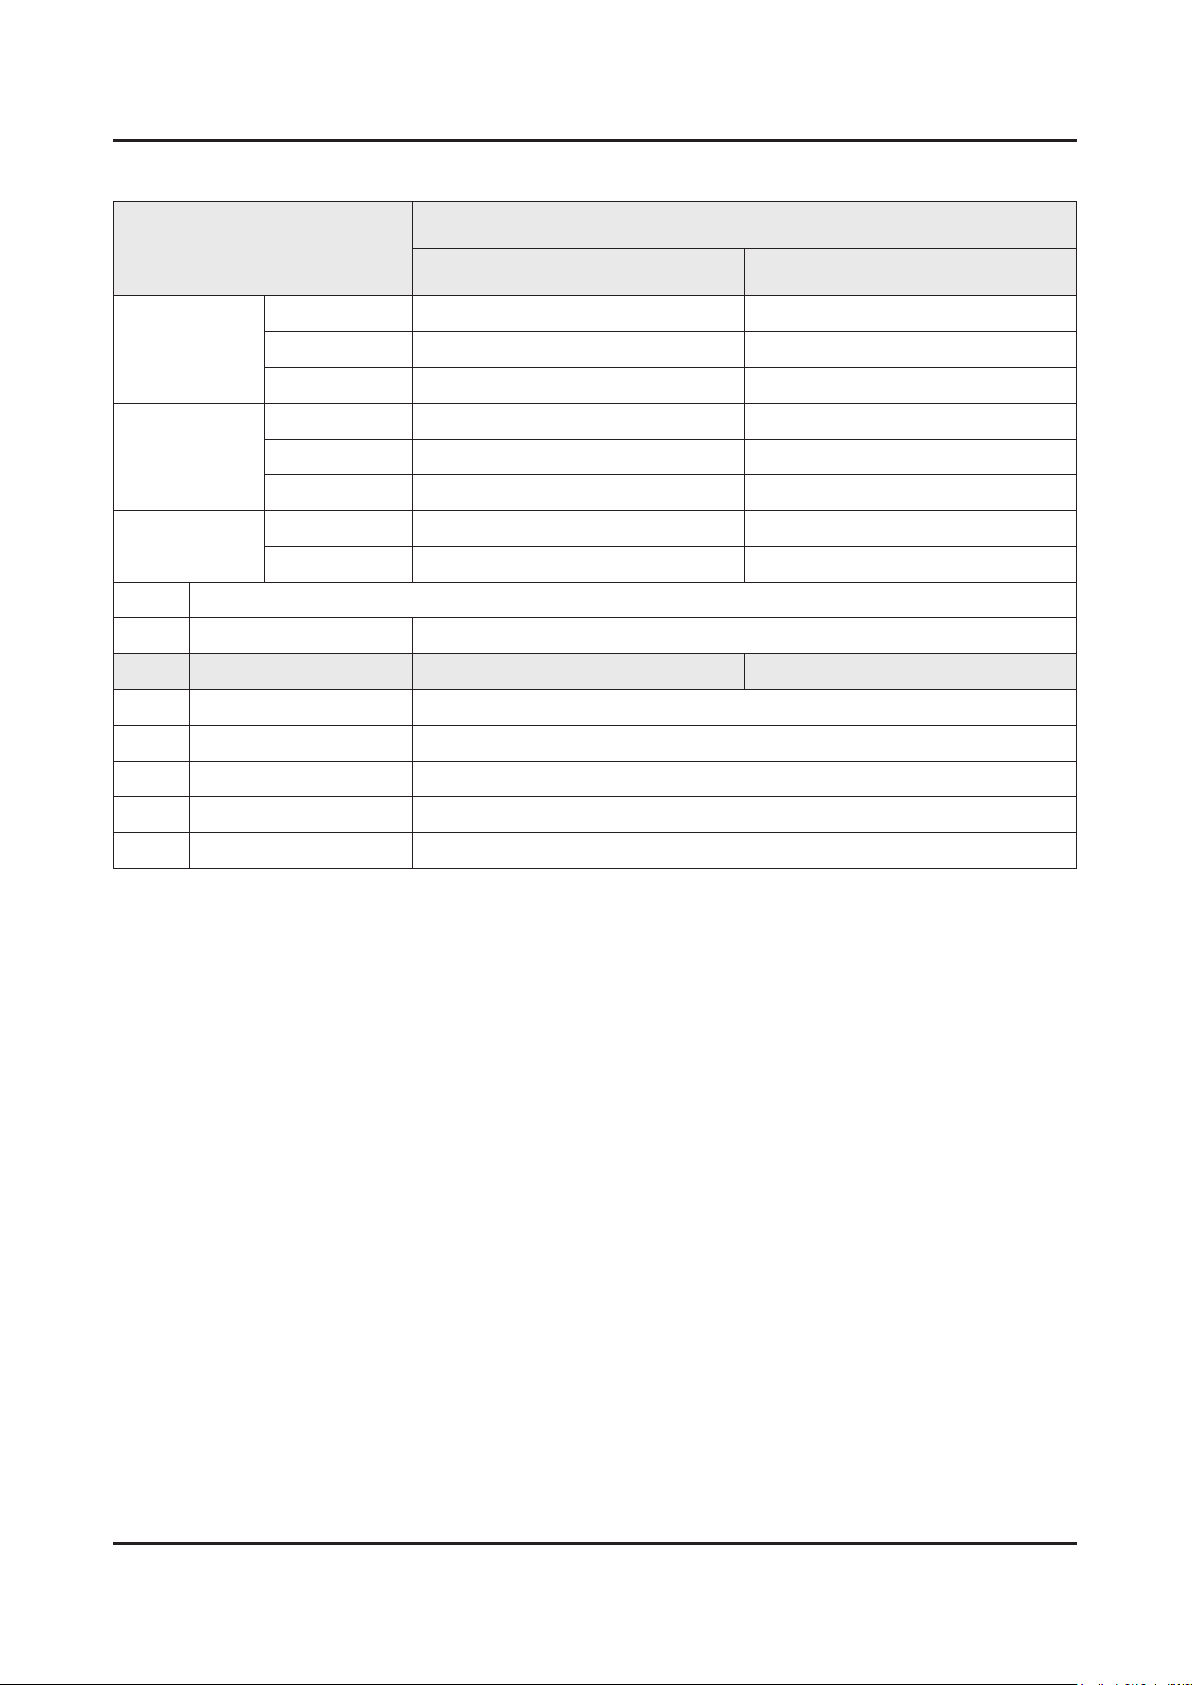
4-20
4. Troubleshooting
UN55KU630DFXZA
Inches
55"
FA01 CA02
Vendor SDC CSOT
PANEL
SMPS BOARD
MAIN BOARD
Byte Item
0 Factory Reset -
1 Type 55A6AU0VK 55S6AU0VK
2 Local set US
3 SW Model UKU6000
4 BOM Model 630D
5 Tuner S_T2C
6 Ch table NONE
Code BN95-02637A BN95-02681A
Spec. CY-GK055HGLV1H CY-GK055HGHV1V/H
Vendor SEC SEC
Code BN94-10712A BN94-10712A
Spec. L55S5_KVD L55S5_KVD
Chassis Ass'y BN91-17857D BN91-17857U
PBA Ass'y BN94-10838A BN94-10838R
Page 71
4-21
4. Troubleshooting
UN60KU630DFXZA
60"
Inches
EA01
Vendor SHARP
PANEL
SMPS BOARD
MAIN BOARD
Byte Item
0 Factory Reset -
1 Type 60H6AU0VK
2 Local set US
3 SW Model UKU6000
4 BOM Model 630D
5 Tuner S_T2C
6 Ch table NONE
Code BN95-02639A
Spec. CY-GK060HGSV1V/H
Vendor SOLUM
Code BN44-00808D
Spec. L65S6N_FSM W,AC/DC
Chassis Ass'y BN91-17279Y
PBA Ass'y BN94-10802X
Page 72
4-22
4. Troubleshooting
UN65KU630DFXZA
Inches
65"
FA01 DA02
Vendor SDC INX
PANEL
SMPS BOARD
MAIN BOARD
Byte Item
0 Factory Reset -
1 Type 65A6AU0VK 65D6AU0VK
2 Local set US
3 SW Model UKU6000
4 BOM Model 630D
5 Tuner S_T2C
6 Ch table NONE
Code BN95-02640A BN95-02641A
Spec. CY-GK065HGLV1V/H CY-GK065HGNV1V/H
Vendor SOLUM SOLUM
Code BN44-00808D BN44-00808D
Spec. L65S6N_FSM W,AC/DC L65S6N_FSM W,AC/DC
Chassis Ass'y BN91-17858B BN91-17858R
PBA Ass'y BN94-10803W BN94-10803Z
Page 73
4-23
4. Troubleshooting
UN70KU630DFXZA
70"
Inches
EA01
Vendor SHARP
PANEL
SMPS BOARD
MAIN BOARD
Byte Item
0 Factory Reset -
1 Type 70H6AU0VK
2 Local set US
3 SW Model UKU6000
4 BOM Model 630D
5 Tuner S_T2C
6 Ch table NONE
Code BN95-02682A
Spec. CY-GK070HGSV1V/H
Vendor HANSOE
Code BN44-00874A
Spec. L75S5N_KHS,AC/DC
Chassis Ass'y BN91-17281C
PBA Ass'y BN94-10804C
Page 74
4-24
4. Troubleshooting
4-3-3. Factory Data
Option
Factory Menu Name Data Range
Factory Reset
Type
Local Set
SW Model
BOM Model
TUNER
Ch Table
-
40" 40A6AU0VK
43" 43L6AU0VK
50" 50D6AU0VK
55" 55A6AU0VK, 55S6AU0VK
60" 60H6AU0VK
65" 65A6AU0VK, 65D6AU0VK
70" 70H6AU0VK
US
UKU6000
630D
- S_T2C
NONE
MRT Option
Control
Factory Menu Name Data Range
EDID
EDID ON/OFF OFF
EDID WRITE ALL …
EDID WRITE HDMI …
EDID WRITE PC …
HDMI EDID Ver …
HDMI EDID Port …
Sub Option
RS-232 Jack UART
EXT Link Support ON
Serial Log On/Off OFF
Watchdog ON
FRC Monitoring OFF
Checksum 0x0000
Fast Boot In Production ON
USB Serial OFF
ECO IC TYPE MC8121
Page 75
Factory Menu Name Data Range
4-25
4. Troubleshooting
Info Link Server Type development
Info Link Country None
TTX Group UserOSD
Visual Test Diable
OPTION_SWU
RF Remocon Support OFF
CDD mode …
DPMS Support OFF
T-CON Device JazzFT
RM Server Type Operating
LMF LEAVE THRESHOLD 160
LMF TRIM THRESHOLD 120
LMF TERM THRESHOLD 80
EOS Click OFF
BP PMS Reset 1
FAnet Thread 2
CI CPLD Version 1
ACM_MC ON
UNIQUE TRIPLET ON
FS_FAV OFF
Private Range USE ON
SCSA Support OFF
OCM Reboot ON
SPI Protection
FKP Server Type Default
OCM Support ON
Preloading Support ON
Multitasking Support ON
Browser preloading Support FULL
EXT IR Boot Support OFF
APP BOOTING SUPPORT ON
NagSam Support OFF
EWBS Support OFF
MVPD MBR Provider COMCAST
cloudscan Always Upload OFF
FirstScreen Cach Size 300
Hotel Option
Page 76
4-26
4. Troubleshooting
Factory Menu Name Data Range
Hospitality Mode OFF
Power On
Menu OSD
Operation
Music Mode
External Source
Eco Solution
Cloning
Shop Option
Exhibition Mode OFF
Peak Mode ON
Metadata ON
Shopmode Picture Reset ON
Asia Option
Unbalance OFF
AF Level adjust 0
TX Power Level 0
Mono Last Memory OFF
H Shaking 0
SOUND
High Devi OFF
Carrier_Mute ON
Pilot Level High Thld 0x20h
Pilot Level Low THLD 0x10h
Carrier2 Amp High ThLD 9
Carrier2 Amp Low THLD 6
Amp Volume 0xc4h
*If the broadcast signal is not good, TV will
complement the characteristics of the signal (most
use when weak signal comes from the growing area
countries)
*If the noise comes from weakness-electromagnetic
eld, TV will be set Mute automatically(Only default
on in North America)
* The High threshold value of stereo signal(If Pilot
level is greather than High threshold value, recognize
Stereo signal)
* The Low threshold value of stereo signal(If Pilot
level is less than Low threshold value, recognize
Mono signal)
Amp Scale 0x3ch
Amp EQ Check Sum 0x000057B5
Subwoofer Support 3
Woofer Type 0
Woofer Volume 0xc7h
Page 77
Factory Menu Name Data Range
4-27
4. Troubleshooting
Woofer Scale 0x3fh
Woofer Check sum 0x0000A273
PEQ Inx 76
PEQ Test Ready
Speaker EQ ON
Bottom Checksum NONE
Wall Filter Type 3
SRS Tuning Parm 0
SPDIF PCM Gain -9
AudioDock BT Delay 90
3D_Glass BT delay 50
Mic Scale OFF
India Sound 0
Speaker Delay Normal 0
NTV CU Delay NORMAL
Lipsync Inx 1
Lipsync Checksum 0x4972
Lipsync USB Test Ready
Lipsync BT Checksum 0x0000
TP volume 0xc4h
TP Scale 0x6ch
TP EQ CheckSum NONE
Debug
Factory Menu Name Data Range
Spread Spectrum
LVDS Spread 0
DDR Spread 0
Period 0
Amplitude 0
HD DDR SSC ON OFF OFF
HD DDR SSC Value 0
FHD DDR SSC ON OFF OFF
FHD DDR SSC Value 4
UHD DDR SSC ON OFF ON
UHD DDR SSC Value 0
P eBus SSC ON/OFF OFF
Page 78
4-28
4. Troubleshooting
Factory Menu Name Data Range
P eBus Value 0
LVDS SSC ON/OFF OFF
LVDS SSC Value 0
AP Vx1 SSC ON/OFF ON
AP Vx1 Value 12
N Vx1 SSC ON/OFF ON
N Vx1 Value 0
FRC Vx1 SSC ON/OFF OFF
FRC Vx1 SSC Period 0
FRC Vx1 SSC Modulation 0
FRC LVDS ON/OFF ON
FRC LVDS SSC MFR 3
FRC LVDS SSC MRR 2
FRC DDR SSC ON/OFF ON
FRC DDR SSC Period 1
FRC DDR SSC Modulation 2
ADV7619 Data strength 1
ADV7619 Clock strength 1
ADV7619 H_V_DE strength 1
AP DDR SSC ON/OFF OFF
AP DDR SSC Value 0
AP USIT SSC ON/OFF ON
AP USIT SSC Value 13
OCM Vx1 SSC ON/OFF OFF
OCM Vx1 SSC Value 0
TCON USIT SSC ON/OFF BYPASS
DDR Margin
A CTRL_OFFSET_0_3 0
A CTRL_OFFSET_D 0
B CTRL_OFFSET_0_3 0
B CTRL_OFFSET_D 0
BT_ON_OFF
RF Mute Time
Tuner Margin
FRC
FRC FDISPLAY ON/OFF OFF
3D FDISPLAY ON/OFF OFF
ON
600ms
3
European specications
Page 79
Factory Menu Name Data Range
4-29
4. Troubleshooting
PC Mode ON/OFF OFF
FRC VX1 RX EQ SETTING OFF
FRC VX1 TX Pre_emphasis setting 0
Netix OSD Threshold 179
TCON
TCON_TEMP READ 34
TEMP LAST 6000
DCC VERSION 0x0
TCON Demura Bypass OFF
TCON FDisplay OFF
Panel Code 1
Panel Code 2
Panel Revision
Panel Menu Week
Panel S/N 1
Panel S/N 2
Panel S/N 3
Panel S/N 4
MPEG Margin
H.264 Margin
CAM Wait Time
Voice Debug
20
15
15
OFF
Power Management
Cert Option
RM_BIST_DTV
RM_BIST_ATV
RM_BIST_CABLE
Waiting
0
0
0
SerDES Check
SerDES Tuner Failure
HDMI SW Failure
HDMI Rx Failure
MP Failure
Main SerDES Failure
Jack SerDES Failure
Stress Mode
Log Analyzer
Error Popup On/Off
OFF
ON
OFF
Page 80
4-30
4. Troubleshooting
Factory Menu Name Data Range
DeadLock KILL
CES Option
CES Convergence Option
CES ATSC 3_0
CES OOBE MVPD SUPPORT
BT DUT
BT Throughput
Reproduce Module
OFF
OFF
OFF
OFF
OFF
OFF
Failure
ON
21_9
L-DETECT STABLE TIME 7
L-DETECT UNSTABLE TIME 3
L-DETECT CAPTION THRESHOLD 720
L-DETECT RAGION THRESHOLD 720
L-DETECT B-LEVEL THRESHOLD 32
L-DETECT USB SUPPORT 0
DB Download
MRT Option Dump Failure
Picture Data Dump Failure
VCONF Dump Failure
Read Eco Sensor Data
No Signal Power OFF
Alert Option
Default HDMI1 Booting
0
ON
ON
OFF
SVC
Factory Menu Name Data Range
Self Test(for HW)
Info
Reset
Apps Reset
SVC Reset
SPI Flash Reset
Data Sync Reset
Factory Data Reset
* the Output of test pattern from each IC
OPTION_HDMI
DVI/HDMI SOUND Auto
HDMI HOT PLUG Disable
Page 81
Factory Menu Name Data Range
4-31
4. Troubleshooting
HOTPLUG SWITCHING Auto
HOT PLUG DURATION 800ms
CLK TERM DURATION 300ms
HDMI FLT CNT SIG 0ms
HDMI FLT CND SIG2
HDMI FLT CNT LOS 0ms
UNSTABLE BAN CNT 1250ms
HDMI ROBIN 0
HDMI Callback ON
HDMI CTS Thld 0
HDMI CTS Cnt1 0
HDMI EQ 0
HDMI Write Type 0
HDMI Switch 0
DVI SET TIME 0
H Write 0
HDMI Sync 0
HDMI 3D DET 1
HOT PLUG OFF HOLD TIME 600ms
HDMI MUTE TIME 0ms
HDMI NFST UNMUTE TIME 800ms
HDMI FST UNMUTE TIME 0ms
REPEA AUDIO PKT OFF
HDMI Stable Count 3
HDMI HDCP EN OFF
HDMI HDCP EN FLAG 85
POWER ON FLT CNT LOS
HDCP UPDATE SPI READY
SPI VERSION 0
HdmiRx EQ 0
HDMI TMDS ERR DET 1
DVB CI
TS Clock delay TC 0
TS Clock delay S 0
CI Control Buf ON ON
TS Clock delay CPU 1
TS Clock delay TC2 0
Page 82

4-32
4. Troubleshooting
Factory Menu Name Data Range
TS Clock delay S2 0
CI Control Buf ON2 1
TS Clock delay CPU2 0
Test Pattern
Scaler Pattern OFF
US Post Pattern OFF
FRC Pre Pattern 0
FRC Post Pattern 0
SOC TCON Pattern 0
SOC TCON Pattern Level 255
FRC OSD Pre Pattern 0
FRC OSD Post Pattern 0
FRC2 Pre Pattern 0
FRC2 Post Pattern 0
SOC TCON2 Pattern 0
SOC TCON2 Pattern Level 255
Upgrade
T-CON DATA UPGRADE
T-CON FW UPGRADE
T-CON CheckSum
T-CON2 Usb Download
T-CON2 CheckSum
PANEL EEPROM UPGRADE
PANEL FLASH UPGRADE
Logic Usb D/L
SUBMICOM UPGRADE * Upgrade Sub-Micom Program
SUBMICOM JP USB UPGRADE
BT UPGRADE * Upgarde BT(There is upgrade program in
BT FREEPAIRING
Function Upgrade
Main-Image)
FRC3D FW UPGRADE
FRC3D SRP UPGRADE
FRC3D LD UPGRADE
FRC2 3D FW UPGRADE
Camera Upgade * Upgarde Camera module(There is upgrade
Mic Upgrade * Upgarde MIC in Camera module(There is
program in Main-Image)
upgrade program in Main-Image)
Page 83
Factory Menu Name Data Range
4-33
4. Troubleshooting
Jump UPGRADE
IR Blaster Upgrade
IR Blaster delay time
NTV CU UPDATE
UD LDC PROFILE UPGRADE
Pic Data USB Update
Audio Data USB Update
Eco Data USB Update
CI CPLD Upgrade
SC ADK Upgrade
Other Setting
Delete S/N
IPERF Stopped
Expert
CAL Data Backup …
CAL Data Restore
MICOM POWER OFF ON
NTV CU FW VER 0
ATV IF AGC SPEED 0
Upgrade UHD OSD Test 0
Main USB Path
JackP USB Path
Source Direct On/Off OFF
Apps Update
Auto Power LAST POWER
SMCE Control
Motor Test
Cube Test
V APP OFF
Picture Direct On/Off OFF
SVC Panel
ORIGINAL
S/N
Serial number
Writing S/N
ADC/WB
Page 84
4-34
4. Troubleshooting
Factory Menu Name Data Range
ADC
AV Calibaration
Comp Calibration
PC Calibration
HDMI Calibration
ADC Result
1st_Y_GH 0
1st_Y_GL 0
1st_Cb_BH 0
1st_Cb_BL 0
1st_Cr_RH 0
1st_Cr_RL 0
2nd_R_L 128
2nd_G_L 128
2nd_B_L 128
2nd_R_H 69
2nd_G_H 69
2nd_B_H 69
White Balance
R-Offset 128
G-Offset 128
B-Offset 128
R-Gain 128
G-Gain 128
B-Gain 128
WB-W2_R_Offset 128
WB_W2_B_Offset 128
WB_W2_R_Gain 136
WB_W2_B_Gain 76
WB_N_R_Offset 128
WB_N_B_Offset 128
WB_N_R_Gain 131
WB_N_B_Gain 119
MGA
MGA On/Off OFF
R1_Gain
G1_Gain
Page 85
Factory Menu Name Data Range
4-35
4. Troubleshooting
B1_Gain
R2_Gain
G2_Gain
B2_Gain
R3_Gain
G3_Gain
B3_Gain
R4_Gain
G4_Gain
B4_Gain
R5_Gain
G5_Gain
B5_Gain
R6_Gain
G6_Gain
B6_Gain
R7_Gain
G7_Gain
B7_Gain
R8_Gain
G8_Gain
B8_Gain
R9_Gain
G9_Gain
B9_Gain
R10_Gain
G10_Gain
B10_Gain
SPI White Balance
SPI White Balance On/Off
SPI R-Offset
SPI G-Offset
SPI B-Offset
SPI R-Gain
SPI G-Gain
SPI B-Gain
SPI N Rgain
Page 86
4-36
4. Troubleshooting
Factory Menu Name Data Range
SPI N Bgain
SPI N Roffset
SPI N Boffset
SPI W2 Rgain
SPI W2 Bgain
SPI W2 Roffset
SPI W2 Boffset
SPI MGA
WB Data to SPI
Advanced
Page 87
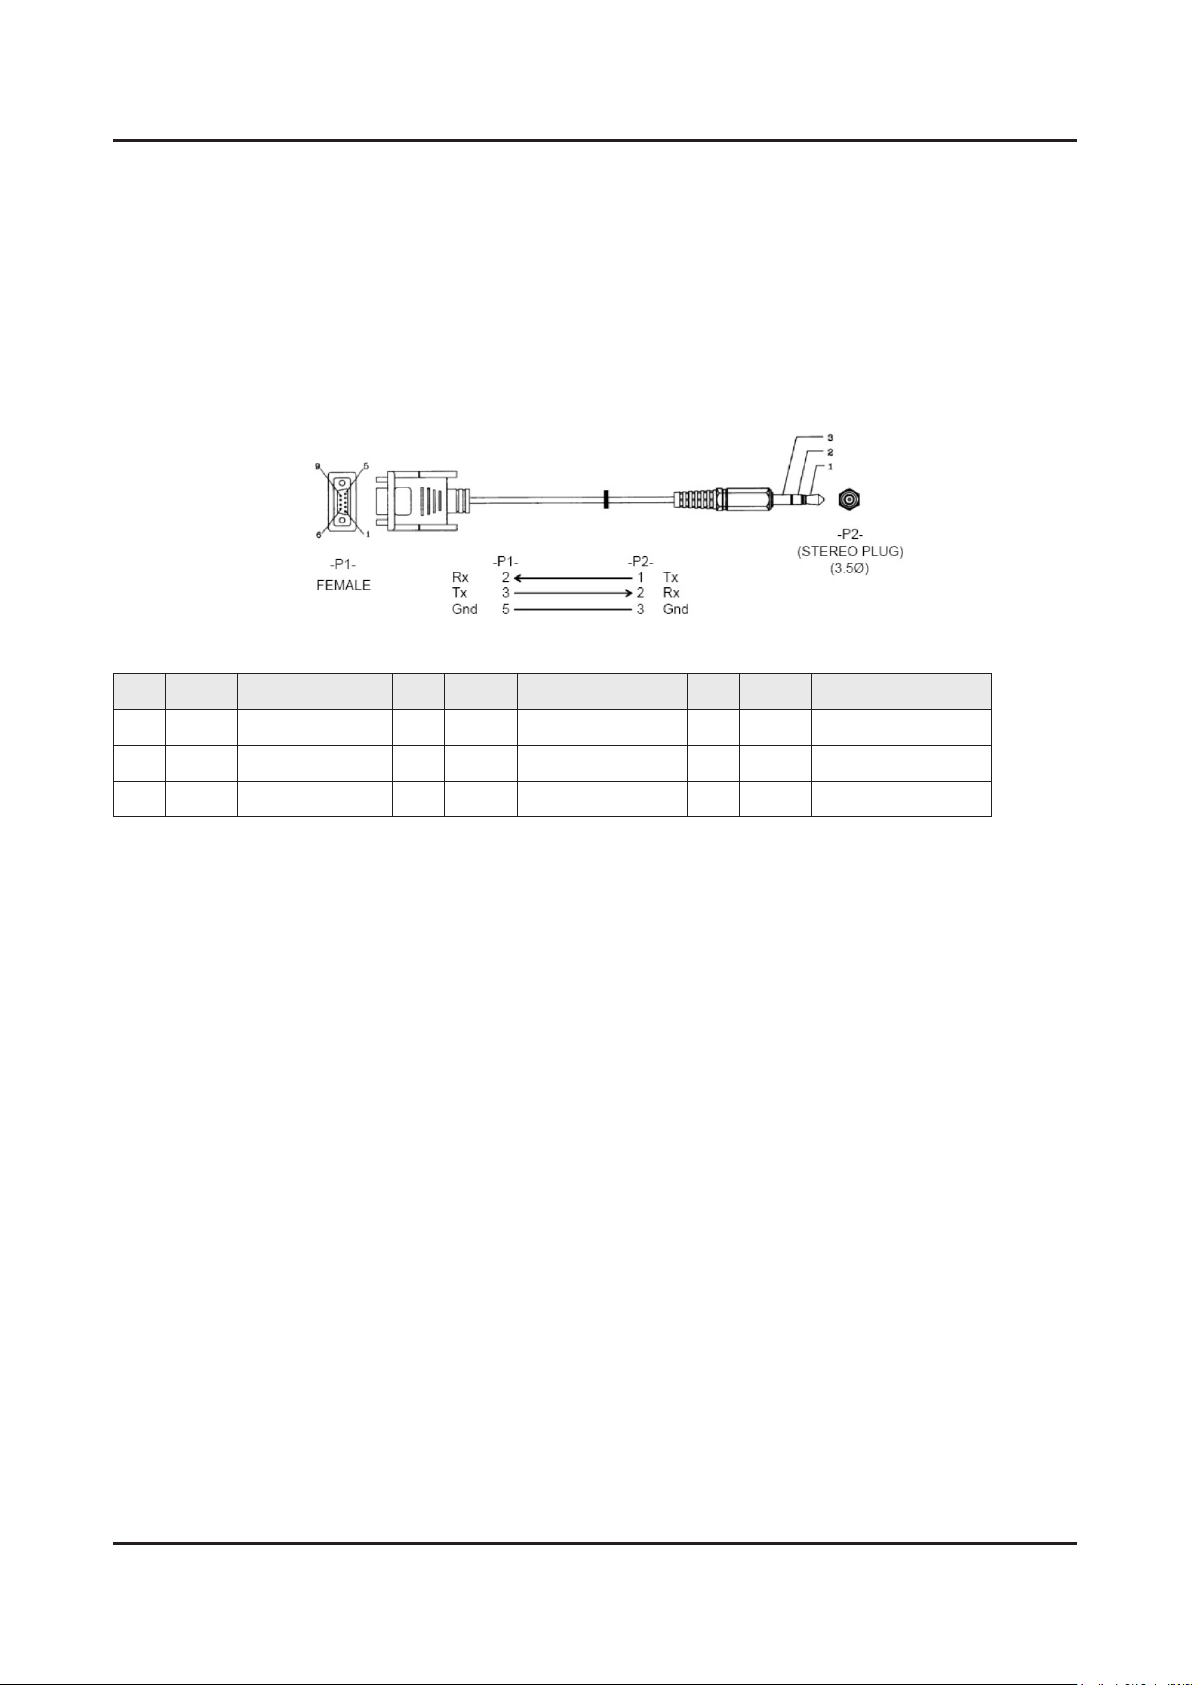
4-4. RS-232C
4-37
4. Troubleshooting
4-4-1. RS232C Control
Port : COM#(Serial)•
Baud rate : 9600•
Data Bit : 8 bit•
Parity : None•
Stop Bits : 1•
Flow Control : None -
Description of RS232C
Pin# Name Full Name Pin# Name Full Name Pin# Name Full Name
CD Carrier Detect
1
RxD Received Data
2
TxD Transmitted Data
3
DTR Data Terminal Ready
4
GND Signal Ground
5
DSR Data Set Ready
6
RTS Request To Send
7
CTS Clear To Send
8
RI Ring Indicator
9
Page 88
4-38
4. Troubleshooting
4-5. AV Control Tabe
Control Item Cmd1 Cmd2 Cmd3 Value
General Power Power 0x00 0x00 0x00 0x00
Off 0x01
On 0x02
Volume Direct 0x01 0x00 0x00 (0~100)
Up 0x01 0x00
Down 0x02 0x00
Mute 0x02 0x00 0x00 0x00
Ch. Direct 0x04 -
Continuous Up
Down
Input Source List TV TV
AV AV1
AV2
AV3
S-Video S-Video1
S-Video2
S-Video3
Component Component1
Component2
Component3
PC PC1
PC2
PC3
HDMI HDMI1
HDMI2
HDMI3
HDMI4
DVI DVI1
DVI2
DVI3
RVU RVU
PICTURE Mode Dynamic(Entertain)
Standard
Movie
Natural
CAL-NIGHT
CAL-DAY
BD Wise
0x03 0x00 0x01 0x00
0x02 0x00
0x0a 0x00 0x00 0x00
0x01 0x00
0x01
0x02
0x02 0x00
0x01
0x02
0x03 0x00
0x01
0x02
0x04 0x00
0x01
0x02
0x05 0x00
0x01
0x02
0x03
0x06 0x00
0x01
0x02
0x07 0x00
0x0b 0x00 0x00 0x00
0x01
0x02
0x03
0x04
0x05
0x06
Page 89
Control Item Cmd1 Cmd2 Cmd3 Value
4-39
4. Troubleshooting
Relax
PICTURE BackLight(CellLight) 0~20
Contrast 0~100
Brightness 0~100
Sharpness 0~100
Color 0~10
Tint G/R
Advanced Settings Black Tone Off
Dark
Darker
Darkest
Dynamic Contrast Off
Low
Medium
HIgh
Gamma -3 ~ 3
RGB Only Mode Off
Red
Green
Blue
Color Space Auto
Native
Custom
White Balance R-Offset(LCD)
White Balance G-Offset(LCD)
White Balance B-Offset(LCD)
White Balance R-Gain(LCD)
White Balance G-Gain(LCD)
White Balance B-Gain(LCD)
White Balance Reset(LCD)
Flesh Tone -15 ~ 15
xvYCC Off
On
Motion Lighting Off
On
Color Space Custom
Color
Red
Green
Blue
0x07
0x01 0x00 (0~20)
0x02 0x00 (0~100)
0x03 0x00 (0~100)
0x04 0x00 (0~100)
0x05 0x00 (0~100)
0x06 0x00 (0~100)
0x07 0x00 0x00
0x01
0x02
0x03
0x01 0x00
0x01
0x02
0x03
0x03 (-3~3)
0x05 0x00
0x01
0x02
0x03
0x06 0x00
0x01
0x02
0x07 (-50~50)
0x08 (-50~50)
0x09 (-50~50)
0x0a (-50~50)
0x0b (-50~50)
0x0c (-50~50)
0x0d 0x00
0x0e (-15~15)
0x10 0x00
0x01
0x11 0x00
0x01
0x12 0x00
0x01
0x02
Page 90
4-40
4. Troubleshooting
Control Item Cmd1 Cmd2 Cmd3 Value
PICTURE Advanced Settings Color Space Custom
Color
Color Space Custom
Color Red Value
Color Space Custom
Color Green Value
Color Space Custom
Color Blue Value
Reset
LED Motion Plus Off
10p White Balance Off
Picture Option Color Tone Cool
Digital Noise Filter Off
MPEG Noise Filter Off
HDMI Black Level Normal
HDMI Black Level Low
Yellow
Cyan
Magenta
0~100
0~100
0~100
On(Normal)
Cinema
Ticker
On
Red
Green
Blue
Reset
10 Point
Interval
Standard
Warm1
Warm2
Low
Medium
High
Auto
Auto
Visualization
Low
Medium
High
Auto
0x03
0x04
0x05
0x13 0~100
0x14 0~100
0x15 0~100
0x16 0x00
0x0a 0x07 0x00
0x01
0x02
0x03
0x0e 0x00 0
0x00 1
0x0f (1~10) (-50~50)
0x10 (1~10) (-50~50)
0x11 (1~10) (-50~50)
0x12 0 (1~10)
0x13 0x00 0x00
0x14 0x00 0x00
0x0a 0x00 0x00
0x01
0x02
0x03
0x02 0x00
0x01
0x02
0x03
0x04
0x05
0x03 0x00
0x01
0x02
0x03
0x04
0x04 0x00
0x01
Page 91
Control Item Cmd1 Cmd2 Cmd3 Value
4-41
4. Troubleshooting
Film Mode Off
PICTURE Picture Option Film Mode Auto1
Auto2
Cinema
Smooth
Auto Motion Plus Off
Clear
Standard
Smooth
Custom
Blur Reduction
Judder Reduction
LED Clear Motion
Reset
HDMI UHD Color Off
On
Analog Clean View On
Off
Screen Adjustment Picture Size 16:9
Zoom1
Zoom2
Wide Fit
4:3
Screen Fit
Smart View I
Smart View II
Auto Wide
Wide Zoom
Zoom
Fit to Screen Off
Zoom Zoom1
Zoom2
Zoom3
Zoom4
Position Position1
Position2
Position3
Position4
Screen Adjustment Reset
0x05 0x00
0x01
0x02
0x03
0x06 0x00
0x01
0x02
0x03
0x04
0x07 value
0x08 value
0x09 Off
0x10 0x00
0x11 0x00
0x01
0x12 0x00
0x01
0x0c 0x0a 0x01 0x00
0x01
0x02
0x03
0x04
0x05
0x06
0x07
0x08
0x09
0x0a
0x0b 0x00 0x00
0x0c 0x00 0x00
0x01
0x02
0x03
0x01 0x00
0x01
0x02
0x03
0x0d 0x00 0x00
Page 92
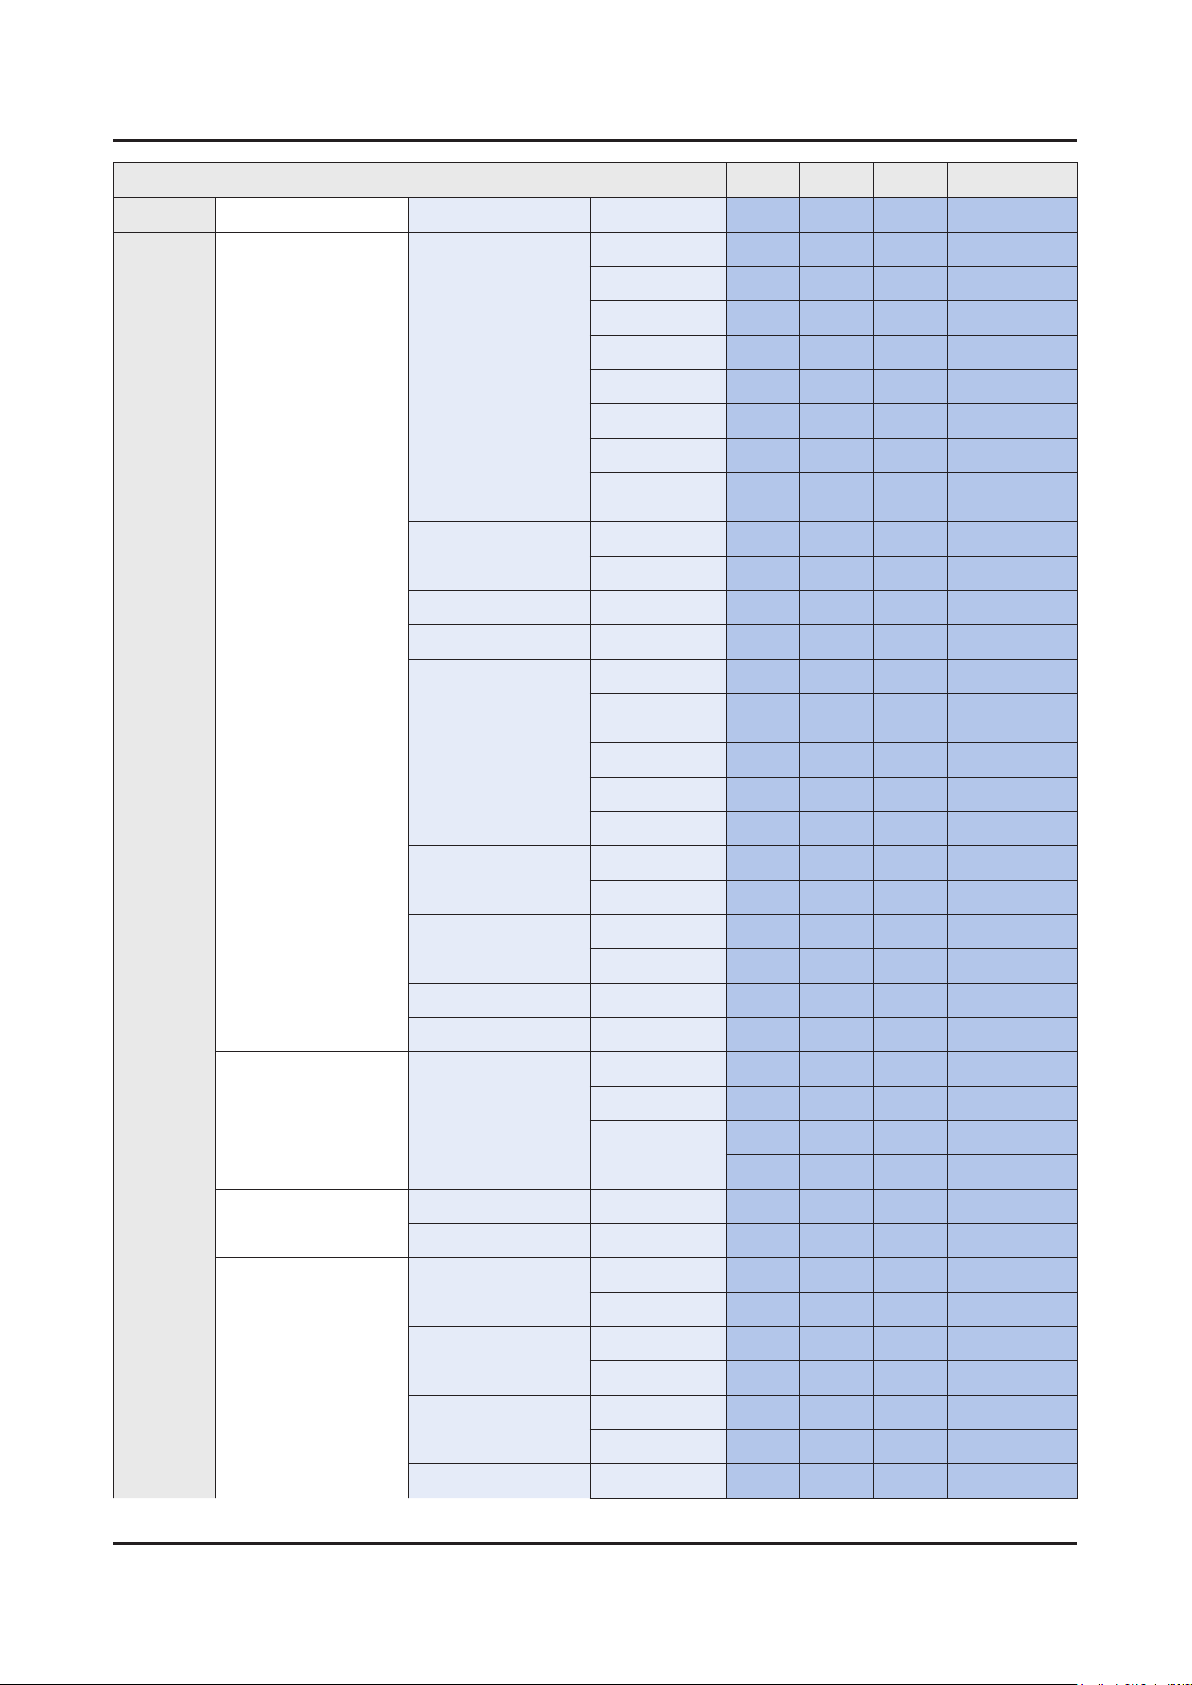
4-42
4. Troubleshooting
Control Item Cmd1 Cmd2 Cmd3 Value
Reset Picture Reset Picture
PICTURE 3D 3D Mode Off
3D->2D Off
3D View Point
Depth
3D Auto View Off
3D Light Control Low
L/R Change L to R
3D Perspective
Optimize
Factory-SVB Expert-N/D Adj On
2D->3D
Side By Side
Top Bottom
Line By Line
Vertical Line
Checker BD
Frame
Sequence
On
Message
Notice
On
Auto1
Auto2
High
R to L
Off
Fix
0x0d 0x0b 0x00 0x00
0x0e 0x0c 0x00 0x00
0x01
0x02
0x03
0x04
0x05
0x06
0x07
0x01 0x00
0x01
0x02 (-5~5)
0x03 (1~10)
0x05 0x00
0x01
0x02
0x03
0x04
0x06 0x00
0x01
0x07 0x00
0x01
0x08 value
0x09 value
0x0b 0x0d 0x00 0x00
0x01
0x02
Apply Picture Mode All Sources
Current Source
Pip Pip Off
On
Antenna Cable
Air
Channel DTV Cable
DTV Terrestrial
Size Size1
0x0f 0x00 0x00 0x00
0x01
0x11 0x00 0x00 0x00
0x01
0x01 0x00
0x01
0x02 0x00
0x01
0x03 0x00
Page 93
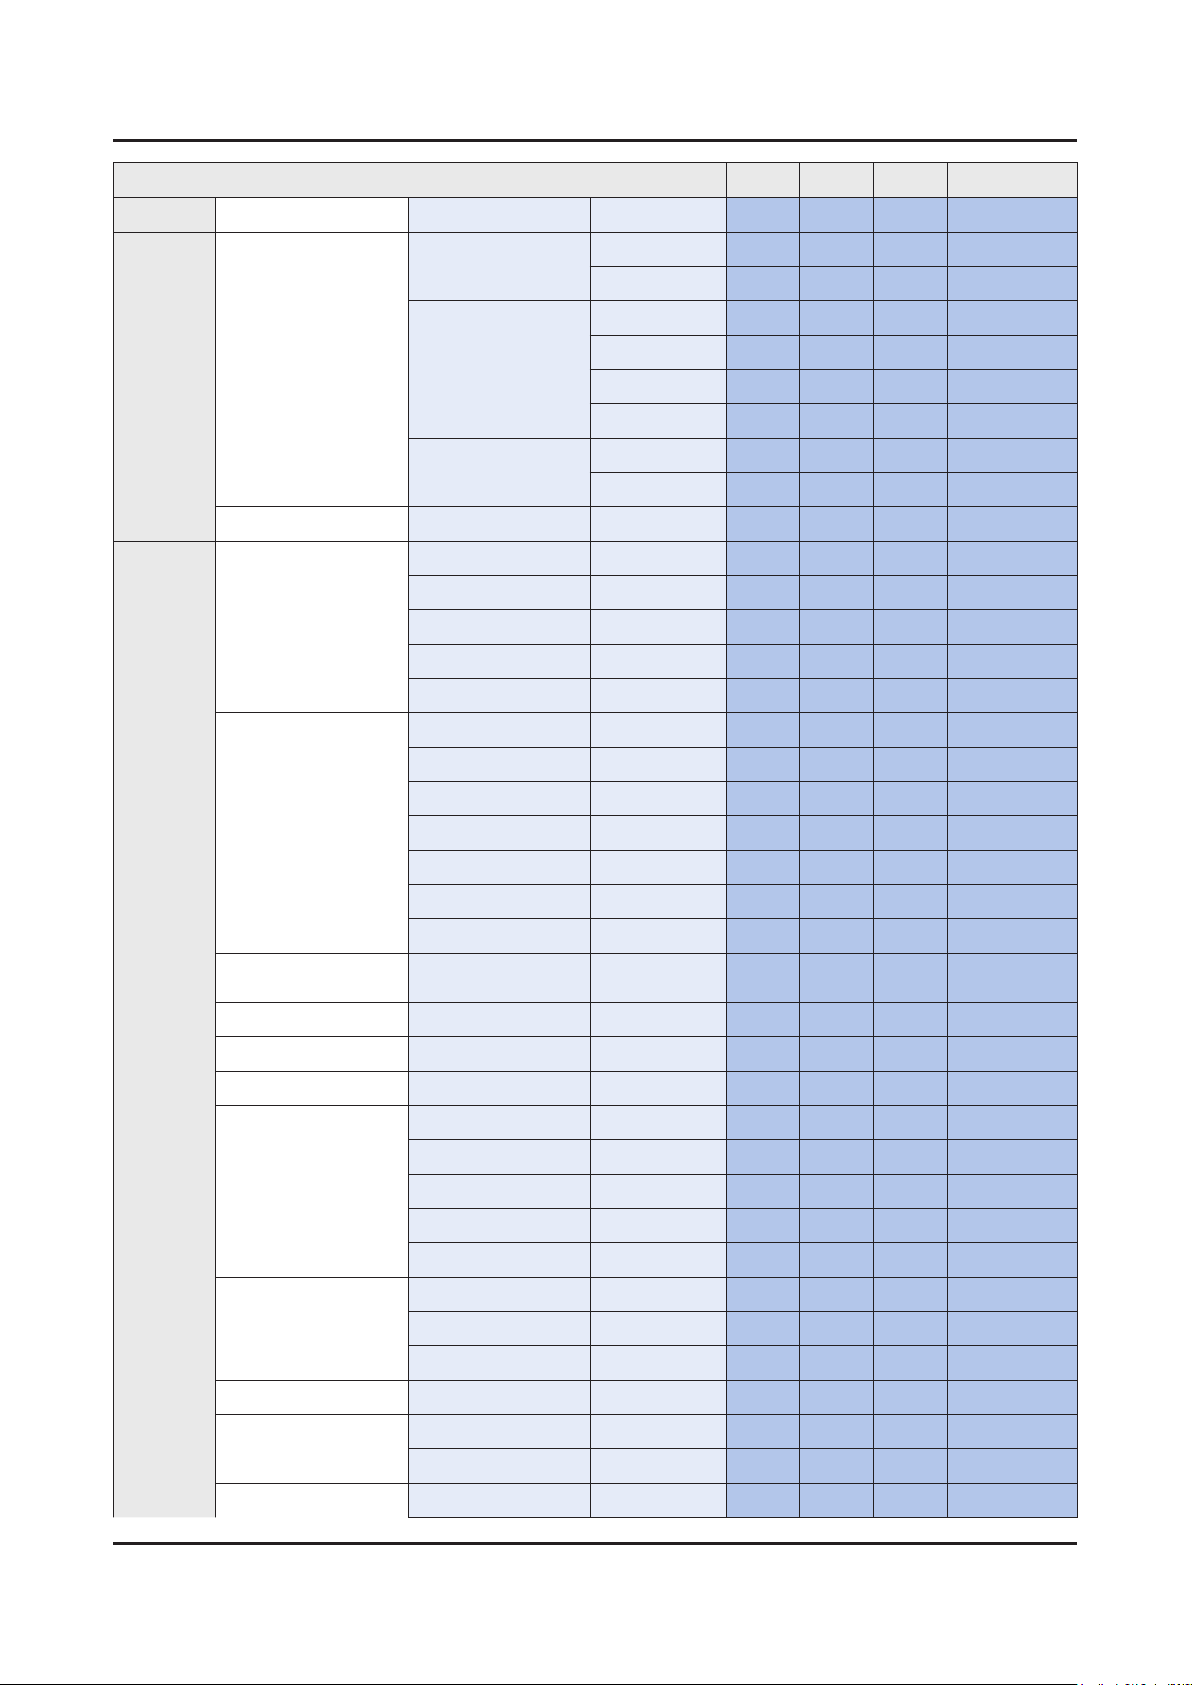
Control Item Cmd1 Cmd2 Cmd3 Value
4-43
4. Troubleshooting
Size2
PICTURE Pip Size Size3
Size4
Position Position1
Position2
Position3
Position4
Sound Select Main
Sub
Picture Off
Sound Sound Mode Standard
Music
Movie
Clear Voice
Amplify
Equalizer Balance
100hz
300hz
1khz
3khz
10khz
Reset
SRS TruSurround HDOff
0x01
0x02
0x03
0x04 0x00
0x01
0x02
0x03
0x05 0x00
0x01
0x12 0x00 0x00 0x00
0x0c 0x00 0x00 0x00
0x01
0x02
0x03
0x04
0x01 0x00 (0~20)
0x01 (0~20)
0x02 (0~20)
0x03 (0~20)
0x04 (0~20)
0x05 (0~20)
0x06 0x00
0x02 0x00 0x00
Virtual Surrond On
SRS TruDialog Off
Dialog Clarify On
Preferred Language English
Spanish
French
Korean
Japanese
Multi-Track Sound Mono
Stereo
SAP
Auto Volume Off
Auto Volume Normal
Night
Speaker Select TV Speaker
0x01
0x03 0x00 0x00
0x01
0x04 0x00 0x00
0x01
0x02
0x03
0x04
0x05 0x00 0x00
0x01
0x02
0x06 0x00 0x00
0x01
0x02
0x07 0x00 0x00
Page 94
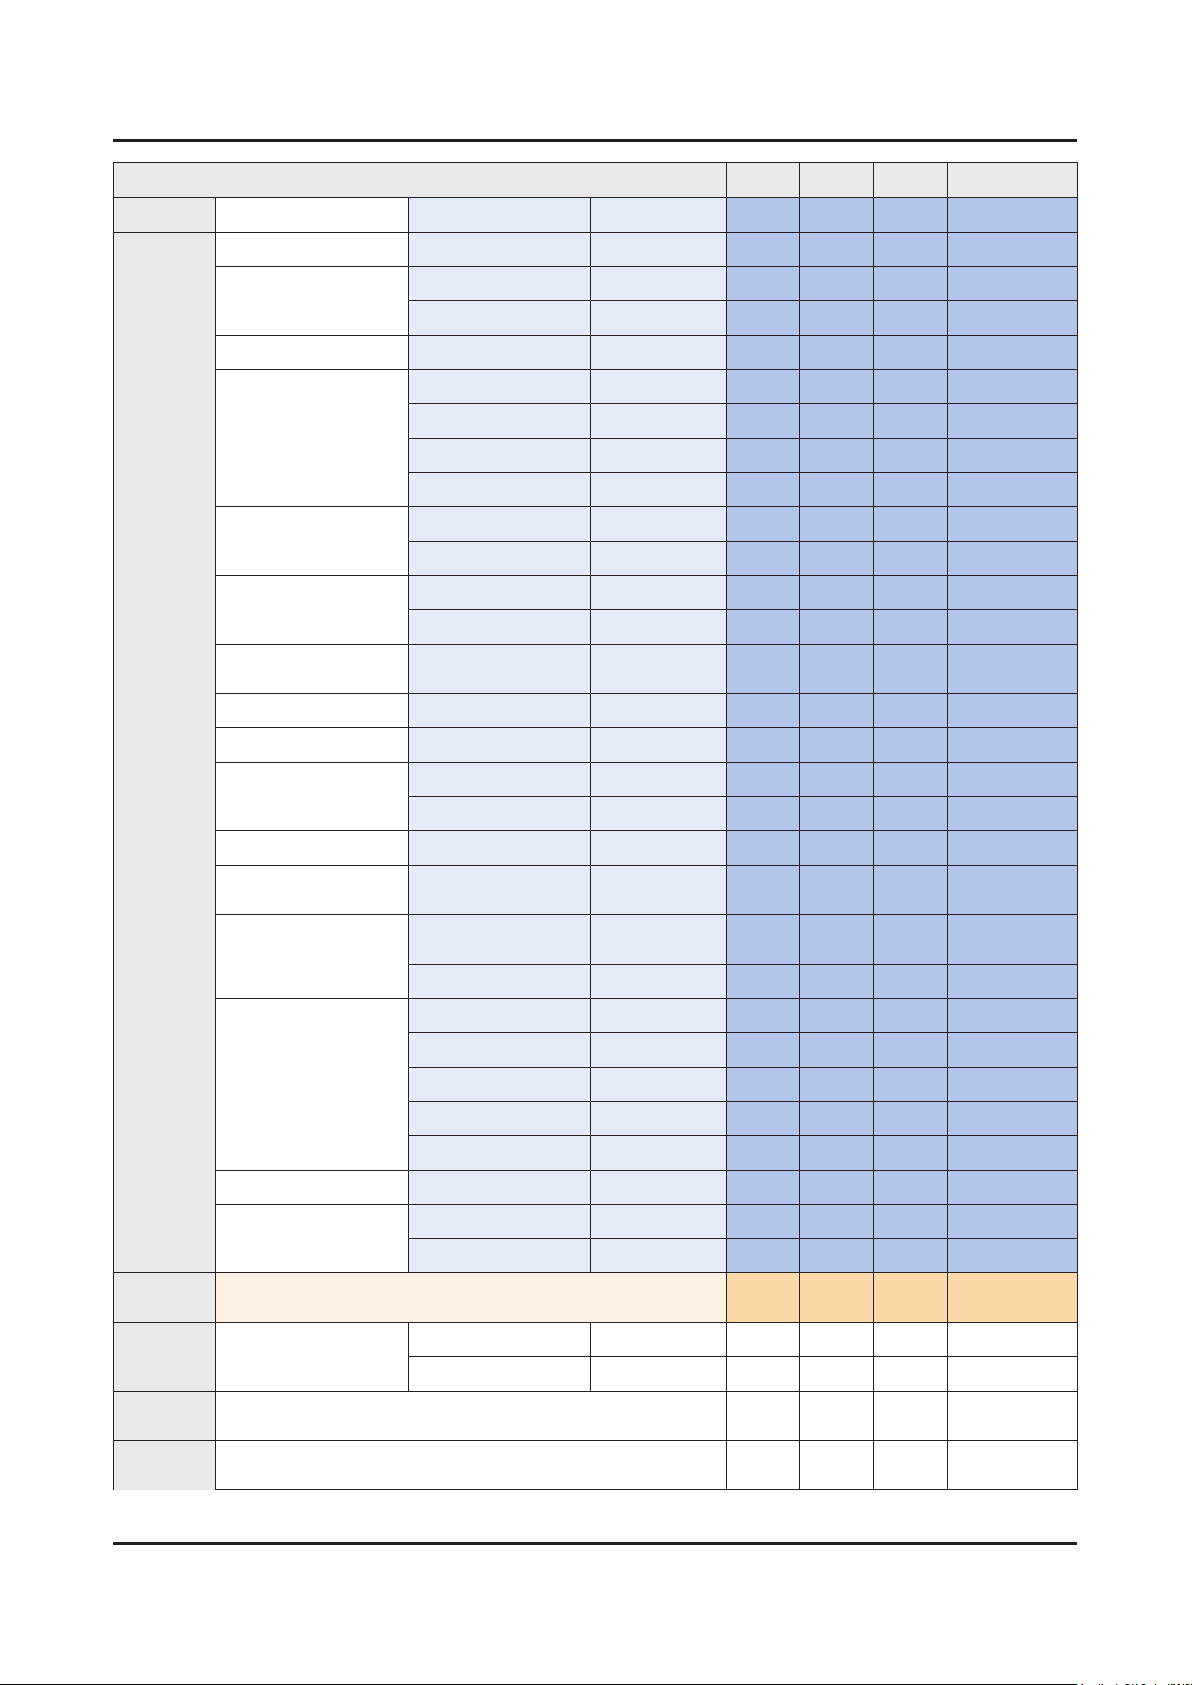
4-44
4. Troubleshooting
Control Item Cmd1 Cmd2 Cmd3 Value
External Speaker
Sound Speaker Select Audio Out
Sound Select Main
Sub
Sound Reset Sound Reset
3D Audio Off
Low
Medium
High
Auto Stereo Manual
Auto
TV Installation Type Stand
Wallmount
Audio Delay Dealy Value (0~250)
SRS CS Headphone Off
Balance
Add New Device On
Off
Audo Multi-Output Off
Multiroom Link
Settings
HDMI Audio Input
Format
Audio Format PCM
Dolby Digital Comp RF
HD Audio Off
KEY Key Generation
OSD Show/Hide Control Show
Get
Status
Get
Status
Power (On/Off)
Volume(0~100)
Multiroom
Bitstream
PCM
Dolby Digital
DTS
DTS Neo 2:5
AAC/HEAAC
On
Hide
0x01
0x01
0x08 0x00 0x00
0x01
0x09 0x00 0x00
0x0a 0x00 0x00
0x01
0x02
0x03
0x0b 0x00 0x00
0x01
0x0c 0x00 0x00
0x01
0x0d 0x00
0x0e 0x00 0x00
0x0f 0x00 0x00
0x10 0x00 0x00
0x11 0x00 0x00
0x12 0x00 0x00
0x13 0x00 0x00
0x14 0x00 0x00
0x15 0x00 0x01
0x16 0x00 0x00
0x0d 0x00 0x00
0x0e 0x00 0x00 0x00
0xf0 0x00 0x00 0x00
0xf0 0x01 0x00 0x00
0~250
(0x00~0xFA)
0x01
0x01
0x01
0x02
0x03
0x04
0x01
*Refer for
Table
0x01
Page 95
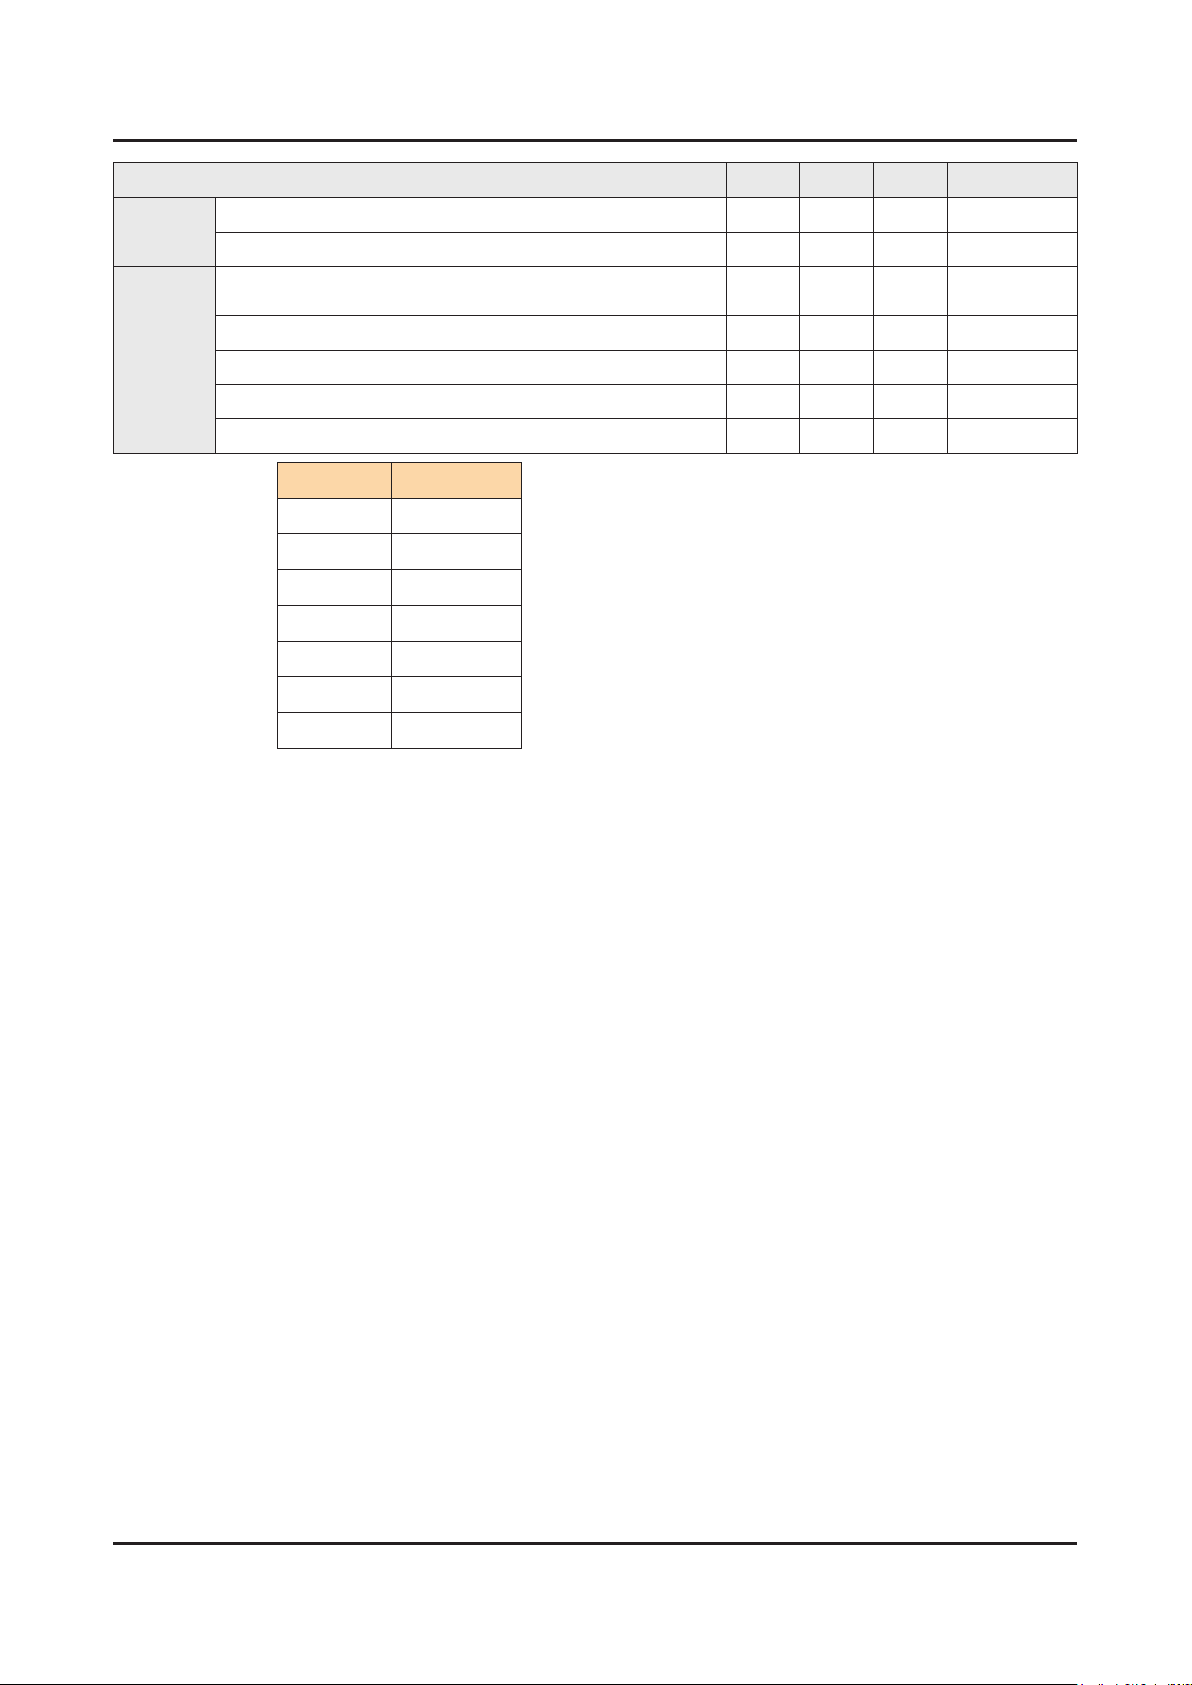
Control Item Cmd1 Cmd2 Cmd3 Value
4-45
4. Troubleshooting
Mute (On/Off)
Channel Number
Get
Status
* Refer for Table KEY Value
Source (TV/AV/…/HDMI/…)
Picture Size
3D (On/Off)
Picture Mode
Sound Mode
Up 96 (0x60)
Down 97 (0x61)
Left 101 (0x65)
Right 98 (0x62)
Menu 26 (0x1A)
Enter(OK) 104 (0x68)
0xf0 0x02 0x00 0x00
0xf0 0x03 0x00 0x00
0xf0 0x04 0x00 0x00
0xf0 0x05 0x00 0x00
0xf0 0x06 0x00 0x00
0xf0 0x07 0x00 0x00
0xf0 0x08 0x00 0x00
EXIT 45 (0x2D)
Page 96
4. Troubleshooting
4-6. Updating the TV’s Software
View your TV's software version and update it if necessary.
Settings• Support Software Update
Updating the TV’s software to the latest version
Settings • Support Software Update Update now
You can update your TV’s software by downloading the update from the Internet directly to your TV or copying the update
from a USB device that contains it to your TV.
Updating from the Internet requires an active Internet connection.•
To update using a USB ash drive, download the update package from Samsung.com to your computer. Then, save •
the update package in the USB device's top-level folder. Otherwise, the TV will not be able to locate the update
package.
DO NOT turn off the TV’s power until the update is complete. The TV will turn off and on automatically
after completing the software update. All video and audio settings return to their default settings after a
CAUTION
Updating the TV automatically
software update.
Settings • Support Software Update Auto Update
If the TV is connected to the Internet, you can have the TV's software update itself automatically while you are watching
the TV. When the background update is completed, it is applied the next time the TV is turned on.
This function may take a longer time if another network function is running concurrently.•
This function requires an Internet connection.•
If you agree to the Smart Hub terms and conditions, • Auto Update is set to On automatically. If you do not want the
TV's software to update itself automatically, set Auto Update to Off.
4-46
Page 97
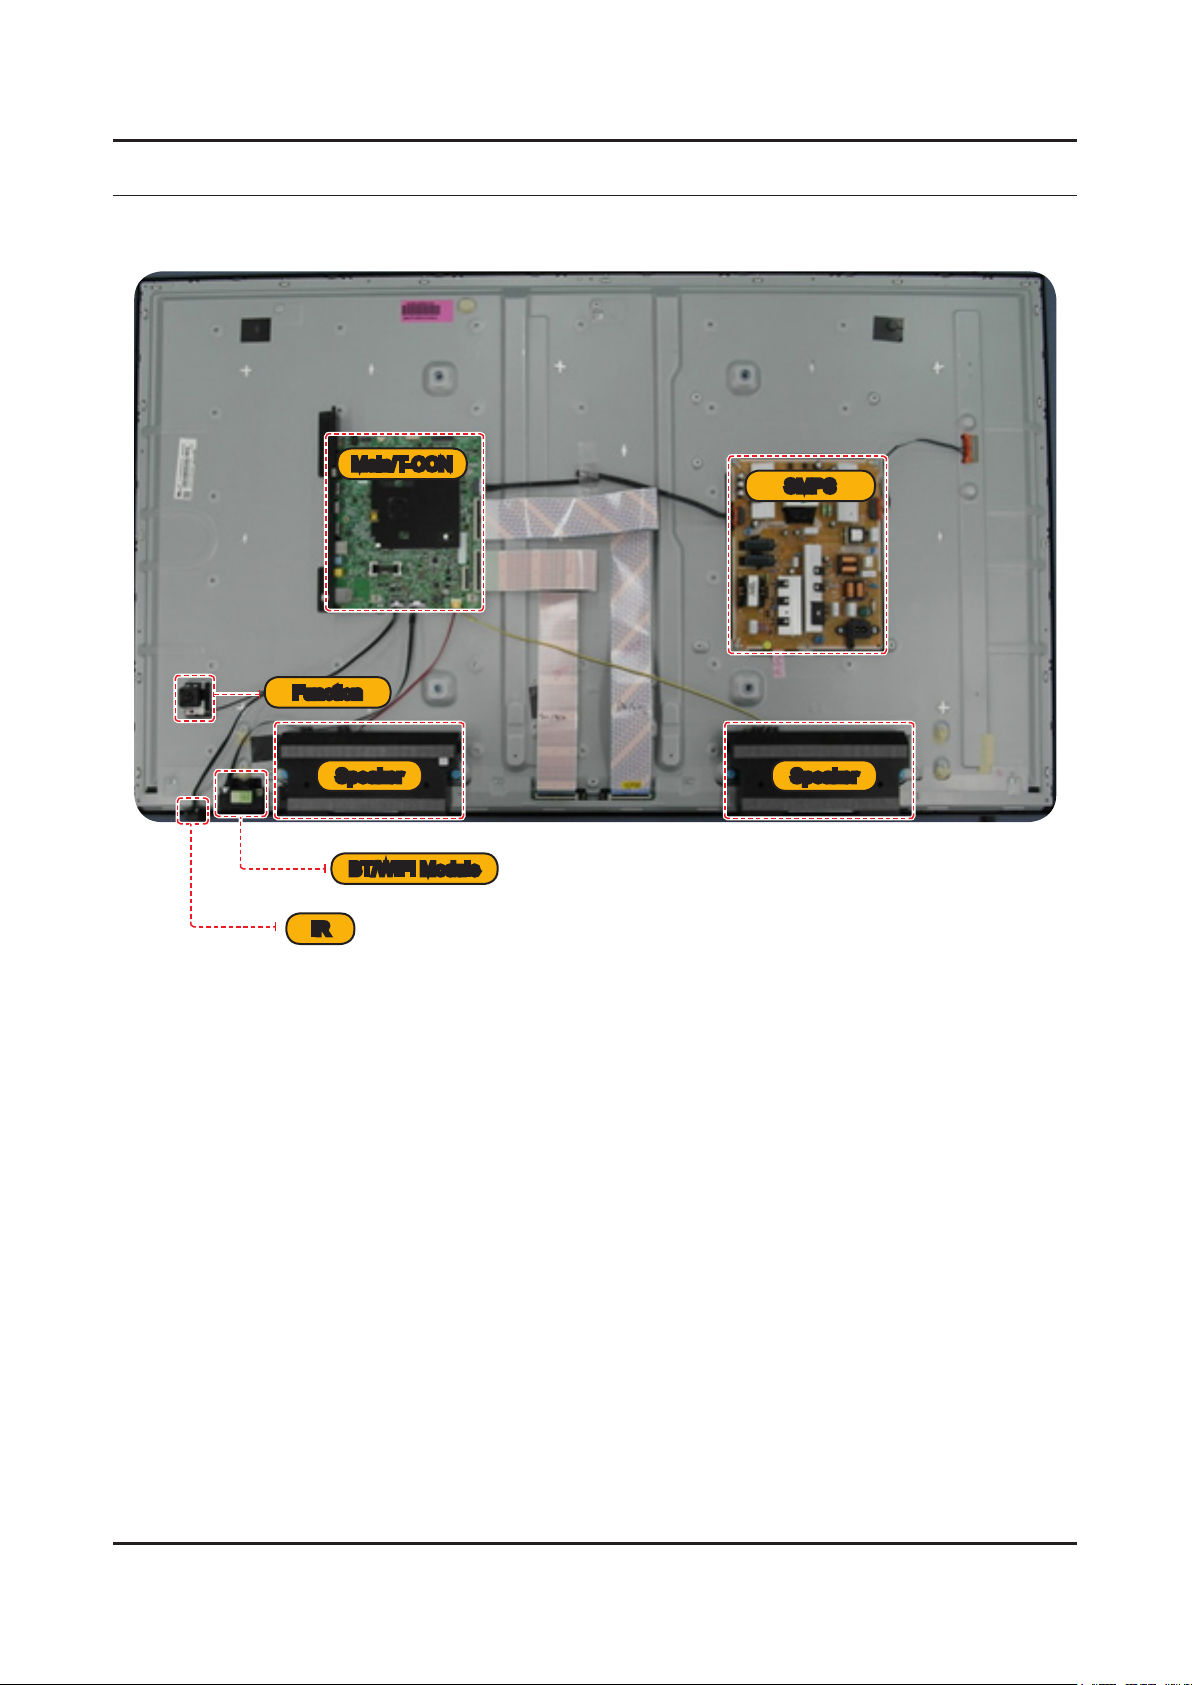
5. Wiring Diagram
5-1. Layout
Main/T-CON
Function
5. Wiring Diagram
SMPS
BT/WIFI Module
IR
SpeakerSpeaker
5-1
Page 98
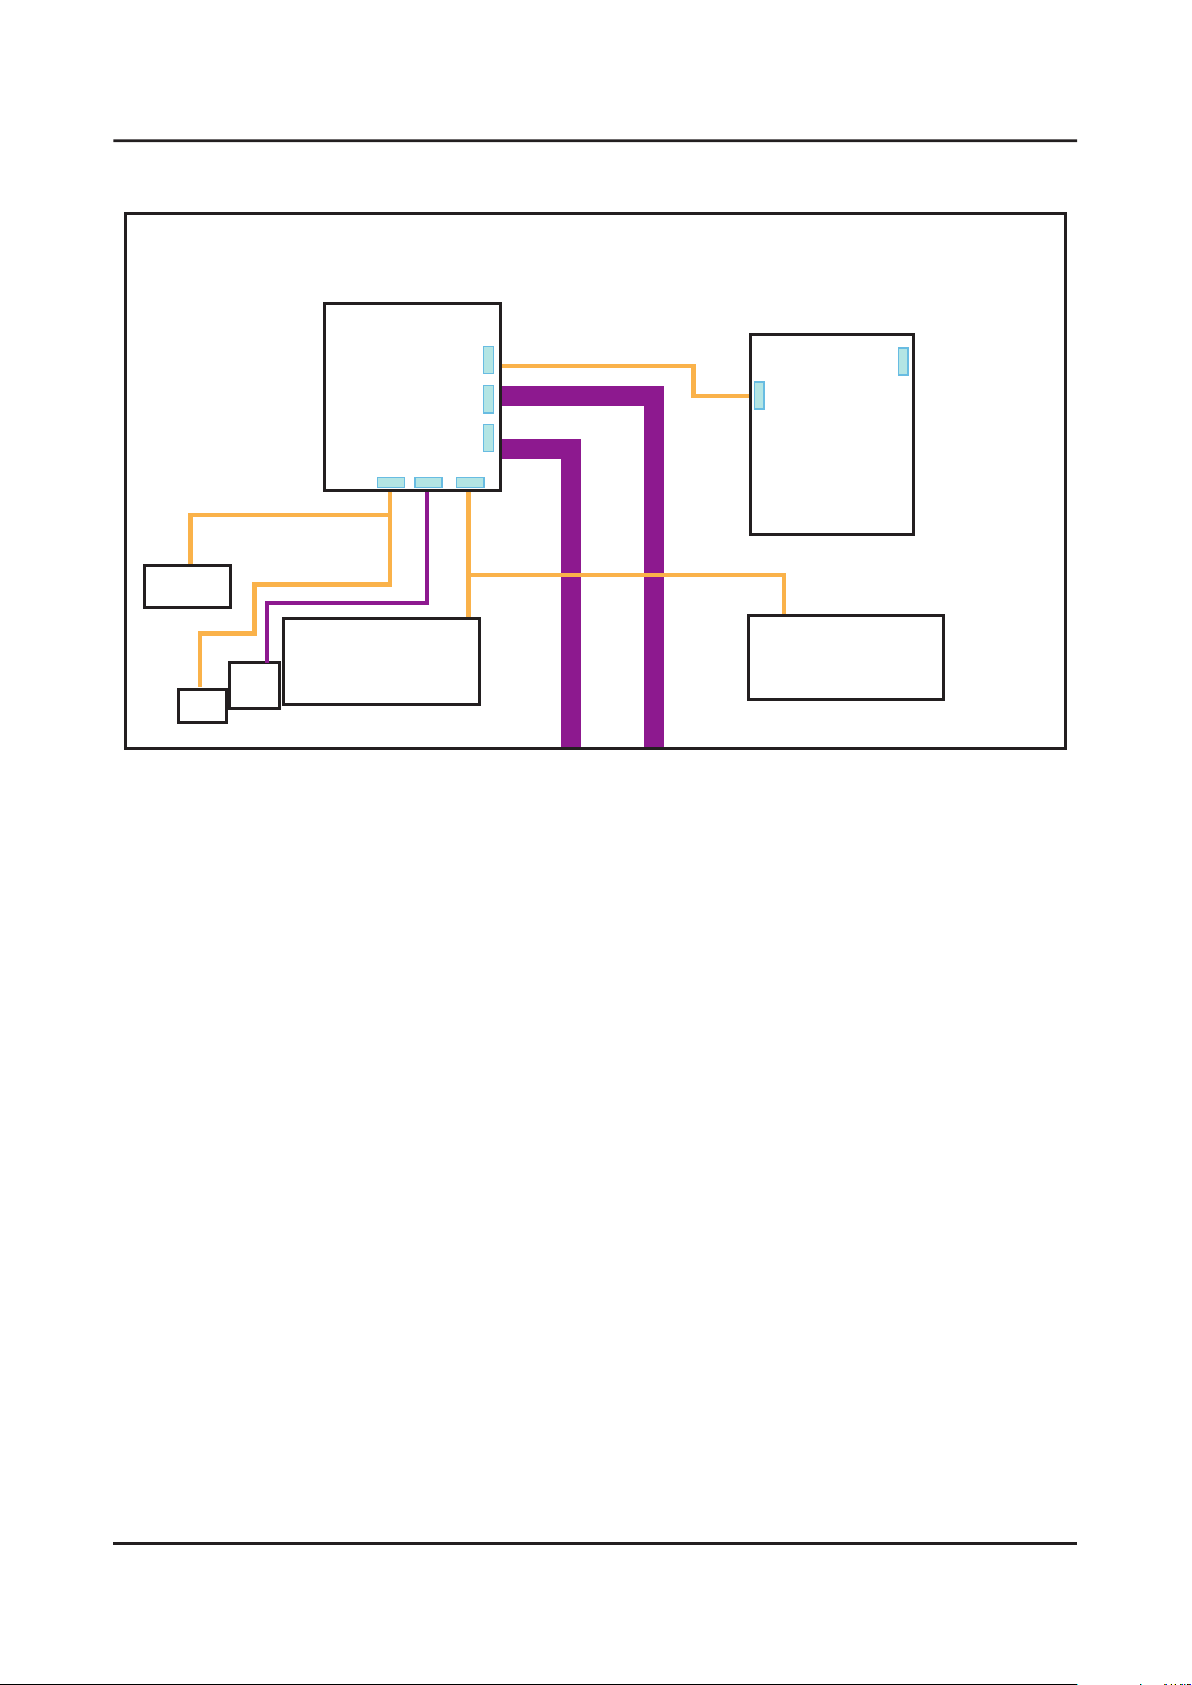
5-2
5. Wiring Diagram
CNM803
CNL802
CN202
CN1802_UT
CN1801_UT
CN501
CN2301
CN1101
MAIN
SMPS
Speaker
Speaker
BT/
WIFI
IR
Function
5-2. Wiring Diagram
Page 99
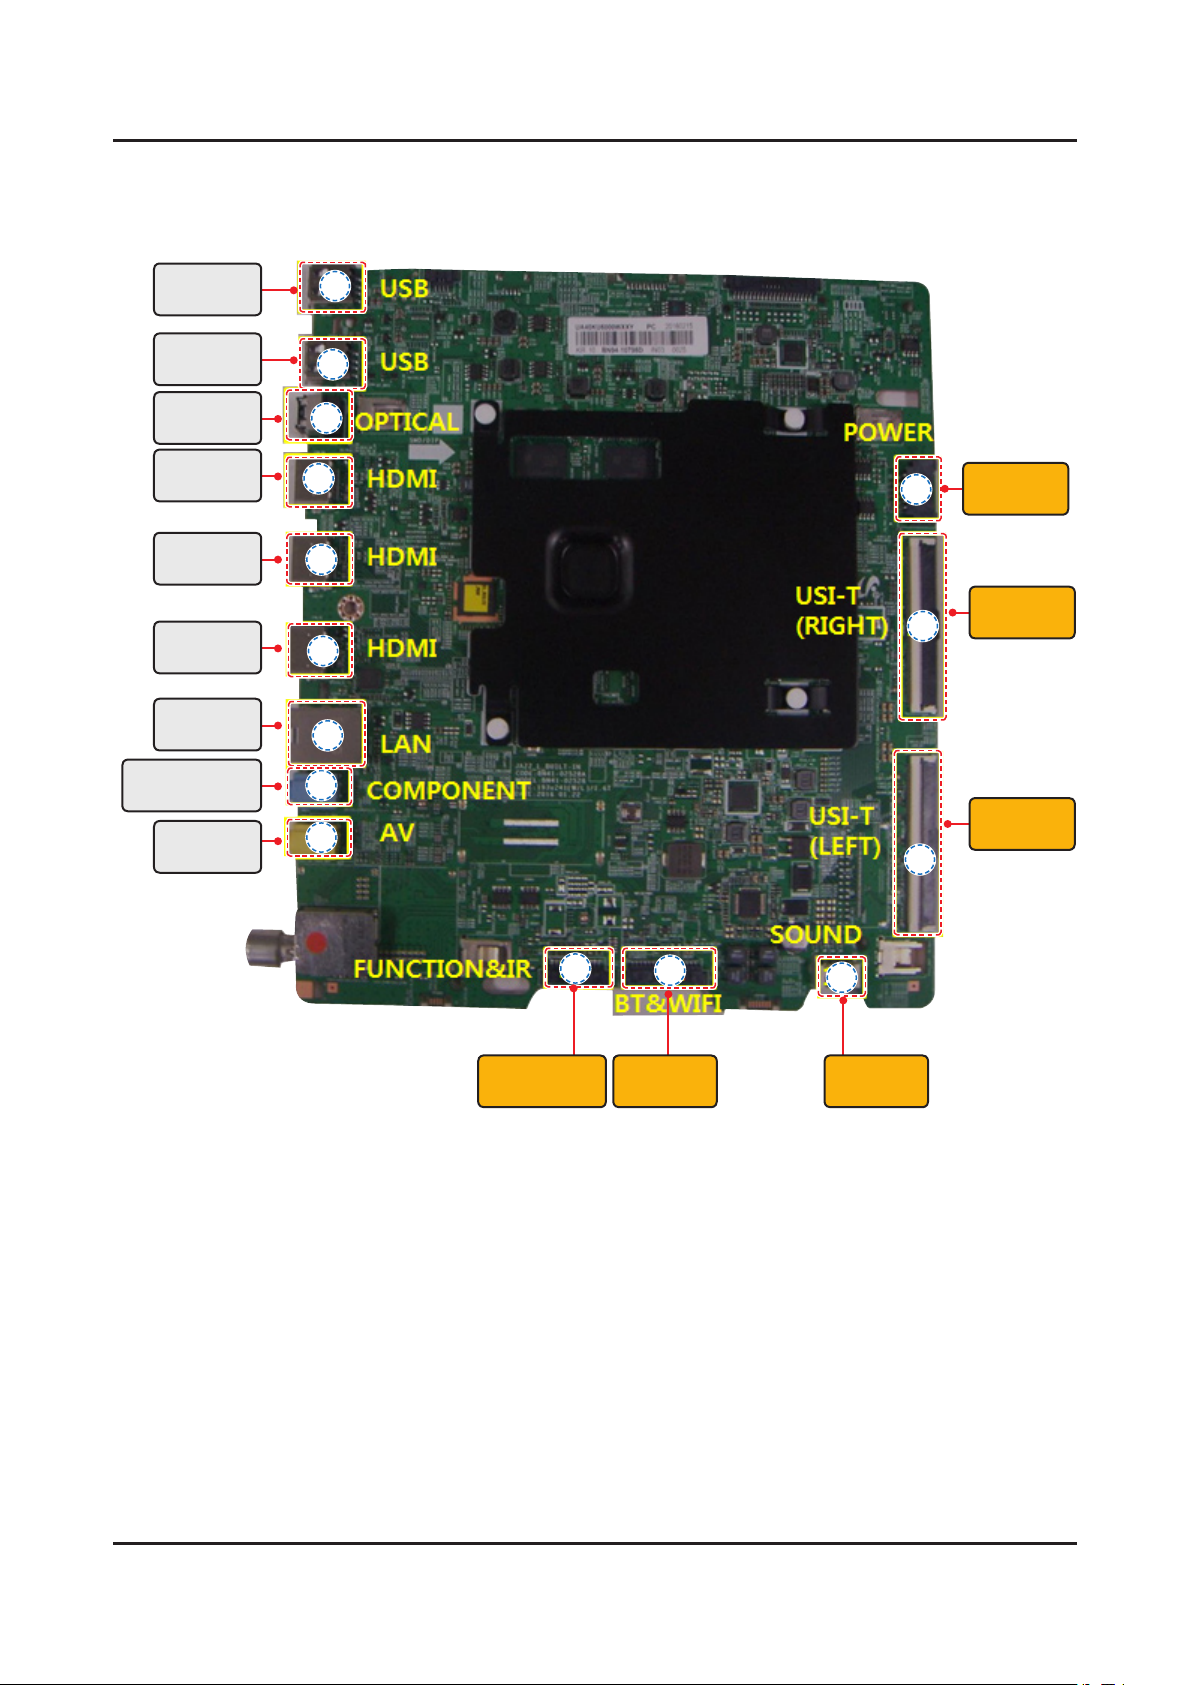
5-3
5. Wiring Diagram
5-3. Connector
5-3-1. Main Board
1 CN2303
(USB)
2 CN2304
(USB)
3 CN501
(OPTICAL)
4 CON_H4
(HDMI)
5 CON_H3
(HDMI)
6 CON_H2
(HDMI)
7 CN2401
(LAN)
8 CN601
(COMPONENT)
9 CN602
(AV)
1
2
3
4
5
6
7
8
9
15
14
13
% CN202
(Power)
$ CN1802
(USI-T
# CN1801
(USI-T LEFT)
10
0 CN1101
(Function/IR)
11
! CN2301
(BT/WIFI)
12
@ CN501
(Sound)
Page 100
5-4
5. Wiring Diagram
Main Board Pin Map
CN2303 (USB)
1
1 A5V_USB2_PW 2 JACK_D+_USB2
3 JACK_D-_USB2 4 GND
CN2304 (USB)
2
1 B5V_USB1_PW 2 JACK_D+_USB1
3 JACK_D-_USB1 4 GND
CN501 (OPTICAL)
3
1 SPDIF_OUT 2 GND
3 B5V_PW
CON_H4 (HDMI)
4
1 HDMI4_RX2+_HDMI 11 GND
2 GND 12 HDMI4_RXC-_HDMI
3 HDMI4_RX2-_HDMI 13 CEC
4 HDMI4_RX1+_HDMI 14 GND
5 GND 15 HDMI4_SCL_DDC
6 HDMI4_RX1-_HDMI 16 HDMI4_SDA_DDC
7 HDMI4_RX0+_HDMI 17 GND
8 GND 18 HDMI4_IDENT
9 HDMI4_RX0-_HDMI 19 HDMI4_HPD
10 HDMI4_RXC+_HDMI
CON_H2 (HDMI)
6
1 HDMI2_RX2+_HDMI 11 GND
2 GND 12 HDMI2_RXC-_HDMI
3 HDMI2_RX2-_HDMI 13 CEC
4 HDMI2_RX1+_HDMI 14 GND
5 GND 15 HDMI2_SCL_DDC
6 HDMI2_RX1-_HDMI 16 HDMI2_SDA_DDC
7 HDMI2_RX0+_HDMI 17 GND
8 GND 18 HDMI2_IDENT
9 HDMI2_RX0-_HDMI 19 HDMI2_HPD
10 HDMI2_RXC+_HDMI
CN2401_LAN (LAN)
7
1 LAN_TXD+_LAN 5 GND
2 GND 6 LAN_RXD-_LAN
3 LAN_TXD-_LAN 7 NC
4 LAN_RXD+_LAN 8 GND
CN601 (COMPONENT)
8
1 GND 5 TEST_SR
2 COMP_PB 6 GND
3 COMP_PR 7 GND
4 IDENT_VIDEO
CON_H3 (HDMI)
5
1 HDMI3_RX2+_HDMI 11 GND
2 GND 12 HDMI3_RXC-_HDMI
3 HDMI3_RX2-_HDMI 13 CEC
4 HDMI3_RX1+_HDMI 14 GND
5 GND 15 HDMI3_SCL_DDC
6 HDMI3_RX1-_HDMI 16 HDMI3_SDA_DDC
7 HDMI3_RX0+_HDMI 17 GND
8 GND 18 HDMI3_IDENT
9 HDMI3_RX0-_HDMI 19 HDMI3_HPD
10 HDMI3_RXC+_HDMI
CN602 (AV)
9
1 GND 5 TEST_SR
2 AV1_CVBS_IN 6 TEST_SL
3 COMP_AV1_SR_IN 7 COMP_AV1_SL_IN
4 IDENT_VIDEO
CN1101 (FUNCTION/IR)
10
1 IR 7 KEY_INPUT2
2 GND 8 LED_STB_OUT
3 A3.3V_PW 9 NC
4 AMP_SCL_I2C 10 NC
5 AMP_SDA_I2C 11 NC
6 KEY_INPUT1 12 NC
 Loading...