

Page 1
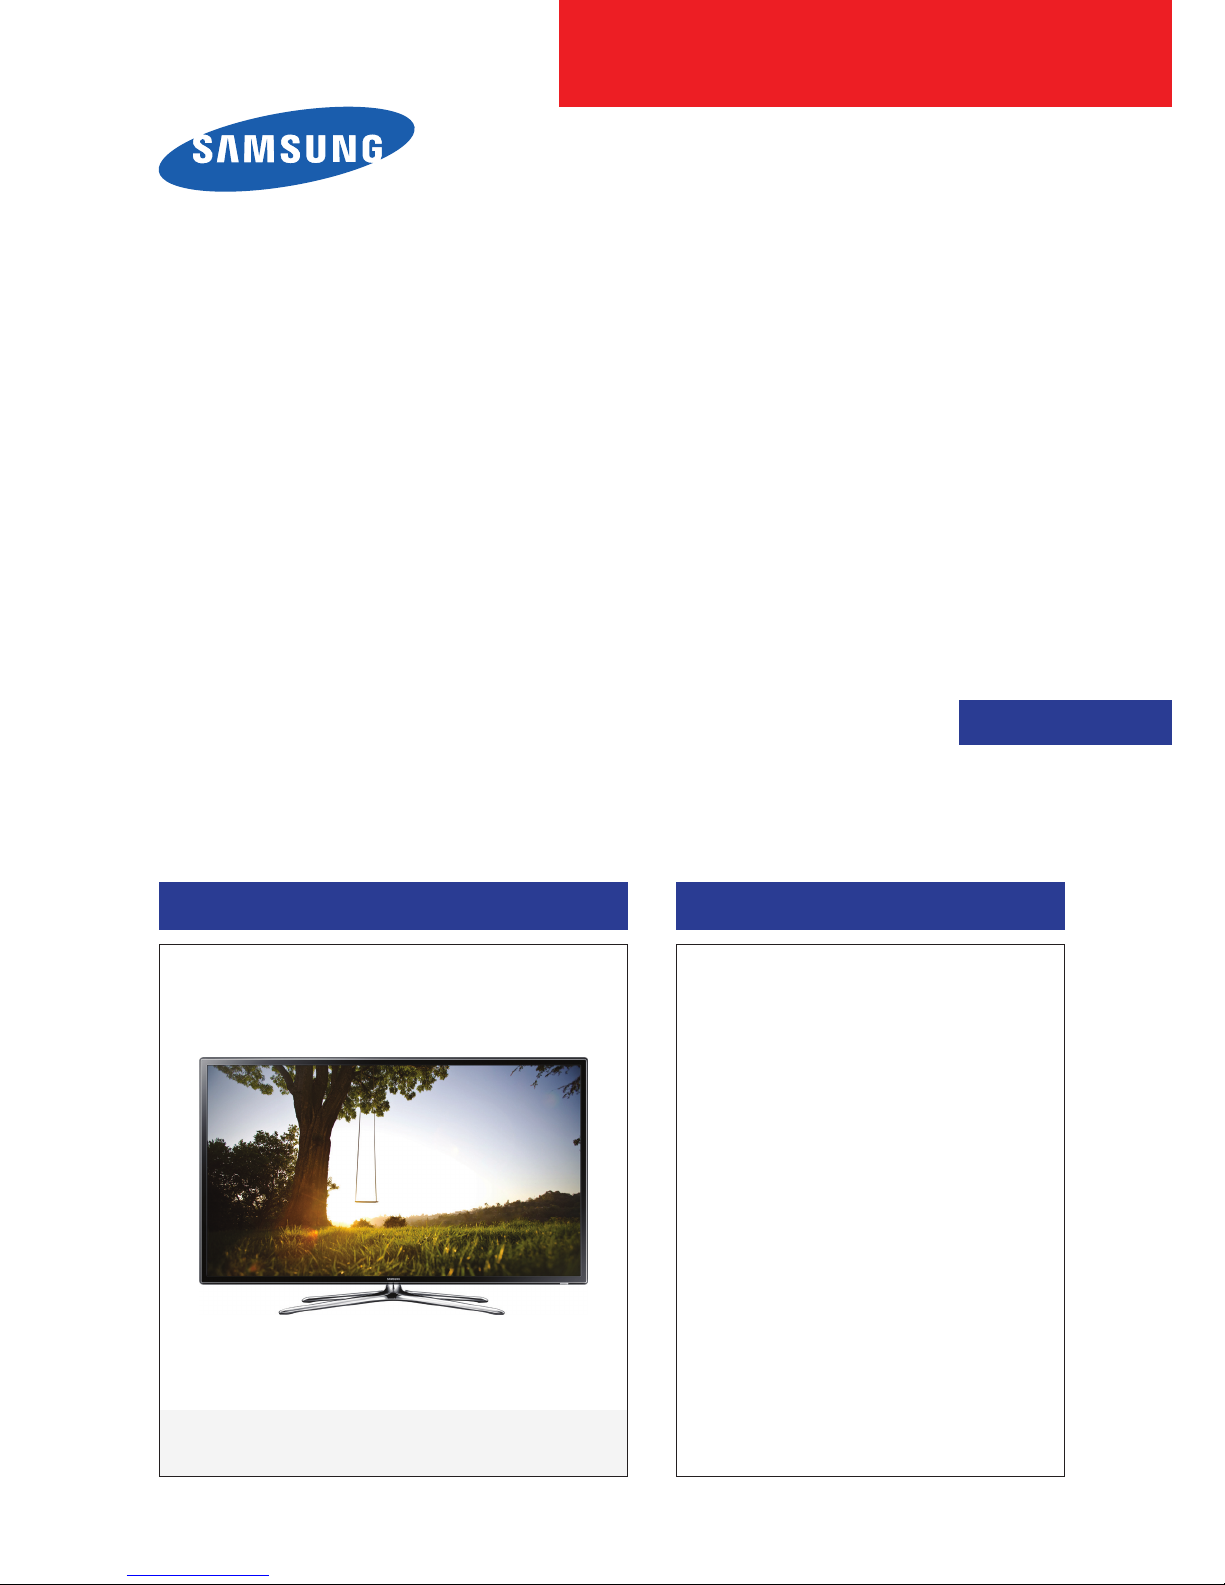
LED TV
SERVICE
Manual
LED TV Contents
1. Precautions
2. Product specications
3. Disassembly and Reassembly
4. Troubleshooting
5. Wiring Diagram
UE**F6320AW
Chassis : U85A
Model : UE40F6320AW
UE46F6320AW
UE55F6320AW
Page 2

Contents
1. Precautions ...................................................................................................................1-1
1-1. Safety Precautions ..............................................................................................................1-1
1-1-1. Warnings ...................................................................................................................1-1
1-1-2. Servicing the LED TV ...............................................................................................1-1
1-1-3. Fire and Shock Hazard .............................................................................................1-1
1-1-4. Product Safety Notices ............................................................................................. 1-2
1-2. Servicing Precautions ..........................................................................................................1-3
1-2-1. General Servicing Precautions ................................................................................. 1-3
1-3. Static Electricity Precautions ...............................................................................................1-4
1-4. Installation Precautions .......................................................................................................1-5
2. Product Specications.................................................................................................2-1
2-1. Product information .............................................................................................................2-1
2-2. Product specication ...........................................................................................................2-2
2-2-1. Detailed Specications .............................................................................................2-2
2-2-2. Feature & Specications ........................................................................................... 2-6
2-3. Accessories ........................................................................................................................2-9
2-4. Viewing the Functions ......................................................................................................2-10
2-4-1. Auto Motion Plus 120 Hz ........................................................................................ 2-10
2-4-2. Supported Formats ................................................................................................. 2-11
2-4-3. Remote Control ......................................................................................................2-13
2-4-4. Universal Remote Control Setup ............................................................................ 2-14
2-4-5. SMART HUB ...........................................................................................................2-15
2-4-6. 3D Display ..............................................................................................................2-17
3. Disassembly and Reassembly ....................................................................................3-1
3-1. Disassembly and Reassembly ............................................................................................3-1
3-1-1. LED TV ..................................................................................................................... 3-1
3-1-2. ASSY BOARD P-RF-MODULE ................................................................................. 3-9
3-1-3. NETWORK ...............................................................................................................3-9
4. Troubleshooting ...........................................................................................................4-1
4-1. Troubleshooting ...................................................................................................................4-1
4-1-1. Previous Check ........................................................................................................4-1
4-1-2. Simple ow chart of malfunction ...............................................................................4-3
4-2. How to Check Fault Symptom .............................................................................................4-4
4-2-1. NO Power ................................................................................................................. 4-4
4-2-2. No Video (HDMI 1, 2, 3, 4 - Digital Signal) .............................................................. 4-7
4-2-3. No Video (Tuner_CVBS) ........................................................................................4-10
4-2-4. No Vido (Tuner DTV) ..............................................................................................4-13
4-2-5. No Video (Video AV) ...............................................................................................4-16
4-2-6. No Video (COMPONENT) ...................................................................................... 4-19
4-2-7. No Sound (1.Speaker 2.Monitor_out 3.Optical) .................................................. 4-22
Page 3

4-3. Factory Mode Adjustments ................................................................................................4-26
4-3-1. Detail Factory Option ..............................................................................................4-26
4-3-2. Entering Factory Mode ...........................................................................................4-27
4-3-3. Factory Data ........................................................................................................... 4-28
4-4. White Balance ...................................................................................................................4-41
4-4-1. Calibration ..............................................................................................................4-41
4-4-2. Service Adjustment ................................................................................................. 4-41
4-4-3. Adjustment .............................................................................................................. 4-42
4-5. RS-232C ............................................................................................................................4-43
4-6. AV Control Tabe .................................................................................................................4-44
4-7. Software Upgrade ..............................................................................................................4-50
4-7-1. How to Check the Software Version .......................................................................4-50
4-7-2. How to Upgade Software ........................................................................................ 4-51
5. Wiring Diagram .............................................................................................................5-1
5-1. Wiring Diagram ....................................................................................................................5-1
5-2. Connector ............................................................................................................................5-2
5-3. Connector Functions ...........................................................................................................5-4
Page 4
This Service Manual is a property of Samsung Electronics Co.,Ltd.
Any unauthorized use of Manual can be punished under applicable
International and/or domestic law.
© 2013 Samsung Electronics Co.,Ltd.
All rights reserved.
Printed in Korea
Page 5
3-1
3. Disassembly and Reassemble
3. Disassembly and Reassembly
This section of the service manual describes the disassembly and reassembly procedures for the LED TV.
WARNING
This LED TV contains electrostatically sensitive devices. Use caution when handling these components.
3-1. Disassembly and Reassembly
CAUTION
Disconnect the LED TV from the power source before disassembly.1.
Follow these directions carefully; never use metal instruments to pry apart the cabinet.2.
If there is no additional coment, it is same for all inches.3.
3-1-1. LED TV
40 / 46 Inches
Description Picture Description Screws
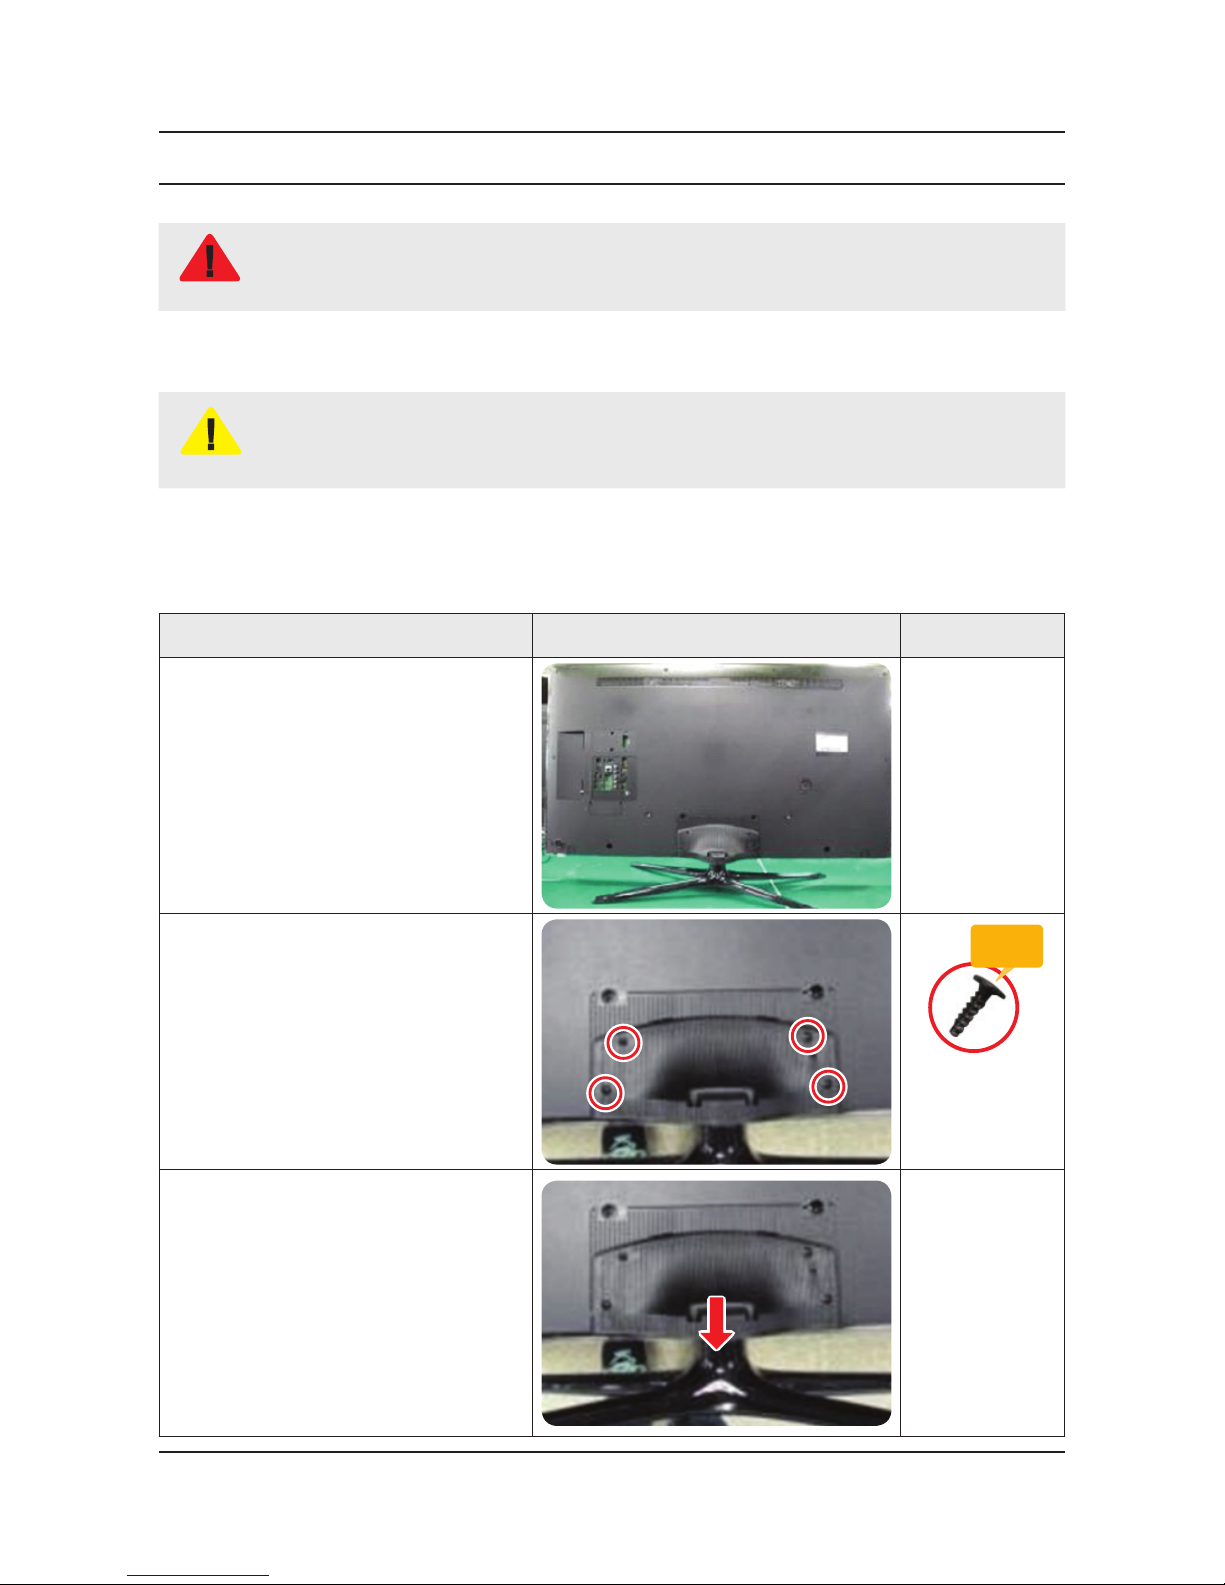
1
Place TV face down on cushioned table.
2
Remove 4 screws from the ASSY
GUIDE P-STAND.
Torque :
9~11Kgf.cm.
128~156psi
6003-001782
SCREW-MACHINE
M4.0, L12.0 BLK
3
Remove STAND.
Page 6
3-2
3. Disassembly and Reassemble
Description Picture Description Screws
4
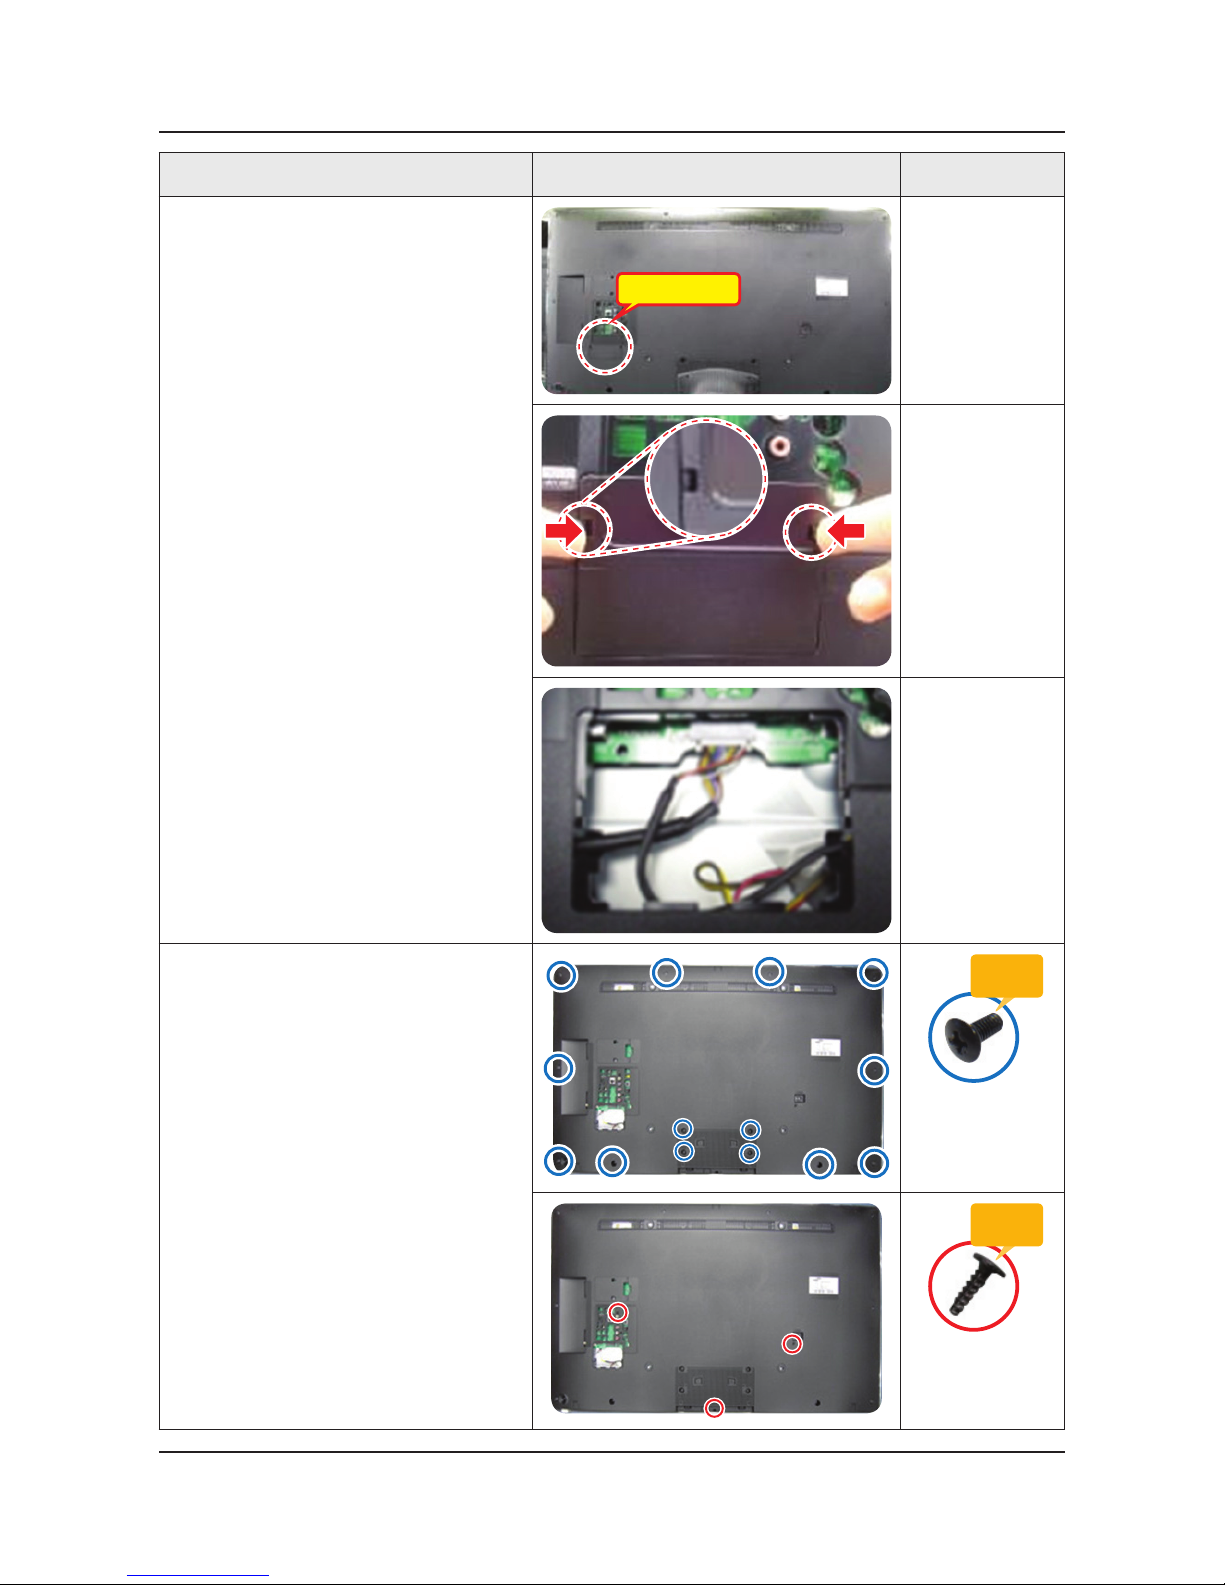
Remove the COVER-JACK after push
the locking in both sides.
COVER-JACK
5
Remove screws of ASSY COVER
P-MIDDLE, REAR.
40 inch : 14 EA•
46 inch : 14 EA•
Torque :
7~8Kgf.cm.
100~113psi
6001-002755
SCREW-MACHINE
M3.0, L6.0 BLK
40 inch : 2 EA•
46 inch : 3 EA•
Torque :
9~11Kgf.cm.
128~156psi
6003-001782
SCREW-MACHINE
M4.0, L12.0 BLK
Page 7
3-3
3. Disassembly and Reassemble
Description Picture Description Screws
6
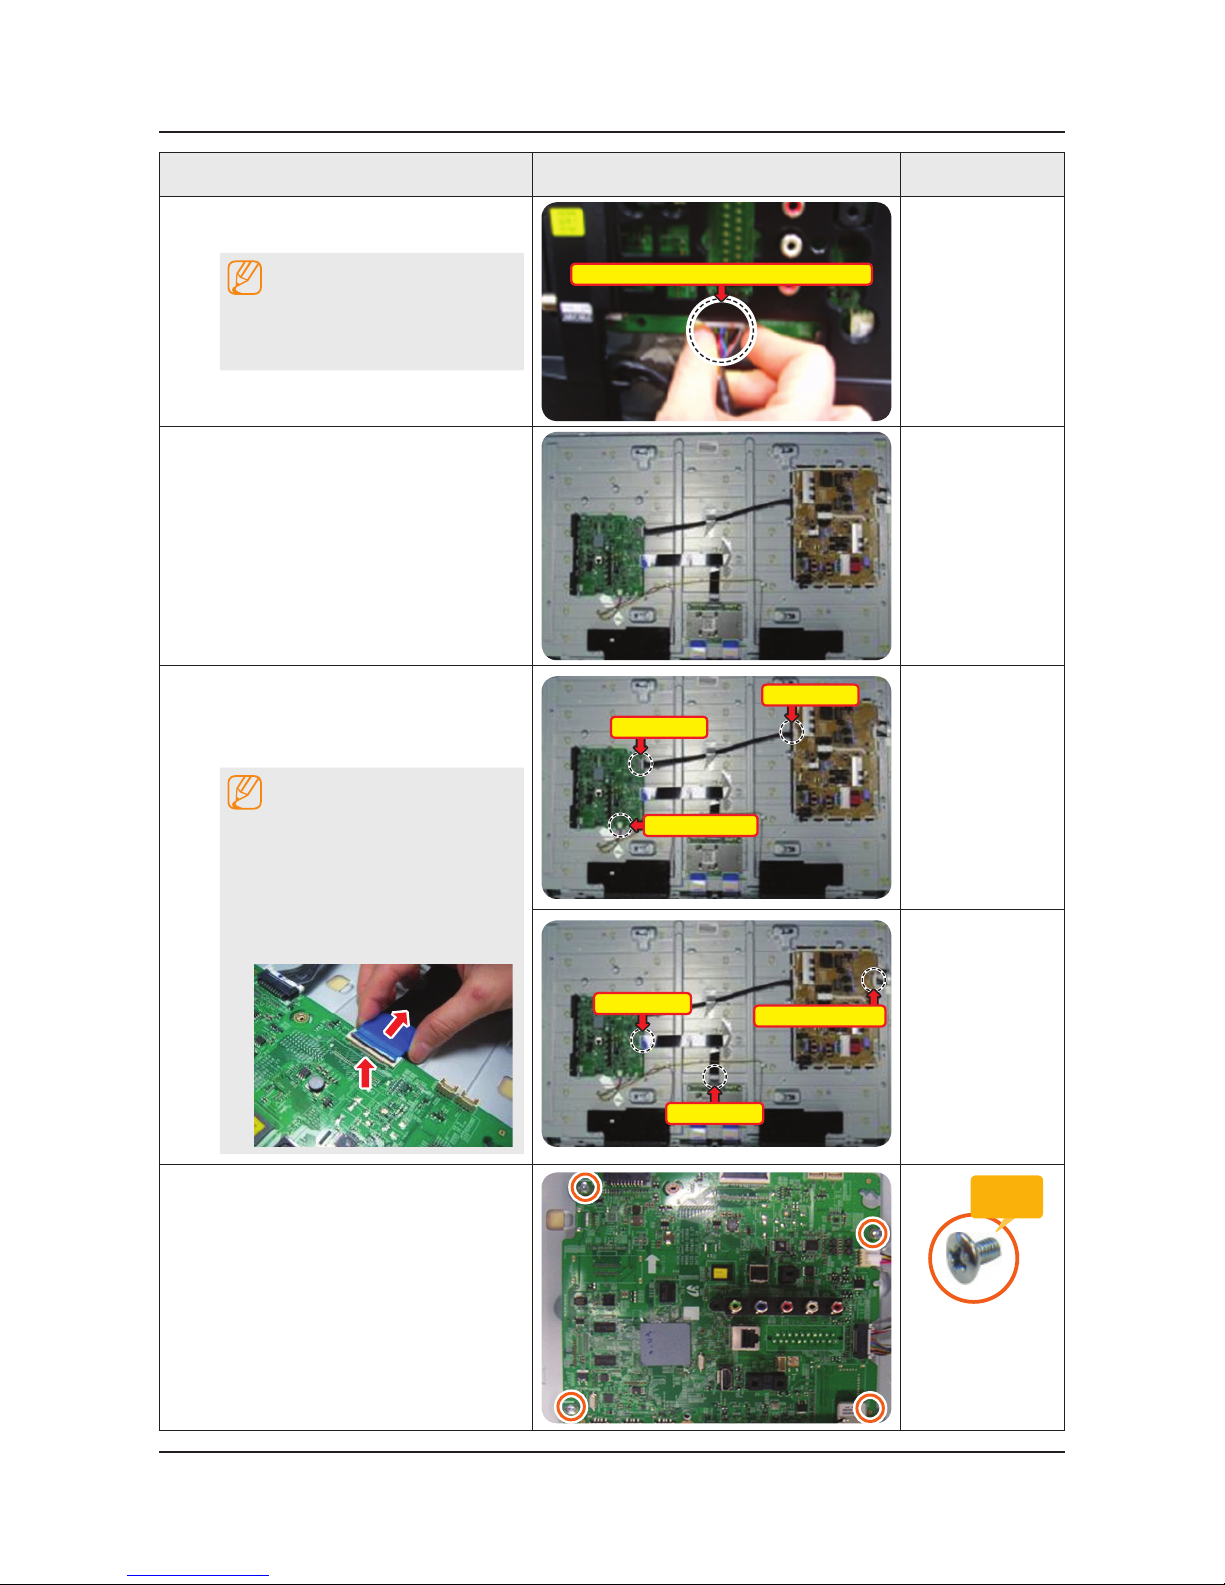
Disconnect the ASSY BOARD P-JOG
SWITCH & IR Cable.
NOTE
First remove the cable before you
remove the ASSY COVER P-MIDDLE,
REAR.
ASSY BOARD P-JOG SWITCH & IR Cable
7
Remove the ASSY COVER P-MIDDLE,
REAR.
8
Remove the Power Cables and Speaker
Cables.
Remove the LVDS Cable and Panel
Drive Cable.
NOTE
Applied to Double locking.
Flip up the locking tab on top of the 1.
connector.
Squeeze the edge of the connector 2.
to release the second tab lock and
gently pull the connector away.
Speaker Cable
Power Cable
Power Cable
LVDS Cable
LVDS Cable
Panel Drive Cable
9
Remove the screws of ASSY PCB
MAIN.
Torque :
7~8Kgf.cm.
100~113psi
6001-002756
SCREW-MACHINE
M3.0, L6.0 WHT
Page 8
3-4
3. Disassembly and Reassemble
Description Picture Description Screws
10
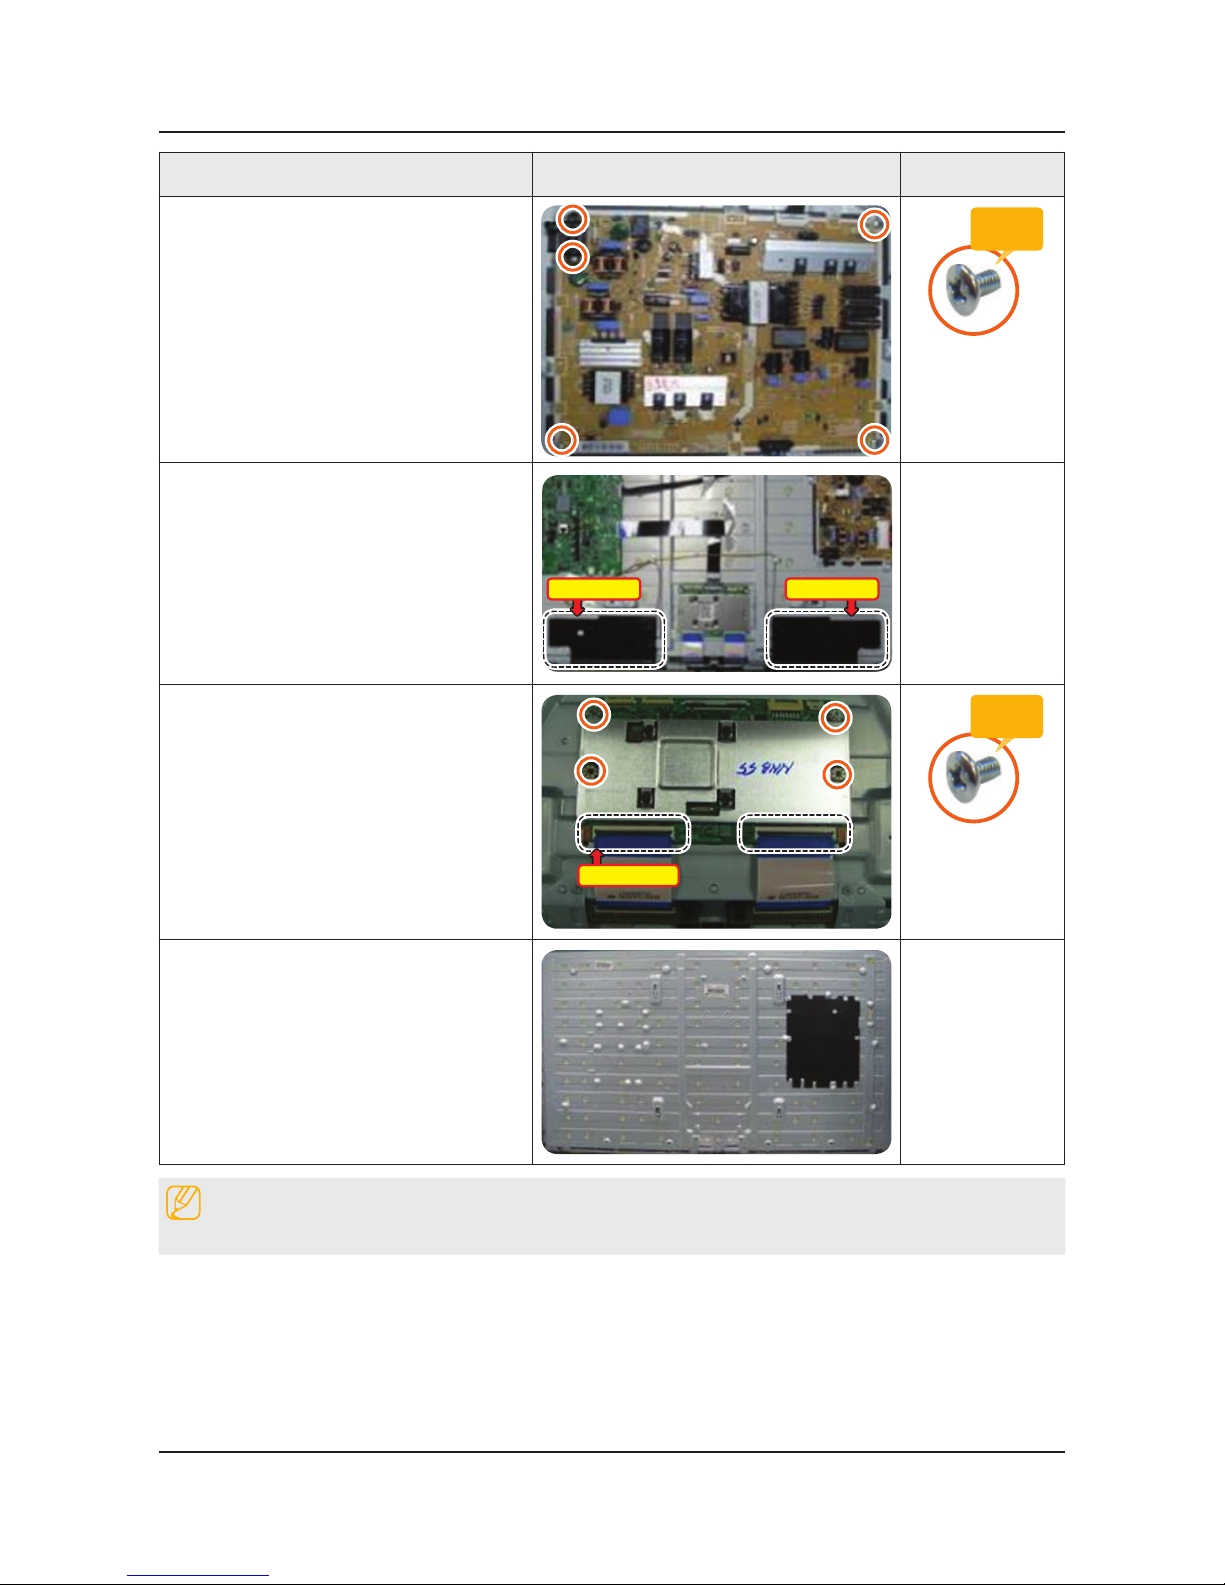
Remove the screws of DC VSS-LED TV
PD BD.
Torque :
7~8Kgf.cm.
100~113psi
6001-002756
SCREW-MACHINE
M3.0, L6.0 WHT
11
Remove the ASSY SPEAKER (L/R).
Speakers(L) Speakers(R)
12
Remove the 4 screws of ASSY T CON
and unlock the locking of T CON Cable.
T CON Cable
Torque :
7~8Kgf.cm.
100~113psi
6001-002756
SCREW-MACHINE
M3.0, L6.0 WHT
13
Completed disassembly.
Panel.•
NOTE
Reassembly procedures are in the reverse order of disassembly procedures.
Page 9
3-5
3. Disassembly and Reassemble
55 Inches
Description Picture Description Screws
1
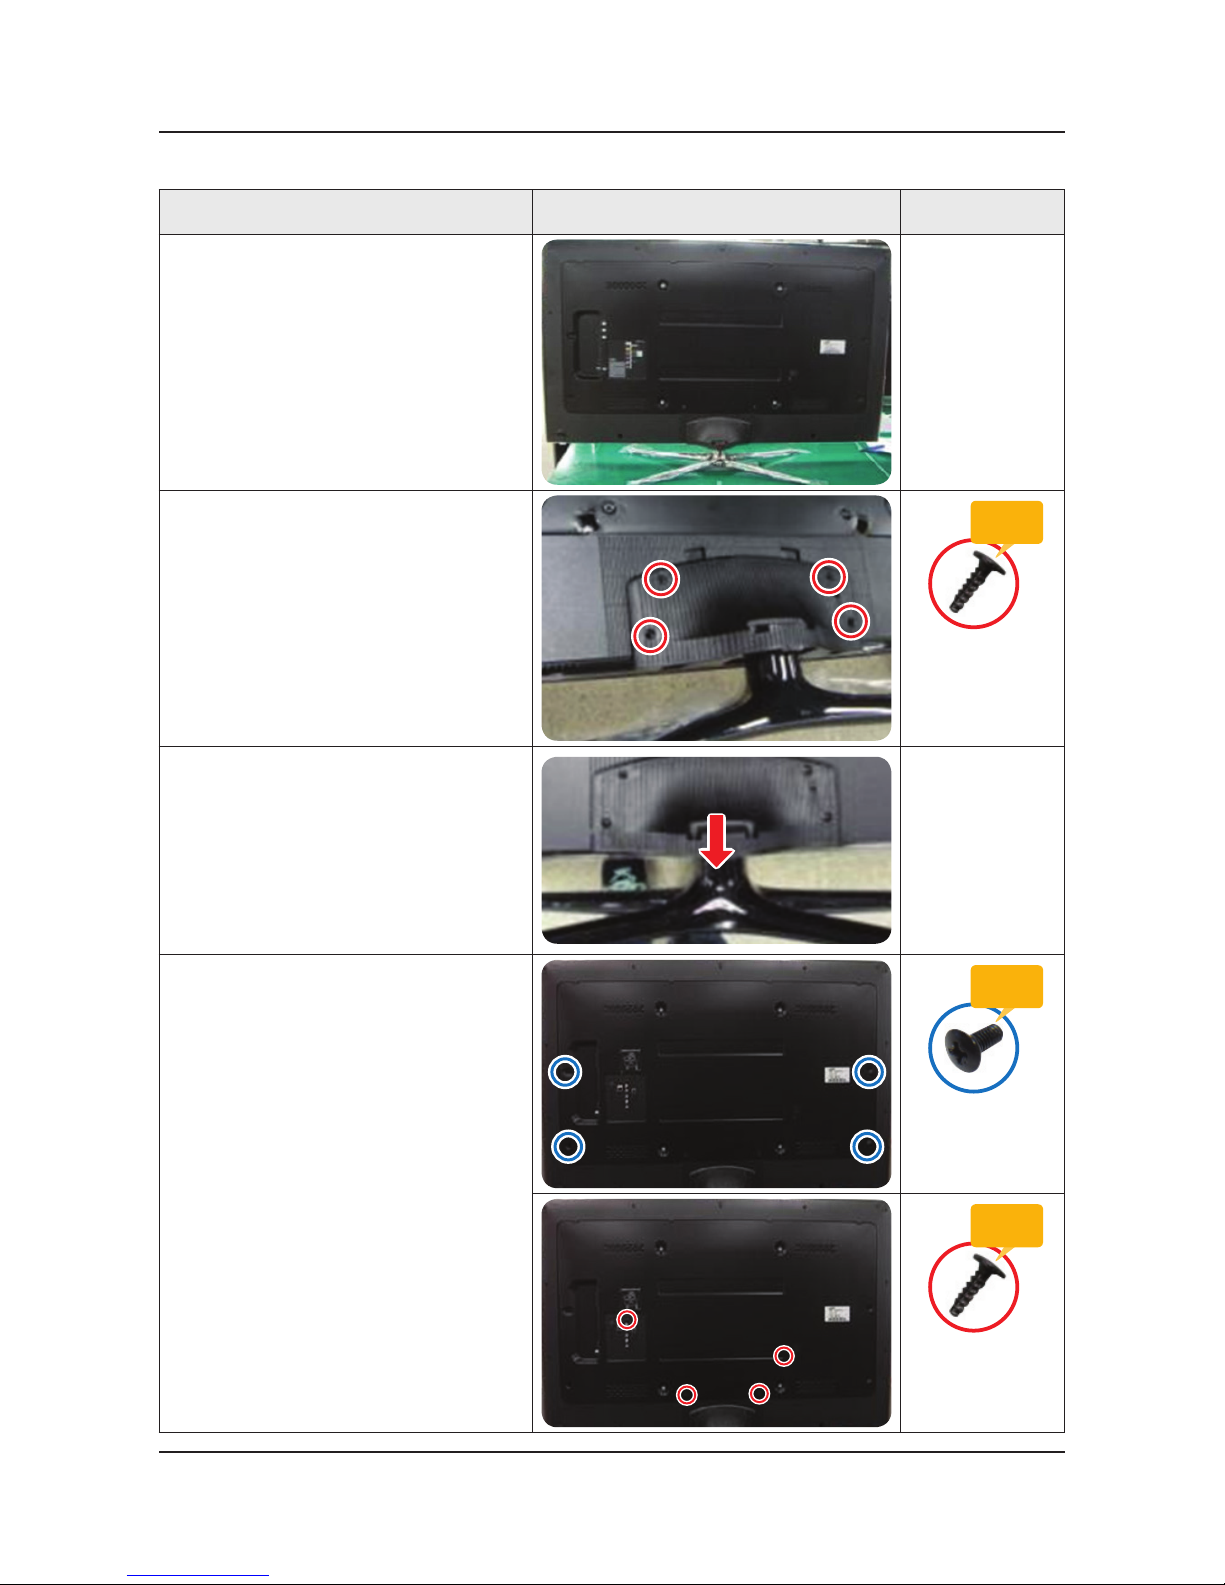
Place TV face down on cushioned table.
2
Remove 4 screws from the ASSY
GUIDE P-STAND.
Torque :
9~11Kgf.cm.
128~156psi
6003-001782
SCREW-MACHINE
M4.0, L12.0 BLK
3
Remove STAND.
4
Remove screws of ASSY COVER
P-REAR.
55 inch : 4 EA •
Torque :
7~8Kgf.cm.
100~113psi
6001-002755
SCREW-MACHINE
M3.0, L6.0 BLK
55 inch : 4 EA •
Torque :
9~11Kgf.cm.
128~156psi
6003-001782
SCREW-MACHINE
M4.0, L12.0 BLK
Page 10
3-6
3. Disassembly and Reassemble
Description Picture Description Screws
5
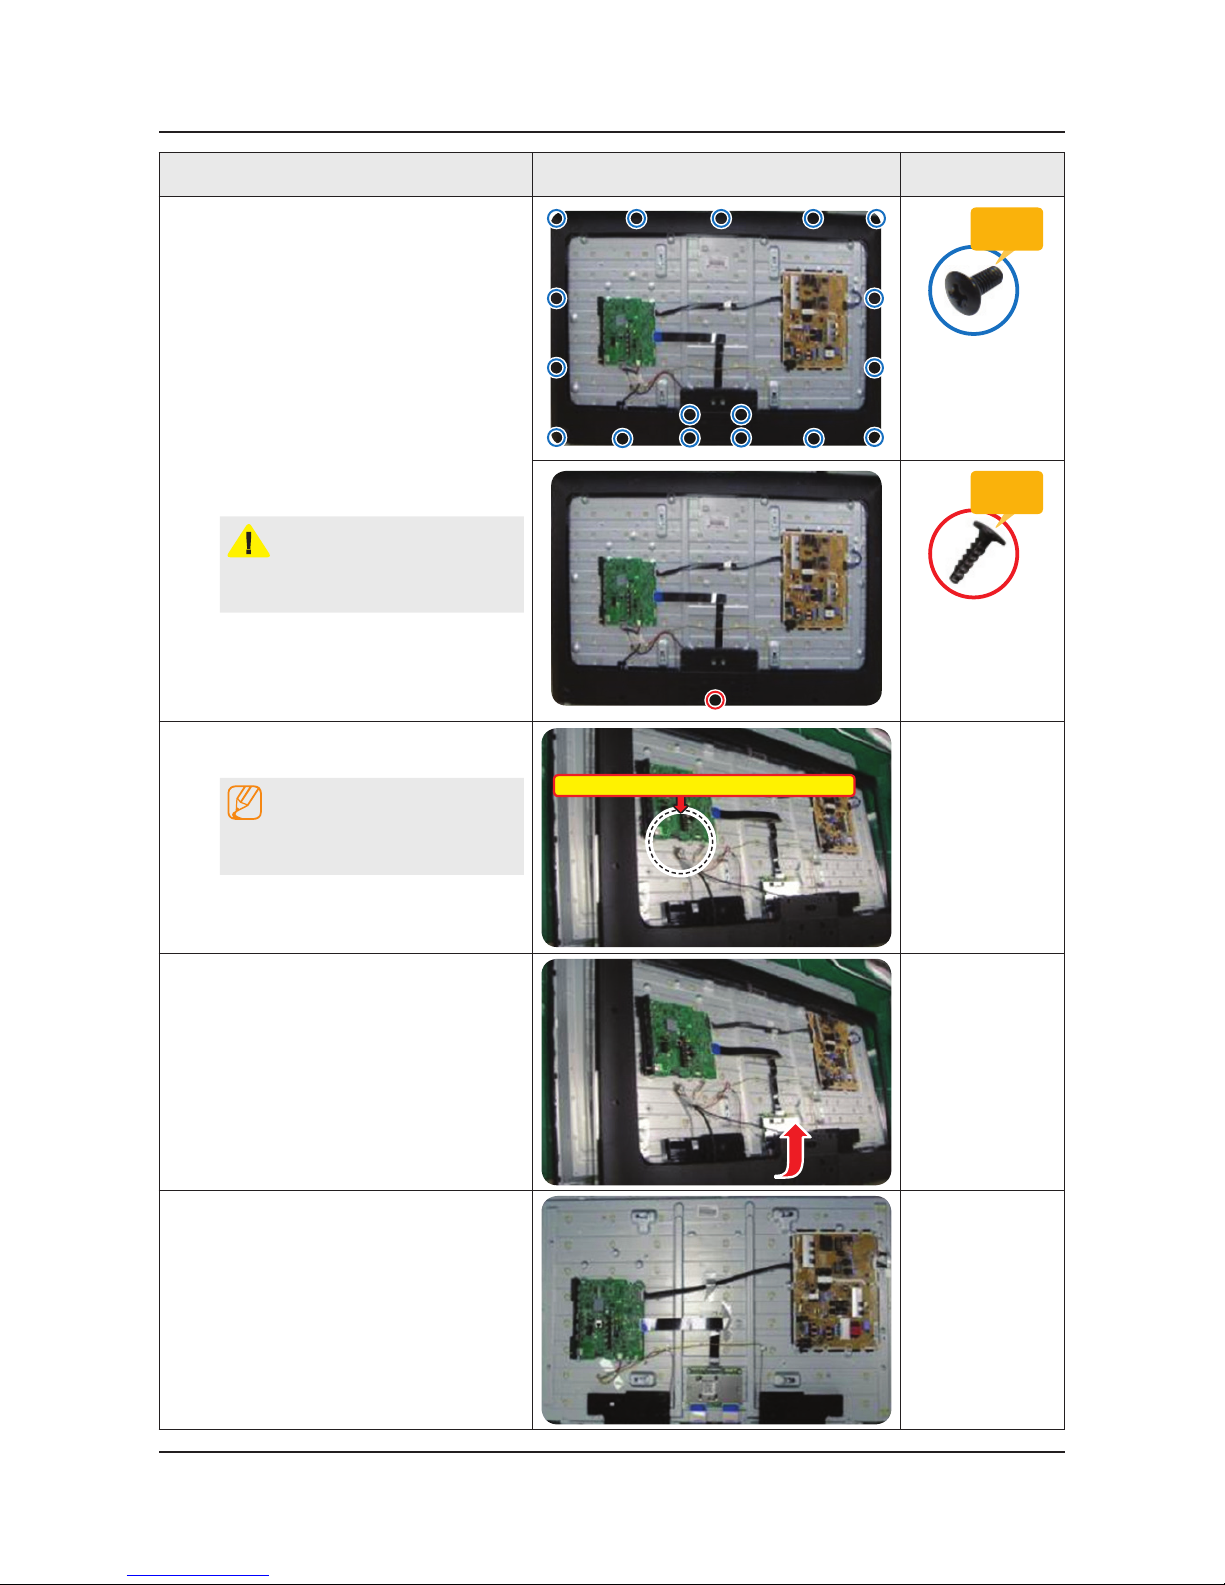
Remove 17 screws of ASSY COVER
P-MIDDLE.
Torque :
7~8Kgf.cm.
100~113psi
6001-002755
SCREW-MACHINE
M3.0, L6.0 BLK
Remove 1 screws of ASSY COVER
P-MIDDLE.
CAUTION
Becareful when you lift up the ASSY
COVER P-MIDDLE, It's really sharp.
Torque :
9~11Kgf.cm.
128~156psi
6003-001782
SCREW-MACHINE
M4.0, L12.0 BLK
6
Disconnect the ASSY BOARD P-JOG
SWITCH & IR Cable.
NOTE
First remove the cable before you
remove the ASSY COVER P-MIDDLE.
ASSY BOARD P-JOG SWITCH & IR Cable
7
Lift up the ASSY COVER P-MIDDLE.
8
Remove the ASSY COVER P-MIDDLE.
Page 11
3-7
3. Disassembly and Reassemble
Description Picture Description Screws
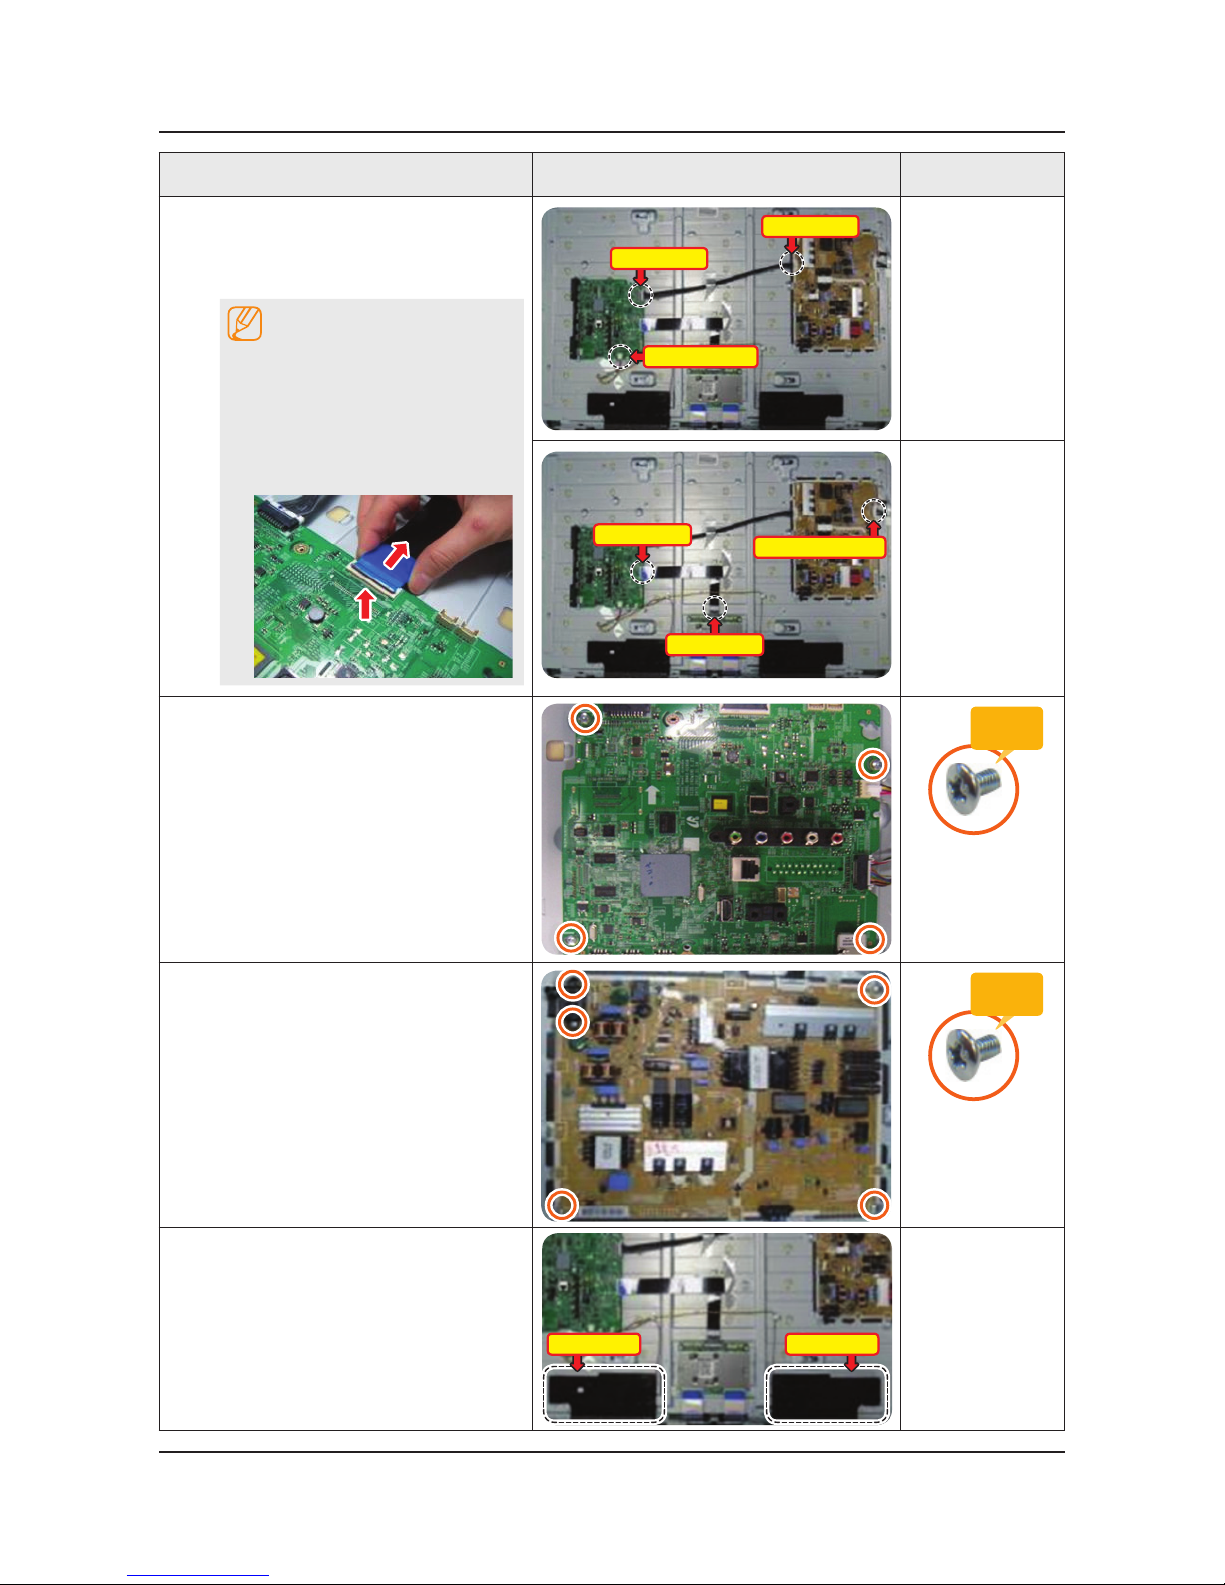
9
Remove the Power Cables and Speaker
Cables.
Remove the LVDS Cable and Panel
Drive Cable.
NOTE
Applied to Double locking.
Flip up the locking tab on top of the 1.
connector.
Squeeze the edge of the connector 2.
to release the second tab lock and
gently pull the connector away.
Speaker Cable
Power Cable
Power Cable
LVDS Cable
LVDS Cable
Panel Drive Cable
10
Remove the screws of ASSY PCB
MAIN.
Torque :
7~8Kgf.cm.
100~113psi
6001-002756
SCREW-MACHINE
M3.0, L6.0 WHT
11
Remove the screws of DC VSS-LED TV
PD BD.
Torque :
7~8Kgf.cm.
100~113psi
6001-002756
SCREW-MACHINE
M3.0, L6.0 WHT
12
Remove the ASSY SPEAKER (L/R).
Speakers(L) Speakers(R)
Page 12
3-8
3. Disassembly and Reassemble
Description Picture Description Screws
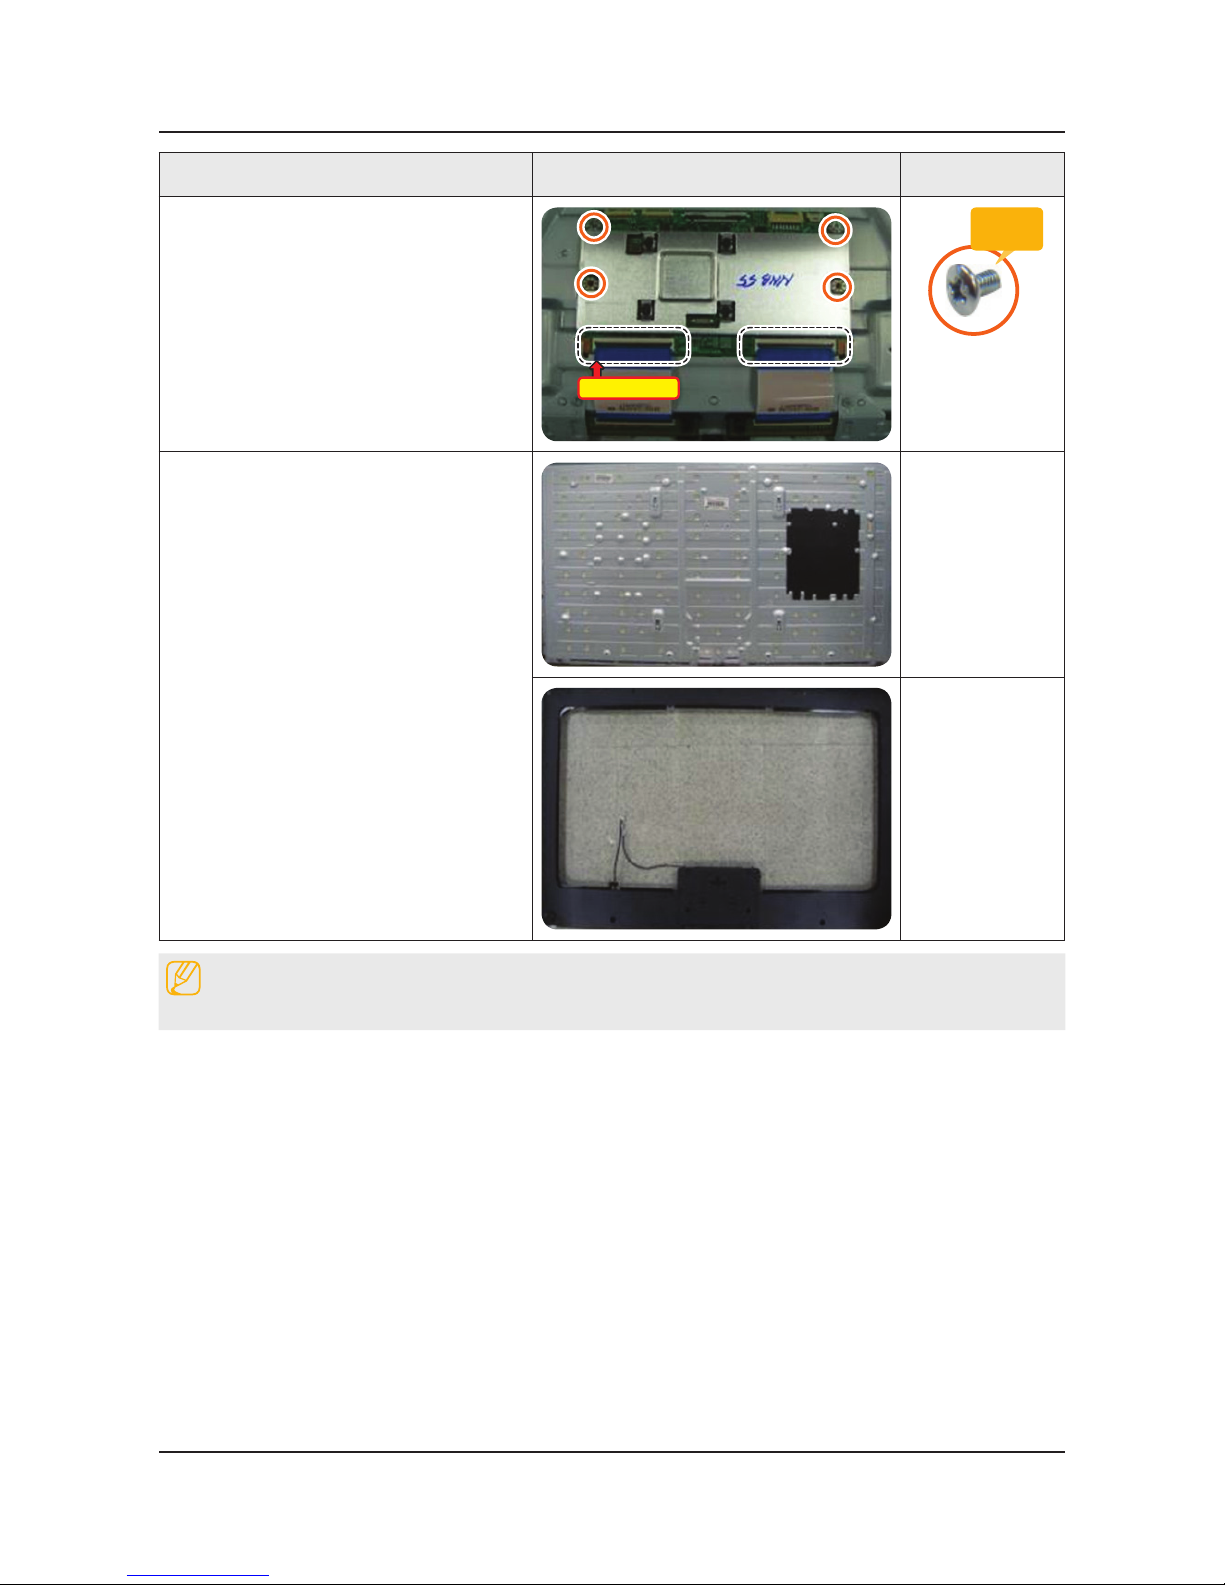
13
Remove the 4 screws of ASSY T CON
and unlock the locking of T CON Cable.
T CON Cable
Torque :
7~8Kgf.cm.
100~113psi
6001-002756
SCREW-MACHINE
M3.0, L6.0 WHT
14
Completed disassembly.
Panel.•
ASSY COVER P-MIDDLE.•
NOTE
Reassembly procedures are in the reverse order of disassembly procedures.
Page 13
3-9
3. Disassembly and Reassemble
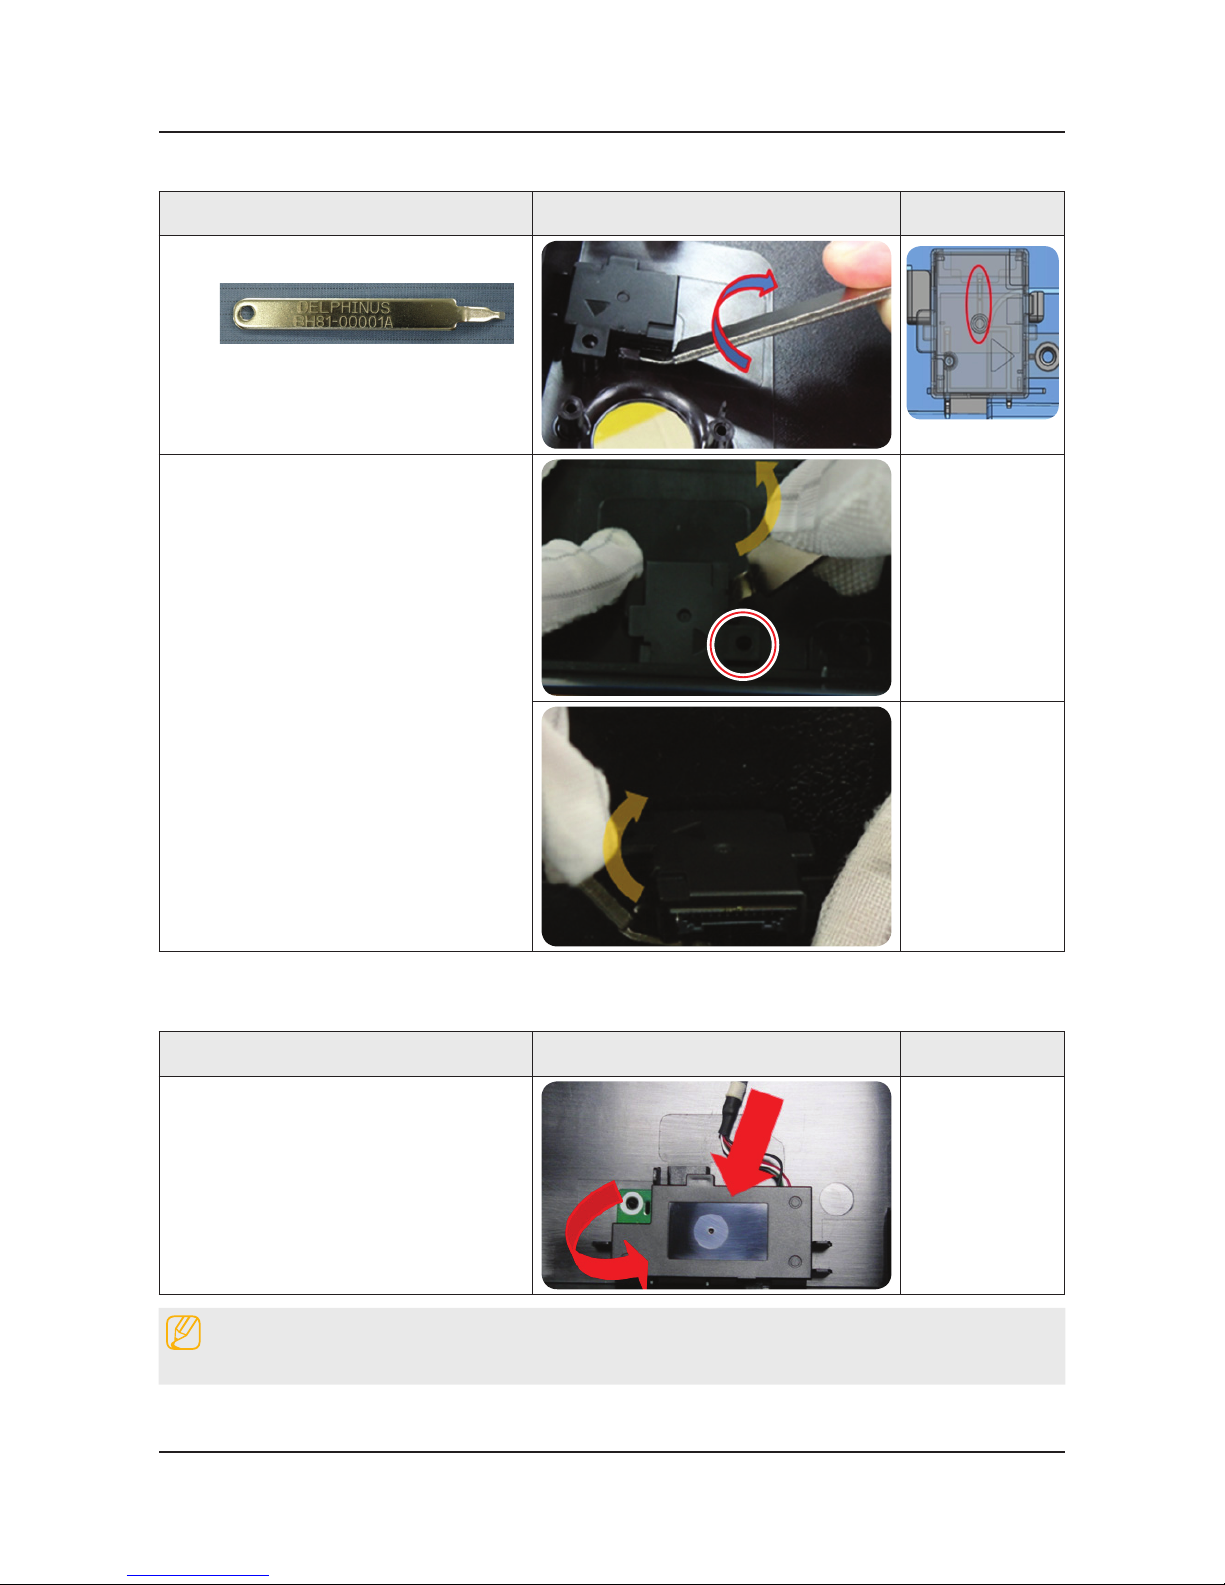
3-1-2. ASSY BOARD P-RF-MODULE
Description Picture Description Refer
1
Preparation : BN81-00001A (Registered in
Jig material)
2
Twist the jig after inserting ASSY BOARD
P-RF-MODULE(B/T module) and ASSY
COVER P-MIDDLE,REAR.
3-1-3. NETWORK
Description Picture Description Refer
1
Remove the NETWORK(Wi-Fi module).
NOTE
Reassembly procedures are in the reverse order of disassembly procedures.
Page 14
3-10
3. Disassembly and Reassemble
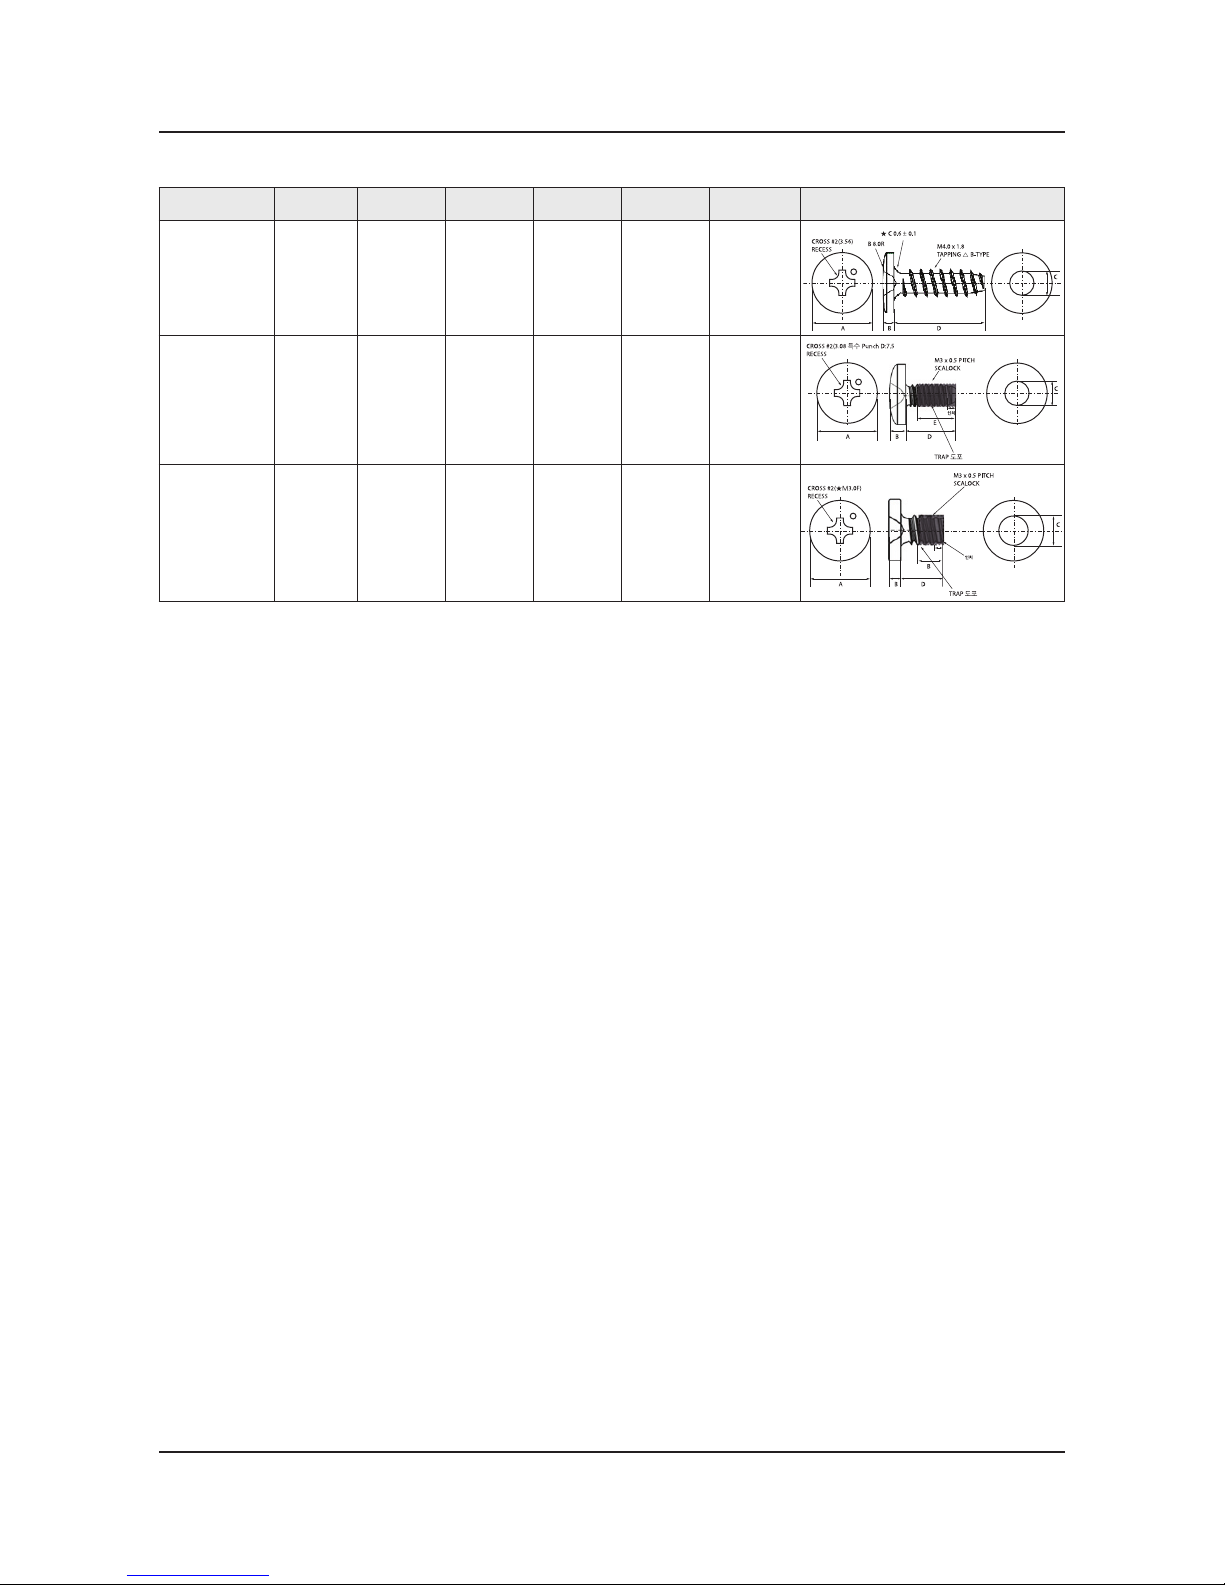
Screw Size
Code No. COLOR A (mm) B (mm) C (mm) D (mm) E (mm) Screw Image
6003-001782 BLACK 7.80~8.20 1.85~1.95 3.81~3.91 11.4~12.0 -
A
CROSS #2(3.56)
RECESS
B 8.0R
★ C 0.6 ± 0.1
M4.0 x 1.8
TAPPING △ B-TYPE
BD
C
6001-002755 BLACK 7.1~7.5 1.9~2.0 2.98~3.02 5.7~6.0 4.4~5.4
A
CROSS #2(3.08 특수 Punch D:7.5
RECESS
M3 x 0.5 PITCH
SCALOCK
TRAP 도포
인치
BD
E
C
6001-002756 WHITE 5.6~6.0 1.15~1.25 2.92~2.98 3.7~4.0 4.4~5.4
A
CROSS #2(★M3.0F)
RECESS
M3 x 0.5 PITCH
SCALOCK
B
B
D
C
TRAP 도포
인치
Page 15
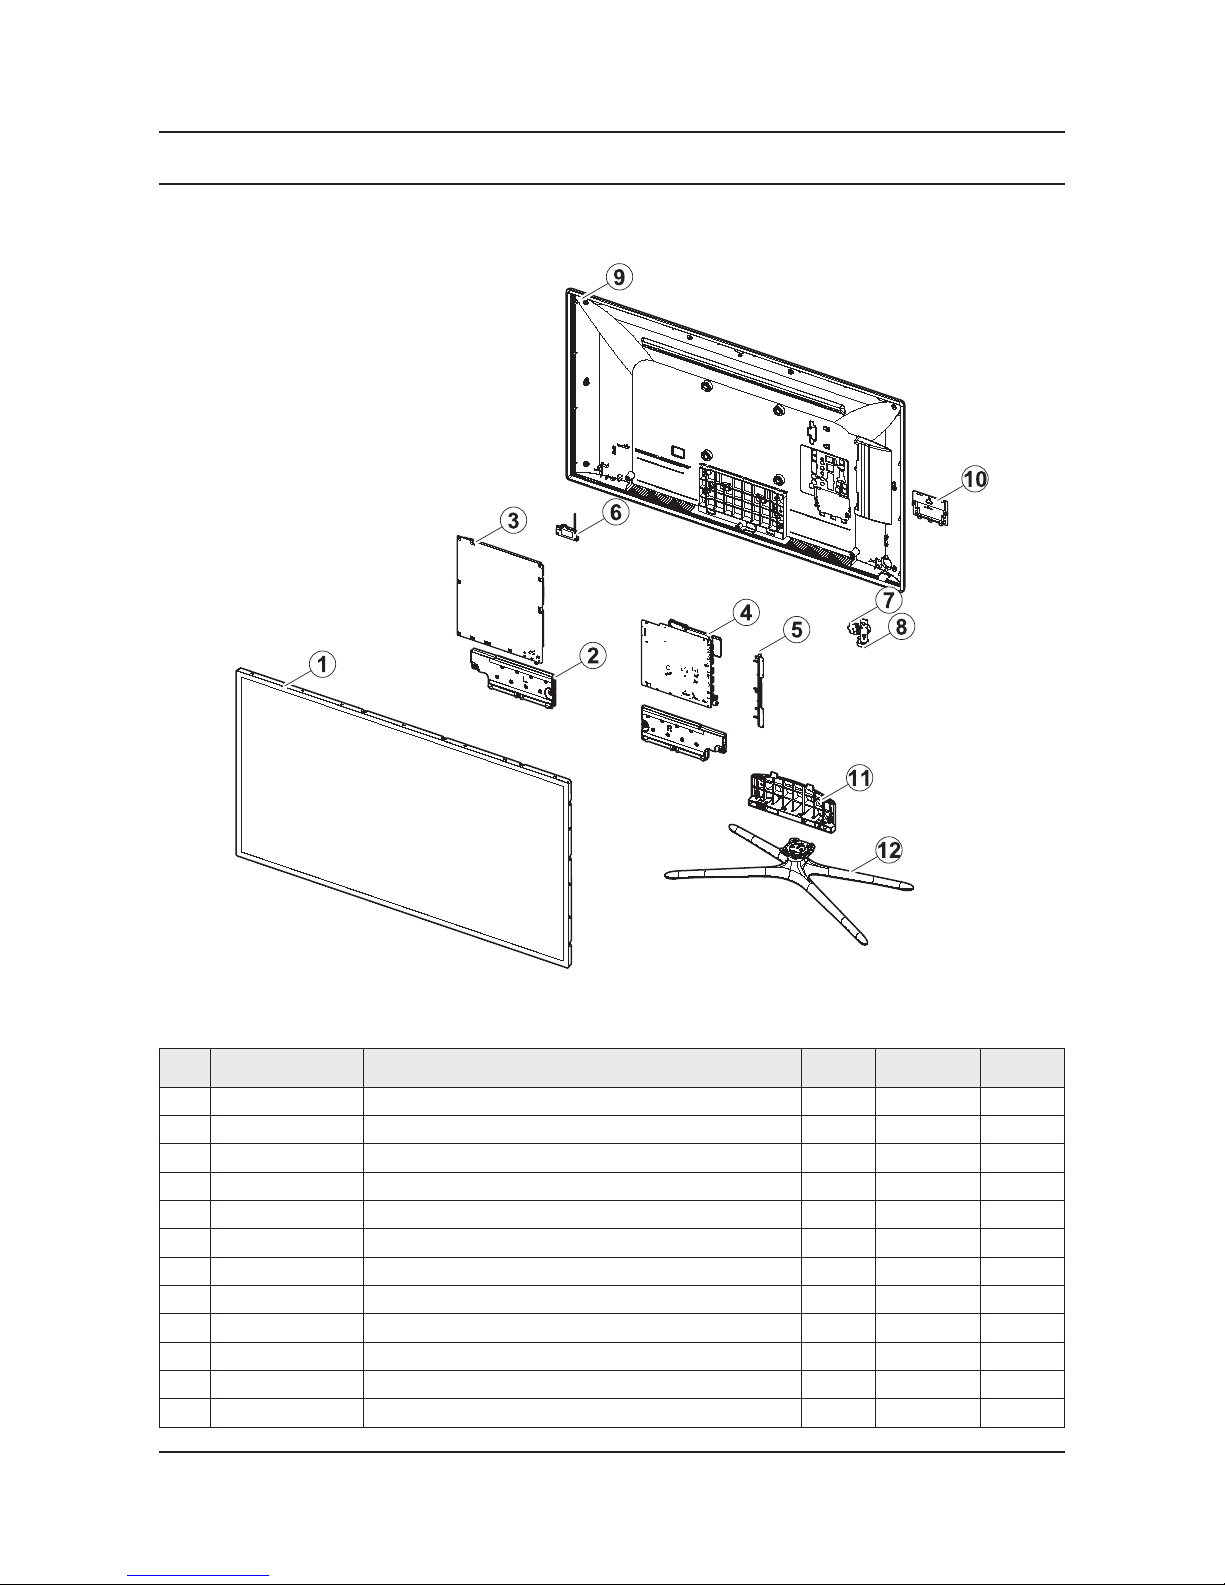
1-1-1. Part List
No. Code No. Description & Specication Q’ty SA/SNA Remark
1 BN95-01110A PRODUCT LCD-AMLCD; LSF400HJ01,CY-HF400CSL 1 SA
2 BN96-25565A ASSY SPEAKER P; 6ohm,10W,Enclosure_F6k 1 SA
3 BN44-00622B DC VSS-LED TV PD BD; L42X1Q_DHS,L42X1Q_DH 1 SA
4 BN94-06624R ASSY PCB MAIN; UE40F6320AWXXC 1 SA
5 BN61-08813D HOLDER-SIDE AV; F6100/6300,ABS+PC,WINERED 1 SNA
6 BN59-01161A NETWORK; WIDT-30Q,Internal WiFi,USB,IEEE8 1 SA
7 BN96-25376A ASSY BOARD P-RF-MODULE; Bluetooth Module, 1 SA
8 BN96-26401E ASSY BOARD P-JOG SWITCH & IR; UE40F6400,F 1 SA
9 BN96-26634U ASSY COVER P-MIDDLE,REAR; UF6320 40,PC V2 1 SA
10 BN63-10178F COVER-JACK; UF6100/6300 40"-50" EO,ABS+PC 1 SNA
11 BN61-08823A GUIDE-STAND; UF6100 55",PC+GF,G/F 20% 1 SA
12 BN96-25547A ASSY STAND P-BASE; UF6100 40,QUAD Chrome 1 SA
ANNEX. Exploded View & Part List [UE40F6320AWXXH UH02]
1-1. Exploded View
ANNEX-1
ANNEX. Exploded View & Part List
Page 16
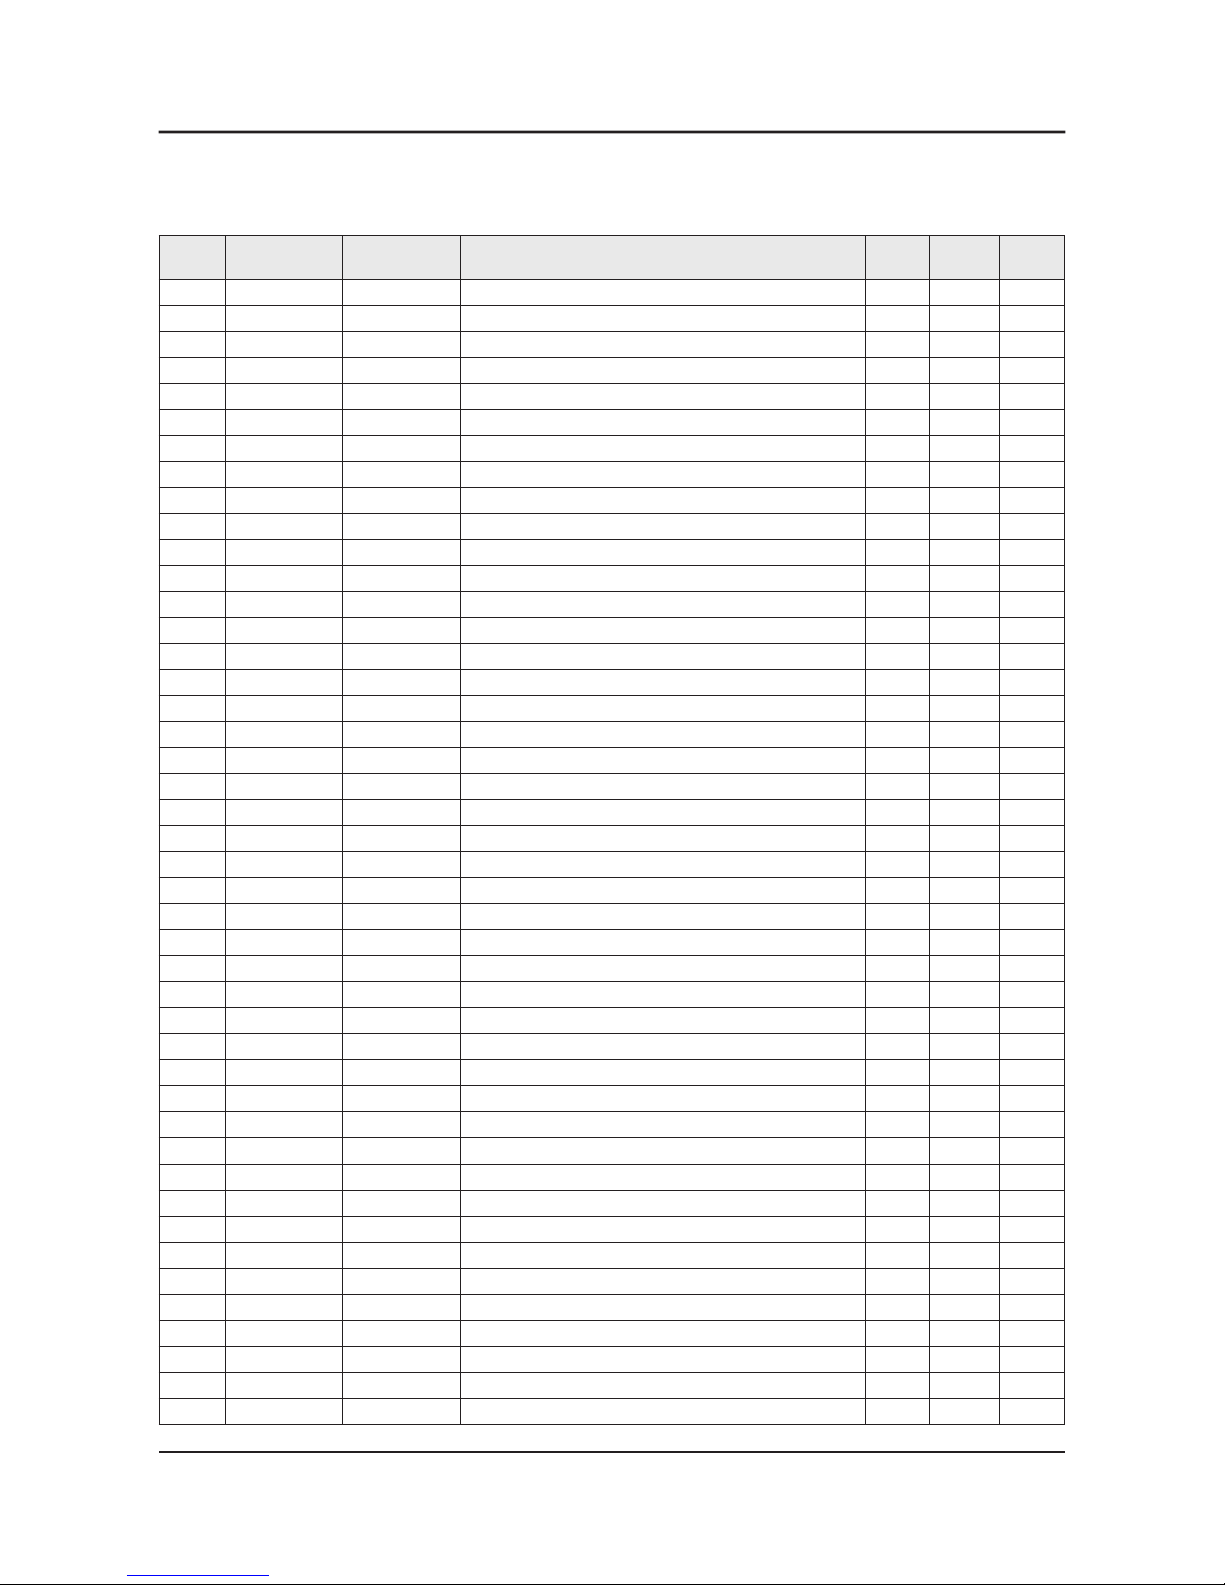
Service Bom (SA: SERVICE AVAILABLE, SNA: SERVICE NOT AVAILABLE)
Level Location No. Code No. Description & Specication Q’ty SA/SNA Remark
UE40F6320AWXXH UH02
1 S001A BN90-04144A ASSY STAND;LEDTV 1 SNA
0.2 SG03 BN61-08823A GUIDE-STAND;UF6100 55",PC+GF,G/F 20% 1 SA
..3 0103-007285 RESIN-PC;MW32020GFU,K032202GFV,BK0007,V2 460 SNA
0.2 SB04A BN96-25547A ASSY STAND P-BASE;UF6100 40,QUAD Chrome 1 SA
..3 6002-001294 SCREW-TAPPING;BH,+,,M4,L16,ZPC(BLK) 4 SA
..3 SCREW 6003-001315 SCREW-TAPTYPE;BH,+,B,M4,L20,ZPC(WHT),SWR 4 SNA
..3 SCREW 6003-001425 SCREW-TAPTYPE;BH,+,B,M4,L25,ZPC(BLK),SWR 1 SNA
..3 SCREW 6003-001785 SCREW-TAPTYPE;FH,+,B,M4,L8,ZPC(BLK),SWRC 4 SA
..3 BN61-07171C HOLDER-SWIVEL,TOP;40 QUAD STAND,ACETAL,D 1 SNA
..3 BN61-07175A BRACKET-SWIVEL,TOP;UD8000 32/3740 QUAD,S 1 SNA
..3 BN61-07738A BRACKET-SWIVEL,BOTTOM;UD8000 37/40 QUAD, 1 SNA
..3 BN61-08733A HOLDER-SWIVEL,BOTTOM;32-40 SLIM QUAD STA 1 SNA
...4 0103-009825 RESIN-POM;TS-25A,Dark Gray,GY0199,HB 5 SNA
..3 BN61-08734A HOLDER-STAND,NECK;32-40 SLIM QUAD STAND, 1 SNA
...4 0103-007285 RESIN-PC;MW32020GFU,K032202GFV,BK0007,V2 95 SNA
..3 BN61-08735A BRACKET-STAND,TOP;32-40 SLIM QUAD STAND, 1 SNA
..3 BN61-08736A BRACKET-STAND,BOTTOM;32-40 SLIM QUAD STA 1 SNA
..3 BN63-05135E COVER-SHEET;4-LEG,Rhcm PE Vinyl,T0.05,W6 2 SNA
..3 BN63-10154A COVER-STAND,TOP-FRONT;32-40 SLIM QUAD ST 1 SNA
..3 BN63-10155A COVER-STAND,TOP-REAR-LEFT;32-40 SLIM QUA 1 SNA
..3 BN63-10156A COVER-STAND,TOP-REAR-RIGHT;32-40 SLIM QU 1 SNA
..3 BN63-10157A COVER-STAND,BASE;32-40 SLIM QUAD STAND,A 1 SNA
...4 0103-005041 RESIN-PC;FR3200TV,901408,BK0008,1.2mm V- 120 SNA
..3 BN67-00385D RUBBER-FOOT;RUBBER-FOOT,SILICONE,ROUND,1 4 SNA
1 BN90-04578J ASSY W/I;UF6K 1 SNA
0.2 BN81-08159Z PART SET-ELEC W/I;UF4* ~ UF8* ELEC 1 SNA
0.2 BN81-08174Q PART SET-MECH W/I;UF6P,U40FP* 1 SNA
1 BN90-04769F ASSY COVER MIDDLE;UF6300 40 1 SNA
0.2 6001-002755 SCREW-MACHINE;BH,+,M3,L6,ZPC(BLK),SWRCH1 14 SA
0.2 SCREW 6003-001782 SCREW-TAPTYPE;BH,+,B,M4,L12,ZPC(BLK),SWR 2 SA
0.2 BN96-26634U ASSY COVER P-MIDDLE,REAR;UF6320 40,PC V2 1 SA
..3 0203-001598 TAPE-FILAMENT;#8915,0.15,12,55000,CLR 0 SNA
..3 SCREW 6003-000115 SCREW-TAPTYPE;BH,+,B,M3,L6,ZPC(BLK),SWRC 2 SA
..3 CCM1 BN63-02183D COVER-SHEET;Rhcm,PE Vinyl,T0.05,680mm,20 1 SNA
..3 BN63-07556X COVER-SHEET;F-LED 3D VE,PO-SHEET,T0.068, 3 SNA
..3 BN63-10188B COVER-MIDDLE,REAR;F6100/6170,40,PC/PC+AB 1 SNA
...4 0103-007268 RESIN-PC;TN-1045M,70784,TP0010,0.8, 3.0 410 SNA
...4 0103-009587 RESIN-PC ABS;NE-1010,431322,RD0071,1.5 V 1900 SNA
..3 BN63-10851A SHEET-COVER;UF5000,PET,0.1,45,16,BLACK 2 SNA
..3 T0071 BN64-02224J INLAY-TERMINAL;UF6200-F6800,PS SHEET,T0. 1 SNA
..3 BN68-03518D LABEL-STICKER-CI SLOT;WW,ALL,PE,132.5,72 1 SNA
..3 BN68-04709S LABEL-TERMINAL SIDE;UF6300,PET,T0.05,UO/ 1 SNA
..3 FB01A BN96-26401E ASSY BOARD P-JOG SWITCH & IR;UE40F6400,F 1 SA
ANNEX-2
ANNEX. Exploded View & Part List
2-1. Electrical Parts List
Page 17
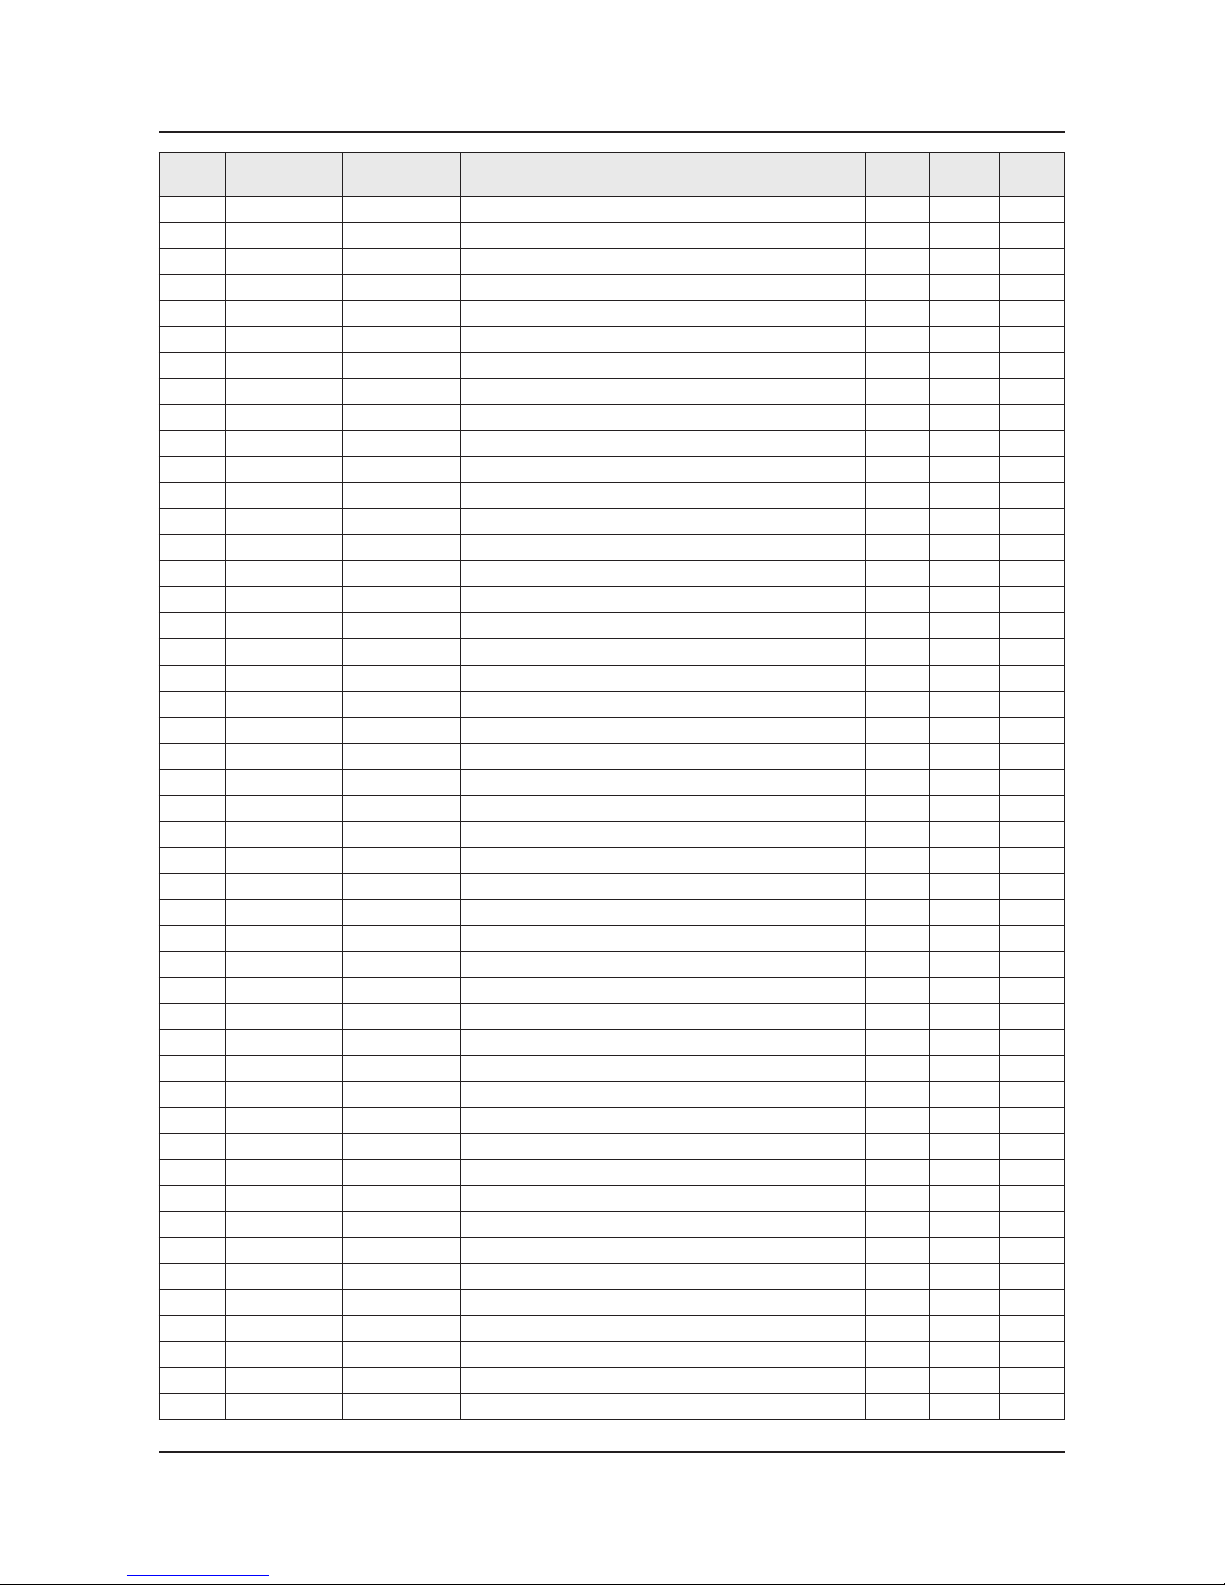
Level Location No. Code No. Description & Specication Q’ty SA/SNA Remark
...4 EC13 BN39-01772B LEAD CONNECTOR;UE40F6400,Cable Connector 1 SNA
...4 5WAY BN96-26401A ASSY BOARD P-JOG SWITCH & IR;UE32F5000,F 1 SNA
1 BN91-10253H ASSY SHIELD;UA40F6400ARX* 1 SNA
0.2 6001-003016 SCREW-MACHINE;PWH,+,M3.0,L5.0,ZPC(WHT),S 9 SA
0.2 SCREW 6003-000115 SCREW-TAPTYPE;BH,+,B,M3,L6,ZPC(BLK),SWRC 1 SA
0.2 BN02-00102B TAPE FILAMENT;UE7000,#893,0.15,25,50,WHI 0 SNA
0.2 EC13 BN39-01475A LEAD CONNECTOR;UN32C6400,Flat Connector, 1 SA
0.2 EC14 BN39-01744A LEAD CONNECTOR-LED WIRE HARNESS;DIRECT w 1 SA
0.2 P001A BN44-00622B DC VSS-LED TV PD BD;L42X1Q_DHS,L42X1Q_DH 1 SA
0.2 NW01 BN59-01161A NETWORK;WIDT-30Q,Internal WiFi,USB,IEEE8 1 SA
0.2 BN61-08813D HOLDER-SIDE AV;F6100/6300,ABS+PC,WINERED 1 SNA
0.2 BN62-00367A PAD GAP;F6400,SILICON,35 35 mm,6.5,Light 1 SNA
0.2 FC05 BN63-10178F COVER-JACK;UF6100/6300 40"-50" EO,ABS+PC 1 SNA
..3 0103-009587 RESIN-PC ABS;NE-1010,431322,RD0071,1.5 V 20 SNA
0.2 BN67-00364C RUBBER-FOOT;X13,RUBBER,10*10,6,Dark Gray 1 SNA
0.2 LVDS BN96-24278N ASSY CABLE P-FFC;UE40F6470,FFC,251mm,51P 1 SA
0.2 BT BN96-25376A ASSY BOARD P-RF-MODULE;Bluetooth Module, 1 SA
..3 AS BT BN81-08545A A/S-BT;Bluetooth Module SCREW 1 SNA
..3 BN97-07275A ASSY MICOM-BLUETOOTH F/W;BN81-08385A 1 SNA
...4 BN81-08385A AS-BLUETOOTH F/W;BLUETOOTH F/W 1 SNA
0.2 SP01A BN96-25565A ASSY SPEAKER P;6ohm,10W,Enclosure_F6k 1 SA
1 BN91-11064A ASSY LCM-AMLCD;BN95-01110A,CY-HF400CSLV2 1 SNA
0.2 PANEL BN95-01110A PRODUCT LCD-AMLCD;LSF400HJ01,CY-HF400CSL 1 SA
..3 6001-002757 SCREW-MACHINE;BH,+,M3,L4,ZPC(WHT),SWRCH1 2 SA
..3 BN02-00102B TAPE FILAMENT;UE7000,#893,0.15,25,50,WHI 1 SNA
..3 BN63-10731A COVER-SOURCE,PCB(L);Y13 SF-LED 40,ABS,HB 2 SNA
...4 0103-007797 RESIN-ABS;EA-0640,K2007,HB 48 SNA
..3 AS109 BN63-11085A SHEET-SIDE;F6100,TAPE,0.125,25mm,130m,BL 3 SNA
..3 BN68-02471A LABEL-STICKER;WW,Art Paper,80,40,AV 1 SNA
..3 BN90-04952A ASSY MISC-BLU;VNB 40 1 SNA
...4 BN02-00152H TAPE ETC-SHEET FIXING;Y13 Slim F-LED,PET 3 SNA
...4 BN61-08638A LGP-DIFFUSESR PLATE;40" Slim FLED_Diffus 1 SNA
...4 BN61-09304A SUPPORT-PLATE;Y13 SLIM / VNB,PC,WHT + CL 8 SNA
....5 0103-005036 RESIN-PC;M2407,550115,TP0003 12 SNA
....5 0103-009493 RESIN-PC;LH-1070W,W92853,WT0107,V-2 20 SNA
...4 BN63-10447A SHEET-REFLECTOR;SY95,SHEET*,0.188,886.6, 1 SNA
...4 BN63-10453A SHEET-DIFFUSER;40inch, SFLED, UTA10 / DM 1 SNA
...4 BN96-25294F ASSY MISC P-CHASSIS BOTTOM;Y13 SF-LED 40 1 SNA
....5 6001-002759 SCREW-MACHINE;CH,+,M3,L4,ZPC(BLK),SWRCH1 1 SA
....5 6001-003005 SCREW-MACHINE;BH,+,M3,L6,ZPC(WHT),SWRCH1 4 SNA
....5 BN02-00040C TAPE DOUBLE FACE-D-PLATE;F-LED ALL,MKT50 2 SNA
....5 BN02-00043D TAPE ETC-SHEET FIXING;Y13 slim F-LED,PET 2 SNA
....5 BN02-00134E TAPE ETC-SHEET FIXING;SFLED 32/40/46/55/ 6 SNA
....5 BN60-00792A SPACER-SOURCE PCB GASKET;Y13 Slim F-LED, 4 SNA
....5 BN61-08161A HOLDER-LED-PCB;Direct-LED,PC,white 2 SNA
.....6 0103-009493 RESIN-PC;LH-1070W,W92853,WT0107,V-2 2 SNA
....5 BN61-09049A BRACKET-WALL MOUNT;Y13 ALL Model,SPCC,T1 4 SNA
ANNEX-3
ANNEX. Exploded View & Part List
Page 18
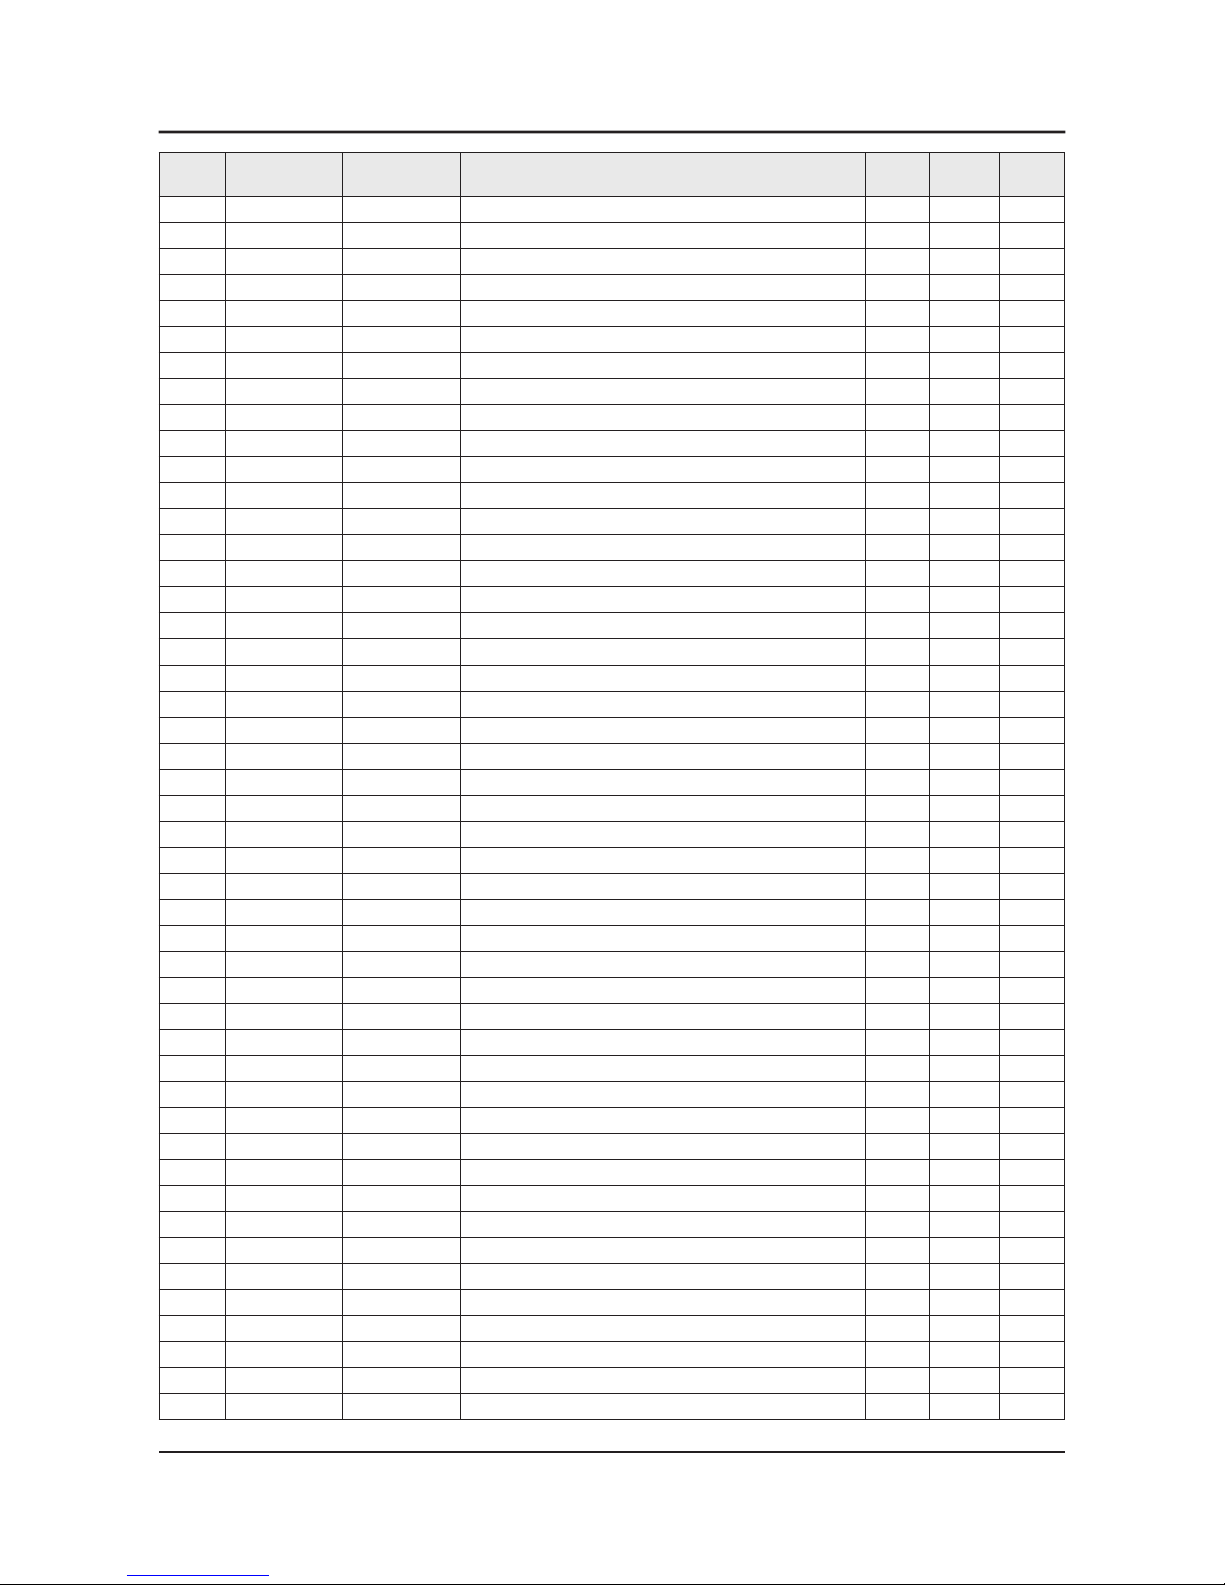
Level Location No. Code No. Description & Specication Q’ty SA/SNA Remark
....5 BN61-09101A SUPPORT-SOURCE PCB;SF-LED,ABS+PC,V0,GRAY 4 SNA
.....6 0103-009930 RESIN-PC ABS;NH-1017SG,GRAY,GY0275,V0 8 SNA
....5 BN61-09555A HOLDER-SOURCE PCB;Y13 SF-LED 40 (VNB CEL 4 SNA
.....6 0103-007442 RESIN-PC ABS;NH-1017SG,W91902,WT0034,2.0 8 SNA
....5 BN62-00338M INSULATION-PD BOARD;Y13 SF-LED 39"~55",P 1 SNA
....5 CC02 BN64-02199E CHASSIS-BOTTOM;Y13 F-LED Slim 40" VNB CE 1 SNA
....5 BN96-25336A ASSY BOARD P-D-LED INTERFACE;40inch Slim 1 SNA
...4 BN96-25304A ASSY MISC P-LED BAR;40inch Slim Direct L 7 SA
...4 BN96-25305A ASSY MISC P-LED BAR;40inch Slim Direct L 7 SA
...4 BN96-28375A ASSY FRAME P-MOLD MIDDLE;Y13 6K SF-LED 4 1 SNA
....5 BN60-00700E SPACER-PANEL (UD);13 SF-LED 40,SILICON+T 1 SNA
....5 BN60-00700W SPACER-PANEL (LR);13 SF-LED 40" VNB,SILI 2 SNA
....5 BN60-00700X SPACER-PANEL (U);13 SF-LED 40" VNB,SILIC 1 SNA
....5 BN60-00744B SPACER-RUBBER;Y13 F-LED SLIM(VNB CELL),S 2 SNA
....5 BN61-09554A FRAME-MOLD MIDDLE;Y13 SF-LED 40 (VNB CEL 1 SNA
.....6 0103-009559 RESIN-PC;210GNH15,6919A,BK0007,PC ABS GF 150 SNA
..3 TCON BN95-00858A ASSY T CON;LSF400HF02,40 FHD 120 VNB 1 SC
...4 BN02-00102B TAPE FILAMENT;UE7000,#893,0.15,25,50,WHI 0 SNA
...4 BN62-00371A HEAT SINK-PS;F6000,A1050,ANODIZING,110*6 1 SNA
...4 BN62-00372B HEAT SINK-PS;F5000/6000,A5052*,BLACK,32* 1 SNA
...4 BN97-06996A ASSY SMD;BN95-00858A 1 SNA
....5 0202-001830 SOLDER-CREAM;LFM-48W TM-HP,D20~38um,96.5 2 SNA
....5 0404-001640 DIODE-SCHOTTKY;SS1060HEWS,60V,1000mA,SOD 2 SA
....5 0404-001643 DIODE-SCHOTTKY;B360A,60V,3000mA,SMA,TP 1 SA
....5 0406-001317 DIODE-TVS;SMAJ14A,15.6/-/17.2V,400W,SMA 1 SNA
....5 0406-001324 DIODE-TVS;RClamp1502B,16.7/-/-V,200W,SOT 2 SNA
....5 0406-001438 DIODE-TVS;SMCJ14A,15.6/-/17.2V,1500W,DO- 1 SA
....5 0406-001445 DIODE-TVS;RClamp7512N,2.7/2.8/2.9,300W,S 2 SA
....5 0406-001483 DIODE-TVS;ESD5B5.0ST1G,5,8V/- /7.8V,50W, 2 SA
....5 0406-001556 DIODE-TVS;NUP4114UCW1,6/-/-V,180W,SC-88 3 SA
....5 0406-001578 DIODE-TVS;P4SMAJ40A,44.4,51.1,400W,SMA 1 SA
....5 0502-001331 TR-POWER;NSS30100LT1G,PNP,310mW,SOT-23,T 3 SA
....5 0502-001345 TR-POWER;FCX491A,NPN,1000mW,SOT89,TR,900 3 SA
....5 0502-001346 TR-POWER;FCX591A,PNP,1000mW,SOT89,TR,30/ 2 SA
....5 0505-002826 FET-SILICON;ZXMN6A07F,N,60V,1A,0.4ohm,0. 1 SNA
....5 0505-003224 FET-SILICON;AO6405,P,-30V,-5A,0.052ohm,2 1 SA
....5 EL02 0601-002037 LED;SMD(TOP VIEW),BLUE,1.6x0.8mm,465/470 3 SNA
....5 0801-003292 IC-CMOS LOGIC;7WB66,Bus Switch,MAB08A,8P 1 SA
....5 1105-002227 IC-DDR3 SDRAM;K4B1G1646G-BCK0,DDR3 SDRAM 1 SA
....5 1201-003130 IC-OP AMP;iML2811SEC,TDFN-EP,TP,8P,3x3mm 1 SA
....5 1203-006130 IC-POSI.FIXED REG.;S-1172B25-U5T1G,SOT-8 1 SA
....5 1203-006138 IC-POSI.ADJUST REG.;AP1117DGZ-13-89,TO-2 1 SA
....5 1203-006999 IC-DC/DC CONVERTER;SM4152,QFN,48P,7x7mm, 1 SNA
....5 1203-007447 IC-VOL. GENERATOR;RT6503GQW,QFN,48Z30,7x 1 SNA
....5 1203-007552 IC-DC/DC CONVERTER;TPS56921PWPR,HTSSOP,2 1 SA
....5 1204-003406 IC-VIDEO PROCESS;SDP1203,HSFCBGA,756Z30, 1 SA
....5 IS01 1209-002183 IC-SENSOR;S-5851AAA-M6T1U,SOT,6Z30,2.9x1 1 SA
ANNEX-4
ANNEX. Exploded View & Part List
Page 19
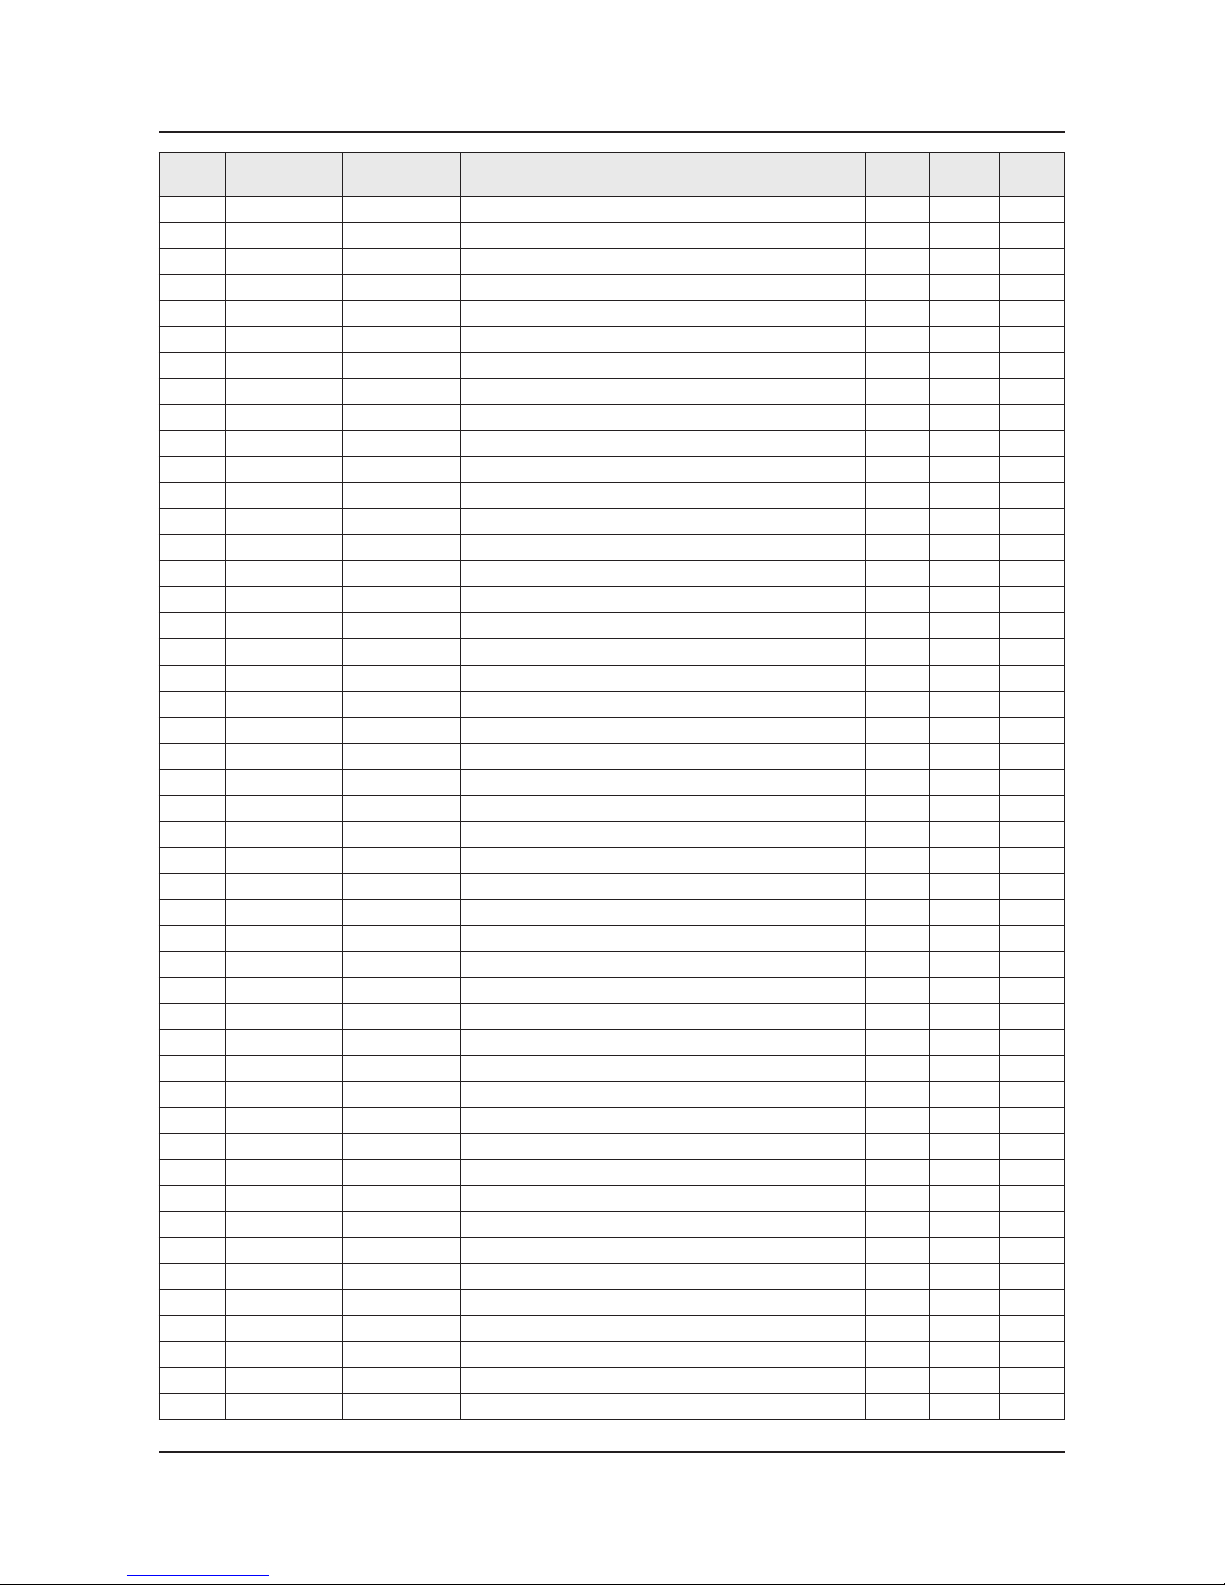
Level Location No. Code No. Description & Specication Q’ty SA/SNA Remark
....5 1404-001731 THERMISTOR-NTC;33Kohm,4050K,1mW/C,TP,1.6 1 SNA
....5 2007-000034 R-CHIP;1ohm,5%,1/4W,TP,3216 1 SNA
....5 2007-000040 R-CHIP;150ohm,1%,1/10W,TP,1608 2 SNA
....5 2007-000043 R-CHIP;1Kohm,1%,1/10W,TP,1608 4 SA
....5 2007-000052 R-CHIP;10Kohm,1%,1/10W,TP,1608 3 SA
....5 2007-000060 R-CHIP;100Kohm,1%,1/10W,TP,1608 1 SNA
....5 2007-000063 R-CHIP;150Kohm,1%,1/10W,TP,1608 1 SNA
....5 2007-000066 R-CHIP;20Kohm,1%,1/10W,TP,1608 1 SNA
....5 2007-000067 R-CHIP;15Kohm,1%,1/10W,TP,1608 1 SNA
....5 2007-000070 R-CHIP;0ohm,5%,1/10W,TP,1608 14 SA
....5 2007-000109 R-CHIP;1Mohm,5%,1/10W,TP,1608 1 SA
....5 2007-000138 R-CHIP;100ohm,5%,1/16W,TP,1005 9 SA
....5 2007-000140 R-CHIP;1Kohm,5%,1/16W,TP,1005 2 SNA
....5 2007-000143 R-CHIP;4.7Kohm,5%,1/16W,TP,1005 11 SNA
....5 2007-000148 R-CHIP;10Kohm,5%,1/16W,TP,1005 8 SA
....5 2007-000171 R-CHIP;0ohm,5%,1/16W,TP,1005 9 SNA
....5 2007-000256 R-CHIP;1.6Kohm,1%,1/10W,TP,1608 1 SA
....5 2007-000336 R-CHIP;120Kohm,1%,1/10W,TP,1608 4 SA
....5 2007-000455 R-CHIP;18Kohm,1%,1/10W,TP,1608 2 SA
....5 2007-000516 R-CHIP;2.7Kohm,1%,1/10W,TP,1608 3 SA
....5 2007-000726 R-CHIP;300ohm,1%,1/10W,TP,1608 2 SA
....5 2007-000736 R-CHIP;30Kohm,1%,1/10W,TP,1608 2 SA
....5 2007-000772 R-CHIP;33Kohm,1%,1/10W,TP,1608 1 SA
....5 2007-000779 R-CHIP;33ohm,1%,1/10W,TP,1608 1 SA
....5 2007-000869 R-CHIP;4.7Kohm,1%,1/10W,TP,1608 1 SA
....5 2007-000962 R-CHIP;5.1Kohm,1%,1/10W,TP,1608 4 SA
....5 2007-000979 R-CHIP;5.6Kohm,1%,1/10W,TP,1608 1 SA
....5 2007-001038 R-CHIP;56Kohm,1%,1/10W,TP,1608 1 SA
....5 2007-001125 R-CHIP;68Kohm,1%,1/10W,TP,1608 1 SA
....5 2007-001139 R-CHIP;7.5Kohm,1%,1/10W,TP,1608 1 SA
....5 2007-001153 R-CHIP;750ohm,1%,1/10W,TP,1608 1 SA
....5 2007-001175 R-CHIP;8.2Kohm,1%,1/10W,TP,1608 1 SA
....5 2007-001206 R-CHIP;82Kohm,1%,1/10W,TP,1608 1 SNA
....5 2007-001433 R-CHIP;12Kohm,1%,1/10W,TP,1608 2 SA
....5 2007-002437 R-CHIP;2ohm,5%,1/10W,TP,1608 3 SNA
....5 2007-002899 R-CHIP;10ohm,1%,1/10W,TP,1608 18 SA
....5 2007-002900 R-CHIP;11Kohm,1%,1/10W,TP,1608 1 SNA
....5 2007-007107 R-CHIP;100Kohm,1%,1/16W,TP,1005 1 SNA
....5 2007-007136 R-CHIP;4.7Kohm,1%,1/16W,TP,1005 10 SNA
....5 2007-007156 R-CHIP;1ohm,5%,1/16W,TP,1005 2 SNA
....5 2007-007306 R-CHIP;100ohm,1%,1/16W,TP,1005 18 SNA
....5 2007-007309 R-CHIP;12Kohm,1%,1/16W,TP,1005,0.35 2 SA
....5 2007-007312 R-CHIP;20Kohm,1%,1/16W,TP,1005 1 SA
....5 2007-007316 R-CHIP;3.3Kohm,1%,1/16W,TP,1005 2 SA
....5 2007-007318 R-CHIP;1Kohm,1%,1/16W,TP,1005 11 SNA
....5 2007-007517 R-CHIP;240ohm,1%,1/16W,TP,1005 3 SNA
....5 2007-007651 R-CHIP;9.1Kohm,1%,1/10W,TP,1608 3 SA
ANNEX-5
ANNEX. Exploded View & Part List
Page 20
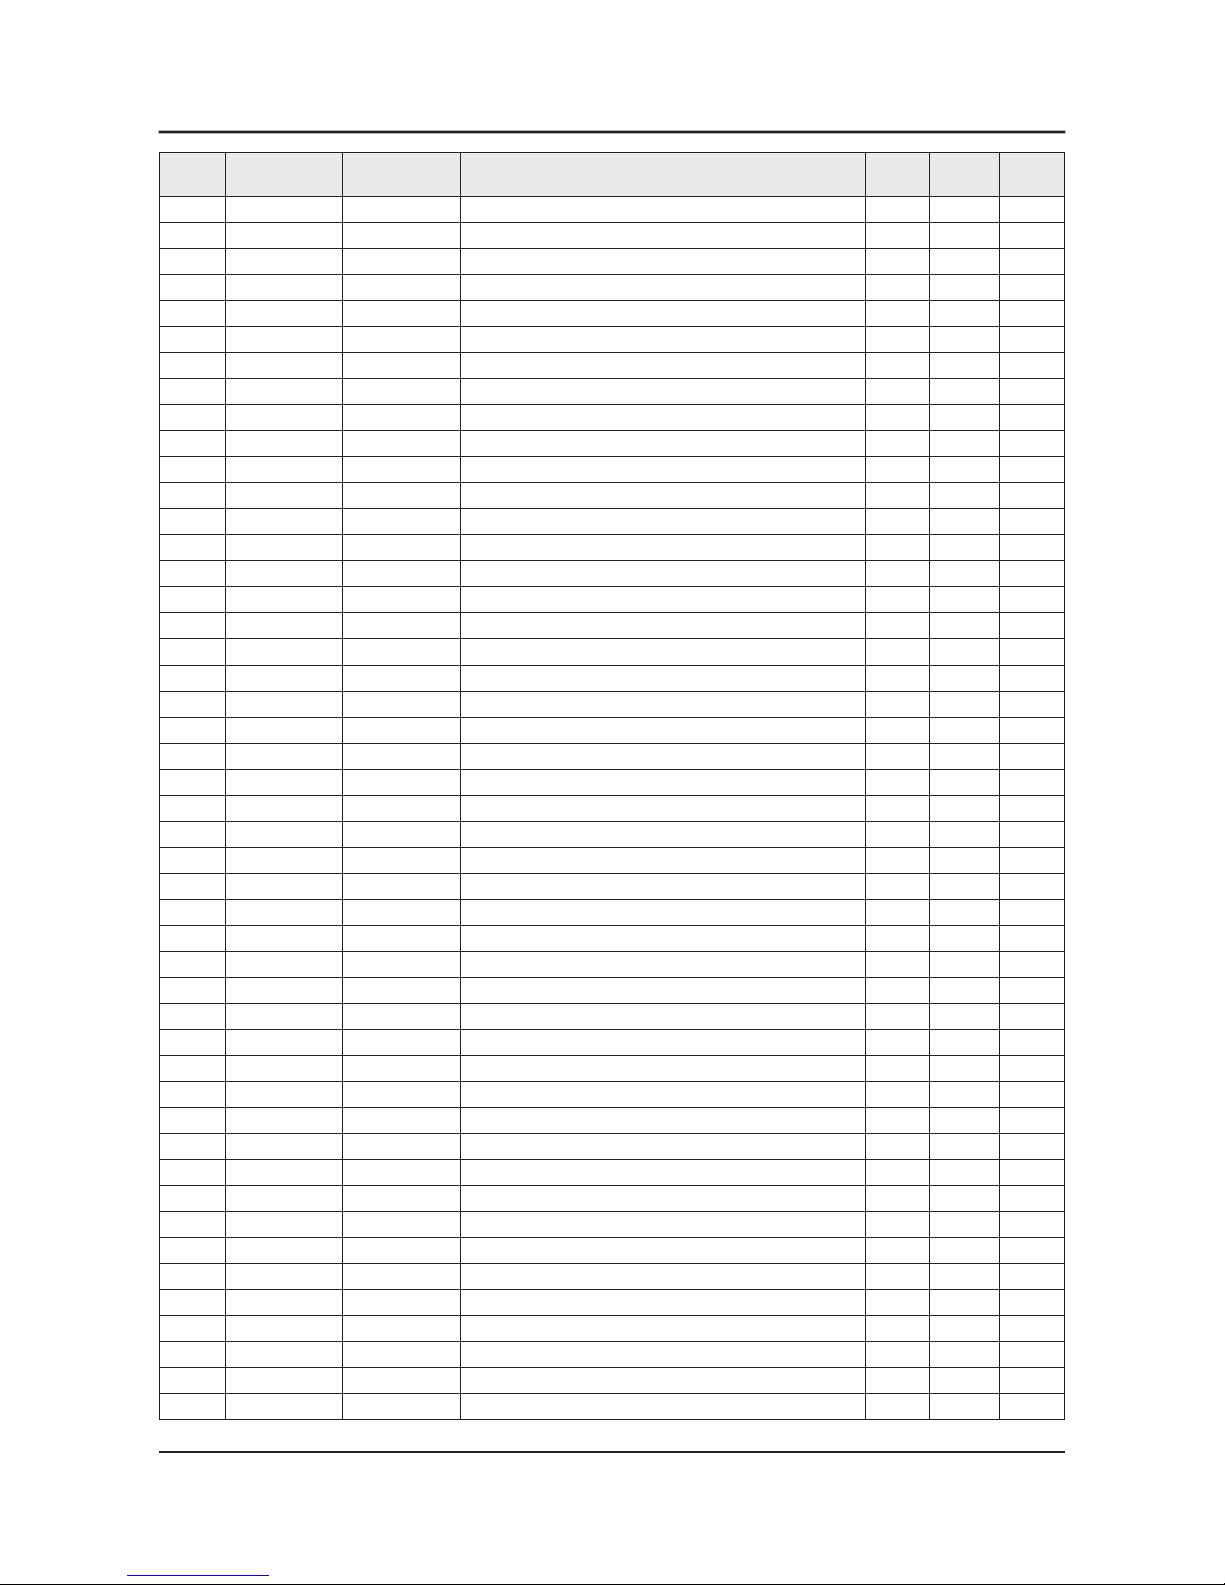
Level Location No. Code No. Description & Specication Q’ty SA/SNA Remark
....5 2007-007698 R-CHIP;5.1Kohm,1%,1/16W,TP,1005 1 SNA
....5 2007-007766 R-CHIP;2Kohm,1%,1/16W,TP,1005 5 SNA
....5 2007-007798 R-CHIP;10ohm,1%,1/16W,TP,1005 32 SA
....5 2007-008015 R-CHIP;75ohm,1%,1/16W,TP,1005 18 SA
....5 2007-008117 R-CHIP;2.7Kohm,1%,1/16W,TP,1005 1 SA
....5 AD480 2203-000257 C-CER,CHIP;10nF,10%,50V,X7R,TP,1608 4 SA
....5 AD480 2203-000489 C-CER,CHIP;2.2nF,10%,50V,X7R,TP,1005 2 SA
....5 AD480 2203-000995 C-CER,CHIP;0.047nF,5%,50V,C0G,TP,1005 2 SA
....5 AD480 2203-001126 C-CER,CHIP;0.68nF,10%,50V,X7R,TP,1608 1 SNA
....5 AD480 2203-001697 C-CER,CHIP;0.082nF,5%,50V,NP0,TP,1608 2 SNA
....5 AD480 2203-001851 C-CER,CHIP;0.016nF,5%,50V,NP0,TP,1608 2 SNA
....5 AD480 2203-002711 C-CER,CHIP;100nF,10%,25V,X7R,TP,1608 3 SA
....5 AD480 2203-002982 C-CER,CHIP;6.8nF,10%,50V,X7R,TP,1005 1 SA
....5 AD480 2203-005138 C-CER,CHIP;1.8nF,10%,50V,X7R,TP,1005 3 SA
....5 AD480 2203-005249 C-CER,CHIP;100nF,10%,50V,X7R,TP,1608 8 SNA
....5 AD480 2203-005344 C-CER,CHIP;22nF,10%,25V,X7R,TP,1005,0.5T 3 SNA
....5 AD480 2203-005918 C-CER,CHIP;1000nF,10%,6.3V,X7R,TP,1608 2 SNA
....5 AD480 2203-006048 C-CER,CHIP;100nF,10%,10V,X7R,TP,1005 9 SA
....5 AD480 2203-006158 C-CER,CHIP;100nF,10%,16V,X7R,TP,1005,0.5 61 SNA
....5 AD480 2203-006320 C-CER,CHIP;2200nF,10%,16V,X7R,TP,2012 1 SNA
....5 AD480 2203-006348 C-CER,CHIP;1000nF,10%,25V,X5R,TP,1608,0. 2 SA
....5 AD480 2203-006427 C-CER,CHIP;4700nF,10%,16V,X5R,TP,2012 1 SA
....5 AD480 2203-006474 C-CER,CHIP;22000nF,20%,6.3V,X5R,TP,2012 6 SA
....5 AD480 2203-006562 C-CER,CHIP;1000nF,10%,10V,X5R,TP,1005 2 SNA
....5 AD480 2203-006698 C-CER,CHIP;1000nF,10%,25V,X7R,TP,1608,0. 9 SA
....5 AD480 2203-006890 C-CER,CHIP;10000nF,20%,6.3V,X5R,TP,1608 8 SA
....5 AD480 2203-006960 C-CER,CHIP;1000nF,10%,50V,X7R,TP,2012 2 SNA
....5 AD480 2203-007240 C-CER,CHIP;22000nF,20%,6.3V,X5R,TP,1608, 3 SA
....5 AD480 2203-007270 C-CER,CHIP;10000nF,10%,10V,X5R,TP,1608,0 13 SNA
....5 AD480 2203-007306 C-CER,CHIP;10000nF,10%,25V,X5R,TP,2012,1 31 SNA
....5 2409-001118 C-POLYMER ,CHIP;47uF,20%,10V,WT,TP,3.5X2 1 SA
....5 2409-001240 C-ORGANIC,SMD;33uF,20%,25V,LR,TP,7343(1. 1 SA
....5 2703-003747 INDUCTOR-SMD;22uH,20%,6060,0.135ohm,1300 2 SA
....5 2703-003803 INDUCTOR-SMD;4.7uH,20%,6060,0.031ohm,270 1 SA
....5 2703-003862 INDUCTOR-SMD;10uH,20%,6060,0.065ohm,1900 1 SA
....5 2703-003867 INDUCTOR-SMD;22uH,20%,4040,1.8T,0.29Ohm, 1 SA
....5 2703-003937 INDUCTOR-SMD;1uH,20%,7.0x6.47x3.0mm,0.00 1 SA
....5 2703-004199 INDUCTOR-SMD;10uH,20%,7066,2.2mm,0.101Oh 1 SNA
....5 2801-003954 CRYSTAL-SMD;27MHz,30ppm,28-AAN,16pF,50oh 1 SA
....5 3301-002039 BEAD-SMD;26ohm,1608,TP 24 SA
....5 3601-001386 FUSE-SURFACE MOUNT;125V,5A,FAST-ACTING,C 1 SA
....5 3708-002157 CONNECTOR-FPC/FFC/PIC;80P,0.5mm,SMD-A,AU 2 SNA
....5 EH01 3711-005601 HEADER-BOARD TO CABLE;BOX,8P,1R,2mm,SMD- 1 SA
....5 EH01 3711-005925 HEADER-BOARD TO CABLE;BOX,51P,1R,0.5mm,S 1 SA
....5 6302-001290 GASKET;SMR-TS-4-4.5-3,4.0mm,Ni+Au+SUS+Mg 4 SNA
....5 BN41-01939B PCB MAIN;2013 FHD 120Hz/240Hz,FR-4,4,1.2 1 SNA
....5 BN97-07132A ASSY MICOM;F40A1F0611_011d,2013.02.16 1 SNA
ANNEX-6
ANNEX. Exploded View & Part List
Page 21
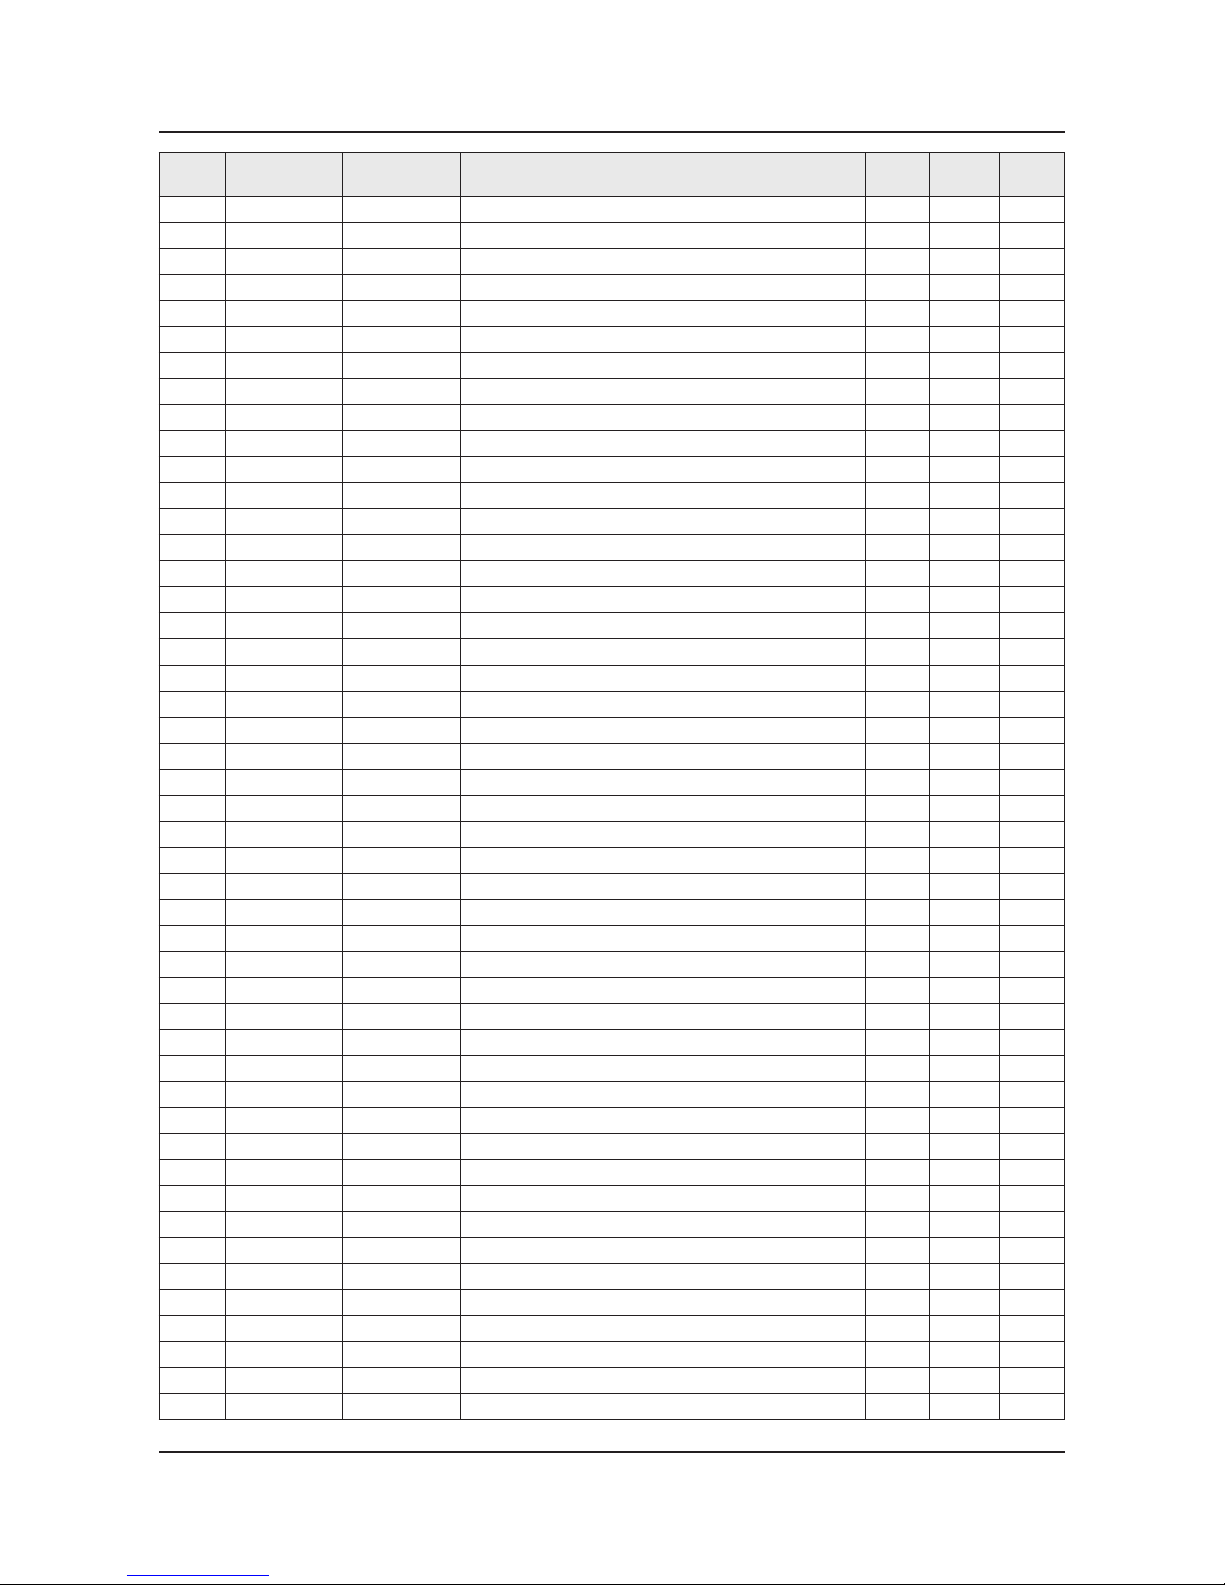
Level Location No. Code No. Description & Specication Q’ty SA/SNA Remark
.....6 1107-002224 IC-FLASH MEMORY;W25X40CLSSIG,4Mbit,SOP,8 1 SNA
..3 OC-TC BN96-24429D ASSY CABLE P-FFC;E7000,FFC,60mm짹1,80P 2 SNA
..3 BN96-24842A ASSY OPEN CELL;LSF400HF02-A,8bit,40 INCH 1 SNA
...4 BN81-07435A A/S-ADHESIVE-A.C.F;ADHESIVE-A.C.F,2-ADHE 1 SNA
...4 BN81-07880B A/S-IC DRIVER SOURCE;IC DRIVER SOURCE,13 1 SNA
...4 BN81-07891A A/S-POLARIZER-C/F;8-POLARIZER-C/F 1 SNA
...4 BN81-07903A A/S-POLARIZER-TFT;POLARIZER-TFT 1 SNA
...4 BN81-07921B A/S-ASSY PCB-SOURCE LEFT;ASSY PCB-SOURCE 1 SNA
...4 BN81-07922B A/S-ASSY PCB-SOURCE RIGHT;ASSY PCB-SOURC 1 SNA
...4 BN81-07943A A/S-ADHESIVE-A.C.F(TP500B);ADHESIVE-A.C. 1 SNA
..3 TC01A BN96-28376A ASSY MISC P-CHASSIS TOP;Y13 SF-LED 40(6K 1 SNA
...4 BN60-00667B SPACER-GASKET;Y13 SF-LED,GASKET(FG200A), 4 SNA
...4 BN60-00701C SPACER-TOP,UD;Y13 Slim F-LED 40,GASKET,L 2 SNA
...4 BN60-00701D SPACER-TOP,LR;Y13 Slim F-LED 40,GASKET*, 2 SNA
...4 BN60-00715B SPACER-TOP CORNER;Y13 Slim F-LED,GASKET+ 4 SNA
...4 BN60-00743C SPACER-PET (UD);Slim F-LED 40",SB00 + SK 2 SNA
...4 BN63-07556U COVER-SHEET;F-LED,urethane,T0.068,W18,10 1 SNA
...4 BN63-10945B COVER-SHEET;Y13 SF-LED,PO-SHEET,T0.068,W 2 SNA
...4 BN63-11161A SHEET-THERMAL;GAP PAD,1.5,W 7,L 65,BLACK 8 SNA
...4 AC157 BN64-02405A CHASSIS-TOP;Y13 SF-LED40 F6K(VNB CELL),P 1 SNA
....5 0103-009559 RESIN-PC;210GNH15,6919A,BK0007,PC ABS GF 260 SNA
1 M0017 BN91-11310R ASSY CHASSIS;UE40F6320AWXXC 1 SNA
0.2 M0014 BN94-06624R ASSY PCB MAIN;UE40F6320AWXXC 1 SA
..3 0202-001608 SOLDER-WIRE FLUX;LFC7-107,D0.8,99.3Sn/0. 0 SNA
..3 BN62-00365B HEAT SINK-PS;F 4k,5k,6k,A1050,ANODIZING, 1 SNA
..3 BN97-07019Y ASSY SMD;F6400,EUROPE,PAL,DVB-T/C 1 SNA
...4 0202-001830 SOLDER-CREAM;LFM-48W TM-HP,D20~38um,96.5 6 SNA
...4 DS01A 0401-001056 DIODE-SWITCHING;MMBD4148SE,100V,200mA,SO 2 SA
...4 0403-001783 DIODE-ZENER;BZB84-C6V2,5.8/6.6V,300mW,SO 4 SNA
...4 0404-001404 DIODE-SCHOTTKY;BAT721C,40V,200mA,SOT-23, 3 SA
...4 0406-001200 DIODE-TVS;RCLAMP0504F,6/-/-V,150W,SC-70 4 SA
...4 0406-001271 DIODE-TVS;RCLAMP0524P,6/-/-V,150W,SLP251 1 SNA
...4 0501-000279 TR-SMALL SIGNAL;KSA1182-Y,PNP,150mW,SOT- 2 SA
...4 0501-000445 TR-SMALL SIGNAL;KTC3875S-Y,NPN,150mW,SOT 10 SC
...4 0505-000110 FET-SILICON;2N7002,N,60V,115mA,7.5ohm,0. 10 SA
...4 0505-002560 FET-SILICON;AO6415,P,-20V,-3.3A,0.15ohm, 1 SA
...4 0505-002598 FET-SILICON;AP2317GN,P,-20V,-4.2A,0.052o 1 SA
...4 0801-002701 IC-CMOS LOGIC;74VHCT125A,BUFFER,TSSOP,14 1 SA
...4 0801-002780 IC-CMOS LOGIC;74LVC1G17,SCHMITT-TRIGGER 1 SA
...4 0801-003330 IC-CMOS LOGIC;Octal buffer,DQFN,20P,4.5x 2 SA
...4 0904-002803 IC-USC;AU6258S-JKF,QFN,28Z30,5.0mm X 5.0 1 SNA
...4 1001-001545 IC-ANALOG MULTIPLEX;TS3USB221ERSER,R-PQF 1 SA
...4 1103-001487 IC-EEPROM;AT24C256C-SSHL-T,256Kbit,32Kx8 1 SA
...4 1105-002338 IC-DDR3 SDRAM;K4B4G1646B-HCMA,DDR3 1866, 1 SA
...4 1105-002430 IC-DDR3 SDRAM;K4B2G1646E-BCMA,DDR3 1866, 2 SA
...4 1201-003183 IC-AUDIO AMP;DRV612,HTSSOP,14P,5x4.4mm,D 1 SA
...4 1201-003526 IC-AUDIO AMP;TAS5745,QFP,48Z30,7x7mm,DUA 1 SNA
ANNEX-7
ANNEX. Exploded View & Part List
Page 22
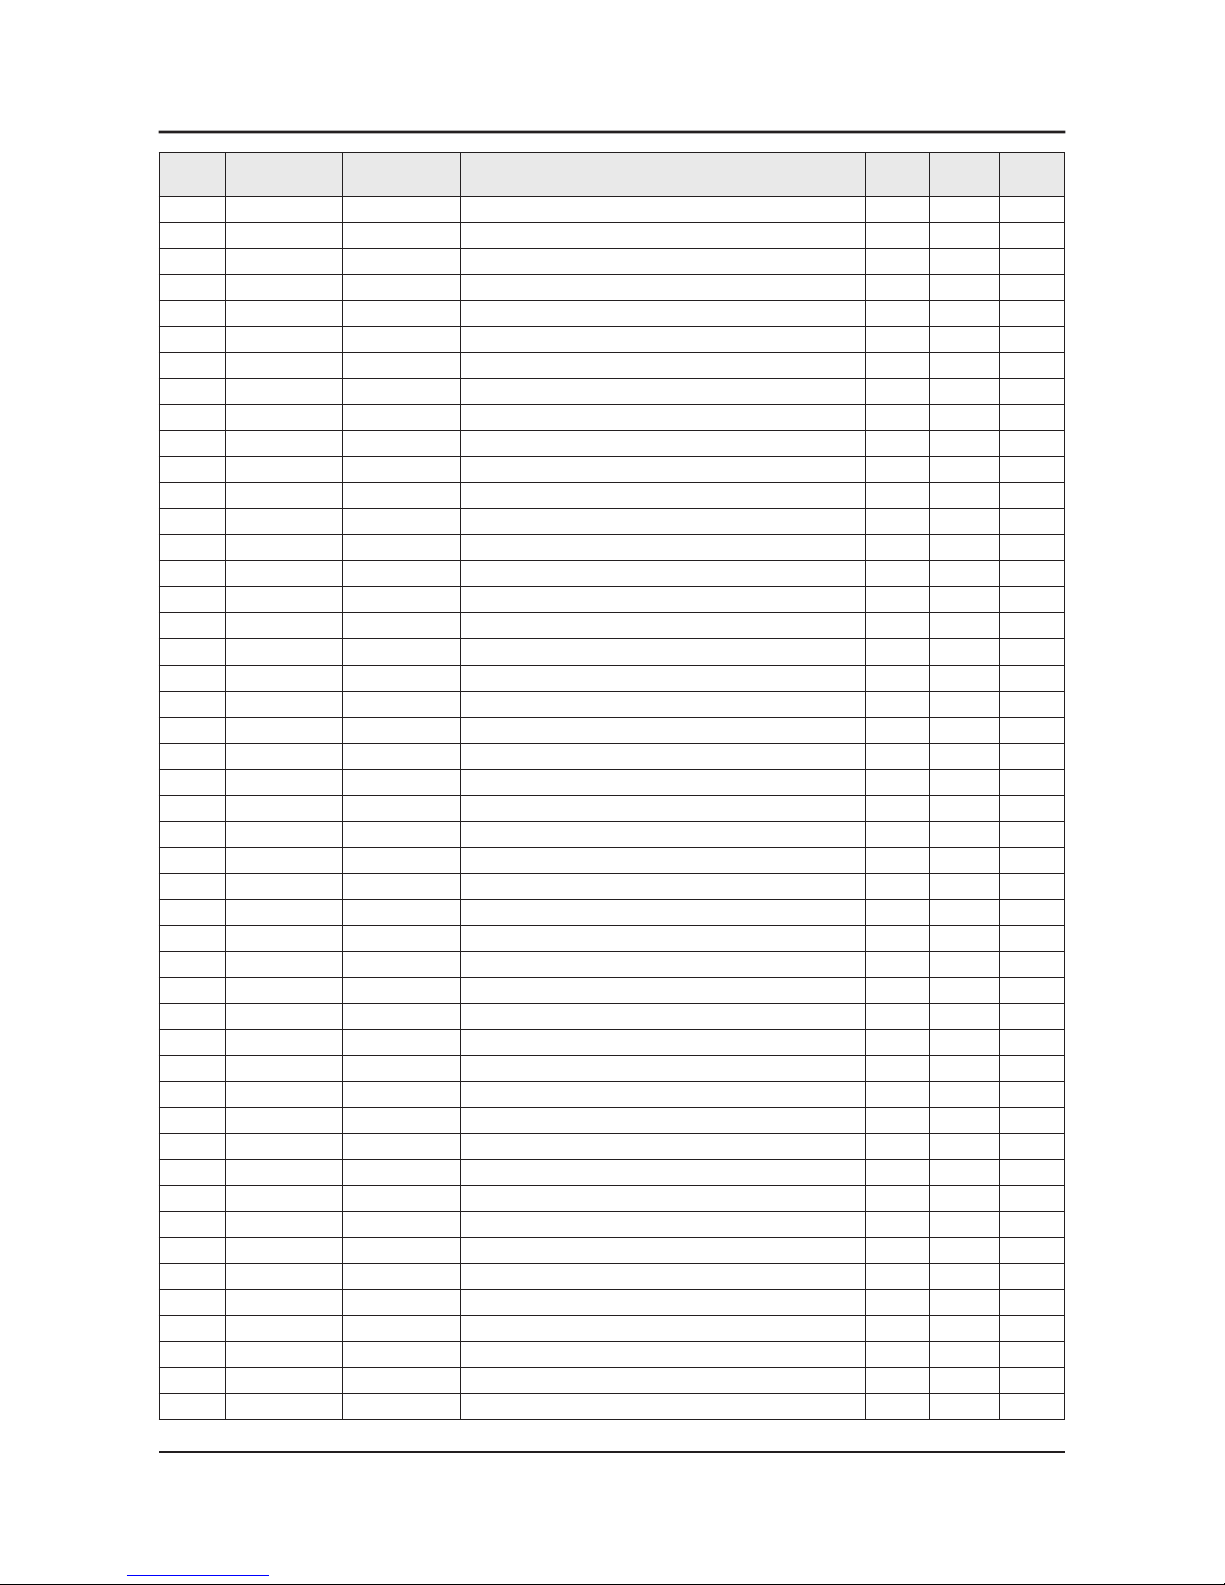
Level Location No. Code No. Description & Specication Q’ty SA/SNA Remark
...4 1203-004364 IC-VOL. DETECTOR;RT9818C-42PV,SOT-23,3P, 1 SA
...4 1203-006109 IC-POSI.FIXED REG.;S-1206B33-M3T1G,SOT-2 2 SA
...4 1203-006130 IC-POSI.FIXED REG.;S-1172B25-U5T1G,SOT-8 1 SA
...4 1203-006135 IC-POSI.FIXED REG.;AP1117D-33-GZ-13-89,T 1 SA
...4 1203-006136 IC-POSI.FIXED REG.;AP1117D-18-GZ-13-89,T 1 SA
...4 1203-006138 IC-POSI.ADJUST REG.;AP1117DGZ-13-89,TO-2 1 SA
...4 1203-007238 IC-PWM CONTROLLER;TPS54427,DDA,8P,4.8x3. 1 SNA
...4 1203-007242 IC-POSI.ADJUST REG.;G2992BP11U,SOP-8,8P, 1 SA
...4 1203-007502 IC-DC/DC CONVERTER;AOZ3011PI,SO-8,8Z30,4 1 SA
...4 1203-007695 IC-DC/DC CONVERTER;AOZ3018,SO-8,8Z30,4.9 1 SNA
...4 1203-007728 IC-VOL. DETECTOR;RT9831GQW,QW : WQFN-20L 1 SA
...4 1204-003421 IC-DECODER;SEMS30,PBGA,729Z30,21.6x21.6m 1 SA
...4 1205-004447 IC-SWITCH;TPS2051CDBVR,SOT23-5,5P,3x1.65 4 SA
...4 1205-004691 IC-SWITCH;BD82022FVJ,MSOP-8L JEDEC,8Z30, 1 SNA
...4 1405-001271 VARISTOR;35V,20Vdc,5A,1.0x0.5x0.6mm,TP,1 28 SA
...4 2007-000137 R-CHIP;2Kohm,5%,1/16W,TP,1005 13 SNA
...4 2007-000138 R-CHIP;100ohm,5%,1/16W,TP,1005 12 SA
...4 2007-000142 R-CHIP;2.7Kohm,5%,1/16W,TP,1005 1 SA
...4 2007-000143 R-CHIP;4.7Kohm,5%,1/16W,TP,1005 50 SNA
...4 2007-000148 R-CHIP;10Kohm,5%,1/16W,TP,1005 43 SA
...4 2007-000153 R-CHIP;22Kohm,5%,1/16W,TP,1005 6 SNA
...4 2007-000155 R-CHIP;27Kohm,5%,1/16W,TP,1005 1 SNA
...4 2007-000157 R-CHIP;47Kohm,5%,1/16W,TP,1005 16 SNA
...4 2007-000170 R-CHIP;1Mohm,5%,1/16W,TP,1005 3 SNA
...4 2007-000171 R-CHIP;0ohm,5%,1/16W,TP,1005 12 SNA
...4 2007-000172 R-CHIP;10ohm,5%,1/16W,TP,1005 5 SNA
...4 2007-000173 R-CHIP;22ohm,5%,1/16W,TP,1005 12 SNA
...4 2007-000174 R-CHIP;47ohm,5%,1/16W,TP,1005 2 SNA
...4 2007-000256 R-CHIP;1.6Kohm,1%,1/10W,TP,1608 1 SA
...4 2007-000336 R-CHIP;120Kohm,1%,1/10W,TP,1608 1 SA
...4 2007-000583 R-CHIP;22Kohm,1%,1/10W,TP,1608 2 SA
...4 2007-000695 R-CHIP;3.3ohm,5%,1/10W,TP,1608 2 SNA
...4 2007-000775 R-CHIP;33Kohm,5%,1/16W,TP,1005 1 SNA
...4 2007-000803 R-CHIP;36Kohm,1%,1/10W,TP,1608 2 SA
...4 2007-000857 R-CHIP;4.3Kohm,1%,1/10W,TP,1608 5 SNA
...4 2007-000932 R-CHIP;470ohm,5%,1/16W,TP,1005 3 SNA
...4 2007-000979 R-CHIP;5.6Kohm,1%,1/10W,TP,1608 1 SA
...4 2007-001116 R-CHIP;680ohm,1%,1/10W,TP,1608 1 SA
...4 2007-001125 R-CHIP;68Kohm,1%,1/10W,TP,1608 1 SA
...4 2007-001168 R-CHIP;75ohm,5%,1/4W,TP,3216 1 SA
...4 2007-001288 R-CHIP;18ohm,5%,1/16W,TP,1005 4 SA
...4 2007-001292 R-CHIP;33ohm,5%,1/16W,TP,1005 14 SNA
...4 2007-001298 R-CHIP;51ohm,5%,1/16W,TP,1005 2 SNA
...4 2007-001301 R-CHIP;68ohm,5%,1/16W,TP,1005 7 SA
...4 2007-002970 R-CHIP;56ohm,5%,1/16W,TP,1005 4 SA
...4 2007-003015 R-CHIP;2.2ohm,5%,1/16W,TP,1005 1 SA
...4 2007-003022 R-CHIP;62ohm,5%,1/16W,TP,1005 26 SNA
ANNEX-8
ANNEX. Exploded View & Part List
Page 23
Level Location No. Code No. Description & Specication Q’ty SA/SNA Remark
...4 2007-007001 R-CHIP;3.9Kohm,5%,1/16W,TP,1005 1 SA
...4 2007-007095 R-CHIP;390ohm,5%,1/16W,TP,1005 1 SA
...4 2007-007107 R-CHIP;100Kohm,1%,1/16W,TP,1005 8 SNA
...4 2007-007135 R-CHIP;18Kohm,1%,1/16W,TP,1005 4 SNA
...4 2007-007138 R-CHIP;27Kohm,1%,1/16W,TP,1005 1 SA
...4 2007-007142 R-CHIP;10Kohm,1%,1/16W,TP,1005 2 SNA
...4 2007-007156 R-CHIP;1ohm,5%,1/16W,TP,1005 13 SNA
...4 2007-007238 R-CHIP;8.25Kohm,1%,1/10W,TP,1608 1 SA
...4 2007-007316 R-CHIP;3.3Kohm,1%,1/16W,TP,1005 3 SA
...4 2007-007318 R-CHIP;1Kohm,1%,1/16W,TP,1005 33 SNA
...4 2007-007331 R-CHIP;90.9Kohm,1%,1/10W,TP,1608 1 SA
...4 2007-007463 R-CHIP;1.1Kohm,1%,1/16W,TP,1005 1 SA
...4 2007-007470 R-CHIP;7.5Kohm,1%,1/16W,TP,1005 1 SNA
...4 2007-007517 R-CHIP;240ohm,1%,1/16W,TP,1005 4 SNA
...4 2007-007538 R-CHIP;56Kohm,1%,1/16W,TP,1005 1 SA
...4 2007-007766 R-CHIP;2Kohm,1%,1/16W,TP,1005 3 SNA
...4 2007-007942 R-CHIP;1Mohm,1%,1/16W,TP,1005 1 SNA
...4 2007-007981 R-CHIP;180Kohm,1%,1/16W,TP,1005 1 SNA
...4 2007-008015 R-CHIP;75ohm,1%,1/16W,TP,1005 11 SA
...4 2007-008133 R-CHIP;56.2Kohm,1%,1/10W,TP,1608 1 SA
...4 2007-008137 R-CHIP;24Kohm,1%,1/16W,TP,1005 2 SNA
...4 2007-008275 R-CHIP;30Kohm,1%,1/16W,TP,1005 1 SNA
...4 2007-008298 R-CHIP;49.9ohm,1%,1/16W,TP,1005 4 SA
...4 2007-008426 R-CHIP;12.4Kohm,1%,1/10W,TP,1608 1 SA
...4 2007-008649 R-CHIP;220ohm,1%,1/16W,TP,1005 1 SNA
...4 2007-008807 R-CHIP;53.6Kohm,1%,1/16W,TP,1005 1 SA
...4 2011-001261 R-NETWORK;33ohm,5%,1/16W,L,CHIP,8P,TP,2. 2 SA
...4 2011-001262 R-NETWORK;22ohm,5%,1/16W,L,CHIP,8P,TP,2. 1 SA
...4 2011-001344 R-NETWORK;100ohm,5%,1/16W,L,CHIP,8P,TP,2 4 SA
...4 2011-001449 R-NETWORK;22ohm,5%,1/16W,L,4P,TP,1010 5 SA
...4 2011-001506 R-NETWORK;10Kohm,5%,1/16W,L,CHIP,4P,TP,1 6 SNA
...4 2011-001527 R-NETWORK;4.7Kohm,5%,1/16W,L,CHIP,4P,TP, 5 SNA
...4 2011-001587 R-NETWORK;100ohm,5%,1/16W,L,CHIP-V,4P,TP 5 SNA
...4 AD480 2203-000233 C-CER,CHIP;0.1nF,5%,50V,C0G,TP,1005 6 SA
...4 AD480 2203-000386 C-CER,CHIP;0.015nF,5%,50V,C0G,TP,1005 3 SA
...4 AD480 2203-000425 C-CER,CHIP;0.018nF,5%,50V,C0G,TP,1005 3 SA
...4 AD480 2203-000438 C-CER,CHIP;1nF,10%,50V,X7R,TP,1005 12 SA
...4 AD480 2203-000489 C-CER,CHIP;2.2nF,10%,50V,X7R,TP,1005 7 SA
...4 AD480 2203-000530 C-CER,CHIP;2.7nF,10%,50V,X7R,TP,1005,- 1 SNA
...4 AD480 2203-000575 C-CER,CHIP;220nF,10%,25V,X7R,TP,2012 6 SNA
...4 AD480 2203-000679 C-CER,CHIP;0.027nF,5%,50V,C0G,TP,1005 2 SNA
...4 AD480 2203-000812 C-CER,CHIP;0.033nF,5%,50V,C0G,TP,1005 7 SA
...4 AD480 2203-000995 C-CER,CHIP;0.047nF,5%,50V,C0G,TP,1005 3 SA
...4 AD480 2203-002285 C-CER,CHIP;10nF,10%,50V,X7R,TP,1005 21 SNA
...4 AD480 2203-002525 C-CER,CHIP;0.56nF,10%,50V,X7R,TP,1005 4 SNA
...4 AD480 2203-002711 C-CER,CHIP;100nF,10%,25V,X7R,TP,1608 3 SA
...4 AD480 2203-003039 C-CER,CHIP;0.008nF,0.25pF,50V,C0G,TP,100 2 SNA
ANNEX-9
ANNEX. Exploded View & Part List
Page 24

Level Location No. Code No. Description & Specication Q’ty SA/SNA Remark
...4 AD480 2203-005249 C-CER,CHIP;100nF,10%,50V,X7R,TP,1608 5 SNA
...4 AD480 2203-005344 C-CER,CHIP;22nF,10%,25V,X7R,TP,1005,0.5T 3 SNA
...4 AD480 2203-005642 C-CER,CHIP;0.22nF,5%,50V,NP0,TP,1005 2 SNA
...4 AD480 2203-005968 C-CER,CHIP;4.7nF,10%,50V,X7R,TP,1005,0.5 2 SNA
...4 AD480 2203-006048 C-CER,CHIP;100nF,10%,10V,X7R,TP,1005 122 SA
...4 AD480 2203-006126 C-CER,CHIP;47nF,10%,16V,X7R,TP,1005 17 SNA
...4 AD480 2203-006324 C-CER,CHIP;2200nF,10%,10V,X5R,TP,1608 6 SA
...4 AD480 2203-006348 C-CER,CHIP;1000nF,10%,25V,X5R,TP,1608,0. 4 SA
...4 AD480 2203-006361 C-CER,CHIP;10000nF,10%,10V,X5R,TP,2012 21 SC
...4 AD480 2203-006474 C-CER,CHIP;22000nF,20%,6.3V,X5R,TP,2012 26 SA
...4 AD480 2203-006562 C-CER,CHIP;1000nF,10%,10V,X5R,TP,1005 19 SNA
...4 AD480 2203-006824 C-CER,CHIP;4700nF,10%,10V,X5R,TP,1608,- 9 SNA
...4 AD480 2203-006890 C-CER,CHIP;10000nF,20%,6.3V,X5R,TP,1608 20 SA
...4 AD480 2203-006992 C-CER,CHIP;0.33nF,5%,50V,C0G,TP,1005 2 SNA
...4 AD480 2203-007176 C-CER,CHIP;10000nF,10%,16V,X5R,TP,2012,1 8 SNA
...4 AD480 2203-007513 C-CER,CHIP;10000nF,10%,10V,X5R,TP,1608,0 4 SA
...4 2703-000158 INDUCTOR-SMD;1uH,10%,2012,.4Ohm,50mA,45, 4 SA
...4 2703-001229 INDUCTOR-SMD;2.2uH,10%,1608,1.15Ohm,15mA 1 SC
...4 2703-001938 INDUCTOR-SMD;56nH,5%,1005,1.5Ohm,200mA,1 3 SA
...4 2703-003713 INDUCTOR-SMD;1.5uH,20%,7366,0.015ohm,700 2 SA
...4 2703-003790 INDUCTOR-SMD;4.7uH,20%,8080,0.025ohm,450 1 SA
...4 2703-003930 INDUCTOR-SMD;4.7uH,20%,5050,0.072Ohm,245 4 SA
...4 2801-000102 CRYSTAL-SMD;12MHz,30ppm,12pF,100ohm,TP 1 SA
...4 2801-003326 CRYSTAL-SMD;24MHz,30ppm,28-ABX,20pF,50oh 1 SA
...4 2801-003856 CRYSTAL-SMD;0.032768MHz,20ppm,28-ACP,7pF 1 SA
...4 2801-004775 CRYSTAL-SMD;12MHz,30ppm,16pF,30ohm,TP 1 SNA
...4 3301-000314 BEAD-SMD;120ohm,1608,TP,120ohm/100MHz 8 SNA
...4 3301-002039 BEAD-SMD;26ohm,1608,TP 29 SA
...4 3601-001374 FUSE-SURFACE MOUNT;32V,5A,FAST-ACTING,PL 1 SA
...4 3701-001856 CONNECTOR-HDMI;19P,2ROW,FEMALE,SMD-S,AU 1 SA
...4 3701-001861 CONNECTOR-HDMI;19P,2ROW,FEMALE,SMD-A,AU 3 SA
...4 3707-001106 CONNECTOR-OPTICAL;STRAIGHT W/L,SPDIF 1 SA
...4 3708-003073 CONNECTOR-FPC/FFC/PIC;51P,0.5mm,SMD,AU,N 1 SNA
...4 3710-003374 CONNECTOR-SOCKET;64P,2R,0.5mm,ANGLE,NI+S 1 SA
...4 EH01 3711-007742 HEADER-BOARD TO CABLE;BOX,20P,2R,2mm,ANG 1 SA
...4 EH01 3711-008131 HEADER-BOARD TO CABLE;BOX,4P,1R,2.5mm,AN 1 SA
...4 EH01 3711-008558 HEADER-BOARD TO CABLE;BOX,26P,2R,1.25mm, 1 SA
...4 3722-003229 JACK-MODULAR;8P/8C W/L,Y,STRAIGHT,N,Au,1 1 SA
...4 3722-003457 JACK-USB;4P/1C,NI,BLK,A 3 SA
...4 3722-003546 JACK-PIN;5P+Screw hole,NI+SN,G,Y/BLU/RED 1 SA
...4 3722-003617 JACK-PHONE;14P/2C,SN,BLK,STRAIGHT,3.6PI, 1 SA
...4 3722-003655 JACK-SCART;21P,SN,BLK 1 SA
...4 ET01 BN40-00256A TUNER;DTOS40EIH035A,DTOS40EIH035A,DVB-TC 1 SA
...4 BN41-01958A PCB MAIN;X12, LED 6 Series,FR-4,4,A,1.2T 1 SNA
...4 BN97-07121A ASSY MICOM;X12-PM51-0011-130709,2013.07. 1 SNA
....5 1107-002226 IC-NOR FLASH;W25Q40CLSSIP,4Mbit,SOIC,8P, 1 SNA
...4 BN97-07122A ASSY MICOM;T-MST12DEUC-XXXX,U85A,2012.11 1 SNA
ANNEX-10
ANNEX. Exploded View & Part List
Page 25
Level Location No. Code No. Description & Specication Q’ty SA/SNA Remark
....5 1107-002077 IC-NAND FLASH;KLM4G1FE3B-B001,4Gbyte,32G 1 SA
...4 BN97-07123A ASSY MICOM;T-MST12DEUS-1009,2013.06.19 1 SNA
....5 0903-001863 IC-MICROCONTROLLER;WT61P807-RG48,LQFP,48 1 SNA
...4 BN97-07278A ASSY MICOM-BLASTER;Blaster-Version:3.03, 1 SNA
....5 BN13-00063A PLD;MAXQ610J,QFN,44 1 SNA
..3 BN97-07143A ASSY DRM-KEY;CI(BN46-00115J),HDCP(BN46-0 1 SNA
...4 BN46-00109H KEY CODE-CERTIFI;MAC,TV/AV,General 1 SNA
...4 BN46-00110N KEY CODE-CERTIFI;MIRACAST,TV,X12 /X13 1 SNA
...4 BN46-00115J KEY CODE-CERTIFI;CI+,TV,2013X,Euro 1 SNA
1 BN92-11716A ASSY P/MATERIAL;UF6000 37 1 SNA
0.2 0203-001595 TAPE-OPP MASKING;OPP-2,0.075,75,800M,CLR 3 SNA
0.2 6902-001671 BAG ROLL;HDPE/PE FOAM,T0.01/T0.3,W750,L3 2 SNA
0.2 6922-000013 BAND PP;PP,W18,L2300/L2900,TRP 1 SNA
0.2 BN01-00156A FOIL-STRETCH-HOOD;UE42F5000,LLDPE*,T0.08 0 SNA
0.2 BN63-11092A COVER-SHEET NITRON;PS51F8500,PE,T4.0,W12 1 SNA
0.2 BN69-08272A CUSHION-SET;UF6200, 40 ,WW,EPS 1 SNA
0.2 BN69-08430A CUSHION-FRONT;UF7000 40,EPS,EXPORT 1 SNA
..3 0103-005099 RESIN-EPS;BASF303,Natural,Natural 40 SNA
0.2 BN69-09102A PALLET-WOODEN;UE40F6510,WOOD,1290,1190,1 1 SNA
1 BN92-13312H ASSY LABEL;F6*** 1 SNA
0.2 BN68-04913E LABEL-LED HIGHLIGHT STICKER;F8500,8000,7 1 SNA
0.2 BN68-05118C LEAFLET-03,QSG;UF6200 ~ UF6700,EU N.AFRI 1 SNA
0.2 T0527 BP68-00052B LABEL-00,RATING;FPTV,PET,T0.05,93,73 1 SNA
1 ACCE1 BN92-13436C ASSY ACCESSORY;F6320 1 SNA
0.2 BN68-04916N LABEL-01,STICKER;UF6P,EDC,PET,T0.1,60,12 1 SNA
0.2 3DGLA BN96-25614A ASSY ACCESSORY 3D GLASSES;SSG-5100GB,In 1 SC
0.2 BN96-29414T ASSY ACCESSORY CABLE;UE40F6320AWXXH 1 SNA
..3 3709-001791 CONNECTOR-CARD SLOT;64P,0.5mm,SMD-A,AU,P 1 SA
..3 T0268 3903-000849 CBF-POWER CORD;DT,CEE,LP-21L,250V,2.5A,B 1 SA
..3 4301-000121 BATTERY-MN;1.5V,R03,10.5x44.5m,7.5g,AAA 2 SNA
..3 SCREW 6003-001782 SCREW-TAPTYPE;BH,+,B,M4,L12,ZPC(BLK),SWR 8 SA
..3 REMO2 AA59-00790A REMOCON;TM1250,49,3.0V,F6370, F6300, F62 1 SA
..3 M9889 BN63-01798B CLOTH-CLEAN;CLOTH,sea blue,ToC 1 SNA
..3 BN69-08226C BOX-ACCESSORY;E7000,PAPER,CCP 400g,NON-S 1 SNA
..3 BN69-08449A BAG VINYL;LDPE,0.04,L1000,W120 0 SNA
..3 BN69-08472G PAD ACCESSARY;ACCESSORY,CB,Black Paper 4 1 SNA
..3 BN69-08751B WRAP VINYL-SHRINK;STAND,PLASTIC OTHERS,P 0 SNA
..3 BN96-15806B ASSY HOLDER P-WIRE STAND;UE5500,NYLON,BL 1 SNA
...4 BN61-04731D BOSS-TAPE;AMBER,ACRYL,T1.1,W20.0mm,WHITE 0 SNA
...4 BN61-05491C HOLDER-WIRE STAND;UE5500,NYLON,BLK 1 SNA
..3 FLIB BN96-26652A ASSY CABLE P;IR BLASTER,IR BLASTER CABL, 1 SA
0.2 BN96-29416K ASSY ACCESSORY MANUAL;UE40F6320AWXXH 1 SNA
..3 6902-000476 BAG PE;LDPE,T0.03,W250,L350,TRP,Recycle, 1 SNA
..3 BN68-03548J LEAFLET-05,WARRANTY CARD;comm,Samsung,17 1 SNA
..3 BN68-04735A LABEL-E,PASS;ALL MODEL,ART PAPER 90G,50, 1 SNA
..3 BN68-04881P MANUAL USERS;UF6320,16LANGS,XH,W/P 80G,E 1 SNA
..3 BN68-04972A MANUAL FLYER-02,REGULATORY GUI;ALL,SAMSU 1 SNA
ANNEX-11
ANNEX. Exploded View & Part List
Page 26
Level Location No. Code No. Description & Specication Q’ty SA/SNA Remark
..3 BN68-05115F LEAFLET-06,FITCH;UF6100,EUROPE,W/P 80G,I 1 SNA
1 BN92-13438A ASSY BOX;UF6300, 40 1 SNA
0.2 BH68-00662A LABEL BOX-01;ALL MODEL,ART PAPER,60,110, 1 SNA
0.2 BN69-08522M BOX-SET;40UF6320-QS,CB,A-01,SW3,YEL,W117 1 SNA
ANNEX-12
ANNEX. Exploded View & Part List
Page 27

Follow these safety, servicing and ESD precautions to prevent damage and to protect against potential hazards such as
electrical shock.
1-1-1. Warnings
WARNING
For continued safety, do not attempt to modify the circuit board.
Disconnect the AC power and DC power jack before servicing.
1-1-2. Servicing the LED TV
When servicing the LED TV, Disconnect the AC line cord from the AC outlet.1.
It is essential that service technicians have an accurate voltage meter available at all times. Check the calibration of this 2.
meter periodically.
1-1-3. Fire and Shock Hazard
Before returning the monitor to the user, perform the following safety checks:
Inspect each lead dress to make certain that the leads are not pinched or that hardware is not lodged between the 1.
chassis and other metal parts in the monitor.
Inspect all protective devices such as nonmetallic control knobs, insulating materials, cabinet backs, adjustment and 2.
compartment covers or shields, isolation resistorcapacitor networks, mechanical insulators, etc.
Leakage Current Hot Check:3.
DEVICE
UNDER
TEST
(READING SHOULD)
NOT BE ABOVE 0.5mA
LEAKAGE
CURRENT
TESTER
TEST ALL
EXPOSED METAL
SURFACES
2-WIRE CORD
ALSO TEST WITH
PLUG REVERSED
(USING AC ADAPTER
PLUG AS REQUIRED)
EARTH
GROUND
WARNING
Do not use an isolation transformer during this test.
Use a leakage current tester or a metering system that complies with American National Standards
Institute (ANSI C101.1, Leakage Current for Appliances), and Underwriters Laboratories (UL
Publication UL1410, 59.7).
With the unit completely reassembled, plug the AC line cord directly into a 120V AC outlet. With the unit’s AC switch rst 4.
in the ON position and then OFF, measure the current between a known earth ground (metal water pipe, conduit, etc.)
and all exposed metal parts, including: metal cabinets, screwheads and control shafts.
The current measured should not exceed 0.5 milliamp.
Reverse the power-plug prongs in the AC outlet and repeat the test.
1-1
1. Precautions
1. Precautions
1-1. Safety Precautions
Page 28

1-2
1. Precautions
1-1-4. Product Safety Notices
Some electrical and mechanical parts have special safetyrelated characteristics which are often not evident from visual
inspection. The protection they give may not be obtained by replacing them with components rated for higher voltage,
wattage, etc. Parts that have special safety characteristics are identied by
on schematics and parts lists. A substitute
replacement that does not have the same safety characteristics as the recommended replacement part might create
shock, re and/or other hazards. Product safety is under review continuously and new instructions are issued whenever
appropriate.
Page 29
WARNING
An electrolytic capacitor installed with the wrong polarity might explode.
CAUTION
Before servicing units covered by this service manual, read and follow the Safety Precautions section of
this manual.
NOTE
If unforeseen circumstances create conict between the following servicing precautions and any of the
safety precautions, always follow the safety precautions.
1-2-1. General Servicing Precautions
Always unplug the unit’s AC power cord from the AC power source and disconnect the DC Power Jack before 1.
attempting to: (a) remove or reinstall any component or assembly, (b) disconnect PCB plugs or connectors, (c) connect
a test component in parallel with an electrolytic capacitor.
Some components are raised above the printed circuit board for safety. An insulation tube or tape is sometimes used. 2.
The internal wiring is sometimes clamped to prevent contact with thermally hot components. Reinstall all such elements
to their original position.
After servicing, always check that the screws, components and wiring have been correctly reinstalled. Make sure that 3.
the area around the serviced part has not been damaged.
Check the insulation between the blades of the AC plug and accessible conductive parts (examples: metal panels, input 4.
terminals and earphone jacks).
Insulation Checking Procedure: Disconnect the power cord from the AC source and turn the power switch ON. Connect 5.
an insulation resistance meter (500 V) to theblades of the AC plug. The insulation resistance between each blade of the
AC plug and accessible conductive parts (see above) should be greater than 1 megohm.
Always connect a test instrument’s ground lead to the instrument chassis ground before connecting the positive lead; 6.
always remove the instrument’s ground lead last.
1-3
1. Precautions
1-2. Servicing Precautions
Page 30
Some semiconductor (solid state) devices can be easily damaged by static electricity. Such components are commonly
called Electrostatically Sensitive Devices (ESD). Examples of typical ESD are integrated circuits and some eld-effect
transistors. The following techniques will reduce the incidence of component damage caused by static electricity.
Immediately before handling any semiconductor components or assemblies, drain the electrostatic charge from your 1.
body by touching a known earth ground. Alternatively, wear a discharging wrist-strap device. To avoid a shock hazard,
be sure to remove the wrist strap before applying power to the monitor.
After removing an ESD-equipped assembly, place it on a conductive surface such as aluminum foil to prevent 2.
accumulation of an electrostatic charge.
Do not use freon-propelled chemicals. These can generate electrical charges sufcient to damage ESDs.3.
Use only a grounded-tip soldering iron to solder or desolder ESDs.4.
Use only an anti-static solder removal device. Some solder removal devices not classied as “anti-static” can generate 5.
electrical charges sufcient to damage ESDs.
Do not remove a replacement ESD from its protective package until you are ready to install it. Most replacement ESDs 6.
are packaged with leads that are electrically shorted together by conductive foam, aluminum foil or other conductive
materials.
Immediately before removing the protective material from the leads of a replacement ESD, touch the protective material 7.
to the chassis or circuit assembly into which the device will be installed.
CAUTION
Be sure no power is applied to the chassis or circuit and observe all other safety precautions.
Minimize body motions when handling unpackaged replacement ESDs. Motions such as brushing clothes together, or 8.
lifting your foot from a carpeted oor can generate enough static electricity to damage an ESD.
1-4
1. Precautions
1-3. Static Electricity Precautions
Page 31

For safety reasons, more than a people are required for carrying the product.1.
Keep the power cord away from any heat emitting devices, as a melted covering may cause re or electric shock.2.
Do not place the product in areas with poor ventilation such as a bookshelf or closet. The increased internal temperature 3.
may cause re.
Bend the external antenna cable when connecting it to the product. This is a measure to protect it from being exposed 4.
to moisture. Otherwise, it may cause a re or electric shock.
Make sure to turn the power off and unplug the power cord from the outlet before repositioning the product. Also check 5.
the antenna cable or the external connectors if they are fully unplugged. Damage to the cord may cause re or electric
shock.
Keep the antenna far away from any high-voltage cables and install it rmly. Contact with the highvoltage cable or the 6.
antenna falling over may cause re or electric shock.
When installing the product, leave enough space (0.4m) between the product and the wall for ventilation purposes. 7.
A rise in temperature within the product may cause re.
1-5
1. Precautions
1-4. Installation Precautions
Page 32
2-1
2. Product specications
2. Product Specications
2-1. Product information
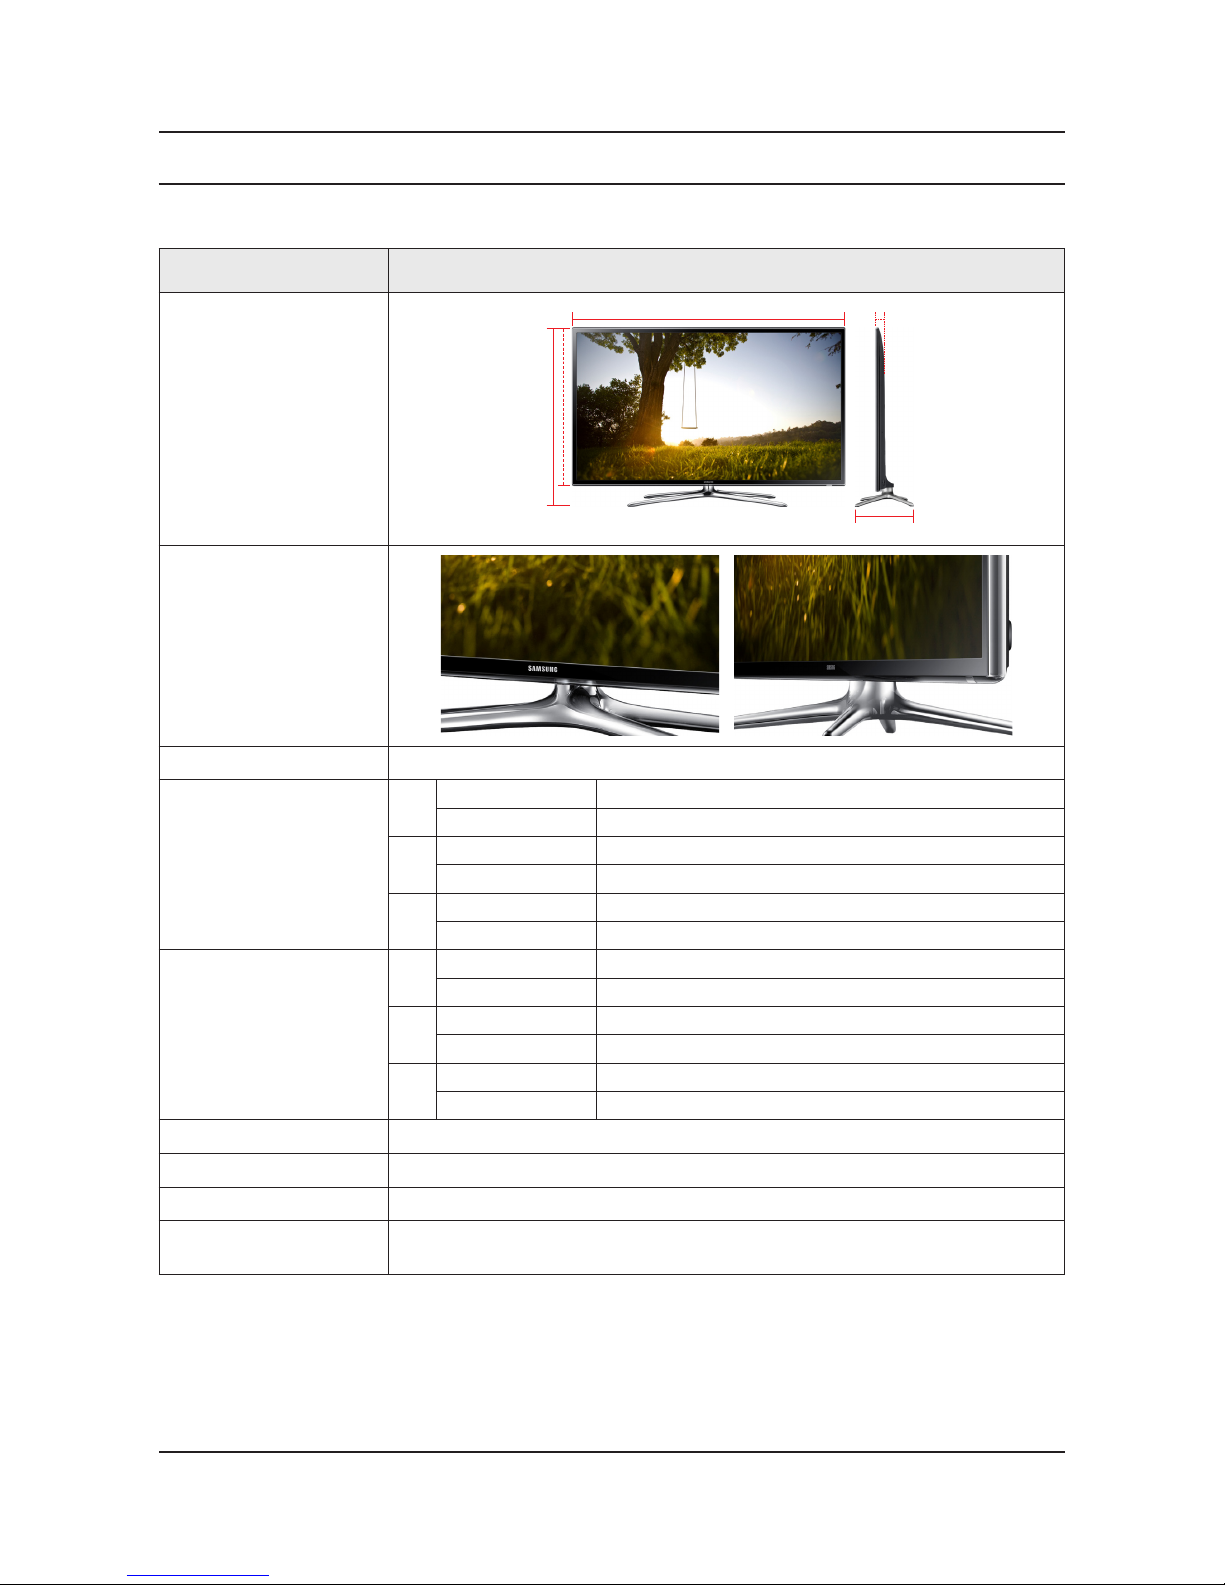
Model UE**F6320AW
Front View
W
D
* W : Width H : High D : Depth
H
Detail View
Front Color CLEAR BLACK
Dimensions
(W x H x D)
40"
Set with Stand 934.0 x 620.1 x 264.8 mm
Set without Stand 934.0 x 548.6 x 49.6 mm
46"
Set with Stand 1065.4 x 704.7 x 306.9 mm
Set without Stand 1065.4 x 622.5 x 49.6 mm
55"
Set with Stand 1256.0 x 811.2 x 306.9 mm
Set without Stand 1256.0 x 729.3 x 49.2 mm
Weight
40"
Set with Stand 10.0 kg
Set without Stand 8.9 kg
46"
Set with Stand 13.5 kg
Set without Stand 11.8 kg
55"
Set with Stand 18.7 kg
Set without Stand 17.0 kg
Panel Type BLACK
Internal Memory 4G
DDR 1G
Feature
3D / SMART HUB / Anynet+ (HDMI-CEC) / e-Manual / Device Manager / Screen
Mirroring
Page 33
2-2
2. Product specications
2-2. Product specication
2-2-1. Detailed Specications
NOTE
Design and specications are subject to change without prior notice.
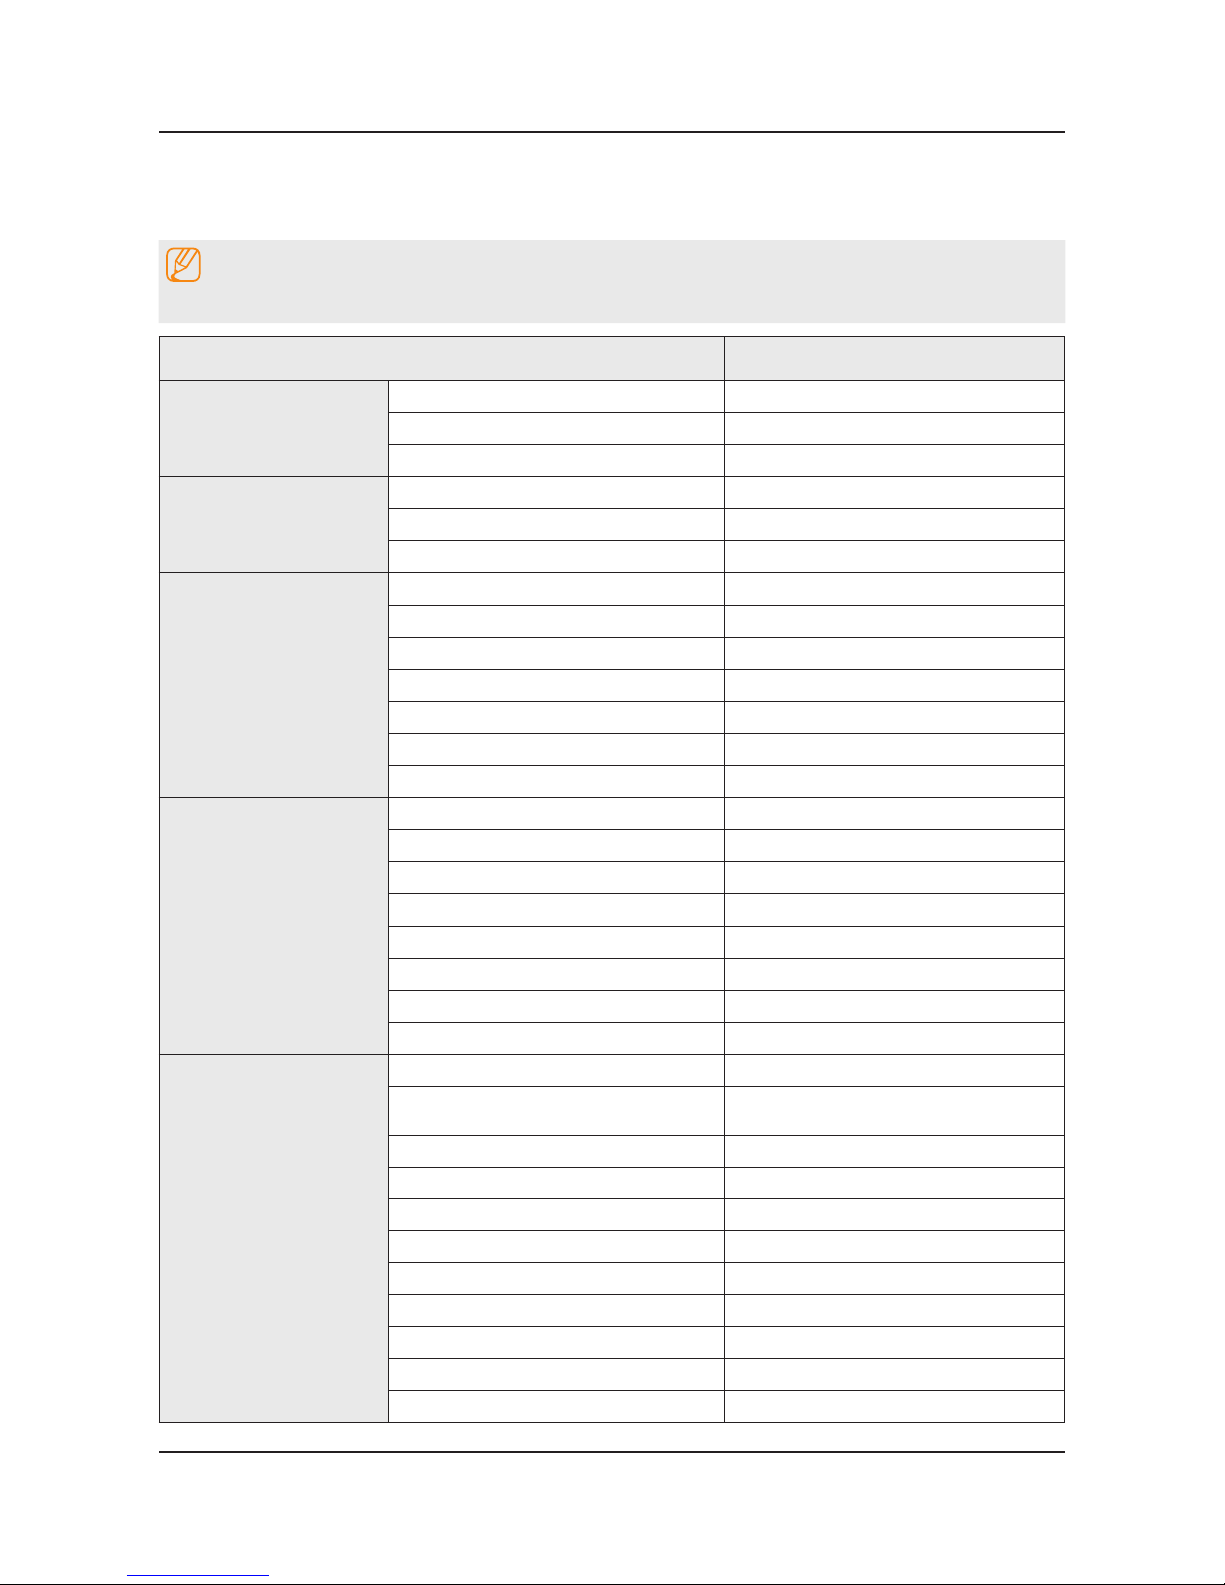
Item UE**F6320AWXXH
General Information
Product LED
Series 6
Country HUNGARY
Display
Inch 40" / 46"
Resolution 1,920 x 1,080
Ultra Clear Panel No
Video
Clear Motion Rate 200
Micro Dimming No
Picture Engine 3D HyperReal Engine
Dynamic Contrast Ratio Mega Contrast
Wide Color Enhancer (Plus) Yes
Film Mode Yes
Natural Mode Support Yes
Audio
3D Sound Yes
Sound Output (RMS) 10 W x 2
Dolby Dolby Digital Plus / Dolby Pulse
SRS / DNSe+ DTS Studio Sound
dts 2.0 + Digital Out / DTS Premium Audio DTS Premium Audio 5.1
Speaker Type Down Firing + Full Range
Sound Customizer No
Woofer No
Smart TV 2.0
Smart Hub Yes
On TV
Yes (AT,BE,CH,DE,DK,ES,FI,FR,UK,IR,IT,
LU,NL,NO,PL,PT,SE)
Movies & TV Shows Yes (FR, DE, ES, SE, NL, AT, CH)
Apps Yes
Social Yes
Photos, Videos & Music Yes
Fitness Yes
Kids Yes
ACR (Advertisement) No
Samsung SMART View Yes (Clone View only)
S Recommendation Yes
Page 34
2-3
2. Product specications
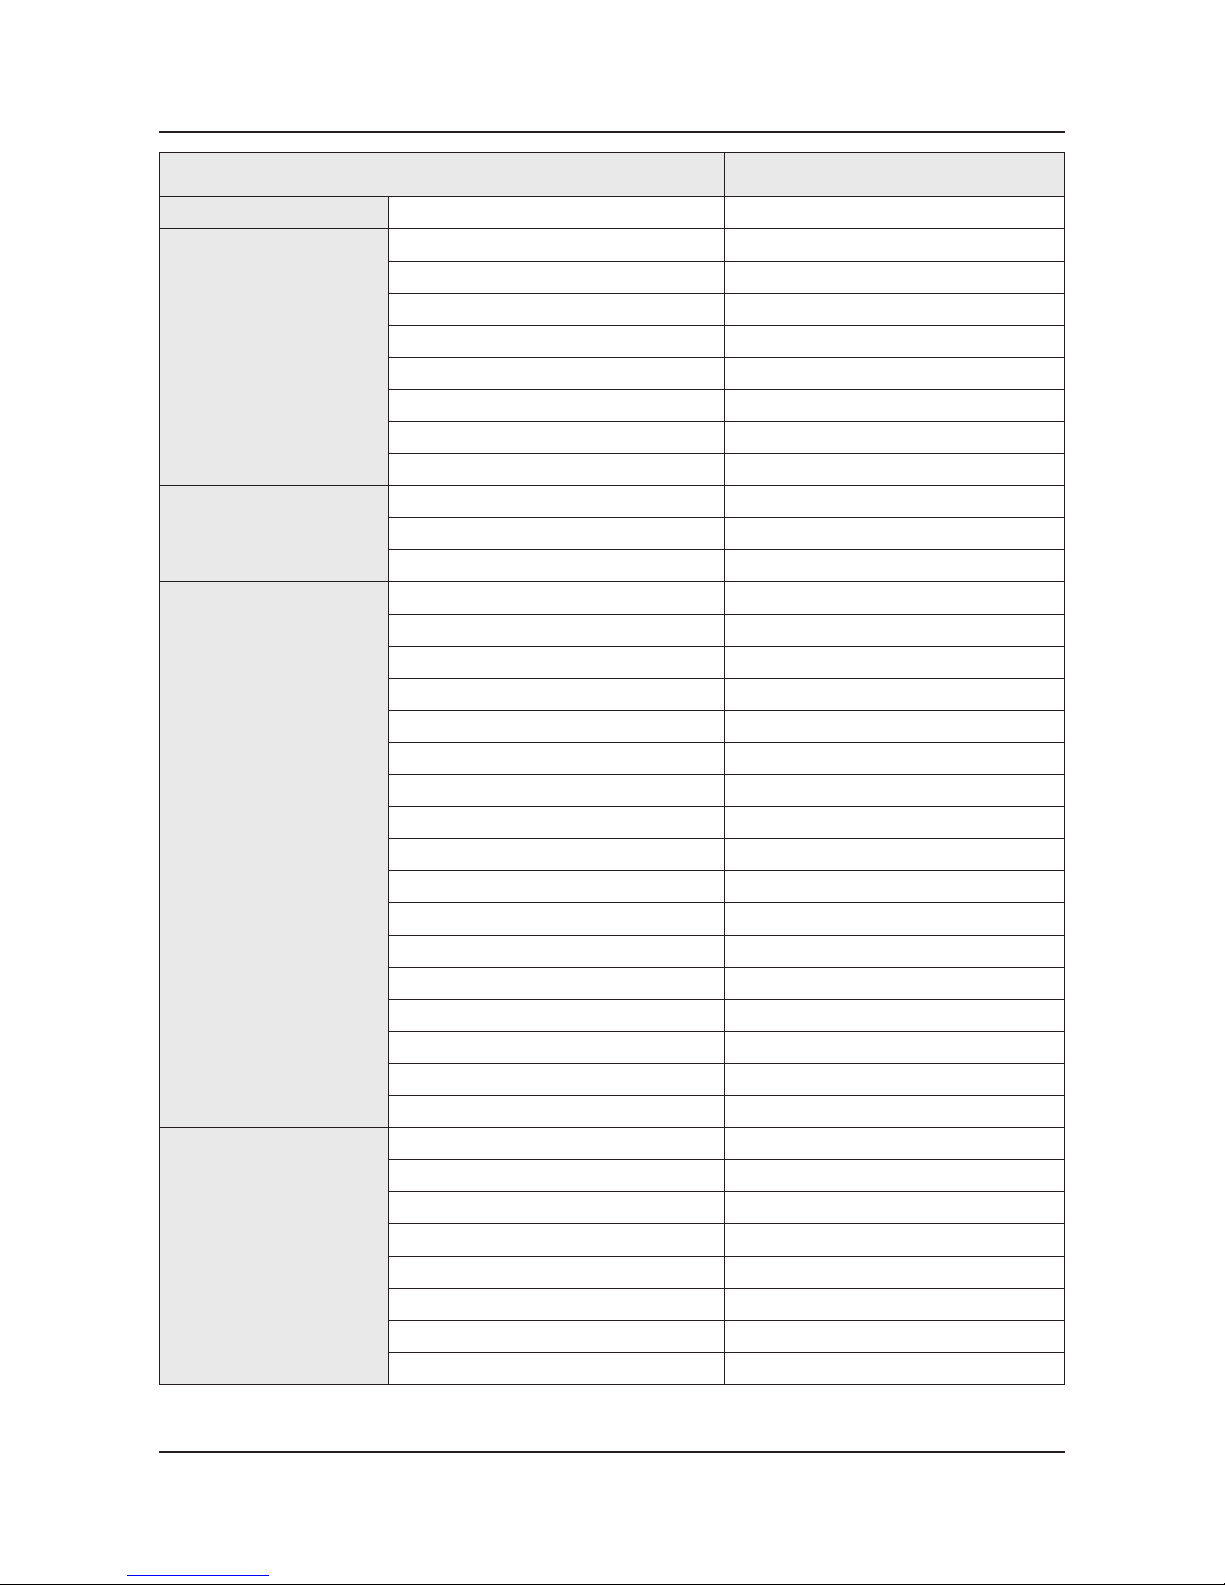
Item UE**F6320AWXXH
Smart TV 2.0
Web Browser Yes
Smart Interaction 2.0
Camera Built-in No
Face recognition No
Motion control No
Voice Control (Embedded) No
Voice Control (Server) No
Voice Interaction No
Camera App No
Samsung TV Apps supported Yes
System
DTV Tuner DVB-T/C
Analog Tuner Yes
CI/CI+ CI+ (1.3)
Input&Output
Audio Out (Mini Jack) No
Component In (Y/Pb/Pr) 1
Composite In (AV) 1 (Common Use for Component Y)
Digital Audio Out (Optical) 1
DVI Audio In (Mini Jack) No
Ethernet (LAN) 1
HDMI 4
PC Audio In (Mini Jack) No
PC In (D-sub) No
RF In (Terrestrial/Cable Input) 1
RF In (Satellite Input) No
RS-232C (AV CONTROL) No
USB 3
Headphone 1
Scart 1
CI Slot 1
IR Out 1
Design
Design One design
Slim Type Slim
Bezel Type Narrow Bezel
Front Color Black
Light Effect (Deco) No
Swivel (Left/Right) Yes
Stand Type Quad
Push & Pull Camera No
Page 35
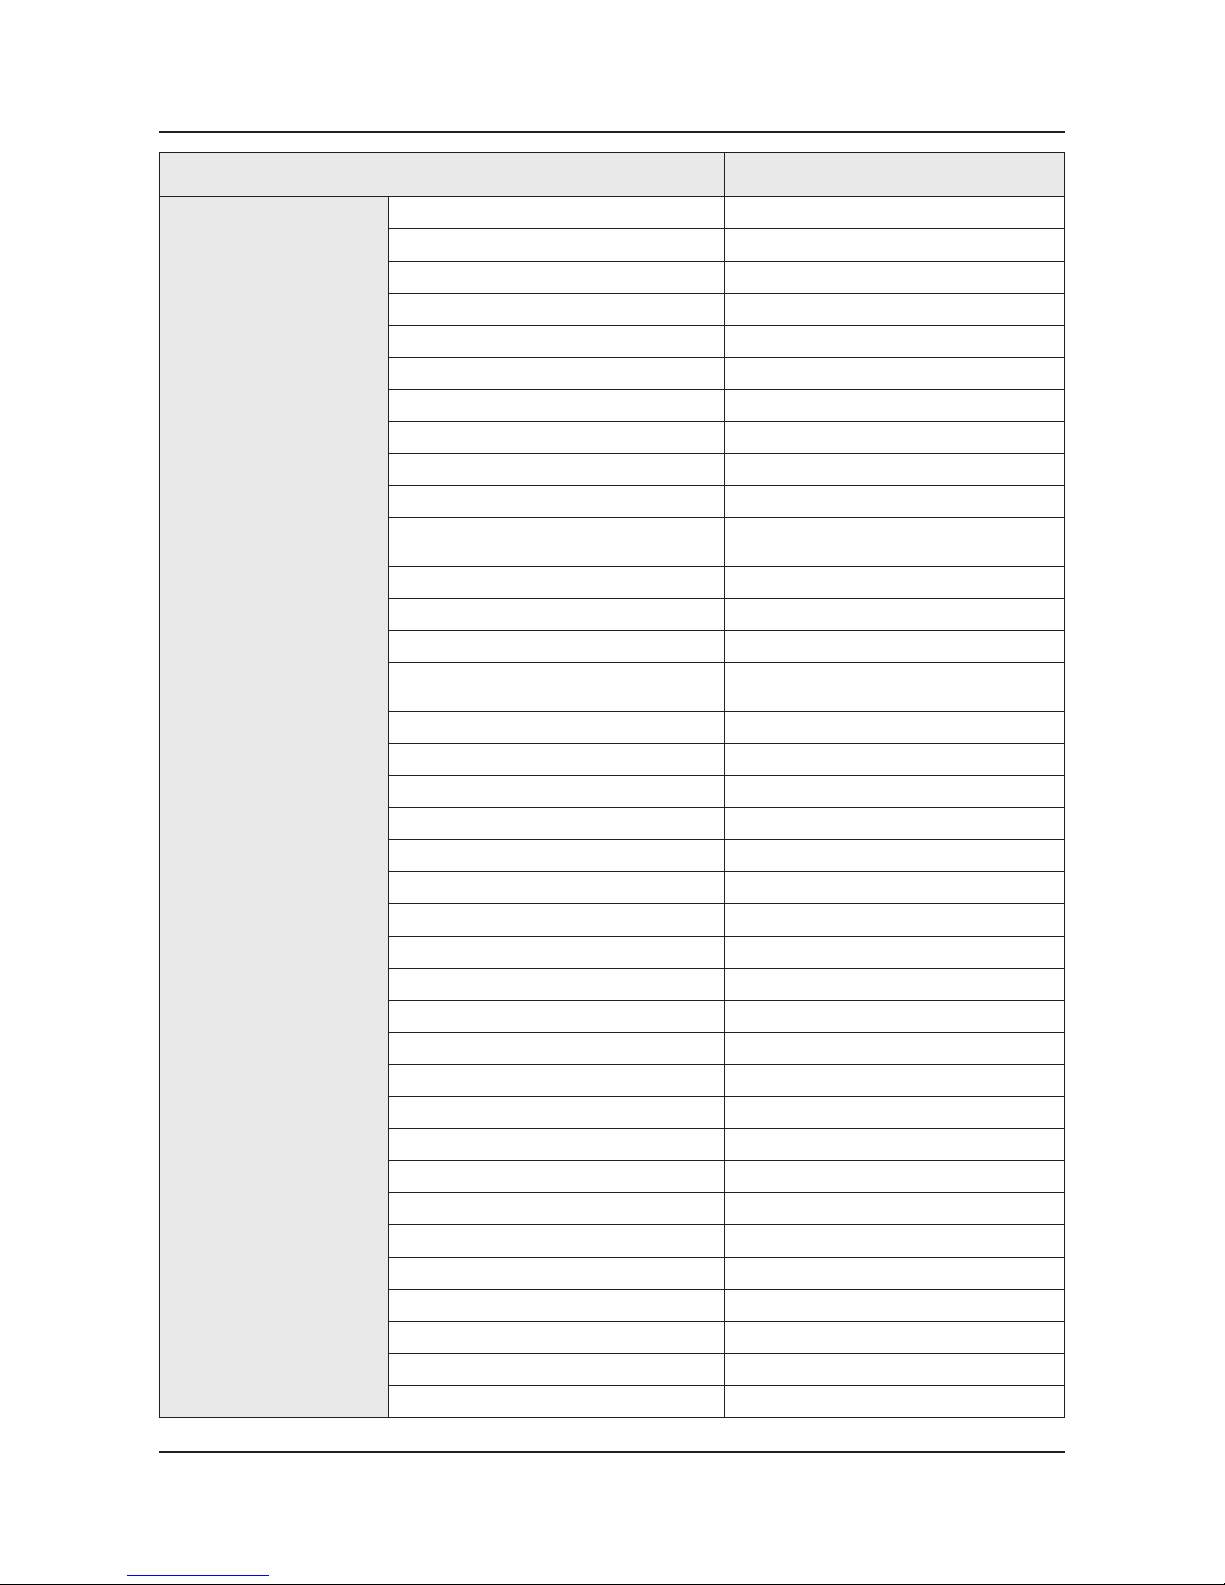
2-4
2. Product specications
Item UE**F6320AWXXH
Feature
3D Converter Yes
ConnectShare™ (USB 2.0) Movie
Samsung 3D Yes
History Yes
MultiTasking No
Smart Evolution Support No
Wireless LAN Built-in Yes
Wireless LAN Adapter Support No
OSD Language 26 European Languages
EPG Yes
HbbTV
Yes ( CZ, PL, DE, AT, CH, BE, NL, LU, PT,
FR, ES )
HDMI 1.4 3D Auto Setting Yes
HDMI 1.4 A/Return Ch. Support Yes
Time Shift Yes
AllShare (Content Sharing, Screen
Mirroring)
Yes
Teletext (TTXT) Yes
InstaPort S (HDMI quick switch) No
Anynet+ (HDMI-CEC) Yes
Auto Channel Search Yes
Auto Power Off Yes
Auto Volume Leveler Yes
Caption (Subtitle) Yes
Clock&On/Off Timer Yes
Game Mode Yes
Sports Mode Advanced
Picture-In-Picture Yes
Sleep Timer Yes
Extended PVR Yes
Smart Phone Remote support Yes
WiFi Direct Yes
ISP Bound Service Yes
BT HID Built-in Yes
USB HID Support Yes
Sound Share Yes
Digital Clean View Yes
MHL No
Twin Tuner No
Page 36
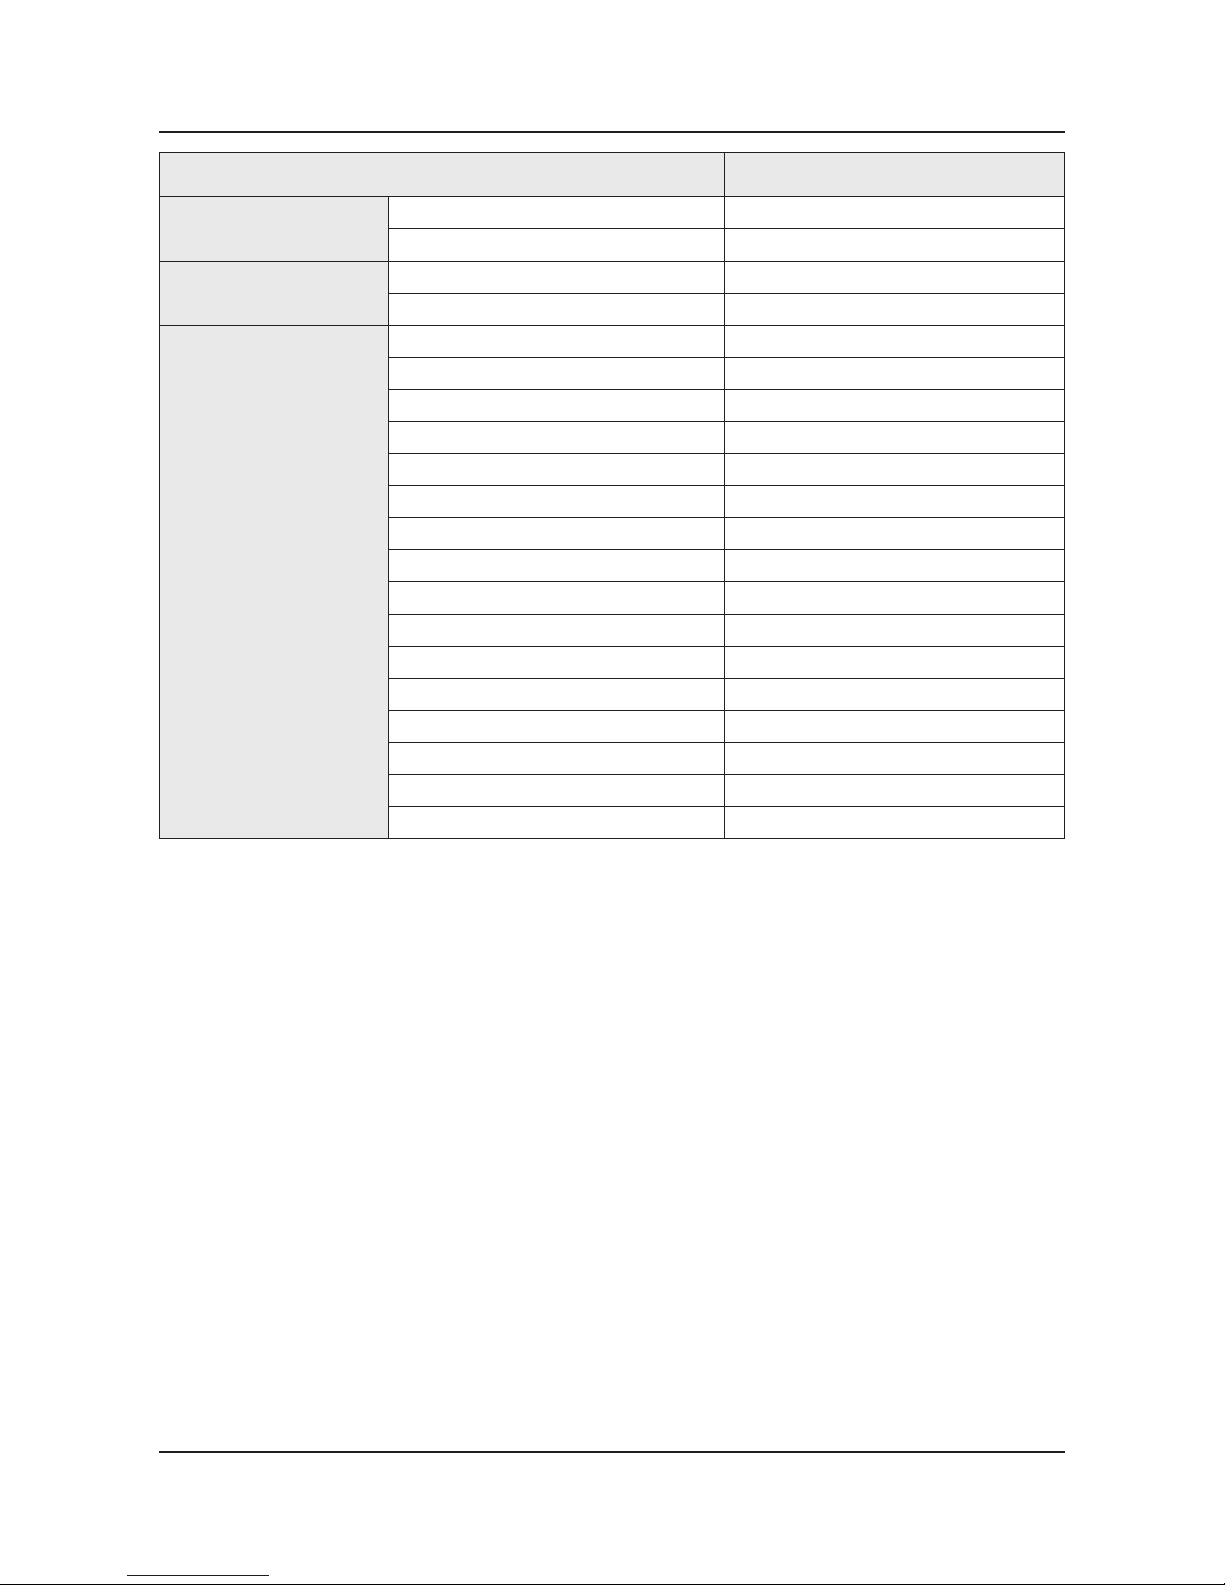
2-5
2. Product specications
Item UE**F6320AWXXH
Feature
BD Wise Plus Yes
Embeded POP Yes
Eco
Energy Efciency Class A+
Eco Sensor Yes
Accessory
3D Active Glasses (Included) 2 * SSG-5100GB
IR Extender Cable (Included) Yes
Wireless LAN Adaptor (Included) No
MoIP Camera No
Wireless Keyboard No
Remote Controller Model TM1240A
Batteries (for Remote Control) Yes
Ultra Slim Wall Mount Supported No
Mini Wall Mount Supported Yes
Vesa Wall Mount Supported Yes
Slim Gender Cable No
Power Cable Yes
ANT-Cable No
User Manual Yes
E-Manual Yes
Floor Stand Support No
Page 37
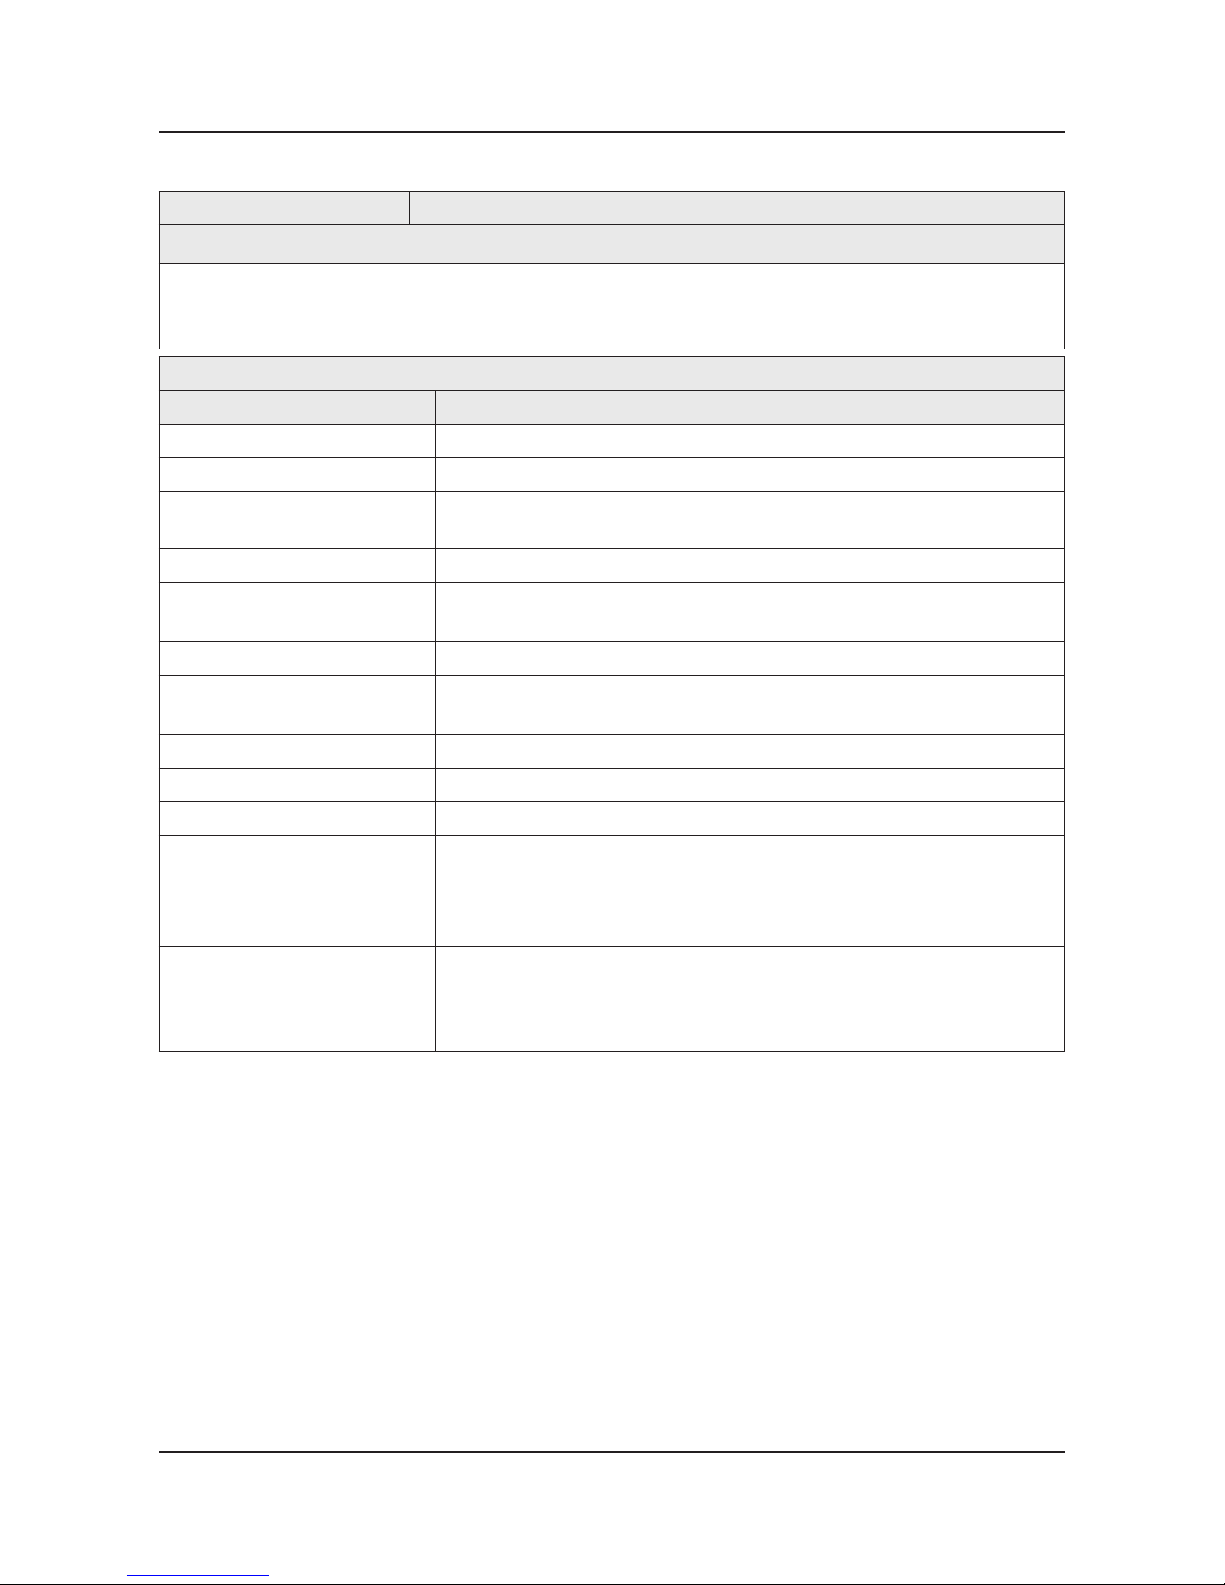
2-6
2. Product specications
2-2-2. Feature & Specications
Model UE40F6320AW
Feature
Digital-TV, RF, 4-HDMI, 1-Component, 1-A/V (Common Use for Component Y), 3-USB2.0 (Media Play), LAN, Wi-Fi•
PIP(in HDMI 1, 2, 3, 4 Component and Sub picture is available only in TV mode (DTV/ATV))•
Dolby Digital Plus Pulse, DTS Premium Sound 5.1, DTS Studio Sound•
Specications
Item Description
LCD Panel 40 inch FHD 120Hz
Display Colors 1.07 B
Active Display (H x V)*
* Horizontal x Vertical
885.6 (H) x 498.15 (V) mm
Input Signal Analog 0.7 Vp-p ± 5% positive at 75Ω, internally terminated
Input Signal Frequency Horizontal : 31~80 kHz
Vertical : 56 ~ 75 Hz
Input Sync Signal H/V Separate, TTL, P. or N.
Maximum Resolution Horizontal : 1920 Pixels
Vertical : 1080 Pixels
Maximum Pixel Clock Rate 138 MHz
AC Power Voltage & Frequency AC100-240V 50/60Hz
Power Consumption 122W
Environmental Considerations Operating Temperature : 50˚F ~ 104˚F (10˚C ~ 40˚C)
Operating Humidity : 10% ~ 80%, non-condensing
Storage Temperature : -4˚F ~ 113˚F (-20˚C ~ 45˚C)
Storage Humidity : 5% ~ 95%, non-condensing
Audio Specications MAX Internal Audio Output Power : Each 10 W (Left/Right)
Equalizer : 5 Band
Output Frequency : RF : 20 Hz ~ 15.4 kHz
AV/Componet/HDMI : 20 Hz ~ 20 kHz
Page 38
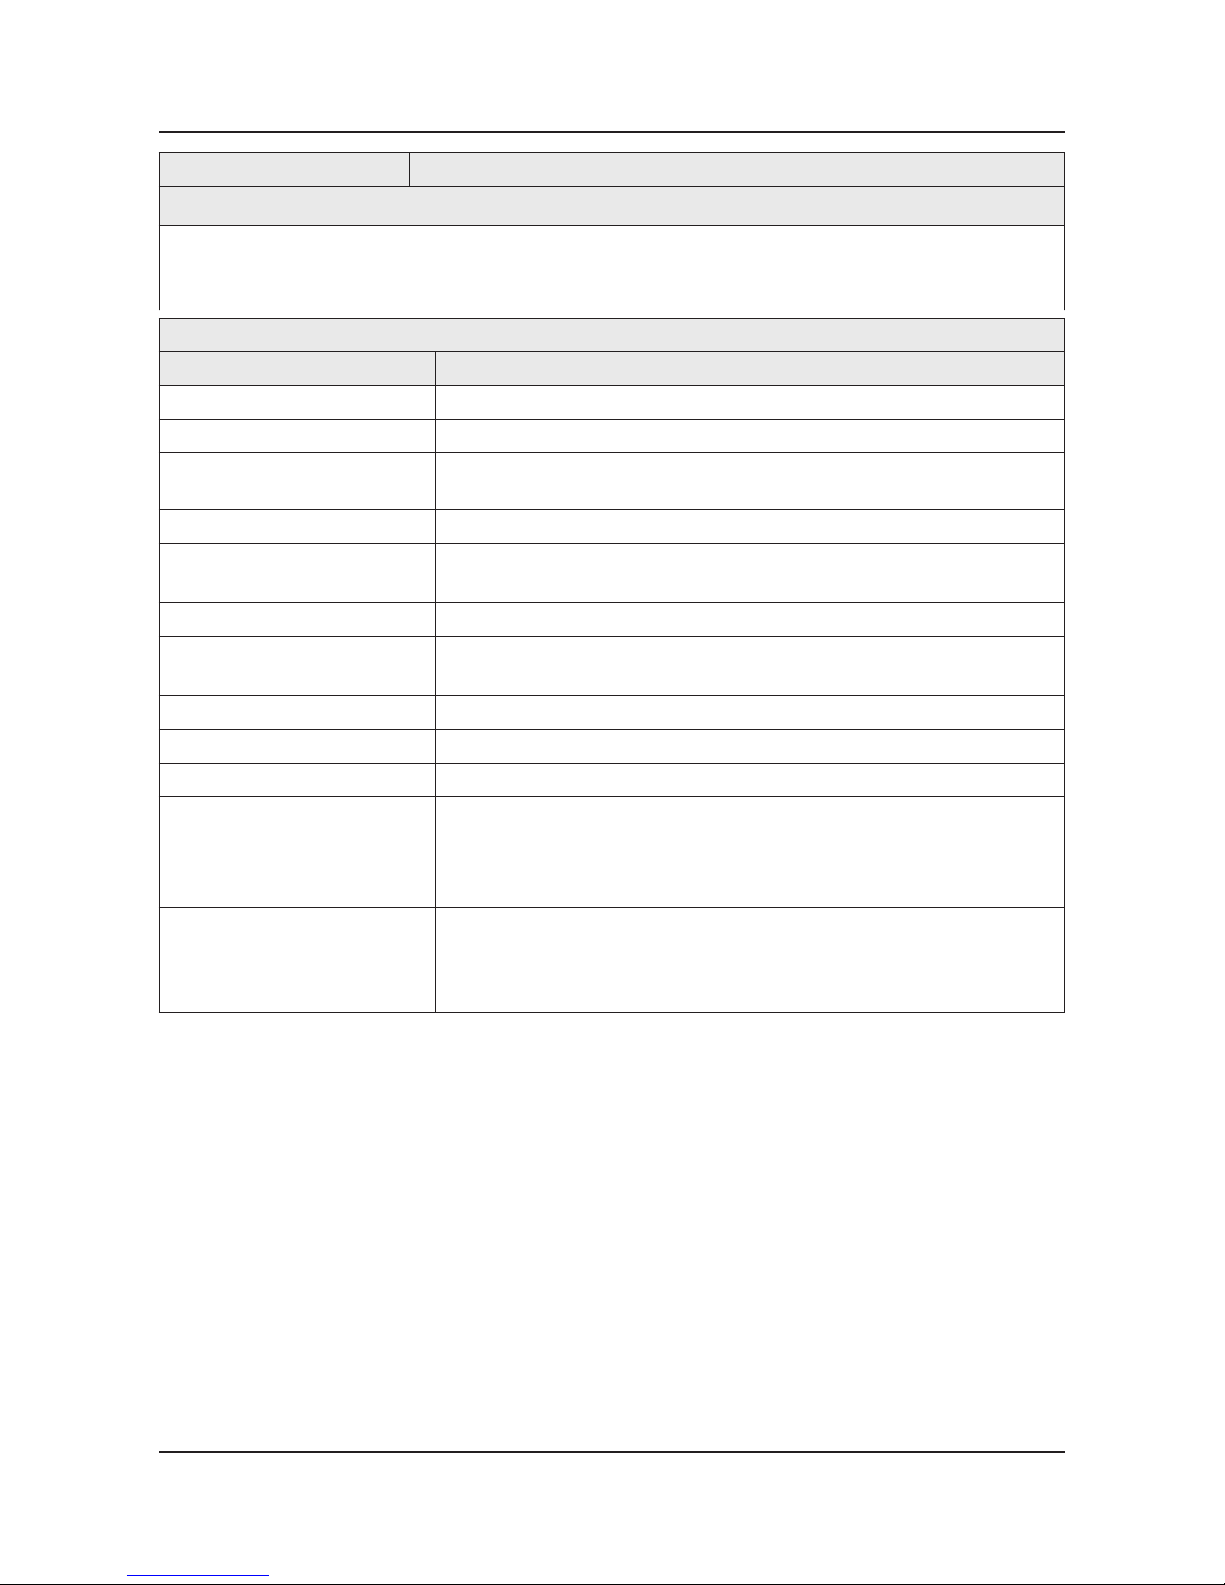
2-7
2. Product specications
Model UE46F6320AW
Feature
Digital-TV, RF, 4-HDMI, 1-Component, 1-A/V (Common Use for Component Y), 3-USB2.0 (Media Play), LAN, Wi-Fi•
PIP(in HDMI 1, 2, 3, 4 Component and Sub picture is available only in TV mode (DTV/ATV))•
Dolby Digital Plus Pulse, DTS Premium Sound 5.1, DTS Studio Sound•
Specications
Item Description
LCD Panel 46 inch FHD 120Hz
Display Colors 1.07 B
Active Display (H x V)*
* Horizontal x Vertical
1018.08 (H) x 572.67 (V) mm
Input Signal Analog 0.7 Vp-p ± 5% positive at 75Ω, internally terminated
Input Signal Frequency Horizontal : 31~80 kHz
Vertical : 56 ~ 75 Hz
Input Sync Signal H/V Separate, TTL, P. or N.
Maximum Resolution Horizontal : 1920 Pixels
Vertical : 1080 Pixels
Maximum Pixel Clock Rate 138 MHz
AC Power Voltage & Frequency AC100-240V 50/60Hz
Power Consumption 128W
Environmental Considerations Operating Temperature : 50˚F ~ 104˚F (10˚C ~ 40˚C)
Operating Humidity : 10% ~ 80%, non-condensing
Storage Temperature : -4˚F ~ 113˚F (-20˚C ~ 45˚C)
Storage Humidity : 5% ~ 95%, non-condensing
Audio Specications MAX Internal Audio Output Power : Each 10 W (Left/Right)
Equalizer : 5 Band
Output Frequency : RF : 20 Hz ~ 15.4 kHz
AV/Componet/HDMI : 20 Hz ~ 20 kHz
Page 39
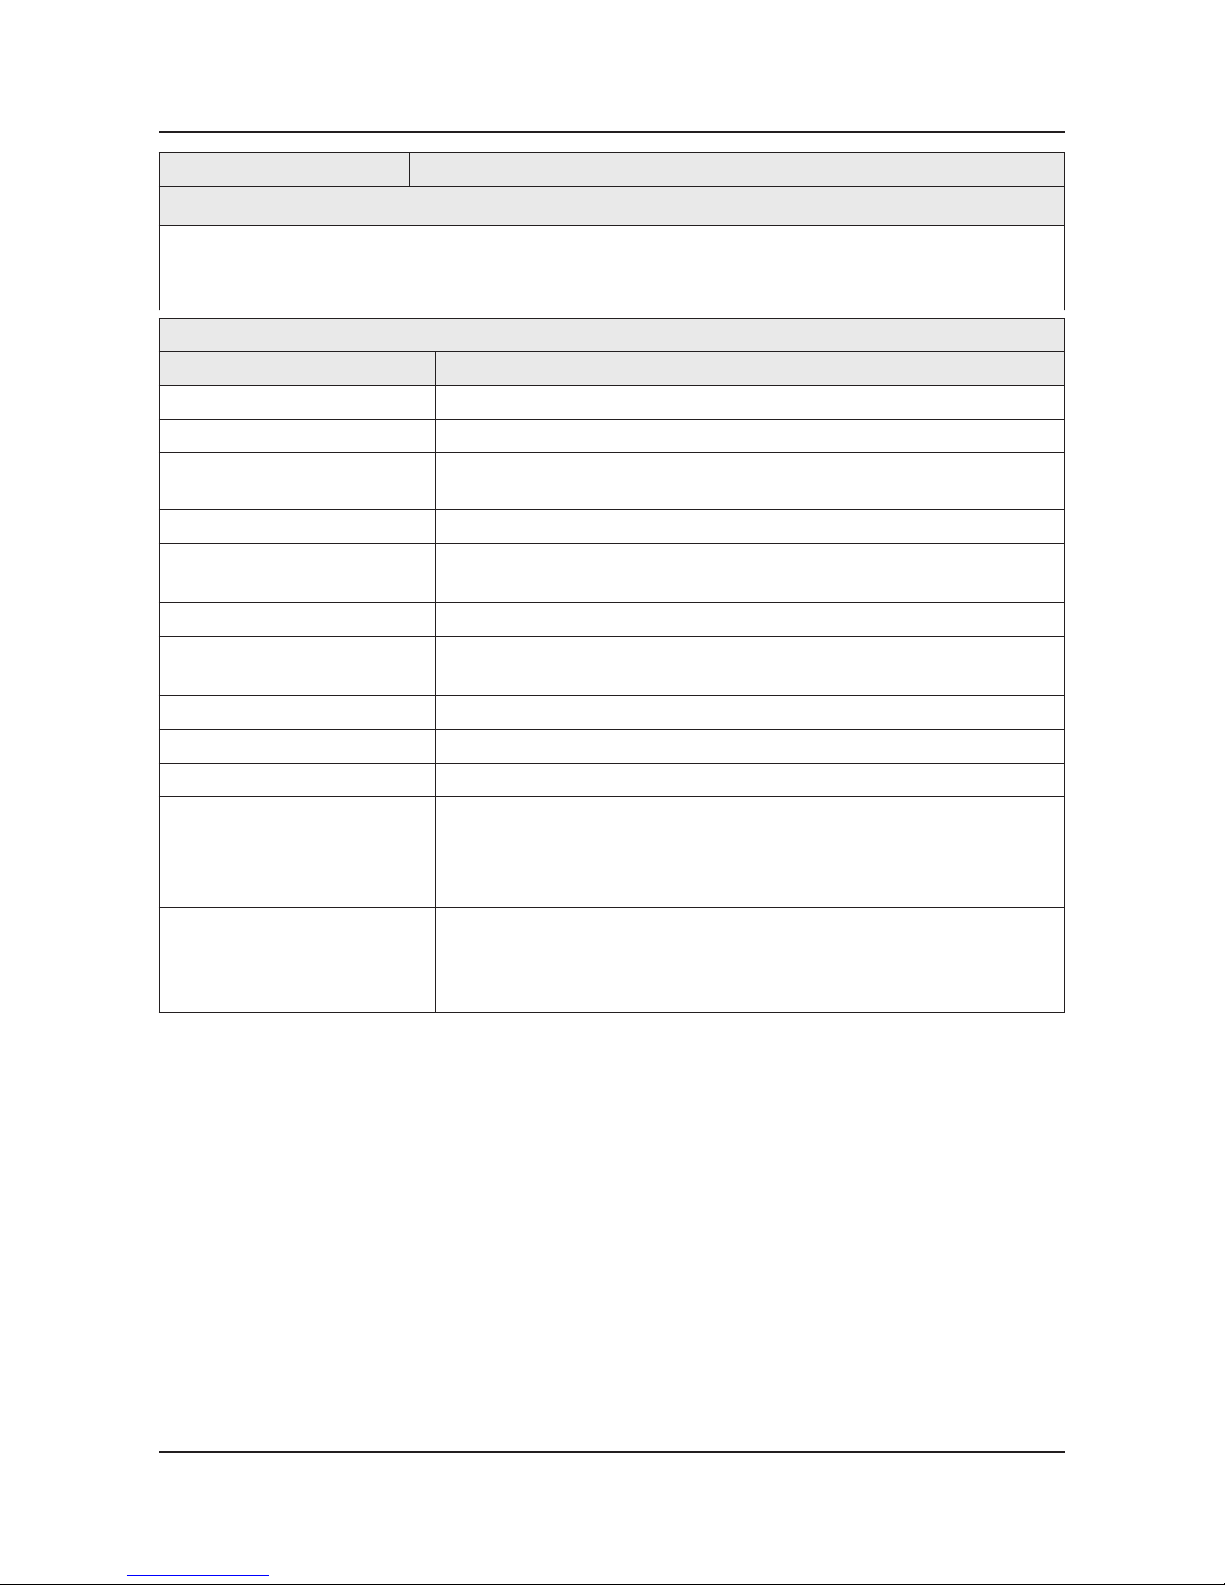
2-8
2. Product specications
Model UE55F6320AW
Feature
Digital-TV, RF, 4-HDMI, 1-Component, 1-A/V (Common Use for Component Y), 3-USB2.0 (Media Play), LAN, Wi-Fi•
PIP(in HDMI 1, 2, 3, 4 Component and Sub picture is available only in TV mode (DTV/ATV))•
Dolby Digital Plus Pulse, DTS Premium Sound 5.1, DTS Studio Sound•
Specications
Item Description
LCD Panel 55 inch FHD 120Hz
Display Colors 1.07 B
Active Display (H x V)*
* Horizontal x Vertical
1209.6 (H) x 680.4 (V) mm
Input Signal Analog 0.7 Vp-p ± 5% positive at 75Ω, internally terminated
Input Signal Frequency Horizontal : 31~80 kHz
Vertical : 56 ~ 75 Hz
Input Sync Signal H/V Separate, TTL, P. or N.
Maximum Resolution Horizontal : 1920 Pixels
Vertical : 1080 Pixels
Maximum Pixel Clock Rate 138 MHz
AC Power Voltage & Frequency AC100-240V 50/60Hz
Power Consumption TBDW
Environmental Considerations Operating Temperature : 50˚F ~ 104˚F (10˚C ~ 40˚C)
Operating Humidity : 10% ~ 80%, non-condensing
Storage Temperature : -4˚F ~ 113˚F (-20˚C ~ 45˚C)
Storage Humidity : 5% ~ 95%, non-condensing
Audio Specications MAX Internal Audio Output Power : Each 10 W (Left/Right)
Equalizer : 5 Band
Output Frequency : RF : 20 Hz ~ 15.4 kHz
AV/Componet/HDMI : 20 Hz ~ 20 kHz
Page 40
2-9
2. Product specications
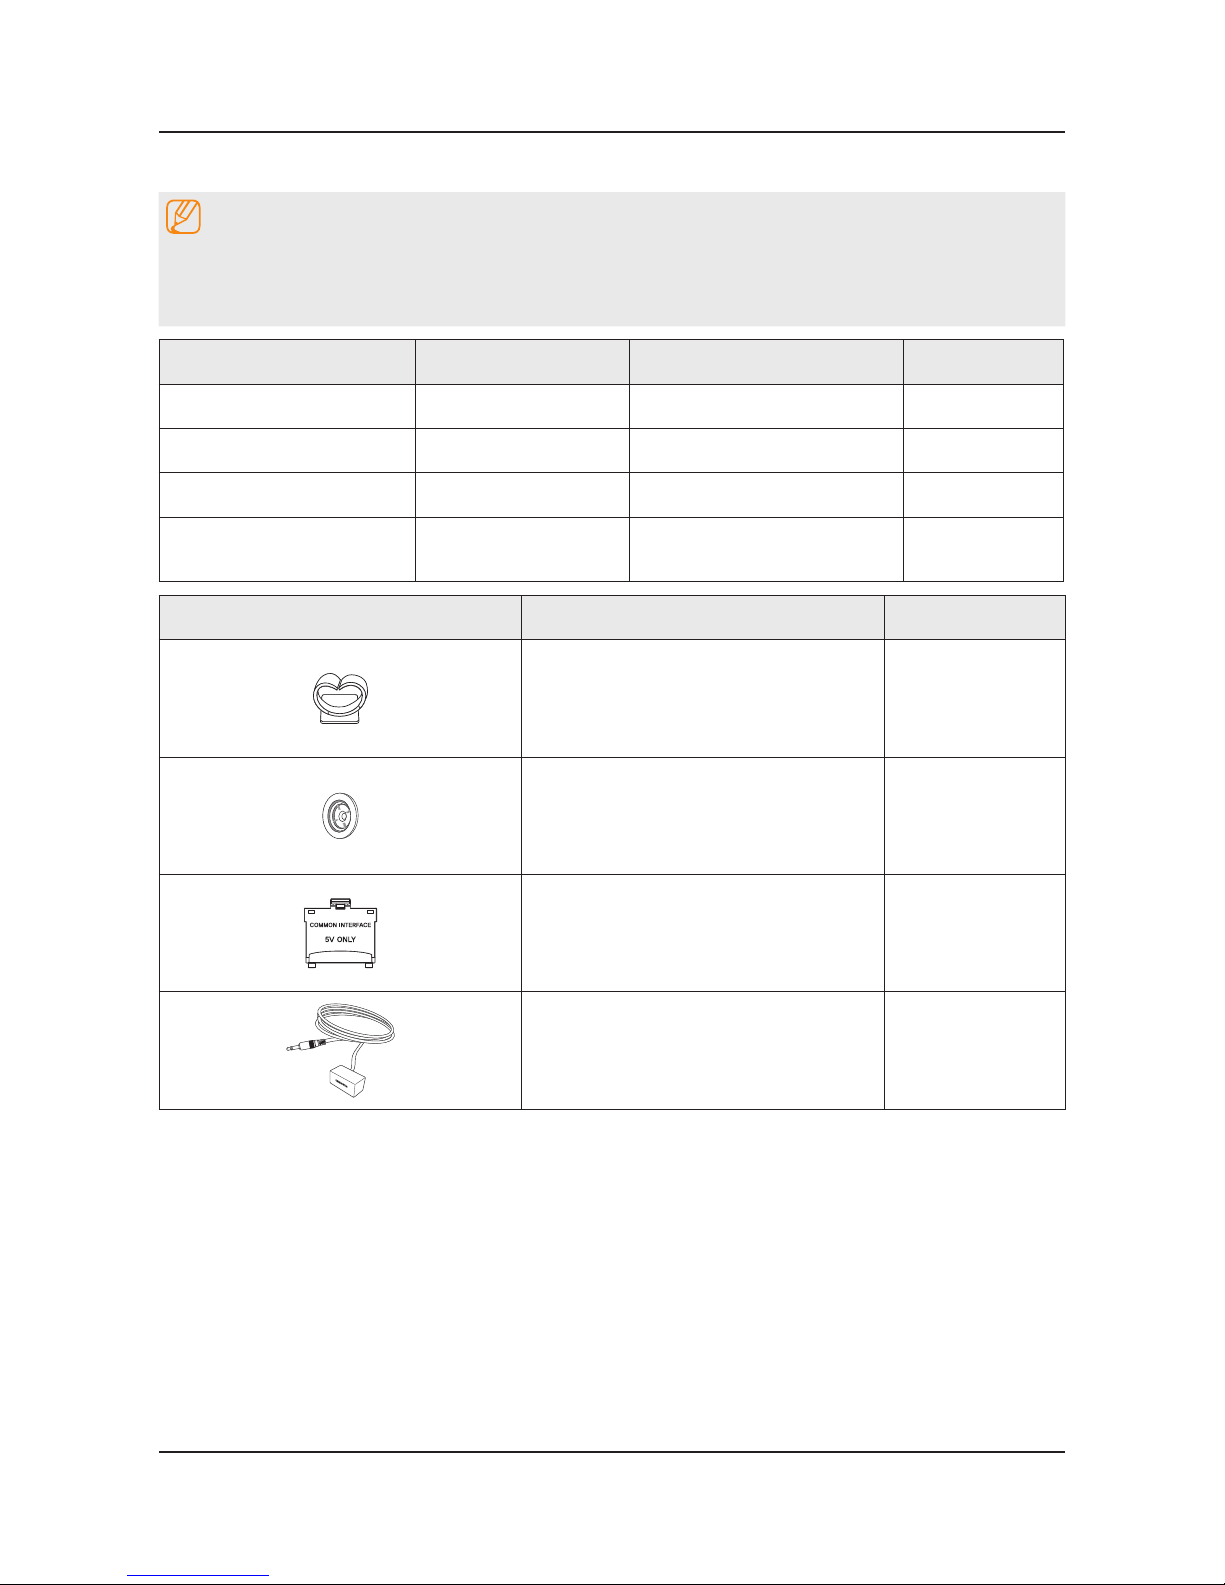
2-3. Accessories
NOTE
The items’ colors and shapes may vary depending on the model.•
Check that there is no accessory hidden behind packing materials when you open the box.•
The part code for some accessories may differ depending on your region.•
Product Code. No Product Code. No
Remote Control• AA59-00790A Warranty Card• -
Batteries (AAA x 2)• 4301-000121 Regulatory Guide• BN68-04972A
Power Cord• 3903-000849 Samsung 3D Active Glasses• BN96-25614A
User Manual•
BN68-04881P (40", 46")
BN68-05566E (55")
Image Product Code. No
Holder-Wire stand• BN61-08370A
Holder-Ring (Depending on the Model)• -
CI Card Adapter• 3709-001791
IR Extension Cable• BN96-26652B
Page 41
2-10
2. Product specications
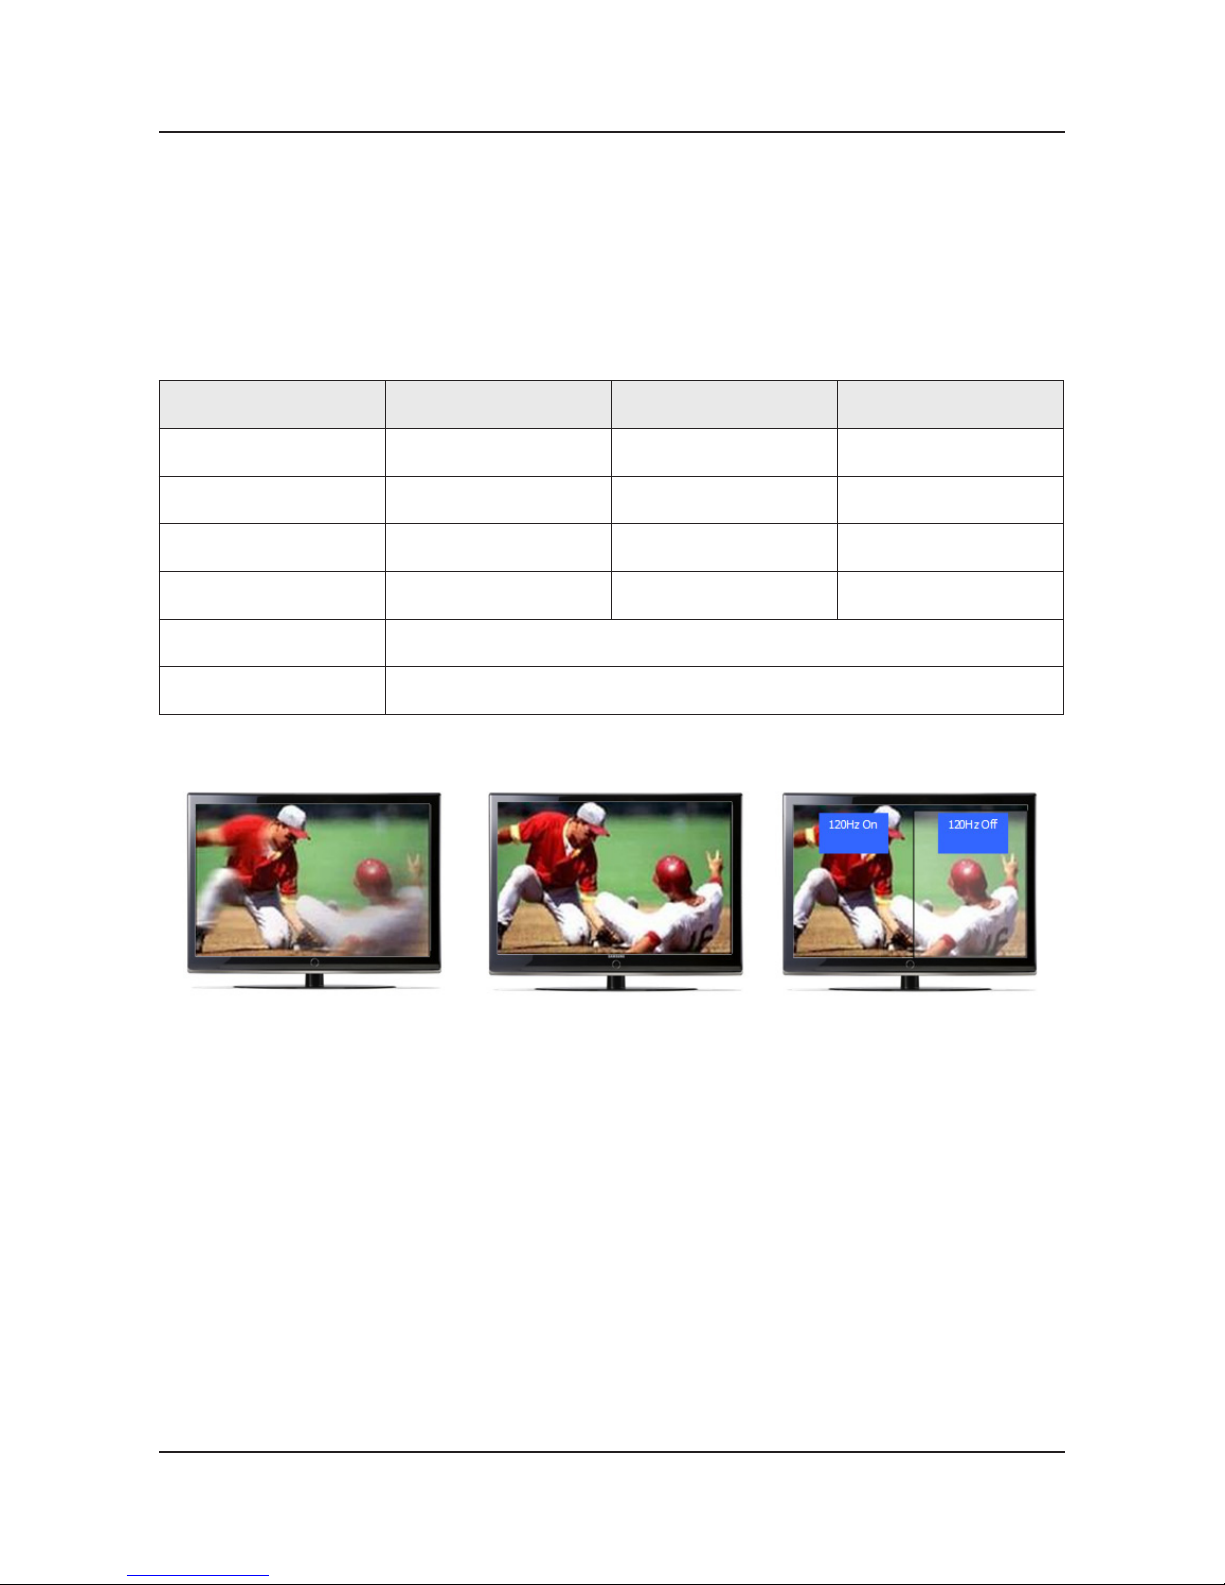
2-4. Viewing the Functions
2-4-1. Auto Motion Plus 120Hz
Function Naming
120Hz FRC + MJC : Auto Motion Plus 120Hz -
Detail Specications
Function (OSD) 120Hz FRC
Judder reduction
(only 24p source)
Blur reduction
Off
Off
(repeat)
Off Off
Clear
ON
(interpolation)
Off High
Standard
ON
(interpolation)
Medium Medium
Smooth
ON
(interpolation)
High High
Custom
Level variable
(0~10)
Demo
Demo
(Standard / Off)
120Hz Motion Enhancement
Off Low / Mudium / High Demo
Page 42
2-11
2. Product specications
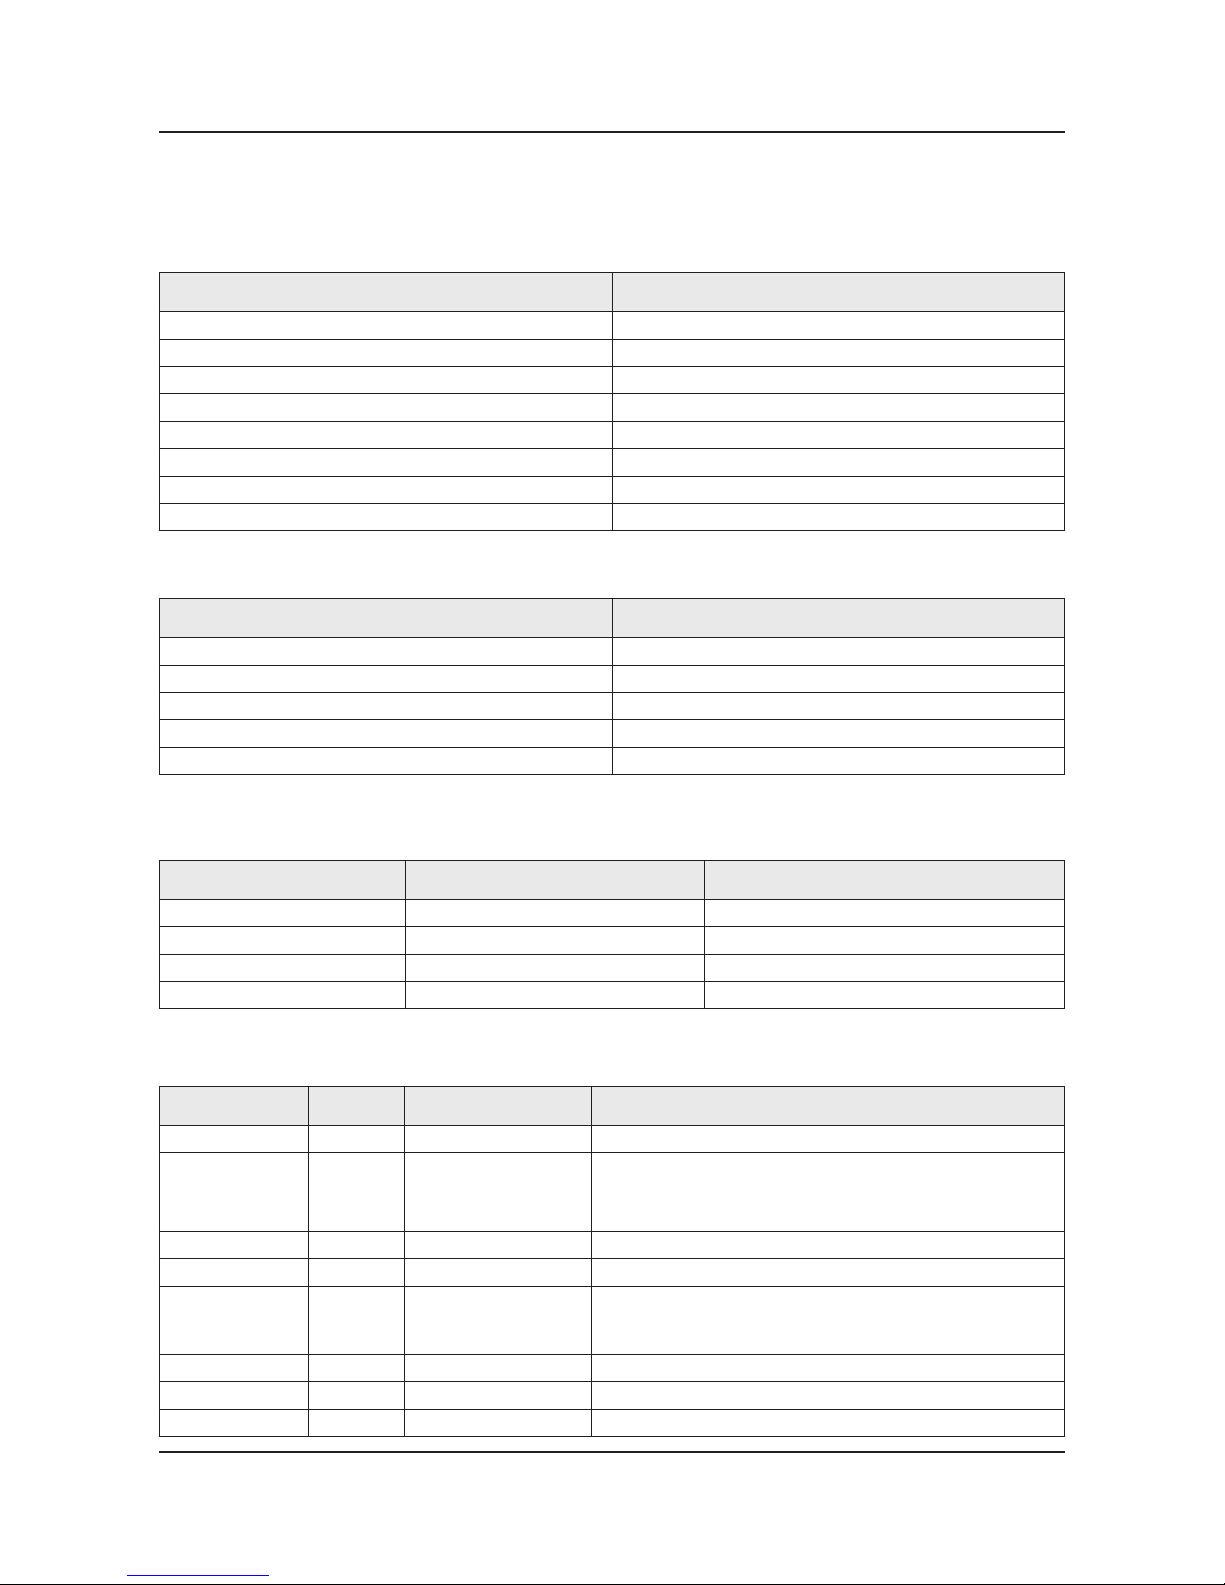
2-4-2. Supported Formats
Supported Subtitle Formats
Exterminal
Name File Extension
MPEG-4 Timed text Timed text .ttxt
SAMI .smi
SubRip .srt
SubViewer .sub
Micro DVD .sub or .txt
SubStation Alpha .ssa
Advanced SubStation Alpha .ass
Powerdivx .psb
Internal
Name Container
Xsub AVI
SubStation Alpha MKV
Advanced SubStation Alpha MKV
SubRip MKV
MPEG-4 Timed text MP4
Supported image resolutions
File Extension Type Resolution
*.jpg, *.jpeg JPEG 15360 x 8640
*.png PNG 4096 x 4096
*.bmp BMP 4096 x 4096
*.mpo MPO 15360 x 8640
Supported Music File Formats
File Extension Type Codec Comments
*.mp3 MPEG MPEG1 Audio Layer 3
*.m4a
*.mpa
*.aac
MPEG4 AAC
*.ac FLAC FLAC Supports up to 2 channel
*.ogg OGG Vorbis Supports up to 2 channel
*.wma WMA WMA
WMA 10 Pro supports up to 5.1 channel. WMA lossless
audio is not supported. Supports up to M2 prole (except
LBR mode)
*.wav wav wav
*.mid , *.midi midi midi type 0, type 1 are supported.
*.ape ape ape
Page 43
2-12
2. Product specications
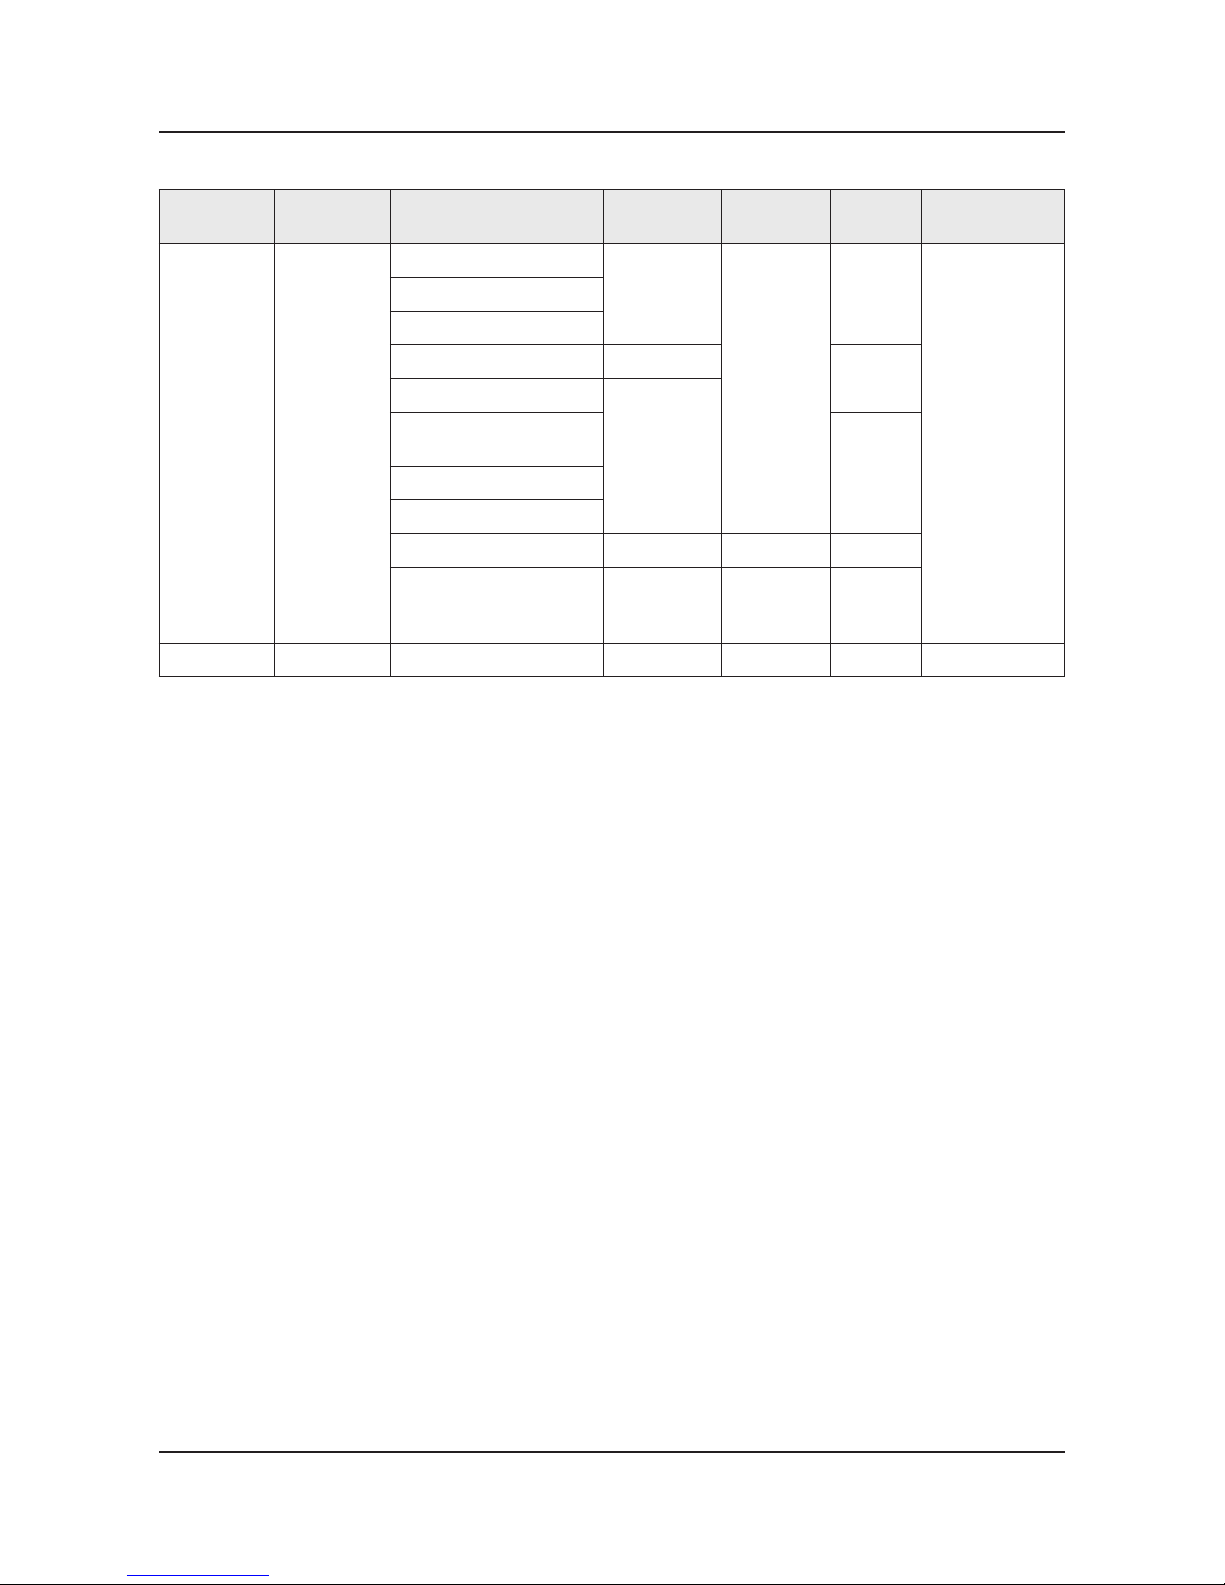
Video Codec
File
Extension
Container Video Codec Resolution
Frame rate
(fps)
Bit rate
(Mbps)
Audio Codec
*.avi
*.mkv
*.asf
*.wmv
*.mp4
*.3gp
*.vro
*.mpg
*.mpeg
*.ts
*.tp
*.trp
*.mov
*.v
*.vob
*.svi
*.m2ts
*.mts
*.divx
AVI
MKV
ASF
MP4
3GP
MOV
FLV
VRO
VOB
PS
TS
SVAF
Divx 3.11 / 4 / 5 / 6
1920 x 1080
6~30
30
AC3
LPCM
ADPCM(IMA,
MS)
AAC
HE-AAC
WMA
DD+
MPEG(MP3)
MPEG4 SP/ASP
H.264 BP/MP/HP
Motion JPEG 640 x 480
8
Microsoft MPEG-4 v3
1920 x 1080
(WMV
v7, v8,
MSMPEG4
v3:
1280x720)
Window Media Video
v7,v8,v9
30
MPEG2
MPEG1
MVC 24/25/30 60
VP6 640 x 480 4
*.webm WebM VP8 1920 x1080 6~30 20 Vorbis
Other Restrictions
Codecs may not function properly if there is a problem with the content data.
Video content does not play or does not play correctly if there is an error in the content or container.
Sound or video may not work if they have standard bit rates/frame rates above the TV’s compatibility ratings.
If the Index Table is wrong, the Seek (Jump) function does not work.
When playing video over a network connection, the video may not play smoothly because of data transmission speeds.
Some USB/digital camera devices may not be compatible with the player.
Video Decorders
Supports up to H.264, Level 4.1 (does not support FMO/ASO/RS)•
VC1 AP L4 is not supported.•
All video codecs excluding WMV v7, v8, MSMPEG4 v3, MVC, and VP6:•
Below 1280 x 720: 60 frame max -
Above 1280 x 720: 30 frame max -
GMC is not supported.•
Supports SVAF top/bottom and left/right only.•
Supports Blu-ray/DVD MVC specs only.•
Audio Decorders
WMA 10 Pro supports up to 5.1 channels. Supports up to M2 prole.•
WMA lossless audio is not supported.•
QCELP, AMR NB / WB is not supported.•
Vorbis is supported for up to 2 channels.•
DD+ is supported for up to 5.1 channels.•
Page 44
2-13
2. Product specications
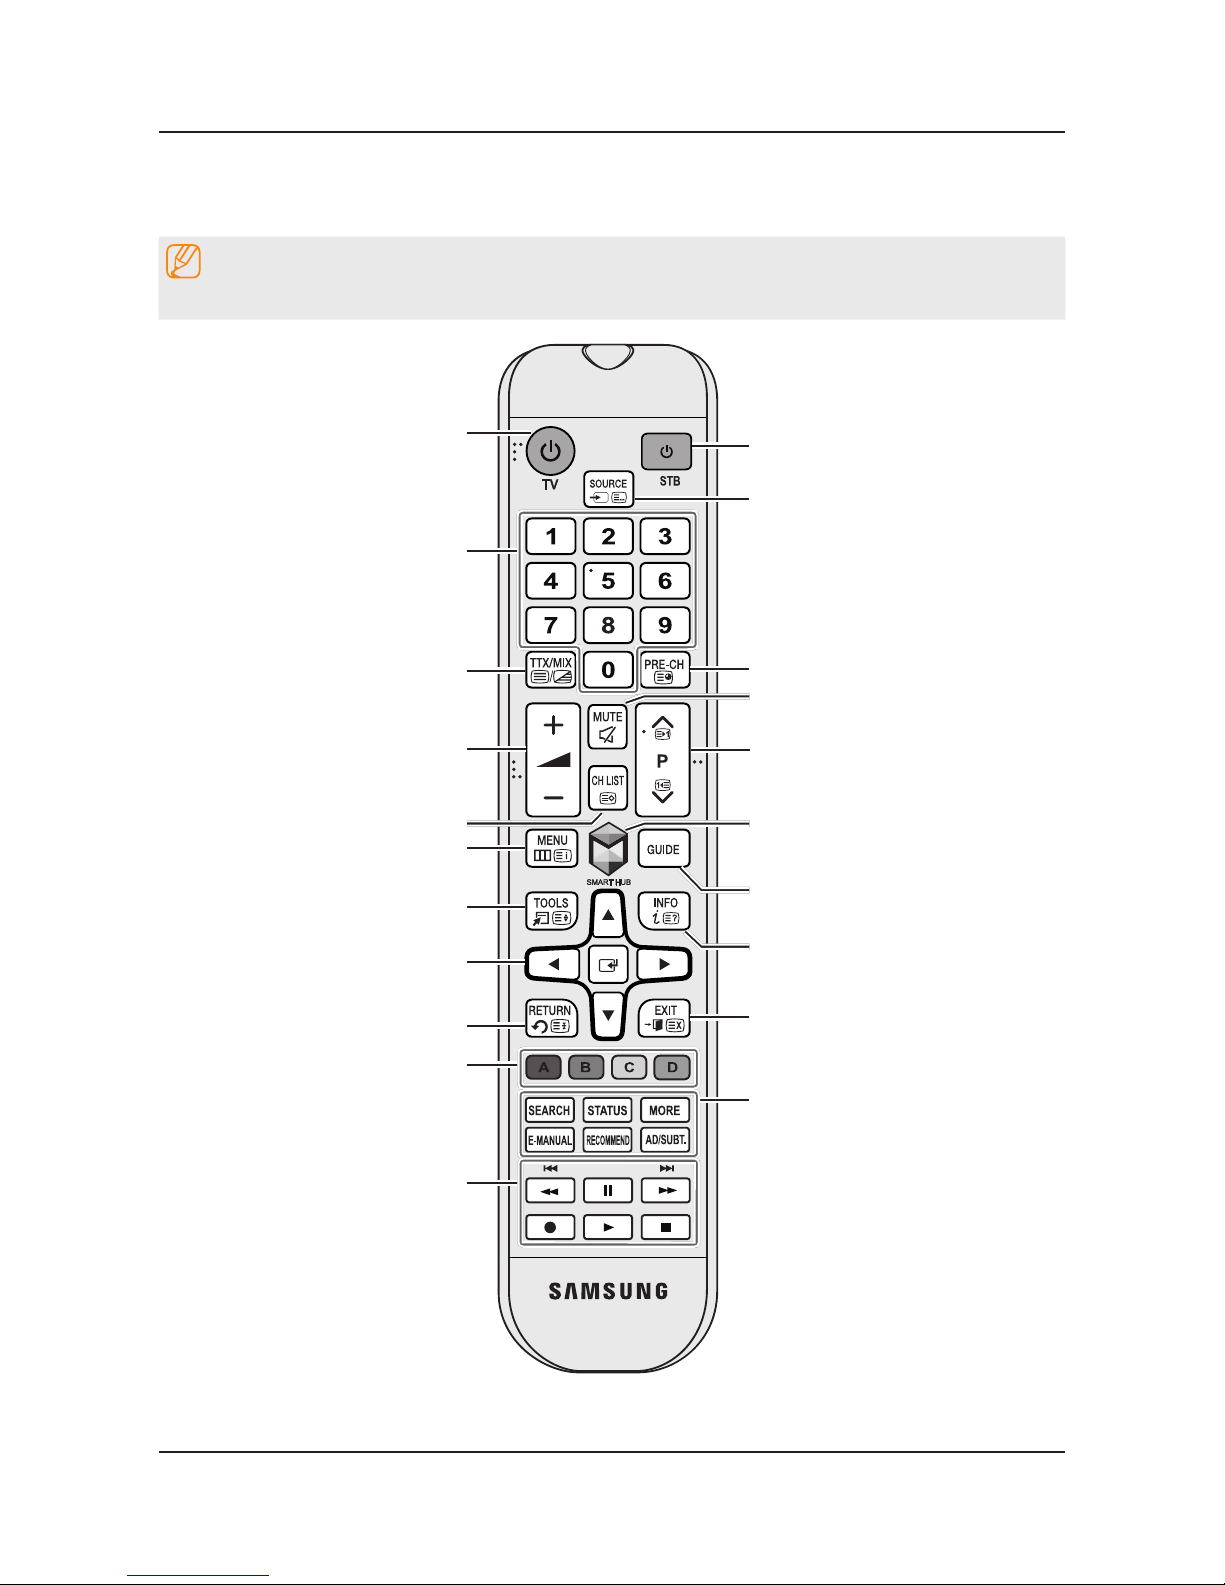
2-4-3. Remote Control
Learn where the function buttons are on your remote. Especially note these: SOURCE, MUTE, Y, < P >, MENU, TOOLS,
E, INFO, CH LIST, RETURN, GUIDE and EXIT.
NOTE
This remote control has Braille points on the Power, Chanel, and Volume buttons and can be used by visually impaired persons.
EnglishEnglish
Basic Features
Using the Remote Control
Learn where the function buttons are on your remote. Especially note these: SOURCE, MUTE, Y,
< P >, MENU, TOOLS, E, INFO, CH LIST, RETURN, GUIDE and EXIT.
✎
This remote control has Braille points on the Power, Chanel, and Volume buttons and can be used
by visually impaired persons.
Displays and selects the available video sources.
Turns the Set-top box on and off.
Returns to the previous channel.
Cuts off the sound temporarily.
Brings up Smart Hub applications. See the
e-Manual chapter, SMART TV Features > Smart
Hub.
Changes channels.
Exits the menu.
Displays the EPG (Electronic Programme Guide).
Displays information on the TV screen.
Turns the TV on and off.
Gives direct access to channels.
Adjusts the volume.
Opens the OSD (Menu).
Quickly selects frequently used functions.
Returns to the previous menu.
Use these buttons according to the directions on
the TV's screen.
Use these buttons in a specific feature. Use these
buttons according to the directions on the TV's
screen.
Moves the cursor, selects the on-screen menu
items, and changes the values seen on the TV's
menu.
Displays channel lists on the screen.
Alternately select Teletext ON Double, Mix or OFF.
SEARCH: Support to recommendation search
word and search function. See the e-Manual
chapter, SMART TV Features > Smart Hub >
Searching.
STATUS: Display the status and notification banner
at the top of the screen.
MORE: Displays a virtual remote control on the
screen. See the e-Manual chapter, Controlling TV
> Using the Virtual Remote Control.
E-MANUAL: Displays the e-Manual.
RECOMMEND: Displays the recommended
programmes from among the programmes
currently being broadcast as well as recommended
applications are listed.
AD/SUBT.: Turns the audio description on and off
(not available in some locations). / Displays digital
subtitles. See e-Manual chapter TV Viewing >
Subtitles.
Page 45
2-14
2. Product specications
2-4-4. Universal Remote Control Setup
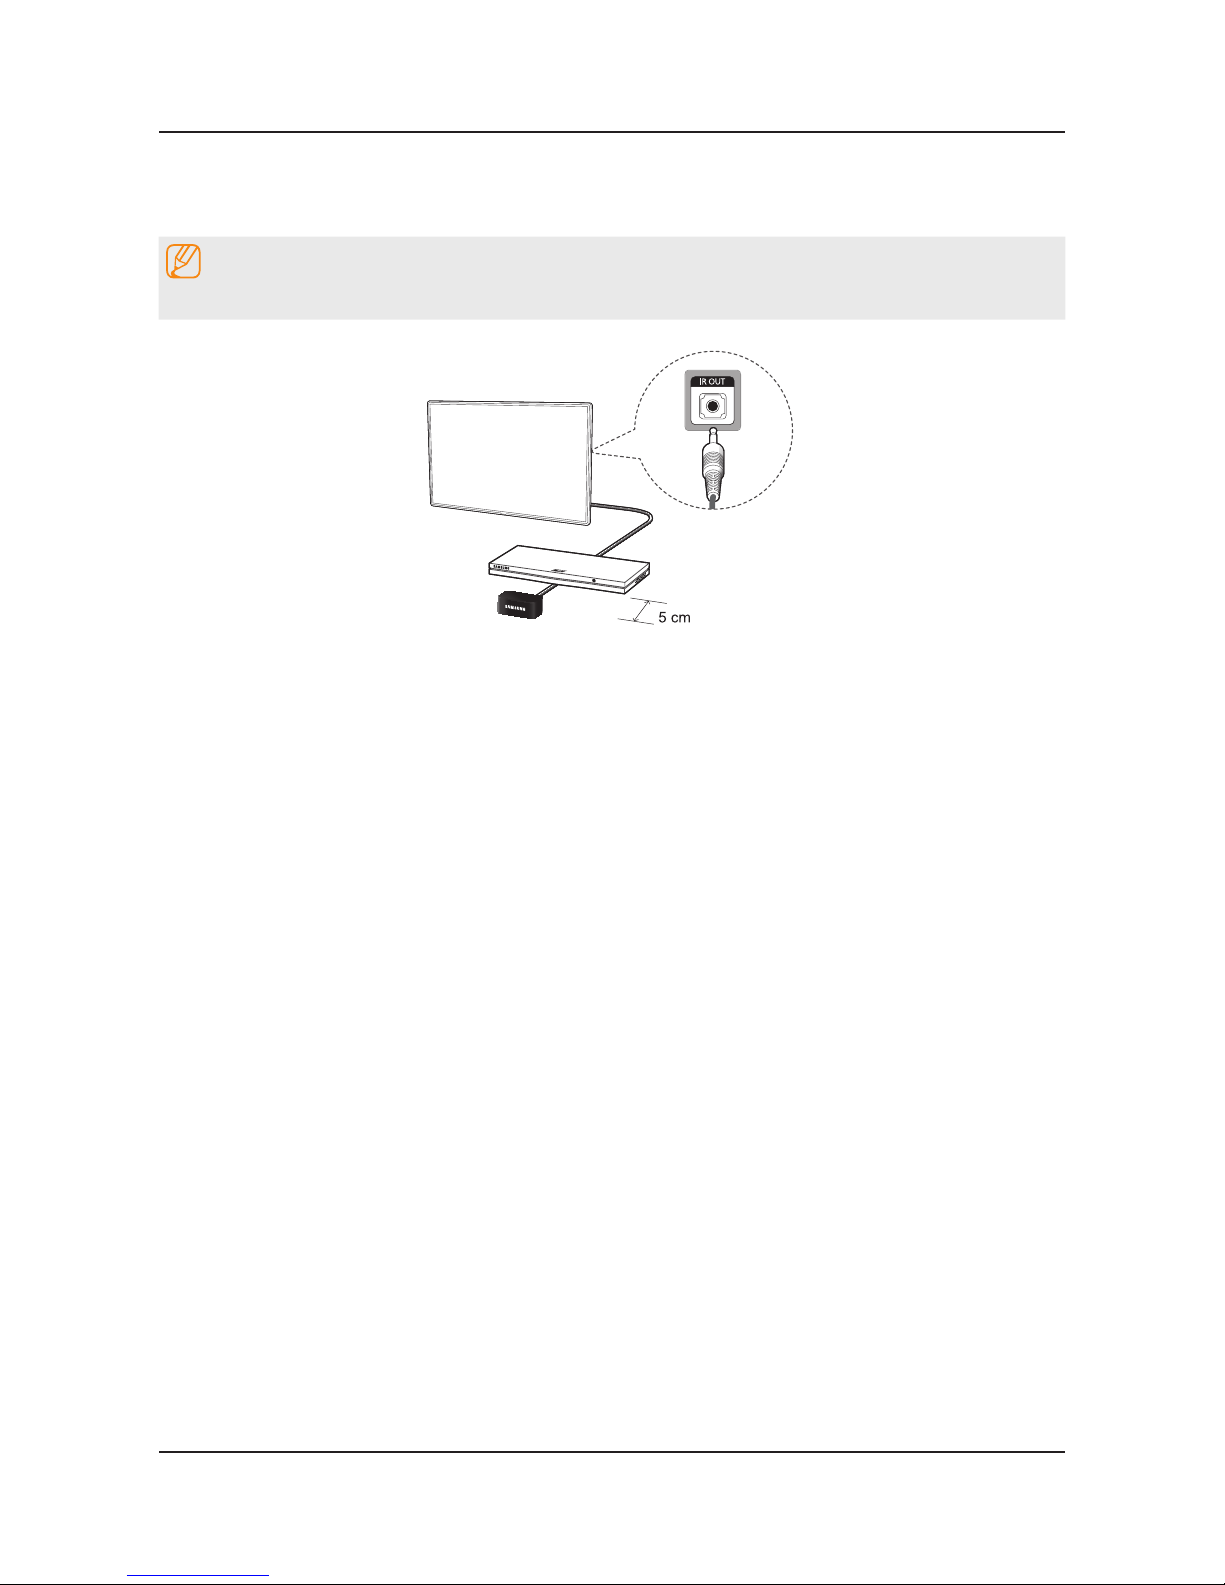
This TV has a universal remote control feature that lets you control cable boxes, Blu-ray players, home theatres, and
other third-party external devices connected to the TV using the TV's remote control.
NOTE
Some or new models of the external device connected to the TV, may not be supported the Universal remote setup.
Universal Remote Control Setup
This TV has a universal remote control feature that lets you control cable boxes, Blu-ray players, home
theatres, and other third-party external devices connected to the TV using the TV's remote control.
✎
Some or new models of the external device connected to the TV, may not be supported the
Universal remote setup.
Keep a distance of 5 cm at least between the IR Extender and the external device, as the illustration shows. Face the
IR Extender toward the external device’s remote control signal receiver. Note that it should be no obstacle between IR
Extender and external device. The presence of an obstacle will interfere with the transmission of the remote control
signal.
Add the External Device
Turn on the external device you wish to set up universal remote function for and then press 1. SOURCE to bring up the
Source screen.
Select 2. Universal remote setup from the top of the screen. This initiates the universal remote setup process.
Follow the on-screen instruction and set up the universal remote control. If it does not work, set up the remote control by 3.
entering the model number manually.
Page 46
2-15
2. Product specications
2-4-5. SMART HUB
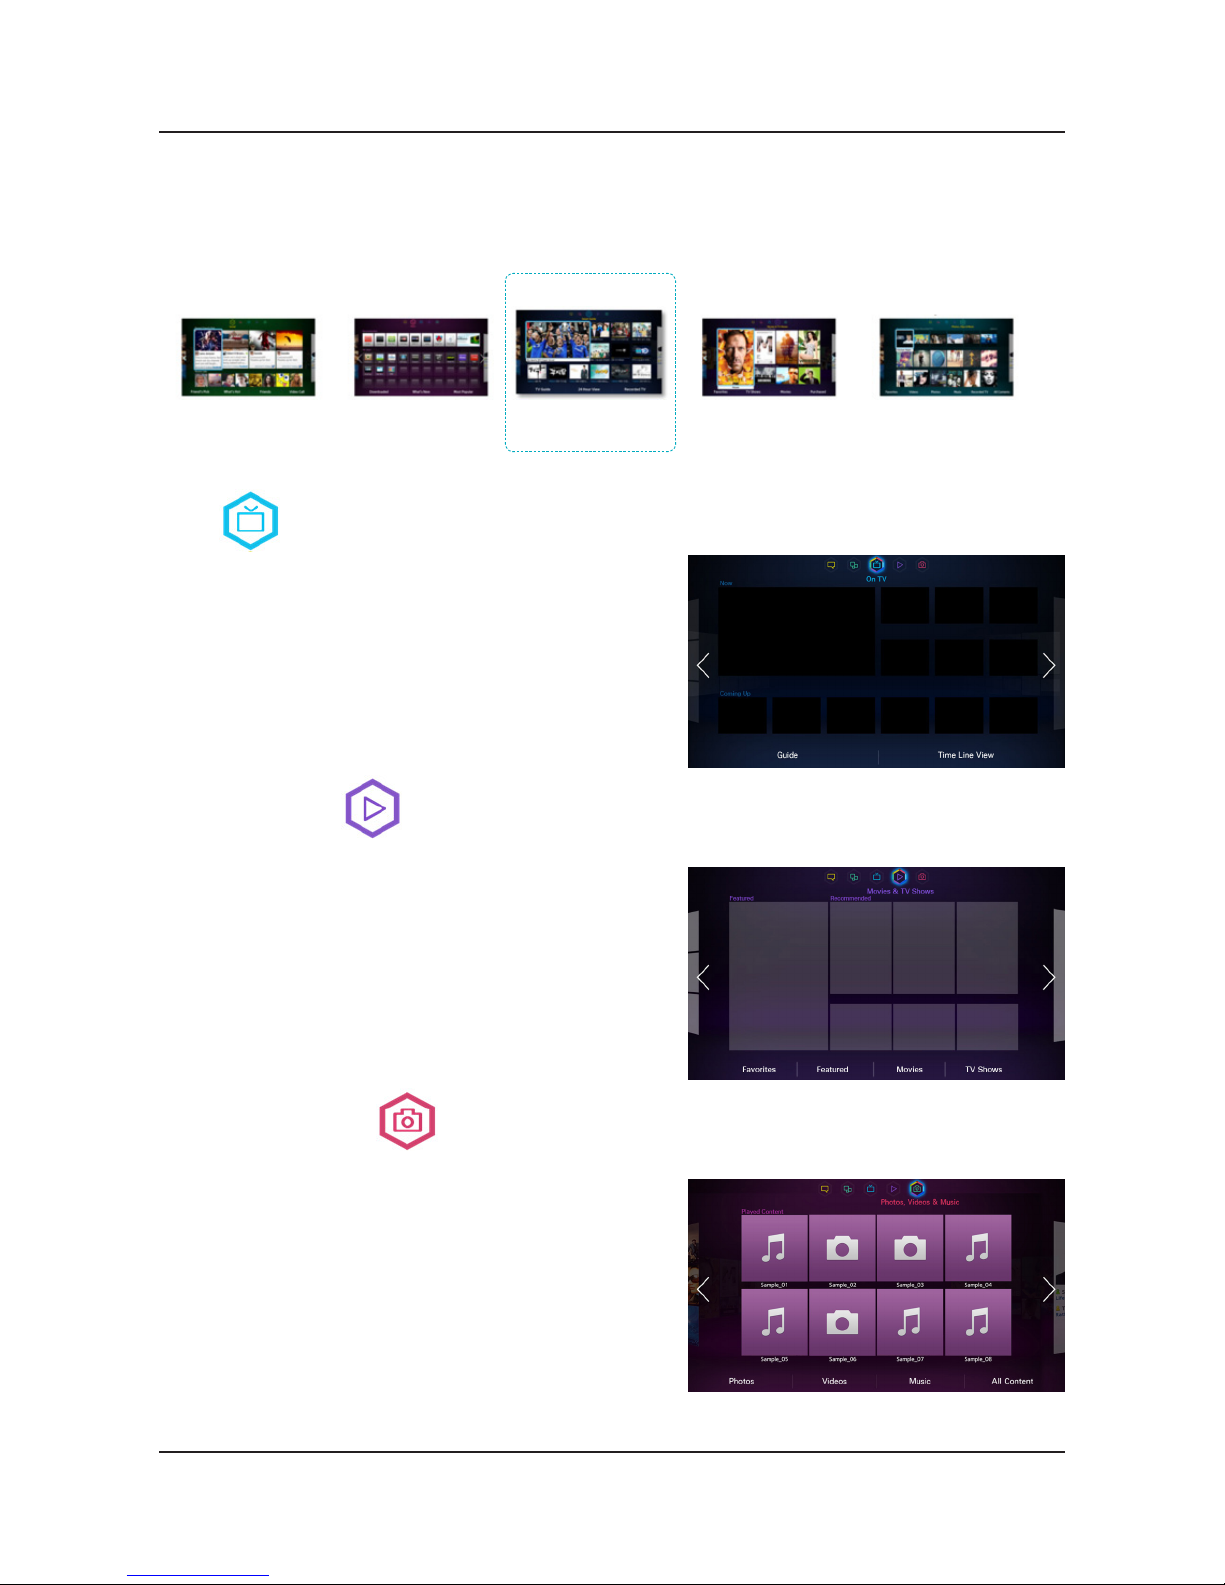
This TV features Smart Hub, a multi-purpose entertainment and family center. With Smart Hub, users can surf the web,
download applications, and stay in touch with family and friends through social networking services. In addition, you can
enjoy photo, video, and music les stored on external storage devices.
Advaced EPG
Watching history baes
1. [HOME] On TV
Social Content
5. Social
Apps & Signature SVC
4. Apps
User EPG
From AllShare
3. Photos, Videos & Music
P-VoD
2. Movies & TV Shows
On TV
This functions is only available on U.S and Canada.
While you watch TV, a list of recommended programs on other
channels appears on the screen. You can use this list to change
the channel and nd out more information about the recommended
programs including how much time is left until they air.
Movies & TV Shows
Purchase and watch movies and series without a separate external device.
This functions is only available on U.S and Canada.
Users can buy movies and TV shows online.
Open Smart Hub and select Movies & TV Shows.
This service may be not available depending on the country or
region.
Photos, Videos & Music
Play back photo, video, and music les from an external storage device.
Open Smart Hub and select Photos, Videos & Music.
Enjoy photo, video and music les from an external storage device
directly on your TV. Back up important les before connecting
an external storage device to the TV. Samsung will not be held
responsible for damaged or lost les.
Page 47
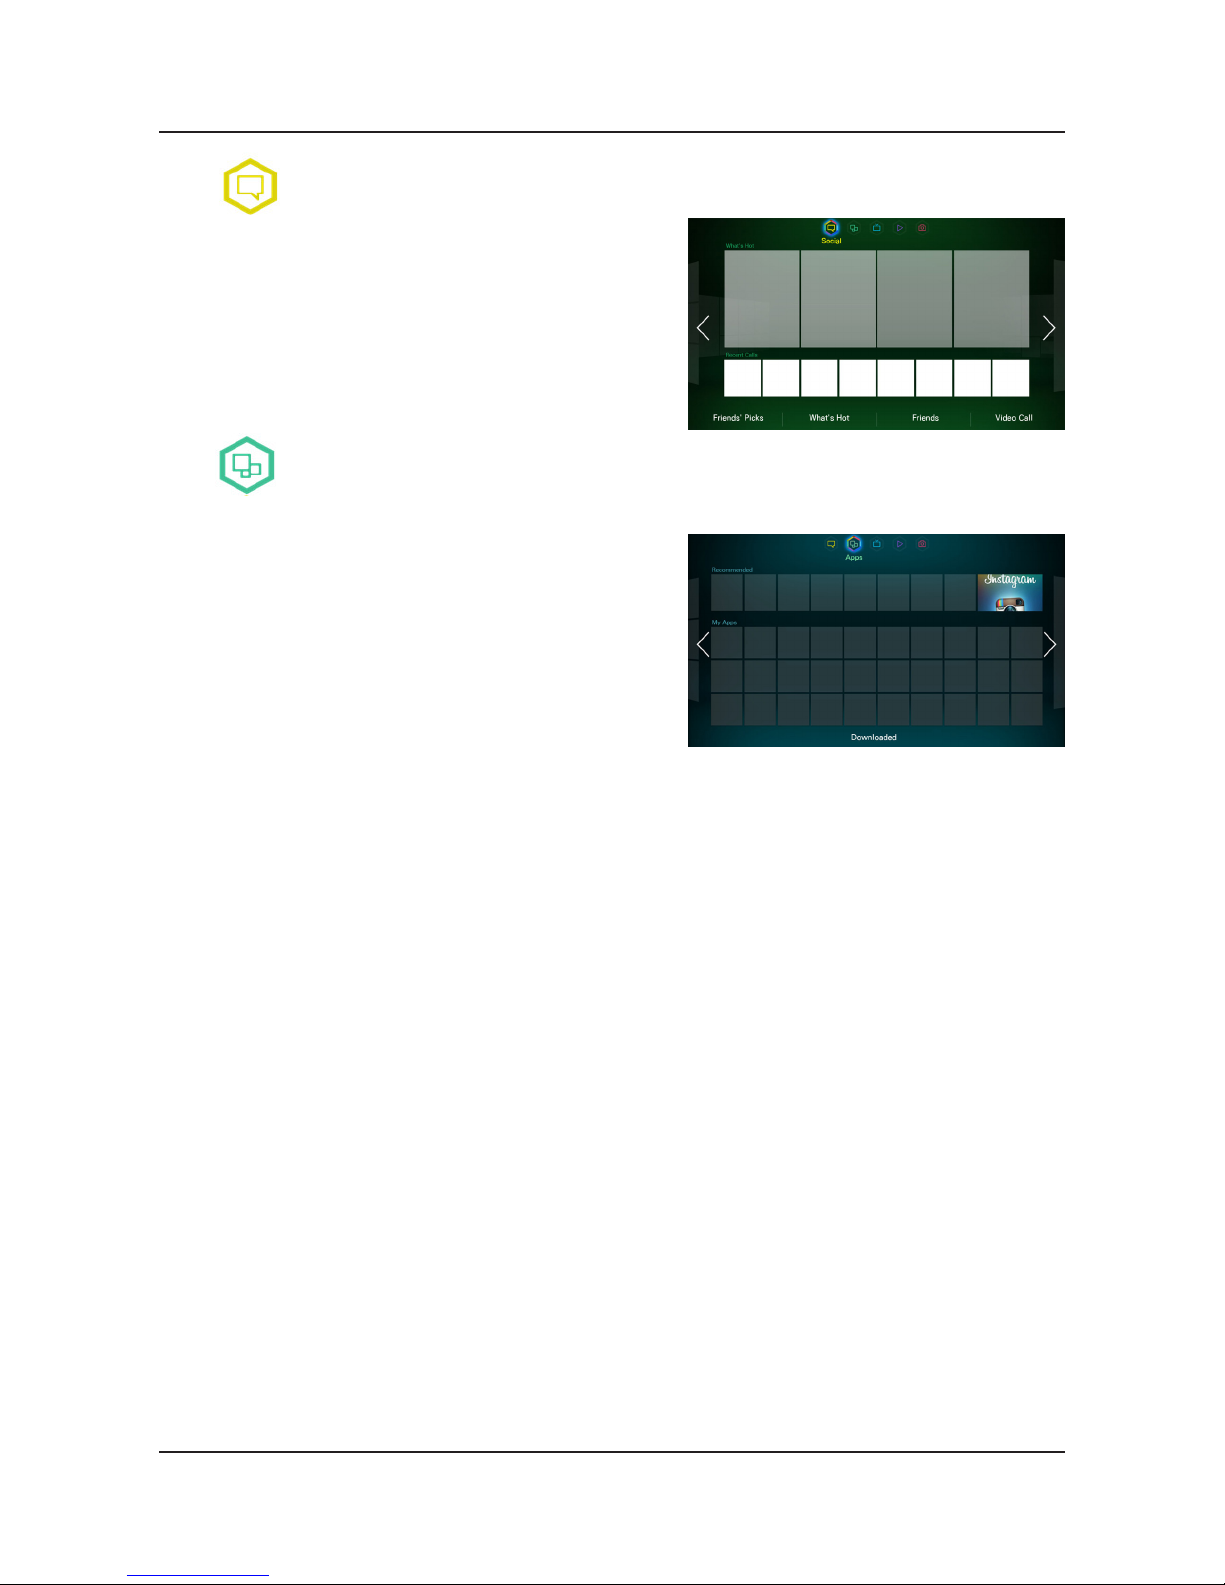
2-16
2. Product specications
Social
Watch the latest YouTube videos and you and your friends' video
posts on Facebook and Twitter. You
can also make video calls to friends by connecting the TV to a
camera (sold separately).
Apps
Download and install applications such as WebBrowser and Family Tree.
Samsung Apps offers an extensive collection of free and paid news,
sports, weather, and gaming content you can directly download to
and enjoy on your TV. First, check the network and make sure the
TV is connected to the Internet. Your TV needs to be connected to
the Internet in order to use Apps.
Samsung Apps•
Samsung Apps offers various free and paid news, sports, weather, and gaming applications. Samsung Apps lets you
search for applications and install them directly on your TV. Read and agree to the terms and conditions of use and
then browse through the categories or directly search for applications.
Fitness•
Fitness is an application that helps you stay t. Create a prole, set up an exercise plan, and start exercising
according to a structured regimen. Read and agree to the terms and conditions before using Fitness.
Kids•
This is a quick launcher and recommended list for applications and content that is suitable for children and even
provides services not currently installed on your TV. Using Kids, you can download applications and content for your
children to your TV. Certain services, however, are fee-based.
WebBrowser•
WebBrowser is a web-browsing application. Using WebBrowser, you can browse the Internet on your TV as you
would on your computer and even watch TV while you surf the web. The browsing experience, however, may not be
the same as it is on your computer. Use a keyboard and mouse for a more convenient web browsing experience.
Social Networks•
Share your thoughts and comments about a program on the air through social networking services. Social Networks
displays social network services such as Twitter, Facebook, Google Talk, and NateOn on a single screen. You can
even post messages and comments in the same manner as you would using a computer. You must rst link your
Samsung account to the respective SNS accounts before you can access them using Social Networks.
Page 48
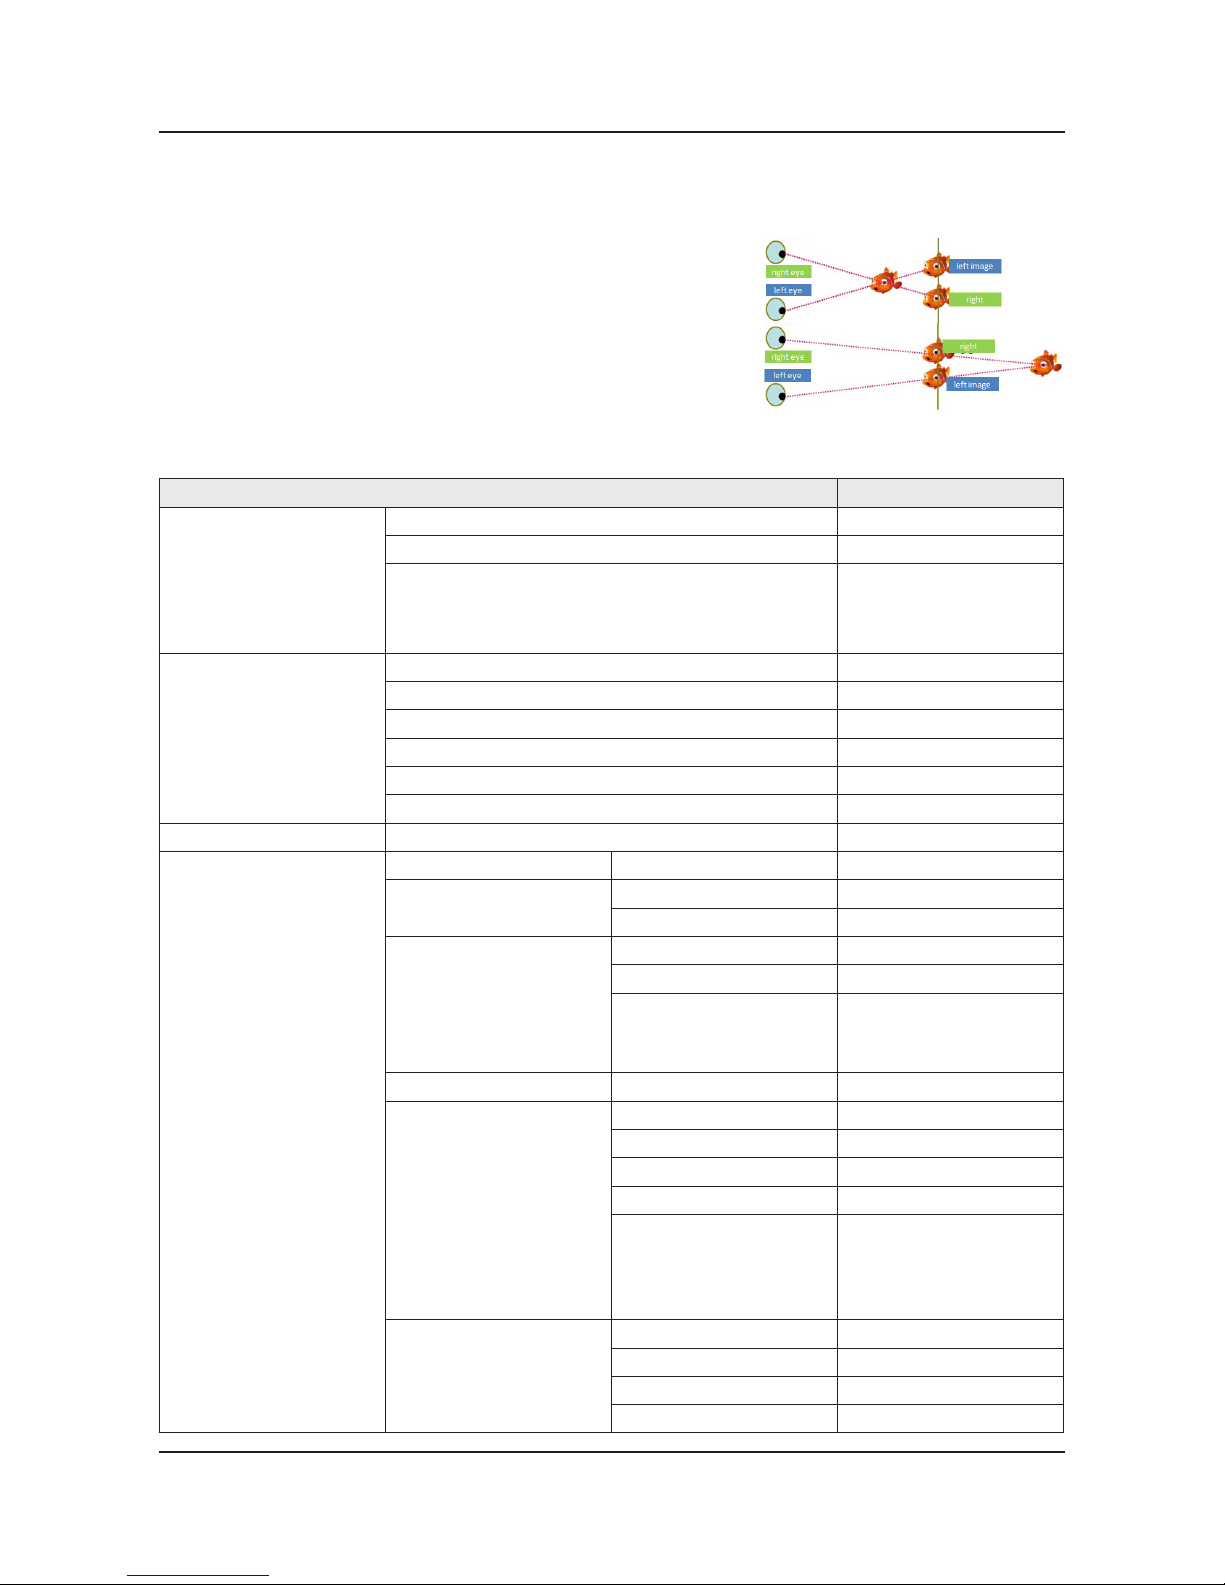
2-17
2. Product specications
2-4-6. 3D Display
What is 3D Display?
This mode is to enables users to view images on the TV/Monitor in 3D by
receiving the video signal in 3D format from sources such as 3D games
and titles. The human brain constructs a 3 dimensional image from the
two images entering both eyes. The depth of a 3 dimensional images is
determined by the horizontal difference between the images from both
the left and right eyes. 3D is displaysed two images alternately on screen
equivalent to left and right at TV, and embodies by doing to see each
relevant image in left eye and right eye through shutter glasses.
3D Function of Model Series
LCD / LED / PDP TV LED
Items
Sub Items 120Hz
Platform (Main) X12
Platform (FRC / Formatter)
Fox-FT1 (SDC)
Fox-FT2 (AUO / CMI)
Echo-Fs (Sharp 3D)
NT7231 2 (Sharp 2D)
3D Feature
2D → 3D Coversion O
3D → 2D O
3D Perspective O
3D Depth O
Auto View (Auto Format Detection) X
3D Optimize O
FRC Feature Auto Motion Plus O
3D Input Format
ATV / AV, PC 2D → 3D O
Component
2D → 3D O
SS, TB O
HDMI
2D → 3D O
SS, TB O
FP 1080P 24 / 25 / 30
FP 720P 50 / 60
FP 1080i 50 / 60
O
HDMI (PC / DVI) LL, VS, Check ker BD, FS X
HDMI (PC / DVI)
2D → 3D O
SS, TB O
MPO O
SVAF IES (SS, BT) O
MVC 1080P 24 / 25 /30
MVC 720P 50 / 60
MVC 1080i 50 / 60
MVC 720P 24 / 25 /30
O
DTV
2D → 3D O
SS, TB O
DVB_Phasel (SS, BT) O
ATSC_KR30 O
Page 49
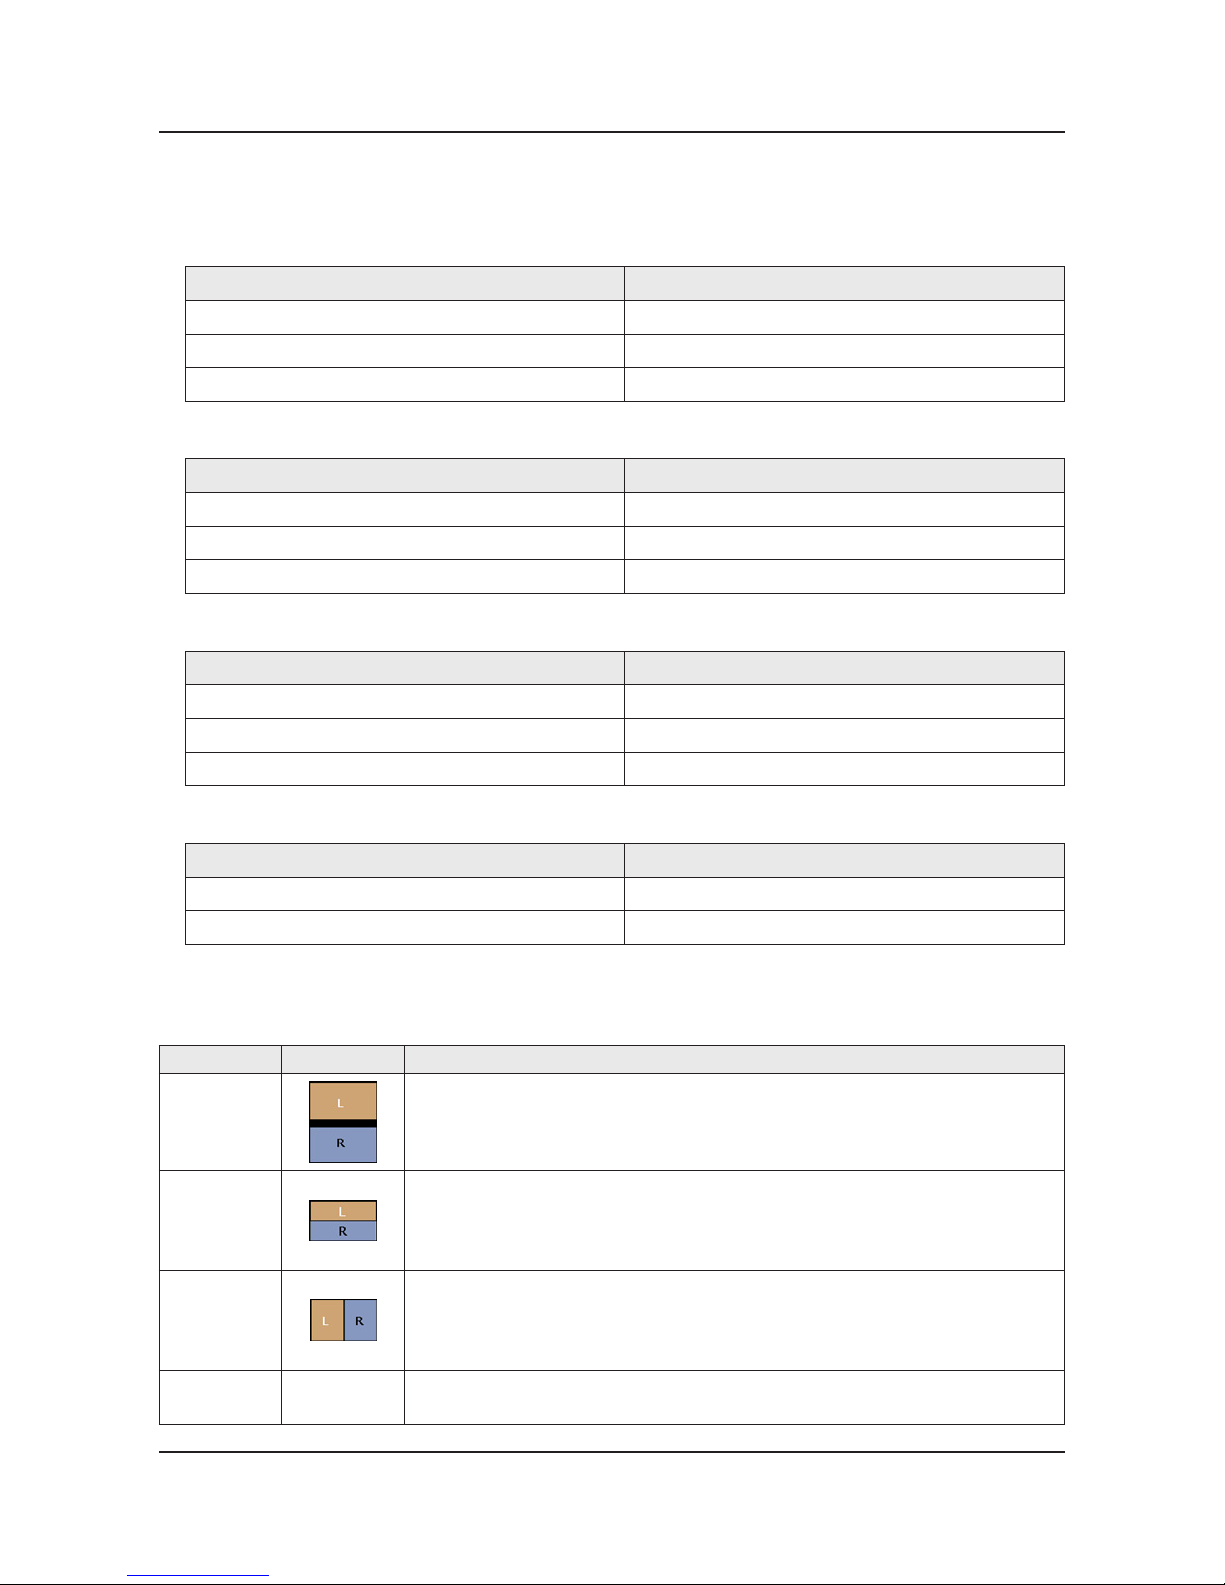
2-18
2. Product specications
Surpported 3D Resolutions
These specications apply to a display ratio of 16:9 only.
3D Format: L/R, T/B•
Resolution Frequency (Hz)
1280 x 720p 59.94 / 60
1920 x 1080i 59.94 / 60
1920 x 1080p 23.98 / 24 / 29.97 / 30 / 59.94 / 60
3D Format: Frame Packing•
Resolution Frequency (Hz)
1280 x 720p 59.94 / 60
1920 x 1080i 59.94 / 60
1920 x 1080p 23.98 / 24 / 29.97 / 30
Component•
Resolution Frequency (Hz)
1280 x 720p 59.94 / 60
1920 x 1080i 59.94 / 60
1920 x 1080p 23.98 / 24 / 29.97 / 30 / 59.94 / 60
Digital Channel•
Resolution Frequency (Hz)
1280 x 720p 59.94 / 60
1920 x 1080i 59.94 / 60
3D Format Test
3D Format : There are several 3D formats existing on how to merge Left and Right images.
Format Input images Test Method
Frame Packin
(HDMI 1.4)
Able to test only by HDMI 1.4 BD Player or MSPG-4600MT(Master Device)
Top & Bottom
Using Format_test.bmp
Check in the PC(HDMI) source. PC resolution and format resolution must be same•
Wearing 3D glass, left eye sees only ‘L’ letter, right eye sees only ‘R’ letter (close •
your eyes one by one)
Side by Side
Using Format_test.bmp
Check in the PC(HDMI) source. PC resolution and format resolution must be same•
Wearing 3D glass, left eye sees only ‘L’ letter, right eye sees only ‘R’ letter (close •
your eyes one by one)
2D → 3D
Check in the normal 2D source. Check not in the test pattern but in the actual video.
Left/Right black region will grow more and more as the depth goes higher.•
Page 50
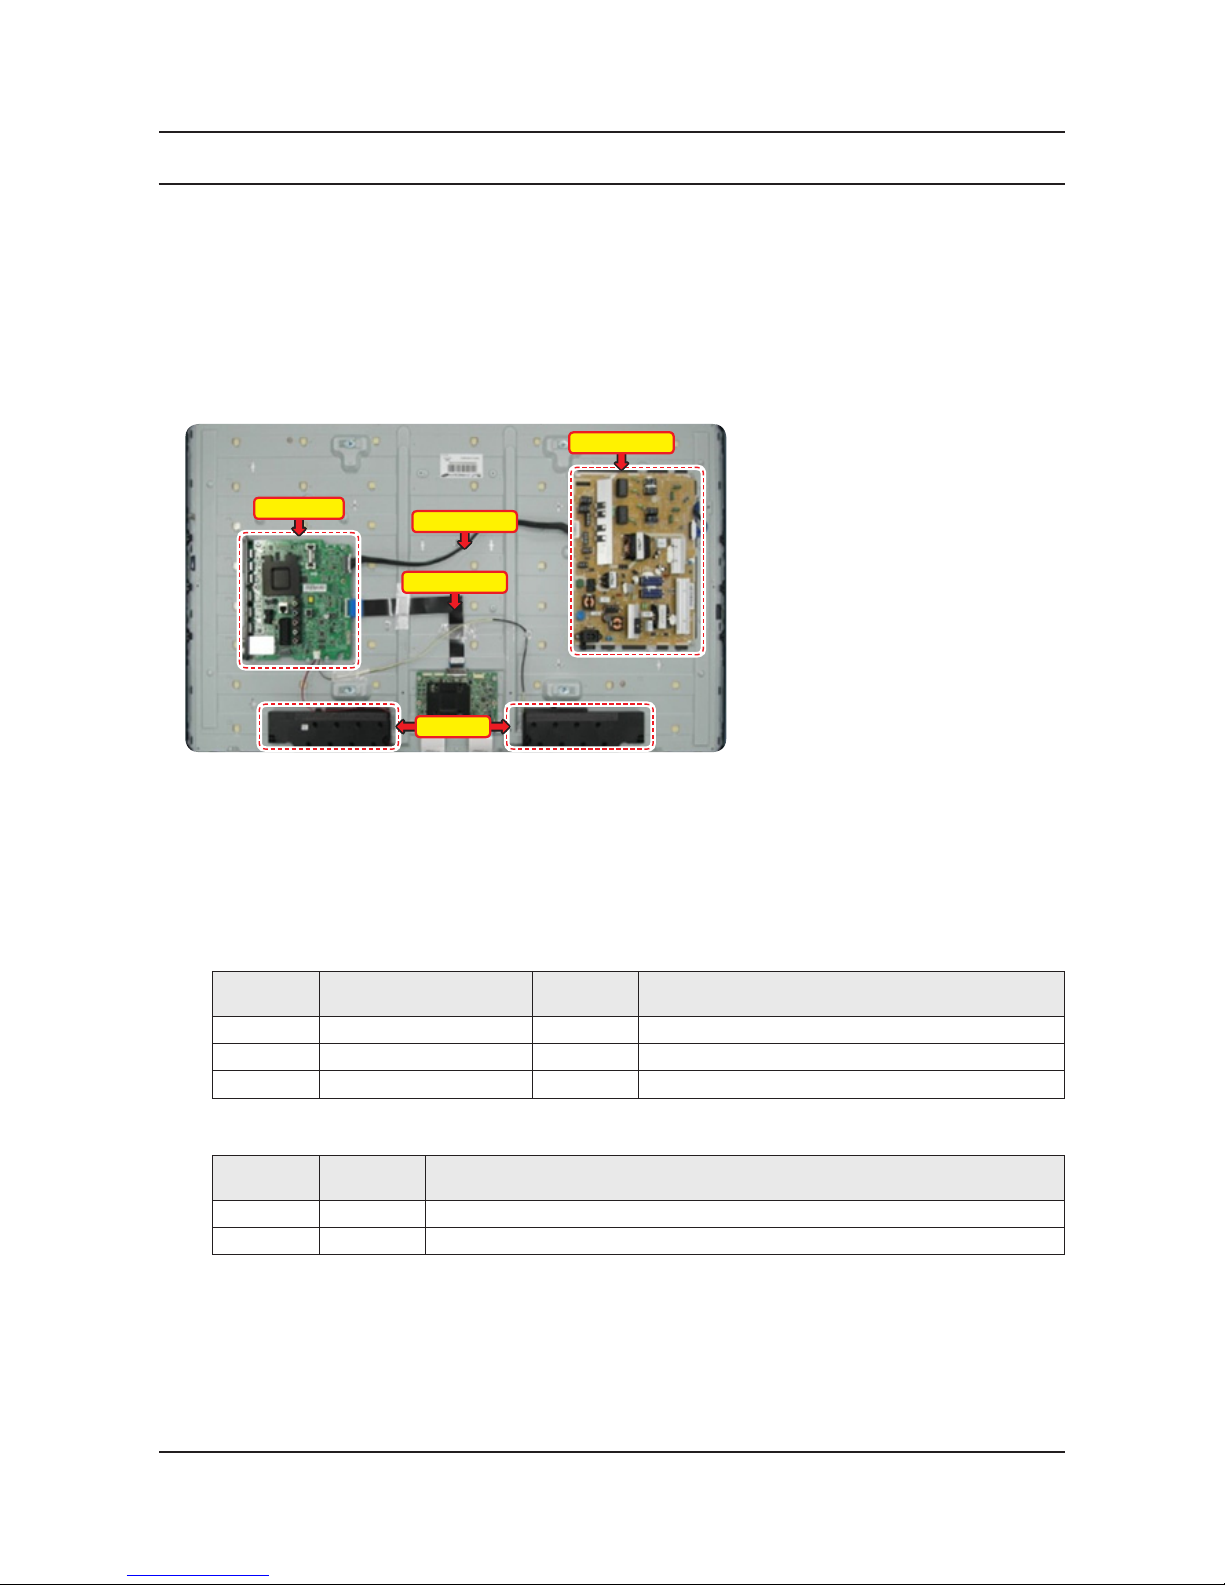
4-1-1. Previous Check
Check the various cable connections rst.1.
Check to see if there is a burnt or damaged cable. -
Check to see if there is a disconnected or loose cable connection. -
Check to see if the cables are connected according to the connection diagram. -
Check the power input to the Main Board.2.
Main Board
Speaker
Power Board
Power Cable
LVDS Cable
How to distinguish if the problem is caused by 3. Main Board or T CON
No Video -
If the problem is No Video but BLU is on and Indication LED is blinking repeatedly and faster than nomal booting,
replace the T-CON board.
Distorted Picture -
Check the inner patterns.
For All mode•
X12 FOX_FT1 FRC Post Picture Problem
OK OK NG Main Board or Signal Source
NG OK NG Main Board
NG NG NG Main Board or LVDS cable or T CON or Panel
Only for HDMI mode (additional check)•
HDMI Picture Problem
OK NG There is no problems after HDMI IC check HDMI source or HDMI jack.
NG NG There is no problems before HDMI IC check X12 pattern or LVDS cable or T CON
4. Troubleshooting
4-1. Troubleshooting
4-1
4. Troubleshooting
Page 51
How to check inner pattern?
Enter the service mode 1. ⇢ Choose ‘SVC’ ⇢ Check the ‘internal pattern.’
Enter ‘Service Mode.’2.
If you do not have Factory remote control -
Power OFF MENU 1 8 2 Power On
If you have Factory remote control -
INFO Factory
Choose ‘SVC 3. ⇢ Test pattern’.
Option
Control
Debug
SVC
ADC/WB
Advanced
Test Pattern Mstar Test Pattern
Check inner patterns.4.
4-2
4. Troubleshooting
Page 52
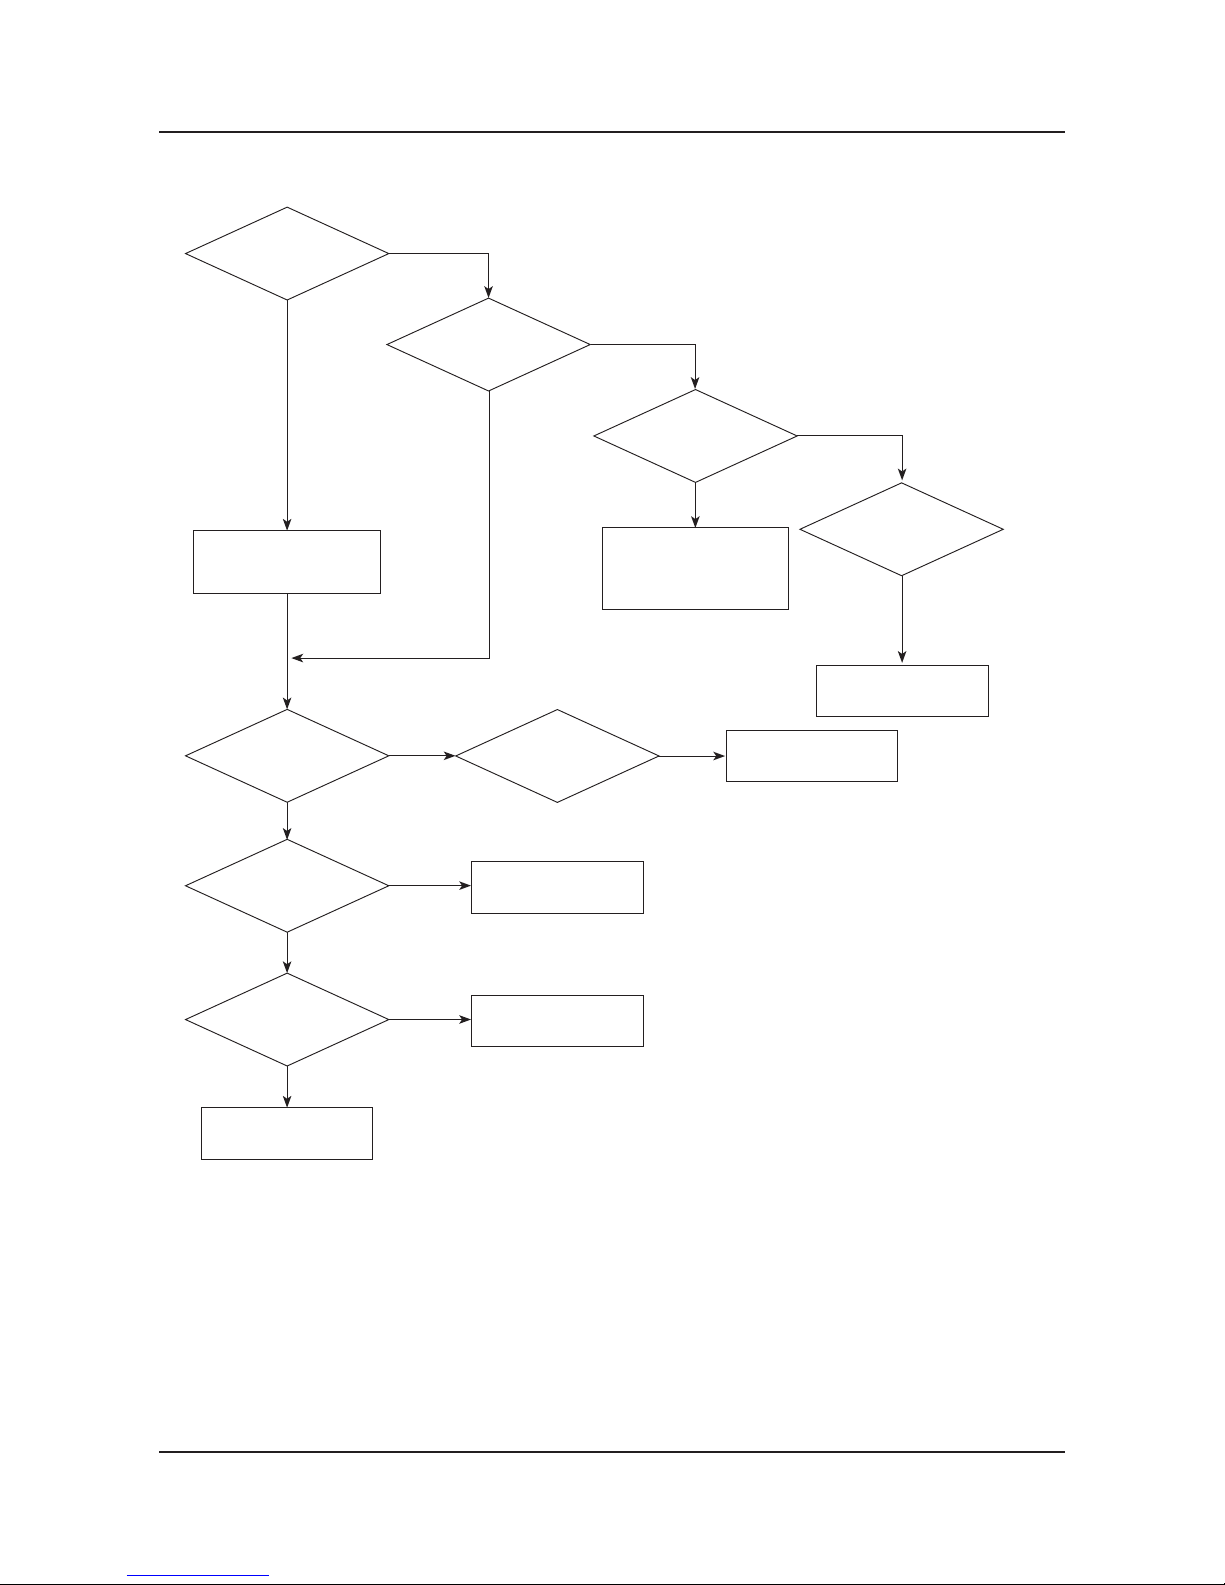
4-1-2. Simple ow chart of malfunction
Yes
No
No
Can you see anything
on the screen?
Yes
Can you see
OSD menu running
on the screen?
Check LVDS cable
connected to Main Board.
If necessary, replace the
Main Board.
Yes
Can you see Digital
Channel broadcast ?
No
Replace the Main Board.
Yes
No
No
Yes
Yes
Check the LVDS
Cable connected.
If necessary replace the
T-CON Board.
No
Change the Main Board.
No
Check 20p Cable.
If necessary, replace the
SMPS Board.
Yes
No
Change the Main Board.
Does the TV turn on?
Check the Power Cord.
Is any sound of
TV when RF signal
connected?
A5V appear at
the pin 4 of CN201?
B13V appear at
the pin 11, 12, 13 of
CN201?
Please, contact Tech
support.
4-3
4. Troubleshooting
Page 53
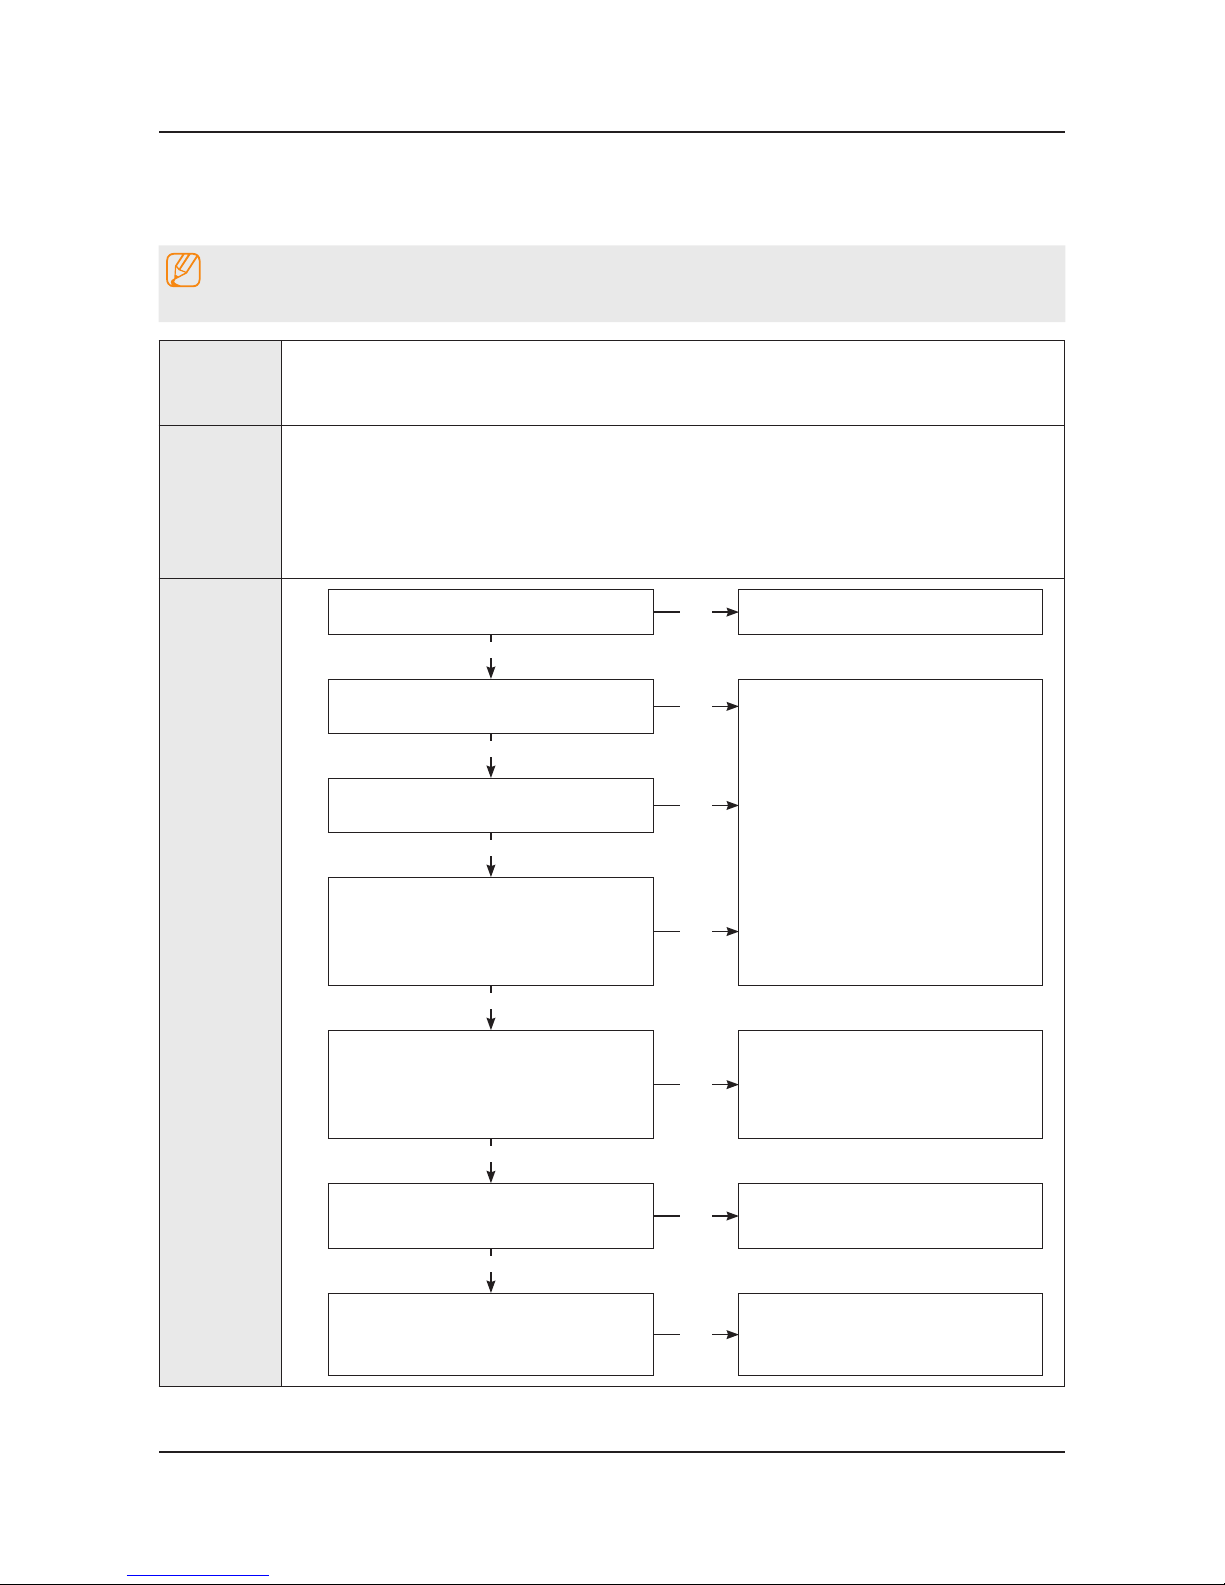
4-2. How to Check Fault Symptom
4-2-1. NO Power
Note
Refer to the next page to check the location such a CN201 or IC201 SVC Manual mentioned.
Symptom
The LEDs on The front panel do not work when connecting The power cord.•
The SMPS relay does not work when connecting The power cord.•
The units appears to be dead.•
Major
checkpoints
The IP relay or the LEDs on the front panel does not work when connecting the power cord if the cables are improperly
connected or the Main Board or SMPS is not functioning. In this case, check the following:
Check the internal cable connection status inside the unit.•
Check the fuses of each part.•
Check the output voltage of SMPS.•
Replace the Main Board.•
Diagnostics
Power indicator LED is on?
No
Check the power cord connection.
Yes
Check the backlight on, when 20 PIN
cable unconnected ?
No
Change 20p cable.
Change Main Power Ass’y.
Yes
Check ‘Stand-By 5V’ ?
BD207 : A5.3V
No
Yes
Check ‘Power input of Main Ass’y’ ?
BD206 / BD201 : B12VS -
BD214 / 209 : B13V -
BD208 / BD213 : B5V -
No
Yes
Check ‘Power IC output of Main Ass’y’ ?
IC202 : A3.3V -
L202 : B1.15V / L201 : B5V -
L203 : B3.3V / BD211 : B1.5V -
No
Change the Main Ass’y.
Yes
Check Input power of ‘T CON Board’ ?
F1(T CON) : B13V -
No
Reconnect or Change.
the LVDS cable.
Yes
Check Power of ‘T CON Board’.
BD1(T CON) : Panel_12V -
B1.1V(T CON-TP) : FT1_1.1V_PW -
No
Change the T CON Board.
4-4
4. Troubleshooting
Page 54
Diagnostics
Yes
Please, Contact tech support.
Caution Make sure to disconnect the power before working on the IP Board.
4-5
4. Troubleshooting
Page 55
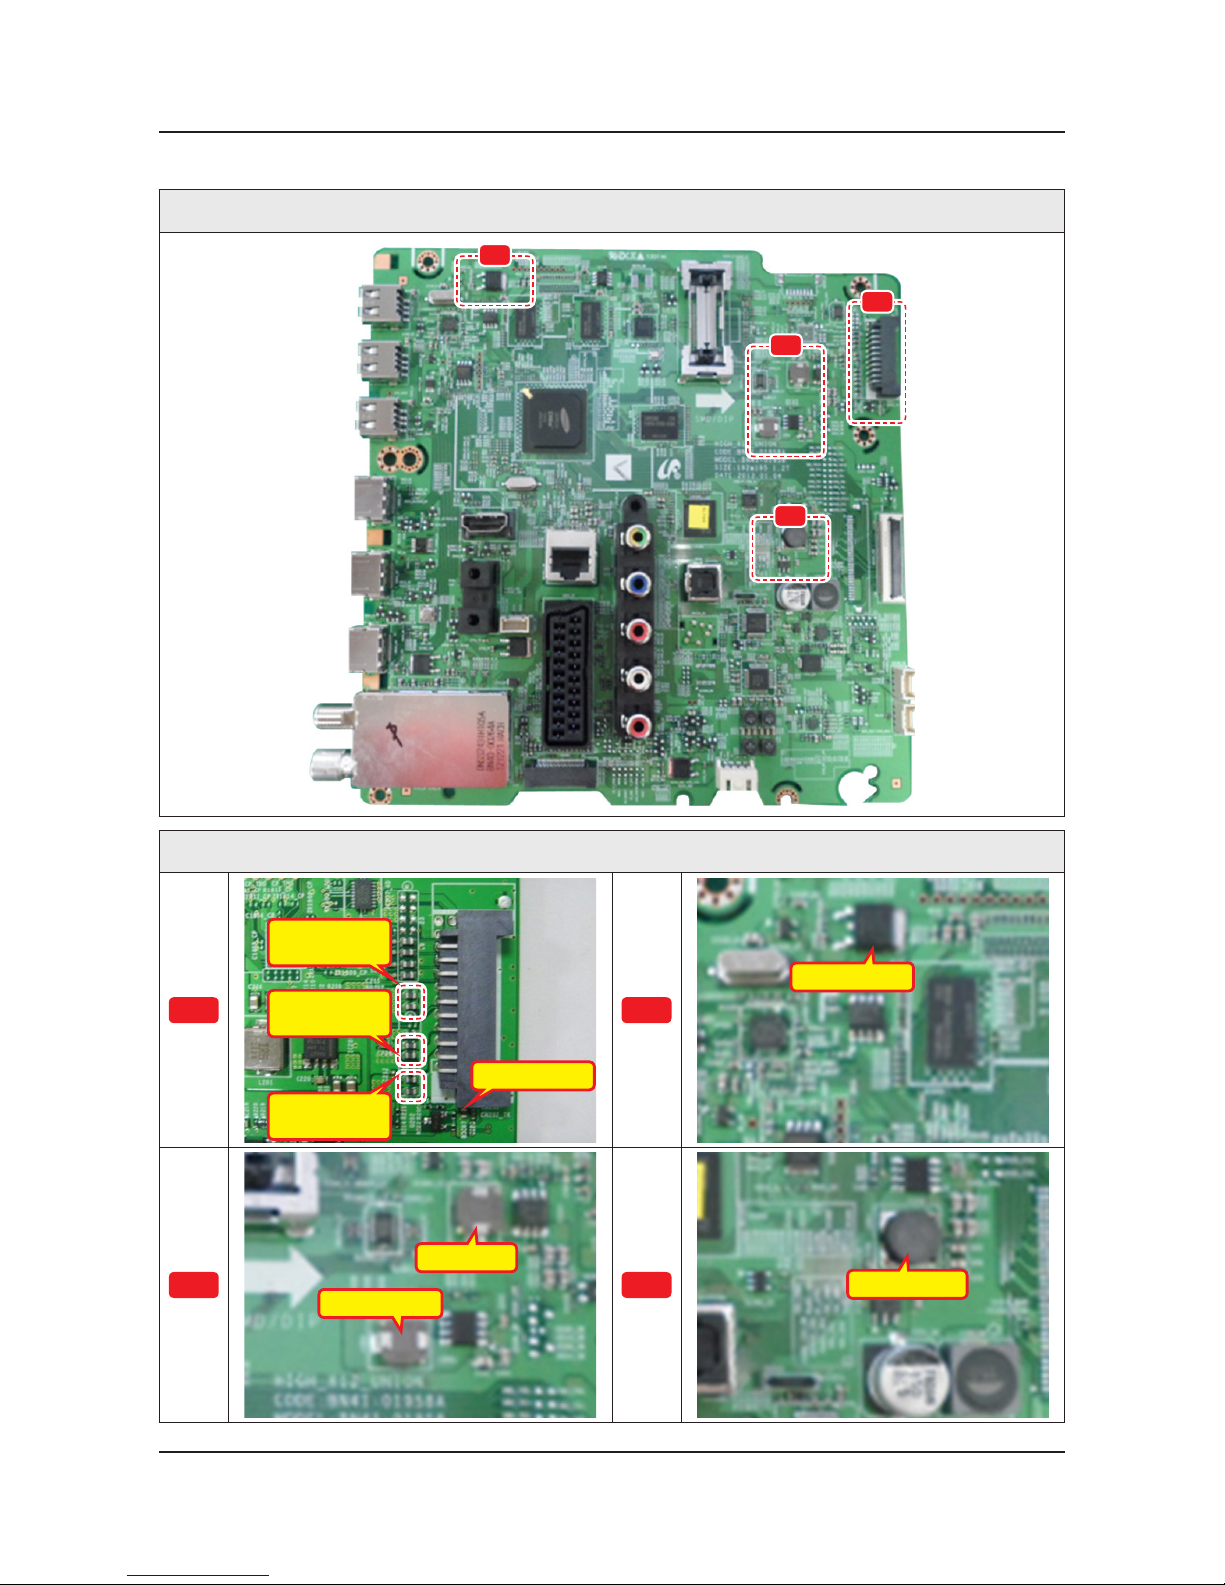
Location of Parts
Main Board_Front
D
B
C
A
Detail
A
BD214 : B13V
BD209 : B13V
BD206 : B12V
BD201 : B12V
BD207 : A5.3V
BD213 : B5.3V
BD208 : B5.3V
B
BD211 : B1.5V
C
L201 : B5V
L202 : B1.15V
D
L203 : B3.3V
4-6
4. Troubleshooting
Page 56
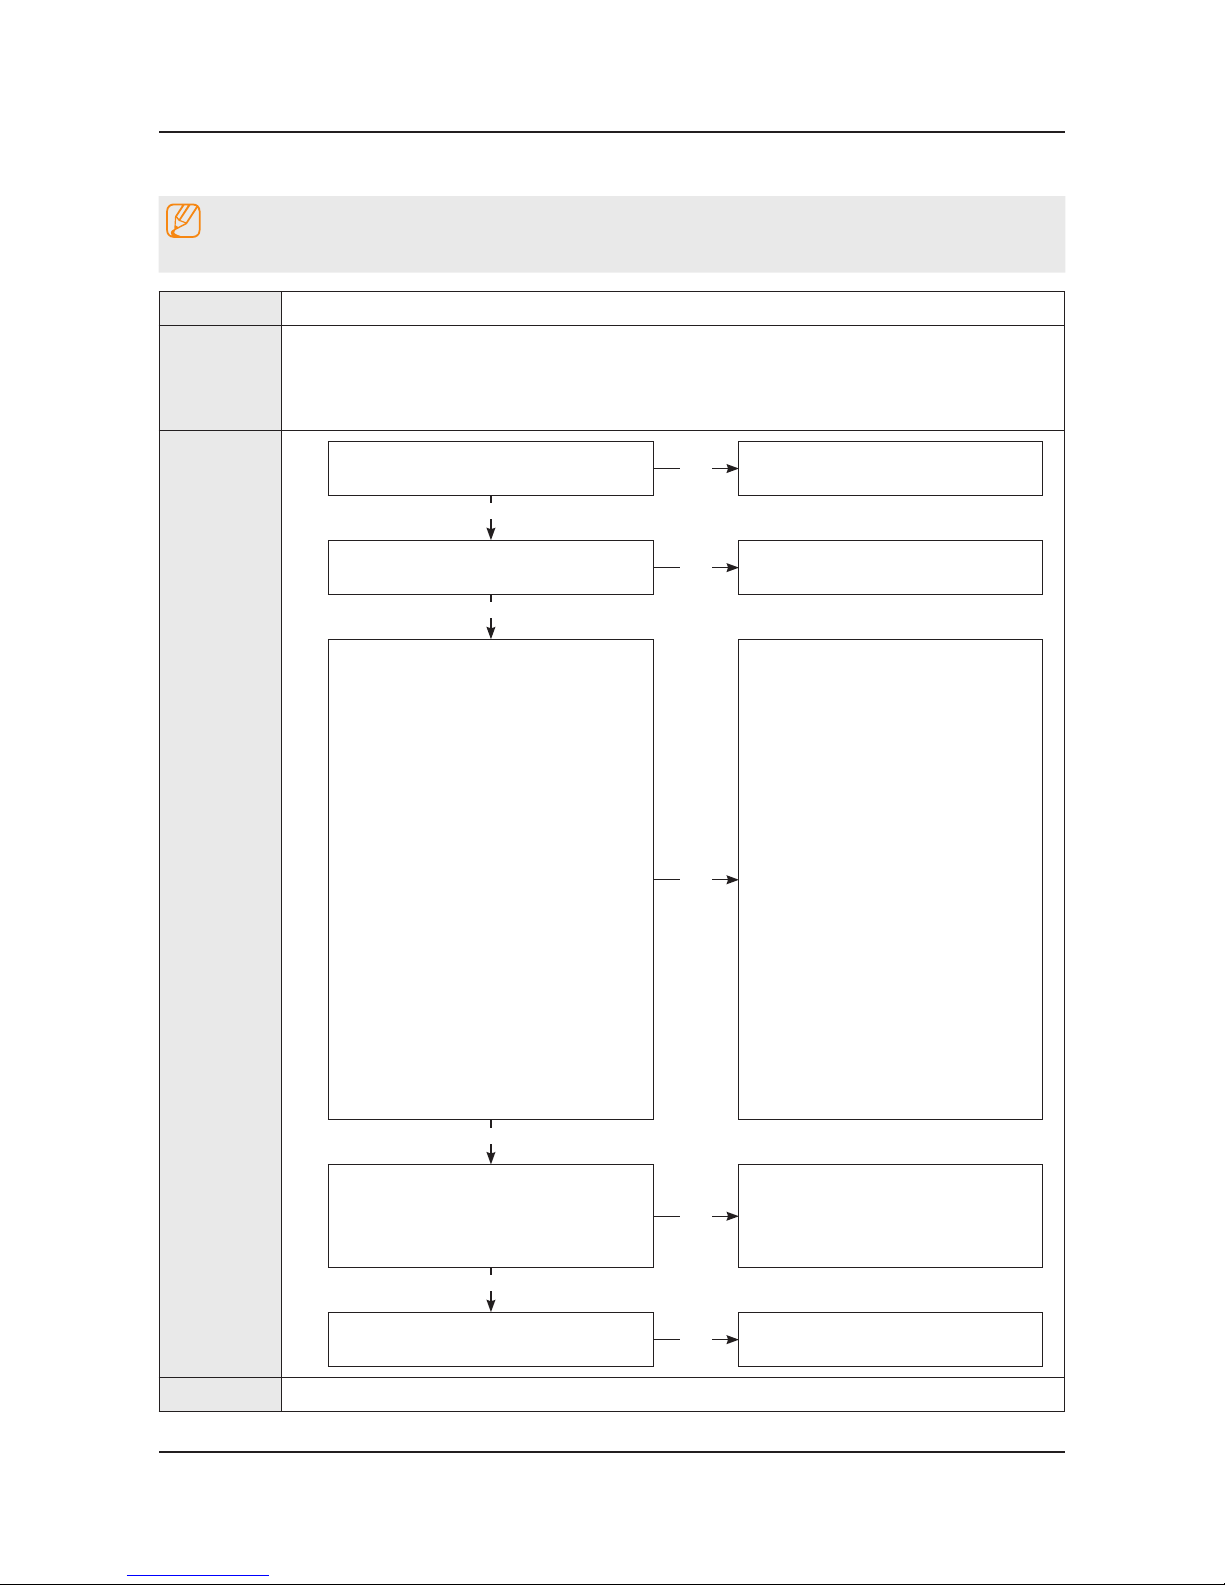
4-2-2. No Video (HDMI 1, 2, 3, 4 - Digital Signal)
Note
Refer to the next page to check the location such a CN201 or IC201 SVC Manual mentioned.
Symptom Audio is normal but no picture is displayed on the screen.•
Major
checkpoints
Check the HDMI source.•
Check the HDMI switch.•
This may happen when the LVDS cable connecting the Main Board and the Panel is •
disconnected.
Diagnostics
Power indicator LED is off.
Lamp(Backlight) on, no video ?
No
Check a set in the ‘Stand-by mode’.
Yes
Check the HDMI source and check the
connection of HDMI cable ?
No
Input the HDMI signal properly.
Yes
1
Check the signal at Input of Main Board ?
HDMI1 Clk -
Pin #10, #12 of CN602_H2
DATA •
Pin #7, #9, #4, #6, #1, #3 of
CN602_H2
HDMI2 Clk -
Pin #10, #12 of CN603_H3
DATA •
Pin #7, #9, #4, #6, #1, #3 of
CN603_H3
HDMI3 Clk -
Pin #10, #12 of CN604_H4
DATA •
Pin #7, #9, #4, #6, #1, #3 of
CN604_H4
HDMI4 Clk -
Pin #10, #12 of CN601_H1
DATA •
Pin #7, #9, #4, #6, #1, #3 of
CN601_H1
No
Check CN601~4.
Check HDMI cable.
Change the Main Ass’y.
or
Check IC1001(X12).
Change the Main Ass’y.
Yes
2
Check the LVDS clk signal at output of
Main Board. (TX)
TX2_CLK : ODD_TXCLK_DN/DP -
TX4_CLK : EVEN_TXCLK_DN/DP -
No
Check IC1001(X12).
Change the Main Ass’y.
Yes
Check the LVDS cable?
Replace the T CON / LCD panel?
No
Please, Contact tech support.
Caution Make sure to disconnect the power before working on the IP Board.
4-7
4. Troubleshooting
Page 57
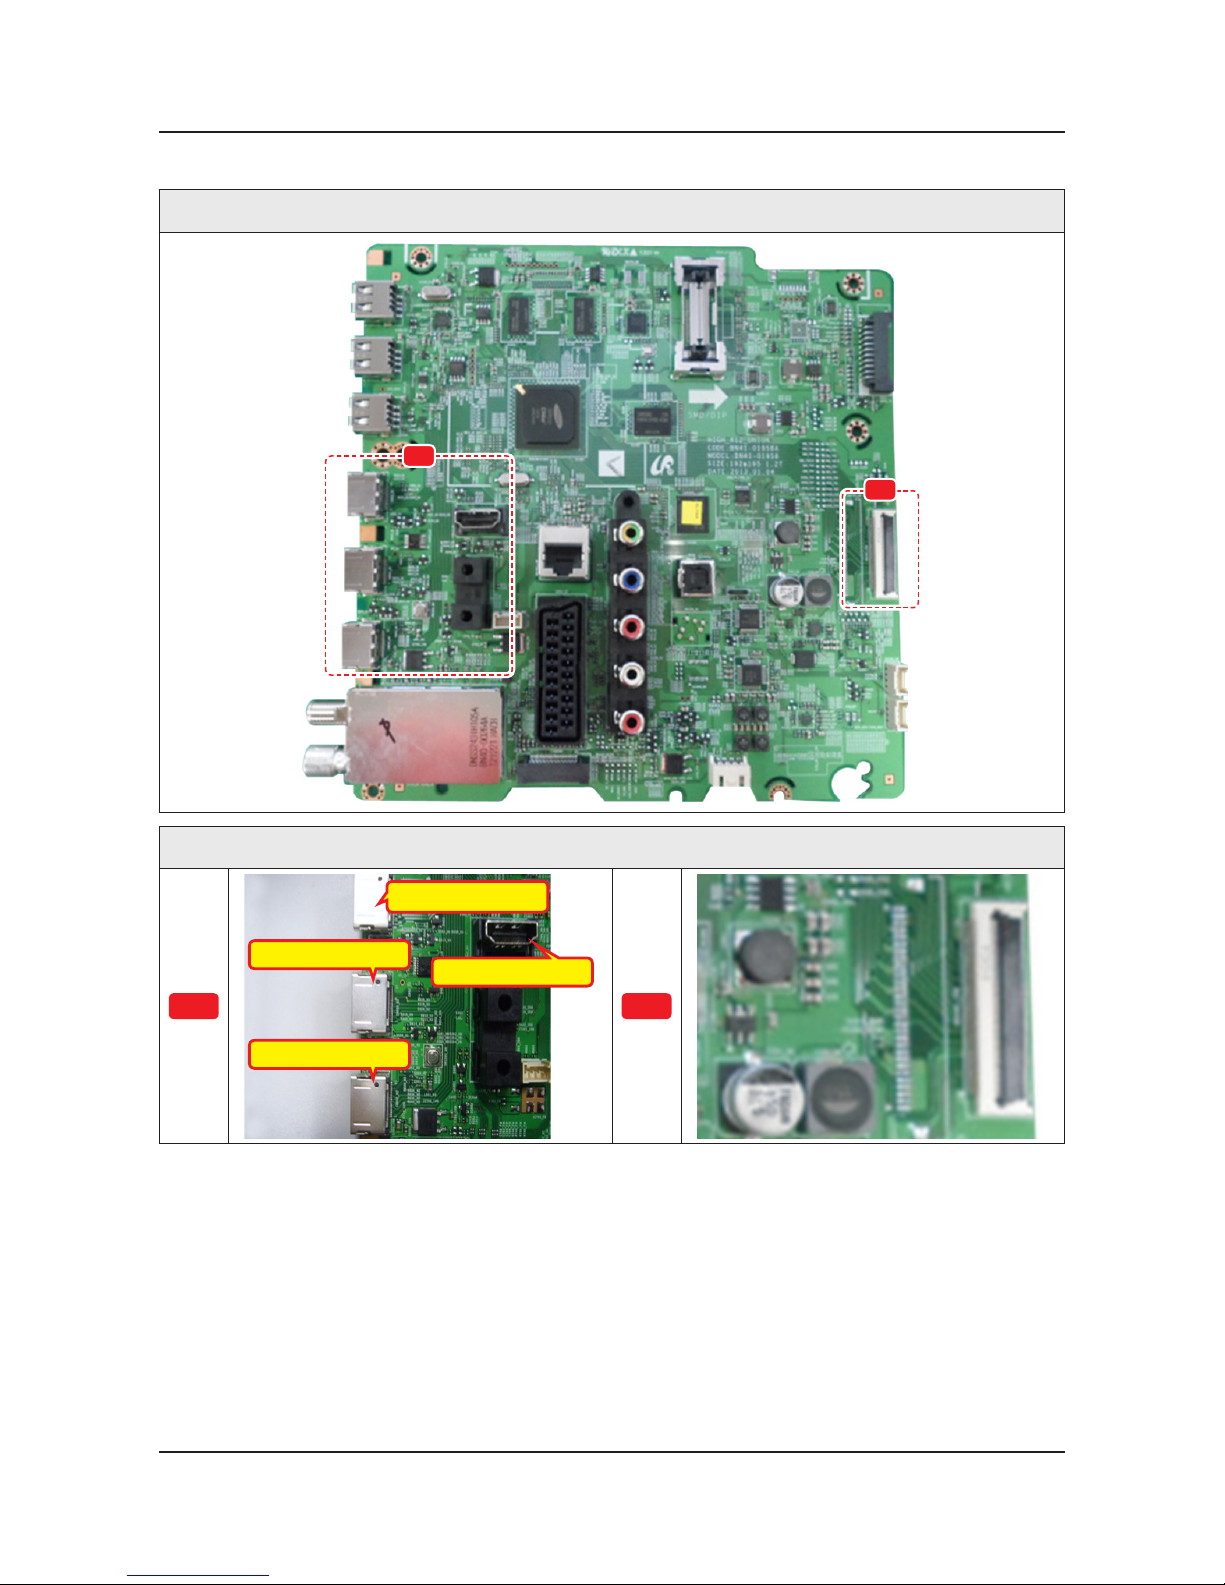
Location of Parts
Main Board_Front
B
A
Detail
A
CN601_H1 : HDMI4
CN603_H3 : HDMI2
CN602_H2 : HDMI1
CN604_H4 : HDMI3
B
4-8
4. Troubleshooting
Page 58
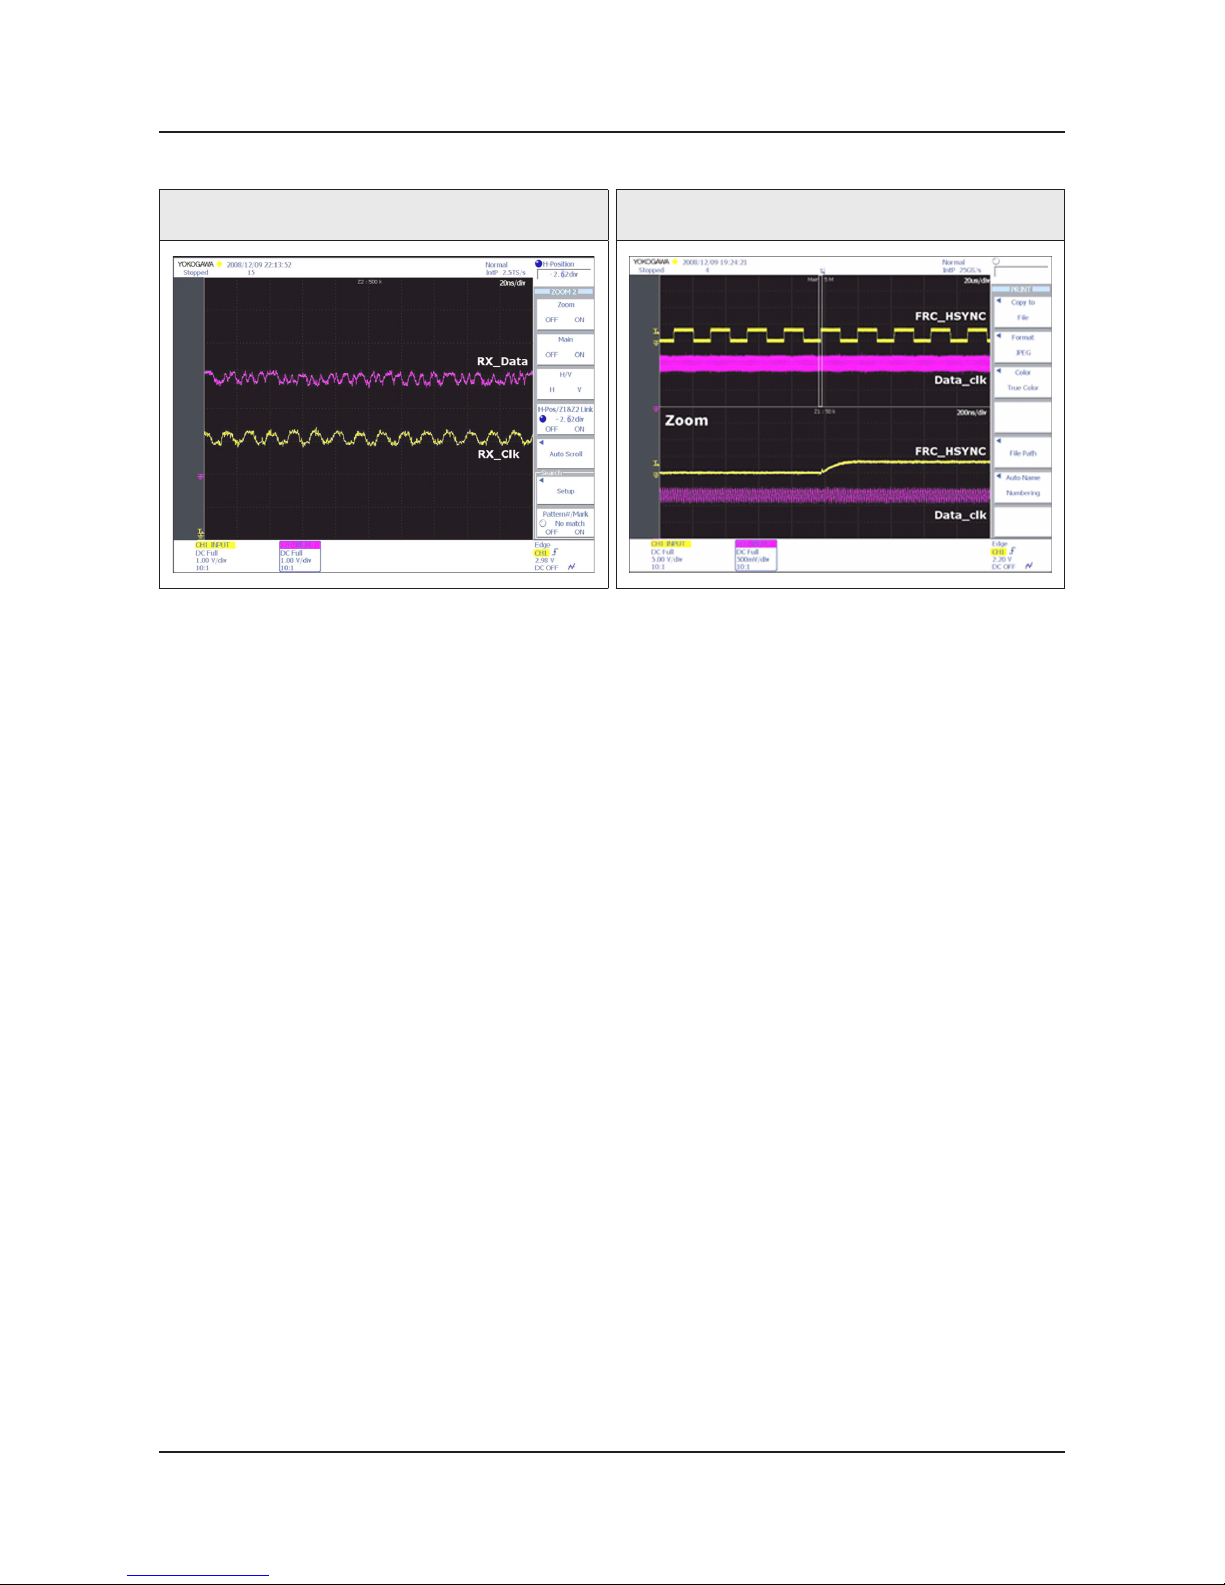
Waveforms
1 HDMI input (RX_Data, RX_Clk) 2 LVDS output
4-9
4. Troubleshooting
Page 59
4-2-3. No Video (Tuner_CVBS)
Note
Refer to the next page to check the location such a CN201 or IC201 SVC Manual mentioned.
Symptom Audio is normal but no picture is displayed on the screen.•
Major
checkpoints
Check the Tuner CVBS source.•
Check the Tuner.•
This may happen when the LVDS cable connecting the Main Board and the Panel is •
disconnected.
Diagnostics
Power indicator LED is off.
Lamp(Backlight) on, no video ?
No
Check a set in the ‘Stand-by mode’.
Yes
Check the RF source and check the
connection of RF cable.
No
Input the RF source properly.
Yes
1
Check the Power of Tuner ?
Pin #4 of Tuner : B3.3V_Tuner -
Pin #1 of Tuner : B1.8V_Tuner -
No
Change the Main Ass’y.
Yes
2
Check the CVBS data out of IC1001 ?
C807 : Tuner CVBS
No
Check IC1001(X12).
Change the Main Ass’y.
Yes
2
Check the LVDS clk signal at output of
Main board. (TX)
TX2_CLK : ODD_TXCLK_DN/DP -
TX4_CLK : EVEN_TXCLK_DN/DP -
No
Check IC1001(X12).
Change the Main Ass’y.
Yes
Check the LVDS cable?
Replace the T CON / LCD panel?
No
Please, Contact tech support.
Caution Make sure to disconnect the power before working on the IP Board.
4-10
4. Troubleshooting
Page 60
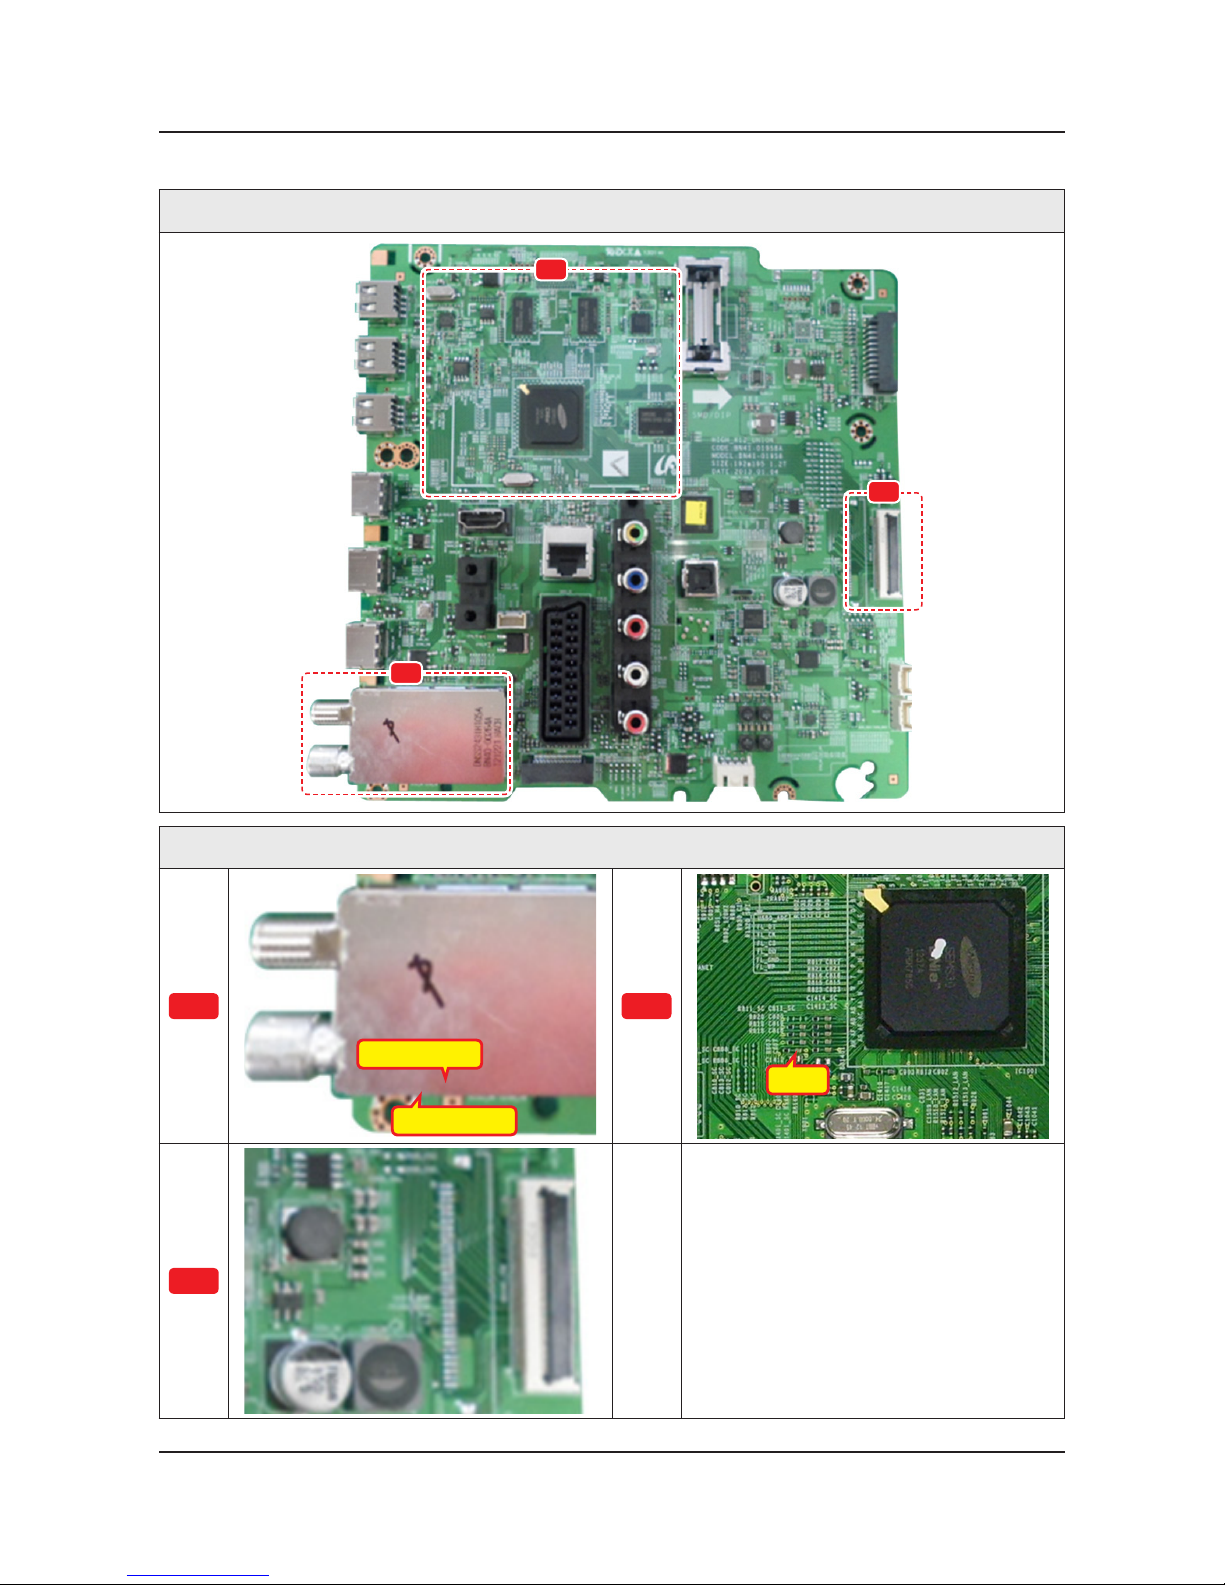
Location of Parts
Main Board_Front
C
A
B
Detail
A
Pin #4 : B3.3V
Pin #1 : B1.8V
B
C807
C
4-11
4. Troubleshooting
Page 61
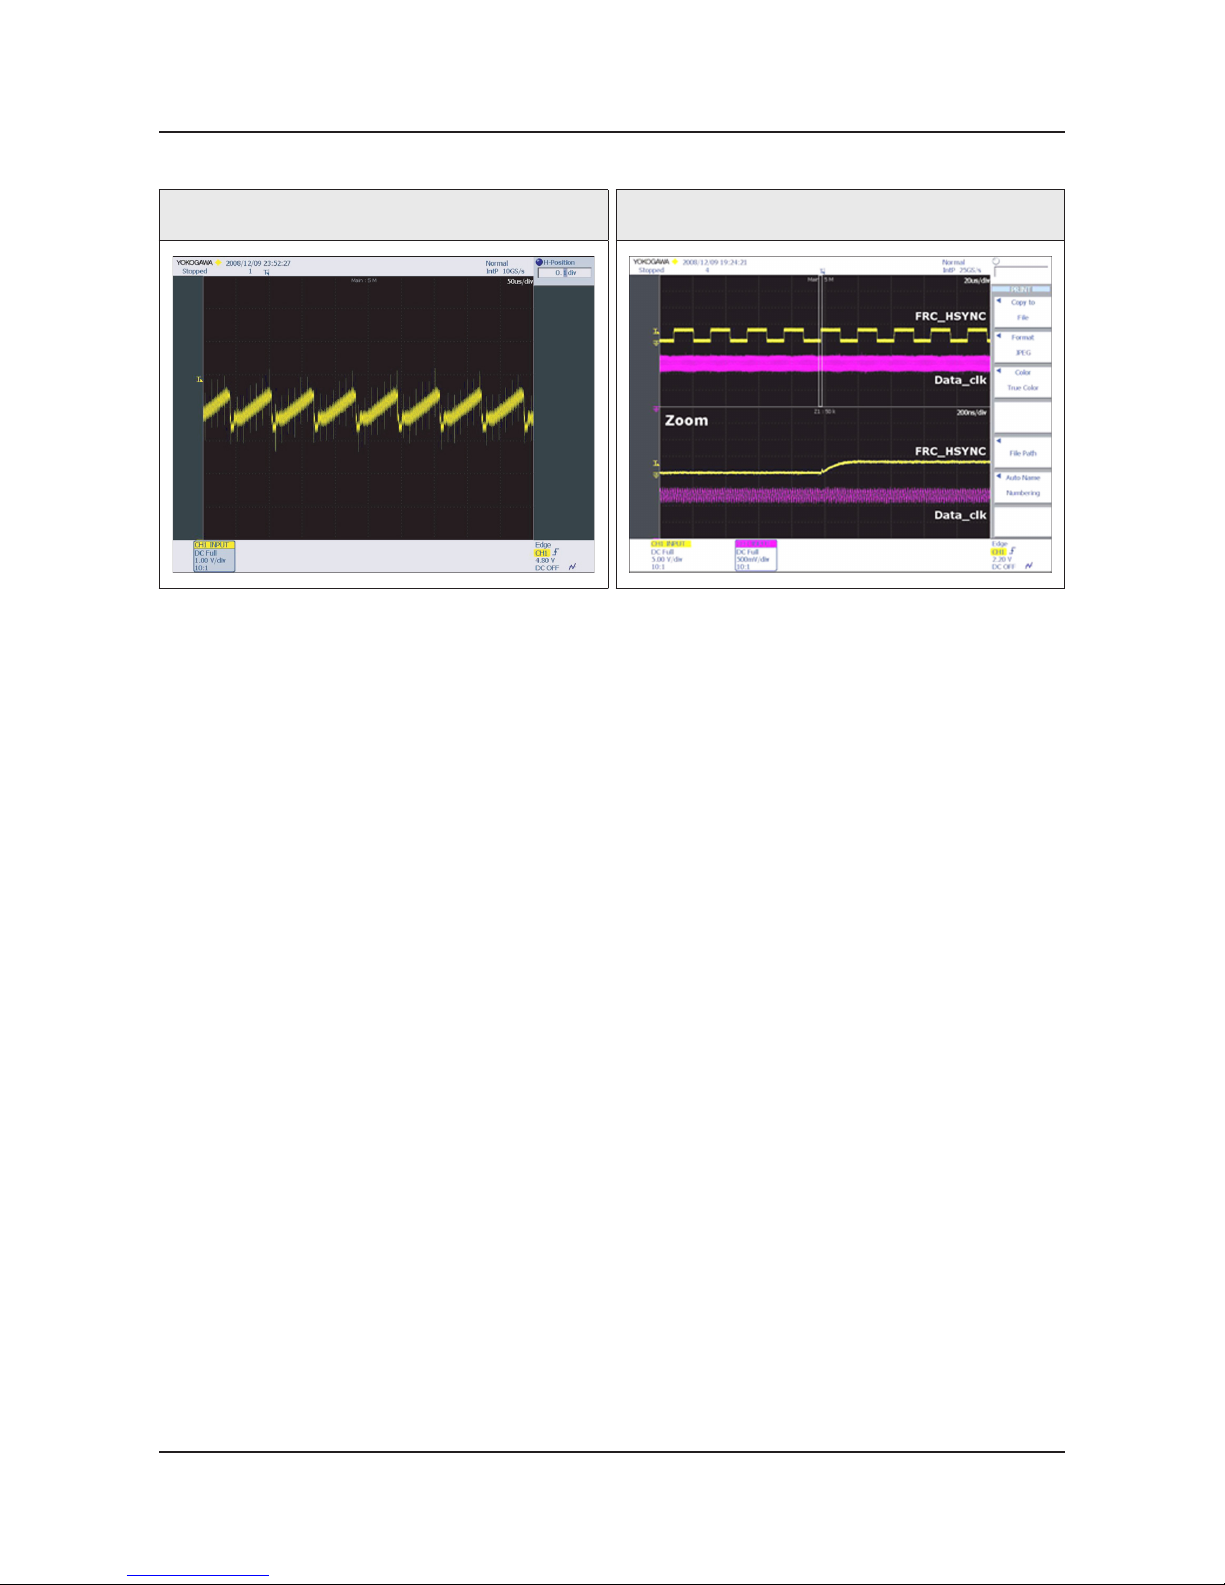
Waveforms
1 CVBS OUT (Grey Bar) 2 LVDS output
4-12
4. Troubleshooting
Page 62
4-2-4. No Vido (Tuner DTV)
Note
Refer to the next page to check the location such a CN201 or IC201 SVC Manual mentioned.
Symptom Audio is normal but no picture is displayed on the screen.•
Major
checkpoints
Check the DTV source.•
Check the Tuner.•
This may happen when the LVDS cable connecting the Main Board and the Panel is •
disconnected.
Diagnostics
Power indicator LED is off.
Lamp(Backlight) on, no video ?
No
Check a set in the ‘Stand-by mode’.
Yes
Check the RF source and check the
connection of RF cable.
No
Input the RF source properly.
Yes
1
Check the ‘signal strength’ in Self
Diagnosis menu Strength is enough ?
No
Check the D-TV source.
Yes
2
Check the Power of Tuner ?
Pin #4 of Tuner : B3.3V_Tuner -
Pin #1 of Tuner : B1.8V_Tuner -
No
Change the Main Ass’y.
Yes
2
Check the LVDS clk signal at output of
Main board. (TX)
TX2_CLK : ODD_TXCLK_DN/DP -
TX4_CLK : EVEN_TXCLK_DN/DP -
No
Check IC1001(X12)
Change the Main Ass’y.
Yes
Check the LVDS cable?
Replace the T CON / LCD panel?
No
Please, Contact tech support.
Caution Make sure to disconnect the power before working on the IP Board.
4-13
4. Troubleshooting
Page 63
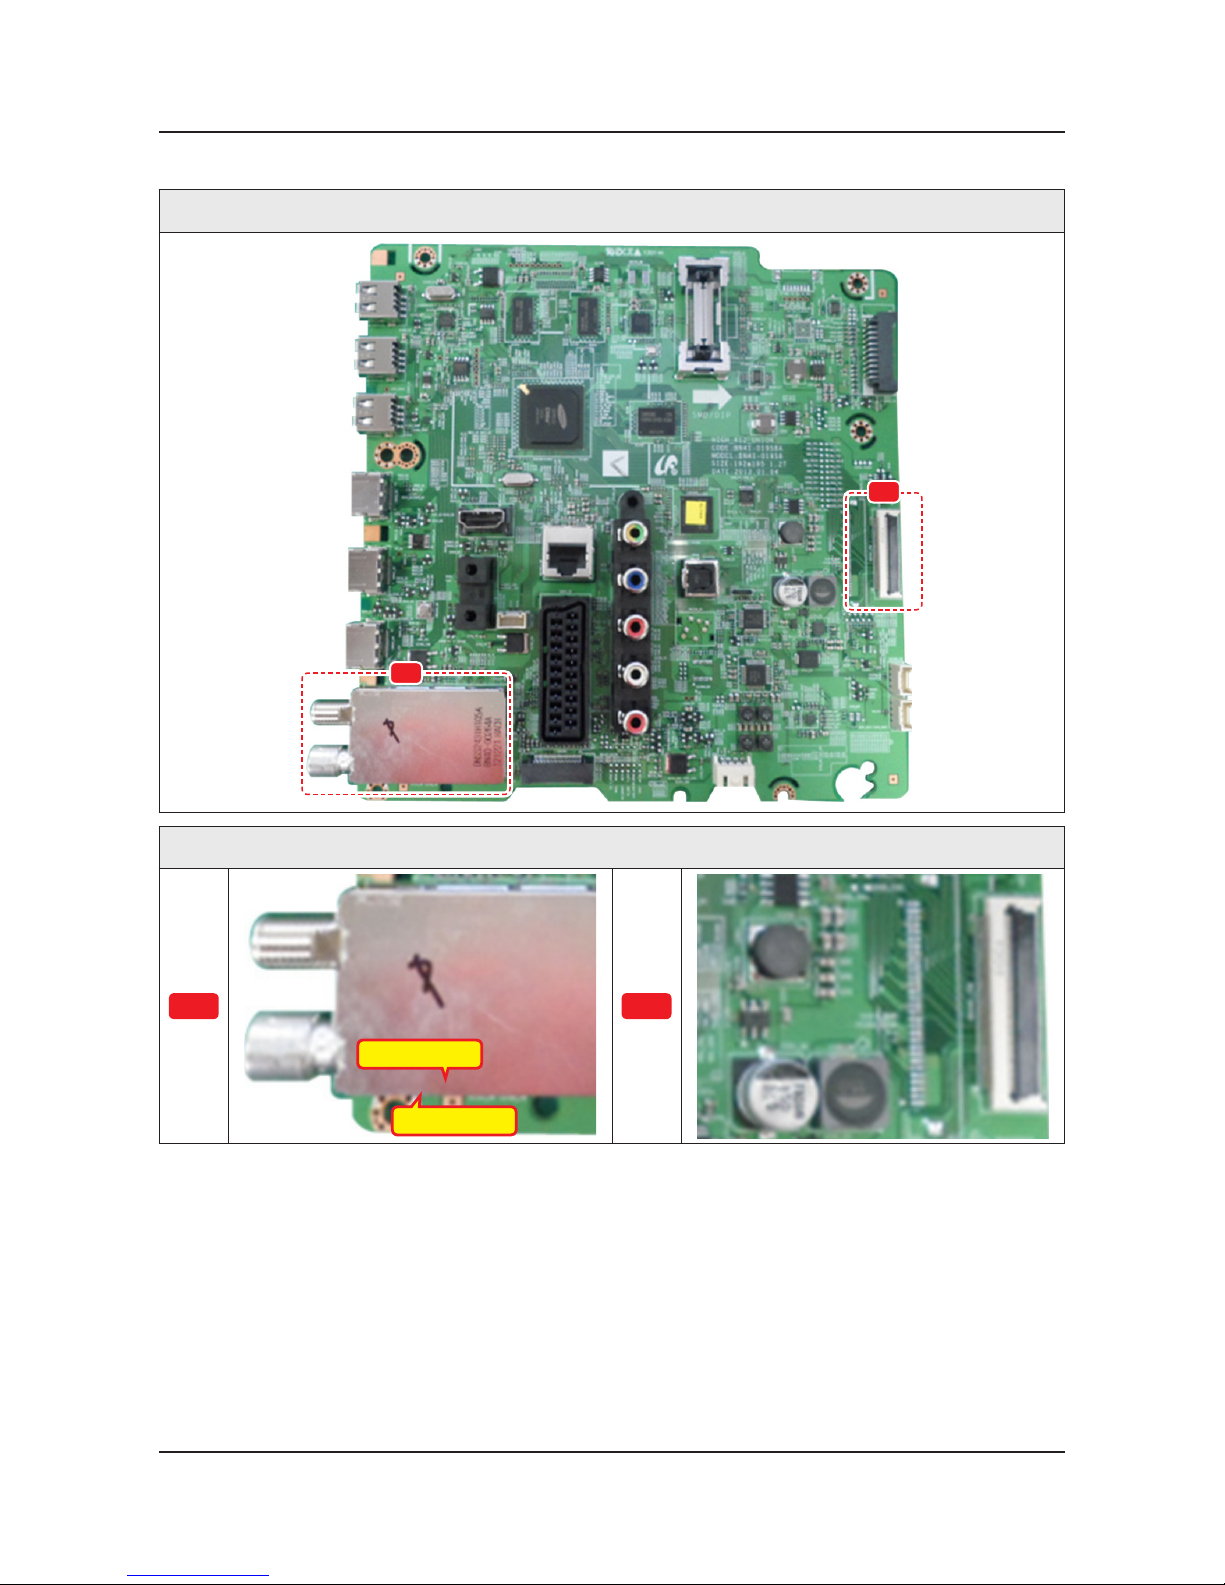
Location of Parts
Main Board_Front
B
A
Detail
A
Pin #4 : B3.3V
Pin #1 : B1.8V
B
4-14
4. Troubleshooting
Page 64
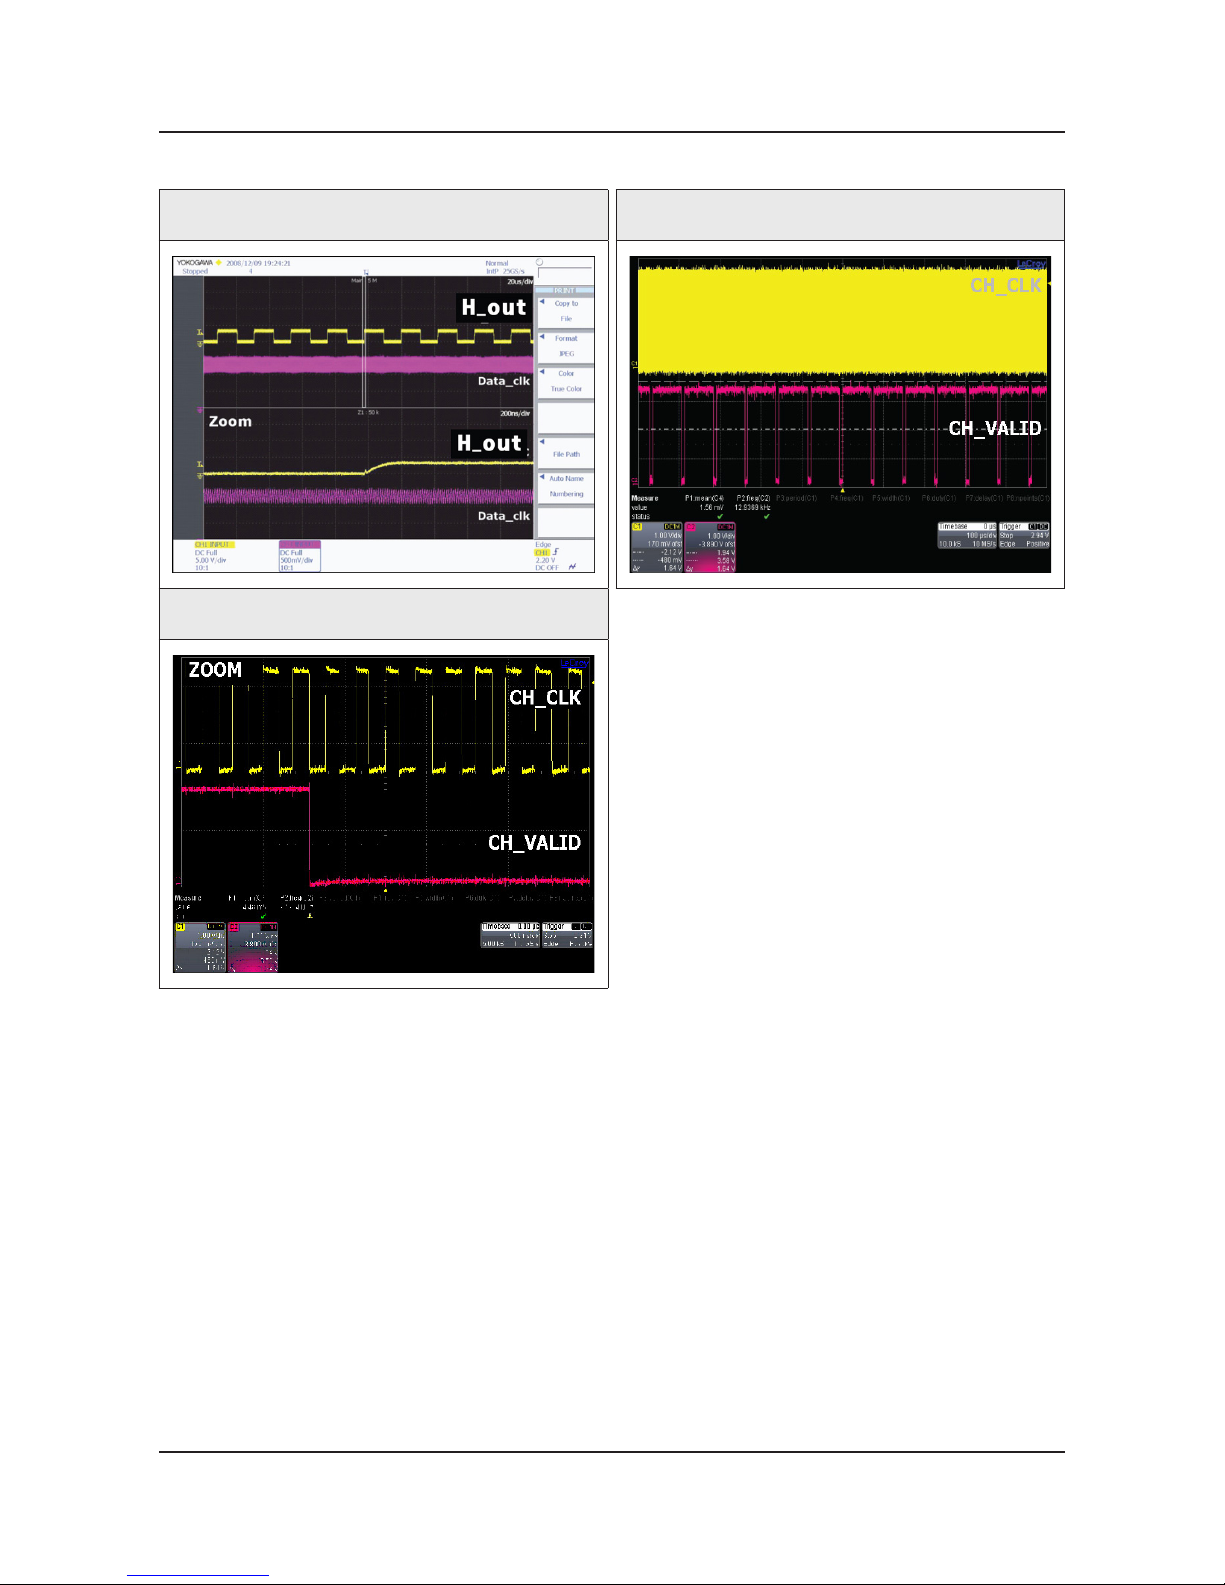
Waveforms
1 CVBS OUT (Grey Bar) 2 CH_CLK, CH_VALID
2 CH_CLK, CH_VALID
4-15
4. Troubleshooting
Page 65
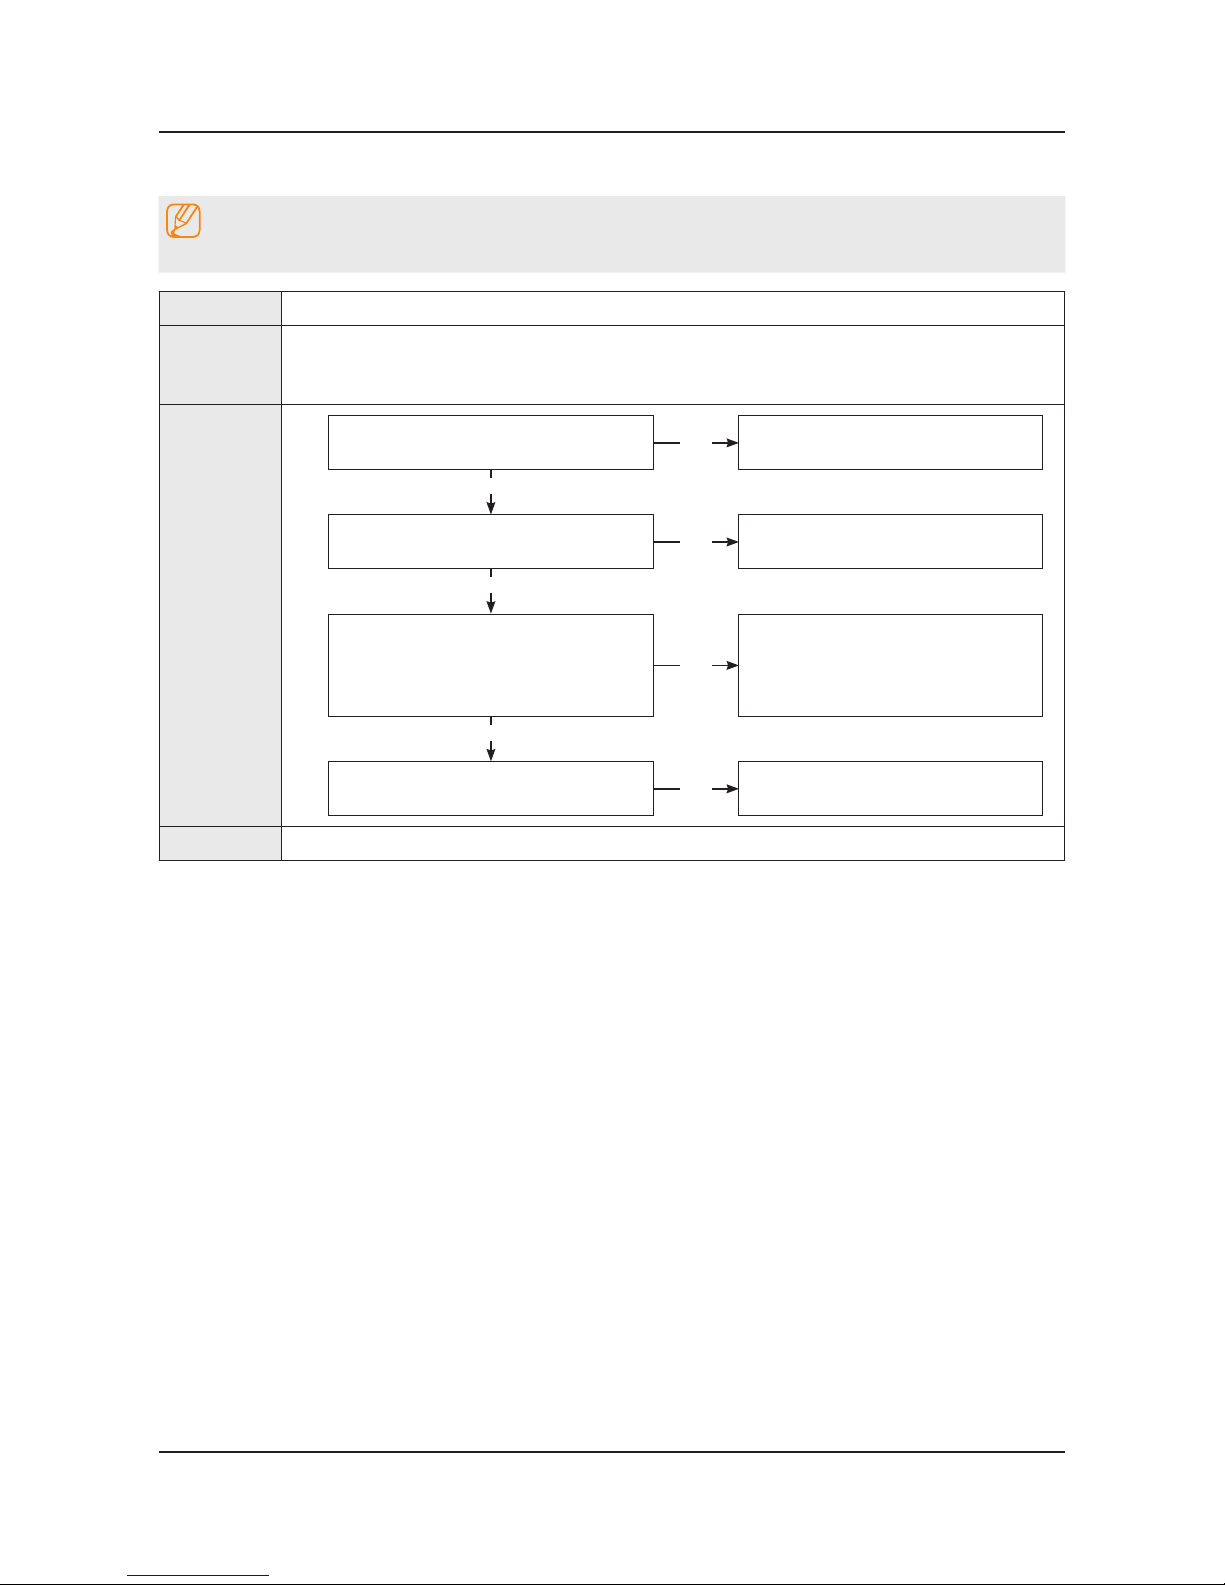
4-2-5. No Video (Video AV)
Note
Refer to the next page to check the location such a CN201 or IC201 SVC Manual mentioned.
Symptom Audio is normal but no picture is displayed on the screen.•
Major
checkpoints
Check the Video CVBS source.•
This may happen when the LVDS cable connecting the Main Board and the Panel is •
disconnected.
Diagnostics
Power indicator LED is off.
Lamp(Backlight) on, no video ?
No
Check a set in the ‘Stand-by mode’.
Yes
Check the video source and check the
connection of video cable?
No
Input the video source properly.
Yes
2
Check the LVDS clk signal at output of
Main board. (TX)
TX2_CLK : ODD_TXCLK_DN/DP -
TX4_CLK : EVEN_TXCLK_DN/DP -
No
Check IC1001(X12)
Change the Main Ass’y.
Yes
Check the LVDS cable?
Replace the T CON / LCD panel?
No
Please, Contact tech support.
Caution Make sure to disconnect the power before working on the IP Board.
4-16
4. Troubleshooting
Page 66
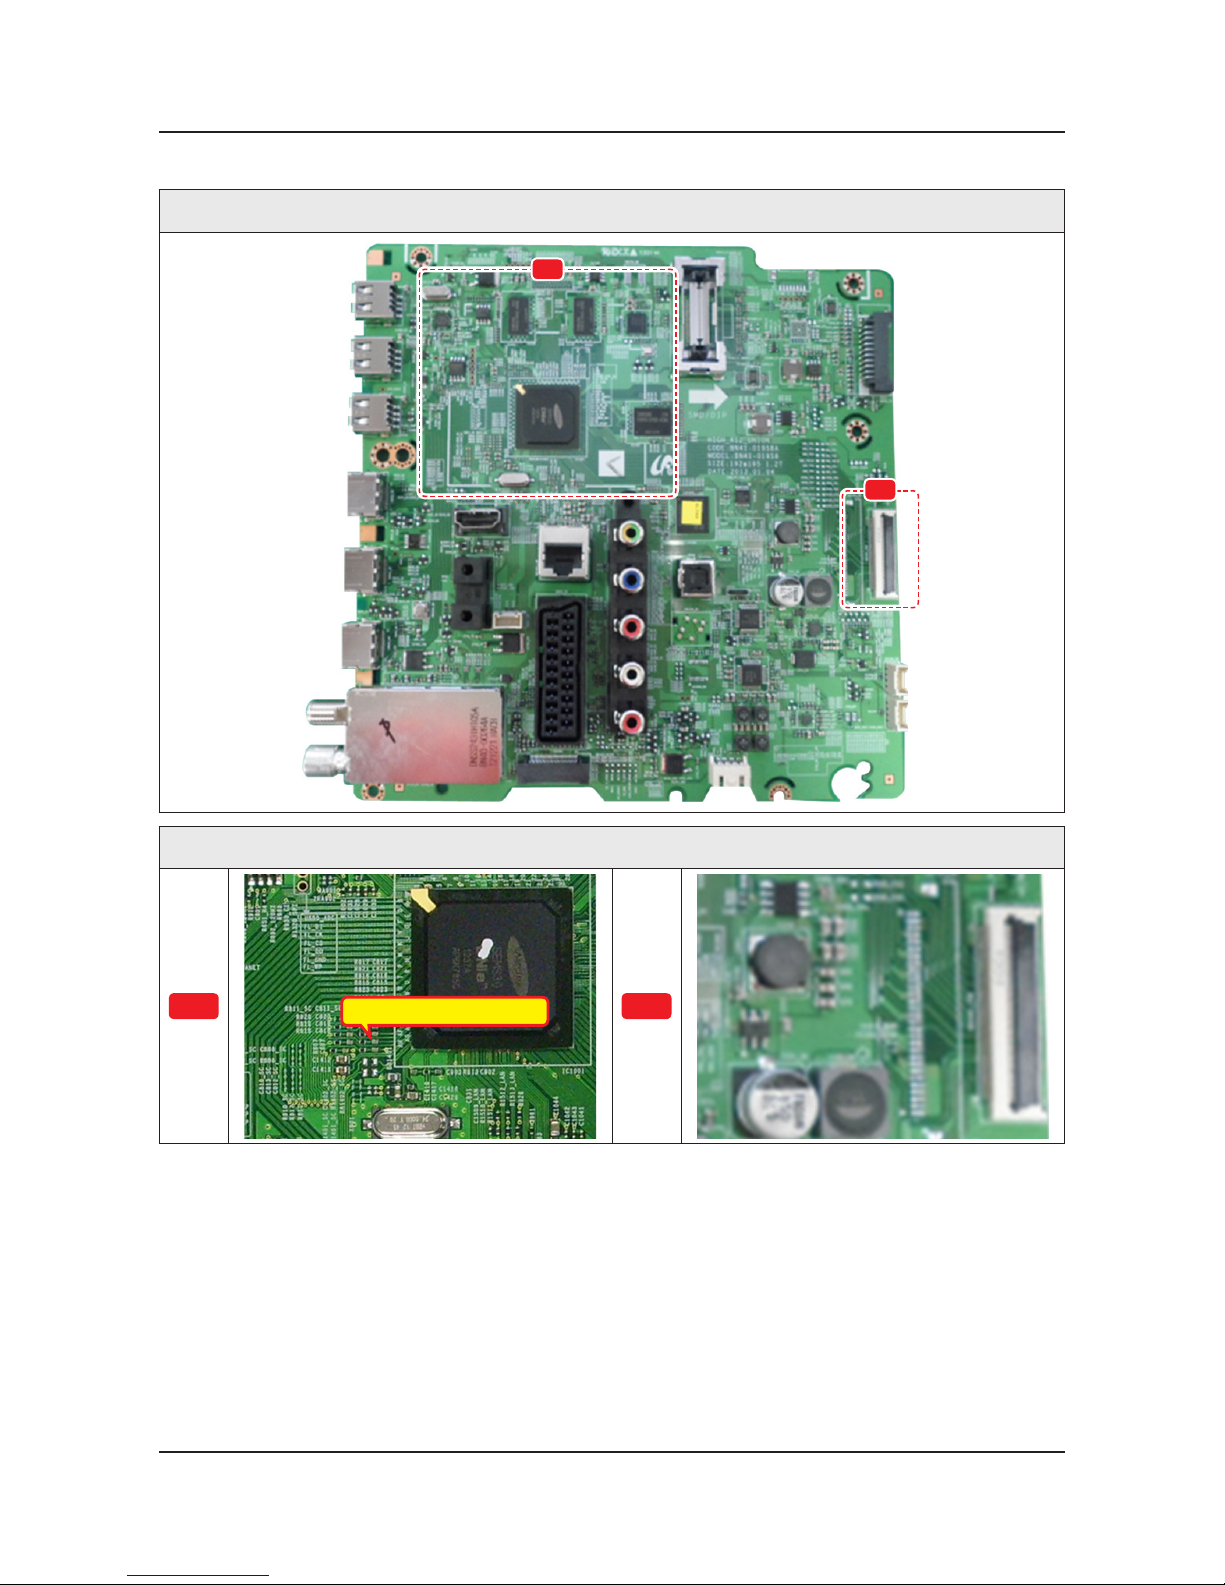
Location of Parts
Main Board_Front
B
A
Detail
A
R816 : COMP2_Y_CVBS
B
4-17
4. Troubleshooting
Page 67
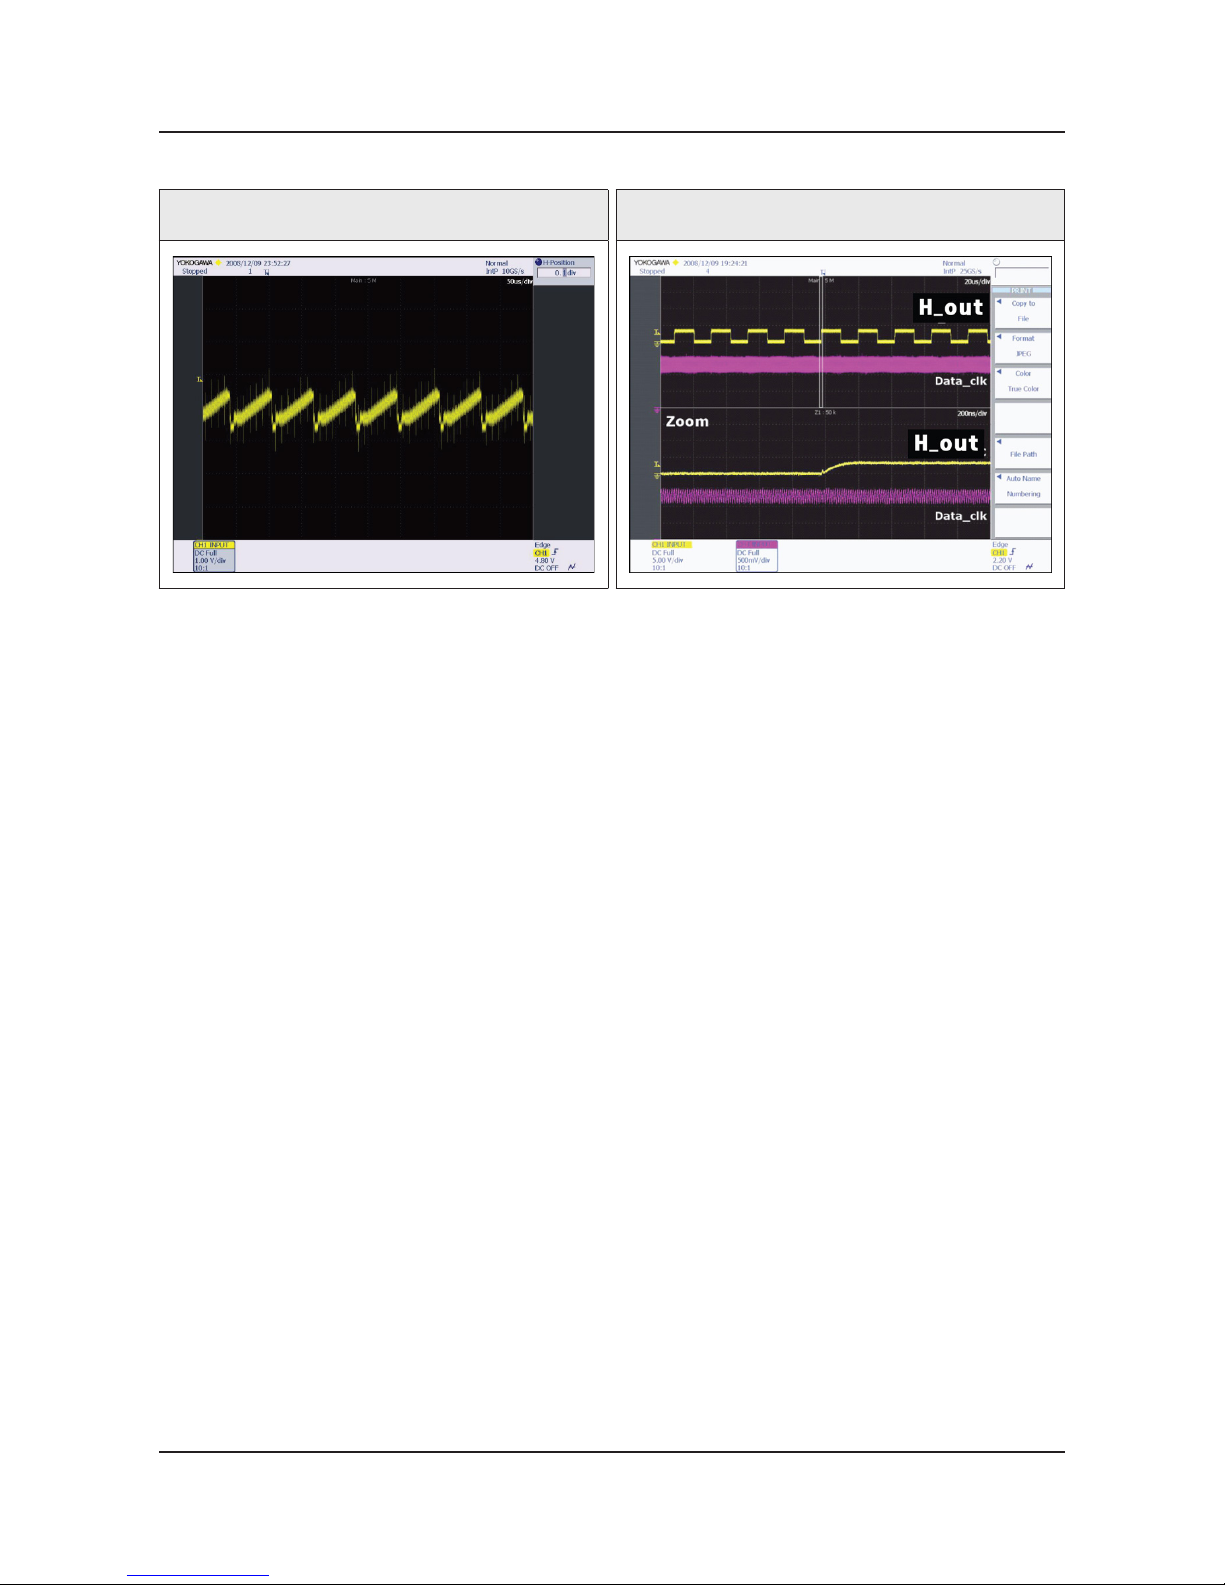
Waveforms
1 CVBS OUT (Grey Bar) 2 LVDS output
4-18
4. Troubleshooting
Page 68
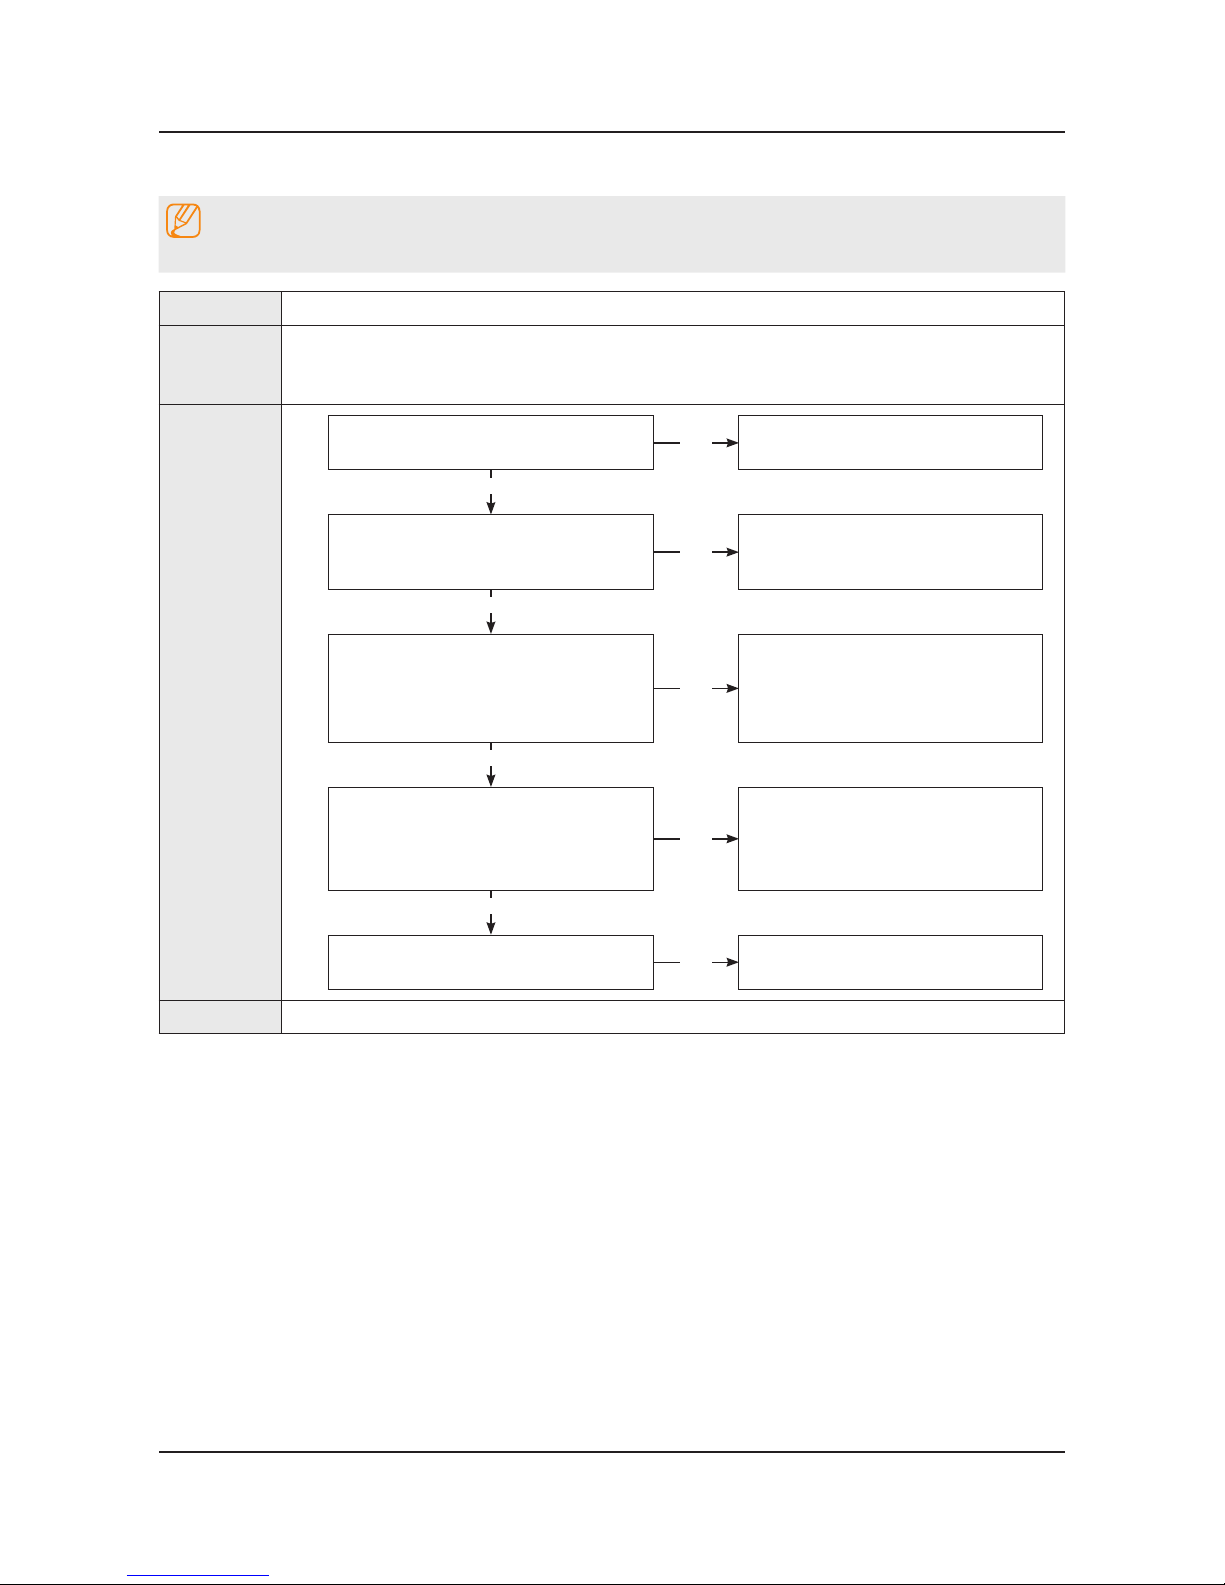
4-2-6. No Video (COMPONENT)
Note
Refer to the next page to check the location such a CN201 or IC201 SVC Manual mentioned.
Symptom Audio is normal but no picture is displayed on the screen.•
Major
checkpoints
Check the Component source•
This may happen when the LVDS cable connecting the Main Board and the Panel is •
disconnected.
Diagnostics
Power indicator LED is off.
Lamp(Backlight) on, no video ?
No
Check a set in the ‘Stand-by mode’.
Yes
Check the component source and check
the connection of component cables ?
Y, Pb, Pr
No
Input the component source properly.
Yes
1
Does the component data appear at ?
COMP2_Y_CVBS : R816 -
Pb : R817 -
Pr : R815 -
No
Check CN502.
Change the Main Ass’y.
Yes
2
Check the LVDS clk signal at output of
Main Board. (TX)
TX2_CLK : ODD_TXCLK_DN/DP -
TX4_CLK : EVEN_TXCLK_DN/DP -
No
Check IC1001(X12).
Change the Main Ass’y.
Yes
Check the LVDS cable?
Replace the T CON / LCD panel?
No
Please, Contact tech support.
Caution Make sure to disconnect the power before working on the IP Board.
4-19
4. Troubleshooting
Page 69
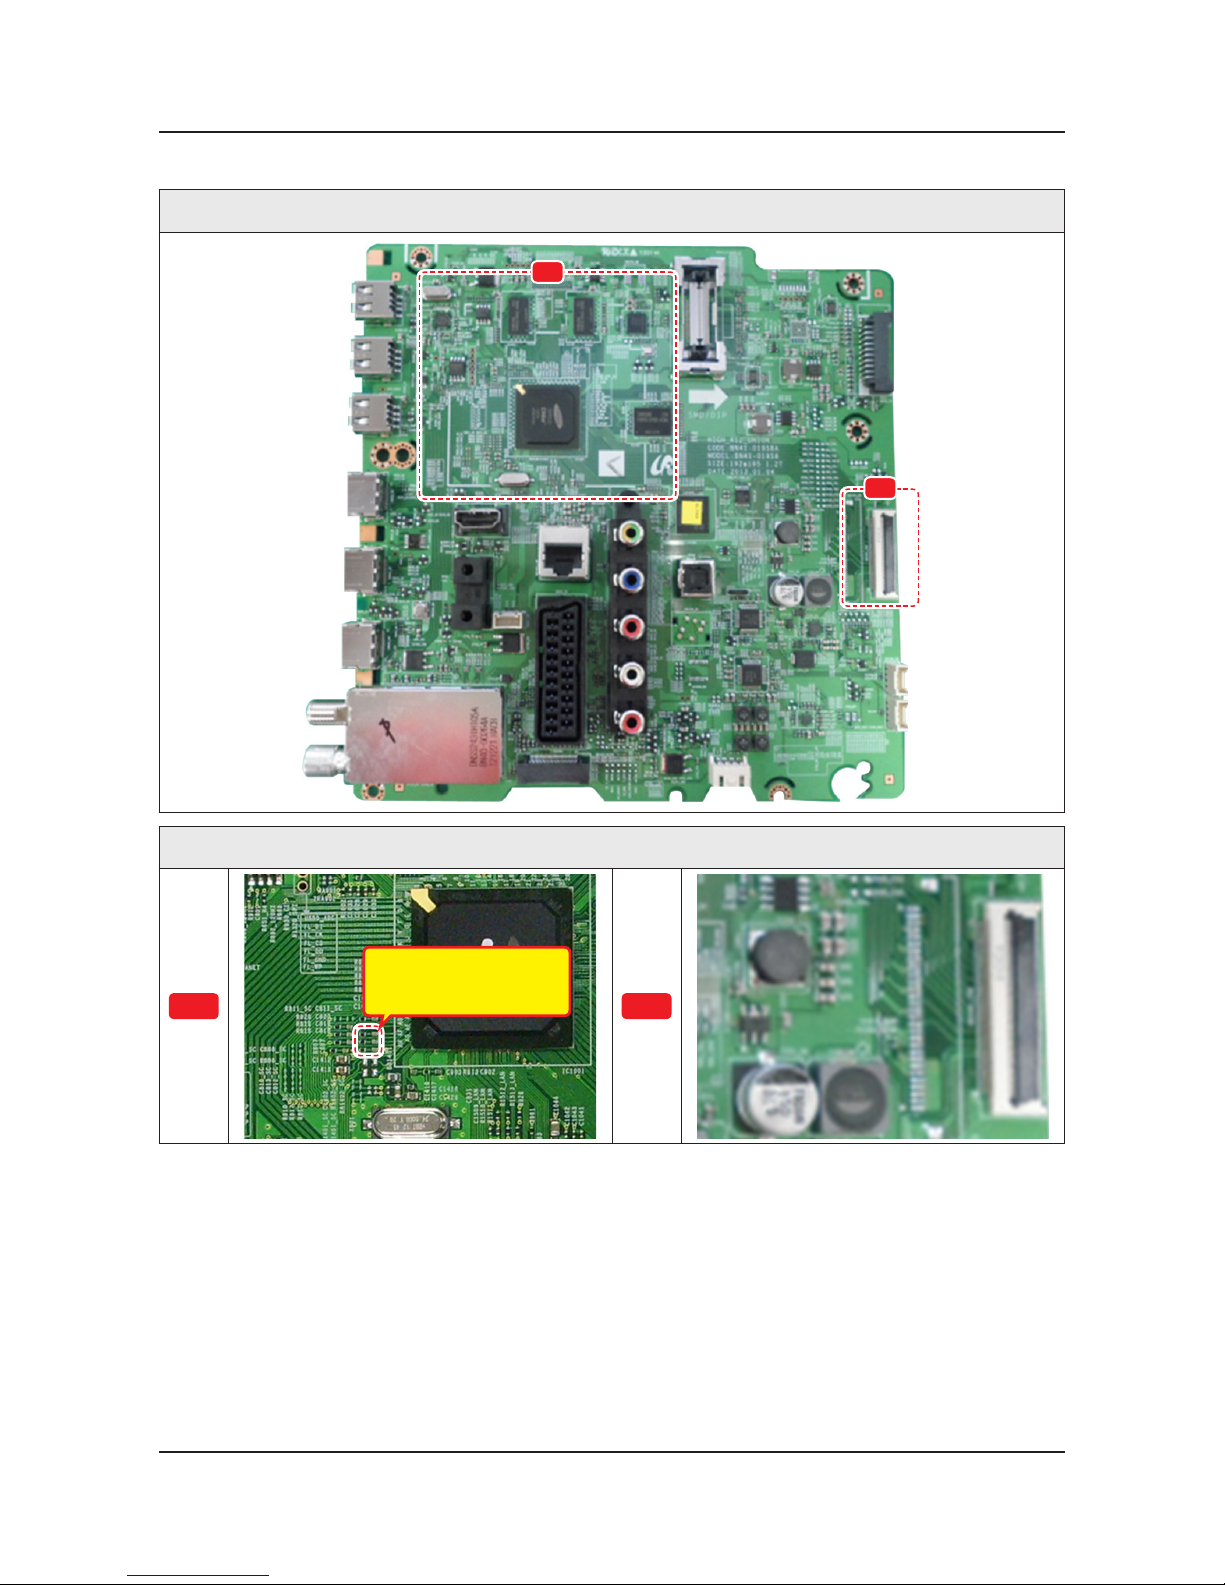
Location of Parts
Main Board_Front
B
A
Detail
A
R817 : COMP2_PB
R816 : COMP2_Y_CVBS
R815 : COMP2_PR
B
4-20
4. Troubleshooting
Page 70
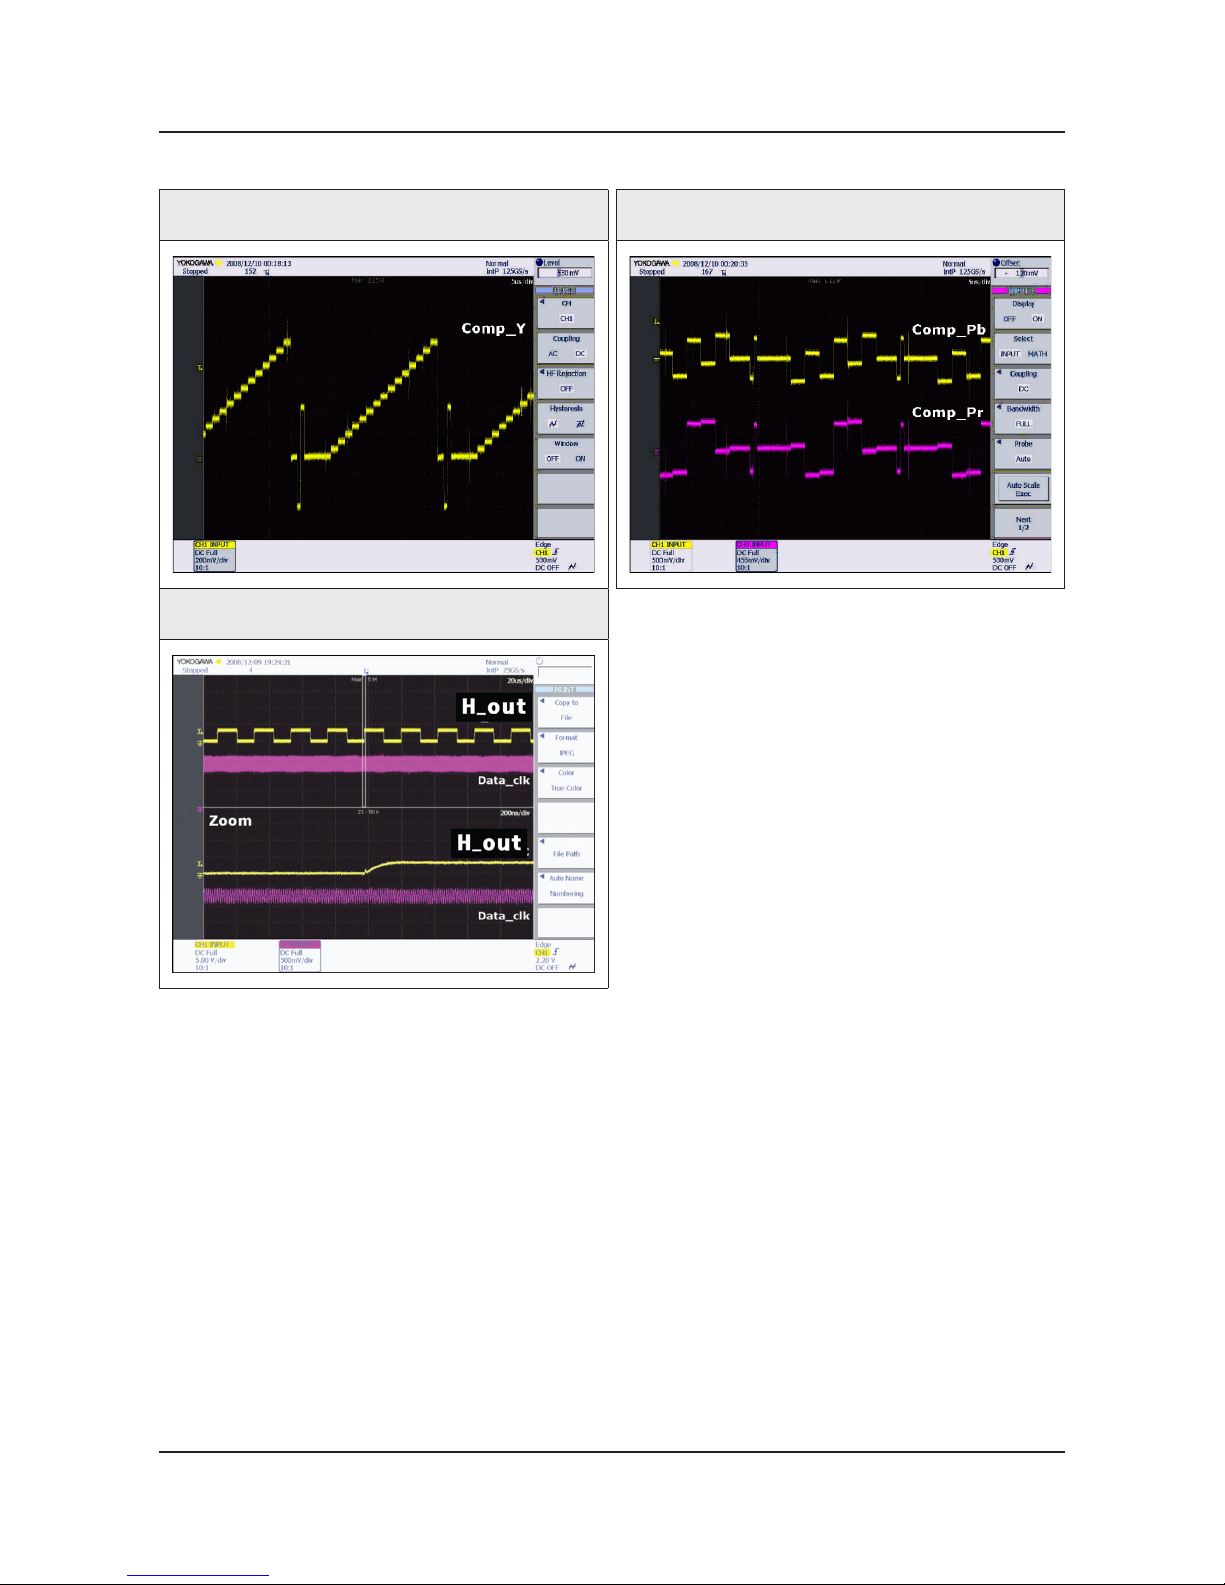
Waveforms
1 Compnent_Y (Gray scale) / Pb / Pr (Color bar) 1 Compnent_Y (Gray scale) / Pb / Pr (Color bar)
2 LVDS output
4-21
4. Troubleshooting
Page 71
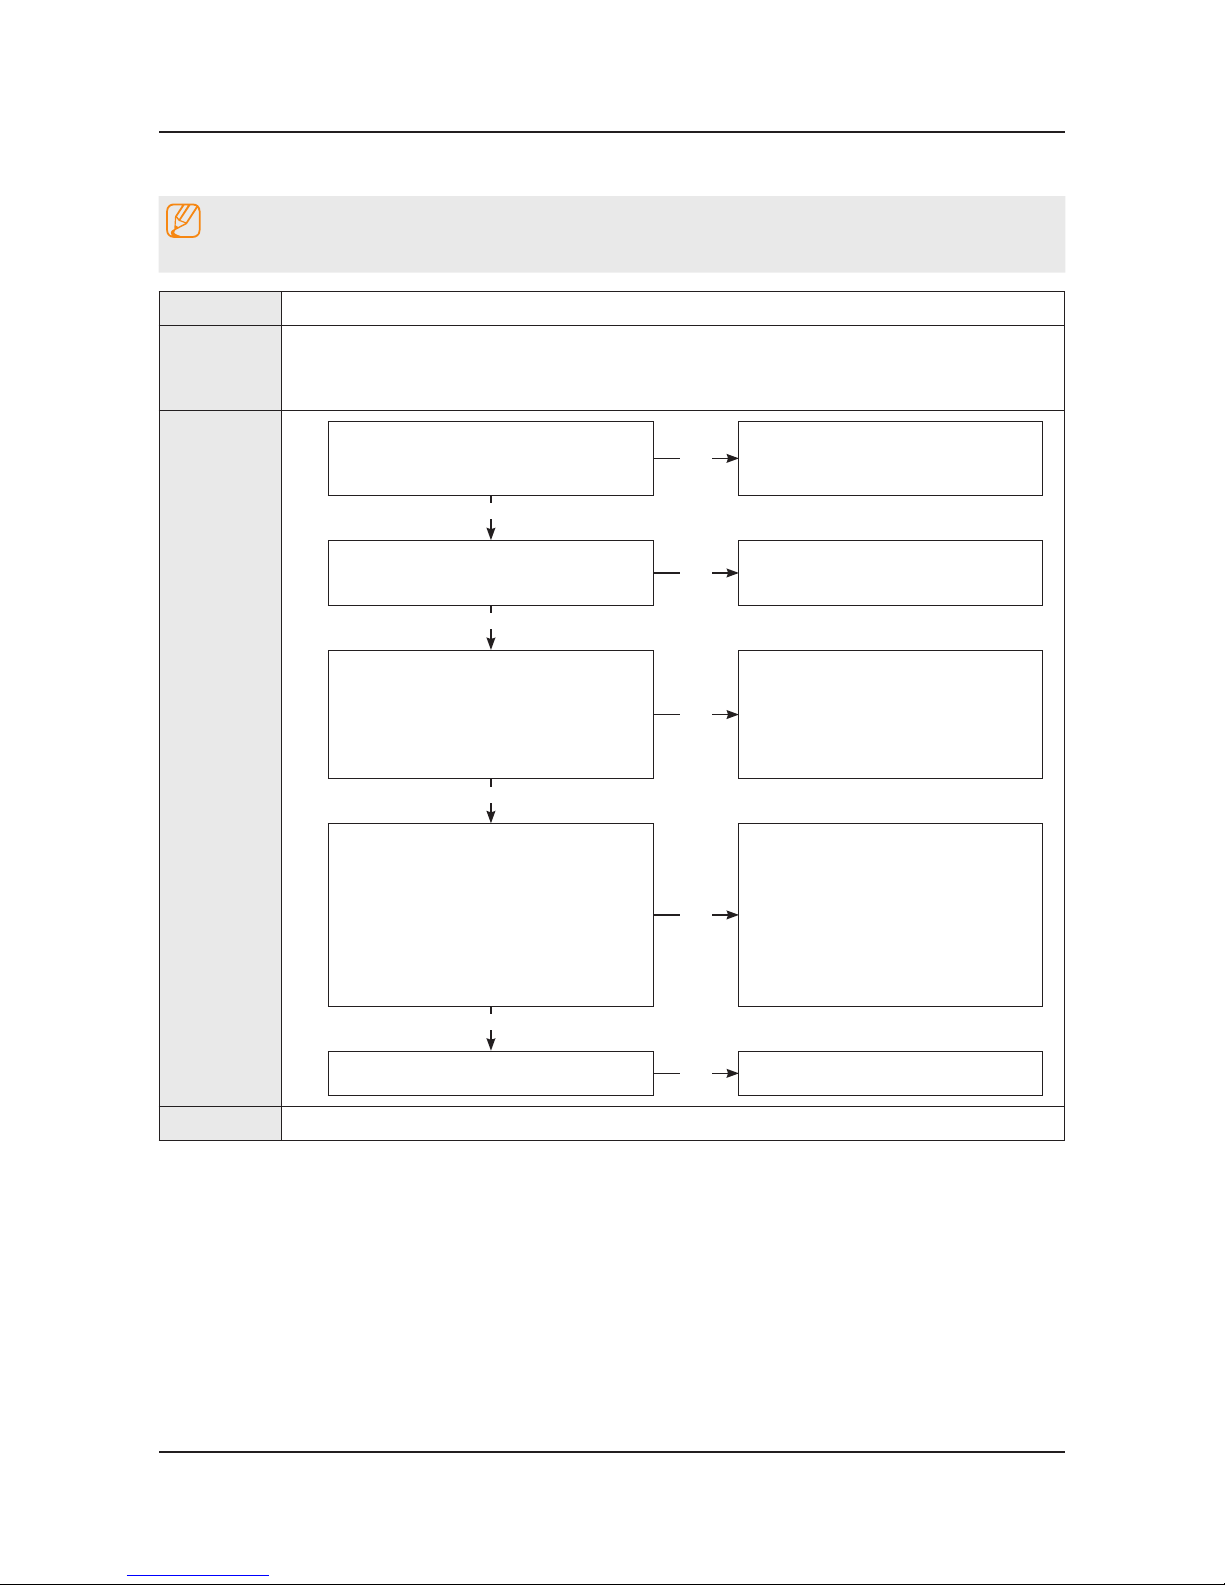
4-2-7. No Sound (1.Speaker 2.Monitor_out 3.Optical)
Note
Refer to the next page to check the location such a CN201 or IC201 SVC Manual mentioned.
Symptom Video is normal but there is no sound.•
Major
checkpoints
When the speaker connectors are disconnected or damaged.•
When the sound processing part of the Main Board is not functioning.•
Speaker defect.•
Diagnostics
Check the source and check the
connection of sound cable ?
COMP
No
Input the sound source properly.
Yes
Check the signal at input of Main Board?
AV, COMP L/R : RA503
No
Check CN502.
Change the Main Ass’y.
Yes
1
Check the DATA between the Audio IC’s ?
Pin #15 of IC301 : B clk -
Pin #20 of IC301 : LR clk -
Pin #23, #24 of IC301 : I2C_SDA/ -
SCL
No
Check IC301.
Change the Main Ass’y.
Yes
2
1. Check the Speaker sound data at ?
CN302 -
2. Check the Monitor out sound data at ?
CN303_IBR -
3. Does the SODIF OUT sound data
appear at ?
OP301 -
No
Change the Main Ass’y.
Yes
Replace speaker ?
No
Please, Contact Tech support.
Caution Make sure to disconnect the power before working on the IP Board.
4-22
4. Troubleshooting
Page 72
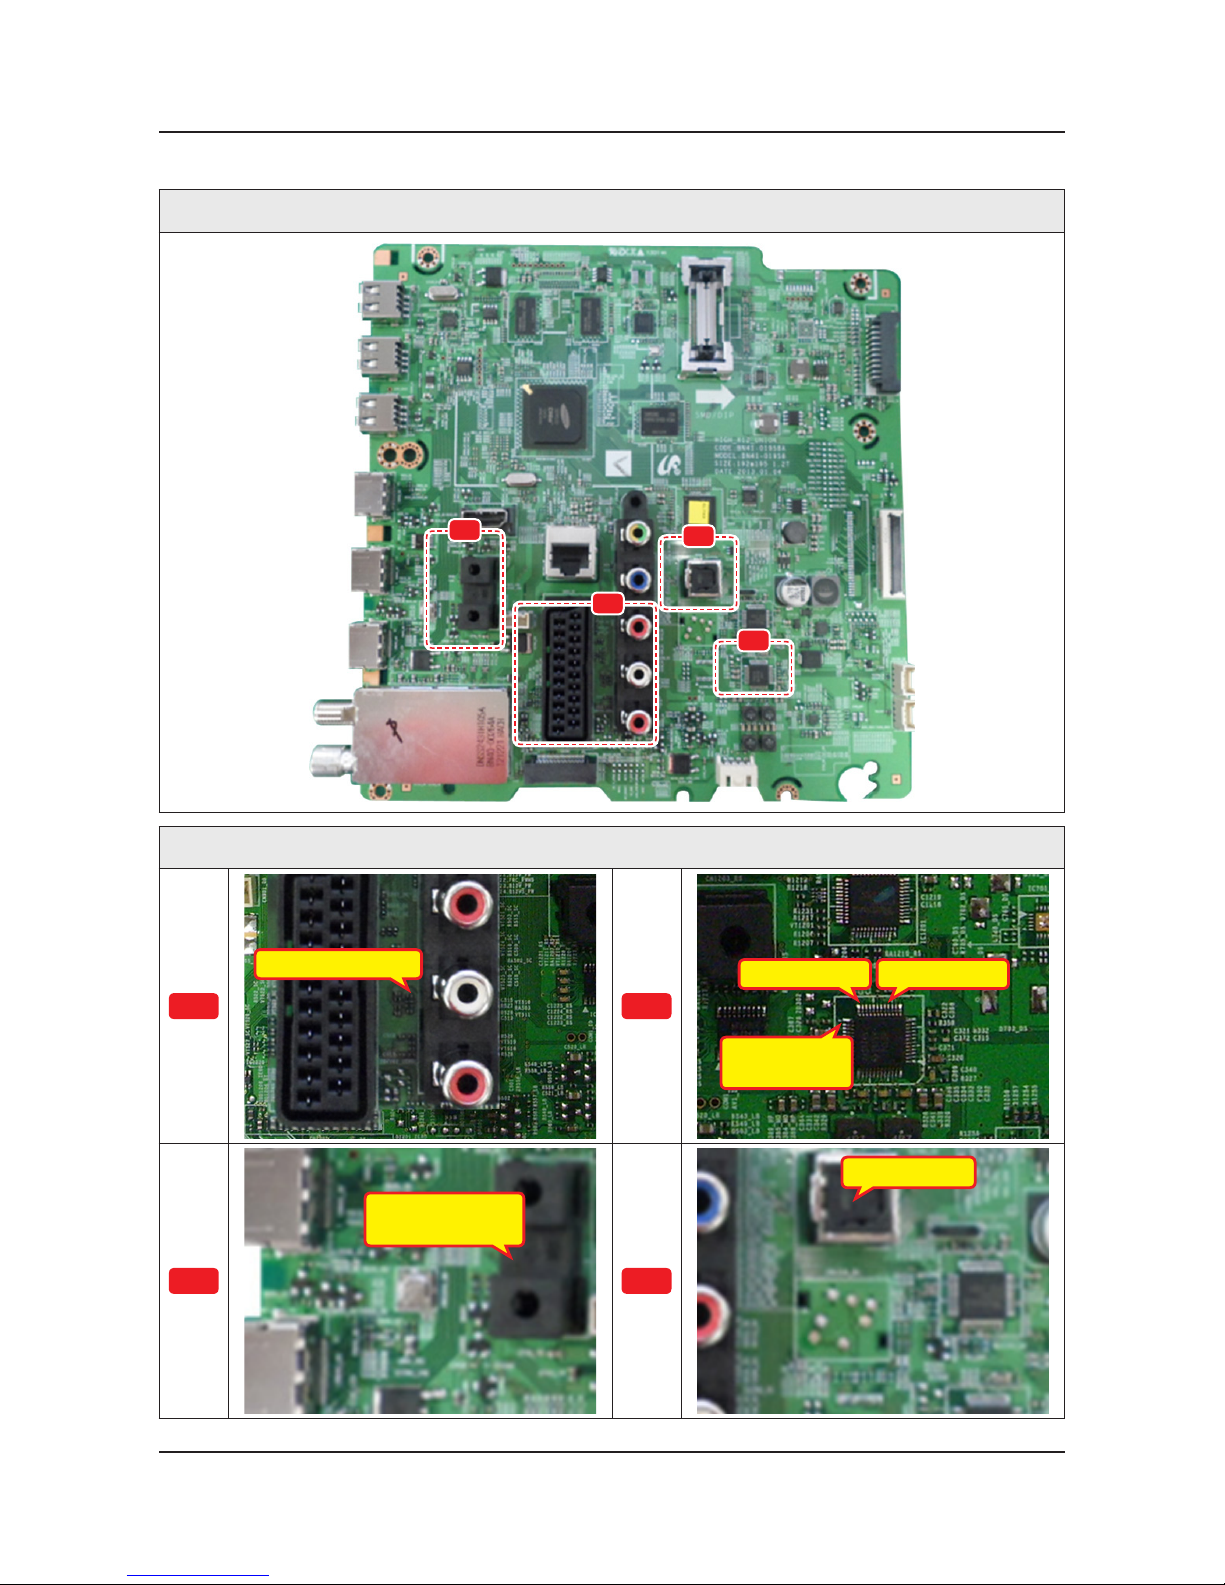
Location of Parts
Main Board_Front
C
D
B
A
Detail
A
RA503 : COMP_L/R
B
Pin #20 : LR clk
Pin #23, #24 :
I2C_SDA/SCL
Pin #15 : B clk
C
CN303_IBR
Monitor out_Sound
D
OP301 : Optical
4-23
4. Troubleshooting
Page 73
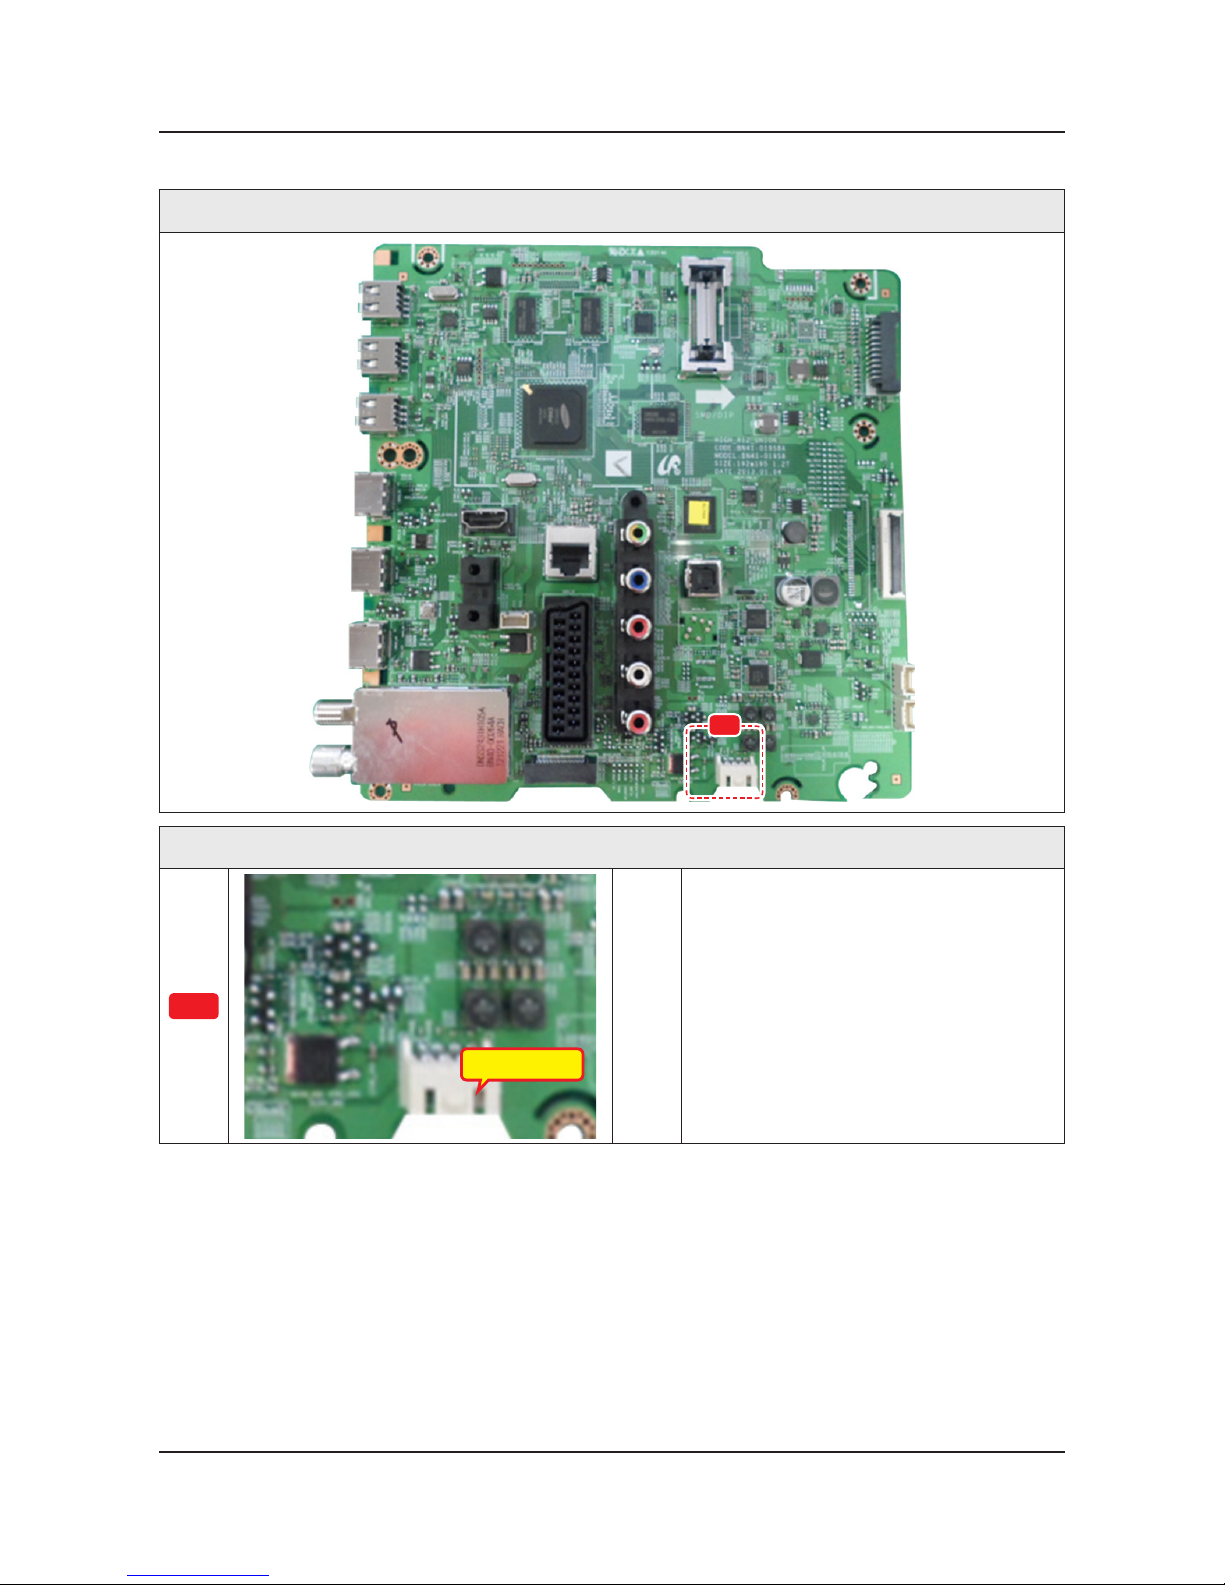
Location of Parts
Main Board_Front
E
Detail
E
CN302 : SPK
4-24
4. Troubleshooting
Page 74
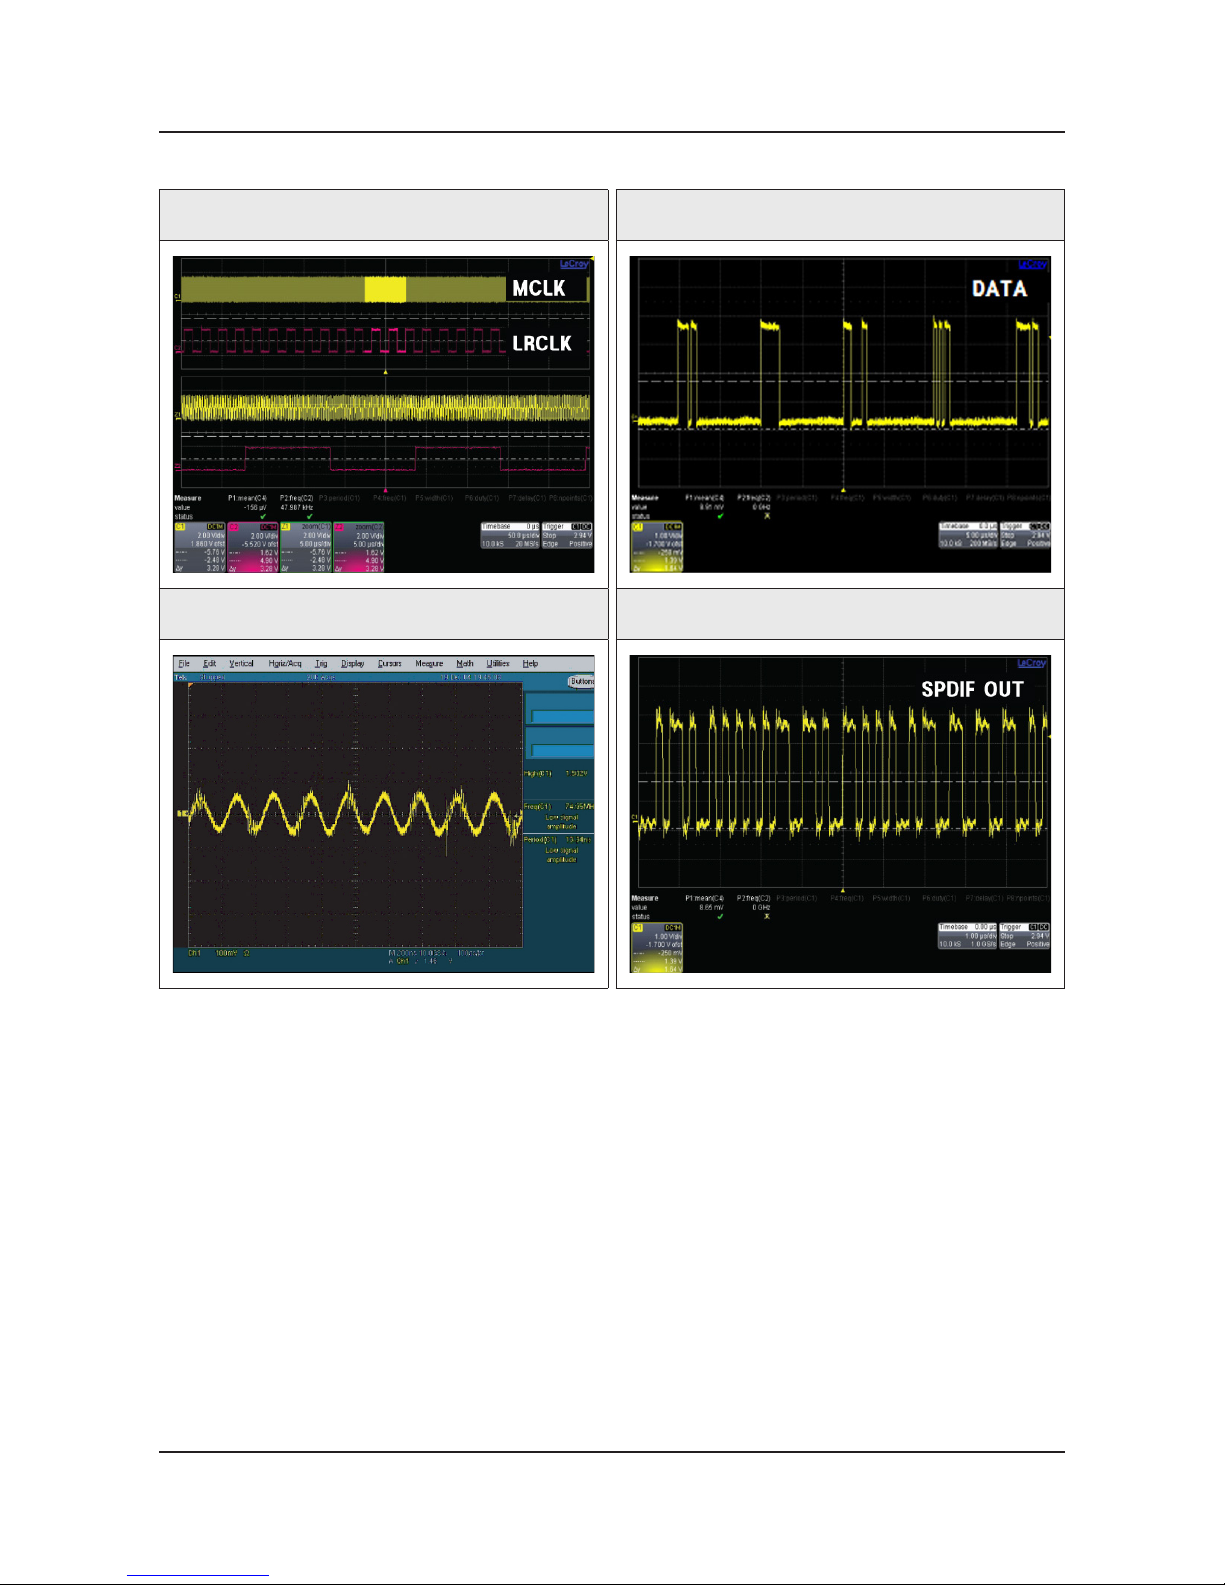
Waveforms
1 MCLK / LRCLK / PCM_I2C_DATA 1 MCLK / LRCLK / PCM_I2C_DATA
2 Speaker / Monitor OUT , SPDIF OUT 2 Speaker / Monitor OUT , SPDIF OUT
4-25
4. Troubleshooting
Page 75
4-3. Factory Mode Adjustments
4-3-1. Detail Factory Option
NOTE
If you replace the main board with new one, please change the factory option as well.
The options you must change are "Type".
UE**F6320AWXXH
Inches 40" 46" 55"
PANEL
Vendor
1) SDC
2) SDC
SDC SDC
Code
1) BN95-00889A
2) BN95-01110A
BN95-00893A BN95-01186A
Spec.
1) CY-HF400CSLV1H/V
2) CY-HF400CSLV2V
CY-HF460CSLV1H/V CY-HF550CSLV3V
SMPS BOARD
Vendor HANSOE HANSOE SEM
Code BN44-00622B BN44-00623B BN44-00625C
Spec. L42X1Q_DHS L46X1Q_DHS L55X1QV_DSM
MAIN BOARD
Chassis Ass'y BN91-11310R BN91-11310Q BN91-11968A
PBA Ass'y BN94-06722R BN94-06722Q BN94-07162A
Byte Item
0 Factory Reset - - -
1 Type
1) 40A1AF0S
2) 40A1AF6V
46A1AF0S 55A1AF1S
2 Local set EU EU EU
3 SW Model F6320 F6320 F6320
4 BOM Model 6320 6320 6320
5 Tuner AUTO AUTO AUTO
6 Ch table NONE NONE NONE
4-26
4. Troubleshooting
Page 76
4-3-2. Entering Factory Mode
To enter ‘Service Mode’ Press the remote -control keys in this sequence :
If you do not have Factory remote control•
Power OFF INFO MENU MUTE Power On
If you have Factory remote control•
INFO Factory
Buttons operations within Service Mode -
Menu Full Menu Display / Move to Parent Menu
Direction Keys ▲/▼ Item Selection by Moving the Cursor
Direction Keys ◄/► Data Increase / Decrease for the Selected Item
Source Cycles through the active input source that are connected to the unit
HOW to enter the Advanced menu (Picture)
1 Cursor move to ‘Advanced’. → 2 Push the ‘0’ button 4 times. → 3 You can see the ‘Picture’ menu.
If you don’t have Factory remote control, can’t control some menus. (Expert, Advanced menu)•
Option
Control
Debug
SVC
ADC/WB
Advanced
T-MST12DEUC-xxxx
T-MST12DEUS-xxxx
BT Version : xxxx
E-Manual : xxxx
Camera Version : xxxx
Blaster-version : ----
EDID SUCCESS
CALIB : AV/COMP/PC/HDMI/
Option : xxxx,UE,6400,NONE
USB RS232C : OFF
SDAL-X12-MAIN-xxxx-xxxx
RFS : "X12 0071" KER/201x-xx-xx
KERNEL : 8.0837, D / Onboot :xxxx.x
Backend IC[x], Data Ver : xxxx
TCON Version : xxxx
DTP-DTVTD-xxxx
Model : UE46F6400
Wired MAC SUCCESS
Wireless MAC SUCCESS
DRM : Crt O, Nf O, Wv O, Hc O, Dc O, Mx O, MI O
Factory Data Ver : 97
EERC Version : 51
DTP-BP-HAL-3183
DTP-AP-CNC-3151
DTP-AP-MM-3145
DTP-AP-WP-3148
DTP-BP-MW-3156
DTP-BP-APP-3156
POP-FLA-13-TEMP
Date of purchase : mm/dd/yyyy
4-27
4. Troubleshooting
Page 77
4-3-3. Factory Data
Option
Factory Menu Name Data Range
Factory Reset
-
Type
40A1AF0S ; 40A1AF6V
46A1AF0S
55A1AF1S
Local Set
EU
SW Model
F6320
BOM Model
6320
TUNER
AUTO
Ch Table
NONE
MRT Option
Front Color
LVDS FORMAT JEIDA
Language_Arabic US
Region USA
PnP Language ENG_US
WIFI REGION S
OTN Support ON
OTA Support OFF
TTX OFF
China HD OFF
NT Conversion OFF
Num of DTV 1
Num of AV 1
Num of COMP 1
Num of HDMI 4
Num of SCART 0
Num of USB Port 3
Num of HeadPhone 0
Num of RVU 1
Num of Display 2
Num of IPTV 0
Num of RUI 0
Num of PVR RECORD 0
TOOLS Support 40
LNA Support OFF
4-28
4. Troubleshooting
Page 78
Factory Menu Name Data Range
24Px4 Support OFF
BD Wise Support ON
Data Service Support OFF
PVR Support OFF
CI Support OFF
LEDMotionPlus Support ON
Natural Mode Support ON
Relax Mode Support OFF
HDMI/DVI SEL 4
Select LCD/PDP LCD
Wall Mount OFF
HV Flip HV Flip / H Filp / OFF
Light Effect OFF
e-Pop Default 1
CAMERA Support OFF
NETWORK Support 3
EcoSensor Support ON
3D Support ON
BT Support ON
BT ADDRESS
Engineer Option
Auto Power MEMORY
Type Of PANEL KEY None
5 Way Function Key R BACK
Contents Bar OFF
Cable Modulation QAM
Standby led on/off OFF
Recognition Support
IF AGC 0
D AGC 0
PH BW 0
FQ BW 0
PH RATE 0
PD EN 0
PEQ Inx 0
WF Scale
WF Type 0
4-29
4. Troubleshooting
Page 79
Factory Menu Name Data Range
Nu of Network Stream 1
DP V Size 0
Backend Device FOX-FT1
BT_AUDIO_ON_OFF OFF
Cong_AV_PATH
ECO Standby OFF
Fast Logo Delay 0
Num of PANEL KEY 6
Control
Factory Menu Name Data Range
EDID
EDID ON/OFF OFF
EDID WRITE ALL …
EDID WRITE HDMI …
EDID Ver …
EDID Port
Sub Option
RS-232 Jack UART Debug/UART
Watchdog OFF
Checksum 0x0000
Fast Boot in Production OFF
USB Serial OFF
Eeprom Reset
ECO IC TYPE NONE
Info Link Server Type development
Info Link Country None
TTX Group -
Visual Test -
MediaPlayDB -
OPTION_SWU
OTN Server Type operating
OTN Test Server OFF
SWU Reset
SWU Duration OFF
SWU Fail Test OFF
OPTION_NUM
4-30
4. Troubleshooting
Page 80
Factory Menu Name Data Range
Num of ATV 1
Num of SVIDEO 0
Num of PC 0
Num of DVI 0
Num of OPTICAL Link 1
Num of MEDIA 1
Num of Tuner 1
Num of ISP 1
RF Remocon Support OFF
CDD mode -
DPMS Support OFF
Num of IPTV CIP 0
Num of CI 0
Num of DECODER 0
T-CON Device
BOARD CONTROL OFF
HP LINE LineOut
RM
Server Type Operating
RTS Mode OFF
PSA
FKP Download1 0
FKP Download2 0
LMK threshold 3
Low threshold 10
High threshold 15
CSB ON
CLB ON
PDP Option
Pixel Shift Test OFF
Logic SW 0
Panel Temperature 0
LOGIC Waveform Day 0
Logic CheckSum 0
MRT 0
SAPC Timer
APC Speed
4-31
4. Troubleshooting
Page 81
Factory Menu Name Data Range
Hotel Option
Hospitality Mode OFF
Power On …
Menu OSD …
Operation …
Music Mode …
External Source …
Eco Solution …
Cloning …
Shop Option
Shop Mode OFF
Exhibition Mode OFF
3D Cube OFF
Asia Option
Unbalance OFF
AF Level adjust 3
TX Power Level 0
Mono Last Memory OFF
H Shaking OFF
SOUND
Carrier_Mute OFF
High Devi OFF
Speaker Delay Normal 0x6Eh
SPDIF PCM Gain -9dB
FM M Prescale 0x30h
FM Prescale 0x00h
AM Prescale 0x32h
NICAM Prescale 0x48h
BTSC Mono Prescale 0x19h
BTSC stereo Prescale 0x2Fh
BTSC SAP Prescale 0x2Bh
A2Ident High THID 31
A2Ident Low THID 0
Pilot Level High Thld 0x28h
Pilot Level Low Thld 0x10h
Carrier2 Amp High THID 4
Carrier2 Amp Low THID 3
4-32
4. Troubleshooting
Page 82
Factory Menu Name Data Range
Carrier2 SNR High THR 16
Carrier2 SNR Low THR 80
Sig Error On 35
Sig Error Off 41
Amp Model TAS5745
Amp Volume 0xcbh
Amp Scale 0x35h
Amp Check Sum 0x000821B2
Woofer Type 0
Woofer Scale 0
Woofer Check Sum 0x8ah
Woofer Local EQ Checksum 0
Speaker EQ ON
PEQ Test Ready
Local Speaker EQ 0
Local EQ Checksum 0
Speaker cut-off Ferq 4
Audio-IP Test
SRS Tuning Parm 0
TruBass-CheckSum 0
Mic Scale 0
Subwoofer Support 0
India Sound OFF
AudioDock BT delay 50
Wall Filter Type 0
Wiselink Delay Menu 90
Debug
Factory Menu Name Data Range
Spread Spectrum
LVDS Spread ON
DDR Spread 1.0% Spectrum
Period 30K
Amplitude 1
HD SSC ON/Off ON
HD SSC Value 1
LVDS SSC ON/Off ON
4-33
4. Troubleshooting
Page 83
Factory Menu Name Data Range
LVDS SSC Value 0
DDR SSC ON/Off ON
DDR SSC Value 1
FRC LVDS SSC ON/OFF ON
FRC LVDS SSC MRR 10
FRC LVDS SSC MFR 1
FRC LVDS SSC Period 1
FRC LVDS SSC Modulation 1
FRC DDR SSC ON/OFF ON
FRC DDR SSC MRR 15
FRC DDR SSC MFR 1
FRC DDR SSC Period 1
FRC DDR SSC Modulation 1
DDR Margin
A CTRL_OFFSET_0_3 0x0
A CTRL_OFFSET_D 0x0
B CTRL_OFFSET_0_3 0x0
B CTRL_OFFSET_D 0x0
ND ADJ Support
OFF
MICOM POWER OFF
OFF
RF Mute Time
6ms
CI+1.3
OFF
FRC
FRC FDISPLAY ON/OFF 0
3D FDISPLAY ON/OFF OFF
PC Mode ON/OFF OFF
Tuner Margin
10
MPEG Margin
1000
H.264 Margin
8
CAM Wait Time
TS Clock deldy
0
TCON_TEMP READ
0
TEMP LAST
60
DCC VERSION
0x0
DCC CHK SEL
0
DCC CHECK LOCAL
0x0
DCC CHECK TOTAL
0x0
4-34
4. Troubleshooting
Page 84
Factory Menu Name Data Range
MulitACC Checksum
0
IIC Bus stop
OFF
Tuner Status
DVB
SNR
BER
Signal Strength
Bandwidth
Frequency
LNA Status
FFT
Modulation
Code Rate
GI
Hier Modulation
Frequency offset
Timing offset
AGC
UCB
PLL Type
DEMOD Type
TPS Lock
RS Lock
SSI
SQI
Firmware Version
ISDB-T
FFT Size_1
Guard Interval_1
Freq. Offset_1
SNR_1
IF AGC_1
TMCC Lock_1
TS Packer_1
Master Lock_1
A_Modulation_1
A_Code Rate_1
4-35
4. Troubleshooting
Page 85
Factory Menu Name Data Range
A_Timer InterLeave_1
A_Segments Num_1
A_BER_1
B_Modulation_1
B_Code Rate_1
B_Timer InterLeave_1
B_Segments Num_1
B_BER_1
C_Modulation_1
C_Code Rate_1
C_Timer InterLeave_1
C_Segments Num_1
C_BER_1
SVC
Factory Menu Name Data Range
Test Pattern
Pattern Sel OFF
Logic Pattern Sel …
Logic Level Sel …
FRC Pre Test Pattern 0
FRC Post Test Pattern 0
FRC3D Fdisplay OFF
FRC3D PC Mode OFF
SOC TCON Test Pattern 0
SOC TCON Pattern Level 255
SOC TCON FRC Pattern 0
HDMI WB Pattern OFF
HDMI Pattern Sel 0
Parma Pre Test Pattern 0
Parma Post Test Pattern 0
Panel Display Time
0Hr
SVC Info
0
Delete S/N
0
Upgrade
T-CON Usb Download Failute
T-CON CheckSum Error
4-36
4. Troubleshooting
Page 86
Factory Menu Name Data Range
Logic Usb D/L …
SUBMICOM UPGRADE Failute
BT UPGRADE
BT FREEPAIRING ON
Function Upgrade Failute
FRC3D FW Upgrade
Camera Upgrade
Mic Upgrade
CPLD USB Download
JP MICOM UPGRADE Failute
DP MICOM UPGRADE Failute
Jump Upgrade Failute
Smart Hub Reset
0
ER Count
WD Count 0
AR Count 0
WIFI ER Count 0
BT ER Count 0
HDMI Err Cnt 0
Camera ER Count 0
LOG(View Log)
Select Log Type NVRAM
Log View 0
Delete Log
Debug Log Down
Emergency Log Copy
Self Diagnosis
Loop Back
LAN Test
AV Audio Test
DVIN Audio Test
CVBS Test
COMP Test
USB HUB Test
HDMI Test
SCART Audio Test
SCART CVBS Test
4-37
4. Troubleshooting
Page 87
Factory Menu Name Data Range
SCART RGB Test
CPU
DDR
FLASH
EEPROM
Sound AMP
HDMI Switch IC
USB HUB IC
WIFI
LVDS
T-CON/FRC
PCB Test
MOIP
App Self Test
Device self Test
Voltage
EcoSensor
BT
EXT Sound Inspection
Woofer Sound Inspection NONE
ATV CH Inspection
DTV CH Inspection
Satellite CH Inspection
IPERF
Stopped
OPTION HDMI
Expert
DVB CI
CAL Data Backup
…
CAL Data Restore
…
ADC/WB
Factory Menu Name Data Range
ADC
AV Calibration Success
Comp Calibraion Success
PC Calibration Success
HDMI Calibration Success
4-38
4. Troubleshooting
Page 88
Factory Menu Name Data Range
ADC Result
1st_Y_GH 258
1st_Y_GL 128
1st_Cb_BH …
1st_Cb_BL …
1st_Cr_RH …
1st_Cr_RL …
2nd_R_L 132
2nd_G_L 132
2nd_B_L 132
2nd_R_H 70
2nd_G_H 70
2nd_B_H 70
White Balance
R-Offset 128
G-Offset 128
B-Offset 128
R-Gain 128
G-Gain 128
B-Gain 128
WB_W2_R_Offset 128
WB_W2_B_Offset 128
WB_W2_R_Gain 164
WB_W2_B_Gain 63
WB_N_R_Offset 128
WB_N_B_Offset 128
WB_N_R_Gain 151
WB_N_B_Gain 108
MGA
MGA On/Off OFF
R1_Gain …
B1_Gain …
G1_Gain …
R2_Gain …
B2_Gain …
G2_Gain …
R3_Gain …
4-39
4. Troubleshooting
Page 89
Factory Menu Name Data Range
B3_Gain …
G3_Gain …
R4_Gain …
B4_Gain …
G4_Gain …
R5_Gain …
B5_Gain …
G5_Gain …
R6_Gain …
B6_Gain …
G6_Gain …
R7_Gain …
B7_Gain …
G7_Gain …
R8_Gain …
B8_Gain …
G8_Gain …
R9_Gain …
B9_Gain …
G9_Gain …
R10_Gain …
B10_Gain …
G10_Gain …
4-40
4. Troubleshooting
Page 90
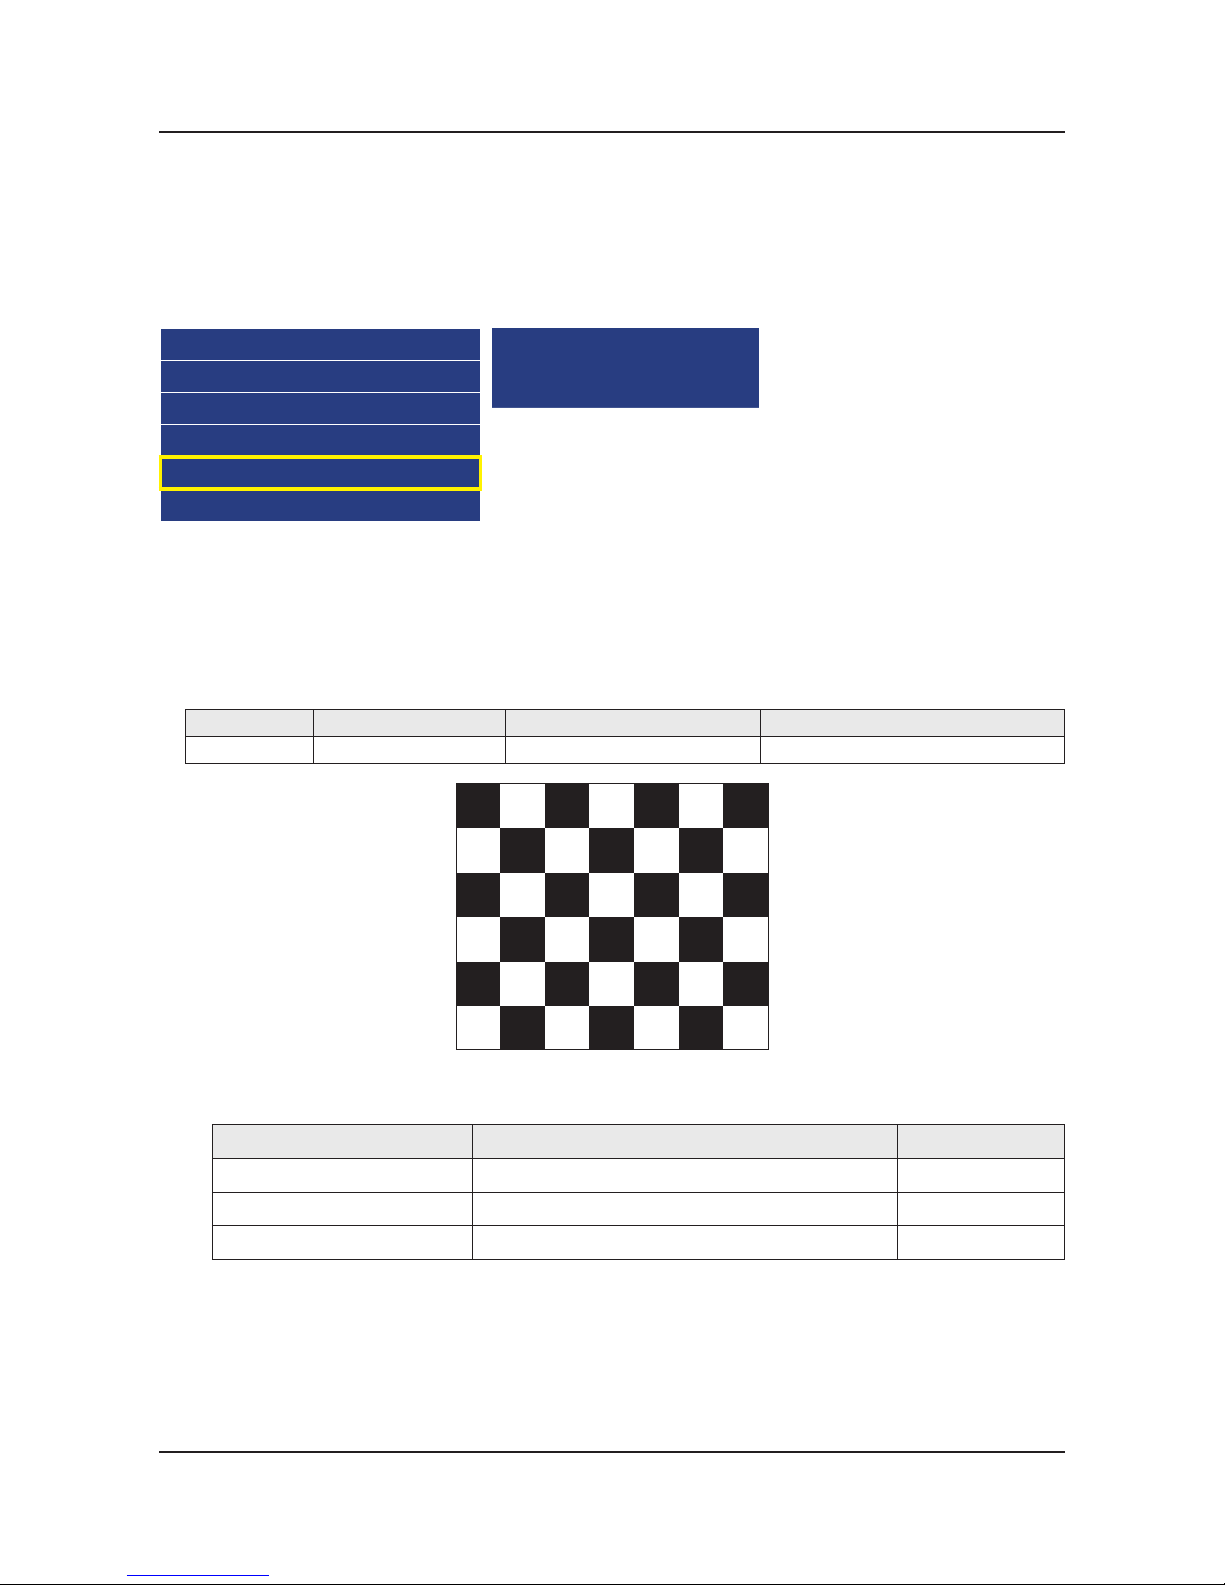
4-4. White Balance
4-4-1. Calibration
Into the Factory Mode.1.
Select 2. ADC/WB menu.
Select 3. ADC menu.
Option
Control
Debug
SVC
ADC/WB
Advanced
AV Calibration
Comp Calibration
HDMI Calibration
4-4-2. Service Adjustment
You must perform Calibration in the Lattice Pattern before adjusting the White Balance.
Color Calibration
Adjust Specication•
Source Setting Mode Pattern Use Equipment
HDMI 1280 x 720@60 Hz Pattern #24 (Chess Pattern) CA210 & Master MSPG925 Generator
(Chess Pattern)
Use other equipment only after comparing the result with that of the Master equipment. -
Input mode Calibration Pattern
CVBS IN (Model_#1) Perform in NTSC B&W Pattern #24 Lattice
Component IN (Model_#6) Perform in 720p B&W Pattern #24 Lattice
HDMI IN Perform in 720p B&W Pattern #24 Lattice
4-41
4. Troubleshooting
Page 91
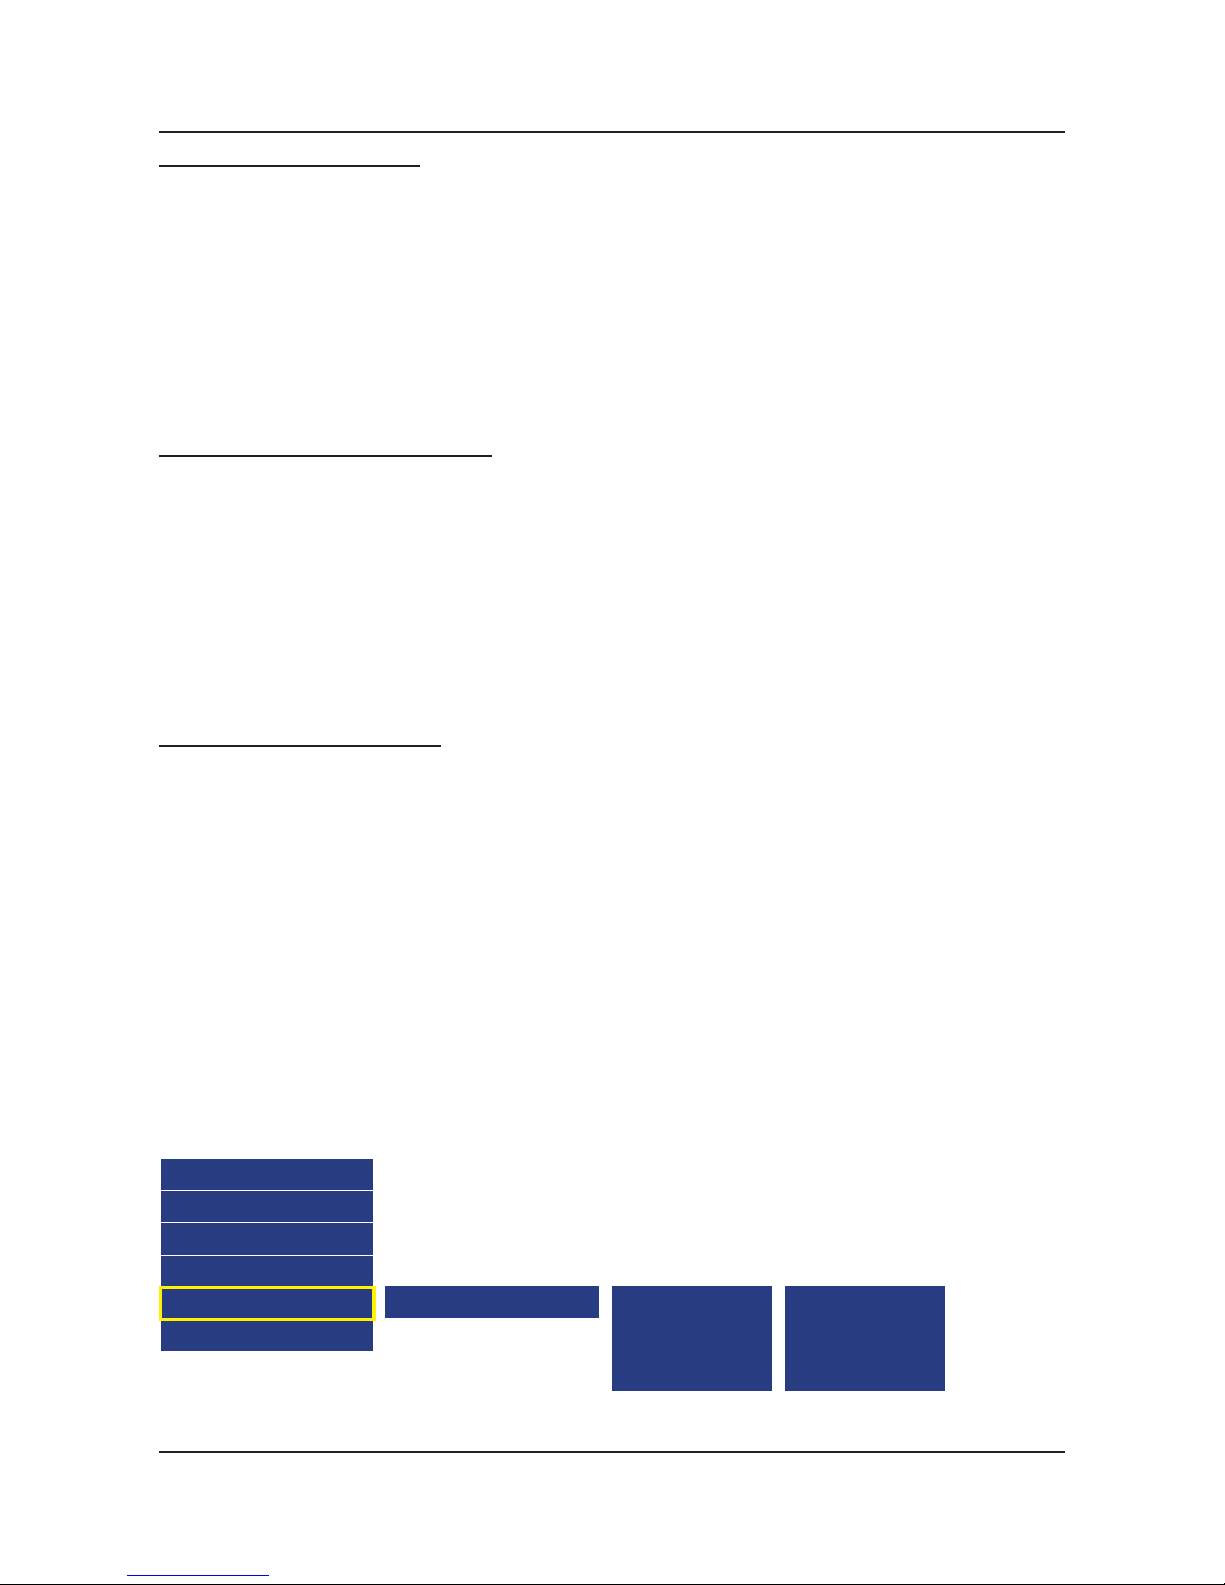
Method of Color Calibration (AV)
Apply the NTSC Lattice (N0. 3) pattern signal to the AV IN 1 port.1.
Press the Source key to switch to “AV1” mode.2.
Enter Service mode.3.
Select the “ADC” menu.4.
Select the “AV Calibration” menu.5.
In “AV Calibration Off” status, press the “► ” key to perform Calibration.6.
When Calibration is complete, it returns to the high-level menu.7.
You can see the change of the “AV Calibration” status from Failure to Success. 8.
Method of Color Calibration (Component)
Apply the 720p Lattice (N0. 6) pattern signal to the Component IN 1 port.1.
Press the Source key to switch to “Component1” mode.2.
Enter Service mode.3.
Select the “ADC” menu.4.
Select the “Comp Calibration” menu.5.
In “Comp Calibration Off” status, press the “ ►” key to perform Calibration.6.
When Calibration is complete, it returns to the high-level menu.7.
You can see the change of the “Comp Calibration” status from Failure to Success.8.
Method of Color Calibration (HDMI)
Apply the 720p Lattice (N0. 6) pattern signal to the HDMI1/DVI IN port.1.
Press the Source key to switch to “HDMI1” mode.2.
Enter Service mode.3.
Select the “ADC” menu.4.
Select the “HDMI Calibration” menu.5.
In “HDMI Calibration Off” status, press the “►” key to perform Calibration.6.
When Calibration is complete, it returns to the high-level menu.7.
You can see the change of the “HDMI Calibration” status from Failure to Success.8.
4-4-3. Adjustment
Into the Factory Mode.9.
Select 10. ADC/WB menu.
Select 11. White Balance menu.
Option
Control
Debug
SVC
ADC/WB
Advanced
White Balance
(Low Light)
Sub Brightness
R offset
G offset
B offset
(Hight Light)
Sub Contrast
R gain
G gain
B gain
4-42
4. Troubleshooting
Page 92
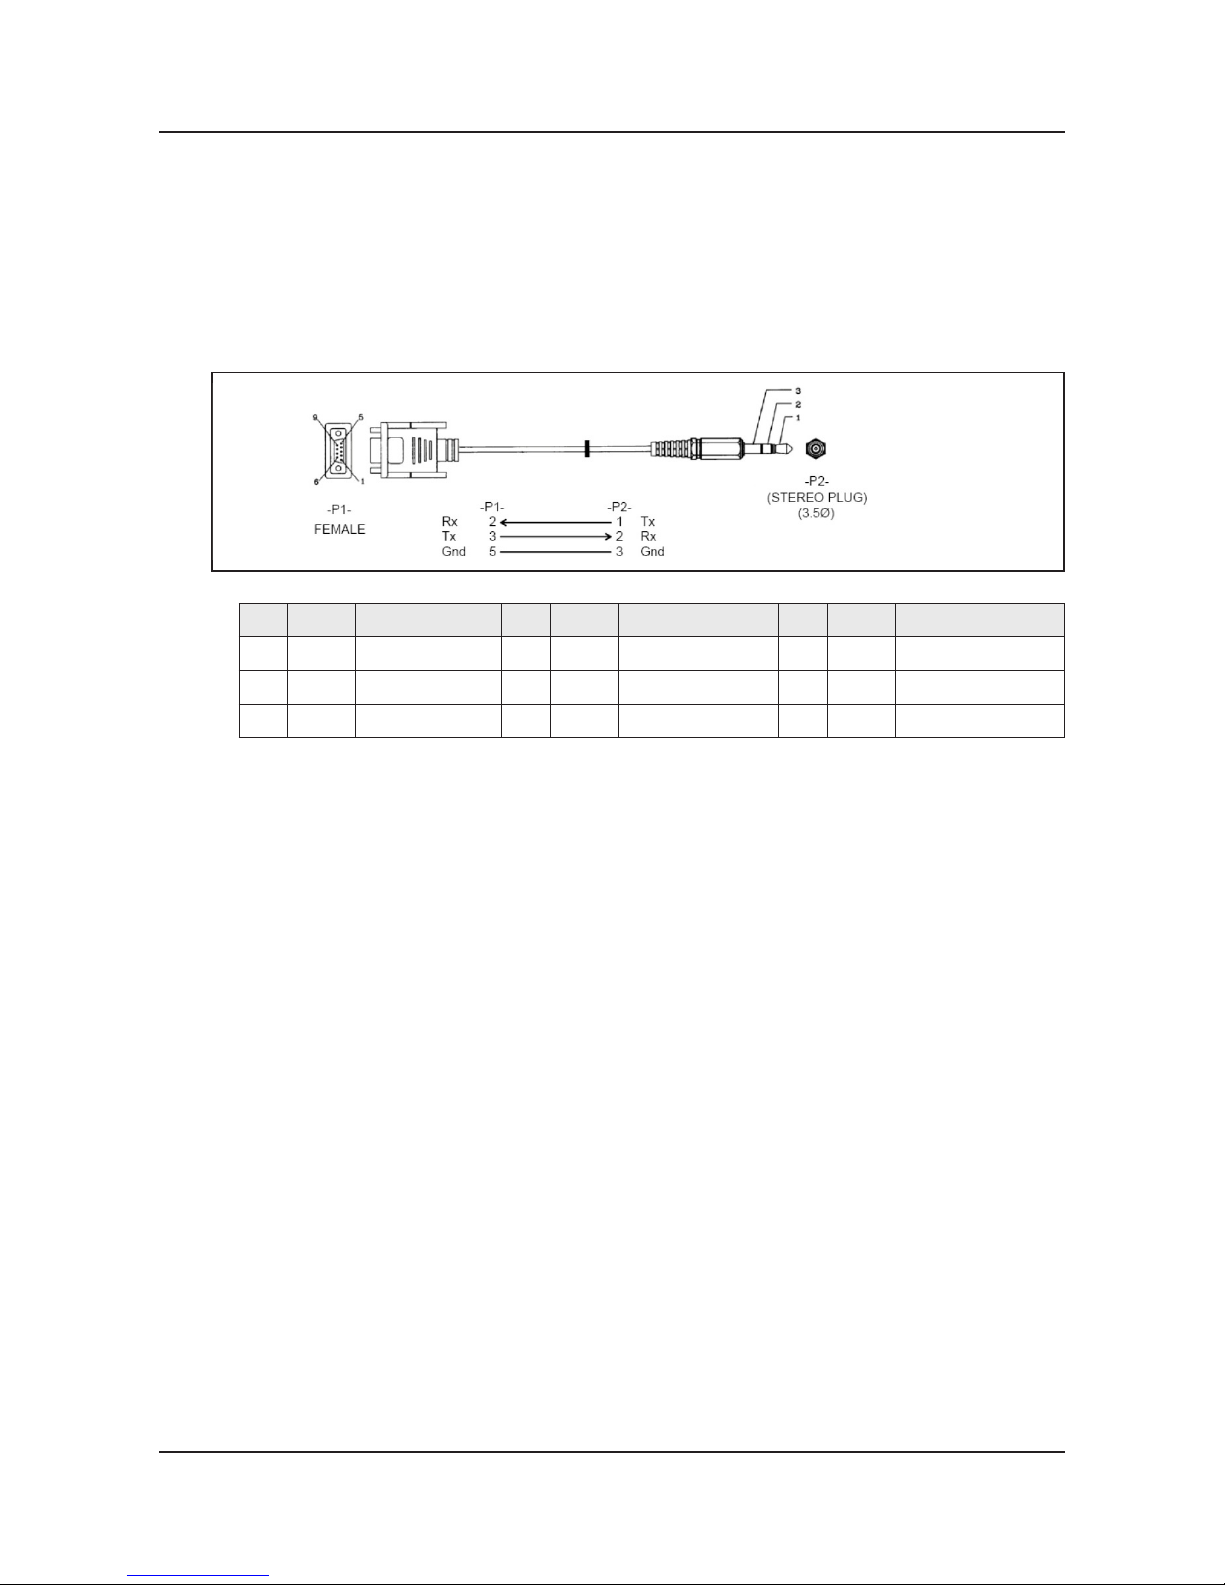
4-5. RS-232C
RS232C Control•
Port : COM#(Serial) -
Bit rate : 115200 -
Data Bit : 8 bit -
Parity : None -
Stop Bits : 1 -
Flow Control : None -
Description of RS232C•
Pin# Name Full Name Pin# Name Full Name Pin# Name Full Name
1
CD Carrier Detect
4
DTR Data Terminal Ready
7
RTS Request To Send
2
RxD Received Data
5
GND Signal Ground
8
CTS Clear To Send
3
TxD Transmitted Data
6
DSR Data Set Ready
9
RI Ring Indicator
4-43
4. Troubleshooting
Page 93
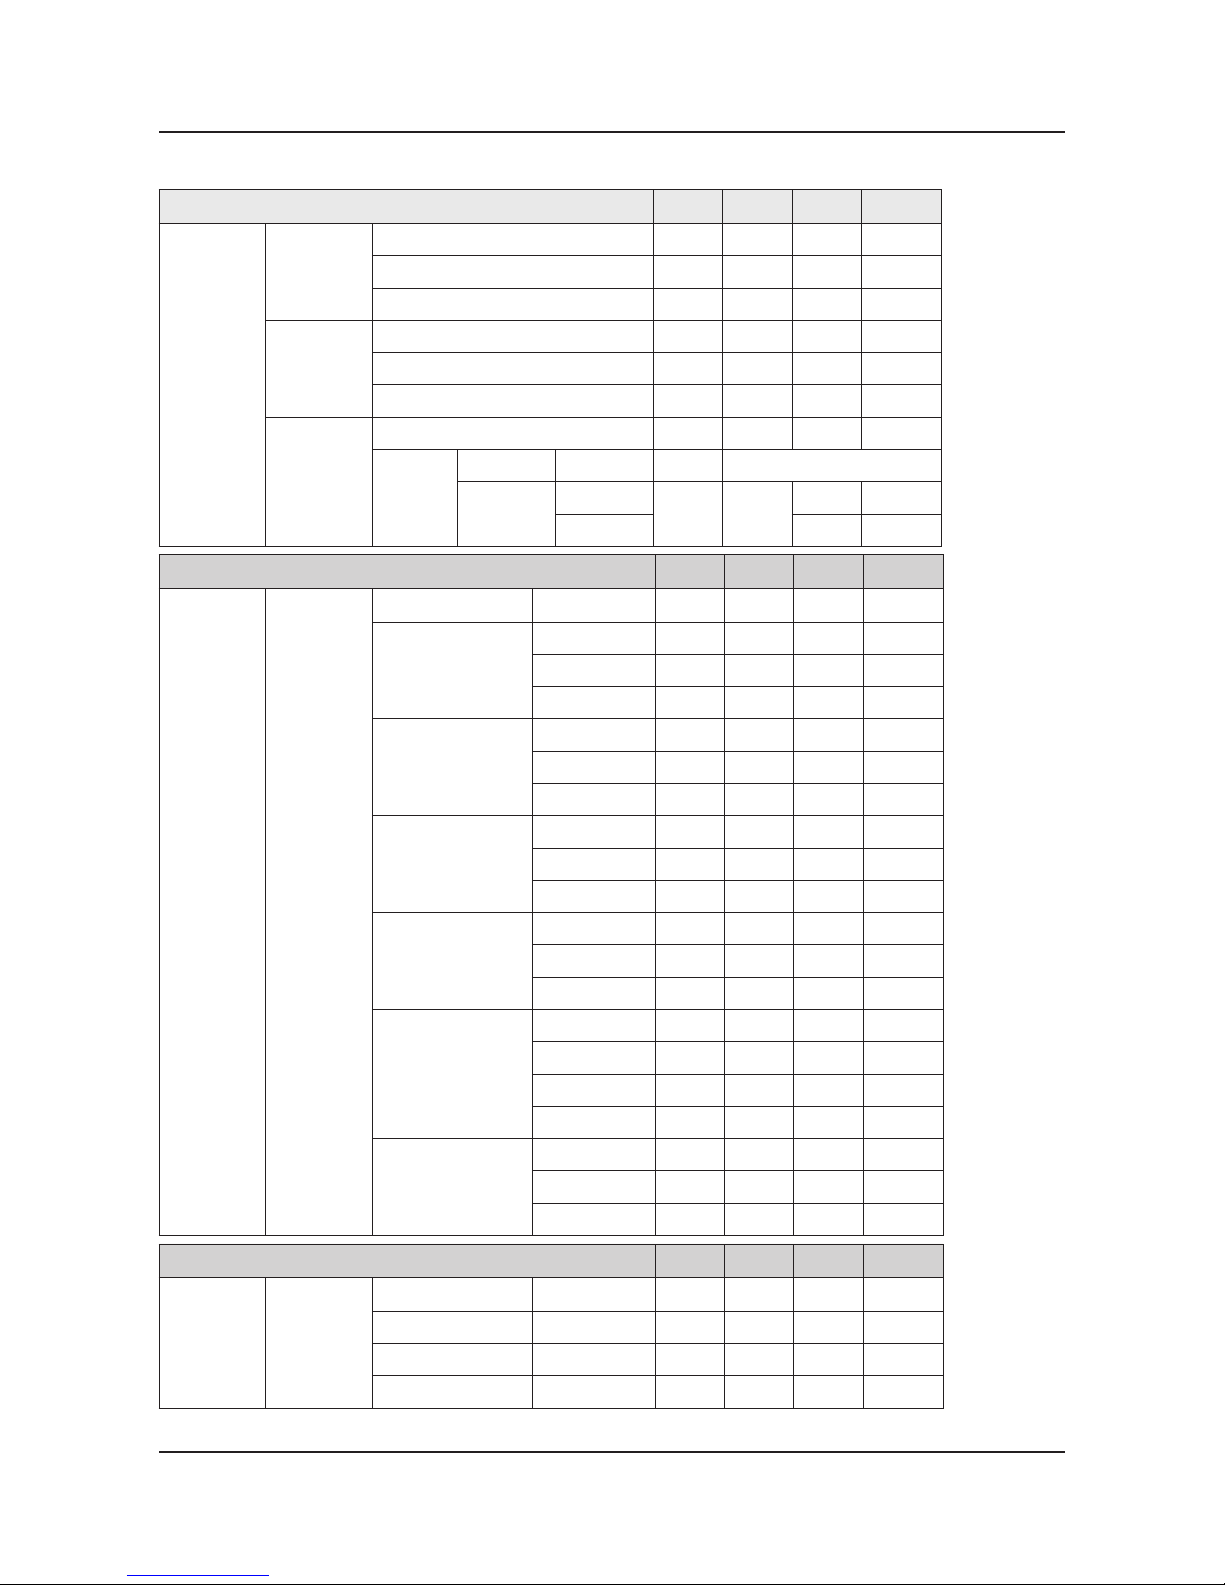
4-6. AV Control Tabe
Control Item Cmd1 Cmd2 Cmd3 Value
General
Power Power 0x00 0x00 0x00 0x00
Off 0x01
On 0x02
Volume Direct 0x01 0x00 0x00 (0~100)
Up 0x01 0x00
Down 0x02 0x00
Mute 0x02 0x00 0x00 0x00
Ch. Direct 0x04 -
Continuous Up
0x03 0x00
0x01 0x00
Down 0x02 0x00
Control Item Cmd1 Cmd2 Cmd3 Value
Input
Source List TV
TV 0x0a 0x00 0x00 0x00
AV AV1 0x01 0x00
AV2 0x01
AV3 0x02
S-Video S-Video1 0x02 0x00
S-Video2 0x01
S-Video3 0x02
Component Component1 0x03 0x00
Component2 0x01
Component3 0x02
PC PC1 0x04 0x00
PC2 0x01
PC3 0x02
HDMI HDMI1 0x05 0x00
HDMI2 0x01
HDMI3 0x02
HDMI4 0x03
DVI DVI1 0x06 0x00
DVI2 0x01
DVI3 0x02
Control Item Cmd1 Cmd2 Cmd3 Value
PICTURE
Mode Dynamic(Entertain)
0x0b 0x00 0x00 0x00
Standard 0x01
Movie 0x02
Natural 0x03
4-44
4. Troubleshooting
Page 94
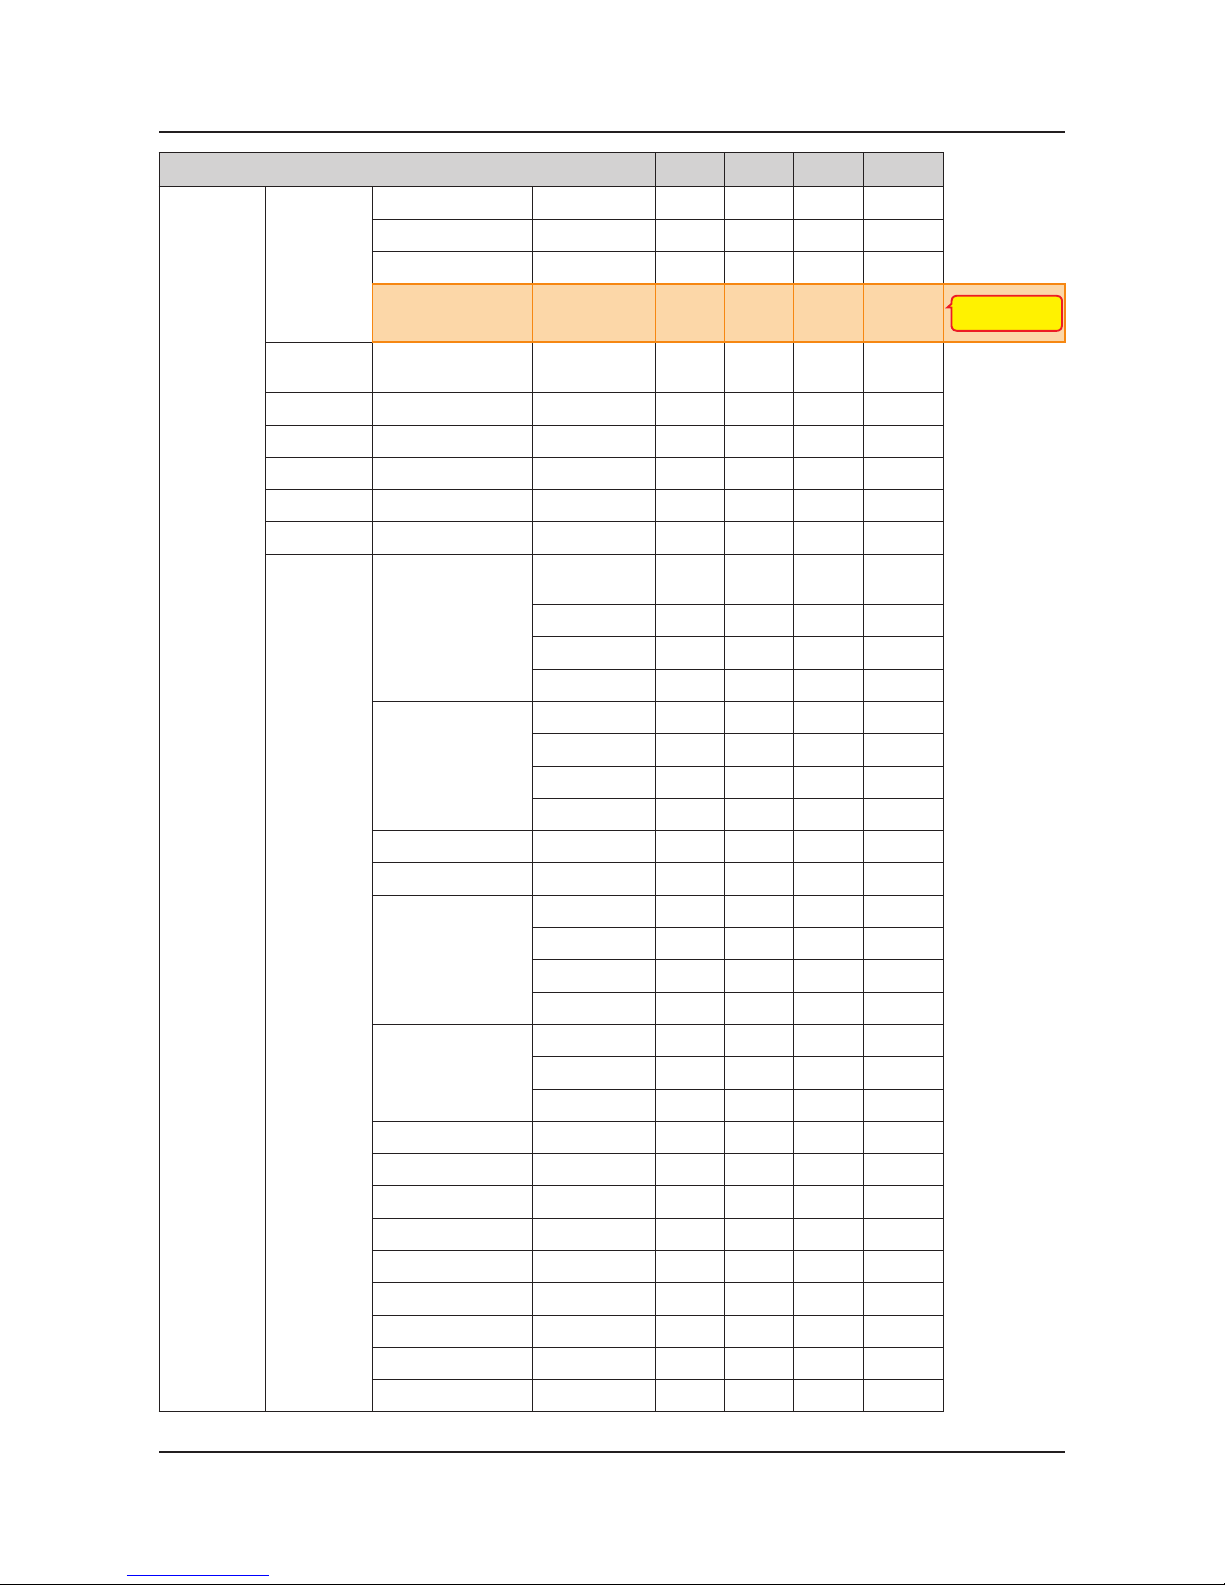
Control Item Cmd1 Cmd2 Cmd3 Value
PICTURE
Mode CAL-NIGHT
0x04
CAL-DAY 0x05
BD Wise 0x06
Relax
0x07
New function of 12"
(only PDP TV)
BackLight
(CellLight)
0~20 0x01 0x00 (0~20)
Contrast 0~100 0x02 0x00 (0~100)
Brightness 0~100 0x03 0x00 (0~100)
Sharpness 0~100 0x04 0x00 (0~100)
Color 0~10 0x05 0x00 (0~100)
Tint G/R 0x06 0x00 (0~100)
Advanced
Settings
Black Tone
Off 0x07 0x00 0x00
Dark 0x01
Darker 0x02
Darkest 0x03
Dynamic Contrast Off 0x01 0x00
Low 0x01
Medium 0x02
HIgh 0x03
Shadow Detail -2 ~ 2 0x02 (-2~2)
Gamma -3 ~ 3 0x03 (-3~3)
RGB Only Mode Off 0x05 0x00
Red 0x01
Green 0x02
Blue 0x03
Color Space Auto 0x06 0x00
Native 0x01
Custom 0x02
White Balance R-Offset(LCD) 0x07 (0~50)
White Balance G-Offset(LCD) 0x08 (0~50)
White Balance B-Offset(LCD) 0x09 (0~50)
White Balance R-Gain(LCD) 0x0a (0~50)
White Balance G-Gain(LCD) 0x0b (0~50)
White Balance B-Gain(LCD) 0x0c (0~50)
White Balance Reset(LCD) 0x0d 0x00
Flesh Tone -15 ~ 15 0x0e (-15~15)
Edge Enhancement Off 0x0f 0x00
4-45
4. Troubleshooting
Page 95
Control Item Cmd1 Cmd2 Cmd3 Value
PICTURE
On 0x01
xvYCC Off 0x10 0x00
On 0x01
Motion Lighting Off 0x11 0x00
On 0x01
LED Motion Plus Off 0x0a 0x07 0x00
On(Normal)
0x01
Cinema
0x02
Ticker
0x03
Picture
Option
Color Tone
Cool 0x0a 0x00
0x00
Standard
0x01
Change Normal →
Standard mode
Warm1
0x02
Warm2
0x03
Digital Noise Filter
Off 0x02
0x00
Low
0x01
Medium
0x02
High
0x03
Auto
0x04
Auto
Visualization
0x05
MPEG Noise Filter
Off 0x03
0x00
Low
0x01
Medium
0x02
High
0x03
Auto
0x04
HDMI Black Level
Normal 0x04
0x00
Low
0x01
Film Mode
Off 0x05
0x00
Auto1
0x01
Auto2
0x02
Cinema
Smooth
0x03
New function of 12"
(only PDP TV)
Auto Motion Plus
Off 0x06
0x00
Clear
0x01
Standard
0x02
Smooth
0x03
Custom
0x04
4-46
4. Troubleshooting
Page 96
Control Item Cmd1 Cmd2 Cmd3 Value
PICTURE
Demo
0x05
Screen
Adjustment
Picture Size
16:9 0x0b 0x0a 0x01
0x00
Zoom1
0x01
Zoom2
0x02
Wide Fit
0x03
4:3
0x04
Screen Fit
0x05
Smart View I
0x06
Smart View II
0x07
Auto Wide
0x08
New function of 12"
(only DVB TV)
Wide Zoom
0x09
Zoom
0x0a
Reset
Picture
Reset Picture
0x0b 0x0b 0x00
0x00
3D 3D Mode
Off 0x0b 0x0c 0x00
0x00
2D
⇢
3D
0x01
Side By Side
0x02
Top Bottom
0x03
Line By Line
0x04
Vertical Line
0x05
Checker BD
0x06
Frame
Sequence
0x07
3D ⇢ 2D
Off 0x01
0x00
On
0x01
3D View Point
0x02
(-5~5)
Depth
0x03
(1~10)
3D Auto View
Off 0x05
0x00
Message
Notice
0x01
On
0x02
Control Item Cmd1 Cmd2 Cmd3 Value
Sound
Sound Mode Standard
0x0c 0x00 0x00 0x00
Music 0x01
Movie 0x02
Clear Voice 0x03
Amplify 0x04
4-47
4. Troubleshooting
Page 97
Control Item Cmd1 Cmd2 Cmd3 Value
Sound
Equalizer Balance
0x01 0x00 (0~20)
100hz 0x01 (0~20)
300hz 0x02 (0~20)
1khz 0x03 (0~20)
3khz 0x04 (0~20)
10khz 0x05 (0~20)
Reset 0x06 0x00
SRS
TruSurround
HD (echo)
Off
0x02 0x00 0x00
Virtual
Surrond
(echo)
On
0x01
SRS
TruDialog
(echo)
Off
0x03 0x00 0x00
Dialog Clarify
(X9)
On
0x01
Preferred
Language
English
0x04 0x00 0x00
Spanish 0x01
French 0x02
Korean 0x03
Japanese 0x04
Multi-Track
Sound
Mono
0x05 0x00 0x00
Stereo 0x01
SAP 0x02
Auto Volume Off 0x06 0x00 0x00
ON 0x01
Night 0x02
Speaker
Select
TV Speaker
0x07 0x00 0x00
External Speaker 0x01
Sound Select Main 0x08 0x00 0x00
Sub 0x01
Sound Reset Sound Reset 0x09 0x00 0x00
3D Audio Off 0x0a 0x00 0x00
New function of 12"
Low 0x01
Medium
0x02
High 0x03
4-48
4. Troubleshooting
Page 98
Control Item Cmd1 Cmd2 Cmd3 Value
KEY
Key Generation
0x0d 0x00 0x00
refer to
table
OSD
Show/Hide
Control
Show
0x0e 0x00 0x00 0x00
New function of 12"
Hide 0x01
Get
Status
Power (On/Off) 0xf0 0x00 0x00 0x00
Volume(0~100) 0xf0 0x01 0x00 0x00
Mute (On/Off) 0xf0 0x02 0x00 0x00
Channel Number 0xf0 0x03 0x00 0x00
Source (TV/AV/…/HDMI/…) 0xf0 0x04 0x00 0x00
Picture Size 0xf0 0x05 0x00 0x00
3D (On/Off) 0xf0 0x06 0x00 0x00
Picture Mode 0xf0 0x07 0x00 0x00
Sound Mode 0xf0 0x08 0x00 0x00
Key value Value
Up 96 (0x60)
Down 97 (0x61)
Left 101 (0x65)
Right 98 (0x62)
Menu 26 (0x1A)
Internet 147 (0x93)
Enter(OK) 104 (0x68)
EXIT 45 (0x2D)
4-49
4. Troubleshooting
Page 99
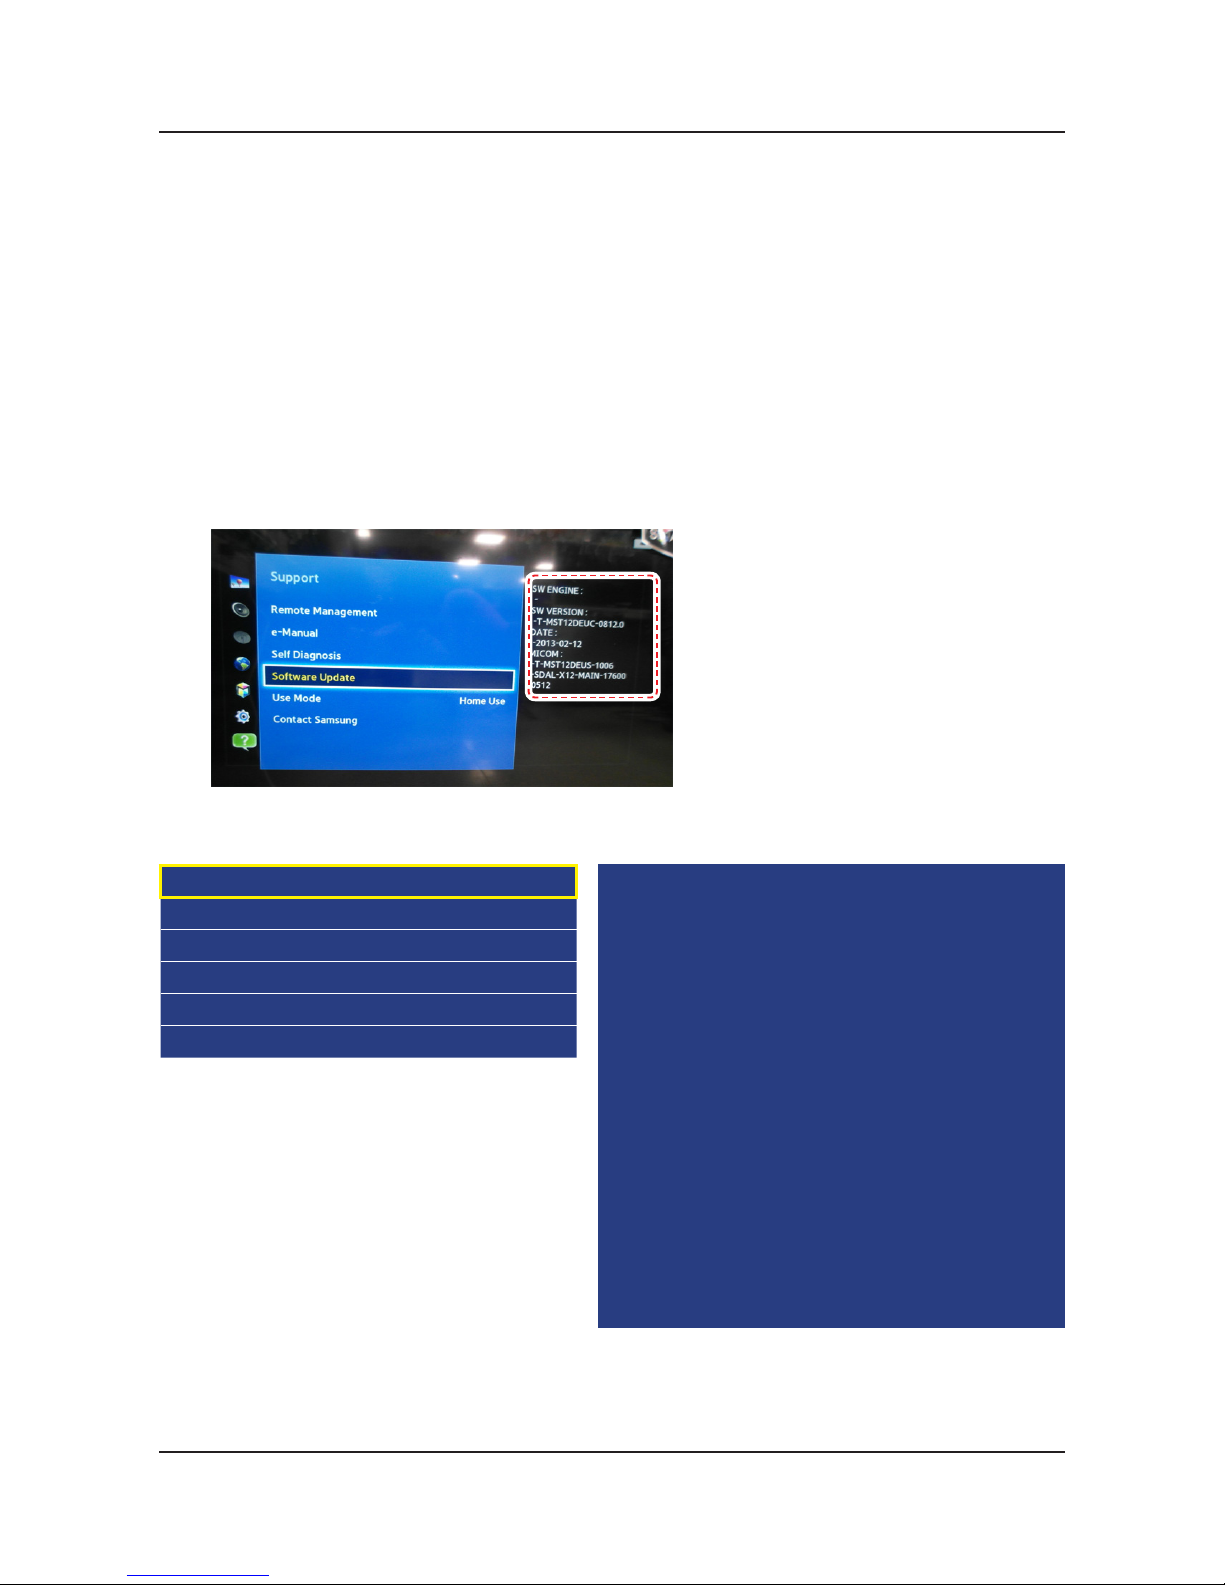
4-7. Software Upgrade
Software Upgrade can be performed by downloading the. latest rmware from samsung.com to a USB memory device.
Current Version - The software already installed in the TV.•
Software is represented as ‘Year/Month/Day_Version’.
4-7-1. How to Check the Software Version
Use the Main Menu
Click the "MENU" key in remote controller.1.
Select "Support" menu.2.
Locate the menu cursor "Software Upgrade" menu.3.
Click the "INFO" key.4.
Check the Main SW and Micom version. -
Use the Factory Mode
Option
Control
Debug
SVC
ADC/WB
Advanced
T-MST12DEUC-xxxx
T-MST12DEUS-xxxx
BT Version : xxxx
E-Manual : xxxx
Camera Version : xxxx
Blaster-version : ----
EDID SUCCESS
CALIB : AV/COMP/PC/HDMI/
Option : xxxx,UE,6400,NONE
USB RS232C : OFF
SDAL-X12-MAIN-xxxx-xxxx
RFS : "X12 0071" KER/201x-xx-xx
KERNEL : 8.0837, D / Onboot :xxxx.x
Backend IC[x], Data Ver : xxxx
TCON Version : xxxx
DTP-DTVTD-xxxx
4-50
4. Troubleshooting
Page 100
4-7-2. How to Upgade Software
Insert a USB drive containing the rmware upgrade downloaded from samsung.com into the TV.1.
NOTE
Please be careful not to disconnect the power or remove the USB drive while upgrades are being applied.
The TV will turn off and turn on automatically after completing the rmware upgrade.2.
Please check the rmware version after the upgrades are complete.3.
the new version will have a higher number than the older version. -
NOTE
When software is upgraded, video and audio settings you have made will return to their default (factory) •
settings.
We recommend you write down your settings before beginning rmware update.•
After update is completed, restore your previous settings.4.
Main Software Upgrade
Store the sw program named "T-MST12DEUC" in USB memory stick.
Click the "MENU" key in Remote Controller.
Select "Support - Software Update - Update Now" menu.
Click the "ENTER" key.
Wait for upgrade complete.•
Check the Software Version.•
4-51
4. Troubleshooting
 Loading...