

Page 1

For LED TV ES7000 Series
UE40ES7000
UE46ES7000
UE55ES7000
UE40ES7500(CIS)
UE46ES7500(CIS)
UE55ES7500(CIS)
Page 2

indexindex
I. Product Concept
II. UES7000 Overview
III. Inside of UES7000
IV. Main board
V. New Function of UES7000
VI. Disassembly and Reassembly
VII. Change IR
VIII. Cables
IX. Troubleshooting
Page 3
Product Concept
SAMSUNG
Page 4
Ⅰ. Product Concept
“Voice/Gesture Control, Face Recognition SI, New Experience NEW Smart TV” (ES7000)
- SI (Smart Interactive) : Quick approch to menu and service by voice control. Direct navigation by
Gesture control
“New Experience(SI), ’12 TV New Design Trend’s New Concept Premium Design, and
Support world best picture quality. High-end Smart TV” (ES8000)
- Design : Flower Petal look Metallic Design (Detailed Premium design)
Curved line Stand: ’12 New Trend of TV Design
- Picture Quality (Micro Dimming Ultimate) : By 576 block’s detaild picture control,
Support world best clear quality
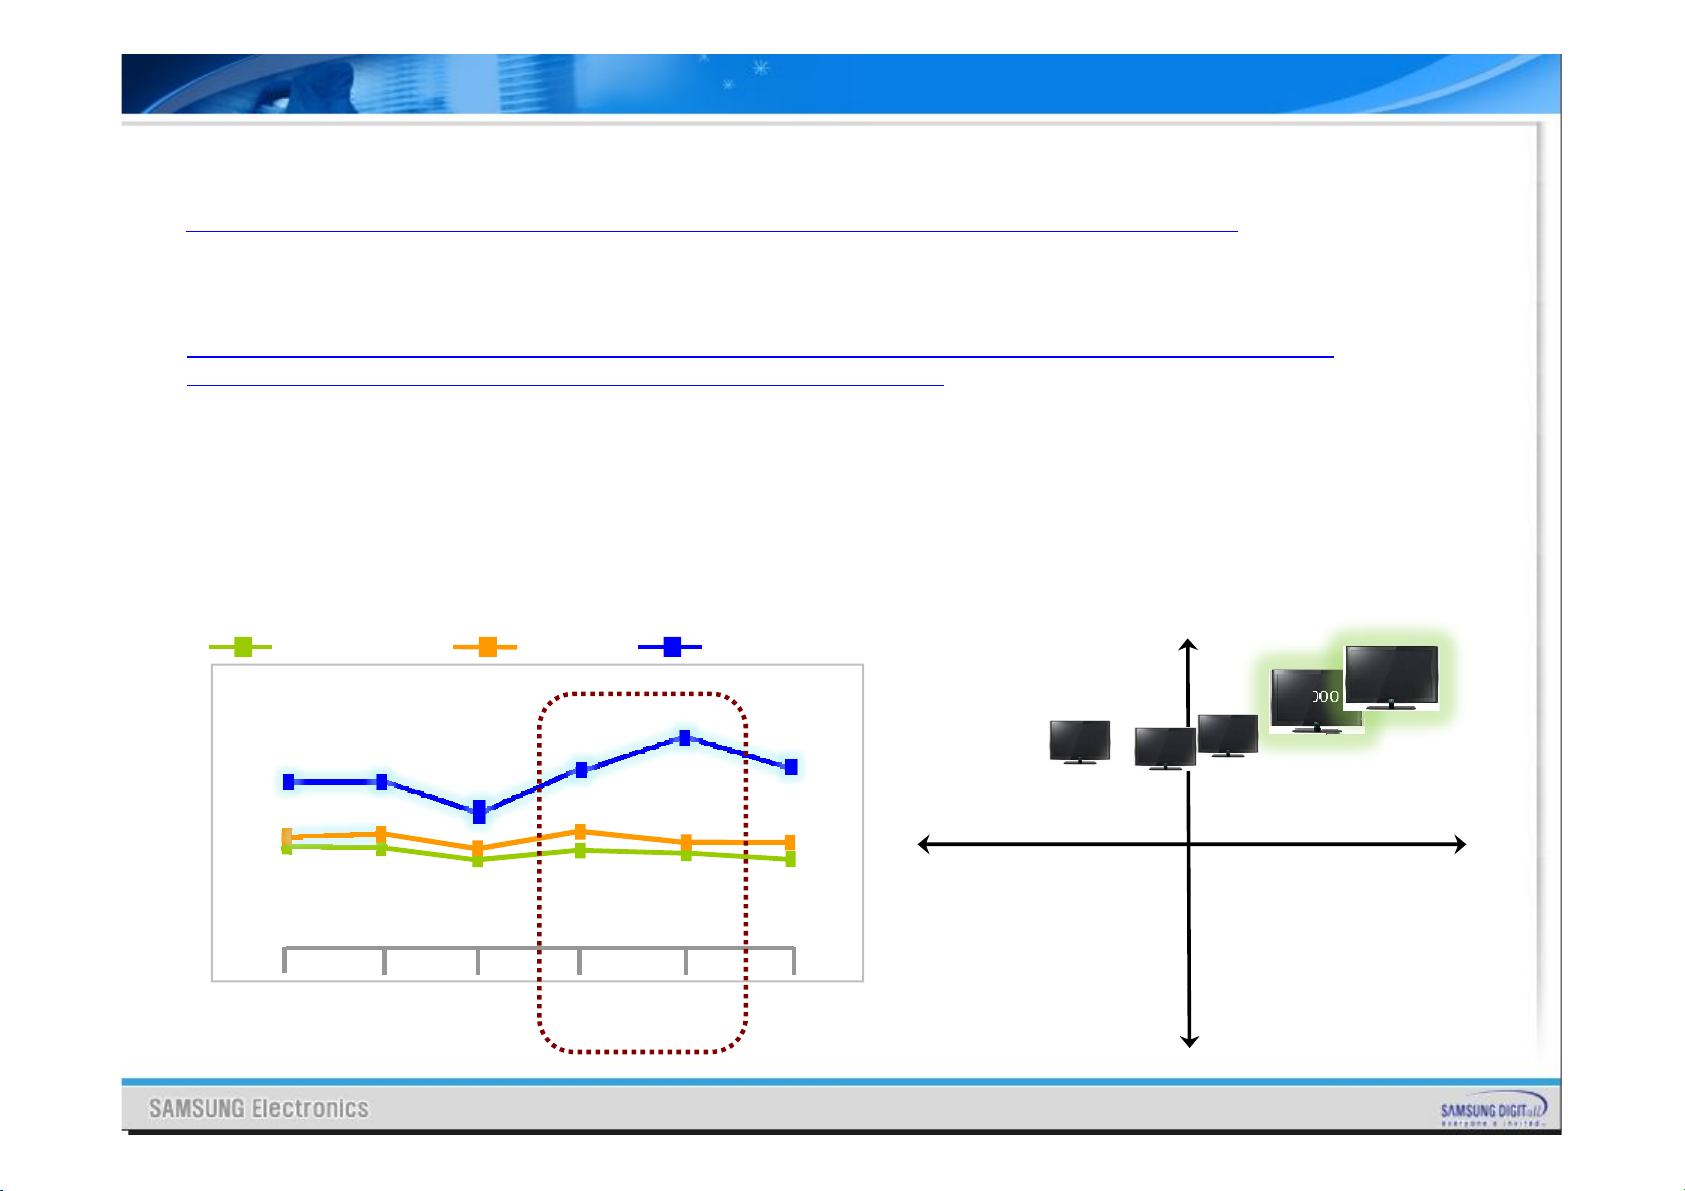
■ External Value Curve
Sony HX929
Cost
Picture
Quality
D8000
Design
ES8000
New
Experience
■ Strategic Positioning
Premium
ES8000
ES7000
HX929 D8000
SONY
Technology
UserabilitySound
D7000
Emotional
Basic
Page 5

UES7000 Overview
SAMSUNG
Page 6
UE8Y Overview
Spec Comparison to the Old ModelsSpec Comparison to the Old Models
Model UES7000 UD7000
Design
Diplay Type LED TV LED TV
Built-in Tuner O O
Resolution 1920 x 1080 1920 x 1080
LCD Panel TFT LCD Panel 240Hz TFT LCD Panel 240Hz
Screen Size 40"/46"/55" 40"/46"/55"
Picture ratio 16:9 16:9
Dimensions(W x H x D)
Weight
Contrast Ratio MEGA CR MEGA CR
Picture Enhancer 3D HyperReal Engine 3D HyperReal Engine
Equalizer 5 Band 5 Band
Auto Volume Control O O
Surround Sound Dolby Digital Plus / Dolby Pulse, DNSe Dolby Digital Plus/Pulse
Speaker Output 10W + 10W
PIP O O
Double Window X X
Caption O O
Entertainment Mode X X
Game Mode O O
Energy Saving O O
Anynet+ O O
Antenna 1(Cable/Air/Satellite) 1(Cable/Air/Satellite)
914.4 * 611.2 * 241.3 mm with stand
914.4 * 545.7 * 29.7 mm without stand
46": 1046.8*691.2*276.7 mm with stand
1046.8*620.2*29.7 mm without stand
55": 1238.4*790.4*276.7 mm with stand
1238.4*728*29.7 mm without stand
40” : 9.55kg_without stand
11.8kg_with stand
46” : 11.98kg_without stand
14.6kg_with stand
55” : 16.6kg_without stand
19.3kg_with stand
40": 908.6 X 29.7 X 524.9 mm with stand
908.6 X 241.3 X 600 mm without stand
46": 1041.1 X 29.7 X 599.4 mm with stand
1041.1 X 276.5 X 607.5 mm without stand
55": 1232.6 X 29.7 X 707.2 mm with stand
1232.6 X 309.3 X 789.7 mm without stand
40” : 10.0kg_without stand
12.0kg_with stand
46” : 12.4kg_without stand
14.3kg_with stand
55” : 16.2kg_without stand
18.6kg_with stand
40"/ 46": 10W + 10W
55"/65" : 15W +15W
Page 7
UE8Y Overview
UES7000 Key parts
- 1080P FULL HD
- 3HDMI, HDMI CEC support
- 240Hz Auto Motion Plus
- All Share Play
- Smart Hub (Full browser, Media play)
- Built–in Wifi
- Motion Control & Voice Contol
- Built-in Camera
- 3D
- Smart Control
-IR Blaster
UES7000
- Vesel: Super Narrow Bezel (Factory Option: U-MOIP-7K)
- Panel: 40”,46”,55”, Super Clear
- memory: 2G
- power consumtion: 40”: 135W / 46”: 150W / 55”:160W/Standby <0.1W
Page 8

UE8Y Overview
Control & Connection PanelControl & Connection Panel
Eco sensor
Remote sensor : light up
Page 9

UE8Y Overview
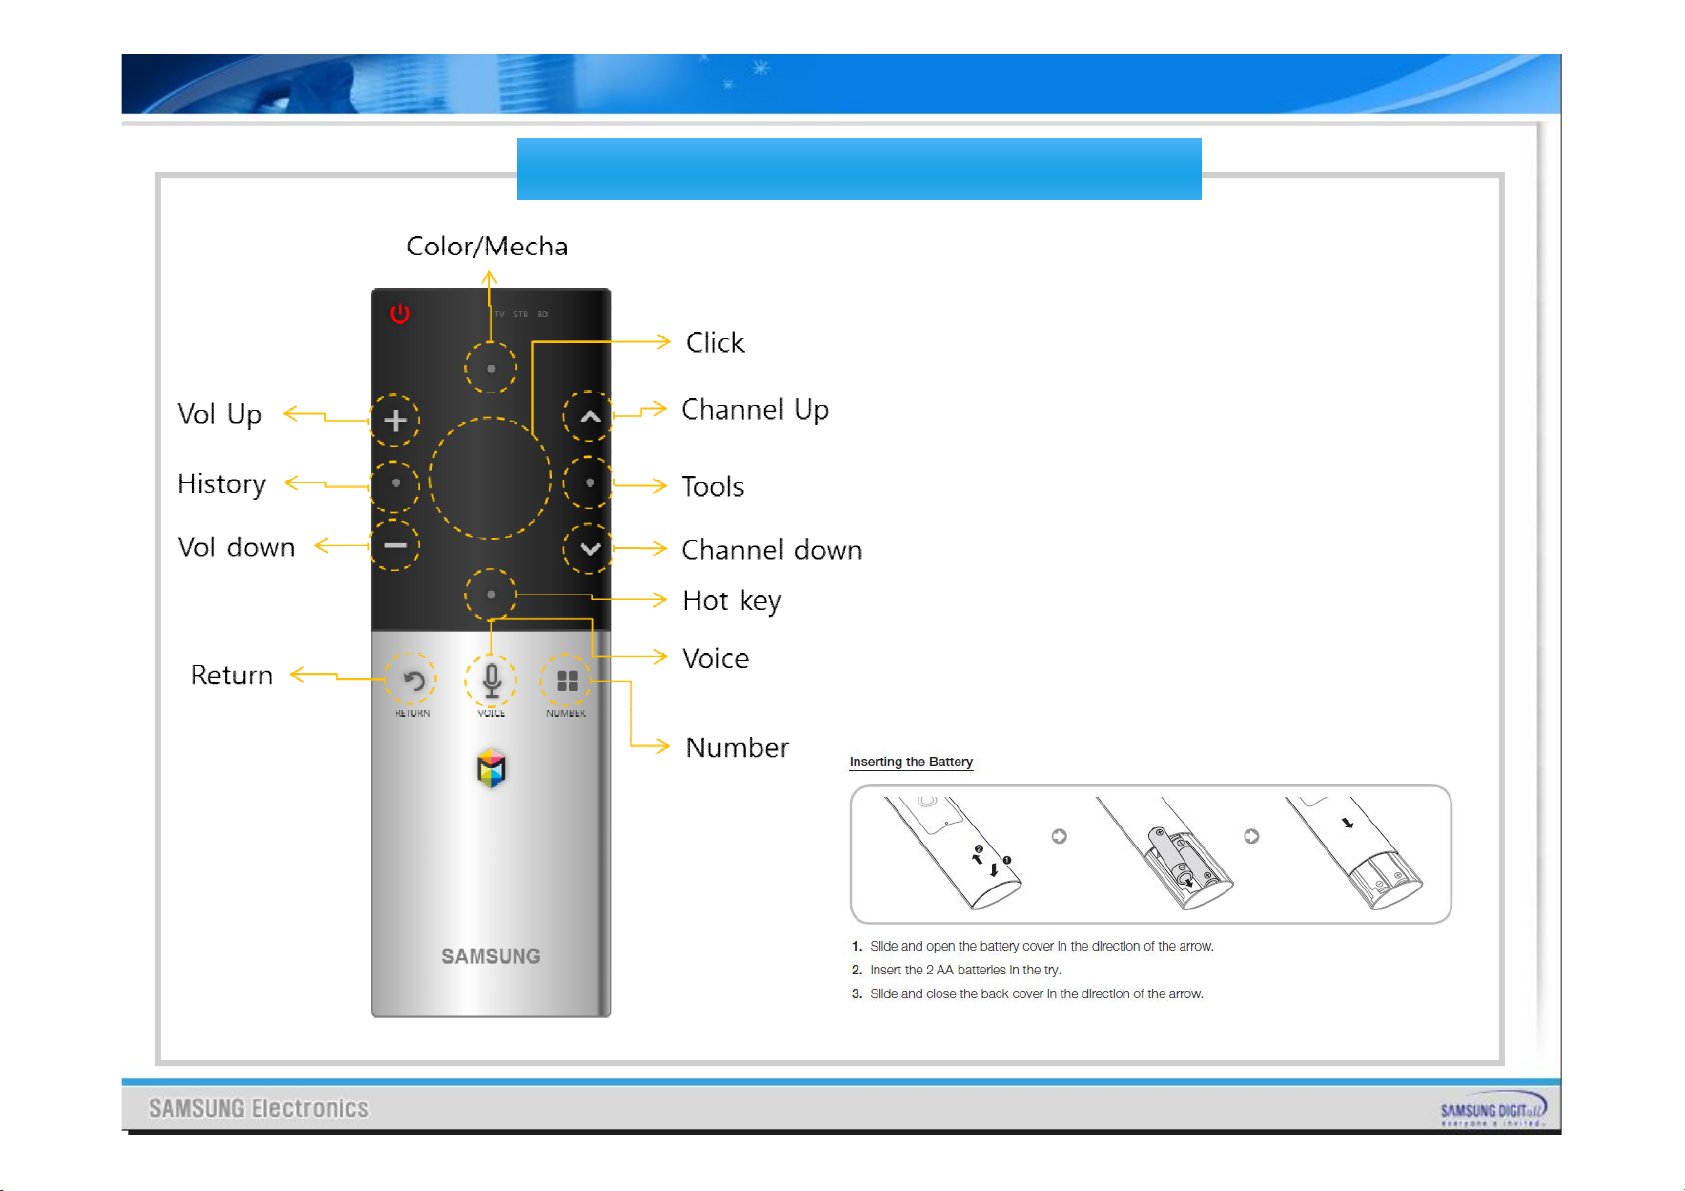
Remote controllerRemote controller
Page 10
UE8Y Overview
Remote controllerRemote controller
Page 11

UE8Y Overview
Remote controllerRemote controller
Page 12

UE8Y Overview
AccessoriesAccessories
Page 13

UE8Y Overview
AccessoriesAccessories
Page 14

UE8Y Overview
AccessoriesAccessories
Page 15

Inside of UES7000
Inside
of UE8Y
SAMSUNG
Page 16

Inside of UE8Y
IP board, Main board, Panel
Main board
Inner Feature of UE8YInner Feature of UE8Y
MoiP(IR)
Power Board
MoiP Cable
LVDS Cable
Speaker(R)
T-CON
Speaker(L)
Page 17

Inside of UE8Y
Wiring Diagram of UE8YWiring Diagram of UE8Y
CNM803
CN8015
CON3
Page 18

Main Board
SAMSUNG
Page 19

Explanation of Main board
Main boardMain board LAYOUTLAYOUT
USB3
USB2
OPTICAL
USB1
HDMI3
HDMI2
HDMI1
PC sound
H/P
EXT1
IC801
IC Video
decoder
IC1202
IC Video
process
Moip
CN201
Power
CN1601
LVDS
CN1201
Function
& LED
Deco
CN301
Speaker
Please show
bottom of board
(move photo up or
make smaller)
RF(S2)
RF
UK/Nordic:
T2/C
EU: T/C
Component
LAN
FRONT BACK
Page 20

Explanation of Main board
ECHOECHO--P/ECHOP/ECHO--A Block A Block DiagramDiagram
DAC
AV2 In
Component
PC/DVI Audio
or AV1
CI
NIM Tuner
RF CVBS
SC1 CVBS
RF_CVBS
Scart1_LR
Scart RGB
Comp/AV_LR
AV1 CVBS
YPbPr
PC/DVI_LR
HDMI
4x1 SW
SIL9587
TS
SIF_I2S
DTV_CVBS
Echo-A
• CVBS AFE
• 3channel
AFE
• Audio
Codec
TMDS
Max : 300MHz
Echo-P
• 2 X Cortex-A9
(@1GHz)
• 32/32/1M
• eMMC4.41
• DDR3-2133
• 2MFD
• H.264 (720p)
Encoder
• HDMI 1.4 TX
300MHz
SD VIDEO 13bit
HD VIDEO 33bit
Interrupt USB Hub
IIC
I2C
PCM_I2S
24bit
96KHz
DAC 2
24bit
96KHz
DAC 1
24bit
96KHz
DAC 3
SC1_I2S
Mon./HP_I2S
I2S_Tx0_SDO
0
I2S_Tx1_SDO
1/2
Line out / Headphone
OUT
Scart 1
DDR3 I/F
800/933MHZ
OD : 1066MHz
eMMC4.41
USB 2.0
DEBUG
RMII
LVDS 2ch
UART
USB 2.0
I2S_TX1_SDO 0
DDR3-1866
256MB x4
eMMC4.41
2GB
USB SW
4X1
UART
MAX3222
Ethernet
RTL8201F
LVDS SW
DS90LV804
X 3
Sub Micom
WT61P806
USB SW
2:4
4X1
Buffer
Speaker
AMP
TAS5735
Audio AMP
2V RMS
USB1/2/3
Optical
LVDS 2ch
Main_check
Bluetooth
Wi-fi
Line out (미주)
Headphone (구주)
Scart 1 (구주)
Debug
LAN
MOIP
Speaker
UART
USB2.0
USB2.0
T-con b’d
SPDIF
I2S
A5V
WOV
B13V
Echo-Fp
. 240 FRC
. 3D
DDR3
DDR3
128MB
128MB
Flash
LVDS
Echo-T
. 240 T-con
Smart
Evolution
Kit
Page 21

New Function of
UES7000
SAMSUNG
Page 22

New Function of UE8Y
Motion Control
1. Shake your hand in front of TV
2. Indicate a menu about CH, VOL in Screen
5. If your hand let down on the screen,
the manu will be a close
4. Grabbing hand is a Click.
(If you maintain hand grabbed, TV execute
channel up consecutively
3. Move a cursor by using hand gesture, move a
cursor to Chanel up area
Page 23

New Function of UE8Y
Voice Control
Chanel up
채널 올려
Hi TV
1. Show a Voice cognition Menu by command “Hi TV”
2. Control CH by command “Channel
up/down”
Volume down
볼륨 내려
3. Control Volume by command
“Volume up/down”
Page 24

New Function of UE8Y
Limitation of Voice control and Gesture Control
Page 25

New Function of UE8Y
Smart Control
Page 26

New Function of UE8Y
IR Bluster
Push SMART touch control Key
1
- Key Data sending to TV (Bluetooth)
TV IR Bluster, Key Data Transfer
2
- Bluetooth
3
External Device control
- IR Bluster Device, IR commend Send
Legacy Device
IR
3
Main TV
2
BT
BT
1
IR
IR Bluster
SMART
Touch
Control
2
6
Page 27

New Function of UE8Y
HID Connection
Wired or wireless
connection
Sold Saparately,
Support models are below.
Item Maker Model No
Keyboard+Mouse
Keyboard SRK-5000UB
Keyboard+Mouse
Keyboard
Mouse Samsung
Mouse Logitech
Mouse Microsoft
Samsung
Logitech
SRP-9100B
MK550
MK520
MK320
MK260
K750
K400
K360
K350
K340
K320
SMO-3500B
SMO-3200B
V220
M510
M505
M325
M310
M305
M235
M215
M185
Wireless Mobile Mouse
6000
Wireless Mouse 5000
Wireless Mobile Mouse
4000
Wireless Mobile Mouse
3500
Wireless Mobile Mouse
3000
Wireless Mouse 1000
Explorer Mini Mouse
Arc Mouse
Page 28

New Function of UE8Y
AllShare Play
AllShare Play AllShare Play lets you access, view,
or play photos, videos, or music
located on USB devices, digital
cameras, cell phones, and PCs.
PCs, cell phones, and other
compatible devices can be accessed
wirelessly, through your wireless
network.
(Enjoy photos, music and/or movie
files saved on a USB Mass Storage
Class (MSC) device and/or your PC.)
Page 29

New Function of UE8Y
Evolution Kit ( Sold Separately)
This socket is designed to accept an exten
sion device called Evolution Kit. The Evolut
ion Kit enables the TV to run a variety of th
e latest applications for a better user experi
ence.
The Evolution Kit, which may not be availa
ble depending on the product, will be sold s
eparately in 2013 or later.
Page 30

Disassembly and Reassembly
Disassembly
and
Reassembly
SAMSUNG
Page 31

Disassembly and Reassembly
Disassembly and Reassembly
Page 32

Disassembly and Reassembly
Page 33

Disassembly and Reassembly
Page 34

Disassembly and Reassembly
Page 35

Disassembly and Reassembly
Change IR
SAMSUNG
Page 36

Page 37

Page 38

Cables
SAMSUNG
Page 39

Page 40

Troubleshooting
SAMSUNG
Page 41

Troubleshooting
Service Mode
1. Check the various cable connections first.
• Check to see if there is a burnt or damaged cable.
• Check to see if there is a disconnected or loose cable connection.
• Check to see if the cables are connected according to the connection diagram.
2. Check the power input to the Main Board.
3. How to distinguish if the problem is caused by Main board or T-Con
a. No Video : If the problem is No Video but BLU is on and Indication
LED is blinking repeatedly and faster than nomal booting, replace the T-Con board.
b. Distorted Picture : Check the inner patterns.
*How to check inner pattern?
1.Factory mode(mute -> 1 -> 8 -> 2 -> Power on when TV is in ‘stand-by mode’)
2. Move to SVC menu
3. Move to Test Pattern
4. Check inner patterns. (This model only support FBE, READ PRE, READ POST)
Page 42

Troubleshooting
Page 43

Troubleshooting
No Video
No video?
Check LCD Panel
BLU ON/OFF ?
Off
Check SMPS, IP
Check SMPS, Main Board
Check TCON input 12V & clock
On
Check Main Board 12V output
12V & clock OK?
12V & clock OK?
No
No
Check Cable, CNT
Yes
Yes
Check TCON DCDC output Voltage
OK ?
No
Yes
T-con faulty
LCD Panel faulty
Page 44

Troubleshooting
Picture Quality Problems
Problem Solution
. First of all, please perform the Picture Test and confirm that your TV is properly displaying test image. (Go to Menu → Support → Self Diagnosis → Picture
Test) If the test image is properly displayed, the poor picture may caused by the source or signal.
. If you have an analogue cable / set top box, upgrade to a digital set top box. Use HDMI or Component cables to deliver HD
(high definition) picture quality.
● The TV image does not
look as good as it did in the
store.
● The picture is distorted:
macro block error, small
block, dots, pixelization
● Colour is wrong or missing.
● There is poor colour or
brightness.
● There is a dotted line on
the edge of the screen.
● The picture is black and
white.
. Cable / Satellite subscribers: Try HD stations from the channel line up.
. Aerial connection: Try HD stations after performing Auto programme.
- Many HD channels are up scaled from SD(Standard Definition) contents.
. Adjust the Cable/Set top box video output resolution to 1080i or 720p.
. Make sure you are watching TV at the minimum recommended distance based on the size and definition of the signal.
. Compression of video contents may cause picture distortion especially in fast moving pictures such as sports and action
movies.
. Low signal level or bad quality can cause picture distortion. This is not a TV issue.
. Mobile phones used close to the TV (cca up to 1m) may cause noise in picture on analogue and digital TV.
. If you’re using a component connection, make sure the component cables are connected to the correct jacks. Incorrect or
loose connections may cause colour problems or a blank screen.
. Adjust the Picture options in the TV menu (go to Picture / Colour / Brightness / Sharpness)
. Adjust Energy Saving option in the TV menu (go to Menu → System → Eco Solution → Energy Saving)
. Try resetting the picture to view the default picture settings (go to Menu → Picture → Reset Picture)
. If the picture size is set to Screen Fit, change it to 16:09.
. Change cable / satellite box resolution.
. If you are using an AV composite input, connect the video cable (yellow) to the Green jack of component input 1 on the TV.
● When changing channels,
the picture freezes or is
distorted or delayed.
. If your TV connected with a cable / set-top box, reconnect the AC cord and wait until the cable / set-top box reboots.
. Set the output resolution of the cable box to 1080i or 720p.
Page 45

Troubleshooting
Sound Quality Problems
Problem Solution
. First of all, please perform the Sound Test to confirm that your TV audio is properly operating. (Go to Menu →Support → Self Diagnosis → Sound Test)
If the audio is OK, the sound problem may caused by the source or signal.
● There is no sound or the
sound is too low at maximum
volume.
● The picture is good but
there is no sound.
● The speakers are making
an inappropriate noise.
Please check the volume the of external device connected to your TV.
. Set the Speaker Select option to TV Speaker in the sound menu.
. If you are using an external device, make sure the audio cables are connected to the correct audio input jacks on the TV.
. If you are using an external device, check the device’s audio output option (ex. you may need to change your cable box’s
audio option
. Check the cable connections. Makesure a video cable is not connected
to an audio input.
. For aerial or cable connections,
check the signal strength. Low signal
level may cause sound distortion.
Page 46

Troubleshooting
No Picture / No video Problems
Problem Solution
● The TV won’t turn on.
● The TV turns off
automatically.
● There is no picture/Video.
● This file may not be
playable properly.
. Make sure the AC power cord is securely plugged in to the wall outlet and the TV.
. Make sure the wall outlet is working.
. Ensure the Sleep Timer is set to Off in the Setup menu.
. If your PC is connected to the TV, check your PC power settings.
. Make sure the AC power cord is plugged in securely to the wall outlet and the TV.
. When watching TV from an aerial or cable connection, the TV will turn off after 10~15 minutes if there is no signal.
. Check cable connections (remove and reconnect all cables connected to the TV and external devices).
. Set your external devices’ (Cable / Set top Box, DVD, Blu-ray etc) video outputs to match the connections to the TV input.
For example, if an external device’s output is HDMI, it should be connected to an HDMI input on the TV.
. Make sure your connected devices are powered on.
. Be sure to select the TV’s correct source by select Source using your remote.
. This may appear because of high bit rate of content. Content generally will play but could experience some playability issue.
Page 47

Troubleshooting
RF (Cable/Aerial) Connection Problems
Problem Solution
•• Make sure the coaxial cable is connected securely.
The TV is not receiving all
channels.
No Caption on digital
channels
•• Please try Auto Program to add available channels to the channel list. Go to MENU - Channel - Auto Program then select
Auto and make surethe correct Cable TV signal type is set in the menu. There are 3 options (STD, HRC and IRC)
•• Verify the Antenna is positioned correctly.
•• Check Caption Setup menu. Try changing Caption Mode Service1 to CC1.
•• Some channels may not have caption data.
The picture is distorted:
macro
block error, small block, dots,
pixelization.
•• Compression of video contents may cause picture distortion, especially
with fast moving pictures such as sports and action movies.
•• A low signal can cause picture distortion. This is not a TV problem.
Page 48

Troubleshooting
PC Connection Problems
Problem Solution
“PC” is always shown on the
source list,
even if a PC is not connected.
•• This is normal; “PC” is always shown on the source list, regardless of whether a PC is connected.
The video is OK but there is
no audio.
•• If you are using an HDMI connection, check the audio output setting on your PC.
Page 49

Troubleshooting
Other Problems
Problem Solution
•• HD channels will have black bars on either side of the screen when displaying up scaled SD (4:3) contents.
The picture won’t display in
full screen.
Caption on TV menu is
greyed out.
•• Black bars on the Top & Bottom will be shown on movies that have aspect ratios different from your TV.
•• Adjust the picture size options on your external device or TV to full screen.
•• Caption can not be selected in the TV menu when connected via HDMI or Component.
•• Caption must be activated on the external device.
There is a plastic smell from
the TV.
The TV Signal Information is
unavailable in the Self
Diagnostic
Test menu.
The TV is tilted to the side.
The channel menu is greyed
out
(unavailable).
Your settings are lost after 30
minutes or every time the TV
is
turned off.
You have intermittent loss of
audio or video.
You see small particles when
you look closely at the edge
of
the frame of the TV.
•• This smell is normal and will dissipate over time.
•• This function is only available with digital channels from an Antenna / RF / Coax connection.
•• Remove the base stand from the TV and reassemble it.
•• The Channel menu is only available when the TV source is selected.
•• If the TV is in the Store Demo mode, it will reset audio and picture settings every 30 minutes.
Change the settings from Store Demo mode to Home Use mode in the Plug & Play procedure.
Press the SOURCE button to select TV mode, and go to MENU →System →Plug & Play →ENTER
•• Check the cable connections and reconnect them.
•• Loss of audio or video can be caused by using overly rigid or thick cables.
Make sure the cables are flexible enough for long term use. If mounting the TV to a wall,
we recommend using cables with 90 degree connectors.
•• This is part of the product’s design and is not a defect.
Page 50

Troubleshooting
Other Problems
Problem Solution
•• Select Home Use under Plug & Play mode. For details, refer to Plug & Play Feature.
POP (TV’s internal banner ad)
appears on the screen.
Melody is not played when television is
turned off.
When the channel is changed, volume
gradually gets louder.
Even if I change sound mode, monitor out
sound is constant.
Even if I set mute on, monitor out is still
outputting.
I set Mute on but sound is still outputting.
There is a vertical line(red,green,blue) on
picture.
If the Volume is Mute or set to Volume level 0 or Melody mode is off, or in the case of automatic power off
due to the 'Sleep timer' function, then no melody will be played at power off.
It takes about 2 seconds to adapt to volume levels on different channels.
The monitor out sound is independent from the main sound output, therefore changes to the audio output will
not affect the monitor output.
The monitor out sound is independent from the main Speaker output, therefore to Mute or adjust the volume
of monitor out a separate external decoder (AMP) is required.
The volume buttons and MUTE buttons do not operate when the Speaker Select is
set to External Speaker. Please set the volume on your Home theater.
Speaker Settings
■
Speaker Select (External Speaker / TV Speaker)
●
A sound echo may occur due to a difference in decoding speed between
the main speaker and the audio receiver. In this case, set the TV to External Speaker.
When Speaker Select is set to External Speaker, the volume and MUTE buttons
☞
will not operate and the sound settings will be limited.
When Speaker Select is set to External Speaker.
☞
TV Speaker: Off, External Speaker: On
●
When Speaker Select is set to TV Speaker.
☞
TV Speaker: On, External Speaker: On
●
If there is no video signal, both speakers will be mute.
☞
This occurs when TV set has a defect on one line from DATA SOURCE DRIVER IC. Contact Samsung
Service centre to resolve this problem.
Page 51

Troubleshooting
Other Problems
Problem Solution
I can not hear any sound from speaker in
HDMI mode when using a DVI-HDMI
conversion cable.
If the input signal is DVI RGB signal through an HDMI conversion cable, there is no digital sound data, you
can not hear any sound. A DVI connection does not carry any sound data. You should connect an audio cable
to the appropriate input jack for a seperate audio channel.
Although the TV caption shows HD, the
visual quality is not satisfactory.
The visual qualities of digital channels vary
HDMI Black Level does not work on HDMI
device that is output by YCbCr.
There is no sound when using HDMI mode.
The HD caption that appears when switching channels or when pressing the Information button on the remote
control means the selected channel is simply a digital channel. If the broadcasting station converts an analog
signal into digital and transmits the signal, the visual quality may not be perfect.
The visual qualities of digital channels may vary depending on the original production method(analog or
digital)
Grouping displayed information when switching channels.
→
If the original production method is digital: High visual quality program.
→
If the original production method is analog: The digital program displayed on the screen is originally
→
an analog program which has been converted. The visual quality is of an SD grade.
This function is active only when the an external device
(DVD player, STB etc.) is connected to the TV via HDMI(RGB Signal).
If you use external equipment that support low HDMI version, sound may not be output at TV that support
new HDMI version(HDMI1.3).
If sound does not work, use HDMI2 IN for video input and DVI IN(HDMI1) port[R(red) - AUDIO - L(white)]
→
for audio input.
Page 52

Troubleshooting
• WMA 10 Pro supports up to 5.1 channel. WMA lossless audio is
not supported.
• RealAudio 10 lossless is not supported.
• QCELP, AMR NB/WB are not supported.
• If
Supported Multi Media format(photo, music, video)
Video Decoder Audio codec
• Supports up to H.264, Level 4.1
• H.264 FMO / ASO / RS, VC1 SP / MP / AP L4 and
AVCHD are not supported.
• For all Video codecs except MVC, VP8, VP6:
−− Below 1280 x 720: 60 frame max
−− Above 1280 x 720: 30 frame max
−− GMC 2 over is not supported.
• Supports only SVAF Top/Bottom and Side by Side.
• Supports only BD MVC Spec.
Vorbis is only in Webm container, supports up to 2 channel
Page 53

Troubleshooting
Supported Multi Media format(video)
 Loading...