

Page 1

Contact SAMSUNG WORLDWIDE
If you have any questions or comments relating to Samsung products, please contact the SAMSUNG customer care centre.
Country
AUSTRIA 0810 - SAMSUNG (7267864, € 0.07/min) www.samsung.com/at
BELGIUM 02-201-24-18 www.samsung.com/be (Dutch)
CZECH 800 - SAMSUNG (800-726786) www.samsung.com/cz
DENMARK 70 70 19 70 www.samsung.com/dk
FINLAND 030 - 6227 515 www.samsung.com/
FRANCE 01 48 63 00 00 www.samsung.com/fr
GERMANY 01805 - SAMSUNG (726-7864 € 0,14/Min) www.samsung.de
HUNGARY 06-80-SAMSUNG (726-7864) www.samsung.com/hu
ITALIA 800-SAMSUNG (726-7864) www.samsung.com/it
LUXEMBURG 261 03 710 www.samsung.com/lu
NETHERLANDS 0900-SAMSUNG (0900-7267864) (€ 0,10/Min) www.samsung.com/nl
NORWAY 815-56 480 www.samsung.com/no
POLAND 0 801 1SAMSUNG (172678)
PORTUGAL 80820-SAMSUNG (726-7864) www.samsung.com/pt
SLOVAKIA 0800-SAMSUNG (726-7864) www.samsung.com/sk
SPAIN 902 - 1 - SAMSUNG (902 172 678) www.samsung.com/es
SWEDEN 0771 726 7864 (SAMSUNG) www.samsung.com/se
Turkey 444 77 11 www.samsung.com/tr
U.K 0845 SAMSUNG (7267864) www.samsung.com/uk
EIRE 0818 717100 www.samsung.com/ie
Switzerland 0848 - SAMSUNG (7267864, CHF 0.08/min) www.samsung.com/ch
LITHUANIA 8-800-77777 www.samsung.com/lt
LATVIA 8000-7267 www.samsung.com/lv
ESTONIA 800-7267 www.samsung.com/ee
Customer Care Centre
Samsung Zrt., česká organizační složka, Oasis Florenc, Sokolovská394/17, 180 00, Praha 8
022-607-93-33
Web Site
www.samsung.com/be_fr (French)
www.samsung.com/pl
www.samsung.com/ch_fr/(French)
LED TV user manual
LED TV
user manual
© 2010 Samsung Electronics Co., Ltd. All rights reserved.
imagine the possibilities
Thank you for purchasing this Samsung product.
To receive more complete service, please register
your product at
www.samsung.com/register
Model _____________ Serial No. _____________
BN68-02590G-03
Page 2
Figures and illustrations in this User Manual are provided for reference only and may differ from actual product appearance.
Product design and specifications may be changed without notice.
Digital TV notice
1. Functionalities related to Digital TV (DVB) are only available in countries/areas where DVB-T (MPEG2 and MPEG4 AVC) digital terrestrial signals are
broadcasted or where you are able to access to a compatible DVB-C (MPEG2 and MPEG4 AAC) cable-TV service. Please check with your local
dealer the possibility to receive DVB-T or DVB-C signal.
2. DVB-T is the DVB European consortium standard for the broadcast transmission of digital terrestrial television and DVB-C is that for the broadcast
transmission of digital TV over cable. However, some differentiated features like EPG (Electric Programme Guide), VOD (Video On Demand) and so
on, are not included in this specification. So, they cannot be workable at this moment.
3. Although this TV set meets the latest DVB-T and DVB-C standards, as of [August, 2008], the compatibility with future DVB-T digital terrestrial and
DVB-C digital cable broadcasts cannot be guaranteed.
4. Depending on the countries/areas where this TV set is used some cable-TV providers may charge an additional fee for such a service and you may
be required to agree to terms and conditions of their business.
5. Some Digital TV functions might be unavailable in some countries or regions and DVB-C might not work correctly with some cable service providers.
6. For more information, please contact your local Samsung customer care centre.
The reception quality of TV may be affected due to differences in broadcasting method between the countries. Please check the TV
✎
performance in the local SAMSUNG Authorized Dealer, or the Samsung Call Centre whether it can be improved by reconfiguring TV setting or
not.
Still image warning
Avoid displaying still images (like jpeg picture files) or still image element (like TV programme logo, panorama or 4:3 image format, stock or news bar at
screen bottom etc.) on the screen. Constant displaying of still picture can cause ghosting of LED screen, which will affect image quality. To reduce risk of
this effect, please follow below recommendations:
• Avoid displaying the same TV channel for long periods.
• Always try do display any image on full screen, use TV set picture format menu for best possible match.
• Reduce brightness and contrast values to minimum required to achieve desired picture quality, exceeded values may speed up the burnout process.
• Frequently use all TV features designed to reduce image retention and screen burnout, refer to proper user manual section for details.
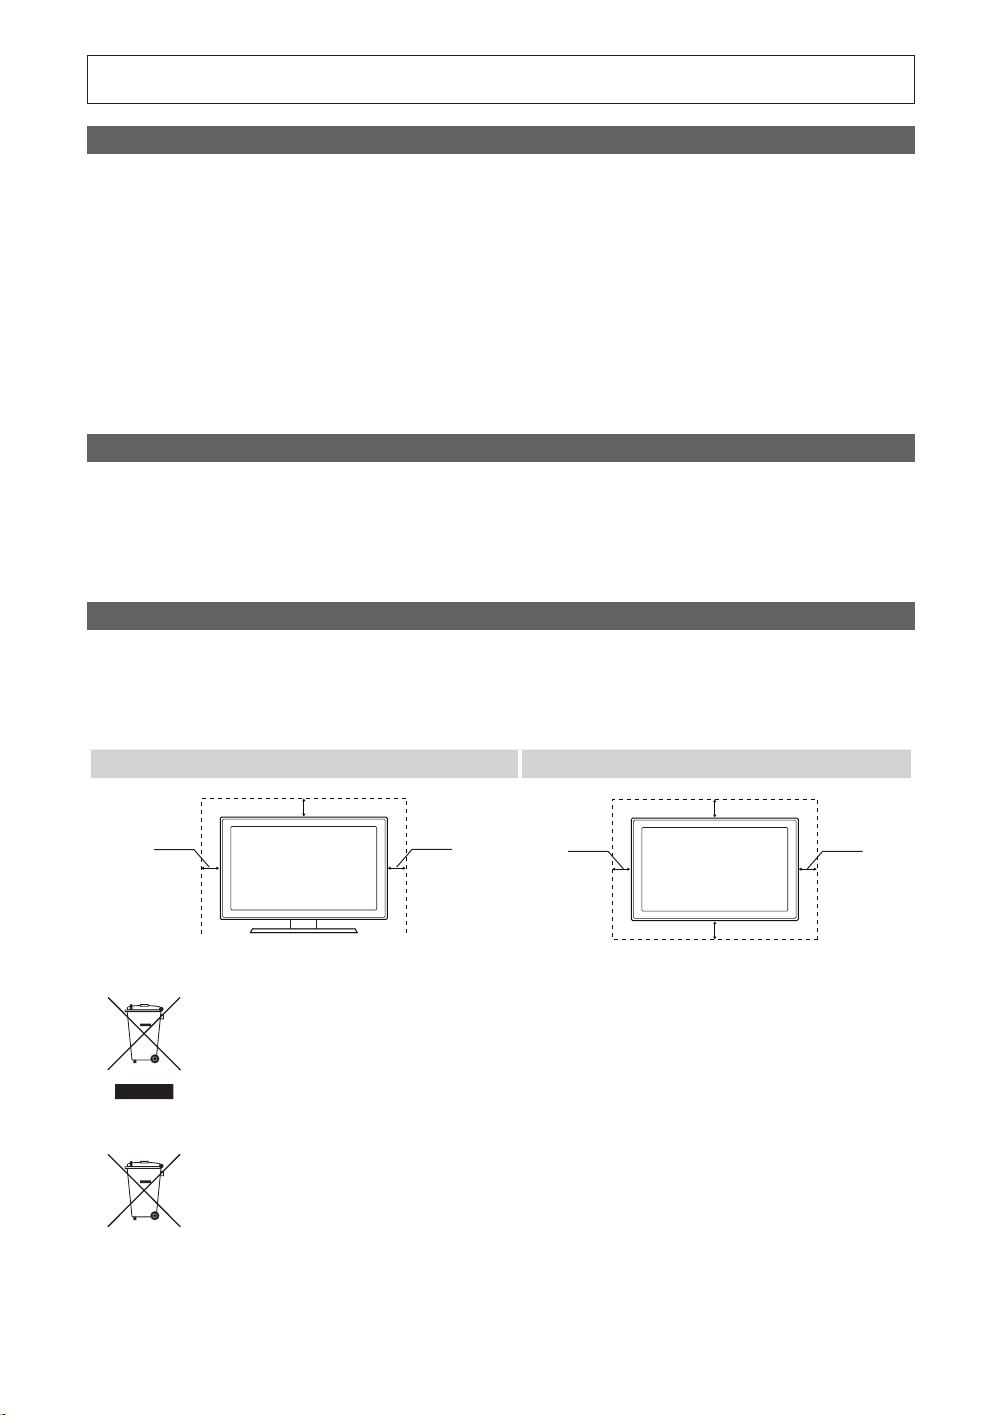
Securing the Installation Space
Keep the required distances between the product and other objects (e.g. walls) to ensure proper ventilation.
Failing to do so may result in fire or a problem with the product due to an increase in the internal temperature of the product.
When using a stand or wall-mount, use parts provided by Samsung Electronics only.
✎
If you use parts provided by another manufacturer, it may result in a problem with the product or an injury due to the product falling.
x
The appearance may differ depending on the product.
✎
Installation with a stand. Installation with a wall-mount.
2
10 cm
English
10 cm
10 cm
Correct Disposal of This Product (Waste Electrical & Electronic Equipment)
(Applicable in the European Union and other European countries with separate collection systems)
This marking on the product, accessories or literature indicates that the product and its electronic accessories (e.g. charger,
headset, USB cable) should not be disposed of with other household waste at the end of their working life. To prevent possible
harm to the environment or human health from uncontrolled waste disposal, please separate these items from other types of waste
and recycle them responsibly to promote the sustainable reuse of material resources. Household users should contact either the
retailer where they purchased this product, or their local government office, for details of where and how they can take these items
for environmentally safe recycling. Business users should contact their supplier and check the terms and conditions of the purchase
contract. This product and its electronic accessories should not be mixed with other commercial wastes for disposal.
Correct disposal of batteries in this product
(Applicable in the European Union and other European countries with separate battery return systems)
This marking on the battery, manual or packaging indicates that the batteries in this product should not be disposed of with other
household waste at the end of their working life. Where marked, the chemical symbols Hg, Cd or Pb indicate that the battery
contains mercury, cadmium or lead above the reference levels in EC Directive 2006/66. If batteries are not properly disposed of,
these substances can cause harm to human health or the environment. To protect natural resources and to promote material
reuse, please separate batteries from other types of waste and recycle them through your local, free battery return system.
10 cm
10 cm
10 cm
10 cm
Page 3

Contents
Getting Started
4
Connections
8
Basic Features
12
Advanced Features
29
4 Accessories
5 Viewing the Control Panel
6 Viewing the Remote Control
7 Connecting to an Antenna
7 Plug & Play (Initial Setup)
8 Connecting to an AV Device
10 Connecting to an Audio Device
11 Changing the Input Source
12 How to Navigate Menus
12 Using the INFO button (Now & Next guide)
12 Planning Your Viewing
14 Channel Menu
17 Picture Menu
23 Sound Menu
25 Setup Menu
28 Support Menu
29 Connecting to a PC
30 Network Connection
37 Media Play
46 Anynet+
50 Internet@TV
53 AllShare
ENGLISH
Other Information
TOOLS
This function can be used by
pressing the TOOLS button on the
remote control.
55
55 Analogue Channel Teletext Feature
56 Assembling the Cables
57 Installing the Wall Mount
59 Anti-theft Kensington Lock
59 Securing the TV to the wall
60 Troubleshooting
65 Specifications
66 Index
Check the Symbol!
Note One-Touch Button
English
3
Page 4

Getting Started
Accessories
✎
Please make sure the following items are included with your LED TV. If any items are missing, contact your dealer.
✎
The items’ colours and shapes may vary depending on the models.
✎
Cables not included in the package contents can be purchased separately.
CAUTION: INSERT SECURELY LEST SHOULD BE DETACHED IN SET
y Remote Control & Batteries (AAA x 2)
y Warranty Card / Safety Guide (Not available in some locations)
(M4 X L8)
y Blanking Bracket & Screw (X1) y Holder-Ring (4ea) y Holder-Wire stand
y Cable Tie y Holder-Wire (3ea) y LAN Adapter
y Cleaning Cloth
y Owner’s Instructions
y Antenna Adapter
(Air / Cable)
y Component Adapter y AV Adapter y SCART Adapter (2EA)
See separate guide for installing the stand.
y Stand (1EA) y Guide Stand (1EA) y Screws (9EA)
✎
For best cable connection to this product, be sure to use cables with a maximum thickness as below:
y Antenna Adapter
(Satellite)
y Maximum thickness - 0.55 inches (14mm)
y Optical Adapter y PC Adapter
s
s
s
s
s
M4 X L8
4
English
Page 5
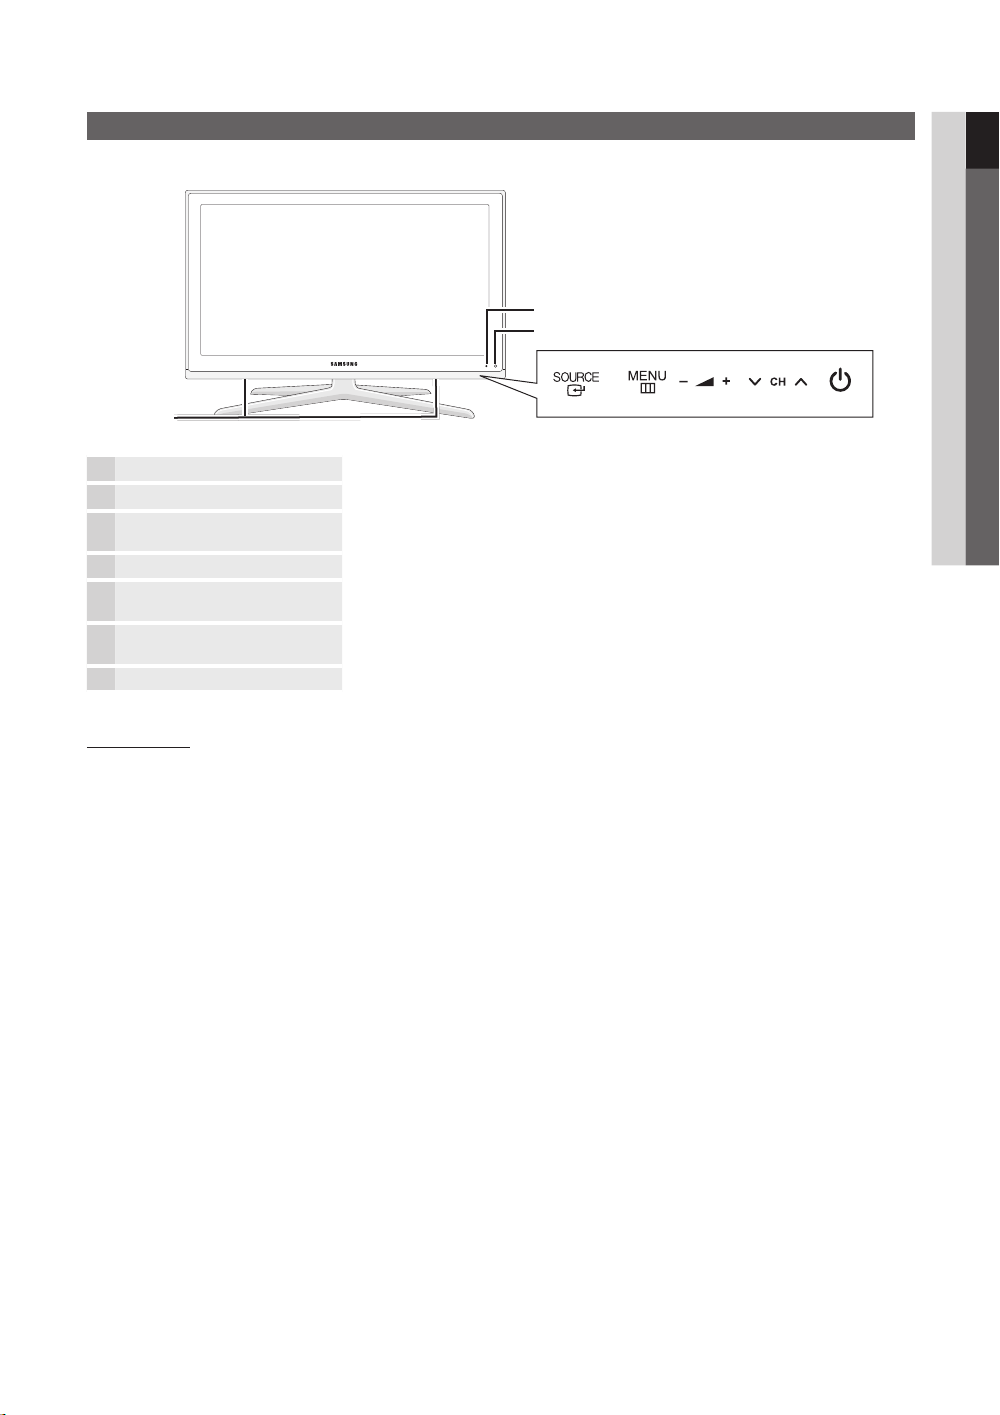
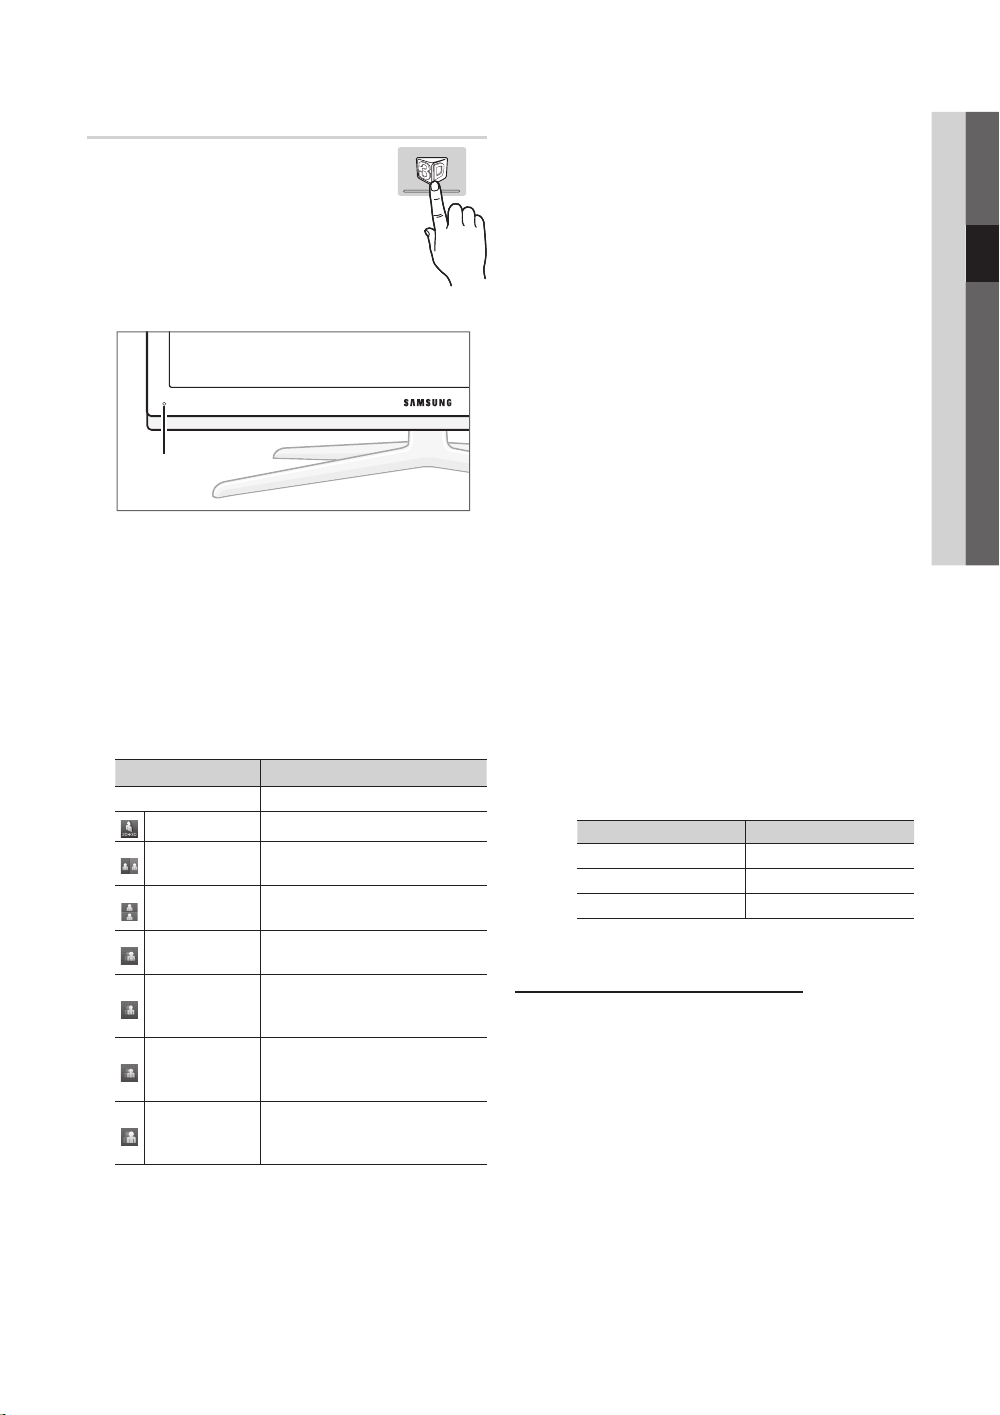
Viewing the Control Panel
✎
The product colour and shape may vary depending on the model.
Power Indicator
Remote control sensor
Speakers
Power Indicator Blinks and turns off when the power is on and lights up in standby mode.
Remote control sensor Aim the remote control towards this spot on the TV.
SOURCE
MENU
(Power)
Toggles between all the available input sources. In the on-screen menu, use this
button as you would use the ENTER button on the remote control.
Displays an on-screen menu, the OSD (on screen display), of your TV’s features.
Adjusts the volume. In the OSD, use the
◄ and ► buttons on the remote control.
Changes the channels. In the OSD, use the
▼ and ▲ buttons on the remote control.
Turns the TV on or off.
buttons as you would use the
buttons as you would use the
01 Getting Started
Standby mode
Do not leave your TV in standby mode for long periods of time (when you are away on a holiday, for example). A small amount
of electric power is still consumed even when the power button is turned off. It is best to unplug the power cord.
English
5
Page 6
Getting Started
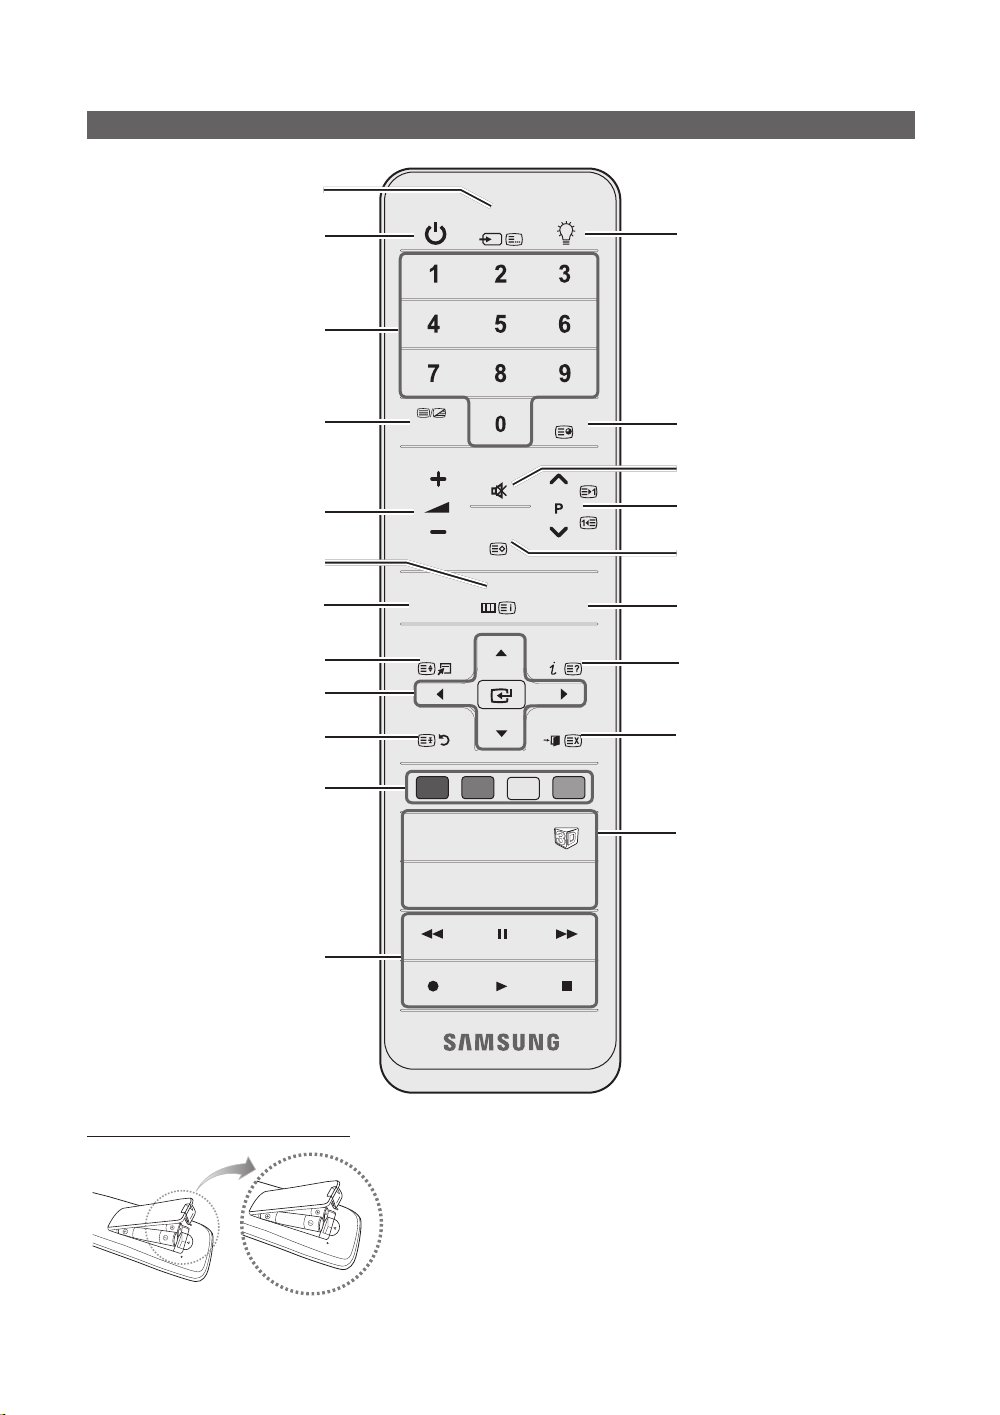
Viewing the Remote Control
Displays✎and✎selects✎the✎available✎video✎
sources✎(p.✎11).
Turns✎the✎TV✎on✎and✎off.
Have✎direct✎access✎to✎channels.
Alternately✎select✎Teletext✎ON,✎Double,✎
Mix✎or✎OFF.
Adjusts✎the✎volume.
✎Opens✎the✎OSD.
Displays✎the✎Content View,✎which✎
includes✎Guide, 3D, Internet@TV,
Media Play,✎and✎AllShare.
✎Quickly✎select✎frequently✎used✎functions.
Selects✎the✎on-screen✎menu✎items✎and✎
changes✎the✎values✎seen✎on✎the✎menu.
Returns✎to✎the✎previous✎menu.
POWER
TTX/MIX
CONTENT
TOOLS
RETURN
SOURCE
MUTE
CH LIST
MENU
ON/OFF
PRE-CH
GUIDE
INFO
EXIT
Turns✎the✎remote✎control✎light✎on✎or✎
off.✎When✎on,✎the✎buttons✎become✎
illuminated✎for✎a✎moment✎when✎pressed.✎
(Using✎the✎remote✎control✎with✎this✎button✎
set✎to✎On✎will✎reduce✎the✎battery✎usage✎
time.)
Returns✎to✎the✎previous✎channel.
Cuts✎off✎the✎sound✎temporarily.
Changes✎channels.
Displays✎channel✎lists✎on✎the✎screen✎
(p.✎14).
Displays✎the✎EPG✎(Electronic✎Programme✎
Guide)✎(p.12).
Displays✎information✎on✎the✎TV✎screen.
Exits✎the✎menu.
These✎buttons✎are✎for✎the✎✎
Channel Manager, Internet@TV,
Media Play✎menu,✎etc.
Use✎these✎buttons✎in✎Media Play✎and✎
Anynet+ (HDMI-CEC)✎modes.✎(p.✎37,✎46)✎
(The✎�✎button✎also✎controls✎recording✎
for✎Samsung✎recorders✎that✎support✎the✎
Anynet+(HDMI-CEC),TimeShift✎and✎PVR✎
features.)
Installing batteries (Battery size: AAA)
English
6
A B C D
MEDIA.P
INTERNET
@TV
P.SIZEAD
✎✎
NOTE
Use✎the✎remote✎control✎within✎23✎feet✎from✎the✎TV.
✎x
Bright✎l ight✎may✎affect✎the✎performance✎of✎the✎remote✎control.✎
✎x
Avoid✎using✎nearby✎special✎fluorescent✎light✎or✎neon✎signs.
The✎colour✎and✎shape✎may✎vary✎depending✎on✎the✎model.
✎x
SUBT.
MEDIA.P:✎Displays✎Media Play (p.✎37).
INTERNET@TV:✎Link✎to✎various✎internet✎
services✎(p.✎50).
3D:✎Sets✎the✎video,✎which✎provided✎with✎
3D✎signal✎(p.✎21).
AD:✎Turns✎the✎audio✎description✎on✎and✎
off✎(p.✎24).✎This✎is✎not✎available✎in✎some
locations.
P.SIZE:✎Selects✎the✎picture✎size✎(p.✎19).
SUBT.:✎Displays✎digital✎subtitles✎(p.✎26).
Page 7
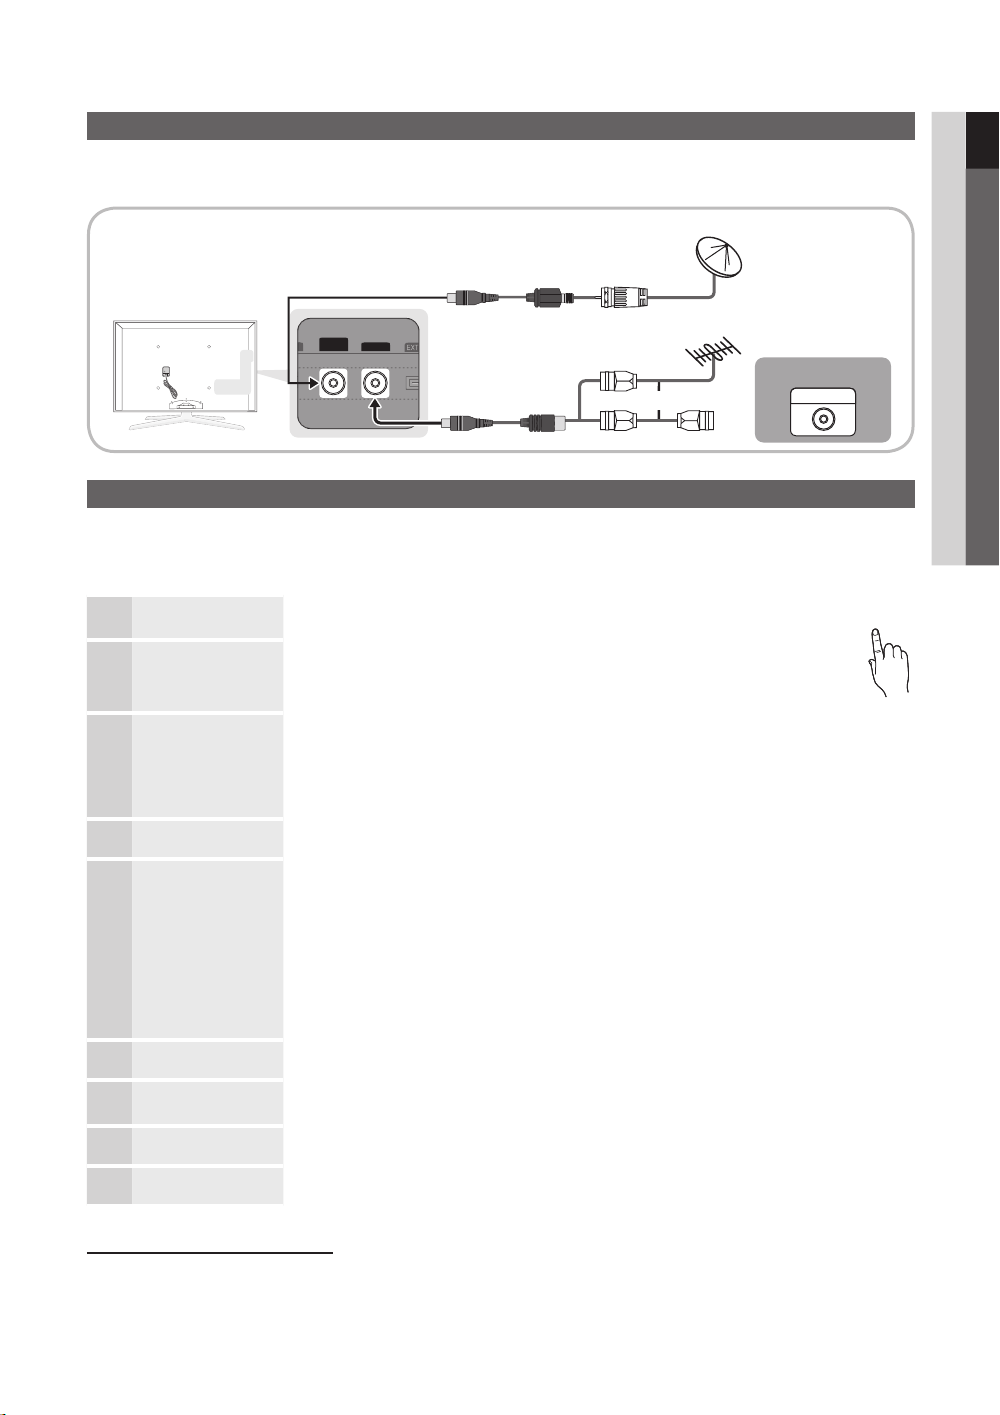
Connecting to an Antenna
When the TV is initially powered on, basic settings proceed automatically.
✎
Preset: Connecting the mains and antenna.
01 Getting Started
Satellite Antenna
ANT 2 IN
(
SATELLITE
)
ANT 1 IN
VHF/UHF Antenna
or
Cable
ANT OUT
Plug & Play (Initial Setup)
When the TV is initially powered on, a sequence of on-screen prompts will assist in configuring basic settings. Press the
POWER button. Plug & Play is available only when the Input source is set to TV.
✎
To return to the previous step, press the Red button.
Selecting a language
1
Selecting Store Demo or
Home Use
2
Selecting a country
3
Selecting an antenna
4
Selecting a channel
5
Setting the Clock Mode Set the Clock Mode automatically or manually.
6
Time Zone
7
Viewing the
HD Connection Guide.
8
Enjoy your TV.
Press the ▲ or ▼ button, then press the ENTER
Select the desired OSD (On Screen Display) language.
Press the ◄ or ► button, then press the ENTER
• Select the Home Use mode. Store Demo mode is for retail environments.
• To return the unit’s settings from Store Demo to Home Use (standard): Press the volume
button on the TV. When the OSD volume is displayed, press and hold MENU for 5 sec.
Press the ▲ or ▼ button, then press the ENTER
Select the appropriate country.
After selecting the country in the Country menu, some models may proceed with an additional option to setup
✎
the pin number.
When you input the PIN number, 0-0-0-0 is not available.
✎
Press the ▲ or ▼ button, then press the ENTER button.
Select Air, Cable or Satellite.
Press the ▲ or ▼ button, then press the ENTER
Select the channel source to memorise. When setting the antenna source to Cable, a step appears allowing you to
assign numerical values (channel frequencies) to the channels. For more information, refer to Channel →
Auto Store (p. 14).
When Air or Cable is selected first: After all Air or Cable channels are stored, the step for storing Satellite
✎
channels is displayed.
When Satellite is selected first: After all Satellite channels are stored, the step for storing Air or Cable
✎
channels is displayed.
Press the ENTER button at any time to interrupt the memorisation process.
✎
Press the ▲ or ▼ button to select Auto, then press the ENTER button.
Press the ▲ or ▼ button to select the your time zone, then press the ENTER button. (depending on the
country)
The connection method for the best HD screen quality is displayed.
Press the ENTER button.
button.
button.
button.
button.
POWER
P
9
If You Want to Reset This Feature...
Select Setup - Plug & Play (Initial Setup). Enter your 4 digit PIN number. The default PIN number is “0-0-0-0.” If you want to
change the PIN number, use the Change PIN function.
English
7
Page 8
Connections
R-AUDIO-L
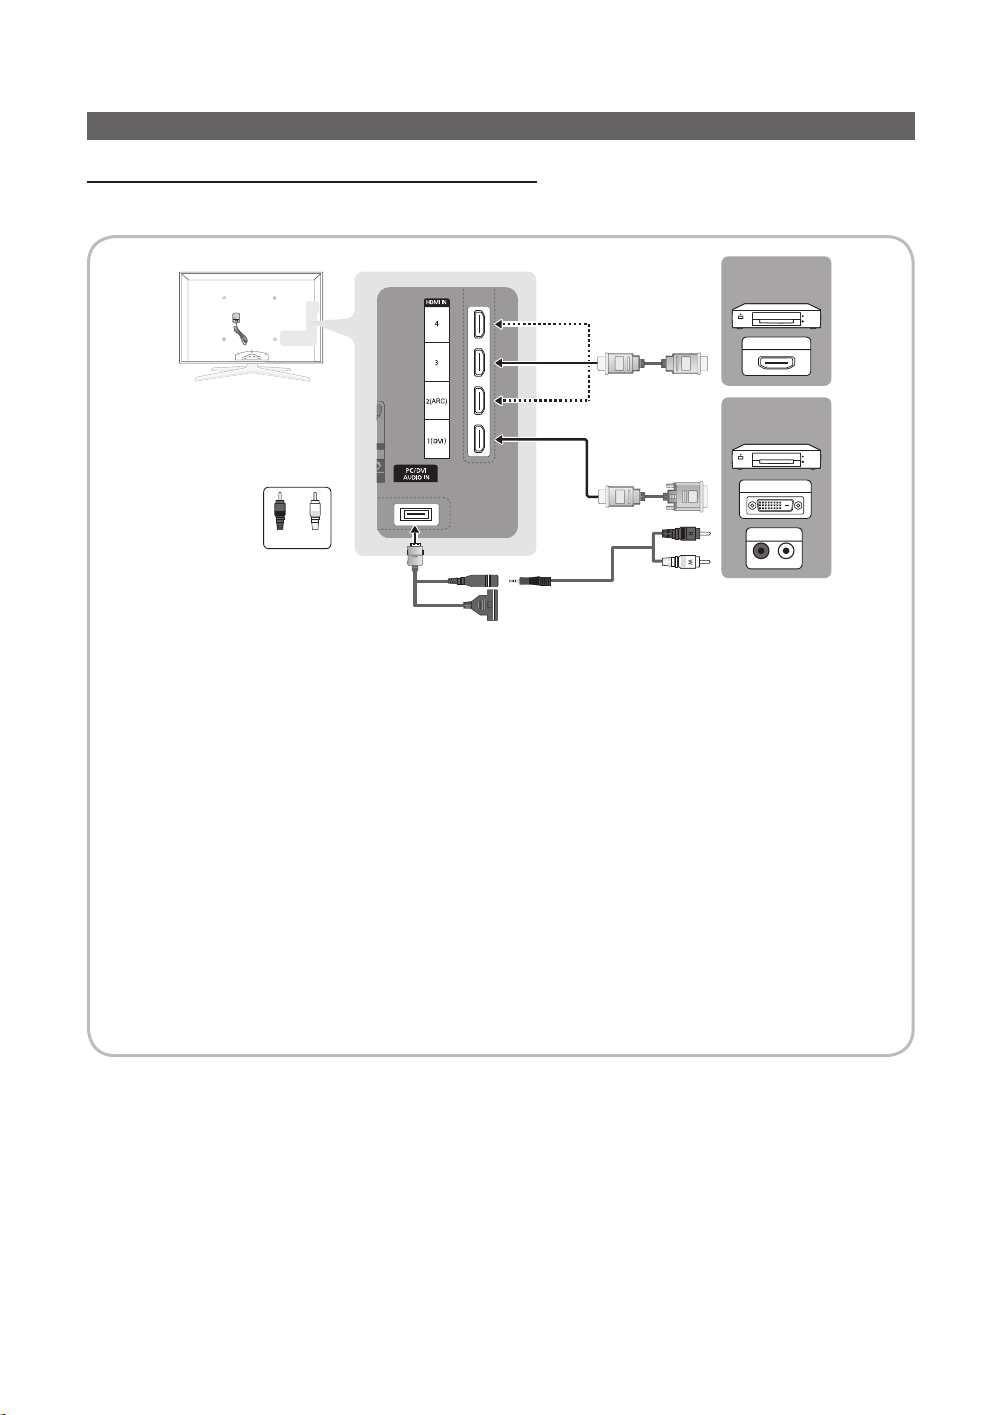
Connecting to an AV Device
Using an HDMI or HDMI/DVI cable: HD connection (up to 1080p)
Available devices: DVD, Blu-ray player, HD cable box, HD STB (Set-Top-Box) satellite receiver, cable box, satellite receiver
(STB)
DVD /
Blu-ray player
HDMI OUT
DVD /
v
Blu-ray player
W
R
Red White
✎
HDMI IN 1(DVI), 2(ARC), 3, 4, PC/DVI AUDIO IN
For better picture and audio quality, connect to a digital device using an HDMI cable.
x
An HDMI cable supports digital video and audio signals, and does not require an audio cable.
x
– To connect the TV to a digital device that does not support HDMI output, use an HDMI/DVI and audio cables.
The picture may not display normally (if at all) or the audio may not work if an external device that uses an older
x
version of HDMI mode is connected to the TV. If such a problem occurs, ask the manufacturer of the external
device about the HDMI version and, if out of date, request an upgrade.
Be sure to use an HDMI cable with a thickness of 14 mm or less.
x
Be sure to purchase a certified HDMI cable. Otherwise, the picture may not display or a connection error may
x
occur.
A basic high-speed HDMI cable or one with ethernet is recommended. This product does not support the
x
ethernet function via HDMI.
This product supports the 3D and ARC (Audio Return Channel) functions via an HDMI cable. Note that the
x
ARC function is supported by the HDMI IN 2(ARC) port only.
– If 3D Auto View is set to On, some functions such as Internet@TV may be disabled. In this case,
set 3D Auto View or 3D Mode to Off.
The ARC function allows digital audio to output via the HDMI IN 2(ARC) port. It can be enabled only when the
x
TV is connected with an audio receiver that supports the ARC function.
DVI OUT
AUDIO OUT
8
English
Page 9
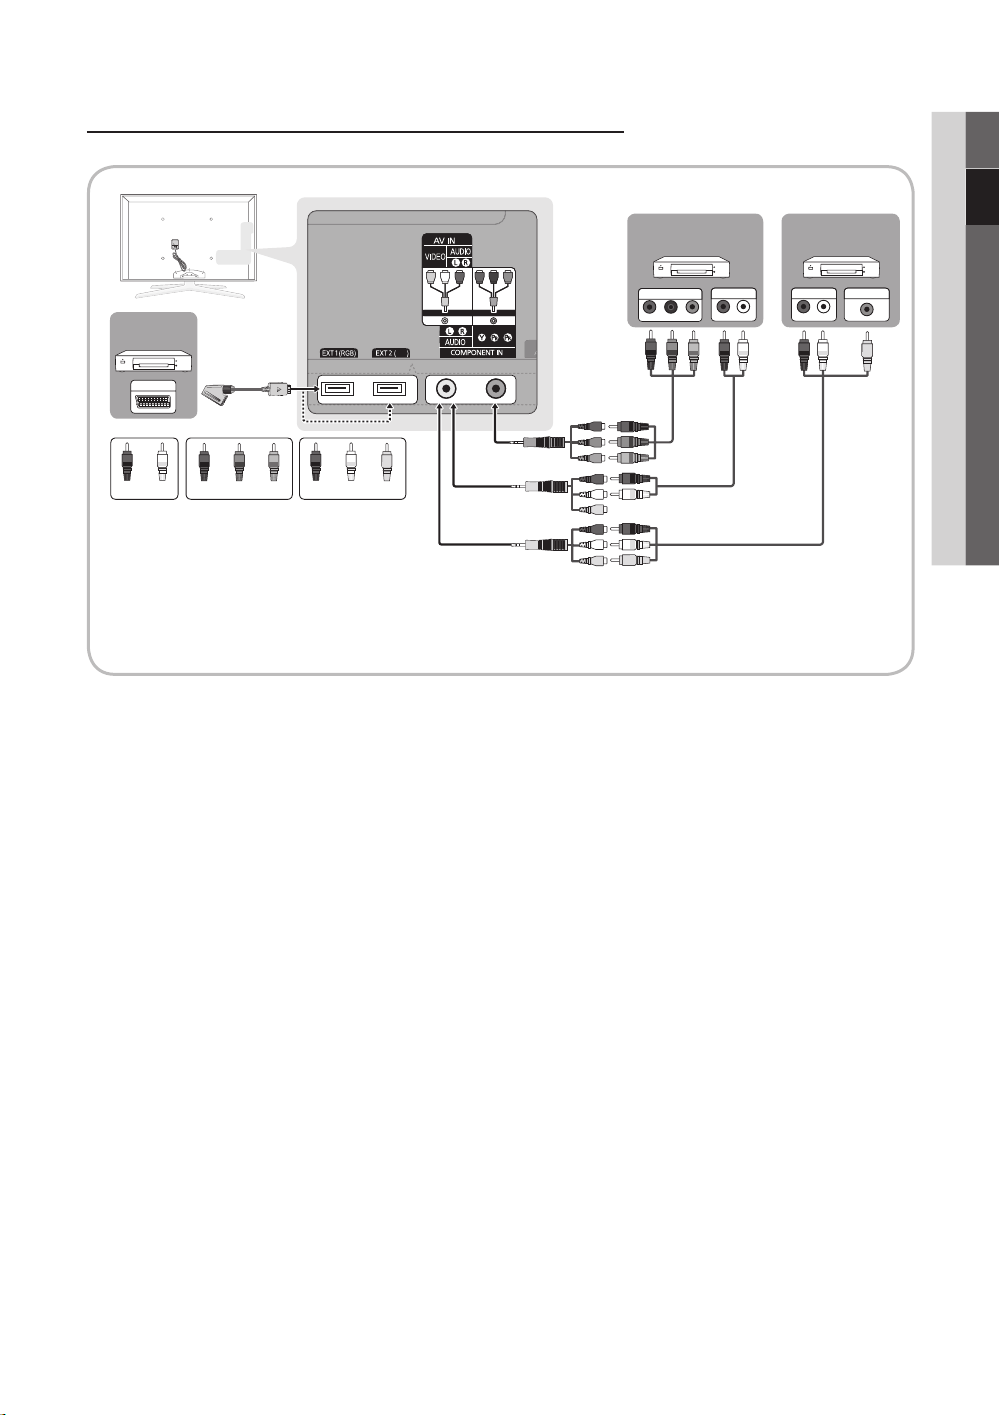
Using a Component (up to 1080p) or Audio/Video (480i only) and Scart Cable
Available devices: DVD, Blu-ray player, cable box, STB satellite receiver, VCR
02 Connections
DVD /
Blu-ray player
COMPONENT OUT
R
B
G
W R
W R
Y
PR PB Y
R
VCR / DVD
AV
EXT
W
W
R
✎
In Ext.1, Ext.2 mode, DTV Out supports MPEG SD Video and Audio only.
✎
To obtain the best picture quality, the Component connection is recommended over the A/V connection.
RGB
R
Y
RedRed WhiteWhite YellowRed Blue Green
AUDIO OUT
R-AUDIO-L
B
G
R-AUDIO-L
VCR
WRWR
VIDEO OUTAUDIO OUT
Y
English
9
Page 10

Connections
Connecting to an Audio Device
Using an Optical (Digital) or Audio (Analogue) Cable or Headphone Connection
Available devices: digital audio system, amplifier, DVD home theatre
AUDIO IN
W R
W
R
Red White
✎
DIGITAL AUDIO OUT (OPTICAL)
When a digital audio system is connected to the DIGITAL AUDIO OUT (OPTICAL) jack, decrease the volume
x
of both the TV and the system.
5.1 CH (channel) audio is available when the TV is connected to an external device supporting 5.1 CH.
x
When the receiver (home theatre) is set to on, you can hear sound output from the TV’s optical jack. When the
x
TV is receiving a DTV signal, the TV will send 5.1 CH sound to the home theatre receiver. When the source is
a digital component such as a DVD / Blu-ray player / cable box / STB (Set-Top-Box) satellite receiver and is
connected to the TV via HDMI, only 2 CH audio will be heard from the home theatre receiver. If you want to
hear 5.1 CH audio, connect the digital audio out jack from your DVD / Blu-ray player / cable box / STB satellite
receiver directly to an amplifier or home theatre.
✎
Headphones : You can connect your headphones to the headphones output on your set. While the
headphones are connected, the sound from the built-in speakers will be disabled.
Sound function may be restricted when connecting headphones to the TV.
x
Headphone volume and TV volume are adjusted separately.
x
✎
AUDIO OUT: Connects to the audio input jacks on your amplifier/DVD home theatre.
When connecting, use the appropriate connector.
x
When an audio amplifier is connected to the AUDIO OUT jacks: Decrease the volume of the TV and adjust
x
the volume level with the amplifier’s volume control.
R-AUDIO-L
OPTICAL
amplifier,
DVD home theatre
digital audio system
10
English
Page 11

CONNECTIONS COMMON INTERFACE Slot
To watch paid channels, the “CI or CI+ CARD” must be inserted.
y If you don’t insert the “CI or CI+ CARD,” some channels will
display the message “Scrambled Signal”.
y The pairing information containing a telephone number, the “CI or
CI+ CARD” ID the Host ID and other information will be displayed
in about 2~3 minutes. If an error message is displayed, please
contact your service provider.
y When the configuration of channel information has finished, the
message “Updating Completed” is displayed, indicating the
channel list is updated.
✎
NOTE
You must obtain a “CI or CI+ CARD” from a local cable service provider.
x
When removing the “CI or CI+ CARD”, carefully pull it out with your hands since dropping the “CI or CI+ CARD” may
x
cause damage to it.
Insert the “CI or CI+ CARD” in the direction marked on the card.
x
The location of the COMMON INTERFACE slot may be different depending on the model.
x
“CI or CI+ CARD” is not supported in some countries and regions; check with your authorized dealer.
x
If you have any problems, please contact a service provider.
x
Insert the “CI or CI+ CARD” that supports the current antenna settings. The screen will be distorted or will not be
x
seen.
When you are watching the satellite TV, remove the “CI or CI+ CARD” of terrestrial and cable. The screen will be
x
distorted or will not be seen.
02 Connections
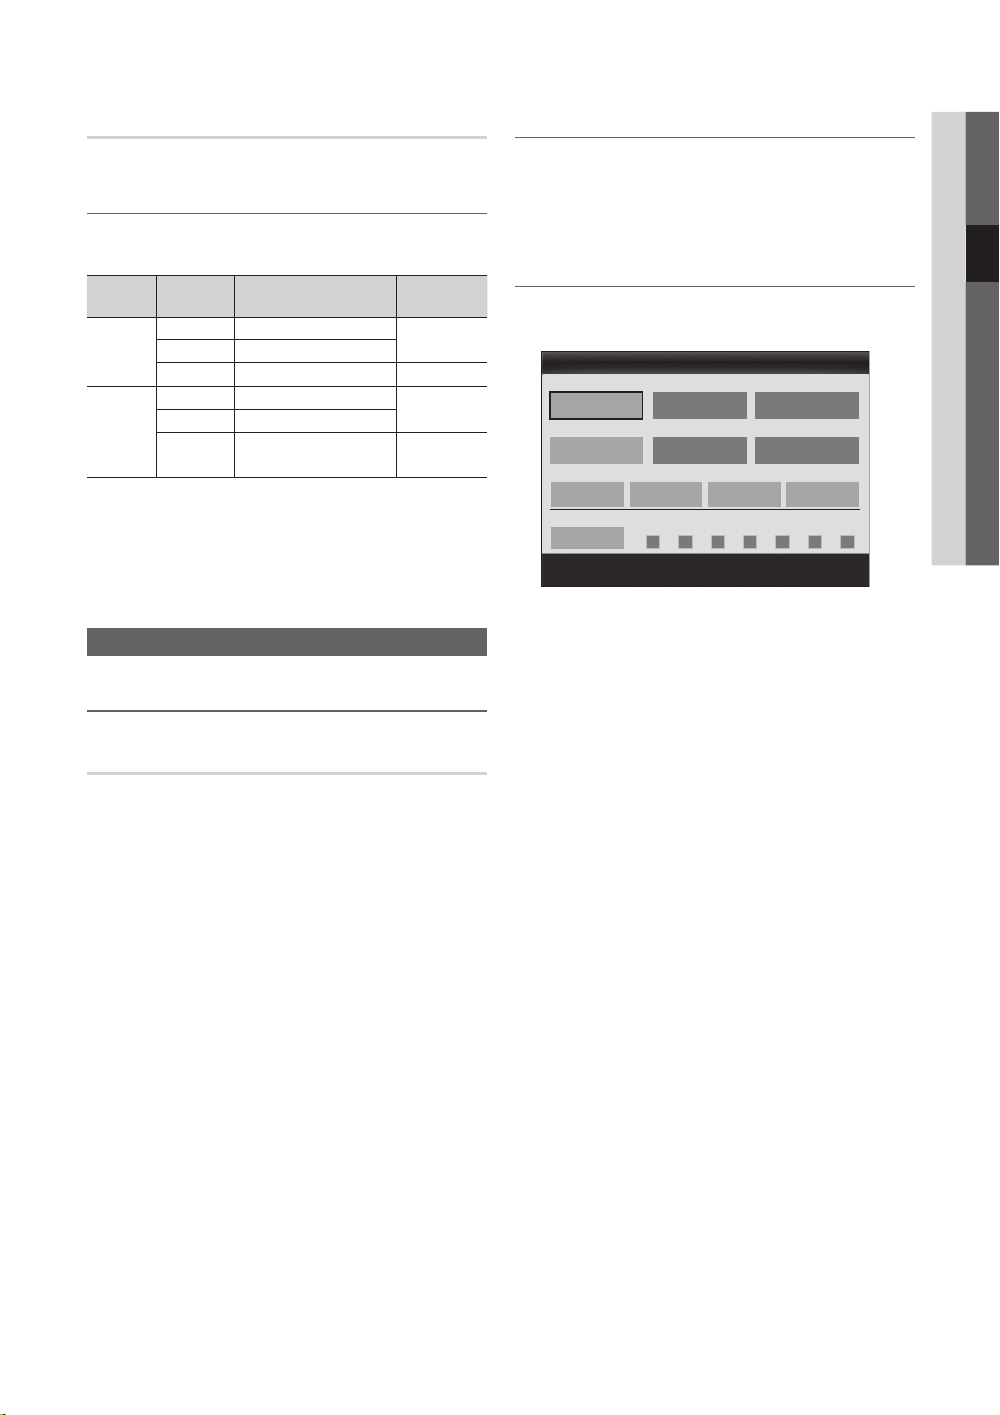
Changing the Input Source
Source List
Use to select TV or other external input
sources such as DVD / Blu-ray players
/ cable box / STB satellite receiver
connected to the TV.
■ TV / Ext.1 / Ext.2 / PC / AV /
Component / HDMI1/DVI / HDMI2 /
HDMI3 / HDMI4 / USB
✎
In the Source List, connected
inputs will be highlighted.
✎
Ext.1, Ext.2 and PC always stay activated.
SOURCE
Edit Name
■ VCR / DVD / Cable STB / Satellite STB / PVR STB /
AV Receiver / Game / Camcorder / PC / DVI PC /
DVI Devices / TV / IPTV / Blu-ray / HD DVD / DMA:
Name the device connected to the input jacks to make
your input source selection easier.
✎
When a PC with a resolution of 1920 x 1080 @
60Hz is connected to the HDMI IN 1(DVI) port,
you should set to DVI PC mode under Edit Name.
✎
When connecting an HDMI/DVI cable to the
HDMI IN 1(DVI) port, you should set to DVI PC or
DVI Devices mode under Edit Name.
✎
If an HDMI cable is connected to the
HDMI IN 1(DVI) port, the audio may not work. In
this case, connect to the PC/DVI AUDIO IN port.
English
11
Page 12
Basic Features
P
OWER
SOURCE
O
N/OFF
CO
T
TTX/MIX
PRE-CH
GUIDE
CH LIS
T
MUTE
TOOLS
INFO
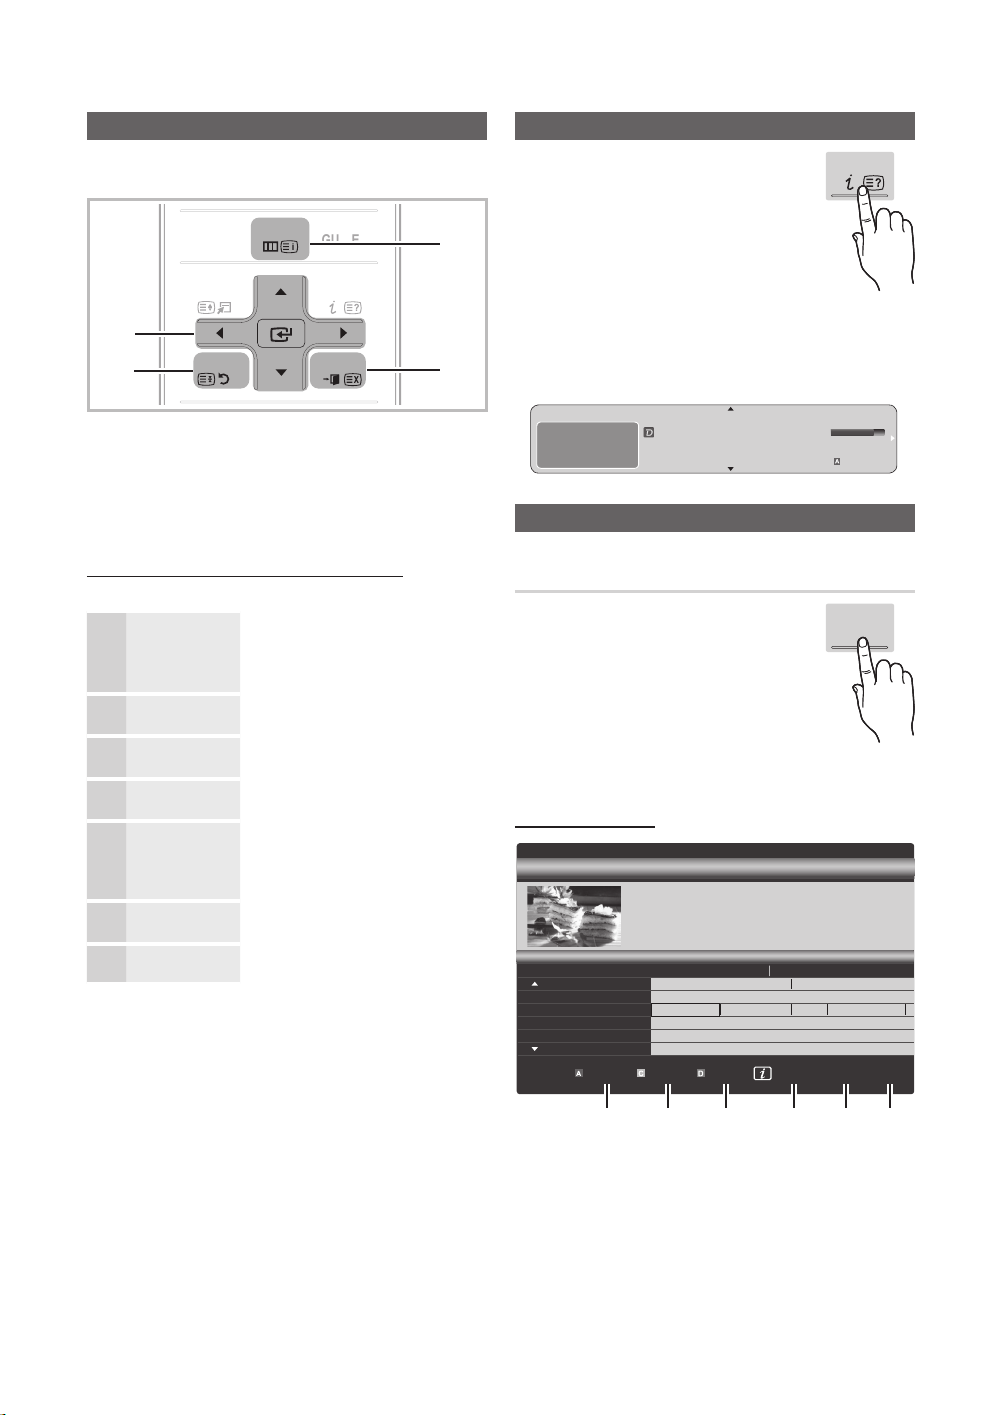
How to Navigate Menus
Before using the TV, follow the steps below to learn how to
navigate the menu and select and adjust different functions.
MENU
NTEN
3
1
2
RETURN
EXIT
4
1 ENTER / Direction button: Move the cursor and
select an item. Confirm the setting.
2 RETURN button: Returns to the previous menu.
3 MENU button: Displays the main on-screen menu.
4 EXIT button: Exits the on-screen menu.
How to Operate the OSD (On Screen Display)
The access step may differ depending on the selected menu.
1
MENU
The main menu options appear on
the screen:
Picture, Sound, Channel, Setup,
Input, Application, Support.
▲ / ▼ Select an icon with the ▲ or ▼
2
3
4
5
ENTER
▲ / ▼
◄ / ►
button.
Press ENTER to access the
sub-menu.
Select the desired submenu with
the ▲ or ▼ button.
Adjust the value of an item with the
◄ or ► button. The adjustment in
the OSD may differ depending on
the selected menu.
ENTER
6
EXIT
Press ENTER to complete the
configuration.
Press EXIT.
7
Using the INFO button (Now & Next guide)
The display identifies the current channel
and the status of certain audio-video
settings.
The Now & Next guide shows daily TV
programme information for each channel
according to the broadcasting time.
y Scroll ◄, ► to view information for a
desired programme while watching the
current channel.
y Scroll ▲, ▼ to view information for other channels. If you
want to move to the currently selected channel, press
the ENTER
DEF
DTV Air
15
button.
Unclass ified
No Det aild Inform ation
Life On Venus Avenu e
18:00 ~ 6:00
INFO
18:11 Thu 6 Jan
Watch
E
Information
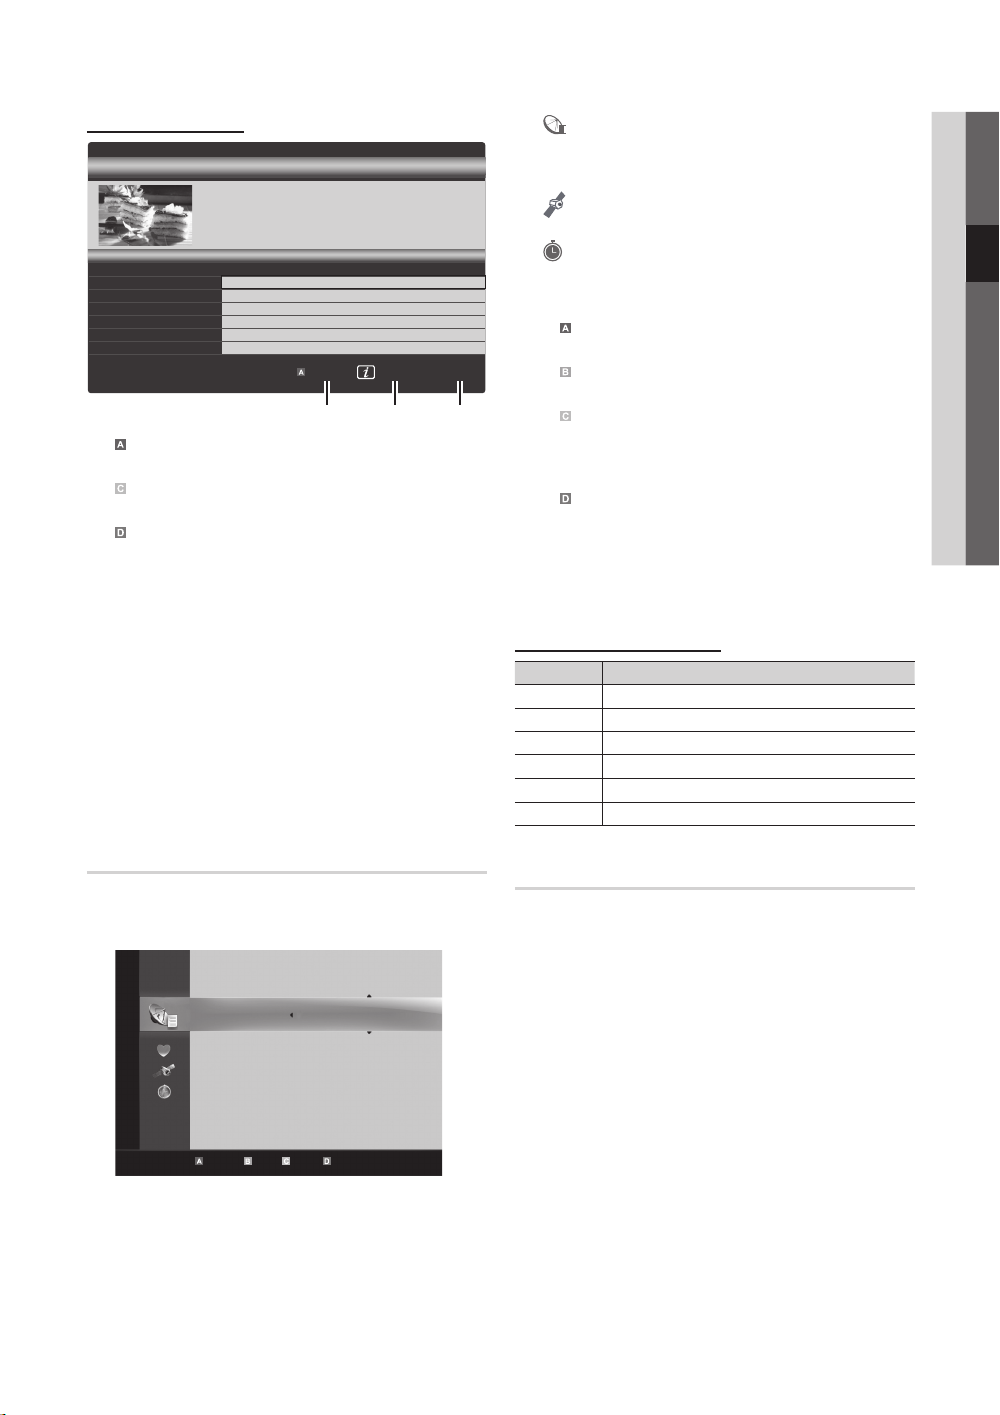
Planning Your Viewing
Guide
The EPG (Electronic Programme Guide)
information is provided by broadcasters.
Using programme schedules provided
by broadcasters, you can specify
programmes you want to watch in
advance so that the channel automatically
changes to the selected programme
channel at the specified time. Programme
entries may appear blank or out of date depending on a
channel status.
Using Channel View
Guide
DTV Air 800 five
Home and Away
18:00 - 18:30
Drama
800 five
Channel View - TV
Today
27
28
800
24
16
6
Dani is devastated when scott makes clear his views on marriage...
Discovery
DiscoveryH&L
five
price-drop.tv
QVC
R4DTT
View Mode +24 Hours Ch. Mode Information Page
18:00 - 19:00 19:00 - 20:00
American Chopper
Programmes resume at 06:00
Home and...
No Information
QVC Selection
No Information
)
Family Affairs
Tine Team
Fiv...
)
GUIDE
2:10 Tue 1 Jun
Dark Angel
Watch
1 2 3 4 5 6
English
12
Page 13
Using Scheduled View
Guide
Family Affairs
)
)
Dark Angel
View Mode Information
1 4 6
800
800
button again and
DTV Air 800 five
Family Affairs
18:00 - 18:30
Drama
800 five
Scheduled View
18:30
Today
19:15
Today
1
Red (View Mode): View the list of programmes that
Tanya confesses all to a stunned Babs. Conrad is anxious to hear...
are playing now or coming up.
2
Yellow (+24 Hours): Viewing the list of programmes to
be broadcasted after 24 hours.
3
Blue (Ch. Mode): Select the type of channels you
want to display on the Channel View window.
– The Ch. Mode differs according to the antenna
source.
4 Information: Displays details of the selected
programme.
5
(Page): Move to next or previous page.
6 ENTER
button
– When selecting the current programme, you can
watch the selected programme.
– When selecting the future programme, you can
reserve to watch the selected programme. To cancel
the schedule, press the ENTER
select Cancel Schedules.
2:10 Tue 1 Jun
five
five
Cancel
■ Channels: Shows the channel list according to
channel type.
My Channels: Shows the group of the channel.
■
■
Satellite: Shows the channel list according to
satellite signal.
■
Scheduled: Shows all the currently reserved
programmes.
✎
Using the colour buttons with the Channel Manager
Red (Antenna): Toggle among Air, Cable or
x
Satellite.
Green (Zoom): Enlarges or shrinks a channel
x
number.
Yellow (Select): Select desired channels and press
x
the Yellow button to set all the selected channels at
the same time. The mark appears to the left of
the selected channels.
Blue (Sort): Change the list ordered by channel
x
name or channel number.
(Page): Move to next or previous page.
x
(Tools): Displays the Channel Manager option
x
menu. (The options menus may differ depending on
the situation.)
Channel Status Display Icons
Icons Operations
An analogue channel.
A channel selected.
A channel set as a Favourite.
A programme currently being broadcast.
A locked channel.
A reserved programme.
03 Basic Features
Channel Manager
Delete or set favourites channels and use the programme
guide for digital broadcasts. Select a channel in the
Channels, My Channels, Satellite or Scheduled screen.
Channels
All
TV
Radio
Data/Other
Free
Scrambled
Searched
Satellite Antenna Zoom Select Sort Page
c 1 1futech
2 * 24ore.tv
15 abc1
3 BBC World
23 bid-up.tv
33 Boonerang
32 Cartoon Nwk
5 Class News
4 Coming Soon
27 Discovery
Tools
Guide Type (Samsung / Guide Plus+)
(depending on the country)
You can select a different type of Guide.
■ Samsung: Uses the guide programme by provided
samsung.
■ Guide Plus+: Uses the guide programme provided by
Rovi International Solutions. For more information, refer
to “www.europe.guideplus.com.”
English
13
Page 14

Basic Features
Using Favourite Channels
My Channels
(in Channel Manager)
Shows all favourite channels.
■ Edit My Channels
channels to desired my channels group.
✎
The “” symbol will be displayed and the channel will
be set as a my channel.
1. Select a channel and press the TOOLS button.
2. Add or delete a channel in the my channel groups
you want among 1, 2, 3 and 4.
One or more groups can be selected.
x
3. After you have changed the settings, the channel list
for each group can be viewed in my channels.
Channels
Satellite Antenna Zoom Select Sort Page
All
TV
Radio
Data/Other
Free
Scrambled
Searched
: You can set the selected
c 1 1futech
2 * 24ore.tv
15 abc1
Edit My Channels
Lock
3 BBC World
Timer Recording
23 bid-up.tv
Timer Viewing
33 Boonerang
Edit Channel Number
32 Cartoon Nwk
Delete
5 Class News
4 Coming Soon
27 Discovery
Tools
Channel List
You can see all the channels searched.
CH LIST
Channel Menu
Returning Channels
Antenna (Air / Cable / Satellite)
Before your television can begin memorizing the available
channels, you must specify the type of signal source that is
connected to the TV (i.e. an Air, Cable or Satellite system).
Country
The PIN input screen appears. Enter your 4 digit PIN number.
■ Digital Channel: Change the country for digital
channels.
■ Analogue Channel: Change the country for analogue
channels.
Auto Store
Scans for a channel automatically and stores in the TV.
✎
Automatically allocated programme numbers may not
correspond to actual or desired programme numbers. If
a channel is locked using the Child Lock function, the
PIN input window appears.
■ Antenna Source (Air / Cable / Satellite): Select the
antenna source to memorise.
When Antenna Source is set to Air or Cable:
■ Channel Source (Digital & Analogue / Digital /
Analogue): Select the channel source to memorise.
When selecting Cable → Digital & Analogue or Digital:
Provide a value to scan for cable channels.
Search Mode (Full / Network / Quick): Scans for all
channels with active broadcast stations and stores them
in the TV.
✎
If you select Quick, you can set up the Network,
Network ID, Frequency, Modulation, and
Symbol Rate manually by press the button on the
remote control.
Network (Auto / Manual): Selects the Network ID
setting mode among Auto or Manual.
Network ID: When Network is Manual, you can set up
Network ID using the numeric buttons.
Frequency: Displays the frequency for the channel.
(differs in each country)
Modulation: Displays available modulation values.
Symbol Rate: Displays available symbol rates.
14
English
Page 15

When Antenna Source is set to Satellite:
■ Channel Type (All / TV / Radio): Select the Channel
type to memorise.
■ Satellite: Selects the satellite to scan.
■ Scan Mode (All Channels / Free Channels Only):
Selects the scanning mode of the selected satellite.
Manual Store
Scans for a channel manually and stores in the TV.
✎
If a channel is locked using the Child Lock function,
the PIN input window appears.
When Antenna Source is set to Air or Cable:
■ Digital Channel: When scanning has finished, channels
are updated in the channel list.
✎
When selecting Antenna → Air: Channel,
Frequency, Bandwidth
✎
When selecting Antenna → Cable: Frequency,
Modulation, Symbol Rate
■ Analogue Channel (Programme, Colour System,
Sound System, Channel, Search): If there is abnormal
sound or no sound, reselect the sound standard
required.
✎
Channel mode
P (programme mode): When tuning is complete,
x
the broadcasting stations in your area have been
assigned to position numbers from P0 to P99. You
can select a channel by entering the position number
in this mode.
C (aerial channel mode) / S (cable channel mode):
x
These two modes allow you to select a channel
by entering the assigned number for each aerial
broadcasting station or cable channel.
When Antenna Source is set to Satellite:
■ Satellite: Selects the satellite using the up/down
buttons.
■ Transponder: Selects the transponder using the up/
down buttons.
■ Scan Mode (All Channels / Free Channels Only):
Selects either free or all channels to store.
■ Network Search (Disable / Enable): Enable / Disable
network search using the up/down buttons.
■ Signal Quality: Display the current status of
broadcasting signal.
✎
Information on a satellite and its transponder is subject
to change depending on the broadcasting conditions.
✎
When setting is completed, move to Search and press
the ENTER button. Channel scan is started.
Satellite System Setup
The PIN input screen appears. Enter your 4 digit PIN number.
Satellite System Setup is available when Antenna is set to
Satellite. Before runZning Auto Store, set
Satellite System Setup. Then channel scan is run normally.
■ Satellite Selection: You can choose the satellites for
this TV.
■ LNB Power (Off / On): Enables or disables the power
supply for the LNB.
■ LNB Settings: Configures the outdoor equipment.
– Satellite: Selects the satellite for receiving digital
broadcasts.
– Transponder: Selects a transponder from the list or
adds a new transponder.
– DiSEqC Mode: Selects DiSEqC mode for the
selected LNB.
– Lower LNB Oscillators: Sets the LNB oscillators to a
lower frequency.
– Upper LNB Oscillators: Sets the LNB oscillators to a
higher frequency.
– Tone 22 kHz (Off / On / Auto): Selects the Tone 22
kHz depending on the LNB type. For a universal LNB
it should be Auto.
– Signal Quality: Display the current status of
broadcasting signal.
■ Positioner Settings: Configures the antenna positioner.
Positioner (On / Off): Enables or disables the positioned
control.
Positioner Type (USALS / DiSEqC 1.2): Sets
the positioned type between DiSEqC 1.2 and
USALS(Universal Satellite Automatic Location System).
– My Longitude: Sets the longitude for my location.
– My Latitude: Sets the latitude for my location.
– Satellite Longitude Settings: Sets the longitude of
user defined satellites.
User Mode: Sets the position of satellite antenna
according to each satellite. If you store the current
position of satellite antenna according to a certain
satellite, when the signal of that satellite is needed,
the satellite antenna can be moved to pre-populated
position.
– Satellite: Selects the satellite to set the position for.
– Transponder: Selects a transponder from the list for
signal reception.
– Moving Mode: Selects the movement mode between
discrete and continuous movement.
– Step Size: Adjusts the step size degrees for the
antenna rotation. Step Size is available when Moving
Mode is set to Step.
03 Basic Features
English
15
Page 16

Basic Features
– Go to Stored Position: Rotates the antenna to the
stored satellite position.
– Antenna Position: Adjusts and stores the antenna
position for the selected satellite.
– Store Current Position: Stores current position as
the selected positioner limit.
– Signal Quality: Display the current status of
broadcasting signal.
Installer Mode: Sets limits to the scope of movement
of satellite antenna or reset the position. Generally,
installation guide uses this function.
– Limit Position (East / West): Selects the direction of
the positioner Limit.
– Antenna Position: Adjusts and stores the antenna
position for the selected satellite.
– Store Current Position: Stores the current position
as the selected positioner Limit.
– Go to Zero: Moves the antenna to the reference
position.
– Reset Positioner Limit: Allows the antenna to rotate
over the full arc.
■ Reset All Setting (OK / Cancel): All satellite settings will
be reset to the initial values.
¦ Editing Channels
Channel Manager Option Menu
(in Channel Manager)
1. Select a channel and press the TOOLS button.
2. Edit the channel name or number using the
Edit Channel Name or Edit Channel Number menu.
■ Edit Channel Name (analogue channels only): Assign
your own channel name.
■ Edit Channel Number (digital channels only): Edit the
number by pressing the number buttons desired.
¦ Other Features
Cable Search Option
(depending on the country)
Sets additional search options such as the frequency and
symbol rate for a cable network search.
■ Freq.Start / Freq.Stop: Set the start or stop frequency
(differs in each country)
■ Symbol Rate: Displays available symbol rates.
■ Modulation: Displays available modulation values.
Channel Manager
Channel Manager Option Menu
Set each channel using the Channel Manager menu options
(Lock / Unlock, Timer Viewing, Timer Recording, Sort,
Reorder, Delete, Select All / Deselect All). Option menu
items may differ depending on the channel status.
1. Select a channel and press the TOOLS button.
2. Select a function and change its settings.
■ Lock / Unlock: Lock a channel so that the channel
cannot be selected and viewed.
✎
NOTE
This function is available only when the
x
Child Lock is set to On.
The PIN input screen appears. Enter your
x
4-digit PIN, the default of which is “0-0-0-0”.
Change the PIN using the Change PIN option.
■ Timer Viewing: You can set a desired channel to be
displayed automatically at the reserved time. Set the
current time first to use this function.
✎
When a digital channel is selected in
Channel Manager, press the ► button to view
the digital Programme.
■ Timer Recording (digital channels only): Allows you to
record a programme currently being broadcasted or
make a reservation to record a programme scheduled
for broadcast.
✎
A USB device with 4GB of memory or greater
must be connected to the TV.
✎
A USB storage device cannot record until it
completes the Device Performance Test.
✎
In case of USB-HDD, over 5400rpm
✎
In case of USB Stick, USB 2.0 and SLC Type.
(Minimum size of USB Stick is 2GB.)
✎
To record, press the �(REC) button on the
remote. Press �(REC) twice to set the recording
duration
■ Sort (analogue channels only): This operation allows
you to change the programme numbers of the stored
channels. This operation may be necessary after using
the auto store.
■ Reorder (when the Antenna was set to Satellite):
Rearrange the channel manager in numerical order.
■ Delete: You can delete a channel to display the channels
you want.
■ Select All / Deselect All: Select all the channels
or deselect all the selected channels in the channel
manager.
16
English
Page 17

Scheduled
(in Channel Manager)
You can view, modify or delete a show you have reserved to
watch.
■ Change Info: Change a show you have reserved to
watch.
■ Cancel Schedules: Cancel a show you have reserved
to watch.
■ Information: Display a show you have reserved
to watch. (You can also change the reservation
information.)
■ Select All / Deselect All: Select or deselect all reserved
programmes.
Adjusting Picture Settings
Backlight / Contrast / Brightness /
Sharpness / Colour / Tint (G/R)
Your television has several setting options for picture quality
control.
✎
NOTE
In analogue TV, Ext., AV modes of the PAL system,
x
the Tint (G/R) function is not available.
In PC mode, you can only make changes to
x
Backlight, Contrast and Brightness.
Settings can be adjusted and stored for each
x
external device connected to the TV.
03 Basic Features
Channel List Transfer
The PIN input screen appears. Enter your 4 digit PIN number.
Imports or exports the channel map. You should connect a
USB storage to use this function.
■ Import from USB: Import channel list from USB.
■ Export to USB: Export channel list to USB. this function
is available when USB is connected.
Fine Tune
(analogue channels only)
If the signal is weak or distorted, fine tune the channel
manually.
✎
Fine tuned channels are marked with an asterisk “*”.
✎
To reset the fine-tuning, select Reset.
Picture Menu
Changing the Preset Picture Mode
Mode
Select your preferred picture type.
■ Dynamic: Suitable for a bright room.
■ Standard: Suitable for a normal environment.
■ Natural: Suitable for reducing eye strain.
✎
Natural is not available in PC mode.
■ Movie: Suitable for watching movies in a dark room.
Economical Solutions
Eco Solution
■ Energy Saving (Off / Low / Medium / High /
Picture Off / Auto)
of the TV in order to reduce power consumption. If you
select Picture Off, the screen is turned off, but the
sound remains on. Press any button except volume
button to turn on the screen.
■ Eco Sensor (Off / On): To enhance your power savings;
the picture settings will automatically adapt to the light
in the room.
✎
If you adjust the Backlight, the Eco Sensor will
be set to Off.
Min Backlight: When Eco sensor is On, the minimum
screen brightness can be adjusted manually.
✎
If Eco Sensor is On, the display brightness
may change (become slightly darker or brighter)
depending on the surrounding light intensity.
■ No-Signal Power Off (Off / 15 min / 30 min / 60 min):
To avoid unnecessary energy consumption, set how long
you want the TV to remain on if it’s not receiving a signal.
✎
Disabled when the PC is in power saving mode.
: Adjust the brightness
English
17
Page 18

Basic Features
Changing the Picture Options
Advanced Settings
(available in Standard / Movie mode)
You can adjust the detailed setting for the screen including
colour and contrast.
✎
In PC mode, you can only make changes to
Dynamic Contrast, Gamma, White Balance and
LED Motion Plus.
Advanced Settings
Black Tone : Off ►
Dynamic Contrast : Medium
Shadow Detail : -2
Gamma : 0
Expert Pattern : Off
RGB Only Mode : Off
Colour Space : Native
▼
Move
Enter
Return
■ Black Tone (Off / Dark / Darker / Darkest): Select the
black level to adjust the screen depth.
■ Dynamic Contrast (Off / Low / Medium / High): Adjust
the screen contrast.
■ Shadow Detail (-2~+2): Increase the brightness of dark
images.
■ Gamma: Adjust the primary colour intensity.
■ Expert Pattern (Off / Pattern1 / Pattern2): By running
the Expert Pattern function, the picture can be
calibrated without a generator or filter. If the OSD menu
disappears or a menu other than the Picture menu is
opened, the calibration is saved and the Expert Pattern
window disappears.
✎
While the Expert Pattern is running, sound is not
outputted.
■ RGB Only Mode (Off / Red / Green / Blue): You can
adjust Colour or Tint (G/R) of Red, Green or Blue for
the picture from an external device (DVD player, home
theatre, etc.).
■ Colour Space (Auto / Native / Custom): Adjust the
range of colours available to create the image. To adjust
Colour, Red, Green, Blue and Reset, set
Colour Space to Custom.
■ White Balance: Adjust the colour temperature for a
more natural picture.
R-Offset / G-Offset / B-Offset: Adjust each colour’s
(red, green, blue) darkness.
R-Gain / G-Gain / B-Gain : Adjust each colour’s (red,
green, blue) brightness.
Reset: Resets the White Balance to it’s default settings.
■ 10p White Balance (Off / On): Controls the white
balance in 10 point interval by adjusting the red, green,
and blue brightness.
✎
Available when the picture mode is set to Movie
and when the external input is set to all input.
✎
Some external devices may not support this
function.
Interval: Select interval to adjust.
Red: Adjust the red level.
Green: Adjust the green level.
Blue: Adjust the blue level.
Reset: Resets the 10p White Balance to its default
settings.
■ Flesh Tone: Emphasize pink “Flesh Tone.”
■ Edge Enhancement (Off / On): Emphasize object
boundaries.
■ xvYCC (Off / On): Setting the xvYCC mode on
increases detail and colour space when watching movies
from an external device (e.g. DVD player) connected to
the HDMI or Component IN jacks.
✎
Available when the picture mode is set to Movie
and when the external input is set to HDMI or
Component.
✎
Some external devices may not support this
function.
■ LED Motion Plus (Off / Normal / Cinema / Ticker):
Removes drag from fast scenes with a lot of movement
to provide a clear picture.
18
English
Page 19

Picture Options
✎
In PC mode, you can only make changes to the
Colour Tone, Size and Auto Protection Time.
Picture Options
Colour Tone : Normal ►
Size : Auto Wide
Screen Mode : 16:9
Digital Noise Filter : Auto
MPEG Noise Filter : Auto
HDMI Black Level : Normal
Film Mode : Off
▼
Move
Enter
■ Colour Tone (Cool / Normal / Warm1 / Warm2)
✎
Warm1 or Warm2 will be deactivated when the
picture mode is Dynamic.
✎
Settings can be adjusted and stored for each
external device connected to an input on the TV.
■ Size : Your cable box/satellite receiver
may have its own set of screen sizes as
well. However, we highly recommend you
use 16:9 mode most of the time.
Auto Wide: Automatically adjusts the
picture size to the 16:9 aspect ratio.
16:9 : Adjusts the picture size to 16:9 for
DVDs or wide broadcasting.
Wide Zoom: Magnifies the picture size more than 4:3.
✎
Adjusts the Position by using ▲, ▼ buttons.
Zoom: Magnifies the 16:9 wide pictures vertically to fit
the screen size.
✎
Adjusts the Position or Size by using ▲, ▼
button.
4:3 : The default setting for a movie or normal
broadcasting.
✎
Do not watch in 4:3 format for a long time. Traces
of borders displayed on the left, right and centre
of the screen may cause image retention(screen
burn) which are not covered by the warranty.
P.SIZE
Return
Screen Fit: Displays the full image without any cut-off
when HDMI (720p / 1080i / 1080p) or Component
(1080i / 1080p) signals are inputted.
✎
NOTE
When Double (, ) mode has been set in PIP,
x
the Picture Size cannot be set.
Depending on the input source, the picture size
x
options may vary.
The available items may differ depending on the
x
selected mode.
In PC mode, only 16:9 and 4:3 modes can be
x
adjusted.
Settings can be adjusted and stored for each
x
external device connected to an input of the TV.
After selecting Screen Fit in HDMI (1080i / 1080p)
x
or Component (1080i / 1080p) mode: Adjusts the
Position or Size by using ▲, ▼, ◄, ► button.
If you use the Screen Fit function with HDMI 720p
x
input, 1 line will be cut at the top, bottom, left and
right as in the overscan function.
■ Screen Mode (16:9 / Wide Zoom / Zoom / 4:3):
Available only when picture size is set to Auto Wide. You
can determine the desired picture size at the 4:3 WSS
(Wide Screen Service) size or the original size. Each
European country requires different picture size.
✎
Not available in PC, Component or HDMI mode.
■ Digital Noise Filter (Off / Low / Medium / High / Auto
/ Auto Visualisation): When the broadcast signal is
weak, some static and ghosting may appear. Select one
of the options until the best picture is displayed.
Auto Visualisation: When changing analogue channels,
displays the intensity of the current signal and defines
the screen noise filter.
✎
Only available for analogue channels.
■ MPEG Noise Filter (Off / Low / Medium / High /
Auto): Reduces MPEG noise to provide improved
picture quality.
■ HDMI Black Level (Normal / Low): Selects the black
level on the screen to adjust the screen depth.
✎
Available only in HDMI mode (RGB signals).
■ Film Mode (Off / Auto1 / Auto2): Sets the TV to
automatically sense and process film signals from all
sources and adjust the picture for optimum quality.
✎
Available in TV, AV, COMPONENT (480i / 1080i)
and HDMI (480i / 1080i).
03 Basic Features
English
19
Page 20

Basic Features
■ Motion Plus (Off / Clear / Standard / Smooth /
Custom / Demo): Removes drag from fast scenes with
a lot of movement to provide a clearer picture.
✎
If noise occurs on the screen, please set up the
Motion Plus to Off. If Motion Plus is Custom,
you can set up the Blur Reduction, Judder
Reduction or Reset manually.
✎
If Motion Plus is Demo, you can compare the
difference of on and off modes.
Blur Reduction: Adjusts the blur reduction level from
video sources.
Judder Reduction: Adjusts the judder reduction level
from video sources when playing films.
Reset: Reset the custom settings.
■ Auto Protection Time (2 hours / 4 hours / 8 hours
/ 10 hours / Off): If the screen remains idle with a still
image for a certain period of time defined by the user,
the screen saver is activated to prevent the formation of
ghost images on the screen.
Viewing TV using the 3D function
IMPORTANT HEALTH AND SAFETY INFORMATION FOR
3D PICTURES.
Read and understand the following safety information
before using the TV’s 3D function.
WARNING
Some viewers may experience discomfort while
x
viewing 3D TV such as dizziness, nausea and
headaches. If you experience any such symptom,
stop viewing 3D TV, remove 3D Active Glasses and
rest.
Watching 3D images for an extended period of time
x
may cause eye strain. If you feel eye strain, stop
viewing 3D TV, remove your 3D Active Glasses and
rest.
A responsible adult should frequently check on
x
children who are using the 3D function. If there are
any reports of tired eyes, headaches, dizziness, or
nausea, have the child stop viewing 3D TV and rest.
Do not use the 3D Active Glasses for other purposes
x
(such as general eyeglasses, sunglasses, protective
goggles, etc.)
Do not use the 3D function or 3D Active Glasses while
x
walking or moving around. Using the 3D function or
3D Active Glasses while moving around may result
in injuries due to running into objects, tripping, and/
or falling.
20
English
Page 21
3D
This exciting new feature enables you to
view 3D content. In order to fully enjoy
this feature, you must purchase a pair
of Samsung 3D Active Glasses (SSG2100AB, SSG-2200AR, SSG-2200KR) to
view 3D video.
Samsung 3D Active Glasses are sold
separately. For more detailed purchasing
information, contact the retailer where you purchased this TV.
3D emitter
✎
If there is any obstacle between the emitter and 3D
Active Glasses, the proper 3D effect may not be
obtained.
■ 3D Mode: Select the 3D input format.
✎
If you want to feel the 3D effect fully, please wear
the 3D Active Glasses first, and then select
3D Mode from the list below that provides the
best 3D viewing experience.
✎
When watching 3D images, turn on 3D Active
Glasses.
3D Mode Operation
Off Turns the 3D function off.
2D → 3D
Side by Side
Top & Bottom
Line by Line
Vertical Stripe
Checker
Board
Frequency
Changes a 2D image to 3D.
Displays two images next to
each other.
Displays one image above
another.
Displays the images for the left
and right eye alternately in rows.
Displays the images for the
left and right eye alternately in
columns.
Displays the images for the
left and right eye alternately in
pixels.
Displays the images for the
left and right eye alternately in
frames.
✎
“Side by Side” and “Top & Bottom” are available
when the resolution is 720p, 1080i and 1080p
in DTV, HDMI and USB mode or set to PC
connecting through HDMI/DVI cable.
✎
“Vertical Strip”, “Line by Line” and “Checker
Board” are available when the resolution is set to
PC connecting through HDMI/DVI cable.
✎
“Frequency” displays the frequency (60Hz only)
when the resolution is set to PC.
■ 3D → 2D (Off / On): Displays the image for the left eye
only.
✎
This function is deactivated when 3D Mode set to
“2D → 3D” or Off.
■ 3D View point: The overall adjustment of 3D
perspective.
✎
This function is deactivated when 3D Mode set to
“2D → 3D” or Off.
■ Depth: Adjusts focus / depth in “2D → 3D” mode.
✎
This function is only activated when the 3D Mode
is “2D → 3D”.
■ Picture Correction: Adjusts the images for the left and
right eye.
■ 3D Auto View (Off / On): If 3D Auto View is set to On,
a “Side by Side” format HDMI signal with one of the
resolutions below is automatically switched to 3D. Here,
correct 3D information must be sent from the Standard
HDMI 3D Format.
✎
If a 3D failure occurs due to a 3D information error,
set 3D Auto View to Off and manually select a
3D Mode using the 3D button or corresponding
menu.
✎
Support resolution (16:9 only)
Resolution Frequency (Hz)
1280 x 720p 50 / 60 Hz
1920 x 1080i 50 / 60 Hz
1920 x 1080p 24 / 30 / 50 / 60 Hz
■ 3D Optimisation: The overall adjustment of 3D effect.
Resolution supported for HDMI PC mode
The resolution for HDMI PC mode is optimized to 1920 x
1080 input.
An input resolution other than 1920 x 1080 may not be
displayed properly in 3D display or full screen mode.
03 Basic Features
English
21
Page 22

Basic Features
How to watch the 3D image
3D
To watch in 3D, wear 3D glasses and
press the power button on the glasses.
Viewing 3D TV motion pictures for long
periods may cause eye fatigue and/or
dizziness.
OK
Cancel
Move
Enter
Exit
3D3D
Using the LEFT / RIGHT keys on the remote control,
Using the LEFT / RIGHT keys on the remote control,
select the icon suitable for the picture on screen.
select the icon suitable for the picture on screen.
Move
Enter
Move
1. Press the CONTENT button, then the Content View
menu will appear.
2. Press the ◄ or ► button, then select 3D.
To watch in 3D, wear 3D Active Glasses and press the
power button on the glasses.
3. Select OK, then press the ENTER
4. Using the ◄ or ► buttons on your remote control,
selects the 3D Mode of the image you want to view.
✎
Some 3D modes may not be available depending
on the format of the image source.
Supported formats and operating specifications for
Standard HDMI 3D
✎
The 3D formats indicated below are recommended by
the HDMI association and must be supported.
Source signal format Standard HDMI 1.4 3D
1920x1080p@24Hz x 2 1920x2205p@24Hz
1280x720p@60Hz x 2 1280x1470p@60Hz
1280x720p@50Hz x 2 1280x1470p@50Hz
The mode is automatically switched to 3D mode for the 3D
video input in one of the formats above.
For the Standard HDMI 3D format with 24Hz, the TV is
optimized as follows:
– Resolution First Display Mode: If Motion Plus is set
to Off, Clear or Standard, you can watch the video
at a high resolution optimized to the resolution of the
source video.
– Judder Reduction Display Mode: When Motion
Plus is set to Smooth or Custom, you can watch a
smooth picture without judder.
Enter
button.
Exit
Exit
Before using 3D function...
✎
NOTE
You may notice a small amount of screen flickering
x
when watching 3D images in poor light conditions
(from a strobe light, etc.), or under a fluorescent lamp
(50Hz ~ 60Hz) or 3 wavelength lamp. If so, dim the
light or turn the lamp off.
3D mode is automatically disabled in following cases:
x
when changing a channel or the input source, or
accessing Media Play or Internet@TV.
Some Picture functions are disabled in 3D mode.
x
PIP and Data broadcasts (MHEG / MHP) are not
x
supported in 3D mode.
3D Active Glasses from other manufacturers may not
x
be supported.
When the TV is initially powered on, it may take some
x
time until the 3D display is optimized.
The 3D Active Glasses may not work properly if there
x
is any other 3D product or electronic devices turned
on near the glasses or TV. If there is a problem,
keep other electronic devices as far away as possible
from the 3D Active Glasses.
When watching pictures from a 50Hz 3D source with
x
its Game mode On, visually-sensitive viewers may
see some flicker on bright images.
Photos of Media Play are shown in “2D → 3D”
x
mode only.
If you lie on your side while watching TV with 3D
x
active glasses, the picture may look dark or may not
be visible.
Be sure to stay within the viewing angle and optimum
x
TV viewing distance when watching 3D pictures.
– Otherwise, you may not be able to enjoy proper 3D
effects.
The ideal viewing distance should be three times or
x
more the height of the screen. We recommend sitting
with viewer’s eyes on a level with the screen.
22
English
Page 23

Picture Reset (OK / Cancel)
Resets your current picture mode to its default settings.
Setting up the TV with Your PC
Sound Menu
03 Basic Features
Changing the Preset Sound Mode
Set the input source to PC.
Auto Adjustment
Adjust frequency values/positions and fine tune the settings
automatically.
✎
Not available when connecting with an HDMI/DVI cable.
Screen
■ Coarse / Fine: Removes or reduces picture noise. If the
noise is not removed by Fine-tuning alone, then adjust
the frequency as best as possible (Coarse) and Finetune again. After the noise has been reduced, readjust
the picture so that it is aligned to the centre of screen.
■ Position: Adjust the PC screen position with direction
button (▲ / ▼ / ◄ / ►).
■ Image Reset: Resets the image to default settings.
Using Your TV as a Computer (PC) Display
Setting Up Your PC Software (Based on Windows XP)
Depending on the version of Windows and the video card,
the actual screens on your PC may differ in which case the
same basic set-up information will almost always be applied.
(If not, contact your computer manufacturer or Samsung
Dealer.)
1. Click on “Control Panel” on the Windows start menu.
2. Click on “Appearance and Themes” in the “Control
Panel” window and a display dialog-box will appear.
3. Click on “Display” and a display dialog box will appear.
4. Navigate to the “Settings” tab on the display dialog-box.
y The correct size setting (resolution) [Optimum: 1920 X
1080 pixels]
y If a vertical-frequency option exists on your display
settings dialog box, the correct value is “60” or “60 Hz”.
Otherwise, just click “OK” and exit the dialog box.
SRS TheaterSound
■ Standard: Selects the normal sound mode.
■ Music: Emphasizes music over voices.
■ Movie: Provides the best sound for movies.
■ Clear Voice: Emphasizes voices over other sounds.
■ Amplify: Increase the intensity of high-frequency sound
to allow a better listening experience for the hearing
impaired.
Adjusting Sound Settings
Equalizer
Adjusts the sound mode (standard sound mode only).
■ Balance L/R: Adjusts the balance between the right and
left speaker.
■ 100Hz / 300Hz / 1kHz / 3kHz / 10kHz (Bandwidth
Adjustment): Adjusts the level of specific bandwidth
frequencies.
■ Reset: Resets the equalizer to its default settings.
Sound Systems, Etc.
SRS TruSurround HD (Off / On)
(standard sound mode only)
This function provides a virtual 5.1 channel surround sound
experience through a pair of speakers using HRTF (Head
Related Transfer Function) technology.
SRS TruDialog (Off / On)
(standard sound mode only)
This function allows you to increase the intensity of a voice
over background music or sound effects so that dialog can
be heard more clearly.
English
23
Page 24

Basic Features
Audio Language
(digital channels only)
Change the default value for audio languages.
✎
The available language may differ depending on the
broadcast.
Audio Format
(digital channels only)
When sound is emitted from both the main speaker and the
audio receiver, a sound echo may occur due to the decoding
speed difference between the main speaker and the audio
receiver. In this case, use the TV Speaker function.
✎
Audio Format option may differ depending on the
broadcast. 5.1ch Dolby digital sound is only available
when connecting an external speaker through an
optical cable.
Audio Description
(not available in all locations) (digital
channels only)
This function handles the Audio Stream
for the AD (Audio Description) which is
sent along with the Main audio from the
broadcaster.
■ Audio Description (Off / On): Turn
the audio description function on or
off.
■ Volume: Adjust the audio description volume.
AD
Auto Volume (Off / Normal / Night)
To equalize the volume level on each channel, set to Normal.
■ Night: This mode provides an improved sound
experience compared to Normal mode, making almost
no noise. It is useful at night.
Speaker Select (External Speaker /
TV Speaker)
A sound echo may occur due to a difference in decoding
speed between the main speaker and the audio receiver. In
this case, set the TV to External Speaker.
✎
When Speaker Select is set to External Speaker, the
volume and MUTE buttons will not operate and the
sound settings will be limited.
✎
When Speaker Select is set to External Speaker
TV Speaker: Off, External Speaker: On
x
✎
When Speaker Select is set to TV Speaker
TV Speaker: On, External Speaker: On
x
✎
If there is no video signal, both speakers will be mute.
Additional Setting
(digital channels only)
■ DTV Audio Level (MPEG / HE-AAC): This function
allows you to reduce the disparity of a voice signal
(which is one of the signals received during a digital TV
broadcast) to a desired level.
✎
According to the type of broadcast signal, MPEG
/ HE-AAC can be adjusted between -10dB and
0dB.
✎
To increase or decrease the volume, adjust
between the range 0 and -10 respectively.
■ SPDIF Output: SPDIF (Sony Philips Digital InterFace)
is used to provide digital sound, reducing interference
going to speakers and various digital devices such as a
DVD player.
Audio Format: During the reception of a digital TV
broadcast, you can select the Digital Audio output
(SPDIF) format from the options PCM or Dolby Digital.
Audio Delay: Correct audio-video sync problems, when
watching TV or video, and when listening to digital audio
output using an external device such as an AV receiver
(0ms ~ 250ms).
■ Dolby Digital Comp (Line / RF): This function minimizes
signal disparity between a dolby digital signal and a
voice signal (i.e. MPEG Audio, HE-AAC, ATV Sound).
✎
Select Line to obtain dynamic sound, and RF
to reduce the difference between loud and soft
sounds at night time.
Line: Set the output level for signals greater or less than
-31dB (reference) to either -20dB or -31dB.
RF: Set the output level for signals greater or less than
-20dB (reference) to either -10dB or -20dB.
24
English
Page 25
Sound Reset (OK / Cancel)
Reset all sound settings to the factory defaults.
↔ Dual
Default
Automatic
change
Dual
Automatic
change
Dual
Selecting the Sound Mode
When you set to Dual -, the current sound mode is
displayed on the screen.
Audio
Type
A2
Stereo
NICAM
Stereo
✎
If the stereo signal is weak and an automatic switching
occurs, then switch to the mono.
✎
Only activated in stereo sound signal.
✎
Only available when the Input source is set to TV.
Mono Mono
Stereo
Dual
Mono Mono
Stereo
Dual
Dual -
Stereo ↔ Mono
Dual
Mono ↔ Stereo
Mono ↔ Dual
Dual
Setup Menu
Setting the Time
Time
■ Clock: Setting the clock is for using various timer
features of the TV.
The current time will appear every time you press
the INFO button.
✎
If you disconnect the power cord, you have to set
the clock again.
Clock Mode (Auto / Manual)
✎
Depending on the broadcast station and signal,
the auto time set up may not be correct. In this
case, set the time manually.
✎
The antenna must be connected in order to set
the time automatically.
Clock Set: Set the Day, Month, Year, Hour and Minute
manually.
✎
Available only when Clock Mode is set to
Manual.
Time Zone (depending on the country): Select your time
zone.
✎
When Country is set to Others, you can use this
function.
✎
This function is only available when the
Clock Mode is set to Auto.
Using the Sleep Timer
■ Sleep Timer
after a preset period of time. (30, 60, 90, 120, 150 and
180 minutes).
✎
To cancel Sleep Timer, select Off.
: Automatically shuts off the TV
03 Basic Features
Setting the On / Off Timer
■ Timer 1 / Timer 2 / Timer 3: Three different on / off
timer settings can be made. You must set the clock first.
On Time
▲
Inactivate
▼
Off Time
Inactivate
Volume
10 TV ATV 1
Repeat
Once
On Time / Off Time: Set the hour, minute, and activate
/ inactivate. (To activate timer with the setting you’ve
chosen, set to Activate.)
Volume: Set the desired volume level.
Source: Select TV or USB content to be played when
the TV is turned on automatically. (USB can be selected
only when a USB device is connected to the TV)
Antenna (when the Source is set to TV): Select ATV or
DTV.
Channel (when the Source is set to TV): Select the
desired channel.
Contents (when the Source is set to USB): Select a
folder in the USB device containing music or photo files
to be played when the TV is turned on automatically.
✎
NOTE
If there is no music file on the USB device or the
x
folder containing a music file is not selected, the
Timer function does not operate correctly.
When there is only one photo file in the USB
x
device, the Slide Show will not play.
If a folder name is too long, the folder cannot be
x
selected.
Each USB you use is assigned its own folder.
x
When using more than one of the same type of
USB, make sure the folders assigned to each
USB have different names.
Timer 1
00 00
00 00
Source Antenna Channel
Sun Mon Tue Wed Thu Fri Sat
Move
Adjust
Enter
Return
English
25
Page 26

Basic Features
Repeat: Select Once, Everyday, Mon~Fri, Mon~Sat,
Sat~Sun or Manual to set at you convenience. If you
select Manual, you can set up the day you want to
activate the timer.
✎
The mark indicates the day is selected.
✎
Auto Power Off (available only when the TV is turned on
by Timer): The TV will be automatically turned off after 3
hours of being left idle to prevent overheating.
Locking Programmes
Security
✎
The PIN input screen appears before the setup screen.
✎
Enter your 4-digit PIN, the default of which is “0-0-0-0”.
Change the PIN using the Change PIN option.
■ Child Lock (Off / On): Lock channels in Channel
Manager, to prevent unauthorized users, such as
children, from watching unsuitable programme.
✎
Available only when the Input source is set to TV.
■ Parental Lock (depending on the country): Prevent
unauthorized users, such as children, from watching
unsuitable programme with a user-defined 4-digit PIN
code. If selected channel is locked, the “
be displayed.
Allow All: Unlock All TV ratings (Not supported in
France).
✎
When Parental Lock is set to 18, the PIN input
screen appears before changing the channels
(France only).
■ Change PIN: Change your personal ID number required
to set up the TV.
✎
If you forget the PIN code, press the remote
control buttons in the following sequence, which
resets the PIN to “0-0-0-0”: POWER (off) →
MUTE → 8 → 2 → 4 → POWER (on).
” symbol will
Other Features
Language
■ Menu Language: Set the menu language.
■ Teletext Language: Set a desired language for teletext.
✎
English is the default in cases where the selected
language is unavailable in the broadcast.
■ Preference (Primary Audio Language /
Secondary Audio Language / Primary Subtitle
Language / Secondary Subtitle Language /
Primary Teletext Language / Secondary Teletext
Language): Select a language, which will be the default
language when a channel is selected.
Subtitle
Use this menu to set the Subtitle mode.
■ Subtitle (Off / On): Switches subtitles on or off.
■ Mode (Normal / Hearing Impaired): Sets the subtitle
mode.
■ Subtitle Language: Sets the subtitle language.
✎
If the programme you are watching does not
support the Hearing Impaired function, Normal
automatically activates even if the
Hearing Impaired mode is selected.
✎
English is the default in cases where the selected
language is unavailable in the broadcast.
Digital Text (Disable / Enable)
(UK only)
If the programme broadcasts with digital text, this feature is
enabled.
Network (Network Type / Network Setup
/ Network Test / SWL(Samsung Wireless
Link) / SWL connect)
For details on set up options, refer to the “Network
Connection” instructions (p. 30).
General
■ Game Mode (Off / On): When connecting to a game
console such as PlayStation™ or Xbox™, you can enjoy
a more realistic gaming experience by selecting game
mode.
✎
NOTE
Precautions and limitations for game mode
x
– To disconnect the game console and connect
another external device, set Game Mode to Off in
the setup menu.
– If you display the TV menu in Game Mode, the
screen shakes slightly.
Game Mode is not available when the input source
x
is set to TV or PC.
After connecting the game console, set Game Mode
x
to On. Unfortunately, you may notice reduced picture
quality.
If Game Mode is On:
x
– Picture mode is set to Standard and Sound mode
is set to Movie.
– Equalizer is not available.
26
English
Page 27

■ BD Wise (Off / On): Provides the optimal picture quality
for Samsung DVD, Blu-ray and Home Theatre products
which support BD Wise. When BD Wise is turned On,
the picture mode is automatically changed to the optimal
resolution.
✎
Available when connecting Samsung products
that support BD Wise through a HDMI cable.
■ Menu Transparency (Bright / Dark): Se t the
Transparency of the menu.
■ Melody (Off / Low / Medium / High): Set so that a
melody plays when the TV is turned on or off.
✎
Melody is disabled when FastStart is On.
■ FastStart (Off / On): When the TV is powered on, the
screen will come on quickly with this feature.
Common Interface
■ CI Menu: This enables the user to select from the CAM-
provided menu. Select the CI Menu based on the menu
PC Card.
■ Application Info: View information on the CAM inserted
into the CI slot and on the “CI or CI+ CARD” which is
inserted into the CAM. You can install the CAM anytime
whether the TV is on or off.
1. Purchase a CI CAM module at your nearest dealer or by
phone.
2. Firmly insert the “CI or CI+ CARD” into the CAM in the
direction of the arrow.
3. Insert the CAM with the “CI or CI+ CARD” into the
common interface slot, in the direction of the arrow so
that it aligns parallel with the slot.
4. Check if you can see a picture on a scrambled signal
channel.
Wireless Remote Control
Turn wireless remote controls on or off or give permission to
wireless remote controls.
Picture In Picture (PIP)
PIP
You can watch the TV tuner and one external video source
simultaneously. PIP (Picture-in-Picture) does not function in
the same mode.
✎
NOTE
For PIP sound, refer to the Sound Select
x
instructions.
If you turn the TV off while watching in PIP mode, the
x
PIP window will disappear.
You may notice that the picture in the PIP window
x
becomes slightly unnatural when you use the main
screen to view a game or karaoke.
While Internet@TV is in operation, the PIP function
x
cannot be used.
PIP settings
x
Main picture Sub picture
Component, HDMI1/DVI,
HDMI2, HDMI3, HDMI4, PCTV
■ PIP (Off / On): Activate or deactivate the PIP function.
■ Channel: Select the channel for the sub-screen.
■ Size (
picture.
■ Position (
sub-picture.
■ Sound Select (Main / Sub): You can choose the
desired sound (Main / Sub) in PIP mode.
/ / / ): Select a size for the sub-
/ / / ): Select a position for the
✎
In Double (, ) mode, Position cannot be
selected.
03 Basic Features
English
27
Page 28
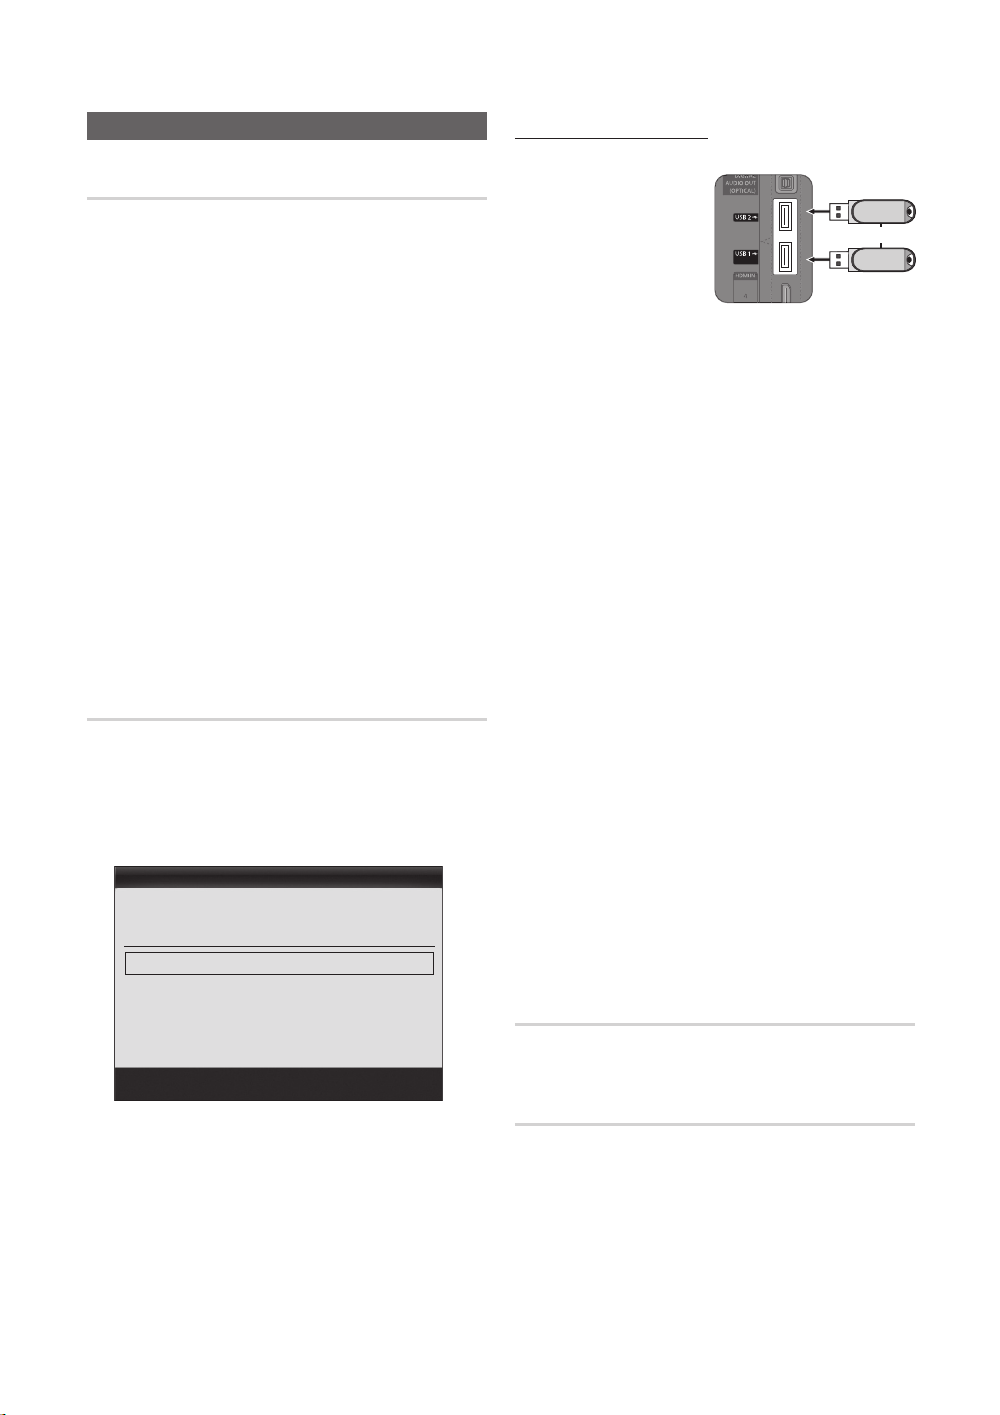
Basic Features
Support Menu
Self Diagnosis
✎
Self Diagnostic might take few seconds, this is part of
the normal operation of the TV.
■ Picture Test (Yes / No): Use to check for picture
problems.
■ Sound Test (Yes / No): Use the built-in melody sound to
check for sound problems.
✎
If you hear no sound from the TV’s speakers,
before performing the sound test, make sure
Speaker Select is set to TV Speaker in the
Sound menu.
✎
The melody will be heard during the test even if
Speaker Select is set to External Speaker or the
sound is muted by pressing the MUTE button.
■ Signal Information: (digital channels only) HDTV
channel’s reception quality is either perfect or the
channels are unavailable. Adjust your antenna to
increase signal strength.
■ Troubleshooting: If the TV seems to have a problem,
refer to this description.
✎
If none of these troubleshooting tips apply, contact
the Samsung customer service centre.
Software Upgrade
Software Upgrade can be performed via a broadcasting
signal or by network connection or downloading the latest
firmware from “www.samsung.com,” to a USB memory
device.
Current Version the software already installed in the TV.
✎
Software is represented as “Year/Month/Day_Version”.
Software Upgrade
Current Version 2010/01/18_000001
By USB ►
By Online
By Channel
Standby Mode Upgrade : 2 Hours Later
Alternative Software 2010/01/15_00000
Move
Enter
Return
Installing the Latest Version
■ By USB: Insert a USB
drive containing the
firmware upgrade file,
downloaded from
“www.samsung.com,”
into the TV. Please
be careful not to
disconnect the power
or remove the USB
drive until upgrades are complete. The TV will be turned
off and on automatically after completing the firmware
upgrade. When software is upgraded, video and audio
settings you have made will return to their default
settings. We advise you to to write down your settings
so that you can easily reset them after the upgrade.
■ By Online: Upgrade the software using the Internet.
✎
First, configure your network. For detailed
procedures on using the Network Setup, refer to
the “Network Connection” instructions.
✎
If the internet connection doesn’t operate properly,
the connection may be broken. Please retry
downloading. If the problem persists, download by
USB and upgrade.
■ By Channel: Upgrade the software using the
broadcasting signal.
✎
If the function is selected during the software
transmission period, software will be automatically
searched and downloaded.
✎
The time required to download the software is
determined by the signal status.
■ Standby Mode Upgrade: A manual upgrade will be
automatically performed at selected time. Since the
power of the unit is turned on internally, the screen
may be turned on slightly for the LED product. This
phenomenon may continue for more than 1 hour until
the software upgrade is complete.
■ Alternative Software (backup): Displays the software
version downloaded through By Online. During the
software upgrading, When the Upgrade will discontinue
from last step, this function be activated.
TV Rear Panel
or
(HDD)
USB Drive
HD Connection Guide
Refer to this information when connecting external devices
to the TV.
Contact Samsung
View this information when your TV does not work properly
or when you want to upgrade the software. You can find
information regarding our call centres, and how to download
products and software.
28
English
Page 29

Advanced Features
Using an HDMI/DVI Cable / a D-sub Cable
Connecting to a PC
04 Advanced Features
AUDIO OUT
PC OUT
Display Modes (D-Sub and HDMI/DVI Input)
Optimal resolution is 1920 X 1080 @ 60 Hz.
Mode Resolution
IBM
MAC
VESA CVT
VESA DMT
VESA GTF
VESA DMT / DTV CEA
640 x 350
720 x 400
640 x 480
832 x 624
1152 x 870
720 x 576
1152 x 864
1280 x 720
1280 x 960
640 x 480
640 x 480
640 x 480
800 x 600
800 x 600
800 x 600
1024 x 768
1024 x 768
1024 x 768
1152 x 864
1280 x 1024
1280 x 1024
1280 x 720
1280 x 800
1280 x 800
1280 x 960
1360 x 768
1440 x 900
1440 x 900
1600 x 1200
1680 x 1050
1280 x 720
1280 x 1024
1920 x 1080p 67.500 60.000 148.500 +/+
Horizontal Frequency
(KHz)
31.469
31.469
35.000
49.726
68.681
35.910
53.783
56.456
75.231
31.469
37.861
37.500
37.879
48.077
46.875
48.363
56.476
60.023
67.500
63.981
79.976
45.000
49.702
62.795
60.000
47.712
55.935
70.635
75.000
65.290
52.500
74.620
Vertical Frequency
(Hz)
70.086
70.087
66.667
74.551
75.062
59.950
59.959
74.777
74.857
59.940
72.809
75.000
60.317
72.188
75.000
60.004
70.069
75.029
75.000
60.020
75.025
60.000
59.810
74.934
60.000
60.015
59.887
74.984
60.000
59.954
70.000
70.000
Pixel Clock Frequency
(MHz)
25.175
28.322
30.240
57.284
100.000
32.750
81.750
95.750
130.000
25.175
31.500
31.500
40.000
50.000
49.500
65.000
75.000
78.750
108.000
108.000
135.000
74.250
83.500
106.500
108.000
85.500
106.500
136.750
162.000
146.250
89.040
128.943
DVI OUT
AUDIO OUT
Sync Polarity
(H / V)
+/-
-/+
-/-
-/-
-/-
-/+
-/+
-/+
-/+
-/-
-/-
-/+/+
+/+
+/+
-/-
-/+/+
+/+
+/+
+/+
+/+
-/+
-/+
+/+
+/+
-/+
-/+
+/+
-/+
-/+
-/-
✎
NOTE
For HDMI/DVI cable connection, you must use the HDMI IN 1(DVI) jack.
x
The interlace mode is not supported.
x
The set might operate abnormally if a non-standard video format is selected.
x
Separate and Composite modes are supported. SOG(Sync On Green) is not supported.
x
English
29
Page 30
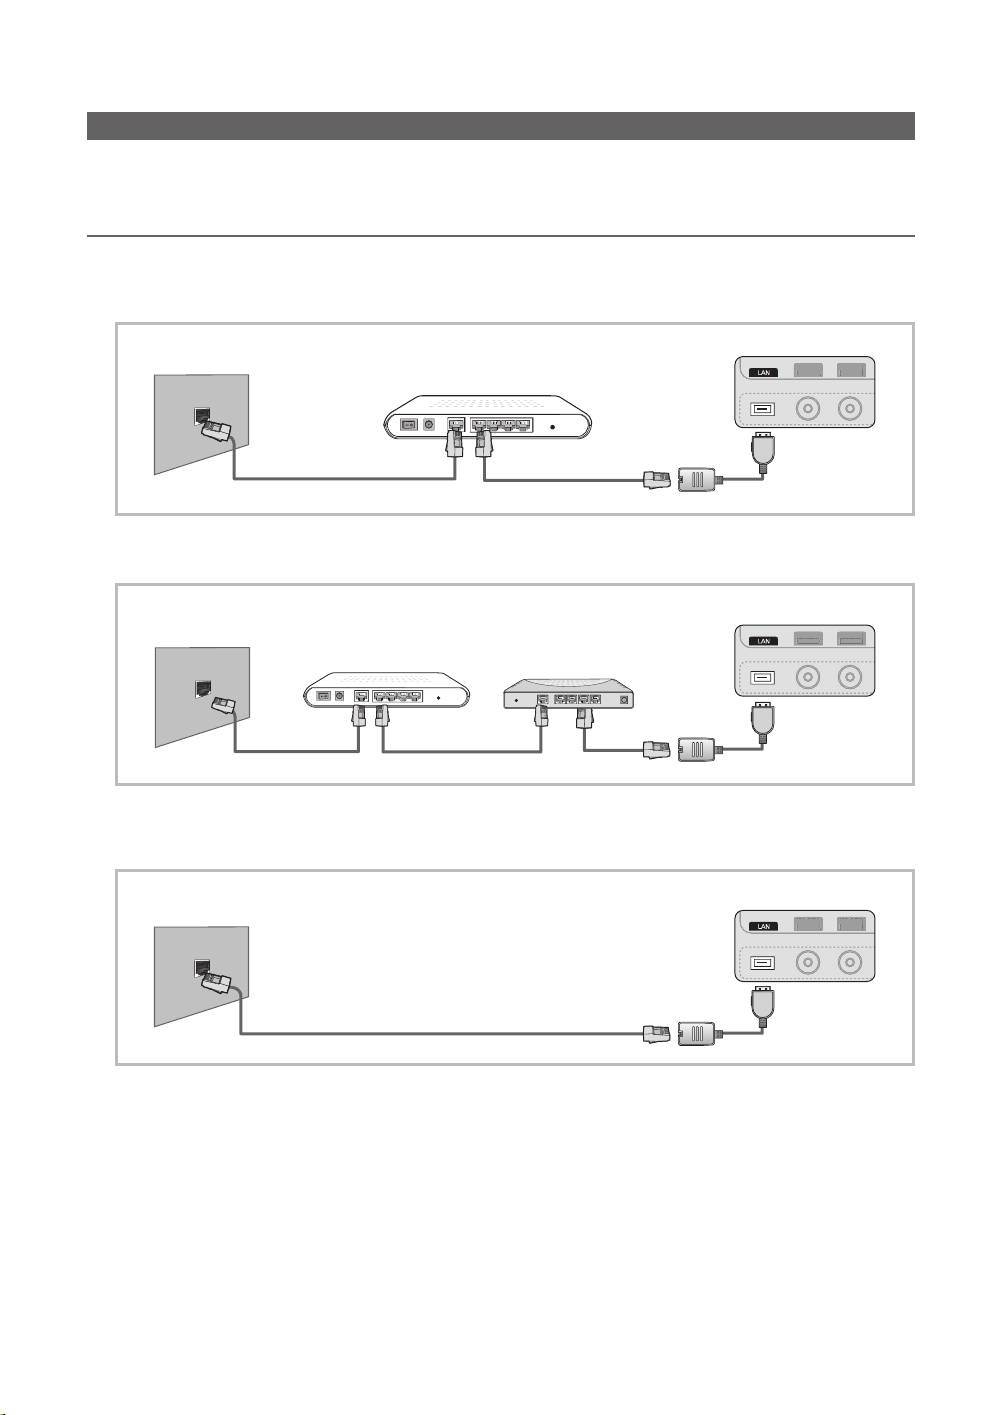
Advanced Features
ANT 2 IN
(
SATELLITE
)
ANT 2 IN
(
AIR/CABLE
)
(
SATELLITE
)
(
AIR/CABLE
)
ANT 2 IN
(
SATELLITE
)
ANT 2 IN
(
AIR/CABLE
)
(
SATELLITE
)
(
AIR/CABLE
)
ANT 2 IN
(
SATELLITE
)
ANT 2 IN
(
AIR/CABLE
)
ANT 2 IN
(
SATELLITE
)
ANT 2 IN
(
AIR/CABLE
)
ANT 2 IN
(
SATELLITE
)
ANT 2 IN
(
AIR/CABLE
)
(
SATELLITE
)
(
AIR/CABLE
)
ANT 2 IN
(
SATELLITE
)
ANT 2 IN
(
AIR/CABLE
)
ANT 2 IN
(
SATELLITE
)
ANT 2 IN
(
AIR/CABLE
)
ANT 2 IN
(
SATELLITE
)
ANT 2 IN
(
AIR/CABLE
)
ANT 2 IN
(
SATELLITE
)
ANT 2 IN
(
AIR/CABLE
)
Network Connection
You can set up your TV so that it can access the Internet through your local area network (LAN) using a wired or wireless
connection.
Connecting to a Wired Network
You can attach your TV to your LAN using cable in three ways:
y You can attach your TV to your LAN by connecting the LAN port on the back of your TV to an external modem using a Cat
5 cable. See the diagram below.
The Modem Port on the Wall
External Modem
(ADSL / VDSL / Cable TV)
LAN Adapter
TV Rear Panel
Modem Cable
LAN Cable
y You can attach your TV to your LAN by connecting the LAN port on the back of your TV to a IP Sharer which is connected
to an external modem. Use Cat 5 cable for the connection. See the diagram below.
TV Rear Panel
The Modem Port on the Wall
External Modem
(ADSL / VDSL / Cable TV)
IP Sharer
(having DHCP server)
LAN Adapter
LAN Cable LAN CableModem Cable
y Depending on how your network is configured, you may be able to attach your TV to your LAN by connecting the LAN
port on the back of your TV directly to a network wall outlet using a Cat 5 cable. See the diagram below. Note that the wall
outlet is attached to a modem or router elsewhere in your house.
TV Rear Panel
The LAN Port on the Wall
LAN Cable
LAN Adapter
If you have a Dynamic Network, you should use an ADSL modem or router that supports Dynamic Host Configuration
Protocol (DHCP). Modems and routers that support DHCP automatically provide the IP address, subnet mask, gateway,
and DNS values your TV needs to access the Internet so you don’t have to enter them manually. Most home networks are
Dynamic Networks.
Some networks require a Static IP address. If your network requires a Static IP address, you must enter the IP address,
subnet mask, gateway, and DNS values manually on your TV’s Cable Setup Screen when you set up the network
connection. To get the IP address, subnet mask, gateway, and DNS values, contact your Internet Service Provider (ISP). If
you have a Windows computer, you can also get these values through your computer.
✎
You can use ADSL modems that support DHCP if your network requires a Static IP address. ADSL modems that
support DHCP also let you use Static IP addresses.
English
30
Page 31

Network Setup (Auto)
Use the Automatic Network Setup when connecting your
TV to a network that supports DHCP. To set up your TV’s
cable network connection automatically, follow these steps:
How to set up automatically
1. Connect your TV to your LAN as described in the
previous section.
2. Turn on your TV, press the MENU button on your
remote, use the ▲ or ▼ button to select Setup, and
then press the ENTER
3. Use the ▲ or ▼ button to select Network in the Setup
menu, and then press the ENTER
Network screen appears.
Network Type : Wired ►
Network Setup
Network Test
SWL(Samsung Wireless Link) : Off
SWL connect
4. On the Network screen, select Network Type.
5. Set Network Type to Wired.
6. Select Network Setup. The Network Setup screen
appears.
Internet Protocol Setup : Auto ►
IP Address :
Subnet Mask :
Gateway :
DNS : Auto
DNS Server :
button.
Network
Move
Network Setup
button. The
Enter
Return
Network Setup (Manual)
Use the Manual Network Setup when connecting your TV to
a network that requires a Static IP address.
Getting the Network Connection Values
To get the Network connection values on most Windows
computers, follow these steps:
1. Right click the Network icon on the bottom right of the
screen.
2. In the pop-up menu that appears, click Status.
3. On the dialog that appears, click the Support tab.
4. On the Support Tab, click the Details button. The
Network connection values are displayed.
How to set up manually
To set up your TV’s cable network connection manually,
follow these steps:
1. Follow Steps 1 through 6 in the “How to set up
automatically” procedure.
2. Set Internet Protocol Setup to Manual.
3. Press the ▼ button on your remote to go to the first
entry field.
4. Enter the IP Address, Subnet Mask, Gateway, and
DNS Server values. Use the number buttons on your
remote to enter numbers and the arrow buttons to move
from one entry field to another.
5. When done, press the RETURN button on your remote.
6. Select Network Test to check the Internet connectivity.
04 Advanced Features
Move
Enter
Return
7. Set Internet Protocol Setup to Auto.
8. Auto acquires and enters the needed Internet values
automatically.
9 When done, press the RETURN button on your remote.
10. If the Network Function has not acquired the network
connection values, go to the directions for Manual.
English
31
Page 32

Advanced Features
Connecting to a Wireless Network
To connect your TV to your network wirelessly, you need a wireless router or modem and a Samsung Wireless LAN Adapter
(WIS09ABGN, WIS09ABGN2, WIS10ABGN), which you connect to your TV’s back or side panel USB jack. See the illustration
below.
To use the SWL(Samsung Wireless Link) function, connect to the USB 1 (HDD) port.
✎
TV Rear Panel
LAN Cable
Wireless IP sharer
or
(HDD)
Samsung Wireless
LAN Adapter
The LAN Port on
the Wall
Samsung’s Wireless LAN adapter is sold separately and is offered by select retailers, Ecommerce sites and Samsungparts.
com. Samsung’s Wireless LAN adapter supports the IEEE 802.11A/B/G and N communication protocols. Samsung
recommends using IEEE 802.11N. When you play the video over a IEEE 802.11B/G connection, the video may not play
smoothly.
✎
NOTE
You must use the “Samsung Wireless LAN Adapter” (WIS09ABGN, WIS09ABGN2, WIS10ABGN) to use a wireless
x
network.
Samsung’s Wireless LAN Adapter is sold separately. The Samsung Wireless LAN Adapter is offered by select
x
retailers, Ecommerce sites and Samsungparts.com.
To use a wireless network, your TV must be connected to a wireless IP sharer. If the wireless IP sharer supports
x
DHCP, your TV can use a DHCP or static IP address to connect to the wireless network.
Select a channel for the wireless IP sharer that is not currently being used. If the channel set for the wireless IP sharer
x
is currently being used by another device nearby, this will result in interference and communication failure.
If you apply a security system other than the systems listed blow, it will not work with the TV.
x
If Pure High-throughput (Greenfield) 802.11N mode is selected and the Encryption type is set to WEP, TKIP or TKIP-
x
AES (WPS2Mixed) for your AP, Samsung TVs will not support a connection in compliance with new Wi-Fi certification
specifications.
If your AP supports WPS (Wi-Fi Protected Setup), you can connect to the network via PBC (Push Button
x
Configuration) or PIN (Personal Identification Number). WPS will automatically configure the SSID and WPA key in
either mode.
If your router, modem, or device isn’t certified, it may not connect to the TV via the “Samsung Wireless LAN Adapter.”
x
Connection Methods: You can setup the wireless network connection six ways.
x
– Samsung Auto Configuration
– PBC (WPS)
– Auto Setup (Using the Auto Network Search function)
– Manual Setup
– SWL(Samsung Wireless Link)
– Ad-Hoc
The Samsung Wireless LAN Adapter may not be recognized or work properly when connecting via a USB hub or via
x
a USB extension cable other than the one available from Samsung.
32
English
Page 33

Notice
The picture may appear corrupted or have static for some channels when the TV is connected to the Samsung Wireless LAN
Adapter. In such a case, establish a connection using one of the following methods or connect the Samsung Wireless LAN
Adapter using a USB cable in a place that is not affected by radio interference.
Method 1 Method 2
Connect using the USB right angle adapter
Connect via an extension cable
✎
The Samsung Wireless LAN Adapter should be
installed in an interference-free area in order to
avoid interference between the adapter and tuner.
or
04 Advanced Features
Network Setup (Samsung Auto
Configuration)
This function is available in APs (Access Points) that support
Samsung Auto Configuration. If your AP does not, you can
connect through PBC (WPS), auto, or manually.
✎
This function is available when SWL(Samsung
Wireless Link) is set to Off.
✎
You can check for equipment that supports Samsung
Auto Configuration on www.samsung.com.
How to set up using Samsung Auto Configuration
1. Place the AP and TV next to each other and turn them
on.
✎
Because the booting times of applications differ,
you may have to wait for approximately 2 minutes.
✎
If the LAN cable connected the WAN port of AP
during Samsung Auto Configuration, you are able
to complete until internet connection test. If you
do not connect, Samsung Auto Configuration will
check only device connecting of AP (Not check
internet).
2. After 2 minutes, connect the Samsung Wireless LAN
Adapter to the TV. When the Samsung Wireless LAN
Adapter is established, the pop-up window appears.
3. As soon as a connection is established, place the AP in
parallel with the Samsung Wireless LAN Adapter giving a
gap no larger than 25cm.
4. Wait until the connection is automatically established.
✎
If Samsung Auto Configuration does not connect
your TV to your AP, a pop-up window appears
on the screen notifying you of the failure. Reset
the AP, and then try again. If the connection fails
again, choose one of the other connection setup
methods, PBC (WPS), auto, or manual.
5. After the connection is established, locate the sharer at
the desired location.
✎
If the AP settings have been changed or it is the
first time you use the new AP after purchase, you
need to set up again beginning from Step 1.
Network Setup (PBC (WPS))
How to set up using PBC (WPS)
If your router has a PBC (WPS) button, follow these steps:
1. Connect your TV to your LAN as described in the
previous section.
2. Turn on your TV, press the MENU button on your
remote, use the ▲ or ▼ button to select Setup, and
then press the ENTER
3. Use the ▲ or ▼ button to select Network in the Setup
menu, and then press the ENTER
4. On the Network screen, select Network Type.
5. Set Network Type to Wireless.
6. Select Network Setup. The Network Setup screen
appears.
button.
button.
English
33
Page 34

Advanced Features
Network Setup
Select a Network : Not Selected ►
Internet Protocol Setup : Auto
Move
Enter
Return
IP Address :
Subnet Mask :
Gateway :
DNS : Auto
DNS Server :
PBC(WPS)
7. Press the Red button on your remote.
8. Press the PBC (WPS) button on your router within 2
minutes. Your TV player automatically acquires all the
network setting values it needs and connects to your
network.
9. After the network connection is set up, press the
RETURN button to exit the Network Setup screen.
Network Setup (Auto)
Most wireless networks have an optional security system
that requires devices that access the network to transmit
an encrypted security code called an Access or Security
Key. The Security Key is based on a Pass Phrase, typically
a word or a series of letters and numbers of a specified
length you were asked to enter when you set up security for
your wireless network. If you use this method of setting up
the network connection, and have a Security Key for your
wireless network, you will have to enter the Pass Phrase
during the setup process.
How to set up automatically
To set up the wireless connection automatically, follow these
steps:
1. Follow Steps 1 through 6 in the “How to set up using
PBC (WPS)” (p. 33).
2. Press the ▼ button to select Internet Protocol Setup,
and then press the ENTER
▼ button to select Auto, and then press the ENTER
button.
3. Press the ▲ button to go to Select a Network, and
then press the ENTER
searches for available wireless networks. When done, it
displays a list of the available networks.
4. In the list of networks, press the ▲ or ▼ button to select
a network, and then press the ENTER
✎
If the AP is set to Hidden (Invisible), you have
to select Add Network and enter the correct
Network Name (SSID) and Security Key to
establish the connection.
button. Press the ▲ or
button. The Network function
button.
5. If the Security/PIN pop-up appears, go to Step 6. If the
Network Connecting Screen appears, go to Step 10.
6. Press the ▲ or ▼ button to select Security or PIN. For
most home networks, you would select Security (for
Security Key). The Security Screen appears.
Network Setup
Security Key
0 entered
0~9
Lower case
Delete
Space
Enter
Number
Return
button.
button. The
A B C D E F G
H I J K L M N
O P Q R S T U
V W X Y Z
Move
7. On the Security screen, enter your network’s Pass
Phrase.
✎
You should be able to find the Pass Phrase on
one of the set up screens you used to set up your
router or modem.
8. To enter the Pass Phrase, follow these general
directions:
– Press the number buttons on your remote to enter
numbers.
– Use the direction buttons on your remote to move
from button to button on the Security Key screen.
– Press the Red button to change case or display
symbols/characters.
– To a enter letter or symbol, move to the letter or
symbol, and then press the ENTER
– To delete the last letter or number you entered, press
the Green button on your remote.
9. When done, press the Blue button on your remote. The
Network Connecting screen appears.
10. Wait until the connection confirmation message is
displayed, and then press the ENTER
Network Setup screen re-appears.
11. To test the connection, press the RETURN button to
select Network Test, and then press the ENTER
button.
34
English
Page 35

Network Setup (Ad-Hoc)
You can connect to a mobile device without an access point
through the “Samsung Wireless LAN Adapter” by using a
peer to peer network.
✎
This function is available when SWL(Samsung
Wireless Link) is set to Off.
How to connect to new Ad-hoc device
1. Follow Steps 1 through 6 in the “How to set up using
PBC (WPS)” (p. 33).
2. Choose Select a Network. A list of devices/networks
appears.
3. While in the device list, press the Blue button on the
remote.
✎
The message Ad-hoc is a direct Wi-Fi
connection with cell phone or PC. The existing
network system may have limited functionality.
Do you want to change the network
connection? is displayed.
4. Input the generated Network Name (SSID) and
Security Key into the device you want to connect.
How to connect an existing Ad-hoc device
1. Follow Steps 1 through 6 in the “How to set up using
PBC (WPS)” (p. 33).
2. Choose Select a Network. The Device/Network list
appears.
3. Select the device you want in the Device list.
4. If security key is required, input the security key.
✎
If network doesn’t operate normally, check
the Network Name (SSID) and Security Key
again. An incorrect Security Key may cause a
malfunction.
Network Setup (Manual)
If the other methods do not work, you need to enter the
Network setting values manually.
Getting the Network Connection Values
To get the Network connection values on most Windows
computers, follow these steps:
1. Right click the Network icon on the bottom right of the
screen.
2. In the pop-up menu, click Status.
3. On the dialog that appears, click the Support tab.
4. On the Support tab, click the Details button. The
Network settings are displayed.
How to set up manually
To enter the Network connection values manually, follow
these steps:
1. Follow Steps 1 through 6 in the “How to set up using
PBC (WPS)” (p. 33).
2. Press the ▼ button to select Internet Protocol Setup,
and then press the ENTER
or ▼ button to select Manual, and then press the
ENTER button.
3. Press the ▼ button to go to the first entry field (IP
Address).
4. Use the number buttons to enter numbers.
5. When done with each field, use the ► button to move
successively to the next field. You can also use the other
arrow buttons to move up, down, and back.
6. Enter the IP Address, Subnet Mask, and Gateway
values.
7. Press the ▲ or ▼ button to go to DNS.
8. Press the ▼ button to go to the first DNS entry field.
Enter the numbers as above.
9. When done, press the ▲ button to go to Select a
Network. Select your network, and then press the
ENTER
button.
10. Go to Step 4 in the “How to set up automatically” (p.
34), and follow the directions from that point on.
button. Press the ▲
04 Advanced Features
English
35
Page 36

Advanced Features
SWL(Samsung Wireless Link)
This function lets you connect a Samsung device that
supports the PBC (WPS) to your TV. You can connect
devices to the TV even if a sharer is not connected to the TV.
✎
To use the Internet@TV, the AP (access point) must be
connected to the wireless network.
✎
If a Samsung Wireless LAN Adapter is connected to the
USB 2 port, the network may not operate normally. We
recommend to connecting it to the USB 1 (HDD) port.
✎
Only sharers using the 2.4 Ghz band are supported.
Sharers using the 5 Ghz band are not supported.
SWL connect
You can directly connect a device that supports the PBC
(WPS) to the TV.
✎
This function is available when SWL(Samsung
Wireless Link) is set to On.
How to connect Samsung Wireless Link
For the procedures to establish a connection, refer to the
following:
1. Follow Steps 1 through 5 in the “How to set up using
PBC (WPS)” (p. 33).
2. Select SWL(Samsung Wireless Link) by using the ▼
button and press the ENTER
3. Select SWL connect by using the ▼ button and press
the ENTER
4. If the “Press the PBC button on the PBC(WPS)
supported device to connect within 120 seconds.”
message appears, press the PBC button on the device
to connect.
5. If the device is connected properly to the TV after
starting count on message box then message box will
be disappeared automatically.
button.
✎
For more information, refer to the wireless network
setup manual of the device to be connected.
✎
If the connection fails, please retry after 2 minutes.
button to turn it On.
If Your TV Fails to Connect to the Internet
Your TV may not be able to connect to the Internet because
your ISP has permanently registered the MAC address (a
unique identifying number) of your PC or modem, which it
then authenticates each time you connect to the Internet as
a way of preventing unauthorized access. As your TV has
a different MAC address, your ISP can not authenticate its
MAC address, and your TV can not connect.
To resolve this problem, ask your ISP about the procedures
required to connect devices other than a PC (such as your
TV) to the Internet.
If your Internet service provider requires an ID or password
to connect to the Internet, your TV may not be able to
connect to the Internet. If this is the case, you must enter
your ID or password when connecting to the Internet.
The internet connection may fail because of a firewall
problem. If this is the case, contact your Internet service
provider.
If you cannot connect to the Internet even after you have
followed the procedures of your Internet service provider,
please contact Samsung Electronics at 1-800-SAMSUNG.
36
English
Page 37

Media Play
SUM
04 Advanced Features
MediaPlay
Recorded TV
Change Device
View Devices
Enter
MEDIA.P
Enjoy recorded tv, photos, music and/or movie
fi les saved on a USB Mass Storage Class (MSC)
device and/or your PC.
Connecting a USB Device
1. Turn on your TV.
2. Connect a USB device containing recorded tv, photo, music and/or movie fi les to
the USB 1 (HDD) or USB 2 port on the back or side panel of the TV.
3. When USB is connected to the TV, popup window appears. Then you can select
Media Play .
TV Rear Panel
or
(HDD)
USB Drive
Connecting to the PC through network
You can play pictures, music and videos saved on your PC through a network connection in the Media Play mode.
✎
If you use Media Play through saved file on your PC, you should download “PC Share Manager” and users manual from
“www.samsung.com.”
Return
TV Rear Panel
(HDD)
Wireless IP Sharer
LAN Cable LAN Cable LAN Cable
or
Samsung
Wireless
LAN Adapter
LAN
LAN Adapter
LAN Cable
PC
External Modem
(ADSL/VDSL/Cable TV)
Modem Cable
1. For more information on how to confi gure your network, refer to “Network Connection” (p. 30).
– You are recommended to locate both TV and PC in same subnet. The fi rst 3 parts of the subnet address of the TV and
the PC IP addresses should be the same and only the last part (the host address) should be changed. (e.g. IP Address:
123.456.789.**)
2. Using a LAN cable, connect between the external modem and the PC onto which the Samsung PC Share Manager
programme will be installed.
– You can connect the TV to the PC directly without connecting it through a Sharer (Router).
English
37
Page 38

Advanced Features
✎
No supported functions when connecting to the PC through network:
The Background Music and Background Music Setting functions.
x
Sorting files by preference in the Photos, Music, and Videos folders.
x
The (REW) or (FF) button while a movie is playing.
x
✎
The Divx DRM, Multi-audio, embedded caption does not supported.
✎
Samsung PC Share manager should be permitted by the firewall programme on your PC.
✎
When you use Media Play mode through a network connection, According to functions of the provided server:
The sorting method may vary.
x
The scene search function may not be supported.
x
The Play Continuously function, which resumes playing of a video, may not be supported.
x
– The Play Continuously function does not support multiple users. (It will have only memorised the point where the
most recent user stopped playing.)
The ◄ or ► button may not work depending on the content information.
x
You may experience file stuttering while playing a video in Media Play through a network connection.
x
✎
It might not work properly with unlicenced multimedia files.
✎
Need-to-Know List before using Media Play
MTP (Media Transfer Protocol) is not supported.
x
The file system supports FAT16, FAT32 and NTFS.
x
Certain types of USB Digital camera and audio devices may not be compatible with this TV.
x
Media Play only supports USB Mass Storage Class (MSC) devices. MSC is a Mass Storage Class Bulk-Only
x
Transport device. Examples of MSC are Thumb drives, Flash Card Readers and USB HDD (USB HUB are not
supported). Devices should be connected directly to the TV’s USB port.
Before connecting your device to the TV, please back up your files to prevent them from damage or loss of data.
x
SAMSUNG is not responsible for any data file damage or data loss.
Connect a USB HDD to the dedicated port, USB 1 (HDD) port.
x
Do not disconnect the USB device while it is loading.
x
The higher the resolution of the image, the longer it takes to display on the screen.
x
The maximum supported JPEG resolution is 15360X8640 pixels.
x
For unsupported or corrupted files, the “Not Supported File Format” message is displayed.
x
If the files are sorted by Basic View, up to 1000 files can be displayed in each folder.
x
MP3 files with DRM that have been downloaded from a non-free site cannot be played. Digital Rights Management
x
(DRM) is a technology that supports the creation of content, the distribution and management of the content in an
integrated and comprehensive way, including the protection of the rights and interests of the content providers, the
prevention of the illegal copying of contents, as well as managing billings and settlements.
If more than 2 PTP devices are connected, you can only use one at a time.
x
If more than two MSC devices are connected, some of them may not be recognized. A USB device that requires high
x
power (more than 500mA or 5V) may not be supported.
If an over-power warning message is displayed while you are connecting or using a USB device, the device may not
x
be recognized or may malfunction.
If the TV has been no input during time set in Auto Protection Time, the Screensaver will run.
x
The power-saving mode of some external hard disk drives may be released automatically when connected to the TV.
x
If a USB extension cable is used, the USB device may not be recognized or the files on the device may not be read.
x
If a USB device connected to the TV is not recognized, the list of files on the device is corrupted or a file in the list is
x
not played, connect the USB device to the PC, format the device and check the connection.
If a file deleted from the PC is still found when Media Play is run, use the “Empty the Recycle Bin” function on the PC
x
to permanently delete the file.
38
English
Page 39

Screen Display
B
Movie 01.avi
00:04:03 / 00:07:38 1/1
SUM
B
Move to the file you desired using the up/down/right/left buttons and then press the ENTER or (Play) button. The file is
played.
✎
Supports the View Devices and Home in Media Play homepage.
You can ascertain the selected
Information:
file name and the number of files
and page.
Sort List Section:
Displays sorting standard.
Sorting standard is
✎
different depending on the
contents.
Videos
SUM
Change Device
/Movie 01.avi 1/1
Movie 01.avi
Movie 03.avi
Movie 05.avi
Movie 07.avi
Movie 09.avi
Jan.10.2010
Jan.10.2010
Jan.10.2010
Jan.10.2010
Jan.10.2010
Movie 02.avi
Movie 04.avi
Movie 06.avi
Movie 08.avi
Movie 10.avi
Select Sorting
Jan.10.2010
Jan.10.2010
Jan.10.2010
Jan.10.2010
Jan.10.2010
Tools
Page
Operation Buttons
Red (Change Device): Selects a connected device.
Green (Preference): Sets the file preference. (not supported in Basic view)
Yellow (Select): Selects multiple files from file list. Selected files are marked with a symbol.
Blue (Sorting): Selects the sort list.
Tools: Displays the option menu.
Using the (REW) or (FF) button, file list can move to next or previous page.
✎
File List Section:
You can confirm the files
and groups that is sorted by
each category.
Recorded TV
To use the recording or Timeshift Mode function, the connected USB device must be available for recording. Device format
is recommended to use USB HDD.
✎
During the Device formatting, do not disconnect the device while formatting is in progress. If you format the device, all
files will be deleted.
✎
Before formatting your device for the tv, please back up your files to prevent them from damage or loss of data.
SAMSUNG is not responsible for any data file damage or data loss.
Playing Recorded TV Programme
04 Advanced Features
1. Press the ◄ or ► button to select Recorded TV, then press
the ENTER
button in the Media Play menu.
2. Press the ◄/►/▲/▼ button to select the desired file in the file
list.
3. Press the ENTER
button or (Play) button.
– The selected file is displayed on the top with its playing time.
– During playing the recorded TV programme, you can search
using the ◄ and ► button.
Operation Buttons
Green (Section Repeat): You can set up the fuction to repeat some section.
You can also watch some section you want to.
Section Repeat Play continuously
Play continuously
Resumes playing from the last viewed
scene.
Chaptering
Jump
English
Tools
39
Page 40

Advanced Features
Using the Timeshift Mode function
If you missed a live broadcast, you can see from the recorded broadcast using this feature.
When the Timeshift Mode is set to Auto, the TV stores the channel you watch currently to record automatically.
When the Timeshift Mode is set to Manual, if you press the
view you want to record.
✎
NOTE
Recorded videos are DRM (digital rights management) protected and cannot be played on a PC or other TVs, nor can
x
they be played when the main board of the TV is changed.
Data broadcasts cannot be recorded.
x
The availability of both recording and the Timeshift Mode function may differ depending on picture quality and the
x
free space on the hard disk drive.
If you press the ▲ or ▼ button, you can see the current channel being on air, or can see the start point the recorded
x
broadcast.
The Timeshift Mode operates for a maximum of 90 minutes.
x
After the Timeshift Mode function has run for the maximum time, the time information will be fixed to “00:00:00.”
x
Note that if you have paused the recording the TV will automatically resume playback.
If the 5% free memory space limit of the USB storage device is reached, the current recording process will be closed.
x
When recording is performed by both the PVR (Personal Video Recorder) function and a device that supports the
x
HDMI-CEC feature, recording by the PVR function takes precedence.
During a playback or the Timeshift Mode, the picture will be displayed according to the display settings of the TV.
x
If you change the input source during recording, the screen will go blank until the change is completed.
x
An application which supports neither the recording nor the Timeshift Mode function will close automatically if you
x
try to use it during either function.
A message may appear in front of the application window indicating that the recording or the Timeshift Mode
x
function is closed.
Timeshift Mode function is not supported for analogue channels.
x
The recording and the Timeshift Mode functions are disabled for channels locked with Child Lock.
x
If the USB device has failed the Device Performance Test, the USB device must go through the Device Format and
x
Device Performance Test again before you record with the Guide or Channel Manager.
The recording and Timeshift Mode functions can only be used with a USB storage device that completed the
x
Device Performance Test.
If you attempt the recording or Timeshift Mode function with a device that did not have the Device Performance
x
Test, the function will not start.
If you press (REC) on the remote control while the Channel Manager screen is being displayed or record with
x
Timer Recording, the TV may start or stop recording 1 or 2 seconds later than you intended due to the time needed
to process the command.
If a USB device dedicated to recording is connected, existing Timeshift Mode or recording files that were saved
x
abnormally will automatically be deleted.
If you switch to external input mode during recording, the recording will continue but the (REC) button will be
x
disabled.
If any function that turns off the TV (Sleep Timer, Off timer, etc.) is set for a time that conflicts with recording, the TV
x
will be turned off once the recording is complete.
(Play) button, the TV stores the channel from the point of
40
English
Page 41

Videos
Movie 01.avi
00:04:03 / 00:07:38 1/1
SUM
Playing Video
1. Press the ◄ or ► button to select Videos, then press the ENTER
2. Press the ◄/►/▲/▼ button to select the desired file in the file list.
3. Press the ENTER
– The selected file is displayed on the top with its playing time.
– If video time information is unknown, play time and progress bar are not displayed.
– During playing the video, you can search using the ◄ and ► button.
✎
In this mode, you can enjoy movie clips contained on a Game,
but you cannot play the Game itself.
y Supported Subtitle Formats
MPEG-4 time-based text .ttxt XML
SubViewer .sub string-based
Micro DVD .sub or .txt string-based
y Supported Video Formats
File Extension Container Video Codec Resolution
*.avi
*.mkv
*.asf ASF
*.wmv ASF Window Media Video v9 1920x1080 6 ~ 30 25 WMA
*.mp4 MP4
*.3gp 3GPP
*.vro
*.mpg
*.mpeg
*.ts
*.tp
*.trp
button or (Play) button.
Name File extension Format
SAMI .smi HTML
SubRip .srt string-based
Divx 3.11 / 4.x / 5.1 / 6.0 1920x1080 6 ~ 30 8
AVI
MKV
VRO
VOB
PS
TS
XviD 1920x1080 6 ~ 30 8
H.264 BP / MP / HP 1920x1080 6 ~ 30 25
MPEG4 SP / ASP 1920x1080 6 ~ 30 8
Motion JPEG 800x600 6 ~ 30 8
Divx 3.11 / 4.x / 5.1 / 6.0 1920x1080 6 ~ 30 8
XviD 1920x1080 6 ~ 30 8
H.264 BP / MP / HP 1920x1080 6 ~ 30 25
MPEG4 SP / ASP 1920x1080 6 ~ 30 8
Motion JPEG 800x600 6 ~ 30 8
H.264 BP / MP / HP 1920x1080 6 ~ 30 25
XVID 1920x1080 6 ~ 30 8
H.264 BP / MP / HP 1920x1080 6 ~ 30 25
MPEG4 SP / ASP 1920x1080 6 ~ 30 8
MPEG1 1920x1080 24 / 25 / 30 30
MPEG2 1920x1080 24 / 25 / 30 30
MPEG1 1920x1080 24 / 25 / 30 30
H.264 1920x1080 6 ~ 30 25
MPEG2 1920x1080 24 / 25 / 30 30
H.264 1920x1080 6 ~ 30 25
VC1 1920x1080 6 ~ 30 25
button in the Media Play menu.
Frame rate
(fps)
Bit rate
(Mbps)
Chaptering
Jump
Tools
Audio Codec
MP3 / AC3 / LPCM /
ADPCM / DTS Core
MP3 / AC3 / LPCM /
ADPCM / WMA
MP3 / ADPCM / AACMPEG4 SP / ASP 1920x1080 6 ~ 30 8
ADPCM / AAC / HE-AAC
AC3 / MPEG / LPCM
AC3 / MPEG / LPCM / AACMPEG2 1920x1080 24 / 25 / 30 30
AC3 / AAC / MP3 / DD+ /
HE-AAC
04 Advanced Features
Return
English
41
Page 42

Advanced Features
Movie 01.avi
00:04:03 / 00:07:38 1/1
SUM
Other Restrictions
✎
NOTE
If there are problems with the contents of a codec, the codec will not be supported.
x
If the information for a Container is incorrect and the file is in error, the Container will not be able to play
x
correctly.
Sound or video may not work if the contents have a standard bitrate/frame rate above the compatible Frame/sec
x
listed in the table above.
If the Index Table is in error, the Seek (Jump) function is not supported.
x
Video Decoder Audio Decoder
• Supports up to H.264, Level 4.1
• H.264 FMO / ASO / RS, VC1 SP / MP / AP L4 and AVCHD are not
supported.
• XVID, MPEG4 SP, ASP :
– Below 1280 x 720: 60 frame max
– Above 1280 x 720: 30 frame max
• GMC 2 over is not supported.
• H.263 is not supported.
• Only Samsung Techwin MJPEG is supported.
Playing recorded TV or movie file continuously (Resume Play)
If you exit the playing Recorded TV or Videos function, it can be played later from the point where it was stopped.
✎
If you press the ENTER button (Chaptering) during playing the file, you can explore scene divided into 5 chapters
you want.
✎
If the index information is damaged or unsupported, you will not be able to use the Chaptering function.
1. Select the movie file you want to play continuously by pressing
the ◄ or ► button to select it from the file list section.
2. Press the
(Play) / ENTER button.
3. Select Play Continuously (Resume Play) by pressing the Blue
button. The Movie will begin to play from where it was stopped.
✎
The Blue button is available when resuming play.
✎
If the Cont. movie play help function is set to On in the
Settings menu, a pop-up message will appear when you
resume play a movie file.
• Supports up to WMA 7, 8, 9, STD
• WMA 9 PRO does not support 2 channel excess multi channel or
lossless audio.
• WMA sampling rate 22050Hz mono is not supported.
Play continuously
Resumes playing from the last viewed
scene.
Play continuously
Chaptering
Jump
Tools
Return
English
42
Page 43

Music
3/15
I Love you
Jhon
Music 1
No Singer
Music 2
No Singer
Music 3
No Singer
Music 4
No Singer
Music 5
No Singer
I Love You
Jhon
1st Album
Pop
2010
4.2MB
01:10 / 04:02
SUM
Image1024.jpg 1024x768 2010/2/1 3/15
SUM
Playing Music
1. Press the ◄ or ► button to select Music, then press the
ENTER
button in the Media Play menu.
Playlist
2. Press the ◄/►/▲/▼ button to select the desired file in the file
list.
3. Press the ENTER
button or (Play) button.
– During playing the music, you can search using the ◄ and ►
button.
–
(REW) and (FF) buttons do not function during play.
✎
Only displays the files with MP3 and PCM file extension. Other
file extensions are not displayed, even if they are saved on the
Pause
Jump
same USB device.
✎
If the sound is strange when playing MP3 files, adjust the Equalizer in the Sound menu. (An over-modulated MP3 file
may cause a sound problem.)
✎
You can create My Playlist selecting the desired music in the file, and can play My Playlist.
Photos
Viewing a Photo (or Slide Show)
1. Press the ◄ or ► button to select Photos, then press the
ENTER
button in the Media Play menu.
2. Press the ◄/►/▲/▼ button to select the desired file in the file
list.
3. Press the ENTER
– While a photo list is displayed, press the
button or (Play) button.
(Play) /
ENTER button on the remote control to start slide show.
– All files in the file list section will be displayed in the slide show.
– During the slide show, files are displayed in order from
currently being shown.
✎
Music files can be automatically played during the Slide Show if
the Background Music is set to On.
✎
The BGM Mode cannot be changed until the BGM has finished
loading.
Normal
Pause
Previous/Next
Tools
Tools
04 Advanced Features
Return
Return
English
43
Page 44

Advanced Features
1/1
/Movie 01.avi
SUM
Movie 01.avi
Jan.10.2010
Jan.10.2010
Jan.10.2010
Jan.10.2010
Jan.10.2010
Jan.10.2010
Jan.10.2010
Jan.10.2010
Jan.10.2010
Jan.10.2010
Movie 03.avi
Movie 05.avi
Movie 07.avi
Movie 09.avi
Movie 02.avi
Movie 04.avi
Movie 06.avi
Movie 08.avi
Movie 10.avi
Playing the Multiple Files
Playing the selected recorded TV/video/music/photo files
1. Press the Yellow button in the file list to select the desired file.
2. Repeat the above operation to select multiple files.
✎
NOTE
The mark appears to the left of the selected files.
x
To cancel a selection, press the Yellow button again.
x
To deselect all selected files, press the TOOLS button
x
Videos
and select Deselect All.
3. Press the TOOLS button and select Play Selected Contents.
Playing the recorded TV/video/music/photo file group
Change Device
1. While a file list is displayed, move to the any file in desired group.
2. Press the TOOLS button and select Play Current Group.
Media Play Additional Function
Sorting the file list
Press the Blue button in the file list to sort the files.
Category Operations Recorded TV Videos Music Photos
Basic View
Title
Preference
Latest Date
Earliest Date
Artist
Album
Genre
Mood
Monthly
Channel
It shows whole folder. You can view the photo by selecting the folder.
It sorts and displays the file title in Symbol/Number/Alphabet/Special order.
It sorts and displays the file by preference. You can change the file preference
in the file list section using the Green button.
It sorts and shows files by latest date.
It sorts and shows files by earliest date.
It sorts the music file by artist in alphabetical.
It sorts the music file by album in alphabetical order.
It sorts music files by the genre.
It sorts music files by the mood. You can change the music mood information.
It sorts and shows photo files by month. It sorts only by month (from January
to December) regardless of year.
It sorts the recorded files by channel name.
2 les selected Page
Select Sorting
Tools
44
English
Page 45

Recorded TV/Videos/Music/Photos Play Option menu
During playing a file, press the TOOLS button.
Category Operations
Title You can move the other file directly.
Repeat Mode You can play recorded TV, movie and music files repeatedly.
Picture Size You can adjust the picture size for preference.
Picture Setting You can adjust the picture setting (p. 17~23).
Sound Setting You can adjust the sound setting (p. 23, 24, 25).
Subtitle Setting You can play the video file with Subtitle. This function only works if the
Audio You can enjoy video in one of supported languages as required. The function
Audio Description You can adjust the audio description (p. 24).
Stop Slide Show /
Start Slide Show
Slide Show Speed You can select the slide show speed during the slide show.
Slide Show Effect You can set variously the slide show effect.
Background Music You can set and select background music when watching a slide show.
Zoom You can zoom into images in full screen mode.
Rotate You can rotate images in full screen mode.
Home Background You can move the file to the Media Play desktop.
Information You can see detailed information about the played file.
subtitles are the same file name as the video file.
is only enabled when stream-type files which support multiple audio formats
are played.
You can start or stop a slide show.
Settings
Recorded TV
04 Advanced Features
Videos Music Photos
Using the Setup Menu
■ Background Setting: Select to display the background you want.
■ Cont. movie play help (Resume Play) (On / Off): Select to display the help pop-up message for continuous movie
playback.
■ Get the DivX® VOD registration code: Shows the registration code authorized for the TV. If you connect to the DivX web
site and register the registration code with a personal account, you can download VOD registration file. If you play the VOD
registration using Media Play, the registration is completed.
✎
For more information on DivX® VOD, visit “www.DivX.com.”
■ Get the DivX® VOD deactivation code: When DivX® VOD is not registered, the registration deactivation code is
displayed. If you execute this function when DivX® VOD is registered, the current DivX® VOD registration is deactivated.
■ Information: Select to view information about the connected device.
English
45
Page 46

Advanced Features
(HDD)
Anynet+
(HDD)
Optical
Adapter
Home Theatre
Optical
Cable
HDMI Cable HDMI Cable
Anynet+
Device 1
Anynet+ Device
2, 3, 4
HDMI Cable
What is Anynet+?
Anynet+ is a function that enables you to control all connected Samsung devices that support Anynet+ with your Samsung
TV’s remote. The Anynet+ system can be used only with Samsung devices that have the Anynet+ feature. To be sure your
Samsung device has this feature, check if there is an Anynet+ logo on it.
To connect to Home Theatre
TV Rear Panel
1. Connect the HDMI IN (1(DVI), 2(ARC), 3 or 4) jack on the TV and the HDMI OUT jack of the corresponding Anynet+
device using an HDMI cable.
2. Connect the HDMI IN jack of the home theatre and the HDMI OUT jack of the corresponding Anynet+ device using an
HDMI cable.
✎
NOTE
Connect the Optical cable between the DIGITAL AUDIO OUT (OPTICAL) jack on your TV and the Digital Audio Input
x
on the Home Theatre.
The ARC function enables digital output of sound using the HDMI IN 2(ARC) port and can only be operated when
x
the TV is connected to an audio receiver that supports the ARC function.
When following the connection above, the Optical jack only outputs 2 channel audio. You will only hear sound from
x
the Home Theatre’s Front, Left and Right speakers and the subwoofer. If you want to hear 5.1 channel audio, connect
the DIGITAL AUDIO OUT (OPTICAL) jack on the DVD / Satellite Box (i.e. Anynet Device 1 or 2) directly to the
Amplifier or Home Theatre, not the TV.
Connect only one Home Theatre.
x
You can connect an Anynet+ device using the HDMI cable. Some HDMI cables may not support Anynet+ functions.
x
Anynet+ works when the AV device supporting Anynet+ is in the standby or on status.
x
Anynet+ supports up to 12 AV devices in total. Note that you can connect up to 3 devices of the same type.
x
46
English
Page 47

Anynet+ Menu
The Anynet+ menu changes depending on the type and status of the Anynet+ devices connected to the TV.
Anynet+ Menu Description
View TV Changes Anynet+ mode to TV broadcast mode.
Device List Shows the Anynet+ device list.
(device_name) MENU Shows the connected device menus. E.g. If a DVD recorder is connected, the disc menu of
(device_name) INFO Shows the play menu of the connected device. E.g. If a DVD recorder is connected, the
Recording: (*recorder) Starts recording immediately using the recorder. (This is only available for devices that
Stop Recording: (*recorder) Stops recording.
Receiver Sound is played through the receiver.
If more than one recording device is connected, they are displayed as (*recorder) and if only one recording device is
connected, it will be represented as (*device_name).
the DVD recorder will appear.
play menu of the DVD recorder will appear.
support the recording function.)
Setting Up Anynet+
■ Setup
Anynet+ (HDMI-CEC) (Off / On): To use the Anynet+ Function, Anynet+ (HDMI-CEC) must be set to On.
✎
When the Anynet+ (HDMI-CEC) function is disabled, all the Anynet+ related operations are deactivated.
Auto Turn Off (No / Yes): Setting an Anynet+ Device to turn off automatically when the TV is turned off.
✎
The active source on the TV must be set to TV to use the Anynet+ function.
✎
Even if an external device is still recording, it may turn off.
04 Advanced Features
Switching between Anynet+ Devices
1. Anynet+ devices connected to the TV are listed.
✎
If you cannot find a device you want, press the Red button to refresh the list.
2. Select a device and press the ENTER
✎
Only when you set Anynet+ (HDMI-CEC) to On in the Application menu, the Device List menu appears.
Switching to the selected device may take up to 2 minutes. You cannot cancel the operation during the switching
x
operation.
If you have selected external input mode by pressing the SOURCE button, you cannot use the Anynet+ function.
x
Make sure to switch to an Anynet+ device by using the Device List.
button. You can switch to the selected device.
English
47
Page 48

Advanced Features
Recording
You can make a recording of a TV Programme using a Samsung recorder.
1. Select Recording.
✎
When there are more than two recording devices
When multiple recording devices are connected, the recording devices are listed. Select one recording device in
x
the Device List.
✎
When the recording device is not displayed, select Device List and press the Red button to search devices.
2. Press the EXIT button to exit.
✎
You can record the source streams by selecting Recording: (device_name).
✎
Pressing the (REC) button will record whatever you are currently watching. If you are watching video from
another device, the video from the device is recorded.
✎
Before recording, check whether the antenna jack is properly connected to the recording device. To properly
connect an antenna to a recording device, refer to the recording device’s users manual.
Listening through a Receiver
You can listen to sound through a receiver (i.e Home Theatre) instead of the TV Speaker.
1. Select Receiver and set to On.
2. Press the EXIT button to exit.
✎
If your receiver supports audio only, it may not appear in the device list.
✎
The receiver will work when you have properly connected the optical in jack of the receiver to the
DIGITAL AUDIO OUT (OPTICAL) jack of the TV.
✎
When the receiver (i.e Home Theatre) is set to On, you can hear sound output from the TV’s Optical jack. When the
TV is displaying a DTV (aerial) signal, the TV will send out 5.1 channel sound to the receiver. When the source is a
digital component such as a DVD and is connected to the TV via HDMI, only 2 channel sound will be heard from
the receiver.
✎
NOTE
You can only control Anynet+ devices using the TV remote control, not the buttons on the TV.
x
The TV remote control may not work under certain conditions. If this occurs, reselect the Anynet+ device.
x
The Anynet+ functions do not operate with other manufacturers’ products.
x
Using the ARC function
You can listen to sound through a receiver connected HDMI cable without the need for a separate optical cable.
1. Select Receiver and set to On.
2. Press the EXIT button to exit.
✎
To use the ARC function, a receiver which supports the HDMI-CEC and ARC features must be connected to the
HDMI IN 2(ARC) port.
✎
To disable the ARC function, set the Receiver to Off. Even if the TV transmits the ARC signal continuously, the
receiver will be blocked from receiving the signal.
48
English
Page 49

Troubleshooting for Anynet+
Problem Possible Solution
Anynet+ does not work. • Check if the device is an Anynet+ device. The Anynet+ system supports Anynet+ devices only.
I want to start Anynet+. • Check if the Anynet+ device is properly connected to the TV and check if the Anynet+ (HDMI-CEC) is set to
I want to exit Anynet+. • Select View TV in the Anynet+ menu.
The message “Connecting to
Anynet+ device...” appears on the
screen.
The Anynet+ device does not play. • You cannot use the play function when Plug & Play (Initial setup) is in progress.
• Connect only one receiver (home theatre).
• Check if the Anynet+ device power cord is properly connected.
• Check the Anynet+ device’s Video/Audio/HDMI cable connections.
• Check whether Anynet+ (HDMI-CEC) is set to On in the Anynet+ setup menu.
• Check whether the TV remote control is in TV mode.
• Check whether it is Anynet+ exclusive remote control.
• Anynet+ doesn’t work in certain situations. (Searching channels, operating Media Play or Plug & Play (Initial
setup), etc.)
• When connecting or removing the HDMI cable, please make sure to search devices again or turn your TV off
and on again.
• Check if the Anynet+ Function of Anynet+ device is set on.
On in the Anynet+ Setup menu.
• Press the TOOLS button to display the Anynet+ menu and select a menu you want.
• Press the SOURCE button on the TV remote control and select a device other than Anynet+ devices.
• Press P
• You cannot use the remote control when you are configuring Anynet+ or switching to a view mode.
• Use the remote control when the Anynet+ setting or switching to view mode is complete.
/
tuner-embedded Anynet+ device is not connected.)
, and PRE-CH to change the TV mode. (Note that the channel button operates only when a
04 Advanced Features
The connected device is not
displayed.
The TV Programme cannot be
recorded.
The TV sound is not output
through the receiver.
• Check whether or not the device supports Anynet+ functions.
• Check whether or not the HDMI cable is properly connected.
• Check whether Anynet+ (HDMI-CEC) is set to On in the Anynet+ setup menu.
• Search Anynet+ devices again.
• You can connect an Anynet+ device using the HDMI cable only. Some HDMI cables may not support Anynet+
functions.
• If it is terminated by an abnormal situation such as disconnecting the HDMI cable or power cord or a power
failure, please repeat the device scan.
• Check whether the antenna jack on the recording device is properly connected.
• Connect the optical cable between TV and the receiver.
• The ARC function enables digital output of sound using the HDMI IN 2(ARC) port and can only be operated
when the TV is connected to an audio receiver that supports the ARC function.
English
49
Page 50

Advanced Features
Getting Started with Internet@TV
Internet@TV
INTERNET
@TV
✎
NOTE
Configure the network settings before using Internet@TV . For more information, refer to “Network Connection” (p.
x
Internet@TV brings useful and entertaining
contents and services directly from the web to
your TV.
Samsung Apps Settings
Recommended
My Applications
Login Mark as Favourite Sort by
30).
Unsupported fonts within the provider’s content will not display normally.
x
Slow responses and/or interruptions may occur, depending on your network conditions.
x
English may be only supported in application depending on region.
x
This feature is not available in some locations.
x
If you experience a problem using a application, please contact the content provider.
x
According to circumstances of the contents provider, an application’s updates or the application itself may be
x
discontinued.
Depending on your country’s regulations, some applications may have limited service or not be supported.
x
Screen Display
Settings
Recommended
My Applications
Login Mark as Favourite Sort by
Controls:
• Red ( Login ): To log in to Internet@TV .
• Green ( Mark as Favourite ): To mark the applications as a favourite.
• Blue ( Sort by ): To sort the applications.
•
Return : To return to the previous menu.
The colour buttons may work differently depending on the application.
✎
by Date 1/1
Return
Recommended Applications:
Displays the recommended service by
Samsung. You are not able to add or
delete a service in this list.
Downloaded Applications:
Displays the downloaded applications
through the Samsung Apps.
Displays the current channel.
TV Screen:
Information:
Displays notices, new
applications, and
advertisements brought to
you by Samsung product
introductions.
Application service:
You can experience
various service by provided
samsung.
Samsung Apps
Internet@TV Settings:
Edit and confi gure applications
and Internet@TV settings.
by Date 1/1
Return
50
English
Page 51

Account Login
admin
For a application with multiple account, use ◄ and ► to
access the different account.
Login
User account :
Password :
Create [0~9] Enter PIN
✎
For a more enjoyable application experience, register
and log in to your account.
✎
For instructions on creating an account, refer to
Settings → Internet@TV ID → Create.
1. Press the Red button in Internet@TV home page.
2. Select desired User account, then press the ENTER
button.
✎
If you want create account, press Red button;
then create account OSD window appear.
3. Enter the Password.
✎
When login succeeds, User account will be
displayed on the screen.
Cancel
Setting up Internet@TV
Settings
Create IDs and configure Internet@TV settings from this
screen. Highlight Settings using ▲ and ▼ buttons and press
the ENTER
button.
Settings
▪ System setup
▪ Internet@TV ID
▪ Service Manager
▪ Properties
▪ Ticker Autorun : Off
▪ Channel Bound Service : Off
▪ Change the Service Lock password
▪ Reset
Return
■ System Setup
Ticker Autorun (Off / On): Enable/disable ticker autorun
upon powering on the TV.
✎
The Ticker application provides useful News,
Weather, and Stock Market information. The
Ticker application on Internet@TV must be
downloaded to use this feature.
✎
Depending on your country, the Ticker application
may have different service or not be supported.
Channel Bound Service (Off / On): Some channels
support applications as an Internet data service, allowing
you to access the Internet service while watching TV.
✎
Only available if supported by the broadcaster.
Change the Service Lock password
✎
The default password set is “0-0-0-0.”
✎
If you forget the password, press the following
sequence of remote control buttons to reset the
password to “0-0-0-0”: POWER (off) → MUTE →
8 → 2 → 4 → POWER (on).
Reset: Resets Internet@TV settings to factory default
settings.
■ Internet@TV ID
You can use this menu when creating, deleting the
account. You can control your account including
contents site’s account information.
✎
Account is only for internet@TV.
Create: Create an account and link it with desired
applications.
✎
NOTE
Account will be made less than 10.
x
Maximum number of characters is 8.
x
Manager
– Service Site: Register login information for service
sites.
– Change Password: Change account password.
– Delete: Delete the account.
■ Service Manager: Delete and lock applications installed
to Internet@TV.
Lock: Lock the application.
✎
Accessing a locked application requires the
password.
Delete: Delete the application.
■ Properties: Display information about Internet@TV. Use
the Check the speed of your internet connection
option to test your network connection.
04 Advanced Features
English
51
Page 52

Advanced Features
B
You Tube
Using the Internet@TV service
Samsung Apps
Samsung Apps is a store for downloading applications to be
used on Samsung TV/AV equipment.
Users can enjoy a variety of contents like videos, music,
photos, games, useful information etc. using the downloaded
applications.
Additional applications will be available hereafter.
Samsung Apps
What’s New?
Video
Sports
Game
Lifestyle
Information
Other
My Page
Help
✎
Using the colour buttons with the Samsung Apps.
Red (Login): To log in to the internet service.
x
Green (Thumbnail View): To change the view
x
mode.
Blue (Sort by): To sort the widgets by Featured,
x
Most downloaded, Most recent or Name.
Return: Moves to previous menu.
x
Featured Most downloaded Most recent Name
YouTube
TV store Test User002
Login Thumbnail View Sort by
Free
Return
Using the Samsung Apps by category
The following categories are available:
y What’s New?: Displays newly registered applications.
y Video: Displays various video media such as movies, TV
shows and short length videos.
y Sports: Displays various sports media such as match
information, images and short length video.
y Game: Displays various games such as sudoku and
chess.
y Lifestyle: Includes various lifestyle media services such
as music, personal photo management tools and social
networking such as Facebook and Twitter.
y Information: Includes various information services such
as news, stocks and weather.
y Other: Includes other miscellaneous services.
y My Page: My Page offers information about already
installed applications on the TV like detailed information,
download contents etc. It can allows delete or lock the
applications.
y Help: If you have questions about Internet@TV, check
this section first.
Skype
Skype created a little piece of software that makes
communicating with people around the world easy and
fun. With Skype you can say hello or share a laugh with
anyone, anywhere. And if both of you are on Skype, it’s free.
Welcome to Skype!
My Video
Communicate with people around the world!
✎
For more information, download the Skype user's
manual from “www.samsung.com.”
Sign Out Online Status Add a Contact Camera Off
[ Legal Statement ]
Due to the various capabilities of products featuring the Samsung Internet@TV - Content Service, as well as limitations in the
available content, certain features, applications, and services may not be available on all devices or in all territories. Some
features on Internet@TV may also require additional peripheral devices or membership fees that are sold separately. Please
visit http://www.samsung.com for more information on specific device information and content availability. The services and
availability of content through Internet@TV are subject to change from time to time without prior notice.
English
52
Jonh001
Skype Credit 2.03 EUR
Contact
Mother
Video
Call
Father
sister
brother
Uncle
Son
Return
Page 53

AllShare
AllShare™
3/7
About AllShare
AllShare connects your TV, mobile phones and other
devices which are compatible through a network. On your
TV, you can view call arrivals, SMS messages and schedules
set on your mobile phones. In addition, you can play media
contents including videos, photos and music saved on your
mobile phones or the other devices (such as your PC) by
controlling them on the TV via the network. Additionally, you
can use your TV as a monitor for your mobile when browsing
a web page.
✎
For more information, visit “www.samsung.com” or
contact the Samsung call centre. Mobile devices may
need additional software installation. For details, refer to
each device’s user’s guide.
Setting Up AllShare
Setup
■ Message (On / Off): Enables or disables the message
function (for call arrivals, SMS messages and schedules
set on your mobile phones).
■ Media (On / Off): Enables or disables the media
function. When the media function is on, it plays videos,
photos and music from a mobile phone or other device
that supports AllShare.
■ ScreenShare (On / Off): Enables or disables the
ScreenShare function for using mobile phone as a
remote control.
■ TV name: Sets the TV name so you can find it easily on
a mobile device.
✎
If you select User Input, you can type on the TV
using the OSK (On Screen Keyboard).
Setup
Messange : On
Media : On
Messange
Media
ScreenShare : On
TV name : Home TV
ScreenShare
Message / Media / ScreenShare
Shows a list of mobile phones or connected devices which
have been set up with this TV for using the Message,
Media, or ScreenShare function.
✎
The Media function is available in all mobile devices
which support AllShare.
■ Allowed / Denied: Allows/Blocks the mobile phone.
■ Delete: Deletes the mobile phone from the list.
✎
This function only deletes the name of the mobile
from the list. If the deleted mobile device is turned
on or trys to connect to the TV, it may appear on
the list again.
Using the Message Function
Using this function, you view call arrivals, SMS messages
and schedules set on the mobile phone through the alarm
window while watching TV.
✎
NOTE
To disable the alarm window, set Message to Off in
x
Setup of AllShare.
If OK is selected, or if OK is not selected after the
x
message has appeared three times, the message
will be deleted. The message is not deleted from the
mobile phone.
The alarm window can be displayed while using
x
some applications such as Media Play etc. To view
the contents of a message, switch to TV viewing
mode.
When a message from an unknown mobile phone is
x
displayed, select the mobile phone on the message
menu in AllShare and select Denied to block the
phone.
Message View
If a new SMS message arrives while you are watching
TV, the alarm window appears. If you click the OK
button, the contents of the message are displayed.
✎
You can configure the viewing settings for SMS
messages on your mobile phones. For the
procedures, refer to the mobile phone manual.
✎
Some types of characters may be displayed as
blank or broken characters.
04 Advanced Features
Select
Return
Exit
Setup
Return
English
53
Page 54

Advanced Features
Call Arrival Alarm
If a call arrives while you are watching TV, the alarm
window appears.
Schedule Alarm
While you are watching TV, the alarm window appears to
display the registered event.
✎
You can configure viewing settings for schedule
contents on your mobile phones. For the
procedures, refer to the mobile phone manual.
✎
Some special characters may be displayed as
blank or broken characters.
Using the Media Function
An alarm window appears informing the user that the media
contents (videos, photos, music) sent from a mobile phone
will be displayed on your TV. The contents are played
automatically 3 seconds after the alarm window appears.
If you press the RETURN or EXIT button when the alarm
window appears, the media contents are not played.
✎
NOTE
If the media function executes for the first time,
x
the warning popup window appears. Press the
ENTER button to select Allow, then you can use
Media function on that device.
“Unknown Device 0” is requesting that the media le be allowed to play.
If you wish to allow the media le to be played at your device, please press
“Allow”, otherwise press “Deny”.
You can also change the setting (or resetting) of this feature at “AllShare
Setup”.
Warning: Please note that if your device is connected to unsecured or
unfamiliar network, unwanted or inappropriate contents might be played.
If you are not sure about the network's identity or content’s appropriateness,
we strongly recommend that you do not “Allow” the request to play.
DenyAllow
To turn off the media contents transmission from
x
the mobile phone, set Media to Off in the AllShare
setup.
Contents may not be played on your TV depending
x
on their resolution and format.
The ENTER and ◄ / ► buttons may not work
x
depending on the type of media content.
Using the mobile device, you can control the media
x
playing. For details, refer to each mobile’s user’s
guide.
When you want to play media contents from
x
your PC, select the PC icon on the main display
of AllShare. Then the TV’s Media Play menu
automatically changes. For more detail information,
refer to “Media Play” (p. 37).
Using ScreenShare Function
Screenshare displays the same web page as provide in
mobile. Using ScreenShare, you can open the various
contents saved in a mobile phone. For example, the image
below displays an access page for contents from a mobile.
You can read the mobile’s various files and view the phone
book and calendar on the TV. Also, in phone book, you can
make a call to other person, or can send to SMS.
✎
NOTE
In Samsung mobile, ScreenShare must be installed
x
and the supporting application must be executed;
then you can use the ScreenShare function.
Available buttons on your remote control may vary
x
for each page.
Doc Viewer can read files in doc format, but cannot
x
modify them.
The screen display may differ depending on the
x
connected device.
My Mobile
Contacts Calendar Doc viewer
Select Return
Using your Samsung phone to control your TV Simply
Before you can use this feature, you must connect to
a Samsung mobile phone that supports ScreenShare
functions. When operating the TV with your mobile phone,
only the POWER,
supported.
✎
Even if you keep pressing down on a control button
(channel or volume) on the mobile phone, the value will
only go up or down by one unit.
, P/ and MUTE buttons are
54
English
Page 55

POWER
Other Information
Analogue Channel Teletext Feature
The index page of the Teletext service gives you information on how to use the service. For Teletext information to be displayed
correctly, channel reception must be stable. Otherwise, information may be missing or some pages may not be displayed.
✎
You can change Teletext pages by pressing the numeric buttons on the remote control.
1
2
3
4
5
6
7
(Teletext on/mix/off):
Activates the Teletext mode for the
current channel. Press the button
twice to overlap the Teletext mode
with the current broadcasting
screen. Press it one more time to
exit teletext.
(store): Stores the Teletext
pages.
(size): Displays the teletext
on the upper half of the screen in
double-size. To move the text to
the lower half of the screen, press
it again. For normal display, press
it once again.
(hold): Holds the display at
the current page, in the case that
there are several secondary pages
that follow automaticially. To undo,
press it again.
Colour buttons (red, green, yellow,
blue): If the FASTEXT system
is used by the broadcasting
company, the different topics on
a Teletext page are colour-coded
and can be selected by pressing
the coloured buttons. Press the
colour corresponding to the topic
of your choice. A new colourcoded page is displayed. Items
can be selected in the same way.
To display the previous or next
page, press the corresponding
coloured button.
(mode): Selects the Teletext
mode (LIST/ FLOF).
If pressed during LIST mode,
switches the mode to List save
mode. In List save mode, you can
save a Teletext page into a list
using the
available sub-page.
(store) button.
(sub-page): Displays the
1
2
3
4
5
SOURCE
TTX/MIX
CH LIST
MENU
TOOLS
RETURN
A B C D
PRE-CH
INFO
EXIT
(page up): Displays the next
6
7
8
9
0
!
@
(page down): Displays the
(index): Displays the index
(contents) page at any time while
you are viewing Teletext.
(reveal): Displays the hidden
text (answers to quiz games, for
example). To display the normal
(cancel): Shrinks the Teletext
display to overlap with the current
Typical Teletext page
Part Contents
A Selected page
B Broadcasting channel
C Current page number
D Date and time.
E Text.
F Status information.
Teletext page.
previous Teletext page.
screen, press it again.
number.
identity.
or search indications.
FASTEXT information.
8
9
0
!
@
broadcast.
05 Other Information
English
55
Page 56

Other Information
Stand Type
1
Assembling the Cables
1
2
3
Wall-Mount Type
2
3
✎
Do not pull the cables too hard when arranging them. This may cause damage to the product’s connection terminals.
English
56
Page 57

Installing the Wall Mount
Assembling the Blanking Bracket
When installing the TV onto a wall, attach the Blanking Bracket as shown.
Preparing before installing Wall-Mount
Case A. Installing the SAMSUNG Wall-Mount Case B. Installing another company’s Wall-Mount
05 Other Information
Blanking Bracket
1
To install a wall-mount, use the Holder-Ring 1.
Installing the Wall Mount Kit
The wall mount kit (sold separately) allows you to mount the TV on the wall.
For detailed information on installing the wall mount, see the instructions provided with the wall mount. Contact a technician for
assistance when installing the wall mount bracket.
Samsung Electronics is not responsible for any damage to the product or injury to yourself or others if you elect to install the
TV on your own.
1
English
57
Page 58

Other Information
Wall Mount Kit Specifications (VESA)
✎
The wall mount kit is not supplied, but sold separately.
Install your wall mount on a solid wall perpendicular to the floor. When attaching to other building materials, please contact
your nearest dealer. If installed on a ceiling or slanted wall, it may fall and result in severe personal injury.
✎
NOTE
Standard dimensions for wall mount kits are shown in the table below.
x
When purchasing our wall mount kit, a detailed installation manual and all parts necessary for assembly are provided.
x
Do not use screws that do not comply with the VESA standard screw specifications.
x
Do not use screws that are longer than the standard dimension or do not comply with the VESA standard screw
x
specifications. Screws that are too long may cause damage to the inside of the TV set.
For wall mounts that do not comply with the VESA standard screw specifications, the length of the screws may differ
x
depending on the wall mount specifications.
Do not fasten the screws that are too strongly; this may damage the product or cause the product to fall, leading to
x
personal injury. Samsung is not liable for these kinds of accidents.
Samsung is not liable for product damage or personal injury when a non-VESA or non-specified wall mount is used or
x
the consumer fails to follow the product installation instructions.
Do not mount the TV at more than a 15 degree tilt.
x
Product Family inches VESA Spec. (A * B) Standard Screw Quantity
19~22 75 X 75 M4
23~29 200 X 100
LED-TV
[Ultra-Slim]
32~37 200 X 200
M8
40~55 400 X 400
56~65 600 X 400
4
58
Do not install your Wall Mount Kit while your TV is turned on. It may result in personal injury due to
electric shock.
English
Page 59

Anti-theft Kensington Lock
The Kensington Lock is not supplied by Samsung. It is a device used to
physically fix the system when using it in a public place. The appearance and
locking method may differ from the illustration depending on the manufacturer.
Refer to the manual provided with the Kensington Lock for additional
information on proper use.
✎
Please find a “” icon on the rear of the TV. A kensington slot is beside
the “” icon.
To lock the product, follow these steps:
1. Wrap the Kensington lock cable around a large, stationary object such as desk or chair.
2. Slide the end of the cable with the lock attached through the looped end of the Kensington lock cable.
3. Insert the locking device into the Kensington slot on the product (1).
4. Lock the lock.
✎
These are general instructions. For exact instructions, see the User manual supplied with the locking device.
✎
The locking device has to be purchased separately.
✎
The location of the Kensington slot may be different depending on the TV model.
Securing the TV to the wall
Caution: Pulling, pushing, or climbing onto the TV may cause the TV to fall. In particular, ensure that your
children do not hang over or destabilize the TV; doing so may cause the TV to tip over, resulting in serious
injuries or death. Follow all safety precautions provided in the included Safety Flyer. For added stability and
safety, install the anti-fall device as follows.
TV Rear
05 Other Information
1
<Optional>
To Avoid the TV from Falling
1. Put the screws into the clamps and firmly fasten them onto the wall.
Confirm that the screws have been firmly installed onto the wall.
✎
You may need additional material such as an anchor depending on
the type of wall.
✎
Since the necessary clamps, screws, and string are not supplied,
please purchase these additionally.
2. Remove the screws from the back centre of the TV, put the screws into
the clamps, and then fasten the screws onto the TV again.
✎
Screws may not be supplied with the product. In this case, please
purchase the screws of the following specifications.
✎
Screw Specifications
For a 19 ~ 22 inch : M4
x
For a 23 ~ 65 inch : M8
x
3. Connect the clamps fixed onto the TV and the clamps fixed onto the wall
with a strong cable and then tie the string tightly.
✎
NOTE
Install the TV near to the wall so that it does not fall backwards.
x
It is safe to connect the string so that the clamps fixed on the
x
wall are equal to or lower than the clamps fixed on the TV.
Untie the string before moving the TV.
x
4. Verify all connections are properly secured. Periodically check
connections for any sign of fatigue for failure. If you have any doubt about
the security of your connections, contact a professional installer.
Wall
English
59
Page 60

Other Information
Troubleshooting
If you have any questions about the TV, first refer to this list. If none of these troubleshooting tips apply, please visit “www.
samsung.com,” then click on Support, or contact the call centre listed on the back-cover of this manual.
Issues Solutions and Explanations
Picture Quality First of all, please perform the Picture Test and confirm that your TV is properly displaying test image.
The TV image does not look as good as it
did in the store.
The picture is distorted: macro block error,
small block, dots, pixelization
Colour is wrong or missing. • If you’re using a component connection, make sure the component cables are connected to the
There is poor colour or brightness. • Adjust the Picture options in the TV menu. (go to Picture mode / Colour / Brightness / Sharpness)
There is a dotted line on the edge of the
screen.
The picture is black and white. • If you are using an AV composite input, connect the video cable (yellow) to the Green jack of
When changing channels, the picture
freezes or is distorted or delayed.
Sound Quality First of all, please perform the Sound Test to confirm that your TV audio is properly operating.
There is no sound or the sound is too low
at maximum volume.
The picture is good but there is no sound. • Set the Speaker Select option to TV Speaker in the sound menu. (p. 24)
The speakers are making an inappropriate
noise.
(go to MENU - Support - Self Diagnosis - Picture Test) (p. 28)
If the test image is properly displayed, the poor picture may caused by the source or signal.
• If you have an analogue cable/set top box, upgrade to a digital set top box. Use HDMI or Component
cables to deliver HD (high definition) picture quality.
• Cable/Satellite subscribers: Try HD stations from the channel line up.
• Antenna connection: Try HD stations after performing Auto programme.
Many HD channels are up scaled from SD(Standard Definition) contents.
✎
• Adjust the Cable/Set top box video output resolution to 1080i or 720p.
• Make sure you are watching the TV at the minimum recommended distance based on the size and
definition of the signal.
• Compression of video contents may cause picture distortion especially in fast moving pictures such
as sports and action movies.
• Low signal level or bad quality can cause picture distortion. This is not a TV issue.
• Mobile phones used close to the TV (cca up to 1m) may cause noise in picture on analog and digital
TV.
correct jacks. Incorrect or loose connections may cause colour problems or a blank screen.
(p. 17)
• Adjust Energy Saving option in the TV menu. (go to MENU - Picture - Eco Solution -
Energy Saving) (p. 17)
• Try resetting the picture to view the default picture settings. (go to MENU - Picture - Picture Reset)
(p. 23)
• If the picture size is set to Screen Fit, change it to 16:9. (p. 19)
• Change cable/set top box resolution.
component input 1 on the TV.
• If connected with a cable box, please try to reset the cable box. Reconnect the AC cord and wait until
the cable box reboots. It may take up to 20 minutes.
• Set the output resolution of the cable box to 1080i or 720p.
(go to MENU - Support - Self Diagnosis - Sound Test) (p. 28)
If the audio is OK, the sound problem may caused by the source or signal.
• Please check the volume the of external device connected to your TV.
• If you are using an external device, make sure the audio cables are connected to the correct audio
input jacks on the TV.
• If you are using an external device, check the device’s audio output option (ex. you may need to
change your cable box’s audio option to HDMI when you have a HDMI connected to your TV).
• If you are using a DVI to HDMI cable, a separate audio cable is required.
• If your TV has a headphone jack, make sure there is nothing plugged into it.
• Check the cable connections. Make sure a video cable is not connected to an audio input.
• For antenna or cable connections, check the signal strength. Low signal level may cause sound
distortion.
60
English
Page 61

Issues Solutions and Explanations
No Picture, No Video
The TV won’t turn on. • Make sure the AC power cord is securely plugged in to the wall outlet and the TV.
The TV turns off automatically. • Ensure the Sleep Timer is set to Off in the Setup menu. (p. 25)
There is no picture/Video. • Check cable connections (remove and reconnect all cables connected to the TV and external
RF(Cable/Antenna) Connection
The TV is not receiving all channels. • Make sure the Antenna cable is connected securely.
The picture is distorted: macro block error
small block, dots, pixelization
PC Connection
A “Mode Not Supported” message
appears.
“PC” is always shown on the source list,
even if a PC is not connected.
The video is OK but there is no audio. • If you are using a HDMI connection, check the audio output setting on your PC.
• Make sure the wall outlet is working.
• Try pressing the POWER button on the TV to make sure the problem is not the remote. If the TV turns
on, refer to “The remote control does not work” below.
• If your PC is connected to the TV, check your PC power settings.
• Make sure the AC power cord is plugged in securely to the wall outlet and the TV.
• When watching TV from an antenna or cable connection, the TV will turn off after 10 ~ 15 minutes if
there is no signal.
devices).
• Set your external devices’ (Cable/Set top Box, DVD, Blu-ray etc) video outputs to match the
connections to the TV input. For example, if an external device’s output is HDMI, it should be
connected to an HDMI input on the TV.
• Make sure your connected devices are powered on.
• Be sure to select the TV’s correct source by pressing the SOURCE button on the TV remote.
• Please try Plug & Play (Initial setup) to add available channels to the channel list. Go to MENU -
Setup - Plug & Play (Initial setup) and wait for all available channels to be stored (p. 7).
• Verify the Antenna is positioned correctly.
• Compression of video contents may cause picture distortion, especially with fast moving pictures
such as sports and action movies.
• A low signal can cause picture distortion. This is not a TV issue.
• Set your PC’s output resolution and frequency so they match the resolutions supported by the TV
(p. 29).
• This is normal; “PC” is always shown on the source list, regardless of whether a PC is connected.
05 Other Information
Network Connection (Depending on Models)
Wireless network connection failed. • Samsung Wireless USB dongle is required to use a wireless network.
Recording / Timeshift
The USB device is not recognized or a
Device Format, Checking Device or
Device Performance Test fails.
A message prompts me to format a USB
device that has been working well.
The recording function does not work. • Check that a USB device is connected.
Timeshift Mode does not work. • Check that a USB device is connected.
A message indicates a performance test
failure, and the recording and Timeshift
Mode functions do not work.
• Make sure the Network Connection is set to Wireless (p. 32).
• Make sure the TV is be connected to a wireless IP sharer (router).
• See the manual for the USB device to check that the USB device supports recording.
• If the USB device has a lock, ensure it is off.
• Check that the USB device can be formatted when connected to the PC. Connect the USB to the TV
and format it. (Formatting may fail intermittently.)
• If a Device Performance Test or formatting failed, it means that there is a problem with the USB
hardware or the performance of the USB hardware is too low.
• If the USB device has a lock, ensure it is off.
• Recover the USB device using the recovery function in Checking Device.
• Check that the channel is a recordable digital channel.
• If the signal is weak or does not exist, the recording function will automatically be closed.
• The TV will not record if the USB device has no free memory space. Check that this is not the case.
• Radio channels and analogue broadcasts are not supported.
• Data broadcast channels are not supported.
• If the signal is weak or does not exist, the Timeshift Mode function will automatically be closed.
• Timeshift Mode cannot be performed if the USB device has no free memory space. Check that this
is not the case.
• These problems may occur if you use a low-capacity USB device that does not support recording.
• We recommend using the USB HDD.
English
61
Page 62

Other Information
Issues Solutions and Explanations
A scheduled recording has failed. A scheduled recording is disabled for certain operations (formatting, performance test, error checking,
Several recording devices are connected
but the TV stopped recording.
Others
The picture won’t display in full screen. • HD channels will have black bars on either side of the screen when displaying up scaled SD (4:3)
The remote control does not work. • Replace the remote control batteries with the poles (+/–) in the right direction.
The cable/set top box remote control
doesn’t turn the TV on or off, or adjust the
volume.
A “Mode Not Supported” message
appears.
There is a plastic smell from the TV. • This smell is normal and will dissipate over time.
The TV Signal Information is unavailable
in the Self Diagnostic Test menu.
The TV is tilted to the side. • Remove the base stand from the TV and reassemble it.
There are difficulties assembling the stand
base.
The channel menu is greyed out.
(unavailable)
Your settings are lost after 30 minutes or
every time the TV is turned off.
You have intermittent loss of audio or
video.
You see small particles when you look
closely at the edge of the frame of the TV.
The PIP menu is not available. • PIP functionality is only available when you are using a HDMI, PC or components source (p. 27).
The message “Scramble signal” or “Weak
Signal/No Signal” appears.
You turned the TV off 45 minutes ago, and
it turned on again.
There are recurrent picture/sound issues. • Check and change the signal/source.
A reaction may occur between the rubber
cushion pads on the base stand and the
top finish of some furniture.
deleting) that access the file system of a USB device.
• If there is no USB device connected, the TV will not record even if the scheduled time is reached.
• The TV will not record if the USB device has no free memory space. Check that this is not the case.
• If you record a channel locked with Parental lock, the PIN input window will appear when you try to
play back the recording.
• If multiple recording devices are connected and the device set as Default Recording Device has no
free memory space, the recording function will be closed. Attempt recording again. The device with
the most free memory space will automatically be set as Default Recording Device and the TV will
start recording.
contents.
• Black bars on the top and bottom will appear during movies that have aspect ratios different from
your TV.
• Adjust the picture size options on your external device or TV to full screen.
• Clean the sensor’s transmission window on the remote.
• Try pointing the remote directly at the TV from 5~6 feet away.
• Programme the Cable/Set top box remote control to operate the TV. Refer to the Cable/Set user
manual for the SAMSUNG TV code.
• Check the supported resolution of the TV, and adjust the external device’s output resolution
accordingly. Refer to the resolution settings on page 29 of this manual.
• This function is only available with digital channels from an Antenna / RF/Coax connection. (p. 28)
• Make sure the TV is placed on a flat surface. It is necessary to use magnetized screw driver if you
cannot remove the screws from the TV.
• The Channel menu is only available when the TV source is selected.
• If the TV is in the Store Demo mode, it will reset audio and picture settings every 30 minutes. Change
the settings from Store Demo mode to Home Use mode in the Plug & Play (Initial setup) procedure.
Press the SOURCE button to select TV mode, and go to MENU → Setup → Plug & Play (Initial
setup) → ENTER
• Check the cable connections and reconnect them.
• Loss of audio or video can be caused by using overly rigid or thick cables. Make sure the cables are
flexible enough for long term use. If mounting the TV to the wall, we recommend using cables with 90
degree connectors.
• This is part of the product’s design and is not a defect.
• If you are using a CAM CARD (CI/CI+), check that it is installed into the common interface slot.
• If there is still a problem, pull the CAM CARD out of the TV and insert it into the slot again.
• It is normal. The TV operates the OTA (Over The Aerial) function itself to upgrade firmware
downloaded whilst your watching TV.
• To prevent this, use felt pads on any surface of the TV that comes in direct contact with furniture.
(p. 7).
✎
This TFT LED panel uses a panel consisting of sub pixels which require sophisticated technology to produce. However,
there may be a few bright or dark pixels on the screen. These pixels will have no impact on the performance of the
product.
English
62
Page 63

Licence
TheaterSound, SRS and the symbol are trademarks of SRS Labs, Inc.
TheaterSound technology is incorporated under licence from SRS Labs, Inc.
Manufactured under licence from Dolby Laboratories. Dolby and the double-D symbol are
trademarks of Dolby Laboratories.
Manufactured under licence under U.S. Patent #’s: 5,451,942; 5,956,674; 5,974,380; 5,978,762;
6,487,535 & other U.S. and worldwide patents issued & pending. DTS and the Symbol are
registered trademarks. & DTS 2.0+ Digital Out and the DTS logos are trademarks of DTS, Inc.
Product Includes software. © DTS, Inc. All Rights Reserved.
DivX Certified to play DivX video up to HD 1080p, including premium content.
ABOUT DIVX VIDEO: DivX® is a digital video format created by DivX,Inc. This is an official DivX Certified device that plays
DivX video. Visit www.divx.com for more information and software tools to convert your files into DivX video.
ABOUT DIVX VIDEO-ON-DEMAND: This DivX Certified® device must be registered in order to play DivX Video-on-Demand
(VOD) content.
To generate the registration code, locate the DivX VOD section in the device setup menu.
Go to vod.divx.com with this code to complete the registration process and learn more about DivX VOD. Pat. 7,295,673;
7,460,688; 7,519,274
05 Other Information
GUIDE Plus+ Trademark / License / Patent Notice
GUIDE Plus+ is (1) a registered trademark or trademark of, (2) manufactured under license from
and (3) subject of various international patents and patent applications owned by, or licensed to,
Gemstar-TV Guide International, Inc. and/or its related affiliates.
GUIDE Plus+ Legal Notice:
GEMSTAR-TV GUIDE INTERNATIONAL, INC. AND/OR ITS RELATED AFFILIATES ARE NOT IN ANY WAY LIABLE FOR
THE ACCURACY OF THE PROGRAM SCHEDULE INFORMATION PROVIDED BY THE GUIDE PLUS+ SYSTEM. IN NO
EVENT SHALL GEMSTAR-TV GUIDE INTERNATIONAL, INC. AND /OR ITS RELATED AFFILIATES BE LIABLE FOR ANY
AMOUNTS REPRESENTING LOSS OF PROFITS, LOSS OF BUSINESS, OR INDIRECT, SPECIAL, OR CONSEQUENTIAL
DAMAGES IN CONNECTION WITH THE PROVISION OR USE OF ANY INFORMATION, EQUIPMENT, OR SERVICES
RELATING TO THE GUIDE PLUS+ SYSTEM.
Open Source Licence Notice
In the case of using open source software, Open Source Licences are available on the product menu.
Open Source Licence Notice is written only English.
English
63
Page 64

Other Information
Specifications
Panel native
Environmental Considerations
Operating Temperature
Operating Humidity
Storage Temperature
Storage Humidity
TV System Analogue: B/G, D/K, L, I (Depending on your country selection)
Colour/Video System Analogue: PAL, SECAM, NTSC-4.43, NTSC-3.58, PAL60
Sound System BG. OK NICAM. MPEGl
HDMI IN 1 ~ 4 Video: 1080 24p, 1080p, 1080i, 720p, 576p, 576i, 480p, 480i
Stand Swivel (Left / Right) -20˚ ~ 20˚
Model Name
Screen Size
(Diagonal) 40 inches 46 inches 55 inches
Sound
(Output) 10W x 2 10W x 2 15W x 2
Dimensions (WxDxH)
Body
With stand
Weight
Without Stand
With Stand
✎
Design and specifications are subject to change without prior notice.
✎
For information about power supply, and more about power consumption, refer to the label attached to the product.
957.4 X 26.5 X 578.7 mm
957.4 X 267.7 X 648.4 mm
Digital: MPEG-2 MP@ML, MPEG-4, H.264/AVC MP@L3, MP@L4.0, HP@L4.0
Audio: 2Ch Linear PCM 32/44.1/48kHz, 16/20/24bits.
Analogue audio input (HDMI IN1 only)
UE40C7700 UE46C7700 UE55C7700
13.2 kg
15.4 kg
1920 x 1080
10°C to 40°C (50°F to 104°F)
10% to 80%, non-condensing
-20°C to 45°C (-4°F to 113°F)
5% to 95%, non-condensing
Digital: DVB-T/DVB-C/DVB-S
PC input (HDMI IN1 only)
1092.3 X 26.5 X 653.2 mm
1092.3 X 302.9 X 724.3 mm
16.8 kg
19.1 kg
1283.4 X 26.5 X 762.3 mm
1283.4 X 302.2 X 833.4 mm
22.2 kg
24.5 kg
64
English
Page 65

Index
05 Other Information
A
AllShare 53
Amplify 23
Antenna 14
Anynet+ 46
AUDIO OUT 10
Auto Adjustment 23
Auto Volume 24
B
Background Music 45
Balance L/R 23
Basic View 44
Batteries 6
Black Tone 18
Blanking Bracket 57
Brightness 17
C
Cable Tie 4, 56
Change PIN 26
Channel Manager 13
Channel Menu 14
Clock 25
Colour Tone 19
Component 9
Connecting to a PC 29
Connecting to an Audio Device 10
D
DIGITAL AUDIO OUT 10, 46
DivX® VOD 45
D-sub 29
Dynamic 17
Dynamic Contrast 18
E
Eco Sensor 17
Edit Name 11
Editing Channels 16
Energy Saving 17
EPG
(Electronic Programme Guide) 12
Equalizer 23
External Speaker 24
F
Favourites Channel 14
Film Mode 19
Fine Tune 17
Flesh Tone 18
Frequency 14
H
HDMI 8, 46
Headphones 10
Home Theatre 10, 46
I
Installation Space 2
Internet@TV 50
L
Language 26
Licence 64
Lock 16
M
Media Play 37
Melody 27
Menu Transparency 27
Music 43
N
Navigate 12
Network Connection 30
Network Setup 31, 33
Now & Next guide 12
O
ON/OFF button 6
Optimal resolution 29
P
Password 51
Photos 43
Picture Size 19, 45
PIP (Picture in Picture) 27
Plug & Play 7
Power Indicator 5
R
Receiver 48
Recording 48
Remote Control 6
Repeat Mode 45
RGB Only Mode 18
Rotate 45
S
Select All 16
Self Diagnosis 28
Sharpness 17
Signal Information 28
Sleep Timer 25
Slide Show 43
Software Upgrade 28
Source List 11
Speaker Select 24
Specifications 65
Standby mode 5
Subtitle 26
Symbol 3
T
Timer 25
Title 44
Tools 3
Troubleshooting 60
TV Speaker 24
U
USB Drive 28, 37
Using Channel View 12
Using Scheduled View 13
Using the Favourite Channels 14
V
VCR 9
Video Formats 41
Videos 41
Volume 5
W
Wall Mount 57
Warm 19
White Balance 18
English
65
Page 66

Les figures et illustrations contenues dans ce mode d’emploi sont fournies pour référence uniquement. Elles peuvent différer de l’aspect
réel du produit. La conception et les spécifications du produit sont susceptibles d’être modifiées sans préavis.
Avis concernant le téléviseur numérique
1. Les fonctions relatives à la télévision numérique (DVB) ne sont disponibles que dans les pays ou régions où des signaux terrestres numériques de type DVB-T
(MPEG2 et MPEG4 AVC) sont diffusés ou dans lesquels vous avez accès à un service de télévision par câble compatible DVB-C (MPEG2 et MPEG4 AAC).
Consultez votre distributeur local pour connaître les possibilités en matière de réception des signaux DVB-T ou DVB-C.
2. DVB-T est la norme du consortium européen DVB pour la diffusion de signaux terrestres de télévision numérique. La norme DVB-C est, quant à elle, prévue
pour la diffusion des signaux de télévision numérique par câble. Certaines fonctions particulières, telles que le guide électronique des programmes (Electric
Program Guide - EPG) ou encore la vidéo à la demande (Video On Demand - VOD), ne sont toutefois pas incluses dans cette spécification. Dès lors, elles ne
seront pas traitées pour l’instant.
3. Bien que ce téléviseur soit conforme aux dernières normes DVB-T et DVB-C (août 2008), il n’est pas garanti qu’il soit compatible avec les futures diffusions de
signaux numériques terrestres DVB-T et par câble DVB-C.
4. En fonction du pays ou de la région où vous vous trouvez, certains opérateurs de télévision par câble peuvent facturer des frais supplémentaires pour un tel
service. Il se peut également que vous deviez accepter les termes et conditions de ces sociétés.
5. Il se peut que certaines fonctions de TV numérique ne soient pas disponibles dans certains pays ou certaines régions et que la réception des signaux DVB-C
ne soit pas correcte avec tous les opérateurs.
6. Pour plus d’informations, contactez votre service client Samsung.
Les différentes méthodes de diffusion adoptées en fonction des pays peuvent affecter la qualité de réception du téléviseur. Vérifiez le fonctionnement
✎
du téléviseur chez votre revendeur agréé SAMSUNG ou contactez le centre d’appel de Samsung pour savoir s’il est possible d’en améliorer les
performances en reconfigurant les réglages.
Avertissement d’image fixe
Evitez d’afficher sur l’écran des images fixes (telles que des photos au format JPEG) ou des éléments d’images fixes (tels que des logos de programmes TV, un
format d’image 4:3 ou panoramique, des bandeaux d’actualités ou d’informations boursières au bas de l’écran, etc.). L’affichage permanent d’images fixes risque,
en effet, d’entraîner l’apparition d’images fantôme à l’écran, ce qui peut se traduire par une dégradation de la qualité d’image. Pour atténuer les risques, suivez
scrupuleusement les recommandations suivantes:
• Evitez d’afficher le même canal de télévision pendant de longues périodes.
• Essayez toujours d’afficher l’image en plein écran; pour obtenir une correspondance optimale, utilisez le menu de format d’image du téléviseur.
• Réduisez les valeurs de luminosité et de contraste sur le minimum requis pour obtenir la qualité d’image souhaitée. L’utilisation de valeurs trop élevées risque
d’accélérer le processus de brûlure.
• Utilisez fréquemment toutes les fonctions du téléviseur conçues pour réduire le phénomène de rémanence et la brûlure d’écran. Pour plus d’informations à ce
sujet, consultez la section appropriée du mode d’emploi.
Sécurisation de l’espace d’installation
Maintenez les distances requises entre le produit et les autres objets (par exemple, les murs) afin de garantir une ventilation adaptée.
Le non-respect de ces distances peut provoquer un incendie ou un problème au produit en raison d’une augmentation de la température interne de celui-ci.
Lors de l’utilisation d’un pied ou d’un support mural, utilisez uniquement les pièces fournies par Samsung Electronics.
✎
L’utilisation de pièces fournies par un autre fabricant peut occasionner un problème au niveau du produit ou la chute de celui-ci, ce qui pourrait vous
x
blesser.
L’aspect peut varier en fonction du produit.
✎
Installation avec un pied. Installation avec un support de montage mural.
2
10 cm
Français
10 cm
10 cm
Instructions de mise au rebut de ce produit (Déchets d’équipements électriques et électroniques)
(Applicable dans les pays de l’Union Européenne et dans d’autres pays européens pratiquant la collecte sélective de déchets)
Ce symbole sur le produit, ses accessoires ou sa documentation indique que ni le produit, ni ses accessoires électroniques usagés (chargeur,
casque audio, câble USB, etc.) ne peuvent être jetés avec les autres déchets ménagers. La mise au rebut incontrôlée des déchets présentant
des risques pour l’environnement et la santé publique, veuillez séparer vos produits et accessoires usagés des autres déchets. Vous favoriserez
ainsi le recyclage de la matière qui les compose dans le cadre d’un développement durable. Les particuliers sont invités à contacter le magasin
leur ayant vendu le produit ou à se renseigner auprès des autorités locales pour connaître les procédures et les points de collecte de ces
produits en vue de leur recyclage. Les utilisateurs professionnels doivent contacter leur fournisseur et consulter les conditions générales du
contrat d’achat. Ce produit et ses accessoires ne peuvent être jetés avec les autres déchets professionnels et commerciaux.
Élimination des piles de ce produit
(Applicable aux pays de l’Union européenne et aux autres pays européens dans lesquels des systèmes de collecte sélective sont mis
en place.)
Le symbole sur le manuel, l’emballage ou les piles indique que celles-ci ne doivent pas être éliminées en fin de vie avec les autres déchets
ménagers. L’indication éventuelle des symboles chimiques Hg, Cd ou Pb signifie que la pile ou l’accumulateur contient des quantités de
mercure, de cadmium ou de plomb supérieures aux niveaux de référence stipulés dans la directive CE2006/66. Si les piles ne sont pas
correctement éliminées, ces substances peuvent porter préjudice à la santé humaine ou à l’environnement. Afin de protéger les ressources
naturelles et de favoriser la réutilisation du matériel, veillez à séparer les piles des autres types de déchets et à les recycler via votre système
local de collecte gratuite des piles et accumulateurs.
10 cm
10 cm
10 cm
10 cm
Page 67

Contenu
Mise en route
4
Connexions
8
Fonctions de base
12
Fonctions avancées
29
4 Accessoires
5 Présentation du panneau de configuration
6 Présentation de la télécommande
7 Raccordement à une antenne
7 Plug & Play (configuration initiale)
8 Connexion à un périphérique AV
10 Connexion à un système audio
11 Changement de la source d’entrée
12 Navigation dans les menus
12 Utilisation du bouton INFO (Guide Now & Next)
12 Planification des émissions à regarder
14 Menu Canal
17 Menu Image
23 Menu Son
25 Menu Configuration
28 Menu Assistance
29 Connexion à un ordinateur
30 Connexion réseau
37 Media Play
46 Anynet+
50 Internet@TV
53 AllShare
FRANÇAIS
Informations supplémentaires
TOOLS
Cette fonction peut être utilisée
lorsque vous appuyez sur le bouton
TOOLS de la télécommande.
55 Fonction Télétexte de chaîne analogique
56 Assemblage des câbles
55
Vérifiez la présence du symbole!
57 Installation du support mural
59 Verrou antivol Kensington
59 Fixation du téléviseur au mur
60 Dépannage
64 Caractéristiques techniques
65 Index
Remarque Bouton tactile
Français
3
Page 68

Mise en route
Accessoires
✎
Vérifiez que les éléments suivants sont fournis avec votre téléviseur à LED. S’il manque des éléments, contactez votre revendeur.
✎
Les couleurs et les formes des éléments peuvent varier en fonction des modèles.
✎
Les câbles qui ne se trouvent pas dans le contenu de l’emballage peuvent être achetés séparément.
ATTENTION : INSEREZ FERMEMENT DE MANIERE A CE QU’IL NE SE DETACHE PAS
y Télécommande et piles (AAA x 2)
y Carte de garantie / Manuel de sécurité (non disponible dans certains pays)
(M4 X L8)
y Cache et vis (X1) y Anneau de support (4ea) y Support du serre-câble
y Attache de câble y Serre-câble (3ea) y Adaptateur LAN
y Chiffon de nettoyage
y Manuel d’utilisation
y Type antenne
(Hertzien / Câble)
y Adaptateur composante y Adaptateur AV y Type SCART (2EA)
Pour installer le pied, consultez le guide approprié.
y Pied (1EA) y Support de guidage (1EA) y Vis (9EA)
✎
Pour obtenir la meilleure connexion câblée possible vers cet appareil, utilisez des câbles de l’épaisseur maximale indiquée ci-dessous.
y Type antenne
(Satellite)
s
s
y Epaisseur maximale: 0,55 pouces (14 mm)
y Adaptateur optique y Adaptateur PC
s
s
s
M4 X L8
4
Français
Page 69

Présentation du panneau de configuration
✎
La couleur et la forme du produit peuvent varier en fonction du modèle.
Témoin d’alimentation
Capteur de la télécommande
Haut-parleurs
Témoin d’alimentation Clignote, puis s’arrête lorsque le téléviseur est allumé. S’allume en mode Veille.
Capteur de la télécommande Dirigez la télécommande vers ce point du téléviseur.
SOURCE
MENUm Permet d’afficher à l’écran les fonctions de votre téléviseur.
(Alimentation)
Bascule entre toutes les sources d’entrée disponibles. Dans le menu du téléviseur, ce bouton a
la même fonction que le bouton ENTER de la télécommande.
Règle le volume. Dans l’affichage à l’écran, utilisez les boutons
que les boutons ◄ et ► de la télécommande.
Permet de modifier les chaînes. Dans l’affichage à l’écran, utilisez les boutons
même façon que les boutons ▼ et ▲ de la télécommande.
Permet d’allumer et d’éteindre le téléviseur.
de la même façon
de la
01 Mise en route
Mode Veille
Ne laissez pas le téléviseur en mode Veille pendant de longues périodes (lorsque vous partez en vacances, par exemple). Même s’il est en
veille, l’appareil consomme toujours une petite quantité d’énergie. Il est préférable de débrancher le cordon d’alimentation.
Français
5
Page 70

Mise en route
Permet✎d’afficher✎et✎de✎sélectionner✎les✎
sources✎vidéo✎disponibles✎(p.11).
Permet✎d’allumer✎et✎d’éteindre✎le✎téléviseur.
Donne✎un✎accès✎direct✎aux✎chaînes.
Présentation de la télécommande
POWER
SOURCE
ON/OFF
Active✎ou✎désactive✎l’éclairage✎de✎la✎
télécommande.✎
Lorsque✎l’éclairage✎est✎activé,✎les✎boutons✎
enfoncés✎restent✎allumés✎pendant✎quelques✎
instants.
(Utiliser✎la✎télécommande✎lorsque✎ce✎
bouton✎est✎réglé✎sur✎OFF✎réduit✎la✎durée✎de✎
vie✎de✎la✎pile.)
Choisissez✎Télétexte✎activé,✎double,✎mix✎ou✎
✎Permet✎d’ouvrir✎l’affichage✎à✎l’écran.
Affiche✎Aff. contenu,✎ce✎qui✎comprend✎
Guide, 3D, Internet@TV, Media Play✎et✎
✎Permet✎de✎sélectionner✎rapidement✎les✎
fonctions✎fréquemment✎utilisées.
Permettent✎de✎sélectionner✎les✎éléments✎des✎menus✎à✎
l’écran✎et✎de✎modifier✎les✎valeurs✎des✎menus.
Permet✎de✎revenir✎au✎menu✎précédent.
Ces✎boutons✎sont✎utilisés✎dans✎les✎menus✎
Gestion chaînes, Internet@TV,
Utilisez✎ces✎boutons✎avec✎les✎modes✎✎
Media Play✎et✎Anynet+✎(HDMI-CEC)
(Le✎bouton✎
�
contrôler✎la✎fonction✎d’enregistrement✎
des✎enregistreurs✎Samsung✎disposant✎
des✎fonctionnalités✎Anynet+(HDMI-CEC),✎
:✎permet✎également✎de✎
désactivé.
Règle✎le✎volume.
AllShare.
Media Play,✎etc.
(p.✎37,✎46).✎✎
TimeShift✎et✎PVR.)
TTX/MIX
MUTE
CH LIST
CONTENT
MENU
TOOLS
RETURN
A B C D
MEDIA.P
INTERNET
@TV
P.SIZEAD
PRE-CH
GUIDE
INFO
EXIT
SUBT.
Permet✎de✎revenir✎à✎la✎chaîne✎précédente.
Permet✎d’arrêter✎temporairement✎le✎son.
Permet✎de✎changer✎de✎chaîne.
Permet✎d’afficher✎les✎listes✎de✎chaînes✎à✎
l’écran✎(p.✎14).
Permet✎d’afficher✎le✎Guide✎des✎programmes✎
électronique✎(EPG)✎(p.✎12)
Permet✎d’afficher✎des✎informations✎à✎
l’écran.
Permet✎de✎quitter✎le✎menu.
MEDIA.P:✎Permet✎d’afficher✎Media Play✎
(p.✎37).
INTERNET@TV:✎permet✎d’accéder✎à✎divers✎
services✎Internet✎(p.✎50).
3D:✎définit✎la✎vidéo✎fournie✎avec✎le✎signal✎
3D✎(p.✎21).
AD:✎permet✎d’activer✎ou✎de✎désactiver✎la✎
description✎audio✎(p.✎24).✎Cette✎fonction✎
n’est✎pas✎disponible✎pour✎tous✎les✎pays.
P.SIZE:✎permet✎de✎sélectionner✎la✎taille✎de✎
l’image✎(p.✎19).
SUBT.:✎permet✎d’afficher✎des✎sous-titres✎
numériques✎(p.✎26).
Installation des piles (type de pile: AAA)
Français
6
✎✎
REMARQUE
Utilisez✎la✎télécommande✎à✎une✎distance✎maximale✎de✎7✎mètres✎du✎
✎x
téléviseur.
Une✎lumière✎intense✎peut✎affecter✎le✎bon✎fonctionnement✎de✎la✎
✎x
télécommande.✎Evitez✎de✎l’utiliser✎à✎proximité✎d’une✎lampe✎fluores cente✎
spéciale✎ou✎d’une✎enseigne✎au✎néon.
La✎couleur✎et✎la✎forme✎peuvent✎varier✎en✎fonction✎du✎modèle.
✎x
Page 71

Raccordement à une antenne
Lorsque vous allumez le téléviseur pour la première fois, des réglages de base s’effectuent de manière automatique.
✎
Préréglage: connexion du câble d’alimentation et de l’antenne.
Antenne parabolique
01 Mise en route
ANT 2 IN
(
SATELLITE
)
ANT 1 IN
Plug & Play (configuration initiale)
Lorsque le téléviseur est allumé pour la première fois, plusieurs invites s’affichent pour vous aider à configurer les réglages de base. Appuyez
sur le bouton POWER. Plug & Play est disponible uniquement si la source Entrée est définie sur TV.
✎
Pour revenir à l’étape précédente, appuyez sur le bouton rouge.
Choix d’une langue
1
Sélection de
Enr. démo ou de
2
Util. domicile
Sélection d’un pays
3
Sélection d’une antenne
4
Sélection d’une chaîne
5
Réglage du Mode Horloge Réglez le Mode Horloge automatiquement ou manuellement.
6
Fuseau horaire
7
Affichage du
Guide de connexion HD.
8
Profitez de votre téléviseur.
Appuyez sur le bouton ▲ ou ▼, puis sur ENTER
Sélectionnez la langue de votre choix pour le menu à l’écran.
Appuyez sur le bouton ◄ ou ►, puis sur ENTER.
• Sélectionnez le mode Util. domicile. Le mode Enr. démo est prévu pour un usage en
magasin.
• Rétablissez les paramètres du téléviseur de Enr. démo sur Util. domicile (standard):
appuyez sur le bouton Volume du téléviseur. Lorsque le menu du volume s’affiche,
appuyez pendant 5 secondes sur le bouton MENU.
Appuyez sur le bouton ▲ ou ▼, puis sur ENTER. Sélectionnez le pays de votre choix.
Après la sélection du pays dans le menu Pays, certains modèles peuvent demander, en plus, le code PIN
✎
Lors de l’entrée du code PIN, 0-0-0-0 n’est pas disponible.
✎
Appuyez sur le bouton ▲ ou ▼, puis sur ENTER.
Sélectionnez Hertzien, Câble ou Satellite.
Appuyez sur le bouton ▲ ou ▼, puis sur ENTER.
Sélectionnez la source des chaînes à mémoriser. Lors du réglage de la source d’antenne sur Câble, une fenêtre
s’affiche pour vous permettre d’attribuer des valeurs numériques (fréquences) aux chaînes. Pour plus d’informations,
reportez-vous à Canal → Mémorisation Auto (p. 14).
Lorsque Air ou Cable est sélectionné en premier: Air ou Cable sont mémorisés, les étapes pour mémoriser les
✎
canaux Satellite s’affichent.
Lorsque Satellite est sélectionné en premier: Une fois que tous les canaux Air ou Cable sont mémorisés, les
✎
étapes pour mémoriser les canaux Satellite s’affichent.
Appuyez sur le bouton ENTERà tout moment pour interrompre la mémorisation.
✎
Appuyez sur le bouton ▲ ou ▼ pour sélectionner Auto., puis sur ENTER
Appuyez sur le bouton ▲ ou ▼ pour sélectionner votre fuseau horaire, puis appuyez sur le bouton ENTER
(en fonction du pays)
La méthode de connexion assurant la meilleure qualité d’image en HD s’affiche à l’écran.
Appuyez sur le bouton ENTER.
.
Antenne VHF/UHF
ou
.
Câble
ANT OUT
POWER
P
.
9
Si vous souhaitez réinitialiser cette fonction...
Sélectionnez Configuration - Plug & Play (Configuration initiale). Entrez votre code PIN à quatre chiffres. Le code PIN par défaut est “0-0-00”. Si vous souhaitez modifier le code PIN, utilisez la fonction Modifier PIN.
Français
7
Page 72

Connexions
R-AUDIO-L
Connexion à un périphérique AV
Utilisation d’un câble HDMI ou HDMI/DVI: connexion HD (jusqu’à 1080p)
Périphériques disponibles: lecteur DVD, lecteur Blu-ray, décodeur câble HD, récepteur satellite HD (boîtier décodeur), décodeur câble,
récepteur satellite (décodeur)
Lecteur DVD/
Blu-ray
HDMI OUT
Lecteur DVD/
v
Blu-ray
W
R
Rouge Blanc
✎
HDMI IN 1(DVI), 2(ARC), 3, 4, PC/DVI AUDIO IN
Pour une meilleure qualité d’image et de son, effectuez la connexion au moyen d’un câbleHDMI.
x
Un câbleHDMI prend en charge les signaux audio et vidéo numériques, et ne nécessite aucun câble audio.
x
– Pour connecter le téléviseur à un appareil numérique dépourvu de sortieHDMI, utilisez une prise HDMI/DVI et des câbles
audio.
Il se peut que l’affichage soit médiocre, voire inexistant, ou que le son soit de mauvaise qualité si un périphérique externe
x
connecté au téléviseur utilise un modeHDMI d’une ancienne version. Dans ce cas, demandez au fabricant du périphérique
externe de vous communiquer la versionHDMI et, dans l’hypothèse où elle serait obsolète, demandez-lui une mise à
niveau.
Veillez à utiliser un câbleHDMI de 14mm de diamètre maximum.
x
Veillez également à acheter un câbleHDMI certifié. Dans le cas contraire, il se peut que l’écran n’affiche aucune image ou
x
qu’une erreur de connexion se produise.
Il est recommandéd’employer un câbleHDMI haut débit de base ou un câble possédant une ficheEthernet. Ce produit ne
x
prend pas en charge la fonction Ethernet via HDMI.
Ce produit prend en charge les fonctions3D et ARC (Audio Return Channel) via un câbleHDMI. Cependant, la
x
fonctionARC n’est prise en charge que sur le port HDMI IN 2(ARC).
– Si Affichage 3D auto est défini sur Activé, certaines fonctionnalités, comme Internet@TV peuvent être désactivées. Si tel
est le cas, définissez Affichage 3D auto ou Mode 3D sur Désactivé.
La fonctionARC permet la sortie audio numérique via le port HDMI IN 2(ARC). Elle ne peut être activée que lorsque le
x
téléviseur est connecté à un récepteur audio compatible.
DVI OUT
AUDIO OUT
8
Français
Page 73

Utilisation d’un câble Composante (jusqu’à 1080p) ou Audio/Vidéo (480i uniquement) et d’un câble Péritel
Périphériques disponibles: DVD, lecteur Blu-ray, décodeur câble, récepteur satellite (boîtier externe), magnétoscope
02 Connexions
Lecteur DVD/
Blu-ray
COMPONENT OUT
R
B
G
W R
W R
Y
PR PB Y
R
B
G
Magnétoscope
/ lecteur DVD
EXT
W
R
✎
En mode Ext.1, Ext.2, la sortie DTV prend uniquement en charge les signaux audio et vidéo MPEG SD.
✎
Pour obtenir une qualité d’image optimale, il est préférable d’opter pour la connexion Composante
RGB
R
RougeRouge BlancBlanc JauneRouge Bleu Vert
AV
W
Y
(plutôt que la connexion A/V).
AUDIO OUT
R-AUDIO-L
Magnétoscope
VIDEO OUTAUDIO OUT
R-AUDIO-L
WRWR
Y
Français
9
Page 74

Connexions
Connexion à un système audio
Utilisation d’une connexion de câble optique (numérique) ou audio (analogique) ou d’une sortie casque
Périphériques disponibles: système audio numérique, amplificateur, système home cinéma DVD
AUDIO IN
W R
W
R
✎
DIGITAL AUDIO OUT (OPTICAL)
Lorsqu’un système audio numérique est relié à la prise DIGITAL AUDIO OUT (OPTICAL), baissez le volume du téléviseur
x
et du système.
Le mode audio5,1 est disponible uniquement si le téléviseur est relié à un dispositif externe prenant en charge ce mode.
x
Lorsque le récepteur (home cinéma) est activé, vous pouvez écouter le son sortant de la prise optique du téléviseur.
x
Lorsque le téléviseur reçoit un signal DTV, il envoie du son 5,1 canaux au récepteur du système home cinéma. Si la source
est un composant numérique (par exemple, un lecteur DVD, un lecteur Blu-ray, un décodeur câble ou un récepteur
satellite) connecté au téléviseur en HDMI, le récepteur home cinéma émet uniquement du son sur 2 canaux. Pour obtenir
un son en mode5,1, reliez la prise de sortie audio numérique du lecteur DVD, du lecteur Blu-ray, du décodeur câble ou du
récepteur satellite (boîtier externe) directement à un amplificateur ou un système home cinéma.
✎
Casques : Vous pouvez brancher votre casque à la prise casque du téléviseur. Lorsque le casque est branché, les
enceintes intégrées n’émettent plus de son.
La fonction Son peut être limitée lorsque des écouteurs sont connectés au téléviseur.
x
Le volume des écouteurs et celui du téléviseur sont réglés séparément.
x
✎
AUDIO OUT: pour raccorder la fiche d’entrée audio de votre amplificateur ou système home cinéma DVD.
Au moment de la connexion, utilisez le connecteur approprié.
x
Lorsqu’un amplificateur audio est relié aux prises AUDIO OUT : réduisez le volume du téléviseur et réglez le volume à l’aide
x
de l’amplificateur.
R-AUDIO-L
OPTICAL
amplificateur, home
cinéma DVD
système audio numérique
10
Français
Page 75

Emplacement COMMON INTERFACE pour les connexions
Pour regarder les chaînes payantes, la carte d’interface commune (CI(CI+)
CARD) doit être insérée.
y Si vous ne l’insérez pas, certaines chaînes afficheront le message “Signal
brouillé”.
y Les informations de pairage contenant un numéro de téléphone, l’ID de
la carte d’interface commune (CI(CI+) CARD), l’ID de l’hôte et d’autres
informations s’afficheront dans 2 ou 3minutes. Si un message d’erreur
s’affiche, contactez votre fournisseur d’accès.
y Lorsque la configuration des informations sur les canaux est terminée,
le message “Mise à jour terminée” s’affiche, indiquant que la liste des
chaînes est mise à jour.
✎
REMARQUE
Vous devez vous procurer une carte d’interface commune (CI(CI+) CARD) auprès d’un fournisseur local de diffusion par câble.
x
Lorsque vous sortez la carte d’interface commune (CI(CI+) CARD), tirez-la délicatement. Une chute pourrait en effet l’endommager.
x
Insérez la carte d’interface commune (CI(CI+) CARD) dans le sens indiqué sur celle-ci.
x
L’emplacement de la fente COMMON INTERFACE peut varier en fonction du modèle.
x
La carte d’interface commune (CI(CI+) CARD) n’est pas prise en charge dans certains pays et certaines régions; vérifiez auprès de
x
votre revendeur agréé.
Si vous rencontrez des problèmes, contactez le fournisseur d’accès.
x
Insérez la carte d’interface commune (CI or CI+ CARD), qui prend en charge les paramètres actuels de l’antenne. L’image sera
x
déformée, voire invisible.
Lorsque vous regardez la télévision par satellite, retirez la carte d’interface commune de la diffusion hertzienne ou par câble.
x
L’image sera déformée, voire invisible.
02 Connexions
Changement de la source d’entrée
Liste Source
Permet de sélectionner le téléviseur ou d’autres
sources d’entrée externes, telles que des
lecteurs DVD/Blu-ray, des décodeurs câble ou
des récepteurs satellite (boîtiers décodeurs),
connectées au téléviseur.
■ TV / Ext.1 / Ext.2 / PC / AV / Composant
/ HDMI1/DVI / HDMI2 / HDMI3 / HDMI4
/ USB
✎
Les entrées connectées sont mises en surbrillance dans
la Liste Source.
✎
Les options Ext.1, Ext.2 et PC sont toujours activées.
SOURCE
Modif. Nom
■ Magnétoscope / DVD / Décodeur Câble / Décodeur
satellite / Décodeur PVR / Récepteur AV / Jeux /
Caméscope / PC / DVI PC / Périph. DVI / TV / IPTV /
Blu-ray / HD DVD / DMA: Nommez le périphérique connecté
aux prises d’entrée pour faciliter la sélection de la source
d’entrée.
✎
Si un PC d’une résolution de 1920 x 1080 à 60 Hz est
connecté au port HDMI IN 1(DVI), vous devez régler le
mode DVI PC sous Modif. Nom.
✎
Lorsque vous connectez un câble HDMI/DVI au port
HDMI IN 1(DVI), vous devez régler le port en mode
DVI PC ou Périph. DVI sous Modif. Nom.
✎
Si un câble HDMI est connecté au port HDMI IN 1(DVI),
le son peut ne pas fonctionner. Dans ce cas, connectezle au port PC/DVI AUDIO IN.
Français
11
Page 76

Fonctions de base
P
OWER
SOURCE
O
N/OFF
CO
T
TTX/MIX
PRE-CH
GUIDE
CH LIS
T
MUTE
TOOLS
INFO
Navigation dans les menus
Avant d’utiliser le téléviseur, procédez comme suit pour apprendre
à naviguer dans le menu afin de sélectionner et de régler les
différentes fonctions.
MENU
NTEN
3
1
2
RETURN
EXIT
4
1 ENTER / Bouton de direction : déplacez le curseur pour
sélectionner un élément. Confirmez le réglage.
2 Bouton RETURN : Permet de revenir au menu précédent.
3 Bouton MENU : permet d’afficher le menu principal à l’écran.
4 Bouton EXIT : permet de quitter le menu affiché à l’écran.
Maniement de l’affichage à l’écran (OSD)
La méthode d’accès peut varier en fonction du menu sélectionné.
1
MENU
Les options du menu principal
apparaissent à l’écran:
Image, Son, Canal, Configuration,
Entrée, Application, Assistance.
2
3
4
5
▲ / ▼
ENTER
▲ / ▼
◄ / ►
Sélectionnez une icône à l’aide du
bouton ▲ ou ▼.
Appuyez sur ENTER pour accéder
au sous-menu.
Sélectionnez le sous-menu de votre
choix à l’aide du bouton ▲ ou ▼.
Réglez la valeur d’un élément à l’aide
du bouton ◄ ou ►. Les informations
de réglage affichées à l’écran peuvent
varier en fonction du menu sélectionné.
ENTER
6
EXIT
Appuyez sur le bouton ENTER pour
terminer la configuration.
Appuyez sur EXIT.
L’affichage identifie la chaîne en cours et l’état de
certains paramètres audio et vidéo.
Le Guide Now & Next affiche des informations
quotidiennes sur les programmes de télévision en
fonction de l’heure de diffusion.
Guide
Les informations du Guide électronique des
programmes (EPG) sont fournies par les
diffuseurs. Les programmes planifiés fournis par
les diffuseurs vous permettent de planifier les
émissions que vous souhaitez regarder, de telle
sorte que le téléviseur change automatiquement
de chaîne à l’heure indiquée. Des entrées de
programmes peuvent être vides ou ne pas être
à jour en raison de l’état d’une chaîne.
Utilisation de la Vue chaînes
7
Utilisation du bouton INFO (Guide Now & Next)
INFO
y Faites défiler à l’aide des boutons ◄, ► pour
afficher des informations sur le programme
de votre choix, tout en regardant la chaîne
actuelle.
y Faites défiler à l’aide des boutons ▲, ▼ pour afficher des
informations sur d’autres chaînes. Pour accéder à la chaîne
actuellement sélectionnée, appuyez sur le bouton ENTER
DEF
DTV Air
15
Life On Venus Avenu e
Unclass ified
No Det aild Inform ation
18:00 ~ 6:00
18:11 Jeu 6 Jan
Regarder
E
Information
Planification des émissions à regarder
GUIDE
Tine Team
Fiv...
)
2:10 Mar 1 Jui
Dark Angel
Regarder
Guide
DTV Air 800 five
Home and Away
18:00 - 18:30
Drama
800 five
Vue chaînes - TV
Aujourd’hui
27
28
800
24
16
6
Dani is devastated when scott makes clear his views on marriage...
Discovery
DiscoveryH&L
five
price-drop.tv
QVC
R4DTT
Mode aff. +24 heures Mode CH Information Page
1 2 3 4 5 6
18:00 - 19:00 19:00 - 20:00
American Chopper
Programmes resume at 06:00
Home and...
No Information
QVC Selection
No Information
)
Family Affairs
.
Français
12
Page 77

Utilisation de l’option Diffusion programmée
800
800
2:10 Mar 1 Jui
five
five
Annuler
Guide
800 five
Diffusion programmée
18:30
Aujourd’hui
19:15
Aujourd’hui
Family Affairs
)
)
Dark Angel
Mode aff. Information
DTV Air 800 five
Family Affairs
18:00 - 18:30
Drama
Tanya confesses all to a stunned Babs. Conrad is anxious to hear...
1 4 6
1
Rouge (Mode aff.): affiche la liste des programmes en cours
de diffusion ou à venir.
2
Jaune (+24 heures): affiche la liste des programmes qui
seront diffusés dans plus de 24 heures.
3
Le bouton bleu (Mode CH): permet de sélectionner le type
des chaînes à afficher dans la fenêtre Vue chaînes:
– Le Mode CH varie en fonction de la source d’antenne.
4 Information: affiche des détails sur le programme sélectionné.
5
(Page): passe à la page précédente ou suivante.
6 Bouton ENTER
Icônes d’état des chaînes
– Si vous sélectionnez le programme en cours, vous pouvez
le regarder.
– Si vous sélectionnez un programme à venir, vous pouvez
le réserver. Pour annuler la programmation, appuyez de
nouveau sur ENTER
et sélectionnez Annuler progr..
Gestion chaînes
Supprimez ou définissez des chaînes favorites et utilisez le guide
des programmes pour les émissions numériques. Sélectionnez
une chaîne dans l’écran Chaînes, Mes chaînes, Satellite ou
Programmé.
Chaînes
Tous
TV
Radio
Donn/autre
Libre
Brouillé
Trouvé
Satellite Antenne Zoom Sélectionner Tri des canaux PageOutils
c 1 1futech
2 * 24ore.tv
15 abc1
3 BBC World
23 bid-up.tv
33 Boonerang
32 Cartoon Nwk
5 Class News
4 Coming Soon
27 Discovery
Type de guide (Samsung / Guide Plus+)
(en fonction du pays)
Vous pouvez sélectionner un type de guide différent.
■ Chaînes: affiche la liste des chaînes selon le type de
chaîne.
Mes chaînes: affiche le groupe du canal.
■
■
Satellite: affiche la liste des canaux en fonction du signal
du satellite.
■
Programmé: affiche tous les programmes réservés
actuellement.
✎
Utilisation des boutons de couleur avec la fonction Gestion
chaînes
Rouge (Antenne): permet de basculer entre Hertzien,
x
Câble et Satellite.
Vert (Zoom) : agrandit ou réduit un numéro de chaîne.
x
Jaune (Sélectionner): sélectionnez les chaînes voulues,
x
puis appuyez sur le bouton jaune pour traiter toutes les
chaînes sélectionnées en même temps. La marque
s’affiche à gauche des chaînes sélectionnées.
Bleu (Tri des canaux): change l’ordre des chaînes
x
classées par nom ou par numéro.
(Page): passe à la page précédente ou suivante.
x
(Outils): affiche le menu d’options Gestion chaînes.
x
(Les menus options peuvent varier en fonction de la
situation.)
Icônes Opérations
Chaîne analogique.
Chaîne sélectionnée.
Chaîne définie comme favorite.
Programme en cours de diffusion.
Chaîne verrouillée.
Programme réservé.
■ Samsung: utilise le programme guide fourni par Samsung.
■ Guide Plus+: utilise le programme guide fourni par Rovi
International Solutions. Pour plus d’informations, reportez-vous
au site “www.europe.guideplus.com”
03 Fonctions de base
Français
13
Page 78

Fonctions de base
Utilisation des chaînes favorites
Mes chaînes
(dans Gestion chaînes)
Affiche toutes les chaînes favorites.
Tous
TV
Radio
Donn/autre
Libre
Brouillé
Trouvé
: vous pouvez définir les
c 1 1futech
2 * 24ore.tv
15 abc1
Modier mes chaînes
Verrouil.
3 BBC World
Enr. Programmé
23 bid-up.tv
Rappel progr.
33 Boonerang
Modif. num. chaîne
32 Cartoon Nwk
Supprimer
5 Class News
4 Coming Soon
27 Discovery
■ Modifier mes chaînes
chaînes sélectionnées dans le groupe Mes chaînes souhaité.
✎
Le symbole “” s’affiche et la chaîne est définie en tant que
Ma chaîne.
1. Sélectionnez une chaîne et appuyez sur le bouton
TOOLS.
2. Ajoutez ou supprimez une chaîne dans les groupes Ma
chaîne de votre choix: 1, 2, 3 ou 4.
Vous pouvez sélectionner un ou plusieurs groupes.
x
3. Une fois les paramètres modifiés, la liste des chaînes pour
chaque groupe peut être affichée dans mes chaînes.
Chaînes
Satellite Antenne Zoom Sélectionner Tri des canaux PageOutils
Liste des chaînes
Vous pouvez afficher toutes les chaînes
recherchées.
CH LIST
Menu Canal
Réinitialisation des chaînes
Antenne (Hertzien / Câble / Satellite)
Avant que votre téléviseur ne puisse commencer à mémoriser les
chaînes disponibles, vous devez spécifier le type de la source du
signal reliée au téléviseur (c’est-à-dire: système Hertzien, Câble ou
Satellite).
Pays
L’écran de saisie du code PIN apparaît. Entrez votre code PIN à
quatre chiffres.
■ Chaîne numérique: permet de changer de pays pour les
chaînes numériques.
■ Chaîne analogique: permet de changer de pays pour les
chaînes analogiques.
Mémorisation Auto
Recherche automatiquement une chaîne et la mémorise dans le
téléviseur.
✎
Il est possible que les numéros de programme attribués
automatiquement ne correspondent pas aux numéros de
programme souhaités ou réels. Si une chaîne est verrouillée
par la fonction Verrouillage Parental, la fenêtre de saisie du
code PIN s’affiche.
■ Antennes (Hertzien / Câble / Satellite): sélectionnez la source
d’antenne à mémoriser.
Lorsque l’option Antennes est réglée sur Hertzien ou Câble:
■ Source des chaînes (Numér. et Anal. / Numérique /
Analogique): Sélectionnez la source des chaînes à mémoriser.
Lors de la sélection de Câble → Numér. et Anal. ou
Numérique : fournissez une valeur à rechercher pour les
chaînes câblées.
Mode de rech. (Complet / Réseau / Rapide): recherche
toutes les chaînes avec des stations de diffusion actives et les
enregistre dans la mémoire du téléviseur.
✎
Si vous sélectionnez Rapide, vous pouvez définir
Réseau, ID réseau, Fréquence, Modulation et
Taux de symbole manuellement en appuyant sur le
bouton de la télécommande.
Réseau (Auto. / Manuel): sélectionnez le mode de réglage
ID réseau Auto ou Manuel.
ID réseau: si Réseau est défini sur Manuel, vous pouvez
configurer un ID réseau à l’aide des boutons numériques.
Fréquence: affiche la fréquence correspondant à la chaîne
(varie d’un pays à l’autre)
Modulation: affiche les valeurs de modulation disponibles.
Taux de symbole: affiche les taux de symboles disponibles.
14
Français
Page 79

Lorsque l’option Antennes est réglée sur Satellite:
■ Type de canal (Tous / TV / Radio): sélectionnez le type de
canal à mémoriser.
■ Satellite: permet de sélectionner le satellite à rechercher.
■ Mode Recherche (Toutes les chaînes / Gratuites seules):
permet de sélectionner le mode de recherche du satellite
sélectionné.
Mémorisation Manuelle
Recherche manuellement une chaîne et la mémorise dans le
téléviseur.
✎
Si une chaîne est verrouillée par la fonction
Verrouillage Parental, la fenêtre de saisie du code PIN
s’affiche.
Lorsque l’option Antennes est réglée sur Hertzien ou Câble:
■ Chaîne numérique: Au terme de la recherche, les chaînes de
la liste sont mises à jour.
✎
Lors de la sélection de Antenne → Hertzien: Chaîne,
Fréquence, Bande passante
✎
Lors de la sélection de Antenne → Câble: Fréquence,
Modulation, Taux de symbole
■ Chaîne analogique (Programme, Système de Couleur,
Système Sonore, Canal, Rechercher): si aucun son ne sort
ou si le son produit est anormal, sélectionnez de nouveau la
norme son requise.
✎
Mode Canal
P (Mode Programme) : à la fin du réglage, des numéros
x
de position compris entre P0 et P99 sont attribués aux
stations de radiodiffusion de votre région. Dans ce mode,
vous pouvez sélectionner un chaîne en saisissant son
numéro de position.
C (antenne) / S (câble) : ces deux modes vous permettent
x
de sélectionner une chaîne en entrant le numéro affecté à
chaque station de radiodiffusion (antenne) ou canal (câble).
Lorsque l’option Antennes est réglée sur Satellite:
■ Satellite: permet de sélectionner le satellite à l’aide des
boutons haut/bas.
■ Transpondeur: permet de sélectionner le transpondeur à l’aide
des boutons haut/bas.
■ Mode Recherche (Toutes les chaînes / Gratuites seules):
permet de choisir de mémoriser les chaînes gratuites ou toutes
les chaînes.
■ Rech. réseau (Désactiver / Activer): permet d’activer/
désactiver la recherche réseau à l’aide des boutons haut/bas.
■ Qualité du signal: permet d’afficher l’état actuel du signal de
diffusion.
✎
Les informations concernant un satellite et son transpondeur
sont sujettes à des modifications selon les conditions de
diffusion.
✎
Une fois le paramétrage terminé, allez sur Rechercher et
appuyez sur le bouton ENTER. La recherche des chaînes
commence.
Configuration du système satellite
L’écran de saisie du code PIN apparaît. Entrez votre code PIN à
quatre chiffres. La fonction Configuration du système satellite
est disponible lorsque l’option Antenne est réglée sur Satellite.
Before running Mémorisation Auto, set Configuration du
système satellite. La recherche des chaînes est alors exécutée
normalement.
■ Sélection du satellite: vous pouvez choisir les satellites pour
ce téléviseur.
■ Alimentation du LNB (Arrêt / Activé): permet d’activer ou de
désactiver l’alimentation du LNB.
■ Réglages LNB: configure l’équipement extérieur.
– Satellite: permet de sélectionner le satellite pour la
réception des programmes numériques.
– Transpondeur: permet de sélectionner un transpondeur
dans la liste ou d’en ajouter un nouveau.
– Mode DiSEqC: permet de sélectionner le mode DiSEqC
pour le LNB sélectionné.
– Osc LNB plus bas: permet de régler les oscillateurs LNB
sur une fréquence inférieure.
– Osc. LNB plus hauts: permet de régler les oscillateurs LNB
sur une fréquence supérieure.
– Tone 22 kHz (Arrêt / Activé / Auto): permet de sélectionner
la tonalité 22KHz en fonction du type de LNB. Pour un LNB
universel, elle doit être définie sur Auto.
– Qualité du signal: permet d’afficher l’état actuel du signal
de diffusion.
■ Réglages du positionneur: configure le positionneur de
l’antenne.
Positionneur (Activé / Arrêt): permet d’activer ou de
désactiver le contrôle du positionneur.
Type de posit. (USALS / DiSEqC 1.2): permet de définir le
type de positionneur entre DiSEqC1.2 et USALS (Universal
Satellite Automatic Location System).
– Longitude: définit la longitude de mon emplacement.
– Latitude: définit la latitude de mon emplacement.
– Réglages longitude satellite: règle la longitude des
satellites définis par l’utilisateur.
Mode Utilisateur: permet de définir la position de l’antenne
satellite en fonction de chaque satellite. Si vous mémorisez la
position actuelle de l’antenne satellite en fonction d’un satellite
donné, lorsque le signal de ce satellite est requis, l’antenne
satellite peut se placer dans la position prédéfinie.
– Satellite: permet de sélectionner le satellite pour lequel
définir la position.
– Transpondeur: permet de sélectionner un transpondeur
dans la liste pour la réception du signal.
– Mode Déplacement: permet de choisir entre le mode de
déplacement individuel ou continu.
– Taille des pas: permet de régler les degrés de la taille des
pas pour la rotation de l’antenne. L’option Step Size (Taille
des pas) est disponible lorsque l’option Moving Mode (Mode
Déplacement) est définie sur Step (Pas).
03 Fonctions de base
Français
15
Page 80

Fonctions de base
– Aller à une pos. enregistrée: permet de faire pivoter
l’antenne jusqu’à la position de satellite enregistrée.
– Position de l’antenne: permet d’ajuster et d’enregistrer la
position de l’antenne pour le satellite sélectionné.
– Mémoriser la position actuelle: permet de mémoriser la
position actuelle comme limite du positionneur sélectionnée.
– Qualité du signal: permet d’afficher l’état actuel du signal
de diffusion.
Mode Installateur: permet de fixer des limites à l’étendue des
mouvements de l’antenne satellite ou de réinitialiser la position.
En règle générale, le guide d’installation utilise cette fonction.
– Position limite (Est / Ouest): permet de sélectionner la
direction de la limite du positionneur.
– Position de l’antenne: permet d’ajuster et d’enregistrer la
position de l’antenne pour le satellite sélectionné.
– Mémoriser la position actuelle: permet de mémoriser
la position actuelle comme Limite du positionneur
sélectionnée.
– Réinitialiser la position: déplace l’antenne jusqu’à la
position de référence.
– Redéfinir limite positionneur: autorise l’antenne à effectuer
un arc complet.
■ Réinit. tous les paramètres (OK / Annuler): toutes les valeurs
initiales des paramètres du satellite seront réinitialisées.
¦ Edition des chaînes
Menu d’options Gestion chaînes
(dans Gestion chaînes)
1. Sélectionnez une chaîne et appuyez sur le bouton TOOLS.
2. Modifiez le nom ou le numéro de la chaîne à l’aide du menu
Modifi. nom de chaîne ou Modif. num. chaîne.
■ Modifi. nom de chaîne (chaînes analogiques uniquement):
attribuez votre propre nom à la chaîne.
■ Modif. num. chaîne (chaînes numériques uniquement):
Modifiez le numéro en appuyez sur les boutons du numéro
souhaité.
¦ Autres fonctionnalités
Option de rech. de câble
(en fonction du pays)
Définit des options de recherche supplémentaires, telles que la
fréquence et le taux de symbole pour une recherche sur un réseau
câblé.
■ Fréq. début / Fréq. fin: définit la fréquence de début ou de fin
(différente dans chaque pays).
■ Taux de symbole: affiche les taux de symboles disponibles.
■ Modulation: affiche les valeurs de modulation disponibles.
Gestion chaînes
Menu d’options Gestion chaînes
Définissez chaque chaîne à l’aide des options du menu
Gestion chaînes (Verrouil. / Déverr., Rappel progr.,
Enr. Programmé, Tri des canaux, Réorganiser, Supprimer,
Sélectionner tout / Désélectionner tout). Les options de menu
peuvent varier selon l’état de la chaîne.
1. Sélectionnez une chaîne et appuyez sur le bouton TOOLS.
2. Sélectionnez une fonction et modifiez ses réglages.
■ Lock / Unlock: verrouillez une chaîne afin qu’elle ne puisse pas
être sélectionnée ni visualisée.
✎
REMARQUE
Cette fonction n’est disponible que si l’option
x
Verrouillage Parental est définie sur Activé
L’écran de saisie du code PIN apparaît. Entrez votre
x
code PIN à 4chiffres; “par défaut “0-0-0-0”. Modifiez
le code PIN à l’aide de l’option Modifier PIN.
■ Rappel progr.: vous pouvez programmer l’affichage
automatique d’une chaîne déterminée à l’heure prévue. Avant
d’utiliser cette fonction, vous devez régler l’heure.
✎
Lorsqu’une chaîne numérique est sélectionnée, appuyez
sur le bouton dans Gestion chaînes ► pour afficher le
programme numérique.
■ Enr. Programmé (chaînes numériques uniquement) : vous
permet d’enregistrer un programme en cours de diffusion ou
d’établir une réservation pour un programme planifié.
✎
Vous devez connecter au téléviseur un périphérique
USB disposant d’une mémoire minimale de 4Go.
✎
Une unité de stockage USB ne peut pas enregistrer
avant d’avoir réalisé le Test de perf. du périph.
✎
En cas de disque dur USB, plus de 5400tr/min
✎
En cas de clé USB, USB 2.0 et SLC.
(La taille minimale de la clé USB est de 2Go.)
✎
Pour enregistrer, appuyez sur le bouton � (REC) de la
télécommande. Appuyez sur le bouton � (REC) deux
fois pour régler la durée de l’enregistrement.
■ Tri des canaux (chaînes analogiques uniquement): cette
opération vous permet de changer les numéros de programme
des chaînes mémorisées. Cela peut s’avérer nécessaire après
avoir utilisé la mémorisation automatique.
■ Réorganiser (lorsque l’option Antenne est définie sur Satellite):
réorganisez la gestion des chaînes dans l’ordre numérique.
■ Supprimer: Vous pouvez supprimer une chaîne afin d’afficher
les chaînes de votre choix.
■ Sélectionner tout / Désélectionner tout: permet de
sélectionner toutes les chaînes ou de désélectionner celles
sélectionnées dans le gestionnaire de chaînes.
16
Français
Page 81

Programmé
(dans Gestion chaînes)
Vous pouvez voir, modifier ou supprimer une émission que vous
avez réservée.
■ Infos modif.: modifiez une émission que vous avez réservée.
■ Annuler progr.: annulez une émission que vous avez réservée.
■ Information: permet d’afficher les informations relatives à
une émission que vous avez réservée (et d’en modifier les
informations de réservation).
■ Sélectionner tout / Désélectionner tout: permet de
sélectionner ou de désélectionner tous les programmes
réservés.
Transfert liste chaînes
Entrez votre code PIN à quatre chiffres.
Importe ou exporte la carte des chaînes. Vous devez connecter un
périphérique de stockage USB pour utiliser cette fonction.
■ Importer depuis le périphérique USB: permet d’importer une
liste de chaînes depuis un périphérique USB.
■ Exporter vers le périphérique USB: permet d’exporter une
liste de chaînes vers un périphérique USB. Cette fonction est
disponible lorsqu’un périphérique USB est connecté.
Réglage fin
Si le signal est faible ou déformé, vous pouvez effectuer
manuellement un réglage fin du canal.
✎
Si le signal est faible ou déformé, vous pouvez effectuer
manuellement un réglage fin du canal. Les chaînes finement
réglées sont marquées par un astérisque “*”.
✎
Pour réinitialiser le réglage précis, sélectionnez Réinit..
Menu Image
Changement du mode Image prédéfinie
Mode
Sélectionnez le type d’image que vous préférez.
■ Dynamique : adapté à un environnement lumineux.
■ Standard : adapté à un environnement normal.
■ Naturel: permet de réduire la fatigue oculaire.
✎
L’option Naturel n’est pas disponible en mode PC.
■ Cinéma: convient au visionnage de films dans une pièce
sombre.
Réglage des paramètres de l’image
Rétroéclairage / Contraste / Luminosité /
Netteté / Couleur / Teinte (V/R)
Votre téléviseur dispose de plusieurs options de réglage pour le
contrôle de la qualité d’image.
✎
REMARQUE
Dans les modes TV, Ext., AV du système PAL, vous ne
x
pouvez pas utiliser la fonction Teinte (V/R).
En mode PC, vous ne pouvez modifier que les options
x
Rétroéclairage, Contraste et Luminosité.
Les paramètres peuvent être réglés et mémorisés pour
x
chaque dispositif externe connecté au téléviseur.
Solutions économiques
Solution Eco
■ Mode éco. (Arrêt / Bas / Moyen / Elevé / Image désactivée
■ Capteur Eco (Arrêt / Activé) : cette fonction permet
■ Veille si aucun signal (Arrêt / 15 min / 30 min / 60 min): Pour
/ Auto.)
téléviseur afin de réduire la consommation d’énergie. Si vous
sélectionnez Image désactivée, l’écran est éteint, mais le son
reste activé. Appuyez de nouveau sur n’importe quel bouton
pour rallumer l’écran.
d’optimiser vos économies d’énergie; les réglages de l’image
s’adaptent automatiquement en fonction de la luminosité de
la pièce.
✎
Lors du réglage du Rétroéclairage, l’Capteur Eco
passe sur Arrêt.
Rétro-écl. min: Lorsque Capteur Eco est sur Activé, la
luminosité minimale de l’écran peut être réglée manuellement.
✎
Si Capteur Eco est Activé, la luminosité de l’écran peut
changer (il devient plus ou moins lumineux) en fonction
de l’intensité de la lumière environnante.
éviter toute consommation d’énergie inutile, définissez la durée
d’activation du téléviseur lorsqu’il ne reçoit pas de signal.
✎
Il est désactivé lorsque le PC est en mode d’économie
d’énergie.
: permet de régler la luminosité du
03 Fonctions de base
Français
17
Page 82

Fonctions de base
Modification des options d’image
Paramètres avancés
(Disponible en mode Standard / Cinéma)
Vous pouvez régler les paramètres avancés de votre écran,
notamment la couleur et le contraste.
✎
En mode PC, vous ne pouvez modifier que les options
Contraste Dynamique, Gamma, Balance blancs et
Balay. rétro. LED.
Paramètres avancés
Nuance de noir : Arrêt ►
Contraste Dynamique : Moyen
Réglage Luminosité : -2
Gamma : 0
Figure Expert : Arrêt
RVB uniquement : Arrêt
Espace couleur : Natif
▼
Déplacer
Entrer
Retour
■ Nuance de noir (Arrêt / Sombre / Plus sombre /
Le plus sombre) : sélectionnez le niveau de noir afin de régler
la profondeur d’écran.
■ Contraste Dynamique (Arrêt / Bas / Moyen / Elevé) : permet
de régler le contraste de l’écran.
■ Réglage Luminosité (-2~+2): permet d’augmenter la
luminosité des images sombres.
■ Gamma : permet de régler l’intensité des couleurs primaires.
■ Figure Expert (Arrêt / Figure1 / Figure2): En exécutant
la fonction Figure Expert, l’image peut être calibrée sans
générateur ni filtre. Si le menu à l’écran disparaît ou si un autre
menu que le menu Image s’ouvre, la calibration est enregistrée
et la fenêtre Figure Expert se ferme.
✎
Pendant l’exécution de Figure Expert, aucun son n’est
émis.
■ RVB uniquement (Arrêt / Rouge / Vert / Bleu) : vous pouvez
régler la Couleur ou la Teinte (V/R) du Rouge, Vert ou Bleu
pour l’image d’un dispositif externe (lecteur DVD, système
home cinéma, etc.).
■ Espace de couleur (Auto. / Natif / Personnalisé): permet de
régler la gamme des couleurs disponibles pour créer l’image.
Pour régler Couleur, Rouge, Vert, Bleu et Réinit., définissez
Espace de couleur sur Personnalisé.
■ Balance blancs : permet de régler la température des couleurs
pour que l’image soit plus naturelle.
Aj. Rouge / Aj. Vert / Aj. Bleu: permet de régler la profondeur
de chaque couleur (rouge, vert, bleu).
Régl. Rouge / Régl. vert / Régl. bleu: permet de régler la
luminosité de chaque couleur (rouge, vert, bleu).
Réinit.: rétablit les paramètres Balance blancs par défaut.
■ Balance Blancs 10p (Arrêt / Activé): contrôle la balance des
blancs par intervalle de 10points en réglant la luminosité des
couleurs rouge, verte et bleue.
✎
Käytettävissä, kun kuvatilaksi on asetettu Cinéma ja
ulkoiseksi tuloksi on asetettu kaikki tulot.
✎
Cette fonction n’est pas prise en charge par tous les
dispositifs externes.
Intervalle: permet de sélectionner l’intervalle à ajuster.
Rouge: permet de régler le niveau de rouge.
Vert: permet de régler le niveau de vert.
Bleu: permet de régler le niveau de bleu.
Réinit.: rétablit les paramètres Balance Blancs 10p par
défaut.
■ Carnation : Accentue la rougeur de la carnation.
■ Netteté des contours (Arrêt / Activé): fait ressortir les
contours des objets.
■ xvYCC (Arrêt / Activé): l’activation du mode xvYCC augmente
les détails et agrandit l’espace colorimétrique lors de l’affichage
de films à partir d’un appareil externe (lecteur de DVD, etc.)
connecté à la prise Entrée Composant ou HDMI.
✎
Ce mode est disponible lorsque le mode d’image est
réglé sur Cinéma et lorsque l’entrée externe est définie
sur HDMI ou Composant.
✎
Cette fonction n’est pas prise en charge par tous les
dispositifs externes.
■ Balay. rétro. LED (Arrêt / Normal / Cinéma / Téléscripteur):
supprime les traînées des scènes rapides avec beaucoup de
mouvements, ce qui rend l’image plus claire.
18
Français
Page 83

Options d’image
✎
En mode PC, vous pouvez uniquement apporter des
modifications aux options Nuance Coul., Taille et
Temps protection auto.
Options d’image
Nuance Coul. : Normal ►
Taille : 16:9 Auto
Mode écran : 16:9
Filtre Bruit num. : Auto.
Filtre Bruit MPEG : Auto.
Niv. noir HDMI : Normal
Mode Film : Arrêt
▼
Déplacer
Entrer
Retour
■ Nuance Coul. (Froide / Normal / Chaude1 / Chaude2)
✎
Les options Chaude1 ou Chaude2 sont désactivées
avec le mode d’image Dynamique.
✎
Les paramètres peuvent être réglés et mémorisés pour
chaque dispositif externe connecté à une entrée du
téléviseur.
■ Taille: il se peut que votre décodeur
câble/récepteur satellite dispose de son
propre jeu de tailles d’écran. Il est toutefois
vivement conseillé d’utiliser le mode 16:9.
16:9 Auto: Règle automatiquement la taille
de l’image au format 16:9.
16:9 : règle la taille de l’image sur 16:9 de
façon appropriée pour les DVD ou la diffusion
au format cinémascope.
Zoom large: Agrandit l’image à une taille supérieure à 4:3.
✎
Réglez la Position à l’aide des boutons ▲ et ▼.
Zoom: Agrandit les images en 16:9 dans le sens vertical pour
l’adapter à la taille de l’écran.
✎
réglez la Position ou la Taille à l’aide des boutons ▲, ▼.
4:3 : Paramètre par défaut pour un film cinéma ou la diffusion
normale.
✎
Ne regardez pas un film au format 4:3 pendant une
période prolongée. Les traces de bordures situées sur
la gauche, sur la droite et au centre de l’écran peuvent
donner lieu au phénomène de rémanence (brûlure
d’écran) non couvert par la garantie.
P.SIZE
Adapter à l’écran: Affiche l’intégralité de l’image sans coupure
lors de l’entrée de signaux HDMI (720p / 1080i / 1080p) ou
Composant (1080i / 1080p).
✎
REMARQUE
Lorsque le mode PIP est réglé sur Double (, ),
x
l’option Format de l’image est désactivée.
Les options de taille de l’image peuvent varier en fonction
x
de la source d’entrée.
Les options disponibles peuvent varier en fonction du
x
mode sélectionné.
En mode PC, seuls les modes 16:9 et 4:3 peuvent être
x
réglés.
Les paramètres peuvent être réglés et mémorisés pour
x
chaque dispositif externe connecté à une entrée du
téléviseur.
Après avoir sélectionné l’option Adapter à écran en mode
x
HDMI (1080i/1080p) ou Composant (1080i/1080p):
réglez la Position ou la Taille à l’aide des boutons
▲, ▼, ◄, ►.
Si vous utilisez la fonction Adapter à écran avec l’entrée
x
HDMI 720p, une ligne sera coupée en haut, en bas, à
gauche et à droite, comme c’est le cas avec la fonction
Overscan.
■ Mode écran (16:9 / Zoom large / Zoom / 4:3): disponible
uniquement lorsque la taille d’image est définie sur 16:9 Auto.
Vous pouvez déterminer la taille d’image souhaitée sur 4:3
WSS (Wide Screen Service) ou sur la taille d’origine. Chaque
pays européen requiert une taille d’image différente.
✎
Non disponible en mode PC, Composant et HDMI.
■ Filtre Bruit num. (Arrêt / Bas / Moyen / Elevé / Auto. /
Visualisation auto): lorsque le signal de diffusion est faible, des
bruits parasites ou une impression fantôme peuvent apparaître.
Sélectionnez l’une des options jusqu’à l’obtention d’une image
de qualité optimale.
Visualisation auto : permet, lors de la modification de chaînes
analogiques, d’afficher l’intensité du signal en cours et de
définir le filtre de bruit de l’écran.
✎
Disponible uniquement pour les chaînes analogiques.
■ Filtre Bruit MPEG (Arrêt / Bas / Moyen / Elevé / Auto.):
réduit le bruit MPEG afin d’offrir une meilleure qualité d’image.
■ Niv. noir HDMI (Normal / Bas): permet de choisir le niveau de
noir pour régler la profondeur de l’écran.
✎
Disponible uniquement en mode HDMI (signaux RVB).
■ Mode Film (Arrêt / Auto.1 / Auto.2): règle le téléviseur de
sorte qu’il détecte et traite automatiquement les signaux de
cinéma en provenance de toutes les sources et adapte l’image
afin d’obtenir une qualité optimale.
✎
Disponible en modes TV, AV, COMPOSANT (480i /
1080i) et HDMI (480i / 1080i).
03 Fonctions de base
Français
19
Page 84

Fonctions de base
■ Motion Plus (Arrêt / Précis / Standard / Fluide /
Personnalisé / Démo): supprime les traînées des scènes
rapides avec beaucoup de mouvements, ce qui rend l’image
plus claire.
✎
Si des parasites apparaissent sur l’écran, configurez la
fonction Motion Plus sur Arrêt. Si la fonction
Motion Plus est définie sur Personnalisé, vous pouvez
configurer manuellement l’option
Réduction de flou, Réduc. vibrations ou Réinit..
✎
Si la fonction Motion Plus est définie sur Démo.,
vous pouvez comparer la différence entre les modes
Arrêt et Activé.
Réduction de flou: règle le niveau de réduction du flou à partir
des sources vidéo.
Réduc. vibrations: règle le niveau de réduction des vibrations
à partir des sources vidéo lors de la lecture de films.
Réinit.: restaure les paramètres par défaut.
■ Temps protection auto (2 heures / 4 heures / 8 heures /
10 heures / Arrêt): Si l’écran est inutilisé et affiche une
image fixe pendant un certain temps défini par l’utilisateur,
l’économiseur d’écran est activé de manière à prévenir la
formation d’images parasites sur l’écran.
Regarder la télévision à l’aide de la fonction 3D
INFORMATIONS DE SECURITE ET DE SANTE IMPORTANTES
CONCERNANT LES IMAGES 3D
Lisez et assurez-vous de comprendre les informations de
sécurité suivantes avant d’utiliser la fonction3D de votre
téléviseur.
ATTENTION
Certaines personnes peuvent être victimes de vertiges,
x
nausées et maux de tête lorsqu’elles regardent la
télévision en3D. Si vous présentez des symptômes de
ce type, arrêtez de regarder la télévision en3D, retirez les
lunettes3D actives et reposez-vous.
Le fait de regarder des images3D pendant une période
x
prolongée peut causer une fatigue oculaire. Si vous
présentez ce type de symptôme, arrêtez de regarder la
télévision en3D, retirez les lunettes3D actives et reposezvous.
Un adulte responsable est censé vérifier régulièrement que
x
tout se passe bien pour les enfants qui utilisent la fonction
3D. Si un enfant vous dit qu’il a les yeux fatigués ou qu’il
est victime de maux de tête, de vertiges ou de nausées,
demandez-lui d’arrêter de regarder la télévision en3D et
dites-lui de se reposer.
N’utilisez pas les lunettes3D actives à d’autres fins (p. ex.
x
comme lunettes de vue, de soleil ou de protection).
N’utilisez pas la fonction3D ou les lunettes3D actives
x
lorsque vous marchez ou vous déplacez. Si vous utilisez la
fonction3D ou les lunettes3D actives lorsque vous vous
déplacez, vous pouvez vous occasionner des blessures en
trébuchant, en chutant et/ou en percutant des objets.
20
Français
Page 85

3D
Cette incroyable nouvelle fonction vous permet
de regarder du contenu 3D. Pour en profiter
pleinement, vous devez acquérir des lunettes
3D Samsung (SSG-2100AB, SSG-2200AR,
SSG-2200KR) afin de regarder des vidéos 3D.
Ces lunettes sont vendues séparément. Pour
obtenir des informations d’achat plus détaillées,
contactez le revendeur qui vous a vendu ce
téléviseur.
Emetteur 3D
✎
Si un obstacle se trouve entre l’émetteur et les lunettes 3D,
vous risquez de ne pas obtenir l’effet 3D attendu.
■ Mode 3D: permet de sélectionner le format d’entrée 3D.
✎
Si vous souhaitez bénéficier pleinement de l’effet 3D,
mettez d’abord les lunettes 3D, puis sélectionnez Mode
3D dans la liste ci-dessous afin de profiter du meilleur
visionnage 3D.
✎
Lorsque vous regardez des images 3D, allumez les
lunettes 3D actives.
Mode 3D Fonctionnement
Arrêt Désactive la fonction 3D.
2D → 3D
Côte à côte Affiche deux images côte à côte.
Haut et bas
Ligne par ligne
Bande verticale
Échiquier
Fréquence
Transforme une image 2D en 3D.
Affiche une image au-dessus de
l’autre.
Affiche alternativement les images
destinées à l’œil gauche et à l’œil
droit dans des lignes.
Affiche alternativement les images
destinées à l’œil gauche et à l’œil
droit dans des colonnes.
Affiche alternativement les images
destinées à l’œil gauche et à l’œil
droit dans des pixels.
Affiche alternativement les images
destinées à l’œil gauche et à l’œil
droit dans des cadres.
✎
Des options “côte à côte” et “Haut et Bas” sont
disponibles lorsque la résolution est 720p, 1080i et
1080p en mode DTV, HDMI et USB ou réglée sur
Connexion PC par câble HDMI/DVI.
✎
Les options “Bande verticale”, “Ligne par ligne” et
“Damier” sont disponibles lorsque la résolution est
réglée sur Connexion PC par câble HDMI/DVI.
✎
L’option “Fréquence” affiche la fréquence (60Hz
uniquement) lorsque la résolution est définie sur PC.
■ 3D → 2D (Arrêt / Activé): affiche uniquement l’image pour l’œil
gauche.
✎
Cette fonction est désactivée lorsque Mode 3D est
défini sur “2D → 3D” ou sur Arrêt.
■ Point de vue 3D: Configuration générale de la perspective 3D.
✎
Cette fonction est désactivée lorsque Mode 3D est
défini sur “2D → 3D” ou sur Arrêt.
■ Profondeur: règle la mise au point/profondeur en mode “2D
→ 3D”.
✎
Cette fonction s’active uniquement lorsque l’option
Mode 3D est définie sur “2D → 3D”.
■ Correction d’image: règle l’image pour l’œil gauche et l’œil
droit.
■ Affichage 3D auto (Arrêt / Activé): si l’option
Affichage 3D auto est définie sur Activé, un signal HDMI au
format “Côte à côte” avec l’une des résolutions ci-dessous
passe automatiquement en 3D. Dans le cas présent, des
informations 3D correctes doivent être envoyées à partir du
format HDMI 3D standard.
✎
Si une erreur 3D se produit en raison d’une erreur
d’information 3D, définissez l’option Affichage 3D auto
sur Arrêt et sélectionnez manuellement un Mode 3D à
l’aide du bouton 3D ou du menu correspondant.
✎
Résolution prise en charge (16:9 uniquement)
Résolution Fréquence (Hz)
1280 x 720p 50 / 60 Hz
1920 x 1080i 50 / 60 Hz
1920 x 1080p 24 / 30 / 50 / 60 Hz
■ Optimisation 3D: Le réglage général de l’effet 3D.
Résolution prise en charge pour le mode PC HDMI
La résolution du mode PC HDMI est optimisée sur une entrée 1920
x 1080.
Il se peut qu’une résolution d’entrée autre que 1920 x 1080 ne
s’affiche pas correctement en mode 3D ou plein écran.
03 Fonctions de base
Français
21
Page 86

Fonctions de base
Visionnage d’une image 3D
3D
Deze functie zorgt door middel
van HRTF-technologie (Head
Related Transfer Function) voor een
virtuele beleving van 5.1-kanaals
surroundgeluid via een paar
luidsprekers.
OK
Déplacer
Annuler
Entrer
Quitter
3D
En utilisant les touches GAUCHE et DROITE de la
En utilisant les touches GAUCHE et DROITE de la
télécommande, sélectionnez l’icône adaptée à l’image diffusée.
télécommande, sélectionnez l’icône adaptée à l’image diffusée.
Déplacer
Entrer
Déplacer
1. Appuyez sur le bouton CONTENT pour faire apparaître le menu
Aff. contenu.
2. Appuyez sur le bouton ◄ ou ►, puis sélectionnez 3D.
Pour regarder la télévision en 3D, portez des lunettes 3D et
appuyez sur le bouton d’alimentation des lunettes.
3. Sélectionnez OK et appuyez ensuite sur le bouton ENTER
4. À l’aide des boutons ◄ et ► de la télécommande,
sélectionnez le Mode 3D de l’image à visionner.
✎
La disponibilité de certains modes 3D dépend du format
de l’image source.
Formats pris en charge et spécifications de fonctionnement du
format HDMI3D standard
✎
Les formats3D indiqués ci-dessous seront recommandés par
l’associationHDMI et doivent être pris en charge.
Format du signal source Norme HDMI 1.4 3D
1920x1080p à 24Hz x 2 1920x2205p à 24Hz
1280x720p à 60Hz x 2 1280x1470p à 60Hz
1280x720p à 50Hz x 2 1280x1470p à 50Hz
Le mode passe automatiquement en 3D pour l’entrée vidéo 3D
dans l’un des formats mentionnés ci-dessus.
Pour le format HDMI3D standard à 24Hz, le téléviseur est optimisé
comme suit:
– Résolution du premier mode d’affichage: si la fonction
Motion Plus est définie sur Arrêt, Précis ou Standard,
vous pouvez visionner la vidéo dans une résolution élevée,
optimisée sur la résolution de la vidéo source.
– Mode d’affichage Réduc. vibrations: si la fonction
Motion Plus est définie sur Fluide ou Personnalisé, vous
pouvez visionner une image fluide, sans vibrations.
Entrer
Quitter
Quitter
.
Avant d’utiliser la fonction 3D...
✎
REMARQUE
Lorsque vous regardez des images 3D sous une lampe
x
fluorescente (50Hz ~ 60Hz) ou une lampe à 3longueurs
d’onde, il se peut que l’écran scintille légèrement. Si c’est le
cas, baissez la lumière ou éteignez la lampe.
Le mode 3D se désactive automatiquement dans les cas
x
suivants: lorsque vous changez de canal ou de source
d’entrée ou lorsque vous accédez à Media Play ou
Internet@TV.
Certaines fonctions (Image) sont désactivées en mode 3D.
x
Le mode 3D ne prend pas en charge les fonctions PIP et
x
diffusion de données (MHEG / MHP).
Il se peut que les lunettes 3D actives d’autres fabricants ne
x
soient pas prises en charge.
Lors de la mise en marche initiale du téléviseur,
x
l’optimisation de l’écran 3D peut nécessiter quelques
instants.
En cas de proximité avec un autre appareil 3D ou
x
électronique, il est possible que les lunettes 3D actives
ne fonctionnent pas correctement. En cas de problème,
éloignez aussi loin que possible les autres appareils
électroniques des lunettes 3D.
Lorsque des personnes ayant une acuité visuelle
x
particulièrement fine visionnent des images en provenance
d’une source 3D à 50Hz dont le mode Jeux est activé,
elles peuvent déceler un scintillement sur les images
lumineuses.
Les Photos de Media Play sont affichées uniquement en
x
mode “2D → 3D”.
Si vous êtes couché sur le côté lorsque vous regardez la
x
télévision avec des lunettes 3D actives, l’image risque de
paraître sombre ou de ne pas être visible.
Veillez à rester dans l’angle de visualisation et à une distance
x
de visualisation de la télévision optimale lorsque vous
regardez des images 3D.
– Sinon, vous risquez de ne pas pouvoir profiter des effets
3D attendus.
La distance de visualisation idéale devrait correspondre
x
à au moins trois fois la hauteur de l’écran. Nous
recommandons une position assise où les yeux du
spectateur sont au même niveau que l’écran.
22
Français
Page 87

Réinitialisation de l’image (OK / Annuler)
Rétablit les paramètres par défaut du mode d’image actuel.
Configuration du téléviseur avec le PC
Menu Son
Changement du mode Son prédéfini
03 Fonctions de base
Réglez le mode d’entrée sur PC.
Réglage automatique
Cette option permet de régler les positions/valeurs de fréquence et
d’affiner automatiquement les paramètres.
✎
Non disponible en cas de connexion à l’aide d’un câble
HDMI/DVI.
SRS TheaterSound
■ Standard : sélectionne le mode son normal.
■ Musique : accentue la musique par rapport aux voix.
■ Cinéma: offre le meilleur son pour les films.
■ Voix claire: accentue les voix par rapport aux autres sons.
■ Amplifier : augmente l’intensité du son aigu pour garantir une
Ecran
■ Régl. Base / Regl. Préc : élimine ou réduit les parasites
visuels. Si vous ne pouvez pas éliminer ces parasites au moyen
d’un réglage précis uniquement, réglez la fréquence
(Régl. Base) au mieux, puis effectuez de nouveau un réglage
précis. Une fois les parasites réduits, effectuez un nouveau
réglage de l’image pour l’aligner au centre de l’écran.
■ Position : réglez la position de l’écran du PC à l’aide des
boutons directionnels (▲ / ▼ / ◄ / ►).
■ Réinitialiser Image : Rétablit les valeurs par défaut de l’image.
Utilisation de votre téléviseur comme écran d’ordinateur (PC)
Configuration de votre logiciel PC (instructions basées sur
WindowsXP) En fonction de la version de Windows et de la carte
vidéo, il se peut que les écrans de votre PC présentent un aspect
différent. Dans ce cas, les mêmes informations de paramétrage de
base seront presque toujours d’application. Dans le cas contraire,
contactez le fabricant de votre ordinateur ou votre revendeur
Samsung.
1. Cliquez sur “Panneau de configuration” dans le menu Démarrer
de Windows.
2. Cliquez sur “Apparence et thèmes” dans le “Panneau de
configuration” et une boîte de dialogue apparaît.
3. Cliquez sur “Affichage” et une boîte de dialogue apparaît.
4. Naviguez vers l’onglet “Paramètres” dans la boîte de dialogue.
y Réglage correct de la taille (résolution) [Optimal: 1920 x
1080pixels]
y S’il existe une option de fréquence verticale dans votre boîte
de dialogue des paramètres d’affichage, la valeur correcte est
“60” ou “60Hz”. Sinon, cliquez sur “OK” et quittez la boîte de
dialogue.
Egaliseur
Cette fonction permet de régler le mode de son (mode de son
standard uniquement).
■ Balance G/D: règle la balance entre les haut-parleurs droit et
■ 100Hz / 300Hz / 1kHz / 3kHz / 10kHz (Réglage de la bande
■ Réinit.: rétablit les paramètres par défaut de l’égaliseur.
SRS TruSurround HD (Arrêt / Activé)
(mode de son standard uniquement)
Cette fonction garantit un son surround virtuel 5.1canaux par le
biais de deux haut-parleurs grâce à la technologie HRTF (Head
Related Transfer Function).
SRS Clarté Dialogues (Arrêt / Activé)
(mode de son standard uniquement)
Cette fonction permet d’accentuer l’intensité d’une voix par rapport
au fond musical ou aux effets sonores, de manière à rendre les
dialogues plus clairs.
meilleure écoute aux personnes malentendantes.
Réglage des paramètres sonores
gauche.
passante) : permet de régler le niveau de fréquence de la
bande passante.
Systèmes sonores, etc.
Français
23
Page 88

Fonctions de base
Langue audio
(chaînes numériques uniquement)
Permet de modifier la valeur par défaut des langues audio.
✎
La langue disponible peut varier en fonction de l’émission.
Format Audio
(chaînes numériques uniquement)
Format Audio peut varier en fonction de la diffusion. Le son Dolby
Digital 5.1 est disponible uniquement en cas de connexion d’un
haut parleur externe au moyen d’un câble optique.
✎
Lorsque le son est émis à la fois par le haut-parleur principal
et le récepteur audio, un effet d’écho peut se produire en
raison de la différence de vitesse de décodage entre le hautparleur principal et le récepteur audio. Dans ce cas, utilisez la
fonction Haut-parleur TV.
Description audio
(non disponible dans tous les pays) (chaînes
numériques uniquement)
Cette fonction traite le flux audio relatif à la
Description audio AD qui est envoyé avec le son
principal par le radiodiffuseur.
■ Description audio (Arrêt / Activé): active ou
désactive la fonction de description audio.
■ Volume: permet de régler le volume de description audio.
AD
Volume auto (Arrêt / Normal / Nuit)
Pour équilibrer le niveau de volume sur chaque canal, définissez
cette option sur Normal.
■ Nuit : ce mode propose un meilleur son que celui du
mode Normal, ne faisant presque aucun bruit. Il s’avère
particulièrement utile pendant la nuit.
Sélection Haut-parleur (Ht-parl ext / Haut-parleur TV)
Un effet d’écho peut se produire en raison de la différence de
vitesse de décodage entre le haut-parleur principal et le récepteur
audio. Dans ce cas, réglez le téléviseur sur Ht-parl ext.
✎
Lorsque Sélection Haut-parleur est défini sur Ht-parl ext,
les boutons MUTE et du volume ne fonctionnent pas et les
paramètres sonores sont limités.
✎
Lorsque Sélection Haut-parleur est défini sur Ht-parl ext.
Haut-parleur TV: Arrêt, Ht-parl ext: Activé
x
✎
Lorsque Sélection Haut-parleur est défini sur Haut-parleur TV.
Haut-parleur TV: Activé, Ht-parl ext : Activé
x
✎
En l’absence de signal vidéo, les deux haut-parleurs sont
coupés.
Paramètre supp.
(chaînes numériques uniquement)
■ Niveau Audio DTV (MPEG / HE-AAC): cette fonction vous
permet de réduire la disparité d’un signal vocal (à savoir l’un
des signaux reçus lors d’une émission de télévision numérique)
sur le niveau souhaité.
✎
En fonction du type de signal de radiodiffusion, les
options MPEG / HE-AAC peuvent être réglées sur une
valeur comprise entre -10dB et 0dB.
✎
Pour augmenter ou diminuer le volume, réglez ces
valeurs entre 0 et -10, respectivement.
■ Sortie SPDIF: SPDIF (Sony Philips Digital InterFace) permet
d’offrir un son numérique et de réduire ainsi les interférences
vers les haut-parleurs et divers périphériques numériques tels
qu’un lecteur DVD.
Format Audio : Lors de la réception d’un programme TV
numérique, vous pouvez sélectionner le format de sortie audio
numérique (SPDIF) à partir des options PCM ou Dolby Digital.
Retard Audio : permet de corriger la différence audio-vidéo,
lorsque vous regardez la télévision ou une vidéo, et d’écouter
une sortie audio numérique à l’aide d’un périphérique externe
tel qu’un récepteur AV (0ms ~ 250ms).
■ Comp Dolby Digital (Line / RF): cette fonction réduit la
disparité entre un signal Dolby Digital et un signal vocal (à
savoir, Audio MPEG, HE-AAC, Son ATV).
✎
Sélectionnez Line pour obtenir un son dynamique et RF
pour réduire la différence entre les sons forts et faibles
pendant la nuit.
Line : permet de définir le niveau de sortie des signaux
supérieurs ou inférieurs à -31dB (référence) sur -20dB ou
-31dB.
RF : permet de définir le niveau de sortie des signaux
supérieurs ou inférieurs à -20dB (référence) sur -10dB ou
-20dB.
24
Français
Page 89

Réinitialisation du son (OK / Annuler)
Cette fonction permet de rétablir tous les paramètres sonores par
défaut.
Sélection du mode Son
Utilisation de la veille
■ Veille
une période déterminée (30, 60, 90, 120, 150 ou 180 minutes).
✎
Pour annuler la fonction Veille, sélectionnez Arrêt.
: éteint automatiquement le téléviseur après
03 Fonctions de base
Lorsque vous définissez Dual -, le mode Son actuel est affiché
à l’écran.
Type
d’audio
Mono Mono
Stéréo A2
NICAM
Stéréo
✎
Si le signal stéréo est faible et qu’une commutation
automatique se produit, passez alors en Mono.
✎
Cette fonction n’est activée qu’avec un signal sonore stéréo.
✎
Disponible uniquement lorsque la source Entrée est définie
sur TV.
Stéréo
Dual
Mono Mono
Stéréo
Dual
Dual
-
Stéréo ↔ Mono
Dual
↔ Dual
Mono ↔ Stéréo
Mono ↔ Dual
Dual
Par défaut
Changement
automatique
Dual
Changement
automatique
Dual
Menu Configuration
Réglage de l’heure
Heure
■ Horloge : le réglage de l’heure est nécessaire pour utiliser
différentes fonctions de minuterie du téléviseur.
L’heure actuelle s’affiche à chaque fois que vous
appuyez sur le bouton INFO.
✎
Si vous débranchez le cordon d’alimentation, vous
devez régler de nouveau l’horloge.
Mode Horloge (Auto. / Manuel)
✎
En fonction du signal et de la station de diffusion, il se
peut que la configuration automatique de l’heure soit
incorrecte. Dans ce cas, réglez l’heure manuellement.
✎
L’antenne doit être connectée pour permettre le réglage
automatique de l’heure.
Réglage Horloge: Définissez manuellement les paramètres
Jour, Mois, Année, Heure et Minute.
✎
Disponible uniquement lorsque l’option Mode Horloge
est définie sur Manuel.
Fuseau Horaire (en fonction du pays): Sélectionnez votre
fuseau horaire
✎
Cette fonction est disponible lorsque l’option Pays est
définie sur Autres.
✎
Cette fonction n’est disponible que si l’option
Mode Horloge est définie sur Auto.
Réglage de la minuterie de mise en marche/arrêt
■ Minuteur 1 / Minuteur 2 / Minuteur 3 : vous pouvez définir
trois réglages de mise en marche/arrêt différents. Vous devez,
au préalable, régler l’horloge.
Période d’activation
▲
Désactiver
▼
Période de désactivation
Désactiver
Volume
10 TV ATV 1
Répétition
Une fois
Période d’activation / Période de désactivation:
sélectionnez l’heure, les minutes et l’action Activer/Désactiver.
(Pour activer le minuteur selon les réglages définis, choisissez
Activer.)
Volume: permet de sélectionner le volume désiré.
Source: sélectionnez le contenu TV ou USB à lire lors de la
mise sous tension automatique du téléviseur. (L’option USB
peut uniquement être sélectionnée lorsqu’un périphérique USB
est connecté au téléviseur.)
Antenne (lorsque Source est réglé sur TV): sélectionnez ATV
ou DTV.
Canal (lorsque Source est réglé sur TV): sélectionnez la chaîne
de votre choix.
Contenu (lorsque Source est réglé sur USB): permet de
sélectionner un dossier du périphérique USB contenant les
fichiers de musique ou les images devant être lus lorsque le
téléviseur s’allume automatiquement.
✎
REMARQUE
Si le périphérique USB ne contient aucun fichier
x
audio ou si le dossier contenant un fichier audio n’est
pas sélectionné, la fonction de veille ne fonctionne
pas correctement.
Si le périphérique USB ne contient qu’un seul fichier
x
photo, la fonction de diaporama ne démarre pas.
Les dossiers dont le nom est trop long ne peuvent
x
pas être sélectionnés.
Chaque périphérique USB utilisé se voit attribuer
x
son propre dossier. Si vous utilisez plusieurs
périphériques USB du même type, assurez-vous
que les dossiers affectés à chacun d’eux portent des
noms différents.
Minuteur 1
00 00
00 00
Source Antenne Canal
Dim Lun Mar Mer Jeu Ven Sam
Déplacer
Régler
Entrer
Retour
Français
25
Page 90

Fonctions de base
Répétition: Sélectionnez Une fois, Quotid., Lun~Ven,
Lun~Sam, Sam~Dim ou Manuel. Si vous sélectionnez
Manuel, vous pouvez choisir le jour d’activation de la minuterie.
✎
La marque indique le jour sélectionné.
✎
Mise hors tension auto. (disponible uniquement lorsque le
téléviseur est allumé par le minuteur): le téléviseur est mis
hors tension automatiquement après trois heures d’inactivité
pour éviter toute surchauffe.
Verrouillage des programmes
Sécurité
✎
L’écran de saisie du code PIN s’affiche avant l’écran de
configuration.
✎
Entrez votre code PIN à 4chiffres; “par défaut “0-0-0-0”.
Modifiez le code PIN à l’aide de l’option Modifier PIN.
■ Verrouillage Parental (Arrêt / Activé): Vous pouvez verrouiller
des chaînes dans la fonction Gestion chaînes afin d’empêcher
certains utilisateurs, tels que des enfants, de regarder des
émissions qui ne leur sont pas destinées.
✎
Disponible uniquement lorsque la source Entrée est
définie sur TV.
■ Verrouillage parental (en fonction du pays): Cette fonction
permet d’empêcher certains utilisateurs, tels que des enfants,
de regarder des émissions qui ne leur sont pas destinées, à
l’aide d’un code PIN à 4 chiffres défini par l’utilisateur. Si la
chaîne sélectionnée est verrouillée, le symbole “
Autor.tout: déverrouille toutes les évaluations TV (fonction non
prise en charge en France).
✎
Lorsque la fonction Verrouillage parental est définie
sur 18, l’écran de saisie du code PIN s’affiche avant
chaque changement de chaîne (France uniquement).
■ Modifier PIN : permet de modifier le code personnel demandé
pour pouvoir configurer le téléviseur.
✎
Si vous avez oublié ce code, appuyez sur les boutons
de la télécommande dans l’ordre suivant, ce qui remet le
code à 0-0-0-0: POWER (Arrêt) → MUTE → 8 → 2 →
4 → POWER (Activé).
” apparaît.
Autres fonctionnalités
Langue
■ Langue des menus: définissez la langue des menus.
■ Langue du télétexte: sélectionnez la langue de votre choix
pour le télétexte.
✎
L’anglais est utilisé par défaut si la langue sélectionnée
n’est pas diffusée.
■ Préférence (Langue Audio principale /
Langue Audio secondaire / Langue princ. sous-titres /
Langue sec. sous-titres / Langue Télétexte principale /
Langue Télétexte secondaire): sélectionnez la langue qui sera
utilisée par défaut lors de la sélection d’une chaîne.
Sous-titres
Utilisez ce menu pour définir le mode Sous-titres.
■ Sous-titres (Arrêt / Activé): active ou désactive les sous-titres.
■ Mode (Normal / Malentendant): configure le mode des sous-
titres.
■ Langue des sous-titres: définit la langue des sous-titres.
✎
Si le programme visionné ne prend pas en charge
la fonction Malentendant, le mode Normal
est automatiquement activé, même si le mode
Malentendant est sélectionné.
✎
L’anglais est utilisé par défaut si la langue sélectionnée
n’est pas diffusée.
Texte numérique (Désactiver / Activer)
(Royaume-Uni uniquement)
Si le programme diffuse du texte numérique, cette fonction est
activée.
Réseau (Type de réseau / Config. du réseau / Test réseau /
SWL (Samsung Wireless Link) / Connexion SWL)
Pour plus d’informations sur la configuration des options, reportezvous à la section “Connexion réseau” (p. 30).
Général
■ Mode Jeu (Arrêt / Activé): En reliant le téléviseur à une
console de jeu telle que PlayStation™ ou Xbox™, vous pouvez
profiter d’une expérience de jeu plus réaliste en sélectionnant
le mode de jeu.
✎
REMARQUE
Précautions et limitations pour le mode de jeu
x
– Pour déconnecter la console de jeux et connecter un
autre périphérique externe, définissez Mode Jeu sur
Arrêt dans le menu de configuration.
– Si vous affichez le menu du téléviseur en Mode Jeu,
l’écran tremble légèrement.
L’option Mode Jeu n’est pas disponible lorsque la source
x
d’entrée est réglée sur TV ou PC.
Après avoir connecté la console de jeu, définissez Mode
x
Jeu sur Activé. pour éviter une mauvaise qualité d’image.
Si le Mode Jeu est défini sur Activé:
x
– Le mode Image est défini sur Standard et le mode Son
est défini sur Cinéma.
– Egaliseur n’est pas disponible.
26
Français
Page 91

■ BD Wise (Arrêt / Activé): fournit une qualité d’image optimale
pour les lecteurs DVD, les lecteurs Blu-ray et les systèmes
home cinéma Samsung qui prennent en charge BD Wise.
Lorsque la fonction BD Wise est réglée sur Activé, le mode
d’image passe automatiquement en résolution optimale.
✎
Disponible lors de la connexion de produits Samsung
prenant en charge BD Wise via un câble HDMI.
■ Transparence menu (Lumineux / Sombre): permet de définir
la transparence du menu.
■ Mélodie (Arrêt / Bas / Moyen / Elevé): cette option permet
de définir la lecture d’une mélodie lors de la mise en marche ou
l’arrêt du téléviseur.
✎
Mélodie est désactivée lorsque FastStart est défini sur
Activé.
■ Démarrage rapide (Arrêt / Activé): cette fonction garantit un
affichage rapide de l’image lors de la mise sous tension du
téléviseur.
Interface commune
■ CI Menu: permet à l’utilisateur d’opérer une sélection dans le
menu du module CAM. Sélectionnez le CI Menu en fonction du
menu Carte PC.
■ Infos sur l’application: affiche des informations sur le module
CAM inséré dans l’emplacement CI et sur la “CARTE CI ou
CI+” insérée dans le module CAM. Vous pouvez installer le
module CAM, que le téléviseur soit allumé ou éteint.
1. Vous pouvez acheter un module CI CAM chez le revendeur le
plus proche ou le commander par téléphone.
2. Insérez fermement la “CARTE CI ou CI+” dans le module CAM
en suivant le sens de la flèche.
3. Insérez le module CAM avec la “CARTE CI ou CI+” dans la
fente de l’interface commune (dans le sens de la flèche), de
telle sorte qu’il soit aligné parallèlement à la fente.
4. Vérifiez si une image est visible sur une chaîne à signal brouillé.
Incrustation d’image (PIP)
PIP
Vous pouvez regarder simultanément le tuner TV et une source
vidéo externe. PIP (Picture-in-Picture) ne fonctionne pas dans le
même mode.
✎
REMARQUE
Pour le son PIP, reportez-vous à Sélection du son.
x
Si vous éteignez le téléviseur alors que le mode PIP est
x
activé, la fenêtre PIP disparaît.
Il est possible que l’image affichée dans la fenêtre PIP
x
semble légèrement moins naturelle lorsque vous utilisez
l’écran principal pour un jeu ou un karaoké.
Lorsque la fonction Internet@TV est activée, la fonction
x
PIP est inaccessible.
Réglages PIP
x
Image principale Image secondaire
Composant, HDMI1/DVI,
HDMI2, HDMI3, HDMI4, PC
■ PIP (Arrêt / Activé): active ou désactive la fonction PIP.
■ Canal: permet de choisir la chaîne affichée dans l’écran
secondaire.
■ Taille (
taille pour l’image secondaire.
■ Position (
position pour l’image secondaire.
■ Sélection du son (Principal / Secondaire): vous pouvez
sélectionner le mode audio de votre choix (Principal /
Secondaire) en mode PIP.
/ / / ): permet de sélectionner une
/ / / ): permet de sélectionner une
✎
En mode Double (, ), la Position n’est pas
réglable.
TV
03 Fonctions de base
Télécommande sans fil
Active ou désactive les commandes à distance ou donne
l’autorisation de les utiliser.
Français
27
Page 92

Fonctions de base
Menu Assistance
Diagnostic automatique
✎
Le diagnostic automatique peut prendre quelques minutes ;
ce phénomène est normal.
■ Test de l’image (Oui / Non): utilisez cette option pour
rechercher d’éventuels problèmes d’image.
■ Test du son (Oui / Non): utilisez la mélodie intégrée pour
rechercher d’éventuels problèmes sonores.
✎
Si les haut-parleurs du téléviseur restent muets, avant
d’effectuer le test du son, vérifiez que l’option
Sélection Haut-parleur est réglée sur Haut-parleur TV
dans le menu Son.
✎
La mélodie est diffusée pendant le test, même si l’option
Sélection Haut-parleur est réglée sur Ht-parl ext ou si
le son a été désactivé en appuyant sur le bouton MUTE.
■ Informations de signal: (chaînes numériques uniquement)
la qualité de réception des chaînes HDTV est parfaite ou
les chaînes sont indisponibles. Réglez votre antenne afin
d’augmenter l’intensité du signal.
■ Résolution des problèmes: consultez cette description s’il
vous semble que le téléviseur rencontre un problème.
✎
Si aucun des conseils de dépannage ne s’applique au
problème rencontré, contactez le service clientèle de
Samsung.
Mise à niveau du logiciel
La Mise à niveau du logiciel peut être effectuée via le téléviseur
lorsqu’il est connecté à Internet ou en téléchargeant le micrologiciel
le plus récent sur une unité de stockage USB à partir de “www.
samsung.com”.
Version actuelle le logiciel déjà installé sur le téléviseur.
✎
Le numéro de version est affiché au format suivant: “année/
mois/jour_version”.
Mise à niveau du logiciel
Version actuelle 2010/01/18_000001
USB ►
En ligne
Canal
Mise à niveau en mode veille : 2 h. plus tard
Autre logiciel 2010/01/15_00000
Déplacer
Entrer
Retour
Installation de la version la plus récente
■ USB : insérez dans le
téléviseur un lecteur
USB contenant la mise à
niveau du micrologiciel,
téléchargée depuis le
site “www.samsung.
com”. Veillez à ne pas
couper l’alimentation
ni retirer le lecteur USB
pendant l’application des mises à niveau. Une fois la mise
à niveau du microprogramme terminée, le téléviseur se met
automatiquement hors tension, puis se rallume. Lorsque la
mise à niveau du logiciel est terminée, les paramètres vidéo et
audio par défaut sont réinitialisés. Nous vous recommandons
de noter vos réglages pour les rétablir facilement après la mise
à niveau.
■ En ligne: permet de mettre le logiciel à niveau par Internet.
✎
Commencez par configurer votre réseau. Pour plus
d’informations sur l’utilisation de la fonction Config. du
réseau, reportez-vous à la section “Connexion réseau”.
✎
Si la connexion Internet ne fonctionne pas correctement,
il se peut que la connexion soit interrompue. Réessayez
le téléchargement. Si le problème persiste, effectuez
la procédure de téléchargement USB et procédez à la
mise à niveau.
■ Canal: met à niveau le logiciel en utilisant le signal de
radiodiffusion.
✎
Si la fonction est sélectionnée pendant la période de
transmission du logiciel, ce dernier est automatiquement
recherché et téléchargé.
✎
Le temps nécessaire au téléchargement du logiciel
dépend de l’état du signal.
■ Mise à niveau en mode veille : une mise à niveau manuelle
est automatiquement effectuée à l’heure indiquée. Etant donné
que la mise sous tension s’effectue de façon interne, il se peut
que l’écran LED s’allume légèrement. Le phénomène peut se
poursuivre pendant plus d’une heure jusqu’à ce que la mise à
jour du logiciel soit terminée.
■ Autre logiciel (sauvegarde): Affiche la version du logiciel
téléchargée par le biais de l’option En ligne. Cette fonction est
activée si la procédure est interrompue au niveau de la dernière
étape du processus de mise à niveau du logiciel.
Panneau arrière du téléviseur
ou
(HDD)
Lecteur USB
Guide de connexion HD
Consultez ces informations lors de la connexion de périphériques
externes au téléviseur.
Contacter Samsung
Consultez ces informations si le téléviseur ne fonctionne pas
correctement ou si vous voulez mettre à niveau le logiciel. Vous
pouvez trouver des informations concernant nos centres d’appel et
la manière de télécharger des produits et logiciels.
28
Français
Page 93

Fonctions avancées
Connexion à un ordinateur
Utilisation d’un câble HDMI/DVI/D-Sub
04 Fonctions avancées
AUDIO OUT
PC OUT
Modes d’affichage (Entrées D-Sub et HDMI/DVI)
La résolution optimale est de 1920 X 1080 à 60Hz.
Mode Résolution
IBM
MAC
VESA CVT
VESA DMT
VESA GTF
VESA DMT / DTV CEA
640 x 350
720 x 400
640 x 480
832 x 624
1152 x 870
720 x 576
1152 x 864
1280 x 720
1280 x 960
640 x 480
640 x 480
640 x 480
800 x 600
800 x 600
800 x 600
1024 x 768
1024 x 768
1024 x 768
1152 x 864
1280 x 1024
1280 x 1024
1280 x 720
1280 x 800
1280 x 800
1280 x 960
1360 x 768
1440 x 900
1440 x 900
1600 x 1200
1680 x 1050
1280 x 720
1280 x 1024
1920 x 1080p 67,500 60,000 148,500 +/+
Fréquence horizontale
(kHz)
31,469
31,469
35,000
49,726
68,681
35,910
53,783
56,456
75,231
31,469
37,861
37,500
37,879
48,077
46,875
48,363
56,476
60,023
67,500
63,981
79,976
45,000
49,702
62,795
60,000
47,712
55,935
70,635
75,000
65,290
52,500
74,620
Fréquence verticale
(Hz)
70,086
70,087
66,667
74,551
75,062
59,950
59,959
74,777
74,857
59,940
72,809
75,000
60,317
72,188
75,000
60,004
70,069
75,029
75,000
60,020
75,025
60,000
59,810
74,934
60,000
60,015
59,887
74,984
60,000
59,954
70,000
70,000
Fréquence d’horloge
pixels (MHz)
25,175
28,322
30,240
57,284
100,000
32,750
81,750
95,750
130,000
25,175
31,500
31,500
40,000
50,000
49,500
65,000
75,000
78,750
108,000
108,000
135,000
74,250
83,500
106,500
108,000
85,500
106,500
136,750
162,000
146,250
89,040
128,943
DVI OUT
AUDIO OUT
Polarité de
synchronisation (H/V)
+/-
-/+
-/-
-/-
-/-
-/+
-/+
-/+
-/+
-/-
-/-
-/+/+
+/+
+/+
-/-
-/+/+
+/+
+/+
+/+
+/+
-/+
-/+
+/+
+/+
-/+
-/+
+/+
-/+
-/+
-/-
✎
REMARQUE
Dans le cas d’une connexion avec câble HDMI/DVI, vous devez utiliser la prise HDMI IN 1(DVI).
x
Le mode entrelacé n’est pas pris en charge.
x
Le téléviseur peut fonctionner de façon anormale si le format vidéo sélectionné n’est pas standard.
x
Les modes Séparé et Composite sont pris en charge. Le mode SOG (Sync On Green) n’est pas pris en charge.
x
Français
29
Page 94

Fonctions avancées
ANT 2 IN
(
SATELLITE
)
ANT 2 IN
(
AIR/CABLE
)
(
SATELLITE
)
(
AIR/CABLE
)
ANT 2 IN
(
SATELLITE
)
ANT 2 IN
(
AIR/CABLE
)
(
SATELLITE
)
(
AIR/CABLE
)
ANT 2 IN
(
SATELLITE
)
ANT 2 IN
(
AIR/CABLE
)
ANT 2 IN
(
SATELLITE
)
ANT 2 IN
(
AIR/CABLE
)
ANT 2 IN
(
SATELLITE
)
ANT 2 IN
(
AIR/CABLE
)
(
SATELLITE
)
(
AIR/CABLE
)
ANT 2 IN
(
SATELLITE
)
ANT 2 IN
(
AIR/CABLE
)
ANT 2 IN
(
SATELLITE
)
ANT 2 IN
(
AIR/CABLE
)
ANT 2 IN
(
SATELLITE
)
ANT 2 IN
(
AIR/CABLE
)
ANT 2 IN
(
SATELLITE
)
ANT 2 IN
(
AIR/CABLE
)
Connexion réseau
Vous pouvez configurer votre téléviseur de telle sorte qu’il puisse accéder à Internet par le biais de votre réseau local (LAN) à l’aide d’une
connexion câblée ou sans fil.
Connexion à un réseau câblé
Vous pouvez connecter votre téléviseur au réseau local de trois manières différentes:
y En connectant le port LAN situé à l’arrière du téléviseur à un modem externe à l’aide d’un câble de catégorie5. Voir le schéma ci-
dessous.
Connecteur modem mural
External Modem
(ADSL/VDSL/Cable TV)
Adaptateur LAN
Panneau arrière du téléviseur
Câble modem
Câble LAN
y En connectant le port LAN situé à l’arrière du téléviseur à un routeurIP connecté, à son tour, à un modem externe. Utilisez un câble de
catégorie5 pour effectuer cette connexion. Voir le schéma ci-dessous.
Panneau arrière du téléviseur
Connecteur modem mural
External Modem
(ADSL/VDSL/Cable TV)
RouteurIP
(avec serveur DHCP)
Adaptateur LAN
Câble modem
Câble LAN Câble LAN
y En fonction de la configuration de votre réseau, il se peut que vous puissiez connecter directement le port LAN situé à l’arrière du
téléviseur à une prise réseau murale à l’aide d’un câble de catégorie5. Voir le schéma ci-dessous. Nous attirons votre attention sur le fait
que la prise murale est connectée à un modem ou routeur situé en un autre point de la maison.
Panneau arrière du téléviseur
Connecteur LAN mural
Câble LAN
Adaptateur LAN
Si vous possédez un réseau dynamique, vous devez utiliser un modem ou routeur ADSL prenant en charge le protocole DHCP
(Dynamic Host Configuration Protocol). Les modems de ce type fournissent automatiquement l’adresseIP, le masque de sous-réseau,
la passerelle et les valeurs DNS dont votre téléviseur a besoin pour accéder à Internet. Aucune saisie manuelle n’est donc requise. La
plupart des réseaux domestiques sont de type dynamique.
Certains réseaux nécessitent une adresseIP statique. Si tel est votre cas, vous devez saisir manuellement l’adresseIP, le masque
de sous-réseau, la passerelle et les valeurs DNS dans l’écran de configuration câble de votre téléviseur lors de la configuration de la
connexion réseau. Pour obtenir ces données, contactez votre fournisseur d’accès Internet. Si vous disposez d’un ordinateur Windows,
vous pouvez également utiliser ce dernier pour obtenir ces paramètres.
✎
Si votre réseau nécessite une adresseIP statique, vous pouvez utiliser un modem ADSL prenant en charge le protocole DHCP.
En effet, les modems de ce type vous permettent également d’utiliser des adressesIP statiques.
Français
30
Page 95

Config. du réseau (Auto.)
Utilisez l’option Config. du réseau Auto. lors de la connexion du
téléviseur à un réseau prenant en charge le protocole DHCP. Pour
configurer automatiquement la connexion réseau par câble de votre
téléviseur, procédez comme suit:
Procédure de configuration automatique
1. Connectez votre téléviseur au réseau local en suivant la
procédure décrite à la section précédente.
2. Allumez le téléviseur, appuyez sur le bouton MENU de la
télécommande, utilisez le bouton ▲ ou ▼ pour sélectionner
Configuration, puis appuyez sur le bouton ENTER
3. Utilisez le bouton ▲ ou ▼ pour sélectionner Réseau dans
le menu Configuration et appuyez ensuite sur le bouton
ENTER
. L’écran Réseau apparaît.
Réseau
Type de réseau : Câble ►
Cong. du réseau
Test réseau
SWL(Samsung Wireless Link) : Arrêt
Connexion SWL
Déplacer
4. Dans l’écran Réseau, sélectionnez Type de réseau.
5. Définissez l’option Type de réseau sur Câble.
6. Sélectionnez Config. du réseau. L’écran Config. du réseau
apparaît.
Cong. du réseau
Cong. prot. Internet : Auto. ►
Adresse IP :
Masque de sous-réseau :
Passerelle :
DNS : Auto.
Serveur DNS :
Entrer
Retour
.
Config. du réseau (Manuel)
Utilisez l’option Config. du réseau Manuel lors de la connexion du
téléviseur à un réseau qui nécessite une adresseIP statique.
Obtention des valeurs de connexion au réseau
Pour obtenir les valeurs de connexion au réseau sur la plupart des
ordinateurs Windows, procédez comme suit:
1. Cliquez avec le bouton droit de la souris sur l’icône Réseau
située dans le coin inférieur droit de l’écran.
2. Cliquez sur Etat dans le menu contextuel.
3. Cliquez sur Assistance dans la boîte de dialogue affichée.
4. Cliquez sur le bouton Détails dans l’onglet Assistance. Les
valeurs de connexion réseau sont affichées.
Procédure de configuration manuelle
Pour configurer manuellement la connexion réseau par câble de
votre téléviseur, procédez comme suit:
1. Suivez les étapes1 à 6 de la procédure de configuration
automatique.
2. Définissez l’option Config. prot. Internet sur Manuel.
3. Appuyez sur le bouton ▼ de la télécommande pour accéder
au premier champ de saisie.
4. Entrez les paramètres Adresse IP, Masque de sous-réseau,
Passerelle et Serveur DNS. Utilisez les touches numériques
de votre télécommande pour saisir des chiffres et les touches
fléchées pour passer d’un champ de saisie à un autre.
5. Une fois cette opération terminée, appuyez sur le bouton
RETURN de votre télécommande.
6. Sélectionnez Test réseau pour vérifier la connexion Internet.
04 Fonctions avancées
Déplacer
Entrer
Retour
7. Définissez l’option Config. prot. Internet sur Auto..
8. L’option Auto. récupère et entre automatiquement les valeurs
Internet requises.
9 Une fois cette opération terminée, appuyez sur le bouton
RETURN de votre télécommande.
10. Si la fonction Réseau n’a pas récupéré les valeurs de
connexion au réseau, consultez les instructions relatives au
mode Manuel.
Français
31
Page 96

Fonctions avancées
Connexion à un réseau sans fil
Pour établir une connexion sans fil entre le téléviseur et le réseau, vous avez besoin d’un routeur ou d’un modem et d’un adaptateur LAN
sans fil Samsung (WIS09ABGN, WIS09ABGN2, WIS10ABGN), que vous connectez à la prise USB située sur le panneau latéral ou arrière du
téléviseur. Voir l’illustration ci-dessous.
Pour utiliser la fonction SWL(Samsung Wireless Link), connectez-la au port USB 1 (HDD).
✎
Routeur IP sans fil
Connecteur LAN
mural
L’adaptateur LAN sans fil de Samsung est vendu séparément. Vous pouvez vous le procurer auprès de certains revendeurs, sur les sites de
commerce électronique et sur Samsungparts.com. Cet adaptateur prend en charge les protocoles de communication IEEE802.11A/B/G
et N. Samsung vous conseille d’utiliser le protocole IEEE802.11N. Si vous lisez la vidéo sur une connexion IEEE802.11B/G, des saccades
risquent d’apparaître.
✎
REMARQUE
Vous devez employer l’adaptateur LAN sans fil Samsung (WIS09ABGN, WIS09ABGN2, WIS10ABGN) pour utiliser un réseau sans
x
fil.
L’adaptateur LAN sans fil Samsung est vendu séparément. L’adaptateur réseau sans fil Samsung est disponible auprès de certains
x
revendeurs, sur les sites de commerce électronique et sur Samsungparts.com.
Pour utiliser un réseau sans fil, vous devez connecter le téléviseur à un routeur IP sans fil. Si ce routeur prend en charge le
x
protocole DHCP, le téléviseur peut utiliser DHCP ou une adresseIP statique pour se connecter au réseau sans fil.
Sélectionnez un canal inutilisé pour le routeurIP sans fil. Si le canal affecté au routeurIP sans fil est actuellement utilisé par un autre
x
périphérique à proximité, il y aura des interférences et des interruptions de communication.
Si vous utilisez des paramètres de sécurité différents de ceux indiqués ci-dessous, le routeur ne fonctionnera pas avec le téléviseur.
x
Si le mode Pure High-throughput (Greenfield) 802.11N est sélectionné et que le type de cryptage est défini sur WEP, TKIP ou TKIP-
x
AES (WPS2Mixed) pour votre point d’accès, les téléviseurs Samsung ne prendront pas en charge la connexion, conformément aux
nouvelles spécifications de certification Wi-Fi.
Si votre point d’accès prend en charge le WPS (Wi-Fi Protected Setup), vous pouvez vous connecter au réseau via PBC (Push
x
Button Configuration) ou à l’aide d’un code PIN (Personal Identification Number). La fonction WPS configurera automatiquement le
SSID et la clé WPA dans ces deux modes.
Si votre routeur, modem ou appareil n’est pas certifié, il risque de ne pas pouvoir se connecter au téléviseur via l’adaptateur LAN
x
sans fil Samsung.
Méthodes de connexion: vous pouvez configurer la connexion réseau sans fil de six façons différentes.
x
– Configuration automatique Samsung
– PBC(WPS)
– Configuration automatique (à l’aide de la fonction Recherche réseau automatique)
– Configuration manuelle
– SWL(Samsung Wireless Link)
– Ad Hoc
L’adaptateur LAN sans fil Samsung peut ne pas être reconnu ou ne pas fonctionner correctement si vous utilisez une connexion
x
par hub USB ou par câble d’extension USB autre que celui mis à disposition par Samsung.
(point d’accès avec
serveur DHCP)
Câble LAN
Panneau arrière du téléviseur
ou
(HDD)
Adaptateur LAN sans fil
Samsung
32
Français
Page 97

Avis
L’image peut apparaître altérée ou statique pour certaines chaînes lorsque le téléviseur est connecté à l’adaptateur LAN sans fil Samsung.
Le cas échéant, établissez une connexion à l’aide de l’une des méthodes suivantes ou branchez l’adaptateur LAN sans fil Samsung avec un
câble USB à un emplacement préservé de toute interférence radio.
Méthode1 Méthode2
Connexion via un câble d’extension
✎
Connexion à l’aide de l’adaptateur USB à angle droit
L’adaptateur LAN sans fil Samsung doit être installé dans
une zone préservée de toute interférence afin d’éviter
toute interférence entre l’adaptateur et le syntoniseur.
ou
04 Fonctions avancées
Config. du réseau (Configuration automatique Samsung)
Cette fonction est disponible sur les points d’accès qui prennent
en charge la configuration automatique Samsung. Si votre point
d’accès ne prend pas en charge cette fonction, vous pouvez établir
une connexion via PBC (WPS), automatiquement ou manuellement.
✎
Cette fonction est disponible lorsque SWL(Samsung
Wireless Link) est défini sur Arrêt.
✎
Vous pouvez rechercher du matériel prenant en charge la
fonction de configuration automatique sur le site Web www.
samsung.com.
Utilisation de la fonction de configuration automatique
1. Placez le point d’accès et le téléviseur l’un à côté de l’autre et
mettez-les sous tension.
✎
La durée de démarrage varie d’une application à l’autre.
Aussi, il se peut que vous deviez patienter environ
2minutes.
✎
Si le câble réseau (LAN) est connecté au port WAN du
point d’accès pendant la configuration automatique
Samsung, vous pouvez effectuer automatiquement le
test de connexion Internet. Dans le cas contraire, la
fonction de configuration automatique Samsung vérifiera
uniquement la connexion périphérique du point d’accès
(et non la connexion Internet).
2. Attendez 2 minutes, puis connectez l’adaptateur LAN sans
fil Samsung au téléviseur. Une fois l’adaptateur branché, la
fenêtre contextuelle s’affiche.
3. Aussitôt la connexion établie, placez le point d’accès
parallèlement à l’adaptateur LAN sans fil Samsung, en laissant
un espace maximum de 25 cm.
4. Attendez que la connexion soit établie automatiquement.
5. Une fois la connexion établie, recherchez le routeur.
Config. du réseau (PBC(WPS))
Configuration à l’aide de la méthode PBC (WPS)
Si votre routeur est pourvu d’un bouton PBC (WPS), procédez
comme suit:
1. Connectez votre téléviseur à l’adaptateur LAN sans fil Samsung
2. Allumez le téléviseur, appuyez sur le bouton MENU de la
3. Utilisez le bouton ▲ ou ▼ pour sélectionner Réseau dans
4. Dans l’écran Réseau, sélectionnez Type de réseau.
5. Définissez l’option Type de réseau sur Sans fil.
6. Sélectionnez Config. du réseau. L’écran Config. du réseau
✎
Si la fonction de configuration automatique Samsung
ne parvient pas à connecter le téléviseur à votre point
d’accès, une fenêtre contextuelle s’ouvre pour vous
informer de l’échec. Redémarrez le point d’accès,
puis réessayez. Si le problème de connexion subsiste,
sélectionnez l’une des autres options de configuration:
PBC (WPS), automatique ou manuel.
✎
Si les paramètres du point d’accès ont été modifiés ou
si vous utilisez le point d’accès pour la première fois,
vous devez procéder à une nouvelle configuration, en
commençant à l’étape1.
en suivant la procédure décrite à la section précédente.
télécommande, utilisez le bouton ▲ ou ▼ pour sélectionner
Configuration, puis appuyez sur le bouton ENTER
le menu Configuration et appuyez ensuite sur le bouton
ENTER
.
apparaît.
.
Français
33
Page 98

Fonctions avancées
Cong. du réseau
Sélectionnez un réseau. : Non sélectionné ►
Cong. prot. Internet : Auto.
Déplacer
Entrer
Retour
Adresse IP :
Masque de sous-réseau :
Passerelle :
DNS : Auto.
Serveur DNS :
PBC(WPS)
5. Si la fenêtre contextuelle Sécurité/PIN s’affiche, passez à
6. Appuyez sur le bouton ▲ ou ▼ pour sélectionner Sécurité
7. Appuyez sur le bouton rouge de votre télécommande.
8. Appuyez sur le bouton PBC (WPS) de votre routeur dans les
deux minutes. Votre lecteur TV récupère automatiquement tous
les paramètres réseau dont il a besoin et se connecte à votre
réseau.
9. Une fois la connexion configurée, appuyez sur le bouton
RETURN pour quitter l’écran Config. du réseau.
7. Dans l’écran Sécurité, entrez la phrase de passe de votre
Config. du réseau (Auto.)
La plupart des réseaux sans fil disposent d’un système de sécurité
en option qui oblige les périphériques qui y accèdent à transmettre
un code de sécurité chiffré, appelé Clé d’accès ou de sécurité.
Cette clé de sécurité repose sur une phrase de passe; il s’agit
généralement d’un mot ou d’une série de lettres et de chiffres
d’une longueur donnée que vous avez été invité à saisir lors de la
configuration de la sécurité de votre réseau sans fil. Si vous utilisez
cette méthode de configuration et qu’une clé de sécurité est définie
pour votre réseau sans fil, vous devrez saisir la phrase de phase lors
de la procédure de configuration.
Procédure de configuration automatique
Pour configurer automatiquement la connexion sans fil, procédez
comme suit:
1. Suivez les étapes1 à 6 de la section “Configuration à l’aide de
la méthode PBC (WPS)” (p. 33).
2. Appuyez sur le bouton ▼ pour sélectionner
Config. prot. Internet, puis sur le bouton ENTER
.
Appuyez sur le bouton ▲ ou ▼ pour sélectionner Auto., puis
sur ENTER.
3. Appuyez sur le bouton ▲ pour accéder à l’option
Sélectionnez un réseau, puis sur le bouton ENTER
. La
fonction Réseau recherche les réseaux sans fil disponibles.
Lorsque vous avez terminé, la liste des réseaux disponibles
s’affiche.
4. Dans la liste des réseaux, appuyez sur le bouton ▲ ou ▼ pour
sélectionner un réseau, puis sur le bouton ENTER
✎
Si le point d’accès est caché (Invisible), vous devez
.
sélectionner l’option Ajouter réseau et entrer les valeurs
Nom du réseau (SSID) et Code de sécurité pour
établir la connexion.
8. Pour entrer la phrase de passe, suivez les instructions ci-
9. Une fois cette opération terminée, appuyez sur le bouton bleu
10. Attendez que le message de confirmation de connexion
11. Pour tester la connexion, appuyez sur le bouton RETURN,
l’étape6. Si l’écran de connexion réseau apparaît, passez à
l’étape10.
ou PIN. Pour la plupart des réseaux domestiques, vous devez
choisir Sécurité (pour Code de sécurité). L’écran Sécurité
apparaît.
Cong. du réseau
Code de sécurité
0 entré.
0~9
Minuscule
Supprimer
Espace
Entrer
.
Nombre
Retour
. L’écran
A B C D E F G
H I J K L M N
O P Q R S T U
V W X Y Z
Déplacer
réseau.
✎
La phrase de passe doit normalement se trouver sur l’un
des écrans de configuration que vous avez utilisés pour
configurer votre routeur ou modem.
dessous:
– Appuyez sur les boutons numériques de la télécommande
pour entrer des chiffres.
– Utilisez les boutons de direction de la télécommande pour
passer d’un bouton à un autre sur l’écran
Code de sécurité.
– Appuyez sur le bouton rouge pour changer la casse ou
afficher des symboles/caractères.
– Pour entrer une lettre ou un symbole, vous devez y accéder,
puis appuyer sur le bouton ENTER
– Pour supprimer le dernier caractère saisi (chiffre ou lettre),
appuyez sur le bouton vert de la télécommande.
de votre télécommande. L’écran de connexion réseau apparaît.
s’affiche, puis appuyez sur le bouton ENTER
Config. du réseau s’affiche à nouveau.
sélectionnez Test réseau et appuyez enfin sur le bouton
ENTER
.
34
Français
Page 99

Config. du réseau (Ad Hoc)
l’adaptateur LAN sans fil Samsung vous permet de vous connecter
à un périphérique mobile sans faire usage d’un point d’accès, en
utilisant un réseau point-à-point.
✎
Cette fonction est disponible lorsque SWL(Samsung
Wireless Link) est défini sur Arrêt.
Procédure de connexion au nouvel appareil adhoc
1. Suivez les étapes1 à 6 de la section “Configuration à l’aide de
la méthode PBC (WPS)” (p. 33).
2. Choisissez l’option Sélectionnez un réseau. La liste des
appareils/réseaux s’affiche.
3. Dans la liste des appareils, appuyez sur le bouton bleu de la
télécommande.
✎
Le message Ad-hoc est connex. Wi-Fi directe avec
téléphone portable ou PC. La fonctionnalité du
système de réseau existant est peut-être restreinte.
Souhaitez-vous changer la connexion réseau?
s’affiche.
4. Saisissez le Nom du réseau (SSID) généré, puis le
Code de sécurité dans le périphérique auquel vous souhaitez
vous connecter.
Comment se connecter à un périphérique ad hoc existant?
1. Suivez les étapes1 à 6 de la section “Configuration à l’aide de
la méthode PBC (WPS)” (p. 33).
2. Choisissez l’option Sélectionnez un réseau. La liste des
appareils/réseaux s’affiche.
3. Sélectionnez l’appareil de votre choix dans la liste.
4. Si la saisie d’un code de sécurité est requise, entrez-le.
✎
Si le réseau ne fonctionne pas correctement, vérifiez
à nouveau les paramètres Nom du réseau (SSID) et
Code de sécurité. Un Code de sécurité incorrect
peut, en effet, provoquer un dysfonctionnement.
Config. du réseau (Manuel)
Si les autres méthodes ne fonctionnent pas, vous devez saisir
manuellement les valeurs de configuration du réseau.
Obtention des valeurs de connexion au réseau
Pour obtenir les valeurs de connexion au réseau sur la plupart des
ordinateurs Windows, procédez comme suit:
1. Cliquez avec le bouton droit de la souris sur l’icône Réseau
2. Cliquez sur Etat dans le menu contextuel.
3. Cliquez sur Assistance dans la boîte de dialogue affichée.
4. Cliquez sur le bouton Détails dans l’onglet Assistance. Les
Procédure de configuration manuelle
Pour saisir manuellement les valeurs de connexion au réseau,
procédez comme suit:
1. Suivez les étapes1 à 6 de la section “Configuration à l’aide de
2. Appuyez sur le bouton ▼ pour sélectionner
3. Appuyez sur le bouton ▼ pour accéder au premier champ de
4. Utilisez les boutons numériques pour saisir des chiffres.
5. Après avoir renseigné un champ, utilisez le bouton ► pour
6. Entrez les paramètres AdresseIP, Masque de sous-réseau
7. Appuyez sur le bouton ▲ ou ▼ pour sélectionner DNS.
8. Appuyez sur le bouton ▼ pour accéder au premier champ
9. Une fois cette opération terminée, appuyez sur le bouton ▲
10. Allez à l’étape 4 de la procédure de configuration automatique
04 Fonctions avancées
située dans le coin inférieur droit de l’écran.
paramètres du réseau s’affichent.
la méthode PBC (WPS)” (p. 33).
Config. prot. Internet, puis sur le bouton ENTER
Appuyez sur le bouton ▲ ou ▼ pour sélectionner Manuel, puis
sur ENTER.
saisie (AdresseIP).
passer au champ suivant. Vous pouvez également utiliser les
autres boutons fléchés pour vous déplacer vers le haut, vers le
bas ou vers l’arrière.
et Passerelle.
de saisie DNS. Entrez les valeurs numériques comme indiqué
précédemment.
pour accéder à l’option Sélectionnez un réseau. Sélectionnez
votre réseau, puis appuyez sur le bouton ENTER
(p. 34) et suivez les instructions à partir de ce point.
.
.
Français
35
Page 100

Fonctions avancées
SWL(Samsung Wireless Link)
Cette fonction vous permet de connecter, au téléviseur, un appareil
Samsung prenant en charge PBC (WPS). Vous pouvez connecter
des appareils au téléviseur, même si ce dernier n’est pas relié à un
routeur.
✎
Pour utiliser Internet@TV, le point d’accès doit être connecté
au réseau sans fil.
✎
Si un adaptateur LAN sans fil Samsung est connecté au
port USB 2, il se peut que le réseau ne fonctionne pas
correctement. Il est conseillé de le connecter au port
USB 1 (HDD).
✎
Seuls les routeurs qui utilisent la bande de fréquences de
2,4GHz sont pris en charge (les routeurs 5GHz ne sont pas
pris en charge).
Connexion SWL
Vous pouvez connecter directement un appareil prenant en charge
la norme PBC (WPS) au téléviseur.
✎
Cette fonction est disponible lorsque
SWL(Samsung Wireless Link) est défini sur Activé.
Procédure de connexion de Samsung Wireless Link
Pour établir une connexion, procédez comme suit:
1. Suivez les étapes1 à 5 de la section “Configuration à l’aide de
la méthode PBC (WPS)” (p. 33).
2. Sélectionnez SWL(Samsung Wireless Link) à l’aide du bouton
▼ et appuyez ensuite sur ENTER
fonction.
3. Sélectionnez SWL connect à l’aide du bouton ▼ et appuyez
ensuite sur ENTER
4. Si le message “Drücken Sie die PBC-Taste auf dem Gerät,
das durch den PBC(WPS) unterst. wird, um sich innerh.
von 120 Sek. zu verb.” s’affiche, appuyez sur le bouton PBC
situé sur l’appareil pour établir une connexion.
✎
Pour plus d’informations, consultez le manuel de
configuration du réseau sans fil de l’appareil à
connecter.
5. Si le périphérique est correctement connecté au téléviseur
après le démarrage du compteur sur la boîte de dialogue,
celle-ci disparaît automatiquement.
✎
Si la connexion échoue, réessayez après 2minutes.
.
pour activer cette
Si le téléviseur ne parvient pas à se connecter à Internet
Il se peut que la connexion échoue car votre fournisseur d’accès
Internet a enregistré, de manière permanente, l’adresse MAC
(numéro d’identification unique) de votre ordinateur ou modem et
qu’il utilise cette adresse à des fins d’authentification chaque fois
que vous vous connectez à Internet. Cela a pour but d’empêcher
tout accès non autorisé. Dans la mesure où votre téléviseur
possède une adresseMAC différente, votre fournisseur d’accès
Internet ne peut pas l’authentifier, ce qui rend impossible toute
connexion.
Pour remédier à ce problème, demandez à votre fournisseur
d’accès la procédure à suivre pour connecter des appareils autres
que votre PC (votre téléviseur, par exemple) à Internet.
Si votre fournisseur d’accès exige un identifiant (ID) ou un mot de
passe pour la connexion à Internet, votre téléviseur ne pourra peutêtre pas se connecter à Internet. Si tel est le cas, vous devez entrer
l’identifiant ou le mot de passe lors de la connexion à Internet.
La connexion à Internet peut échouer en raison d’un problème
de pare-feu. Dans ce cas, contactez votre fournisseur d’accès
Internet.
Si vous ne parvenez toujours pas à vous connecter à Internet
après avoir suivi les procédures indiquées par votre fournisseur
d’accès, contactez Samsung Electronics au 1-800-SAMSUNG.
36
Français
 Loading...