

Samsung UE55H6204, UE40H6204, UE46H6204, UE46H5304, UE50H5304 User Manual
...
Contact SAMSUNG WORLD WIDE
If you have any questions or comments relating to Samsung products, please contact the SAMSUNG customer care centre.
Country
AUSTRIA 0800 - SAMSUNG (0800 - 7267864) www.samsung.com/at/support
BELGIUM 02-201-24-18 www.samsung.com/be/support (Dutch)
BOSNIA 051 331 999 www.samsung.com/support
BULGARIA 800 111 31 , Безплатна телефонна линия www.samsung.com/bg/support
CROATIA 072 726 786 www.samsung.com/hr/support
CZECH 800 - SAMSUNG (800-726786) www.samsung.com/cz/support
DENMARK 70 70 19 70 www.samsung.com/dk/support
FINLAND 030-6227 515 www.samsung.com/fi/support
FRANCE 01 48 63 00 00 www.samsung.com/fr/support
GERMANY 0180 6 SAMSUNG bzw.
CYPRUS 8009 4000 only from landline, toll free
GREECE 80111-SAMSUNG (80111 726 7864) only from land line
HUNGARY 0680SAMSUNG (0680-726-786)
ITALIA 800-SAMSUNG (726-7864) www.samsung.com/it/support
LUXEMBURG 261 03 710 www.samsung.com/support
MONTENEGRO 020 405 888 www.samsung.com/support
SLOVENIA 080 697 267
NETHERLANDS 0900-SAMSUNG (0900-7267864) (€ 0,10/Min) www.samsung.com/nl/support
NORWAY 815 56480 www.samsung.com/no/support
POLAND 0 801-172-678* lub +48 22 607-93-33 *
PORTUGAL 808 20 7267 www.samsung.com/pt/support
ROMANIA 08008 726 78 64 (08008 SAMSUNG)
SERBIA 011 321 6899 www.samsung.com/rs/support
SLOVAKIA 0800 - SAMSUNG (0800-726 786) www.samsung.com/sk/support
SPAIN 0034902172678 www.samsung.com/es/support
SWEDEN 0771 726 7864 (SAMSUNG) www.samsung.com/se/support
SWITZERLAND 0800 726 78 64 (0800-SAMSUNG) www.samsung.com/ch/support (German)
UK 0330 SAMSUNG (7267864) www.samsung.com/uk/support
EIRE 0818 717100 www.samsung.com/ie/support
LITHUANIA 8-800-77777 www.samsung.com/lt/support
LATVIA 8000-7267 www.samsung.com/lv/support
ESTONIA 800-7267 www.samsung.com/ee/support
TURKEY 444 77 11 www.samsung.com/tr/support
Customer Care Centre
Samsung Electronics Czech and Slovak, s.r.o. V Parku 2343/24, 148 00 - Praha 4
0180 6 7267864*
(*0,20 €/Anruf aus dem dt. Festnetz, aus dem Mobilfunk
max. 0,60 €/Anruf)
(+30) 210 6897691 from mobile and land line
0680PREMIUM (0680-773-648)
090 726 786
* (koszt połączenia według taryfy operatora)
Apel GRATUIT
Web Site
www.samsung.com/be_fr/support (French)
www.samsung.com/de/support
www.samsung.com/gr/support
http://www.samsung.com/hu/support
www.samsung.com/si/support
www.samsung.com/pl/support
www.samsung.com/ro/support
www.samsung.com/ch_fr/support (French)
LED TV
user manual
Thank you for purchasing this Samsung product.
To receive more complete service, please register
your product at
www.samsung.com/register
Model _____________Serial No. _____________
© 2014 Samsung Electronics Co., Ltd. All rights reserved.
BN68-06334F-01

Warning! Important Safety Instructions
(Please read the appropriate section that corresponds to the marking on your Samsung
product before attempting to install the product.)
CAUTION
RISK OF ELECTRIC SHOCK DO NOT OPEN
CAUTION: TO REDUCE THE RISK OF ELECTRIC SHOCK, DO
NOT REMOVE COVER (OR BACK). THERE ARE NO USER
SERVICEABLE PARTS INSIDE. REFER ALL SERVICING TO
QUALIFIED PERSONNEL.
The slots and openings in the cabinet and in the back or bottom are provided for necessary ventilation. To ensure reliable operation of this
apparatus, and to protect it from overheating, these slots and openings must never be blocked or covered.
- Do not cover this apparatus in a confined space, such as a bookcase or built-in cabinet, unless proper ventilation is provided.
- Do not place this apparatus near or over a radiator or heat resistor, or where it is exposed to direct sunlight.
- Do not place a vessel containing water (vases etc.) on this apparatus, as this can result in a risk of fire or electric shock.
Do not expose this apparatus to rain or place it near water (near a bathtub, washbowl, kitchen sink, or laundry tub, in a wet basement, or near
a swimming pool etc.). If this apparatus accidentally gets wet, unplug it and contact an authorised dealer immediately. Make sure to pull out the
power cord from the outlet before cleaning.
This apparatus use batteries. In your community there might be regulations that require you to dispose of these batteries properly under
environmental considerations. Please contact your local authorities for disposal or recycling information.
Do not overload wall outlets, extension cords or adaptors beyond their capacity, since this can result in fire or electric shock.
Power-supply cords should be routed so that they are not likely to be walked on or pinched by items placed upon or against them, paying
particular attention to cords at plug end, adaptors and the point where they exit from the appliance.
To protect this apparatus from a lightning storm, or when it is left unattended and unused for long periods of time, unplug it from the wall outlet
and disconnect the antenna or cable system. This will prevent damage to the set due to lightning and power line surges.
Before connecting the AC power cord to the DC adaptor outlet, make sure the voltage designation of the DC adaptor corresponds to the local
electrical supply.
Never insert anything metallic into the open parts of this apparatus. Doing so may create a danger of electric shock.
To avoid electric shock, never touch the inside of this apparatus. Only a qualified technician should open this apparatus.
Make sure to plug the power cord in until it is firmly inserted. When removing the power cord, make sure to hold the power plug when pulling the
plug from the outlet. Do not touch the power cord with wet hands.
If this apparatus does not operate normally - in particular, if there are any unusual sounds or smells coming from it - unplug it immediately and
contact an authorised dealer or service centre.
Be sure to pull the power plug out of the outlet if the TV is to remain unused or if you are to leave the house for an extended period of time
(especially when children, elderly or disabled people will be left alone in the house).
- Accumulated dust can cause an electric shock, an electric leakage or a fire by causing the power cord to generate sparks and heat or
the insulation to deteriorate.
Be sure to contact an authorised service centre, when installing your set in a location with heavy dust, high or low temperatures, high humidity,
chemical substances and where it operates for 24 hours such as the airport, the train station etc. Failure to do so may cause serious damage to
your set.
Use only a properly grounded plug and receptacle.
- An improper ground may cause electric shock or equipment damage. (Class l Equipment only.)
To disconnect the apparatus from the mains, the plug must be pulled out from the mains socket, therefore the mains plug shall be readily
operable.
Do not allow children to hang onto the product.
Store the accessories (battery, etc.) in a location safely out of the reach of children.
Do not install the product in an unstable location such as a shaky self, a slanted floor or a location exposed to vibration.
Do not drop or impart any shock to the product. If the product is damaged, disconnect the power cord and contact a service centre.
Unplug the power cord from the power outlet and wipe the product using a soft, dry cloth. Do not use any chemicals such as wax, benzene,
alcohol, thinners, insecticide, aerial freshener, lubricant or detergent. This may damage the appearance or erase the printing on the product.
Apparatus shall not be exposed to dripping or splashing.
Do not dispose of batteries in a fire.
Do not short circuit, disassemble or overheat the batteries.
Danger of explosion if battery is incorrectly replaced. Replace only with the same or equivalent type.
WARNING - TO PREVENT THE SPREAD OF FIRE, KEEP CANDLES OR OTHER OPEN FLAMES AWAY FROM THIS PRODUCT AT ALL TIMES.
This symbol indicates that high voltage is present
inside. It is dangerous to make any kind of contact
with any internal part of this product.
This symbol alerts you that important literature
concerning operation and maintenance has been
included with this product.
* Figures and illustrations in this User Manual are provided for reference only and may differ from the actual product
appearance. Product design and specifications may change without notice.
CIS languages (Russian, Ukrainian, Kazakhs) are not available for this product, since this is manufactured for customers in EU
region.
English - 2

What's in the Box?
Remote Control & Batteries (AAA x 2) Regulatory Guide
User Manual Power Cord
Warranty Card (Not available in some locations)
IR Extender Cable Cable Holder
- Please make sure the following items are included with your TV. If any items are missing, contact your dealer.
- The items’ colours and shapes may vary depending on the models.
- Cables not included can be purchased separately.
- Check for any accessories hidden behind or in the packing materials when opening the box.
An administration fee may be charged if either
(a) an engineer is called out at your request and there is no defect with the product (i.e. where the user manual has not
been read).
(b) you bring the unit to a repair centre and there is no defect with the product (i.e. where the user manual has not been
read).
You will be informed of the administration fee amount before a technician visits.
English
Warning: Screens can be damaged from direct pressure when
handled incorrectly. We recommend lifting the TV at the edges, as
shown.
English - 3
Don't Touch
This Screen!

Attaching the TV to the Stand
Make sure you have all the accessories shown, and that you assemble the stand following the provided assembly instructions.
Mounting the TV on the Wall Using the Wall
Mount Kit (Optional)
If you mount this product on a wall, it should be mounted only as recommended by the manufacturer.
Unless it is correctly mounted, the product may slide or fall, causing serious injury to a child or adult, and
serious damage to the product.
Installing the Wall Mount Kit
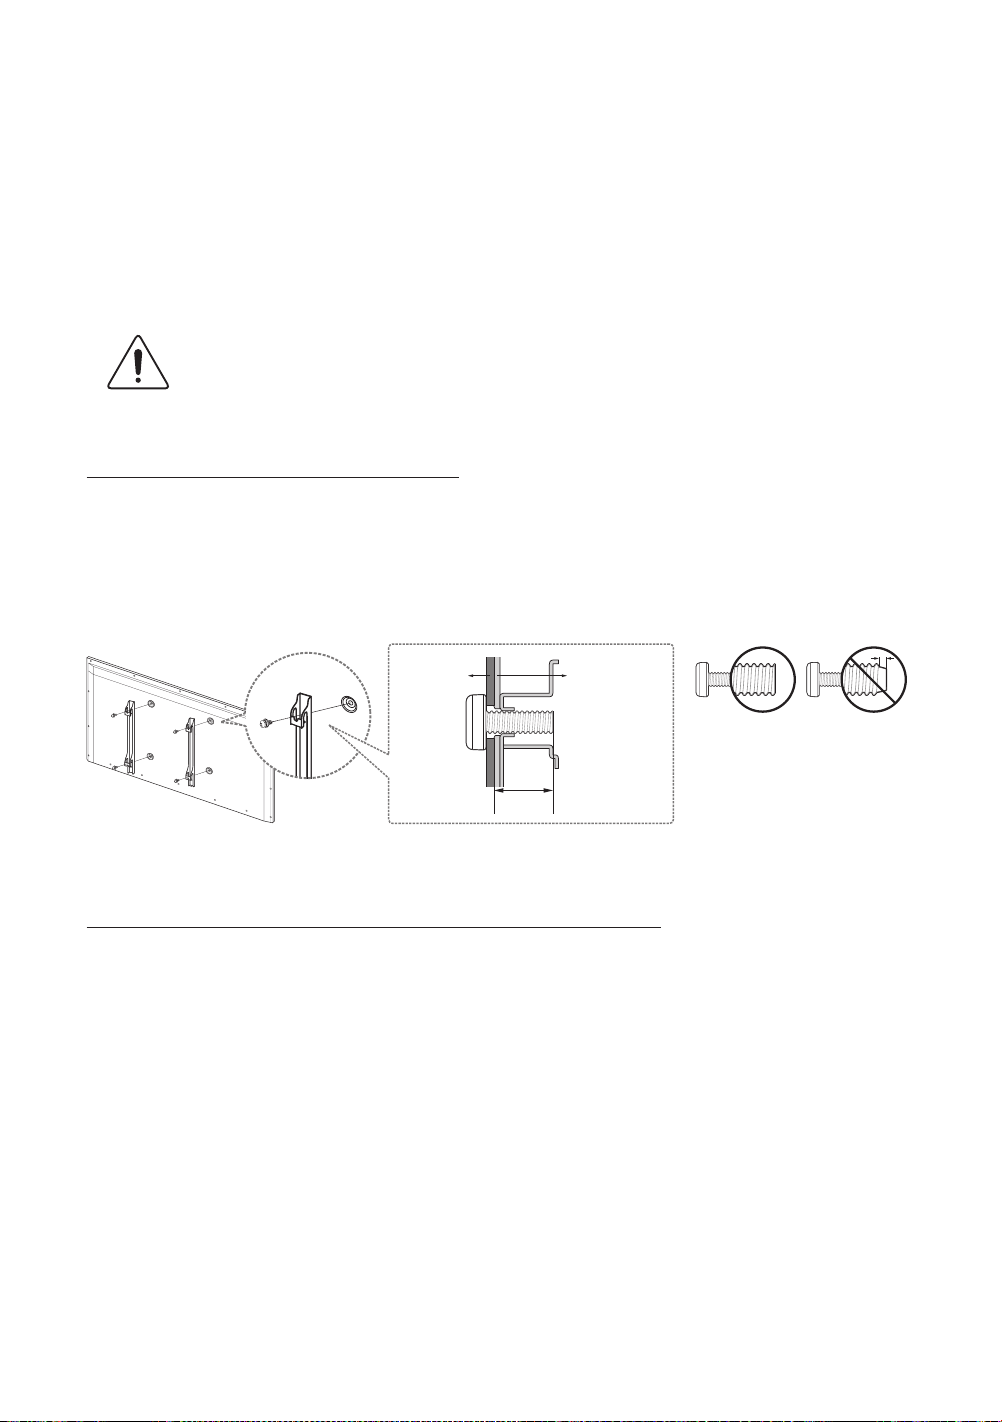
The wall mount kit (sold separately) lets you mount the TV on the wall.
For detailed information about installing the wall mount, refer to the instructions provided with the wall mount. We recommend
that you contact a technician for assistance when installing the wall mount bracket. We do not advise you to do it yourself.
Samsung Electronics is not responsible for any damage to the product or injury to yourself or others if you select to install the
wall mount on your own.
Wall mount
Bracket
TV
C
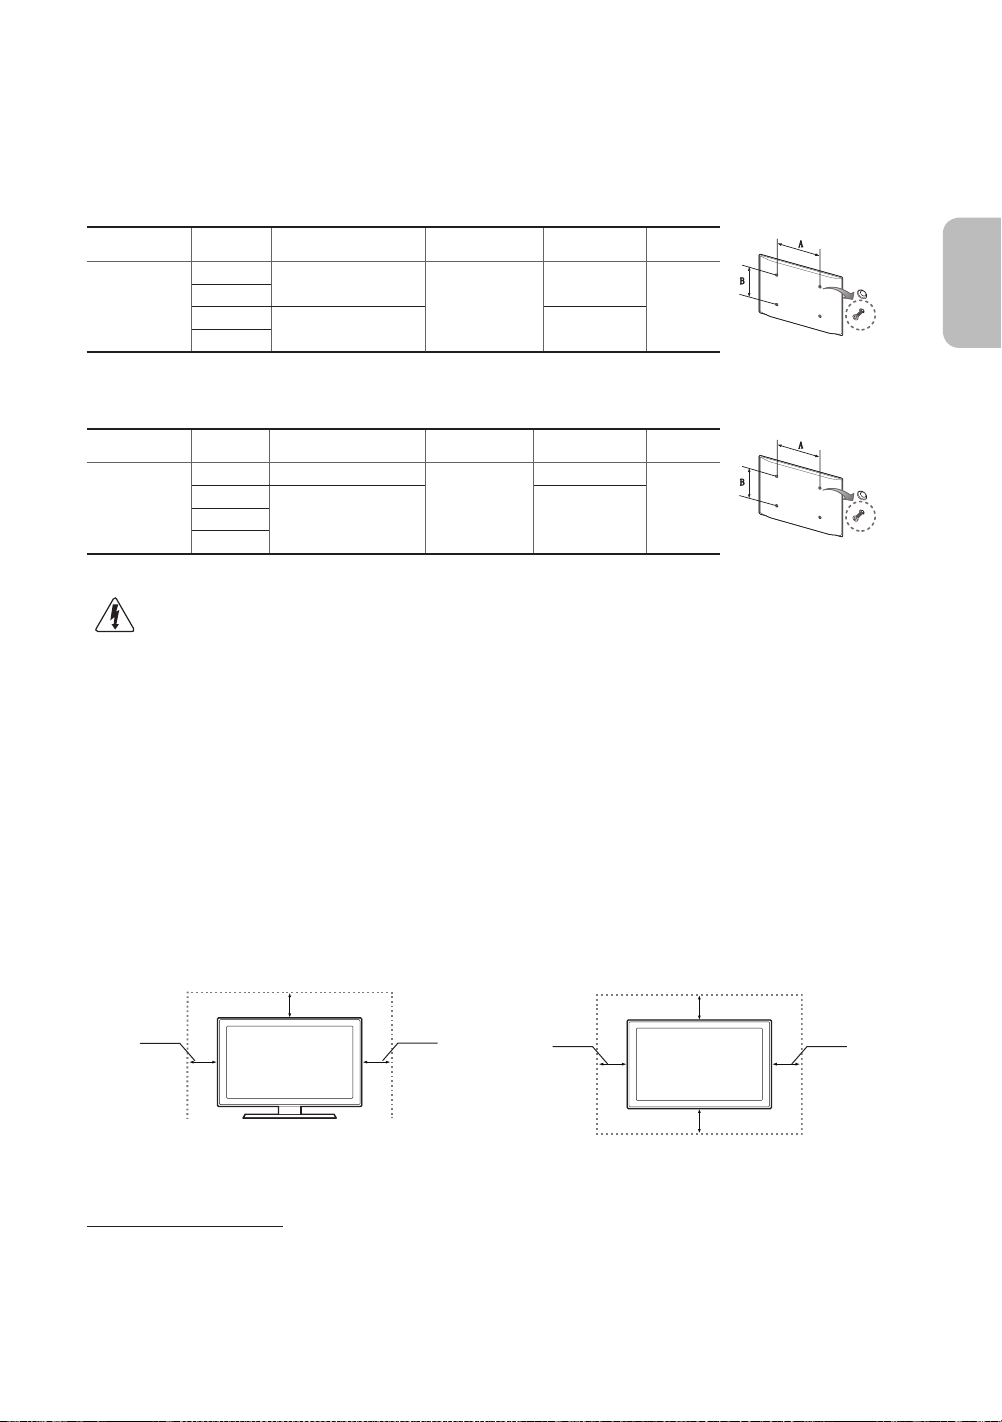
Wall Mount Kit Specifications (VESA)
The wall mount kit is not supplied, but is sold separately. Install your wall mount on a solid wall perpendicular to the floor. When
attaching the wall mount to other building materials, please contact your nearest dealer. If the product is installed on a ceiling
or slanted wall, it may fall and result in severe personal injury.
- Standard dimensions for wall mount kits are shown in the table below.
- When purchasing our wall mount kit, a detailed installation manual and all parts necessary for assembly are provided.
- Do not use screws that do not comply with the VESA standard screw specifications.
- Do not use screws that are longer than the standard dimension or do not comply with the VESA standard screw
specifications. Screws that are too long may cause damage to the inside of the TV set.
- For wall mounts that do not comply with the VESA standard screw specifications, the length of the screws may differ
depending on the wall mount specifications.
- Do not fasten the screws that are too strongly; this may damage the product or cause the product to fall, leading to
personal injury. Samsung is not liable for these kinds of accidents.
English - 4

- Samsung is not liable for product damage or personal injury when a non-VESA or non-specified wall mount is used or
the consumer fails to follow the product installation instructions.
- Do not mount the TV at more than a 15 degree tilt.
When using a third-party wall mount, note that the assembling screw length(C) is shown below.
LED 5 Series
English
Product Family Inches VESA Spec.(A * B) C (mm)
32
LED-TV
LED 6 Series
Product Family Inches VESA Spec.(A * B) C (mm)
LED-TV
Do not install your Wall Mount Kit while your TV is turned on. It may result in personal injury due to
electric shock.
40
46
50
40 200 X 200
46
55
60
200 X 200
400 X 400
400 X 400
10.0 ~ 28.0
10.0 ~ 28.0
Standard
Screw
M6
M8
Standard
Screw
M6
M8
Quantity
4
Quantity
4
Providing Proper Ventilation for Your TV
When you install your TV, maintain a distance of at least 10 cm between the TV and other objects (walls, cabinet sides, etc.) to
ensure proper ventilation. Failing to maintain proper ventilation may result in a fire or a problem with the product caused by an
increase in its internal temperature.
If you use parts provided by another manufacturer, it may cause difficulties with the product or result in injury caused by the
product falling.
- Whether you install your TV using a stand or a wall-mount, we strongly recommend you use parts provided by Samsung
Electronics only.
Installation with a stand. Installation with a wall-mount.
10 cm
10 cm
10 cm
10 cm
10 cm
10 cm
Other Cautions
- The actual appearance of the TV may differ from the images in this manual, depending on the model.
- Be careful when you touch the TV. Some parts can be somewhat hot.
English - 5
10 cm
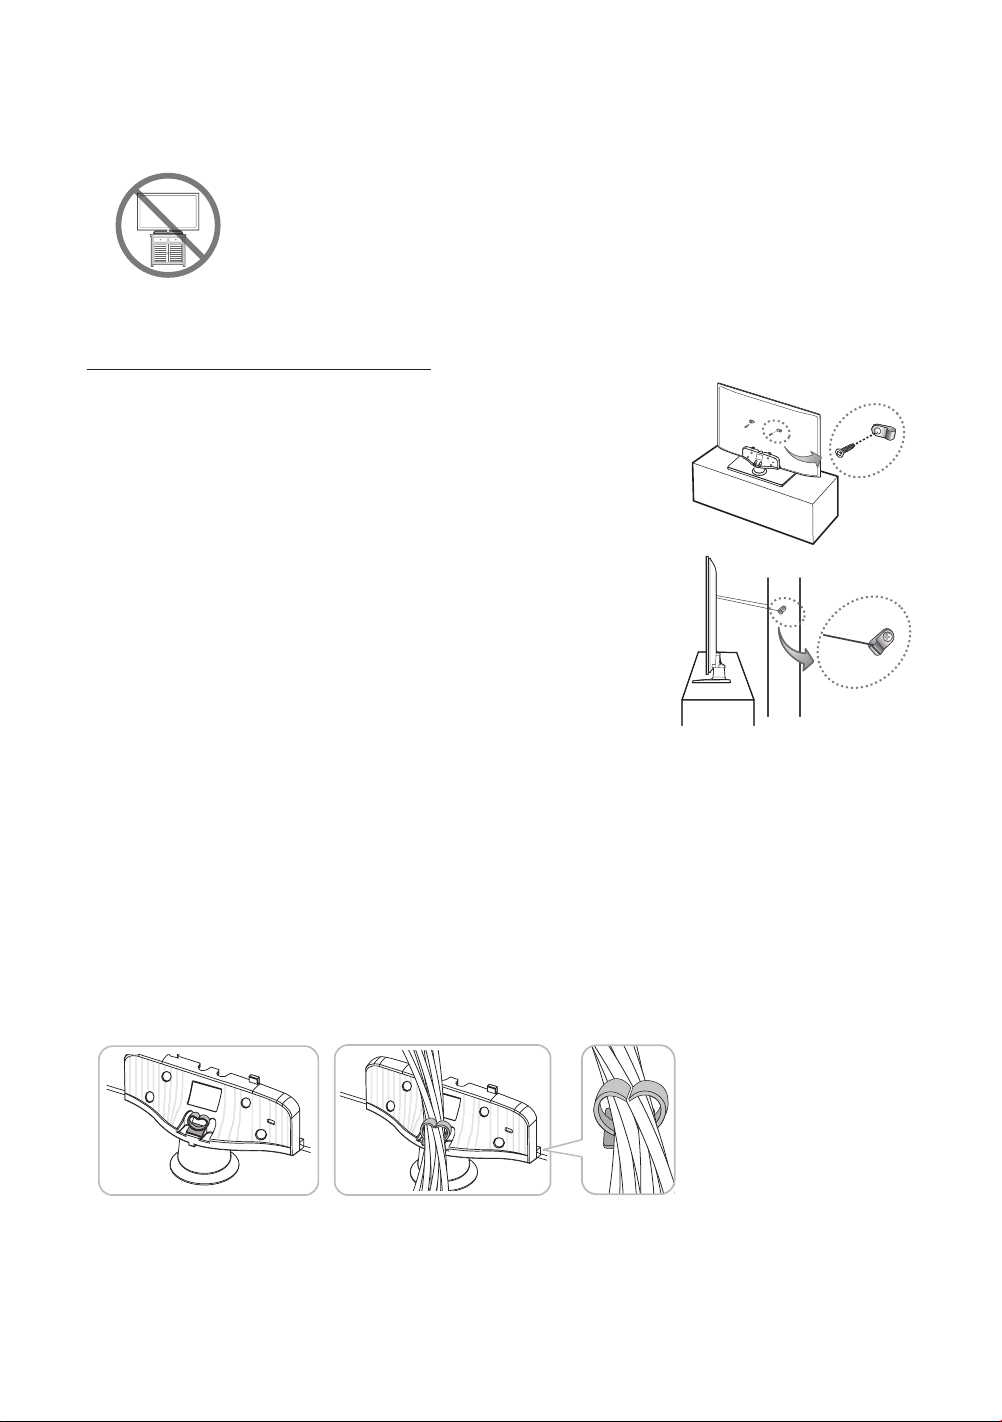
Securing the TV to the Wall
Caution: Pulling, pushing, or climbing on the TV may cause the TV to fall. In particular,
ensure that your children do not hang on to or destabilize the TV. Doing so may cause
the TV to tip over, resulting in serious injuries or death. Follow all safety precautions
provided in the Safety Flyer included with your TV. For added stability and safety, you can
purchase and install the anti-fall device as described below.
To Avoid the TV from Falling
1. Put the screws into the clamps and firmly fasten them into the wall. Confirm
that the screws have been firmly installed into the wall.
- You may need additional material such as anchors depending on the type
of wall.
- Since the necessary clamps, screws, and string are not supplied, please
purchase these additionally.
2. Remove the screws from the centre back of the TV, put the screws into the
clamps, and then fasten the screws into the TV again.
- Screws may not be supplied with the product. In this case, please
purchase screws of the following specifications.
- Screw Specifications:
LED 5 Series: For a 32 ~ 40 inches: M6 / 46 ~ 50 inches: M8
LED 6 Series: For a 40 inches: M6 / 46 ~ 60 inches: M8
3. Connect the clamps fixed into the TV and the clamps fixed onto the wall with a
strong cable and then tie the string tightly.
- Install the TV close to the wall so that it does not fall backwards.
- It is safe connecting the string so that the clamps fixed onto the wall are
equal to or lower than the clamps fixed on the TV.
- Untie the string before moving the TV.
4. Verify that all connections are properly secured. Periodically check connections for any sign of damage. If you have any
doubt about the security of your connections, contact a professional installer.
- The product colour and shape may
vary depending on the model.
wall
Arrange the cables using the Cable Holder
English - 6

Connecting devices to your TV
You can connect various external devices using the connectors located at the back of the product. Check the connectors and
then refer to the assembly instructions provided for more information on supported external devices.
Connecting to a COMMON INTERFACE slot (Your
TV viewing Card Slot)
- Turn the TV off to connect or disconnect a CI card or CI card adapter.
Using the “CI or CI+ CARD”
To watch paid channels, the “CI or CI+ CARD” must be inserted.
- If you don’t insert the “CI or CI+ CARD”, some channels will display the
“Scrambled Signal” message.
- The pairing information containing a telephone number, the “CI or CI+
CARD” ID, the Host ID, and other information will be displayed in about
2~3 minutes. If an error message is displayed, please contact your service
pr ov id er.
- When the configuration of channel information has finished, the message
“Updating Completed” is displayed, indicating the channel list is updated.
English
NOTE
- You must obtain a “CI or CI+ CARD” from a local cable service provider.
- When removing the “CI or CI+ CARD”, carefully pull it out as dropping the “CI or CI+ CARD” may damage it.
- Insert the “CI or CI+ CARD” in the direction marked on the card.
- The location of the COMMON INTERFACE slot may differ depending on the model.
- A “CI or CI+ CARD” is not supported in some countries and regions, therefore, check with your authorised dealer.
- If you have any problems, please contact a service provider.
- Insert the “CI or CI+ CARD” that supports the current aerial settings. The screen will be distorted or will not be visible.
English - 7
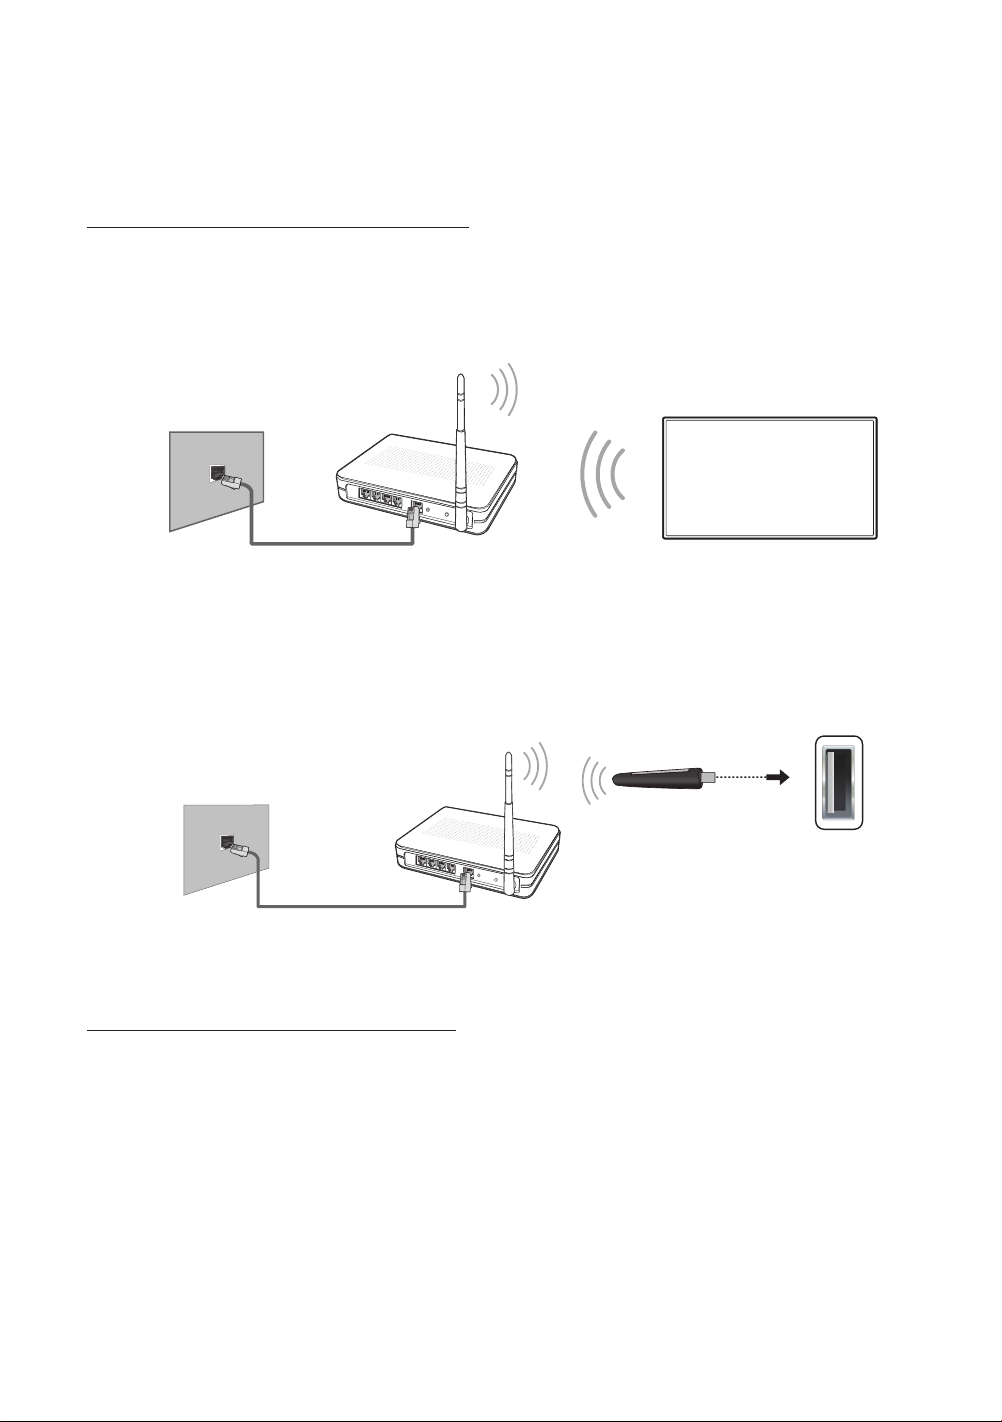
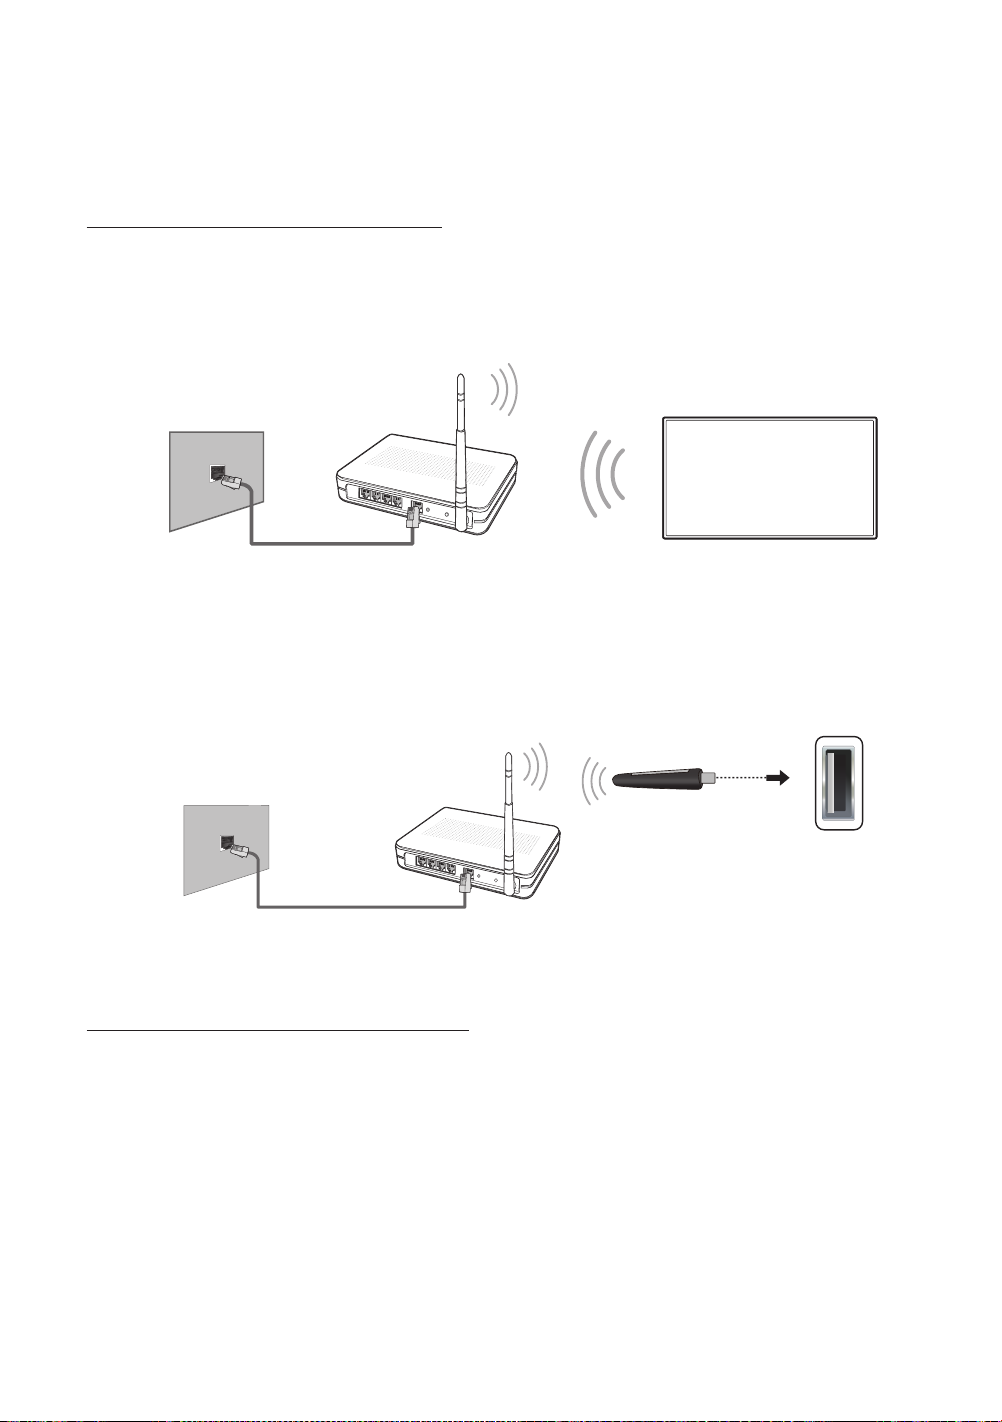
Connecting to a Network
Connecting the TV to a network gives you access to online services such as the Smart Hub, as well as software updates.
Network Connection - Wireless
LED 6 Series
Connect the TV to the Internet using a standard router or modem.
Wireless IP Router or Modem with
The LAN Port on the Wall
LAN Cable (Not Supplied)
LED 5 Series
Connect the TV to the Internet using a standard router or modem. To connect wirelessly, you must first attach a “Samsung
Wireless LAN Adapter” (WIS12ABGNX - sold separately) to the USB port on your TV. See the illustration below.
The LAN Port on the Wall
a DHCP Server
Wireless IP Router or Modem
that has a DHCP Server
Samsung Wireless
LAN Adapter
(Not Supplied)
LAN Cable (Not Supplied)
Wireless Network Precautions
- Samsung’s Wireless LAN adapter supports the IEEE 802.11a/b/g and n communication protocols. Samsung
recommends using IEEE 802.11n. When you play the video over a IEEE 802.11b/g connection, the video may not play
smoothly.
- To use a wireless network, the TV must be connected to a wireless router or modem. If the wireless router supports
DHCP, the TV can use a DHCP or static IP address to connect to the wireless network.
- Select a channel that is not currently in use for the wireless router. If the channel set for the wireless router is currently
being used by another device, the result is usually interference and/or a communications failure.
English - 8
- Most wireless networks have an optional security system. To enable a wireless network's security system, you need to
create a security key using characters and numbers. This security key is then needed to connect to the wireless network.
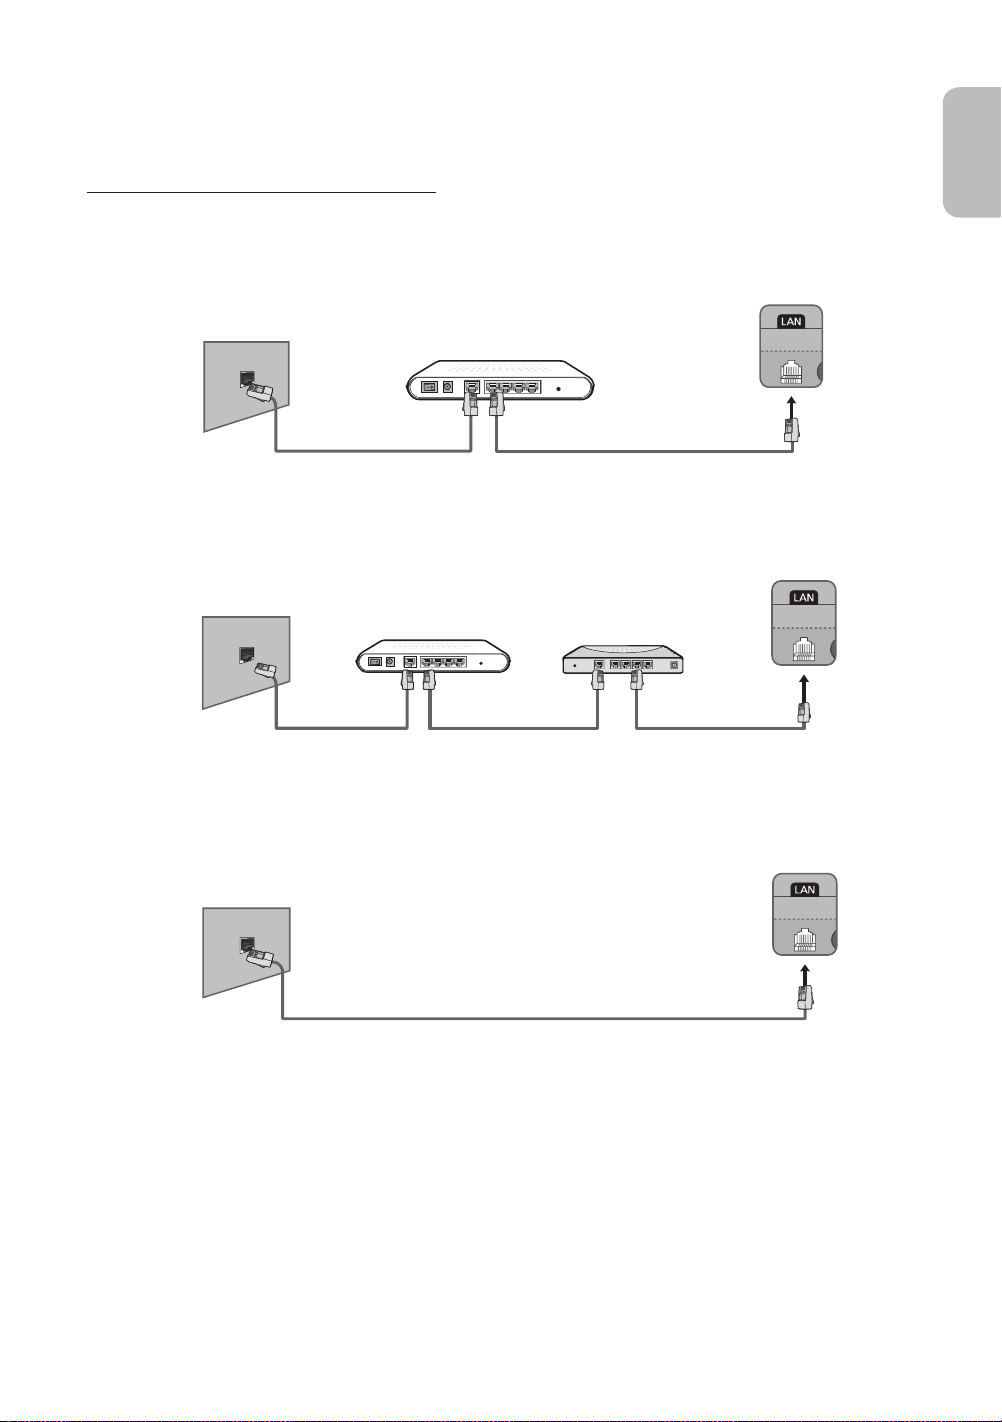
Network Connection - Wired
There are three main ways to connect your TV to your network using cable, depending on your network setup. They are
illustrated starting below:
TV Rear Panel
The Modem Port on the Wall
Modem Cable (Not Supplied) LAN Cable (Not Supplied)
The Modem Port on the Wall
External Modem
(ADSL / VDSL / Cable TV)
External Modem
(ADSL / VDSL / Cable TV)
TV Rear Panel
IP Router with a DHCP
Server
English
Modem Cable
(Not Supplied)
The LAN Port on the Wall
- The TV does not support network speeds less than or equal to 10Mbps.
- Use Cat 7 cable for the connection.
LAN Cable
(Not Supplied)
LAN Cable (Not Supplied)
LAN Cable
(Not Supplied)
TV Rear Panel
English - 9
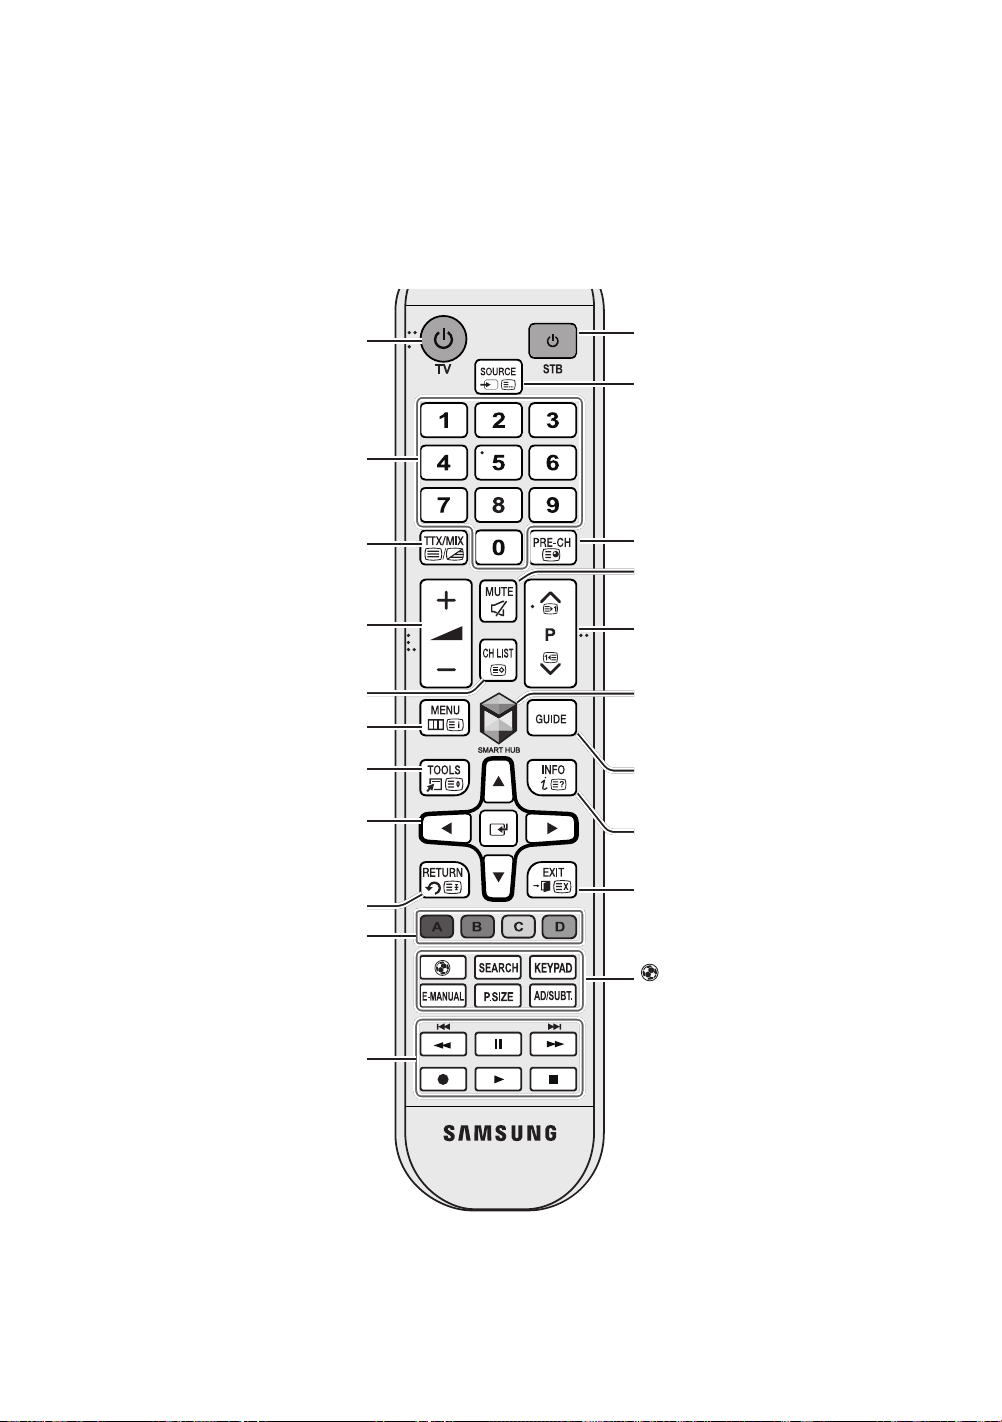
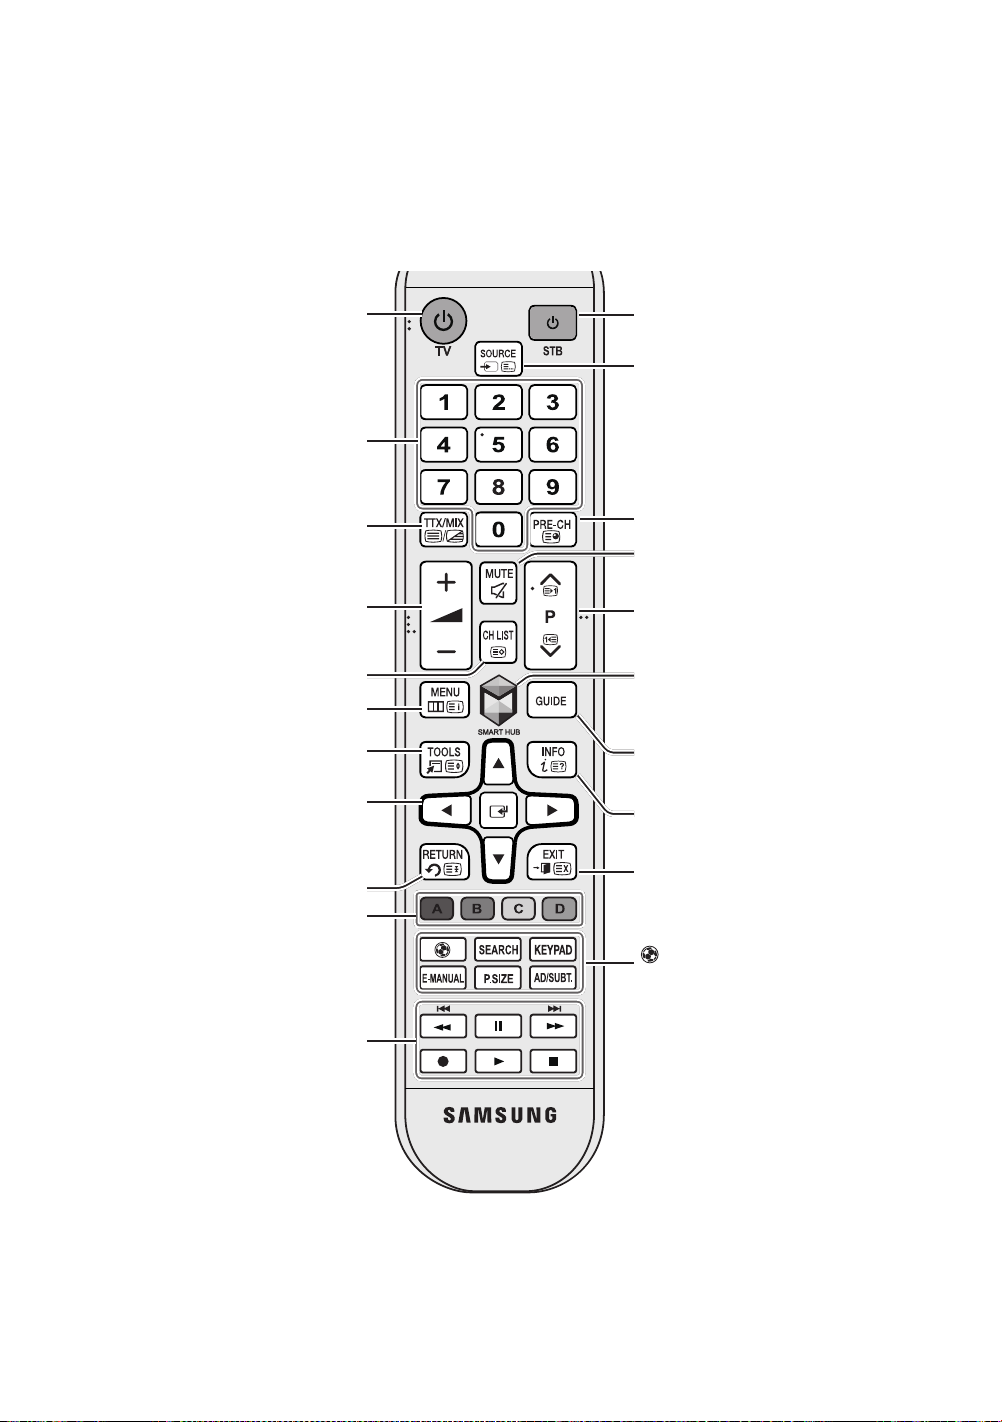
Remote Control
Learn where the function buttons are on your remote, such as:
INFO, CH LIST, RETURN, GUIDE
- This remote control has Braille points on the
persons.
Turns the TV on and off.
Gives direct access to channels.
Alternately selects Teletext ON Double,
Adjusts the volume.
Displays channel lists.
Opens the OSD (Menu).
and
EXIT
Mix or OFF.
.
Power, Channel
SOURCE, MUTE
, and
Volume
,
Y, < P >
buttons and can be used by visually impaired
Turns the Set-top box on and off.
Displays and selects available video
sources.
Returns to the previous channel.
Cuts off the sound temporarily.
Changes channels.
Brings up
to the e-Manual chapter, Smart Features
>
Smart Hub
,
MENU, TOOLS
Smart Hub
.
, E,
applications. Refer
Quickly selects frequently used functions.
Moves the cursor, selects the on-screen
menu items, and changes the values
seen on the TV's menu.
Returns to the previous menu.
Use these buttons according to the
directions on the TV screen.
Use these buttons with specific features.
Use these buttons according to the
directions on the TV screen.
Displays the EPG (Electronic Programme
Guide).
Displays information on the TV screen.
Exits the menu.
: Enable
Football Mode
sports viewing experience.
SEARCH
: Press this button to use the
search window.
KEYPAD
: With the virtual remote control
on the screen, you can easily enter digits,
control content, and use functions.
E-MANUAL
P.SIZE
AD/SUBT.
Shortcuts
: Displays the
: Change the picture size.
: Displays the
.
for an optimal
e-Manual
.
Accessibility
English - 10
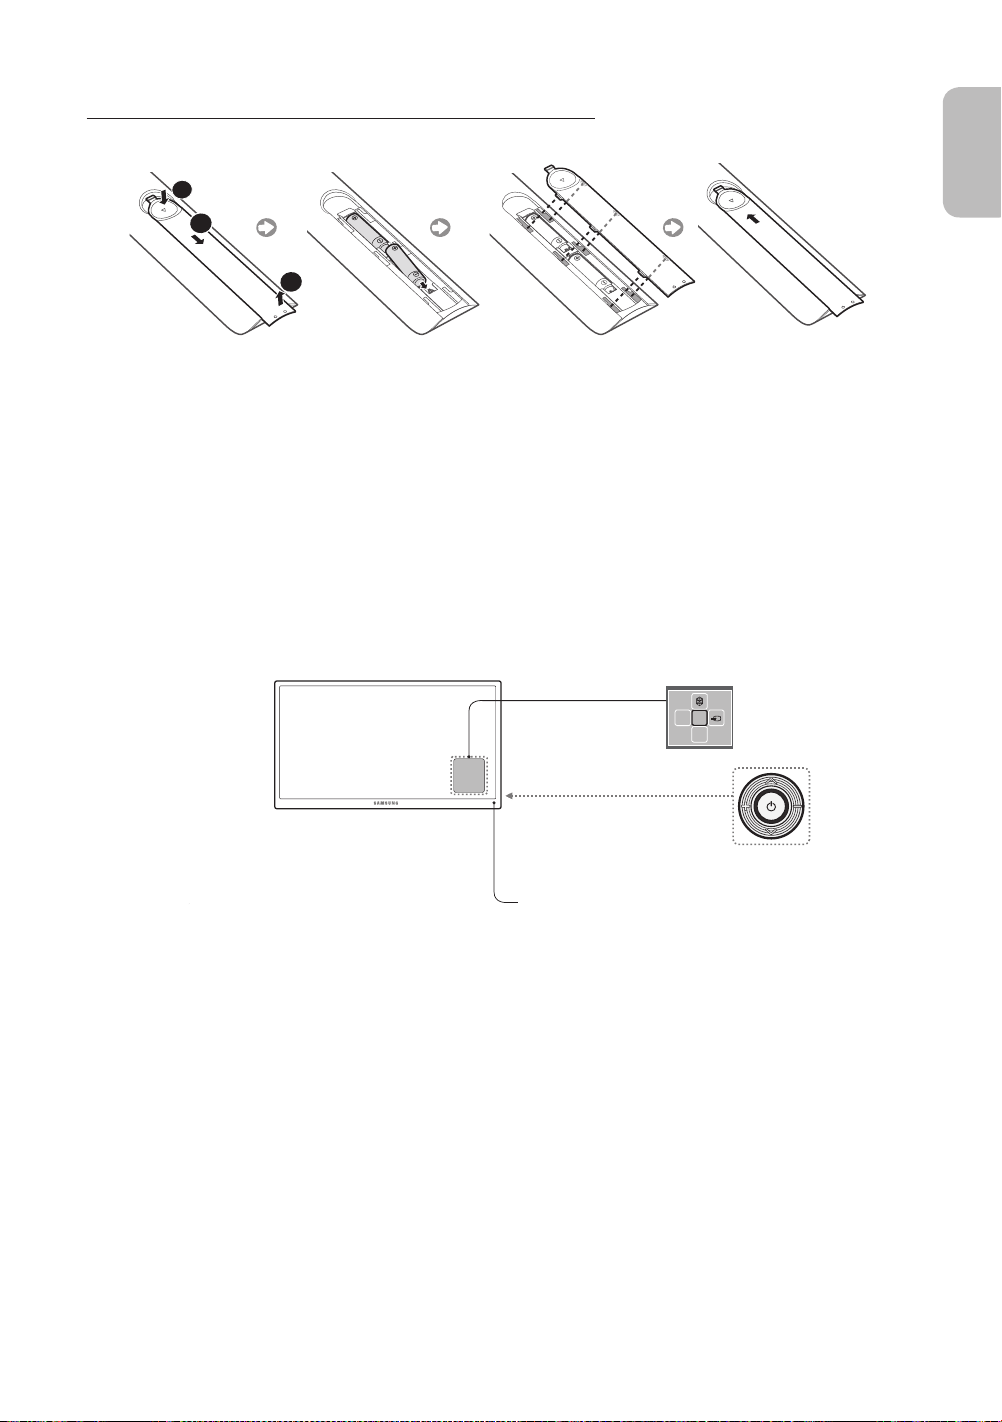
Installing the batteries (Battery size: AAA)
Match the polarities of the batteries to the symbols in the battery compartment.
1
2
3
- Use the remote control within 7m of the TV.
- Bright lights may affect the performance of the remote control. Avoid using the remote control near special fluorescent
lights or neon signs.
- The colour and shape may vary depending on the model.
Turning on the TV
Turn on the TV using the P button on the remote control or TV panel.
- The product colour and shape may vary depending on the model.
- The TV’s Controller, a small joystick-like button at the right back of the TV, lets you control the TV without the remote
control.
English
Function menu
TV Controller
Remote control sensor
mR
P
English - 11

Initial setup
The initial setup dialogue box appears when the TV is first
activated. Follow the on-screen instructions to finish the initial
setup process, including the selecting the menu language,
scanning channels, connecting to the network, and more.
During each step, either make a choice or skip the step.
You can manually perform this process at a later time in the
System > Setup
- If you connect any device to
installation, the
top box
- If you do not want to select
Aerial
menu.
Channel Source
automatically.
.
HDMI1
before starting the
will be changed to
Set-top box
, please select
Set-
Selecting the video source
You can select a connected external device using the
SOURCE
button.
For example, to switch to a gaming console connected
SOURCE
Source
. From the
screen:
to the second HDMI connector, press
Source
list, select
mode. Connector names may vary depending on the model.
The following options are available in the
TOOLS
Select a port connected to an external device, and press and
hold the Enter button. The following functions are available:
- Available options for each connector may vary.
HDMI2
Button
to change the input signal to HDMI
Edit Name
Rename devices connected to the TV for easier
identification of external sources.
Password Change
System
>
Change PIN
Changing the TV’s password.
1. Run
Change PIN
the password field. The default password is “0-0-0-0”.
2. Enter a new password and then enter it again to confirm
it. The password change is complete.
- If you forgot your PIN code, press the buttons in the
following sequence to reset the PIN to “0-0-0-0”:
In Standby mode:
For example, you can designate a computer connected
to the TV via an HDMI-DVI cable as
Alternatively, simply designate a computer connected to
the TV via an HDMI cable as
You can also designate an AV device connected to the
TV via an HDMI-DVI cable as
Information
View detailed information about the connected devices.
Disconnect USB Device
Used to safely remove a USB device connected to the
TV. This option is only available when a USB device has
been selected.
and then enter the current password in
MUTE
→ 8 → 2 → 4 →
PC
.
DVI Devices
DVI PC
.
POWER
.
(On)
English - 12

Controlling External Devices with the TV Remote
(
Universal Remote Setup
System
>
Universal Remote Setup
- Availability depends on the specific model and area.
The universal remote control feature lets you control cable boxes, Blu-ray players, home theatres, and other external devices
connected to the TV using the TV's remote control. In order to use the TV's remote control as a universal remote, you must
first connect the IR extender cable (included).
- You can also use the Anynet+ (HDMI-CEC) function to operate some external Samsung devices with your TV's remote
control without any additional setup. For more information, refer to the e-Manual.
- Certain external devices connected to the TV may not support the universal remote feature.
Setting Up the Universal Remote Control
Connect the IR extender cable to the TV's IR output connector as shown in the diagram and place the transmitter end within
10 cm of the external device's receiver pointing in the direction of the remote receiver. However, there must be no obstacles
between the IR extender cable and the external device. The presence of obstacles interferes with the transmission of the
remote control signal.
)
English
10 cm
Controlling External Devices with the TV Remote
1. Turn on the external device to set up the universal remote function for, and bring up the
2. Select
3. Follow the on-screen instructions and register the external device.
Universal remote setup
from the top of the screen. This initiates the universal remote setup process.
Source
screen.
English - 13
Viewing more TV features
The
e-Manual
contains more detailed information on the TV features. Refer to the embedded
Launching the e-Manual
The embedded e-Manual contains information.
- You can also download a copy of the e-Manual from Samsung's website, and read it on your computer or print it out.
- Yellow words indicate a menu item; white bold words indicate remote control buttons. Arrows are used to indicate the
menu path. (Example:
1. Select
2. Select a category from the side of the screen. Once a selection has been made, the contents of the selected category
3. Select an item from the list. This opens the e-Manual on the corresponding page.
appear.
e-Manual
. The e-Manual loads.
Picture
>
Picture Mode
)
If a description doesn't fit on a single screen...
You can scroll pages in one of the following ways.
•
Position the focus on the page to display / on the screen. Press <, > button.
Additional e-Manual Features
Loading Pages using Keywords
Select
Search
from the side of the screen to bring up the search screen. Enter a search term and then select
item from the search results to load the corresponding page.
e-Manual (Support
Done
>
e-Manual
. Select an
).
English - 14

Loading Pages from the Index Page
Select
Index
from the side of the screen to bring up the index screen. Select a keyword from the list to navigate to the relevant
page.
Using the History to Load Previously Read Pages
Select
Recent pages
to the selected page.
from the side of the screen. A list of previously read pages is shown. Select a page. The e-Manual jumps
Accessing the Menu from the e-Manual (Try Now)
Select (
If you want to read an
- Certain menu options cannot be used.
Try Now
) on a feature-description to directly move to the corresponding menu and try out the feature.
e-Manual
entry on a specific screen menu feature, Press the
Loading Reference Pages
Select (
Link
) from the side of a feature-description page to access the corresponding reference page.
Updating the e-Manual to the Latest Version
You can update the e-Manual in the same way as updating apps.
-
Update apps
e-Manual
e-Manual
1. Select the
2. Press and hold the Enter button. The Options menu appears.
3. From the Options menu on the screen, select
4. Select
item in the
is shown on the screen only when an update is required.
in the popup window and then select
SAMSUNG APPS
Update apps
screen.
. A popup window appears.
Update
. You can update the
E-MANUAL
e-Manual
English
button.
to the latest version.
English - 15

Troubleshooting
If you have any questions about the TV, first refer to the Troubleshooting list below. If none of these troubleshooting tips apply,
please visit “www.samsung.com” and click on Support, or contact the call centre listed on the back cover of this manual.
Issues Solutions and Explanations
The TV won’t turn on. Make sure the AC power cord is securely plugged into the wall outlet and the TV.
Make sure the wall outlet is working.
Try pressing the P button on the TV to make sure the problem is not the remote. If the TV
turns on, refer to the “Remote control does not work” item below
There is no picture/video. Check the cable connections. Remove and reconnect all cables connected to the TV
and external devices.
Set the video outputs of your external devices (Cable/Sat Box, DVD, Blu-ray etc) to
match the TV's input connections. For example, if the output of an external device is
HDMI, it should be connected to an HDMI input on the TV.
Make sure your connected devices are powered on.
Be sure to select the correct input source.
Reboot the connected device by unplugging it, and then reconnecting the device’s
power cable.
.
The remote control does not
work.
The remote control of the cable/
set top box doesn’t turn the TV
on or off or adjust the volume.
- This TFT LED panel uses a panel consisting of sub pixels which require sophisticated technology to produce. There may,
however be a few bright or dark pixels. These pixels will have no impact on the performance of the product.
- To keep your TV running optimally upgrade to the latest firmware on the Samsung website via the USB device USB
(Samsung.com > Support > Downloads).
- Some of the pictures and functions above are available for specific models only.
Replace the remote control batteries. Make sure the batteries are installed with their
polarities (+/–) in the correct direction.
Clean the sensor’s transmission window on the remote.
Try pointing the remote directly at the TV from 1.5 ~ 1.8 m away.
Programme the Cable/Set remote control to operate the TV. Refer to the Cable/SetTop-Box user manual for the SAMSUNG TV code.
English - 16

Cautions about the Eco Sensor and Screen
Brightness
The Eco Sensor measures the light in the room and optimises the brightness of the TV automatically to reduce power
consumption. This causes the TV to brighten and dim automatically. To turn this function off, go to
Eco Sensor
.
System
>
Eco Solution
English
>
Do not block the sensor with any material. This may decrease the picture brightness.
Eco Sensor
1.
detected by the Light Sensor.
2. To enable or disable the
3. Please note: If the screen is too dark while watching TV in a dark environment, this may be due to the
: This power-saving feature automatically adjusts the screen brightness of the TV according to the ambient light
Eco Sensor
, go to
System
>
Eco Solution
>
Eco Sensor
and select On or
Off
.
Eco Sensor
.
English - 17

What is Remote Support?
Samsung's Remote Support service offers you one-on-one support with a Samsung Technician who can remotely:
•
Diagnose your TV
•
Adjust your TV settings
•
Perform a factory reset for your TV
•
Install recommended firmware updates
How Does it Work?
Having a Samsung Tech remotely service your TV is really pretty simple
1. Call the Samsung
Contact Centre and ask
for remote support.
2. Open the menu on
your TV and go to the
Support section.
3. Select Remote
Management and
Provide the Pin# to the
agent.
4. The agent will then
access your TV. That's
it!
Storage and Maintenance
- If a sticker was attached to the TV screen, some debris may remain after you remove the sticker. Please clean the debris
off before watching TV.
- The exterior and screen of the product can get scratched while cleaning it. Be sure to wipe the exterior and screen
carefully using a soft cloth to prevent scratches.
Do not spray water directly onto the product. Any liquid
that enters the product may result in product failure, fire, or
electric shock.
Clean the product with a soft damp cloth using a small
amount of water. Do not use a flammable liquid (e.g.
benzene, thinners) or a cleaning agent.
English - 18

TV Specifications
Display Resolution 1920 x 1080
Environmental Considerations
Operating Temperature
Operating Humidity
Storage Temperature
Storage Humidity
Stand Swivel (Left / Right) 0˚
Sound (Output) 10W X 2
Model Name UE32H5304 UE40H5304
Screen Size (Diagonal) 32 inches 40 inches
Dimensions (W x H x D)
Body
With stand
Weight
Without Stand
With Stand
Model Name UE46H5304 UE50H5304
Screen Size (Diagonal) 46 inches 50 inches
Dimensions (W x H x D)
Body
With stand
Weight
Without Stand
With Stand
Model Name UE40H6204 UE46H6204
Screen Size (Diagonal) 40 inches 46 inches
Dimensions (W x H x D)
Body
With stand
Weight
Without Stand
With Stand
Model Name UE55H6204 UE60H6204
Screen Size (Diagonal) 55 inches 60 inches
Dimensions (W x H x D)
Body
With stand
Weight
Without Stand
With Stand
738.3 x 444.9 x 93.4 mm
738.3 x 498.2 x 191.9 mm
5.7 kg
6.4 kg
1059.8 x 625.6 x 94.8 mm
1059.8 x 680.7 x 247.8 mm
12.2 kg
14.2 kg
927.5 x 548.0 x 93.2 mm
927.5 x 607.2 x 227.6 mm
8.9 kg
10.9 kg
1251.4 x 730.1 x 94.7 mm
1251.4 x 790.7 x 227.6 mm
18.0 kg
20.6 kg
10°C to 40°C (50°F to 104°F)
10% to 80%, non-condensing
-20°C to 45°C (-4°F to 113°F)
5% to 95%, non-condensing
927.6 x 551.0 x 93.3 mm
927.6 x 607.1 x 247.8 mm
8.6 kg
10.6 kg
1137.6 x 669.4 x 94.8 mm
1137.6 x 725.7 x 247.8 mm
15.7 kg
17.7 kg
1060.0 x 622.5 x 96.3 mm
1060.0 x 681.8 x 227.6 mm
11.3 kg
13.3 kg
1373.6 x 799.3 x 94.8 mm
1373.6 x 862.5 x 329.7 mm
23.0 kg
27.2 kg
English
- The design and specifications are subject to change without prior notice.
- For information about the power supply, and about power consumption, refer to the label attached to the product.
- Typical power consumption is measured according to IEC 62087 Ed.2
Standby mode
To decrease power consumption, unplug the power cord when the TV will not be used for a long time.
English - 19
Licences
The terms HDMI and HDMI High-Definition Multimedia Interface, and the HDMI Logo are trademarks or
registered trademarks of HDMI Licensing LLC in the United States and other countries.
Still image warning
Avoid displaying still images (such as jpeg picture files), still image elements (such as TV channel logos, stock or news bars
at the bottom of the screen etc.), or programmes in panorama or 4:3 image format. Constantly displaying still pictures can
cause image burn-in on the LED screen, which will affect the image quality. To reduce risk of this occurring please follow the
recommendations below:
•
Avoid displaying the same TV channel for long periods.
•
Always try to display any image in full screen. Use the TV set’s picture format menu for the best possible match.
•
Reduce brightness and contrast to avoid the appearance of after-images.
•
Use all TV features designed to reduce image retention and screen burn. Refer to the e-Manual for more details.
LED 5 Series
Recommendation - EU Only
Hereby, Samsung Electronics, declares that this TV is in compliance with the essential requirements and other relevant
provisions of Directive 1999/5/EC.
The official Declaration of Conformity may be found at http://www.samsung.com, go to Support > Search Product Support
and enter the model name.
This equipment may be operated in all EU countries.
English - 20

LED 6 Series
Recommendation - EU Only
Hereby, Samsung Electronics, declares that this TV is in compliance with the essential requirements and other relevant
provisions of Directive 1999/5/EC.
The official Declaration of Conformity may be found at http://www.samsung.com, go to Support > Search Product Support
and enter the model name.
This equipment may only be used indoors.
This equipment may be operated in all EU countries.
Correct Disposal of This Product (Waste Electrical & Electronic Equipment)
(Applicable in countries with separate collection systems)
This marking on the product, accessories or literature indicates that the product and its electronic accessories (e.g. charger, headset,
USB cable) should not be disposed of with other household waste at the end of their working life. To prevent possible harm to the
environment or human health from uncontrolled waste disposal, please separate these items from other types of waste and recycle
them responsibly to promote the sustainable reuse of material resources.
Household users should contact either the retailer where they purchased this product, or their local government office, for details of
where and how they can take these items for environmentally safe recycling.
Business users should contact their supplier and check the terms and conditions of the purchase contract. This product and its
electronic accessories should not be mixed with other commercial wastes for disposal.
Correct disposal of the batteries in this product
(Applicable in countries with separate collection systems)
This marking on battery, manual or packaging indicates that the batteries in this product should not be disposed of with other
household waste at the end of their working life. Where marked, the chemical symbols Hg, Cd or Pb indicate that the battery contains
mercury, cadmium or lead above the reference levels in EC Directive 2006/66. If batteries are not properly disposed of, these
substances can cause harm to human health or the environment.
To protect natural resources and to promote material reuse, please separate batteries from other types of waste and recycle them
through your local, free battery return system.
English
English - 21

Varning! Viktiga säkerhetsanvisningar
(Läs överensstämmande avsnitt enligt märket på din produkt från Samsung innan du
försöker installera produkten.)
VARNING
RISK FÖR ELSTÖT. ÖPPNA INTE
VARNING! FÖR ATT UNDVIKA RISK FÖR ELSTÖTAR SKALL DU
INTE TA BORT (ELLER FÖRA TILLBAKA) SKYDDET. DET FINNS
INGA DELAR DU KAN BYTA INUTI. ÖVERLÅT REPARATIONER
TILL BEHÖRIG SERVICEPERSONAL.
Facken och öppningarna i kåpan och på bak- och undersidan är till för nödvändig ventilation. För att säkerställa tillförlitlig användning av den här
apparaten och skydda den från överhettning får facken och öppningarna aldrig täckas över eller täppas till.
- Täck inte över apparaten i ett trångt utrymme, t.ex. en bokhylla eller ett inbyggt skåp, där ventilationen inte är tillräcklig.
- Placera inte den här apparaten nära eller ovanför ett element eller värmeaggregat, eller där den utsätts för direkt solljus.
- Placera inte behållare med vatten (vaser etc.) på den här apparaten, eftersom det kan orsaka brandrisk eller risk för elektrisk kortslutning.
Utsätt inte apparaten för regn och placera den inte på en plats nära vatten (vid ett badkar, tvättställ, köksvask, tvättmaskin, i en fuktig källare,
nära en swimmingpool etc.). Om den här apparaten blir våt ska du koppla ur den och kontakta en auktoriserad återförsäljare direkt. Se till att dra
ur strömsladden från uttaget före rengöring.
Den här apparaten fungerar med batterier. Det kan finnas regler i din kommun som kräver att du gör dig av med de här batterierna på rätt sätt
och enligt gällande miljölagstiftning. Kontakta din lokala kommun för information om kassering och återvinning.
Överbelasta inte vägguttag, förlängningssladdar eller adaptrar eftersom detta kan medföra brandfara eller elstötar.
Strömsladdar ska dras så att de inte trampas på eller kläms av föremål som placeras på eller mot dem. Var speciellt uppmärksam vid eluttagen,
adaptrar och anslutningspunkten på apparaten.
Koppla bort apparaten från eluttaget och dra ut sladdarna för att ytterligare skydda bildskärmen under åskväder eller när den lämnas oövervakad
och oanvänd under långa perioder. Det förhindrar att utrustningen skadas på grund av blixtnedslag eller strömrusning.
Innan du ansluter växelströmssladden till ett likströmsuttag, ska du se till att spänningen för likströmsadaptern överensstämmer med lokal
eltillförsel.
För aldrig in några metallföremål i öppningarna på den här apparaten. Om du gör det kan det orsaka skada till följd av elektrisk kortslutning.
För att undvika elektrisk kortslutning ska du aldrig röra vid apparatens insidor. Endast en kvalificerad tekniker bör öppna den här apparaten.
Se till att koppla in strömsladden tills den sitter fast ordentligt. När du tar bort strömsladden ska du se till att hålla i strömkontakten när du drar ut
den ur uttaget. Rör inte vid strömsladden med våta händer.
Om den här apparaten inte fungerar normalt – speciellt om det förekommer ovanliga ljud eller lukter från den – ska du omedelbart koppla ur den
och kontakta en auktoriserad återförsäljare eller ett servicecenter.
Se till att dra ur strömkontakten ur uttaget om TV:n inte ska användas under en längre tid eller om du ska åka från huset en längre tid (speciellt
när barn, äldre eller funktionshindrade ska vara ensamma hemma).
- Ansamlingar av damm kan orsaka elektrisk kortslutning, elavbrott eller brand på grund av att strömsladden genererar flammor och hetta,
eller att isoleringen försämras.
Kontakta ett auktoriserat servicecenter när du skall installera din utrustning på en plats som är dammig, har höga eller låga temperaturer, hög
luftfuktighet, har kemisk påverkan eller där den används dygnet runt, som exempelvis på en tågstation etc.
Använd en jordad kontakt och sladd.
- Felaktig jordning kan orsaka elektrisk kortslutning eller skada på utrustningen. (Endast utrustning av klass l.)
Om du vill koppla ur apparaten från strömkällan måste kontakten dras ut ur eluttaget och därför måste den vara lätt att komma åt.
Låt inte barn hänga på produkten.
Förvara tillbehör (batteri etc.) på en plats där det är oåtkomligt för barn.
Installera inte produkten på en instabil plats, såsom en skakig hylla, ett golv som lutar eller en plats som är utsatt för vibrationer.
Tappa inte och utsätt inte produkten för stötar. Om produkten skadas ska du koppla ur strömsladden och kontakta ett servicecenter.
Koppla ur strömsladden från uttaget och torka av produkten med en mjuk och torr trasa. Använd inga kemikalier, såsom vax, bensen, alkohol,
thinner, insektsmedel, luftrenare, smörjmedel eller rengöringsmedel. Detta kan skada produkten eller radera tryckt text.
Apparaten ska inte utsättas för dropp eller stänk.
Kasta inte batterierna i eld.
Var försiktig så du inte kortsluter, plockar isär eller överhettar batterierna.
Risk för explosion om batteriet byts på fel sätt. Byt bara mot samma eller liknande typ.
VARNING – FÖR ATT FÖRHINDRA RISK FÖR BRAND, SKA DU ALLTID FÖRVARA STEARINLJUS OCH ANDRA ÖPPNA ELDLÅGOR PÅ
AVSTÅND FRÅN PRODUKTEN.
Utrustning som är kopplad till skyddsjord via jordat vägguttag och/eller via annan utrustning och samtidigt är kopplad till kabel-TV nät kan i
vissa fall medfőra risk főr brand. Főr att undvika detta skall en galvanisk isolator finnas mellan utrustningen och kabel-TV-nätet vid anslutning av
utrustningen till kabel-TV-nätet.
Den här symbolen visar att det finns hög spänning
på insidan. Det är farligt att komma i kontakt med
produktens insida.
Den här symbolen anger att det finns viktig
dokumentation som medföljer produkten
angående dess funktion och underhåll.
* Siffrorna och bilderna i den här bruksanvisningen är endast för referens och kan skilja sig från den verkliga produkten.
Produktdesignen och -specifikationerna kan ändras utan föregående meddelande. CIS-språken (ryska, ukrainska,
kazakstanska) är inte tillgängliga för den här produkten, eftersom den har tillverkats för kunder inom EU-området.
Svenska - 2

Vad finns i förpackningen?
Fjärrkontroll batterier (AAA x 2) Regelguide
Bruksanvisning Strömsladd
Garantibevis (inte tillgängligt på alla platser)
IR-förlängningskabel Kabelhållare
- Försäkra dig om att följande delar följer med din TV. Kontakta din återförsäljare om det saknas något.
- Delarnas färg och form kan variera beroende på modell.
- Kablar som inte följer med kan köpas separat.
- Kontrollera efter tillbehör gömda bakom eller i förpackningsmaterialet när du öppnar förpackningen.
En administrationsavgift kan tillkomma om
(a) en tekniker tillkallas och det inte finns något fel på produkten (t.ex. om du inte har läst den här bruksanvisningen)
(b) du tar enheten till ett reparationscenter och det inte finns något fel på produkten (t.ex. om du inte har läst den här
bruksanvisningen).
Du kommer att informeras om administrationsavgiften innan teknikern besöker dig.
Svenska
Varning: Skärmen kan skadas från direkt tryck vid felaktig
hantering. Vi rekommenderar att du lyfter TV:n i kanterna, så som
visas.
Svenska - 3
Rör ej
den här skärmen!
Montera TV:n på stativet
Se till att du har alla tillbehör som visas och att du monterar stativet enligt medföljande monteringsanvisningar.
Installera TV:n på väggen med
väggmonteringskitet (tillbehör)
Om du monterar produkten på en vägg ska den monteras enligt tillverkarens rekommendationer. Om
produkten inte är korrekt monterad kan den glida eller ramla ner, vilket kan orsaka skador på barn och vuxna
samt allvarliga skador på produkten.
Installera väggmonteringskitet
Kit för väggmontering (säljs separat) gör det möjligt för dig att montera TV:n på väggen.
För detaljerad information om hur du utför en väggmontering, se de medföljande anvisningarna för väggmontering. Vi
rekommenderar att du kontaktar en tekniker för montering av väggfästet. Vi rekommenderar att du inte gör detta själv.
Samsung Electronics är inte ansvarigt för eventuella skador på produkten eller personskada på dig själv eller andra om du
väljer att montera produkten själv.
Väggfäste
TV
C
Specifikationer för väggmonteringssats (VESA)
Väggmonteringssatsen medföljer inte utan säljs separat. Installera väggfästet på en fast vägg som är helt lodrät mot golvet. Om
väggsatsen monteras i andra byggmaterial, kontakta närmaste återförsäljare. Om produkten har installerats i ett tak eller på en
vägg som lutar kan det resultera i allvarlig personskada.
- Standardmåtten för väggmonteringskitet visas i tabellen nedan.
- Vid köp av vår väggmonteringssats medföljer en detaljerad installationsmanual och alla nödvändiga delar för montering.
- Använd inte skruvar som inte efterlever VESA-standard för skruvspecifikationer.
- Använd inte skruvar som är längre än standardmåtten eller inte uppfyller VESA-standardskruvspecifikationer. Skruvar
som är för långa kan orsaka skada mot TV:ns insida.
- För väggmonteringar som inte efterlever VESA-standard för skruvspecifikationer kan skruvarnas längd variera beroende
på specifikationerna.
- Fäst inte skruvarna för hårt eftersom det kan skada produkten eller göra att den ramlar ned och orsakar personskada.
Samsung kan inte hållas ansvarigt för den här typen av olyckor.
Svenska - 4
- Samsung kan inte hållas ansvarigt för produkt- eller personskada som uppstår till följd av att en väggmontering används
som inte är VESA-certifierad eller om kunden underlåter att följa produktinstallationsbeskrivningarna.
- Montera inte TV:n i mer än 15 graders lutning.
När du använder ett väggfäste från tredje part – observera att monteringsskruvens längd (C) visas nedan.
LED 5-serien
Produktfamilj Tum VESA-spec.(A * B) C (mm) Standardskruv Antal
32
LED-TV
LED 6-serien
Produktfamilj Tum VESA-spec.(A * B) C (mm) Standardskruv Antal
LED-TV
40
46
50
40 200 X 200
46
55
60
Installera inte väggmonteringssatsen med TV:n påslagen. Det kan leda till personskada på grund av
elstötar.
200 X 200
400 X 400
400 X 400
10,0 ~ 28,0
10,0 ~ 28,0
M6
M8
M6
M8
4
4
Tillhandahåll fullgod ventilation för din TV
När du installerar TV:n ska du hålla ett avstånd på minst 10 cm mellan TV:n och andra föremål (väggar, höljets sidor etc.) för
att säkerställa lämplig ventilation. Om du underlåter att hålla fullgod ventilation kan det resultera i brand eller problem med
produkten orsakat av en ökning av den invändiga temperaturen.
Om du använder delar från en annan tillverkare kan det orsaka problem med produkten eller skador på grund av att produkten
faller.
- Om du installerar din TV med ett stativ eller ett väggstativ ska du endast använda delar som tillhandahålls av Samsung
Electronics.
Svenska
Installation med ett stativ. Installation med ett väggfäste.
10 cm
10 cm
10 cm
10 cm
10 cm
10 cm
Andra varningar
- TV:ns faktiska utseende kan variera från bilderna i den här bruksanvisningen, beroende på modell.
- Var försiktig när du rör vid TV:n. Vissa delar kan bli något varma.
Svenska - 5
10 cm

Montera TV:n mot väggen
Varning: Om du drar i, trycker på eller klättrar på TV:n kan det göra att den faller ned.
I synnerhet är det viktigt att barn inte hänger på eller gör TV:n ostadig. Om de gör det
kan det orsaka att TV:n välter och leda till allvarlig personskada eller dödsfall. Följ alla
säkerhetsanvisningar som medföljer i säkerhetsflyern för TV:n. För ökad stabilitet och
säkerhet kan du köpa och installera antifall-skyddsenheten som beskrivs nedan.
Så här gör du för att undvika att TV:n faller ned
1. Skruva i skruvarna ordentligt i klämmorna och fäst dem i väggen. Se till att
skruvarna har skruvats fast ordentligt i väggen.
- Det kan krävas ytterligare material, t.ex. förankringar, beroende på typ av
vägg.
- Eftersom nödvändiga klämmor, skruvar och band inte medföljer måste
dessa köpas separat.
2. Ta bort skruvarna från TV:ns baksida i mitten, sätt skruvarna i klämmorna och
dra sedan åt skruvarna i TV:n igen.
- Skruvar kanske inte medföljer produkten. I så fall ska du köpa skruvar
med följande specifikationer.
- Specifikationer för skruvar:
LED 5-serien: För 32 - 40 tum: M6 / 46 - 50 tum: M8
LED 6-serien: För 40 tum: M6 / 46 - 60 tum: M8
3. Anslut klämmorna på TV:n med klämmorna på väggen med ett starkt band och
knyt bandet ordentligt.
- Montera TV:n nära väggen så att den inte faller bakåt.
- Det är säkert att ansluta bandet så att klämmorna som sitter fast i väggen
är i samma nivå eller lägre än klämmorna som sitter fast på TV:n.
- Knyt upp bandet innan du flyttar TV:n.
4. Se till att alla anslutningar sitter fast ordentligt. Kontrollera anslutningarna periodvis avseende tecken på skador. Om du har
några frågor angående säkerheten för dina anslutningar ska du kontakta en professionell fackman.
- Produktens färg och form kan
variera beroende på modell.
vägg
Ordna kablarna med kabelhållaren
Svenska - 6

Ansluta enheter till TV:n
Du kan ansluta flera externa enheter med kontakterna på baksidan av produkten. Kontrollera kontakterna och läs sedan
monteringsanvisningarna som följer med för mer information om vilka externa enheter som stöds.
Ansluta till en COMMON INTERFACE-plats (din
kortplats för TV-tittande)
- Stäng av TV:n för att ansluta eller koppla från ett CI-kort eller en CI-kortadapter.
Använda ”CI” eller ”CI+”-kort
För att kunna titta på betalkanaler måste ”CI”- eller ”CI+”-kortet matas in.
- Om du inte matar in ”CI”- eller ”CI+”-kortet kommer vissa kanaler att visa
meddelandet ”Kodad signal”.
- Information som bland annat omfattar ett telefonnummer, ”CI”- eller ”CI+”kortets ID, värdens ID och annan information som visas i ungefär 2–3
minuter. Om ett felmeddelande visas kontaktar du tjänsteleverantören.
- När konfigurationen av kanalinformationen slutförts visas meddelandet
”Uppdateringen klar”, vilket innebär att kanallistan har uppdaterats.
OBS!
- Du behöver ett ”CI”- eller ”CI+”-kort från en lokal kabeltjänstleverantör.
- Ta ut ”CI”- eller ”CI+”-kortet genom att försiktigt dra ut det, eftersom ”CI”- eller ”CI+”-kortet kan skadas om det tappas.
- Sätt i ”CI”- eller ”CI+”-kortet i pilens riktning på kortet.
- Placeringen av platsen COMMON INTERFACE kan variera beroende på modell.
- Ett ”CI”- eller ”CI+”-kort stöds inte i alla länder och regioner. Kontrollera med din auktoriserade återförsäljare.
- Om du får problem ska du kontakta ett serviceställe.
- Mata in ”CI”- eller ”CI+”-kortet som stöder de aktuella antenninställningarna. Skärmen blir förvriden eller syns inte.
Svenska
Svenska - 7
Ansluta till ett nätverk
Genom att ansluta TV:n till ett nätverk kan du få åtkomst till onlinetjänster, t.ex. Smart Hub, samt programuppdateringar.
Nätverksanslutning – Trådlös
LED 6-serien
Anslut TV:n till internet med en standardrouter eller ett modem.
Trådlös IP-router eller modem med
Nätverksporten på väggen
Nätverkskabel (medföljer ej)
LED 5-serien
Anslut TV:n till Internet med en standardrouter eller ett modem. Om du vill ansluta trådlöst måste du först koppla in en
”Samsung trådlös nätadapter” (WIS12ABGNX – säljs separat) i någon av USb-portarna på TV:n.
Nätverksporten på väggen
en DHCP-server
Trådlös IP-delare
(Router med DHCP-server)
Samsung trådlösa
LAN-adapter (medföljer ej)
LAN-kabel (medföljer ej)
Föreskrifter för trådlöst nätverk
- Samsung trådlös LAN-adapter stöder IEEE 802.11a/b/g och n-kommunikationsprotokoll. Samsung rekommenderar
användning av IEEE 802.11n. När du spelar video över en IEEE 802.11b/g-anslutning kanske inte videon visas i så bra
kvalitet.
- För att använda ett trådlöst nätverk måste din TV vara ansluten till en trådlös IP-router eller ett modem. Om den trådlösa
routern stöder DHCP, kan din TV använda en DHCP eller fast IP-adress för att ansluta till det trådlösa nätverket.
- Välj en kanal som inte används för trådlös router. Om kanalinställningen för den trådlösa routern används av en annan
enhet i närheten leder det ofta till störningar och kommunikationsfel.
Svenska - 8

- De flesta trådlösa nätverk har ett valfritt säkerhetssystem. För att aktivera ett trådlöst nätverkssystem behöver du skapa
en säkerhetsnyckel med bokstäver och siffror. Den här säkerhetsnyckeln behövs då för att ansluta till det trådlösa
nätverket.
Nätverksanslutning – Kabel
Det finns tre sätt att ansluta TV:n till nätverket med kabel, beroende på nätverksinställningar. Dessa illustreras nedan:
TV:ns bakpanel
Svenska
Modemporten på väggen
Modemkabel (medföljer ej) Nätverkskabel (medföljer ej)
Modemporten på väggen
Modemkabel
(medföljer ej)
Nätverksporten på väggen
Externt modem
(ADSL-/VDSL-/kabel-TV)
Externt modem
(ADSL-/VDSL-/kabel-TV)
Nätverkskabel
(medföljer ej)
TV:ns bakpanel
IP-router med en DHCP-
server
Nätverkskabel
(medföljer ej)
TV:ns bakpanel
Nätverkskabel (medföljer ej)
- TV:n stöder inte nätverkshastigheter som är mindre än eller lika med 10 Mbps.
- Använd en Kategori 7-kabel för anslutningen.
Svenska - 9
Fjärrkontroll
Lär dig var funktionsknapparna på fjärrkontrollen finns, t.ex:
CH LIST, RETURN, GUIDE
- Den här fjärrkontrollen har blindskrift på knapparna
Ger direkt åtkomst till kanaler.
Väljer alternativt Text-tv PÅ, Dubbel, Mix
Väljer enkelt funktioner som används ofta.
Flyttar markören, väljer menyalternativ på
skärmen och ändrar de värden som visas
Återgår till föregående meny.
Använd de här knapparna enligt
anvisningarna på TV-skärmen.
Använd de här knapparna med specifika
funktioner. Använd de här knapparna
enligt anvisningarna på TV-skärmen.
och
EXIT
.
Slår på och av TV:n.
eller AV.
Justerar volymen.
Visar kanallistor.
Öppnar OSD-menyn.
på TV-menyn.
Power, Channel
SOURCE, MUTE
, och
,
Y, < P >
Volume
och kan användas av synskadade.
Slår på och av digital-tv-boxen.
Visar och väljer tillgängliga videokällor.
Går tillbaka till föregående kanal.
Stänger av ljudet tillfälligt.
Byter kanal.
Startar
e-Manual-kapitlet Smarta funktioner >
Smart Hub
Visar EPG-information (Elektronisk
programguide).
Visar information på TV-skärmen.
Stänger menyn.
sportvisningsupplevelse.
SEARCH
att använda sökfönstret.
KEYPAD
på skärmen kan du enkelt mata in siffror,
styra innehåll och använda funktioner.
E-MANUAL
P.SIZE
AD/SUBT.
,
MENU, TOOLS
Smart Hub
: Aktivera
: Med den virtuella fjärrkontrollen
: Ändra bildstorlek.
-programmen. Se
.
Fotbollsläge
: Tryck på den här knappen för
: Visar
e-Manual
: Visar
Hjälpmedelsgenvägar
, E,
INFO
för optimal
.
,
.
Svenska - 10
 Loading...