

Samsung UE32D5500RW, UE32D5520RW, UE40D5520RW, UE40D5500RW, UE46D5520RW User Manual [pl]
E-MANUAL
Связывайтесь с SAMSUNG по всему миру
Если у вас есть предложения или вопросы по продуктам Samsung, связывайтесь с информационным центром
Samsung.
Страна
RUSSIA 8-800-555-55-55 www.samsung.ru
Georgia 8-800-555-555 -
Armenia 0-800-05-555 -
Azerbaijan 088-55-55-555 -
KAZAKHSTAN 8-10-800-500-55-500 -
UZBEKISTAN 8-10-800-500-55-500 www.samsung.com/kz_ru
KYRGYZSTAN 00-800-500-55-500 www.samsung.com
TADJIKISTAN 8-10-800-500-55-500 www.samsung.com
UKRAINE 0-800-502-000 www.samsung.ua
Belarus 810-800-500-55-500 -
Moldova 00-800-500-55-500 -
Производитель:
ООО «Самсунг Электроникс Рус Калуга»,
249002, Калужская обл., Боровский р-н, д. Коряково, Первый Северный проезд, владение 1
Центр поддержки покупателей
Веб-узел
www.samsung.com/ua_ru
LED-ТЕЛЕВИЗОР
руководство пользователя
© 2011 Samsung Electronics Co., Ltd. All rights reserved.
удивительные возможности
Благодарим за приобретение продукта компании.
Для получения более полного обслуживания
зарегистрируйте свое устройство по адресу
www.samsung.com/register
Модель____ Серийный номер. _____________
BN68-03404J-02
For more information on how to use e-Manual (p. 14)
Figures and illustrations in this User Manual are provided for reference only and may differ from actual product
appearance. Product design and specifications may be changed without notice.
Digital TV notice
1. Functionalities related to Digital TV (DVB) are only available in countries/areas where DVB-T (MPEG2 and MPEG4 AVC) digital terrestrial signals are
broadcasted or where you are able to access to a compatible DVB-C (MPEG2 and MPEG4 AAC) cable-TV service. Please check with your local
dealer the possibility to receive DVB-T or DVB-C signal.
2. DVB-T is the DVB European consortium standard for the broadcast transmission of digital terrestrial television and DVB-C is that for the broadcast
transmission of digital TV over cable. However, some differentiated features like EPG (Electric Programme Guide), VOD (Video On Demand) and so
on, are not included in this specification. So, they cannot be workable at this moment.
3. Although this TV set meets the latest DVB-T and DVB-C standards, as of [August, 2008], the compatibility with future DVB-T digital terrestrial and
DVB-C digital cable broadcasts cannot be guaranteed.
4. Depending on the countries/areas where this TV set is used some cable-TV providers may charge an additional fee for such a service and you may
be required to agree to terms and conditions of their business.
5. Some Digital TV functions might be unavailable in some countries or regions and DVB-C might not work correctly with some cable service providers.
6. For more information, please contact your local Samsung customer care centre.
The reception quality of TV may be affected due to differences in broadcasting method between the countries. Please check the TV
✎
performance in the local SAMSUNG Authorized Dealer, or the Samsung Call Centre whether it can be improved by reconfiguring TV setting or
not.
Still image warning
Avoid displaying still images (like jpeg picture files) or still image element (like TV programme logo, panorama or 4:3 image format, stock or news bar at
screen bottom etc.) on the screen. Constant displaying of still picture can cause ghosting of LED screen, which will affect image quality. To reduce risk of
this effect, please follow below recommendations:
• Avoid displaying the same TV channel for long periods.
• Always try do display any image on full screen, use TV set picture format menu for best possible match.
• Reduce brightness and contrast values to minimum required to achieve desired picture quality, exceeded values may speed up the burnout process.
• Frequently use all TV features designed to reduce image retention and screen burnout, refer to e-Manual for details.
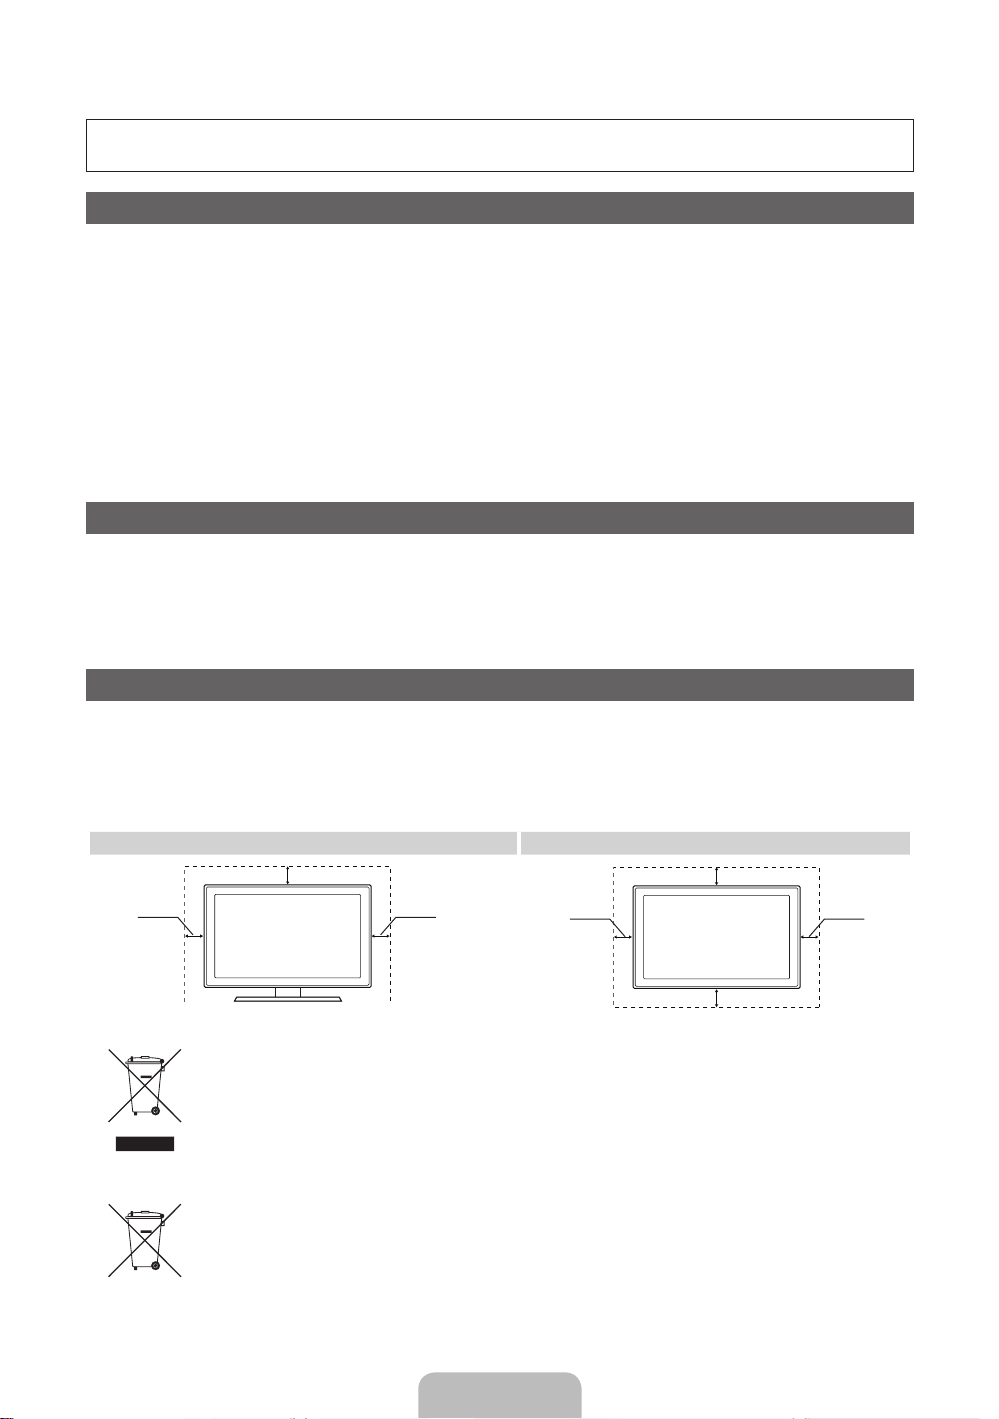
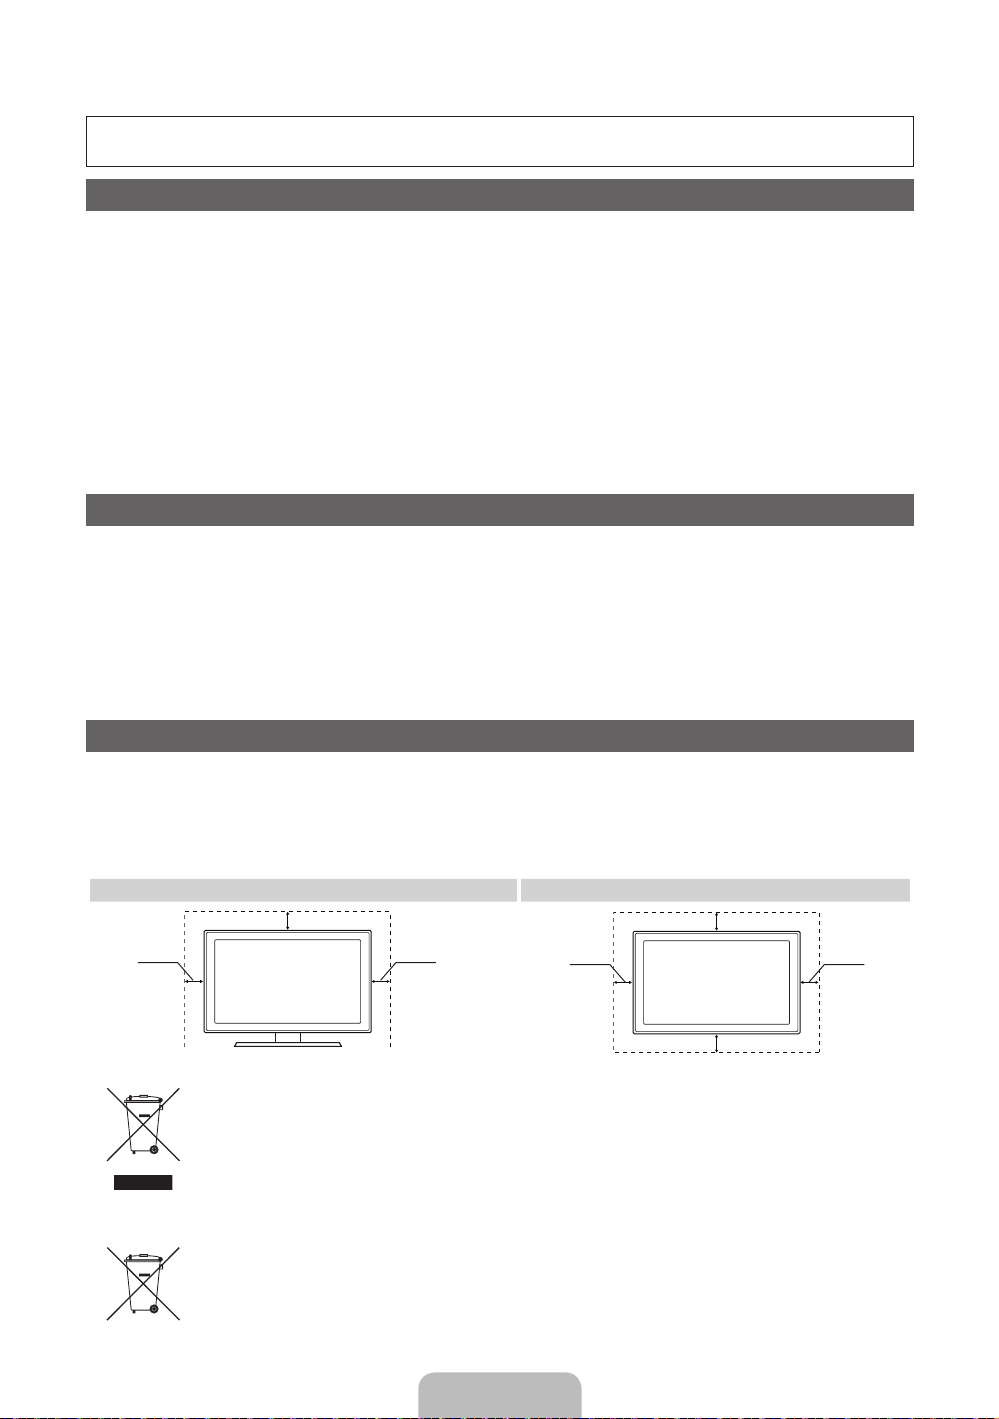
Securing the Installation Space
Keep the required distances between the product and other objects (e.g. walls) to ensure proper ventilation.
Failing to do so may result in fire or a problem with the product due to an increase in the internal temperature of the product.
When using a stand or wall-mount, use parts provided by Samsung Electronics only.
✎
• If you use parts provided by another manufacturer, it may result in a problem with the product or an injury due to the product falling.
The appearance may differ depending on the product.
✎
• Be careful when you contact the TV because some parts can be somewhat hot.
Installation with a stand. Installation with a wall-mount.
10 cm
10 cm10 cm
Correct Disposal of This Product (Waste Electrical & Electronic Equipment)
(Applicable in the European Union and other European countries with separate collection systems)
This marking on the product, accessories or literature indicates that the product and its electronic accessories (e.g. charger,
headset, USB cable) should not be disposed of with other household waste at the end of their working life. To prevent possible
harm to the environment or human health from uncontrolled waste disposal, please separate these items from other types of waste
and recycle them responsibly to promote the sustainable reuse of material resources. Household users should contact either the
retailer where they purchased this product, or their local government office, for details of where and how they can take these items
for environmentally safe recycling. Business users should contact their supplier and check the terms and conditions of the purchase
contract. This product and its electronic accessories should not be mixed with other commercial wastes for disposal.
Correct disposal of batteries in this product
(Applicable in the European Union and other European countries with separate battery return systems)
This marking on the battery, manual or packaging indicates that the batteries in this product should not be disposed of with other
household waste at the end of their working life. Where marked, the chemical symbols Hg, Cd or Pb indicate that the battery
contains mercury, cadmium or lead above the reference levels in EC Directive 2006/66. If batteries are not properly disposed of,
these substances can cause harm to human health or the environment. To protect natural resources and to promote material
reuse, please separate batteries from other types of waste and recycle them through your local, free battery return system.
10 cm
10 cm
10 cm
10 cm
English - 2
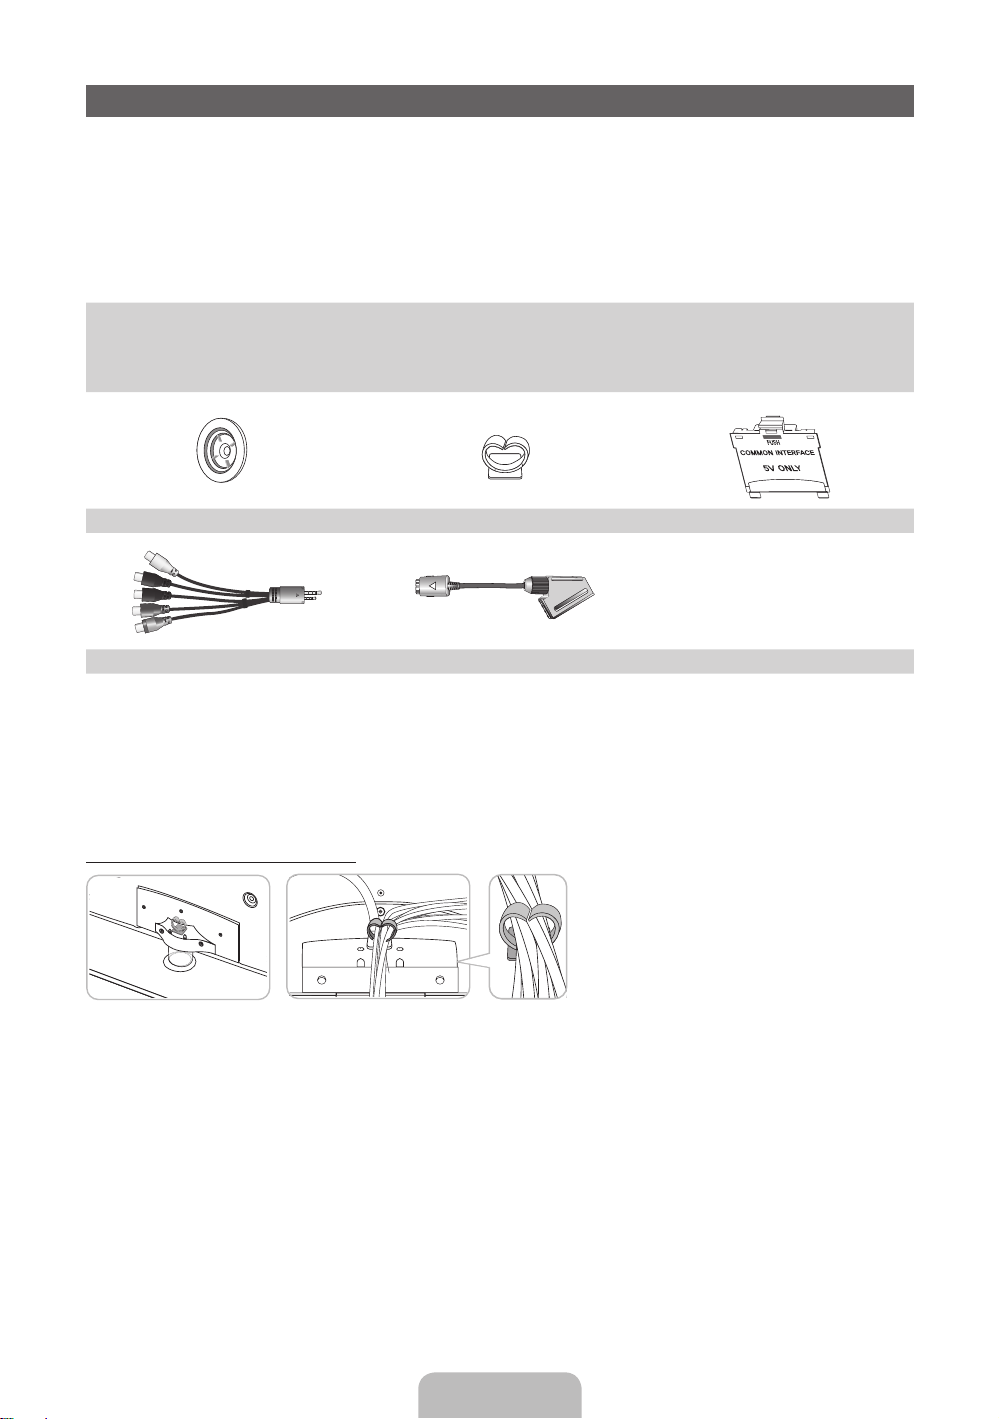
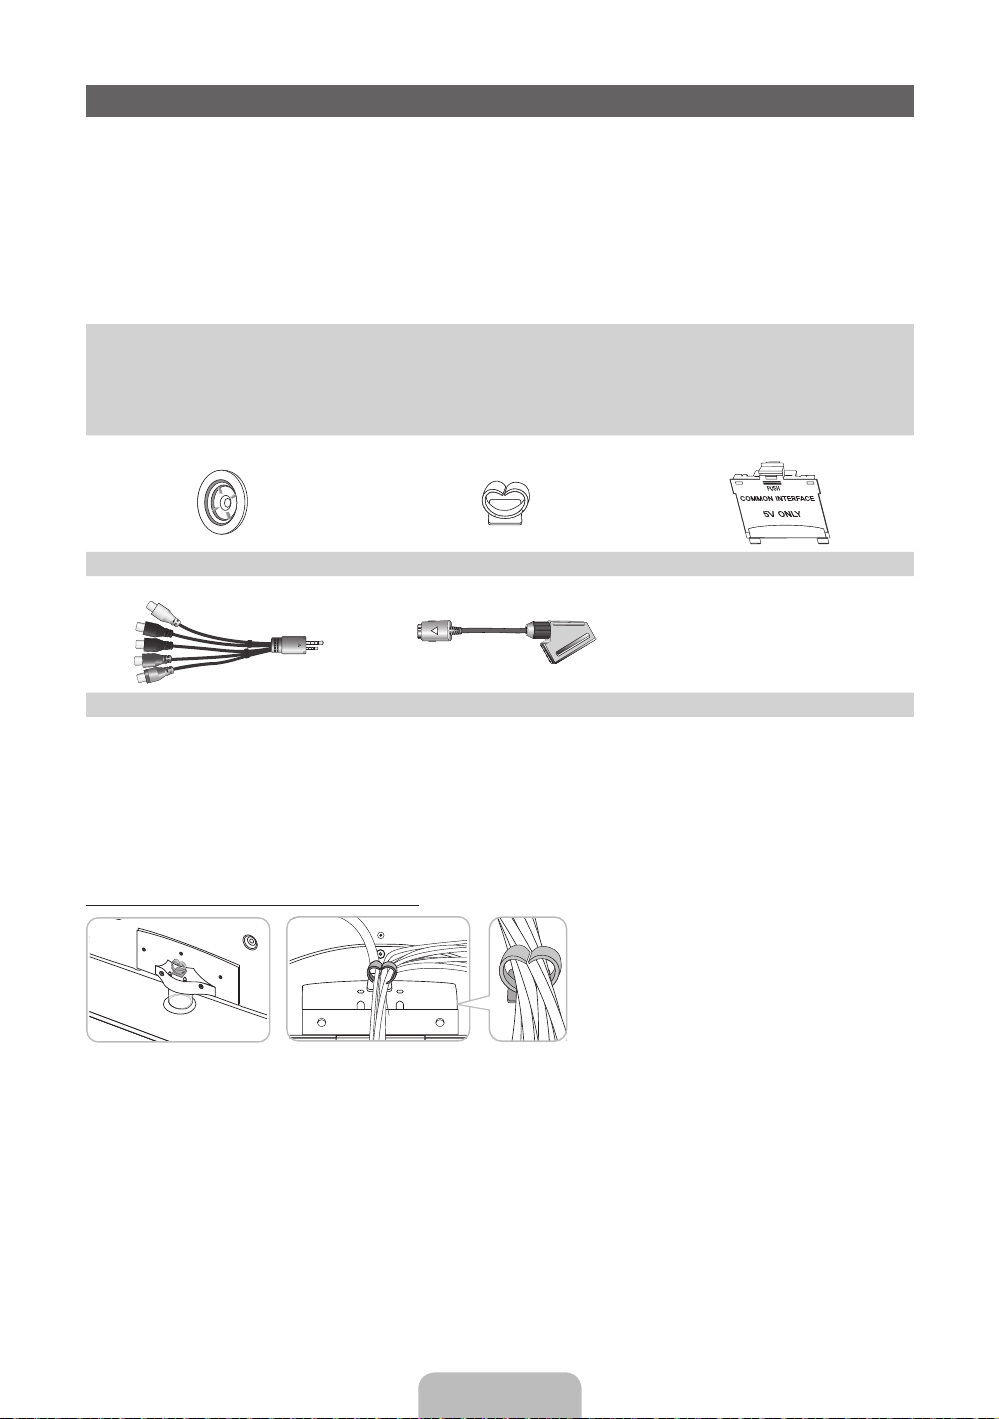
Accessories
✎
Please make sure the following items are included with your TV. If any items are missing, contact your
dealer.
✎
The items’ colours and shapes may vary depending on the models.
✎
Cables not included in the package contents can be purchased separately.
✎
Check that there is no accessory hidden behind packing materials when you open the box.
CAUTION: INSERT SECURELY LEST SHOULD BE DETACHED IN SET
[
• Remote Control & Batteries (AAA x 2) • Power Cord
• Owner’s Instructions • Cleaning-Cloth
• Warranty Card (Not available in some locations) / Safety Guide
Holder Ring (4ea) Holder-Wire Stand CI Card Adapter
AV / Component Adapter Scart Adapter
• An administration fee may be charged if either
– (a) an engineer is called out at your request and there is no defect in the product
(i.e. where you have failed to read this user manual)
– (b) you bring the unit to a repair centre and there is no defect in the product
(i.e. where you have failed to read this user manual).
• The amount of such administration charge will be advised to you before any work or home visit is carried out.
Assembling the Holder-Wire stand
English - 3
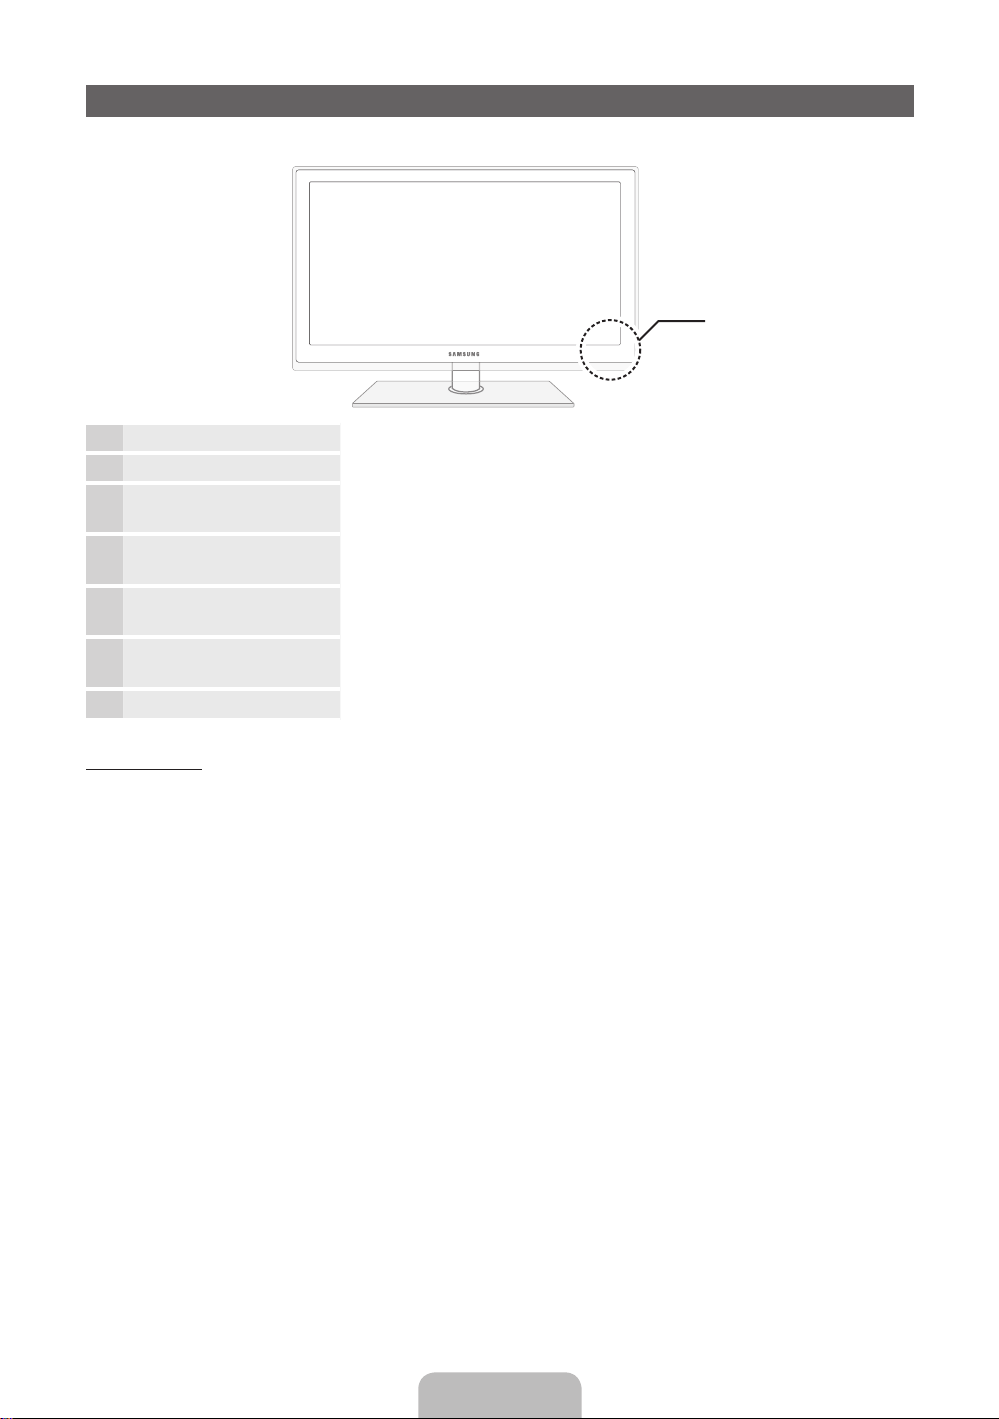
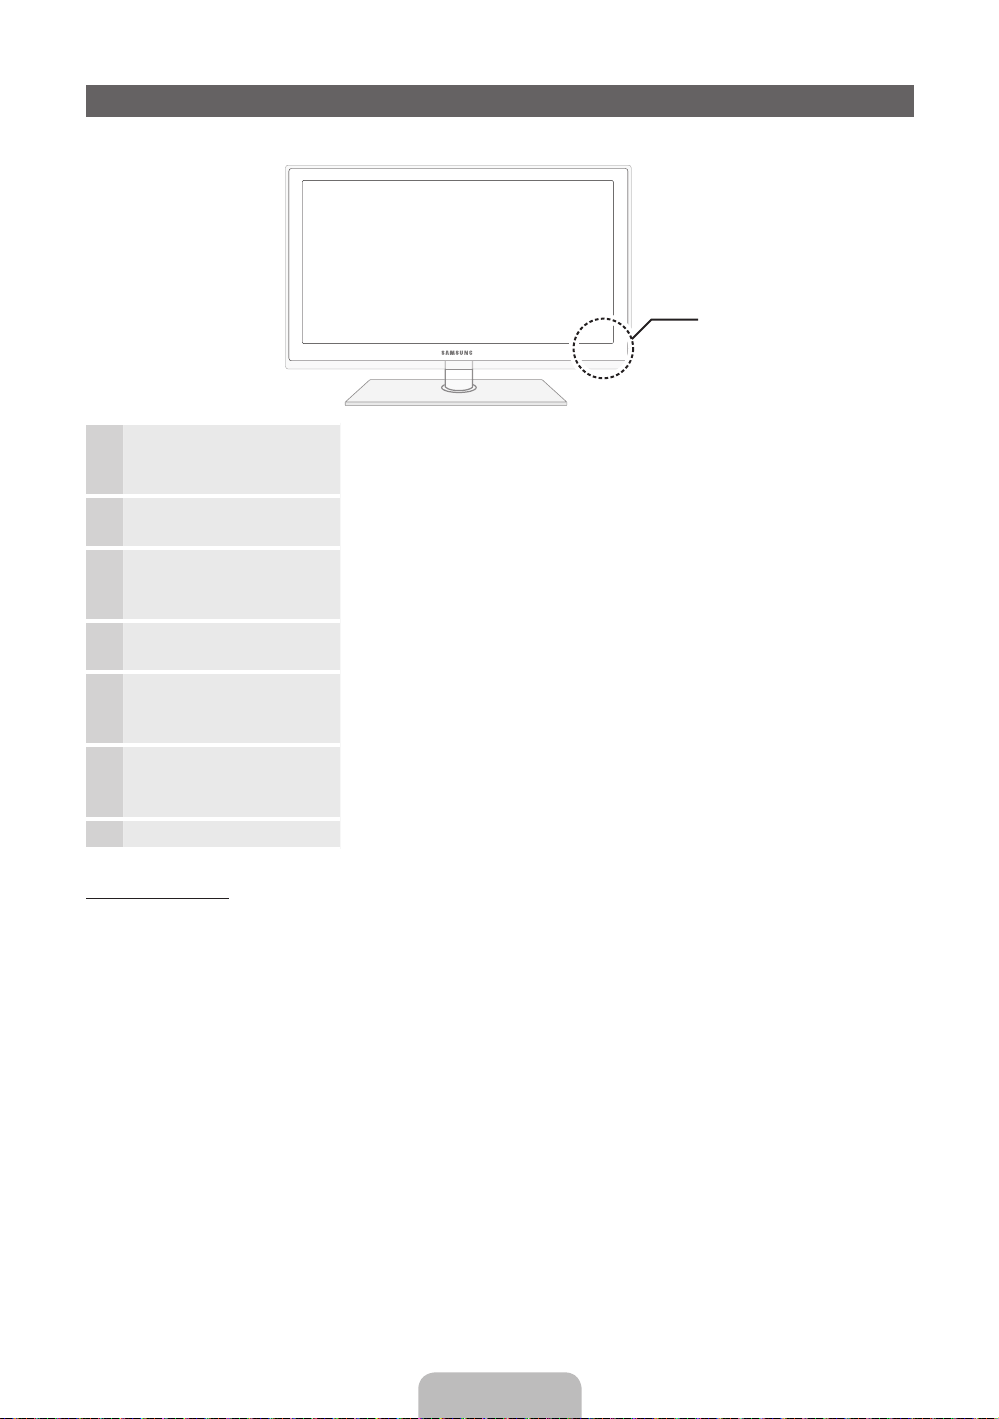
Viewing the Control Panel
✎
The product colour and shape may vary depending on the model.
Control Panel
Remote control sensor Aim the remote control towards this spot on the TV.
Power Indicator Blinks and turns off when the power is on and lights up in standby mode.
SOURCE
MENU Displays an on-screen menu, the OSD (on screen display) of your TV’s
Y
z
P
E
(Power)
Toggles between all the available input sources. In the on-screen menu, use
this button as you would use the ENTERE button on the remote control.
features.
Adjusts the volume. In the OSD, use the
the ◄ and ► buttons on the remote control.
Changes the channels. In the OSD, use the
would use the ▼ and ▲ buttons on the remote control.
Turns the TV on or off.
Y
z
buttons as you would use
buttons as you
Standby mode
Do not leave your TV in standby mode for long periods of time (when you are away on a holiday, for example).
A small amount of electric power is still consumed even when the power button is turned off. It is best to unplug
the power cord.
English - 4
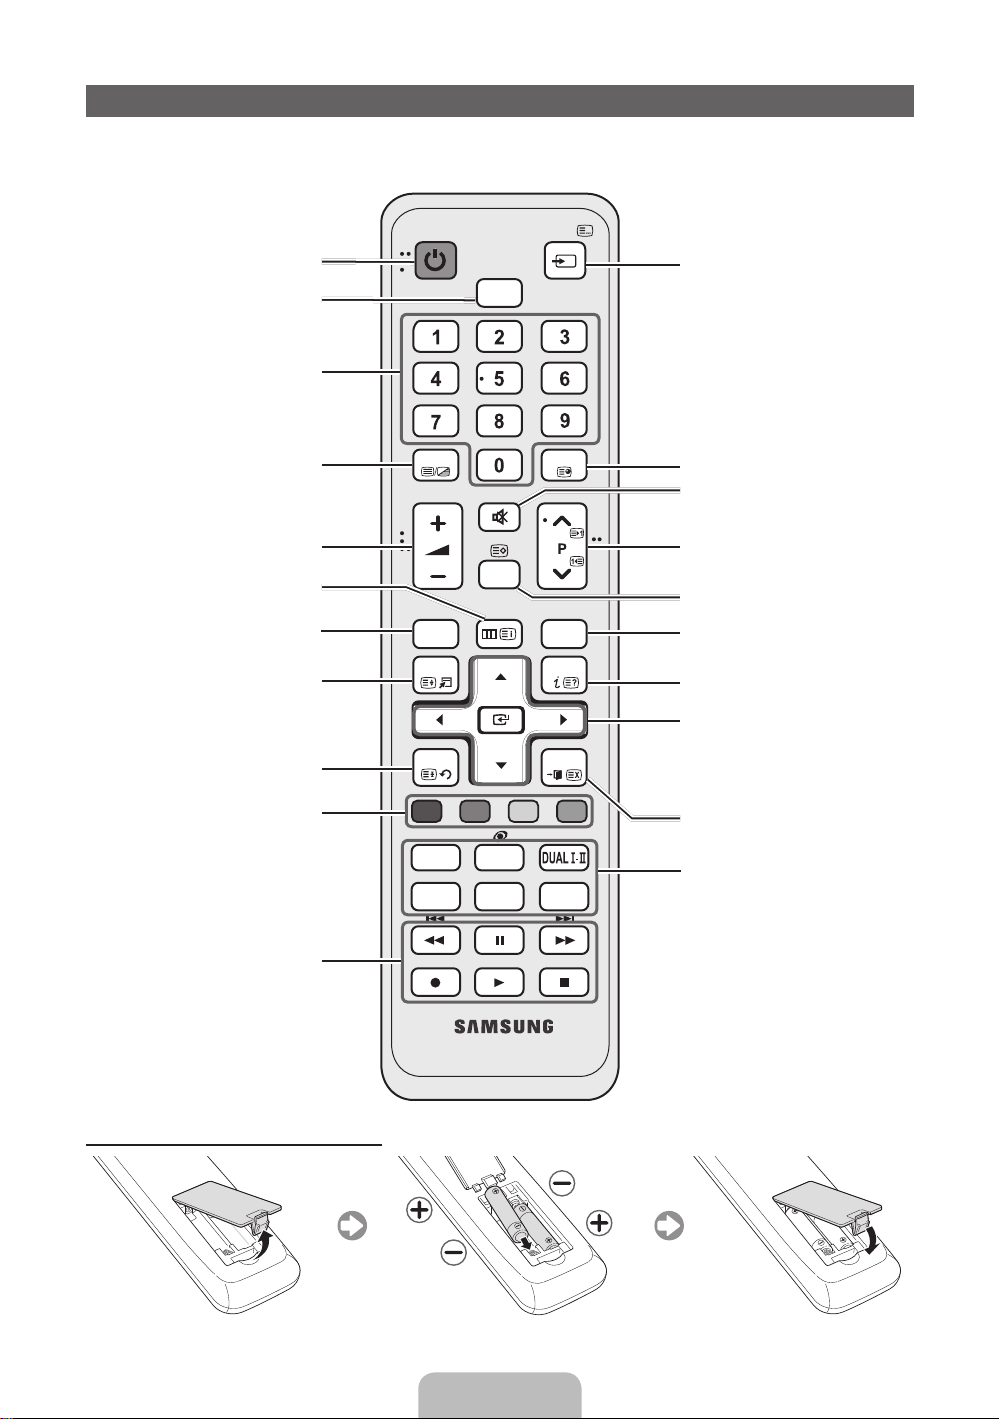
Viewing the Remote Control
✎
This is a special remote control for the visually impaired persons and has Braille points on the Power,
Channel and Volume buttons.
Turns the TV on and off.
Selects the HDMI mode directly.
Have direct access to channels.
Alternately select Teletext ON, Double,
Mix or OFF.
Adjusts the volume.
Opens the OSD.
Link to various application services.
Quickly select frequently used functions.
Returns to the previous menu.
POWER
TTX/MIX
HUB
SMART
TOOLS
RETURN
HDMI
MUTE
CH LIST
MENU
SOURCE
PRE-CH
GUIDE
INFO
EXIT
Displays and selects the available video
sources.
Returns to the previous channel.
Cuts off the sound temporarily.
Changes channels.
Displays channel lists on the screen.
Displays the EPG (Electronic Programme
Guide).
Displays information on the TV screen.
u/d/l/r
: Move the cursor on-screen
menu item.
E
ENTER
changes the corresponding item value.
: Selects the menu and
These buttons are for the Channel List
and SMART HUB menu, etc.
Use these buttons in SMART HUB and
Anynet+ modes.
Installing batteries (Battery size: AAA)
A B C D
P.MODE
E-MANUAL
SRS
P.SIZE
AD/SUBT.
Exits the menu.
P.MODE: Press to select the Picture
Mode.
SRS: Selects the SRS Theatersound
mode.
DUAL f-g: Sound effect selection.
E-MANUAL: Displays the e-Manual.
P.SIZE: Selects the Picture Size.
AD/SUBT.: Turns the audio description on
and off (not available in some locations). /
Displays digital subtitles.
English - 5
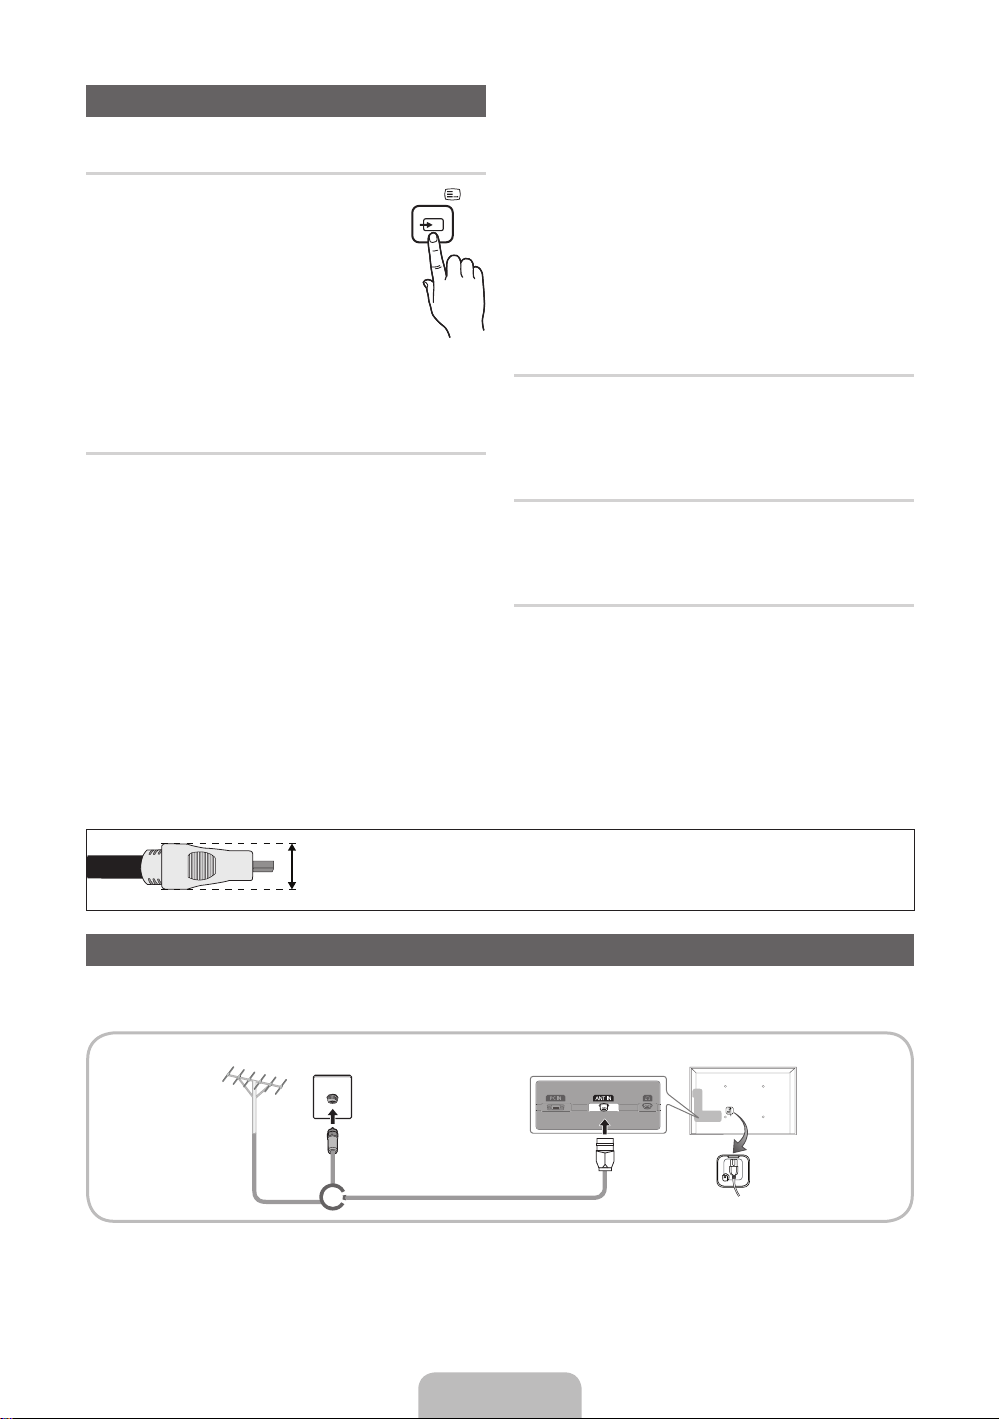
Changing the Input Source
SOURCE
Source
Use to select TV or an external input
sources such as a DVD / Blu-ray player /
cable box / STB satellite receiver.
■ TV / Ext. / PC / HDMI1/DVI / HDMI2
/ HDMI3 / HDMI4 / AV / Component
/ USB / AllShare
✎
In the Source, connected inputs will
be highlighted.
✎
Ext. and PC always stay activated.
Edit Name
In the Source, press the TOOLS button, and then you
can set an external input sources name you want.
■ VCR / DVD / Cable STB / Satellite STB / PVR
STB / AV Receiver / Game / Camcorder / PC /
DVI PC / DVI Devices / TV / IPTV / Blu-ray / HD
DVD / DMA: Name the device connected to the
input jacks to make your input source selection
easier.
✎
When connecting a PC to the HDMI IN 1(DVI)
port with HDMI cable, you should set the TV to
PC mode under Edit Name.
✎
When connecting a PC to the HDMI IN 1(DVI)
port with HDMI to DVI cable, you should set the
TV to DVI PC mode under Edit Name.
✎
When connecting an AV devices to the HDMI IN
1(DVI) port with HDMI to DVI cable, you should
set the TV to DVI Devices mode under Edit
Name.
Edit Favourites
In the Source, press the TOOLS button to select Edit
Favourites. You can set an external input source to
Favourites.
Information
You can see detailed information about the selected
external device.
Refresh
In the Source, If the external devices is not displayed,
press the TOOLS button to select Refresh. Searching
for connected devices.
✎
For best cable connection to this product, be sure to use cables with a maximum thickness as below:
• Maximum thickness - 0.55 inches (14mm)
Connecting to an Antenna
When the TV is initially powered on, basic settings proceed automatically.
✎
Preset: Connecting the mains and antenna.
VHF/UHF Antenna Cable
or
English - 6
Plug & Play (Initial Setup)
POWER
When the TV is initially powered on, a sequence of on-screen prompts will assist in configuring basic settings.
Press the POWERP button. Plug & Play is available only when the Source is set to TV.
✎
Before turning on the TV, make sure the antenna cable is connected (p. 6).
Selecting a language
1
Setting the Network
2
Selecting Store
3
Demo or Home Use
Selecting a country
4
Setting the Clock
5
Mode
Selecting an antenna
6
Selecting a channel
7
Complete
8
Press the ▲ or ▼ button, then press the ENTER
Select the desired OSD (On Screen Display) language.
Set up your network connection. Press the ENTER
to start. If you want to setting to it later, select Skip. For more
information, refer to “Wired / Wireless Network Connection” in the
e-Manual.
Press the ◄ or ► button, then press the ENTER
Select the Home Use mode. Store Demo mode is for retail environments.
To return the unit’s settings from Store Demo to Home Use (standard): Press the
volume button on the TV. When you see the volume OSD, press and hold MENU
for 5 sec.
Store Demo is only for shop display. If you select it, several functions are not able
to use. Please select Home Use when you watch at home.
Press the ▲ or ▼ button, then press the ENTER
appropriate country.
✎
After selecting the country in the Country menu, some models may proceed
with an additional option to setup the pin number.
✎
When you input the PIN number, “0-0-0-0” is not available.
✎
The option may differ depending on country.
Set the Clock Mode automatically or manually.
Auto: Select the time zone where you are located.
Manual: Allows you to manually set the current date and time.
Press the ▲ or ▼ button, then press the ENTER
source to memorise. The option may differ depending on country.
Press the ▲ or ▼ button, then press the ENTER
source to memorise. When setting the antenna source to Cable, a step appears
allowing you to assign numerical values (channel frequencies) to the channels. For
more information, refer to Channel → Memorising Channels in the e-Manual.
Press the ENTER
E
button.
E
button.
E
button
E
button.
E
button. Select the
E
button. Select the Antenna
E
button. Select the channel
P
If You Want to Reset This Feature...
Select System - Plug & Play (Initial Setup). Enter your 4 digit PIN number. The default PIN number is “0-0-0-0”.
If you want to change the PIN number, use the Change PIN function.
You should do Plug & Play (MENU → System) again at home although you did in shop.
✎
If you forget the PIN code, press the remote control buttons in the following sequence in Standby mode,
which resets the PIN to “0-0-0-0”: MUTE → 8 → 2 → 4 → POWER (on).
English - 7
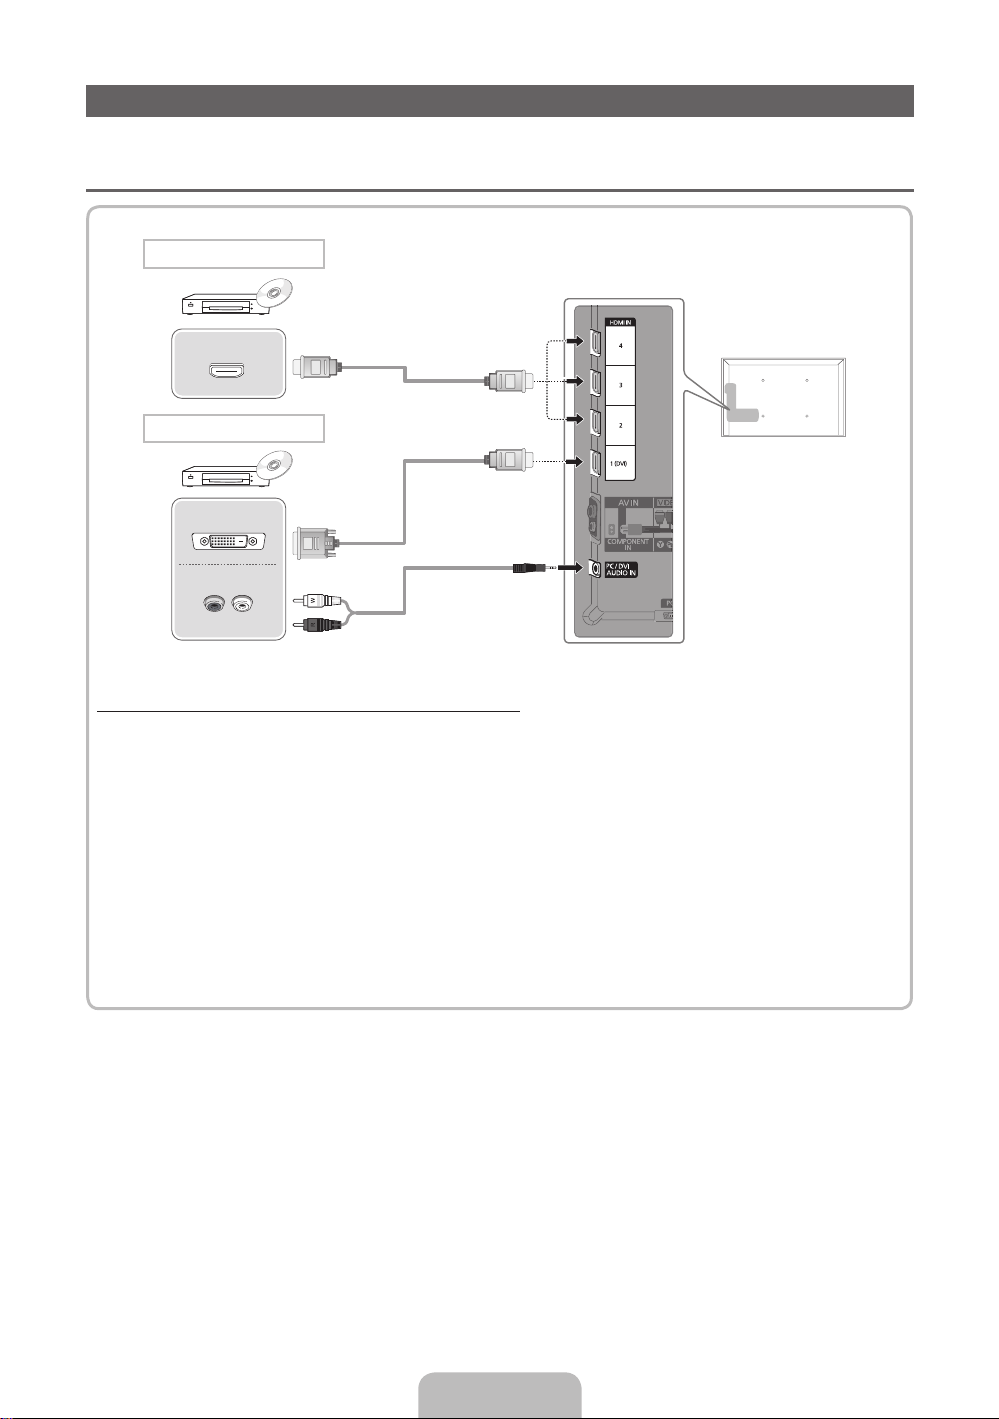
Connecting to an AV devices
Available devices: DVD, Blu-ray player, HD cable box, HD STB (Set-Top-Box) satellite
¦
receiver, VCR
HDMI connection
HDMI OUT
HDMI to DVI connection
DVI OUT
AUDIO OUT
R-AUDIO-L
Using an HDMI or an HDMI to DVI cable (up to 1080p)
✎
HDMI IN 1(DVI), 2, 3, 4 / PC/DVI AUDIO IN
When using an HDMI/DVI cable connection, you must use the HDMI IN 1(DVI) jack for video. A DVD,
x
Blu-ray player, HD cable box, or HD STB satellite receiver may require a DVI-HDMI (DVI to HDMI)
cable or DVI-HDMI (DVI to HDMI) adapter. The PC/DVI AUDIO IN jack is required for audio.
Be sure to use an HDMI cable with a thickness of 14 mm or less.
x
The picture may not display normally (if at all) or the audio may not work if an external device that
x
uses an older version of HDMI mode is connected to the TV. If such a problem occurs, ask the
manufacturer of the external device about the HDMI version and, if out of date, request an upgrade.
Be sure to purchase a certified HDMI cable. Otherwise, the picture may not display or a connection
x
error may occur.
English - 8
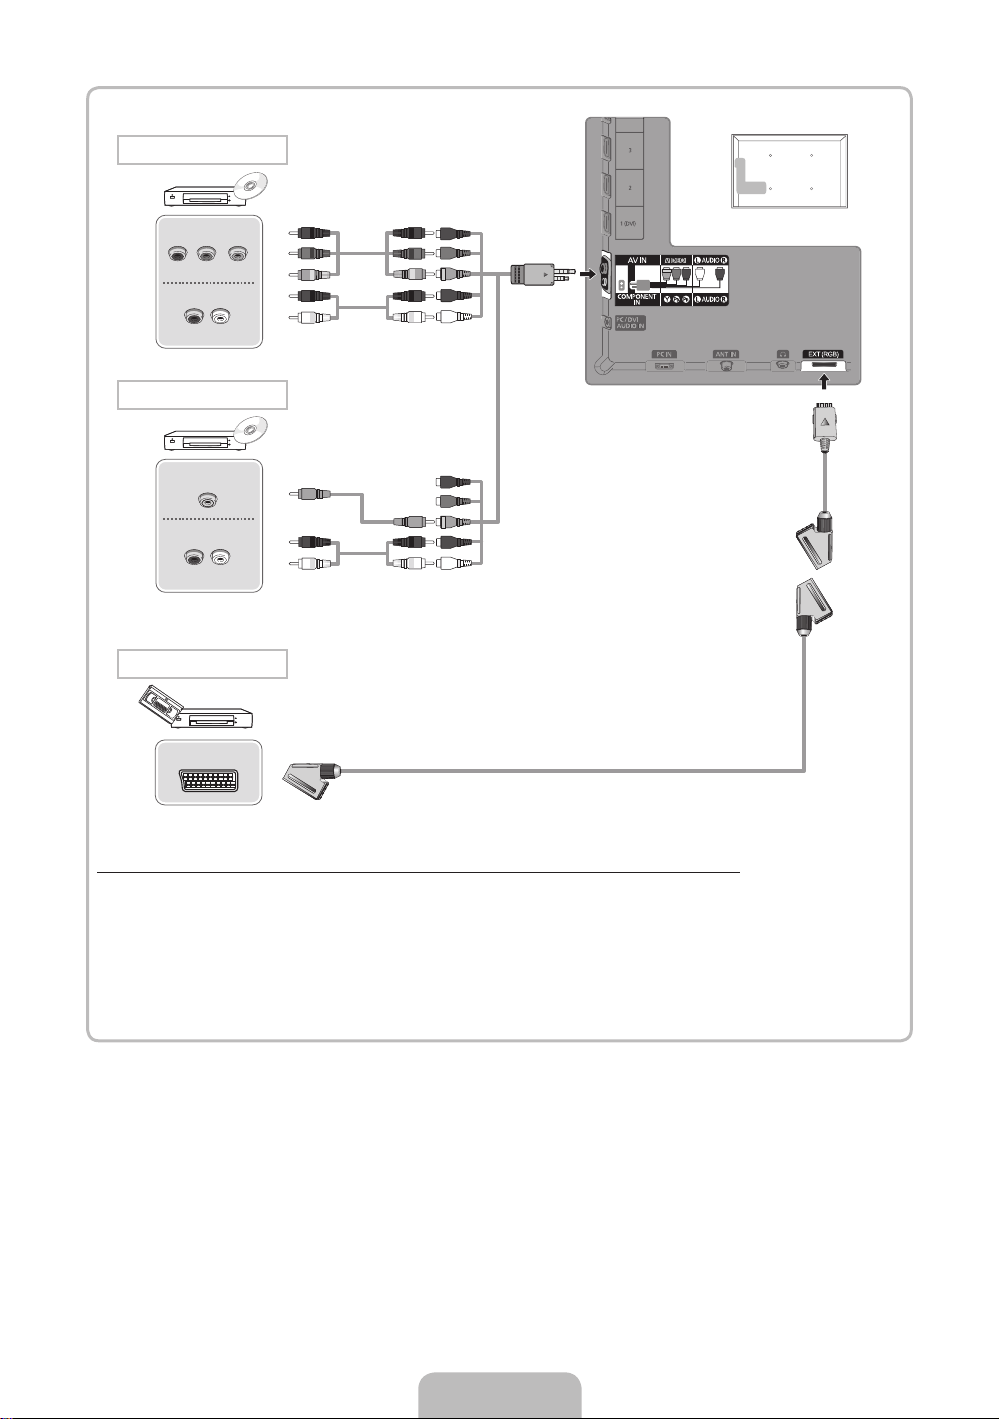
Component connection
COMPONENT OUT
PRPBY
AUDIO OUT
R-AUDIO-L
AV connection
VIDEO OUT
AUDIO OUT
R-AUDIO-L
SCART connection
EXT
RBGRW
Y
RW
R B G R W
Y
R W
Using a Component (up to 1080p) or an Audio/Video (480i only) and a Scart Cable
✎
In Ext. mode, DTV Out supports MPEG SD Video and Audio only.
✎
When connecting to AV IN, the colour of the AV IN [VIDEO] jack (green) will not match the video cable
(yellow).
✎
To obtain the best picture quality, the Component connection is recommended over the A/V
connection.
English - 9
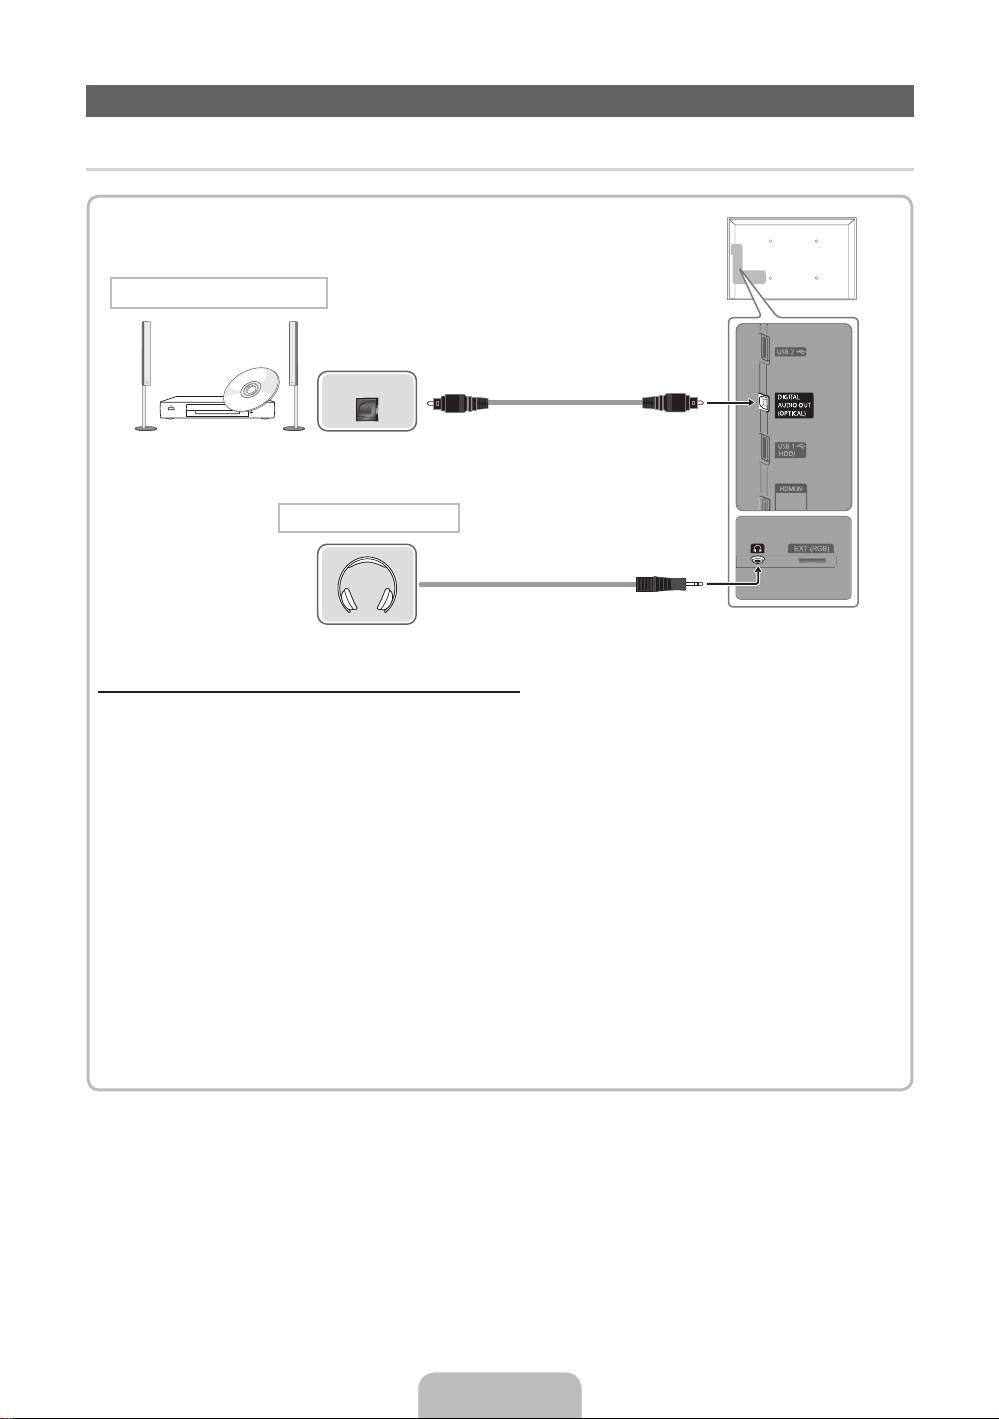
Connecting to a Audio device and PC
¦ Available devices: digital audio system, amplifier, DVD home theatre
DVD home theatre connection
OPTICAL
Headphones connection
Using an Optical (Digital) or a Headphone Connection
✎
DIGITAL AUDIO OUT (OPTICAL)
When a digital audio system is connected to the DIGITAL AUDIO OUT (OPTICAL) jack, decrease the
x
volume of both the TV and the system.
5.1 CH (channel) audio is available when the TV is connected to an external device supporting 5.1 CH.
x
When the receiver (home theatre) is set to on, you can hear sound output from the TV’s optical jack.
x
When the TV is receiving a DTV signal, the TV will send 5.1 CH sound to the home theatre receiver.
When the source is a digital component such as a DVD / Blu-ray player / cable box / STB (Set-TopBox) satellite receiver and is connected to the TV via HDMI, only 2 CH audio will be heard from the
home theatre receiver. If you want to hear 5.1 CH audio, connect the digital audio out jack from your
DVD / Blu-ray player / cable box / STB satellite receiver directly to an amplifier or home theatre.
✎
Headphones H: You can connect your headphones to the headphones output on your set. While the
headphones are connected, the sound from the built-in speakers will be disabled.
Sound function may be restricted when connecting headphones to the TV.
x
Headphone volume and TV volume are adjusted separately.
x
English - 10

¦ Using an HDMI cable or an HDMI to DVI cable or a D-sub cable
✎
Connecting through the HDMI cable may not be supported depending on the PC.
PC connection
HDMI OUT
DVI OUT
AUDIO OUT
AUDIO OUT
PC OUT
Display Modes (D-Sub and an HDMI to DVI Input)
Optimal resolution is 1920 X 1080 @ 60 Hz.
Mode Resolution Horizontal Frequency (KHz) Vertical Frequency (Hz) Pixel Clock Frequency (MHz) Sync Polarity (H / V)
IBM
MAC
VESA DMT
VESA DMT /
DTV CEA
640 x 350
720 x 400
640 x 480
832 x 624
1152 x 870
640 x 480
640 x 480
640 x 480
800 x 600
800 x 600
800 x 600
1024 x 768
1024 x 768
1024 x 768
1152 x 864
1280 x 1024
1280 x 1024
1280 x 800
1280 x 800
1280 x 960
1360 x 768
1440 x 900
1440 x 900
1680 x 1050
1920 x 1080p 67.500 60.000 148.500 +/+
31.469
31.469
35.000
49.726
68.681
31.469
37.861
37.500
37.879
48.077
46.875
48.363
56.476
60.023
67.500
63.981
79.976
49.702
62.795
60.000
47.712
55.935
70.635
65.290
70.086
70.087
66.667
74.551
75.062
59.940
72.809
75.000
60.317
72.188
75.000
60.004
70.069
75.029
75.000
60.020
75.025
59.810
74.934
60.000
60.015
59.887
74.984
59.954
25.175
28.322
30.240
57.284
100.000
25.175
31.500
31.500
40.000
50.000
49.500
65.000
75.000
78.750
108.000
108.000
135.000
83.500
106.500
108.000
85.500
106.500
136.750
146.250
+/-
-/+
-/-
-/-
-/-
-/-
-/-
-/+/+
+/+
+/+
-/-
-/+/+
+/+
+/+
+/+
-/+
-/+
+/+
+/+
-/+
-/+
-/+
✎
NOTE
For HDMI/DVI cable connection, you must use the HDMI IN 1(DVI) jack.
x
The interlace mode is not supported.
x
The set might operate abnormally if a non-standard video format is selected.
x
Separate and Composite modes are supported. SOG(Sync On Green) is not supported.
x
English - 11
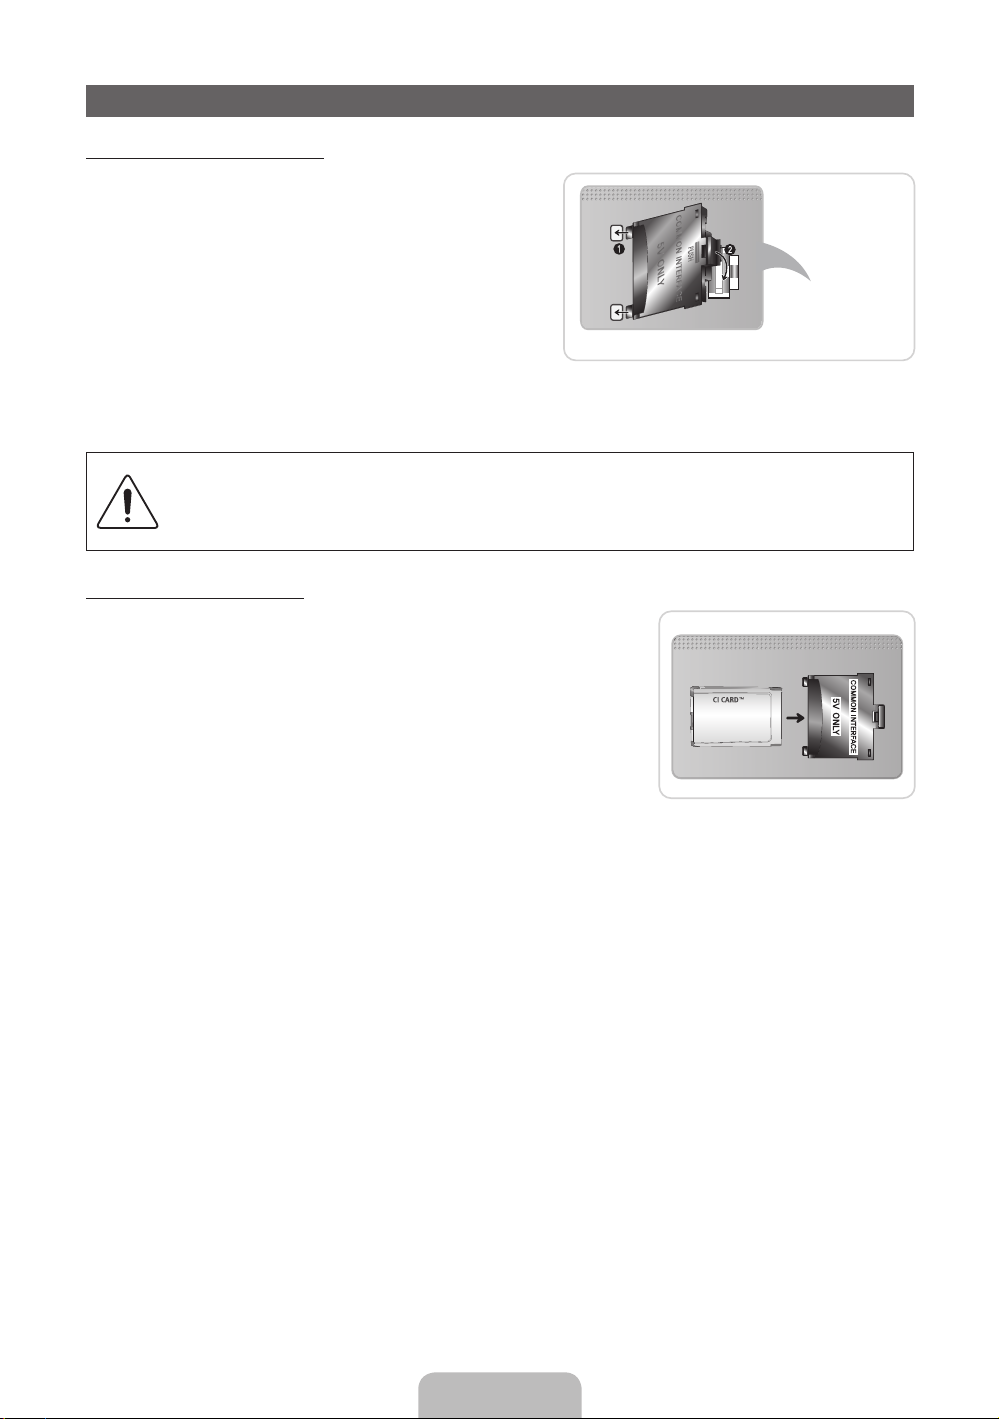
Connecting to a COMMON INTERFACE slot
Attaching the CI Card Adapter
Attach the adapter as shown below.
To connect the CI CARD Adapter, follow these steps.
✎
We recommend attaching the adapter before installing
the wall mount, or inserting the “CI or CI+ CARD.”
1. Insert the CI CARD Adapter into the two holes on the
product 1.
✎
Please find a two holes on the rear of the TV. A two
holes is beside the COMMON INTERFACE port.
2. Connect the CI CARD Adapter into the COMMON
INTERFACE port on the product 2.
3. Insert the “CI or CI+ CARD”.
We recommand that you insert the CI card before you mount the TV on a wall.
It may be difficult to insert after the mounting.
Insert the card after attaching the CI-Module on TV.
It is difficult to attach the module if you insert the card before attaching.
Using the “CI or CI+ CARD”
To watch paid channels, the “CI or CI+ CARD” must be inserted.
• If you don’t insert the “CI or CI+ CARD”, some channels will display
the message “Scrambled Signal”.
• The pairing information containing a telephone number, the “CI or CI+
CARD” ID the Host ID and other information will be displayed in about
2~3 minutes. If an error message is displayed, please contact your
service provider.
• When the configuration of channel information has finished, the
message “Updating Completed” is displayed, indicating the channel
list is updated.
✎
NOTE
You must obtain a “CI or CI+ CARD” from a local cable service provider.
x
When removing the “CI or CI+ CARD”, carefully pull it out with your hands since dropping the “CI or CI+
x
CARD” may cause damage to it.
Insert the “CI or CI+ CARD” in the direction marked on the card.
x
The location of the COMMON INTERFACE slot may be different depending on the model.
x
“CI or CI+ CARD” is not supported in some countries and regions; check with your authorized dealer.
x
If you have any problems, please contact a service provider.
x
Insert the “CI or CI+ CARD” that supports the current antenna settings. The screen will be distorted or
x
will not be seen.
TV Rear
English - 12
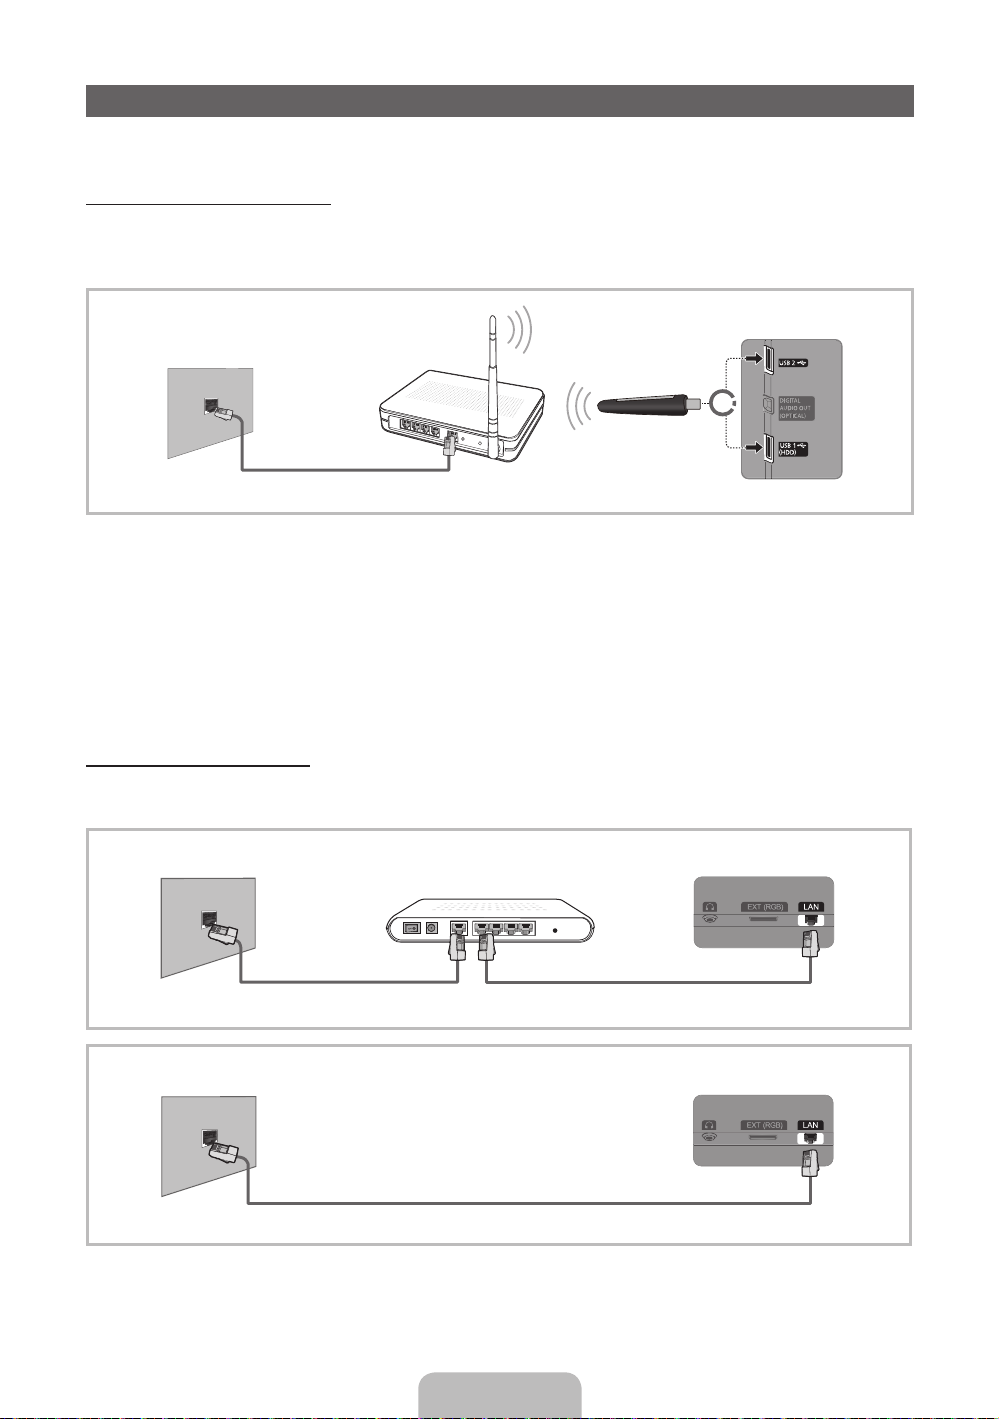
Network Connection
You can set up your TV so that it can access the Internet through your local area network (LAN) using a wired or
wireless connection.
Network Connection - Wireless
You can connect your TV to your LAN through a standard wireless router or modem. To connect wirelessly,
you must first attach a “Samsung Wireless LAN adapter” (WIS09ABGN, WIS09ABGN2, WIS10ABGN - sold
separately) to either the USB 1 (HDD) or USB 2 on the back of your TV. See the illustration below.
The LAN Port on
the Wall
Wireless IP sharer
router
(
LAN Cable
having DHCP
server)
or
Samsung Wireless
LAN Adapter
Samsung’s Wireless LAN adapter supports the IEEE 802.11a/b/g and n communication protocols. Samsung
recommends using IEEE 802.11n. When you play the video over a IEEE 802.11b/g connection, the video may
not play smoothly.
Most wireless network systems incorporate a security system that requires devices that access the network
through an access point or wireless router (typically a wireless IP Sharer) to transmit an encrypted security code
called an access key.
If Pure High-throughput (Greenfield) 802.11n mode is selected and the Encryption type is set to WEP, TKIP or
TKIP AES (WPS2Mixed) for your wireless router, Samsung TVs will not support a connection in compliance with
new Wi-Fi certification specifications.
Network Connection - Wired
There are two main ways to connect your TV to your network using cable, depending on your network setup.
They are illustrated below:
The Modem Port on the Wall
External Modem
(ADSL / VDSL / Cable TV)
TV Rear Panel
The LAN Port on the Wall
LAN Cable
✎
It is not supported when the network speed is under 10 Mbps.
English - 13
LAN CableModem Cable
TV Rear Panel
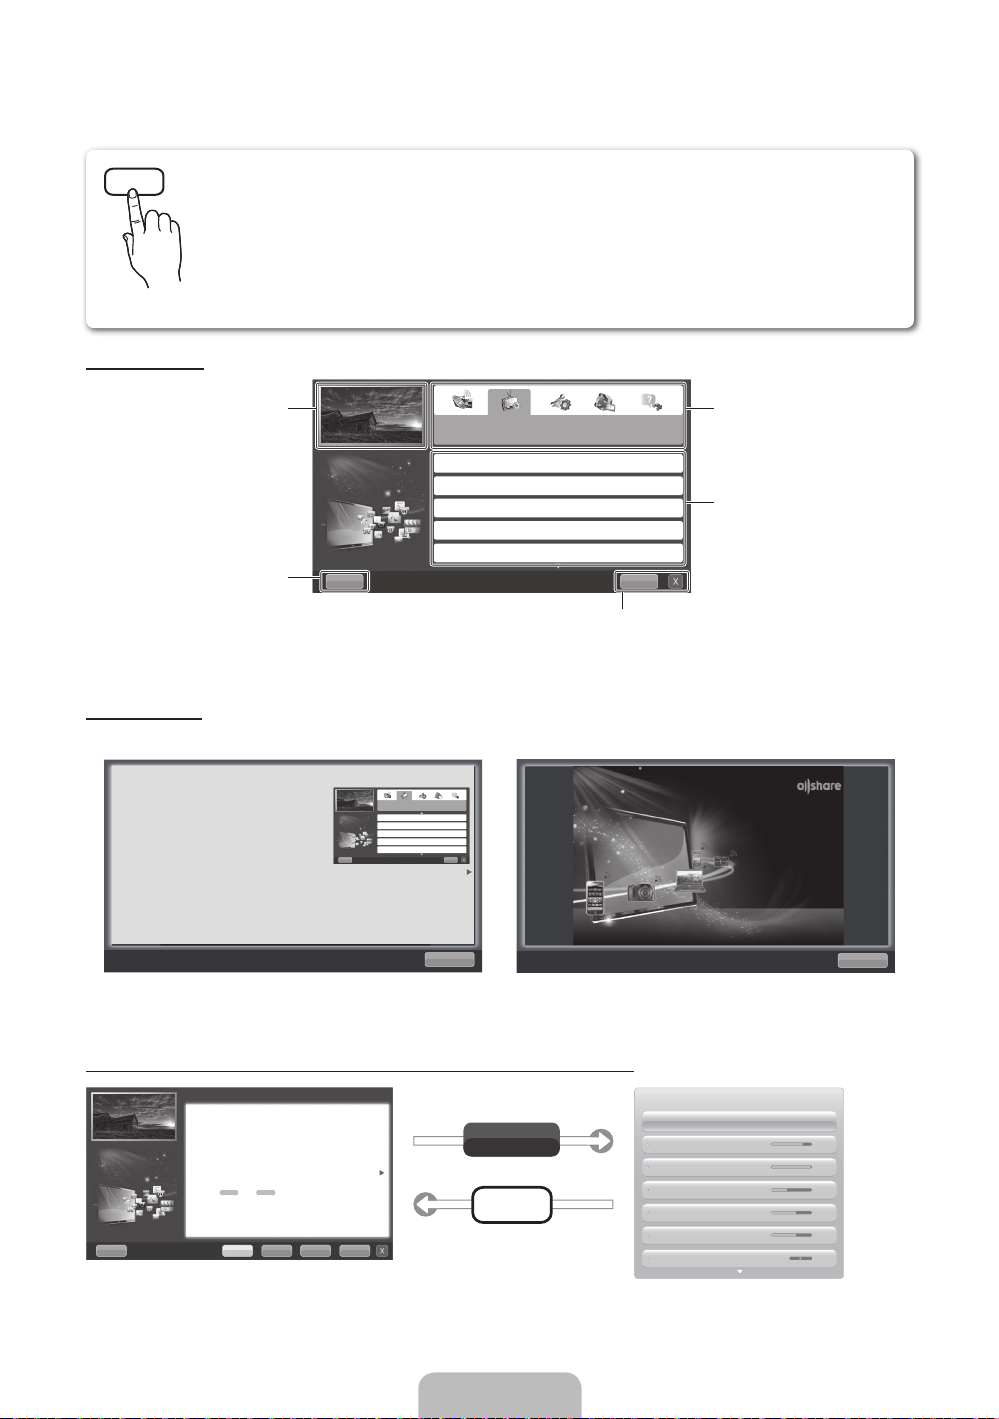
How to view the e-Manual
E-MANUAL
You can read the introduction and instructions about the TV features stored
in your TV.
O
MENUm → Support → e-Manual → ENTER
✎
If you want to return to e-Manual, press E-MANUAL button on remote.
✎
You can’t use the Try Now function, if the menu is not activated.
Screen Display
TV Screen: Displays the current input
Help: Displays the e-Manual Guide
or Product guide. Press ENTER
Using the Help
Display the Product Guide by pressing Help.
source screen.
E
button.
Basic Features
Changing the Preset Picture Mode
Adjusting Picture Settings
Changing the Picture Size
Changing the Picture Options
Setting up the TV with Your PC
E
Change the category. Press
button to select category you want.
Displays the sub-menu list. Press
ENTER
menu you want.
IndexHelp
Index: Displays index screen.
X: Exit the e-Manual.
E
button to select sub-
l
or r
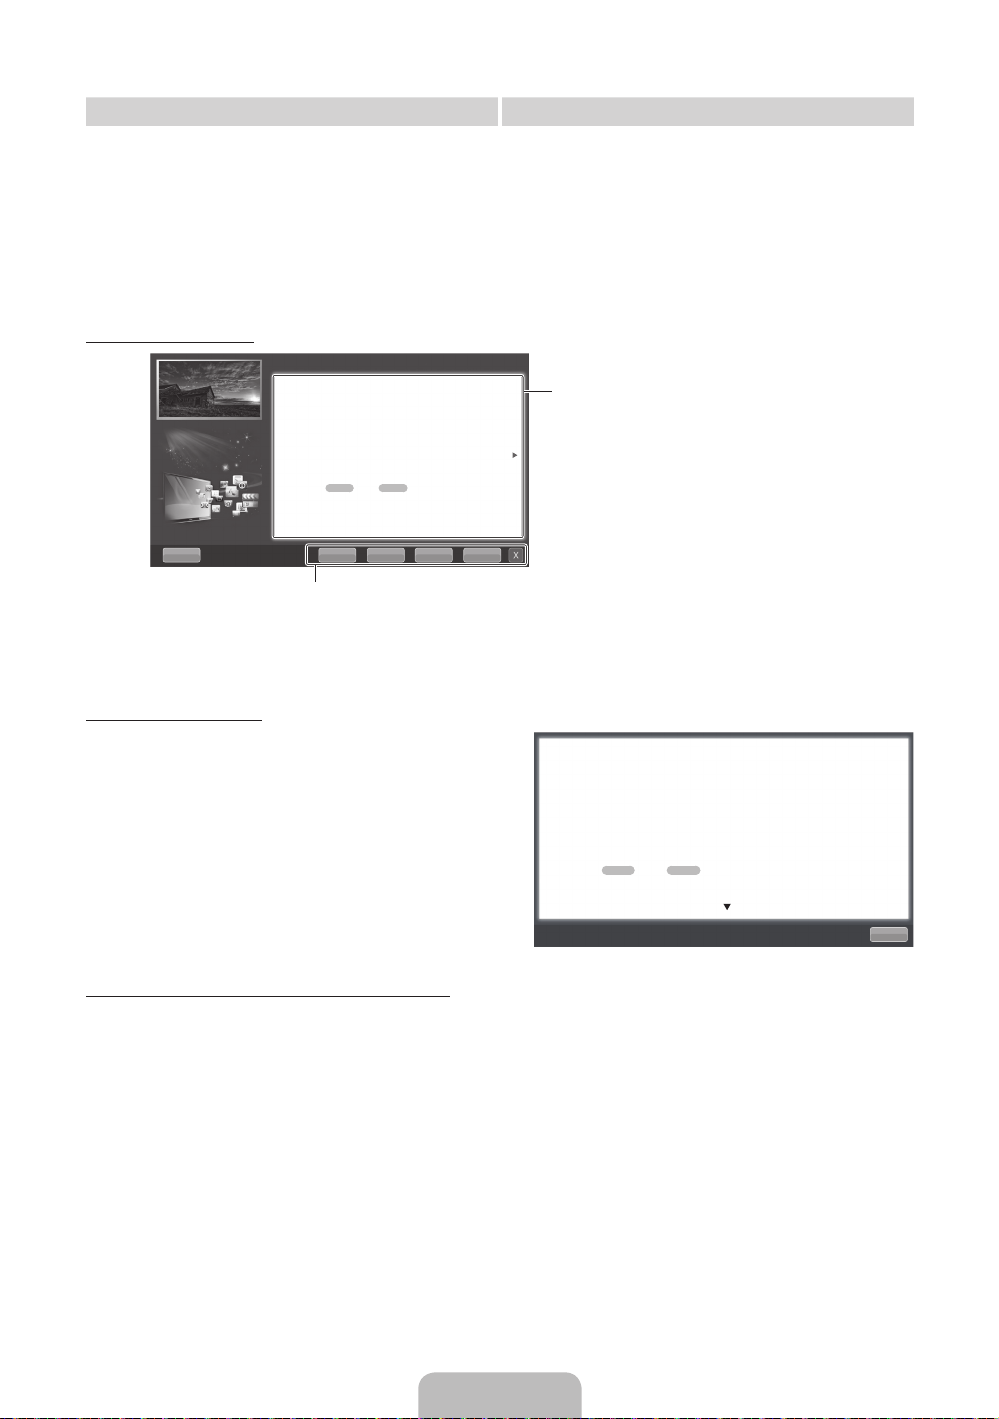
How to view the e-Manual
You can read the introduction and instructions about
the TV features stored in your TV.
m
→ Support → e-Manual → ENTER
O MENU
E
Basic Features
Changing the Preset Picture Mode
Adjusting Picture Settings
Changing the Picture Size
Changing the Picture Options
Setting up the TV with Your PC
IndexHelp
Return
<E-manual Guide>
The e-Manual guide appears as above.
The product guide appears as above.
How to toggle between the e-Manual and the corresponding menu(s).
Basic Features > Changing the Preset Picture Mode (5/10)
Changing the Preset Picture Mode
O MENUm → Picture → Picture Mode → ENTER
■
Picture Mode t
Select your preferred picture type.
N When an input source is set to PC, the Picture Mode is only available the
Standard and Entertain.
• Dynamic: Suitable for a bright room.
• Standard: Suitable for a normal environment.
for LED TV
/ Relax
• Natural
• Movie: Suitable for watching movies in a dark room.
• Entertain: Suitable for watching movies and games.
Help Try Now Home Zoom Index
✎
This function is not enabled in some menus.
for PDP TV
: Suitable for reducing eye strain.
E
Try Now
E-MANUAL
Sync media from multiple devices with AllShare
AllShare™ syncs your digital devices so you can
enjoy music, movies and photos from your PC,
camera and mobile devices, on your larger TV
screen. Connects you to multiple PCs, as well.
<Product Guide>
Picture
Picture Mode Standard
Cell light 14
Contrast 100
Brightness 45
Sharpness 50
Colour 50
Tint (G/R) G 50 R 50
Return
English - 14
Method 1 Method 2
1. Select Try Now, if you want to execute the
corresponding menu(s).
2. To return to the e-Manual screen, press the
E-MANUAL button.
Viewing the Contents
Basic Features > Changing the Preset Picture Mode (5/10)
Changing the Preset Picture Mode
O MENUm → Picture → Picture Mode → ENTER
■
Picture Mode t
Select your preferred picture type.
N When an input source is set to PC, the Picture Mode is only available
the Standard and Entertain.
• Dynamic: Suitable for a bright room.
• Standard: Suitable for a normal environment.
for LED TV
for PDP TV
/ Relax
• Natural
• Movie: Suitable for watching movies in a dark room.
• Entertain: Suitable for watching movies and games.
Help Try Now Home Zoom Index
Try Now: Displays the corresponding menu(s).
Home: Moves to the e-Manual home screen.
Zoom: Magnifies a screen.
Index: Displays index screen.
: Suitable for reducing eye strain.
1. Press the ENTER
E
button when selecting
Contents Area. The “Are you sure?” is displayed.
Select Yes and then press the ENTERE button.
The OSD window will be displayed.
2. To return to the e-Manual screen, press the
E-MANUAL button.
E
Contents Area: You can view the corresponding
contents, if you selected a sub-menu. To move
l
previous or next page, press the
or r button.
Using the Zoom mode
When you view the e-Manual instruction, select the
Zoom to magnify the screen. You can scroll through
u
the magnified screen by using the
✎
To return to the previous screen, press the RETURN
or d buttons.
button.
How to search a keyword by using index page
✎
This function may not be supported depending on the language.
u
1. If you want to search a keyword, press the
l
2. Press the
3. Press the
or r button to select a character order you want, and then press the ENTERE button.
u
or d button to select a keyword you want to see, and then press the ENTERE button.
/ d / l / r button to select Index.
4. You can view the corresponding e-Manual instruction screen.
✎
To close the Index screen, press the RETURN button.
Changing the Preset Picture Mode
O MENUm → Picture → Picture Mode → ENTER
■
Picture Mode t
Select your preferred picture type.
N When an input source is set to PC, the Picture Mode is only available the Standard
and Entertain.
• Dynamic: Suitable for a bright room.
• Standard: Suitable for a normal environment.
for LED TV
• Natural
• Movie: Suitable for watching movies in a dark room.
• Entertain: Suitable for watching movies and games.
/ Relax
for PDP TV
E
: Suitable for reducing eye strain.
Return
English - 15

Installing the Wall Mount
Installing the Wall Mount Kit
The wall mount kit (sold separately) allows you to mount the TV on the wall.
For detailed information on installing the wall mount, see the instructions provided with the wall mount. Contact a
technician for assistance when installing the wall mount bracket.
Samsung Electronics is not responsible for any damage to the product or injury to yourself or others if you elect
to install the TV on your own.
Preparing before installing Wall-Mount
✎
If you attched some stickers on the TV screen, it remains some debris after removing the sticker. Please
clean it to watch TV.
Case A. Installing the SAMSUNG Wall-Mount Case B. Installing another company’s Wall-Mount
1
To install a wall-mount, use the Holder-Ring 1.
1
English - 16
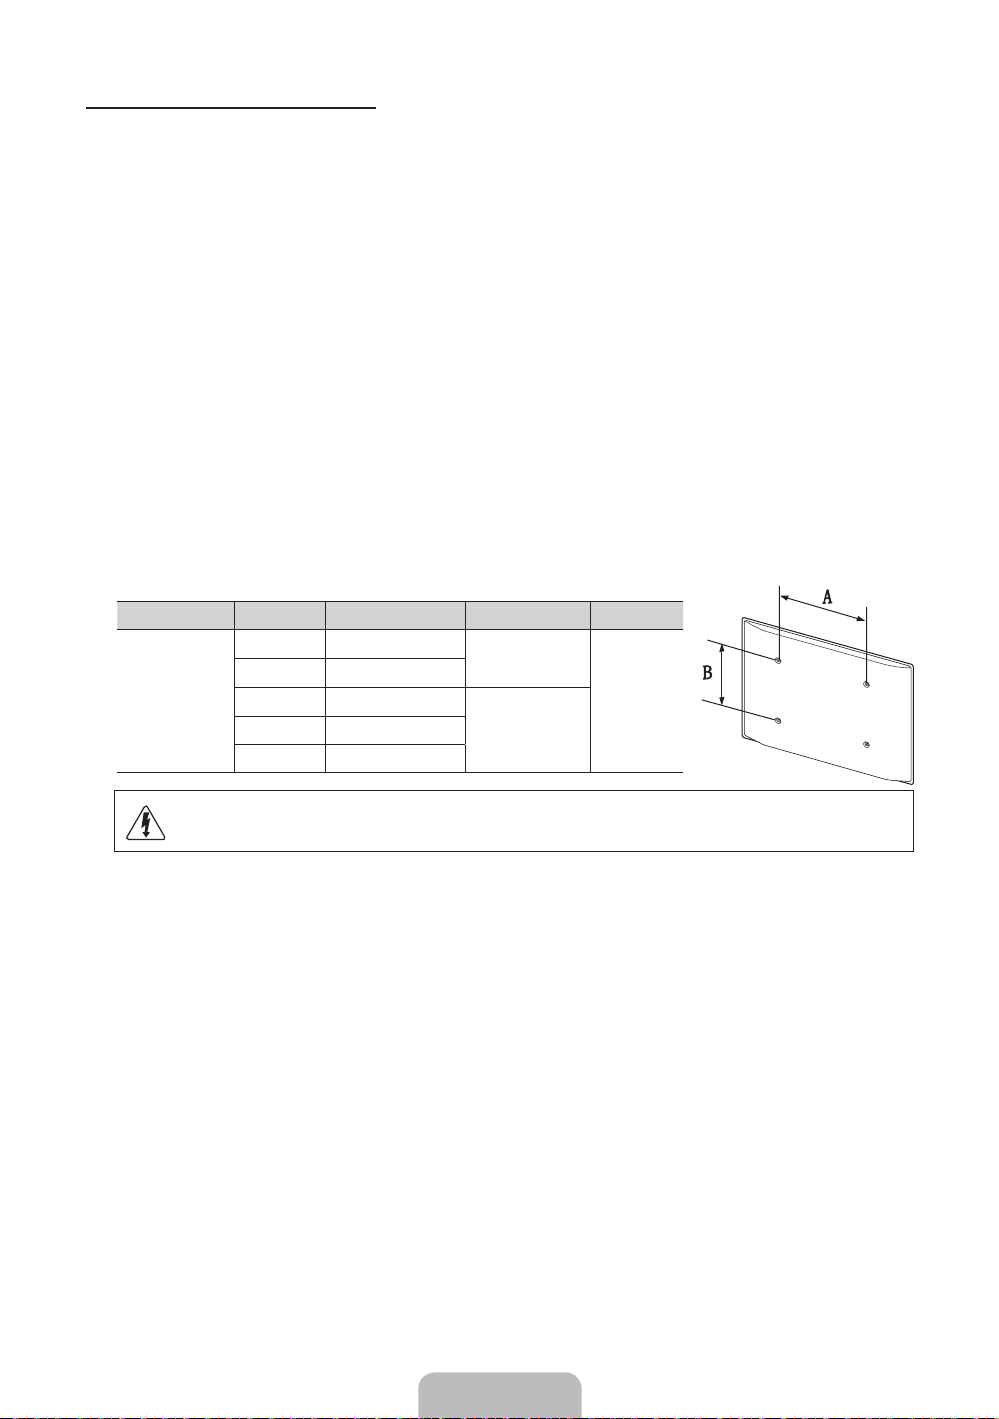
Wall Mount Kit Specifications (VESA)
✎
The wall mount kit is not supplied, but sold separately.
Install your wall mount on a solid wall perpendicular to the floor. When attaching to other building materials,
please contact your nearest dealer. If installed on a ceiling or slanted wall, it may fall and result in severe personal
injury.
✎
NOTE
Standard dimensions for wall mount kits are shown in the table below.
x
When purchasing our wall mount kit, a detailed installation manual and all parts necessary for assembly
x
are provided.
Do not use screws that do not comply with the VESA standard screw specifications.
x
Do not use screws that are longer than the standard dimension or do not comply with the VESA standard
x
screw specifications. Screws that are too long may cause damage to the inside of the TV set.
For wall mounts that do not comply with the VESA standard screw specifications, the length of the
x
screws may differ depending on the wall mount specifications.
Do not fasten the screws that are too strongly; this may damage the product or cause the product to fall,
x
leading to personal injury. Samsung is not liable for these kinds of accidents.
Samsung is not liable for product damage or personal injury when a non-VESA or non-specified wall
x
mount is used or the consumer fails to follow the product installation instructions.
Do not mount the TV at more than a 15 degree tilt.
x
Product Family inches VESA Spec. (A * B) Standard Screw Quantity
LED-TV
19~22 75 X 75
23~27 200 X 100
32~40 200 X 200
60~65 600 X 400
M4
4
M846~55 400 X 400
Do not install your Wall Mount Kit while your TV is turned on. It may result in personal injury
due to electric shock.
English - 17

Troubleshooting
If you have any questions about the TV, first refer to this list. If none of these troubleshooting tips apply, please
visit “www. samsung.com,” then click on Support, or contact the call centre listed on the back-cover of this
manual.
Issues Solutions and Explanations
The TV won’t turn on. • Make sure the AC power cord is securely plugged in to the wall outlet and the TV.
There is no picture/video. • Check cable connections (remove and reconnect all cables connected to the TV and external
The remote control does not work. • Replace the remote control batteries with the poles (+/–) in the right direction.
The cable/set top box remote control
doesn’t turn the TV on or off, or adjust the
volume.
✎
This TFT LED panel uses a panel consisting of sub pixels which require sophisticated technology to
produce. However, there may be a few bright or dark pixels on the screen. These pixels will have no impact
on the performance of the product.
✎
You can keep your TV as optimum condition to upgrade the latest firmware on web site (samsung.com →
Support → Downloads) by USB.
• Make sure the wall outlet is working.
• Try pressing the POWER button on the TV to make sure the problem is not the remote. If the TV turns
on, refer to “Remote control does not work” below.
devices).
• Set your external device’s (Cable/Sat Box, DVD, Blu-ray etc) video outputs to match the connections
to the TV input. For example, if an external device’s output is HDMI, it should be connected to an
HDMI input on the TV.
• Make sure your connected devices are powered on.
• Be sure to select the TV’s correct source by pressing the SOURCE button on the remote control.
• Reboot the connected device by reconnecting the device’s power cable.
• Clean the sensor’s transmission window on the remote.
• Try pointing the remote directly at the TV from 5~6 feet away.
• Programme the Cable/Set remote control to operate the TV. Refer to the Cable/Set user manual for
the SAMSUNG TV code.
Licence
List of Features
Excellent Digital Interface & Networking: With a built-in HD digital tuner, nonsubscription HD broadcasts can be
viewed without a cable box / STB (Set-Top-Box) satellite receiver.
SMART HUB
The Gateway to all content integrated in one place
• It’s all integrated to guide you to easier and diverse entertainment choices
• Control your entertainment life with easy and simple user friendly UI
• Access to diverse Apps that are adding up every day
• Customize your TV, by App grouping & sorting to your taste
AllShare™
AllShare™ connects your TV and compatible Samsung mobile phones/devices through a network.
Anynet+(HDMI-CEC)
Allows you to control all connected Samsung devices that support anynet+ with your Samsung TV’s remote.
English - 18
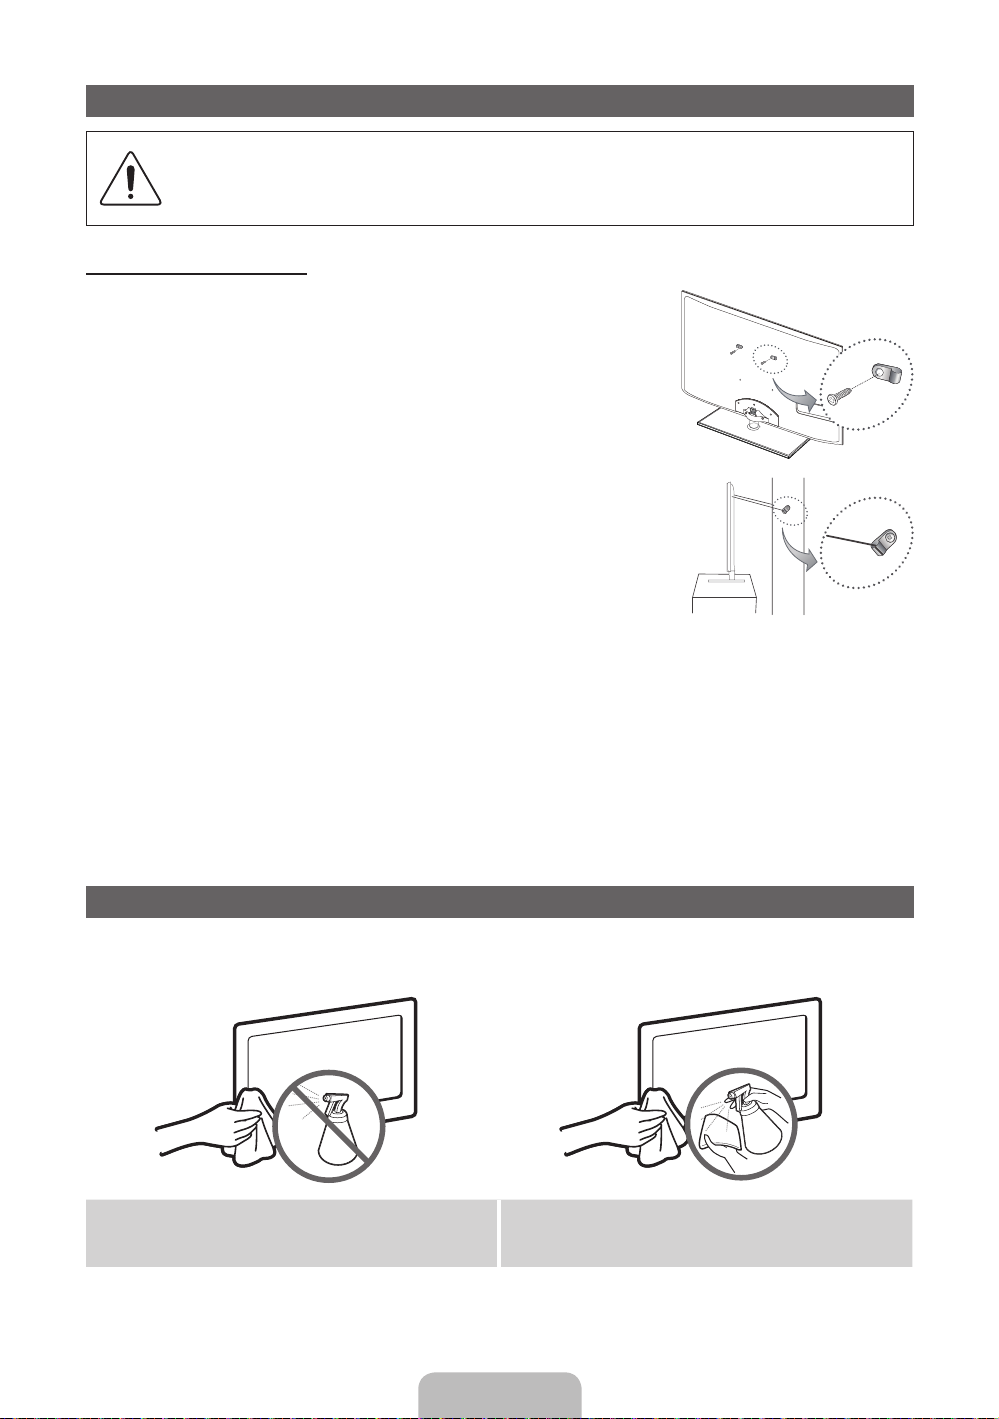
Securing the TV to the wall
Caution: Pulling, pushing, or climbing onto the TV may cause the TV to fall. In particular, ensure
that your children do not hang over or destabilize the TV; doing so may cause the TV to tip over,
resulting in serious injuries or death. Follow all safety precautions provided in the included Safety
Flyer. For added stability and safety, install the anti-fall device as follows.
To Avoid the TV from Falling
1. Put the screws into the clamps and firmly fasten them onto the wall.
Confirm that the screws have been firmly installed onto the wall.
✎
You may need additional material such as an anchor depending on
the type of wall.
✎
Since the necessary clamps, screws, and string are not supplied,
please purchase these additionally.
2. Remove the screws from the back centre of the TV, put the screws into
the clamps, and then fasten the screws onto the TV again.
✎
Screws may not be supplied with the product. In this case, please
purchase the screws of the following specifications.
✎
Screw Specifications
For a 19 ~ 27 inch: M4
x
For a 32 ~ 65 inch: M8
3. Connect the clamps fixed onto the TV and the clamps fixed onto the wall with a strong cable and then tie the
4. Verify all connections are properly secured. Periodically check connections for any sign of fatigue for failure. If
x
string tightly.
✎
NOTE
Install the TV near to the wall so that it does not fall backwards.
x
It is safe to connect the string so that the clamps fixed on the wall are equal to or lower than the
x
clamps fixed on the TV.
Untie the string before moving the TV.
x
you have any doubt about the security of your connections, contact a professional installer.
Wall
Storage and Maintenance
✎
If you attached some stickers on the TV screen, it remains some debris after removing the sticker. Please
clean it to watch TV.
Do not spray water or a cleaning agent directly onto
the product. Any liquid that goes into the product may
cause a failure, fire, or electric shock.
Clean the product with a soft cloth dapped in a small
amount of water.
English - 19
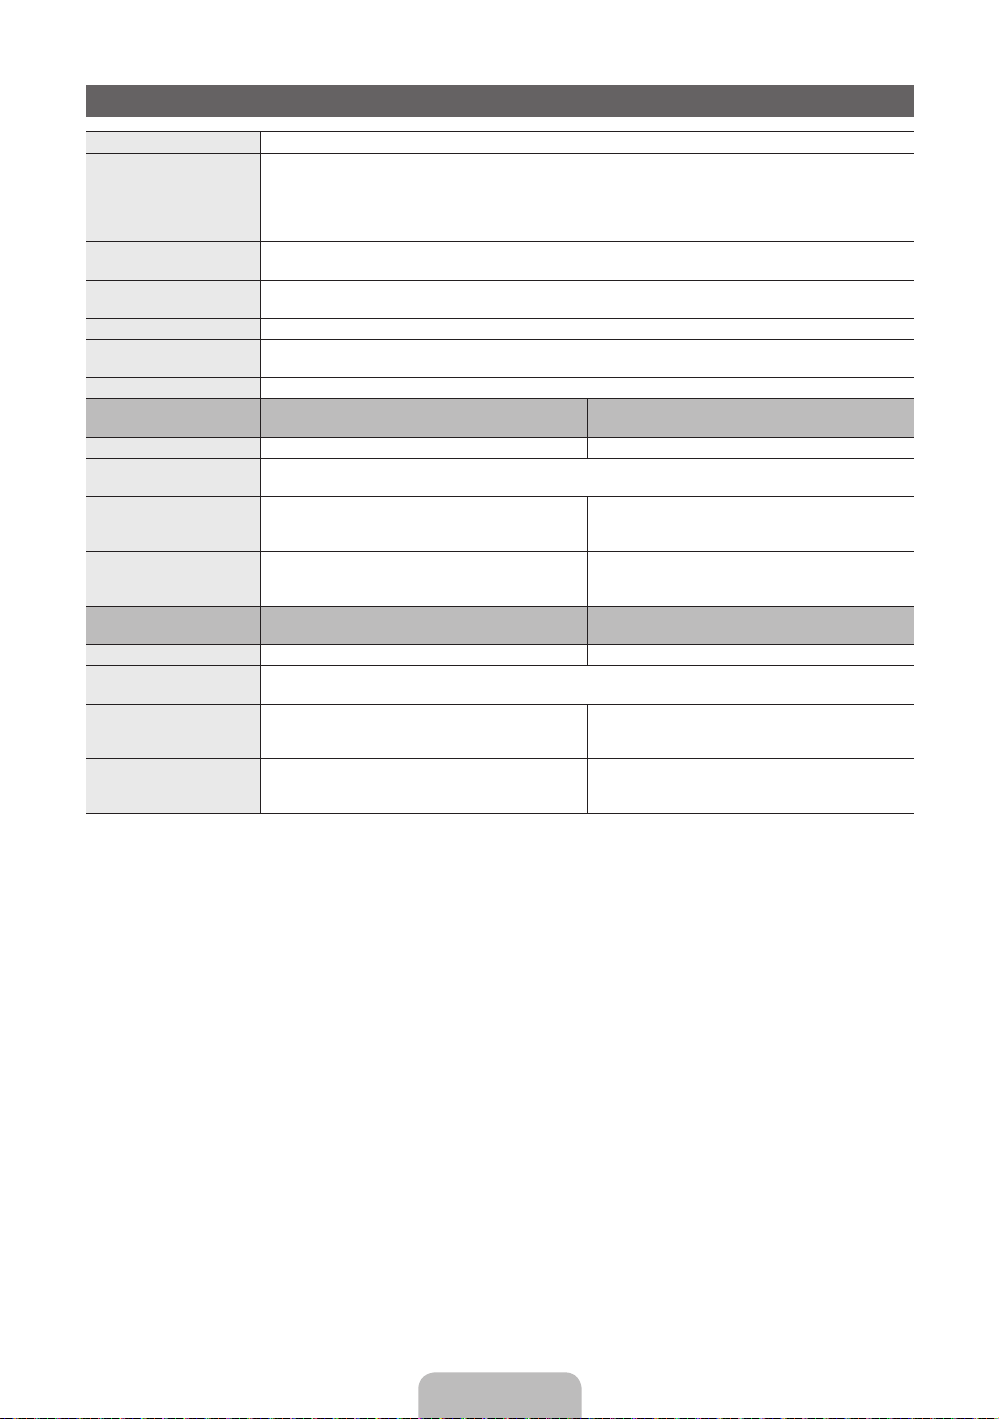
Specifications
Display Resolution 1920 x 1080
Environmental Considerations
Operating Temperature
Operating Humidity
Storage Temperature
Storage Humidity
TV System Analogue: B/G, D/K, L, I (Depending on your country selection)
Colour/Video System Analogue: PAL, SECAM, NTSC-4.43, NTSC-3.58, PAL60
Sound System BG, DK, L, NICAM, MPEG1, DD, DD+, HEAAC.
HDMI IN Video: 1080 24p, 1080p, 1080i, 720p, 576p, 480p
Stand Swivel (Left / Right) -20˚ ~ 20˚
Model Name UE32D5500R
Screen Size 32 inches 37 inches
Sound
(Output) 10W X 2
Dimensions (WxDxH)
Body
With stand
Weight
Without Stand
With Stand
Model Name UE40D5500R
Screen Size 40 inches 46 inches
Sound
(Output) 10W X 2
Dimensions (WxDxH)
Body
With stand
Weight
Without Stand
With Stand
Digital: MPEG-2 MP@ML, MPEG-4, H.264/AVC MP@L3, MP@L4.0, HP@L4.0
Audio: 2Ch Linear PCM 32/44.1/48kHz, 16/20/24bits.
UE32D5520R
768.0 X 29.9 X 468.2 mm
768.0 X 240.0 X 532.1 mm
7.4 kg
10.2 kg
UE40D5520R
955.8 X 29.9 X 574.0 mm
955.8 X 255.0 X 638.5 mm
11.1 kg
14.4 kg
10°C to 40°C (50°F to 104°F)
10% to 80%, non-condensing
-20°C to 45°C (-4°F to 113°F)
5% to 95%, non-condensing
Digital: DVB-T/DVB-C
UE37D5500R
UE37D5520R
890.6 X 29.9 X 537.4 mm
890.6 X 255.0 X 602.1 mm
9.2 kg
12.5 kg
UE46D5500R
UE46D5520R
1091.8 X 29.9 X 650.4 mm
1091.8 X 275.0 X 714.8 mm
13.7 kg
17.3 kg
✎
Design and specifications are subject to change without prior notice.
✎
For information about power supply, and more about power consumption, refer to the label attached to the
product.
English - 20

This page is intentionally
left blank.
Дополнительные сведения об использовании электронного руководства (p. 14)
Рисунки и иллюстрации в данном руководстве пользователя представлены только для справки. Они могут отличаться от реального
внешнего вида устройства. Конструкция и характеристики устройства могут быть изменены без предварительного уведомления.
Примечание относительно цифрового телевещания
1. Функции цифрового телевидения (DVB) доступны только в тех странах и регионах, где передаются цифровые наземные сигналы DVB-T
(MPEG2 и MPEG4 AVC) или где имеется доступ к совместимой услуге кабельного телевидения DVB-C (MPEG2 и MPEG4 AAC). Узнайте у
местного дилера о возможности приема сигнала DVB-T или DVB-C.
2. DVB-T – это стандарт цифрового наземного телевещания, принятый консорциумом европейских организаций DVB, а DVB-C – это стандарт
цифрового кабельного телевидения. Однако некоторые дифференцированные функции, такие как EPG (Electric Programme Guide), VOD
(Video on Demand) и другие, не входят в эту спецификацию. Поэтому в настоящее время они не работают.
3. Несмотря на то, что данный телевизор поддерживает последние стандарты DVB-T и DVB-C [с августа 2008 года], компания не гарантирует
совместимость с последующими стандартами цифрового наземного телевещания DVB-T и цифрового кабельного вещания DVB-C.
4. В зависимости от того, в какой стране или регионе используется телевизор, некоторые поставщики услуг кабельного телевидения могут
взимать отдельную плату за данную услугу. При этом пользователю необходимо будет принять условия предоставления услуги.
5. Некоторые функции цифрового ТВ могут быть недоступны в отдельных странах или регионах, кроме того, не все поставщики услуг
кабельного телевидения могут обеспечить правильную работу DVB-C.
6. Для получения более подробной информации обратитесь в местный центр по обслуживанию клиентов Samsung.
Качество приема телепрограмм может варьироваться в разных странах в зависимости от способа телевещания. Чтобы узнать,
✎
можно ли повысить качество приема с помощью настроек телевизора, обратитесь к местному официальному дилеру SAMSUNG или
в Центр обслуживания клиентов Samsung.
Предупреждение относительно неподвижных изображений
Старайтесь избегать длительного воспроизведения на экране неподвижных изображений, например файлов jpeg, или неподвижных объектов,
например логотипов телепрограмм, полей при панорамном воспроизведении или воспроизведении в формате 4:3, биржевой или новостной
ленты внизу. Это может привести к раздвоению изображения на светодиодном экране и, соответственно, к снижению качества изображения.
Чтобы избежать преждевременного износа, выполняйте следующие рекомендации.
• Старайтесь не смотреть очень долго один и тот же телевизионный канал.
• Отдавайте предпочтение полноэкранному режиму. Используйте меню настройки формата изображения на телевизоре для выбора
оптимального соответствия размеру экрана.
• Установите минимальные приемлемые значения яркости и контрастности. Чем выше значения этих параметров, тем быстрее идет процесс
выгорания экрана.
• Постоянно используйте функции, призванные сократить эффект остаточного изображения и выгорания экрана. Подробнее см.
соответствующий раздел электронного руководства.
Выбор пространства для безопасной установки
Соблюдайте требуемое расстояние между устройством и другими объектами (например, стенами) для обеспечения достаточной вентиляции.
Несоблюдение этого правила может привести к возгоранию или поломке устройства из-за перегрева.
В качестве подставки или настенного крепления используйте только те детали, которые поставляются Samsung Electronics.
✎
• При использовании деталей других производителей устройство может упасть и сломаться или нанести травму.
Внешний вид устройства зависит от модели.
✎
• При обращение с телевизором соблюдайте осторожность – некоторые его части могут нагреваться.
Установка на подставку Установка на настенное крепление
10 см
10 см10 см
Правильная утилизация данного устройства (Утилизация электрического и электронного оборудования)
(Действует во всех странах Европейского Союза и других странах Европы, принявших систему разделения отходов)
Подобная маркировка на изделии, принадлежностях или в руководстве к нему предупреждает, что по истечении срока службы изделие
или электронные принадлежности для него (например, зарядное устройство, наушники, кабель USB) не следует выбрасывать вместе с
другим бытовым мусором. Чтобы избежать вредного воздействия на окружающую среду или на здоровье человека от неконтролируемой
утилизации отходов, следует отделять маркированные подобным образом изделия от другого мусора для соответствующей переработки
и повторного использования в качестве сырья. За подробной информацией о месте и способе экологически безопасной утилизации
бытовым потребителям следует обращаться к продавцу данного изделия или в органы местного самоуправления. Промышленным
потребителям необходимо обратиться к поставщику, чтобы уточнить сроки и условия договора купли-продажи. Подобные изделия и
электронные принадлежности не следует утилизировать вместе с другими производственными отходами.
Правильная утилизация аккумуляторных батарей
(действует на территории Европейского Союза и других европейских государств с раздельной системой утилизации батарей)
Данный знак на батарее, руководстве или упаковке означает, что батарея этого изделия по истечению срока службы
должна утилизироваться отдельно от бытовых отходов. Химические символы Hg,Cd или Pb означают то, что аккумулятор
содержит ртуть, кадмий или свинец в количествах, превышающих контрольный уровень, указанный в Директиве ЕС 2006/66.
Чтобы поддержать программу повторного использования материалов и помочь сохранить природные ресурсы, отделяйте
аккумуляторные батареи от отходов других типов и утилизируйте их через местную бесплатную систему возврата батарей.
10 см
10 см
10 см
10 см
Русский - 2
Принадлежности
✎
Убедитесь, что следующие принадлежности входят в комплект поставки телевизора. Если какойлибо элемент комплекта отсутствует, обратитесь к своему дилеру.
✎
Цвет и форма устройств могут различаться в зависимости от модели.
✎
Кабели, не входящие в комплект поставки, можно приобрести дополнительно.
✎
Открывая коробку, убедитесь что все принадлежности на месте (некоторые из них могут быть
скрыты под упаковочным материалом).
ВНИМАНИЕ! ВСТАВЬТЕ НАДЕЖНО, ЧТОБЫ ИСКЛЮЧИТЬ ВЕРОЯТНОСТЬ ОТСОЕДИНЕНИЯ
[
• Пульт дистанционного управления и батареи
(AAA x 2)
• Руководство пользователя • Чистящая салфетка
• Гарантийный талон (прилагается не во всех странах)/Инструкция по технике безопасности
Держатель в форме кольца (4ea) Подставка-держатель проводов Адаптер карты CI
AV / Компонентный адаптер Адаптер SCART
• Плата за обслуживание может взиматься в следующих случаях.
– (a) Если вы вызовете специалиста, и он не обнаружит неисправности устройства (это возможно,
если вы не знакомы с настоящим руководством).
– (b) Если вы передадите устройство в ремонтный центр, и его специалисты не обнаружат
неисправности устройства (это возможно, если вы не знакомы с настоящим руководством).
• Размер этой платы будет сообщен вам перед тем, как сотрудник компании выедет на место.
Сборка подставки-держателя проводов
• Кабель питания
Русский - 3
Обзор панели управления
✎
Цвет и форма устройства могут различаться в зависимости от модели.
Панель управления
Датчик пульта
дистанционного
управления
Индикатор питания Мигает и отключается при включенном питании; горит в режиме
SOURCE
MENU
Y
z
P
Режим ожидания
Не оставляйте телевизор в режиме ожидания надолго (например, уезжая в отпуск). Даже когда питание
выключено, устройство потребляет небольшое количество электроэнергии. Рекомендуется отключать
кабель питания от сети.
E
(Питание)
Направляйте пульт дистанционного управления на эту точку на панели
управления телевизора.
ожидания.
Переключение между всеми доступными источниками входящего
сигнала. Эта кнопка в экранном меню выполняет те же функции, что и
E
кнопка ENTER
Отображение экранного меню, в котором перечислены функции
телевизора.
Настройка громкости. Кнопки
те же функции, что и кнопки ◄ и ► на пульте дистанционного
управления.
Переключение каналов. Кнопки
выполняют те же функции, что и кнопки ▼ и ▲ на пульте
дистанционного управления.
Включение и выключение телевизора.
на пульте дистанционного управления.
Y
в экранном меню выполняют
z
в экранном меню
Русский - 4
 Loading...