

Samsung TX-T3093WH User Manual
Ow
st
Register your product at www.samsung.com/global/register
Record your Model and Serial number here for future reference.
- Model - Serial No.
Contents
• Accessories ............................................................................. 3
• Viewing the Control Panel ....................................................... 3
• Viewing the Connection Panet ................................................ 4
• Remote Control ....................................................................... 5
4, Connecting VHF and UHF Antennas ...................................... 6
• Connecting Cable TV .............................................................. 6
• Connecting a VCR .................................................................. 7
• Connecting a Camcorder ........................................................ 7
• Connecting a DVD Player/Set-Top Box .................................. 8
• Connecting a DVD Player/Set-Top Box via HDMI................... 8
• Connecting a Digital Audio System ......................................... 9
• Connecting an Amplifier/DVD Home Theater- Analog ........... 9
• Plug & Play Feature .............................................................. 10
• Memorizing the Channels ..................................................... 11
• To Select the Source ............................................................. 12
• To Edit the input Source Name ............................................. 12
• UsingAutomatic Picture Settings .......................................... 12
• Changing the Screen Size .................................................... 13
• Tilt ......................................................................................... 13
• UsingAutomatic Sound Settings ........................................... 13
• Customizing the Sound ......................................................... 14
• Setting the SRS TruSurround XT .......................................... 14
• AutomaticVotume Control .................................................... 14
• Choosing a Multi-Channel Sound (MTS) Track - Digital ....... 14
• Choosing a Multi-Channel Sound (MTS)Track -Analog ......15
• Clearing Scrambled Channels - Digital ................................. 15
• Adding and Erasing Channels .............................................. 15
• Setting YourFavorite Channels ............................................ 16
• Viewing the Channel Lists ..................................................... 16
• Setting the Default Channel List Mode ................................. 16
• Labeling Channels-Analog .................................................. 17
• FineTuning Analog Channels ............................................... 17
• Checking the Digital-Signal Strength .................................... 17
• Selecting a Menu Language ................................................. 17
• Setting the Time .................................................................... 18
• Usingthe V-Chip ................................................................... 19
• Viewing Closed Captions
(On-Screen Text Messages) - Analog ................................... 21
• Viewing Closed Captions
(On-Screen Text Messages) - Digital .................................... 22
• Menu Transparency Level..................................................... 22
• Setting the Blue Screen Mode .............................................. 23
• Adjusting the Melody Sound ................................................. 23
• Setting the HDMI Black Level ............................................... 23
• Setting the Film Mode ........................................................... 23
4, Setting the Function Help...................................................... 24
• Upgrading the Software ........................................................ 24
• Setting Up YourRemote Control ........................................... 24
• identifying Problems ............................................................. 27
• Specifications
Symbols
m_
Press Important Note
One-Touch
Button
important Warranty information Regarding Television Format Viewing
Standard screen format televisions(4:3, the aspect ratio of the screen width to height) are primarily designed to view standard format
full-motion video. The images displayed onthem should primarily be in the standard 4:3 ratio format and constantly moving. Displaying
stationary graphics and images on screen, such as the dark top andbottom letterbox bars(wide screen pictures), should be limited to no
more than 15% of the total television viewing per week.
Wide screen format televisions(16:9, the aspect ratio of the screen width to height) are primarily designed to view wide screen format
full-motion video. The images displayed onthem should primarily be in the wide screen 16:9 ratio format, or expanded to fill the screen
if your model offers this feature, and constantly moving. Displaying stationary graphics and images on screen, such asthe dark side-
barson non-expanded standard format television video and programming, should be limited to no more than 15% of the total television
viewing per week.
Additionally, viewing other stationary images and text such asstock market reports, video game displays, station Iogos, web sites or
computer graphics and patterns, should be limited as described above for alt televisions. Displaying any stationary images that
exceed the above guidelines can cause uneven aging of picture tubes(CRTs) that leave subtle, but permanent burned-in ghost
images in the television picture. To avoid this, vary the programming and images, and primarily display full screen moving
images, not stationary patterns or dark bars. On television models that offer picture sizing features, use these controls to view the
different formats as a full screen picture.
Becareful in the selection and duration of television formats used for viewing. Uneven CRT aging as a result of format selection and
use, as welt as other burned-in images, is not covered by your Samsung limited warranty.
© 2007 Samsung Electronics Co., Ltd.All rights reserved.
Accessories
Please make sure the following items are included with your TV.
If any items are missing, contact your dealer.
RemoteControl(AA59-00411A)/ Owner'sInstructions/ WarrantyCards/
AAABatteries SafetyGuideManual RegistrationCard
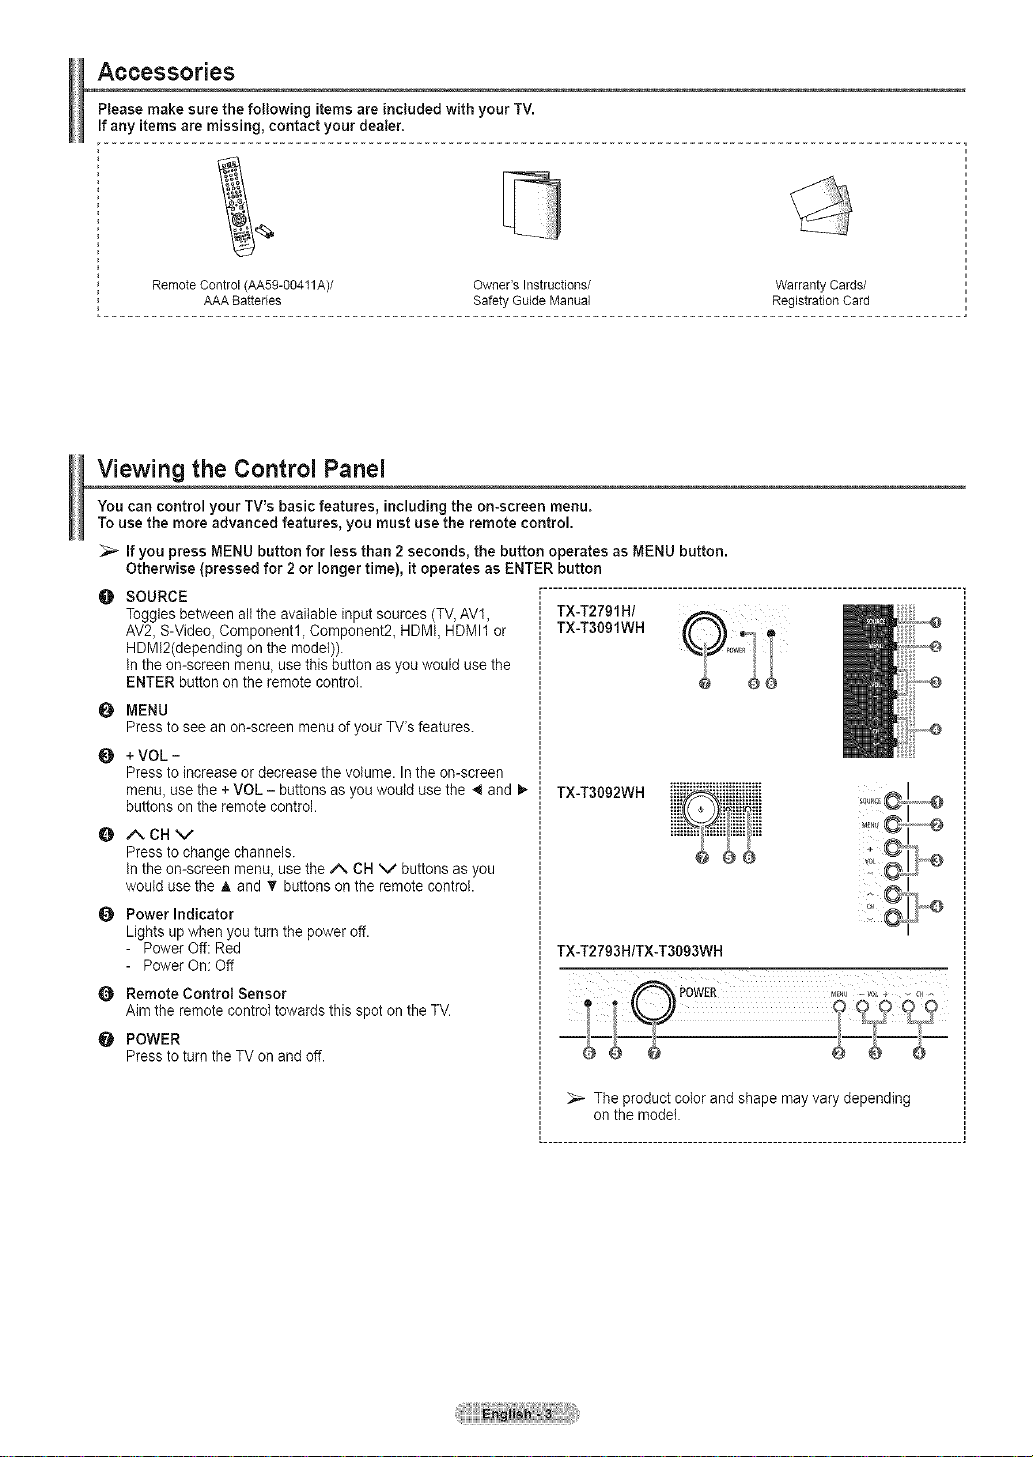
Viewing the Control Panel
You can control your TV's basic features, including the on-screen menu.
To use the more advanced features, you must use the remote control.
_,_ If you press MENU button for less than 2 seconds, the button operates as MENU button.
Otherwise (pressed for 2 or longer time), it operates as ENTER button
O SOURCE
Togglesbetween all the available input sources (TV,AV1, TX-T2701H/
AV2, S-Video, Component1, Component2, HDMI, HDMI1 or TX-T3091WH
HDMI2(depending on the model)).
in the on-screen menu, use this button asyou would use the
ENTER button on the remote control.
O MENU
Press to see an on-screen menu of your TV's features.
Q + VOL-
Press to increase or decrease the volume. Inthe on-screen
menu, use the + VOL - buttons as you would use the 4 and 1_
buttons on the remote control.
O ACHV
Press to change channels.
in the on-screen menu, use the zX CH V buttons as you
would usethe A and _' buttons on the remote control.
O Power Indicator
Lights up when you turn the power off.
- Power Off: Red
- Power On: Off
O Remote Control Sensor
Aim the remote control towards this spot on the TV.
POWER
Press to turn the TV on and off
......................................................................................
TX-T3092WH ............................
TX-T2793H/TX-T3003WH
_
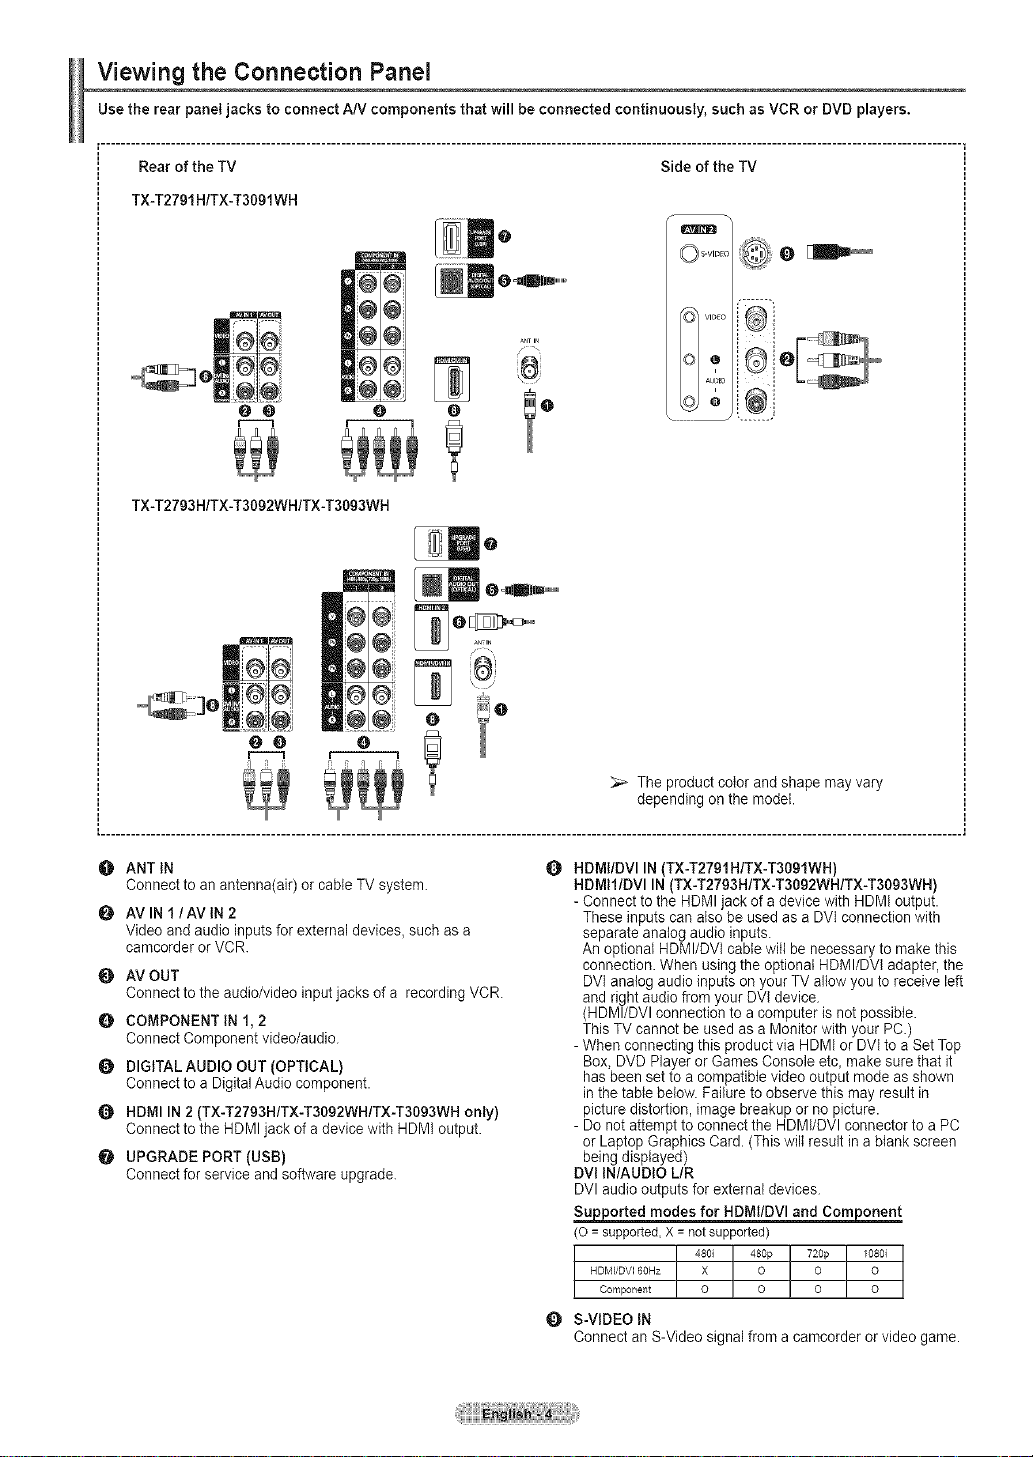
Viewing the Connection Panel
Usethe rear panel jacks to connect A/V components that will be connected continuously, such as VCR or DVD players.
Rear of the TV Side of the TV
TX-T2791 H/TX-T3091WH
O m I
O_.......l i_il;!¸O
O o=lB|lm.........
oo o
O
f--1
TX-T2793H/TX-T3092WH/TX-T3093WH
O ANT IN
Connect to an antenna(air) or cable TV system.
O AVlN I/AVIN 2
Video and audio inputs for external devices, such as a
camcorder or VCR
O AV OUT
Connect to the audio/video input jacks of a recording VCR
0 COMPONENT IN 1, 2
Connect Component video/audio.
DIGITAL AUDIO OUT (OPTICAL)
Connect to a Digital Audio component.
0 HDMI IN 2 (TX-T2793H/TX-T3092WH/TX-T3093WH only)
Connect to the HDMI jack of a device with HDMI output.
UPGRADE PORT (USB)
Connect for service and software upgrade.
O
HDMI/DVI IN (TX-T2791H/TX-T3091WH)
HDMII/DVI IN (TX-T2793H/TX-T3092WH/TX-T3093WH)
- Connect to the HDMI jack of a device with HDMI output.
These inputs can also be used as a DVI connection with
separate analog audio inputs.
An optional HDMI/DVl cable witl be necessary to make this
connection. When using the optionat HDMI/DVI adapter, the
DVI analog audio inputs on your TV allow you to receive left
and right audio from your DVI device.
(HDMI/DVl connection to a computer is not possible.
This TV cannot be used as a Monitor with your PC.)
- When connecting this product via HDMI or DVI to a Set Top
Box, DVD Player or Games Console etc, make sure that it
has been set to a compatible video output mode as shown
in the table below. Failure to observe this may result in
picture distortion, image breakup or no picture.
- Do not attempt to connect the HDMI/DVI connector to a PC
or Laptop Graphics Card. (This wilt result in a blank screen
being displayed)
DVI IN/AUDIO L/R
DVI audio outputs for external devices.
_orted modes for HDMt/DVl and Com_
(o = supported,X = notsupported)
HDMI_DV160Hz X O O O
Component O O O O
480i 480p 720p 1080i
0 S-VIDEO IN
Connect an S-Video signal from a camcorder or video game.
Remote Control
You can use the remote control up to a distance of about 23 feet from the TV. When using the remote control, always point it
directly at the TV. You can also use your remote control to operate your VCR, Cable box, DVD player, or Set-Top Box.
• This is aspecial remote control for the visually impaired,and has Braille points on the POWER, Channel, Volume, STOP and
PLAY/PAUSEbuttons.
• The performance of the remote control may beaffected by bright light.
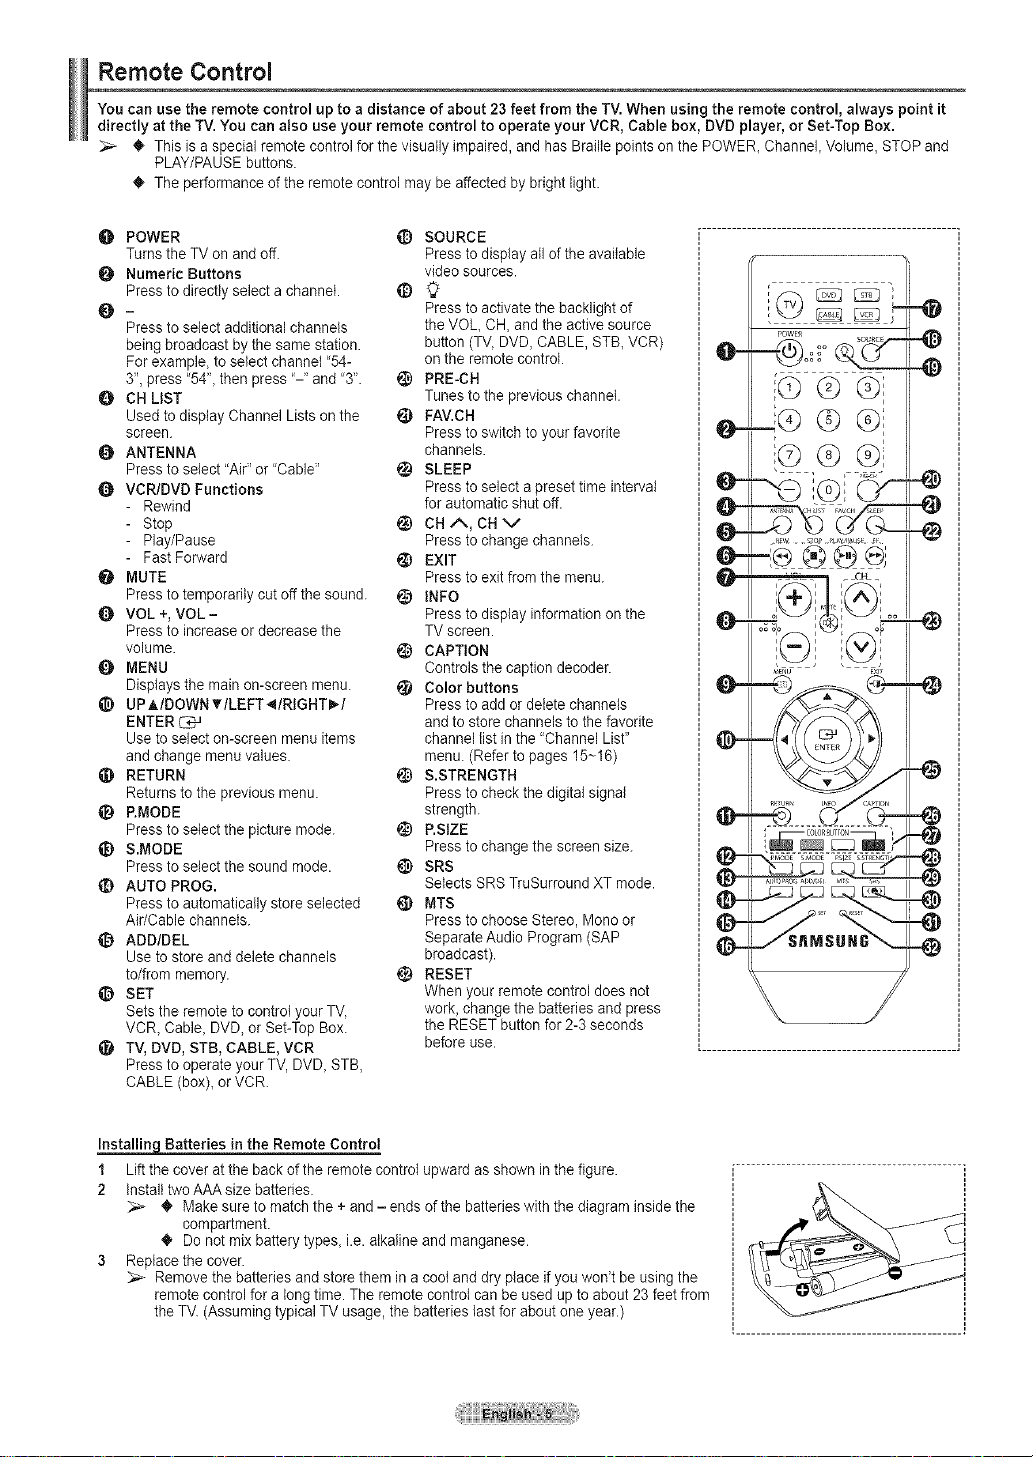
O POWER
Turnsthe TV on and off.
O Numeric Buttons
Press to directly select a channel.
Q-
Press to select additional channels
being broadcast by the same station.
For example, to select channel '54-
3", press '54", then press '-" and '3".
0 CH LIST
Used to display Channel Lists on the
screen.
O ANTENNA
Press to select "Air" or 'Cable"
Q VCR/DVD Functions
- Rewind
- Stop
- Play/Pause
- Fast Forward
MUTE
Press to temporarily cut off the sound.
VOL +, VOL -
Press to increaseor decrease the
volume.
_) MENU
Displays the main on-screen menu.
UPMDOWN _rlLEFT 41RIGHT_. I
ENTER _<J
Use to select on-screen menu items
and change menu values.
RETURN
Returns to the previous menu.
_) P.MODE
Press to setect the picture mode.
_) &MODE
Press to select the sound mode.
_) AUTO PROG.
Press to automatically store selected
Air/Cable channels.
_{_ ADD/DEL
Use to store and delete channels
to/from memory.
_) SET
Sets the remote to control your TV,
VCR_Cable_DVD, or Set-Top Box.
_) TV,DVD, STB, CABLE, VCR
Press to operate your TV, DVD, STB,
CABLE (box)_ or VCR
_) SOURCE
Press to display atlof the available
video sources.
Press to activate the backlight of
the VOL CH, and the active source
button (TV, DVD, CABLE, STB_VCR)
on the remote control.
_)) PRE-CH
Tunes to the previous channel.
FAV.CH
Press to switch to your favorite
channels.
_) SLEEP
Press to select a preset time interval
for automatic shut off.
_) CH/% CH v
Press to change channels.
EXIT
Press to exit from the menu.
INFO
Press to display information on the
TV screen.
CAPTION
Controls the caption decoder.
Color buttons
Press to add or deiete channels
and to store channels to thefavorite
channel list in the "Channel List"
menu. (Refer to pages 15~16)
S.STRENGTH
Press to check the digital signal
strength.
_) RSIZE
Press to change the screen size.
@ SRS
Selects SRS TruSurround XT mode.
_) MTS
Press to choose Stereo, Mono or
Separate Audio Program (SAP
broadcast).
RESET
When your remote control does not
work, change the batteries and press
the RESET button for 2-3 seconds
before use.
_
0-
0=
Batteries in the Remote Control
1 Lift the cover at the back of the remote control upward as shown in the figure.
2 install two AAA size batteries.
_' Make sure to match the + and - ends of the batteries with the diagram inside the
compartment.
_' Do not mix battery types, i.e. alkaline and manganese.
3 Reptacethe cover.
Remove the batteries and store them in a coot and dry place if you won't be using the
remote control for a long time. The remote controi can be used up to about 23 feet from
theTV. (Assuming typical TV usage, the batteries last for about one year.)
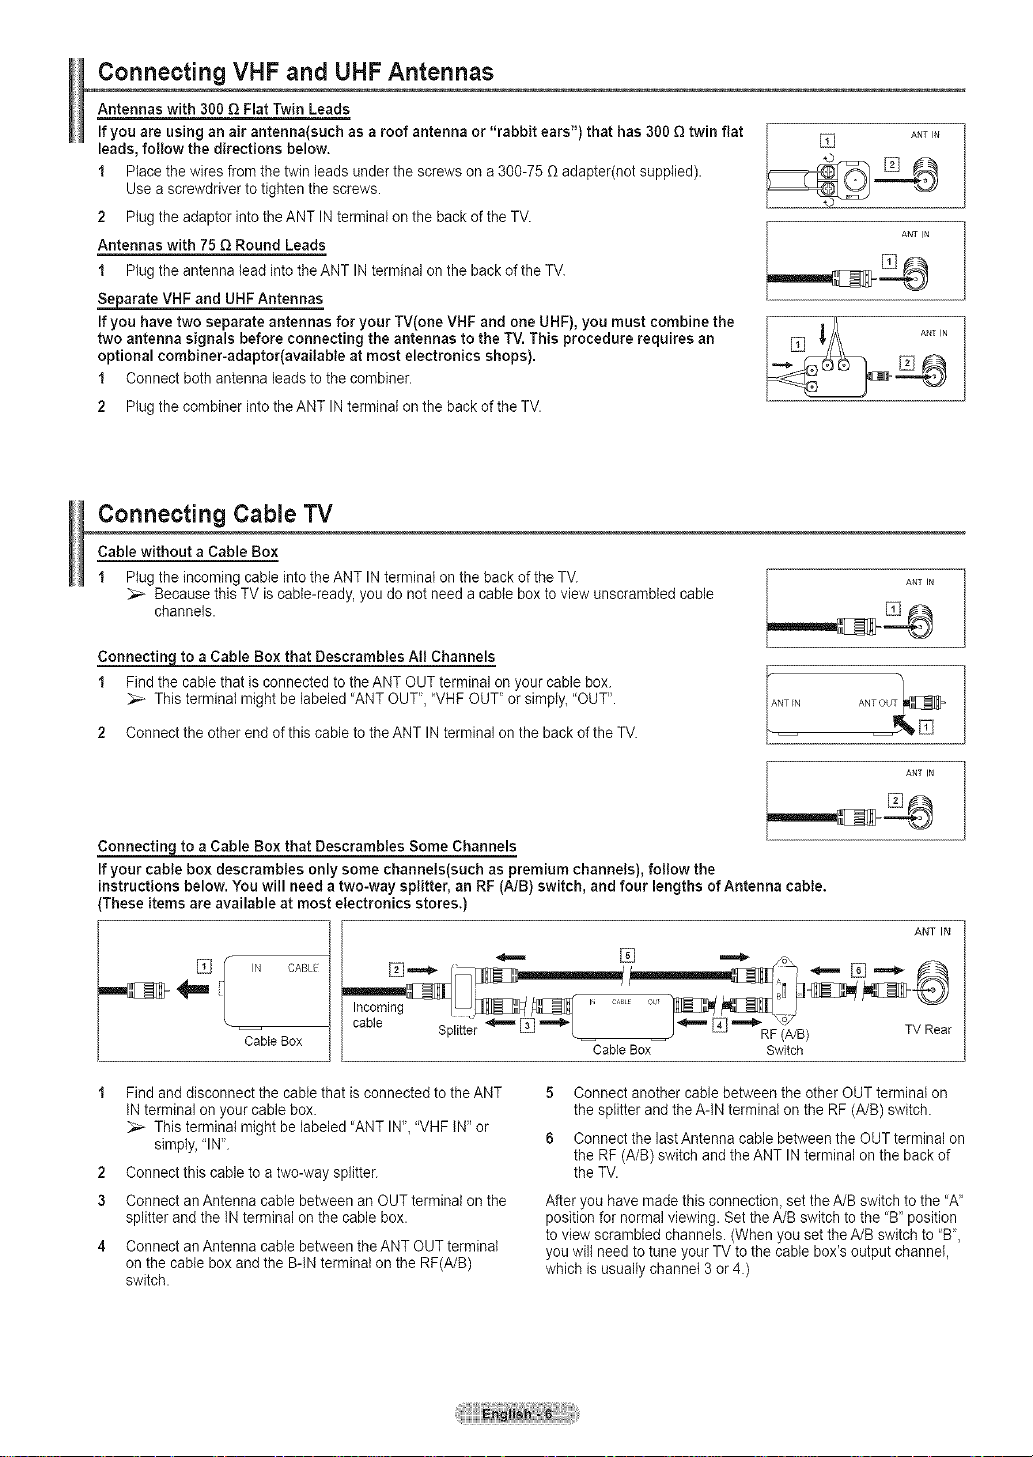
Connecting VHF and UHF Antennas
Antennas with 300 Q Flat Twin Leads
If you are using an air antenna(such as a roof antenna or "rabbit ears") that has 300£_twin fiat
leads, follow the directions below.
1 Place the wires from thetwin leads under the screws on a 300-75 _ adapter(not supplied).
Use a screwdriver to tighten the screws.
2 Plug the adaptor into the ANT IN terminal onthe back of the TV.
Antennas with 75 Q Round Leads
1 Plug the antenna lead into the ANT IN terminal on the back of the TV.
Separate VHF and UHF Antennas
If you have two separate antennas for your TV(one VHF and one UHF), you must combine the
two antenna signals before connecting the antennas to the TV. This procedure requires an
optional combiner-adaptor(available at most electronics shops).
1 Connect both antenna leadsto the combiner.
2 Plug the combiner into the ANT INterminal on the back of the TV.
Connecting Cable TV
Cable without a Cable Box
1 Plug the incoming cable into the ANT IN terminal on the back of the TV.
Because this TV is cable-ready, you do not need a cable box to view unscrambled cable
channels.
ANT IN
ANT IN
ANT IN
ANT IN
a Cable Box that Descrambtes All Channels
1 Find the cable that is connected to the ANT OUT terminal on your cable box.
This terminal might be labeled "ANT OUT", "VHF OUT" or simply, "OUT".
2 Connect the other end of this cable to the ANT INterminal on the back of the TV.
to a Cable Box that Descrambles Some Channels
If your cable box descrambles only some channels(such as premium channels), follow the
instructions below. You will need a two-way splitter, an RF (A/B) switch, and four lengths of Antenna cable.
These items are available at most electronics stores.)
% IN CABL
Cable Box
cable _ _ _ _ _ _l =""_.\,_./,_ TVR
1 Find and disconnect the cable that is connected to the ANT
IN terminal on your cable box.
This terminal might be labeled 'ANT IN_, "VHF IN" or
simply, "IN".
2 Connect this cane to a two-way splitter.
3 Connect an Antenna cable between an OUT terminal on the
splitter and the iN terminal on the cable box.
4 Connect an Antenna cable between the ANT OUT terminai
onthe cable box and the B-IN terminai on the RF(A/B)
switch.
Splitter ] "''_ L J_ [ RF(A/B) ear
CableBox Switch
5 Connect another cable between the other OUT terminal on
the splitter and the A-IN terminal on the RF (A/B) switch.
6 Connect the last Antenna cable between the OUT terminal on
the RF (A/B) switch andthe ANT IN terminal on the back of
the TV.
After you have made this connection, set the A/B switch to the 'W'
position for normal viewing. Set the A/B switch to the "B' position
to view scrambled channels. (When you set the A/B switch to "B",
you wilt need to tune your TV to the cable box's output channel,
which is usually channel 3or4.)
ANT IN
ANT IN
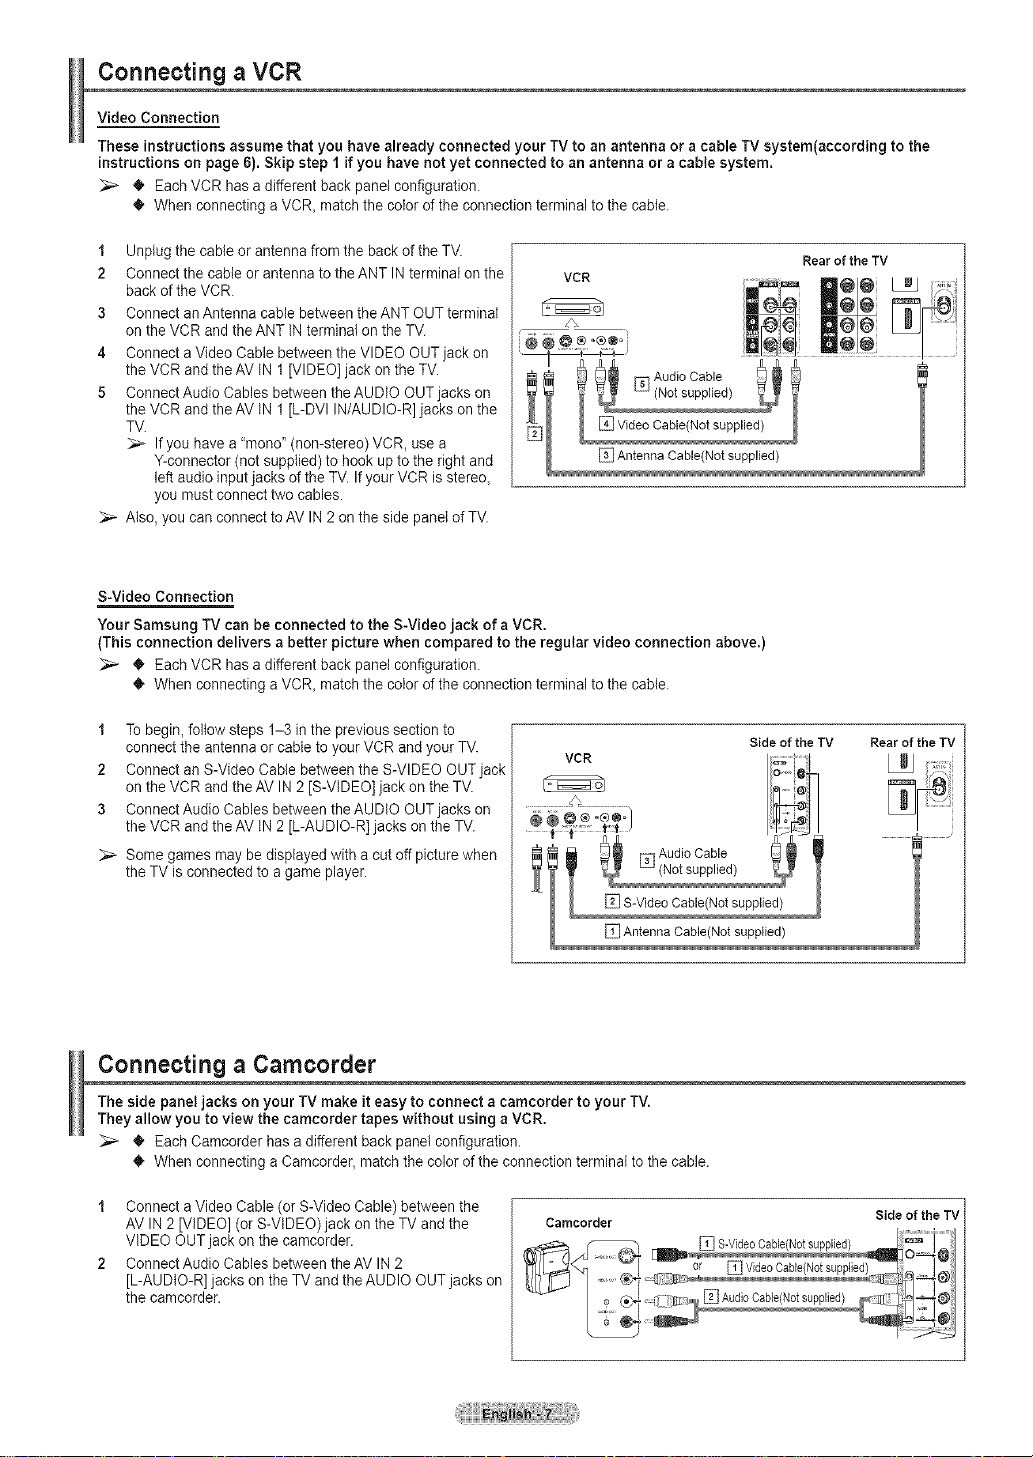
Connecting a VCR
Video Connection
These instructions assume that you have already connected your TVto an antenna or a cable TV system(according to the
instructions on page 6). Skip step 1 if you have not yet connected to an antenna or a cable system.
_,_ • Each VCR has a different back panel configuration.
• When connecting a VCR, match the color of the connection terminal to the cable.
1 Unplug the cable or antenna from the back of theTV.
2 Connect the cable or antenna to theANT IN terminal on the
back of the VCR.
3 Connect an Antenna cable between the ANT OUT terminal
onthe VCR and the ANT iN terminal on the TV.
4 Connect a Video Cable between the VIDEO OUT jack on
the VCR and the AV iN 1 [VIDEO] jack on the TV.
5 Connect Audio Cables between theAUDIO OUT jacks on
the VCR and the AV iN 1 [L-DVI IN/AUDIO-R] jacks on the
TV.
If you have a "mono' (non-stereo) VCR, use a
Y-connector (not supplied) to hook up to the right and
left audio input jacks of the TV. Ifyour VCR is stereo,
you must connect two cables.
Also, you can connect to AV IN 2 on the side panel of TV.
S-Video Connection
Your Samsung TV can be connected to the S-Video jack of a VCR.
(This connection delivers a better picture when compared to the regular video connection above.)
• Each VCR has a different back panel configuration.
• When connecting a VCR, match the color of the connection terminal to the cabte.
1 Tobegin, follow steps 1-3 in the previous section to
connect the antenna or cable to your VCR and your TV.
2 Connect an S-Video Cable between the S-VIDEO OUT jack
onthe VCR and the AV IN 2 [S-VIDEO] jack on the TV.
3 Connect Audio Cables between theAUDIO OUT jacks on
the VCR and the AV iN 2 [L-AUDIO-R] jacks on the TV.
Some games may be displayed with a cut off picture when
the TV is connected to a game player.
VCR _ q@e L_J
J\ @ [_J
%
AntennaCable(Netsupp!ied)
VCR
Rear of the TV
Side of the TV Rear of the TV
Connecting a Camcorder
The side panel jacks on your TV make it easy to connect a camcorder to your TV.
They allow you to view the camcorder tapes without using a VCR.
_,_ • Each Camcorder has a different back panel configuration.
• When connecting a Camcorder, match the color of the connection terminal to the cable.
1 Connect a Video Cable (or S-Video Cable) between the
AV IN 2 [VIDEO] (or S-ViDEO) jack on the TV and the
VIDEO OUTjack on the camcorder.
2 Connect Audio Cables between theAV IN 2
[L-AUDIO-R] jacks on the TV and theAUDIO OUT jacks on
the camcorder.
Camcorder
Side of the TV
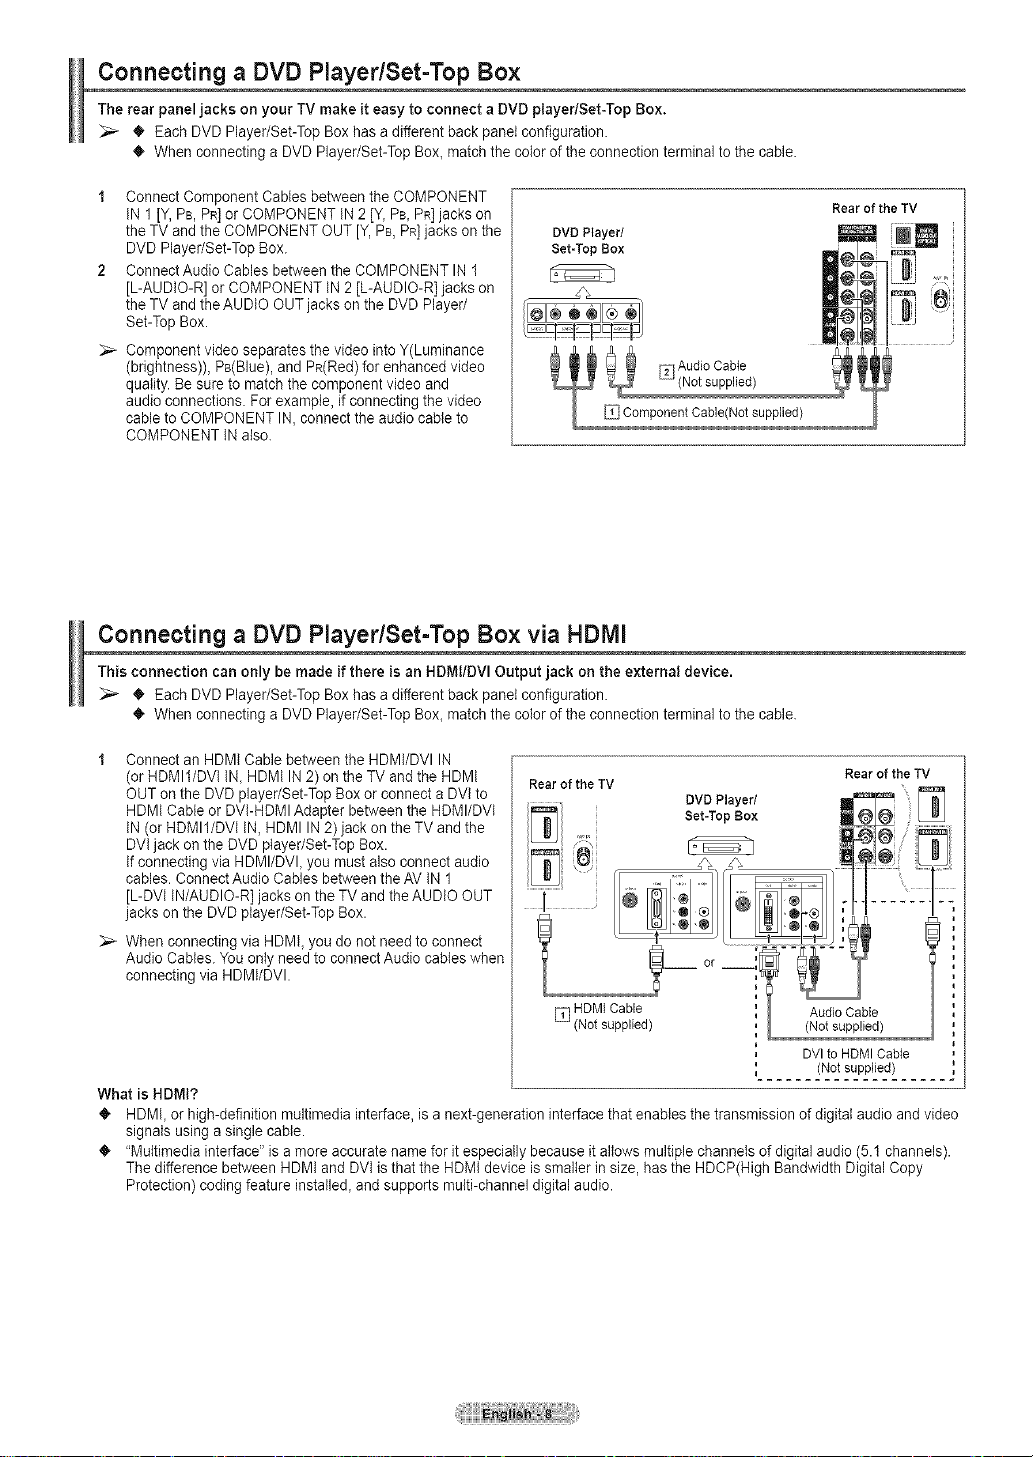
Connecting a DVD PlayedSet-Top Box
The rear panel jacks on your TV make it easy to connect a DMDplayer/Set-Top Box.
_;_ • Each DVD Player/Set-Top Box has a different back panel configuration.
• When connecting a DVD Player/Set-Top Box_match the color of the connection terminal to the cable.
1 Connect Component Cables between the COMPONENT
IN 1 [Y, PB,PR]or COMPONENT IN 2 [Y, PB,PR]jacks on
the TV andthe COMPONENT OUT [Y, PB,PR]jacks on the
DVD Player/Set-Top Box.
2 Connect Audio Cables between the COMPONENT IN 1
[L-AUDIO-R] or COMPONENT IN 2 [L-AUDIO-R] jacks on
the TV andtheAUDIO OUT jacks on the DVD Player/
Set-Top Box.
Component video separates the video into Y(Luminance
(brightness)), PB(Blue), and PR(Red)for enhanced video
quality. Be sure to match the component video and
audio connections. For example, ifconnecting the video
cable to COMPONENT IN, connect the audio cable to
COMPONENT IN also.
_ Component Cable(Net supplied)
Connecting a DVD PlayedSet-Top Box via HDMI
This connection can only be made if there is an HDMt/DVI Output jack on the external device.
_;_ • Each DVD Player/Set-Top Box has a different back panel configuration.
• When connecting a DVD Player/Set-Top Box_match the color of the connection terminal to the cable.
1 Connect an HDMI Cable between the HDMI/DVI IN
(or HDMI1/DVl IN, HDMI IN2) on the TV and the HDMI
OUT onthe DVD player/Set-Top Box or connect a DVI to
HDMI Cable or DVI-HDMIAdapter between the HDMI/DVI
IN (or HDMII/DVI IN, HDMI IN 2) jack on the TV and the
DVIjack on the DVD player/Set-Top Box.
If connecting via HDMI/DVL you must also connect audio
cables. Connect Audio Cables between the AV IN 1
[L-DVI IN/AUDIO-R] jacks on the TV and theAUDIO OUT
jacks on the DVD player/Set-Top Box.
When connecting via HDMI, you do not needto connect
Audio Cables. You onty need to connectAudio cables when
connecting via HDMI/DVI.
Rear of the TV
Rear of the TV
Rear of the TV
DVI to HDMI Cable
(Not supplied)
Whatis HDMI?
HDMI_or high-definition multimedia interface, is a next-generation interface that enables the transmission of digital audio and video
signals using a single cable.
"Multimedia interface" is a more accurate name for it especially because it allows multiple channels of digital audio (5.1 channels).
The difference between HDMI and DVIis that the HDMI device is smaller in size, has the HDCP(High Bandwidth Digital Copy
Protection) coding feature installed, and supports multi-channel digital audio.
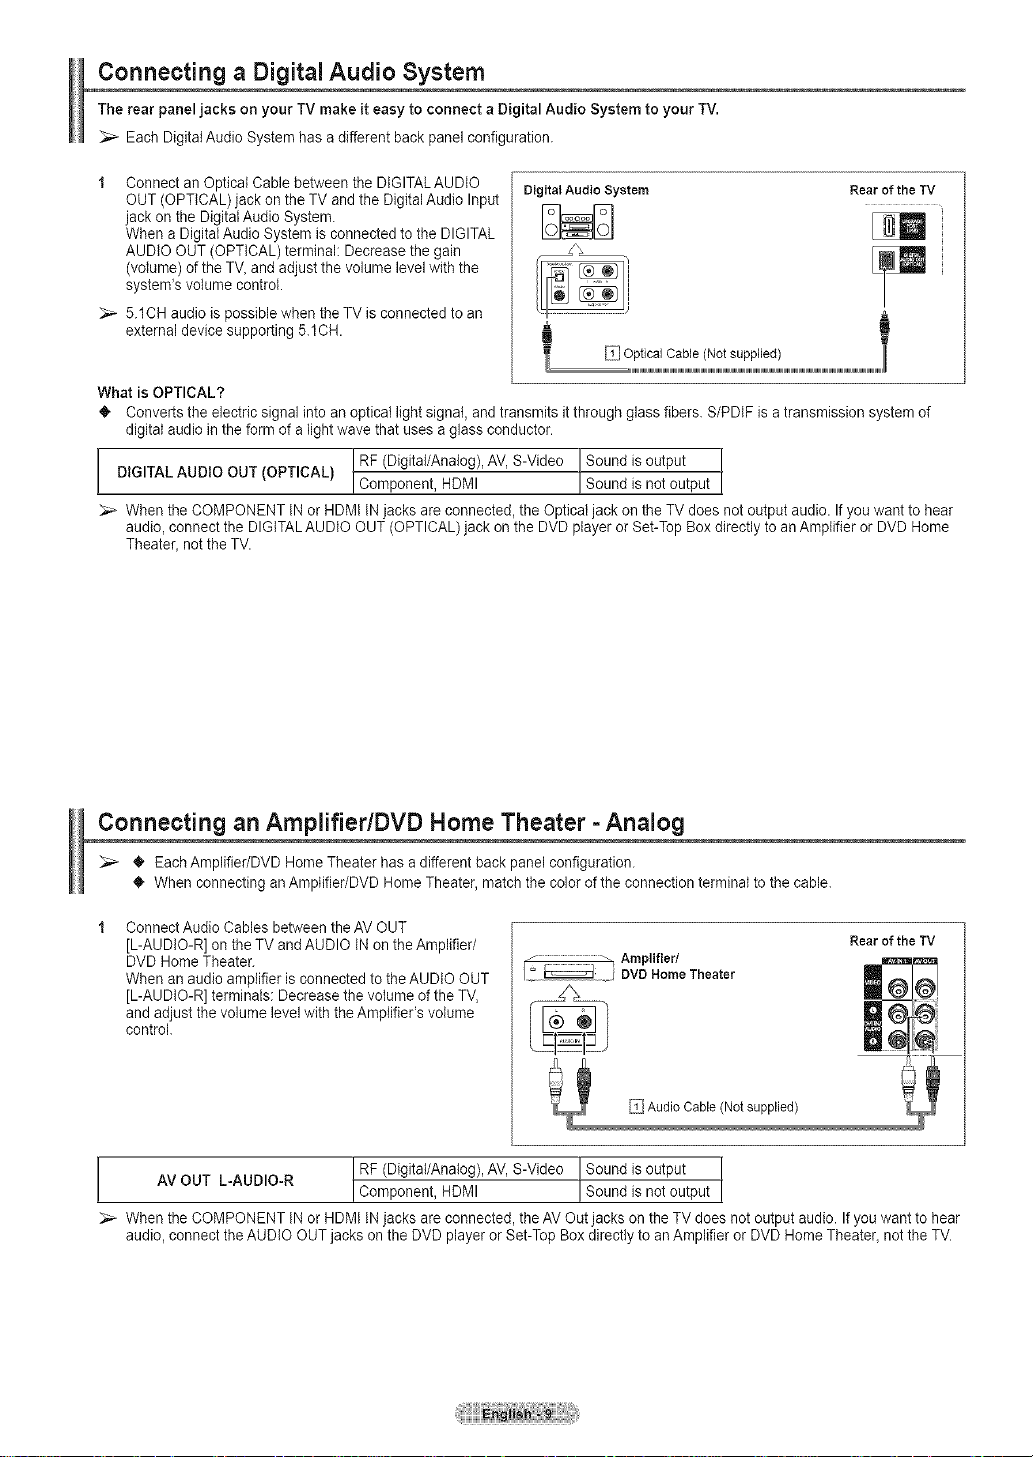
Connecting a DigitaJAudio System
The rear panel jacks on your TV make it easy to connect a Digital Audio System to your TM.
Each Digital Audio System has a different back panel configuration.
Connect an Optical Cable between the DIGITALAUDIO
OUT (OPTICAL) jack on the TV and the Digital Audio Input
jack on the Digital Audio System.
When a Digital Audio System is connected to the DIGITAL
AUDIO OUT (OPTICAL) terminal: Decrease the gain
(volume) of the TV_and adjust the volume level with the
system's volume control.
5.1CH audio is possible when the TV is connected to an
external device supporting 5.1CH.
What is OPTICAL?
• Converts the electric signal into an optical light signal, and transmits itthrough glass fibers. S/PDIF is atransmission system of
digital audio in the form of a light wave that uses a glass conductor.
DIGITAL AUDIO OUT (OPTICAL}
When the COMPONENT IN or HDMI IN jacks are connected, the Optical jack on the TV does not output audio. If you want to hear
audio, connect the DIGITALAUDIO OUT (OPTICAL) jack onthe DVD player or Set-Top Box directly to an Amplifier or DVD Home
Theater, not the TV.
! RF (Digital/Analog), AV, S-Video ! Sound is output
Component, HDMI Sound is not output
Digital Audio System Rear of the TV
Connecting an Amplifier/DVD Home Theater =Analog
_;_ • Each Amplifier/DVD Home Theater has a different back panel configuration.
• When connecting an AmplJfier/DVD Home Theater, match the color of the connection terminal to the cable.
Connect Audio Cables between theAV OUT
[L-AUDIO-R] on the TV andAUDIO IN on theAmplifier/
DVD Home Theater.
When an audio amplifier is connected to the AUDIO OUT
[L-AUDIO-R] terminals: Decrease the volume ofthe TV,
and adjust the volume level with theAmplifier's volume
controk
AV OUT L-AUDIO-R Component, HDMI ! Sound is not output
When the COMPONENT IN or HDMt IN jacks are connected, the AV Out jacks on the TV does not output audio. Ifyou want to hear
audio, connect the AUDIO OUT jacks on the DVD player or Set-Top Box directly to an Amplifier or DVD Home Theater_ notthe TV.
t RF (Digital/Analog), AV, S-Video JSound is output
[_ _: I DVDHomeTheater
_Amplifier/
Audio Cable (Not supplied)
Rear of the TV
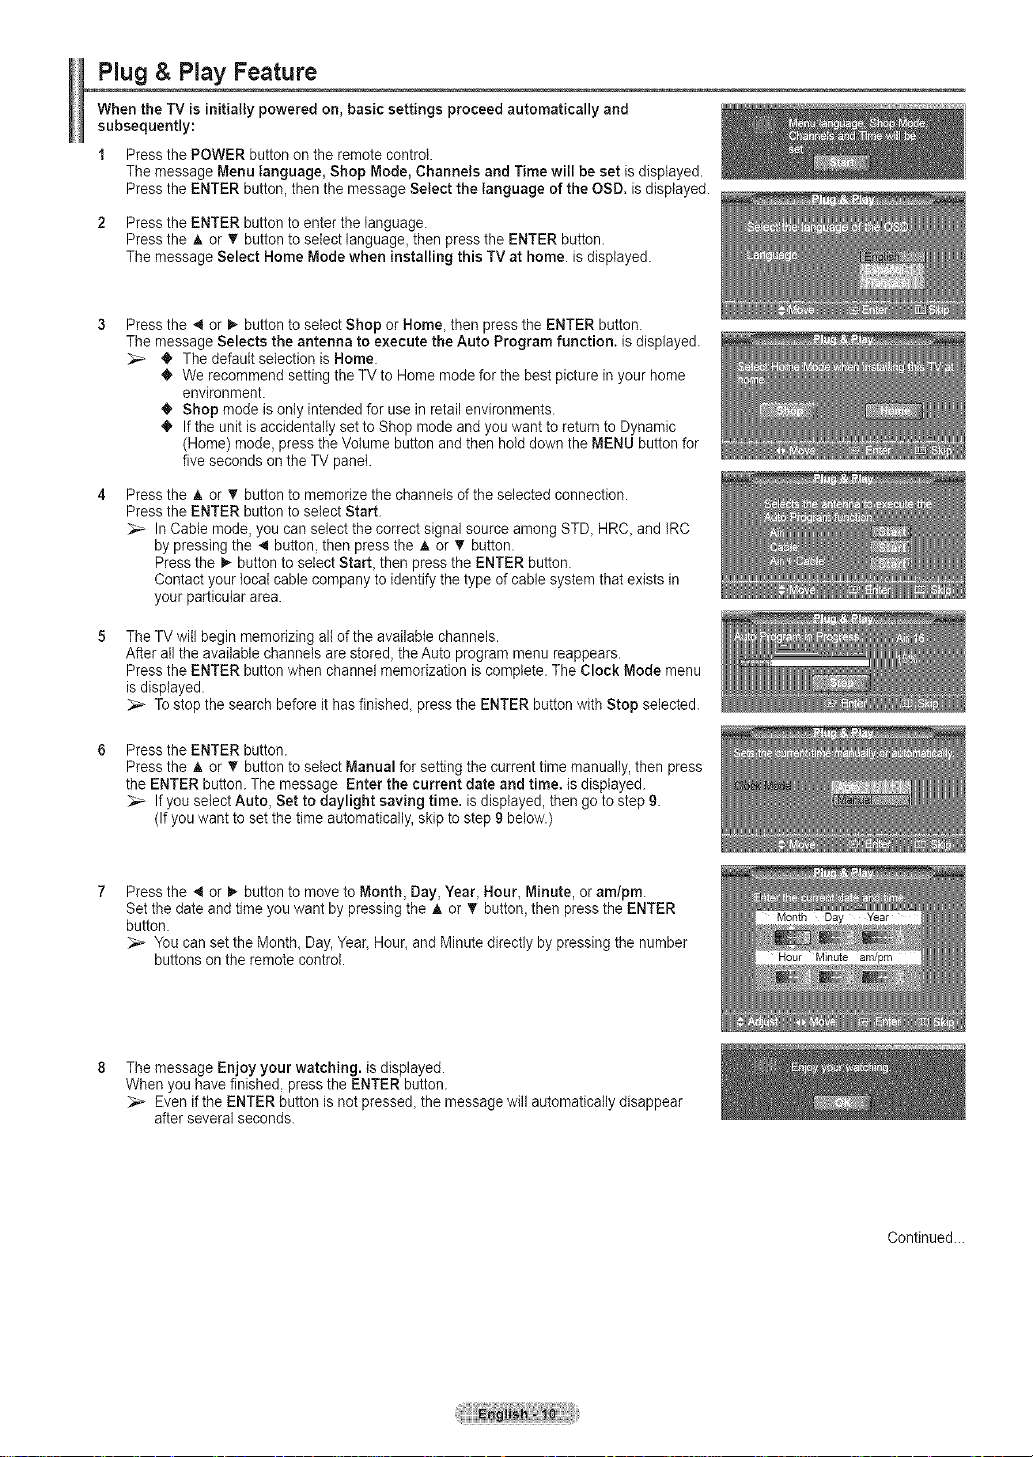
Plug & Play Feature
When the TV is initially powered on, basic settings proceed automatically and
subsequently:
1 Press the POWER button on the remote control.
The message Menu language, Shop Mode, Channels and Time will be set isdisplayed.
Press the ENTER button, then the message Select the language of the OSD. isdisplayed.
2 Press the ENTER button to enter the language.
Press the A or _' button to select language, then press the ENTER button.
The message Select Home Mode when installing this TV at home. is displayed.
Press the .,4or _- button to select Shop or Home, then press the ENTER button.
The message Selects the antenna to execute the Auto Program function, is displayed.
_- • The default selection is Home.
• We recommend setting the TV to Home mode for the best picture in your home
environment.
• Shop mode is only intended for use in retail environments.
• If the unit is accidentally set to Shop mode and you want to return to Dynamic
(Home) mode, press the Volume button andthen hold down the MENU button for
five seconds on the TV panel.
Press the A or V' button to memorize the channels of the selected connection.
Press the ENTER buttonto select Start.
In Cable mode, you can select the correct signal source among STD, HRC, and IRC
by pressing the 4 button, then press the A or T button.
Press the _,-button to select Start, then press the ENTER button.
Contact your local cable company to identify thetype of cable system that exists in
your particular area.
The TV will begin memorizing all of the available channels.
After all the available channels are stored, the Auto program menu reappears.
Press the ENTER buttonwhen channel memorization is complete. The Clock Mode menu
is displayed.
Tostop the search before it has finished, press the ENTER button with Stop selected.
Press the ENTER button.
Press the A or _' button to select Manual for setting the current time manually, then press
the ENTER button. The message Enter the current date and time. is displayed.
If you select Auto, Set to daylight saving time. is displayed, then go to step 9.
(If you want to set the time automatically, skipto step 9 below.)
Press the _ or _,, button to move to Month, Day, Year, Hour, Minute, or am/pro.
Set the date and time you want by pressing the A or T button, then press the ENTER
button.
You can set the Month, Day, Year, Hour, and Minute directly by pressing the number
buttons on the remote control.
The message Enjoy your watching, is displayed.
When you have finished, press the ENTER button.
Even if the ENTER button is not pressed, the message will automatically disappear
after several seconds.
Continued...
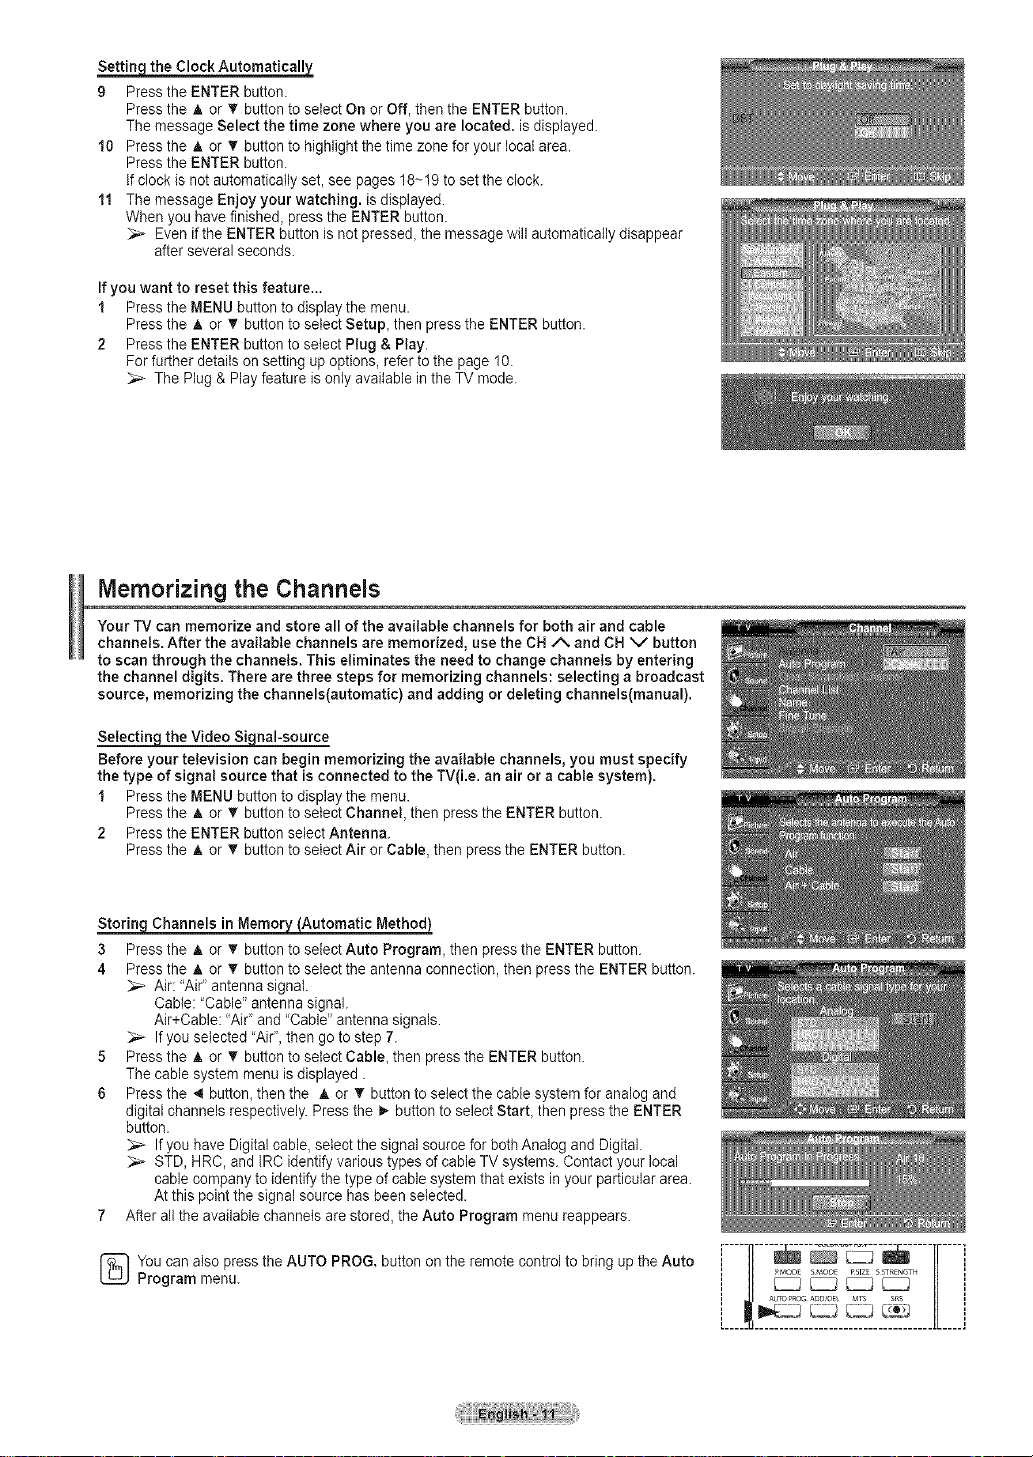
_the Clock Automatically
9 Pressthe ENTER button.
Press the A or • button to select On or Off, then the ENTER button.
The message Select the time zone where you are located, is displayed.
10 Press the _. or T button to highlight the time zone for your local area.
Press the ENTER button.
If clock is not automatically set, see pages 18~19 to set the clock.
11 The message Enjoy your watching, is displayed.
When you have finished, press the ENTER button.
Even if the ENTER button is not pressed, the message will automatically disappear
after several seconds.
If you want to reset this feature...
1 Press the MENU button to display the menu.
Press the A or _' button to select Setup, then press the ENTER button.
2 Press the ENTER button to select Plug & Play.
For further details on setting up options, referto the page 10.
The Plug & Play feature is only available in the TV mode.
Memorizing the Channels
Your TV can memorize and store all of the available channels for both air and cable
channels. After the available channels are memorized, use the CN _*, and CH V button
to scan through the channels. This eliminates the need to change channels by entering
the channel digits. There are three steps for memorizing channels: selecting a broadcast
source, memorizing the channels(automatic) and adding or deleting channels(manual).
Selectin- the Video Si nal-source
Before your television can begin memorizing the available channels, you must specify
the type of signal source that is connected to the TV(i.e. an air or a cable system).
1 Press the MENU button to displaythe menu.
Press the A or T button to select Channel, then press the ENTER button.
2 Press the ENTER button select Antenna.
Press the A or _' button to select Air or Cable, then press the ENTER button.
Channels in Memor_
3 Press the A or _' button to select Auto Program, then press the ENTER button.
4 Press the A or T button to select the antenna connection, then press the ENTER button.
Air: "Ai¢ antenna signal.
Cable: "Cable" antenna signal.
Air+Cable: "Air" and "Cable" antenna signals.
If you selected "Air", then go to step 7.
5 Press the A or _' button to select Cable, then press the ENTER button.
The cable system menu is displayed.
6 Press the _i button, then the A or T button to select the cable system for analog and
digital channels respectively. Press the _,-button to select Start, then press the ENTER
button.
If you have Digital cable, select the signal source for bothAnalog and Digital.
STD, HRC, and IRC identify various types of cable TV systems. Contact your local
cable company to identify the type of cable system that exists in your particular area.
Atthis point the signal source has been selected.
7 After all the available channels are stored, the Auto Program menu reappears.
You can also press the AUTO PROG. button on the remote control to bring up the Auto
Program menu.
 Loading...