

Samsung SyncMaster 17GLi User Manual
SyncMaster 17GLi
43 Cm ( 17” Diagonal )
Basic : CMG7377L
User’s Manual
COLOR DISPLAY UNIT

Contents of Your Package
The SyncMaster 17GLi is a delicate, precision instrument. Be
sure that you can comfortably lift the monitor from its package, and that you have a sturdy and stable work surface that
can support the monitor.
After removing the SyncMaster 17GLi from its packing, make
sure you have everything you need to set up your system.
Unpack all components and match them against the following packing list:
1 Samsung SyncMaster 17GLi Color Monitor
1 Power Cord
1 User’s Manual
1 Warranty Registration Card ( Optional )
If you are missing any of these items, contact your Samsung
dealer.
Note : Samsung recommends saving your SyncMaster
17GLi Color Monitor box and its packing materials. Use only
the original packaging for shipment or relocation of your
monitor. Substitute packaging may not provide adequate protection.
*MPR // Compliance: SyncMaster 17GLi comply with
SWEDAC ( MPR II ) recommendations for reduced electric
and magnetic fields.
Table of Contents
Introduction
About This Manual
Features of Your Monitor
Safety Tips
Installation
Connection to Your Computer
IBM or PC-Compatible
Macintosh
Controls and Adjustments
Controls and Their Locations
Basic Controls and LED indicator
Functions
Microprocessor Controls and
Functions
On Screen Display ( OSD )
Control Function Buttons
Examples of OSD
Power Management System
Adjustment Examples
Troubleshooting
Troubleshooting Chart
Appendix
Specifications
FCC Information
IC Compliance Notice
Pin Assignments
Factory modes Timing Signal Chart
2
3
4
5
7
10
10
10
11
11
13
14
15
17
18
19
20
20
21
Note:
l
SyncMaster is a registered trademark of Samsung
Electronics, Co.,Ltd.
l
IBM, VGA, XGA, XGA II and PS/2 are registered trademarks of International Business Machines
Corporation.
l Apple and Macintosh are registered trademarks of Apple
Computer, Inc. Macintosh Centris and Macintosh Quadra
are trademarks of Apple Computer, Inc.
l
Super-VGA (SVGA) and VESA are registered trademarks
of the Video Electronics Standards Association.
ongratulations on your
purchase of the Samsung
SyncMaster 17GLi Color
Monitor! Your SyncMaster is a
43 cm ( 17” ), high-resolution
( 1280 x 1024 ) color monitor
that offers many outstanding
high-performance features
( see page 3 ).
Green Series Monitor: This product is
one of Samsung’s Green Series family of
monitors. As such, it offers you new
opportunities to cut power consumption,
recycle materials and reduce the risk of
health hazards.
Samsung stands for quality: Samsung
is one of the world’s largest manufacturers of quality monitors. At Samsung, quali-
ty control starts by checking and testing
every component that goes into a
SyncMaster monitor. Then, every monitor
undergoes rigorous performance testing.
This meticulous attention to detail has
been recognized by the International
Organization for Standards, which conferred its prestigious ISO certification to
Samsung for product quality.
For you the end user, Samsung’s quality
means reliability. You are assured that
your SyncMaster monitor will deliver crisp,
high-resolution images and trouble-free
performance, day after day, year after year.
Samsung stands for technology: Every
SyncMaster monitor meets stringent international ergonomic standards for low radiation. The monitor is designed to satisfy
the most demanding “safe-workplace”
requirements by meeting the strict
Swedish MPR II guidelines for lower ELF
and VLF emissions. What’s more, all user
comfort and safety features are built to
Samsung’s quality standards.
The outstanding clarity and brilliantly rendered color of the monitor are provided by
Samsung’s lnvar shadow mask. The flat, nonglare screen assures safe and non-fatiguing
viewing all day long. Each monitor's controls
are positioned in front so they are easy to
reach and use. The monitor includes a tiltswivel base that easily adjusts to your preferred angle of vision.
ENGLISH
1

About This Manual
This manual is designed to help you take
full advantage of your color monitor’s features. It includes a Table of Contents, and
is divided into the following six sections:
Introduction
provides helpful information
about the User’s Manual and your
Color Monitor.
lnstallation explains how to easily
connect the monitor to your computer
system.
and return it to Samsung so that we can
provide you with the best customer service
possible.
Important: Protect your Warranty by
completing and mailing the Registration
Card within 10 days of purchase.
Warning and Cautions
Controls and Adjustments
shows you
the locations of the front panel controls, explains their functions, and provides examples that illustrate how to
properly adjust these controls for optimum performance.
Troubleshooting
offers a handy chart
that may be used to quickly correct problems with the monitor, should they
occur.
Appendix contains important reference
information such as the monitor’s specifications, important FCC and IC operating information, signal connections and
pin assignments, plus the signal timing
settings that have been preset at the
factory.
Please take the time to read through this
manual so that you can obtain the maximum performance and use from your monitor. After reading the manual, store it in a
safe place for future reference.
Warranty Registration Card (Optional)
You will find a Warranty Registration Card
included with your monitor (see “Contents
of your package” ). Please fill out the card
The lightning flash and arrowhead within
the triangle is a warning sign alerting you
of “dangerous voltage” inside the product.
The exclamation point within the triangle
is a warning sign alerting you of important
instructions accompanying the product.
CAUTION: To reduce the risk of electric
shock, do not remove cover (or back). No
user serviceable parts inside. Refer
servicing to qualified service personnel.
2

Features of Your Monitor
The Color Monitor is designed for exceptional screen performance - offering a tight
0.28 mm dot-pitch for resolutions up to
1280 x 1024. It also offers an unlimited
number of colors and high refresh rates for
stable, “flicker-free” images.
With this monitor, you have a high-contrast screen that helps eliminate blurring
and delivers exceptionally sharp text and
graphics. In addition, the monitor supports
all standard analog modes - from VGA to
EVGA - which are easily selected from a
convenient front panel control. Other features of the Monitor include:
43 cm (17”) [ 40 cm (15.7”) Viewable ].
The Flat Square Technology CRT
reduces glare and enhances viewing.
Anti-static CRT coating eliminates static electric shock and helps keep the
screen dirt free.
Automatically scans horizontal frequencies from 30 KHz - 65 KHz and vertical
frequencies from 50 Hz - 120 Hz.
Supports VESA flicker-free modes,
adding to the image quality.
Microprocessor-based digital control
system saves up to 11 user-definable
display settings. Also includes 11 factory preset display settings.
“Safe-workplace” design complies
with SWEDAC ( MPR II ) recommendations for reduced electric and magnetic
fields.
The monitor features an On Screen
Display ( OSD ) that shows information
about the display settings. The OSD
appears on the screen when you select
a function button. The OSD shows the
name, range and current setting of the
control function. In addition, the OSD
shows the current input signal frequency and the list of user and factory preset timings. The OSD remains active
for approximately 10 seconds after
completion of any adjustments.
Monitor provides compatibility with a
wide variety of video standards including VGA, Super-VGA, IBM XGA, XGA II,
Apple Macintosh II, IBM 8514/A, 1024
x 768 non-interlaced and 1280 x 1024
non-interlaced.
Power supply operates on AC 100-240
Volt and 60 Hz / 50 Hz for use worldwide.
Auto save function automatically saves
any size, position, and distortion
adjustments.
PowerSaver, the monitor’s built-in
power management system, provides
advantages such as energy cost sav-
ings, the extension of product life and
a decrease in air pollution caused by
power generation.
The New AR (Anti Reflection) coating
of this monitor provides a much higher
contrast surface than the common silica coating. It offers the advanced technology of CDT treatment.
Optional Feature Macintosh Cable Adapter
Your dealer offers an optional
MacMaster Cable Adapter for connecting your monitor to the entire
Macintosh line of computers. Please
consult your dealer for information
about this optional feature.
ENGLISH
3

Safety Tips
1.
Before connecting the AC power cord
to an outlet, make sure the voltage
designation on your monitor corresponds to the local electrical supply.
Never insert anything metallic into the
2.
monitor openings. Doing so may cre-
ate the danger of electric shock.
To avoid electric shock, never touch
3.
the inside of the monitor. Only a qualified technician should open the monitor’s case.
4.
Never use your monitor if the power
cord has been damaged. Do not allow
anything to rest on the power cord,
and keep the cord away from where
people could trip over it.
Be sure to hold the plug, not the cord,
5.
when disconnecting the monitor from
an electric socket.
Openings in the monitor cabinet are
6.
provided for ventilation. To prevent
overheating, these openings should
not be blocked or covered. Also, avoid
using the monitor on a bed, sofa, rug
or other soft surface. Doing so may
block the ventilation openings in the
bottom of the cabinet. If you put the
monitor in a bookcase or some other
enclosed space, be sure to provide
adequate ventilation.
7.
Put your monitor in a location with low
humidity and a minimum of dust.
Avoid places like damp basements or
dusty hallways.
Do not expose the monitor to rain or
8.
use it near water ( in kitchens, next to
swimming pools, etc.). If the monitor
accidentally gets wet, unplug it and
contact an authorized dealer immediately. You can clean the monitor with
a damp cloth when necessary, but be
sure to unplug the monitor first.
9.
Place the monitor on a solid surface,
and treat it kindly. The screen is made
of glass and can be damaged if
dropped or sharply hit.
Locate your monitor near an easily
10.
accessible AC outlet.
11.
If your monitor does not operate normally - in particular, if there are any
unusual sounds or smells coming from
it - unplug it immediately and contact
an authorized dealer or service center.
12.
High temperatures can cause problems. Don’t try to use your monitor in
direct sunlight, and keep it away from
heaters, stoves, fireplaces and other
sources of heat.
Unplug the monitor when it is going to
13.
be left unused for an extended period
of time.
Unplug your monitor from the AC out-
14.
let before any service.
ENGLISH
4
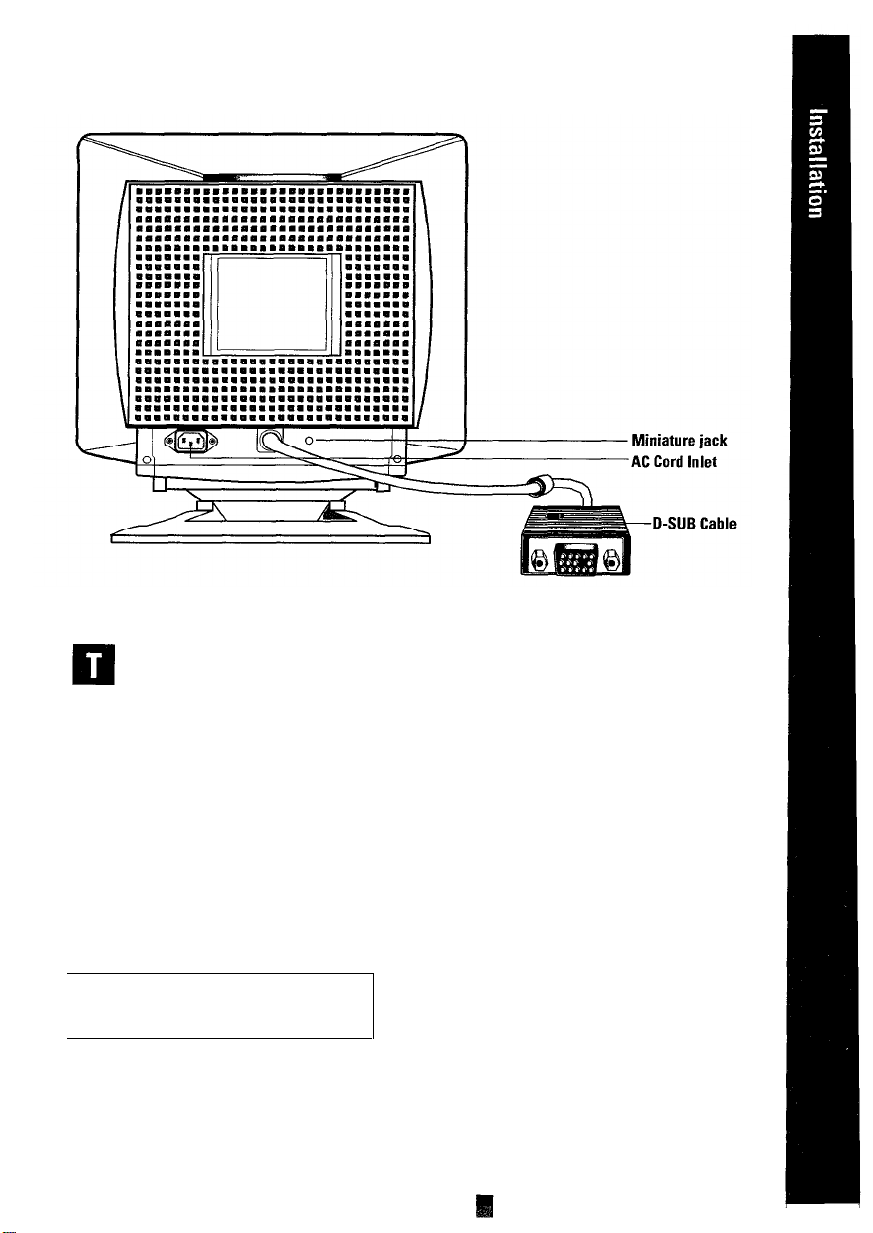
Miniature jack AC Cord Inlet D-Sub Cable
his section of the User’s Manual
explains how to connect the Color
Monitor to IBM or PC-compatible
computers, as well as Apple Macintosh
computers.
Note : Miniature jack
Do not plug anything into the miniature
jack on the rear of the monitor This interface is for factory adjustments and certified service center use only. Unauthorized
use of this connector will cause damage to
the monitor.
Connection to Your Computer IBM or PC-Compatible
Your Color Monitor complements a wide
range of IBM and PC-compatible systems.
To attach the monitor to this type of system, follow these instructions
1.
Turn off the power to the monitor and
computer.
2.
Connect the 15-pin end of the signal
cable to the video connector on your
computer’s video controller. Tighten
the screws of the signal cable to
ensure proper connection.
Note: Your computer system has one of
two configurations:
l The video controller is built into the
computer.
l The video controller is in the form of a
display adapter ( also referred to as a
video card, graphics card, graphics
board, or graphics adapter ).
ENGLISH
5
Both configurations have a video connector ( sometimes called a video port ).
If you are not sure which connector is the
video connector, consult your computer or
display adapter manual.
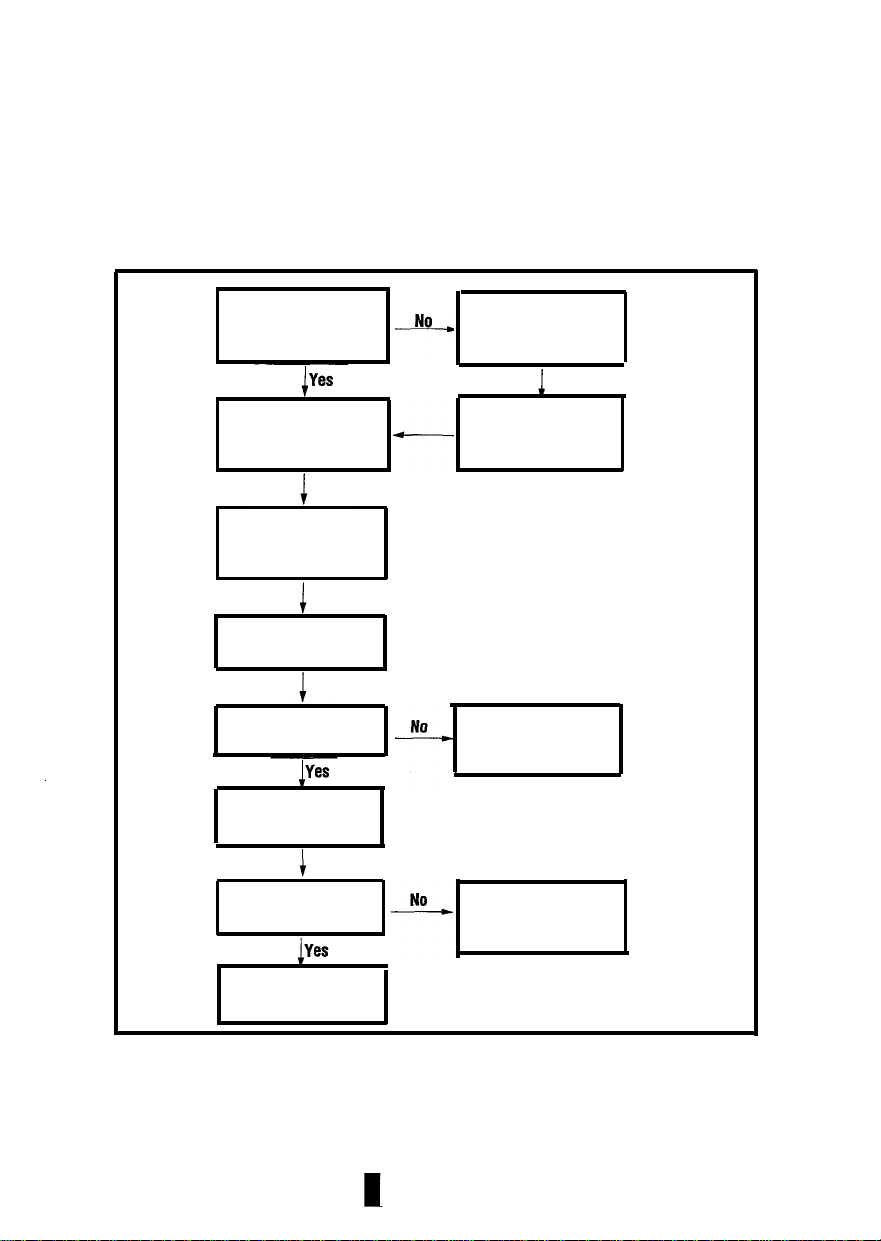
Installation Procedure
3.
Connect one end of the power cord to
the monitor and the other end to the
power outlet.
4. Turn on the monitor and the computer.
Is your computer an IBM
or a compatible PC?
Connect the monitor
signal cable to the
computer video controller.
Connect the monitor
power cord to the power
outlet.
Turn on the monitor
Turn on the computer.
Does the image display?
If needed, adjust the
image.
Is your computer a
Macintosh (MAC II or LC
series)?
Connect the Macintosh
cable adapter to the
computer video controller.
Check the connection of
D-Sub connector and
power cord.
Is the image correct?
Installation is complete.
ENGLISH
Refer to the
Troubleshooting section,
page 17 of this manual.
6
Before turning power on to the
monitor and computer: Check the
User’s Manual of your computer for
instructions about turning on equip-
ment connected to the computer. Also,
check for any instructions concerning
your video system when using a multisync monitor. In some cases, jumper or
switch settings may be required for the
display adapter to output extended
resolution modes.
To turn on monitor: Use the power
switch on the monitor’s front panel.
The LED indicator should glow green
( see Basic Controls and LED Indicator
Functions, page 10 ).
Connection to Your Computer Macintosh Computer
1. This monitor requires a cable adapter
for use with a Macintosh computer.
The MacMaster Cable Adapter sup-
ports all monitors and all Macintosh,
Centris, Quadra, Duo Dock, and Power
Macintosh computers. If you do not
already have a cable adapter, check
with your computer dealer.
2. Refer to your computer and cable
adapter User’s Manuals to help determine the appropriate display mode
and resolution. This monitor supports
resolutions up to 1024 x 768 for the
Macintosh, but the resolution most
highly recommended is 832 x 624 or
1024 x 768.
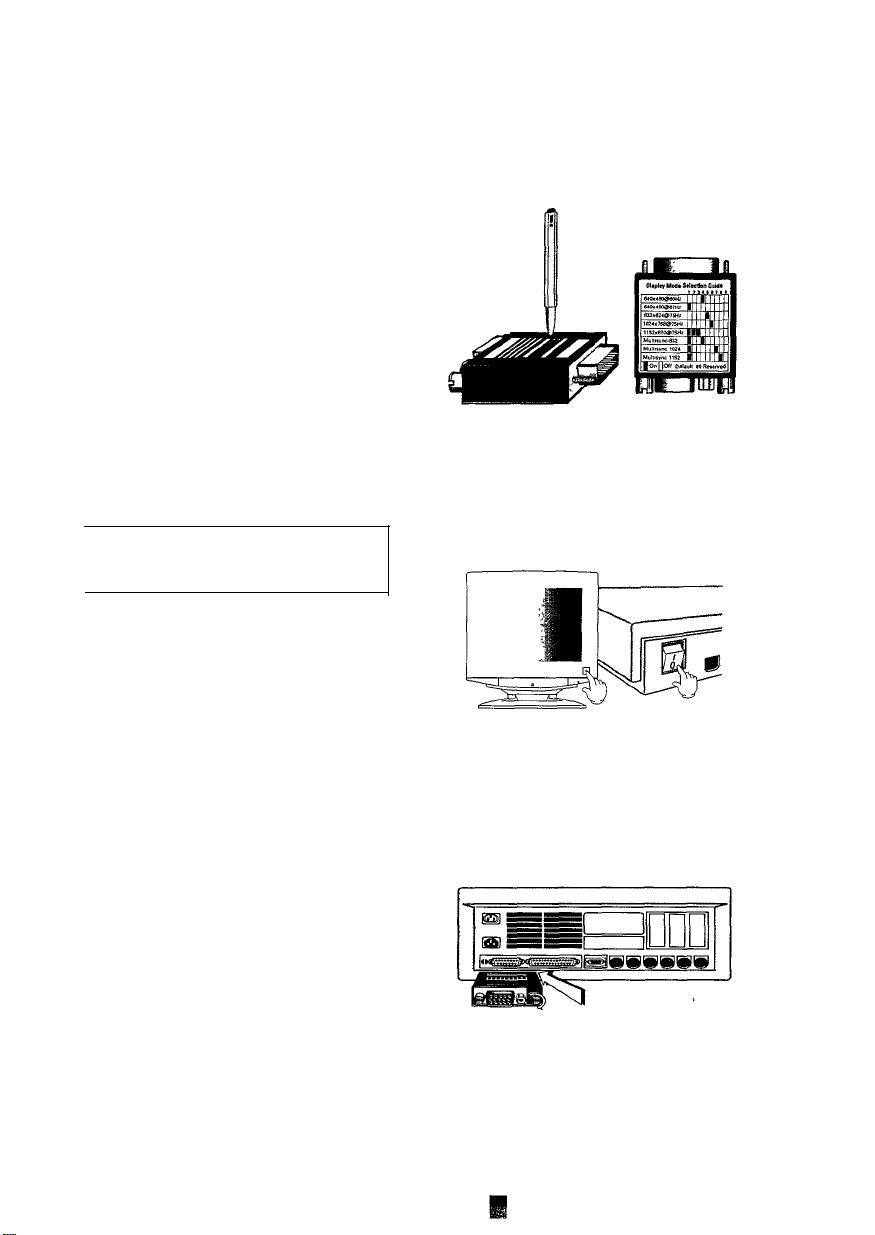
3. Set the display mode and resolution
using the DIP switches on the cable
adapter.
4. Power off your Macintosh computer
and monitor including other peripheral
devices.
5. Connect the cable adapter to the video
port of the Macintosh computer.
Tighten the screws on the cable
adapter.
ENGLISH
7
 Loading...