

Page 1

SVP-6000N/P
SVP-6000N/P
HIGH RESOLUTION
HIGH RESOLUTION
VIDEO PRESENTER
VIDEO PRESENTER
User’s Manual
User’s Manual
Before attempting to operate this product,
please read the instructions carefully.
Page 2

English French German Italian Spanish
Special features
Thank you for purchasing this product.
This product is a high resolution video presenter that can project all kinds of
data on a PC monitor, a TV, or a projector with simple manipulations.
12X zoom lens
(can be used for the materials with sizes from B4 to film)
By adopting 12X super optic angle zoom lens that it is
possible to shoot material in the size of a film to B4.
Adopted 1.5 million pixel CCD
By adopting 1/2 inch PS type CCD, high resolution
and excellent color reappearance are realized.
Can control USB and RS-232
By using USB, it is possible to view or store the
image in a PC and control the functions of the
this set. Also it is possible to control the this set
by using RS-232C port.
Output modes from SXGA to VGA
(supports FULL/SCROLL modes)
It supports various output modes from SXGA
to VGA that it can be connected to all kinds of
projectors.
Remote control is a standard feature
Remote control is supplied as a standard feature
for the product so that it can be manipulated
from a distance. Thus it is very convenient during a
conference.
page1
TV output mode
By adopting TV output mode, monitoring and
conference data can be recorded through VTR.
Page 3

Contents
Product features and structure
English French German Italian Spanish
Uses
Accessories
Names and functions of each part
Front side
Main control panel
Terminals at the back
Remote control
Operation methods
Set preparation
Basic connecting methods
To view an image projected on the video presenter
through a PC monitor or a projector
To view an image on a TV screen or a monitor while
listening to the sound from a microphone
To view the VGA output of an external device
through a PC monitor or a projector
To connect to a PC for USB communication
To connect to a PC for RS-232C communication
3
3
4
4
5
6
10
12
9
9
9
10
10
11
To connect with a mouse
Basic operations
Methods of using various buttons for the screen
contro
l 13
Before requesting service
Notes on operations
Storage after use
Trouble shooting
Fuse replacement
Battery replacement
Specifications
11
12
15
15
16
16
16
17
page2
Page 4

Uses of video presenter/Supplied accessories
English French German Italian Spanish
Thus it is very helpful for an effective progress of a conference.
Conference
Detailed information in a report, form, table,
etc. as well as a three dimensional object,
such as a model, can be projected on a
screen clearly that all the participants can
focus on the same topic during a conference.
Medicine and science areas
It is possible to present various visual data
including slides and X-ray film etc. at a
medical conference or a doctors' association
in the order of file.
Demonstration or exhibition
By connecting to a large projector, it can
produce dynamic images at a new product
demonstration, an exhibition, or an event.
Education
It can be used as an audiovisual tool for
printed materials, such as text books, as well
as audiovisual materials, educational
materials, and especially for students' art
works.
Advertisement and design areas
It is useful in design area where visualization
is necessary. It is possible to project catalogs
and slides, thus the effect of a job can be
checked easily.
PC interface function(USB/RS-232C)
By using USB, the next generation interface,
it is possible to view or store the image in a
PC with higher speed and control the
functions of the this set.Also it is prssible to
control the this set by using RS-232C.
Supplied accessories
User’s Manual Audio/Video cables S-video cable Remote control
Power cable Dust cover
PC monitor cable USB cable BGVu program Mouse Pad
Adaptor lens and Lens cap
PS/2 mouse
page3
Diskette
Program
Manual
Page 5
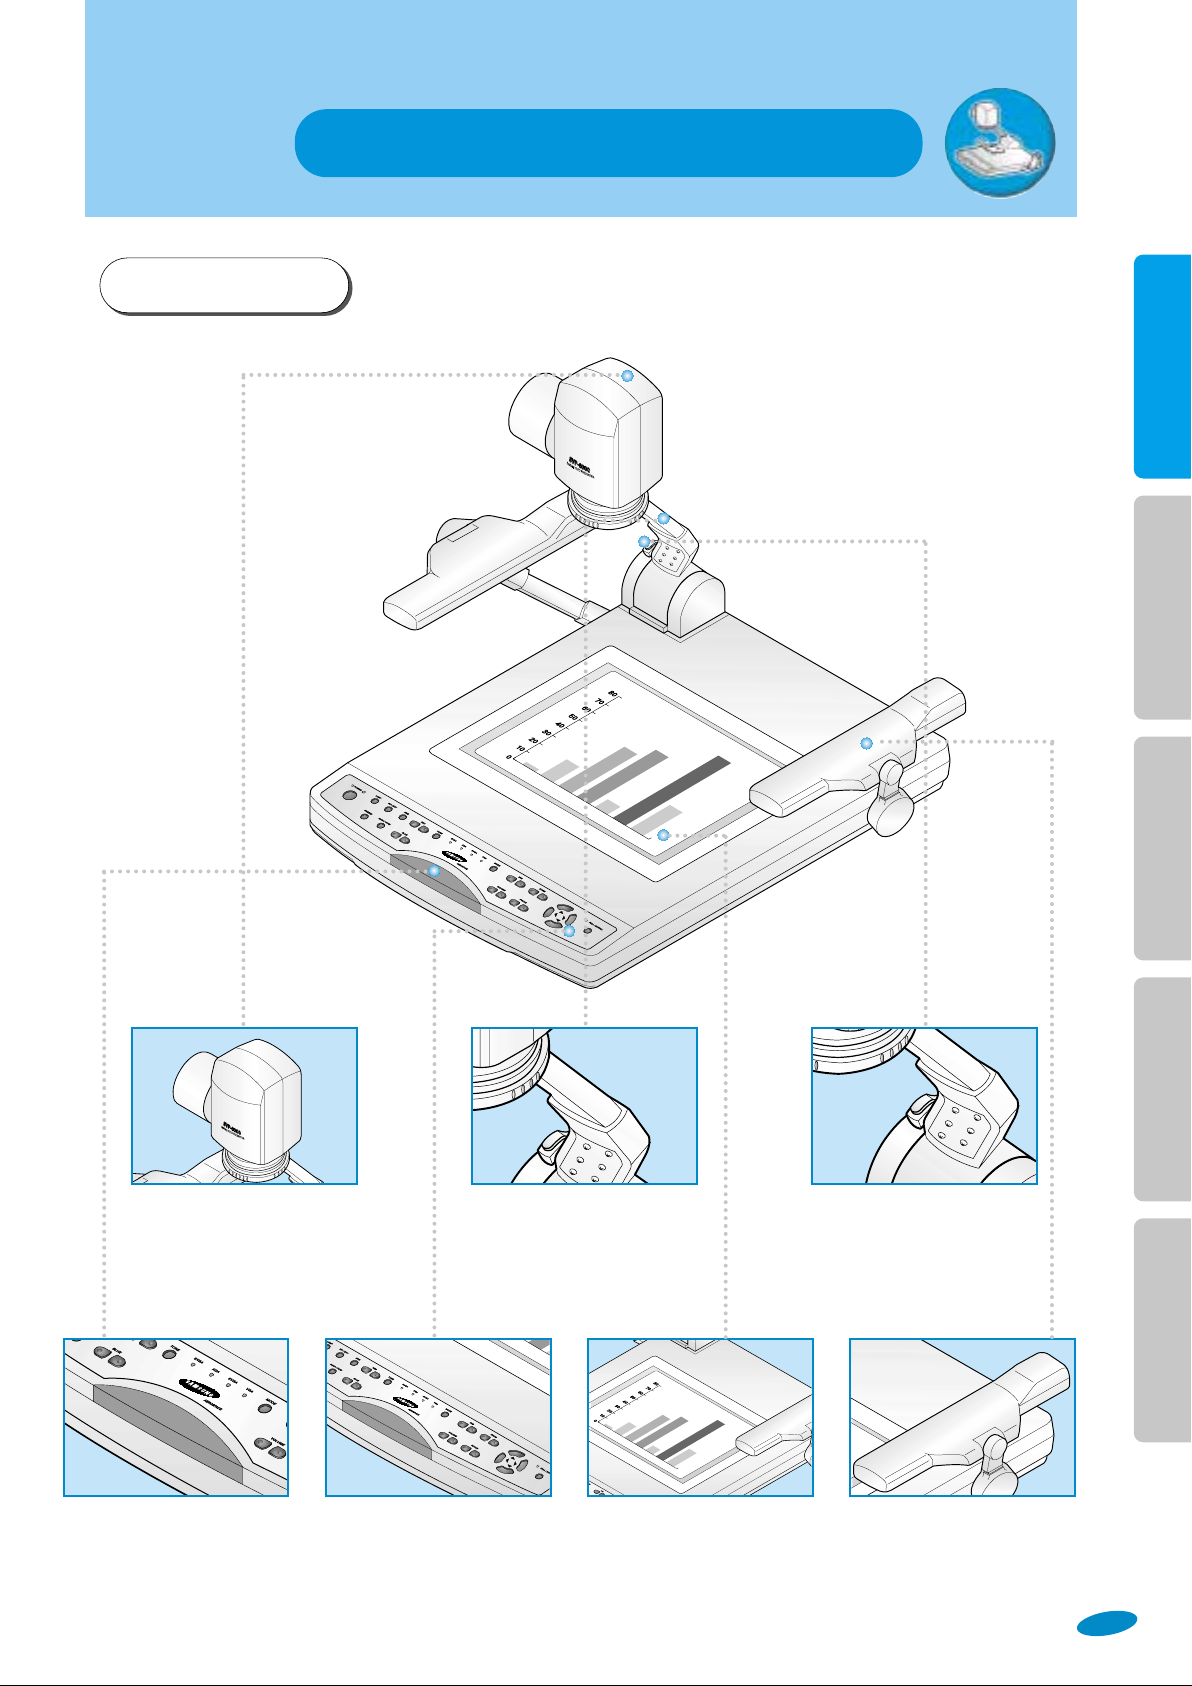
Names and functions of each part
Front side
English French German Italian Spanish
Lens
Can rotate to the front and back.
Remote control signal
receiver
Main support Main lock button
Main control panel
(see next page)
Document plate
(built-in lower lamp)
Press to move the main support.
Lamp unit
(upper lamp
)
page4
Page 6

English French German Italian Spanish
Names and functions of each part
Main control panel
The buttons on the main control panel can be found in the
remote control. These buttons perform the same functions
Power
Use this to turn the power on or off.
Lamp
Use this to turn the upper or lower lamp on or off.
INT/EXT
Use this to select internal or external image
INT: to view the image on this product.
EXT: to view the VGA output from another device on a PC monitor
or a projector by connecting it to this product.
AWC
Use this to control the color automatically
Red/Blue control
Use this to control the color manually
Tone
Use this to control the tone of the image.
Freeze
Use this to freeze the image
Nega/Posi
Positive: for regular pictures or positive films
Negative: for negative films
Use this to select the desired resolution for the video output
device(PC monitor, projector) connected to this product.
SXGA (1280 x 1024), XGA (1024 x 768)
SVGA (800 x 600), VGA (640 x 480)
(when the power is on, the initial setting is in SXGA mode)
Use this to control the brightness of the image by using the iris.
Use this to control the size of an object projected on the screen.
Use this to control the volume of the microphone.
Use this to adjust the focus
Use this to move the image on the screen to up and down, right
and left in the SCROLL mode.
FULL: use this to display the whole image
SCROLL: use this to display only a part of the image
(applicable to XGA, SVGA, and VGA modes only)
Mode
Iris
Zoom
Volume
Focus
Control key
FULL/SCROLL
page5
Page 7

Names and functions of each part
Terminals at the back
Power input terminal
Use this to connect the power cable (100 - 240V, free volt method)
VGA video input
Connect this to the VGA output terminal of another VGA output device.
When external input is selected, the image is shown through the VGA out terminal.
USB: computer connection terminal
Use this to connect USB cable when transmitting image by USB port.
VGA video output
Connect this to the RGB input terminal of a PC monitor or a projector.
English French German Italian Spanish
S-video output
This is the video output terminal connecting to a TV that has S-video input terminal.
RS-232C: computer connection terminal
Use this to connect RS-232C cable.
TV output
Connect this to the TV input terminal.
Connect this to view the image projected on the TV screen.
Even when the external input is selected, only the image on the main unit is displayed on
TV output terminal.
Audio output (left/right)
Connect this to the audio output terminal of a TV or a VCR or speakers.
The sound from an external AV device or microphone is heard through this.
Mouse
Connect PS/2 mouse to this when the user wants to use the mouse pointer.
Audio input
Connect this to the audio output terminal of a PC.
Connect this to listen to the sound from another AV device.
Microphone
Use this to connect the microphone to the main unit.
page6
Page 8

English French German Italian Spanish
Names and functions of each part
Remote Control
POWER button
Use this to turn the power on or off
INT/EXT button
Use this to select internal image or external image
- INT: to view an image projected on this product
- EXT: to view another VGA output though a PC monitor or a
projector by connecting it to this product.
FOCUS F button
Use this to focus on area far away
FOCUS N button
Use this to focus on area near
NEGA/POSI button
- POSI: use this to view regular or positive films
- NEGA: use this to view negative films
LIGHT button
Use this to turn the upper or lower light
on or off
R ADJ. +, -button
Use this to control the red hue
B ADJ. +, -button
Use this to control the blue hue
VOLUME +, - buttons
Use this to increase or decrease the
volume level of the microphone.
W button
Use this to reduce the image on
the screen
IRIS+button
Use this to brighten the image
IRIS-button
Use this to dim the image
Control key buttons
(←, →, ↑, ↓)
Use this to move the image up and down,
right and left in the scroll mode.
FREEZE button
Use this to freeze the screen
AWC button
Use this to adjust the color automatically
F/S button
FULL: Use this to display the whole image on the screen
SCROLL: Use this to display a part of the whole image
on the screen.
TONE button
When adjusting the output tone of this product.
(select the appropriate tone according to the type of
original material)
T button
Use this to enlarge the image on the screen
Resolution mode selection buttons
(SXGA, XGA, SVGA, VGA)
Use this to adjust the resolution of the VGA output device
connected to the video presenter
(Select the maximum resolution the output device supports)
page7
Page 9

Set preparation
Press the main lock button
and raise the main support
Turn the lens area to face
downward
Raise the lamp unit until it is convenient for use,
and set it to the center of the document plate.
Remove the lens cap
English French German Italian Spanish
Connect the power cable to the main unit
and the outlet.
For 230V
For 120V
page8
Page 10

English French German Italian Spanish
Basic connecting methods
To view an image projected on the video presenter
through a PC monitor or a projector
Connect to the VGA input terminal
PC monitor,
projector, etc.
Video Presenter
• Set the resolution mode of the main unit to the maximum resolution of the external device connected.
To view an image on a TV screen or a monitor
while listening to the sound from a microphone
Connect to the audio
input terminal
Red
Yellew
White
TV, monitor, projector, etc.
Yellew
Connect to the video
input terminal
Video Presenter
White
Red
page9
• The resolution of the TV output is much lower than the VGA output,
so please use it for monitoring or recording.
• Microphone is not supplied. Use one purchased from an audio shop.
• When a microphone is used, the image and sound are produced simultaneously through the projector.
Thus it can be very useful for a demonstration or an exhibition.
Page 11

Basic connecting methods
To view the VGA output of an external device
through a PC monitor or a projector.
Connect to the
Connect to the
VGA input terminal
PC monitor,
projector, etc.
VGA output terminal
External VGA output device
(PC etc.)
English French German Italian Spanish
Video Presenter
To connect to a PC for USB communication
USB cable
Connect to the USB port
of the PC
Video Presenter
When it is properly connected, put the BGVu program installation diskette supplied with this product into
•
the PC and install USB driver and PC operation program. For installation method, refer to the program
manual supplied with the program.
Can't view the image input from an external device on a PC through USB
•
page10
Page 12

Basic connecting methods
English French German Italian Spanish
To connect to a PC for RS-232C communication
RS-232C cable
Connect to the serial port
(9pin or 25pin)
Video Presenter
• RS-232 operation program is not supplied.
To connect with a mouse
Connect to the VGA input terminal
PC monitor,
projector, etc.
• It supports mouse pointer function and enables effective presentation. Also, various colors and shapes
of mouse pointer are available.
Video Presenter
page11
Page 13

Basic operations
Please check
. Is the power connected properly?
. Is the desired device (PC monitor, Projector, etc.) connected to the output terminal correctly?
Press the power button
• The power button on the main unit can be pressed
• When connecting to a PC monitor etc., select the maximum resolution mode
• Select RGB mode if it is connected to a projector.
• If it is connected to a TV, select the input mode as the external input.
Set the resolution mode
supported.
English French German Italian Spanish
Place the material on the document plate and adjust the size of the image
with the zoom button. For better result, use the [ T] to maximize the image
and focus, and then use the [W] button to obtain the size wanted.
•Notes for better result
• Glossy material could cause irregular reflection, so take
precautions.
• When using a material that is vertically long, use [T] and
fill up the screen for better result.
• For a material with more words, select the text mode of the
[TONE] button, and for a material with more pictures,
select the image mode for better result.
page12
Page 14

Basic operations
English French German Italian Spanish
Methods of using various buttons for the screen control
INT/EXT
• Whenever the button is pressed, the
identification of INT or EXT alternates on the
screen.
• INT: to view an image through this product.
•EXT: to view the image and sound from an
external VGA output device through a PC
monitor or a projector connected to this video presenter
If the <INT/EXT> button is pressed when another VGA output device is not
connected, NO SYNC sign appears.
LIGHT
• When the power is supplied, use the light
button to turn the upper or lower lamp on or
off.
•Select the upper or lower lamp according to
the material to be projected.
size by pressing the [W] button.
NEGA/POSI
• When this button is pressed, alternates
between the POSI mode and NEGA mode.
• POSI: to view regular material or a picture
•NEGA: to view a film
•POSI •NEGA
FOCUS F/N
• Manual focus control: press [Focus F]
or [Focus N] to adjust
•If the user want to adjust more accurately,
press the [T] button to the maximum
close-up then bring the image into focus
and then adjust to the desired screen
page13
AWC
• When [AWC] button is pressed,
the color is adjusted automatically.
At this time, project the camera lens on a
white piece of paper and press the [AWC]
button, then the color control is more
accurate.
• If more minute control is desired, adjust by using the [R/B ADJ. +, - ]
buttons.
• Press the [R/B ADJ. +, - ] button to adjust color when the film is used.
The color level chosen wll be displayed.
FREEZE
• When this button is pressed, the image
freezes. It is a convenient feature when
replacing a material or a picture.
• Press the [FREEZE] button one more time
to release the freeze mode.(VGA video
output only)
VOLUME
• Controls the volume level of the microphone
when it is used.
TONE
• Use this to control the tone of the output
image of this product.
•When the [TONE] button is pressed,
alternates between the Image Mode and
Text mode.Image mode: for a material with
many pictures or colors Text mode: for a
material mostly with words
Page 15

Basic operations
Methods of using various buttons for the screen control
IRIS +/-
• To adjust the brightness, press the [Iris +/-]
buttons on the main control panel or the [Iris
+/-] buttons on the remote control.
[Iris +]: when the subject is too dark.
[Iris-]: when the subject is too bright.
Resolution selection
• This is used to select the resolution required
by the VGA output device connected to the
video presenter so that the image data don't
get changed.
- SXGA (1280 x 1024) - XGA (1024 x 768)
- SVGA (800 x 600) - VGA (640 x 480)
• If the output mode is not correct, it could lower the resolution or
there might be no valid output, Be sure to select the correct resolution for
the VGA output device.
ZOOM W/T
• Press the [Zoom W/T] buttons on the main
control panel or the [W/T] buttons on the
remote control to select appropriate image
size
[Zoom W]:to reduce the size of the subject
[Zoom T]:to increase the size of the subject
• Wide • Tele
F/S
• FULL mode: When trying to compress the
entire image taken and project it on the
screen.
• SCROLL mode: use this to display a part of
the whole image (This is in operation only
when the resolution is in XGA, or SVGA, or
VGA mode)
English French German Italian Spanish
Control key
• Use this to select the desired area by moving
the image up and down and right and left in
the scroll mode.
When an adaptor lens is necessary
• Attach the adaptor lens only in the camera mode
(possible focal length: 1m~ °ƒ)
• Remove the adaptor lens to view a material or a
document or a film placed on the document plate.
(Possible focal length: 230mm - 320mm)
• Beyond the possible focal length mentioned above, it
might be out of focus. So pay attention to the
distance between the object to be viewed and the
main unit and whether the adaptor lens is attached.
page14
Page 16

Notes on operations / Storage after use
English French German Italian Spanish
Please note that any slides, pictures,
documents that are protected under
the copy right law can't be reproduced
without permission.
Wipe with dry and soft cloth
Do not place heavy objects.
Do not use in the humid or wet area
Do not drop.
Use of benzene or thinner can damage the
product.
Cover the product when not in use.
Storage after use
Turn the power off and unplug the
product from the outlet when it is
left unused for a long period of time.
page15
Turn the lens to make
it parallel to the main support
1
Press the main lock button and fold the
lens so that it touches the document plate.
2
Fold the upper lamp so that it touches the
document plate successively.
3
Page 17

Trouble shooting / Fuse and battery replacement
No image appears
- Check if the resolution of the output device corresponds to that of the video
presenter.(for example, when the maximum resolution of a projector is XGA and if
the video presenter is set to SXGA, then no image appears.)
- Check if the input selection of the output devic is appropriate.
- Check if the iris control is adequate
- Check if the VGA cable is connected to the VGA output terminal correctly.
- Check if there is any problem with the fuse
Remote control is not working
- Check the battery of the remote control.
Replace it with a new one.
No image from a slide film or
a negative film
- Check if the lower lamp is turned on
- Adjust the lens to face the film directly
- Check if the NEGA/POSI button is selected properly
The light is not turned on right away after
the [LIGHT] button is pressed
No communication
between the PC and USB.
- Make sure the operating system is Windows 98. It doesn’t
work on Windows 95.
- For other detailed information, please refer to the program
manual supplied with the product.
The image is out of focus
- Check if the adaptor lens is attached properly for the purpose.
(Be sure to attach the adaptor lens in the camera mode)
- Check if the distance from the object is too short.
If there are problems,
please contact the store
you purchased the product
or our distributor nearest
you.
English French German Italian Spanish
It is a normal phenomenon occurring because the protection circuit is in operation to protect
the lamp
Fuse replacement
Take out the fuse holder
1
• Fuse type:2A, 250V
Take out the fuse and replace it
2
Spare fuse
fuse
Battery replacement
Open the battery compartment lid
at the back of the remote control
1
Insert the batteries so
that their with a new one
2
Put the fuse holder back
3
Close the lid
3
• Battery type:AAA type 1.5V
page16
Page 18

SVP
English French German Italian Spanish
SAMSUNG
SAMSUNG
• Specifications
Items
Specifications
Specifications
Optical
Lighting
Video
PC connection
Other
Lens
Shooting range
Zoom
Focus
Iris
Upper lamp
Lower lamp
Pick-up Device/Effective pixel
Frame rate
Sync system
VGA Output
Video Output
White Balance
Positive/Negative
Freeze
Input terminals
Output terminals
Mouse pointer
Application software
USB
RS-232C
Operating
temperature
and humidity
Powersource/power
consumption
Dimensions and weight
Accessories
F2.8 - 3.3, f =6.4 - 73.6, 12x power zoom
MAX:384 x 272mm, MIN:50 x 40mm
Powered
Powered
Auto(with fine level adjustment)
Attach to the side arm of the main unit
Light box (built-in main unit)
1/2” 1.5 million pixel PS CCD / 1360 (H) x 1024 (V)
7.5 frame / sec.
Internal sync
1280 x1024 (SXGA) RGB COLOR, 1024 x 768 (XGA) RGB COLOR
800 x 600 (SVGA) RGB COLOR, 640 x 480 (VGA) RGB COLOR
SVP-6000N
SVP-6000P
C-Video VBS 1.0Vp-p / 75Ω (unbalance)
S-Video Y:1.0Vp-p / 75Ω(unbalance)
Manual/Auto(one touch type)
Selectable
built-in ( VGA video output only )
Microphone:1, VGA:1, Audio:1, Mouse:1,
VIDEO:1, Audio:1, VGA:1, USB:1, RS-232C:1, S-Video:1
Adopted
TWAIN Driver & Viewer ( for WIN98 )
built-in
SET control
5˚C~35˚C, 30%~90%
AC100V - 240V Free voltage, 50/60Hz, 60W
Weight:11.5kg
In store : 533 (W) x 145 (H) x 558 (D)
In use : 676 (W) x 537 (H) x 558 (D)
Remote control, PS/2 Mouse, Cables
H. Sync : 15. 734KHz
V. Sync : 59. 94Hz
(NTSC)
(PAL)
C:0.286Vp-p / 75Ω(unbalance)
Subcarrier : 3. 579545MHz
Resolution : 400TVL (H), 350TVL (V)
H. Sync : 15. 625KHz
V. Sync : 50Hz
Subcarrier : 4.43361875MHz
Resolution : 400TVL (H), 400TVL (V)
page17
•Design of mainframe and specifications subject to change without notice to enhance the quality of production.
 Loading...