

Samsung SV240B-XEU, SV-243B User Manual
VIDEO
PAL
CASSETTE RECORDER
SV-245B
SV-243B
SV-240B
Instruction Manual
www.samsungvcr.com

Safety Precautions
CAUTION
RISK OF ELECTRIC SHOCK
DO NOT OPEN
CAUTION. TO REDUCE THE RISK OF ELECTRIC
SHOCK, DO NOT REMOVE REAR COVER. NO
USER SERVICEABLE PARTS INSIDE. REFER TO
QUALIFIED SERVICE PERSONNEL.
IMPORTANT NOTE
The mains lead on this equipment is supplied with a
moulded plug incorporating a fuse. The value of the fuse is
indicated on the pin face of the plug. If it requires
replacing, a fuse approved to BS1362 of the same rating
must be used.
Never use the plug with the fuse cover omitted if the cover
is detachable. If a replacement fuse cover is required, it
must be of the same colour as the pin face of the plug.
Replacement covers are available from your dealer.
If the fitted plug is not suitable for the power points in your
house or the cable is not long enough to reach a power
point, you should obtain a suitable safety approved
extension lead or consult your dealer for assistance.
However, if there is no alternative to cutting off the plug,
remove the fuse and then safely dispose of the plug. Do
not connect the plug to a mains socket, as there is a risk of
shock hazard from the bared flexible cord.
The wires in the mains lead are coloured in accordance
with the following code: -
BLUE = NEUTRAL BROWN = LIVE
As these colours may not correspond with the coloured
markings identifying the terminals in your plug, proceed as
follows: -
The wire coloured BLUE must be connected to the
terminal marked with the letter N or coloured BLUE or
BLACK. The wire coloured BROWN must be connected to
the terminal marked with the letter L or coloured BROWN
or RED.
WARNING: DO NOT CONNECT EITHER WIRE TO THE
EARTH TERMINAL WHICH IS MARKED WITH THE
LETTER E OR BY THE EARTH SYMBOL , OR
COLOURED GREEN OR GREEN AND YELLOW.
IMPORTANT
DANGER
This symbol is intended to alert you to the
presence of dangerous voltage within the
product.
CAUTION
This symbol is intended to alert you to the
presence of important instructions
accompanying the product.
2

GB
Contents
◆ F
OREWORD
■ Safety Instructions......................................................................................... 6
◆ VCR O
◆ CONNECTING YOUR VIDEO CASSETTE RECORDER
◆ SETTING UP YOUR VIDEO CASSETTE RECORDER
◆ R
◆ PLAYING BACK
VERVIEWS
■ Front View of the VCR................................................................................... 7
■ Rear View of the VCR ................................................................................... 7
■ Infrared Remote Control (SV-245B).............................................................. 8
■ Infrared Remote Control (SV-243B/SV-240B)............................................... 8
■ Display Indicators.......................................................................................... 9
■ Accessories................................................................................................... 9
■ Deciding How to Connect Your VCR............................................................. 10
■ Connecting Your VCR to the TV using the Coaxial Cable............................. 11
■ Connecting Your VCR to the TV using the SCART Cable ............................ 11
■ Connecting Your VCR to the Satellite receiver or Other Equipment............. 12
■ Plug & Auto Set Up........................................................................................ 13
■ Tuning Your Television for the VCR.............................................................. 14
■ Inserting Batteries in the Remote Control...................................................... 15
■ Setting the Date and Time............................................................................. 15
■ Displaying/Hiding On-Screen Information ..................................................... 16
■ Setting the VCR Output Channel................................................................... 16
■ Presetting the Stations Automatically............................................................ 17
■ Presetting the Stations Manually................................................................... 18
■ Clearing a Preset Station............................................................................... 19
■ Changing the Preset Station Table................................................................ 20
ECORDING TELEVISION BROADCASTS
■ Selecting the Cassette Type.......................................................................... 21
■ Selecting the Recording Speed..................................................................... 21
■ Protecting a Recorded Cassette.................................................................... 22
■ Recording a Programme Immediately........................................................... 22
■ Recording a Programme with Automatic Stop............................................... 23
■ Using the VIDEOPLUS+ Feature (SV-245B/SV-243B Only)......................... 24
■ Modifying VIDEOPLUS+ Programming (SV-245B/SV-243B Only)............... 25
■ Using the Timer Programming Feature......................................................... 26
■ Checking a Preset Recording........................................................................ 27
■ Cancelling a Preset Recording...................................................................... 27
■ Playing a Cassette......................................................................................... 28
■ Adjusting Picture Alignment Automatically (SV-243B/SV-240B Only).......... 28
■ Adjusting Picture Alignment Manually........................................................... 28
■ Intelligent Picture Control .............................................................................. 29
■ Intelligent Picture Control (SV-243B/SV-240B Only)..................................... 29
■ Selecting the Colour Mode............................................................................ 30
■ Selecting the Audio Mute Mode..................................................................... 30
4

GB
HH
5°C
40°C
10% 75%
EJECT
STANDBY/ON
PROG
REC
STOP
PLAY
REW
F.F
REC STOP
PROG
EJECT
STANDBY/ON
REW F.F
PLAY
TV
AV2 (DEC./EXT.)
AV1 (EURO AV)
R/D
L/G
AUDIO
OUT/SORTIE
Safety Instructions
The following illustrations represent precautions.
The lightning bolt is a warning sign alerting you to dangerous voltage inside the product.
DO NOT OPEN THE VCR. Refer to service personnel.
Do NOT expose the VCR to
extreme temperature conditions (below 5°C and above
40°C) or to extreme humidity
conditions (less than 10% and
more than 75%).
Do NOT place any objects on
the VCR or remote control.
6
Do NOT expose the VCR to
direct sunlight.
During a storm and/or lightning, unplug the VCR from the
mains socket and aerial.
THIS DEVICE IS NOT FOR USE IN INDUSTRIAL
ENVIRONMENTS
Do NOT expose the VCR to
any liquids.
If the remote control is not
used for a long period of time,
remove the batteries and store
it in a cool, dry place.

GB
O
K
S
T
A
N
D
B
Y
/O
N
EJEC
T
S
L
O
W
S
H
U
T
T
L
E
V
-
L
O
C
K
CLR
/RS
T F.A
D
V IN
D
E
X
A.TRK
IP
C
IN
P
U
T
RE
PE
AT
T
R
K
P
R
O
G
A
U
D
I
O
R
E
C
M
E
N
U
S
P
E
E
D
D
U
B
T
V
/
V
C
R
T
I
M
E
R
D
I
S
P
L
A
Y
OK
VCR STANDBY/ON TV STANDBY/ON
SLOW
SHUTTLE
V-LOCK
CLR/RST F.ADV INDEX
TV VCR INPUT
REPEAT
VOL PROG/TRK
AUDIO
REC MENU
SPEED DUB TV/VCR TIMER
DISP./
SELECT
-/--
OK
STANDBY/ON EJECT
SLOW
SHUTTLE
V-LOCK
CLR/RST F.ADV INDEX
A.TRK IPC INPUT
REPEAT
TRK PROG
AUDIO
REC MENU
SPEED DUB TV/VCR TIMER
DISPLAY
VCR
Infrared Remote Control (SV-245B)
VCR STANDBY/ON BUTTON
CLEAR AND RESET BUTTON
REWIND/REVERSE PICTURE SEARCH
MENU SELECTION BUTTON
MENU SELECTION DOWN BUTTON
RECORDING SPEED SELECTION BUTTON
CLEAR AND RESET BUTTON
REWIND/REVERSE PICTURE
MENU SELECTION DOWN BUTTON
RECORDING SPEED SELECTION BUTTON
TV STANDBY/ON BUTTON
SHUTTLE BUTTON
V-LOCK BUTTON
INDEX BUTTON
FRAME ADVANCE BUTTON
TV BUTTON
VCR BUTTON
VOLUME BUTTONS
AUDIO MUTE BUTTON
STOP BUTTON
BUTTON
RECORD BUTTON
TUNER, AV1 SELECTION /
REPEAT SELECTION BUTTON
PROGRAMME SELECTION /
TRACKING BUTTONS
DISPLAY BUTTON
PLAY/PAUSE/STILL BUTTON
FAST-FORWARD/FORWARD
SEARCH BUTTON
MENU BUTTON
MENU SELECTION UP BUTTON
MENU SELECTION BUTTON
OK BUTTON
TIMER BUTTON
Infrared Remote Control (SV-243B/SV-240B)
STANDBY/ON BUTTON
SHUTTLE BUTTON
V-LOCK BUTTON
AUTO TRACKING BUTTON
IPC BUTTON
TRACKING BUTTONS
AUDIO MUTE BUTTON
STOP BUTTON
SEARCH BUTTON
RECORD BUTTON
MENU SELECTION BUTTON
8
EJECT BUTTON
INDEX BUTTON
FRAME ADVANCE BUTTON
TUNER, AV1 SELECTION /
REPEAT SELECTION BUTTON
PROGRAMME SELECTION BUTTON
DISPLAY BUTTON
PLAY/PAUSE/STILL BUTTON
FAST-FORWARD/FORWARD
SEARCH BUTTON
MENU BUTTON
MENU SELECTION UP BUTTON
MENU SELECTION BUTTON
OK BUTTON
TIMER BUTTON

TV
GB
TV
AV1 (EURO AV)
TV
AV2 (DEC./EXT.)
AV1 (EURO AV)
R/D
L/G
AUDIO
OUT/SORTIE
TV
AV2 (DEC./EXT.)
AV1 (EURO AV)
R/D
L/G
AUDIO
OUT/SORTIE
Deciding How to Connect Your VCR
You must take into account various factors when connecting audio or video systems:
◆ Types of connectors available on your systems
◆ Systems connected permanently to the VCR (satellite receiver for example) or temporarily
(camcorder for example)
Your VCR is equipped with the following connectors.
Connector Location Type Direction Recommended Use
AV1(EURO AV)
OUT TO TV Rear 75 Ω Out ◆ Television
IN FROM ANT. Rear 75 Ω In ◆ Aerial
Rear SCART In/Out ◆ Television
◆ Satellite receiver
◆ Other VCR
coaxial
coaxial ◆ Cable television network
◆ Satellite receiver
☛ Whenever you connect an audio or video system to your VCR, ensure that all
switched off
Refer to the documentation supplied with your equipment for detailed connection instructions
and associated safety precautions.
.
10
elements are
GB
TV
AV2 (DEC./EXT.)
AV1 (EURO AV)
R/D
L/G
AUDIO
OUT/SORTIE
TV
AV2 (DEC./EXT.)
AV1 (EURO AV)
R/D
L/G
AUDIO
OUT/SORTIE
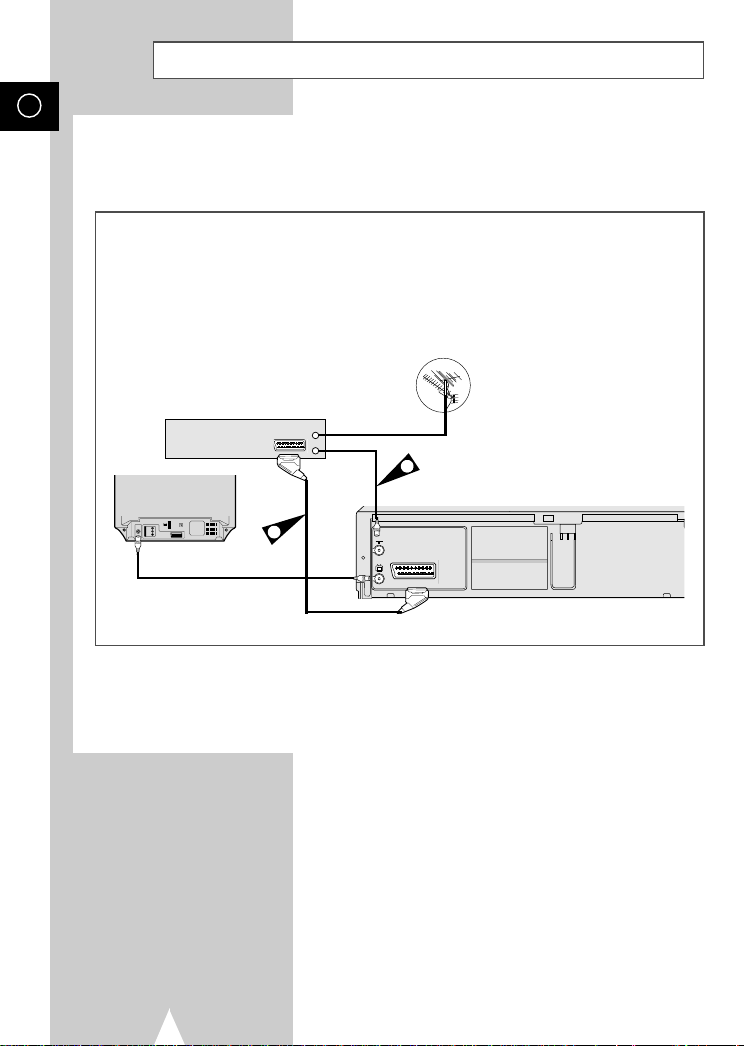
Connecting Your VCR to a Satellite Receiver or Other Equipment
You can connect your VCR to a Satellite receiver or other VCR using the SCART cable if the appropriate
outputs are available on the equipment chosen. The following illustrations give a few examples of the
connection possibilities.
1. AV1(EURO AV): By means of 21-pin Scart Cable
Plug the SCART Cable with satellite receiver or other equipment into the AV1(EURO AV) socket on the rear of the
VCR.
After making this connection, select the source by pressing the INPUT button for the AV1 input sources.
2. By means of RF Coaxial Cable
After making this connection, you must preset the station received through the satellite tuner.
RF output channel of the satellite receiver should be adjusted away from channel 60, which is used by the VCR,
e.g. re-adjust to channel 65.
Aerial
Satellite Receiver or other Equipment
Aerial Connector
2
TV
1
SCART Cable
12
GB
OK
REC MENU
L
U
VCR STANDBY/ON
S
★
(SV-245B)
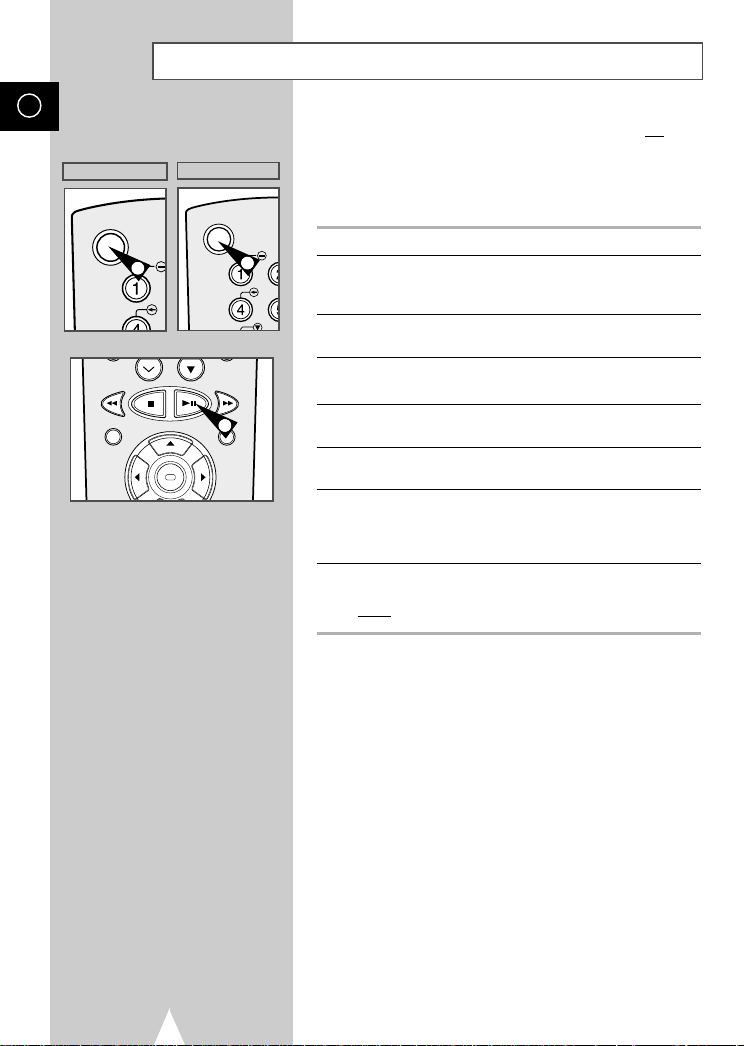
Tuning Your Television for the VCR
You must tune your television for the VCR only if you are not
a Scart cable
★
2
(SV-243B/SV-240B)
STANDBY/ON
2
SH
4
S
-
➢ To view pictures from your VCR when a Scart cable is
used, the television must be set to the audio/video mode
(AV).
1 Switch on the television.
2 Switch on the VCR by pressing STANDBY/ON on the front of the
VCR or VCR STANDBY/ON (STANDBY/ON) on the remote
control.
3 Select a programme position on the television to be reserved for
use with your VCR.
4 Insert the video cassette in the VCR. Check that the VCR starts
reading the cassette; if not, press
5 Start a scan on your television or set the television to UHF
channel 60.
6 Fine tune the television until the pictures and sound are obtained
clearly.
7 If you cannot find the pictures and sound, or there is interference
from nearby channels, it may be necessary to change the setting
of the VCR output channel (see Setting the VCR Output Channel
on page 16 and Problems and Solutions on page 40).
8 When the picture and sound are perfectly clear, store this channel
at the desired programme position on the television.
Result:
That programme is now reserved for use with your VCR.
using
.
❿
button
II
14
 Loading...