


Online Guide
www.boostmobile.com
©2010 Samsung. All rights reserved. BOOST and BOOSTMOBILE and Logo are
trademarks of Boost. Other marks are the property of their respective owners.
3/26/10

M540_Boost_Online_DC13_TE_032610_F5

Table of Contents
Introduction . . . . . . . . . . . . . . . . . . . . . . . . . . . . . . 1
Your Phone’s Menu. . . . . . . . . . . . . . . . . . . . . . . . 1
Section 1: Getting Started . . . . . . . . . . . . . . . . . 7
1A. Setting Up Service . . . . . . . . . . . . . . . . . . . . 8
Setting Up Your Phone . . . . . . . . . . . . . . . . . . . . . . 8
Activating Your Phone . . . . . . . . . . . . . . . . . . . . . . . 9
Welcome Sequence . . . . . . . . . . . . . . . . . . . . . . . . 9
Setting Up Your Voicemail . . . . . . . . . . . . . . . . . . 10
Getting Help . . . . . . . . . . . . . . . . . . . . . . . . . . . . . . 10
Section 2: Your Phone . . . . . . . . . . . . . . . . . . . . 13
2A. Phone Basics . . . . . . . . . . . . . . . . . . . . . . . 14
Your Phone . . . . . . . . . . . . . . . . . . . . . . . . . . . . . . . 14
Viewing the Display Screen . . . . . . . . . . . . . . . . . 18
Turning Your Phone On and Off . . . . . . . . . . . . . 21
Using Your Phone’s Battery and Charger . . . . . 22
Navigating Through the Menus . . . . . . . . . . . . . . 25
Displaying Your Phone Number . . . . . . . . . . . . . 26
Making and Answering Calls . . . . . . . . . . . . . . . 26
Entering Text in Portrait Mode . . . . . . . . . . . . . . . 34
Entering Text in Landscape Mode . . . . . . . . . . . 39
2B. Navigating the Main Screen . . . . . . . . . . 44
Getting to Know One Click . . . . . . . . . . . . . . . . . 44
Personalizing the Carousel . . . . . . . . . . . . . . . . . 46
Personalizing the Home Screen . . . . . . . . . . . . . 49
2C. Settings . . . . . . . . . . . . . . . . . . . . . . . . . . . . . 51
Personalizing Your Phone . . . . . . . . . . . . . . . . . . 51
Sound Settings . . . . . . . . . . . . . . . . . . . . . . . . . . . 52
Display Settings . . . . . . . . . . . . . . . . . . . . . . . . . . . 55
Location Settings . . . . . . . . . . . . . . . . . . . . . . . . . . 58
Messaging Settings . . . . . . . . . . . . . . . . . . . . . . . 58
Airplane Mode . . . . . . . . . . . . . . . . . . . . . . . . . . . . 61
TTY Use . . . . . . . . . . . . . . . . . . . . . . . . . . . . . . . . . 61
Phone Setup Options . . . . . . . . . . . . . . . . . . . . . . 62
Security Settings . . . . . . . . . . . . . . . . . . . . . . . . . . 64
2D. History . . . . . . . . . . . . . . . . . . . . . . . . . . . . . . 70
Viewing History . . . . . . . . . . . . . . . . . . . . . . . . . . . 70
History Options . . . . . . . . . . . . . . . . . . . . . . . . . . . 71
Making a Call From History . . . . . . . . . . . . . . . . . 71
Saving a Phone Number From History . . . . . . . 72

Erasing History . . . . . . . . . . . . . . . . . . . . . . . . . . . . 72
2E. Contacts . . . . . . . . . . . . . . . . . . . . . . . . . . . . 74
Adding a New Contacts Entry . . . . . . . . . . . . . . . 74
Saving a Number from Standby . . . . . . . . . . . . . 75
Adding a Phone Number to a Contacts Entry . 76
Editing a Contacts Entry’s Phone Number . . . . 76
Deleting a Contact . . . . . . . . . . . . . . . . . . . . . . . . . 76
Assigning Speed Dial Numbers . . . . . . . . . . . . . 76
Editing a Contacts Entry . . . . . . . . . . . . . . . . . . . . 78
Adding a New Group . . . . . . . . . . . . . . . . . . . . . . 78
Assigning a Picture to an Entry . . . . . . . . . . . . . . 79
Selecting a Ringtone for an Entry . . . . . . . . . . . . 79
Secret Contacts Entries . . . . . . . . . . . . . . . . . . . . . 80
Dialing Services . . . . . . . . . . . . . . . . . . . . . . . . . . . 81
2F. Calendar and Tools . . . . . . . . . . . . . . . . . . 82
Using Your Phone’s Calendar . . . . . . . . . . . . . . . 82
Task List . . . . . . . . . . . . . . . . . . . . . . . . . . . . . . . . . . 85
Countdown . . . . . . . . . . . . . . . . . . . . . . . . . . . . . . . 86
File Manager . . . . . . . . . . . . . . . . . . . . . . . . . . . . . . 86
Alarm Clock . . . . . . . . . . . . . . . . . . . . . . . . . . . . . . 87
Memo Pad . . . . . . . . . . . . . . . . . . . . . . . . . . . . . . . 88
Calculator . . . . . . . . . . . . . . . . . . . . . . . . . . . . . . . . 89
Tip Calculator . . . . . . . . . . . . . . . . . . . . . . . . . . . . . 90
World Time . . . . . . . . . . . . . . . . . . . . . . . . . . . . . . . 90
Updating Phone Software . . . . . . . . . . . . . . . . . . 90
Updating the PRL . . . . . . . . . . . . . . . . . . . . . . . . . 90
2G. Voice Services . . . . . . . . . . . . . . . . . . . . . . 91
Automatic Speech Recognition (ASR) . . . . . . . 91
Managing Voice Memos . . . . . . . . . . . . . . . . . . . 97
2H. microSD Card . . . . . . . . . . . . . . . . . . . . . . . 99
Your Phone’s microSD Card Slot . . . . . . . . . . . . 99
microSD Settings . . . . . . . . . . . . . . . . . . . . . . . . 101
microSD Folders . . . . . . . . . . . . . . . . . . . . . . . . . 102
Connecting Your Phone to Your Computer . . 102
2I. Camera . . . . . . . . . . . . . . . . . . . . . . . . . . . 106
Taking Pictures . . . . . . . . . . . . . . . . . . . . . . . . . . 106
Recording Videos . . . . . . . . . . . . . . . . . . . . . . . . 112
Storing Pictures . . . . . . . . . . . . . . . . . . . . . . . . . . 114
Sending Pictures and Video via Media Mail . 116
Managing Boost Media Mail . . . . . . . . . . . . . . . 118
Settings and Info . . . . . . . . . . . . . . . . . . . . . . . . . 122
2J. Bluetooth . . . . . . . . . . . . . . . . . . . . . . . . . 123

Turning Bluetooth On and Off . . . . . . . . . . . . . . 123
Using the Bluetooth Settings Menu . . . . . . . . . 124
Pairing Bluetooth Devices . . . . . . . . . . . . . . . . . 125
Sending Items via Bluetooth . . . . . . . . . . . . . . . 126
Section 3: Service. . . . . . . . . . . . . . . . . . . . . . . 129
3A. Service Features: The Basics . . . . . . . . 130
Voicemail . . . . . . . . . . . . . . . . . . . . . . . . . . . . . . . . 130
Text Messaging (SMS) . . . . . . . . . . . . . . . . . . . . 132
Caller ID . . . . . . . . . . . . . . . . . . . . . . . . . . . . . . . . . 135
Call Waiting . . . . . . . . . . . . . . . . . . . . . . . . . . . . . . 135
Making a Three-Way Call . . . . . . . . . . . . . . . . . . 135
Call Forwarding . . . . . . . . . . . . . . . . . . . . . . . . . . 136
3B. Web and Data Services . . . . . . . . . . . . . 137
Data Applications . . . . . . . . . . . . . . . . . . . . . . . . . 137
Getting Started With Data Services . . . . . . . . . 138
Accessing Messaging . . . . . . . . . . . . . . . . . . . . . 142
Downloading Games, Ringtones and More . . 145
Exploring the Web . . . . . . . . . . . . . . . . . . . . . . . . 147
Data Services FAQs . . . . . . . . . . . . . . . . . . . . . . . 152
3C. Music . . . . . . . . . . . . . . . . . . . . . . . . . . . . . 154
Playing a Music File . . . . . . . . . . . . . . . . . . . . . . . 155
3D. GPS Navigation . . . . . . . . . . . . . . . . . . . . 157
GPS Services . . . . . . . . . . . . . . . . . . . . . . . . . . . . 157
Navigation . . . . . . . . . . . . . . . . . . . . . . . . . . . . . . 157
Using Navigation . . . . . . . . . . . . . . . . . . . . . . . . . 158
Section 4: Safety and Warranty Information 159
4A. Important Safety Information . . . . . . . . 160
General Precautions . . . . . . . . . . . . . . . . . . . . . . 160
Maintaining Safe Use of and Access
to Your Phone . . . . . . . . . . . . . . . . . . . . . . . . . . 161
Using Your Phone With a Hearing
Aid Device . . . . . . . . . . . . . . . . . . . . . . . . . . . . . 163
Caring for the Battery . . . . . . . . . . . . . . . . . . . . . 164
Radio Frequency (RF) Energy . . . . . . . . . . . . . 165
Owner’s Record . . . . . . . . . . . . . . . . . . . . . . . . . . 167
User Guide Proprietary Notice . . . . . . . . . . . . . 168
4B. Manufacturer’s Warranty . . . . . . . . . . . 169
Manufacturer’s Warranty . . . . . . . . . . . . . . . . . . 169
Index . . . . . . . . . . . . . . . . . . . . . . . . . . . . . . . . . . 175

Introduction
Your Phone’s Menu
This User Guide introduces you to Boost® service and all
the features of your new phone. It’s divided into four
sections:
⽧ Section 1: Getting Started
⽧ Section 2: Your Phone
⽧ Section 3: Service
⽧ Section 4: Safety and Warranty Information
WARNING
Please refer to the Important Safety
Information section on page 160 to learn
about information that will help you safely use
your phone. Failure to read and follow the
Important Safety Information in this phone
guide may result in serious bodily injury,
death, or property damage.
The following table outlines your phone’s menu
structure. For more information about using your
phone’s menus, see “Navigating Through the Menus”
on page 25.
Softkeys
From the Main screen, Options and Contacts are
available using the softkeys.
Contacts (Right Softkey)
Options (Left Softkey)
1: Main Menu
2: Personalize Carousel
3: Personalize Home Screen
4: Tutorial
5: Reset
6: About
1

Main Menu
From the Main screen, navigate to the Home tile ( )
and press to access these Main menu items.
Contacts
Messaging
1: Messages
2: Send Messages
1: Text Message 2: Media Mail
3: Email 4: IM
3: Voicemail
1: Call Voicemail 2: Clear Envelope
4: Media Mail
1: Inbox 2: Sent Mail
3: Saved Mail 4: Pending
5: Email
6: IM (AOL Instant Messenger, Windows Live
Messenger, Yahoo! Messenger)
2
7: Settings
1: General
1: Notification 2: Preset Messages
3: Message Alert 4: Auto-Erase
2: Text Message
1: Save in Outbox 2: Priority
3: Call Back # 4: Edit Signature
My Stuff
1: Application Manager
2: Games
1: Get New Games 2: My Stuff Manager Games
3: Asphalt 4: Elite Racing
3: Ringtones
1: Get New Ringtones 2: My Stuff Manager Ringtones
4: Applications
1: Get New Applications
2: My Stuff Manager Applications
3: Hookt
4: TeleNav Navigator
5: Wallpapers
1: Get New Wallpapers
2: My Stuff Manager Wallpapers
6: Chat Flirt Fun
Re-Boost
Missed Alerts
Get Stuff
History
Web
Music
Bluetooth
1: Pair with Hands Free
2: Send a Contact
3:Add a New...
4: Trusted Devices
5: More...
1: Settings
1: On/Off 2: Visibility
3: My Device Name 4: My Device Info
5: Exchange Folders 6: Voice Priority
2: Block List
Pictures
1: Camera
Press the right softkey to view the following options:
1: Selftimer
1: Off 2: 5 sec
3: 10 sec
2: Multi Shot
1: Series Shot (off/3/5/10)
2: Divided Shot (off/4/9/16)
3: Fun Tools...
1: Fun Frames 2: Color Tones
4: Controls...
1: Brightness 2: White Balance
3: Night Shot 4: Metering
5: Settings..
1: Resolution 2: Quality
3: Shutter Sound 4: Status Bar
5: Storage
6: Launch
1: Review Pictures 2: Camcorder
3
2: Camcorder (Video Mail/Long Video)
Press the right softkey to view the following options:
1: Selftimer
1: Off 2: 5 sec
3: 10 sec
2: Fun Tools..
1: Color Tones
3: Controls..
1: White Balance
4: Settings..
1: Quality 2: Storage
3: Video Length
5: Launch
1: Review Pictures 2: Camera
3: Media Mail
1: Inbox 2: Sent Mail
3: Saved Mail 4: Pending
4: My Albums
1: In Phone 2: Memory Card
3: Online Albums
4
5: Settings and Info
1: Auto Save to
1: Phone 2: Memory Card
2: Status Bar (On/Off)
3: Account Info
Settings/Tools
1: Settings
1: Display
1: Main Screen 2: Brightness
3: Backlight 4: Dialing Font Size
5: PowerSave Mode 6: Keypad Light
7: Language
2: Sounds
1: Volume 2: Ringtone Type
3: Alerts 4: Key Tone
3: Bluetooth
1: On/Off 2: Visibility
3: My Device Name 4: My Device Info
5: Exchange Folders 6: Voice Priority
4: Messages
1: Notification 2: Message Reminder
3: Callback Number 4: Auto-Delete
5: Signature 6: Pre-set Message
7: Draft Alert 8: Priority
9:Save in Outbox
5: Contacts
1: Speed Numbers 2: Hide Secret
3: My Name Card 4: Services
6: Text Entry
1: Auto-Capital 2: Auto-Space
3: Dual Language 4: Personal Dictionary
5: Used Word Dictionary
6: Display Candidate 7: Prediction Start
8: Auto Word Insertion
9: Help
7: Phone Info
1: Phone Number 2: Icon Glossary
3: Version 4: Advanced
8: More...
1: Auto Keyguard 2: Accessibility
3: Airplane Mode 4: Browser
5: Call Setup 6: Data
7: Headset Mode 8: Location
9: Restrict and Lock 0: Security
2: Tools
1: Alarm
1: Alarm #1 2: Alarm #2
3: Alarm #3
2: Calculator
3: Tip Calculator
4: Calendar
1: Today 2: Scheduler
3: Task List 4: Countdown
5: Mass Storage
1: Connect to PC 2: File Manager
3: Format Memory Card
4: Memory Info.
6: Memo Pad
7: World Time
8: Update Phone
1: Update Firmware 2: Update PRL
9: Voice Memo
1: Record 2: Review
5
0: Voice Service
1:Call <Name or #>
2: Send Text <Name or #>
3: Send Picture <Name or #>
4: Lookup <Name>
5: Go To <Menu>
6: Check <Item>
In Use Menu
While in an active call press Mute/Unmute (left softkey)
to turn the microphone on or off.
In Use Menu
While the call is active, press Options (right softkey) to
display the following options:
1: Save/Contact Details
2: 3-Way Call
3: Contacts
4: Voice Memo
5: Phone Info
6: Key Mute/Unmute
7: Messaging
8: Recent History
9: Tools
0: Whisper On/Off
6

Section 1
Getting Started

Section 1A
Setting Up Your Phone
Setting Up Service
⽧ Setting Up Your Phone (page 8)
⽧ Activating Your Phone (page 9)
⽧ Setting Up Your Voicemail (page 10)
⽧ Getting Help (page 10)
8 Section 1A. Setting Up Service
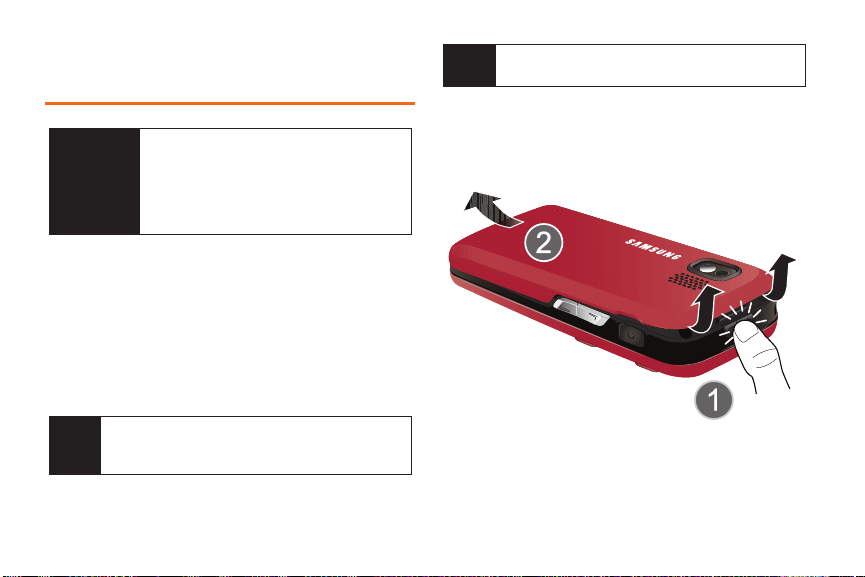
1. Install the battery. (See “Installing the Battery” on
page 22.)
䡲 Press the cover release latch and remove the
battery cover from the phone.
䡲 Insert the battery into the opening, making sure
the connectors align. Gently press down to
secure the battery.
䡲 Replace the cover by lining up the tabs and then
firmly pressing the cover down until it snaps into
place.
2. Press and hold for two seconds to turn the
phone on.
䡲 If your phone is activated, it will turn on, search for
Boost service, and enter the One Click main
screen (standby mode).
䡲 If your phone is not yet activated, see “Activating
Your Phone” on page 9 for more information.

3. Make your first call.
䡲 Use your keypad to enter a phone number.
䡲 Press .
Your phone’s battery should have enough charge for
Note
your phone to turn on and find a signal, set up your
voicemail, and make a call. You should fully charge
your battery as soon as possible. See “Charging the
Battery” on page 23 for details.
WARNING
If your handset has a touch-screen display,
please note that a touch-screen responds
best to a light touch from the pad of your
finger or a non-metallic stylus. Using
excessive force or a metallic object when
pressing on the touch-screen may damage
the tempered glass surface and void the
warranty. See “Manufacturer’s Warranty” on
page 169.
Activating Your Phone
To activate your new phone, please refer to the included
“Activation Kit” documentation.
For additional support information visit us at:
www.boostmobile.com
– or –
Call Boost Customer Care at
(
1-888-266-7848).
1-888-BOOST-4U
Welcome Sequence
After activation, the Welcome sequence guides you
through an overview of the three high-level topics you
should know prior to using your phone.
䢇 Carousel of Tiles: The carousel of tiles at the bottom of
the screen gives quick access to the things you use
the most. You can add, remove, re-add and
rearrange tiles as often as you want.
䢇 Home Screen: The Home Screen can provide date
and time at a glance. You can remove or re-add this
Bubble.
Section 1A. Setting Up Service 9
Setting Up Service

䢇 Personalizing your phone: To start personalizing your
phone, click or
䊳 Follow the onscreen instructions to read through
Options on the Home Screen.
the information messages and exit the tutorial.
Setting Up Your Voicemail
All unanswered calls to your phone are automatically
transferred to your voicemail, even if your phone is in
use or turned off. Therefore, it is recommended that you
set up your voicemail and personal greeting as soon
as your phone is activated.
1. While in the One Click main screen (standby
mode), press and hold .
2. Follow the system prompts to:
䡲 Create your password.
䡲 Record your name announcement.
䡲 Record your greeting.
10 Section 1A. Setting Up Service
Voicemail Password
Note
If you are concerned about unauthorized access to
your voicemail account, it is recommended that you
enable your voicemail password.
Without a passcode, anyone who has access to your
handset is able to access your voicemail messages.
(Do not activate One-Touch Message Access.)
For more information about using your voicemail, see
“Voicemail” on page 130.
Getting Help
Managing Your Account
You can go to ‘My Account’ on www.boostmobile.com to
view your account information, recharge your account,
or to make account changes. To log into ‘My Account,’
you will need your mobile phone number and the
Account PIN number you set up at activation.
From Your Phone
䢇 Dial #225 (#BAL) to check minute usage and
account balance.

䢇 Dial #233 (#ADD) to make a payment by calling the
Re-boost automated system.
䢇 Dial #611 to access a summary of your service plan
or get answers to other questions by contacting
Boost Customer Care.
From Any Other Phone
䢇 Call Boost Customer Care: 1-888-BOOST-4U
(1-888-266-7848).
411 (Directory Assistance)
The 411 service provides you with up to three pieces of
information per call, and the operator can automatically
connect your call at no additional charge.
䊳 Press
There is a per-call charge to use 411 and you will be
Note
billed for airtime. Visit
additional details.
www.boostmobile.com for
Some mobile phone features are dependent on either
the capabilities of your phone and settings of your
service provider’s network. Additionally, certain features
may not be activated by your service provider, and/or
the provider's network settings may limit the feature’s
functionality. Always contact your service provider
about feature availability and functionality.
All features, functionality and other specifications, as
well as the information contained in this user guide are
based upon the latest available information and are
believed to be accurate at the time of printing.
Samsung reserves the right to change or modify any
information or specifications without notice or
obligation.
Section 1A. Setting Up Service 11
Setting Up Service

12 Section 1A. Setting Up Service

Section 2
Your Phone
Section 2A
Portrait Mode
Phone Basics
⽧ Your Phone (page 14)
⽧ Viewing the Display Screen (page 18)
⽧ Turning Your Phone On and Off (page 21)
⽧ Using Your Phone’s Battery and Charger (page 22)
⽧ Navigating Through the Menus (page 25)
⽧ Displaying Your Phone Number (page 26)
⽧ Making and Answering Calls (page 26)
⽧ Entering Text in Portrait Mode (page 34)
⽧ Entering Text in Landscape Mode (page 39)
14 Section 2A. Phone Basics
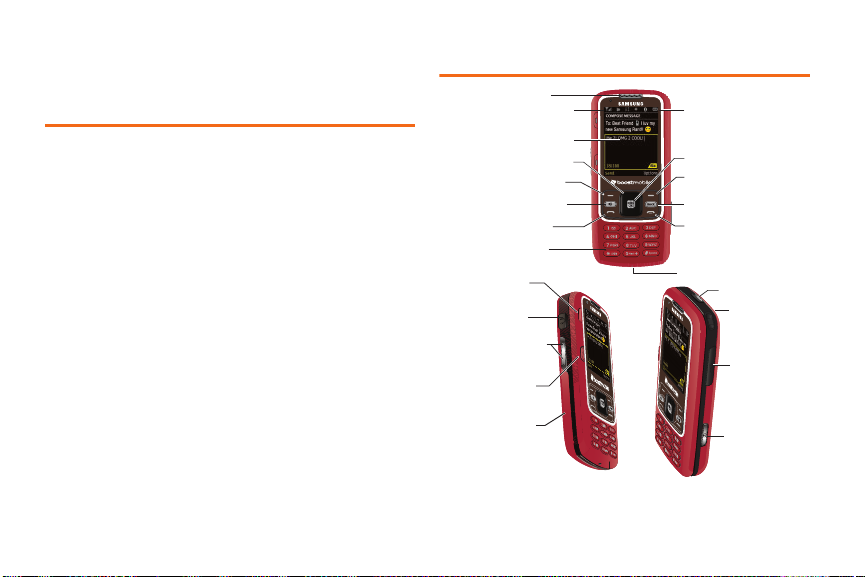
Your Phone
1. Earpiece
2. Signal Strength
Indicator
3. Display Screen
4. Navigation Key
5. Softkey (left)
6. Speaker Key
7. TALK Key
8. Keypad
15. Softkey (left)
Landscape Mode
16. Headset Jack
17. Volume Button
18. Softkey (right)
Landscape Mode
19. microSD Card
slot (under cover)
14. Battery Strength
Indicator
13. MENU/OK
12. Softkey (right)
11. BACK/Clear Key
10. END/POWER Key
9. Microphone
20. Cover Release
Latch
23. Camera
Button
21. Camera Lens
22. Charger/
Accessories
Jack

Key Functions
1. Earpiece lets you hear the caller and automated
prompts.
2. Signal Strength Indicator represents the signal
strength by displaying bars. The more bars
displayed, the better the signal strength.
3. Display Screen displays all the information needed
to operate your phone, such as the call status, the
Contacts list, the date and time, and the signal and
battery strength.
4. Navigation Key scrolls through the phone’s menu
options.
5. Softkey (left) Portrait Mode lets you select softkey
actions or menu items corresponding to the
bottom left line on the display screen while the
phone is in portrait mode.
6. Speaker Key lets you enable/disable speakerphone
mode.
7. TA LK Ke y ( ) allows you to place or receive calls,
answer Call Waiting, use Three-Way Calling, or
activate Voice Dial.
8. Keypad lets you enter numbers, letters, and
characters, and navigate within menus. Press and
hold number keys for speed dialing.
9. Mic rophone allows other callers to hear you clearly
when you are speaking to them.
10. END/POWER Key ( ) lets you turn the phone on
or off, end a call, or return to standby mode. While
in the main menu, it returns the phone to standby
mode and cancels your input. When you receive
an incoming call, press to send the call directly to
voicemail.
11. BACK/Clear Key deletes characters from the display
in text entry mode. When in a menu, pressing
returns you to the previous menu. This key
also allows you to return to the previous screen in
a data session.
12. Softkey (right)) Portrait Mode lets you select softkey
actions or menu items corresponding to the
bottom right line on the display screen while the
phone is in portrait mode.
13. MENU/OK lets you access the phone’s menus and
selects the highlighted choice when navigating
through a menu.
Section 2A. Phone Basics 15
Phone Basics

14.
Battery Strength Indicator represents the amount of
remaining battery charge currently available in
your phone. When all bars display in the battery
icon, the phone’s battery is fully charged. When no
bars display, the phone’s battery is completely
discharged or empty.
15. Softkey (left) Landscape Mode lets you select softkey
actions or menu items corresponding to the
bottom left line on the display screen while the
phone is in landscape mode.
16. Headset Jack allows you to plug in either a stereo
headset (sold separately) or an optional headset
for convenient, hands-free conversations.
CAUTI ON! Inserting an accessory into the incorrect
jack may damage the phone.
17. Volume Button allows you to adjust the ringtone
volume in standby mode or adjust the voice
volume during a call. The volume key can also be
used to scroll up or down to navigate through the
different menu options.
16 Section 2A. Phone Basics
18. Softkey (right) Land scape Mode lets you select softkey
actions or menu items corresponding to the
bottom right line on the display screen while the
phone is in landscape mode.
19. microSD Card Slot lets you use a microSD card to
expand the memory of your phone. To gain access
to this slot, you must first remove the battery cover.
(See “Installing the Battery” on page 22.)
20. Cover Release Latch lets you remove the battery
cover and expose both the internal battery
compartment and internal microSD card slot.
21. Camera Lens, as part of the built-in camera, lets you
take pictures and videos.
22. Charger/Accessories Jack allows you to connect a
compatible charging cable or USB data cable.
CAUTI ON! Inserting an accessory into the incorrect
jack may damage the phone.
23. Camera Button lets you activate the camera and
camcorder mode and take pictures and videos.

Landscape Phone Features
32. End/Back
Key
31. Enter/
OK Key
30. Space Key
29. Symbol Key
28. Shift Key
27. Fn Key
26. QWERTY
Keyboard
25. Softkey
(left)
24. Softkey (right)
Landscape Mode
24. Softkey (right) Landscape Mode lets you select softkey
actions or menu items corresponding to the
bottom right line on the display screen while the
phone is in landscape mode.
25. Softkey (left) Landscape Mode lets you select softkey
actions or menu items corresponding to the
bottom left line on the display screen while the
phone is in landscape mode.
26. QWERTY keyboard provides an alphanumeric
character keyboard layout.
27. Fn (Function) Key toggles to access the white
numbers/symbols on the QWERTY keyboard.
28. Shift Key lets you toggle alphabet characters
between mixed case, uppercase and lowercase.
Character case remains as selected until the Shift
key is pressed again.
29. Symbol Key lets you access symbol characters.
30. Space Key lets you add spaces between words and
characters.
31. Enter/OK Key lets you perform the function
highlighted in the current menu. Press to enter
additional lines of text.
32. End/Back Key deletes characters from the display in
text entry mode. When in a menu, pressing
returns you to the previous menu. This key also
allows you to return to the previous screen in a
data session.
Section 2A. Phone Basics 17
Phone Basics

Viewing the Display Screen
Your phone’s display screen provides information
about your phone’s status and options. The following
list identifies the symbols you’ll see on your phone’s
display screen:
To view a list of your phone’s icons and descriptions,
Tip
from the main menu select
Settings > Phone Info > Icon Glossary.
Settings/Tools >
Icon Description
Status of mobile broadband service communication.
Mobile broadband connection is active and
communicating.
Mobile broadband service is dormant.
The location feature is on.
Icon Description
Data connection status. (The icon is animated when
service is active.)
The data connection is active and data is being
transmitted.
The data connection is active and data is being
received.
The data connection is dormant (no data is being
sent or received).
Mobile broadband service is available.
18 Section 2A. Phone Basics
The location feature is off.
Your phone is using SSL (Secure Sockets Layer)
protocol for client/server communication.
A microSD memory card is installed.
You have missed an incoming call.
You have a new Media Mail message.
You have a new text message.

Icon Description
You have a new voicemail message.
Icon Description
An alarm is set on your phone.
You have an event scheduled.
An alarm event is active.
You have a new message.
The message is locked.
Your phone is operating in TTY mode.
The ringtone volume is set to vibrate.
The ringtone volume is set and the vibrate option is
checked.
The ringtone volume is set or 1-Beep is selected.
The ringtone is turned off and the vibrate option is not
enabled (Silence Mode).
A call is in progress.
Your phone cannot find a signal.
Current signal strength. (The more bars you have, the
stronger your signal.)
Battery charge level (icon shown is full).
Low battery charge level.
Key tones are muted.
Speakerphone is enabled.
Whisper mode is on. Whisper mode increases the
microphone to its maximum level.
The camera is enabled.
Section 2A. Phone Basics 19
Phone Basics

Icon Description
The camcorder is enabled.
Icon Description
A voice memo or video is playing.
The camera’s self-timer function is enabled.
The white balance is set to Sunny. This is used for
taking pictures or movies outdoors on sunny days.
The white balance is set to Cloudy. This is used for
taking pictures or movies outdoors on cloudy days.
The white balance is set to Tungsten. This is used for
taking pictures or movies indoors under normal
lighting conditions.
The white balance is set to Fluorescent. This is used
for taking pictures or movies indoors under
fluorescent lighting conditions.
The white balance is set to Manual. This is used for
taking pictures indoors or outdoors using your own
custom settings.
A video or voice memo is currently being recorded.
A voice memo or video is paused.
20 Section 2A. Phone Basics
Files have been uploaded to an online album or
folder.
Bluetooth technology is active and enabled.
A Bluetooth device is connected.
A Bluetooth Headset is connected and visible.
Bluetooth technology is hidden.

Turning Your Phone On and Off
Turning Your Phone On
䊳 Press and hold for two seconds.
Once your phone is on, it searches for a signal. When
your phone finds a signal, it automatically enters
standby mode – the phone’s idle state. At this point,
you are ready to begin making and receiving calls.
If your phone is unable to find a signal after a brief
period of searching, the PowerSave feature is
automatically activated. When a signal is found, your
phone automatically returns to standby mode.
In PowerSave mode, your phone searches for a signal
periodically without your intervention. You can also
initiate a search for Boost service by pressing any key
(when your phone is turned on).
The PowerSave feature conserves your battery
Tip
power when you are in an area where there is no
signal.
Turning Your Phone Off
䊳 Press and hold for two seconds until you see
the powering down animation on the display
screen.
Your screen remains blank while your phone is off
(unless the battery is charging).
Phone Basics
Section 2A. Phone Basics 21
Using Your Phone’s Battery and Charger
WARNING
Battery Capacity
Your phone is equipped with a Lithium Ion (Li-Ion)
battery. It allows you to recharge your battery before it is
fully drained. The battery provides up to 5.6 hours of
continuous digital talk time.
At 5% of charge capacity, the battery icon blinks. When
there are approximately two minutes of talk time left, the
phone sounds an audible alert and then turns off.
Note
22 Section 2A. Phone Basics
Use only Samsung-approved batteries and
chargers with your phone. The failure to use a
Samsung-approved battery and charger may
increase the risk that your phone will overheat,
catch fire, or explode, resulting in serious
bodily injury, death, or property damage.
Long backlight settings, searching for service, vibrate
mode, browser use, and other variables may reduce
the battery’s talk and standby times.
Watch your phone’s battery level indicator and
Tip
charge the battery before it runs out of power.
Installing the Battery
1. Remove the battery cover by pressing the Cover
Release Latch (1) and then carefully lifting the
battery cover away from the phone (2).
2. Slide the battery into the compartment so that the
tabs on the end align with the slots at the bottom of
the phone, making sure to line up the gold
contacts (3).
3. Gently press down on the battery until it snaps into
place (4).
4. Replace the cover by lining up the tabs and then
firmly pressing the cover down until it snaps into
place. Check that the battery is properly installed
before turning on the phone.
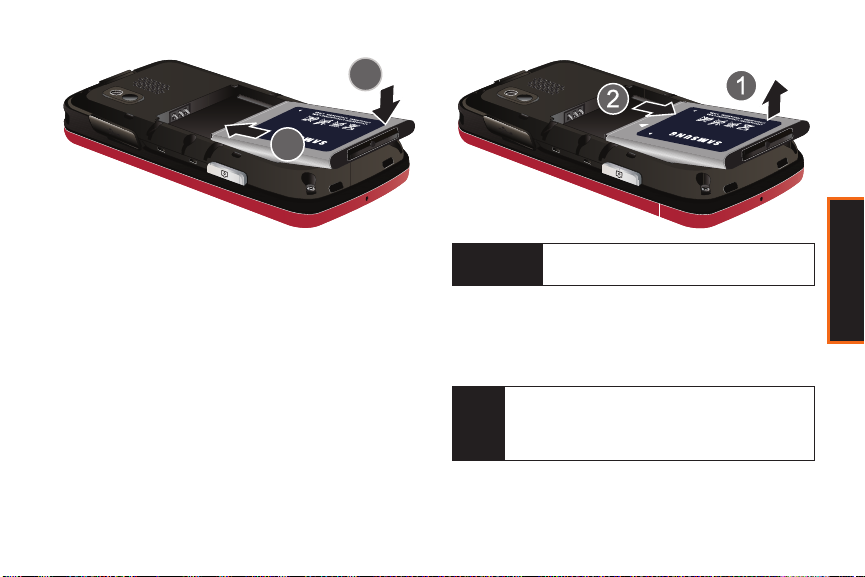
Removing the Battery
1. Follow step 1 from “Installing the Battery” on
page 22.
2. Grip the battery at the top end (1) and pull it up
and out (2).
WARNING
Do not handle a damaged or leaking Li-Ion
battery as you may be burned.
Charging the Battery
Your phone’s Li-Ion battery is rechargeable and should
be charged as soon as possible so you can begin
using your phone.
It is recommended that you completely charge your
Tip
battery first before using your phone. This guarantees
you begin using your phone with a fully charged
battery.
Section 2A. Phone Basics 23
Phone Basics

Keeping track of your battery’s charge is important. If
Charge Indicator
your battery level becomes too low, your phone
automatically turns off, and you will lose any
information you were just working on. For a quick
check of your battery level, glance at the battery charge
indicator located in the upper-right corner of your
phone’s display screen. If the battery charge is getting
too low, the battery icon ( ) blinks and the phone
sounds a warning tone.
Always use a Samsung-approved desktop charger,
travel charger, or vehicle power adapter to charge your
battery.
Using the Phone Charger
䊳 Plug the flat end of the charger/accessories jack
into the phone’s charger/accessories jack and the
other end into an electrical outlet.
24 Section 2A. Phone Basics
䡲 A red indicator light means the battery is charging.
䡲 A charging icon located in the top right corner of
the display screen lets you know the battery is
charging.
䡲 A green indicator light means the battery is fully
charged.
 Loading...