

Samsung SPH-M500 User Manual

SPH-m500
PORTABLE Dual-Mode
TELEPHONE
User Guide
Please read this manual before operating your phone, and keep it for
future reference.
BMC_UG_m500_101606_F1_ZJ04

Intellectual Property
All Intellectual Property, as defined below, owned by or which is
otherwise the property of Samsung or its respective suppliers
relating to the SAMSUNG Phone, including but not limited to,
accessories, parts, or software relating thereto (the “Phone
System”), is proprietary to Samsung and protected under federal
laws, state laws, and international treaty provisions. Intellectual
Property includes, but is not limited to, inventions (patentable or
unpatentable), patents, trade secrets, copyrights, software, computer
programs, and related documentation and other works of authorship.
You may not infringe or otherwise violate the rights secured by the
Intellectual Property. Moreover, you agree that you will not (and will
not attempt to) modify, prepare derivative works of, reverse engineer,
decompile, disassemble, or otherwise attempt to create source code
from the software. No title to or ownership in the Intellectual Property
is transferred to you. All applicable rights of the Intellectual Property
shall remain with SAMSUNG and its suppliers.
Copyright
© 2006 Samsung Electronics Canada, Inc.. SAMSUNG is a registered
trademark of Samsung Electronics Co., Ltd. and its related entities.
Licensed by Qualcomm Incorporated under one or more of the
following patents: U.S. Patent No. 4, 901, 307; 5, 056, 109; 5, 099,
204; 5, 101, 501; 5, 103, 459; 5, 107, 225; 5, 109, 390.
Printed in South Korea
Openwave® is a registered Trademark of Openwave, Inc.
RSA® is a registered Trademark of RSA Security, Inc.
Post-it® is a registered Trademark of Minnesota Mining and
Manufacturing Company AKA 3M CORPORATION DELAWARE.
The Bluetooth® word mark and logos are owned by the Bluetooth
SIG, Inc. and any use of such marks by Samsung Electronics Canada,
Inc. is under license. Other trademarks and trade names are those of
their respective owners.

Disclaimer of Warranties; Exclusion of Liability
Except as set forth in the express warranty contained on the warranty page
enclosed with the product, the purchaser takes the product "as is", and Samsung
makes no express or implied warranty of any kind whatsoever with respect to the
product, including but not limited to the merchantability of the product or its
fitness for any particular purpose or use; the design, condition or quality of the
product; the performance of the product; the workmanship of the product or the
components contained therein; or compliance of the product with the
requirements of any law, rule, specification or contract pertaining thereto. Nothing
contained in the instruction manual shall be construed to create an express or
implied warranty of any kind whatsoever with respect to the product. In addition,
Samsung shall not be liable for any damages of any kind resulting from the
purchase or use of the product or arising from the breach of the express warranty,
including incidental, special or consequential damages, or loss of anticipated
profits or benefits.
Privacy
The privacy and copyright laws of Canada govern the disclosure, reproduction and
distribution of data, media and other content, including music and video content.
Certain activities, including downloads or transfer by any means (including, via
cable, Bluetooth® or otherwise) of such content may be an infringement of
privacy or copyright law. Neither Samsung Electronics Canada Inc. nor any of its
affiliates shall be liable or responsible for any data or content disclosed,
reproduced, downloaded or distributed by the user of this equipment.

Table of Contents
Getting Started..............................................................................1
Closed View of Phone . . . . . . . . . . . . . . . . . . . . . . . . . . . . . . . . . . . . . . 1
Front View of Your Phone . . . . . . . . . . . . . . . . . . . . . . . . . . . . . . . . . . . 3
Viewing the Display Screen. . . . . . . . . . . . . . . . . . . . . . . . . . . . . . . . . . 6
Features of Your Phone. . . . . . . . . . . . . . . . . . . . . . . . . . . . . . . . . . . . 10
Turning Your Phone On and Off . . . . . . . . . . . . . . . . . . . . . . . . . . . . . 11
Using Your Phone’s Battery and Charger . . . . . . . . . . . . . . . . . . . . . . 12
Phone Basics..............................................................................17
Displaying Your Phone Number . . . . . . . . . . . . . . . . . . . . . . . . . . . . . 17
Making and Answering Calls . . . . . . . . . . . . . . . . . . . . . . . . . . . . . . . . 18
Using Caller ID . . . . . . . . . . . . . . . . . . . . . . . . . . . . . . . . . . . . . . . . . . 26
Responding to Call Waiting. . . . . . . . . . . . . . . . . . . . . . . . . . . . . . . . . 26
Making a Three-Way Call . . . . . . . . . . . . . . . . . . . . . . . . . . . . . . . . . . 27
TTY Use With Handset . . . . . . . . . . . . . . . . . . . . . . . . . . . . . . . . . . . . 28
Roaming ..................................................................................... 30
Understanding Roaming . . . . . . . . . . . . . . . . . . . . . . . . . . . . . . . . . . . 30
Setting Your Roaming Mode. . . . . . . . . . . . . . . . . . . . . . . . . . . . . . . . 31
Set NAM . . . . . . . . . . . . . . . . . . . . . . . . . . . . . . . . . . . . . . . . . . . . . . . 31
Entering Text ..............................................................................32
Voice Service .............................................................................. 36
Activating Voice Service . . . . . . . . . . . . . . . . . . . . . . . . . . . . . . . . . . . 36
Customizing Voice Service . . . . . . . . . . . . . . . . . . . . . . . . . . . . . . . . . 42
Main Menu..................................................................................47
Menu Styles. . . . . . . . . . . . . . . . . . . . . . . . . . . . . . . . . . . . . . . . . . . . . 47
Backing Up Within a Menu . . . . . . . . . . . . . . . . . . . . . . . . . . . . . . . . . 49
Viewing the Menus . . . . . . . . . . . . . . . . . . . . . . . . . . . . . . . . . . . . . . . 49
Web ............................................................................................59
The Wireless Web . . . . . . . . . . . . . . . . . . . . . . . . . . . . . . . . . . . . . . . . 59
Call History .................................................................................64
Viewing History . . . . . . . . . . . . . . . . . . . . . . . . . . . . . . . . . . . . . . . . . . 64
Call History Options. . . . . . . . . . . . . . . . . . . . . . . . . . . . . . . . . . . . . . . 64

Making a Call From Call History . . . . . . . . . . . . . . . . . . . . . . . . . . . . . 65
Saving a Phone Number From Call History. . . . . . . . . . . . . . . . . . . . . 66
Erasing Call History . . . . . . . . . . . . . . . . . . . . . . . . . . . . . . . . . . . . . . . 67
Air Time. . . . . . . . . . . . . . . . . . . . . . . . . . . . . . . . . . . . . . . . . . . . . . . . 67
Media Player...............................................................................68
Channel Listing . . . . . . . . . . . . . . . . . . . . . . . . . . . . . . . . . . . . . . . . . . 68
Memory Card . . . . . . . . . . . . . . . . . . . . . . . . . . . . . . . . . . . . . . . . . . . 69
My Play List. . . . . . . . . . . . . . . . . . . . . . . . . . . . . . . . . . . . . . . . . . . . . 71
Bluetooth ....................................................................................73
Enable . . . . . . . . . . . . . . . . . . . . . . . . . . . . . . . . . . . . . . . . . . . . . . . . . 73
Visibility. . . . . . . . . . . . . . . . . . . . . . . . . . . . . . . . . . . . . . . . . . . . . . . . 74
Device Name . . . . . . . . . . . . . . . . . . . . . . . . . . . . . . . . . . . . . . . . . . . . 74
Exchange FTP Folder. . . . . . . . . . . . . . . . . . . . . . . . . . . . . . . . . . . . . . 75
Pairing Bluetooth Devices . . . . . . . . . . . . . . . . . . . . . . . . . . . . . . . . . . 75
Missed Alerts..............................................................................78
Music..........................................................................................79
Downloads.................................................................................. 81
Games . . . . . . . . . . . . . . . . . . . . . . . . . . . . . . . . . . . . . . . . . . . . . . . . . 81
Ringers . . . . . . . . . . . . . . . . . . . . . . . . . . . . . . . . . . . . . . . . . . . . . . . . 82
Screen Savers . . . . . . . . . . . . . . . . . . . . . . . . . . . . . . . . . . . . . . . . . . . 83
Applications. . . . . . . . . . . . . . . . . . . . . . . . . . . . . . . . . . . . . . . . . . . . . 85
Messaging ..................................................................................86
Text Messaging . . . . . . . . . . . . . . . . . . . . . . . . . . . . . . . . . . . . . . . . . . 86
Pic/Video Msg . . . . . . . . . . . . . . . . . . . . . . . . . . . . . . . . . . . . . . . . . . . 90
Voicemail. . . . . . . . . . . . . . . . . . . . . . . . . . . . . . . . . . . . . . . . . . . . . . . 92
Web Alert. . . . . . . . . . . . . . . . . . . . . . . . . . . . . . . . . . . . . . . . . . . . . . . 95
Settings . . . . . . . . . . . . . . . . . . . . . . . . . . . . . . . . . . . . . . . . . . . . . . . . 95
Tools......................................................................................... 103
Mass Storage . . . . . . . . . . . . . . . . . . . . . . . . . . . . . . . . . . . . . . . . . . 103
Voice Service. . . . . . . . . . . . . . . . . . . . . . . . . . . . . . . . . . . . . . . . . . . 106
Voice Memo . . . . . . . . . . . . . . . . . . . . . . . . . . . . . . . . . . . . . . . . . . . 106
Bluetooth. . . . . . . . . . . . . . . . . . . . . . . . . . . . . . . . . . . . . . . . . . . . . . 109
Planner . . . . . . . . . . . . . . . . . . . . . . . . . . . . . . . . . . . . . . . . . . . . . . . 109

Memo Pad. . . . . . . . . . . . . . . . . . . . . . . . . . . . . . . . . . . . . . . . . . . . . 115
World Time . . . . . . . . . . . . . . . . . . . . . . . . . . . . . . . . . . . . . . . . . . . . 116
Using the Alarm Clock. . . . . . . . . . . . . . . . . . . . . . . . . . . . . . . . . . . . 117
Calculator . . . . . . . . . . . . . . . . . . . . . . . . . . . . . . . . . . . . . . . . . . . . . 118
Pics/Videos...............................................................................119
Camera . . . . . . . . . . . . . . . . . . . . . . . . . . . . . . . . . . . . . . . . . . . . . . . 119
Camcorder. . . . . . . . . . . . . . . . . . . . . . . . . . . . . . . . . . . . . . . . . . . . . 124
Pic/Video Msg . . . . . . . . . . . . . . . . . . . . . . . . . . . . . . . . . . . . . . . . . . 127
My Pics/Videos . . . . . . . . . . . . . . . . . . . . . . . . . . . . . . . . . . . . . . . . . 128
PictBridge Print . . . . . . . . . . . . . . . . . . . . . . . . . . . . . . . . . . . . . . . . . 130
Settings & Info . . . . . . . . . . . . . . . . . . . . . . . . . . . . . . . . . . . . . . . . . 132
Contacts ...................................................................................134
Adding a New Contact. . . . . . . . . . . . . . . . . . . . . . . . . . . . . . . . . . . . 134
Finding Contacts . . . . . . . . . . . . . . . . . . . . . . . . . . . . . . . . . . . . . . . . 134
Adding a Phone Number to an Existing Contact Entry . . . . . . . . . . . 135
Editing a Contacts Entry’s Phone Number . . . . . . . . . . . . . . . . . . . . 135
Selecting a Ringer Type for an Entry. . . . . . . . . . . . . . . . . . . . . . . . . 136
Speed Dial #s . . . . . . . . . . . . . . . . . . . . . . . . . . . . . . . . . . . . . . . . . . 137
Group . . . . . . . . . . . . . . . . . . . . . . . . . . . . . . . . . . . . . . . . . . . . . . . . 138
Memory. . . . . . . . . . . . . . . . . . . . . . . . . . . . . . . . . . . . . . . . . . . . . . . 139
My Name Card. . . . . . . . . . . . . . . . . . . . . . . . . . . . . . . . . . . . . . . . . . 139
Services. . . . . . . . . . . . . . . . . . . . . . . . . . . . . . . . . . . . . . . . . . . . . . . 140
Settings .................................................................................... 141
Display. . . . . . . . . . . . . . . . . . . . . . . . . . . . . . . . . . . . . . . . . . . . . . . . 141
Sounds . . . . . . . . . . . . . . . . . . . . . . . . . . . . . . . . . . . . . . . . . . . . . . . 148
Voice Service. . . . . . . . . . . . . . . . . . . . . . . . . . . . . . . . . . . . . . . . . . . 154
Security . . . . . . . . . . . . . . . . . . . . . . . . . . . . . . . . . . . . . . . . . . . . . . . 154
Roaming . . . . . . . . . . . . . . . . . . . . . . . . . . . . . . . . . . . . . . . . . . . . . . 154
Launch Pad . . . . . . . . . . . . . . . . . . . . . . . . . . . . . . . . . . . . . . . . . . . . 154
Others . . . . . . . . . . . . . . . . . . . . . . . . . . . . . . . . . . . . . . . . . . . . . . . . 155
Phone Info. . . . . . . . . . . . . . . . . . . . . . . . . . . . . . . . . . . . . . . . . . . . . 162
Phone Security ........................................................................163
Accessing the Security Menu . . . . . . . . . . . . . . . . . . . . . . . . . . . . . . 163
Using Your Phone’s Lock Feature. . . . . . . . . . . . . . . . . . . . . . . . . . . 163

Special #s . . . . . . . . . . . . . . . . . . . . . . . . . . . . . . . . . . . . . . . . . . . . . 165
Erase . . . . . . . . . . . . . . . . . . . . . . . . . . . . . . . . . . . . . . . . . . . . . . . . . 165
Default Settings. . . . . . . . . . . . . . . . . . . . . . . . . . . . . . . . . . . . . . . . . 166
Reset Pic/Video Account. . . . . . . . . . . . . . . . . . . . . . . . . . . . . . . . . . 166
Reset Phone . . . . . . . . . . . . . . . . . . . . . . . . . . . . . . . . . . . . . . . . . . . 167
Safety .......................................................................................168
Getting the Most Out of Your Reception . . . . . . . . . . . . . . . . . . . . . . 168
Maintaining Safe Use of and Access to Your Phone. . . . . . . . . . . . . 169
Caring for the Battery . . . . . . . . . . . . . . . . . . . . . . . . . . . . . . . . . . . . 173
Owner’s Record. . . . . . . . . . . . . . . . . . . . . . . . . . . . . . . . . . . . . . . . . 176
User Guide Proprietary Notice. . . . . . . . . . . . . . . . . . . . . . . . . . . . . . 176
Manufacturer’s Warranty ..........................................................177
Index......................................................................................... 180

Getting Started
Closed View of Phone
1. Camera Lens
2. Volume Key
3. External
Display
1 Getting Started
4. Headset
Jack
5. Camera Key

1. Camera Lens: The camera lens allows you to take pictures
and record videos whether the phone is open or closed.
2. Volume Key: Allows you to adjust the ringer volume in
standby mode (with the flip open) or to adjust the voice
volume during a call. You can also:
• mute the ringer during an incoming call by pressing the
volume key up or down
• press and hold the key to ignore an incoming call
• scroll up or down through menu options
• mute the alarm
3. External Display: Displays information needed to operate
your phone.
4. Headset Jack: Allows you to plug in an optional headset for
safe, convenient hands-free conversations.
5. Camera Key: This key is used to launch the integrated
digital camera, both when the phone is open or closed.
Getting Started
Getting Started 2

Front View of Your Phone
1. Speaker
2. Display
Screen
3. Navigation Key
4. Left Soft Key
5. TALK Key
6. Back Key
7. Voicemail Key
8. Shift/Asterisk
Key
9. Microphone
3 Getting Started
15. OK/Menu Key
14. Right Soft Key
13. END Key
12. Numeric Keypad
11. Space/Pound Key
10. Power/Accessory
Interface Connector

1. Speaker: The speaker allows you to hear the other caller
and the different ring tones and sounds offered by your
phone. The speaker also allows you to hear your music
when not using headphones.
2. Display Screen: This screen displays all the information
needed to operate your phone.
3. Navigation Key: This key allows you to scroll through the
phone menu options and provides a shortcut to phone
functions from standby mode.
4. Left Soft Key: This key can be used in several different
ways.
• In idle mode, press to access your Favorites.
• When using other features, such as the Web Browser, the
left softkey performs a context-sensitive action.
This action is shown in the bottom left corner of the
Display Screen.
5. TAL K Key : This key can be used in several different ways.
• Allows you to place or receive a call.
• In standby mode, press the key once to access the Recent
calls log.
• If you press and hold the key down, you will initiate the
Voice Recognition feature.
6. BACK Key: Deletes characters from the display when you
are in text entry mode. When in a menu, press to return to
the previous menu.
7. Voicemail Key: From standby mode, press and hold to
access your Voicemail.
Getting Started
Getting Started 4

8. Shift/Asterisk Key: Enters the asterisk [*] character for
calling features. In text entry mode, press to change the
character input type (ABC, Abc, abc).
9. Microphone: The microphone allows the other caller to hear
you clearly when you are speaking to them.
10.Power/Accessory Interface Connector: Allows you to plug
in the battery charger or connect optional accessories, such
as a USB data cable.
11. Space/Pound Key: Enters the pound [#] character for
calling features. In text entry mode, press to enter a space.
12.Numeric Keypad: Use these keys to enter numbers, letters,
and characters.
13.END Key: This key can be used in several different ways.
• During a call, press to end the call.
• When you receive an incoming call, press to mute the
ringer.
• When the phone is off or in standby mode, press and hold
this key for a few seconds to turn your phone On or Off.
• When in the main menu, press to return the phone to
standby mode and cancel your input.
14.Right Soft Key: This key can be used in several different
ways.
• In idle mode, press to access your Contacts.
• In text entry mode, press to change the character input
type.
• When using other features, such as the Web Browser, the
right softkey performs a context-sensitive action.
This action is shown in the bottom right corner of the
Display Screen.
5 Getting Started

15.OK/Menu Key: This key can be used in several different
ways.
• In idle mode, press for the main Menu.
• Press while navigating through a menu to accept the
highlighted choice in the menu.
Viewing the Display Screen
Your phone’s interior and exterior display screens provides a wealth
of information about your phone’s status and options. This list
identifies the symbols you’ll see on your phone’s display screens:
indicates that your 1X web connection is active. Incoming
voice calls go directly to Voicemail; outgoing voice calls can
be made, but the web connection will terminate.
indicates that data is being transferred over the 1X network.
The arrow direction indicates whether the handset is sending
or receiving data.
indicates that your 1X connection is dormant.
indicates that you are in a high-speed EV-DO coverage area.
indicates that you have an active EV-DO connection. When
the arrows are moving, data is being transferred over the EVDO network.
indicates that the EV-DO connection is dormant.
Getting Started
indicates that position location is active.
indicates that position location is inactive.
indicates that your phone is in web security mode.
Getting Started 6

indicates that your phone is roaming.
indicates that you have a new Text Message.
indicates that you have a new Picture Message.
indicates that you have a new Voice Mail.
indicates that there is an unread message in your inbox.
indicates that the message has been read.
indicates that there is an unread urgent message in
your inbox.
indicates that you have read the urgent message.
indicates that the message was sent.
indicates that the message failed to send.
indicates that you have a pending message to be sent.
indicates that the message is a draft.
indicates that there is URL contained in the text message.
indicates that the text message is locked. A locked message
cannot be deleted without confirmation.
indicates that your phone is in vibrate all mode.
indicates that your phone is set to ringer plus vibrate mode.
indicates that the ringer is off and vibrate is turned on.
indicates that the TTY option is On. This icon is displayed
only when earphones or a Bluetooth headset is in use.
indicates that the ringer is set at a level between 1-8 or that
1-Beep is selected.
7 Getting Started

indicates that the ringer is turned Off.
indicates that an alarm is set on your phone.
tells you a call is in progress.
means there is no service, as your phone cannot find a
signal.
displays your current signal strength. When you are
receiving maximum signal strength, six bars are shown.
displays your current battery strength at full.
displays your current battery strength at empty.
indicates that the handset is in Mute mode.
indicates that the handset is in Key Mute mode.
indicates that the handset is in Speaker mode.
indicates that the Camera is enabled.
indicates that the camcorder is enabled.
indicates that the self-timer function is enabled. With the self
timer enabled, a set amount of time is required prior to
taking a picture.
indicates that the white balance has been set to Sunny. This
is used for taking pictures outdoors on bright sunny days.
indicates that the white balance has been set to Cloudy. This
is used for taking pictures outdoors under cloudy conditions.
Getting Started
indicates that the white balance has been set to Tungsten.
This is used for taking pictures indoors under normal
lighting conditions.
Getting Started 8

indicates that the white balance has been set to Fluorescent.
This is used for taking pictures indoors under fluorescent
lighting conditions.
indicates that the white balance has been set to Manual. This
is used for taking pictures indoors or outdoors using your
own custom settings.
indicates that a voice memo or video is being recorded.
indicates the key you must press to pause playback.
indicates the key you must press to play.
indicates that media has been uploaded to an
online album or folder.
indicates that there is a voice caption attached
to an image.
indicates that Bluetooth technology is enabled.
indicates that Bluetooth technology is connected.
Your phone can also display a handy glossary of icons:
1. Press , followed by for Settings.
2. Press for Phone Info.
3. Press for Icon Glossary.
4. Use the navigation keys to scroll through the list of icons.
9 Getting Started

Features of Your Phone
Congratulations on the purchase of your Samsung SPH-m500
phone. This phone is lightweight, easy-to-use, reliable, and it also
offers many significant features and service options:
• Dual-band/Dual-Mode capability provides high-speed data and
voice access to other Digital Networks where roaming
agreements are established. See "Roaming" on page 30.
• Mobile Browser
"Launching the Browser" on page 59.
• Messaging provides quick and convenient text and picture/
video messaging capabilities. See "Messaging" on page 86.
• Streaming media. See "Media Player" on page 68.
• Music store and player. See "Music" on page 79.
• Downloadable games, ringers, screen savers, and applications
allow you to turn down time into fun time and to personalize
your phone. See "Downloads" on page 81.
• The built-in organizer lets you schedule alerts to remind you of
important events. See "Planner" on page 109.
• 500 numbers stored in your Contacts list. Each Contact can
have up to 5 phone numbers each. See "Contacts" on page 134.
• Hands-free interface using Voice Service.
TM
provides access to the wireless Internet. See
Getting Started
• Menus and options that you can view in English or French.
Getting Started 10

Turning Your Phone On and Off
To turn your phone on:
• Press and hold to turn your phone on.
Once your phone is On, it displays “Looking for Service” which
indicates that your phone is searching for a signal. When your phone
finds a signal, it automatically enters standby mode – the phone’s
idle state. At this point, you are ready to begin making and receiving
calls.
If your phone is unable to find a signal after 15 minutes of searching,
a Power Save feature is automatically activated. When a signal is
found, your phone automatically returns to standby mode.
In Power Save mode, your phone searches for a signal periodically
without your intervention. You can also initiate a search for service
by pressing any key (when your phone is turned On).
Tip: The Power Save feature helps to conserve your battery power when
you are in an area where there is no signal.
To turn your phone off:
• Press and hold for two seconds until you see the powering
down animation on the display screen.
Your screen remains blank while your phone is off (unless the battery
is charging).
11 Getting Started

Using Your Phone’s Battery and Charger
Battery Capacity
Your phone is equipped with a Lithium Ion (LiIon) battery. It allows
you to recharge your battery before it is fully drained. The battery
provides up to 3 hours of continuous digital talk time or
approximately 8 days of continuous digital standby time.
When the battery reaches 5% of its capacity, the battery icon blinks.
When there are approximately two minutes of talk time left, the
phone sounds an audible alert and then powers down.
Note: Long backlight settings, low signal strength, searching for service,
vibrate mode, playing games, or browser use affect the battery’s talk and
standby times.
Tip: Be sure to watch your phone’s battery level indicator and charge the
battery before it runs out of power.
Installing the Battery
To install the LiIon battery:
1. Insert the battery into the opening on the back of the phone
at an angle, making sure the plastic tab on the bottom of the
Getting Started
Getting Started 12

battery is inserted into the matching slot in the phone.
2. Press down until the battery snaps into place.
13 Getting Started
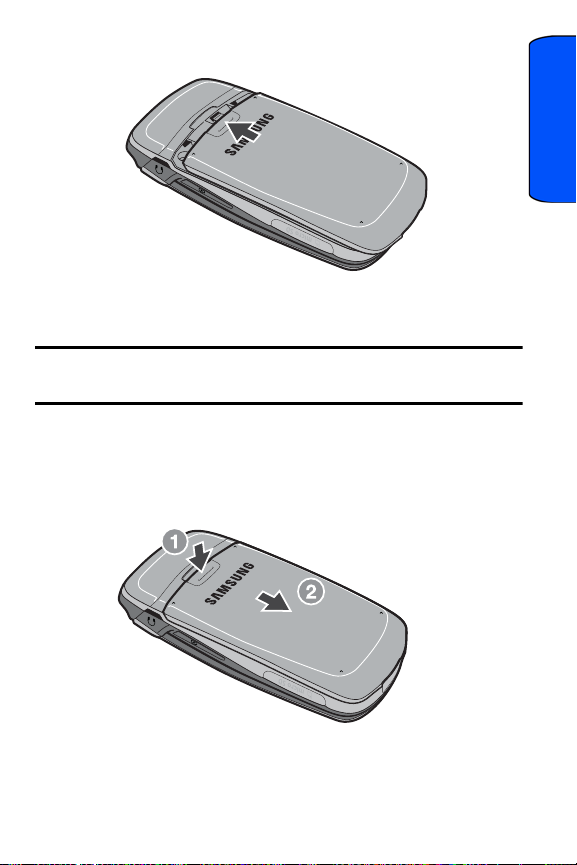
3. Replace the cover.
Removing the Battery
Note: Make sure the power is off so that you don’t lose any stored
numbers or messages.
To remove your battery:
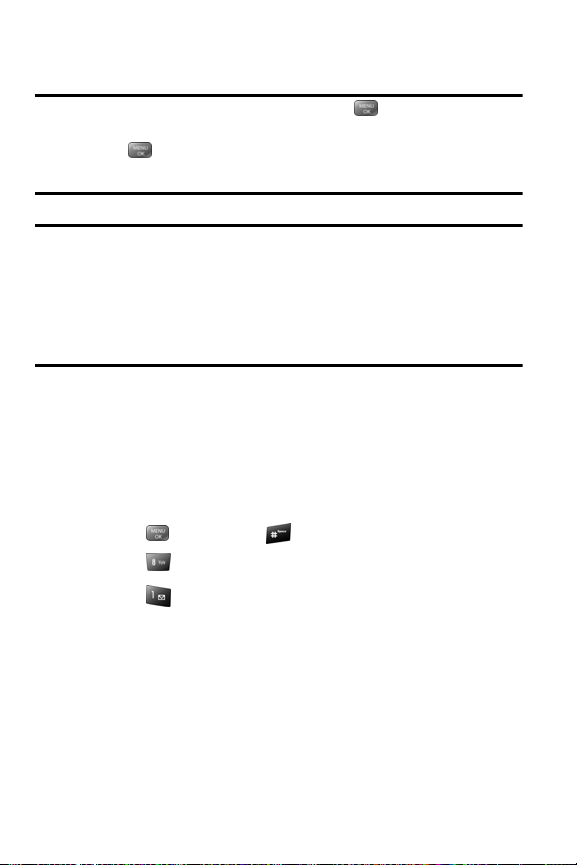
1. Remove the protective cover by pressing the release latch
and pulling up on the back of the cover.
Getting Started
Getting Started 14

2. Grip the battery at the bottom and pull up and out at a 45°
angle.
Charging the Battery
Your phone’s LiIon battery is rechargeable and should be charged as
soon as possible so you can begin using your phone.
Keeping track of your battery’s charge is important. If your battery
level becomes too low, your phone automatically turns off and you
will lose all the information you were just working on. For a quick
check of your phone’s battery level, glance at the battery charge
indicator located in the upper-right corner of either of your phone’s
display screens. indicates that the battery is full. If the battery
charge is getting too low, the battery icon blinks and the phone
sounds a warning tone.
Always use a Samsung-approved desktop charger, travel adapter, or
vehicle power adapter to charge your battery.
WARNING! FOR CONNECTION TO AN ELECTRICAL SUPPLY NOT
LOCATED IN NORTH AMERICA, YOU
PROPER CONFIGURATION FOR THE POWER OUTLET. USE OF THE
WRONG ADAPTER COULD DAMAGE YOUR PHONE AND VOID YOUR
WARRANTY. IMPORTANT SAFETY INSTRUCTIONS - SAVE THESE
INSTRUCTIONS. DANGER - TO REDUCE THE RISK OF FIRE OR
15 Getting Started
MUST USE AN ADAPTOR OF THE

ELECTRIC SHOCK, CAREFULLY FOLLOW THESE INSTRUCTIONS. THIS
POWER UNIT IS INTENDED TO BE CORRECTLY ORIENTED IN A
VERTICAL OR HORIZONTAL OR FLOOR MOUNT POSITION.
Note: You must unplug the adapter before removing the battery from
the phone during charging to avoid damage.
It takes approximately 4 hours to fully recharge a completely drained
standard battery. With the Samsung approved LiIon battery, you can
recharge the battery before it drains completely.
An animated battery icon is displayed on both the external LCD
screen and the main screen. The icon provides an indication of
whether the battery is being charged or is fully charged.
Getting Started
Getting Started 16
Phone Basics
Note: To access the phone’s main Menu, press from standby mode.
Menu items may be selected by highlighting them with the navigation key
and pressing , or you can press the key corresponding to the menu’s
position in the 3x4 grid.
Note: Your phone can display the various features and options in one of
two different menu styles,
handset is set to the 3x4 menu style. Key commands for the first menu
level in the List style differ from those in this guide. For more information
on changing the menu style between 3x4 and List, see "Changing the
Phone’s Menu Style" on page 48.
Displaying Your Phone Number
Just in case you forget your phone number, your phone can remind
you.
To display your phone number:
1. Press , followed by for Settings.
2. Press for Phone Info.
3. Press for Phone Number.
3x4 (black or white) and List. By default, your
17 Phone Basics

Making and Answering Calls
Making Calls
Placing a call from your phone is as easy as making a call from any
land-line phone. Just enter the number and press and you’re on
your way to clear calls.
To make a call using your keypad:
1. Make sure your phone is on.
2. Enter a phone number. (If you make a mistake while dialing,
press to erase one digit at a time. Press and hold to
erase the entire number.)
3. Press to call.
4. Press or close the phone when you are finished.
Tip: To redial your last recent call, press twice.
Tip: Some networks support + dialing. + dialing automatically indicates
to the network that you are dialing an international call and adds the
international dialing prefix (typically ‘011’) to the call automatically. To
use + dialing, press and hold (until the + appears) before entering
the phone number.
You can also place calls from your phone by using Voice Command
(page 37), Speed Dialing numbers from your Contacts (page 25), and
using your Call History listings (page 65).
Phone Basics
Phone Basics 18

Answering Calls
To answer an incoming call:
1. Make sure your phone is on. (If your phone is off, incoming
calls go to Voicemail.)
2. Press to answer an incoming call. (Depending on your
phone’s settings, you may also answer incoming calls by
opening the phone or by pressing any number key. See
“Call Answer Mode” on page 158 for more information.)
Your phone notifies you of incoming calls in the following ways:
• The phone rings or vibrates (unless set to Silence All).
• The screen displays an incoming call message.
If the incoming call is from a number stored in your Contacts, the
Contacts entry’s name is displayed. The caller’s phone number may
also be displayed, if available.
The following options are also available to handle an incoming call:
• Press or the volume key to quiet the ringer.
• Press the right softkey for Ignore or press and hold the
volume key to send the incoming call to your Voicemail box
immediately.
Note: When your phone is off, incoming calls go to Voicemail.
19 Phone Basics
Ending a Call
To disconnect a call when you are finished:
• Close the phone or press .
Missed Call Notification
When an incoming call is not answered, a Missed Call message is
displayed on your screen.
To dial a missed call back press .
Calling Emergency Numbers
You can place calls to 911 (dial and press ), even
if your phone is locked or your account is restricted.
Warning: After initiating a 911 call, you must end the call by
pressing
terminated intentionally by the user. No other calls can be made prior to
terminating the 911 call.
. This notifies the phone that the 911 call was
In-Call Options
During a call, use the left softkey to Mute or Unmute your
phone’s microphone. Additional actions are available by pressing the
right softkey for Options during a call. (To select an option,
press the corresponding keypad number or highlight the option and
press .)
• (1) Turn Speaker On/Off allows you to activate or deactivate
your phone’s speaker (routing calls through an attached
headset).
Phone Basics
• (2) Key Mute or Key Unmute allows you to mute or reactivate
your phone’s keypad sounds.
Phone Basics 20

• (3) Contacts accesses the Contacts menu options.
• (4) Messaging allows you to check notifications and access the
contents of voice or text messages.
• (5) 3-Way Call allows you to talk to two different people at the
same time. (For more information, see "Making a Three-Way
Call" on page 27.)
• (6) Call History checks your call log for Missed, Outgoing, and
Incoming calls. You can also erase the logs from this menu.
• (7) Voice Memo allows you to record the current conversation.
(For more information, see "Reviewing and Erasing Memos" on
page 107.)
• (8) Tools accesses the Tools menu options.
• (9) Phone Info displays the phone number, icon glossary, the
hardware/software version, Preferred Roaming List (PRL), the
system and the technology being used.
End-of-Call Options
After receiving a call from or making a call to a phone number that is
not in your Contacts, the phone number and the duration of the call
are displayed. Press the left softkey to Save the new number in
your Contacts. (See “Saving a Phone Number” below for more
information.)
Note: The End-of-Call options are not displayed for calls identified as
Unknown ID or Restricted Number.
21 Phone Basics
Saving a Phone Number
Your phone can store up to 500 phone numbers in its Contacts list.
Each Contacts entry can store up to a total of five phone numbers,
and each entry’s name can contain up to 20 characters. (For more
information, see "Adding a New Contact" on page 134.)
To save a number from standby mode:
1. Enter a phone number.
2. Press the right softkey for Options.
3. Press for Save.
4. Select New Entry and press .
Note: Step 4 does not appear when your Contacts list is empty.
5. Select the Type using the navigation key and press .
• Mobile • Home • Work
• Pager • Others
6. Enter the name using the keypad and press .
7. Press the left softkey for Done.
After you save the number, the new Contacts entry is displayed.
Phone Basics
Finding a Phone Number
To find an entry from the Contacts menu:
1. From the Idle screen, press the right softkey for
Contacts.
Phone Basics 22

2. Scroll down through your list of contacts to highlight the
name and press to make the call.
Tip: To search through your list more quickly, enter the first few letters in
the
Name box. The display will move down the list to the first entry that
matches the text in the Name box.
Dialing and Saving Phone Numbers With Pauses
You can dial or save phone numbers with pauses for use with
automated systems, such as Voicemail or credit card billing
numbers.
There are two types of pauses available on your phone:
• Hard Pause sends the next set of numbers when you
press .
• 2-Second Pause automatically sends the next set of numbers
after two seconds.
Note: You can have multiple pauses in a phone number and combine
2-second and hard pauses.
To dial or save phone numbers with pauses:
1. Enter a phone number from standby mode.
2. Press the right softkey for Options and select Hard
pause or 2sec pause. Hard pauses are displayed as a “P”
and 2-second pauses as a “T”.
3. Enter additional numbers.
23 Phone Basics
 Loading...