

Samsung SPH-M390ZSAVMU User Manual

MOBILE PHONE
User Guide
Please read this manual before operating your
phone and keep it for future reference.

Intellectual Property
All Intellectual Property, as defined below, owned by or which is otherwise the property of Samsung or its
respective suppliers relating to the SAMSUNG Phone, including but not limited to, accessories, parts, or
software relating there to (the “Phone System”), is proprietary to Samsung and protected under federal
laws, state laws, and international treaty provisions. Intellectual Property includes, but is not limited to,
inventions (patentable or unpatentable), patents, trade secrets, copyrights, software, computer programs,
and related documentation and other works of authorship. You may not infringe or otherwise violate the
rights secured by the Intellectual Property. Moreover, you agree that you will not (and will not attempt to)
modify, prepare derivative works of, reverse engineer, decompile, disassemble, or otherwise attempt to
create source code from the software. No title to or ownership in the Intellectual Property is transferred to
you. All applicable rights of the Intellectual Property shall remain with SAMSUNG and its suppliers.
Open Source Software
Some software components of this product incorporate source code covered under GNU General Public
License (GPL), GNU Lesser General Public License (LGPL), OpenSSL License, BSD License and other open
source licenses. To obtain the source code covered under the open source licenses, please visit:
http://opensource.samsung.com
.
Disclaimer of Warranties; Exclusion of Liability
EXCEPT AS SET FORTH IN THE EXPRESS WARRANTY CONTAINED ON THE WARRANTY PAGE ENCLOSED
WITH THE PRODUCT, THE PURCHASER TAKES THE PRODUCT "AS IS", AND SAMSUNG MAKES NO
EXPRESS OR IMPLIED WARRANTY OF ANY KIND WHATSOEVER WITH RESPECT TO THE PRODUCT,
INCLUDING BUT NOT LIMITED TO THE MERCHANTABILITY OF THE PRODUCT OR ITS FITNESS FOR ANY
PARTICULAR PURPOSE OR USE; THE DESIGN, CONDITION OR QUALITY OF THE PRODUCT; THE
PERFORMANCE OF THE PRODUCT; THE WORKMANSHIP OF THE PRODUCT OR THE COMPONENTS
CONTAINED THEREIN; OR COMPLIANCE OF THE PRODUCT WITH THE REQUIREMENTS OF ANY LAW, RULE,
SPECIFICATION OR CONTRACT PERTAINING THERETO. NOTHING CONTAINED IN THE INSTRUCTION
MANUAL SHALL BE CONSTRUED TO CREATE AN EXPRESS OR IMPLIED WARRANTY OF ANY KIND
WHATSOEVER WITH RESPECT TO THE PRODUCT. IN ADDITION, SAMSUNG SHALL NOT BE LIABLE FOR ANY
DAMAGES OF ANY KIND RESULTING FROM THE PURCHASE OR USE OF THE PRODUCT OR ARISING FROM
VMU_SPH-M390_UG_Eng_LG2_TE_073012_F2

THE BREACH OF THE EXPRESS WARRANTY, INCLUDING INCIDENTAL, SPECIAL OR CONSEQUENTIAL
DAMAGES, OR LOSS OF ANTICIPATED PROFITS OR BENEFITS.
SAMSUNG IS NOT LIABLE FOR PERFORMANCE ISSUES OR INCOMPATIBILITIES CAUSED BY YOUR EDITING
OF REGISTRY SETTINGS, OR YOUR MODIFICATION OF OPERATING SYSTEM SOFTWARE.
USING CUSTOM OPERATING SYSTEM SOFTWARE MAY CAUSE YOUR DEVICE AND APPLICATIONS TO WORK
IMPROPERLY.
Samsung Telecommunications America (STA), LLC
Headquarters:
1301 E. Lookout Drive
Richardson, TX 75082
Customer Care Center:
1000 Klein Rd.
Plano, TX 75074
Toll Free Tel: 1.888.987.HELP (4357)
Internet Address:
http://www.samsung.com
©
2012 Samsung Telecommunications America, LLC. Samsung is a registered trademark of Samsung
Electronics Co., Ltd.
Do you have questions about your Samsung Mobile Phone?
For 24 hour information and assistance, we offer a new FAQ/ARS System (Automated Response System)
www.samsung.com/us/support
at:

Nuance®, VSuite™, T9® Text Input, and the Nuance logo are trademarks or registered trademarks of
Nuance Communications, Inc., or its affiliates in the United States and/or other countries.
®
and NetFront™ are trademarks or registered trademarks of ACCESS Co., Ltd. in Japan and
ACCESS
other countries.
®
The Bluetooth
word mark, figure mark (stylized “B Design”), and combination mark (Bluetooth word
mark and “B Design”) are registered trademarks and are wholly owned by the Bluetooth SIG.
microSD™,
microSDHC™, and the microSD logo are T
©2012 Samsung T
elecommunications America, LLC. Samsung is a registered trademark of Samsung
rademarks of the SD Card Association.
Electronics Co., Ltd. All product and brand names are trademarks or registered trademarks of their
respective companies. Screen images simulated. Appearance of the device may vary.
®
and the Virgin signature logo are registered trademarks of Virgin Enterprises Limited and are
VIRGIN
used under license. payLo™ and the payLo logo are trademarks of Virgin Mobile USA, L.P.

Table of Contents
Section 1: Getting Started ................4
Understanding this User Manual . . . . . . .4
Battery . . . . . . . . . . . . . . . . . . . . . . . . . . 6
Turning Your Phone On and Off . . . . . . .9
TTY Mode . . . . . . . . . . . . . . . . . . . . . . . .9
Voicemail . . . . . . . . . . . . . . . . . . . . . . . .9
Memory Card . . . . . . . . . . . . . . . . . . . . .9
Section 2: Understanding Your
Phone ..............................................10
Features of Your Phone . . . . . . . . . . . .10
Front View . . . . . . . . . . . . . . . . . . . . . . 11
Side Views . . . . . . . . . . . . . . . . . . . . . .12
Open View . . . . . . . . . . . . . . . . . . . . . .13
Back View . . . . . . . . . . . . . . . . . . . . . . 13
Command Keys . . . . . . . . . . . . . . . . . .14
Function Keys . . . . . . . . . . . . . . . . . . . .15
Main Screen . . . . . . . . . . . . . . . . . . . . . 16
Understanding the Menu . . . . . . . . . . .19
Section 3: My Account ....................20
Create your Account and Pick Your Plan 20
Activating Your Device . . . . . . . . . . . . .20
Additional Information . . . . . . . . . . . . .20
Managing Your Account . . . . . . . . . . . .21
Section 4: Calling ............................22
Displaying Your Phone Number . . . . . .22
Making Calls . . . . . . . . . . . . . . . . . . . .22
Answering Calls . . . . . . . . . . . . . . . . . .23
Options During a Call . . . . . . . . . . . . . . 25
Ending a Call . . . . . . . . . . . . . . . . . . . . 25
Options After a Call Ends . . . . . . . . . . . 25
Emergency Calling . . . . . . . . . . . . . . . . 25
Using Speaker Mode . . . . . . . . . . . . . . 26
Using Pauses . . . . . . . . . . . . . . . . . . . . 26
Using Abbreviated Dialing . . . . . . . . . . 27
Using Contact Match . . . . . . . . . . . . . . 28
Plus (+) Code Dialing . . . . . . . . . . . . . . 28
History . . . . . . . . . . . . . . . . . . . . . . . . . 28
Missed Call Alerts . . . . . . . . . . . . . . . . 29
Section 5: Contacts ........................30
Using the QWERTY Keyboard . . . . . . . . 30
Accessing Contacts . . . . . . . . . . . . . . . 30
Adding Contacts . . . . . . . . . . . . . . . . . 30
Using Contacts . . . . . . . . . . . . . . . . . . 32
Deleting Contacts . . . . . . . . . . . . . . . . 33
Editing Contacts . . . . . . . . . . . . . . . . . 34
Adding Pauses or Waits . . . . . . . . . . . . 36
Secret Contacts . . . . . . . . . . . . . . . . . . 37
Groups . . . . . . . . . . . . . . . . . . . . . . . . 37
Speed Dials . . . . . . . . . . . . . . . . . . . . . 38
My Name Card . . . . . . . . . . . . . . . . . . . 39
Contact History . . . . . . . . . . . . . . . . . . 40
Contacts Settings . . . . . . . . . . . . . . . . 41
Section 6: Entering Text .................42
Using the QWERTY Keyboard . . . . . . . . 42
Choosing a Text Entry Mode . . . . . . . . 42
Using the External Keypad . . . . . . . . . . 45
Text Settings . . . . . . . . . . . . . . . . . . . . 47
1

Section 7: Messaging ....................48
Types of Messages . . . . . . . . . . . . . . . 48
Using the QWERTY Keyboard . . . . . . . . 48
Accessing Messages . . . . . . . . . . . . . . 48
Text and Picture Messages . . . . . . . . . 49
Service Alerts . . . . . . . . . . . . . . . . . . . 50
Email . . . . . . . . . . . . . . . . . . . . . . . . . . 50
Voicemail . . . . . . . . . . . . . . . . . . . . . . 51
Messages Settings . . . . . . . . . . . . . . . 52
Section 8: Multimedia .....................54
My Stuff . . . . . . . . . . . . . . . . . . . . . . . 54
Downloads . . . . . . . . . . . . . . . . . . . . . 54
Media Player . . . . . . . . . . . . . . . . . . . . 54
Web . . . . . . . . . . . . . . . . . . . . . . . . . . 54
Search . . . . . . . . . . . . . . . . . . . . . . . . 55
My Photos + Videos . . . . . . . . . . . . . . 55
Section 9: Tools ..............................60
Alarm . . . . . . . . . . . . . . . . . . . . . . . . . 60
Calendar . . . . . . . . . . . . . . . . . . . . . . . 61
Bluetooth . . . . . . . . . . . . . . . . . . . . . . 65
Mass Storage . . . . . . . . . . . . . . . . . . . 67
Voice Service . . . . . . . . . . . . . . . . . . . 68
Calculator . . . . . . . . . . . . . . . . . . . . . . 69
World Time . . . . . . . . . . . . . . . . . . . . . 71
Memo Pad . . . . . . . . . . . . . . . . . . . . . . 71
Voice Memo . . . . . . . . . . . . . . . . . . . . 72
Section 10: Settings ........................73
Display . . . . . . . . . . . . . . . . . . . . . . . . 73
Volume . . . . . . . . . . . . . . . . . . . . . . . . 77
Ringtones . . . . . . . . . . . . . . . . . . . . . . 78
Auto Key Guard . . . . . . . . . . . . . . . . . . 80
2
Text Entry . . . . . . . . . . . . . . . . . . . . . . 80
Phone Information . . . . . . . . . . . . . . . 81
Lock Phone . . . . . . . . . . . . . . . . . . . . 82
Location . . . . . . . . . . . . . . . . . . . . . . . 82
Parental Controls . . . . . . . . . . . . . . . . 83
Others . . . . . . . . . . . . . . . . . . . . . . . . 89
Section 11: Health and Safety
Information ......................................96
Exposure to Radio Frequency (RF)
Signals . . . . . . . . . . . . . . . . . . . . . . 96
Specific Absorption Rate (SAR)
Certification Information . . . . . . . . 100
FCC Part 15 Information to User . . . . 102
Commercial Mobile Alerting System
(CMAS) . . . . . . . . . . . . . . . . . . . . . 102
Smart Practices While Driving . . . . . . 102
Battery Use and Safety . . . . . . . . . . . 104
Samsung Mobile Products and
Recycling . . . . . . . . . . . . . . . . . . . 105
UL Certified Travel Charger . . . . . . . . 106
Display / Touch-Screen . . . . . . . . . . 107
GPS & AGPS . . . . . . . . . . . . . . . . . . . 107
Emergency Calls . . . . . . . . . . . . . . . . 108
Care and Maintenance . . . . . . . . . . . 109
Responsible Listening . . . . . . . . . . . . 109
Operating Environment . . . . . . . . . . . 111
FCC Hearing Aid Compatibility (HAC)
Regulations for Wireless Devices . 113
Restricting Children's Access to
Your Mobile Device . . . . . . . . . . . . 114
FCC Notice and Cautions . . . . . . . . . 115

Other Important Safety Information . . .115
Section 12: Warranty Information 117
Standard Limited Warranty . . . . . . . . .117
End User License Agreement for
Software . . . . . . . . . . . . . . . . . . . . .121
Section 13: Index ..........................127
3

Section 1: Getting Started
This section allows you to quickly start using
your phone by installing and charging the
battery, activating your service, and setting up
voicemail.
Understanding this User Manual
The sections of this manual generally follow the
features of your phone. A robust index for
features begins on page 127.
Also included is important safety information that
you should know before using your phone. Most
of this information is near the back of the guide,
beginning on page 96.
This manual gives navigation instructions
according to the default display settings. If you
select other settings, navigation may be
different.
Unless otherwise specified, all instructions in this
manual assume that you are starting from the
Main screen, and using the external keys. To get
to the Main screen, you may need to unlock the
phone or keypad.
Note:
Instructions in this manual are based on
default settings, and may vary from your
phone, depending on the software version
on your phone, and any changes to the
phone’s Settings.
Unless stated otherwise, instructions in this
User Manual start with the phone unlocked,
at the Main screen.
All screen images in this manual are
simulated. Actual displays may vary,
depending on the software version of your
phone and any changes to the phone’s
Settings.
4

Special Text
Throughout this manual, you’ll find text that is
set apart from the rest. These are intended to
point out important information, share quick
methods for activating features, to define terms,
and more. The definitions for these methods are
as follows:
•
Notes
: Presents alternative options for the current
feature, menu, or sub-menu.
•
Tips
: Provides quick or innovative methods, or
useful shortcuts.
•
Important
: Points out important information about
the current feature that could affect performance.
•
Warning
: Brings to your attention important
information to prevent loss of data or functionality,
or even prevent damage to your phone.
Text Conventions
This manual provides condensed information
about how to use your phone. To make this
possible, the following text conventions are used
to represent often-used steps:
Highlight Use
on the screen.
Select Use
an item on the screen, then press
the
The Center Select Key function
changes based on the type of
item highlighted.
➔
Arrows are used to represent the
“highlight, then select” steps in
longer, or repetitive, procedures.
For example: “From the Main
screen, press
New
Navigation Keys
to move focus to an item
Navigation Keys
Center Select Key
CONTACTS ➔ Add
➔ New Contact
or
to highlight
or .
.
Getting Started 5

Battery
Your phone is powered by a rechargeable,
standard Li-Ion battery. A USB cable and
Charging Head are included with the phone, for
charging the battery.
Note:
The battery comes partially charged. You
must fully charge the battery before using
your phone for the first time. A fully
discharged battery can require up to 4
hours of charge time. After the first charge,
you can use the phone while charging.
Warning!
Use only Samsung-approved charging
devices and batteries. Samsung
accessories are designed to maximize
battery life. Using other accessories may
invalidate your warranty and may cause
damage.
Battery Indicator
The battery icon in the upper-right corner of the
display shows battery power level . Two to
three minutes before the battery becomes too
low to operate, the empty battery icon will flash
and a tone will sound. If you continue to operate
the phone without charging, the phone will
power off.
Battery Cover
The battery is under a removable cover on the
back of the phone.
Removing the battery cover
Lift the cover at the cover release latch.
Installing the battery cover
Align the cover and press it into place,
making sure it snaps securely all the way
around.
6
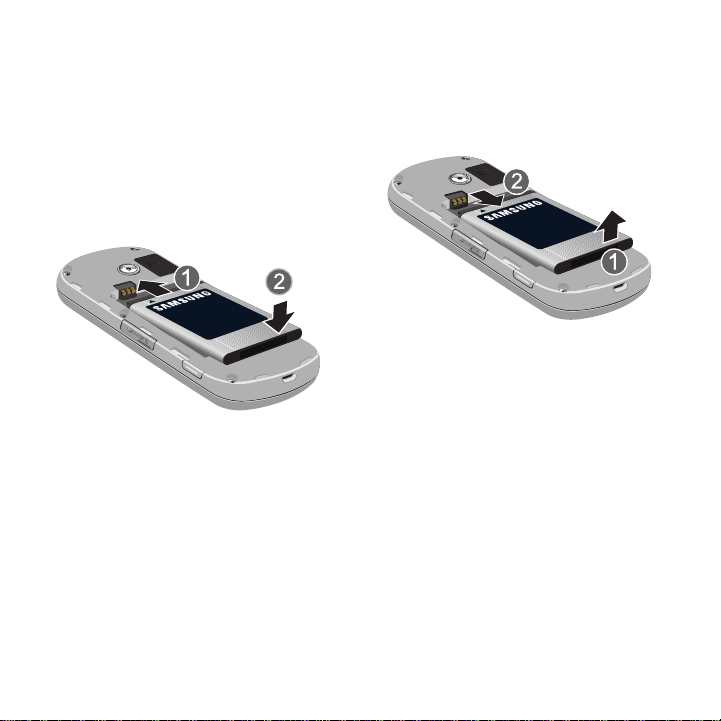
Installing the Battery
1. Remove the battery cover. For more
information, see “Removing the battery
cover” on page 6.
2. Insert the top end of the battery into the
phone housing, aligning the gold contacts
on the battery with the gold contacts in the
phone. Push down on the bottom of the
battery down until it snaps into place.
3. Install the battery cover.
Removing the Battery
1. Remove the battery cover. For more
information, see “Removing the battery
cover” on page 6.
2. Lift the battery up by the slot provided.
3. Lift the battery up and out of the phone.
Getting Started 7

Charging the Battery
Incorrect
Your phone includes a USB Chargr to rapidly
charge your phone from any 120/220 VAC outlet.
Note:
The battery comes partially charged. You
must fully charge the battery before using
your phone for the first time. A fully
discharged battery can require up to 4
hours of charge time. After the first charge,
you can use the phone while charging.
1. Insert the USB cable into the USB port.
2. Plug the charging head into a standard AC
power outlet.
Non-Supported Batteries
Samsung handsets do not support the use of
non-approved batteries.
Important!
Note:
Using a non-supported battery may
damage to your phone.
When using a non-supported battery you will
hear a series of beeps and see a warning
message:
NON-SUPPORTED BATTERY. SEE USER MANUAL
“
If you receive this warning, battery charging has
been disabled.
Samsung charging accessories, such as the
charging head and cigarette lighter adapter, will
only charge Samsung-approved batteries.
When using a non-supported battery, the
phone can only be used for the duration of
the life of the battery and cannot be
recharged.
”
8
Turning Your Phone On and Off
Press and hold the
turn the phone on or off.
END/Power Key
to
TTY Mode
Your phone is fully TTY-compatible, allowing you
to connect a TTY device to the phone’s headset
jack. Before you can use your phone with a TTY
device, you’ll need to enable TTY Mode.
For more information about TTY settings, see
“TTY Options” on page 97.
Voicemail
All unanswered calls to your phone are sent to
voicemail, even if your phone is turned off, so
you’ll want to set up your voicemail and personal
greeting as soon as you activate your phone.
For more information, see “Voicemail” on
page 51.
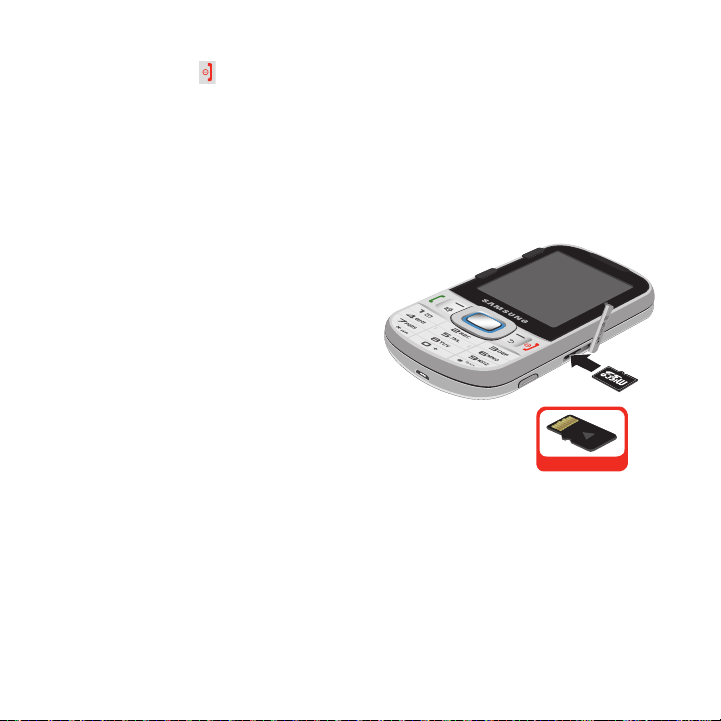
Memory Card
Your phone supports optional, removable
microSD™ and microSDHC™memory cards of
up to 32GB capacity (not included). You can store
music, pictures, and other files on a memory
card.
Installing a Memory Card
1. Pull the memory card cover out and turn it
to expose the card slot.
Incorrect
2. Slide the memory card into the slot,
pushing gently until it locks into place.
Removing a Memory Card
1. Pull the memory card cover out and turn it
to expose the memory card in the card
slot.
2. Press on the memory card to release the
lock, then remove the card.
Getting Started 9

Section 2: Understanding Your Phone
•
Features of Your Phone
•
High Speed Data (1x Technology)
•
Full slide-out QWERTY keyboard
•
2.4” QVGA color display
•
Global Positioning (GPS) Technology
•
Personal Productivity Tools
–
Alarm
–
Calendar
–
Bluetooth
–
Calculator
–
World Time
–
Memo Pad
–
Voice Memo
•
Messaging
–
Tex t
–
Picture
–
Video
–
Voice
–
Email
–
Emergency Alerts
2 Megapixel Camera
•
Voice Service, for no-training voice-activated dialing
and other features
•
Speaker, for hands-free conversations
•
Memory Card slot, for optional microSD™ and
microSDHC™ cards up to 32GB capacity, not
included
10
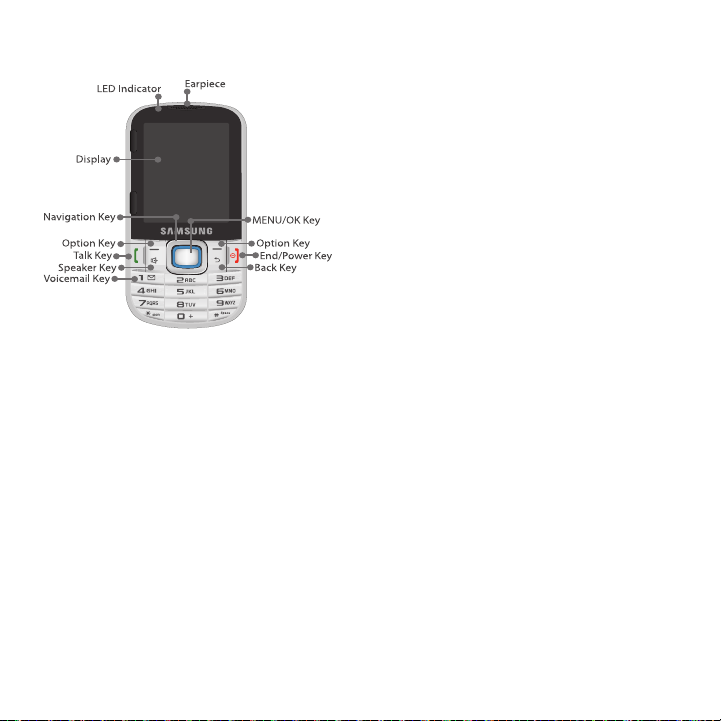
Front View
Features
•
LED Indicator
blinks for new notifications.
•
Display
phone.
•
Navigation Key
scroll through menus or lists. From the Main screen,
each direction also acts as a shortcut to an
application.
•
Option Key
the bottom left of the display.
•
Talk Key
Main screen, press to access Recent History.
: Glows to indicate charging status, or
: Displays information to operate your
: Press Up, Down, Left or Right to
: Press to select the item displayed at
: Press to place or receive a call. From the
•
Speaker Key
speakerphone.
•
Voicemail Key
•
Back Key
display. Press to return to the previous menu or
screen.
•
End/Power Key
to power the phone On or Off. Press to send an
incoming call directly to voicemail. When
navigating, press to return to the Main screen.
•
Option Key
the bottom right of the display.
•
MENU/OK Key
access the Menu. When browsing menus, press to
select the highlighted item.
•
Earpiece
: Press to enable/disable
: Press and hold to access voicemail.
: Press to delete characters from the
: Press to end a call. Press and hold
: Press to select the item displayed at
: From the Main screen, press to
: Plays call audio and prompts.
Understanding Your Phone 11

Side Views
Features
•
Memory Card Slot
memory card (not included) to add additional
storage capacity.
•
Camera Key
Camera, or press and hold to launch Camcorder.
While in Camera mode, press to take a picture.
While in Camcorder mode, press to record video, or
press and hold to toggle to Camera mode.
•
Strap attachment
•
Volume Key
Master Volume. Press to adjust voice volume during
calls, adjust audio volume, or mute an incoming call
ringtone.
•
USB Port
sync music and files.
: Insert an optional microSD
: From the Main screen, press to launch
: Attach a strap (not included).
: From the Main screen, press to adjust
: Plug in a USB cable for charging or to
12
Open View
Features
•
Option Keys
above the key.
•
Navigation Keys
scroll through menus, or to move the insertion point.
•
MENU/OK Key
access the Menu. When browsing menus, press to
select the highlighted item.
•
Back Key
characters. Press to return to the previous menu or
screen.
: Press to select the item displayed
: Press Up, Down, Left or Right to
: From the Main screen, press to
: When entering text, press to delete
Back View
Features
•
3.5mm Headset Jack
(not included) for conversations or music playback.
•
Camera
: Used to take pictures.
•
Speaker
: Plays music, ringtones and sounds, plus
call audio when using Speakerphone.
: Plug in an optional headset
Understanding Your Phone 13
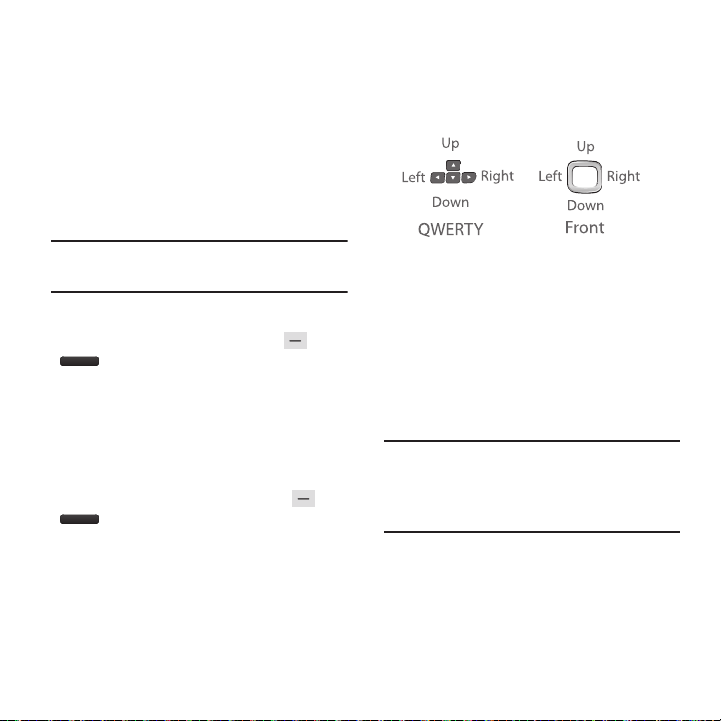
Command Keys
Option Keys
The Left and Right Option Keys are defined by
what appears above them, in the bottom line of
the display.
Your phone has two sets of option keys, on the
front of the phone for use when the phone is
closed, or on the side and QWERTY keyboard for
use when the phone is open.
Tip:
When the phone is open, you can use any
option keys.
Left Option Key
Some functions of the
are:
•
From the Main screen, press
the Messaging menu.
•
When the
Left Option Key
item or field.
Right Option Key
Some functions of the
are:
•
From the Main screen, press
your Contacts list.
•
When the
Right Option Key
choose options for the current item.
Left Option Key
MESSAGES
is
EDIT
, press to edit the
Right Option Key
CONTACTS
is
OPTIONS
or
to open
or
to open
, press to
Navigation Keys
Press the
Navigation Key Up, Down, Left
to browse menus and lists, or to launch
applications from the Main screen.
Navigation Key Shortcuts
From the Main screen, press a
Down, Left
application:
•
•
•
•
Tip:
or
Right
to launch the corresponding
Up
: Send Message
Down
: My Stuff
Left
: Web
Right
: Alarm
Customize
your favorite applications. For more
information, see “Navigation Keys” on
page 98.
Navigation Key
Navigation Key Up
shortcuts to launch
or
Right
,
14

Function Keys
End/Power Key
Use the
the phone on or off, and to return to a previous
menu. For example:
•
phone on or off.
•
•
screen from any menu, or to cancel the last input.
•
to Voicemail.
Talk Key
Use the
and to recall the last number(s) dialed, received,
or missed. For example:
•
•
call.
•
a list of all calls to and from your phone.
•
to launch Voice Service.
End/Power Key
Press and hold the
Press the
Press the
Press the
Press the
Enter a number and press the
Press the
Press and hold the
End/Power Key
End/Power Key
End/Power Key
End/Power Key
Tal k Key
Tal k Key
Tal k Key
to disconnect a call.
to return to the Main
to send an incoming call
to answer calls, dial calls,
to answer calls.
from the Main screen to display
Tal k Key
to end calls, to turn
to turn your
Tal k Key
to make a
from the Main screen
MENU/OK Key
Some functions of the
are:
•
From the Main screen, press the
open the Menu.
•
When browsing menus or options, press the
to select the highlighted option.
OK Key
MENU/OK Key
MENU/OK Key
Camera Key
Use the
the phone for Camera functions:
•
From the Main screen, press and hold the
to launch the Camera.
Key
•
While in Camera mode, press the
take a photo.
•
While in Camcorder mode, press the
record video.
Camera Key
on the right side of
Camera Key
or
MENU/
Camera
Camera Key
to
to
to
Understanding Your Phone 15
Volume Key
Use the
volume:
•
From the Main screen, press the
adjust Master Volume.
•
During calls, press the
volume.
•
During music playback, press the
adjust audio volume.
•
Press the
incoming call.
Volume Key
Volume Key
to adjust
Volume Key
Volume Key
to mute the ringtone of an
to adjust voice
Volume Key
Speakerphone Key
Press the
the earpiece and the speakerphone, before or
during a call.
Speaker Key
to switch between
Back Key
Press the
Back Key or , to erase or clear
characters when entering text, or to return to a
previous menu or step.
to
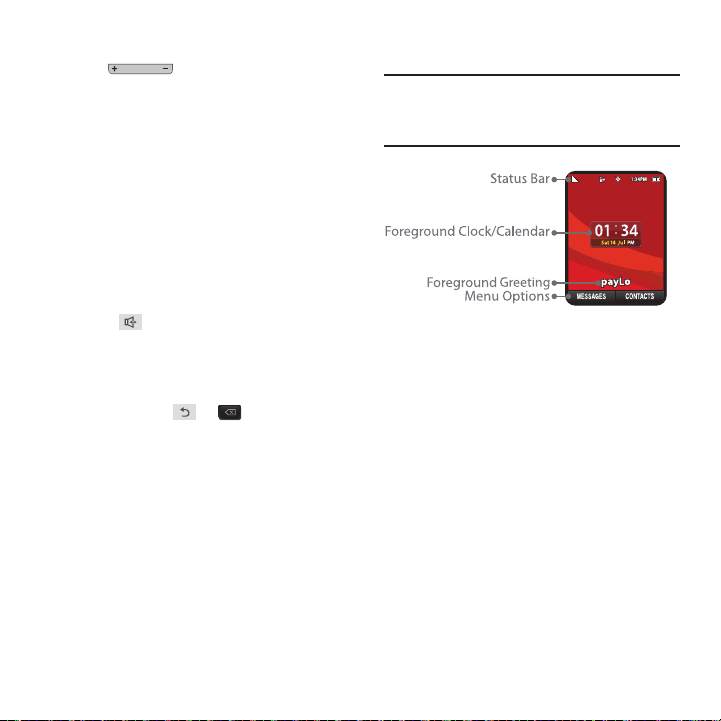
Main Screen
Note:
Unless stated otherwise, instructions in this
User Manual start with the phone unlocked,
at the Main screen.
to
Features
•
Status Bar
battery power, and connection details. For a list, see
“Status Bar Icons”
•
Foregrounds
Scheduler information, or a default or personalized
greeting. For more information, see
on page 76.
•
Options
the screen.
Customizing the Main screen
Customize the Main screen by selecting
wallpaper and foregrounds. For more
information, see “Display” on page 73.
: Presents icons to show network status,
on page 17.
: Displays Clock, Calendar, or
“Foreground”
: Presents options for the option keys below
16

Status Bar Icons
Icons display in the top line of the screen to
show the phone’s status.
Common icons are listed here. For a list of all
icons, see the Icon Glossary. From the Main
screen, press the
Tools+Settings
Icon Glossary
➔
➔
.
MENU/OK Key
Settings
➔
➔
Phone Information
Status Bar - Message Icons
Text Message
Picture Mail Message
messages.
Message
: New text message(s).
: New Urgent messages.
: New picture mail
Status Bar - Service Icons
Signal Strength
strength. (More bars = stronger
signal.)
No Service
available.
1x Data Status
available. When active, the icon is
animated.
1x Data Sending
transmitting data.
1x Data Receiving
receiving data.
1x Data Dormant
dormant.
: No usable signal is
: Current signal
: 1xRTT data service
: 1xRTT data service
: 1xRTT data service
: Data service
Voicemail
: New voicemail message(s).
Multiple Alerts
messages.
Missed Picture Mail Message
Picture mail message(s).
Missed Text Message
message(s).
Missed Voicemail Message
voicemail message(s).
Locked Message
and cannot be deleted.
Status Bar – Status Icons
Battery Strength
(Icon shown is fully charged.)
Low battery
low.
Understanding Your Phone 17
: You have multiple alert
: New
: New unread text
: New
: Message is locked
: Battery charge level.
: Battery charge level is
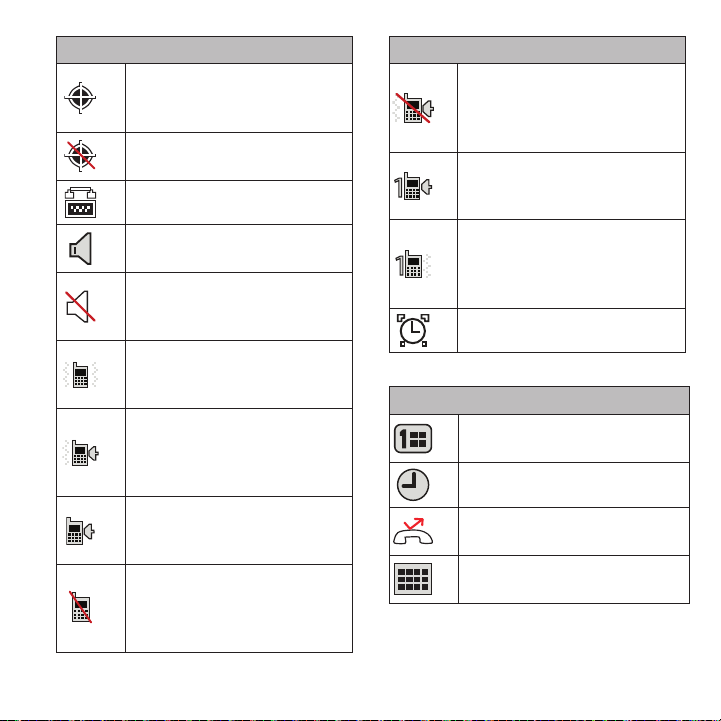
Status Bar – Status Icons
Location On
available for location-based services
such as GPS Navigation.
Location Off
Your location is available only for 911.
TTY
: TTY mode is active.
Speakerphone Enabled
feature is On.
Silence All
Silence all. No sounds, or vibrate, play
for incoming calls or alerts.
Vibrate All
: Ringtone Volume set to
Vibrate All. The phone vibrates for
incoming calls or alerts.
Ringtone and Vibrate
Volume are set and the Vibrate option
is on. The phone plays the ringtone and
vibrates for incoming calls and alerts.
Ringtone
: Ringtone and Volume are set
for incoming calls. The phone plays the
ringtone for incoming calls and alerts.
Ringtone Off
off and vibrate mode is off. No sounds
or vibrations for incoming calls and
alerts.
: Location is on and
: Location feature is off.
: Speakerphone
: Ringtone Volume set to
: Ringtone and
: Ringtone Volume turned
Status Bar – Status Icons
Ringtone Off and Vibrate
Volume set to Ringtone Off, Always
Vibrate On. The phone will vibrate for
incoming calls and alerts.
1 Beep
: Ringtone Volume set to Beep.
The phone beeps for incoming calls
and alerts.
1 Beep and Vibrate
set to Beep, and Vibrate All is on. The
phone beep and vibrate for incoming
calls and alerts.
Alarm
: Alarm set.
Status Bar - Other Icons
Missed Scheduler
start time has passed.
Missed Alarm
Missed Call Alert
alert.
Calendar Event
scheduled.
: Ringtone
: Ringtone Volume
: Scheduled event
: Alarm has passed.
: You have missed a call
: You have an event
18

Understanding the Menu
The Menu is the starting point for launching
applications and features. To access the Menu:
From the Main screen, press the
MENU/OK Key
Menu Items
Menu Items
My Stuff
phone, including ringtones, screen
savers, and photos.
My Account
account.
My Photos+Videos
pictures and videos on your phone.
Downloads
you downloaded from the Web.
Messages
messages, and view and manage
messages you receive.
Contacts
your contacts.
Web
.
: Manage your content on the
: Access your Virgin Mobile
: View and manage
: View and manage content
: Create and send
: Enter, view and manage
: Browse the Web.
Menu Items
Media Player
media content on your phone.
Search
Tools+Settings
to your preferences, and access tools.
History
dialed, missed, or received.
: View and manage
: Search the Internet.
: Configure your phone
: View and manage calls you
Missed Alerts
new messages, or missed calls.
: View alerts for events,
Understanding Your Phone 19

Section 3: My Account
Before using your device, you must activate your
service with payLo by Virgin Mobile. You will
need your phone’s serial number, printed on a
sticker inside the battery compartment.
Create your Account and Pick Your Plan
1. From your computer web browser,
navigate to
click on
2. When prompted, enter the
(MEID)
battery compartment.
3. Follow the on-screen instructions to
choose your plan and select a payment
method.
4. You must follow the
instructions (below) after creating your
plan in order to start using your phone.
www.virginmobileusa.com
Activate
.
serial number
printed on a sticker inside the
Activating Your Device
and
Activating Your Device
1. From the Main screen, press the
MENU/OK Key
Settings
Activation
2. Press
When you finish the process, make a phone call
to confirm your activation. If the phone is still not
activated or you do not have access to the
Internet, contact payLo by Virgin Mobile
Customer Service at
assistance.
YES
prompts to complete activation.
➔
Tools+Settings
➔
Phone Information
.
to activate the device. Follow the
1-888-322-1122
Additional Information
For more information about your payLo by
Virgin Mobile account, as well as other payLo
by Virgin Mobile services, visit us at:
www.virginmobileusa.com
Or, call payLo by Virgin Mobile Customer Service:
1-888-322-1122
.
.
➔
➔
for
20

Managing Your Account
From the Phone
Manage your payLo by Virgin Mobile account
from your phone. You can:
•
Check your minutes
•
Add money (Top-Ups)
•
Change plans, plus a lot more...
For more information about your account, go to
www.virginmobileusa.com
Check your Balance
To check your payLo by Virgin Mobile account
balance from your phone:
From the Main screen, press the
MENU/OK Key
Balance + Usage
.
➔
.
My Account
➔
Top-Up Your Account
When your balance is low, Top-Up is how you
add money to your payLo by Virgin Mobile
account balance. You can Top-Up your payLo by
Virgin Mobile account right from your phone.
First, buy a Top-Up card at one of the thousands
of retailers that carry them, or register your debit
card, credit card, or PayPal account at:
www.virginmobileusa.com
1. Buy a Top-Up card from any available
retailer.
2. From the Main screen, press the
MENU/OK Key
.
Up
3. Follow the prompts to enter payment
information and complete the process.
.
➔
My Account
➔
Top -
From a Computer Web Browser
Log in with your phone number and account
PIN at:
www.virginmobileusa.com
My Account 21

Section 4: Calling
Displaying Your Phone Number
Display the phone number assigned to your
phone, and other information about your phone.
From the Main screen, press the
MENU/OK Key
Settings
Number
.
➔
➔
Phone Information
Tools+Settings
➔
➔
My
Making Calls
Your phone offers multiple ways to make calls.
Making Calls Using the Keypad
Enter the phone number on the keypad,
the
Talk Key
then press
Making Calls Using Speed Dials
Use speed dials to make dialing easier.
For more information, see “Making Calls using
Speed Dials” on page 39.
Making Calls from Contacts
Call a contact from Contacts.
For more information, see “Making Calls using
Contacts” on page 32.
Making Calls from History
Return a call, or call a recent caller from History.
For more information, see “Making Calls using
History” on page 29.
.
22

Dialing Options
When dialing, you can use these options:
•
Press
SEND MESSAGE
number.
•
Press
OPTIONS
–
Save
: Save the number to Contacts, to create or
update a contact.
–
Hard Pause: Add a hard pause in the phone
number string, to pause dialing to wait for your
action.
–
2-Sec Pause
number string, to pause dialing before continuing.
Tip:
Pauses can be useful when dialing automated
phone menus, where you might need to press
keys to enter passwords or other inputs.
You can also add pauses to numbers you save
as contacts, to make routine calling easier.
For more information, see “Using Pauses” on
page 26.
to send a message to the
for dialing options:
: Add a 2-second pause in the phone
Answering Calls
The phone alerts you to incoming calls.
Depending on the phone’s status, your settings,
and the type of call, you may see:
•
Playing the ringtone and/or vibrating.
•
Flashing the LED indicator.
•
Illuminating the backlight.
•
Displaying an incoming call message. If the call is
from a number stored in Contacts, the name
displays. You may also see the caller’s phone
number, if available based on their preferences.
To answer a call
•
Press the TALK Key
•
Answer
is highlighted automatically. Press the
OK/Menu Key
•
Open the phone to answer in Speaker mode.
Tip:
These are default answer options. You can
choose other options for answering calls. For
more information, see “Call Answer” on
page 90.
.
to select it.
Calling 23

Muting an Incoming Call Ringtone
When an incoming call’s ringtone plays, you can
quickly mute the ringtone.
Use the Navigation Key
Silent
, then press the
– or –
Volume Key
Press the
OK/Menu Key
.
to highlight
.
Sending Calls to Voicemail
When an incoming call’s ringtone plays, you can
send the call directly to Voicemail.
Use the
Navigation Key
, then press the
VoiceMail
.
Key
– or –
Press the
to select
END/Power Key
Send to
OK/Menu
.
Ignoring Calls
Ignoring a call sends the caller a text message
and takes them to VoiceMail.
1. Use the
2. Create a text message and send it to the
Navigation Key
Tex t
, then press the
caller. For more information, see “Sending
Messages” on page 49.
to select
Ignore with
OK/Menu Key
.
Answering calls while on a call
During a call, if a new call is incoming, your
phone will alert you. You can choose to answer
the new call, or ignore it to send the caller to
voicemail.
When you answer the new call, the first call is
put on hold, and both calls display on the screen.
TALK Key
Press the
To answer a new call while on a call
•
Press
ANSWER
answer the new call.
•
Press
IGNORE
to switch between calls.
to put the first call on hold and
to send the new call to voicemail.
24

Options During a Call
During a call, press an option key for these
options:
•
Press
MUTE
to mute the Microphone, so the other
party cannot hear your voice.
•
Press
OPTIONS
for these options:
–
Save
: Save the other party’s number to Contacts
as a new contact or to update an existing contact.
–
Contacts
: Launch Contacts. For more information,
“Contacts”
see
–
Voice Memo
information, see
–
Phone Info
For more information, see
on page 81.
–
Key Mute/Key Unmute
sound setting. Muting the keys prevents
unintentional key presses from playing during a
call.
–
Messages
information, see
–
Recent History
information, see
–
Tools
: Launch the Tools menu. For more
information, see
on page 30.
: Record the call audio. For more
“Voice Memo”
: View information about your phone.
: Open the Messaging menu. For more
“Messaging”
: View recent call records. For more
“History”
“Tools”
on page 72.
“Phone Information”
: Override the Key Beeps
on page 48.
on page 28.
on page 60.
Ending a Call
Press the END/Power Key
Options After a Call Ends
After a call, press an option key for options:
•
Press
addressed to the other party.
•
Press
–
New Group
–
Save
as a new contact or to update an existing contact.
–
Delete
–
Delete All
History.
Note:
End-of-Call options do not display for calls
identified as No ID or Restricted.
SEND MSG
OPTIONS
to create a new message,
for these options:
: Create a new group.
: Save the other party’s number to Contacts
: Delete the call record from Recent History.
: Delete all call records from Recent
Emergency Calling
You can make emergency calls, including calls to
911, from your phone even if the phone is locked
or your account is restricted.
When you place an emergency call, the phone
automatically goes into emergency mode. While
in emergency mode, you have specific options.
To exit Emergency mode
Press * # until the phone exits Emergency
mode.
:
.
Calling 25

Enhanced 911 (E911) Information
This phone features an embedded Global
Positioning System (GPS) chip necessary for
utilizing E911 emergency location services,
where available.
When you place an emergency call, your phone’s
GPS feature attempts to calculate your
approximate location. Depending on several
variables, including availability and access to
satellite signals, it may take 30 seconds or more
to determine and report your approximate
location.
Important!
Be prepared to report your location to
the 911 operator when placing an
emergency call. Some emergency call
takers, known as Public Safety
Answering Points (PSAPs) may not be
equipped to receive GPS location
information from your phone.
Using Speaker Mode
Use Speaker mode to talk hands-free, or to share
a call with others.
During a call, press the Speaker Key
to turn Speakerphone On or Off.
Caution!
Due to increased volume, do not place
the phone near your ear when the
Speaker is On.
Using Pauses
You can dial or save phone numbers with pauses
for use with automated systems, such as
voicemail or credit card billing numbers.
When you save a number with pauses, you can
also save the key presses to navigate a menu,
separated by pauses, to automate dialing.
You can combine multiple pauses in a number
and combine two-second and hard pauses.
There are two types of pauses:
•
Hard Pause
action from you. When you press the
dialing continues. Places “p” in the number to
indicate the pause.
•
2-Second Pause
two seconds, then automatically dials the next set of
numbers Places “t” in the number record to indicate
the pause.
: Stops the dialing sequence, to wait for
TALK K ey
: Stops the dialing sequence for
,
26
 Loading...