

Samsung SM-V700VZWAXAR, SM-V700VZOAXAR, SM-V700VZKAXAR, SM-V700VZGAXAR, SM-V700VZAAXAR User Manual
...
MOBILE DEVICE
User Manual
Please read this manual before operating your
device and keep it for future reference.

Warning!
This product contains chemicals known to the State of California to cause cancer, birth defects, or other reproductive
harm. For more information, please call 1-800-SAMSUNG (726-7864).
Intellectual Property
All Intellectual Property, as defined below, owned by or which is otherwise the property of Samsung or its respective suppliers
relating to the SAMSUNG Phone, including but not limited to, accessories, parts, or software relating there to (the “Phone
System”), is proprietary to Samsung and protected under federal laws, state laws, and international treaty provisions. Intellectual
Property includes, but is not limited to, inventions (patentable or unpatentable), patents, trade secrets, copyrights, software,
computer programs, and related documentation and other works of authorship. You may not infringe or otherwise violate the
rights secured by the Intellectual Property. Moreover, you agree that you will not (and will not attempt to) modify, prepare
derivative works of, reverse engineer, decompile, disassemble, or otherwise attempt to create source code from the software. No
title to or ownership in the Intellectual Property is transferred to you. All applicable rights of the Intellectual Property shall remain
with SAMSUNG and its suppliers.
Open Source Software
Some software components of this product incorporate source code covered under GNU General Public License (GPL), GNU Lesser
General Public License (LGPL), OpenSSL License, BSD License and other open source licenses. To obtain the source code covered
under the open source licenses, please visit:
WEA_V700_EN_UM_TN_MK7_082516_FINAL
opensource.samsung.com
.

Disclaimer of Warranties; Exclusion of Liability
EXCEPT AS SET FORTH IN THE EXPRESS WARRANTY CONTAINED ON THE WARRANTY PAGE ENCLOSED WITH THE PRODUCT, THE
PURCHASER TAKES THE PRODUCT “AS IS”, AND SAMSUNG MAKES NO EXPRESS OR IMPLIED WARRANTY OF ANY KIND
WHATSOEVER WITH RESPECT TO THE PRODUCT, INCLUDING BUT NOT LIMITED TO THE MERCHANTABILITY OF THE PRODUCT OR
ITS FITNESS FOR ANY PARTICULAR PURPOSE OR USE; THE DESIGN, CONDITION OR QUALITY OF THE PRODUCT; THE
PERFORMANCE OF THE PRODUCT; THE WORKMANSHIP OF THE PRODUCT OR THE COMPONENTS CONTAINED THEREIN; OR
COMPLIANCE OF THE PRODUCT WITH THE REQUIREMENTS OF ANY LAW, RULE, SPECIFICATION OR CONTRACT PERTAINING
THERETO. NOTHING CONTAINED IN THE INSTRUCTION MANUAL SHALL BE CONSTRUED TO CREATE AN EXPRESS OR IMPLIED
WARRANTY OF ANY KIND WHATSOEVER WITH RESPECT TO THE PRODUCT. IN ADDITION, SAMSUNG SHALL NOT BE LIABLE FOR
ANY DAMAGES OF ANY KIND RESULTING FROM THE PURCHASE OR USE OF THE PRODUCT OR ARISING FROM THE BREACH OF
THE EXPRESS WARRANTY, INCLUDING INCIDENTAL, SPECIAL OR CONSEQUENTIAL DAMAGES, OR LOSS OF ANTICIPATED PROFITS
OR BENEFITS.
Modification of Software
SAMSUNG IS NOT LIABLE FOR PERFORMANCE ISSUES OR INCOMPATIBILITIES CAUSED BY YOUR EDITING OF REGISTRY SETTINGS,
OR YOUR MODIFICATION OF OPERATING SYSTEM SOFTWARE.
USING CUSTOM OPERATING SYSTEM SOFTWARE MAY CAUSE YOUR DEVICE AND APPLICATIONS TO WORK IMPROPERLY. YOUR
CARRIER MAY NOT PERMIT USERS TO DOWNLOAD CERTAIN SOFTWARE, SUCH AS CUSTOM OS.

Samsung Electronics America (SEA), Inc.
Address
:
85 Challenger Road
Ridgefield Park,
New Jersey 07660
Phone
:
1-800-SAMSUNG (726-7864)
Internet Address
samsung.com
©
2016 Samsung Electronics America, Inc. Samsung, Samsung Galaxy, Gear, S Voice, and S Health are all registered trademarks
of Samsung Electronics Co., Ltd.
Other marks are the property of their respective owners.
Note:
Screen images are simulated. Appearance of device may vary.
:

Do you have questions about your Samsung Mobile Device?
For 24 hour information and assistance, we offer a new FAQ/ARS System (Automated Response System) at:
samsung.com/us/support
The actual available capacity of the internal memory is less than the specified capacity because the operating system and default
applications occupy part of the memory. The available capacity may change when you upgrade the device.
Legal Information
Important legal information can be accessed at
samsung.com
Samsung Limited Warranty
Samsung Limited Warranty - This product is covered under the applicable Samsung Limited Warranty INCLUDING ITS DISPUTE
RESOLUTION PROCEDURE and your right to opt out of arbitration within 30 calendar days of the first consumer purchase.
You may opt out by either sending an email to
calling 1-800-SAMSUNG (726-7864). For more detailed procedures, please refer to the “Dispute Resolution Procedures and
Arbitration and Opt-Out” section of the Limited Warranty.
The EULA for this device is found in the Gear Manager application, which is required for operation of your device.
You may also access this EULA at:
vice can be found at:
optout@sea.samsung.com
samsung.com/us/Legal/SamsungLegal-EULAGEAR
with the subject line “Arbitration Opt-Out” or by

Table of Contents
Section 1: Getting Started ...........................4
Understanding this User Manual . . . . . . . . . . . . 4
Setting Up Your Device . . . . . . . . . . . . . . . . . . . 6
Turning Your Device On and Off . . . . . . . . . . . . . 9
Checking the battery charge status . . . . . . . . .10
Installing Gear Manager . . . . . . . . . . . . . . . . . .10
Launching Gear Manager . . . . . . . . . . . . . . . . 11
Pairing the Devices Automatically . . . . . . . . . . 11
Pairing the Devices Manually . . . . . . . . . . . . . . 12
Disconnecting the Devices . . . . . . . . . . . . . . .14
Wearing the Device . . . . . . . . . . . . . . . . . . . . .14
Removing the Device . . . . . . . . . . . . . . . . . . . . 15
Section 2: Understanding Your Device .....16
Features of Your Device . . . . . . . . . . . . . . . . . . 16
Front and Back Views . . . . . . . . . . . . . . . . . . . 16
Side View . . . . . . . . . . . . . . . . . . . . . . . . . . . . 18
Charging Cradle Views . . . . . . . . . . . . . . . . . .19
On-Screen Indicators . . . . . . . . . . . . . . . . . . . . 20
Navigation and Gestures . . . . . . . . . . . . . . . . . 21
1
Configuring your Device . . . . . . . . . . . . . . . . . .22
Section 3: Understanding the
Gear Manager ...........................................24
Overview . . . . . . . . . . . . . . . . . . . . . . . . . . . . . 24
Launching Gear Manager . . . . . . . . . . . . . . . . .25
Working with a Paired Gear . . . . . . . . . . . . . . .25
Clocks . . . . . . . . . . . . . . . . . . . . . . . . . . . . . . . 27
My Apps . . . . . . . . . . . . . . . . . . . . . . . . . . . . . 28
Using the Favorites Tab . . . . . . . . . . . . . . . . . .28
Adjusting the Settings of Installed Apps . . . . . .29
Installing Featured Applications . . . . . . . . . . . .30
Samsung Apps . . . . . . . . . . . . . . . . . . . . . . . .30
Finding Your Galaxy Gear . . . . . . . . . . . . . . . . .31
Using Notifications . . . . . . . . . . . . . . . . . . . . . . 31
Gear Manager Settings . . . . . . . . . . . . . . . . . .32
Help . . . . . . . . . . . . . . . . . . . . . . . . . . . . . . . . .33
Section 4: Calling Features ....................... 34
Making a Call . . . . . . . . . . . . . . . . . . . . . . . . .34
Ending a Call . . . . . . . . . . . . . . . . . . . . . . . . . .34

Answering a Call . . . . . . . . . . . . . . . . . . . . . . 34
Making a Call Using Logs . . . . . . . . . . . . . . . . 35
Sending a Call to the Device . . . . . . . . . . . . . . 35
Sending a Call to the Galaxy Gear . . . . . . . . . . 35
In Call Options . . . . . . . . . . . . . . . . . . . . . . . . 35
Active Call Menu Options . . . . . . . . . . . . . . . . 36
Logs Tab . . . . . . . . . . . . . . . . . . . . . . . . . . . . 37
Section 5: Applications ............................ 38
Accessing Applications . . . . . . . . . . . . . . . . . 38
Camera . . . . . . . . . . . . . . . . . . . . . . . . . . . . . 38
Contacts . . . . . . . . . . . . . . . . . . . . . . . . . . . . 40
Dialer . . . . . . . . . . . . . . . . . . . . . . . . . . . . . . . 41
Find my device . . . . . . . . . . . . . . . . . . . . . . . 41
Gallery . . . . . . . . . . . . . . . . . . . . . . . . . . . . . . 41
Logs . . . . . . . . . . . . . . . . . . . . . . . . . . . . . . . 41
Media Controller . . . . . . . . . . . . . . . . . . . . . . 42
Pedometer . . . . . . . . . . . . . . . . . . . . . . . . . . . 43
S Voice . . . . . . . . . . . . . . . . . . . . . . . . . . . . . 45
Settings . . . . . . . . . . . . . . . . . . . . . . . . . . . . . 46
Stopwatch . . . . . . . . . . . . . . . . . . . . . . . . . . . 46
Timer . . . . . . . . . . . . . . . . . . . . . . . . . . . . . . . 46
Today’s Schedule . . . . . . . . . . . . . . . . . . . . . . 47
Voice Memo . . . . . . . . . . . . . . . . . . . . . . . . . . 47
Weather . . . . . . . . . . . . . . . . . . . . . . . . . . . . . 47
Section 6: Settings ....................................48
Turning on Outdoor Mode . . . . . . . . . . . . . . . . 48
Accessing the Settings Menu . . . . . . . . . . . . . 48
Clock . . . . . . . . . . . . . . . . . . . . . . . . . . . . . . . 48
Sound Settings . . . . . . . . . . . . . . . . . . . . . . . . 49
Volume . . . . . . . . . . . . . . . . . . . . . . . . . . . . . . 49
Display . . . . . . . . . . . . . . . . . . . . . . . . . . . . . . 50
Battery . . . . . . . . . . . . . . . . . . . . . . . . . . . . . . 50
Bluetooth . . . . . . . . . . . . . . . . . . . . . . . . . . . . 51
Motions . . . . . . . . . . . . . . . . . . . . . . . . . . . . . 52
Privacy Lock . . . . . . . . . . . . . . . . . . . . . . . . . . 52
Language . . . . . . . . . . . . . . . . . . . . . . . . . . . . 53
Reset Gear . . . . . . . . . . . . . . . . . . . . . . . . . . . 53
Gear Info . . . . . . . . . . . . . . . . . . . . . . . . . . . . 53
Section 7: Health and Safety
Information ................................................54
FCC Part 15 Information to User . . . . . . . . . . . 54
Smart Practices While Driving . . . . . . . . . . . . 54
Battery Use and Safety . . . . . . . . . . . . . . . . . . 55
Samsung Mobile Products and Recycling . . . . 57
2

UL Certified Travel Charger . . . . . . . . . . . . . . . 57
Display / Touch-Screen . . . . . . . . . . . . . . . . . . 58
GPS . . . . . . . . . . . . . . . . . . . . . . . . . . . . . . . . . 58
Care and Maintenance . . . . . . . . . . . . . . . . . . 59
Responsible Listening . . . . . . . . . . . . . . . . . . . 60
Operating Environment . . . . . . . . . . . . . . . . . . 62
Restricting Children's Access to Your
Mobile Device . . . . . . . . . . . . . . . . . . . . . . . 64
FCC Notice and Cautions . . . . . . . . . . . . . . . . . 64
Other Important Safety Information . . . . . . . . . 65
Section 8: Warranty Information ..............67
Standard Limited Warranty . . . . . . . . . . . . . . . 67
End User License Agreement for Software . . . . 72
3

Section 1: Getting Started
Understanding this User Manual
The sections of this manual are laid out to assist you with
your setup and follow the UI features of your Galaxy Gear™.
A robust index for features begins on page 79.
Also included is important safety information, beginning on
page 54, that you should know before using your device.
This manual gives navigation instructions according to the
default display settings.
Unless otherwise specified, all instructions in this manual
assume you are starting from the Home (Clock) screen.
For a list of compatible smartphones, please visit:
samsung.com/us/galaxygearsupport
.
Note:
Instructions in this manual are based on default settings,
and may vary from your device, depending on the
software version on your device, and any changes to the
device’s Settings.
Unless stated otherwise, instructions in this User Manual
start with the device at the Home screen.
All screen images in this manual are simulated. Actual
displays may vary, depending on the software version of
your device and any changes to the device’s firmware.
Getting Started 4

Special Text
Throughout this manual, you’ll find text that is set apart from
the rest. These are intended to point out important
information, share quick methods for activating features, to
define terms, and more. The definitions for these methods
are as follows:
•
Caution
: Provides information for the user to take care and avoid
danger or risk.
•
Important
: Points out important information about the current
feature that could affect performance.
•
Notes
: Presents alternative options for the current feature, menu,
or sub-menu.
•
Tips
: Provides quick or innovative methods, or useful shortcuts.
•
Warning
: Brings to your attention important information to
prevent loss of data or functionality, or even prevent damage to
your device.
5
Text Conventions
This manual provides condensed information about how to
use your phone. To make this possible, the following text
conventions are used to represent often-used steps:
➔ Arrows are used to represent the sequence of
selecting successive options in longer, or repetitive,
procedures.
Note:
From the Home (Clock) screen, slide left or right to
select (
Apps) ➔ Dialer
.
Setting Up Your Device
Charging Pins
These steps take you through an out-of-the-box setup
process. These procedures are intended to help you get your
device setup, activated, and assist you with your initial
connection.
Charging the Battery
Your device is powered by an internal rechargeable Li-ion
battery. Use only approved chargers with this device. Ask
your local Samsung dealer for further details.
Important!
Note:
Note:
It is recommended you fully charge the battery
before using your device for the first time.
If the battery is completely discharged, the device
cannot be turned on. Allow a depleted battery to charge
for a few minutes before turning on the device.
Make sure the Gear's microphone is not obstructed
when you are speaking into it while charging.
Warning!
Do not allow children or animals to chew or suck the
device. Do not disassemble, modify, or repair your
device. Magnetic stripe cards, including credit cards,
phone cards, passbooks, and boarding passes, may
be damaged by magnetic fields.
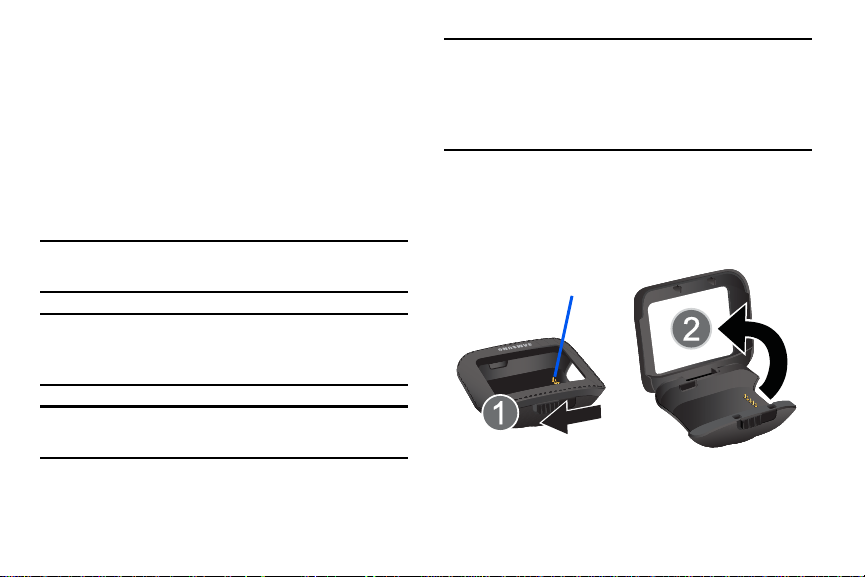
1. Before turning on your Galaxy Gear for the first time,
charge it fully.
2. In a single motion, slide and hold the switch (1) to open
the Charging cradle’s protective cover. (2)
Getting Started 6

3. Carefully place the device onto the cradle (3), making
USB Connector
Power Plug
Release Switch
Charger Jack
sure to align the connector plates to the charging pins.
4. Firmly close the cover (4).
5. Insert the power plug into a compatible electrical
outlet.
6. Insert the USB connector into the Charging cradle’s
charger jack.
7

Caution!
Connecting the charger improperly may cause
serious damage to the device. Any damage caused
by misuse is not covered by the warranty.
7. Plug the charging head into a standard AC power
outlet. The device turns on and indicates its charge
state.
Note:
While charging, you cannot use calling features, voice
recorder, and camera.
8. When charging is finished, first unplug the charger’s
power plug from the AC wall outlet, then disconnect
the charger’s connector from the device.
Caution!
Use only charging devices and batteries approved by
Samsung. Samsung accessories are designed for
your device to maximize battery life. Using other
accessories may invalidate your warranty and may
cause damage.
Warning!
Prevent the USB charger port and the small end of
the charger from coming into contact with
conductive materials, such as liquids, dust, metal
powders, and pencil leads.
Getting Started 8

Turning Your Device On and Off
Turning Your Device On
Press and hold (
device on.
9
Power/Home
) to turn the
Turning Your Device Off
1. With the device on, press and hold
(
Power/Home
2. Tap
) until the Device options screen appears.
Power off
() ➔ OK.
Restarting Your Device
1. With the device on, press and hold
(
Power/Home
2. Tap
) until the Device options screen appears.
Restart
() ➔ OK.
Checking the battery charge status
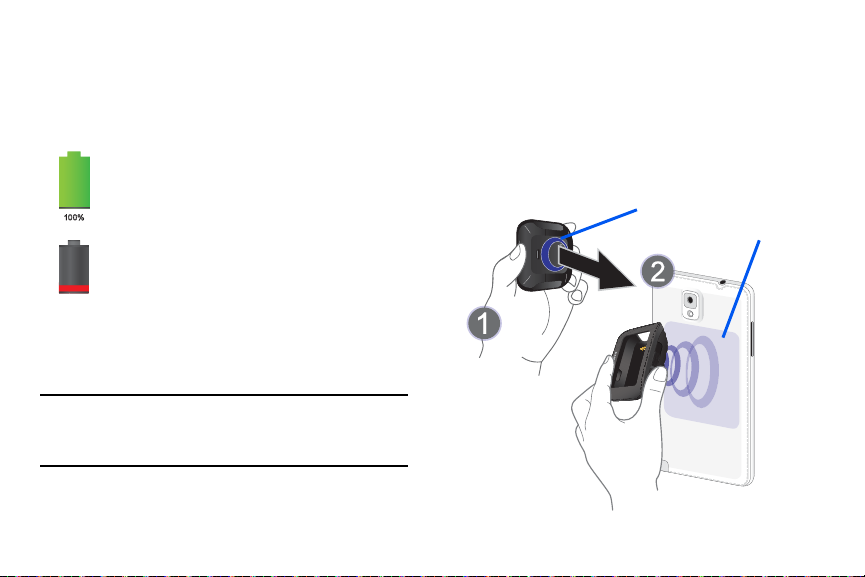
NFC tag
NFC Antenna
With the device turned off, the current charge state is
displayed on-screen. The following icons will show the
current battery charge status when the Galaxy Gear is off:
Displays your current battery charge level.
Icon shown is fully charged.
Shows your current battery level and percentage.
Icon shows the device only has a few
minutes of power remaining and will soon
shutdown.
Once paired, its the Gear Manager application that provides a
direct connection and access to setup/configuration menus
for the Galaxy Gear.
Installing Gear Manager
1. Remove the Charging cradle from the packaging.
2. Turn on your smartphone and enable NFC
communication.
The Galaxy Gear communicates to a compatible smartphone
via an active Bluetooth
Important!
Before the pairing process can be initiated, the
smartphone should have a current version of the
Gear Manager application loaded.
®
connection.
Getting Started 10

Note:
Ensure that a Wi-Fi or mobile network is active on your
smartphone before installing the Gear Manager
application.
3. Tap the back of your Charging cradle (1) to the back of
your compatible smartphone (2) (as indicated below).
4. Read the on-screen Installation information on the
smartphone, then tap
5. If prompted,
6. Confirm the
OK
➔
Accept
Google’s app verification.
Gear manager
application is now open.
Install
.
Manually Installing Gear Manager
If you do not have your cradle or are having issues
automatically downloading the application, it might be
necessary to manually download the application via
Samsung Apps.
1. From within your smartphone’s Applications page, tap
Samsung Apps
(
2. Enter the term “Gear Manager” into the application’s
search field.
3. Follow the on-screen prompts to manually install the
Gear Manager application.
11
).
Launching Gear Manager
The appearance of on-screen items within Galaxy Gear are
controlled via the Gear Manager application.
From within your smartphone’s Applications page, tap
Gear Manager
(
).
Pairing the Devices Automatically
The Galaxy Gear and smartphone are paired using Bluetooth
technology.
Important!
The Galaxy Gear must be paired from within the
Gear Manger application. If it is paired from within
your smartphone’s Bluetooth menu, the Galaxy
Gear will not correctly appear in the application
listing.
1. Press and hold (
Galaxy Gear on.
2. Tap
3. Turn on your smartphone and enable NFC
(
Play
) on the Gear’s screen to play the
connection tutorial.
communication. If not already active, you may be
prompted to activate Bluetooth.
Power/Home
) to turn the

4. Turn your Charging cradle around and tap it to the back
of the smartphone (as previously shown).
Note:
The Charging cradle contains the Bluetooth connection
information for the Galaxy Gear embedded within its
NFC tag.
Accept
5. Tap (
the PIN codes match, and tap
to confirm the pairing request.
6. Read the on-screen legal and disclaimer information
and accept the terms and conditions to complete the
process.
7. Read the on-screen Galaxy Gear tips and tap
8. Verify the Samsung Galaxy Gear entry now shows
“Connected” within the Gear Manager application and
the icon appears at the top of your smartphone’s
screen.
Note:
If the connection process fails, restart both devices and
repeat the steps above.
) on the Galaxy Gear screen, confirm
OK
on your smartphone
Close
Important!
If re-pairing a previously connected device, select
Restore
to update all settings and parameters from
your smartphone.
DO NOT interrupt the restore process.
Pairing the Devices Manually
If there is an issue when trying to pair the devices
automatically via the use of the NFC tapping (between the
smartphone and the Charging cradle), then manual pairing
must be done.
Note:
Use this process if the previous NFC automatic
.
connection method fails.
To pair the devices manually:
1. Activate Bluetooth on the smartphone.
Note:
Verify Bluetooth visibility is active.
2. From within your smartphone’s Applications page, tap
the previously installed (
Gear Manager
Getting Started 12
).

3. If the Gear Manager has not yet been used to pair a
Gear, tap
Connect manually ➔ OK
– or –
Tap the paired device from within the
of the screen and select
Connect manually
4. Tap the listed on-screen
5. Tap (
confirm the PIN codes match, and then tap
smartphone to confirm the pairing request.
13
.
Accept
) on the Galaxy Gear screen,
.
Paired Gear
Connect new Gear
GALAXY Gear
device.
➔
OK
area
OK
on your
➔
Important!
Note:
If prompted to restore a connection, select
to update all settings and parameters from your
smartphone.
DO NOT interrupt the restore process.
6. Read the on-screen legal and disclaimer information
and accept the terms and conditions to complete the
process.
7. Read the on-screen Galaxy Gear tips and tap
8. Verify the Samsung Galaxy Gear entry now shows
“Connected” within the Gear Manager application and
the icon appears at the top of your smartphone’s
screen.
If the connection process fails, restart both devices and
repeat the steps above.
Restore
Close
.

Disconnecting the Devices
Frame
1. From within your smartphone’s Applications page, tap
Gear Manager
(
2. Tap the paired Galaxy Gear device from within the
application’s
3. Select
Note:
Disconnect
The icon disappears from the top of your
smartphone’s screen.
).
Paired Gear
➔ OK.
area of the screen.
Wearing the Device
1. Thread the wristband through the Frame (1).
2. Slide your hand through the strap opening.
Caution!
Humidity and liquids may damage your device.
Keep your device dry.
3. Place the Metal Pin into the desired hole on the
wristband (2).
Note:
Use care when opening and closing the clasp.
Getting Started 14

4. In a single motion, push the metal joint downwards
Metal Joint
Buckle
Metal Pin
Buckle
Speaker
(towards the back of the Galaxy Gear), and then push
the buckle down towards until you hear a click.
Removing the Device
1. Firmly grasp both sides of the buckle.
2. Carefully pull the Buckle upwards and away from the
wristband. This causes the metal joint to move
upwards (away from the back of the Galaxy Gear).
Caution!
Do not bend the strap excessively. Doing so may
damage the device.
15
3. Slide the wristband out from the Frame.

Section 2: Understanding Your Device
3
2
1
This section outlines key features of your device. It also
describes the device’s keys, screen and the icons that
display when the device is in use.
Features of Your Device
Your device is lightweight, easy-to-use and offers many
significant features. The following list outlines a few of the
features included in your device.
•
Touch screen with virtual (on-screen) keypad
•
Brilliant 1.63-inch sAMOLED (320x320)
•
800MHz Processor
•
Android 4.2.2, Jelly Bean Platform
•
Bluetooth 4.0 enabled
•
Capable of loading compatible third-party applications
•
Display and reply to incoming calls and messages.
•
1.9 Megapixel Camera and Camcorder with autofocus
•
Video recording: HD(720p) Recording
•
Music Player control of target device
Front and Back Views
The following illustrations show the main elements of your
device. The following list correlates to the illustrations.
For more information, refer to “Navigation and Gestures” on
page 21.
Control panel
1.
status, battery level, Volume and Brightness levels.
shows information about the connection
Understanding Your Device 16

Display
4
3
6
5
2.
3.
17
shows all the information needed to operate
your device, such as the number of wirelessly
connected devices, number of received messages
(along with date, time and phone number), and data
usage.
Wristband
threads through the frame to secure the
device to your wrist.
4.
Buckle
secures the wristband.
Cradle Connector Plates
5.
connected to the connector pins on the cradle,
provides charging to the device.
6.
Speaker
allows you to hear callers during a live call and
hear media that is being playback or through the
device.
(back of device) when

Side View
1
4
3
2
2
5
6
The following illustration shows the side elements:
Note:
Do not use a screen protector. This causes sensor
malfunctions.
1.
Camera lens
is used to take photos and shoot videos.
Microphones
2.
and allow other callers to hear you clearly when you
are speaking to them. There are two microphones on
the device:
•
Bottom microphone: used during handset mode.
•
Top microphone: used while an active call is in the
speakerphone mode and assists in noise cancellation
(2 microphone solution).
3.
Power/Home key
off and on.
•
Press and hold to turn the device on or off.
•
Press and hold for more than 7 seconds to reset the device if it
develops any fatal errors, hang-ups, or freezes.
•
Press once to return to the Home (Clock) screen.
•
Press to unlock the device. The device goes into lock mode
when the touch screen turns off.
4.
Frame
securing the Galaxy Gear.
Metal Pin
5.
Joint
6.
strap or aid in the removal of the Galaxy Gear.
(along sides) are used during phone calls
ends switches the device
is used to thread the wristband through for
is placed on the wristband
is folded together to either secure the buckle to
Understanding Your Device 18

Charging Cradle Views
2
4
1
3
The Charging cradle provides both power and connectivity
for a connected and mounted Galaxy Gear.
Note:
The Charging Cradle contains an embedded TecTile that
is used in conjunction with your smartphone’s NFC
technology to both acquire the Gear Manager
application and aid in automatically pairing the two
devices.
Charging Port
1.
compatible power cable.
Caution!
Please use only an approved charging accessory to
charge your device. Improper handling of the
charging port, as well as the use of an incompatible
charger, may cause damage to your device and void
the warranty.
Security Latch
2.
Charging Pins
3.
secured onto the cradle.
4.
Cover
Charging cradle.
(back of unit) allows you to connect a
used to release the security cover.
provide power to the device once
used to hold the Galaxy Gear securely within the
19

On-Screen Indicators
Control Panel
Reveal the Control Panel (Bluetooth connection status,
Battery level, Volume and Brightness levels) by quickly
tapping simultaneously twice on the screen using two
fingers.
The following icons will show within the Notifications Bar
when the Galaxy Gear is turned on:
Displays your battery is currently charging.
Displays when Bluetooth technology is active
and enabled but the Galaxy Gear is not
communicating with the paired smartphone.
Displays when the Bluetooth technology is active,
paired, and communicating with an external
device.
Once the device is connected, confirm the corresponding
icon appears on the smartphone’s display.
Displays when the Galaxy Gear connection is
active and communicating with your
smartphone. Both devices are successfully
communicating via the Gear Manager.
Displays your current battery charge level.
Icon shown is fully charged.
Understanding Your Device 20
 Loading...