

Samsung SMV700 Users Manual
DRAFT
Internal Use Only
MOBILE DEVICE
This document is watermarked because certain important information in the document has not yet been verified.
This document has been sent to you as a draft and for informational purposes only.
The document should only be used for internal purposes and may not be distributed outside of Samsung,
except to Samsung's carrier customer for testing purposes. Distributing the
document outside of Samsung, except to Samsung's carrier customer for testing purposes could result in legal exposure
to the company if the preliminary, unverified information in the draft turns out to be inaccurate.
User Manual
Please read this manual before operating your
phone and keep it for future reference.

DRAFT
Internal Use Only
Intellectual Property
All Intellectual Property, as defined below, owned by or which is otherwise the property of Samsung or its respective suppliers
relating to the SAMSUNG Phone, including but not limited to, accessories, parts, or software relating there to (the “Phone
System”), is proprietary to Samsung and protected under federal laws, state laws, and international treaty provisions. Intellectual
Property includes, but is not limited to, inventions (patentable or unpatentable), patents, trade secrets, copyrights, software,
computer programs, and related documentation and other works of authorship. You may not infringe or otherwise violate the
rights secured by the Intellectual Property. Moreover, you agree that you will not (and will not attempt to) modify, prepare
derivative works of, reverse engineer, decompile, disassemble, or otherwise attempt to create source code from the software. No
title to or ownership in the Intellectual Property is transferred to you. All applicable rights of the Intellectual Property shall remain
with SAMSUNG and its suppliers.
Open Source Software
Some software components of this product incorporate source code covered under GNU General Public License (GPL), GNU Lesser
General Public License (LGPL), OpenSSL License, BSD License and other open source licenses. To obtain the source code covered
under the open source licenses, please visit:
http://opensource.samsung.com
.
Disclaimer of Warranties; Exclusion of Liability
EXCEPT AS SET FORTH IN THE EXPRESS WARRANTY CONTAINED ON THE WARRANTY PAGE ENCLOSED WITH THE PRODUCT, THE
PURCHASER TAKES THE PRODUCT "AS IS", AND SAMSUNG MAKES NO EXPRESS OR IMPLIED WARRANTY OF ANY KIND
WHATSOEVER WITH RESPECT TO THE PRODUCT, INCLUDING BUT NOT LIMITED TO THE MERCHANTABILITY OF THE PRODUCT OR
ITS FITNESS FOR ANY PARTICULAR PURPOSE OR USE; THE DESIGN, CONDITION OR QUALITY OF THE PRODUCT; THE
PERFORMANCE OF THE PRODUCT; THE WORKMANSHIP OF THE PRODUCT OR THE COMPONENTS CONTAINED THEREIN; OR
COMPLIANCE OF THE PRODUCT WITH THE REQUIREMENTS OF ANY LAW, RULE, SPECIFICATION OR CONTRACT PERTAINING
SM-V700_UM_English_MH3_PS_082713_D1

DRAFT
Internal Use Only
THERETO. NOTHING CONTAINED IN THE INSTRUCTION MANUAL SHALL BE CONSTRUED TO CREATE AN EXPRESS OR IMPLIED
WARRANTY OF ANY KIND WHATSOEVER WITH RESPECT TO THE PRODUCT. IN ADDITION, SAMSUNG SHALL NOT BE LIABLE FOR
ANY DAMAGES OF ANY KIND RESULTING FROM THE PURCHASE OR USE OF THE PRODUCT OR ARISING FROM THE BREACH OF
THE EXPRESS WARRANTY, INCLUDING INCIDENTAL, SPECIAL OR CONSEQUENTIAL DAMAGES, OR LOSS OF ANTICIPATED PROFITS
OR BENEFITS.
Modification of Software
SAMSUNG IS NOT LIABLE FOR PERFORMANCE ISSUES OR INCOMPATIBILITIES CAUSED BY YOUR EDITING OF REGISTRY SETTINGS,
OR YOUR MODIFICATION OF OPERATING SYSTEM SOFTWARE.
USING CUSTOM OPERATING SYSTEM SOFTWARE MAY CAUSE YOUR DEVICE AND APPLICATIONS TO WORK IMPROPERLY. YOUR
CARRIER MAY NOT PERMIT USERS TO DOWNLOAD CERTAIN SOFTWARE, SUCH AS CUSTOM OS.
Samsung Telecommunications America (STA), LLC
Headquarters:
1301 E. Lookout Drive
Richardson, TX 75082
Customer Care Center:
1000 Klein Rd.
Plano, TX 75074
Toll Free Tel: 1.888.987.HELP (4357)

DRAFT
Internal Use Only
Internet Address:
http://www.samsung.com
©
2013 Samsung Telecommunications America, LLC. Samsung is a registered trademark of Samsung Electronics Co., Ltd.
Do you have questions about your Samsung Mobile Device?
For 24 hour information and assistance, we offer a new FAQ/ARS System (Automated Response System) at:
www.samsung.com/us/support
The Bluetooth® word mark, figure mark (stylized “B Design”), and combination mark (Bluetooth word mark and “B Design”) are
registered trademarks and are wholly owned by the Bluetooth SIG.

DRAFT
Internal Use Only
Table of Contents
Section 1: Getting Started .......................... 3
Understanding this User Manual . . . . . . . . . . . . 3
Setting Up Your Device . . . . . . . . . . . . . . . . . . . 5
Turning Your Device On and Off . . . . . . . . . . . . 6
Section 2: Understanding Your Device ...... 7
Features of Your Device . . . . . . . . . . . . . . . . . . 7
Front and Back Views . . . . . . . . . . . . . . . . . . . 7
Side Views . . . . . . . . . . . . . . . . . . . . . . . . . . . . 9
Charging Cradle Views . . . . . . . . . . . . . . . . . . 10
On-Screen Indicators . . . . . . . . . . . . . . . . . . . 10
Navigation and Gestures . . . . . . . . . . . . . . . . 11
Section 3: Connecting Your Device .......... 13
Installing Gear Manager on a Target Device . . 13
Pairing the Two Devices . . . . . . . . . . . . . . . . . 14
Launching Gear Manager . . . . . . . . . . . . . . . . 15
Unpairing the Two Devices . . . . . . . . . . . . . . . 15
Wearing the Device . . . . . . . . . . . . . . . . . . . . 15
Removing the Device . . . . . . . . . . . . . . . . . . . 16
Section 4: Understanding Gear Manager . 17
Launching Gear Manager . . . . . . . . . . . . . . . . 18
Section 5: Calling Features .......................20
Section 6: Messaging on Your Device ......21
Section 7: Applciations .............................23
Section 8: Settings ....................................24
Section 9: Troubleshooting .......................26
Technical Support . . . . . . . . . . . . . . . . . . . . . 26
Section 10: Health and Safety Information 27
FCC Part 15 Information to User . . . . . . . . . . . 27
Smart Practices While Driving . . . . . . . . . . . . 27
Battery Use and Safety . . . . . . . . . . . . . . . . . . 28
Samsung Mobile Products and Recycling . . . . 30
UL Certified Travel Charger . . . . . . . . . . . . . . . 31
Display / Touch-Screen . . . . . . . . . . . . . . . . . 31
GPS . . . . . . . . . . . . . . . . . . . . . . . . . . . . . . . . 32
Care and Maintenance . . . . . . . . . . . . . . . . . . 33
Responsible Listening . . . . . . . . . . . . . . . . . . 34
Operating Environment . . . . . . . . . . . . . . . . . . 36
Restricting Children's Access to Your Mobile Device
1

DRAFT
Internal Use Only
38
FCC Notice and Cautions . . . . . . . . . . . . . . . . . 38
Other Important Safety Information . . . . . . . . .38
Section 11: Warranty Information ............40
Standard Limited Warranty . . . . . . . . . . . . . . . 40
End User License Agreement for Software . . . . 45
End User License Agreement for Software . . . . 52
Index ...........................................................60
2

DRAFT
Internal Use Only
Section 1: Getting Started
Understanding this User Manual
The sections of this manual is laid out to assist your with
setup and follow the UI features of your device.
A robust index for features begins on page 60.
Also included is important safety information, beginning on
page 27, that you should know before using your device.
This manual gives navigation instructions according to the
default display settings.
Unless otherwise specified, all instructions in this manual
assume you are starting from the Home screen.
Note:
Instructions in this manual are based on default settings,
and may vary from your device, depending on the
software version on your device, and any changes to the
device’s Settings.
Unless stated otherwise, instructions in this User Manual
start with the device at the Home screen.
All screen images in this manual are simulated. Actual
displays may vary, depending on the software version of
your device and any changes to the device’s firmware.
Getting Started 3

DRAFT
Internal Use Only
Special Text
Throughout this manual, you’ll find text that is set apart from
the rest. These are intended to point out important
information, share quick methods for activating features, to
define terms, and more. The definitions for these methods
are as follows:
•
Notes
: Presents alternative options for the current feature, menu,
or sub-menu.
•
Tips
: Provides quick or innovative methods, or useful shortcuts.
•
Important
: Points out important information about the current
feature that could affect performance.
•
Warning
: Brings to your attention important information to
prevent loss of data or functionality, or even prevent damage to
your phone.
Text Conventions
This manual provides condensed information about how to
use your phone. To make this possible, the following text
conventions are used to represent often-used steps:
➔
Note:
Arrows are used to represent the sequence of
selecting successive options in longer, or
repetitive, procedures.
From the Web portal home screen, select ➔ Messaging
tab.
4

DRAFT
Internal Use Only
Setting Up Your Device
Charging Head
USB Cable
These steps take you through an out-of-the-box setup
process. These procedures are intended to help you get your
device setup, activated, and assist you with your initial
connection.
Charging the Battery
Your device is powered by a rechargeable Li-ion battery. A
wall charger, which is used for charging the battery, is
included with your device. Use only approved batteries and
chargers. Ask your local Samsung dealer for further details.
Before using your device for the first time, you must fully
charge the battery.
Note:
Verify that the battery is installed prior to connecting the
wall charger. If both the wall charger is connected and
the battery is not installed, the device can power cycle
continuously and prevent proper operation. Failure to
unplug the wall charger before you remove the battery,
can cause the device to become damaged.
Important!
It is recommended you fully charge the battery
before using your device for the first time.
1. Before turning on your XXXX® for the first time, it is
recommended that you charge it fully.
2. In a single motion, slide and hold the switch to open
the cover of the charging cradle.
3. Place the device onto the charging cradle, making sure
to align the connector plates to the charging pins.
Firmly close the cover.
4. Connect the USB cable to the charging head.
5. Insert the USB cable connector into the charging
cradle’s charger jack.
Getting Started 5

DRAFT
Internal Use Only
6. Plug the charging head into a standard AC power
Charging pins
Charging port
outlet. The device turns on and indicates its charge
state.
7. When charging is finished, first unplug the charger’s
power plug from the AC wall outlet, then disconnect
the charger’s connector from the device.
Turning Your Device On and Off
Turning Your Device On
Press and hold (
on.
Turning Your Device Off
With the device on, press and hold
(
Power/Lock
Power/Lock
) to turn the device off.
) to turn the device
6
DRAFT
Internal Use Only
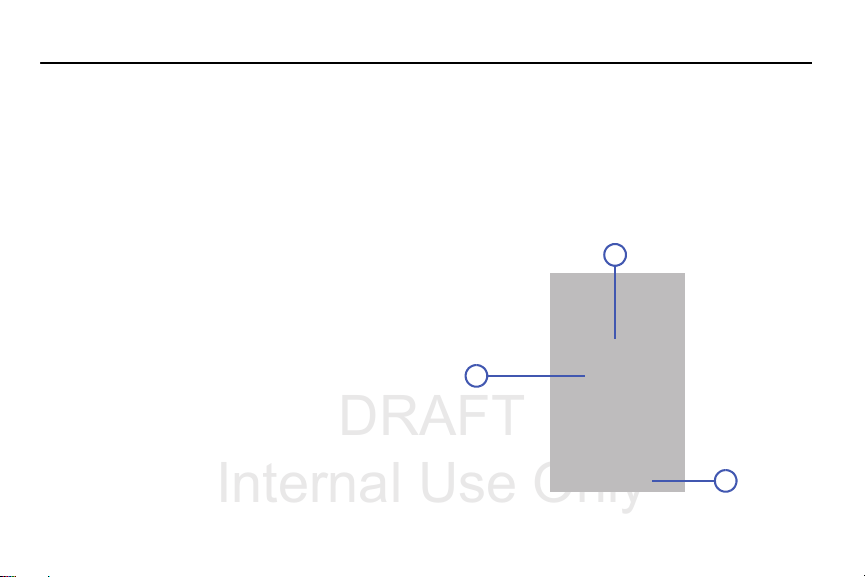
Section 2: Understanding Your Device
3
2
1
This section outlines key features of your device. It also
describes the device’s keys, screen and the icons that
display when the device is in use.
Features of Your Device
Your device is lightweight, easy-to-use and offers many
significant features. The following list outlines a few of the
features included in your device.
•
Touch screen with virtual (on-screen) keypad
•
Brilliant 4-inch WVGA screen (320x320) XX???
•
Android 4.2.2, Jelly Bean Platform
•
Bluetooth® enabled
•
Capable of loading compatible third-party applications
•
Display and reply to incoming calls and messages.
•
1.9 Megapixel Camera and Camcorder with autofocus
•
Music Player control of target device
Front and Back Views
The following illustrations show the main elements of your
device. The following list correlates to the illustrations.
Notifications panel
1.
connection status, signal strength, battery level, and
time, and displays notifications about incoming
messages, and other action.
shows information about the
Understanding Your Device 7

DRAFT
Internal Use Only
Display
4
3
6
5
7
7
2.
3.
4.
8
shows all the information needed to operate
your device, such as the number of wirelessly
connected devices, number of received messages
(along with date, time and phone number), and data
usage.
Wristband
threads through the frame to secure the
device to your wrist.
Buckle
secures the wristband.
Clasp Release
5.
wristband and releases the device.
6.
Speaker
hear media that is being playback or throu the device.
Cradle Connector Plates
7.
connector pins on the cradle, provides charging to the
device.
un-fastens the buckle from the
allows you to hear callers duing a live call and
when connected to the
DRAFT
Internal Use Only
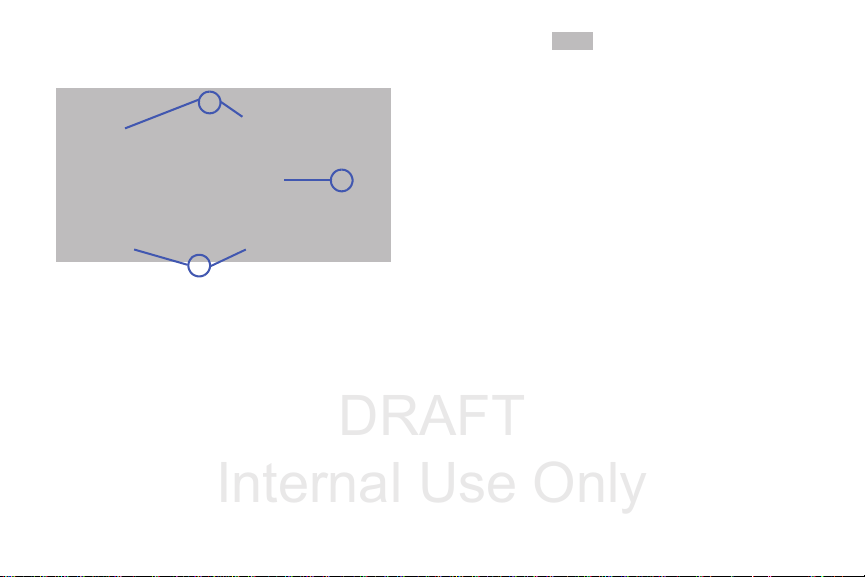
Side Views
1
2
1
The following illustration shows the side elements:
1.
Microphones
other callers to hear you clearly when you are speaking
to them. There are two microphones on the device:
•
Bottom microphone: used during handset mode.
•
Top microphone: used while an active call is in the
speakerphone mode and assists in noise cancellation
(2 microphone solution).
are used during phone calls and allow
2.
Power key
•
Press and hold to turn the device on or off.
•
Press and hold for more than 5 seconds to reset the device if it
develops any fatal errors, hang-ups, or freezes.
•
Press to return to the Home (Clock) screen.
•
Press to unlock the device. The device goes into lock mode
when the touch screen turns off.
ends switches the phone off and on.
Understanding Your Device 9

DRAFT
Internal Use Only
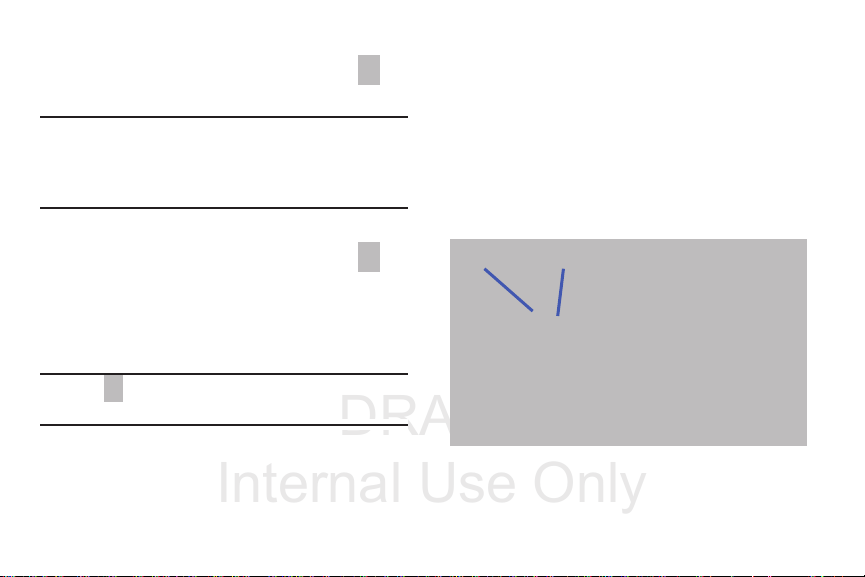
Charging Cradle Views
2
1
The Charging cradle is used as a charging station for the
device.
1.
Charging Pins
secured onto the cradle.
Charging Port
2.
power cable.
provide power to the device once
allows you to connect a compatible
10
Caution!
Please use only an approved charging accessory to
charge your device. Improper handling of the
charging port, as well as the use of an incompatible
charger, may cause damage to your device and void
the warranty.
On-Screen Indicators
Reveal the Notifications panel (Time/date, Bluetooth
connection status, and Battery level) by quickly tapping twice
on the screen using two fingers.

DRAFT
Internal Use Only
Swipe Tap Double-tap Pinch/Spread
Displays your current battery charge level. Icon
shown is fully charged.
Displays your battery is currently charging.
Displays your current battery charge level is
low (Charge: ~28% - 15%).
Shows your current battery only has a few
minutes of power remaining and will soon
shutdown.
Displays when the Bluetooth technology is
active, paired, and communicating with an
external device.
Once the device is connected, confirm the corresponding
icon appears on the target device (phone).
Displays when the target device (phone) is
active and communicating with your device. Both
devices are successfully communicating via the
Gear Manager.
Navigation and Gestures
Using the touch screen display you can navigate the features
of your device, select menu items, and enter characters.
The following conventions are used in this manual to
describe the navigation action in the procedures.
Waking the Device
Shake the XXX?? on your wrist or tap (
Lock
).
Navigating Through the Screens
The following terms describe the most common hardware
and on-screen actions.
Power/
Understanding Your Device 11

DRAFT
Internal Use Only
•
Swipe or slide
screen to view the top functions. This allows you to move the area
of focus or to scroll through a list. For example: slide your finger
left or right on the Home (Clock) screen to scroll among the top
functions or slide through an available on-screen list.
Note:
From an open application screen, swipe down to exit the
current application and return to the Home screen.
•
Tap
: Use a brief touch to select items on the display or to enter
text on the virtual keypad. For example: tap an Application icon to
open the application.
•
Double-Tap
connection status, and Battery level). Launch the panel by quickly
double-tapping once on the screen using two fingers.
•
Pinch
zoom out when viewing a picture or a Web page. (Move fingers
inward to zoom out.)
•
Spread
zoom in when viewing a picture or a Web page. (Move fingers
outward to zoom in.)
: Quickly drag your finger left or right across the
: reveals the Notifications panel (Time/date, Bluetooth
: “Pinch” the screen using your thumb and forefinger to
: “Spread” the screen using your thumb and forefinger to
12

DRAFT
Internal Use Only
Section 3: Connecting Your Device
The XXX?? communicates to a compatible target device
(phone) via an active Bluetooth connection.
Before the pairing process can be initiated, the target device
should have a current version of the Gear Manager
application loaded.
Once paired, its the Gear Manager application that provides a
direct connection and access to setup/configuration menus
for the XXX??.
Installing Gear Manager on a Target Device
1. Remove the Gear Manager TecTile from the packaging.
2. Turn on your target device (phone) and enable NFC
communication.
•
Refer to your device’s online User Manual for information about
activating the NFC feature.
3. Turn your device over, tap the back with the TecTile.
4. Follow the on-screen installation instructions.
5. Confirm the
appears within the application screen on the target
device.
6. Launch the application, agree to the Terms of Use and
select Accept. This is a one-time process.
Gear Manager
application ( ) now
Connecting Your Device 13

DRAFT
Internal Use Only
Pairing the Two Devices
The XX??X® and your target device are both paired using
Bluetooth technology.
1. Press and hold (
on. The following should occur once your device turns
on:
•
The battery indicator shows a solid green color (if there is more
than a 15% charge.)
2. Activate both the NFC and Bluetooth on the target
device (phone).
Important!
Make sure to enable Bluetooth visibility.
3. Launch Gear Manager on the target device and tap
Connect manually
4. From the device’s Bluetooth device list screen, tap the
target device, navigate to the
Bluetooth
menu.
5. Tap t he
SM-VXX
on-screen list. The devices now begin their pairing
process.
Power/Lock
.
device from within the available
) to turn the device
Settings
page, locate the
6. Tap (
OK
7. Read the on-screen EULA information, accept the
terms and conditions, and select
process.
8. Verify the
within the Gear Manager application and the icon
appears at the top of your target device’s screen.
Note:
If the connection process fails, restart both devices and
repeat steps 1-5.
Important!
Accept
) on the XXX screen and then select
on your target device to confirm the pairing request.
Finish
to complete the
SM-VXX
entry now shows “Connected”
If re-pairing a previously connected device, select
Restore
to update all settings and parametrs
between the two devices.
14
DRAFT
Internal Use Only
Launching Gear Manager
Frame Metal Prong
From your device’s Applications page, launch
(
Gear Manager
Important!
The appearance of on-screen items within XXXX
are controlled via the Gear Manager application.
Ex: Appearance of the on-screen clock, available
applications, settings, etc...
).
Unpairing the Two Devices
1. From your device’s Applications page, launch
(
Gear Manager
2. Tap the paired device from within the
of the screen.
3. From the Home screen, tap
Note:
The icon disappears from the top of your target
device’s screen.
).
Paired watch
Disconnect
Wearing the Device
1. Thread the wristband through the frame (1).
2. Place the metal prong into the desired hole on the
wristband (2).
3. In a single motion, push the metal joint downwards
(towards the back of the XXXX??), and then push the
buckle down towards the metal prong until you hear a
click.
area
➔ OK.
Connecting Your Device 15

DRAFT
Internal Use Only
Removing the Device
Clasp Release
Speaker
1. Firmly press both Clasp Release buttons located at
either side of the buckle.
2. Push the metal joint upwards (away from the back of
the XXX??).
3. Slide the wristband out from the Frame.
16
 Loading...