

Page 1
Page 2

Page 3
Page 4
VEILIGHEID
Het doel van het hoofdstuk Veiligheidsoverwegingen is het waarborgen van de
veiligheid van gebruikers en het voorkomen van schade aan eigendommen.
Lees dit document zorgvuldig door voor correct gebruik.
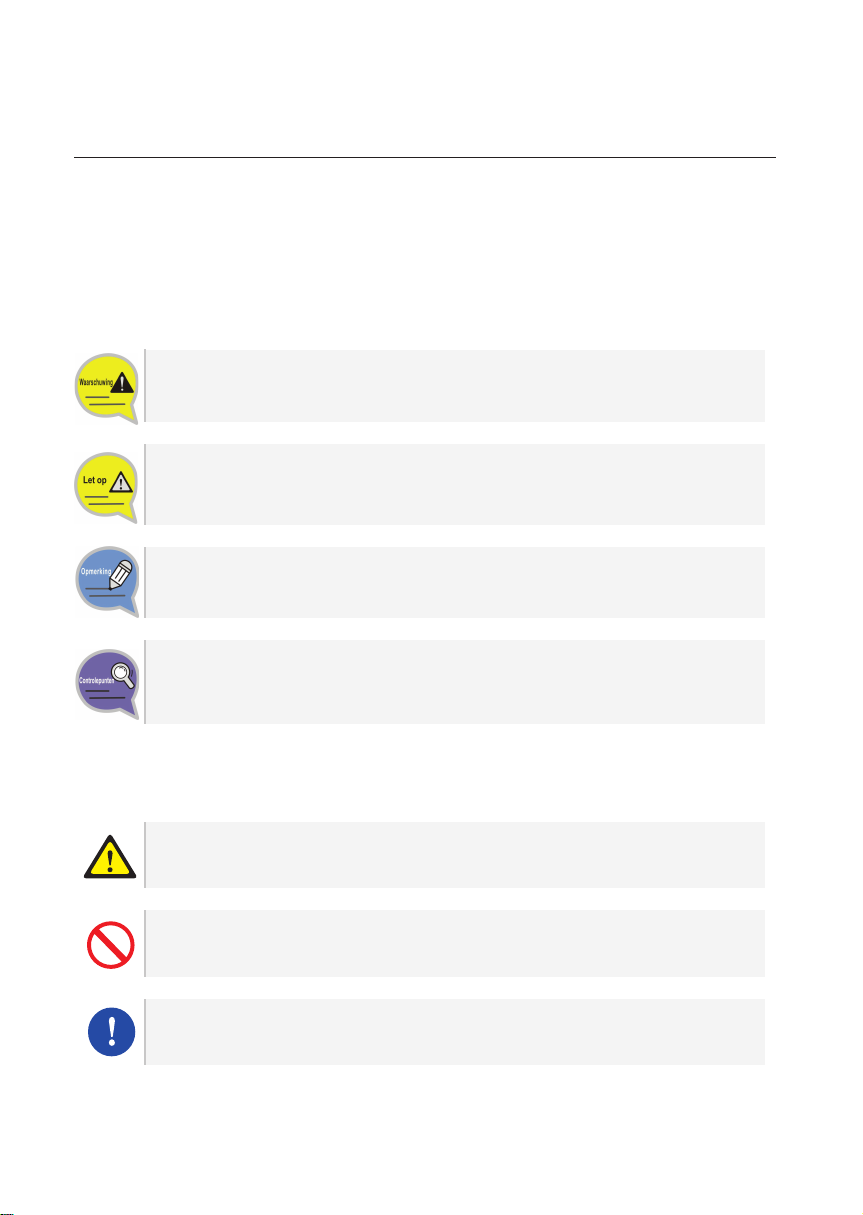
Aanduidingen
Waarschuwing
Biedt informatie of instructies waar u zich aan moet houden om persoonlijk letsel
of dodelijke ongevallen te voorkomen.
Let op
Biedt informatie of instructies waar u zich aan moet houden om een storing in de
service of schade aan uw STB te vermijden.
Opmerking
Geeft aanvullende informatie voor referentiedoeleinden aan.
Controlepunten
Voorziet de operator van controlepunten voor een stabiele werking van het
systeem.
Symbolen
Let op
Aanduiding van een algemene waarschuwing
Beperking
Aanduiding van het verbod op een handeling voor een product
Instructie
Aanduiding van een specifieke vereiste actie
Nederlands _1
Page 5
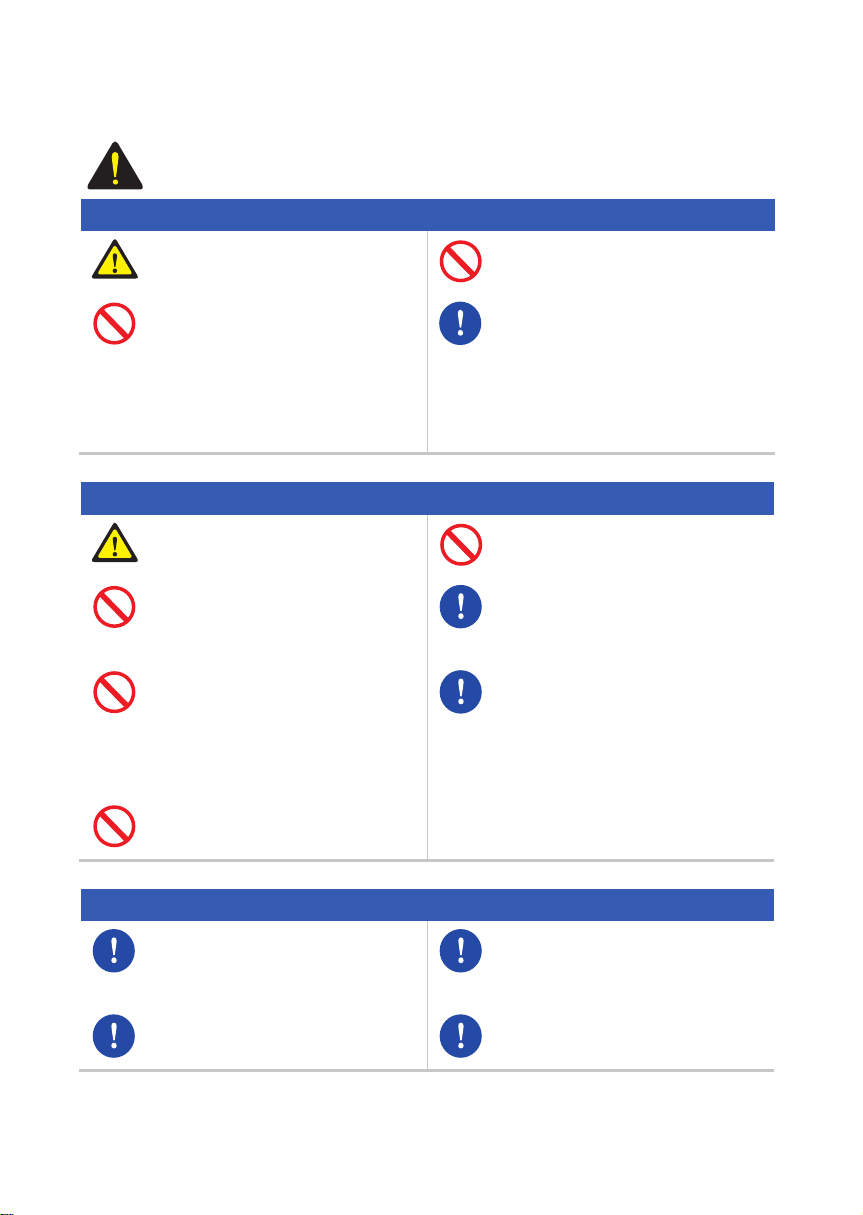
Waarschuwing
WAARSCHUWING
Voeding
Steek het netsnoer stevig in een
stopcontact.
Raak de behuizing, het netsnoer en
de stekker niet aan met natte
handen.
Installatie/onderhoud
Installeer het product op een plek
met goede ventilatie.
Installeer het product niet op
vochtige of stoffige plekken of in de
buurt van verwarmingsapparaten.
Houd brandbare stoffen en
spuitbussen uit de buurt van de
settopbox.
Plaats geen zware objecten op dit
product.
#
Sluit niet meerdere apparaten
tegelijk aan op één stopcontact.
Als de video-/geluidskabel na
aansluiting warmte genereert, trekt
u onmiddellijk de stekker van het
netsnoer uit het stopcontact en
neemt u contact op met de
klantenservice.
Dek de bovenkant niet af.
Trek de stekker uit het stopcontact
tijdens onweer of als het apparaat
voor langere tijd niet wordt gebruikt.
Trek meteen de stekker uit het
stopcontact en neem contact op
met de klantenservice als
ongebruikelijke geluiden, geuren of
rook uit het apparaat komen.
Algemeen
Controleer of de coaxkabel correct
is geaard voordat u de settopbox
aansluit.
Klasse 1 LED-product.
2
_ © SAMSUNG Electronics Co., Ltd.
Vraag de installatietechnicus om te
controleren of de aan te sluiten
settopbox correct is geaard.
Dit product voldoet aan 21 CFR
Hoofdstuk 1, paragraaf J.
Page 6
Let op
LET OP
Voeding
Sluit uw tv pas aan nadat u de tv en
de settopbox hebt uitgeschakeld
door de netsnoeren los te koppelen.
Steek de stekker niet in het
stopcontact alvorens het netsnoer
op het product te hebben
aangesloten.
Installatie/onderhoud
Installeer het product op correcte
wijze, volgens de instructies in de
gebruikershandleiding.
Sproei geen water direct op de
eenheid en gebruik geen
chemische oplosmiddelen, zoals
was, muggenspray, alcohol of
reinigingsmiddel.
Plaats het product niet op een
instabiele ondergrond.
Het stopcontact moet zich in de
buurt van het apparaat bevinden en
moet gemakkelijk bereikbaar zijn.
Alvorens de voedingsbron aan te
sluiten, moet een permanente
veilige, geaarde aansluiting worden
gemaakt naar de kabelverdeling.
Verwijder de CableCARD™ niet uit
de settopbox.
Leg geen metalen voorwerpen
zoals spelden, paperclips of
munten boven op het apparaat.
Gevaar voor elektrische schok.
NIET OPENEN.
Het apparaat mag niet worden
gedemonteerd, gerepareerd of
aangepast.
Geen verbinding met de antenne.
Veeg het product bij het
schoonmaken af met een zachte,
droge doek.
Nederlands _3
Page 7

INHOUDSOPGAVE
VEILIGHEID 1
Aanduidingen .......................................................................... 1
Symbolen................................................................................. 1
Waarschuwing ........................................................................ 2
Let op ....................................................................................... 3
VOOR GEBRUIK 6
SD-kabel STB .......................................................................... 6
Toetsfuncties van SMT-C1140 ............................................... 6
Inhoud van de doos ................................................................ 7
Namen en functies .................................................................. 8
Voorpaneel ...................................................................................... 8
Achterpaneel ................................................................................... 9
Afstandsbediening ............................................................... 10
INSTALLATIE 12
Installatieomgeving ............................................................. 12
Aansluiting randapparaten ................................................. 13
Aansluiting op een tv met een SCART-poort .............................. 14
Aansluiting op een videorecorder met een SCART-poort ........... 15
Aansluiting op digitale audio ........................................................ 16
Aansluiten op RF-antenne ........................................................... 17
4
_ © SAMSUNG Electronics Co., Ltd.
Page 8

GEBRUIK 18
Installatiehulpprogramma ................................................... 18
Basisfuncties ........................................................................ 20
Hoofdmenu........................................................................... 23
Gids ............................................................................................... 24
Kanaal ........................................................................................... 25
Timer ............................................................................................. 27
Instellingen .................................................................................... 28
Irdeto ............................................................................................. 31
PROBLEMEN OPLOSSEN 33
BIJLAGE 35
Productspecificaties ............................................................ 35
WARRANTY CARD (GARANTIEKAART) ............................ 37
Nederlands _5
Page 9
VOOR GEBRUIK
SD-kabel STB
SMT-C1140 is SD-kabel STB (settopbox).
Toetsfuncties van SMT-C1140
Videodisplay van SD (standaarddefinitie)
Ondersteunt video-uitgang met standaardresolutie tot 480, voor een helder en
scherp beeld.
EPG-ondersteuning
Met de kanaalgids EPG kunt u de programma-informatie en het uitzendschema van
het gewenste kanaal bekijken en programma’s die u wilt bekijken programmeren.
[Actieve Standby-Modus]
Als u op (
zal de STB van Actieve modus overschakelen naar Actieve Standby-Modus.
6
_ © SAMSUNG Electronics Co., Ltd.
) knop drukt met de STB in bedrijf (in de Actieve modus),
Actieve Standby-Modus
De STB verbruikt nog steeds energie. Om de settopbox naar de modus UIT te
schakelen, drukt u op de uit-knop op de achterkant van de STB.
Page 10

Inhoud van de doos
Controleer of de doos waarin uw product is verpakt de volgende items bevat.
SMT-C1140
SCART-kabel
Afstandsbediening
(met AAA-batterij)
Voedingsadapter Gebruiksaanwijzing
Nederlands _7
Page 11
Namen en functies
In dit hoofdstuk worden naam en functie van de onderdelen beschreven.
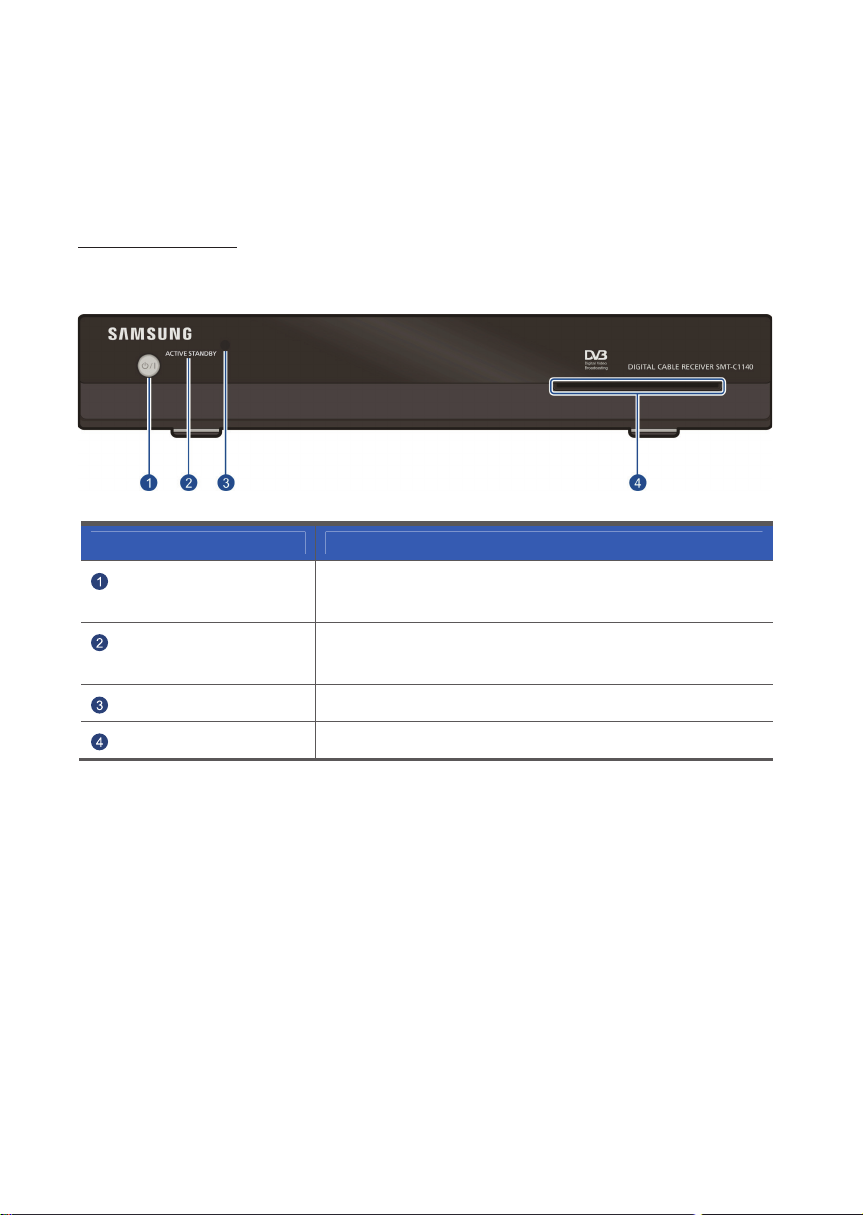
Voorpaneel
In dit hoofdstuk wordt het voorpaneel beschreven.
Naam Beschrijving
Voeding De status van een STB wijzigen naar actieve modus of actieve
standby-modus.
LED Actieve Standby Een groene LED gaat branden in de actieve standby-
modus.
IR-ontvanger Ontvangt signalen van de afstandsbediening.
Smartcard-sleuf Plaats hier de smartcard.
8
_ © SAMSUNG Electronics Co., Ltd.
Page 12

Achterpaneel
In dit hoofdstuk worden de namen en functies van de poorten op het achterpaneel
beschreven.
Naam Beschrijving
LOOP-THROUGH Een poort die verbinding maakt met een andere STB of tv
met een RF-kabel.
CABLE IN Een poort die verbinding maakt met een RF-antenne met
een RF-kabel.
AV1 (TV) SCART Een tv-SCART-uitgang die is verbonden met een tv via een
SCART-kabel.
AV2 (EXT) SCART Een EXT SCART-uitgang die is verbonden met een
videorecorder via een SCART-kabel.
DIGITAL AUDIO OUT
(OPTICAL)
Aan-uitschakelaar Een schakelaar om de STB-voeding in en uit te schakelen.
POWER IN Een voedingsingang (DC 12 V).
Een digitale audio-uitgang die is aangesloten op een
audiosysteem met een SPDIF-poort via een optische kabel.
LOOP-THROUGH aansluiten
De loop-through-poort vormt de verbinding voor de ontvangen data. Als een tv of
andere STB is aangesloten op deze poort en u het aangesloten apparaat wilt
gebruiken, moet u de STB inschakelen.
Nederlands _9
Page 13
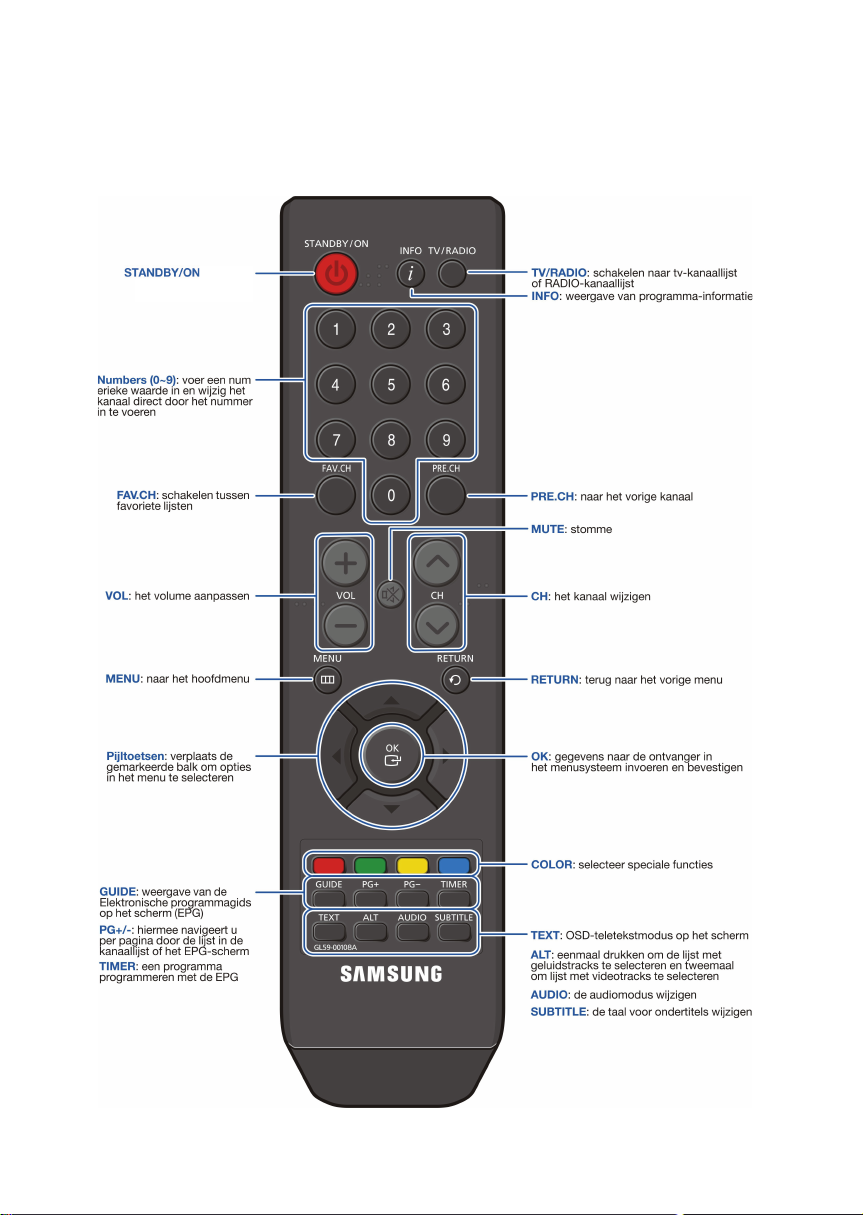
Afstandsbediening
In dit hoofdstuk wordt de functie van de toetsen op een afstandsbediening beschreven.
: actieve
standby-modus aan / uit
10
_ © SAMSUNG Electronics Co., Ltd.
Page 14

Een batterij voor de afstandsbediening plaatsen
Gebruik voor een langere levensduur van de batterij een alkaline-batterij (geen
normale batterij) voor de afstandsbediening. Als u een normale batterij gebruikt,
kan dit problemen veroorzaken bij het gebruik van de afstandsbediening.
- Gebruik voor de afstandsbediening twee identieke en nieuwe batterijen.
- Verwijder de batterijen als de afstandsbediening voor langere tijd niet wordt
gebruikt.
Nederlands _11
Page 15
INSTALLATIE
In dit deel wordt de installatie van de STB (SMT-C1140) beschreven.
Installatieomgeving
In onderstaande tabel vindt u de vereisten voor de installatieomgeving van de STB.
Item Beschrijving
Temperatuur tijdens bedrijf 0-40°C
Vochtigheid tijdens bedrijf 20-80% (40°C)
Nominale spanning, frequentie AC 220-240 V~, 50-60 Hz, 0.3 A max
Nominaal stroomverbruik Actieve modus : max. 7.3 W
Actieve Standby-Modus : 5.5 W
Gebruik en installatie van het product:
Het product mag alleen worden gebruikt als is voldaan aan de opgegeven
vereisten aan de omgeving. Anders kan de levensduur van het product worden
verkort.
Een STB op randapparatuur aansluiten
- Vraag de servicetechnicus om te controleren of de voeding van de tv of
videorecorder waarop een STB wordt aangesloten naar behoren geaard is.
Anders kan het apparaat brand veroorzaken.
- Neem contact op met uw servicecenter als overmatige warmte wordt
geproduceerd door de kabels na het aansluiten van de video-/audiokabels.
Een dergelijke situatie kan tot brand leiden.
12
_ © SAMSUNG Electronics Co., Ltd.
Page 16
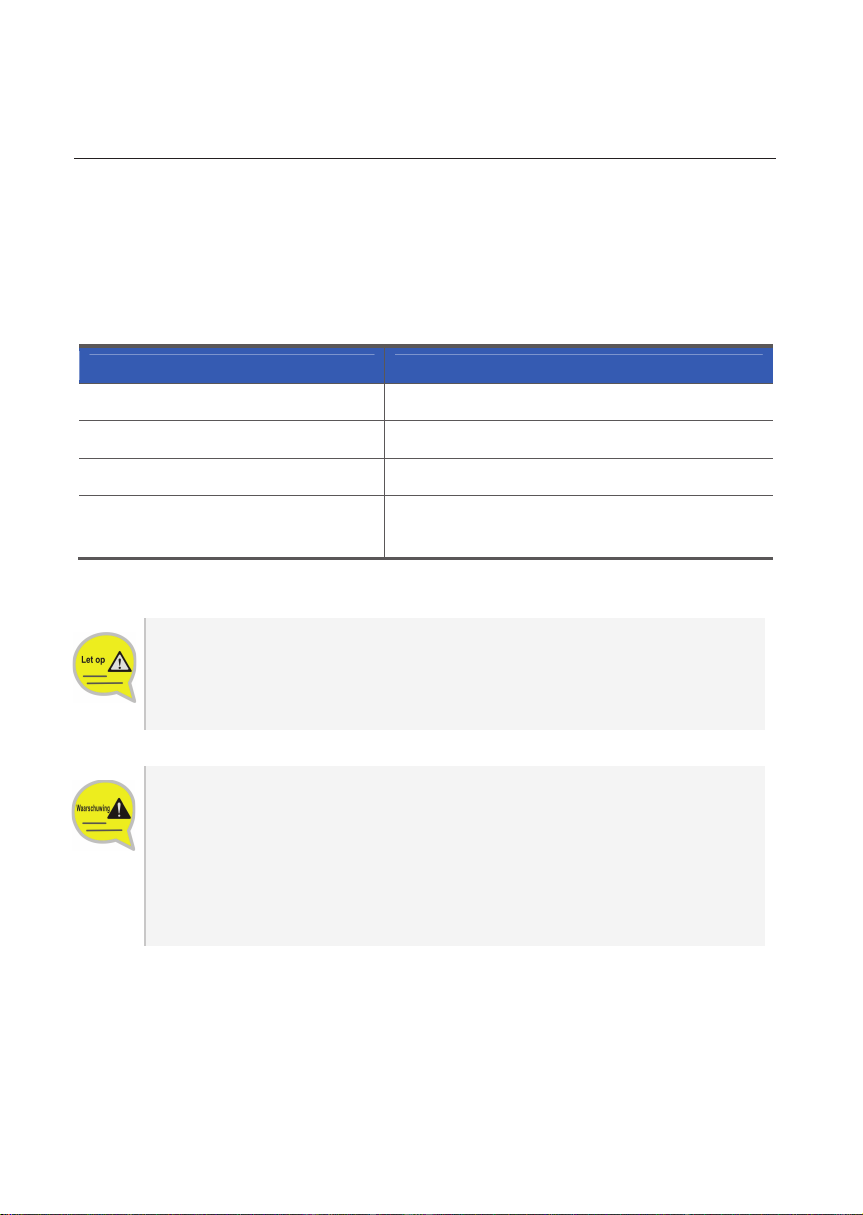
Aansluiting randapparaten
In dit hoofdstuk wordt beschreven hoe de kabel en ieder randapparaat moet worden
aangesloten op de STB.
(De productafbeelding kan afwijken van het daadwerkelijke product.)
Nederlands _13
Page 17
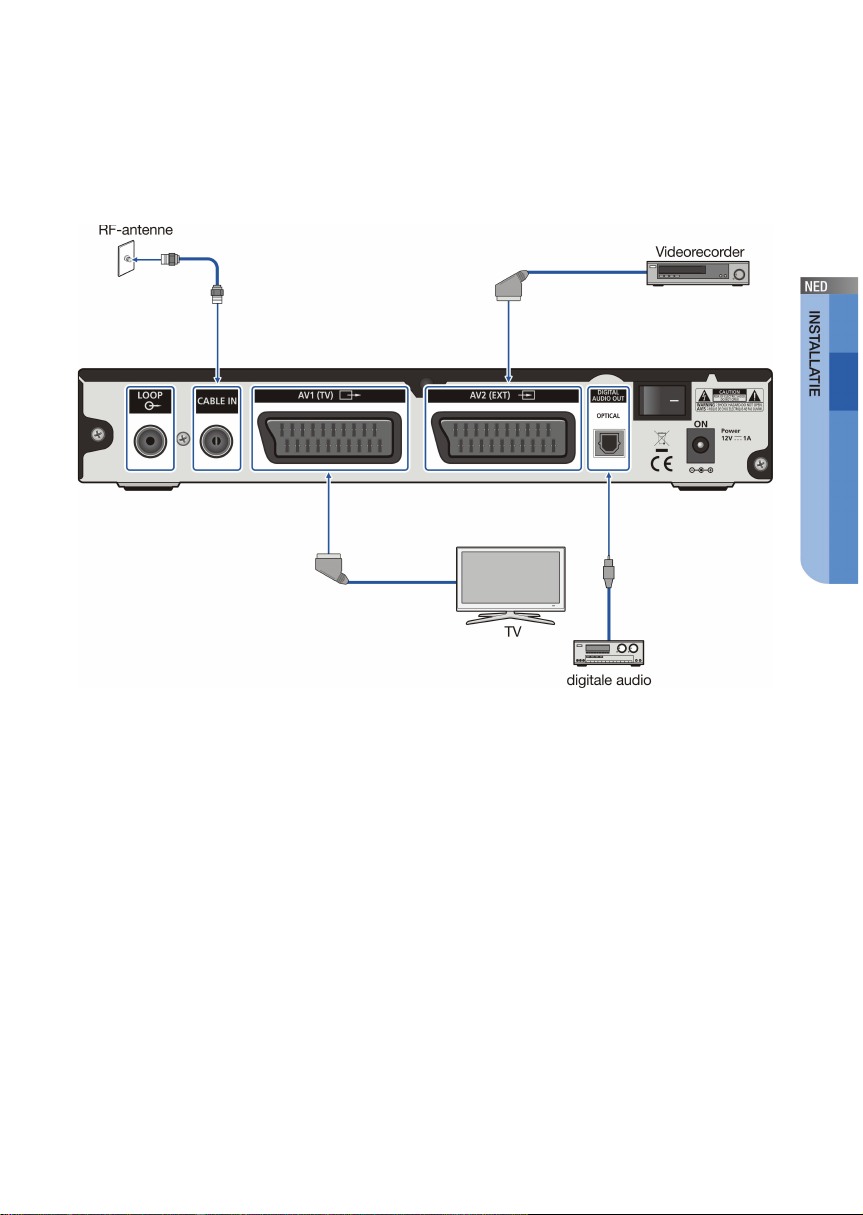
Aansluiting op een tv met een SCART-poort
In dit hoofdstuk wordt beschreven hoe de STB moet worden aangesloten op een tv
met een SCART-poort.
Sluit de tv-SCART-poort aan de achterkant van de STB met een SCART-kabel aan
op de SCART-poort van de tv.
14
_ © SAMSUNG Electronics Co., Ltd.
Page 18
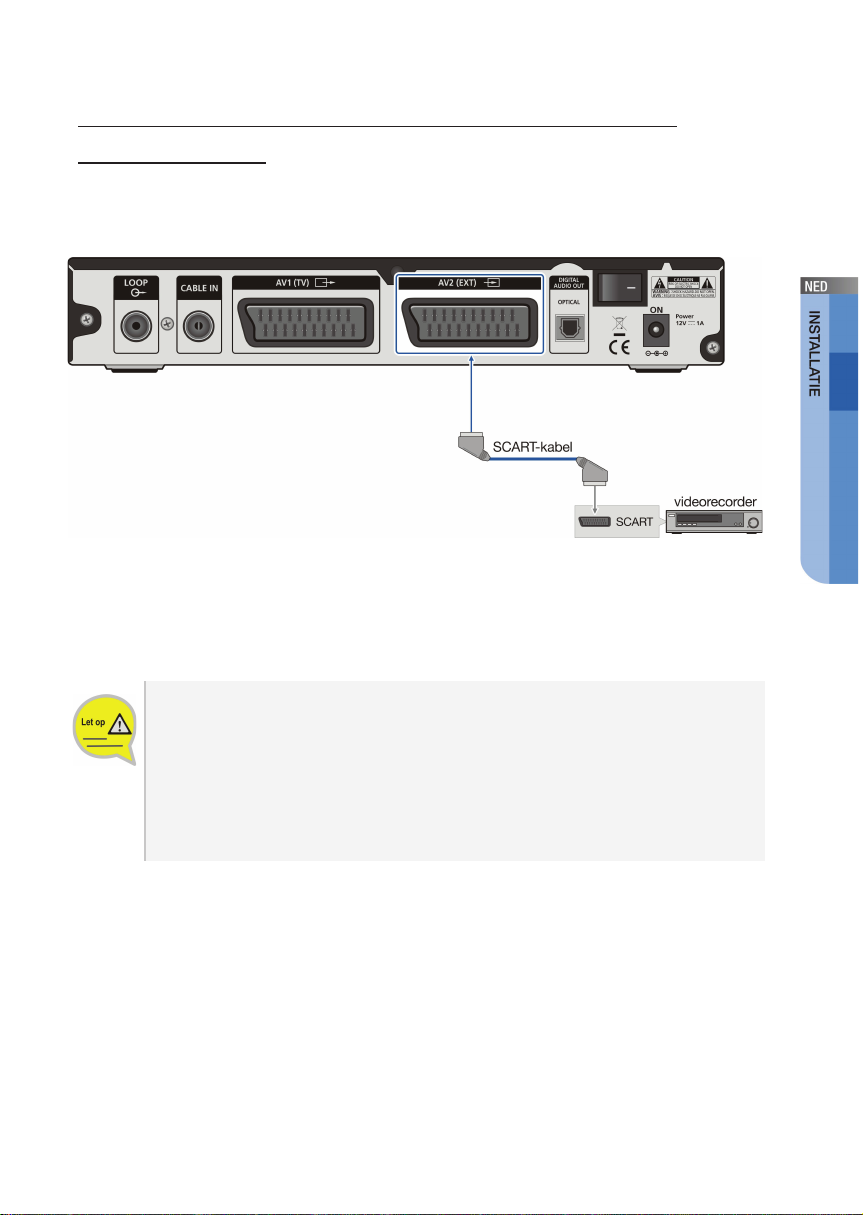
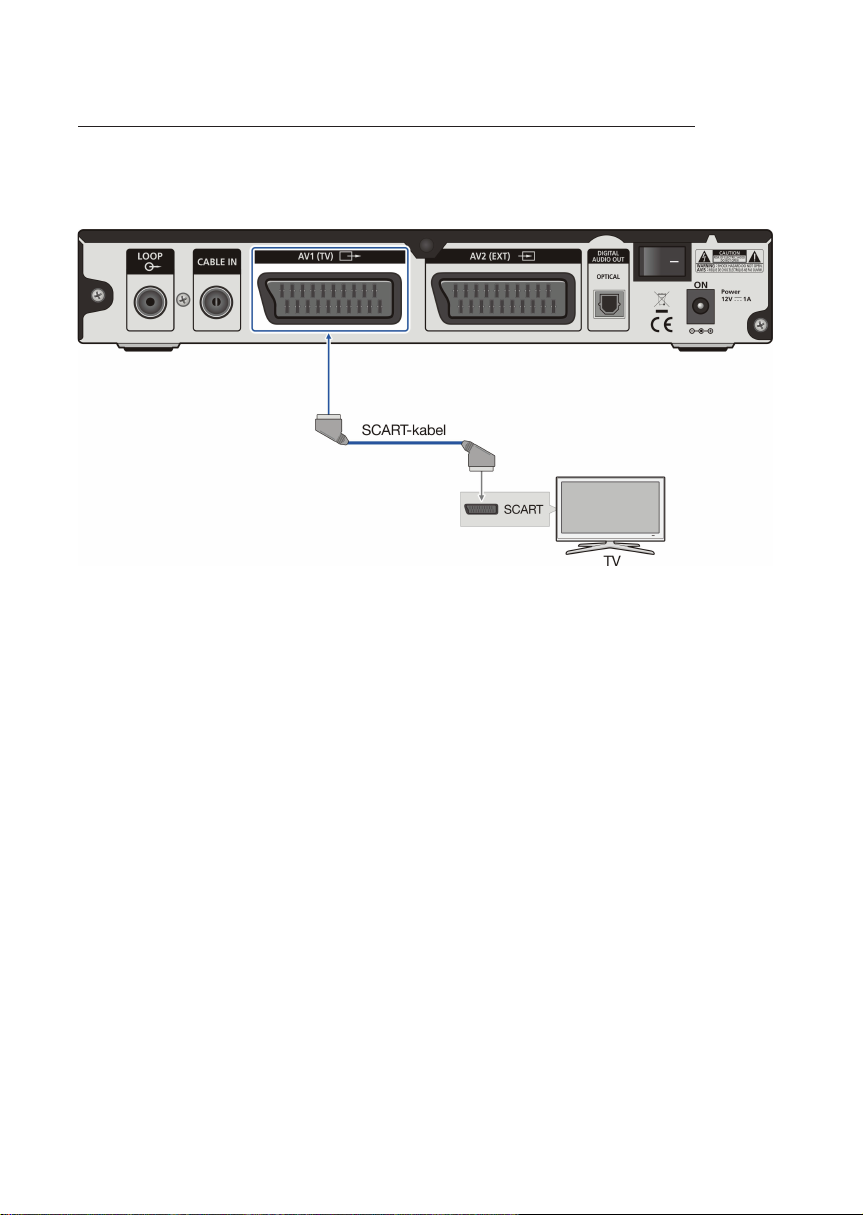
Aansluiting op een videorecorder met een
SCART-poort
In dit hoofdstuk wordt beschreven hoe een videorecorder met een SCART-kabel
moet worden aangesloten op een STB.
Sluit de VCR SCART-poort van de STB met een SCART-kabel aan op de SCARTpoort van de videorecorder.
Aansluiten op een videorecorder:
Schakel voorafgaand aan het aansluiten op een videorecorder zowel de
videorecorder als de STB uit en haal de stekkers uit het stopcontact.
Maak daarna de aansluiting. U kunt gemakkelijk aansluiten met behulp van de
‘gebruiksaanwijzing van de videorecorder’.
- Het is mogelijk dat de videorecorder programma’s met antikopieersignalen niet
goed opneemt.
Nederlands _15
Page 19
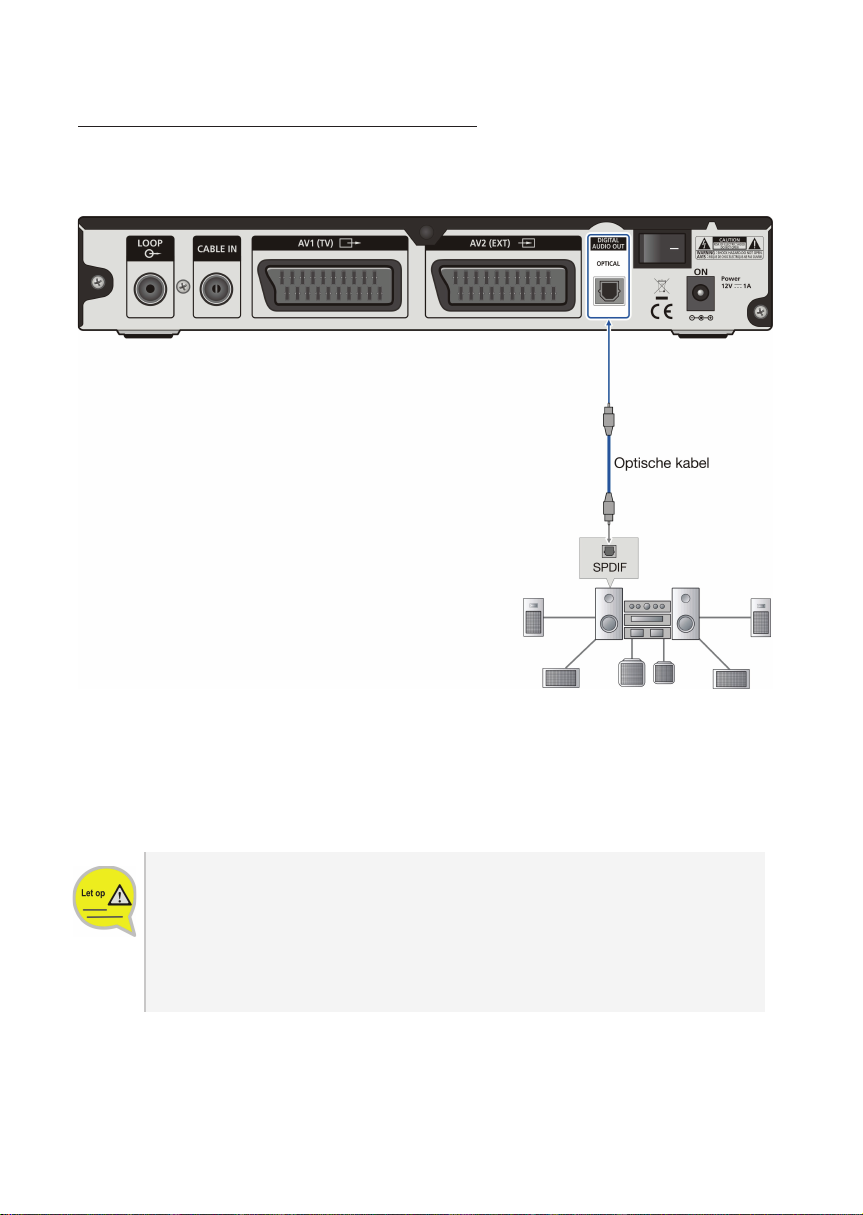
Aansluiting op digitale audio
In dit hoofdstuk wordt beschreven hoe u digitale audio kunt aansluiten (een versterker
of thuisbioscoop met een Dolby Digital-decoderingsfunctie).
Gebruik de optische kabel voor digitale audio en sluit de poort DIGITAL AUDIO
OUT aan de achterkant van de behuizing aan op de poort Digital audio in (SPDIF)
van een Dolby Digital-audioapparaat.
Aansluiten op Dolby Digital-audio
- Zelfs als de Dolby Digital-versterker is aangesloten op een digitale voiceuitgang, moet de voice-uitgang worden aangesloten op de voice-ingang van
een tv, voor het geval dat een tv-luidspreker wordt gebruikt.
- Als een digitale voice-uitgang wordt gebruikt, pas dan het volume van een
digitale versterker aan, niet van een ontvanger.
16
_ © SAMSUNG Electronics Co., Ltd.
Page 20
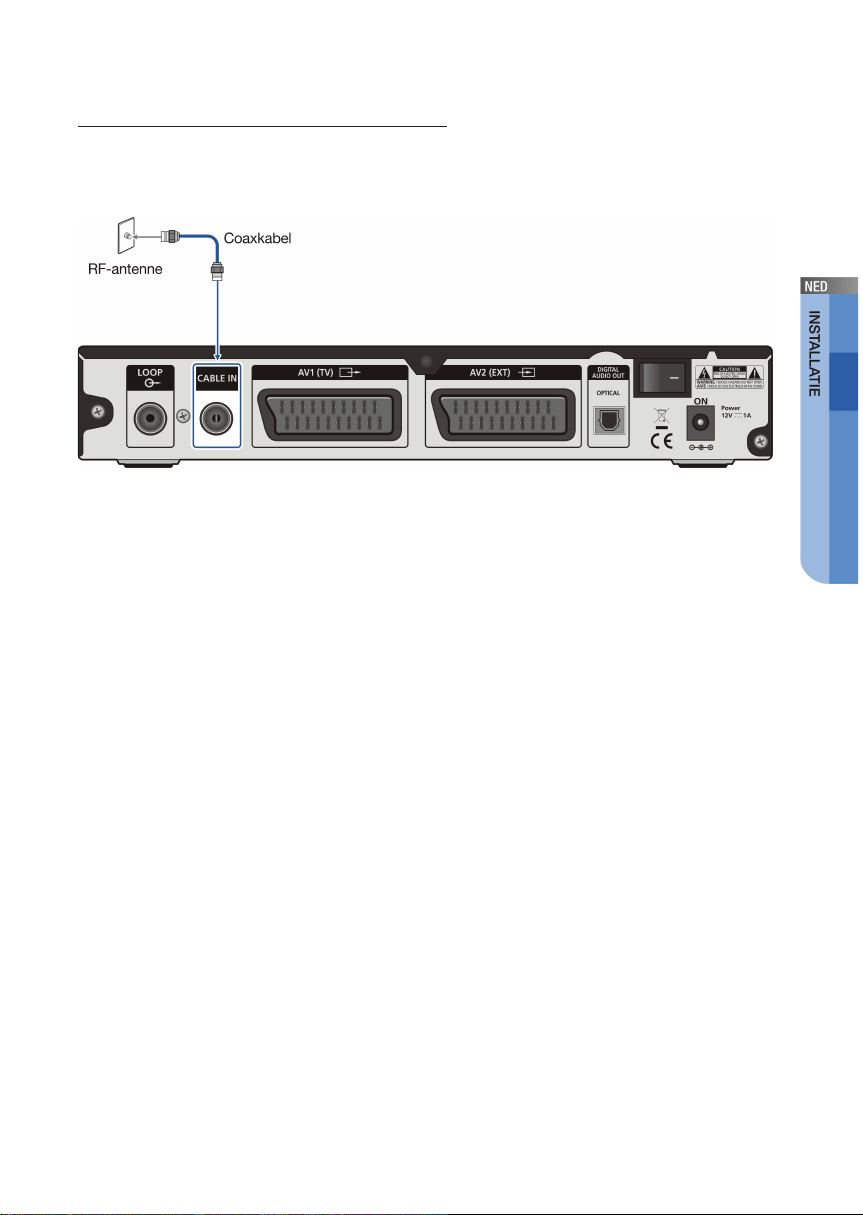
Aansluiten op RF-antenne
In dit hoofdstuk wordt aansluiting op een RF-antenne beschreven. Sluit de
coaxkabel die verbonden is met een RF-antenne aan op de RF IN-poort.
Nederlands _17
Page 21
GEBRUIK
Installatiehulpprogramma
Voordat u het televisieprogramma kunt bekijken, moet u het installatiehulpprogramma
uitvoeren, dat de eerste keer dat de STB wordt aangezet wordt gestart.
Voorbereiding-de smartcard plaatsen
U moet de Smartcard in de smartcard-sleuf aan de zijkant van de STB steken.
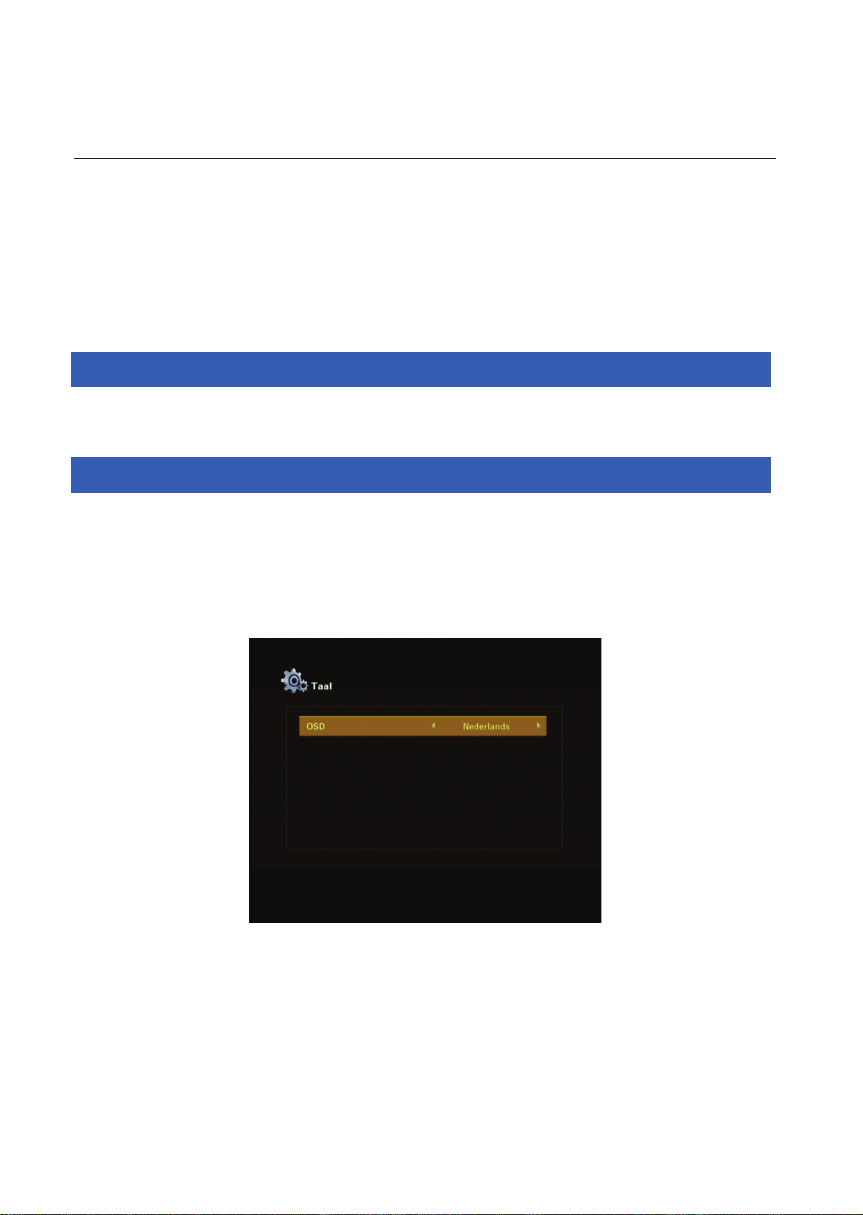
Stap 1-taalselectie
In deze stap selecteert u de taal die zal worden gebruikt in de EPG en het menu.
- Druk op de navigatietoetsen om de taalopties te kiezen (Nederlands/Frans/Engels).
- Druk op de toets OK of selecteer Confirm (Bevestigen) om te bevestigen en naar
het volgende scherm te gaan.
18
_ © SAMSUNG Electronics Co., Ltd.
Page 22

Stap 2-kanaalscan
De STB voert een kanaalscan uit om de kanaaldatabase te vullen.
- Maak de juiste instellingen voor ieder item (frequentie/netwerk-id/modulatie/
symboolfrequentie). De instellingen kunt u krijgen van de tv- en radioleverancier.
- Na een succesvolle scan wordt het resultatenscherm weergegeven met de
nummers van de gevonden tv- en radiokanalen.
- Druk op de toets OK om te bevestigen en naar het volgende scherm te gaan.
Nederlands _19
Page 23
Basisfuncties
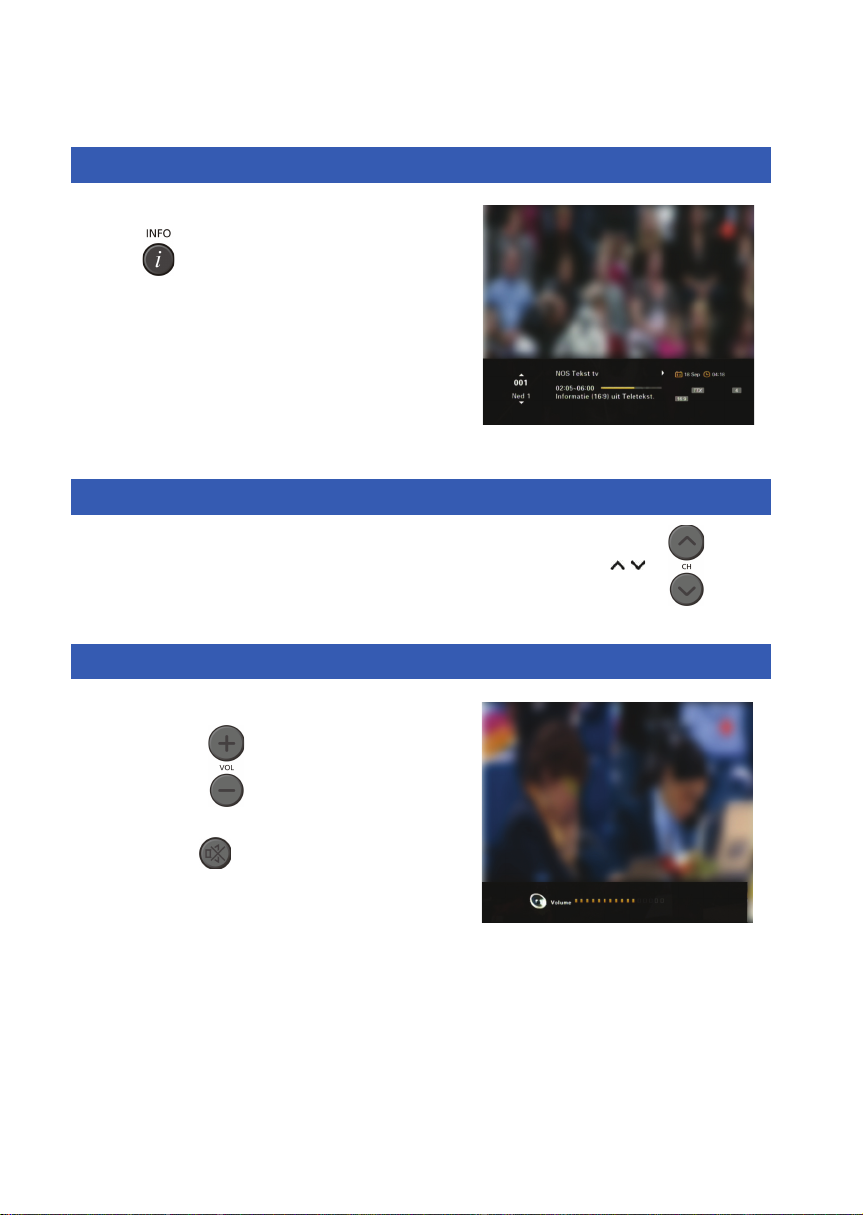
Service-informatie
Als u naar een ander scherm gaat of op de toets
INFO (
op het scherm weergegeven.
- U krijgt de gegevens van een programma, de tijd,
enz. te zien.
) drukt, wordt kanaalinformatie
Kanalen wijzigen
U kunt van het ene naar het andere kanaal gaan met de toets CH / ( ).
Volumeregeling/geluid uit
U kunt het volume afstellen met de
toets VOL+/- (
Om het geluid uit te schakelen drukt u op de
To et s MUTE (
Het geluid wordt weer ingeschakeld als u
nogmaals op de toets drukt.
).
).
20
_ © SAMSUNG Electronics Co., Ltd.
Page 24
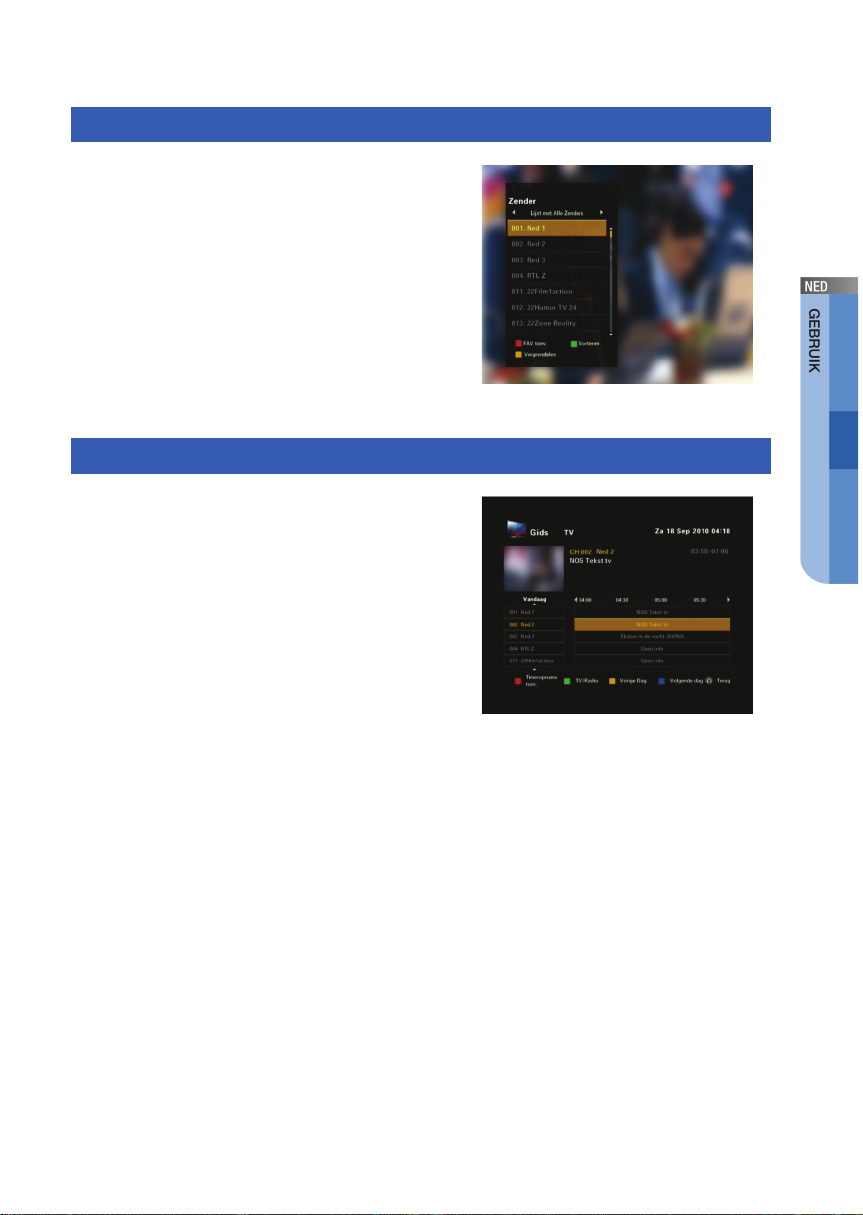
Kanaallijst/Favoriet kanaal
Druk op de toets OK op de afstandsbediening
om de kanaallijst op het scherm weer te
geven.
- Druk op de rode toets om uw favoriete kanaal in te
stellen.
Gids
Druk op de toets GUIDE op de afstandsbediening
om de Elektronische programmagids (EPG) op het
scherm weer te geven.
- Druk op de gekleurde toets om een programmering
in te stellen.
Nederlands _21
Page 25

Infobalk
U ziet de infobalk als u eenmaal op de toets INFO drukt terwijl u naar een programma
kijkt.
- U kunt de volgende programma’s op het huidige kanaal en op een ander kanaal
zien met de navigatietoetsen.
- U kunt de status van het huidige programma bevestigen (kanaal, titel, uitzendtijd).
22
_ © SAMSUNG Electronics Co., Ltd.
Page 26
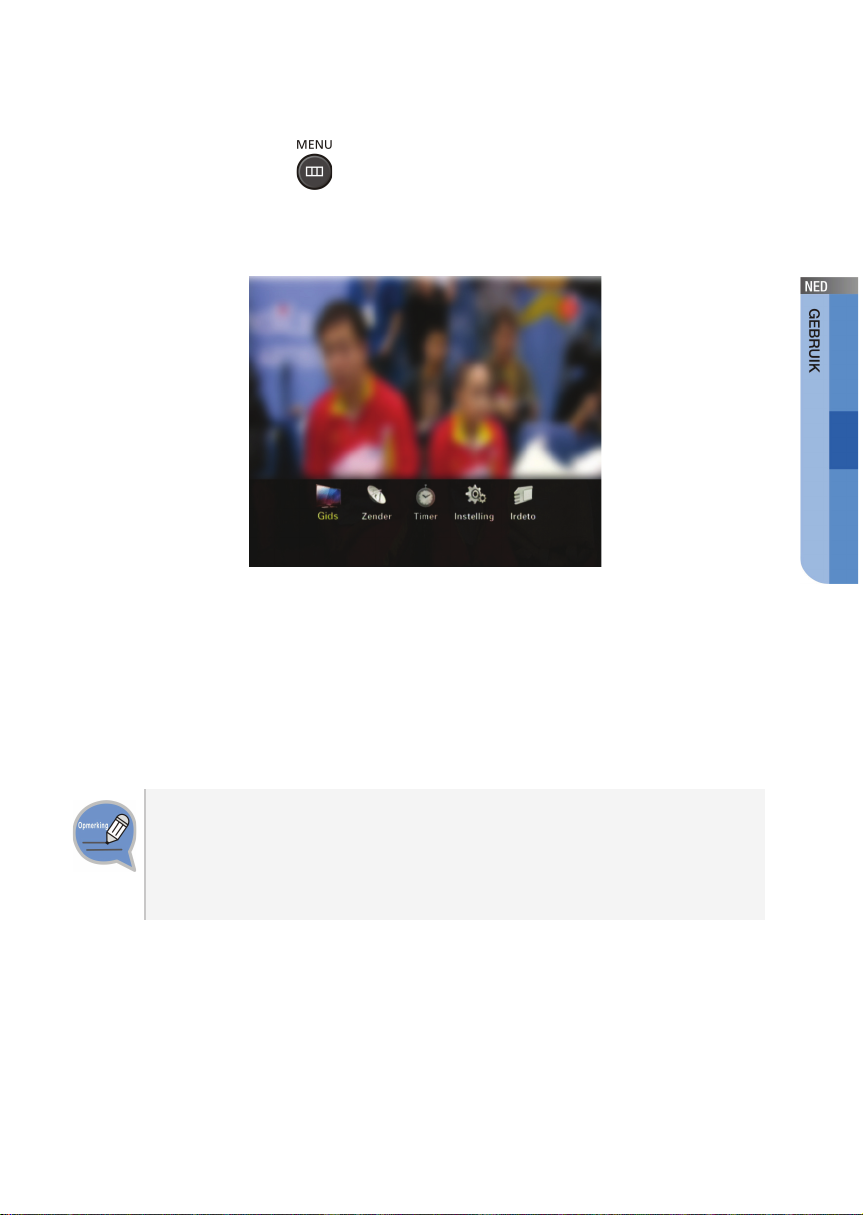
Hoofdmenu
Als u op de toets MENU ( ) drukt terwijl u naar de tv kijkt, verschijnt een
Hoofdmenuscherm.
zoals hieronder weergegeven:
- Selecteer het gewenste item met de pijl naar links/rechts (/).
Druk op de toets OK om naar een menu op lager niveau te gaan; of de toets return
om naar een menu op hoger niveau te gaan.
- Als het gewenste menu is gevonden, kunt u op de toets OK drukken om naar het
scherm van het geselecteerde menu te gaan.
Alvorens het product te gebruiken
De informatie in dit hoofdstuk kan door een programma-aanbieder worden
gewijzigd zonder voorafgaande schriftelijke mededeling, om de dienstverlening te
verbeteren of een nieuwe dienst aan te bieden. Neem contact op met een
plaatselijk servicecenter als de dienst is gewijzigd.
Nederlands _23
Page 27
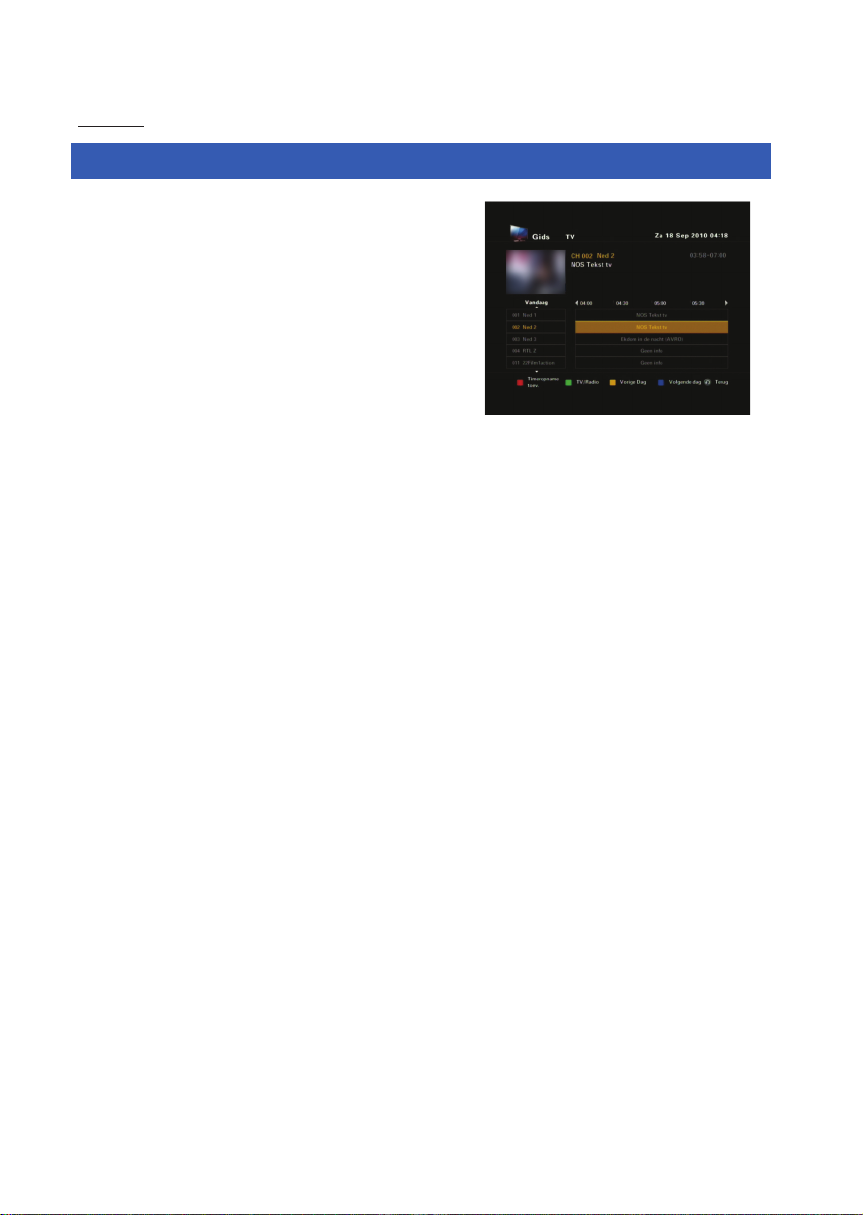
Gids
Gids
U kunt naar een kanaalgidsscherm gaan waarop
de programmalijst per kanaal, programmainformatie enz. worden weergegeven.
- De kleurentoets op de afstandsbediening wordt
bediend door de functies die onderaan op het
scherm worden weergegeven.
- Selecteer een kanaalprogramma met de pijltoetsen
en druk vervolgens op de OK-toets om het kanaal te
bekijken.
- U kunt programma’s programmeren door een
gewenst programma te selecteren in een
programmalijst en op de RODE toets op de
afstandsbediening te drukken. Op het moment dat
het geprogrammeerde programma start, wordt het
betreffende kanaal automatisch weergegeven.
Druk opnieuw op de RODE toets om de
programmering ongedaan te maken.
24
_ © SAMSUNG Electronics Co., Ltd.
Page 28

Kanaal
Kanaallijst
Gebruik deze functie om kanalen te verwijderen.
- Selecteer de lijst door op TV/RADIO te drukken.
- Selecteer het kanaal met de toetsen ɀ/Ɂ.
- Druk op de OK-toets om dat kanaal te bekijken.
De kleurentoets geeft de volgende servicelijst.
- Druk op de GROENE toets om de kanalen in
alfabetische volgorde of standaard (op nummer) te
sorteren.
- Druk op de GELE toets om het kanaal te
vergrendelen. Om het kanaal te bekijken moet u in
het venster dat verschijnt de pincode invoeren.
Dit betekent dat u toegang hebt tot alle kanalen met
kinderslot als u de pincode juist invoert op een
willekeurig kanaal met kinderslot.
- Druk op de RODE toets om een lijst met favoriete
kanalen toe te voegen. Selecteer de lijst met
favoriete kanalen die u wilt toevoegen.
(Er worden vijf lijsten ondersteund.)
- Met de toetsen PG+/- navigeert u per pagina door
de lijst.
Pincode Wijzigen
U kunt de pincode wijzigen.
- Druk op de cijfertoetsen om de huidige pincode in
te voeren.
- Druk op de cijfertoetsen om de nieuwe pincode in
te voeren.
- Druk op de cijfertoetsen om de nieuwe pincode te
bevestigen.
Nederlands _25
Page 29

Ouderlijk Toezicht
U kunt het specifieke kanaal vergrendelen door
een leeftijd te selecteren. Als de leeftijd om het
kanaal te mogen bekijken hoger ligt dan de
leeftijd die u hebt ingesteld, wordt het kanaal
vergrendeld. Gebruik de pijltoetsen
links/rechts om de tijd aan te passen.
- U kunt een leeftijd van 4 tot 18 kiezen.
- ‘All blocked’ (Allemaal vergrendeld) betekent dat u
geen enkel kanaal kunt bekijken, ongeacht de
leeftijdsgrens.
- ‘Unblocked’ (Ontgrendeld) betekent dat u alle
kanalen kunt bekijken, ongeacht de leeftijdsgrens.
Netwerk Scannen
Om af te stemmen op nieuwe kanalen is de
STB voorzien van ‘Netwerk scannen’, waarbij
de kanaalgegevens door de gebruiker kunnen
worden ingevoerd.
Na selectie van ‘Netwerk scannen’ in het menu
Zender verschijnt het volgende scherm:
- Voer de frequentie in van het kanaal dat u wilt
vinden. De volgende opties zijn standaard
gedefinieerd, maar u kunt deze optioneel kiezen.
De balk Signal Status (Signaalstatus) geeft aan of de
keuze geldig is. U kunt kiezen tussen eenmaal,
dagelijks of wekelijks.
- Voer de netwerk-id in van het kanaal dat u zoekt.
- Voer de modulatie in van het kanaal dat u zoekt.
U kunt de waarden 16, 32, 64, 128, 256 kiezen.
- Voer de symboolfrequentie in van het kanaal dat u
zoekt.
- Voer de te scannen bufferbandtijd in. U kunt 0 tot 15
min. selecteren
- Na het selecteren van de opties, gaat u naar de
scan-toets. Druk op de OK-toets om de
scanprocedure te starten.
26
_ © SAMSUNG Electronics Co., Ltd.
Page 30

Timer
Timeropname
U kunt de kanalen zien die u hebt gereserveerd
via de EPG of handmatig hebt ingesteld.
- Druk op de RODE toets om timers toe te voegen.
U kunt het programma handmatig reserveren.
- Druk om de timers te bewerken op de GROENE
toets nadat u de cursor op het programma hebt
geplaatst dat u wilt bewerken. U kunt timers die zijn
ingesteld via de EPG niet bewerken.
- Druk om de timers te verwijderen op de GELE toets
nadat u de cursor op het programma hebt geplaatst
dat u wilt verwijderen.
Handmatig Instellen
U kunt de programma’s handmatig reserveren.
Stel het kanaal, de datum, de start-/eindtijd en
de frequentie in met de toetsen / of de
toetsen /.
Extra tijd
De bufferbandtijd is een functie die ervoor zorgt
dat de hele opname past binnen ingestelde
tijdsgrenzen. 1 minuut bufferbandtijd betekent
dat de STB deze timeropname 1 minuut eerder
dan de ingestelde tijd begint en 1 minuut na de
ingestelde tijd beëindigt.
Nederlands _27
Page 31

Instellingen
Preference (Voorkeur)
Met deze optie kunt u vooraf ingestelde
instellingen, zoals de breedte/hoogteverhouding
en de tv-instelling, naar wens aanpassen.
U kunt verschillende voorkeurinstellingen
maken. Plaats de cursor op dit submenu en
druk op de OK-toets.
- TV Aspect Ratio (breedte/hoogteverhouding tv)
selecteren: STANDAARD 4:3-verhouding of
BREEDBEELD 16:9-verhouding.
- 16:9 LB: LB betekent Letterbox. Selecteer dit als u
een beeld met een verhouding van 16:9 wilt zien op
een tv-scherm met een verhouding van 4:3.
Het beeld met de verhouding van 16:9 wordt dan
verkleind zonder dat het beeld wordt vervormd, dus
de bovenkant en de onderkant van het scherm zijn
leeg.
- TV-functie gebruiken: De tv zorgt voor de conversie.
- Pillarbox: Als de breedte/hoogteverhouding van het
bekeken programma 4:3 is, zal de STB lege ruimten
toevoegen aan de linker- en rechterkant van het
scherm. Het volledige oorspronkelijk beeld is
zichtbaar in het midden.
- Zoom: De STB vergroot het oorspronkelijke beeld.
- Selecteer de tv-instelling: Composiet of RGB.
U kunt het type videosignaal selecteren.
- Automatische ondertitels ‘On’ (Aan) of ‘Off’ (Uit)
selecteren. Als u ‘On’ selecteert en het kanaal
ondersteunt ondertitels, dan worden de ondertitels
automatisch weergegeven. U hoeft niet op de toets
SUBTITLE te drukken.
- Stel de duur in van de weergave van de
informatiebalk op het scherm. De tijdsduur heeft een
bereik van 1 tot 60 seconden.
- De instelling wordt gemaakt met de numerieke
toetsen of de toetsen /.
28
_ © SAMSUNG Electronics Co., Ltd.
Page 32

Transparantie
U kunt het transparantieniveau instellen van 0
tot 100%. De instelling wordt gemaakt met de
cijfertoetsen of de toetsen /.
Taal
Met de taaloptie kan de gebruiker de
gewenste taal selecteren voor OSD, audiouitvoer en ondertitels. Er zijn 3 talen
beschikbaar. Gebruik de toetsen / om de
gewenste taal te selecteren en druk vervolgens
op de toets OK.
- U kunt de taal instellen voor OSD, audio-uitvoer en
ondertitels. Voor het gemak van gebruikers uit
andere gebieden die een andere taal spreken zijn
voor OSD 3 talen beschikbaar. (Momenteel Engels,
Nederlands en Frans)
Nederlands _29
Page 33

Systeem
Dit menu bestaat uit 2 submenu’s: Product
Info en Geluid resetten.
- Als u contact moet opnemen met uw tv- en
radioleverancier of een servicecenter is het mogelijk
dat zij u vragen om informatie die in dit menu
beschikbaar is. Plaats de cursor op dit submenu en
druk op de OK-toets.
- Dit is om de fabrieksinstellingen te herstellen, in het
geval dat de gebruiker problemen heeft na het
invoeren van nieuwe waarden van kanaalgegevens
of andere gegevens, die een fout veroorzaken.
Selecteer het menu Geluid resetten in het menu
System (Systeem) en druk op de toets OK.
Selecteer ‘YES’ (Ja) in het waarschuwingsvenster als
u door wilt gaan. De instellingen van de ontvanger
worden automatisch gereset. Het herstellen van de
fabriekinstellingen kan enige seconden duren.
30
_ © SAMSUNG Electronics Co., Ltd.
Page 34

Irdeto
Signaalstatus
U kunt de status van het signaal zien.
Status Smartcard
U kunt de status van de Smartcard zien.
Servicestatus
U kunt de status van de service zien.
Nederlands _31
Page 35

Laderstatus
U kunt de status van de lader zien.
Mails
U kunt het bericht lezen dat naar de
afzonderlijke decoders is verzonden.
Er kunnen maximaal 10 berichten worden
opgeslagen.
32
_ © SAMSUNG Electronics Co., Ltd.
Page 36

PROBLEMEN OPLOSSEN
In dit hoofdstuk wordt beschreven hoe moet worden omgegaan met problemen die zich
tijdens het gebruik van de STB kunnen voordoen.
Controleer eerst het volgende als de STB afwijkend gedrag vertoont:
Neem contact op met een plaatselijk servicecenter als het probleem blijft bestaan.
Scherm
Probleem Oplossing
Er verschijnt niets op het tv-
scherm.
Er wordt geen menuscherm
weergegeven.
Afstandsbediening
Probleem Oplossing
De afstandsbediening werkt
niet.
1. Controleer of de tv en de STB zijn ingeschakeld.
2. Controleer de aansluiting van de kabel tussen de
tv en de STB.
3. Controleer of de tv-ingang is ingesteld op een
externe ingangsmodus.
4. Druk op de Power-knop om te controleren of de
STB in de standby-modus staat.
1. Schakel de STB in en druk op de Menu-toets op
de afstandsbediening.
2. Als er nadat u op de Menu-toets hebt gedrukt nog
steeds geen normaal menuscherm wordt
weergegeven, neem dan contact op met een
lokaal servicecenter.
1. Controleer of de afstandsbediening geschikt is
voor gebruik met de STB.
2. Vervang de batterijen door nieuwe en controleer of
de afstandsbediening normaal werkt.
3. Controleer of de batterijen goed geplaatst zijn.
4. Controleer of er zich een obstakel bevindt tussen
de STB en de afstandsbediening.
5. Gebruik de afstandsbediening vlak bij de STB om
te controleren of de afstandsbediening normaal
werkt.
Nederlands _33
Page 37

Algemeen
Probleem Oplossing
Er komt geen geluid uit de tv of
de audio.
Ik weet het wachtwoord van de
STB niet meer.
1. Controleer de aansluiting van de kabel tussen de
audiopoort van het tv-/audiosysteem en de AUDIO
OUT-poort aan de achterkant van de STB.
2. Controleer of de functie MUTE (Geluid uit) is
ingeschakeld als de kabel normaal is aangesloten.
Als de functie voor het uitschakelen van het geluid
actief is drukt u op de toets MUTE op de
afstandsbediening om de functie uit te schakelen.
Het standaardwachtwoord van de STB is ‘0000’.
Neem contact op met een plaatselijk servicecenter
als u het wachtwoord niet meer weet. U kunt een
nieuw wachtwoord opgeven na initialisatie van het
apparaat.
34
_ © SAMSUNG Electronics Co., Ltd.
Page 38

BIJLAGE
Productspecificaties
Item Beschrijving
Modelnaam SMT-C1140
Ontvanger DVB-C
Type ingangsconnector Vrouwelijk IEC in overeenstemming met IEC 60169-2
Ingangsimpedantie 75
Zendfrequentie Rx 47~862 MHz
Zendniveau Rx -15~+15 dBm (gemiddeld vermogen)
Type zendmodulatie Rx Kwadratuur amplitude modulatie
Bandbreedte kanalen 8 MHz
Type uitgangsconnector Mannelijke IEC in overeenstemming met IEC 60169-2
Audio-uitgang Digitale audio (SPDIF): 1 poort
Simultane uitgang video/audio SCART: 2 poorten (tv/videorecorder)
Nominale spanning, frequentie AC 220-240 V~, 50-60 Hz, 0.3 A max
Nominaal stroomverbruik Actieve modus : max. 7.3 W
Actieve Standby-Modus : 5.5 W
Temperatuur tijdens bedrijf 0~40°C
Vochtigheid tijdens bedrijf 20~80% (40°C)
Afmetingen (mm) 233 (l) x 133 (b) x 38 (h)
Gewicht 582 g
Nederlands _35
Page 39

Class B EMI Compliance Listed (for home telecommunication device)
This product has been registered as an EMI-compliant device for home use, which
cannot only be used in residential areas, but also in all the other areas.
European Notice(Europe Only)
Products with the CE marking comply with the EMC Directive(2004/108/EC) and the
Low Voltage
Directive(2006/95/EC) issued by the Commission of the European Community.
Compliance with these directives implies conformity to the following European
Norms:
- EN55022: Radio Frequency Interference
- EN55024: Electromagnetic Immunity of Information Technology Equipment
- EN61000-3-2: Power Line Harmonics
- EN61000-3-3: Voltage Fluctuations
- EN55013: Radio disturbance characteristics of broadcast receivers and associated
equipments
- EN55020: Electromagnetic immunity of broadcast receivers and associated
equipments
36
_ © SAMSUNG Electronics Co., Ltd.
Page 40

NEDERLAND
Dit Samsung-product is gegarandeerd tegen fabricage- en/of materiaalfouten voor een periode van
Vierentwintig (24) maanden gerekend vanaf de oorspronkelijke aankoopdatum, tenzij in de nationale of
Europese wet- of regelgeving een andere garantieperiode is vastgesteld. Indien aanspraak wordt gemaakt
op een reparatie onder garantie, dient u het product te retourneren aan de winkelier waar u het product
gekocht heeft.
Erkende dealers van Samsung danwel door Samsung erkende servicecentra in West-Europese Ianden zullen
eveneens garantie verlenen, echter op de voorwaarden die van toepassing zijn in het betreffende land.
Ingeval van problemen kunt u nadere informatie verkrijgen via de Samsung service- en informatielijn:
Samsung Electronics Benelux B.V. Olof Palmestraat 10,
Delft postbus 681, 2600 AR Delft
Voor Nederland: tel. 0900-SAMSUNG (0900-7267864) (€ 0,10/min.)
Voor Belgie: tel. 02/201.24.18
GARANTIECONDITIES
1. De garantie is alleen geldig wanneer de garantiekaart volledig is ingevuld en samen met de originele
aankoopbon of –bevestiging waarop duidelijk het serienummer vermeld staat, wordt overlegd.
2. Samsungs verplichtingen beperken zich tot reparatie of, indien nodig en na haar beoordeling, tot het
vervangen van het product of het defecte onderdeel.
3. Reparaties onder garantie moeten door Samsung erkende service-centra worden uitgevoerd.
Er zal geen vergoeding plaatsvinden voor reparaties uitgevoerd door niet erkende Samsung dealers of
niet erkende servicecentra. Alle daaruit voortvloeiende schades vallen niet onder deze garantie.
4. Aanpassingen aan het product die noodzakelijk zijn om te voldoen aan landelijke of plaatselijke
technische of veiligheidsvoorschriften die gelden in enig land anders dan dat waarvoor het product
oorspronkelijk is ontworpen en gefabriceerd, worden niet beschouwd als voortvloeiende uit materiaal- of
fabricagefouten.
5. Deze garantie dekt geen van de volgende zaken:
a) Periodieke controles, onderhoud en reparatie of vervanging van onderdelen veroorzaakt door
normaal gebruik en slijtage. Hierbij dient vermeld te worden dat bij alle beeldbuizen, ongeacht het
fabrikaat, de helderheid met het verstrijken van de tijd afneemt.
b) Kosten verbonden aan transport, verwijdering of installatie van het product.
c) Misbruik, inclusief het gebruik voor andere doeleinden dan waarvoor het product bestemd is,
of onjuiste installatie.
d) Schade veroorzaakt door bliksem, water, vuur, overmacht, oorlog, rellen, aansluiting op onjuist
voltage, onvoldoende ventilatie, vallen, stoten, onoordeelkundig gebruik of enige andere oorzaak die
buiten de controle van Samsung valt.
6. Deze garantie geldt voor iedereen die gedurende de garantieperiode legaal in het bezit is gekomen van
het product.
7. De wettelijke rechten van de koper krachtens enigerlei van toepassing zijnde nationale wetgeving, hetzij
jegens de verkoper en voortvloeiend uit het koopcontract, hetzij anderszins, worden door deze garantie
niet beïnvloed. Tenzij de nationale wetgeving anders bepaalt, zijn de rechten voortvloeiend uit deze
garantie de enige rechten van de koper, en kunnen Samsung, haar dochtermaatschappijen en vertegenwoordigingen niet aansprakelijk worden gesteld voor indirect of voortvloeiend verlies.
EUROPESE GARANTIE
Page 41

Page 42

Page 43

Page 44

Correcte verwijdering van dit product
(elektrische & elektronische afvalapparatuur)
Dit merkteken op het product, de accessoires of het informatiemateriaal duidt erop dat het product en zijn
elektronische accessoires (bv. lader, headset, USB-kabel) niet met ander huishoudelijk afval verwijderd
mogen worden aan het einde van hun gebruiksduur. Om mogelijke schade aan het milieu of de menselijke
gezondheid door ongecontroleerde afvalverwijdering te voorkomen, moet u deze artikelen van andere
soorten afval scheiden en op een verantwoorde manier recyclen, zodat het duurzame hergebruik van
materiaalbronnen wordt bevorderd.
Huishoudelijke gebruikers moeten contact opnemen met de winkel waar ze dit product hebben gekocht of
met de gemeente waar ze wonen om te vernemen waar en hoe ze deze artikelen milieuvriendelijk kunnen
laten recyclen.
Zakelijke gebruikers moeten contact opnemen met hun leverancier en de algemene voorwaarden van de
koopovereenkomst nalezen. Dit product en zijn elektronische accessoires mogen niet met ander bedrijfsafval
voor verwijdering worden gemengd.
Correcte behandeling van een gebruikte accu uit dit product
(Van toepassing op de Europese Unie en andere Europese landen met afzonderlijke
inzamelingssystemen voor accu’s en batterijen.)
Dit merkteken op de accu, handleiding of verpakking geeft aan dat de accu in dit product aan het einde van
de levensduur niet samen met ander huishoudelijk afval mag worden weggegooid. De chemische symbolen
Hg, Cd of Pb geven aan dat het kwik-, cadmium- of loodgehalte in de accu hoger is dan de referentieniveaus
in de Richtlijn 2006/66/EC. Indien de gebruikte accu niet op de juiste wijze wordt behandeld, kunnen deze
stoffen schadelijk zijn voor de gezondheid van mensen of het milieu.
Ter bescherming van de natuurlijke hulpbronnen en ter bevordering van het hergebruik van materialen,
verzoeken wij u afgedankte accu’s en batterijen te scheiden van andere soorten afval en voor recycling aan
te bieden bij het gratis inzamelingssysteem voor accu’s en batterijen in uw omgeving.
Page 45

Page 46

Page 47

Page 48

SAFETY CONCERNS
The purpose of the Safety Concerns section is to ensure the safety of users and
prevent property damage. Please read this document carefully for proper use.
Conventions
Warning
Provides information or instructions that you should follow in order to avoid
personal injury or fatality.
Caution
Provides information or instructions that you should follow in order to avoid a
service failure or damage to your STB.
Note
Indicates additional information for referrence.
Checks
Provides the operator with checkpoints for stable system operation.
Symbols
Caution
Indication of a general caution
Restriction
Indication for prohibiting an action for a product
Instruction
Indication for commanding a specifically required action
English _1
Page 49

Warning
WARNING
Power
Insert the power plug firmly.
Do not touch the main body,
power cable, or power plug with
wet hands.
Installation/Maintenance
Install the product in an area with
good ventilation.
Do not install in humid or dusty
areas, and avoid installing near
heating devices.
Keep flammable substances or
sprays away from the set-top box.
Do not place heavy objects on this
product.
Do not connect multiple devices to
a single outlet simultaneously.
If video/sound cable generates
heat after connection, pull out the
power plug and contact customer
service immediately.
Do not cover the top.
Pull out the power plug during
thunderstorms or when not used
for a prolonged period of time.
Pull out the power plug at once
and contact customer service if
unusual noise, smell, or smoke
comes out.
General
Check if the coaxial cable is
correctly grounded before
connecting to the set-top box.
Class 1 LED Product.
2
_ © SAMSUNG Electronics Co., Ltd.
Ask the installation engineer to
check if the set-top box to be
connected is correctly grounded.
This product complies with 21 CFR
Chapter 1, subchapter J.
Page 50

Caution
CAUTION
Power
Connect your TV after powering off
the TV and the set-top box by
pulling out the power plugs.
Do not insert the power plug
before connecting the power cable
to the product.
Installation/Maintenance
Install the product correctly
complying with the instructions in
the user guide.
Do not spray water directly on the
unit and do not use chemical
solvents such as wax, mosquito
spray, alcohol or detergent.
Do not place the product on
unstable support.
The socket-outlet shall be installed
near the equipment and shall be
easily accessible.
Before connecting the power
source, permanent protective earth
connection to the cable distribution
should be made.
Do not remove the CableCARD™
from the set-top box.
Do not place any metal items such
as pins, paper clips or coins on the
top of the product.
Risk of electric shock, Do NOT
OPEN.
Do not disassemble, repair, or
remodel.
No connection to antenna.
Wipe the product with a soft and
dry cloth when cleaning.
English _3
Page 51

TABLE OF CONTENTS
SAFETY CONCERNS 1
Conventions ............................................................................ 1
Symbols ................................................................................... 1
Warning .................................................................................... 2
Caution .................................................................................... 3
BEFORE USE 6
SD Cable STB ......................................................................... 6
Button Functions of SMT-C1140 ........................................... 6
Package Contents .................................................................. 7
Names and Functions ............................................................ 8
Front Panel ...................................................................................... 8
Rear Panel....................................................................................... 9
Remote Control .................................................................... 10
INSTALLATION 12
Installation Environment ...................................................... 12
Peripheral Device Connection ............................................ 13
Connection to a TV with a SCART Port ....................................... 14
Connection to a VCR with a SCART Port ................................... 15
Connection to a Digital Audio ...................................................... 16
Connection to RF Antenna ........................................................... 17
4
_ © SAMSUNG Electronics Co., Ltd.
Page 52

HOW TO USE 18
Installation Wizard ............................................................... 18
Basic Functions ................................................................... 20
Main Menu ............................................................................ 23
Guide ............................................................................................. 24
Channel ......................................................................................... 24
Timer ............................................................................................. 27
Settings ......................................................................................... 28
Irdeto ............................................................................................. 30
TROUBLESHOOTING 32
ANNEX 34
Product Specifications ........................................................ 34
Open Source Announcement ............................................. 36
English _5
Page 53

BEFORE USE
SD Cable STB
SMT-C1140 is SD Cable STB (Set-top box).
Button Functions of SMT-C1140
Video Display of SD (Standard Definition)
Supports standard resolution video output of up to 480, enabling you to enjoy clear
and sharp video.
EPG Support
Using the EPG Channel Guide, you can check the program information and
broadcasting schedule of a desired channel, and schedule the programs to watch.
[Active Standby Mode]
When you press (
STB shall switch from Active Mode to Active Standby Mode.
Active Standby Mode
STB is still consuming energy. In order for the box to enter into OFF mode,
please push the power off button situated at the rear panel of the STB.
6
_ © SAMSUNG Electronics Co., Ltd.
) button while STB is in service (in Active Mode),
Page 54

Package Contents
Please make sure the following items are contained in your product package box.
SMT-C1140
SCART Cable Remote Control
(with AAA Battery)
Power adaptor User Guide
English _7
Page 55

Names and Functions
This section describes the name and function of the parts.
Front Panel
This section describes the front panel.
Name Description
Power Change the state of a STB to a active mode or active
standby mode.
ACTIEVE STANDBY LED A green LED lights during active standby mode.
IR receiver Receive signals from the remote control.
Smart Card Slot Insert the smart card.
8
_ © SAMSUNG Electronics Co., Ltd.
Page 56

Rear Panel
This section describes the names and functions of the ports on the rear panel.
Name Description
LOOP THROUGH A port which connects another STB or TV with a RF cable.
CABLE IN A port which connects a RF antenna with a RF cable.
AV1 (TV) SCART A TV SCART output port which is connected to a TV with a
SCART cable.
AV2 (EXT) SCART A EXT SCART output port which is connected to a VCR with
a SCART cable.
DIGITAL AUDIO OUT
(OPTICAL)
Power on/off switch A switch to turn the STB power on/off.
POWER IN A power in port (DC 12 V).
A digital audio output port, which is connected to an audio
system with an SPDIF port with an optical cable.
Connecting LOOP THROUGH
The loop through port bypasses the received data. If TV or other STB is
connected to this port and you want to use the connected device, please make
sure to turn the STB on.
English _9
Page 57

Remote Control
This section describes the function of each button on a remote control.
Active Standby Mode
On/Off
10
_ © SAMSUNG Electronics Co., Ltd.
Page 58

Loading a Battery for the Remote Control
An alkaline battery (not a standard battery) should be used for the remote control
to ensure the life span of the battery. If you use a standard battery, it may cause
problems in operating the remote control.
- Two identical and new batteries should be used for the remote control.
- When a remote control is not used for a long time, remove the batteries.
English _11
Page 59

INSTALLATION
This section describes how to install the STB (SMT-C1140).
Installation Environment
The table below shows the installation environment for the STB.
Item Description
Operating Temperature 0-40°C
Operating Humidity 20-80% (40°C)
Rated Voltage, Frequency AC 220-240 V~, 50-60 Hz, 0.3 A max
Rated Power Consumption Active Mode : Max. 7.3 W
Active Standby Mode : 5.5 W
When Using and Installing the Product:
The product must be used under the specified environment. Otherwise, it may
damage or shorten the life of the product.
When Connecting a STB to Peripherals
- Ask the service technician to check if the TV or VCR power supply where a STB
will be connected is properly grounded. If not, there is a risk of it causing a fire.
- If excessive heat is produced from cables after connecting the video/audio
cables, contact your service center. Such a situation may cause fire.
12
_ © SAMSUNG Electronics Co., Ltd.
Page 60

Peripheral Device Connection
This section describes how to connect the cable and each peripheral device to the STB.
(The product image may differ from the actual product.)
English _13
Page 61

Connection to a TV with a SCART Port
This section describes how to connect the STB to a TV with a SCART port.
Connect the TV SCART port on the rear of the STB to the SCART port of the TV by
using a SCART cable.
14
_ © SAMSUNG Electronics Co., Ltd.
Page 62

Connection to a VCR with a SCART Port
This section describes how to connect VCR to a STB with a SCART cable.
Connect the VCR SCART port of the STB to the SCART port of the VCR by using a
SCART cable.
When Connecting to VCR:
Upon connecting to a VCR, power off both VCR and STB, and pull out their
power plugs, and then connect. You can easily connect it by referring to the ‘VCR
User Manual’.
- VCR may not record programs including anti-record signals properly.
English _15
Page 63

Connection to a Digital Audio
This section describes how to connect a digital audio (an amplifier or home theater
that has a Dolby Digital decoding function).
Using the optical cable for digital audio, connect the DIGITAL AUDIO OUT port at
the rear of the body to the Digital audio in (SPDIF) port of a Dolby Digital audio.
When Connecting to Dolby Digital Audio
- Even when the Dolby Digital amplifier is connected to a digital voice output
port, connect the voice output port to the voice input port of a TV in preparation
for the case when a TV speaker is used.
- When a digital voice output is used, adjust the volume of a digital amplifier, not
of a receiver.
16
_ © SAMSUNG Electronics Co., Ltd.
Page 64

Connection to RF Antenna
This section describes how to connect to a RF antenna. Connect the coaxial cable
connected to a RF antenna to the RF IN port.
English _17
Page 65

HOW TO USE
Installation Wizard
Before you can view the television program, you must perform the installation wizard
that is run when the STB is first powered up.
Preparation-Insert the Smart card
You have to insert the Smart card into the smart card slot on the side of the STB.
Step 1-Language Selection
In this step, you select the language to use on the EPG and Menu.
- Press the Direction buttons to choose the language options (Nederlands/
French/English).
- Press the OK button or select the Confirm to confirm and move to the next screen.
18
_ © SAMSUNG Electronics Co., Ltd.
Page 66

Step 2-Channel Scan
The STB shall carry out a channel scan in order to populate its channel database.
- Set the appropriate settings for each of the items (Frequency/Network ID/
Modulation/Symbol rate). You can get the settings from the service provider.
- After successfully scanning, the results screen shall be shown indicating the
numbers of TV and radio channels found.
- Press the OK button to confirm and move to the next screen.
English _19
Page 67

Basic Functions
Service Information
Changing to another screen or pressing the
INFO button (
information on the screen.
- You can see the details of a program, time etc.
) displays a channel
Changing the Channels
You can move among channels by using the CH / button ( ).
Volume Control/Mute
You can adjust the volume by using the
VOL+/- button (
To turn off the sound, press the MUTE button
(
).
When pressing it again, sound is turned on.
).
20
_ © SAMSUNG Electronics Co., Ltd.
Page 68

Channel List/Favorite Channel
Pressing the OK button on the remote
controller displays the channel list on the
screen.
- Pressing the red button allows you to set favorite
channel.
Guide
Pressing the GUIDE button on the remote
controller displays the Electronic Program
Guide (EPG) on the screen.
- Pressing the color button allows you to set
scheduling.
English _21
Page 69

Info Banner
You can see the info banner by pressing once the INFO button while watching a
program.
- You can see the other scheduled programs on the current channel or on another
channel when using the Direction buttons.
- You can confirm the current program’s status (channel, title, broadcast time).
22
_ © SAMSUNG Electronics Co., Ltd.
Page 70

Main Menu
If you press the MENU button ( ) while watching a TV, a main menu screen is
displayed as follows:
- Select a desired item by using the left/right button (/).
Press the OK button to move to a lower level menu; or the return button to a
higher level menu.
- When a desired menu is found, press the OK button to move to the selected menu
screen.
Before Using the Product
The information contained in this chapter may be subject to change by a
program provider without prior written notice to improve service or provide a new
service. If the service has been changed, please contact a local service center.
English _23
Page 71

Guide
Guide
You can move to a channel guide screen,
which displays the program list per channel,
program details etc.
- The color button on the remote control is operated
by the functions displayed at the bottom of a screen.
- Select a channel program using Direction buttons
and then press the OK button to watch the channel.
- You can schedule programs by selecting a desired
program from a program list and pressing the RED
button on a remote control. When it becomes the
start time of the scheduled program, the relevant
channel is displayed automatically. Pressing the
RED button again cancels the scheduling.
Channel
Channel List
This function is used to delete the channels.
- Select the list by pressing the TV/RADIO.
- Select the channel by pressing the / buttons.
- Press the OK button to watch that channel.
The color button corresponds the following service
list.
- To sort the channels in order of alphabet or default
(channel number) press the GREEN button.
- To lock the channel press YELLOW button.
Whenever you need to view the channel, you will
have to enter the PIN at the request window.
It means that you can access all parental locked
channels with entering PIN Code on any parental
locked channel successfully.
- To add favorite channel list press the RED button.
Select favorite channel list you want to add.
(Five lists are supported.)
- Pressing PG+/- buttons navigates the list by page.
24
_ © SAMSUNG Electronics Co., Ltd.
Page 72

Change PIN Code
You can change PIN code.
- Press NUMBER buttons to input current PIN Code.
- Press NUMBER buttons to input New PIN Code.
- Press NUMBER buttons to input Confirm New PIN
Code.
Parental Guide
You can block the specific channel by
selecting age rating. If the available age of the
channel is older than age which you set, that
channel will be blocked-Left/Right direction
button is used to adjust the time.
- You can choose age from 4 to 18.
- ‘All blocked’ means that you cannot watch any
channels regardless of the grade.
- ‘Unblocked’ means that you can watch the all
channels regardless of the grade.
English _25
Page 73

Manual Scan
To tune-in new channels, the STB has been
provided with ‘Manual Scan’ where the
channel data can be entered by the user.
After selecting the ‘Manual Scan’ from the
Channel Menu, the following screen will be
displayed:
- Input the frequency of the channel you want to find.
The followings are defined as a default, but
optionally you can choose it. Signal Status bar
shows you if it is valid. You can select the value of
once, daily, weekly.
- Input the Network ID of the channel you want to find.
- Select the Modulation of the channel you want to
find. You can select the value of 16, 32, 64, 128, 256.
- Input the symbol rate of channel you want to find.
- Enter the guard band time to scan. You can choose
from 0 to 15 min.
- After select option, move to scan button and press
OK button to start the scan process.
26
_ © SAMSUNG Electronics Co., Ltd.
Page 74

Timer
Scheduled Timer
You can see the channels you reserved
through EPG or manual settings.
- To add the timers press the RED button.
You can reserve the program manually.
- To edit the timers press the GREEN button after
highlighting the cursor on the program you want to
edit. But it is impossible to edit the timers which was
set through EPG.
- To delete the timers press the YELLOW button after
highlighting the cursor on the program you want to
delete.
Manual Setting
You can reserve the programs manually.
Set channel, date, start/end time and
frequency by using / or /buttons.
Guard-Band Time
Guard-Band time is a function to ensure, that
whole event will fit in set time boundaries.
1 minute of Guard-Band Time means that STB
will start this timer operation 1 minute before
set time and end 1 minute after set time.
English _27
Page 75

Settings
Preference
This option enables you to change preset
setting such as Aspect Ratio, TV setting as per
your requirement. You can set the various
preference settings you want. Place the cursor
on this sub menu and press OK button.
- Select the TV Aspect Ratio: STANDARD 4:3 ratio or
WIDE SCREEN 16:9 ratio type.
- 16:9 LB: LB means the letter box. Select this when
you want to see a 16:9 ratio image on the 4:3 ratio
TV monitor. It shrinks the 16:9 ratio image with no
screen distortion so the top and bottom of the
screen are black empty.
- Use TV’s feature: The TV will do the conversion.
- Pillar box: If the aspect ratio of the watched
programme is 4:3, the STB will add empty spaces on
the left and on the right side of screen. The whole
original picture will be visible in the center.
- Zoom: The STB will zoom the original video.
- Select the TV setting: Composite or RGB.
You can select the Video signal type.
- Select Automatic Subtitles ‘On’ or ‘Off’. If you select
‘On’ and the channels support subtitles, you can see
the subtitles automatically. You don’t need to press
SUBTITLE button.
- Set the display duration of the banner (information)
box displayed in the screen. The time ranges from 1
to 60 seconds.
- Setting is made with the numeric buttons or /
buttons.
28
_ © SAMSUNG Electronics Co., Ltd.
Page 76

Transparency
You can set Transparency level from 0 to
100%. Setting is made with NUMBER buttons
or / buttons.
Language
The Language option allows the user to select
the desired language for OSD, Audio Out and
Subtitles. 3 languages are available.
Use the / buttons to select a desired
language, then press the OK button.
- You can set the OSD, Audio Out, Subtitles language.
To accommodate user from different regions
speaking different languages, OSD languages are
available 3 languages. (English, Nederlands and
French provided currently)
System
This menu consists of 2 sub-menus: Product
Info and Factory Default.
- If you have to contact your service provider or a
service center they might ask for information
available from this menu. Place the cursor on this
sub menu and press the OK button.
- This is to restore the factory set values in case the
user has encountered some problems after changing
any new values of channel data and others, which
may be in error. Select Factory Default menu in
System menu and press OK button. If you want to
continue, select ‘YES’ in the warning window.
The receiver will be reset to settings automatically.
Please note that the Factory Default procedure may
take a few seconds.
English _29
Page 77

Irdeto
Signal Status
You can see the Signal Status.
Smart Card Status
You can see the Smart Card Status.
Service Status
You can see the Service Status.
30
_ © SAMSUNG Electronics Co., Ltd.
Page 78

Loader Status
You can see the Loader Status.
Mails
You can read the message sent to the
individual decoders. You can save up to 10
mail messages.
English _31
Page 79

TROUBLESHOOTING
This section describes how to handle the problems that may occur while using the STB.
If the STB becomes abnormal, first check the following:
If the problem still exists, contact a local service center.
Screen
Troub le Solution
Nothing appears on a TV
screen.
A menu screen is not displayed.
Remote Control
Troub le Solution
The remote control does not
work.
1. Check if the TV and STB are powered on.
2. Check the connection status of the cable between
TV and STB.
3. Check if the TV input is set to an external input
mode.
4. Press Power button to check the STB is in
standby mode.
1. Power on the STB, and then press the Menu
button on the remote control.
2. If pressing the Menu button still does not display a
menu screen properly, contact the local service
center.
1. Check if the remote control is suitable for the STB.
2. Replace the batteries with new ones and check if
the remote control works normally.
3. Check if the batteries are placed correctly.
4. Check if there is an obstacle between a STB and a
remote control.
5. Operate the remote control near to the STB to see
if it works normally.
32
_ © SAMSUNG Electronics Co., Ltd.
Page 80

General
Troub le Solution
No sound comes out from TV or
audio.
Password to the STB has been
forgotten.
1. Check the connection status of the cable between
the audio port of TV/audio system and the AUDIO
OUT port at the rear of the STB.
2. If the cable is connected normally, check if the
MUTE function is enabled. If the MUTE function is
enabled, press the MUTE button on the remote
control to disable it.
The default password for the STB is ‘0000’.
If you cannot remember the password, contact a
local service center. You can specify a new
password after initializing it.
English _33
Page 81

ANNEX
Product Specifications
Item Description
Model Name
Receiver DVB-C
Input Connector Type IEC female in accordance with IEC 60169-2
Input Impedance 75
Broadcasting Rx Frequency 47~862 Mhz
Broadcasting Rx Level -15~+15 dBmV (average power)
Type of Broadcasting Rx Modulation Quadrature Amplitude Modulation
Channels Bandwidth 8 Mhz
Output Connector Type IEC male in accordance with IEC 60169-2
Audio Output Port Digital Audio (SPDIF): 1 port
Video/Audio Concurrent Output Port SCART: 2 port (TV/EXT)
Rated Voltage, Frequency AC 220-240 V~, 50-60 Hz, 0.3 A max
Rated Power Consumption Active Mode : Max. 7.3 W
Operating Temperature 0~40°C
Operating Humidity 20~80% (40°C)
Dimensions (mm) 233 (L) × 133 (W) × 38 (H)
SMT-C1140
Active Standby Mode : 5.5 W
Weight 582 g
34
_ © SAMSUNG Electronics Co., Ltd.
Page 82

Class B EMI Compliance Listed (for home telecommunication device)
This product has been registered as an EMI-compliant device for home use, which
cannot only be used in residential areas, but also in all the other areas.
European Notice(Europe Only)
Products with the CE marking comply with the EMC Directive(2004/108/EC) and the
Low Voltage
Directive(2006/95/EC) issued by the Commission of the European Community.
Compliance with these directives implies conformity to the following European
Norms:
- EN55022: Radio Frequency Interference
- EN55024: Electromagnetic Immunity of Information Technology Equipment
- EN61000-3-2: Power Line Harmonics
- EN61000-3-3: Voltage Fluctuations
- EN55013: Radio disturbance characteristics of broadcast receivers and associated
equipments
- EN55020: Electromagnetic immunity of broadcast receivers and associated
equipments
English _35
Page 83

Open Source Announcement
Some software components of this product incorporate source code covered under the Tcl/Tk License,
zlib/libpng License and BSD License etc. Below is the list of components covered under the Tcl/Tk License,
zlib/libpng License and BSD License etc.
Software License
Tix Widget Set for Tk/Tcl and Python-tix BSD Licensesp
Tcl/Tk TCL/TK License
Python Python Software Foundation License 2.3
zlib zlib/libpng License
BSD License
Copyright (c) <YEAR>, <OWNER>
All rights reserved.
Redistribution and use in source and binary forms, with or without modification, are permitted provided that
the following conditions are met:
- Redistributions of source code must retain the above copyright notice, this list of conditions and the
following disclaimer.
- Redistributions in binary form must reproduce the above copyright notice, this list of conditions and the
following disclaimer in the documentation and/or other materials provided with the distribution.
- Neither the name of the <ORGANIZATION> nor the names of its contributors may be used to endorse or
promote products derived from this software without specific prior written permission.
THIS SOFTWARE IS PROVIDED BY THE COPYRIGHT HOLDERS AND CONTRIBUTORS “AS IS” AND ANY
EXPRESS OR IMPLIED WARRANTIES, INCLUDING, BUT NOT LIMITED TO, THE IMPLIED WARRANTIES OF
MERCHANTABILITY AND FITNESS FOR A PARTICULAR PURPOSE ARE DISCLAIMED. IN NO EVENT SHALL
THE COPYRIGHT OWNER OR CONTRIBUTORS BE LIABLE FOR ANY DIRECT, INDIRECT, INCIDENTAL,
SPECIAL, EXEMPLARY, OR CONSEQUENTIAL DAMAGES (INCLUDING, BUT NOT LIMITED TO,
PROCUREMENT OF SUBSTITUTE GOODS OR SERVICES; LOSS OF USE, DATA, OR PROFITS; OR
BUSINESS INTERRUPTION) HOWEVER CAUSED AND ON ANY THEORY OF LIABILITY, WHETHER IN
CONTRACT, STRICT LIABILITY, OR TORT (INCLUDING NEGLIGENCE OR OTHERWISE) ARISING IN ANY
WAY OUT OF THE USE OF THIS SOFTWARE, EVEN IF ADVISED OF THE POSSIBILITY OF SUCH DAMAGE.
The following terms apply to all versions of the core Tcl/Tk releases, the Tcl/Tk browser plug-in version 2.0,
and TclBlend and Jacl version 1.0. Please note that the TclPro tools are under a different license agreement.
This agreement is part of the standard Tcl/Tk distribution as the file named “license.terms”.
TCL/TK LICENSE TERMS
This software is copyrighted by the Regents of the University of California, Sun Microsystems, Inc., Scriptics
Corporation, and other parties. The following terms apply to all files associated with the software unless
explicitly disclaimed in individual files.
The authors hereby grant permission to use, copy, modify, distribute, and license this software and its
documentation for any purpose, provided that existing copyright notices are retained in all copies and that this
notice is included verbatim in any distributions. No written agreement, license, or royalty fee is required for any
of the authorized uses. Modifications to this software may be copyrighted by their authors and need not follow
the licensing terms described here, provided that the new terms are clearly indicated on the first page of each
file where they apply.
IN NO EVENT SHALL THE AUTHORS OR DISTRIBUTORS BE LIABLE TO ANY PARTY FOR DIRECT,
INDIRECT, SPECIAL, INCIDENTAL, OR CONSEQUENTIAL DAMAGES ARISING OUT OF THE USE OF THIS
SOFTWARE, ITS DOCUMENTATION, OR ANY DERIVATIVES THEREOF, EVEN IF THE AUTHORS HAVE BEEN
ADVISED OF THE POSSIBILITY OF SUCH DAMAGE.
36
_ © SAMSUNG Electronics Co., Ltd.
Page 84

Y
THE AUTHORS AND DISTRIBUTORS SPECIFICALLY DISCLAIM ANY WARRANTIES, INCLUDING, BUT NOT
LIMITED TO, THE IMPLIED WARRANTIES OF MERCHANTABILITY, FITNESS FOR A PARTICULAR PURPOSE,
AND NON-INFRINGEMENT. THIS SOFTWARE IS PROVIDED ON AN "AS IS" BASIS, AND THE AUTHORS
AND DISTRIBUTORS HAVE NO OBLIGATION TO PROVIDE MAINTENANCE, SUPPORT, UPDATES,
ENHANCEMENTS, OR MODIFICATIONS.
GOVERNMENT USE: If you are acquiring this software on behalf of the U.S. government, the Government
shall have only “Restricted Rights” in the software and related documentation as defined in the Federal
Acquisition Regulations (FARs) in Clause 52.227.19 (c) (2). If you are acquiring the software on behalf of the
Department of Defense, the software shall be classified as “Commercial Computer Software” and the
Government shall have only “Restricted Rights” as defined in Clause 252.227-7013 (c) (1) of DFARs.
Notwithstanding the foregoing, the authors grant the U.S. Government and others acting in its behalf
permission to use and distribute the software in accordance with the terms specified in this license.
Python 2.5.2 license
This is the official license for the Python 2.3.3 release:
A. HISTORY OF THE SOFTWARE
Python was created in the early 1990s by Guido van Rossum at Stichting Mathematisch Centrum (CWI, see
http://www.cwi.nl) in the Netherlands as a successor of a language called ABC. Guido remains Python’s
principal author, although it includes many contributions from others.
In 1995, Guido continued his work on Python at the Corporation for National Research Initiatives (CNRI, see
http://www.cnri.reston.va.us) in Reston, Virginia where he released several versions of the software.
In May 2000, Guido and the Python core development team moved to BeOpen.com to form the BeOpen
PythonLabs team. In October of the same year, the PythonLabs team moved to Digital Creations (now Zope
Corporation, see http://www.zope.com). In 2001, the Python Software Foundation (PSF, see http://www.
python.org/psf/) was formed, a non-profit organization created specifically to own Python-related Intellectual
Property. Zope Corporation is a sponsoring member of the PSF.
All Python releases are Open Source (see http://www.opensource.org for the Open Source Definition).
Historically, most, but not all, Python releases have also been GPL-compatible; the table below summarizes
the various releases.
Release Derived from
0.9.0 thru 1.2 - 1991-1995 CWI yes
1.3 thru 1.5.2 1.2 1995-1999 CNRI yes
1.6 1.5.2 2000 CNRI no
2.0 1.6 2000 BeOpen.com no
1.6.1 1.6 2001 CNRI yes (2)
2.1 2.0+1.6.1 2001 PSF no
2.0.1 2.0+1.6.1 2001 PSF yes
2.1.1 2.1+2.0.1 2001 PSF yes
2.2 2.1.1 2001 PSF yes
2.1.2 2.1.1 2002 PSF yes
2.1.3 2.1.2 2002 PSF yes
2.2.1 2.2 2002 PSF yes
2.2.2 2.2.1 2002 PSF yes
2.2.3 2.2.2 2003 PSF yes
2.3 2.2.2 2002-2003 PSF yes
2.3.1 2.3 2002-2003 PSF yes
2.3.2 2.3.1 2002-2003 PSF yes
2.3.3 2.3.2 2002-2003 PSF yes
2.3.4 2.3.3 2004 PSF yes
2.3.5 2.3.4 2005 PSF yes
ear Owner GPL-compatible? (1)
English _37
Page 85

Y
Release Derived from
2.4 2.3 2004 PSF yes
2.4.1 2.4 2005 PSF yes
2.4.2 2.4.1 2005 PSF yes
2.4.3 2.4.2 2006 PSF yes
2.4.4 2.4.3 2006 PSF yes
2.5 2.4 2006 PSF yes
2.5.1 2.5 2007 PSF yes
2.5.2 2.5.2 2008 PSF yes
Footnotes:
1) GPL-compatible doesn’t mean that we’re distributing Python under the GPL. All Python licenses, unlike
the GPL, let you distribute a modified version without making your changes open source.
The GPL-compatible licenses make it possible to combine Python with other software that is released
under the GPL; the others don’t.
2) According to Richard Stallman, 1.6.1 is not GPL-compatible, because its license has a choice of law
clause. According to CNRI, however, Stallman’s lawyer has told CNRI’s lawyer that 1.6.1 is “not
incompatible” with the GPL.
Thanks to the many outside volunteers who have worked under Guido’s direction to make these releases
possible.
B. TERMS AND CONDITIONS FOR ACCESSING OR OTHERWISE USING PYTHON
PSF LICENSE AGREEMENT FOR PYTHON 2.3
1) This LICENSE AGREEMENT is between the Python Software Foundation (“PSF”), and the Individual or
Organization (“Licensee”) accessing and otherwise using Python 2.3 software in source or binary form and
its associated documentation.
2) Subject to the terms and conditions of this License Agreement, PSF hereby grants Licensee a
nonexclusive, royalty-free, world-wide license to reproduce, analyze, test, perform and/or display publicly,
prepare derivative works, distribute, and otherwise use Python 2.3 alone or in any derivative version,
provided, however, that PSF’s License Agreement and PSF’s notice of copyright, i.e., “Copyright (c) 2001,
2002, 2003 Python Software Foundation; All Rights Reserved” are retained in Python 2.3 alone or in any
derivative version prepared by Licensee.
3) In the event Licensee prepares a derivative work that is based on or incorporates Python 2.3 or any part
thereof, and wants to make the derivative work available to others as provided herein, then Licensee
hereby agrees to include in any such work a brief summary of the changes made to Python 2.3.
4) PSF is making Python 2.3 available to Licensee on an “AS IS” basis. PSF MAKES NO REPRESENTATIONS
OR WARRANTIES, EXPRESS OR IMPLIED. BY WAY OF EXAMPLE, BUT NOT LIMITATION, PSF MAKES
NO AND DISCLAIMS ANY REPRESENTATION OR WARRANTY OF MERCHANTABILITY OR FITNESS FOR
ANY PARTICULAR PURPOSE OR THAT THE USE OF PYTHON 2.3 WILL NOT INFRINGE ANY THIRD
PAR TY R I GHT S.
5) PSF SHALL NOT BE LIABLE TO LICENSEE OR ANY OTHER USERS OF PYTHON 2.3 FOR ANY
INCIDENTAL, SPECIAL, OR CONSEQUENTIAL DAMAGES OR LOSS AS A RESULT OF MODIFYING,
DISTRIBUTING, OR OTHERWISE USING PYTHON 2.3, OR ANY DERIVATIVE THEREOF, EVEN IF
ADVISED OF THE POSSIBILITY THEREOF.
6) This License Agreement will automatically terminate upon a material breach of its terms and conditions.
7) Nothing in this License Agreement shall be deemed to create any relationship of agency, partnership, or
joint venture between PSF and Licensee. This License Agreement does not grant permission to use PSF
trademarks or trade name in a trademark sense to endorse or promote products or services of Licensee,
or any third party.
8) By copying, installing or otherwise using Python 2.3, Licensee agrees to be bound by the terms and
conditions of this License Agreement.
ear Owner GPL-compatible? (1)
The zlib/libpng License
Copyright (c) <year> <copyright holders>
This software is provided ‘as-is’, without any express or implied warranty. In no event will the authors be held
liable for any damages arising from the use of this software.
Permission is granted to anyone to use this software for any purpose, including commercial applications, and
to alter it and redistribute it freely, subject to the following restrictions:
(continued)
38
_ © SAMSUNG Electronics Co., Ltd.
Page 86

1) The origin of this software must not be misrepresented; you must not claim that you wrote the original
software. If you use this software in a product, an acknowledgment in the product documentation would
be appreciated but is not required.
2) Altered source versions must be plainly marked as such, and must not be misrepresented as being the
original software.
3) This notice may not be removed or altered from any source distribution.
English _39
Page 87

Page 88

(Waste Electrical & Electronic Equipment)
Correct Disposal of This Product
(Applicable in the European Union and other European countries with separate collection systems)
This marking on the product, accessories or literature indicates that the product and its electronic accessories
(e.g. charger, headset, USB cable) should not be disposed of with other household waste at the end of
their working life. To prevent possible harm to the environment or human health from uncontrolled waste
disposal, please separate these items from other types of waste and recycle them responsibly to promote
the sustainable reuse of material resources.
Household users should contact either the retailer where they purchased this product, or their local
government office, for details of where and how they can take these items for environmentally safe recycling.
Business users should contact their supplier and check the terms and conditions of the purchase contract.
This product and its electronic accessories should not be mixed with other commercial wastes for disposal.
Correct disposal of batteries in this product
(Applicable in the European Union and other European countries with separate battery return systems.)
This marking on the battery, manual or packaging indicates that the batteries in this product should not be
disposed of with other household waste at the end of their working life.
Where marked, the chemical symbols Hg, Cd or Pb indicate that the battery contains mercury, cadmium or
lead above the reference levels in EC Directive 2006/66. If batteries are not properly disposed of, these
substances can cause harm to human health or the environment.
To protect natural resources and to promote material reuse, please separate batteries from other types
of waste and recycle them through your local, free battery return system.
Page 89

 Loading...