

Samsung SM-R7320ZKAXAR, SM-R7320ZDAXAR, SM-R7320WDAXAR User Manual
User Manual
SM-R732

Legal
WARNING! This product contains chemicals known to the State of California to cause
cancer, birth defects, or other reproductive harm. For more information, please call
1-800-SAMSUNG (726-7864).
Notice: Water-resistant and dustproof based on IP68 rating, which tests submersion
up to 5.0 feet for up to 30 minutes.
Intellectual Property
All Intellectual Property, as defined below, owned by or which is otherwise the property
of Samsung or its respective suppliers relating to the SAMSUNG mobile device, including
but not limited to, accessories, parts, or software relating thereto (the “mobile device”), is
proprietary to Samsung and protected under federal laws, state laws, and international treaty
provisions. Intellectual Property includes, but is not limited to, inventions (patentable or
unpatentable), patents, trade secrets, copyrights, software, computer programs, and related
documentation and other works of authorship. You may not infringe or otherwise violate the
rights secured by the Intellectual Property. Moreover, you agree that you will not (and will not
attempt to) modify, prepare derivative works of, reverse engineer, decompile, disassemble,
or otherwise attempt to create source code from the software. No title to or ownership in the
Intellectual Property is transferred to you. All applicable rights of the Intellectual Property
shall remain with SAMSUNG and its suppliers.
Open Source Software
Some software components of this product incorporate source code covered under GNU
General Public License (GPL), GNU Lesser GeneralPublic License (LGPL), OpenSSL License,
BSD License and other open source licenses. Toobtain the source code covered under the
opensource licenses, please visit: opensource.samsung.com.
i
WEA_R732 _EN_UM_TN_051116_FINAL

Disclaimer of Warranties; Exclusion of Liability
EXCEPT AS SET FORTH IN THE EXPRESS WARRANTY CONTAINED ON THE WARRANTY
PAGE ENCLOSED WITH THE PRODUCT, THE PURCHASER TAKES THE PRODUCT “AS IS”, AND
SAMSUNG MAKES NO EXPRESS OR IMPLIED WARRANTY OF ANY KIND WHATSOEVER WITH
RESPECT TO THE PRODUCT, INCLUDING BUT NOT LIMITED TO THE MERCHANTABILITY OF THE
PRODUCT OR ITS FITNESS FOR ANY PARTICULAR PURPOSE OR USE; THE DESIGN, CONDITION
OR QUALITY OF THE PRODUCT; THE PERFORMANCE OF THE PRODUCT; THE WORKMANSHIP
OF THE PRODUCT OR THE COMPONENTS CONTAINED THEREIN; OR COMPLIANCE OF THE
PRODUCT WITH THE REQUIREMENTS OF ANY LAW, RULE, SPECIFICATION OR CONTRACT
PERTAINING THERETO. NOTHING CONTAINED IN THE INSTRUCTION MANUAL SHALL BE
CONSTRUED TO CREATE AN EXPRESS OR IMPLIED WARRANTY OF ANY KIND WHATSOEVER
WITH RESPECT TO THE PRODUCT. IN ADDITION, SAMSUNG SHALL NOT BE LIABLE FOR ANY
DAMAGES OF ANY KIND RESULTING FROM THE PURCHASE OR USE OF THE PRODUCT OR
ARISING FROM THE BREACH OF THE EXPRESS WARRANTY, INCLUDING INCIDENTAL, SPECIAL
OR CONSEQUENTIAL DAMAGES, OR LOSS OF ANTICIPATED PROFITS OR BENEFITS.
Modification of Software
SAMSUNG IS NOT LIABLE FOR PERFORMANCE ISSUES OR INCOMPATIBILITIES CAUSED BY
YOUR EDITING OF REGISTRY SETTINGS, OR YOUR MODIFICATION OF OPERATING SYSTEM
SOFTWARE.
USING CUSTOM OPERATING SYSTEM SOFTWARE MAY CAUSE YOUR DEVICE AND
APPLICATIONS TO WORK IMPROPERLY. YOUR CARRIER MAY NOT PERMIT USERS TO
DOWNLOAD CERTAIN SOFTWARE, SUCH AS CUSTOM OS.
Samsung KNOX
Samsung KNOX™ is Samsung’s security platform and is a mark for a Samsung device tested
for security with enterprise use in mind. Additional licensing fee may be required. For more
information about KNOX, please refer to: samsung.com/us/knox [041516]
ii

Samsung Electronics America (SEA), Inc.
Address:
85 Challenger Road
Ridgefield Park,
New Jersey 07660
Phone:
1-800-SAMSUNG (726-7864)
Internet Address:
samsung.com
©2016 Samsung Electronics America, Inc. Samsung, Samsung Galaxy, and SHealth are all
trademarks of SamsungElectronics Co., Ltd.
Other marks are the property of their respective owners.
Notice: Screen images are simulated. Appearance of device may vary.
Do you have questions about your Samsung Mobile Device?
For 24 hour information and assistance, we offer a new FAQ/ARS System (Automated
Response System) at: samsung.com/us/support
The actual available capacity of the internal memory is less than the specified capacity
because the operating system and default applications occupy part of the memory. The
available capacity may change when you upgrade the device.
Legal Information
Important legal information can be accessed at samsung.com
READ THIS INFORMATION BEFORE USING YOUR MOBILE DEVICE.
iii

Samsung Limited Warranty
Samsung Limited Warranty - This product is covered under the applicable Samsung Limited
Warranty INCLUDING ITS DISPUTE RESOLUTION PROCEDURE and your right to opt out of
arbitration within 30 calendar days of the first consumer purchase. You may opt out by
either sending an email to optout@sea.samsung.com with the subject line “Arbitration
Opt-Out” or by calling 1-800-SAMSUNG (726-7864). For more detailed procedures, please
refer to the “Dispute Resolution Procedures and Arbitration and Opt-Out” section of the
Limited Warranty.
The EULA for this device is found in the Gear Manager application, which is required for
operation of your device.
You may also access this EULA at: samsung.com/us/Legal/SamsungLegal-EULAGEAR
iv

Table of Contents
46 Weather
Basics
1 Package contents
2 Device layout
4 Battery
7 Wearing the Gear
10 Replacing the strap
11 Turning the Gear on and off
13 Remote connection
14 Turning the screen on and off
14 Using the bezel
16 Touchscreen
18 Navigating the screen
19 Home screen
47 Alarm
47 Timer
48 Stopwatch
48 Bloomberg
49 CNN
49 Music Player
51 Gallery
53 Buddy
53 Email
54 Find My Phone
54 Maps
55 Voice Memo
24 Status panel
26 Apps screen
27 Setting the screen lock
28 Entering text
31 Screen capture
31 Updating the Gear
Applications
32 Messages
33 Phone
35 S Health
43 Running
44 Schedule
45 S Voice
Samsung Gear App
56 Introduction
57 Watch faces
57 Notifications
58 Manage apps
58 Send media
59 App settings
59 Samsung Gear Apps
59 Settings
62 Find My Gear
v

Table of Contents
Settings
63 Introduction
63 Display
63 General
64 Vibration
64 Call
65 Connections
67 Screen lock
67 Input
68 Power saving
68 Gear info
vi

Basics
Instructional icons
Warning: Situations that could cause injury to yourself or others.
Caution: Situations that could cause damage to your device or other equipment.
Notice: Notes, usage tips, or additional information.
Package contents
Check the product box for the following items:
•
Gear
•
Wireless charger dock
•
Strap
•
Quick start guide
1
Basics
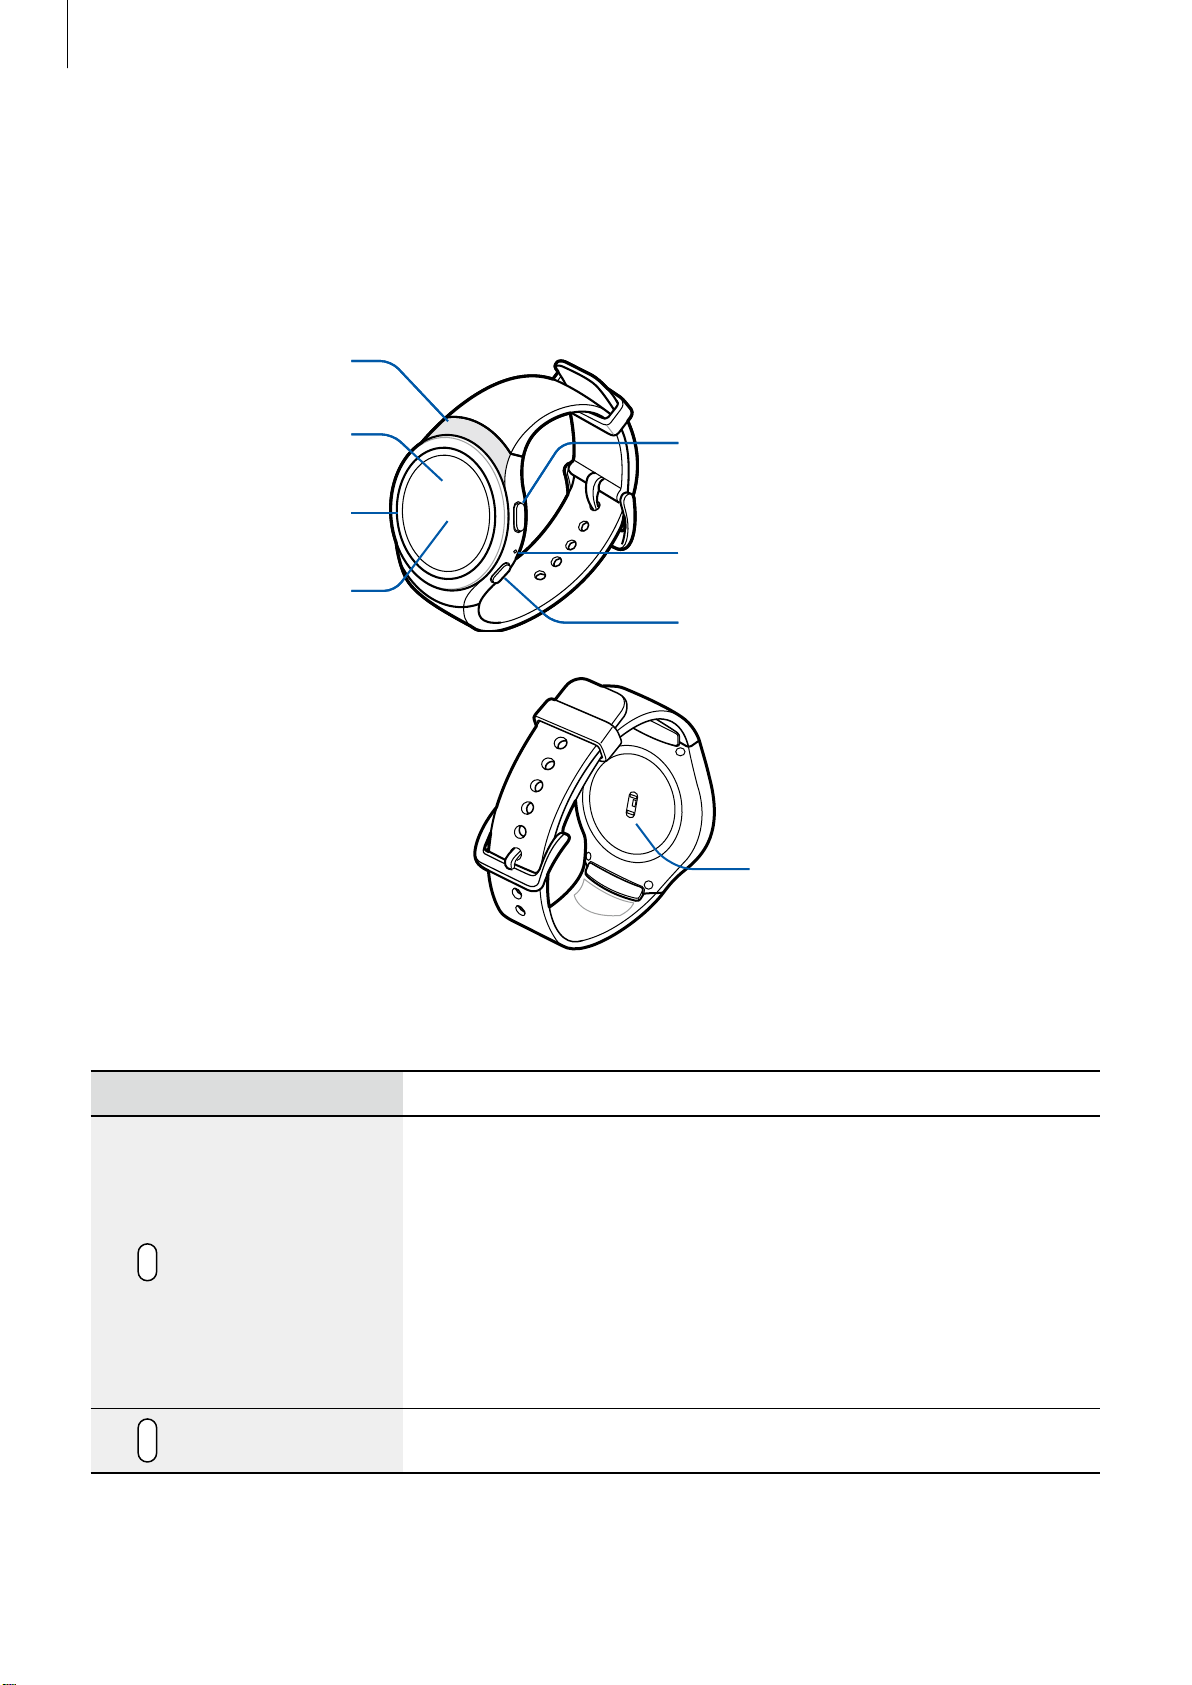
Device layout
Gear S2
NFC antenna
Touchscreen
Bezel
Light sensor
Back button
Microphone
Home button (Power button)
Heart rate sensor
Buttons
Button Function
•
Press and hold to turn the Gear on or off.
•
Press to turn on the screen.
•
Press and hold for more than 7 seconds to restart the Gear.
Home/Power
Back
•
Press to open the Apps screen when you are on the Watch
screen.
•
Press to open the Watch screen when you are on any other
screen.
•
Press to return to the previous screen.
2

Basics
Make sure the Gear’s microphone is not obstructed when you are speaking into it.
Do not allow children or animals to chew or suck the device. Do not disassemble,
modify, or repair your device. Magnetic stripe cards, including credit cards, phone
cards, passbooks, and boarding passes, may be damaged by magnetic fields.
Wireless charger dock
Wireless
charging
surface
LED indicator
USB charger
port
3
Basics
Battery
Charging the battery
Charge the battery before using it for the first time or when it sits unused for extended
periods.
Use only charging devices and batteries approved by Samsung. Samsung accessories
are designed for your device to maximize battery life. Using other accessories may
invalidate your warranty and may cause damage.
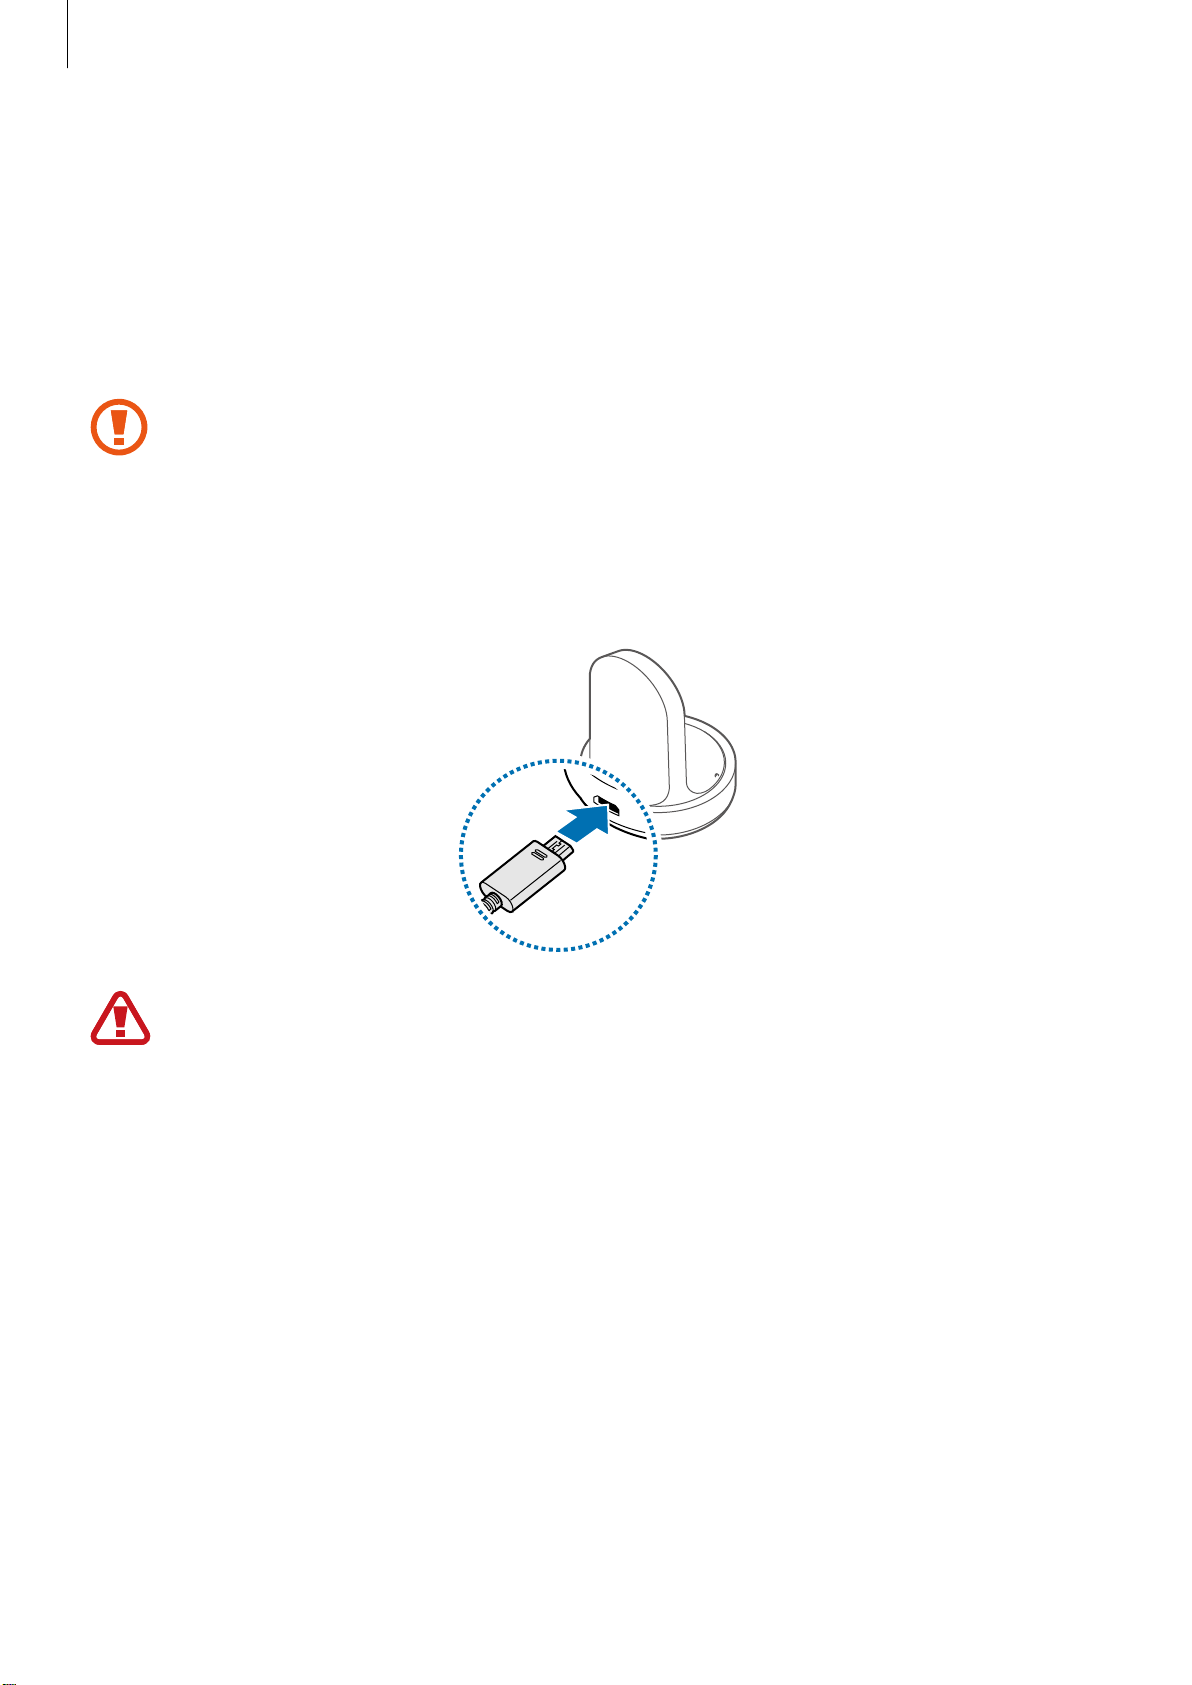
Connect the USB cable to the USB power adaptor. Then, connect the other end of the
1
USB cable to the wireless charger dock.
Prevent the multi-purpose jack and the small end of the charger from coming into
contact with conductive materials, such as liquids, dust, metal powders, and pencil
leads.
Plug the USB power adaptor into an electric socket.
2
4
Basics
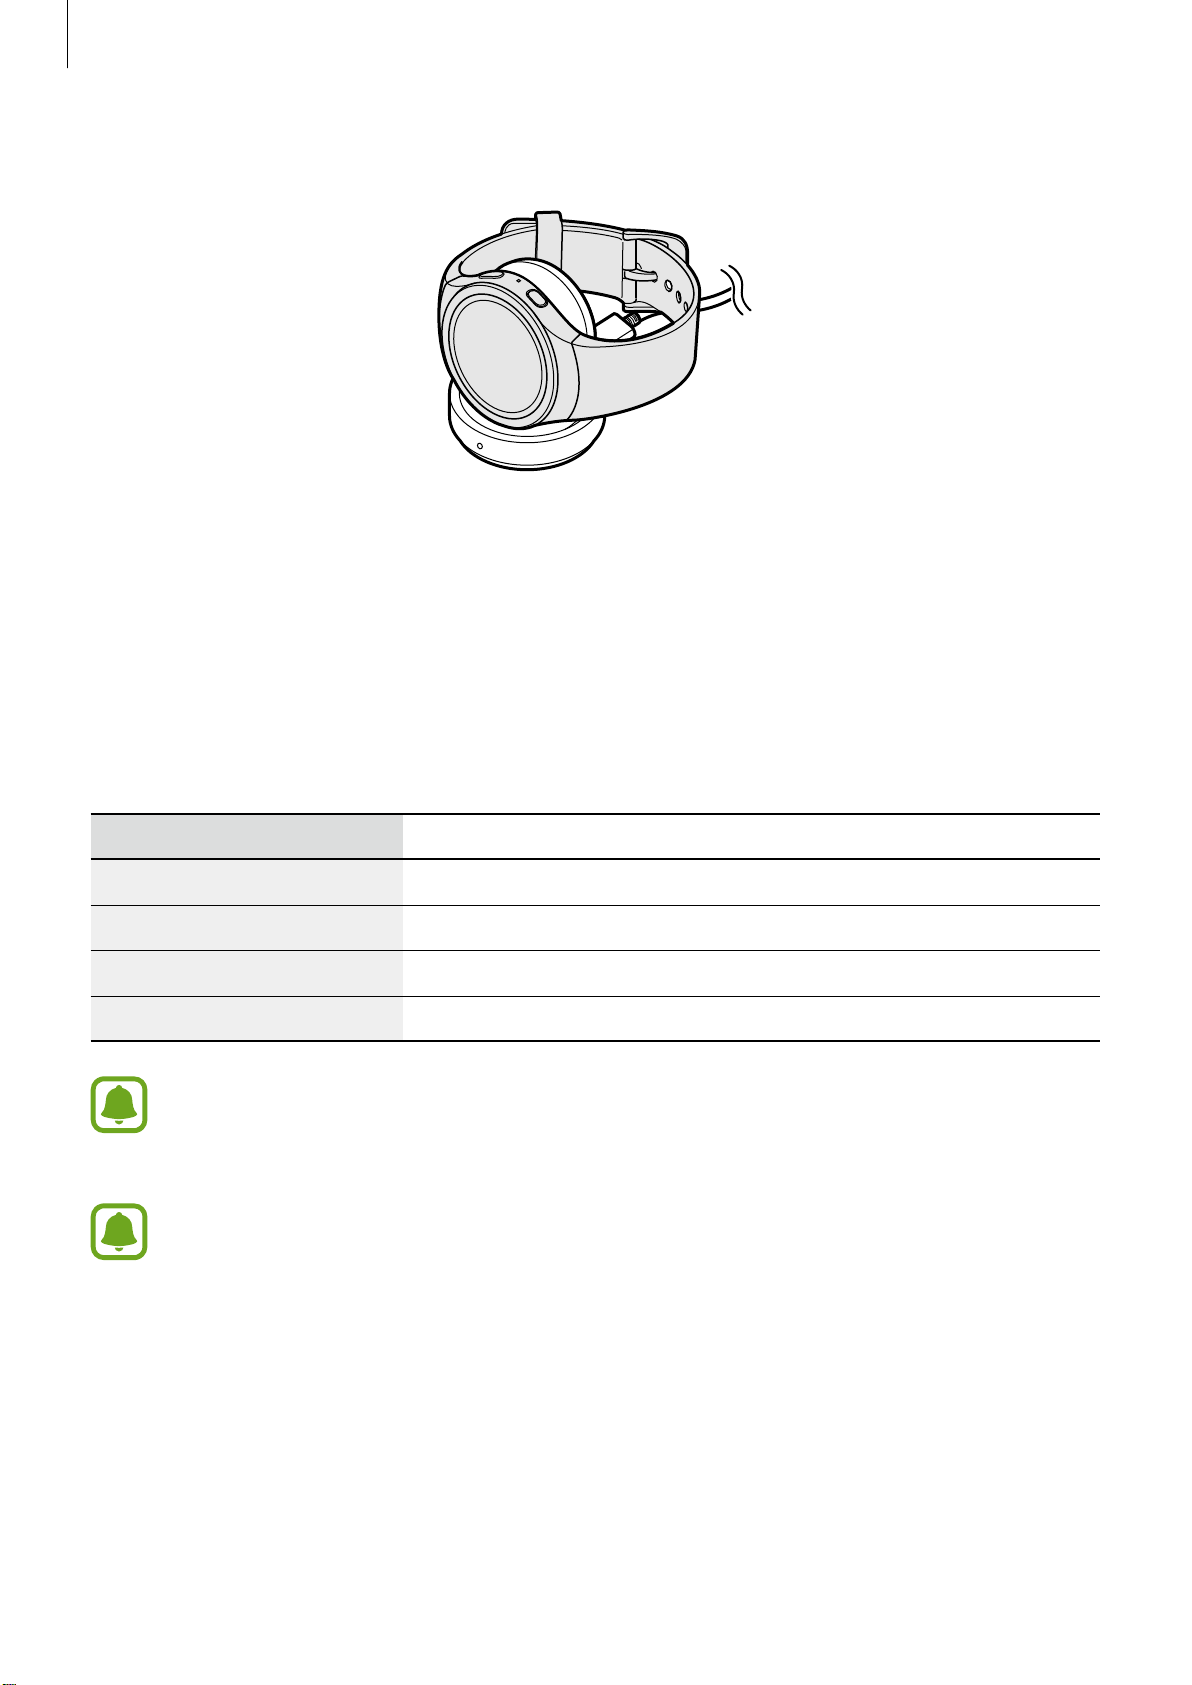
Place the Gear into the wireless charger dock.
3
After fully charging your Gear, disconnect it from the wireless charger dock. Unplug the
4
charger from the wireless charger dock, and then unplug the charger from the electric
socket.
Checking the charging status
When you connect the Gear and the wireless charger dock, the wireless charger dock’s LED
indicator flashes certain colors to indicate the battery level.
Color
→ →
Red Green Yellow
Red
Green
Yellow
When a wireless charger dock error occurs, the LED indicator flashes red. Disconnect
the Gear from the wireless charger dock and reconnect them. If the error occurs
again, contact a Samsung Service Center for service support.
The LED indicator may work differently depending on the Gear.
Charging status
Standby mode
Charging
Fully charged
Connected to a low-power adaptor
5

Basics
Reducing the battery consumption
Your Gear provides various options that help you conserve battery power.
•
When you are not using the Gear, switch to sleep mode by covering the screen with
yourpalm.
•
Activate power saving mode.
•
Close unnecessary apps.
•
Deactivate the Bluetooth feature when not in use.
•
Deactivate the Wi-Fi feature when not in use.
•
Decrease the screen brightness.
•
Deactivate the watch always on feature.
•
Deactivate the voice wake-up feature in S Voice™.
•
Customize the notification settings in the Samsung Gear app on the connected
mobiledevice.
Battery charging tips and precautions
•
If there are obstructions between the Gear and the wireless charger dock, the Gear may
not charge properly.
•
Prevent the Gear and the wireless charger from coming into contact with sweat, liquids,
or dust.
•
If the battery is completely discharged, the Gear cannot be turned on immediately after
being connected to the charger. Allow a depleted battery to charge for a few minutes
before turning on the Gear.
•
If you use multiple apps at once, the battery will drain quickly. To avoid losing power
during a data transfer, always use these apps after fully charging the battery.
•
Using a power source other than the charger, such as a computer, may result in a slower
charging speed due to a lower electric current.
•
If the Gear is being charged with other devices via a multi-charger, charging may
takelonger.
•
The Gear can be used while it is charging, but it may take longer to fully charge the
battery.
•
If the Gear receives an unstable power supply while charging, the touchscreen may not
function. If this happens, immediately disconnect the Gear from the wireless charger
dock and leave the device aside until another power connection can be found.
6
Basics
•
While charging, the Gear may heat up. This is normal and should not affect the Gear’s
lifespan or performance. If the battery feels hot to the touch during this charging process,
remove the Gear from the charger and allow it to cool down before restarting the
charging process, or call 1-800-SAMSUNG (726-7864) to receive technical support.
•
If the Gear is not charging properly, take the Gear to a Samsung Service Center.
•
Avoid using a bent or damaged USB cable.
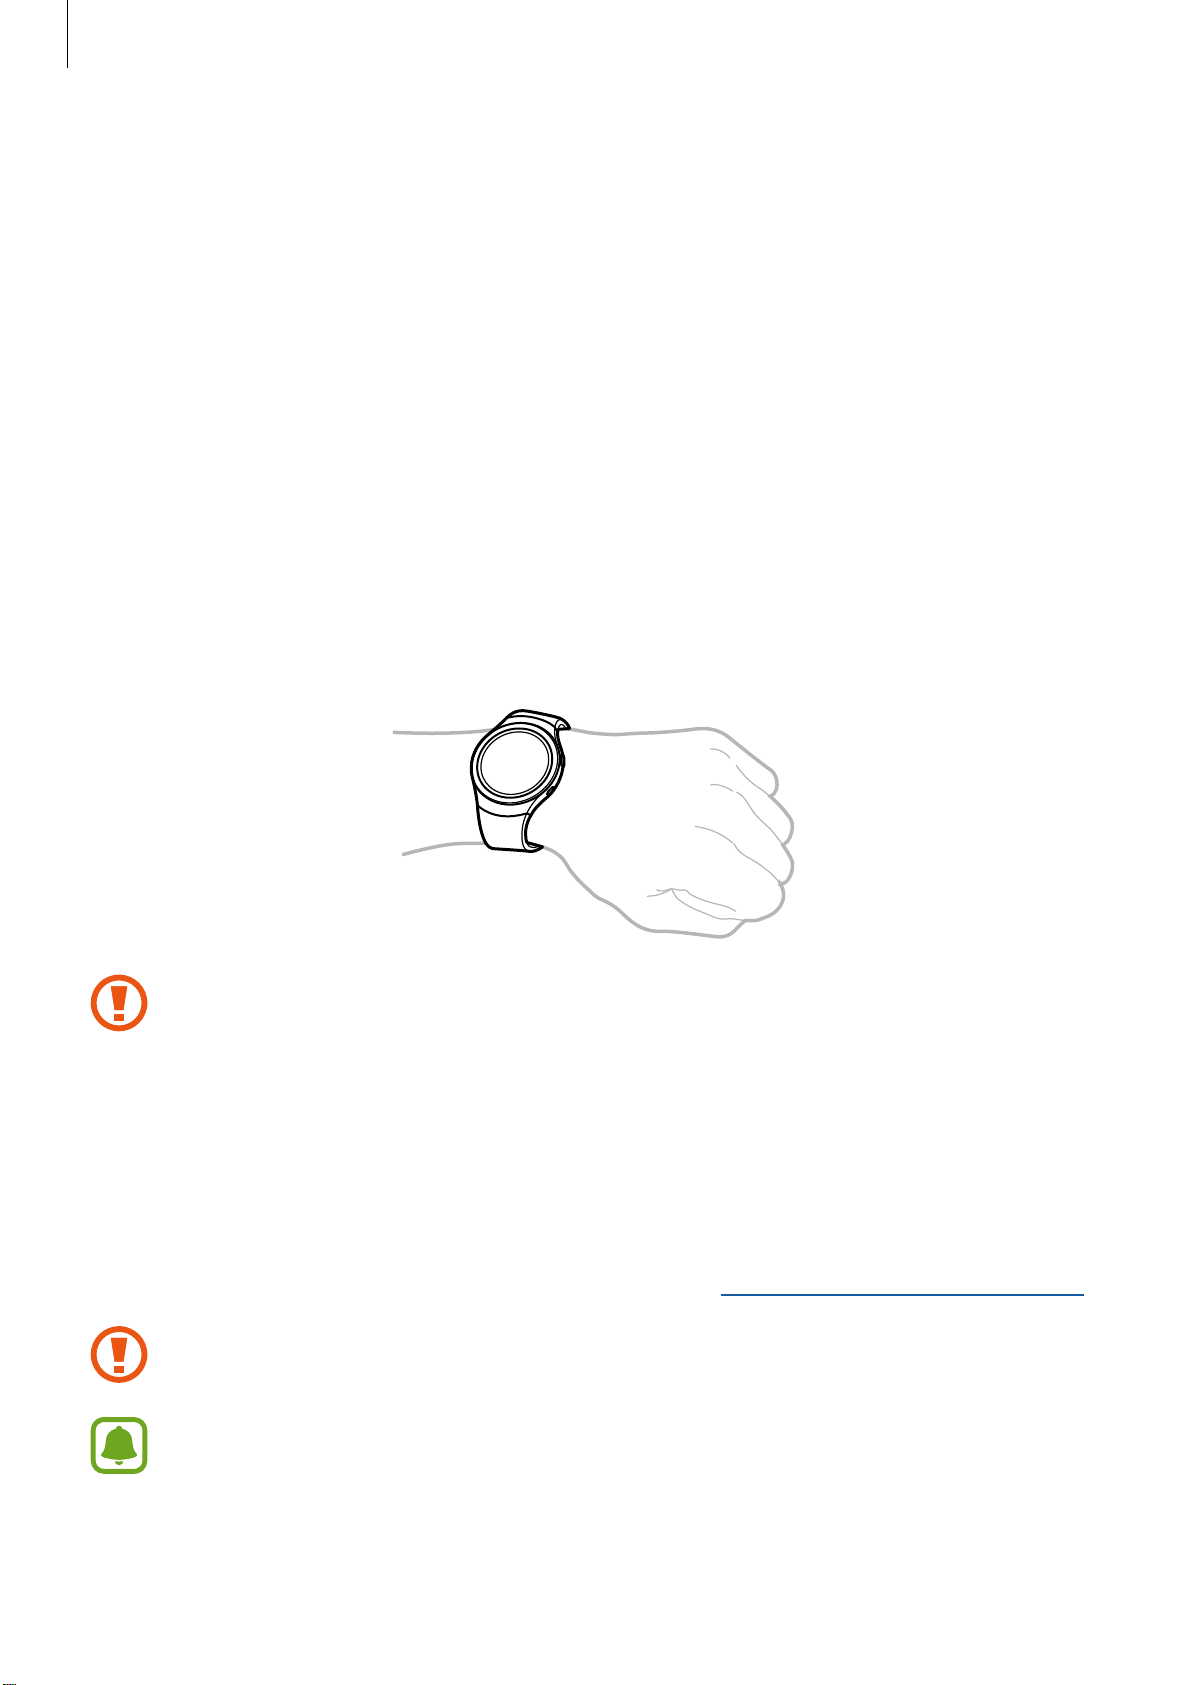
Wearing the Gear
Putting on the Gear
Open the buckle and place the strap around your wrist. Fit the strap to your wrist, insert the
pin into an adjustment hole, and then secure the buckle to close it.
The information gathered from this device, S Health, or related software is not
intended for use in the diagnosis of disease or other conditions, or in the cure,
mitigation, treatment or prevention of disease.
The accuracy of the information and data provided by this device and its related
software, including heart rate readings, may be affected by factors such as
environmental conditions, skin condition, specific activity performed while using/
wearing the device, settings of the device, user configuration/user-provided
information, placement of the sensor on the body, and other end-user interactions.
For more information on proper wear and use, see samsung.com/us/heartratesensor.
If you feel discomfort while using the device, stop using it and remove it from your
wrist. If your device becomes hot to the touch, please remove it until it cools.
To measure your heart rate more accurately with the Gear, wear the Gear firmly
around your lower arm just above the wrist. Refer to Wearing the Gear correctly
fordetails.
7

Basics
Maintaining Water and DustResistance
Notice: Water-resistant and dustproof based on IP68 rating, which tests submersion
up to 5.0 feet for up to 30 minutes.
This device is rated IP68 using the Ingress Protection rating system.
Your device has been tested in a controlled environment and shown to be water and dust
resistant in certain circumstances (meets requirements of classification IP68 as described
by the international standard IEC 60529 - Degrees of Protection provided by Enclosures [IP
Code]; test conditions: 15-35°C, 86-106 kPa, 5.0 feet, for 30minutes). Despite this classification,
your device is not impervious to water damage in any situation. It is important that all
compartments are closed tightly.
Follow these tips carefully to prevent damage to the device.
• Whenever your device gets wet, dry it thoroughly with a clean, soft cloth.
• Do not expose the device to salt water or ionized water, or to water over 5.0 feet deep
for more than 30 minutes. If your device is exposed to fresh water, dry it thoroughly with
a clean, soft cloth. If the device is exposed to any liquid other than fresh water, rinse the
device with fresh water immediately and dry it thoroughly with a clean, soft cloth. Failure to
rinse the device in fresh water and dry it as instructed may cause the device to suffer from
operability or cosmetic issues.
• Do not expose the device to water at high pressure.
• If the device is dropped or receives an impact, the water and dust resistant features of the
device may be damaged.
• The touchscreen and other features may not work properly if the device is used in water or
in other liquids.
8

Basics
Strap tips and precautions
•
Be cautious when wearing the Gear. If you have sensitive skin or fasten the Gear too
tightly, you may feel some discomfort.
•
Some people may experience discomfort when wearing the Gear for prolonged periods.
•
Do not expose the straps to very wet conditions. Wet straps can cause skin irritations. Dry
the straps first. If you experience skin irritation when wearing the device, stop wearing
the device and consult a physician.
•
Do not use harsh chemicals, cleaning solvents, or strong detergents to clean the mobile
device. Wipe it with a soft cloth slightly dampened in a mild soap-and-water solution. If
the mobile device has a retractable camera lens, do not use soap and water to clean the
lens. Use a blower or brush or lens cleaning paper dampened in a lens cleaning solution.
•
The Gear and the strap have passed the hazardous materials test and meet international
safety standards.
9

Basics
Replacing the strap
Detach the strap from the Gear to replace it with a new one.
Slide the strap’s spring bar inwards.
1
Insert one end of the spring bar into the lug, slide the spring bar inwards, and connect
2
the strap.
10
Basics
Turning the Gear on and off
Press and hold the
Gear for the first time or reset it, a pop-up window displays. Follow the prompts to download
and install the Samsung Gear app on your mobile device. Refer to Connecting the Gear to a
mobile device for details.
To turn off the Gear, press and hold the
Power
button for a few seconds to turn on the Gear. When you turn on the
Power
button, and then tap
Power off
.
Connecting the Gear to a mobile device
You should connect your Gear to your mobile device once before using the Gear. To connect
your Gear to a mobile device, install the Samsung Gear app on the mobile device. Launch
Galaxy Apps
Compatible with Android 4.4 and later with 1.5GB RAM. Some features may not be available.
For best compatibility, connect with compatible Samsung Galaxy devices.
Turn on the Gear.
1
On the mobile device Apps screen, tap
2
If necessary, update the Samsung Gear app to the latest version.
Tap
3
When the
4
on your Gear and mobile device match, and then tap
from your mobile device or visit apps.samsung.com/gear to download it.
CONNECT TO GEAR
Bluetooth pairing request
Samsung Gear
.
window displays, confirm the passkeys displayed
.
OK
.
11

Basics
Follow the prompts to complete the connection.
5
When the devices are connected, a tutorial displays on the Gear’s screen. Follow the prompts
to learn the Gear’s basic controls.
•
Connection methods and screenshots may vary depending on your device and
software version.
•
You cannot install the Samsung Gear app on the mobile devices that do not
support Gear syncing. Ensure that your mobile device is compatible with a Gear.
•
Supported mobile devices and features may vary depending on your region,
service provider, and device manufacturer. Visit www.samsung.com and search for
your Gear device’s support page to view a list of compatible mobile devices.
12

Basics
Connecting the Gear to a new mobile device
When you connect the Gear to another mobile device, the Gear automatically resets and
all data is removed from its memory. Make sure you back up any important data stored on
yourGear.
Back up your Gear’s data on your mobile device.
1
• On your mobile device, open the Apps screen and tap
Back up and restore
End the connection between your Gear and mobile device. Refer to Disconnecting the
2
Gear for more information.
Connect your Gear to another mobile device.
3
Refer to Connecting the Gear to a mobile device for more information.
If the mobile device you want to connect to is already connected to another Gear,
your Gear cannot establish a connection.
Back up data
→
.
Samsung Gear
Settings
→
→
Remote connection
You can remotely connect the Gear to your mobile device when a Bluetooth connection
is not available. With this connection, you can still receive notifications from your mobile
device. This feature is automatically activated when you connect to your mobile device using
Bluetooth for the first time.
If this feature is not turned on, on your mobile device, open the Apps screen, tap
→
Gear
Settings → Connection
, and then tap the
Use Remote connection
Samsung
switch.
13
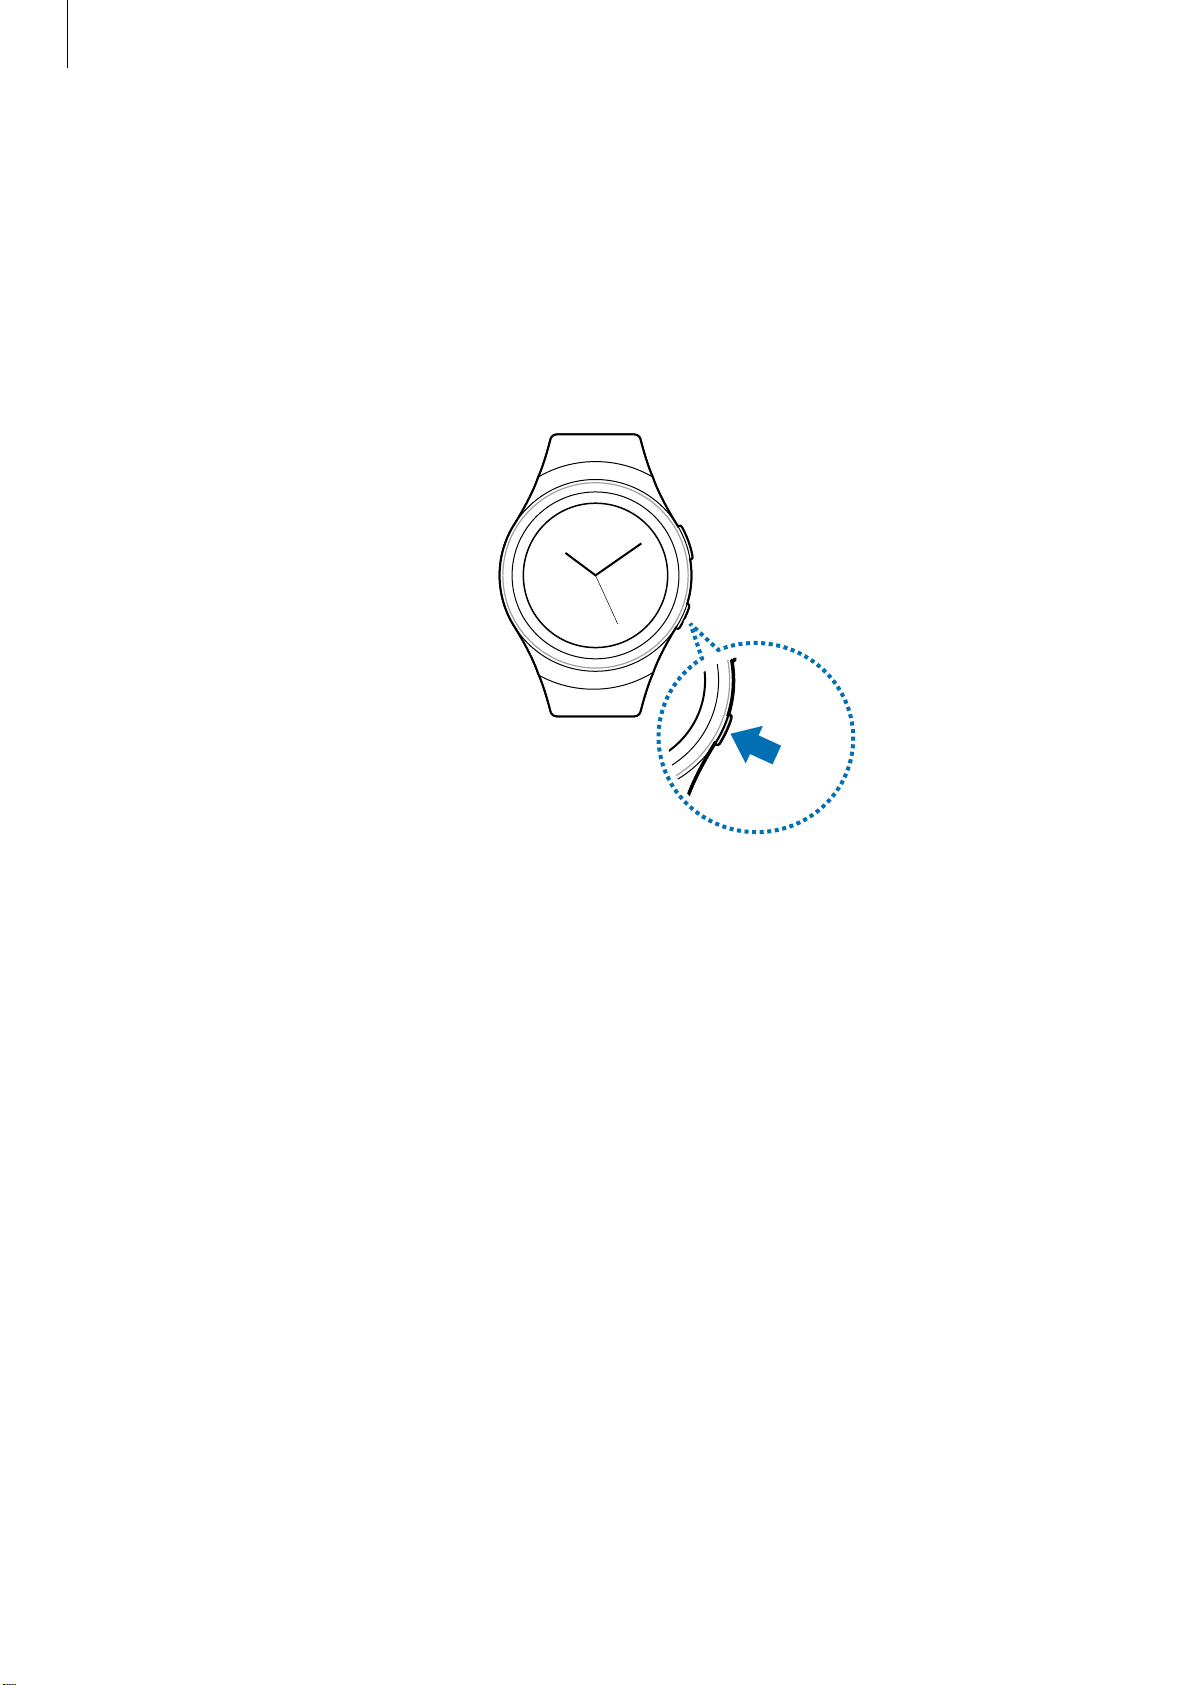
Basics
Turning the screen on and off
To turn on the screen, rotate the bezel, or press the
To turn off the screen, cover it with your palm. Also, the screen will turn off if the Gear is not
used for a specified period.
You can also turn on the screen using a gesture.
Home
button or the
Back
button.
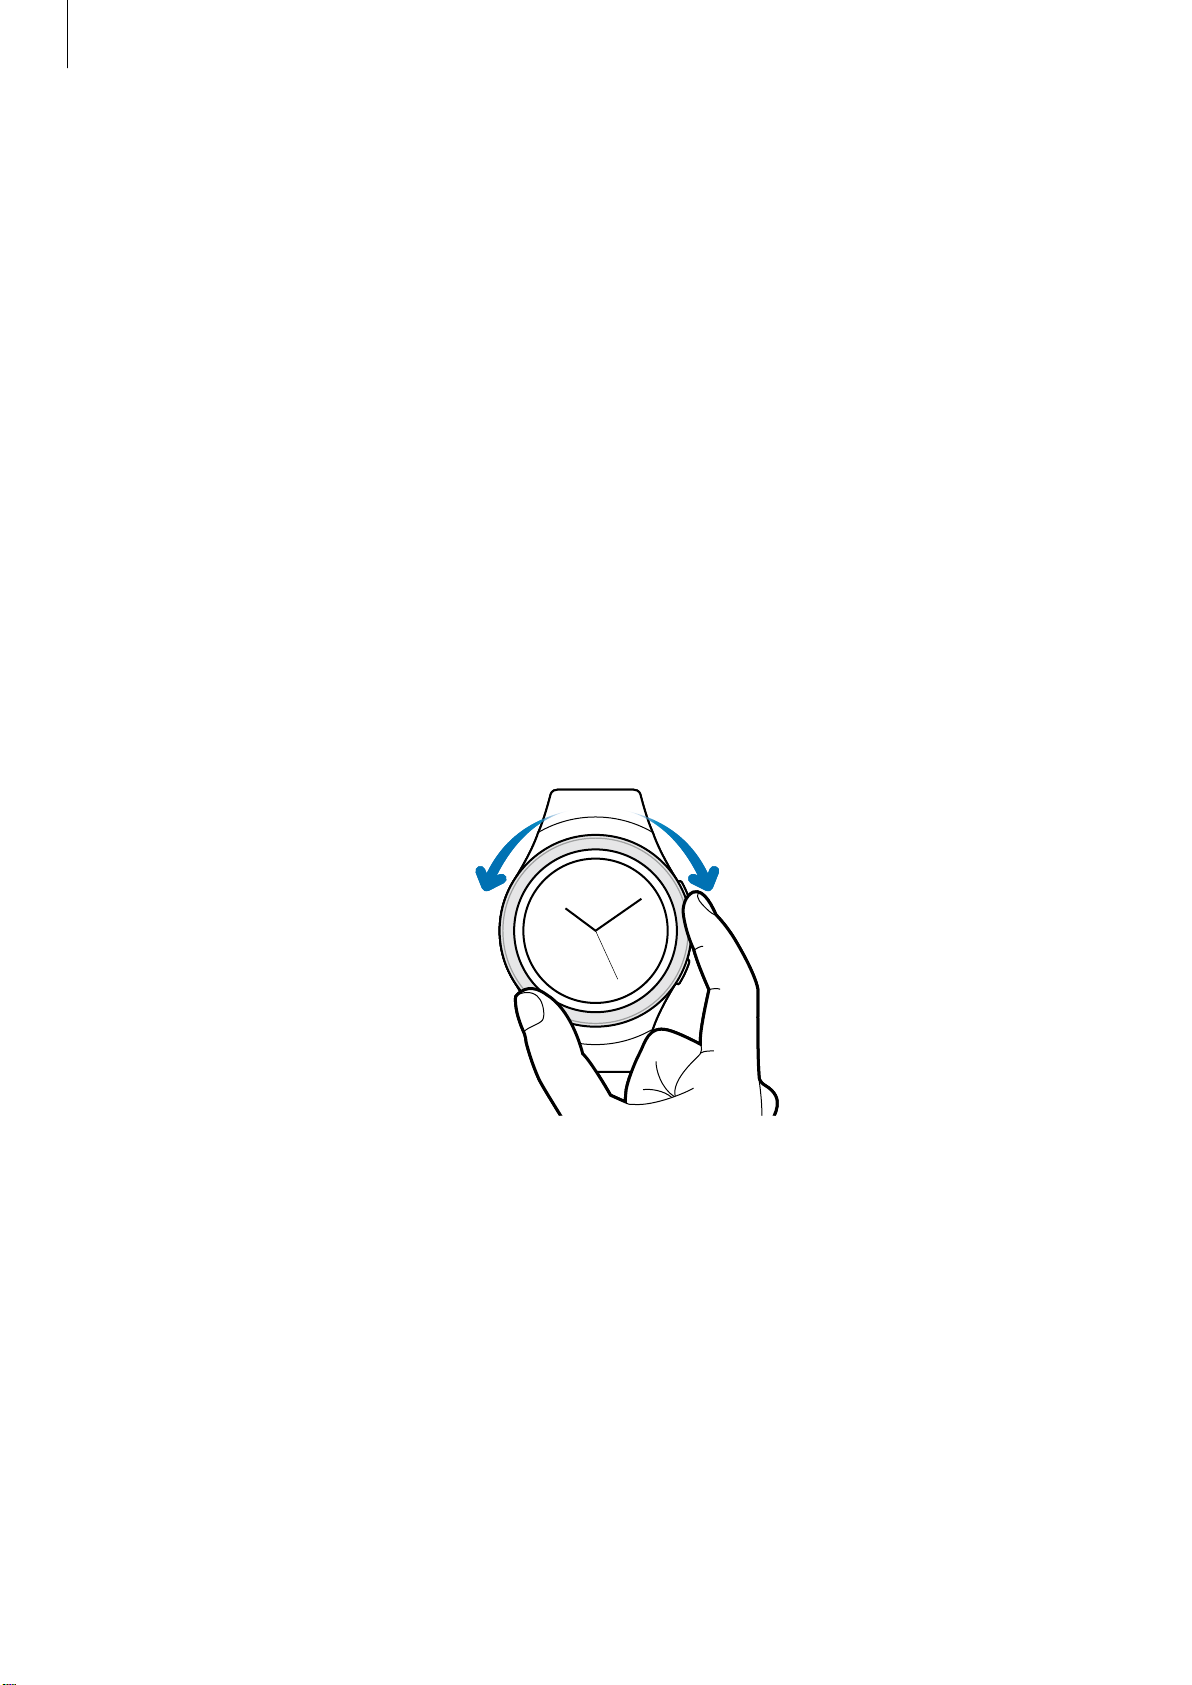
Using the bezel
Rotate the bezel to easily control the Gear’s various functions.
Scrolling through screens
Rotate the bezel to view other screens. On the Watch screen, rotate the bezel counterclockwise to view notifications.
14
Basics
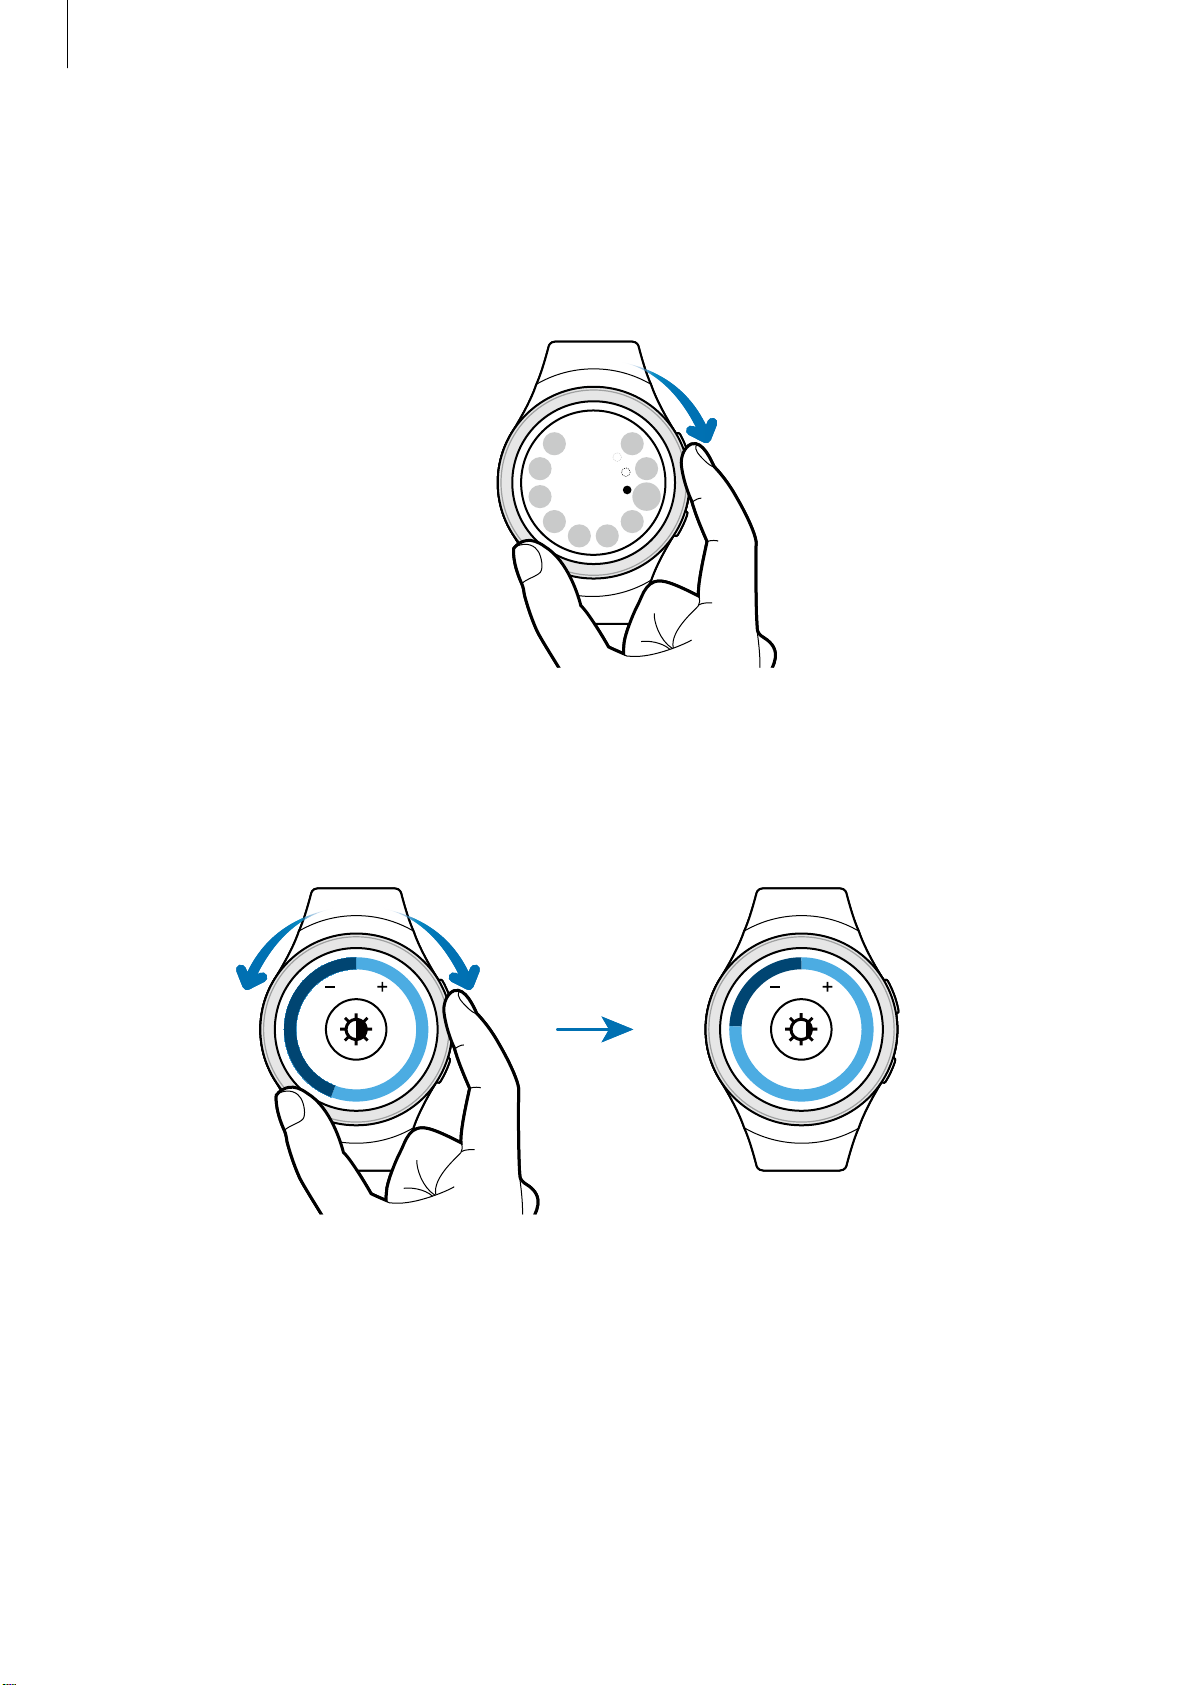
Selecting an item
Rotate the bezel to highlight the item you want to select and then tap the item. When you
rotate the bezel, the highlight indicator moves in the same direction.
Adjusting the input value
Rotate the bezel to adjust the volume or brightness.
6 8 6 8
15

Basics
Touchscreen
The Gear may not recognize touch inputs close to the edges of the screen, which are
outside of the touch input area.
Tapping
Tap with your finger to open an app, select a menu item, press a displayed button, or enter a
character using the keyboard.
Touch-screens respond best to a light touch from the pad of your finger or a
capacitive stylus. Using excessive force or a metallic object when pressing on the
touch-screen may damage the tempered glass surface and void the warranty. For
more information, please refer to the Samsung Limited Warranty.
16
 Loading...