

Samsung SM-R3800VSAXAR, SM-R3800GNAXAR, SM-R3800MOAXAR User Manual

User Manual
Please read this manual before operating your
device and keep it for future reference

Warning! This product contains chemic als known to the State of California to cause cancer and reproductive
tox icit y.
Intellectual Property
All Intellectual Property, as defined below, owned by or which is otherwise the property of Samsung or its
respective suppliers relating to the SAMSUNG Phone, including but not limited to, accessories, parts, or software
relating there to (the “Phone System”) , is proprietary to Samsung and protected under federal laws, state laws,
and international treaty provisions. Intellectual Property includes, but is not limited to, inventions (patentable
or unpatentable), patents, trade secrets, copyrights, software, computer programs, and related documentation
and other works of authorship. You may not infringe or otherwise violate the rights secured by the Intellectual
Property. Moreover, you agree that you will not (and will not attempt to) modify, prepare derivative works of,
reverse engineer, decompile, disassemble, or otherwise attempt to create source code from the software. No title
to or ownership in the Intellectual Property is transferred to you. All applicable rights of the Intellectual Property
shall remain with SAMSUNG and its suppliers.
Open Source Software
Some software components of this product incorporate source code covered under GNU General Public License
(GPL), GNU Lesser General Public License (LGPL), OpenSSL License, BSD License and other open source
licenses. To obtain the source code covered under the open source licenses, please visit: http://opensource.
samsung.com.
GEN_SM-R380_SamsungGear2_UM_English_BN66_060214_PM_F2_Rev 1.1

Disclaimer of Warranties; Exclusion of Liability
EXCEPT AS SET FORTH IN THE EXPRESS WARRANT Y CONTAINED ON THE WARRANTY PAGE ENCLOSED
WITH THE PRODUCT, THE PURCHASER TAKES THE PRODUCT “AS IS”, AND SAMSUNG MAKES NO EXPRESS
OR IMPLIED WARRANTY OF ANY KIND WHATSOEVER WITH RESPECT TO THE PRODUCT, INCLUDING
BUT NOT LIMITED TO THE MERCHANTABILITY OF THE PRODUCT OR ITS FITNESS FOR ANY PARTICULAR
PURPOSE OR USE; THE DESIGN, CONDITION OR QUALITY OF THE PRODUCT; THE PERFORMANCE OF
THE PRODUCT; THE WORKMANSHIP OF THE PRODUCT OR THE COMPONENTS CONTAINED THEREIN;
OR COMPLIANCE OF THE PRODUCT WITH THE REQUIREMENTS OF ANY LAW, RULE, SPECIFICATION
OR CONTRACT PERTAINING THERETO. NOTHING CONTAINED IN THE INSTRUCTION MANUAL SHALL
BE CONSTRUED TO CREATE AN EXPRESS OR IMPLIED WARRANTY OF ANY KIND WHATSOEVER WITH
RESPECT TO THE PRODUCT. IN ADDITION, SAMSUNG SHALL NOT BE LIABLE FOR ANY DAMAGES OF ANY
KIND RESULTING FROM THE PURCHASE OR USE OF THE PRODUCT OR ARISING FROM THE BREACH OF
THE EXPRESS WARRANTY, INCLUDING INCIDENTAL, SPECIAL OR CONSEQUENTIAL DAMAGES, OR LOSS
OF ANTICIPATED PROFITS OR BENEFITS.
Modification of Software
SAMSUNG IS NOT LIABLE FOR PERFORMANCE ISSUES OR INCOMPATIBILITIES CAUSED BY YOUR EDITING
OF REGISTRY SETTINGS, OR YOUR MODIFICATION OF OPERATING SYSTEM SOFTWARE.
USING CUSTOM OPERATING SYSTEM SOFTWARE MAY CAUSE YOUR DEVICE AND APPLICATIONS TO
WORK IMPROPERLY. YOUR CARRIER MAY NOT PERMIT USERS TO DOWNLOAD CERTAIN SOFTWARE, SUCH
AS CUSTOM OS.

Samsung Telecommunications America (STA), LLC
Headquarters:
1301 E. Lookout Drive
Richardson, TX 75082
Customer Care Center:
1000 Klein Rd.
Plano, TX 75074
Toll Free Tel: 1.888.987.HELP (4357)
Internet Address:
©2014 Samsung Telecommunications America, LLC. Samsung, and Gear 2 are all trademarks of Samsung
Electronics Co., Ltd. Bluetooth is a registered trademark of Bluetooth SIG. Other company and product names
mentioned herein may be trademarks of their respective owners. Screen images simulated.
Appearance of device may vary.
Do you have questions about your Samsung Mobile Device?
For 24 hour information and assistance, we offer a new FAQ/ARS System (Automated Response System) at:
www.samsung.com/us/support
The Bluetooth® word mark, figure mark (stylized “B Design”), and combination mark (Bluetooth word mark and
“B Design”) are registered trademarks and are wholly owned by the Bluetooth SIG.
www.samsung.com

Legal Information
The online version of the Health/Safety and Warranty guide for your device can be found at:
www.samsung.com.
The online version of the End User Licensing Agreement for your device can be found at:
www.samsung.com/us/Legal/EULA.


Table of Contents
Intellectual Property .................................................... 2
Disclaimer of Warranties; Exclusion of Liability
Samsung Telecommunications America (STA), LLC 4
Legal Information
......................................................... 5
Section 1: Getting Started ............................. 3
About Gear 2 ................................................................. 3
Device layout
Charging Dock
Power Button
Maintaining water and dust resistance
Charging the battery
About using batteries
Wearing the Gear
Replacing the strap
Turning the Gear on and off
Notices for using Bluetooth
Locking and unlocking the Gear
Adjusting the brightness of the display
Adjusting the volume
Switching to silent mode
1
................................................................. 4
.............................................................. 6
................................................................. 6
................................................... 8
................................................13
.......................................................13
...................................................16
....................................19
.....................................20
............................24
.................................................24
..........................................24
.... 3
................... 7
................24
Section 2: Basics ............................................25
Viewing mobile device connection status and
battery status
Using the touch screen
Finger gestures
Viewing the Home screen
Apps screen
Using applications
Securing the Gear 2
Using calling features
Using notifications
Transferring files
Upgrading the Gear 2
..............................................................25
............................................26
...........................................................26
........................................30
................................................................34
.....................................................34
..................................................35
................................................36
.....................................................38
.........................................................41
...............................................42
Section 3: Gear Manager .............................44
Launching Gear Manager ........................................44
Connecting a new Gear 2
Configuring the Gear settings
Home screen styler
Wallpapers
Clock
S Health
...................................................................45
.............................................................................45
........................................................................45
........................................44
.................................44
...................................................45

Notifications .................................................................46
........................................................................47
My apps
Samsung Apps
Find my Gear
Settings
...............................................................................52
Help
...........................................................48
...............................................................48
........................................................................49
Section 4: Applications ................................. 53
S Voice .........................................................................53
WatchON Remote
..........................................................................55
Gallery
........................................................................56
Weather
Find My Device
Health Management Applications
Pedometer
Using additional features
.............................................................................62
Sleep
Heart Rate
........................................................................66
Exercise
Messages
Music Player
Media Controller
Stopwatch
Contacts
.......................................................................76
......................................................54
...........................................................57
..........................57
....................................................................60
.........................................61
....................................................................64
.....................................................................72
................................................................73
.........................................................75
....................................................................76
Voice Memo
Email
Schedule
Controls
Logs
Camera
Timer
.................................................................76
..............................................................................79
......................................................................79
........................................................................80
..............................................................................80
.........................................................................80
.............................................................................84
Section 5: Settings ........................................85
Clock .............................................................................85
Wallpapers
Notifications
Sound
Display
Bluetooth
Double press
Privacy lock
Profile
Reset Gear
Gear info
...................................................................85
.................................................................85
...........................................................................86
..........................................................................86
......................................................................87
...............................................................87
.................................................................88
............................................................................88
...................................................................88
......................................................................89
Section 6: Index ..............................................90
2

Section 1: Getting Started
About Gear 2
When you connect the Samsung Gear 2™ (also referred to as Gear) to your mobile device, you can use the
Gear 2™ to view call logs or set alarms. You can use mobile devices more conveniently by connecting to various
applications with the Gear. Set your exercise programme and manage your health by connecting the Gear 2™ to
a mobile device.
To connect your Gear to a mobile device, install the Gear Manager on the mobile device. Search for the Gear
Manager from Samsung Apps or visit apps.samsung.com/gear2 to download it.
Package contents
● The items supplied with the Gear 2™ and any available accessories may vary depending on the region
or service provider.
● The supplied items are designed only for this Gear 2™ and may not be compatible with other devices.
● Appearances and specifications are subject to change without prior notice.
● You can purchase additional accessories from your local Samsung retailer. Make sure they are
compatible with the Gear 2™ before purchase.
● Other accessories may not be compatible with your Gear 2™.
● Use only Samsung-approved accessories. Malfunctions caused by using unapproved accessories are
not covered by the warranty service.
● Availability of all accessories is subject to change depending entirely on manufacturing companies.
For more information about available accessories, refer to the Samsung website.
3
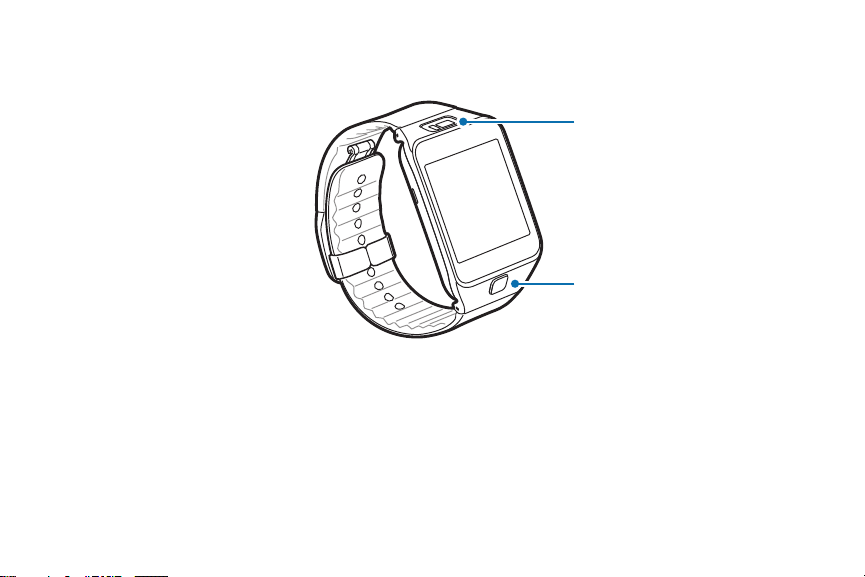
Device layout
Gear 2
Infrared LED/Camera
Power button
Section 1: Getting Started
4
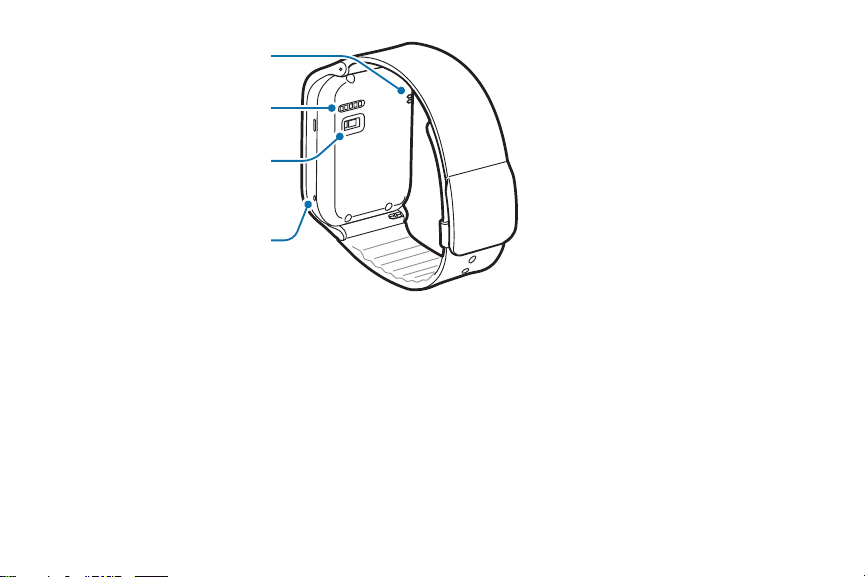
Speaker
Charging terminals
Heart rate sensor
Microphone
● Ensure that the strap is kept clean. Contact with contaminants, such as dust and dye, can cause stains
on the strap that may not come out.
● Do not use a screen protector which causes touch screen sensor malfunctions.
● Water may af fect the touchscreen operation, ensure it is dry before use.
● If the speaker is wet, sound may be distorted. Ensure that the speaker is dr y.
5
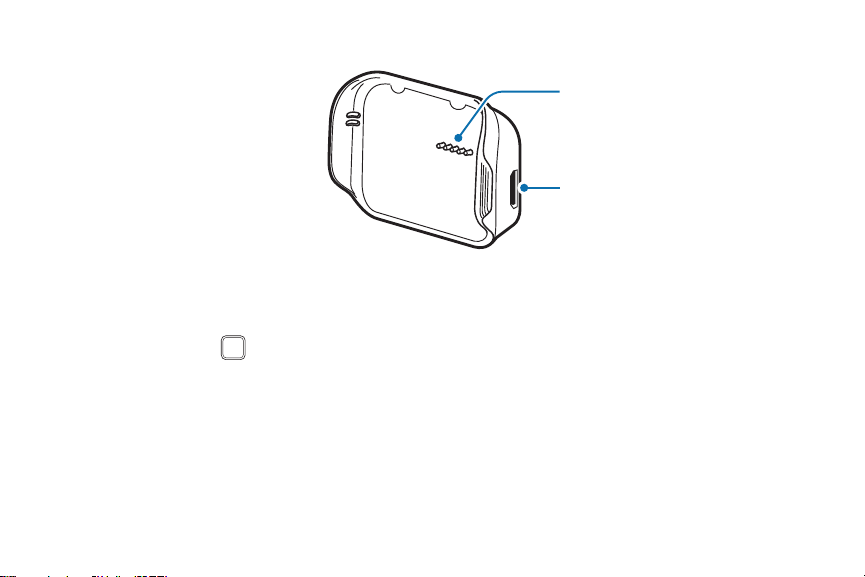
Charging Dock
Charging terminals
USB port
Power Button
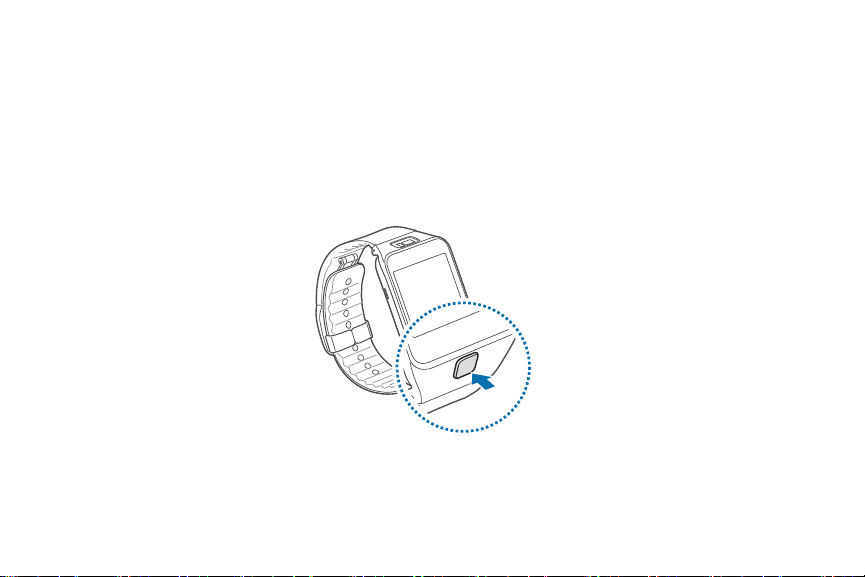
The Power Button turns the Gear 2™ on or off, displays the Clock screen, locks the device on the Clock screen,
and resets the device.
1. Press and hold the Power button to turn the Gear 2™ on or off.
2. Press the Power button once to display the Clock screen.
3. From the Clock screen, press the Power button once to lock the Gear 2™.
4. Press and hold the Power button for more than 7 seconds to reset the Gear 2™.
Section 1: Getting Started
6

Maintaining water and dust resistance
The device may be damaged if water or dust enters the device. Follow these tips carefully to prevent damage to
the device and to maintain the water- and dust-resistant performance of the device.
● Do not immerse the device in water deeper than 1 m and keep it submerged for more than 30 minutes.
● Do not expose the device to water moving with force, such as water running from a tap, ocean waves,
or waterfalls.
● If the device or your hands are wet, dr y them thoroughly before handling the device.
● If the device is exposed to fresh water, dry it thoroughly with a clean, soft cloth. If the device is
exposed to any liquid other than freshwater, rinse the device with fresh water immediately and dry it
thoroughly with a clean, soft cloth.
● If the device is dropped or receives an impact , the water and dust resistant features of the device may
be damaged.
● If the device has been immersed in water or the microphone or the speaker is wet , sound may not be
heard clearly during a call. Ensure that the microphone or the speaker is clean and dry by wiping it
with a dr y cloth.
● The touch screen and other features may not work properly if the device is used in water or in other
liquids.
● Your device has been tested in a controlled environment and shown to be water and dust resistant in
certain circumstances (meets requirements of classification IP67 as described by the international
standard IEC 60529 - Degrees of Protection provided by Enclosures [IP Code]; test conditions: 15 - 35
°C, 86 - 106 kPa, 1 meter, for 30 minutes). Despite this classification, your device is not imper vious to
water damage in any situation.
7

Charging the battery
Charge the battery before using the Gear for the first time. A computer can be also used to charge the
Gear™ 2 by connecting them via the USB cable.
Important! Use only Samsung-approved chargers, batteries, and cables. Unapproved chargers or cables can
Note: When the bat tery power is low, the batter y icon displays as empty.
cause the batter y to explode or damage the Gear™ 2.
If the bat tery is completely discharged, you cannot immediately turn on the Gear™ 2 when the charger is
connected. Allow a depleted batter y to charge for a few minutes before turning on the device.
The charging dock provided with the Gear™ 2 is used for charging the device’s battery.
Section 1: Getting Started
8

1. Locate the location of the charging terminals on the Gear 2™ and the charging dock.
Charging terminals
Charging dock
9
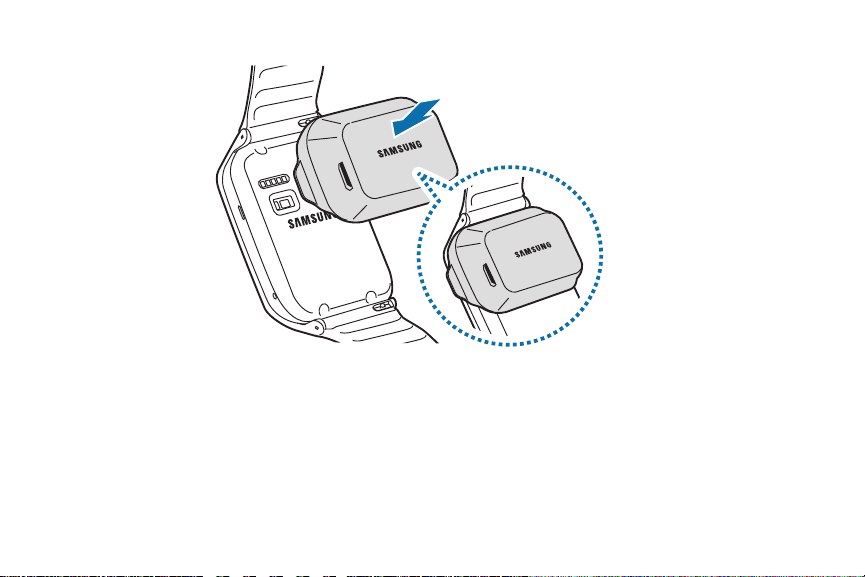
2. Place the Gear on the charging dock with the charging terminals facing each other.
Section 1: Getting Started
10
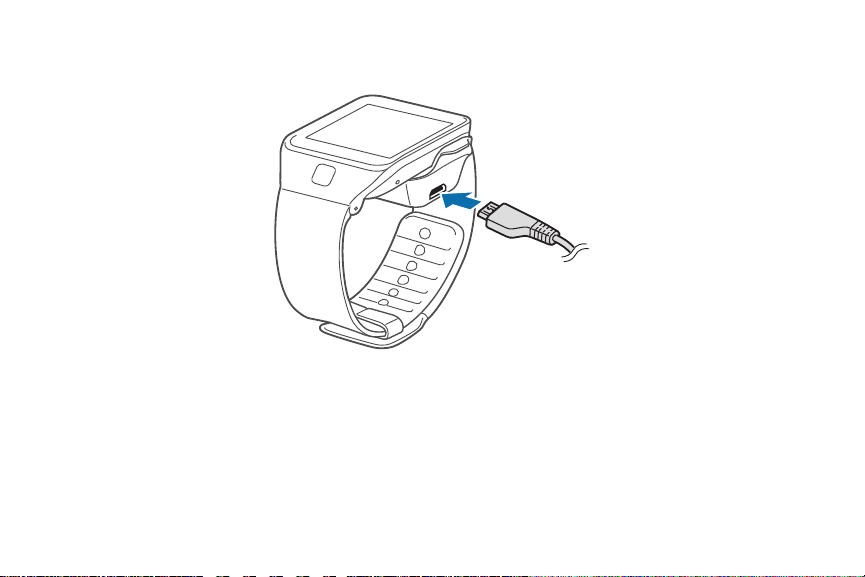
3. Plug the small end of the charger cable into the USB port of the charging dock. Then, plug the large
end of the charger into an electric socket.
11

4. After fully charging, disconnect the Gear 2™ from the charging dock.
Warning! Connecting the charger improperly may cause serious damage to the Gear 2™. Any damage caused
Note: While charging, some features are not available.
by misuse is not covered by the warranty.
● If the Gear receives an unstable power supply while charging, the touch screen may not function. If this
happens, unplug the charger from the Gear 2™.
● While charging, the Gear 2™ may be warm. This is normal and should not affect the Gear’s lifespan or
performance. If the battery gets hot ter than usual, the charger may stop charging.
Section 1: Getting Started
12

● Unplug the charger when not in use to save energy. The charger does not have a power switch, so you
must unplug the charger from the electric socket.
About using batteries
● Battery operating time is affected by device usage patterns and the condition of the battery.
● The battery is a consumable item. Battery life can be reduced when multiple applications or features
are simultaneously running. Batter y life may be reduced even when the device is idle.
● The battery is consumable so the device charge reduces over time.
● Battery power is reduced when you play high -definition video. The affects on battery power vary
depending on the situation.
Wearing the Gear
1. Open the clasp.
13
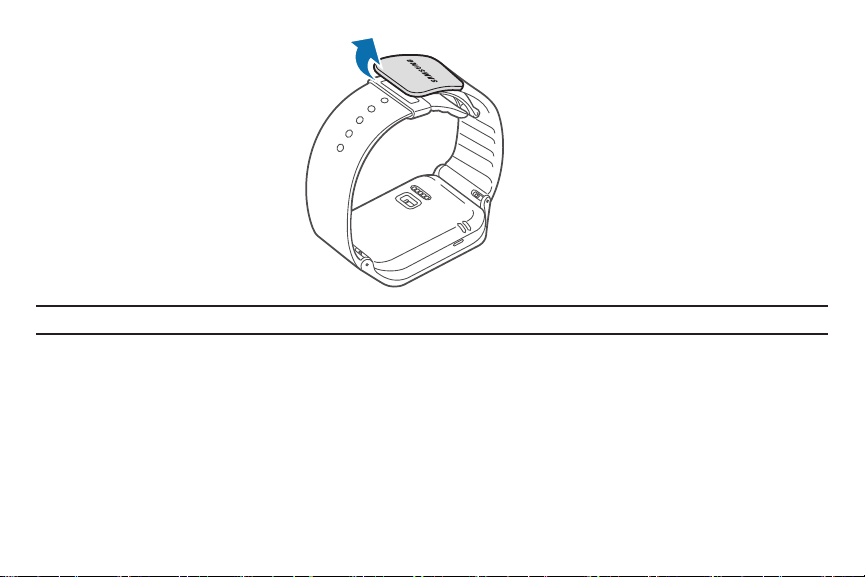
Caution! Excessively bending the strap may damage the device.
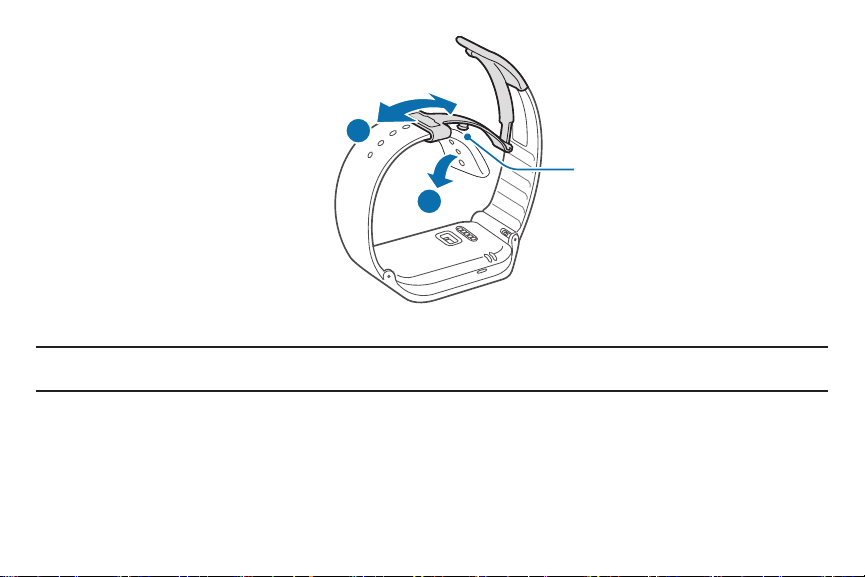
2. Open the clasp and fit the strap to your wrist using the pin as a guide to size the band.
Section 1: Getting Started
14
2
Pin
1
3. Press the button to close the clasp.
Tip: To measure your hear t rate more accurately with the Gear, wear the Gear comfortably around your lower
arm just above the wrist. Refer to ‘Wearing the Gear’ for details.
15
Replacing the strap
The strap is held in place by small spring-loaded pins (called presto pins) . Detach the strap from the Gear to
replace it with a new one.
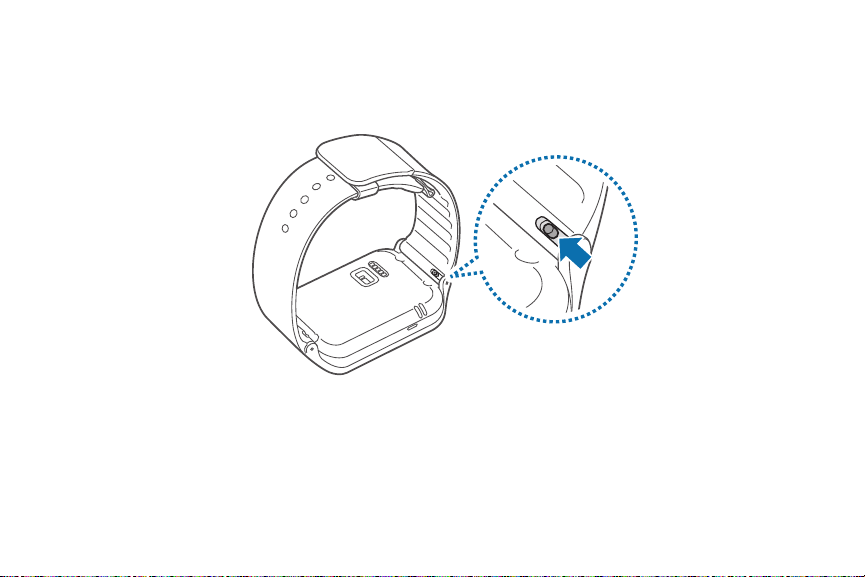
1. Press in on the pin to release it from the case.
Section 1: Getting Started
16
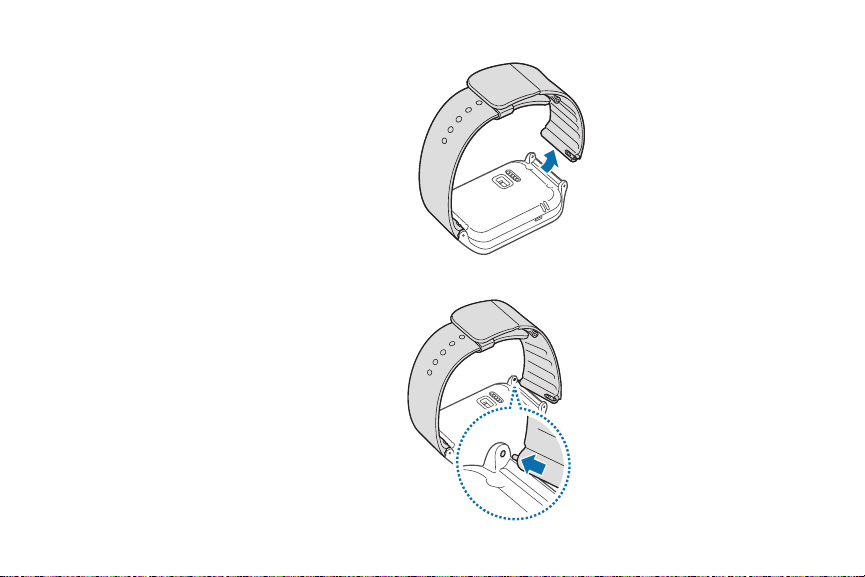
2. Lift the strap out to detach it from the Gear 2™.
3. On the new strap, insert one side of the pin into the Gear 2™ case.
17
4. On the new strap, insert one side of the pin into the Gear 2™ case.
5. Press in on the pin. Slip the band into the case and then release the pin to secure the band in place.
2
1
Note: If you replace the strap on your Gear 2™ w ith another strap not manufactured by Samsung, please use a
strap with a standard 22mm spring bar pin, and refer to the manufacturer’s instructions to properly attach
the band.
Section 1: Getting Started
18
Turning the Gear on and off
When you turn on the Gear 2™ for the first time, follow the displayed instructions. The instructions describe how
to connect the Gear 2™ to a mobile device and to set up the device.
1. Press and hold the Power button for a few seconds to turn on the Gear 2™.
A pop-up window displays and provides instructions that prompt you to download and install the Gear
Manager.
You can use the Gear 2™ only after the Gear Manager is installed on the mobile device.
Refer to ‘Connecting the Gear to a mobile device’ for details.
2. Press and hold the Power button, and then tap Power off to turn off the Gear 2™.
19

Notices for using Bluetooth
● Place the devices close to each other when pairing your Gear 2™ with another mobile device.
● The Bluetooth communication range is usually up to approximately 30 feet.
● Do not touch the Bluetooth antenna of a connected mobile device.
● Always ensure that you share and receive data with devices that are trusted and properly secured.
● Some devices, especially those that are not tested or approved by the Bluetooth SIG, may not be
compatible with your Gear 2™.
Connecting the Gear to a mobile device
Install the Gear Manager on the mobile device and connect the Gear 2 to the device using a Bluetooth
connection.
Note: You cannot install Gear Manager on mobile devices that do not support Gear 2 syncronizing. Ensure that
your mobile device is compatible with a Gear 2™.
You can connect only one mobile device to one Gear. You cannot use multiple Gear devices at the same
time.
1. Turn on the Gear 2™ device.
2. From the Gear 2™, read the download information in the displayed window and tap Next.
The model details display.
3. From the Mobile device, download the Gear Manager from Samsung Apps.
You can also visit apps.samsung.com/gear2 to download the Gear manager.
4. From the Mobile device Apps screen, tap Gear Manager.
5. From the Mobile device, select the Gear model name (e.g. Gear 2™ (0000)) that displayed in Step 2.
Section 1: Getting Started
20
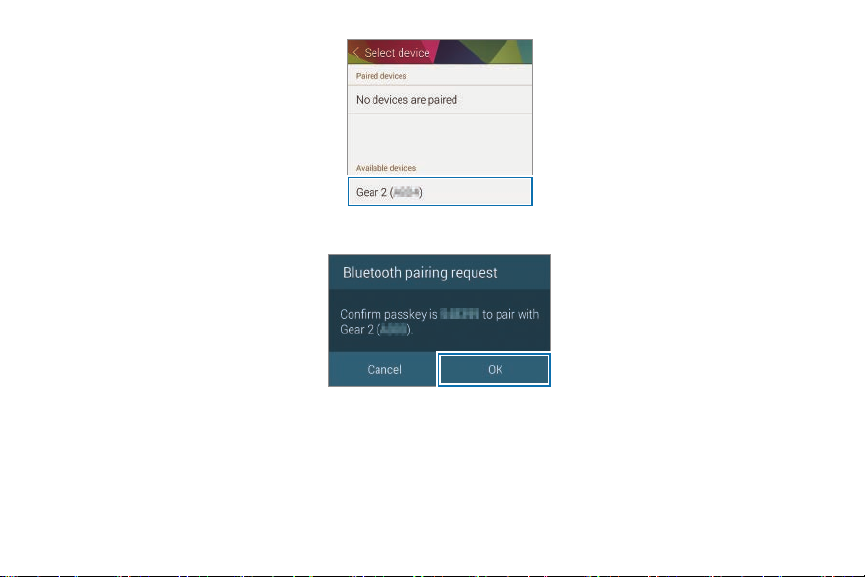
6. From the Mobile device, when the Bluetooth pairing request displays, tap OK.
21
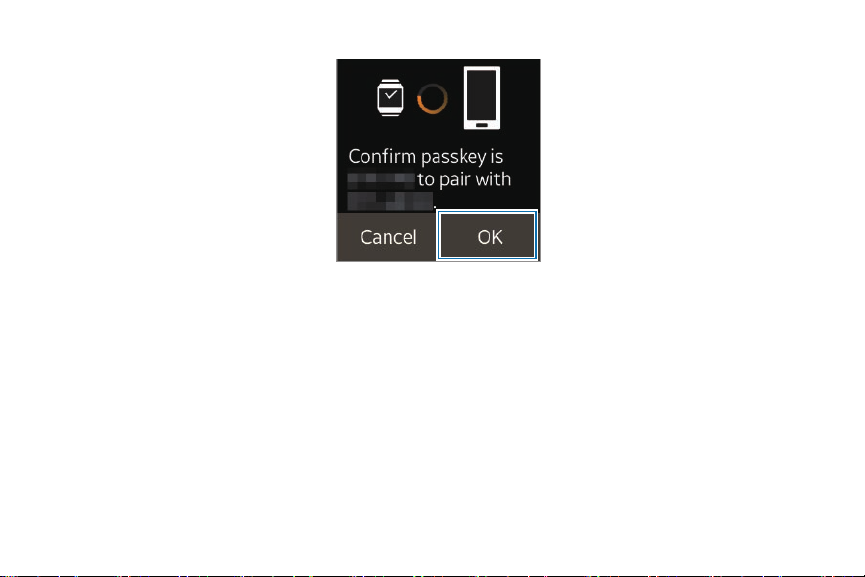
7. Tap OK when the Confirm passkey screen displays.
8. The Install window displays on the Mobile device.
9. From the Mobile device, read and agree to the terms and conditions.
When the devices connect, the Gear Manager displays on the mobile device and the clock screen
displays on the Gear 2™.
Section 1: Getting Started
22

Note: The Gear Manager application guide displays.
● You can configure the Gear 2™ from the Gear Manager.
● Connection methods and screenshots may vary depending on the type of dev ice and the device’s
software version.
● When connecting the Gear to another mobile device
If you want to connect the Gear 2™ to a newly purchased mobile device or to another mobile device
for the first time, reset the Gear 2™ device. Resetting the G ear 2™ removes the data from the
memor y. After the reset , you can connect the Gear 2™ to a different mobile device.
23

Locking and unlocking the Gear
When not in use, lock the Gear 2™ to prevent unwanted operation. Pressing the Power button on the Clock
screen turns off the screen and locks the Gear 2™. The Gear automatically locks if it is inactive for a specified
period.
► Press the Power button. to unlock the Gear 2™ device.
Adjusting the brightness of the display
You can adjust the display’s brightness on the Gear 2™.
► From the Home screen, tap Settings → Display → Brightness, and then adjust the brightness.
Tip: In bright conditions, such as direct sunlight, you can set the brightness of the device’s display to Outdoor
mode. If the screen remains off for 5 minutes, outdoor mode automatic ally resets to the default setting.
Adjusting the volume
You can adjust the volume level on the Gear 2™.
1. From the Home screen, tap Settings → Sound → Volume.
2. Select an item and adjust the level.
Switching to silent mode
Use one of the following methods to switch to Silent mode:
1. Press and hold the Power button, and then tap Sound or Vibration.
2. From the Home screen, tap Settings → Sound → Sound mode → Vibrate or Mute.
Section 1: Getting Started
24
 Loading...