

Samsung SMR210 User Manual

User Manual
SM-R210
English. 02/2017. Rev.1.0
www.samsung.com

Table of Contents
Basics
3 About the Gear 360
4 Read me first
5 Package contents
6 Device layout
8 Indicator light
9 Camera status screen
11 Memory card
14 Battery
17 Attaching the strap to the Gear 360
18 Turning the Gear 360 on and off
19 Connecting the Gear 360 to a mobile
device
45 Settings
46 Updating the software
Appendix
47 Troubleshooting
Using the Gear 360
22 Using the Gear 360’s menus
23 Using the Gear 360 solely
24 Connecting to a mobile device
remotely
25 Recording videos or taking photos
35 Live broadcast
36 Configuring camera settings
38 Viewing videos or images
44 Connecting the Gear 360 and a
computer
44 Transferring files to a computer
2

Basics
About the Gear 360
The Gear 360 camera captures 360-degree videos and photos of you and your surroundings
in one shot. The two fisheye lenses capture lively photos and videos.
When you connect the Gear 360 to your mobile device via Bluetooth or Wi-Fi, you can capture
videos and photos remotely from your mobile device. You can also view, edit, and share
videos and photos.
If you connect the Gear 360 to a Gear VR, you can view your Gear 360 videos more realistically.
3
Basics
Read me first
Please read this manual before using this device to ensure safe and proper use.
•
Images may differ in appearance from the actual product. Content is subject to change
without prior notice. You can access the full user manual for more information. Visit
www.samsung.com to view device information, the user manual, and more.
•
Before using other devices, make sure they are compatible with the Gear 360. Visit
www.samsung.com to see a list of compatible mobile devices.
•
This product includes certain free/ open source software. To see the instructions for
viewing the open source license, go to the Samsung website (opensource.samsung.com).
Instructional icons
Warning: situations that could cause injury to yourself or others
Caution: situations that could cause damage to your device or other equipment
Notice: notes, usage tips, or additional information
4

Basics
Package contents
Check the product box for the following items:
•
Gear 360
•
USB Cable (USB Type-C)
•
Strap
•
Pouch
•
Quick start guide
•
The items supplied with the Gear 360 and any available accessories may vary
depending on the region or service provider.
•
The supplied items are designed only for this Gear 360 and may not be compatible
with other devices.
•
Appearances and specifications are subject to change without prior notice.
•
You can purchase additional accessories from your local Samsung retailer. Make
sure they are compatible with the Gear 360 before purchase.
•
Use only Samsung-approved accessories. Using unapproved accessories may cause
the performance problems and malfunctions that are not covered by the warranty.
•
Availability of all accessories is subject to change depending entirely on
manufacturing companies. For more information about available accessories, refer
to the Samsung website.
5
Basics
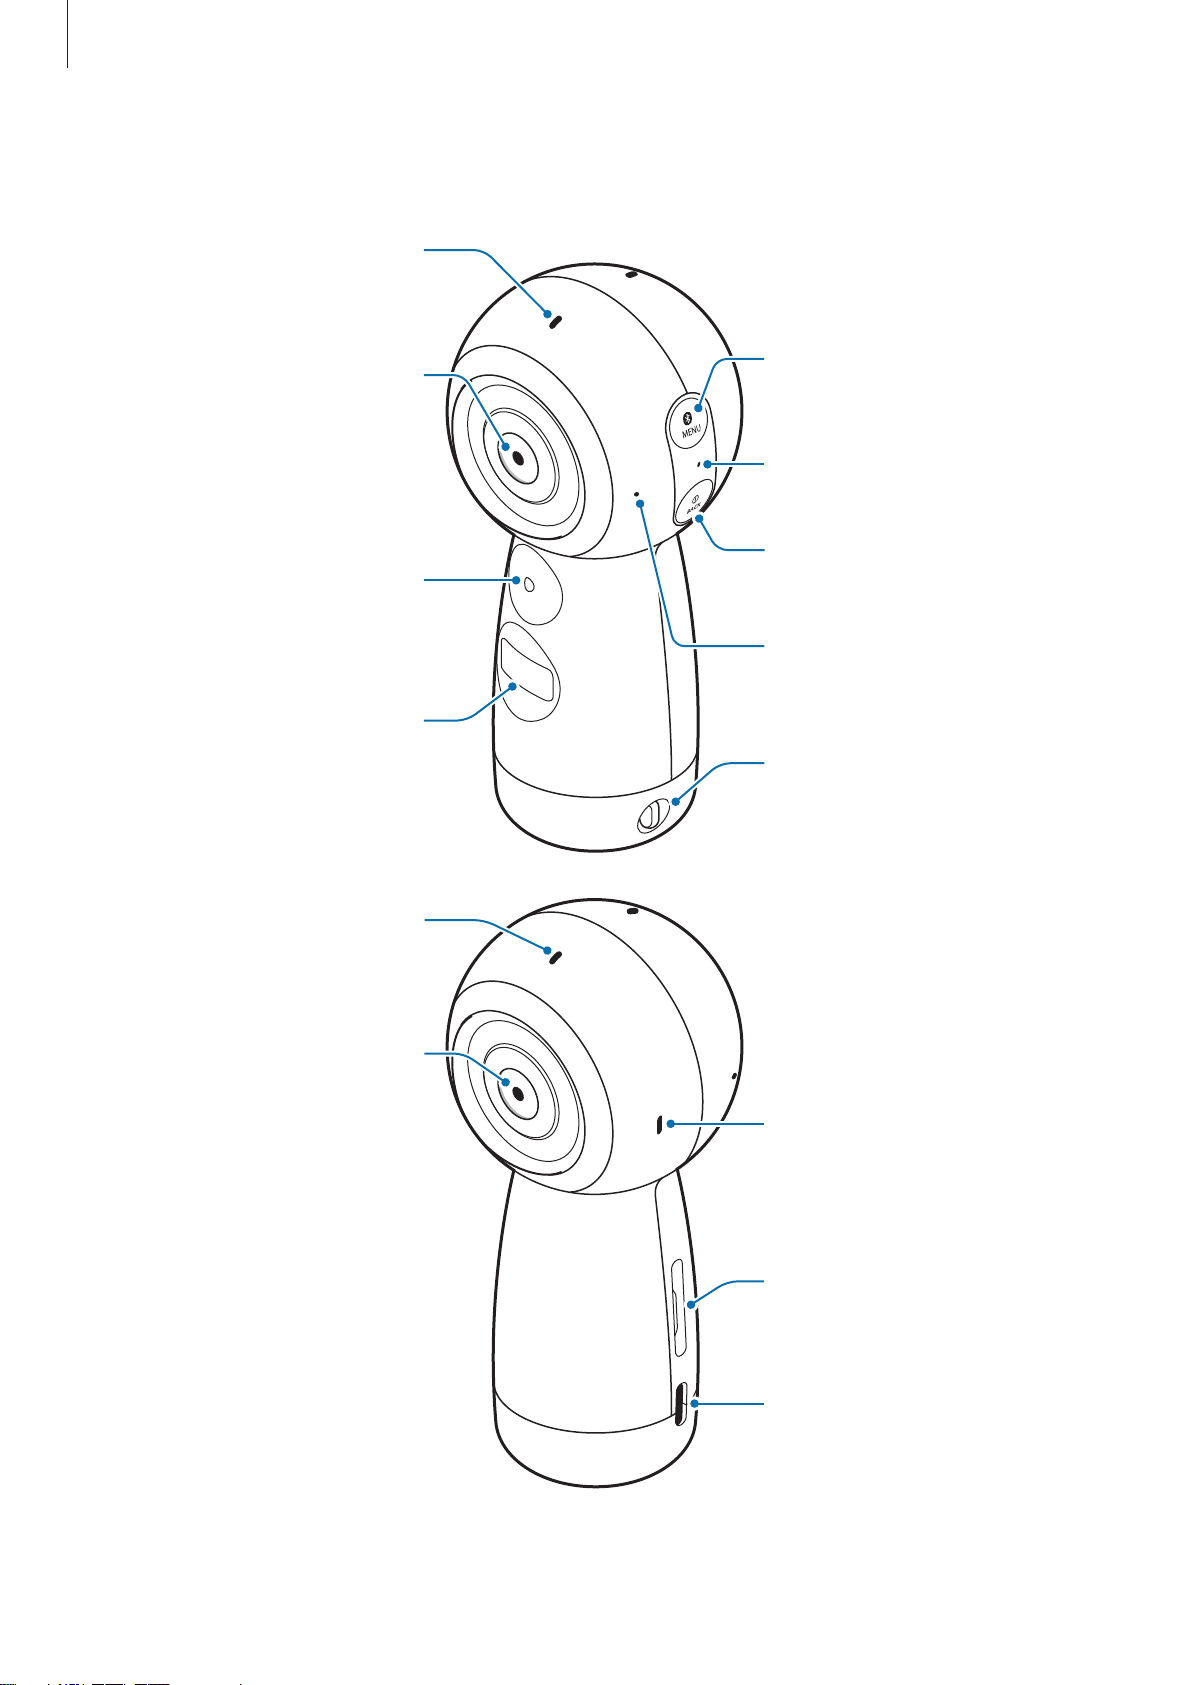
Front camera status
Device layout
light
Front camera
OK key
Camera status screen
Rear camera status
light
Menu key
Indicator light
Power key
Microphone
Strap hole
Rear camera
Speaker
Memory card tray
Multipurpose jack
6
Basics
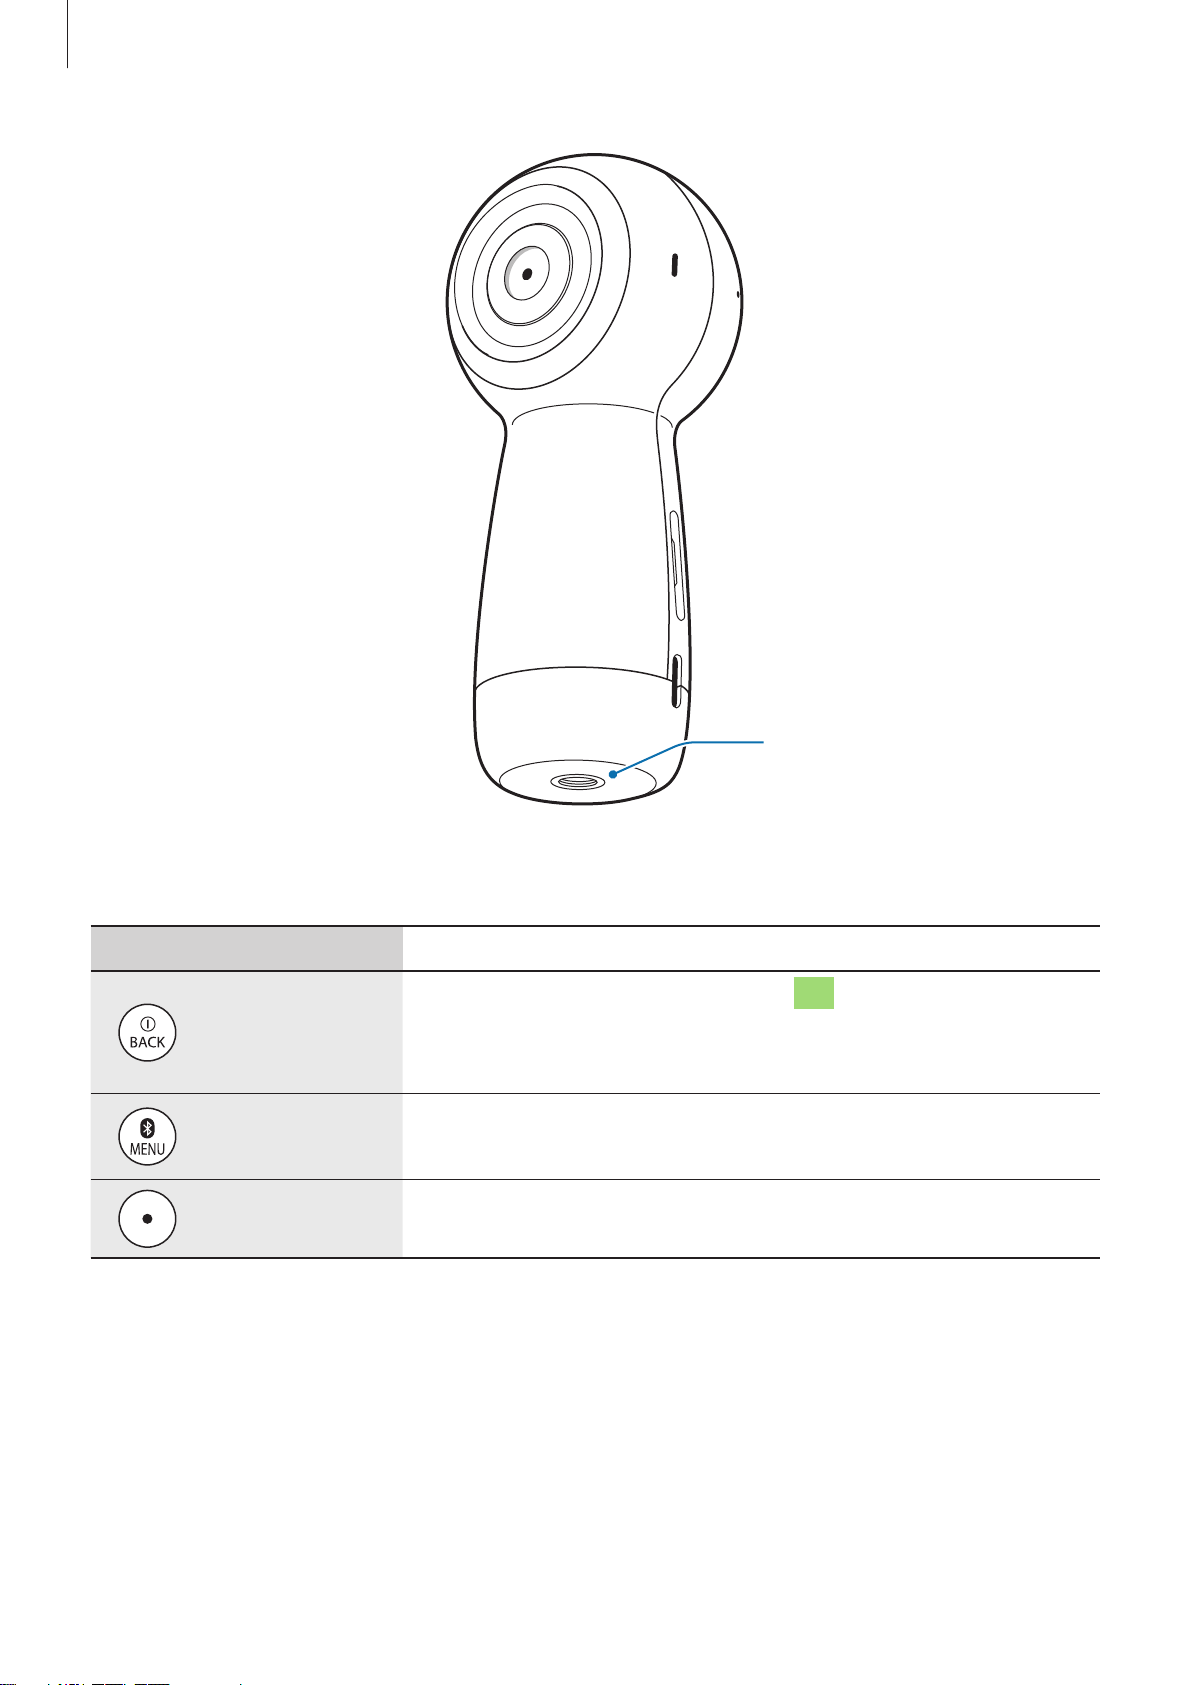
Keys
Key Function
•
Press and hold to turn the Gear 360 on or off.
Power
Menu
OK
•
Press to return to the previous screen on the camera status
screen.
•
Press repeatedly to move to the menu you want.
•
Press and hold to access connection modes.
•
Press to record a video or take a photo, or select the option
you want.
Tripod socket
7

Basics
Indicator light
The indicator light informs you of your Gear 360’s status.
Indicator light
Colour Status
•
Power on
Flashes blue three times
Flashes red three times
Flashes red
Continuously on red
Continuously on green
→
Red
Continuously on blue
Flashes blue
Green → Blue
•
Formatting a memory card or successfully resetting the
Gear 360
•
Power off
•
Battery power is low (lower than 10 %)
•
Overheating
•
The battery is charging.
•
The battery is fully charged.
•
Bluetooth pairing mode
•
Connected to a mobile device via Bluetooth
•
Transferring videos or photos, or updating software
8
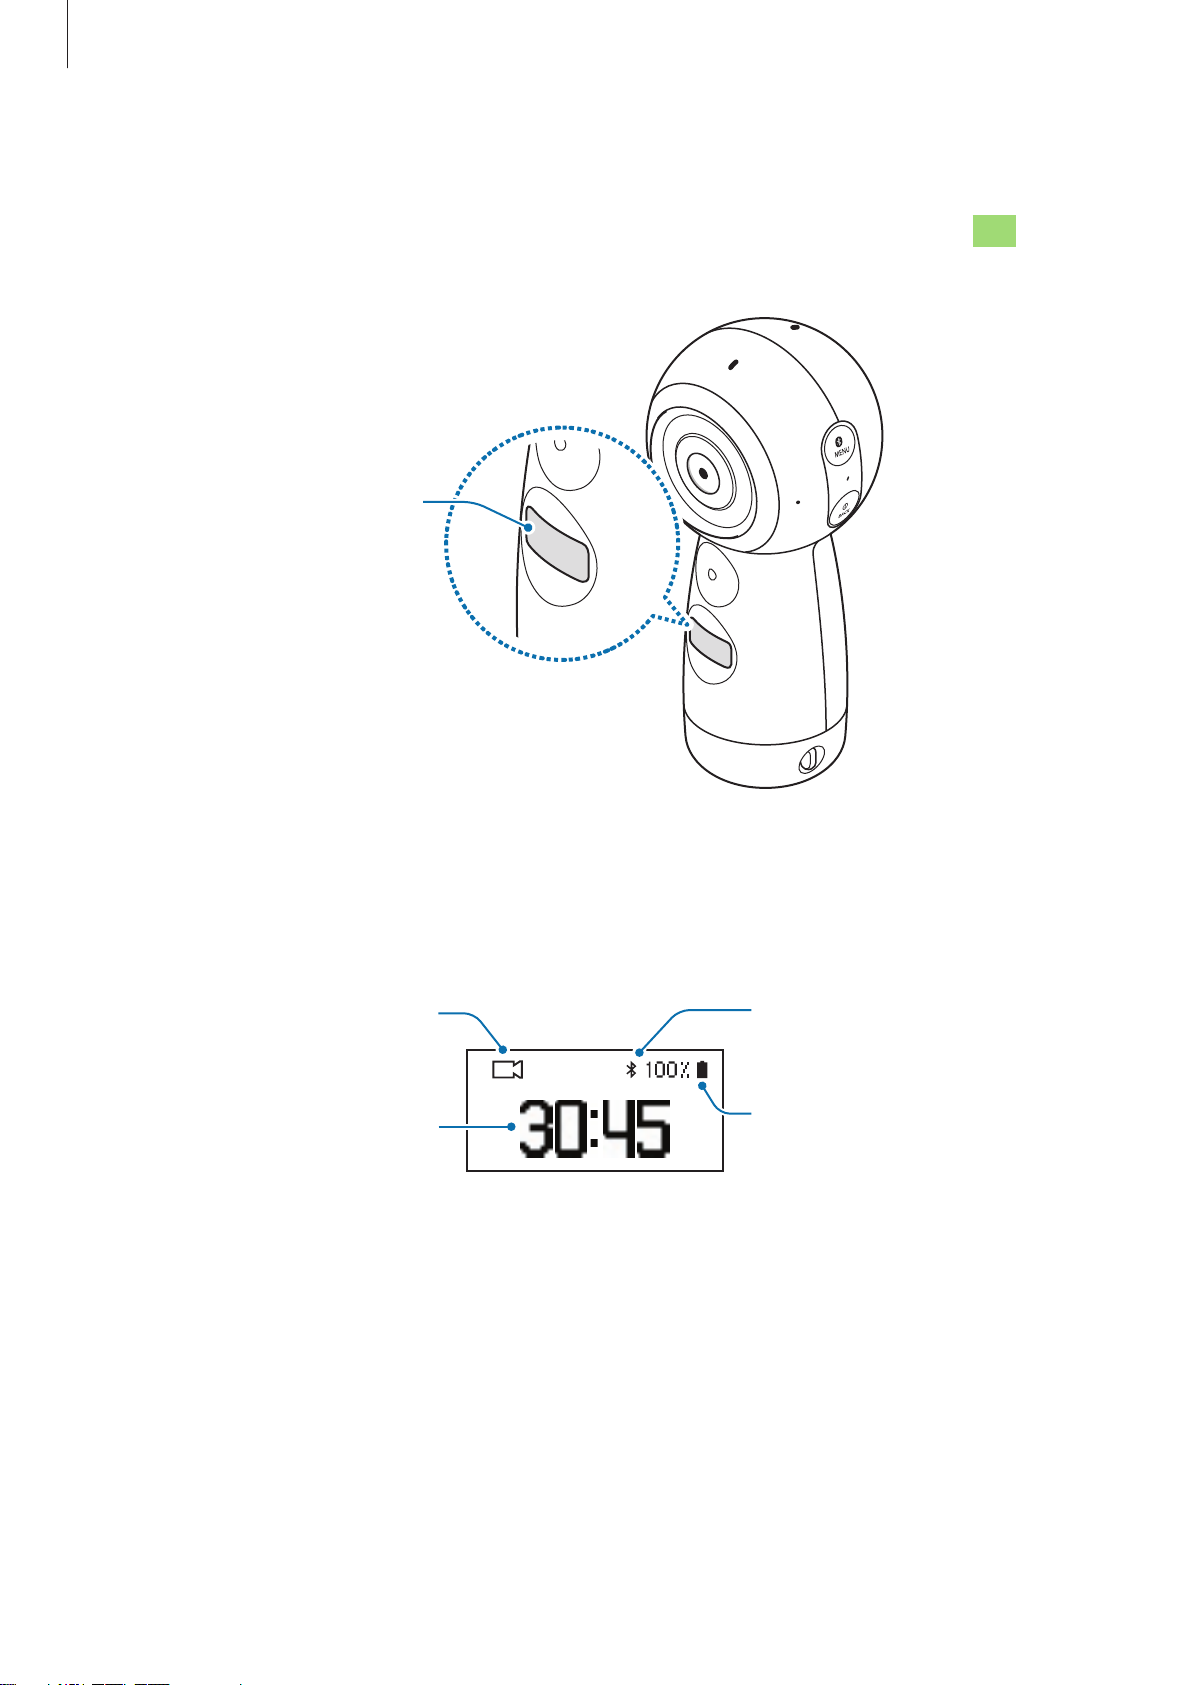
Basics
Current shooting mode
Connected via
Camera status screen
Access options, such as camera modes and connection modes, and view the Gear 360’s status
via messages and indicator icons on the camera status screen.
Camera status screen
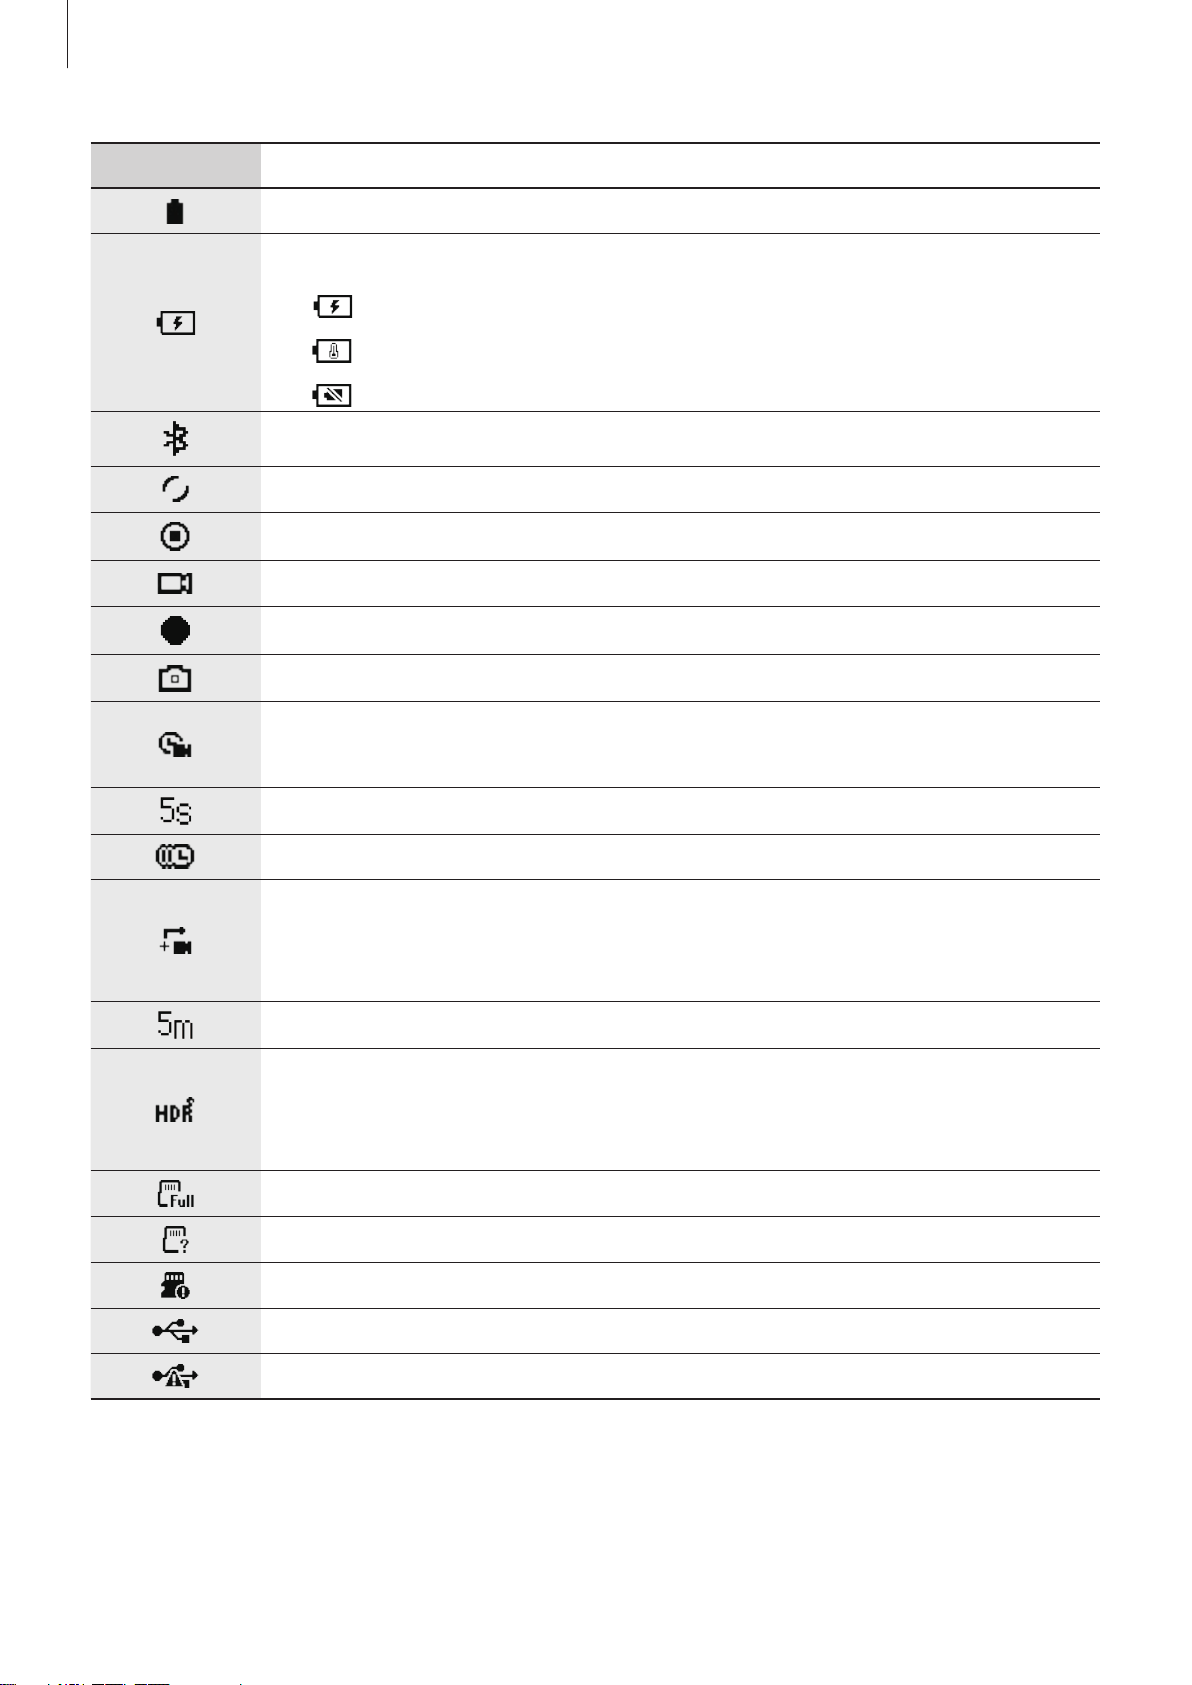
Indicator icons
Indicator icons appear on the camera status screen. You can check the Gear 360’s status on
the camera status screen.
Bluetooth
Available video
recording
time/Available number
of photos you can take
Battery power/Charging
status
9
Basics
Icon Function
Battery power level
Battery charging status
•
•
•
Connected to a mobile device via Bluetooth
Bluetooth pairing mode
Bluetooth pairing mode ended
Recording mode
Recording a video
Shooting mode
Time lapse mode
Take several photos at set intervals and save them as one video.
Time lapse shooting interval
Recording a time lapse video
: Charging
: Overheating
: Charger connected improperly
Video looping mode
Record a video continuously by overwriting a set period of the previously
recorded content and saving the new content.
Video looping overwriting time
Landscape HDR mode
Taking photos with rich colours and reproduce details even in bright and
dark areas.
Memory card full
No memory card
Memory card error
Connected to computer
USB connection error
10

Basics
Memory card
Installing a memory card
A memory card must be inserted to take photos or record videos. Depending on the memory
card manufacturer and type, some memory cards may not be compatible with your device.
•
Some memory cards may not be fully compatible with the Gear 360. Using an
incompatible card may damage the Gear 360 or the memory card, or corrupt the
data stored in it.
•
If you use a slow writing memory card, the recording of your movie can be
interrupted because the card cannot process data at the rate the video is being
shot. If this occurs, replace the card with a faster memory card or reduce the video
size.
•
Use caution to insert the memory card right-side up.
•
Memory cards are sold separately.
•
If you insert or remove a memory card while the Gear 360 is turned on, the power
will turn off.
•
Frequent writing and erasing of data shortens the lifespan of memory cards.
•
When a memory card is not inserted,
status screen.
Check SD Card
is displayed on the camera
11

Basics
Pull out the memory card tray gently from the memory card tray slot.
1
Memory card tray
Be careful not to damage your fingernails when you remove the memory card tray.
Gently press the memory card into the memory card tray with the gold-coloured
2
contacts properly aligned with the Gear 360’s contacts.
Insert the memory card tray back into the memory card tray slot.
3
Memory card tray slot
Memory card
12

Basics
Removing the memory card
Pull out the memory card tray gently from the memory card tray slot.
1
Remove the memory card.
2
Insert the memory card tray back into the memory card tray slot.
3
Formatting the memory card
A memory card formatted on a computer may not be compatible with the Gear 360. Format
the memory card on the Gear 360 or on the Samsung Gear 360 app.
Before formatting the memory card, remember to make backup copies of all
important data stored in the memory card. The manufacturer’s warranty does not
cover loss of data resulting from user actions.
Formatting on the Gear 360
Press the Menu key until
1
the OK key to select it.
Press the Menu key until
2
OK key to select it.
Press the Menu key until
3
key to select it.
A confirmation message will appear on the camera status screen when the formatting is
finished.
Settings
Format
Yes
appears on the camera status screen, and then press
appears on the camera status screen, and then press the
appears on the camera status screen, and then press the OK
13
Basics
Formatting on the Samsung Gear 360 app
On the mobile device, tap
1
Tap
2
Reset and format
A confirmation message will appear on the camera status screen when the formatting is
finished.
If you want to format a memory card using the Samsung Gear 360 app, you must
connect the Gear 360 to the mobile device. Refer to Connecting the Gear 360 to a
mobile device for more information.
Samsung Gear 360
→
Format Gear 360 SD card
app →
.
Settings
.
Battery
Charging the battery
Charge the battery before using it for the first time or when it has been unused for extended
periods.
Use only Samsung-approved chargers, batteries, and cables. Unapproved chargers or
cables can cause the battery to explode or damage the Gear.
Connecting the charger improperly may cause serious damage to the device. Any
damage caused by misuse is not covered by the warranty.
•
Chargers are sold separately.
•
To save energy, unplug the charger when not in use. The charger does not have a
power switch, so you must unplug the charger from the electric socket when not in
use to avoid wasting power. The charger should remain close to the electric socket
and easily accessible while charging.
14

Basics
Plug the small end of the charger into the multipurpose jack of the Gear 360, and plug
1
the large end of the charger into an electric socket.
Multipurpose jack
After fully charging, disconnect the Gear 360 from the charger. First unplug the charger
2
from the Gear 360, and then unplug it from the electric socket.
15

Basics
Battery charging tips and precautions
•
When the battery power is low, the battery icon appears empty.
•
If the battery is completely discharged, the device cannot be turned on immediately
when the charger is connected. Allow a depleted battery to charge for a few minutes
before turning on the device.
•
Using a power source other than the charger, such as a computer, may result in a slower
charging speed due to a lower electric current.
•
The device can be used while it is charging, but it may take longer to fully charge the
battery.
•
If the device receives an unstable power supply while charging, the touchscreen may not
function. If this happens, unplug the charger from the device.
•
While charging, the Samsung Gear 360 and the charger may heat up. This is normal and
should not affect the Samsung Gear 360’s lifespan or performance. If the temperature
rises above a certain level, battery charging will be stopped.
•
You cannot charge the Samsung Gear 360 while recording a video, using the time lapse
feature, or using the viewfinder remotely on the connected mobile device.
•
To save the battery power, activate the auto shut-off feature.
•
If the Samsung Gear 360 is not charging properly, take the Samsung Gear 360 and the
charger to a Samsung Service Centre.
16
 Loading...