

Samsung SM-G390W service manual Cover
SM-G390W
Mobile Device
CONTENTS
Notice: All functionality, features, specifications,
1. Safety Precautions
2. Specification
3. Product Function
4. Exploded View and Parts list
5. MAIN Electrical Parts List
6. Level 1 Repair
7. Level 2 Repair
8. Level 3 Repair
9. Reference data
and other product information provided in this
document, including but not limited to, benefits,
design, pricing, components, performance,
availability, and capabiliti-es of the product are
subject to change without notice. Samsung
reserves the right to alter this doc-ument or the
product described herein at anytime, without
obligation to provide notification of such
changes.

1. Safety Precautions
1-1. Repair Precaution
Before attempting any repair or detailed tuning, shield the device from RF noise or static
electricity discharges.
Use only demagnetized tools that are specifically designed for small electronic repairs,
as most electronic parts are sensitive to electromagnetic forces.
Use only high quality screwdrivers when servicing products. Low quality screwdrivers can
easily damage the heads of screws.
Use only conductor wire of the properly gauge and insulation for low resistance, because of the low margin
of error of most testing equipment.
We recommend 22-gauge twisted copper wire.
Hand-soldering is not recommended, because printed circuit boards (PCBs) can be easily
damaged, even with relatively low heat. Never use a soldering iron with a power rating of
more than 100 watts and use only lead-free solder with a melting point below 250°C (482°F).
Prior to disassembling the battery charger for repair, ensure that the AC power is disconnected.
Always use the replacement parts that are registered in the SEC system. Third-party replacement parts
may not function properly.
Confidential and proprietary-the contents in this service guide subject to change without prior notice
Distribution, transmission, or infringement of any content or data from this document without Samsung’s written authorization is strictly prohibited.

1. Safety Precautions
1-2. ESD(Electrostatically Sensitive Devices) Precaution
Many semiconductors and ESDs in electronic devices are particularly sensitive to static discharge and can
be easily damaged by it. We recommend protecting these components with conductive anti-static bags
when you store or transport them.
Always use an anti-static strap or wristband and remove electrostatic buildup or dissipate
static electricity from your body before repairing ESDs.
Ensure that soldering irons have AC adapter with ground wires and that the ground wires are properly
connected.
Use only desoldering tools with plastic tips to prevent static discharge.
Properly shield the work environment from accidental electrostatic discharge before opening
packages containing ESDs.
The potential for static electricity discharge may be increased in low humidity environments,
such as air-conditioned rooms. Increase the airflow to the working area to decrease the
chance of accidental static electricity discharges.
Confidential and proprietary-the contents in this service guide subject to change without prior notice
Distribution, transmission, or infringement of any content or data from this document without Samsung’s written authorization is strictly prohibited.
2. Specification
1537~1738
2-1. GSM General Specification
Freq.
Band[MHz]
Uplink/
Downlink
ARFCN
range
Tx/Rx
spacing
Mod. Bit
rate/
Bit Period
Time Slot
Period/
Frame
Period
GSM850 EGSM 900 DCS1800 PCS1900
824~849
869~894
128~251
45MHz 45MHz 95MHz 80MHz 190MHz 80MHz 45MHz
270.833kbp
s
3.692us
576.9us
4.615ms
880~915
925~960
0~124
& 975~1023
270.833kbps
3.692us
576.9us
4.615ms
1710~1785
1805~1880
512~885 512~810
270.833kbp
s
3.692us
576.9us
4.615ms
1850~1910
1930~1990
270.833kbp
s
3.692us
576.9us
4.615ms
WCDMA
2100
1922~1977
2112~2167
UL:
9612~9888
DL:
10562~10838
3.84Mcps 3.84Mcps 3.84Mcps 3.84Mcps
FrameLength:
10ms
Slotlength:
0.667ms
WCDMA
1900
1852~1907
1932~1987
UL:
9262~9538
DL:
9662~9938
FrameLength:
10ms
Slotlength:
0.667ms
WCMDA
824~849
869~894
4132~4233
4357~4458
FrameLength:
Slotlength:
0.667ms
850
UL:
DL:
10ms
WCDMA
1700
1710~1755
2110 ~ 2155
UL :
1312~1513
DL :
400MHz
FrameLength:
10ms
Slotlength:
0.667ms
Modulation 0.3GMSK 0.3GMSK 0.3GMSK 0.3GMSK QPSK/HQPSK QPSK/HQPSK QPSK/HQPSK
MS Power 33dBm~5dBm 33dBm~5dBm 30dBm~0dBm 30dBm~0dBm
Power Class 5pcl ~ 19pcl 5pcl ~ 19pcl 0pcl ~ 15pcl 0pcl ~ 15pcl 3(max+24dBm) 3(max+24dBm) 3(max+24dBm)
Sensitivity -102dBm -102dBm -100dBm -100dBm -106.7dBm -106.7dBm -106.7dBm 106.7dBm
TDMA Mux 8 8 8 8 8 8 8 8
Cell Radius 35Km 35Km 2Km 2Km 2Km 2Km 2Km 2Km
24dBm~
-50dBm
24dBm~
-50dBm
24dBm~
-50dBm
QPSK/HQPSK
24dBm~-
50dBm
3(max+24dB
m)
Distribution, transmi ssion, or infringement of any content or data from this document without Samsung’s written authorization is strictly prohi bited.
Confidential and pr oprietary-the contents in this service guide subjec t to change without pr ior notice

2. Specification
control level
control level
control level
control level
2-2. GSM Tx Power Class
TX Power
5 33±2 dBm 5 33±2 dBm 0 30±3 dBm 0 30±3 dBm
6 31±2 dBm 6 31±2 dBm 1 28±3 dBm 1 28±3 dBm
7 29±2 dBm 7 29±2 dBm 2 26±3 dBm 2 26±3 dBm
8 27±2 dBm 8 27±2 dBm 3 24±3 dBm 3 24±3 dBm
9 25±2 dBm 9 25±2 dBm 4 22±3 dBm 4 22±3 dBm
10 23±2 dBm 10 23±2 dBm 5 20±3 dBm 5 20±3 dBm
11 21±2 dBm 11 21±2 dBm 6 18±3 dBm 6 18±3 dBm
12 19±2 dBm 12 19±2 dBm 7 16±3 dBm 7 16±3 dBm
GSM850
TX Power
EGSM900
TX Power
DCS1800
TX Power
PCS1900
13 17±2 dBm 13 17±2 dBm 8 14±3 dBm 8 14±3 dBm
14 15±2 dBm 14 15±2 dBm 9 12±4 dBm 9 12±4 dBm
15 13±2 dBm 15 13±2 dBm 10 10±4 dBm 10 10±4 dBm
16 11±3 dBm 16 11±3 dBm 11 8±4 dBm 11 8±4 dBm
17 9±3dBm 17 9±3dBm 12 6±4 dBm 12 6±4 dBm
18 7±3 dBm 18 7±3 dBm 13 4±4 dBm 13 4±4 dBm
19 5±3 dBm 19 5±3 dBm 14 2±5 dBm 14 2±5 dBm
- - - - 15 0±5 dBm 15 0±5 dBm
Confidential and pr oprietary-the contents in this service guide subjec t to change without pr ior notice
Distribution, transmi ssion, or infringement of any content or data from this document without Samsung’s written authorization is strictly prohi bited.
2. Specification
Freq.
Downlink
UL:
0~599
UL:
600~1199
UL:
1805~1880
UL:
1950~2399
UL:
2400~2649
UL:
2750~3449
Channel
Bandwidth
5/10/15/20
MHz
1.4/3/5/10/15/
20 MHz
1.4/3/5/10/15/
20 MHz
1.4/3/5/10/15/
20 MHz
1.4/3/5/10
MHz
5/10/15/20
MHz
MS Power
(MPR)
Sensitivity
(BW 10MHz)
Freq.
Downlink
UL:
66436~67335
MHz
MS Power
(MPR)
Sensitivity
(BW 10MHz)
2-3. LTE General Specification
Band[MHz]
Uplink/
ARFCN range
Tx/Rx spacing
Modulation QPSK,16/64QAM QPSK,16/64QAM QPSK,16/64QAM QPSK,16/64QAM QPSK,16/64QAM QPSK,16/64QAM
(QPSK)
Cell Radius >5Km >5Km >5Km >5Km >5Km >5Km
LTE Band1 LTE Band2 LTE Band3 LTE Band4 LTE Band5 LTE Band7
1920~1980
2110~2170
18000~18599
DL:
190MHz 80MHz 95MHz 400MHz 45MHz 120MHz
-35~25.7 dBm -35~25.7 dBm -35~25.7 dBm -35~25.7 dBm -35~25.7 dBm -35~25.7 dBm
-96.3 dBm -94.3 dBm -93.3 dBm -96.3 dBm -94.3 dBm -94.3dBm
1850~1910
2110~2170
18600~19199
DL:
1710~1785
1805~1880
19200~19950
DL:
1710~1755
2110~2155
19950~20399
DL:
824~849
869~894
20400~20649
DL:
2500~2570
1805~1880
20750~21449
DL:
LTE Band 12 LTE BAND 13 LTE Band 17 LTE BAND 20 LT E BAND 29 LTE Band66
Band[MHz]
Uplink/
ARFCN range
Tx/Rx spacing
Channel
Bandwidth
Modulation QPSK,16/64QAM QPSK,16/64QAM QPSK,16/64QAM QPSK,16/64QAM QPSK,16/64QAM QPSK,16/64QAM
(QPSK)
Cell Radius >5Km >5Km >5Km >5Km >5Km >5Km
698~716
729~746
UL:
23000~23179
DL:
5010~5179
30MHZ -31Mhz 30MHz -41MHz N/A 400MHz
1.4/3/5/10 MHz 5/10 MHz 5/10 MHz 5/10/15/20 MHz 3/5/10 MHz
-35~25.7 dBm -35~25.7 dBm -35~25.7 dBm -35~25.7 dBm -35~25.7dBm -35~25.7 dBm
-93.3 dBm -93.3dBm -93.3 dBm -93.3dBm N/A -95.8
777~787
746~756
UL:
23180~23279
DL:
5180~5279
704~716
734~746
UL:
23703~23849
DL:
5730~5849
832~862
791~821
UL:
24150~24449
DL:
6150~6449
N/A
716~728
UL:
Downlink only
DL:
9660~9769
1710~1780
2110~2220
131927
~132671
DL:
1.4/3/5/10/15/20
Distribution, transmi ssion, or infringement of any content or data from this document without Samsung’s written authorization is strictly prohi bited.
Confidential and pr oprietary-the contents in this service guide subjec t to change without pr ior notice
3. Operation Instruction and Installation
Main Function
Item Description
OS Android V7.0
RF 2G Quad(850/ 900/1800/1900), WCDMA(1,2,4,5), LTE (1,2,3,4,5,7,12,13,17,20,29,66)
Battery 2,800mAh
Base Band 1.4GHz Quad-Core
Other RF GPS, Glonass, BT4.2, USB 2.0, WIFI 802.11 b/g/n/a 2.4+5GHz
Camera 13MP AF (Main). 5M FF(Front)
LCD 5" HD TFT LCD, 1280 x 720
RAM 2GB LPDDR3 RAM + 16GB eMMC
Sensor Accelerometer, Proxy, Magnetic
Accessory
Charger: 5V, 1.55A ,Headset, DLC
Confidential and proprietary-the contents in this service guide subject to change without prior notice
Distribution, transmission, or infringement of any content or data from this document without Samsung’s written authorization is strictly prohibited.
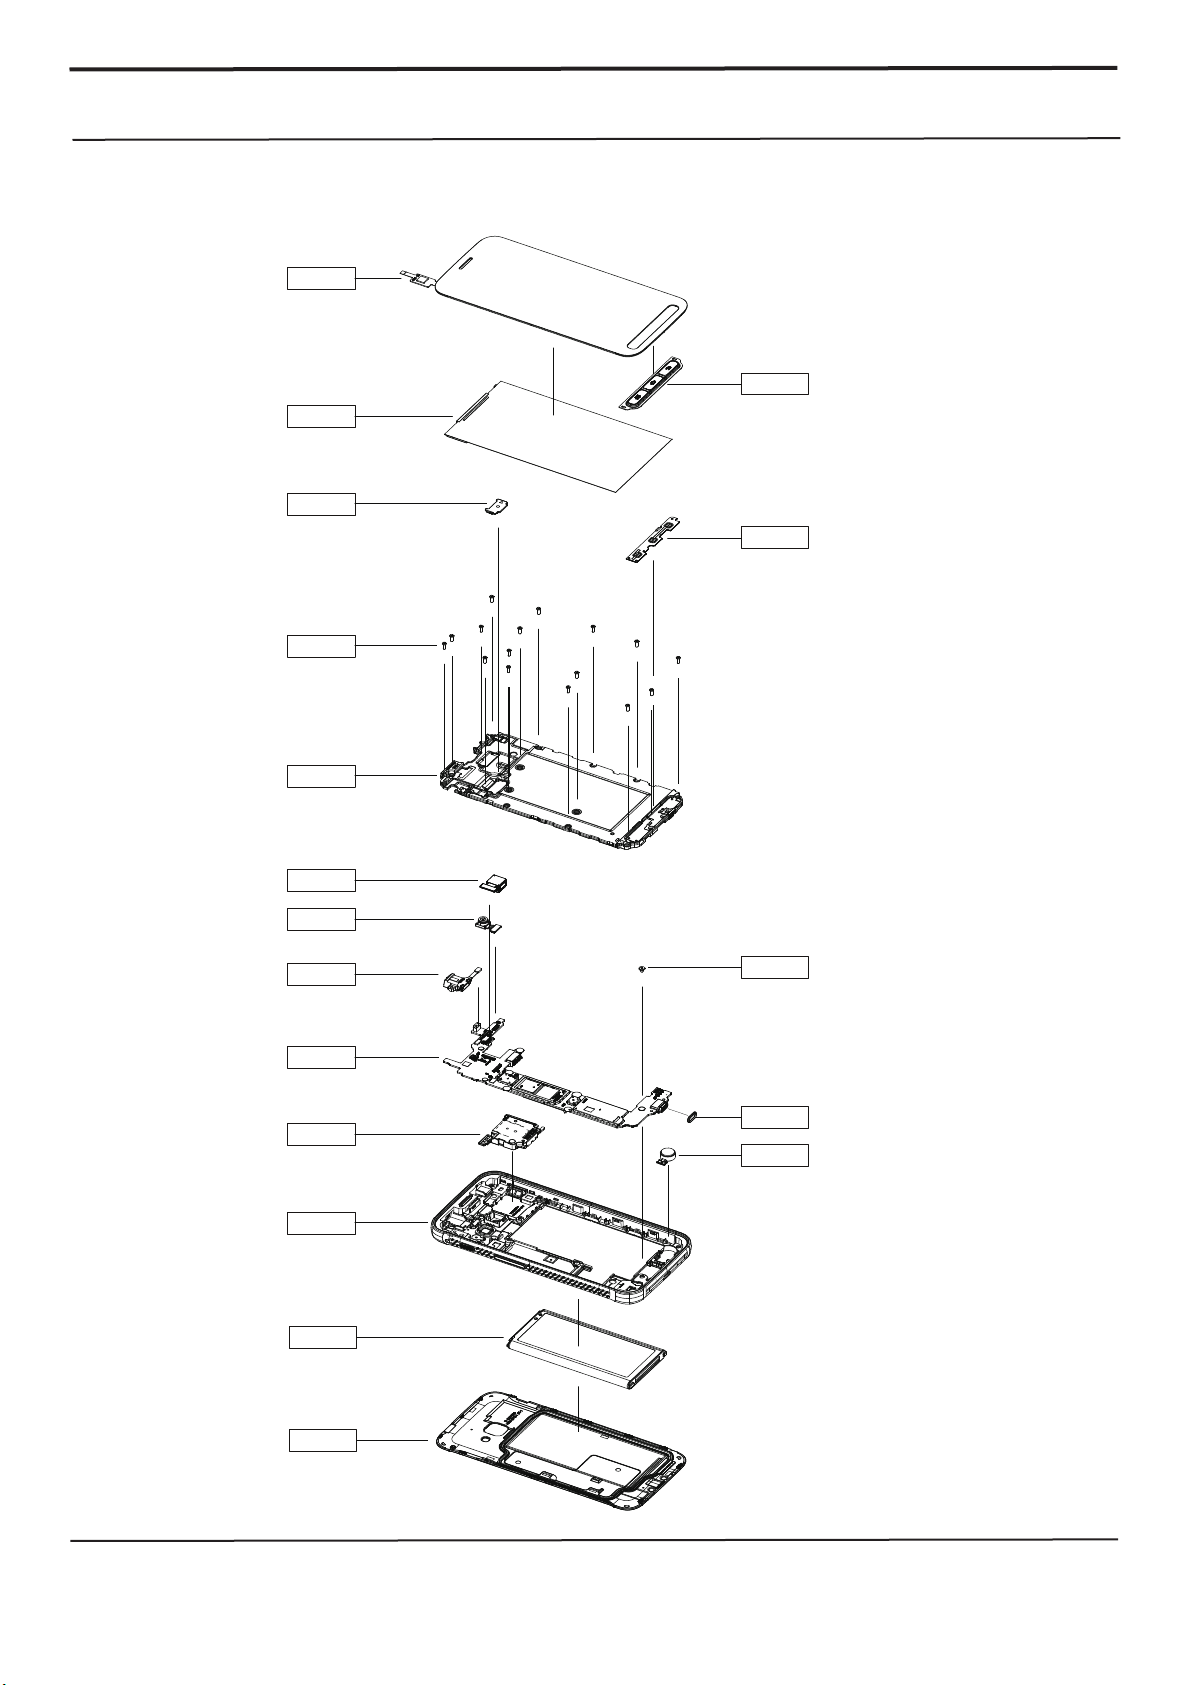
4. Exploded View and Parts List
4-1. Cellular phone Exploded View
QME03
QLC01
QIF01
QCR98
QKP01
QME01
QBR01
QCA01
QCA02
QJK01
QMP01
QSP01
QRE01
QBA01
QCR96
QRF01
QMO01
QBC01
Confidential and proprietary-the contents in this service guide subject to change without prior notice
Distribution, transmission, or infringement of any content or data from this document without Samsung’s written authorization is strictly prohibited.
※ SVC REPAIR TAPE
QRT01, QRT02, QRT03, QRT04

5. MAIN Electrical Parts List
Part Code Design Loc Description
0401-001110 D5000 DIODE-SWITCHING
0406-001459 ZD5002,ZD5018,ZD5019 DIODE-TVS
0406-001459 ZD6001,ZD6002,ZD6003 DIODE-TVS
0406-001459 ZD6007,ZD6029,ZD6030 DIODE-TVS
0406-001459 ZD6031 DIODE-TVS
0406-001709 ZD5008,ZD5011,ZD5012 DIODE-TVS
0406-001709 ZD5013,ZD5015,ZD5022 DIODE-TVS
0406-001728 ZD4000 DIODE-TVS
0406-001740 ZD5000,ZD5001 DIODE-TVS
0406-001743 ZD4007,ZD5021,ZD6016 DIODE-TVS
0406-001743 ZD6017,ZD6018,ZD6019 DIODE-TVS
0406-001743 ZD6020,ZD6021 DIODE-TVS
0406-001762 ZD4003,ZD4004,ZD6022 DIODE-TVS
0406-001763 ZD6026,ZD6027,ZD6028 DIODE-TVS
0505-002388 Q2000 FET-SILICON
0601-003541 LED4000 LED
1001-001655 U5005 IC
1001-001964 U1013,U2000 IC
1003-002802 U3003 IC
1108-000626 UME5000 MEMORY
1201-003786 U2001 IC
1201-003972 F1000 IC
1201-003975 U1027 IC
1201-003980 U1015 IC
1201-004036 U2004 IC
1201-004084 U1021 IC
1201-004099 U5004 IC
1201-004103 U1026 IC
1201-004129 U1017 IC
1203-008251 U5006 IC
1203-008269 U6001 IC
1203-008711 U4001 IC
1203-008831 U4000 IC;
1203-008867 U2003,U6003 IC
1203-008948 L1058,U2006 IC
1203-008950 U4002 IC
1203-008951 U4004 IC
1205-005175 U4003 IC
Confidential and proprietary-the contents in this service guide subject to change without prior notice
Distribution, transmission, or infringement of any content or data from this document without Samsung’s written authorization is strictly prohibited.

5. MAIN Electrical Parts List
1205-005301 U2008 IC
1205-005671 U3000 IC
1205-005767 R1010 IC
1205-005783 U2005 IC
1209-002275 U5002 IC
1209-002300 U5001 IC
1209-002401 U5003 IC
1404-001664 TH3000 THERMISTOR
1404-001724 V3000 THERMISTOR
1404-001734 TH1000 THERMISTOR
2007-003015 R4024,R4025 R-CHIP
2007-007131 R4011 R-CHIP
2007-007142 R5040,R5050,R5070 R-CHIP
2007-007193 R5028,R5051 R-CHIP
2007-007307 R4012 R-CHIP
2007-007318 R4018 R-CHIP
2007-007517 R3036 R-CHIP
2007-007589 R5013 R-CHIP
2007-007741 R1008,R1009,R1011 R-CHIP
2007-007741 R2017,R3012,R3018 R-CHIP
2007-007741 R3019,R3127,R5001 R-CHIP
2007-007741 R5002,R5034,R5042 R-CHIP
2007-007741 R6017,R6037,R6038 R-CHIP
2007-007741 R6220 R-CHIP
2007-007798 R4026 R-CHIP
2007-007942 R3041 R-CHIP
2007-007946 R3042 R-CHIP
2007-008055 R5071 R-CHIP
2007-008056 R1002,R1003 R-CHIP
2007-008210 R6219 R-CHIP
2007-008420 R5068 R-CHIP
2007-008531 R1007 R-CHIP
2007-008579 R3122,R3123,R3124 R-CHIP
2007-008579 R3125 R-CHIP
2007-008587 L5003,L5005,R2013 R-CHIP
2007-008587 R2014 R-CHIP
2007-008785 R1000 R-CHIP
2007-008800 R3129,R3130 R-CHIP
2007-009157 R3006,R3007,R3037 R-CHIP
Confidential and proprietary-the contents in this service guide subject to change without prior notice
Distribution, transmission, or infringement of any content or data from this document without Samsung’s written authorization is strictly prohibited.

5. MAIN Electrical Parts List
2007-009157 R3038,R5003,R5044 R-CHIP
2007-009201 R5035,R5036 R-CHIP
2007-009212 R5005,R6015,R6029 R-CHIP
2007-009352 R6031,R6032,R6033 R-CHIP
2007-009352 R6034,R6035,R6036 R-CHIP
2007-009408 R3025,R3026,R3032 R-CHIP
2007-009408 R3033,R5007,R6000 R-CHIP
2007-009408 R6004,R6005 R-CHIP
2007-009410 R5014 R-CHIP
2007-009766 R2010 R-CHIP
2007-009801 R2004,R4016,R4027 R-CHIP
2007-009805 R1001,R1005 R-CHIP
2007-009920 R5008 R-CHIP
2007-009924 R4002 R-CHIP
2007-009969 R4032,R5006 R-CHIP
2007-010202 R6014,R6214,R6216 R-CHIP
2007-010685 R2003,R4031,R6016 R-CHIP
2007-010856 R4003 R-CHIP
2007-011043 R3005 R-CHIP
2007-011377 R5011 R-CHIP
2007-011648 R4030 R-CHIP
2007-012033 R1004,R2018,R6221 R-CHIP
2203-000233 C2078,C2092,C4109 C-CERAMIC,CHIP
2203-000278 C2085,C2089 C-CERAMIC,CHIP
2203-000386 C6047,C6055,C6056 C-CERAMIC,CHIP
2203-000425 C6060 C-CERAMIC,CHIP
2203-001101 C4082 C-CERAMIC,CHIP
2203-001153 C4092 C-CERAMIC,CHIP
2203-003019 C4021 C-CERAMIC,CHIP
2203-005682 C1001,C1028,C1040 C-CERAMIC,CHIP
2203-005682 C1052,C1053,C1069 C-CERAMIC,CHIP
2203-005682 C1104,C2030,C2111 C-CERAMIC,CHIP
2203-005682 C2112,C2117,C4098 C-CERAMIC,CHIP
2203-005682 C4099,C4100,C4101 C-CERAMIC,CHIP
2203-005682 C6021,C6025,C6033 C-CERAMIC,CHIP
2203-005682 C6054,C6062 C-CERAMIC,CHIP
2203-005725 L2046 C-CERAMIC,CHIP
2203-005726 C1129 C-CERAMIC,CHIP
2203-005727 C6000 C-CERAMIC,CHIP
Confidential and proprietary-the contents in this service guide subject to change without prior notice
Distribution, transmission, or infringement of any content or data from this document without Samsung’s written authorization is strictly prohibited.

5. MAIN Electrical Parts List
2203-005729 C1055,C1073,C1074 C-CERAMIC,CHIP
2203-005729 C1075,C2031,C5025 C-CERAMIC,CHIP
2203-005729 C5026,C5029,C5030 C-CERAMIC,CHIP
2203-005729 C5036,C5053,C5054 C-CERAMIC,CHIP
2203-005729 C6031,C6046,C6053 C-CERAMIC,CHIP
2203-005731 C5074,C6022,C6023 C-CERAMIC,CHIP
2203-005731 C6052 C-CERAMIC,CHIP
2203-005732 C1048,C1070,C2121 C-CERAMIC,CHIP
2203-005732 C4089,C5035 C-CERAMIC,CHIP
2203-005734 C4111 C-CERAMIC,CHIP
2203-005736 C1000,C1004,C1009 C-CERAMIC,CHIP
2203-005736 C1010,C1011,C1012 C-CERAMIC,CHIP
2203-005736 C1014,C1019,C1021 C-CERAMIC,CHIP
2203-005736 C1024,C1032,C1036 C-CERAMIC,CHIP
2203-005736 C1047,C1054,C1063 C-CERAMIC,CHIP
2203-005736 C1072,C1099,C2000 C-CERAMIC,CHIP
2203-005736 C2001,C2002,C2013 C-CERAMIC,CHIP
2203-005736 C2020,C2022,C2023 C-CERAMIC,CHIP
2203-005736 C2024,C2025,C2027 C-CERAMIC,CHIP
2203-005736 C2039,C2043,C2047 C-CERAMIC,CHIP
2203-005736 C2049,C2050,C2056 C-CERAMIC,CHIP
2203-005736 C2058,C2061,C2063 C-CERAMIC,CHIP
2203-005736 C2067,C2069,C2072 C-CERAMIC,CHIP
2203-005736 C2083,C2106,C2108 C-CERAMIC,CHIP
2203-005736 C2116,C4033,C5012 C-CERAMIC,CHIP
2203-005736 C5013,C5069,C5073 C-CERAMIC,CHIP
2203-005736 C6065,L1011,L1061 C-CERAMIC,CHIP
2203-005777 C1013,C1016,C1026 C-CERAMIC,CHIP
2203-005777 C1029,C1030,C2006 C-CERAMIC,CHIP
2203-005777 C2052 C-CERAMIC,CHIP
2203-005789 C1105,C2008,C2012 C-CERAMIC,CHIP
2203-005789 U1002 C-CERAMIC,CHIP
2203-005792 C1002,C1035,C1051 C-CERAMIC,CHIP
2203-005792 C1132 C-CERAMIC,CHIP
2203-005806 C1031,C1038,C2021 C-CERAMIC,CHIP
2203-005806 C2081,C2086,C2110 C-CERAMIC,CHIP
2203-005806 C3053,C3054 C-CERAMIC,CHIP
2203-006048 C4001,C4005,C4009 C-CERAMIC,CHIP
2203-006121 C5024,C5084 C-CERAMIC,CHIP
Confidential and proprietary-the contents in this service guide subject to change without prior notice
Distribution, transmission, or infringement of any content or data from this document without Samsung’s written authorization is strictly prohibited.

5. MAIN Electrical Parts List
2203-006187 C1064,L1039 C-CERAMIC,CHIP
2203-006194 C1111,C5039 C-CERAMIC,CHIP
2203-006318 C1045,C1050,C1067 C-CERAMIC,CHIP
2203-006399 C1076,C1081,C1086 C-CERAMIC,CHIP
2203-006399 C1090,C4004,C5003 C-CERAMIC,CHIP
2203-006399 C5057,C5085,C6039 C-CERAMIC,CHIP
2203-006400 C1015,C1044,C1068 C-CERAMIC,CHIP
2203-006400 C1100,C1101,C2042 C-CERAMIC,CHIP
2203-006400 C2062,C2065,C2080 C-CERAMIC,CHIP
2203-006400 C3008,C3048,C4110 C-CERAMIC,CHIP
2203-006400 C5010,C5027,C5028 C-CERAMIC,CHIP
2203-006400 R5043 C-CERAMIC,CHIP
2203-006410 C1062 C-CERAMIC,CHIP
2203-006423 C1042,C1046,C1080 C-CERAMIC,CHIP
2203-006423 C1097,C3035,C3044 C-CERAMIC,CHIP
2203-006423 C3050,C5008,C5016 C-CERAMIC,CHIP
2203-006423 C5032,C5046,C5058 C-CERAMIC,CHIP
2203-006423 C5078,C5081,C5082 C-CERAMIC,CHIP
2203-006423 C5083,C6036,C6058 C-CERAMIC,CHIP
2203-006423 C6064 C-CERAMIC,CHIP
2203-006556 C1007,C4027,C5033 C-CERAMIC,CHIP
2203-006556 C5037 C-CERAMIC,CHIP
2203-006562 C4105,C4107,C5079 C-CERAMIC,CHIP
2203-006562 C5086 C-CERAMIC,CHIP
2203-006604 C2035 C-CERAMIC,CHIP
2203-006636 C4117,C4118 C-CERAMIC,CHIP
2203-006665 C2123,C6018,L1034 C-CERAMIC,CHIP
2203-006668 C3029,C4010,C4011 C-CERAMIC,CHIP
2203-006674 C1043 C-CERAMIC,CHIP
2203-006707 C1102 C-CERAMIC,CHIP
2203-006824 C4068 C-CERAMIC,CHIP
2203-006839 C5059,C5060 C-CERAMIC,CHIP
2203-006844 C2094 C-CERAMIC,CHIP
2203-006846 C1133 C-CERAMIC,CHIP
2203-006872 C4047,C4048,C4054 C-CERAMIC,CHIP
2203-006872 C4066,C5000,C5002 C-CERAMIC,CHIP
2203-006872 C5007,C5045 C-CERAMIC,CHIP
2203-006968 C2029 C-CERAMIC,CHIP
2203-006979 C1077,C1078,C1082 C-CERAMIC,CHIP
Confidential and proprietary-the contents in this service guide subject to change without prior notice
Distribution, transmission, or infringement of any content or data from this document without Samsung’s written authorization is strictly prohibited.

5. MAIN Electrical Parts List
2203-006979 C1083,C1085,C1087 C-CERAMIC,CHIP
2203-006979 C1089,C1092,C1110 C-CERAMIC,CHIP
2203-006979 C5034,C5038 C-CERAMIC,CHIP
2203-007170 C2124 C-CERAMIC,CHIP
2203-007194 C1020,C2037 C-CERAMIC,CHIP
2203-007210 C5001,C5019,C5021 C-CERAMIC,CHIP
2203-007240 C4030,C4032,C4038 C-CERAMIC,CHIP
2203-007270 C4000,C4020,C4025 C-CERAMIC,CHIP
2203-007270 C4028,C4029,C4035 C-CERAMIC,CHIP
2203-007270 C4079,C4080,C5077 C-CERAMIC,CHIP
2203-007271 C1034,C1094,C4013 C-CERAMIC,CHIP
2203-007271 C4017,C4085,C4102 C-CERAMIC,CHIP
2203-007271 C6015 C-CERAMIC,CHIP
2203-007279 C4022,C4023,C5011 C-CERAMIC,CHIP
2203-007279 C6016,C6017,C6020 C-CERAMIC,CHIP
2203-007279 C6024,C6061 C-CERAMIC,CHIP
2203-007317 C3001,C3018,C4039 C-CERAMIC,CHIP
2203-007317 C4040,C4049,C4057 C-CERAMIC,CHIP
2203-007317 C4065,C4071,C5020 C-CERAMIC,CHIP
2203-007317 C5022,C6037,C6040 C-CERAMIC,CHIP
2203-007317 C6043,C6057,C6063 C-CERAMIC,CHIP
2203-007369 C2073 C-CERAMIC,CHIP
2203-007391 C1079,C2057,C5015 C-CERAMIC,CHIP
2203-007393 C4014,C4015,C4018 C-CERAMIC,CHIP
2203-007393 C4026,C4031,C4036 C-CERAMIC,CHIP
2203-007393 C4037,C4041,C4042 C-CERAMIC,CHIP
2203-007403 C2120 C-CERAMIC,CHIP
2203-007449 C1126,C1127,C2068 C-CERAMIC,CHIP
2203-007449 C2104,C2107,C3000 C-CERAMIC,CHIP
2203-007449 C3005,C3007,C3009 C-CERAMIC,CHIP
2203-007449 C3010,C3012,C3013 C-CERAMIC,CHIP
2203-007449 C3014,C3015,C3016 C-CERAMIC,CHIP
2203-007449 C3017,C3020,C3021 C-CERAMIC,CHIP
2203-007449 C3022,C3023,C3024 C-CERAMIC,CHIP
2203-007449 C3025,C3026,C3027 C-CERAMIC,CHIP
2203-007449 C3028,C3031,C3032 C-CERAMIC,CHIP
2203-007449 C3033,C3034,C3036 C-CERAMIC,CHIP
2203-007449 C3037,C3038,C3039 C-CERAMIC,CHIP
2203-007449 C3040,C3041,C3042 C-CERAMIC,CHIP
Confidential and proprietary-the contents in this service guide subject to change without prior notice
Distribution, transmission, or infringement of any content or data from this document without Samsung’s written authorization is strictly prohibited.

5. MAIN Electrical Parts List
2203-007449 C3045,C3046,C3047 C-CERAMIC,CHIP
2203-007449 C3052,C3067,C3068 C-CERAMIC,CHIP
2203-007449 C3069,C3072,C3073 C-CERAMIC,CHIP
2203-007449 C4008,C4050,C4055 C-CERAMIC,CHIP
2203-007449 C4056,C4060,C4061 C-CERAMIC,CHIP
2203-007449 C4062,C4063,C4064 C-CERAMIC,CHIP
2203-007449 C4070,C4072,C4088 C-CERAMIC,CHIP
2203-007449 C4112,C4113,C4115 C-CERAMIC,CHIP
2203-007449 C4120,C5009,C5049 C-CERAMIC,CHIP
2203-007449 C5075,C6012,C6014 C-CERAMIC,CHIP
2203-007456 C1098 C-CERAMIC,CHIP
2203-007474 C1084,C1088,C1091 C-CERAMIC,CHIP
2203-007474 C3002,C3019,C4121 C-CERAMIC,CHIP
2203-007474 R1006 C-CERAMIC,CHIP
2203-007796 C2079,C3004,C3049 C-CERAMIC,CHIP
2203-007796 C3051,C4002,C4003 C-CERAMIC,CHIP
2203-007796 C4006,C4007,C4045 C-CERAMIC,CHIP
2203-007796 C6002,C6059 C-CERAMIC,CHIP
2203-008097 C1037,C1093,C2093 C-CERAMIC,CHIP
2203-008097 C2095,C2118,C3006 C-CERAMIC,CHIP
2203-008097 C3011,C3043,C4019 C-CERAMIC,CHIP
2203-008097 C4043,C4044,C4073 C-CERAMIC,CHIP
2203-008097 C4119 C-CERAMIC,CHIP
2203-008217 C5076 C-CERAMIC,CHIP
2203-008242 C2055,C2059,C2060 C-CERAMIC,CHIP
2203-008242 C2064,C2071,C3071 C-CERAMIC,CHIP
2203-008242 C4051,C4052,C4053 C-CERAMIC,CHIP
2203-008242 C4058,C4059 C-CERAMIC,CHIP
2203-008243 C4034 C-CERAMIC,CHIP
2203-008394 C1008 C-CERAMIC,CHIP
2203-008654 C4091,C4108 C-CERAMIC,CHIP
2203-008749 C6013 C-CERAMIC,CHIP
2203-008860 C2066,C2097,C2098 C-CERAMIC,CHIP
2203-008860 C2115,C3070,C4024 C-CERAMIC,CHIP
2203-008860 C4087,C4104,C4114 C-CERAMIC,CHIP
2203-008860 C6001,C6004,C6010 C-CERAMIC,CHIP
2203-008860 C6011 C-CERAMIC,CHIP
2203-009167 C2084,C2088 C-CERAMIC,CHIP
2203-009733 C1039,C1096 C-CERAMIC,CHIP
Confidential and proprietary-the contents in this service guide subject to change without prior notice
Distribution, transmission, or infringement of any content or data from this document without Samsung’s written authorization is strictly prohibited.

5. MAIN Electrical Parts List
2703-001231 L4006 INDUCTOR-SMD
2703-002201 L5008 INDUCTOR-SMD
2703-002900 L2043 INDUCTOR-SMD
2703-002901 L1032,L1036,L6013 INDUCTOR-SMD
2703-002907 L1019,L1029,L2020 INDUCTOR-SMD
2703-002953 L1028,L1066,L1078 INDUCTOR-SMD
2703-002959 L6007,L6009,L6010 INDUCTOR-SMD
2703-002959 L6011 INDUCTOR-SMD
2703-002960 L1006,L2035,L2042 INDUCTOR-SMD
2703-003121 C2077,C2091 INDUCTOR-SMD
2703-003476 L2028 INDUCTOR-SMD
2703-003878 L5013 INDUCTOR-SMD
2703-003970 L1079,L2061 INDUCTOR-SMD
2703-004000 L1009 INDUCTOR-SMD
2703-004012 L1014,L2019 INDUCTOR-SMD
2703-004013 C2048,L1003,L2009 INDUCTOR-SMD
2703-004013 L2050 INDUCTOR-SMD
2703-004014 L1007,L2053 INDUCTOR-SMD
2703-004018 L1075,L1080,L2018 INDUCTOR-SMD
2703-004018 L2048 INDUCTOR-SMD
2703-004030 L1046,L1047,L1048 INDUCTOR-SMD
2703-004032 C2046,L1018,L1031 INDUCTOR-SMD
2703-004032 L1040,L1044 INDUCTOR-SMD
2703-004034 L1004,L2015,L2037 INDUCTOR-SMD
2703-004034 L2062 INDUCTOR-SMD
2703-004035 C2028,C2044,L1017 INDUCTOR-SMD
2703-004035 L1025,L1041,L1063 INDUCTOR-SMD
2703-004035 L1070,L2005 INDUCTOR-SMD
2703-004036 L2017,L2027 INDUCTOR-SMD
2703-004038 L1000,L1005,L1067 INDUCTOR-SMD
2703-004038 L2004,L2032,L2060 INDUCTOR-SMD
2703-004286 L1062 INDUCTOR-SMD
2703-004289 L2045,L2049 INDUCTOR-SMD
2703-004297 L4000 INDUCTOR-SMD
2703-004302 L2016 INDUCTOR-SMD
2703-004328 C1112,L1065 INDUCTOR-SMD
2703-004366 C1130,L1023,L1024 INDUCTOR-SMD
2703-004366 L2007,L2044 INDUCTOR-SMD
2703-004367 L1030,L1035,L2033 INDUCTOR-SMD
Confidential and proprietary-the contents in this service guide subject to change without prior notice
Distribution, transmission, or infringement of any content or data from this document without Samsung’s written authorization is strictly prohibited.

5. MAIN Electrical Parts List
2703-004371 L1038 INDUCTOR-SMD
2703-004763 L1016 INDUCTOR-SMD
2703-004764 C2033,L1012,L1022 INDUCTOR-SMD
2703-004775 L5027 INDUCTOR-SMD
2703-004901 L4001,L4002,L4004 INDUCTOR-SMD
2703-004947 L4003 INDUCTOR-SMD
2703-005085 C1131,C2032,L1001 INDUCTOR-SMD
2703-005085 L1008,L1013 INDUCTOR-SMD
2703-005116 L6002 INDUCTOR-SMD
2703-005118 L6001 INDUCTOR-SMD
2703-005366 L1064 INDUCTOR-SMD
2801-005230 OSC4000 CRYSTAL-UNIT
2805-001113 OSC3000 OSCILLATOR
2901-001673 F6004 FILTER-EMI SMD
2901-001674 F6000,F6002 FILTER-EMI SMD
2901-001798 F6005,F6006,F6007 FILTER-EMI SMD
2901-001798 F6008,F6009,F6010 FILTER-EMI SMD
2901-001798 F6011,F6012 FILTER-EMI SMD
2904-002201 F2005,U1023 FILTER-SAW
2904-002266 F2001 FILTER-SAW
2904-002314 F2006 FILTER-SAW
2904-002356 F2002,F2003 FILTER-SAW
2910-000364 F1001 FILTER
2910-000390 F1002 FILTER
2911-000446 U1020 FILTER
2911-000449 U2002 FILTER
3003-001245 MIC5000 MIC-CONDENSOR
3301-001534 C2019,L5021 CORE-FERRITE BEAD
3301-001682 L3000 CORE-FERRITE BEAD
3301-001729 L5002 CORE-FERRITE BEAD
3301-001812 L6006 CORE-FERRITE BEAD
3301-001885 L5004 CORE-FERRITE BEAD
3301-001895 L1021 CORE-FERRITE BEAD
3301-001901 L6000 CORE-FERRITE BEAD
3301-002122 L5000,L5001 CORE-FERRITE BEAD
3301-002236 L2000,L5033,L5036 CORE-FERRITE BEAD
3301-002236 L5037 CORE-FERRITE BEAD
3301-002237 L5034,L5035,L5038 CORE-FERRITE BEAD
3301-002238 L1002,L1051,L1052 CORE-FERRITE BEAD
Confidential and proprietary-the contents in this service guide subject to change without prior notice
Distribution, transmission, or infringement of any content or data from this document without Samsung’s written authorization is strictly prohibited.

5. MAIN Electrical Parts List
3301-002238 L1054,L1055,L1056 CORE-FERRITE BEAD
3301-002238 L2038,L6012 CORE-FERRITE BEAD
3301-002243 L6003,L6004 CORE-FERRITE BEAD
3301-002254 L4005,L4007 CORE-FERRITE BEAD
3301-002312 L1049,L1050,L1053 CORE-FERRITE BEAD
3301-002312 L1057 CORE-FERRITE BEAD
3301-002335 L5024,L5025 CORE-FERRITE BEAD
3705-001708 RFS1000 CONNECTOR-COAXIAL
3705-001994 RFS2001,RFS2010 CONNECTOR-COAXIAL
3705-001994 U2007 CONNECTOR-COAXIAL
3709-001745 CN6001 CONNECTOR-CARD EDGE
3710-004184 HDC5000 CONNECTOR-SOCKET
3711-007295 HDC6000,HDC6003 CONNECTOR-HEADER
3711-008511 HDC6001 CONNECTOR-HEADER
3711-008758 BTC4000 CONNECTOR-HEADER
3712-001714 ANT1000,ANT1001 CONNECTOR
3712-001714 ANT2000,ANT2001 CONNECTOR
3712-001714 ANT2002,ANT2004 CONNECTOR
3712-001714 ANT5000,ANT5001 CONNECTOR
3712-001714 ANT5002,ANT5003 CONNECTOR
3712-001714 ANT5017,ANT5020 CONNECTOR
3712-001714 ANT6000,ANT6001 CONNECTOR
3712-001714 ANT6002,ANT6003 CONNECTOR
3712-001714 ANT6004,ANT6005 CONNECTOR
3712-001714 ANT6006,ANT6007 CONNECTOR
3712-001714 ANT6008,ANT6009 CONNECTOR
3712-001714 ANT6010,BGND2001 CONNECTOR
3712-001714 BGND2002,BGND2003 CONNECTOR
3712-001714 BGND2006,BGND2007 CONNECTOR
3712-001714 BGND2011 CONNECTOR
3722-003985 IFC4000 JACK-PHONE
4709-002187 CPL1000 RF-MODULE
4709-002196 F2007 RF-MODULE
4709-002226 U1004 RF-MODULE
4709-002336 F2008,U1009 RF-MODULE
GH63-13384A SC2002
GH63-13492A SC2004
GH98-34785A SC2000
GH98-38893A SC2005
SHIELD CAN
SHIELD CAN
SHIELD CAN
SHIELD CAN
Confidential and proprietary-the contents in this service guide subject to change without prior notice
Distribution, transmission, or infringement of any content or data from this document without Samsung’s written authorization is strictly prohibited.

5. MAIN Electrical Parts List
GH98-41515A SC2006
GH98-41516A SC2007
Please consult the GSPN website (Samsung Portal) for the most recent version of the product's part list.
SHIELD CAN
SHIELD CAN
Confidential and proprietary-the contents in this service guide subject to change without prior notice
Distribution, transmission, or infringement of any content or data from this document without Samsung’s written authorization is strictly prohibited.
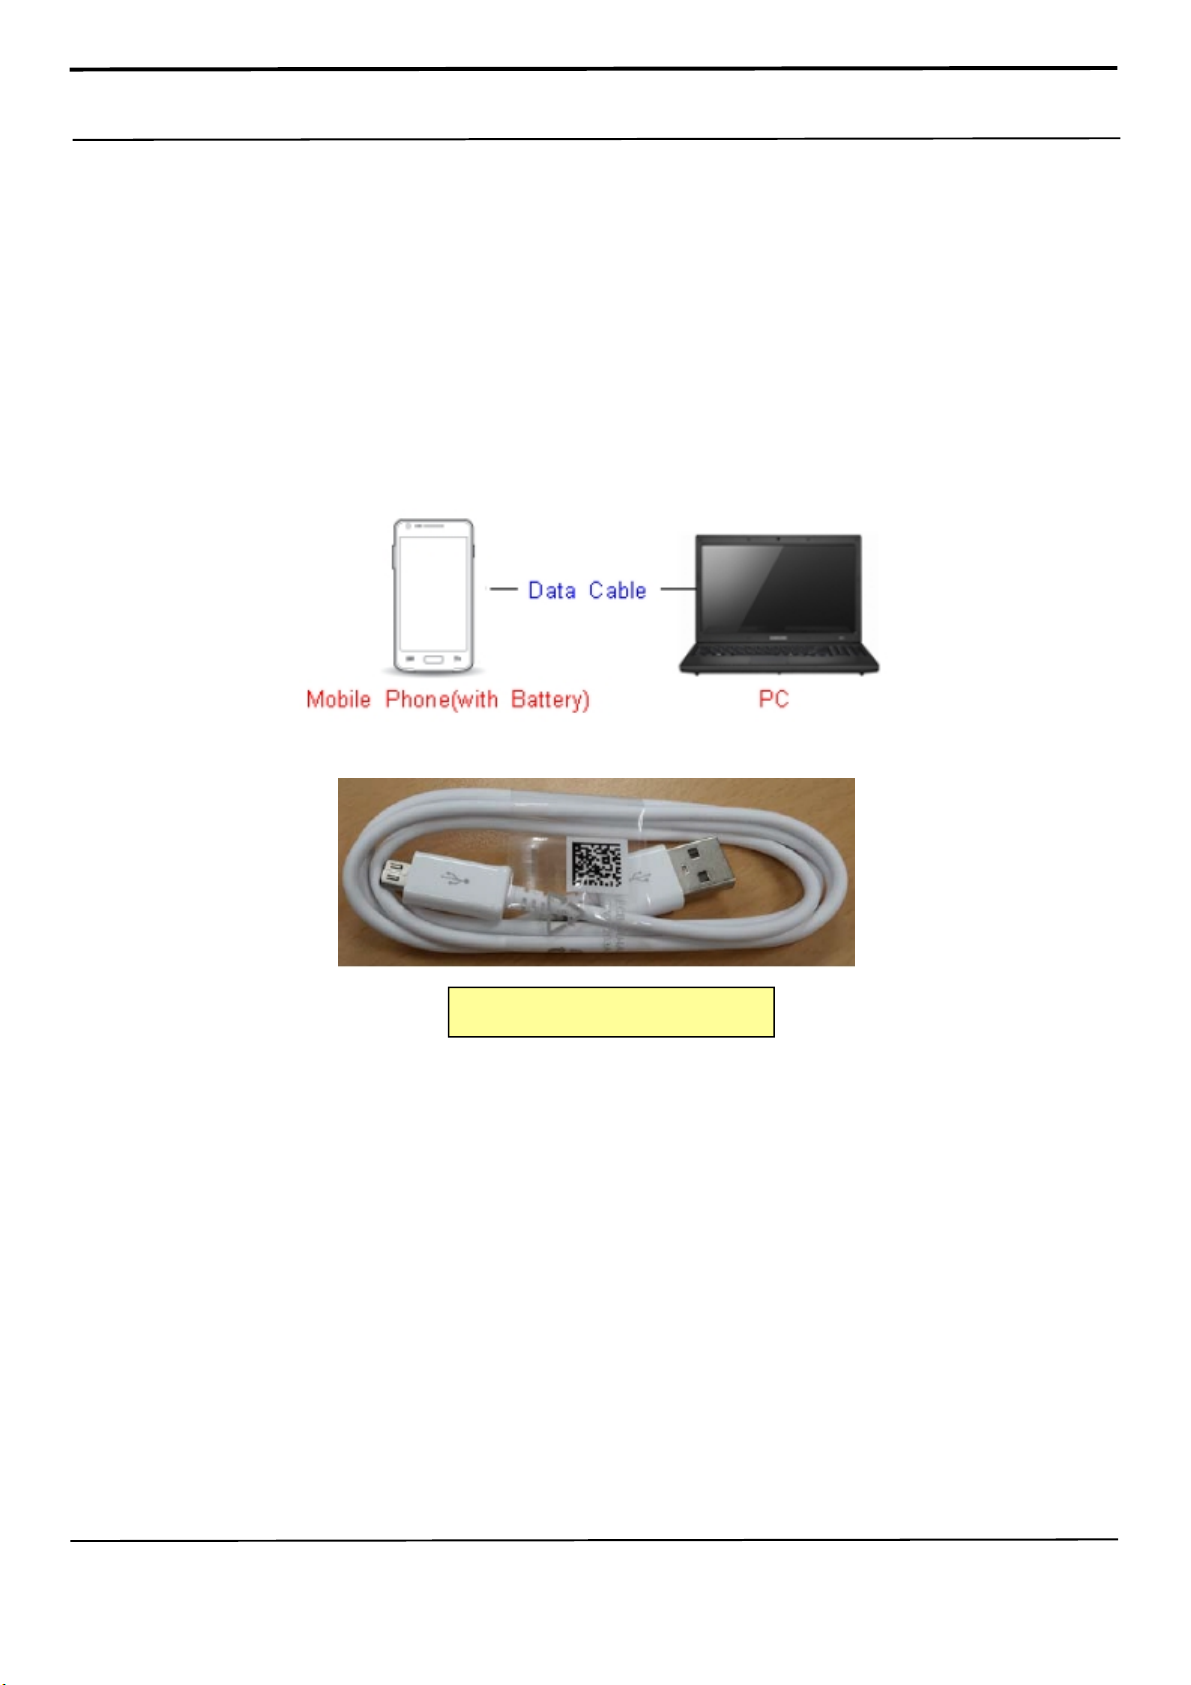
6. Level 1 Repair
6-1. S/W installation
6-1-1. Required items in order to install S/W
Installation program: Downloader Program (Odin3 v3.12.5.exe)
Mobile Phone
Data Cable
Mobile device specific S/W: Binary files
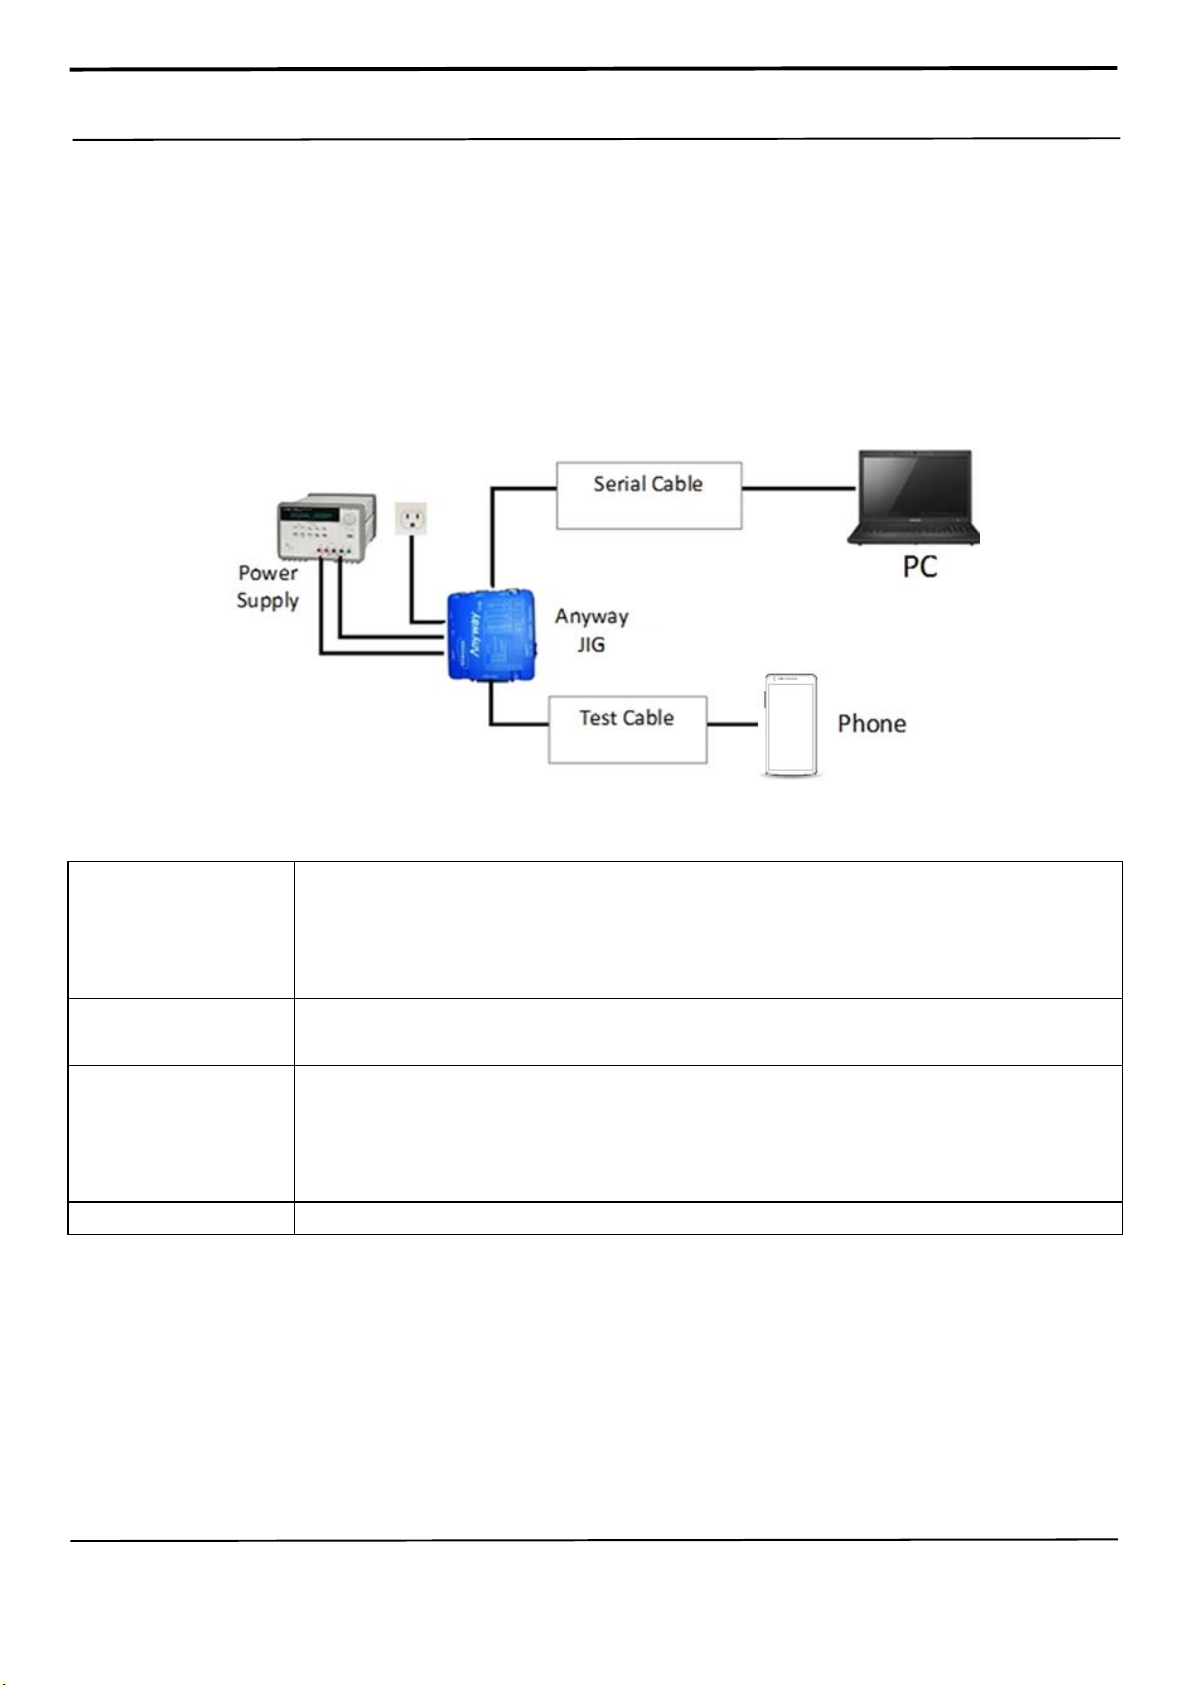
※ Settings
Data Cable : GH39-01710D
Confidential and proprietary-the contents in this service guide subject to change without prior notice
Distribution, transmission, or infringement of any content or data from this document without Samsung’s written authorization is strictly prohibited.
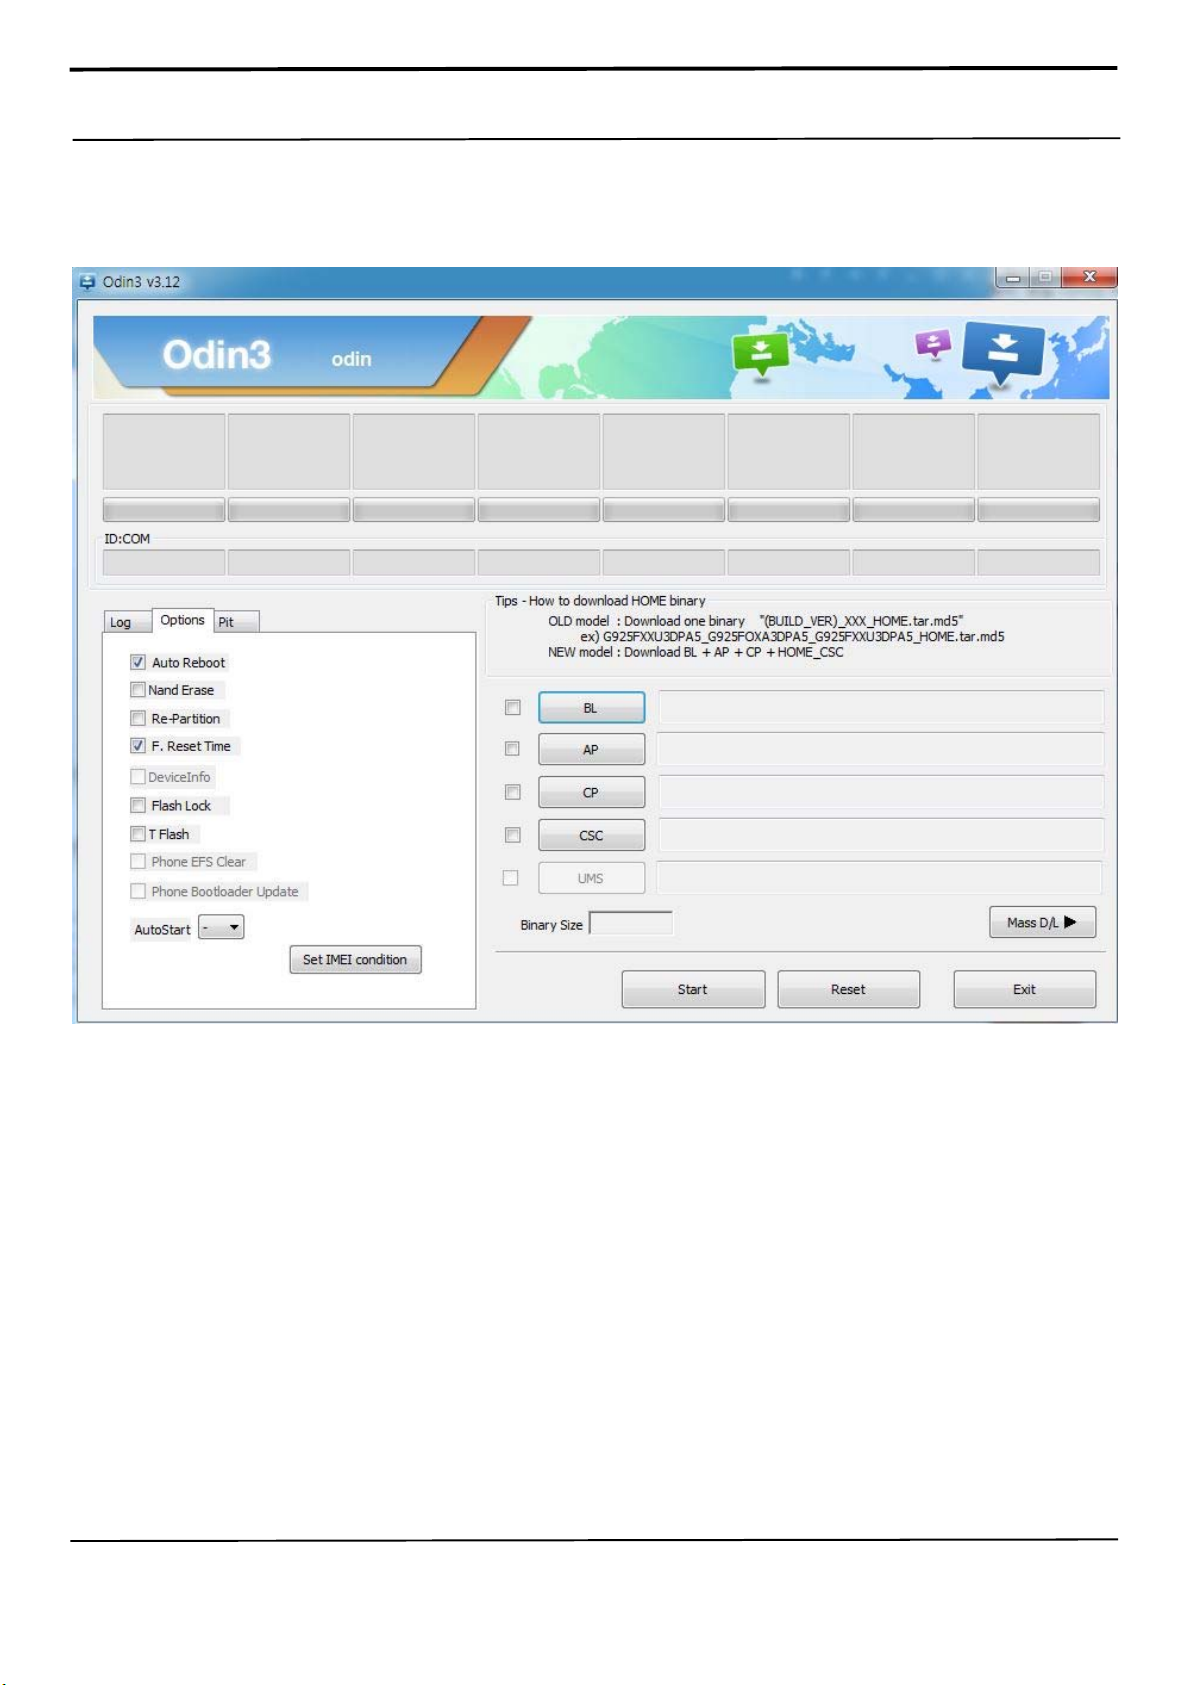
6. Level 1 Repair
6-1-2. S/W Installation Program (Downloader program)
Open up the S/W Installation Program by executing the "Odin3 v3.12.5.exe"
Confidential and proprietary-the contents in this service guide subject to change without prior notice
Distribution, transmission, or infringement of any content or data from this document without Samsung’s written authorization is strictly prohibited.
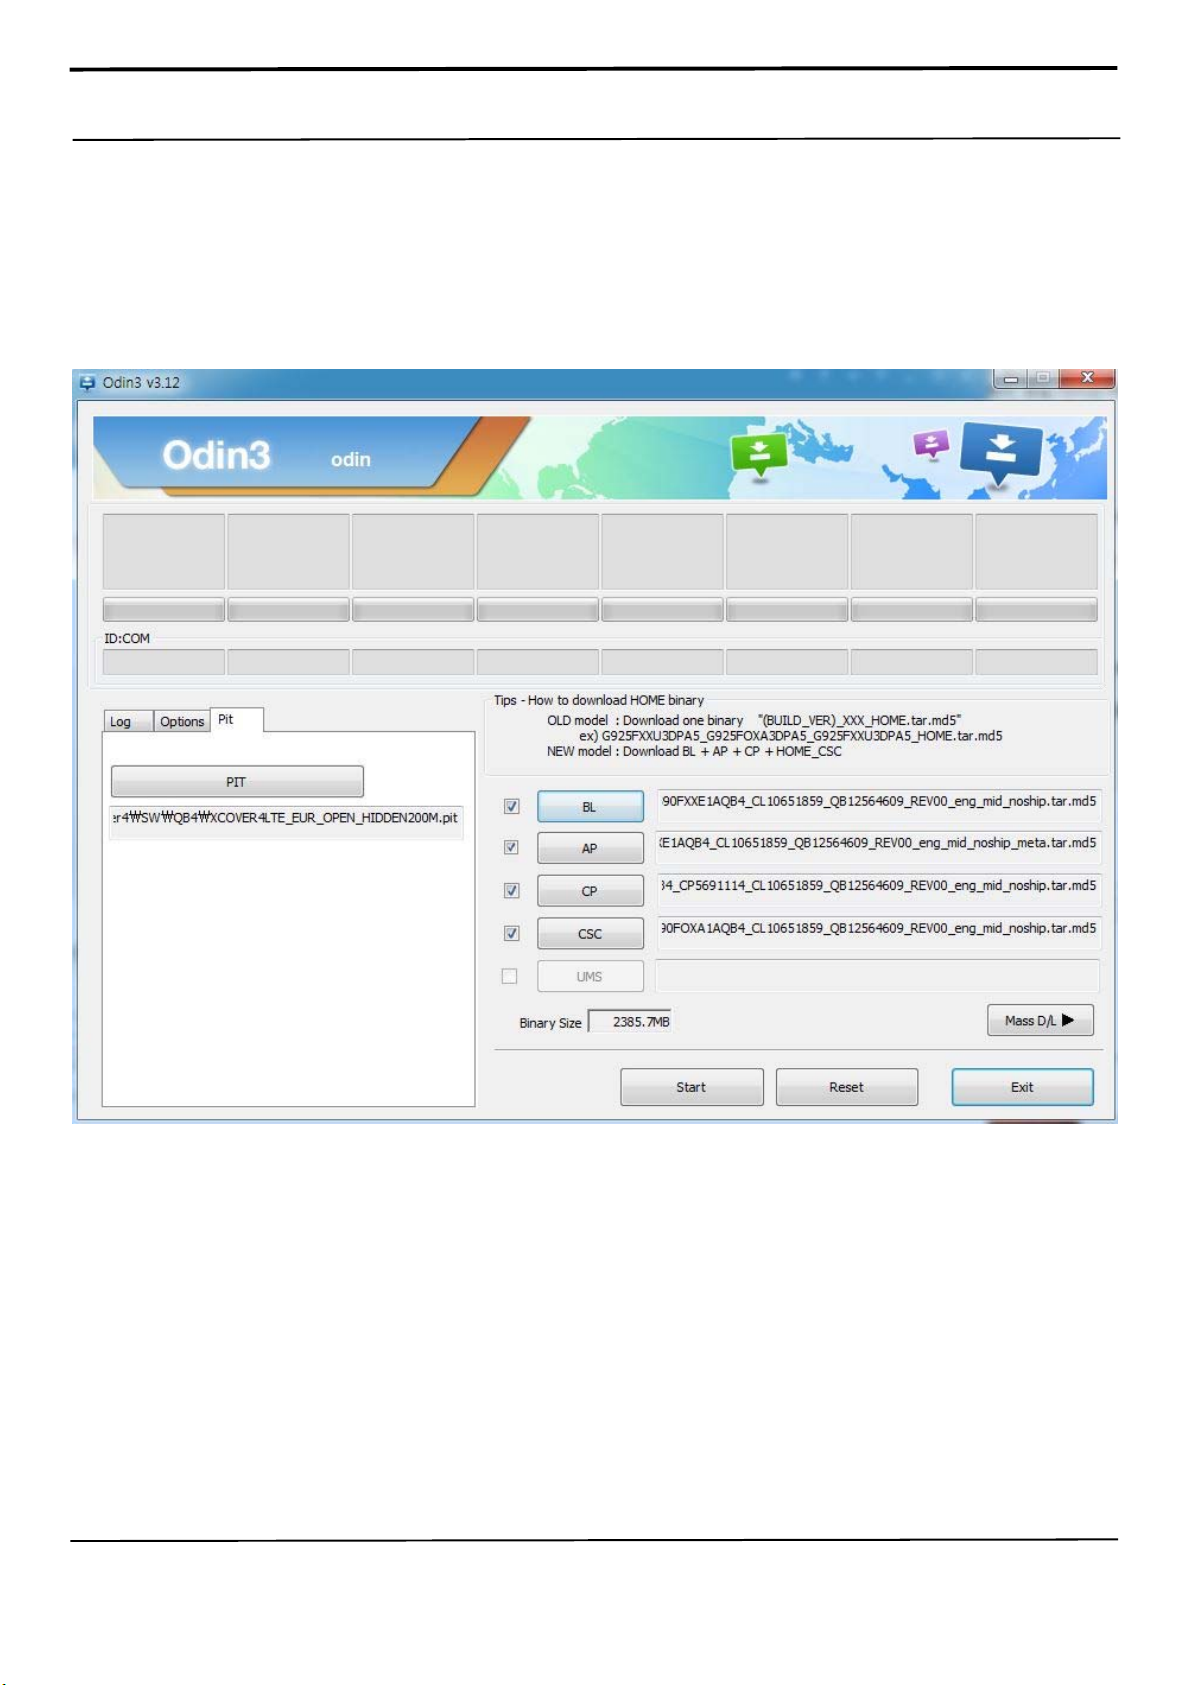
6. Level 1 Repair
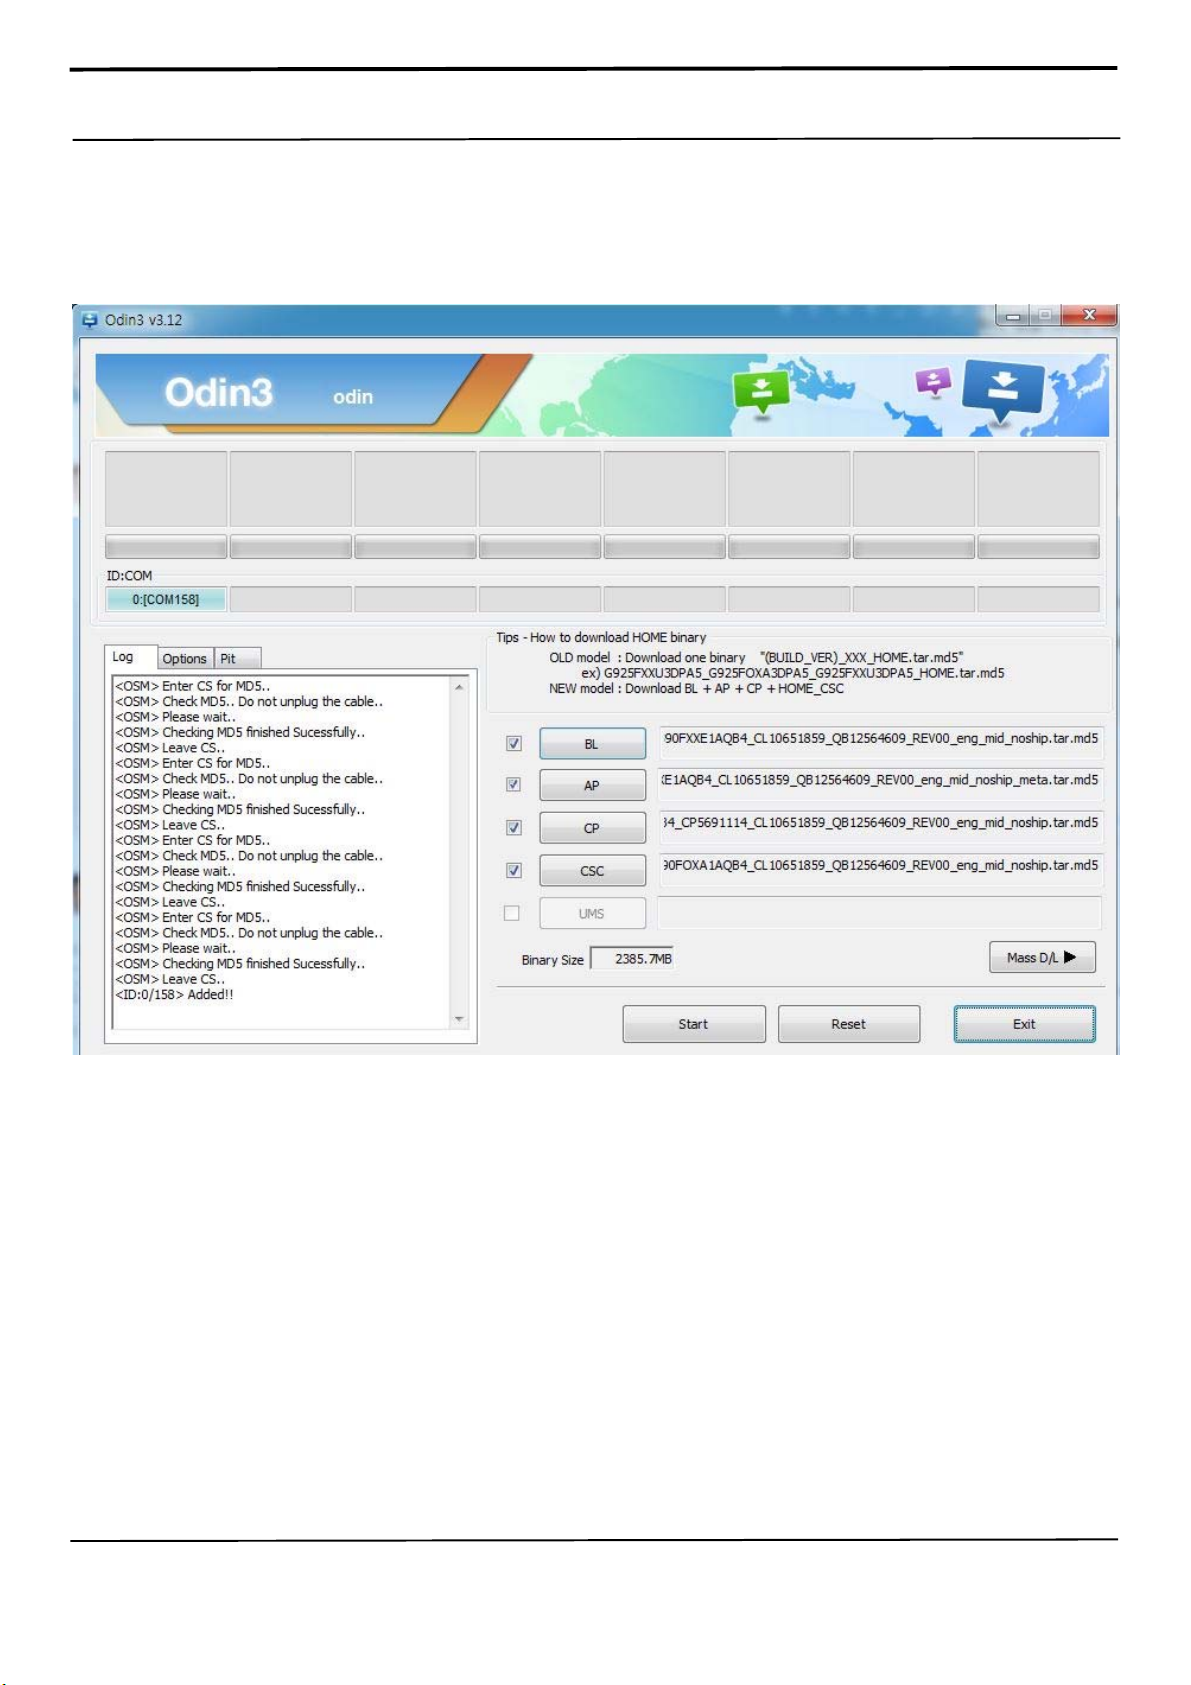
1. Enable the check mark by click on the following options,
- Check Auto Reboot, Re-Partition, and F. Reset Time
- Check PIT
- Check BOOTLOADER, PDA, PHONE, and CSC Files
* Note : "Odin v3.12.5 or above" checks MD5 checksum just after file selection.
Confidential and proprietary-the contents in this service guide subject to change without prior notice
Distribution, transmission, or infringement of any content or data from this document without Samsung’s written authorization is strictly prohibited.
6. Level 1 Repair
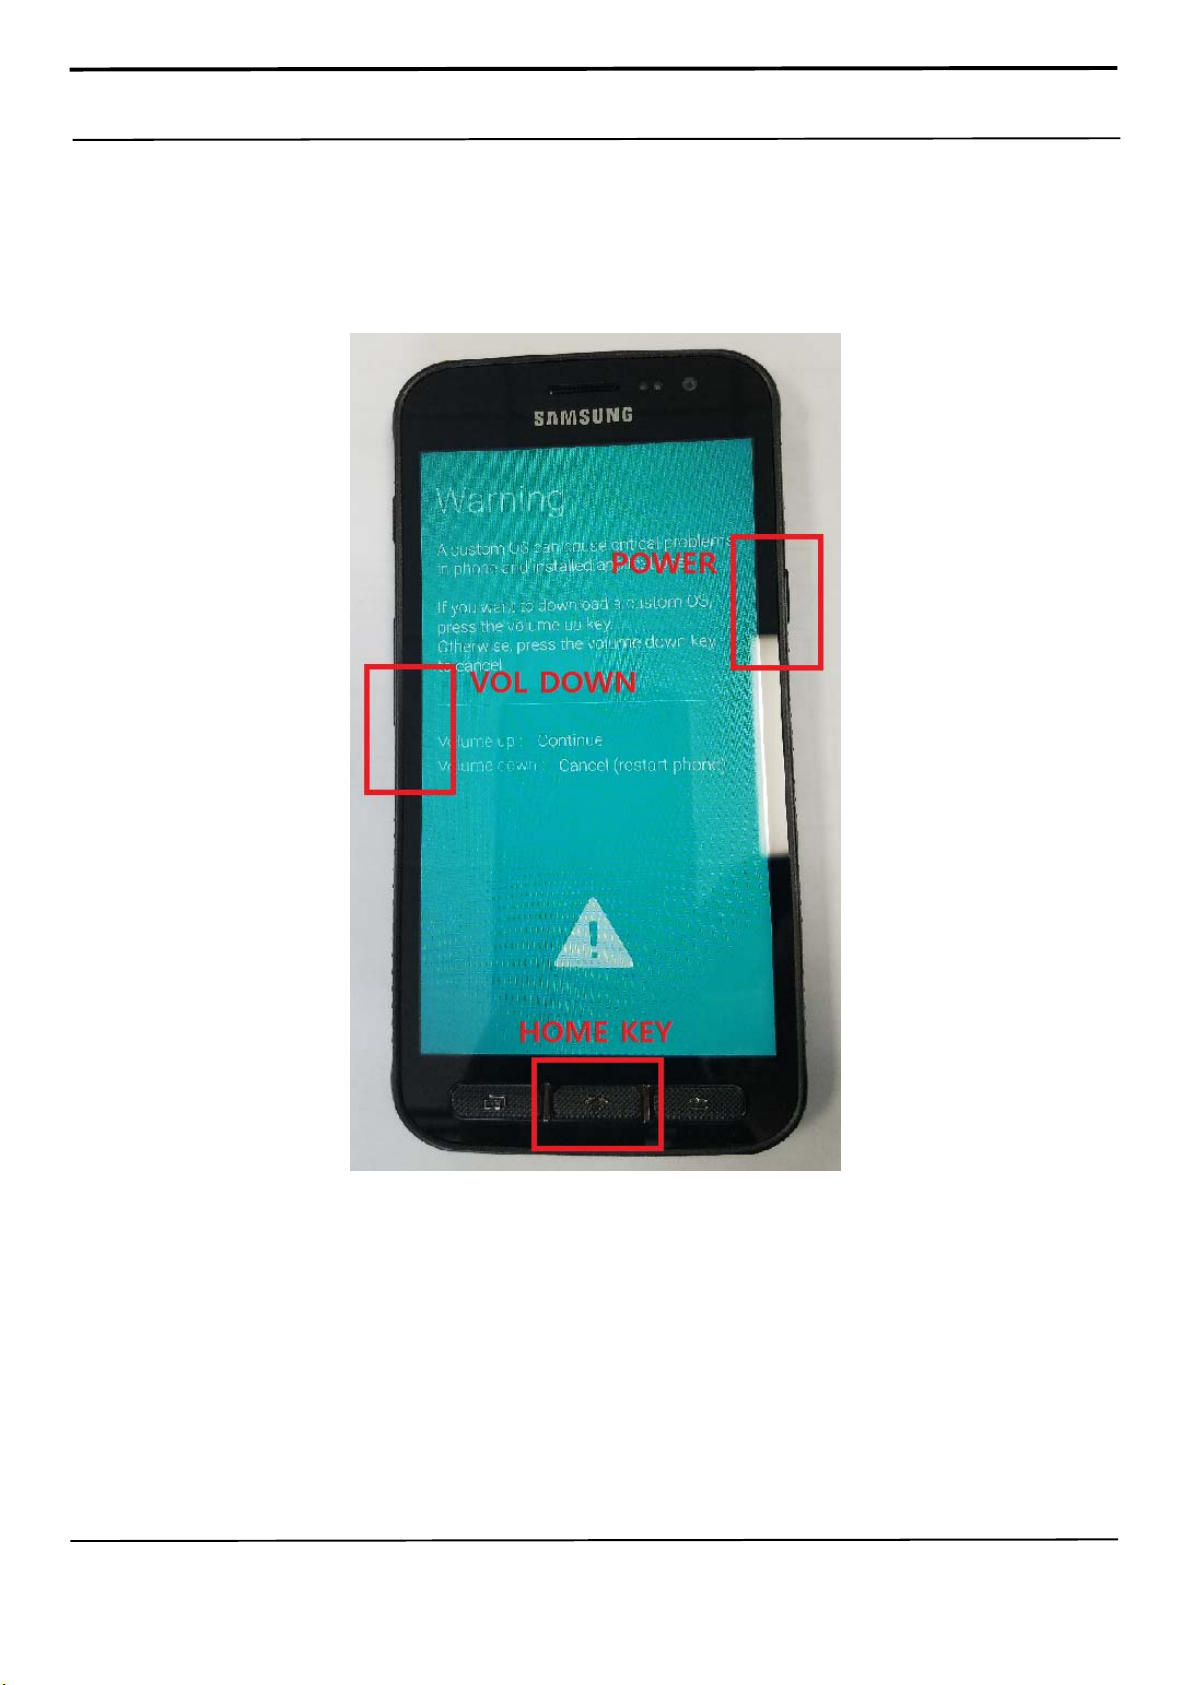
2. Enter into Download Mode
- Enter into Download Mode by pressing Volume Down, Home and Power button
simultaneously followed by pressing
- Volume up button as a direction of the phone.
Confidential and proprietary-the contents in this service guide subject to change without prior notice
Distribution, transmission, or infringement of any content or data from this document without Samsung’s written authorization is strictly prohibited.
6. Level 1 Repair
3. Connect the device to PC via Data Cable.
Make sure that the one of communication ports [ID:COM] box is highlighted in
sky blue. The device is now connected with the PC and ready to download the
binary files in it.
Confidential and proprietary-the contents in this service guide subject to change without prior notice
Distribution, transmission, or infringement of any content or data from this document without Samsung’s written authorization is strictly prohibited.
6. Level 1 Repair
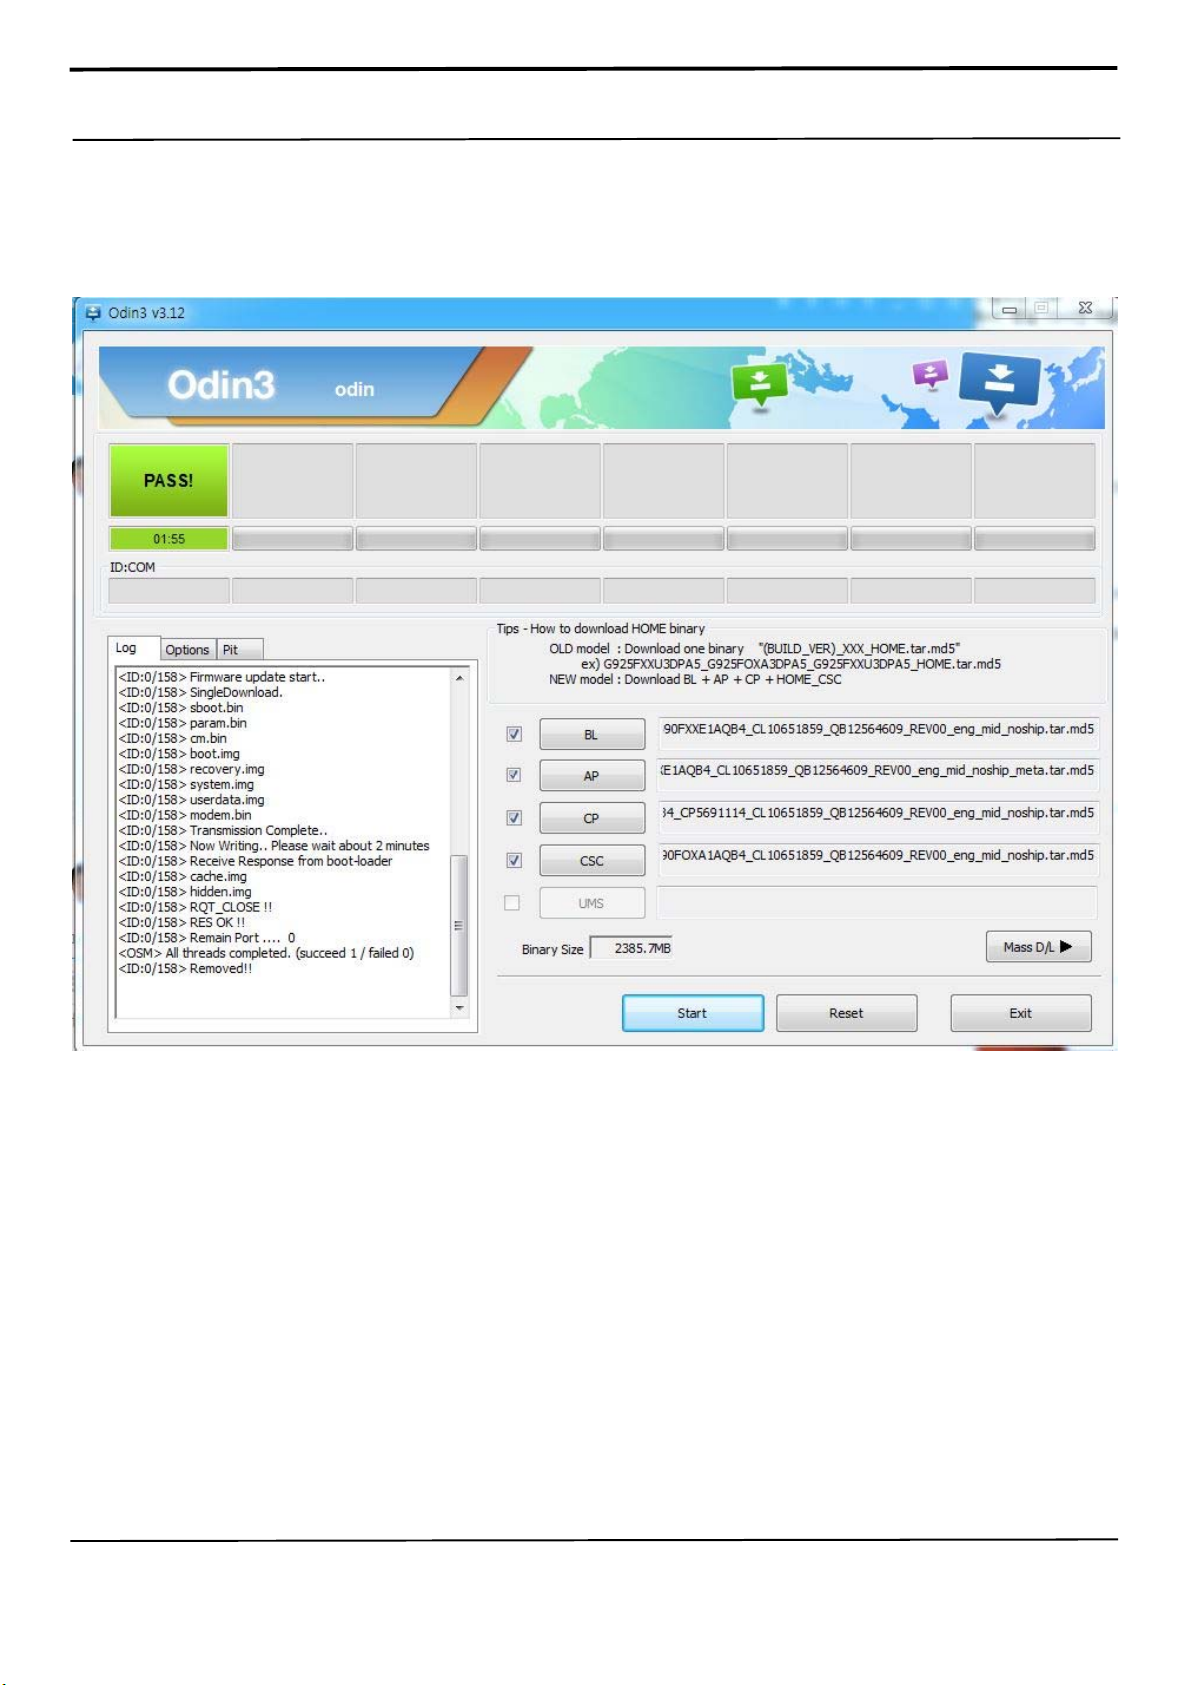
4. Start downloading the binary files into the device by clicking Start button on the screen.
The green colored "PASS!" sign will appear on the upper-left box
if the binary files have been successfully downloaded into the device.
5. Disconnect the device from the Data cable.
6. Once the device boots up, you can check the version of the binary file or name
by pressing the following code in sequence; *#1234#
You can perform Factory Reset by Settings → Accounts → Backup and reset
※ Caution. Never disconnect during the S/W downloading.
Confidential and proprietary-the contents in this service guide subject to change without prior notice
Distribution, transmission, or infringement of any content or data from this document without Samsung’s written authorization is strictly prohibited.
6. Level 1 Repair
6-2 IMEI writing
6-2-1 Preparation
- New IMEI writing Program has been released.
- Supported Model : Models which CAB files are uploaded on HHPsvc INI File
category, instead of ini file.
- Refer to below IMEI writing procedure.
- H/W
- S/W
① Library Install
②Launcher
③ Runtime File
④Model File
To use Daseul, library files should be installed.
Refer to SVC Bulletin
“(11-82) Daseul (New IMEI writing Program) Library Install guide_rev1.0”
DASEUL_SVC_Launcher_v3_0_25 or higher
-Uploaded on HHPsvc Notice
1. DASEUL_Runtime_Ver_3.1.139.0.CAB or higher
-Uploaded on HHPsvc Notice
2. Make ‘ModelName’ folder at the same position with
launcher & Runtime file.
Copy Model File under the ‘Model Name’ folder
Confidential and proprietary-the contents in this service guide subject to change without prior notice
Distribution, transmission, or infringement of any content or data from this document without Samsung’s written authorization is strictly prohibited.
6. Level 1 Repair
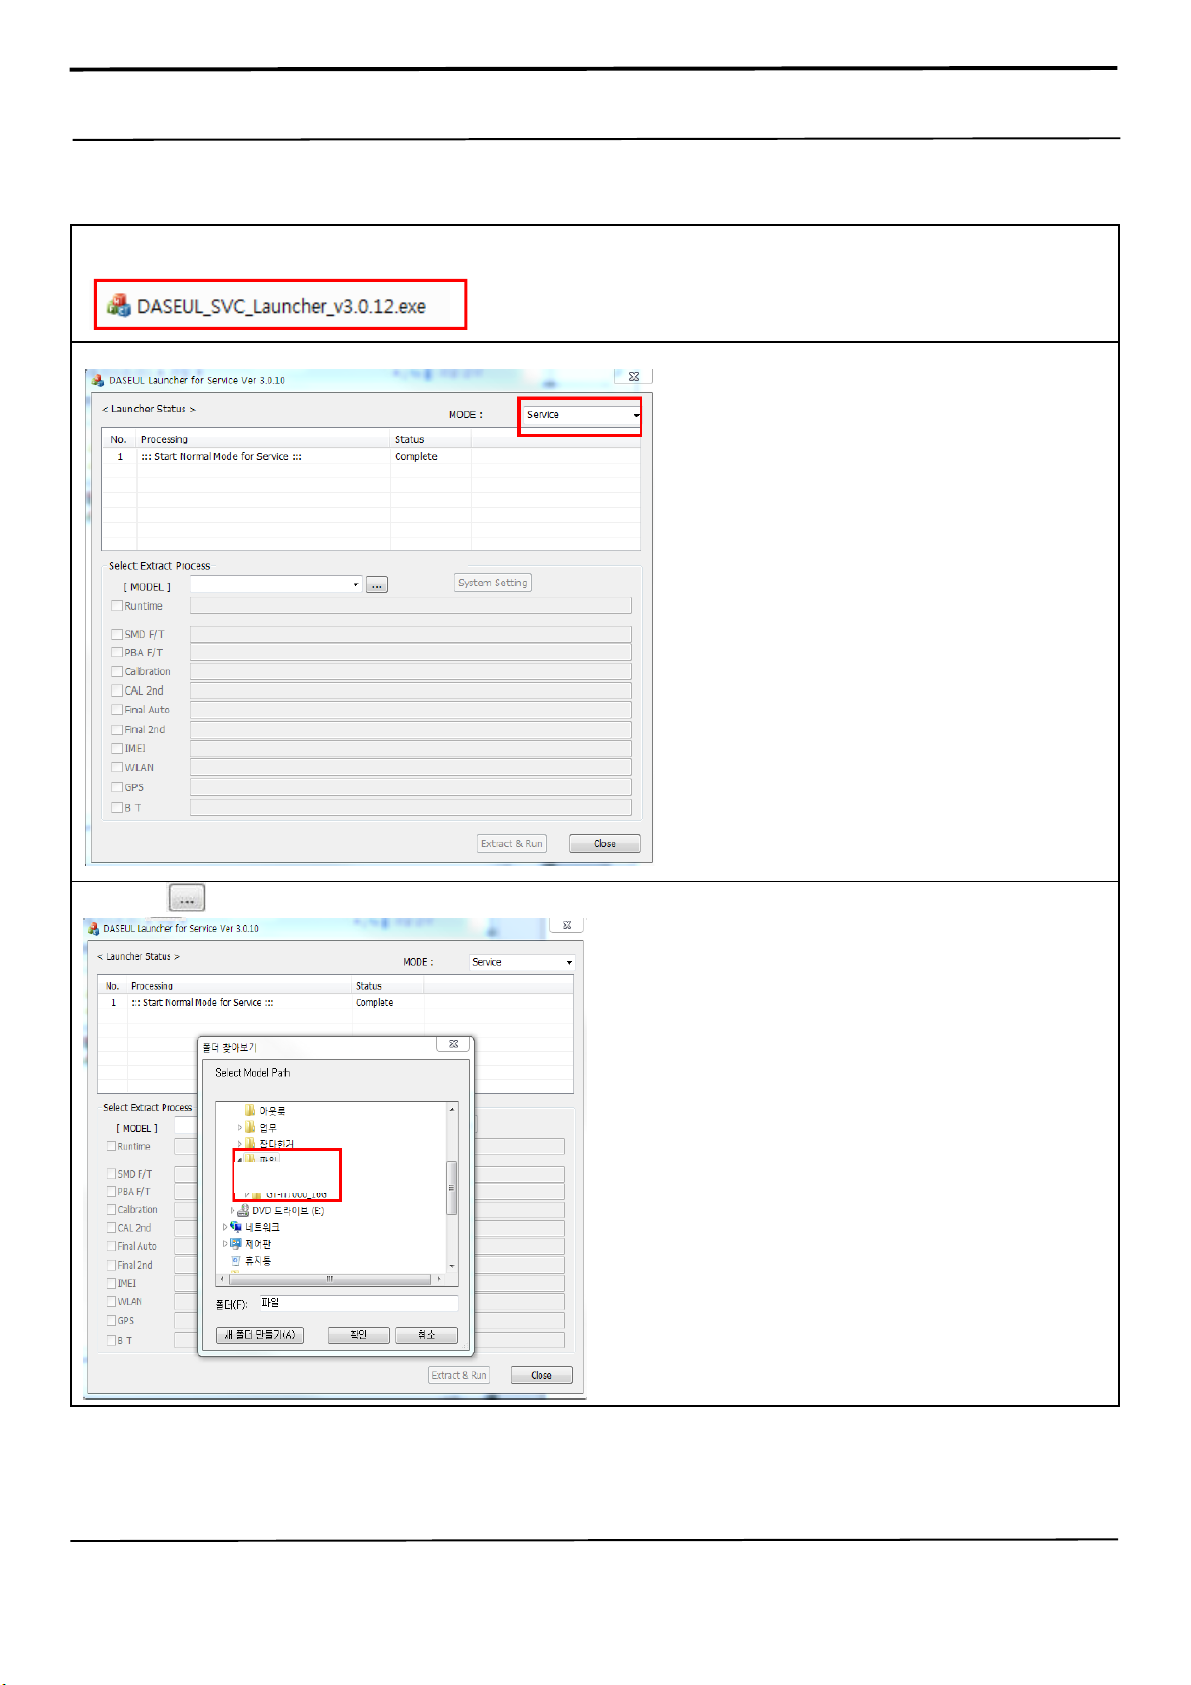
6-2-2 IMEI writing Process
1. Run DASEUL_SVC_Launcher_v3.0.12.exe
2. Select Service Mode
3. Click and Select folder where the Launcher exists
Model name
Confidential and proprietary-the contents in this service guide subject to change without prior notice
Distribution, transmission, or infringement of any content or data from this document without Samsung’s written authorization is strictly prohibited.
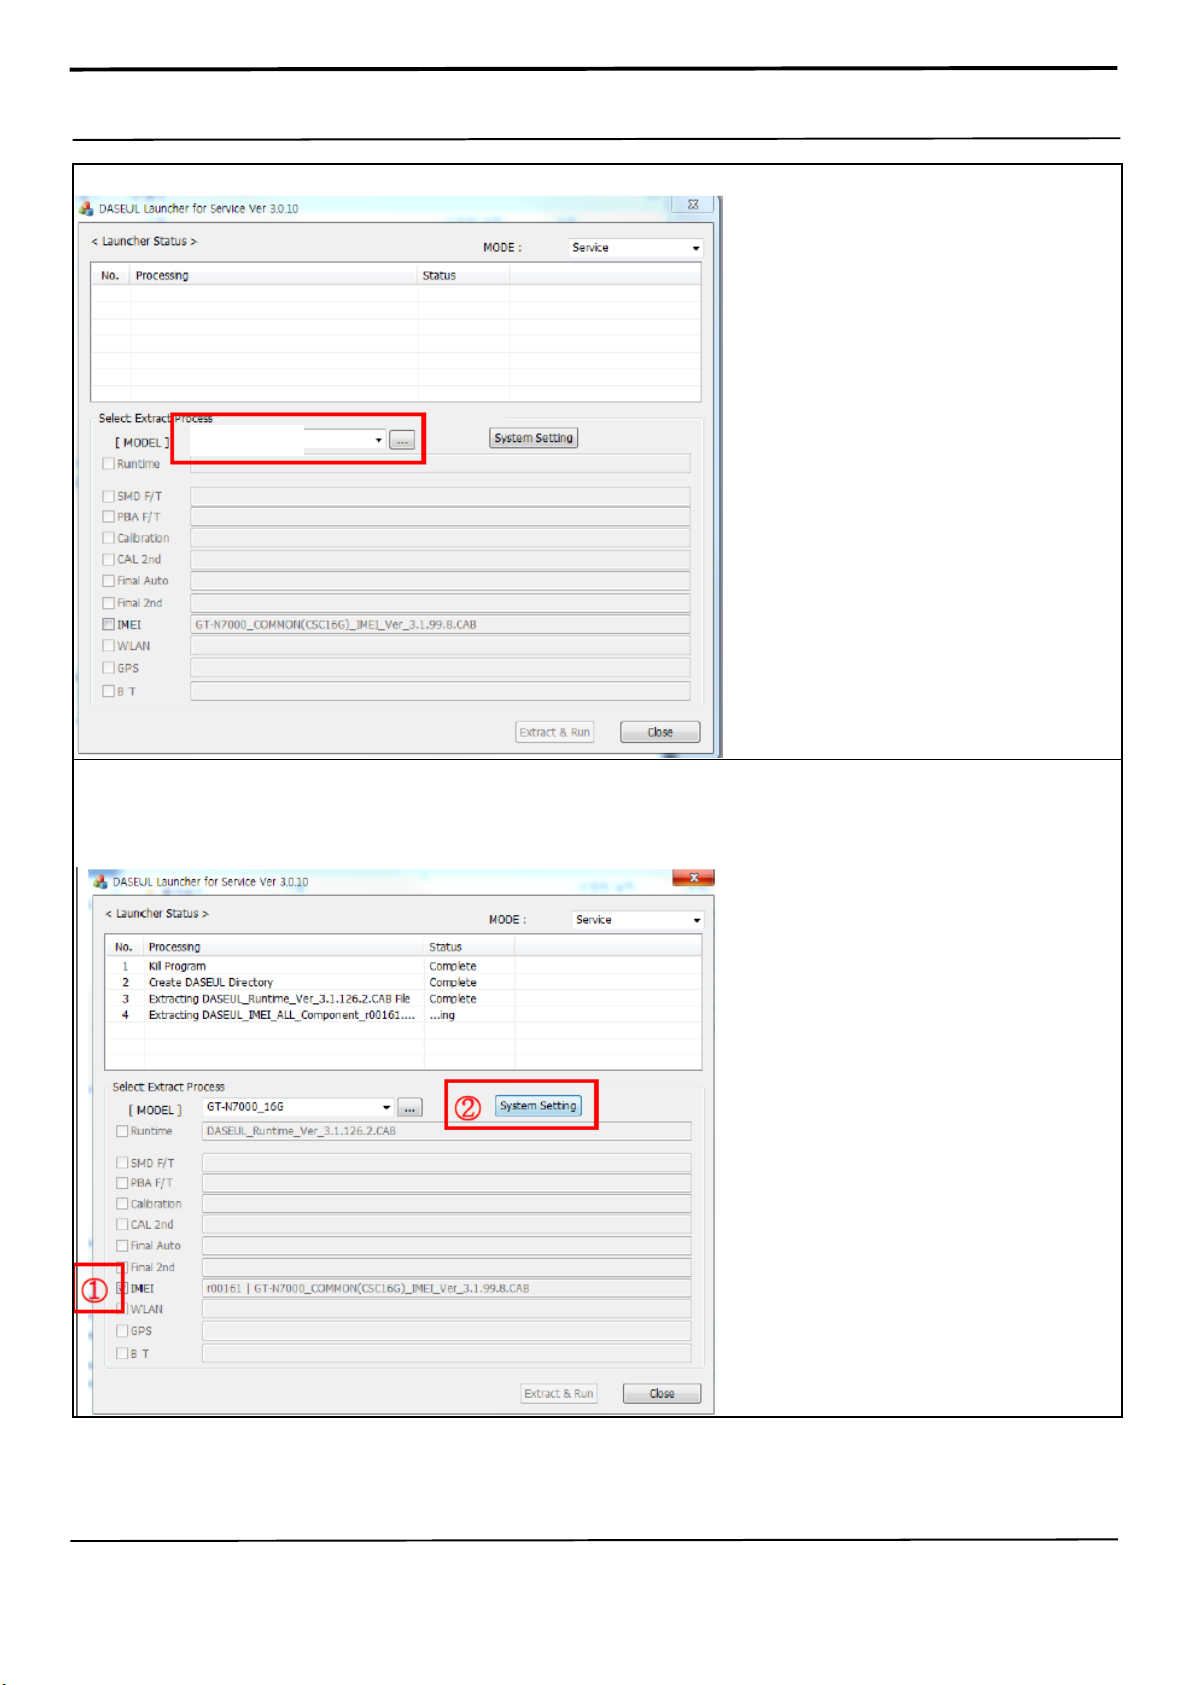
6. Level 1 Repair
4. Select Model
Model name
5. Check IMEI and click System Setting
※Once you setup the setting, you don t have to do it again, unless there is change.
From second run of the IMEI program, check IMEI and click Extract & Run.
Confidential and proprietary-the contents in this service guide subject to change without prior notice
Distribution, transmission, or infringement of any content or data from this document without Samsung’s written authorization is strictly prohibited.
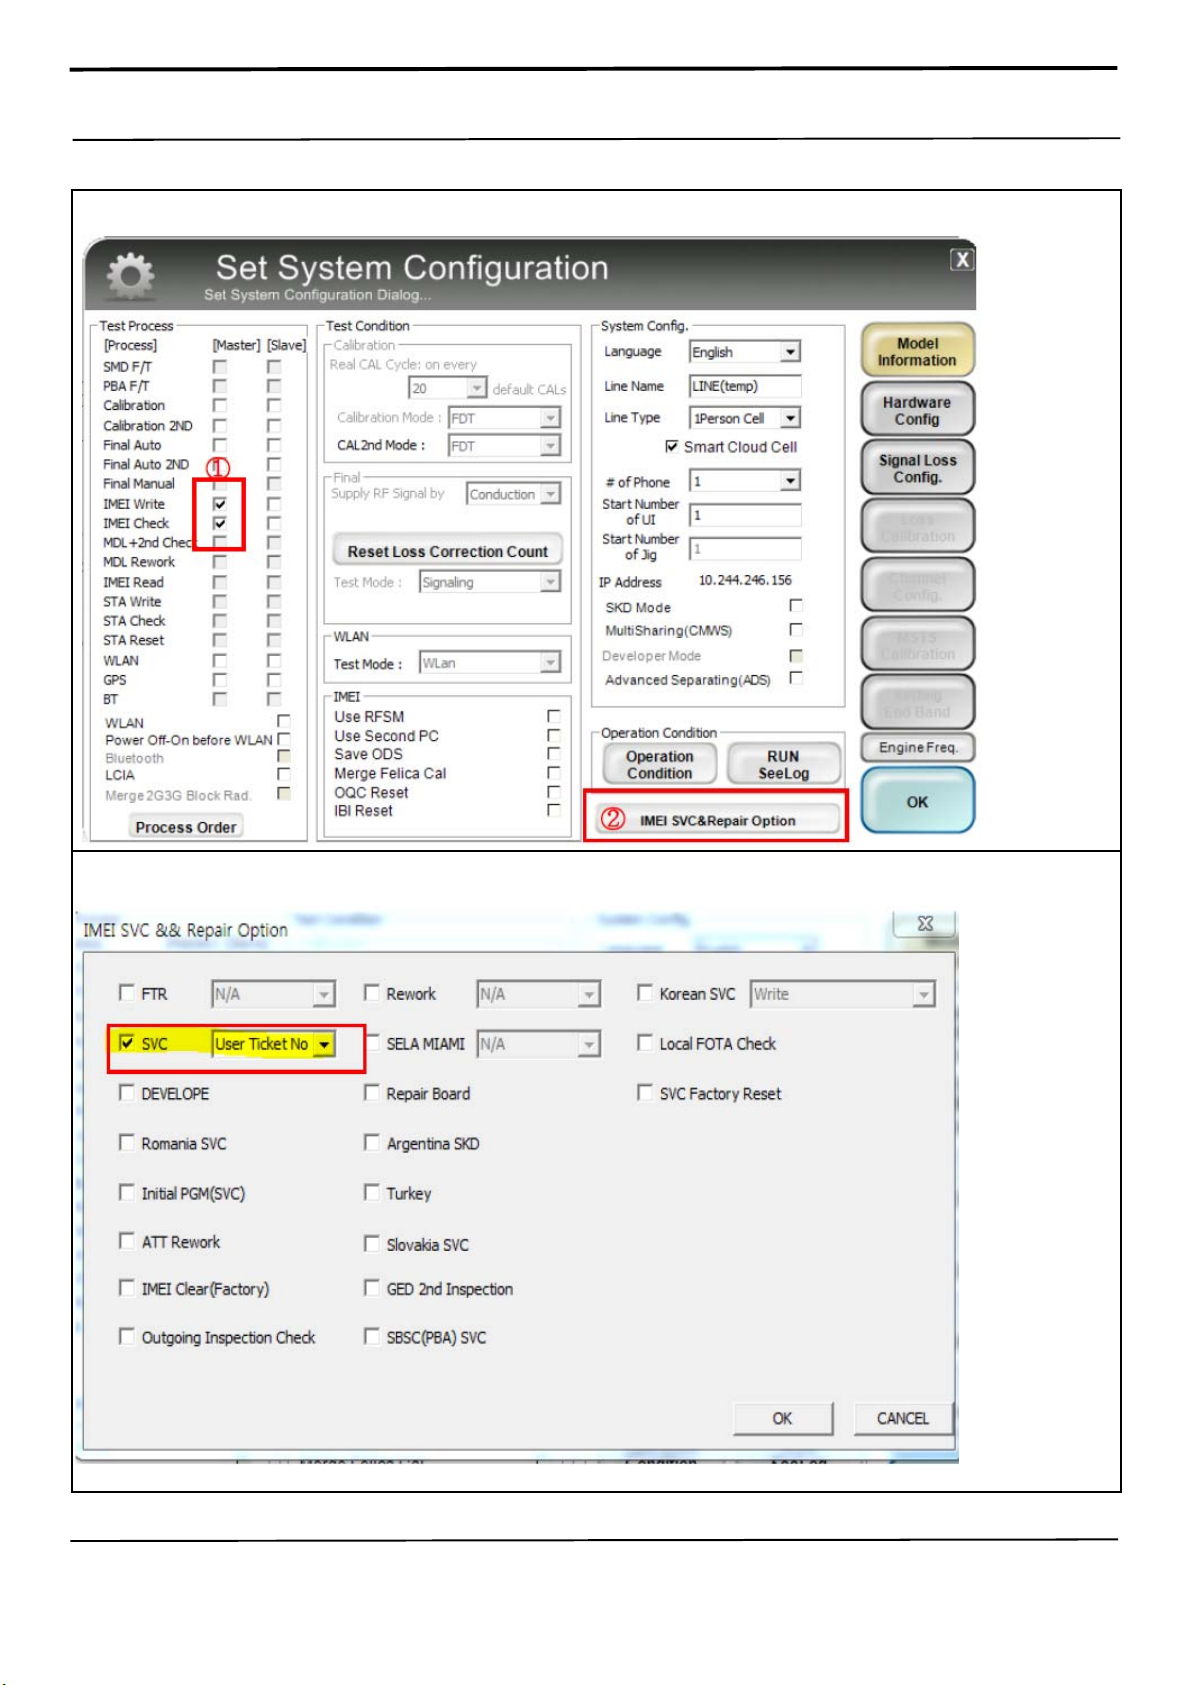
6. Level 1 Repair
6. Check IMEI Write / IMEI Check and click IMEI SVC & Repair Option.
7. Check ‘SVC , User Ticket No’ and click OK
Confidential and proprietary-the contents in this service guide subject to change without prior notice
Distribution, transmission, or infringement of any content or data from this document without Samsung’s written authorization is strictly prohibited.
 Loading...