

Samsung SM-G386TZKATMB User Manual
4G LTE SMARTPHONE
User Manual
Please read this manual before operating your
device and keep it for future reference
GH68-41834A

Warning! This product contains chemicals known to the State of California to cause cancer
and reproductive toxicity.
Intellectual Property
All Intellectual Property, as defined below, owned by or which is otherwise the property
of Samsung or its respective suppliers relating to the SAMSUNG Phone, including but
not limited to, accessories, parts, or software relating there to (the “Phone System”) , is
proprietary to Samsung and protected under federal laws, state laws, and international treaty
provisions. Intellectual Property includes, but is not limited to, inventions (patentable or
unpatentable), patents, trade secrets, copyrights, software, computer programs, and related
documentation and other works of authorship. You may not infringe or otherwise violate the
rights secured by the Intellectual Property. Moreover, you agree that you will not (and will not
attempt to) modify, prepare derivative works of, reverse engineer, decompile, disassemble,
or otherwise attempt to create source code from the software. No title to or ownership in the
Intellectual Property is transferred to you. All applicable rights of the Intellectual Property
shall remain with SAMSUNG and its suppliers.
Open Source Software
Some software components of this product incorporate source code covered under GNU
General Public License (GPL), GNU Lesser General Public License (LGPL), OpenSSL
License, BSD License and other open source licenses. To obtain the source code covered
under the open source licenses, please visit: http://opensource.samsung.com.
G368T_UM_English_NEA_PS_060414_F3

Disclaimer of Warranties; Exclusion of Liability
EXCEPT AS SET FORTH IN THE EXPRESS WARRANT Y CONTAINED ON THE WARRANTY
PAGE ENCLOSED WITH THE PRODUCT, THE PURCHASER TAKES THE PRODUCT "AS
IS", AND SAMSUNG MAKES NO EXPRESS OR IMPLIED WARRANTY OF ANY KIND
WHATSOEVER WITH RESPECT TO THE PRODUCT, INCLUDING BUT NOT LIMITED TO
THE MERCHANTABILITY OF THE PRODUCT OR ITS FITNESS FOR ANY PARTICULAR
PURPOSE OR USE; THE DESIGN, CONDITION OR QUALITY OF THE PRODUCT; THE
PERFORMANCE OF THE PRODUCT; THE WORKMANSHIP OF THE PRODUCT OR
THE COMPONENTS CONTAINED THEREIN; OR COMPLIANCE OF THE PRODUCT
WITH THE REQUIREMENTS OF ANY LAW, RULE, SPECIFICATION OR CONTRACT
PERTAINING THERETO. NOTHING CONTAINED IN THE INSTRUCTION MANUAL SHALL
BE CONSTRUED TO CREATE AN EXPRESS OR IMPLIED WARRANTY OF ANY KIND
WHATSOEVER WITH RESPECT TO THE PRODUCT. IN ADDITION, SAMSUNG SHALL NOT
BE LIABLE FOR ANY DAMAGES OF ANY KIND RESULTING FROM THE PURCHASE OR
USE OF THE PRODUCT OR ARISING FROM THE BREACH OF THE EXPRESS WARRANTY,
INCLUDING INCIDENTAL, SPECIAL OR CONSEQUENTIAL DAMAGES, OR LOSS OF
ANTICIPATED PROFITS OR BENEFITS.
Modification of Software
SAMSUNG IS NOT LIABLE FOR PERFORMANCE ISSUES OR INCOMPATIBILITIES
CAUSED BY YOUR EDITING OF REGISTRY SETTINGS, OR YOUR MODIFICATION OF
OPERATING SYSTEM SOFTWARE.
USING CUSTOM OPERATING SYSTEM SOFTWARE MAY CAUSE YOUR DEVICE AND
APPLICATIONS TO WORK IMPROPERLY. YOUR CARRIER MAY NOT PERMIT USERS TO
DOWNLOAD CERTAIN SOFTWARE, SUCH AS CUSTOM OS.
SAFE™ (Samsung Approved For Enterprise)
SAFE™: "SAFE™" (Samsung for Enterprise) is a mark for a Samsung device which has
been tested against Samsung's own internal criteria for interoperability with certain third
party security‑related solutions for MDM and VPN. The testing includes field testing with
local network connection and menu tree testing which tests functionality of the solutions

in conjunction with the Samsung device. During the testing, the device is tested with the
security solutions to see if the solutions work with the device as described by the third party
security solution providers. The testing, for example, includes field testing with local network
connection and menu tree testing which tests functionality of the solutions in conjunction
with the Samsung device. For more information about Samsung's SAFE™ program, please
refer to www.samsung.com/us/safe.
Disclaimer of Warranties: EXCEPT AS OTHERWISE PROVIDED IN THEIR STANDARD
END USER LICENSE AND WARRANTY, TO THE FULL EXTENT PERMITTED BY
LAW SAMSUNG ELECTRONICS CO., LTD., SAMSUNG TELECOMMUNICATIONS
AMERICA, LLC, AND THEIR AFFILIATES (COLLECTIVELY REFERRED TO HEREIN AS
THE "SAMSUNG ENTITIES") EXPRESSLY DISCLAIM ANY AND ALL WARRANTIES,
EXPRESS OR IMPLIED, INCLUDING ANY WARRANTY OF MERCHANTABILITY, FITNESS
FOR A PARTICULAR PURPOSE, INTEROPERABILITY OR NON‑INFRINGEMENT, WITH
RESPECT TO INFORMATION TECHNOLOGY SECURITY PROTECTION, SAFE™ DEVICES
AND APPLICATIONS TESTED WITH SAFE™ DEVICES. IN NO EVENT SHALL THE
SAMSUNG ENTITIES BE LIABLE FOR ANY DIRECT, INDIRECT, INCIDENTAL, PUNITIVE,
OR CONSEQUENTIAL DAMAGES OF ANY KIND WHATSOEVER WITH RESPECT
TO INFORMATION TECHNOLOGY SECURIT Y PROTECTION, SAFE™ DEVICES OR
APPLICATIONS TESTED WITH SAFE™ DEVICES. In addition, information technology
security protection will be affected by features or functionality associated with, among other
things the e‑mail platform, master data management, and virtual private network solutions
selected by the software provider, solution provider or user. Choice of an e ‑mail, master data
management, and virtual private network solution is at the sole discretion of the software
provider, solution provider or user and any associated effect on information technology
security protection is solely the responsibility of the software provider, solution provider or
user. For complete statement of limited warranty, please refer to www.samsung.com/us/
safe, available on the web and where Samsung smartphones and mobile devices are sold.
[051214]

Samsung Telecommunications America (STA), LLC
Headquarters:
1301 E. Lookout Drive
Richardson, TX 75082
Customer Care Center:
1000 Klein Rd.
Plano, TX 75074
Toll Free Tel: 1.888.987.HELP (4357)
Internet Address: www.samsung.com
©
2014 Samsung Telecommunications America, LLC. Samsung is a registered trademark of
Samsung Electronics Co., Ltd.
Do you have questions about your Samsung Mobile Device?
For 24 hour information and assistance, we offer a new FAQ/ARS System (Automated
Response System) at: www.samsung.com/us/support.
The actual available capacity of the internal memory is less than the specified capacity
because the operating system and default applications occupy part of the memory. The
available capacity may change when you upgrade the device.
Nuance®, VSuite™, T9® Text Input, and the Nuance logo are trademarks or registered
trademarks of Nuance Communications, Inc., or its affiliates in the United States and/or
other countries.
ACCESS® and NetFront™ are trademarks or registered trademarks of ACCESS Co., Ltd. in
Japan and other countries.
The Bluetooth® word mark, figure mark (stylized “B Design”), and combination mark
(Bluetooth word mark and “B Design”) are registered trademarks and are wholly owned by
the Bluetooth SIG.
microSD™ and the microSD logo are Trademarks of the SD Card Association.
Openwave® is a registered Trademark of Openwave, Inc.

Google, the Google logo, Android, the Android logo, Google Play, Gmail, Google Mail,
Google Maps, Google Music, Google Hangouts, Picasa, Play Newsstand, YouTube and other
marks are trademarks of Google Inc.
Wi‑Fi is a registered trademark of the Wireless Fidelity Alliance, Inc.
LTE is a trademark of ETSI
Swype and the Swype logos are trademarks of Swype, Inc. © 2010 Swype, Inc. All rights
reserved.
Dynamic Noise Suppression from Audience
Your phone is equipped with an advanced voice processing chip that delivers clear
mobile calls by suppressing background noise, intermittent sounds (like a siren or nearby
conversation), and echoes, allowing you to hear and be heard nearly anywhere.
How Does It Work?
Based on the intelligence of the human hearing system, the technology:
● Captures, evaluates and distinguishes all the sound signals surrounding your
phone, and the person you're speaking with.
● Then isolates the primary voice in conversation and filters out the background
noise ‑ so the person you're calling hears only your voice, without disturbing
background noise.
● Dynamically equalizes and adjusts voice volume to optimize your calling
experience, so you can hear clearly and don't need to speak louder to overcome
surrounding noise.
The noise suppression technology is built‑in and already enabled in your new mobile phone.
So it's ready to provide unsurpassed voice clarity with every call.

Legal Information
The online version of the Health/Safety and Warranty guide for your device can be found at:
English: www.samsung.com/us/Legal/Phone_HSGuide
Spanish: www.samsung.com/us/Legal/Phone_HSGuide_SP
Location of Legal Information on the Device:
Health and Safety Information
● Settings g About device g Legal information g Samsung legal g Health and
safety
Warranty
● Settings g About device g Legal information g Samsung legal g Warranty
EULA
● Settings g About device g Legal information g Samsung legal g END USER
LICENSE AGREEMENT

Table of Contents
Intellectual Property ..............................2
Disclaimer of Warranties;
Exclusion of Liability ..............................3
Samsung Telecommunications
America (STA), LLC ...............................5
Legal Information ...................................7
Section 1: Getting Started ........ 12
Understanding this User Manual ..... 12
Removing the Battery Cover ............ 14
Installing and Removing the
SIM card ................................................ 15
Installing the microSD
Memory Card ....................................... 17
Installing the Battery........................... 18
Replacing the Battery Cover ............ 19
Charging the Battery .......................... 20
Extending Your Battery Life .............. 22
Switching the Device On or Off ....... 23
Initial Device Configuration ............... 24
Restarting the Device ......................... 25
Locking and Unlocking the
Device .................................................... 25
Voicemail ............................................... 26
Section 2: Understanding Your
Device ....................................... 28
Features of Your Device .................... 28
Front View ............................................. 30
Back View ............................................. 33
8
Status Bar ............................................. 34
Home Screen ....................................... 41
Customizing the Screens .................. 45
Screen Navigation .............................. 52
Menu Navigation ................................. 54
Entering Text......................................... 55
Using the Google Voice Typing ....... 56
Using the Samsung Keyboard ......... 57
Section 3: Call Functions and
Contacts List ........................... 63
Displaying Your Phone Number .......63
Making a Call ....................................... 63
Ending a Call ........................................ 65
Making Emergency Calls .................. 66
Dialing Options .................................... 67
Answering a Call ................................. 68
Managing Reject Calls ....................... 69
International Calls ............................... 70
Pause Dialing ....................................... 71
Wait Dialing ........................................... 72
Redialing the Last Number ............... 72
Speed Dialing....................................... 73
In Call Options ..................................... 75
Logs Tab................................................82
Section 4: Contacts .................... 87
Accounts ............................................... 87
Contacts List ........................................ 88

Finding a Contact ................................ 91
Contacts Screen Options ................. 95
Contacts Settings ............................... 96
Contact Entry Options ....................... 98
Linking Contact Information ...........100
Sending a Namecard .......................102
Copying Contact Information .........104
Synchronizing Contacts ..................105
Display Options .................................106
Additional Contact Options.............107
Groups .................................................108
The Favorites Tab .............................. 110
Section 5: Messages ................ 111
Types of Messages ...........................111
Creating and Sending Messages ..112
Message Options .............................114
Viewing Newly Received
Messages ............................................117
Deleting Messages ...........................119
Message Search ...............................119
Messages Settings ........................... 120
Assigning Messages as Spam .......123
Accessing Your Spam Folder ........125
Quick Responses .............................. 125
Using Email .........................................126
Microsoft Exchange Email
(Outlook) .............................................131
Section 6: Multimedia ..............136
Assigning the Default Storage
Location ...............................................137
Using the Camera .............................137
Camera Options ................................139
Camera and Camcorder Settings .140
Using the Camcorder .......................145
Sharing Pictures ................................147
Editing a Photo ..................................151
The Gallery ......................................... 151
Section 7: Applications and
Development .........................153
Applications ........................................153
Amazon ................................................155
Calculator ............................................156
Calendar ..............................................156
Camera ................................................159
ChatON ................................................159
Chrome ................................................161
Clock ....................................................162
Contacts ..............................................164
Drive .....................................................165
Dropbox ...............................................165
Email.....................................................167
Flipboard .............................................167
Gallery .................................................167
Gmail ....................................................168
Google .................................................169
Google Settings .................................170
9

Google + ..............................................170
Hangouts .............................................171
Internet .................................................171
Lookout Security ...............................180
Maps ....................................................180
Memo ...................................................182
Messages ............................................182
Mobile HotSpot ..................................183
Music ...................................................183
Using Playlists ....................................187
My Files ...............................................189
Phone ...................................................190
Photos ..................................................191
Play Books ..........................................191
Play Games.........................................191
Play Movies & TV ............................... 192
Play Music ..........................................192
Play Newsstand .................................194
Play Store ............................................194
Samsung Apps ..................................196
Settings ............................................... 196
T‑Mobile My Account .......................197
T‑Mobile Name ID .............................198
T‑Mobile TV ........................................198
Video ....................................................199
Visual Voicemail ................................201
Voice Recorder ..................................201
Voice Search ......................................203
YouTube ............................................... 204
10
Section 8: Connections ...........207
Accessing Device Storage ..............207
Wi‑Fi Connections ............................. 208
Bluetooth Connection ......................210
USB Tethering ....................................214
Mobile HotSpot ..................................216
Section 9: Changing Your
Settings ..................................219
Accessing the Settings Options .... 219
Wi‑Fi Settings ..................................... 221
Download booster .............................226
Bluetooth .............................................227
Mobile HotSpot ..................................228
Airplane Mode ...................................229
Data Usage .........................................230
Location ...............................................231
More Networks ..................................232
Near Field Communication .............241
Nearby Devices .................................242
Printing.................................................243
Screen Mirroring ...............................243
Sound Settings .................................. 244
Display Settings .................................247
Wallpaper ............................................248
Lock Screen .......................................248
Notification panel .............................. 253
Toolbox ................................................ 253
Easy Mode ..........................................254
Accessibility ....................................... 255

Blocking Mode ...................................258
Private Mode ......................................258
Motions and Gestures......................259
Cloud ....................................................262
Backup and Reset ............................263
Backing up Your Data Before
Factory Reset .....................................264
Language and Input .........................268
Date and Time ....................................274
Safety assistance .............................. 275
Accessories ........................................276
Battery Usage .................................... 276
Power saving mode ..........................277
SD Card & Device Storage .............278
Security ............................................... 279
Help ......................................................282
About Device ......................................282
Application Manager ........................285
Default applications ..........................288
Calendar ..............................................288
Call Settings ....................................... 289
Contacts Settings ............................. 298
Email Settings .................................... 298
Gallery Settings ................................. 299
Internet Settings ................................ 300
Messages Settings ........................... 300
S Voice Settings ................................300
Section 10: Index .......................302
11

Section 1: Getting Started
This section explains how to get started with your phone by installing and charging the
battery, installing the micro SIM card and optional memory card, and setting up your voice
mail.
Before using your device for the first time, you’ll need to install and charge the battery and
install the micro SIM card. The micro SIM card is loaded with your subscription details, such
as your PIN, available optional services, and many other features. If desired, you can also
install an SD card to store media for use with your device.
Understanding this User Manual
The sections of this manual generally follow the features of your device.
This manual provides navigation instructions according to the default display settings. If you
select other settings, navigation may be different.
Unless otherwise specified, all instructions in this manual assume you are starting from the
Home screen and using the available keys.
Note: Instructions in this manual are based on default settings, and may vary from your
device, depending on the sof tware version on your device, and any changes to the
device’s Settings.
Unless stated otherwise, instructions in this User Manual start with the device
unlocked, at the Home screen.
All screen images in this manual are simulated. Actual displays may vary, depending
on the sof tware version of your device and any changes to the device’s Settings.
12
Special Text
Throughout this manual, you’ll find text that is set apart from the rest. These are intended to
point out important information, share quick methods for activating features, to define terms,
and more. The definitions for these methods are as follows:
● Caution!: Brings to your attention information that should be noted to avoid danger
or mistakes.
● Important!: Points out impor tant information about the current feature that could
affect performance.
● Notes: Presents alternative options for the current feature, menu, or sub‑menu.
● Tips: Provides quick or innovative methods, or useful shortcuts.
● Warning!: Brings to your attention important information to prevent loss of data or
functionality, or even prevent damage to your phone.
Text Conventions
This manual provides condensed information about how to use your phone. To make this
possible, the following text conventions are used to represent often‑used steps:
g
Example: From the Home screen, tap Apps g Settings g Bluetooth.
asdasasdasdsadasdasdasdasdsadas
Arrows are used to represent the sequence of selecting successive
options in longer, or repetitive, procedures.
13 Section 1: Getting Started

Removing the Battery Cover
The battery, micro SIM card and SD card are installed under the battery cover.
Important! Before removing or replacing the bat tery cover, make sure the device is
switched off. To turn the device of f, hold down the Power/Lock key
until the Device options pop up displays, then tap Power off.
Caution! Do not bend or t wist the back cover excessively during installation or removal.
Doing so may damage the cover.
To remove the battery cover:
► Hold the device firmly and locate the cover release latch (1) and carefully remove
the cover off the device (2).
Release Latch
14

Installing and Removing the SIM card
This device uses a different type of SIM card called a “micro SIM”. Other larger SIM cards
will not function or fit within this slot.
SIM Card Overview
Important! Before removing or replacing the micro SIM card, make sure the device is
switched off. To turn the device of f, hold down the Power/Lock key
until the Device options pop up displays, then tap Power off.
The micro SIM card is loaded with your subscription details such as your telephone number,
PIN, available optional services, and many other features.
Important! The micro SIM card and its information can be easily damaged by scratching or
bending, so be careful when handling, inserting, or removing the card. Keep all
SIM cards out of reach of small children.
Some features on your device (such as Wi‑Fi Calling) can be unlocked by using the new
micro SIM card.
To use this new micro SIM card, call or contact customer service for more information.
This card contains the necessary information for identifying and authenticating the user to
the IMS (IP Multimedia Subsystem).
15 Section 1: Getting Started
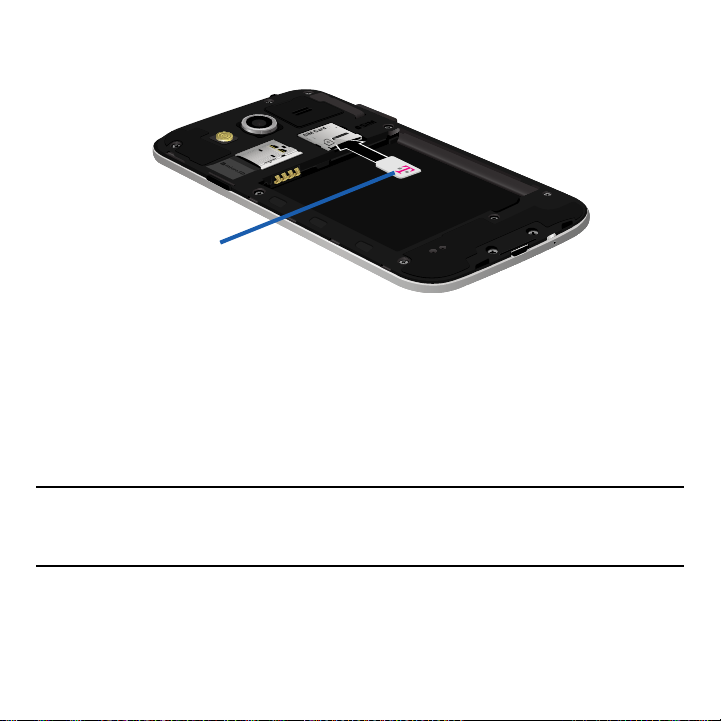
To install the SIM card:
1. Carefully slide the micro SIM card into the SIM card socket until it clicks into place.
Micro SIM Card
2. Make sure that the card’s gold contacts face into the device and that the upper‑left
angled corner of the card is positioned as shown.
To remove the micro SIM card:
1. Remove the battery cover.
2. Carefully place your fingernail into the end of the micro SIM slot and push the card
slightly out.
3. Carefully slide the card out of the micro SIM card socket.
Note: If the card is not inserted correctly, the device will not detect it and no service will be
available. If this happens, turn off the device, remove the card, and reinstall the card
in the correct orientation.
16

Installing the microSD Memory Card
Your device supports an optional (external) microSD™ memory cards for storage of media
such as music, pictures, video and other files. The SD card is designed for use with this
mobile device and other devices.
Note: This device supports an expandable memory card.
1. Remove the battery cover.
2. Locate the microSD card slot on the inside of the device.
3. Orient the card with the gold strips facing down.
4. Carefully slide the microSD card into the card socket until it clicks into place.
Important! Be sure to align the gold contact pins on the card with the device’s contact
pins.
Note: MicroSD cards should be formatted within the Storage menu. Using an older or slow
microSD card can af fect camera per formance, especially for video recording.
17 Section 1: Getting Started

To remove the microSD Memory Card:
1. Remove the battery cover.
2. Firmly press the card into the slot and release it. The card should pop partially out
of the slot.
3. Remove the card from the slot.
4. Replace the battery cover.
Installing the Battery
Before using your device for the first time, install the battery and charge it fully.
Important! Before removing or replacing the bat tery, make sure the device is switched off.
To turn the device off, hold down the Power/Lock key until the Device
options pop up displays, then tap Power off.
18
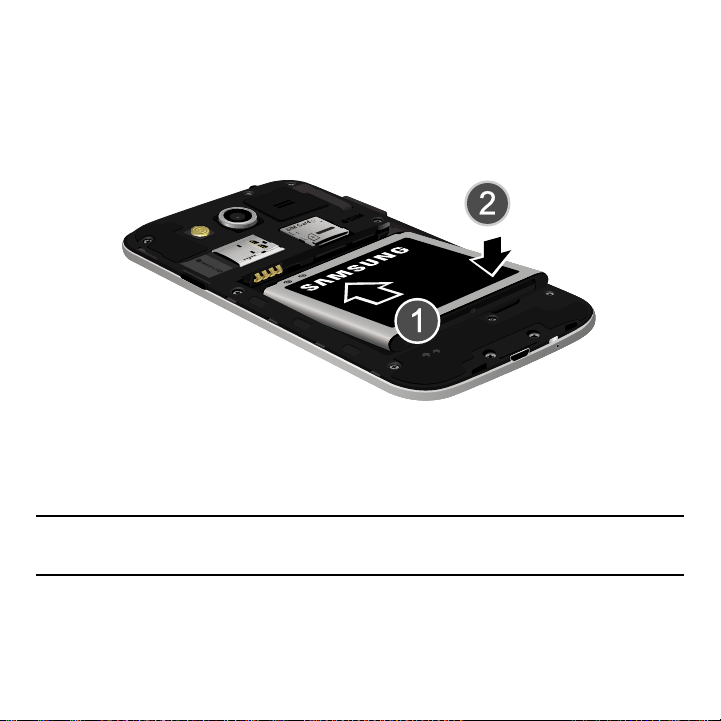
To install the battery:
1. Slide the battery into the compartment (1) so that the tabs on the end align with the
slots at the bottom of the phone, making sure the connectors align.
2. Gently press down to secure the battery (2).
To remove the battery:
► Grip the battery at the top end and lift it up and out of the battery compartment.
Installing Battery
Replacing the Battery Cover
► Position the battery cover over the battery compartment and securely press down
around the edges until you hear clicking.
Caution! When replacing the bat tery cover, do not apply pressure to the screen
(“squeeze”) as this can damage the screen.
19 Section 1: Getting Started
Charging the Battery
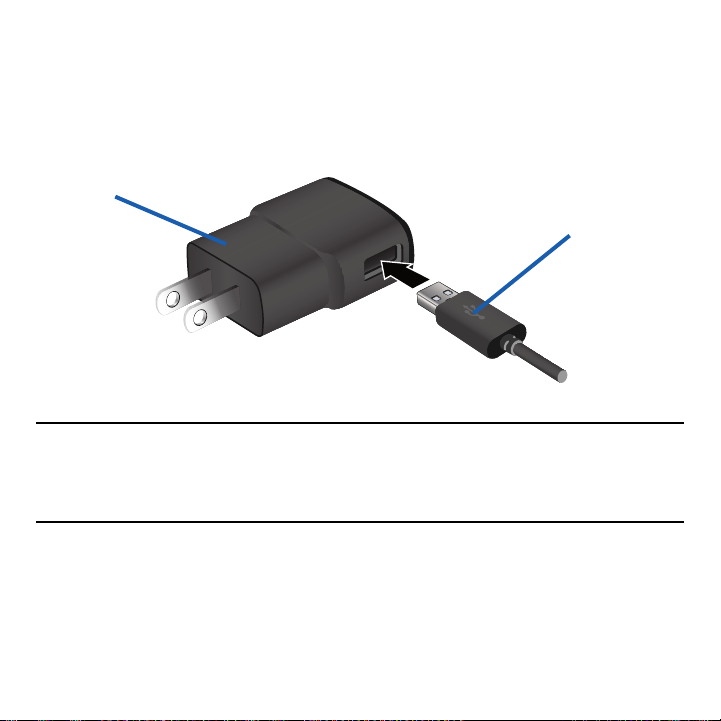
Your device is powered by a rechargeable Li‑ion battery. A wall charger, which is used
for charging the battery, is included with your device. Use only approved batteries and
chargers. Ask your local Samsung dealer for further details.
Before using your device for the first time, you must fully charge the battery.
Charging Head
USB Cable
Note: Verify that the battery is installed prior to connecting the wall charger. If both the wall
charger is connected and the battery is not installed, the handset will power cycle
continuously and prevent proper operation. Failure to unplug the wall charger before
you remove the batter y, can cause the device to become damaged.
20
Important! It is recommended you fully charge the battery before using your device for the
first time.
Note: If the charger is incorrectly connected, damage to the accessory port will occur
therefore voiding the device’s warranty.
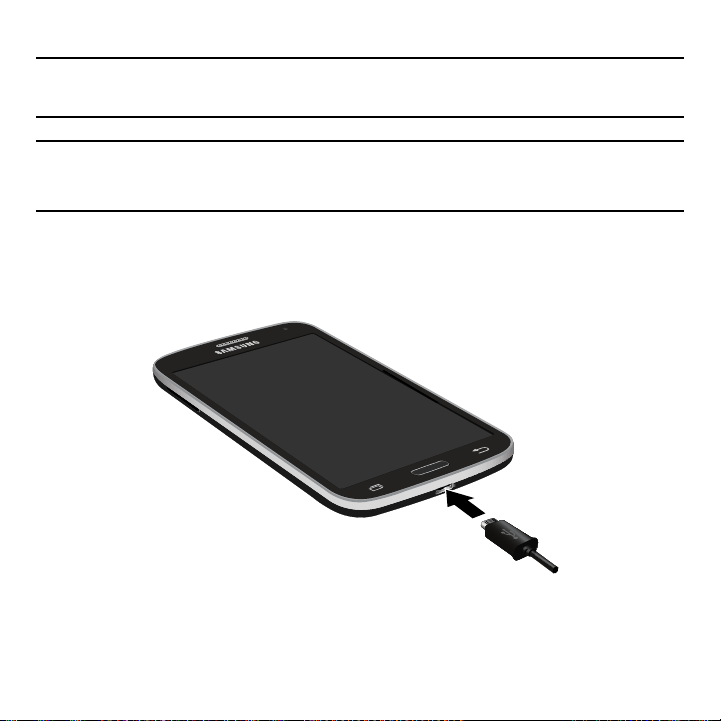
To connect a USB cable to the device:
1. Connect the USB cable to the charging head.
2. Locate the Charger/Accessory jack and iinsert the USB cable into the appropriate
jack.
3. Plug the charging head into a standard AC power outlet. The device turns on with
the screen locked and indicates both its charge state and percent of charge.
21 Section 1: Getting Started

Warning! While the device is charging, if the touch screen does not function due to an
unstable power supply unplug the USB power adapter from the power outlet or
unplug the USB cable from the device.
4. When charging is finished, first unplug the charger’s power plug from the AC wall
outlet, then disconnect the charger’s connector from the device.
5. When charging is finished, first unplug the charger’s power plug from the AC wall
outlet, then disconnect the charger’s connector from the phone.
Important! If your handset has a touch screen display, please note that a touch screen
responds best to a light touch from the pad of your finger or a non-metallic
stylus. Using excessive force or a metallic object when pressing on the touch
screen may damage the tempered glass surface and void the warranty.
Extending Your Battery Life
Active applications, light levels, Bluetooth usage, and GPS functionality all act to drain your
battery. The following is a list of helpful tips that can help conserve your battery power:
● Reduce the time your backlight stays on.
● Turn Bluetooth off when not in use.
● Turn Wi‑Fi off when not in use.
● Deactivate your GPS functionality when not needed. Most applications using this
function will periodically query the GPS satellites for your current location; each
query drains your battery.
● Do not wait until your battery is completely depleted before charging your device.
Repeating this process of a complete discharge and recharge can over time
reduce the storage capacity of any battery.
● Use the Power Saving feature to deactivate some hardware and inter face functions.
● Check the Battery use screen to review what features or functions have been
consuming your battery resources.
22

● Check the Running Services and close any unnecessary applications.
● Use the Task Manager feature to end/shutdown background applications that are
still running. These minimized applications can, over time, cause your device to
“slow down”.
● Animated wallpapers use processing power, memory, and more power. Change
your Live Wallpaper to a non‑animated Wallpaper gallery or Galler y image.
Switching the Device On or Off
Once the device has been configured, you will not be prompted with setup screens again.
To turn the device on:
► Press and hold Power/Lock until the device switches on.
The device searches for your network and after finding it, you can make or receive
calls.
Note: The display language is preset to English at the factory. To change the language, use
the Language menu. For more information, refer to “Language and Input” on page
268.
To turn the device off:
1. Press and hold Power/Lock until the Device options screen appears.
2. Tap Power off.
23 Section 1: Getting Started

Initial Device Configuration
1. Select a language from the associated field. English is the default language.
Note: If you are visually impaired or have difficulty hearing, tap Accessibility to configure
the accessibility settings.
2. Tap Start and follow the on‑screen setup instructions.
Note: You may be prompted with a notification that your activation is completed. Enabling
Google location services can drain battery power.
For more information, refer to “Creating a Samsung Account” on page 261.
Note: Read the on-screen Dropbox set up and registration information regarding new
services.
3. Enter a unique device name and tap Finish to complete the setup process.
Important! The device name is also used to provide an identification for your device’s
Bluetooth and
Wi- Fi Direct names.
4. Read the on‑screen Collect diagnostics information.
Note: This software collects only diagnostic data from your device so that customer
service technicians can better troubleshoot issues with your device.
5. Select either More info... (to read additional information) or Close to close the
message screen.
24
Important! Selecting Close only closes the current description screen and does not disable
data collection.
To disable data collection, go to Settings g Backup and reset g Collect
diagnostics and turn of f the Allow Diagnostics feature. For more information,
refer to “Collect Diagnostics” on page 267.
Restarting the Device
1. Press and hold Power/Lock until the Device options screen appears.
2. Tap Restart.
Locking and Unlocking the Device
By default, the device screen locks when the backlight turns off.
► Place your finger on the screen and swipe the glass in any of the directions shown
unlock the device.
Note: You can choose to configure lock settings to prevent unauthorized use of your
device. For more information, refer to “Security” on page 279.
25 Section 1: Getting Started

Voicemail
Setting Up Your Voicemail
Your device automatically transfers all unanswered calls to voicemail, even if your device is
in use or turned off. As soon as your battery is charged and the micro SIM card inserted,
activate your voicemail account.
Important! Always use a password to protect against unauthorized access.
For new users, follow the instructions below to set up voicemail:
Note: Voicemail setup may be different depending on your network.
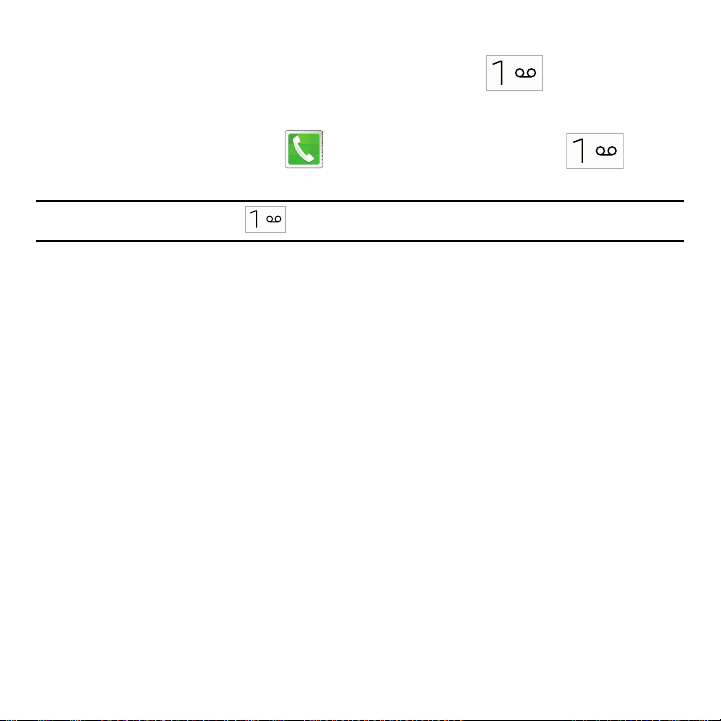
1. From the Home screen, tap Phone and then touch and hold the key
until the device dials your voicemail service.
You may be prompted to enter a password.
2. Follow the tutorial to create a password, a greeting, and a display name.
26
Accessing You r Voicemail
You can access your Voicemail by either pressing and holding on the keypad, or
by using the device’s Application icon, then tapping the Voicemail application. To access
Voice Mail using the menu:
1. From the Home screen, tap Phone and then touch and hold until
the device dials voicemail.
Note: Touching and holding will launch the voicemail application.
2. When connected, follow the voice prompts from the voicemail center.
Accessing Your Voicemail From Another Phone
1. Dial your wireless phone number.
2. When you hear your voicemail greeting, press the asterisk key on the phone you
are using.
3. Enter your passcode.
27 Section 1: Getting Started

Section 2: Understanding Your Device
This section outlines key features of your device. It also describes the device’s keys, screen
and the icons that display when the device is in use.
Features of Your Device
Your device is lightweight, easy‑to‑use and offers many significant features. The following list
outlines a few of the features included in your device.
● Touch screen with vir tual (on‑screen) QWERTY keyboard
● Brilliant 4.5” qHD screen (960x540)
● Quad‑core processor
● 4G LTE and High Speed Packet Access Plus (HSPA+).
● Android 4.4.2, Kit Kat OS Platform
● Galaxy Gear™ compliant. For a list of compatible smartphones, please visit:
www.samsung.com/us/galaxygearsupport.
● Smart Switch™ compliant. For more information, see www.samsungsmartswitch.
com
● Support for Motions and Gestures.
● Wi‑ Fi® Capability @ both 2.4GHz and 5GHz
● Apps available to download from the Google Play™ Store and Samsung Apps
● 5 Megapixel Camera and Camcorder with autofocus with smart stabalization and
LED flash.
● 2 Megapixel Front Facing camera for Video Chat
● S‑Beam file transfer technology
● NFC‑compatible
● Bluetooth v4.0 enabled
● Full Integration of Google Mobile™ Services (Gmail, Google Maps, Google
Hangouts, etc..)
28

● Multiple Messaging Options: Text/Picture/Video Messaging and Google
Hangouts™
● Corporate and Personal Email
● Music Player with multitasking features
● Pre‑loaded e‑reader applications such as: Play Books™ and Play Newsstand™
● Assisted GPS Navigation
● Expandable memory slot
● Mobile HotSpot and USB Tethering‑capability
● T‑Mobile® TV
● Video Chat via Google Hangouts
● Google Play™ Music
● Wi‑Fi® Calling
29 Section 2: Understanding Your Device
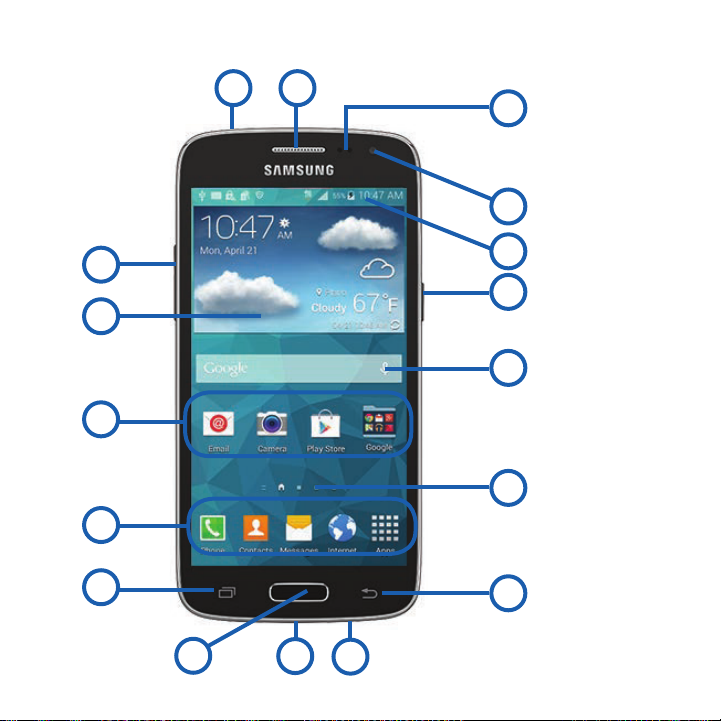
Front View
16
7
15
14
30
1
2
3
4
5
76
8
13
12
11
10
9
 Loading...