

Samsung SHT-8610 User Manual
6YgifYhcfYUXh\]gigYfaUbiU`UbXZc``ck
h\Y]bghfiWh]cbgZcfWcffYWhigY"
=hWcbhU]bggUZYhm]bghfiWh]cbghcgYWifYigYfgUZYhm
UbXhc\Y`ddfYjYbhXUaU[YhcdfcdYfhm"
User Manual
SHT-8610

1
Convenience and Safety.
● be sure to read the user manual for safe and correct use.
● The product exterior, design, color, parts, and contents in this manual are subject to change without prior notice.
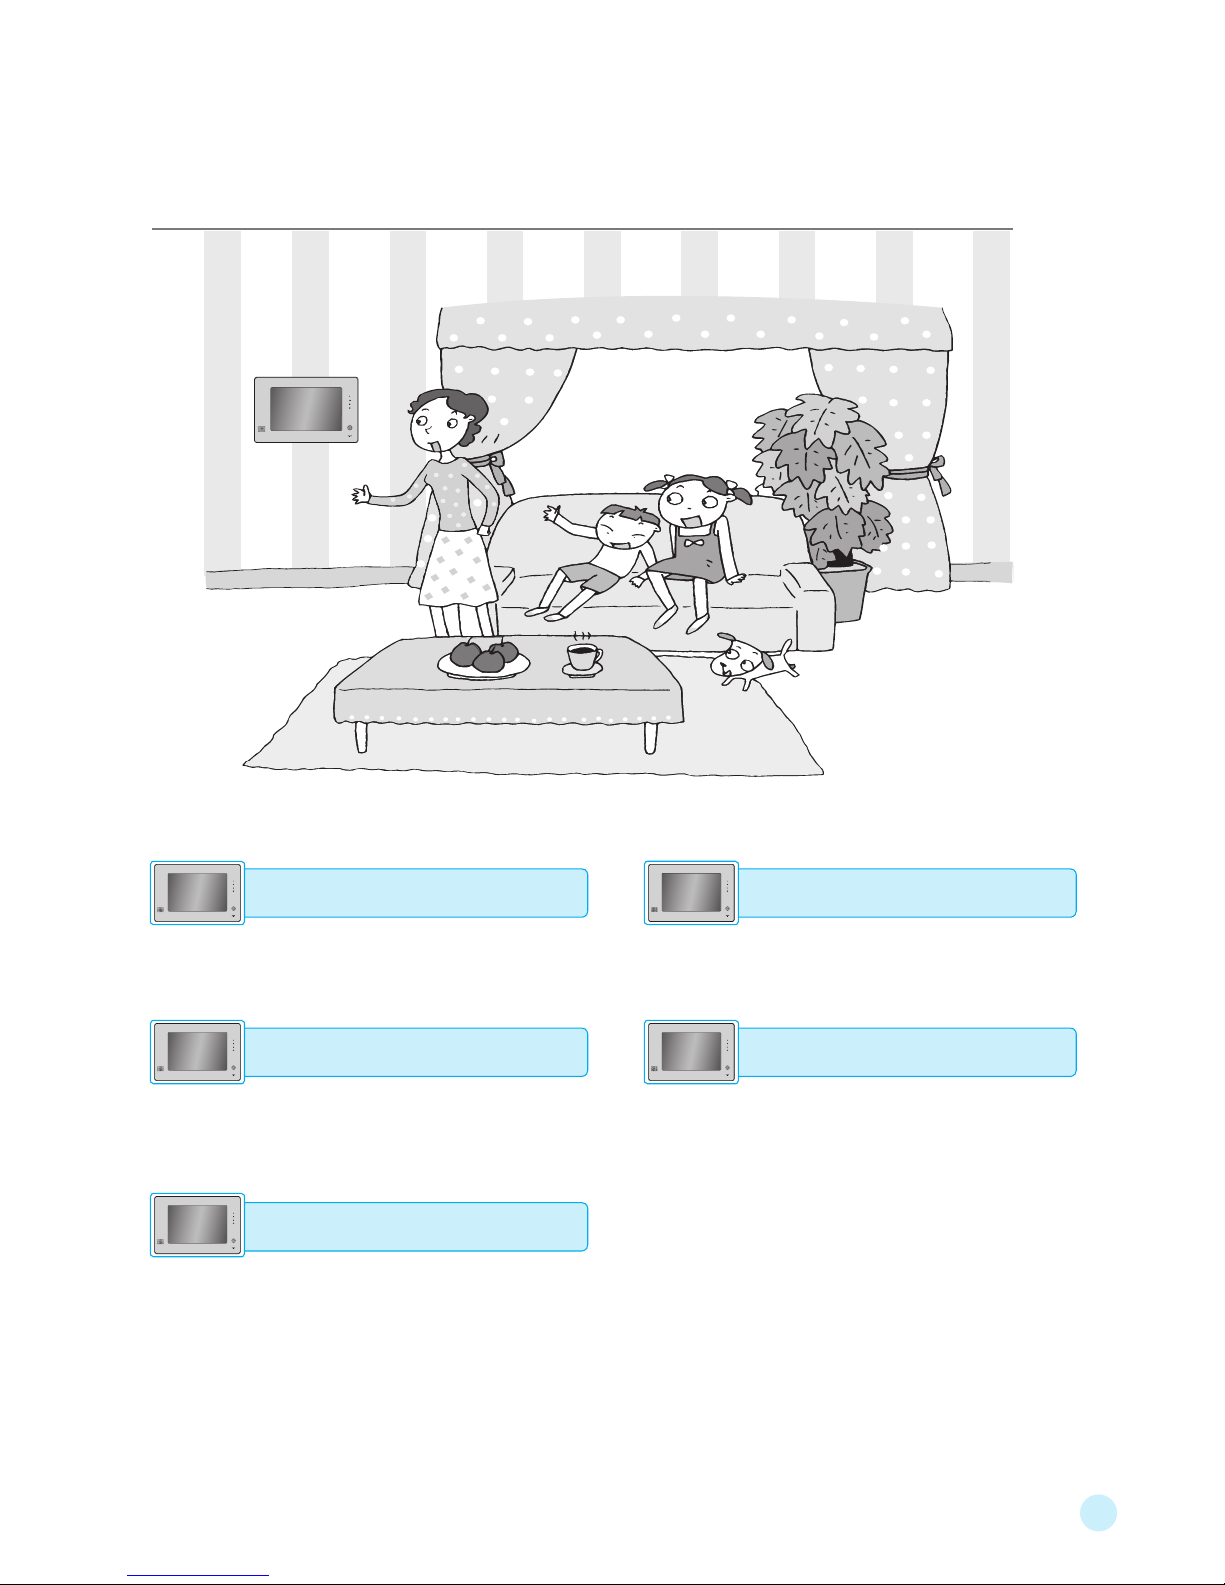
Monitoring and talking to a visitor
You can see a visitor through the 10.1˝ wide
color monitor and talk with him/her.
Memo
You can create your own memos.
Safety alarms (gas leak/emergency/intrusion)
Wh en the se ns or de te ct s an y e ve nt , it
announces the corresponding status to the
house and security office, and delivers the
alert to the registered phone.
Controls (optional)
It can control operations for lights, gas valve,
heater, and the like.
Notice search (optional)
Th rough the EZ ON sys te m, you can be
notied of meter readings, notications, and
the like, which can be also viewed.

2
Contents
Controlling lights ……………………………………………………………………………………………… 12
Remote-controlling lights …………………………………………………………………………………… 13
Controlling light dimmers …………………………………………………………………………………… 14
Controlling heating system ………………………………………………………………………………… 15
Remote controlling heaters ………………………………………………………………………………… 16
Controlling air conditioners ………………………………………………………………………………… 17
Controlling ventilation ……………………………………………………………………………………… 18
Controlling curtains ………………………………………………………………………………………… 19
Remote-controlling curtains ………………………………………………………………………………… 20
Controlling gas valve ………………………………………………………………………………………… 21
Remote-controlling gas valve ……………………………………………………………………………… 22
Controlling all ………………………………………………………………………………………………… 23
Controlling mode …………………………………………………………………………………………… 24
Setting/Canceling Away ……………………………………………………………………………………… 26
Setting/Canceling Away -when using the registration card ……………………………………………… 28
Setting/Canceling Security ………………………………………………………………………………… 30
Automatic alarm ……………………………………………………………………………………………… 31
Alarm Stop/Return …………………………………………………………………………………………… 31
Getting Started
Safety Instructions …………………………………………………………………………………………… 4
Part names and functions …………………………………………………………………………………… 8
1 Controls
3 Phone Functions
2 Alarms
Telephone call ………………………………………………………………………………………………… 34
In-house call ………………………………………………………………………………………………… 37
Intercom call ………………………………………………………………………………………………… 38
Security office call …………………………………………………………………………………………… 41
Control office call …………………………………………………………………………………………… 43
Monitoring entrance ………………………………………………………………………………………… 44
3
Monitoring a visitor …………………………………………………………………………………………… 52
Checking CCTV image ……………………………………………………………………………………… 53
Checking notices …………………………………………………………………………………………… 62
Checking utility information ………………………………………………………………………………… 63
Checking vehicle information ……………………………………………………………………………… 64
Checking delivery information ……………………………………………………………………………… 65
Setting bell sound …………………………………………………………………………………………… 68
Setting screen ………………………………………………………………………………………………… 69
Setting password …………………………………………………………………………………………… 70
Registering notice call ……………………………………………………………………………………… 71
Setting favorites ……………………………………………………………………………………………… 72
Setting for ARS (Automatic Response System) …………………………………………………………… 73
Setting security sensor ……………………………………………………………………………………… 74
Setting time …………………………………………………………………………………………………… 75
Registering card ……………………………………………………………………………………………… 76
Setting vehicle information notice ………………………………………………………………………… 77
Troubleshootings …………………………………………………………………………………………… 80
Product information ………………………………………………………………………………………… 81
Contact information ………………………………………………………………………………………… 81
Warranty ……………………………………………………………………………………………………… 83
6 Search Functions
7 Environment Configuration
8 Things To Know
4 Image Functions
Memo ………………………………………………………………………………………………………… 56
Alarm ………………………………………………………………………………………………………… 57
Digital photo album ………………………………………………………………………………………… 58
Calculator …………………………………………………………………………………………………… 59
5 Additional Functions
4
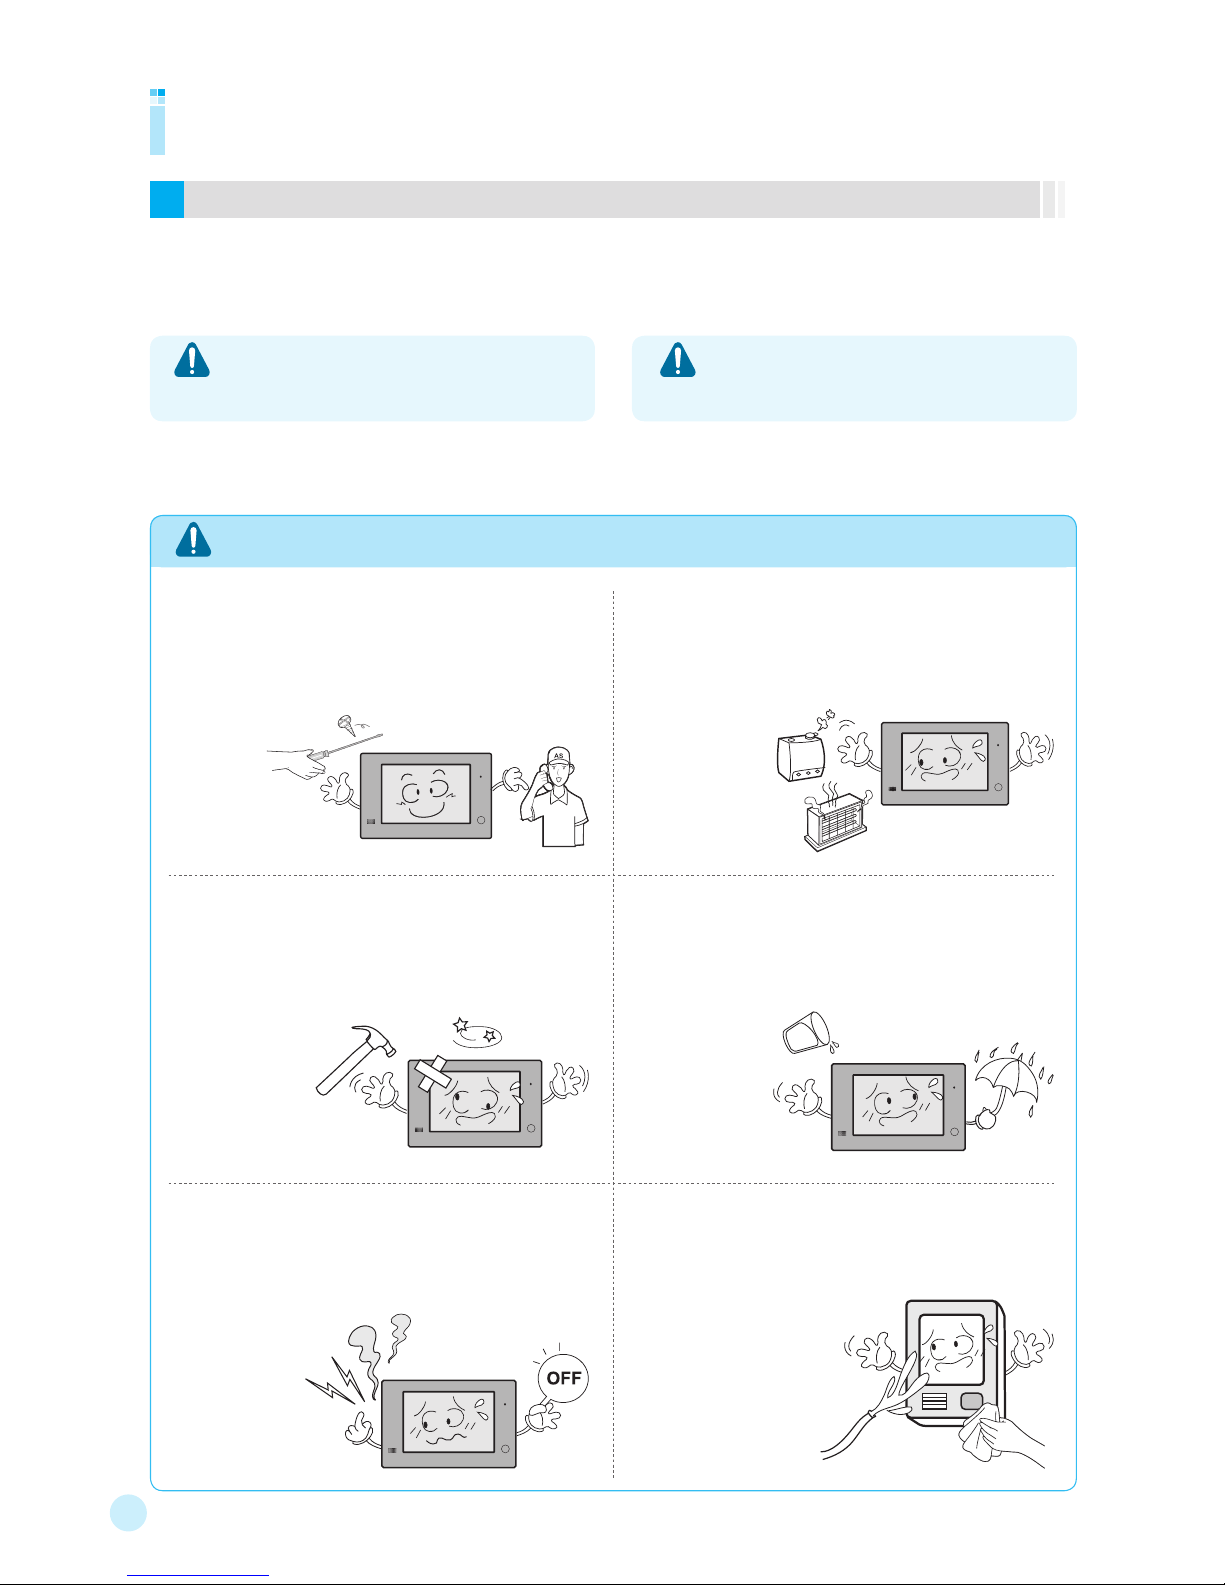
Safety Instructions
Warnings and cautions
※ For safe and correct use of the product, be sure to read the followings.
● If you do not follow the instructions, it may cause
serious injury or death.
Warning
Warning
It may cause product failure, electric shock or fire.
Do not place a heater, aquarium or humidifier near the
product.
- It may cause fire or malfunction.
Do not apply a strong shock to the product with a hard
material (e.g. hammer).
- It may cause product failure, electric shock or fire
Do not let any liquid run into the product.
- It may cause electric shock or fire..
If any strange sound, smell or smoke is detected,
first turn off the circuit breaker that is connected to
the power distributor’s heater switch (connected to a
home automation product) and consult with the service
agency.
- It may cause
electric shock or fire.
When cleaning the entrance, do not let water run into
the camera.
- It may cause electric shock or fire.
● If you do not follow the instructions, it may cause
injury or property damage.
Cautions
Do not arbitrarily disassemble, install or repair the
product.
- Do not arbitrarily disassemble, install or repair the product.
5
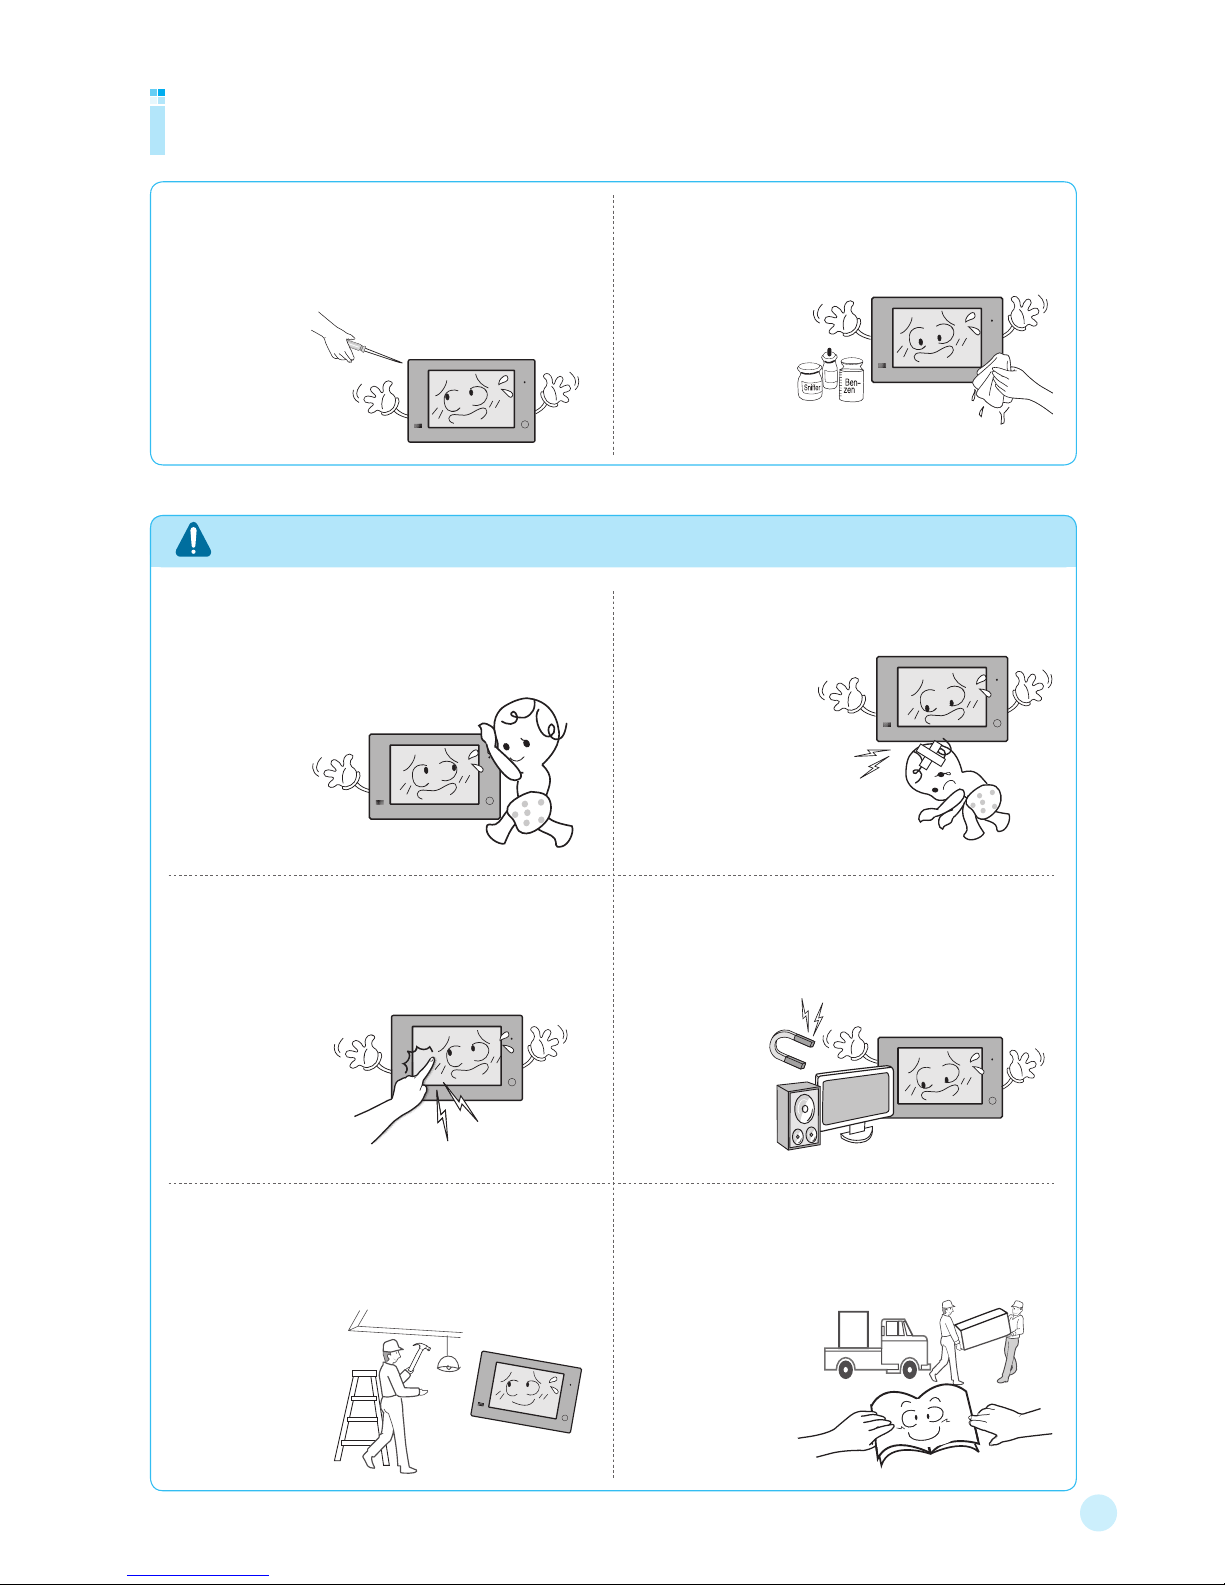
Safety Instructions
Warning
Do not apply a shock to the monitor screen.
- If you apply a strong shock to the touch screen, it may cause
product failure or damage.
Keep away from a magnetic force generating device.
- If the product is near a huge TV or speaker, its performance
may get worse.
When modifying, repairing or maintaining the interior
near the product, be cautioned.
- When the operation environment
changes due to the interior
modification, repair or
maintenance, the
controls of the product
may not operate
properly.
When you move to a new house, transfer this manual
to the tenant.
- It can prevent the tenant’s misoperation.
Do not cling to the product nor pull the product.
- Do not let children access to the product.
If fallen together with the product, it may cause injury.
Please be cautioned when you get up under the
product.
- It may cause injury to
your head..
Do not press the buttons with an awl or pin.
- It may cause electric shock or fire.
Do not clean the product with a wet cloth and never
use alcohol, benzene or thinner.
- It may cause electric shock or fire.


Part names and functions
Getting Started
8
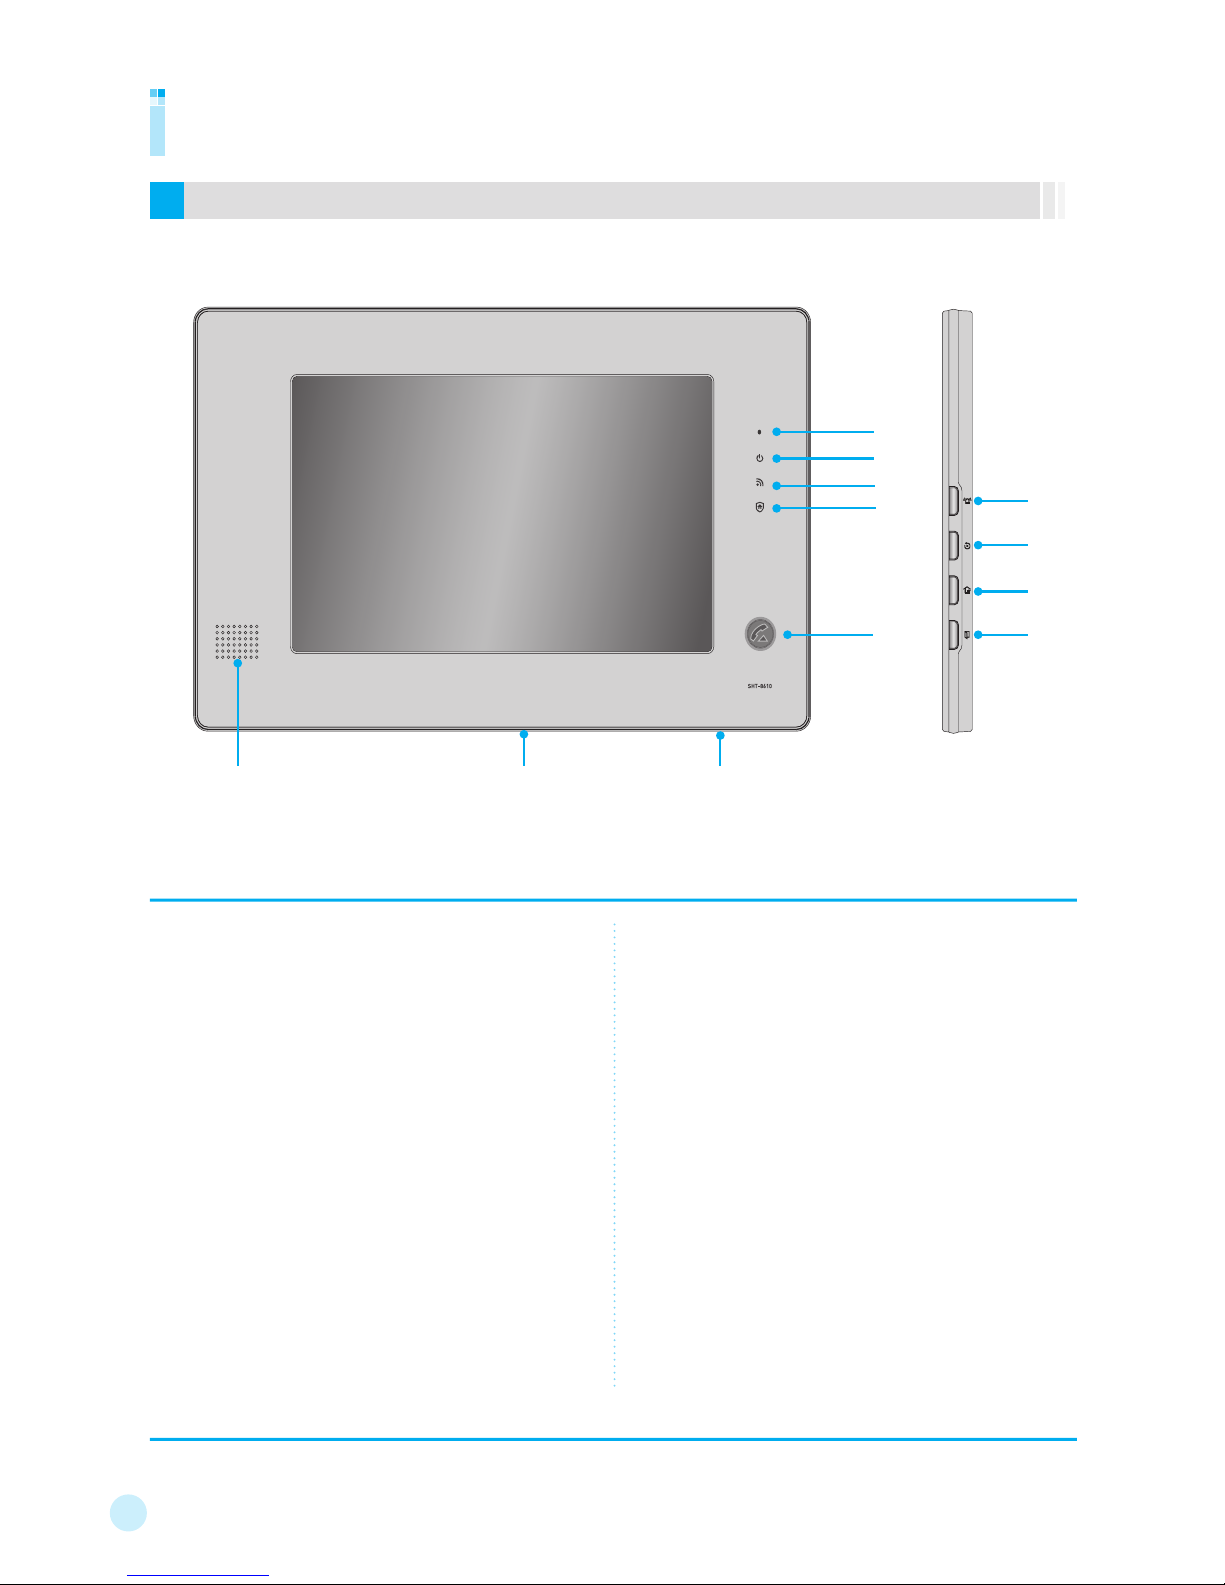
Part names and functions
① Built-in Microphone
Used to talk on the telephone (e.g. interphone to house or security
ofce, or external call).
② Power
Displays the power supply status. (Lighted in usual time)
③ Communication
Indicates the status of connection.
(When disconnected, it blinks.)
④ Security
Displays the Away/Security related setting.
(It lights in Security mode, while it blinks in Away mode.)
⑤ Call
Used to receive a phone call (e.g. interphone to house or security
ofce, or external call) or terminate the call, or move to the call
screen.
⑥ SOS
Used when any emergency situation happens.
※ It operates when pressed for one or more seconds.
⑦ Stop/Return
Used to stop the alarm or to return to the normal status.
⑧ Away
Used to move to the security (Away/Security) setting screen.
⑨ Door Open
Used to open the entrance door or main entrance door (possible
when the doorlock is installed) or to move to the initial screen.
⑩ Speaker
⑪ USB Port
Used to connect a USB storage, with which a digital photo album
can be played or visitor (or intruder) images can be stored.
⑫ Power Switch
Controls power supply to the main body.
Body
※ The product color and design may be changed.
①
③
④
⑤
⑥
⑦
⑧
②
⑨
⑩ ⑪ ⑫
9
Getting Started
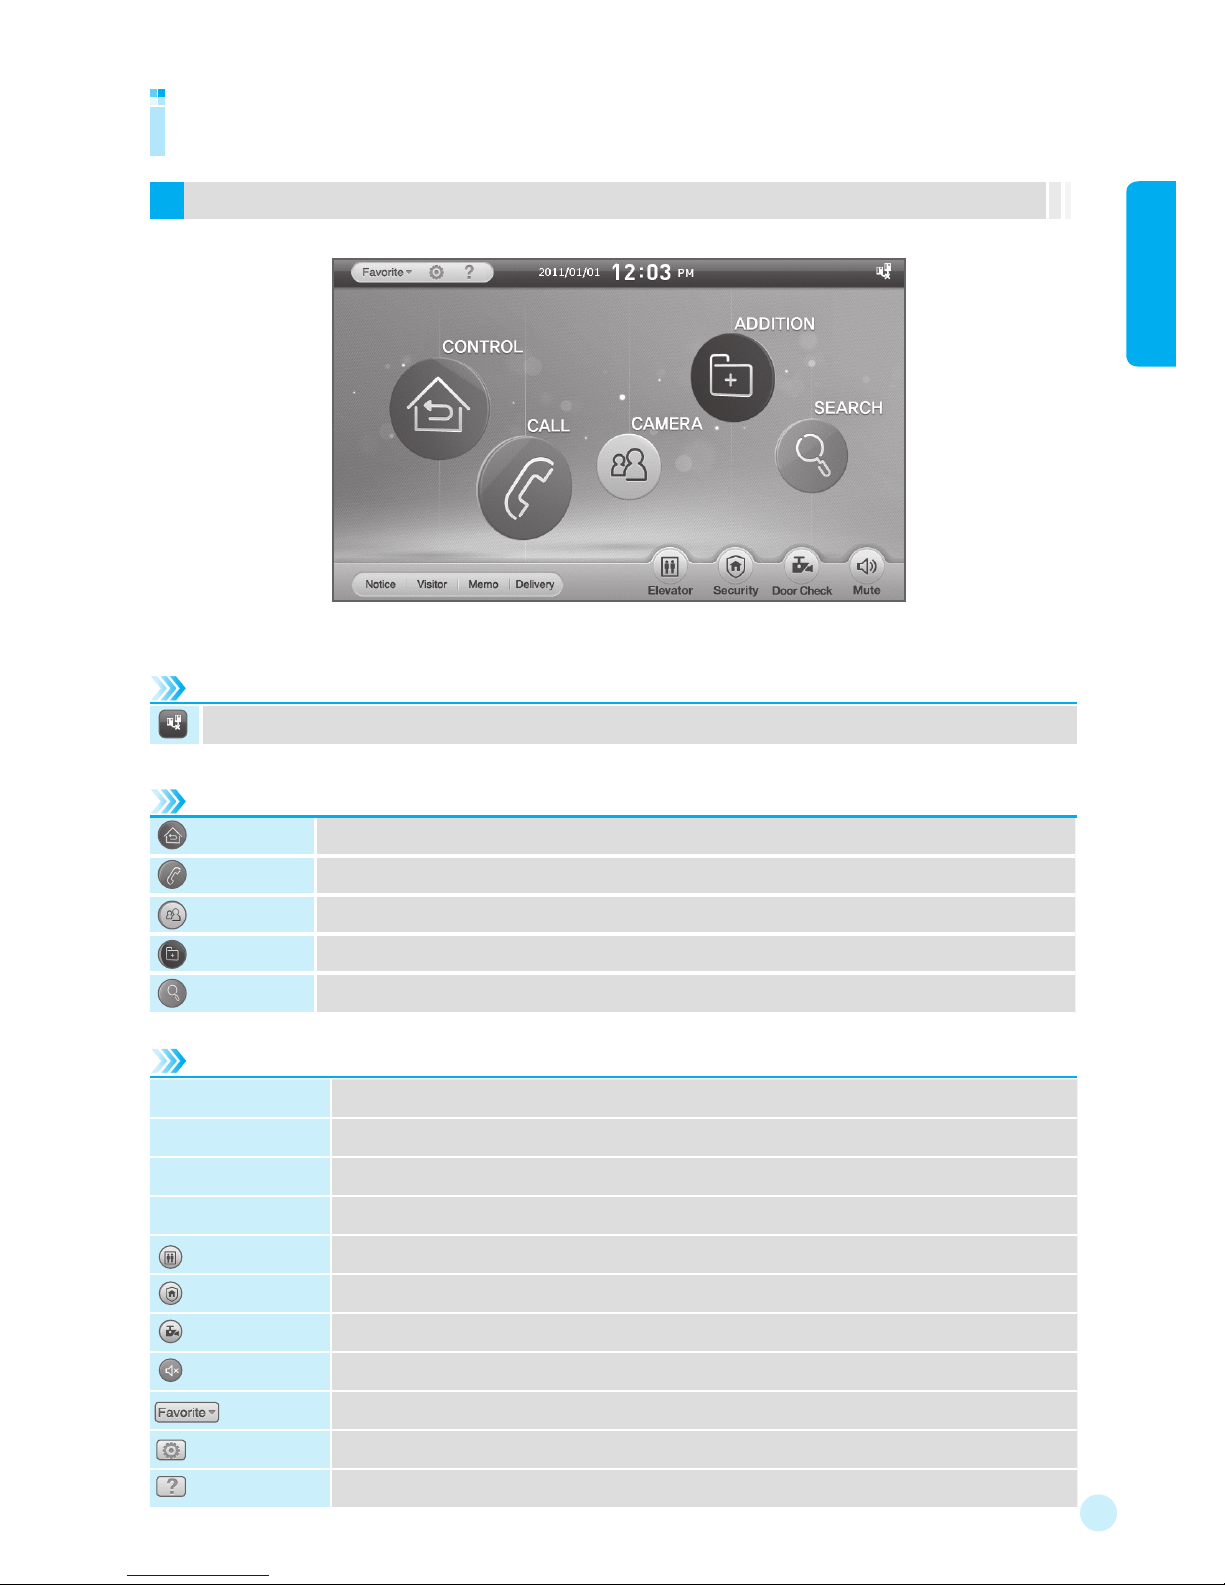
Part names and functions
Initial screen
CONTROL
It can control operations for lights, curtain, air conditioner, mode, and the like.
CALL
Used to make a phone call (e.g. interphone to house or security ofce, or external call).
CAMERA
Can monitor image for a visitor, or CCTV.
ADDITION
Can use extra functions, such as memo, alarm, digital photo album, and calculator.
SEARCH
Can check the notices.
Main menu
Status display icons
Short cut menus
Notice
Can check the notices informed from the control ofce.
Visitor
Can check the stored visitor images.
Memo
Can check the stored memos.
Delivery
You can check the Delivery Arrival/Receipt information. (Optional)
Elevator
Used to call the elevator. (Optional)
Security
Can set the Away/Security function.
Door Check
Can view the entrance.
Mute
Can mute the sound.
Favorite
Favorite icons
Environment
Can set the bell sound, the screen, the password, the ARS, and the favorite list.
Help
Displays the help screen.
Displays the connection status. (Displayed in abnormal status)

10
Controlling lights
Remote-controlling lights
Controlling light dimmers
Controlling heating system
Remote-controlling heaters
Controlling air conditioners
Controlling ventilation
Controlling curtains
Remote-controlling curtains
Controlling gas valve
Remote-controlling gas valve
Controlling all
Controlling mode
1
Controls
※ The control functions are optional. (to be purchased separately)
The control functions are not provided for this product. If the other systems are
installed with integrated with this product, you can use the functions. According to
the integration, the functions may not be provided or they may be changed.
※ When an Internet phone is used, the ARS function is not supported.

12
To control lights
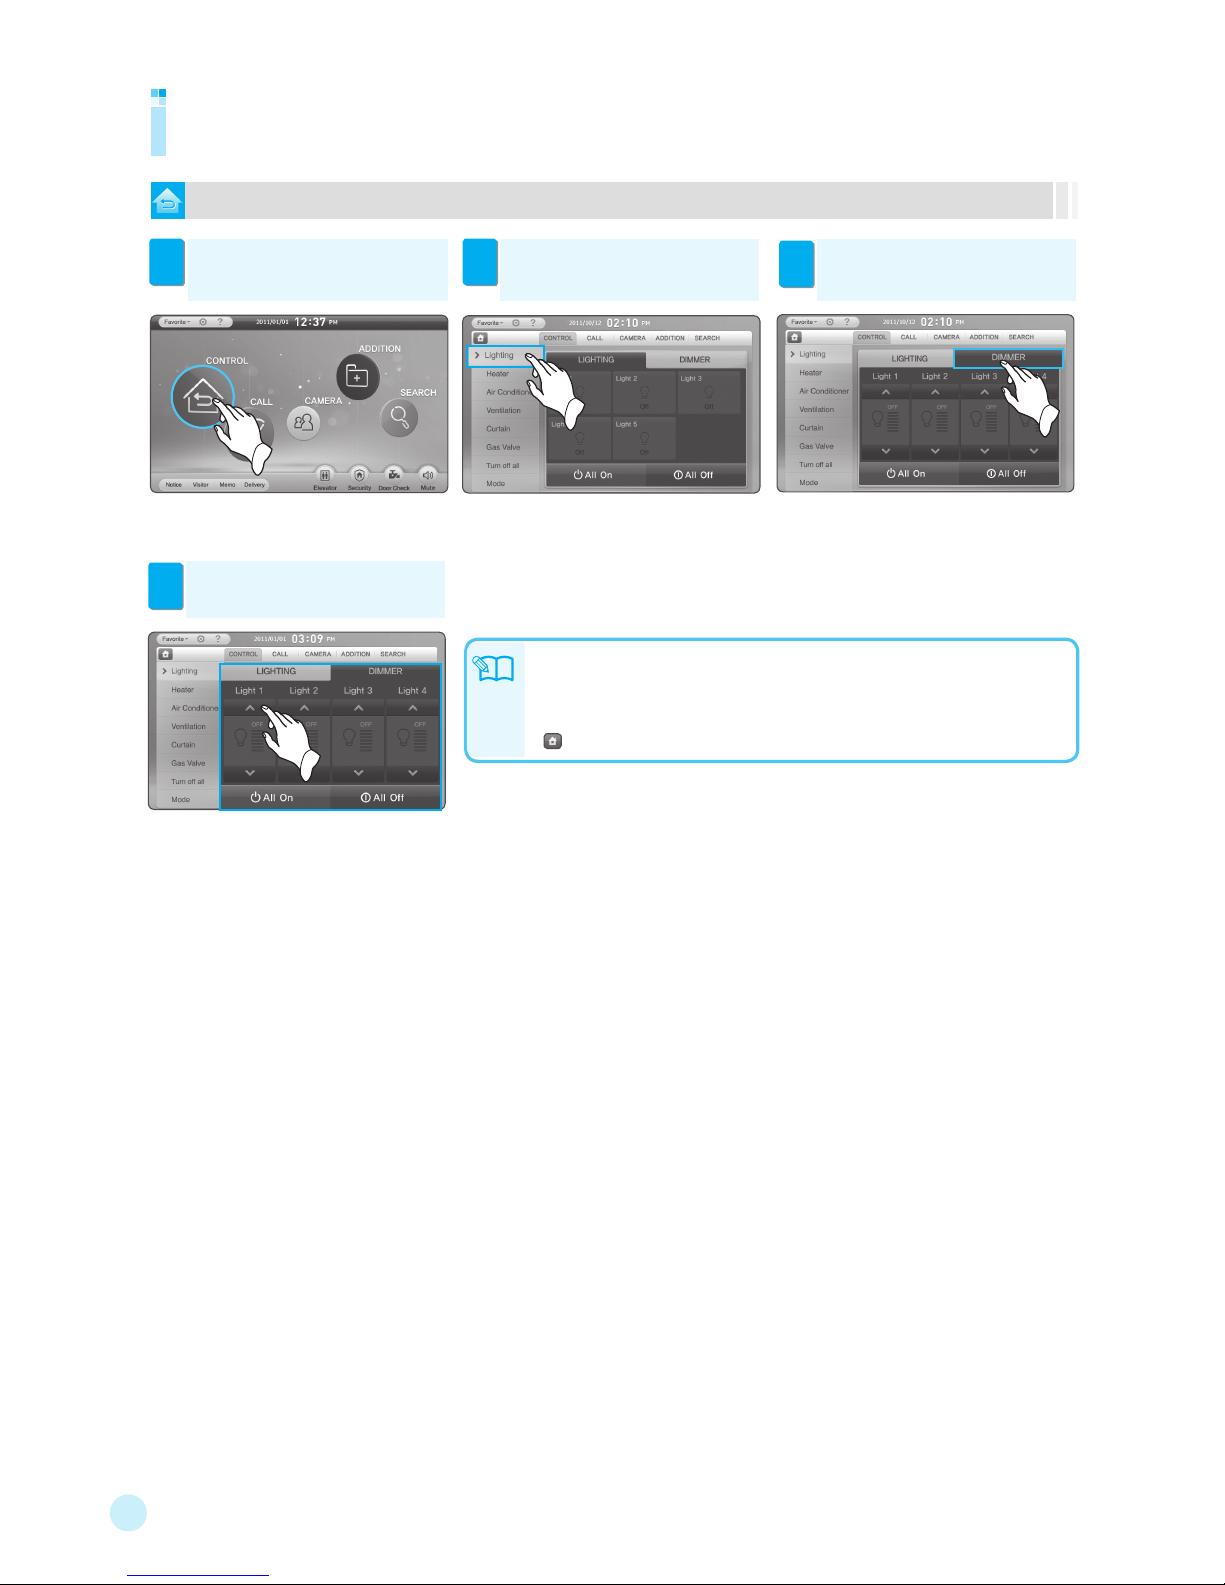
Controlling lights
Touch [CONTROL]. Then the control
screen appears.
1
Touch [Lighting]. Then the current
lighting status appears.
2
Touch [On/Off] to control for each
light.
3
※ The controllers may be changed according to the
installation status.
Note
● The number of lights can vary (1 to 8) accordingly.
● When another icon is pressed while a command is in progress, the message
“Please, wait...” appears.
● : Returns to the main screen.
※ When [All On/All Off] is selected, all lights can be
turned on or off.
※ Optional function
13
1 Controls
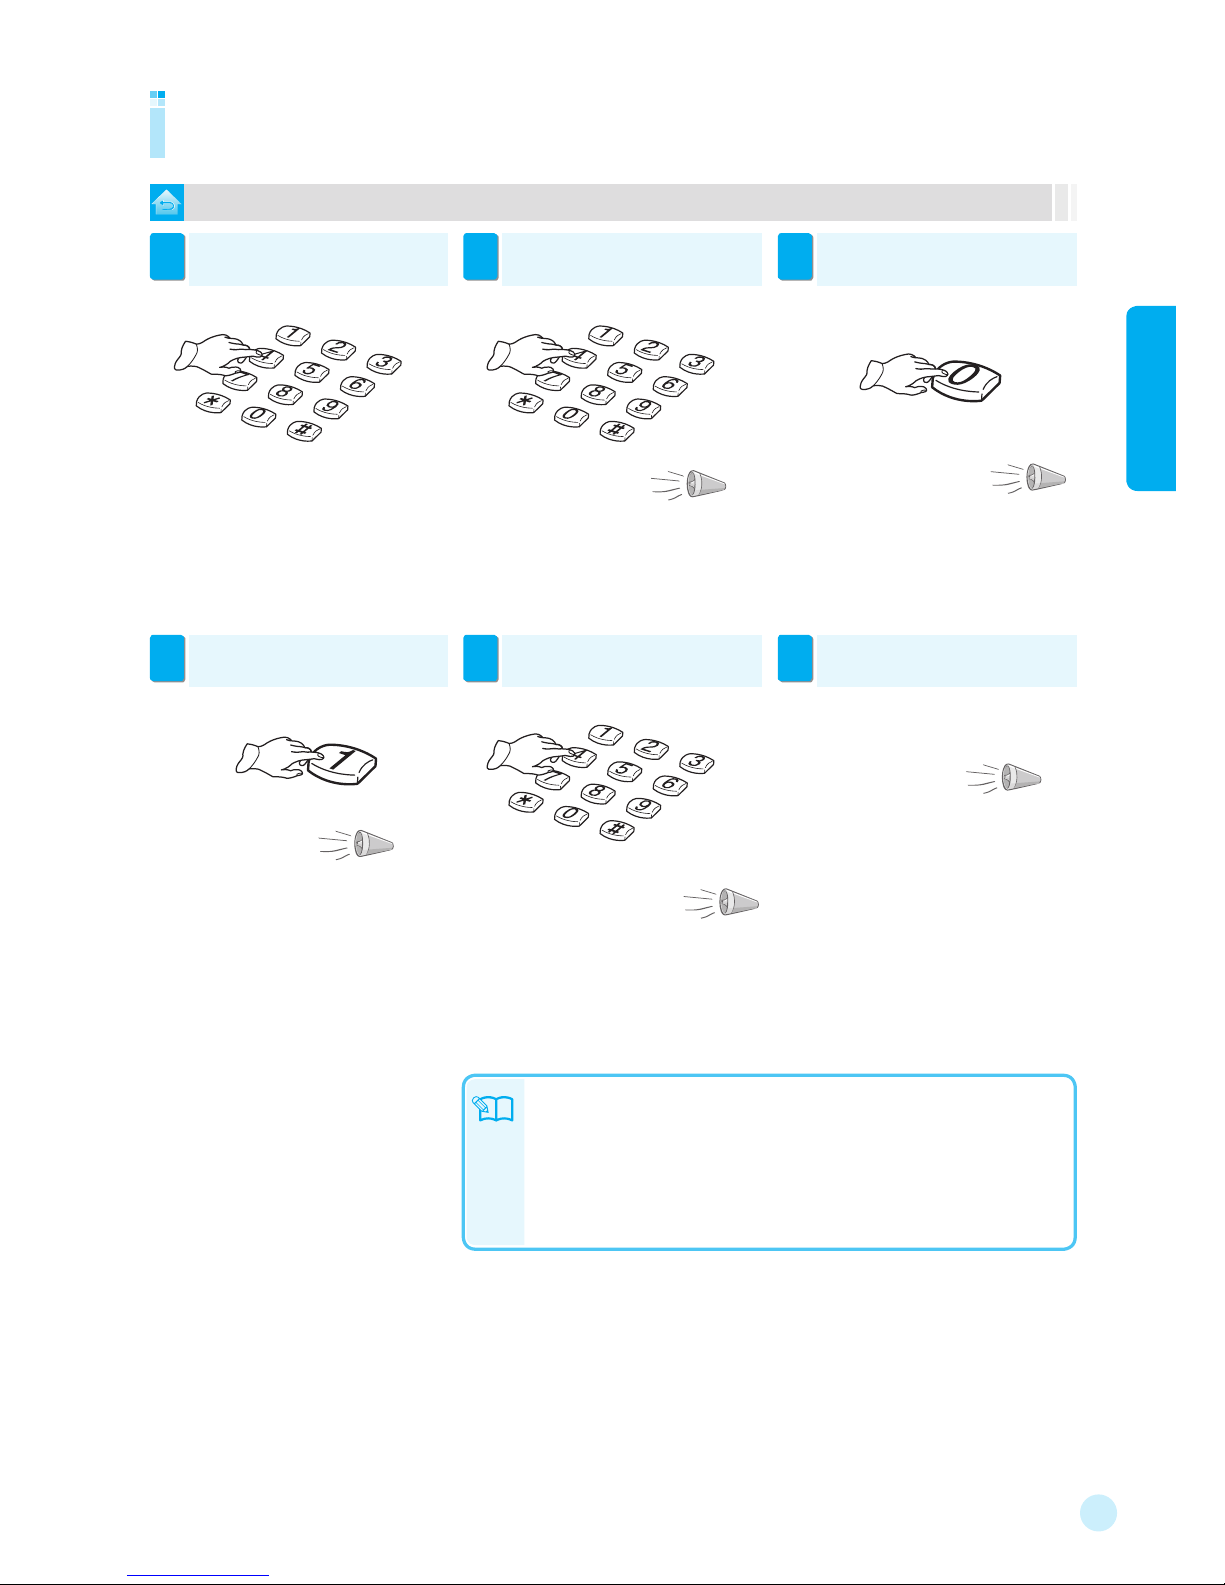
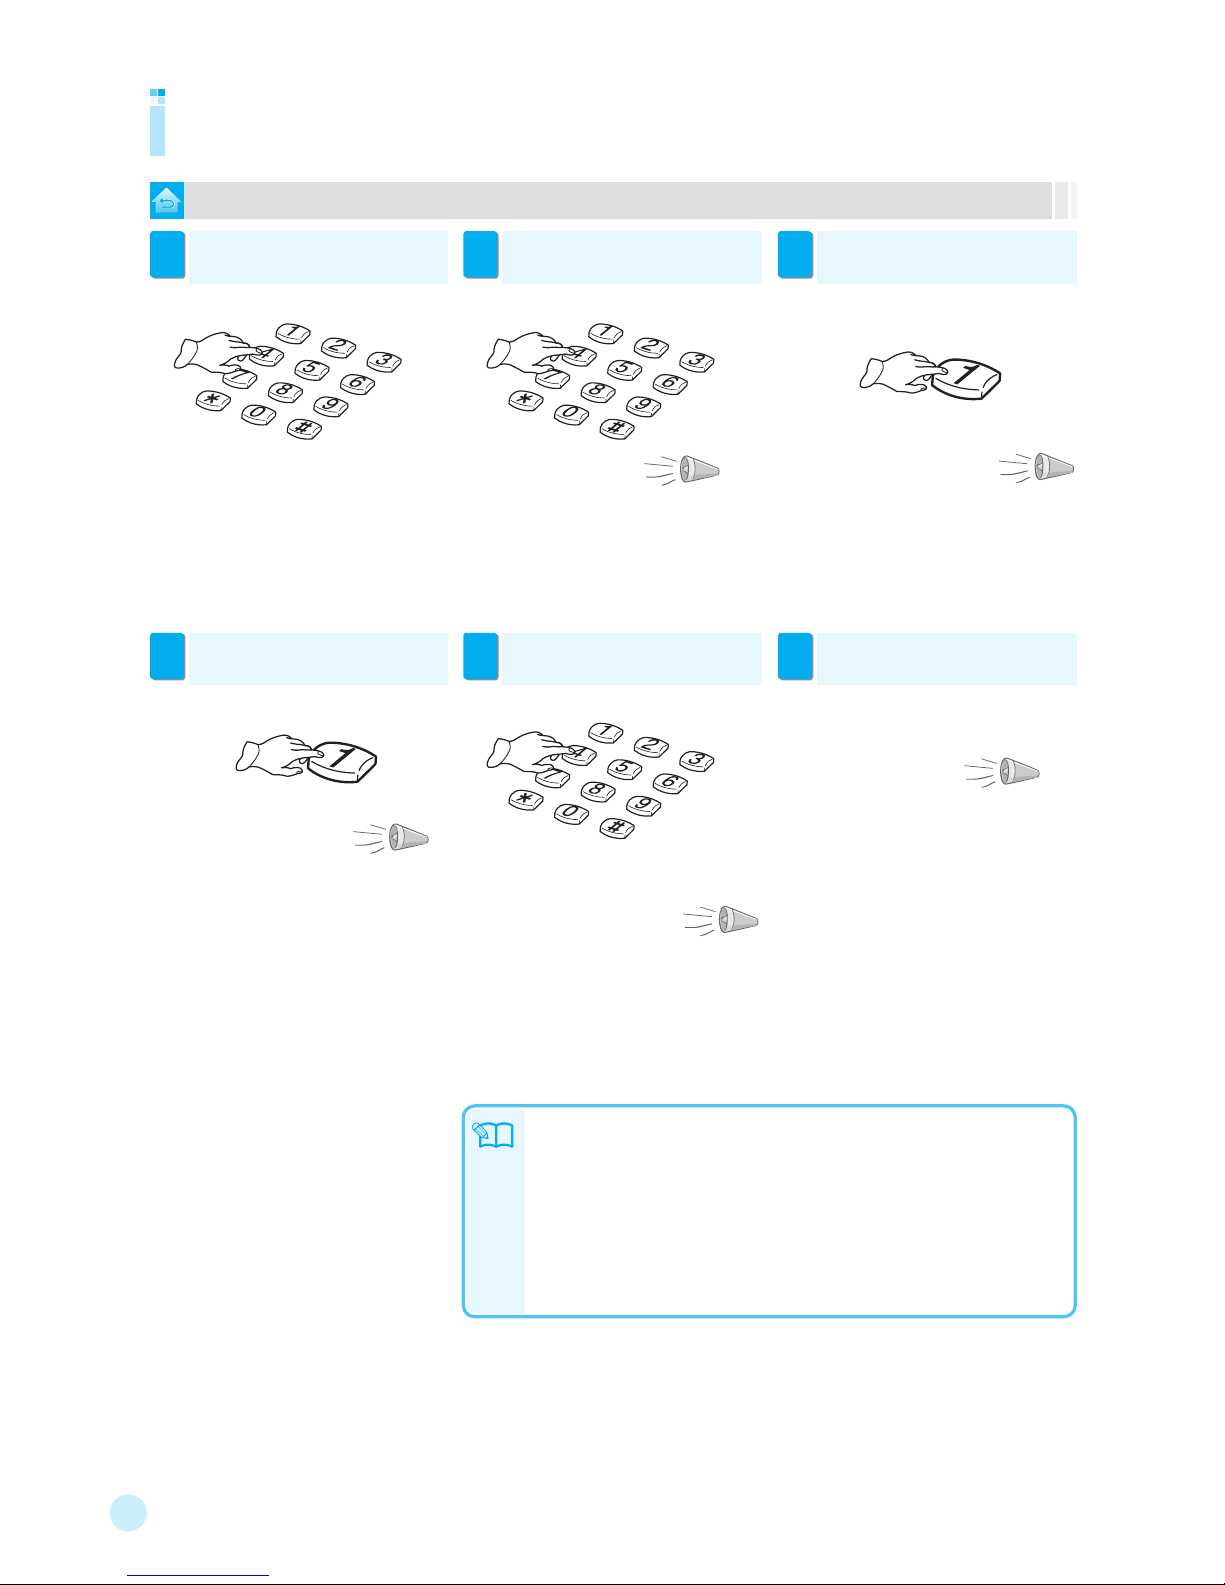
Remote-controlling lights
To use ARS (Automatic Response System) for remote light control
Call the desired phone number.
1
If the following announcement is
heard, press the 4-digit [Password].
2
If the following announcement is
heard, press [0].
3
● When the call is not answered for a specific time
(usual case: 30 seconds, away mode: 10 seconds),
it is switched to the remote control mode.
● At this time, use the disengagement password.
“Enter the
password.”
“Enter the 0 button to control the light.
Enter the 1 button to control the gas valve.
Enter the 2 button to control the curtain.
Enter the 3 button to control the boiler. ”
If the following announcement is
heard, press [1].
4
To end the remote control, press any
button except [0], [1], [2], and [3].
5
If the following announcement is
heard, hang up the phone.
6
● If any light is turned on, the message, “The
lights is on.
Enter the 0 button to turn off the light.” is heard.
To turn them off, press “0.” Or hang up the
phone.
● To end the function, hang up the phone.
● To control the gas valve, press
[1].
● To control the curtain, press [2].
● To control the heater, press [3].
“The light has been turned on.
Enter the 0 button to control the light.
Enter the 1 button to control the gas valve.
Enter the 2 button to control the curtain.
Enter the 3 button to control the boiler. ”
“Setting is completed.”
“The lights is off.
Enter the 1 button to turn
on the light.”
● After 5 or 6 seconds, the phone is automatically
disconnected.
Note
● If no button is presses for 20 seconds, the phone is automatically disconnected.
● When a phone with the answering machine is installed, the remote control function
may not operate depending on the automatic response interval setting.
● For setting the password, see page 70.
● All lights are turned off or on at once.
● To use ARS for remote light control, the disengagement password has to be registered
and ARS has to be activated. (see page 73)
14
To control light dimmers
Controlling light dimmers
Note
Touch [CONTROL]. Then the control
screen appears.
1
Touch [Lighting]. Then the current
lighting status appears.
2
※ The controllers may be changed according to the
installation status.
Touch [DIMMER]. Then the dimming
control screen appears.
3
Touch [▲/▼] to adjust the
brightness of lights.
4
※ When [All On/All Off] is selected, all lights can be
turned on or off.
● The number of lights can vary (1 to 4) accordingly.
● When another icon is pressed while a command is in progress, the message
“Please, wait...” appears.
● The dimming function dose not support the ARS control.
● : Returns to the main screen.
※ Optional function

15
1 Controls
To control the heater
Controlling heating system
Select the desired room, touch
[▲/▼] to adjust the desired
temperature, and touch [OK].
3
Note
● To turn the heater on or off, touch [On/Off].
● When another icon is pressed while a command is in progress, the message
“Please, wait...” appears.
● : Returns to the main screen.
Touch [On/Off] to turn the heater
on or off.
4
※ When [All On/All Off] is selected, all boilers can
be turned on or off.
※ Temperature control is possible while the heater
operates.
Touch [CONTROL]. Then the control
screen appears.
1
Touch [Heater]. Then the current
heating status appears.
2
※ The controllers may be changed according to the
installation status.
※ Optional function
16
To use ARS (Automatic Response System) for remote heater control
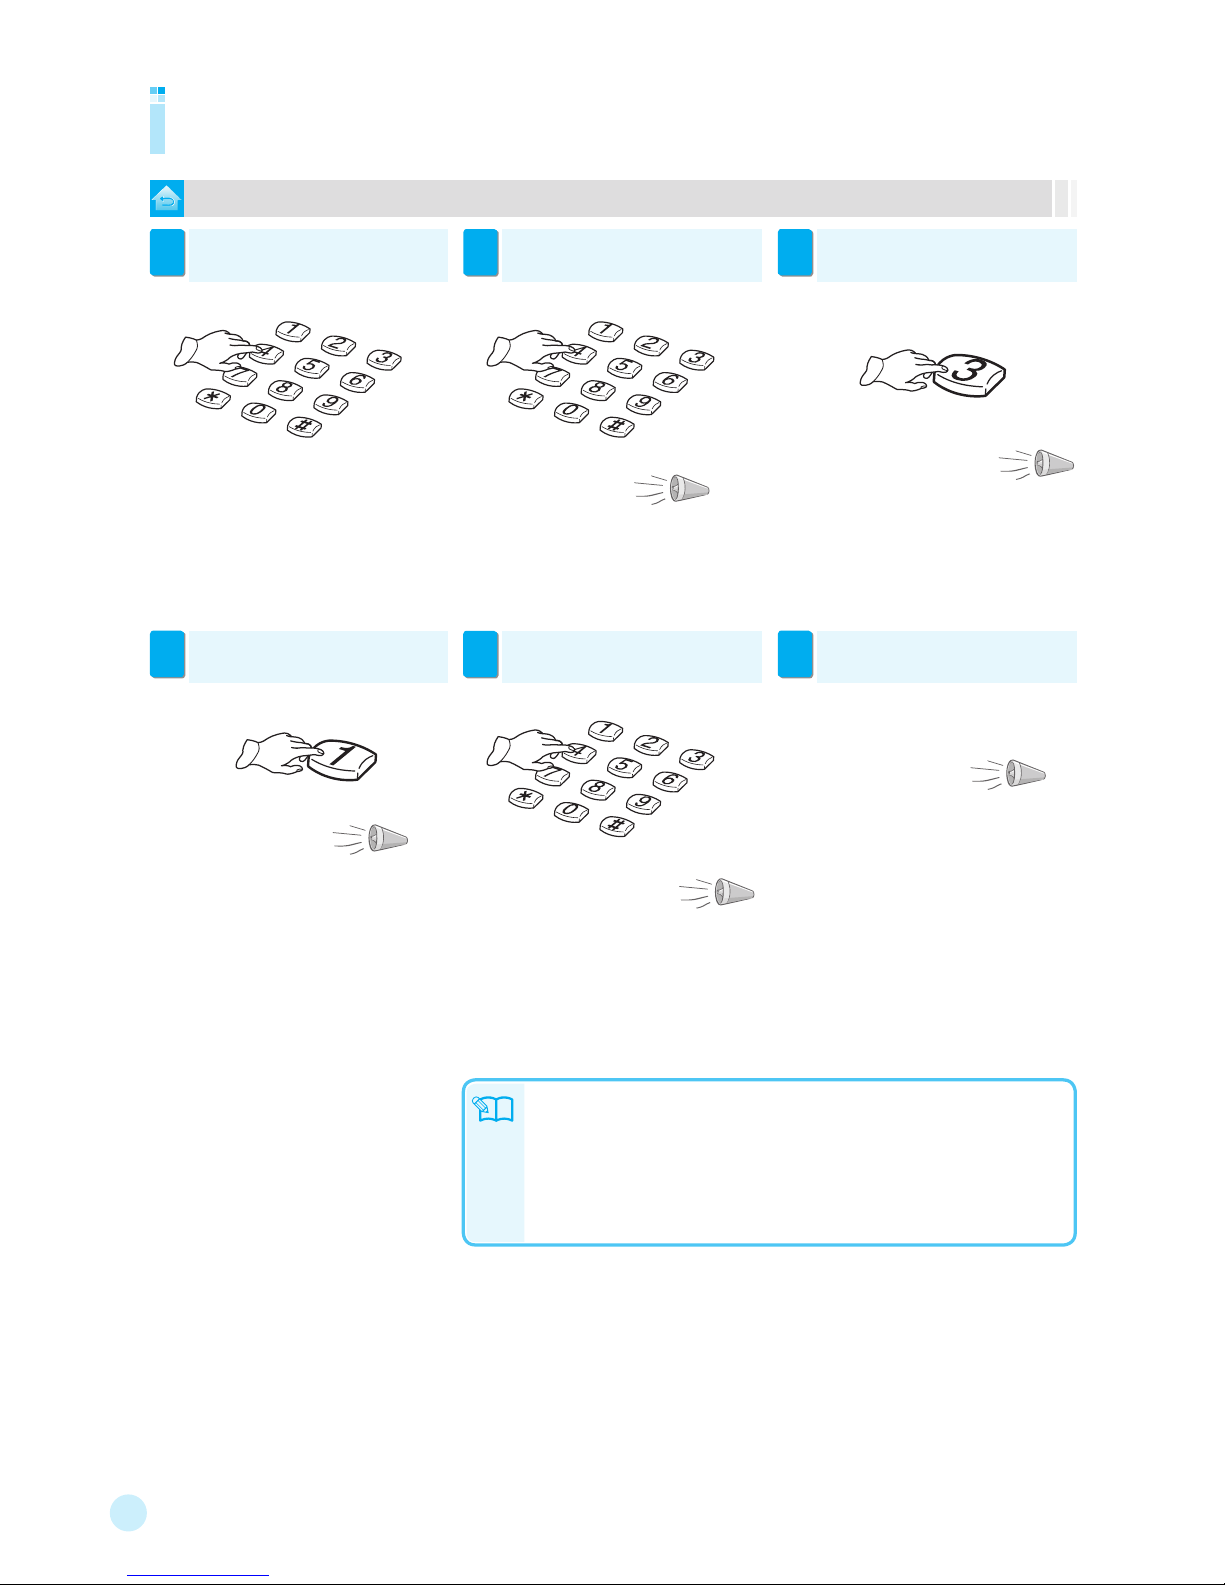
Remote controlling heaters
Call the desired phone number.
1
If the following announcement is
heard, press the 4-digit [Password].
2
If the following announcement is
heard, press [3].
3
● When the call is not answered for a specific time
(usual case: 30 seconds, away mode: 10 seconds),
it is switched to the remote control mode.
● At this time, use the disengagement password.
If the following announcement is
heard, press [1].
4
If the following announcement is
heard, hang up the phone.
6
● When the heaters are turned on, the message,
“The boiler is on. Enter the 0 button to turn off the
boiler.” is heard. To turn them off, press [0].” Or
hang up the phone.
● After 5 or 6 seconds, the phone is automatically
disconnected.
Note
● All heaters can be turned on or off at once.
● If no button is presses for 20 seconds, the phone is automatically disconnected.
● When a phone with the answering machine is installed, the remote control function
may not operate depending on the automatic response interval setting.
● For setting the password, see page 70.
● To use ARS for remote heater control, the disengagement password has to be
registered and ARS has to be activated. (see page 73)
To end the remote control, press any
button except [0], [1], [2], and [3].
5
● To end the function, hang up the phone.
● To control the gas valve, press [1].
● To control the curtain, press [2].
● To control the heater, press [3].
“Enter the
password.”
“Enter the 0 button to control the light.
Enter the 1 button to control the gas valve.
Enter the 2 button to control the curtain.
Enter the 3 button to control the boiler. ”
“The
boiler
is off.
Enter the 1 button to turn on
the boiler.
”
“The boiler has been turned on.
Enter the 0 button to control the light.
Enter the 1 button to control the gas valve.
Enter the 2 button to control the curtain.
Enter the 3 button to control the boiler. ”
“Setting is completed.”
17
1 Controls
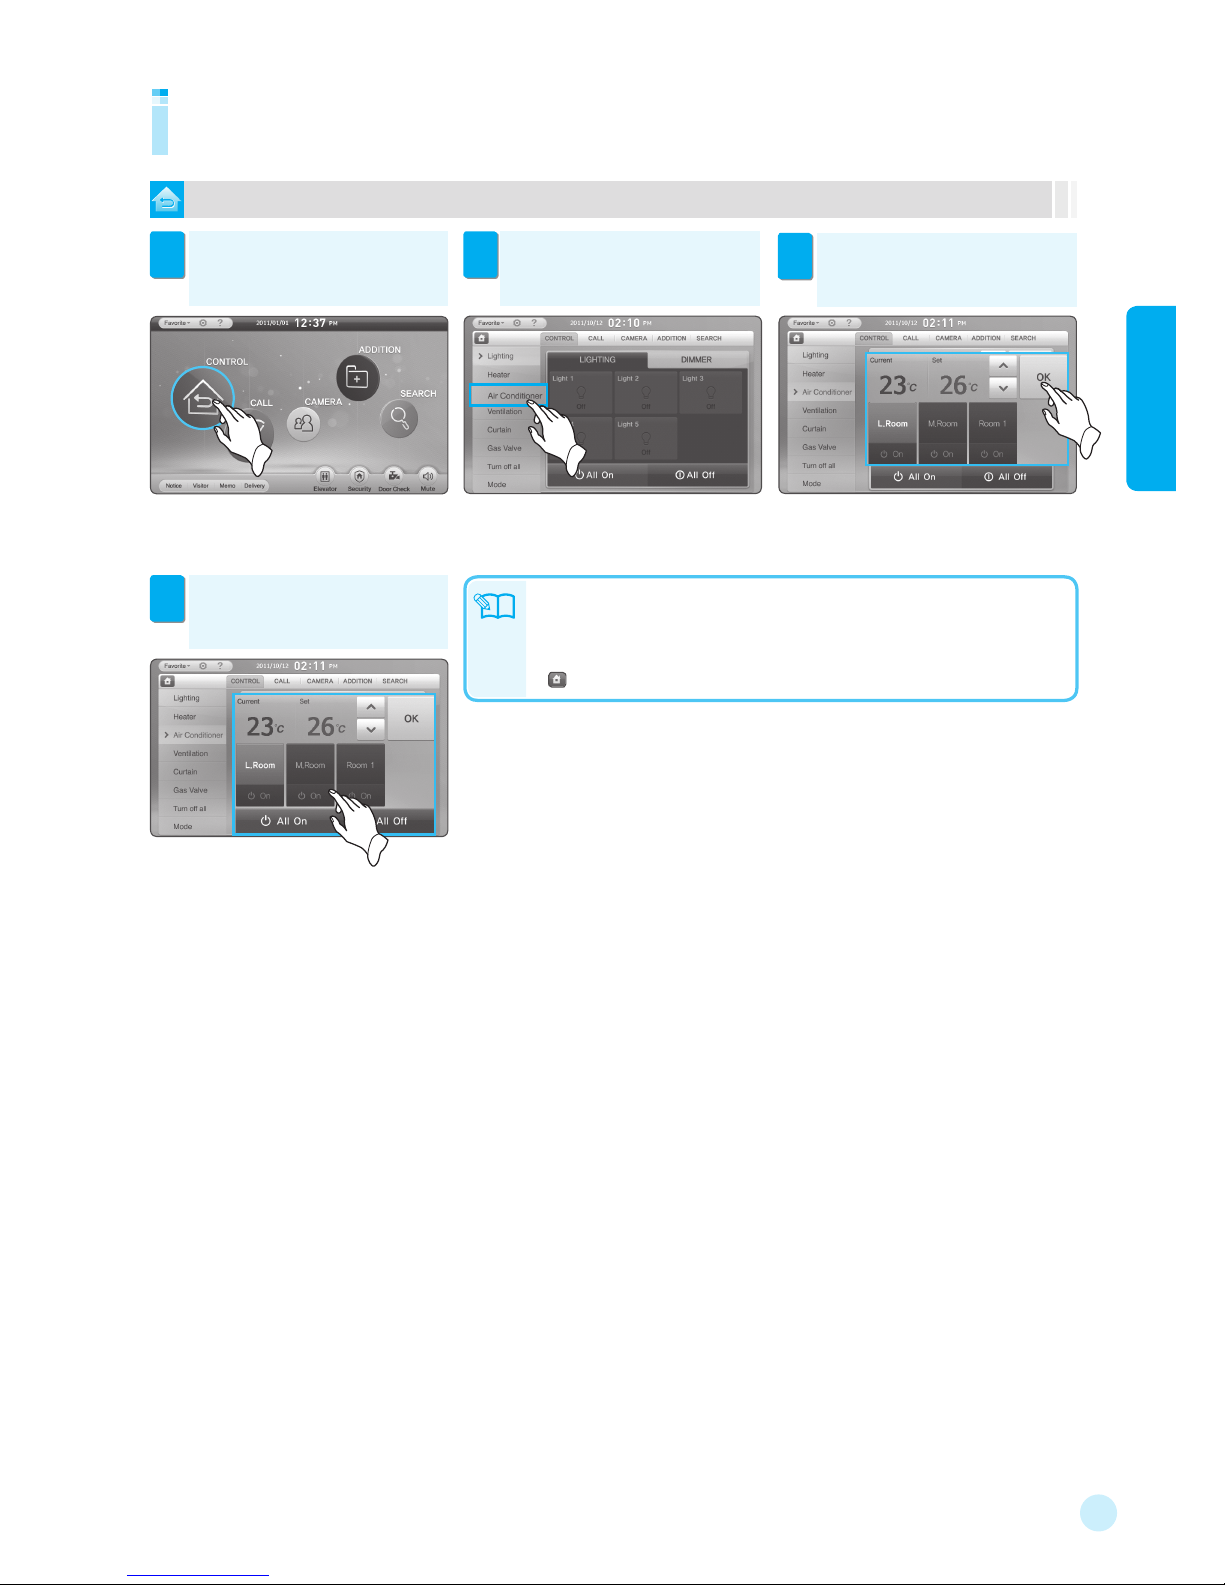
Controlling air conditioners
To control the air conditioners
Select the desired house, touch
[▲/▼] to adjust the desired
temperature, and touch [OK].
3
Note
Touch [On/Off] to turn the air
conditioner on or off.
4
※ When [All On/All Off] is selected,
all air conditioners can be turned on or off.
※ Temperature control is possible while the air
conditioner operates.
Touch [CONTROL]. Then the control
screen appears.
1
Touch [Air Conditioner]. Then the
current air conditioning status
appears.
2
※ The controllers may be changed according to the
installation status.
※ Optional function
● To turn the air conditioner on or off, touch [On/Off].
● When another icon is pressed while a command is in progress, the message “Please,
wait...” appears.
● The air conditioner function does not support the ARS control.
● : Returns to the main screen.
18
To control ventilation
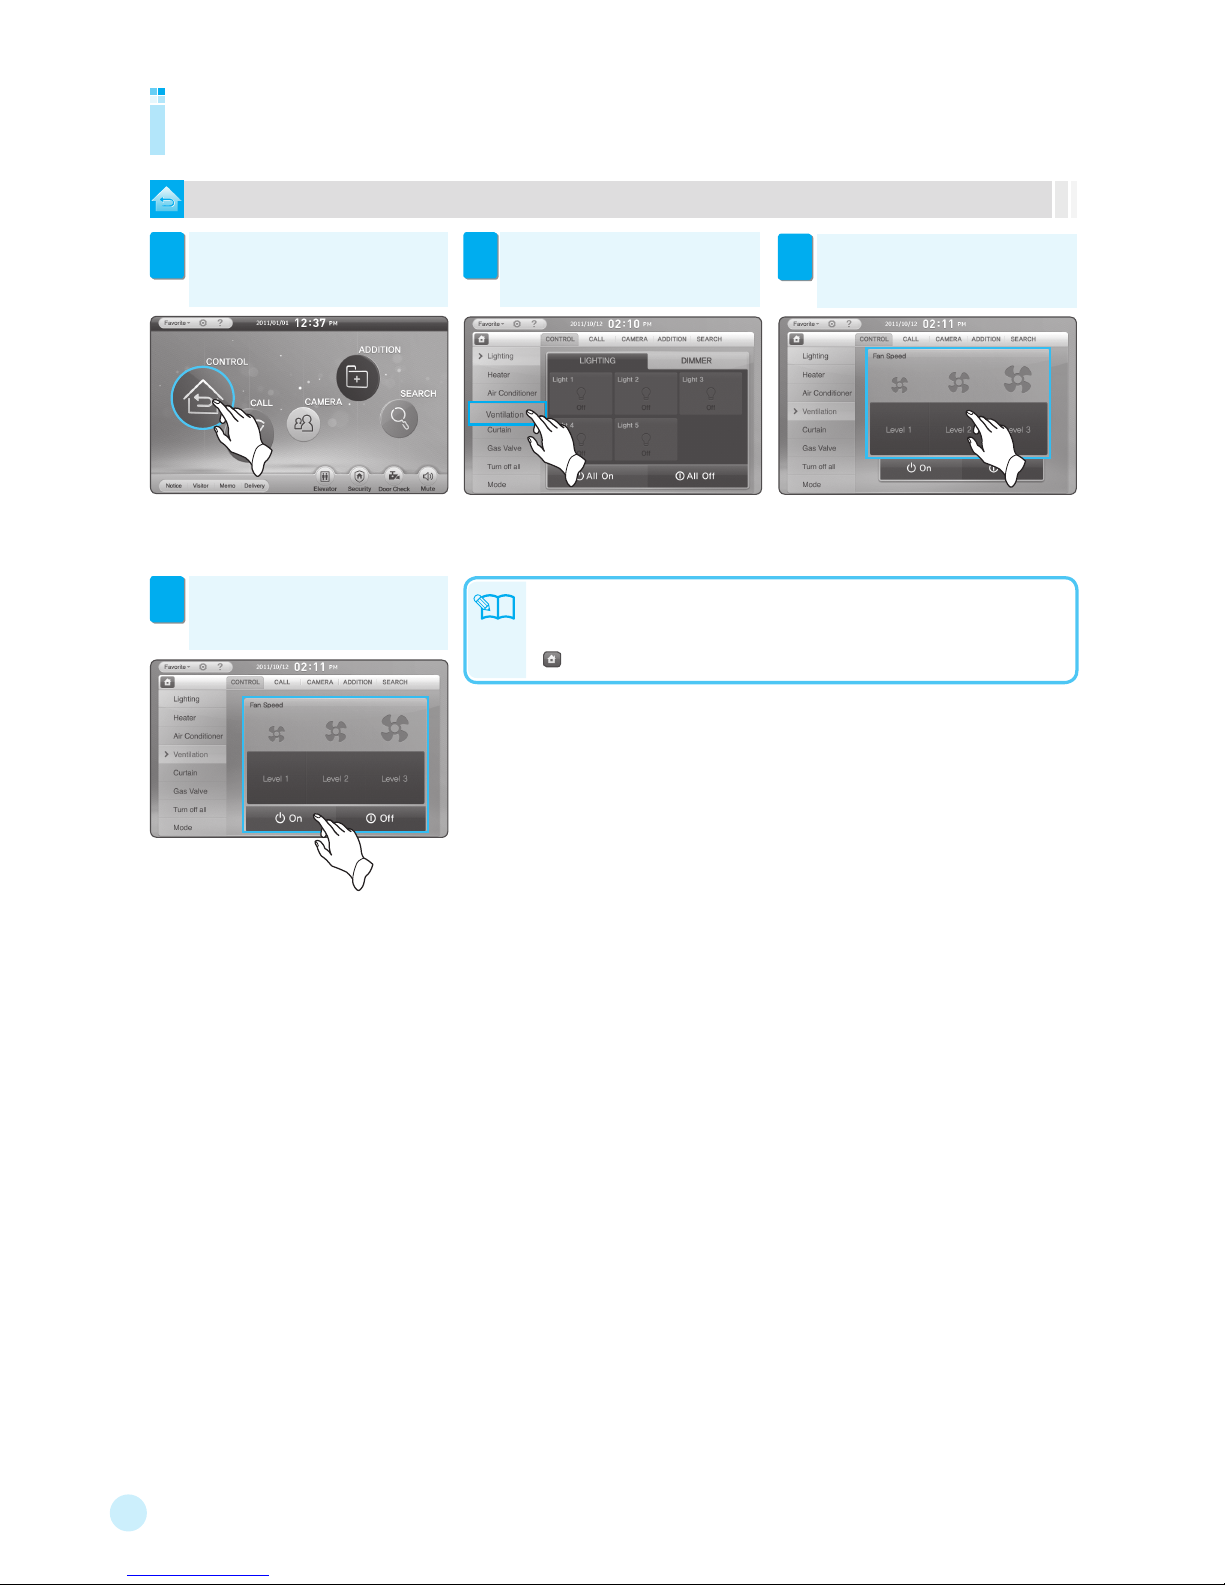
Controlling ventilation
Touch [Level 1~3] to control the fan
speed.
3
Note
● The ventilation function does not support the ARS control.
● When another icon is pressed while a command is in progress, the message “Please,
wait...” appears.
● : Returns to the main screen.
Touch [On/Off] to control the power
supply.
4
Touch [CONTROL]. Then the control
screen appears.
1
Touch [Ventilation] to move to the
ventilation control screen.
2
※ The controllers may be changed according to the
installation status.
※ Optional function
19
1 Controls
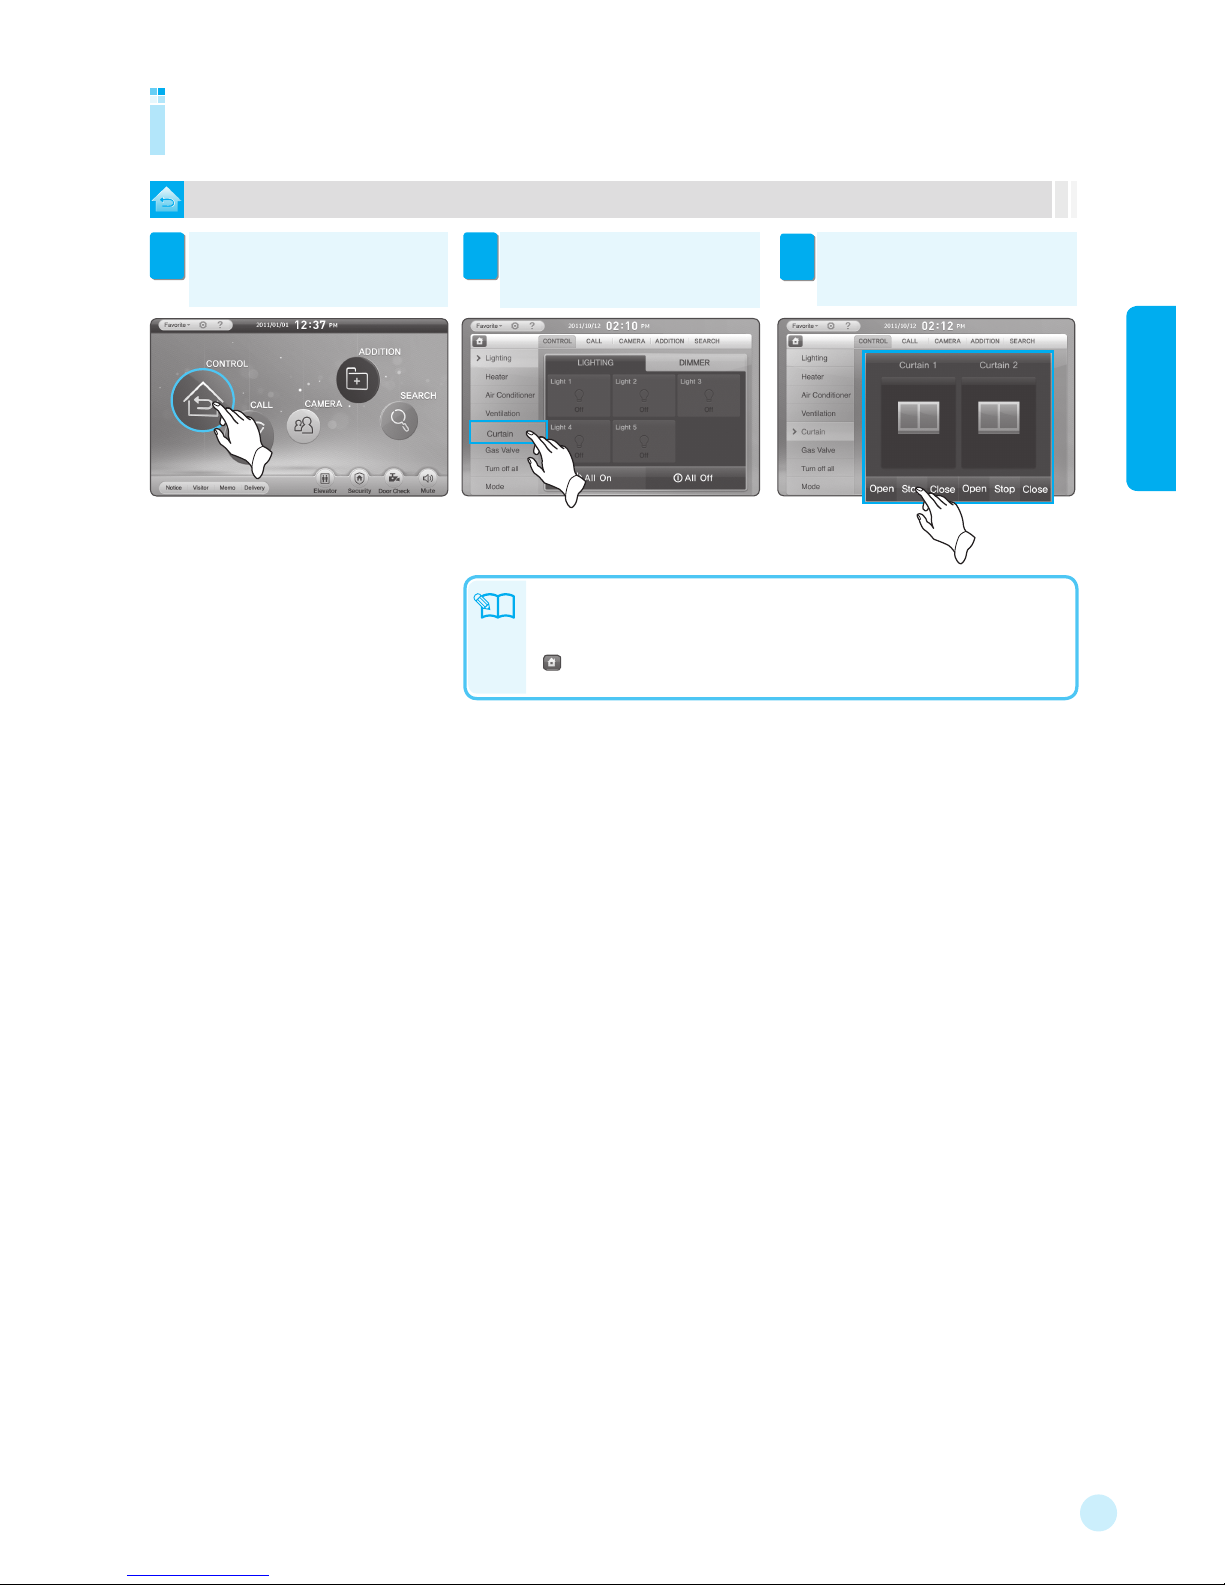
To control the curtains
Controlling curtains
Note
● The number of curtains can vary (1 to 2) accordingly.
● When another icon is pressed while a command is in progress, the message
“Please, wait...” appears.
● : Returns to the main screen.
Touch [Open/Stop/Close] to control
the curtain.
3
※ Optional function
Touch [CONTROL]. Then the control
screen appears.
1
Touch [Curtain]. Then the current
curtain status appears.
2
※ The controllers may be changed according to the
installation status.
20
To use ARS (Automatic Response System) for remote curtain control
Remote-controlling curtains
Call the desired phone number.
1
If the following announcement is
heard, press the 4-digit [Password].
2
If the following announcement is
heard, press [2].
3
● When the call is not answered for a specific
time (usual case: 30 seconds, away mode: 10
seconds), it is switched to the remote control
mode.
If the following announcement is
heard, press [1].
4
If the following announcement is
heard, hang up the phone.
6
● If curtains are opened, the message, “The
curtain is drawn back. Enter the 1 button to draw the
curtain.” is heard. To close them, press [1].” Or
hang up the phone.
“The curtain is drawn.
Enter the 1 button to draw
the curtain back.”
● After 5 or 6 seconds, the phone is automatically
disconnected.
To end the remote control, press any
button except [0], [1], [2], and [3].
5
● To end the function, hang up the phone.
● To control lights, press [0].
● To control the gas valve, press [1].
● To control the heater, press [3].
“The curtain has been drawn back.
Enter the 0 button to control the light.
Enter the 1 button to control the gas valve.
Enter the 2 button to control the curtain.
Enter the 3 button to control the boiler. ”
● At this time, use the disengagement password.
“Enter the
password.”
“Enter the 0 button to control the light.
Enter the 1 button to control the gas valve.
Enter the 2 button to control the curtain.
Enter the 3 button to control the boiler. ”
“Setting is completed.”
Note
● If no button is presses for 20 seconds, the phone is automatically disconnected.
● When a phone with the answering machine is installed, the remote control function
may not operate depending on the automatic response interval setting.
● For setting the password, see page 70.
● All curtains are closed or opened at once.
● To use ARS for remote curtain control, the disengagement password has to be
registered and ARS has to be activated. (see page 73)
21
1 Controls
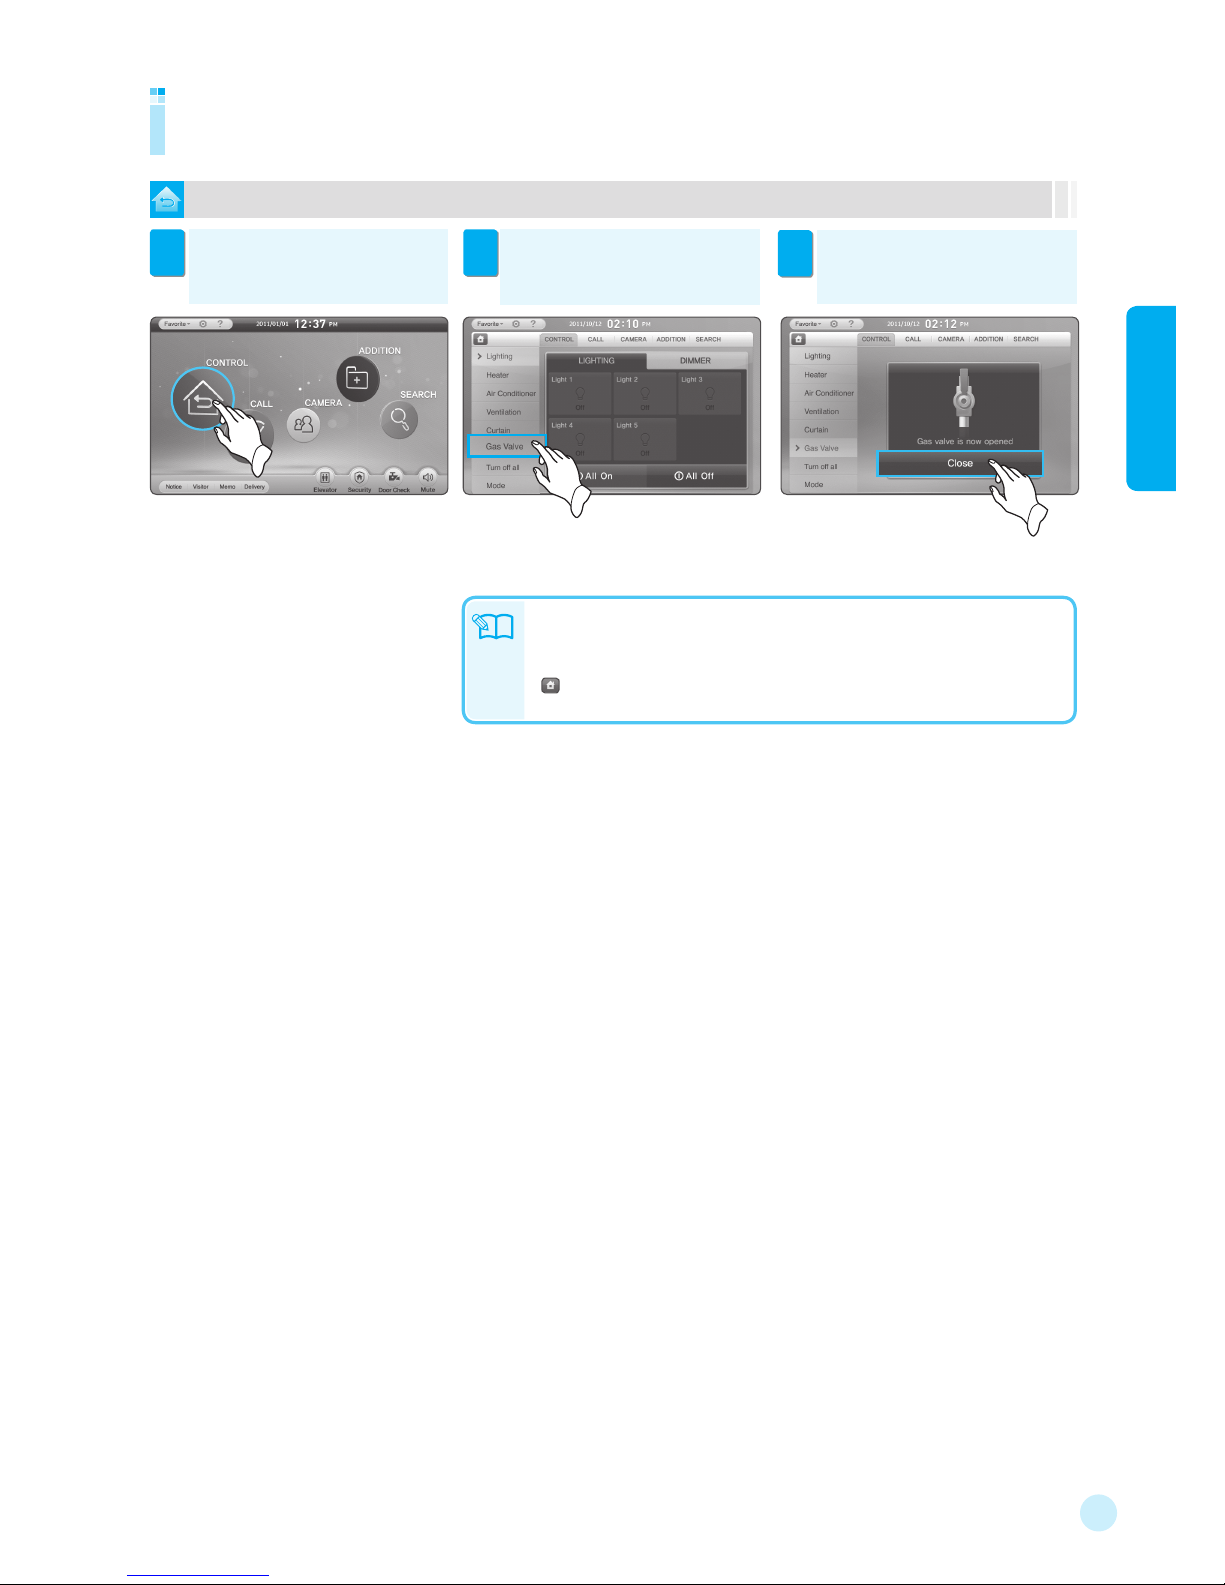
To control the gas valve
Controlling gas valve
Touch [Close]. Then the gas valve
is closed.
3
※ Optional function
Touch [CONTROL]. Then the control
screen appears.
1
Touch [Gas Valve]. Then the current
gas valve status appears.
2
※ The controllers may be changed according to the
installation status.
Note
● For safety reason, the gas valve can be closed only.
● When another icon is pressed while a command is in progress, the message
“Please, wait...” appears.
● : Returns to the main screen.
22
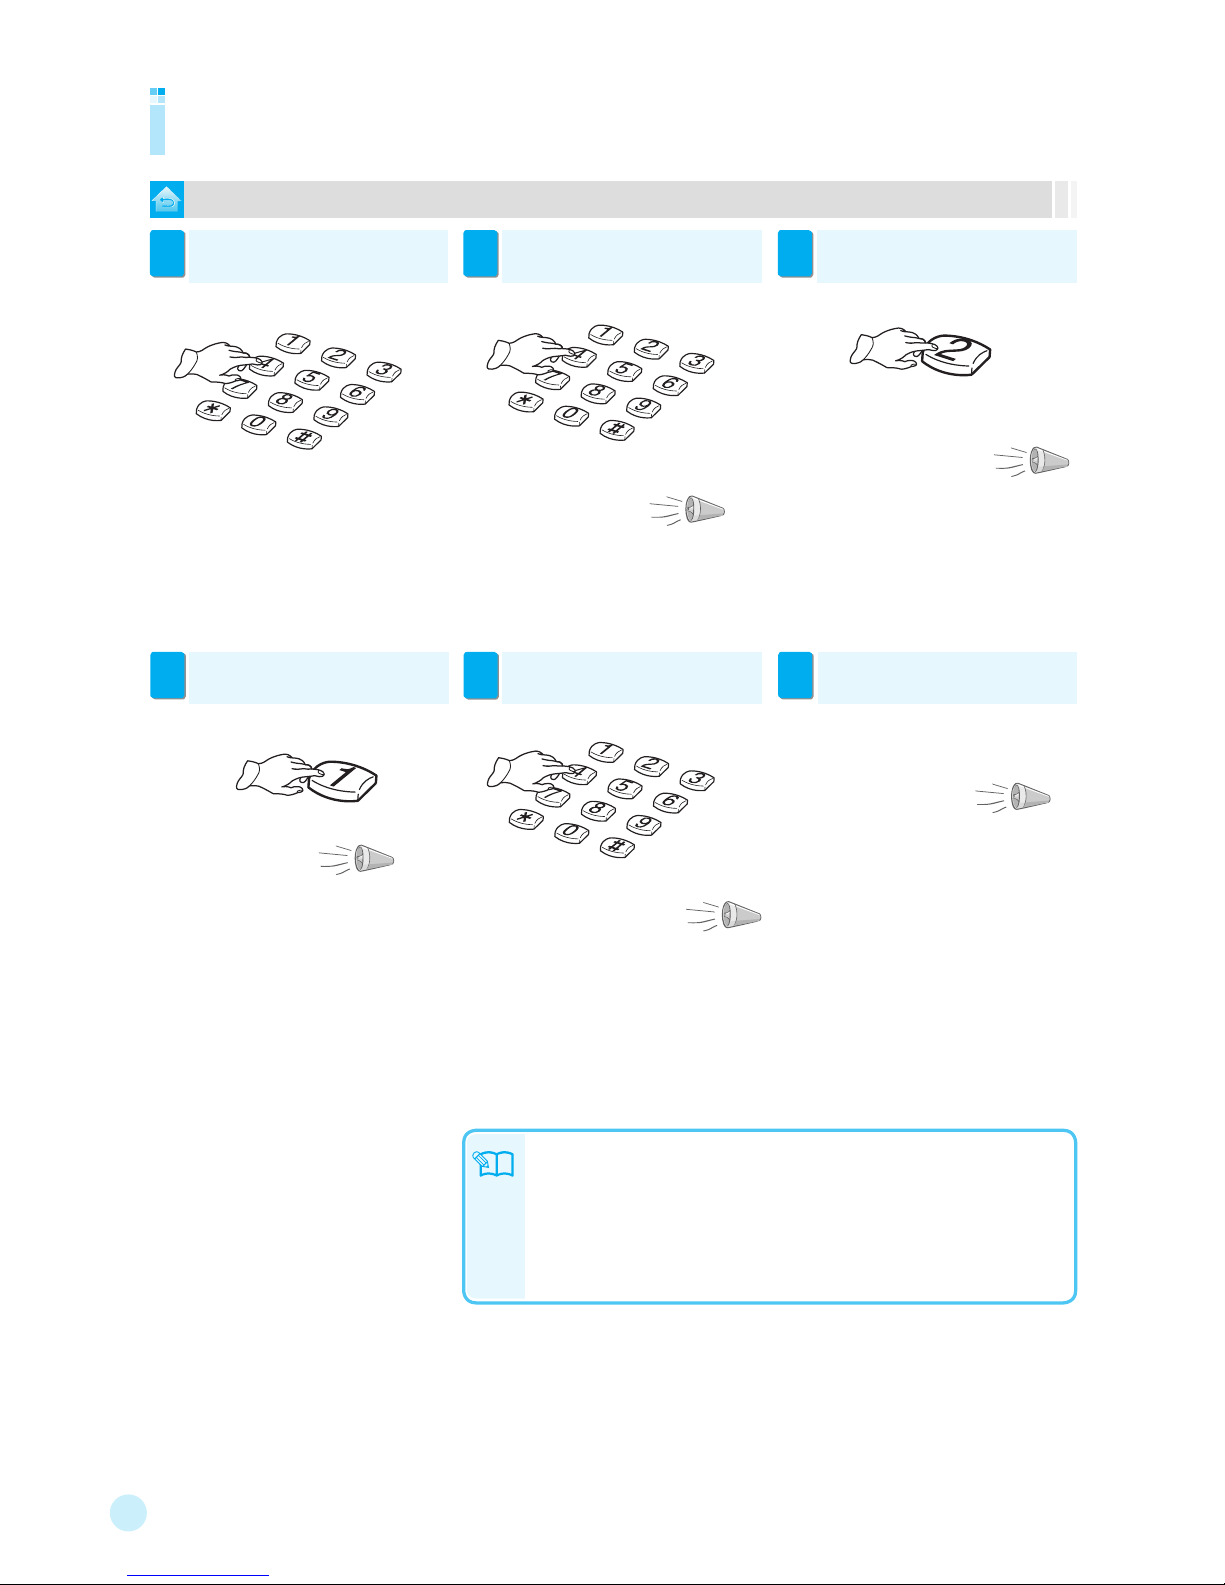
To use ARS (Automatic Response System) for remote gas valve control
Remote-controlling gas valve
Call the desired phone number.
1
If the following announcement is
heard, press the 4-digit [Password].
2
If the following announcement is
heard, press [1].
3
● When the call is not answered for a specific
time (usual case: 30 seconds, away mode: 10
seconds), it is switched to the remote control
mode.
If the following announcement is
heard, press [1].
4
To end the remote control, press any
button except [0], [1], [2], and [3].
5
If the following announcement is
heard, hang up the phone.
6
● When the gas valve is closed, the message, “The
gas valve is shut.” is heard.
※ When the gas circuit breaker is not installed, the
message, “Remote control has failed.” is heard.
“The gas valve is open.
Press the 1 button to shut the gas
valve.”
● After 5 or 6 seconds, the phone is automatically
disconnected.
Note
● The gas valve is automatically closed upon gas leak.
● When the gas circuit breaker detects any gas leak, the internal alarm is
activated.
● If no button is presses for 20 seconds, the phone is automatically disconnected.
● When a phone with the answering machine is installed, the remote control function
may not operate depending on the automatic response interval setting.
● For setting the password, see page 70.
● To use ARS for remote gas valve control, the disengagement password has to be
registered and ARS has to be activated. (see page 73)
● To end the function, hang up the phone.
● To control lights, press
[0].
● To control the gas valve, press [2].
● To control the heater, press [3].
※ For safety reason, the gas valve can be closed
only.
● At this time, use the disengagement password.
“Enter the
password.”
“Enter the 0 button to control the light.
Enter the 1 button to control the gas valve.
Enter the 2 button to control the curtain.
Enter the 3 button to control the boiler. ”
“Setting is completed.”
“The gas valve has been shut.
Enter the 0 button to control the light.
Enter the 1 button to control the gas valve.
Enter the 2 button to control the curtain.
Enter the 3 button to control the boiler. ”
23
1 Controls
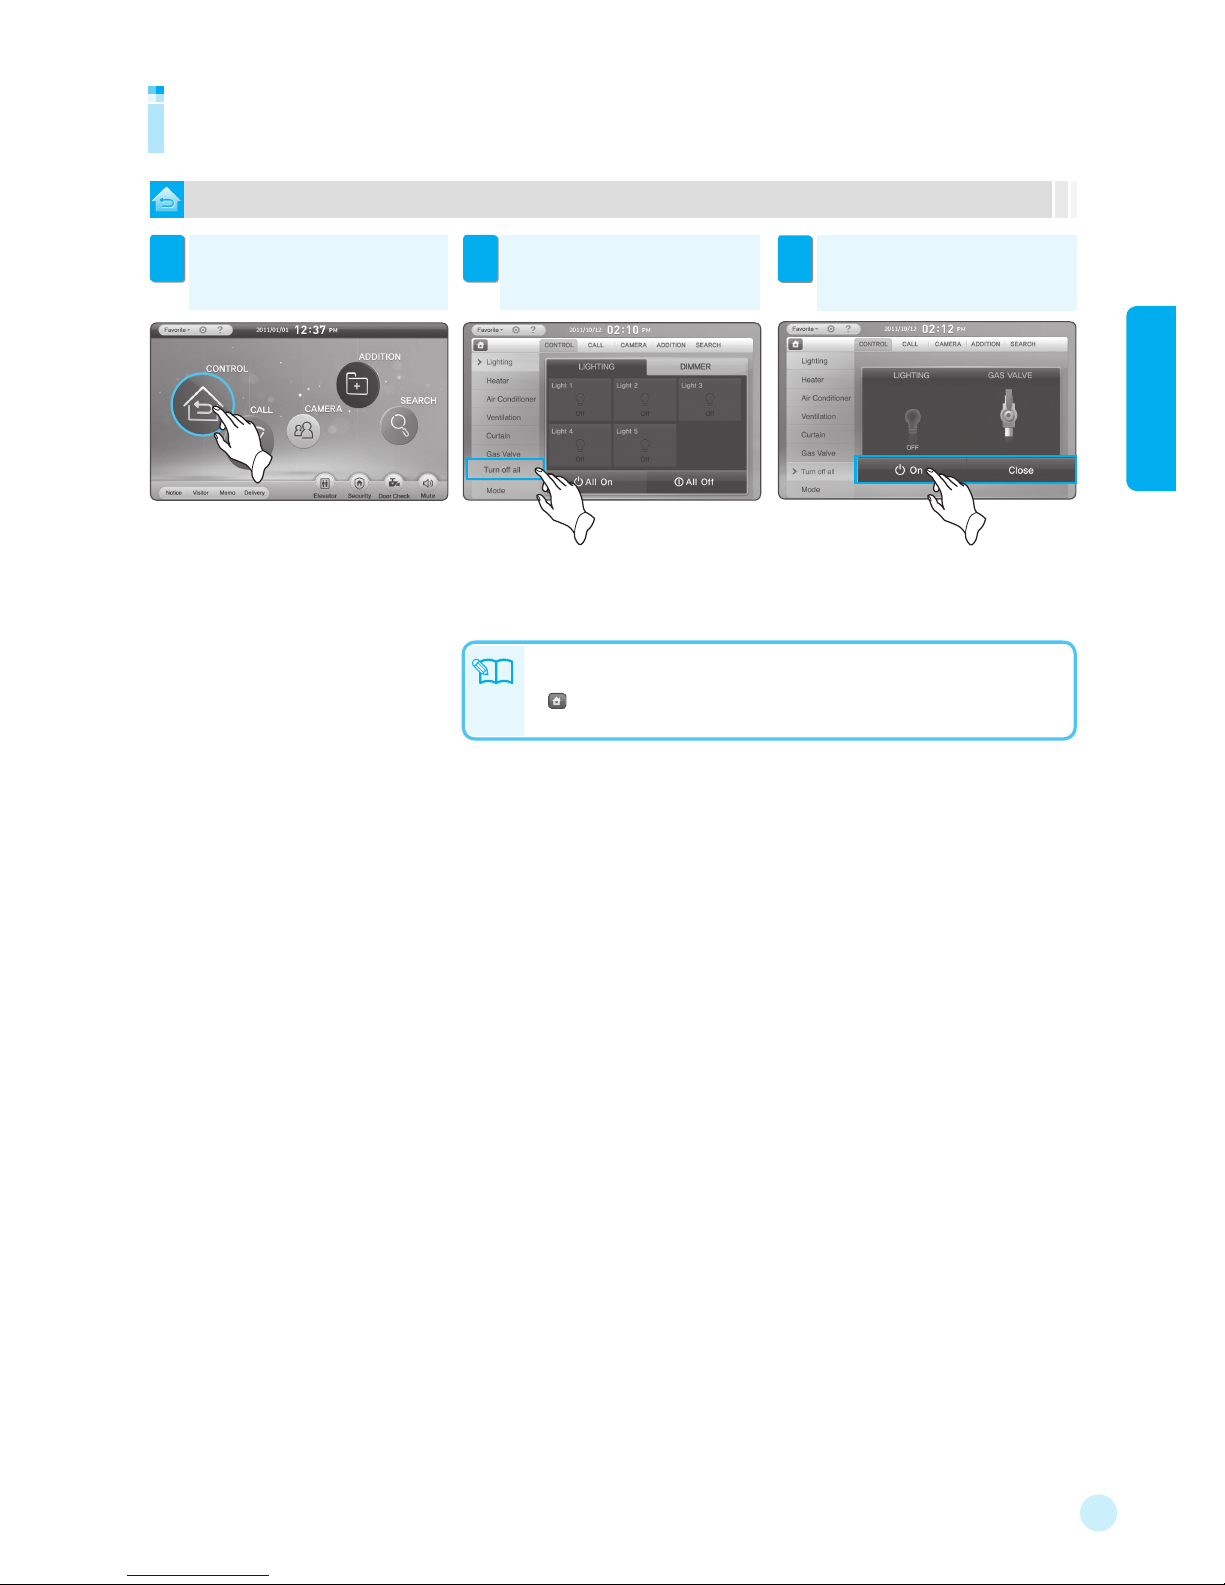
Controlling all
Touch [On/Close] to control the lights
and gas valve.
3
To control both lighting and gas valve functions
Touch [CONTROL]. Then the control
screen appears.
1
Touch [Turn off all]. Then the current
lighting and gas valve status appear.
2
※ The controllers may be changed according to the
installation status.
Note
※ Optional function.
● When another icon is pressed while a command is in progress, the message
“Please, wait...” appears.
● : Returns to the main screen.
● This function does not support the ARS control.
24
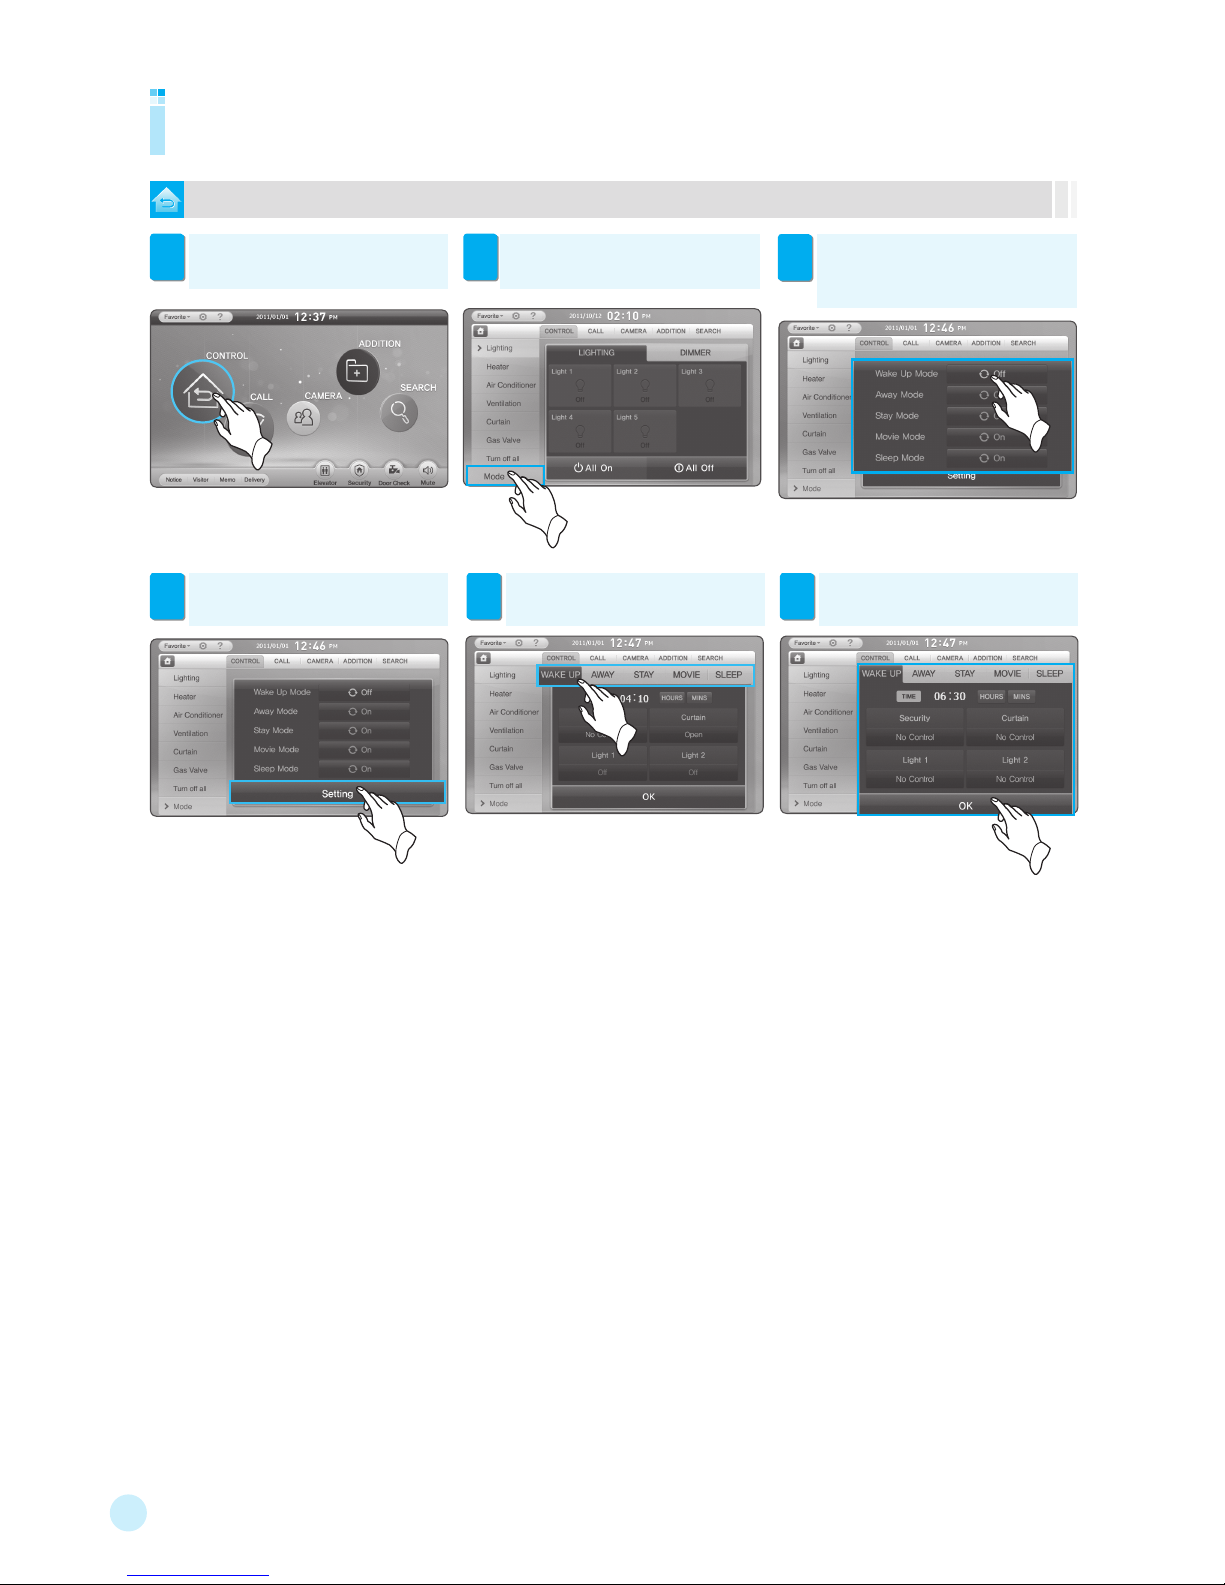
To control the mode
Controlling mode
Touch [CONTROL]. Then the control
screen appears.
1
Touch [Mode]. Then the current
mode appears.
2
※ The controllers may be changed
according to the installation status.
Touch the desired mode tab. Then
the setting detail screen appears.
5
After setting the detail, Touch [OK].
6
Touch [Setting] to set the control
mode.
4
To activate the specified mode
setting, Touch [On].
3
※ The Wake Up mode works in the specified
time. The other modes work only when the
corresponding button is touched.
※ In Away mode, the Security
mode can not be activated.

Setting/Canceling Away
Setting/Canceling Security
Automatic alarm
Alarm Stop/Return
2 Alarms
※ The gas leak detector that is cooperated with the product is used just for
alarming. Therefore it is required to place the law-enforced gas detector
and handset separately for fire prevention. The detectors for security can
detect illegal intrusion and generate alarms just in case. But we assume
no responsibility for property loss by any theft because it is not an anti-theft
device.
 Loading...