

Samsung SHS-H635 User Manual


1
Product Features
The door can be opened with a card as well
as a key tag.
The door can be opened with a transit card or a credit card with the
transit card function as well as a keypad contained in the product. Up
to 20 cards may be registered.
The door can also be opened with a password.
Once the user’s password is registered, the door can be opened
without a key by entering the registered password.
The anti-panic function allows for easy
opening of a locked door from the inside.
When opening the locked door from the inside, just turn the handle.
The door does not have to be locked manually.
Using the automatic lock function, the door is automatically locked
when it closes, eliminating the need to lock it manually.
The double-locking function adds security.
The double-locking function adds security by preventing the door from
being opened from outside at night or at times when extra security is
needed.
Pranks played by children and juveniles can
be prevented.
When an unregistered card or key tag is used, or when an invalid
password is entered 5 or more times consecutively, an alarm sound is
generated and power to the lock is automatically cut off for three
minutes.
The built-in fire detection function helps
occupants escape in case of fire.
When the inside temperature rises to a certain level due to fire, an
alarm is generated and the door is opened automatically.

2
Table of Contents
Product Features 1
Safety Cautions 3
Notes before Operation 6
Product Components ................................................................... 6
Outer Body Parts ........................................................................ 8
Inner Body Parts ....................................................................... 10
Mortise .................................................................................... 11
Replacing the Batteries .............................................................. 12
Using the Emergency Battery ...................................................... 13
Using the Emergency Key ........................................................... 14
Basic Functions 15
Initialization (Password, Card, Key Tag) ........................................ 15
Password Change ...................................................................... 16
Card and Key Tag Registration .................................................... 18
Deleting the Card or Key Tag ..................................................... 20
Opening the Door from Outside with a Password ............................ 21
Opening the Door from Outside with a Card or Key Tag .................. 22
Opening the Door from the Inside ............................................... 23
Closing the Door from the Outside .............................................. 24
Closing the Door from the Inside ................................................. 24
Additional Functions 25
Multi-leveled Security Code Entry Mode Setting ........................... 25
Double Authorization Mode Setting ............................................. 26
Automatic/Manual Locking Setting .............................................. 27
Sound Setting and Releasing ..................................................... 28
Alarm Sound/Emergency Sound ................................................. 29
Troubleshootings 33
Operation Summary 35
Product Specifications 37
Wa r r a nt y 3 9
3
Safety Cautions
This section contains important information to ensure the user’s safety and prevent
potential damage to property. Please, read this section carefully and use the product
accordingly.
Warning, Caution and Note Explained:
Warning
Information given under this heading is information the user must be aware of to
prevent physical harm.
Caution
Information given under this heading is information the user must be aware of to
prevent service problems or system damage.
Note
Information given under this heading provides additional information relating to the
text in this manual.
Descriptions of Symbols
General warning or caution
Prohibited activity
Recommended activity
4
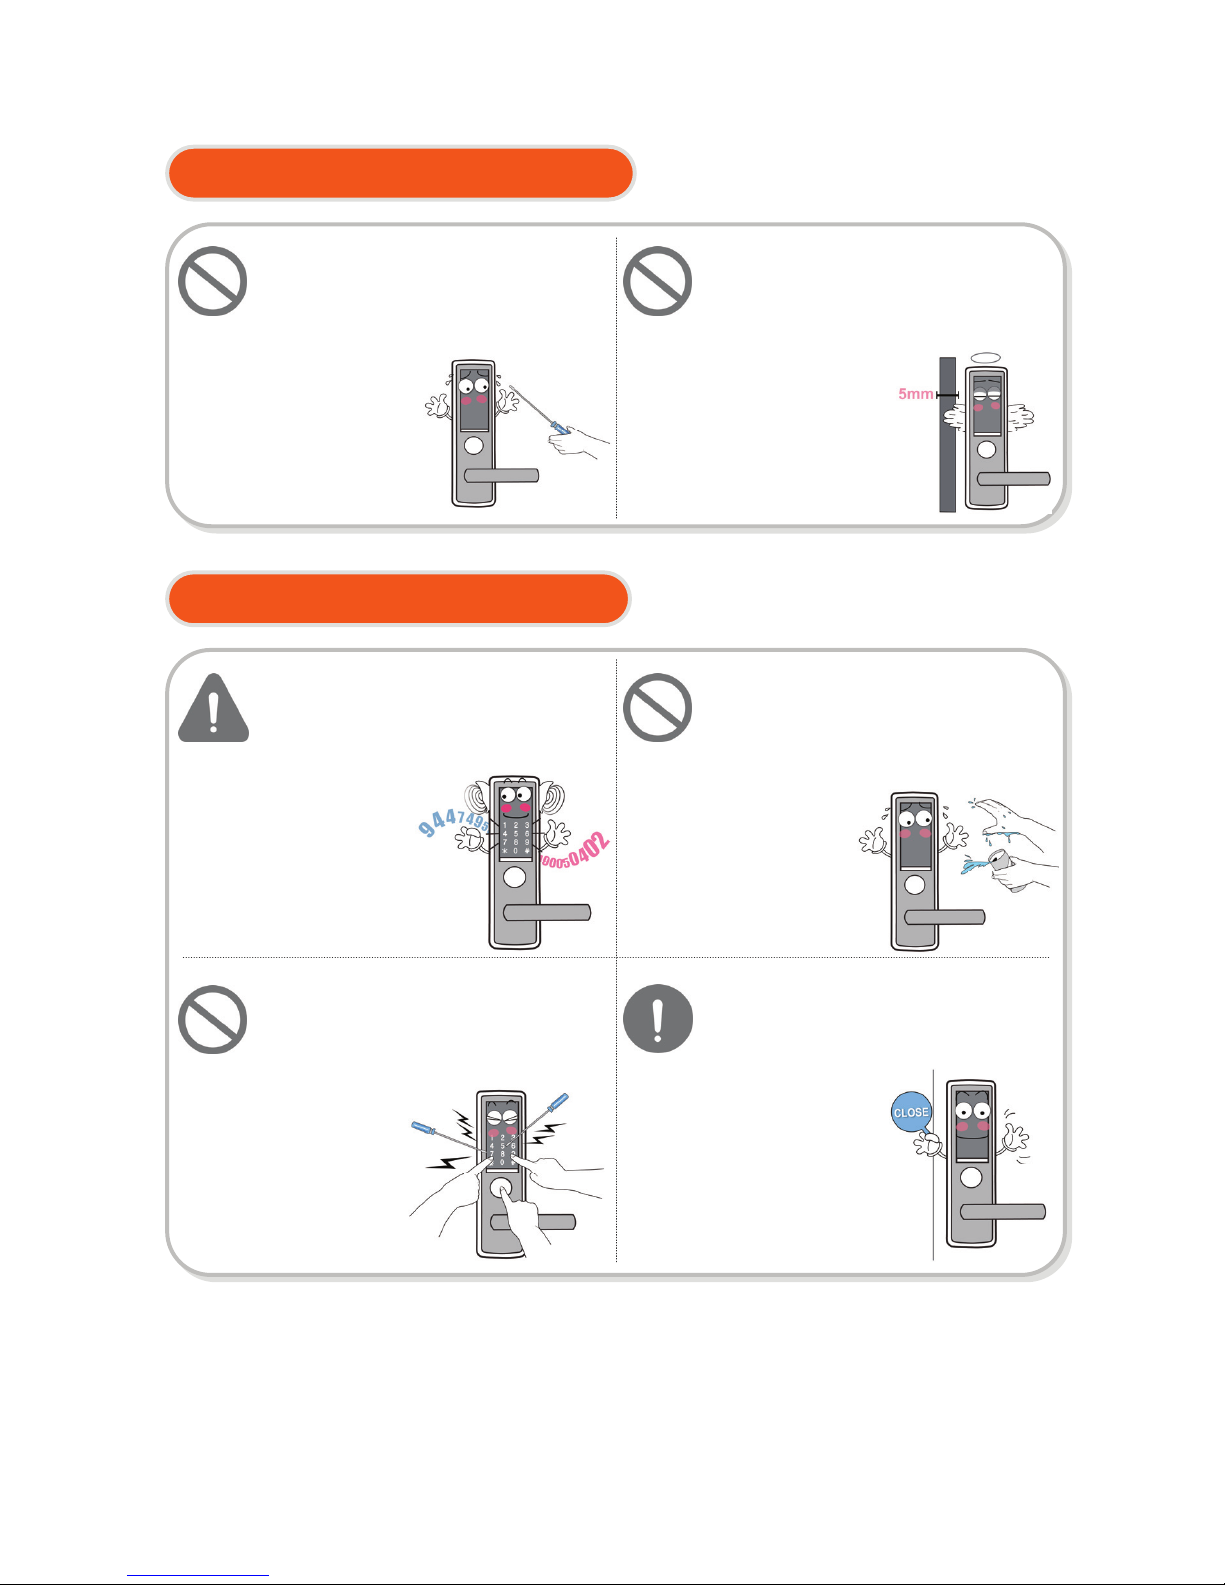
Cautions during Installation
Cautions during Operation
The user shall not install or repair
the product without authorization.
The manufacturer does not assume
responsibility for
damage to the
product resulting
from attempts to the
user to install or repair
it without authorization.
Do not use the excessive force or
sharp objects to push the lock
buttons, as this can
damage
the
product.
Make sure that no unauthorized
person has the access to the
password.
To minimize the risk of
burglary, it is
recommended
that you periodically
change the password.
Do not operate the product with
wet hands, and keep liquids such
as water or drinks away from the
product, or the product
may
malfunction
or be
damaged.
Make sure that the door is
completely closed when going
outside. The manufacturer does
not assume the
responsibility for
any harm caused
by engagement of
the lock on an
improperly
closed
door.
Do not install the product in the
place where the gap between the
door and the frame is 5mm or
more.
If the gap is too wide,
the product may not
function properly.
5
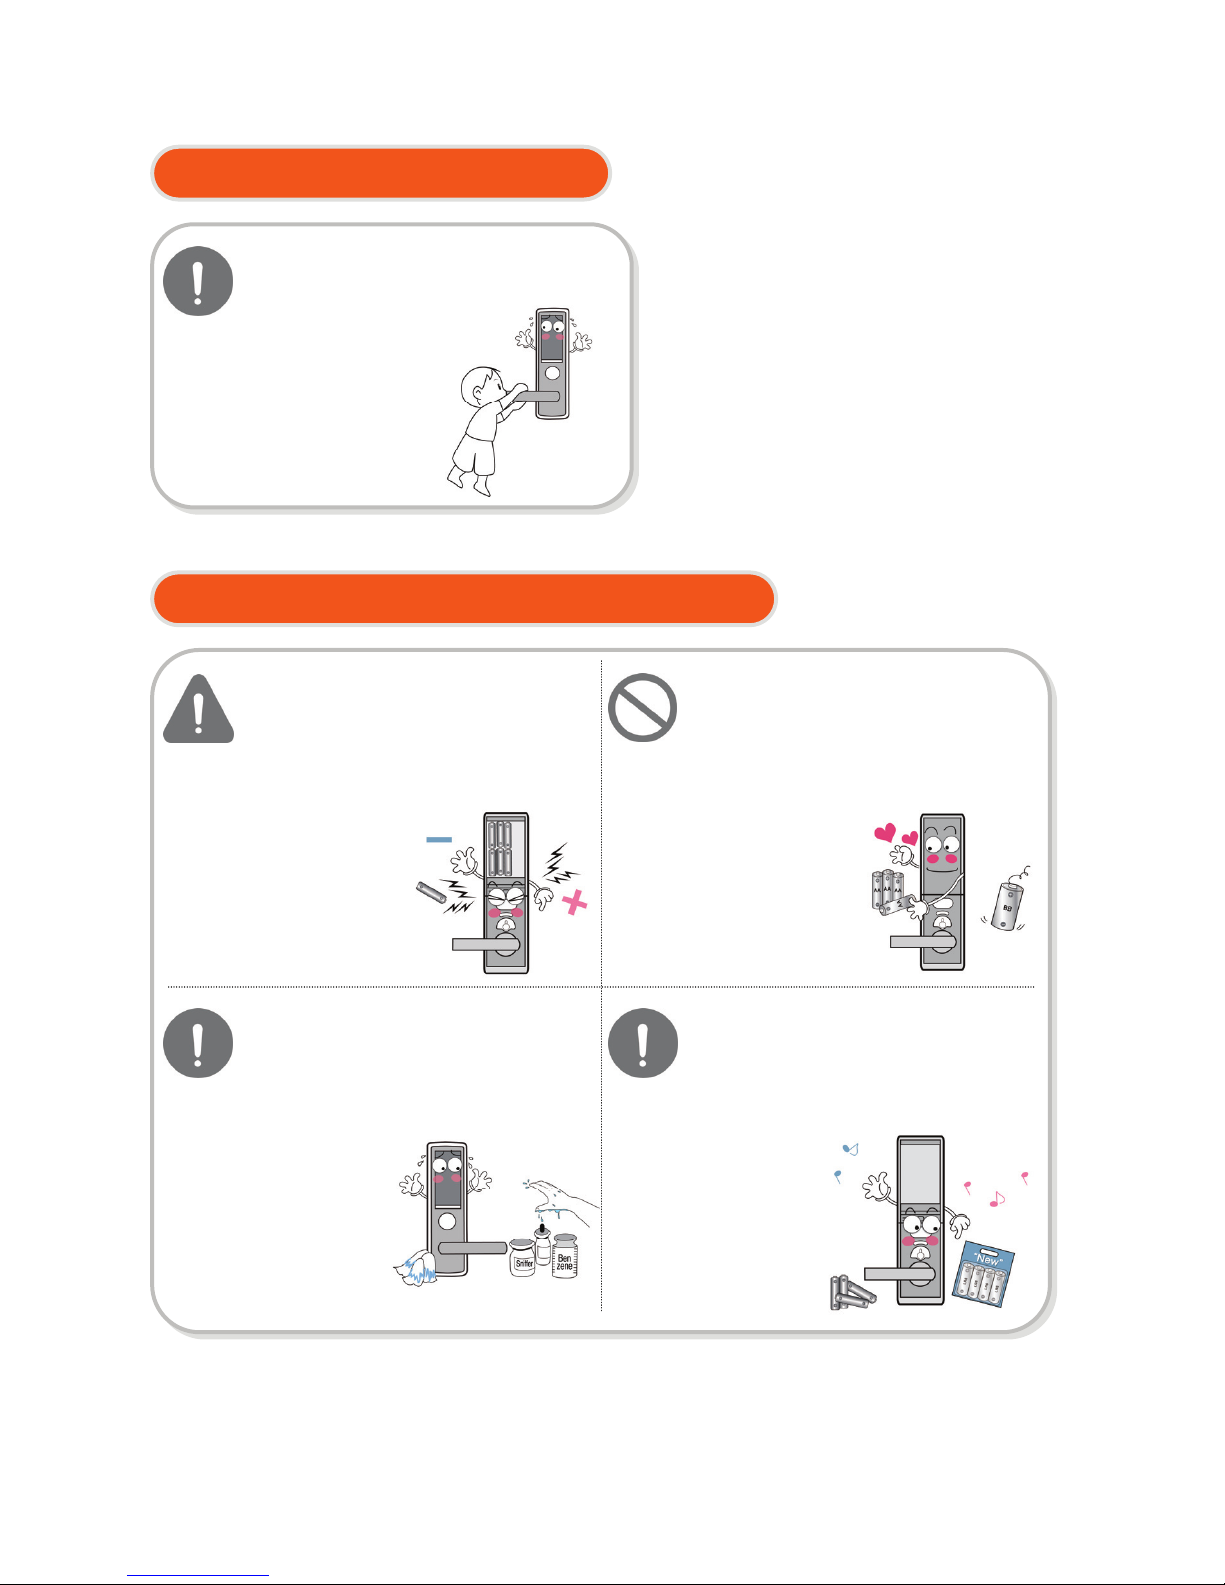
Cautions during Operation
Cautions during Repair or Maintenance
Replace all batteries immediately
after they run out of power, and
never mix new batteries with used
ones.
This can cause
reduction of
product life or
malfunction
in the product.
Be sure to correctly match the
poles (+/-) when installing the
batteries. Install the batteries with
the correct poles (+/-).
Improperly installed
batteries can cause
rupture or battery
fluid leakage.
Do not use water, benzene or
alcohol when cleaning the product,
as these fluids can cause product
malfunction.
Use a soft and
dry cloth instead.
Please do not hang on the product
or pull it.
It can damage the product
or cause its malfunction.
Replace the batteries within 1 week
after the battery replacement alarm
sounds.
The product can stop operating
if the batteries
are not
replaced in time.

6
'AA' Batteries (LR6)
Or
Strike
Strike box
Mortise
(SHS-AML220)
Mortise
(SHS-AML320)
Strike
Notes before Operation
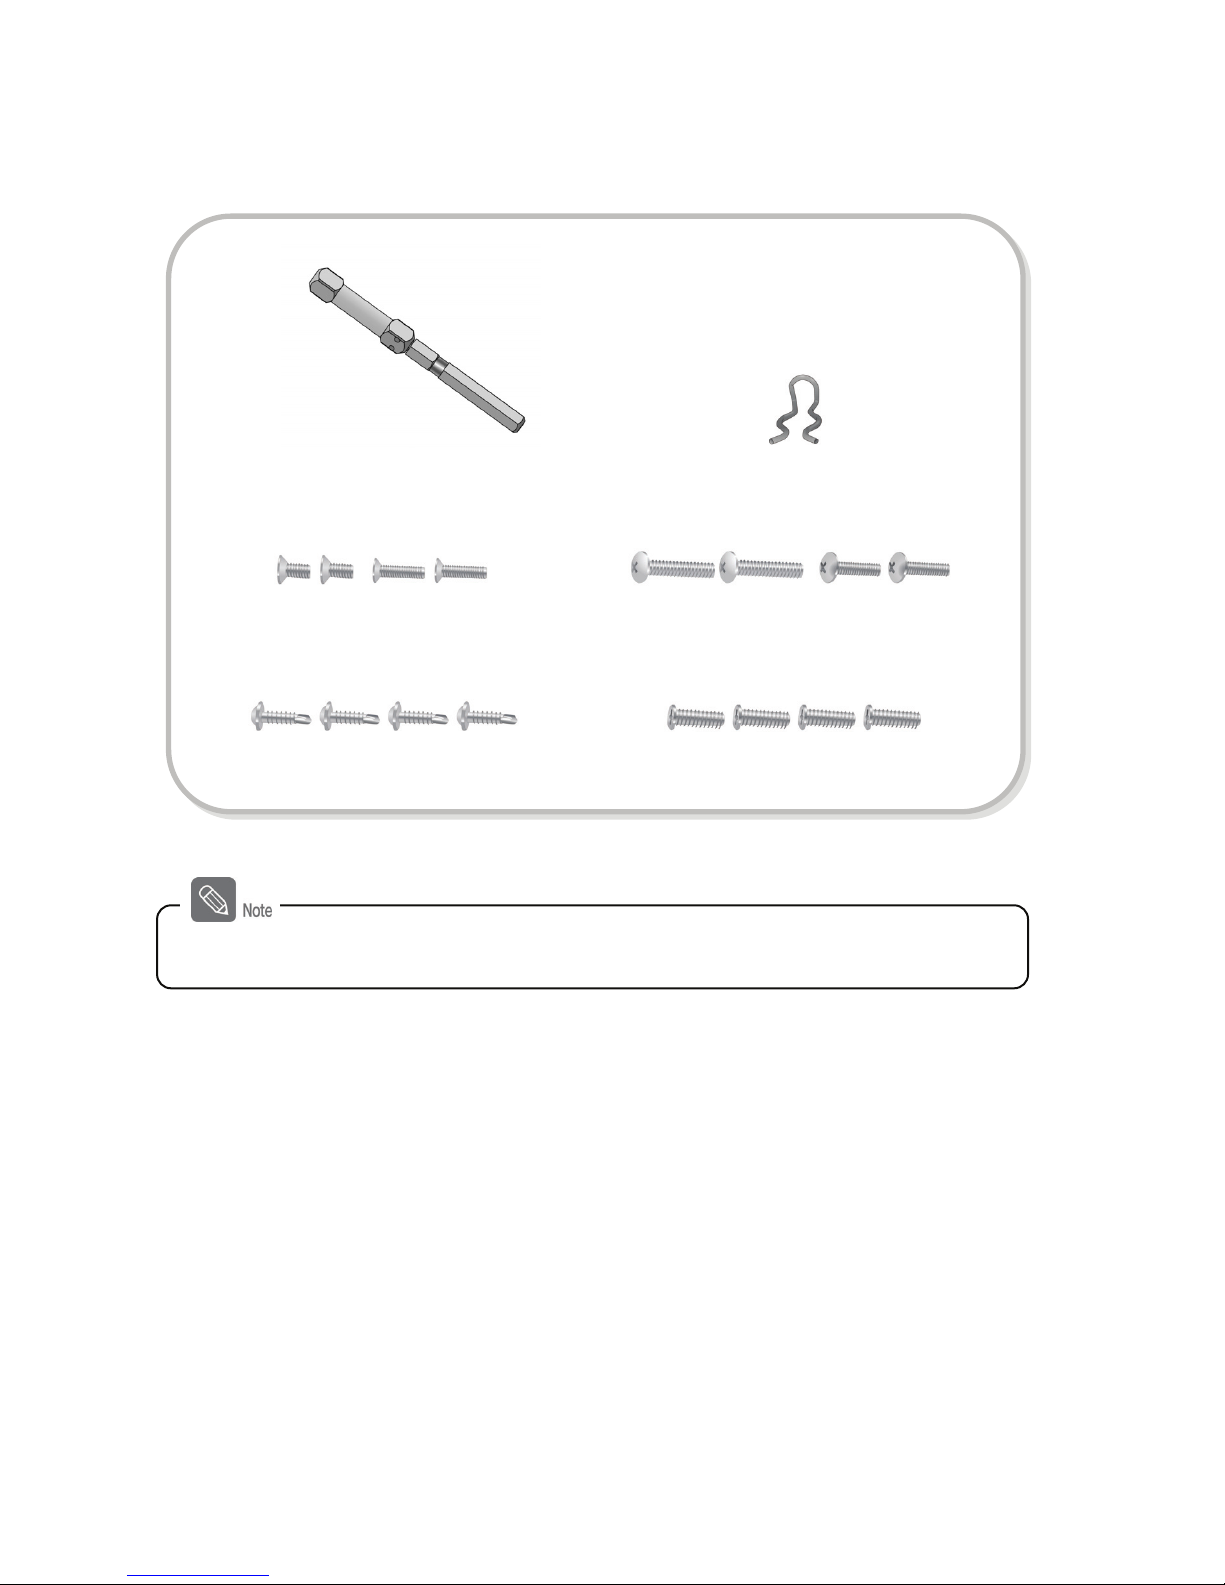
Product Components
User Guide
Inner Body
Outer Body
Key Tag
Emergency Key(5EA)
7
Support Panel and Outer Body
Fastening Bolts
Handle Shaft
Support Panel and Inner Body
Fastening Bolts
Inner Fastening Bolts
Strike Fastening Bolts
Handle Shaft Spring
The product components used may vary depending on the installation environment.
8
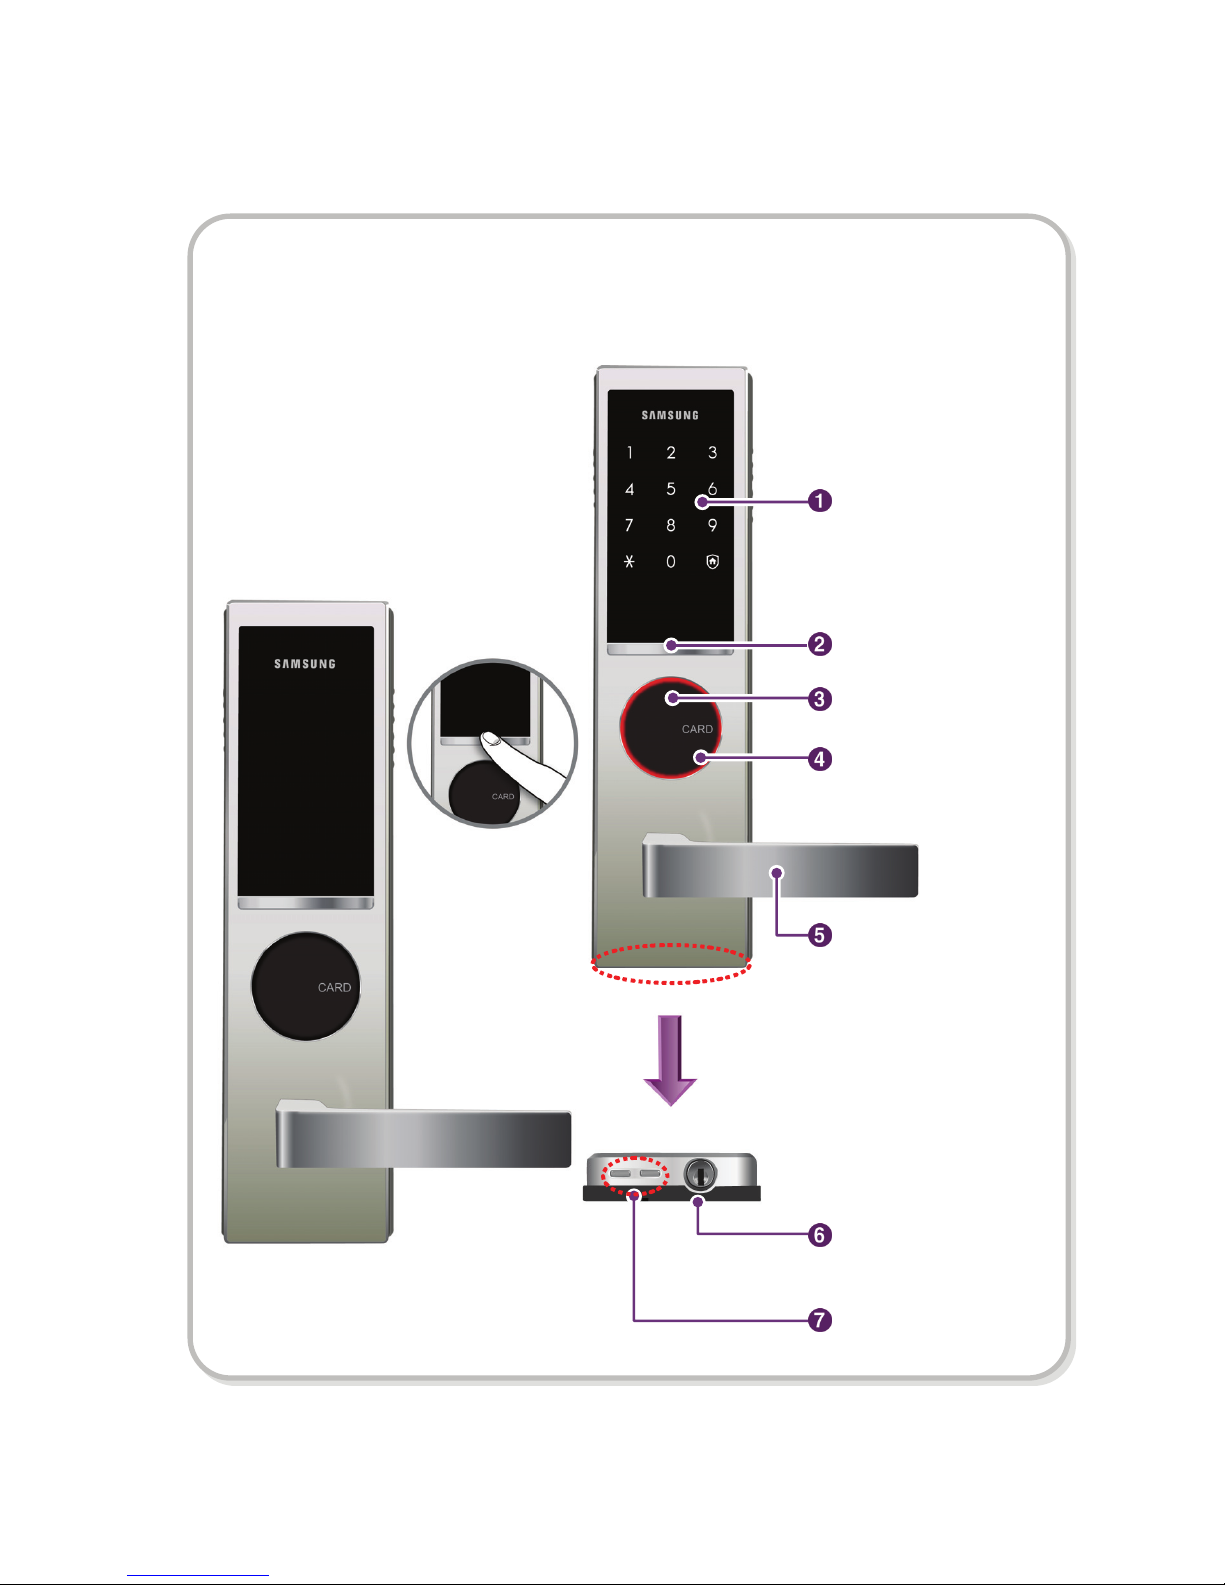
Outer Body Parts
External Power Port
Emergency Keyhole
Number Pad Unlighted
Outer Body Handle
Number Pad
Enter Number Button
Number Pad Lighted
LED Indicator
Card Reader

9
No. Name Description
1 Number Pad Enter numbers to register, change and delete a password. The
door can be opened by entering the registered password onto the
number pad.
2 [Enter Number]
Button
The number pad is lighted so that numbers can be entered
exactly.
3 Card Reader The card reader is used to recognize a card or key tag for
opening the door.
4 LED Indicator
It displays the operation status of the lock when it reads a card or
i
t
operates.
5 Outer Body
Handle
The door will be opened when the handle is rotated downward
after the lock is released.
6 Emergency
Keyhole
When the lock stops operating because of batteries that have
been completely discharged or a circuit problem, the emergency
key can be used to unlock the door. After that, the door will be
opened when the outer body handle is rotated downward.
7 External Power
Port
Power can be supplied from the emergency battery after the main
batteries have been completely discharged (9V battery).
10
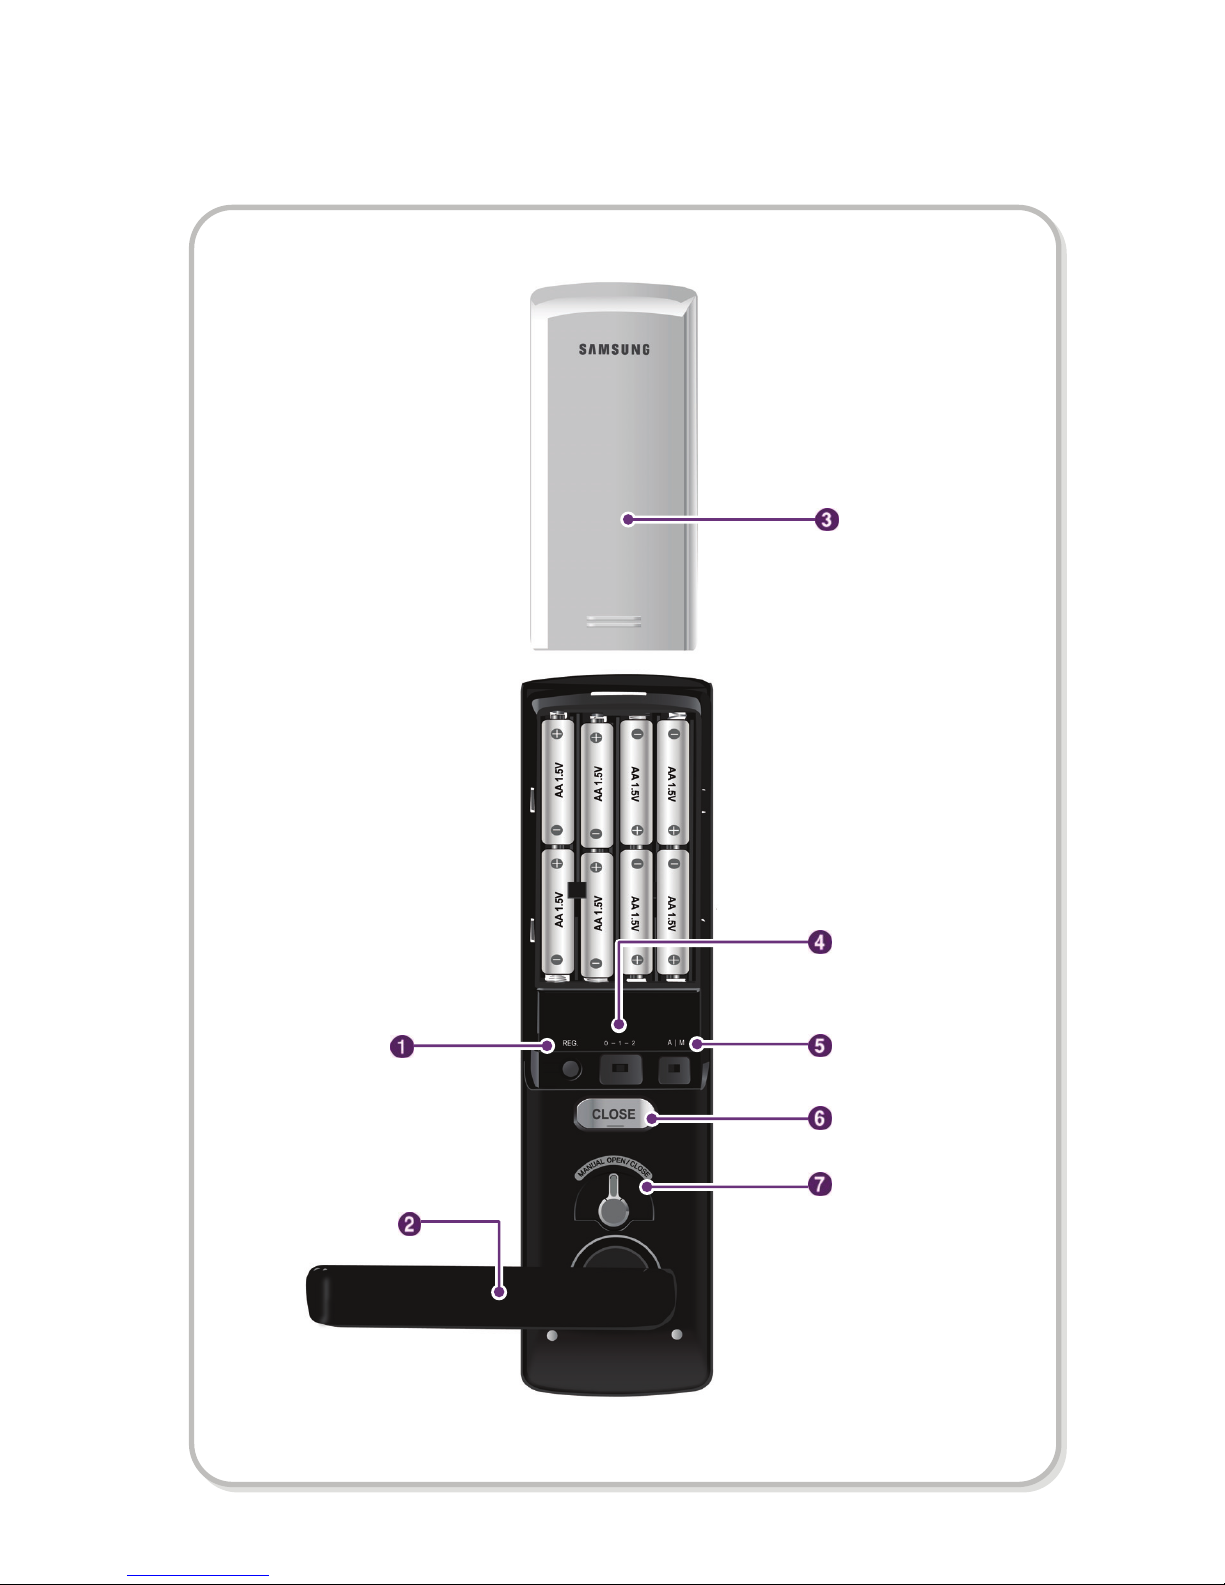
Inner Body Parts
Auto/Manual
Locking Switch
Inner body
Handle
CLOSE Button
Registration
Button
Manual Open-andclose Lever
Battery Cover
Sound Control
Switch

11
No. Name Description
1 Registration
Button
This button is used to change the password and register a card or a
key tag.
2 Inner body
Handle
The door will be opened when the inner body handle is rotated
downward.
3 Battery Cover The battery cover protects the batteries and the registration button.
4 Sound Control
Switch
This is used to control the volume of the sound that is generated on
the lock.
5 Auto/Manual
Locking Switch
This switch is used to switch between automatic locking and manual
locking. If it is set for automatic locking, the door is automatically
locked when closed. If it is set for manual locking, the door is not
automatically locked when closed.
6
CLOSE Button
This button is used to lock the door from the inside and to set the
double locking function.
7
Manual Openand-close Lever
This is used to lock or unlock the door in case there is an
emergency or a circuit problem.
Mortise
※ The package includes SHS-AML320, but it would be able to substitute SHS-AML320 to
SHS-AML220 depending on the door type.
No. Name Description
1 Deadbolt It fastens the door to the door frame.
2 Latch Bolt It fastens the door and door frame when the door is closed.
3 Door Opening
Sensor
It monitors door opening and closing when the automatic locking
function is activated.
Latch bolt
Deadbolt
Open-door sensor
SHS-AML320
SHS-AML220
12
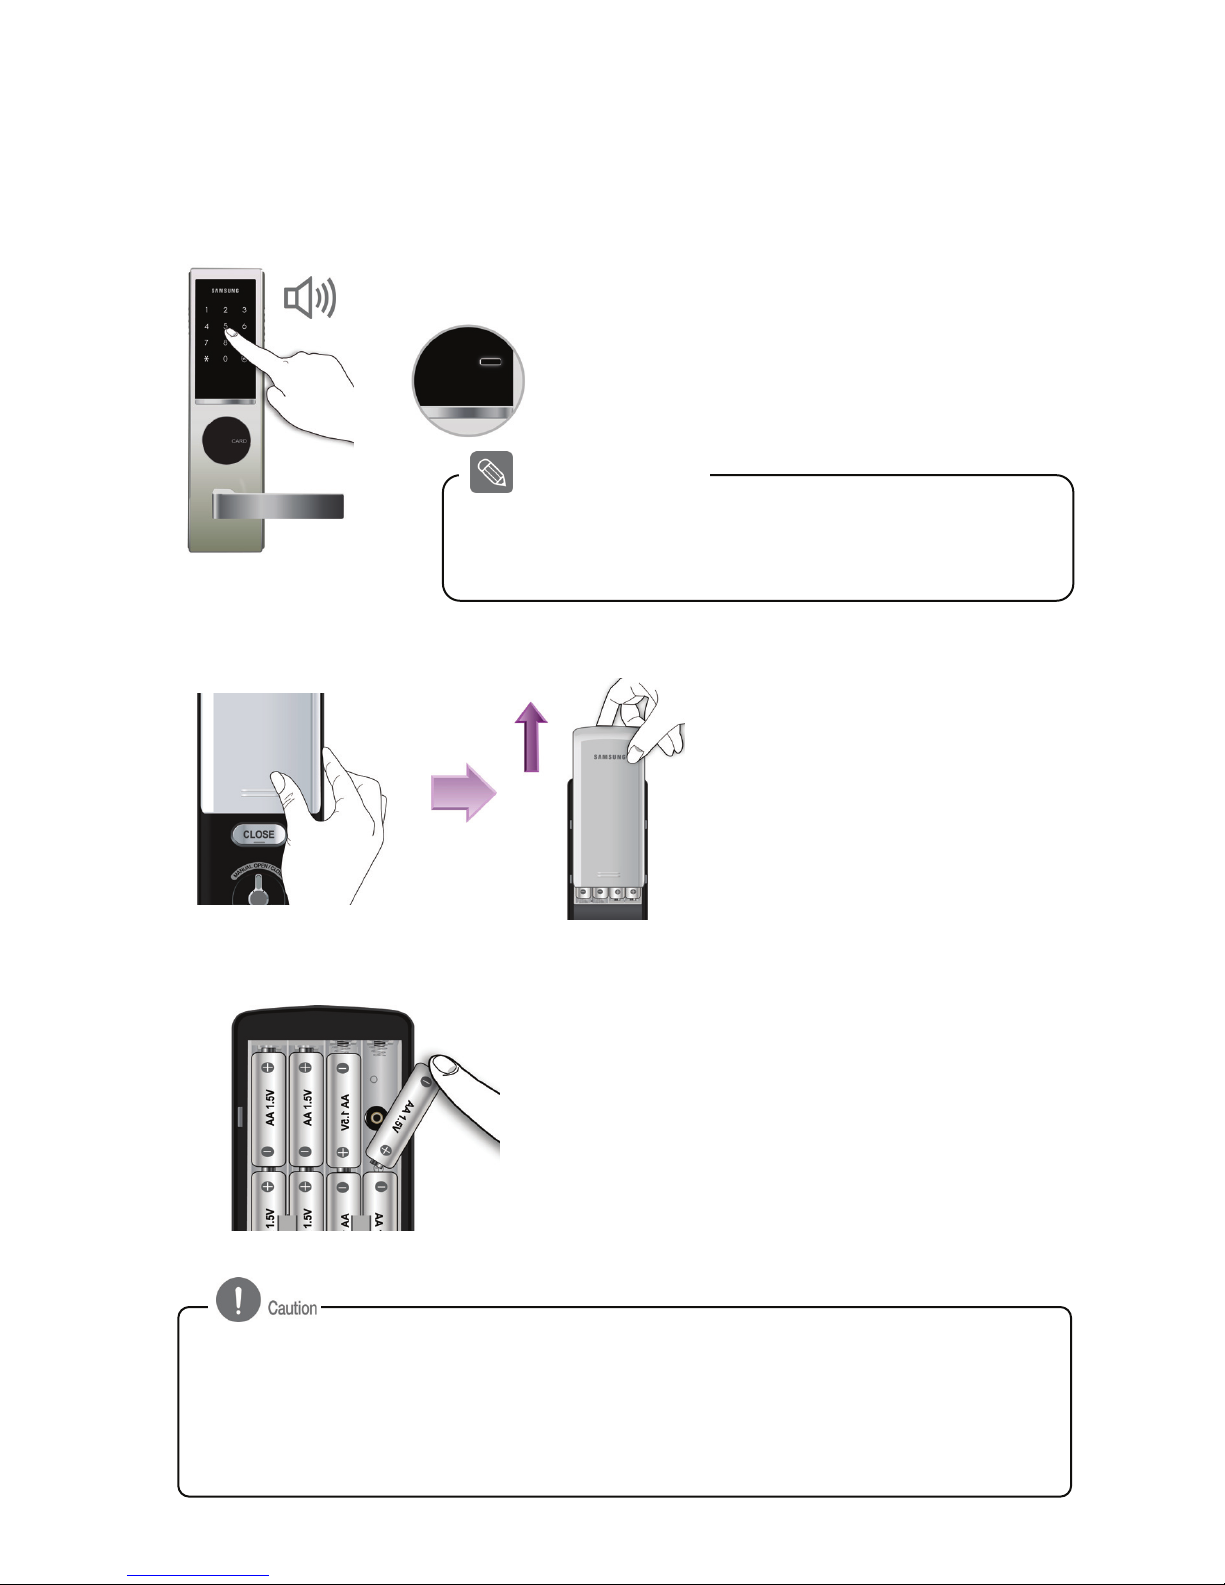
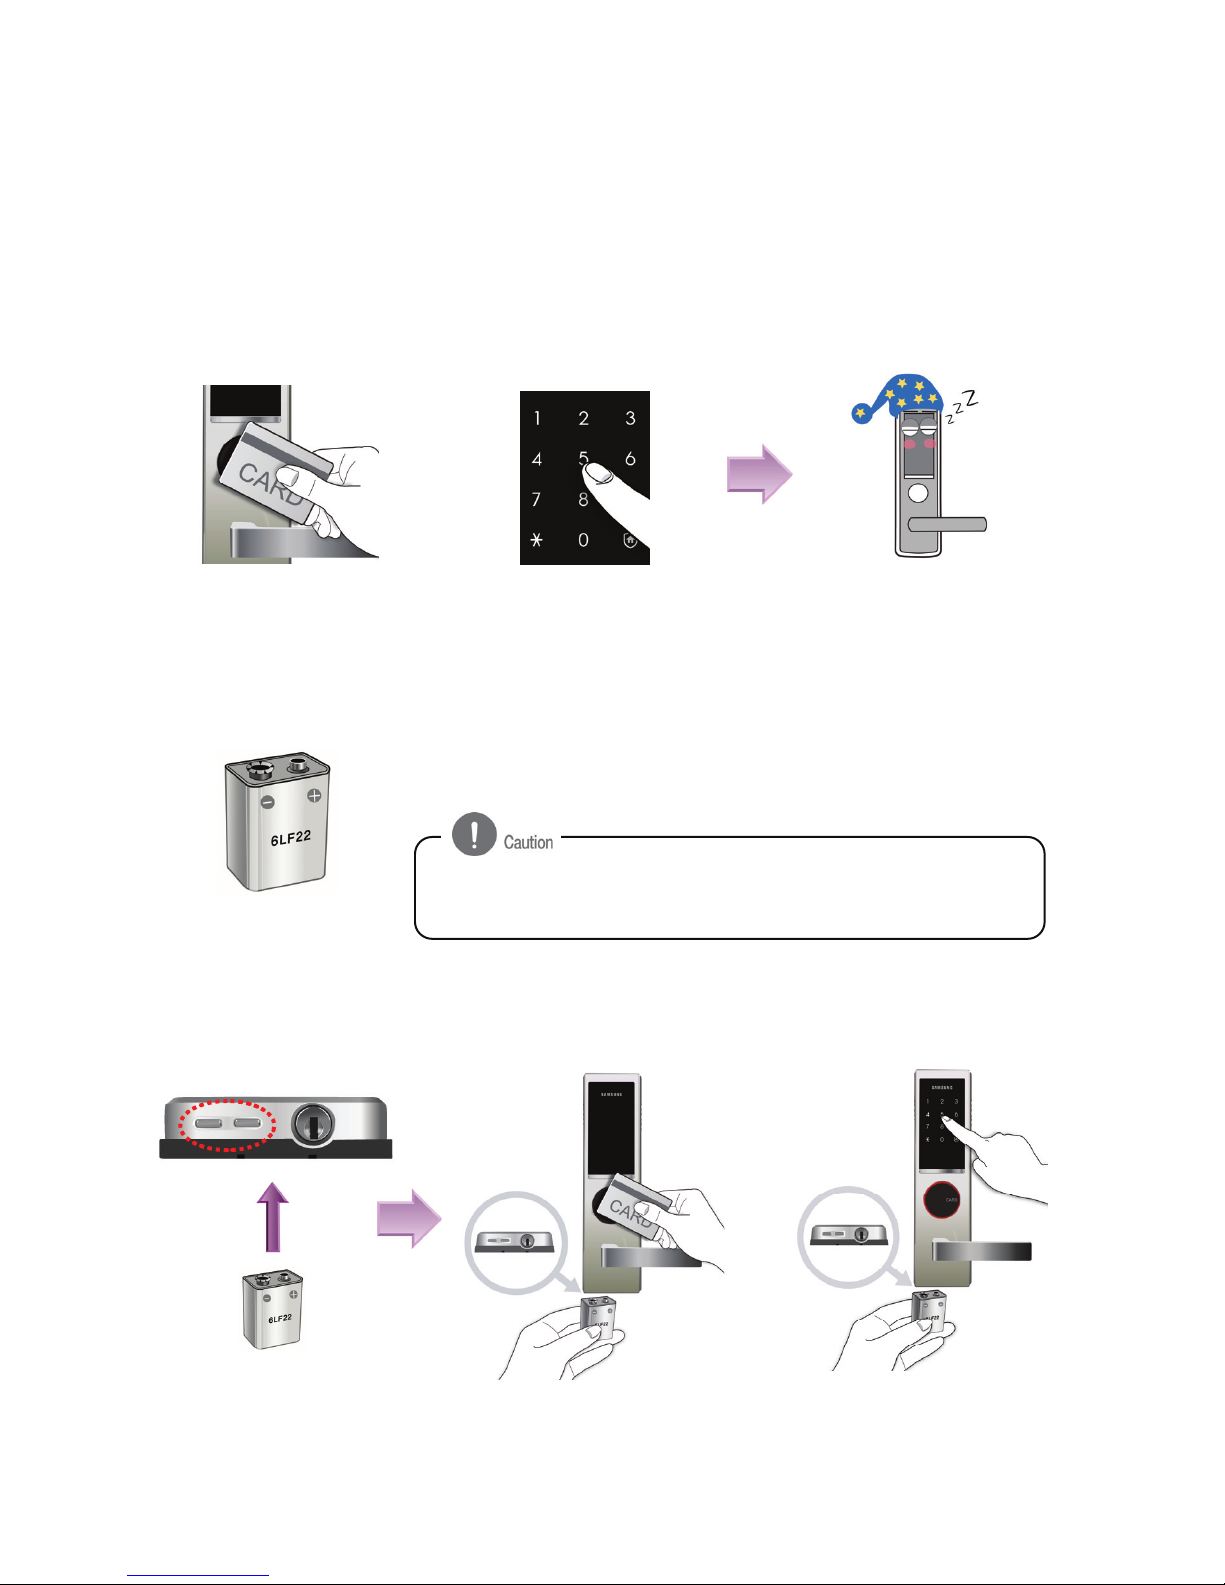
Replacing the Batteries
1. Battery Replacement Alarm Generation
If the melody of “Blues for Elise” sounds when
opening the door with the password or a
card (key tag), it is time to replace the batteries.
(The low battery indicator is lighted when the
melody sounds.)
2. Opening the Inner Body Cover
Lightly press on the battery cover
of the inner body and push it up
as shown in the picture.
3. Replacing the Battery
Replace all 8 batteries within a 1 week of the
first alarm sound.
Although actual battery life differs depending on the manufacturer,
date of production and operation environment, 8 1.5V AA alkaline
batteries can last for one year, based on an average of 10 uses per
day.
Battery Life
- If the poles of the batteries are not placed properly, the lock will not operate normally.
- Liquid leaks from batteries can damage the product. Check the batteries regularly (every 6
months).
- After the battery replacement alarm has sounded, password/card information cannot be
registered, changed, deleted, initialized or configured until the batteries are replaced.
- The unit will stop operating suddenly if the batteries are not replaced.
8 AA batteries
Blues for
Elise~
13
Using the Emergency Battery
1. When the Lock Fails to Operate Due to Discharged AA
Batteries
If the batteries are not replaced after their replacement time comes, they will be
completely discharged and the lock will not operate.
2. Using 9V Battery
Purchase an emergency battery (9V) at the
nearest store.
3. Opening the Door Using the Emergency Battery
Place the card or key tag on the card reader, or enter the password, while the 9V battery
is connected to the external power port of the outer body.
As the alkaline batteries offer longer life, they are recommended
over the manganese batteries or rechargeable ones.
Or
Password Entry
The door is not opened.
Recognition of Card or Key Tag
Or
14
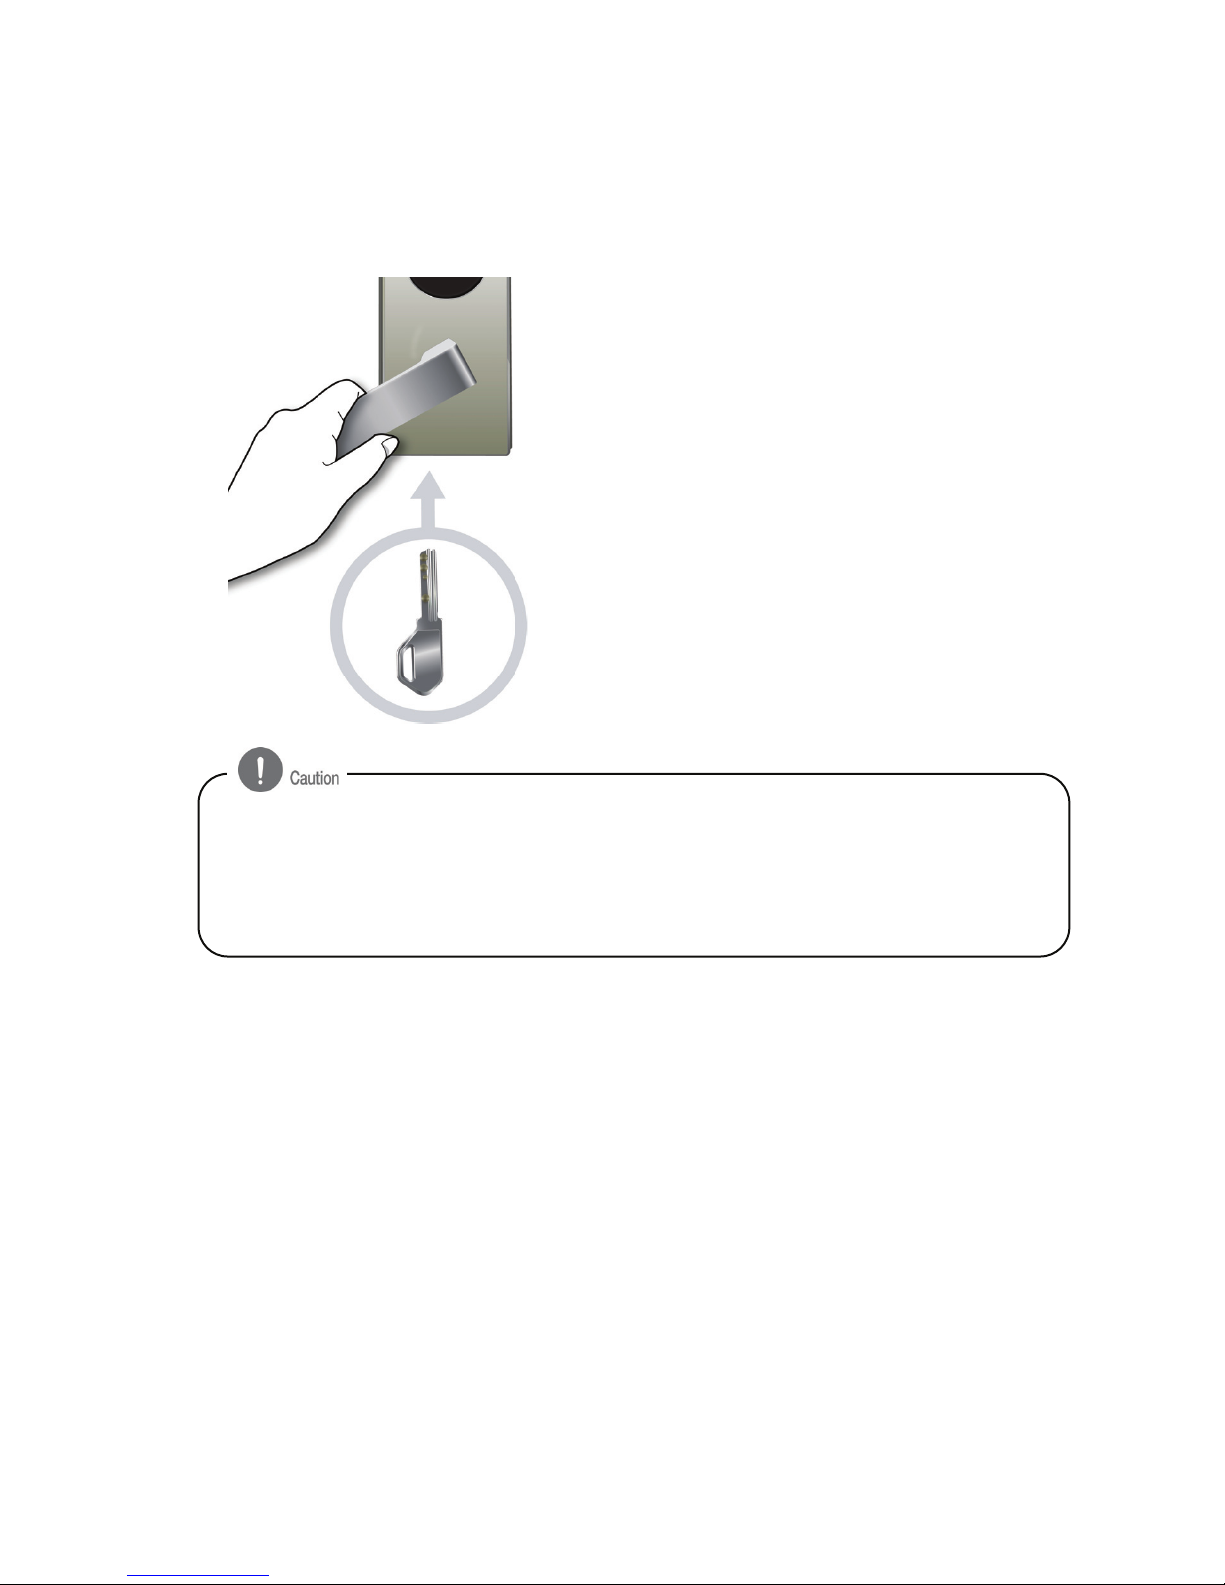
Using the Emergency Key
The emergency key is used when the lock does not operate due to discharged
batteries or a circuit problem.
An emergency keyhole is located at the bottom
of the outer body. Insert the key into the
keyhole and rotate it to the right or left to lock
or unlock the lock.
- Always carry one or more emergency keys, or store one in a secret place outside.
- If the emergency key is lost, it is recommended to replace the whole key cylinder unit.
Contact your local dealer. Replacement of the key cylinder unit is not a free service.
- Remove the emergency key from the keyhole after the lock has been released, and store it
in a safe place.

15
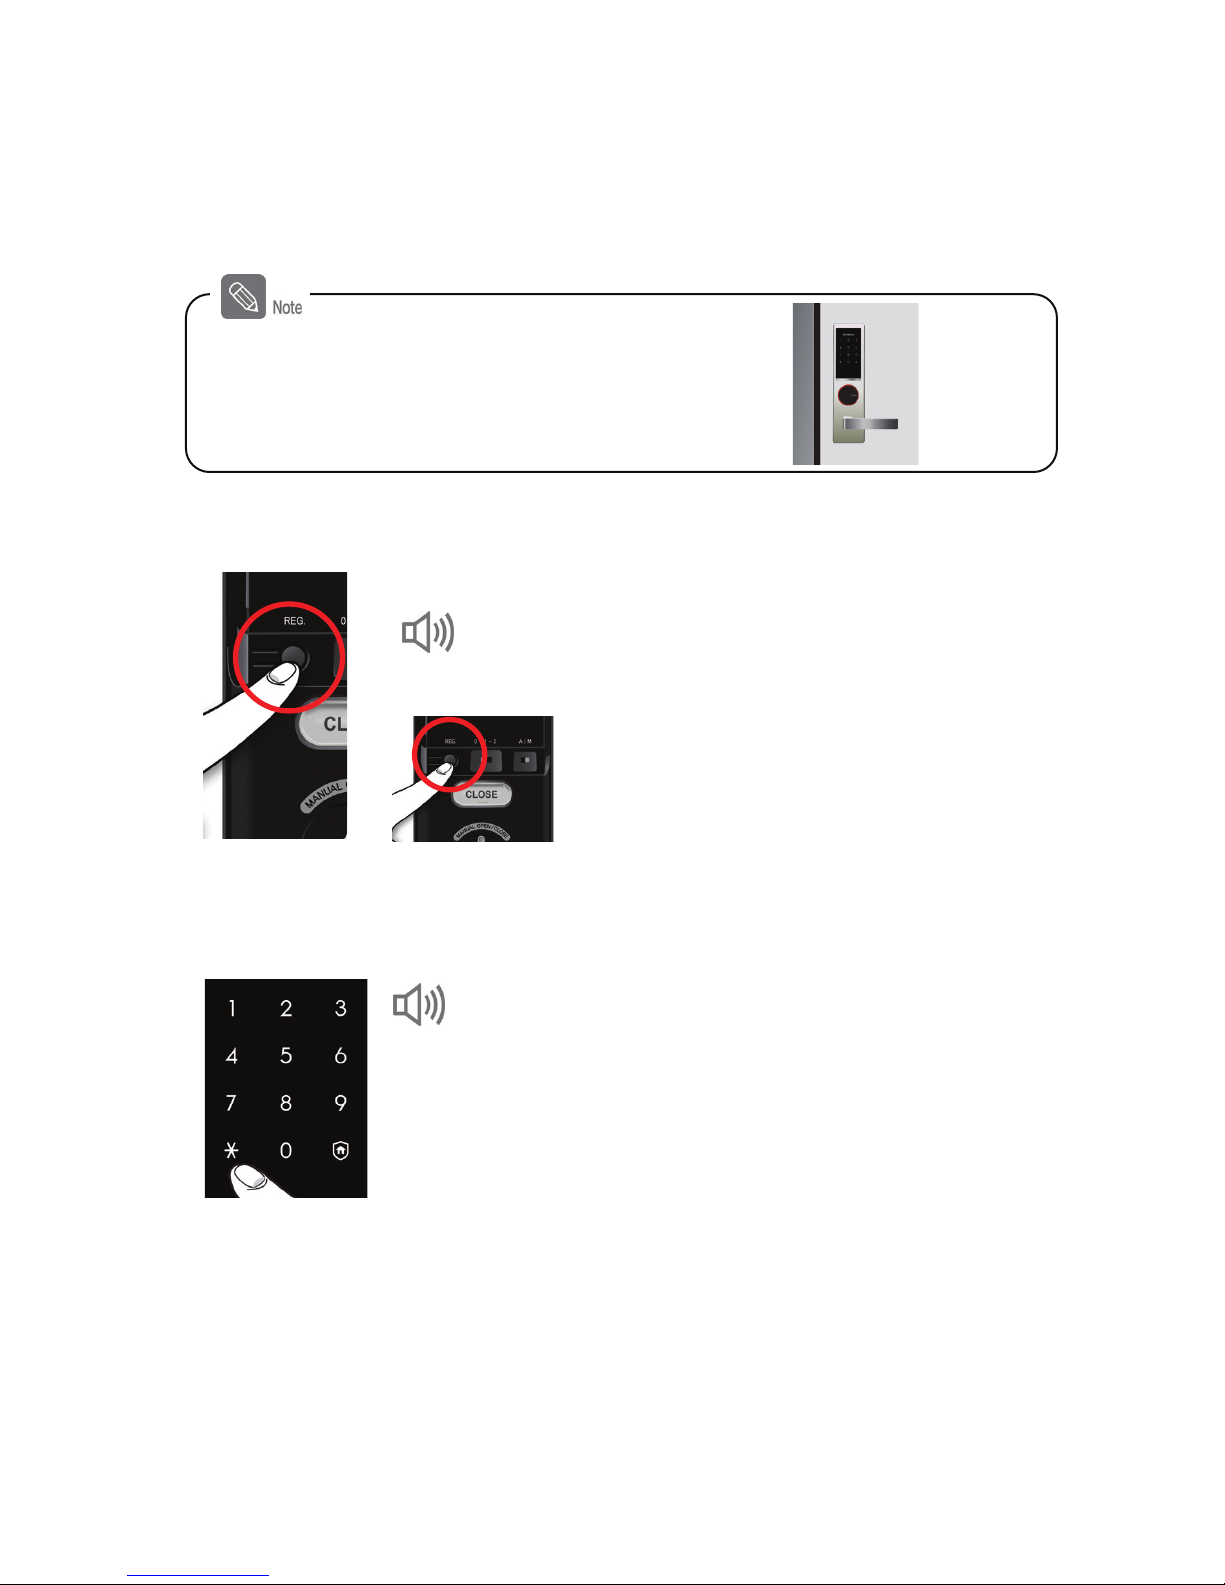
Basic Functions
This section describes the ways to initialize the information registered in the lock, to
register the password and card data, and to open or close the door.
Initialization (Password, Card, Key Tag)
All registered data (password, card, key tag) are deleted. After initialization, the
password is set to ‘12345’, and the registered card, key tag data are erased.
1. Opening the Battery Cover (from the inside)
Lightly press the battery cover and push it up,
as shown in the picture.
2. Pressing the [Register] Button (from the inside)
Press and hold the [Register] button for 5
seconds.
- Success: “Too tÆToot, tootÆToot, toot, toot, toot”
sounds are generated.
3. Entering the Numbers for Initialization (from the outside)
When the number pad is lighted, enter
‘4560852580’ and then press the [º] button.
- Success: “Too~~~t” sound is generated.
- Fail: “To ot ~” sound is generated.
- After initializing the registered data, reregister the card and password.
- Initialization is available while the door is open.
16
Password Change
The password can be 5~12 digits number. Only one password can be registered.
Please register a new password after initialization.
1. Pressing the [Register] button (from the inside)
Open the battery cover of the inner body and
briefly press the [Register] button.
2. Entering the Current Password (from the outside)
Enter the current password ('12345' after
initialization) when the number pad is lighted,
and press the [¹] button.
Too~~t, toot, toot
To ot
Always hold the door open while registering or changing
the password.
Open
17
3. Entering a New Password (from the outside)
Enter the new password (5 to 12 digits) and
press the [¹] button.
- To prevent burglary, it is recommended to use a
password of 6 digits or longer. (Only numbers
between 0 and 9 can be used.)
4. Reentering a New Password (from the outside)
Enter the new password again to check if the
new password is accurately configured, and
then press the [¹] button.
5. Checking New Password Operation (from the outside)
To make sure the password has been properly
registered, check the new password and close
the door.
- Please refer to "Opening the Door from Outside with
a Password" on page 21.
Too~~~t
Too~~~t
- To check the new password, press the door-opening sensor on the Mortise while the
door is open. When the dead bolt is pushed out, check the password, referring to the
procedure described in "Opening the Door from Outside with a Password."
- Manage your password with care so that unauthorized people will not have access to it.
Regularly changing your password can reduce the risk of it being leaked.
- A registered password cannot be deleted. Change the password to a new one or
initialize it to delete all registered data (password, card and key tag) and then reregister
them.
To ot , t oo t
18
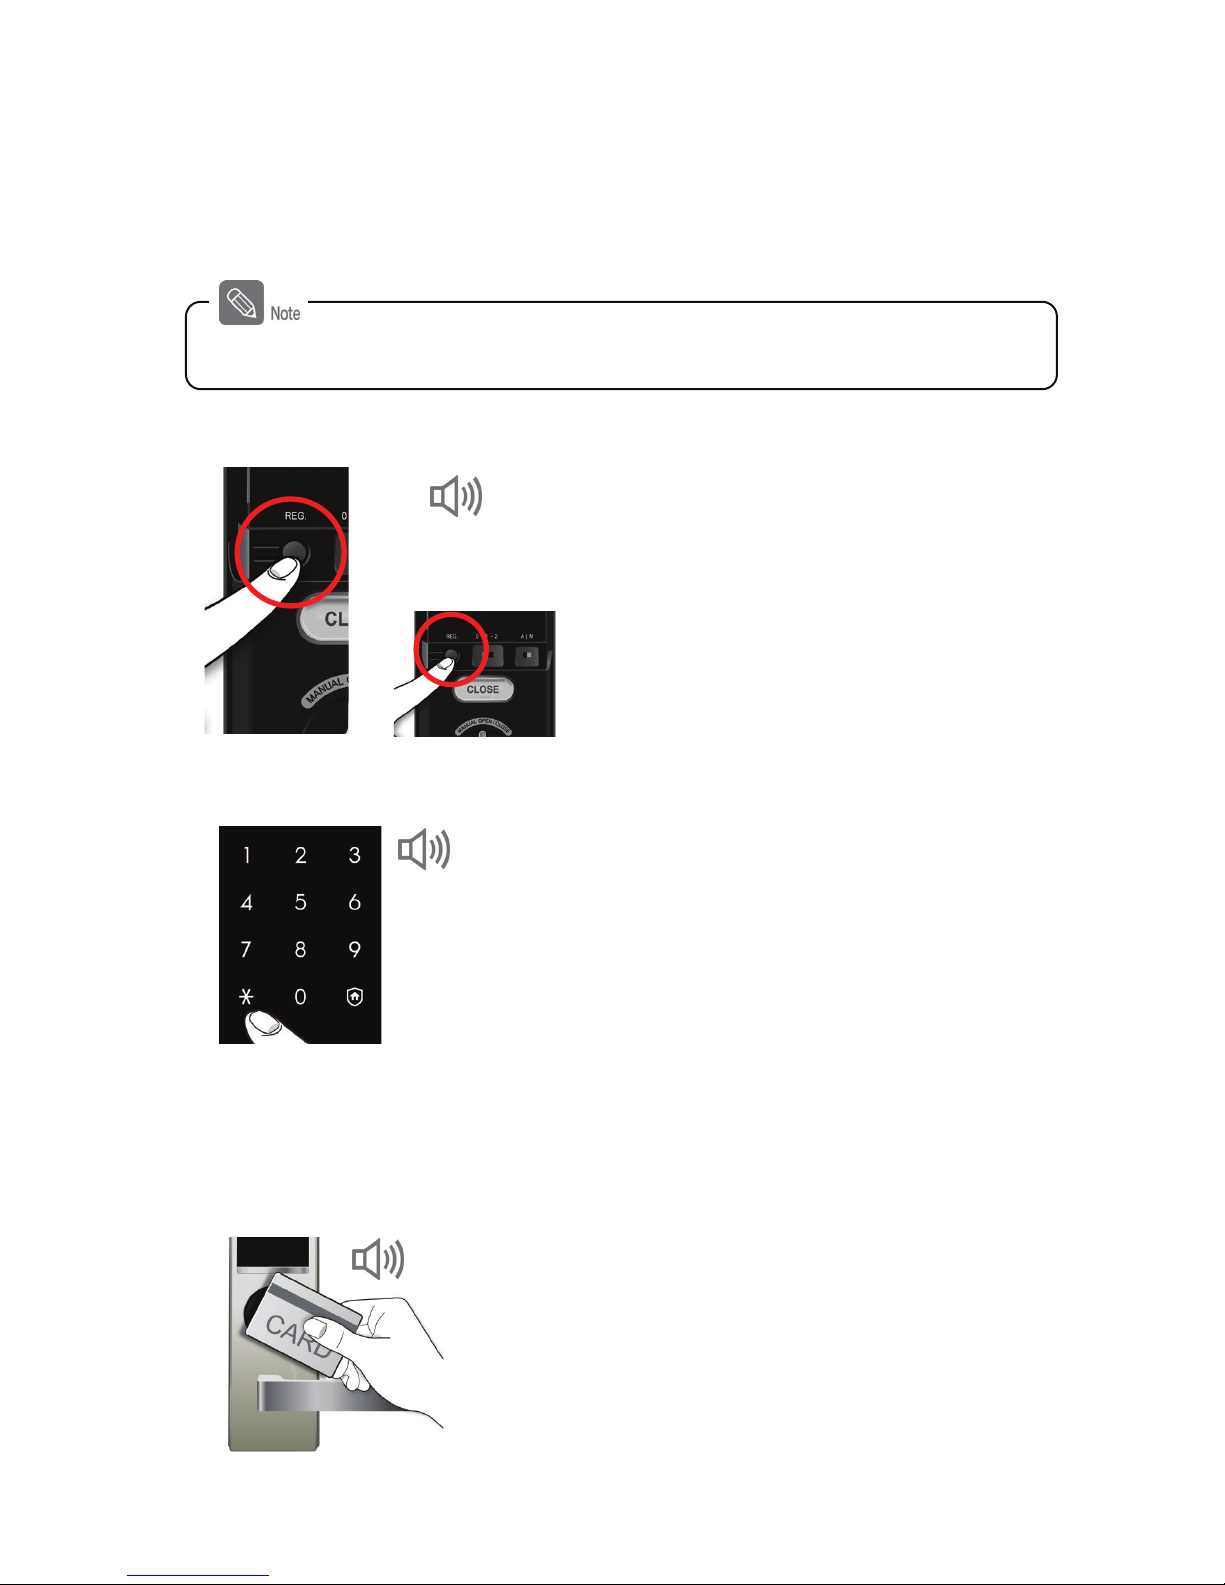
Card and Key Tag Registration
Up to 20 cards, including the key tag, can be registered. (Only ISO14443 A Type is
available.)
1. Pressing the [Register] Button (from the inside)
Open the battery cover of the inner body and
briefly press the [Register] button.
2. Entering the Password (from the outside)
Enter the password when the number pad is
lighted, and press the [¹] button.
3. Placing the Card or Key Tag on the Card Reader
(from the outside)
Place the card or key tag to be registered on
the card reader of the outer body. You will
know the card or key tag has been registered
when a long "too~t" sounds.
Too~~~t, toot, toot
To ot
Too~~~t
Registering a card or key tag is available while the door is open.
19
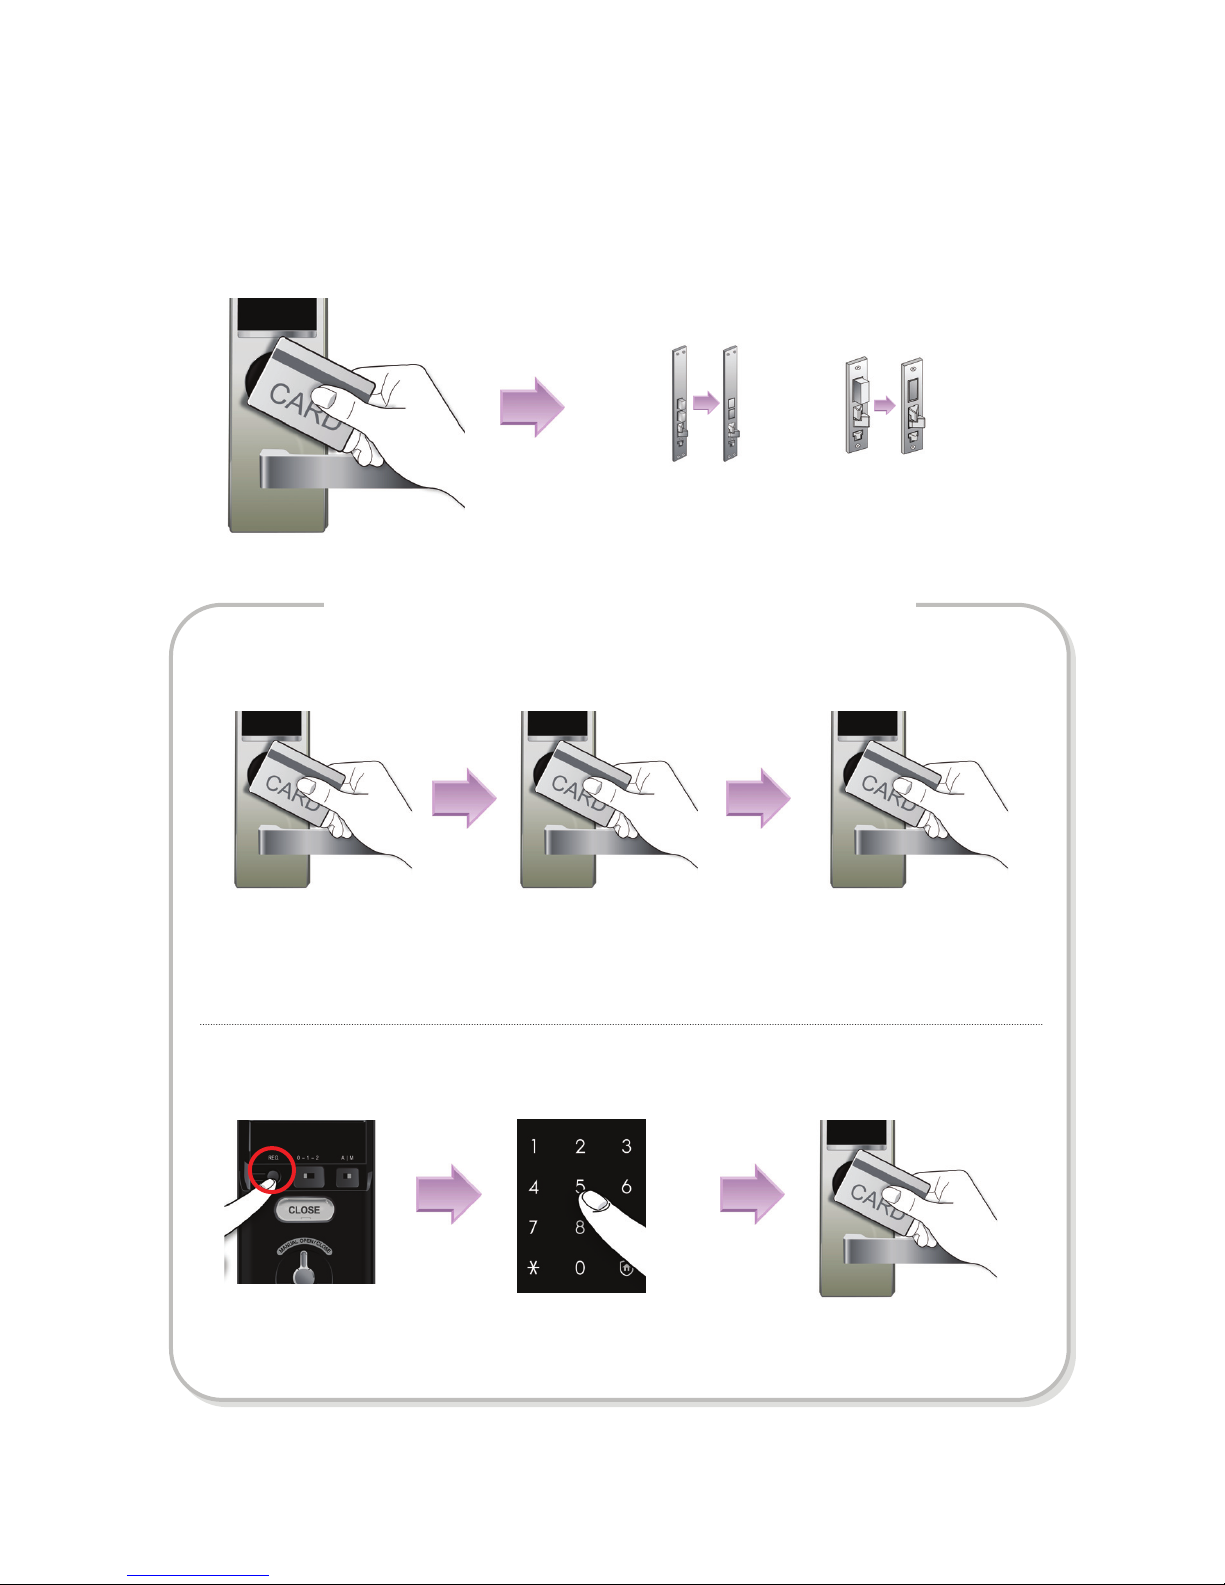
4. Confirming Card or Key Tag Registration
(from the outside)
Place the registered card or key tag to the card reader on the outer body.
- Please refer to "Opening the Door from Outside with a Card or Key Tag" on page 22.
€
Continued Registration
Registration at another Time
To register an additional card or key tag after the registration process is terminated, repeat
the registration process with the card or key tag.
To register multiple cards or key tags, lightly place another card or key tag to the card
reader within 20 seconds of registering the previous card or key tag. If another card or key
tag is not exposed to the card reader within 20 seconds of registering the previous card or
key tag, the registration process is automatically terminated.
Registering Additional Cards
Or
SHS- AML320 SHS-AML220
20
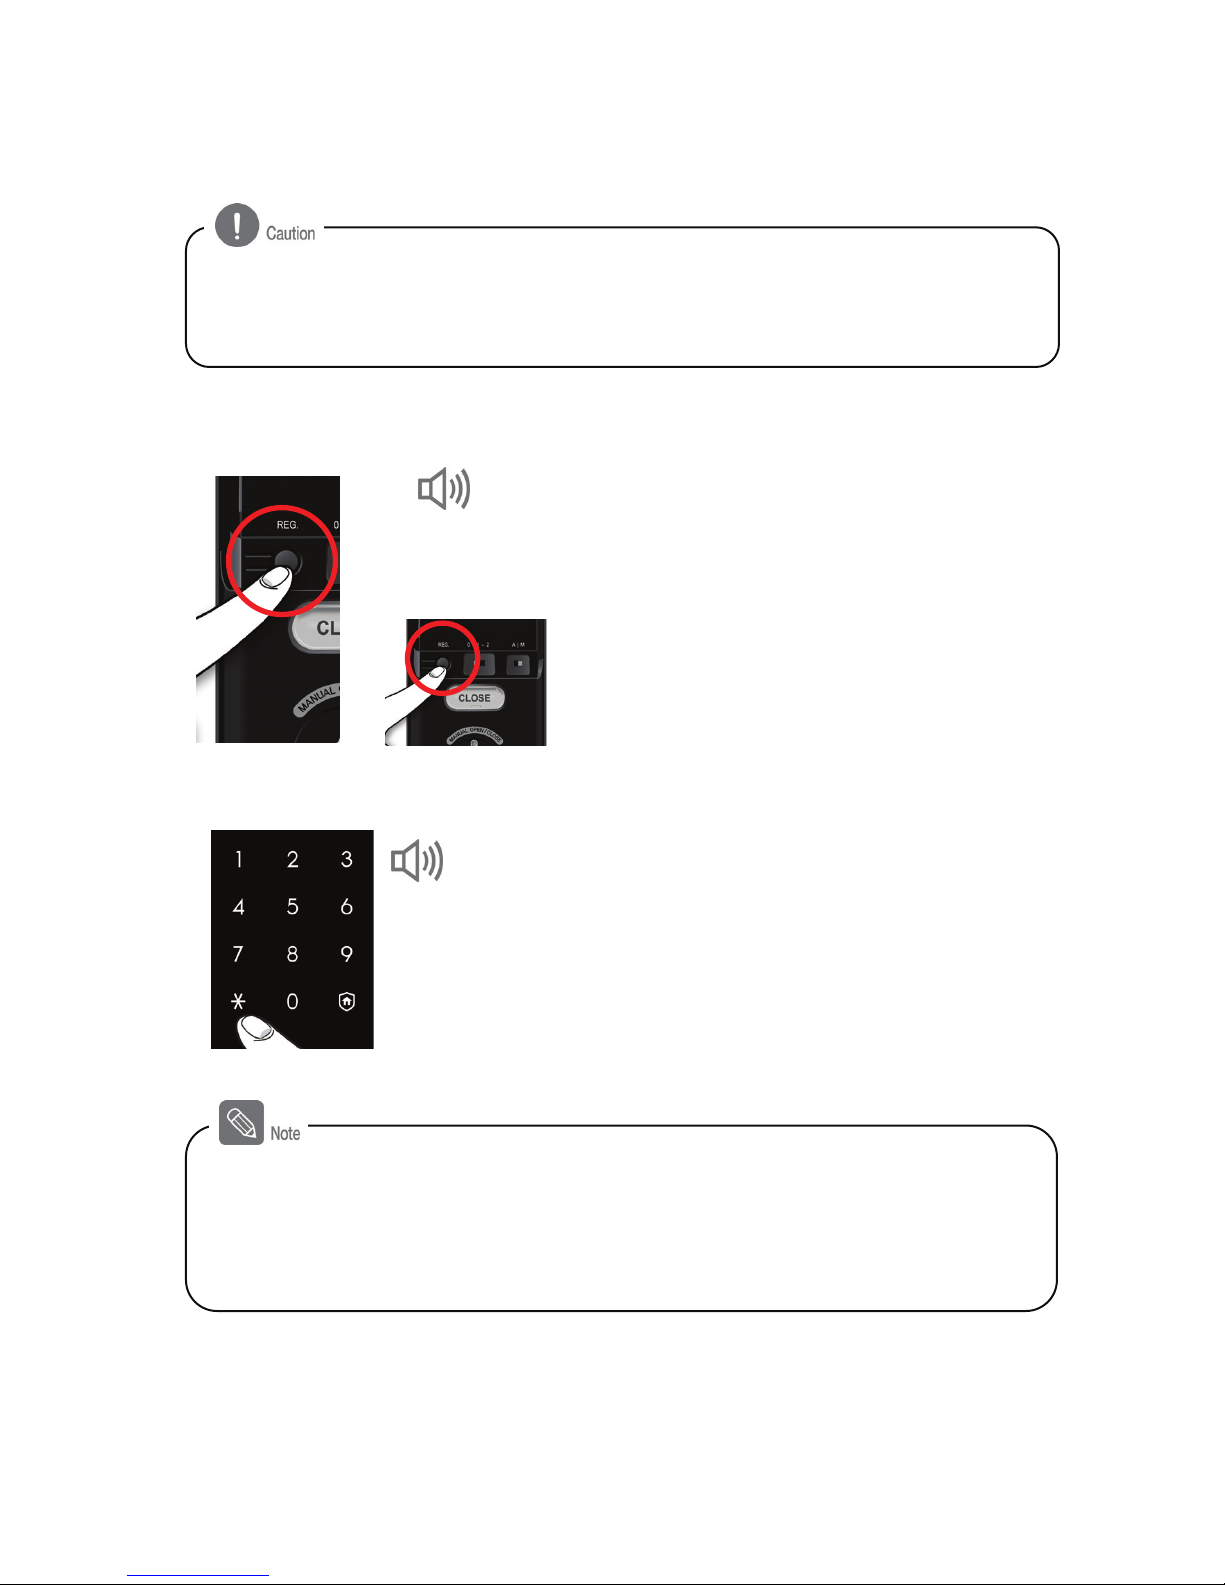
Deleting the Card or Key Tag
1. Pressing the [Register] Button (from the inside)
Open the battery cover of the inner body and
press and hold the [Register] button for 3
seconds.
2. Entering the Password (from the outside)
Enter the password when the number pad is
lighted, and press the [¹] button.
Successful: "Too~~~t" sound is generated.
Failed: "Toot~" sound is generated.
To ot ÆToot, toot
Registered cards cannot be individually deleted. All card information is deleted when the
card delete function is selected. Previously registered cards cannot be used to open the
locked door after they are deleted.
- Register a new card after deleting the card data.
- To open the locked door from outside after deleting card data, use the registered
password.
- Deleting the card or key tag is available while the door is open.
21
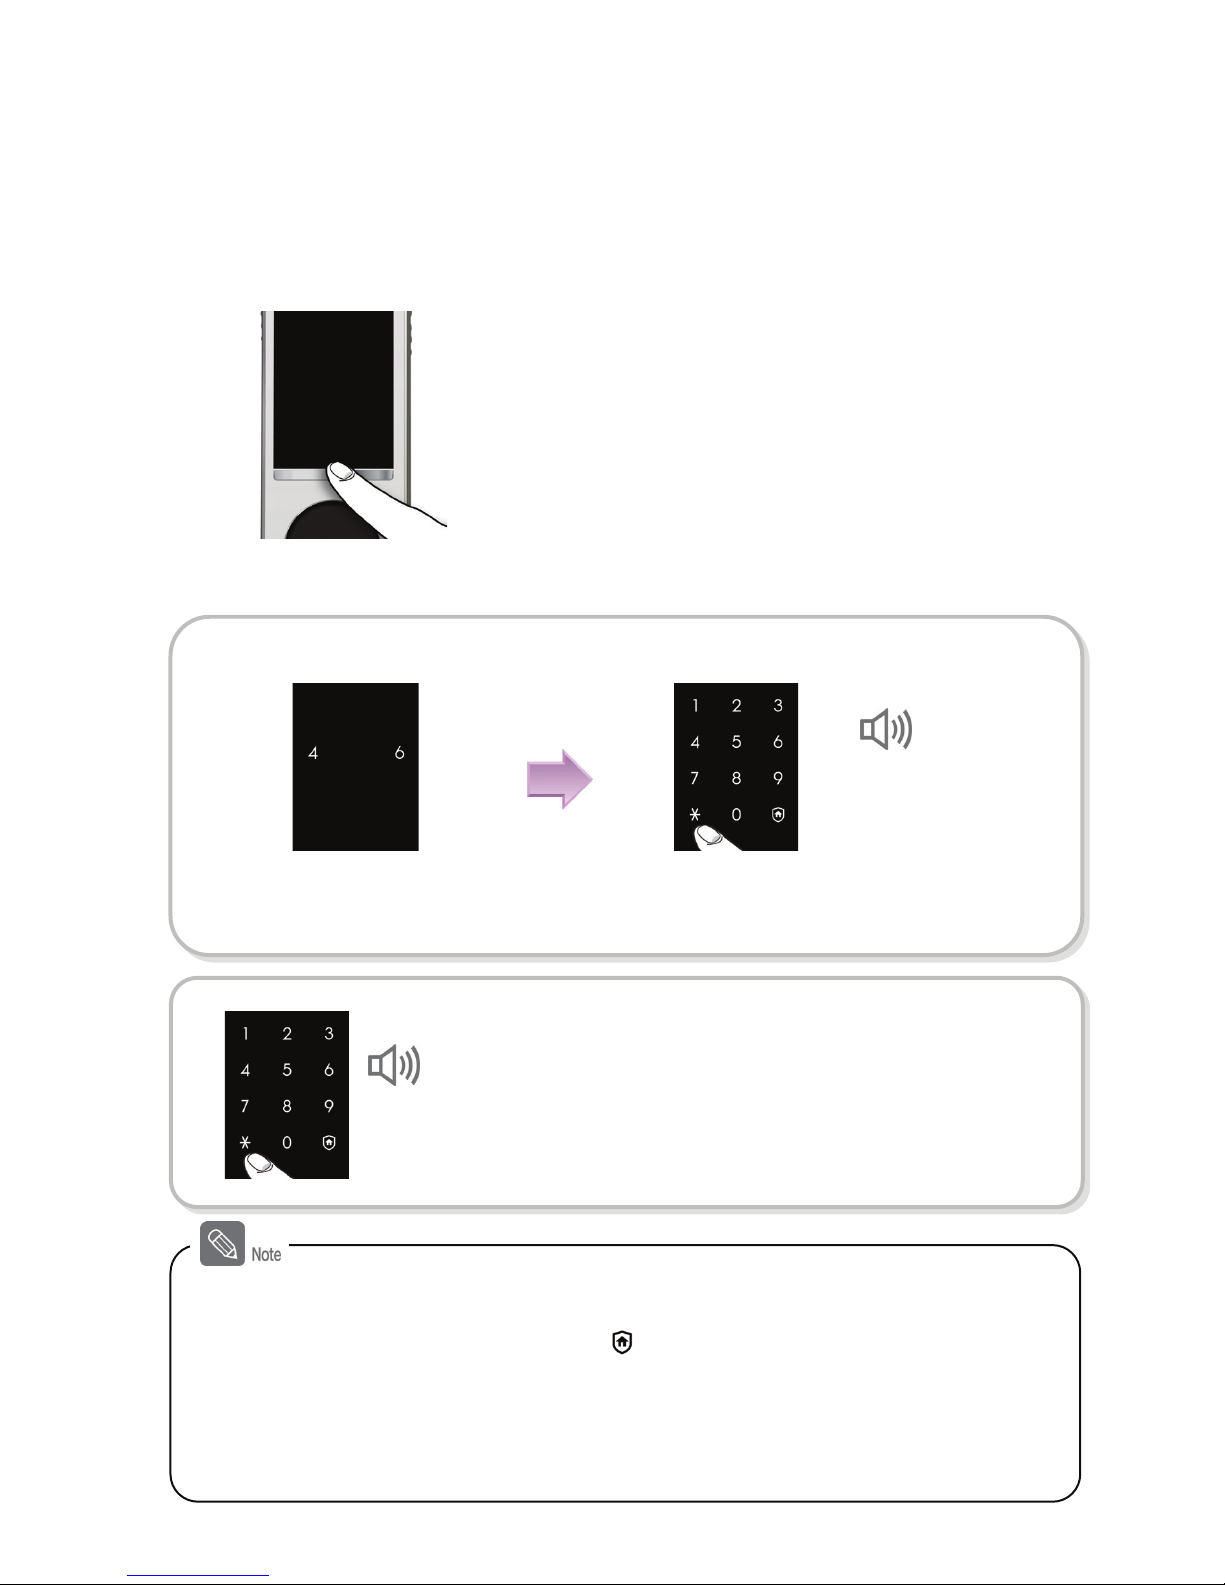
Opening the Door from Outside with a
Password
1. Pressing the [Enter Number] Button
When the [Enter Number] button is
pressed, the number pad is lighted.
2. Entering the Password
- The password must be entered while the number pad is lighted. If the light is turned off, press
the [Enter Number] button and reenter the password.
- If the wrong password is entered, press the [
] button to cancel the entry and start from the
beginning.
- If the wrong password is entered 5 times in a row, a “toot~ toot~ toot~” alarm will sound 20
times and the lock will stop operating for 3 minutes. While the door is in this inactive mode, a
single “toot” sound is generated every 10 seconds and seven consecutive “toots” will sound
after 3 minutes. Following this, the lock is released from the inactive mode.
Multi-leveled Security Code Entry Mode
When the numbers on the number pad
are lighted, enter the password and press
the [º] button.
When two arbitrary buttons are lighted, press
the buttons in order.
Success:
“Too~~~t”
Fail: “Toot~”
Common Mode
Enter the password when the number pad is
lighted, and press the [º] button.
Success:
“Too~~~t”
Fail: “Toot~”
22
- The card reader will operate properly when a key tag and a transportation card are placed
within 20mm and within 10mm of the card reader, respectively.
- The recognition distance may differ depending on the card manufacturer.
- A “toot~” alarm sound is generated when an unregistered card is placed or the card is
not recognized.
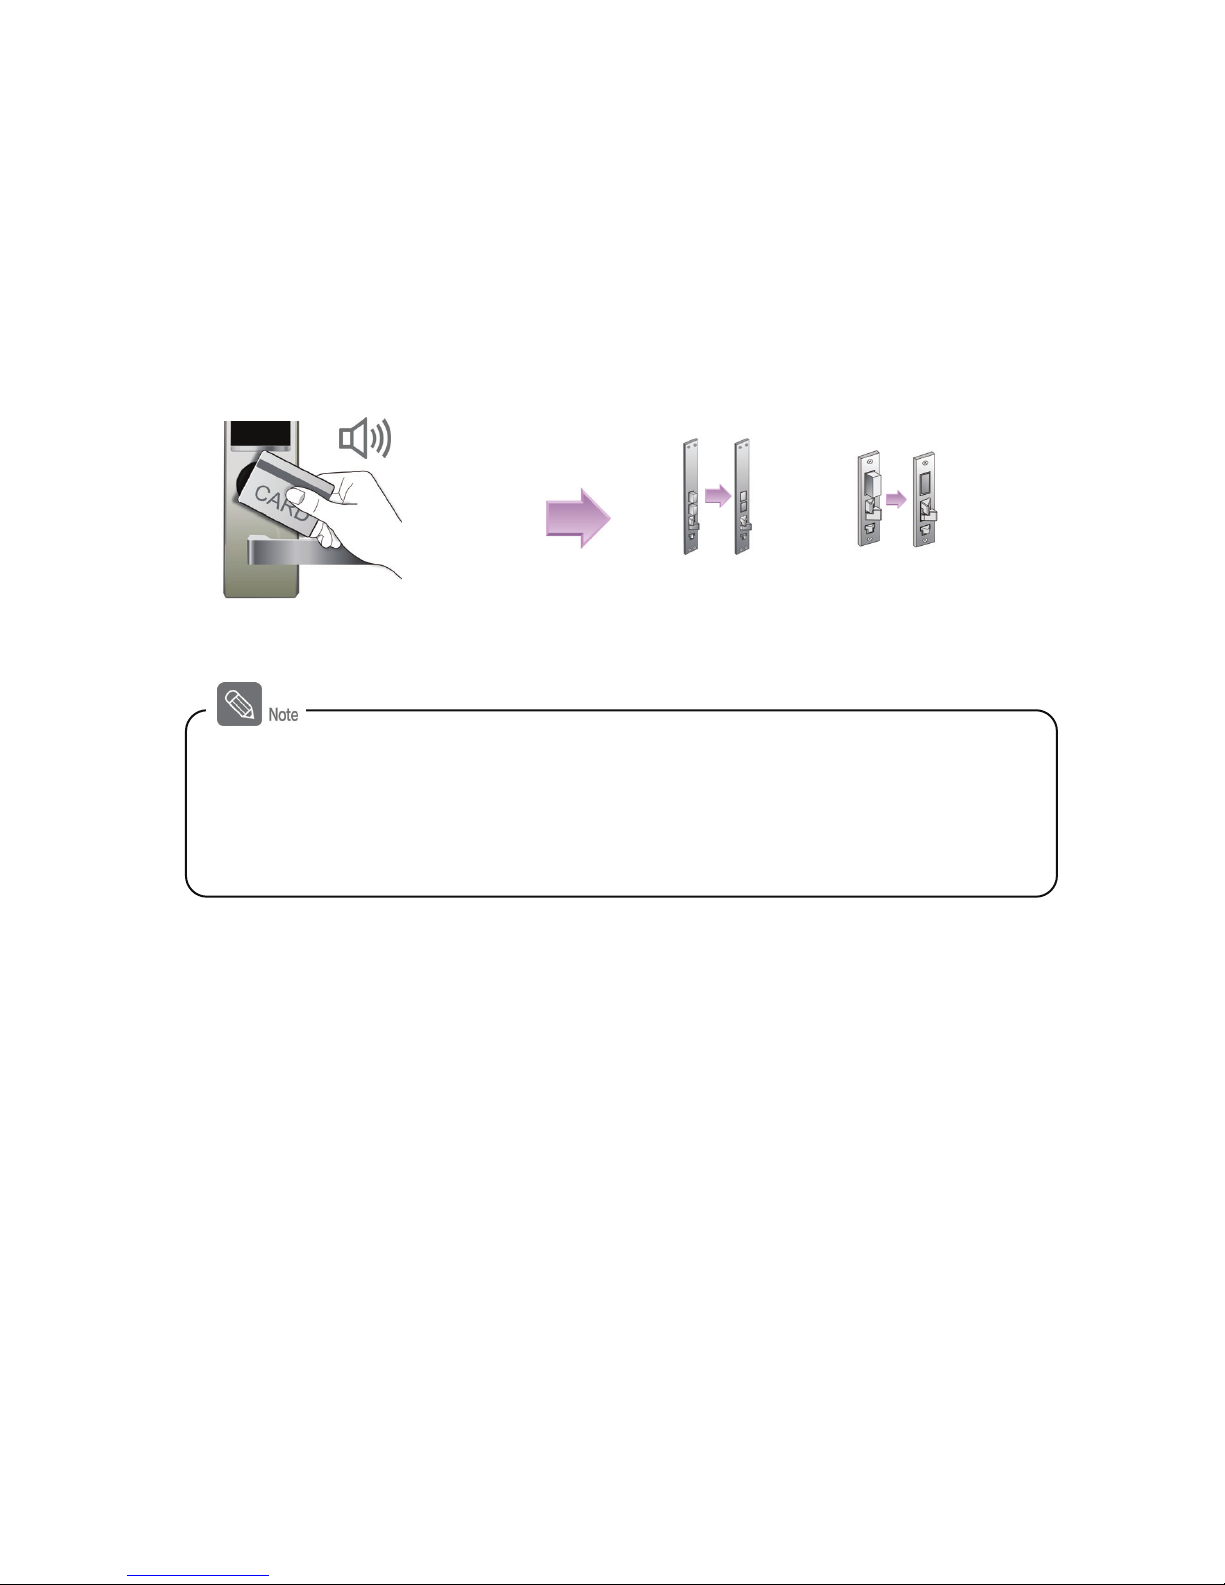
Opening the Door from Outside with a
Card or Key Tag
The door can be opened from outside using a card or key tag. Place the registered
card or key tag on the card reader.
Applying the Card or Key Tag
The door will be opened after
1 second.
Place the card or key
tag on the card reader.
Success:
“Too~~~t”
Fail: “Toot~”
Or
SHS- AML320 SHS-AML220
23
Opening the Door from the Inside
Open the locked door using the lock handle from the inside.
Pulling down the Door Lock Handle
Rotate the door lock handle of the inner body
downward.
Rotating the Manual Open/Close Lever to the Right or Left
Rotate the manual Open/Close lever to the
right or left to lock the door or release the
locking.
- This function operates regardless of batteries.
24
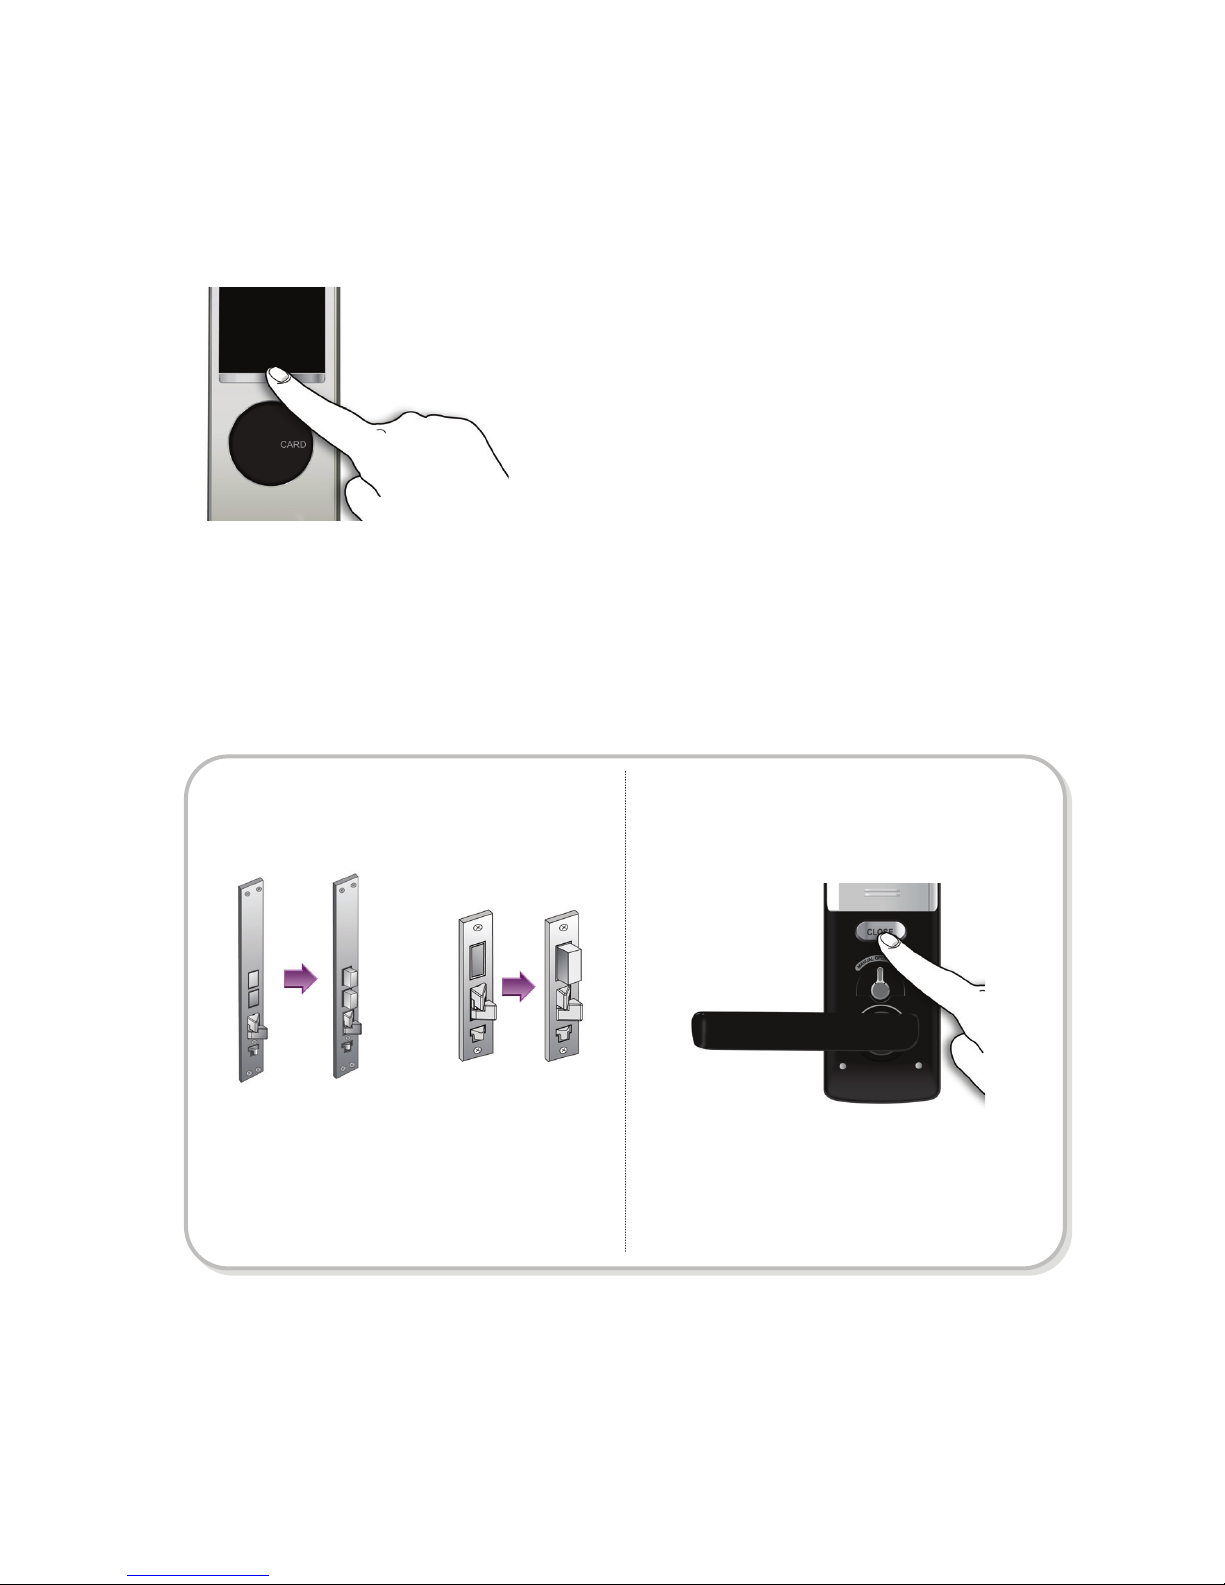
Closing the Door from the Outside
Pressing the [Enter Number] Button
When you come out opening the door from the
inside in the Manual Locking mode, press the
[Enter Number] button on the outer body.
Closing the Door from the Inside
In the Automatic Locking
Mode
In the Manual Locking
Mode
The door is automatically locked 2 seconds
after the door is closed.
The door is locked when the [Close] button is
pressed, or the manual Open/Close lever is
rotated.
Or
SHS-AML320 SHS-AML220
 Loading...