

Samsung SGH-x506 Series User Manual

UZFD2_cb_x506_051706_F2
SGH-x506 Series
PORTABLE Quad-BAND
MOBILE PHONE
User Guide
Please read this manual before operating your
phone, and keep it for future reference.

Intellectual Property
All Intellectual Property, as defined below, owned by or
which is otherwise the property of Samsung or its
respective suppliers relating to the SAMSUNG Phone,
including but not limited to, accessories , parts, or
software relating there to (the “Phone System”), is
proprietary to Samsung and protected under federal
laws, state laws, and international treaty provisions.
Intellectual Property includes, but is not limited to,
inventions (patentable or unpatentable), patents, trade
secrets, copyrights, software, computer programs, and
related documentation and other works of authorship.
You may not infringe or otherwise violate the rights
secured by the Intellectual Property. Moreover, you
agree that you will not (and will not attempt to) modify,
prepare de rivative works of, reverse engineer,
decompile, disassemble, or otherwise attempt to create
source code from the software. No title to or ownership
in the Intellectual Property is transferred to you. All
applicable rights of the Intellectual P roperty shall
remain with SAMSUNG and its suppliers.
Samsung Telecommunications America (STA),
L.P.
Headquarters: Customer Care Center:
1301 E. Lookout Drive 1000 Klein St.
Richardson, TX 75082 Plano, TX 75074
Toll Free Tel: 1.888.987.HELP
(4357)

Internet Address: http://www.samsungusa.com
©
2006 Samsung Telecommunications America, L.P. is a
registered tradema rk of Samsung Electronics America,
Inc. and its related entities.
GH68-09276A
Printed in Korea
Openwave® is a register ed Trademark of Openwave, Inc.
RSA® is a registered Trademark RSA Security, Inc.
Disclaimer of Warranties; Exclusion of Liability
EXCEPT AS SET FORTH IN THE EXPRESS
WARRANTY CONTAINED ON THE WARRANT Y
PAGE ENCLOSED WITH THE PRODUCT, THE
PURCHASER TAKES THE PRODUCT "AS IS", AND
SAMSUNG MAKES NO EXPRESS OR IMPLIED
WARRANTY OF ANY KIND WHATSOEVER WITH
RESPECT TO THE PRODUCT, INCLUDING BUT NOT
LIMITED TO THE MERCHANTABILITY OF THE
PRODUCT OR ITS FITNESS FOR ANY PARTICULAR
PURPOSE OR USE; THE DESIGN, CONDITION OR
QUALITY OF THE PRODUCT; THE PERFORMANCE
OF THE PRODUCT; THE WORKMANSHIP OF THE
PRODUCT OR THE COMPONENTS CONTAINED
THEREIN; OR COMPLIANCE OF THE PRODUCT
WITH THE REQUIREMENTS OF ANY LAW, RULE,
SPECIFICATION OR CONTRACT PERTAINING
THERETO. NOTHING CONTAINED IN THE
INSTRUCTION MANUAL SHAL L BE CONSTRUED T O
CREATE AN EXPRESS OR IMPLIED WARRANTY OF

ANY KIND WHATSOEVER WITH RESPECT TO THE
PRODUCT. IN ADDITION, SAMSUNG SHALL NOT
BE LIABLE FOR ANY DAMAGES OF ANY KIND
RESUL TING FROM THE PURCHASE OR USE OF TH E
PRODUCT OR ARISING FROM THE BREACH OF
THE EXPRESS WARRANTY, IN CLUDING
INCIDENTAL, SPECIAL OR CONSEQUENTIAL
DAMAGES, OR LOSS OF ANTICIPATED PROFITS OR
BENEFITS.

Table of Contents 1
Table of Contents
Table of Contents
Section 1: Getting Started .................................5
Activating Your Phone ......................................................6
Powering On or Off the Phone ........................................10
Setting Up Your Voice Mail .............................................10
Section 2: Understanding Your Phone ............13
Features of Your Phone ..................................................14
Front Views of Your Phone ..............................................14
Internal Display Layout ................................................... 18
Selecting Functions and Options ....................................20
Command Keys ..............................................................21
Section 3: Call Functions .................................25
Making a Call .................................................................26
Adjusting the Call Volume ...............................................28
Answering a Call ............................................................28
Recent Calls ...................................................................29
Quiet Mode ....................................................................32
Options During a Call .....................................................32
Section 4: Menu Navigation ............................37
Menu Navigation ............................................................38
In Use Menu Outline .......................................................39
Menu Outline .................................................................40
Section 5: Entering Text ..................................47
Changing the Text Input Mode ........................................48
Using T9 Mode ...............................................................49
Using ABC Mode ............................................................51
Using Symbols ...............................................................52
Using Numbers ..............................................................52
Section 6: Understanding Your Contacts List .53
Using Contacts List ........................................................54

Table of Contents
2
Adding a New Contact ....................................................55
Group .............................................................................59
Speed Dial ......................................................................61
My Name Card ...............................................................63
Finding My Own Phone Number .....................................64
Management ..................................................................64
Section 7: Messaging ......................................69
Types of Messages .........................................................70
Creating and Sending New Messages .............................70
Retrieving New Messages ..............................................77
Viewing Messages ..........................................................78
Managing Your Own Message Folders ............................80
Using Message Options ..................................................82
Using Message Templates ..............................................84
Deleting Messages .........................................................85
Settings ..........................................................................86
Memory Status ...............................................................89
Section 8: Changing Your Settings .................91
Time & Date ...................................................................92
Phone Settings ...............................................................93
Display Settings .............................................................97
Sound Settings ...............................................................99
Network Services .........................................................102
Security ........................................................................107
Connection Settings .....................................................111
Reset Settings ..............................................................112
Section 9: Games ...........................................113
Games Menu ................................................................114
Getting Games ..............................................................114
My Games ....................................................................115
Section 10: Applications ................................117
Alarm ...........................................................................118

Table of Contents 3
Table of Contents
Calculator ....................................................................120
Record Audio ...............................................................121
Converter .....................................................................123
Timer ........................................................................... 123
Stopwatch .................................................................... 123
World Time ..................................................................124
Section 11: Calendar .....................................125
Calendar Options ..........................................................126
View Mode ...................................................................126
Create .......................................................................... 127
Go to ............................................................................134
Sort by .........................................................................134
Delete ..........................................................................134
Missed Alarm Events ....................................................135
Memory Status .............................................................135
Section 12: File Manager ...............................137
File Manager Menu ......................................................138
Audio ...........................................................................138
Graphics ......................................................................142
Video ...........................................................................143
Other Files ...................................................................144
Memory Status .............................................................145
Section 13: Internet .......................................147
Internet Options ...........................................................148
Favorites ...................................................................... 148
Go to URL .....................................................................150
Browser Profiles ...........................................................150
Clear Cache .................................................................152
Section 14: Health and Safety Information ...153
Health and Safety Information ......................................154
UL Certified Travel Adaptor ...........................................156
Consumer Information on Wireless Phones ...................157

Table of Contents
4
Road Safety ..................................................................166
Operating Environment .................................................168
Potentially Explosive Environments ...............................170
Emergency Calls ...........................................................171
FCC Notice and Cautions ..............................................172
Other Important Safety Information ...............................173
Product Performance ....................................................174
Availability of Various Features/Ring Tones ...................175
Battery Standby and Talk Time .....................................176
Battery Precautions ......................................................176
Care and Maintenance ..................................................178
Section 15: Warranty Information .................181
Standard Limited Warranty ...........................................182
Index ..............................................................189

Section 1: Getting Started 5
Section 1
Section 1: Getting Started
Topics Covered
• Activating Your Phone
• Powering On or Off the Phone
• Setting Up Your Voice Mail
This section describes how to start using your phone
by activating your servic e and setting up your Voice
Mail.
6
Section 1
Activating Your Phone
When you subscribe to a cellular network, a plug-in
SIM card is pro vided loaded with your subscription
details, such as your PIN and other optional services
available.
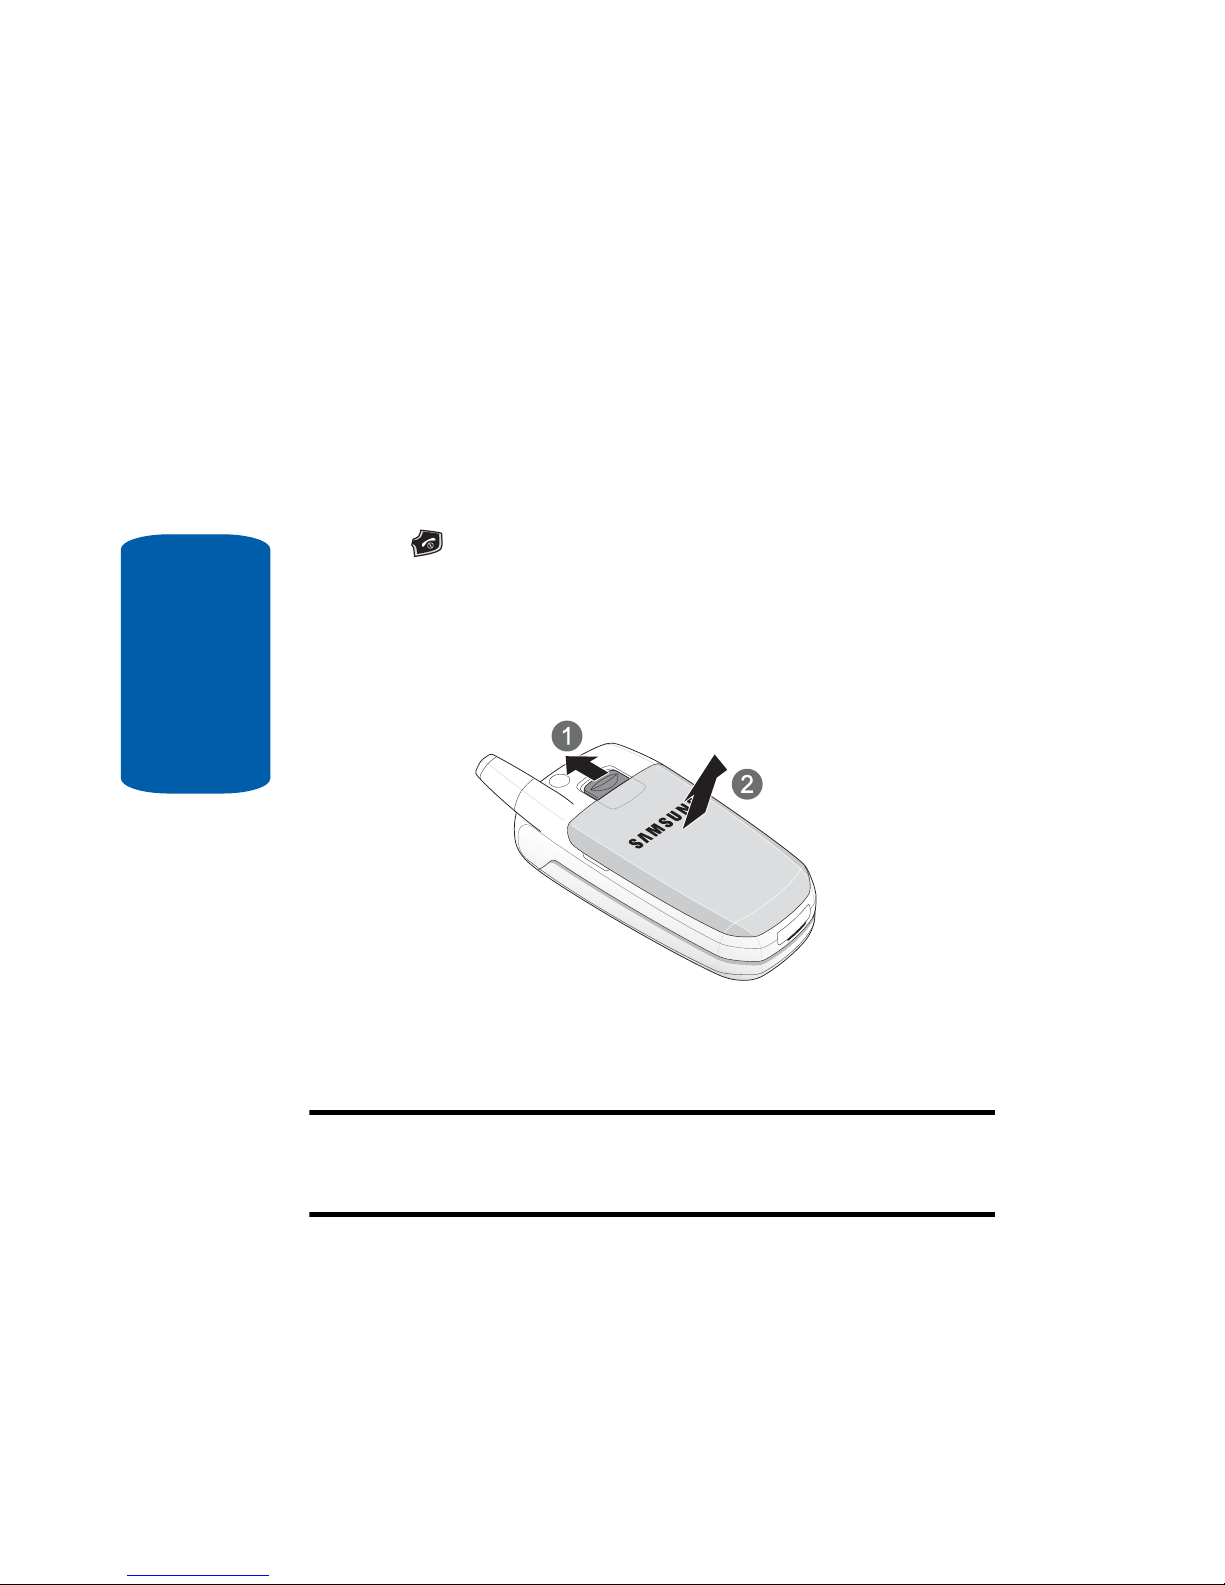
Removing the Battery
1. If necessary, power-off the phone by holding down the
key until the power-off image displays.
2. Remove the battery by 1) sliding the battery lock up and
holding it in position, then 2) lift the battery away, as
shown.
Installing the SIM Card
Important! The plug-in SIM card and its contacts can be easily damaged
by scratches or bending. Use caution when insert ing or removing the card
and keep all SIM cards out of reach from children.
Make sure the gold contacts of the card face into the
phone, then slide the SIM card into the socket.

Section 1: Getting Started 7
Activating Your Phone
Section 1
Removing the SIM Card
To remove the SIM card, slide it away from the crossbar. See the following illustration.
Installing the Battery
1. Align the battery tabs with the slots at the bottom of the
phone.
2. Press the battery down until it clicks into place. Make
sure that the battery is properly installed before
switching on the phone.

8
Section 1
Charging a Battery
Your phone is powered by a r echargeable Li-ion ba ttery.
Use the travel adapter to charge the battery, and use
only Samsung approved batteries and chargers.
Note: You must fully charge the battery before using your phone for the
first time. A discharged battery recharges fully in approximately 2–3 hours.
You can use the phone while the battery is charging, but this causes the
phone to charge more slowly.
Note: For connection to an electrical supply not located in the U.S., you
must use an adapter of the proper configuration for the power outlet. Use
of the wrong adapter could damage your phone and void your warranty.
1. With the battery in position on the phone, plug the
connector of the travel adapter into the jack at the
bottom of the phone.
Section 1: Getting Started 9
Activating Your Phone
Section 1
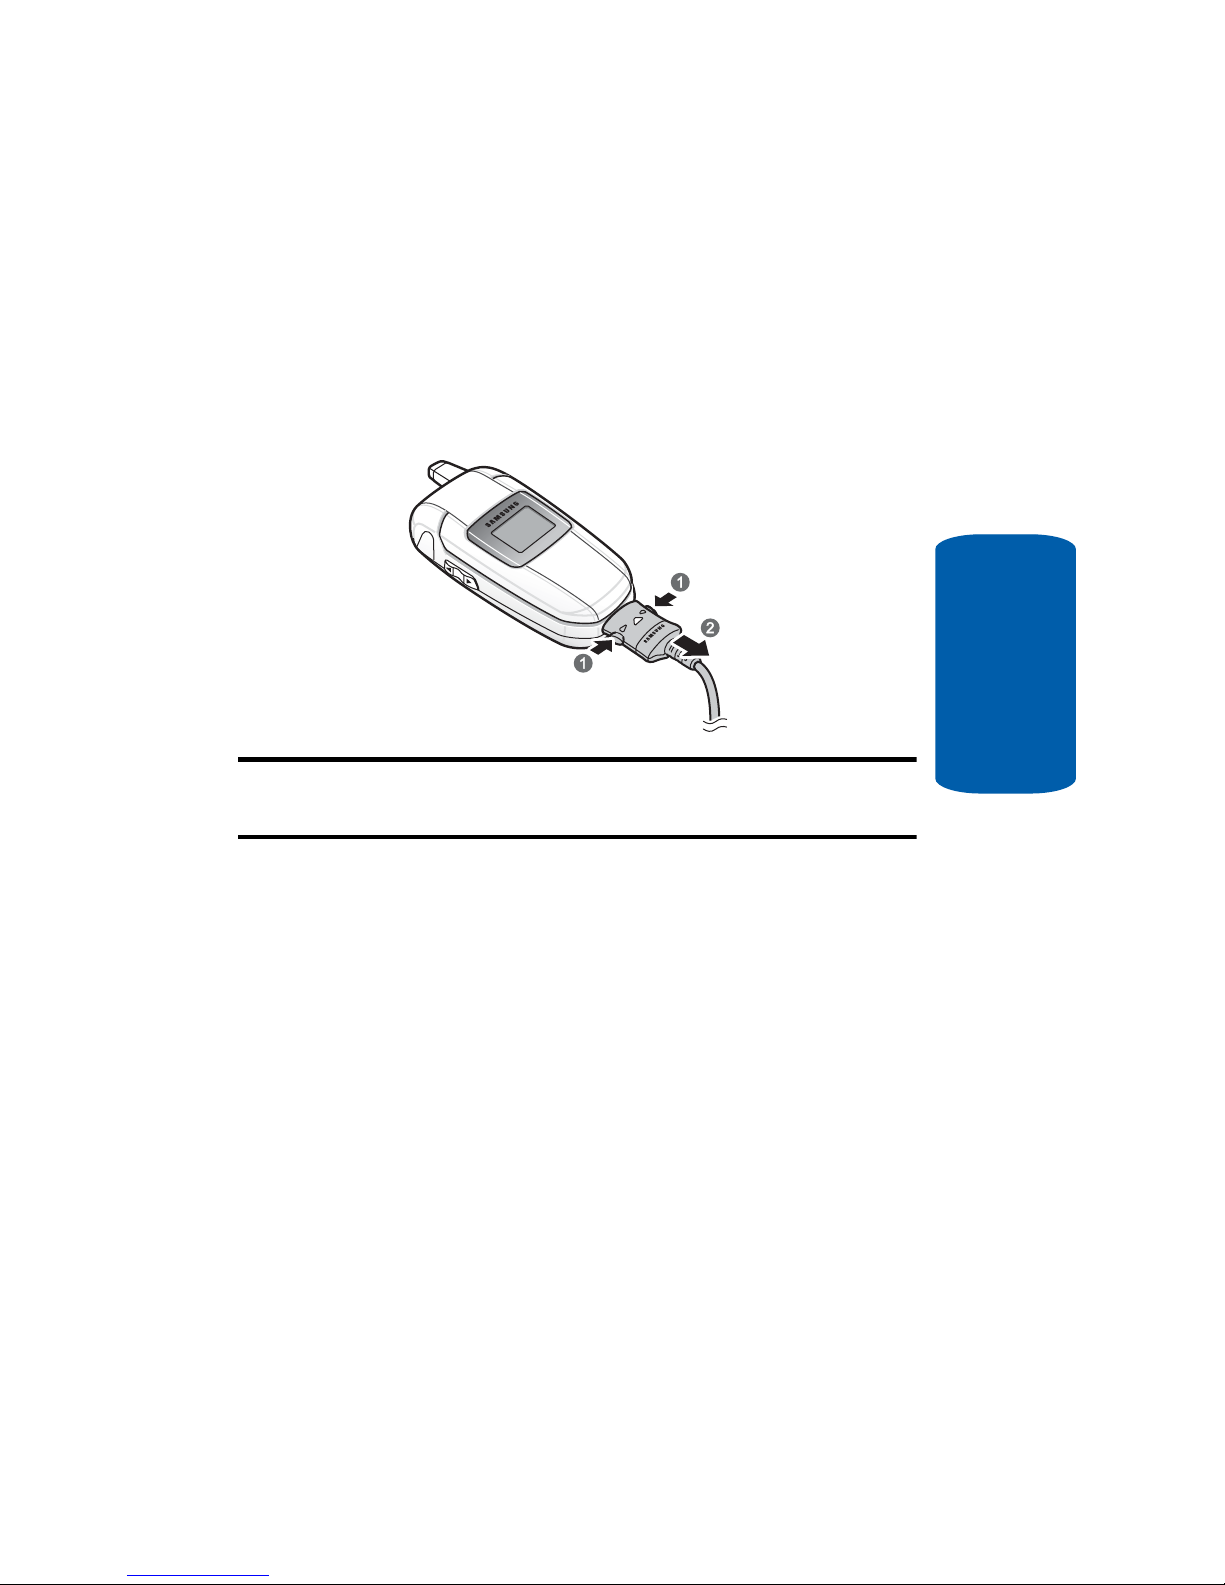
2. Plug the adapter into a standard AC wall outlet. When
charging is finished, unplug the adapter from the power
outlet.
3. Press the buttons on both sides of the connector (1) and
(2) pull the connector out.
Note: You must unplug the adapter before removing the battery from the
phone during charging to avoid damage.
Low Battery Indicator
When the battery is weak and only a fe w minutes of
talk time remain, a warning tone sounds and the
“Warning Low Battery” message repeats at regular
intervals on the display. The backlight turns off to
conserve the remaining battery power.
When the battery level becomes too low, the phone
automatically turns off.

10
Section 1
Powering On or Off the Phone
1. Open the phone.
2. Press and hold the key until the phone power-on
screen displays.
3. If the phone is locked, enter the phone password and
press the OK soft key or the key. The password is
preset to “00000000” at the factory. For further details,
see “Change Password” on page 109.
4. If the phone asks for a PIN, enter the PIN and press the
OK soft key or the key. For further details, see “PIN
Check” on page 108.
The phone searches for your network and after finding it,
the Idle screen displays. Now, you can make or receive
calls.
Note: The display language is preset to Automatic at the factory. To change
the language, use the Language menu. For further details, see
“Language” on page 94.
5. When you wish to switch off the phone, press and hold
the key until the power-off image displays.
Setting Up Your Voice Mail
To access you voice mail from your keypad, use the
following steps:
1. Open the phone to access your keypad.
2. From an Idle screen, press and hold the key.
3. Follow the voice mail prompts to access messages.

Section 1: Getting Started 11
Setting Up Your Voice Mail
Section 1
Accessing Your Voice Mail
1. In Idle mode, press the Menu soft key to access Menu
mode.
2. Highlight Recent Calls and press the Select soft key or
the key.
3. Highlight Voice Mail and press the Select soft key or the
key.
4. Highlight Connect to Voice Mail and press the OK soft
key or the key.
5. Voice Server appears in the display.
6. Press the OK soft key or the key to dial your phone
specified voice mail number.
7. When connected, follow the voice prompts from the
voice mail center.
Changing the Voice Mail Number
Your SIM card gives you the default service number of
the voice mail center. However, you may need to
change the number. Use the following procedures to
change your voice mail number.
1. In Idle mode, press the Menu soft key to access Menu
mode.
2. Highlight Recent Calls and press Select soft key or the
key.
3. Highlight Voice Mail and press the Select soft key or the
key.
4. Highlight Voice Server Number and press the OK soft
key or the key.

12
Section 1
5. Highlight Voice Server and press the OK soft key or the
key.
6. Press the Edit soft key to modify the number.
Note: Pressing the key takes you directly into Edit mode.
7. Enter your new Voice Server number and press the OK
soft key to save.
8. Press the key to return to Idle mode.

Section 2: Understanding Your Phone 13
Section 2
Section 2: Understanding Your Phone
Topics Covered
• Features of Your Phone
• Front Views of Your Phone
• Internal Display Layout
• Selecting Functions and Options
• Command Keys
This section outlines some key features of your
phone. It also displays the screen and the icons that
are displayed when the phone is in use.
14
Section 2
Features of Your Phone
Your phone is lightweight, easy-to-use and offers many
significant features. The following list outlines a few of
the features included in your phone.
User friendly, menu driven access to features and
options.
• Multimedia capability
• Speakerphone capability
• Featured applications provide alarms, calendar, calculator,
record audio, converter, timer, stopwatch, and world time.
Front Views of Your Phone
The following illustrations show the main elements of
your phone.
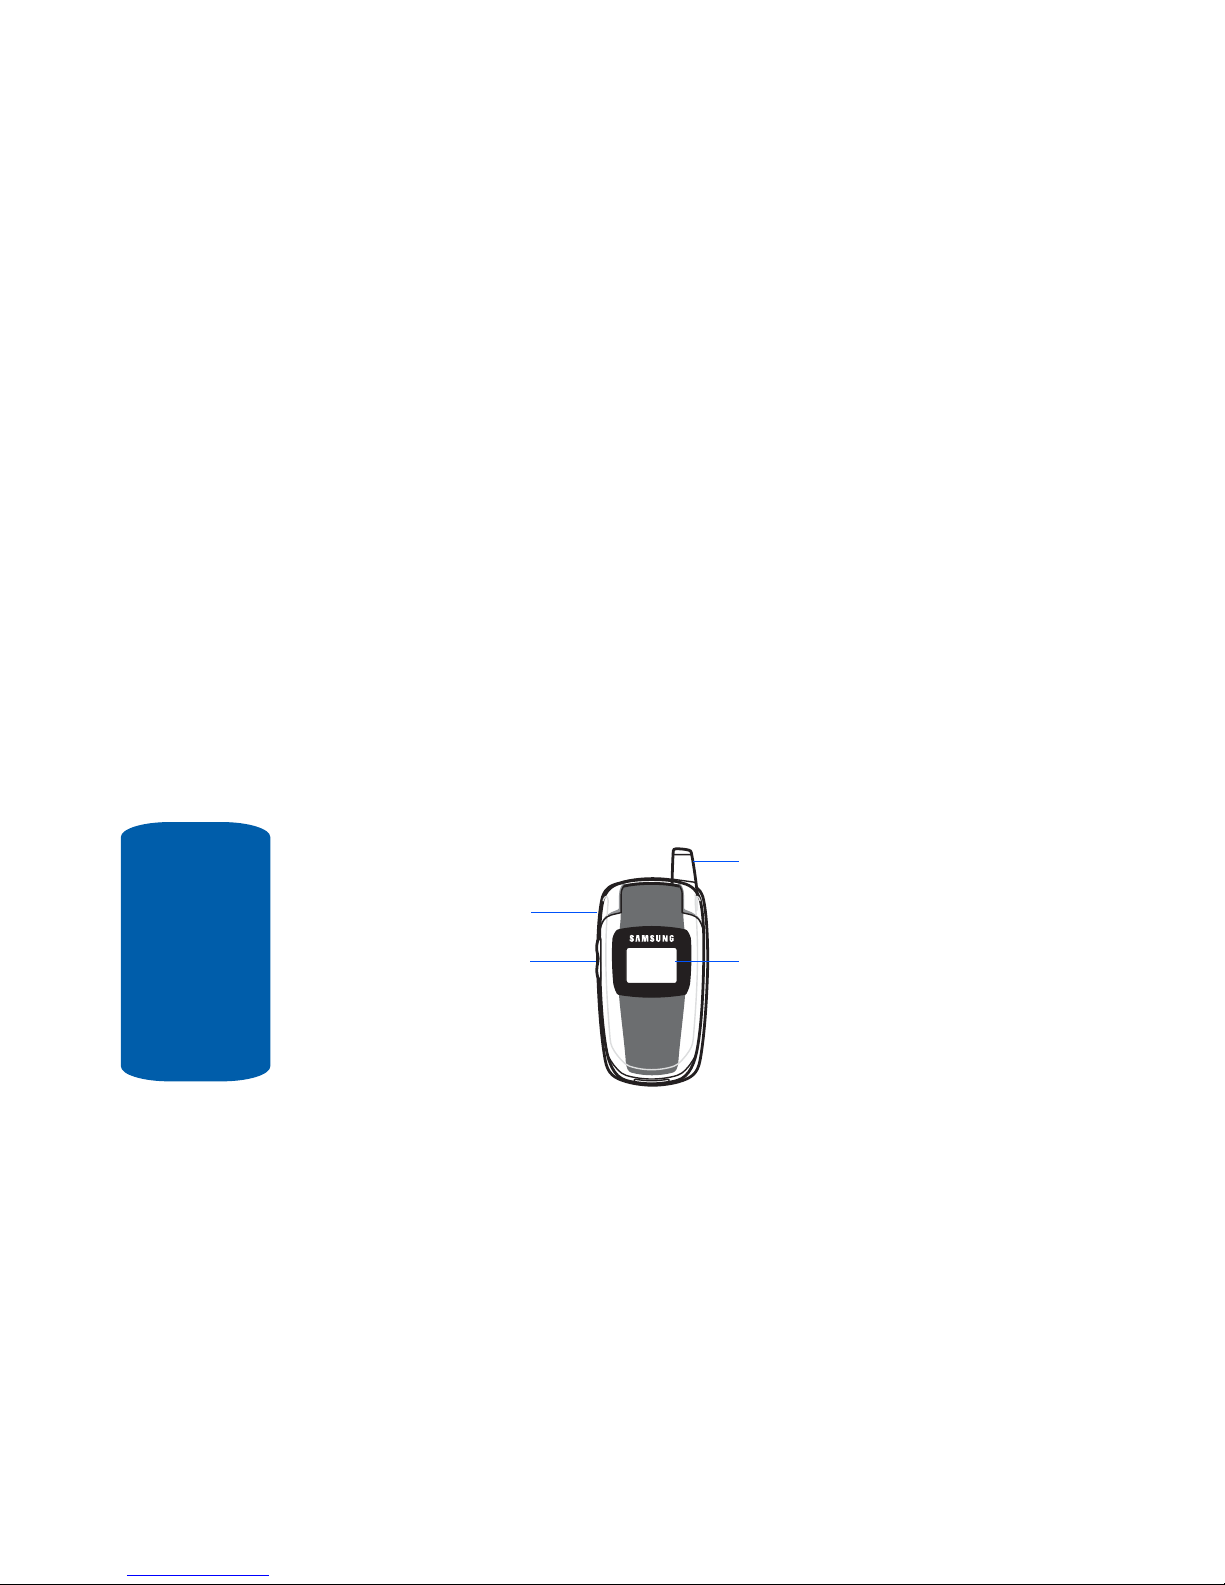
Front Closed View
Keys
The following list correlates to the open and front view
illustrations.
1. Headset Connector — Allows you to plug in a headset
for safe, convenient, hands-free conversations.
3. Front LCD
1. Headset
Connector
2. V o lume/Menu
Navigation Key
4. Antenna

Section 2: Understanding Your Phone 15
Front Views of Your Phone
Section 2
2. Volume/Menu Navigation key — Allows you to adjust
the ringer volume in standby mode or adjust the voice
volume during a call. The volume key can also be used to
scroll up or down to navigate through the different menu
options. To mute the ringer during an incoming call,
press the volume key up or down.
3. Front LCD — Your phone has an external display on the
front of the phone. It indicates when you have an
incoming call or message. It also displays date, time,
reception, battery power, and any icons associated with
alerts, such as messages, or a set alarm.
4. Antenna — Used to obtain maximum reception.
16
Section 2
Front Open View
Keys
The following list correlates to the open and front view
illustrations.
1. Display — This screen displays all the information
needed to operate your phone.
2. Soft key — Performs the functions indicated by the
screen text on the bottom of the display.
14. Earpiece
1. Display
2. Soft Key (Left)
2. Soft Key (Right)
3. Send Key
4. Clear Key
5. Voice Mail Key
6. Asterisk/Shif t
Key
7. Power Interface
Connector
8. Microphone
9. Pound/Space/
Quiet Mode Key
10. Alphanumeric
Keypad
11. End Key
12. W AP Browser
Menu Confirm Ke
y
13. Navigation Key

Section 2: Understanding Your Phone 17
Front Views of Your Phone
Section 2
3. Send key — Allows you to place or receive a call. In
standby mode, press the key once to access the Recent
Call log. If you press and hold the key down, you will
initiate the most recent call from the Recent Call log.
4. Clear key — Deletes characters from the display when
you are in text entry mode. When in a main menu, press
to return to the previous menu.
5. Voice Mail key — Press and hold to automatically dial
your Voice Mail.
6. Asterisk/Shift key —
Enters the [*] character for calling
features. In text mode, press to change the character
input type.
7. Power Interface Connector — The power interface
connector is used to plug in the charging accessories.
8. Microphone — The Microphone allows the other callers
to hear you clearly when you are speaking to them.
9. Pound/Space/Quiet Mode key — Enters the pound
[#]
character for calling features. In text entry mode, press
to enter a space between characters. Press and hold to
place handset in Quiet mode.
10.Alphanumeric keypad — Use these keys to enter
numbers, letters and characters.
11.End key — Ends a call. Press and hold this key for a
few seconds to power your phone On or Off. While in the
main menu, it returns the phone to standby mode and
cancels your input. When you receive an incoming call,
press to reject call.
18
Section 2
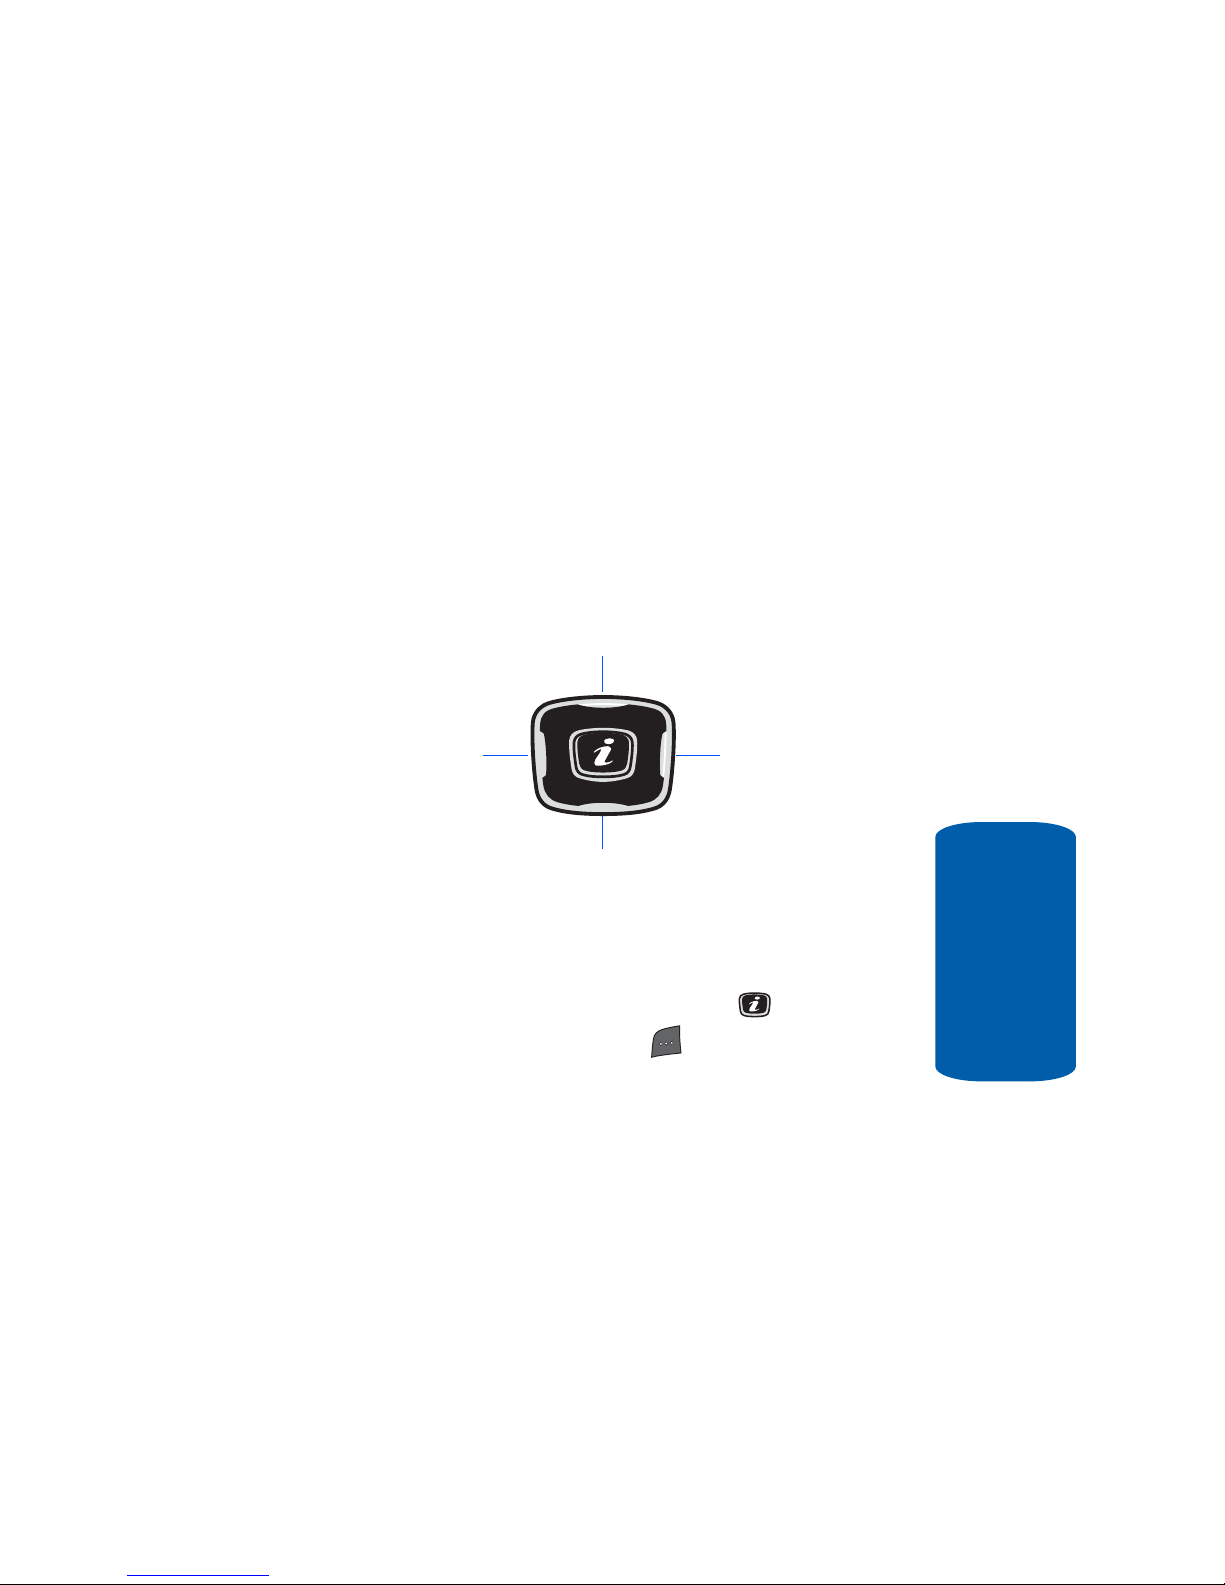
12.WAP Browser/Menu confirm key — When navigating
through a menu accepts the highlighted choice in the
menu. If you press once in Idle mode, the WAP browser
will launch.
13.Navigation key — This key allows you to scroll through
phone menu options and provides a shortcut to phone
functions from standby mode.
14.Earpiece — The earpiece allows you to hear the other
caller .
Back Light
A back light illuminates the display and the ke ypad
when you press any key or open the phone. It turns off
when no keys are pressed within a given period of
time, and/or dims the light, depending on the settings
in the Back Light menu.
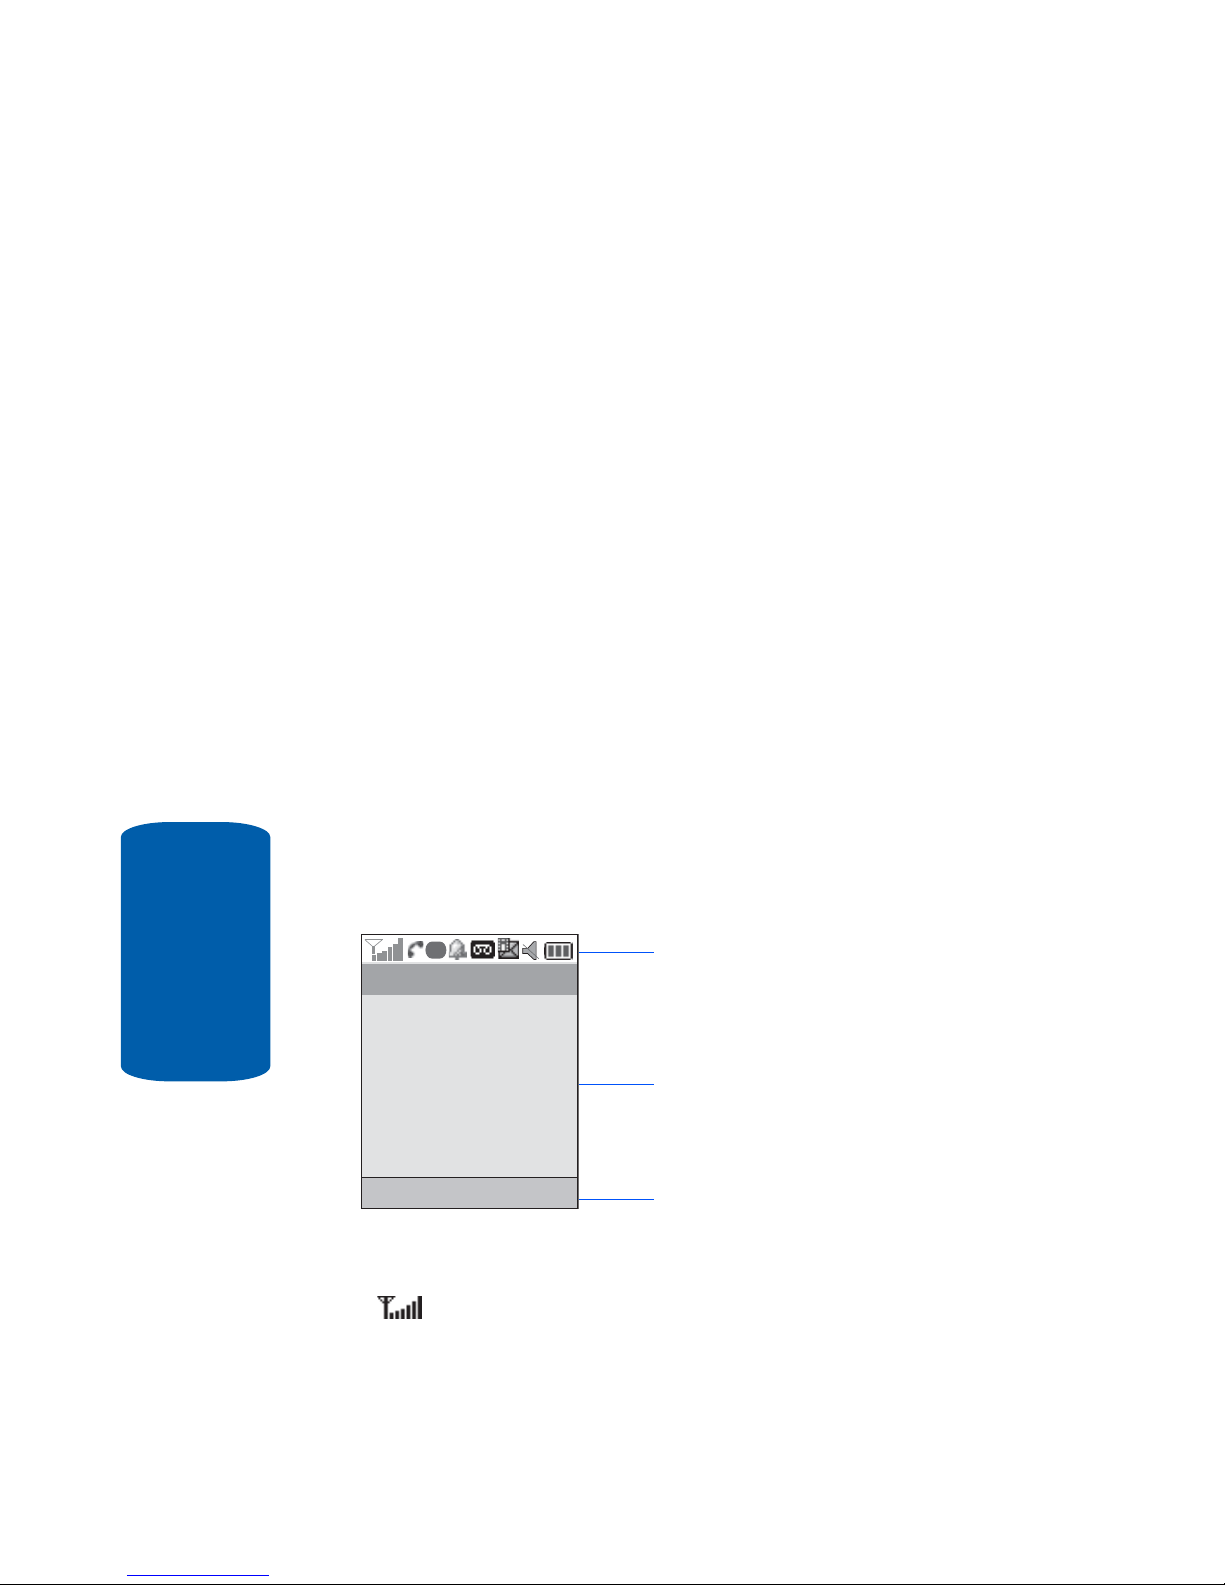
Internal Display Layout
The display has 3 areas:
Icons
Shows the received signal strength. The greater the
number of bars, the stronger the signal.
Icons
Text and graphics area
Soft key function indicators
G
Menu
Contacts

Section 2: Understanding Your Phone 19
Internal Display Layout
Section 2
Appears when a new text me ssage has be en received.
Appears when a new voice mai l has be en r eceive d .
Appears when a new multimedia message has been
received.
Appears when you set an alarm to ring at a specified time.
For details, see page “Alarm” on page 118.
Appears when you there is no network coverage available .
Appears when a call is in progress.
G
Appears when you are connected t o a WAP service.
Appears when the Call Forwarding feature is active. For
details, see page “Call Forwarding” on page 103.
Appears when incoming call Ale rt Type is set to Vibration.
Appears when an incomi ng cal l Alert Type is s et t o
Vibration then Melody.
Appears when Quiet Mode, Silent All is act ive.
Appears when Quiet Mode, Vibration All is active.
Shows the level of your battery. The more bars you see,
the more power you have remaining.

20
Section 2
Selecting Functions and Options
Your phone offers a set of functions that can be
customized for your ease and specific needs. These
functions are arranged in menus and sub-menus,
accessed using the two soft keys. Each menu and submenu allows you to view and alter the settings of a
particular function.
In some functions, you may be asked for a password or
PIN. Enter the code and press the OK soft key or the
key.
When you access a list of options, your phone
highlights the currently active option. If, however, there
are only two options, such as On/Off or Enable/
Disable, your phone highlights the option that is not
currently active, so that you ca n select it directly.
Selecting Options
To view the various functions and options available
and to select the one you want:
• Press the appropriate soft key.
• To select the function displayed or the option highlighted, press
the Select soft key or the key.
• To view the next function or highlight the next option on a list,
press the Down key or the key on the left side of the phone.
• To move back to the previous function or option on a list, press
the Up key or the key on the left side of the phone.
• To move back up one level in the menu structure, press the Left
navigation key or the Back soft key.
• To exit the menu structure without changing the settings, press
the key.

Section 2: Understanding Your Phone 21
Command Keys
Section 2
Command Keys
Functions for the soft keys are defined by what appears
above each in the di splay. There are two soft keys, the
left soft key and the right soft key .
Soft Keys
The roles of the soft keys vary depending on the
function you are currently using; the labels on the
bottom line of the display just abov e each key indicate
their current role.
Left Soft Key
Some functions of the left soft key are as follows.
• In the Idle screen, press the Menu (left) soft key to open
the Menu screen.
• When in a menu mode the left soft key function is Select.
Right Soft Key
Some functions of the right soft key are as follows.
• In the Idle screen, press the Contacts (right) soft key to
open your Contacts List.
• When in a menu mode the right soft key function is Back.
Right soft key
Left soft key

22
Section 2
Clear Key
The CLR key is used to erase or clear numbers, text,
or symbols from the display. You can also use to
return to a previous menu or to r eturn to standby mode
from any menu.
• If you enter an incorrect character, briefly press to
backspace (and delete) the character.
• To erase the entire sentence, press and hold .
• To back up one menu level, briefly press .
End Key
The End key is used to turn on/off your phone,
disconnect calls, and return to the standby mo de.
• Press and hold the End key to turn on your phone.
• Briefly press once to disconnect a call.
• Press to return to standby mode from any menu, or to
cancel the last input.
Send Key
The Send key is used to answer calls, di al cal ls, and
to recall the last number(s) dialed, received, or missed.
• Press once to ans wer calls.
• Enter a number and briefly press to make a call.
• Briefly press in standby mode to display a list of recent calls
to and from your phone.
• Press twice in standby mode to call the most recent
number.
• Press to pick up a waiting call. Press again to switch
back to the other call.
Section 2: Understanding Your Phone 23
Command Keys
Section 2
Navigation Key
Use the directional keys on the navigation key to
browse menus, sub-menus, and lists. Press the up or
down navigation when jumping to highlighted links on
the web.
Each key also acts as a shortcut to launch applications.
All navigation keys are setup as *User-Defined
Shortcut Keys. To set the shortcut key functions see
“Short Cut” on page 94.
Speakerphone Key
During a call, use the speakerphone key in
conjunction with the left soft key to activate the
speakerphone operation. Use the volume keys (located
on the left side of your phone) to adjust the volume.
Games*
Create Text
Message*
File Manager*
Contact List*

24
Section 2

Section 3: Call Functions 25
Section 3
Section 3: Call Functions
Topics Covered
• Making a Call
• Adjusting the Call Volume
• Answering a Call
• Recent Calls
• Quiet Mode
• Options During a Call
This section describes how to make or answer a call.
It also includes the features and functionality
associated with making or answering a call.
26
Section 3
Making a Call
䡵 When the Idle screen displays, enter the area code and
phone number, and press the key.
Note: When you activate the Auto Redial option in the Extra Settings menu,
the phone will automatically redial up to 10 times when the person does
not answer the call or is already on the phone. See page “Extra Settings”
on page 95 for further details.
Making an International Call
1. Press and hold the key. The + character appears.
2. Enter the country code, area code, and phone number.
Press the key.
Correcting a Dialed Number
Use the following steps to correct a mis-typed entry
when dialing.
1. After dialing a number
䢇 To clear the last digit displayed, press the key.
䢇 To clear another digit in the number, press the Left or Right
navigation key until the cursor is immediately to the right of the
digit to be cleared. Press the key .
䢇 T o enter a missing di git press the Left or Right navigation key
until the cursor is in position and enter the digit.
䢇 To clear the whole display , press and hold the key. The
Idle screen displays.
2. Press the key to return to the Idle screen.
Ending a Call
When you want to finish your call, briefly press the
key.
 Loading...