

Samsung SGH-T999ZAATMB User Manual


Table of Contents
MY CARRIER 4
SERVICE 5
DEVICE FUNCTIONS 6
SETTING UP YOUR DEVICE 8
Turning Your Device On and Off 11
Locking and Unlocking Screen 11
Initial Device Configuration 11
HOME SCREEN 12
Status Bar 12
Notification Screen 12
CALLING FEATURES 13
Making a Call 13
Ending a Call 14
Answering a Call 14
Rejecting a Call 14
VOICEMAIL 15
Set Up Voicemail 15
Access Voicemail 15
1

VISUAL VOICEMAIL 16
Initial Configuration and Setup 16
Checking Visual Voicemail Messages 16
Deleting Visual Voicemail Messages 16
CONTACTS 17
Creating a New Contact 17
Adding a Number to an Existing Contact 17
Deleting an Existing Contact 17
MESSAGES 18
Create and Send a Message 18
CONNECTIONS 19
Connecting to Bluetooth 19
Connecting to Wi-Fi 19
Near Field Communication 20
S Beam 20
Smartphone Mobile HotSpot 21
USB Tethering 23
APPS & MORE 25
Installing Apps 25
Samsung Smart Switch 25
Gmail (Google Account) 25
2

Setting Up Your Email Accounts 26
Internet 27
Multi Window 28
Camera 29
Wi-Fi Calling 30
Lock Screen 31
LEGAL 32
APPROVED FIRMWARE VERSIONS 32
INFORMATION ABOUT SAFEGUARDING
HANDSETS 32
EMERGENCY DIALING 33
ADDITIONAL INFORMATION 34
3

My Carrier
This guide provides you with the information you need to get started.
For more information and additional support, please visit
www.t-mobile.com/support/ where you can:
• Register at my.t-mobile.com/ to check your minutes, pay your
bill, upgrade your device, and change your rate plan.
• Review your device’s User Manual and troubleshooting FAQs.
• View the latest troubleshooting solutions in the Support
Forums or ask a question of your own.
Access account information from:
1. From the Home screen, tap (Apps)
My Account).
2. If prompted, follow the on-screen information for what’s new
in the app.
3. Choose from an available category such as: Account Info,
Device Support, Notifications, [promotional], and others.
NOTE: Devices and software are constantly evolving—the screen images and
icons you see here are fo r referenc e only.
g
(T-Mobile
4

Service
If you are a new T-Mobile® customer and your service has not yet
been activated, call Customer Care at 1-800-937-8997 and a
T-Mobile Activations representative will assist you.
You will need the following information when activating
service:
• Your Service Agreement and the agent code on your
Agreement
• Your name, home address, home phone number, and billing
address
NOTE: For business and government ac counts , please pr ovide the n ame of
the organization, the address, and the tax ID.
• Your Social Security number, current driver’s license number,
and date of birth for credit check purposes
• Your choice of T-Mobile rate plan and services
(see www.t-mobile.com for the latest plan information)
• SIM serial number and IMEI number ( located on the box
barcode label)
NOTE: By activating ser vice, you acknowledge that you have read,
underst and, and agree to be bound by each of T-Mobile’s Terms and
Conditions, and your Service Agreement.
5
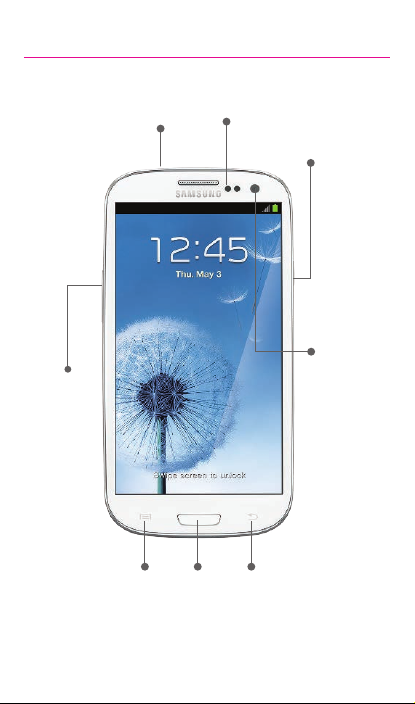
Device Functions
Headset
Volume
Menu* Home Back*
*Menu and Back illuminates when navigating through the device.
6
jack
Sensors
Power/lock
Front
facing
camera
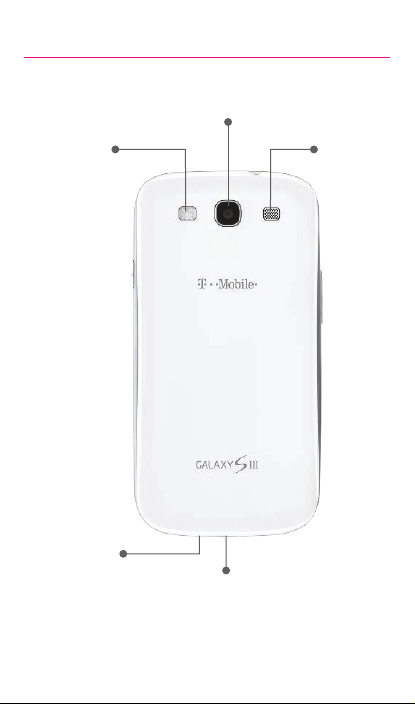
Camera lens
Flash
Microphone
Charging/USB port
WARNING: Use only approved charging devices and batteries.
The approved accessories are designed to
maximize batter y life. Using other accessories may
invalidate your warranty and may cause damage.
Speaker
7

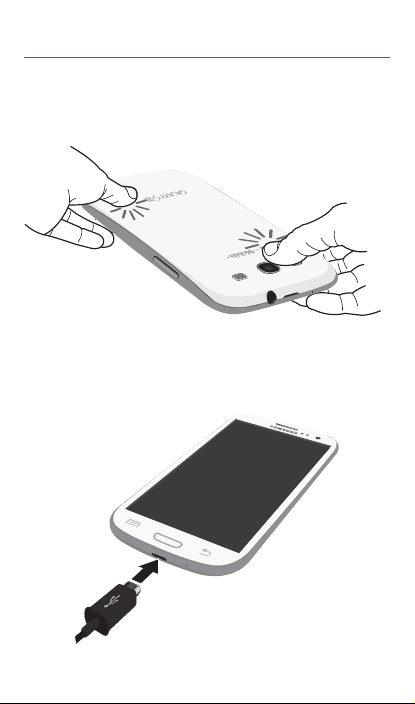
Setting Up Your Device
Step 1. Remove the Back Cover
• Place your fingernail in the groove and firmly “pop” the
cover off the device.
Step 2. Install the SIM Card
• Slide the SIM card into the SIM card slot until it is secured
into place.
8
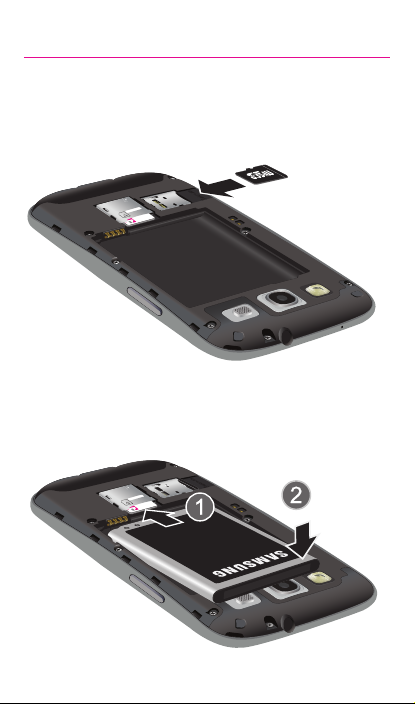
Step 3. Install the microSD card
NOTE: A microS D card is not included with the pro duct.
• Slide the memor y card into the card slot until it is secured
into place.
Step 4. Insert the Battery
• Insert the batter y, making sure to align the gold contacts
(1). Press down gently to secure the battery (2).
9
Step 5. Replace the Back Cover
• Position the battery cover over the battery compartment
and press down firmly along the edges of the cover.
Step 6. Charging the Device
• Before turning on your device, charge it fully. Be sure to
use the charger that came with the device.
10
 Loading...