

Samsung SGHP777 Users Manual

SGH-p777 Series
PORTABLE Dual-Mode
TELEPHONE
User Guide
Please read this manual before operating your
phone, and keep it for future reference.
Cover Page
UCDJ6.01_WBp777_110804_D1

Intellectual Property
All Intellectual Property, as defined below, owned by or which is
otherwise the property of Samsung or its respective suppliers relating
to the SAMSUNG Phone, including but not limited to, accessories,
parts, or software relating there to (the “Phone System”), is
Cover Page
proprietary to Samsung and protected under federal laws, state laws,
and international treaty provisions. Intellectual Property includes,
but is not limited to, inventions (patentable or unpatentable), patents,
trade secrets, copyrights, software, computer programs, and related
documentation and other works of authorship. You may not infringe or
otherwise violate the rights secured by the Intellectual Property.
Moreover, you agree that you will not (and will not attempt to) modify,
prepare derivative works of, reverse engineer, decompile, disassemble,
or otherwise attempt to create source code from the software. No title to
or ownership in the Intellectual Property is transferred to you. All
applicable rights of the Intellectual Property shall remain with
SAMSUNG and its suppliers.
Samsung Telecommunications America (STA), Inc.
Headquarters: Customer Care Center:
1301 E. Lookout Drive 1601 E. Plano Parkway, Suite 150
Richardson, TX 75082 Plano, TX 75074
Tel: 972.761.7000 Toll Free Tel: 1.888.987.HELP (4357)
Fax: 972.761.7001 Fax: 972.801.6065
Internet Address: http://www.samsungusa.com
©
2004 Samsung Telecommunications America, Inc. is a registered
trademark of Samsung Electronics America, Inc. and its related entities.
Licensed by Qualcomm Incorporated under one or more of the
following patents: U.S. Patent No. 4, 901, 307; 5, 056, 109; 5, 099, 204; 5,
101, 501; 5, 103, 459; 5, 107, 225; 5, 109, 390.

Disclaimer of Warranties; Exclusion of Liability
Printed in South Korea
GH
Openwave® is a registered Trademark of Openwave, Inc.
RSA® is a registered Trademark RSA Security, Inc.
Disclaimer of Warranties; Exclusion of Liability
EXCEPT AS SET FORTH IN THE EXPRESS WARRANTY
CONTAINED ON THE WARRANTY PAGE ENCLOSED WITH THE
PRODUCT, THE PURCHASER TAKES THE PRODUCT "AS IS", AND
SAMSUNG MAKES NO EXPRESS OR IMPLIED WARRANTY OF
ANY KIND WHATSOEVER WITH RESPECT TO THE PRODUCT,
INCLUDING BUT NOT LIMITED TO THE MERCHANTABILITY OF
THE PRODUCT OR ITS FITNESS FOR ANY PARTICULAR PURPOSE
OR USE; THE DESIGN, CONDITION OR QUALITY OF THE
PRODUCT; THE PERFORMANCE OF THE PRODUCT; THE
WORKMANSHIP OF THE PRODUCT OR THE COMPONENTS
CONTAINED THEREIN; OR COMPLIANCE OF THE PRODUCT
WITH THE REQUIREMENTS OF ANY LAW, RULE, SPECIFICATION
OR CONTRACT PERTAINING THERETO. NOTHING CONTAINED
IN THE INSTRUCTION MANUAL SHALL BE CONSTRUED TO
CREATE AN EXPRESS OR IMPLIED WARRANTY OF ANY KIND
WHATSOEVER WITH RESPECT TO THE PRODUCT. IN ADDITION,
SAMSUNG SHALL NOT BE LIABLE FOR ANY DAMAGES OF ANY
KIND RESULTING FROM THE PURCHASE OR USE OF THE
PRODUCT OR ARISING FROM THE BREACH OF THE EXPRESS
WARRANTY, INCLUDING INCIDENTAL, SPECIAL OR
CONSEQUENTIAL DAMAGES, OR LOSS OF ANTICIPATED
PROFITS OR BENEFITS.
Cover Page

Cover Page

Table of Contents
Intellectual Property .......................................................................2
Samsung Telecommunications America (STA), Inc. ........................2
Disclaimer of Warranties; Exclusion of Liability ...............................3
Section 1: Getting Started .............................................5
Activating Your Phone ....................................................................6
Dialing Your Voice Mail Box ..........................................................12
Accessing Your Voice Mail ...........................................................12
Changing the Voice Mail Number .................................................13
Section 2: Understanding Your Phone .......................15
Features of Your Phone ................................................................16
Front View of Your Phone .............................................................17
Rear .............................................................................................18
Keys ............................................................................................18
Icons ............................................................................................20
Section 3: Call Functions ............................................23
Making a Call ...............................................................................24
Answering a Call ..........................................................................25
Adjusting the Call Volume ............................................................25
Missed Calls ................................................................................26
Call Log .......................................................................................27
Options During a Call ...................................................................29
Section 4: Menu Navigation ........................................35
Menu Navigation ..........................................................................36
Menu Outline ...............................................................................37
Section 5: Entering Text ..............................................47
Changing the Text Entry Mode .....................................................48
Using T9 Mode .............................................................................49
Using Alphabet Mode ...................................................................50
Entering Numbers ........................................................................51
Entering Symbols .........................................................................52
Table of Contents
Tab le of Co nt en ts 1

f
tent
Section 6: Understanding Your Address Book .......... 53
Adding a New Address Book Entry ...............................................54
Dialing a Number from the Address Book ..................................... 56
Speed Dialing ..............................................................................57
Finding an Entry in Address Book ................................................. 59
Deleting Address Book Entries .....................................................63
Checking the Memory Status ....................................................... 64
Section 7: Messaging ................................................. 65
s
Using Instant Messenger ..............................................................66
Creating and Sending New Messages .......................................... 67
Creating a Long Text Message .....................................................69
Con
Retrieving New Messages ............................................................74
Viewing Messages ....................................................................... 75
Tab l e o
Delete All .....................................................................................79
Settings .......................................................................................80
Memory Status ............................................................................84
Section 8 Changing Your Settings ............................. 87
Sound Settings ............................................................................88
Display Settings ...........................................................................91
Phone Settings .............................................................................93
Connection Settings ..................................................................... 95
Time and Date ............................................................................. 96
Network Services .........................................................................97
Infrared Activate ........................................................................104
Security .....................................................................................105
Reset Settings ...........................................................................109
Section 9: Multimedia .............................................. 111
Using the Camera ......................................................................112
Music Zone ................................................................................ 120
Using the Voice Recorder ...........................................................124
Section 10: Personal Assistant ................................ 129
Using the Calendar ....................................................................130
Consulting the Calendar .............................................................131
2 Table of Contents

Using the To Do List ...................................................................133
Setting Alarms ...........................................................................135
Using the Calculator ...................................................................137
Using the Currency Convertor .....................................................138
Synchronizing PIM Data .............................................................138
Section 11:WAP .........................................................141
Launching the WAP Browser ......................................................142
Access a WAP Site .....................................................................142
Navigating the WAP Browser ......................................................142
Using Favorites ..........................................................................144
Downloading Multimedia Files ....................................................146
Clearing the Cache .....................................................................147
Section 12: Games and Accessories ........................149
Games .......................................................................................150
Accessories ...............................................................................151
Section 13: Health and Safety Information ..............153
Health and Safety Information ....................................................154
Consumer Information on Wireless Phones .................................156
Road Safety ...............................................................................164
Operating Environment ...............................................................166
Using Your Phone Near Other Electronic Devices ........................167
Potentially Explosive Environments .............................................168
Emergency Calls ........................................................................169
FCC Notice and Cautions ............................................................170
Other Important Safety Information ............................................171
Product Performance .................................................................172
Section 14: Warranty Information ............................177
Standard Limited Warranty .........................................................178
Intellectual Property Statement ..................................................183
Samsung Telecommunications America (STA), L.P. ....................184
Table of Contents
Tab le of Co nt en ts 3

f
tent
s
Con
Tab l e o
4 Table of Contents

Section 1: Getting Started
Topics Covered
• Activating your phone
• Setting Up Voicemail
• Customer Support
• Understanding this User Manual
This section allows you to start using your phone by
activating your service, setting up your voice mail, contacting
customer support, or getting an understanding of how this
manual is put together.
Section 1
Section 1: Getting Started 5
Activating Your Phone
When you subscribe to a cellular network, you are provided
with a plug-in SIM card loaded with your subscription
details, such as your PIN or any optional services available. To
Install the SIM card, use the following instructions:
Installing the SIM Card
Note: The plug-in SIM card and its contacts can be easily damaged by scratches or
bending, so be careful when handling, inserting, or removing the card. Keep your SIM
card out of reach from small children.
To install the SIM card:
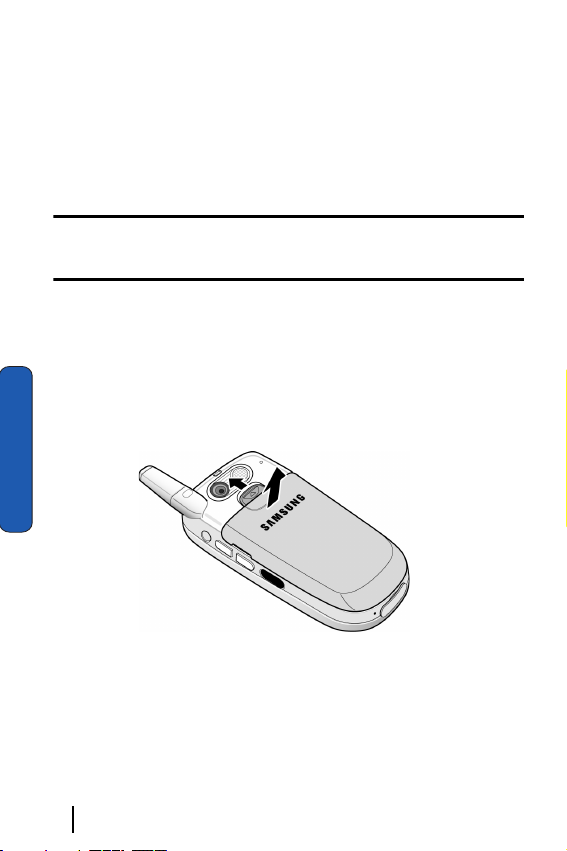
1. With the phone turned off, remove the battery as shown in
the following illustration.
Slide the battery lock toward the top of the phone and hold it
in that position. Lift the battery away as shown.
Section 1
6 Section 1: Getting Started
Activating Your Phone
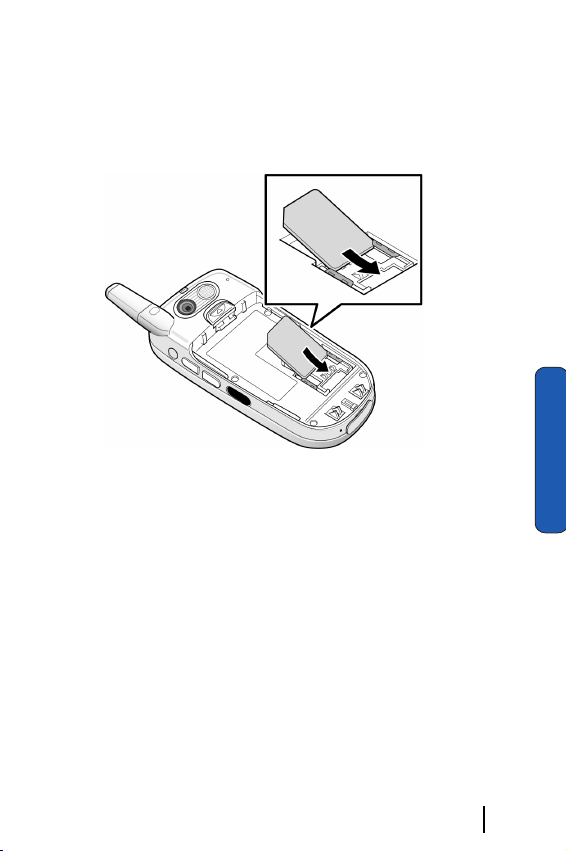
2. Slide the SIM card into the SIM card socket so that the card
socket, as shown, so that the card locks into position.
Make sure the gold colored contacts of the card face into the
phone.
3. To remove the SIM card, slide it upwards, as shown, and take
it out of the socket.
Section 1
Section 1: Getting Started 7
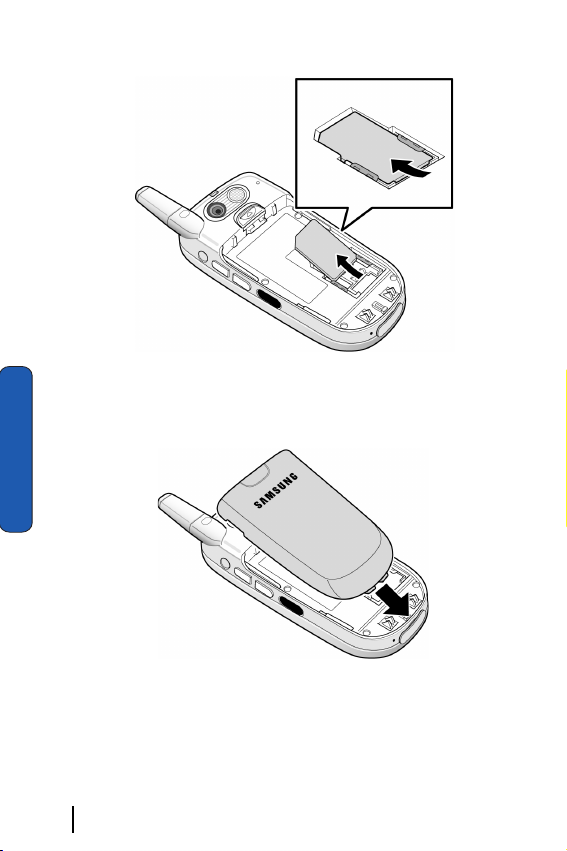
4. Replace the battery so that the tabs on the end align with the
slots at the bottom of the phone.
Section 1
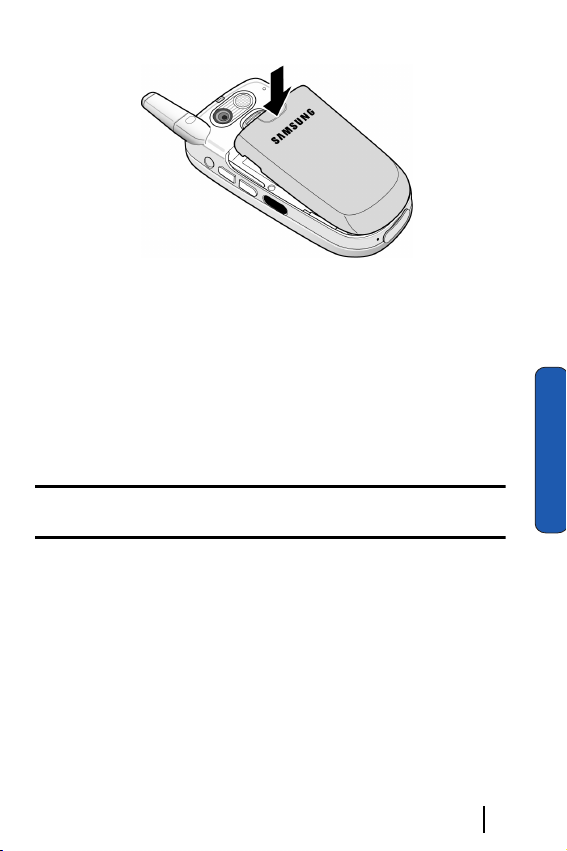
5. Press the battery down until it clicks into place. Make sure
that the battery is properly installed before switching on the
power.
8 Section 1: Getting Started
Activating Your Phone
Charging the Battery
Your phone is powered by a rechargeable Li-ion battery. A
travel charger comes with your phone for charging the
battery. Use only approved batteries and chargers. Ask your
local Samsung dealer for further details.
The travel charger allows you to use the phone while the
battery is charging, but this causes the phone to charge more
slowly.
Note: You must fully charge the battery before using your phone for the first time. A
discharged battery recharges fully in approximately 200 minutes.
To charge the battery:
1. With the battery in position on the phone, plug the connector
of the travel charger into the jack at the bottom of the phone.
Section 1
Section 1: Getting Started 9

2. Plug the charger into a standard AC wall outlet.
3. When charging is finished, unplug the charger from the
power outlet then disconnect it from the phone by pressing
Section 1
10 Section 1: Getting Started
the buttons on both sides of the connector and pulling the
connector out.
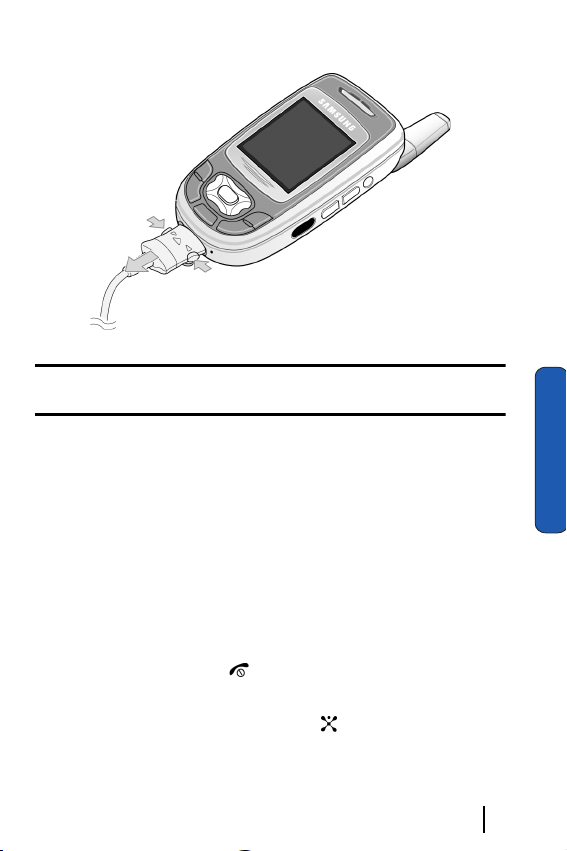
Activating Your Phone
Note: You must unplug the charger before removing the battery from the phone
during charging, otherwise, the phone could be damaged.
Low Battery Indicator
When the battery is weak and only a few minutes of talk time
remain, a warning tone sounds and a pop-up message repeats
at regular intervals on the display. In this case, your phone
will turn off the backlight to conserve the remaining battery
power.
When the battery level is too low, the phone turns off
automatically.
Turning on your phone
1. Press and hold the key until the phone turns on.
2. If the phone asks you to enter a password, enter a password
and press the OK soft key or the key. The password
default is ‘00000000’.
Section 1
Section 1: Getting Started 11

3. If the phone asks for a PIN, enter the PIN and press the OK
soft key or the key.
Turning off your phone
Press and hold the key until the power-off image displays.
Using Keypad Lock
The keypad can be locked to prevent accidental key entries.
This option is enabled and disabled in Settings (Menu 9.8).
1. When the display is on, press the Unlock soft key and then
press the OK soft key.
2. When the display is off, press and hold the key and then
press the OK soft key. Or you can press and hold either of the
Volume keys on the side of the phone and press the Unlock
soft key and then press the OK soft key.
Dialing Your Voice Mail Box
To access your voicemail from your keypad, use the following
steps:
Section 1
1. Open the slider to access your keypad.
2. From an Idle screen, press and hold the key.
3. Follow the voice mail prompts to access messages.
Accessing Your Voice Mail
1. In Idle mode, press the Menu soft key to access Menu mode.
2. Highlight Recent Calls and press the key.
3. Highlight Voice Mail and press the key.
4. Highlight Connect to Voice Mail and press the key. Your
phone dials the specified number of the voice mail center.
12 Section 1: Getting Started

Changing the Voice Mail Number
5. When connected, follow the voice prompts from the voice
mail center.
Changing the Voice Mail Number
Your SIM card gives you default service number of the voice
mail center. However, you may need to change the number.
Use the following procedures to change your voice mail
number.
1. In Idle mode, press the Menu soft key to access the Menu
mode.
2. Highlight Recent Calls and press the soft key or the
key.
3. Highlight Voice Mail and press the soft key or the
key.
4. Highlight Voice Mail Number and press the key or the
key. Voice Server 1 displays, press the OK soft key to
edit.
5. Press the Edit soft key or the key.
6. Use the key to clear the current number, enter a new
number and press the OK soft key or the key.
7. When you are finished, press the key.
Section 1
Section 1: Getting Started 13
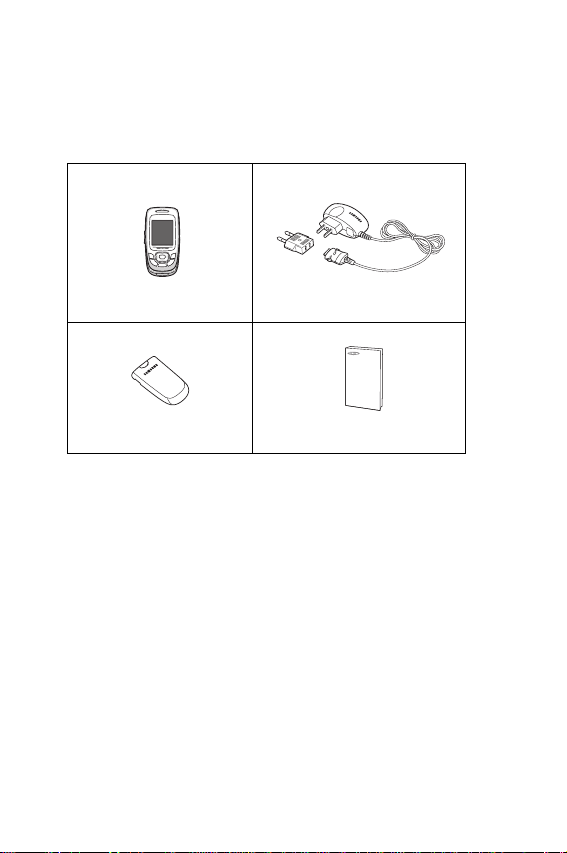
Unpacking
Your package contains the following items:
Ha nds e t
Battery
For details about accessories available for your phone, see
page 151.
Trave l Ada pte r
Use r’s Manual

Section 2: Understanding Your Phone
Topics Covered
• Features of Your Phone
• Front and Rear View of Your Phone
•Command Keys
• Understanding the Display Screen
This section outlines some key features of your phone. It also
displays the screen and the icons that will are displayed when
the phone is in use.
This section outlines some key features of your phone. It also
displays the screen and the icons that will are displayed when
the phone is in use.
Section 2
Section 2: Understanding Your Phone 15

Features of Your Phone
Your phone is lightweight, easy-to-use and offers many
significant features. The following list outlines a few of the
features included in your phone.
User friendly, menu driven access to features and options.
• Instant Messaging capability
• Multimedia capability including Camera, MP3 player, Voice Recording
and Java Games.
• Personal Assistant feature provides calendar, to-do list, alarms,
calculator, currency convertor, and PIM Synchronization.
Section 2
16 Section 2: Understanding Your Phone
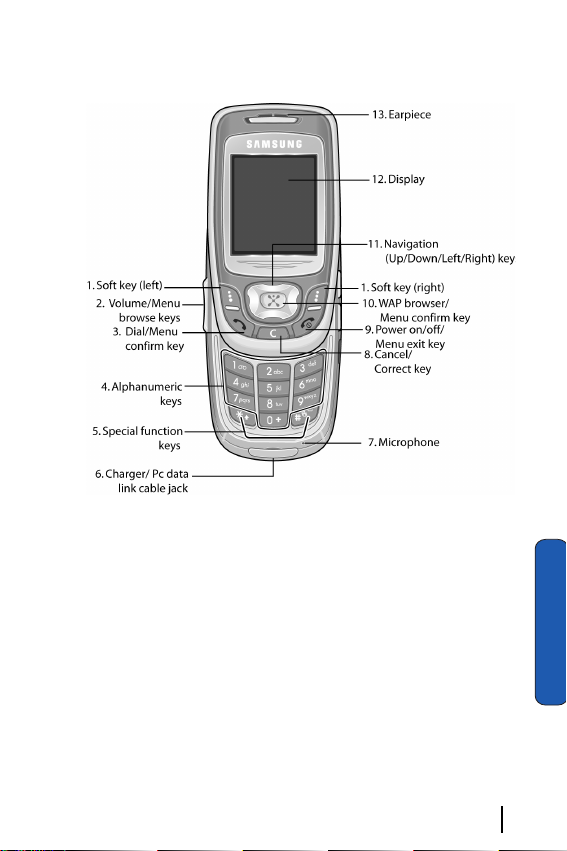
Front View of Your Phone
Front View of Your Phone
Section 2
Section 2: Understanding Your Phone 17
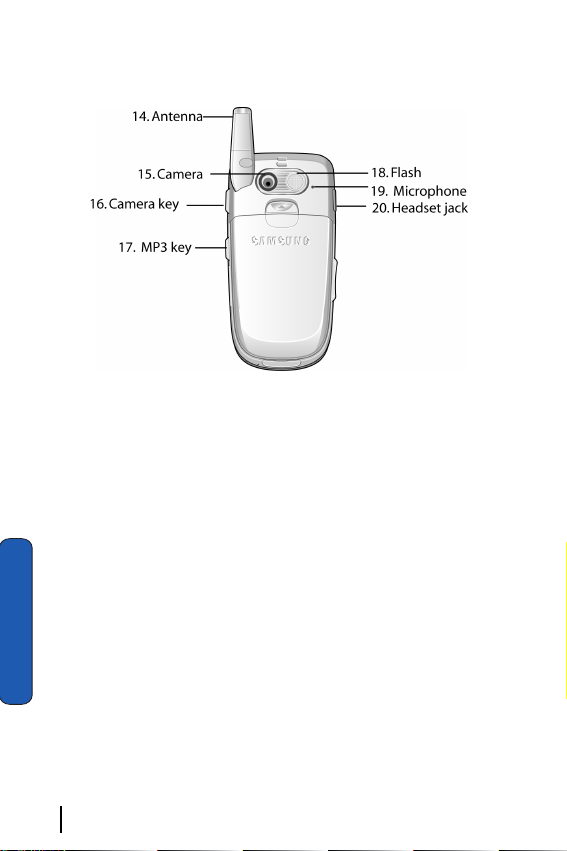
Rear
Keys
The following list correlates to the from and rear illustrations.
1.
Performs the functions indicated by the screen text on the
bottom line of the display.
2. (on the left side of the phone)
Adjusts the ringer volume when the phone is ringing. Adjusts
the earpiece volume during the call.
In Idle mode, adjusts the keypad tone volume.
Section 2
In Menu mode, scrolls through the menu option.
3. Makes or answers a call.
In Idle mode, recalls the last number dialed or received when
held down.
18 Section 2: Understanding Your Phone

Keys
In Menu mode, selects a menu option or stores information that
you have entered.
4. Enters numbers, letters, and some special characters.
5. Enters special characters and performs various functions.
6. Port provided for charging and PC data link cable.
7. The microphone used during phone calls and voice memo
recordings.
8. Deletes characters from the display.
In Menu mode, returns you to the previous menu level.
9. Ends a call. Also switches the phone on or off when held down.
10. In Idle mode, launches the WAP (Wireless Application Protocol)
browser.
In Menu mode, selects the highlighted menu option or confirms
your input.
11. In Idle mode, allows you to access your favorite menu options
directly. For further details about shortcuts, see "Using
Shortcuts" on page 36.
On a menu list, the Up or Down keys scrolls through the menu
options. The soft key returns you to the previous menu level
and the Right key selects the highlighted menu option.
When entering text, moves the cursor, depending on which side
you push.
12. The display area where text and graphics appear.
13. The earpiece used to listen to audio from your phone.
14. The antenna is used to obtain reception.
15. The camera lens used for taking photos and videos.
Section 2
Section 2: Understanding Your Phone 19
16. The external camera key used to launch the camera and take a
photo or video.
17. Launches the MP3 player.
18. The flash sense will light when the flash is turned on.
19. The microphone used to record audio during a video recording.
20. The headset jack is used for the handsfree equipment.
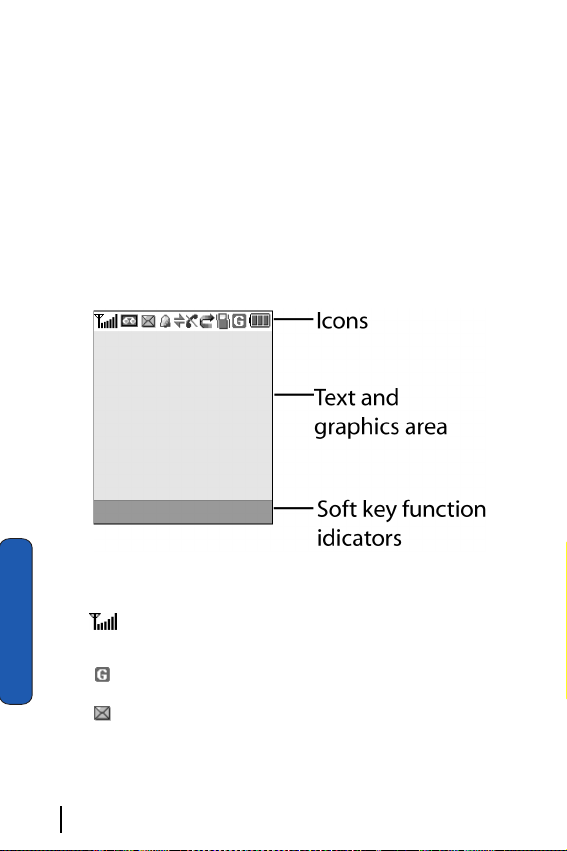
Display Screen Layout
The display screen has 3 areas. They are:
Icons
Shows the received signal strength. The greater the number of
Section 2
bars, the stronger the signal.
Appears when you are connected to the GPRS network.
Appears when a new text message has been received.
20 Section 2: Understanding Your Phone

Icons
Appears when a new voice mail has been received.
Appears when a new multimedia message has been received.
Appears when there is a new text message and a new multimedia
message received.
Appears when a new e-mail has been received.
Appears when a multimedia message is being sent.
Appears when the IrDA port is active. For details, see "Infrared
Activate" on page 104.
Appears when you set an alarm to ring at a specified time. For
details, see page page 96.
Appears when you are out of your service area.
Appears when a call is in progress.
Appears when you are connected to a WAP service.
Appears when the Call Forwarding feature is active. For details,
see page "Call Forwarding" on page 98.
Appears when you are in the Home Zone if you are subscribed to
the service.
Appears when you are in the City Zone if you are subscribed to
the service.
Appears when Silent mode is active or you set the phone to
vibrate when you receive a call.
Appears when Mute mode is active. For details, see"Sound
Settings" on page 88.
Shows the level of your battery. The more bars you see, the more
power you have remaining.
Section 2
Section 2: Understanding Your Phone 21

Section 2
22 Section 2: Understanding Your Phone

Section 3: Call Functions
Topics Covered
• Making a Call
• Answering a Call
• Adjusting the Call Volume
•Call Log
• Silent Mode
This section allows you to make or answer a call. It also include s
the features and functionality associated with making or
answering a call.
Section 3
Section 3: Call Functions 23

Making a Call
1. When the Idle screen displays, enter the area code and phone
number.
2. To clear the last digit displayed, press the key.
3. To clear any other digit, press the Left or Right soft keys.
4. To clear the whole display, press and hold the key.
Ending a Call
When you want to end your call, briefly press the key or
close the phone.
Section 3
Making an International Call
1. Press and hold the key. The + character appears.
2. Enter the country code, area code, and phone number and
press the key.
Redialing the Last Number
The phone stores the number of calls dialed, received, or
missed.
In Idle mode, press and hold the key to redial the last number
dialed or received.
Making a Call from the Address Book
Phone numbers stored in the SIM card or in the phone’s
memory are accessed in the Address Book.
Once numbers have been stored in the Address Book they can
be accessed by pressing a few keys. Also, numbers frequently
used can be assigned a Speed Dial entry. For more information
see "Speed Dialing" on page 57.
24 Section 3: Call Functions

Answering a Call
Answering a Call
When you receive a call, the phone rings and displays the
incoming call image.
The caller’s phone number or name, if stored in the Address
Book, displays.
1. If necessary, open the phone.
2. Press the key or the Accept soft key to answer the incoming
call.
When the Anykey Answer option in the Extra Settings menu is
activated, you can answer the call simply by opening the phone.
Notes:
To reject the call, press the
You can mute the ringer by pressing and holding the volume keys on the side of the
phone.
Reject soft key or the key.
3. End the call by closing the phone or press the key.
Note: You can answer a call while using the menu features. After ending the call,
the display returns to the function screen you were using.
Adjusting the Call Volume
During a call, you can adjust the earpiece volume using the
volume keys on the left side of the phone.
Press the key to increase the volume level and the key to
decrease the level.
In Idle mode, you can also adjust the keypad tone volume using
these keys.
Section 3
Section 3: Call Functions 25

Missed Calls
Viewing and Calling Missed Calls
When you are unable to answer a call for any reason, a missed
call list is created.
The number of calls missed displays on the Idle screen
immediately after a call is missed.
To view a missed call immediately:
1. If necessary, open the phone.
2. Press the View soft key or the key.
Section 3
Editing a Missed Call Number
The number for the most recent missed call displays.
3. To scroll through the missed calls, press the Up or Down key.
4. To call the number displayed, press the key or key.
5. To return to the Menu mode, press the key.
1. Press the View soft key or the key.
2. To scroll through the missed calls, press the Up or Down key.
3. Press the Select soft key.
4. Press the Options soft key to highlight the Edit option.
5. Press the Select soft key or the key.
6. Change the number.
7. To call the number, press the key.
8. To store the number, press the Save soft key or the key.
9. Use the Right or Left navigation keys to choose the Entry Type.
10. Select the location (SIM or Phone Memory) and press the
Select soft key.
26 Section 3: Call Functions
 Loading...