

Samsung SGHP500 Users Manual

Camera
Camera
Protection: allows you to set the picture not to be
deleted.
Delete: deletes the picture.
Using the Camera options
In the capture mode, you can use various options
by pressing the Options soft key.
To Press the
scroll to an option or key.
select the highlighted
option
return to the capture
mode
The following options are available:
Effects: allows you to change the colour tone or
apply special effects to the picture. When you select
an option, the display shows your setting and
prompts you to confirm it. Press the Yes soft key.
Frame: allows you to use the frame. Select a frame
from the list using the Navigation keys.
Multi-Shot: allows you to take action stills. Select
the capture speed, High Speed or Normal Speed,
and the number of pictures the camera will take.
When you press the Take soft key, the camera
takes pictures successively.
Rotation: rotates the picture. You can reverse the
picture as a mirror image or flip the picture
vertically.
Select soft key or the
key.
Back soft key or C key.
Timer: allows you to have a delay time before the
camera takes a picture. Select the length of time
you want. When you press the Take soft key, the
camera takes the picture after a specified time.
Picture Size: allows you to select a picture size.
The higher the value, the higher the image quality
and larger the file size. Once you change this
setting, it is saved for the next shots.
Image Quality: allows you to change the image
quality. Once you change this setting, it is saved for
the next shots.
My Photos
(Menu 4.2)
This menu allows you to review your photos.When
you access this menu, your phone displays them in
the thumbnail mode, which shows photos as a small
image.
To view the photos on the full screen, press the
View soft key. To go back to the thumbnail mode,
press the Multi soft key.
Press the Options soft key to use the following
options:
Send: allows you to send the photo as a
multimedia message. For further details, see
page 80.
Set This Photo as: allows you to set the picture as
your wallpaper for the idle screen or power on or off
image.
Protection: allows you to set the picture not to be
deleted.
94
95
Camera
Camera
Delete: deletes the picture.
Delete All: deletes all of the pictures saved in your
phone. This option
Rename: allows you to change the name of the
picture.
Properties: shows the properties of the picture,
such as date and time it was taken, file size, image
size, protection status, file format and file name.
Video
(Menu 4.3)
You can record a video that is currently displayed
on the camera screen and save it as a video file.
Record
(Menu 4.3.1)
1. Press the Rec soft key to start recording.
If you want to use the video options before
recording, press the Options soft key. For
details, see the next page.
2. When you are finished, press the Stop soft key.
Or, the phone automatically stops when the
recording time expires.
Using the Video Options
When you press the Options soft key before
starting recording, the following options are
available:
(The options are not available on the current
phone!!!)
Video Clips
(Menu 4.3.2)
When you access this menu, the thumbnail images
of the videos displays.
To play back a video:
1. Press the Navigation keys to scroll to the video
you want to view.
2. Press the Play soft key to start the playback.
3. To Press the
pause the playback Pause soft key.
resume Continue soft key.
stop the playback Stop soft key.
return to the idle
key.
screen
3. Press the Save soft key.
The video is saved.
96
Press the Options soft key to use the following
options:
Rename: allows you to change the file name.
Delete This: deletes the current video file.
Delete All: deletes all of your video files.
Protection: allows you to set the video file not to
be deleted.
97

Sound Settings
You can use the Sound Settings feature to
customise various settings, such as the:
• ring melody, volume and type.
• sounds made when you press a key, receive a
message, open/close the folder or switch your
phone on/off.
• alert tone made every minute during a call, when
you make an error or when your call is connected
to the system.
: When the phone is in Silent Mode (see
Note
page 28), you cannot change the sound
settings.
Sound Settings
Alert Type
This menu allows you to specify how you are to be
informed of incoming calls.
The following options are available:
Light Only: the service light flashes; the phone
neither rings nor vibrates.
Melody: the phone rings using the ring melody
selected in the Ring Tone menu (Menu 5.1); see
page 98.
Vibration: the phone vibrates but does not ring.
Vibra+Melody: the phone first vibrates three
times and then starts ringing.
(Menu 5.3)
Ring Tone
This menu allows you to select a ring melody.
You can choose between many different melodies.
Each time you select a melody, it plays for a few
seconds. If you have downloaded sounds from the
Internet or EasyGPRS programme, you can use
them in this menu.
Ring Volume
This menu allows you to adjust the ring volume to
one of five levels.
Use the and keys or the volume keys on the
left side of the phone to increase or decrease the
volume.
98
(Menu 5.1)
(Menu 5.2)
Keypad Tone
This menu allows you to select a tone that the
phone sounds when you press a key.
To turn the sound off, select Off.
(Menu 5.4)
99

Sound Settings
Sound Settings
Message Tone
This menu allows you to select how the phone
informs you that a new message has been received.
SMS Tone
This menu allows you to select how the phone
informs you that a new SMS message has been
received.
The following options are available:
Off: the phone does not use the SMS tone.
Light Only: the service light flashes.
Vibration: the phone vibrates.
Single Beep: the phone beeps once.
SMS Tonex: the phone uses one of several SMS
tones.
SMS-CB Tone
This menu allows you to select how the phone
informs you that a new cell broadcast (CB) message
has been received.
The following options are available:
Off: the phone does not use the CB tone.
Light Only: the service light flashes.
Vibration: the phone vibrates.
Single Beep: the phone beeps once.
SMS-CB Tonex: the phone uses one of several CB
tones.
(Menu 5.5)
(Menu 5.5.1)
(Menu 5.5.2)
Folder Tone
This menu allows you to select a tone that the
phone sounds when you open or close the folder.
To turn the sound off, select Off.
Power On/Off
This menu allows you to select a melody that the
phone sounds when it is switched on and off.
To turn the sound off, select Off.
Extra Tones
You can customise additional tones used for the
phone.
To turn a given
tone
on On soft key.
off Off soft key again.
(Menu 5.6)
(Menu 5.7)
(Menu 5.8)
Press the
A check mark displays in
front of the option.
The check mark no longer
displays.
100
101
Sound Settings
The following options are available:
Error Tone: sets whether or not the phone informs
you when you make a mistake.
Minute Minder: sets whether or not the phone
beeps every minute during an outgoing call to keep
you informed of the length of your call.
Connect Tone: sets your phone to beep when your
call is connected to the system.
Phone Settings
Many different features of your phone can be
customised to suit your preferences. All of these
features are accessed in the Phone Settings
menu.
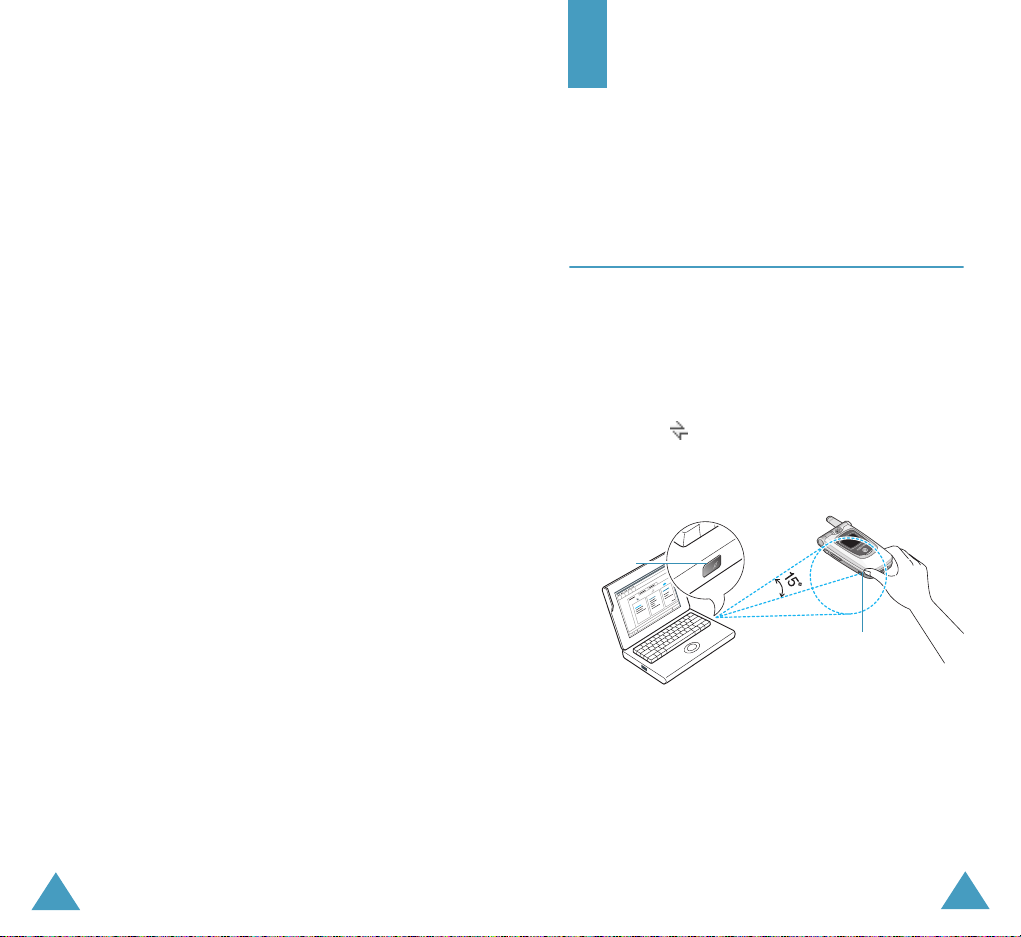
Infrared Activate
This feature allows you to send or receive data
through the infrared port. To use an infrared
connection, you must:
• configure and activate an IrDA-compliant infrared
port on your PC.
• activate the infrared feature on the phone; the
IrDA icon ( ) appears on the top line of the
display.
• align the IrDA port on the phone with the IrDA
port on your computer.
IrDA port
(Menu 6.1)
IrDA port
102
The connection is ready for data transmission.
If there is no communication between your phone
and the IrDA-compliant device within 30 seconds of
activating the feature, it is automatically
deactivated.
Note
: For the best performance, use the data link
cable supplied in your SGH-P500 kit.
103

Phone Settings
Phone Settings
Display Settings
In this menu, you can change various settings for
the display or backlight.
Wallpaper
This menu allows you to change the background
image or the colour of the text to be displayed in
Idle Mode.
The following options are available:
Wallpaper List: you can select a background
image to be displayed on the idle screen.
To change the background image:
1. Scroll through the list by pressing the or
key.
You have various preset images available. You
can also select the blank background and any
images downloaded from the Internet and the
EasyGPRS programme or received by messages.
Once you have set a photo as the wallpaper, it
displays as My Photo.icn on this list.
2. Press the Select soft key when the image you
want highlights.
3. When the image displays, press the Select soft
key to display it on the idle screen.
Text Display: you can specify whether or not the
phone displays the text, such as the date and time
and the service provider’s name.
Text Color: you can select a colour of the text to
be displayed on the idle screen.
(Menu 6.2.1)
(Menu 6.2)
Menu Style
This menu allows you to select the menu display
style. You can choose either Film Style or Page
Style.
Brightness
This menu allows you to adjust the brightness of
the display screen to see it better in different
lighting conditions.
Adjust the brightness by using the and keys
or the and keys on the left side of the phone.
Back Light
You can select whether or not the phone uses the
backlight. A marginal increase in standby/talk time
can be achieved by turning the backlight off.
Select the length of time the backlight is on. The
backlight turns on when you press a key or receive
a call or message and remains on for the specified
length of time.
If you do not want to use the backlight, select Off.
(Menu 6.2.2)
(Menu 6.2.3)
(Menu 6.2.4)
104
105

Phone Settings
Phone Settings
Auto Light
This feature helps you to conserve your battery
power by allowing you to set the backlight to be
used at certain times.
The following options are available:
Disable: the backlight is used according to your
setting in the Back Light menu (Menu 6.2.4); see
page 105.
Enable: the backlight is used only during the
specified period of time. Enter the time when the
phone turns the light on and then turns it off, using
the appropriate number keys.
Service Light
This menu allows you to select whether or not the
service light is used or in which colour it flashes.
Select one of the seven colour settings. When the
phone is ready for use, the service light flashes in
the appropriate colour.
If you do not wish to use the service light,
select Off.
Graphic Logo
This menu allows you to display your service
provider’s logo instead of its name.
Off: the service provider’s name displays in Idle
Mode.
On: the service provider’s logo stored in your
phone displays in Idle Mode; if no logo has been
stored, the service provider’s name displays.
(Menu 6.2.5)
(Menu 6.2.6)
(Menu 6.2.7)
Greeting Message
This menu allows you to set a greeting to be
displayed briefly when the phone is switched on.
To Press the
clear the existing
message
enter a new
message
change the text
input mode
For further details about how to enter characters,
see page 42.
Own Number
This feature allows you to:
• assign a name to each of your own phone
numbers registered on your SIM card.
• edit the names and numbers.
This function is a memory aid, which you can use to
check your own phone numbers if you need to do so.
Any changes made here do not in any way affect
the actual subscriber numbers on your SIM card.
(Menu 6.3)
C key and hold it down until
the message is cleared.
appropriate alphanumeric
keys.
right soft key.
(Menu 6.4)
106
107

Phone Settings
Phone Settings
Language
You can select a display language. When the
language option is set to Automatic, the language
is automatically selected according to the language
of the SIM card used.
Security
The Security feature enables you to restrict the use
of your phone to the people and the types of calls of
your choice.
Various codes and passwords are used to protect
the features of your phone. They are described in
the following sections. Also see pages 149-152.
PIN Check
When the PIN Check feature is enabled, you must
enter your PIN each time you switch the phone on.
Consequently, any person who does not have your
PIN cannot use your phone without your approval.
Note
: Before disabling the PIN Check feature, you
must enter your PIN.
To change your PIN, see the Change PIN menu
(Menu 6.6.2) on the following page.
The following options are available:
Disable: the phone connects directly to the
network when you switch it on.
Enable: you must enter the PIN each time the
phone is switched on.
(Menu 6.5)
(Menu 6.6)
(Menu 6.6.1)
Change PIN
This feature allows you to change your current PIN
to a new one, provided that the PIN Check feature
is enabled. You must enter the current PIN before
you can specify a new one.
Once you have entered a new PIN, you are asked to
confirm it by entering it again.
Phone Lock
When the Phone Lock feature is enabled, the phone
is locked and you must enter the 8-digit phone
password each time the phone is switched on.
The password is preset to “00000000” at the
factory. To change the phone password, see the
Change Password menu (Menu 6.6.4) below.
Once the correct password has been entered, you
can use the phone until you switch it off.
The following options are available:
Disable: you are not asked to enter the phone
password when you switch the phone on.
Enable: you are required to enter the phone
password when you switch the phone on.
Change Password
The Change Password feature allows you to change
your current phone password to a new one. You
must enter the current password before you can
specify a new one.
The password is preset to “00000000” at the
factory. Once you have entered a new password,
you are asked to confirm it by entering it again.
(Menu 6.6.2)
(Menu 6.6.3)
(Menu 6.6.4)
108
109
Phone Settings
Phone Settings
SIM Lock
When the SIM Lock feature is enabled, your phone
only works with the current SIM. You must enter
the SIM lock code.
Once you have entered the lock code, you are
asked to confirm it by entering it again.
To unlock the SIM, you must enter the SIM lock
code.
FDN Mode
The FDN (Fixed Dial Number) mode, if supported by
your SIM card, allows you to restrict your outgoing
calls to a limited set of phone numbers.
The following options are available:
Disable: you can call any number.
Enable: you can only call phone numbers stored in
Phonebook. You must enter your PIN2.
Note
To change your PIN2, see the Change PIN2 menu
(Menu 6.6.7) below.
Change PIN2
The Change PIN2 feature allows you to change your
current PIN2 to a new one. You must enter the
current PIN2 before you can specify a new one.
Once you have entered a new PIN2, you are asked
to confirm it by entering it again.
Note
110
(Menu 6.6.5)
(Menu 6.6.6)
: Not all SIM cards have a PIN2. If your SIM card
does not, this menu is not displayed.
: Not all SIM cards have a PIN2. If your SIM card
does not, this menu is not displayed.
(Menu 6.6.7)
Extra Settings
You can turn the automatic redialling or answering
features on or off.
To turn a feature Press the
on On soft key.
off Off soft key.
The following options are available:
Auto Redial: when this option is checked, the
phone makes up to ten attempts to redial a phone
number after an unsuccessful call.
Note
: The interval between two call attempts varies.
Active Folder: when this option is checked, you
can simply open the folder to answer a call.
When it is unchecked, you must open the folder and
press a key, depending on the setting of the
Anykey Answer option. See below.
Anykey Answer: when this option is checked, you
can answer an incoming call by pressing any key,
except the key and the Reject soft key. To
reject the call, press the key or the Reject
soft key.
When this option is unchecked, you can only press
the key or Accept soft key.
(Menu 6.7)
A check mark displays in
front of the option.
The check mark no longer
displays.
111

Phone Settings
Reset Settings
You can easily reset your phone to its default
settings. To reset your phone:
1. Select the Reset Settings menu.
2. Enter the 8-digit phone password and press the
OK soft key.
Note
: The password is preset to “00000000.” To
change this password, see page 109.
(Menu 6.9)
Organiser
The Organiser feature enables you to:
• set an alarm so that the phone rings at a specific
time, such as to remind you of an appointment.
• view the calendar and organise your schedule.
• set the current date and time.
• define a list of things to do.
• record voice memos.
• use the phone as a calculator for basic
mathematical equations or currency exchange
operations.
112
Alarm
This feature allows you to:
• set the alarm to ring at a specific time.
• set the phone to switch on automatically and ring
The following options are available:
Once Alarm: the alarm rings only once and is then
deactivated.
Daily Alarm: the alarm rings every day at the
same time.
Morning Call: the alarm rings to wake you up in
the morning.
(Menu 7.1)
the alarm even if the phone is switched off.
113

Organiser
Organiser
To set an alarm:
1. Choose the type of alarm to be set and press the
Select soft key.
2. Enter the time for the alarm to sound.
Note
: Your phone is preset to use 24-hour format.
To change the format, see page 118.
If you want to use the alarm options, press the
Options soft key. The following options are
available:
• Remove Alarm: deactivates the current
alarm.
• Alarm Sound Set: allows you to select the
alarm melody.
3. Press the OK soft key.
4. If you select Morning Call in Step 1, choose the
repeat option, Monday to Friday or Monday
to Saturday, and press the Select soft key.
To stop the alarm when it rings, open the folder and
press the Exit soft key.
Remove Alarm: deactivates all alarm settings.
Autopower: when this option is set to Enable, the
alarm rings at the specified time, even if the phone
is switched off.
If the menu option is set to Disable and the phone
is switched off at the specified time, the alarm does
not ring.
Calendar
With the Calendar feature, you can:
• consult the calendar to check your memos.
•write memos to keep track of your schedule.
• trigger an alarm, if necessary.
(Menu 7.2)
Consulting the Calendar
When you select the Calendar menu (Menu 7.2),
the calendar displays. The following options are
available when you press the Options soft key:
Search All: displays all of the memos, starting with
the oldest regardless of the day. To scroll through
the memos, press the or key.
Delete All: allows you to delete all of the memos.
You are asked to confirm your action.
Go to Date: allows you to go to a specific date.
Exit: exits the Calendar feature and returns to Idle
Mode.
Writing a Memo
You can make up to 30 memos for one day.
To write or edit a memo on a specific date:
1. Select a date on the calendar, using the
navigation keys.
Note
: To skip to the previous or next month,
the or key
press
the phone.
on the left side of
114
115

Organiser
Organiser
2. Press the Select soft key.
An empty memo screen displays allowing you to
enter your memo.
3. Enter your memo and then press the OK soft
key.
: For further details about how to enter
Note
characters, see page 42.
You are asked if you wish to set an alarm.
4. If you want an alarm to ring on the chosen day,
press the Yes soft key.
Otherwise, press the No soft key. The memo is
saved.
5. If you pressed the Yes soft key, enter the time
for the alarm and press the OK soft key.
You can also select the melody for the alarm by
pressing the Melody soft key.
The colour of the date on the calendar changes to
green to indicate that a memo exists.
Viewing a Memo
When you select a day for which a memo already
exists on the calendar, the latest memo for the day
displays.
If more than one memo is stored, press the or
key to scroll to the previous or next memo.
Press the New soft key to add a new memo to the
day.
You can use the following options by pressing the
Options soft key:
Edit: allows you to change the memo text.
Alarm: allows you to set an alarm to ring at the
specified time to inform you of the memo. If you set
the alarm earlier, you can change or delete it.
Delete: allows you to delete the memo.
Copy to: allows you to copy the memo to another
date.
Move to: allows you to change the date of the
memo.
Time & Date
This menu allows you to change the current time
and date displayed. You can also use this option to
find out what time it is in another part of the world.
The following options are available:
Set Time: allows you to enter the current time. You
can choose the time format in the Time Format
menu (Menu 7.3.4). See below.
Note
: Before setting the time, you must specify your
time zone, in the
7.3.3
Set Date: allows you to enter the day, month and
year.
).
(Menu 7.3)
World Time
menu (
Menu
116
117

Organiser
Organiser
World Time: allows you to find out what time it is
in another part of the world, using the and
keys.
The screen shows the:
• city name.
• current date and time.
• time difference between the selected city and
your city if you have set the local time (see below
for further details) or GMT (by default).
To select your time zone:
1. Select the city corresponding to your time zone
by pressing the or key one or more times.
The local date and time display.
2. Press the Set soft key.
Time Format: allows you to change the time
format to
Calculator
With this feature, you can use the phone as a
calculator. The calculator provides the basic
arithmetic functions; addition, subtraction,
multiplication and division.
1. Enter the first number using the numeric keys.
24 Hours
Notes
:
• To delete mistakes or clear the display, press the
C
key.
• To include a decimal point or a bracket, press the
left soft key until the symbol you want displays.
or 12 Hours.
(Menu 7.4)
2. Press the right soft key until the required
arithmetic symbol appears: + (addition),
- (subtraction), (multiplication), / (division).
3. Enter the second number.
4. To view the result, press the key.
5. Repeat steps 1 to 4 as many times as required.
To Do List
This feature allows you to:
• enter a list of tasks to be done.
• assign a priority and a deadline to each task.
• sort the tasks by priority and status mark.
(Menu 7.5)
Creating the To Do List
1. Press the New soft key.
2. Enter the first task.
: For further details about how to enter
Note
characters, see page 42.
3. Press the OK soft key.
4. Select high, normal or low priority using the
and keys and press the Select soft key.
5. Enter your deadline and press the OK soft key.
If you do not want to set a deadline, press the
Skip soft key.
118
119

Organiser
Organiser
Editing the To Do List
When you select the To Do List menu (Menu 7.5),
the current contents display with the status mark
and priority; for High, for Normal and for
Low.
To view the
details for a
specific task
To change the
status of a
specific task
To create a new
task
To edit an
existing
task
➀ highlight the task.
➁ press the View soft key.
➂ scroll through the tasks using
the and keys, if
necessary.
➀ highlight the task.
➁ press the key to mark the
task as completed as of the
current date and time.
or
➀ highlight the task.
➁ press the Options soft key.
➂ select the Mark option.
➃ select the appropriate status
(Done or Undo).
➀ press the Options soft key.
➁ select the New option.
➂ enter the text, priority and/
or deadline for the task.
➀ highlight the task.
➁ press the Options soft key.
➂ select the Edit option.
➃ change the text, priority and/
or deadline for the task, as
required.
To sort the
existing
tasks by priority
or status
➀ press the Options soft key.
➁ select the Sort option.
➂ select the sort criterion
(High, Low, Done or
Undo).
To copy a task ➀ highlight the task.
➁ press the Options soft key.
➂ select the Copy option.
➃ change the text, priority and/
or deadline for the task, as
required.
To copy a task to
the calendar
➀ highlight the task.
➁ press the Options soft key.
➂ select the Copy to Calendar
option.
➃ change the text and deadline
for the task and set the
alarm, as required.
To delete a task ➀ highlight the task.
➁ press the Options soft key.
➂ select the Delete option.
To delete all
tasks
➀ press the Options soft key.
➁ select the Delete All option.
➂ confirm the deletion by
pressing the OK soft key.
To exit the To Do
list
➀ press the Options soft key.
➁ select the Exit option.
120
121

Organiser
Organiser
Voice Memo
You can record up to 5 voice memos of 30 seconds
each. After recording, you can send a memo to
other people using the multimedia message service.
Record
This menu allows you to record a new memo. When
you select this option, the display shows the 30second timer.
1. To start recording, press the Record soft key.
2. Record a memo by speaking into the
3. When you press the Stop soft key or the
4. To save the memo, choose Save from the
5. Press the C key to clear the default name, if
(Menu 7.6.1)
microphone.
recording time expires, the following options
display:
• Replay: plays back your memo.
• Re-record: discards the memo and enables
you to record another one.
• Save: allows you to save the memo.
• Quit: cancels your recording and exits the
Record menu.
options and press the Select soft key.
necessary, and enter a name for the memo.
For further details about how to enter
characters, see page 42.
(Menu 7.6)
6. Press the OK soft key.
The memo is saved and then the display shows
the memo information.
7. Press the Options soft key to use the following
memo options:
• Send: allows you to send the memo to other
people by using the MMS feature. Follow the
procedure on page 80.
• Rename: allows you to change the memo’s
name.
• Delete: deletes the memo.
8. To exit, press the C or key.
Memo List
This menu shows your voice memo list. Scroll to a
memo and press the Options soft key. The
following options are available:
Play: plays back the memo.
Send: allows you to send the memo to other people
by using the MMS feature. See page 80 for further
details about sending a message.
Rename: allows you to change the memo’s name.
Information: displays information about the
memo, such as name, recording duration, and date
and time when the memo was made.
Delete: deletes the memo.
(Menu 7.6.2)
122
123
 Loading...