

Samsung SGH-i620 User Manual

Smartphone
SGH-i620
User’s Guide

Table of contents
CHAPTER 1 Getting started
What’s in the box? . . . . . . . . . . . . . . . . . . . . . . . . . . . . . 8
Getting to know your device . . . . . . . . . . . . . . . . . . . . . . 9
Installing the SIM card . . . . . . . . . . . . . . . . . . . . . . . . . 12
Installing the battery. . . . . . . . . . . . . . . . . . . . . . . . . . . 14
Charging your device . . . . . . . . . . . . . . . . . . . . . . . . . . 15
Turning your device on or off . . . . . . . . . . . . . . . . . . . . . 17
CHAPTER 2 The basics
Using the Home screen . . . . . . . . . . . . . . . . . . . . . . . . . 18
Start menu screen . . . . . . . . . . . . . . . . . . . . . . . . . . . . 22
Entering text . . . . . . . . . . . . . . . . . . . . . . . . . . . . . . . . 23
Customising your device . . . . . . . . . . . . . . . . . . . . . . . . 24
Searching for items. . . . . . . . . . . . . . . . . . . . . . . . . . . . 37
Locking the touch keys . . . . . . . . . . . . . . . . . . . . . . . . . 39
Using an optional memory card . . . . . . . . . . . . . . . . . . . 39
Adding and removing programs . . . . . . . . . . . . . . . . . . . 41
Managing certificates . . . . . . . . . . . . . . . . . . . . . . . . . . 44
Resetting your device . . . . . . . . . . . . . . . . . . . . . . . . . . 45
Using online help . . . . . . . . . . . . . . . . . . . . . . . . . . . . . 46
CHAPTER 3 Synchronisation
Installing ActiveSync . . . . . . . . . . . . . . . . . . . . . . . . . . . 48
Customising connection settings. . . . . . . . . . . . . . . . . . . 49
Connecting your device to a computer. . . . . . . . . . . . . . . 49
Synchronising information . . . . . . . . . . . . . . . . . . . . . . . 51
Customising synchronisation settings . . . . . . . . . . . . . . . 52
CHAPTER 4 Call functions
Turning the phone functions on and off . . . . . . . . . . . . . . 55

Using the Dialling screen . . . . . . . . . . . . . . . . . . . . . . . . 56
Making a call . . . . . . . . . . . . . . . . . . . . . . . . . . . . . . . . 56
Advanced calling features . . . . . . . . . . . . . . . . . . . . . . . 57
Answering or ignoring a call . . . . . . . . . . . . . . . . . . . . . . 60
Options during a call . . . . . . . . . . . . . . . . . . . . . . . . . . . 60
Call-related features . . . . . . . . . . . . . . . . . . . . . . . . . . . 63
Customising your phone functions . . . . . . . . . . . . . . . . . 66
CHAPTER 5 Messaging, Internet, and
Messenger
Messaging . . . . . . . . . . . . . . . . . . . . . . . . . . . . . . . . . . 72
Opera Browser . . . . . . . . . . . . . . . . . . . . . . . . . . . . . . . 86
Internet Explorer . . . . . . . . . . . . . . . . . . . . . . . . . . . . . 90
Windows Live . . . . . . . . . . . . . . . . . . . . . . . . . . . . . . . . 90
Windows Live Messenger . . . . . . . . . . . . . . . . . . . . . . . . 90
RSS Reader . . . . . . . . . . . . . . . . . . . . . . . . . . . . . . . . . 94
CHAPTER 6 Organiser
Contacts . . . . . . . . . . . . . . . . . . . . . . . . . . . . . . . . . . . 97
Alarms . . . . . . . . . . . . . . . . . . . . . . . . . . . . . . . . . . . 103
Calendar . . . . . . . . . . . . . . . . . . . . . . . . . . . . . . . . . . 104
D-Day . . . . . . . . . . . . . . . . . . . . . . . . . . . . . . . . . . . . 108
Tasks . . . . . . . . . . . . . . . . . . . . . . . . . . . . . . . . . . . . 109
Voice Notes . . . . . . . . . . . . . . . . . . . . . . . . . . . . . . . . 111
World Clock . . . . . . . . . . . . . . . . . . . . . . . . . . . . . . . . 112
Table of contents
3

CHAPTER 7 Multimedia
Camera . . . . . . . . . . . . . . . . . . . . . . . . . . . . . . . . . . . 114
Windows Media Player. . . . . . . . . . . . . . . . . . . . . . . . . 120
Podcast . . . . . . . . . . . . . . . . . . . . . . . . . . . . . . . . . . . 128
Adobe Flash Lite . . . . . . . . . . . . . . . . . . . . . . . . . . . . . 130
My Files . . . . . . . . . . . . . . . . . . . . . . . . . . . . . . . . . . . 131
CHAPTER 8 Extra programs
Games . . . . . . . . . . . . . . . . . . . . . . . . . . . . . . . . . . . 136
Calculator . . . . . . . . . . . . . . . . . . . . . . . . . . . . . . . . . 138
Smart Converter. . . . . . . . . . . . . . . . . . . . . . . . . . . . . 139
Stopwatch . . . . . . . . . . . . . . . . . . . . . . . . . . . . . . . . . 140
Document viewers . . . . . . . . . . . . . . . . . . . . . . . . . . . 140
File Manager . . . . . . . . . . . . . . . . . . . . . . . . . . . . . . . 142
Task Manager. . . . . . . . . . . . . . . . . . . . . . . . . . . . . . . 143
SIM Manager . . . . . . . . . . . . . . . . . . . . . . . . . . . . . . . 145
SIM Application Toolkit . . . . . . . . . . . . . . . . . . . . . . . . 146
CHAPTER 9 Getting connected
Beaming with Bluetooth. . . . . . . . . . . . . . . . . . . . . . . . 147
Connecting to a computer via USB . . . . . . . . . . . . . . . . 151
Internet Sharing . . . . . . . . . . . . . . . . . . . . . . . . . . . . . 152
Connecting to the Internet or your network . . . . . . . . . . 153
Table of contents
CHAPTER 10 Troubleshooting
General problems . . . . . . . . . . . . . . . . . . . . . . . . . . . . 158
4

Call problems . . . . . . . . . . . . . . . . . . . . . . . . . . . . . . . 161
Power and charging problems . . . . . . . . . . . . . . . . . . . 162
Program problems . . . . . . . . . . . . . . . . . . . . . . . . . . . 164
CHAPTER 11 Regulatory notices
SAR certification information . . . . . . . . . . . . . . . . . . . . 169
European Union notice . . . . . . . . . . . . . . . . . . . . . . . . 170
Important safety information . . . . . . . . . . . . . . . . . . . . 171
Safety precautions for power supply unit . . . . . . . . . . . . 173
Care and maintenance . . . . . . . . . . . . . . . . . . . . . . . . 173
Microsoft End User License Agreement . . . . . . . . . . . . . 175
DESCRIPTION OF OTHER RIGHTS
AND LIMITATIONS. . . . . . . . . . . . . . . . . . . . . . . . . . . . 177
Table of contents
5

Important safety precautions
Read these guidelines before using your wireless device.
Failure to comply with them may be dangerous or illegal.
Drive safely at all times
Do not use a hand-held device while driving. Park the
vehicle first.
Switch off the device when refuelling
Do not use the device at a refuelling point (service station)
or near fuels or chemicals.
Switch off in an aircraft
Wireless devices can cause interference. Using them in an
aircraft is both illegal and dangerous.
Switch off the device near all medical equipment
Hospitals or health care facilities may be using equipment
that could be sensitive to external radio frequency energy.
Follow any regulations or rules in force.
Interference
All wireless devices may be subject to interference, which
could affect their performance.
Be aware of special regulations
Meet any special regulations in force in any area and
always switch off your device whenever it is forbidden to
use it, or when it may cause interference or danger.
Water resistance
Your device is not water-resistant. Keep it dry.
6

Sensible use
Use only in the normal position (held to the ear). Avoid
unnecessary contact with the antenna when the device is
switched on.
Emergency calls
Key in the emergency number for your present location,
then press .
Keep your device away from small children
Keep the device and all its parts, including accessories, out
of the reach of small children.
Accessories and batteries
Use only Samsung-approved batteries and accessories,
such as headsets and PC data cables. Use of any
unauthorised accessories could damage you and your
device and may be dangerous.
CAUTION:
• The
device
could explode if the battery is replaced with an
incorrect type.
• Dispose of used batteries according to the manufacturer’s
instructions.
At very high volumes, prolonged listening to a
headset can damage your hearing.
Qualified service
Only qualified service personnel may install or repair your
device. Failure to do so may invalidate the warranty.
For more detailed safety information, see “Important safety
information” on page 171.
7

1
Getting started
Congratulations on the purchase of your new Smartphone!
This chapter helps you set up your device, charge the
device’s batteries, and familiarise yourself with the different
components of your device.
What’s in the box?
Your package contains the following items:
•Device
• PC data cable
• Battery
• Travel adapter
•CD-ROM
• Quick Reference Guide
In addition, you can obtain the following accessories for
your device from your local Samsung dealer:
• Car charger or adapter • Standard battery
• Travel adapter • Straight headset
• PC data cable • Bluetooth USB dongle kit
• Bluetooth hands-free car
kit
• Bluetooth mono &
stereo headset
1
• Ear microphone
Note
: The items supplied with your
available at your Samsung dealer may vary, depending
on your country or service provider.
1. It contains Microsoft ActiveSync software, Add-on software and
programs.
device
and the accessories
8
Getting started
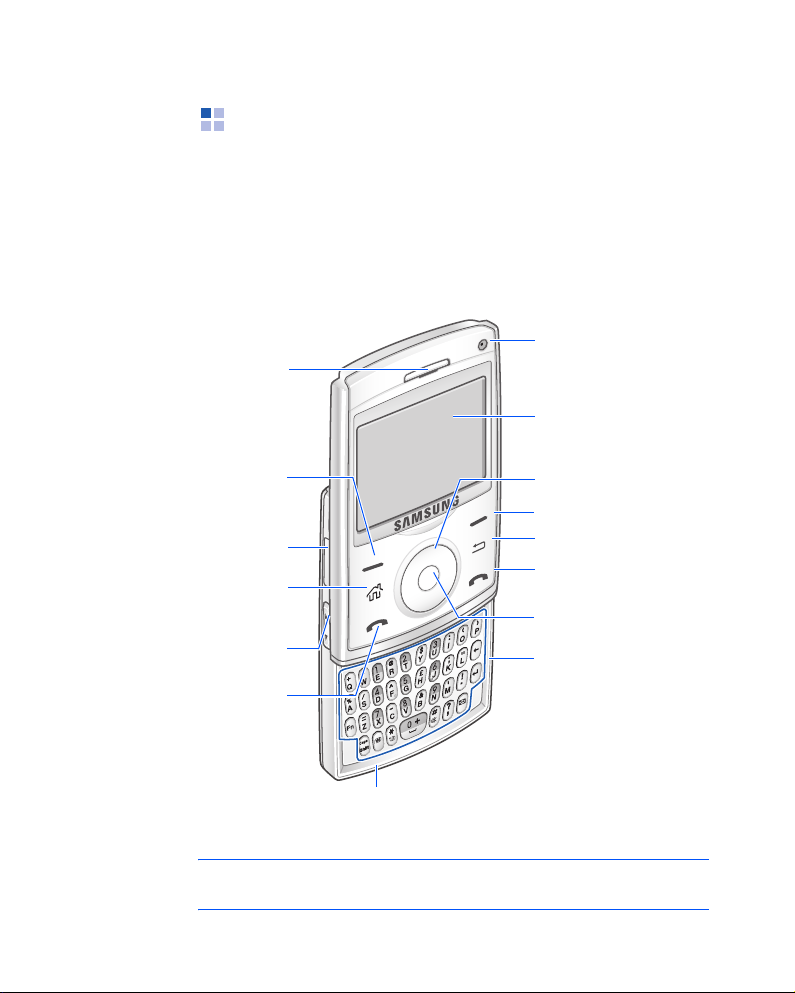
Getting to know your device
Front view
The following illustrations show the main elements of your
device:
Front camera lens
Earpiece
Display
Left soft key (LSK)
microSD™card slot
Home key (short
press)/Task Manager
key (long press)
Volume keys
Send key (short press)/
Speakerphone key (long
press during a call)
Note
: Depending on your country, the keyboard may be
different.
4-Way Navigation key
Right soft key (RSK)
Back/Clear key
End key
Centre key
Built in Full keyboard
Mouthpiece
9
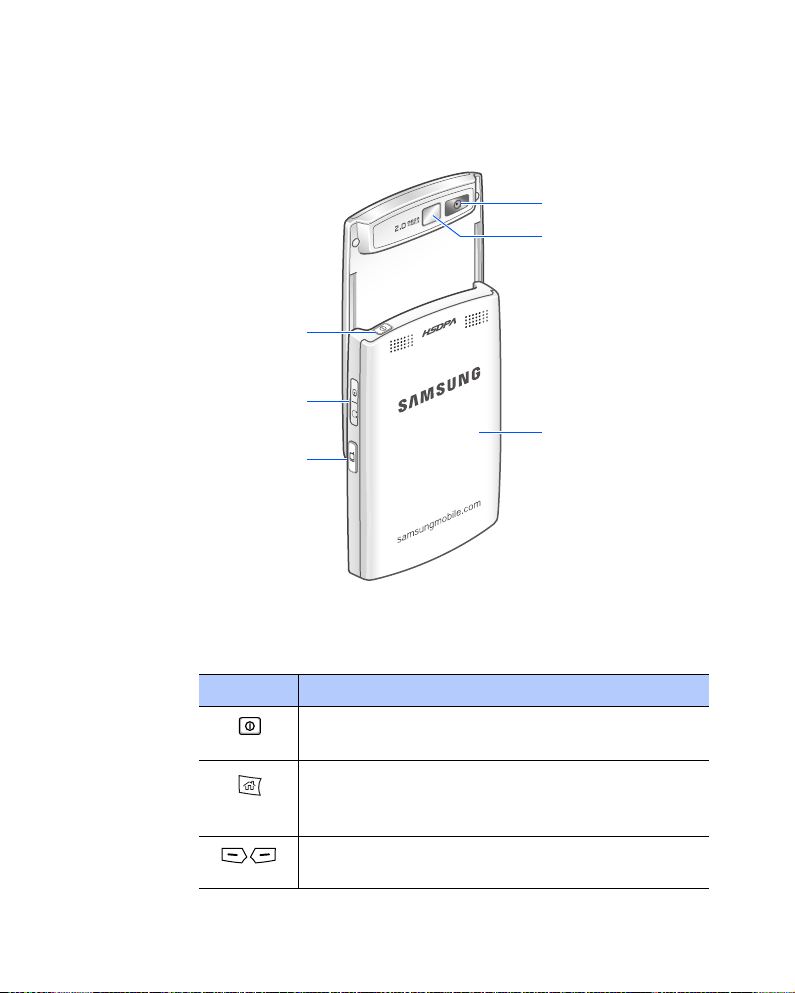
Rear view
Power ON/OFF button
(long press)/Key lock
(short press)
Headset/Power adapter/
USB or data cable jack
Quick List key (short
press)/Camera key (long
press)
Getting started
Rear camera lens
Mirror
Battery cover
Keys of your device
Key Description
• Press and hold to turn the device on or off.
• Press to lock the touch keys.
• Press to switch to the Home screen from a
program.
• Press and hold to open Task Manager.
Press to perform the command shown on the
screen immediately above the key.
10
Key Description
• Press to close the current menu and return
to the previous menu or screen.
• Press to delete characters in a text input
field.
• Press to scroll through a list.
• Press to move the cursor in a text input
field.
Press to confirm your selection or input.
• Press to open the Dialling screen.
• Press to make or answer a call.
• Press and hold to activate the
speakerphone feature during a call.
• Press to end a call.
• Press to close the current menu.
~
Press to enter numbers, characters, and
symbols.
Press to delete characters.
Press to use characters on the upper half of
the keys in a text input field for once.
• Press to confirm your selection or input.
• Press to start a new line in a text input field.
Press to change case in a text input field.
Getting started
Press to switch the text input mode to 123
mode and then back to the previous mode.
Press to change the text input mode.
11

Getting started
Key Description
• Press to enter a space between characters.
• Press and hold to insert an international call
prefix.
Press and hold to activate or deactivate the
Silent profile from the Home screen.
Press to open the Messaging program.
• Press to adjust the audio volume.
• Press to mute the call ringer as a call comes
in. Press and hold to reject a call.
• Press to open the Quick List screen.
• Press and hold to open a specified program.
Installing the SIM card
When you subscribe to a cellular network, you are provided
with a plug-in SIM card loaded with your subscription
details, such as your PIN, any optional services available,
and many other details. For 3G services, you can purchase
a USIM (Universal Subscriber Identity Module) card.
• Keep all miniature SIM cards out of the reach of small
children.
• The SIM card and its contacts can be easily damaged by
scratches or bending, so be careful when handling the
card.
• When installing the SIM card, always make sure that the
device is switched off before you remove the battery.
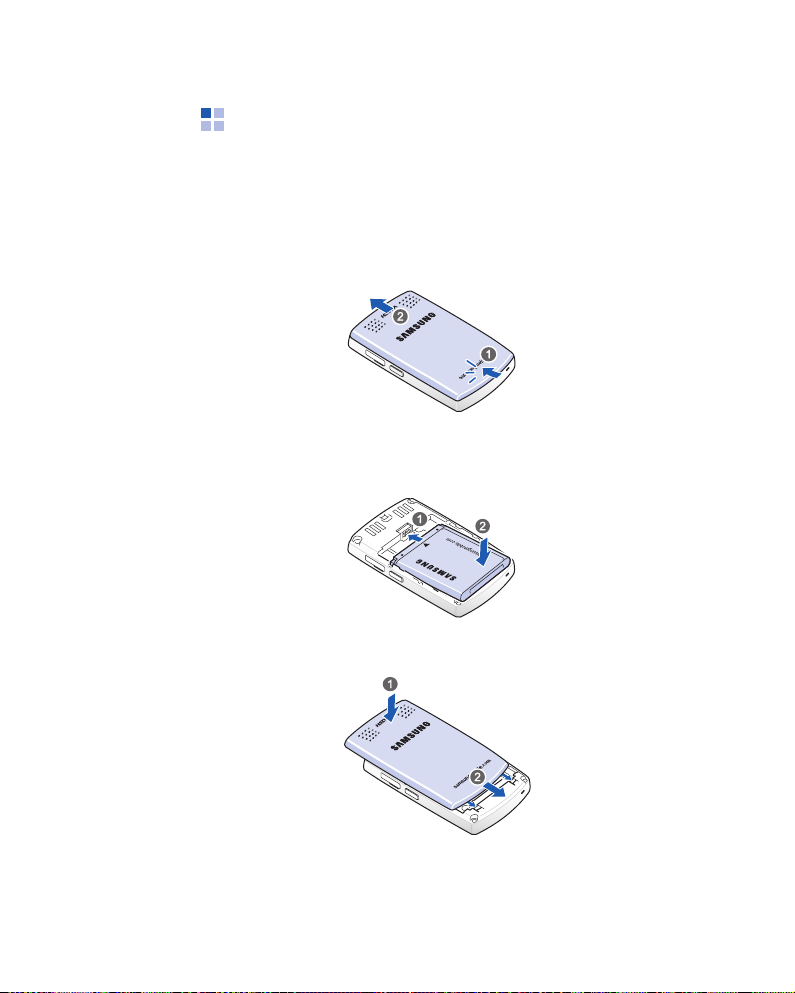
12

Getting started
Inserting the SIM card
1. Remove the battery cover.
2. Insert and slide the SIM card, as shown, ensuring that
the gold-coloured contacts of the card are face down.
Continue to install the battery. See the next page.
Removing the SIM card
To remove the SIM card, slide the card out of the holder, as
shown.
13
Getting started
Installing the battery
Your device is powered by a rechargeable Li-Ion battery.
Installing the battery
1. Remove the battery cover, if necessary.
2. Insert the battery into the battery compartment, as
shown.
3. Reattach the battery cover.
14

Getting started
Removing the battery
1. If necessary, press and hold (located at the top-right
of your device) until the power-off image displays.
2. Remove the battery cover.
3. Lift the battery away from the device.
Charging your device
Your device is powered by a rechargeable Li-ion battery.
Use the travel adapter to charge the battery, and use only
Samsung approved batteries and chargers. Use of the
wrong adaptor could damage your device and void your
warranty.
Note
: You must fully charge the battery before using your
device for the first time. A discharged battery recharges
fully in approximately 150 minutes. You can use the
device while the battery is charging, but this causes the
device to charge more slowly.
1. Plug the connector of the travel adapter into the jack on
the right side of the device.
15

Getting started
Note
: The following illustration shows the correct and
incorrect method for connecting the adapter. Verify
the arrow on the adapter is showing and pointing to
the device for a correct connection. If it is not,
damage to the accessory port will occur therefore
voiding the device’s warranty.
2. Plug the travel adapter into a standard AC power outlet.
When charging is finished, unplug the adapter from the
power outlet.
3. Remove the travel adapter from the device.
Note
: Do not remove the battery while charging. It may cause
malfunctions and may damage the
device
.
16
Getting started
Low battery warning
When the battery is weak and only a few minutes of talk
time remain, a warning tone sounds and the “Main Battery
very low” message on the display and the battery icon ( )
displays. The backlight turns off to conserve the remaining
battery power.
When the battery level becomes too low, the device
automatically turns off.
Turning your device on or off
Press and hold to turn on your device. The device is
logged into your home network and receives the signal
from the network. You can now make or answer calls and
use programs on the device.
To turn off the device, press and hold
Note
: Your device supports HSDPA (High-Speed Downlink
Packet Access) connections. In some countries,
incoming and outgoing voice calls may be limited until
the HSDPA networks are upgraded.
.
17

2
The basics
This chapter explains basic information about using your
device, such as customising your device and using online
help.
Using the Home screen
When you turn on your device, the Home screen, the
device’s idle screen, appears. You can also access this
screen by pressing from any program.
Status bar
On the top line of the screen, the status bar displays icons
to show your device’s current status. Followings are some
of the status icons you may see:
Icon Description
Shows the strength of the signal.
You can also view the following service status:
• : You are out of your service area.
• : The phone functions are turned off.
Appears when a call is in progress.
Appears when a data call is in progress.
Appears when the current call is on hold.
Appears when a GPRS connection is available in
the network. When a GPRS connection is active,
appears.
18
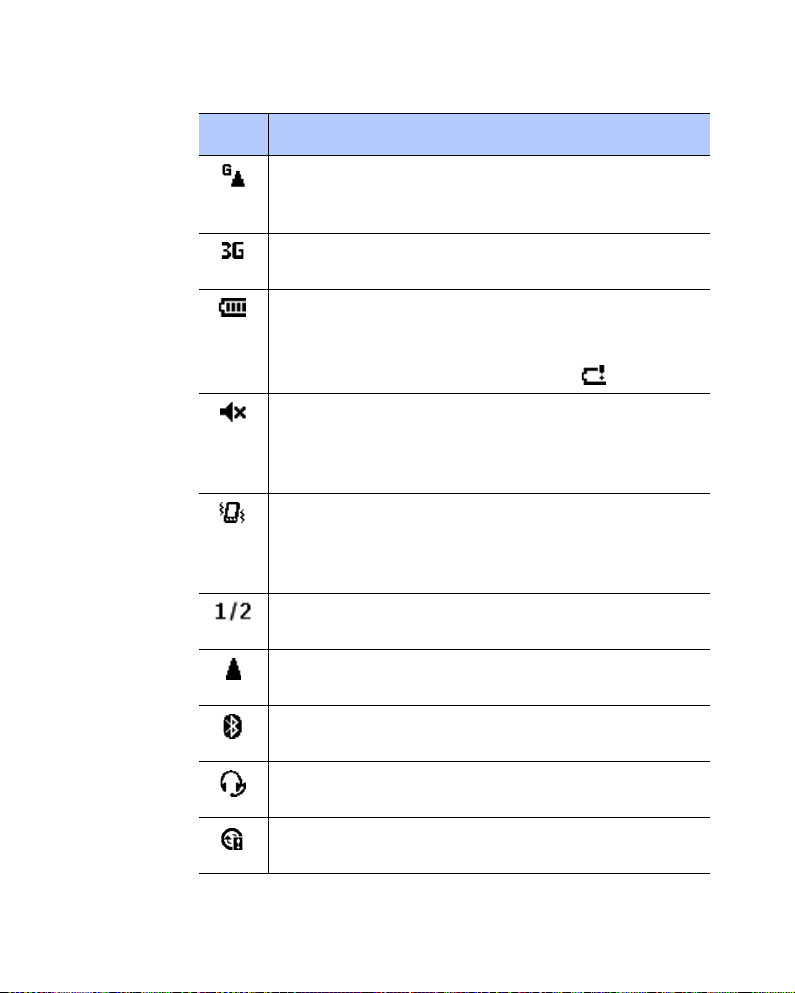
Icon Description
Appears when you are roaming out of your home
service area and logged onto a different GPRS
network.
Appears when a 3G (UMTS) connection is
available in the network.
Shows the level of your battery power. The more
bars you see, the more power you have
remaining.
When the battery level is very low, appears.
Appears when the ring type has been set to
Silent
in the current profile or the ring tone has
been set to
page 27.
Appears when the ring type has been set to
Vibrate
in the current profile or the ring tone has
been set to
page 27.
Indicates that you can make calls using phone
line 1 or 2 (network service).
Appears when you are roaming outside of your
home area and logged onto a different network.
None
in Sounds. For details, see
Vibrate
in Sounds. For details, see
The basics
Appears when Bluetooth is activated. For details,
see page 147.
Appears when a Bluetooth headset is connected
to the device.
Appears when an error occurs during
synchronisation.
19

The basics
Icon Description
Appears when a text (SMS) or multimedia (MMS)
message has been received.
Appears when an instant message has been
received.
Appears when a new voicemail has been
received.
• : A new voicemail from line 1.
• : A new voicemail from line 2.
• : A new voicemail from both lines.
Appears when there is a call you have missed.
Appears when you have set incoming calls to be
diverted to another destination.
Accessing information from the Home
screen
From the Home screen, you can:
• check the service status and the current time and date
• view missed calls or unread messages
• view upcoming appointments
• play music files
To access information from the Home screen:
1. From the
Home
screen, scroll to the item you want by
pressing the Navigation keys and press .
20

The basics
2. Access items in the selected program by pressing the
Navigation keys or sliding the thumbwheel.
For more information on these items, see the
appropriate instructions for each task in this guide.
3. Press or to return to the Home screen.
Customising the Home screen
You can customise the Home screen according to your
preferences.
1. On the
2. Select
Home screen, press the Start
Settings →
Display →
Home Screen
soft key.
.
3. Press the Up or Down Navigation key to scroll to an
option, and press the Left or Right Navigation key to
change the setting.
The following options are available:
Home screen layout
•
: Select the layout to be used for
the Home screen.
Note:
The
Samsung Living World
layout is easy to know
the current time, signal strength, and country
because of its graphical screen.
•
Colour scheme
: Select the colour scheme to be used
for the Home screen.
Background image
•
: Select an image to use as a
background image on the Home screen.
•
Time out
: Specify the length of time the device waits
before returning the display to the Home screen if the
device is not used.
21

The basics
4. When you have finished, press the
Done
soft key.
Start menu screen
On the Start menu, you can access all of the programs in
Start
your device. On the Home screen, press the
to open the Start menu screen.
You can change the start menu type. Press the
key, and select
Then select the option you want.
Settings → Display → Start Menu Style
Opening programs or folders
Scroll to a program or a folder by pressing the Navigation
keys or sliding the thumbwheel, and press to open it.
Switching between programs
Your device is a multi-tasking device. You can run multiple
programs at the same time and switch from one program
to another. From any program, press or to switch
to the Home screen.
Note:
Your device supports multiple PDP so that you can
activate multiple data connections at the same time.
For example, you can use the MMS service while
browsing the Internet. However, if a network does not
support multiple PDP, you must end the current data
connection in order to make a new data connection.
soft key
Start
soft
.
22

The basics
Closing programs
Using Task Manager, you can end the programs which are
currently open.
1. On the Home screen, press and hold .
Stop
2. Scroll to a program, press the
of the running programs, press the
select
Stop All
.
soft key. To close all
Menu
soft key and
Entering text
Your device is equipped with a Full keyboard to support
easy and quick text input. You can enter text as you would
when using a computer’s keyboard.
The keys are labelled with alphabet on the lower half and
numbers and symbols on the upper half. Press the key
corresponding to the character you want to enter. To switch
between using the upper case characters and lower case
characters, press .
You can move the cursor by pressing the Navigation keys.
To delete a character, press .
In addition, you can use the following function keys:
• : deletes characters.
• : starts a new line.
• : changes the text input mode to Upper case mode or
Lower case mode.
• : switches to 123 mode.
23

The basics
• : allows you to change the text input mode. You can
switch between ABC mode and T9 mode in which
displays the word choices for your key presses. 123
mode and Symbol mode are also available for
entering numbers and symbols. Using the
Languages
T9 mode.
• : press and hold to switch to Symbol mode.(Or press
to switch to Symbol mode.)
option, you can change the language for
Customising your device
You can customise the device settings to suit the way you
work.
Regional settings
You can change number, currency, and time and date
formats appropriate to the countries in question.
Start
1. On the Home screen, press the
soft key.
2. Select
3. Select the option you want in each field.
4. When you have finished, press the
5. If you changed the
Settings →
OK
soft key.
.
Settings
the
Then you need to turn the device off and then back on
to make your changes take effect.
More... →
Language
More... →
Done
or
Locale
Regional
soft key.
option, press
24

Time and date settings
The
Date and Time
time, and time zone.
1. On the Home screen, press the
setting enables you to set the date,
Start
The basics
soft key.
2. Select
Settings → Date and Time
.
3. Select your time zone and set the current date and time.
4. If necessary, select a mode for updating the current
time and date in the
Manual only
Prompt first
: you can set the time and date manually.
: the device will ask you if you want to
Time zone updating
field:
update time information.
Note
: When you set the device to automatically update
time information, the time zone on the device may
appear to be different from the time zone you are in.
Automatic
: your device will receive time information
from the network and automatically update the current
time. This option is available only if supported by your
network.
Done
5. When you have finished, press the
Note
: You can change the time and date format to be
displayed in
Regional Settings
soft key.
.
25

The basics
Power settings
You can conserve battery power by adjusting the time-out
settings for the display.
Home
1. On the
screen, press the
Start
soft key.
2. Select
Settings → More... →
Power management
3. Select the power settings:
•
Battery
•
Backlight time out
: You can check the remaining battery power.
: You can select the length of time
the display backlight stays on when you do not use the
device.
Display time out
•
: You can select the length of time
the display stays on. During standby, the device goes
to Sleep mode after a specified period of time, so very
little power is being consumed.
•
Display brightness
: You can adjust the brightness
for the display.
•
Keypad backligt time out
: you can select the length
of the keypad backlight stays on when you do not use
the device.
•
Keypad backlight on
Custom time
. If you have chosen
: Choose from
Custom time
Any time
enter the starting time and ending time for the keypad
to work.
Done
4. When you have finished, press the
soft key.
.
or
,
26

The basics
Accessibility settings
You can configure the options to increase the accessibility
to your device’s functions.
Start
1. On the Home screen, press the
soft key.
2. Select
3. Select the options you want.
4. When you have finished, press the
Settings → More... → More... → Accessibility
•
System font size
your screen.
•
Confirmation time out
an unconfirmed action times out.
•
In-call alert volume
alert tone that sounds when you are on a call.
: You can set the size of the font on
: You can set the delay before
: You can set the volume of the
Done
soft key.
.
Sound settings
You can customise sound settings for various events on the
device.
Setting sounds and notifications
Your device reminds you in various ways when you have
something to do, receive a message, or press the keys on
the device. For example, if you have set up an
appointment, you are notified in any of the following ways:
• A sound, which you can specify, plays.
• Your device vibrates.
27

The basics
You can change device sounds by choosing types or sounds
for each event.
To choose a ringtone for the call ringer:
1. On the Home screen, press the
2. Select
Settings → Sounds → Ring Tone
Start
soft key.
.
3. Select the ringtone you want.
4. Press the
To choose a message notification:
1. On the Home screen, press the
2. Select
Done
soft key.
Start
soft key.
Settings → Sounds → Notification
.
3. Select a notification for each message type.
4. Press the
To choose reminder types and sounds:
1. On the Home screen, press the
2. Select
Done
soft key.
Start
soft key.
Settings → Sounds → System Sound
3. Select the event for which to specify a sound.
4. Select the reminder type or ringtone.
5. When you have finished, press the
Done
soft key.
.
28

To choose a keypad tone:
The basics
1. On the Home screen, press the
2. Select
Settings → Sounds → Keypad Tone
Start
soft key.
.
3. Select a keypad tone.
4. Press the
Notes
Done
soft key.
:
• You can connect to the Internet and then download ringtones
that are in a .wav or .mid format.
• To use an .mp3 or .wma file as your call ringtone, it must be
saved in a Storage or Storage Card folder.
Changing the sound profile
Using Profiles, you can adjust and customise the device
tones for different events or environments and then apply
the settings as a group. The currently selected profile
displays on the Home screen.
To change profiles:
1. On the Home screen, press the
2. Select
Settings → Profiles
Start
soft key.
. The list of profiles opens.
3. Select the profile you want.
Notes
:
• You can quickly change the profile. Press and select the
profile you want from the Quick List.
• Press and hold from the Home screen to quickly activate
or deactivate the Silent profile.
29

The basics
To customise profiles:
1. On the Profiles screen, scroll to the profile you want.
2. Press the
Menu
soft key and select
Edit
.
3. Change the settings in each field. Available options may
differ depending on the selected profile.
4. When you have finished, press the
Note
: To change all profile settings to their factory default,
Menu
press the
Reset to default
soft key from the profile list and select
.
Done
soft key.
Owner information setting
Owner Information identifies the owner or user of the
device. Set your contact information in case you have lost
the device.
1. On the Home screen, press the
2. Select
Settings → More... → More... → Owner
Information
.
Start
soft key.
3. Fill in each input field.
4. When you have finished, press the
Done
soft key.
Error reporting setting
Your device has the Error Reporting function which informs
you of errors in a program that can give a crash to the
device system. You can enable or disable this function.
30
 Loading...