

Page 1

QUAD BAND Series
SGH-A736
Portable Digital Mobile Phone
User Manual
Please read this manual before operating your phone, and keep it for
future reference.
Printed in China
Code No.: GH68-16832A
English 10/2007. Rev. 1.0
Page 2

Intellectual Property
All Intellectual Property, as defined below, owned by or which is otherwise
the property of Samsung or its respective suppliers relating to the
SAMSUNG Phone, including but not limited to, accessories, parts, or
software relating thereto (the “Phone System”), is proprietary to Samsung
and protected under federal laws, state laws, and international treaty
provisions. Intellectual Property includes, but is not limited to, inventions
(patentable or unpatentable), patents, trade secrets, copyrights, software,
computer programs, and related documentation and other works of
authorship. You may not infringe or otherwise violate the rights secured by
the Intellectual Property. Moreover, you agree that you will not (and will not
attempt to) modify, prepare derivative works of, reverse engineer,
decompile, disassemble, or otherwise attempt to create source code from
the software. No title to or ownership in the Intellectual Property is
transferred to you. All applicable rights of the Intellectual Property shall
remain with SAMSUNG and its suppliers.
©2007 Samsung Electronics Canada, Inc. SAMSUNG is a registered
trademark of Samsung Electronics Co., Ltd. and its related entities.
The Bluetooth® word mark and logos are owned by the Bluetooth SIG, Inc.
and any use of such marks by Samsung Electronics Canada, Inc. is under
license. Other trademarks and trade names are those of their respective
owners.
Page 3

Table of Contents
Important Safety Precautions ................................................................1
Your Phone ..............................................................................................3
Features of Your Phone ...................................................................................... 3
Phone Layout ...................................................................................................... 4
Display ................................................................................................................ 8
Selecting Functions and Options ...................................................................... 12
Memory Card .................................................................................................... 13
Getting Started ......................................................................................17
Activating Your Phone ...................................................................................... 17
Switching the Phone On and Off ....................................................................... 21
Call Functions .......................................................................................23
Making a Call .................................................................................................... 23
Adjusting the Volume ........................................................................................ 25
Answering a Call ............................................................................................... 25
Missed Calls ...................................................................................................... 26
Silent Profile ...................................................................................................... 28
Options During a Call ........................................................................... 29
In Call Options .................................................................................................. 29
Put a Call on Hold ............................................................................................. 29
Switching the Microphone Off (Mute) ................................................................ 30
Using the Speakerphone .................................................................................. 31
Muting or Sending Key Tones ........................................................................... 31
Making a Multi-party Call .................................................................................. 31
Sending a Sequence of DTMF Tones ............................................................... 33
Searching for a Number in the Contact List ...................................................... 33
Call Waiting ....................................................................................................... 34
Access Codes .......................................................................................35
Phone Password ............................................................................................... 35
PIN .................................................................................................................... 35
PUK ................................................................................................................... 36
PIN2 .................................................................................................................. 36
PUK2 ................................................................................................................. 36
i
Page 4

Video Calling ..........................................................................................38
Making a Video Call ..........................................................................................38
Receiving a Video Call ...................................................................................... 39
Options During a Video Call .............................................................................. 39
Entering Text .........................................................................................44
Changing the Text Input Mode .......................................................................... 44
Using T9 Mode .................................................................................................. 45
Using Alphabet Mode ........................................................................................ 46
Using Number Mode .........................................................................................47
Using Symbol Mode .......................................................................................... 48
Transferring Files ..................................................................................49
Transferring Files via USB Cable ...................................................................... 49
Transferring Files via Bluetooth ........................................................................ 51
Transferring Files via microSD Card ................................................................. 52
Menus .....................................................................................................53
Main Menu Style ............................................................................................... 54
List of Menu Functions ...................................................................................... 54
Fido Mall .................................................................................................56
Using the Internet Browser ................................................................................ 56
Go to ................................................................................................................. 58
Music & Tones .................................................................................................. 58
Games ............................................................................................................... 59
Images .............................................................................................................. 59
Messaging ......................................................................................................... 60
Video ................................................................................................................. 60
News & Info ....................................................................................................... 61
Internet .............................................................................................................. 61
Internet Settings ................................................................................................ 61
Media ......................................................................................................63
Ring Tunes ........................................................................................................ 63
Graphics ............................................................................................................ 65
Videos ............................................................................................................... 67
Music ................................................................................................................. 69
Voice List ........................................................................................................... 70
Media Applications ............................................................................................ 72
Other Files ......................................................................................................... 85
ii
Page 5

Memory Status .................................................................................................. 86
Games and Apps .................................................................................. 87
Download Games ............................................................................................. 87
Call History ............................................................................................89
All Calls ............................................................................................................. 89
Missed Calls ...................................................................................................... 90
Calls Made ........................................................................................................ 90
Calls Received .................................................................................................. 90
Speed Dial List .................................................................................................. 90
Delete All ........................................................................................................... 92
Voice Call Time ................................................................................................. 92
Video Call Time ................................................................................................. 93
i.Fido ...................................................................................................... 94
Internet .............................................................................................................. 94
Video Calling ..................................................................................................... 94
Video/Radio ...................................................................................................... 94
Mobile TV .......................................................................................................... 94
Music ................................................................................................................. 95
More Services ................................................................................................... 96
Messages ............................................................................................... 97
Fido IM .............................................................................................................. 97
MobileMail ......................................................................................................... 99
Create New Message ....................................................................................... 99
Message Folders ............................................................................................ 106
Templates ....................................................................................................... 109
Voice Mail ....................................................................................................... 110
Delete All ......................................................................................................... 111
Messages Settings .......................................................................................... 112
Memory Status ................................................................................................ 112
Tools .................................................................................................... 113
Alarms ............................................................................................................. 113
Calendar ......................................................................................................... 116
Tasks .............................................................................................................. 122
Notes ............................................................................................................... 125
Calculator ........................................................................................................ 126
Tip Calculator .................................................................................................. 126
iii
Page 6

Converter ........................................................................................................ 127
World Time ...................................................................................................... 128
Timer ............................................................................................................... 129
Stopwatch ....................................................................................................... 129
Contacts ...............................................................................................131
Add New Contact ............................................................................................131
Find Contact Information by Name ................................................................. 134
Groups ............................................................................................................ 137
My Business Card ........................................................................................... 138
Settings ................................................................................................140
Set Profiles ...................................................................................................... 140
Set Display ...................................................................................................... 143
Set Time & Date .............................................................................................. 144
Set Phone ....................................................................................................... 146
Set Calls .......................................................................................................... 148
Set Connectivity ..............................................................................................157
Set Applications .............................................................................................. 165
Reset Settings ................................................................................................. 172
Solving Problems ................................................................................174
Health and Safety Information ...........................................................177
Exposure to Radio Frequency (RF) Signals .................................................... 177
For Body Operation ......................................................................................... 178
Precautions When Using Batteries ................................................................. 179
Operating Environment ...................................................................................180
Electronic Devices ........................................................................................... 180
Potentially Explosive Environments ................................................................ 182
Emergency Calls ............................................................................................. 183
Other Important Safety Information ................................................................. 184
Care and Maintenance .................................................................................... 184
FCC Notice ...................................................................................................... 186
Appendix A: CERTIFICATION INFORMATION (SAR) ...................................187
Appendix B: Safe and Responsible Wireless Phone Use ............................... 189
Appendix C: Consumer Update on Wireless Phones ..................................... 192
STANDARD LIMITED WARRANTY .....................................................201
iv
Page 7

Important Safety Precautions
Please read these guidelines before using your wireless phone. Failure to
comply with them may be dangerous or illegal.
Road Safety at All Times
Do not use a hand-held phone while driving; park the vehicle first.
Switching Off When Refueling
Do not use the phone at a refueling point (service station) or near fuels or
chemicals.
Switching Off in Aircraft
Wireless phones can cause interference. Using them in aircraft is both
illegal and dangerous.
Switching Off in Hospitals
Switch your phone off near medical equipment. Follow any regulations or
rules in force.
Interference
All wireless phones may be subject to interference, which could affect their
performance.
Special Regulations
Follow any special regulations in force in any area and always switch your
phone off whenever it is forbidden to use it, or when it may cause
interference or danger (for example, in a hospital).
Important Safety Precautions
1
Page 8

Sensible Use
Use the phone only in the normal position (held to the ear).
Emergency Call
Ensure the phone is switched on and in service. Key in the emergency
number for your present location, then press the key. You must
deactivate any unnecessary features before you can make an emergency
call. Give all the necessary information as accurately as possible. Do not
end the call until given permission to do so.
Water Resistance
Your phone is not water-resistant. Keep it dry.
Accessories and Batteries
Use only Samsung-approved accessories and batteries. Use of any
unauthorized accessories could damage your phone and may be
dangerous.
Qualified Service
Only qualified service personnel may repair your phone.
For more detailed safety information, see “Health and Safety Information”
on page 177.
Important Safety Precautions
2
Page 9

Your Phone
Features of Your Phone
Your phone is lightweight, easy-to-use and offers many valuable features.
The following list outlines a few of the features included in your phone.
♦Bluetooth
♦Camera and camcorder
♦Video calling
♦Multitasking
♦Instant messaging capability
♦E-mail
♦Featured applications provide alarms, calendar, task lists, notes,
calculator, converter, timer, stopwatch, and world time.
♦Name card
♦Multimedia capability (with included Music Player)
♦Photo caller ID
♦Speakerphone capability
♦Web browser
Your Phone
3
Page 10
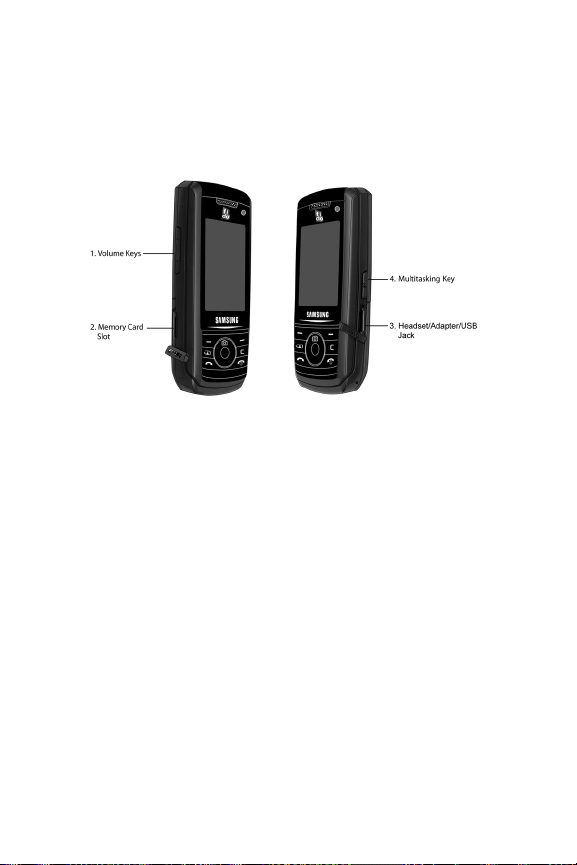
Phone Layout
Closed View of Your Phone
The following illustration shows some of the external elements of your
phone
1. Volume keys: Allow you to adjust the ringer volume in standby mode,
mute the ringer when receiving a call and adjust the voice volume
during a call. Can also be used to scroll up or down to navigate through
menu options.
2. Memory Card Slot: Used to install an optional microSD™ card for
additional data storage (see “Memory Card” on page 13).
3. Headset/Adapter/USB Jack: Allows you to connect the headset, PC
connection cable (see “Transferring Files via USB Cable” on page 49),
and travel adapter (see “Charging the Battery” on page 20).
4. Multitasking key: Launches the multitasking menu, which includes
Call, Messages, Internet, Music Player, and Games and Apps. See
“Multitasking Menu” on page 11 for additional information.
Your Phone
4
Page 11

Open View of Your Phone
The following illustration shows the rest of the main elements of your
phone:
15. Earpiece/Speaker
14. Front Camera
1. Display
2. Navigation Keys
3. Soft Key (Left)
4. Video Call Key
5. Send Key
6. Voice Mail Key
7. Video Mail Key
8. Special Function Keys
13. Menu Access/Confirm/
Speakerphone key
3. Soft Key (Right)
12. Clear Key
11. Power On/Off/Menu Exit Key
10. Alphanumeric Keypad
9. Microphone
1. Display: This screen displays all the information needed to operate
your phone.
2. Navigation keys: In Menu mode, the navigation keys work as
directional keys to scroll through menus and lists. In Idle mode, the
navigation keys work as shortcuts, allowing you to access other menus
directly.
Your Phone
5
Page 12

The shortcuts are:
Press Up to access the Camera.
Press Left to
access the Call
History menu.
Press Right to
access the
Messages Inbox.
Press Down to open the Contacts menu.
When entering text, the left and right navigation keys move the cursor
left and right.
3.
Soft keys: Perform the function indicated by text on the display directly
above the key.
4. Video Call key: allows you to place a video call.
5. Send key: Allows you to place or receive a call. In Idle mode, press the
key once to access the Recent Call log. Press and hold the key to
redial the most recent call.
6. Voice Mail key: Press and hold the key to automatically dial your
voicemail.
7. Video Mail key: Press and hold the key to launch Video Mail.
8. Special Function keys: The key enters the
[*]
character for
calling features, such as a pause between numbers. In text entry mode,
press to change the character input type. The key enters the
pound [#] character for calling features. In text entry mode, press to
enter a space between characters. Press and hold to activate and
deactivate Silent mode.
Your Phone
6
Page 13

9. Microphone: Converts your voice into an electrical signal during phone
calls and voice recordings.
10. Alphanumeric keypad: Use these keys to enter numbers, letters, and
some special characters.
11. Power On/Power Off/Menu Exit key: Ends a call. Press and hold for a
few seconds to power your phone on or off. While in the main menu, it
returns the phone to standby mode and cancels any input. Rejects an
incoming call.
12. Clear key: Deletes characters from the display when you are in text
entry mode. When in a main menu, press to return to the previous
menu. Rejects an incoming call.
13. Menu Access/Confirm/Speakerphone key: While in Idle mode, it
launches the main menu. When navigating through a menu, it accepts
the highlighted choice in the menu. During a call, it turns the
speakerphone function on and off.
14. Front Camera: Used to create image of you when making a video call.
You can switch between front and rear cameras during a call (see
“Options During a Video Call” on page 39).
15. Earpiece/Speaker: used to listen to audio and music from your phone.
Your Phone
7
Page 14

Display
Display Layout
The internal display has three main areas:
Icons
d
Text and graphics area
lace
ep
e r
b
o
T
Area Description
Icons Displays various icons that indicate phone status.
Text and graphics
area
Soft key function
indicators
Displays messages, menus, instructions and any
information that you enter, such as the number you are
dialing.
Shows the current functions assigned to the two soft keys.
Soft key function indicators
Your Phone
8
Page 15
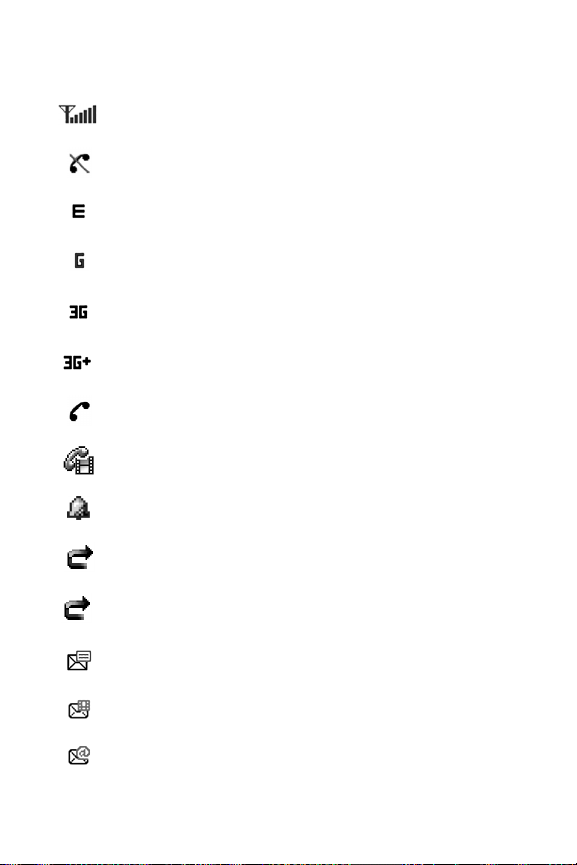
Icons
Shows the received signal strength. The more bars, the
stronger the signal.
Appears when there is no network coverage available.
Appears when the phone is accessing services on an Edge
network. When data is being transferred, this icon animates.
Appears when the phone is accessing services on an GPRS
network. When data is being transferred, this icon animates.
Appears when the phone is accessing services on a 3G
(UMTS) network. Animates when data is being transferred.
Appears when the phone is accessing services on a 3G+
(HSDPA) network. Animates when data is being transferred.
Appears when a call is in progress.
Appears when a video call is in progress.
Appears when an alarm is set. For details, see “Alarms” on
page 113.
Appears when the Call Forwarding feature is active. For
details, see “Call Forwarding” on page 151.
Appears when the Video Call Forwarding feature is active.
V
For details, see “Call Forwarding” on page 156.
Appears when a new text message or notification of a new
voice mail has been received.
Appears when a new picture message has been received.
Appears when a new email message has been received.
Your Phone
9
Page 16

Appears when a push message has been received from the
WAP server.
Appears after a memory card is inserted.
Appears when Bluetooth wireless technology is active. When
transferring data, this icon blinks.
Appears when the phone’s profile is set to Silent.
Appears when the phone’s profile is set to Driving.
Appears when the phone’s profile is set to Outdoor.
Appears when the phone’s profile is set to Airplane.
Appears when Call Alert Type is set to Melody or Increasing
Melody.
Appears when Call Alert Type is set to Vibration then Melody,
Vibration and Melody, or Vibration and Increasing Melody.
Appears when the Profile is set to Silent mode and Call Alert
Type set to
Vibration.
Appears when the Profile is set to Silent mode and Call Alert
Type set to
Mute.
Appears when the phone is connected to a PC.
Appears when the phone is being used as a modem.
Your Phone
10
Appears at the bottom of the screen during an active call to
indicate that speakerphone can be accessed by pressing the
key.
Shows the level of your phone’s battery. The more bars, the
more power you have remaining.
Page 17

Multitasking Menu
The Multitasking key on the right side of the handset opens an
application-switch window that allows you to select from a group of
commonly used applications without having to exit from a currently active
application. The menu icon choices are as follows:
Call icon: Allows you to make a voice call while using the handset for
other tasks. If Music Player is active, it is muted during the call.
Messages icon: Allows you to send a text or multimedia message
while using the handset for other tasks.
Internet icon: Allows you to launch the Internet browser while using
the handset for other tasks.
Media Player icon: Allows you to launch the Media Player while
using the handset for other tasks. If an incoming call is received or
you make a call, the Media Player is muted.
Games and Apps icon: Allows you launch games or other
applications while using the handset for other tasks.
End all? icon: Allows you to cancel multitasking and return the
handset to single task usage.
When the application-switch window is open, scroll to the application you
want to open using the navigation keys, or press the Multitasking key
repeatedly. When you have highlighted the application you want, press the
Select soft key or the key to launch that application. Press the Back
soft key to return to the previous screen. The End all? option returns the
phone to Idle mode.
Note: If you access the switch window while performing Internet-based activities, some
applications are not functional. For example, if you are browsing the Internet and use the Activity
key to initiate a phone call, the call will not connect.
Your Phone
11
Page 18

Selecting Functions and Options
Soft Keys
There are two soft keys, left and right (see “Open View of Your Phone” on
page 5). The roles of the soft keys vary depending on the function you are
currently using. The icons or labels on the bottom line of the display just
above each key indicate their current role.
Some functions of the Left soft key are as follows.
♦From the Idle screen, press to open the i.Fido screen.
♦In a menu mode, press to select the highlighted menu item.
Some functions of the Right soft key are as follows.
♦From the Idle screen, press to access the Internet. (For more information
see “Fido Mall” on page 56.)
♦When using other features, such as the web browser, it performs a
context-sensitive action such as displaying the Back option.
Clear Key
The CLR key is used to erase or clear numbers, text, or symbols from
the display. You can also use it to return to a previous menu or to return to
standby mode from any menu.
♦If you enter an incorrect character, press to backspace (and delete) the
character.
♦To erase an entire sentence, press and hold.
♦To back up one menu level, press briefly.
Your Phone
12
Page 19

End Key
The End key is used to turn your phone on and off, disconnect
calls, and return to the standby mode.
♦Press and hold to turn on your phone.
♦Briefly press once to disconnect a call.
♦Press to return to standby mode from any menu, or to cancel the last
input.
Send Key
The Send key is used to answer calls, dial calls, and to recall the
last number(s) dialed, received, or missed.
♦Press once to answer a call.
♦Enter a number and briefly press to make a call.
♦In standby mode, briefly press to display a list of all recent calls.
♦Press twice in standby mode to call the most recent number.
♦Press to pick up a waiting call.
Speakerphone Key
During a call, press the key to enable the speakerphone. Use the
volume keys (on the left side of the phone) to adjust the volume.
Memory Card
Your phone accepts a microSD (Secure Digital) memory card, which you
can use to expand the phone’s available memory space. This allows you to
store more images, videos, music files, and voice data in your phone than
the phone’s internal memory can hold. You can also use a card to transfer
Your Phone
13
Page 20
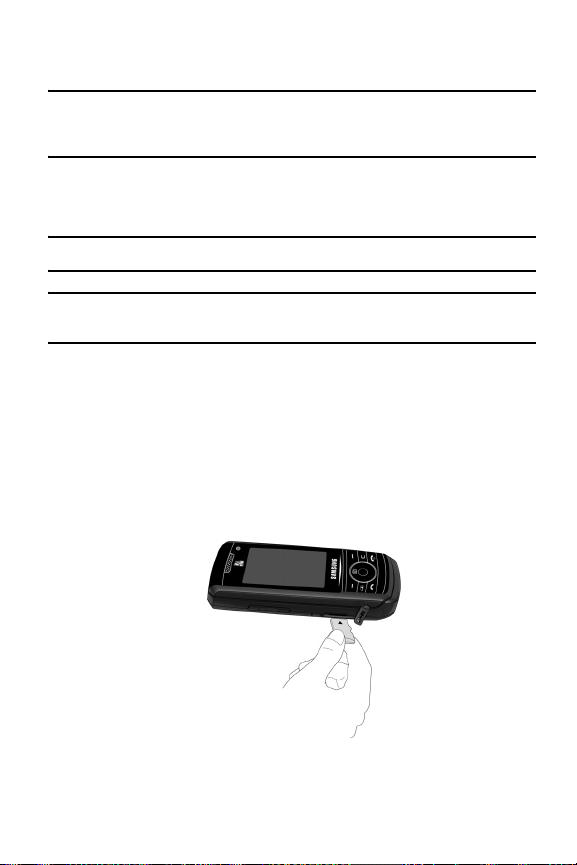
files to and from your PC if your PC is equipped with a microSD card reader
or SD card reader and microSD adapter.
Note: Before using a microSD card, it must be formatted with the FAT32 file system. Check the
documentation that came with the memory card before using it with your phone and, if
necessary, format the card.
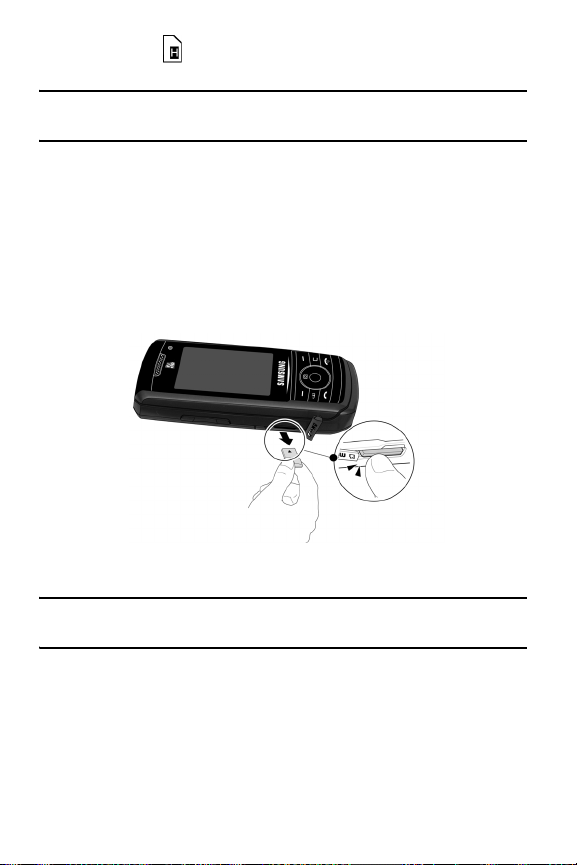
Inserting a microSD Card
Note: Your phone supports microSD cards up to 4GB capacity.
Note: Ensure your battery is fully charged before using a microSD card. Your data may become
damaged or unusable if the battery runs out while reading or writing to the microSD card.
To insert a microSD card into your phone:
1. Open the cover over the microSD card slot (on the left side of the
phone).
2. Holding the microSD card with the gold contacts facing down and
toward the phone, gently insert the card into the slot. Push the card in
until it is fully inserted and locked.
3. Replace the protective cover.
Your Phone
14
Page 21
The MicroSD icon is displayed on the main screen to indicate that a
microSD card is inserted in the phone.
Note: If this is the first time that the microSD card is inserted into your phone, the phone
automatically creates a series of folders on it (Images, Videos, Music, Sounds, and Other files).
Removing a microSD Card
To remove a microSD card from your phone:
1. Open the microSD access cover located on the right side of the phone.
2. Use a thumbnail or fingernail to press and release the microSD card.
The card will pop part way out to allow removal.
3. Pull the microSD card out of the phone.
Warning! Do not remove a microSD card while files are being accessed or
transferred. You could cause data loss or damage the card.
Using the microSD Adapter
Available microSD adapters allow use of microSD cards in SD-compatible
devices, including PC card readers. Some adapters connect to USB ports.
Your Phone
15
Page 22

To insert a microSD card into a microSD adapter, hold the microSD card
with the label side facing up and the gold contacts toward the adapter.
Gently insert the card into the microSD adapter and slide it into the adapter
until it is fully inserted.
To remove a microSD card from a microSD adapter, grasp the front edge
of the microSD card and gently pull it out of the adapter.
Reformatting a microSD Card
If you need to reformat a microSD card at any time:
1. Insert the card into the slot (see above).
2. From the Idle screen, press the key to access Menu mode.
3. Use the navigation keys to highlight Media and press the Select soft
key or the key.
4. Press the left or right soft key to highlight On Card.
5. Press the Options soft key, highlight Memory Card Settings, and
press the Select soft key or the key.
6. Highlight Format and press the Select soft key or the key.
7. You may be prompted to confirm the loss of data on the memory card.
Press the Yes soft key if you agree. The card is formatted.
Your Phone
16
Page 23
Getting Started
Activating Your Phone
When you subscribe to a cellular network, you receive a plug-in USIM
(Universal Subscriber Identity Module) card loaded with your subscription
details, such as your PIN, and optional services you have selected.
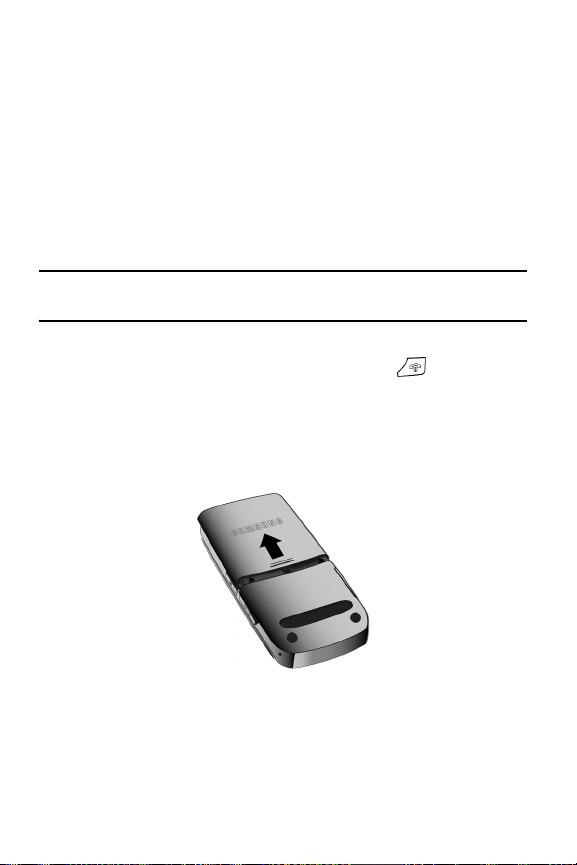
Removing the Battery
Note: You must unplug the travel adapter before removing the battery from the phone to avoid
damage.
If necessary, power-off the phone by holding down the key until the
power-off image displays.
1. Press the battery lock down, slide the battery cover away from the
phone and lift up to remove it.
Getting Started
17
Page 24

2. Lift the battery out of the phone (bottom edge first).
Installing the SIM Card
Important! The plug-in SIM card and its contacts can be easily damaged by scratches or
bending. Use caution when inserting or removing the card and keep all SIM cards out of reach of
children.
Make sure the gold contacts of the SIM card face into the phone and the
angled corner is at the outer right side, then slide the card into the socket.
To remove the SIM card, slide it out of the socket.
Getting Started
18
Page 25

Installing the Battery
1. Align the top edge of the battery under the tabs at the top edge of the
battery chamber.
2. Press the battery down until it is seated in the battery chamber. Make
sure that the battery is properly installed before switching on the phone.
3. With the battery in position in the phone, slide the cover back on the
phone until it locks into position.
Getting Started
19
Page 26
Charging the Battery
Your phone is powered by a rechargeable Li-ion (lithium ion) battery. Use
the travel adapter to charge the battery, and use only Samsung approved
batteries and chargers.
Note: Fully charge the battery before using your phone for the first time. A discharged battery
recharges fully in approximately four hours. You can use the phone while the battery is charging,
but this causes the phone to charge more slowly.
Note: For connection to an electrical supply not located in North America, you must use an
adapter of the proper configuration for the power outlet. Use of the wrong adapter could damage
your phone and void your warranty.
1. Plug the connector of the travel adapter into the jack on the right side of
the phone.
2. Plug the adapter into a standard AC wall outlet. If the phone is off, the
display indicates that the phone is charging. If the phone is on, the bars
in the battery icon flash to indicate charging.
Note: The battery charging circuit may stop functioning if you are viewing a streaming video and
receive a call while charging as the capacity of the charging circuit will be exceeded.
Getting Started
20
Page 27

3. When the phone is fully charged, the message “Battery Full” appears
on the display or the bars in the battery icon stop flashing. Unplug the
adapter from the power outlet.
4. Disconnect the adapter from the phone by gently pulling the connector
out of the jack.
Note: To avoid damaging the phone, you must unplug the adapter before removing the battery
from the phone.
Low Battery Indication
When the battery is weak and only a few minutes of talk time remain, a
warning tone sounds, the “Low Battery” message repeats at regular
intervals on the display and the empty battery icon displays. The
backlight turns off to conserve the remaining battery power. When the
battery level becomes too low, the phone automatically turns off. Recharge
the battery to restore phone operation.
Switching the Phone On and Off
To switch the phone on:
1. Press and hold the key until the phone switches on.
2. If prompted, enter the password and press the Confirm soft key or the
key. For further details, see the Security option in section “Set
Phone” on page 146.
3. If prompted, enter the PIN and press the key. For further details,
see the Check PIN Code section in “Set Phone” on page 146.
The phone searches for your network and, after finding it, the Idle
screen appears on the display. You can now make and receive calls.
Getting Started
21
Page 28

The default display language setting is Automatic, which is dependent
on the setting in the SIM provided by your service provider. For further
details or to change the language, see the Language section in “Set
Phone” on page 146.
To switch the phone off, press and hold the key until the power-off
image is displayed.
Getting Started
22
Page 29

Call Functions
Making a Call
From the Idle screen, enter the phone number (with area code, if
necessary), then press the key.
Note: When you activate the Auto Redial option, the phone automatically redials up to ten times
when the call is not answered or someone is already on the phone. For carriers that
automatically divert unanswered calls to voice mail, the Auto redial feature will not provide useful
service. See the Auto Redial section in “Voice Call” on page 150 for further details.
Making an International Call
1. Press and hold the key. The + character appears.
2. Enter the country code, area code and phone number then press the
key.
Correcting an Entered Number
1. To correct one or more digits in a dialed number:
♦To clear the last digit displayed, press the key.
♦To clear another digit in the number, press the Left or Right
navigation key until the cursor is immediately to the right of the digit
to be cleared. Press the key.
♦To enter a missing digit, press the Left or Right navigation key until
the cursor is in position and enter the digit.
♦To clear the whole display, press and hold the key.
2. Press the key to return to the Idle screen.
Call Functions
23
Page 30

Ending a Call
When you want to end your call, briefly press the key.
Redialing a Recent Number
All incoming, outgoing and missed calls are listed in the Call History menu.
If the number or caller is listed in your Contact List, the name associated
with the number also displays.
To access the Call History menu:
1. From the Idle Screen, press the key. Use the navigation keys to
highlight Call History and press the Select soft key or the key.
2. Use the Up and Down navigation keys to highlight one of the available
options (All Calls, Missed Calls, Calls Made, or Calls Received) and
press the Select soft key or the key.
3. Use the Up and Down navigation keys to scroll through the listed
numbers until the number you want is highlighted.
4. Press to dial the number.
You can also directly access the Call History screen:
1. From the Idle Screen, press the key to display the Call History
screen. The All Calls list is displayed; press the Left and Right
navigation keys to scroll through the other lists (Missed Calls, Calls
Made, and Calls Received).
2. Use the Up and Down navigation keys to scroll through the list until the
number you want is highlighted.
3. Press to dial the number.
Call Functions
24
Page 31

Making a Call from the Contacts List
You can store phone numbers that you use regularly in the SIM card or the
phone’s memory. These entries are collectively grouped in Contacts, one
of your phone’s main menus.
For details on using the Contacts menu, see “Contacts” on page 131.
Adjusting the Volume
To adjust the earpiece volume during a call, use the Volume key on the left
side of the phone.
Press the upper half of the key to increase the volume level and the
lower half of the key to decrease the level.
In Idle mode, this key adjusts the ringtone volume.
Answering a Call
When a call is received, the phone rings and displays the caller’s phone
number. If the caller can be identified and their name is stored in your
Contact List, the name is displayed.
To answer a call:
1. Press the key or the Accept soft key to answer the incoming
call.
If the Any Key option in the Call Answer menu is activated, you can
press any key to answer a call except the key and the Reject
soft key (see the Call Answer section in “General” on page 148 for
more information).
If the Open Slide option in the Call Answer menu is activated, you
can answer the call simply by opening the phone (see Call Answer
section in “General” on page 148 for more information).
Call Functions
25
Page 32

2. End the call by pressing the key.
Note: You can answer a call while using the Contact list or menu features. After ending the call,
the phone returns to the function screen you were using.
Missed Calls
Whenever you miss one or more calls, the number of calls missed is
displayed on the Idle screen. If you only missed one call, the caller’s
number is displayed or, if the caller’s name is stored in your Contact List,
their name is displayed.
To view more than one missed call:
1. Press the View soft key.
2. To scroll through the missed calls, press the Up or Down navigation
key.
3. To call the highlighted number, press the key.
Note: To view missed calls not displayed on the Idle screen, go to the Call History menu,
highlight Missed Calls, and press the Select soft key or the key.
Viewing the Details of Missed Calls
To view the details of a missed call:
1. Press the View soft key.
2. Using the Up or Down navigation key, highlight the call you want to
view and press the key or the Options soft key, highlight Details
and press the Select soft key or the key.
Call Functions
26
Page 33

Calling Back a Missed Call
To call back a missed call number:
1. Press the View soft key.
2. Using the Up or Down navigation key, highlight the call you want to
return and press the Options soft key.
3. Use the Navigation keys to highlight either Voice Call or Video Call
and press the Select soft key or the key.
Sending a Message to a Missed Call
To send a text or picture message to a missed call number:
1. Press the View soft key.
2. Using the Up or Down navigation key, highlight the call you want to
return and press the Options soft key.
3. Use the Navigation keys to highlight Send Message and press the
Select soft key or the key.
For more information on sending messages, see “Create and Send a Text
Message” on page 99 or “Create and Send a Picture Message” on
page 103.
Deleting Missed Calls
1. Press the View soft key.
2. If you want to delete one call, press the Up or Down navigation key to
highlight the number you wish to delete and press the Options soft
key. If you want to delete several calls or all calls, press the Options
soft key.
3. Press the Down navigation key to scroll to the Delete option and press
the key or Right navigation key.
Call Functions
27
Page 34

4. To delete one call, highlight Selected and press the Select soft key or
key. To delete all calls, highlight All and press the Select soft key
or key. Press Yes to confirm the deletion.
Silent Profile
The Silent sound profile is convenient when you want to stop the phone
from making any sounds, such as when you are in a theater. Your phone
provides a choice of two silent call alerts, Mute (the phone gives only visual
indication on the screens when a call is received) or Vibration (the phone
vibrates and provides visual indication). For instructions on selecting sound
profiles, see “Set Profiles” on page 140.
Your phone provides a quick method for entering the Silent profile:
♦From the Idle screen, press and hold the key until the “Silent Profile
On” message, the Silent icon and either the Mute icon or the
Vibration icon displays.
♦To return to the previous sound profile, press and hold the key until
a screen message indicates the return to the previous sound profile and
the Mute icon or the Vibration icon disappears.
Call Functions
28
Page 35

Options During a Call
Your phone provides a number of features that you can use during a call.
In Call Options
During a call, press the Options soft key to access the following:
♦Whisper Mode On/Off: Increases the microphone sensitivity so that you
do not have to speak loudly to be heard by the other party.
♦Hold: Places the call on hold.
♦Mute/Send Keypad Tone: Silences or enables key tones.
♦New Call: Places the current call on hold and allows you to enter and
dial another number.
♦Send DTMF: Lets you send DTMF (Dual Tone Multi-Frequency) tones,
the sounds generated when you press the number keys, as a group. See
“Sending a Sequence of DTMF Tones” on page 33.
♦Contacts: Accesses your Contacts list.
♦Save to Contacts: Allows you to add the current phone number to your
Contacts list on either your SIM card or phone.
♦Send Message: Allows you to create and send a new SMS/MMS
message.
♦Notes: Allows you to associate a note with the current phone number.
♦End Call: Allows you to end the current call.
Put a Call on Hold
You can place the current call on hold at any time. You can also make
another call while you have a call in progress if your network supports this
service.
Options During a Call
29
Page 36

To put a call on hold:
1. While on a call, press the Options soft key. Use the Up and Down
navigation keys to scroll to Hold and press the Select soft key or the
key. The call is placed on hold.
2. You can reactivate the call by pressing the Resume soft key.
To make a call while you have a call in progress:
1. While on a call, press the Options soft key. Use the Up and Down
navigation keys to scroll to New Call and press the Select soft key.
2. Enter the new number and press the key to dial the second call.
To switch between the two calls, changing the one on hold to active
and placing the other on hold, press the Options soft key, highlight
Swap and press the Select soft key or the key.
3. To finish, end each call by pressing the key.
Switching the Microphone Off (Mute)
You can temporarily switch your phone’s microphone off so that the other
person on the call cannot hear you. For example, you might wish to speak
to another person in the room without the person on the call hearing you.
To switch the microphone off temporarily:
♦Press the Mute soft key. The soft key indicator changes to Unmute and
the other person on the call can no longer hear you.
To switch the microphone back on:
♦Press the Unmute soft key. The other person on the call can hear you
again.
Options During a Call
30
Page 37

Using the Speakerphone
Speakerphone lets several persons near the phone participate in a call at
the same time by broadcasting the voice or voices of those on the other
end of the telephone line and using the microphone to capture the voices of
everyone near the phone.
To use the speakerphone function during a call, press the key. Use the
volume keys (on the left side of the phone) to adjust the volume.
Muting or Sending Key Tones
This option allow you to turn the key tones off or on. If the Mute Keypad
Tone option is selected, your phone does not transmit the DTMF (Dual
Tone Multi-Frequency) tones produced by the numeric keys during a call.
This allows you to use the keypad without hearing annoying key tones.
Note: To communicate with answering machines or computerized telephone systems, the Send
Keys option must be selected.
Making a Multi-party Call
Multi-party calling is a network service that allows up to six people to take
part simultaneously in a multi-party or “conference” call.
Note: Please contact your service provider to determine if multi-party calling is supported.
To set up the multi-party call:
1. Call the first participant in the normal manner (see “Making a Call” on
page 23).
2. To call another participant, press the Options soft key, use the Up and
Down navigation keys to scroll to New Call and press the Select soft
Options During a Call
31
Page 38

key. Enter the new number and press the Call soft key or the
key to dial the second call.
3. To add this person to the call, press the Options soft key and select
the Join option. Press the Select soft key.
4. To continue adding people to the call, repeat steps 2 and 3 above.
You can also add incoming callers by answering the call, pressing the
Options soft key, and selecting the Join option.
To have a private conversation with one participant:
1. Press the Options soft key and select Split.
2. Using the Up and Down navigation keys, select the number you wish to
talk with and press the Select soft key or the key.
3. You can now talk privately to that person. The other participants can
still converse with each other.
4. To return to the multi-party call, press the Options soft key, highlight
the Join option and press the Select soft key or the key.
5. All the multi-party call participants can now hear each other.
To drop a participant:
1. Press the Options soft key and select End.
2. Highlight Select Participant and press the Select soft key or the
key.
3. Highlight a participant you wish to drop and press to place a check
mark beside that participant. Repeat this step as necessary.
4. When you are finished, press the Drop soft key.
The calls to the selected participant(s) are ended but you can continue to
talk to the others.
Options During a Call
32
Page 39

To end the multi-party call:
When you want to end a multi-party call, press the key.
Sending a Sequence of DTMF Tones
You can choose to send DTMF tones after entering the entire number you
need to send rather than as you press the numeric keys. This option is
helpful for entering a password or an account number when you call an
automated system, like a banking service.
To send the DTMF tones:
1. Press the Options soft key.
2. Press the Down key to highlight Send DTMF.
3. Press the Select soft key or the key.
4. Enter the numbers you want to send and press the Send soft key. The
tones are sent.
Searching for a Number in the Contact List
You can search for a number in the Contact List during a call.
1. Press the Options soft key.
2. Use the Down navigation key to scroll to Contacts and press the
Select soft key or the key.
3. Begin entering the letters of the name. As you type, the first Contact
List entry that matches the entered letters is highlighted.
To select a different contact than the one that is highlighted, press the
Up or Down Navigation key until the entry you want is highlighted.
4. Press the key to open the contact information.
Options During a Call
33
Page 40

For further information on using the Contact list feature, see “Contacts” on
page 131.
Call Waiting
The Call Waiting feature lets you answer an incoming call while you have a
call in progress, if your network supports this service and you have set the
Call waiting-Voice Calls option to Activate.For information on changing Call
Waiting settings see “Call Waiting” on page 153.
.To answer a call while you have a call in progress:
1. Press the key or the Accept soft key to answer the incoming
call. The first call is automatically put on hold.
2. To switch between the two calls, press the Options soft key and select
the Swap option.
3. To end one or more calls, press the Options soft key or the key,
highlight the End option and press the key or the Right navigation
key. Highlight Active Call, Held Call or All Calls and press the Select
soft key or the key. You can also press the key to end the
current call.
Options During a Call
34
Page 41

Access Codes
There are several access codes used by your phone and its SIM card.
These codes help you protect the phone against unauthorized use.
When requested for any of the codes listed below, enter the appropriate
code (displayed as asterisks) and press the Select soft key. If you make a
mistake, press one or more times until the incorrect digit is cleared and
then continue entering the correct code.
Except for the PUK and PUK2 codes, access codes can be changed using
the Security menu (see the Security section in “Set Phone” on page 146).
Important! Avoid using access codes that are similar to emergency numbers, such as 911, so
that you do not accidentally dial an emergency number.
Phone Password
The Phone Lock feature allows you to set a password to protect your
phone against unauthorized use. For instructions on activating or
deactivating the Phone Lock feature and changing the phone password,
see the Security section in “Set Phone” on page 146.
PIN
The Personal Identification Number or PIN (4 to 8 digits) protects your SIM
card against unauthorized use. It is usually supplied with the SIM card.
If you enter an incorrect PIN three times in succession, the code is disabled
and cannot be used until you re-enable it by entering the PUK (see below).
For instructions on activating or deactivating the PIN Check feature and
changing the PIN, see the Security section in “Set Phone” on page 146.
Access Codes
35
Page 42

PUK
The 8-digit PUK (PIN Unblocking Key) is required to change a disabled
PIN. The PUK may be supplied with the SIM card. If not, or you have lost it,
contact your service provider.
To re-enable your PIN:
1. Enter the PUK and press the OK soft key.
2. Enter a new PIN of your choice and press the OK soft key.
3. When the Confirm New PIN message displays, enter the same code
again and press the OK soft key.
If you enter an incorrect PUK ten times in succession, the SIM card
becomes invalid. Contact your service provider for a new card.
PIN2
The PIN2 (4 to 8 digits), supplied with some SIM cards, is required to
access specific functions supported by those cards.
If you enter an incorrect PIN2 three times in succession, the code is
disabled and you cannot access the functions until you re-enable it by
entering the PUK2.
To change the PIN2, see the Security section in “Set Phone” on page 146.
PUK2
The 8-digit PUK2 (PIN Unblocking Key 2), supplied with some SIM cards, is
required to change a disabled PIN2. If you lose the code, contact your
service provider.
To re-enable your PIN2:
1. Enter the PUK2 and press the OK soft key.
Access Codes
36
Page 43

2. Enter a new PIN2 of your choice and press the OK soft key.
3. When the Confirm New PIN2 message displays, enter the same code
again and press the OK soft key.
If you enter an incorrect PUK2 ten times in succession, you will not be able
to access the functions requiring the PIN2. Contact your service provider
for a new card.
Access Codes
37
Page 44

Video Calling
Video calling allows you to transmit photos and live video from your camera
phone to another video calling-capable handset, as well as receive photos
and live video from that handset. Both phones must be located within a 3G
Network coverage area.
Note: Your phone must be equipped with an HSDPA SIM card and your network must support
video calling for this feature to work. Consult your service provider for more details.
Making a Video Call
To make a video call from the Idle screen:
1. Enter the area code and phone number.
2. Press the key.
Your phone switches to video calling mode and initiates the call. During
the video call, your phone can transmit photos or videos from your
camera and receive photos or videos from the other phone.
3. To end the call, briefly press the key or close the phone.
Note: To quickly make a video call, press the key and enter the phone number followed by
the key again.
To make a video call to one of your Contacts:
1. In Idle mode, press the key to access the main menu.
2. Highlight Contacts and press the Select soft key or key.
3. Highlight the desired contact and press the key or press the
Options soft key, highlight Video Call, and press the Select soft key or
the key.
Video Calling
38
Page 45

Your phone switches to video calling mode. During the video call, your
phone can transmit photos or videos from your camera and receive
photos or videos from the other phone during the conversation.
4. To end your call, briefly press the key or close the phone.
Receiving a Video Call
When somebody places a video call to you, the phone rings and displays
the incoming Video Call image. When the caller can be identified, the
caller’s phone number or name stored in your Contact list is displayed.
To answer a video call:
1. If necessary, open the phone.
2. Press the key or the Accept soft key to answer the incoming video
call.
Your phone switches to video calling mode. During the video call, your
phone can transmit photos or videos from your camera and receive
photos or videos from the other phone during the conversation (see
below).
3. To end the call, briefly press the key or close the phone.
Options During a Video Call
Your phone provides a number of features that you can use during a video
call. The main options can be accessed using the on-screen menu bar.To
access any of the following features, press the left or right navigation keys
to highlight the desired option. The current setting is shown above the
menu bar. To change the setting, press the key, highlight a new
selection and press the Select soft key or the key.
Video Calling
39
Page 46

Loudspeaker Outgoing Mute Capture Front/ Viewing Brightness
Image Image Rear Style
Camera
♦Loudspeaker: Switches between Normal speaker volume and
Loudspeaker. The other phone’s sound is not affected.
♦Outgoing Image: Controls the image or video that is displayed on the
other phone. You can select between:
•Show Me: Displays your current camera view (either Internal or
External).
•Default Image: Shows the default picture on the other phone. Your
camera is no longer transmitting video.
•Freeze Me: Takes a photo using your camera and transmits that
photo to the other phone. To update the photo, select Show Me
Again, followed by Freeze Me.
•My Image: Transmits a preselected image stored in your phone’s
memory. To select the image, see “Graphics” on page 65.
♦Mute: Press to check/uncheck one or more of the following:
•All: To mute/unmute both the microphone and keypad tones.
•My Voice: Mutes your microphone so that the other caller cannot
hear you.
•Keypad Tones: Mutes your keypad tones so that the other caller
cannot hear them.
♦Capture Image: Lets you save a still image on your phone.
♦Front/Rear Camera: Allows you to switch the view you are transmitting
between the front and rear cameras.
♦Viewing Style: Switches the view on your display between:
Video Calling
40
Page 47

•full screen view of receiving image
•full screen view of my receiving image with picture-in-picture view of
transmitting image
•full screen view of my transmitting image
•full screen view of my transmitting image with picture-in-picture view
of receiving image
♦Brightness: Allows you to change the brightness of your display. Press
the left or right navigation key to adjust the brightness and press the
key to save the new setting.
You can also press the Options soft key during a video call to access a
wider range of options.
♦Normal/Speaker On: Switches between Normal speaker volume and
Loudspeaker. The other caller’s sound is not affected.
♦Whisper Mode On/Off: Increases the microphone sensitivity level so
that you do not have to speak louder to be heard by the other party.
♦Outgoing Image: Controls the image or video that is displayed on the
other phone (see above).
♦Mute/Unmute: Press to check/uncheck one or more of the following:
•All: To mute/unmute both the microphone and keypad tones.
•My Voice: Mutes your microphone so that the other caller cannot
hear you.
•Keypad Tones: Mutes your keypad tones so that the other caller
cannot hear them.
♦Front/Rear Camera: Allows you to switch the view you are transmitting
between the front and rear cameras.
♦Capture Image: Lets you save a still image on your phone.
♦Display Options: Select this option to choose one of the following:
•Brightness: Lets you adjust the image lighter or darker.
Video Calling
41
Page 48

•Effects: Lets you apply Black and White or Sepia effect to the image.
•Video Quality: Allows you to optimize the transmitted video quality for
Normal, Little movement or Lots of movement.
•Viewing Style: Switches the view on your display between:
• full screen view of receiving image
• full screen view of my receiving image with picture-in-picture view of
transmitting image
• full screen view of my transmitting image
• full screen view of my transmitting image with picture-in-picture view of
receiving image
•Zoom: Lets you magnify a portion of the image on your screen.
•Hide/Show caller ID: Hides or shows the caller ID of the person you
are speaking with on your screen.
♦Save to Contacts: Lets you save the number of the person you are
speaking with to Contacts.
♦More Options
•Contacts: Allows you to access your Contacts list. Your video call will
continue.
•Send Message: Allows you to create and send a new text or
multimedia message. Your video call will continue.
•Message Inbox: Allows you to access your Message Inbox. Your
video call will continue.
•Send DTMF: Lets you send DTMF (Dual Tone Multi-Frequency)
tones, the sounds generated when you press the number keys, as a
group. See “Sending a Sequence of DTMF Tones” on page 33.
•Notes: Allows you to create a note with the current phone number.
Your video call will continue.
♦Switch to Voice Call: Ends the video call and initiates a voice call.
♦Settings: Allows you to view and change call settings.
Video Calling
42
Page 49

•Select My Image: Press the Select soft key and select either Get
From My files or Use Preset Image.
•Use Call Fail Options: Select either Off or On. When this option is
on, you will be prompted to choose another connection method when
a video call connection is not successful.
•Auto Redial: Select either Off or On. While On, your phone will redial
automatically if a call is unable to connect or is cut off.
Video Calling
43
Page 50

Entering Text
This section explains the various text input modes available for entering
characters into your phone. It also describes how to use the T9 predictive
text entry system to reduce the number of key strokes required for entering
text.
Your phone has the following text input modes:
♦Alphabet modes (ABC, abc, Abc): These modes allow you to enter
letters by pressing the key labeled with the letter you want multiple times
until the desired character displays. You can select all upper case, all
lower case, or initial capital format.
♦Number mode: This mode allows you to enter series of numbers.
♦Symbol mode: This mode allows you to enter various symbols and
special characters.
♦T9 Input modes (T9 abc, T9 Abc, T9 ABC): These modes let you enter
words with only one keystroke per letter. As you press one key on the
keypad for each letter, your keystrokes are automatically compared with
an internal linguistic dictionary to determine the correct word, thus
requiring far fewer keystrokes than the traditional Alphabet mode.
Changing the Text Input Mode
When you are in a field that allows characters to be entered, you will see
the text input mode indicator near the top right corner of the display.
To change the text input mode:
♦Press and hold the key to switch between T9 and Alphabet modes.
Entering Text
44
Page 51

♦Press the key to cycle between Initial Capital , Upper
ABC abc 123
Case , Lower Case and Numeric entry
modes.
♦To access the Symbol mode, press and hold the key.
SYM
Abc
♦You can also access any of the input modes by pressing the Options
soft key and selecting Input Method. Highlight the desired input method
(and case) and press the Select soft key or the key.
Using T9 Mode
T9 is a predictive text input mode based on a built-in dictionary that allows
you to key in characters using a single keystroke. Your phone selects the
most likely word based on your keystroke combinations.
To enter a word in T9 mode:
1. Start entering a word by pressing the numeric keys. Press each key
only once for each letter.
Example: To enter “HELLO”, press the
, , , and keys.
As you type, the characters on the screen change as the built-in
dictionary matches your keystrokes to commonly used words. Enter all
letters in the word without editing or deleting the keystrokes.
If the word displayed is not the one you want, press the key to
2.
display an alternative word choice.
displays or no choices remain, at which time you can spell the word
and add it to the phone’s dictionary (see below).
Continue until the correct word
3. Insert a space by pressing the key and start entering the next
word.
Entering Text
45
Page 52

To add a new word to the T9 dictionary:
1. When you press the key on the last alternative word available,
the left soft key changes to Spell. Press the Spell soft key and enter
the word you want using Alphabet mode.
♦To enter a punctuation mark (period, hyphen, colon, apostrophe,
etc.), use the Symbol mode (see below).
♦To shift case, use the key to toggle between Initial Capital,
Upper Case, Lower Case and Numeric modes.
♦You can move the cursor using the Left and Right navigation keys.
To delete letters, press the key. Press and hold the key to
clear the display.
2. Press the Add soft key. The word is added to the T9 dictionary and
becomes the first word for the associated key presses.
Using Alphabet Mode
Use the 0 to 9 keys to enter your text.
1. Press the keys labeled with the letter you want:
♦ Once to enter the first letter
♦ Twice in quick succession for the second letter
♦ Three times in quick succession for the third letter
♦Four times in quick succession for the fourth letter
2. Select the other letters in the same way.
Note: The cursor moves to the right when you press a different key. When entering the same
letter twice or a different letter on the same key, wait a few seconds for the cursor to move to the
right automatically and then select the next letter.
Entering Text
46
Page 53

The following table shows the characters available for each key:
Characters in order displayed when key is pressed repeatedly
Key
Uppercase Lowercase
1
2
3
4
5
6
7
8
9
0
#
♦To shift the case in Alphabet mode, use the key.
♦Move the cursor using the Left and Right navigation keys.
♦To delete letters, press . Press and hold to clear the display.
Using Number Mode
Number mode lets you enter numbers into a text message. Press the keys
corresponding to the digits you want to enter.
Entering Text
47
Page 54

Using Symbol Mode
Symbol mode enables you to insert symbols and punctuation marks into
text. Press and hold the key access Symbol mode.
To Press the
select a symbol group navigation keys
select a symbol
clear an entry
insert the symbol(s) into your
message
cancel your input and return
to the previous mode
corresponding number key adjacent to the
symbol
key
OK soft key
Cancel soft key
Entering Text
48
Page 55

Transferring Files
You can transfer music, pictures, video clips and other files between your
phone and a personal computer in several ways, including:
♦using a USB cable
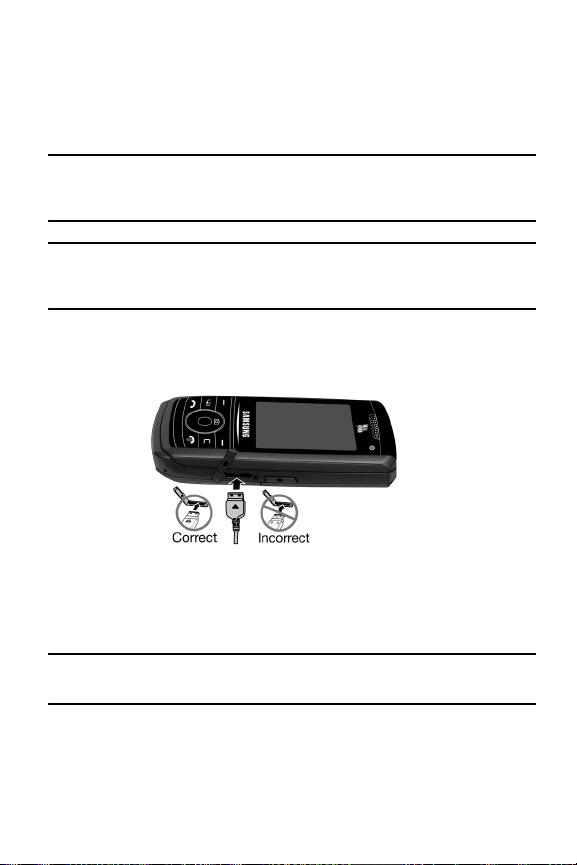
♦using Bluetooth
♦using a microSD card reader
Transferring Files via USB Cable
Between PC and Phone or Card Using PC Studio 3
File transfer between your phone and a PC or card using Samsung’s PC
Studio 3 software (included with your phone) requires a PC with available
USB port, installation of PC Studio 3 on the PC, and a USB cable.
Note: For more information on Samsung PC Studio 3, consult the online help provided with the
PC Studio 3 software.
Note: Your phone’s USB Setting must be set to PC Studio or Ask on Connection to use PC
Studio 3 (see “Select USB Mode” on page 165).
1. Start the PC Studio 3 software.
Note: The first time you start the PC Studio 3 software, a connection wizard appears that leads
you through the process of setting up your phone connection. Do not plug the USB cable into a
USB port on your PC until instructed to do so by the software.
2. Connect the USB cable to a USB port on your PC and to your phone.
♦USB Mode set to Ask on Connection: the Ask on Connection
window appears on the phone. Highlight PC Studio and press the
Transferring Files
49
Page 56

Select soft key or the key. The status message at the bottom
right of the PC Studio screen changes from Not Connected to SGH-
E747 Connected.
♦USB Mode set to PC Studio: The status message at the bottom
right of the PC Studio screen changes from Not Connected to SGH-
E747 Connected.
3. In the PC Studio program, select Manage Files. The Phone Explorer
window appears. It displays the folders on your phone at the top left of
the screen, folders on your PC at the bottom left and contents of the
highlighted folder on the right side.
4. Using Phone Explorer, navigate to the folder(s) containing the files you
wish to transfer. You can drag and drop files between computer and
phone or microSD card folders.
Between PC and Card using Microsoft Windows
You can also transfer files between a microSD card in your phone and a
PC using a USB cable and Microsoft Windows using the following
procedure.
Note: Your phone’s USB Setting must be set to Mass Storage or Ask on Connection (see “Select
USB Mode” on page 165).
1. Connect the USB cable to a USB port on your PC and to your phone.
♦USB Mode set to Ask on Connection: the Ask on Connection
window appears on the phone. Highlight Mass Storage and press
the Select soft key or the key. “Connected” appears on the
phone display.
♦USB Mode set to Mass Storage: “Connected” appears on the
phone display.
2. Open My Computer on the PC. The list of contents will include a
“Removable Disk” with the name of the microSD card in your phone
(the default card name is Samsung).
Transferring Files
50
Page 57

3. Double click the disk icon to view the contents of the card. You can
drag and drop files between the computer and the folders on the card.
Transferring Files via Bluetooth
File transfer between your phone and a PC using Bluetooth requires a PC
with Bluetooth wireless capability and installation of Samsung’s PC Studio
3 software (included with your phone).
Note: For more information on Samsung PC Studio 3, consult the online help provided with the
PC Studio 3 software.
To transfer files using Bluetooth:
1. Start the PC Studio 3 software.
2. Select Manage Files. The Phone Explorer window appears.
3. On the File menu, select Connection to open the Connection Manager
window.
4. Select Bluetooth. If you do not have a Bluetooth connection
established, follow the on-screen instructions to create your
connection.
Note: To receive data via Bluetooth, your phone’s Bluetooth feature must be active. For more
information on activating Bluetooth on your phone, see “Activation” on page 169.
5. Phone Explorer displays the folders on your phone at the top left of the
screen, folders on your PC at the bottom left and contents of the
highlighted folder on the right side. Navigate to the folder(s) containing
the files you wish to transfer. You can drag and drop files between the
computer and phone or microSD card folders.
Transferring Files
51
Page 58

Transferring Files via microSD Card
You can directly transfer music and other files between your PC and a
microSD memory card.
1. Remove the microSD card from your phone (see “Removing a microSD
Card” on page 15) and insert it into your PC’s microSD card reader or,
if you are using an SD card reader, first insert the microSD card into a
microSD adapter (see “Using the microSD Adapter” on page 15) then
insert the adapter into the SD card reader.
2. Open My Computer on the PC. The list of contents will include a
“Removable Disk” with the name of the microSD card.
3. Double click the disk icon to view the contents of the card. You can
drag and drop files between the computer and the folders on the card.
Note: The first time that a microSD card is inserted into your phone, your phone automatically
creates a series of folders on it for file storage (Images, Videos, Music, Sounds, and Other files).
Transferring Files
52
Page 59

Menus
The navigation keys on your phone allow you to scroll through menus
quickly and easily. The scroll bar at the right of the menu keeps track of
your position in the menu at all times.
♦To access menus from the Idle screen, press the key.
♦To navigate through a menu, press the navigation key up or down. If you
are in the main menu displayed in Grid format, you may also navigate to
adjacent menus by pressing the navigation key left or right. Press the
Vol ume key (located on the left side of your phone) to move to the top or
bottom of the displayed list.
♦As you navigate through a menu, menu options are highlighted. To
select the highlighted item, press the Select soft key or the key. You
can also select any numbered option by pressing the corresponding
number on the phone’s keypad.
Note: When you access a list of options, your phone highlights the current option. If, there are
only two options, however, such as On/Off or Enable/Disable, your phone highlights the option
that is not currently active so that you can select it directly.
♦If Pop Up List Menu is set to On (see “Set Display” on page 143),
submenus display to the right of a highlighted menu item. Press either
the Right navigation key or the key to access the submenu.
♦To return to the previous menu level, press the Back soft key or the
key.
♦To exit the menu and return to the Idle screen, press the key.
Menus
53
Page 60

Main Menu Style
You can choose to display the Main menu as a 3x3 grid of icons or a list.
For more information, see Menu Style in “Display Settings” on page 143.
List of Menu Functions
The following list shows the menu structure.
1. Fido Mall
1. Go To
2. Music & Tones
3. Games
4. Images
5. Messaging
6. Video
7. News & Info
8. Internet
9. Internet Settings
2. Media
1. Ring Tunes
2. Graphics
3. Videos
4. Music
5. Voice List
6. Media Applications
7. Other Files
8. Memory Status
3. Games and Apps
1. Download Games
4. Call History
1. All Calls
2. Missed Calls
3. Calls Made
4. Calls Received
5. Speed Dial List
6. Delete All
7. Voice Call Time
8. Video Call TIme
5. i.Fido
1. Internet
2. Video Calling
3. Video/Radio
Menus
54
Page 61

4. Mobile TV
5. Music
6. More Services
6. Messages
1. Fido IM
2. MobileMail
3. Create New Message
4. Inbox
5. Sent
6. Outbox
7. Drafts
8. My Folder
9. Templates
10. Voice Mail
11. Video Mail
12. Delete All
13. Messages Settings
14. Memory Status
7. Tools
1. Alarms
2. Calendar
3. Tasks
4. Notes
5. Calculator
6. Tip Calculator
7. Converter
8. World Time
9. Timer
10. Stopwatch
8. Contacts
Contacts (tab)
Group (tab)
Business
Family
Friends
9. Settings
1. Set Profiles
2. Set Display
3. Set Time & Date
4. Set Phone
5. Set Calls
6. Set Connectivity
7. Set Applications
8. Reset Settings
9. Set Memory
Menus
55
Page 62

Fido Mall
This menu (Menu 1) allows you to view Internet sites; shop for music, ring
tunes, games, images and video files; access messaging functions; and
view news and information.
Using the Internet Browser
While using the Internet Browser, the following navigational controls are
available:,
To Press the
scroll through and select
browser items
select a numbered item corresponding numeric key
return to the previous page Back soft key or the key
return to the startup
homepage
exit the browser key
Navigation
highlighted, and then press the
confirm the selection
press the Options soft key and select
Go to Homepage
keys until the item is
When you are prompted to enter text, the current text input mode is
indicated on the screen. See “Entering Text” on page 44 for more
information.
While using the Browser, press the Options soft key to access the
following functions:
Fido Mall
56
key to
Page 63

♦Go: Lets you navigate Forward (next sequenced web page) or
Backward (to the previously visited web page) through pages in your
browsing history.
♦Reload: Reloads the current page.
♦Desktop/Smart-Fit View: Changes the display mode of the browser.
♦Page Size: Lets change the page size of the displayed web page by
zooming using the Left and Right navigation keys.
♦Go to Homepage: Takes you back to the homepage of the Wireless
Web service provider.
♦Add to Favorites: Adds the current page to your Favorites list.
♦View Favorites: Accesses and displays the bookmarks assigned as
favorite web pages.
♦Send URL via: Send the URL of the current page via either a message
or to another party via a Bluetooth device.
♦Copy URL to Message: Send the URL of the current page to another
party as a message.
♦Save: Saves either the image of the current web page or the current
page itself.
♦Saved Pages: Access the list of web pages you have saved.
♦History: Displays a list of web pages you have recently accessed.
♦Advanced: Allows you to change the following settings for the browser.
•Clear Caches: Deletes the information stored in the cache. The
cache stores the most recently accessed pages.
•Empty Cookies: Delete cookies. Cookies are pieces of personal
information sent to a web server while navigating the web.
•Cookie Options: Sets whether or not cookies are stored on your
phone. If you select Prompt, the phone will ask you whether to save
the cookies on every page requiring cookies.
Fido Mall
57
Page 64

•Preferences: Lets you change the settings for the web browser to suit
your preference.
•Certificates: Accesses certificate information from your phone.
•Page Details: Displays the properties for the currently active web
page.
•Browser Settings: Selects a connection profile to be used when
connecting to the Internet.
•About Browser: Displays the version and copyright information for
the browser.
Go to
Selecting this menu (Menu 1.1) lets you enter a Web site address and open
the Web page.
1. From the Idle screen, press the key to access the menu.
2. Using the navigation keys, highlight Fido Mall and press the Select
soft key or the key.
3. Highlight Go to and press the Select soft key or the key.
4. Press the key to activate the URL entry area. Enter the address of
site you wish to access.
5. Press the Down navigation key and highlight Submit, then press the
key to open the Web page.
For more information on using the browser, see “Using the Internet
Browser” on page 56.
Music & Tones
This menu (Menu 1.2) lets you shop for audio tones using the built-in
browser. You can download and save audio to either your Ring Tunes or
Music folder.
Fido Mall
58
Page 65

To access this menu option, use the following steps:
1. From the Idle screen, press the key to access the menu.
2. Using the navigation keys, highlight Fido Mall and press the Select
soft key or the key.
3. Highlight Music & Tones and press the Select soft key or the key.
4. Follow the online instructions shown on your display screen after you
launch this service. For more information on using the browser, see
“Using the Internet Browser” on page 56.
For more information on file storage, see “Media” on page 63.
Games
The Games menu option allows you to shop for games using the built-in
browser. You can download new games to your Games and Apps folder.
To access this menu option, use the following steps:
1. From the Idle screen, press the key to access the menu.
2. Using the navigation keys, highlight Fido Mall and press the Select
soft key or the key.
3. Select Games and press the Select soft key or the key.
4. Follow the online instructions shown on your display screen after you
launch this service. For more information on using the browser, see
“Using the Internet Browser” on page 56.
For more information, see “Games and Apps” on page 87.
Images
The Images menu option allows you to shop for graphic images using the
built-in browser. You can download new images to your Graphics folder. To
access this menu option, use the following steps:
Fido Mall
59
Page 66

1. From the Idle screen, press the key to access the menu.
2. Using the navigation keys, highlight Fido Mall and press the Select
soft key or the key.
3. Highlight Images and press the Select soft key or the key.
4. Follow the online instructions shown on your display screen after you
launch this service. For more information on using the browser, see
“Using the Internet Browser” on page 56.
For more information on file storage, see “Graphics” on page 65.
Messaging
The Messaging menu option allows you to use Fido online messaging. To
access this menu option, use the following steps:
1. From the Idle screen, press the key to access the menu.
2. Using the navigation keys, highlight Fido Mall and press the Select
soft key or the key.
3. Highlight Messaging and press the Select soft key or the key.
4. Follow the online instructions shown on your display screen after you
launch this service. For more information on using the browser, see
“Using the Internet Browser” on page 56.
Video
The Video menu option allows you to shop for video files using the built-in
browser. You can download new videos to your Videos folder. To access
this menu option, use the following steps:
1. From the Idle screen, press the key to access the menu.
2. Using the navigation keys, highlight Fido Mall and press the Select
soft key or the key.
Fido Mall
60
Page 67

3. Highlight Video and press the Select soft key or the key.
4. Follow the online instructions shown on your display screen after you
launch this service. For more information on using the browser, see
“Using the Internet Browser” on page 56.
For more information on files storage, see “Videos” on page 67.
News & Info
This menu option allows you to view online news and information. To
access this menu option, use the following steps:
1. From the Idle screen, press the key to access the menu.
2. Using the navigation keys, highlight Fido Mall and press the Select
soft key or the key.
3. Highlight News & Info and press the Select soft key or the key.
4. Follow the online instructions shown on your display screen after you
launch this service. For more information on using the browser, see
“Using the Internet Browser” on page 56.
Internet
The Internet menu option opens the Web browser and accesses the Fido
home page. For more information on using the Web browser, see “Using
the Internet Browser” on page 56.
Internet Settings
This menu lets you add or change WAP profiles.To access this menu
option, use the following steps:
1. From the Idle screen, press the key to access the menu.
Fido Mall
61
Page 68

2. Using the navigation keys, highlight Fido Mall and press the Select
soft key or the key.
3. Highlight Internet Settings and press the Select soft key or the
key.
4. To view or edit the settings for an existing profile, press the Options
soft key, highlight Edit and press the Select soft key or the key.
Use the Up and Down navigation keys to scroll through the settings
and make any changes required using the keypad.
To create a new profile, press the Options soft key, highlight New and
press the Select soft key or the key. Use the Down navigation key
to move through the settings and enter the required information using
the keypad.
For more information managing and editing browser profiles, see
“Connections” on page 163.
For more information on entering text, see “Entering Text” on page 44.
Fido Mall
62
Page 69

Media
The Media menu (Menu 2) is used to manage your media files (ring tunes,
graphics, videos, music, and audio recordings) and access media
applications (camera, media player, camcorder and audio recorder).
Media files are organized in a series of named folders. You can also create
additional folders or sub-folders to further organize your files.
Note: If you have inserted a microSD memory card in your phone, you can scroll right or left
while in the Media menu to view similar folders, and the files they contain, in the memory card.
Ring Tunes
In this folder you can download ring tunes using the Internet browser and
manage your ring tunes.
Download Ring Tunes
This option allows you to download ring tunes from your service provider.
To launch the service, highlight Download Ring Tunes and press the
key. Follow the online instructions shown on your display screen after you
launch this service. Press the Options soft key to access browser options
(see “Using the Internet Browser” on page 56).
Ring Tunes Options
The following options are available when you press the Options soft key
while in the Ring tunes folder. The availability of some of these options
depends on what is currently highlighted (selected) in the folder:
♦Play: Plays the currently selected ring tune.
♦Send via: Lets you send the selected file to a recipient in a message.
You can also send the file via Bluetooth to another Bluetooth device.
Media
63
Page 70

♦Set as: Lets you set the selected ring tune as your Voice Call Ring Tune,
Video Call Ring Tune, Caller Ring Tune or Alarm Tone.
♦Move: Lets you move the Selected file or Multiple files to another folder
on the phone or in the microSD memory card if one is inserted.
♦Copy: Lets you place a copy of the Selected file or Multiple files in
another location, including folder on the microSD memory card if one is
inserted.
♦Delete: Lets you delete the Selected file, Multiple files or All files.
♦Rename: Lets you change the name of the selected file.
♦Create Folder: Lets you create a subfolder. After you create a folder,
you can highlight it and access the following additional options from the
Option soft key:
•Open: Opens the selected folder or subfolder.
•Create Folder: Lets you create a subfolder.
•Move Folder: Lets you move the folder to another location in the
phone or on a memory card.
•Copy Folder: Lets you copy the folder to another location in the
phone or on a memory card.
•Delete Folder: Deletes the selected folder or subfolder.
•Rename Folder: Lets you rename the selected folder or subfolder.
•Sort by: Lets you arrange all your files by Date, Type, Name, or Size.
•Bluetooth Visibility: Allows the media file to be shared or released
for the use with another Bluetooth device.
•Memory Card Settings: Lets you view memory card details, format
or rename the card, and enable/disable Bluetooth visibility.
•Properties: Displays all the properties of the currently selected file.
♦Sort by: Lets you arrange all your files by Date, Type, Name or Size.
♦Bluetooth Visibility: Allows the media file to be shared or released for
the use with another Bluetooth device.
Media
64
Page 71

♦Lock/Unlock: Allows you to lock the file so it can not be deleted. Files
must be unlocked before they can be deleted.
♦Properties: Displays all the properties of the currently selected file.
Graphics
This folder contains your collections of provided and downloaded pictures
as well as those taken with your phone’s internal camera. You can also
download pictures and select pictures to be displayed as wallpaper or as
caller ID images.
To view an image, highlight it and press the Select soft key or the key.
Download Graphics
The Download Graphics option allows you to download images from your
service provider.
1. From the Idle screen, press the Menu soft key or the key to access
Menu mode.
2. Use the navigation keys to highlight Media and press the Select soft
key or the key. Highlight Graphics and press the Select soft key or
the key.
3. Highlight the Download Graphics menu option to launch the browser.
Follow the on-screen options to select and download a file.
Downloaded files are stored in the Downloaded Graphics folder.
4. Select the key to return to the Idle screen.
Graphics Options
The following options are available when you press the Options soft key
while in the Graphics folder. The availability of some of these options
depends on what is currently highlighted (selected) in the folder:
Media
65
Page 72

♦View: Displays the image. While viewing the image, press the Options
soft key to access additional options.
♦Send: Lets you send the selected file to a recipient in a Message, via
Bluetooth to another Bluetooth device, or to an Online Album.
♦Set as: Lets you set the selected image as wallpaper or to be used as a
Caller ID.
♦Move: Lets you move the Selected file or Multiple files to another folder
on the phone or to a microSD memory card (if one is inserted).
♦Copy: Lets you place a copy of the Selected file or Multiple files in
another location, including folder on the microSD memory card if one is
inserted.
♦Delete: Lets you delete the Selected file, Multiple files or All files.
♦Rename: Lets you change the name of the selected file.
♦Take Photo: Lets you take a picture using your phone’s camera.
♦Create Folder: Lets you create a subfolder. After you create a folder,
you can highlight it and access the following additional options from the
Option soft key:
•Open: Opens the selected folder or subfolder.
•Take Photo: Lets you take a picture using your phone’s camera.
•Create Folder: Lets you create a subfolder.
•Move Folder: Lets you move the folder to another location in the
phone or on a memory card.
•Copy Folder: Lets you copy the folder to another location in the
phone or on a memory card.
•Delete Folder: Deletes the selected folder or subfolder.
•Rename Folder: Lets you rename the selected folder or subfolder.
•Sort by: Lets you arrange all your files by Date, Type, Name, or Size.
•Bluetooth Visibility: Allows the media file to be shared or released
for the use with another Bluetooth device.
Media
66
Page 73

•Memory Card Settings: Lets you view memory card details, format
or rename the card, and enable/disable Bluetooth visibility.
•Properties: Displays all the properties of the currently selected file.
♦Sort by: Lets you arrange all your files by Date, Type, Name or Size.
♦Bluetooth Visibility: Allows the media file to be shared or released for
the use with another Bluetooth device.
♦Print via: Lets you print the media file via USB connection to a printer or
computer, or via Bluetooth.
♦Lock/Unlock: Lets you lock the file and unlock it when necessary.
Locking files prevents accidental deletion.
♦Properties: Display all the properties of the currently selected file.
Videos
In this folder, you can view the videos you have taken using the built in
camcorder, as well as videos downloaded from the Web or received in
picture messages.
Download Videos
Using the Download Videos option, you can access your service provider’s
site where you can download new videos.
1. From the Idle screen, press the key to access Menu mode.
2. Use the navigation keys to highlight Media and press the Select soft
key or the key. Highlight Videos and press the Select soft key or
the key.
3. Highlight the Download Videos menu option to launch the browser.
Follow the on-screen options to select and download a file.
Downloaded files are stored in the Downloaded Videos folder.
Media
67
Page 74

Video Options
The following options are available when you press the Options soft key
while in the Video folder. The availability of some of these options depends
on what is currently highlighted (selected) in the folder:
♦Play: Plays the currently selected video.
♦Send: Lets you send the selected file to a recipient in a Message, via
Bluetooth to another Bluetooth device, or to an Online Album.
♦Move: Lets you move the Selected file or Multiple files to another folder
on the phone or to a microSD memory card if one is inserted.
♦Copy: Lets you place a copy of the Selected file or Multiple files in
another location, including folder on the microSD memory card if one is
inserted.
♦Delete: Lets you delete the Selected file, Multiple files or All files.
♦Rename: Lets you change the name of the selected file.
♦Record Video: Lets you record and save a video clip using your phone’s
camcorder.
♦Create Folder: Lets you create a subfolder. After you create a folder,
you can highlight it and access the following additional options from the
Options soft key:
•Open: Opens the selected folder or subfolder.
•Record Video: Lets you take record a video using your phone’s
camcorder.
•Create Folder: Lets you create a subfolder.
•Move Folder: Lets you move the folder to a new location.
•Copy Folder: Lets you copy the folder to another location.
•Delete Folder: Deletes the selected folder or subfolder.
•Rename Folder: Lets you rename the selected folder or subfolder.
•Sort by: Lets you arrange all your files by Date, Type, Name, or Size.
•Bluetooth Visibility: Allows the media file to be shared or released
for the use with another Bluetooth device.
Media
68
Page 75

•Memory Card Settings: Lets you view memory card details, format
or rename the card, and enable/disable Bluetooth visibility.
•Properties: Displays all the properties of the currently selected file.
♦Sort by: Lets you arrange all your files by Date, Type, Name or Size.
♦Bluetooth Visibility: Allows the media file to be shared or released for
the use with another Bluetooth device.
♦Lock/Unlock: Lets you lock the file and unlock it when necessary.
Locking files prevents accidental deletion.
♦Properties: Display all the properties of the currently selected file.
Music
In this folder, you can access songs downloaded from the Rogers Music
Store or transferred from your computer or your memory card. Press the
Options soft key to access additional options.
Music Options
The following options are available when you press the Options soft key
while in the Music folder. The availability of some of these options depends
on what is currently highlighted (selected) in the folder:
♦Play: Plays the currently selected music file.
♦Send via: Lets you send the selected file to a recipient in a Message or
via Bluetooth to another Bluetooth device.
♦Move: Lets you move the Selected file or Multiple files to another folder
on the phone or to a microSD memory card if one is inserted.
♦Copy: Lets you place a copy of the Selected file or Multiple files in
another location, including folder on the microSD memory card if one is
inserted.
♦Delete: Lets you delete the Selected file, Multiple files or All files.
♦Rename: Lets you change the name of the selected file.
Media
69
Page 76

♦Add to Playlist: Lets you add the file to a new or existing playlist.
♦Create Folder: Lets you create a subfolder. After you create a folder,
you can highlight it and access the following additional options from the
Option soft key:
•Open: Opens the selected folder or subfolder.
•Create Folder: Lets you create a subfolder.
•Move Folder: Lets you move the folder to a new location.
•Copy Folder: Lets you copy the folder to another location.
•Delete Folder: Deletes the selected folder or subfolder.
•Rename Folder: Lets you rename the selected folder or subfolder.
•Sort by: Lets you arrange all your files by Date, Type, Name, or Size.
•Bluetooth Visibility: Allows the media file to be shared or released
for the use with another Bluetooth device.
•Memory Card Settings: Lets you view memory card details, format
or rename the card, and enable/disable Bluetooth visibility.
•Properties: Displays all the properties of the currently selected file.
♦Sort by: Lets you arrange all your files by Date, Type, Name or Size.
♦Bluetooth Visibility: Allows the media file to be shared or released for
the use with another Bluetooth device.
♦Lock/Unlock: Lets you lock the file and unlock it when necessary.
Locking files prevents accidental deletion.
♦Properties: Display all the properties of the currently selected file.
Voice List
This folder contains the audio files that you create with the built in recorder.
This is the default save location for recorded audio files. To access the
Record Audio function, see “Record Audio” on page 83.
Media
70
Page 77

Voice list Options
Press the Options soft key to select one of the following options. The
availability of some of these options depends on what is currently
highlighted (selected) in the folder:
♦Play: Plays the currently selected audio file.
♦Send via: Lets you send the selected file to a recipient in a Message.
You can also send the file via Bluetooth to another Bluetooth device.
♦Move: Lets you move the selected file or Multiple files to another folder
on the phone or a microSD memory card if one is inserted. Highlight the
location you want to move the files and press .
♦Copy: Lets you place a copy of the Selected file or Multiple files in
another location, including folder on the microSD memory card if one is
inserted.
♦Delete: Lets you delete the Selected file, Multiple files or All files.
♦Rename: Lets you change the name of the selected file.
♦Record Audio: Lets you use the Record Audio function to record an
audio clip using your phone’s microphone and save it to the Voice list
folder.
♦Create Folder: Lets you create a subfolder. After you create a folder,
you can highlight it and access the following additional options from the
Option soft key:
•Open: Opens the selected folder or subfolder.
•Record Audio: Lets you use the Record Audio function to record an
audio clip using your phone’s microphone.
•Create Folder: Lets you create a subfolder.
•Move Folder: Lets you move the folder to a new location.
•Copy Folder: Lets you copy the folder to another location.
•Delete Folder: Deletes the selected folder or subfolder.
•Rename Folder: Lets you rename the selected folder or subfolder.
•Sort by: Lets you arrange all your files by Date, Type, Name, or Size.
Media
71
Page 78

•Bluetooth Visibility: Allows the media file to be shared or released
for the use with another Bluetooth device.
•Memory Card Settings: Lets you view memory card details, format
or rename the card, and enable/disable Bluetooth visibility.
•Properties: Displays all the properties of the currently selected file.
♦Sort by: Lets you arrange all your files by Date, Type, Name or Size.
♦Bluetooth Visibility: Allows the media file to be shared or released for
the use with another Bluetooth device.
♦Lock/Unlock: Lets you lock the file and unlock it when necessary.
Locking files prevents accidental deletion.
♦Properties: Display all the properties of the currently selected file.
Media Applications
Provides access to the phone’s built in camera, camcorder, media player
and audio recorder.
Camera
Using the Camera menu in your phone, you can take photos of people or
events while on the move. Additionally, you can send photos to other
people in a picture message or set one as wallpaper on your display
screen. The camera produces JPEG photo files.
Caution: Do not take photos of people without their permission. Do not take
photos in a place where cameras are not allowed or where you might interfere
with another person’s privacy.
You can also record videos using your phone as a video camcorder. For
more information, see “Camcorder” on page 77.
For information on configuring the default settings for the camera, see
“Camera Settings” on page 169.
Media
72
Page 79

Taking Photos
1. Open your phone.
2. From the Idle screen, press the key to access the menu.
3. Using the navigation keys, scroll to Media and press the Select soft
key or the key.
4. Select Media Applications and press the Select soft key or the
key.
5. Select Camera and press the Select soft key or the key. You are
now in Capture mode. The LCD screen acts as the viewfinder.
6. Adjust the image by aiming the camera at the subject and framing the
photo you want to take on the screen.
♦Press the Options soft key to configure settings or apply effects. For
more information, see “Camera Options in Capture Mode” on
page 73.
♦You can change the brightness using the left and right navigation
keys.
♦You can change the zoom using the up and down navigation keys.
7. Press the key to take the photo.
Note: Your camera produces photos in JPEG format.
Camera Options in Capture Mode
In Capture mode, you can access various options by pressing the Options
soft key:
♦Take Photo: Records the image.
♦Shooting Mode: Allows you to switch camera modes.
Media
73
Page 80

•
Single Shot:
photo after taking it (Take and Review) or return immediately to the
viewfinder to take another (Take and Return).
•Multi-Shot: Allows you to take a series of 6, 9 or 15 photos in quick
succession.
•Mosaic Style: Allows you to take 4 photos in succession and arrange
them in a 2x2 grid or 9 photos in a 3x3 grid.
allows you to take a single photo and either review the
♦Effects: allows you to choose a custom color tone for your photo.
Choose from the following Effects Mode.
No Effects: cancels any effects applied to the image.
Black and White: removes all color and display the picture in black
and white.
Sepia: displays the picture in black and white with a sepia tint that
makes it look like an old picture.
Negative: changes the image to a negative image display.
♦Frames: Allows you to set the picture you take in a decorated frame.
Select a frame from the list using the navigation keys and press the
key for a preview. To choose the selected frame, press the Select soft
key. To take a photo that is inserted into the frame, press the key. To
return to the list, press the Back soft key.
♦Timer: Allows you set the delay before the camera takes a photo to Off,
3, 5 or 10 seconds. The camera counts down the time on the screen and
by playing a sound twice a second.
♦Record Video: Launches the camcorder so you can take a video.
♦Go to Graphics: Allows you to view photos stored in your photo album.
♦Camera Settings: Allows you to customize your camera settings. See
“Camera Settings” on page 169 for complete information.
♦Camera Shortcuts: Allows you to see the shortcut keys associated
when using the camera. Shortcut keys allow you to change camera
Media
74
Page 81

options while taking photos using your keypad, Navigation keys, and
Volume key. The following options are available.
takes a photo
zooms in or out (not available when picture size is
set to 1280 x 1024)
adjusts the image brightness
zooms in
zooms out
toggles to Camcorder mode
changes the image size
changes the image quality
changes the camera shooting mode
changes the Effect applied to the photo
adds a frame (custom border) to the photo
sets a time delay (Off, 3, 5, or 10 seconds)
opens the Graphics folder
switches between standard screen, full screen
without shortcut icons, full screen with shortcut icons
and full screen with grid
Camera Options After Taking a Photo
When you press the left soft key after taking a photo, the following options
are available:
♦Send: Allows you to send the photo in a picture message or to an online
album.
♦Delete: Deletes the photo.
♦Viewfinder: Lets you take another picture.
Media
75
Page 82

♦Set as:
•Wallpaper: Sets the photo as your wallpaper for the idle screen on
the LCD display.
•Caller ID: Sets the photo as a caller ID image for Contact list entries.
♦Edit Photo: Opens the Edit screen, which provides the following editing
and sharing tools you can access using the Options soft key:
•Save as: Lets you specify a unique name for the photo file.
Otherwise, photos are named using the default naming convention
(to change the default format see “Camera Settings” on page 169).
•Effects: Allows you to
Negative, Milky, Lighting, Crayon Pastel, Oil Paint, Blur, Despeckle, or
Sharpen effect to the image.
•Partial Effects: Lets you apply a Partial Blur effect or perform Redeye
Repair. Press the Options soft key and Blur or Repair to apply the
effect in the selected area, Size to change the size of the selected
area or Shape to select a different shape for the selection area.
•Adjust: Lets you adjust Brightness, Contrast and Color settings. Use
the Left and Right navigation keys to move the adjustment slider.
•Transform: Lets you Resize, Rotate or Flip the image.
•Crop: Lets you crop the image to a selected area.Use the navigation
keys to move the cropping frame. Press the Options soft key and
Crop to crop the image, Size to change the size of the cropping
frame or Shape to select a different cropping frame.
•Insert: Lets you add Frames, Clipart, Emoticons and Text to the
image.
•Send: Allows you to send the photo in a picture message or to an
online album.
•Set as: Allows you to set the photo as your wallpaper for the idle
screen on the LCD display or as a caller ID image for Contact entries.
•Print via: Lets you print via Bluetooth or USB connection.
allows you to apply a Black and White, Sepia,
♦Rename: Lets you specify a different name for the file.
♦Go to Graphics: Opens the Graphics folder.
Media
76
Page 83

♦Lock/Unlock: Lets you lock the file to prevent accidental deletion and
unlock it when necessary.
♦Bluetooth Visibility: Allows the media file to be shared or released for
the use with another Bluetooth device.
♦Properties: Displays the properties of the currently selected file.
Viewing Pictures
For information on accessing your photo files, see “Graphics” on page 65.
Camcorder
Using the camcorder, you can record videos with your phone. The video
clips you create can be sent to other properly equipped phones. You can
also view the clips with the built-in media player.
Caution: Do not take videos of people without their permission. Do not take
videos in a place where cameras are not allowed or where you might interfere
with another person’s privacy.
For information on configuring the default settings for the camcorder, see
“Camcorder Settings” on page 170.
Recording Videos
The camcorder allows you to take videos. Your camera produces video
files in 3gp format.
To record a video:
1. Open your phone.
2. From the Idle screen, press the key to access the menu.
3. Using the navigation keys, scroll to Media and press the Select soft
key or the key.
Media
77
Page 84

4. Select Media Applications and press the Select soft key or the
key.
5. Select Camera and press the Select soft key or the key.
6. Press the Options soft key, select Record video and press the Select
soft key or the key. The phone is now in video recording mode. The
LCD screen acts as the viewfinder.
7. Adjust the image by aiming the camera at the subject and framing the
video you want to take on the screen.
♦Press the Options soft key to configure settings or apply effects. For
more information, see “Video options in Record Mode” on page 78.
♦You can change the brightness using the left and right navigation
keys.
♦You can change the zoom using the up and down navigation keys.
8. Press the key to start the video.
9. When you are finished, Press the key to stop the video.
The video clip is saved in the Video folder. You can now preview it or
access the Options soft key menu. For more information on menu options,
see “Options After Recording a Video” on page 80.
Video options in Record Mode
In Record mode, you can use various options for the camera by pressing
the left soft key. The following options are available:
♦Record Video: Starts a video recording.
♦Effects: Allows you to choose a custom color tone for your video.
Choose from the following Effects modes.
No Effects: Cancels any effects applied to the camcorder image.
Black and White: Removes all color and display the picture in black
and white.
Media
78
Page 85

Sepia: Displays the picture in black and white with a sepia tint that
makes it look like an old picture.
Negative: Changes the image to a negative image display.
♦Timer: Allows you set the delay before the camera starts a video to Off,
3, 5 or 10 seconds. The camera counts down the time on the screen and
by playing a repeating sound.
♦Take Photo: Switches your phone to Camera mode.
♦Go to Video: Opens the Videos folder.
♦Camcorder Settings: Allows you to customize your camcorder settings.
See “Camcorder Settings” on page 170 for more information.
♦Camcorder shortcuts: Shortcut keys allow you to change camcorder
options using your keypad, Navigation keys, and Volume key while in
capture mode. The following options are available.
starts and stops video recording
zooms in or out
adjusts the image brightness
zooms in
zooms out
toggles to Camera mode
changes the video resolution
changes the video quality
changes the maximum recording time
changes the Effect applied to the video
switches the audio recording on and off
sets a time delay (Off, 3, 5, or 10 seconds)
opens the Videos folder
Media
79
Page 86

Options After Recording a Video
When you press the Options soft key after saving a video, the following
options are available:
♦Play: Plays the video you recorded.
♦Send: Allows you to send the photo in a picture message or to an online
album.
♦Delete: Deletes the video.
♦Viewfinder: Lets you take another video.
♦Rename:
default naming convention is used. To change the default naming see
“Camcorder Settings” on page 170.
Lets you specify a unique name for the video file. Otherwise, the
♦Go to Video: Opens the Videos folder.
♦Lock/Unlock: Locking prevents the video from being accidentally
deleted. A locked video must be unlocked before it can be deleted.
♦Bluetooth Visibility: Allows Bluetooth-enabled devices within range to
download copies of your video.
♦Properties: shows the properties of the video, such as Size, Format,
Duration, Created (date and time), and Location.
♦Player Settings: Allows you to change the options for playing a video.
For more information, see
Viewing Videos
For information on accessing your video files and viewing videos, see
“Videos” on page 67.
“Player Settings” on page 171
.
Media Player
The Media player lets you access and play music files saved on the phone
or a microSD memory card.
Media
80
Page 87

To access music files and playlists:
1. From the Idle screen, press the key to access the menu.
2. Using the navigation keys, scroll to Media and press the Select soft
key or the key.
3. Select Media Applications and press the Select soft key or the
key.
4. Select Media Player and press the Select soft key or the key.
5. Press the Library soft key to open the Music Library.
The choices available are:
•Now Playing: displays details of a song currently playing or paused.
•All: Displays a list of all songs currently available on the phone and
the microSD memory card (if inserted).
•Artists: Displays a list of all artists performing the available songs. To
view a list of the available songs by an artist, highlight the name and
press the key. To play a song, highlight the title and press the
key.
•Albums: Displays a list of all albums currently available on the phone
or an inserted microSD card. To view a list of the songs on an album,
highlight the name and press the key. To play a song, highlight
the title and press the key.
•Playlists: shows all saved playlists.
Playing a Music File
While viewing Media Player files, as described above, highlight the file you
want to play and press the key to launch the Media player and play the
file.
While an audio file is playing, the left and right navigation keys operates as
Last Track/Next Track controls, the key as Pause control even when
you return to the Idle screen.
Media
81
Page 88

Before or after a file is played, you can press the Options soft key for
additional options (see below).
Media Player Options
When you open the Media Player screen, the following options are
available by pressing the Options soft key:
♦Play via: Selects whether to play the selected file through the phone’s
speaker or Bluetooth stereo headphones.
♦Hide Player: Displays or hides the on-screen playback controller image.
♦Open Music Library: opens the Library screen.
♦Repeat: Lets you repeat the playing of one file, repeat all files, or switch
the function Off.
♦Shuffle: Plays all files in random order.
♦Add to Playlist: Lets you add the selected file, multiple files or all files to
a new or existing playlist.
♦Send: Lets you send the selected file to a recipient in a Message, via
Bluetooth to another Bluetooth device or to an Online Album.
♦Player Settings: Allows you to change music player options, including
Equalizer Type and Visualization Type. See “Player Settings” on
page 171 for more information.
♦Rate Track: Lets you add a personal rating to the music file (from one to
five stars).
♦Properties: Displays the properties of the selected file (Title, Size,
Format, Duration, etc.).
When you select a music file, the following options are available by
pressing the Options soft key:
♦Play via: Selects whether to play the selected file through the phone’s
speaker or Bluetooth stereo headphones.
Media
82
Page 89

♦Add to Playlist: Lets you add the selected file, multiple files or all files to
a Playlist.
♦Sort by: Lets you sort files by Recently Added, My Rating, or Title.
♦Delete: Lets you delete the selected file, multiple files or all files.
♦Send: Lets you send the selected file to a recipient in a message or via
Bluetooth to another Bluetooth device.
♦Player Settings: Allows you to change music player options, including
Equalizer Type and Visualization Type. See “Player Settings” on
page 171 for more information.
♦Rate Track: Lets you add a personal rating to the music file (from one to
five stars).
♦Lock/Unlock: Lets you lock the file to prevent accidental deletion and
unlock it when necessary.
♦Properties: Displays the properties of the selected file (Title, Size,
Format, Duration, etc.).
Play Music Through a Stereo Bluetooth Device
Your phone supports the Stereo Bluetooth profile (A2DP) that will play back
music in stereo on a stereo Bluetooth headset. Your phone must be paired
to a stereo Bluetooth device (see “Bluetooth” on page 157 for instructions).
To play music through a paired stereo Bluetooth headset, during playback
press the Options soft key, highlight Transfer to Bluetooth Stereo Headset
and press the Select soft key or the key.
Record Audio
Record Audio allows you to record audio clips such as voice memos and
send audio clips to other people.
To create audio recordings:
1. From the Idle screen, press the key to access the menu.
Media
83
Page 90

2. Using the navigation keys, scroll to Media and press the Select soft
key or the key.
3. Select Media Applications and press the Select soft key or the
key.
4. Select Record Audio and press the Select soft key or the key.
5. To begin recording, press the key. Record a memo by speaking
into the microphone.
6. Press the Stop soft key to stop the recording and save the file or the
key to pause the recording. If the recording time expires, the
message is automatically saved.
7. To play back the recording, press the key.
Using Record Audio Options
Before recording, you can access various options by pressing the Options
soft key. To execute an option, highlight it and press the Select soft key or
the key. The following options are available:
♦Record: Immediately begins recording an audio clip.
♦Go to Voice List: Takes you to Voice List folder where recorded audio
clips are stored.
♦Record Audio Settings: Allows you to select the Recording Time and
Default Name (see “Record Audio Settings” on page 171 for more
information).
After recording you can access various options by pressing the Options
soft key. To execute an option, highlight it and press the Select soft key or
the key. The following options are available:
♦Play: Plays the recorded file.
♦Record: Immediately begins recording an audio clip.
Media
84
Page 91

♦Go to Voice List: Takes you to the Voice List folder, which contains
audio files that you have created using the built-in recorder.
♦Record Audio Settings: Lets you set default Record audio settings. For
more detailed information, see “Record Audio Settings” on page 171.
♦Send: Lets you send the selected file to a recipient in a message or via
Bluetooth to another Bluetooth device.
♦Delete: Deletes the selected file.
♦Rename:
default naming convention is used. Note that you can change the default
naming. See “Record Audio Settings” on page 171.
Lets you specify a unique name for the audio file. Otherwise, the
♦Bluetooth Visibility: Allows other Bluetooth-enabled devices within
range to download copies of your video.
♦Lock/Unlock: Locking prevents the file from being accidentally deleted.
A locked file must be unlocked before it can be deleted.
♦Properties: Display the properties of the currently selected media file.
Other Files
This folder allows you to store and access other types of files on your
phone, such as Excel spreadsheets, text files, PowerPoint presentations,
PDFs, HTML, Word documents, and graphics. You can send these files to
others by message, email, or Bluetooth. You can also move or copy the
files to your memory card. To open the Other Files folder:
1. From the Idle screen, press the key to access the menu mode.
2. Use the Navigation keys to highlight Media and press the Select soft
key or the key.
3. Highlight Other Files and press the key to open the Other Files
folder. If there is a memory card in your phone, you can access files
stored in your phone or on the card using the Left and Right navigation
keys to switch between On Phone and On Card.
Media
85
Page 92

While in the Other files folder, press the Options soft key to access the
following options (availability depends on the type of file currently
highlighted):
♦View: Lets you view the contents of the selected file.
♦Save to Favorites/Contacts, Register to Address Book/Calendar/
Note: Saves/lists the file in an additional location.
♦Play: Lets you play a compatible media file.
♦Send: Lets you send the selected file in a message or to a Bluetooth-
enabled device.
♦Set as: Lets you set an image file as your screen background or Caller
ID image.
♦Move: Lets you move the selected file or multiple files.
♦Copy: Lets you copy the selected file or multiple files to another location.
♦Delete: Lets you delete the selected file, multiple files or all files.
♦Rename: Lets you change the name of the selected file.
♦Create Folder: Lets you create a subfolder.
♦Sort by: Lets you arrange all your files by Date, Type, Name, or Size.
♦Bluetooth Visibility: Allows other Bluetooth-enabled devices within
range to download the file.
♦Lock/Unlock: lets you lock the file to prevent accidental deletion and
unlock locked files to allow deletion.
♦Properties: displays all the properties of the currently selected file.
Memory Status
The Memory Status menu allows you to view the memory usage and
available space in your phone and on an inserted microSD card. It displays
the total memory used and available as well as the memory usage for each
storage folder. Use the left or right navigation key to toggle between On
Phone and On Card.
Media
86
Page 93

Games and Apps
Using the Games and Apps menu (Menu 3) you can play games already
stored on your phone, as well as download games and other applications
from your service provider.
Download Games
This option allows you to download games from your service provider. To
launch the service, highlight Download Games and press the key.
Follow the online instructions shown on your display screen after you
launch this service. Press the Options soft key to access browser options
(see “Using the Internet Browser” on page 56). Downloaded games are
added to the Games and Apps menu.
Game Options
While in the Games and Apps screen, you can access the following
options by pressing the Options soft key:
1. Start: starts the game that was highlighted on the screen when you
entered the Options menu.
2. Delete: lets you delete the game that was selected on the screen when
you entered the Options menu, multiple games or all games.
3. Rename: Lets you change the name of the game.
4. Lock/Unlock: Allows you to lock the file so it can not be deleted or
renamed. Files must be unlocked before they can be deleted or
renamed.
5. Connections: Press the Options soft key, highlight Edit and press the
Select soft key or the key to view the specifics of the network
settings, including Set Name, Access Name, Auth Type, User ID,
Games and Apps
87
Page 94

Password, Protocol, Home URL, Proxy address, Port, Linger Time, and
Advanced Settings.
6. Properties: displays the properties of the selected game, including
Size, Version, Supplier, Creation Date and Time, Description and
Location.
To Start a Game
1. From the Idle screen, press the key to access the menu.
2. Highlight Games and Apps and press the Select soft key or the
key.
3. Scroll to the game you want to play and press the key.
4. The game’s welcome screen displays information about the game.
Follow the on-screen instructions to play the game.
Game Options
While playing a game, to Press the
adjust the sound volume Volume keys Up
exit the game key
highlight an option in a list Navigation keys
select an option
Games and Apps
88
Down
key
Page 95

Call History
In this menu (Menu 4), you can:
♦View calls you missed, received or dialed
♦Check your voice mail
♦Add phone numbers from your call history to Speed Dial
♦View the length of calls made and received
While in any of the call lists, press the Options soft key to access the
following functions:
♦Details: View call details (phone number, date and time of call).
♦Voice Call: Calls the highlighted number.
♦Video Call: Makes a video call to the highlighted number.
♦Save to Contacts: Saves the number to your Contact List, either on
your SIM card or phone.
♦Send Message: Lets you send a text message to the caller.
♦Delete: Lets you delete the selected call or all calls from the list.
♦Add to Reject List: Adds the phone number the selected call was made
from to the Reject List. To view and configure your reject list, see “Enable
and Configure Auto Reject” on page 149.
All Calls
This menu (Menu 4.1) lets you view a list of calls made and received,
including missed calls. Icons at the left of each listing indicate whether the
call was made ( ), received ( ) or missed ( ). Use the up and down
navigation keys to scroll through the list and press the key to view call
Call History
89
Page 96

details. The number is displayed along with the time and date when the call
was made.
Note: You can access the most recent numbers in All Calls by pressing the key in Idle
mode.
Missed Calls
This menu (Menu 4.2) lets you view a list of calls you received but did not
answer. Use the navigation key to scroll through the list and press the
key to view call details. The number is displayed along with the time and
date when the call was made.
Calls Made
This menu (Menu 4.3) lets you view a list of the numbers you dialed. Use
the navigation key to scroll through the list and press the key to view
call details. The number is displayed along with the time and date when the
call was made.
Calls Received
This menu (Menu 4.4) lets you view a list of calls you answered. Use the
navigation key to scroll through the list and press the key to view call
details. The number is displayed along with the time and date when the call
was received.
Speed Dial List
Using Speed dial (Menu 4.5), you can assign up to seven phone numbers
from your Contact list that you use most frequently to the number keys (3 to
9), and then dial them easily whenever you want, simply by pressing and
holding the associated number key.
Call History
90
Page 97

To add a speed dial entry:
1. From the Idle screen, press the key to access the menu mode.
2. Use the Navigation keys to highlight Call History and press the Select
soft key or the key.
3. Highlight Speed Dial List and press the Select soft key or the key.
4. A virtual representation of your keypad appears onscreen. Existing
speed dial entries appear within their associated key.
Using the navigation keys, select a number from the onscreen keypad
to assign the speed dialling number, and press the Options soft key,
highlight Add and press the Select soft key or the key.
Note: Speed dial key 1 is reserved for your Voice Mail server number.
5. Select either Contacts or FDN Contacts to choose an entry.
6. Select an entry from the list and press the Select soft key.
The virtual keypad reappears with the new speed dial entry appearing
in its associated key.
When an existing Speed Dial entry is highlighted, the following options are
available by pressing the Options soft key:
♦View: Allows you to view the number assigned to the key. You can dial
the number by pressing the key.
♦Change: Allows you to assign a different number to the key.
♦Voice Call: Dials the selected speed dial number to start a voice call.
♦Video Call: Dials the selected speed dial number to start a video call.
♦Remove: Allows you to clear the setting so that no number is assigned
to the key.
Call History
91
Page 98

Using Speed Dial
While in Idle mode, you can speed-dial the numbers assigned to numeric
keys 3 to 9 by pressing and holding the appropriate key until the phone
begins dialing.
Delete All
This menu (Menu 4.6) allows you to delete all of the records in one or more
call record types.
1. From the Idle screen, press the key to access the menu mode.
2. Use the Navigation keys to highlight Call History and press the Select
soft key or the key.
3. Highlight Delete All and press the Select soft key or the key.
4. Use the up and down navigation keys to highlight the type(s) of records
you want to delete and press the key to enter a check mark in the
selection box at the left side.
5. Press the Delete soft key and when a message displays asking you to
confirm the deletion, press the Yes soft key to confirm.
Voice Call Time
This menu (Menu 4.7) lets you view the timers for voice calls you made and
received.
Note: The actual time invoiced for calls by your service provider may vary, depending on
network features, rounding-off for billing purposes, etc.
The following timers are available:
♦Last Voice Call Time: Length of the last voice call.
Call History
92
Page 99

♦Tot al Sent: Total length of all calls you made since the timer was last
reset.
♦Total Received: Total length of all calls you received since the timer
was last reset.
To reset the timers, press the Reset soft key, enter the phone password
and then press the Confirm soft key.
Video Call Time
This menu (Menu 4.8) lets you view the timers for video calls you made and
received.
Note: The actual time invoiced for calls by your service provider may vary, depending on
network features, rounding-off for billing purposes, etc.
The following timers are available:
♦Last Video Call Time: Length of the last voice call.
♦Tot al Sent: Total length of all calls you made since the timer was last
reset.
♦Total Received: Total length of all calls you received since the timer
was last reset.
To reset the timers, press the Reset soft key, enter the phone password
and then press the Confirm soft key.
Call History
93
Page 100

i.Fido
The i.Fido menu (Menu 5) allows you to access numerous online services,
including Internet, Video Calling, Video/Radio, Mobile TV, Music, and More
Services.
Note: These services are provided and maintained by Fido and require paid subscription. They
are not specific to your phone. Contact your service provider on consult the insert provided with
your phone for additional information.
Internet
The Internet menu option opens the Web browser and accesses the Fido
home page. For more information on using the Web browser, see “Using
the Internet Browser” on page 56.
Video Calling
This menu selection initiates a video call. For more information, see “Video
Calling” on page 38.
Video/Radio
Accesses the Fido On Demand service. Follow the online instructions
shown on your display screen after you launch this service.
Mobile TV
Accesses Fido Mobile TV. Follow the online instructions shown on your
display screen after you launch this service.
i.Fido
94
 Loading...