

Page 1

i
Important Precautions and Safety Information
When using this fax machine, these basic safety precautions should always be followed to reduce risk of fire,
electric shock, and injury to persons:
1
Read and understand all instructions.
2
Use common sense whenever operating electrical appliances.
3
Follow all warnings and instructions marked on the product and in the literature accompanying the
product.
4
If an operating instruction appears to conflict with safety information, heed the safety information. You
may have misunderstood the operating instruction. If you cannot resolve the conflict, contact your sales or
service representative for assistance.
5
Unplug the fax machine from the AC wall socket and telephone jack before cleaning. Do not use liquid or
aerosol cleaners. Use only a damp cloth for cleaning.
6
Do not place the fax machine on an unstable cart, stand, or table. It may fall, causing serious damage.
7
Your fax machine should never be placed on, near, or over a radiator, heater, air conditioner, or ventilation
duct.
8
Do not allow anything to rest on the power or telephone cords. Do not locate your fax machine where the
cables may be damaged by people walking on them. Do not place the machine where the power or
telephone cord may be bent. Any case of above may cause the hazardous result or malfunction.
9
Do not overload wall outlets and extension cords. This can diminish performance, and may result in the
risk of fire or electric shock.
10
Do not allow pets to chew on the AC power, telephone, or PC interface cords.
11
Never push objects of any kind into the fax machine through case or cabinet openings. They may touch
dangerous voltage points, creating a risk of fire or shock. Never spill liquid of any kind onto or into the fax
machine.
12
To reduce the risk of electric shock, do not disassemble the fax machine. Take it to a qualified service
technician when repair work is required. Opening or removing covers may expose you to dangerous
voltages or other risks. Incorrect reassembly could cause electric shock when the unit is subsequently used.
Page 2

ii
13
Unplug the machine from the telephone jack, PC, and AC wall outlet, and refer servicing to qualified
service personnel under the following conditions:
• When any part of the power cord, plug, or connecting cable is damaged or frayed.
• If liquid has been spilled into the product.
• If the product has been exposed to rain or water.
• If the product does not operate properly after instructions have been followed.
• If the product has been dropped, or the cabinet appears damaged.
• If the product exhibits a sudden and distinct change in performance
14
Adjust only those controls covered by the operating instructions. Improper adjustment of other controls
may result in damage, and may require extensive work by a qualified service technician to restore the product to normal operation.
15
Avoid using this fax machine during a lightning storm. There may be a remote risk of electric shock from
lightning. If possible, unplug the AC power and telephone for the duration of the lightning storm.
16
Do not install the machine on a wet place. This may raise a risk of fire or shock.
17
SAVE THESE INSTRUCTIONS.
Page 3

Table Of Contents
iii
Chapter 1: Setup and Copying
List of features .......................................................................................................................................................... 1.2
Familiarizing yourself with your new machine ........................................................................................................ 1.3
Front view .......................................................................................................................................................... 1.3
Rear view ........................................................................................................................................................... 1.3
Control Panel ..................................................................................................................................................... 1.4
Loading paper ........................................................................................................................................................... 1.5
Paper type and sizes ........................................................................................................................................... 1.5
Making a copy .......................................................................................................................................................... 1.6
Setting date and time ................................................................................................................................................ 1.6
Setting fax number/name .......................................................................................................................................... 1.7
How to enter letters ............................................................................................................................................ 1.7
Copying/receiving in Ink Save mode ....................................................................................................................... 1.8
Adjusting ring volume .............................................................................................................................................. 1.8
Adjusting speaker volume ........................................................................................................................................ 1.8
Chapter 2: Programming and Dialling
Making a phone call ................................................................................................................................................. 2.2
On-Hook dialling ...................................................................................................................................................... 2.2
Phonebook dialling ................................................................................................................................................... 2.2
Storing a number in the Phonebook ................................................................................................................... 2.2
One-Touch dialling ............................................................................................................................................ 2.3
Speed dialling ..................................................................................................................................................... 2.3
Searching for a number in memory (Directory dialling) .......................................................................................... 2.3
Searching sequentially through the Phonebook ................................................................................................. 2.3
Searching for a particular first letter .................................................................................................................. 2.4
Redialling .................................................................................................................................................................. 2.4
To redial the last number called ......................................................................................................................... 2.4
To redial the number in memory ....................................................................................................................... 2.4
To find a number received via the Caller ID service ......................................................................................... 2.4
Chapter 3: The Fax Machine
Sending a fax ............................................................................................................................................................ 3.2
Loading documents ............................................................................................................................................ 3.2
Acceptable documents ....................................................................................................................................... 3.2
Setting document resolution and contrast .......................................................................................................... 3.3
Sending a fax manually ...................................................................................................................................... 3.3
Sending a fax automatically ............................................................................................................................... 3.3
Automatic redial ................................................................................................................................................. 3.4
Receiving a fax ......................................................................................................................................................... 3.4
Reception modes ................................................................................................................................................ 3.4
Receiving in FAX mode .................................................................................................................................... 3.5
Receiving in TEL mode ..................................................................................................................................... 3.5
Receiving in AUTO mode ................................................................................................................................. 3.5
Receiving in TAM mode (SF-330/SF-331P) ..................................................................................................... 3.5
Receiving in TAM mode (SF-335T) .................................................................................................................. 3.6
Receiving in DRPD mode .................................................................................................................................. 3.6
Receiving via an extension telephone (SF-330/SF-331P only) ......................................................................... 3.6
Chapter 4: The Answering Machine
Recording your TAM message ................................................................................................................................. 4.2
Checking your TAM message .................................................................................................................................. 4.2
Monitoring an incoming call .................................................................................................................................... 4.2
Playing back messages ............................................................................................................................................. 4.3
Playing back newly received caller messages ................................................................................................... 4.3
Playing back all messages .................................................................................................................................. 4.3
Skipping backward or forward ........................................................................................................................... 4.3
Erasing old messages you ve heard .......................................................................................................................... 4.4
To erase a selected message ............................................................................................................................... 4.4
To erase all recorded messages .......................................................................................................................... 4.4
Using the answering machine from a remote phone ................................................................................................ 4.5
Accessing the machine ....................................................................................................................................... 4.5
Using remote commands .................................................................................................................................... 4.5
Page 4

iv
Chapter 5: Advanced Fax
Broadcasting ............................................................................................................................................................. 5.2
Delayed fax ............................................................................................................................................................... 5.2
Polling ....................................................................................................................................................................... 5.3
Setting send polling ............................................................................................................................................ 5.3
Setting receive polling ....................................................................................................................................... 5.3
To cancel the scheduled job ...................................................................................................................................... 5.3
Forwarding a fax or message .................................................................................................................................... 5.4
Fax forwarding ................................................................................................................................................... 5.4
Message forwarding (SF-335T only) ................................................................................................................. 5.4
Chapter 6: Special Features
Inserting a pause ....................................................................................................................................................... 6.2
Using Recall (R or Flash) ......................................................................................................................................... 6.2
Using Caller ID ......................................................................................................................................................... 6.2
Using the Mute ......................................................................................................................................................... 6.3
To mute a call ..................................................................................................................................................... 6.3
To release the mute ............................................................................................................................................ 6.3
Recording a conversation (SF-335T only) ............................................................................................................... 6.3
Sound setup ............................................................................................................................................................... 6.3
User reports ............................................................................................................................................................... 6.4
To print a report ................................................................................................................................................. 6.4
Re-Printing faxes ...................................................................................................................................................... 6.5
Registering/deleting the junk fax numbers ............................................................................................................... 6.5
Entering junk fax setup mode ............................................................................................................................ 6.5
Clearing memory ...................................................................................................................................................... 6.6
User options .............................................................................................................................................................. 6.6
Setting system/TAM options ............................................................................................................................. 6.6
Chapter 7: Care and Maintenance
Cleaning the document scanner ................................................................................................................................ 7.2
Replacing the print cartridge .................................................................................................................................... 7.3
Cleaning the printhead .............................................................................................................................................. 7.4
Aligning the printhead .............................................................................................................................................. 7.4
Ink level view ........................................................................................................................................................... 7.4
Shading adjustment ................................................................................................................................................... 7.4
Self testing ................................................................................................................................................................ 7.5
Print cartridge maintenance ...................................................................................................................................... 7.5
Cleaning the cartridge ............................................................................................................................................... 7.5
Wiping the print nozzles and contacts ............................................................................................................... 7.5
Cleaning the cartridge carrier contacts .............................................................................................................. 7.6
LCD error messages ................................................................................................................................................. 7.7
Fixing Problems ........................................................................................................................................................ 7.9
Fax problems ...................................................................................................................................................... 7.9
Print quality problems ...................................................................................................................................... 7.10
Paper feeding problems .................................................................................................................................... 7.10
Clearing jams .......................................................................................................................................................... 7.11
Document jams during transmission ................................................................................................................ 7.11
Paper jams during printing ............................................................................................................................... 7.11
Chapter 8: Appendix
Specifications ............................................................................................................................................................ 8.2
A sample of ITU #1 chart (reduced to 60.5%) ......................................................................................................... 8.3
Replacing the fitted plug (UK) ................................................................................................................................. 8.4
Notes for use of this device (New Zealand) ............................................................................................................. 8.4
Declaration of conformity (European countries) ...................................................................................................... 8.5
In case of interference (US) ...................................................................................................................................... 8.9
Fax branding (US) .................................................................................................................................................... 8.9
Telephone company information (US) ................................................................................................................... 8.10
Index
Page 5

C
HAPTER
1
S
ETUP
AND
C
OPYING
This chapter describes the preliminary setup procedure. A full installation instruction is explained in the
separate Installation Guide. If you are installing or reinstalling the machine from the beginning, refer to the
Installation Guide provided with the machine.
Page 6

1.2
List of features
This machine was designed using the latest technology. It is a full-featured, high-performance machine that not
only meets, but also exceeds industry standards. The following is a list of its many exciting features:
Common features to SF-330 Series (SF-330/SF-335T/SF-331P)
• Save Ink (see "Copying/receiving in Ink Save mode" on page 1.8.)
• Inkjet printing on plain paper
• 14.4Kbps high speed faxing
• 80 page holding memory
• Multilingual display and report; English, German, French, Italian, Spanish, Portuguese and Dutch (see "Language"
on page 6.7.)
• Stand-alone, full-function fax machine
• Convenient 50 page desktop copier
• 10 page Skew Free Document Feeder
• 50 Speed Dialling locations (10 One-Touch included)
• Five reception modes; TEL, FAX, AUTO, TAM
1
(Telephone Answering Machine) and DRPD
• Broadcasting to send the same document to multiple destinations
• Delayed FAX to send the document at a later time
• Send/Receive Polling
• Last 10 number redial
• Report management; sending confirmation, Journal report and Phonebook, etc.
Features for SF-335T only
• Built-in digital TAM
• Access from a remote telephone
• Message Forwarding (you can have the machine transfer a call when the caller leaves a message.)
• Call monitor
Features for SF-331P only
• PC printing capability
• Compatible with the most recent operating system
• Network sharing
1. If your machine is an SF-330 or an SF-331P, you need to have an answering machine attached.
Page 7
S
ETUP
AND
C
OPYING
1.3
S
ETUP
AND
C
OPYING
S
ETUP
AND
C
OPYING
S
ETUP
AND
C
OPYING
S
ETUP
AND
C
OPYING
S
ETUP
AND
C
OPYING
S
ETUP
AND
C
OPYING
S
ETUP
AND
C
OPYING
Familiarizing yourself with your new machine
Take a moment to familiarise yourself with your new machine by looking at the pictures on the next few pages.
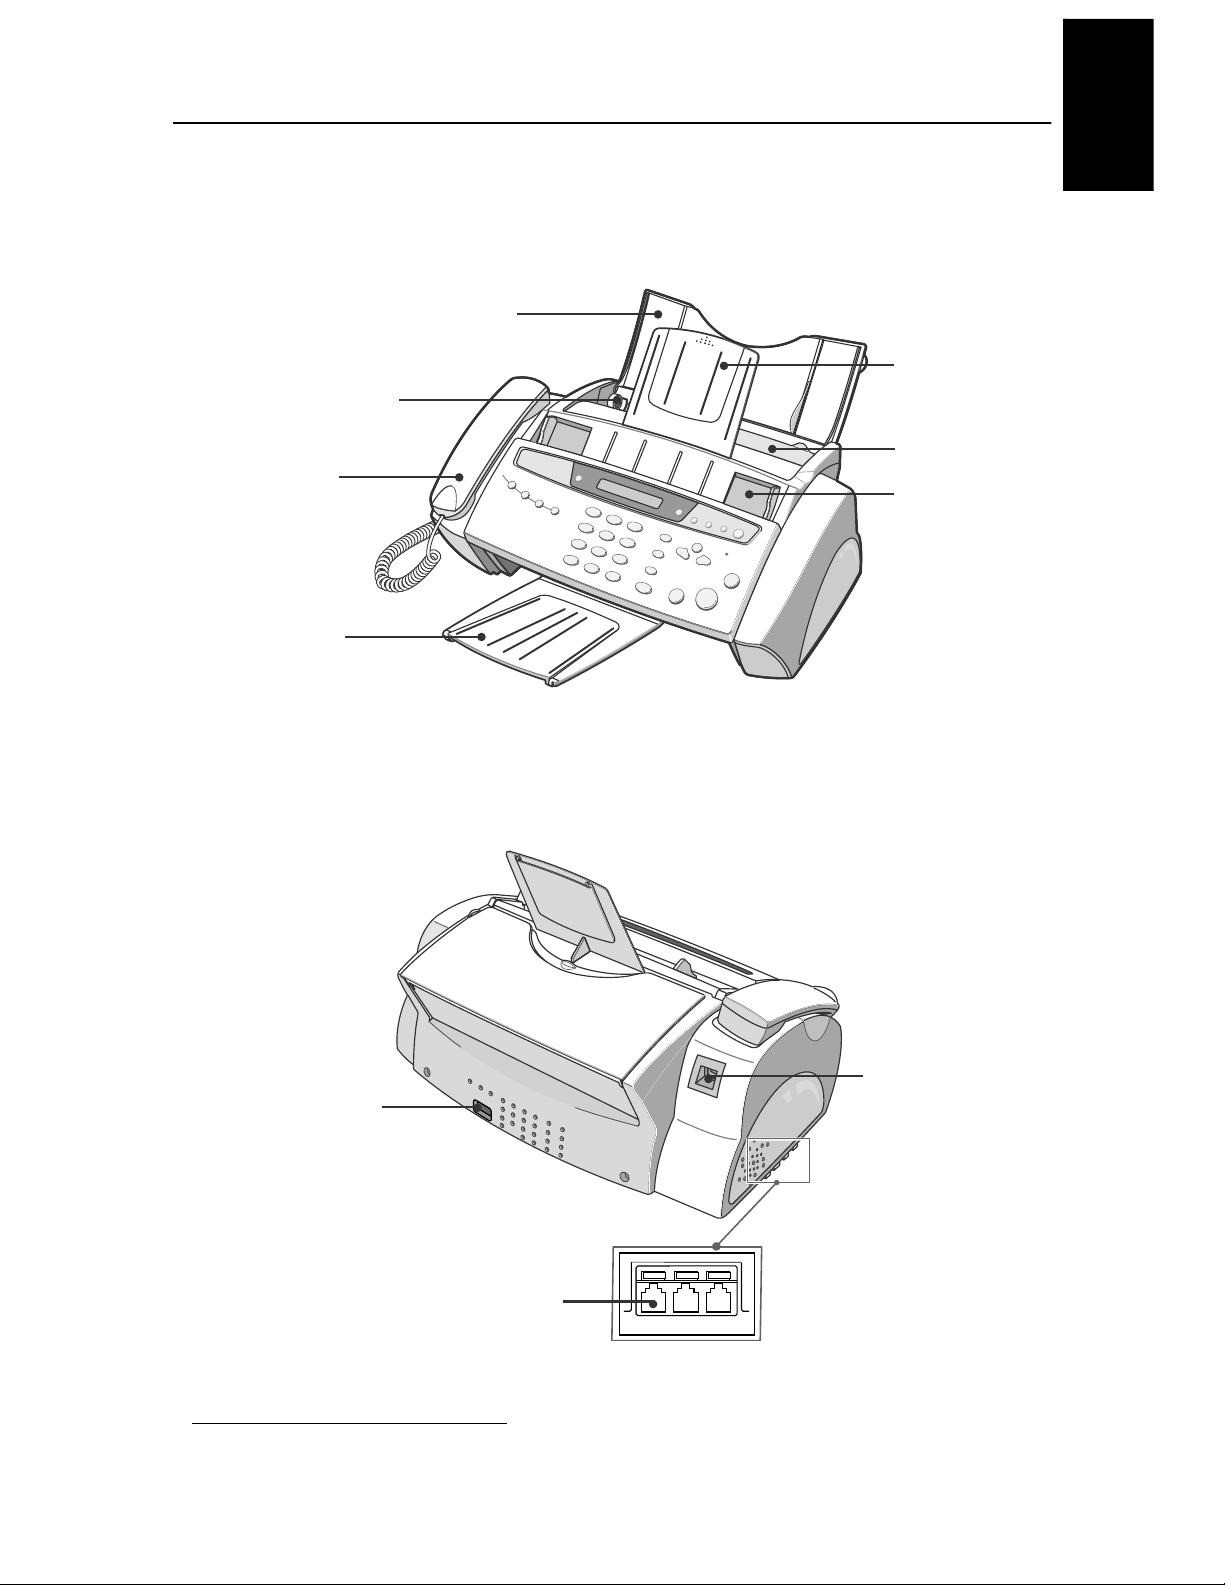
Front view
2
Rear view
2. Note that all of illustrations on this User Guide are from SF-335T, so some parts may be different from your machine.
EXT. LINE HANDSET
Connect extension phone
or TAM here, if applicable.
AC Power Socket
USB Connector
(SF-331P only)
Document
Guide
Dust Cover
Document Tray
Paper Support
Paper Guide
Handset
Document
Out Tray
Page 8
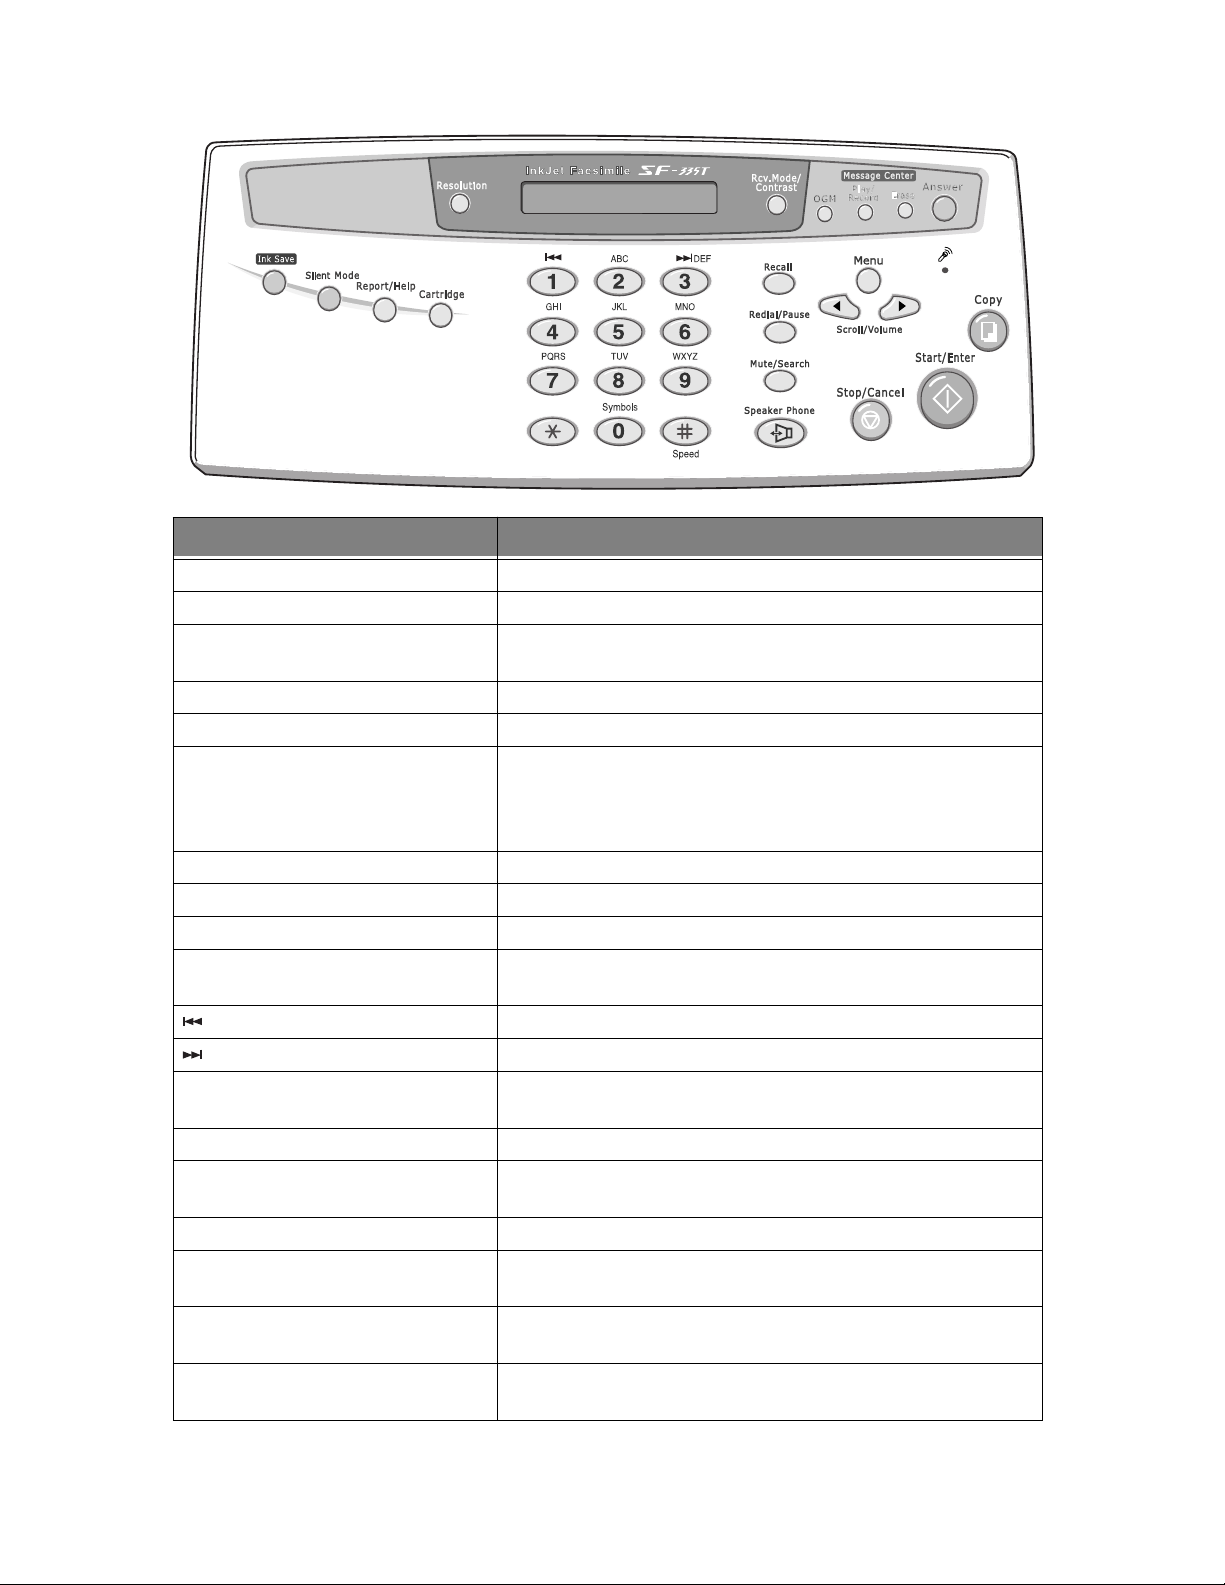
1.4
Control Panel
Button name Function
Ink Save
Used for less ink consumption. It toggles On and Off.
Silent Mode
Used when you want to turn off all sounds made by the machine.
Report/Help
Used to print status reports or to access HELP files for information on how
to operate your machine.
Cartridge
Used to install a new cartridge or replace an old one.
Resolution
Improves the clarity of a document you are sending.
Rcv.Mode/Contrast
This button has two functions:
When no document is loaded, pressing this button changes the Receive
Mode.
When a document is loaded, the pressing this button changes the contrast.
OGM
(SF-335T only) Used to record or play the outgoing message used in TAM Mode.
Play/Record
(SF-335T only) Plays incoming messages. Used to record a phone conversation.
Erase
(SF-335T only) Used to erase a message or all messages.
Answer
(SF-335T only) Switches the TAM mode on/off. It lights when in TAM Mode and blinks
when a new message is received.
(SF-335T only) Used to repeat the current message, or to skip back to the previous one.
(SF-335T only) Used to skip forward to the next message.
Number keypad
Dial numbers manually as you would usually do with the telephone, or
enter letters while setting up your machine.
Symbols
Used to enter special characters when entering a name in edit mode.
Speed
Used to store and dial the most frequently used 50 telephone/fax numbers
with two-digit location number.
Recall (R/Flash)
Performs a switch-hook operation.
Redial/Pause
Used to redial the last number called. You can also use it to add a pause
while storing a number in memory.
Mute/Search (or Search)
To mute the phone while you are speaking via the microphone. To search
for a number in memory.
Speaker Phone (or On Hook Dial)
Used to speak without picking up the handset (SF-335T only), or dial
numbers.
Page 9
SETUP AND
C
OPYING
1.5
SETUP AND
C
OPYING
SETUP AND
C
OPYING
SETUP AND
C
OPYING
SETUP AND
C
OPYING
SETUP AND
C
OPYING
SETUP AND
C
OPYING
SETUP AND
C
OPYING
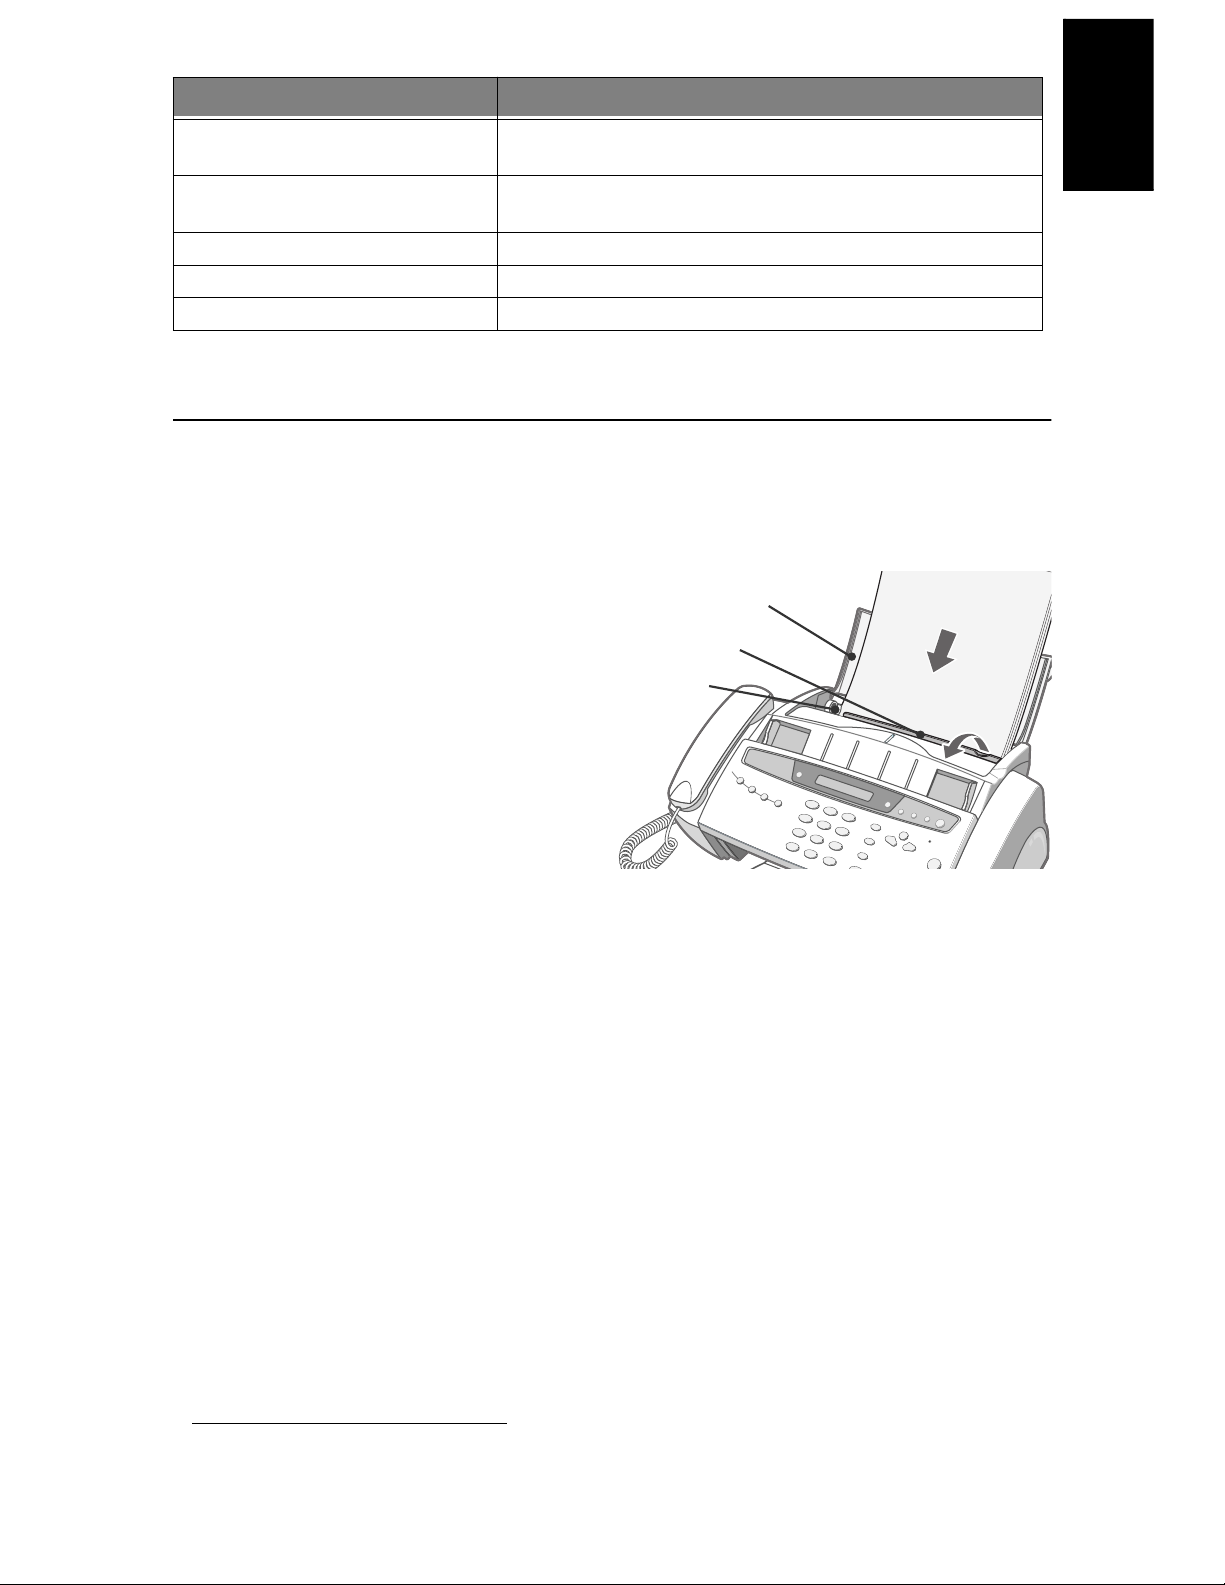
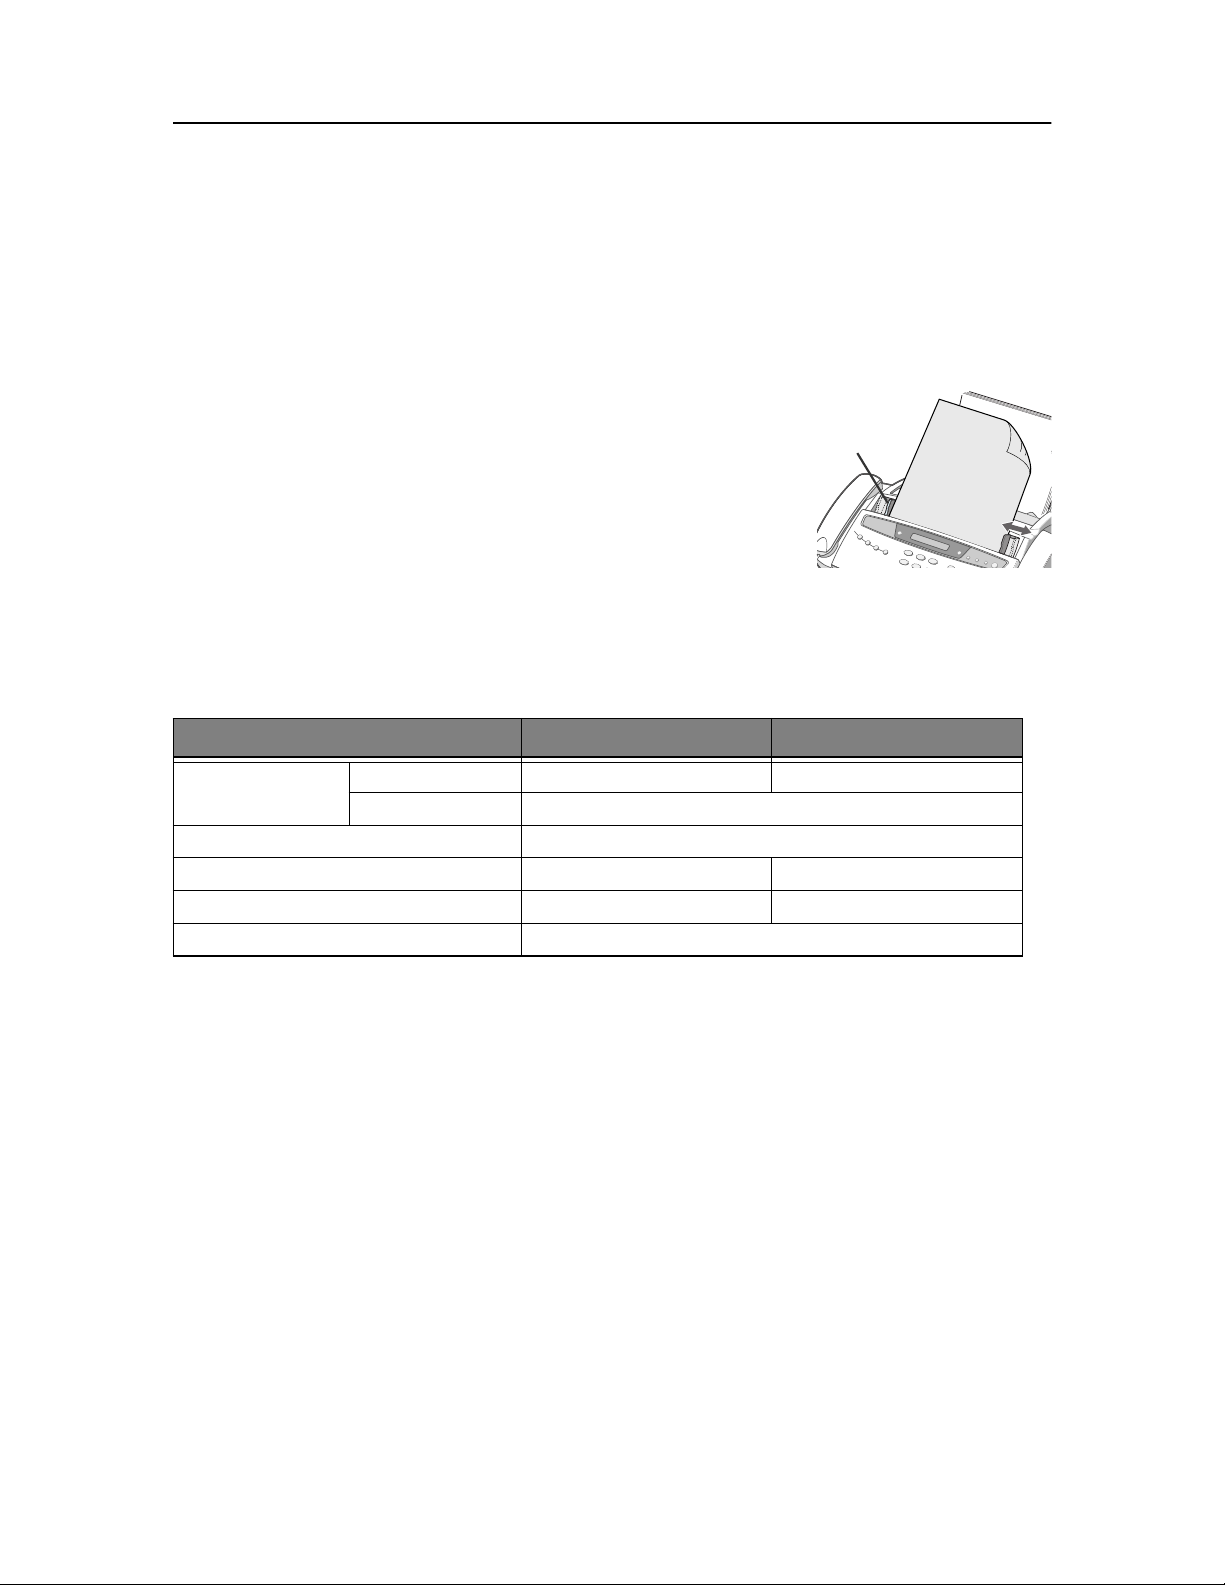
Loading paper
To receive faxes or make copies, you should load the paper in the ASF3. You can load approximately 50 sheets of
paper. Before loading the paper, see if the paper size is set correctly in the System Setup.
For more information, see "Paper Size" on page 6.7.
1
Flip the Paper Support open, and pull out
the Extender.
2
Pull the Dust Cover toward you.
3
Fan the papers and insert them into the ASF
with the print side face up.
4
Squeeze the Paper Guide, and move it to the
right to match the width of the paper.
5
When completed, replace the Dust Cover to
its original position.
Paper type and sizes
Satisfactory print and receive quality can be obtained with many types of plain paper. Since the quality of plain
paper varies widely, test the print quality before buying large quantities of paper. Your machine uses a variety of
papers including:
• Xerographic paper
• Bond paper
• Dual-purpose paper
Because all paper varies in physical characteristics, you can receive mixed results from different packages of
paper even though the packages contain the same type of paper. If you encounter undesirable results, try the
other side of the paper, a different type, or another package of the same kind of paper.
DO NOT use the following types of paper with your machine:
• Continuous form feed paper
• Synthetic paper
• Thermal paper
• Multi-sheet forms and documents
• Chemically treated paper
• Papers with raised, embossed lettering
Menu
Used to choose special functions such as system setup and maintenance,
etc.
Scroll/Volume
Used to display the previous or next menu item, to adjust the volume, or to
move the cursor to the digit you want to edit.
Copy
Used to copy a document.
Start/Enter
Used to start a job or to activate the selection shown in the display.
Stop/Cancel
Stops an operation at any time. Or used to delete digits in the edit mode.
3. Automatic Sheet Feeder.
Button name Function
Paper Guide
Paper Support
Dust Cover
Page 10
1.6
The following print media can be used with your machine:
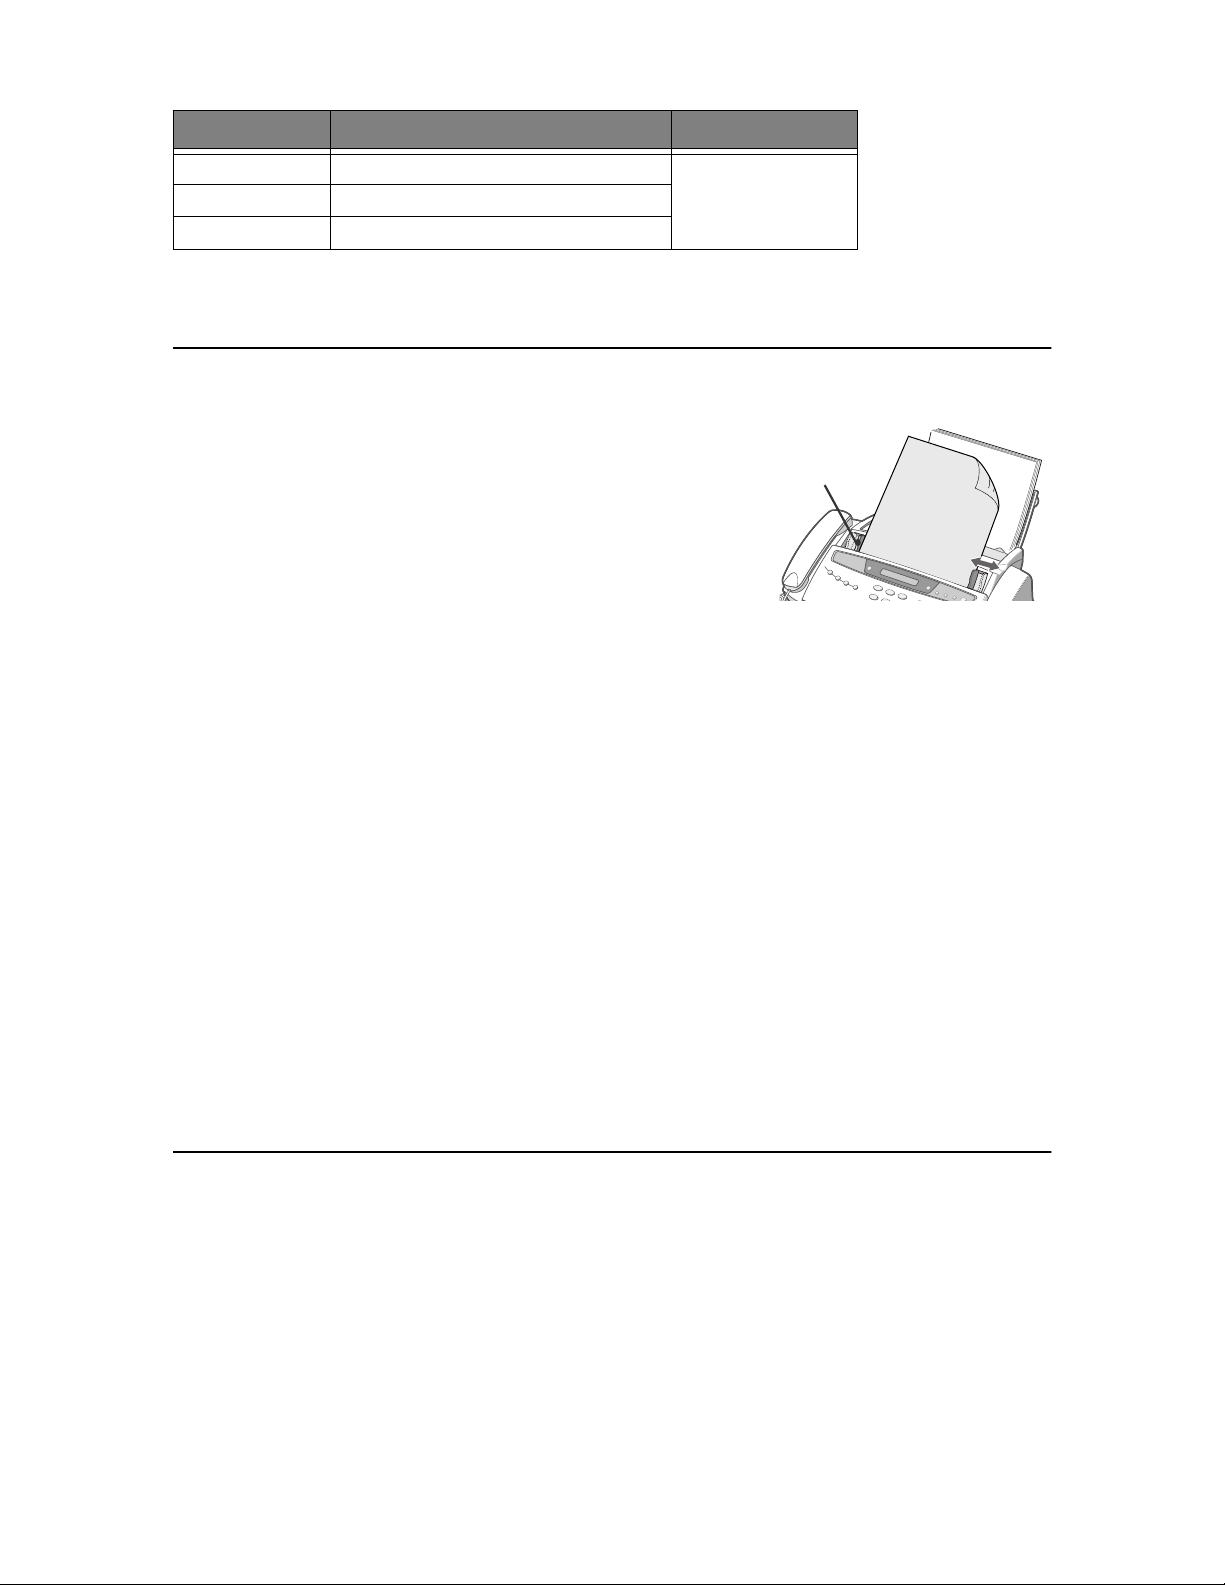
Making a copy
If you want to save ink while copying or receiving a fax, see "Copying/receiving in Ink Save mode" on page 1.8.
1
Turn the page face down and insert it into the document feeder.
2
Adjust the document guide to match the width of the document.
3
Feed the document into the machine.
4
Adjust the resolution by pressing
Resolution
.
• In case you selected the Standard, it automatically changes to Fine mode.
5
Press
Copy
.
• The display shows
Number Of Copies
.
6
Enter the number of copies you want, and press
Start/Enter
.
• The display shows
Zoom Rate
.
• If you want one copy without specific copy options, you can press
Copy
again at this time, and copying will start
immediately.
7
Select the zoom rate you want by pressing < or >, and then press
Start/Enter
.
• You can scale the document from 50% to 150% by selecting a pre-defined rate. The default rate is 97%.
8
Choose if you want to collate document.
• When collation is selected, you need to select the sorting order; Normal, Reverse.
9
Press
Start/Enter
when all options have been selected.
• When the machine runs out of paper,
Load paper and press Start/Enter
appears in the display. Supply
additional paper and press
Start/Enter
.
Setting date and time
The current date and time are shown in the display when the machine is on and ready for use (Standby Mode).
The date and time will be printed on all faxes you send.
1
Press
Menu
.
2
Press < or > to choose
SET DATE & TIME
and press
Start/Enter
.
3
Press
Start/Enter
when the display shows
Date Format
.
4
Press < or > to select either
Europe
or
USA
and press
Start/Enter
.
5
Press
Start/Enter
when the display shows
Date & Time
.
Paper size Dimensions Paper weight
A4 210mm x 297mm (8.3” x 11.7”)
70 ~ 90g/m
2
(20 ~ 24lbs)
Letter 216mm x 279mm (8.5” x 11.0”)
Legal 216mm x 356mm (8.5” x 14.0”)
Document
Guide
Page 11

SETUP AND
C
OPYING
1.7
SETUP AND
C
OPYING
SETUP AND
C
OPYING
SETUP AND
C
OPYING
SETUP AND
C
OPYING
SETUP AND
C
OPYING
SETUP AND
C
OPYING
SETUP AND
C
OPYING
6
Set the date and time. You can move the cursor by pressing < or >.
• If you enter an invalid number, the machine beeps and doesn’t proceed to the next step. If this happens, just re-enter
the correct number.
• When entering the hour, you should enter it in 24-hour format.
7
Press
Start/Enter
when the date and time appear correctly.
• The display shows the date and time you have set, then returns to Standby Mode.
Setting fax number/name
If this option is not selectable even though you followed the described steps, you have to consult the service technician or
your dealer.
This is very useful information for the recipient. It allows them to see who sent a fax and what number they
should send a response to.
1
Press
Menu
.
2
Press < or > to choose
SET SYSTEM ID
and press
Start/Enter
.
3
Press
Start/Enter
when the display shows
Fax Number
.
4
Enter the fax number to which your machine is connected.
• You can enter up to 20 digits, and include special characters (space, plus sign, etc.)
• To enter a delimiter, press #.
• To enter plus symbol (+), press *.
• If you enter a wrong number, use < or > to move to the number and correct it.
5
Press
Start/Enter
when finished.
6
Press
Start/Enter
when the display shows
Fax Name
.
7
Enter the fax name (up to 40 characters) by using the number keypad.
• You can include special characters (space, plus sign, etc.).
8
Press
Start/Enter
when the name in the display is correct.
• The machine returns to Standby Mode when you have finished or when
Stop/Cancel
has been pressed.
How to enter letters
These instructions assume that the display is asking you to enter a name.
1
Press the appropriate button for the letter you want.
• To enter an O, for example, press the 6 button three times. Each time you press the button, the display shows a
different letter: first M, then N, an O, and finally 6.
• For a list of letters and corresponding buttons, see "Keypad character assignments" on page 1.8.
2
Select the next letter in the same way.
• The blinking cursor moves right and the next letter appears in the display.
• If the letter is assigned to the same button you have pressed in step 1, then first move the cursor by pressing < or >,
then press the button.
3
Press
Start/Enter
when you’re finished entering letters.
Page 12

1.8
Keypad character assignments
Copying/receiving in Ink Save mode
Your machine has an Ink Save mode to optimize consumption of ink when copying and receiving a fax.
Press
Ink Save
.
• The button backlights to indicate Ink Save mode is active. From now on, every printout except reports will consume
less ink.
• If you feel the print quality is not good enough, exit the Ink Save mode by pressing the
Ink Save
button again and
print quality will return to normal mode.
Adjusting ring volume
Your machine has several levels of ring volume. Adjust it as you prefer.
Press
Scroll/Volume
with machine in standby.
• Whenever you press the button, it will increase or decrease the volume.
• The volume
0
indicates that the machine will not ring when the call is received.
Adjusting speaker volume
When you are speaking via the speaker phone, you can adjust the volume as you follows:
1
Press
Speaker Phone (or On Hook Dial)
.
• You can adjust it when you are talking as well.
2
Press
Scroll/Volume
as many times as you want.
• Whenever you press the button, it will increase or decrease the volume.
Key
Assigned numbers, letters, or
characters
Key
Assigned numbers, letters, or
characters
1 (Space) 1 6 M N O 6
2 A B C 2 7 P Q R S 7
3 D E F 3 8 T U V 8
4 G H I 4 9 W X Y Z 9
5 J K L 5 0 (Symbols) + - , . ‘ / * # & 0
Page 13

C
HAPTER
2
P
ROGRAMMING AND
D
IALLING
Page 14

2.2
Making a phone call
Your new machine provides many ways for making a phone call. You can use either of following:
• On-Hook dialling
• Phonebook dialling (One-Touch and Speed dial)
• Directory dialling
• redialling
• manual dialling via the handset as you do with a regular telephone
On-Hook dialling
You do not need to pick up the handset to make a phone call. When dialling, just press the
Speaker Phone (or On
Hook Dial)
button and enter the numbers. Depending on your machine, you need to pick up the handset or keep
speaking through the microphone.
If you have an SF-330 or an SF-331P
• You have to pick up the handset to speak after the call is answered.
• If you want to share the conversation with somebody beside you, pick up the handset and press
On Hook Dial
and
then replace the handset. The line is still connected and everybody can listen to the conversation.
This is called a 1-way conversation.
• While you are using 1-way conversation, do not place the handset beside the speaker, as this may result in howling.
If you have an SF-335T
• You do not need to pick up the handset. Speak into the microphone on the Control Panel when the call is answered.
Phonebook dialling
There are two types of Phonebook dialling; One-Touch and Speed dial. The way to programme numbers into
memory is the same for both but how you dial stored numbers is different. To One-Touch dial, you just press and
hold a number (0~9) on the keypad and the number will be dialled. To Speed dial, you need to first press the
Speed
button and then the two-digit location number.
Phonebook dialling provides you with quick access to your most frequently used numbers. Before using
Phonebook dialling, you must first programme the numbers into the memory.
Storing a number in the Phonebook
1
Press and hold the
Speed
button for about two seconds.
• The display shows
Speed [00-50]>##
.
2
Enter a two-digit (00~50) number and press
Start/Enter
.
• From 00 to 09 will be used for One-Touch dialling, and from 10 to 50 for Speed dialling.
3
Enter the telephone/fax number you want to store (up to 40 digits) and press
Start/Enter
.
• If you want a pause between numbers, press
Redial/Pause
; a ‘P’ appears in the display.
• If you make a mistake while entering a number, use < or > to move the cursor under the digit, then enter the correct
digit.
Page 15

PROGRAMMIN
G
AND DIALLIN
G
2.3
PROGRAMMING
AND DIALLING
PROGRAMMING
AND DIALLING
PROGRAMMING
AND DIALLING
PROGRAMMING
AND DIALLING
PROGRAMMING
AND DIALLING
PROGRAMMING
AND DIALLING
PROGRAMMING
AND DIALLING
4
Enter the name and press
Start/Enter
.
• If you do not want a name, just skip this step by pressing
Start/Enter
. If you have subscribed to a Caller ID service,
it is recommended you enter a name.
• You can assign up to 20 characters to a name. see "How to enter letters" on page 1.7.
5
Press
Stop/Cancel
to exit.
One-Touch dialling
1
Place document(s) if you are sending a fax.
2
Press and hold one of the number keypad. (0 through 9)
• The display briefly shows the name or number and the number is then automatically dialled. You hear the dialling
process through the speaker.
• When the remote fax machine answers, the machine scans the document into memory and begins to transmit if a
document is loaded in the document feeder.
• To send a fax directly without scanning into memory, turn off the
Send From Memory
option (see "Send From
Memory" on page 6.7.)
• You can refer to the number assigned to each location by printing the Phonebook. see "To print a report" on page 6.4.
• Regardless of the setting of the
Send From Memory
option, the machine will first dial and then send a fax if you set
the resolution to Super Fine.
Speed dialling
1
Press
Speed
.
2
Enter a two-digit speed dial location number.
3
Press
Start/Enter
to dial the number.
• The display briefly shows the name or number and the number is then automatically dialled. You hear the dialling
process through the speaker.
• When the remote fax machine answers, the machine scans the document into memory and begins to transmit if a
document is loaded in the document feeder.
• To send a fax directly without scanning into memory, turn off the
Send From Memory
option (see "Send From
Memory" on page 6.7.)
• You can refer to the number assigned to each location by printing the Phonebook. see "To print a report" on page 6.4.
• Regardless of the setting of the
Send From Memory
option, the machine will first dial and then send a fax if you set
the resolution to Super Fine.
Searching for a number in memory (Directory dialling)
You can search the entire Phonebook to find the number you want to dial.
Searching sequentially through the Phonebook
1
Press
Mute/Search (or Search)
.
2
Press < or > to move upward or downward through the directory until you find the number you want.
• Pressing > allows you to search downward through the entire Phonebook by incremental order of location number,
and < allows you to search upward by decrescent order.
3
When the number you want appears in the display, press
Start/Enter
to dial.
Page 16

2.4
Searching for a particular first letter
1
Press
Mute/Search (or Search)
.
2
Press the button labelled with the letter you want to search for.
• For example, if you want to find the name ‘NEW YORK’, press the ‘6’ button, which is labelled with ‘MNO’.
• The machine finds the closest entry so you may need to specify as clearly as you can.
• If the machine cannot find a name that begins with the given letter, the machine shows the message
Not Found
.
3
When the name and number you want appears correctly in the display, press
Start/Enter
to dial.
Redialling
You can redial the number last called or one of ten unique numbers recently stored in memory.
To redial the last number called
1
Press
Redial/Pause
.
• The number is dialled automatically.
• If a document is loaded, the machine automatically begins to send. If there is no number stored, the machine will
beep.
2
Speak into the microphone when the call is answered.
• Pick up the handset, if you are an SF-330 or an SF-331P user.
To redial the number in memory
1
Press and hold
Redial/Pause
for about two seconds.
2
Select
Recent Numbers
and press
Start/Enter
.
• The display shows the most recent numbers.
3
Press < or > to find the number you are dialling.
4
Press
Start/Enter
when the correct number appears.
• If a document is loaded, the machine automatically begins to send.
To find a number received via the Caller ID service
You sometimes need to see who has called you. To see the number or name follow the instructions below:
1
Press and hold
Redial/Pause
for about two seconds.
2
Select
Caller ID
and press
Start/Enter
.
3
Scroll through the numbers by pressing < or >.
• The Caller ID displays in two ways. One is by name and other is by number. If the number is the same as the one you
saved to a One-Touch or Speed dial location and you assigned a name to that location, the machine shows the name
instead of the number.
Page 17

C
HAPTER
3
T
HE
F
AX
M
ACHINE
Page 18
3.2
Sending a fax
Sending a fax is very simple if you follow the instructions starting from here. They will describe how to load the
document, set the resolution/contrast and dial the number.
Loading documents
1
Load your document(s) top down in the document tray with the printed side facing away from you.
• Be sure that your document is dry and free of staples, paper clips, and other foreign objects.
• For more information on what kind of paper you can use for documents, see "Acceptable documents" on page 3.2.
2
Adjust the document guides to match the width of the document, and load
document consisting of up to 10 sheets until the Automatic Document
Feeder seizes and pulls it in. The display will indicate
Document Ready
when it senses that a document has been loaded.
• If you are sending more than one sheet, make sure the bottom sheet enters first.
Insert the sheets with a slight push to ensure smooth feeding.
• If you’re loading pages that are unusually thick or thin, feed one sheet at a time. If
the document doesn’t feed correctly, open the Control Panel, remove the document, and try loading it again.
3
Choose the proper resolution and contrast by pressing
Rcv.Mode/Contrast
and
Resolution
respectively.
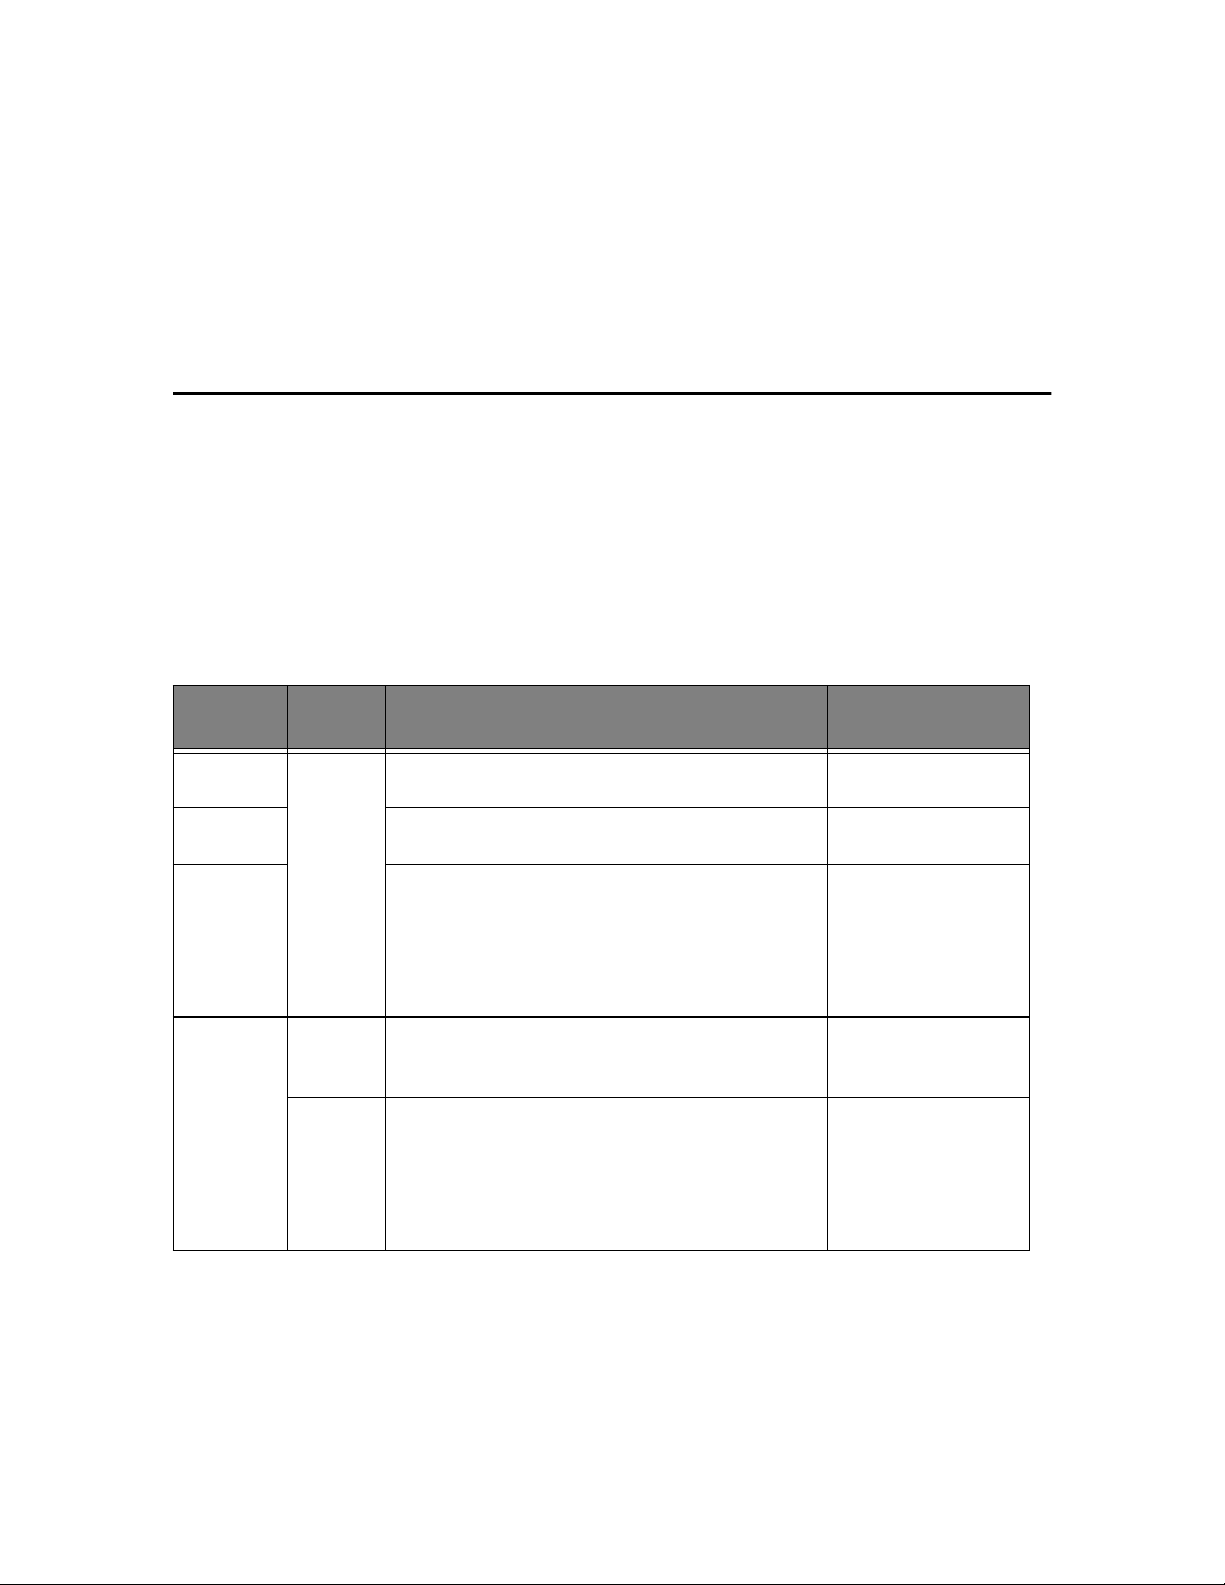
Acceptable documents
For multiple sheets, all pages of the document must be the same size and paper type.
DO NOT try to send documents that are:
• wet
• covered with wet ink or paste
• wrinkled, curled, or folded
• too thin (less than 0.07mm thick-onionskin, airmail paper, etc.)
• too thick (more than 0.15mm thick)
• chemically processed (pressure-sensitive paper, carbon-coated paper, etc.)
• coated (glossy, etc.)
• too small or short (such as a label, voucher, etc.)
• made of cloth or metal
To send these documents, use an office copier to make a photocopy first, and then send the copy.
Single sheet 2 or more sheets
Document size Max 216mm (W) x 356mm (L) 216mm (W) x 297mm (L)
Min. 148mm (W) x 128mm (L)
Effective scanning width 210mm
Number of sheets which can be loaded at a time - Up to 10
Thickness of document 0.07mm ~ 0.15mm 0.075mm ~ 0.12mm
Paper quality Uncoated on both sides
Document
Guide
Page 19

THE FAX
M
ACHINE
3.3
THE FAX
M
ACHINE
THE FAX
M
ACHINE
THE FAX
M
ACHINE
THE FAX
M
ACHINE
THE FAX
M
ACHINE
THE FAX
M
ACHINE
THE FAX
M
ACHINE
Setting document resolution and contrast
We recommend you send documents printed using a typewriter, felt tip pen, black ink, or LaserWriter. The paper
should be white or very light, and of normal weight not cardboard.
Blue lines on a ruled pad don’t fax well. For more information on what kind of paper you can use for documents,
see "Paper type and sizes" on page 1.5. When you send/copy normal documents, you need not adjust the
resolution and the contrast.
If you send/copy documents with unusual contrast characteristics, including photographs, you can adjust the
resolution and contrast to send a high-quality transmission of the documents.
To adjust the resolution and contrast
1
Turn the page face down and insert it into the document feeder.
For more information, see "Loading documents" on page 3.2.
2
Press
Resolution
as many times as you want to adjust the sharpness and clarity.
• STANDARD works well for printed or typewritten originals with normal-sized characters.
• FINE is good for documents containing a lot of detail.
• SUPER FINE works well for documents containing extremely fine detail. SUPER FINE only works if the remote
machine also has the SUPER FINE feature.
• SUPER FINE mode is not used when sending documents scanned into memory (i.e., Broadcasting and Delayed Fax).
• If you are sending document by using memory (broadcasting, delayed tx, for example), SUPER FINE will be changed
back to FINE even though you selected SUPER FINE.
3
Press
Rcv.Mode/Contrast
as many times as you want to adjust the darkness.
• NORMAL works well for normal handwritten, typed, or printed documents.
• LIGHTEN works with very dark print.
• DARKEN works with light print or faint pencil markings.
• PHOTO is used when faxing photographs or other documents containing color or gray shades.
When Photo is chosen, the resolution is automatically set to FINE.
• When sending/copying is executed, resolution/contrast automatically returns to default.
Sending a fax manually
1
Turn the page face down and insert it into the document feeder.
For more information, see "Loading documents" on page 3.2.
2
Pick up the handset or press
Speaker Phone (or On Hook Dial)
.
3
Enter the number of the remote fax machine by using the number keypad.
4
Press
Start/Enter
when you hear the fax tone.
5
Replace the handset.
Sending a fax automatically
To send a fax automatically, you must have already stored numbers into Speed Dial locations. To learn how to
register One-Touch Dial or Speed Dial, see "Storing a number in the Phonebook" on page 2.2.
1
Turn the page face down and insert it into the document feeder.
For more information, see "Loading documents" on page 3.2.
2
Enter the One-Touch or Speed Dial location.
If you are using the Speed Dial, you have to press
Start/Enter
.
• The machine scans the document into memory and begins to transmit. If you turned off the
Send From Memory
option, the machine will first dial and send.
• You can set your machine to print out a Sending Confirm automatically. For more information, see "Sending Confirm"
on page 6.7.
Page 20
3.4
Automatic redial
When you send a fax, if the number you have dialled is busy or there is no answer, the machine will attempt to
redial the number every three minutes up to two times.
Before redialling, the display shows
To redial now, press Start/Enter
.
If you want to redial the number immediately, press
Start/Enter
.
Or, press
Stop/Cancel
to cancel redialling and then the machine returns to Standby Mode.
Receiving a fax
Before you receive a fax, be sure to load one of the supported paper sizes for receiving faxes. For information on
what paper types you can use, see "Paper type and sizes" on page 1.5.
Reception modes
Your fax machine has various reception modes; FAX, TEL, AUTO, TAM and DRPD. For DRPD Mode, see
"DRPD Mode" on page 6.7. first. If you are an SF-335T user, you have to press the
Answer
button to select TAM
mode. Do not press the
Rcv.Mode/Contrast
button. You can change the reception mode by pressing
Rcv.Mode/Contrast
when no document is loaded. The following chart describes how each reception mode works:
If you rarely use the fax line for voice conversation, set the machine to receive faxes automatically by selecting
either FAX or AUTO Mode.
Reception
mode
Your model How it works Reference section
FAX All The machine answers an incoming call and immediately
goes into receive mode, expecting a fax to be received.
Receiving in FAX mode
on page 3.5.
TEL The automatic fax reception is turned off. You can receive a
fax only by manually pressing Start/Enter.
Receiving in TEL mode
on page 3.5.
AUTO Your fax machine will answer faxes automatically after the
number of rings you specify. If the machine does not pick up
a fax signal, it will give another ringing tone to tell you it is a
phone call. You should lift the handset to answer the call. If
you do not pick up the handset on your fax machine, it will
switch to the automatic reception mode.
Receiving in AUTO mode
on page 3.5.
TAM SF-335T Your machine plays a greeting message to callers, and then
the caller can leave an incoming message on your machine
as well as a fax.
Receiving in TAM mode
(SF-335T) on page 3.6.
SF-330/
SF-331P
You have to have an answering machine attached to the EXT
line socket on your fax machine. When the phone rings, the
attached answering machine answers and stores the caller’s
message if they leave one. If your machine senses a fax tone
on the line, the call automatically switches over to fax
receive mode.
Receiving in TAM mode
(SF-330/SF-331P) on
page 3.5.
Page 21

THE FAX
M
ACHINE
3.5
THE FAX
M
ACHINE
THE FAX
M
ACHINE
THE FAX
M
ACHINE
THE FAX
M
ACHINE
THE FAX
M
ACHINE
THE FAX
M
ACHINE
THE FAX
M
ACHINE
Receiving in FAX mode
To set the machine to FAX Mode, press
Rcv.Mode/Contrast
repeatedly until
Fax Mode
is displayed.
• In Standby Mode, FAX appears in the right hand corner of the display.
• When you get a call, the machine answers after the second ring, and receives the fax automatically. When reception is
complete, the machine returns to Standby Mode.
• If you want to change the ‘Rings to Answer’ option, see "Rings To Answer" on page 6.7.
Receiving in TEL mode
To set the machine to TEL Mode, press
Rcv.Mode/Contrast
repeatedly until
Tel Mode
is displayed.
In Standby Mode, TEL appears in the right hand corner of the display.
1
Pick up the handset and answer it when the telephone rings.
If your machine is an SF-335T, and you do not answer the call within pre-defined rings
4
, the TAM OGM
will be played.
2
Press
Start/Enter
if you hear a fax tone, or if the person on the other end asks you to receive a document. Be
sure there is no document loaded, or, the document will be sent to the caller’s fax showing ‘TX’ in the
display.
3
Hang up the handset.
Receiving in AUTO mode
To set the machine to AUTO Mode, press
Rcv.Mode/Contrast
repeatedly until
Auto Mode
is displayed.
• In Standby Mode, AUTO appears in the right hand corner of the display.
• When a call comes in, the machine answers it. If a fax is being received, the machine goes into receive mode. If the
machine does not sense a fax signal, it will continue ringing to tell you it is a phone call. You should pick up the
handset to answer the call, or it will switch to automatic reception mode, after approximately 25 seconds.
Receiving in TAM mode (SF-330/SF-331P)
To use this receiving mode, you need to have an answering machine attached. To set the machine to TAM Mode,
press
Rcv.Mode/Contrast
repeatedly until
TAM MODE
is displayed.
In Standby Mode, TAM appears in the right hand corner of the display.
• When a call comes in, the answering machine answers and stores the caller’s message if they leave one. If the
machine detects a fax signal, it goes into receive mode.
• If you have set your machine to TAM Mode and your answering machine is switched off, or the answering machine is
not connected to your fax machine, the machine will automatically go into receive mode after several rings.
• If your answering machine has a ‘User-Selectable Ring Counter’, set the machine to answer an incoming call in less
than 4 rings.
• If the sound level of the call is too low due to a poor phone connection, the fax machine or answering machine may
not work properly.
• When you set the machine to TEL Mode and you have an answering machine attached, you must make sure you
switch off the answering machine, or, the outgoing message will interrupt your phone conversation. Not all
answering machines will work with your fax machine.
• When your answering machine answers an incoming call, it records a fax tone until it realizes it is a fax coming
through. Due to this, your answering machine may tell you a voice message has been left, even when it is actually a
fax.
4. UK: 20, other countries: 13
Page 22

3.6
Receiving in TAM mode (SF-335T)
If you are an SF-335T user, you have to activate/deactivate the TAM Mode by pressing the
Answer
button, not by
Rcv.Mode/Contrast
. Once you press
Answer
to turn TAM Mode on, the machine returns to Standby Mode after
playing the message back. TAM appears in the right hand corner of the display and the
Answer
button lights.
• When you get a call, the machine answers the call with the TAM greeting message.
• The machine records the caller’s message. If a fax tone is sensed, the machine goes into receive mode.
• Anytime the greeting message is playing, or an incoming message is being recorded, you can talk to the other
person by picking up the handset. If the memory becomes full while recording, your machine beeps a warning and
disconnects the line. The machine will not function as an answering machine unless you make space by erasing
unwanted recorded messages.
• If there is a power failure while recording a caller’s message, it will not be recorded.
• When you want to talk to a caller on another telephone on the same line while recording an incoming message (ICM),
lift its handset and press ‘#’ (hash) and ‘* ’ (asterisk).
Receiving in DRPD mode
DRPD stands for Distinctive Ring Pattern Detection, which is a telephone company service. It enables a user to
use a single telephone line to answer several different telephone numbers. To receive a fax in DRPD mode, you
should first set DRPD and activate it. Once you have activated DRPD mode it can be one of the receiving modes
which can be selectable by pressing the
Rcv.Mode/Contrast
button as FAX, TEL and AUTO. To set up DRPD, see
"DRPD Mode" on page 6.7.
Press
Rcv.Mode/Contrast
repeatedly until
DRPD Mode
appears in the display.
• Now, the machine will manage faxes and call as programmed.
• In Standby Mode, DRPD appears in the right hand corner of the display.
DRPD must be set up again if you reassign your fax number, or connect the machine to another telephone line. After DRPD
has been set up, call your fax number again to verify that the machine answers with a fax tone, then have a call placed to a
different number assigned to that same line to be sure the machine answers the normal phone call.
Receiving via an extension telephone (SF-330/SF-331P only)
If you have an extension phone connected to your machine, you can remotely control your fax machine to start
receiving.
1
Answer the call on the extension phone.
2
Press *9* (remote receive start code) in sequence when you hear a fax tone.
• Your fax machine detects the code and starts to receive the document.
• The code is preset at the factory. The first and the last asterisks are fixed, but you can change the middle digit to whatever you prefer 0 through 9. For more information, see "Rcv. Start Code" on page 6.7.
3
Hang up the phone when your fax machine starts to receive.
Page 23

C
HAPTER
4
T
HE
A
NSWERING
M
ACHINE
This chapter is only for SF-335T users. If your machine is SF-330 or SF-331P, please refer to the User’s
Guide supplied by the answering machine manufacturer.
In this chapter, you will learn how to check your TAM greeting message, monitor incoming calls, play/erase
messages, and access your machine from a remote telephone. All the instructions in this chapter assume that
your fax machine is set to TAM Mode. The SF-335T uses electronic memory as a recording medium.
Recording time is dependent on the content of the message. The total recording time (TAM OGM + ICM) is
about 15 minutes.
Page 24

4.2
Recording your TAM message
The TAM message is an outgoing message (OGM) which plays whenever a call comes in and the machine is in
TAM Mode. For more information about reception modes, see "Receiving in TAM mode (SF-335T)" on
page 3.6.
1
Press and hold
OGM
until you hear a beep.
2
Speak into the microphone on the Control Panel within 30cm range from the time you see
Record
in the
display.
• You can record a message which lasts up to 20 seconds.
• You are advised to record a message of less than 15 seconds in duration to prevent the incoming faxes from
malfunctioning due to a long message.
• Press
Stop/Cancel
or
OGM
if you want to stop recording before the time is up.
• After the message has been recorded, the machine briefly displays the date and time when the message was recorded.
Then, it displays the elapsed time as the message plays back automatically.
Checking your TAM message
The TAM message plays back when your machine is in TAM Mode and receives a call.
Press
OGM
.
• The display shows the time when the message was recorded. The display then counts down the seconds as the
message is playing back.
Monitoring an incoming call
Call Monitoring is useful for screening calls in case you do not want to be disturbed by the person calling. To use
this feature, you have to first set Call Monitoring ON through the TAM Options. To learn how to set this
feature on or off, see "Call Monitor" on page 6.8.
1
When the call monitor option is on and an incoming message is being recorded, you hear the caller’s voice
through the speaker.
2
Lift the handset to speak to the caller.
• The machine stops recording the caller’s message and you can speak directly to the caller.
• If there is a power failure while recording a caller’s message, it will not be recorded.
Page 25

THE
A
NSWERING
MACHINE
4.3
THE
A
NSWERING
MACHINE
THE
A
NSWERING
MACHINE
T
HE
A
NSWERING
M
ACHINE
THE
A
NSWERING
MACHINE
THE
A
NSWERING
MACHINE
THE
A
NSWERING
MACHINE
THE
A
NSWERING
MACHINE
Playing back messages
When there are messages waiting to be heard, the
Answer
button flashes and the display shows that you have new
messages, for example,
New: 1 ICM: 3
. (‘
New: 1
’ indicates there’s one new message, and ‘
ICM: 3
’ says that
there are three incoming messages recorded in total.)
Playing back newly received caller messages
Simply press
Play/Record
.
• The machine briefly displays recorded time then starts to play the message. This procedure is repeated for all NEW
messages.
• When the display reads
50s(01/03)
, ‘01’ is the number of the caller message currently being played and ‘03’ is
the total number of new caller messages in memory. ‘
50s
’ is the play back time for the message currently playing.
This time counts down as the message plays back.
Playing back all messages
Press and hold
Play/Record
until you hear a beep.
• All the messages are played back. The display briefly shows recorded time of each message, then plays ALL the
messages recorded.
• When the display reads
50s(01/03)
, ‘01’ is the number of the caller message currently being played and ‘03’ is
the total number of caller messages in memory. ‘
50s
’ is the play back time for the message currently playing. This
time counts down as the message plays back.
• Press
Stop/Cancel
or
Play/Record
to stop before the last message. While the message is playing back, the display
shows a variety of useful information.
Skipping backward or forward
To skip backward
Press |<<(1) while listening to the message.
• If you press |<<(1) while playing back the message, the machine will replay it.
• The machine skips back to the previous message and plays it if you press |<<(1) twice.
To skip forward
Press >>|(3) while listening to a message.
• The machine skips forward to the next message and plays it.
• If you press >>|(3) while playing the last message, the machine beeps and returns to the Standby Mode.
Page 26

4.4
Erasing old messages you’ve heard
The memory of your machine fills up as messages are recorded. Make room for new messages by erasing old
messages that you have already listened to. If the memory becomes full while recording, your machine beeps a
warning and disconnects the line. The machine will not function as an answering machine unless you make
space by erasing unwanted recorded messages. This is why you should erase old messages.
To erase a selected message
Press
Erase
while the message is playing.
• BE CAREFUL! Once you have pressed
Erase
while a message is playing, there’s no way to cancel or recover it.
• The selected message is erased and
Erasing
is displayed.
To erase all recorded messages
1
Press
Erase
. The display asks if you want to erase ALL messages.
2
Press
Start/Enter
if you’re sure.
• All messages in memory are erased while
Erasing
is displayed.
• If you do not want to erase all messages, press
Stop/Cancel
when asked and the machine returns to Standby Mode.
Page 27

THE
A
NSWERING
MACHINE
4.5
THE
A
NSWERING
MACHINE
THE
A
NSWERING
MACHINE
T
HE
A
NSWERING
M
ACHINE
THE
A
NSWERING
MACHINE
THE
A
NSWERING
MACHINE
THE
A
NSWERING
MACHINE
THE
A
NSWERING
MACHINE
Using the answering machine from a remote phone
You don’t need to be at the machine’s Control Panel to operate the answering machine. If you have access to a
Touch-Tone phone, you can operate many features, such as message playback, regardless of where you are.
To operate your machine from a remote phone, you need to enter a five-character: Remote Password. The
Remote Password is preset at the factory to ‘#139#’ and you can change the password to any number you want,
through the User Options. For more information, see "Remote Password" on page 8.
Accessing the machine
1
Place a call to your fax machine from a Touch-Tone phone.
2
Enter your Remote Password when the machine answers with the greeting.
• When the correct password is recognized by the machine, you will hear two short beeps (the confirmation tone).
3
Enter the Remote Command corresponding to the operation within 15 seconds.
• When the specified operation is complete, you hear a short beep. You can then enter another command for another
operation. If you enter a remote code while the machine is responding to your command, the unit stops the current
operation and performs new operation. For the Remote Commands, see "Using remote commands" on page 4.5.
4
Press #0 to finish the remote session.
If you don’t enter ‘#0’, your machine might not hang up for several minutes.
Using remote commands
The chart below describes which Remote Code you have to enter for remote operation:
Code; Operation;
#0 Exits remote control mode.
#1 Skips a message backward. The machine skips the current message and plays the previous one.
#2 Plays back new messages. The machine beeps and plays all new messages. If there are no new
messages, the machine beeps four times and waits for another command to be entered.
#3 Skips a message forward. The machine skips the current message and plays the next one.
#4 Changes the TAM message. After entering the command, speak into the handset. When you finish,
press #. If you run out of recording time, the machine stops and plays back the message.
#5 Plays back messages. The machine beeps and plays messages one by one. When a message is
played back, the machine waits for another command. To listen to next message, press * within 15
seconds. If there are no messages, the machine beeps four times and waits for another command to
be entered.
#6 Changes the Paging OGM message. The machine beeps and is ready to record new message.
Speak into the handset. When you finish, press #.
#7 Erases the message currently playing, and plays back the next message.
#8 Turns TAM Mode on/off. The machine plays the greeting message when TAM Mode is turned on.
Each time you press #8 thereafter, TAM mode is turned off, then back on.
#9 Erases all the messages.
* Plays the next ICM message if you entered the #5 or #2 command.
#* Exits the fax machine from answering mode. This code is used at a phone extension connected to
the same line as your fax machine
Page 28

4.6
Page 29

C
HAPTER
5
A
DVANCED
F
AX
In this chapter, you will learn how to use the advanced fax features of your machine. For example, how to
send the same documents to many different locations (Broadcasting) or how to set up your machine to send
faxes at a preset time (Delayed Fax).
Page 30

5.2
Broadcasting
With Broadcasting you can programme your machine to automatically scan and send documents to a number of
different recipients. The documents are automatically erased from memory when Broadcasting is finished.
1
Turn the document face down and feed it into the machine.
2
Press
Menu
.
3
Press < or > to choose
ADVANCED FAX
and press
Start/Enter
.
4
Select
Set Broadcasting
by pressing < or >, and press
Start/Enter
.
5
Enter the fax number.
• You can enter a One-Touch or Speed Dial location number, which consists of two digits.
• You can enter 5 fax numbers into one job.
6
Press
Start/Enter
when the correct number appears in the display.
• If you have more destinations, select ‘Y’ and press
Start/Enter
when asked
Another? Y/N
and repeat steps from 5.
• If you have finished entering all the numbers, answer ‘
N
’ and press
Start/Enter
.
7
Press
Start/Enter
.
• The document will be scanned into memory before transmission.
Delayed fax
You can set your machine to send a fax at a later time when you will not be present. Normally it is cheaper to
send a fax at night because telephone rates are lower than they are during the day.
1
Turn the document face down and feed it into the machine.
2
Press
Menu
repeatedly until
ADVANCED FAX
appears, and press
Start/Enter
.
3
Select
Set Delayed Fax
by pressing < or >, and press
Start/Enter
.
4
Enter the fax number.
• You can enter a One-Touch or Speed Dial location number, which consists of two digits.
• You can enter 5 fax numbers into one job.
5
Press
Start/Enter
when the number appears in the display.
• If you have more destinations, select ‘Y’ and press
Start/Enter
when asked
Another? Y/N
and repeat steps from 5.
• If you have finished entering all the numbers, answer ‘
N
’ and press
Start/Enter
.
6
Enter the name if you want to name the transmission.
If not, skip this step.
7
Press
Start/Enter
.
8
Enter the time the transmission starts, in 24-hour format.
• For example, Enter 2230 for 10:30 P.M.
9
Press Start/Enter when the time appears correctly in the display.
• The document will be scanned into memory before transmission, and be sent at programmed time.
Page 31

ADVANCED FA
5.3
ADVANCED FAXADVANCED FAXADVANCED FAXADVANCED FAXADVANCED FAXADVANCED FAXADVANCED FAX
Polling
Polling enables you (or a remote fax machine) to retrieve a document. This is useful when a person who has a
document to be sent is leaving the office. The person who wants to receive the document at a later time places a
call to the machine holding the original, and requests that the document be sent. In other words, it “requests” the
machine holding the original.
Setting send polling
You can programme your fax machine to send documents in your absence when it is requested by a remote fax
machine.
1
Turn the document face down and feed it into the machine.
2
Press
Menu
repeatedly, and press
Start/Enter
when
ADVANCED FAX
appears.
3
Select
Set Polling Send
by pressing < or >, and press
Start/Enter
.
4
Enter the poll code and press
Start/Enter
.
• The poll code is used to prevent your document from being retrieved by the unauthorised caller.
• Your machine starts scanning the document(s) into memory and shows
POLLING SEND
in the display. If the
receiving mode was TEL, the machine changes it to FAX mode automatically for being polling.
• The poll code is preset to 0000 at the factory, which represents no poll code.
• When it is polled, the page in memory will be deleted automatically and receiving mode returns to the state before set-
ting polling. To cancel Send Polling, see "To cancel the scheduled job" on page 5.3.
Setting receive polling
1
Lift the handset or press
Speaker Phone (or On Hook Dial)
and enter the telephone number of the remote
machine which is in Send Polling state.
2
Press
Menu
when you hear a fax tone from the remote machine.
• The display shows
To poll documents press Start/Enter
.
3
Press
Start/Enter
.
4
Enter the Poll Code to retrieve the document, and press
Start/Enter
.
• The machine starts to receive document and prints.
Not all fax machines have polling capability, and polling incompatibility sometimes occurs between fax machines made by
different manufacturers.
To cancel the scheduled job
All scheduled jobs remain in memory after they have been set. Cancel unnecessary scheduled jobs to make more
memory available.
1
Press
Menu
repeatedly, and press
Start/Enter
when
ADVANCED FAX
appears.
2
Select
Cancel Schedule
by pressing < or >, and press
Start/Enter
.
3
Select the reserved transmission you want to cancel by pressing < or > repeatedly.
4
Press
Start/Enter
to cancel the selected schedule.
Page 32

5.4
Forwarding a fax or message
Fax forwarding
While you are away from your home or office, you do not have to miss important faxes. Your machine can
forward any faxes it receives to a fax machine at your new location, and it can print a copy for you to review
when you get back as well.
1
Press
Menu
repeatedly, and press
Start/Enter
when
ADVANCED FAX
appears.
2
Select
Set Fax Forward
by pressing < or >, and press
Start/Enter
.
The display shows
Off, Forward
or
Forward & Print
whenever you press < or >.
• Off: disables fax forwarding
• Forward: forwards a fax to your new location
• Forward & Print: prints a fax and forwards it to your new location
3
Press
Start/Enter
after selecting
Forward
or
Forward & Print
.
4
Enter the fax number and press
Start/Enter
.
5
Enter the start time and press
Start/Enter
.
6
Enter the end time and press
Start/Enter
• The machine returns to Standby Mode and
FWD
will appear in the display at Fax Forward start time and every fax will
be forwarded to your new location till the end time.
• During forwarding time, the receive mode temporarily changes to:
Message forwarding (SF-335T only)
When you’re out of the office or home and you want to be notified whenever there’s a new message left on your
machine, you need to use the Message Forwarding feature supplied with your machine.
1
Press
Menu
repeatedly, and press
Start/Enter
when
SETUP TAM
appears.
2
Select
Message Forward
by pressing < or >, and press
Start/Enter
.
The display shows
Off
or On whenever you press < or >.
• Off: disables message forwarding
• On: forwards a message to your new location
3
Press
Start/Enter
after selecting On.
4
Enter the fax number and press
Start/Enter
.
If you have ever recorded a Paging OGM before, the machine asks if you want to change.
If there is no recorded OGM, the machine asks to record OGM.
5
To change or record the OGM press
Start/Enter
, and speak into the microphone.
Or, press
Stop/Cancel
to keep as it is.
If your model is Receive mode In case
SF-330/SF-331P Fax -
SF-335T TAM TAM message is recorded
Fax no TAM message
Page 33

C
HAPTER
6
S
PECIAL
F
EATURES
Page 34

6.2
Inserting a pause
With some private telephone systems, you must dial an access code (9, for example) and listen for a second dial
tone before dialling an outside number. In such cases, you need to insert a pause in the number when you are
registering Auto Dial such as a One-Touch or Speed Dial number.
If you are asked for the number when setting up Auto Dial, follow this procedure:
Press
Redial/Pause
to insert a pause while entering the number.
• A ‘P’ is inserted at the point where you pressed
Redial/Pause
. If you need a longer pause, press
Redial/Pause
as
many times you want.
Using Recall (R or Flash)
The name of this button (
Recall
) differs depending on your country. The
Recall
button is equivalent to R or Flash.
If you do not have a special service that uses the switch-hook signal, do not press
Recall
during a call. If you do,
you could disconnect the line.
If you get a call and you want to transfer it to someone else, press
Recall
and dial the number of that other
person. This may not work with some phone systems. Refer to your telephone’s instruction manual for more
information. The recall is of “Time break” type.
1
Press
Recall
when you are on the telephone.
2
Enter the phone number to transfer it to someone else.
• In UK, you may have some problems when you try to use BT services.
3
Hang up the handset when the person answers.
Using Caller ID
Many countries have the Caller ID system which enables the receiver to view the numbers or names of callers.
Once you have subscribed to Caller ID services, your machine can display caller information. To switch the
Caller ID feature on:
1
Press
Menu
repeatedly until
SETUP SYSTEM
appears, and press
Start/Enter
.
2
Select
Caller ID
by pressing < or >, and press
Start/Enter
.
3
Choose the desired option, and press
Start/Enter
.
• On: Activates the Caller ID feature.
•
On /w Junk Fax
: Activates Caller ID and ignores any fax registered as a junk fax (see "Registering/deleting the
junk fax numbers" on page 6.5.)
•
Off
: Deactivates the Caller ID feature.
Page 35

SPECIAL
F
EATURES
6.3
SPECIAL
F
EATURES
SPECIAL
F
EATURES
SPECIAL
F
EATURES
SPECIAL
F
EATURES
SPECIAL
F
EATURES
SPECIAL
F
EATURES
SPECIAL
F
EATURES
Using the Mute
While talking on the phone via speaker phone or handset, you many want to mute your voice for secret.
To mute a call
Press
Mute/Search (or Search)
while speaking.
• The display shows
MUTE
to indicate it is activated.
To release the mute
Press
Mute/Search (or Search)
to resume conversation.
Recording a conversation (SF-335T only)
While you are talking on the phone via speaker phone you may need to record the conversation for tracking a
story. Your machine provides this convenience for your purpose.
To record the conversation
Press
Play/Record
while you are speaking.
• The machine starts to record the conversation, and recording time is unlimited before memory is full.
• The recorded conversation will be treated as an ICM.
To stop recording
Press
Stop/Cancel
to stop recording.
Sound setup
You can adjust both the alarm and key volume levels.
1
Press
Menu
repeatedly until
SETUP SOUND
appears, and press
Start/Enter
.
• The display shows the type of volume you can choose.
• The display shows the two options you can adjust:
Alarm Sound
and
Key Sound
.
2
Press < or > to select the volume type you want, and press
Start/Enter
.
3
Select On or
Off
and press
Start/Enter
.
4
If you selected
Off
, the alarm or key click does not make any sound.
Page 36

6.4
User reports
Your fax machine can print reports containing useful information - Scheduled Info, System Data, Help report,
etc.
To print a report
1
Press
Report/Help
.
2
Choose the report you want by using < or >.
3
Press
Start/Enter
when the desired report is displayed.
The selected report will be printed. The available reports are shown below:
Report name Content How it prints
Help List
This report covers the machine’s basic functions and commands. It can also
be used as a quick reference guide.
Manual
Sent Journal
and Received
Journal
These reports show information concerning the transmission and reception
activities. They can be printed on command or if the machine is set to do so.
They will automatically print after every 40 transmissions or receptions.
Manual/Automatic
Phonebook
This report shows all of the numbers currently stored in the fax machine’s
memory as One-Touch Dial and Speed Dial.
Manual
Sending
Confirm
This report shows the fax number, the number of pages, elapsed time of the
operation, the communication mode, and the communication results. Set up
your machine as described in "Sending Confirm" on page 6.7. to
automatically print Sending Confirm.
Manual/Automatic
Schedule Inform
This report shows the document currently stored for Delayed FAX and Send
Polling along with the operation number, starting time and type of operation,
etc.
Manual
System Data
This report shows the status of the User Options. After you have changed
any setting, print this report to check your changes.
Manual
Caller ID
This report shows the information of the most recent 30 callers who have
called your machine.
Manual
Junk Fax
This report shows the 20 telephone numbers which was marked as a junk
fax.
Manual
TAM Status
a
a. SF-335T only
This report shows the status of the recorded messages. You can see when you
have received a message and if you’ve listened to it or not.
Manual
Print Fax
Your machine stores fax data into memory as far as the memory is available
and lets you print it at later time. For more information, see "Re-Printing
faxes" on page 6.5.
Manual
Multi-Communication This report prints automatically if you have faxed documents to more than
one location by using Broadcasting.
Automatic
Power Fail Report If experience a power failure, this report is printed automatically when
power is restored, to notify you that there was a power failure. This report
prints only when there was any scheduled job such as Delayed FAX or Send
Poll, received job or TAM Message (SF-335T).
Page 37

SPECIAL
F
EATURES
6.5
SPECIAL
F
EATURES
SPECIAL
F
EATURES
SPECIAL
F
EATURES
SPECIAL
F
EATURES
SPECIAL
F
EATURES
SPECIAL
F
EATURES
SPECIAL
F
EATURES
Re-Printing faxes
You may sometimes need to re-print a received fax. Your machine stores the most recently received faxes in
memory. As this memory is filled, old faxes that have been printed will be erased to make room for new faxes. To
access this facility:
1
Press
Report/Help
.
2
Press < or > to choose
Print Fax
, and press
Start/Enter
.
• If there are only old faxes, the machine will automatically print and returns to Standby mode without moving to the
next step.
• If there are no faxes in memory, the machine will inform you by displaying
Memory Empty
.
3
Select between
Print New Fax
or
Reprint Old Fax
and press
Start/Enter
.
•
Print New Fax
: The machine prints all new faxes which have never been printed.
•
Reprint Old Fax
: The machine prints all faxes regardless of new or old.
Registering/deleting the junk fax numbers
Provided you have entered a junk fax number and activated the Caller ID option by selecting
On /w Junk Fax
,
your machine will not receive any faxes those entered numbers. To set up the Caller ID, see "Using Caller ID" on
page 6.2.
Entering junk fax setup mode
1
Press
Menu
repeatedly until
SETUP SYSTEM
appears, and press
Start/Enter
.
2
Select
Set Junk Fax No.
3
Press
Start/Enter
and follow the instructions below depending on the setup type.
To add a number
1
Choose
Add
and press
Start/Enter
.
• The machine shows the first CID (Caller ID) number.
• If the number is the same as one you have programmed in a One-Touch or Speed dial location and you assigned the
name to that location, the machine shows the name instead of the number.
2
Select the CID number you want to register as a junk fax, and press
Start/Enter
.
• You can scroll to the next one by pressing < or >.
• You can enter up to 30 numbers. Numbers which have already been entered as a junk numbers are marked by ‘*’ at
the end of the display.
To delete a number
1
Choose
Delete
and press
Start/Enter
.
• The machine shows the first junk number.
2
Select the junk fax number you want to delete, and press
Start/Enter
.
• You can scroll to the next one by pressing < or >.
Page 38

6.6
Clearing memory
You can selectively clear information stored in your machine’s memory.
1
Press
Menu
repeatedly until
MEMORY CLEAR
appears, and press
Start/Enter
.
The display shows the type of information you can clear from memory.
2
Select what you want to delete by pressing < or >, and press
Start/Enter
.
3
Select ‘Y’ and press
Start/Enter
when the machine asks if you are sure.
• The types of information you can clear are:
User options
Your fax machine has various user-selectable features. These options are preset at the factory, but you may need
to change them.To find out how the options are currently set, print the System Data List. For more information
on printing a report, see "To print a report" on page 6.4.
Setting system/TAM options
The System Setup includes settings related to fax operation, and TAM Setup has settings related to answering
machine operations.
1
Press
Menu
.
2
Select
SETUP SYSTEM
or
SETUP TAM
(SF-335T only) by pressing < or >.
3
Press
Start/Enter
to enter specified Setup mode.
4
Scroll up or down by pressing < or > to select the option you want to change.
5
Press
Start/Enter
when the option you want appears in the display.
6
Press < or > to choose the desired status.
7
Press
Start/Enter
for the status you want.
• To exit Setup mode at any time, press
Stop/Cancel
.
• When you press
Stop/Cancel
, the machine stores the options you’ve changed, and returns to the Standby Mode.
System setup options
The chart below shows the options in the left column and their suboptions in the right column.
Item It will
System ID Delete your system ID.
Dial/Schedule Clear the stored numbers in the Phonebook. In addition, all the
Scheduled Jobs are also cancelled.
Journal Clear all records of transmissions and receptions.
Default System Restore user-selectable options to factory default value.
Page 39

SPECIAL
F
EATURES
6.7
SPECIAL
F
EATURES
SPECIAL
F
EATURES
SPECIAL
F
EATURES
SPECIAL
F
EATURES
SPECIAL
F
EATURES
SPECIAL
F
EATURES
SPECIAL
F
EATURES
When you have entered System Setup, now you can see one of the options in the display by selecting < or >. The
right column shows the suboptions belonging to the options.
Option Suboption
Language
There are 7 languages you can use for display and report. The languages are:
English, German, French, Italian, Spanish, Portuguese and Dutch.
Sending Confirm
A confirmation report shows whether the transmission was successful or not, how many
pages were sent, etc. Choose
ON
to print a confirmation report automatically each time you
send a fax. Choose
OFF
not to print whatever the result is. Choose
ERROR
to print only when
an error occurs, and the transmission was unsuccessful. Note that a confirmation report of a
memory transmission includes the Image TCR (Transmission Confirmation Report) which
shows the image of the first page with the various information depending on the value you
made as described in "Image TCR" on page 6.8.
Paper Size
Select the paper size you will use for fax receive, and copying.
Auto Reduction
When receiving a document as long as or longer than the paper loaded, the machine can
reduce the data to fit your paper. If the fax machine cannot fit the data into one page with the
feature enabled, the data is divided and printed in actual size on two or more sheets.
Discard Size
If you turn the Automatic Reduction feature off, you can set the fax machine to discard any
excess image at the bottom of the page when receiving a document as long as or longer than
the paper loaded in your machine. If the incoming fax is out of the margin you have set, it
will be printed on two sheets of paper. Enter the desired
Discard Size
in millimeter.
Rings To Answer
You can select the number of rings before answering an incoming call. If you are using your
machine as both a telephone and a fax machine, we suggest you set the ring count to at least
4 to give you time to answer.
Rcv. Start Code
a
The
Rcv. Start Code
(Remote Receive Start Code) allows you to start fax receive from
an extension phone plugged into the EXT socket (except SF-335T) or equivalent. If you pick
up the extension phone and hear a fax tone, press the
Rcv. Start Code
then the fax will
start receiving. The code is preset to *9* at the factory. Enter the desired code from 0 to 9.
ECM Mode
b
This mode compensates for poor line quality and ensures accurate, error- free transmission
with any other ECM-equipped facsimile machine. If the line quality is poor, transmission
time may be increased when ECM is enabled.
Send From Memory
This determines how to transmit the document manually. If it is on, the machine will scan
documents into memory and then send a fax. If it is off, the machine will first dial and send.
Caller ID
c
You can see the number of the person calling you. Note that the
Rcv. Start Code
is disabled when this
Caller ID
option is on. Before using the
Caller ID
feature, Caller
ID service must be installed on your telephone line by the telephone company. For more
information, see "Using Caller ID" on page 6.2.
Set Junk Fax No.
You can prohibit your machine from uncertified or unwanted junk faxes like spam mail. To
add a number as a junk fax you should have at least one Caller ID detected by the machine.
Even though you have added junk fax numbers, if you turned off the Caller ID option above,
the Junk Fax protection will be removed. For more information, see "Registering/deleting
the junk fax numbers" on page 6.5.
Auto Journal
A journal report shows the specific information concerning transmission or reception
activities, the time and date of most recent 40 transmissions or receptions.
DRPD Mode
d
DRPD (Distinctive ring) is a service provided by some telephone companies that assigns two
phone numbers to one phone line, each of which makes your phone ring differently. If you
subscribe to this service, you can program your machine to learn one phone number and
distinctive ring for incoming faxes.
As the display shows, call this fax from other fax machine. The machine will learn the ring
pattern and displays
DRPD OK
when finished. Now, you can use the
Rcv.Mode/Contrast
to
select DRPD receiving mode.
Page 40

6.8
TAM options (SF-335T only)
Remote Test
This lets the service center check the status of your machine to find out if there is anything
wrong.
Silent Mode
You can turn off sounds the machine makes. There are two kinds of this mode;
Manual
and
Daily
.
•
Manual
: To activate or deactivate this mode, the user presses Silent Mode.
•
Daily
: Enter start and end time. You have to specify them in 24-hour format.
Resolution
Sets the default resolution when copying and faxing.
Contrast
Sets the default contrast when copying and faxing.
Image TCR
You can prevent the Image TCR from being included in the confirmation report for privacy
or security protection.
Dial Mode
e
Set the dialling mode to the type of the exchange to which you are connected.
Behind PABX
e
If your machine is connected to the line from PABX (Private Automatic Branch eXchange),
you need to enable this option by selection
On
.
a. SF-330/SF-331P only.
b. Error Correction Mode
c. This option may not work when connected to a PABX.
d. Distinctive Ring Pattern Detection
e. One or more options may not appear in the display depending on your country. If so, it is not applicable to your machine.
Options Suboption
Save Charge
Lets you dial into your machine from a remote phone and check whether anyone has left a
message without being charged. When
Save Charge
is On, the machine answers your call
on the number of rings you have specified in the
Rings to Answer
option. If there is no
message, the machine answers on the second ring after the number of
Rings to Answer
.
This gives you time to hang up the phone before the machine answers and saves the price of
the call.
Call Monitor
Enables you to hear callers leave messages on your machine.
ICM Record Time
You can select the maximum time allowed for caller messages.
Remote Password
You can change the three-character password used to access your machine from a remote
phone. The password is preset to “#139#” at the factory. The first and the last #’s are fixed,
but you can change the three middle numbers.
Silence Action
In TAM mode, the machine decides the next action when silence is detected for 10 seconds.
Available suboptions are:
•
Receive Fax
: Switches to FAX Receive Mode.
•
Record Silence
: Keeps the recording silent.
•
Disconnect
: Disconnects the line and returns to Standby Mode.
Howler Action
In TAM mode, the machine decides the next action when a howling is detected for 9 seconds.
Available suboptions are:
•
Record Howler
: Disregards howling.
•
Disconnect
: Disconnects the line and returns to Standby Mode.
Message Forward
Forwards a message to your new location whenever a caller leaves a message. For more
information, see "Message forwarding (SF-335T only)" on page 5.4.
Option Suboption
Page 41

C
HAPTER
7
C
ARE AND
M
AINTENANCE
Page 42

7.2
Cleaning the document scanner
To keep your machine working properly, occasionally clean the White Roller, ADF Rubber, and the Scanning
Glass. If they are dirty, documents sent to another fax machine won’t be clear.
If you turn the power off to clean the scanner, documents stored in memory will be lost.
1
Open the Control Panel.
2
Remove the White Roller.
• At the right-hand end of the White Roller there is a bushing that is secured with a small tab.
• Push the tab slightly inward, then rotate towards you. Then pull up the right-hand part to take it out.
3
Wipe the roller surface with a soft cloth dampened with water.
4
Clean the ADF Rubber piece at the back of the Control Panel,
too.
5
Carefully wipe the Scanning Glass with a soft, dry cloth.
• If the glass is very dirty, first wipe it with a slightly dampened cloth,
then with a dry one.
• Be careful not to scratch the glass surface.
6
Replace the roller in reverse order, and then close the Control
Panel firmly until it clicks into place.
Page 43

CARE AND
M
AINTENANC
E
7.3
CARE AND
M
AINTENANCE
CARE AND
M
AINTENANCE
CARE AND
M
AINTENANCE
CARE AND
M
AINTENANCE
CARE AND
M
AINTENANCE
CARE AND
M
AINTENANCE
CARE AND
M
AINTENANCE
Replacing the print cartridge
When you notice that the print becomes light or
Ink Low. Install new ink cartridge
appears in the
display, replace the print cartridge. You should replace the cartridge with the same one which was provided with
the machine.
The part number for replacement cartridges are:
• mono: INK-M40, colour: INK-C40 (available only for SF-331P)
1
Prepare a cartridge.
• Take out a cartridge from its packaging and carefully remove the tape covering the printhead.
• Hold the cartridge by the colored top or black areas only. Do not touch the copper area.
2
Press
Cartridge
.
The Cartridge Carrier moves to the install position.
3
Open the Control Panel and Cartridge Compartment cover.
4
Push down the cartridge, and remove it.
5
To load the cartridge insert the cartridge below the metal clip and pointing down at the front. When the
cartridge is pushed to the back of the cartridge carrier lift the front of the cartridge up until it clicks into
place.
• If the cartridge moves loosely in the Carrier, it has not clicked into place. Repeat this step.
6
Replace the Cartridge Compartment Cover and Control Panel.
7
Press
Start/Enter
.
8
Press 1 for new cartridge, or 2 for the old one.
• In case you selected the
1:New
, the alignment form will print.
• When you put in a new cartridge, you must choose
1:New
.
• When you put in a used cartridge, choose
2:Used
. This helps you to check the correct amount of ink you have left.
• If you mix up several used cartridges, it is not possible to check the correct amount of remaining ink. Once you have
put in a new cartridge, use it until it is completely exhausted.
9
Enter the number which represents the straightest line, and press
Start/Enter
.
Page 44

7.4
Cleaning the printhead
If the nozzles seem to be clogged and characters are not printing completely, clean the printhead as described
below:
1
Press
Menu
repeatedly until
MAINTENANCE
appears, and press
Start/Enter
.
2
Scroll to
Clean Head
by pressing < or >, and press
Start/Enter
.
3
Examine the printed test pattern.
• If print quality does not improve, reinstall the cartridge and repeat Clean Head.
• If the line is still broken, wipe the nozzles and contacts.
For more information, see "Wiping the print nozzles and contacts" on page 7.5.
Aligning the printhead
When the vertical line does not seem to be straight or you want to improve the print quality, you may need to
align the cartridge.
1
Press
Menu
repeatedly until
MAINTENANCE
appears, and press
Start/Enter
.
2
Scroll to
Align Head
by pressing < or >, and press
Start/Enter
.
• The machine prints a form.
3
Enter the number which represents the straightest line, and press
Start/Enter
.
Ink level view
Your machine allows you to check the amount of ink remaining. To view the current ink level:
1
Press
Menu
repeatedly until
MAINTENANCE
appears, and press
Start/Enter
.
2
Scroll to
View Ink Level
by pressing < or >, and press
Start/Enter
.
• The machine displays a fractional number. For examples, ‘1/8’ means that ink is low and you need to replace the
cartridge.’8/8’ means that a new cartridge is installed.
Shading adjustment
The shading is adjusted at the factory. If, however, you drop and damage your machine while moving, we recommend you adjust shading for optimized lightness.
To adjust shading, do as follows:
1
Press
Menu
repeatedly until
MAINTENANCE
appears, and press
Start/Enter
.
2
Scroll to
Adjust Scanner
by pressing < or >, and press
Start/Enter
.
3
Load a plain WHITE sheet of paper (no writing or graphics) into the loading slot, and press
Start/Enter
.
• The machine starts to scan the document to adjust shading.
• Printing quality may be unexpectedly worse if you do not use a plain WHITE paper for the adjustment.
Page 45

CARE AND
M
AINTENANC
E
7.5
CARE AND
M
AINTENANCE
CARE AND
M
AINTENANCE
CARE AND
M
AINTENANCE
CARE AND
M
AINTENANCE
CARE AND
M
AINTENANCE
CARE AND
M
AINTENANCE
CARE AND
M
AINTENANCE
Self testing
When you want to test if the machine is working correctly, you can check it by running self test.
1
Press
Menu
repeatedly until
MAINTENANCE
appears, and press
Start/Enter
.
2
Scroll to
Self Test
by pressing < or >, and press
Start/Enter
.
• The machine runs self test and prints a report which shows the current status of the machine.
Print cartridge maintenance
The print cartridge life is very sensitive to the content of the received fax or a copy you made. To increase its life,
we recommend you follow the instructions below:
• DO NOT unpack the cartridge until you are ready to use it.
• Store it in the same environment as the printer.
• If you have unpacked the cartridge but are not using it, store it in a storage unit. If you do not have a storage unit,
store the cartridge in an airtight plastic bag.
• DO NOT leave it exposed for an extended period.
• DO NOT refill the cartridge. The warranty will not cover damage caused by using refilled cartridges.
Cleaning the cartridge
To maintain good printing quality, we recommend you occasionally wipe the Print Nozzles and Contacts as
described below:
Wiping the print nozzles and contacts
When the print is not clear or dots are missing, the problem may be caused by dried ink on the:
• Print cartridge nozzles
• Print cartridge contacts
• Print cartridge carrier contacts
1
Press
Cartridge
.
2
Open the Control Panel and Cartridge Compartment Cover and remove the cartridge.
3
Gently blot and wipe the contacts and nozzles dry.
• Use a clean cloth dampened with water only to gently clean the entire copper-colored
area, including the nozzles and contacts.
• To dissolve any dried ink, hold the damp cloth against the nozzles for about three seconds.
4
Reinstall the cartridge and close the Cover and Panel.
• If you spend a long time cleaning the cartridge, the cartridge carrier may have moved back to the original position.
If so, press
Cartridge
again to move the carrier to the install position.
5
Press 1 for new cartridge, or 2 for the old one.
• If the line is still broken, clean the Cartridge Carrier contacts. For more information, see "Cleaning the cartridge
carrier contacts" on page 7.6.
Page 46

7.6
Cleaning the cartridge carrier contacts
Before cleaning these parts, there should be no scheduled job such as Delayed Fax, Send Polling, or faxes received into memory. Once you have unplugged the power cord from the machine, all data will be lost.
1
Press
Cartridge
.
2
Open the Control Panel and Cartridge Compartment Cover and remove the cartridge.
3
Remove the print cartridge.
4
Unplug the power cord from the electrical outlet of the rear of the machine.
5
Clean the Cartridge Carrier contacts with clean and dry cloth.
6
Plug in the power cord and reinstall the cartridge.
Page 47

CARE AND
M
AINTENANC
E
7.7
CARE AND
M
AINTENANCE
CARE AND
M
AINTENANCE
CARE AND
M
AINTENANCE
CARE AND
M
AINTENANCE
CARE AND
M
AINTENANCE
CARE AND
M
AINTENANCE
CARE AND
M
AINTENANCE
LCD error messages
Display Status/Solution Related to:
Adjust scanner first
in Maintenance menu
The shading waveform to be used as a reference is corrupted
due to unknown reason. Adjust the scanner to fix this problem
as described in "Shading adjustment" on page 7.4.
Scanner
Check white paper
document and try
again
The scanning level is too low to compare with reference level.
To adjust shading, you should use the plain and white paper.
Scanner
Clean white roller,
glass and try again
The scanning level is slightly low, which can affect the image
quality. To clean concerned parts, see "Cleaning the document
scanner" on page 7.2.
Scanner
Duplicated with
[Speed No.xx]
The xx indicates the location
number.
The same number has already been registered into another
speed dial location.
Telephone
Exceeded Job Memory
Cancel scheduled job
and try again
The broadcasting and delayed fax can hold 5 jobs in total.
Cancel scheduled job and try again.
Fax
Exceeded Total
Message Memory
The machine can hold up to 100 messages (OGM + ICM +
recorded conversations).
Erase old messages to make a room in the memory.
TAM (SF-335T only)
ICM Memory Full
The voice memory is full. No more caller’s messages can be
recorded (Total recording time is about 15 minutes).
TAM (SF-335T only)
Ink Low. Install new
ink cartridge
The print cartridge has run out of ink. To install a new Print
Cartridge, see "Replacing the print cartridge" on page 7.3.
Although this message is displayed, you can make a copy or
print a report. But, stored data in memory can be printed by
changing the cartridge.
Cartridge
Install ink cartridge
Print cartridge is not installed or improperly installed. Cartridge
Install mono ink
cartridge
The mono print cartridge should be installed to copy, print a
report or receive a fax.
Cartridge (SF-331P
only)
Job Not Assigned
You attempted to cancel the scheduled job but there is no jobs
scheduled.
Fax
Junk Fax Empty
You attempted to delete the junk fax number when there is no
junk fax number.
Fax
Junk Fax Full
The machine can hold 20 junk fax numbers but you tried to add
more.
Fax
Load Document
You have tried to send a fax and there is no document loaded
into the machine.
Document
Memory Full
Memory has become full while receiving a fax. Fax
Memory Full
Press Start/Enter to
continue
Memory has become full while scanning a document. Press
Start/Enter
to send or copy the scanned pages only. To cancel
the job press
Stop/Cancel
and try again when memory
becomes available, or split the new document into smaller
parts.
Fax/Copy
Page 48

7.8
Memory Received
When it toggles with:
Ink Low. Install new
ink cartridge
Load paper and press
Start/Enter
Install ink cartridge
The machine has data stored in memory. Depending on the
message do as follows:
Replace the print cartridge with new one.
Load the paper, and press
Start/Enter
. There might be a jam.
Clear the jam as described in "Paper jams during printing" on
page 7.11.
Install a print cartridge.
Fax
No answer from remote
fax
The other machine has not answered after all your attempts to
send a fax.
Fax
No CID Number
The machine could not detect the CID (Caller ID) number. Telephone
No Dial Number
There is no number in the redial memory, which is successfully
dialled up to now.
Telephone
No Message
There is no message to play or erase. TAM (SF-335T only)
No New Message
There is no new caller message. TAM (SF-335T only)
Not Found
The number you are searching does not exist in memory. Telephone
Number already
registered
The number you are trying to register already exists in the
phonebook or junk fax list.
Telephone
Number Not Assigned
There is no number assigned to the One-Touch or two-digit
Speed number.
Telephone
Poll Code Error
The remote user entered wrong poll code. Fax
Poll job exists
already
You have programmed a polling send. Cancel scheduled job
and try again.
Fax
Polling Error
Check remote site
The machine you want to poll is not ready to answer your poll.
The person you are polling should have loaded their fax
machine with a document and be in send poll state.
Fax
Record TAM OGM
To select TAM receive mode, you should record OGM prior to
pressing the
Answer
button.
TAM (SF-335T only)
Remove jammed
document
The document you are sending has jammed in the feeder. To
clear the document jam, see "Document jams during transmission" on page 7.11.
You tried to copy or fax a document which is longer than
390mm.
Document
System Busy
Try again later
There is no available resource to execute job you ordered. Fax
To redial now, press
Start/Enter
The machine is waiting to automatically redial the fax number
that was busy or did not answer.
Fax
Display Status/Solution Related to:
Page 49

CARE AND
M
AINTENANC
E
7.9
CARE AND
M
AINTENANCE
CARE AND
M
AINTENANCE
CARE AND
M
AINTENANCE
CARE AND
M
AINTENANCE
CARE AND
M
AINTENANCE
CARE AND
M
AINTENANCE
CARE AND
M
AINTENANCE
Fixing Problems
Your problem may be listed in "LCD error messages" on page 7.7. The chart below shows other problems you
can solve yourself. If not, call the service company shown in the separate Warranty Card.
Fax problems
Problem Solution
The machine is not working, there is no
display and the buttons are not working.
Unplug the power cord and plug it in again. Check that your socket is live.
No dial tone. Check that the phone is connected properly. Check the phone socket in the
wall by plugging in another phone.
The numbers stored in memory do not dial
correctly.
Make sure the numbers are programmed correctly. To print a Phonebook
Report, see "To print a report" on page 6.4..
The document does not feed into the
machine.
Be sure the document is not wrinkled, and you are putting it in correctly.
Check that the document is the right size and not too thick or too thin.
You cannot receive faxes automatically. Check if
TEL
appears on the right side of the display. In TEL mode, you
cannot receive a fax automatically. Be sure the handset is seated on the
cradle properly.
The machine cannot receive faxes
manually.
Do not hang up the handset before pressing
Start/Enter
.
The machine does not send anything. Check that the document is loaded face down.
Send
should show up in the
display.You may have hung up the handset before you pressed
Start/Enter
.
Check if the machine to which you are sending can receive your fax.
You cannot poll another machine. The fax machine you are polling may be using a poll code.
The fax you received has blank bits on it. The machine sending to you may be faulty. A noisy phone line can cause
line errors. Check your machine by making a copy.
Spots or lines missing from the fax you
receive.
Check if your phone line is noisy. Check if the printhead is clean by
making a copy.
You are receiving poor quality copies. The fax machine sending to you may have a dirty scan glass. Check for a
noisy phone line.
Some of the stretched words on the fax you
receive
The machine sending to you had a temporary document jam.
Your machine does not make copies. Make sure your document is loaded face down.
There are lines on copies or documents you
send.
Check your scan glass for marks and clean it (see "Cleaning the document
scanner" on page 7.2.)
The machine dials a number, but fails to
make a connection with a remote fax
machine.
The remote fax machine may be turned off, or unable to answer incoming
calls. Speak with the remote operator and ask for the problem to be
rectified.
You cannot store a document in memory. There may not be enough memory available to hold the document you
want to store. If the display shows a
Memory Full
message, delete any
documents you no longer need, then retry the document.
Blank areas appear at the bottom of each
page or on continuation pages, with only a
small strip of material printed at the top.
You may have selected the wrong paper settings. To select the proper paper
size, see "Paper Size" on page 6.7.
Page 50

7.10
Print quality problems
Paper feeding problems
Problem; Solution;
Light or blurred characters. Check Ink Level Viewas described in "Ink level view" on page 7.4. If the
printer cartridge has completely run out,
Ink Low. Install new ink
cartridge
is displayed. To install a new print cartridge, see "Replacing
the print cartridge" on page 7.3. Make sure the print cartridge is installed
correctly. To clean the print cartridge, see "Cleaning the cartridge" on
page 7.5.
Smudged or dark characters. Make sure the paper is straight and unwrinkled. Let ink dry before
handling the paper. To clean the print cartridge, see "Cleaning the cartridge" on page 7.5.
Characters with white lines. If
Ink Low. Install new ink cartridge
is displayed, install a
new print cartridge as described in "Replacing the print cartridge" on
page 7.3. Remove and reinstall the print cartridge. Clean the print cartridge
(see "Cleaning the cartridge" on page 7.5.)
Improperly formed or misaligned
characters.
Clean the print cartridge (see "Cleaning the cartridge" on page 7.5.)
Abnormal black horizontal lines Clean the cartridge carrier (see "Cleaning the cartridge carrier contacts" on
page 7.6.)
Problem; Solution;
Paper is jammed during
printing.
Clear paper jam as described in "Paper jams during printing" on page 7.11.
Paper sticks together. You can load up to 50 sheets in the ASF (Automatic Sheet Feeder).
Check if you overloaded. Humid conditions may cause some paper to stick together.
Paper fails to feed. Remove any obstructions inside the printer.
Multiple sheets of paper
feed.
When loading paper, do not force the paper down into the printer. If multiple sheets have
caused a paper jam, clear the paper jam. (see "Paper jams during printing" on page 7.11.)
Paper skews or buckles in
the automatic sheet
feeder.
ASF can hold up to 50 sheets. Make sure the paper guides do not cause the paper to bow in
the bin. When loading paper, do not force it down into the printer.
Page 51

CARE AND
M
AINTENANC
E
7.11
CARE AND
M
AINTENANCE
CARE AND
M
AINTENANCE
CARE AND
M
AINTENANCE
CARE AND
M
AINTENANCE
CARE AND
M
AINTENANCE
CARE AND
M
AINTENANCE
CARE AND
M
AINTENANCE
Clearing jams
Document jams during transmission
If a document jams during transmission or copying,
Remove jammed document
appears in the display. DO
NOT pull the document out of the slot. Doing so could harm your machine.
To clear document jam:
1
Open the Control Panel.
2
Carefully remove the jammed document.
3
Close the Control Panel firmly until it clicks into place.
Paper jams during printing
If the fax paper jams while you are receiving or printing,
Remove jammed paper and press Stop/Cancel
appears in the message.
If the paper is jammed in the Received Paper Output Area
1
Remove the jammed paper by pulling it out smoothly in the
direction of the arrow as shown.
• If the paper tears when it is being removed check to ensure that
no small pieces have been left inside the machine.
2
Press
Stop/Cancel
.
If the paper is jammed in the Paper Feed Area
1
Remove the jammed paper as shown.
• If the paper tears when it is being removed check to ensure that
no small pieces have been left inside the machine.
2
Reload new paper with the print side facing toward you.
3
Press
Stop/Cancel
when finished.
Page 52

7.12
Page 53

C
HAPTER
8
A
PPENDIX
Page 54

8.2
Specifications
Item Specification
Type of unit Inkjet Desktop Facsimile Transceiver
Communication System Public Switched Telephone Network (PSTN) and PABX
Compatibility ITU Group3
Compression scheme MH, MR, MMR
Modem speed 14400/12000/9600/7200/4800/2400bps
Scanning method CIS (Contact Image Sensor)
Input document size 8.5 inches (216mm)
Effective scanning width 8.27 inches (210mm)
Effective recording width 8 inches (203mm)
Power consumption Standby: 5 Wh
Printing Mode: Maximum 15 Wh
Temperature range 50°F to 95°F (10°C to 35°C)
Humidity range 20 to 80% RH (non-condensing)
Dimension (W x D x H) 365 x 250 x 150mm (folded all trays)
365 x 540 x 270mm (extended all trays)
Weight 3.1 Kg (including handset)
Power source See Rating Label attached on the back of the machine.
Resolution Scan 200 x 200dpi
PC print Mono: 600 x 300dpi
Colour: 300 x 300dpi
Copy Mono: 600 x 300dpi (Colour copy is not supported)
Faxing Standard: 98 x 203dpi
Fine: 196 x 203dpi
Super Fine: 392 x 203dpi
ADF 10 sheets (0.075~0.12mm thick)
ASF
50 sheets (70g/m
2
~ 90g/m2)
ECM mode YES
Grey scale 64 Greyscales
User memory capacity 0.5 Mbytes (capable of 80 pages at 4% print duty on A4)
Voice Recording time About 15 Min. (SF-335T only)
Ink Cartridge Part Number
Mono: INK-M40, Colour: INK-C40
a
a. Colour cartridge is available for SF-331P only.
Ink Cartridge Life Mono: About 750 sheets (based on ITU #1 chart - see "A sample
of ITU #1 chart (reduced to 60.5%)" on page 8.3.)
Colour: About 350 sheets at 15% coverage
Page 55

APPENDIX
8.3
APPENDIXAPPENDIXAPPENDIXAPPENDIXAPPENDIXAPPENDIXAPPENDIX
A sample of ITU #1 chart (reduced to 60.5%)
Page 56

8.4
Replacing the fitted plug (UK)
Notes for use of this device (New Zealand)
Important
The mains lead for this machine is fitted with a standard (BS 1363) 5 amp plug and has a 5 amp fuse.
When you change or examine the fuse, you must re-fit the correct 5 amp fuse. You then need to replace
the fuse cover. If you have lost the fuse cover, do not use the plug until you get another fuse cover from the people
from whom you bought the machine.
The 5 amp plug is the most widely used type in the UK and should be suitable.
However, some buildings (mainly old ones) do not have normal 5 amp plug sockets.
You need to buy a suitable plug adaptor. Do not remove the moulded plug.
Warning
If you cut off the moulded plug, get rid of it straight away.
You cannot rewire the plug or you may get an electric shock if you put it into a socket.
Important warning: You must earth this machine
The wires in the mains lead have the following colour code:
• Blue: Neutral
• Brown: Live
If the wires in the mains lead do not match the colours marked in your plug, do the following:
You must connect the blue wire to the pin which is marked with the letter ‘N’ or coloured black.
You must connect the brown wire to the pin which is marked with the letter ‘L’ or coloured red.
You must have a 5 amp fuse in the plug, adaptor, or at the distribution board.
The grant of a Telepermit for any item of terminal equipment indicates only that Telecom has accepted that
the item complies with minimum conditions for connection to its network. It indicates no endorsement of the
product by Telecom, nor does it provide any sort of warranty. Above all, it provides no assurance that any item
will work correctly in all respects with another item of Telepermitted equipment of a different make or model,
nor does it imply that any product is compatible with all of Telecom’s network services.
This equipment shall not be set up to make automatic calls to the Telecom ‘111’ Emergency Service.
This equipment may not provide for the effective hand-over of a call to another device connected to the same line.
Important Notice
Under power failure conditions, this telephone may not operate. Please ensure that a separate telephone,
not dependent on local power, is available for emergency use.
Page 57

APPENDIX
8.5
APPENDIXAPPENDIXAPPENDIXAPPENDIXAPPENDIXAPPENDIXAPPENDIX
Declaration of conformity (European countries)
Approvals and Certifications
The CE marking applied to this product symbolises Samsung Electronics Co., Ltd. Declaration of Conformity
with the following applicable 93/68/EEC Directives of the European Union as of the dates indicated:
January 1, 1995: Council Directive 73/23/EEC Approximation of the laws of the member states related to low
voltage equipment.
January 1, 1996: Council Directive 89/336/EEC (92/31/EEC), approximation of the laws of the Member States
related to electromagnetic compatibility.
March 9, 1999: Council Directive 1999/5/EC on radio equipment and telecommunications terminal equipment and
the mutual recognition of their conformity.
A full declaration, defining the relevant Directives and referenced standards can be obtained from your
Samsung Electronics Co., Ltd. representative.
EC Certification
Certification to 1999/5/EC Radio Equipment & Telecommunications Terminal Equipment
Directive (FAX)
This Samsung product has been self-certified by Samsung for pan-European single terminal connection to the
analogue public switched telephone network (PSTN) in accordance with Directive 1999/5/EC. The product has
been designed to work with the national PSTNs and compatible PBXs of the European countries:
In the event of problems, you should contact the Euro QA Lab of Samsung Electronics Co., Ltd. in the first instance.
The product has been tested against TBR21 and/or TBR 38. To assist in the use and application of terminal equipment
which complies with this standard, the European Telecommunication Standards Institute (ETSI) has issued an
advisory document (EG 201 121) which contains notes and additional requirements to ensure network compatibility
of TBR21 terminals. The product has been designed against, and is fully compliant with, all of the relevant advisory
notes contained in this document.
Page 58

8.6
Page 59

APPENDIX
8.7
APPENDIXAPPENDIXAPPENDIXAPPENDIXAPPENDIXAPPENDIXAPPENDIX
Page 60

8.8
Page 61

APPENDIX
8.9
APPENDIXAPPENDIXAPPENDIXAPPENDIXAPPENDIXAPPENDIXAPPENDIX
In case of interference (US)
Fax branding (US)
See "Chapter 1" for instructions on how to enter this information into your Samsung FAX machine’s memory.
In normal operation, your SAMSUNG fax machine produces and uses radio-frequency energy. In some cases,
this can cause interference to other electronic equipment. Part 15 of the FCC rules establishes guidelines limiting
the amount of radio-frequency energy which may be produced by electronic equipment. Tests have proven that your
Samsung FAX machine meets or exceeds these guidelines, and is classified a “Class B Digital Device” for operation
in a residential environment. When installed and operated according to instructions, your SAMSUNG fax machine
should not cause interference to the types of equipment expected to be found in a normal residential environment.
Unauthorized changes or modifications could void the user’s authority to operate the equipment.
In the event your SAMSUNG fax machine appears to cause interference to other electronic equipment, it can often
be easily remedied. First determine if the source of interference really is your FAX machine. To do this, turn its power
off and on while observing the equipment experiencing the interference. If the interference disappears when you turn
the FAX machine off, the following steps can be very effective in correcting interference problems:
• Connect the FAX machine to an AC outlet which is on a different circuit breaker from the equipment experiencing
interference.
• Increase the distance between the FAX machine and the equipment experiencing interference.
• Cable TV amplifiers and splitters are extremely prone to interference. Be certain that they are as far as possible from
the FAX machine and its AC power and telephone cords.
• Replace “twin lead” antenna wire with shielded coaxial cable, and use proper connectors and adaptors.
• Turn or relocate the receiving antenna. In most cases this is easily done by simply moving a radio. A TV antenna may
need to be reoriented or installed in another area of the building.
• Consult your dealer, a reputable radio/TV technician, or an Amateur Radio Operator for help.
The Telephone Consumer Protection Act of 1991 makes it unlawful for any person to use a computer or other
electronic device to send any message via a telephone facsimile machine unless such message clearly contains in a
margin at the top or bottom of each transmitted page or on the first page of the transmission the following information:
the date and time of transmission identification of either business, business entity or individual sending the message;
and telephone number of either the sending machine, business, business entity or individual.
The Telephone Company may make changes in its communications facilities, equipment operations, or procedures
where such action is reasonably required in the operation of its business and is not inconsistent with the rules and
regulations in FCC Part 68. If such changes can be reasonably expected to render any customer terminal equipment
incompatible with telephone company communications facilities, or require modification or alteration of such
terminal equipment, or otherwise materially affect its use or performance, the customer shall be given adequate notice
in writing, to allow the customer an opportunity to maintain uninterrupted service.
Page 62

8.10
Telephone company information (US)
FCC identification number
The Ringer Equivalence Number and FCC Registration Number for this equipment may be found on the label located
on the bottom or rear of the machine. In some instances you may need to provide these numbers to the telephone
company.
Ringer equivalence number
The Ringer Equivalence Number (REN) is a measure of the electrical load placed on the telephone line, and is useful
for determining whether you have “overloaded” the line. Installing several types of equipment on the same telephone
line may result in problems making and receiving telephone calls, especially ringing when your line is called.
The sum of all Ringer Equivalence Numbers of the equipment on your telephone line should be less than five in order
to assure proper service from the telephone company. In some cases, a sum of five may not be usable on your line.
If any of your telephone equipment is not operating properly, you should immediately remove it from your telephone
line, as it may cause harm to the telephone network.
Warning
FCC Regulations state that changes or modifications to this equipment not expressly approved by the manufacturer
could void the user’s authority to operate this equipment.
In the event that terminal equipment causes harm to the telephone network, the telephone company should notify the
customer that service may be stopped. However, where prior notice is impractical, the company may temporarily
cease service, providing that they:
a) Promptly notify the customer.
b) Give the customer an opportunity to correct the equipment problem.
c) Inform the customer of the right to bring a complaint to the Federal Communication Commission pursuant to
procedures set out in FCC Rules and Regulations Subpart E of Part 68.
Y
ou should also know that:
• Your Samsung FAX machine is not designed to be connected to a digital PBX system.
• Special features, such as “Call Waiting”, may interrupt FAX service, and we suggest that these services not be
installed on the FAX line.
• If you intend to use a computer modem or fax modem on the same phone line as your FAX machine, you may
experience transmission and reception problems with all the equipment. It is recommended that no other equipment,
except for a regular telephone, share the line with your FAX machine.
• If your area experiences a high incidence of lightning or power surges, we recommend that you install surge protectors
for both the power and the telephone lines. Surge protectors can be purchased from your dealer or telephone and
electronic specialty stores.
• When programming emergency numbers and/or making test calls to emergency numbers, use a non-emergency
number to advise the emergency service dispatcher of your intentions. The dispatcher will give you further instructions
on how to actually test the emergency number.
• This equipment may not be used on coin service or party lines.
• This telephone provides magnetic coupling to hearing aids.
• You may safely connect this equipment to the telephone network by means of a standard modular jack, USOC RJ-11C.
Page 63

I
NDEX
A
ADF 7.2, 8.2
alignment 7.3
appearance 1.3
ASF 1.5, 7.10, 8.2
asf 1.5, 7.10
auto journal 6.7
auto reduction 6.7
B
broadcasting 1.2, 3.3, 5.1, 5.2, 6.4, 7.7
C
call monitor 1.2, 4.2, 6.8
caller id 2.3, 2.4, 6.2, 6.4, 6.5, 6.7, 7.8
cartridge
alignment 7.4
cleaning 7.4, 7.5, 7.6, 7.10
ink level 7.4
installation 7.7, 7.8, 7.10
life 8.2
maintenance 7.5
part number 8.2
replacing 1.4, 7.3, 7.7, 7.10
contrast 1.4, 3.2, 3.3, 6.8
control panel 1.4, 2.2, 3.2, 4.2, 4.5, 7.2,
7.3, 7.5, 7.6, 7.11
D
delayed fax 1.2, 3.3, 5.1, 5.2, 6.4, 7.6,
7.7
dialling 1.2, 1.4, 2.4, 3.4, 7.8
discard size 6.7
E
ECM mode 6.7, 8.2
F
fax forward 5.4
feeder 1.2, 1.5, 1.6, 2.3, 3.2, 3.3, 7.8,
7.10
H
howler action 6.8
I
ICM record time 6.8
image TCR 6.7, 6.8
ink save mode 1.8
ITU #1 chart 8.2, 8.3
J
junk fax 6.2, 6.4, 6.5, 6.7, 7.7, 7.8
6.4, 6.5
K
keypad character 1.8
L
language 6.7
M
making a copy 1.6, 7.9
message forward 4.5, 5.4, 6.8
mute 1.4, 6.3
O
one-touch
caller ID 2.4
dialling 1.2, 2.2, 2.3, 7.8
junk fax 6.5
programming 2.2, 6.2, 6.4
sending 3.3, 5.2
on-hook dial 2.2
P
paging OGM 4.5, 5.4
paper size 1.5, 1.6, 6.7, 7.9
pause 1.4, 2.2, 6.2
phonebook 1.2, 2.2, 2.3, 6.4, 7.8, 7.9
polling 1.2, 5.3, 6.4, 7.6, 7.8, 7.9
R
rcv. start code 6.7
recall 6.2
receive mode
auto mode 3.4, 3.5
DRPD 1.2, 3.4, 3.6, 6.7
fax mode 3.5, 5.3
TAM mode 1.4, 3.4, 3.5, 3.6, 4.1,
4.2, 4.5, 6.8
tel mode 3.5, 7.9
remote command 4.5
remote commands 4.5
remote password 4.5, 6.8
remote test 6.8
Page 64

report 1.2, 6.4, 6.6, 6.7, 7.5, 7.7, 7.9
resolution 1.6, 2.3, 3.2, 3.3, 6.8, 8.2
ring volume 1.8
rings to answer 3.5, 6.7, 6.8
S
save charge 6.8
scanning glass 7.2
scheduled job 5.3, 6.4, 7.6, 7.7, 7.8
search 1.4, 2.3, 2.4
send from memory 2.3, 3.3, 6.7
sending confirm 3.3, 6.4, 6.7
setting date and time 1.6
setting fax number 1.7
shading 7.4, 7.7
silence action 6.8
silent mode 6.8
speaker volume 1.8
specifications 8.2
speed dial
caller ID 2.4
dialling 2.2, 2.3
junk fax 6.5
programming 2.2, 6.2, 6.4, 7.7
sending 3.3, 5.2
T
TAM message 4.2, 4.5, 5.4, 6.4
W
white roller 7.2, 7.7
 Loading...