

Page 1

ELECTRONICS
P/N. JF68-60860A
01-cover 3/25/98 4:10 PM Page 1
Page 2
Operator’s Guide
SAMSUNG FACSIMILE
Please read this guide before you use this equipment.
0
0
0
0
0
0
0
0
0
0
0
0
0
0
0
0
0
0
0
0
0
0
01-cover 3/25/98 4:10 PM Page 2
Page 3

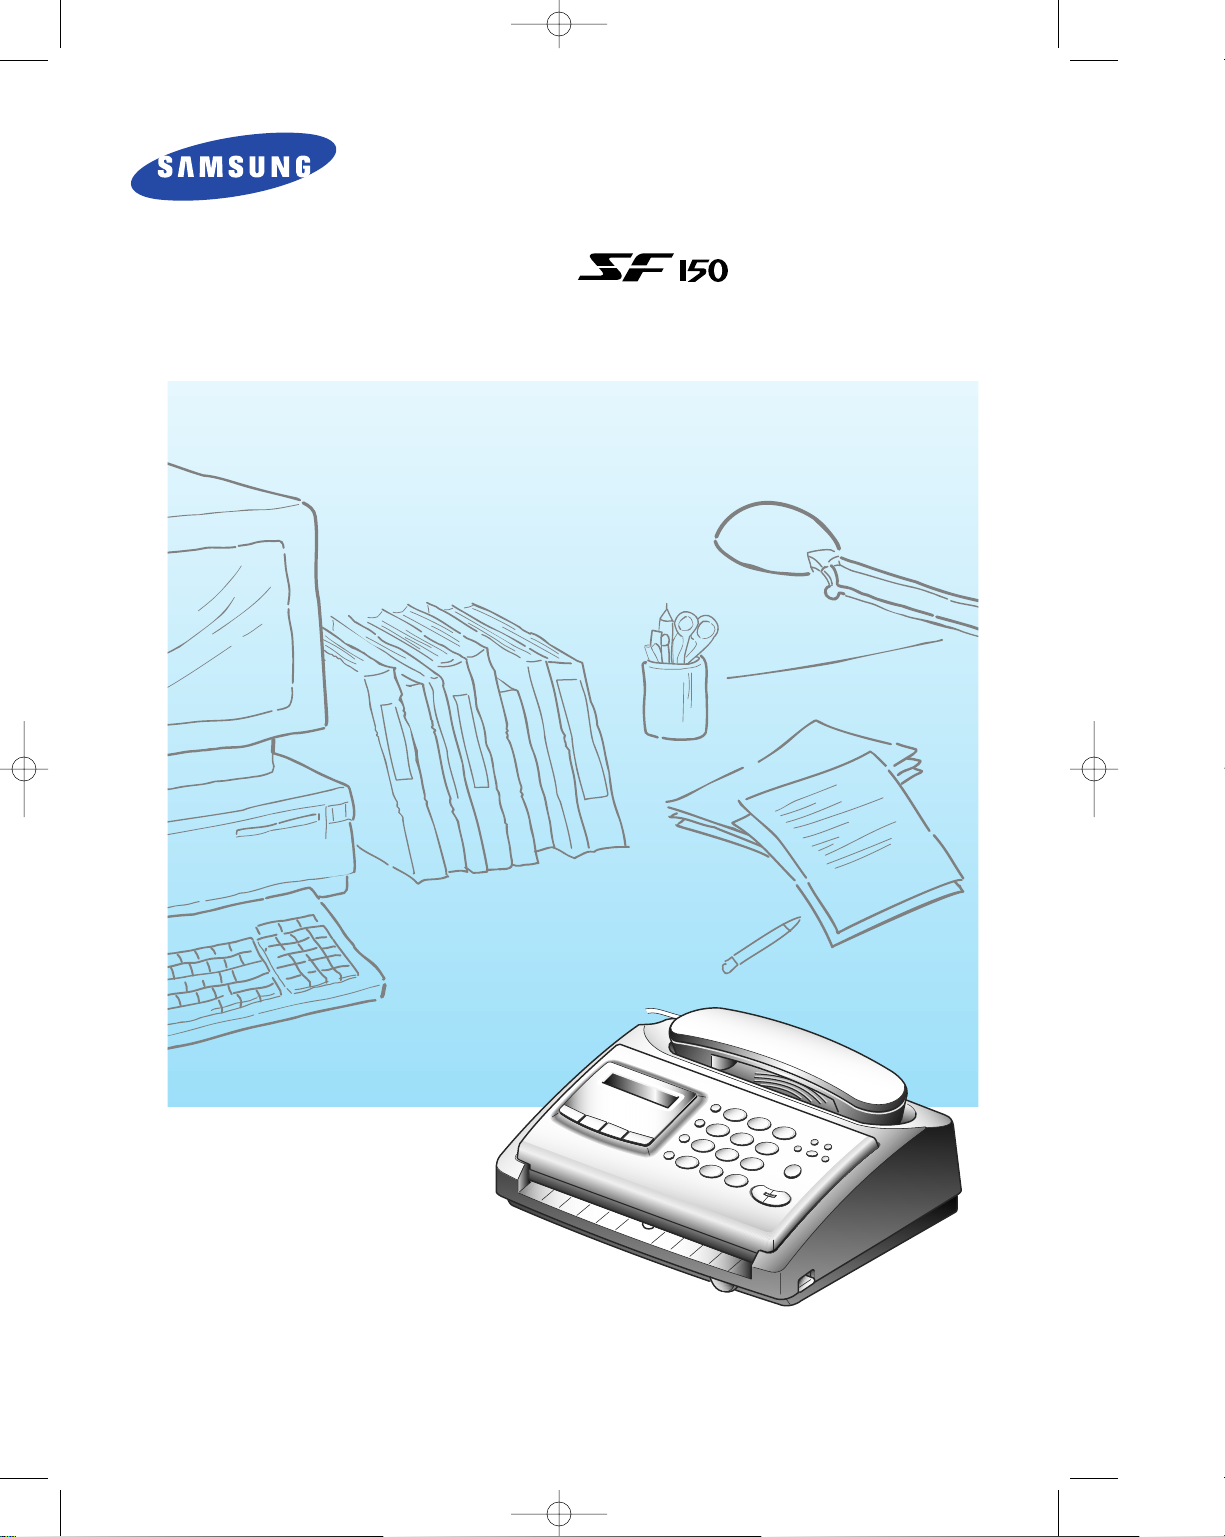
Thank You for Choosing Samsung!
Your SF 150 facsimile machine represents the very latest in technology. It is a full-featured, highperformance device, built to SamsungÕs strict quality standards- the highest in the industry. WeÕre
proud to offer you a product that will provide convenience and dependability for years to come.
Important Precautions and Safety Information
When using your Samsung fax machine, these basic safety precautions should always be followed to
reduce risk of fire, electric shock, and injury to persons:
1. Read and understand all instructions.
2. Use common sense whenever operating electrical appliances.
3. Follow all warnings and instructions marked on the product and in the literature accompanying
the product.
4. If an operating instruction appears to conflict with safety information, heed the safety information.
You may have misunderstood the operating instruction. If you cannot resolve the conflict, contact
any SAMSUNG sales or service representative for assistance.
5. Unplug your SAMSUNG fax machine from the AC wall socket and telephone jack before cleaning.
Do not use liquid or aerosol cleaners. Use only a damp cloth for cleaning.
6. Do not place your SAMSUNG fax machine on an unstable cart, stand, or table. The product may
fall, causing serious damage.
7. Your SAMSUNG fax machine should never be placed on, near, or over a radiator, heater, air
conditioner, or ventilation duct.
8. Do not allow anything to rest on the power or telephone cords. Do not locate your SAMSUNG fax
machine where the cords will be abused by persons walking on them.
9. Do not overload wall outlets and extension cords as this can diminish performance, and may result
in the risk of fire or electric shock.
10. Do not allow pets to chew on the AC power or telephone cords.
11. Never push objects of any kind into your SAMSUNG fax machine through case or cabinet
openings as they may touch dangerous voltage points creating a risk of fire or shock. Never spill
liquid of any kind on or into your SAMSUNG fax machine.
12. To reduce the risk of electric shock, do not disassemble your SAMSUNG fax machine. Take it to a
qualified service technician when repair work is required. Opening or removing covers may
expose you to dangerous voltages or other risks. Incorrect reassembly could cause electric shock
when the unit is subsequently used.
13. Unplug this unit from the telephone jack and AC wall outlet, and refer servicing to qualified
service personnel under the following conditions:
¥ When any part of the AC power cord, plug, or connecting cable is damaged or frayed.
¥ If liquid has been spilled into the product.
¥ If the product has been exposed to rain or water.
¥ If the product does not operate properly after instructions have been followed.
¥ If the product has been dropped, or the cabinet appears damaged.
¥ If the product exhibits a sudden and distinct change in performance.
14. Adjust only those controls that are covered by the operating instructions. Improper adjustment of
other controls may result in damage, and will often require extensive work by a qualified
technician to restore the product to normal operation.
Ch-1 3/25/98 6:09 PM Page 1
Page 4

15.Avoid using your SAMSUNG fax machine during a lightning storm. There may be a remote risk
of electric shock from lightning. If prudent, unplug the AC power and telephone cords for the
duration of the lightning storm.
16.This product contains a recyclable battery. At the end of its useful life, under various state and
local laws, it may be illegal to dispose of this battery into the municipal waste stream. Check with
your local solid waste officials for details regarding recycling options or proper disposal.
17.Never dispose of batteries or battery packs in a fire. There is a serious risk of explosion and/or
the release of highly toxic chemicals.
18.Do not use the machineÕs telephone to report a gas leak if you can smell gas near the machine.
Normal operation of any telephone can cause an explosion if it occurs in a heavy concentration of gas.
19.SAVE THESE INSTRUCTIONS.
In Case of Interference
In normal operation, your SAMSUNG fax machine produces and uses radio-frequency energy. In
some cases, this can cause interference to other electronic equipment. Part 15 of the FCC rules
establishes guidelines limiting the amount of radio-frequency energy which may be produced by
electronic equipment. Tests have proven that your Samsung FAX machine meets or exceeds these
guidelines, and is classified a ÒClass B Digital DeviceÓ for operation in a residential environment.
When installed and operated according to instructions, your SAMSUNG fax machine should not
cause interference to the types of equipment expected to be found in a normal residential
environment.
Unauthorized changes or modifications could void the userÕs authority to operate the equipment.
In the event your SAMSUNG fax machine appears to cause interference to other electronic
equipment, it can often be easily remedied. First determine if the source of interference really is your
FAX machine. To do this, turn its power off and on while observing the equipment experiencing the
interference. If the interference disappears when you turn the FAX machine off, the following steps
can be very effective in correcting interference problems:
¥ Connect the FAX machine to an AC outlet which is on a different circuit breaker from the
equipment experiencing interference.
¥ Increase the distance between the FAX machine and the equipment experiencing interference.
¥ Cable TV amplifiers and splitters are extremely prone to interference. Be certain that they are as
far as possible from the FAX machine and its AC power and telephone cords.
¥ Replace Òtwin leadÓ antenna wire with shielded coaxial cable, and use proper connectors and
adaptors.
¥ Turn or relocate the receiving antenna. In most cases this is easily done by simply moving a
radio. A TV antenna may need to be re-oriented or installed in another area of the building.
¥ Consult your dealer, a reputable radio/TV technician, or an Amateur Radio Operator* for help.
*To locate an Amateur Radio Operator in your area, contact The American Radio Relay League, 610 Main St., Newington, CT 06111.
Ch-1 3/25/98 6:09 PM Page 2
Page 5

Fax Branding
The Telephone Consumer Protection Act of 1991 makes it unlawful for any person to use a computer
or other electronic device to send any message via a telephone facsimile machine unless such
message clearly contains in a margin at the top or bottom of each transmitted page or on the first
page of the transmission the following information:
(1) the date and time of transmission
(2) identification of either business, business entity or individual sending the message; and
(3) telephone number of either the sending machine, business, business entity or individual.
See page 2.6 for instructions on how to enter this information into your Samsung FAX machineÕs
memory.
The Telephone Company may make changes in its communications facilities, equipment operations,
or procedures where such action is reasonably required in the operation of its business and is not
inconsistent with the rules and regulations in FCC Part 68. If such changes can be reasonably
expected to render any customer terminal equipment incompatible with telephone company
communications facilities, or require modification or alteration of such terminal equipment, or
otherwise materially affect its use or performance, the customer shall be given adequate notice in
writing, to allow the customer an opportunity to maintain uninterrupted service.
Telephone Company Information
FCC IDENTIFICATION NUMBER
The Ringer Equivalence Number and FCC Registration Number for this equipment may be found on
the label located on the bottom or rear of the machine. In some instances you may need to provide
these numbers to the telephone company.
RINGER EQUIVALENCE NUMBER
The Ringer Equivalence Number (REN) is a measure of the electrical load placed on the telephone
line, and is useful for determining whether you have ÒoverloadedÓ the line. Installing several types
of equipment on the same telephone line may result in problems making and receiving telephone
calls, especially ringing when your line is called. The sum of all Ringer Equivalence Numbers of the
equipment on your telephone line should be less than five in order to assure proper service from the
telephone company. In some cases, a sum of five may not be usable on your line. If any of your
telephone equipment is not operating properly, you should immediately remove it from your
telephone line, as it may cause harm to the telephone network.
WARNING:
FCC Regulations state that changes or modifications to this equipment not expressly approved by the
manufacturer could void the userÕs authority to operate this equipment.
In the event that terminal equipment causes harm to the telephone network, the telephone company
should notify the customer that service may be stopped. However, where prior notice is impractical,
the company may temporarily cease service, providing that they:
a) Promptly notify the customer.
b) Give the customer an opportunity to correct the equipment problem.
c) Inform the customer of the right to bring a complaint to the Federal Communication
Commission pursuant to procedures set out in FCC Rules and Regulations Subpart E of Part 68.
Ch-1 3/25/98 6:09 PM Page 3
Page 6

You should also know that:
¥ Your Samsung FAX machine is not designed to be connected to a digital PBX system.
¥ Special features, such as ÒCall WaitingÓ, may interrupt FAX service, and we suggest that these
services not be installed on the FAX line.
¥ If you intend to use a computer modem or fax modem on the same phone line as your FAX
machine, you may experience transmission and reception problems with all the equipment. It is
recommended that no other equipment, except for a regular telephone, share the line with your
FAX machine.
¥ If your area experiences a high incidence of lightning or power surges, we recommend that you
install surge protectors for both the power and the telephone lines. Surge protectors can be
purchased from your dealer or telephone and electronic specialty stores.
¥ When programming emergency numbers and/or making test calls to emergency numbers, use a
non-emergency number to advise the emergency service dispatcher of your intentions. The
dispatcher will give you further instructions on how to actually test the emergency number.
¥ This equipment may not be used on coin service or party lines.
¥ This telephone provides magnetic coupling to hearing aids.
¥ You may safely connect this equipment to the telephone network by means of a standard
modular jack, USOC RJ-11C.
Ch-1 3/25/98 6:09 PM Page 4
Page 7

C
HAPTER
1 Y
OURNEWMACHINE
Parts ..................................................................................................................................... 1.1
Familiarizing Yourself with Your New Machine .......................................................... 1.2
Front View ....................................................................................................................... 1.2
Rear View ........................................................................................................................ 1.3
Control Panel .................................................................................................................. 1.4
C
HAPTER
2 I
NSTALLATION ANDSETUP
Choosing a Location ......................................................................................................... 2.1
Making the Connections .................................................................................................. 2.1
Installing Paper .................................................................................................................. 2.2
Making a Copy .................................................................................................................. 2.3
Setting the Date and Time ............................................................................................... 2.4
Setting the Terminal ID (Your Name and Number) .................................................... 2.6
C
HAPTER
3 THEFAXM
ACHINE
Sending a Fax ..................................................................................................................... 3.1
Preparing a Document .................................................................................................. 3.1
Setting Resolution and Contrast................................................................................... 3.2
Loading a Document ..................................................................................................... 3.2
Dialing a Number .......................................................................................................... 3.3
Confirming the Transmission ....................................................................................... 3.4
Canceling Transmission ................................................................................................ 3.4
Receiving a Fax .................................................................................................................. 3.5
Reception Modes ............................................................................................................ 3.5
Receiving in FAX Mode ................................................................................................ 3.5
Receiving Manually (in TEL Mode) ............................................................................ 3.6
Receiving in AUTO Mode ............................................................................................ 3.7
Receiving in TAD Mode ................................................................................................ 3.7
Canceling Reception ...................................................................................................... 3.9
Using an Extension Telephone ..................................................................................... 3.9
Voice Request ................................................................................................................... 3.10
Sending a Voice Request ............................................................................................. 3.10
Answering a Voice Request ........................................................................................ 3.10
Polling ............................................................................................................................... 3.11
C
HAPTER
4 S
PECIALFEATURES
Automatic Dialing ............................................................................................................. 4.1
Storing a Number for One-Touch Dialing ................................................................. 4.1
Using the Keypad to Enter Name ............................................................................... 4.2
Keypad Character Assignments .................................................................................. 4.3
Storing a Number for Speed Dialing .......................................................................... 4.4
Dialing One-Touch Number ......................................................................................... 4.5
Dialing Speed Dial Number ......................................................................................... 4.6
Redial/Pause ..................................................................................................................... 4.7
TONE .................................................................................................................................. 4.8
Flash .................................................................................................................................... 4.8
User Options ...................................................................................................................... 4.9
Setting an Option ........................................................................................................... 4.9
Options You Can Choose ............................................................................................ 4.10
User Reports ..................................................................................................................... 4.11
Printing Reports ........................................................................................................... 4.12
Clearing Memory ............................................................................................................ 4.13
Alarm ................................................................................................................................ 4.14
CONTENTS
C
ONTENTS
1
Ch-1 3/25/98 6:09 PM Page 5
Page 8

CONTENTS
C
HAPTER
5 C
ARE ANDMAINTENANCE
Clearing Jams ..................................................................................................................... 5.1
Paper Jams During Transmission ................................................................................ 5.1
Paper Jams During Reception ...................................................................................... 5.2
Cleaning the Roller and Thermal Head ......................................................................... 5.4
Purchasing and Storing Paper ......................................................................................... 5.5
Understanding LCD Error Messages ............................................................................. 5.6
Specifications ..................................................................................................................... 5.7
2 C
ONTENTS
Ch-1 3/25/98 6:09 PM Page 6
Page 9

Chapter One
YOUR NEW MACHINE
Ch-1 3/25/98 6:09 PM Page 7
Page 10
Chapter One
YOUR NEW MACHINE
This chapter will familiarize you with your new fax machine.
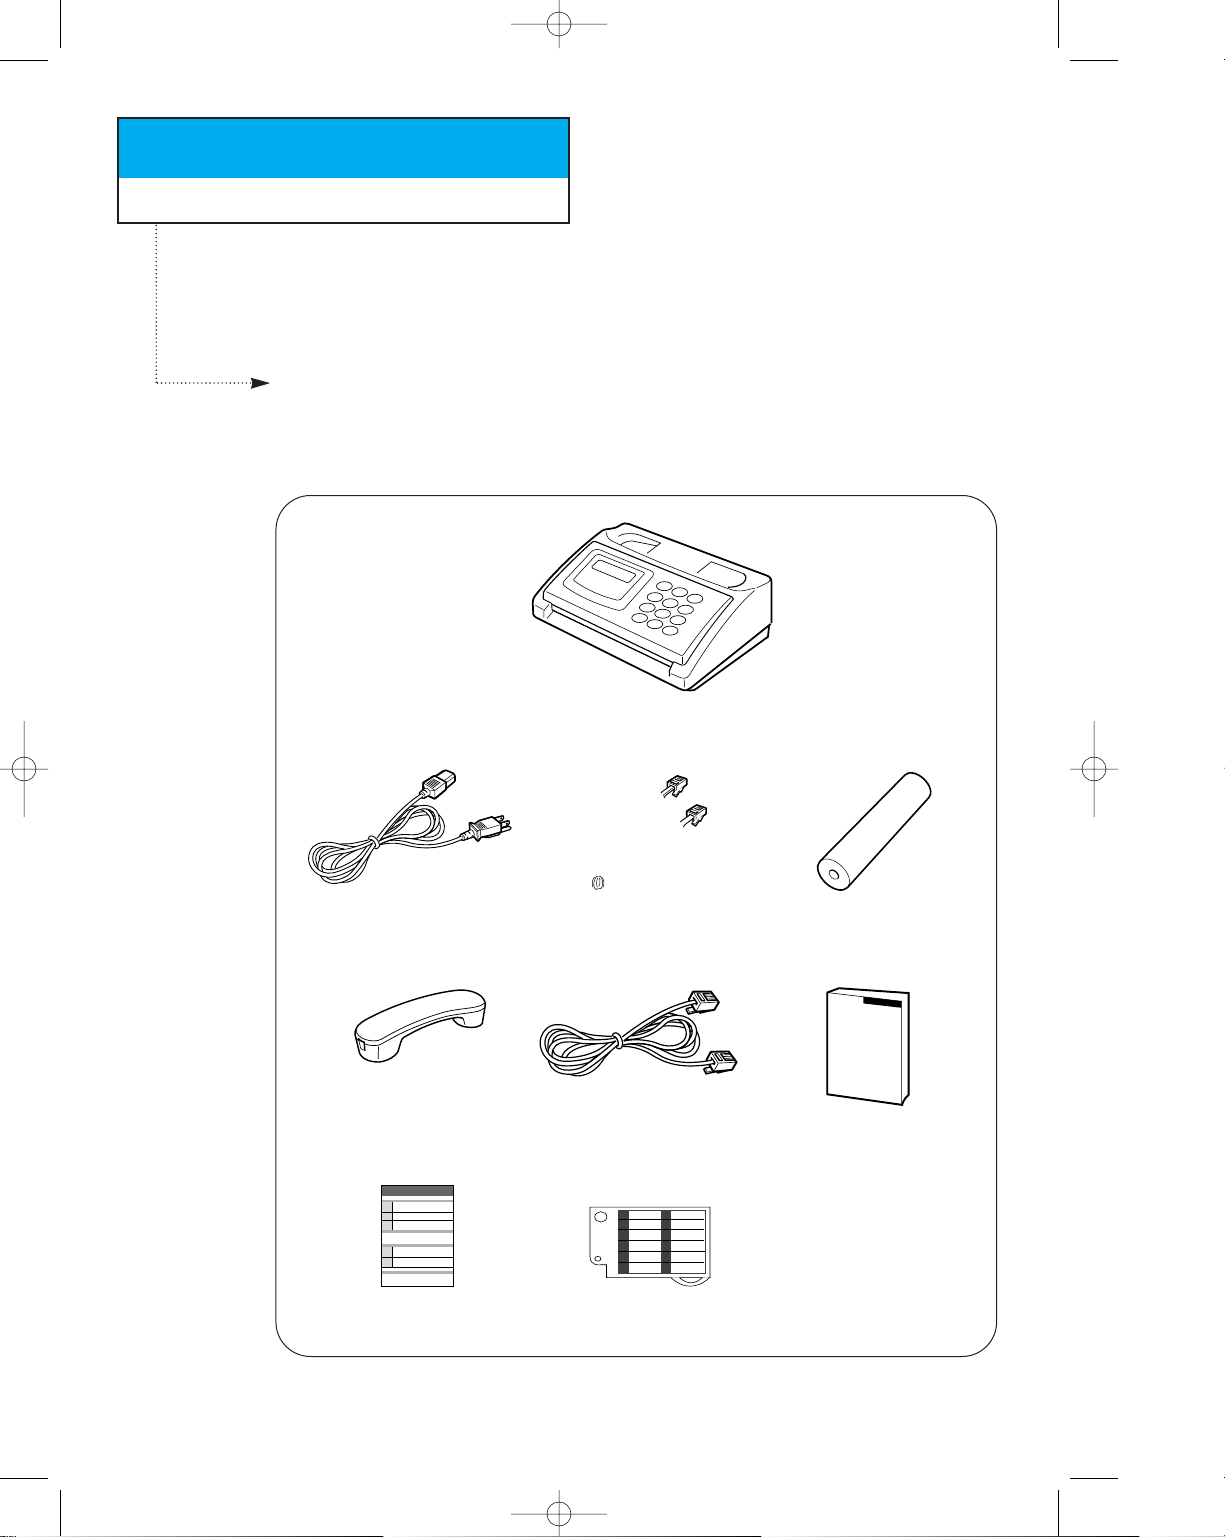
Parts
Once you have unpacked your fax machine, check to make sure that you have all the
parts shown here. If any piece is missing or broken, call your dealer.
C
HAPTER ONE : YOUR NEW MACHINE
1.1
000000000000000000000000000
0
0
0
0
0
0
0
0
0
0
0000000000000000000000000000
0
0
0
0
0
0
0
0
0
0
0
0
Machine
Handset
Telephone line cord
Power cord
Coiled Handset cord
This manual
Quick reference guide Name card
Thermal paper roll
The power and telephone cords shown in this manual may differ depending on the
country of sale.
Ch-1 3/25/98 6:09 PM Page 8
Page 11
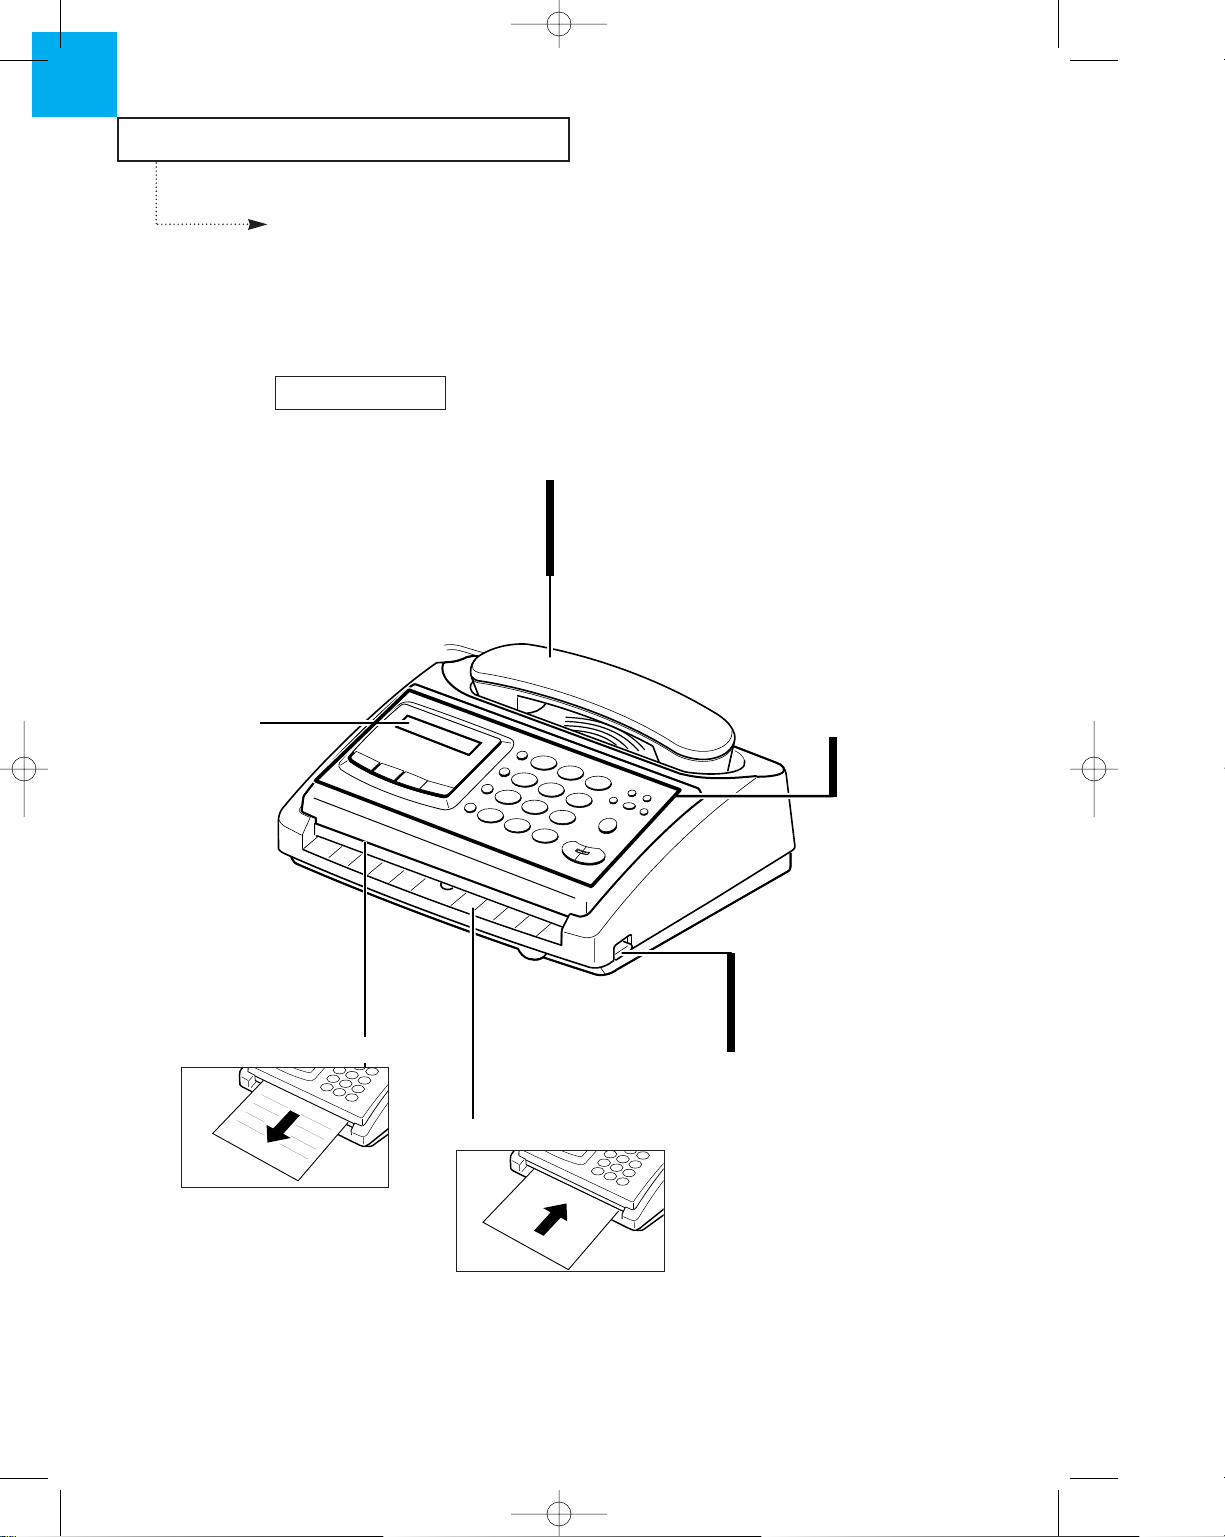
YOUR NEW MACHINE
1.2 C
HAPTER ONE : YOUR NEW MACHINE
1
Familiarizing Yourself with Your New
Machine
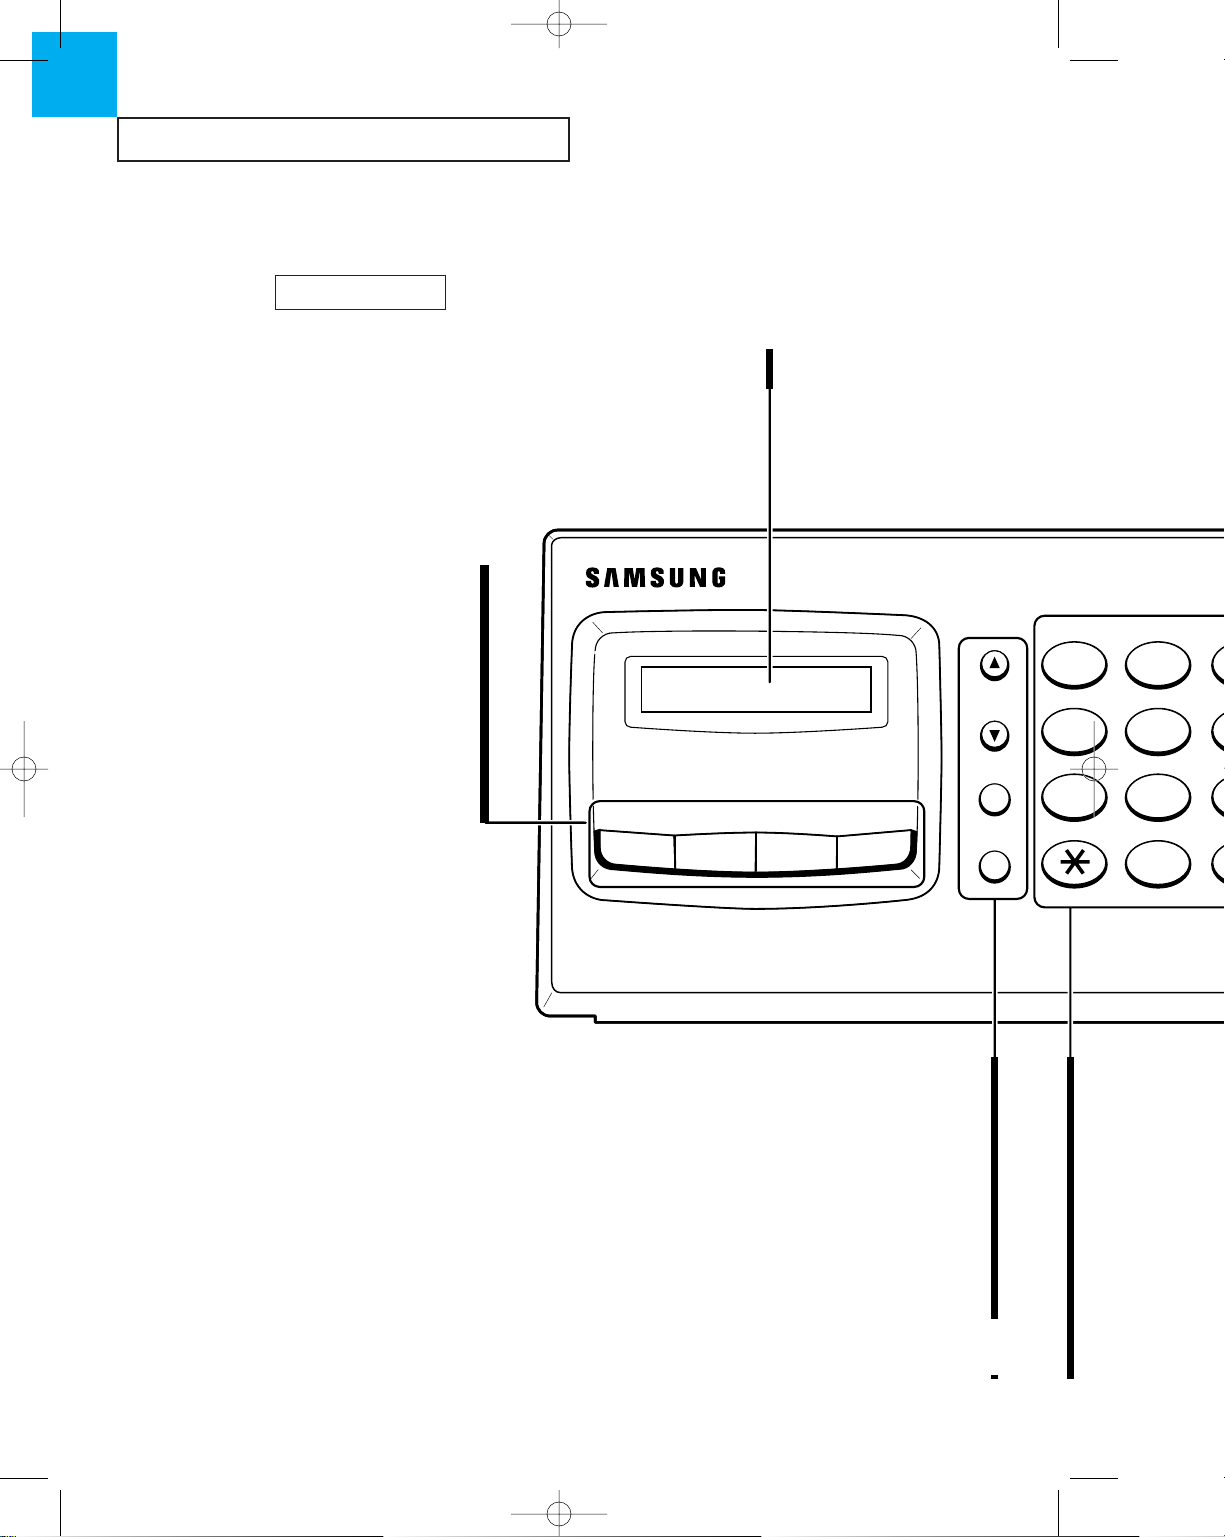
Take a moment to familiarize yourself with your new machine by looking at the pictures
on the next few pages.
Handset
Use this as you would use
a telephone handset.
Feed the document into
the slot to fax or copy.
Cover Release Lever
Slide upward to open
the paper cover.
Control Panel
See page 1.4
Front View
LCD Display
Document Feeder
Recording Paper Exit
Copy and fax printouts
exit from this slot.
Ch-1 3/25/98 6:09 PM Page 9
0
0
0
0
0
0
0
0
0
0
0
0
0
0
0
0
0
0
0
0
0
0
Page 12
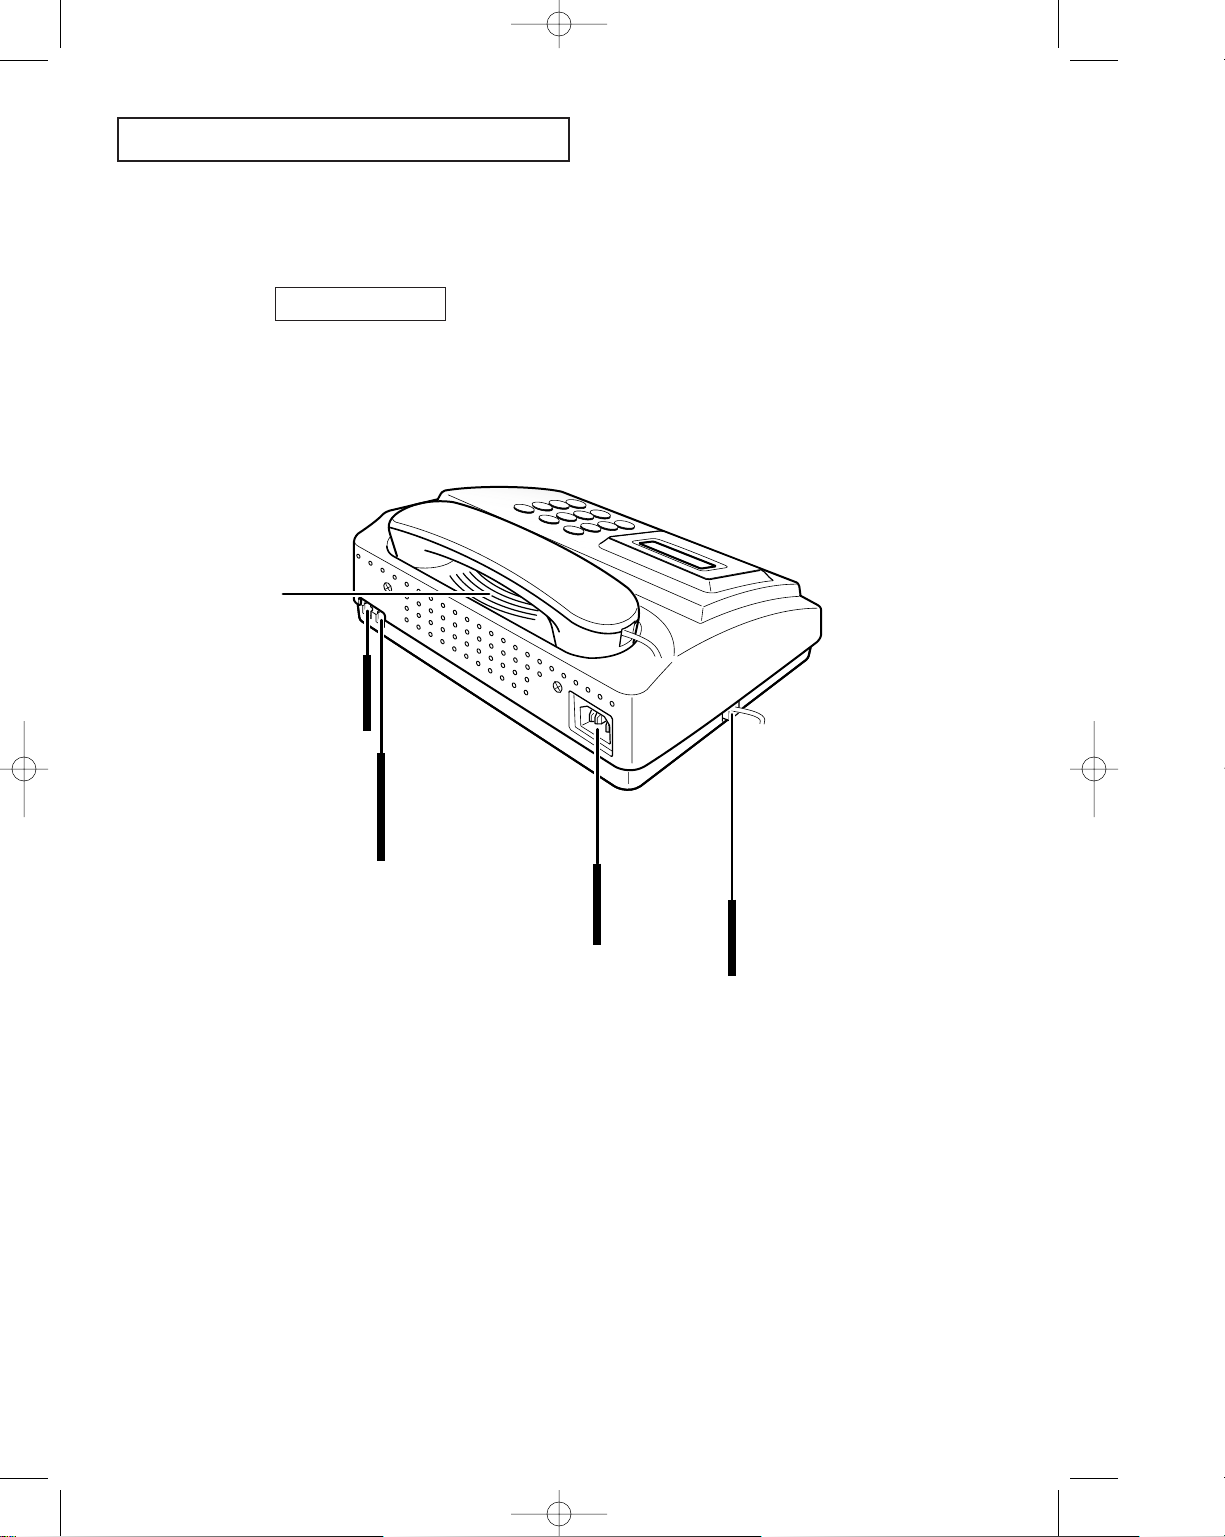
YOUR NEW MACHINE
C
HAPTER ONE : YOUR NEW MACHINE
1.3
Speaker
Rear View
AC Power Socket
The power cord connects
to this socket.
Phone Line Socket (LINE)
The telephone line cord
connects to this jack.
Handset Socket
This is where you connect
the handset to the machine.
0
0
0
0
0
0
0
0
0
0
0
0
0
0
0
0
0
0
0
0
0
0
0
0
0
0
0
0
0
0
0
0
0
0
0
0
0
0
0
0
0
0
0
0
0
0
0
0
0
Extension Socket (EXT)
(Present where applicable)
Connect a normal phone or
answering machine.
Ch-1 3/25/98 6:09 PM Page 10
Page 13
ABC
JKLGHI
TUVPQRS
Flash
Redial/
Pause
Scroll/
Volume
45
78
0
12
Menu
Resolution
Rcv. Mode
Speed Dial
YOUR NEW MACHINE
1.4 C
HAPTER ONE : YOUR NEW MACHINE
1
Speed Dial Button
Make calls and send documents by entering
a 2-digit number (01-30).
RCV. Mode Button
Use to choose the receive mode you want to
use. (TEL, FAX, TAD, AUTO)
Resolution Button
Use to choose the document resolution.
(STANDARD, FINE, SUPER FINE, PHOTO)
Menu Button
Use to choose various functions.
LCD Display
Displays information.
Scroll/Volume Button
Use to adjust the speaker volume, to scroll menu
in the function mode, or to move the blinking
line to the digit you want to edit.
Redial/Pause Button
Use to redial the last phone number you called.
You can also use it to add a pause
when entering a number in memory.
Flash Button
Use to transfer a call in a PABX
(Private Automatic Branch Exchange).
Control Panel
OPE 3/25/98 6:38 PM Page 2
Page 14
OHD/V.Req.
Start/
Copy
Stop
1
23
45
ABC DEF
JKLGHI MNO
TUV
Help
PQRS WXYZ
ial/
se
me
456
7 8 9
0
123
OHD/V.Req.
This button allows you to dial a number without
picking up the handset. You can also use it to
initiate a voice request after sending or receiving
documents.
Number Keypad
Use to dial numbers manually.
[ Button
Press to temporarily switch from pulse to tone dialing.
Help Button
Press to print out the Help list. The Help list shows the
machine’s basic functions and commands. Use as a
quick reference guide.
Start/Copy Button
Use to start a job, make copies, or print reports.
Stop Button
Use to stop the machine in the middle of a job. It
also clears an error display and ejects your original
documents.
YOUR NEW MACHINE
C
HAPTER ONE : YOUR NEW MACHINE
1.5
One-Touch Dial Buttons
Make calls and send documents by
simply pressing one button.
OPE 3/25/98 6:38 PM Page 3
Page 15

Chapter Two
INSTALLATION AND SETUP
Ch-2 3/25/98 6:11 PM Page 1
Page 16
Chapter Two
INSTALLATION AND SETUP
Please review the safety information at the front of this manual, then follow the
directions in this chapter to connect your machine and set it up for use.
Choosing a Location
To help guarantee trouble-free operation of your machine, place it in a spot where:
¥ It is not in direct sunlight or in excessive humidity.
¥ It is not too close to heating or air conditioning vents.
¥ Its ventilation openings arenÕt blocked.
¥ It is at least 4 inches away from other objects.
¥ Its cords wonÕt get in the way.
¥ It canÕt be easily knocked off a table or dropped.
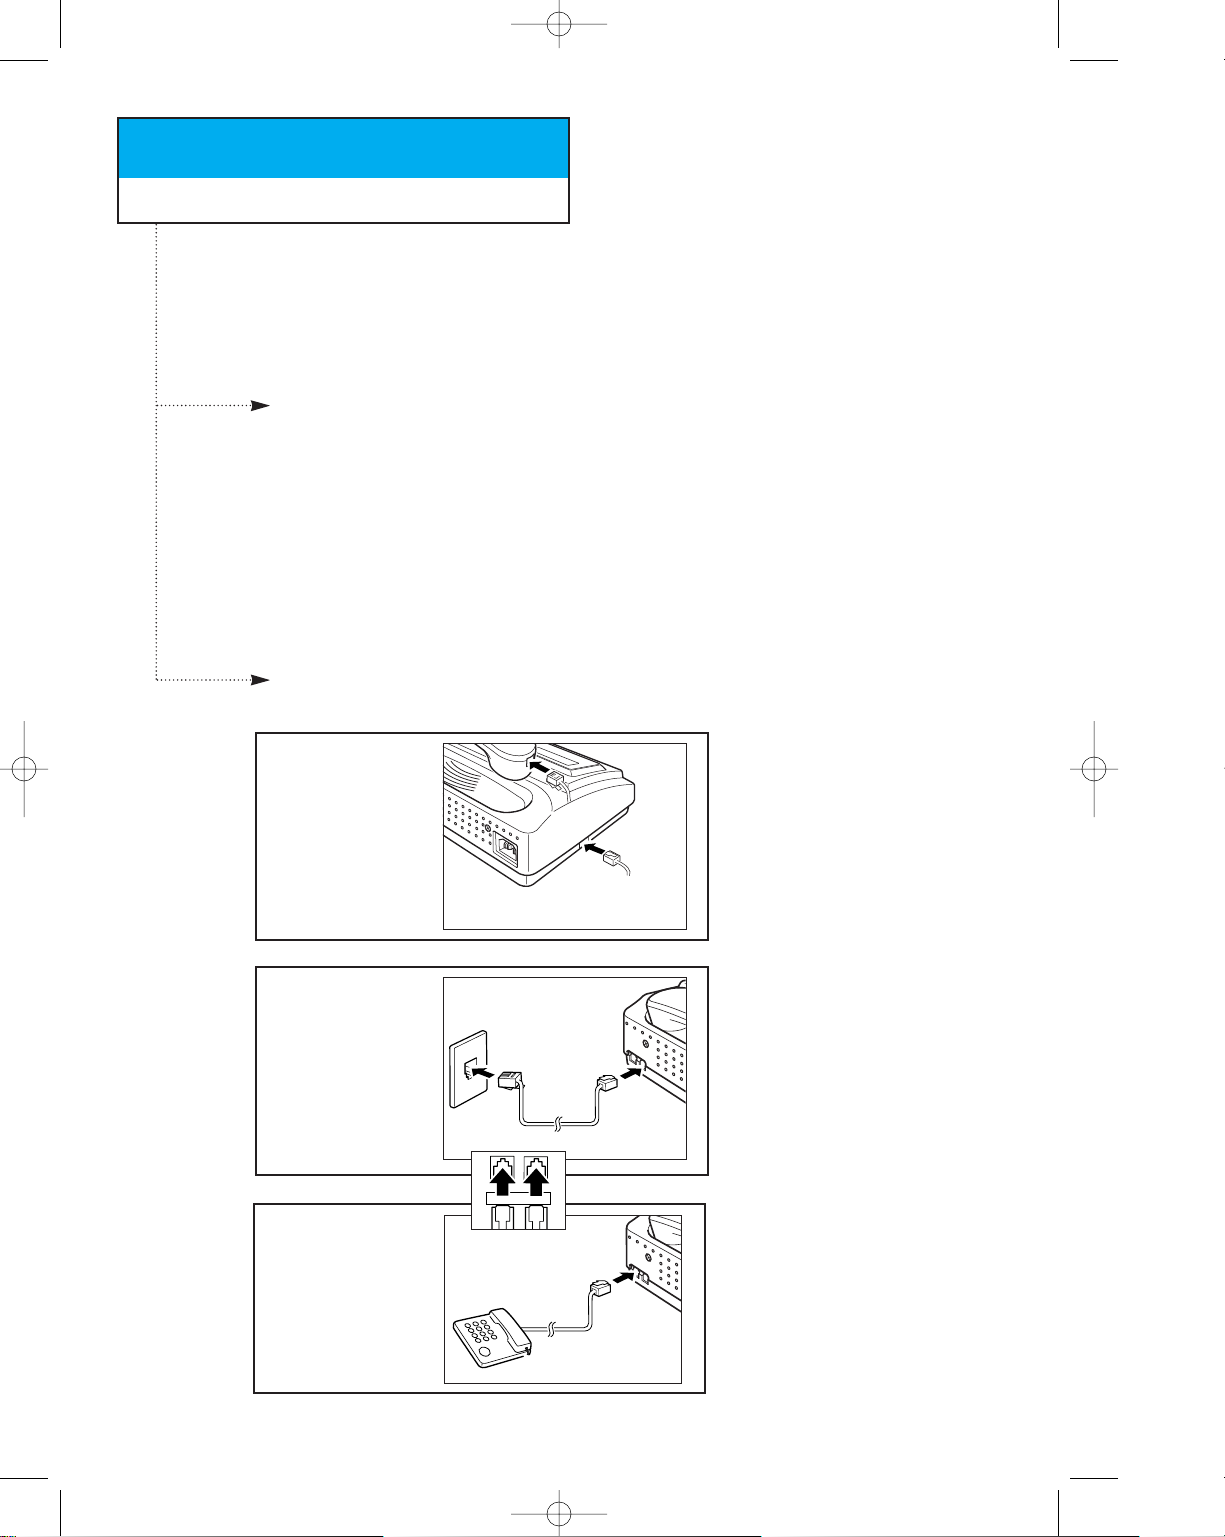
Making the Connections
C
HAPTER TWO : INSTALLATION AND SETUP
2.1
1
Connect the coiled
handset cord.
0
0
0
0
0
0
0
0
0
0
0
0
0
0
0
0
0
0
0
0
0
0
0
0
0
0
0
0
0
0
0
0
0
0
0
0
0
0
0
0
0
0
0
0
0
0
0
0
0
0
0
0
0
0
0
0
0
0
0
0
0
0
0
0
2
Connect the telephone
line.
Ã
Plug the coiled cord into the
HANDSET jack on the left side of
the machine.
Ã
Plug one end of the telephone
line cord into the TEL LINE jack and
the other end into a standard
telephone wall jack.
3
Connect an extension
phone or answering
machine, if desired.
(Skip this step if EXT LINE
jack is not present.)
0
0
0
0
0
0
0
0
0
0
0
0
0
0
0
0
0
0
0
0
0
0
0
0
0
0
0
Ã
Plug the cord of your extension
telephone or answering machine into
the EXT LINE jack on the back of the
machine.
TEL LINE
EXT. LINE
Ch-2 3/25/98 6:11 PM Page 2
Page 17
INSTALLATION AND SETUP
2.2 C
HAPTER TWO : INSTALLATION AND SETUP
2
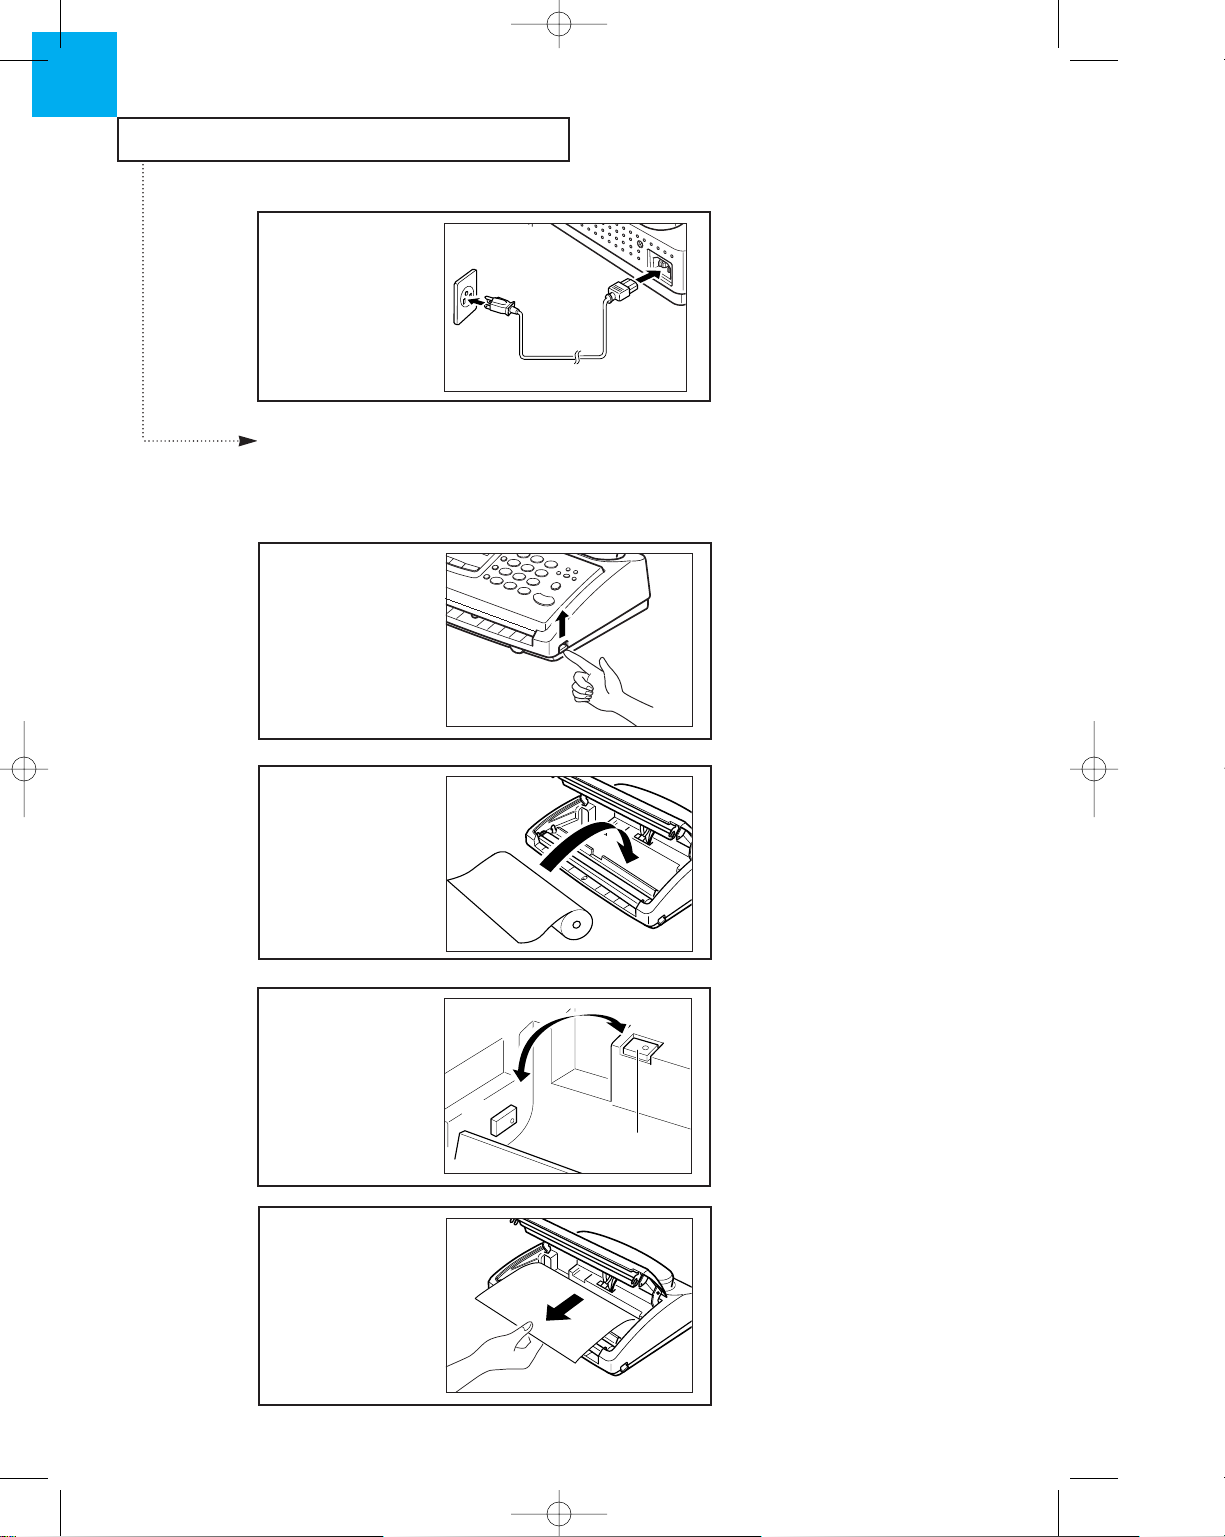
1
Open the cover by lifting
the release lever on the
side of the machine.
2
Insert the paper roll.
0
0
0
0
0
0
0
0
0
0
0
0
0
0
0
0
0
0
0
0
0
0
0
0
0
0
0
0
0
0
0
0
0
0
0
0
0
0
0
0
0
0
0
0
0
0
0
0
0
3
Install the spacer, if
necessary.
A
B
SPACER
Installing Paper
Your machine must have a roll of paper installed in order to operate. Find the paper roll
included with the parts, and follow the directions below:
Ã
If there is an adhesive sticker
sealing the paper roll, remove it
completely.
The outer diameter of the paper roll
should not exceed 2.05 in/52mm.
(total length of the paper roll is
approximately 98.4ft/30m.)
Ã
If your paper roll is 8.5
in/216mm wide (letter size), the
spacer should be in position ÒAÓ.
For narrow paper (A4 size, 8.27
in/210mm), place the spacer in
position ÒBÓ, pushing its pins into
two small holes on the left-hand
wall of the paper compartment.
4
Pull the paper end past
the edge of the machine
case.
0
0
0
0
0
0
0
0
0
0
0
0
0
0
0
0
0
0
0
0
0
0
0
0
0
0
0
0
0
0
0
0
0
0
0
0
0
0
0
0
0
0
0
0
0
0
0
0
0
Ã
Be sure the paper exits from the
top of the roll as shown.
4
Connect the AC power
cord.
Ã
Plug one end of the cord into the
back of the machine and the other
end into a standard grounded AC
power outlet.
Ch-2 3/25/98 6:11 PM Page 3
Page 18
INSTALLATION AND SETUP
C
HAPTER TWO : INSTALLATION AND SETUP
2.3
Ã
For information on preparing a
document, see page 3.1.
1
Turn the document face
down and slide it into the
feeder slot.
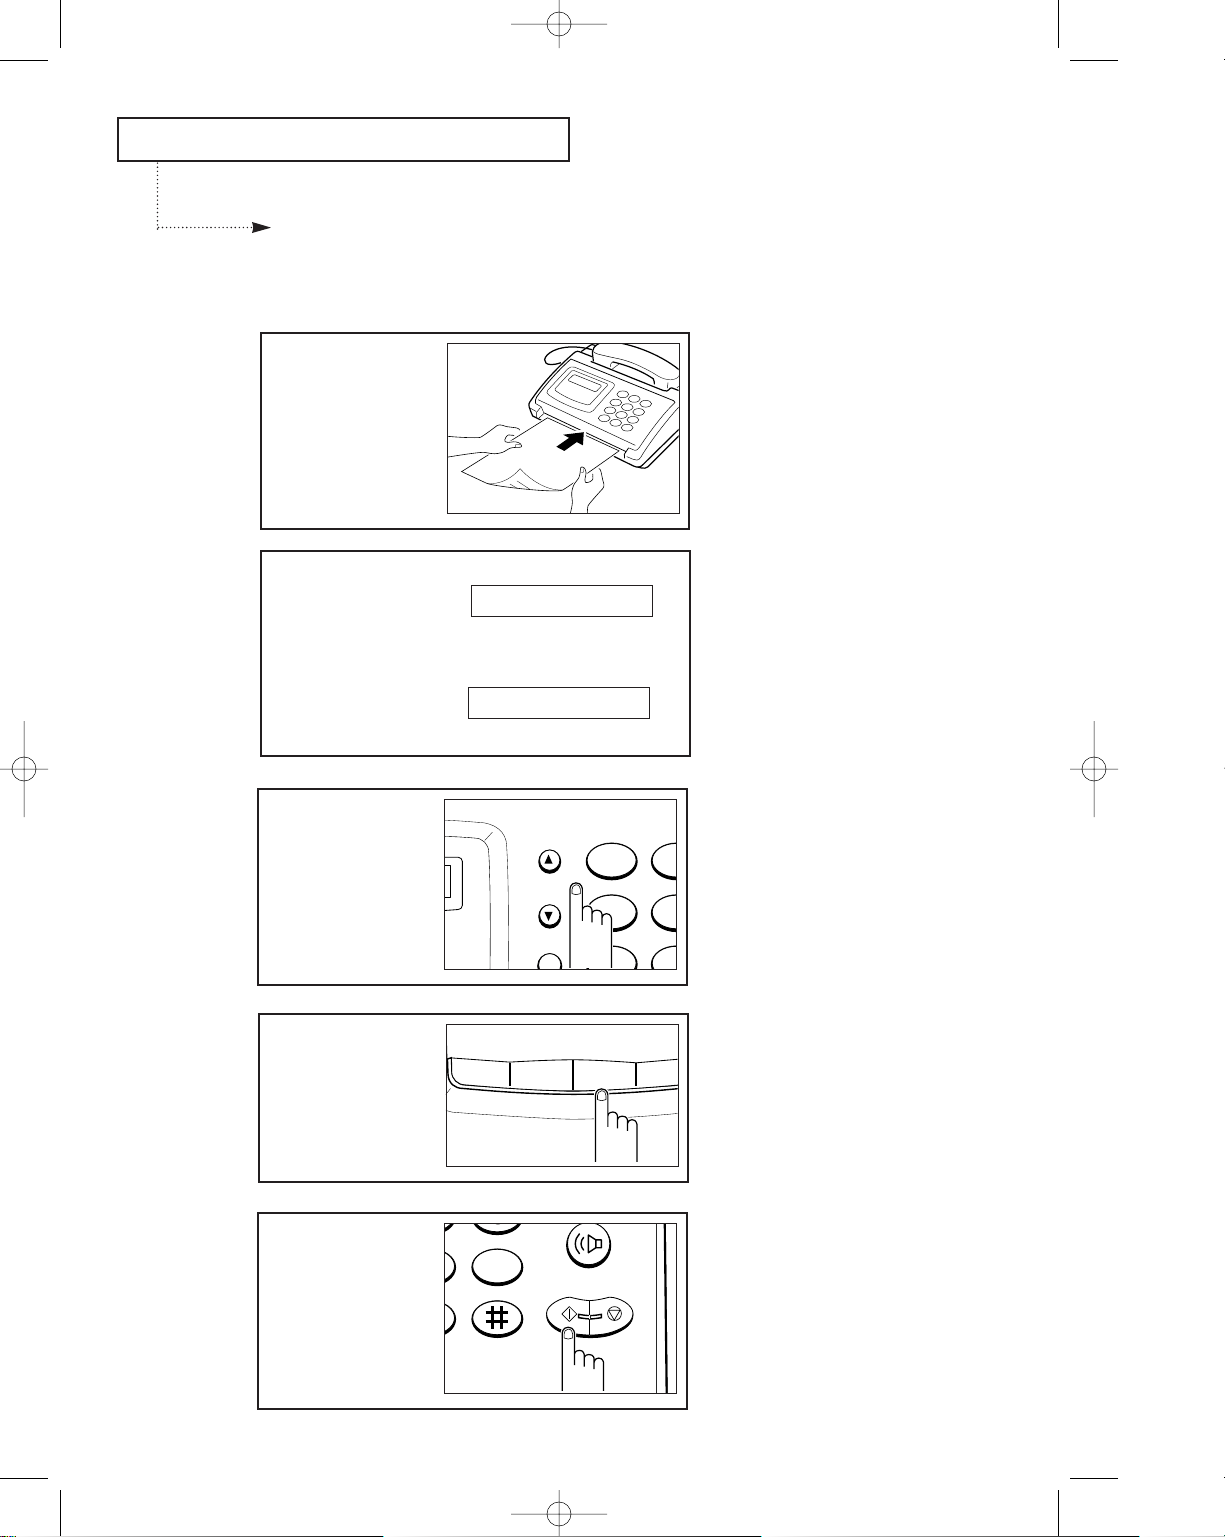
Making a Copy
Copy a document to make sure that the machine is working properly.
The LCD window briefly
displays the message
ÔDOCUMENT LOADINGÕ,
then prompts you to
select the proper
contrast.
DOCUMENT LOADING
Ã
For more information on contrast,
see page 3.2.
The print resolution is automatically set
to FINE when making a copy.
LIGHT AUTO DARK
2
Select the proper
contrast by pressing
¹
or .
AB
JKGHI
TUPQRS
45
12
Redial/
Pause
Scroll/
Volume
4
Press Start/Copy.
Start/
Copy
Stop
WXYZ
Help
6
9
3
If required, press
Resolution until you find
the desired setting.
Menu
Resolution
Rcv. Mode
Speed Dial
Ã
Each time you press Resolution the
selected mode appears in the LCD.
Ch-2 3/25/98 6:11 PM Page 4
Page 19

INSTALLATION AND SETUP
2.4 C
HAPTER TWO : INSTALLATION AND SETUP
2
1
Press Menu.
Flash
Pause
Menu
Resolution
2
Press 2.
ABC DEF
JKLGHI MNO
TUVPQRS WXYZ
456
123
/
/
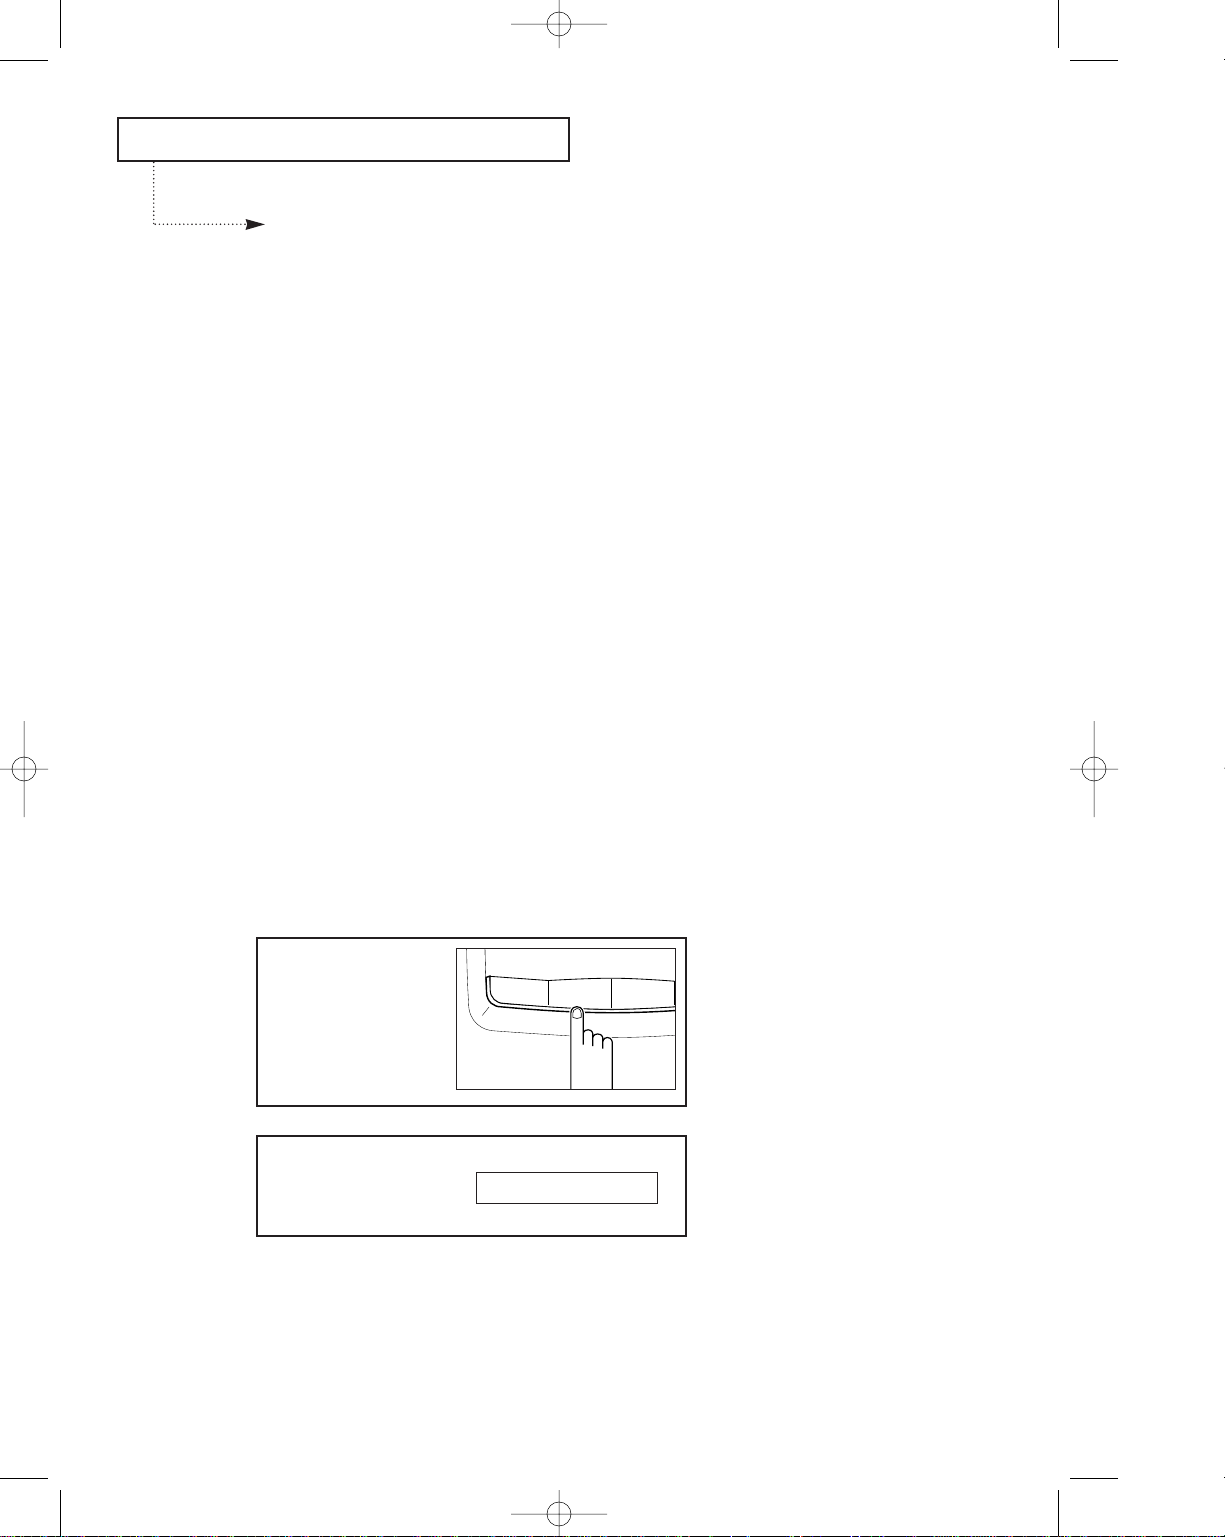
Setting the Date and Time
The LCD window displays
ÔDATE & TIMEÕ.
2. DATE & TIME
3
Press Start/Copy.
Start/
Copy
Stop
Help
9
The LCD prompts you to
choose a date format.
TYPE? [EUR] USA
Ã
Europe: Day-Month-Year
USA: Month-Day-Year
4
Choose the date format
by using ¹or .
A
JGHI
TPQRS
45
12
Redial/
Pause
Scroll/
Volume
Ch-2 3/25/98 6:11 PM Page 5
Page 20

INSTALLATION AND SETUP
C
HAPTER TWO : INSTALLATION AND SETUP
2.5
5
Press Start/Copy to save
the mode chosen.
Start/
Copy
Stop
Help
9
6
Press ¹or to move
the blinking line under the
number you want to
change.
A
JGHI
TPQRS
4
1
Redial/
Pause
Scroll/
Volume
The LCD window displays
the date and time
previously set in the
chosen format.
06-15-97 10:30
7
Enter the correct number
by using the number
keypad.
OHD/V.Req
Start/
Copy
Stop
1
23
5
ABC DEF
JKLGHI MNO
TUVPQRS WXYZ
Help
456
7 8 9
0
123
Flash
Redial/
Pause
Scroll/
Volume
Ã
Month = 01~12
Day = 01~31
Year = 00~99 (From 1990 to 2089)
Hour = 00~23
Minute = 00~59
The machine uses 24-hour time format.
8
When the date and time
are correct, press
Start/Copy..
Start/
Copy
Stop
Help
Ã
If you enter a wrong number, use
¹ or to move the blinking line
under the number you want to correct,
then enter the correct number.
The LCD window displays
the date and time, then
returns to standby mode.
06-15 10:30 FAX
Ch-2 3/25/98 6:11 PM Page 6
Page 21

INSTALLATION AND SETUP
2.6 C
HAPTER TWO : INSTALLATION AND SETUP
2
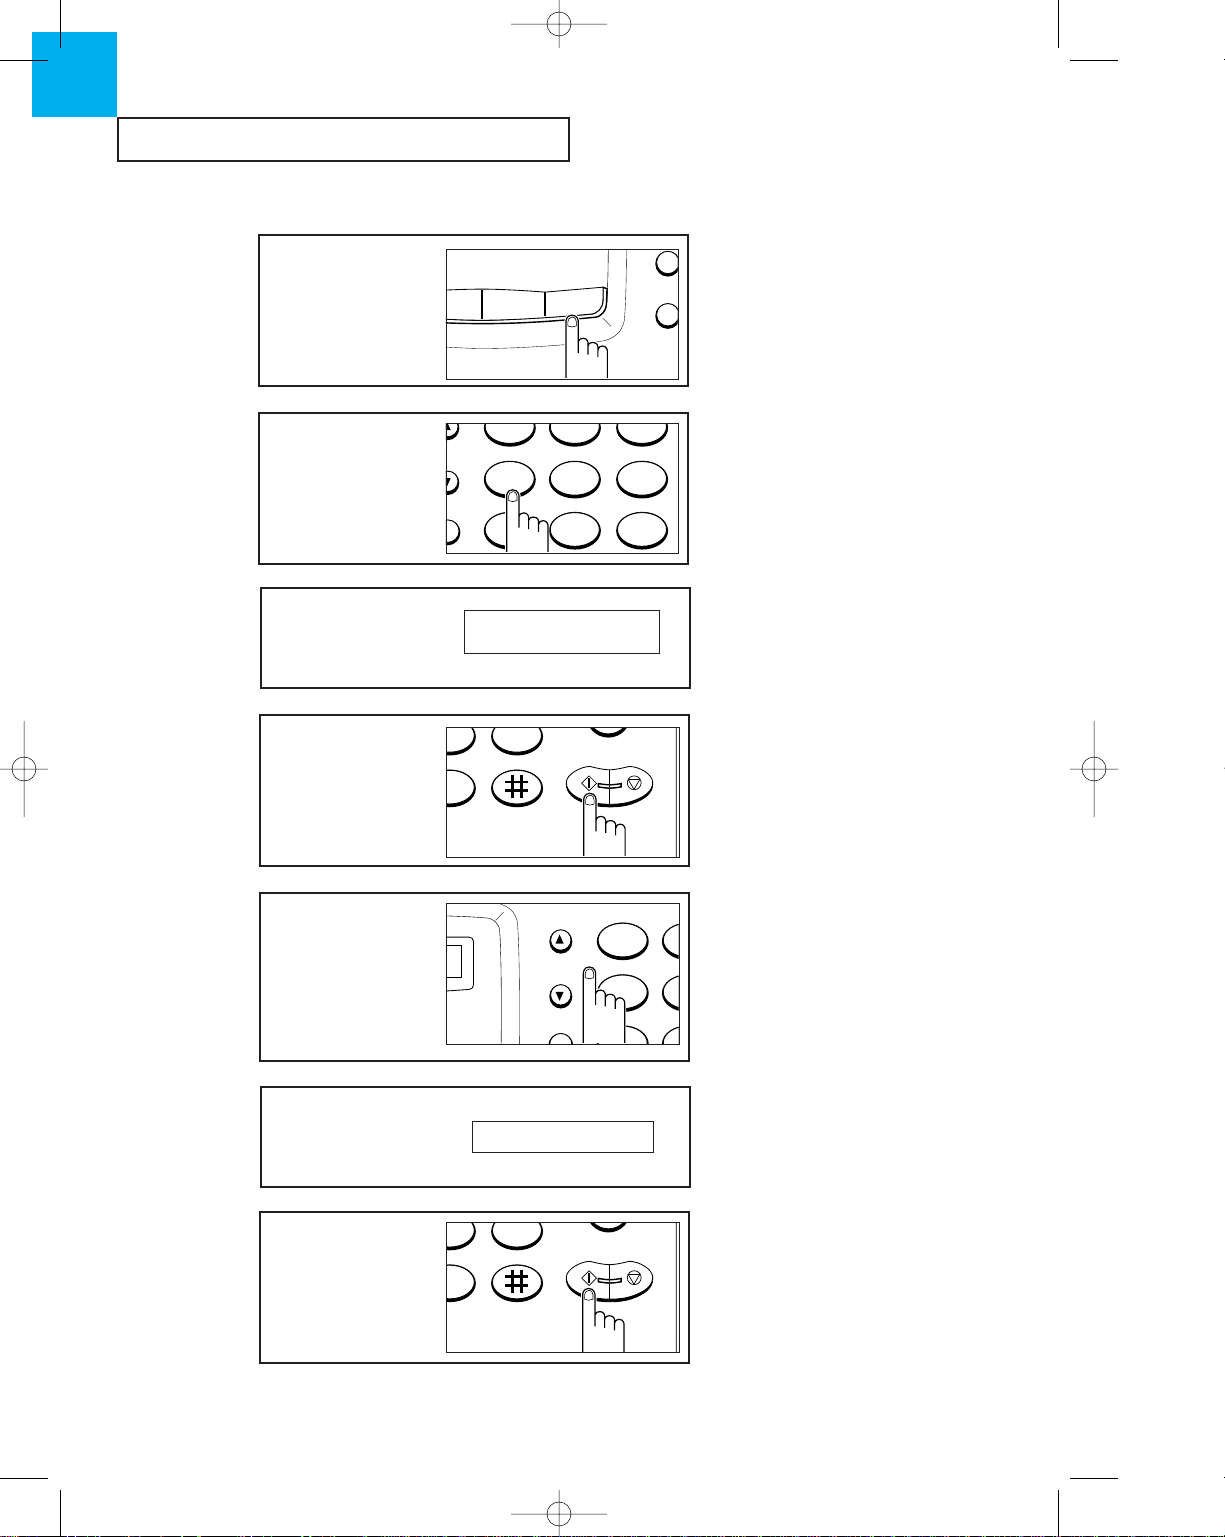
1
Press Menu.
Flash
Menu
Resolution
ode
2
Press 1.
ABC D
JKLGHI M
TUVPQRS W
45
12
Redial/
Pause
Scroll/
Volume
Setting the Terminal ID (Your Name and Number)
This terminal ID will print at the top of each page sent from your machine.
The LCD window displays
'TERM. ID'.
1. TERM. ID
3
Press Start/Copy.
Start/
Copy
Stop
Help
The LCD prompts you to
enter the telephone
number.
TEL.:
4
Using the number keypad,
enter the telephone
number of the line to
which your machine is
connected.
OHD/V.R
Start/
Copy
S
1
2
5
ABC DEF
JKLGHI MNO
TUVPQRS WXYZ
456
7 8 9
0
123
Flash
Redial/
Pause
Scroll/
Volume
Ã
You can include special characters
(space, hyphen, or plus sign) in the
number. To enter a space, press
Redial/Pause. To enter a hyphen (-),
press #. To enter plus symbol (+),
press
✽.
You can enter up to 20
digits.
TEL.:4602775_
Ch-2 3/25/98 6:11 PM Page 7
Page 22

INSTALLATION AND SETUP
C
HAPTER TWO : INSTALLATION AND SETUP
2.7
5
Press Start/Copy when
the number in the LCD is
correct.
Start/
Copy
Stop
Help
The machine prompts you
to enter your name.
NAME:
6
Press the number button
labeled with the letter
you want.
TUVPQRS WXYZ
Help
456
7 8 9
0
Ã
For information using the number
keypad to enter name, see page 4.2.
You can enter a total of up to 20
characters for the name.
The letter appears in the
LCD.
NAME:S
8
Press Start/Copy when
your name appears
correctly in the LCD.
Start/
Copy
Stop
Help
7
When the letter you want
appears in the LCD, press
the button labeled with
the next letter you want.
1
ABC DEF
JKLGHI MNO
456
123
Ã
Select additional letters in the same
way.
The letter appears in the
LCD.
NAME:SA
Ch-2 3/25/98 6:11 PM Page 8
Page 23

Chapter Three
THE FAX MACHINE
Ch-3 3/25/98 6:28 PM Page 1
Page 24

Chapter Three
THE FAX MACHINE
C
HAPTER THREE : THE FAX MACHINE
3.1
In this chapter, you will learn how to send and receive fax documents, use the four fax
reception modes, and the voice request feature.
Sending a Fax
Preparing a Document
Here are some things you can do to improve the quality of your faxed documents:
¥ Send documents printed using a typewriter, felt trip pen, black ink, or laserwriter.
¥ The paper should be white or very light and of normal weight.
¥ Do not attempt to feed the following types of document into the unit, or they may jam.
Instead, make a photocopy first, and then send the copy.
- Wrinkled or creased paper
- Curled or rolled paper
- Torn paper
- Carbon paper or carbon-backed paper
- Coated paper
- Too thin (less than 0.074mm) or thick (more than 0.15mm) paper
¥ Remove clips, staples, or other similar objects from documents before feeding them
into the machine.
¥ Let ink or paste on documents dry completely before sending.
¥ The machine can transmit documents with the following size.
Maximum
Minimum
216mm
216mm
152mm
127mm
Up to maximum
of 1500mm
Feeding
direction
¥ The shaded parts of the document shown below are not recorded by the receiving
facsimile machine. Write your information within the effective scanning area.
5mm approx.
1.8mm approx.
→
→
→→
→→
Ch-3 3/25/98 6:28 PM Page 2
Page 25

THE FAX MACHINE
3.2 C
HAPTER THREE : THE FAX MACHINE
3
Loading a Document
1
Turn the document face
down.
2
Insert the top edge of the
document into the feeder
slot.
The LCD window briefly
displays the message
ÔDOCUMENT LOADINGÕ,
then prompts you to set
the contrast if required.
DOCUMENT LOADING
LIGHT AUTO DARK
Ã
The automatic document feeder
seizes and pulls in the page.
For more information about resolution
and contrast, see ÒSetting Resolution
and ContrastÓ above.
Setting Resolution and Contrast
¥ After the document has been loaded, press ¹ or to adjust the brightness of your
faxed document. By pressing ¹ or repeatedly, you can choose between LIGHT,
AUTO, or DARK.
LIGHT works with very dark print.
AUTO works well for normal handwritten, typed, or printed documents.
DARK works with light print or faint pencil markings.
¥ After the document has been loaded, press Resolution to increase the sharpness and
clarity. By pressing Resolution repeatedly, you can choose between STANDARD, FINE,
SUPER FINE or PHOTO mode.
STANDARD works well for printed or type-written originals with normal-sized
characters.
FINE is good for documents containing a lot of detail.
SUPER FINE works well for documents containing extremely fine detail. SUPER FINE
works only if the remote machine also has the SUPER FINE feature.
PHOTO is used when faxing photographs or other documents containing colour or
shades of grey. When PHOTO is chosen, the FINE setting is automatically chosen.
Ch-3 3/25/98 6:28 PM Page 3
Page 26

THE FAX MACHINE
C
HAPTER THREE : THE FAX MACHINE
3.3
Dialing a Number
1
Pick up handset.
2
Using the number keypad,
enter the number of the
remote fax machine.
OHD/
Start/
Copy
1
2
ABC DEF
JKLGHI MNO
TUVPQRS WXYZ
456
7 8 9
0
123
Flash
Redial/
Pause
Scroll/
Volume
Ã
For hands-off operation, press
OHD.
Ã
You can store One-Touch or Speed
Dial numbers in your machine to dial
your most frequently used numbers
with the touch of a button. For more
information, see page 4.4.
Ã
If a person answers the telephone,
ask him or her to press ÔStartÕ so that
you can send the document.
The LCD window displays
ÔPHONEÕ.
The LCD window displays
the number you are
dialing.
PHONE
01952292033
3
If required, set the
contrast of the document
by pressing
¹
or .
GHI
PQRS
4
1
Redial/
Pause
Scroll/
Volume
Ã
The selected mode flickers. The
contrast is preset to AUTO.
For a normal document, skip over this
step because it is not necessary to
change the contrast.
To skip this step, press Stop or wait for
a second, then perform step 4.
4
If required, set the
appropriate resolution by
pressing Resolution until
you find the desired
setting.
Menu
Resolution
Rcv. Mode
Speed Dial
Ã
Each time you press Resolution the
selected mode appears in the LCD.
Ch-3 3/25/98 6:28 PM Page 4
Page 27

THE FAX MACHINE
3.4 C
HAPTER THREE : THE FAX MACHINE
3
Confirming the Transmission
When the last page of
your document has been
sent successfully, the
machine beeps, the LCD
window displays ÔOKÕ and
returns to Standby Mode.
Canceling Transmission
1
Press Stop at any time to
cancel transmission.
Start/
Copy
Stop
Help
9
Ã
If something went wrong during
your transmission, an error message
appears in the LCD.
For a listing of LCD error messages and
their meanings, see page 5.6.
If you receive an error message, press
Stop to clear it and try to send the
document again. For more information
about canceling transmission, see
below.
You can set your machine to print a
confirmation report automatically. For
more information, see page 4.9.
The fax transmission is
canceled and the machine
returns to Standby Mode.
OK
STOP PRESSED
3
Press Start/Copy when
you hear the fax tone.
Start/
Copy
Stop
Help
Ã
You can cancel the transmission of a
document at any time by pressing Stop.
4
Replace the handset.
Ã
You can send or receive a Voice
Request while sending a fax. For more
information about the Voice Request
feature, see page 3.10.
Ch-3 3/25/98 6:28 PM Page 5
Page 28
THE FAX MACHINE
C
HAPTER THREE : THE FAX MACHINE
3.5
Receiving a Fax
Reception Modes
Your fax machine has four reception modes:
¥ In FAX mode, the machine answers an incoming call and immediately goes into receive
mode, expecting a fax to be sent.
¥ In TEL mode, automatic fax reception is turned off. You can receive a fax only by
manually pressing Start/Copy.
¥ In AUTO mode, your fax machine will answer faxes automatically. If you want to use
your phone line for both fax and phone, you may want to choose this AUTO mode. If
the machine does not sense a fax signal, it will resume ringing to tell you it is a phone
call. If you do not pick up the handset, it will switch to automatic reception mode.
¥ In TAD mode, you must attach an answering machine to the EXT line socket on your
machine. When the phone rings, the answering machine answers and stores the callerÕs
message. If your machine hears a fax tone on the line, the call automatically switches
over to fax receive.
If you rarely use the fax line for voice conversation, set the machine to receive faxes
automatically by selecting either FAX or AUTO mode.
1
Press RCV.Mode repeatedly
until ÔFAXÕ appears in the
display.
Resolution
Rcv. Mode
Speed Dial
Ã
In FAX mode, when you get a call,
the machine answers the call on the
second ring. You can change the
number of rings. See page 4.10.
When reception is complete, the
machine returns to Standby Mode.
Receiving in FAX Mode
The LCD displays ÔFAXÕ.
03-15 12:30 FAX
Ch-3 3/25/98 6:28 PM Page 6
Page 29

THE FAX MACHINE
3.6 C
HAPTER THREE : THE FAX MACHINE
3
2
When the telephone rings,
answer it as a normal
phone call.
3
If you hear a fax tone, or if
the person on the other
end asks you to receive a
document, press
Start/Copy.
Start/
Copy
Stop
WXYZ
Help
9
4
Replace the handset.
Ã
The machine begins receiving and
returns to Standby Mode when
reception is complete.
Ã
Take out document loaded, if any,
before pressing the Start/Copy button.
1
Press RCV.Mode repeatedly
until ÔTELÕ appears in the
display.
Resolution
Rcv. Mode
Speed Dial
Receiving Manually (in TEL Mode)
The LCD displays ÔTELÕ.
03-15 12:30 TEL
Ch-3 3/25/98 6:28 PM Page 7
Page 30

THE FAX MACHINE
C
HAPTER THREE : THE FAX MACHINE
3.7
Ã
You should answer the call, or it
will switch to automatic reception
mode.
2
When a call comes in, the
machine waits for a fax
signal.
If a fax is being sent, the
machine goes into receive
mode.
If the machine does not
detect a fax signal, it will
continue ringing to tell you
it is a phone call.
1
Press RCV.Mode repeatedly
until ÔAUTOÕ appears in the
display.
Resolution
Rcv. Mode
Speed Dial
Receiving in AUTO Mode
The LCD displays ÔAUTOÕ.
03-15 12:30 AUTO
The LCD displays ÔTADÕ.
03-15 12:30 TAD
1
Press RCV.Mode repeatedly
until ÔTADÕ appears in the
display.
Resolution
Rcv. Mode
Speed Dial
Receiving in TAD Mode
Ch-3 3/25/98 6:28 PM Page 8
Page 31

THE FAX MACHINE
3.8 C
HAPTER THREE : THE FAX MACHINE
3
2
When a call comes in, the
answering machine
answers and stores the
callerÕs message if they
leave one.
Notes:
¥ If you have set your machine to TAD and your answering machine is switched off, or
an answering machine is not connected to your fax machine, it will automatically go
into receive mode after several rings.
¥ If your answering machine has a Ôuser-selectable ring counterÕ, set it to answer an
incoming call in 4 rings or less.
¥ If the sound level of the call is too low because of a poor phone connection, the fax
machine or answering machine may not work properly.
¥ When using manual reception mode on your machine you must make sure you switch
off the answering machine, or the outgoing message from the answering machine will
interrupt your phone conversation.
¥ Not all answering machines may work with your fax machine.
¥ When your answering machine answers an incoming call, it may record a fax tone
until it realizes it is a fax coming through. Your answering machine may tell you a
voice message has been left when it is actually a fax tone.
Ch-3 3/25/98 6:28 PM Page 9
Page 32

THE FAX MACHINE
C
HAPTER THREE : THE FAX MACHINE
3.9
The phone extension might not work
properly depending on the line
condition.
2
When you are finished
speaking, or the machine
begins receiving
documents, replace the
handset of the extension
telephone.
Using an Extension Telephone
If you have a phone extension connected to the same line as your machine, you can
control your fax machine from this phone.
This feature only works when you connected extension telephone to the fax machine.
1
When you receive a call
on the extension phone
and hear fax tones, press
the buttons Ò✽9✽Ó on
the extension telephone.
The machine receives the
document.
7
8
9
0
Ã
Ô✽9✽Õ is the remote receive start
code preset at the factory. The first and
the last asterisks are fixed, but you can
change the middle number to any digit
you choose. For more information, see
page 4.10.
1
Press Stop to cancel
reception at any time.
Start/
Copy
Stop
Help
9
Canceling Reception
Fax reception is canceled
and the machine returns
to Standby Mode.
STOP PRESSED
Ch-3 3/25/98 6:28 PM Page 10
Page 33

THE FAX MACHINE
3.10 C
HAPTER THREE : THE FAX MACHINE
3
2
When the phone rings,
pick up the handset and
answer it.
Ã
When you finish talking, if you
have another document to send, load
the document and tell the other person
to press Start. When you hear the fax
tones, press Start/Copy.
3
When you finish speaking,
replace the handset.
Ã
You can cancel a voice request by
pressing V.Req. a second time while
sending documents.
Check that the fax machine you are
sending to has a voice request facility.
Answering a Voice Request
When the phone rings,
pick up the handset and
answer it.
Ã
If you donÕt answer the voice
request within 10 to 15 seconds, the
machine prints out a CALL BACK
MESSAGE list.
Voice Request
If youÕre sending or receiving a document and you need to speak to the other person
during the same phone call, use Voice Request to alert the person at the remote site. You
can also respond to a voice request made by the person on the remote end.
Sending a Voice Request
1
Press OHD/V.Req. while a
document is being sent or
received.
The OHD/V.Req. button
lights up and a voice
request signal is sent to
the remote fax machine
after the document has
been sent or received.
OHD/V.Req.
Start/
Copy
Stop
MNO
WXYZ
6
9
Ã
You cannot talk with the other
person and send a fax at the same time.
The person on the remote end has 10 to
15 seconds to pick up the handset and
begin talking to you. If no one answers,
your machine returns to Standby Mode.
If you cannot seem to alert the other
person, it may be because the remote
fax machine doesnÕt have the voice
request feature.
Ch-3 3/25/98 6:28 PM Page 11
Page 34

THE FAX MACHINE
C
HAPTER THREE : THE FAX MACHINE
3.11
1
Press OHD/V.Req.
OHD/V.Req.
Start/
Copy
Stop
MNO
WXYZ
6
9
Ã
You'll hear the dial tone through the
speaker.
You may lift the handset instead of
pressing OHD, if you prefer.
There should be no documents loaded
in your machine, and the remote
machine must be ready for your call.
2
Dial the remote machine.
OHD/V
Start/
Copy
1
2
5
ABC DEF
JKLGHI MNO
TUVPQRS WXYZ
456
7 8 9
0
123
Flash
Redial/
Pause
Scroll/
Volume
Ã
When polling another fax machine
to retrieve a document, the remote
machine may be secured with a poll
code. In this case, you cannot receive
the document.
Polling
Polling is when one fax machine requests another machine to send a document. This is
useful when the person with the original document is not in the office or is not going to
pay for the phone call. The person who wants to receive the document calls the machine
holding the original, and requests that the document be sent.
The LCD window displays
the number you are
dialing.
3
When you hear a fax
tone, press RCV. Mode.
Resolution
Rcv. Mode
Speed Dial
Ã
Not all fax machines have polling
capability, and polling incompatibility
sometimes occurs between fax
machines from different manufactures.
Therefore, polling may fail in some
cases, even when poll codes are not
used.
Your fax machine cannot be polled, so
other fax machines cannot poll a
document from your machine.
Your machine begins to
receive the document
from the remote machine.
1952292033
POLLING
Ch-3 3/25/98 6:28 PM Page 12
Page 35

Chapter Four
SPECIAL FEATURES
Ch-4 3/25/98 6:32 PM Page 1
Page 36

STORE ONETOUCH 3
TEL.:_
Chapter Four
SPECIAL FEATURES
C
HAPTER
F
OUR
: SPECIALFEATURES
4.1
Automatic Dialing
There are two ways to store numbers for automatic dialing: One-Touch dialing and
Speed Dialing. One-Touch dialing lets you touch any one of 5 One-Touch buttons to dial
your number automatically. Speed Dialing allows you to enter only two digits to dial a
complete number.
Storing a Number for One-Touch Dialing
1
Press and hold the OneTouch button that you
want to use.
OHD/V.Req.
1
23
45
DEF
MNO
6
3
2
Enter the number using
the number keypad.
OHD/V.Req
Start/
Copy
Sto
1
23
5
ABC DEF
JKLGHI MNO
TUVPQRS WXYZ
Help
456
7 8 9
0
123
Flash
Redial/
Pause
Scroll/
Volume
The display will show the
One-Touch button
number you are going to
use.
The display prompts you
for a phone number.
Ã
If there is a number or name
already stored at the One-Touch button,
it will display. To change the number or
name, enter the new information over
the old. If not, press Stop.
Ã
You can enter up to 34 digits into a
One-Touch location. To insert a pause
between digits, press Redial/Pause.
This ÔPÕ in the displayed telephone
number will cause a few secondsÕ
pause when you actually dial the
number.
The display will prompt
you for a name.
NAME:_
3
When the number
appears correctly in the
display, press Start/Copy.
Start/
Copy
Stop
Help
8 9
0
Ch-4 3/25/98 6:32 PM Page 2
Page 37

SPECIAL FEATURES
4.2 C
HAPTER
F
OUR
: SPECIALFEATURES
4
Ã
You can enter up to 20 letters. For
more information on how to enter
letters using the number keypad, see
below.
Ã
To cancel the operation, press Stop.
The machine returns to Standby Mode.
If necessary, start over again.
4
Enter the name. If you
donÕt want a name, skip
to step 5.
OHD/V.Re
Start/
Copy
St
1
23
5
ABC DEF
JKLGHI MNO
TUVPQRS WXYZ
Help
456
7 8 9
0
123
Flash
Redial/
Pause
Scroll/
Volume
5
Press Start/Copy when
the name you want
appears in the display.
Start/
Copy
Stop
Help
Ã
Press the button repeatedly to get
the letter or number.
For a list of letters and corresponding
button, see the next page.
The letter appears in the
LCD display.
1
Repeatedly press the
button labeled with the
letter you want until the
letter appears in the LCD.
OHD/V.Re
Start/
Copy
Sto
1
23
5
ABC DEF
JKLGHI MNO
TUVPQRS WXYZ
Help
456
7 8 9
0
123
Flash
Redial/
Pause
Scroll/
Volume
2
When the letter you want
appears in the LCD, press
the other number button
labeled with the next
letter you want.
OHD/V.Req.
Start/
Copy
Stop
1
23
45
ABC DEF
JKLGHI MNO
TUVPQRS WXYZ
Help
456
7 8 9
0
123
Flash
Redial/
Pause
Scroll/
Volume
Using the Keypad to Enter Name
These instructions assume that the LCD is prompting you to enter a name.
The letter appears in the
LCD.
NAME:S
NAME:SA
Ch-4 3/25/98 6:32 PM Page 3
Page 38

SPECIAL FEATURES
C
HAPTER
F
OUR
: SPECIALFEATURES
4.3
3
If you want to enter the
same letter, move the
blinking line to next
position using the
button.
JGHI
TPQRS
45
7
12
Redial/
Pause
Scroll/
Volume
The blinking line is moved
to the next position.
NAME:SA_
Keypad Character Assignments
Number
1
2
3
4
5
6
7
8
9
0
Assigned numbers, letters, or characters
Space 1
AB C2
DE F 3
GHI 4
JKL5
MNO 6
PQRS7
TUV8
WX Y Z 9
+ _ , . / * # & 0
4
Press the same number
button.
OHD/V.Req.
Start/
Copy
Stop
1
23
45
ABC DEF
JKLGHI MNO
TUVPQRS WXYZ
456
7 8 9
0
123
Flash
Redial/
Pause
Scroll/
Volume
5
When finished entering
name, press Start/Copy.
Start/
Copy
Stop
Help
The same letter appears
in the LCD.
NAME:SAA
Ã
Select additional letters in the same
way.
Ch-4 3/25/98 6:32 PM Page 4
Page 39

SPECIAL FEATURES
4.4 C
HAPTER
F
OUR
: SPECIALFEATURES
4
Storing a Number for Speed Dialing
1
Press and hold Speed Dial
until ÔSPD.NO [01-30] ??Õ
appears in the display.
Resolution
Rcv. Mode
Speed Dial
The display will prompt
you for the Speed Dial
location you want to use.
2
Enter the 2-digit Speed
Dial number (01 to 30) at
which you want to store
the phone or fax number.
OHD/V.Req
Start/
Copy
Stop
1
23
5
ABC DEF
JKLGHI MNO
TUVPQRS WXYZ
Help
456
7 8 9
0
123
Flash
Redial/
Pause
Scroll/
Volume
3
Enter the number.
OHD/V.R
Start/
Copy
S
1
2
5
ABC DEF
JKLGHI MNO
TUVPQRS WXYZ
Help
456
7 8 9
0
123
Flash
Redial/
Pause
Scroll/
Volume
4
When the number
appears correctly in the
display, press Start/Copy.
Start/
Copy
Stop
Help
The display will prompt
you for the phone
number.
The display will prompt
you for a name.
Ã
You can store up to 30 phone or fax
numbers at any 2-digit Speed Dial
location.
If there is a number or name already at
the chosen Speed Dial location, the
number or name will show up on the
display. To change the number or name,
enter the new information over the. If
not, press Stop.
Ã
You can enter up to 34 digits at a
Speed Dial location.
To insert a pause between digits, press
Redial/Pause. ÔPÕ appears in that
position in the number. This ÔPÕ will
cause a few secondsÕ pause when
aetually dialing.
SPD.NO[01-30] ??
TEL.:_
NAME:_
Ch-4 3/25/98 6:32 PM Page 5
Page 40

SPECIAL FEATURES
C
HAPTER
F
OUR
: SPECIALFEATURES
4.5
5
Add a name to the
number, or skip to step 6.
OHD/V.Req
Start/
Copy
Sto
1
23
5
ABC DEF
JKLGHI MNO
TUVPQRS WXYZ
Help
456
7 8 9
0
123
Flash
Redial/
Pause
Scroll/
Volume
6
Press Start/Copy when
the name has been
entered.
Start/
Copy
Stop
Help
1
Pick up handset.
Ã
You can enter up to 20 letters. For
more information on how to enter
letters using the number keypad, see
page 4.2.
Ã
To cancel the operation, press Stop.
The machine returns to Standby Mode.
If necessary, start over again.
Ã
For hands-off operation , press
OHD/V.Req.
Dialing One-Touch Number
2
Press a One-Touch button
(1 through 5).
OHD/V.Req.
1
23
45
DEF
MNO
WXYZ
6
3
Ã
If you pressed OHD/V.Req., pick
up the handset when the other person
answers.
The LCD window displays
the number or name
stored at that One-Touch
button. You hear the
dialing on the speaker.
123456789
Ch-4 3/25/98 6:32 PM Page 6
Page 41

SPECIAL FEATURES
4.6 C
HAPTER
F
OUR
: SPECIALFEATURES
4
Dialing Speed Dial Number
2
Press Speed Dial.
Resolution
Rcv. Mode
Speed Dial
3
Enter the 2-digit location
number.
OHD/V.R
Start/
Copy
S
1
2
5
ABC DEF
JKLGHI MNO
TUVPQRS WXYZ
Help
456
7 8 9
0
123
Flash
Redial/
Pause
Scroll/
Volume
Ã
If you pressed OHD/V.Req., pick
up the handset when the other person
answers.
The LCD prompts you to
enter the location
number.
The LCD window displays
the Speed-Dial number or
name.
1
Pick up handset.
Ã
For hands-off operation, press
OHD/V.Req.
SPD.NO[01-30] ??
460P2114
Ch-4 3/25/98 6:32 PM Page 7
Page 42

SPECIAL FEATURES
C
HAPTER
F
OUR
: SPECIALFEATURES
4.7
Redial/Pause
Redial/Pause has two functions. It can be used to redial the last dialed number, or it can
be used to insert a pause in a number when youÕre setting up a One-Touch or Speed Dial
number.
To redial the number you last called:
2
Press Redial/Pause.
The number is dialed
automatically.
PQRS
4
7
Flash
Redial/
Pause
Menu
1
Pick up handset.
Ã
For hands-off operation, press
OHD/V.Req.
1
When entering the
number, press
Redial/Pause at the
position in the number
where dialing should
pause momentarily.
PQRS
4
7
Flash
Redial/
Pause
Menu
A ÔPÕ appears in the
number you are entering.
With some telephone systems, you must dial an access code (Ò9Ó, for example) and listen
for a second dial tone before you can dial an outside number. In such cases, you should
insert a pause in the number.
To insert a pause when storing an automatic dial number:
Ã
For more information on storing
automatic-dial numbers, see page 4.1.
02P259P2114
Ch-4 3/25/98 6:32 PM Page 8
Page 43

SPECIAL FEATURES
4.8 C
HAPTER
F
OUR
: SPECIALFEATURES
4
TONE
Some special services, such as alternate long-distance services and bank-by-phone, need
tone signals.
If you have pulse service, you can still use the special tone services by following these
steps:
1
Make a call to the special
service access number.
OHD/V.
Start/
Copy
1
2
5
ABC DEF
JKLGHI MNO
TUVPQRS WXYZ
Help
456
7 8 9
0
123
Flash
Redial/
Pause
Scroll/
Volume
2
When the special service
answers, press ✻.
All following numbers you
dial will be Touch-Tone.
78
0
Flash
1
When you are on the
telephone and want to
connect the caller to
someone else, press
Flash.
7
Flash
Menu
Flash
If you get a call and you want to transfer it to someone else, press Flash and dial the
number of that person. This may not work with some phone systems. Contact the
telephone maintenance party for information.
2
Enter the number of the
other person, then hang
up.
OHD/V.
Start/
Copy
1
2
5
ABC DEF
JKLGHI MNO
TUVPQRS WXYZ
Help
456
7 8 9
0
123
Flash
Redial/
Pause
Scroll/
Volume
Ch-4 3/25/98 6:32 PM Page 9
Page 44

SPECIAL FEATURES
C
HAPTER
F
OUR
: SPECIALFEATURES
4.9
1
Press Menu.
Flash
Menu
Resolution
Mode
2
Press 3.
OHD/V.Req
1
23
5
ABC DEF
JKL MNO
56
23
3
Press Start/Copy.
Start/
Copy
Stop
Help
User Options
Your fax machine has various user-selectable features. These options are preset at the
factory, however you may need to change them. To find out how the options are
currently set, print out an option report. For more information on printing a report, see
page 4.11.
Setting an Option
The LCD window displays
ÔSYSTEM DATAÕ.
The LCD displays
ÔCONFIRM.REPORTÕ first.
3. SYSTEM DATA
CONFIRM. REPORT
4
Scroll to the option you
want to set by pressing
¹
or repeatedly.
A
JGHI
TPQRS
4
1
Redial/
Pause
Scroll/
Volume
Ã
You can exit from setup mode at
any time by pressing Stop. When you
press Stop, the machine stores the
features already changed and the LCD
window switches back to the previous
menu or Standby Mode.
Ch-4 3/25/98 6:32 PM Page 10
Page 45

SPECIAL FEATURES
4.10 C
HAPTER
F
OUR
: SPECIALFEATURES
4
5
When the desired option
appears in the LCD, press
Start/Copy.
Now, you can set each
option by following the
instructions below.
Start/
Copy
Stop
Help
Options You Can Choose
These instructions assume youÕve followed the steps above under ÒSetting an optionÓ
and the machine is asking if you want to change one of the options listed here.
¥ Confirmation report - You can set the fax machine to automatically print out a
confirmation report every time you send a fax. The report shows whether your fax
went through or not. It also tells you how many pages were sent, and so on.
Choose YES to print out a confirmation report automatically each time you send a fax.
Choose ERROR to print out a confirmation report automatically only when there is an
error.
Choose NO to disable this feature.
Press Start/Copy when you selected a variable which you want.
¥ Dial type - Select TONE (MF) or PULSE (DP) dial mode to match the type of service
you have.
Press Start/Copy when you selected a variable which you want.
¥ Ring count - Select the number of times your machine rings before answering an
incoming call. If you are using your machine as both a telephone and a fax machine,
we suggest you set the ring count to at least 4 to give you time to answer.
Enter a number on the number keypad, then press Start/Copy.
¥ Remote receive code - The remote receive code allows you to initiate fax receive from a
phone extension connected to the same line as your fax machine. If you pick up the
phone extension and hear fax tones, you can enter the remote receive code and the fax
will start receiving. The password is preset to Ò*9*Ó (star nine star) at the factory.
The *Õs are fixed, but you can change the middle character to any digit from 0 to 9.
Enter the number you want to use, then press Start/Copy.
¥ Auto print - The fax machine keeps records of communications. You can get a
transmission or reception journal printout manually or automatically.
Choose YES to print out a communication (send and receive) journal automatically.
Choose NO to disable this feature.
Press Start/Copy when you selected a variable which you want.
¥ Modem speed - You can select the modem speed. Choose 48 for 4800 bps or 96 for 9600
bps.
Press Start/Copy when you selected a variable which you want.
Ch-4 3/25/98 6:32 PM Page 11
Page 46

SPECIAL FEATURES
C
HAPTER
F
OUR
: SPECIALFEATURES
4.11
User Reports
Your machine can print out reports containing useful information - transmission and
reception verification, option settings, etc. For instructions on printing reports, see page
4.12. The following reports are available:
¥ Confirmation report - This report can be printed on command or automatically by
selecting the appropriate user option. You may have a confirmation report printed
automatically after each document you send.
¥ Transmission/Reception journal - This report gives specific information concerning
transmission and reception activity: times and dates of the most recent transmissions
and receptions, phone numbers, etc.
¥ System data list - This list shows the status of the user - selectable options. After you
change the settings, print out this list to confirm your changes.
¥ Telephone number list - This list shows all numbers currently stored in One-Touch
and Speed-Dial locations. Before changing or adding an automatic dial number, print
this report to check the numbers currently stored. Print this report after making
changes to confirm the new settings. This report also includes the One-Touch button
addresses.
Ch-4 3/25/98 6:32 PM Page 12
Page 47
SPECIAL FEATURES
4.12 C
HAPTER
F
OUR
: SPECIALFEATURES
4
1
Press Menu.
Flash
Menu
Resolution
Mode
2
Press 4.
JKLGHI MNO
TUVPQRS WXYZ
456
7 8 9
123
The LCD window displays
ÔREPORTÕ.
4. REPORT
Printing Reports
The LCD window displays
the report you selected.
Ã
The available lists are:
CONFIRM. REPORT
TX/RX JOURNAL
SYSTEM DATA LIST
TEL. NUMBER LIST
Ã
The machine will print the selected
report.
4
The LCD window displays
the list from which to
choose.
Select the report you
want by using ¹or .
A
JGHI
TPQRS
4
1
Redial/
Pause
Scroll/
Volume
5
Press Start/Copy.
Start/
Copy
Stop
Help
CONFIRM. REPORT
3
Press Start/Copy.
Start/
Copy
Stop
Help
Ch-4 3/25/98 6:33 PM Page 13
Page 48

SPECIAL FEATURES
C
HAPTER
F
OUR
: SPECIALFEATURES
4.13
Clearing Memory
You can clear the information in your fax machineÕs memory.
1
Press Menu.
Flash
Menu
Resolution
2
Press 5.
The LCD window displays
ÔMEMORY CLEARÕ.
JKLGHI MNO
TUVPQRS WXYZ
456
7 8 9
123
4
Select the desired menu
by using ¹or .
AB
JKGHI
TUPQRS
45
12
Redial/
Pause
Scroll/
Volume
3
Press Start/Copy.
Start/
Copy
Stop
Help
9
Ã
Menu available:
TERMINAL ID
TX/RX JOURNAL
SYSTEM DATA
ONE-TOUCH DIAL
SPEED DIAL
The LCD window (briefly)
displays the menu you
have selected.
TERMINAL ID
5
Press Start/Copy.
The LCD asks if you are
sure you want to clear
memory.
Start/
Copy
Stop
Help
9
ARE YOU SURE ?
Ch-4 3/25/98 6:33 PM Page 14
Page 49

SPECIAL FEATURES
4.14 C
HAPTER
F
OUR
: SPECIALFEATURES
6
If you want to clear that
memory, press Start/Copy.
The LCD window displays the
message ÔMEMORY
CLEARED!Õ.
Start/
Copy
Stop
Help
9
Ã
If you donÕt want to clear the
memory, press Stop.
Alarm
You can set the fax machine to sound an alarm at an appointed time. If you set an alarm
time, the fax machine will sound the alarm automatically at that time everyday.
1
Press MENU.
Flash
Pause
Menu
Resolution
3
Press START/COPY.
Start/
Copy
Stop
Help
2
Press 6.
OH
Start
1
JKLGHI MNO
TUVPQRS WXYZ
456
7 8 9
123
The LCD displays ÔALARM
TIMEÕ
6. ALARM TIME
The LCD prompts if you
to set alarm ON or OFF.
[OFF] ON
Ch-4 3/25/98 6:33 PM Page 15
Page 50

SPECIAL FEATURES
C
HAPTER
F
OUR
: SPECIALFEATURES
4.15
The LCD displays the time
previously set.
TIME 12:00
5
Press Start/Copy.
Start/
Copy
Stop
Help
6
Press ¹or to move
the blinking line under the
number you want to
change.
AB
JKGHI
TUPQRS
45
12
Redial/
Pause
Scroll/
Volume
7
Enter the correct number
by using the number
keypad.
OH
Sta
Co
1
JKLGHI MNO
TUVPQRS WXYZ
456
7 8 9
0
123
Flash
Redial/
Pause
Scroll/
Volume
Ã
Hours=00~23
Minutes=00~59
Ã
The machine uses 24-hour time
format.
8
When the time is correct,
press Start/Copy.
Start/
Copy
Stop
Help
Ã
If you enter a wrong number, use
¹ or to move the blinking line
under the number you want to correct,
then enter the correct number.
To stop the alarm when it sounds, pick
up the handset or press either Stop or
OHD.
If you donÕt stop the alarm when it
sounds, in 3 minutes it will sound
again for 30 seconds.
4
Choose ÔONÕ by using
¹
or .
A
JGHI
TPQRS
4
1
Redial/
Pause
Scroll/
Volume
Ã
If you donÕt want to set an alarm
time, select ÔOFFÕ, and press
Start/Copy.
Ch-4 3/25/98 6:33 PM Page 16
Page 51

Chapter Five
CARE AND MAINTENANCE
Ch-5 3/25/98 6:36 PM Page 1
Page 52

Chapter Five
CARE AND MAINTENANCE
In this chapter you will learn how to clear documents jams, what the various error
messages mean, and how to fix problems.
Clearing Jams
Paper Jams During Transmission
C
HAPTER
F
IVE
: CARE AND MAINTENANCE
5.1
1
Unplug the power cord.
0
0
0
0
0
0
0
2
Open the cover by lifting
the release lever on the
side of the machine.
3
Remove the guide by
lifting it.
0
0
0
0
0
0
0
0
0
0
0
0
0
0
0
0
0
0
0
0
0
0
0
0
0
0
0
0
0
0
0
0
0
0
0
0
0
0
0
0
0
0
0
0
0
0
0
0
0
4
Remove the jammed
document.
0
0
0
0
0
0
0
0
0
0
0
0
0
0
0
0
0
0
0
0
0
0
0
0
0
0
0
0
0
0
0
0
0
0
0
0
0
0
0
0
0
0
Ã
If a document jams during
transmission, do NOT pull it out of
the slot. Doing so could harm the
machine.
Guide
Ch-5 3/25/98 6:36 PM Page 2
Page 53

CARE AND MAINTENANCE
5.2 C
HAPTER
F
IVE
: CARE AND MAINTENANCE
5
5
Replace the guide.
0
0
0
0
0
0
0
0
0
0
0
0
0
0
0
0
0
0
0
0
0
0
0
0
0
0
0
0
0
0
0
0
0
0
0
0
0
0
0
0
0
0
0
0
0
0
0
0
0
Ã
Make sure the handles on the
end of the roller lock in place.
6
Close the cover firmly.
0
0
0
0
0
0
0
0
0
0
0
0
0
0
0
0
0
0
7
Plug in the power cord.
Ã
Press down on the cover using
both hands until it snaps into place.
Paper Jams During Reception
1
Unplug the power cord.
2
Open the cover by lifting
the release button.
Ã
If a document jams during
reception, do NOT pull the
document out of the slot. Doing so
could harm the machine.
Ch-5 3/25/98 6:36 PM Page 3
Page 54

CARE AND MAINTENANCE
C
HAPTER
F
IVE
: CARE AND MAINTENANCE
5.3
3
Remove the guide by
lifting it with both hands.
0
0
0
0
0
0
0
0
0
0
0
0
0
0
0
0
0
0
0
0
0
0
0
0
0
0
0
0
0
0
0
0
0
0
0
0
0
0
0
0
0
0
0
0
0
0
0
0
0
4
Carefully pull out the
jammed paper in the
direction of arrow.
0
0
0
0
0
0
0
0
0
0
0
0
0
0
0
0
0
0
0
0
0
0
0
0
0
0
0
0
0
0
0
0
0
0
0
0
0
0
0
0
0
0
0
0
0
0
0
0
0
5
Replace the guide.
0
0
0
0
0
0
0
0
0
0
0
0
0
0
0
0
0
0
0
0
0
0
0
0
0
0
0
0
0
0
0
0
0
0
0
0
0
0
0
0
0
0
0
0
0
0
0
0
0
6
Close the cover firmly.
0
0
0
0
0
0
0
0
0
0
0
0
0
0
0
0
0
0
7
Turn the power back on.
Ã
Cut off any wrinkled paper
from the end of the paper, making
the end straight and neat.
Ch-5 3/25/98 6:36 PM Page 4
Page 55

1
Turn the power off. Open
the paper cover by lifting
the release button.
2
Remove the guide and
the recording paper roll.
0
0
0
0
0
0
0
0
0
0
0
0
0
0
0
0
0
0
0
0
0
0
0
0
0
0
0
0
0
0
0
0
0
0
0
0
0
0
0
0
0
3
Wipe the roller and the
thermal head with a soft
cloth dampened with
water.
0
0
0
0
0
0
0
0
0
0
0
0
0
0
0
0
0
0
0
0
0
0
0
0
0
0
0
0
0
0
0
0
0
0
0
0
0
0
0
0
0
0
0
0
0
0
0
0
0
4
Replace the guide and the
recording paper.
0
0
0
0
0
0
0
0
0
0
0
0
0
0
0
0
0
0
0
0
0
0
0
0
0
0
0
0
0
0
0
0
0
0
0
0
5
Close the cover firmly.
Turn the power back on.
0
0
0
0
0
0
0
0
0
0
0
0
0
0
0
0
0
0
Cleaning the Roller and Thermal Head
To keep your machine working properly, occasionally clean the roller and thermal print
head, as shown below. If they are dirty, documents will not be clear.
CARE AND MAINTENANCE
5.4 C
HAPTER
F
IVE
: CARE AND MAINTENANCE
5
Ch-5 3/25/98 6:36 PM Page 5
Page 56

CARE AND MAINTENANCE
C
HAPTER
F
IVE
: CARE AND MAINTENANCE
5.5
Purchasing and Storing Paper
Purchase replacement rolls of coated thermal fax paper with a maximum outer diameter
of 2.05 in/52 mm. (Total length of the paper roll is approximately 98.4 ft/30 m) Coated
paper has a shiny surface and will print better than uncoated.
We recommend that you use only authorized recording paper. Other types of paper can
produce poor results, and even damage your fax machine.
Contact your dealer for more information on paper.
Store rolls in a cool, dark place, at or below 76ûF (24.5ûC) and avoid humidity higher than
65%.
To keep fax pages from darkening and fading, keep them out of direct sunlight. Avoid
temperatures above 105ûF (40.5ûC). DonÕt let them come in contact with blueprints (diazo
copies), plastic films, or transparent tape. Keep stored pages from touching each other
face to face. If they touch, print can transfer from one to another.
Ch-5 3/25/98 6:36 PM Page 6
Page 57

CARE AND MAINTENANCE
5.6 C
HAPTER
F
IVE
: CARE AND MAINTENANCE
5
Understanding LCD Error Messages
The document you are sending has jammed in the feeder.
Clear the document jam. See page 5.1
Call the service center for help.
Your machine is out of paper or the paper cover is open. See
page 2.2
The One-Touch or Speed Dial number you tried to use has
no number programmed into it. See page 4.1
This may happen if someone faxes several all-black copies to
your machine. When the machine cools down, it will
automatically go back to showing the date and time.
The fax machine you want to poll is not ready to answer
your poll. The person you are polling should know what
you want to do and should have loaded their fax machine
with the original document.
There is a problem with facsimile communication during
transmission or reception. Press Stop and try again.
LCD message Meaning
CHECK DOCUMENT
CAM JAM
NO PAPER
NOT ASSIGNED
OVERHEAT
POLLING ERROR
COMM. ERROR
Ch-5 3/25/98 6:36 PM Page 7
Page 58

CARE AND MAINTENANCE
C
HAPTER
F
IVE
: CARE AND MAINTENANCE
5.7
Specifications
Type of unit . . . . . . . . . . . . . . . . . . . . . . . . . . . . . Personal Desktop Facsimile Transceiver
Communication System . . . . . . . . . . . . . . . . . . . . . Public Switched Telephone Network and PABX
Compatibility . . . . . . . . . . . . . . . . . . . . . . . . . . . . CCITT Group 3
Compression scheme . . . . . . . . . . . . . . . . . . . . . . . MH/MR
Modem speed . . . . . . . . . . . . . . . . . . . . . . . . . . . . . 9600/7200/4800/2400 bps
Resolution . . . . . . . . . . . . . . . . . . . . . . . . . . . . . . . 3.85 lines per millimeter, 7.7 lines per millimeter and
15.4 lines per millimeter
Scanning method . . . . . . . . . . . . . . . . . . . . . . . . . . Flat-bed scanning using CIS image sensor
Printer . . . . . . . . . . . . . . . . . . . . . . . . . . . . . . . . . Thermal
Input document size . . . . . . . . . . . . . . . . . . . . . . . . 216 millimeters
Effective scanning width . . . . . . . . . . . . . . . . . . . . 210 millimeters
+
1%
Effective recording width . . . . . . . . . . . . . . . . . . . . 216 millimeters
Thermal paper roll size . . . . . . . . . . . . . . . . . . . . . 30 meters x 216 millimeters wide,
core 12.7 millimeters diameter
Power requirement . . . . . . . . . . . . . . . . . . . . . . . . Check Power Label attached near the power cord
connection.
Power consumption . . . . . . . . . . . . . . . . . . . . . . . . Stand-by : 7 Watt; Maximum when in use : 115 Watt
Temperature range . . . . . . . . . . . . . . . . . . . . . . . . 41ûF to 113ûF (5ûC to 45ûC)
Humidiity range . . . . . . . . . . . . . . . . . . . . . . . . . . . 20 to 80 % RH (non-condensing)
Dimensions (HxWxD) . . . . . . . . . . . . . . . . . . . . . . . .107mm x 278mm x 211mm
Weight . . . . . . . . . . . . . . . . . . . . . . . . . . . . . . . . . .5.5 lbs (2.5 kg)
Ch-5 3/25/98 6:36 PM Page 8
 Loading...