

Page 1

Copyright
© 2010 Samsung Electronics Co., Ltd. All rights reserved.
This guide is provided for information purposes only. All information included herein is subject to change without notice.
Samsung Electronics is not responsible for any direct or indirect damages, arising from or related to use of this guide.
• Samsung and Samsung logo are trademarks of Samsung Electronics Co., Ltd.
• PCL and PCL 6 are trademarks of Hewlett-Packard Company.
• Microsoft, Internet Explore, Windows, Windows Vista, Windows 7 and Windows 2008 Server R2 either registered
trademarks or trademarks of Microsoft Corporation.
• PostScript 3 is a trademark of Adobe System, Inc.
• UFST® and MicroType™ are registered trademarks of Monotype Imaging Inc.
• TrueType, Mac and Mac OS are trademarks of Apple Inc., registered in the U.S and other countries.
• LaserWriter is a trademark of Apple Inc.
• All other brand or product names are trademarks of their respective companies or organizations.
Copyright_ 1
Page 2

Contents
ABOUT THIS INSTALLATION GUIDE
SETTING UP THE HARDWARE
Convention . . . . . . . . . . . . . . . . . . . . . . . . . . . . . . . . . . . . . . . . . . . . . . . . . . . . . . . . 3
Finding more information . . . . . . . . . . . . . . . . . . . . . . . . . . . . . . . . . . . . . . . . . . . . 4
Installation environment . . . . . . . . . . . . . . . . . . . . . . . . . . . . . . . . . . . . . . . . . . . . . 7
Machine configuration . . . . . . . . . . . . . . . . . . . . . . . . . . . . . . . . . . . . . . . . . . . . . . 8
Optional goods by models . . . . . . . . . . . . . . . . . . . . . . . . . . . . . . . . . . . . . . . . . . . 9
Installation flow of the hardware . . . . . . . . . . . . . . . . . . . . . . . . . . . . . . . . . . . . . 10
Unpacking and placing the hardware . . . . . . . . . . . . . . . . . . . . . . . . . . . . . . . . . 11
Installing the cabinet stand, optional dual cassette feeder or optional high capac-
ity feeder . . . . . . . . . . . . . . . . . . . . . . . . . . . . . . . . . . . . . . . . . . . . . . . . . . . . . . 12
Installing the duplex automatic document feeder . . . . . . . . . . . . . . . . . . . . . . . 13
Installing the accessory box . . . . . . . . . . . . . . . . . . . . . . . . . . . . . . . . . . . . . . . . 24
Removing the scanner locking screw . . . . . . . . . . . . . . . . . . . . . . . . . . . . . . . . . 25
Putting the rubber packings . . . . . . . . . . . . . . . . . . . . . . . . . . . . . . . . . . . . . . . . . 25
Installing the toner cartridges . . . . . . . . . . . . . . . . . . . . . . . . . . . . . . . . . . . . . . . 26
Installing the imaging units . . . . . . . . . . . . . . . . . . . . . . . . . . . . . . . . . . . . . . . . . 27
Installing other options . . . . . . . . . . . . . . . . . . . . . . . . . . . . . . . . . . . . . . . . . . . . . 31
Loading paper . . . . . . . . . . . . . . . . . . . . . . . . . . . . . . . . . . . . . . . . . . . . . . . . . . . . 32
Standard tray . . . . . . . . . . . . . . . . . . . . . . . . . . . . . . . . . . . . . . . . . . . . . . . . . . . 32
Connecting a printer cable . . . . . . . . . . . . . . . . . . . . . . . . . . . . . . . . . . . . . . . . . . 38
Using a network cable . . . . . . . . . . . . . . . . . . . . . . . . . . . . . . . . . . . . . . . . . . . . 38
Turning the machine on . . . . . . . . . . . . . . . . . . . . . . . . . . . . . . . . . . . . . . . . . . . . 39
INITIAL SETTINGS AND TESTING OF THE MACHINE
Initial setting . . . . . . . . . . . . . . . . . . . . . . . . . . . . . . . . . . . . . . . . . . . . . . . . . . . . . 41
Print adjustment (Dual cassette feeder or High capacity feeder) . . . . . . . . . . 47
DADF skew test and adjustment . . . . . . . . . . . . . . . . . . . . . . . . . . . . . . . . . . . . . 50
Skew test . . . . . . . . . . . . . . . . . . . . . . . . . . . . . . . . . . . . . . . . . . . . . . . . . . . . . . 50
DADF adjustment . . . . . . . . . . . . . . . . . . . . . . . . . . . . . . . . . . . . . . . . . . . . . . . 53
INSTALLING THE SUPPLIED SOFTWARE
Supplied software . . . . . . . . . . . . . . . . . . . . . . . . . . . . . . . . . . . . . . . . . . . . . . . . . 57
System requirements . . . . . . . . . . . . . . . . . . . . . . . . . . . . . . . . . . . . . . . . . . . . . . 58
Windows . . . . . . . . . . . . . . . . . . . . . . . . . . . . . . . . . . . . . . . . . . . . . . . . . . . . . . 58
Macintosh . . . . . . . . . . . . . . . . . . . . . . . . . . . . . . . . . . . . . . . . . . . . . . . . . . . . . 58
Linux . . . . . . . . . . . . . . . . . . . . . . . . . . . . . . . . . . . . . . . . . . . . . . . . . . . . . . . . . 58
UNIX . . . . . . . . . . . . . . . . . . . . . . . . . . . . . . . . . . . . . . . . . . . . . . . . . . . . . . . . . 59
Installing a network connected machine’s driver . . . . . . . . . . . . . . . . . . . . . . . 59
Windows . . . . . . . . . . . . . . . . . . . . . . . . . . . . . . . . . . . . . . . . . . . . . . . . . . . . . . 59
Contents_ 2
Page 3

1.
About this installation guide
This installation guide provides information about the installation of the machine as well as
detailed explanation on how to install with step-by-step instructions. This installation guide is
valuable for both novice and professional users. You can refer to this as a guide for installing and
setting up the machine.
• Read the safety information before using the machine.
• If you have a problem using the machine, refer to the troubleshooting chapter. Refer to User’s Guide on the
User’s Guide CD.
• Use Index to find information.
• All the illustrations in this installation guide may differ from your machine depending on its options or models.
• The procedures in this guide are mainly based on Windows XP.
Convention
Some terms in this installation guide are used interchangeably, as shown below:
• Document is synonymous with original.
• Paper is synonymous with media, or print media.
• Machine refers to printer or MFP.
The following table offers the conventions of this guide:
CONVENTION DESCRIPTION EXAMPLE
Bold For texts on the display or button names on the
machine.
Note Provides additional information or detailed
specification of the machine function and
feature.
Caution Gives users information to protect the machine
from possible mechanical damage or
malfunction.
Footnote Provides additional more detailed information
on certain words or a phrase.
(“Cross-reference”) Guides users to a reference page for the
additional detailed information.
Start
The date format may differ from
country to country.
Do not touch the green surface of the
toner cartridge.
a. pages per minute
(See "Finding more information" on page 4.)
About this installation guide_ 3
Page 4

Finding more information
You can find information for setting up and using your machine from the following resources, either as a print-out or on
screen.
MATERIAL NAME DESCRIPTION
Installation Guide
This guide provides information on setting up your machine. Follow the instructions in the
guide to prepare the machine.
Quick Reference Guide
User’s Guide
Machine Driver Help
Samsung website If you have Internet access, you can get latest machine drivers, manuals, firmware and
Downloadable
softwares
This guide provides operating procedures and descriptions of the most frequently used
functions.
This guide provides you with step-by-step instructions for using your machine’s full
features, and contains information for maintaining your machine, troubleshooting, and
installing accessories.
This help provides you with help information on printer driver and instructions for setting up
the options for printing. (See the User’s Guide.)
ordering information from the Samsung website, www.samsung.com/printer.
You can download useful software from the Samsung website.
• SyncThru
manage many machines simultaneously. This software is for network models only.
(http://solution.samsungprinter.com)
• Samsung AnyWeb Print: helps personal users to screen-capture the website screen
in Windows Internet Explorer easily. (http://solution.samsungprinter.com/personal/
anywebprint)
• XPS printer driver: used to print XPS print path. XPS printer driver can be installed
only on Windows Vista OS or higher.
(www.samsung.com/printer)
TM
Web Admin Service: convenient for network administrators who need to
About this installation guide_ 4
Page 5

1.
Setting up the hardware
We recommend you leave to setting up the hardware to the installation engineer from Samsung or
the dealership where you bought the machine.
This chapter gives you step-by-step instructions for setting up the hardware. We recommend you
set up the hardware following the order in this chapter.
This chapter includes:
• Installation environment
• Machine configuration
• Optional goods by models
• Installation flow of the hardware
• Unpacking and placing the hardware
• Installing the cabinet stand, optional dual cassette feeder or optional high capacity feeder
• Installing the duplex automatic document feeder
• Installing the accessory box
• Removing the scanner locking screw
• Putting the rubber packings
• Installing the toner cartridges
• Installing the imaging units
• Installing other options
• Loading paper
• Connecting a printer cable
• Turning the machine on
Be sure to go through the following before setting up the hardware:
• If you are installing the machine after moving it from a cold to warm location, leave the machine unpacked for at
least two hours so that the machine is fully adapted to the site temperature, avoiding image faults caused by
condensation (The term “condensation” refers to the formation of droplets of water on the surface of a metal
object brought from cold to warm place, i.e., as the result of the rapid cooling of the moisture (vapor) around the
object).
• Installation engineer must prepare the screw drivers and diagonal-cutting pliers.
Setting up the hardware_ 5
Page 6
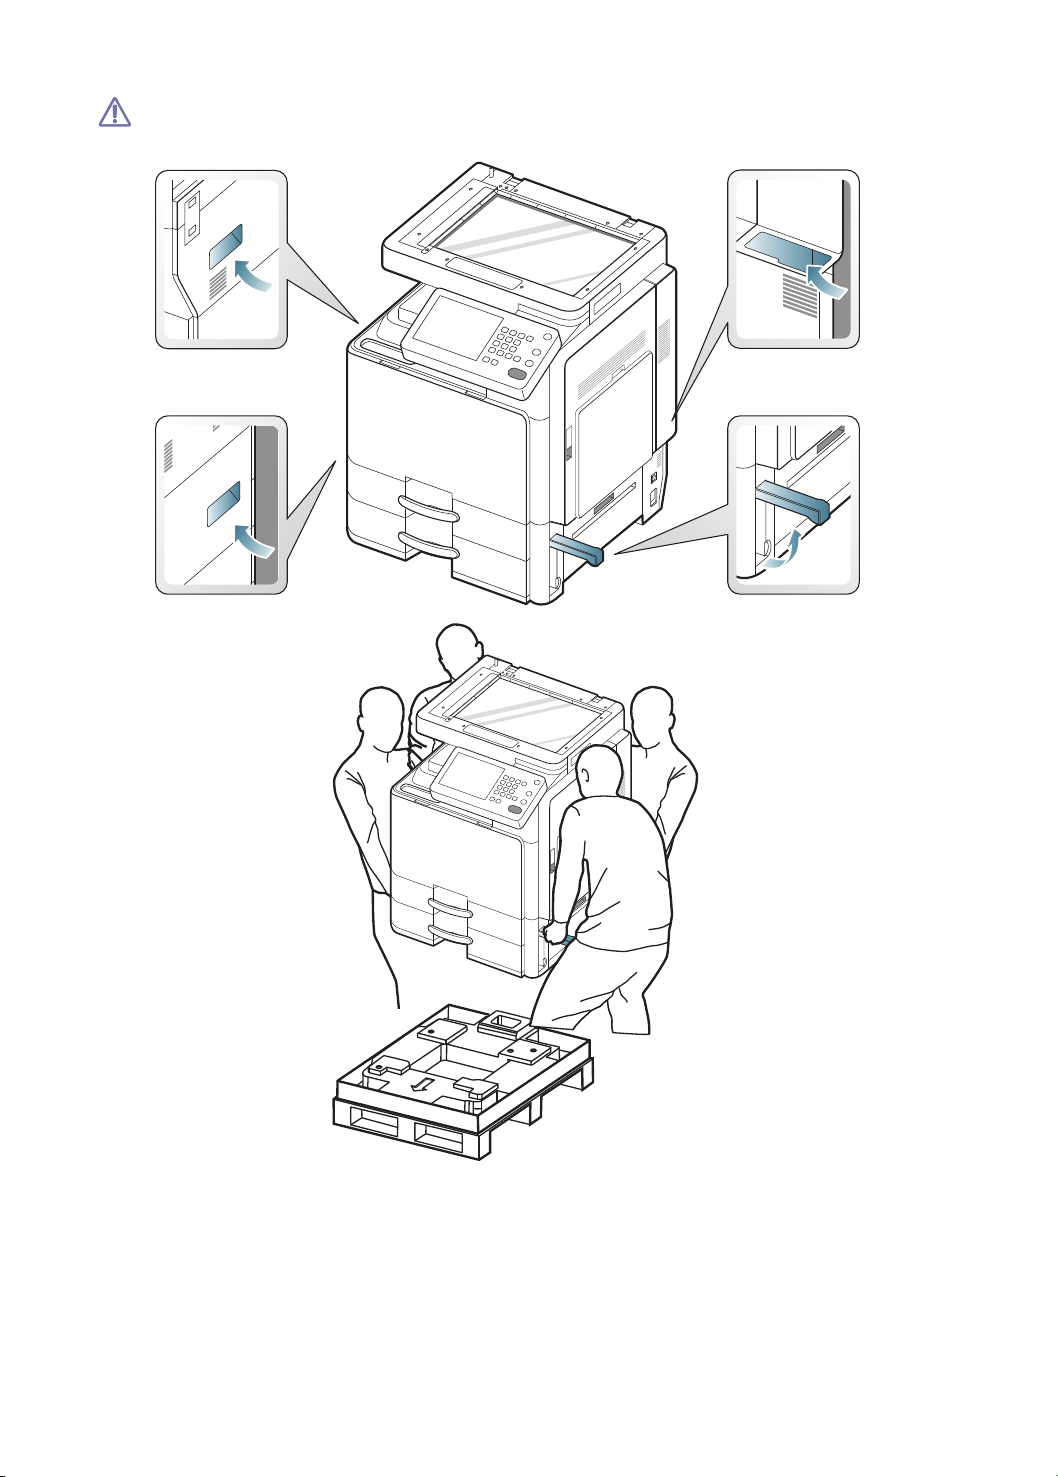
The body of this machine weighs about 93.7 Kg (206.6 lbs) to the maximum including the trays. Use safe
lifting and handling techniques. If you need to move this machine, you need at least four people. Use the
lifting handles, as shown. If less than four people attempt to lift the machine, you can sustain back injury.
Setting up the hardware_ 6
Page 7
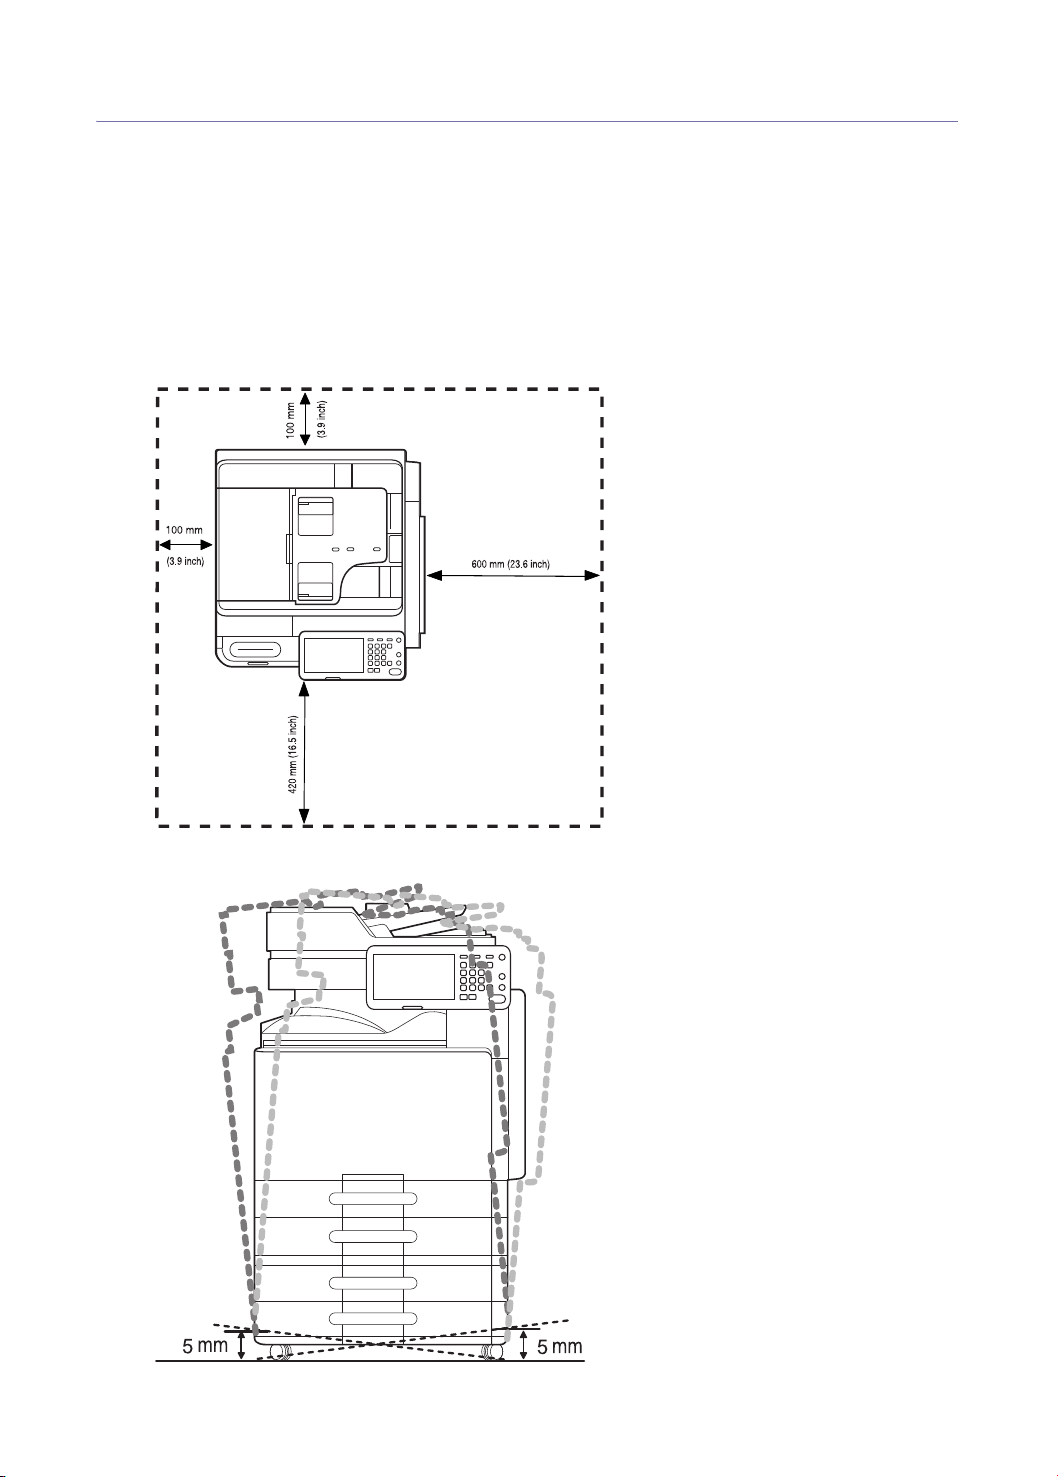
Installation environment
Make sure to have the below recommended environment before you install the machine.
• Range of temperature
- Operatio
- Stor
• Range of
- Operatio
- Stor
• Select a level, stable, vibration-free surface on which to install the machine.
• Select an area with adequate air circulation.
• Avoid areas near windows, with exposure to direct sunlight, or sources of heat and air conditioning.
• Avoid areas of high humidity and with possible exposure to dust or moisture (e.g, rain).
• Allow extra space to open doors and trays.
n: 10 and 32 °C (50 and 90 °F)
age: -20 and 40°C (-4 and 104 °F)
humidity
n: 20 and 80% RH
age: 10 and 90% RH
• Place the machine on a flat, stable surface in order to avoid tilting the machine more than 5 mm (0.20 inch). Printing
quality may be affected if the machine is tilted too much.
Setting up the hardware_ 7
Page 8

Machine configuration
Setting up the hardware_ 8
Page 9

Optional goods by models
The machine is designed to support all of your document needs from printing and copying to more advanced networking
solutions for your business. Some optional goods may not be available depending on models or countries.
Optional goods by models include:
OPTIONAL GOODS SCX-8030 SERIES SCX-8040 SERIES
Job Separator oo
1,250-Sheet Standard Finisher oo
3,250-Sheet Booklet Finisher oo
Bridge Kit oo
2/3 Hole Punch Kit oo
2/4 Hole Punch Kit oo
Cabinet Stand oo
Dual Cassette Feeder oo
High Capacity Feeder oo
Working Table oo
Fax Kit oo
Fax Multiline Kit oo
IP Fax Kit oo
Wireless Network Kit oo
FDI Kit oo
Expansion Memory Module 512 MB oo
Common Criteria Data Security Kit oo
SmarThru Workflow X oo
CounThru 2 oo
Advanced Scan Kit oo
Heating wire for Cassette, HCF, DCF oo
Heating wire for Scan R L oo
Mono PM Kit - Cleaning & Transfer Set oo
Mono PM Kit - Tray Roller Set oo
Mono PM Kit - DADF Roller Set oo
Mono PM Kit - Bypass Tray Roller Set oo
( ●: Included, o: Optional)
Setting up the hardware_ 9
Page 10
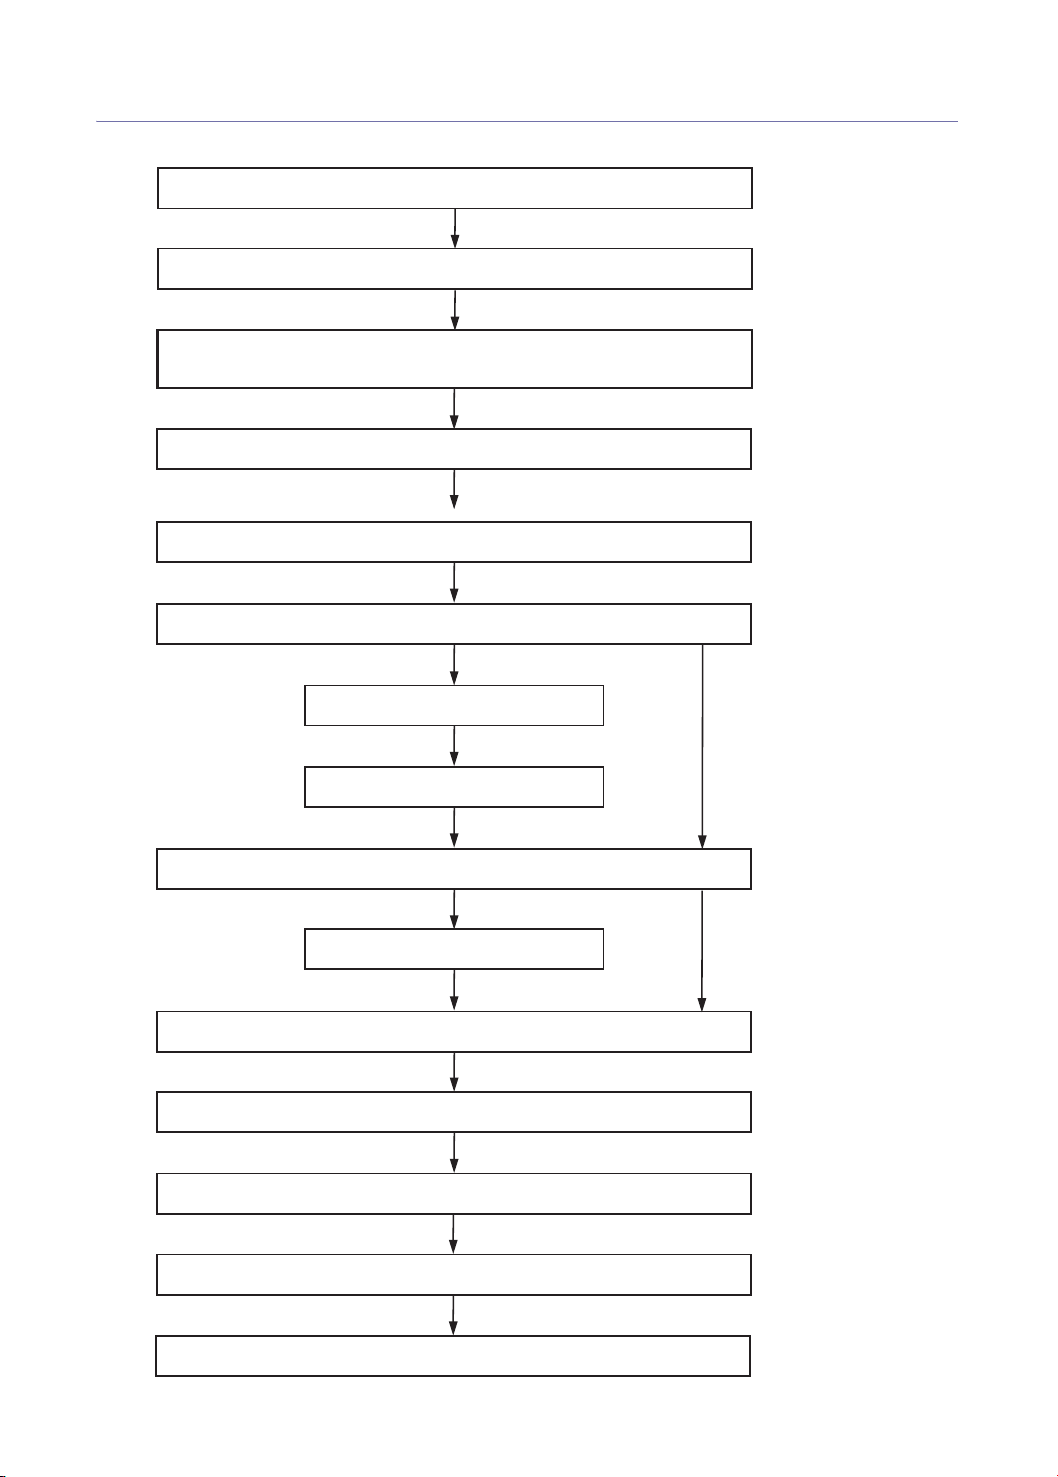
Installation flow of the hardware
We recommend you refer to the below installation flow to install the hardware.
Set installation location and check included items in the package.
Remove all the packing pads and tapes.
Install the machine with the one of the purchased items:
Cabinet Stand, Dual Cassette Feeder, or High Capacity Feeder.
Install the Duplicate Automatic Document Feeder(DADF).
Install Toner Cartridge and Imaging Unit.
Do you need to install the Standard finisher or the Booklet finisher?
Yes
Install the Bridge kit.
Install the Finisher.
Do you need to install other option items?
Yes
Install purchased other option items.
Load paper into the trays of the machine.
Connect a printer cable to the machine.
Connect a power cord to the machine and turn on the power.
No
No
Set the initial setting and test the machine.
Explain to customer how to use the machine.
Setting up the hardware_ 10
Page 11

Unpacking and placing the hardware
Follow the steps below:
1. Select a stable location.
2. Unpack the machine and check all the enclosed items. Included items may differ depending on the country
TONER CARTRIDGE IMAGING UNIT
POWER CORD INSTALLATION GUIDE & WARRANTY CARD
SOFTWARE CD & USER’S GUIDE CD QUICK REFERENCE GUIDE
ACCESSORY BOX AND CLEANING CLOTH RUBBER PACKING(2)
3. Remove all the tapes.
• Make sure that the black toner cartridge is enclosed.
• Make sure that the black imaging unit is enclosed.
• If any items are missing or damaged, notify your dealer immediately.
• The appearance of the power cord may differ depending on your country’s specifications. The power cord must
be plugged into a grounded power socket.
Setting up the hardware_ 11
Page 12
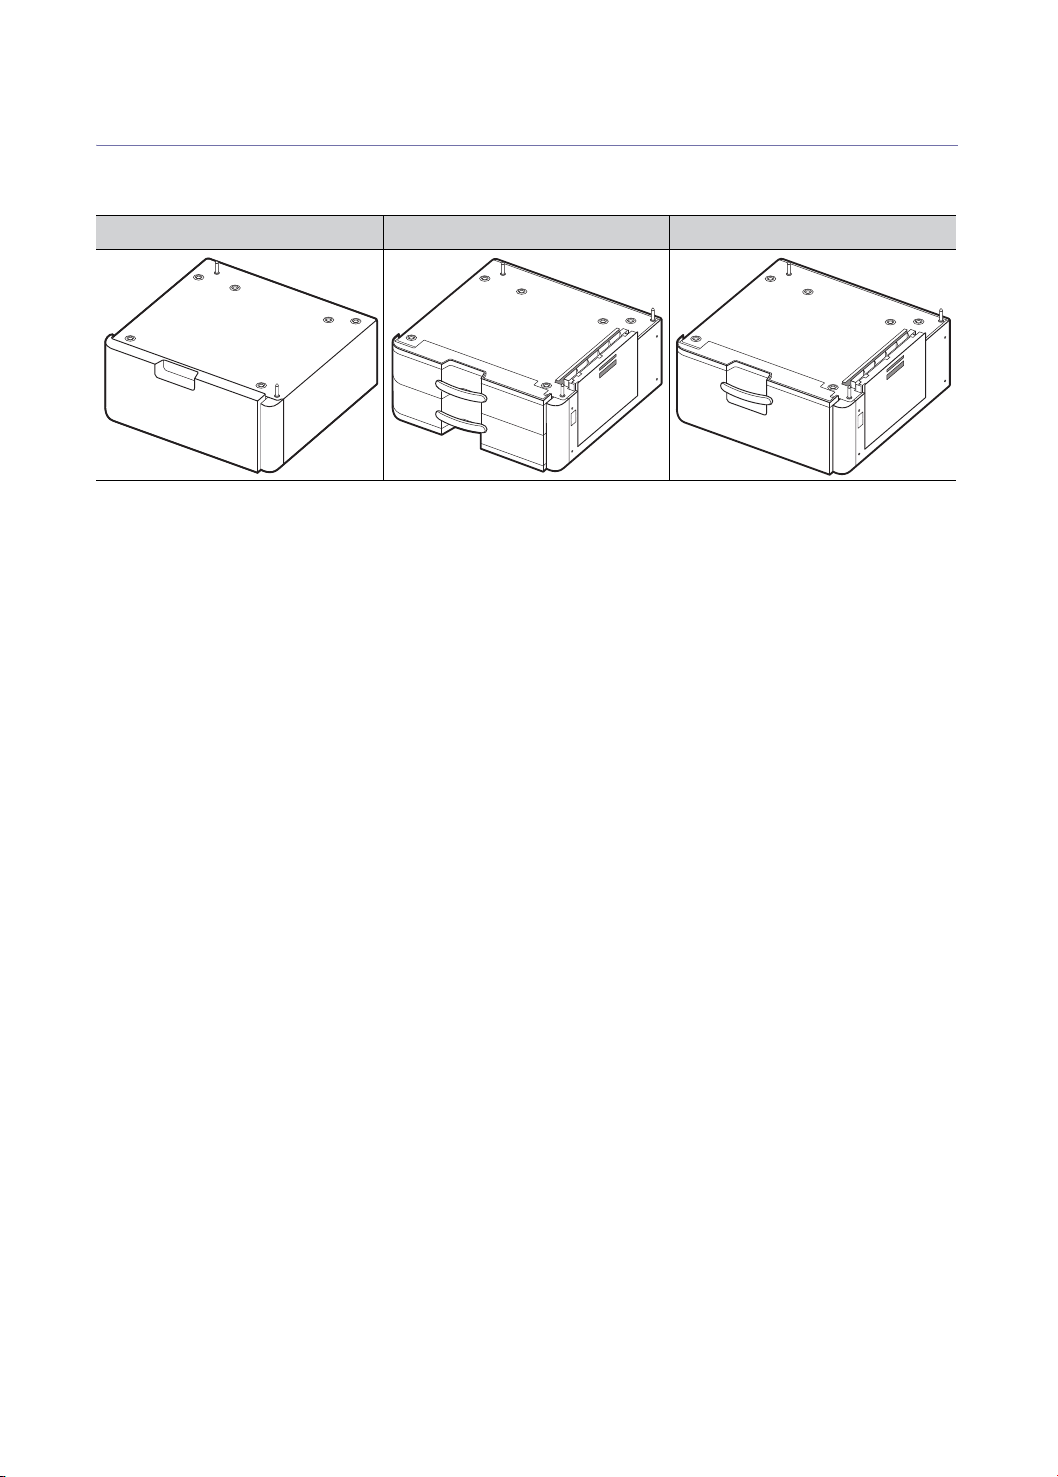
Installing the cabinet stand, optional dual cassette feeder or optional high
capacity feeder
When you purchased this machine, you would have chosen one of the below items. To install the item, refer to its
installation guide.
CABINET STAND DUAL CASSETTE FEEDER HIGH CAPACITY FEEDER
Setting up the hardware_ 12
Page 13
Installing the duplex automatic document feeder
You need to install the duplex automatic document feeder(DADF), it will automatically feed and then scan some amount of
the original documents at once. It can also automatically feed and flip over an original sheet of paper so that the machine
can scan on both sides of the paper.
Follow the steps below:
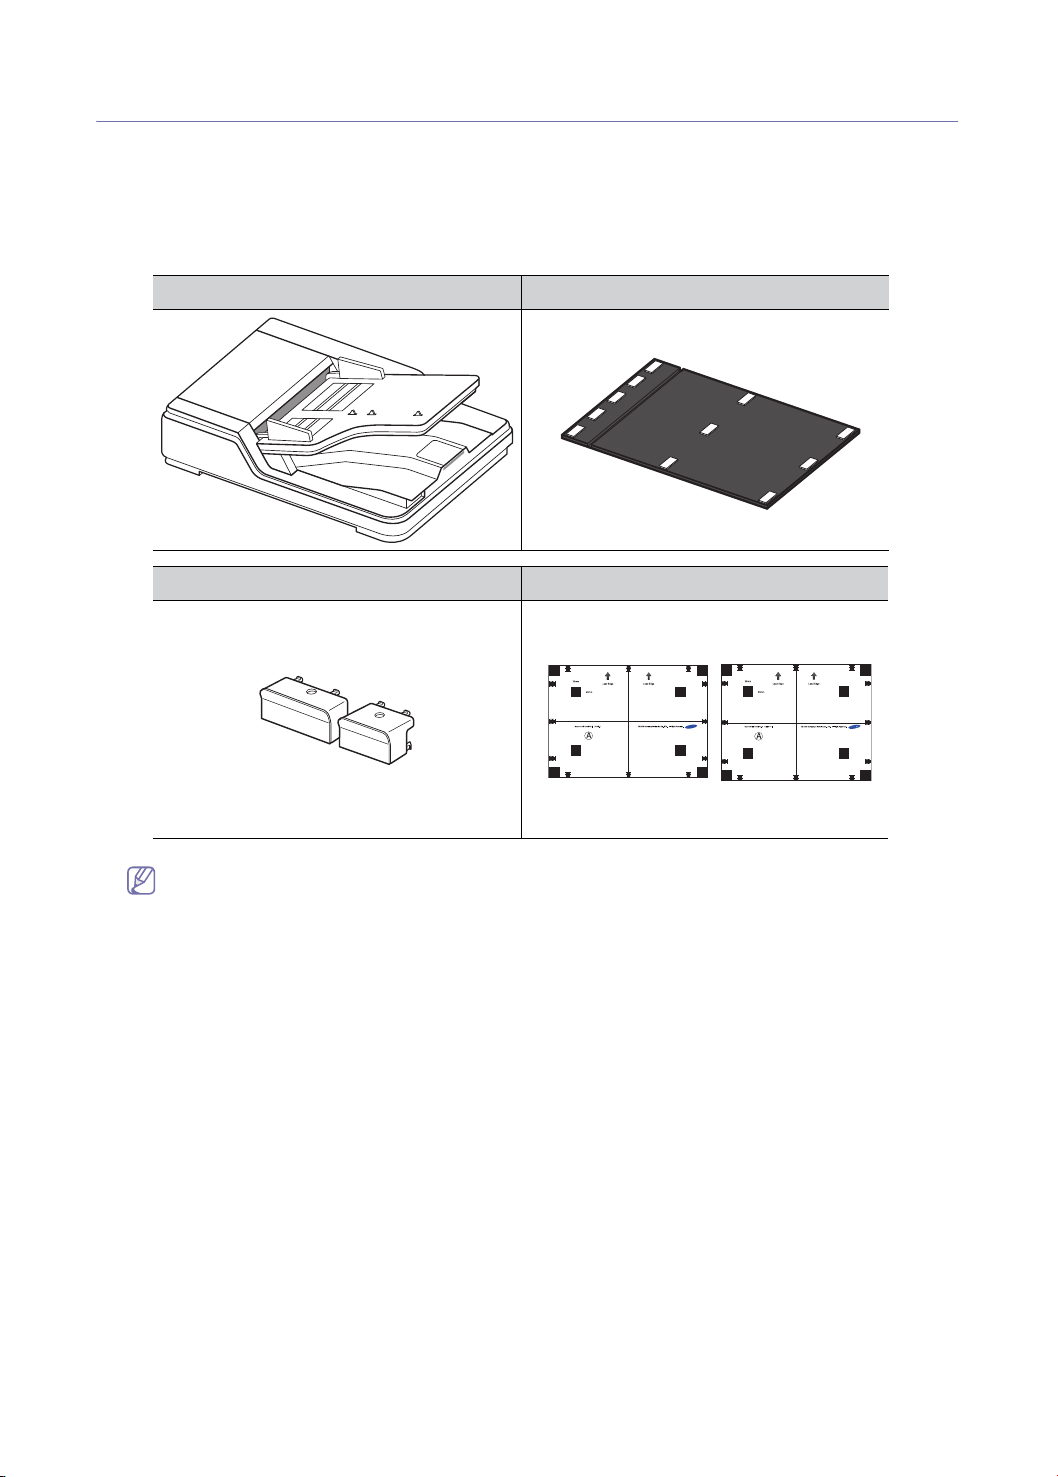
1. Unpack the DADF.
2. Make sure you have all of the following items.
DADF WHITE SHEET
PLASTIC COVER (2) DADF TEST CHART (A4, LETTER)
3. Remove all the packing tapes.
If the packing tapes are unremoved, the DADF may not operate normally. Make sure that all the packing tapes
are removed.
Setting up the hardware_ 13
Page 14

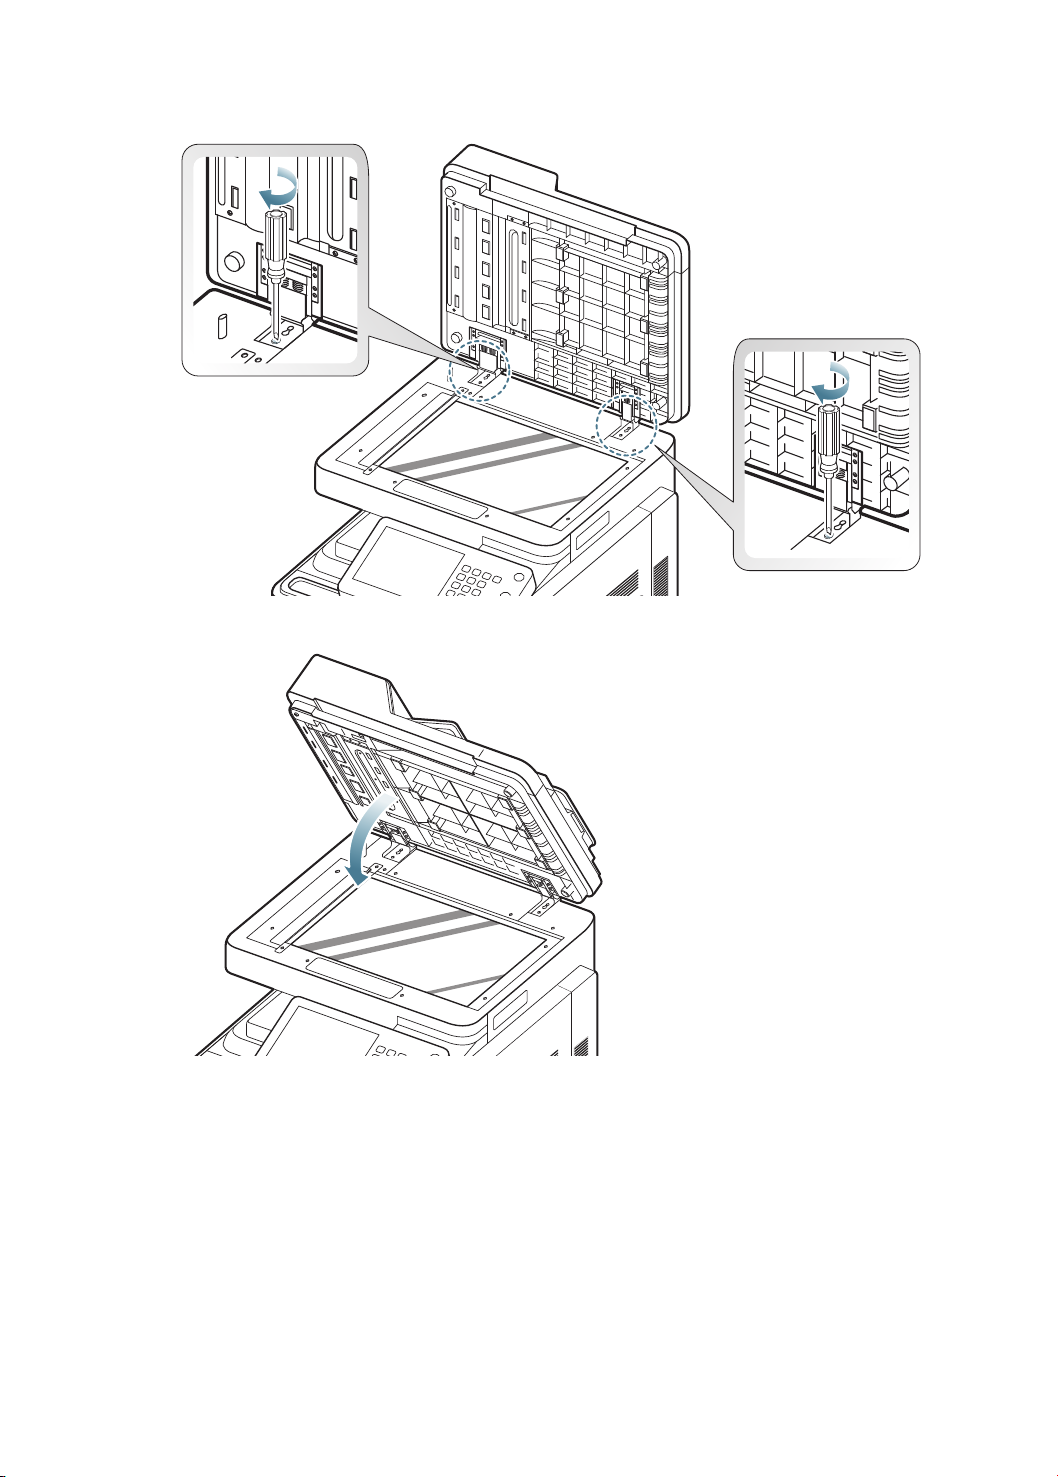
4. Remove the protecting sheet and tape.
5. Loosen the two handle hinges from the machine. The two handle hinges are used after put the DADF on the machine.
Setting up the hardware_ 14
Page 15

6. Put the DADF on the machine as shown below.
7. Fix the DADF using the two handle hinges that you loosened in the step 5. Loosely tighten the two handle hinges.
Setting up the hardware_ 15
Page 16

8. Fix the steel plate on the longest scale mark using the handle hinge.
You can place the scale mark by handling it back and forth while tightening or loosening the screw at the
backside.
Setting up the hardware_ 16
Page 17
9. Tighten the two handle hinges for fixing the DADF.
10. Close the DADF.
Setting up the hardware_ 17
Page 18

11. Loosen the three screws.
12. Push up the steel frames, and tighten the three screws.
Setting up the hardware_ 18
Page 19
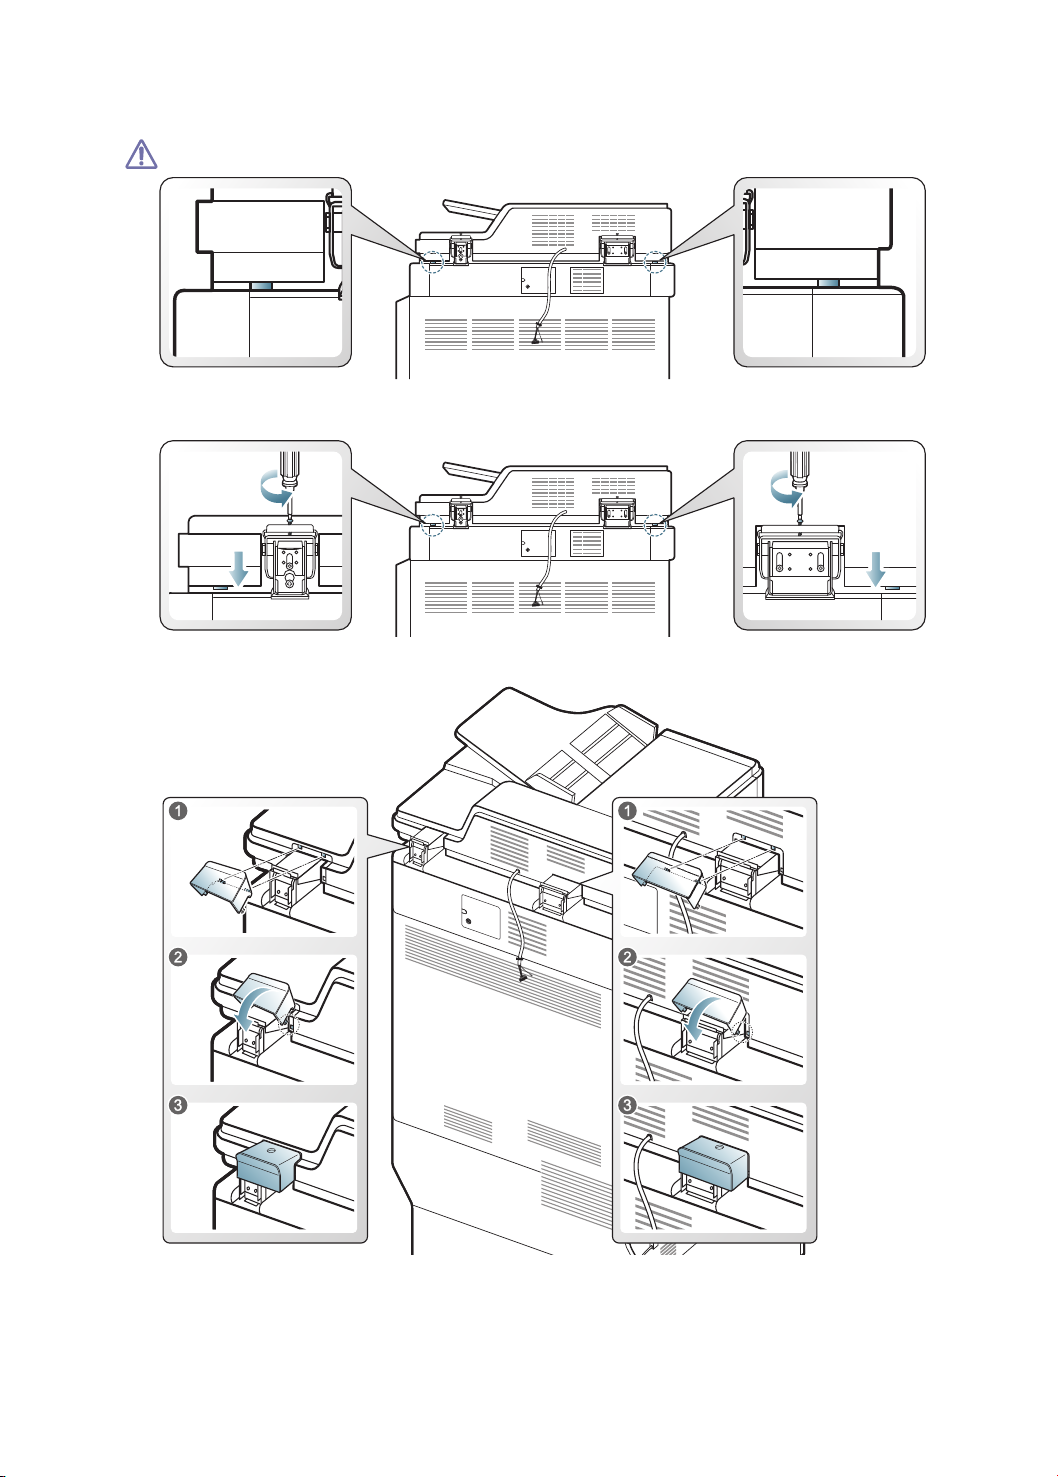
13. Make sure the two rubber pads (left side) and two plastic projections (right side) on the bottom of the DADF on both
sides touch the top of the machine as shown below.
• If you skip this step, it could cause originals to jam.
• If the gap is more than 0.5 mm (0.02 inch), adjust the screw on both sides as shown below until the gap is
smaller 0.5 mm (0.02 inch). You have to check all rubber pads and plastic projections.
14. Fit the plastic covers in the both hinges of the DADF.
Setting up the hardware_ 19
Page 20

15. Remove the screw and open the DADF cable cover.
16. Plug the DADF interface cable into the connector.
Setting up the hardware_ 20
Page 21

17. Tighten the screw to ground the ground wire.
18. Put the supporting rubber into the DADF cable cover.
Setting up the hardware_ 21
Page 22

19. Replace the DADF cable cover and tighten the screw .
20. Open the DADF and place the sheet inside. The white side should face down toward the scanner glass. Then remove
all protective pieces of paper from the white sheet’s Velcro fastener.
Setting up the hardware_ 22
Page 23

21. Align the white sheet with the registration guide at the top left coner of the glass.
22. Close the DADF carefully. The white sheet will be attached to the DADF. If the white sheet is not attached properly,
stick the white sheet on the DADF properly using the stickers when the DADF is opened.
Setting up the hardware_ 23
Page 24

Installing the accessory box
You can keep the cleaning cloth, scanner locking screw, etc. in the accessory box. You can also keep the screws, rubber
packing, etc. that are left after optional item installation.
Follow the steps below:
• The accessory box is provided for user’s convenience. There are no problems using the machine without the
1. Remove the protecting sheet on the sticker.
2. Attach the accessory box. We recommend you attach it to the location as shown below.
accessory box.
• You can attach the accessory box to any location. When you attach the accessory box, consider possible
disturbance of the DADF, control panel, trays, etc due to the accessory box.
Setting up the hardware_ 24
Page 25

Removing the scanner locking screw
You need to remove the screw locking the scanner. If you do not remove it, you cannot use the copy and scan functions.
We recommend you keep the screw in the accessory box. You need to lock the scanner when moving the machine
or when the machine is not in use for a long time.
Putting the rubber packings
If you need to install the optional standard finisher or booklet finisher, do not put the rubber packings in the holes.
Setting up the hardware_ 25
Page 26

Installing the toner cartridges
Follow the steps below:
1. Open the front cover.
2. Take the new toner cartridges out from their packages.
3. Thoroughly shake the new toner cartridge side to side five or six times to distribute the toner evenly inside the toner
cartridge.
4. Pull the sealed tape out of the toner cartridge carefully.
If toner gets on your clothing, wipe it off with a dry cloth and wash clothing in cold water. Hot water sets toner into
fabric.
Setting up the hardware_ 26
Page 27

5. Hold the new toner cartridge by the handle and slide it into its corresponding positions until it locks into place.
Leave the front cover opened.
Installing the imaging units
Follow the steps below:
1. Lift the locking lever upward. Then remove the waste toner container.
Setting up the hardware_ 27
Page 28

2. Open the right door.
3. Remove the new imaging units from its package.
Do not use sharp objects, such as a knife or scissors, to open the imaging unit package. You could damage the
surface of the imaging unit.
4. Pull out the OPC protecting pad.
If toner gets on your clothing, wipe it off with a dry cloth and wash clothing in cold water. Hot water sets toner into
fabric.
• Be careful not to scratch the surface of the imaging unit.
• To prevent damage, do not expose the imaging unit to light for more than a few minutes. Cover it with a
piece of paper to protect it if necessary.
Setting up the hardware_ 28
Page 29

5. Remove the tape.
6. Pull out the rubber stopper.
7. Remove the paper protecting the surface of the imaging unit.
Setting up the hardware_ 29
Page 30

8. Hold the handles on the new imaging unit, and push the imaging unit until it locks into place.
9. Close the right door.
Setting up the hardware_ 30
Page 31

10. Insert the waste toner container until it locks in place.
11. Close the front cover.
If the front cover is not completely closed, the machine will not operate.
Installing other options
This machine is a full-featured multi function printer that has been optimized to meet most of the users needs. Recognizing
that each user may have different requirements, Samsung makes many options available to enhance the machine’s
capabilities. Refer to Supplies & Accessories Guide on the User’s Guide CD.
For details about how to install the options, refer to the each option’s installation guide.
Setting up the hardware_ 31
Page 32

Loading paper
Standard tray
Load the print media you use for the majority of your print jobs into standard tray.
You can also purchase an optional dual cassette feeder or optional high capacity feeder, and attach it below the standard
tray. Refer to Supplies & Accessories Guide on the User’s Guide CD.
• This standard tray contains two trays (Tray 1, Tray 2).
• This standard tray holds up to 1,040 sheets of paper.
• The process to load paper in tray 1, and tray 2 is the same.
• If you have installed the optional dual cassette feeder (tray 3. tray 4) or the optional high capacity feeder, refer to
the installation guide provided with them.
Using photographic paper or coated paper may cause problems requiring repairs. Such repairs are not covered by
the warranty or service agreements.
1. Squeeze the lock lever and pull out the tray.
Setting up the hardware_ 32
Page 33

2. Remove the packing pad and tapes.
3. Remove the plastic bag which has two screws. Keep the two screws, it could use to be fixed the paper legnth guides
completely, if necessary.
Setting up the hardware_ 33
Page 34

4. Squeeze the paper length guide, and slide it to the end of the tray.
5. Squeeze the paper width guide, and slide it to the end of the tray.
1 Paper length guide
6. Flex or fan the edge of the paper stack to separate the pages before loading papers.
When handling the paper, be careful not to get a paper cut.
Setting up the hardware_ 34
1 Paper width guide
Page 35

7. Load paper with the print side facing up.
8. Adjust the paper legnth guide to the desired paper length.
Setting up the hardware_ 35
Page 36

9. After loading paper into the tray, pinch the paper width guide and move it toward the stack of paper until it lightly
touches the side of the stack. Do not press the guide too tightly to the edge of the paper; the guide may bend the
paper.
• Do not push the paper width guide too far causing the media to warp.
• If you do not adjust the paper width guide, it may cause paper jams.
Do not overload the tray with paper. Otherwise, it may cause paper jams. Make sure that the paper is below the
maximum paper capacity guide inside the tray.
1 Paper capacity guide
Setting up the hardware_ 36
Page 37

10. Fix the paper length guide using the locking switch. Release the locking switch to load a different sized paper
1 Locking switch
If you use only one size of paper or you want to fix the paper length guides completely, fix the paper length
guides using the two screws which are enclosed in the plastic bag.
11. Insert the tray back into the machine.
• When you load special type of paper such as thick paper, transparency, etc, you need to set the paper type
to improve the quality of your printed documents. Refer to User’s Guide on the User’s Guide CD.
• If you have problems with paper feeding, check the media specification. Then, try placing one sheet at a
time in the multi-purpose tray. Refer to User’s Guide on the User’s Guide CD.
• The settings made from the machine driver override the settings on the control panel. Refer to User’s Guide
on the User’s Guide CD.
• For details about how to use other trays or various papers, refer to User’s Guide on the User’s Guide CD.
Setting up the hardware_ 37
Page 38

Connecting a printer cable
Using a network cable
This machine has a bulit-in network interface card. You can connect your machine to a network using a network cable.
Connect your machine to the network with a network cable:
Setting up the hardware_ 38
Page 39

Turning the machine on
Keep in mind that you should use the power cord supplied with the machine. Otherwise, it can cause damage or fire
to the machine.
1. Plug the power cord into the power receptacle.
2. Plug another side into a properly grounded AC outlet.
Setting up the hardware_ 39
Page 40

3. Turn on the power switch.
• Some parts inside of the machine may be hot when power is on, or after printing. Be careful not to burn
yourself when working inside the machine.
• Do not disassemble the machine when it is turned on or plugged in. Doing so may give you an electric
shock.
If you need to turn the machine off, press the Power button for more than three seconds on the right side of the
control panel.
When the confirmation window appears, press Yes from the d
isplay screen, then wait until power is turned off.
If you turn the machine off directly using the power switch, it could cause the hard disk problem in the machine.
Setting up the hardware_ 40
Page 41

2.
Initial settings and testing of the machine
After hardware installation is completed, initial settings and some tests are necessary before using
the machine. This chapter gives you step-by-step instructions for initial settings and tests. For
detailed information about setting up the machine, refer to the User’s Guide or Administrator’s
Guide on the User’s Guide CD.
This chapter includes:
• Initial setting
• Print adjustment (Dual cassette feeder or High capacity feeder)
• DADF skew test and adjustment
Initial setting
When you turn the machine on after hardware installation, you can see the initial setting menu on the display screen. You
need to follow the steps below. You can also change the setting values on the control panel and SyncThru
For the detailed information about setting up the machine, refer to the User’s Guide or Administrator’s Guide on the User’s
Guide CD.
1. Press a language for using on the display screen and then press Next.
2. Read the note and then press Next.
TM
Web Service.
If you want to reset the language, press Back and select the language you want.
Initial settings and testing of the machine_ 41
Page 42

3. Press the Device Name field.
The pop up keyboard appears.
Remove the existing device name and enter the device name you want to use and then press OK. Then press Next.
Keep in mind to enter the device name to be used on the network.
• If necessary, enter the location of the machine in the Location field.
• If necessary, enter the information in the Administrator field for the person to contact when any problem
occurs on the machine.
4. Press the Test button to verify the LAN connection. When Connected appears after pressing the Test button, press
Next.
If Not connected appears, make sure that the machine is connected to the network then verify the LAN connection
again.
• If a network connection problem persists, contact your network administrator.
• If you installed an optional fax kit or finisher, press each Test button for verify connection of them.
Initial settings and testing of the machine_ 42
Page 43

5. Enter the IP address, subnet mask, and gateway in each field. Then press Next.
• If a new IP address is assigned automatically by a DHCP or BOOTP, press DHCP or BOOTP.
• If you are not sure about your network environment, contact your network administrator.
6. Press the Name field.
a) The the pop-up keyboard appears.
b) The admin is entered as a default. If you want to replace with another name, remove admin and enter a new
administrator name and then press OK.
c) Press the New Password field. The pop-up keyboard appears.
d) Enter the password to use and then press OK. This password is to be used for accessing the administrator
account.
e) Press the Confirm Password field. The pop up keyboard appears.
f) Re-enter the password to confirm it, then press OK and Next.
Initial settings and testing of the machine_ 43
Page 44

7. Set the time on the machine. You can set the time manually or use SNTP (Simple Network Time Protocol) to set time
automatically using the time server.
When you press Manual:
a) Set the date, time, time offset using the left/right and up/down arrows.
Example for selecting the time offset: If your local time is 4 hours faster than UTC, press the right arrow until
+4 shows.
ess Result to check the Manual setting and then press Close. If necessary, try to set it again.
b) Pr
c) Press Next.
When you press SN
TP (Simple Network Time Protocol):
a) Set the date, time, time offset using the left/right and up/down arrows.
Example for selecting the time offset: If your local time is 4 hours faster than UTC, press the right arrow until
+4 shows.
b) If you press IP, go to step c. If
you press Host, step e.
c) Press the IP field. The pop-up keyboard appears. Enter a IP address which provides the time information, and then
press OK.
d) Press the Port No field. The pop-up keyboard appears. Enter a port number and then press OK. Go to step f.
e) Press the Host field. The pop-up keyboard appears. Enter a host name manually. You can also press Host List,
and then select a host name in Time Server List and press Close.
f) Press the Port No field. The pop-up keyboard appears. Enter a port number and then press OK.
g) Press Result for checking the SNTP setting and then press Close. If necessary, try to set it again.
h) Press Next.
Initial settings and testing of the machine_ 44
Page 45

8. Select a unit, numeric separation, and standard paper size to be used on the display screen and then press Next.
0
4,000 m
(13,123 ft)
3,000 m
(9,842 ft)
2,000 m
(6,561 ft)
1,000 m
(3,280 ft)
4
3
2
1
9. Select an altitude level where the machine is installed. The print quality is affected by atmospheric pressure, which is
determined by the height of the machine above sea level. Then press Next.
1 High 3
2 High 2
3 High 1
4 Normal
Initial settings and testing of the machine_ 45
Page 46

10. Enter the Community Name and select the Access Permission then press Finish.
You do not need to enter the community name.
11. The Completed window appears. Press the Close button. The machine restarts.
If you want to print a configuration report, click Print Con
figuration.
If the engine is busy, the machine might take longer to reboot.
Initial settings and testing of the machine_ 46
Page 47

Print adjustment (Dual cassette feeder or High capacity feeder)
If you have installed the dual cassette feeder or high capacity feeder on the machine, you have to print adjustment before
using the machine. The procedure of print adjustment for the dual cassette feeder and the high capacity feeder is same.
The explanation in this user’s guide is based on the dual cassette feeder.
• If you have installed the dual cassette feeder, select Tray 3 and Tray 4 for print adjustment.
• If you have installed the high capacity feeder, select Tray 3 for print adjustment.
1. Press Machine Setup from the display screen.
2. Press Machine Setup > General Settings > Machine Test.
3. Press ID’s input area. The pop-up keyboard appears.
Enter the name which is entered in the initial setting step 6 (See "Press the Name field." on page 43).
Then press OK on t
You can also select the ID by pressing R
4. Press
Password’s input area. The pop-up keyboard appears.
he pop-up keyboard.
ecent users.
Enter the password which is entered in the initial setting step 6 (See "Press the Name field." on page 43).
Then press OK on t
5. Press
Domain’s input area. The pop-up keyboard appears.
Press L, O, C, A, L and press OK on the p
You can also select the domain name by pressing D
he pop-up keyboard.
op-up keyboard.
omain List.
The domain name may differ for your machine depending on its options or models.
6. Press
OK.
Initial settings and testing of the machine_ 47
Page 48

7. Press Adjustment > Print Adjustment > Paper Supply > Tray 3.
8. Press Paper Size > A3 > Print.
9. The machine prints the print test chart. Press Next.
Initial settings and testing of the machine_ 48
Page 49

10. Place the front of the print test chart face down on the scanner glass. The print test chart has A (Front Side) on the
front page.
11. Press Start from the control panel.
If you select Apply to all trays, the trays that are not selected also have the print adjustment results appllied.
We recommend performing print adjustment for each tray individually to optimize each tray’s settings. Print
adjustment results performed in this way will be better than using Apply to all trays.
12. Follow the steps on the display screen. When print adjustment is finished, remove the print test chart on the scanner
glass.
Initial settings and testing of the machine_ 49
Page 50

DADF skew test and adjustment
After initial setting is completed, you need to conduct the DADF skew test and adjustment using the DADF test chart which
supplied with DADF.
Skew test
1. Load the A4 (or LTR) DADF test chart face up into the DADF.
2. Adjust the document width guides to the paper size.
Initial settings and testing of the machine_ 50
Page 51

3. Press Copy from the display screen.
4. Press Start from the control panel to begin copying.
5. Compare the condition of the printout with the DADF test chart.
For example, the length of scale marks in the circles is equivalent (a
means the DADF was installed well.
Initial settings and testing of the machine_ 51
cceptable range by less or more than 0.5 mm), it
Page 52

Otherwise, adjust the DADF using the screw at the backside and handle hinge as shown by the examples below.
For example, the length of scale on the left side is 1mm shorter th
rear side by two scale marks using the screw at the backside and handle hinge. A scale mark is 0.5 mm.
an that of right side, move the steel plate toward the
For example, the length of scale on the left side is 1mm longer than that of right side, move the steel plate toward the
front side by two scale marks using the screw at the backside and handle hinge. A scale mark is 0.5 mm.
Initial settings and testing of the machine_ 52
Page 53

DADF adjustment
1. Load the A4 (or LTR) DADF test chart face up into the DADF.
2. Adjust the document width guides to the paper size.
Initial settings and testing of the machine_ 53
Page 54

3. Press Machine Setup from the display screen.
4. Press Machine Setup > General Settings > Machine Test.
5. Press ID’s input area. The pop-up keyboard appears.
Enter the name which is entered in the initial setting step 6 (See "Press the Name field." on page 43).
Then press OK on t
You can also select the ID pressing Recent
6. Press
Password’s input area. The pop-up keyboard appears.
he pop-up keyboard.
users.
Enter the password which is entered in the initial setting step 6 (See "Press the Name field." on page 43).
Then press OK on t
7. Press
Domain’s input area. The pop-up keyboard appears.
Press L, O, C, A, L and press OK on the p
You can also select the domain name pressing Dom
he pop-up keyboard.
op-up keyboard.
ain List.
The domain name may differ for your machine depending on its options or models.
8. Press
OK.
Initial settings and testing of the machine_ 54
Page 55

9. Press Adjustment > DADF Adjustment > OK.
The machine adjusts the DADF automatically.
After the DADF skew test and adjustment, the pop-up window appears on the display screen.
Remove the the A4 (or LTR) DADF test chart from the DADF.
Initial settings and testing of the machine_ 55
Page 56

Initial settings and testing of the machine_ 56
Page 57

3.
Installing the supplied software
This chapter gives you step-by-step instructions for installing the supplied software. For the
detailed information about supplied software, refer to the User’s Guide or Administrator’s Guide on
the User’s Guide CD.
This chapter includes:
• Supplied software
• System requirements
• Installing a network connected machine’s driver
Supplied software
After you have set up your machine and connected it to your computer, you must install the machine software. If you are a
Windows or Macintosh OS user, install the software from the software CD and if you are a Linux OS user, download the
software from the Samsung website (www.samsung.com/printer) and install.
Machine software are occasionally updated due to release of new operating system and etc. If needed, download
the latest version from the Samsung website (www.samsung.com/printer).
OS CONTENTS
Windows • Printer driver: Use this driver to take full advantage of your machine’s features.
• PostScript printer driver: Use the PostScript driver to print documents with complex fonts
and graphics in the PS language.
• Scanner driver: TWAIN driver is available for scanning documents on your machine.
• Smart Panel: This program allows you to monitor the machine’s status and alerts you when
an error occurs during printing.
• SmarThru Office
• Samsung Scan Manager: You can find out about Scan Manager program and installed
scan driver's condition.
• SetIP: Use this program to set your machine’s TCP/IP addresses.
• Network PC Fax: You can send a fax from your computer without going to the machine.
• XPS printer driver: Use XML Paper Specification (XPS) printer driver to print documents for
taking advantages in XPS print path. You can install this driver only on Windows Vista or
higher. (www.samsung.com/printer)
• Direct Printing Utility: This program allows you to print PDF files directly.
Macintosh • PostScript printer driver: Use this driver to run your machine from a Macintosh computer
and print documents (PostScript printer description file is included).
• Scanner driver: TWAIN and ICA scanner drivers are available for scanning documents on
your machine.
• Smart Panel: This program allows you to monitor the machine’s status and alerts you when
an error occurs during printing.
• Scan Manager: You can find out about Scan Manager program information and installed
scan driver's condition.
• SetIP: Use this program to set your machine’s TCP/IP addresses.
• Fax Utilities: You can send a fax from your computer without going to the machine.
Linux • Unified Linux Driver: Use this driver to take full advantage of your machine’s features.
• Printer Description (PPD) file: Use this file to run your machine from a Linux computer and
print documents.
• SANE: Use this driver to scan documents.
• Smart Panel: This program allows you to monitor the machine’s status and alerts you when
an error occurs during printing.
• SetIP: Use this program to set your machine’s TCP/IP addresses.
Unix • Unified Unix Printer Driver: Use this driver to take full advantage of your machine’s
features.
a. Allows you to edit a scanned image in various ways using a powerful image editor and to send the image by email.
You can also open other image edit programs, such as Adobe Photoshop, from SmarThru Office . For details, refer
to the on screen help supplied on the SmarThru Office program.
a
: This program assists you in documents management.
Installing the supplied software_ 57
Page 58

System requirements
Before you begin, ensure that your system meets the following requirements:
Windows
Your machine supports the following Windows operating systems.
OPERATING SYSTEM
REQUIREMENT (RECOMMENDED)
CPU RAM FREE HDD SPACE
Windows 2000 Pentium II 400 MHz (Pentium III 933 MHz) 64 MB
600 MB
(128 MB)
Windows XP Pentium III 933 MHz (Pentium IV 1 GHz) 128 MB
1.5 GB
(256 MB)
Windows Server 2003 Pentium III 933 MHz (Pentium IV 1 GHz) 128 MB
(512 MB)
Windows Server 2008 Pentium IV 1 GHz (Pentium IV 2 GHz) 512 MB
1.25 GB to
2 GB
10 GB
(2048 MB)
Windows Vista Pentium IV 3 GHz 512 MB
15 GB
(1024 MB)
Windows 7 Pentium IV 1 GHz 32-bit or 64-bit
processor or higher
1 GB
(2 GB)
16 GB
• Support for DirectX 9 graphics with 128 MB memory (to enable the Aero theme).
• DVD-R/W Drive
Windows Server 2008 R2 Pentium IV 1 GHz (x86) or 1.4 GHz (x64)
processors (2GHz or faster)
512 MB
(2048 MB)
10 GB
• Internet Explorer 6.0 or higher is the minimum requirement for all Windows operating systems.
• Users who have an administrator right can install the software.
• Windows Terminal Service is compatable with this machine.
Macintosh
OPERATING SYSTEM
CPU RAM FREE HDD SPACE
Mac OS X 10.5 • Intel Processors
• 867 MHz or faster Power
PC G4/ G5
Mac OS X 10.6 • Intel Processors 1 GB (2 GB) 1 GB
REQUIREMENTS (RECOMMENDED)
512 MB (1 GB) 1 GB
Linux
ITEM REQUIREMENTS
Operating system RedHat Enterprise Linux WS 4, 5 (32/64bit)
Fedora Core 2~10 (32/64bit)
SuSE Linux 9.1 (32bit)
OpenSuSE 9.2, 9.3, 10.0, 10.1, 10.2, 10.3, 11.0, 11.1 (32/64bit)
Mandrake 10.0, 10.1 (32/64bit)
Mandriva 2005, 2006, 2007, 2008, 2009 (32/64bit)
Ubuntu 6.06, 6.10, 7.04, 7.10, 8.04, 8.10 (32/64bit)
SuSE Linux Enterprise Desktop 9, 10 (32/64bit)
Debian 3.1, 4.0, 5.0 (32/64bit)
CPU Pentium IV 2.4GHz (IntelCore2)
RAM 512 MB (1024 MB)
Free HDD space 1 GB (2GB)
It is necessary to claim swap partition of 300 MB or larger for working with large scanned images.
Installing the supplied software_ 58
Page 59

UNIX
ITEM REQUIREMENTS
Operating system Sun Solaris 8,9,10 (x86, SPARC)
IBM AIX 5.x
HP-UX 11i (PA-RISC, Itanium)
Free HDD space Up to 100 MB
Installing a network connected machine’s driver
If you are a Macintosh or Linux OS user, refer to the Administrator’s Guide on the User’s Guide CD for installing
printer driver.
Windows
You can install the machine software using the typical or custom method.
The following steps below are for typical installation which is recommended for most users. All components necessary for
machine operations will be installed.
1. Make sure that the machine is connected to the network or USB and powered on.
If the “Found New Hardware Wizard” window appears during the installation procedure, click Cancel to close
the window.
rt the software CD into your CD-ROM drive.
2. Inse
• The software CD should automatically run and an installation window appears.
• If the installation window does not appear, click Start and then Run. Type X:\Setup.exe, replacing “X” with the
letter which represents your drive. Click OK.
• If you use Windows Vista, Windows 7 and Windows 2008 Server R2 click Start > All programs > Accessories >
Run.
Type X:\Set
• If the AutoPlay window appears in Windows Vista, click Run Setup.exe in Install or run program field, and click
Continue in the User Account Control windows.
• If the AutoPlay window appears in Windows 7 and Windows 2008 Server R2, click Run Setup.exe in Install or
run program field, and click Yes in the User Account Control windows.
3. Select Install now.
up.exe replacing “X” with the letter which represents your drive and click OK.
If necessary, select a language from the drop-down list.
• Advanced Installation contains Custom Installation. Custom Installation allows you to select the
machine’s connection and choose individual components to install. Follow the instructions in the window.
• The Administrator Installation allows IT administrator or system administrator to install printer driver and
supplied software to multiple clients simultaneously. (See Administrator’s Guide.)
Installing the supplied software_ 59
Page 60

4. Read License Agreement, and select I accept the terms of the License Agreement. Then, click Next.
The program searches the machine.
If your machine is not found in the network or locally, the following window will appear.
• Check if you want to install the software without connection of the printer.
ck this option to install this program without a machine connected. In this case, the print a test page
- Che
window will be skipped, and completes the installation.
• Search ag
ain
When you press this button, the firewall notice window appears;
urn off the firewall and Search again. For Window operating system, click Start > Control Panel >
- T
Windows Firewall, and inactivate this option.
urn off the firewall from the third party's program beside the operating system. Refer to the manual
- T
provided by individual programs.
• Direct
Input
The Direct in
- Search
put allows you to search a specific machine on the newtwork.
by IP address: Enter the IP address or the host name. Then click Next.
To verify your machine’s IP address, pr
- Sear
ch by network path: To find a shared machine (UNC Path), enter the shared name manually or find
int a network configuration report.
a shared printer by clicking the Browse button. Then click Next.
• Help
If your machine is not connected to the computer or networ
k, This help button gives detailed information
about the how to connect the machine.
• SNMP Co
If your system administrator set the new SNMP Co
mmunity Name
mmunity Name on the machine, you can find the
machine in the network. Contact your system administrator for new SNMP Community Name.
5. The searched machines will be shown on the screen. Select the one you wish to use and click Next.
If the driver searches only one machine, this step is skipped.
6. The Confirm Printer Connection window appears. Then click Next.
Installing the supplied software_ 60
Page 61

7. After the installation is finished, a window asking you to print a test page appears. If you want to print a test page, click
Print a test page.
Otherwise, just click Nex
8. If the test page pr
If not, click No to reprint it
t and go to step 9.
ints out correctly, click Yes.
.
9. If you want to register your machine on Samsung web site, click On-line Registration.
If your machine is not connected to the network or computer, click How to connect?. How to connect? gives
detailed information about the how to connect the machine. Follow the instructions in the window.
10. Click Finish.
• After the driver setup, you may enable firewall.
• If the printer driver does not work properly, follow the steps below to reinstall the driver.
a) Make sure that the machine is connected to your machine and powered on.
b) From the Start menu, select Programs or All Programs > Samsung Printers > your printer driver name
> Uninstall.
c) Follow the instruction on the window to uninstall the driver.
d) Insert the software CD into your CD-ROM drive and reinstall the driver.
Installing the supplied software_ 61
Page 62

Contact samsung worldwide
If you have any comments or questions regarding Samsung products, contact the Samsung
customer care center.
COUNTRY/
REGION
ARGENTINE 0800-333-3733 www.samsung.com
ARMENIA 0-800-05-555
AUSTRALIA 1300 362 603 www.samsung.com
AUSTRIA 0810-SAMSUNG (7267864, €
AZERBAIJAN 088-55-55-555
BAHRAIN 8000-4726
BELARUS 810-800-500-55-500 www.samsung.ua
BELGIUM 02-201-24-18 www.samsung.com/be (Dutch)
BRAZIL 0800-124-421
CANADA 1-800-SAMSUNG (726-7864) www.samsung.com
CHILE 800-SAMSUNG (726-7864) www.samsung.com
CHINA 400-810-5858
COLOMBIA 01-8000112112 www.samsung.com
COSTA RICA 0-800-507-7267 www.samsung.com
CZECH REPUBLIC 800-SAMSUNG (800-726786) www.samsung.com
DENMARK 70 70 19 70 www.samsung.com
ECUADOR 1-800-10-7267 www.samsung.com
EGYPT 0800-726786
EIRE 0818 717100 www.samsung.com
EL SALVADOR 800-6225 www.samsung.com
ESTONIA 800-7267 www.samsung.com
KAZAKHSTAN 8-10-800-500-55-500 www.samsung.com/kz_ru
KYRGYZSTAN 00-800-500-55-500
FINLAND 030-6227 515 www.samsung.com
FRANCE 01 48 63 00 00 www.samsung.com
GERMANY 01805 - SAMSUNG (726-7864
GEORGIA 8-800-555-555
GUATEMALA 1-800-299-0013 www.samsung.com
HONDURAS 800-7919267 www.samsung.com
HONG KONG (852) 3698-4698 www.samsung.com/hk
HUNGARY 06-80-SAMSUNG (726-7864) www.samsung.com
CUSTOMER CARE CENTER WEB SITE
www.samsung.com
0.07/min)
www.samsung.com/ua_ru
www.samsung.com/be_fr (French)
www.samsung.com
4004-0000
www.samsung.com
010-6475 1880
Samsung Zrt., česká organizační složka, Oasis Florenc, Sokolovská394/17, 180 00, Praha 8
www.samsung.com
€ 0,14/min)
www.samsung.com/hk_en/
Contact samsung worldwide_ 62
Page 63

COUNTRY/
REGION
CUSTOMER CARE CENTER WEB SITE
INDIA 3030 8282
1800 110011
1800 3000 8282
1800 266 8282
INDONESIA 0800-112-8888
021-5699-7777
ITALIA 800-SAMSUNG (726-7864) www.samsung.com
JAMAICA 1-800-234-7267 www.samsung.com
JAPAN 0120-327-527 www.samsung.com
JORDAN 800-22273
KSA 9200-21230 www.samsung.com
LATVIA 8000-7267 www.samsung.com
LITHUANIA 8-800-77777 www.samsung.com
LUXEMBURG 261 03 710 www.samsung.com
MALAYSIA 1800-88-9999 www.samsung.com
MEXICO 01-800-SAMSUNG (726-7864) www.samsung.com
MOLDOVA 00-800-500-55-500 www.samsung.ua
NETHERLANDS 0900-SAMSUNG
(0900-7267864) (€ 0,10/min)
NEW ZEALAND 0800 SAMSUNG (0800 726
786)
NICARAGUA 00-1800-5077267 www.samsung.com
NORWAY 815-56 480 www.samsung.com
PANAMA 800-7267 www.samsung.com
PHILIPPINES 1800-10-SAMSUNG
(726-7864)
1-800-3-SAMSUNG (726-7864)
1-800-8-SAMSUNG (726-7864)
02-5805777
POLAND 0 801 1SAMSUNG (172678)
022-607-93-33
PORTUGAL 80820-SAMSUNG (726-7864) www.samsung.com
PUERTO RICO 1-800-682-3180 www.samsung.com
QATAR 800-2255
REP. DOMINICA 1-800-751-2676 www.samsung.com
RUSSIA 8-800-555-55-55 www.samsung.ru
SINGAPORE 1800-SAMSUNG (726-7864) www.samsung.com
SLOVAKIA 0800-SAMSUNG (726-7864) www.samsung.com
SOUTH AFRICA 0860 SAMSUNG (726-7864) www.samsung.com
SPAIN 902-1-SAMSUNG(902 172
678)
SWEDEN 0771 726 7864 (SAMSUNG) www.samsung.com
SWITZERLAND 0848-SAMSUNG (7267864,
CHF 0.08/min)
SYRIA 1825-22-73
www.samsung.com
www.samsung.com
www.samsung.com/ua_ru
www.samsung.com
www.samsung.com
www.samsung.com
www.samsung.com
www.samsung.com
www.samsung.com
Contact samsung worldwide_ 63
Page 64

COUNTRY/
REGION
TADJIKISTAN 8-10-800-500-55-500
TAIWAN 0800-329-999 www.samsung.com
THAILAND 1800-29-3232
TRINIDAD &
TOBAGO
TURKEY 444 77 11 www.samsung.com
U.A.E 800-SAMSUNG (726-7864) www.samsung.com
U.K 0845 SAMSUNG (726-7864) www.samsung.com
U.S.A 1-800-SAMSUNG (726-7864) www.samsung.com
UKRAINE 8-800-502-000 www.samsung.ua
UZBEKISTAN 8-10-800-500-55-500 www.samsung.com/kz_ru
VENEZUELA 0-800-100-5303 www.samsung.com
VIETNAM 1 800 588 889 www.samsung.com
CUSTOMER CARE CENTER WEB SITE
www.samsung.com
02-689-3232
1-800-SAMSUNG (726-7864) www.samsung.com
www.samsung.com/ua_ru
Contact samsung worldwide_ 64
Page 65

Index
C
connect
network cable 38
printer cable 38
convention 3
F
features
supplied software 57
I
initial setting 41
install
duplex automatic document
feeder 13
imaging unit
optional high capacity feeder
12
optional tray
stand 12
toner cartridge 26
27
12
L
Linux
supplied softwares 57
system requirements 58
loading
paper in the standard tray 32
S
scanner lock 25
service contact numbers 62
T
test
DADF skew 50
turn on
machine 39
U
UNIX
system requirements 59
W
Windows
driver installation for network
connected 59
supplied software
system requiremnets 58
57
M
machine configuration 8
Macintosh
supplied softwares 57
system requirements 58
N
network
driver installation
Windows
59
P
placing a machine 11
spacing
11
R
requirements
Unix 59
rubber packing 25
Index_ 65
Page 66

Index_ 66
 Loading...