

Samsung SCH-X799P, SCH-X799, SCH-X799X User Manual

* Some of the contents in this manual may differ from your phone,
depending on the software inst alled or y o u r se rvic e p ro v ider.
Depending on your country, your phone and accessories may
appear different from the illustrations in this man ua l.
SAMSUNG
ELECTRONICS
World Wide Web
http://www.samsungmobile.com
Code No. : GH68-06657A
Printed in Korea
English. 06/2005. Rev.1.0

PORTABLE CELLULAR
TELEPHONE
SCH-X799
User’s Manual


Table of contents
Important Safety Precautions....... ... ....................... 7
Unpacking ..............................................................9
Your Phone...........................................................10
Phone Layout.......................................................... 10
Display................................................................... 13
Backlight ................................................................ 15
Service Light........................................................... 15
Getting Started.....................................................16
Using a Battery ....................................................... 16
Switching On or Off the Phone................................... 19
Using the Soft Keys.................................................. 21
Your Phone’s Modes ................................................. 22
Call functions........................................................24
Making a Call .......................................................... 24
Ending a Call........................................................... 25
Emergency Dialing................................................... 25
Using the Recent Call Logs........................................ 26
Making a Call from Phonebook................................... 26
Prepend Dialing....................................................... 27
Speed Dialing.......................................................... 28
Pause Dialing .......................................................... 29
Adjusting the Volume During a Call ............................ 31
Answering a Call...................................................... 32
Silencing an Incoming Call ........................................ 32
Viewing Missed Calls ................................................ 33
Options During a Call ............................................... 34
Call Waiting ............................................................ 35
Call Forwarding ....................................................... 35
Three-way Calling.................................................... 36
Entering Text........................................................37
Changing the Text Input Mode................................... 37
Using T9 Hebrew, T9 English Mode............................. 38
Using Hebrew, English Mode...................................... 40
Using Symbol Mode.................................................. 43
Using Number Mode................................................. 43
Using the Menus...................................................44
3

Table of contents
Accessing a Menu Function by Scrolling ...................... 44
Using Shortcuts....................................................... 45
List of Menu Functions.............................................. 46
Calls ..................................................................... 51
Outgoing
Incoming
Missed
Erase History
Air Time
(Menu 1-1)
(Menu 1-2)
(Menu 1-3)
(Menu 1-4)
(Menu 1-5)
................................................. 51
................................................ 52
.................................................... 53
........................................... 53
.................................................. 54
Phonebook............................................................ 55
Find
(Menu 2-1)
Add New Entry
Group Settings
My Phone #
Memory Info
....................................................... 55
(Menu 2-2)
(Menu 2-3)
(Menu 2-4)
(Menu 2-5)
......................................... 58
......................................... 62
............................................. 63
............................................ 63
Messages..............................................................64
New MSG
Voice
Inbox
Sent
Draft
Erase MSG
MSG Setting
(Menu 3-1)
(Menu 3-2)
(Menu 3-3)
(Menu 3-4)
(Menu 3-5)
(Menu 3-6)
(Menu 3-7)
................................................ 64
...................................................... 65
..................................................... 66
....................................................... 67
...................................................... 68
.............................................. 68
............................................ 69
Planner.................................................................71
Today
(Menu 4-1)
Scheduler
Task List
Memo Pad
Alarm
(Menu 4-5)
Calculator
World Time
Countdown
Set Time
..................................................... 71
(Menu 4-2)
(Menu 4-3)
(Menu 4-4)
............................................... 73
................................................. 75
............................................... 76
..................................................... 77
(Menu 4-6)
(Menu 4-7)
(Menu 4-8)
(Menu 4-9)
............................................... 78
............................................. 79
.............................................. 79
................................................. 80
Voice Tools ...........................................................81
Voice Memo
Voice Answer
(Menu 5-1)
(Menu 5-2)
............................................ 81
........................................... 83
Sounds .................................................................86
4

Table of contents
Ringer Volume
Ringer Type
Key Tone
Alerts
(Menu 6-4)
Tone Length
Power On/Off
(Menu 6-1)
(Menu 6-2)
(Menu 6-3)
......................................... 86
............................................. 87
................................................ 87
..................................................... 88
(Menu 6-5)
(Menu 6-6)
............................................ 89
........................................... 89
Display .................................................................90
Image Box
Language/
Backlight
Banner
Dual Clock
Service LED
Contrast
(Menu 7-1)
(Menu 7-3)
(Menu 7-4)
(Menu 7-5)
(Menu 7-6)
(Menu 7-7)
.............................................. 90
(Menu 7-2)
........................................ 91
................................................ 91
................................................... 92
.............................................. 92
............................................. 93
................................................. 93
Games ..................................................................94
Chicken Run
Mobile Cop
(Menu 8-1)
(Menu 8-2)
............................................ 95
.............................................. 96
Set up...................................................................97
Auto Answer
Call Answer
Data/Fax
Version
Security
(Menu 9-1)
(Menu 9-2)
(Menu 9-3)
(Menu 9-4)
(Menu 9-5)
............................................ 97
............................................. 97
................................................ 98
................................................... 99
.................................................. 99
VAS..................................................................... 103
Internet Portal
Games & App.
Ringtone
Animation
Voice Portal
SMS INFO
What’s new?
(-1)
............................................. 103
(-2)
(-3)
(-4)
(-6)
.............................................. 106
..................................................... 108
................................................... 109
(-5)
................................................. 110
................................................... 110
(-7)
................................................ 110
Health And Safety Information ...........................111
Exposure to Radio Frequency (Rf) Signals ................. 111
For Body Operation................................................ 113
Precautions When Using Batteries ............................ 114
Road Safety.......................................................... 115
Operating Environment........................................... 116
Electronic Devices.................................................. 116
Potentially Explosive Environments .......................... 118
5

Table of contents
Emergency Calls.................................................... 119
Other Important Safety Information......................... 120
Care and Maintenance............................................ 121
Glossary .............................................................123
Index..................................................................126
Quick Reference Card .........................................129
6

Important Safety Precautions
Read these guidelines before using your wireless
phone. Failure to comply with them may be
dangerous or illegal.
Road Safety at All Times
Do not use a hand-held phone while driving; park
the vehicle first.
Switching Off When Refuelling
Do not use the phone at a refuelling point (service
station) or near fuels or chemicals.
Switching Off in Aircraft
Wireless phones can cause interference. Using them
in aircraft is both illegal and dangerous.
Switching Off Near All Medical Equipment
Switch off your phone near the medical equipment.
Hospitals or health care facilities may be using
equipment that could be sensitive to external RF
energy. Follow any regulations or rules in force.
Interference
All wireless phones may be subject to interference,
which could affect their performance.
Special Regulations
Meet any special regulations in force in any area and
always switch off your phone whenever it is
forbidden to use it, or when it may cause
interference or danger (in a hospital for example).
Water Resistance
Your phone is not water-resistant. Keep it dry.
7

Important Safety Precautions
Sensible Use
Use only in the normal position (held to the ear).
Avoid unnecessary contact with the antenna when
the phone is switched on, especially when the phone
is in service.
Emergency Call
Key in the emergency number for your present
location, then press the key. Give all the
necessary information as accurately as possible. Do
not cut off the call until given permission to do so.
Keeping Small Children Away from Your Phone
Keep the phone and all its parts including
accessories out of the reach of small children.
Accessories and Batteries
Use only Samsung-approved accessories. Use of any
unauthorised accessories could damage your phone
and may be dangerous.
Use only Samsung-approved batteries and recharge
your battery only with Samsung-approved chargers.
Qualified Service
Only qualified service personnel may install or repair
your phone.
For more detailed safety information, see “Health
and safety information” on page 111.
CAUTION
RISK OF EXPLOSION IF A BATTERY IS REPLACED
DISPOSE OF USED BATTERIES ACCORDING TO
8
BY AN INCORRECT TYPE.
THE INSTRUCTIONS.

Unpacking
Your package contains the following items. The
illustrations below may look different from your
phone and accessories:
Handset
Battery
Travel Adapter
User’s Manual
9
Your Phone
Phone Layout
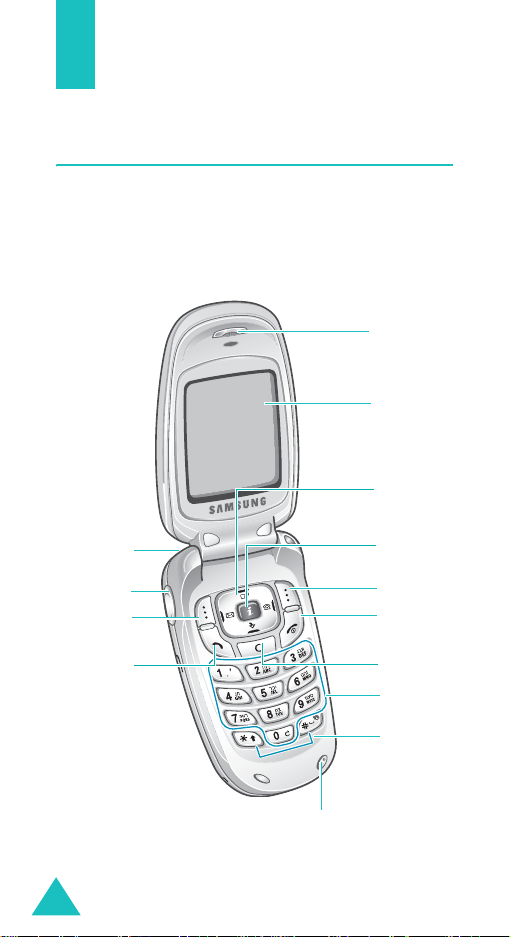
The following illustrations sh ow th e m ain el em e nts
of your phone:
With the Phone Open
Earpiece
Display
Navigation (Up/
Down/Left/
Right) keys
Headset jack
Volume/menu
browse keys
Soft key (left)
Dial key
VAS key
Soft key (right)
Power On/Off/
menu exit key
Cancel/
correction key
Alphanumeric
keys
Special
function keys
10
Microphone
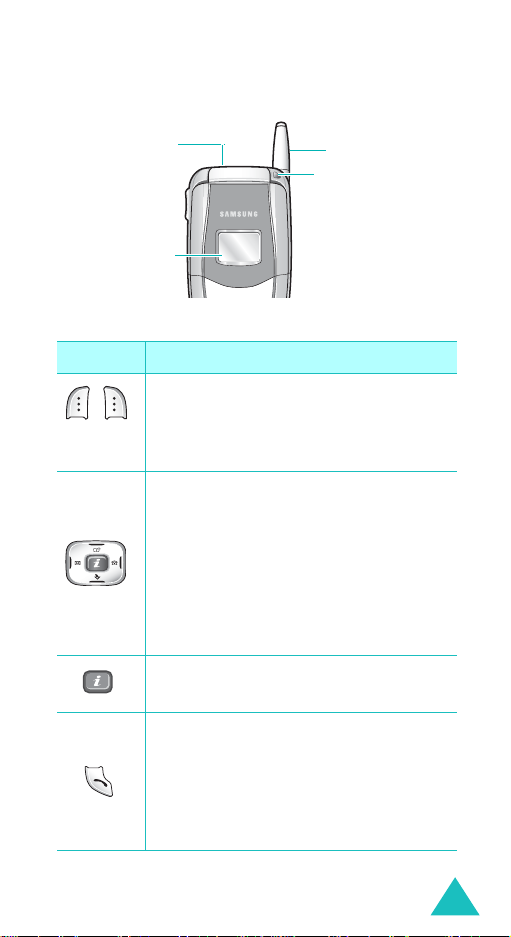
With the Phone Closed
Your Phone
Headset jack
External display
Key
(s)
(soft keys)
Antenna
Service light
Description
Performs the functions indicated by the
screen text above them, on the bottom
line of the display.
In Menu mode, scrolls through menu
options.
In Standby mode; quickly enters the
following menu respectively:
• Up:
Scheduler
• Down:
• Left:
• Right:
Enters the
Games & App.
Messages
Find
VAS
menu.
Makes or answers a call.
In Standby mode, retrieves the most
recent numbers dialed, received, or
missed. Redials the last number when
pressed and held.
11
Your Phone
Key
(s)
Description
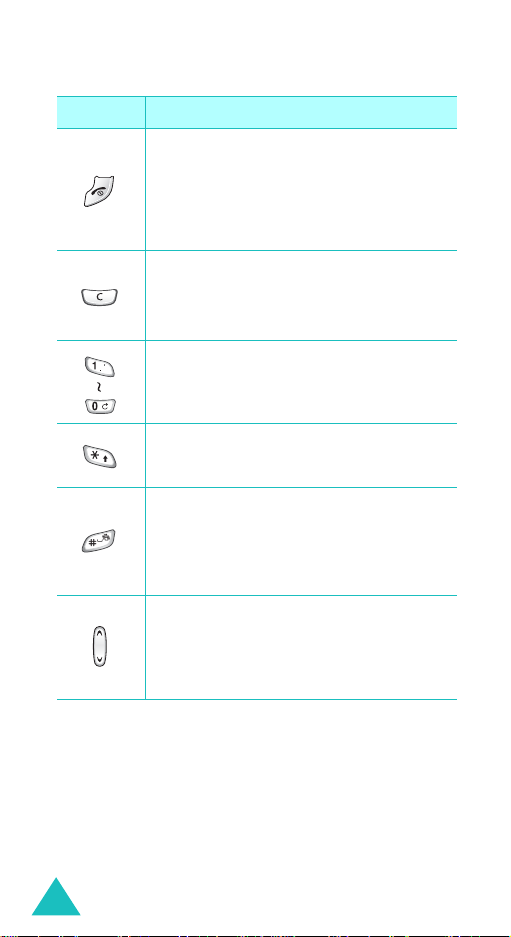
(continued)
Ends a call. Also switches the phone on
and off when pressed and held.
In Menu mode, cancels your input and
returns to Standby mode.
Deletes characters from the display.
In Menu mode, returns you to the
previous menu level.
Enters numbers, letters, and some
special characters.
In the text entry mode, changes the
case of letters.
In Standby mode, quickly enters or
exits Silent mode when pressed and
held.
In the text entry mode, inserts a space.
(on the left side of the phone)
During a call, adjust the voice volume.
In Standby mode, adjusts the key tone
volume.
12
Your Phone
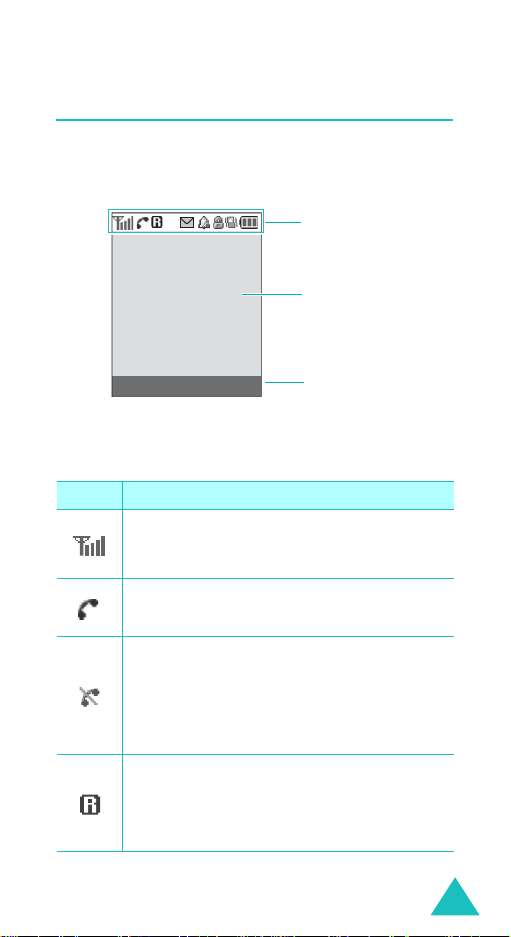
Display
The display has three areas: the top line of icons,
the text and graphic area, and the bottom line of
soft key indicators.
Icons
Text and
graphics area
Menu VA
Icons
Icon Description
Signal Strength
signal strength. The greater the number
of bars, the better the signal.
Service
progress.
No Service
outside a service area. When it displays,
you cannot make or receive calls. W ait a
little while for a better signal or m ove in to
an open area to regain service.
Roaming
your home area and have logged onto a
different network; for example, when
traveling in other countries.
Soft key function
indicators
: Shows the received
: Appears when a call is in
: Appears when you are
: Appears when you are out of
13

Your Phone
Icon Description
Auto Answer On
auto answer feature is activated.
New Message
new message waiting to be checked.
New Voice Mail Message
there is a new voice mail message waiting
to be checked.
Alarm Mode
alarm to ring at a specified time.
Silent Mode
is in the silent mode.
Ringer Silent
volume for calls is set to
1 Beep
: Appears when the ringer volum e
for calls is set to
Ringer Vibration
ringer volume for calls is set to
Ringer mode
volume for calls is set to
Vibration and Ringer
ringer volume for calls is set to
High+Vib
.
(continued)
: Appears when the
: Indicates that there is a
: Indicates that
: Appears when you set an
: Appears when your phone
: Appears when the ringer
: Appears when the ringer
Silent
.
1 Beep
.
: Appears when the
Vibration
Level 1 ~ 5
.
: Appears when the
.
14
Restriction On
option of the Restriction feature is
activated.
Lock Mode
locked.
: Appears when any
: Appears when your phone is

Your Phone
Icon Description
Battery Status
battery . The m ore b ars yo u see, the more
power you have remaining.
(continued)
: Shows the level of your
External Display
Your phone has an external display on the phone.
When you close the phone, it turns on and indicates
when you have an incoming call or a message. It
also alerts you at the specified time when you have
set an alarm by turning its backlight and showing
the corresponding icon on it.
Backlight
The backlight illuminates the display and keypad.
When you press any key or open the phone, the
backlight illuminates. It turns off if no key is
pressed within a given period of time, depending on
Backlight
the
Display
T o specify the leng th of time the phone waits before
the backlight turns off, set the
See page 91 for further details.
menu.
menu (
Menu 7-3
) set in the
Backlight
menu.
Service Light
The service light on the folder flashes to indicate an
incoming call, message, or alarm and flashes for a
few seconds when you turn on or off the phone. It
lights up while the battery is charging with the
travel adapter; the color of the light turns green
when the battery is fully charged.
You can select whether or not the service light is
used in
Service LED
menu (
MENU 7-6
).
15

Getting Started
Using a Battery
Your phone is powered by a rechargeable Li-ion
battery. Use only approved batteries and chargers.
Ask your local Samsung dealer for further details.
Note
: You must fully c harge the batte ry before using
your phone for the first time. A discharged
battery recharges fully in approximately 180
minutes for a standard battery.
Installing the Battery
1. Place the battery so that the tabs on the end
align with the slots at the bottom of the phone.
16
Getting Started
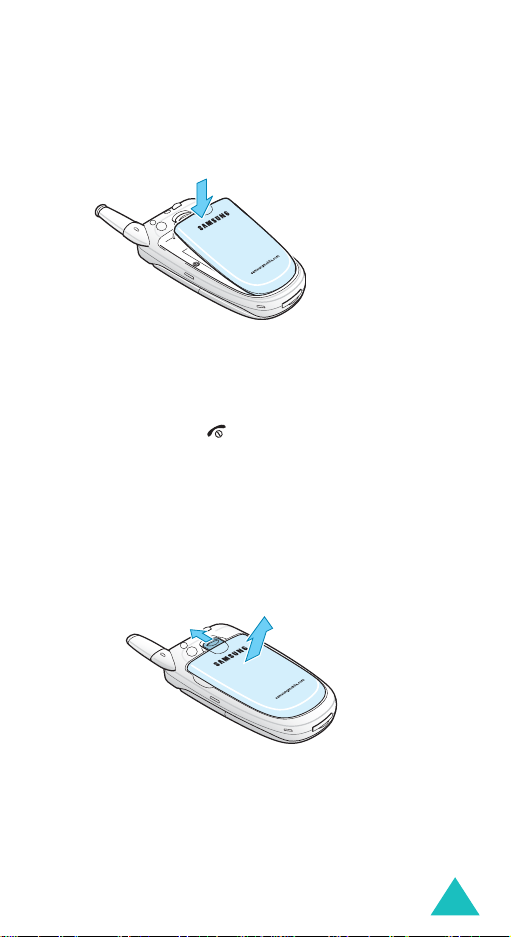
2. Press the battery until it clicks into place.
Make sure that the battery is properly installed
before switching on the phone.
Removing the Battery
1. If necessary, switch off the phone by pressing
and holding the key down until the power-off
image displays.
2. To remove the battery. To do so:
➀
Slide the battery lock towards the top of the
phone.
➁
Lift away the battery, as shown.
➀
➁
17
Getting Started
Charging the Battery
A travel adapter and a battery charger are provided
for charging your batteries.
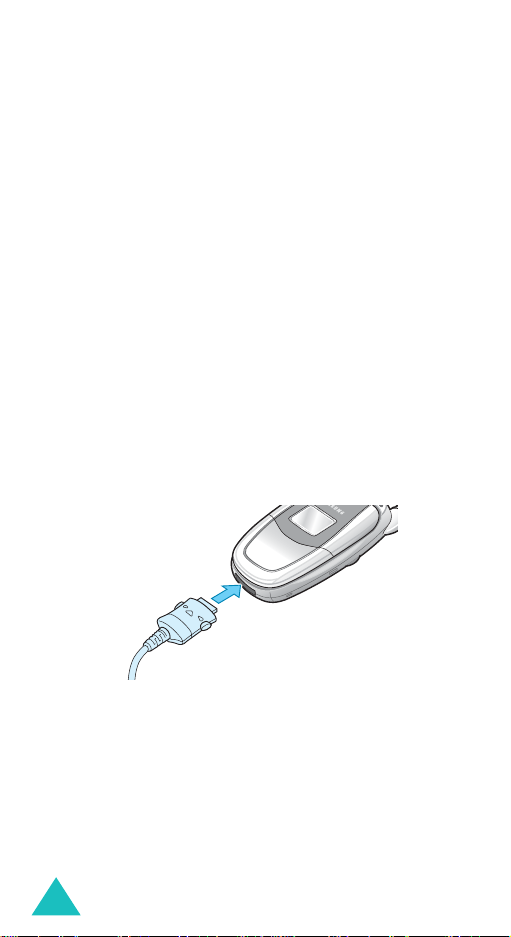
Using the Travel Adapter
The travel adapter allows you to use the phone
while the battery is charging, but this will cause th e
battery to charge more slowly.
1. With the battery in position on the phone, plug
the connector of the travel adapte r into the jack
at the bottom of the phone.
Make sure that the arrow on the connector is
facing toward the front of the phone.
2. Plug the adapter into a standard AC wall outlet.
The battery strength icon on the display shows
that the battery is charging.
18
Getting Started
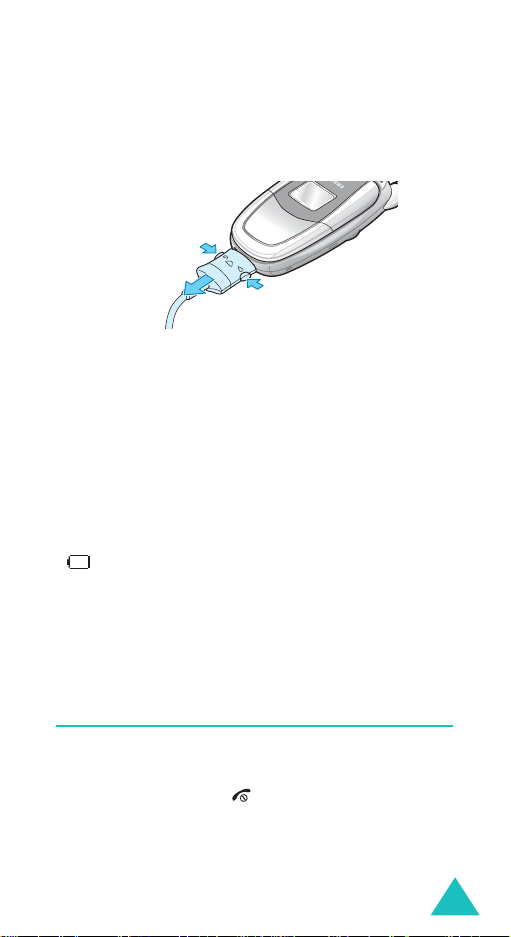
3. When charging is finished, unplug the adapter
from both the power outlet and the phone by
pressing the buttons on both sides of the
connector and pulling the connector out.
➀
➁
Note
: Do not remove the battery from the phone
without unplugging the adapter while it i s
charging. Otherwise, the phone may be
damaged.
➀
Low Battery Indicator
When the battery is weak and only a few minutes of
talk time remain, the battery sensor will let y ou
know by blinking the empty battery strength icon
( ) and you will hear a warning tone and a “LOW
BATTERY WARNING!” message will be repeated at
regular intervals on the display. When the battery
becomes too weak for the phone to operate, it
switches off automatically.
Switching On or Off the Phone
1. Open the phone.
2. Press and hold the key for more than one
second to switch on the phone.
19

Getting Started
3. The service light flashes and then the idle screen
appears on the display when the system locates
services.
If the phone is out of the service area, the No
Service icon ( ) appears on the display. In this
case, you cannot place and receive calls. You
can try again later when service is available.
4. When you wish to switch off the phone, press
and hold the key for more than two seconds
until the power-off image displays.
WARNING!
Do not switch on the phone when mobile phone use
is prohibited or when it may cause interferen ce o r
danger.
Note
: Do not touch the antenna on the phone
unnecessarily when the phone is switched on.
Contact with the antenna affects the call quality
and may cause the phone to operate at a
higher power level than otherwise needed.
20
Getting Started
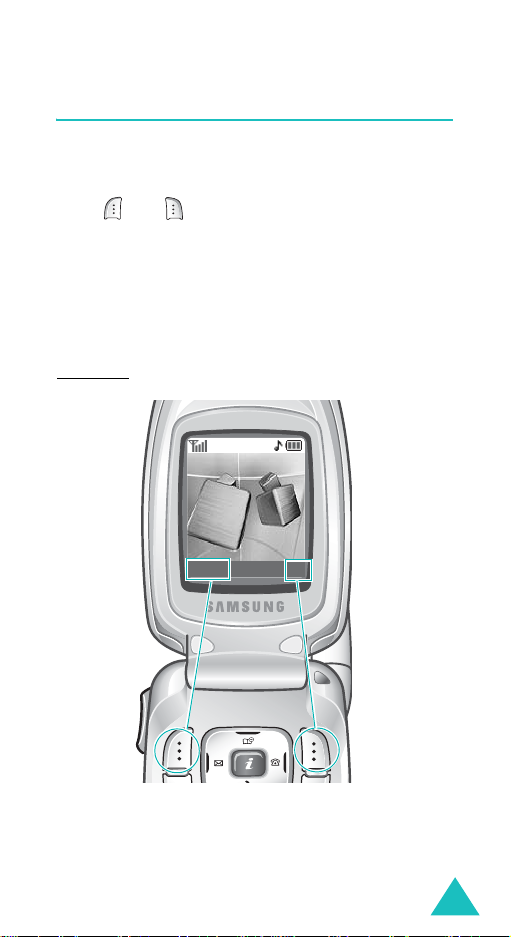
Using the Soft Keys
Your phone offers a set of functions that allows you
to customize it. These functions are arranged in
menus and submenus, accessed using the two soft
keys, and . Each menu and submenu allows
you to view and alter the settings of a particular
function.
The roles of the soft keys vary, depending on the
current function you are using; the labels on the
bottom line of the display just above each key
indicate their current role.
Example:
SAMSUNG
04/12 Mon 14:43
Menu
VA
Press the left soft
key to access Menu
mode.
Press the right soft
key to access the
Voice Answer
menu.
21

Getting Started
Your Phone’s Modes
Standby Mode
Standby mode is the most basic state of your
phone. The phone goes into Standby mode soon
after you turn it on, or whenever you briefly press
the key. When your phone is in Standby mode,
you will typically see the current time and date. If
you enter a phone number, you can press the
key to dial it, or press the
in the internal Phonebook.
Press the key at any time to return to Standby
mode. Be careful; if you are on a call when you
press the key, your phone disconnects the call
and returns to Standby mode. Press the
several times or hold it to return to Stan db y m ode
without ending the call.
Talk Mode
You can place and answer calls only when your
phone is turned on. During a call, the phone is in
T alk mod e. While you are in Talk mode, pressing the
Menu
soft key gives you a list of options. See
page 34 for details on the options.
Save
soft key to save it
C
key
Power Save Mode
Your phone comes with a power save feature that
will automatically be activated if your phone is
unable to find a signal after 15 minutes of
searching. While this feature is active, the pho n e’s
battery charge is conserved. To return to Standby
mode, press any key.
22

Getting Started
Lock Mode
When you lock your phone using the
menu (
Menu 9-5-1
and calls, but you cannot place a call until you
unlock the phone.
), you can receive messages
Lock Phone
Silent Mode
Silent mode disables all sounds on the phone. This
feature is best used in situations where the phone
might disturb others, such as in a meeting, a
library, and a theater.
To enter Silent mode, press and hold the key
until “Entering Silent Mode” and the Silent mode
icon ( ) appears.
To exit and reactive the previous sound settings,
press and hold the key until “Exit Silent Mode”
appears. The Silent mode icon no longer displays.
Note
: If you turn off the phone in
silent mode
the phone.
is still activated when you turn on
silent mode
, the
23
Call functions
Making a Call
To make a call:
1. In Standby mode, enter the area code, and
phone number.
While entering a phone number, press the
Pause
soft key to insert a hard pause. For more
information on pause dialing, see page 29.
2. Press the key. The phone places the call to
the entered phone number.
Correcting the number
To clear Press the
the last digit
displayed
the whole display
C
key .
C
key for more than one
second.
24

Call functions
Ending a Call
When you want to finish your call, press the
key .
The call time, the length of the call, displays along
with the phone number of the called person. If the
number is stored in your Phonebook, the name
displays. If there is no match, you can press the
Save
soft key and store the number in Phonebook.
For further details about storing the number in
Phonebook, see page 58.
Alternatively, simply close the phone to end a call.
Emergency Dialing
You can place emergency call from your emergency
number list even if your phone is locked. For further
information on emergency numbers, refer to
page 100.
25
Call functions
Using the Recent Call Logs
The phone stores up to 90 of the calls dialed,
received, or missed chronologically. The last call is
saved in the first position.
To recall any of these numbers:
1. If there are any characters on the display,
return to Standby mode by pressing the key.
2. Press the key. The list of recent calls
displays.
• : Outgoing calls
• : Incoming calls
• : Missed calls
3. Press the Up and Down keys, or the Volume
keys on the left side of the phone to scan
through the list until the number you want
highlights.
4. Press to dial the highlighted number.
Making a Call from Phonebook
You can store the phone numbers regularly in the
phone’s memories, which is called “Phonebook. ”
You then simply recall the numb er to dia l. For
further details on Phonebook, see page 55.
26

Call functions
Prepend Dialing
The Prepend option lets you add digits, such as area
codes and network feature activation codes, to a
phone number that is in your call logs before dialing
it.
To prepend the phone numbers stored in the call
logs:
1. Access a call log in the Recent Calls list referring
to page 26 or in the
2. When the phone number you want to dial
highlights, press the
The display shows the details of the number.
Calls
Select
menu (
soft key.
Menu 1
).
3. Press the
pop-up list.
4. Press the
5. Enter the area code or feature code.
6. Press the key to dial the number.
Menu
soft key to access the Menu
3
key to select the
Edit
option.
27

Call functions
Speed Dialing
Once you have stored phone numbers in
Phonebook, you can dial them easily with the few
presses of the keys.
Enter the memory location of a number and press
and hold the final digit to dial.
One-touch Dial
009 are special one-touch locations. You can dial
the phone numbers stored in the Phonebook
memory from 001 through 009 simply by pressing
one key.
Press and hold the third digit of the memory
location containing the number to be dialed.
For example
The number (and name) stored displays, then dials.
Two-touch Dial
digits.
Press the second digit briefly, then hold down the
third digit of the memory cell.
For example
The number (and name) stored displays, then dials.
Three-touch Dial
digits.
Press the first two digits briefly, then hold down the
third digit of the memory cell.
: Memory locations 001 through
: Location no. 009
Press the
: Location no. 023
Press the
the
9
key and hold.
: For memory locations of two
2
key briefly and hold down
3
key .
: For memory locations of three
28

Call functions
For example: Location no. 123
The number (and name) stored displays, then dials.
Press the
down the
1
and 2 key briefly and hold
3
key.
Pause Dialing
When you call an auto mated system , lik e a bank ing
service, you are often required to enter a password
or an account number. Instead of manually entering
the numbers each time, you can store the numbers
in your Phonebook, separated by pauses.
Storing Pauses in a Phonebook Entry
To store a number in your Phonebook that contains
pauses:
1. Enter the phone number you want to store, such
as a bank’s teleservice phone number.
2. Press the
displays, meaning that a hard pause will occur
at that point in the dialing sequence.
The “P” stops the dialing and waits for the
teleservice to prompt you for a number. The
number following the “P” is your account
number, etc.
Pause
soft key to insert a pause. A “P”
3. Enter the digits that need to follow the pause,
such as your account number.
4. Repeat steps 2 and 3 to add more pauses and
numbers, if necessary.
29
 Loading...