

Samsung SCH-U680 User Manual

GH68-38328A Printed in USA
PORTABLE ALL DIGITAL
MOBILE PHONE
User Manual
Please read this manual before operating your
phone and keep it for future reference.

VZW_u680_UM_Eng_MB1_TN_080513_F6
Intellectual Property
All Intellectual Property, as defined below, owned by or which is otherwise the property of Samsung or its respective suppliers
relating to the SAMSUNG Phone, including but not limited to, accessories, parts, or software relating there to (the “Phone
System”), is proprietary to Samsung and protected under federal laws, state laws, and international treaty provisions. Intellectual
Property includes, but is not limited to, inventions (patentable or unpatentable), patents, trade secrets, copyrights, software,
computer programs, and related documentation and other works of authorship. You may not infringe or otherwise violate the
rights secured by the Intellectual Property. Moreover, you agree that you will not (and will not attempt to) modify, prepare
derivative works of, reverse engineer, decompile, disassemble, or otherwise attempt to create source code from the software. No
title to or ownership in the Intellectual Property is transferred to you. All applicable rights of the Intellectual Property shall remain
with SAMSUNG and its suppliers.
Open Source Software
Some software components of this product, including but not limited to 'PowerTOP' and 'e2fsprogs', incorporate source code
covered under GNU General Public License (GPL), GNU Lesser General Public License (LGPL), OpenSSL License, BSD License and
other open source licenses. To obtain the source code covered under the open source licenses, please visit:
http://opensource.samsung.com
.
Disclaimer of Warranties; Exclusion of Liability
EXCEPT AS SET FORTH IN THE EXPRESS WARRANTY CONTAINED ON THE WARRANTY PAGE ENCLOSED WITH THE PRODUCT, THE
PURCHASER TAKES THE PRODUCT "AS IS", AND SAMSUNG MAKES NO EXPRESS OR IMPLIED WARRANTY OF ANY KIND
WHATSOEVER WITH RESPECT TO THE PRODUCT, INCLUDING BUT NOT LIMITED TO THE MERCHANTABILITY OF THE PRODUCT OR
ITS FITNESS FOR ANY PARTICULAR PURPOSE OR USE; THE DESIGN, CONDITION OR QUALITY OF THE PRODUCT; THE
PERFORMANCE OF THE PRODUCT; THE WORKMANSHIP OF THE PRODUCT OR THE COMPONENTS CONTAINED THEREIN; OR
COMPLIANCE OF THE PRODUCT WITH THE REQUIREMENTS OF ANY LAW, RULE, SPECIFICATION OR CONTRACT PERTAINING

GH68-38328A Printed in USA
THERETO. NOTHING CONTAINED IN THE INSTRUCTION MANUAL SHALL BE CONSTRUED TO CREATE AN EXPRESS OR IMPLIED
WARRANTY OF ANY KIND WHATSOEVER WITH RESPECT TO THE PRODUCT. IN ADDITION, SAMSUNG SHALL NOT BE LIABLE FOR
ANY DAMAGES OF ANY KIND RESULTING FROM THE PURCHASE OR USE OF THE PRODUCT OR ARISING FROM THE BREACH OF
THE EXPRESS WARRANTY, INCLUDING INCIDENTAL, SPECIAL OR CONSEQUENTIAL DAMAGES, OR LOSS OF ANTICIPATED PROFITS
OR BENEFITS.
Modification of Software
SAMSUNG IS NOT LIABLE FOR PERFORMANCE ISSUES OR INCOMPATIBILITIES CAUSED BY YOUR EDITING OF REGISTRY SETTINGS,
OR YOUR MODIFICATION OF OPERATING SYSTEM SOFTWARE.
USING CUSTOM OPERATING SYSTEM SOFTWARE MAY CAUSE YOUR DEVICE AND APPLICATIONS TO WORK IMPROPERLY. YOUR
CARRIER MAY NOT PERMIT USERS TO DOWNLOAD CERTAIN SOFTWARE, SUCH AS CUSTOM OS.
IF YOUR CARRIER PROHIBITS THIS, IF YOU ATTEMPT TO DOWNLOAD SOFTWARE ONTO THE DEVICE WITHOUT AUTHORIZATION,
YOU WILL BE NOTIFIED ON THE SCREEN THAT THE PHONE WILL NO LONGER OPERATE AND BE INSTRUCTED TO POWER DOWN
THE DEVICE. YOU MUST THEN CONTACT YOUR CARRIER TO RESTORE THE DEVICE TO THE CARRIER AUTHORIZED SETTINGS.

Samsung Telecommunications America (STA), LLC
©
2013 Samsung Telecommunications America, LLC. Samsung is a registered trademark of Samsung Electronics Co., Ltd.
Do you have questions about your Samsung Mobile Phone?
For 24 hour information and assistance, we offer a new FAQ/ARS System (Automated Response System) at:
www.samsung.com/us/support
Headquarters:
1301 E. Lookout Drive
Richardson, TX 75082
Customer Care Center:
1000 Klein Rd.
Plano, TX 75074
Toll Free Tel: 1.888.987.HELP (4357)
Internet Address:
http://www.samsung.com

Nuance®, VSuite™, T9® Text Input, and the Nuance logo are trademarks or registered trademarks of Nuance Communications,
Inc., or its affiliates in the United States and/or other countries.
ACCESS
®
and NetFront™ are trademarks or registered trademarks of ACCESS Co., Ltd. in Japan and other countries.
The Bluetooth
®
word mark, figure mark (stylized “B Design”), and combination mark (Bluetooth word mark and “B Design”) are
registered trademarks and are wholly owned by the Bluetooth SIG.
microSD™ and the microSD logo are Trademarks of the SD Card Association.
©Verizon Wireless. Verizon Wireless, the Verizon Wireless logos, and Convoy™ are trademarks of Verizon Trademark Services
LLC. All company names, trademarks, logos and copyrights not property of Verizon Wireless are the property of their respective
owners.

1
Table of Contents
Section 1: Getting Started ...........................5
Understanding This User Manual . . . . . . . . . . . .5
The Battery . . . . . . . . . . . . . . . . . . . . . . . . . . . . 6
Powering Your Phone On and Off . . . . . . . . . . .10
Voicemail . . . . . . . . . . . . . . . . . . . . . . . . . . . . 10
Set-up Wizard . . . . . . . . . . . . . . . . . . . . . . . . . 11
TTY Mode . . . . . . . . . . . . . . . . . . . . . . . . . . . .12
Roaming . . . . . . . . . . . . . . . . . . . . . . . . . . . . .12
Memory Card . . . . . . . . . . . . . . . . . . . . . . . . . 13
Section 2: Understanding Your Phone .....14
Closed View . . . . . . . . . . . . . . . . . . . . . . . . . .14
Side Views . . . . . . . . . . . . . . . . . . . . . . . . . . . 15
Open View . . . . . . . . . . . . . . . . . . . . . . . . . . . .16
Navigation Keys . . . . . . . . . . . . . . . . . . . . . . . .17
Soft Keys . . . . . . . . . . . . . . . . . . . . . . . . . . . . . 18
Command Keys . . . . . . . . . . . . . . . . . . . . . . . .19
Understanding the Home Screen . . . . . . . . . . . 23
Section 3: Call Functions ..........................24
Making Calls . . . . . . . . . . . . . . . . . . . . . . . . . . 24
Answering Calls . . . . . . . . . . . . . . . . . . . . . . . .25
Ending Calls . . . . . . . . . . . . . . . . . . . . . . . . . .26
Recent Calls . . . . . . . . . . . . . . . . . . . . . . . . . .26
Fake Call . . . . . . . . . . . . . . . . . . . . . . . . . . . . .28
Driving Mode . . . . . . . . . . . . . . . . . . . . . . . . . .29
Section 4: Push to Talk (PTT) Functions ..30
Making a Barge Call . . . . . . . . . . . . . . . . . . . .30
Receiving a Barge Call . . . . . . . . . . . . . . . . . . .30
Making an Alert Call . . . . . . . . . . . . . . . . . . . .31
Receiving an Alert Call . . . . . . . . . . . . . . . . . . .31
PTT Contacts . . . . . . . . . . . . . . . . . . . . . . . . . .32
Turn PTT On/Off . . . . . . . . . . . . . . . . . . . . . . . .32
Section 5: Contacts ...................................33
Adding a Contact . . . . . . . . . . . . . . . . . . . . . . .33
Erasing Contacts . . . . . . . . . . . . . . . . . . . . . . .35
Editing a Contact . . . . . . . . . . . . . . . . . . . . . . .35
Managing Contacts . . . . . . . . . . . . . . . . . . . . .36
Adding Pauses or Waits . . . . . . . . . . . . . . . . . .37
Finding Contacts . . . . . . . . . . . . . . . . . . . . . . .37

2
Using Contacts . . . . . . . . . . . . . . . . . . . . . . . . 38
Backup Assistant . . . . . . . . . . . . . . . . . . . . . . 38
Favorites . . . . . . . . . . . . . . . . . . . . . . . . . . . . 39
Groups . . . . . . . . . . . . . . . . . . . . . . . . . . . . . . 40
Speed Dials . . . . . . . . . . . . . . . . . . . . . . . . . . 42
My Name Card . . . . . . . . . . . . . . . . . . . . . . . . 43
Emergency Contacts . . . . . . . . . . . . . . . . . . . 44
Sharing Contacts . . . . . . . . . . . . . . . . . . . . . . 46
Adding PTT Contacts . . . . . . . . . . . . . . . . . . . 47
Editing a PTT Contact . . . . . . . . . . . . . . . . . . . 48
PTT Groups . . . . . . . . . . . . . . . . . . . . . . . . . . 49
Section 6: Entering Text ........................... 50
Changing the Text Entry Mode . . . . . . . . . . . . 50
Entering Text Using XT9 Word . . . . . . . . . . . . 50
Entering Text Using XT9 Palabra . . . . . . . . . . 51
Entering Text Using Abc Mode . . . . . . . . . . . . 52
Entering Numbers . . . . . . . . . . . . . . . . . . . . . 52
Entering Symbols . . . . . . . . . . . . . . . . . . . . . . 53
Entering Smileys . . . . . . . . . . . . . . . . . . . . . . 53
Entering Quick Text . . . . . . . . . . . . . . . . . . . . 54
Entering Domain Extensions . . . . . . . . . . . . . . 54
Section 7: Messaging ................................55
Types of Messages . . . . . . . . . . . . . . . . . . . . 55
Creating and Sending Messages . . . . . . . . . . 55
Message Settings . . . . . . . . . . . . . . . . . . . . . . 58
Receiving Messages . . . . . . . . . . . . . . . . . . . . 60
Emergency Alerts . . . . . . . . . . . . . . . . . . . . . . 62
Message Folders . . . . . . . . . . . . . . . . . . . . . . 63
Voicemail . . . . . . . . . . . . . . . . . . . . . . . . . . . . 67
Social Networks . . . . . . . . . . . . . . . . . . . . . . . 67
Mobile Email . . . . . . . . . . . . . . . . . . . . . . . . . 68
Section 8: Media Center ............................69
Apps . . . . . . . . . . . . . . . . . . . . . . . . . . . . . . . 69
Mobile Web . . . . . . . . . . . . . . . . . . . . . . . . . . 69
Music and Tones . . . . . . . . . . . . . . . . . . . . . . 70
Picture and Video . . . . . . . . . . . . . . . . . . . . . . 70
Online Album . . . . . . . . . . . . . . . . . . . . . . . . . 79
Section 9: Apps .........................................80
Shop Apps . . . . . . . . . . . . . . . . . . . . . . . . . . . 80
VZ Navigator . . . . . . . . . . . . . . . . . . . . . . . . . . 80

3
Section 10: Music ......................................81
Manage and Transfer Media . . . . . . . . . . . . . .81
My Music . . . . . . . . . . . . . . . . . . . . . . . . . . . . 81
Section 11: Tools .......................................85
Voice Commands . . . . . . . . . . . . . . . . . . . . . . 85
Calculator . . . . . . . . . . . . . . . . . . . . . . . . . . . . 87
Tip . . . . . . . . . . . . . . . . . . . . . . . . . . . . . . . . . 88
Calendar . . . . . . . . . . . . . . . . . . . . . . . . . . . . .88
Alarm Clock . . . . . . . . . . . . . . . . . . . . . . . . . . .90
Stop Watch . . . . . . . . . . . . . . . . . . . . . . . . . . .92
World Clock . . . . . . . . . . . . . . . . . . . . . . . . . . .92
Notepad . . . . . . . . . . . . . . . . . . . . . . . . . . . . . 92
USB Mass Storage . . . . . . . . . . . . . . . . . . . . . . 94
Phone Search . . . . . . . . . . . . . . . . . . . . . . . . .94
Section 12: Bluetooth ................................95
Turning Bluetooth On or Off . . . . . . . . . . . . . . . 95
Supported Profiles . . . . . . . . . . . . . . . . . . . . . . 96
Bluetooth Options . . . . . . . . . . . . . . . . . . . . . . 97
Adding a New Device . . . . . . . . . . . . . . . . . . .97
Section 13: Settings ..................................99
My Verizon . . . . . . . . . . . . . . . . . . . . . . . . . . . 99
Master Volume . . . . . . . . . . . . . . . . . . . . . . . .99
Tools . . . . . . . . . . . . . . . . . . . . . . . . . . . . . . . .99
Bluetooth Menu . . . . . . . . . . . . . . . . . . . . . .101
PTT Settings . . . . . . . . . . . . . . . . . . . . . . . . .101
Sounds Settings . . . . . . . . . . . . . . . . . . . . . .102
Display Settings . . . . . . . . . . . . . . . . . . . . . . .106
Phone Settings . . . . . . . . . . . . . . . . . . . . . . .114
Call Settings . . . . . . . . . . . . . . . . . . . . . . . . .123
Memory . . . . . . . . . . . . . . . . . . . . . . . . . . . . .127
USB Mode . . . . . . . . . . . . . . . . . . . . . . . . . . .128
Phone Info . . . . . . . . . . . . . . . . . . . . . . . . . . .128
Set-Up Wizard . . . . . . . . . . . . . . . . . . . . . . . .129
Section 14: Health and Safety
Information ..............................................130
Exposure to Radio Frequency (RF) Signals . . .130
Specific Absorption Rate (SAR)
Certification Information . . . . . . . . . . . . . . .135
FCC Part 15 Information to User . . . . . . . . . . .136
Commercial Mobile Alerting System (CMAS) .137
Smart Practices While Driving . . . . . . . . . . . .137
Battery Use and Safety . . . . . . . . . . . . . . . . .138
Samsung Mobile Products and Recycling . . . .140

4
UL Certified Travel Charger . . . . . . . . . . . . . 141
Display / Touch-Screen . . . . . . . . . . . . . . . . 142
GPS & AGPS . . . . . . . . . . . . . . . . . . . . . . . . . 142
Emergency Calls . . . . . . . . . . . . . . . . . . . . . 143
Care and Maintenance . . . . . . . . . . . . . . . . . 144
Responsible Listening . . . . . . . . . . . . . . . . . 145
Operating Environment . . . . . . . . . . . . . . . . 147
FCC Hearing Aid Compatibility (HAC)
Regulations for Wireless Devices . . . . . . . 149
Restricting Children's Access to Your
Mobile Device . . . . . . . . . . . . . . . . . . . . . . 150
FCC Notice and Cautions . . . . . . . . . . . . . . . 151
Other Important Safety Information . . . . . . . 151
Section 15: Warranty Information .......... 153
Standard Limited Warranty . . . . . . . . . . . . . . 153
End User License Agreement for Software . . 158
Index ........................................................ 166

5
Section 1: Getting Started
Understanding This User Manual
The chapters of this manual generally follow the features of
your phone. A robust index for quick reference to most
features begins on page 166.
Also included is important safety information that you should
know before using your phone. Most of this information is
near the back of the guide, beginning on page 130.
Instructions in this manual are based on default settings
(such as Grid Menu Layout and Wave Display Theme), and
may vary from your phone, depending on the software
version of your phone, and any changes to the phone’s
Settings.
Unless stated otherwise, instructions in this User Manual
start with the phone open and unlocked, at the Home screen.
Instructions in this User Manual offer the simplest, or most
direct steps to complete a procedure. Other methods may
exist, and may be described as well.
All screen images in this User Manual are simulated. Actual
displays may vary, depending on the software version of your
phone and any changes to the phone’s Settings.
Special Text
This manual uses special text to emphasize important
details:
•
Note
: Presents alternative options for the current feature or
menu.
•
Tip
: Provides quick or innovative methods, or useful shortcuts.
•
Important
: Points out important information about the current
feature that could affect performance.
•
Warning
: Brings to your attention important information to
prevent loss of data or functionality, or even prevent damage to
your phone.

Getting Started 6
Text Conventions
This manual provides condensed information about how to
use your phone, including these conventions:
The Battery
Your phone is powered by a rechargeable, standard Li-Ion
battery. A Wall/USB Charger (Charging Head and USB cable)
are included with the phone, for charging the battery.
Note:
The battery comes partially charged. You must fully
charge the battery before using your phone for the first
time. A fully discharged battery requires up to 4 hours of
charge time.
Warning!
Use only Samsung-approved charging devices and
batteries. Samsung accessories are designed to
maximize battery life. Using other accessories may
invalidate your warranty and may cause damage.
Highlight Use the
Directional Key
to focus on items.
Press Use the
Directional Key
to highlight an item,
then press the
Center Select Key
. The
function of the Center Select Key changes.
➔ Arrows represent the “highlight, then press”
steps in longer, or repetitive procedures:
From the Home screen, press
MENU
➔
Settings & Tools ➔ Memory
.
7
Battery Indicator
The Battery Level icon in the Status Bar shows battery
power level. Before the battery becomes too low to operate,
the empty battery icon will flash and a tone will sound. If you
continue to operate the phone without charging, the phone
will power off.
Non-Supported Batteries
Samsung phones do not support non-approved batteries.
Samsung charging accessories, such as the Wall/USB
Charger, will only charge Samsung-approved batteries. If you
install a non-approved battery and try to charge it, the phone
will reset and display the message:
“
Battery disconnected
”
Screen will keep in dimming state and blink empty
battery bar.
Important!
Using a non-approved battery may damage
your phone.
Charging the Battery
The battery is under a removable cover on the back of
the phone.
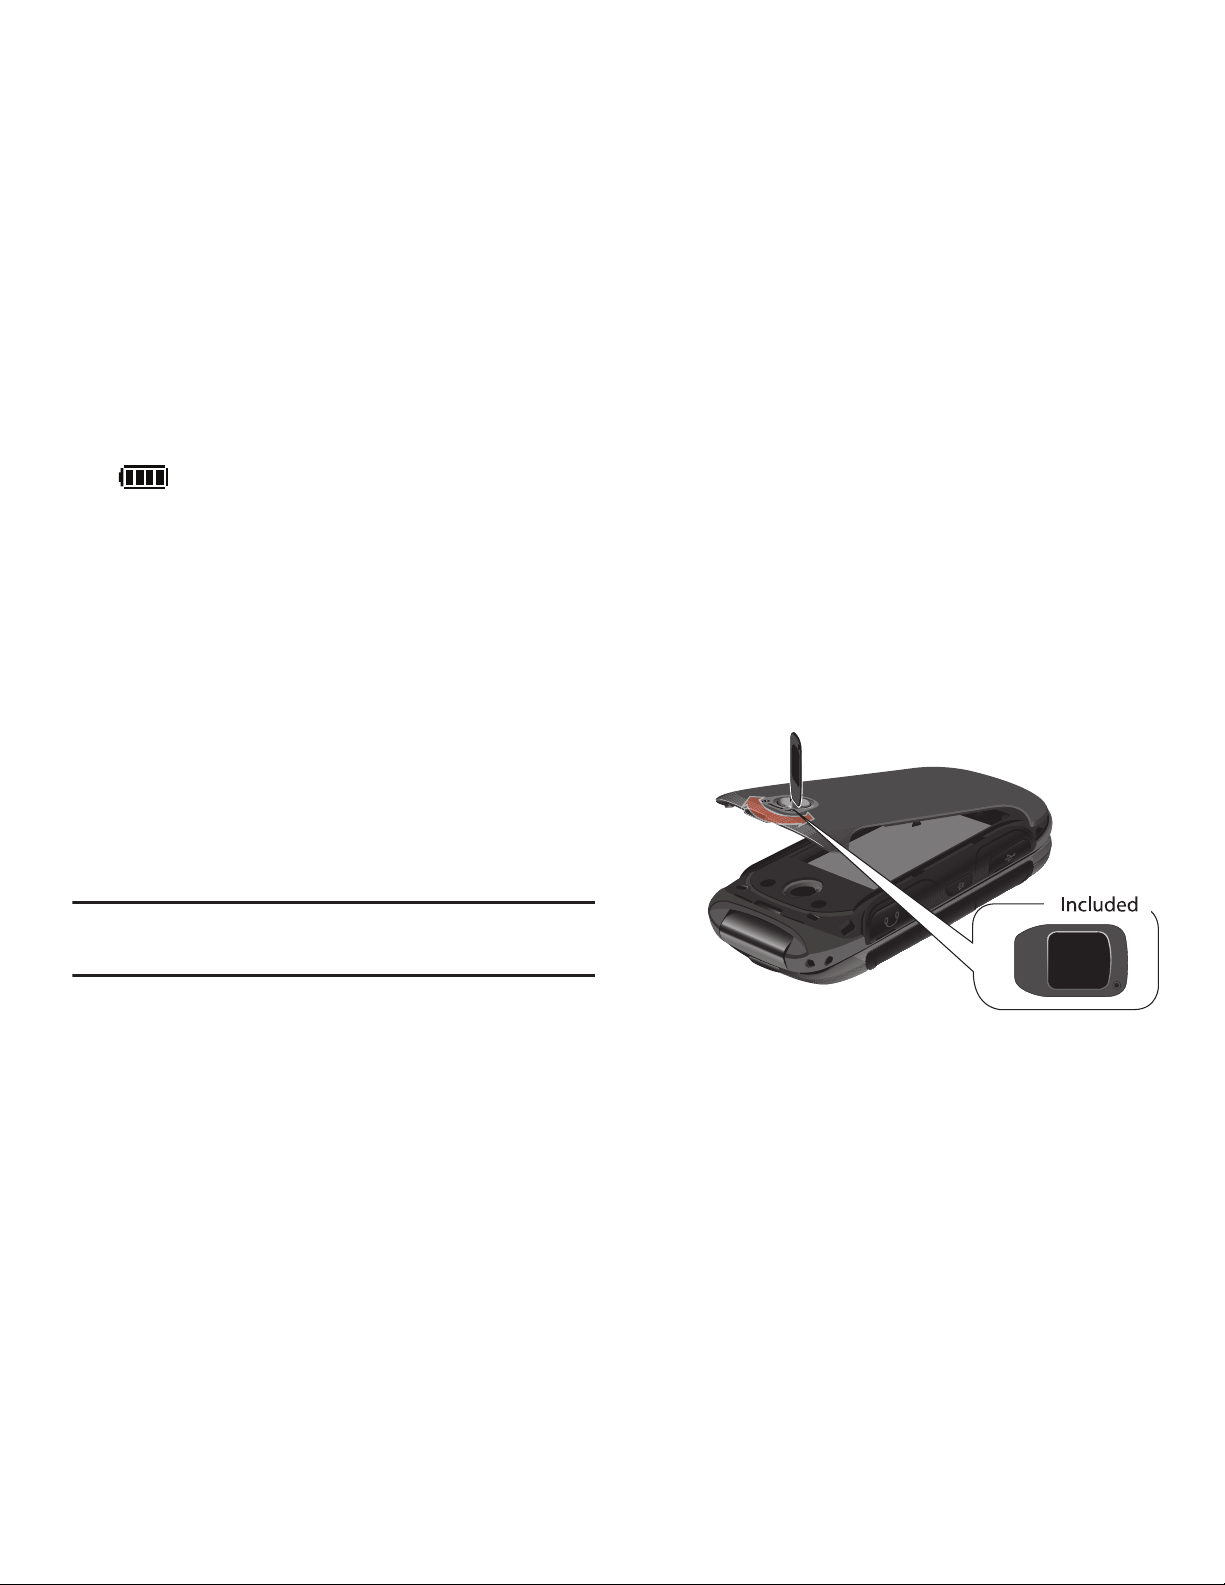
Remove the Back Cover
1. Insert the battery cover removal tool into the slot on the
back cover and turn it counter clockwise to open the
battery cover.
2. Insert the tool in the groove at the top of the cover to lift
the cover up and remove.
Getting Started 8
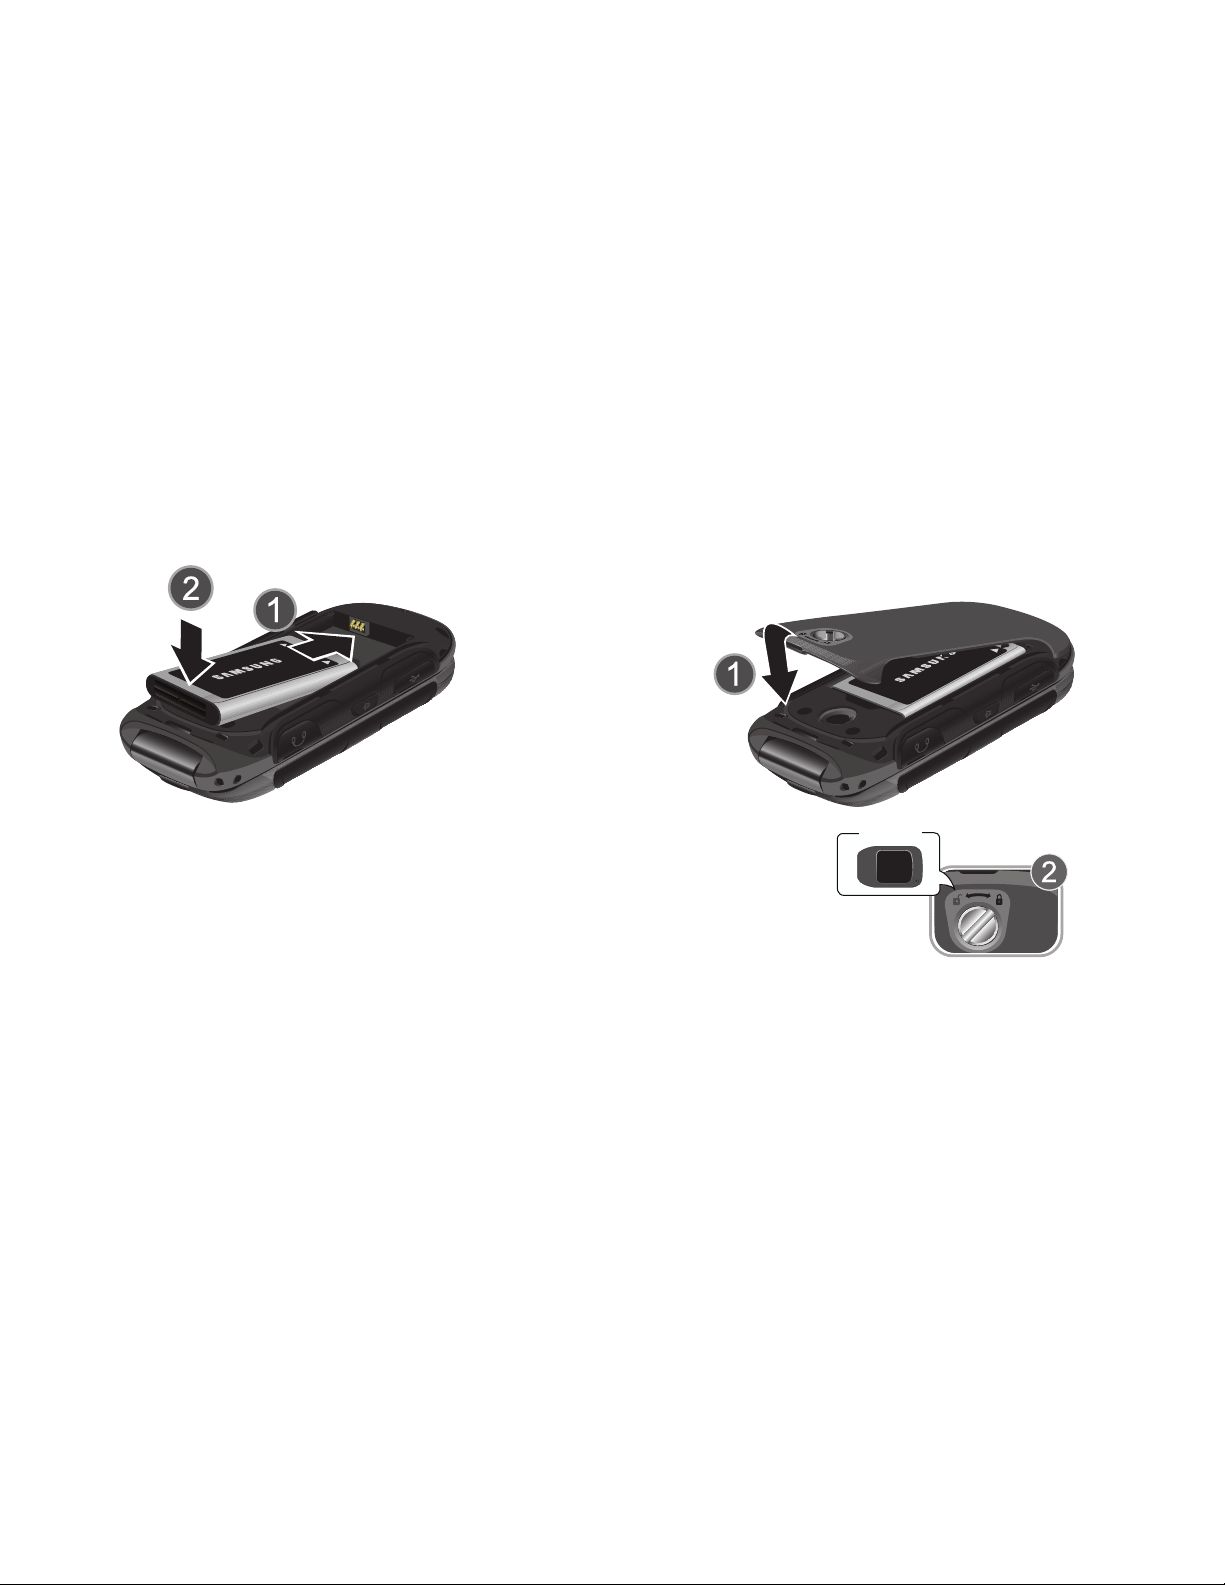
Insert the Battery
1. Insert the battery, making sure to align the gold
contacts.
2. Press down gently to secure the battery.
Replace the Battery Cover
1. Place the cover over the back of the phone, then press
down along the edges to secure the cover.
2. Use the battery cover removal tool to turn the dial
clockwise until the cover is locked.
Included
9
Charge the Battery
Your phone comes with a Wall/USB Charger (Charging Head
and USB Cable) to charge your phone from any 110/220
VAC outlet.
Note:
The battery comes partially charged. You must fully
charge the battery before using your phone for the first
time. A fully discharged battery requires up to 4 hours of
charge time. After the first charge, you can use the
phone while charging.
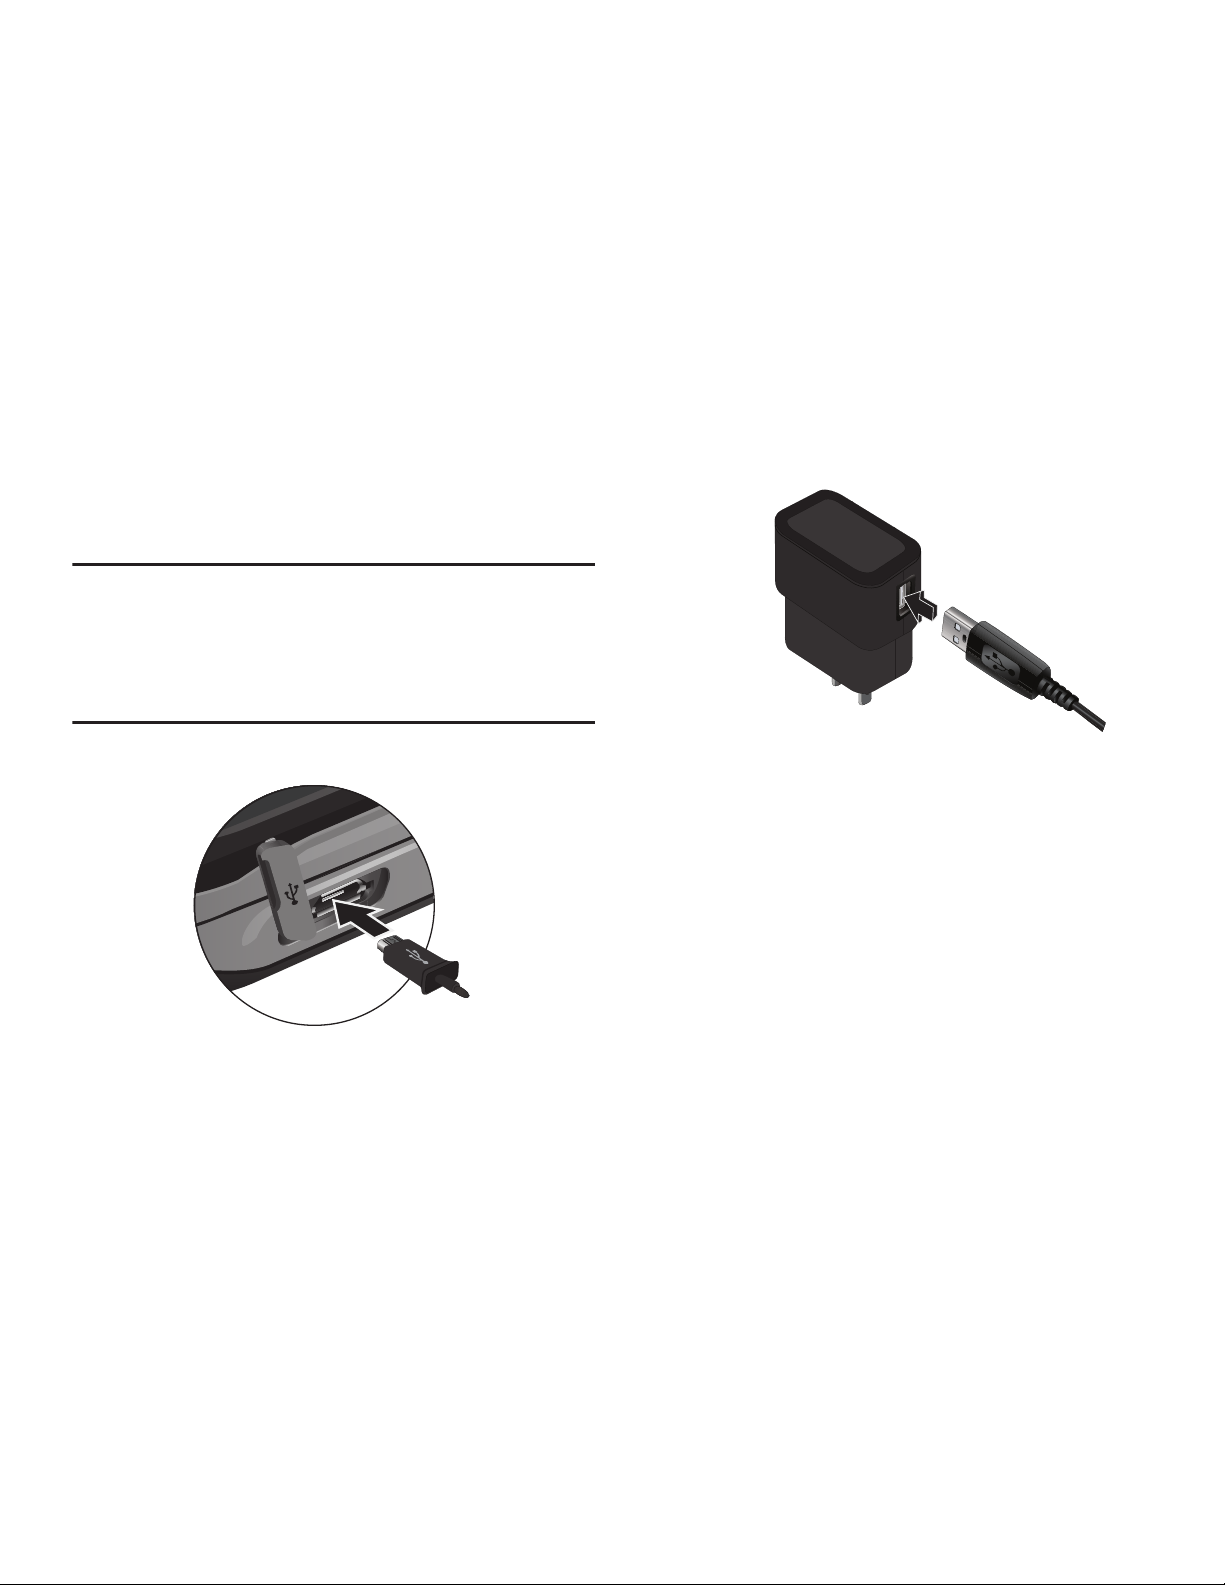
1. Insert the USB cable into the port.
2. Connect the USB cable to the Charging Head.
3. Plug the Charging Head into a standard AC power
outlet.
4. When charging is complete, unplug the Charging Head
from the power outlet and remove the USB cable from
the phone.
USB Cable
Charging Head
Getting Started 10
Powering Your Phone On and Off
Powering Your Phone On
Open the phone, then press and hold the
End/Power Key
. While powering on, the phone
connects with the network, then displays the Home
screen and active alerts.
Note:
If the phone is outside your provider’s coverage area, the
Roaming
icon appears in the Status Bar.
Powering Your Phone Off
Open the phone, then press and hold the
End/Power Key
.
Voicemail
Voicemail allows callers to leave voice messages.
Note:
Airtime and long distance charges apply. Mobile to
Mobile minutes do not apply to Voicemail setup or
retrievals.
Setting Up Voicemail
1. Dial
*86 (*VM)
and press the
Send Key
.
2. If you hear a greeting, press
#
to interrupt, and follow
the setup tutorial.
Note:
You can also access Voicemail from the Messaging
menu, or by dialing your phone number from any touchtone phone.

11
Accessing Voicemail
You can access your voicemail directly from your phone, or
by dialing your wireless number from another phone.
From your phone, dial
*86
and press the
Send
Key
. When you hear the greeting, press # to interrupt,
follow the prompts.
– or –
From any phone, dial your wireless number. When you
hear the greeting, press
#
to interrupt, follow the
prompts.
Note:
Voice mailboxes not set up within 45 days will be
canceled. Your voice mailbox is not password protected
until you create a password by following the setup
tutorial.
Set-up Wizard
The first time you turn on your phone, Set-up Wizard will
prompt you to configure basic preferences, to quickly get
started using your phone.
You can also access Set-up Wizard at any time in Settings.
1. From the Home screen, press
MENU
➔
Settings & Tools ➔ Set-up Wizard
.
2. Use the
Left Soft Key
(Preview), Right Soft Key
(Skip)
, and
Center Select Key
(NEXT)
or
(SET)
to
follow the prompts and set preferences:
•Font Style
: Choose a font style for the dial, menus, and
messaging.
•Font Size
: Choose a font size for the dial, menus, and
messaging.
• Volume Key Control
: When enabled, you can adjust the
display’s font size by pressing the Volume Key.
•Front Screen Menu
: View information about the menu
available on the Front Screen when the phone is closed.
• Call Sounds
: Choose how your phone alerts you to
incoming calls.
• Display Themes
: Choose the look of your phone’s screen.
• Menu Layout
: Choose the look of the Main menu.
•Main Clock
: Select a format for the clock on the Home screen.
•Front Clock
: Select a format for the clock on the external
display when the phone is closed.

Getting Started 12
TTY Mode
Your phone is fully TTY-compatible, allowing you to connect a
TTY device to the phone’s headset jack. Before you can use
your phone with a TTY device, you’ll need to enable TTY
Mode. For more information about TTY settings, see “TTY
Mode” on page 123.
Roaming
When you travel outside your home network’s coverage area,
your phone can roam to acquire service on other compatible
digital networks. When Roaming is active, the Roaming icon
appears in the Annunciator line of the display.
During roaming, some services may not be available.
Depending on your coverage area and service plan, extra
charges may apply when making or receiving call.
You can set your phone’s roaming behavior. For more
information, see “System Select” on page 122.
Note:
Contact Verizon Wireless for more information about
your coverage area and service plan.
13
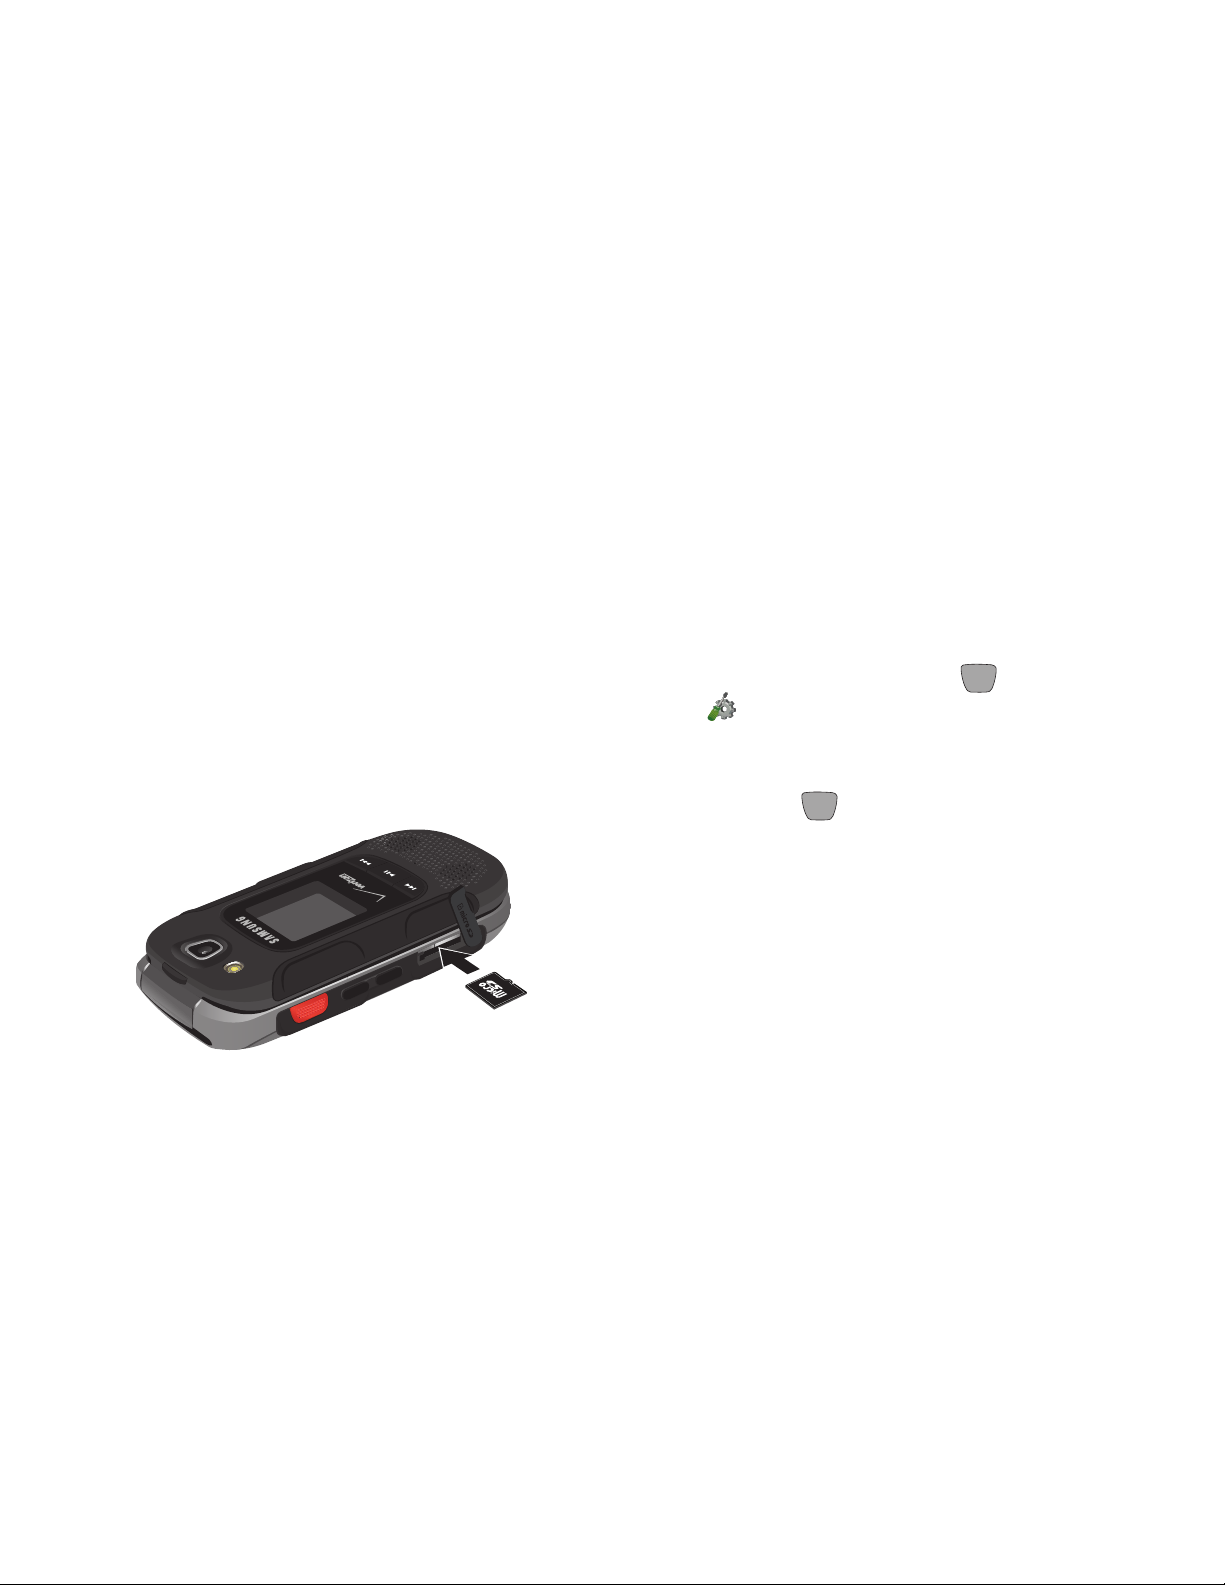
Memory Card
Your phone supports the use of an optional, removable
microSD
™
and microSDHC™ memory card of up to 32GB
capacity (included). You can store music or pictures
you download to your phone, and other files, on the memory
card. When inserted, it becomes the default storage location.
Inserting a Memory Card
1. Lift the memory card cover out and turn it to expose
the card slot.
2. With the gold contacts facing down, carefully push the
memory card into the slot until it “clicks” into place.
3. Replace the memory card cover.
Removing a Memory Card
1. Lift the memory card cover out and turn it to expose
the card slot.
2. Push the memory card inward to release and carefully
slide the card out of the memory card slot.
3. Replace the memory card cover.
Formatting a Memory Card Using Your Phone
1. From the Home screen, press
MENU
➔
Settings & Tools ➔ Memory ➔ Card Memory ➔
Format Card
.
2. At the prompt, highlight
Yes
to confirm the formatting,
then press
OK
to format the card.
Understanding Your Phone 14
Section 2: Understanding Your Phone
This section outlines key features of your phone as well as
screens and icons that display when the phone is in use.
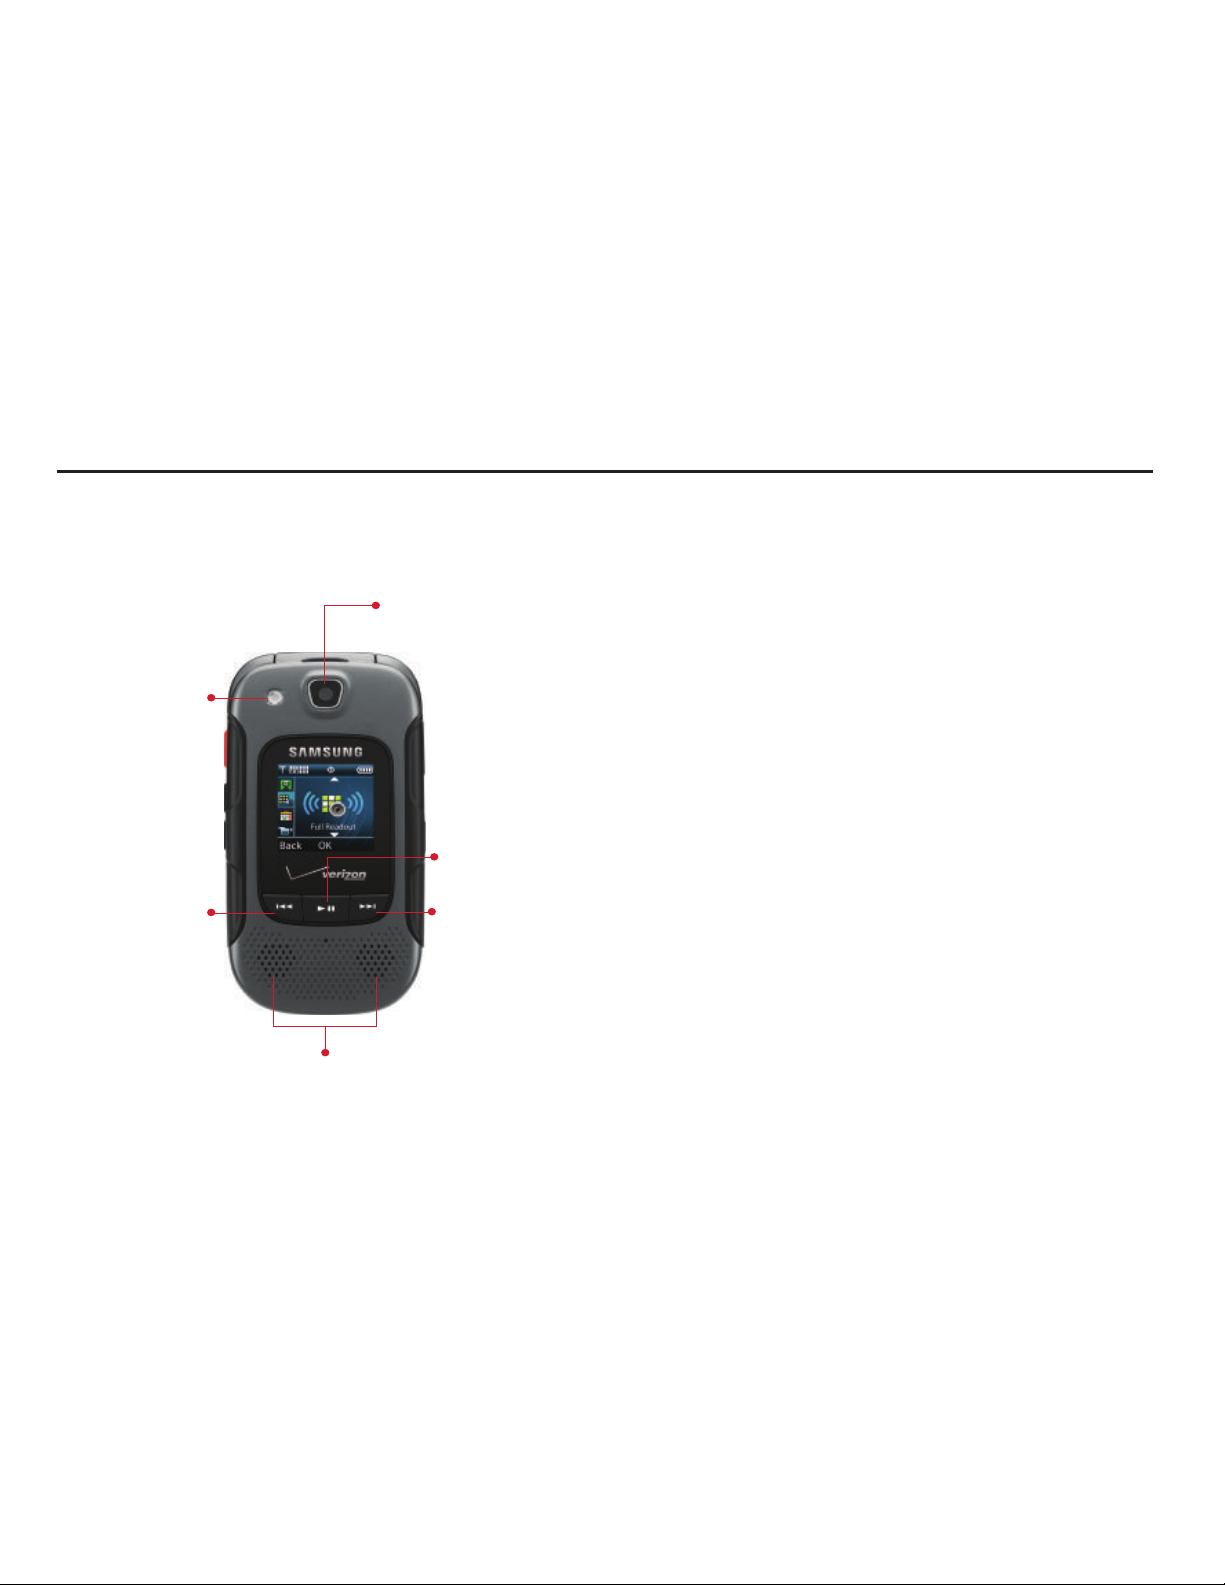
Closed View
Features
1.
Flashlight
: Provides light for Camera/Camcorder, or use
as a flashlight.
2.
Camera
: Use to take photos and record video.
3.
Rewind Key
: During music playback, press and hold to
rewind music. Press to go to the previous song. When
the phone is closed, press to turn on the flashlight.
4.
Play/Pause Key
: During music playback, press to play/
pause music. When the phone is closed, press to
access an external menu of applications.
5.
Fast Forward Key
: When the phone is closed, press to
Lock or Unlock external keys (press
Fast Forward Key,
then press and hold the
Rewind Key
to unlock external
keys). During music playback, press and hold to fast
forward music. Press to go to the next song. When the
flashlight is on with the phone closed, press to turn off
the flashlight.
6.
Speakers
: Plays Music, Ringtones and Sounds.
Flashlight
Rewind
Fast Forward
Play/Pause
Camera
Speakers
15
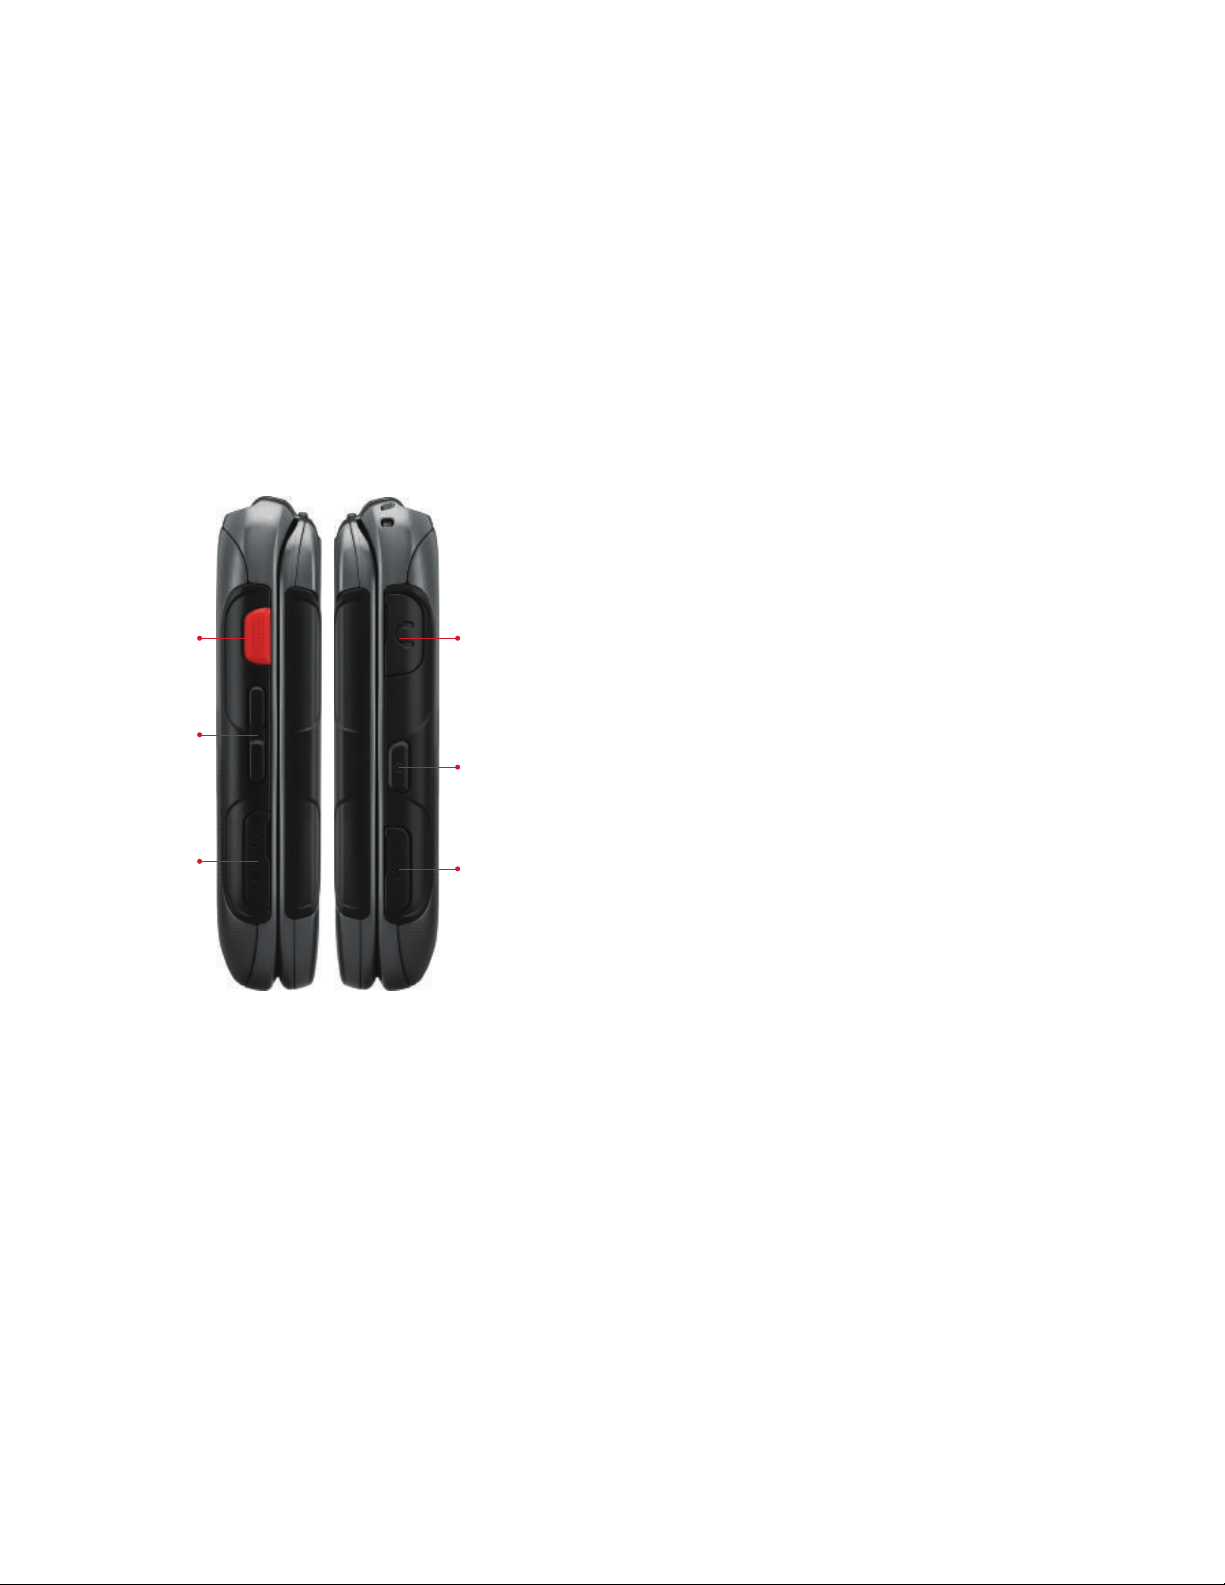
Side Views
1.
Shortcut Key/PPT (Push To Talk) Key
: Press and hold to
launch a shortcut menu. When PTT Mode is turned on,
press to initiate PTT.
2.
Volume Key
: Press to adjust master volume, or voice
volume during a call. Press to mute an incoming call
ringtone. Press and hold down to activate Sound Off
mode, or press and hold up to return to the Master
Volume level. When using the external menu, press to
navigate lists. With the phone closed, press down four
times to initiate the Fake Call feature.
3.
microSD Card Slot
: Insert an optional microSD™ or
microSDHC
™
memory card (not included) for additional
storage capacity.
4.
3.5 mm Headset Jack
: Plug in an optional 3.5 mm
headset for safe, convenient conversations.
5.
Speakerphone Key
: When the phone is closed, press
and hold to turn Driving Mode on or off. When the
phone is open, press to turn Speakerphone on or off.
6.
Charging/USB Port
: The charging port is used to plug in
the charging accessories and also connect any
available accessory cables to your phone.
Headphone jack
Speakerphone
Charging/
USB Port
Shortcut/PTT
Volume
microSD
Card Slot
Understanding Your Phone 16
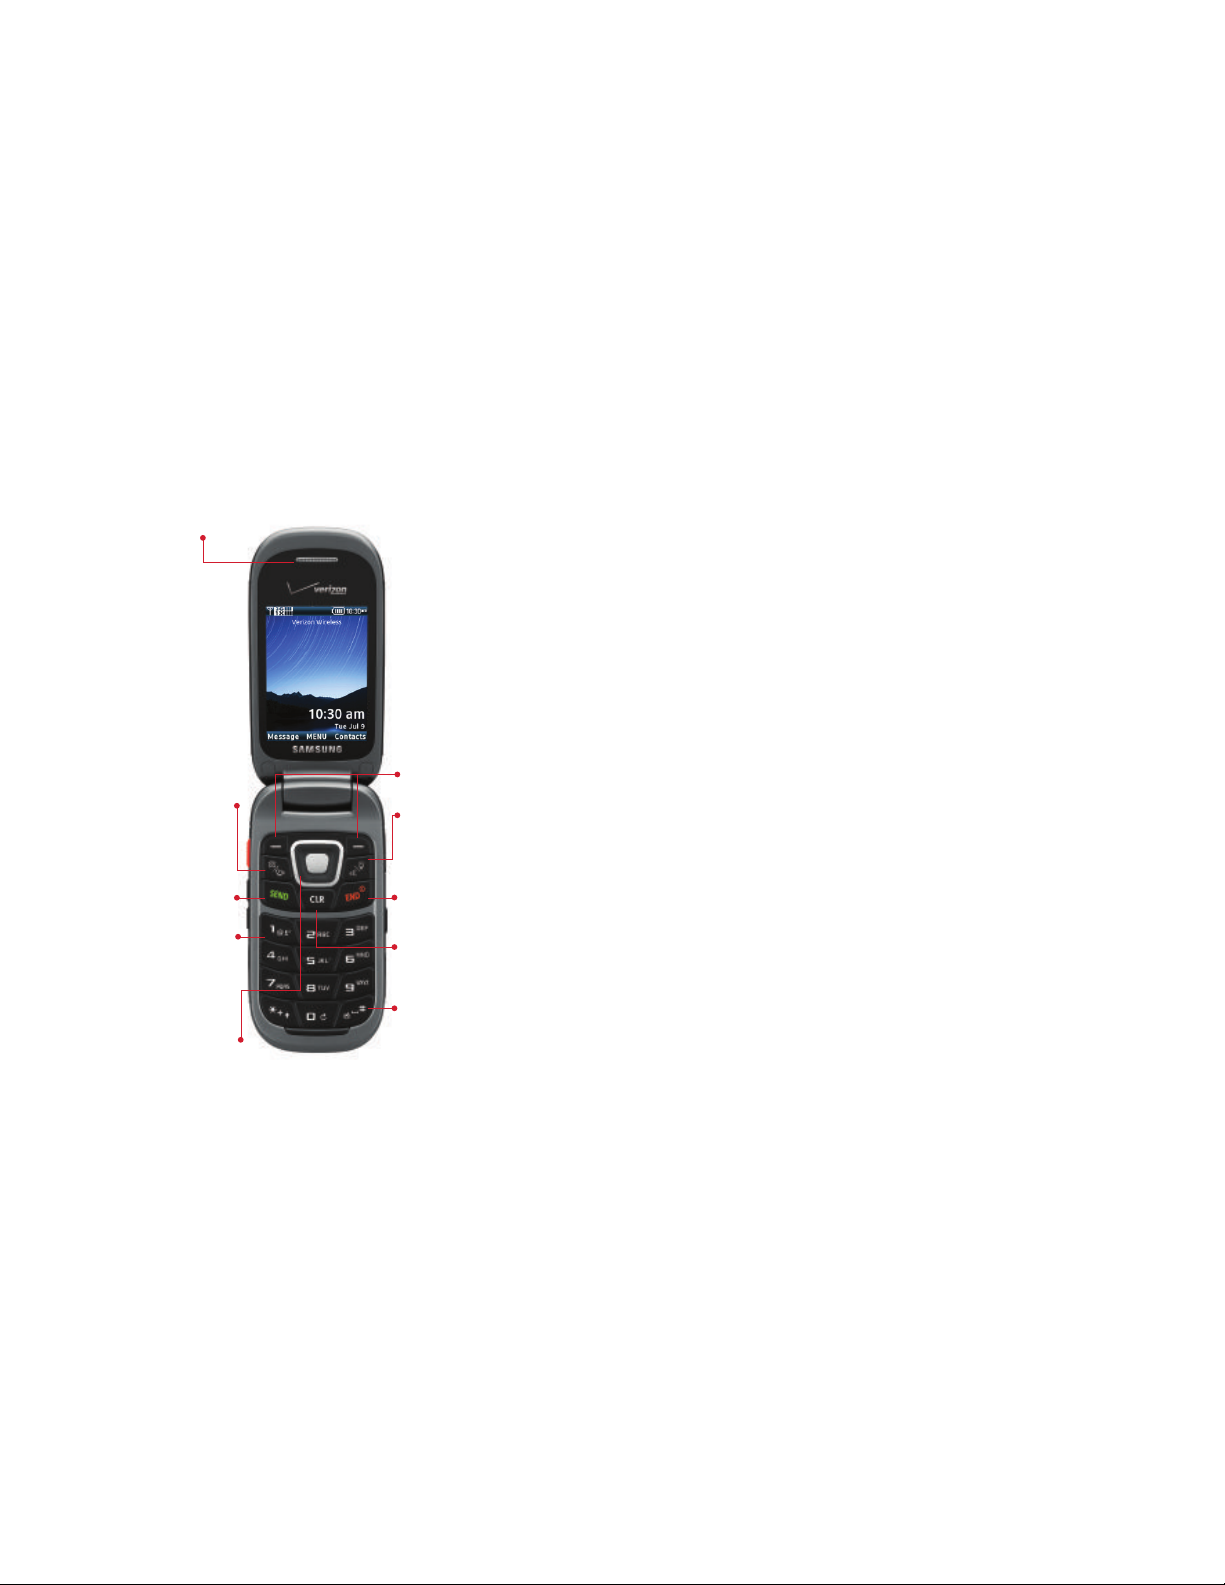
Open View
Features
1.
Earpiece
: Hear call sounds, including the caller.
2.
Camera/Camcorder Key
: Press to launch the camera, or
press and hold to launch the camcorder.
3.
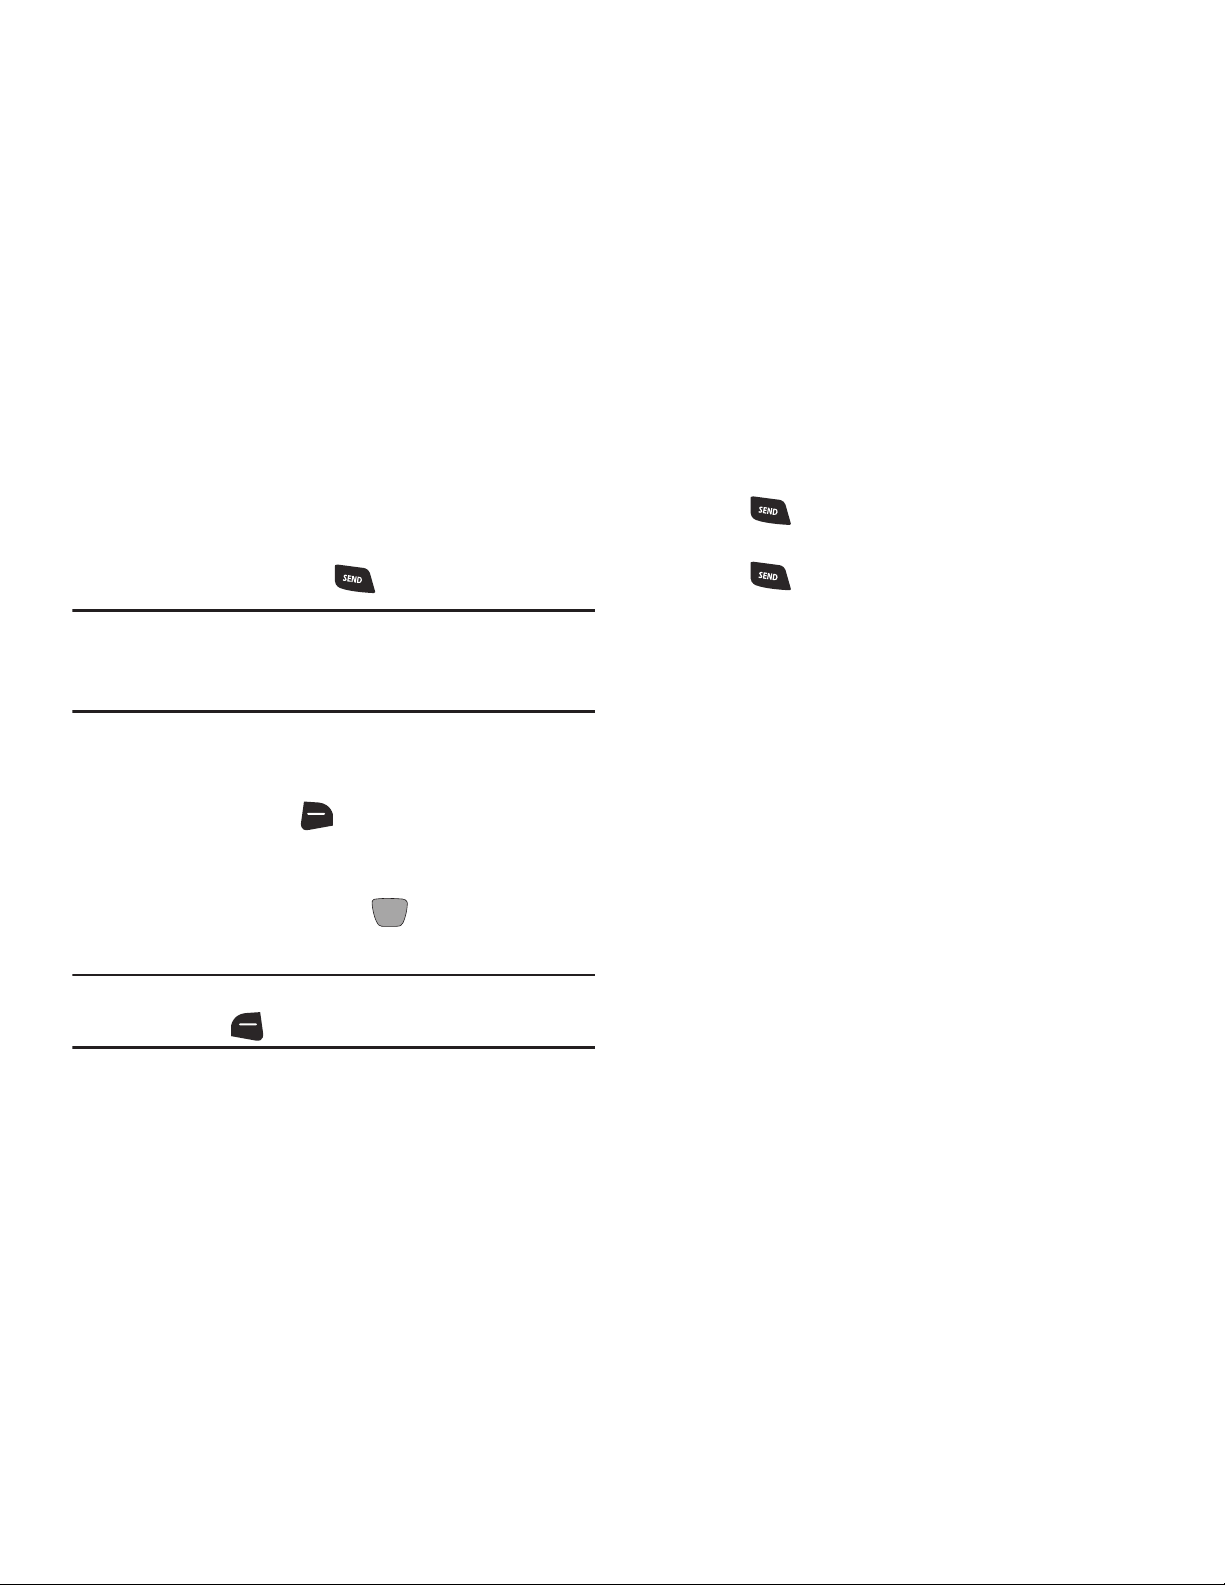
Send Key
: Press to dial a call. From the Home screen,
press to view Recent Calls.
4.
Voicemail Key
: Press and hold to dial voicemail.
5.
Directional Key
: Press to scroll phone menus.
6.
Center Select Key
: Press to select the highlighted item.
7.
Right Soft Key
: Press to select the lower right menu
item on the display.
8.
Left Soft Key
: Press to select the lower left menu item
on the display.
9.
Voice Commands/Flashlight Key
: With the flip open,
press to launch Voice Commands, or press and hold to
turn the Flashlight on or off.
10.
End/Power Key
: Press to end a call. Press and hold to
turn the phone On or Off. Press to send an incoming
call to voicemail.
11.
Clear Key
: Press to delete a character, or go back.
Press and hold to delete the previous word.
12.
Vibrate Key
: With the flip open, press and hold to switch
between Vibrate Mode and Master Volume level.
[ FPO
Image to be
placed by
manufacturer]
Camera/
Camcorder
Earpiece
Send
Voicemail
Soft Keys
Voice
Commands/
Flashlight
End/Power
Clear
Vibration
Mode
Directional/
Center Select
17
Navigation Keys
Directional Key
Press the
Directional Key
UP, DOWN, LEFT or
RIGHT to browse menus
and lists, or to launch
applications from the
Home screen with
Directional Key
Shortcuts.
Tip:
While navigating, you can also press the number key
corresponding to an menu item to launch the item.
Directional Key Shortcuts
From the Home screen, press the
Directional Key
to
launch favorite applications.
Tip:
Customize Directional Key Shortcuts with Set Shortcuts
under Phone Settings. For more information, see “Set
Directional Keys” on page 115.
UP
DOWN
LEFT RIGHT
NEW TEXT MSG
My Pictures
My Verizon
My Shortcuts
2. Phone Search
3. Bluetooth On/Off
4. Calendar
1. Alarm Clock
Default Directional Key Shortcuts

Understanding Your Phone 18
Soft Keys
Left Soft Key
Press the
Left Soft Key
to select the option that appears
in the bottom left corner of the display.
For example, from the Home screen, press the
Left Soft Key
(Message)
to launch Messaging.
• If Inbox View is set as Time
: From the Home screen, press
the
Left Soft Key (Message)
to launch Messaging.
• If Inbox View is set as Contact: For example, from the Home
screen, press the
Left Soft Key
(Message)
to launch
Messages.
Right Soft Key
Press the
Right Soft Key
to select the option that appears
in the bottom right corner of the display.
For example, from the Home screen, press the
Right
Soft Key
(Contacts)
to launch Contacts.
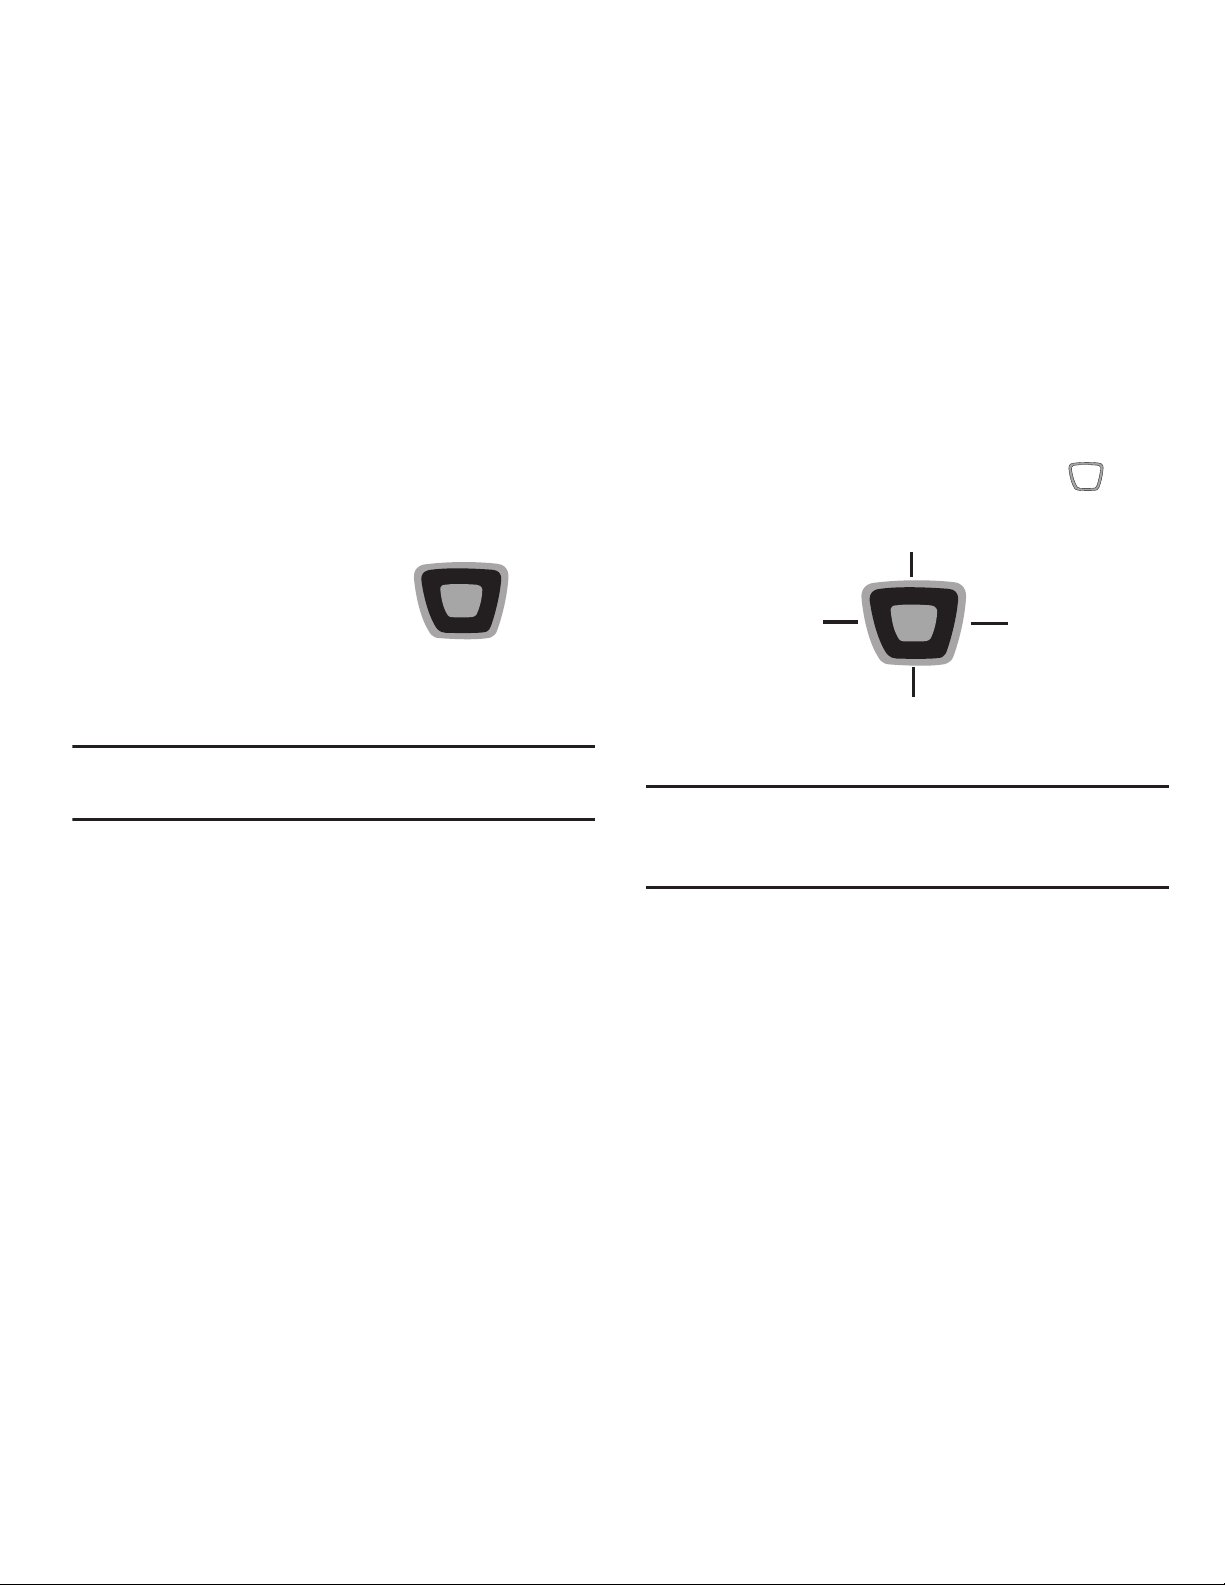
Center Select Key
Press the
Center Select Key
to select a highlighted item
or perform the highlighted action.
For example, from the Home screen, press
MENU
to
launch the Menu.
Using the Front Keys as Soft Keys
When the phone is closed, use the front keys as soft keys to
navigate a special menu.
1. With the phone closed, press the
Play/Pause Key
to launch the special
MENU
. Press the
Volume Key
to navigate the menu:
• Message
: View messages and reply using Quick Text.
• My Music
: Play music.
• Voice Commands
: Open Voice Commands.
•Full Readout
: Numbers, menus, alerts, and messages will be
read aloud.
• Today’s Schedule
: List events scheduled for today.
• Record Video
: Launches the camcorder.
•Take Picture
: Launches the camera.
• Bluetooth
: Turns Bluetooth on or off.

19
2. In this menu, the
Play Key
functions as the
Center Select Key
, and the
Rewind Key
functions as the
BACK
key, and may be used to return
to the previous menu.
Locking the Front Keys
The front keys can be locked or disabled, preventing them
from being pressed accidentally.
1. To lock (disable) the front keys, press the
Fast
Forward Key
.
2. To unlock (enable) the front keys, press the
Fast
Forward Key
, then press and hold the
Rewind Key
Command Keys
Clear Key
Press the
Clear Key
to:
•
While entering text, press the
Clear Key
once to backspace and
delete a character.
•
While entering text, press and hold the
Clear Key
to erase the
previous word in a sentence.
•
While navigating, press the
Clear Key
to return to the previous
menu.
End/Power Key
Press the
End/Power Key
to:
•
Press and hold the
End/Power Key
to turn the phone on or off.
•
Press the
End/Power Key
to end a call.
•
Press the
End/Power Key
to return to the Home screen from
any menu.
•
Press the
End/Power Key
to cancel the last input.
•
Press the
End/Power Key
to send an incoming call directly to
Voicemail.

Understanding Your Phone 20
Send Key
Press the
Send Key
to:
•
Press the
Send Key
to answer calls.
•
Enter a number and press the
Send Key
to make a call.
•
Press the
Send Key
from the Home screen to display a list of all
calls to and from your phone.
•
Press the
Send Key
twice from the Home screen to call the most
recently dialed, received, or missed number.
•
While on a call, press the
Send Key
to answer a new incoming
call. Press the
Send Key
again to switch back to the first call.
Camera/Camcorder Key
Press the
Camera/Camcorder Key
to:
•
Press the
Camera/Camcorder Key
to launch the camera.
•
While in camera mode, press the
Camera/Camcorder Key
to
take a photo.
•
Press and hold
Camera/Camcorder Key
to launch the
camcorder.
•
While in camcorder mode, press the
Camera/Camcorder Key
to
begin recording a video.
Voice Commands/Flashlight Key
Press the
Voice Commands/Flashlight Key
to:
•
Press the
Voice Commands/Flashlight Key
to launch Voice
Commands.
•
Press and hold the
Voice Commands/Flashlight Key
to turn the
Flashlight on or off.
Voicemail Key
Press the
Voicemail Key
to:
•
Press and hold the
Voicemail Key
to call Voicemail.

21
PTT (Push to Talk) Key
Press the
PTT Key
to:
•
When PTT Mode is On, press the
PTT Key
to activate PTT. For
information about making PTT calls, see
“Push to Talk (PTT)
Functions”
on page 30.
•
When PTT Mode is Off, press the
PTT Key
to launch an
application. For information about selecting an application for the
PTT Key, see
“Set Side Key”
on page 115.
Speakerphone Key
Press the
Speakerphone Key
to:
•
During a call, press and hold the
Speakerphone Key
to switch
call audio from the Earpiece to the Speakers.
•
To answer an incoming call in Speakerphone mode, press and
hold the
Speakerphone Key
.
•
With the flip closed, press and hold the
Speakerphone Key
to
turn Driving Mode on or off.
Volume Key
Press the
Volume Key
to:
•
Press the
Volume Key
to set Master Volume.
•
Press and hold the
Volume Key
down to activate Sound Off
mode.
•
During calls, press the
Volume Key
to adjust voice volume.
•
During music playback, press the
Volume Key
to adjust
audio volume.
•
Press the
Volume Key
to silence the ringtone of an incoming call.
•
With the phone closed, press the Volume Key down 4 times to
initiate a Fake Call. For more information about Fake Calls, see
“Fake Call”
on page 28.
•
With the phone closed, press the
Volume Key
to navigate the
external menu.
•
When navigating menus with the phone open, press the
Volume
Key
to change the font size of the menus.

Understanding Your Phone 22
Vibration Key
Press the
Vibration Key
to:
•
Press and hold the
Vibration Key
to switch between the current
volume setting and Vibrate Only mode.
Rewind Key
Press the
Rewind Key
to:
•
With the phone closed, press the
Rewind Key
to turn on the
Flashlight.
•
With the phone closed, press and hold the
Rewind Key
to unlock
the external display.
•
During music playback with the phone closed, press the
Rewind
Key
to go to the previous song, or press and hold to move
backward in the current song.
•
While browsing the external menu with the phone closed, press
the
Rewind Key
to go back to the previous screen or item.
Play/Pause Key
Press the
Play/Pause Key
to:
•
With the phone closed, press the
Play/Pause Key
to access the
external menu of applications.
•
During music playback with the phone closed, press the
Play/Pause Key
to start playback of a song or to pause playback.
Fast Forward Key
Press the
Fast Forward Key
to:
•
With the phone closed, press the
Fast Forward Key
to lock
the external keys, or press to wake the display to unlock the
external keys.
•
During music playback with the phone closed, press the
Fast Forward Key
to go to the next song, or press and hold to
move forward in the current song.
23
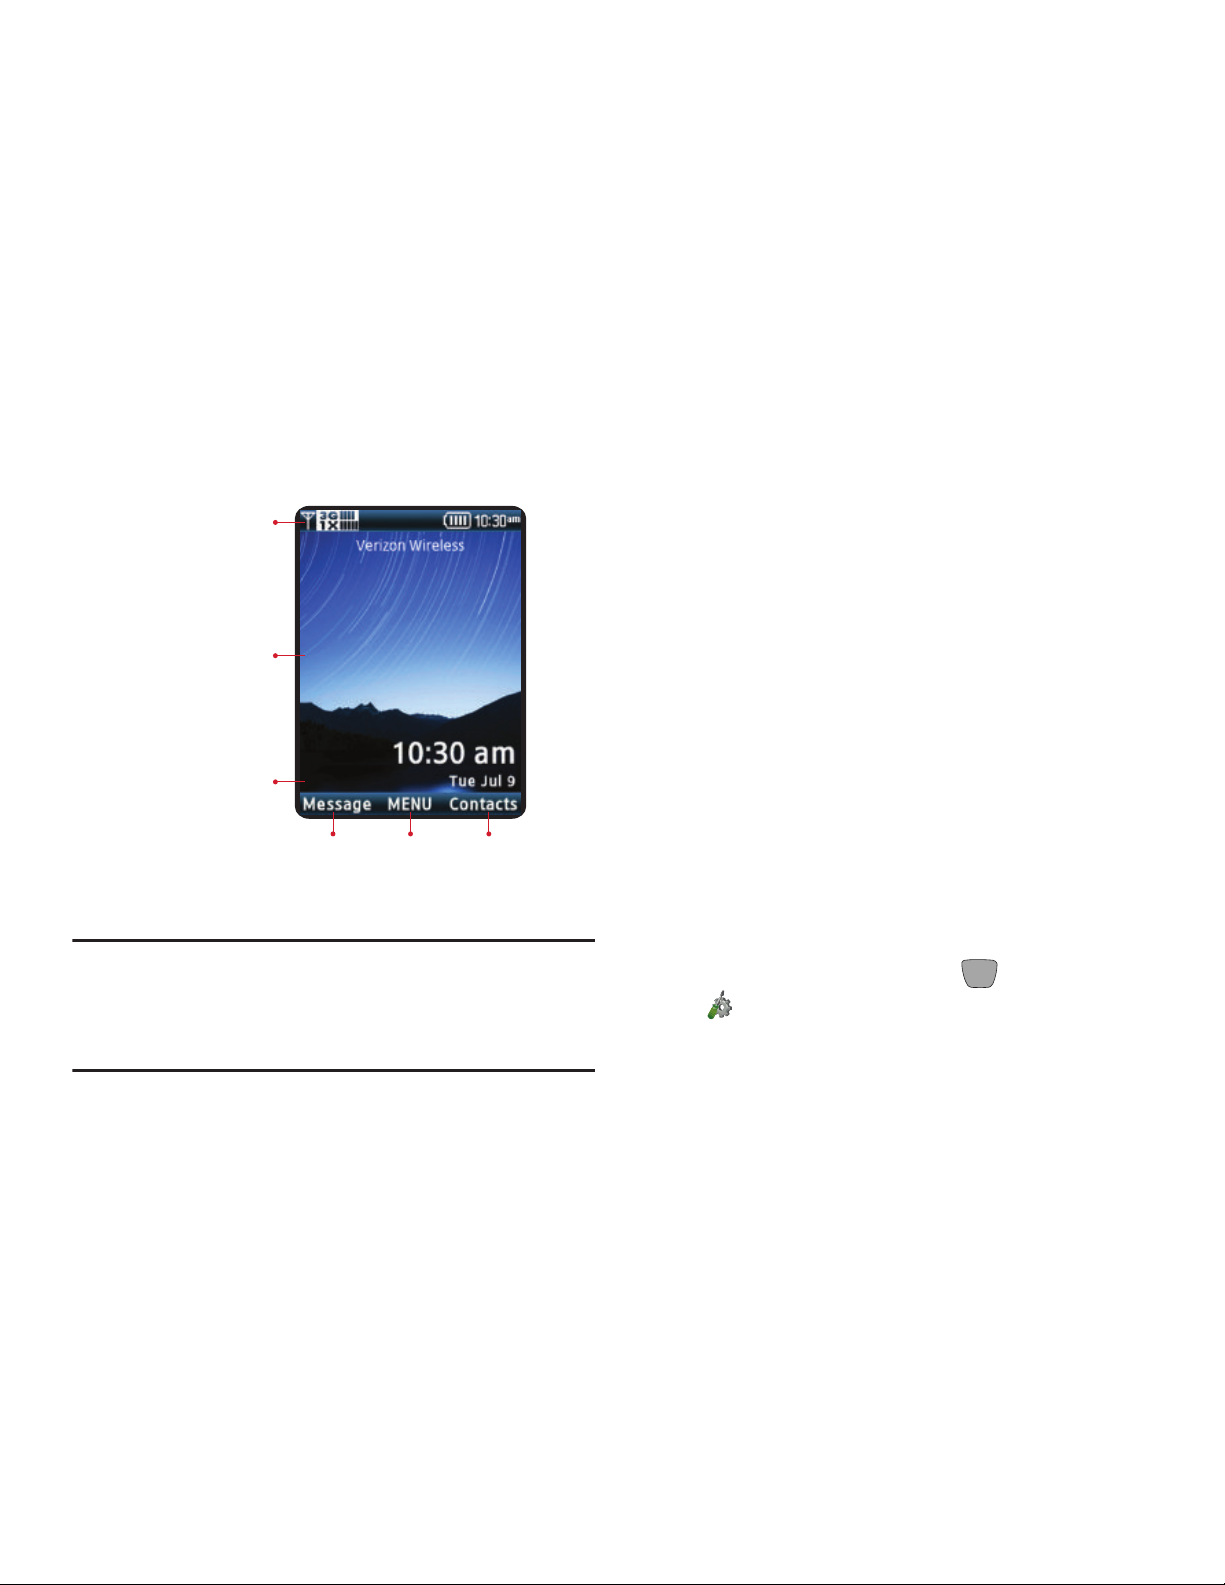
Understanding the Home Screen
The Home screen is the starting point for using your phone.
Warning!
Using excessive force or a metallic object to press on
the screen may damage the tempered glass surface
and void the warranty. See “Warranty Information”
on page 153.
Features
1.
Status Bar
: Displays icons to show network status,
battery power, and connection details.
2.
Home Screen
: Displays Wallpaper, Banners, and Clock.
3.
Event Status
: Displays icons to indicate active alerts,
reminders, and alarms.
4.
Message Shortcut
: Opens the Messaging or Messages
application.
5.
MENU Shortcut
: Opens the Menu screen.
6.
Message Shortcut
: Opens the Contacts application.
Status Icons
Status icons appear in your phone’s display to alert you to
your phone’s network and battery status, new calls or
messages, and other information.
Icon Glossary
The Icon Glossary is a list of all icons used on your phone.
From the Home screen, press
MENU
➔
Settings & Tools ➔ Phone Info
➔
Icon Glossary
.
Status Bar
Event Status
Home Screen
MENU
Shortcut
Message
Shortcut
Contacts
Shortcut

Call Functions 24
Section 3: Call Functions
This section describes how to make or answer a call. It also
includes the features and functionality associated with
making or answering a call.
Making Calls
Your phone offers multiple ways to make calls:
•
Enter a phone or speed dial number on the Keypad.
•
Call a contact from Contacts. For more information, see
“Making
Calls Using Contacts”
on page 38.
•
Return a call, or call a recent caller via Recent Calls. For more
information, see
“Making Calls Using Recent Calls”
on
page 27.
•
Voice dial using Voice Commands.
For more information, refer
to “Voice Commands”
on page 85.
Making a Call
1. Open the phone.
2. Using the keypad, enter the phone number, then press
the
Send Key
.
Note:
To make a call using a speed dial, enter the speed dial
digits, holding down the last digit until the phone dials
the stored telephone number. For more information
about assigning Speed Dials, see “Speed Dials” on
page 42.
25
Answering Calls
You can answer a call, or send the caller to voicemail.
•
If the phone is closed, open the flip to answer the call
automatically.
•
If the phone is open, press the
Send Key
.
Note:
These are default answer options. You can choose other
options for answering calls. For more information, see
“Answer Options” on page 123.
Sending a Call to Voicemail
To send a call to voicemail:
•
Press the
Right Soft Key (Ignore)
to send the call to
voicemail.
•
To send the call to voicemail and send a reply message to the
caller, press the
Center Select Key (TXT)
, then select a
message.
Note:
To silence the ringtone for an incoming call, press the
Left Soft Key
(Quiet)
.
Answering Call-Waiting Calls
When you receive a call while on a call:
•
Press the
Send Key
to answer the new call. The original
call is placed on hold.
•
Press the
Send Key
again to return to your original call.
 Loading...