

Samsung SCHR960 Users Manual

6. Read the information on the
DRAFT
FOR INTERNAL USE ONLY
then touch
7. Read the information on the
then touch
8. Read the information on the
Finish
9. At the S Voice screen, say “Hi Galaxy” to wake up
S voice.
10. Speak into the phone and follow the on-screen
instructions.
Next
.
Next
.
.
Wake up S Voice
Edit what you said
Help
screen, then touch
screen,
screen,
Samsung Link
Samsung Link is a smart remote that allows you to use your
phone to control your TV and other devices.
1. From the
2. Tou ch
3. Tou ch
account.
4. Follow the on-screen instructions.
Samsung Apps
Samsung Apps allows you to easily download many different
types of applications to your phone. You can download
games, news, reference, social networking, navigation, and
other applications.
1. From the
2. Read the Disclaimer, Terms and conditions, and Privacy
policy and touch
3. Follow the on-screen instructions to use Samsung
Apps.
120
Apps
screen, touch
Accept
to continue.
Samsung Apps
.
Apps
screen, touch
Sign in
to sign in to Samsung Link.
Sign in
again and sign in to your Samsung
Samsung Link
.

Settings
DRAFT
FOR INTERNAL USE ONLY
Configure your phone to your preferences. (For more
information, see “Settings” on page 139.)
From the
Apps
screen, touch
Settings
.
Story Album
Create an album with your story on one timeline.
From the
Apps
screen, touch
Story Album
.
Tal k
Use Google Talk to chat with other Google Talk users. (For
more information, see “Google Talk” on page 85.)
From the
Apps
screen, touch
Tal k
.
TripAdvisor
TripAdvisor allows you to access traveler reviews and
opinions on hotels, restaurants and more. You can also
compare prices and check availability on hotels, flights, car
rentals and more.
Note:
This application requres a Samsung account sign in to
access its features.
From the
Apps
screen, touch
TripAdvisor
.
Video
Video identifies and plays video files (3GP or MP4) stored on
your phone or on an optional microSD Memory card.
1. From the
2. Select a video from those listed, if any. (For information
on downloading videos from Samsung Hub, see
“Samsung Hub” on page 122.)
3. To uch
Voice Recorder
Record your voice or other sounds, and share recordings via
Bluetooth, Messaging, or Gmail.
From the
Voice Search
Voice Search offers voice-activated Google searches. If you
agree, Voice Search uses your location to improve search
results and offer other services.
From the
Apps
screen, touch
Menu
for additonal options.
Apps
screen, touch
Apps
screen, touch
Applications and Widgets 121
Video
.
Voice Recorder
Voice Search
.
.

VPN Client
DRAFT
FOR INTERNAL USE ONLY
VPN Client lets you define multiple Virtual Private Networks
(VPNs) to your device and connect to them as needed by
simply selecting a connection from the VPN Client list.
From the
Apps
screen, touch
VPN Client
.
WatchON
Use the Samsung WatchON application to use your phone as
a remote control for your TV, set top box, DVR, Blu-Ray/DVD,
stereo or other device.
1. From the
2. Follow the prompts to setup WatchON.
Apps
screen, touch
(For more information, touch
Introduction to WatchON
.)
WatchON
.
Menu ➔ Help
➔
122
Configure your Device as a Remote
1. Touch
2. Tou ch
3. Select your TV’s manufacturer name from the
your TV Brand
– or –
Tou ch the
button if you own a TV brand or projector other than
those listed.
4. Aim your device at the TV and touch
on your TV with the remote.
5. Tou ch
– or –
Tou ch
6. Select your current channel control method:
If Connected Directly to a TV
Select
connected to the tv.
Remote Control
Set up now
Yes
No
My xxx TV
at the prompt.
screen.
Show other brands
if the TV turned on.
, or
Retry
if the TV did not turn on.
: select when a signal is directly
or
I have a projector
Power
Select
to turn

If Connected through a Set Top Box
DRAFT
FOR INTERNAL USE ONLY
1. Select
2. Configure your set top box for IR communication with
3. Touch
4. Select the Satellite Box Brand from the list.
Cable
/
Satellite
/
this device.
More Info...
set top box for IR controls.
to view a tutorial on configuring the
STB
/
PVR
/
DVR
.
YouTube
Access your YouTube™ account, and view and upload
YouTube videos, right from your phone.
From the
Apps
screen, touch
YouTube
.
Accessing Widgets
1. Press
to scroll to a particular Home screen panel.
2. To uch
screen appears in the display.
– or –
Touch and hold on the displayed
until the Home screen menu pops-up, then touch
to Home screen
tab. The
3. Sweep your finger right or left to scroll through the
Widgets screens and find the desired widget.
4. To place a widget on the selected Home screen panel,
touch and hold the widget’s image or icon, then
position the widget on the Home screen panel.
5. If needed, follow any prompts to configure the widget.
Home
, then Sweep your finger right or left
Apps
, then the
Widgets
➔
Apps and widgets
Widgets
screen appears in the display.
Applications and Widgets 123
tab. The
Home screen
, then the
Widgets
panel
Widgets
Add

•
DRAFT
FOR INTERNAL USE ONLY
Widgets List
The following widgets are available for executing on your
Home screen:
•
Active Apps Manager 2 x 1
Touch to launch the Apps Manager
•
Adapt Sound 1 x 1
headset or headphones.
•
Alarm 5 x 1
widget or using the Clock application.
•
Assistive Light 2 x 1
•
Book 1 x 1
books from
•
Bookmark 1 x 1
bookmark.
•
Bookmarks 3 x 2
browser bookmarks.
•
Briefing 5 x 2
•
Calendar 2 x 3
•
Calendar (mini today) 5 x 4
events scheduled for today.
124
: Add, view, and manage alarms you set using this
: Directly access one of your downloaded electronic
Play Books
: Directly access a selected Internet browser
: View and directly access either of two events.
: View your Calendar events scheduled for today.
: Shows the number of active apps.
Active applications
: Touch to adapt your phone’s sound to suit a
: Use your phone’s flash as a flashlight.
.
screen.
: Directly access any of four selected Internet
: View and access your Calendar
Calendar (month) 5 x 5
Calendar events, one month at a time.
•
Clock (digital) 5x 1
•
Clock (digital) 3 x 1
•
Contact 1 x 1
messaging.
•
Direct Dial 1 x 1
•
Direct Message 1 x 1
selected contact.
•
Directions & Navigation 1 x 1
a selected location.
•
Dropbox Folder 1 x 1
folders.
•
Dual clock (digital) 2 x 2
for two selected locations.
•
Email 5 x 5
Combined email box.
•
Flipboard 4 x 2
“magazine”.
•
Gmail 3 x 3
: View and access your scheduled
: View a digital clock-calendar.
: View a digital clock-calendar.
: Directly access a selected contact for calls or
: Immediately call a selected contact.
: Immediately send a message to a
: Immediately obtain directions to
: Directly access one of your Dropbox
: View digital clock-calendar displays
: View and directly access email messages in your
: View a small image of your Flipboard
: View and directly access your Gmail messages.

•
DRAFT
FOR INTERNAL USE ONLY
Gmail label 1 x 1
selected Gmail label.
•
Google Now 5 x 4
of your selected navigation, weather, and stock information.
•
Google Play Books 2 x 3
•
Google Play Music 4 x 1
music playbook.
•
Google Search 5 x 1
manage Internet searches.
•
Google Search 4 x 1
Internet searches.
•
Messaging 5 x 4
•
Music 5 x 1
Music Hub.
•
Music playlist 1 x 1
•
Picture frame 2 x 2
•
Play - My Library 5 x 5
music, magazines, and videos).
•
Play Recommendations 5 x 2
Google Play Store.
: Directly access Gmail messages with a
: View and directly access the current version
: Directly access your Google books.
: Directly access and play a selected
(transparent background): Perform and
(opaque background): Perform and manage
: View and access your latest messages.
: Play your music purchased and downloaded from
: Play a selected music playlist.
: Directly access your photos and images.
: Access your Google content (ebooks,
: View recommendations from
•
Play Store 2 x 2
Play Store.
•
S Bookmarks 2 x 2
access the related web sites.
•
S Memo 2 x 2
•
Settings Shortcut 1 x 1
your phone.
•
Software update 1 x 1
status information and access
•
Story Album 5 x 5
•
Traffic 1 x 1
destination.
•
Travel 3 x 3
recommendations from S Travel.
•
User manual 1 x 1
•
Video 5 x 5
videos.
•
Weather 5 x 3
weather conditions for a selected location.
: View recommendations from and access Google
: View selected bookmarks and directly
: View and access a stored memo.
: Directly access selected settings for
: Directly access your device software
Software update
: View and access your stories.
: Directly access traffic information for a selected
: View and access travel destination
: .
: Directly access and play one or more selected
: View current and forecast temperature and
Applications and Widgets 125
.

•
DRAFT
FOR INTERNAL USE ONLY
Yahoo! Finance 4 x 3
and/or commodities and directly access additional financial
information.
•
Yahoo! News 4 x 2
articles.
•
You Tube 3 x 2
access your YouTube account.
: View current prices for selected stocks
: View news headlines and access full news
: Receive and view suggested videos. Directly
126

Section 7: Connections
DRAFT
FOR INTERNAL USE ONLY
Wi-Fi
Wi-Fi is a wireless networking technology that provides
access to local area networks.
Wi-Fi communication requires access to an existing Wi-Fi
network. Wi-Fi networks can be Open (unsecured), or
Secured (requiring you to provide login credentials).
Your phone supports the 802.11 a/b/g/n Wi-Fi protocols.
Configuring Wi-Fi Settings
Configure your phone’s Wi-Fi settings. For more information,
see “Wi-Fi Settings” on page 141.
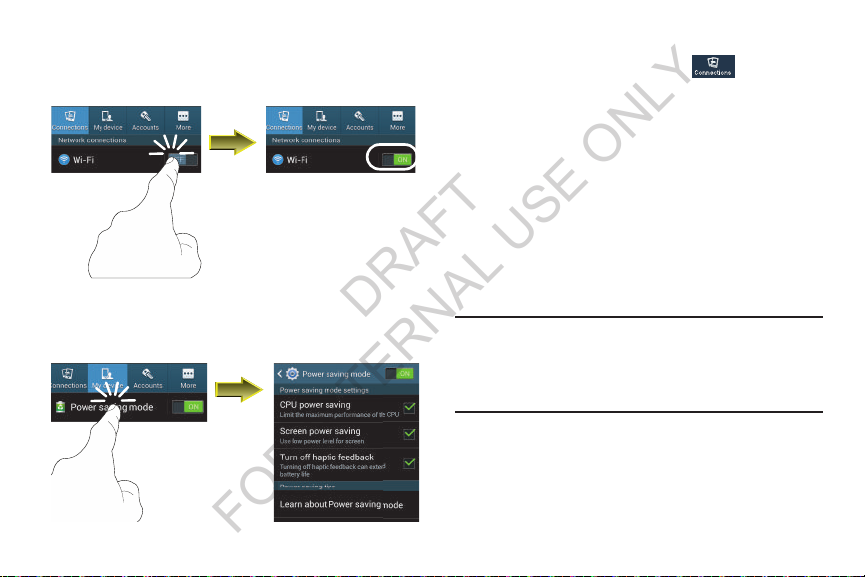
Turning Wi-Fi On or Off
When you turn Wi-Fi service on, your phone automatically
searches for available, in-range “hotspots” [also termed
WAPs (Wireless Access Points)].
Turning Wi-Fi On
1. From the top of the Home screen, sweep your finger
downward to display the Notifications screen.
2. At the top of the Notifications screen, touch
to turn Wi-Fi On.
Turning Wi-Fi Off
1. From the top of the Home screen, sweep your finger
downward to display Notifications.
2. At the top of the Notifications screen, touch
to turn Wi-Fi Off.
Connections 127
Wi-Fi
Wi-Fi

Scanning and Connecting to a Wi-Fi Network
DRAFT
FOR INTERNAL USE ONLY
1. Turn Wi-Fi on (see “Turning Wi-Fi On” on page 127).
Your phone scans for available hotspots and pops-up a
list of any it finds.
2. To connect to a hotspot, touch it on the pop-up list.
•
If the Wi-Fi network is open, you will be automatically
connected.
•
If the Wi-Fi network is secured, enter the password at the
prompt to connect.
Adding a Wi-Fi Network Manually
1. From the Home screen, touch Menu ➔ Settings
Connections ➔ Wi-Fi
appears. (For more information, refer to “Accessing
Settings” on page 139.)
2. Touch
3. Touch
128
Wi-Fi
to turn on Wi-Fi.
Add Wi-Fi network
values:
• Network SSID
Point).
• Security
• Password
: Enter the name of the WAP (Wireless Access
: Select the type of security used by the WAP.
: If the WAP is secured, enter the password or key.
. The
Wi-Fi
options screen
, then enter the following
Wi-Fi Direct
Wi-Fi Direct allows devices to connect to each other directly
via Wi-Fi, without a Wi-Fi network or hotspot, and without
having to set up the connection. For example, some printers
support Wi-Fi Direct, and you could print from your phone via
Wi-Fi Direct.
Establishing Wi-Fi Direct Connections
1. From the Home screen, touch Menu ➔ Settings
The
➔
for available Wi-Fi Direct devices and lists them under
Available devices
2. To connect to a single Wi-Fi Direct device, touch its
name in the list.
3. To connect to multiple Wi-Fi Direct devices, touch
Multi-connect
devices, then touch
Connections ➔ Wi-Fi ➔ Wi-Fi Direct
Wi-Fi Direct
screen appears, and your phone scans
.
, next touch
Done
Select all
.
➔
.
or individual

Bluetooth
DRAFT
FOR INTERNAL USE ONLY
Note:
For Hearing Aid Compatibility Information, see page 217.
Bluetooth is a short-range wireless communications
technology for exchanging information over a distance of
about 30 feet.
You don’t need to line up the devices to send information
with Bluetooth. If the devices are in range, you can exchange
information between them, even if they are in different
rooms.
Configuring Bluetooth Settings
Configure your phone’s Bluetooth settings. For more
information, see “Bluetooth settings” on page 144.
Note:
Bluetooth profiles are specifications for services
supported by individual devices. For a list of profiles your
phone supports, see “Bluetooth profiles” on page 143.
Turning Bluetooth On or Off
1. From the Home screen, sweep your finger from the top
of the screen downward to display Notifications.
2. Touc h
Touc h
Pairing with a Bluetooth Device
Search for a Bluetooth device and pair with it, to exchange
information between your phone and the device.
After pairing, your phone and the target device will connect
with each other and exchange information without a
passcode or PIN.
Note:
When connected, the
displays in the Status Bar. If you receive a new request
for connection while connected with a Bluetooth
headset, a new Bluetooth icon displays at the left of the
Status bar and Notifications displays the connection
request.
1. Activate the target device’s discoverable mode.
Bluetooth
to turn Bluetooth On.
Bluetooth
to turn Bluetooth Off.
Bluetooth connected
Connections 129
icon

2. On your phone, turn on Bluetooth (see “Turning
DRAFT
FOR INTERNAL USE ONLY
Bluetooth On or Off” on page 129). A list of detected
devices pops-up on your display.
3. From the list of detected devices, touch the target
device, your phone attempts to automatically pair with
the target device.
If automatic pairing fails, then follow the prompts to
complete manual pairing:
•
Enter a PIN for the target device and touch OK.
Tip:
Some devices use a default passcode of 0000. Refer to
the target device’s user manual for more information.
•
When prompted to connect with the target device, touch OK to
Cancel
complete the connection, touch
only.
to retain the pairing
VPN
You can use your phone’s VPN (Virtual Private Network)
feature to connect to VPNs.
Configuring VPN Settings
For information about configuring your phone’s VPN settings,
see “VPN” on page 150.
Accessing a VPN
1. From the Home screen, touch Menu ➔ Settings
2. Under
VPN
connections.
3. Tou ch
network.
Connecting with a Bluetooth Device
1. From the Home screen, touch Menu ➔ Settings
Connections ➔ Bluetooth
appears in the display.
2. Under
130
Available devices
device. The device connects with your phone.
. The
Bluetooth
, touch a previously paired
➔
screen
Connections
Network connections
. The
VPN
a VPN and follow any prompts to access the
.
, touch
More networks
screen appears, listing available VPN
➔
➔

Personal Computer Connections
DRAFT
FOR INTERNAL USE ONLY
Connect your device to a personal computer to transfer data
between your device and the computer. Use the USB data
cable that comes with your device, or use the Kies via Wi-Fi
connection on your device to connect wirelessly.
Transferring Data
Connect your device to a computer, via USB cable, to transfer
data as a Media device using MTP (Media Transfer Protocol),
or as a Camera using PTP (Photo Transfer Protocol).
1. Attach your device to the computer with a USB data
cable. Your device recognizes the connection as the
last connection method you used, and displays a
connection
2. From the Home screen, sweep your finger downward
to display Notifications, then touch the alert.
alert in the Status bar and Notifications.
3. Select a connection method:
• Media device (MTP)
• Camera (PTP)
4. On your computer, choose a method for accessing your
device. Available options depend on the programs
installed on your computer.
5. Transfer files to the memory card. When finished, you
can disconnect the USB cable.
: Transfer media files with Windows, or
using Android file transfer on a Mac (see
filetransfer
).
: Transfer photos using camera software, and
transfer files to computers that do not support MTP.
www.android.com/
Connections 131

Kies via Wi-Fi
DRAFT
FOR INTERNAL USE ONLY
Kies via Wi-Fi lets you wirelessly synchronize files on your
device (in mass storage and on a memory card) with files on
a Windows computer or Mac, provided they are both on the
same Wi-Fi network. You can also view and share call logs,
videos, photos, music, bookmarks, ringtones, and even send
SMS messages from your computer.
Kies via Wi-Fi connects via Wi-Fi to the Kies application, that
you can install on your computer.
For more information, visit:
Note:
To sync your device to a PC, it is highly recommended
that you install Samsung Kies, which is available at
http://www.samsung.com/us/kies
If you are a Windows XP user, ensure that you have
Windows XP Service Pack 3 or higher installed on your
computer. Also, ensure that you have Samsung Kies 2.0
or Windows Media Player 10 or higher installed on your
computer.
132
www.samsung.com/us/kies
(for Windows/Mac).
.
Tet h ering
Use Tethering to share your phone’s internet connection with
a computer connected to your device using the USB data/
charging cable, or using Bluetooth.
(For more information, refer to “Tethering” on page 149.)
1. From the Home screen, touch
2. Under
Tethering and portable hotspot
portable hotspot
3. Choose a tethering method:
• USB tethering
cable, then touch
When On, a check appears in the check box.
• Bluetooth tethering
using Bluetooth. Consult the computer’s documentation for
more information about using your computer to make a
Bluetooth connect. Touch
On or Off. When On, a check appears in the check box.
Note:
Using Tethering requires a subscription to your Wireless
Provider’s mobile data service.
Connections
Network connections
.
, touch
More networks
. The
screen appears.
: Connect the computer to the phone via USB
USB Tethering
: Connect your phone with the computer
to turn tethering On or Off.
Bluetooth Tethering
Menu ➔ Settings
Tethering and
to turn tethering
➔
➔

Portable Wi-Fi Hotspot
DRAFT
FOR INTERNAL USE ONLY
Use Portable Wi-Fi Hotspot to share your phone’s internet
connection with a PC or other device through Wi-Fi, using
your phone as the mobile hotspot.
Note:
Portable Wi-Fi Hotspot requires a subscription to the
applicable service to use the application.
Portable Wi-Fi Hotspot consumes battery power and
uses data service. While the Portable Wi-Fi Hotspot is
active, your phone’s applications will use the Portable
Wi-Fi Hotspot data feature allowance.
Activating Portable Wi-Fi Hotspot
Activate your phone’s Portable Wi-Fi Hotspot application to
allow other devices to use your phone’s internet connection.
1. From the Home screen, touch
2. Under
Tethering and portable hotspot ➔ Portable Wi-Fi Hotspot
3. To uch
prompts to turn Portable Wi-Fi Hotspot ON.
Configuring Portable Wi-Fi Hotspot Settings
Configure your phone’s Portable Wi-Fi Hotspot settings,
including your phone’s name and password, and set the
visibility of your phone’s Wi-Fi hotspot.
Tip:
By default, your device’s mobile hotspot has security
applied, and a password (your device’s phone number) is
required to connect. (For more information about
configuring your mobile hotspot, see “Portable Wi-Fi
hotspot” on page 147.)
Connections
Network connections
Portable Wi-Fi Hotspot
.
Menu ➔ Settings
, touch
More networks
and follow the
Connections 133
➔
➔
.

Connecting a Device via Portable Wi-Fi Hotspot
DRAFT
FOR INTERNAL USE ONLY
Use the other device’s Wi-Fi control to connect to your
phone’s Portable Wi-Fi Hotspot.
1. Activate Portable Wi-Fi Hotspot on your phone. (For
more information, see “Activating Portable Wi-Fi
Hotspot” on page 133.)
2. Activate Wi-Fi on the other device, using that device’s
Wi-Fi control.
3. Scan for Wi-Fi hotspots, and select your phone from
the list. (To find your phone’s name, see “Configuring
Portable Wi-Fi Hotspot” on page 148.)
4. At the prompt, enter your phone’s Portable Wi-Fi
Hotspot password.
By default, the password is your phone’s telephone
number. (For information on changing your phone’s
Portable Wi-Fi Hotspot password, see “Configuring
Portable Wi-Fi Hotspot” on page 148.)
134
Beaming
NFC
NFC (Near Field Communication) allows data exchange when
you touch your device with another compatible device. This
is used for applications such as Android Beam and S Beam.
1. From the Home screen, touch
2. Under
•
Touch the
•
Touch the
Note: NFC
Connections
Connect and share
must be turned ON to use
.
NFC
slider
to turn NFC ON.
NFC
slider
to turn NFC OFF.
:
Menu ➔ Settings
Android Beam
or
S Beam
➔
.

Android Beam
DRAFT
FOR INTERNAL USE ONLY
When Android Beam is activated, you can beam application
content to another NFC-capable device by holding the
devices close together. You can beam browser pages,
YouTube videos, contacts, and more.
Turning Android Beam On or Off
1. From the Home screen, touch Menu ➔ Settings
Connections
2. Under
3. Touch the
4. Touch the
Connect and share
information, see “NFC”.)
Beam ON.
Touch the
Beam OFF.
.
NFC
option.
Android Beam
Android Beam
, turn
NFC
ON. (For more
slider to turn Android
slider to turn Android
Using Android Beam
1. Tur n
2. Launch the desired feature or application or browse to
➔
3. Place your phone back-to-back with the device to
4. Once the user of the receiving device accepts your
or Off” .)
the desired web page (See “Applications and Widgets”
on page 86.)
receive your “beamed” content, then touch the screen
on your phone. The receiving device prompts the user
to accept your “beamed” content.
“beamed” content, it appears on the screen of that
device.
Android Beam
ON. (See “Turning Android Beam On
Connections 135

➔
DRAFT
FOR INTERNAL USE ONLY
Using S Beam
1. Tur n
2. Launch
“Applications and Widgets” on page 86.) When using
Gallery, you can select multiple files to S Beam.
3. Place your phone back-to-back with the device to
receive your “beamed” content, then touch the screen
on your phone. The receiving device prompts the user
to accept your “beamed” content.
4. Once the user of the receiving device accepts your
“beamed” content, it appears on the screen of that
device.
S Beam
When S Beam is activated, you can beam files to another
NFC-capable device by holding the devices close together.
You can beam images and videos from your gallery, music
files from your music player, and more.
Turning S Beam On or Off
1. From the Home screen, touch Menu ➔ Settings
Connections
2. Under
3. Touch
4. Under
136
Connect and share
information, see “NFC”.)
Connect and share
S Beam ON, or
touch
SBeam
.
, turn
NFC
ON. (For more
Back
.
, touch
S Beam
to turn S Beam OFF.
to turn
S Beam
On. (See “Turning S Beam On or Off” .)
Camera,
Music
, or
Gallery
(See

Screen Mirroring
DRAFT
FOR INTERNAL USE ONLY
Screen Mirroring lets your phone share the contents of its
display with other Digital Living Network Alliance (DLNA)
certified devices, such as Smart televisions.
Note:
To view more information about DLNA certified products
visit
http://www.dlna.org/home
1. Connect your phone and another DLNA certified device
to the same Wi-Fi network. (For more information, refer
to “Wi-Fi” on page 127.)
2. From the Home screen, touch
Connections
3. Under
4. Touch the desired device to establish a connection. You
Connect and share
Screen Mirroring
set to ON and begins scanning for available devices. All
detected DLNA certified devices are listed under
Available devices
can now view the contents of your phone’s display on
the connected device.
screen appears with
.
.
Menu ➔ Settings
.
, touch
Screen Mirroring
Screen Mirroring
. The
Nearby devices
Share files with nearby DLNA certified devices over Wi-Fi.
(For information on configuring Nearby devices, For more
information, refer to “Nearby devices” on page 152.)
Note:
To use Nearby devices for sharing, you must have set up
a connection with another Wi-Fi device that supports
DLNA.
1. Connect your phone and another DLNA certified device
to the same Wi-Fi network. (For more information, refer
➔
to “Wi-Fi” on page 127.)
2. From the Home screen, touch
3. Under
Nearby devices
4. To uch
Off. When On, a check mark appears in the check box.
Connections
Connect and share
File sharing
.
screen appears.
to turn file sharing via DLNA On or
Menu ➔ Settings
, touch
Nearby devices
Connections 137
➔
. The

Memory Card
DRAFT
FOR INTERNAL USE ONLY
Your phone supports removable microSD™ or microSDHC™
memory cards of up to 64GB capacity, for storage of music,
pictures, videos, and other files.
Installing and Removing a Memory Card
(For more information about installing and removing a
memory card, see “Installing a Memory Card” on page 9.)
Important!
To prevent damage to information stored on the
memory card, unmount the card before removing it
from the phone.
Formatting a Memory Card
Use the Format SD card setting to remove all content from an
installed memory card.
1. From the Home screen, touch
2. Under
3. If needed, under
4. After mounting the SD card, touch
follow the prompts to confirm the deletion of
information from the card.
138
More
. The
More
Device manager
SD card
screen appears.
, touch
Storage
, touch
Mount SD card
Menu ➔ Settings ➔
.
.
Format SD card
, then

Section 8: Settings
DRAFT
FOR INTERNAL USE ONLY
Accessing Settings
From the Home screen, touch Menu ➔ Settings
– or –
From the Home screen, touch
Settings
.
– or –
Pull down the Notifications screen, then touch
Settings
. (For more information, refer to
“Notifications panel” on page 33.)
Settings
The
Note:
This section does not include information about Call
settings. (For Call settings information, see “Call
Settings” on page 73.)
menu appears.
Apps
➔
Settings Tabs
.
Your phone’s Settings are divided into 4 main groups. When
the Settings screen appears, the following 4 tabs are located
at the top of the screen:
Connections
networks, NFC, S Beam, Nearby devices, Screen
Mirroring, and Kies via Wi-Fi.
My device
screen mode, Call, Blocking mode, Sound,
Display, Power saving mode, Accessory,
Accessibility Date and time, Accessibility,
Language and input, Motions and gestures, Smart
screen, Air view, and Voice control.
Accounts
account, ChatON, Dropbox, Email, Google, LDAP,
Microsoft Exchange, and Sync apps with
Facebook)] and Backup options (Cloud and
Backup and reset).
More
manager, Battery, Storage, Date and time, and
About device.
: Wi-Fi, Bluetooth, Data usage, More
: Lock screen, Display, Sound, Home
: My accounts [Add account (Samsung
: Location services, Security, Application
Settings 139
Using Setting Sliders
DRAFT
FOR INTERNAL USE ONLY
To enable or disable a setting, touch the setting slider
as shown.
Accessing Additional Options
To access additional setting options, touch the setting
label.
140
Connections
From the
The
Wi-Fi
Set up and manage your phone’s connections to Wi-Fi
networks. Your phone supports Wi-Fi a/b/g/n.
(For more information about using Wi-Fi, see “Wi-Fi” on
page 127.)
Turning Wi-Fi On or Off
Turn your phone’s Wi-Fi service on or off. When you turn WiFi service on, your phone automatically searches for nearby
available Wi-Fi networks.
Tip:
When you turn Wi-Fi service on, your phone automatically
searches for available networks and displays them.
You can also turn Wi-Fi On or Off from the Notifications
panel.
Settings
Connections
screen, touch
screen appears.
Connections
.

Turn Wi-Fi On:
DRAFT
FOR INTERNAL USE ONLY
Turn Wi-Fi Off:
From the
Connections
connections
– or –
From the Home screen and others, touch and swipe the
Status Bar downward, then touch
From the
Connections
connections
– or –
From the Home screen and others, touch and swipe the
Status Bar downward, then touch
, touch
, touch
screen and under
Wi-Fi
.
screen and under
Wi-Fi
.
Network
Wi-Fi
.
Network
Wi-Fi
.
Wi-Fi Settings
Configure and manage connections to Wi-Fi access points.
1. From the
connections
appears.
2. Touch options to configure:
• Add Wi-Fi network
“Adding a Wi-Fi Network Manually”
•Scan
• Wi-Fi Direct
on page 142.)
3. To uch Menu
options:
• Advanced
settings.
• WPS push button
Protected Set-up push button on your Wi-Fi router.
• WPS PIN entry
Personal Identification Number for your Wi-Fi router.
•Help
tasks.
Connections
: Search for available Wi-Fi networks.
: View and configure your phone’s Advanced Wi-Fi
: Provides on-line assistance to perform Wi-Fi interface
screen and under
, touch
Wi-Fi
. The
Wi-Fi
: Connect to a new Wi-Fi network (see
: Access Wi-Fi Direct settings (see
to access the following additional
: Record/send the signal from the Wi-Fi
: Record/send the Wi-Fi Protected Set-up
Network
options screen
on page 128).
Settings 141
“Wi-Fi Direct”

Advanced Wi-Fi settings
DRAFT
FOR INTERNAL USE ONLY
1. From the
2. Configure settings:
142
Connections
connections
• Network notification
of nearby Wi-Fi networks when you launch a high data-usage
application.
• Passpoint
• Keep Wi-Fi on during sleep
• Check for Internet service
•MAC address
•IP address:
: When set to ON, your phone automatically
connects to passpoint-enabled Wi-Fi hotspots.
Wi-Fi to mobile data for data communications, when the phone
goes to sleep (when the backlight goes out). This setting can
affect your data usage, and the behavior of devices you
connect to your phone, such as when tethering or using Mobile
Hotspot.
service is available when connected to a W-Fi hotspot.
address, needed for connecting to some secured networks
(only shows when Wi-Fi is active).
(only shows when connected to a Wi-Fi network).
screen and under
, touch
Wi-Fi
➔
Menu ➔ Advanced
: When enabled, your phone notifies you
: Specify when to switch from
: Check whether Wi-Fi Internet
: (Not configurable) View your phone’s MAC
(Not configurable) View your phone’s IP address
Network
.
Wi-Fi Direct
Wi-Fi Direct allows devices to connect to each other directly
via Wi-Fi, without a Wi-Fi network or hotspot, and without
having to set up the connection. For example, some printers
support Wi-Fi Direct, and you could print from your phone via
Wi-Fi Direct.
Turning Wi-Fi Direct On or Off
From the
connections
The
for available Wi-Fi Direct devices and lists them under
Available devices
(For information on connecting your phone to other
Wi-Fi Direct devices, see “Establishing Wi-Fi Direct
Connections” on page 128.)
Connections
, touch
Wi-Fi Direct
screen and under
Wi-Fi
➔ Wi-Fi Direct
screen appears, and your phone scans
.
Network
.

•
DRAFT
FOR INTERNAL USE ONLY
Bluetooth
Your phone supports Bluetooth® 4.0.
Bluetooth profiles
Bluetooth profiles are specifications for services supported
by individual devices. Profiles improve the ability of different
devices to work together. Your phone supports these
Bluetooth profiles:
•
Headset
: HSP v1.2 profile supports use of compatible Bluetooth
headsets for mono voice.
•
Handsfree
: HFP v1.5 profile supports Bluetooth headsets, and
may also support other compatible Bluetooth devices with
speakerphone capabilities.
•
Stereo
: A2DP v1.2, AVRCP v1.0, GAVDP 1.2, AVCTP 1.3 and
AVDTP 1.2 profiles support delivery of stereo audio to compatible
Bluetooth devices.
•
Object Exchange
of contact name cards (vCard 2.1) and calendar events
(vCalendar) between devices. PBAP v1.2 supports exchange of
Phone Book Objects.
•
Human Interface Devices
interface devices.
: OPP v1.0 profile allows sending and receiving
: HID v1.0 profile supports certain
Personal Area Networking
with other devices.
•
Message Access Profile
between devices, such as with an automotive hands-free device.
Turning Bluetooth On or Off
Turn Bluetooth On:
From the
connections
Turn Bluetooth Off:
From the
connections
Tip:
You can also turn Bluetooth On or Off at the Notifications
Panel. (For more information, refer to “Quick Settings
Menu” on page 33.)
: PAN 1.0 supports exchange of data
: MAP 1.0 allows exchange of messages
Connections
Connections
, touch
, touch
screen and under
Bluetooth
.
screen and under
Bluetooth
.
Network
Network
Settings 143

Bluetooth settings
DRAFT
FOR INTERNAL USE ONLY
Pair and connect with other Bluetooth devices, manage your
Bluetooth connections, and control your device’s visibility to
other devices.
Note:
Bluetooth must be turned On to access Bluetooth
settings.
1. From the
2. Touch a setting to configure Bluetooth:
144
Connections
connections
•
Touch
Bluetooth
Bluetooth
or touch
•
Touch your phone’s name to enable/disable its visibility to other
devices’ Bluetooth searches. Available when Bluetooth is On.
•
Touch
Scan
detected device to pair and connect with it (see
a Bluetooth Device”
•
Under
Paired devices
connect with it or disconnect from it.
–
Tou ch
to enable or disable its Bluetooth Profiles.
screen and under
, touch
Bluetooth
.
to turn Bluetooth On,
to turn Bluetooth Off.
to search for visible Bluetooth devices. Touch a
on page 129).
, touch a Bluetooth device option to
Settings
to Rename the device, Unpair from it, or
Network
“Pairing with
•
Touch
–
–
–
Data usage
Control your device’s connection to your Wireless Provider’s
data service, and monitor your data usage.
Turning Mobile data On or Off
1. From the
touch
2. Tou ch
Wireless Provider’s mobile data network. When
data
checkbox.
Menu
to access the following options:
Visibility timeout
visible to other devices.
Received files
Bluetooth connections.
Help
: Explains how to connect with and configure your phone’s
Bluetooth interface.
Data usage
Mobile data
is enabled, a check mark appears in the
: Select how long your phone will remain
: Lists files received from other devices over
Settings
screen, under
. The
to enable/disable access to your
Data usage
Wireless and network
screen appears.
,
Mobile

Tip:
DRAFT
FOR INTERNAL USE ONLY
You can also enable or disable Mobile data by touching
the
Mobile data
Notifications panel. (For more information, refer to “Quick
Settings Menu” on page 33.)
Viewing data usage by app or process
1. From the
touch
Quick set button on the top of the
Settings
screen, under
Data usage
. The
Data usage
Wireless and network
screen appears.
,
2. Scroll down the page to see the processes or apps
using mobile data service listed in order of their
amount of usage.
Settings 145

3. Touch a process or app to see data usage for the
DRAFT
FOR INTERNAL USE ONLY
process or app, and to configure specific settings
(touch
View app settings
4. To access mobile data usage settings, touch
Menu
:
• Data roaming
the graph.
• Restrict background data
and services unless your device is connected to a Wi-Fi
network.
• Auto sync data
and conservers battery power, but you must manually sync
your accounts and you will not receive app update notices.
•Show Wi-Fi usage
top of the
Data usage
–
Mobile
: Shows Mobile data usage.
–
Wi-Fi
: Shows Wi-Fi data usage.
• Mobile hotspots
mobile hotspot (a check mark appears in the check box),
restricting background apps from using this hotspot and
warning you when you attempt to use it for large downloads.
146
, when active).
: When enabled, includes data roaming usage in
: When enabled, stops some apps
: When enabled, reduces mobile data usage
: When enabled, two buttons appear at the
screen:
: Lets you mark a detected Wi-Fi hotspot as a
More Wireless and Network Settings
Airplane mode
When airplane mode is enabled, all your phone’s wireless
connections are disabled, and you cannot make or receive
calls [except for Emergency (E911) calls] or messages. You
can, however, make Wi-Fi and Bluetooth connections.
While in airplane mode, you can use other features of your
phone, such as playing music, watching videos, or using
other applications.
1. From the
connections
networks
2. Tou ch
Airplane mode
mode.
A check mark in the check box indicates this option is
enabled.
Connections
screen appears.
screen and under
, touch
More networks
to enable or disable airplane
. The
Network
Wireless and

Mobile networks
DRAFT
FOR INTERNAL USE ONLY
Set options for network selection, data service, and roaming
behavior.
1. From the
2. Set these options:
Wireless and networks
Mobile networks
• Mobile data
mobile data network. You can also control this setting at
Notifications with the Mobile data toggle.
• Data roaming
when your device is roaming on another network. (For more
information about roaming, see
•Network mode
networks.
–
LTE / CD MA
and/or EV-DO mobile networks when available.
–
CDMA
. The
: Enable or disable your phone’s connection to the
: Enable or disable connection to data services
: Configure roaming for CDMA, LTE, and EV-DO
: Lets your phone automatically access LTE, CDMA,
: Restricts your phone to CDMA mobile networks.
screen, touch
Mobile networks
“Roaming”
screen appears.
on page 18.)
• System select
Portable Wi-Fi hotspot
Use Portable Wi-Fi hotspot to share your phone’s internet
connection with up to 5 other devices, through Wi-Fi.
You can control whether devices connect to your Portable WiFi Hotspot with the Allowed device list.
(For more information about using your phone as a mobile
hotspot, see “Portable Wi-Fi Hotspot” on page 133.)
Note:
Using Portable Wi-Fi Hotspot requires a subscription to
data service. For more information, contact your
Wireless Provider.
Using your phone as a mobile hotspot consumes battery
power and uses data service. While Portable Wi-Fi
Hotspot is active, your phone’s applications will use your
Wireless Provider’s data service. Roaming while using
your phone as a mobile hotspot will incur extra data
charges.
: Configure data roaming mode.
–
Home only
: Restricts your phone to your Wireless Provider’s
network.
–
Automatic
: Permits your phone to automatically roam to
networks other than that provided by your Wireless Provider.
Settings 147

Turning Portable Wi-Fi Hotspot On or Off:
DRAFT
FOR INTERNAL USE ONLY
1. From the
2. Touch
Note:
Using your phone as a mobile Wi-Fi hotspot consumes
battery power and uses data service. While Portable WiFi hotspot is active, your phone’s applications will use
your Wireless Provider’s data service. Roaming while
using your phone as a mobile Wi-Fi hotspot will incur
extra data charges. (For additonal information, contact
your Wireless Provider.)
148
Wireless and networks
Tethering and portable hotspot
Portable Wi-Fi Hotspot
prompts to turn Portable Wi-Fi Hotspot On, or touch
Portable Wi-Fi Hotspot
Hotspot Off.
to turn Portable Wi-Fi
screen, touch
➔ Portable Wi-Fi hotspot
and follow the
Configuring Portable Wi-Fi Hotspot
1. From the
.
Tethering and portable hotspot
The
2. Tou ch
• Network SSID
Hotspot.
• Hide my device
not visible to other Wi-Fi devices during a scan. Other devices
can still connect to your Portable Wi-Fi Hotspot, but will have to
set up the connection manually with your Network SSID and
Password.
• Security
Hotspot.
• Password
enter the password. By default, the password is your mobile
telephone number.
• Show password
• Show advanced options
including Broadcast channel, to specify the channel your device
uses for Portable Wi-Fi Hotspot.
Wireless and networks
Portable Wi-Fi hotspot
Configure
to access the following options:
: View and change the name of your Mobile
: When enabled, your Portable Wi-Fi Hotspot is
: Choose the security level for your Portable Wi-Fi
: If you choose a security level that uses a password,
: Enable to make the Password field visible.
screen, touch
➔ Portable Wi-Fi hotspot
screen appears.
: Enable to access advanced options,
.

Allowed Devices List
DRAFT
FOR INTERNAL USE ONLY
Control whether devices connect to your Portable Wi-Fi
Hotspot with the Allowed device list. After you add devices to
the list, they can scan for your device and connect using your
device’s Wi-Fi hotspot name (SSID) and password.
Note:
Using your phone as a mobile hotspot consumes battery
power and uses data service. While Portable Wi-Fi
Hotspot is active, your phone’s applications will use your
Wireless Provider’s data service. Roaming while using
your phone as a mobile hotspot will incur extra data
charges.
1. From the
2. Touch
3. Touch
Tip:
For information about connecting to your Portable Wi-Fi
Hotspot, see “Connecting a Device via Portable Wi-Fi
Hotspot” on page 134.
Wireless and networks
Tethering and portable hotspot
The
Portable Wi-Fi hotspot
Allowed devices
device’s Device name and MAC address.
OK to add the device to the
screen, touch
➔ Portable Wi-Fi hotspot
screen appears.
➔
, then enter the other
Allowed devices
list.
Tet heri ng
Use Tethering to share your phone’s internet connection with
a computer that connects to your device via USB cable, or by
Bluetooth.
(For more information about connecting computers to your
phone via Tethering, see “Tethering” on page 132.)
1. From the
Tethering and portable hotspot
portable hotspot
2. Choose a tethering method:
• USB tethering
.
• Bluetooth tethering
Note:
Using Tethering requires a subscription to your Wireless
Provider’s mobile data service.
Wireless and networks
screen appears.
: Connect the computer to the phone via USB
cable, then touch
When On, a check appears in the check box.
Bluetooth. Consult the computer’s documentation for more
information about configuring your computer to pair via
Bluetooth. Touch
Off. When On, a check appears in the check box.
USB Tethering
: Pair your phone with the computer via
Bluetooth Tethering
screen, touch
. The
Tethering and
to turn tethering On or Off.
to turn tethering On or
Settings 149
 Loading...