

Samsung SCH-I600MSAXAR User Manual

quick
www.verizonwireless.com
6801-001224
reference
guide
SCHi600
WELCOME TO VERIZON WIRELESS

WELCOME
▲
WELCOME AND THANK YOU FOR CHOOSING VERIZON WIRELESS
You’re now connected to one of the nation’s largest wireless networks, covering more
cities, towns, and places than anyone else. This guide will help you understand your
3. If you ever have a problem, it becomes our problem the first time you call. No
runarounds, no hassles. If your issue can’t be resolved during the course of your first
call, we’ll take the responsibility of getting back to you with an answer.
Smartphone and all the things you can do with it.
SM
program, sign up for and maintain two years of service
For more details, please refer to the User Guide. If you ever have any questions and
would like to access an online Q&A, please visit us online at verizonwireless.com and
check out How to Use Your Phone.
Be sure to try the enclosed SD card and CDs to see all the great things your new
device and service can do. You’ll also get a glimpse of all that Verizon Wireless has to
offer.
▲
WITH VERIZON WIRELESS, YOU WILL ENJOY THE BENEFITS OF OUR WORRYFREE GUARANTEE
SM
1. You’ll enjoy the largest, most advanced, nationwide wireless network.
2. You have the option to change to any qualifying price plan or airtime promotion at
any time. Note: You won’t pay any additional fees to change plans. Some price plans
4. With our New Every Two
on a select digital plan of $35 or higher to qualify for a phone (up to $100 value), or
receive $100 toward the purchase of a more expensive phone with a two-year renewal (see New Every TwoSMbrochure for details).
5. Your satisfaction is guaranteed on any equipment you purchase from us. We provide a 15-day satisfaction guarantee on any product you buy from Verizon Wireless.
You pay only for the service you’ve used.
Note: Certain conditions and restrictions apply. See store for details. Annual
Customer Agreement required. Network claim based on industry reports
of carrier-operated covered population, and over 32 million customers.
See the Worry-Free Guarantee brochure and our Return/Exchange Policy
for details.
require specific equipment. You become eligible to take advantage of equipment
upgrades at promotional pricing during the last two months of your contract period.
If you’re not upgrading equipment within the final two months of your contract, you
may have to pay full retail price. Promotional offers will require an extension of your
customer agreement.
Page 1 Page 2
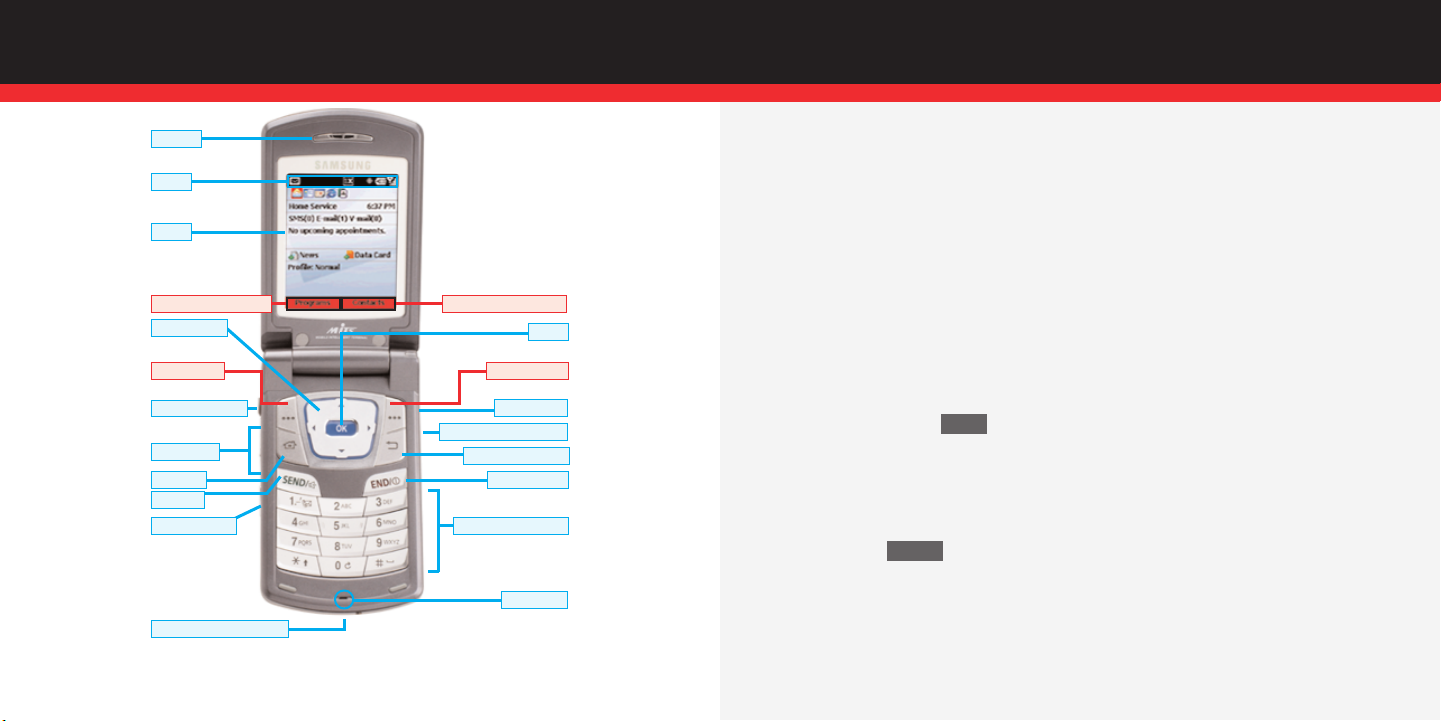
SMARTPHONE BASICS
▲
Earpiece
Icons
*Functions for the left and
right soft keys are defined by
what appears above each (soft
key) in the display.
GETTING STARTED
■
Installing the Battery
1.) Line up the battery with the corresponding grooves on the Smartphone.
2.) Gently slide the battery toward the top of the Smartphone until it snaps into place.
Display
■
Charging the battery
1.) Plug the AC module for the power accessory into a 120 or 220 VAC wall outlet.
*Left Soft Key Function
Navigation Key
*Left Soft Key
Headset Connector
Volume Keys
Home Key
SEND Key
Voice Memo Key
Power/Interface Connector
*Right Soft Key Function
OK Key
*Right Soft Key
Quick List Key
Browser/Voice Signal Key
Backspace/Clear Key
END/Power Key
Alpha-Numeric Keypad
Microphone
Samsung SCH-i600
Page 3 Page 4
2.) Remove the rubber plug from the power accessory port in the bottom end of your
Smartphone, if necessary.
3.) Plug the power accessory connector into the bottom end of your Smartphone,
button side facing up.
■
Powering the Smartphone on and off
1.) Press and hold .
▲
PLACING AND RECEIVING CALLS
■
Placing Calls
END
1.) Enter the number that you wish to call using the keypad.
2.) Press .
■
Receiving Calls
SEND
1.) When you receive an incoming call, the Incoming screen appears in
the display.
2.) Press the left soft key Accept to answer the call or press the right soft key Reject
to send the call to voice mail.

SMARTPHONE BASICS
▲
SETTING UP VOICEMAIL
■
First Time User
1.) Press and hold or dial , , and press . The
1
*
MNO
TUV
6
8
SEND
Smartphone calls voicemail.
2.) Follow the voice mail tutorial to set up your account.
■
Existing user
1.) Press and hold or dial , , to dial your
1
*
MNO
TUV
6
8
voice mailbox.
2.) Enter your password when prompted, then press
# —
.
3.) Follow the recorded prompts to listen to messages, change administrative
▲
options, and so on.
USING TXT MESSAGING
■
Sending a new TXT message
1.) At the Home Screen, press the left soft key Programs. Inbox/SMS is highlighted.
2.) Press , then press the left soft key New. The New Message screen appears
OK
in the display.
3.) Enter the phone number of the recipient (or the e-mail address) in the To: field.
4.) Use the navigation key to move the cursor to the Cc: and Subj: fields.
5.) Enter information in the Cc: and Subj: fields using the keypad.
6.) Use the navigation key to move the cursor to the message composition field.
7.) Enter the content of your message using the keypad.
8.) Press the left soft key Send. Your message is sent.
■
Entering letters and numbers
You can enter letters and numbers into messages depending on the current mode of
TXT entry.
1.) To change between TXT entry modes: At any TXT entry screen, press and hold
until the desired mode of TXT entry appears in the upper right corner of
∗ ⇑
the display.
■
In 123 mode, press the corresponding number on the keypad to enter the
desired number.
■
In ABC mode, press the keys containing the letters that you wish to enter into your
message. Press a key repeatedly to cycle between letters. Pause briefly to allow the
displayed letter to be inserted into your message.
■
Entering symbols
1.) To change to symbol mode from any txt entry mode: At any TXTentry screen,
press and hold . The Symbols screen appears in the display.
# —
2.) Use the navigation key to highlight the symbol that you wish to enter into
your message.
3.) Once the desired symbol is highlighted, press the left soft key Done to enter the
symbol into your message.
Note: To switch TXT entry modes (between ABC, 123, and T9), press and hold
until the desired text entry mode appears in the upper right corner
∗ ⇑
Page 5 Page 6
of the display.
 Loading...