

Page 1
ANDROID TABLET
User Manual
Please read this manual before operating your
phone and keep it for future reference.
Page 2

Intellectual Property
All Intellectual Property, as defined below, owned by or which is otherwise the property of Samsung or its respective suppliers relating to
the SAMSUNG Galaxy Tab, including but not limited to, accessories, parts, or software relating there to (the “Galaxy Tab System”), is
proprietary to Samsung and protected under federal laws, state laws, and international treaty provisions. Intellectual Property includes, but
is not limited to, inventions (patentable or unpatentable), patents, trade secrets, copyrights, software, computer programs, and related
documentation and other works of authorship. You may not infringe or otherwise violate the rights secured by the Intellectual Property.
Moreover, you agree that you will not (and will not attempt to) modify, prepare derivative works of, reverse engineer, decompile,
disassemble, or otherwise attempt to create source code from the software. No title to or ownership in the Intellectual Property is
transferred to you. All applicable rights of the Intellectual Property shall remain with SAMSUNG and its suppliers.
Open Source Software
Some software components of this product incorporate source code covered under GNU General Public License (GPL), GNU Lesser General
Public License (LGPL), OpenSSL License, BSD License and other open source licenses. To obtain the source code covered under the open
source licenses, please visit:
http://opensource.samsung.com
.
Disclaimer of Warranties; Exclusion of Liability,
EXCEPT AS SET FORTH IN THE EXPRESS WARRANTY CONTAINED ON THE WARRANTY PAGE ENCLOSED WITH THE PRODUCT, THE
PURCHASER TAKES THE PRODUCT "AS IS", AND SAMSUNG MAKES NO EXPRESS OR IMPLIED WARRANTY OF ANY KIND WHATSOEVER
WITH RESPECT TO THE PRODUCT, INCLUDING BUT NOT LIMITED TO THE MERCHANTABILITY OF THE PRODUCT OR ITS FITNESS FOR ANY
PARTICULAR PURPOSE OR USE; THE DESIGN, CONDITION OR QUALITY OF THE PRODUCT; THE PERFORMANCE OF THE PRODUCT; THE
WORKMANSHIP OF THE PRODUCT OR THE COMPONENTS CONTAINED THEREIN; OR COMPLIANCE OF THE PRODUCT WITH THE
REQUIREMENTS OF ANY LAW, RULE, SPECIFICATION OR CONTRACT PERTAINING THERETO. NOTHING CONTAINED IN THE INSTRUCTION
MANUAL SHALL BE CONSTRUED TO CREATE AN EXPRESS OR IMPLIED WARRANTY OF ANY KIND WHATSOEVER WITH RESPECT TO THE
PRODUCT. IN ADDITION, SAMSUNG SHALL NOT BE LIABLE FOR ANY DAMAGES OF ANY KIND RESULTING FROM THE PURCHASE OR USE OF
SCH-I905_UM_English_FB04_CH_031412_F4
Page 3

THE PRODUCT OR ARISING FROM THE BREACH OF THE EXPRESS WARRANTY, INCLUDING INCIDENTAL, SPECIAL OR CONSEQUENTIAL
DAMAGES, OR LOSS OF ANTICIPATED PROFITS OR BENEFITS.
SAMSUNG IS NOT LIABLE FOR PERFORMANCE ISSUES OR INCOMPATIBILITIES CAUSED BY YOUR EDITING OF REGISTRY SETTINGS, OR
YOUR MODIFICATION OF OPERATING SYSTEM SOFTWARE.
USING CUSTOM OPERATING SYSTEM SOFTWARE MAY CAUSE YOUR DEVICE AND APPLICATIONS TO WORK IMPROPERLY.
Samsung Telecommunications America (STA), LLC
Headquarters:
1301 E. Lookout Drive
Richardson, TX 75082
Customer Care Center:
1000 Klein Rd.
Plano, TX 75074
Toll Free Tel: 1.888.987.HELP (4357)
Internet Address:
http://www.samsung.com
©
2012 Samsung Telecommunications America, LLC. Samsung is a registered trademark of Samsung Electronics Co., Ltd.
Do you have questions about your Samsung Mobile Device?
For 24 hour information and assistance, we offer a new FAQ/ARS System (Automated Response System) at:
www.samsung.com/us/support
Page 4

Nuance®, VSuite™, T9® Text Input, and the Nuance logo are trademarks or registered trademarks of Nuance Communications, Inc., or its
TM
affiliates in the United States and/or other countries.
The Bluetooth® word mark, figure mark (stylized “B Design”), and combination mark (Bluetooth word mark and “B Design”) are registered
trademarks and are wholly owned by the Bluetooth SIG.
Openwave® is a registered Trademark of Openwave, Inc.
, DivX®, DivX Certified® and associated logos are trademarks of Rovi Corporation or its subsidiaries and are used under license.
DivX Certified® to play DivX® video up to HD 720p, including premium content.
ABOUT DIVX VIDEO: DivX® is a digital video format created by DivX, LLC, a subsidiary of Rovi Corporation. This is an official DivX
Certified® device that plays DivX video. Visit
divx.com
for more information and software tools to convert your files into DivX videos.
ABOUT DIVX VIDEO-ON-DEMAND: This DivX Certified® device must be registered in order to play purchased DivX Video-on-Demand (VOD)
movies. To obtain your registration code, locate the DivX VOD section in your device setup menu. Go to
vod.divx.com
for more information
on how to complete your registration.
Google, the Google logo, Android, the Android logo, Android Market, Gmail, Google Mail, Google Apps, Google Calendar, Google Checkout,
Google Earth, Google Latitude, Google Maps, Google Voice, Google Talk, Google+, Picasa, and YouTube are trademarks of Google Inc.
Wi-Fi is a registered trademark of the Wireless Fidelity Alliance, Inc.
Swype and the Swype logos are trademarks of Swype, Inc.
Page 5

Table of Contents
Section 1: Getting Started ..............................................5
Understanding This User Manual . . . . . . . . . . . . . . . . . . . . . . . 5
Battery . . . . . . . . . . . . . . . . . . . . . . . . . . . . . . . . . . . . . . . . . . . 6
Installing the SIM Card . . . . . . . . . . . . . . . . . . . . . . . . . . . . . . . 7
Turning Your Tab On and Off . . . . . . . . . . . . . . . . . . . . . . . . . . 9
Setting Up Your Tab . . . . . . . . . . . . . . . . . . . . . . . . . . . . . . . . . 9
Retrieving Your Google Account Password . . . . . . . . . . . . . . . 10
Task Manager . . . . . . . . . . . . . . . . . . . . . . . . . . . . . . . . . . . . 10
Tab Accessories . . . . . . . . . . . . . . . . . . . . . . . . . . . . . . . . . . . 11
Securing Your Tab . . . . . . . . . . . . . . . . . . . . . . . . . . . . . . . . . 11
System Reset . . . . . . . . . . . . . . . . . . . . . . . . . . . . . . . . . . . . . 12
Android System Recovery . . . . . . . . . . . . . . . . . . . . . . . . . . . 12
Section 2: Understanding Your Tab .............................13
Features . . . . . . . . . . . . . . . . . . . . . . . . . . . . . . . . . . . . . . . . 13
Front and Rear Views . . . . . . . . . . . . . . . . . . . . . . . . . . . . . . . 14
Home Screen . . . . . . . . . . . . . . . . . . . . . . . . . . . . . . . . . . . . . 15
Navigating Your Tab . . . . . . . . . . . . . . . . . . . . . . . . . . . . . . . . 17
Notifications . . . . . . . . . . . . . . . . . . . . . . . . . . . . . . . . . . . . . . 19
Status Details and Quick Settings . . . . . . . . . . . . . . . . . . . . . . 19
Status Bar . . . . . . . . . . . . . . . . . . . . . . . . . . . . . . . . . . . . . . . 20
Widgets . . . . . . . . . . . . . . . . . . . . . . . . . . . . . . . . . . . . . . . . . 22
App Shortcuts . . . . . . . . . . . . . . . . . . . . . . . . . . . . . . . . . . . . 22
Wallpaper . . . . . . . . . . . . . . . . . . . . . . . . . . . . . . . . . . . . . . . 23
More . . . . . . . . . . . . . . . . . . . . . . . . . . . . . . . . . . . . . . . . . . . 24
Mini App Tray . . . . . . . . . . . . . . . . . . . . . . . . . . . . . . . . . . . . 24
Apps Screen . . . . . . . . . . . . . . . . . . . . . . . . . . . . . . . . . . . . . 25
Section 3: Entering Text ............................................... 27
Virtual QWERTY Keyboard . . . . . . . . . . . . . . . . . . . . . . . . . . . 27
Text Input Methods . . . . . . . . . . . . . . . . . . . . . . . . . . . . . . . . 27
Using the Samsung Keypad . . . . . . . . . . . . . . . . . . . . . . . . . . 27
Configuring the Keypad . . . . . . . . . . . . . . . . . . . . . . . . . . . . . 28
Entering Upper and Lower Case Letters . . . . . . . . . . . . . . . . . 28
Entering Symbols and Numbers . . . . . . . . . . . . . . . . . . . . . . . 28
Using XT9 Predictive Text . . . . . . . . . . . . . . . . . . . . . . . . . . . 29
Editing Text . . . . . . . . . . . . . . . . . . . . . . . . . . . . . . . . . . . . . . 29
Using Speech Recognition . . . . . . . . . . . . . . . . . . . . . . . . . . . 31
Entering Text Using Swype . . . . . . . . . . . . . . . . . . . . . . . . . . 31
Entering Text Using the English(US) Keyboard . . . . . . . . . . . . 32
Section 4: Contacts and Accounts ..............................34
Accounts . . . . . . . . . . . . . . . . . . . . . . . . . . . . . . . . . . . . . . . . 34
Contacts . . . . . . . . . . . . . . . . . . . . . . . . . . . . . . . . . . . . . . . . 34
Groups . . . . . . . . . . . . . . . . . . . . . . . . . . . . . . . . . . . . . . . . . 39
Favorites . . . . . . . . . . . . . . . . . . . . . . . . . . . . . . . . . . . . . . . . 41
Section 5: Messaging ................................................... 42
Types of Messages . . . . . . . . . . . . . . . . . . . . . . . . . . . . . . . . 42
Gmail . . . . . . . . . . . . . . . . . . . . . . . . . . . . . . . . . . . . . . . . . . 42
Email . . . . . . . . . . . . . . . . . . . . . . . . . . . . . . . . . . . . . . . . . . . 45
Google Talk . . . . . . . . . . . . . . . . . . . . . . . . . . . . . . . . . . . . . . 48
1
Page 6

Social Hub . . . . . . . . . . . . . . . . . . . . . . . . . . . . . . . . . . . . . . . 51
Section 6: Web ..............................................................52
Browser . . . . . . . . . . . . . . . . . . . . . . . . . . . . . . . . . . . . . . . . . 52
Section 7: Multimedia ..................................................57
Music Player . . . . . . . . . . . . . . . . . . . . . . . . . . . . . . . . . . . . . . 57
Music . . . . . . . . . . . . . . . . . . . . . . . . . . . . . . . . . . . . . . . . . . . 62
Camera . . . . . . . . . . . . . . . . . . . . . . . . . . . . . . . . . . . . . . . . .62
Video player . . . . . . . . . . . . . . . . . . . . . . . . . . . . . . . . . . . . . . 67
Videos . . . . . . . . . . . . . . . . . . . . . . . . . . . . . . . . . . . . . . . . . .68
Gallery . . . . . . . . . . . . . . . . . . . . . . . . . . . . . . . . . . . . . . . . . . 68
Photo Editor . . . . . . . . . . . . . . . . . . . . . . . . . . . . . . . . . . . . . . 72
Media Hub . . . . . . . . . . . . . . . . . . . . . . . . . . . . . . . . . . . . . . . 73
Movie Studio . . . . . . . . . . . . . . . . . . . . . . . . . . . . . . . . . . . . . 74
Section 8: Connections ................................................77
Wi-Fi . . . . . . . . . . . . . . . . . . . . . . . . . . . . . . . . . . . . . . . . . . .77
Bluetooth . . . . . . . . . . . . . . . . . . . . . . . . . . . . . . . . . . . . . . . . 78
Tethering . . . . . . . . . . . . . . . . . . . . . . . . . . . . . . . . . . . . . . . . 79
Portable Wi-Fi Hotspot . . . . . . . . . . . . . . . . . . . . . . . . . . . . . . 80
Managing Downloads . . . . . . . . . . . . . . . . . . . . . . . . . . . . . . . 81
PC Connections . . . . . . . . . . . . . . . . . . . . . . . . . . . . . . . . . . .82
Section 9: Applications ................................................83
Accessing Applications . . . . . . . . . . . . . . . . . . . . . . . . . . . . . . 83
Alarm . . . . . . . . . . . . . . . . . . . . . . . . . . . . . . . . . . . . . . . . . . .83
AllShare . . . . . . . . . . . . . . . . . . . . . . . . . . . . . . . . . . . . . . . . . 85
Amazon Kindle . . . . . . . . . . . . . . . . . . . . . . . . . . . . . . . . . . . . 86
Amazon MP3 . . . . . . . . . . . . . . . . . . . . . . . . . . . . . . . . . . . . . 86
2
Android HD games . . . . . . . . . . . . . . . . . . . . . . . . . . . . . . . . . 86
Appstore . . . . . . . . . . . . . . . . . . . . . . . . . . . . . . . . . . . . . . . . 86
Asphalt 6 . . . . . . . . . . . . . . . . . . . . . . . . . . . . . . . . . . . . . . . . 86
Audible . . . . . . . . . . . . . . . . . . . . . . . . . . . . . . . . . . . . . . . . . 86
Books . . . . . . . . . . . . . . . . . . . . . . . . . . . . . . . . . . . . . . . . . . 86
Browser . . . . . . . . . . . . . . . . . . . . . . . . . . . . . . . . . . . . . . . . . 86
Calculator . . . . . . . . . . . . . . . . . . . . . . . . . . . . . . . . . . . . . . . 87
Calendar . . . . . . . . . . . . . . . . . . . . . . . . . . . . . . . . . . . . . . . . 87
Camera . . . . . . . . . . . . . . . . . . . . . . . . . . . . . . . . . . . . . . . . . 89
Contacts . . . . . . . . . . . . . . . . . . . . . . . . . . . . . . . . . . . . . . . . 89
Downloads . . . . . . . . . . . . . . . . . . . . . . . . . . . . . . . . . . . . . . . 90
Email . . . . . . . . . . . . . . . . . . . . . . . . . . . . . . . . . . . . . . . . . . . 91
Gallery . . . . . . . . . . . . . . . . . . . . . . . . . . . . . . . . . . . . . . . . . . 91
Gmail . . . . . . . . . . . . . . . . . . . . . . . . . . . . . . . . . . . . . . . . . . . 91
Google Search . . . . . . . . . . . . . . . . . . . . . . . . . . . . . . . . . . . . 91
Google+ . . . . . . . . . . . . . . . . . . . . . . . . . . . . . . . . . . . . . . . . . 92
IMDb . . . . . . . . . . . . . . . . . . . . . . . . . . . . . . . . . . . . . . . . . . . 92
Latitude . . . . . . . . . . . . . . . . . . . . . . . . . . . . . . . . . . . . . . . . . 92
Maps . . . . . . . . . . . . . . . . . . . . . . . . . . . . . . . . . . . . . . . . . . . 94
Market . . . . . . . . . . . . . . . . . . . . . . . . . . . . . . . . . . . . . . . . . . 95
Media Hub . . . . . . . . . . . . . . . . . . . . . . . . . . . . . . . . . . . . . . . 96
Memo . . . . . . . . . . . . . . . . . . . . . . . . . . . . . . . . . . . . . . . . . . 97
Messenger . . . . . . . . . . . . . . . . . . . . . . . . . . . . . . . . . . . . . . . 98
Movie Studio . . . . . . . . . . . . . . . . . . . . . . . . . . . . . . . . . . . . . 98
Music . . . . . . . . . . . . . . . . . . . . . . . . . . . . . . . . . . . . . . . . . . . 98
Music Player . . . . . . . . . . . . . . . . . . . . . . . . . . . . . . . . . . . . . 98
My files . . . . . . . . . . . . . . . . . . . . . . . . . . . . . . . . . . . . . . . . . 99
Page 7

Navigation . . . . . . . . . . . . . . . . . . . . . . . . . . . . . . . . . . . . . . 100
Pen Memo . . . . . . . . . . . . . . . . . . . . . . . . . . . . . . . . . . . . . . 101
Photo Editor . . . . . . . . . . . . . . . . . . . . . . . . . . . . . . . . . . . . . 102
Places . . . . . . . . . . . . . . . . . . . . . . . . . . . . . . . . . . . . . . . . . 102
Quickoffice . . . . . . . . . . . . . . . . . . . . . . . . . . . . . . . . . . . . . . 102
Settings . . . . . . . . . . . . . . . . . . . . . . . . . . . . . . . . . . . . . . . . 103
Social Hub . . . . . . . . . . . . . . . . . . . . . . . . . . . . . . . . . . . . . . 103
Talk . . . . . . . . . . . . . . . . . . . . . . . . . . . . . . . . . . . . . . . . . . . 103
Video player . . . . . . . . . . . . . . . . . . . . . . . . . . . . . . . . . . . . . 104
Videos . . . . . . . . . . . . . . . . . . . . . . . . . . . . . . . . . . . . . . . . . 104
Voice Search . . . . . . . . . . . . . . . . . . . . . . . . . . . . . . . . . . . . 104
World Clock . . . . . . . . . . . . . . . . . . . . . . . . . . . . . . . . . . . . . 104
YouTube . . . . . . . . . . . . . . . . . . . . . . . . . . . . . . . . . . . . . . . 105
Information on GPS Applications . . . . . . . . . . . . . . . . . . . . . 106
Section 10: Settings ...................................................107
Accessing Settings . . . . . . . . . . . . . . . . . . . . . . . . . . . . . . . . 107
Wireless and networks . . . . . . . . . . . . . . . . . . . . . . . . . . . . . 107
Sound Settings . . . . . . . . . . . . . . . . . . . . . . . . . . . . . . . . . . . 113
Screen Settings . . . . . . . . . . . . . . . . . . . . . . . . . . . . . . . . . . 114
Power Saving Mode . . . . . . . . . . . . . . . . . . . . . . . . . . . . . . . 115
Location and Security . . . . . . . . . . . . . . . . . . . . . . . . . . . . . . 116
Applications . . . . . . . . . . . . . . . . . . . . . . . . . . . . . . . . . . . . . 118
Accounts and Sync . . . . . . . . . . . . . . . . . . . . . . . . . . . . . . . 120
Motion Settings . . . . . . . . . . . . . . . . . . . . . . . . . . . . . . . . . . 122
Privacy . . . . . . . . . . . . . . . . . . . . . . . . . . . . . . . . . . . . . . . . . 122
Storage . . . . . . . . . . . . . . . . . . . . . . . . . . . . . . . . . . . . . . . . 123
Language and Input . . . . . . . . . . . . . . . . . . . . . . . . . . . . . . . 123
Accessibility . . . . . . . . . . . . . . . . . . . . . . . . . . . . . . . . . . . . 127
Date and Time . . . . . . . . . . . . . . . . . . . . . . . . . . . . . . . . . . . 128
About Device . . . . . . . . . . . . . . . . . . . . . . . . . . . . . . . . . . . . 128
Section 11: Health and Safety Information ............... 129
Exposure to Radio Frequency (RF) Signals . . . . . . . . . . . . . . 129
Specific Absorption Rate (SAR) Certification Information . . . 133
FCC Part 15 Information to User . . . . . . . . . . . . . . . . . . . . . . 134
Smart Practices While Driving . . . . . . . . . . . . . . . . . . . . . . . 135
Battery Use and Safety . . . . . . . . . . . . . . . . . . . . . . . . . . . . 136
Samsung Mobile Products and Recycling . . . . . . . . . . . . . . . 137
UL Certified Travel Charger . . . . . . . . . . . . . . . . . . . . . . . . . 137
Display / Touch-Screen . . . . . . . . . . . . . . . . . . . . . . . . . . . . 138
GPS . . . . . . . . . . . . . . . . . . . . . . . . . . . . . . . . . . . . . . . . . . . 138
Care and Maintenance . . . . . . . . . . . . . . . . . . . . . . . . . . . . . 139
Responsible Listening . . . . . . . . . . . . . . . . . . . . . . . . . . . . . 140
Operating Environment . . . . . . . . . . . . . . . . . . . . . . . . . . . . 142
Restricting Children's Access to Your Mobile Device . . . . . . 144
FCC Notice and Cautions . . . . . . . . . . . . . . . . . . . . . . . . . . . 144
Other Important Safety Information . . . . . . . . . . . . . . . . . . . 144
Section 12: Warranty Information ............................. 146
Standard Limited Warranty . . . . . . . . . . . . . . . . . . . . . . . . . 146
End User License Agreement for Software . . . . . . . . . . . . . . 150
Social Hub . . . . . . . . . . . . . . . . . . . . . . . . . . . . . . . . . . . . . . 155
LIMITATION OF LIABILITY . . . . . . . . . . . . . . . . . . . . . . . . . . . 160
Social Hub Privacy Policy . . . . . . . . . . . . . . . . . . . . . . . . . . . 162
INFORMATION THAT WE COLLECT . . . . . . . . . . . . . . . . . . . . 162
USE OF INFORMATION WE COLLECT . . . . . . . . . . . . . . . . . . 163
3
Page 8

DISCLOSURE OF INFORMATION TO THIRD PARTIES . . . . . . . . 164
CHILDREN . . . . . . . . . . . . . . . . . . . . . . . . . . . . . . . . . . . . . . . 165
SECURITY OF THE INFORMATION WE COLLECT . . . . . . . . . . . 165
CHAT ROOMS AND OTHER PUBLIC AREAS . . . . . . . . . . . . . . 165
CONTESTS AND SWEEPSTAKES . . . . . . . . . . . . . . . . . . . . . . 165
ACCURACY OF THE INFORMATION WE COLLECT . . . . . . . . . . 166
CHANGES TO PRIVACY POLICY . . . . . . . . . . . . . . . . . . . . . . . 166
Social Hub End User License Agreement . . . . . . . . . . . . . . . . 166
Index ............................................................................171
4
Page 9
Section 1: Getting Started
This section helps you to quickly start using your Samsung
Galaxy Tab™ 10.1.
Understanding This User Manual
The sections of this manual generally follow the features of your
Tab .
Also included is important safety information, beginning on
page 129, that you should know before using your Tab.
This manual gives navigation instructions according to the
default display settings. If you select other settings, navigation
steps may be different.
Unless otherwise specified, all instructions in this manual
assume that you are starting from a Home screen. To get to a
Home screen, you may need to unlock the Tab. For more
information, refer to “Securing Your Tab” on page 11.
Note:
Instructions in this manual are based on default settings and may vary
from your Tab depending on the software version on your Tab and any
changes to the Tab’s settings.
All screen images in this manual are simulated. Actual displays may
vary depending on the software version of your Tab and any changes
to the Tab’s settings.
Special Text
In this manual, some text is set apart from the rest. This special
text is intended to point out important information, share quick
methods for activating features, define terms, and more. The
definitions for these methods are as follows:
•
Notes
: Presents alternative options for the current feature, menu, or
sub-menu.
•
Tips
: Provides quick or innovative methods or useful shortcuts.
•
Important
: Points out important information about the current feature
that could affect performance.
•
Warning
: Brings important information to your attention that can help
to prevent loss of data or functionality or damage to your Tab.
Text Conventions
This manual provides condensed information about how to use
your Tab. To make this possible, the following text conventions
are used to represent often-used steps:
➔
Arrows are used to represent the sequence of selecting
successive options in longer, or repetitive, procedures.
For example:
From a Home screen, touch
➔
Wireless and networks
Applications
➔
Wi-Fi settings
➔
Settings
.
Getting Started 5
Page 10
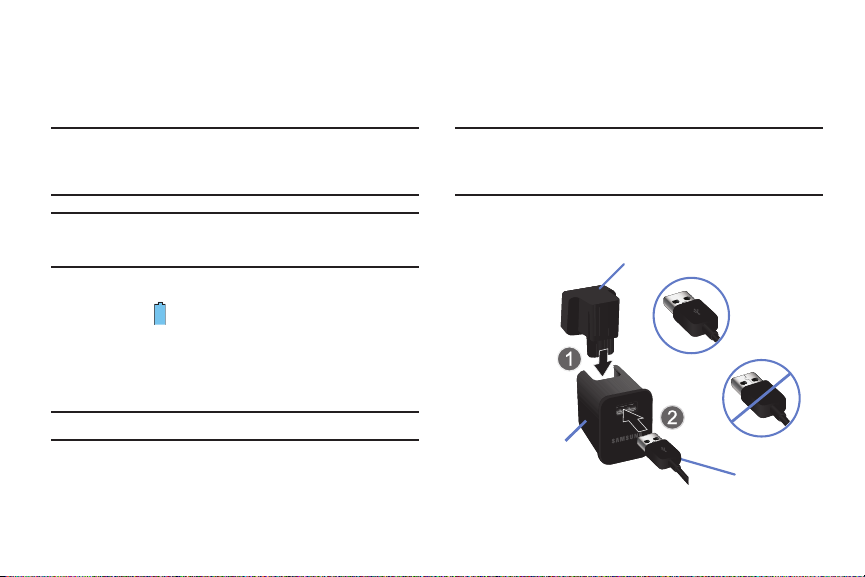
Battery
USB Cable
Charging
Head
Outlet Connector
Correct
Incorrect
Your Tab is powered by a rechargeable, standard Li-Ion battery.
The USB Charger that is used to charge the battery, is included
with your Tab.
Note:
The battery comes partially charged. You must fully charge the battery
before using your Tab for the first time.
After the first charge, you can use the Tab while charging.
Charging the Battery
Your Tab comes with a Wall/USB Charger (Outlet Connector,
Charging Head, and USB cable) to charge your Tab from any
standard AC power outlet.
Note:
The battery comes partially charged. You must fully charge the battery
before using your Tab for the first time.
After the first charge, you can use the Tab while charging.
Warning!:
Use only approved charging accessories. Approved accessories
are designed to maximize battery life. Using other accessories
may invalidate your warranty and may cause damage.
Battery Indicator
The Battery icon in the Status Bar shows the battery power
level. When battery power is 15% or less, your Tab prompts you
to charge the battery. If you continue to operate the Tab without
charging, the Tab powers off. For battery use information, see
“About Device” on page 128
Tip:
Touch the Time field to display battery charge status.
6
1. Carefully slide the Outlet Connector into the Charging Head
(1), making sure the connection is secure.
Page 11
Insert the USB cable into the Charging Head (2).
2.
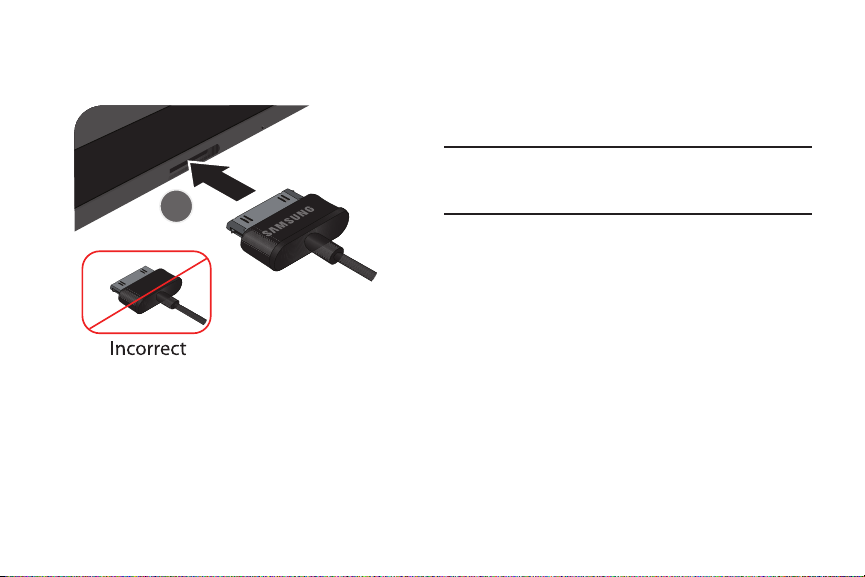
3. Insert the USB cable into the Tab’s Charger/Accessory Port
(3).
4. Plug the Charging Head into a standard AC power outlet.
5. When charging is complete, unplug the Charging Head
from the power outlet and remove the USB cable from the
Tab .
Installing the SIM Card
When you subscribe to a cellular network, you are provided with
a plug-in SIM card loaded with your subscription details, such as
your PIN, available optional services, and many others features.
This SIM card will only work with this device.
Important!:
The plug-in SIM card information and its contacts can be easily
damaged by scratching or bending, so be careful when handling,
inserting, or removing the card. Keep all SIM cards out of reach
of small children.
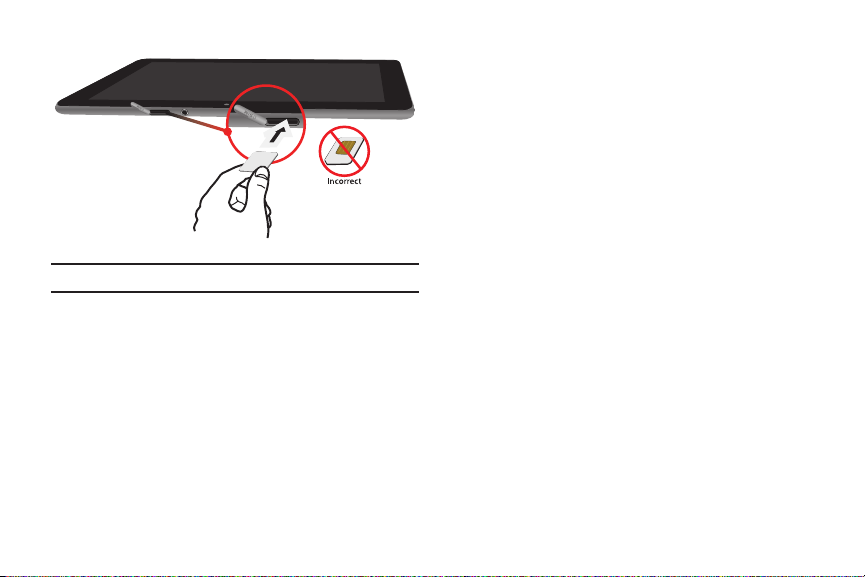
1. Prior to turning on the device, carefully slide the SIM card
into the SIM card socket (as shown) until the card locks
into place.
2. Make sure that the card’s gold contacts face downward
and that the notched corner of the card goes in first (as
shown).
Getting Started 7
Page 12
Note:
Once the SIM card has been inserted, do not remove it.
If your SIM card is ever separated from the device or damaged,
your device will not function. If you experience any issues with
your device, contact Customer Service at 888-944-9400 or visit
your nearest U.S. Cellular® retail location.
SIM Card Limited Warranty
Subject to the exclusions contained below, United States Cellular
Corporation (“U.S. Cellular”) warrants to the original purchaser
(“You” or “Your”) of the handset with which the SIM card was
provided that the SIM card will be free from defects in material
and workmanship for a period of one (1) year from the date You
8
purchased the handset (the “Warranty Period”). This warranty is
not transferable. Should a defect appear during the Warranty
Period, U.S. Cellular will send a replacement SIM card to Your
address within the United States without charge provided that
you request the replacement SIM card during or within thirty (30)
days following the Warranty Period by calling U.S. Cellular
Customer Service at 888-944-9400 (or dialing 611 on Your U.S.
Cellular handset) or by visiting a U.S. Cellular retail store.
REPLACEMENT OF THE SIM CARD AS PROVIDED HEREIN IS YOUR
EXCLUSIVE REMEDY UNDER THIS LIMITED WARRANTY, AND IS IN
LIEU OF ALL OTHER WARRANTIES, EXPRESS OR IMPLIED
INCLUDING, WITHOUT LIMITATION, ANY WARRANTIES OF TITLE,
FITNESS FOR A PARTICULAR PURPOSE, MERCHANTABILITY, NONINFRINGEMENT OR ARISING FROM COURSE OF DEALING OR
USAGE OF TRADE. NEITHER U.S. CELLULAR NOR ANY OF ITS
AFFILIATES OR RETAILERS SHALL BE LIABLE TO YOU FOR ANY
DIRECT, INDIRECT, INCIDENTAL, SPECIAL, ECONOMIC,
EXEMPLARY, PUNITIVE OR CONSEQUENTIAL DAMAGES
(INCLUDING, WITHOUT LIMITATION, LOSS OF DATA, LOSS OF
REVENUE OR PROFITS, DAMAGE TO PROPERTY OR LOSS OF
USE). IN NO EVENT SHALL U.S. CELLULAR’S, ITS AFFILIATES’ OR
RETAILERS’ LIABILITY TO YOU OR ANY THIRD PARTY WITH
RESPECT TO THE SIM CARD EXCEED THE COST OF REPLACING
THE SIM CARD.
Page 13
THIS LIMITED WARRANTY SHALL BE CONSTRUED UNDER THE
LAWS OF THE STATE OF ILLINOIS, EXCLUDING ITS CONFLICTS OF
LAW PROVISIONS. SOME STATES AND JURISDICTIONS DO NOT
ALLOW LIMITATIONS ON HOW LONG AN IMPLIED WARRANTY
LASTS, OR THE DISCLAIMER OR LIMITATION OF INCIDENTAL OR
CONSEQUENTIAL DAMAGES, SO THE ABOVE LIMITATIONS AND
DISCLAIMERS MAY NOT APPLY TO YOU.
No agent, employee, dealer, retailer, representative or reseller is
authorized to modify or extend the terms of this Limited Warranty.
Turning Your Tab On and Off
Turning Your Tab On
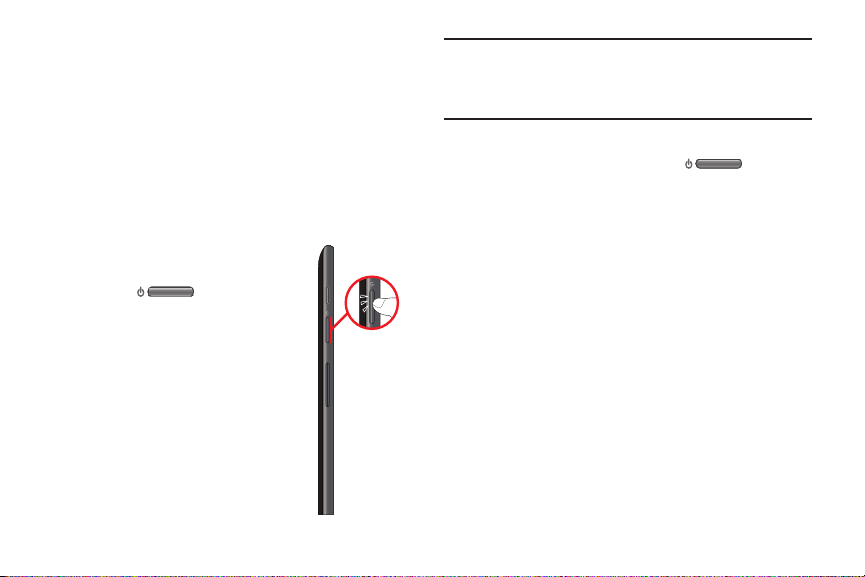
䊳
Press and hold the
Lock Key
Power/
.
For more information, refer
to “Unlocking the Tab” on
page 11
Note:
Your Tab’s internal antenna is located along the top back of the Tab. Do
not block the antenna; doing so may affect signal quality and may
cause the Tab to operate at a higher power level than necessary. For
more information, refer to “Information on GPS Applications” on page
106.
Turning Your Tab Off
1. Press and hold the
2. At the prompt, touch
Power/Lock Key
Power off
. A pop-up prompts you to
.
confirm you want to shut down your Tab.
3. To power off your Tab, touch
OK
.
Setting Up Your Tab
When you first turn on your Tab, you are asked to set up a few
things.
1. A
Welcome
screen displays. The Tab language is set to
English by default. To change the language, touch
English
and scroll through the list and touch the language you
want your Tab to use.
2. Touch
3. Read the
Start
.
Use Google’s location service
screen information
and enable either or both of the Google location services,
then touch
Next
.
Getting Started 9
Page 14
4.
Your new Tab uses your Google account to fully utilize its
Android features, including Gmail, Maps, Navigation,
Google Talk, and the Android Market.
The
Sign in with your Google Account
screen allows you to
create a new Google account or sign in, if you already have
a Google account.
•
Tou ch
Next
and then touch
Create account
or enter the email
address and password of your existing account.
For more information, refer to
Account”
on page 42
“Setting Up Your Gmail
– or –
•
Tou ch
Skip
to perform this task later. For more information, refer to
“Setting Up Your Gmail Account”
on page 42
The main Home screen displays.
Retrieving Your Google Account Password
A Google account password is required for Google applications. If
you misplace or forget your Google Account password, follow
these instructions to retrieve it:
1. From your computer, use an Internet browser to navigate
to
http://google.com/accounts
2. Once the URL loads, click on the
account?
link and follow the on-screen instructions.
10
.
Can’t access your
Task Manager
Your Tab can run applications simultaneously and some
applications run in the background.
Use Task Manager to see which applications are running on your
Tab and to end running applications to extend battery life. You
can also uninstall applications from your Tab and see how much
memory is used by applications.
Task Manager provides information about
includes a
RAM manager
.
Active applications
To access the Task Manager:
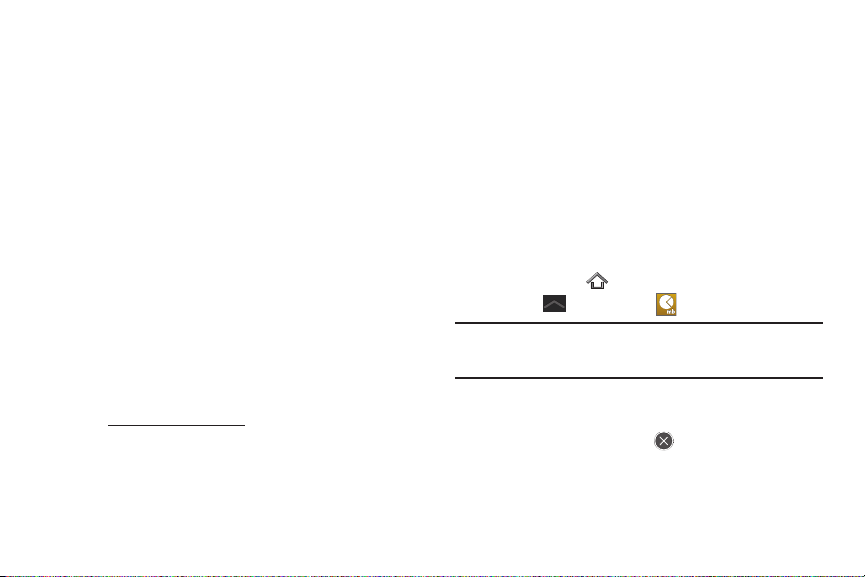
1. From a Home screen, do one of the following:
•
Touch and hold
•
Tou ch
Tip:
You can add the Program monitor widget to a Home screen and then
touch the Program monitor widget. For more information, refer to
“Widgets” on page 22.
Home
Mini App Tray
➔
.
Task manager
.
Task manager displays.
2. Touch the
Active applications
tab to view applications
running on your Tab. Touch to end an application or
End all
to stop all running applications.
and
Page 15
Touch the
3.
RAM manager
tab to display the amount of
Random Access Memory (RAM) currently in use. Touch
Clear memory
4. Touch the
to clear inactive and background processes.
X
in the top right corner of the Task Manager
pop-up to close the application.
Tab Accessories
To find accessories for your Tab:
1. Go to
http://www.samsung.com/us/mobile/galaxy-tab-
accessories
.
Tab accessories display.
2. Use your model number to find compatible accessories.
Securing Your Tab
By default, the Tab locks automatically when the screen times
out or you can lock it manually. You can unlock the Tab using one
of the default Unlock screens or, for increased security, use a
personal screen unlock pattern.
For more information about creating and enabling a Screen
unlock pattern, see “Configure Lock Screen” on page 116.
For other settings related to securing your Tab, see “Location and
Security” on page 116.
Note:
Unless stated otherwise, instructions in this User Manual start with the
Tab unlocked, at the Home screen.
Locking the Tab manually
䊳
Press the
Power/Lock Key
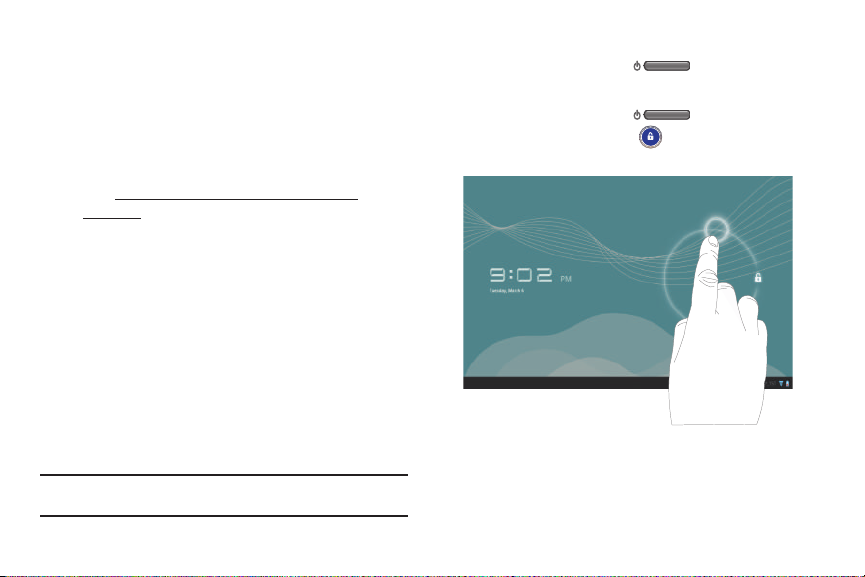
Unlocking the Tab
1. Press the
2. Touch and drag the
Power/Lock Key
Unlock
circle that appears, as shown.
The last screen you accessed displays.
.
.
icon to any edge of the
Getting Started 11
Page 16

Note:
You can choose the type of Screen Unlock to use, Pattern, PIN or
Password. For more information, refer to “Location and Security” on
page 116.
System Reset
If your Tab screen freezes, you may need to reset the Tab to
regain functionality.
䊳
Press and hold the
Power/Lock Key
for at least
20 seconds.
Android System Recovery
Android System Recovery is used for Google updates. The
average user should never need to perform a system recovery.
Note:
If you enter this menu by mistake, use the
select
reboot system now
Your Tab then continues to boot up.
, then press the
Volume
key to
Power/Lock
key .
To enter the Android System Recovery mode, follow these steps:
1. Turn the Tab off.
2. Press the
the
Power/Lock
Volume
key up and then press
key at the same time until the
Tab switches on.
Tip:
Volume Down is the end of the
the
Power/Lock
key .
12
Volume
key farthest from
3. Once the SAMSUNG logo appears, release the Power/Lock
key while continuing to press the Volume key up.
4. Continue to press the Volume key up until the Android
System Recovery / Downloading screen displays.
5. Release the Volume key.
6. To toggle between
Recovery
the
System Recovery
7. Press the Volume Up key to enter System Recovery mode.
Downloading
mode, press the
mode (on the left) is blinking.
mode and
Volume
key down. Make sure
System
The following options are available:
• reboot system now
• apply update from /sdcard
• wipe data/factory reset
: Turns on your Tab.
: Not applicable for your Tab.
: Deletes all data from the Tab except
captured pictures and videos. For more information, refer to
“Factory Data Reset”
• wipe cache partition
8. Press the Volume Up/Down key to scroll up or down, then
on page 123.
: Deletes all cache data, such as log files.
press the Power/Lock key to make a selection.
Page 17

Section 2: Understanding Your Tab
This section outlines key features of your Tab and describes the
screen and the icons that appear when you use your Tab is in
use. This section also shows how to navigate through the menus,
screens, and features on your Tab.
Features
•
10.1-inch diagonal WXGA (1280 x 800 pixels) TFT PLS LCD touch
screen
•
AndroidTM 3.2, Honeycomb
•
LTE Band 4 & 17 HSPA+ 21 Tri-band, EDGE/GPRS Quad-band
•
Android MarketTM for access to over 200,000 Apps
•
Full HTML Web Browser with Adobe® Flash® Technology
•
Bluetooth®
3.0
Wireless technology
•
Built-in Wi-Fi technology (801.11 a/b/g/n)
•
3.2 Megapixel backward-facing Camera-Camcorder with Flash, plus 2
Megapixel forward-facing Camera-Camcorder for Video Chat
•
Messaging Features:
–
Gmail
–
Email (business and personal)
–
Google Talk (Instant Messaging)
•
Social Hub
•
Photo Gallery that supports JPEG, PNG, GIF, WBMP, BMP, and AGIF
formats
•
HD Video Player (720p)
–
Codec: MPEG4, H.264, H.263, VC-1, XviD, WMV7/8, VP8, MP43
–
Format: 3GP, 3G2, MP4, WMV (ASF), AVI, and DivX® formats
•
DivX Certified® to play DivX® video up to 640x480, including premium
content
•
Music Player that supports MP3, AAC+, eAAC+, and MID formats
•
Ringer that supports WAV, MP3, AAC+, eAAC+, AMR, WMA, MID, FLAC,
IMY, RTTTL/RTX, OTA, and Vorbis formats
•
1GB RAM memory and 32GB on-board memory, which is used for data
storage and access
•
Samsung Media Hub
•
Android Movie Studio
•
Quickoffice® for easy document viewing and editing
Note:
This device does not support external memory cards.
Warning!:
This device does not support some USB storage media devices.
For more information, refer to “Tab Accessories” on page 11.
Understanding Your Tab 13
Page 18
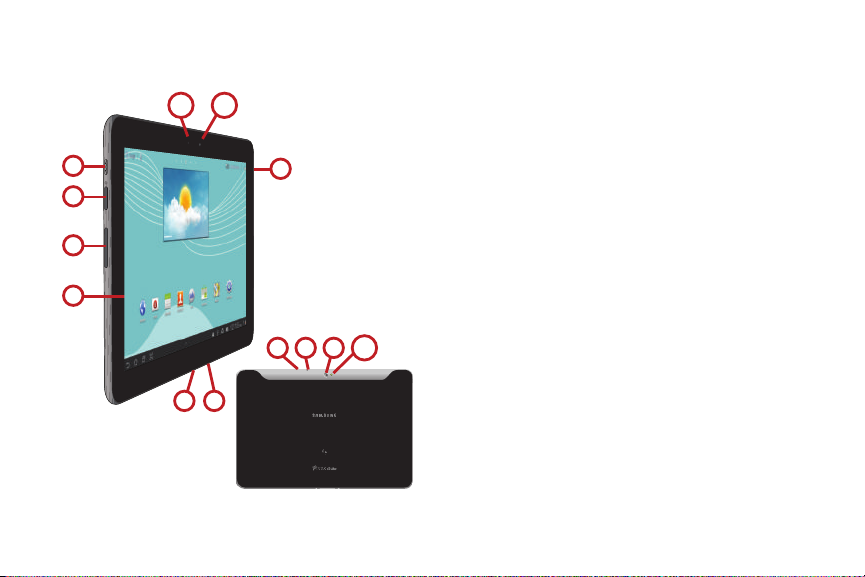
Front and Rear Views
1
2
3
4
5
11
987
1
12
6
10
The following items can be found on your Tab.
14
1.
Speakers
: Used in music or video playback, notification
tones, and for other sounds.
2.
Power/Lock Key
Press to lock the Tab or to wake the screen for unlocking.
3.
Volume Key
Volume. During music playback, press to adjust volume.
4.
Display Screen
rotates with the tablet as you turn it. You can turn this
feature on and off. For more information, refer to
“Auto-Rotate Screen” on page 115
5.
Charger/Accessory Port
to sync music and files.
6.
Microphone
recording and video chat.
7.
SIM Card Slot
service.
8.
3.5mm Headset Jack
9.
Camera Lens
videos.
10.
Camera Flash
11.
Front-facing Camera Lens
yourself or using video chat.
: Press and hold to turn the Tab on or off.
: From a Home screen, press to adjust Master
: The orientation of the display screen
: Plug in a USB cable for charging or
: Used to pick up your voice or audio during
: Install the 4G LTE SIM card, for 4G LTE
: Plug in for headphones.
: Used when taking photos or recording
: Used when taking photos.
: Used when taking photos of
Page 19
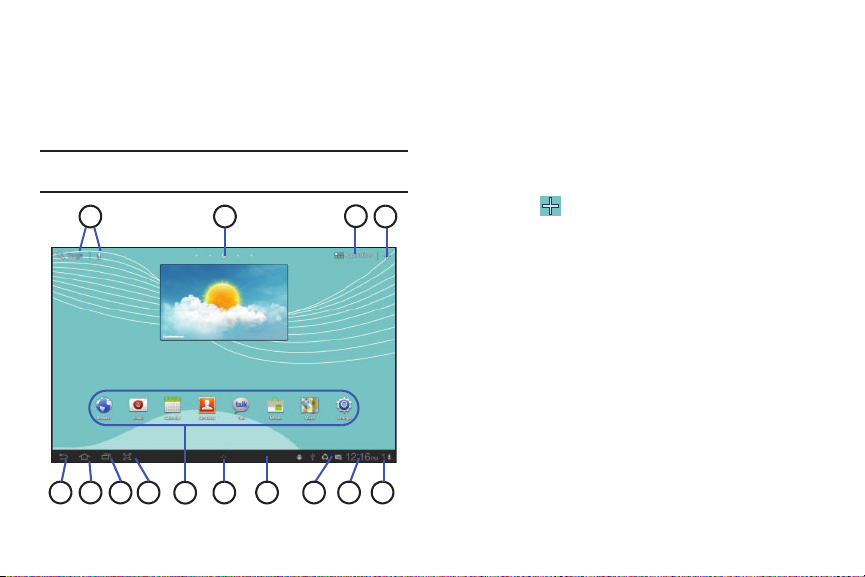
Light Sensor
105
4
3
1
2
6 7 1312
9
148 11
12.
: Used to automatically control screen
brightness and picture brightness when using the
Front-facing Camera.
Home Screen
The Home screen is the starting point for using your Tab.
Note:
Unless stated otherwise, instructions in this user manual start with the
Tab unlocked, at the Home screen.
1.
Google
and
Voice Search
: Search your tablet and the web by
typing or speaking.
2.
Home screen panel indicator
: shows which Home screen
panel is presently displayed.
3.
4.
Applications
Customize
: Display the Apps screen.
or
Menu
: Display options for the current screen.
From a Home screen, you can add Widgets and App
shortcuts, and change the Home screen wallpaper by
touching
Customize
. For more information, see
“Widgets” on page 22, “App Shortcuts” on page 22, and
“Wallpaper” on page 23.
5.
Back
: Return to the previous screen or option.
6.
Home
: Display the central Home screen.
7.
Recent Apps
: Open a list of thumbnail images of apps you have
worked with recently. Touch an App to open it.
8.
Screen Capture
: Captures a picture of the current screen and
saves it in your /Root/ScreenCapture folder. For more information,
refer to
“My files”
on page 99
9.
Shortcuts
: Shortcuts to applications. These shortcuts are
displayed on the Tab by default. You can add your own
shortcuts. For more information, refer to “App Shortcuts”
on page 22
Understanding Your Tab 15
Page 20
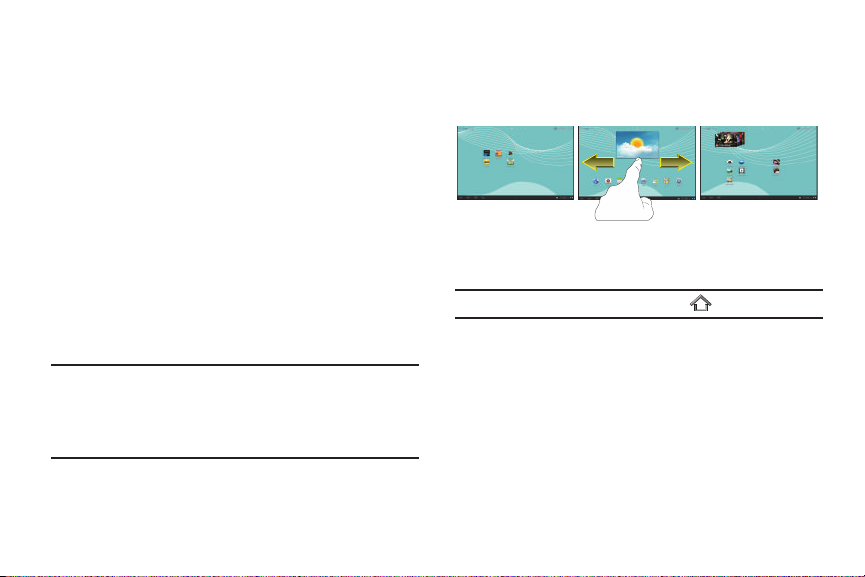
10.
MIni App Tray:
Shortcuts to apps that you can use anytime,
such as your calendar, a memo pad, and a calculator. For
more information, refer to “Mini App Tray” on page 24.
11.
Status Bar
: The area along the bottom of the Home screen
where you can find navigation buttons and icons that show
notifications, battery power, and connection details.
12.
Notification Icons
: Presents icons to show notifications
from the system or from an application. Touch a
Notification Icon to display more detail. For a list of icons,
see “Status Bar” on page 20.
13.
Time
: The current time. For more information, refer to
“Date and Time” on page 128.
14.
Status Icons
: Indicate the status of your tablet. Touch the
Time / Status Icons area to display the Status Details
panel. For more information, refer to “Status Bar” on
page 20.
Note:
Network status icons turn blue if you have a Google Account added to
your tablet and the tablet is connected to Google services for syncing
your Gmail, Calendar events, contacts, backing up your settings, and
so on. If you do not have a Google Account or if, for example, you are
connected to a Wi-Fi network that is not connected to the Internet, the
network icons are gray.
16
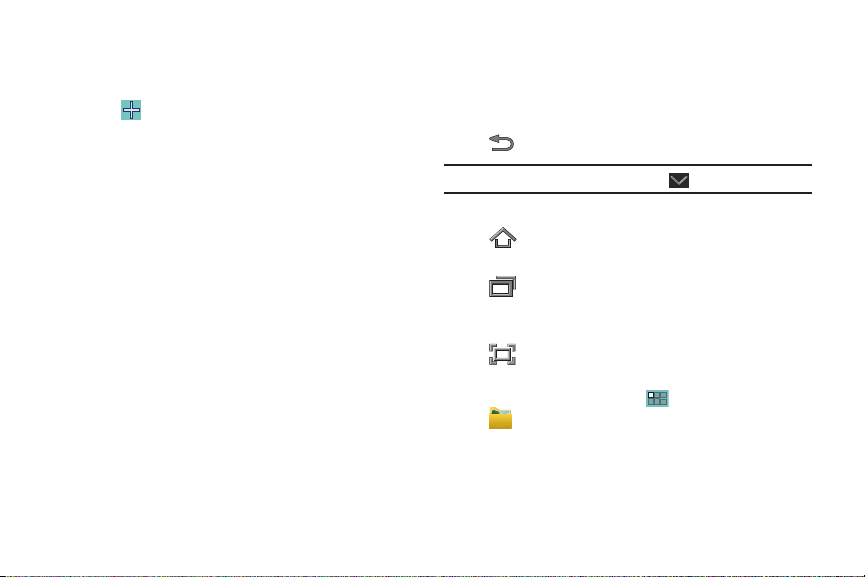
Extended Home Screen
The Home screen consists of the Home panel, plus four panels
that extend beyond the display width to provide more space for
adding shortcuts and widgets.
Slide your finger horizontally across the screen to scroll to the left
or right to display additional panels.
Note:
The Home panel displays when you touch
Home
.
Page 21
Customizing the Home Screens
To customize the Home screens to suit your preferences just
navigate to the desired Home screen, then:
1. Touch
Customize
.
– or –
Touch and hold on the screen
The
Add to Home screen
2. Touch one of the options:
• Widgets
: For more information, refer to
• App shortcuts
options screen displays.
“Widgets”
: For more information, refer to
on page 22.
“App Shortcuts”
on page 22.
• Wallpapers
: For more information, refer to
“Wallpaper”
on
page 23.
•More
: For more information, refer to
“More”
on page 24.
Screen Settings
You can customize display screen settings to your preferences.
For more information, refer to “Screen Settings” on page 114.
Navigating Your Tab
Use command buttons and the touch screen to navigate.
Command Buttons
Back
Touch Back
Note:
When the on-screen keyboard is active,
Home
Touch Home
Recent Apps
Touch
to return to the previous screen, option, or step.
to display the first center Home screen.
Recent Apps
to open a list of thumbnail images of
apps you have worked with recently. Touch an App to open it.
Screen Capture
Touch
Screen Capture
to take a snapshot of the screen
currently displayed. To view the screen shots:
1. From a Home screen, touch
My files
.
2. Touch
3. Touch a screen capture file to display it.
Screen Capture
.
Applications
Understanding Your Tab 17
Close Keyboard
➔
displays.
Page 22
Other Buttons
Google Search
Touch
Context-Sensitive Menus
Google
to search the web or your Tab.
Context-sensitive menus offer options for features or screens. To
access context-sensitive menus:
•
Touch
•
Touch an option in the list.
Menu
to display a list of options.
Screen Navigation
Touch
Touch items to select or launch them. For example:
•
Touch the on-screen keyboard to enter characters or text.
•
Touch a menu item to select it.
•
Touch an application icon to launch the application.
Touch and Hold
Activate on-screen items. For example:
•
Touch and hold a widget on the home screen to move it.
•
Touch and hold on a field to display a pop-up menu of options.
18
Swipe, Flick, or Slide
Swipe, flick, or slide your finger vertically or horizontally across
the screen. For example:
•
Unlocking the screen
•
Scrolling the Home screens or a menu
Pinch
Use two fingers, such as your index finger and
thumb, to make an inward pinch motion on the
screen, as if you are picking something up, or an
outward motion by sweeping your fingers out. For
example:
•
Pinch a photo in Gallery to zoom in.
•
Pinch a web page to zoom in or out.
Panning
To pan, touch and hold a selected icon, then move the Tab to the
left or right to reposition it to another page. You must first
activate Motion on your Tab. Use panning to:
•
Move icons on your Home screens or Application Menus to another
page.
For more information, refer to “Motion Settings” on page 122
Page 23
Notifications
Valentine’s Day Deals
Notification icons appear in the System Bar, to the left of the Time
when you receive a notification. Notifications indicate the arrival
of Gmail, Email, alarms, calendar events, and so on.
Touch a Notification icon for more detail. For example, touch a
Gmail Notification icon to see who sent the message.
Touch the Time field to open the Notifications list to view all of
your current notifications. Touch a Notification in the list to
display the item. For example, touch a Gmail entry to open the
Gmail application and view the message.
Most apps that send notifications, such as Gmail and Google
Talk, have their own settings, which you can use to configure
whether and how they send notifications, whether they sound a
ringtone, and so on. See the documentation for those apps for
details.
Status Details and Quick Settings
To view and control the most common settings for your tablet, as
well as accessing the complete Settings application, launch the
Quick Settings pop-up.
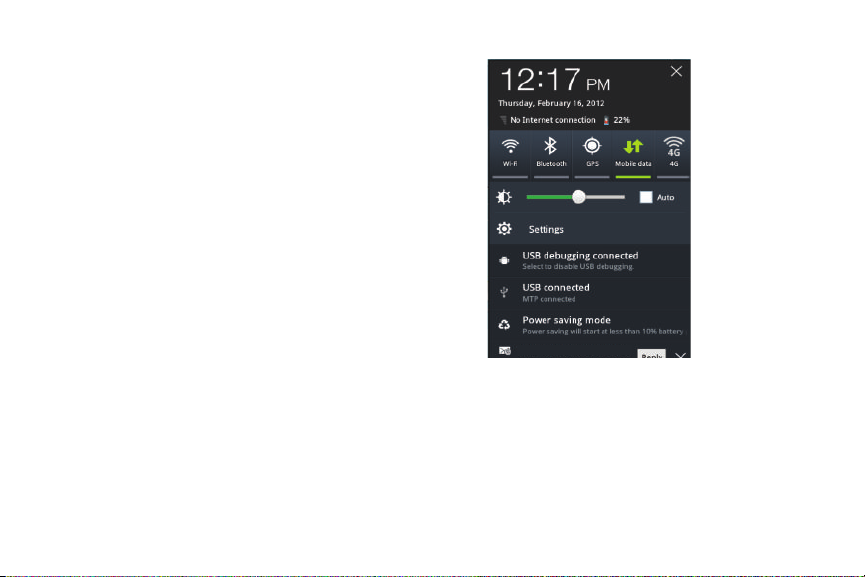
1. In the Status bar, touch the Time. The Status Details and
Quick Settings pop-up displays.
The Status Details (current date and time, Wi-Fi
connectivity status, and battery status) appear at the top of
the pop-up.
If you have any current or recurring notifications, their
summaries are listed below the Status Details and Quick
Settings.
Understanding Your Tab 19
Page 24
2.
To respond to a notification summary, touch it.
To close a current notification summary (such as new
message, Gmail, or Email), touch X on the right hand side
of the summary.
3. To close the Status Details, touch
X
in the upper right hand
corner, or touch any other part of the screen.
The Quick Settings are:
•Wi-Fi
: Touch to enable or disable access to Wi-Fi hot spots
[Wireless Access Point (WAP)]. (For more information, refer to
Fi settings”
• Notifications
notifications. For more information, refer to
on page 107.)
: Touch to enable or disable system and application
“Notifications”
page 19.
•GPS
: Touch to enable or disable
more information, refer to
Standalone GPS services
“Standalone GPS Services”
page 116.)
•Mobile data
: Turn access to the Mobile data network On or Off.
When ON, you can access the internet with your device.
•4G
: Touch to enable or disable the 4G network.
• Brightness
: Touch and drag the slider to set the brightness or
touch
Auto
to allow the Tab to set brightness automatically based
on available light and battery charge status. (For more information,
refer to
20
“Brightness”
• Settings
: Touch to open the Settings application. (For more
information, refer to
on page 114.)
“Settings”
on page 107.)
on
“Wi-
on
. (For
Status Bar
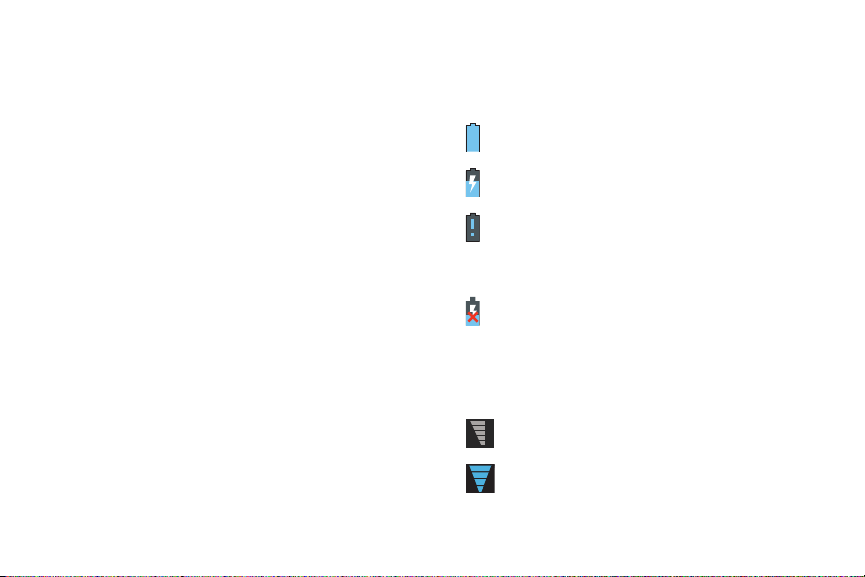
The Status Bar displays icons to show network status, battery
power, and other details.
Battery Level
Charging Indicator
Device Power Critical
: Shown fully charged.
: Battery is charging.
: Battery has only three percent
power remaining. At about 15 percent power
remaining, a popup is displayed to remind you to
charge immediately.
USB Charging Indicator
: The device is connected to a
computer using a USB cable, but it is not charging. The
battery is only charged while connected to a computer,
if the device is turned off. When the device is off, press
the Power/Lock key to see the battery charging
indicator.
Signal Strength
: Displays your current signal strength.
The greater the number of bars, the stronger the signal.
Wi-Fi Active
: Wi-Fi is connected, active, and
communicating with a Wireless Access Point (WAP).
Page 25
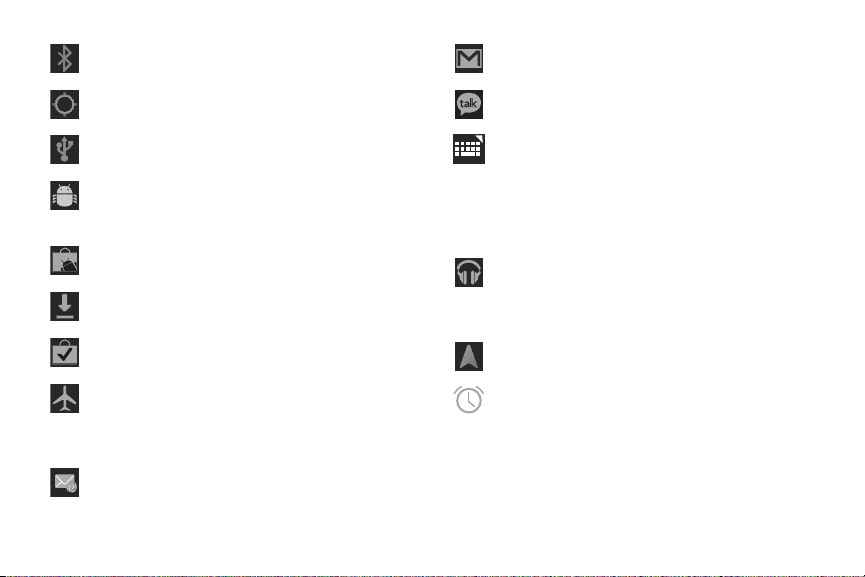
Bluetooth Active
: Bluetooth is turned on. (For more
information, refer to “Bluetooth” on page 78.)
GPS Active
: Displays when GPS is active.
USB Cable Connected
: Displays when the device is
connected to a computer with a supported USB cable.
USB Debugging
: Device is connected to a computer in
Application (app) debugging mode. (For more
information, refer to “USB Debugging” on page 120.)
Updates Available
: Updates to the applications you have
downloaded are available.
Download in progress
: An application is being
downloaded to the Tab.
Download Successful
: A recent application download or
update completed successfully.
Airplane Mode
: Indicates that the Airplane Mode is
active, which allows you to use many of your device’s
features, but it cannot access online information or
applications.
New Email Message
: You have new email. Touch the
icon for additional information.
New Gmail Message
: You have new Gmail. Touch the
icon for additional information.
Google Talk Invitation
: Someone has invited you to chat
using Google Talk.
Configure input methods
: When a keyboard or keypad
appears in the display, touch this icon to pop-up a
menu that lets you quickly select the text input
keyboard or keypad and/or access keyboard or keypad
settings. (For more information, refer to “Language and
Input” on page 123.)
Music Player
: A song is playing. Touch the Music icon or
touch the Status Details to see the song title and music
player controls. For more information, refer to “Music
Player Screen” on page 58.
Navigation Active
: The Navigation App is active. For
more information, refer to “Navigation” on page 100.
Alarm Set
: Displays when you set an alarm to ring at a
specified time. For more information, refer to “Alarm”
on page 83.
Understanding Your Tab 21
Page 26
Power Saving Mode
: Displays when the battery level is
below the value defined in the Custom power saving
settings. Touch this icon to view the current Power
saving mode status, then touch the status message to
launch the
Power saving mode
settings menu. (For more
information, refer to “Power Saving Mode” on
page 115.)
Widgets
Widgets are self-contained applications that you can place on the
Home screens to access your favorite features.
Adding Widgets to a Home screen
1. Navigate to the Home screen panel on which you want the
Widget to be placed.
2. Touch and hold on the screen.
– or –
Touch
The
3. Touch
Customize
.
Add to Home screen
Widgets
options screen displays.
, then touch a widget to add it to the Home
screen. Sweep the screen to the left to see more widgets.
4. Touch
22
Back
to return to the Home screen.
Removing Widgets
䊳
Touch and hold the Widget until
Remove
appears at
the top right corner of the screen, then drag the Widget to
the
Remove
icon to remove it.
App Shortcuts
Use App Shortcuts for quick access to applications or features,
such as Email or other applications.
Adding Shortcuts from a Home Screen
1. Navigate to the Home screen on which you want the App
Shortcut to be placed.
2. Touch and hold on the screen.
– or –
Touch
The
3. Touch
Customize
Add to Home screen
App Shortcuts
, then touch an application to add it to
.
options screen displays.
the Home screen. Sweep the screen to the left to see more
Apps.
For a list of applications, see “Apps Screen” on page 25
4. Touch
Back
to return to the Home screen.
Page 27
Adding App Shortcuts from the Apps Screen
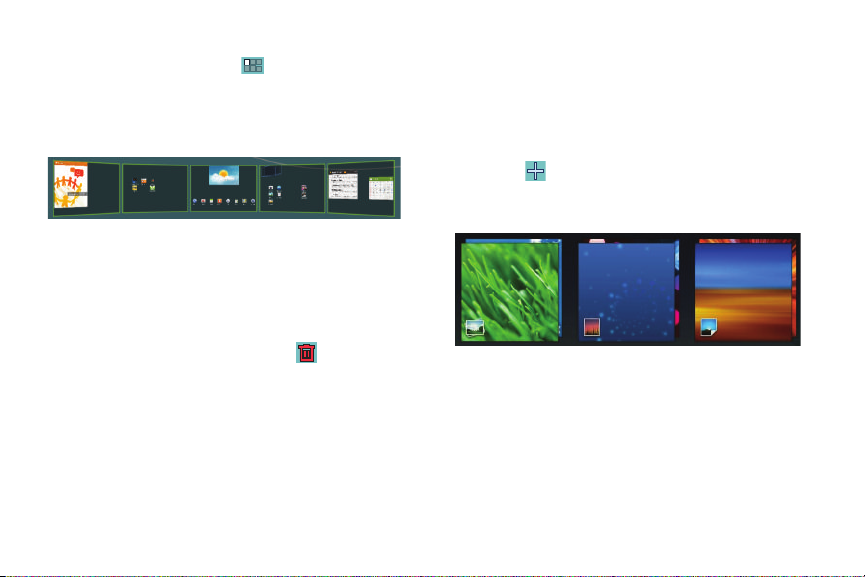
1. From a Home screen, touch
2. Touch and hold on an application icon until the Home
Applications
.
screen selection area is displayed at the bottom of the
screen.
3. Drag the application icon to the desired Home screen.
The Home screen frame is highlighted.
4. Drag the application icon approximately where you want it
on the Home screen.
Removing App Shortcuts
䊳
Touch and hold the App Shortcut until
Remove
appears at the top right corner of the screen, then drag the
App Shortcut to the
Remove
icon.
Wallpaper
You can choose a picture to display in the background of the
Home screen. Choose from preloaded wallpaper images or select
a photo you have downloaded or taken with the Camera.
1. From a Home screen, touch and hold on the screen.
– or –
Touch
The
2. Touch
Customize
.
Add to Home screen
Wallpapers
to view the Wallpaper menu.
options screen displays.
Choose a source for images:
•Gallery
: Touch to display the Set as pop-up and then touch
screen Wallpaper
or
Lock screen Wallpaper
. Access the Gallery
Home
to choose a picture. Touch a picture to select it, then crop and
resize the picture, if desired. Touch OK to save the picture as
wallpaper. Touch X to cancel.
Understanding Your Tab 23
Page 28
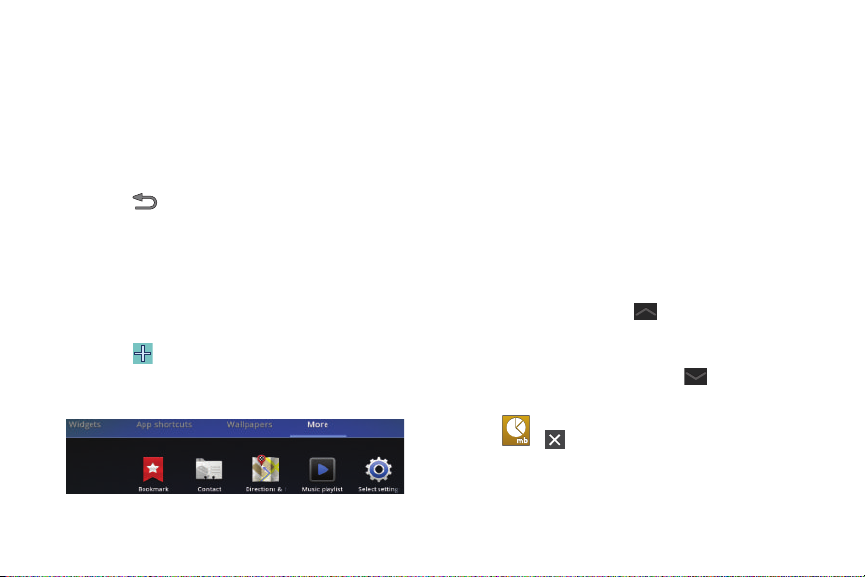
• Live Wallpapers
: Choose from pre-loaded interactive animated
wallpapers. Touch a wallpaper to see an example. If available,
touch
Settings
wallpaper
to view options for the selection. Touch
to save your choice. Touch
Cancel
to return to the
Wallpaper menu.
• Wallpapers
: Touch to display the Set as pop-up and then touch
Home screen Wallpaper
or
Lock screen Wallpaper
pre-loaded wallpaper images. Touch an image to save it as
wallpaper. Touch
3. Touch
Cancel
to return to the Wallpaper menu.
Back
to return to the Home screen.
More
The final
Add to Home screen
option,
More
, includes shortcuts to
Browser bookmarks, to Directions and Navigation, and an
assortment of other useful items.
1. From a Home screen, touch and hold on the screen.
– or –
Touch
The
2. Touch
24
Customize
.
Add to Home screen
More
to view additional shortcuts.
options screen displays.
Set
. Choose from
•
Bookmark
: Launch a bookmarked web page
•
Contact
: View or email a contact you specify.
•
Directions & Navigation
: Get directions and navigation from Google
Maps. For more information, refer to
•
Music playlist
•
Select settings
: Launch Music Player to play a selected playlist.
: Displays a list of Settings shortcuts. Touch an entry in
the list. For more information, refer to
“Maps”
“Settings”
.
on page 94
on page 107.
Mini App Tray
There are shortcuts available that link to apps that you might
need while working in other apps, such as your calendar, a
memo pad, and a calculator. In some cases, these shortcuts are
actually links to the part of the app you need most and they
contain link to the actual app where you can use other functions.
1. From any screen, touch
Mini App Tray open
at the
bottom, center of the screen.
The Mini App Tray icons display.
To close the Mini App Tray, touch
2. Touch one of the following icons to display the app.
Tas k ma na ger
: Displays the Task manager. Touch
Mini App Tray close
to close the app. For more information, refer
to “Task Manager” on page 10.
.
Page 29
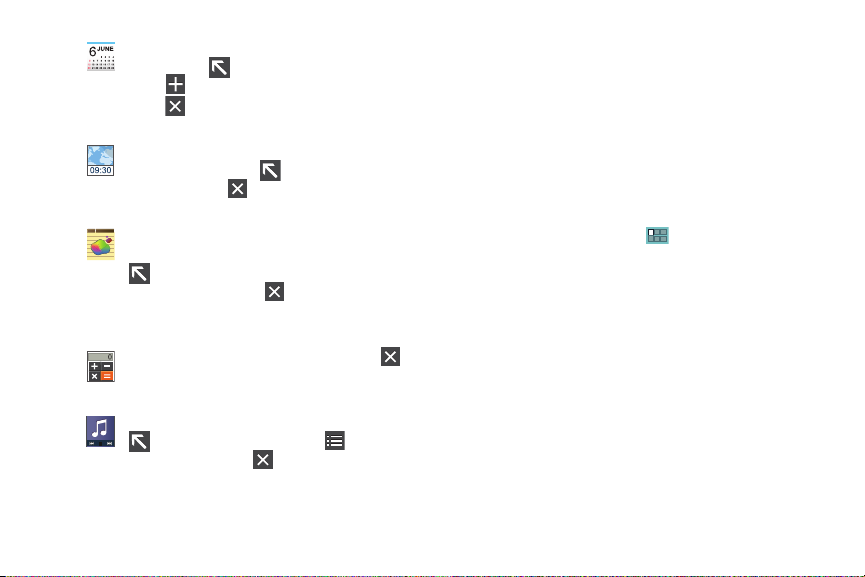
Calendar
: Displays the calendar with today’s date
circled. Touch to link to the Calendar app.
Touch to add a new event to your calendar.
Touch to close the app. For more information,
refer to “Calendar” on page 87.
World Clock
: Displays the time for the locations
you have set up. Touch to link to the World
Clock app. Touch to close the app. For more
information, refer to “World Clock” on page 104.
Pen memo
: Displays the Pen memo app, which
you can use to create and save a memo. Touch
to link to the Pen memo app. Touch
Done
to
save your memo. Touch to close the app. For
more information, refer to “Pen Memo” on
page 101.
Calculator
: Displays a basic calculator. Touch
to close the app. For more information, refer to
“Calculator” on page 87.
Music player
: Displays the music player. Touch
to link to the Music app. Touch to display
your songs list. Touch to close the app.
Apps Screen
The
Apps screen
holds all applications on your wireless device.
Applications that you download and install from the Android
Market or from the web are also added to the
Downloaded
screen.
The Apps icons are arranged in alphabetic order.
You can place shortcuts to applications on the Home screen for
quick access to the application. For more information, refer to
“Adding App Shortcuts from the Apps Screen” on page 23.
1. From a Home screen, touch
2. Touch the
3. Touch an icon on the
My apps
tab to view apps you have downloaded.
All
or
Applications
My apps
screen to launch the
.
application.
– or –
Add an App Shortcut to a Home screen by dragging an App
icon down to the thumbnails of your Home screen panels
that appear when you drag an App. Pause on a Home
screen panel thumbnail to place the shortcut. For more
information, refer to “Adding App Shortcuts from the Apps
Screen” on page 23.
Understanding Your Tab 25
Page 30

Application Information
To view information about an App, such as the amount of storage
it is using, force the App to stop, uninstall updates, and clear
data:
1. From a Home screen, touch
2. Touch and hold an App icon, then drag it to icon located
Applications
.
at the top right corner of the screen to open a screen with
details about the App.
3. Touch
26
Back
to return to the
Apps
screen.
Page 31

Section 3: Entering Text
This section describes how to enter words, letters, punctuation
and numbers when you need to enter text.
Virtual QWERTY Keyboard
Your device uses a virtual QWERTY keyboard for text entry. Use
the keyboard to enter letters, punctuation, numbers, and other
characters into text entry fields or applications. Access the
keyboard by touching any text entry field.
The virtual QWERTY keyboard displays at the bottom of the
screen. By default, when you rotate the device, the screen
orientation updates to display the keyboard at the bottom of the
screen.
Text Input Methods
There are four text input methods available:
•
English (US) Keyboard (default)
keypad usable in both portrait and landscape orientation.
The on-screen QWERTY keypad works the same in both portrait
and landscape mode.
•
English Voice
•
Samsung Keypad
portrait and landscape orientation.
: A voice-to-text Android keyboard feature.
: An on-screen QWERTY keypad usable in both
: Another on-screen QWERTY
•
Swype
: Instead of tapping each key, use your finger to trace
over each letter of a word.
Using the Samsung Keypad
The Samsung Keypad is a custom virtual QWERTY keyboard,
featuring predictive text. Input characters by touching the
on-screen keys with your finger or use speech recognition.
As you enter characters, predictive text matches your key
touches to common words and displays them. Select a word
from the display to insert it into your text.
Entering Text 27
Page 32
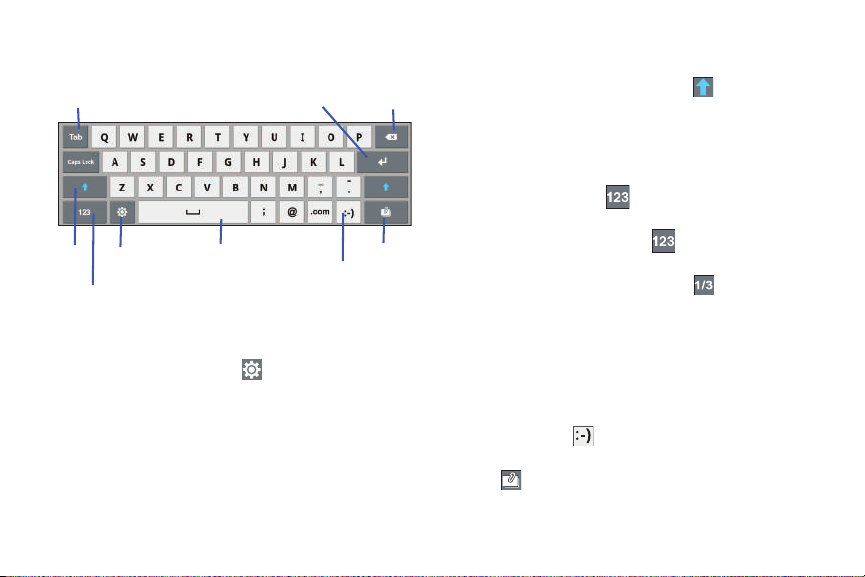
Your tablet also provides handwriting recognition to make the
New
Paragraph
Delete
Key
Shift
Key
Text Input Mode
Keypad
Settings
Space Bar
Emoticons
Attachment
Resize
Keypad
task of text entry that much easier.
Configuring the Keypad
To configure the Samsung Keypad to your preferences:
䊳
While entering text, touch
Settings
The Samsung keypad settings screen is displayed. For
more information, refer to “Configure Input Methods” on
page 125.
Entering Upper and Lower Case Letters
The default case is lower case (abc). Enter upper and lower case
alphabet letters by touching the Shift key to toggle the case,
before touching the letter key(s).
•
Touch once to switch from abc to Abc mode
•
Touch and hold to switch to ABC mode
Entering Symbols and Numbers
To enter a number, touch , then touch the corresponding
key.
To enter common symbols, touch to switch to Symbols
mode, then touch the corresponding key.
There are three pages of symbols. Touch to switch to the
next page.
Touch and hold a vowel key (A, E, I, O, U, or Y) or the C, N, or S
.
key to open a small window where you can touch an accented
vowel or other alternate letter.
Touch and hold the Period key ( . ) to open a small window with a
set of common symbols.
Touch and hold the
Emoticons
key to open a small window
with a set of Emoticons.
Touch to add an attachment from the Gallery.
28
Page 33
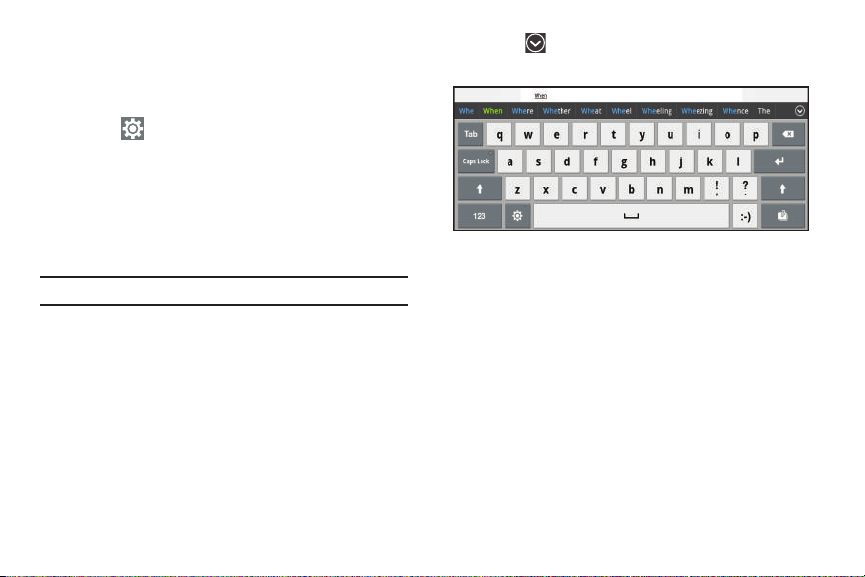
Using XT9 Predictive Text
XT9 is a predictive text system that has next-letter prediction and
regional error correction, which compensates for users pressing
the wrong keys on QWERTY keyboards.
1. Touch
Settings
at the bottom of the keypad.
The Samsung keypad settings screen displays.
2. Touch the
XT9
field so a green check mark appears next to
the field.
3. Touch the
XT9 advanced settings
field to modify XT9
associated settings. For more information, refer to
“Configure Input Methods” on page 125.
Note:
The XT9 option is available only when Abc mode has been selected.
4. Begin typing a word. A list of word options displays. Touch
one of the words to replace the word that has already been
typed.
– or –
Touch and then touch
Add word
to register a new
word to XT9.
5. Continue typing your message. XT9 mode can be used in
portrait or landscape mode.
Editing Text
You can edit the text you enter in text fields by cutting, copying,
or pasting text. These operations can be performed within and
across apps. However, some apps do not support editing some or
all of the text displayed while others may offer their own way to
select text.
Entering Text 29
Page 34
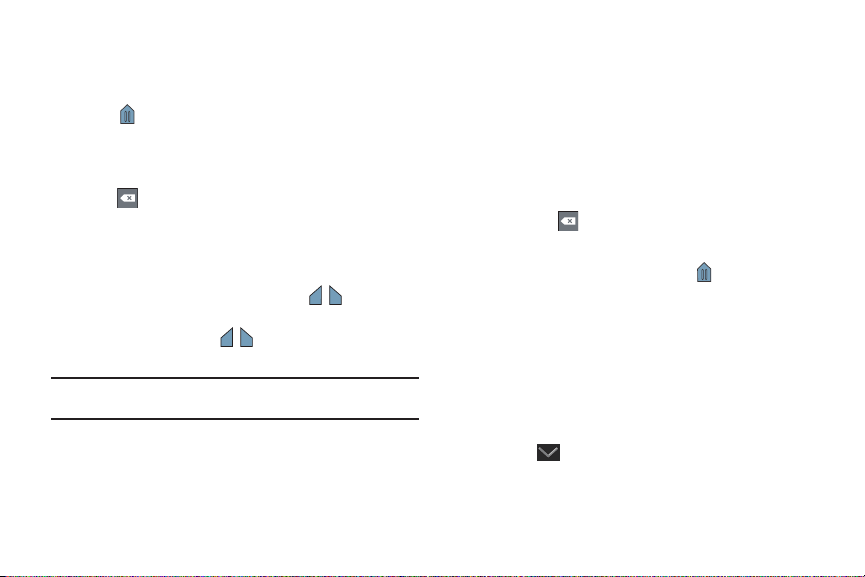
Editing Existing Text
To edit text that you have entered:
1. Touch the text at the point you want to edit.
The
Cursor
displays at the point you touched.
2. Touch and drag the
Cursor
to a better position, if
necessary.
3. Enter additional text or delete text by repeatedly touching
the
Delete
key.
Copying, Deleting, or Replacing Text
To select and copy, delete, or replace text:
1. Touch hold the text or word you want to select.
The selected text is highlighted with a tab at each
end of the selection.
2. Touch and drag either tab to select more or less
text.
Tip:
Touch
Select all
on another area of the screen or touch
30
in the Application bar to select all text in the field. Touch
X Cancel
to deselect the text.
3. Depending on the action you want to take for the selected
text, in the Application bar touch
selected text,
clipboard, or
Copy
to save the selected text to the
Clipboard
Cut
to remove the
to replace the selected text with
text previously saved to the clipboard.
– or –
Enter text by typing or speaking to replace the selection
with what you type.
– or –
Touch the
Delete
key to delete the selected text.
Pasting Text
To paste previously copied text where the
Cursor
is
positioned:
1. Touch the text at the point you want to paste the copied
text.
The
Cursor
displays at the point you touched.
2. Touch and hold the
Cursor
and touch
Paste
in the pop-up.
Closing the Keyboard
To close the keyboard:
䊳
Touch
Close Keyboard
.
Page 35
Using Speech Recognition
You can use your voice to enter text using the Voice input feature,
which lets you enter text by speaking. Samsung Keypad
recognizes your speech and enters text for you.
Note:
To enable
Voice Input
Voice input
on page 125.
, on the Samsung keypad, touch
. For more information, refer to “Configure Input Methods”
Settings
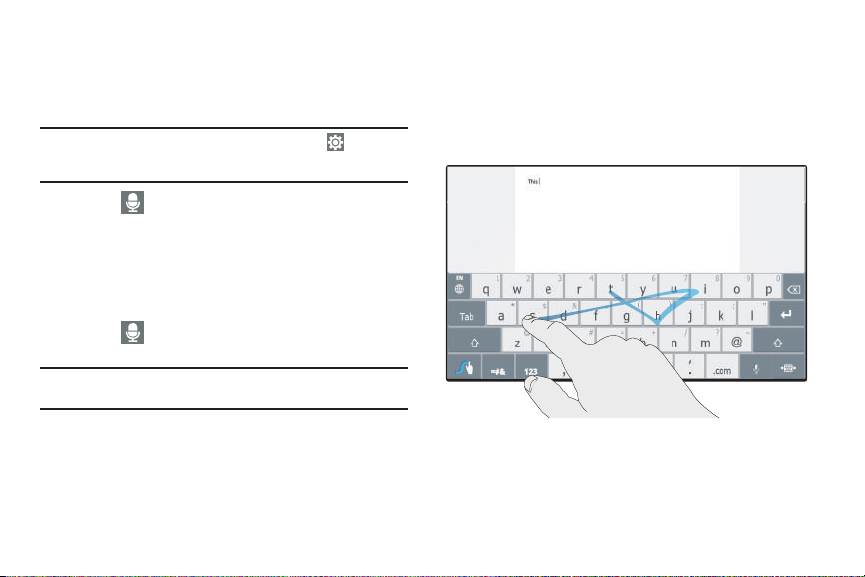
Entering Text Using Swype
Swype™ is a text input method that allows you to enter a word by
sliding your finger or stylus from letter to letter, lifting your finger
between words. Swype uses error correcting algorithms and a
language model to predict the next word. Swype also includes a
➔
tapping predictive text system.
1. Touch
2. At the
Speech Recognition
Speak now
prompt, speak clearly and distinctly into
on the Samsung Keypad.
the microphone.
3.
Working...
is displayed while the software is converting
your voice to text.
The text is displayed in the message.
4. Touch
Speech Recognition
again to speak and add
more text.
Note:
The feature works best when you break your message down into
smaller segments.
Entering Text 31
Page 36
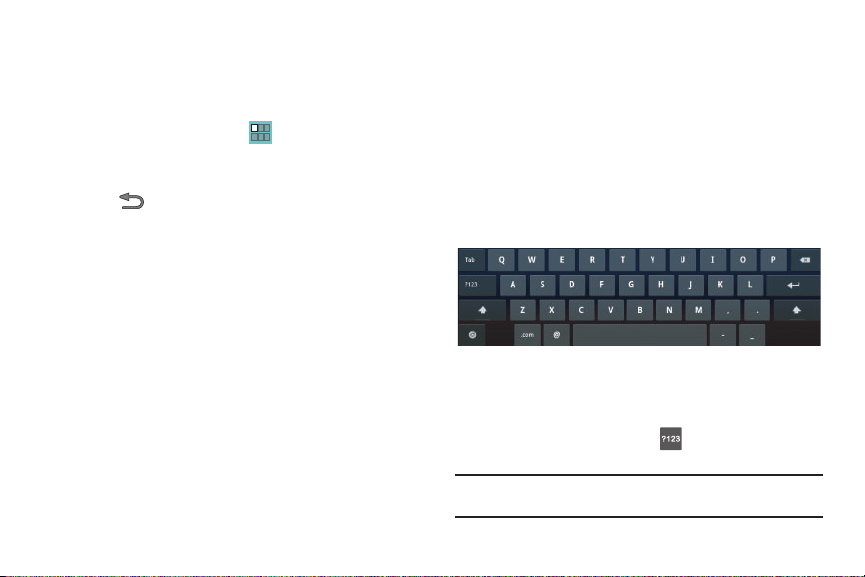
Enabling and Configuring Swype
The Samsung keypad is the default text input method, so to use
Swype, you must first change the default keyboard setting.
To enable Swype:
1. From the Home screen, tap ➔
and input ➔ Current input method
2. Tap the
3. Tap to return to the previous menu.
Swype
option.
Settings ➔ Language
.
Swype Settings
For information on the Swype settings, see “Keyboard Settings”
on page 124.
Swype Text Entry Tips
You can access the Swype Tips application and watch a video or
tutorial on using Swype. You can also use the following Swype
text entry tips.
•
Create a “squiggle” (like an S shape) to create a double letter (such as
pp in apple).
•
Touch and hold a key to view the punctuation menu then make a
selection.
•
Move your finger or stylus over the apostrophe to enter contractions.
32
•
Double-tap on the word you want to change to correct a misspelled
word, then tap the delete key to erase one character. Touch and hold
the delete key to erase an entire word.
Entering Text Using the English(US) Keyboard
The English(US) Keyboard is a custom virtual QWERTY keyboard,
featuring predictive text. Input characters by tapping the onscreen keys with your finger, or use speech recognition.
As you enter characters, predictive text matches your key
touches to common words and displays them. Select a word
from the display to insert it into your text.
Configuring
the English(US)
Keyboard
Configure the Android Keyboard to your preferences.
•
For more information, refer to
•
While entering text,
keyboard settings
Tip:
To customize predictive text, configure the User dictionary settings. (For
more information, refer to “Keyboard Settings” on page 124.)
“Keyboard Settings”
touch and hold , then touch
.
on page 124.
Android
Page 37

Entering Upper and Lower Case Letters
The default case is lower case (abc). Enter upper and lower case
alphabet letters by touching the Shift key to toggle the case,
before touching the letter key(s).
•
Touch once to switch from abc to Abc mode
•
Touch and hold to switch to ABC mode
Entering Symbols and Numbers
To enter common symbols, touch to switch to symbol mode,
then touch the corresponding key.
To enter less-common symbols, touch
➔
, then touch
the corresponding key.
Enter numbers by touching , then touching the number keys.
Entering Text 33
Page 38
Section 4: Contacts and Accounts
This section explains how to manage contacts and accounts.
Accounts
Your device can synchronize with a variety of accounts. With
synchronization, information on your device is updated with any
information that changes in your accounts.
•
Social Hub accounts
–
Facebook
–
LinkedIn
–
Twitter
: Add your Twitter SNS Service to sync Contacts.
•
More accounts
–
Email
: Add an Email account to sync Contacts. For more information,
refer to
–
Google
: Add your Google account to sync your Contacts, Calendar, and
Gmail. For more information, refer to
–
Microsoft Exchange ActiveSync
account to sync Contacts, Calendar, and Email.
–
Yah o o!
: Add your Yahoo! account to sync Contacts, Calendar, and
Email.
34
:
: Add your Facebook account to sync Contacts.
: Add your LinkedIn account to sync data with LinkedIn.
:
“Google Talk”
on page 48.
“Gmail”
: Add your Microsoft Exchange
on page 42.
Setting Up Your Accounts
Set up and manage your synchronized accounts with the
Accounts and sync
1. From a Home screen, touch
2. Touch
3. Follow the prompts to enter your account credentials to
setting.
Settings ➔ Accounts and sync
Add account
, then touch the account type.
Applications
.
➔
complete the set-up process.
4. The device communicates with account servers to set up
your account. When complete, your account appears in the
Manage accounts
area of the
Accounts and sync
screen.
Contacts
Store contact information for your friends, family, and colleagues
to quickly access information or to send a message.
To access Contacts:
䊳
From a Home screen, touch
Contacts
.
Applications
➔
Page 39
Creating Contacts
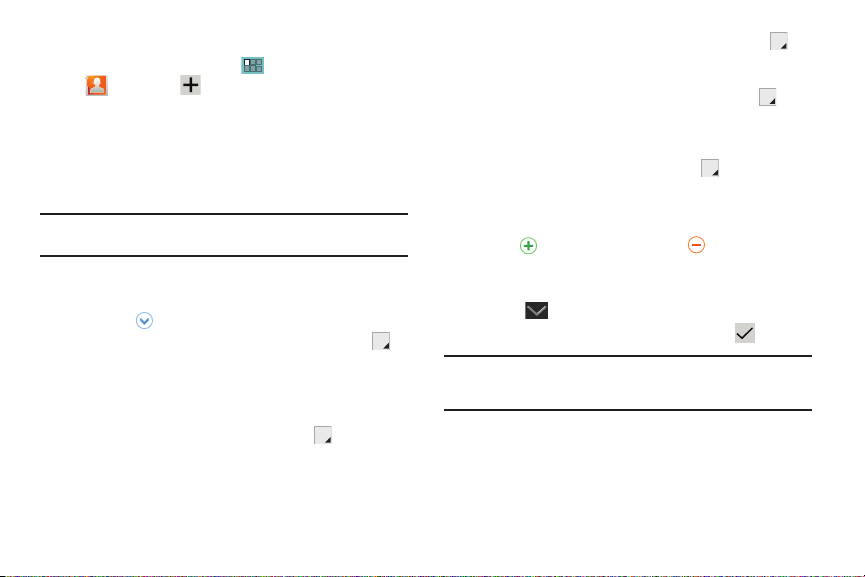
1. From a Home screen, touch
Contacts➔ New
2. Touch the
3. Touch contact fields to display the keyboard and enter
Photo ID to set up a photo to identify the contact.
•Album
: Choose a photo from the Gallery.
• Take photo
: Display the Camera and take a photo of the contact.
Applications
.
information:
Tip:
Touch the screen and swipe up or down to display additional fields or
touch
Next
on the keypad to move to the next field.
• First name
•Last name
• Phone number
: Enter a first name for the contact.
: Enter a last name for the contact.
–
Touch to enter a
Name prefix, Middle name
: Enter a telephone number, then touch the
drop-down list box to choose a label from
, and
Mobile, Home, Work
Main, Work Fax, Home Fax, Pager, Other, Custom
custom label, or
• Internet call
•Email
box to choose a label from
Callback
.
: Enter an Internet call number.
: Enter an email address, then touch the drop-down list
Work, Home, Other
, or
Custom
create a custom label.
➔
Name suffix
to create a
to
• Instant messenger
drop-down list box to choose a label from
Windows Live
• Groups
down list box to choose a group from
and so on. For more information about Groups, see
: Enter an IM address, then touch the
Google Talk, AIM
,
, and so on.
: Assign the contact to a group, then touch the drop-
Coworkers, Family, Friends
“Groups”
,
on
page 39. print namecard
• Address
: Enter an address, then touch the drop-down list box
to choose a label from
Home, Work, Other
, or
Custom
to create a
custom label.
• Organization
4.
Touch to add additional fields.
: Enter a company name and job title.
Touch to remove an
unused field.
5. Touch
6. Touch
7. When you finish entering information, touch
,
Tip:
Add another field
Back
Display a contact’s record and touch the
touch the
Phone number
Website
field to link to the website.
to add additional fields.
to remove the keyboard.
field to send a text message, or touch the
Done
.
Email
field to send an email,
Contacts and Accounts 35
Page 40
Updating Contacts
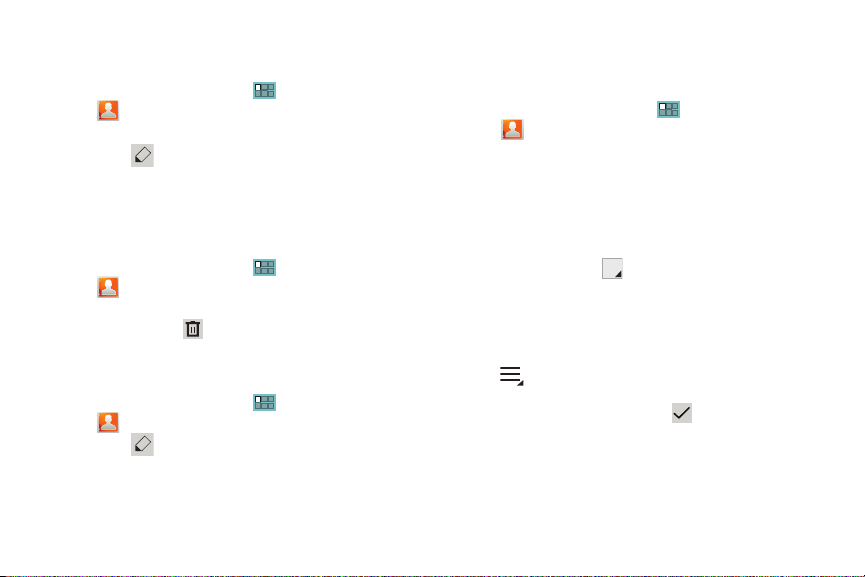
To make changes to update an existing contact:
1. From a Home screen, touch
Contacts
.
2. Touch a contact in the Contacts list to view its information:
3. Touch
4. Continue entering contact information. For more
Edit
.
Applications
➔
information, refer to “Creating Contacts” on page 35.
Deleting Contacts
To delete a contact:
1. From a Home screen, touch
Contacts
.
2. Touch a contact in the
and then touch
Contacts
Delete
Applications
➔
list to view its information,
. At the prompt, touch OK.
Managing Photo IDs
To remove or update a contact’s Photo ID:
1. From a Home screen, touch
Contacts
.
2. Touch
3. Touch the Photo ID, then touch
Remove
36
Edit
.
.
Applications
➔
Album, Take photo
, or
Contacts Display Options
There are various ways to display your Contacts and general
Contacts settings.
1. From a Home screen, touch
Contacts
.
2. Touch
Contacts, Favorites
, or
Groups
Applications
➔
above the Contacts
List, to view contacts various ways:
•Contacts
: Show all your contacts. Touch the
Search contacts
and enter a keyword to list contacts that contain that keyword.
•Favorites
: Show only your favorite, or starred, contacts. For more
information, refer to
• Groups
“Favorites”
on page 41.
: Touch the drop-down list box displayed above the
Contacts List to display the possible Groups, such as Not assigned,
Coworkers, Family, Friends, and so on. Touch a group name to
show only contacts in that group. For more information, refer to
“Creating a New Group”
3. From the
Contacts, Favorites
Menu
to display all or some of these options:
• Delete contacts
contact you want to delete. Touch Delete
• View SNS friends
on page 39.
, or
Groups
list, touch
. Touch and check mark the box next to each
and then touch OK.
: Touch
Add account
to add a new account or
touch an existing account to get contacts from your friends on
Facebook, Twitter, or LinkedIn.
field
Page 41

•Import/Export
: Use the USB cable to import your contacts from, or
export your contacts to, a storage device, such as a PC. For more
information, refer to
“Importing and Exporting Contacts”
page 39.
• Join contact
more information, refer to
•My profile
add a new contact. For more information, refer to
Contacts”
• Set default
: Join a contact to one or more other contacts. For
“Joining Contacts”
on page 38.
: Set up information for yourself similar to the way you
“Creating
on page 35.
: If a contact has multiple email addresses, for example,
touch the field that should be the default value.
• Send namecard via
: To send contact information, touch and check
mark the box next to each contact you want to send to, or touch
Select all
, and touch Send
Gmail
as the method for sending the information.
• Settings (Display options)
–
Only contacts with phones
contacts that have phone numbers.
–
List by
: List contacts by
–
Display contacts by
Contacts List as
–
Select contacts to display
that you want displayed. Touch your account(s) and then select the
Groups that you want displayed.
Given name first
• Settings (General settings)
. Touch
Bluetooth, Email
: Set the following Display options:
: Touch to check the box to only display
Given name
or
Family name
: Set whether contact names should appear in the
or
Family name first
: Touch
Device
.
.
and then select the Groups
: Set the following Display options:
, or
on
–
Save new contact to
Options are:
account.
• Send contacts
: Set the default location for new contacts.
Always ask, Device
, or an account, such as your Gmail
: Lets you send a namecard to one or more
members of the group.
–
Send all namecards
–
Send individual namecards
use with devices that do not support Send all namecards.
: Reduces transmission time.
: Use to transmit a single namecard or
Linked Contacts
Your device can synchronize with multiple accounts, including
Google, Corporate Exchange, and other email providers. When
you synchronize contacts from these accounts with your device,
you may have multiple contacts for one person.
Linking, or joining, imported contact records allows you to see all
the contact’s numbers and addresses together in one contact
entry. Linking also helps you keep your contacts updated,
because any changes that your contacts make to their
information in the respective accounts is automatically updated
the next time you synchronize with the account.
Contacts and Accounts 37
Page 42
Joining Contacts
1. From a Home screen, touch
Contacts
.
2. Touch a contact in the
3. Touch
Menu
Contacts
➔
Join contact,
Applications
list to view its information.
then touch one or more
contacts to link.
4. Touch
Join
.
The joined contact’s information is displayed with the
original contact’s information.
Separating Contacts
1. From a Home screen, touch
Contacts
.
2. Touch the contact that you want to separate in the
Applications
list to view its information.
3. Touch
Menu
➔
Join contact,
then touch to
separate joined contacts.
A is displayed instead.
4. Touch
Join
.
The contact is separated.
38
➔
➔
Contacts
Sharing Contact Infor mation
You can send a contact’s information by way of Bluetooth to other
Bluetooth devices or in an Email or Gmail as an attachment.
Note:
Not all Bluetooth devices accept contacts and not all devices support
transfers of multiple contacts. Check the target device’s
documentation.
1. From a Home screen, touch
Contacts
.
2. Touch
Tip:
Set up a contact record for yourself to share your information with
others.
3. Touch the check box next to each contact you want to
choose or touch the
4. Touch
5. At the prompt, choose a sending method, then follow the
Menu
Send
➔
.
Send namecard via
Select all
Applications
check box.
prompts to send the contact information:
•Bluetooth
: For more information, refer to
“Bluetooth”
page 78.
•Email
: For more information, refer to
•Gmail
: For more information, refer to
Gmail”
on page 43.
“Google Talk”
“Composing and Sending
➔
.
on
on page 48.
Page 43
Importing and Exporting Contacts
To back up and restore your contacts information, you can export
your contacts list to a storage device, such as a PC, or import
your contacts list (previously exported) from a storage device.
1. Use the USB cable to connect your device to the storage
device.
1. From a Home screen, touch
Contacts
.
2. Tou ch
Menu
3. Touch
Import from USB storage, Export to USB storage
Import from SIM card
➔
Import/Export
, or
Applications
.
Export to SIM card
➔
,
then follow the
prompts to complete the operation.
Groups
Assign contacts to Groups to make searching for contacts faster
or to quickly send messages to group members.
Creating a New Group
Create a new group when you add or edit a contact.
1. From a Home screen, touch
Contacts
.
2. Touch
3. Touch
Groups
above the Contacts List.
New
.
Applications
➔
4. Touch the
5. Touch
Tip:
Contacts can belong to more than one group. Just touch the contact’s
Groups
Group name
Group name
.
Done
to save the new group name.
field and touch each group.
field
and use the keyboard to enter a new
Once you create a new group, the Contacts List can be set to
display only the contacts in that group. For more information,
refer to “Contacts Display Options” on page 36
Renaming a Group
To rename a group that you created:
1. From a Home screen, touch
Contacts
.
2. Touch
3. Touch the
Groups
above the Contacts List.
drop-down list box displayed above the
Applications
➔
Contacts List to display the possible Groups.
4. Touch the Group you want to rename.
5. Tou ch
Menu
6. Use the keyboard to enter a new group name.
7. Touch
➔
Edit group
.
Done
to save the new group name.
Contacts and Accounts 39
Page 44
Deleting a Group
To rename a group that you created:
1. From a Home screen, touch
Contacts
.
2. Touch
3. Touch the
Groups
above the Contacts List
drop-down list box displayed above the
Applications
➔
Contacts List to display the possible Groups.
4. Touch the Group you want to delete.
5. Tou ch
Menu
➔
Delete groups
.
The groups that can be deleted are displayed.
6. Touch the check box next to the group you want to delete.
7. Touch
8. At the
Note:
40
OK
to delete the group.
Delete
prompt, touch OK.
The group (or groups) is deleted from any contact information in which
it appears. The contact’s in the group are not deleted. The group name
no longer appears as a Contacts List display option.
Adding Group Members
To add a contact to a group, just Edit a contact’s Group field. For
more information, refer to “Updating Contacts” on page 36
Removing Group Members
To remove contacts from a group:
1. From a Home screen, touch
Contacts
.
2. Touch
3. Touch the
Groups
above the Contacts List.
drop-down list box displayed above the
Applications
➔
Contacts List to display the possible Groups.
4. Touch the group from which you want to remove members.
5. Tou ch
Menu
6. Touch
The group name is removed from the contact’s
➔
Edit group members
Remove
for each contact you want to remove.
.
Group
and the contact is removed from the group.
field
Page 45
Favorites
Mark contact records with an orange star to identify them as
favorites.
You can set your contacts display options to display only your
favorites (Starred in Android) for fast viewing or messaging.
Adding Favorites
To add a contact to your
1. From a Home screen, touch
Contacts
2. Touch a contact to display it.
3. Touch the
Favorit es
list:
Applications
.
Star
next to the contact name so that it
➔
turns orange .
The contact is stored in you Favorites list.
Tip:
You do not have to edit the contact to change the Starred status.
Accessing Favorites
To view your favorites list:
1. From a Home screen, touch
Contacts
.
2. Touch
Favorites
above the Contacts List.
Applications
➔
Only your starred contacts display.
Removi ng Favorites
To remove a contact from your favorites list:
1. From a Home screen, touch
Contacts
.
2. Touch
Favorites
above the Contacts List.
Only your starred contacts display.
3. Touch the
Star
next to the contact’s name so that it
turns gray to remove it from the
Contacts and Accounts 41
Applications
Favorit es
➔
list.
Page 46
Section 5: Messaging
This section describes how to compose, send, and receive
messages and other features associated with messaging.
Types of Messages
Your tablet supports the following message types:
Gmail
: Send and receive email with Gmail,
Google’s web-based email.
Email
: View and manage all your email accounts
(including Microsoft Exchange ActiveSync
accounts) in one application.
Tal k
: Chat with other Google Talk users.
Social Hub
: Access your social networks, like
Facebook, Twitter, and LinkedIn, and your email
all in one place.
Gmail
Send and receive email with Gmail, Google’s web-based email.
Tip:
To manage your Google account on your device, use
settings. For more information, refer to “Accounts and Sync” on
page 120.
42
Accounts and sync
䊳
From a Home screen, touch
Gmail
.
Applications
Setting Up Your Gmail Account
The first time you launch Gmail, your device prompts you to set
up your Google account.
Note:
You can use more than one Google account on your device. To add
another account, use
1. From a Home screen, touch
Gmail
2. At the
Sign in with your Google Account
•
If you do not have a Google account, touch
Menu
➔
Settings
➔
Applications
.
follow the prompts to create a new account.
•
If you do have a Google account, use the on-screen keypad to enter
your Google
Email
name and
Passw ord
, then touch
3. At the
4. The device communicates with the Google server to set up
Backup and restore
screen, touch
your account and synchronize your email. When complete,
your Gmail appears in the Inbox.
➔
Add account
option.
➔
screen:
Create account
Sign in
Done
.
and
.
Page 47
Refreshing Your Gmail Account
Refresh your account to update your device from the Gmail
servers.
1. From a Home screen, touch
Gmail
.
2. Tou ch
Refresh
in the Application Bar.
Applications
➔
Managing Your Gmail Account
Use menu options to manage your Gmail.
1. From a Home screen, touch
Gmail
.
2. Touch
• Settings
•Help
• Feedback?
Menu
for these options:
: Configure settings. For more information, refer to
Account Settings”
on page 44.
: Learn about using Gmail.
: Fill out a Google feedback form.
Applications
➔
“Gmail
Composing and Sending Gmail
1. From a Home screen, touch
Gmail
.
2. Tou ch
Compose
3. Touch the
.
To
field to enter recipients. As you enter names
Applications
➔
or email addresses, matching contacts display. Touch a
contact to add it to the field.
4. Touch the
5. Touch
6. While composing a message, the following options are
Subject
Compose Mail
field to enter a subject.
to enter the text of your email.
displayed:
• Send
•Save Draft
•+Cc/Bcc
: Send the Gmail.
: Save the message as a draft for sending later.
: Create Cc (copy) and Bcc (blind copy) fields in the
message. After creating the fields, touch to enter recipients.
• Attach
: Launch Gallery to select a photo to add to the
message.
• Discard
7. Touch
: Close the message without saving.
Send
to send the email.
Messaging 43
Page 48

Gmail Account Settings
1. From a Home screen, touch
Gmail
.
2. Touch
General preferences
Menu
➔
:
Settings
• Confirm before deleting
Applications
for settings:
: Have your device prompt you to confirm
Delete actions.
• Confirm before archiving
: Have your device prompt you to confirm
archiving actions.
• Confirm before sending
: Have your device prompt you to confirm
Send actions.
• Auto-advance
: Choose a screen to show after you delete or
archive a conversation.
•Message text size
• Clear search history
• Restore default for “Show pictures”
: Set the size of text in message displays.
: Remove previous searches you performed.
: Restores the default setting
(do not show pictures automatically) for all the people who send you
email, including those whose Show pictures setting you may have
changed when reading messages from them.
44
➔
Gmail account settings
• Sync options
–
Gmail sync for this account is ON/OFF
Gmail synchronization turned on for this account in the
sync
settings. Touch to open those settings.
–
Labels to Sync
–
Auto-download attachments
messages when connected through Wi-Fi.
• Notifications
–
Email notifications
in the Status Bar.
–
Ringtone
–
Vibr ate
: Choose vibration settings for email notifications.
–
Notify once
new email, not for every new message.
• Signature
:
–
Signature
About Gmail
•
Tou ch
Feedback?
(displays your Gmail account name):
:
: Choose which labels are synchronized.
: Download files attached to recent
:
: When enabled, notifications for new email appear
: Choose a ringtone for new email notifications.
: When enabled, a notification appears in the Status Bar for
: Create a text signature to add to outgoing messages.
:
to send Gmail feedback to Google.
: Indicates whether you have
Account and
Page 49
Use Email to view and manage all your email accounts in one
application.
Configuring Email Accounts
Note:
If you want to set up a Corporate email account or one that uses a
specific exchange server, see “Setting up a Corporate Email Account”
on page 45
1. From a Home screen, touch
Email
.
2. At the
Note:
3. Review the Account options screen. Available options vary,
Set up email
Password
, then touch
If you are not sure about what value a setting should have, contact
your Email Service Provider for more information.
screen, enter an
Next
.
Applications
Email address
➔
and
depending on the provider:
• Email check frequency
: Enter how often you want your device to
check for new emails.
• Notify me when email arrives
: Touch this option if you want an
audio alert when new email arrives. A checkmark will appear.
4. Touch
Next
.
5. Enter an account name for the email account just added,
which is displayed on the email screen.
6. Enter your name as you want it to appear on outgoing
messages.
7. Touch
Done
.
The device communicates with the appropriate server to
set up your account and synchronize your email. When
complete, your email appears in the Inbox for the account.
Note:
To configure email account settings at any time, use
➔
Settings
. Touch the account to display Account settings.
Menu
Setting up a Corporate Email Account
Use the following procedure to configure your tablet to
synchronize with a corporate email account.
1. From a Home screen, touch
Email
.
Applications
➔
Your accounts screen displays with an Email setup screen
displayed.
2. Enter you email address in the
3. Enter your password in the
4. If you want to see your password as it is being typed, touch
Show password
5. Touch
to create a checkmark.
Manual setup
at the top right of the screen.
Email address
Password
field.
field.
Messaging 45
Page 50
6.
Touch the
Microsoft Exchange ActiveSync
7. Enter all the Exchange server information, Domain/
field.
Username, Password, and Exchange server, then touch
Next
.
Note:
If you are not sure about what value a setting should have, contact
your Exchange administrator for more information.
8. At the prompt touch
OK
.
The Account options screen is displayed.
9. Enter the desired information in the different fields, then
touch
Next
.
10. Enter an Account name for this account (Optional).
Wait for the Inbox to synchronize before use.
11. Touch
12. Touch
Done
.
Menu ➔ Settings
to change the account
settings.
Adding Additional Email Accounts
To add additional email accounts:
1. From a Home screen, touch
Email
.
2. Touch
3. Enter the
46
Menu
➔Settings
Email address, Password
Applications
➔
Add account
➔
.
, and so on.
Composing and Sending Email
1. From a Home screen, touch
Email
.
2. Touch an account, if you have more than one account set
up, then touch
3. Touch the
Compose
To
field to enter recipients. As you enter names
.
Applications
➔
or email addresses, matching contacts display. Touch a
contact to add it to the field.
4. Touch the
5. Touch the body of the email to enter the text of your email.
6. Touch
Subject
field to enter a subject.
Send
to send the message.
Managing Email
You can view email you receive to all accounts in the
view
screen or you can view email accounts individually.
1. From a Home screen, touch
Email
.
2. Touch the drop-down list box at the top left of the screen to
Applications
Combined
➔
select:
• Combined view
•<Account Name
: View all email in a combined inbox.
>: View email for the specific account only.
Page 51
Account Settings
Account settings lets you configure handling of email on your
device.
Note:
Available settings may vary depending on the type of email account.
Also, the order that these settings are displayed may vary.
1. From a Home screen, touch
Email
.
2. Tou ch
Menu
➔
Settings
Applications
➔
, then touch an account for
options:4
General settings
• Account name
•Your name
• Signature
• Email check frequency
: Enter a name to identify this account.
: Enter your name as you want it to appear.
: Enter a signature to add to email from this account.
: Enter how often you want the device to
check for new emails.
• Default account
: When enabled, email from your device is
automatically sent from this account.
• Always Cc/Bcc myself
: Lets you manage whether your email
address is included in the Cc or Bcc lines.
Notification settings
• Email notifications
: When enabled, the New Email icon appears in
the Status Bar when a new email arrives.
• Select ringtone
: Choose a ringtone for email notifications for this
account.
•Vibrate
: When enabled, email notifications for this accounts are
accompanied by vibration.
Server settings
• Incoming settings
• Outgoing settings
: Configure incoming server settings.
: Configure outgoing server settings.
Common settings
• Forward with files
: Set whether to include file attachments when
forwarding an email.
Common settings
• Forward with files
: Forwards the file attachments to another email
address.
Messaging 47
Page 52
Google Talk
Talk is Google’s instant messaging and audio and video chat
service. You can use it to communicate, in real time, with other
people who also use Google Talk on another Tab or phone or on a
computer.
Tip:
Talk requires that you have a Google account. To set up your Google
account on your device use
information, refer to “Accounts and Sync” on page 120
Accounts and sync
settings. For more
Open Talk and Sign In
1. From the Home screen, touch
Tal k
.
Applications
➔
If you are not signed in to a Google account, the Sign in
with your Google Account screen displays.
2. Touch
Create account
to create a new Google account.
– or –
Enter your
Email
address and
Password
and touch
Sign in
if you have an existing Google account.
Note:
If you have already set up your Google account, you are automatically
logged in. Just touch
48
Sign in
.
3. After entering your user name and password, touch
Sign in
.
Once sign in is complete, the Talk main screen displays.
Invite a Friend to Chat
You can invite anyone with a Google Account to become your
friend in Google Talk, so you can chat with each other and view
each other’s online status.
1. While viewing your Friends list, touch
2. Enter your friend’s address and touch
Your friend’s address in Talk is a Gmail or other email
address that is configured to connect to Google Talk.
If your friend accepts your invitation, they are added to
your Friends list in Talk and you can share each others
status in Talk and other applications.
View and Accept an Invitation to Become a Friend
,
When a contact invites you to become a friend in Google Talk,
you receive a notification in the System bar and the
invitation appears in your Friends list.
1. Touch the invitation.
Add friend
Send invitation
.
.
Page 53
Touch
Accept
2.
Decline
, if you want to accept the invitation and chat,
, if you do not want to chat with and share your
Google Talk status with the sender right now, or
you do not want to receive any more invitations from that
person.
If you touch
Accept
, the friend is added to your Friends list
in Talk and you can share your status in Talk and other
applications.
Options While Chatting
There are several options that are available while you are
chatting.
䊳
Touch
Chat Menu
to the right of the chat window. The
following options display:
• Go off the record/Stop chatting off the record
: Set whether you
want to stop saving your chat to the chat history.
• Friend info
: Display information about the friend with which you are
chatting.
–
View in Contacts
–
Nickname
–
Show in Friends list
Options are: Always, Never, or Automatically. Automatically determines
whether your friend is popular with you.
• Block friend
: View the friend’s Contact information.
: Create a nickname for the friend.
: Set how to show this friend in you Friends list.
: Block a friend from sending you messages and
remove the friend from your Friends list.
Block
, if
• Remove friend
: Remove the friend as if you never accepted their
invitation. However, the friend is not blocked.
Note:
If you touch the
chat invitation to, to make the Friend visible again.
• Add to chat
• Clear chat history
Remove friend
option, touch
Add friend
: Select another friend to join in the current chat.
: Remove the history of this chat from your
device.
Additional Talk Options
1. While viewing your Friends list, touch to search your
Talk messages. Use the on-screen keypad to enter a
search term. Touch on the keypad to search your Talk
messages.
2. Touch
• All friends
Menu
to display the following options:
/
Most popular
: List all friends or the most popular
friends.
• Close all chats
• Sign out
• Settings
information, refer to
•Help
3. Touch a Friend’s entry to display the Chat entries for that
: Terminates any chats that you have open.
: Sign out of Google Talk and display the Talk main screen.
: Offers various settings for Google talk. For more
“Google Talk Settings”
on page 50.
: Displays additional help information.
Friend.
Messaging 49
➔
Send
Page 54

Google Talk Settings
Use Google Talk Settings to configure your Talk account. If you
have more than one account, each maintains its own Talk
settings.
1. From the Home screen, touch
Tal k
.
2. Tou ch
Menu
➔
Settings
Applications
➔
, then touch an account for
options:
General settings
• Sign in automatically
: Enable or disable automatic sign in to
Google Talk when you power on your tablet.
• Mobile indicator
: Check and your friends see an outline of an
android next to your name in their Friends list when you are signed
into Google Talk on an Tab or phone.
• Set status to away when the screen is turned off
: Check to
change your Talk status to Away when your screen turns off. When
unchecked, your status is not changed.
Chat notifications
• IM notifications
: Set whether to open a dialog, display a
notification in the System bar, or neither, when you receive a text
chat.
• Notification ringtone
: Set a ringtone to sound, or silent, when you
receive a text chat.
•Vibrate
: Set how vibrate functions. Choices are: Always, Only when
silent, or Never.
50
• Invitation notifications
: Enable or disable a notification in the
System bar when you receive an invitation to become a friend in
Tal k.
Voice & video chat settings
• Video chat notifications
: Set whether to open a dialog or display a
notification in the System bar when you are invited to a video chat.
• Video chat ringtone
: Set a ringtone to sound, or silent, when you
receive an invitation to a video chat.
•Vibrate
: Set how vibrate functions. Choices are: Always, Only when
silent, or Never.
Account
• Blocked friends
: Displays a list of friends you have blocked. Touch
a blocked friend and then touch OK to unblock the friend.
• Clear search history
: Erases your search history. No previous
searches are shown until you search for new words.
• Manage account
more information, refer to
: Opens the Accounts and sync settings. For
“Accounts and Sync”
on page 120
About
• Terms & privacy
: Displays the Google Talk terms of use and
privacy policies.
Page 55

Social Hub
Access your social networks, such as Facebook, Twitter, and
LinkedIn, and your email all in one place.
䊳
From the Home screen, touch
Social Hub
.
Applications
➔
Add an Account
1. In the Social Hub screen, touch
Set up now
.
The Add account screen displays.
2. Touch the account you want to add and then enter the
required information, such as email address and
password.
The added account now appears on the Social Hub screen
with any other accounts.
3. Touch an account entry to start the application.
Messaging 51
Page 56
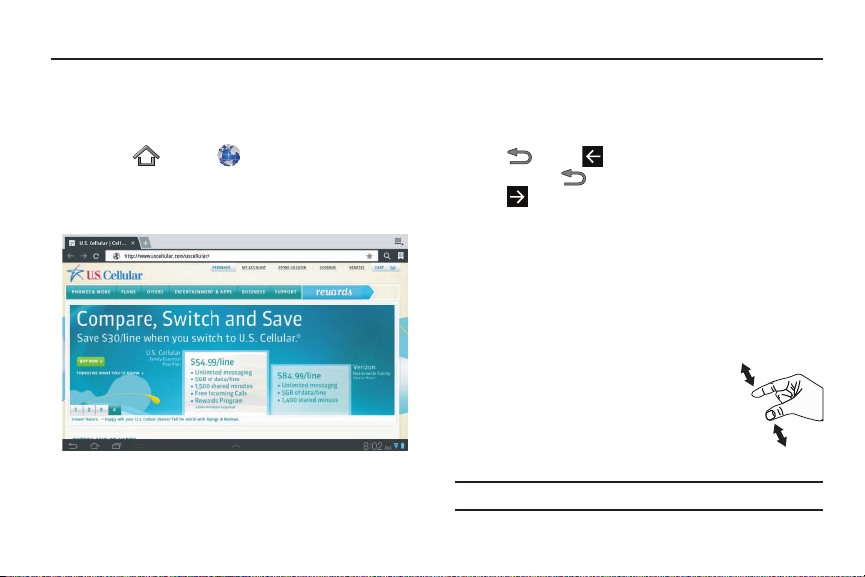
Section 6: Web
Browser
Your device is equipped with a full HTML browser that allows you
to access the internet.
䊳
Touch
Home
➔
Browser
.
The Browser screen appears showing Your Wireless
Provider’s portal web page (similar to the following
sample).
52
Navigating the Web
The following options are available for web navigation.
Command Keys
•
Touch
–
•
Touch to go forward to a recent page.
Touching and dragging
•
Touch and drag your finger on the screen to navigate pages and to
Back
Touch and hold
or to return to the previous page.
Back
to display a list of Most visit pages.
reposition pages within the screen.
Entering text in a field
•
While browsing, touch a text field to display the QWERTY keyboard to
enter text.
Zoom
•
Tap the screen twice to zoom in or out.
• Use two fingers, such as your index finger
and thumb, to zoom out by making an inward
pinch motion on the screen. To zoom in,
make an outward motion by sweeping your
fingers out.
Tip:
For convenient browsing, you can rotate the device to landscape mode.
Page 57
Selecting items on a page
While browsing, use gestures and menus to navigate:
•
Touch an item to select it.
•
Touch a hyperlink to follow the link.
•
Touch and hold on a hyperlink for these options:
–
Open
: Open the linked page.
–
Open in new tab
–
Save link
–
Copy link URL
–
Select text
: Open a new window to display the linked page.
: Save the linked page to Download history.
: Save the link’s URL to the clipboard.
: Copy the link text to the clipboard.
The following additional options can appear with images used as links:
–
Save image
–
–
–
:
Copy image
:
View image
:
Set as wallpaper
:
Using Browser Windows
You can have multiple windows open at one time and easily
switch between windows.
1. Touch
2. To open a new window, touch at the top of the screen.
3. To switch to another open window, touch its tab at the top
Home
➔
Browser
.
of the screen.
4. To delete an open window, touch the tab at the top of the
screen, and then touch .
Entering a URL
Access a website quickly by entering the URL.
1. Touch
2. Touch the
Home
➔
Browser
.
URL
field at the top of the screen, then enter the
URL using the QWERTY keyboard.
As you enter characters, potential matches display.
Note:
Use the
3. Touch a match to complete the URL.
Delete
key to clear the URL field, if necessary.
– or –
Continue entering characters and touch to load the
page.
Copying Fields or Text
Copy information from a web page to the clipboard for pasting,
searching, or sharing.
Web 53
Page 58
Selecting, Copying, and Pasting Text
1. Touch
2. Browse to a web page.
3. On the web page, touch and hold on the text until you see
Home
➔
Browser
.
the text you want highlighted, then stop touching the
screen.
The text is highlighted.
4. Touch and drag the tabs to the left or right to select
more or less text.
5. Touch
6. To paste the copied text, navigate to the desired field (or to
Copy
text or touch
at the top of the screen to copy the selected
Cancel
to stop.
another application), then touch and hold in a text field and
touch
Paste
in the pop-up.
Copying and Pasting a Hyperlink or URL
1. Touch
2. Browse to a web page.
3. Touch and hold on the link or URL, then touch
Home
➔
Browser
.
Copy
top of the screen.
4. To paste the copied link or URL, navigate to the desired
field (or to another application), then touch and hold in a
text field and touch
54
Paste
on the pop-up menu.
at the
Using Bookmarks
While browsing, bookmark a site to quickly access it later.
Creating a bookmark
1. Touch
2. Browse to a website, then touch
The
and
3. Touch
Bookmarks
4. Touch
Home
➔
Browser
Add bookmark
Mobile phone number
Add to
options list displays. Confirm the
(URL/address) for the bookmark.
, touch the drop-down menu, and touch
.
OK
to save the bookmark.
.
Add Bookmark
A gold star displays on the Bookmarked page.
Accessing Bookmarks and Histor y
Launch a bookmarked page or reload recent pages.
1. Touch
2. Touch
3. On the
•
•
Home
➔
Browser
.
Bookmarks and History
Bookmarks
tab, use these options:
.
Touch a bookmark to load the page.
Touch and hold on a bookmark for these options:
–
Open
: Open the bookmarked page.
–
Open in new tab
–
Edit bookmark
–
Add shortcut to home screen
screen.
: Open the linked page in a new window.
: Make changes to the bookmark description.
: Create a bookmark on the Home
.
Label
Page 59

–
Share link
: Use Bluetooth, Email, or Gmail to send the link.
–
Copy link URL
–
Delete bookmark
–
Set as homepage
4. On the
Last 7 days
•
Touch a page to reload it.
•
Touch the next to a page to bookmark it.
•
Touch and hold on a page for these options:
–
Open
–
Open in new tab
–
Add to bookmarks/Delete bookmark
remove the bookmark for this page.
–
Share link
–
Copy link URL
–
Remove from history
–
Set as homepage
: Save the link’s URL to the clipboard.
: Remove the bookmark.
: Assign the bookmarked link as the home page.
History
tab, touch
Most visited, Tod ay, Yes t er da y
to use these options:
: Open the web page.
: Launch the web page in a new window.
: Use Bluetooth, Email, or Gmail to send the link.
: Save the link’s URL to the clipboard.
: Remove the record of this page.
: Assign the bookmarked link as the home page.
: Bookmark the page or
Browser Menu
While viewing a web page, touch
•
New tab
: Open the web page in a new window, under a new tab.
•
New incognito tab
: Open the web page in a new window, under a
Menu
for options:
new tab, and the pages you view in the new window will not appear in
your browser history or search history. See the on-screen explanation
of
going incognito
•
Find on page
.
: Search for content on the current page.
, or
•
Share page
•
Save page
“Downloads”
•
Page info
•
Downloads
•
Print
•
Settings
: Use Bluetooth, Email, or Gmail to send the web page URL.
: Save this page. For more information, refer to
on page 90
: View information about the current page, including the URL.
: View and manage recent downloads.
: Print the current screen or page to a Samsung printer.
: Customize the Browser by using the following options:
General
–
Set homepage
you launch the Browser.
–
Sync with Google Chrome
with your Google account.
–
Form auto-fill
with a single click.
–
Auto-fill data
information:
: View and set the default first page that displays when
: Associate or remove Android bookmarks
: Enable or disable form auto-fill to complete web forms
: If
Form auto-fill
• Full name
: Enter your name.
• Company name
• Address line 1
• Address line 2
•City / Town
• County
• Zip code
: Enter the name of your city or town.
: Enter the name of your county or parish.
: Enter your ZIP or postal code.
is enabled, set up the following
: Enter a company name.
: Enter your address.
: Enter any additional address information.
Web 55
Page 60

• Country
: Enter the name or abbreviation for your country.
• Phone number
•Email
: Enter your telephone number.
: Enter a valid email address.
Privacy and Security
–
Clear cache
–
–
: Delete content and databases stored on the device.
Clear history
Show security warnings
: Delete the list of previously-visited pages.
: When enabled, the Browser warns you if
there is a problem with a site’s security.
–
Accept cookies
: When enabled, allows Browser to save and read
cookie information used by web pages.
–
Clear all cookie data
–
Remember form data
: Delete cookie information saved to the device.
: When enabled, stores information you enter into
forms to make future forms easier.
–
Clear form data
–
Enable location
: Deletes saved form information.
: When enabled, sites you visit can request access to
your location.
–
Clear location access
–
Remember passwords
: Clear location access for all websites.
: When enabled, saves usernames and
passwords for sites you visit, to make future visits easier.
–
Clear passwords
: Clear all saved usernames and passwords.
Advanced
–
Select search engine
: Choose a search engine from Google, Yahoo!, or
Bing.
56
–
Open in background
: When enabled, new windows open behind the
current window.
–
Enable JavaScript
: When enabled, the Browser automatically runs
JavaScript scripts on pages you visit.
–
Enable plug-ins
: When enabled, the Browser automatically loads and
runs plug-ins on pages you visit.
–
Internet settings
–
Open pages in overview
: Advanced settings for individual websites.
: When enabled, displays an overview of newly-
opened pages.
–
Auto-fit pages
: When enabled, the Browser automatically sizes web
pages to fit your device’s display.
–
Block pop-up tabs
–
Load images
: When enabled, blocks pop-up windows.
: When enabled, images are automatically loaded when
you visit a page. When disabled, images are indicated by a link, which
you can touch to download the picture.
–
Text encoding
–
Reset APNs:
: Choose a default character set for web pages.
Clear all browser data and reset all settings to the factory
defaults.
Labs
–
Quick controls
: Access quick controls and hide application and URL
bars by sweeping your tablet.
–
Most visited pages
: Sets your homepage to show your most visited
pages.
–
Google Instant
: When using Google Search, Google Instant allows you
to have results shown as you type (this can increase data use).
Page 61
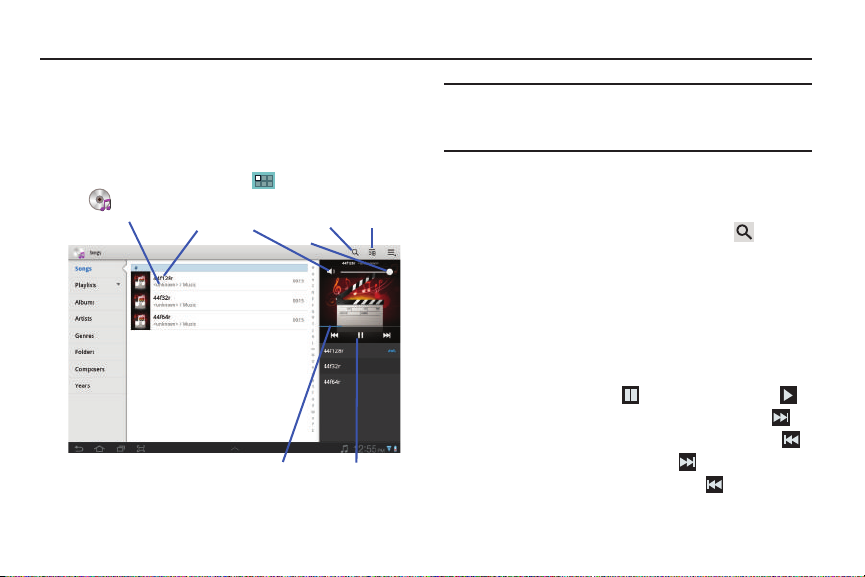
Section 7: Multimedia
Search Playlist
Song Title
Artist / Album
Playback Controls
Progress
Bar
Mute/Unmute
Volume
Music Player
The Music Player plays
music and other audio files that you purchase
or copy from your computer.
Songs Screen
1. From the Home screen, touch
Music player
. The
Songs
Applications
screen appears.
➔
Note:
Music Player searches your device’s internal storage for music and
playlists. This can take from a few seconds to several minutes,
depending on the amount of new music added since you last launched
Music Player.
2. To find a song to play, do one of the following:
•
Browse the menu options on the left of the screen, and the
associated song lists or playlists.
•
Search for a song or playlist by name by touching
entering part of the song title.
3. To begin music playback, touch a song or playlist.
The Music Player thumbnail appears to the right of the
music list.
4. During playback, use the sound and playback controls:
•
To adjust the volume, press the Volume key (on the left side of your
device) up or down.
•
To pause playback, touch . To resume playback, Touch .
•
To scan forward through the current song, touch and hold ,
•
To scan backward through the current song, touch and hold ,
•
To play the next song in the list, touch .
•
To play the preceding song in the list, touch .
Multimedia 57
and
Page 62
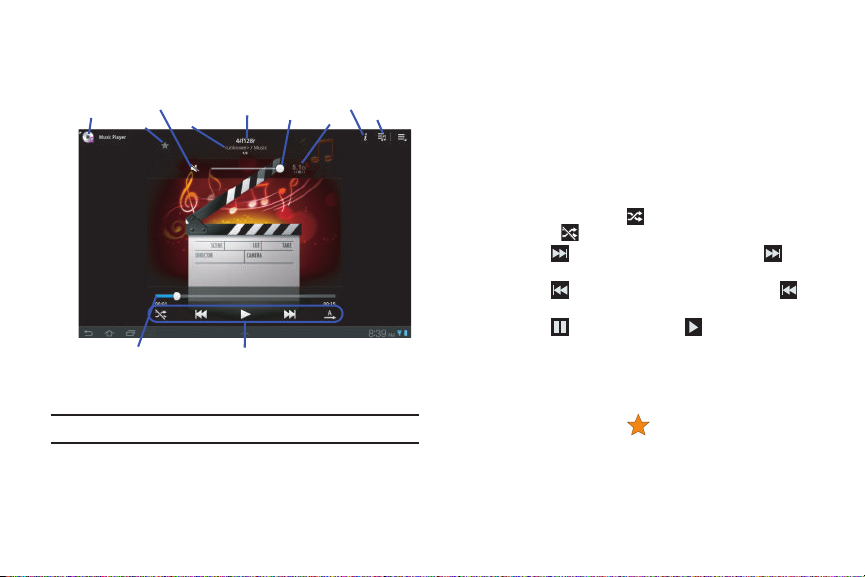
Music Player Screen
Info Music
Song Title
Artist / Album
Playback Controls
Progress
Bar
Mute/Unmute
Favorite
Songs
screen
Volume
Slider
List
5.1Ch
1. In the
2. During playback, use the sound and playback controls:
Tip:
58
Songs
screen, touch the center of the Music Player
thumbnail to enlarge it to fill the display.
To hide the sound and playback controls, touch the screen.
•Mute
/
Unmute
: Touch to deactivate/activate playback sound and
on-screen Volume Slider.
• Volume Slider
: Touch and drag on the scale to set volume. You can
also adjust playback volume by pressing the Volume Key on the
side of the device.
• 5.1 Channel Mode
•Progress Bar
: Touch to enable stereo “surround” sound.
: Touch and drag the end of the progress bar to scan
forward or backward through the current song.
–
Time indicators
how much of the song has played (left) and the length of the song (right).
• Playback controls
–
Shuffle
disabled , songs play in the order they appear in List view.
–
Touch to advance to the next song. Touch and hold to scan
forward through the current song.
–
Touch to go back to the previous song. Touch and hold to
scan backward through the current song.
–
Touch to pause playback. Touch to resume playback.
–
Repeat
repeat mode.
• Songs screen
: The time indicators show, in minutes and seconds,
: These buttons control the playback of songs:
: When enabled , songs play in random order. When
: Touch to repeat the current song, repeat all songs, or disable
: Touch to switch from the Music Player screen to the
Songs screen.
•Favorite
: Touch the star to mark the current song as a
favorite.
•Info
: Touch to view information about the current song.
•Music List
: Show other songs in list with current song.
Page 63
Options While Playing a Song
There are various options and controls available while a song is
playing.
Songs screen
1. From the Home screen, touch
Music Player
. The
Songs
Applications
➔
screen appears in the
display.
Note:
Music Player searches your device’s internal storage for music and
playlists. This can take from a few seconds to several minutes,
depending on the amount of new music added since you last launched
Music Player.
2. Touch
Songs, Playlists, Albums, Artists, Genres, Folders
Composers
, or
Yea r s
to change the way you view the
contents of your music library.
3. Touch an album or song.
4. Touch
Search
to find a song by title, artist name, or
album title.
5. Touch
Add to playlist
to add the selected song to a
new or existing playlist. (For more information, refer to
“Creating a Playlist” on page 60 or to “Adding Songs to
Playlists” on page 60.)
,
6. Touch
• Delete
Menu
to display the following options:
: Touch the box for any song or album you want to delete or
touch the box for
Select all
to select every song or album. A check
mark indicates the song or album is to be deleted. Touch
Delete
to delete the selected items, then touch
•Share via
: Share the current song by using AllShare, Bluetooth,
Gmail, or Email.
• Set as alarm tone
• Settings
–
Sound settings
enable or disable 5.1 Channel Mode for stereo sound.
–
Music menu
Player screen (
Yea r s
or
Music Player screen
1. In the
Songs
: Use the current song and as an alarm tone.
: The following settings display:
: Choose
Equalizer
and
: Choose which music file options appear in the Music
Albums, Artists, Genres, Folders, Composers
).
screen, touch the center of the Music Player
thumbnail to enlarge it to fill the display.
2. Touch
3. Touch
Info
to list details about the current song.
Music List
to show the current song in a list
with other songs.
4. Touch
• Add to playlist
•Via Bluetooth
Menu
to display the following options:
: Add the current song to an existing or new Playlist.
: Share the current song ove r a Bluetooth connection.
Sound effects
Multimedia 59
Done
.
settings, and
, and/
Page 64
•Share via
: Share the current song by using AllShare, Bluetooth,
Gmail, or Email.
• Set as alarm tone
• Settings
–
Sound settings
enable or disable 5.1 Channel Mode for stereo sound.
–
Music menu
Player screen (
Yea r s
or
: Use the current song and as an alarm tone.
: The following settings display:
: Choose
Equalizer
and
Sound effects
: Choose what music file options appear in the Music
Albums, Artists, Genres, Folders, Composers
).
settings, and
Managing Your Music
Searching for Music
To find music in your library:
1. From a Home screen, touch
➔
Music player
2. Touch
3. Type the name of an artist, album, song, or playlist.
Search
.
.
Applications
Matching songs are displayed in a list below the search
box.
4. Touch a matching song to play it. Touch a matching album,
artist, or playlist to view a list of its songs.
60
, and/
Creating a Playlist
1. From a Home screen, touch
Music player
2. Touch the name field to enter a name for the playlist.
3. Touch
Renaming a Playlist
1. From a Home screen, touch
2. Tou ch
3. Touch the name field to enter a new name for the playlist.
4. Touch
Adding Songs to Playlists
1. From a Home screen, touch
Done
➔
Playlists
Menu ➔ Rename playlist
Music player
2. Tou ch
➔
to save the new playlist.
Music player
.
, touch a playlist, and then touch
Done
to save the new playlist.
.
and touch a playlist.
Applications
Add to playlist
Applications
.
Applications ➔
➔
➔ New playlist
– or –
Touch
Playlists
, touch a playlist, and then touch
Add music
All songs are displayed.
.
.
Page 65
Tou ch next to each song you want to add to the
3.
selected playlist.
– or –
Tou ch next to
Add all
to add all songs to the playlist.
The song(s) appear under the playlist to the right of the
songs list.
4. Touch
Removing Songs from Playlists
1. From a Home screen, touch
2. Touch a playlist.
Done
Music player
to save the playlist.
➔
Add to playlist
Applications
.
All songs are displayed to the left and the songs in the
playlist are displayed on the right, under the playlist name.
3. Tou ch
to remove a song from the playlist.
4. Touch
Changing the Order of a Playlist
1. From a Home screen, touch
2. Touch
3. Touch
4. Touch the grid on an entry and drag the entry to a
Done
Music player
Playlists
and touch a playlist.
Reorder
to save the playlist.
Applications
.
to change the order of the songs.
new position in the list.
➔
➔
5. Touch
Playing a Playlist
1. From a Home screen, touch
2. Display the
3. Touch
playlist title that you created. and touch
Deleting a Playlist
1. From a Home screen, touch
2. Touch
3. Touch
4. Touch the box next to a playlist title. A check mark
Done
to change the order and save the playlist.
Music player
.
Playlists
library view.
Favorites, Most played
Music player
Playlists
and touch a playlist.
Delete
.
in the Application bar.
Applications
➔
, or Recently added, or touch a
Play
.
Applications
➔
indicates the playlist is to be deleted.
5. Touch
Changing Music Settings
Remove
to delete the selected playlist.
To change settings in the Music application:
1. From a Home screen, touch
Music player
.
Applications
Multimedia 61
➔
Page 66
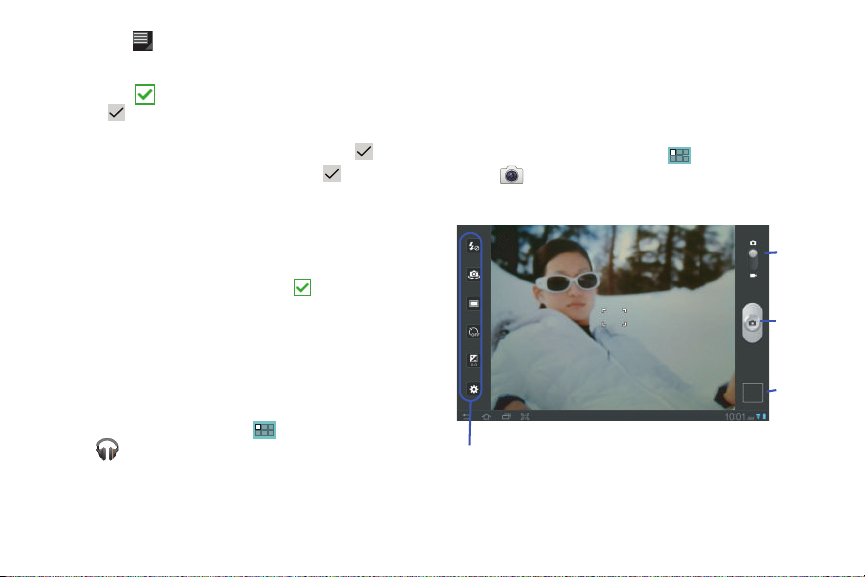
2.
Options
Image
Mode
Tak e
Viewer
Touch
• Delete
Menu
to display the following options:
: Touch the box for any song or album you want to delete or
touch the box for
Select all
to select every song or album. A check
mark indicates the song or album is to be deleted. Touch
Delete
to delete the selected items, then touch
•Share via
: Share your music by using AllShare, Bluetooth, Gmail, or
Email. Select the songs you want to share and touch
• Set as alarm tone
: Choose a song and touch
song as an alarm tone.
• Settings
: The following settings display:
–
Sound settings
enable or disable 5.1 Channel Mode for stereo sound.
–
Music menu
on the main music screen. A check mark
that it is enabled.
: Choose
Equalizer
and
: Enable or disable the music display options that appear
Music
With the Music application, while online, you can play music that
you have added to your music file as well as any music you
copied from your PC. While offline, you can listen to music you
have copied from your PC.
1. From a Home screen, touch
Applications
Music.
Your music is displayed as icons on the screen.
2. Sweep your screen to the left to see all of your music.
62
Done
Set
Sound effects
settings, and
next to an option means
➔
.
Share
to use the
3. Touch an icon to play the song.
4. Follow the on-screen instructions.
Camera
Use your device’s built-in camera and camcorder to take photos
and record videos.
.
䊳
From the Home screen, touch
Camera
.
The Camera screen displays.
Applications ➔
Page 67
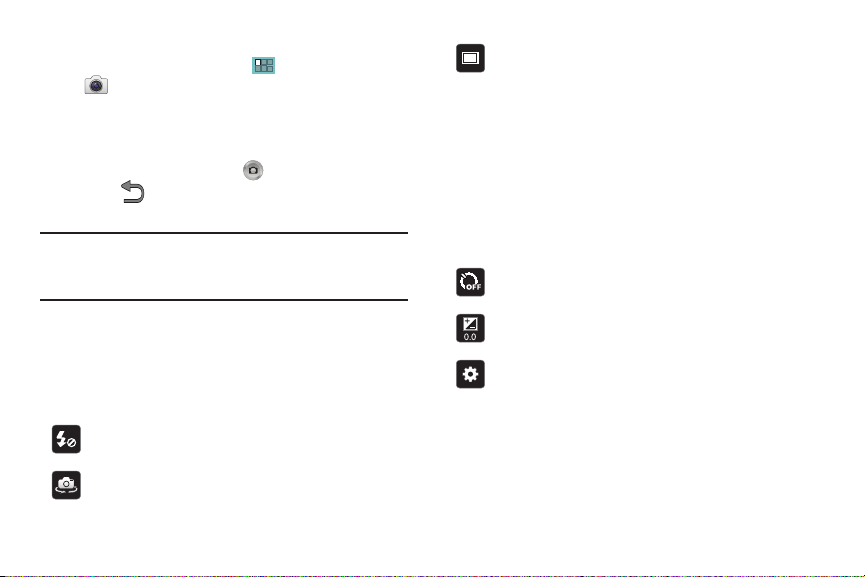
Taking Photos
1. From the Home screen, touch
Camera
.
2. Using the display as a viewfinder, compose your photo by
Applications ➔
aiming the lens at the subject. To configure settings, see
“Camera Options” on page 63.
3. To take the photo, touch the
4. Touch
Back
to leave the Camera and display the
Tak e
button.
previous screen.
Important!:
Do not take photos of people without their permission.
Do not take photos in places where cameras are not allowed.
Do not take photos in places where you may interfere with
another person’s privacy.
Camera Options
Before you start taking photos, use the camera options to
configure the camera for best results. Camera options are
represented by icons on the left side of the screen. While in
Camera mode, touch the following icons to set camera options:
Flash
: Choose a flash mode from Auto flash, On, or Off,
which is the default.
Self shot
: Touch to switch to the front-facing camera lens
and take a photo of yourself.
Shooting mode
•
Single shot
•
Smile shot
: Choose an automatic shooting mode:
: Take a single photo.
: Touch the Camera button to
automatically focus on the subject’s face and take
the photo.
•
Panorama
: Touch the Camera button to take a photo,
then use the on-screen guideline to move the
viewfinder and take the next 7 shots automatically.
•
Action shot
: Detects action and creates a panorama
of the moving object.
Timer
: Set a timer for how long to wait before taking a
photo. Options are: Off, 2 sec, 5 sec, and 10 sec.
Exposure value
: Set the brightness of the photo by
sweeping the bar up or down.
Settings
:
•
Focus mode
: Set the focus mode to Auto focus or
Macro.
•
Scene mode
: Choose an automatic scene mode from
None, Landscape, Night, Sports, Party/Indoor,
Sunset, Dawn, Text, or Candlelight.
Multimedia 63
Page 68
•
White balance
: Set the light source. Options are:
Auto, Daylight, Incandescent, Fluorescent, or Cloudy.
•
Effects
: Apply an effect to photos. Options are: None,
Grayscale, Sepia, or Negative.
•
Resolution
: Set a size for the image. Options
are: 3.2M (2048x1536) or 0.8M (1024x768).
•
Metering
: Set how the camera measures or meters
the light source: Matrix, Center-weighted, or Spot.
•
GPS tag
: Enable or disable tagging of photos with
your GPS location. displays on the screen when
this option is active.
Caution!:
Be aware that your location may be present on a
photo when posting your photos on the internet.
Viewing Photos with the Image Viewer
After taking a photo, use the Image Viewer to view, share, delete,
or edit photos.
1. Touch
2. Touch the screen to show or hide Image Viewer options.
64
Image Viewer
to view the photo.
3. Touch the screen with two fingers or double-tap on the
screen to zoom all the way in or out. For more information,
refer to “Pinch” on page 18
4. Sweep across the screen to display the next or previous
photo. The current photo is outlined in the thumbnails at
the bottom of the screen. Touch a thumbnail to view the
photo it represents.
5. Touch
Slideshow
to show the current photo and your
other phones in the Gallery as a slideshow.
6. Touch
Gmail,
7. Touch
Touch
Note:
Photos are stored in the /Root/DCIM/Camera folder as jpg files.
8. Touch
Share via
to use AllShare,
Picasa, or Social Hub
Delete
Confirm delete
to delete the photo being displayed.
to delete the photo or
Menu ➔ Set as
Bluetooth
to
share the photo.
, Email,
Cancel
to assign the photo as a
Contact photo, Lock Screen, or Wallpaper; and to access
other options. For more information, refer to “Gallery” on
page 68.
9. Press
Back
to return to the Camera to take more
photos.
to exit.
Page 69
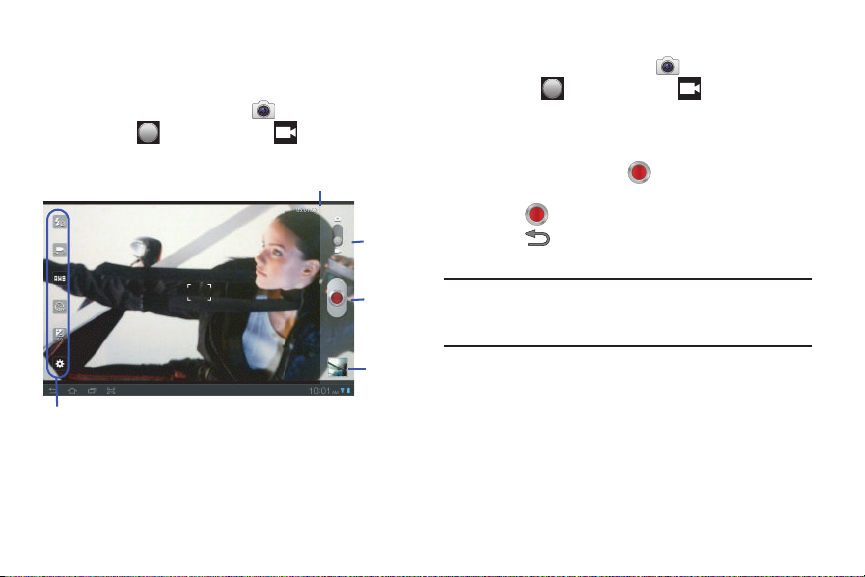
Camcorder
Record
Options
Image
Mode
Viewer
Current or Elapsed Time
Use your device’s built-in Camcorder to record high-definition
video in 720p resolution.
1. From the Home screen, touch
2. Slide the
Mode
button to the
Camera
The Camcorder screen displays.
.
Camcorder
setting.
Recording Videos
1. From the Home screen, touch
2. Slide the
3. Using the display as a viewfinder, compose your shot by
Mode
button to the
Camera
Camcorder
.
aiming the lens at the subject. To configure settings, see
“Camcorder Options” on page 66
4. To start recording, touch
the
Record
button flashes.
5. Touch
6. Touch
Record
Back
to leave the Camcorder and display the
Record
to stop recording.
. During recording,
previous screen.
Important!:
Do not take videos of people without their permission.
Do not take videos in places where cameras are not allowed.
Do not take videos in places where you may interfere with
another person’s privacy.
Multimedia 65
setting.
Page 70
Camcorder Options
Before you start recording videos, use the camcorder options to
configure the camcorder for best results. Camcorder options are
represented by icons on the left side of the screen. While in
Camcorder mode, touch the following icons to set camcorder
options:
Flash
: Touch Off or On.
Self shot
: Touch to switch to the front-facing camera lens
and record a video of yourself.
White balance
: Set the light source. Options are: Auto,
Daylight, Incandescent, Fluorescent, or Cloudy.
Timer
: Set a timer for how long to wait before recording a
video. Options are: Off, 2 sec, 5 sec, and 10 sec.
Exposure value
: Set the brightness of the video by
sweeping the bar up or down.
Settings
➔ Video
:
•
Effects
: Apply an effect to videos. Options are: None,
Grayscale, Sepia, or Negative.
•
Resolution
: Set a size for the video. Options
are: 1280x720 or 640x480.
66
Viewing Videos with the Image Viewer
After recording a video, use the Video Viewer to play, share, or
delete your video.
1. From the Camcorder screen, touch
Quick View
to display
the available videos.
2. Touch the thumbnail (at bottom of screen) that represents
the video to share.
3. Touch
Bluetooth
4. Touch
Touch
5. Touch
Share via
to use AllShare, Social Hub, YouTube,
, Gmail, or Email to share the video.
Delete
Confirm delete
to delete the video being displayed.
to delete the photo or
Slide show
to open the current video in the
Cancel
to exit.
Gallery, which offers additional video management
options. For more information, refer to “Gallery” on
page 68.
Note:
Videos are stored in the /Root/DCIM/Camera folder as mp4 files.
6. To play a video, touch
pause the video and touch
Play
. Touch
Resume
Pause
to
to resume playing
the video.
Page 71
Touch and drag the white dot on the progress bar
7.
to fast forward or rewind the video. Touch the left end of
the progress bar to restart the video. Touch the right end of
the progress bar to end the video playback.
– or –
Touch
Rewind to restart the video or
Fast F orward
end the video.
8. Press
Back
to return to the Camcorder.
Video player
Your device’s 10.1-inch 1280x800
WXGA
TFT (PLS) LCD screen
provides playback of videos. Use Video player to view and
manage videos stored on your tablet.
1. From a Home screen, touch
Video player
2. Touch the
3. While viewing the list, touch
•List by
•Share via
.
Thumbnails, List
: Display videos by Name (default), Date, Size, or Type.
: Share the video with
Applications
, or
Folders
tab.
Menu
for options:
AllShare, Social Hub,
Bluetooth, Gmail, or Email.
• Delete
: Touch videos to select them for deletion or touch
to delete all videos. Touch Delete
to deleted the selected
videos.
• Auto play next
: Touch to enable or disable automatic playing of
videos in the order they appear.
to
➔
YouTube,
Select all
4. Touch a video to play it. While playing a video, touch the
screen to display or hide on-screen playback controls.
5. Touch the icon in the upper left corner of the display
screen
while the video is playing
to change the Display Mode
from original size to full screen in ratio or full screen.
•Original Size
• Full-Screen in Ratio View
( ): Changes the display mode to the original size.
( ): Changes the display mode to
the full-screen in ratio option. The video is enlarged as much as
possible without becoming distorted.
• Full-Screen View
( ): Changes the display mode to full screen.
That is, the entire screen is used, which may cause some minor
distortion.
6. While the video is playing, touch
your favorite areas of the video. A yellow mark appears on
the progress bar.
7. During playback, press
•Share via
: Send the video by
Menu
for options:
AllShare, Social Hub,
Bluetooth, Gmail, or Email.
• Bookmarks
: If bookmarks have been set for this video, a thumbnail
and time are displaye d for each bookmark. Touch to r emove a
bookmark.
•Color tone
• Outdoor visibility
• Details
: Set the color tone to Normal, Warm, or Cold.
: Turn outdoor visibility On or Off.
: Provides details about the video, such as Name, Size,
Resolution, Duration, Format, and Date modified.
For more information, refer to “Playing Videos” on page 71.
Bookmark
Multimedia 67
to mark
You Tube ,
Page 72
Videos
The Videos application allows you to rent videos to watch on your
tablet. You can also watch other videos that you have on your
tablet.
1. From a Home screen, touch
Videos
.
The
My Rentals
screen displays.
2. Touch a video to read more information on it.
Applications ➔
The video will display from the Market application where
you can read a synopsis, see previews, and read reviews.
3. Follow the on-screen instructions to rent the video.
4. Touch the
Personal Videos
heading at the top-left of the
screen to view the other videos that you have on your
tablet.
5. Touch the video to watch it from your video player.
Gallery
Your device’s 10.1-inch
provides high-resolution
-inch 1280x800 WXGA PLS TFT LCD screen
display of photos and videos.
Use Gallery to view, capture, and manage photos and videos.
68
Selecting Photos and Videos to View
1. From a Home screen, touch
Gallery
.
All categories display.
2. Touch
By album
to display other ways to group your photos
and videos. Options are:
• By album
: Based on the folder in which they are stored.
•By time
: Based on the time taken.
•By location
•By tags
•By size
3. Touch
4. Touch
: Based on where taken.
: Based on tags applied.
: Based on size.
Camera
to launch the Camera app.
Information
and touch an Album to display
information about it.
5. Touch
• Images and videos
Menu
to access these additional options:
: Choose whether to display Images and
videos, Images only, or Videos only.
• Make available offline
: Allow offline access to selected images
and/or videos.
Applications
➔
Page 73
Viewing Categories of Photos and Videos
1. From a Home screen, touch
Gallery
.
2. Touch a category to view it.
3. Touch
Information
Applications
➔
and touch a photo or video to
display information about it. Touch X in the pop-up to close
it.
4. Depending on the way you chose the category, you can
view it
By Album, By time, By location, By tags
You can also change the category to view
videos, Images only
5. Touch
, or
Videos only
Slideshow
to view a slideshow of the photos
.
, or
Images and
and video thumbnails in the category. Touch the screen to
stop the slideshow and view the photo or video being
displayed.
Viewing Photos and Videos
1. From a Home screen, touch
Gallery
.
2. Touch a category to view it and then touch a photo or video
Applications
➔
thumbnail.
3. Touch the screen to show or hide Gallery options.
By size
4. Touch the screen with two fingers or double-tap on the
screen to zoom all the way in or out. For more information,
refer to “Pinch” on page 18.
5. Touch the thumbnail of the photo or video to view.
6. Touch
Slideshow
to view a slideshow of photos and
video thumbnails in the category. Touch the screen to stop
the slideshow and view the photo or video being displayed.
7. Touch
.
(videos),
video.
8. Touch
displayed. Touch
video or
9. Touch
Share
to use Allshare, Picasa (photos), YouTube
Bluetooth
, Gmail, or
Delete
Confirm Delete
Cancel
to exit.
Menu
to display the following options for
Email to
share the photo or
to delete the photo or video being
to delete the photo or
photos:
• Details
: Provides details about the photo such as Title, Time,
Location, Width, Height, File Size, and so on. Touch the X to close
the pop-up.
Note:
Photos are stored in the /Root/DCIM/Camera folder as jpg files.
• Details
: Provides details about the video such as Title, Time,
Duration, File Size, and so on. Touch the X to close the pop-up.
Multimedia 69
Page 74
For menu options while a video is playing and other video
options, see “Videos” on page 68.
Note:
Videos are stored in the /Root/DCIM/Camera folder as mp4 files.
•Show on map
photo. A Location is added to the photo if
: This option displays if a Location exists for the
GPS tag
Camera settings. Touch this option to open the Map app and
display the Location where the photo was taken. For more
information, refer to
Caution!:
Be aware that your location may be present on a photo when
posting your photos on the internet.
• Rotate Left
“Camera Options”
on page 63.
: Allows you to rotate the photo counterclockwise 90
degrees.
• Rotate Right
• Set picture as
: Allows you to rotate the photo clockwise 90 degrees.
: Assign the photo as a Contact photo, Lock Screen,
or Wallpaper.
•Crop
: Allows you to crop the image. Touch and drag the crop box or
the sides or corners of the crop box to create the crop area, then
touch Ok. Touch X to stop without cropping the photo.
•Print
: Print the current photo to a Samsung printer.
•Copy
: Copy the current photo to the clipboard.
•Motion
: Allows you to access your Motion settings. This will allow
you to use the Tilt and Panning features if desired. For more
information, refer to
70
“Motion Settings”
on page 122.
is set On in the
There is only one option for videos that are not playing:
10. Press
Back
to return to the category screen.
Setting a Photo as a Contact Icon
1. From a Home screen, touch
2. Touch a category, then touch a photo to select it.
3. Touch
4. Touch a contact entry.
The
5. Touch and drag the crop box or the sides or corners of the
Menu ➔ Set picture as ➔ Contact photo
Crop picture
screen displays.
Gallery
.
crop box to create the crop area, then touch Ok to
save the cropped photo as the contact’s icon. Touch X to
stop without cropping the photo.
Tip:
To remove the icon, see “Updating Contacts” on page 36.
Setting a Photo as Wallpaper
1. From a Home screen, touch
2. Touch a category, then touch a photo to select it.
3. Touch
The
Menu ➔ Set picture as ➔ Wallpaper
Crop picture
screen displays.
Gallery
.
.
.
Page 75
Touch and drag the crop box or the sides or corners of the
4.
crop box to create the crop area, then touch Ok to
save the cropped photo as wallpaper. Touch X to stop
without cropping the photo.
Tip:
To change wallpaper, see “Wallpaper” on page 23.
Playing Videos
1. From a Home screen, touch
2. Touch a category to view it and then touch a video
Gallery
.
thumbnail to play the video.
Note:
Videos are marked with a
3. Touch and drag the white dot on the progress bar
Play
button.
to fast forward or rewind the video. Touch the left end of
the progress bar to restart the video. Touch the right end of
the progress bar to end the video playback.
– or –
Touch
Rewind to restart the video or
Fast F orward
end the video.
to
Sharing Photos and Videos
Share photos and videos with your friends.
1. From a Home screen, touch
2. Touch a category to display thumbnails, then select items
Gallery
.
for sharing:
•
To select an entire category, touch and hold a photo or video
thumbnail, then touch
All
to un highlight photos and videos.
•
To select multiple photos or videos from a category, touch and hold
Select all ➔
Share
. Touch
a photo or video thumbnail, touch thumbnails to highlight them for
sharing, then touch Share
3. Touch
AllShare, Social Hub
only),
Picasa
(photos only),
.
(photos only),
Bluetooth, Gmail
YouTube (videos
, or
Email
follow the prompts.
Multimedia 71
Deselect
then
Page 76
Photo Editor
The Photo editor application provides basic editing functions for
photos that you take on your tablet. Along with basic image
tuning like brightness, contrast, and color, it also provides a wide
variety of effects used for editing the photo.
1. From a Home screen, touch
Photo editor
2. Touch
.
Select picture
to edit a photo in your Gallery.
Applications
➔
– or –
Touch
Capture picture
3. Touch the photo to load it into the Photo editor.
4. Use the following Photo editor controls to edit your photo:
Selection
Rectangle, Ellipse, Lasso
to take a photo with the camera.
: Touch the selection icon and then touch
, or
Grab
to set how to
mark an area for cropping, rotating, and so on.
Touch to select a single area, to add to
a selected area, or to remove part of a
selected area.
Selection Size
: Set the size of the Grab selection
area. Drag the slider from small to large.
Select All
: Select the entire photo.
72
Undo
: Remove the last change.
Redo
: Restore a removed change.
Rotate
: Rotate a photo to the left or to the right or
create a mirror image of the photo.
Resize
: Touch and then drag the corners of the
photo to resize it.
Crop
: Touch to crop (cut-out) an area of a photo.
Color
: Set the
Saturation, Contrast, Brightness
Auto adjustment, Exposure
photo. You can also make it
Tem pe ra tu re
Effects
effect.
: Add various effects to your photo, such as
Blur, Motion, Filter
Tools
: Copy and Paste to another image or to the
, or
Frames
Grey-scale
.
, and
,
Hue
of a
or add a
original image. You can also Fill a selected area.
Page 77
When all updates to the photo have been made, touch
5.
Save
. Use the keypad to name the edited photo and
touch
Yes
to save it.
6. While editing a photo, touch
Menu
to display the
following options:
• Select picture
• Capture picture
•Share via
or
•Set as
Wallpaper
: Open a new photo for editing.
: Open the Camera and take a new photo.
: Touch
Email
AllShare, Social Hub, Picasa, Bluetooth, Gmail
to send memos to another device or another person.
: Use this photo as a
Contact photo
, a
Lock Screen
image.
, or
Media Hub
Samsung Media Hub is your one stop for the hottest movie and
TV content. With hundreds of titles available at your fingertips,
entertaining on the go has never been easier. You can rent or
purchase your favorite content and conveniently watch
anywhere. Featuring the stunning viewing quality Samsung is
known for, Samsung Media Hub is your gateway to mobile video
like you have never experienced it before.
Note:
Media Hub service requires a Media Hub account and depends on
service availability.
2. Read the End-User License Agreement (EULA) and touch
Accept
to continue or
Decline
to exit.
The Media Hub screen displays.
3. To rent or buy media, you must have a Media Hub account.
Touch
Menu
➔
My Account
to log in to your account
or to create an account. Follow the prompts to complete
log-in.
4. Browse content using these options:
,
• What’s new
•Movies
• TV Shows
•My Media
5. When you find media you want to view, use these options:
•Preview
•Own
: Recently-added titles for rent or purchase.
: Movies you can rent or purchase.
: TV shows you can rent or purchase.
: Content you have previously purchased or rented.
: View a short clip from the movie or show.
: Purchase the media for unlimited viewing on your device.
Follow the prompts to enter payment details.
•Rent
: Purchase a time-limited download of the media. Follow the
prompts to enter payment details.
1. From a Home screen, touch
Media Hub
.
Applications
➔
Multimedia 73
Page 78
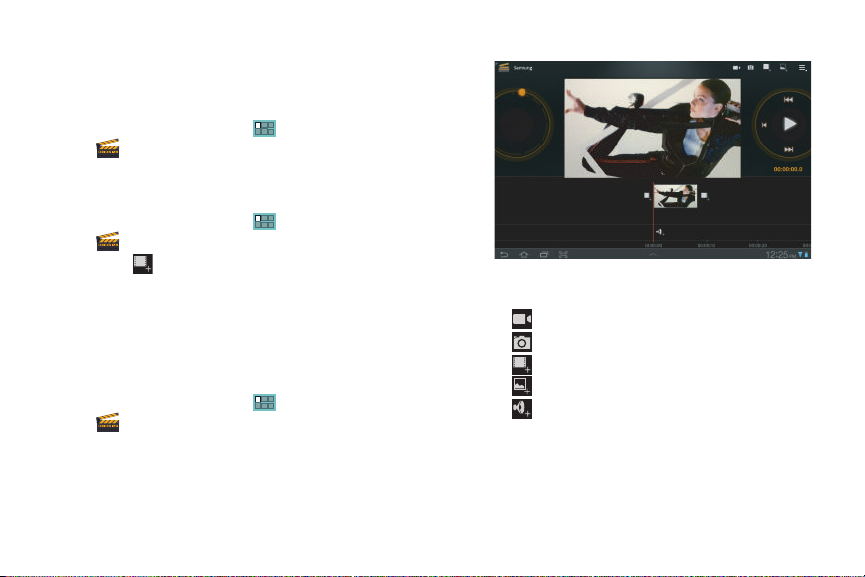
Movie Studio
Use Movie Studio to edit the videos you take with the camcorder
or copy onto your tablet into movies. You can cut and order
scenes, add a sound track, and so on.
䊳
From a Home screen, touch
Movie Studio
.
Applications
➔
Adding a New Movie Project
To use Movie Studio to work with videos, add a new project:
䊳
From a Home screen, touch
Movie Studio
6. Touch
The
Project name
7. Use the keypad to enter a project name and touch
.
New project
pop-up displays.
Applications
➔
.
OK
Updating a Movie Project
There are several ways to add videos, photos, and sound to your
movie project.
䊳
From a Home screen, touch
Movie Studio
8. Add a new project or touch an existing movie project.
The
Movie Project
74
.
screen displays.
Applications
➔
9. To add video clips or photos to your project, touch one of
.
the following:
• Camcorder
• Camera
to take a new photo.
to record a new video segment.
• Add video to add an existing video.
• Add photo to add an existing photo.
• Add music to add music to your project.
Page 79

Touch
10.
•Import Music
• Change aspect ratio
Menu
to display the following options:
: Add music to your project.
: Choose an aspect ratio. The aspect ratio of
each segment in the project is listed.
• Change project name
: Use the keypad to change the name of the
current movie project.
•Export movie
: Set the movie size and quality, and save the updated
movie.
• Delete project
11. To control playback of your project, touch one of the
: Delete the current movie project.
following
• Play
to play the video.
• Pause
• Previous segment
• Next segment
• Rewind
12. Touch and drag the
to pause the video.
to go back one segment.
to go forward one segment.
to back up to the start of the project segments.
Workspace control
to expand or
contract the workspace.
13. Touch a segment to add effects, add a title, and select a
transition for the beginning or end of the segment.
14. Touch a segment and then touch one of the following
icons:
• Effects
to apply an effect to the segment such as
Sepia effect, Negative effect
• Title template
to apply a template to the Title of the video.
, or
Fifties effect
Gradient effect
.
Selections are: Centered title, Bottom title, or Centered title.
• Select transition
Selections are:
to apply a transition effect into the next segment.
Contur alpha, Diagonal alpha, Crossfade, Fade t o
and from black, Sliding right out left in, Sliding left out right
in, Sliding top out bottom in
Tou c h
to increase or
want to lapse for the transition effect
• Select transition
the next. Selections are:
, or
Sliding bottom out top in
to decrease the amount of time you
.
to apply a transition effect from this segment to
Contur alpha, Diagonal alpha
,
Crossfade, Fade to and from black, Sliding right out left in
Sliding left out right in, Sliding top out bottom in
bottom out top in
Tou c h
want to lapse for the transition effect
• Delete
.
to increase or
to decrease the amount of time you
to remove the selected video clip.
.
, or
Sliding
Multimedia 75
,
.
,
Page 80

Deleting a Movie Project
To delete an existing movie project:
䊳
From a Home screen, touch
Movie Studio
15. Sweep across the screen to locate the project you want to
.
Applications
➔
delete.
16. Touch and hold the project thumbnail.
17. Touch
76
Delete project
.
Page 81

Section 8: Connections
Your device includes features to connect to the internet and to
other devices by using Wi-Fi, Bluetooth, or a USB cable.
Wi-Fi
Wi-Fi is a wireless networking technology that provides access to
local area networks. Use your device’s Wi-Fi feature to:
•
Access the internet for browsing or to send and receive email.
•
Access your corporate network.
•
Use hotspots provided by hotels or airports while traveling.
Wi-Fi communication requires access to an existing Wireless
Access Point (WAP). WAPs can be Open (unsecured, as with most
hotspots) or Secured (requiring you to provide login credentials).
Your device supports the 802.11 a/b/g/n Wi-Fi protocol.
Configuring Wi-Fi Settings
For more information about configuring your device’s Wi-Fi
settings, see “Wi-Fi settings” on page 107.
Finding Wi-Fi Networks
You can have your device automatically notify you of available
networks. For more information, refer to “Notify me” on
page 108.
Turning Wi-Fi On or Off
Turn your device’s Wi-Fi function on or off. When you turn Wi-Fi
function on, your device automatically searches for available,
in-range WAPs (Wireless Access Points).
Turning Wi-Fi On
1. From any screen that shows the Status Bar, touch the Time
to display the Status Details panel. (For more information,
refer to “Home Screen” on page 15.)
2. Touch
Turning Wi-Fi Off
1. From any screen that shows Notification icons, the Time,
Wi-Fi
to turn Wi-Fi On.
and Status icons on the right hand side of the System Bar,
touch the Time / Status Icons area to display the Status
Details and Quick Settings pop-up.
2. Touch the
Wi-Fi
notification launch the Wi-Fi settings
menu.
3. Touch
Wi-Fi
to turn your device’s Wi-Fi function on. (For
more information, refer to “Wi-Fi settings” on page 107.)
Connections 77
Page 82
Scanning and Connecting to a Wi-Fi Network
When you turn on Wi-Fi, your device searches for available Wi-Fi
connections, then displays them on screen.
1. From any screen, touch the Time / Status Icons area to
display the Status Details panel.
2. Touch
Wi-Fi
to turn Wi-Fi On. Your device automatically
scans for available Wireless Access Points.
3. When the scan is complete, touch a Wi-Fi network to
connect. If the Wi-Fi network is open, your device
automatically connects. If the Wi-Fi network is secured,
enter the password at the prompt to connect.
Adding a Wi-Fi Network Manually
1. From a Home screen, touch
Applications
➔
Settings ➔Wireless and networks ➔ Wi-Fi settings
2. Touch
3. Touch
Wi-Fi
to turn Wi-Fi On.
Add Wi-Fi network
, then enter information about the
network:
• Network SSID
: Enter the name of the Wi-Fi Wireless Access
Point (WAP).
• Security
: Select the type of security used by the WAP.
• Password
: If the WAP is secured, enter the password or hex key.
• Proxy settings
• IP settings
78
: Select a value.
: Select a value.
Note:
Depending on the Security protocol used by the WAP, additional
network information may be required.
4. Touch
Bluetooth
Bluetooth is a short-range wireless communications technology
for exchanging information over a distance of about 30 feet.
You do not need to line up the devices to send information with
Bluetooth. If the devices are in range, you can exchange
information between them, even if they are in different rooms.
Configuring Bluetooth Settings
Configure your device’s Bluetooth settings. For more information,
refer to “Bluetooth Settings” on page 109
.
Turning Bluetooth On or Off
To turn Bluetooth on or off:
1. From a Home screen, touch
Settings ➔Wireless and networks
2. Touch
Bluetooth
is enabled, a green check mark appears next to the field.
Note:
When Bluetooth is on, the
Bar.
Save
to save the settings.
Applications
to turn Bluetooth on or off. When Bluetooth
Bluetooth
icon displays in the Status
➔
.
Page 83
Pairing with a Bluetooth Device
Search for a Bluetooth device and pair with it, to exchange
information between your device and the target device.
Tip:
After pairing, your device and the target device recognize each other
and exchange information without having to enter a passcode or PIN.
1. From a Home screen, touch
Applications
➔
Settings ➔Wireless and networks ➔ Bluetooth
settings
.
2. Touch
3. Enable the target device’s discoverable or visible mode.
4. Touch
5. From the list of scanned devices, touch the target device,
Bluetooth
to turn on Bluetooth.
Scan for nearby devices
.
then follow the prompts to complete the pairing:
•
If the target device requires a PIN, enter a PIN for the target device
and touch OK. When prompted, enter the PIN on the target device.
•
If the device allows automatic or smart pairing, your device
attempts to pair with the device automatically. Follow the prompts
on your device and the target device to complete the pairing.
Tethering
When activated, Tethering uses your phone to provide a USBconnected device (such as a personal computer) with access to
your Wireless Provider’s network.
1. From the Home screen, touch
Applications
➔
Settings ➔ Wireless & network ➔ Tethering and
portable hotspot ➔ USB Tethering
2. Connect the other device to the phone using the USB Data
.
Cable.
3. Touch
USB Tethering
to turn tethering On or Off. When On, a
check appears in the checkbox.
Note:
Using your phone as a tethered wireless internet connection consumes
battery power and increases your data usage. Roaming while using
your phone as a tethered wireless internet connection will incur extra
data charges.
Connections 79
Page 84
Portable Wi-Fi Hotspot
Use Portable Wi-Fi Hotspot to share your phone’s network
connection with a PC or other device through Wi-Fi, using your
phone as the portable hotspot.
Note:
Portable Wi-Fi Hotspot consumes battery power and uses data service.
There is a monthly charge for the Portable Wi-Fi Hotspot feature, and
all data used by connected devices will apply to the customer’s data
allowance. Contact your service provider for more information.
Configuring Portable Wi-Fi Hotspot Settings
Configure your phone’s Portable Wi-Fi Hotspot settings, including
your phone’s name and password, security, and visibility of your
phone’s Portable Wi-Fi Hotspot. For more information, refer to
“Portable Wi-Fi Hotspot” on page 110.
80
Turning On Portable Wi-Fi Hotspot
Activate your phone’s Portable Wi-Fi Hotspot application to allow
other devices to use your phone’s internet connection.
1. From the Home screen, touch
Settings ➔ Tethering and portable hotspot
Portable Wi-Fi hotspot
2. Touch
Portable Wi-Fi Hotspot
.
Applications
➔
➔
to turn the service on. Read
the information about Portable Wi-Fi Hotspot, then touch
Continue
to proceed.
3. Portable Wi-Fi Hotspot consumes battery power. Read the
information about battery usage, then touch Turn on
Portable Wi-Fi Hotspot
4. Your phone establishes a connection to the network for the
to proceed.
Portable Wi-Fi Hotspot service.
5. When you are finished using Portable Wi-Fi Hotspot, touch
Portable Wi-Fi Hotspot
to turn the service off.
Page 85

Connecting a Device via Portable Wi-Fi Hotspot
Use the other device’s Wi-Fi control to connect to your phone’s
Portable Wi-Fi Hotspot.
Tip:
In order for other devices to connect to your Portable Wi-Fi Hotspot, you
can set your device to allow all devices to connect, or add the device.
1. Activate Portable Wi-Fi Hotspot on your phone. For more
information, refer to “Portable Wi-Fi Hotspot” on page 110.
2. Activate Wi-Fi on the device, using the device’s Wi-Fi
control.
3. On the other device, scan for Wi-Fi hotspots, and select
your phone from the list.
Tip:
Tip: Your phone’s default Name (SSID) and Password are displayed on
the screen. For more information, For more information, refer to
“Portable Wi-Fi Hotspot” on page 110.
4. At the prompt on the other device, enter your phone’s
Portable Wi-Fi Hotspot password.
Managing Downloads
Files, apps, and other items you download in Browser, Gmail,
Email, or in other ways, are stored on your tablet’s internal
storage. You can use the Downloads app to view, reopen, or
delete what you have downloaded.
To manage the demands on their networks or to help you avoid
unexpected charges, some mobile networks place restrictions on
the size of the files you can download. When you are connected
to such networks, and you try to download an oversized-file, you
are asked or required to delay downloading the file until the next
time you are connected to a Wi-Fi network. At that time, the
download resumes automatically. The Downloads app can also
be used to view and manage these queued files.
Downloaded files are stored in the Download directory in your
tablet’s internal storage. You can view and copy files from this
directory when connected to a computer with a USB cable.
Connections 81
Page 86
Uninstalling an App
Apps come pre-installed on your device and you can download
additional apps from Market. If you decide to, you can uninstall
apps you downloaded from Market and other sources.
There are several ways to uninstall an app:
1. From a Home screen, touch
Settings
➔
Applications ➔ Manage applications
2. Touch the
3. Touch the app you want to uninstall.
4. Touch the
Downloaded
Uninstall
button.
tab.
Applications
➔
.
The Uninstall application? pop-up displays.
5. Touch
OK
to confirm you want to uninstall the app.
You can also use Market to uninstall apps you downloaded from
there. For more information, refer to “Market” on page 95
To uninstall an app from the My apps screen:
1. From a Home screen, touch
2. Touch the
3. Touch and hold an the app’s icon and drag it to the
My apps
tab in the Application Bar.
Remove
icon to uninstall and remove the app from
Applications
.
your tablet.
82
Note:
You cannot uninstall the apps that are included with Android. You can
only uninstall the apps you have downloaded.
PC Connections
You can connect your device to a PC using an optional PC data
cable using various USB connection modes. When you connect
the device to a PC, you can synchronize files with Windows
Media Player or transfer data to and from your device directly.
Connecting as a Removable Disk
You can connect your device to a PC as a removable disk and
access the PC file directory.
1. Connect the multifunction jack on your device to a PC
using the PC data cable that is included with your charger.
2. The
Portable Device
window displays on the PC when
connected.
3. Highlight
Open device to view files using Windows Explorer
and click OK.
Your device will appear on your PC as a removable disk.
4. Copy files between your PC and your device.
Page 87
Section 9: Applications
This section contains a description of each application that is
available on the Apps screen, its function, and how to navigate
through that particular application. If the application is already
described in another section of this user manual, then a cross
reference to that particular section is provided.
Accessing Applications
䊳
From a Home screen, touch
screen appears in the display, showing
Applications
All
apps on your
. The Apps
device.
To list only those apps you have installed on your device,
touch
My apps
.
Tip:
To open applications quickly, add the icons of frequently-used
applications to one of the Home screens. For details, see “Adding App
Shortcuts from the Apps Screen” on page 23.
Alarm
Schedule alarms to remind you of appointments or events, or as
a wake-up.
Adding and Configuring Alarms
1. From the Apps screen, touch
2. Touch
Add alarm
or touch an alarm that is already
Alarm
.
set.
3. Touch fields to configure the alarm:
•Time
: Set a time for the alarm to sound. Touch + or - to change the
hour and minute, and touch AM or PM.
•Label
: Enter a name for the alarm.
•Repeat
: Choose days for the alarm to repeat. Alarm days are blue.
•Ringtone
: Choose a tone for alarms.
•Vibrate
: Enable or disable vibration for the alarm.
•Snooze
: Enable or disable the snooze option for the alarm.
4. Touch
Done
to save the alarm.
The main Alarm screen displays showing the new or
updated alarm.
Applications 83
Page 88
Activating Alarms
1. From the Apps screen, touch
2. Touch to deactivate the alarm. A gray alarm icon
Alarm
.
means the alarm is deactivated.
3. Touch an alarm to change any of its settings and then
touch
Done
to save the updates.
Deactivating and Deleting Alarms
1. From the Apps screen, touch
2. Touch and hold an alarm and then touch one of the
Alarm
.
following options:
• Delete alarm
• Deactivate alarm
: Delete the alarm.
: Turn off the alarm.
– or –
Touch an existing alarm and touch Delete
alarm pop-up displays. Touch OK.
84
. The Delete
Alarm Settings
To configure general alarm settings:
1. From the Apps screen, touch
2. Touch
Settings
.
The following options display:
• Alarm in silent mode
: Enable alarms to play even if the tablet is in
Silent mode.
• Alarm volume
• Snooze duration
: Touch and drag the slider to set Alarm volume.
: Set the snooze delay time to 3, 5, 10, 15, or 30
minutes.
• Snooze repeat
: Indicate how many times to repeat the snooze
alarm: 1, 2, 3, 5, or 10 times.
• Side button settings
: Set what action the side buttons should take
during an alarm: None, Snooze, or Dismiss.
• Set default ringtone
: Choose a ringtone to play as a default, if the
Ringtone is not defined for an alarm. Touch the button next to the
ringtone you want to set and touch OK.
Alarm
.
Page 89
Alarm Volume
Alarm volume can also be set by using the Settings app.
1. From the Apps screen, touch
Volume
.
2. Touch and drag the slider to set
Settings
Alarm
➔
volume.
Sound ➔
Another method of setting the alarm volume is to:
1. Press the
2. Touch on the pop-up.
3. Touch and drag the slider next to the
Volume key
.
Alarm
.
AllShare
AllShare allows your tablet to stream photos, music, and videos
from its memory to other Digital Living Network Alliance (DLNA)
certified devices. Your tablet can also play digital content
streamed from other DLNA certified devices.
Note:
To view more information about DLNA certified products visit
http://www.dlna.org/home
.
Configuring AllShare
Connect to Wi-Fi, configure AllShare settings to identify your
device as a server, and set treatment of copied files.
1. Connect to a Wi-Fi network. For more information, refer to
“Scanning and Connecting to a Wi-Fi Network” on page 78
2. From the Apps screen, touch
3. Touch
• Media server name
Settings
to configure the following settings:
: Use the keypad to enter a new media server
AllShare
.
name, if desired (the default is your device’s default name), then
touch
Save
.
• Share media
: Allows you to restrict what is shared from your
device. Touch the items you want to share and touch OK.
• Access point network
: Turn on your Wi-Fi service and connect to
an available Wi-Fi Access Point.
• Upload from other devices
copied from other devices. Choose from
ask
, or
Never allow
4. Touch one of the device entries on the left of the AllShare
screen.
My device
: Set your device’s treatment of files
Always accept, Always
, then touch OK.
lists the video, audio, and picture files
on your device.
5. Touch a file to play it.
The Select playback device pop-up displays. Touch the
playback device.
– or –
Touch the playback area on your tablet to view the video or
photo.
Applications 85
Page 90
Amazon Kindle
Shop for, download, and view e-books from Amazon.com.
䊳
From the
Applications
menu, touch
Amazon Kindle
Amazon MP3
Shop for, download, and play MP3 music files from Amazon.com.
䊳
From the
Applications
menu, touch
Amazon MP3
Android HD games
Shop for, download, and play High Definition (HD) games.
䊳
From the
games
Applications
.
menu, touch
Android HD
Appstore
Shop for applications from Amazon.com.
Note:
This app requires you to enable
Unknown sources
page 118.)
䊳
From the
Applications
86
. (For more information, refer to “Applications” on
Settings
➔
Applications
menu, touch
➔
Appstore
.
Asphalt 6
Asphalt 6 is a car racing game.
.
䊳
From the
Applications
screen, touch
Asphalt 6
.
Audible
Shop for, download, and play audio books from Audible.com.
.
䊳
From the
Applications
menu, touch
Audible
.
Books
Allows you to purchase and download e-books from the Google
e-books Website.
䊳
From the
Applications
menu, touch
Books
.
Browser
Your device includes a full HTML Browser, to access the internet.
For more information about using Browser, see “Browser” on
page 52.
䊳
From the Apps screen, touch
Browser
.
Page 91
Calculator
The calculator provides the basic arithmetic functions to solve
simple arithmetic problems and advanced operators to solve
more complex problems.
1. From the Apps screen, touch
2. Enter the first number using the numeric keys.
3. Enter the operation for your calculation by touching the
+
(add), - (subtract), × (multiply), or ÷ (divide) key.
4. Enter the next number.
5. To view the result, touch the
6. Repeat steps 3 through 5 as many times as required.
7. Touch
8. For more advanced problems, use the operators
CLR
cos, log, tan
to clear the result.
, and so on, just as you would on a scientific
Calculator
=
(equals) key.
.
sin, ln
calculator.
9. Touch and hold the Calculator’s display to copy the
contents of the display.
Text copie d
displays. You can then paste the copied value
in another app.
,
Calendar
Record events and appointments to manage your schedule.
The first time you open the Calendar application on your tablet, it
displays any existing calendar events from your Google Account
on the web.
1. From the Apps screen, touch
2. Touch a tab to choose a calendar view:
•Day
: Display today’s schedule and scroll to other days.
•Week
: Display the current week and scroll to other weeks.
•Month
: Display the current month and scroll to other months.
•List
: Display only event names and dates for a selected year.
3. Swipe left or right across the screen to view other days or
Calendar
.
other weeks. Swipe up or down the screen to view other
months or events list.
4. Touch
5. Touch
Tod ay
to return to the current date.
Search
to find an event. Use the on-screen
keypad to enter a search term. Touch on the keypad
to search your calendar.
6. Touch
New event
to add a new event to your calendar.
For more information, refer to “Creating a Calendar Event”
on page 88
Applications 87
Page 92
7.
Tou ch
Menu
•Go to
for these options:
: Use the Set date pop-up to enter a date and then touch Set
to display that date on your calendar.
• Delete
: Delete events for the day, week, month, before today, or all
events, depending on the calendar view.
• Sync Calendar
: Synchronize the calendar with the calendar
provided by your email account. (For more information, refer to
“Accounts”
• Settings
“Customizing the Calendar”
on page 34.)
: Customize the calendar. (For more information, refer to
on page 89.)
Creating a Calendar Event
To create a calendar event:
1. From the Apps screen, touch
2. Touch and hold the date for which you want to enter an
Calendar
.
event.
– or –
Touch the date for which you want to enter an event, then
touch .
3. Enter the event information in the Calendar event screen,
then touch
88
Done
.
Managing Calendar Events
You can view and add events in Google Calendar on your mobile
device, but, to delete existing events, you must access Google
Calendar on a computer.
To delete a non-Google event:
1. From the Apps screen, touch
2. Touch an event. A pop-up displays event information.
3. From the pop-up, touch to display the following
Calendar
.
options:
•
Tou ch
Delete
and then touch OK to delete the event.
•
Tou ch
Send
to send this calendar event to a Bluetooth device.
•
Tou ch
Edit
to update the event details.
•
Tou ch
Hide
to hide the options.
Page 93
Customizing the Calendar
To add additional accounts and set up Calendar preferences:
1. From the Apps screen, touch
➔
Settings
.
2. To add an account, touch
Add account
to display the
Calendar ➔ Menu
Synchronize calendars
Add account
option. Touch
➔
an account type and enter your account information. (For
more information, refer to “Setting Up Your Accounts” on
page 34.)
3. Touch the following for additional settings:
• Calendar view settings
–
Calendars
–
Synchronize calendars
more information, refer to
–
Week view
–
First day of week
–
Font size
: Choose the font size to be used when viewing event details.
–
Hide declined events
–
Hide contacts anniversary events
contact anniversary events.
–
Show week number
in the Month view and the inset calendar in the Day view.
–
Lock time zone
your selected time zone, which is defined by the following field.
:
: Enable calendars for your various accounts.
: Displays the General sync settings. (For
“General Sync Settings”
: Choose Analog (the default view) or Timeline.
: Choose a day to begin each week.
: Enable or disable display of events.
: Enable or disable display of
: Show the week number to the left of each week
: Allows you to lock event times and dates based on
on page 120.)
–
Select time zone
select a time zone to lock event times and dates.
• Reminder settings
–
Notifications
ringtone and Pop-up notification options.
–
Select ringtone
–
Pop-up notifications
notification.
–
Default reminder time
event is to occur.
4. Touch
About calendar
: If
Lock time zone
is enabled, used this option to
:
: Touch to select, which allows you to set the Select
: Choose a tone for calendar notifications.
: Set a pop-up notification as a calendar event
: Set the default time for a notification before an
for additional Calendar information.
Camera
Take photos and record videos with your device’s built in
Camera-Camcorder. For more information, refer to “Camera” on
page 62.
䊳
From the Apps screen, touch
Camera
.
Contacts
Store contact information for your friends, family and colleagues,
to quickly access information or to send a message. For more
information, refer to “Contacts” on page 34
䊳
From the Apps screen, touch
Contacts
Applications 89
.
Page 94

Downloads
Files, apps, and other items you download in Browser, Gmail,
Email, or in other ways, are stored on your tablet’s internal
storage. Use the Downloads app to view, reopen, or delete what
you have downloaded.
1. From the Apps screen, touch
2. Touch an item to open it.
3. Touch headings for earlier downloads to view them.
4. Touch items you want to send, to check them, and then
touch
Share
. Touch an option to share the item.
Downloads
.
Options are: AllShare, Bluetooth, Email, Gmail, Picasa,
YouTube, or Social Hub.
5. Touch items you want to delete, to check them, and then
touch
Delete
.
The items are deleted from your tablet.
6. Touch
Sort by size
or
Sort by date
, at the bottom of the
Downloads pop-up, to switch back and forth.
Managing Downloads
Files, apps, and other items you download in Browser, Gmail,
Email, or in other ways, are stored on your tablet’s internal
storage. You can use the Downloads app to view, reopen, or
delete what you have downloaded.
90
To manage the demands on their networks or to help you avoid
unexpected charges, some mobile networks place restrictions on
the size of the files you can download. When you are connected
to such networks, and you try to download an oversized-file, you
are asked or required to delay downloading the file until the next
time you are connected to a Wi-Fi network. At that time, the
download resumes automatically. The Downloads app can also
be used to view and manage these queued files.
Downloaded files are stored in the Download directory in your
tablet’s internal storage. You can view and copy files from this
directory when connected to a computer with a USB cable.
Uninstalling an App
Apps come pre-installed on your device and you can download
additional apps from Market. If you decide to, you can uninstall
apps you downloaded from Market and other sources.
There are several ways to uninstall an app:
1. From the Apps screen, touch
➔
Manage applications
2. Touch the
3. Touch the app you want to uninstall.
4. Touch the
Downloaded
Uninstall
.
tab.
button.
Settings ➔Applications
The Uninstall application? pop-up displays.
Page 95
Touch OK to confirm you want to uninstall the app.
5.
You can also use Market to uninstall apps you downloaded from
there (see “Market” on page 95).
To uninstall an app from the My apps screen:
1. From a Home screen, touch
2. Touch the
3. Touch and hold an the app’s icon and drag it to the
My apps
tab in the Application Bar.
Remove
icon to uninstall and remove the app from
Applications
.
your tablet.
Note:
You cannot uninstall the apps that are included with Android. You can
only uninstall the apps you have downloaded.
Use Email to view and manage all your email accounts in one
application. For more information, refer to “Email” on page 45.
䊳
From the Apps screen, touch
Email
.
Gallery
Use Gallery to view, capture, and manage photos and videos. For
more information, refer to “Gallery” on page 68.
䊳
From the Apps screen, touch
Gallery
.
Gmail
Send and receive email with Gmail, Google’s web-based email.
For more information, refer to “Gmail” on page 42.
䊳
From the Apps screen, touch
Gmail
.
Google Search
Search the internet, and your device, using the Google search
engine.
Tip:
The Google Search widget appears on a Home screen by default. For
information about displaying widgets on the Home screen, see “Adding
Widgets to a Home screen” on page 22
1. From any Home screen panel, touch
Google
.
– or –
From any Home screen panel, touch
Google Search
. The default keypad appears at the
Applications
bottom of the display.
2. Use the keypad to enter search criteria to display matching
searches.
Suggestions display below the text entry area.
3. Touch a suggestion to search for that term.
– or –
Touch Go to start the search.
A browser window displays the search results.
Applications 91
➔
Page 96
Google+
Latitude
Google+™ social service is a social networking platform that
makes sharing online more like sharing in real life. Share
thoughts, links and photos with the right circles. Video chat with
as many as nine people simultaneously. Group chat is also
available.
䊳
From the Apps screen, touch
Google+
.
IMDb
Provides show times, trailers, critic and user reviews,
personalized recommendations, photo galleries, entertainment
news, quotes, trivia, box-office data, an editorial feature sections
and a universal Watchlist to keep you in touch with all the latest
entertainment information.
䊳
From the Apps screen, touch
IMDb
.
Latitude
With Google Latitude, you can see the location of all of your
friends on a map or on a list. You can also share or
hide your location.
You must first set up your tablet to use wireless networks to help
pinpoint your location. Also, Latitude works best when Wi-Fi is
enabled.
92
To enable Wi-Fi:
1. From the Apps screen, touch
and security
➔
Use wireless networks
Settings
.
➔
Location
A green check mark indicates the feature is enabled.
2. Touch
3. Touch
Wireless and networks ➔ Wi-Fi
to turn Wi-Fi on.
Wireless and networks ➔ Wi-Fi settings
, if
necessary. For more information, refer to “Wi-Fi” on
page 77
4. Log on to your Google account.
To create a Google account or set up your Google account
on your device use
Accounts and sync
settings. For more
information, refer to “Accounts and Sync” on page 120
5. Touch
Home
➔
Applications
➔
Latitude
Your location is displayed on the map, accurate to
30 meters.
Sharing Your Location with Friends
1. From the Latitude map screen, touch to
display your Latitude list of friends. At first, only your name
is displayed.
2. Touch
3. Touch
Menu ➔ Add friends
Select from Contacts
.
or
Add via email address
.
.
Page 97
Touch a contact.
Latitude
4.
– or –
Enter an email address and touch
5. At the
Send sharing requests
Send
.
prompt, touch
Yes
.
Your friend will receive an email or text message with your
location marked on a map. They will also receive instructions on
how to view your location from the web or use Latitude on their
device, if it is available. Once they acknowledge your request,
their location will display on your tablet. They can share their
location from their computer, phone, or tablet.
For more information, go to
http://www.google.com/latitude
.
Latitude Menu
1. From the Apps screen, touch
2. Touch to display your Latitude list of
Latitude
.
friends.
3. Touch
Menu
for these options:
• Refresh friends
• Check in
: Update your Latitude list of friends.
: Automatically check in at specific places you designate,
and you will be checked in when you are there.
• Add friends
: Share your location with friends. For more
information, refer to
“Sharing Your Location with Friends”
page 92
• Latitude Settings
: Used to set various Latitude options.
on
–
Location reporting
location, Do not update your location.
–
Enable location history
–
Manage your friends
–
Sign out of Latitude
application.
–
Enable automatic check-ins
designated.
–
Check-in notifications
check in.
–
Manage your places
muted places.
•Clear Map
• Latitude
•My Places
• Settings
–
Cache Settings
map tile cache
–
Labs
: Access experimental features.
–
Terms, Privacy & Notices
including the Terms and Conditions, Privacy Policy, Legal Notices, and
Web History.
–
About
•Help
: Learn about Latitude.
: Settings for Detect your location, Set your
: This history is only seen by you.
:
: Signs you out of Latitude and launches the Maps
: Checks you in to places that you have
: Enables notifications that suggest places to
: View and modify your automatic check-ins and
: Remove search results from the map.
:
: Display starred locations.
:
: Enable or disable
.
: View information about Latitude.
Prefetch on mobile
: View information about Google Maps,
Applications 93
or
Clear
Page 98
Maps
Use Google Maps to find your current location, get directions, and
other location-based information. The Google Maps shortcut
appears by default on the Home screen.
Note:
You must enable location services to use Maps. Some features require
Standalone or Google location services. For more information, refer to
“Location and Security” on page 116
䊳
From the Apps screen, touch
Maps
.
Navigating the Map
Zooming
䊳
Double-tap on the screen to zoom in.
– or –
1. Use two fingers, such as your index finger
and thumb, to zoom out by making an
inward pinch motion on the screen.
2. To zoom in, make an outward motion by
sweeping your fingers out.
Tip:
For convenient browsing, you can rotate the device to landscape mode.
Scrolling
䊳
Touch and drag on the screen to reposition the map in the
display.
94
Touch
䊳
Touch an icon on the map to display information about the
location.
For example, your location is indicated by a flashing
and a pop-up that says
My Location
.
Maps Menu
1. From the Apps screen, touch
2. While viewing a map, touch
• Clear Map
• Latitude
• My Places
• Settings
: Remove search results from the map.
: Enable Latitude functions. (For more information, refer to
“Latitude”
on page 92.)
: Display starred locations.
: Used to set various Latitude options.
–
Cache Settings
map tile cache
–
Labs
–
Terms, Privacy & Notices
: Enable or disable
.
: Access experimental features.
Maps
Menu
for these options:
Prefetch on mobile
: View information about Google Maps,
including the Terms and Conditions, Privacy Policy, Legal Notices, and
Web History.
–
About
: View information about Maps.
.
or
Clear
Page 99
Other Map Options
Touch the indicated icon to use these additional Map options:
Search Maps
: Use the keypad to enter your request to
Search the map for a city, location, and so on.
Suggestions are displayed as you type.
Speak
: Just speak a city, location, and so on, to display.
Compass
: Set the map to always display north at the top
of the screen or to automatically rotate like a compass,
keeping north on the map facing north, and so on. Your
device may have to be calibrated the first time you use
this feature. Follow the on-screen instructions.
Places
: Launch the Places app. For more information,
refer to “Places” on page 102
Directions
: Displays the Directions pop-up. Enter
point
and
End point
or touch the button to the right of the
fields to choose your current location, a contact’s
location, or to touch a point on the map. Touch the
automobile, bus, bicycle, or walking icon for the
appropriate directions. Then touch Go to display a list of
directions. Touch the Directions list and scroll up or
down. Touch an entry in the Directions list to show the
point mentioned on the map.
Layers
: Enable or disable a map layer to display. Choose
from Traffic, Satellite, Terrain, Transit Lines, Latitude,
My Maps, Bicycling, Wikipedia, or Buzz. Touch
Clear Map
to remove all layers.
Market
Browse for new Android applications, games, or downloads for
your device. You must have a Google account set up on your
device to download a new application.
Tip:
A shortcut to Market appears on the Home screen by default.
Start
1. From the Home screen, touch
– or –
From the Apps screen, touch
Market
.
Market
.
Applications 95
Page 100

2.
The first time you open Market, read the Terms of Service,
then touch
3. Browse for items to install:
• Apps
Accept
to continue.
: Displays applications, games, and more, which you can
browse by categories, such as games, business, entertainment,
education, and so on.
–
My apps
: Displays when
updates to applications installed on your device. For more information,
“My Apps”
refer to
•Music
: Displays categories of free songs from Google music.
• Books
: New arrivals and top selling books, which you can also
Apps
is active and displays downloads and
on page 96
browse by categories, such as children’s books, fantasy, fiction,
history, and more.
•Movies
: Displays a wide range of Movies that you can rent.
4. Touch
• Accounts
• Settings
96
Menu
for the following options:
: Touch the account you want to use.
:
–
Notifications
: Notifies for updates to applications or games that were
downloaded to this device.
–
Auto-update apps
–
Update over Wi-Fi only
when connected through a Wi-Fi connection.
–
Auto-add widgets
applications.
–
Clear search history
: Automatically updates applications by default.
: Conserves data usage by updating only
: Automatically add Home screen widgets fro new
: Clear the history of previous searches.
–
Content filtering
downloaded to this device. The choices are apps rated for: Everyone,
Low maturity, Medium maturity, High maturity, and Show all apps.
Tou ch
–
Use PIN for purchases
applications or other content.
–
Set or change PIN
Or change the PIN number.
–
Google AdMob Ads
–
Open source licenses
software.
–
Build version
•Help
: Get help for using Android Market.
: Set which apps are displayed and can be
OK
when you have made your choices.
: Requires a PIN before purchasing
: Create a PIN to prevent changes to user controls.
: Personalize ads based on your interests.
: Displays license details for open source
: Displays the build version.
My Apps
1. Touch
My apps
tab in the Application Bar to display
information about apps you have downloaded on your
device.
2. Touch a listed application to begin using that application.
Media Hub
Samsung Media Hub is your one stop for the hottest movie and
TV content. For more information, refer to “Media Hub” on
page 73.
䊳
From the Apps screen, touch
Media Hub
.
 Loading...