

Page 1

SCH-i910 Series
PORTABLE DUAL MODE
SMARTPHONE
User Guide
Please read this manual before operating your phone, and keep it for future
reference.
i910_UG_EN_03132009_D7
Page 2

Intellectual Property
All Intellectual Property, as defined below, owned by or which is otherwise
the property of Samsung or its respective suppliers relating to the
SAMSUNG Phone, including but not limited to, accessories, parts, or
software relating thereto (the “Phone System”), is proprietary to Samsung
and protected under federal laws, state laws, and international treaty
provisions. Intellectual Property includes, but is not limited to, inventions
(patentable or unpatentable), patents, trade secrets, copyrights, software,
computer programs, and related documentation and other works of
authorship. You may not infringe or otherwise violate the rights secured by
the Intellectual Property. Moreover, you agree that you will not (and will not
attempt to) modify, prepare derivative works of, reverse engineer,
decompile, disassemble, or otherwise attempt to create source code from
the software. No title to or ownership in the Intellectual Property is
transferred to you. All applicable rights of the Intellectual Property shall
remain with SAMSUNG and its suppliers.
© 2009 Samsung Electronics Canada Inc. Samsung is a registered
trademark of Samsung Electronics Co. Ltd. and its related entities.
Licensed by Qualcomm Incorporated under one or more of the
following patents: U.S. Patent No. 4, 901, 307; 5, 056, 109; 5, 099,
204; 5, 101, 501; 5, 103, 459; 5, 107, 225; 5, 109, 390.
Printed in South Korea
®
Openwave
RSA® is a registered Trademark RSA Security, Inc.
The Bluetooth® word mark and logos are owned by the Bluetooth
SIG, Inc.
The privacy and copyright laws of Canada govern the disclosure,
reproduction and distribution of data, media and other content,
including music and video content. Certain activities, including
downloads or transfer by any means (including, via cable, Bluetooth®
or otherwise) of such content may be an infringement of privacy or
copyright law. Neither Samsung Electronics Canada Inc. nor any of
its affiliates shall be liable or responsible for any data or content
disclosed, reproduced, downloaded or distributed by the user of this
equipment.
is a registered Trademark of Openwave, Inc.
Page 3

Disclaimer of Warranties; Exclusion of Liability
EXCEPT AS SET FORTH IN THE EXPRESS WARRANTY CONTAINED ON THE
WARRANTY PAGE ENCLOSED WITH THE PRODUCT, THE PURCHASER TAKES
THE PRODUCT "AS IS", AND SAMSUNG MAKES NO EXPRESS OR IMPLIED
WARRANTY OF ANY KIND WHATSOEVER WITH RESPECT TO THE PRODUCT,
INCLUDING BUT NOT LIMITED TO THE MERCHANTABILITY OF THE PRODUCT
OR ITS FITNESS FOR ANY PARTICULAR PURPOSE OR USE; THE DESIGN,
CONDITION OR QUALITY OF THE PRODUCT; THE PERFORMANCE OF THE
PRODUCT; THE WORKMANSHIP OF THE PRODUCT OR THE COMPONENTS
CONTAINED THEREIN; OR COMPLIANCE OF THE PRODUCT WITH THE
REQUIREMENTS OF ANY LAW, RULE, SPECIFICATION OR CONTRACT
PERTAINING THERETO. NOTHING CONTAINED IN THE INSTRUCTION MANUAL
SHALL BE CONSTRUED TO CREATE AN EXPRESS OR IMPLIED WARRANTY OF
ANY KIND WHATSOEVER WITH RESPECT TO THE PRODUCT. IN ADDITION,
SAMSUNG SHALL NOT BE LIABLE FOR ANY DAMAGES OF ANY KIND
RESULTING FROM THE PURCHASE OR USE OF THE PRODUCT OR ARISING
FROM THE BREACH OF THE EXPRESS WARRANTY, INCLUDING INCIDENTAL,
SPECIAL OR CONSEQUENTIAL DAMAGES, OR LOSS OF ANTICIPATED PROFITS
OR BENEFITS.
Page 4

Table of Contents
Important Safety Precautions ......................................................................1
Road Safety at All Times . . . . . . . . . . . . . . . . . . . . . . . . . . . . . . . . . . . . . . . . . . . . . . 1
Switching Off When Refueling. . . . . . . . . . . . . . . . . . . . . . . . . . . . . . . . . . . . . . . . . . 1
Switching Off in an Aircraft. . . . . . . . . . . . . . . . . . . . . . . . . . . . . . . . . . . . . . . . . . . . . 1
Switching Off in Hospitals . . . . . . . . . . . . . . . . . . . . . . . . . . . . . . . . . . . . . . . . . . . . . 1
Interference . . . . . . . . . . . . . . . . . . . . . . . . . . . . . . . . . . . . . . . . . . . . . . . . . . . . . . . . 1
Special Regulations . . . . . . . . . . . . . . . . . . . . . . . . . . . . . . . . . . . . . . . . . . . . . . . . . . 1
Sensible Use . . . . . . . . . . . . . . . . . . . . . . . . . . . . . . . . . . . . . . . . . . . . . . . . . . . . . . . 1
Emergency Call . . . . . . . . . . . . . . . . . . . . . . . . . . . . . . . . . . . . . . . . . . . . . . . . . . . . . 1
Liquid Resistance. . . . . . . . . . . . . . . . . . . . . . . . . . . . . . . . . . . . . . . . . . . . . . . . . . . . 1
Accessories and Batteries . . . . . . . . . . . . . . . . . . . . . . . . . . . . . . . . . . . . . . . . . . . . . 1
Qualified Service . . . . . . . . . . . . . . . . . . . . . . . . . . . . . . . . . . . . . . . . . . . . . . . . . . . . 2
Getting Started..............................................................................................3
Understanding the User Manual . . . . . . . . . . . . . . . . . . . . . . . . . . . . . . . . . . . . . . . . 3
Powering the Phone On and Off . . . . . . . . . . . . . . . . . . . . . . . . . . . . . . . . . . . . . . . . 3
Turning the Phone Feature On and Off. . . . . . . . . . . . . . . . . . . . . . . . . . . . . . . . . . . 3
Rebooting your Phone after Lockup . . . . . . . . . . . . . . . . . . . . . . . . . . . . . . . . . . . . . 4
Resetting your Phone to Factory Defaults. . . . . . . . . . . . . . . . . . . . . . . . . . . . . . . . . 4
Battery . . . . . . . . . . . . . . . . . . . . . . . . . . . . . . . . . . . . . . . . . . . . . . . . . . . . . . . . . . . . 5
Using a microSD Memory Card (sold separately). . . . . . . . . . . . . . . . . . . . . . . . . . 10
Reformatting the microSD Memory Card . . . . . . . . . . . . . . . . . . . . . . . . . . . . . . . . 11
Voicemail . . . . . . . . . . . . . . . . . . . . . . . . . . . . . . . . . . . . . . . . . . . . . . . . . . . . . . . . . 12
Menus .........................................................................................................14
Display Icons . . . . . . . . . . . . . . . . . . . . . . . . . . . . . . . . . . . . . . . . . . . . . . . . . . . . . . 14
Main Menu . . . . . . . . . . . . . . . . . . . . . . . . . . . . . . . . . . . . . . . . . . . . . . . . . . . . . . . . 17
Start Menu . . . . . . . . . . . . . . . . . . . . . . . . . . . . . . . . . . . . . . . . . . . . . . . . . . . . . . . . 18
Programs Menu . . . . . . . . . . . . . . . . . . . . . . . . . . . . . . . . . . . . . . . . . . . . . . . . . . . . 18
Settings Menu . . . . . . . . . . . . . . . . . . . . . . . . . . . . . . . . . . . . . . . . . . . . . . . . . . . . . 20
Your Phone................................................................................................. 23
Features of Your Phone. . . . . . . . . . . . . . . . . . . . . . . . . . . . . . . . . . . . . . . . . . . . . . 23
Front View of Your Phone . . . . . . . . . . . . . . . . . . . . . . . . . . . . . . . . . . . . . . . . . . . . 24
Back View of Your Phone . . . . . . . . . . . . . . . . . . . . . . . . . . . . . . . . . . . . . . . . . . . . 26
Today Screen. . . . . . . . . . . . . . . . . . . . . . . . . . . . . . . . . . . . . . . . . . . . . . . . . . . . . . 27
Command Keys . . . . . . . . . . . . . . . . . . . . . . . . . . . . . . . . . . . . . . . . . . . . . . . . . . . . 28
Motions Sensor . . . . . . . . . . . . . . . . . . . . . . . . . . . . . . . . . . . . . . . . . . . . . . . . . . . . 29
Customization and Navigation ....................................................................30
Menu Navigation . . . . . . . . . . . . . . . . . . . . . . . . . . . . . . . . . . . . . . . . . . . . . . . . . . . 30
Opening an Application . . . . . . . . . . . . . . . . . . . . . . . . . . . . . . . . . . . . . . . . . . . . . . 30
Accessing a Menu Function . . . . . . . . . . . . . . . . . . . . . . . . . . . . . . . . . . . . . . . . . . 30
Page 5

Widgets . . . . . . . . . . . . . . . . . . . . . . . . . . . . . . . . . . . . . . . . . . . . . . . . . . . . . . . . . . 33
Widget Bar Navigation . . . . . . . . . . . . . . . . . . . . . . . . . . . . . . . . . . . . . . . . . . . . . . . 35
Customizing your Start Menu List . . . . . . . . . . . . . . . . . . . . . . . . . . . . . . . . . . . . . . 36
Customizing the Shortcut Menu . . . . . . . . . . . . . . . . . . . . . . . . . . . . . . . . . . . . . . . 36
Today Screen. . . . . . . . . . . . . . . . . . . . . . . . . . . . . . . . . . . . . . . . . . . . . . . . . . . . . . 37
Customizing your Today Screen Theme. . . . . . . . . . . . . . . . . . . . . . . . . . . . . . . . . 37
Customizing your Today Screen Item List. . . . . . . . . . . . . . . . . . . . . . . . . . . . . . . . 37
Customizing your Display Theme . . . . . . . . . . . . . . . . . . . . . . . . . . . . . . . . . . . . . . 37
Customizing Buttons . . . . . . . . . . . . . . . . . . . . . . . . . . . . . . . . . . . . . . . . . . . . . . . . 38
Security.......................................................................................................39
Locking Your Phone . . . . . . . . . . . . . . . . . . . . . . . . . . . . . . . . . . . . . . . . . . . . . . . . 39
Call Functions .............................................................................................41
Making a Call . . . . . . . . . . . . . . . . . . . . . . . . . . . . . . . . . . . . . . . . . . . . . . . . . . . . . . 41
Answering a Call . . . . . . . . . . . . . . . . . . . . . . . . . . . . . . . . . . . . . . . . . . . . . . . . . . . 41
Using the Speakerphone . . . . . . . . . . . . . . . . . . . . . . . . . . . . . . . . . . . . . . . . . . . . . 42
Displaying Your Phone Number . . . . . . . . . . . . . . . . . . . . . . . . . . . . . . . . . . . . . . . 42
Call Log . . . . . . . . . . . . . . . . . . . . . . . . . . . . . . . . . . . . . . . . . . . . . . . . . . . . . . . . . . 43
Roaming-Networks . . . . . . . . . . . . . . . . . . . . . . . . . . . . . . . . . . . . . . . . . . . . . . . . . 47
TTY. . . . . . . . . . . . . . . . . . . . . . . . . . . . . . . . . . . . . . . . . . . . . . . . . . . . . . . . . . . . . . 47
Voice Command . . . . . . . . . . . . . . . . . . . . . . . . . . . . . . . . . . . . . . . . . . . . . . . . . . . 48
Network Services........................................................................................50
Three-way Calling . . . . . . . . . . . . . . . . . . . . . . . . . . . . . . . . . . . . . . . . . . . . . . . . . . 50
Call Waiting . . . . . . . . . . . . . . . . . . . . . . . . . . . . . . . . . . . . . . . . . . . . . . . . . . . . . . . 50
Caller ID . . . . . . . . . . . . . . . . . . . . . . . . . . . . . . . . . . . . . . . . . . . . . . . . . . . . . . . . . . 50
Entering Text ..............................................................................................51
Virtual QWERTY Keyboard . . . . . . . . . . . . . . . . . . . . . . . . . . . . . . . . . . . . . . . . . . . 51
Text Entry - Input Mode . . . . . . . . . . . . . . . . . . . . . . . . . . . . . . . . . . . . . . . . . . . . . . 51
Text Entry - Word Completion . . . . . . . . . . . . . . . . . . . . . . . . . . . . . . . . . . . . . . . . . 52
Text Entry - Options. . . . . . . . . . . . . . . . . . . . . . . . . . . . . . . . . . . . . . . . . . . . . . . . . 53
Messaging ..................................................................................................55
Types of Messages . . . . . . . . . . . . . . . . . . . . . . . . . . . . . . . . . . . . . . . . . . . . . . . . . 55
Retrieving a Message . . . . . . . . . . . . . . . . . . . . . . . . . . . . . . . . . . . . . . . . . . . . . . . 55
Accessing Message Folders . . . . . . . . . . . . . . . . . . . . . . . . . . . . . . . . . . . . . . . . . . 55
Configuration of Messaging Parameters. . . . . . . . . . . . . . . . . . . . . . . . . . . . . . . . . 56
Sending Messages . . . . . . . . . . . . . . . . . . . . . . . . . . . . . . . . . . . . . . . . . . . . . . . . . 58
Message Option. . . . . . . . . . . . . . . . . . . . . . . . . . . . . . . . . . . . . . . . . . . . . . . . . . . . 59
Spell Checking a Text Message . . . . . . . . . . . . . . . . . . . . . . . . . . . . . . . . . . . . . . . 61
Checking Names with an SMS Message . . . . . . . . . . . . . . . . . . . . . . . . . . . . . . . . 61
Using My Text Messages . . . . . . . . . . . . . . . . . . . . . . . . . . . . . . . . . . . . . . . . . . . . 61
E-mail Account Setup . . . . . . . . . . . . . . . . . . . . . . . . . . . . . . . . . . . . . . . . . . . . . . . 62
Message Folders . . . . . . . . . . . . . . . . . . . . . . . . . . . . . . . . . . . . . . . . . . . . . . . . . . . 64
Page 6

Contacts......................................................................................................65
Phone Book . . . . . . . . . . . . . . . . . . . . . . . . . . . . . . . . . . . . . . . . . . . . . . . . . . . . . . . 65
Understanding Your Contacts . . . . . . . . . . . . . . . . . . . . . . . . . . . . . . . . . . . . . . . . . 66
Working with your Contacts. . . . . . . . . . . . . . . . . . . . . . . . . . . . . . . . . . . . . . . . . . . 67
Adding Notes to Contacts . . . . . . . . . . . . . . . . . . . . . . . . . . . . . . . . . . . . . . . . . . . . 69
Speed Dial Contacts . . . . . . . . . . . . . . . . . . . . . . . . . . . . . . . . . . . . . . . . . . . . . . . . 70
Mobile Applications .....................................................................................71
Mobile Applications . . . . . . . . . . . . . . . . . . . . . . . . . . . . . . . . . . . . . . . . . . . . . . . . . 71
Office Mobile . . . . . . . . . . . . . . . . . . . . . . . . . . . . . . . . . . . . . . . . . . . . . . . . . . . . . . 71
Multimedia ..................................................................................................76
Camera . . . . . . . . . . . . . . . . . . . . . . . . . . . . . . . . . . . . . . . . . . . . . . . . . . . . . . . . . . 76
Video . . . . . . . . . . . . . . . . . . . . . . . . . . . . . . . . . . . . . . . . . . . . . . . . . . . . . . . . . . . . 77
Media Album . . . . . . . . . . . . . . . . . . . . . . . . . . . . . . . . . . . . . . . . . . . . . . . . . . . . . . 78
Photo Slides. . . . . . . . . . . . . . . . . . . . . . . . . . . . . . . . . . . . . . . . . . . . . . . . . . . . . . . 79
Digital Frame . . . . . . . . . . . . . . . . . . . . . . . . . . . . . . . . . . . . . . . . . . . . . . . . . . . . . . 81
FM Radio . . . . . . . . . . . . . . . . . . . . . . . . . . . . . . . . . . . . . . . . . . . . . . . . . . . . . . . . . 82
Podcasts . . . . . . . . . . . . . . . . . . . . . . . . . . . . . . . . . . . . . . . . . . . . . . . . . . . . . . . . . 83
RSS Reader. . . . . . . . . . . . . . . . . . . . . . . . . . . . . . . . . . . . . . . . . . . . . . . . . . . . . . . 84
SharePix. . . . . . . . . . . . . . . . . . . . . . . . . . . . . . . . . . . . . . . . . . . . . . . . . . . . . . . . . . 85
Smart Reader. . . . . . . . . . . . . . . . . . . . . . . . . . . . . . . . . . . . . . . . . . . . . . . . . . . . . . 87
TV Out Viewer . . . . . . . . . . . . . . . . . . . . . . . . . . . . . . . . . . . . . . . . . . . . . . . . . . . . . 88
Video Editor . . . . . . . . . . . . . . . . . . . . . . . . . . . . . . . . . . . . . . . . . . . . . . . . . . . . . . . 88
Windows Media Player . . . . . . . . . . . . . . . . . . . . . . . . . . . . . . . . . . . . . . . . . . . . . . 91
Touch Player . . . . . . . . . . . . . . . . . . . . . . . . . . . . . . . . . . . . . . . . . . . . . . . . . . . . . . 92
Connected Home. . . . . . . . . . . . . . . . . . . . . . . . . . . . . . . . . . . . . . . . . . . . . . . . . . . 93
Web ............................................................................................................ 94
Opera™ Browser . . . . . . . . . . . . . . . . . . . . . . . . . . . . . . . . . . . . . . . . . . . . . . . . . . . 94
Internet Explorer. . . . . . . . . . . . . . . . . . . . . . . . . . . . . . . . . . . . . . . . . . . . . . . . . . . . 95
Application Management. . . . . . . . . . . . . . . . . . . . . . . . . . . . . . . . . . . . . . . . . . . . . 96
Managing Certificates . . . . . . . . . . . . . . . . . . . . . . . . . . . . . . . . . . . . . . . . . . . . . . . 97
Personal Organizer .....................................................................................98
Date and Time Settings . . . . . . . . . . . . . . . . . . . . . . . . . . . . . . . . . . . . . . . . . . . . . . 98
Scheduling an Alarm . . . . . . . . . . . . . . . . . . . . . . . . . . . . . . . . . . . . . . . . . . . . . . . . 99
Owner Information . . . . . . . . . . . . . . . . . . . . . . . . . . . . . . . . . . . . . . . . . . . . . . . . . . 99
Message - Task Status . . . . . . . . . . . . . . . . . . . . . . . . . . . . . . . . . . . . . . . . . . . . . 100
Calendar. . . . . . . . . . . . . . . . . . . . . . . . . . . . . . . . . . . . . . . . . . . . . . . . . . . . . . . . . 100
Tasks . . . . . . . . . . . . . . . . . . . . . . . . . . . . . . . . . . . . . . . . . . . . . . . . . . . . . . . . . . . 103
Notes . . . . . . . . . . . . . . . . . . . . . . . . . . . . . . . . . . . . . . . . . . . . . . . . . . . . . . . . . . . 105
Remote Desktop Mobile . . . . . . . . . . . . . . . . . . . . . . . . . . . . . . . . . . . . . . . . . . . . 107
Bluetooth and Wi-Fi Services....................................................................108
About Bluetooth Wireless Technology . . . . . . . . . . . . . . . . . . . . . . . . . . . . . . . . . 108
Page 7

Bluetooth Modes . . . . . . . . . . . . . . . . . . . . . . . . . . . . . . . . . . . . . . . . . . . . . . . . . . 109
Bluetooth Bonds. . . . . . . . . . . . . . . . . . . . . . . . . . . . . . . . . . . . . . . . . . . . . . . . . . . 110
Bluetooth Hands-Free Device . . . . . . . . . . . . . . . . . . . . . . . . . . . . . . . . . . . . . . . . 112
Bluetooth OBEX FTP. . . . . . . . . . . . . . . . . . . . . . . . . . . . . . . . . . . . . . . . . . . . . . . 113
Bluetooth Virtual Serial Port. . . . . . . . . . . . . . . . . . . . . . . . . . . . . . . . . . . . . . . . . . 113
ActiveSync via Bluetooth Wireless Technology . . . . . . . . . . . . . . . . . . . . . . . . . . 114
About Wi-Fi . . . . . . . . . . . . . . . . . . . . . . . . . . . . . . . . . . . . . . . . . . . . . . . . . . . . . . 114
Enabling Wi-Fi . . . . . . . . . . . . . . . . . . . . . . . . . . . . . . . . . . . . . . . . . . . . . . . . . . . . 114
Automatically Connecting to a Network. . . . . . . . . . . . . . . . . . . . . . . . . . . . . . . . . 114
Manually Entering Network Settings . . . . . . . . . . . . . . . . . . . . . . . . . . . . . . . . . . . 115
Changing Connection Information. . . . . . . . . . . . . . . . . . . . . . . . . . . . . . . . . . . . . 115
Synchronization ........................................................................................ 117
Active Sync . . . . . . . . . . . . . . . . . . . . . . . . . . . . . . . . . . . . . . . . . . . . . . . . . . . . . . 117
Changing the Synchronization Schedule . . . . . . . . . . . . . . . . . . . . . . . . . . . . . . . 120
Connecting Your Phone to a Computer . . . . . . . . . . . . . . . . . . . . . . . . . . . . . . . . 120
Windows Mobile Device Center 6 for Windows Vista. . . . . . . . . . . . . . . . . . . . . . 121
Tools .........................................................................................................123
Search . . . . . . . . . . . . . . . . . . . . . . . . . . . . . . . . . . . . . . . . . . . . . . . . . . . . . . . . . . 123
File Explorer. . . . . . . . . . . . . . . . . . . . . . . . . . . . . . . . . . . . . . . . . . . . . . . . . . . . . . 123
Calculator . . . . . . . . . . . . . . . . . . . . . . . . . . . . . . . . . . . . . . . . . . . . . . . . . . . . . . . . 123
Smart Converter. . . . . . . . . . . . . . . . . . . . . . . . . . . . . . . . . . . . . . . . . . . . . . . . . . . 124
Clock . . . . . . . . . . . . . . . . . . . . . . . . . . . . . . . . . . . . . . . . . . . . . . . . . . . . . . . . . . . 124
Games . . . . . . . . . . . . . . . . . . . . . . . . . . . . . . . . . . . . . . . . . . . . . . . . . . . . . . . . . . 125
Settings.....................................................................................................127
Omnia Settings . . . . . . . . . . . . . . . . . . . . . . . . . . . . . . . . . . . . . . . . . . . . . . . . . . . 127
Personal Settings. . . . . . . . . . . . . . . . . . . . . . . . . . . . . . . . . . . . . . . . . . . . . . . . . . 127
System Settings . . . . . . . . . . . . . . . . . . . . . . . . . . . . . . . . . . . . . . . . . . . . . . . . . . . 136
Connections Settings. . . . . . . . . . . . . . . . . . . . . . . . . . . . . . . . . . . . . . . . . . . . . . . 145
Sound Settings. . . . . . . . . . . . . . . . . . . . . . . . . . . . . . . . . . . . . . . . . . . . . . . . . . . . 146
Safety .......................................................................................................147
Getting the Most Out of Your Reception . . . . . . . . . . . . . . . . . . . . . . . . . . . . . . . . 147
UL Certified Travel Adapter . . . . . . . . . . . . . . . . . . . . . . . . . . . . . . . . . . . . . . . . . . 148
Caring for the Battery. . . . . . . . . . . . . . . . . . . . . . . . . . . . . . . . . . . . . . . . . . . . . . . 150
Owner’s Record . . . . . . . . . . . . . . . . . . . . . . . . . . . . . . . . . . . . . . . . . . . . . . . . . . . 153
User Guide Proprietary Notice. . . . . . . . . . . . . . . . . . . . . . . . . . . . . . . . . . . . . . . . 153
Warranty ..................................................................................................154
Index .........................................................................................................157
Page 8

Important Safety Precautions
Please read these guidelines before using your wireless phone. Failure to comply with
them may be dangerous or illegal.
Road Safety at All Times
Do not use a hand-held phone while driving; park the vehicle first.
Switching Off When Refueling
Do not use the phone at a refueling point (service station) or near fuels or chemicals.
Switching Off in an Aircraft
Wireless phones can cause interference. Using them in an aircraft is both illegal and
dangerous.
Switching Off in Hospitals
Switch your phone off near medical equipment. Follow any regulations or rules in force.
Interference
All wireless phones may be subject to interference, which could affect their performance.
Special Regulations
Follow any special regulations in force in any area and always switch your phone off
whenever it is forbidden to use it, or when it may cause interference or danger (in a
hospital, for example).
Sensible Use
Use the phone in the intended position (held to the ear). If your phone has an external
antenna, avoid unnecessary contact with the antenna when the phone is on.
Emergency Call
Ensure the phone is switched on and in-service. Key in the emergency number for your
present location, then press the key. Give all the necessary information as
accurately as possible. Do not end the call until given permission to do so.
Liquid Resistance
Your phone is not liquid resistant. Keep it dry.
Accessories and Batteries
Use only Samsung-approved accessories and batteries. Use of any unauthorized
accessories could damage your phone and may be dangerous.
1 Important Safety Precautions
Page 9

Important: Although the phone can be used while the battery is charging, the battery
must be fully charged before first use, otherwise you could damage the battery.
Important: Using a non-supported battery may cause damage to your phone.
Qualified Service
Only qualified service personnel may repair your phone.
For more detailed safety information, see "Safety" on page 147.
Important
Important Safety Precautions 2
Page 10
Getting Started
This section allows you to start using your phone by activating your service, setting up
your voicemail, inserting your battery, and navigating from the Today screen.
Understanding the User Manual
The chapters of this guide generally follow the same order as the menus and sub menus
in your phone. A robust index for quick reference to most features begins on page 157.
Also included in this manual is important safety information that you should know before
using your phone.
Powering the Phone On and Off
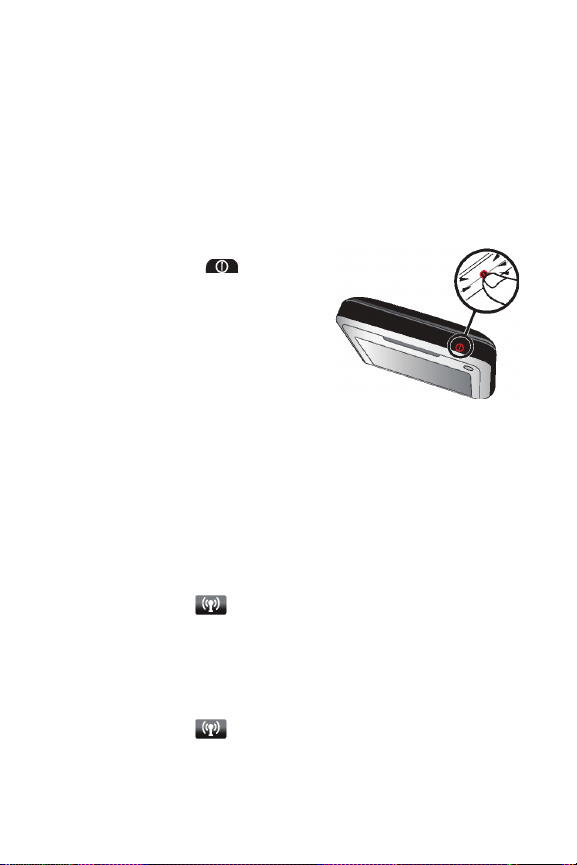
1. Press and hold (for 5 seconds) the
Power On/Off key located at the
top of the phone.
2. The phone receives a signal from your
home network and then logs in. At this
point, the phone displays the Tod ay
screen and only functions as a PDA
(allowing you to run applications) until
you activate the phone features.
Powering Off the Phone
Press and hold the Power On/Off key located at the top of the phone.
Turning the Phone Feature On and Off
Before you can use your Omnia™ phone features, the onboard phone must first be
activated.
Turning On the Phone Feature
From the Tod ay screen, tap the Widget Bar and drag and drop the Wireless
1.
Manager widget onto the desktop.
2. Tap Phone off. The Phone feature is now turned on and you are now able to
make and receive phone calls.
Turning Off the Phone Feature
From the Tod ay screen, tap the Widget Bar and drag and drop the Wireless
1.
Manager widget onto the desktop.
3 Getting Started
Page 11

2. Tap Phone on. The Phone feature is now turned off and you are now unable
to make or receive phone calls.
Rebooting your Phone after Lockup
The Reset button allows you to quickly turn off the
phone in the event of a program or application error. In
this case your Omnia would appear to “freeze” and
become unresponsive.
1. Locate the Reset button located at the top
of the phone, adjacent to the power key.
2. Carefully insert the stylus into the reset
button hole. After depressing the reset
button, the phone will reboot.
Note: This reset action retains all of your phone’s default parameters and settings. This
action is similar to that of a reset action on your computer which only restarts the machine
while maintaining all data intact.
Resetting your Phone to Factory Defaults
Hard Reset allows you to reset your phone’s settings and clear all data/applications from
the phone’s internal memory. This action resets your phone to its factory default settings,
ends all applications currently running, and wipes all data (pics/video/contacts) from your
phone.
Note: Although this action wipes all information and settings from your Omnia, you can
circumvent the deletion of important data by storing it on your removable microSD memory
card.
1. From the Today screen, tap the right soft key function Main Menu > Settings
> All Settings > System tab > Hard Reset.
2. The Hard Reset screen displays with the Memory tab open. To reset your
phone, tap the Clear all data button.
3. At the Clear all data prompt, tap Yes .
Getting Started
4. Tap the QWERTY keyboard icon at the bottom bar on the main LCD
screen to open the virtual QWERTY keyboard and enter the Device Lock
Code (last 4-digits of your phone number) and tap “yes” in the box.
Getting Started 4
Page 12
5. Tap the Yes box to proceed. Your phone will reboot to the factory settings.
After the phone reboots, you will need to align the screen and set your local
time. Follow the on-screen prompts when directed.
Note: Press the Reset button (on the top of the phone) while holding the SEND and END
simultaneously. Continue to hold SEND and END until the prompt to re-format device
arrives on screen. Press SEND again to re-format or END to cancel.
Battery
Your Omnia comes with a standard rechargeable battery, power adapter, and headset
accessory.
Note: This phone comes packaged with a partially charged rechargeable standard Li-Ion
battery and travel charger. You must fully charge the battery before using your phone for
the first time. A fully discharged battery requires up to 4 hours of charge time.
Note: When using a non-supported battery the handset can only be used for the duration
of the life of the battery and cannot be recharged.
Important!: Using a non-supported battery may cause damage to your phone. Use a
Samsung supported battery only.
Installing the Battery
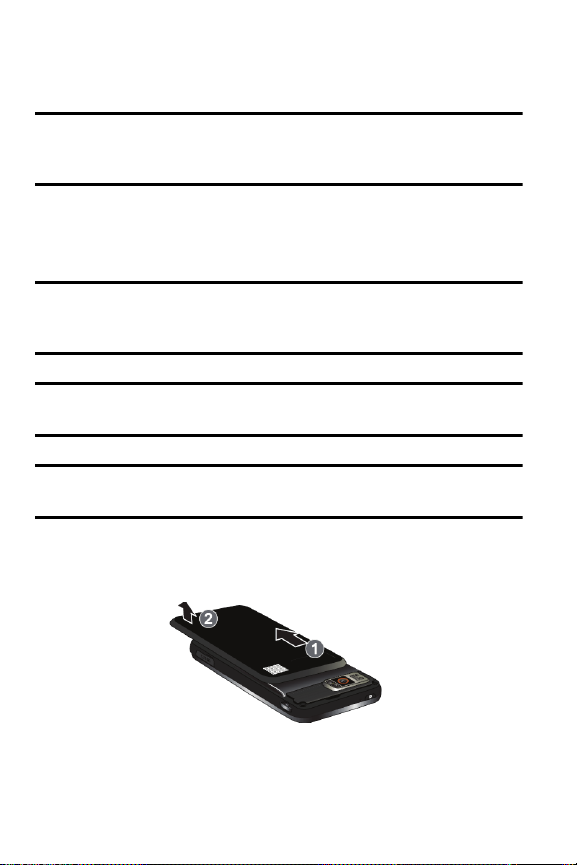
Press down at the top of the battery cover and push in the direction of the
1.
arrow to remove.
5 Getting Started
Page 13
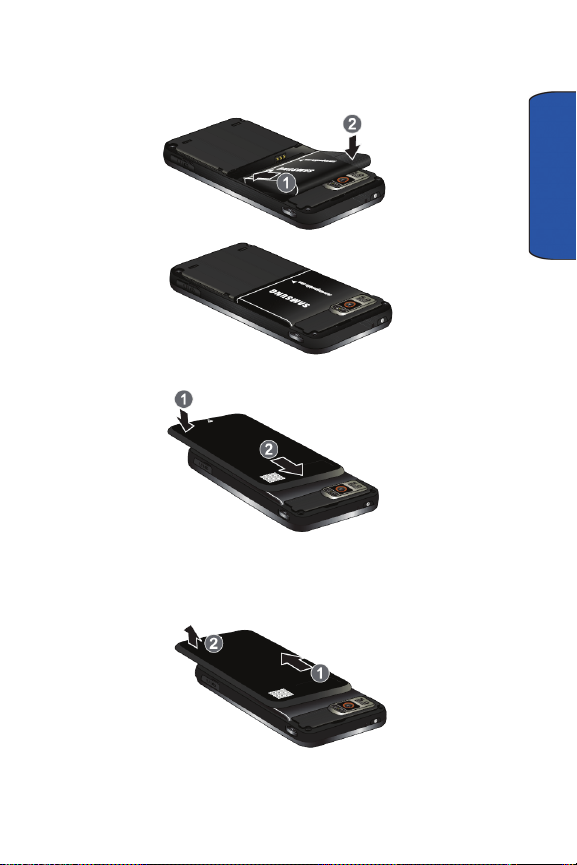
2. Insert the top end of the battery into the phone housing using the directional
arrow printed on the battery. The gold contacts at the battery end must align
with contacts on the phone. Push bottom end of the battery down until it
snaps into place.
3. Slide the battery cover up until it snaps into place.
Removing the Battery
Power off the phone. Press down at the top of the battery cover and push in
1.
the direction of the arrow to remove.
Getting Started
Getting Started 6
Page 14
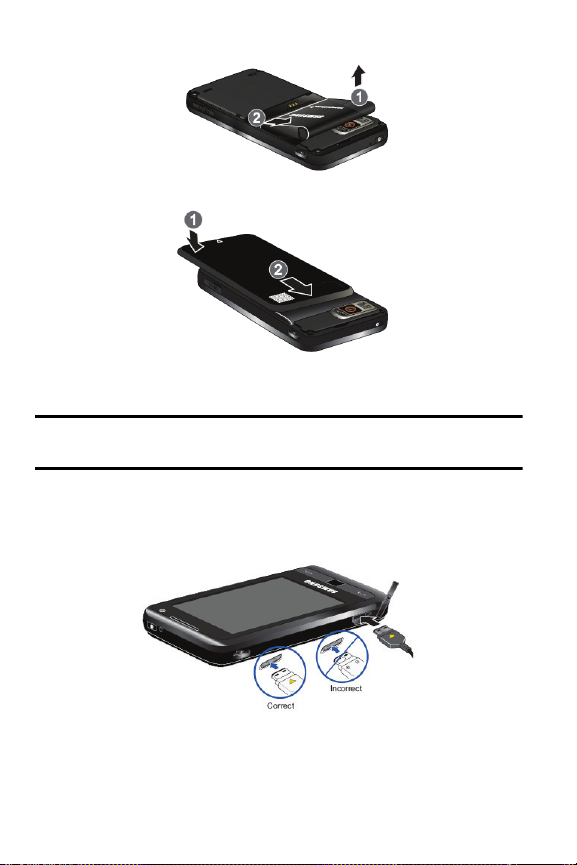
2. Lift the battery up at each end and remove from the phone.
3. Slide the battery cover up until it snaps into place.
Charging the Battery
Note: Your Omnia comes with a rechargeable battery. Fully charge this battery before
using your phone.
Your phone is powered by a rechargeable standard Li-ion battery. Only use Samsungapproved charging devices and batteries. Samsung accessories are designed to
maximize battery life. Using other accessories may invalidate your warranty and may
cause damage.
1. Plug the terminal end of the wall charger into the phone’s power/accessory
interface connector and the other end into an electrical outlet.
7 Getting Started
Page 15
Battery Indicator
The battery indicator in the upper-right corner of the display indicates battery power
level. Four bars indicate a full charge while one bar indicates an almost empty battery.
Two to three minutes before the battery becomes too low to operate, a blinking empty
battery icon appears and a tone sounds. If you continue to operate the phone
without charging, it shuts down.
Checking Battery Charge
Keeping track of the battery’s charge is important. If the battery level becomes too low,
your phone automatically shuts down and you could lose important data.
• For a quick check of your battery level, tap the battery icon to display the
main battery’s remaining battery power.
Battery Capacity
When the battery is low, a warning window displays and the backlight turns off.
Note: Long backlight settings, simultaneous use of Wi-Fi and Bluetooth, searching for
service, vibrate mode and browser use affect the battery’s talk and standby times.
There is also an internal backup battery that saves all phone settings if the regular battery
is discharged. The internal battery maintains data for approximately four hours. This
internal backup battery needs an initial charge of 24 hours.
Perform ActiveSync operations or use a backup utility frequently to avoid losing any
information in case the battery is fully discharged. For more information see
"Synchronization" on page 117.
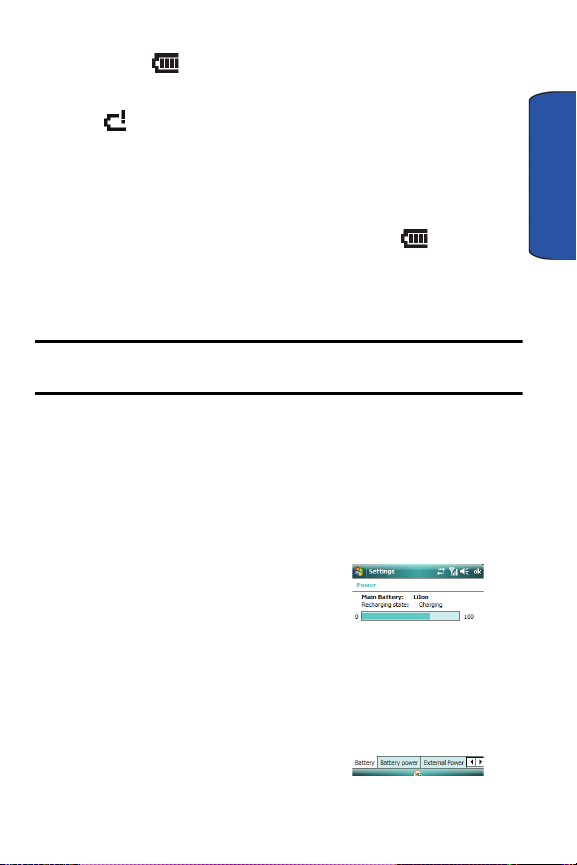
Battery tab - Charge state
The Battery tab allows you to view the current
power state of the Li-Ion battery. To perform a
battery check:
1. From the Tod ay screen, tap the right
soft key function Main Menu >
Settings > All Settings > System
tab > Power.
Getting Started
Getting Started 8
Page 16
Battery Power tab - Power parameters
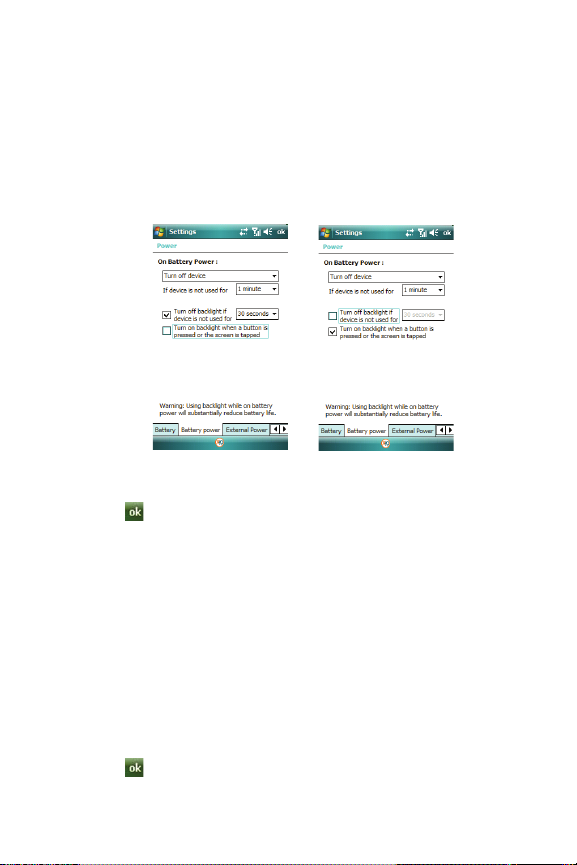
The Battery Power tab allows you to set the following battery power parameters for your
device.
1. The On Battery Power screen displays. If you wish to have the device turn off
when not in use, select: Turn off dev ice in the first drop-down box.
2. Select a time interval (from 1 to 5 minutes) for the phone to turn off.
3. Tap the box for: “Turn off backlight if device is not used for” if desired.
Select a time interval (from 10 seconds to 5 minutes) for the backlight to turn
off.
4. Tap the box for: “Turn on backlight when a button is pressed or the
screen is tapped” if desired.
5. Tap to save your changes and return to the previous Settings screen.
External Power tab
The External Power tab allows you to set the following external power parameters for
your device.
1. The On External Power screen displays. If you wish to have the device turn
off when not in use, select: Turn off device in the first drop-down box.
2. Select a time interval (from 1 to 30 minutes) for the phone to turn off.
3. Tap the box for: “Turn off backlight if device is not used for” if desired.
Select a time interval (from 1 to 10 minutes) for the backlight to turn off.
4. Tap the box for: “Turn on backlight when a button is pressed or the
screen is tapped” if desired.
5. Tap to save your changes and return to the previous Settings screen.
9 Getting Started
Page 17
Using a microSD Memory Card (sold separately)
Your phone has an expansion slot compatible with microSDTM memory cards which are
primarily used to back up or transfer files and data. This type of card is specifically
designed for use with ultra-small mobile phones and other devices. It’s ideal for storing
media-rich files such as music, programs, videos, and photographs for your phone.
Note: Use only compatible memory cards with your phone.
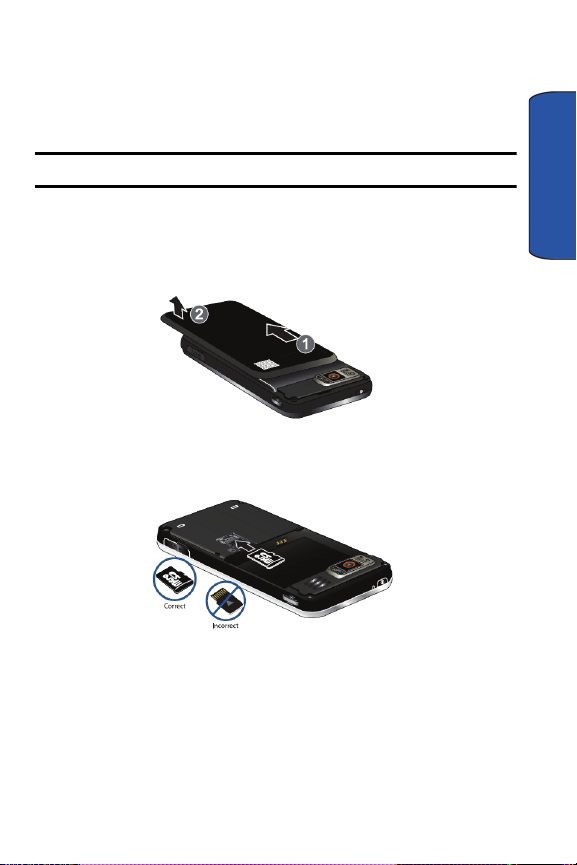
Installing the microSD Memory Card
Press down at the top of the battery cover and push in the direction of the
1.
arrow to remove.
2. Remove the battery, locate the memory slot and orient the microSD card so
the contact pins are facing up (see illustration below).
Getting Started
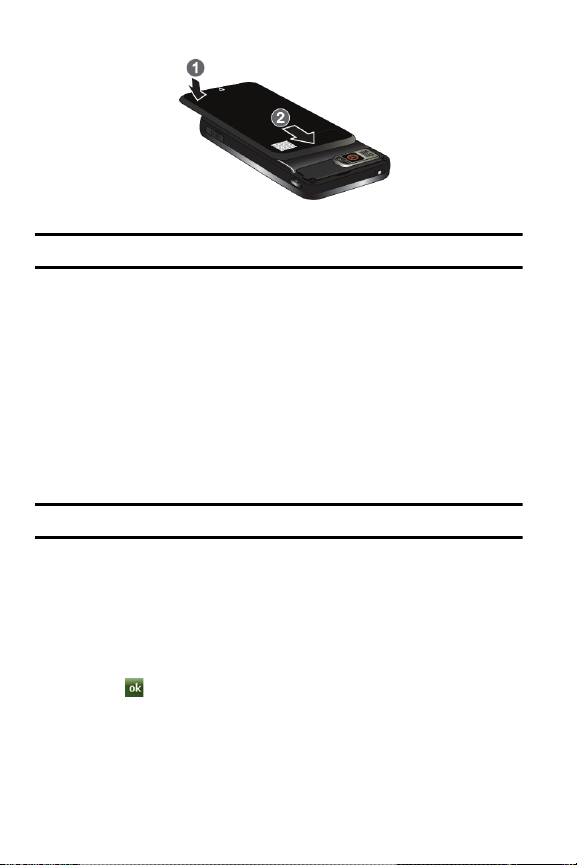
3. Carefully insert the compatible microSD card into the opening and firmly push
it in until you hear a click that indicates the card is securely installed. The card
is secure when it is not protruding from the slot within the phone.
4. Re-insert the battery and slide the battery cover up until it snaps into place.
Getting Started 10
Page 18
Note: Memory cards with a storage capacity of over 16GB will not work with this phone.
Removing the microSD Memory Card
Power off the phone. Remove the battery cover (see "Installing the microSD
1.
Memory Card" on page 10.) Firmly push in the microSD card and release so
that it becomes disengaged from the slot. The card should pop out from the
slot.
2. Carefully grab the card and pull it out of the slot.
Reformatting the microSD Memory Card
You can reformat your MicroSD memory card at the Storage Card tab in Hard Reset
menu.
Note: Reformatting your microSD memory card will delete all data stored on the card.
1. From the Tod ay screen, tap the right soft key function. Main Menu > Settings
> All Settings > System tab > Hard Reset.
2. The Hard Reset screen displays with the Memory tab open. Tap the Storage
Card tab.
3. To format your microSD card, tap the Format button. At the Reset prompt, tap
Yes . The format will complete and the Format Success prompt will display.
Tap at the prompt.
11 Getting Started
Page 19

Transferring data to the microSD card from a PC
Insert the microSD card into the microSD slot lot of your Omnia. For
1.
information on inserting the microSD card, see "Installing the microSD
Memory Card" on page 10.
2. Synchronize your Omnia with your PC via ActiveSync. For information on
installing ActiveSync, see "Installing Microsoft® ActiveSync®" on page 117.
3. Open Windows Explorer on your PC, then highlight the application or folder
that you wish to transfer to the microSD card.
4. Highlight and copy the file(s) or folder(s) to your computer’s clipboard.
5. Using the ActiveSync menu, click the Explore icon to open the Mobile Device
folder.
6. Double-click on the My Windows Mobile-Based Device folder.
7. Double-click the Storage Card folder to open. Any contents of the microSD
card appear in the display.
8. Locate the folder or sub folder where you wish to paste the files that you’ve
copied.
9. Press Ctrl-V on your computer to paste the files or folders on your computer’s
clipboard onto the microSD card.
Use the microSD/microSDHC card
Once you’ve transferred files from your computer to the microSD card using ActiveSync,
you can access games or applications that have been transferred to your microSD card.
For example, if you’ve transferred any multimedia files onto your microSD card that are
compatible with Windows Media Player, simply open Windows Media Player and select
the media file that you wish to play. There is no need to look or browse your phone for the
microSD card. The microSD card is recognized when it is installed.
Voicemail
Setting Up Your Voicemail
All unanswered calls to your phone are sent to voicemail, even if your device is turned off.
Therefore, you’ll want to set up your voicemail and personal greeting as soon as you
activate your phone.
1. From the Tod ay screen, press the Send key .
2. Press and hold the Voicemail key to call Voicemail. Follow the
automated instructions to set up your voicemail.
Getting Started
Getting Started 12
Page 20

Check Voicemail
From the Tod ay screen, press the Send key .
1.
2. Press and hold the Voicemail key to call Voicemail. Follow the
automated instructions to check your voicemail.
13 Getting Started
Page 21
Menus
Display Icons
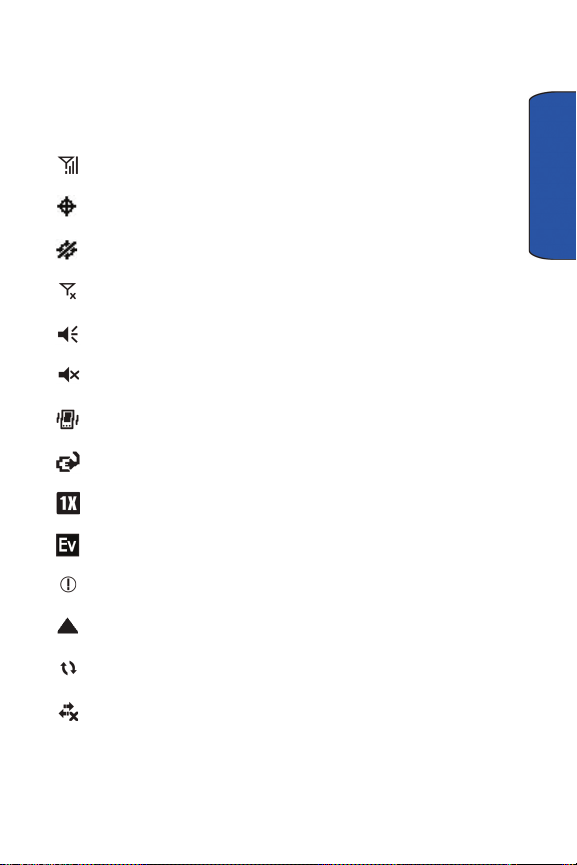
Various icons appear in your Omnia’s display or Title Bar during operation. The following
table lists these icons as well as their descriptions.
Indicates signal strength. More bars mean better signal.
Indicates GPS is on for location.
Indicates GPS for 911 is active.
Indicates your device is in Flight mode and your cellular radio is turned off
(i.e. the phone is turned Off but the PDA is On).
Indicates the ringer for the selected profile is set to On.
Indicates the ringer for the selected profile is set to Off.
Indicates the ringer for the selected profile is set to Vibrate.
Indicates your Omnia is charging.
Indicates the 1xRTT high speed data transfer protocol is supported.
Indicates your phone has high speed data services (Ev-Do protocol), which
is required for video streaming and downloads.
Indicates important information. Indicates a programming error. The phone
can not connect until it is properly programmed.
Indicates your Omnia is in Roaming mode. Indicates your phone is outside
of the home service area.
Indicates ActiveSync or a Data Session is currently in use.
Menus
Indicates there are no data sessions active.
Menus 14
Page 22

Indicates two or more icons are being displayed. Tap to see additional
icons.
Indicates a reminder of an upcoming calendar event.
Indicates you have a new email message.
Indicates you have a new text message. If you tap this icon, a bubble is
displayed that allows you to access the Inbox.
Indicates you have a new voicemail message. If you tap this icon a bubble is
displayed that allows you to listen to new voicemail messages.
Indicates you have a missed call. If you tap the icon a bubble is displayed
indicating the number of calls missed. It also gives you the ability to view the
missed call information.
Indicates your Omnia is in Speakerphone mode.
Indicates a Wi-Fi connection is inactive.
Indicates a Wi-Fi connection is available and active.
Indicates the Voice Command feature is active and awaiting a verbal
command.
Indicates the current battery charge strength. Icon shown fully charged.
Indicates the current battery charge strength. Icon shown fully discharged
and will appear two to three minutes before the battery becomes too low to
operate. If you continue to operate the phone without charging, it shuts
down.
Indicates that an alarm is set on your phone.
15 Menus
Indicates that your phone is in Auto Answer mode. If you are using a
headset or hands-free kit, then calls are automatically answered after a
preselected number of rings. If you are not using the headset or hands-free
kit, then this setting is ignored.
Page 23

Indicates that the TTY option is On.
Indicates an active data call.
Indicates a dormant data call.
Indicates there is no service, as your phone cannot find a signal.
Menus
Menus 16
Page 24

Main Menu
From the Tod ay screen tap the right soft key function Main Menu. The following options
appear in the display:
• Call Log: Displays call history of incoming, outgoing, and missed calls.
• Phone Book: Directory listing of contacts stored on the device.
• Message: Direct entry to messaging.
• Touch Player: Activate native Music/video player.
• Camera: Tap to launch the Camera.
• FM Radio: Activates the FM Radio. (Antenna cable / 3.5mm headset adapter must
be attached for FM radio to function.)
• Internet: Launches Opera Mobile web browser.
• Photo Slides: Allows you to display a series of chosen images in a slide show.
• Media Album: Folder listing of all media (music, video, photos, or docs) on device.
• Clock: Clock has integrated Alarms, Anniversary Day, Stopwatch, and World
Clock.
• Programs: Displays the Programs menu.
• Settings: Displays the Settings menu.
Tap the white triangle at the bottom of the display to view additional
applications:
• Word Mobile: Allows you to create, open, and save Word documents on your
mobile device.
• Excel Mobile: Allows you to create, open, and save Excel documents on your
mobile device.
• PowerPoint Mobile: Allows you to open, and save PowerPoint documents on
your mobile device.
• OneNote Mobile: Allows you to create, open, and save Notes on your mobile
device.
Note: This will not synchronize with Outlook Notes.
• Smart Reader: Smart Reader allows you to take a photo of a business card,
extract the information from the card, and save it as a new contact in Contacts.
You can also take a photo of a document and convert it to an editable text file.
• Digital Frame: Tap to open Digital Frame menu.
17 Menus
Page 25

• TV Out Viewer: Allows you to view your device’s display on a TV screen. This is
done by using an optional cable to connect your device to your monitor’s TV input
jacks. Cable sold separately.
• RSS Reader: Provides news updates from a website in a simple form for your
phone.
• Podcasts: Provides a series of digital-media files, which are distributed over the
internet for playback on phone.
• Internet Explorer: Tap to launch Internet Explorer.
• Programs: Displays the Programs menu.
• Settings: Displays the Settings menu.
Start Menu
• Tod ay: Tap to return to the Today screen.
• Office Mobile: Tap to open the Office Mobile menu.
• Calendar: Tap to open the Calendar menu.
• Contacts: Tap to open your Contacts list.
• Messaging: Tap to open Messaging accounts selection menu.
• Opera Browser: Tap to launch the Opera Browser. Opera enables you to take
your full Web experience to your phone. Stay in touch with your friends on
Facebook, Twitter, get your e-mail on the go, do your online banking. There are no
limits — Opera is the quick, easy and secure way to get any Web page you want.
• Task Manager: Displays all applications that are currently running on your device.
• Programs: Tap to open the Programs menu.
• Settings: Tap to open the Settings menu.
• Help: Tap to open the Help menu.
Programs Menu
• Games: Tap to open the Games menu.
• Telus Applications: Tap to open Telus Applications menu.
• ActiveSync: Tap to configure ActiveSync connection settings.
• Calculator: Tap to launch the calculator.
• Call Log: Displays call history of incoming, outgoing, and missed calls.
• Camera: Tap to launch the Camera.
• Clock: Tap to launch Clock menu. The Clock menu allows you to set Alarms,
Anniversary Dates, World clock and use the Stop Watch feature.
Menus
Menus 18
Page 26

• Connected Home: Allow your phone to serve as a Mobile Digital Media Server
(M-DMS), sending photos, music and videos from its memory to other DLNA
Certified devices. Or, it could function as a Mobile Digital Media Player (M-DMP) to
play digital content received from other DLNA Certified devices.
• Digital Frame: Tap to open Digital Frame menu.
• Easy Settings: Tap to open Easy Settings menu.
• FM Radio: Allows you to listen to your favorite FM radio station.
• File Explorer: Allows you to browse all the files and folders on your device.
• Internet Explorer: Tap to launch Internet Explorer.
• Internet Sharing: Tap to launch Internet Sharing.
• Main Menu: Tap to launch the Main Menu. You can also access the Main Menu
via the right soft key function from the Today screen.
• Media Album: Folder listing of all media (music, video, photos, or docs) on device.
• Messenger: Tap to launch Messenger.
• MyMobiler: Tap to launch MyMobiler.
• Notes: Tap to launch Notes application.
• Phonebook: Tap to open phonebook menu.
• Photo Slides: Allows you to display a series of chosen images in a slide show.
• Podcasts: Provides a series of digital-media files, which are distributed over the
internet for playback on phone.
• RSS Reader: Provides news updates from a website in a simple form for your
phone.
• Remote Desktop: Remote desktop technology makes it possible to view another
computer's desktop on your phone.
• Search: Allows you to search for files and/or folders by a specific name or type.
• SharePix: Allows you to share photos. SharePix allows you to upload your photos
to the photo sharing websites Facebook, Picasa, Flickr, Photobucket, Friendster,
and MySpace. You can also download your friends’ photos to your phone.
• Smart Converter: Allows you to convert numbers to one of the following
conversion types:
• Length
• Weight
• Area
• Vol ume
• Temperature
19 Menus
Page 27

• Smart Memo: Tap to open Smart Memo menu
• Smart Reader: Allows you to take a photo of a business card and extract the
information from the card, and save it as a new contact in Contacts. You can also
take a photo of a document and convert it to an editable text file.
• TV Out Viewer: Allows you to view your device’s display on a TV screen. This is
done by using an optional cable to connect your device to your monitor’s TV input
jacks. Cable sold separately.
• Task Switcher: Allows you to switch between applications currently running on
your device.
• Tasks: Allows you to create and track task. A task is an item that you create in
Outlook or via your Omnia to track until its completion. A to-do item is any
Outlook item — such as a task, an email message, or a contact — that has been
flagged for follow-up. By default, all tasks are flagged for follow-up when they are
created, even if they have no start date or due date. Therefore, whenever you
create a task, or flag an e-mail message or a contact, a to-do item is created
automatically.
• Text Messages Retry: Tap to open Text Messages Retry menu.
• Touch Player: Allows you to play music and video.
• Video Editor: Tap to launch Video Editor. Video Editor allows you to edit videos
recorded with the camcorder feature on your device.
• Windows Live: Tap to launch Windows Live.
• Windows Media: Tap to launch Windows Media player.
Settings Menu
Personal Tab
• Buttons: Allows you to customize the Main Menu button and Camera button
located on the right side of your device.
• DivX VOD Registration: DivX Video-on-Demand (VOD) is a digital video delivery
service that allows you to download and enjoy high-quality video content from a
diverse group of DivX content partners.
• Input: Allows you to set the default text entry method.
• Lock: Allows you to set up your device security.
• Menus: Allows you to select the applications that will appear in the Start menu.
• Owner Information: Stores information about the owner or user of the device.
• Phone: Allows you to set phone options and services.
• Sounds & Notifications: Allows you to select the actions for which you hear
sounds and how you are notified when different events occur.
Menus
Menus 20
Page 28

• Theme Maker: Allows you to create your own customized theme for the Today
screen.
• Tod ay: Allows you to select preloaded themes for the Today screen. Also allows
you to set applications that will display in the Today screen.
• Vibration: Set vibration settings on your device.
• Voice Command: Allows you to set which applications can be accessed with
Voice Commands.
System Tab
• About: Displays the Windows Mobile OS software version.
• Backlight: Allows you to set your display brightness.
• Certificates: Allows you to manage your personal certificates.
• Clock & Alarms: Allows you to set the clock that appear in the Today screen and
alarms.
• Customer Feedback: Allows you to provide customer feedback to Microsoft to
help identify trends and usage patterns in order to improve Windows Mobile 6.1.
• Encryption: Allows you to encrypt files that can only be read by your Omnia.
• Error Reporting: Collects information on software operation for later reporting in
the event of serious error.
• Hard Reset: Allows you to reset your phone’s settings and clear all data/
applications from the phone’s internal or external memory.
• Language Change: Allows you to change your phone’s language settings.
• Large Display: Allows you to set the font size displayed in the Start menu.
• Managed Programs: Allows you to manage programs that have been
downloaded onto your device.
• Memory: Allows you to view the used and available memory on your Omnia.
• Motion Sensor: Allows you to set your device’s orientation settings for sensor
sensitivity, etiquette, and screen rotation animation.
• Optical Mouse: Allows you to define the functionality of the Optical Mouse.
• Power: Allows you to view the current state of your battery and set your power
settings.
• Regional Settings: Allows you to set your phone’s appearance settings for region,
number, currency, time, and date.
• Remove Programs: Allows you to remove programs from your device.
• Screen: Allows you to align the screen if it’s not responding accurately to stylus
taps and additional screen settings.
21 Menus
Page 29

• TV Out: Allows you to view your device’s current media content (playback - video)
on a TV screen. This is done by using an optional cable to connect your device to
your monitor’s TV input jacks. Cable sold separately.
• Tas k Manager: Displays all applications that are currently running on your
device.
• Text Message: Allows you to view your Message Inbox.
• Ver sion: Displays the ROM Version, Modem Version, H/W Version, PRL
Version, Bluetooth MAC, and WLAN MAC.
• Windows Update: Allows you to automatically search and update your OS when
updates are available.
Connections Tab
• Beam: Allows you to set your device to receive beams from other devices.
• Bluetooth: Allows you to turn on and search for other Bluetooth devices.
• Connections: Allows you to set your network connection settings.
• Domain Enroll: Allows you to enroll your device with your company domains.
Enrolling your device will allow connection to company resources. Check with your
System Administrator for more information.
• USB Connection Mode: Allows you to select how your device will function when
connected to your PC via USB.
• USB to PC: Allows you to change the type of USB connection your device uses
when having problems connecting to ActiveSync.
• Wi-Fi: Allows you to search, configure and connect to a wireless access point.
• Wireless Manager: Allows you to turn on/off the following services: Wi-Fi,
Bluetooth and Phone. You can access Wireless Manager from the Today screen.
Menus
Menus 22
Page 30

Your Phone
This section outlines many key features of your phone.
Features of Your Phone
Congratulations on your purchase of the Samsung Omnia. The Microsoft software
upgrade supports thousands of applications. Using ActiveSync® 4.5 or later you can keep
your PC and Omnia synchronized at all times. The features listed below are just a sample
of what your Omnia has to offer. You should read this guide to understand the many
features that this phone supports and keep it handy for reference.
Key Features of your Omnia
• Touch Screen
• Large 240x400 pixel, 65k color TFT screen
• Wireless Internet Capability
• Windows Mobile® 6.1 Professional
• 2-Way Text Messaging (SMS)
• E-mail Message Service
• microSD™ (up to 16GB) Expansion Memory
• Utilizes Microsoft's Voice Command technology for voice recognition
• Full Internet Browser with touch gesture support
• Built-in Bluetooth® Technology
• Built-in Wi-Fi Support
• 5 Megapixel Camera with Camcorder
23 Your Phone
Page 31
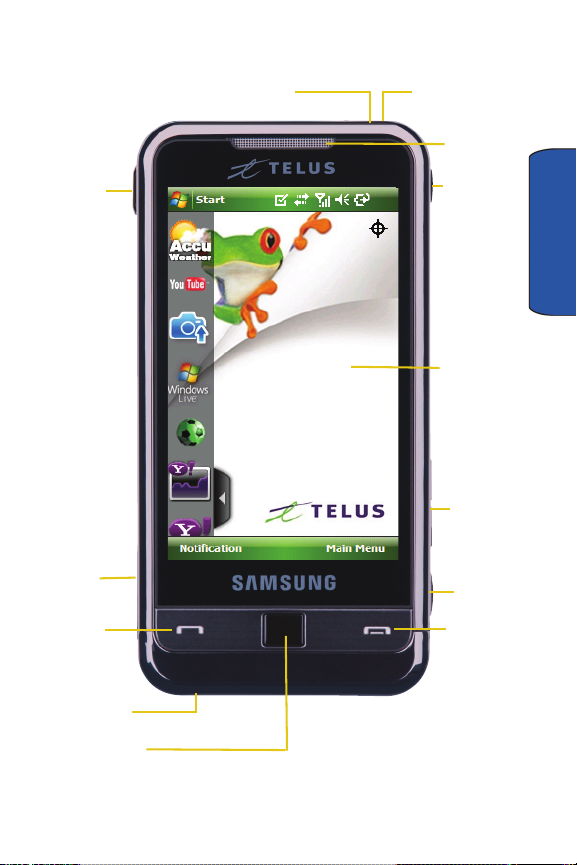
Front View of Your Phone
10. Main LCD
12. Earpiece
6. Optical Mouse/
Action Button
4. Send Key
7. End Key
2. Lanyard
3. Power/
9. Volume
8. Camera
11. Main
Accessory Port
Loop
Button
Key
Menu Key
13. Power On/Off
1. Reset Button
Button
5. Microphone
Your Phone
Your Phone 24
Page 32

1. Reset Button: Resets your phone and ends all applications currently
running.
2. Lanyard Loop: Used to hold the Stylus.
3. Power/Accessory Port: Used to plug in the charging accessories and also
connect any available accessory cables to your phone such as the
headphone adapter.
4. Send Key: This key is used to initiate your calls or to activate your phone
feature.
5. Microphone: Allows the other caller to hear you clearly when you are
speaking to them.
6. Optical Mouse/Action Button: The Optical Mouse allows you to scroll
through the phone menu options and open menu options.
7. End Key: Ends a call. Press and hold this key for a few seconds to lock or
unlock your phone. When you receive an incoming call, press the END key to
ignore the incoming call and to send the call to voicemail.
8. Camera Button: This key allows you to activate the camera. Press to open
the Media Album application. Press and hold to activate the camera.
9. Volume Key: Allows you to adjust the system volume in idle mode or adjust
the voice volume during a call. To mute the ringer during an incoming call,
press the volume key up or down.
10. Main LCD: The main LCD screen displays all the information needed to
operate your phone.
11. Main Menu Key: This key allows you to open the Main Menu. Press to open
Main Menu. Press and hold to launch Voice Command.
12. Earpiece: Allows you to hear the other caller.
13. Power On/Off Button: Press and hold to power On or Off and press to turn
On or Off the LCD.
25 Your Phone
Page 33
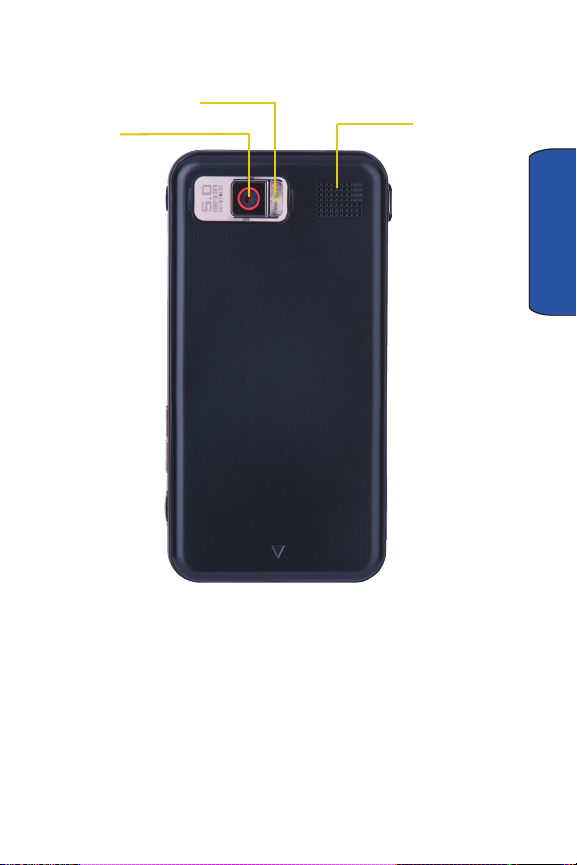
Back View of Your Phone
3. Speaker
1. Camera/
Camcorder Lens
2. Flash
1. Camera/Camcorder Lens: The lens of the built-in camera/camcorder.
2. Flash: The built-in flash has manual and automatic capabilities.
3. Speaker: Allows you to hear and play music, ringtones and sounds.
Your Phone
Your Phone 26
Page 34

Today Screen
1. Start Menu
5. Left Soft Key
3. Widget Bar
2. Title Bar
1. Start Menu: This drop down menu serves as the Windows Mobile central
launching point for applications. This menu provides access to a list of
programs for the user to launch, access to settings, and a way to find files and
get help.
2. Title Bar: The Title bar at the top of the screen displays the active program,
wireless status, battery level status and allows you to close screens. Use the
Start menu to select a program.
3. Widget Bar: Contains user selectable widgets such as Analog and Digital
Clock, Calendar, Game Controller, Media Player and other user selectable
widgets.
4. Right Soft Key Command: Right soft key function.
5. Left Soft Key Command: Left soft key function.
Command
4. Right Soft Key
Command
27 Your Phone
Page 35
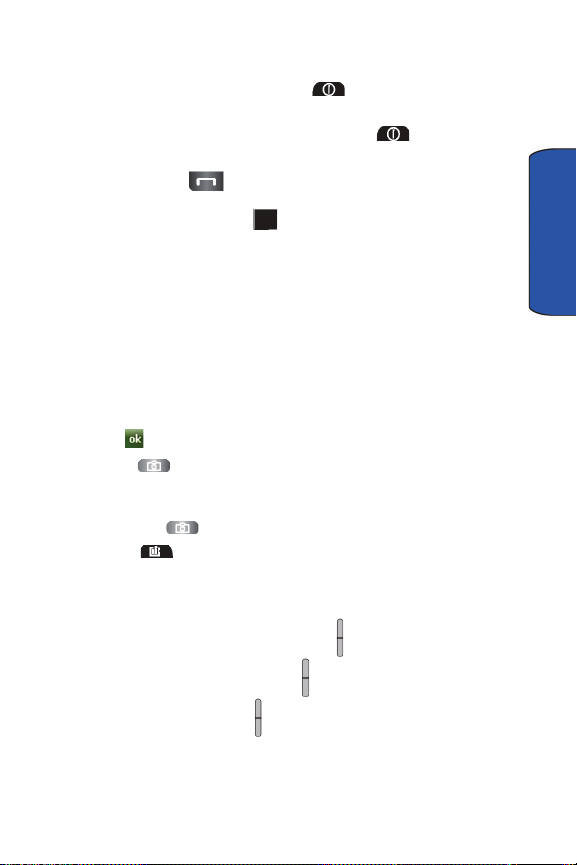
Command Keys
Power On/Off Key
1.
Press and hold the Power On/Off key located at the top and to the
right side of the phone.
2. To turn your LCD off, press the Power On/Off key .
Send Key
• Press the Send key at the Toda y screen to display the phone screen and
to dial a call after you have entered a telephone number.
4-way Navigation or Optical Mouse
Use the Optical Mouse to scroll through and highlight items, menus, and programs in a
list or on the Internet. Once an item, link, or menu is highlighted, press the optical mouse
to perform the function related to the selection.
1. From the Tod ay screen, tap the right soft key function Main Menu >
Settings > All Settings.
2. Tap the System tab > Optical Mouse.
3. Tap an Action method. Choose either 4-way Navigation or Mouse.
4. To set the optical mouse speed, touch and hold the slider. Move the slider left
to decrease speed or right to increase speed.
5. Tap to return to the System tab.
Camera Button
• Press to open the Media Album menu.
• Press and hold to activate Camera mode. While in camera mode press the
Camera button to take a photo.
Main Menu Key
• Press to open the Main Menu.
• Press and hold to activate Voice Command.
Volume Up/Down Keys
• Press and release the up or down Vol um e key to adjust audio volume for any
screen.
• Pressing up or down on the Vo lum e key to mute the ringer when receiving a
phone call.
• Press and hold the Vol ume key in the up position to zoom in or zoom out.
Your Phone
Your Phone 28
Page 36
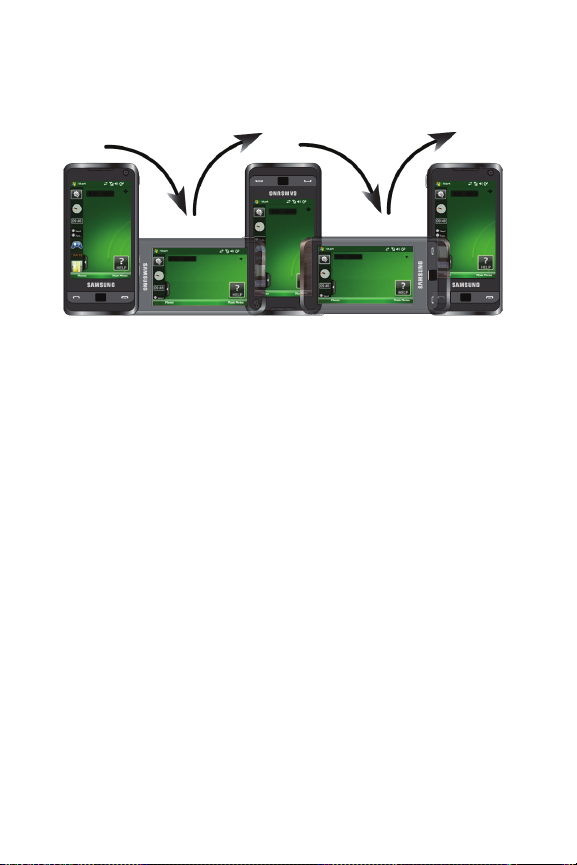
Motions Sensor
Setting your screen orientation
You can use your device in either portrait or landscape screen orientation. Simply turn
device in either direction to change orientation.
1. From the Today screen, tap the right soft key function Main Menu > Settings
> All Settings > System tab > Motion Sensor.
• Screen tab: Allows you to set sensor sensitivity and screen orientation settings.
• Etiquette tab: Allows you to Mute the device by turning the device over. The
Sound profile is not changed.
• Rotate Animation tab: Select the screen animation when orientation is changed.
29 Your Phone
Page 37

Customization and Navigation
This section explains the menu navigation for your phone.
Menu Navigation
You can tailor the phone’s range of functions to fit your needs using both menus and
widgets. Menus, sub-menus, and features can be accessed by scrolling through the
available on-screen menus.
Navigating Through Menus
As you navigate through a menu, options display on the screen as scrollable lists. The
right soft key function Main Menu (located at the bottom of the Today screen, provide
access to all menus).
To navigate a scrollable list:
1. From the Tod ay screen, touch the right soft key function Main Menu.
2. Touch and gently press an on-screen option.
3. From the available list of options you can either:
• Touch an on-screen entry to activate it.
• Firmly press and slide your finger up or down the screen to scroll
through lists of menu items.
Note: Tapping or touching individual entries on the list opens the list entry.
Opening an Application
The Tod ay Screen is the first screen displayed. The Main Menu displays when you tap
the right soft key function Main Menu.
You can also access menu items using the Start Menu.
The Start menu also contains links to all the applications and settings information, similar
to that of a Windows based PC system. To access the Start menu, simply tap the Start
icon in the upper left corner of the screen. A drop down menu list is then displayed, and
from there, all other applications and settings can be accessed.
Accessing a Menu Function
Dragging and Dropping
Certain menus allow you to move (drag and drop) an application onto the Main display
screen or other object. For example, you can drag the Music Player from the Shortcut
menu onto the Main display screen using the drag and drop feature.
Customization
Customization and Navigation 30
Page 38
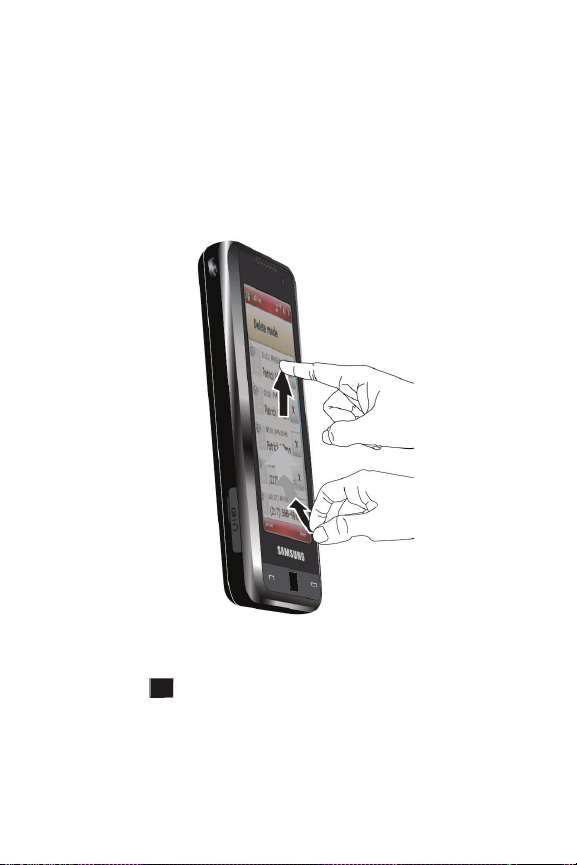
To drag and drop an application or item into another object or onto the Main
display:
• Tap and hold the icon you wish to move and drag it to another location or another
object (for example, moving widgets onto the Today Screen). Drop the icon by
releasing your finger. The application is now located in on the Main display screen.
Tapping
After you drag and drop an application to the desktop, simply tap the icon or application to
display more information.
Scrolling
To view more widgets or additional menus: Swipe up and down along the Widget bar.
Using the Optical Mouse
Using 4-Way Navigation
The Optical Mouse can be used to scroll through menu items. A highlighted menu
item can be selected by pressing the Optical Mouse.
1. You can use the finger to scroll left or right through menus, sub-menus and
options when using the phone feature.
31 Customization and Navigation
Page 39
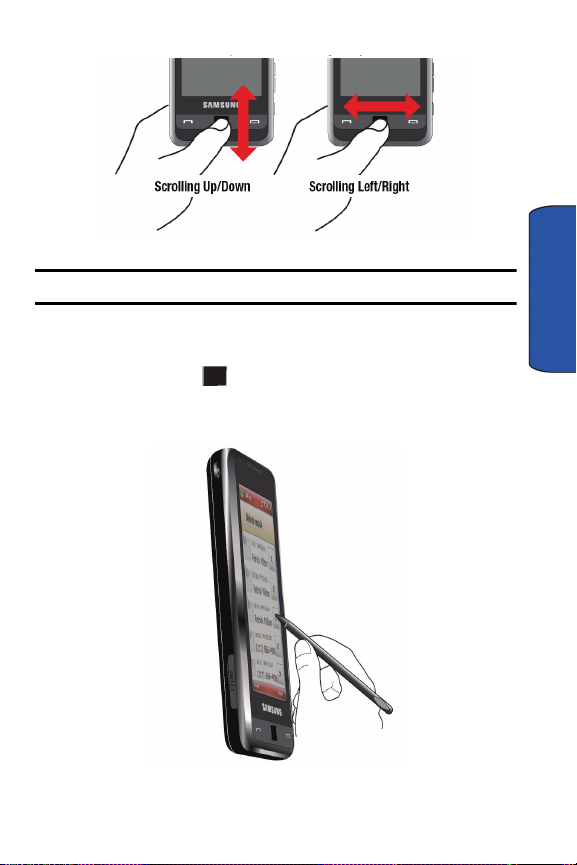
Note: You may need to scroll several times to move through the menus.
Using Mouse Navigation
Mouse navigation allows you to control your device Cursor as you move your thumb or
fingers on the Optical Mouse pad.
Using the Stylus
The Stylus is used for accessing menu items and may be used for handwriting or drawing
on the screen.
Customization and Navigation 32
Customization
Page 40
Using the Accelerator tab
Within the Phone Book (accessed via the right soft key function Main Menu) the
Accelerator tab allows you to quickly “thumb through” the alphabetical listing of entries by
first letter (A > B > C, etc...). The Accelerator tab is located along the right side of the
screen and Contacts entries are then selected by pressing their name fields.
Widgets
The Widget bar (located at the left of the Idle screen) provides quick access to miniprograms (widgets), and keeps them organized and always accessible. It provides the
following functions:
• Gives you information at a glance and provides easy access to frequently used
tools such as (Analog Clock, Digital Clock, Dual Clock/World Clock, Calendar,
Photo, and Sound Profile).
• Makes great use of the available space on your Omnia.
The following list contains a description of each available Widget, its function, and how to
navigate to that particular application. If the application is already described in another
section of this user manual, only a cross reference is then provided.
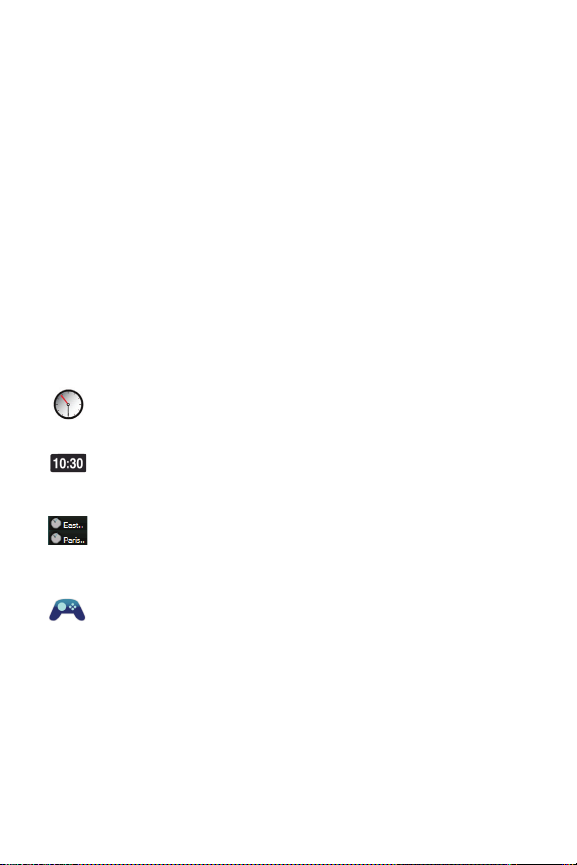
Analog Clock: Displays the current time and date on an analog clock.
Touch, drag and drop the Analog clock onto the desktop to view the time in
an analog format.
Digital Clock: Displays the current time on a digital clock.
Touch, drag and drop the analog clock onto the desktop to view the time in
a digital format.
Dual Clock/World Clock: Displays current time in user-defined home
location, as well as another city as designated by the user.
Touch, drag and drop the World clock onto the desktop to view the time in
dual locations.
Game: Touch, drag and drop the Game controller onto the Today screen.
Tap to open the games folder, which includes the pre-loaded games,
Solitaire, Bubble Breaker, Asphalt4, Dice, and The Sims 2.
33 Customization and Navigation
Page 41
Calendar: Allows you to access the Calendar feature. With the Calendar
feature, you can:
• Consult the calendar by Agenda, Day, Week, Month, or Year.
• Set schedules and note anniversaries.
• Make a tasks list.
• Write memos to keep track of your schedule.
• Set an alarm to act as a reminder, if necessary.
Photo: Allows you to view preloaded wallpaper and photos taken with your
Omnia that can be set as the Today screen wallpaper.
Music Player: Allows you to play music files stored on the phone.
FM Radio: Activates the FM Radio. (Antenna cable / 3.5mm headset
adapter must be attached for FM radio to function).
Phone book: Allows you to save up to 4 of your most frequently accessed
contacts for quick access.
To add a contact:
Tap to select a contact. The contacts name displays in the selected
square.
Messages: Automatically displays when you have received a new Email
message, Text message, or Missed call.
Profile: Allows you to quickly modify your current sound Profile.
Web Browser: Tap to launch the Opera Browser. Opera enables you to
take your full Web experience to your phone. Stay in touch with your friends
on Facebook, Twitter, get your e-mail on the go, do your online banking.
There are no limits — Opera is the quick, easy and secure way to get any
Web page you want.
Note: Allows you to quickly capture thoughts, reminders, ideas, drawings,
and phone numbers. Notes can be either recorded or written.
Wireless Manager: Allows you to turn on/off the following services, Wi-Fi,
Bluetooth and Phone.
Customization
Customization and Navigation 34
Page 42
Operator: Displays active carrier.
Help: Provides information about functionality and features.
Sports: Provides access to Sports.
YouTube: Provides access to YouTube.
Tel us A pps: Provides access to Telus Applications.
AccuWeather: Provides access to AccuWeather.
YahooFinance: Provides access to Yahoo’s finance information.
Google: Provides access to Google.
YahooSearch: Provides access to Yahoo’s search engine.
Windows Live: Provides access to Windows Live.
SharePix: Provides access to SharePix.
Widget Bar Navigation
You can drag the widgets to the desktop to use the application or feature, then drag it back
to the Widget Bar when you are finished.
Accessing the Widget Bar
Tap the Widget bar tab, located on the left side of the main display to open the
1.
widget (quick access) bar.
2. Tap the Widget bar tab again to close the widget bar.
35 Customization and Navigation
Page 43

Undocking Widgets
You can easily customize the Widget bar by either keeping these mini-apps docked within
the bar itself or undocking them by dragging anywhere onto your Main display screen.
1. Touch and hold the widget.
2. While still holding the icon, in a single motion, drag it over to the new location
and release your finger from the screen. The application is now located in
another menu or in the case of this example, on the Main display screen.
Adding and Removing Widget Icons
Tap the Widget bar tab to open the widget (quick access) bar.
1.
2. Tap the settings widget located at the top of the widget bar list.
3. Tap the Widget circle to turn the widget display on or off.
• A checkmark in the circle indicates the widget display is on.
• An unchecked circle indicates the widget display is off.
4. Tap the left soft key function Done to save and exit.
Activating a Widget
• Once a widget has been moved to the Main display screen, simply touch the icon
to activate the mini-application (widget).
Scrolling Through the Widget Bar
• Use your fingertip to scroll up and down along the Widget bar.
Tip: Flick the screen in an upward or downward motion to scroll through the list.
Customizing your Start Menu List
1. From the Today screen, tap the right soft key function Main Menu > Settings
> All Settings > Menus.
2. Enable/Disable an application by tapping the adjacent box. Select up to seven
items you want displayed within the Start menu.
3. Tap to save your new settings and return to the previous screen.
Customizing the Shortcut Menu
1. From the Tod ay screen, tap the right soft key function Main Menu.
2. Tap the left soft key function Shortcuts.
Customization
Customization and Navigation 36
Page 44

3. Tap Edit. From the Application bar on the left side of the screen, drag and
drop the application(s) you would like to show in the shortcut menu.
4. Tap the left soft key function Ok and tap the left soft key function Menu to
return to the Main Menu.
Today Screen
The items listed on the Today screen provide quick access to several user selectable
applications. The Tod ay screen displays important information, such as upcoming
appointments, status indicators, the current date, time, and profile, as well as recently
used program icons. You can open a program directly tapping its associated icon.
Customizing your Today Screen Theme
1. From the Today screen, tap the right soft key function Main Menu > Settings
> All Settings > Today.
2. Select your new theme by tapping an entry from the list.
• The default theme is Telus theme 1.
3. Tap to save your new settings and return to the previous screen.
Customizing your Today Screen Item List
1. From the Today screen, tap the right soft key function Main Menu > Settings
> All Settings > Today > Items tab.
2. Select those items which will appear on the Toda y screen by tapping each
item and placing a check mark adjacent to the entry.
• Remove these items by removing the check mark from each item.
3. Position each item (from top to bottom) on the list by tapping an entry and
using the Move Up/Move Down buttons to position them in the list.
4. Tap to save your new settings and return to the previous screen.
Note: When using the SamsungOnlineWidget setting the other items are not applicable.
Customizing your Display Theme
1. From the Today screen, tap the right soft key function Main Menu > Settings
> All Settings > Theme Maker.
2. Tap the Theme drop down menu and select a theme color.
3. Tap the Today Text drop down menu and select the Today display text color.
37 Customization and Navigation
Page 45

4. To select a different background image other than the default image, tap the
Use default image box to deselect it. Tap Browse and tap an image from the
My Pictures folder.
5. Tap and tap Yes to confirm the change and to return to the previous
screen. Tap No to return to the previous screen without saving changes. Tap
Cancel to return to the Theme Maker screen.
Customizing Buttons
1. From the Tod ay screen, tap the right soft key function Main Menu >
Settings > All Settings > Buttons.
2. Tap any of the assigned buttons from the Button menu.
3. Tap the down arrow at the Assign a program: drop down menu and tap a
program you would like as your new assigned button.
4. Tap the Up/Down Control tab. Choose a setting for Delay before first
repeat: by tapping and dragging the slider.
5. Choose a setting for Repeat rate: by tapping and dragging the marker.
6. Tap the End Key tab. To activate the lock feature by pressing the End key,
tap the Lock device radio button.
7. Tap the Wake up tab. Choose any of the settings by tapping the appropriate
radio buttons.
8. Tap the Flash Light tab. Tap the box next to “Press volume down key long
on Today screen to turn on Flash Light” to activate the flash light option.
9. Tap the Timeout scroll down window to choose a flash light timeout setting.
10. Tap to save your new settings.
Customization
Customization and Navigation 38
Page 46

Security
Locking Your Phone
When you lock your phone, it requires a password to return to normal operation. When a
password is set up, the phone can be locked immediately or configured to lock when the
screen blanks out.
Setting Up a Lock
From the Today screen, tap the right soft key function Main Menu > Settings
1.
> All Settings > Lock.
2. Tap the check box next to Prompt if device unused for.
3. Tap the Minutes drop down menu and select the amount of unused time
required before you are prompted for a password if the phone becomes idle.
4. Tap the Password type box and select one of the following options:
• Simple PIN: This password must be at least four characters in length
and can not contain a simple sequence such as: 0000, 1111, or 1234.
• Strong alphanumeric: This password must be at least seven
characters in length and contain at least three of the following:
uppercase/lowercase letters, numerals, and punctuation.
5. Tap the Password box and use either the alphanumeric keypad or the virtual
QWERTY keyboard to enter your password. Re-enter the password in the
Confirm box.
6. Tap , then tap Yes to confirm.
Setting Up a Password Hint
Another way to make sure you don’t accidentally forget your password is to use the Hint
feature.
1. At the Password screen, tap the Hint tab.
2. Use either the virtual QWERTY keyboard or the numeric keypad to enter a
hint for your password into the dialogue box. This hint may be visible by
others.
Note: The password hint you set will only appear after five consecutive incorrect password
entries.
3. Tap to save your settings, hint and then return to the previous screen.
39 Security
Page 47

Unlocking the Phone After a Timeout
To unlock your phone after the timer has expired:
1. Tap your LCD screen to activate the password screen.
2. Enter your password on either the keypad or by using either the virtual
QWERTY keyboard or alphanumeric keypad.
3. Tap Unlock to unlock the handset.
Manually Locking the Phone
This process acts to temporarily lock the phone without the need to enter a password.
To manually lock the phone:
1. Press and hold the End key to manually lock the phone.
• Unlock is then displayed as a left soft key function at the lower left of
the screen.
To manually unlock the phone:
1. From the Tod ay screen, tap Unlock. The Unlock screen displays. Tap the
Unlock button.
You can also manually unlock the screen by pressing and holding the End key .
This method bypasses the Unlock screen.
Security
Security 40
Page 48

Call Functions
This section describes how to make or answer calls. It also includes the features and
functionality associated with using your phone, as well as explaining the voice command
feature built into your Omnia.
Note: Before initiating a call, verify your phone features are active, see "Turning the Phone
Feature On and Off" on page 3.
Making a Call
There are several ways to make calls on your new Omnia. You can use speed dial, voice
dial, call log, or simply enter the desired number and press .
Method 1 - Using the Optical Mouse
Tap the left soft key function Phone. The phone keypad is displayed.
1.
2. Tap the left soft key function Hide Keypad to hide the keypad and view both
the recent call numbers and your Address Book.
3. Use the Optical Mouse to highlight a previously dialed phone number and
press .
Method 2 - Using the Tap Method
Tap the left soft key function Phone. The phone keypad is displayed.
1.
2. Tap the left soft key function Hide Keypad to hide the keypad and view both
the recent call numbers and your Address Book.
3. Tap the name or phone number of the person you are calling then tap Call to
initiate the call.
Note: Always use the stylus when tapping the screen to avoid scratching or damage
caused by other instruments.
Answering a Call
Make sure the phone is turned on. When you receive an incoming call, the Phone
Incoming screen appears in the display.
• Tap the left soft key function Answer, or press to answer the call.
• Tap the right soft key function Ignore, or press to send the call to
voicemail.
41 Call Functions
Page 49
Note: When you receive a call, you can silence the ringer by pressing the volume key on
the side of your phone.
Using the Speakerphone
During an active call, the speakerphone allows you to speak to others without the need to
hold the phone to your ear.
Method 1
While in a call, press and hold to activate the speakerphone. The
1.
speakerphone icon then appears at the top of the screen.
2. To deactivate the speakerphone, press and hold again.
Method 2
While in a call, press to activate the speakerphone. The speakerphone
1.
icon appears in the top of the screen.
2. To deactivate the speakerphone, press .
Method 3
While in a call, tap the right soft key function Menu then tap Tur n
1.
Speakerphone On to activate the speakerphone. The speakerphone icon
appears in the top of the screen.
2. To deactivate the speakerphone, tap the right soft key function Menu then
tap Turn Speakerphone Off.
Displaying Your Phone Number
1. From the Today screen, tap the right soft key function Main Menu > Settings
> All Settings > Phone.
2. Your phone number displays at the top of the screen.
3. Tap from the upper right of the screen to exit.
Call Functions
Call Functions 42
Page 50
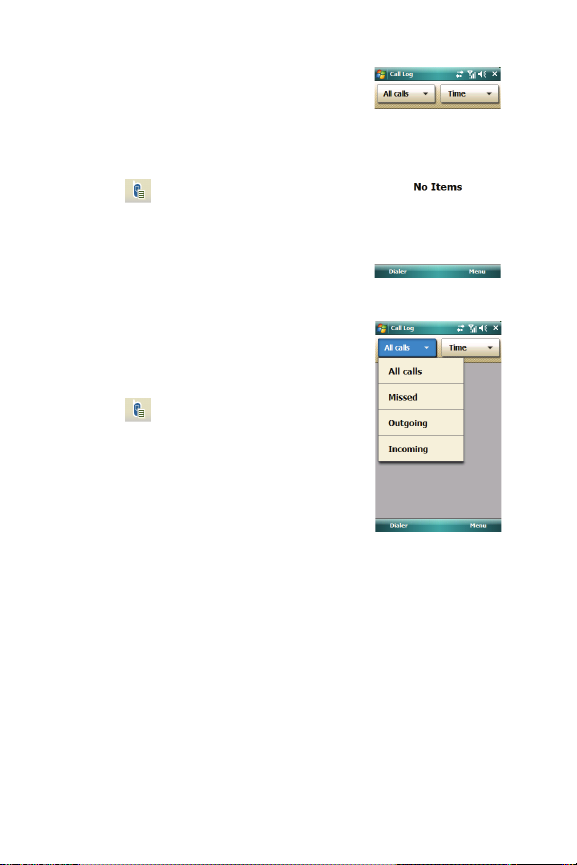
Call Log
When a call is received, made, or missed a record is
saved with all the available information in the Call Log.
Tapping an entry displays the time, date, and duration of
the call.
1. From the Tod ay screen, press the left soft key
function Phone.
2. Tap .
Filtering Call Log
Filtering allows you to sort and view calls by selecting from
one of the preset call filters.
1. From the Tod ay screen, press the left soft key
function Phone.
2. Tap .
3. Tap All calls button or the Time button. The
following filter options are available for the All
calls button:
• All Calls: Displays all calls received,
sent, or missed.
• Missed: Displays any missed calls.
• Outgoing: Displays all outgoing calls.
• Incoming: Displays all incoming calls that were answered.
43 Call Functions
Page 51
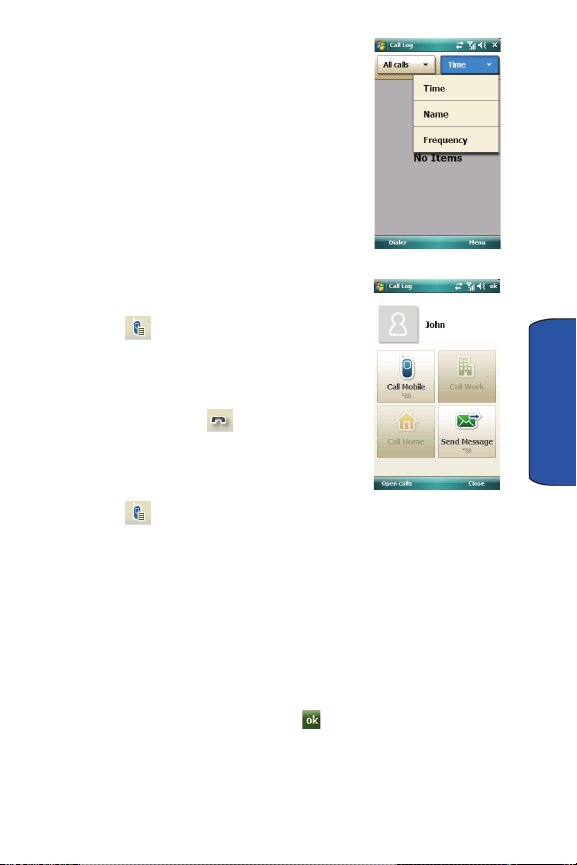
4. The following filter options are available for
the Time button:
• Time: Allows you to filter calls by time.
• Name: Allows you to filter calls by the
callers first name.
• Frequency: Allows you to filters call by
the number of calls received by each
caller.
5. Tap the desired filter type to then refresh the
screen entries with those calls matching the
selection.
Placing a Call Using Call Log
1.
From the Tod ay screen, press the left soft key
function Phone.
2. Tap .
3. Tap the call log entry.
4. Tap the call type (Call Mobile, Call Work, or
Call Home).
5. When finished, tap .
Creating a Contact Using Call Log
1.
From the Tod ay screen, press the left soft key
function Phone.
2. Tap .
3. Tap the All calls button (All Calls, Missed, Outgoing, or Incoming) or the
Time button (Time, Name, or Frequency) and tap one of the available filter
options.
4. Tap a call log entry.
5. Tap the right soft key function Add contact.
6. From the Contacts screen, tap the left soft key function New.
7. Use your virtual QWERTY keyboard to enter the contact information such as
name, and number type. The phone number is already pre-entered.
8. Tap the left soft key function Save or to save your new contact and return
to the previous screen.
Call Functions
Call Functions 44
Page 52
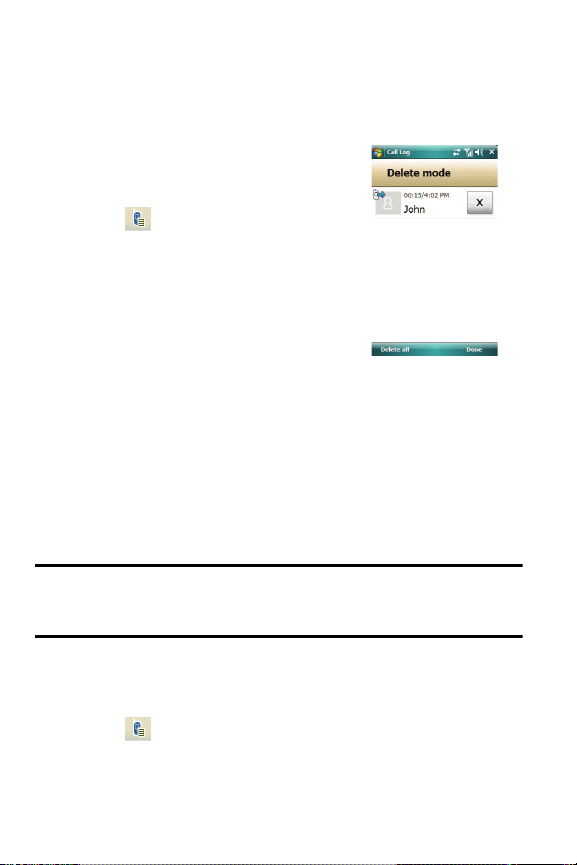
Deleting the Call Log
The call logs found within the Call Log listing can be deleted individually or as a whole.
Deleting all call entries will remove all currently displayed call entries. These entries are
dependant on the filter used for call log display (All Calls, Missed, Outgoing, or
Incoming).
Deleting Individual Call Log Entries
From the Tod ay screen, press the left soft
1.
key function Phone.
2. Tap .
3. Tap the All calls button (All Calls, Missed,
Outgoing, or Incoming) or the Time button
(Time, Name, or Frequency) and tap one of
the available filter options.
4. Press the right soft key function Menu. The
following options display:
• Call Timer
• Kilobyte Counter
• Delete mode
5. Tap Delete mode.
6. Tap the X beside the entry you want to delete.
Deleting All Call Entries
This option is dependant on the list of currently displayed call logs. Only those entries
displayed in your current list will be displayed.
Note: If your currently selected filter is only displaying your Missed Calls, for example,
deleting all calls in this instance would only delete these listed calls while leaving all
remaining Incoming and Outgoing Call entries untapped.
To truly delete all call log entries, you will need to activate the All Calls Filter and then
select the Delete all calls option.
1. From the Tod ay screen, press the left soft key function Phone.
2. Tap .
45 Call Functions
Page 53
3. Tap the All calls button (All Calls, Missed, Outgoing, or Incoming) or the
Time button (Time, Name, or Frequency) and tap one of the available filter
options.
4. Press the right soft key function Menu. The following options display:
• Call Timer
• Kilobyte Counter
• Delete Mode
5. Tap Delete Mode.
6. Tap the left soft key function Delete all.
7. Tap Yes to confirm deletion.
Sending a Text Message using the Call Log
Text messages can be sent to other users that support SMS capabilities.
Note: Contact your service provider for more information on SMS messaging services.
1. From the Tod ay screen, press the left soft key function Phone.
2. Tap .
3. Tap the All calls button (All Calls, Missed, Outgoing, or Incoming) or the
Time button (Time, Name, or Frequency) and tap one of the available filter
options.
4. Tap the number to whom you are sending a message.
5. Tap the Send Message icon to open the Text Message screen with the
recipient already filled in.
6. Use your virtual QWERTY keyboard to enter the message text.
Note: Each text message can contain a maximum of 146 characters. Any characters (text)
over that limit will be moved onto consecutive text messages to the same recipient.
7. Tap the Send soft key when your finished and send the message.
Call Functions 46
Call Functions
Page 54

Roaming-Networks
What is Roaming
Your phone can roam on other digital networks. Roaming occurs when you travel outside
a pre-designated coverage area. The roaming icon appears on when in roaming is
active, and extra charges may apply when making or receiving a call.
Note: Some features may be unavailable while roaming. Roaming also consumes
additional power from the battery requiring more frequent battery charges.
Changing your Roaming Network Options
Note: Contact your service provider for information regarding preferred systems.
To change your Roaming option:
1. From the Today screen, tap the right soft key function Main Menu > Settings
> All Settings > Phone > Services tab > Networks.
2. Tap the Change Setting button and from the Phone - Networks screen make
your changes.
• Home only: Your phone is available for normal operation only in the designated
coverage area.
• Automatic: The preferred roaming list is used to acquire service. If no preferred
systems are found, any digital “Automatic A” or “Automatic B” system is acquired.
Note: If the phone feature is off, this menu cannot be accessed.
3. Tap to save your changes and return to the previous screen.
TTY
Your Omnia is fully TTY compatible, and it allows you to connect TTY equipment to the
phone’s headset jack. However, before you can use a TTY device, you need to enable
TTY functions using these steps:
1. From the Today screen, tap the right soft key function Main Menu > Settings
> All Settings > Phone > Services tab > TTY.
2. Tap the Change Setting button.
47 Call Functions
Page 55

3. Tap the Yes button from the TTY Warning popup. Enabling TTY Full will
disable the audio of any connected headset.
Voice Command
Voice CommandTM transforms your device into your own virtual personal assistant, letting
you use your voice to look up contacts, make phone calls, get calendar information, play
and control your music, as well as start programs.
See http://www.microsoft.com/windowsmobile/en-us/help/more/voicecommandsupport.mspx for a Voice Command demo.
Voice Command Settings
1.
From the Today screen, tap the right soft key function Main Menu > Settings
> All Settings > Voice Command.
2. Tap the Enabled box to enable/disable the Voice Command feature.
• A checkmark in the boxes adjacent to an application indicates the Voice
Command is enabled for that particular feature.
• An unmarked box indicates the Voice Command feature is disabled.
• If a selected application has available options, the Options button
becomes active. Tap the Options softy key to access that application’s
available options.
• If a selected application has available notification parameters, the
Notifications button becomes active. Tap the Notifications softy key
to access that application’s available notification parameters and make
modifications if desired.
3. Tap the Password Protected box to turn password protection On/Off.
• A checkmark in the box indicates Password Protected is on.
• An unmarked box means indicates Password Protected is off.
4. Tap the menu applications you want to be accessible when using the Voice
Command. Choose from the following:
• Calendar
• Contacts
• Media
• Messaging
• Phone
• Start Menu
• Status
Using the Voice Command
1.
Press and hold the Main Menu-Voice Command key (located on the
Call Functions 48
Call Functions
Page 56

upper right side of the phone) to activate the Start menu. A microphone icon
displays in the Title bar.
2. After the phone beeps, say the name of the command you want to perform.
The Voice Command options are:
• Call: Lets you dial a phone number by saying a name saved in your
contact list.
• Lookup: Lets you retrieve contact information for any entry in your
contacts list.
• Open: This provides you with one-step access to many of your phone’s
applications such as Calendar.
• Dial: Lets you dial a phone number by saying the digits in the telephone
number.
49 Call Functions
Page 57
Network Services
This section allows you to set up the network functions supported by your carrier. Some of
these services may not be available due to coverage area or service plans. If you have
any questions, please contact your service provider.
Three-way Calling
Three way calling allows you to talk to two different people at the same time. When using
this feature, normal airtime rates apply for each of the two calls.
To use three way calling:
1. Dial the number for the first person and press .
2. Dial the number for the second person and press .
3. When the second person answers, press again to connect all three
parties.
Note: There is no on screen indication of the two other parties currently in the active threeway call.
If one of the people you called hangs up, you and the remaining caller stay connected. If
you initiated the call and are the first one to hang up, all three calls are disconnected.
Call Waiting
You can answer an incoming call while on an existing call. If you are on an existing call
and another call is received, a tone is heard and a call waiting message is displayed on
the screen. If the caller is stored in the address book, their name is also displayed.
Answering a waiting call
1.
Press or tap the Answer soft key. The phone connects to the other call
while placing the existing caller on hold.
2. Press or tap the Answer soft key again to switch back over to the
original caller and place the second caller on hold.
Caller ID
Caller ID alerts you to who’s calling by displaying the phone number of the person calling
when you receive an incoming call. Similarly, if you call someone who has this feature,
your phone number displays on their phone. If the caller’s name and number are already
stored in your Internal Phone Book, the corresponding name appears with the number.
• To block caller ID from displaying when you call another user, tap the left soft key
function Phone and then press and then dial the phone number.
Network Services 50
Network
Page 58

Entering Text
This section outlines how to select the desired text input mode when entering characters
into your Omnia. This section also describes the predictive text entry system that reduces
the amount of key strokes associated with entering text.
Virtual QWERTY Keyboard
Your Omnia has a virtual QWERTY keyboard. You can access this keyboard by tapping
the QWERTY keyboard icon located at the bottom of the display, when certain menus
are accessed. Using this keypad, you can type letters, punctuation, numbers, and other
special characters into text entry fields or other applications available on your Omnia.
Text Entry - Input Mode
There are different character input methods available:
• Block Recognizer
• Keyboard
• Letter Recognizer
• Samsung keyboard
• Samsung keypad
• Samsung Phonepad
• Transcriber
Each of these methods allow you to input alphanumeric characters and symbols into your
Omnia. In addition to these input methods, there are other options such as Word
Completion associated with the input selected.
To access the Input settings:
• From the Tod ay screen, tap the right soft key function Main Menu > Settings >
All Settings > Input.
Block Recognizer
This input method uses the traditional writing area box split in the middle. This method
allows you to enter characters using single strokes.
The left side is used to write letters and the right side is for number entry. Symbols and
common functions are located in other smaller boxes located to the right of the writing box
area. There are no options associated with this type of input method.
Keyboard
This input method displays an on-screen keyboard that can be used to input characters by
tapping the screen using the stylus. The keyboard entry method has the following options:
• Large keys
51 Entering Text
Page 59

• Small keys
• Use gestures for the following keys: allows you to use tap point shortcuts to
indicate the following keyboard actions:
• Space
• Shift+key
• Backspace
• Enter
To select larger or smaller keys, simply tap the button next to the desired option.
The gestures feature allows you to replace keys used on the keyboard for space,
backspace, shift+key, and enter by drawing a gesture or motion. The large key option
must be selected for this option to be available.
Letter Recognizer
This option allows you to enter text using your own handwriting (natural character strokes).
The screen is divided into three different areas. A capital letter area, small letter area, and
a number area. Characters are entered by printing letters in each area. The character is
then analyzed and typed on the screen automatically.
• Tap the Options button to access the following options associated with this
method:
• Quick stroke
• Right to left crossbar
• Allow accented characters
Transcriber
The transcriber option is similar to the letter recognizer, except instead of entering
characters into a designated area, you can enter entire words and sentences using your
own handwriting (cursive), print, or mixed formats. Transcriber supports both printing and
cursive writing styles and then automatically types the information on the screen.
Text Entry - Word Completion
Word completion settings determine if words are automatically displayed after entering a
defined number of characters on the screen. The following options are available:
• Suggest words when entering text
• Suggest after entering (a space or 1-7 letters)
• Suggest (1-4) word(s)
• Add a space after word
• Clear Stored Entries
• Enable Auto Correct
Entering Text
Entering Text 52
Page 60

To access the Word Completion settings:
1. From the Today screen, tap the right soft key function Main Menu > Settings
> All Settings > Input > Word Completion tab.
2. The Suggest words when entering text is the default setting.
Note: Tapping the box adjacent to each item can either enable (check) or disable
(uncheck) the features.
3. Tap the Suggest after entering drop down list and choose the minimum
number of letters a word must contain before a word is suggested.
4. Tap the Suggest # words drop down list and choose the numbers of words
your Omnia will suggest once the word completion parameters are met.
5. To enter an empty space after each recognized word, tap Add a space after
word.
6. To enable the auto correction feature which dynamically corrects for spelling
errors and other mistakes, tap Enable Auto Correct.
7. Tap to save your changes and return to the previous screen.
Text Entry - Options
Note: These option settings only apply when writing or recording is supported.
The Options tab provides the following input options:
• Voice recording format
• Default zoom level for writing
• Default zoom level for typing
• Capitalize first letter of sentence
• Scroll upon reaching the last line
To access these options:
1. From the Today screen, tap the right soft key function Main Menu > Settings
> All Settings > Input > Options tab.
Note: Tapping the box adjacent to each item can either enable (check) or disable
(uncheck) the features.
53 Entering Text
Page 61

2. Tap each option's associated box or field and make your desired changes.
3. Tap to save your changes and return to the previous screen.
Entering Text
Entering Text 54
Page 62

Messaging
This section discusses the types of messages you can send and receive, how to set up
your phone to work with email and how to send email messages using different types of
connections.
Types of Messages
Your Omnia is capable of sending Email and text (SMS) messages. Send Email and text
messages by simply entering the Email address or the phone number of the recipient in
the To: field when creating a new message.
Retrieving a Message
Retrieving a Text Message
When you receive a new text message the message ringer sounds, (unless turned off),
and the message appears in a preview pane.
Note: The Message Notification icon appears in the top of the display.
1. Press Notification (left soft key) to re-open and to display the message in the
preview pane.
2. Once the preview of the message appears in the display press Reply (left soft
key) to reply to the message.
Accessing Message Folders
1. From the Tod ay screen, tap the right soft key function Main Menu >
Message.
2. At the top left of your screen is a drop-down menu. Tap this arrow to display a
menu tree that lists folders for the following message types:
• Setup E-mail, Text Messages, and any other accounts you have
created.
3. Expand the folders by tapping the + sign next to folder. Select Inbox to display
its contents.
4. Tap any of the folders within any of the account trees to view that particular
folder’s contents.
Message Folders
There are message folders in the Outlook E-mail and Text Messages directory.
55 Messaging
Page 63
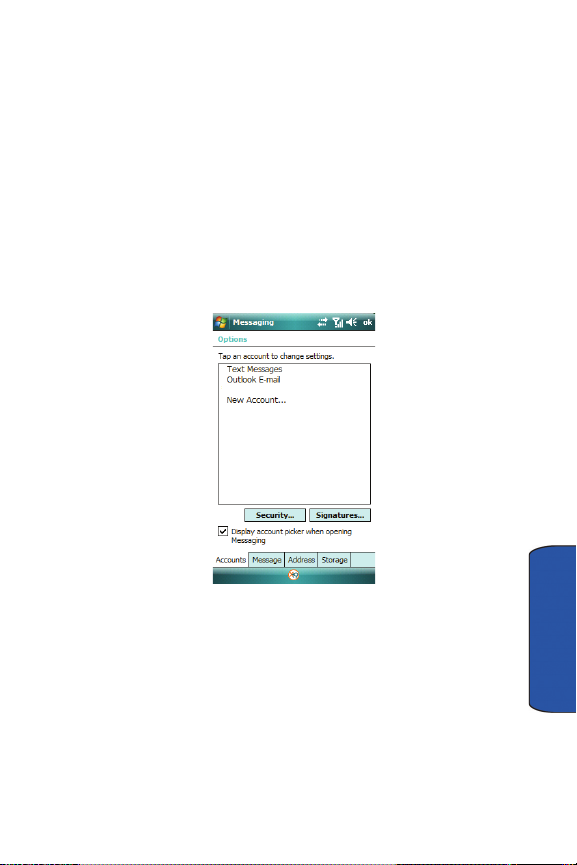
The folders and their functions are similar to the folders in the ActiveSync directory, except
for Outbox. In ActiveSync, E-mail is stored in the Outbox until you perform an ActiveSync
with your PC.
In Text Messages, new messages are stored in the Outbox folder until message sending
is complete.
Configuration of Messaging Parameters
Configuring Text Message Parameters
From the Tod ay screen, tap the right soft key function Main Menu > Message
1.
> Text Messages.
2. Tap the right soft key function Menu > Tools > Options. The following tabs
appear in the display:
• Accounts: Allows you to change message settings for Text Messages,
Outlook E-mail, and New Accounts.
Messaging
Messaging 56
Page 64
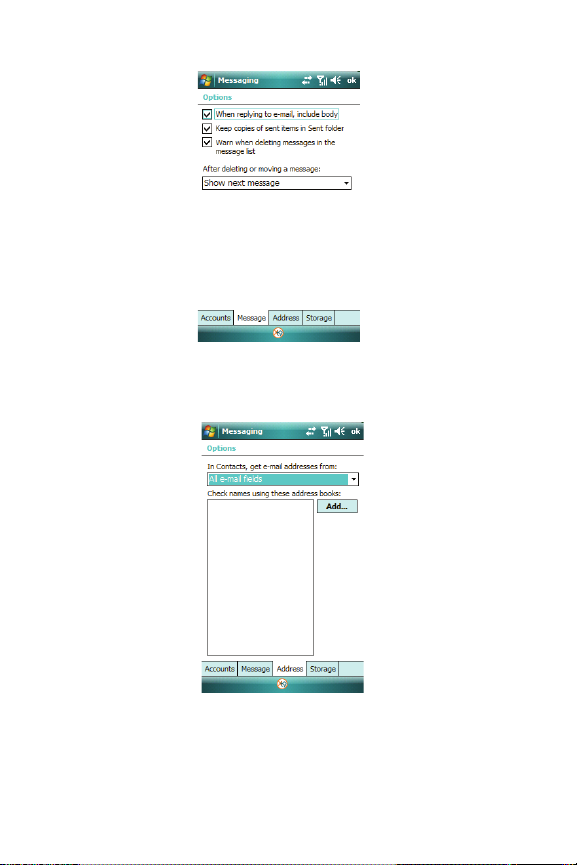
• Message: Allows you to change message options. Tap the box of the
options you would like to turn on or off.
• Address: Allows you to check e-mail address information using set
address books. Tap the Add button to add address books to your
Omnia. These additional address books provide more available e-mail
addresses.
57 Messaging
Page 65
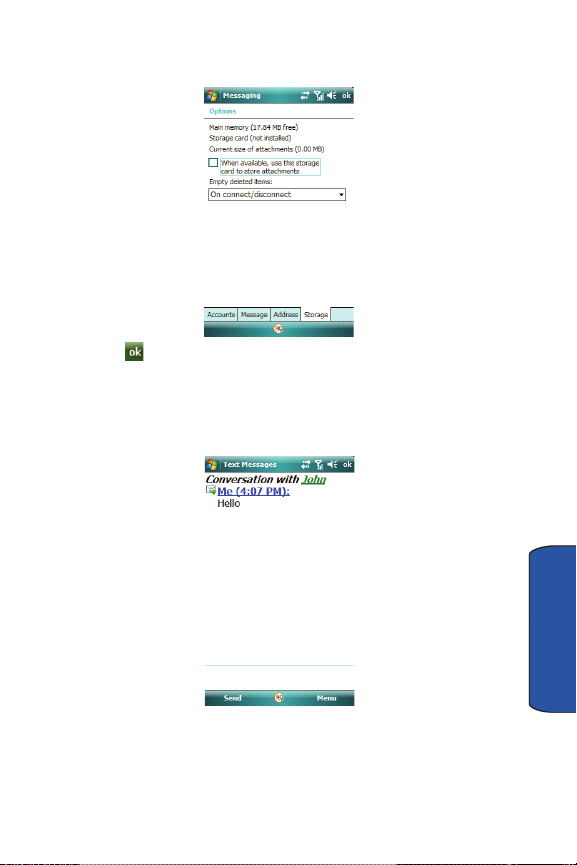
• Storage: Allows you to view the amount of memory available for the
Main Memory, Storage Card (when inserted), and Current size of
attachments.
3. Tap to save your changes and return to the previous screen.
Sending Messages
Threaded Messaging
When you text with a friend or colleague, the messages are threaded together into a single
conversation, so you can view the entire conversation as you type.
Messaging
Creating and Sending Text Messages
1.
From the Tod ay screen, tap the right soft key function Main Menu > Message
> Text Messages.
Messaging 58
Page 66

2. Tap the right soft key function Menu > New.
3. Enter a destination number or tap Menu > Add Recipient to select a contact.
Note: Use the virtual QWERTY keyboard to place a semicolon between numbers, if there
is more than one recipient.
4. Tap the message body.
5. Enter your message text.
6. Tap left soft key function Send to send the message.
Note: There is a 146-character limit for text messages. The limit applies to messages sent
using Text Messaging only. If you send a text message with more than 146 characters, the
message is truncated after the first 146 characters and the remaining characters are then
sent in consecutive messages until the entire message text has been sent. Charges apply
in accordance with the sender's and the recipient's calling plans.
Message Option
New Text Messages Options
Several message features are available under Menu when creating a new text message.
1. From the Tod ay screen, tap Main Menu > Message > Text Messages.
Note: If Text Messages is not shown at the upper left screen, tap the Inbox drop down
menu and tap Text Messages.
2. Tap the right soft key function Menu > New.
3. Tap the right soft key function Menu.
• Add Recipient: Browse for and attach a recipient from your contacts.
• Check Names: Check contacts for the name of the recipient.
• My Text: (Available when in the text field.) Choose from up to 9 pre-loaded
messages. You can add 10 additional messages.
• Save to Drafts: Saves the message to the draft folder.
• Spell Check: Spell check your message.
• Cancel Message: Cancels the new message.
59 Messaging
Page 67

• Message Options: Priority and Send a callback number for the message.
Received Text Messages Options
Several message features are available for received text messages.
1. From the Tod ay screen, tap Main Menu > Message > Text Messages.
2. Tap the desired text message. The Text Message screen then displays your
unread and read SMS text messages on screen. The Text Message screen
(as a whole) has the following options available:
• New: Allows you to create a new message.
• Reply: Sends a reply to the sender and/or all other recipients, or
forwards the message to other people.
• Delete: Erases a message.
• Mark as Unread: Allows you to mark a message that has been read as
unread. Unread messages display in bold font.
• Move: Allows you to move the message to other folders.
• Go To: Allows you to switch to another message account or message
folder. Select one of the following:
• Folders...
• Text Messages
• Outlook E-mail
• Too ls
• Sort By: Allows you to sort messages by one of the following:
Message Type, From, Received, or Subject.
• Manage Folders: Allows you to select folders for synchronization and
to create or modify folders.
• Empty Deleted Items: Allows you to permanently delete all items in
the Deleted Items folder.
• Clear “Text Messages”: Deletes all items in the Inbox and Sent
Items folder.
• New Account...: Allows you set-up a new e-mail account.
• Options...: Allows you to change the options for the Messaging.
• Select Messages
• All: Selects all messages in the folder.
• All Below: Selects all message below a highlighted message.
• Several: Selects several messages.
• Send/Receive: Select to send or receive new messages.
Messaging
Messaging 60
Page 68

Spell Checking a Text Message
1. Create a new text message. For more information, refer to "Creating and
Sending Text Messages" on page 58.
2. Tap the right soft key function Menu > Spell Check. Words that are not
present in the Spell Check library of files are then highlighted and available
word choices are presented in a list.
3. From this list of alternate words, tap either:
• An alternate word
• Ignore: To ignore the currently selected word.
• Ignore All: To ignore all remaining misspelled words in the text
message.
• Add: To add the currently highlighted word into the Spell Check’s word
library.
4. When the spell check is complete, tap to return to the message.
5. Tap the Send soft key to transmit your message to the selected recipients.
Checking Names with an SMS Message
1. Create a new text message. For more information, refer to "Creating and
Sending Text Messages" on page 58.
2. Tap the right soft key function Menu > Check Names. Recipient names
currently used within the To field will be verified against the current Contacts
list and e-mail addresses are reviewed to verify they conform with the
standard e-mail formats.
Using My Text Messages
My Text Messages consist of 9 pre-composed text message phrases you can quickly
insert into the body of a new message or as a response to a received message without
having to type a message. These default messages are:
• How are you?
• Hi there!
• Thanks!
• I'll call you later.
• On my way.
• Busy right now.
• Call me.
• Running late will be there soon.
61 Messaging
Page 69

• Where are you?
Inserting a My Text Message
1.
Create a new text message. For more information, refer to "Creating and
Sending Text Messages" on page 58.
2. Tap the right soft key function Menu > My Text.
3. Tap a desired message from the list. The selected message is then inserted
into the body of the message.
4. Tap the Send soft key to transmit your message to the selected recipients.
Editing a My Text Message
1.
Create a new text message. For more information, refer to "Creating and
Sending Text Messages" on page 58.
2. Tap the right soft key function Menu > My Text.
3. Tap the Edit My Text Messages entry to display the list of editable Text
Messages.
4. Tap a pre-existing message entry.
5. Use either the virtual QWERTY keyboard or virtual keypad to edit the text.
6. Tap to save your changes and return to the message.
E-mail Account Setup
E-mail can be sent and received using ActiveSync, or you can also configure your Omnia
to send E-mail using an ISP account.
Note: For more information on how to wirelessly sync e-mail, refer to the Wireless Sync
documentation included within the Companion CD.
Creating an Email Account
1.
From the Tod ay screen, tap the right soft key function Main Menu >
Message > Setup E-mail to launch the E-mail Setup screen and begin the
setup process.
2. Follow the setup procedure.
Using Outlook for E-mail
Install ActiveSync on your PC and set up a Standard Partnership, so you can send/
receive E-mail. For more information, refer to "Setting Up a Partnership" on page 118. E-
Messaging 62
Messaging
Page 70

mail is composed off-line and is sent to the intended recipient(s) the next time you perform
ActiveSync.
1. From the Tod ay screen, tap Main Menu > Message > Outlook E-mail.
2. Press the right soft key function Menu > New.
3. Enter the E-mail address in the To field.
4. Tap the Subject field and enter a subject.
5. Tap the Message field and enter the content of your E-mail.
6. When you’re finished, press the left soft key function Send.
Using an ISP for E-mail
If you’ve configured your Omnia to send E-mail using an Internet Service Provider (ISP),
you can send E-mail directly from your Omnia without connecting to your PC through
ActiveSync.
Tip: Before you can send and receive E-mail using your ISP, see "Setup of an ISP" on
page 63.
Setup of an ISP
Before you can send E-mail directly, you’ll need to configure your Omnia to work through
an existing account with an Internet Service Provider (ISP) or your network at work. To
configure your Omnia to work with an ISP:
1. From the Tod ay screen, tap the right soft key function Main Menu > Message
> Setup E-mail.
2. Enter your e-mail address and password. Tap Next.
3. Tap Next again. Your Omnia will attempt to automatically find the mail settings
for your account.
4. If successful, proceed to Step 6 > Step 10. If not, tap Next to proceed for the
next step.
5. Select Internet e-mail form the drop down box.
6. Enter your name, select Next.
7. Enter the incoming mail server address and choose the Account Type. Tap
Next.
8. Type in your Username, Password and if desired, check the Save Password
box. Tap Next.
63 Messaging
Page 71

9. Enter the outgoing mail server name, check the box if authentication is
required. Tap Next.
10. Use the drop down box to choose how often you want to sync. Tap Finish.
Message Folders
The following is a list of Text folders and their function.
• Deleted Items: Deleted messages are sent to the Deleted Items folder. Once
messages are removed from the Deleted Items folder, they are permanently
erased.
• Drafts: Drafts contain all messages that were not completed and saved to be sent
at a later date.
• Inbox: All incoming messages arrive and are stored in the Inbox until deleted. If
memory is full, new messages are rejected. Delete older messages to free up
space for incoming messages.
• Outbox: When you send a message, it is stored in the Outbox until the message
sent is complete.
• Sent Items: Sent Items keeps a record of all sent messages from your device.
Messaging
Messaging 64
Page 72
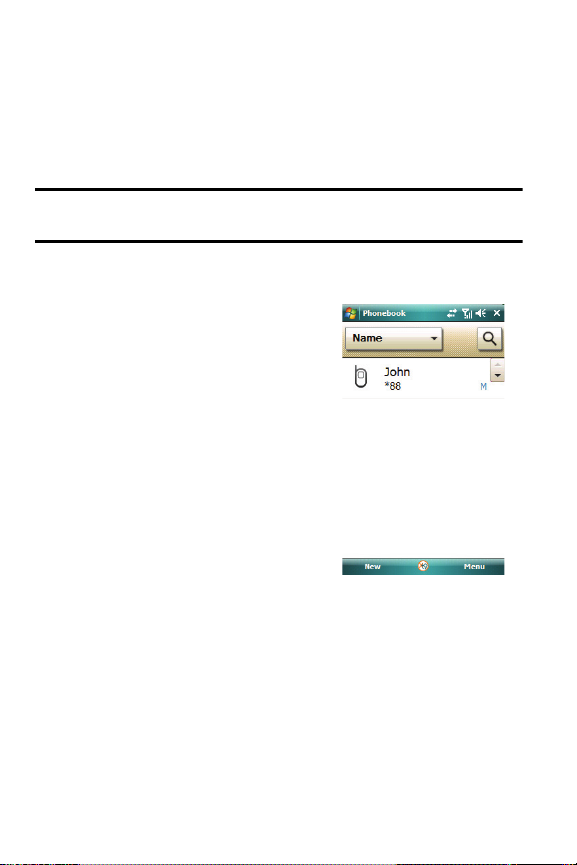
Contacts
This section describes how to manage your daily contacts by storing someone’s name and
number in your phone book.
Phone Book
Phone Book allows you to save important data regarding your friends, colleagues, or
business acquaintances.
Note: Any changes made in the phonebook directly effects the contact menu and vice
versa.
Add a New Phone Book Entry
For more information, refer to "Add a New Contact" on page 67.
Find a Phone Book Entry
1.
From the Tod ay screen, tap the right soft
key function Main Menu > Phone Book.
2. Tap the Name drop down menu.
3. Tap Search button.
4. Enter the required information. Use the
virtual QWERTY keyboard to enter the
first few characters of the contact entry.
With each consecutive character, the list
of matching contacts becomes more
refined. With each consecutive character,
the list of matching contacts becomes
more refined.
5. Tap an entry from the list to display its
information.
Find a Phone Book Entry using the Accelerator tab
For more information, refer to "Using the Accelerator tab" on page 33.
Editing a Phone Book Entry
1.
From the Today screen, tap the right soft key function Main Menu > Phone
Book.
2. Press the right soft key function Menu > Edit mode.
3. Tap an entry.
65 Contacts
Page 73

4. Update the contact information and tap .
5. Tap the right soft key function Done.
Deleting a Phone Book Entry
1.
From the Today screen, tap the right soft key function Main Menu > Phone
Book.
2. Press the right soft key function Menu > Delete mode.
3. Tap the X beside the contact you want to delete.
4. Tap the left soft key function Delete all to delete all phonebook entries.
Note: Delete all will delete all contact entries from the device.
5. Tap the right soft key function Done to return to the Phonebook.
Understanding Your Contacts
This feature is used to save important data regarding your friends, colleagues, or business
acquaintances. The contacts screen allows you to save the person’s:
• Name • Office loc • E-mail2
• Picture • Home tel • E-mail3
• Company • Home addr • Assistant
• Department • Categories • Assistant tel
• Job Title • Other addr • Manager
• File as • Pager • Govt. ID
• Work tel • Car tel • Account
• Work fax • Home fax • Customer ID
• Work addr • Company tel • Birthday
• IM • Work2 tel • Anniversary
• E-mail • Home2 tel • Spouse
• Mobile tel • Radio tel • Children
• Ring tone • IM2
• Web page • IM3
Contacts
Contacts 66
Page 74

Working with your Contacts
In addition to the information available in contacts, you can also record or write a note
associated with the contact. All of this information can be synchronized with a PC or
Laptop using the Microsoft ActiveSync application. For more information, refer to
"Synchronization" on page 117.
Add a New Contact
1.
From the Tod ay screen, tap Start located in the upper left corner of the
screen.
2. Tap Contacts.
3. Tap the left soft key function New.
4. Use the keypad or the QWERTY keyboard to enter your contact information
into the fields provided.
5. Tap to save your new contact information and return to the previous
screen.
Find a Contact
To locate a specific contact, you can use the find feature. Find allows you to enter the first
few letters of the contact entry and then have the results displayed on the screen. The
Find box is located in the upper corner of the contact screen. To find a contact:
1. From the Tod ay screen, tap Start located in the upper left corner of the
screen.
2. Tap Contacts.
3. Tap the Enter a name field and use the virtual QWERTY keyboard to enter
the first few characters of the contact entry. With each consecutive character,
the list of matching contacts becomes more refined. With each consecutive
character, the list of matching contacts becomes more refined.
4. Tap an entry from the list to display its information.
Edit a Contact
1.
From the Tod ay screen, tap Start located in the upper left corner of the
screen.
2. Tap Contacts.
3. Tap the Enter a name field and use the virtual QWERTY keyboard to enter
the first few characters of the contact entry or scrolling through the contact list.
Tap the desired contact.
4. Tap the right soft key function Menu > Edit.
67 Contacts
Page 75

5. From the available list of contact information, tap a field to begin updating the
desired information.
6. Tap to save your changes and return to the previous screen.
Delete a Contact
1.
From the Tod ay screen, tap Start located in the upper left corner of the
screen.
2. Tap Contacts.
3. Tap the Enter a name field and use the virtual QWERTY keyboard to enter
the first few characters of the contact entry or scrolling through the contact list.
Tap the desired contact.
4. Tap the right soft key function Menu > Delete Contact.
5. Tap the Yes button from the Delete Contact popup to confirm the deletion.
Make a Call from Contacts
1.
From the Tod ay screen, tap Start located in the upper left corner of the
screen.
2. Tap Contacts.
3. Tap the Enter a name field and use the virtual QWERTY keyboard to enter
the first few characters of the contact entry or scrolling through the contact list.
Tap the desired contact.
4. Tap the desired number for the contact to place the call.
Beam a Contact Entry via
Your Omnia allows you to send and receive information wirelessly between either two
Omnia Bluetooth enabled devices.
1. From the Tod ay screen, tap Start located in the upper left corner of the
screen.
2. Tap Contacts.
3. Tap the Enter a name field and use the virtual QWERTY keyboard to enter
the first few characters of the contact entry or scrolling through the contact
list. Tap the desired contact.
4. Tap the right soft key function Menu > Send Contact > Beam. Your phone
begins to search for compatible device is its communication range.
5. Tap the devices you wish to transmit to. When the contact has been
successfully transferred, the selected device displays Done.
Contacts
Contacts 68
Page 76

6. Tap to exit and return to the previous screen.
Accepting Incoming Beams
To set your Omnia to accept all incoming beams, follow these steps:
1. From the Tod ay screen, drag and drop the Wireless Manager widget
onto the Today screen.
2. Tap the Bluetooth Settings icon > Mode tab.
3. Tap the box Turn on Bluetooth and the box Make this device visible to
other devices. A check mark will display in the boxes.
4. Tap to start receiving incoming beams.
Adding Notes to Contacts
Notes allow you to attach either a recorded audio file or attach a written note to a saved
contact entry. When you view the summary screen on the contact, you can view or listen to
any notes that are associated with the contact.
Adding a Note
1.
From the Tod ay screen, tap Start located in the upper left corner of the
screen.
2. Tap Contacts.
3. Tap the Enter a name field and use the virtual QWERTY keyboard to enter
the first few characters of the contact entry or scrolling through the contact list.
Tap the desired contact.
4. Tap the Notes tab.
5. Tap the left soft key function Edit to open the notepad.
6. Enter the note using the desired entry method (such as the QWERTY
keyboard).
7. After the note has been successfully entered, tap to return to the previous
screen.
Deleting a Note
1.
From the Tod ay screen, tap Start located in the upper left corner of the
screen.
2. Tap Contacts.
3. Tap the Enter a name field and use the virtual QWERTY keyboard to enter
the first few characters of the contact entry or scrolling through the contact list.
Tap the desired contact.
69 Contacts
Page 77

4. Tap the Notes tab.
5. Tap the left soft key function Edit to open the notepad.
6. Tap the right soft key function Menu > Edit > Select All.
7. Tap the right soft key function Menu > Edit > Clear. To exit and save, tap .
Speed Dial Contacts
Speed dial can be used to dial contacts that you talk to the most. Speed dial allows you to
press up to two numeric keys to dial to the contact. Memory locations 2-99 are available
for speed dialing.
Note: Location 1 is pre-configured and can not be altered.
To speed dial:
1. From the Tod ay screen, press Menu > Speed Dial.
2. Tap the right soft key function Menu > New.
3. From the list of available contacts, tap an entry for speed dial assignment.
4. From the Speed Dial screen, tap the Location field's up or down arrows to
assign this contact to an available speed dial location (2 - 99).
5. After the contact has been successfully assigned a location, tap to return
to the previous screen.
6. To exit the Phone screen, press .
Contacts
Contacts 70
Page 78

Mobile Applications
This section introduces applications included with your phone.You can view different
document formats with the document viewing tool, access word processing and
spreadsheets documents, and even instant message others using the preloaded
applications on your Omnia.
Mobile Applications
Your Omnia™ is an integrated communication device with the power of a mobile phone
and the intelligence of a PC. Your Omnia™ is loaded with familiar Microsoft® Office
Mobile applications, like Excel Mobile, OneNote Mobile, PowerPoint Mobile, Word Mobile,
Internet Explorer, WL Messenger, Windows® Media™ Player 10 for Omnia™ and several
specialty applications.
Office Mobile
Excel Mobile
Excel Mobile works with Microsoft Excel on your computer to give you easy access to
copies of your workbooks. You can create new workbooks or copy workbooks from your
computer to your Omnia. Synchronize workbooks between your computer and your Omnia
to ensure that you have the most up-to-date content in both locations. Excel Mobile also
provides fundamental spreadsheet tools, such as formulas, functions, sorting, and
filtering.
Create a New Workbook
From the Tod ay screen, tap the right soft key function Main Menu.
1.
2. Tap the white triangle at the bottom of the display to view additional
applications.
3. Tap Excel Mobile.
4. Enter text using the desired character input method.
5. When finished, tap to save and exit.
Note: You can open one workbook at a time. If you try to open a second, you are asked to
save the first workbook.
Delete a Workbook
From the Tod ay screen, tap the right soft key function Main Menu.
1.
71 Mobile Applications
Page 79
2. Tap the white triangle at the bottom of the display to view additional
applications.
3. Tap Excel Mobile.
4. Tap and hold the workbook you want to delete.
5. From the on screen pop-up menu, tap Delete.
6. Tap Yes to confirm the deletion.
Beaming a Workbook
From the Tod ay screen, tap the right soft key function Main Menu.
1.
2. Tap the white triangle at the bottom of the display to view additional
applications.
3. Tap Excel Mobile.
4. Tap and hold the workbook you want to beam.
5. From the on screen pop-up menu, tap Beam File.
6. Tap the device you want to send the file to.
7. Tap when finished to exit the screen.
OneNote Mobile
1.
From the Tod ay screen, tap the right soft key function Main Menu.
2. Tap the white triangle at the bottom of the display to view additional
applications.
3. Tap OneNote Mobile.
4. Tap the left soft key function New to create a new note.
5. Create your note with the input panel.
6. To change the format, tap the right soft key function Menu > Format > tap a
format type.
7. To add a picture(s) or voice memo(s), tap right soft key function Menu > Take
Picture, Insert Picture, or Insert Recording.
8. To save the note, tap the left soft key function Done.
PowerPoint Mobile
PowerPoint Mobile works with Microsoft PowerPoint on your computer to give you easy
access to copies of your presentations. You can copy presentations from your computer to
your Omnia. Synchronize presentations between your computer and your Omnia to
ensure that you have the most up-to-date content in both locations.
Mobile Applications 72
Mobile Applications
Page 80

Set up a Show
From the Tod ay screen, tap the right soft key function Main Menu.
1.
2. Tap the white triangle at the bottom of the display to view additional
applications.
3. Tap PowerPoint Mobile.
4. Tap the right soft key function Menu > Set up Show.
5. Tap a Slide show orientation.
6. Tap the Playback tab to tap playback options.
Delete a Presentation
From the Tod ay screen, tap the right soft key function Main Menu.
1.
2. Tap the white triangle at the bottom of the display to view additional
applications.
3. Tap PowerPoint Mobile.
4. Tap and hold the presentation you want to delete.
5. From the on screen pop-up menu, tap Delete.
6. Tap Yes to confirm the deletion.
Word Mobile
Word Mobile works with Microsoft Word on your computer to give you easy access to
copies of your documents. You can create new documents or copy documents from your
computer to your Omnia. Synchronize the documents between your computer and your
Omnia to ensure you have the most up-to-date content in both locations.
Use Word Mobile to create documents, such as letters, meeting minutes, and trip reports.
Create a New Document
From the Tod ay screen, tap the right soft key function Main Menu.
1.
2. Tap the white triangle at the bottom of the display to view additional
applications.
3. Tap Word Mobile.
4. Tap the left soft key function New.
73 Mobile Applications
Page 81
Note: If this is the first document being created, you will automatically be in a new
document screen.
5. Enter text using the desired character input method.
6. When finished, tap to save and exit.
You can open one document at a time. If you try to open a second document, you are
asked to save the first document. You can save a document in any one of the following
formats:
• Word Document (*.docx)
• Word Template (*.dotx)
• Rich Text Format (*.rtf)
• Plain Text (*.txt)
Accessing Word Mobile options
From the Tod ay screen, tap the right soft key function Main Menu.
1.
2. Tap the white triangle at the bottom of the display to view additional
applications.
3. Tap Word Mobile.
4. Tap the right soft key function Menu > Options.... The following options are
available:
Note: While viewing a document access the Options menu by tapping Menu > Tools >
Options...
• Default template: Allows you to select: Word Document (.docx), Meeting Notes,
Memo, Phone Memo, To Do and Word 97-2003 Document (.doc) as the default
document.
• Save to: Allows you to select Main memory, My Storage, Bluetooth FTP, or
Storage Card.
• Display in list view: Allows you to display Word Files, Rich Text Files, Plain Text
Files, All Known File Types.
5. When finished, tap to save and exit.
Mobile Applications
Mobile Applications 74
Page 82

Delete a Document
To delete a Word Mobile document:
1. From the Tod ay screen, tap the right soft key function Main Menu.
2. Tap the white triangle at the bottom of the display to view additional
applications.
3. Tap Word Mobile.
4. Tap and hold the document you want to delete.
5. From the on screen pop-up menu, tap Delete.
6. Tap Yes to confirm the deletion.
Beaming a Document
To beam a document to another Windows Mobile device user:
1. From the Tod ay screen, tap the right soft key function Main Menu.
2. Tap the white triangle at the bottom of the display to view additional
applications.
3. Tap Word Mobile.
4. Tap and hold the document you want to beam.
5. From the on screen pop-up menu, tap Beam File.
6. Tap the device you want to send the file to.
7. Tap when finished to exit the screen.
75 Mobile Applications
Page 83
Multimedia
Camera
Taking pictures with your device’s built-in camera is as simple as choosing a subject,
pointing the camera, then pressing the camera button.
Take Pictures
1.
Press and hold the Camera button on the right side of the phone. The
camera is now active.
2. Rotate the device counter clockwise to landscape orientation. Camera is
always activated in landscape orientation.
3. Using the phone’s main display screen as a viewfinder, adjust the image by
aiming the camera at the subject.
4. Press the Camera button until the shutter sounds. (The picture will
automatically be saved into the DCIM folder of your internal microSD card.)
5. Tap OK to return to the viewer.
View a photo
Method 1 (Using Quick View)
While in Camera mode, tap the QuickView button.
1.
Method 2 (Using Media Album)
From the Tod ay screen, tap the right soft key function Main Menu > Media
1.
Album.
2. Tap a thumbnail to view image in full screen mode.
Camera Options
Camera options are represented by icons across both sides of the screen.
Mode: Switches from Camera to Camcorder.
Multimedia
Shooting Mode: Single, Continuous, Mosaic, Panorama, Smile.
Scene: Portrait, Landscape, Sports, Party & Indoor, Beach & Snow, Sunset,
Dusk & Dawn, Fall Color, Night Shot, Firework, Text, Show Window, Candle
Light, Black Light.
Multimedia 76
Page 84
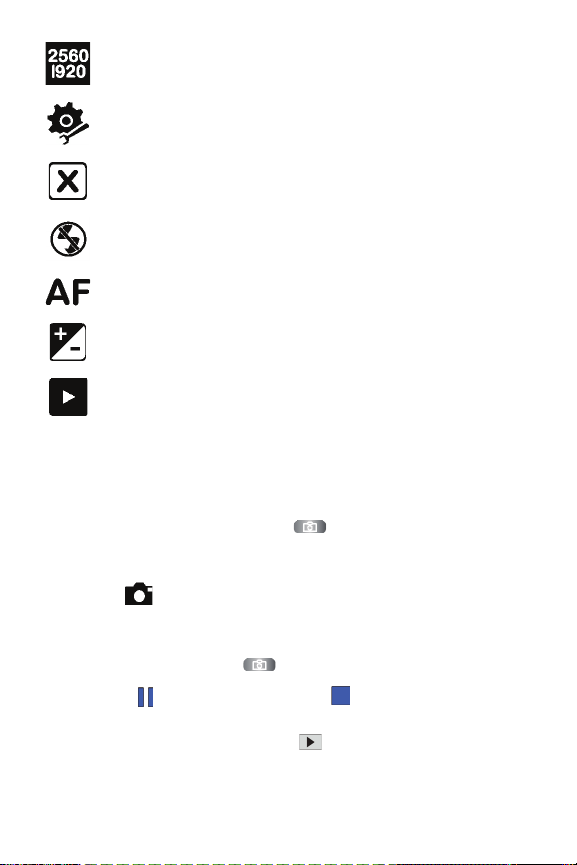
Size: 2560x1920, 2048x1536, 1600x1200, 1280x960, 640x480, 320x240.
Settings: Allows you to change your image settings.
Exit: Tap to exit Camera Mode.
Flash: Off, On, Auto.
Focus: Auto, Macro, Face.
Brightness: Allows you to adjust brightness.
Quick View: Allows you to quickly view photos.
Video
In addition to taking photos, the camera also doubles as a camcorder allowing you to also
record, view, and send videos.
Record a Video
1.
Press and hold the Camera button on the right side of the phone.
2. Rotate the device counter clockwise to landscape orientation. Camera is
always activated in landscape orientation.
3. Tap . The camcorder is now active.
4. Using the phone’s main display screen as a viewfinder, adjust the image by
aiming the camera at the subject.
5. Press the Camera button again to begin shooting video.
6. Touch to pause your recording. Touch to stop the recording and save
the video file to your Videos folder.
7. Once the file has been saved, touch (located in the center of the display)
to play back your video for review.
77 Multimedia
Page 85
8. Tap OK to return to the viewer.
Play a video
1.
From the Tod ay screen, tap the right soft key function Main Menu > Media
Album.
2. Tap the Video button and tap the video you want to watch.
Camcorder Options
Camcorder options are represented by icons across both sides of the screen.
Mode: Switches from Camera to Camcorder.
Recording Mode: Normal and Slow.
Size: 640x480, 320x240, 176x144.
Settings: Allows you to change your image settings.
Exit: Tap to exit.
Focus: Auto, Macro, Face.
Brightness: Allows you to adjust brightness.
Quick View: Allows you to quickly view photos.
Multimedia
Media Album
Media Album, allows you to view and access all the files and folders on your device.
View a photo
1.
From the Tod ay screen, tap the right soft key function Main Menu > Media
Album.
Multimedia 78
Page 86

2. Tap a thumbnail to open it. While viewing photos, you can perform the
following functions:
• To zoom in, drag your finger upward on the right side of the screen. To
exit the zoom screen, tap the screen twice.
• To view your photos as a slideshow, tap the right soft key function Menu
> Play Slide Show.
• To send a photo, tap the right soft key function Menu > Send > as E-
mail, via Beam, or via Web.
• To set a photo as a background or caller ID image, tap the right soft key
function Menu > Set as > Today Background or Caller ID.
• To delete a photo, tap the right soft key function Menu > Delete.
• To crop a photo, tap the right soft key function Menu > Crop.
• To edit the picture, tap the right soft key function Menu > Edit Image.
• To view information about the photo, tap the right soft key function
Menu > Properties.
• To set your slide show options, tap the right soft key function Menu >
Slide Show Options...
Play a video
1.
From the Tod ay screen, tap the right soft key function Main Menu > Media
Album.
2. Tap the Video button and tap the video you want to watch.
Open documents
1.
From the Tod ay screen, tap the right soft key function Main Menu > Media
Album.
2. Locate and open the folder where the document is stored.
3. Tap the document name or thumbnail to open it.
Send a file
1.
From the Tod ay screen, tap the right soft key function Main Menu > Media
Album.
2. Locate and open the folder where the file is stored.
• Tap the right soft key function Menu > Send > > as E-mail, via Beam,
or via Web.
Photo Slides
Photo Slides allows you to create photo albums, edit photos, and view slideshows with
background music.
79 Multimedia
Page 87
Create a photo album
1.
From the Tod ay screen, tap the right soft key function Main Menu > Photo
Slides.
2. Tap the right soft key function Menu > Create album.
3. Enter an album name, set the creation date, and tap OK.
4. Locate a photo in another album or folder and tap the right soft key function
Menu > Edit > Copy.
5. Tap the name of your new album or folder and then tap the right soft key
function Menu > Edit > Paste.
Edit Photos
1.
From the Tod ay screen, tap the right soft key function Main Menu > Photo
Slides.
2. Tap a thumbnail twice to open the photo.
3. Tap the right soft key function Menu > Crop or Effect.
4. Crop the photo or select an effect option (if necessary).
5. To save your changes tap .
View slideshows with background music
1.
From the Tod ay screen, tap the right soft key function Main Menu > Photo
Slides.
2. Tap the right soft key function Menu > Slide Show.
3. During a slide show, tap the screen to display the following controls:
Play: Tap to play slide show
Multimedia
Pause: Tap to pause slide show
Stop: Tap to stop slide show.
Rewind: Tap to skip to previous photo.
Multimedia 80
Page 88
Fast Forward: Tap to skip to next photo.
Rotate: Tap to rotate image.
Background Music: Tap to select background music for the slide show.
Exit: Tap to exit Slide Show.
Note: Adjust the volume by dragging your finger up or down on the optical mouse, if the
optical mouse function is set to 4-way Navigation (from the Today screen, tap Start >
Settings > System tab > Optical Mouse).
Digital Frame
Digital Frame, allows you to view your favorite photos with a clock in the screen.
1. From the Tod ay screen, tap the right soft key function Main Menu.
2. Tap the white triangle at the bottom of the display to view additional
applications.
3. Tap Digital Frame.
4. Tap the screen to display the following controls:
Style: Change the display image.
Rewind: Tap to skip to previous photo.
Play: Tap to play show.
Fast Forward: Tap to skip to next photo.
81 Multimedia
Page 89
Time and Date: Allows you to set how the time and date will display.
Settings: Allows you to change your Digital Frame settings.
Exit: Tap to exit Digital Frame.
FM Radio
FM Radio, allows you to listen to your favorite radio stations.
Listen to the FM radio
1.
Plug in your 3.5mm headset adaptor/antenna into the multifunction jack.
2. From the Tod ay screen, drag and drop the FM Radio widget onto the
Today screen.
3. Tap the widget.
4. Tap to turn on the FM radio.
5. Tap or to scan through available radio stations.
6. To adjust the volume level, tap . Tap + to increase the volume or tap - to
decrease the volume. To switch sound output to the loudspeaker, tap Menu >
Speaker on.
Save radio stations by automatic tuning
1.
From the radio screen, tap Scan to scan available stations automatically.
2. Tap Done.
Save radio stations manually
1.
From the radio screen, scroll to the radio station you want.
2. Tap to save the station.
Select a station
1.
From the radio screen, tap or .
2. Tap the station you want.
Record the FM radio
1.
From the radio screen, tap the right soft key function Menu > Record to
Multimedia
Multimedia 82
Page 90

record the current station.
2. When you are finished, tap the left soft key function Stop.
3. The recorded file is saved to Start > Programs > File Explorer > My Storage
> FM Radio.
Podcasts
Podcast is a series of digital-media files, which are distributed over the Internet using
syndication feeds for playback on portable media players and computers.
Search for audio and video files
1.
From the Tod ay screen, tap the right soft key function Main Menu.
2. Tap the white triangle at the bottom of the display to view additional
applications.
3. Tap Podcasts.
4. From the Podcasts screen, tap PODCAST.
5. Tap the right soft key function Menu > New Subscription > Online Search.
6. Enter a keyword and tap Search. Your device searches for related reports on
the wireless web and displays the results.
7. Scroll to the report and tap Add.
Play the stored audio and video files
1.
From the Today screen, tap the right soft key function Main Menu >
Podcasts.
2. From the Podcasts screen, tap EPISODE LIST, LAST 10 PODCASTS, or
LIBRARY.
3. Tap the file and tap the right soft key function Menu > Play.
Note: Tap the left soft key function Change to open the other playlist.
Update the library
Update the audio and video libraries, and playlists with new files.
1. From the Tod ay screen, tap the right soft key function Main Menu >
Podcasts.
2. From the Podcasts screen, tap PODCAST or EPISODE LIST.
3. Tap the right soft key function Menu > Update.
83 Multimedia
Page 91

Note: From the Podcasts screen, tap the right soft key function Menu > Options to select
a default memory location.
RSS Reader
RSS Reader provide news updates from your favorite website(s) in a simple form for your
device. If you are switching from another reader, you can import your existing
subscriptions into your RSS Reader. You can also export your subscriptions to an OPML
file for importing into another reader.
Create feeds
From the Tod ay screen, tap the right soft key function Main Menu.
1.
2. Tap the white triangle at the bottom of the display to view additional
applications.
3. Tap RSS Reader.
4. Tap the right soft key function Menu > New Subscription > Enter URL.
5. Enter a web address you would like to subscribe to for web feeds and tap the
left soft key function Add.
Read latest contents
From the Tod ay screen, tap the right soft key function Main Menu.
1.
2. Tap the white triangle at the bottom of the display to view additional
applications.
3. Tap RSS Reader.
4. Tap a feed and tap the right soft key function Menu > Update to get the latest
contents.
5. Tap the left soft key function Done when the search is complete.
6. Tap an updated post.
Import an existing subscription list
From the Tod ay screen, tap the right soft key function Main Menu.
1.
2. Tap the white triangle at the bottom of the display to view additional
applications.
3. Tap RSS Reader.
Multimedia
Multimedia 84
Page 92
4. Tap the right soft key function Menu > OPML > Import.
5. The following options are available for importing a subscription list:
• Select OPML file: Allows you to locate and select an OPML file to
import.
• Enter OPML URL: Allows you to enter the URL of the OPML file to
import.
Export subscription list to an OPML file
From the Tod ay screen, tap the right soft key function Main Menu.
1.
2. Tap the white triangle at the bottom of the display to view additional
applications.
3. Tap RSS Reader.
4. Tap the right soft key function Menu > OPML > Export.
5. Specify the folder location and OPML filename.
6. Tap the left soft key function Save to create the OPML file.
SharePix
SharePix allows you to upload your photos to the photo sharing websites Facebook,
Picasa, Flickr, Photobucket, Friendster, and MySpace. You can also download your
friends’ photos to your phone.
Launching SharePix
1.
From the Tod ay screen, tap the Widget Bar and drag and drop the SharePix
widget onto the desktop.
2. Tap the SharePix widget .
Note: You can also launch SharePix from the Programs menu.
3. A message appears indicating that network access will be activated and
additional charges may be incurred if not using a WiFi network. Tap the check
box next to Do not show this message again if you do not want the message
to appear next time.
4. Tap the right soft key function OK or to continue.
5. The following menu options display: Facebook, Picasa, Flickr, Photobucket,
Friendster, and MySpace.
85 Multimedia
Page 93

Uploading a File
1.
From the Tod ay screen, tap the Widget Bar and drag and drop the SharePix
widget onto the desktop.
2. Tap the SharePix widget .
3. Tap one of the menu options: Facebook, Picasa, Flickr, Photobucket,
Friendster, or MySpace.
4. Tap Upload.
5. If required, follow the on-screen instructions to enter your login details.
6. Select or create (if available) an Album from the Album drop-down box.
7. Tap the right soft key function Add Files.
8. Tap My Pictures, My Storage, or My Device from the drop-down box to
browse and locate files to upload.
9. Tap a photo file. Repeat steps 7 to 9 to add additional files.
10. Tap the left soft key function Upload to upload the files to the photo sharing
website.
Going to a SharePix Photo Sharing Website
1.
From the Tod ay screen, tap the Widget Bar and drag and drop the SharePix
widget onto the desktop.
2. Tap the SharePix widget .
3. Tap one of the menu options: Facebook, Picasa, Flickr, Photobucket,
Friendster, or MySpace.
4. Tap Go to site.
5. Follow the on-screen instructions.
Deleting a SharePix Menu
1.
From the Tod ay screen, tap the Widget Bar and drag and drop the SharePix
widget onto the desktop.
2. Tap one of the menu options: Facebook, Picasa, Flickr, Photobucket,
Friendster, or MySpace.
3. Tap Delete.
Multimedia
Note: If you delete one or more of the SharePix menus, you can restore them by tapping
the left soft key function Update.
Multimedia 86
Page 94

SharePix Options
1.
From the Tod ay screen, tap the right soft key function Main Menu >
Programs > SharePix.
2. Tap the right soft key function Options.
3. Tap one of the following options:
• Upload settings: Allows you to select the Image resize setting.
• Upload reservation: Allows you to schedule times in the future for
uploading your files.
• Upload details: Allows you to view upload details such as status,
website, and filename.
• Preferred Sites settings: Allows you to store your login details for any
of the SharePix photo sharing websites. Once your login details are
stored, you will no longer be prompted to login when uploading files.
• Disclaimer: Allows you to view the disclaimer.
4. Tap to return to the previous menu.
Smart Reader
Smart Reader allows you to take a photo of a business card and extract the information
from the card, and save it as a new contact in Contacts. You can also take a photo of a
document and convert it to a editable text file.
Tip: Hold the device firmly while taking the business card or document. Be careful not to
let any shadows on the business card or document. Place the business card or document
on level, evenly lit place and photograph it. Depending on the shooting environment, the
result of the business card or document conversion may not be satisfying. The Bizcard
Automatically Capture setting is on by default and therefore takes the business card
photo automatically.
To take a name card:
1. From the Tod ay screen, tap the right soft key function Main Menu.
2. Tap the white triangle at the bottom of the display to view additional
applications.
3. Tap Smart Reader.
4. Center the business card within the frame.
5. Press the Camera button or the Optical Mouse to take the photo.
87 Multimedia
Page 95

6. Your device recognizes the name card and converts it to contact card format.
7. Tap Save to save the contact card.
To take a document:
1. From the Tod ay screen, tap the right soft key function Main Menu.
2. Tap the white triangle at the bottom of the display to view additional
applications.
3. Tap Smart Reader.
4. Tap the bizcard icon to change from “Bizcard mode” to “Document mode”.
5. Center the document.
6. Press the Camera button or the Optical Mouse to take the photo.
7. Your device recognizes the document and converts it to a editable text file.
8. Edit the document, if necessary.
9. Tap Save to save the document.
TV Out Viewer
TV Out Viewer allows you to view the display of your device on a TV screen by
connecting the device and TV with a TV out cable (sold separately). When TV Out Viewer
is launched, folders in memory can be viewed and selected.
1. From the Today screen, tap the right soft key function Main Menu > Settings
> All Settings > System tab > TV Out.
2. Select the settings for your TV.
3. Tap .
4. Switch the TV to External Input mode.
5. Connect your device to the TV with a TV out cable.
6. From the Tod ay screen, tap Start located in the upper left corner of the
screen.
7. Tap Programs > TV Out Viewer.
8. The display switches to TV Out mode and you can view the device’s display
on the TV screen.
Video Editor
Video Editor, allows you to edit and/or make videos by combining photos, videos and
sound.
Multimedia
Multimedia 88
Page 96
Crop a video
1.
From the Tod ay screen, tap the right soft key function Main Menu >
Programs > Video Editor.
2. Tap Edit Video.
3. Select a video file.
4. Tap Crop .
5. Tap to start playback.
6. Tap at the point where you want the new video to begin.
7. Tap at the point where you want the new video to end.
8. Tap Save > Done.
Add a stored audio to a video
1.
From the Today screen, tap the right soft key function Main Menu >
Programs > Video Editor.
2. Tap Edit Video.
3. Select a video file.
4. Tap Add Music .
5. Tap to start playback.
6. Tap to add one of the sounds you have saved.
7. Select an audio file.
8. Tap to stop adding the audio file.
9. Tap Save > Done.
Add a new audio to a video
1.
From the Today screen, tap the right soft key function Main Menu >
Programs > Video Editor.
2. Tap Edit Video.
3. Select a video file.
4. Tap .
5. Tap to start playback.
6. Tap to add audio by recording a new sound.
7. Tap to stop recording.
8. Tap Save > Done.
89 Multimedia
Page 97

Add texts to a video
1.
From the Today screen, tap the right soft key function Main Menu >
Programs > Video Editor.
2. Tap Edit Video.
3. Select a video file.
4. Tap .
5. Tap to start playback.
6. Tap at the point where you want the text to be displayed.
7. Enter text.
8. Adjust the location and change the font format.
9. Tap Done.
10. Tap at the point where you want the text to be disappeared.
11. Tap Save > Done.
Make a slideshow
You can combine photos to make a slideshow with your favorite photos.
1. From the Tod ay screen, tap the right soft key function Main Menu >
Programs > Video Editor.
2. Tap Make Photo Movie.
3. Select the photos you want and tap Select.
4. While viewing photos, tap Menu to use the following options:
• Insert: Insert an additional photo or add a song or sound.
• Effect: Change the color tone or apply a special effect.
• Transition: Allows you to select how the display will change.
• Duration: Set the time interval.
• Insert Text: Insert text.
• Remove: Remove photos.
• Preview: Preview photo movie.
• Options: Change the properties for saving the video file, such as image
resolution, memory location, and the duration of photos.
• Cancel: Cancel Make Photo Movie.
Make a storyboard
You can combine photos and videos to make a storyboard.
1. From the Tod ay screen, tap the right soft key function Main Menu >
Multimedia
Multimedia 90
Page 98

Programs > Video Editor.
2. Tap Create Storyboard.
3. Select the photos and videos you want and tap Select. You can use similar
options as when making a slideshow. See the previous section.
4. When you are finished, tap Save.
5. After saving the video, tap Done.
Windows Media Player
Use Microsoft Windows Media Player® to play digital audio and video files that are stored
on your device or downloaded from the internet. The media formats that the player
supports for audio are: WAV, MP3, AAC, AAC+, eAAC+, AMR, WMA, WCP, MIDI, and
MMF. The media formats supported for video are: H.263, H.264, MPEG4, 3GP, 3G2,
WMV, Divx, Xvid, and ASF.
Launch Media Player
• From the Tod ay screen, tap the right soft key function Main Menu > Programs >
Windows Media.
Load Media Player files
Media player files must be copied to your Omnia using the ActiveSync application or
copied or saved to a microSD card (max 16GB). The files are copied to the local content
folder on your Omnia after the ActiveSync operation. To load a file:
1. From the Today screen, tap the right soft key function Main Menu >
Programs > Windows Media.
2. Tap the right soft key function Menu > Open File.
Note: When the Media Player is displayed tap Menu > Library > Menu > Open File to
access Open File.
3. Use the File System screen to locate your desired multimedia file.
4. Select the desired file from the list and tap Play.
Media Player Controls
The following settings are available in the media player:
• Tap the Play icon to listen to a file. The Play icon turns into the Pause icon once
the file begins playing.
• This slider control adjusts the playback progress of the selected file and appears
above the play, pause, and skip buttons.
91 Multimedia
Page 99
• The volume controls adjust the sound level during playback. Tap the mute control
to toggle between mute on and off.
Playlist
Windows Media player allows you to configure personal playlists with your favorite music
or video files. Playlists group media content and store the location of media content,
whether the location is your computer, a network, or the Internet.
1. From the Tod ay screen, tap the right soft key function Main Menu >
Programs > Windows Media.
2. Tap the right soft key function Menu > Library > My Playlists.
3. Tap a file and press Play.
Touch Player
With Touch Player, you can play music and video files stored on the device's memory.
Update the library
1.
From the Tod ay screen, drag and drop the Touch Player widget onto
the Today screen.
2. Tap the widget.
3. Tap the left soft key function Update.
4. Tap the left soft key function Search to update the library.
5. When updating the library is finished, tap right soft key function Done.
Play music or video files
1.
From the Tod ay screen, drag and drop the Touch Player widget onto
the Today screen.
2. Tap the widget.
3. Tap the library you want.
4. Tap a file.
5. During playback, use the following controls:
Multimedia
Play: Tap to play song. Tap again to pause song.
Rewind: Tap to move back one song or tap and hold to rewind the current
song.
Multimedia 92
Page 100

Fast Forward: Tap to move forward one song or tap and hold to fast
forward through the current song.
Return to file list: Tap to view All Music in your library.
Volume button: Tap to adjust the volume.
Connected Home
Connected Home allows your phone to serve as a Mobile Digital Media Server (M-DMS),
sending photos, music and videos from its memory to other Digital Living Network Alliance
(DLNA) certified devices. Also it could function as a Mobile Digital Media Player (M-DMP)
to play digital content received from other DLNA certified devices.
Note: To view more information about DLNA certified products visit www.dlna.org/home.
1. From the Tod ay screen, tap the right soft key function Main Menu >
Programs > Connected Home.
2. Tap the left soft key function Settings.
3. Update your settings and tap the left soft key function Done.
4. Once you have turned on Media Sharing your device name will display in the
Server list.
5. Tap the Details button to display information about the server such as Server
Name, IP Address, Model, Model No. and Company. Tap Done to return to
Server list.
6. You are now ready to transfer file between DLNA certified device.
93 Multimedia
 Loading...