

Page 1
ENGLISH
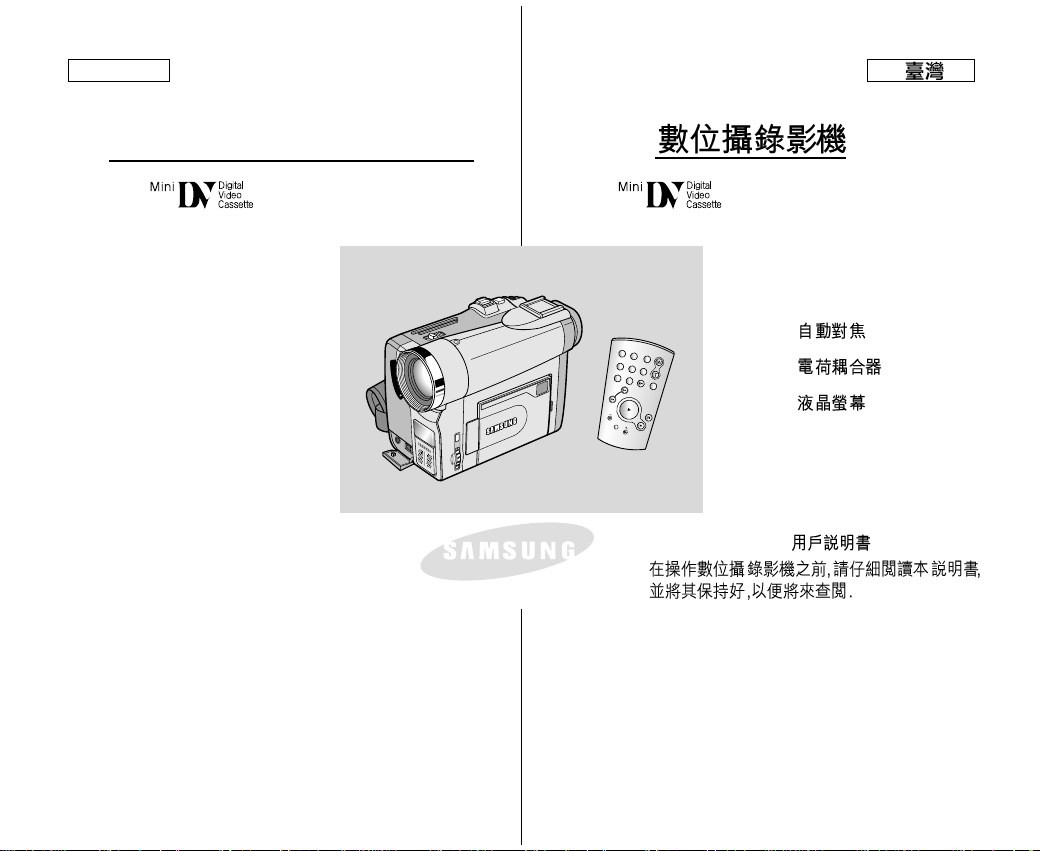
Digital Video Camcorder
Owner’s Instruction Book
Before operating the unit, please read this instruction
book thoroughly, and retain it for future reference.
AF Auto Focus
CCD Charge Coupled Device
LCD Liquid Crystal Display
AF
CCD
LCD
SCD93/D99 SCD93/D99
AD68-00656P
S
S
S
EL
TIM
P
H
O
T
S
E
A
R
C
F
.A
D
V
ELECTRONICS
TAR
T
/
TO
P
PH
O
T
O
D
IS
PL
A
Y
F
ZE
R
E
O
R
M
E
DATE/
M
O
RY
TIME
O
H
A
.D
U
B
S
LO
W
X
2
Page 2
........................................................................................................................ 11
............................................................................. 12
..................................................................................................... 13
................................................................................................................. 14
..................................................................................................... 15
......................................................................................................... 16
..................................................................................................................... 17
OSD
...................................................................18
OSD
............... 19
............................................................................. 19
..................................................................................................... 20
.............................................................................................. 20
Self Record ................................................................. 20
..........................................................................................................21
................................................................................................................. 22
.................................................................................................................. 22
....................................................................................................................22
................................................................................................................. 23
.............................................................. 23
............................................................................................23
................................................................................................. 24
.......................................................................................... 24
.............................................. 25
.......................................................................................... 26
................................................................................................. 27
................................................................................................................. 28
REC SEARCH ....................................................................... 29
................................................................................................. 30
................................................................................. 30
.............................................................................................. 30
......................................................................................................... 31
VIEWFINDER ............................................................................... 32
.......................................................................................................... 32
......................................................................... 33
PLA Y .................................................................. 34
................................................................................................. 34
Contents
22
ENGLISH
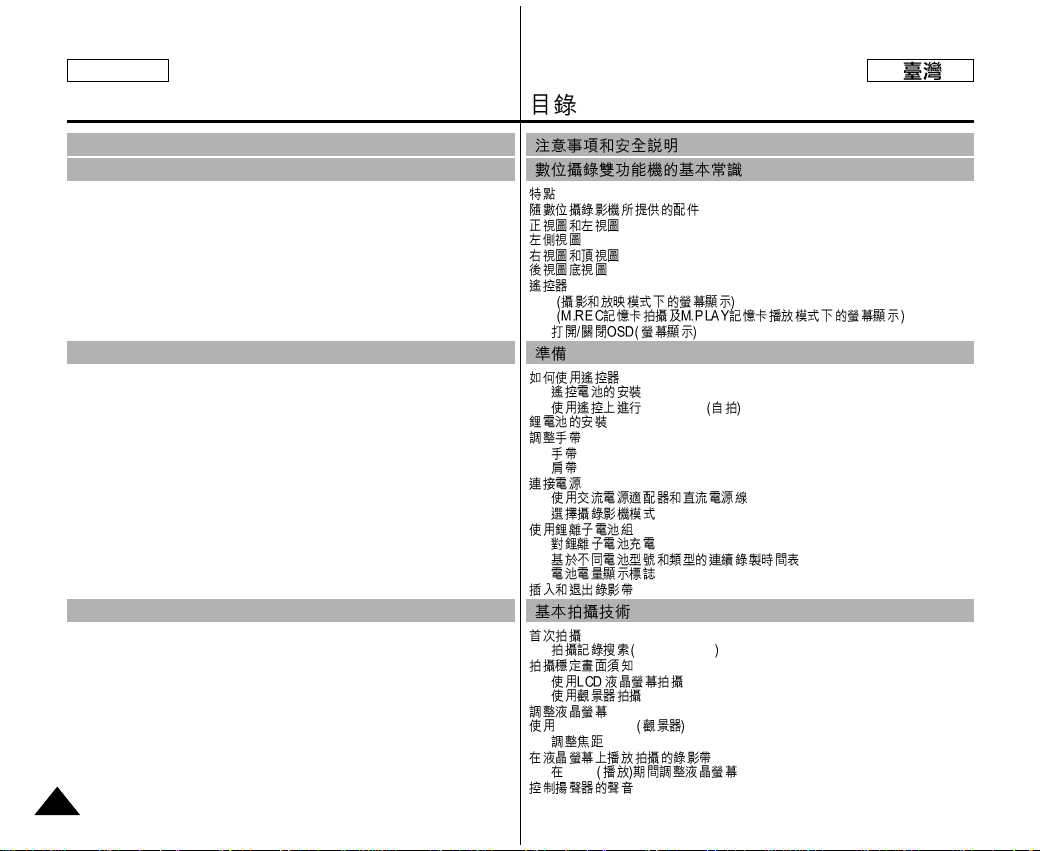
Features .......................................................................................................................... 11
Accessories Supplied with camcorder ........................................................................... 12
Front & Left View .......................................................................................................... 13
Left side View ................................................................................................................ 14
Right & Top View .......................................................................................................... 15
Rear & Bottom View ...................................................................................................... 16
Remote control ............................................................................................................... 17
OSD (On Screen Display in CAM and PLAYER modes) ............................................. 18
OSD (On Screen Display in M.REC and M.PLAYmodes)........................................... 19
Turning the OSD on/off (On Screen Display) ........................................................ 19
How to use the Remote Control ................................................................................... 20
Battery Installation for the Remote Control ........................................................... 20
Self Record using the Remote Control ................................................................... 20
Lithium Battery Installation.............................................................................................21
Adjusting the Hand Strap .............................................................................................. 22
Hand strap ............................................................................................................... 22
Shoulder strap............................................................................................................22
Connecting a Power Source ........................................................................................... 23
To use the AC Power adapter and DC Cable ......................................................... 23
To select the CAMCORDER mode .........................................................................23
Using the Lithium Ion Battery Pack ............................................................................. 24
Charging the Lithium Ion Battery Pack .................................................................. 24
Table of continuous recording time based on model and battery type .................. 25
Battery level display ................................................................................................ 26
Inserting and Ejecting a Cassette .................................................................................. 27
Making your First Recording ......................................................................................... 28
Record Search (REC SEARCH) ............................................................................ 29
Hints for Stable Image Recording ................................................................................. 30
Recording with the LCD monitor ........................................................................... 30
Recording with the Viewfinder .............................................................................. 30
Adjusting the LCD ........................................................................................................ 31
Using the VIEWFINDER ............................................................................................. 32
Adjusting the Focus ................................................................................................ 32
Playing back a tape you have recorded on the LCD ..................................................... 33
Adjusting the LCD during PLAY ........................................................................... 34
Controlling Sound from the Speaker ............................................................................ 34
BASIC Recording ............................................................... 28
Preparation ......................................................................... 20
Notes and Safety Instructions .............................................. 6
Getting to Know Your Camcorder ....................................... 11
....................................................................... 28
..................................................................................... 20
.............................................................. 6
.............................................. 11
Page 3
......................................................................................................... 35
.................................................................................................. 35
.................... 35
.............................................................................. 36
CLOCK SET
.................................................................................. 37
WL. REMOTE
....................................................................................... 38
BEEP SOUND
.................................................................................. 39
SHUTTER SOUND
........................................................................... 40
DEMONSTRATION
..................................................................... 41
PROGRAM AE
..................................................................... 42
.......................................................................................... 43
WHT.BALANCE
WHITE BALANCE ........................................... 44
DIGITALZOOM ............................................... 45
Zooming In and Out
.................................................................. 45
Digital Zoom
.................................................................................. 46
EIS (
) ................................................................................... 47
DSE
......................................... 48
.......................................................................................... 49
MEMORY MIX
............................................................................. 50
.................................................................. 51
..................................................................................................... 52
...................................................................................................... 52
REC MODE
................................................................................... 53
AUDIO MODE
...................................................................... 54
WIND CUT
................................................................................... 55
DATE/TIME
................................................................................. 56
TV DISPLAY
................................................................................. 57
...................................................................................... 58
.................................................................................................. 59
.......................................................................................... 60
................................................................................................................. 61
EASY
......................................................................... 62
MF/AF(Manual Focus/Auto Focus
............................................. 63
.......................................................................................................... 63
.......................................................................................................... 63
BLC
....................................................................................................... 64
Fade In and Out
................................................................................ 65
.......................................................................................................... 65
....................................................................................... 65
Audio dubbing
..............................................................................................66
.................................................................................................................. 66
.................................................................................................. 67
Contents
33
ENGLISH
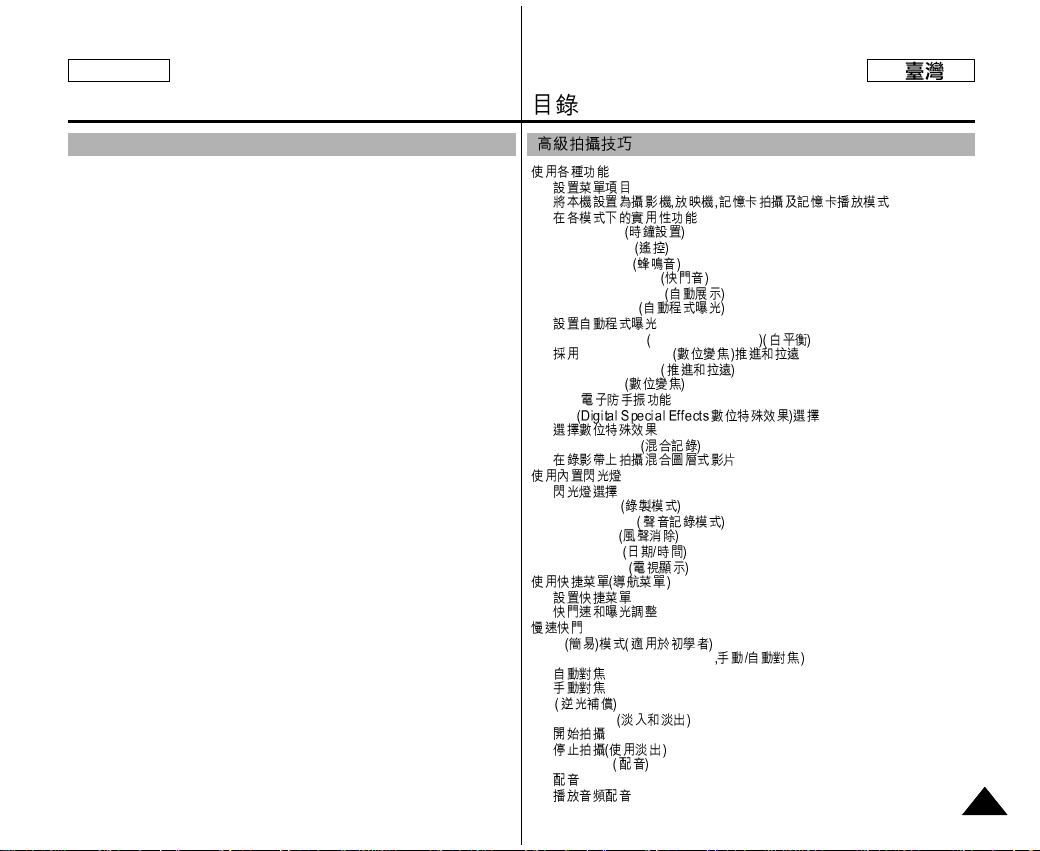
Use of various Functions ............................................................................................... 35
Setting menu items .................................................................................................. 35
Set the camcorder to CAM or PLAYER mode and M.REC or M.PLAYmode ..... 35
Availability of functions in each mode ................................................................... 36
CLOCK SET .......................................................................................................... 37
WL. REMOTE ....................................................................................................... 38
BEEP SOUND ....................................................................................................... 39
SHUTTER SOUND ................................................................................................ 40
DEMONSTRATION .............................................................................................. 41
PROGRAM AE ...................................................................................................... 42
Setting the PROGRAM AE .................................................................................... 43
WHT. BALANCE (WHITE BALANCE) .............................................................. 44
Zooming In and Out with DIGITALZOOM .......................................................... 45
Zooming In and Out ................................................................................................ 45
Digital Zoom .......................................................................................................... 46
EIS (Electronic Image Stabilizer) ........................................................................... 47
DSE (Digital Special Effects) SELECT .................................................................. 48
Selecting an effect ................................................................................................... 49
MEMORY MIX ....................................................................................................... 50
Recording Superimposed images on a tape............................................................. 51
Using the Built-in Flash.................................................................................................. 52
FLASH SELECT...................................................................................................... 52
REC MODE ........................................................................................................... 53
AUDIO MODE ...................................................................................................... 54
WIND CUT ............................................................................................................ 55
DATE/TIME ........................................................................................................... 56
TV DISPLAY ......................................................................................................... 57
Using Quick Menu ........................................................................................................ 58
Setting the Quick menu ........................................................................................... 59
SHUTTER SPEED & EXPOSURE ...................................................................... 60
SLOW SHUTTER(Low Shutter Speed) ....................................................................... 61
EASY Mode (for Beginners) ......................................................................................... 62
MF/AF (Manual Focus/Auto Focus) ............................................................................. 63
Auto Focusing ......................................................................................................... 63
Manual Focusing ..................................................................................................... 63
BLC (Back Light Compensation) .................................................................................. 64
Fade In and Out .............................................................................................................. 65
To Start Recording .................................................................................................. 65
To Stop Recording (use FADE IN / FADE OUT) .................................................. 65
Audio dubbing ............................................................................................................... 66
Dubbing sound. ........................................................................................................ 66
Dubbed Audio Playback .......................................................................................... 67
Advanced Recording .......................................................... 35
....................................................................... 35
Page 4
Contents
44
ENGLISH
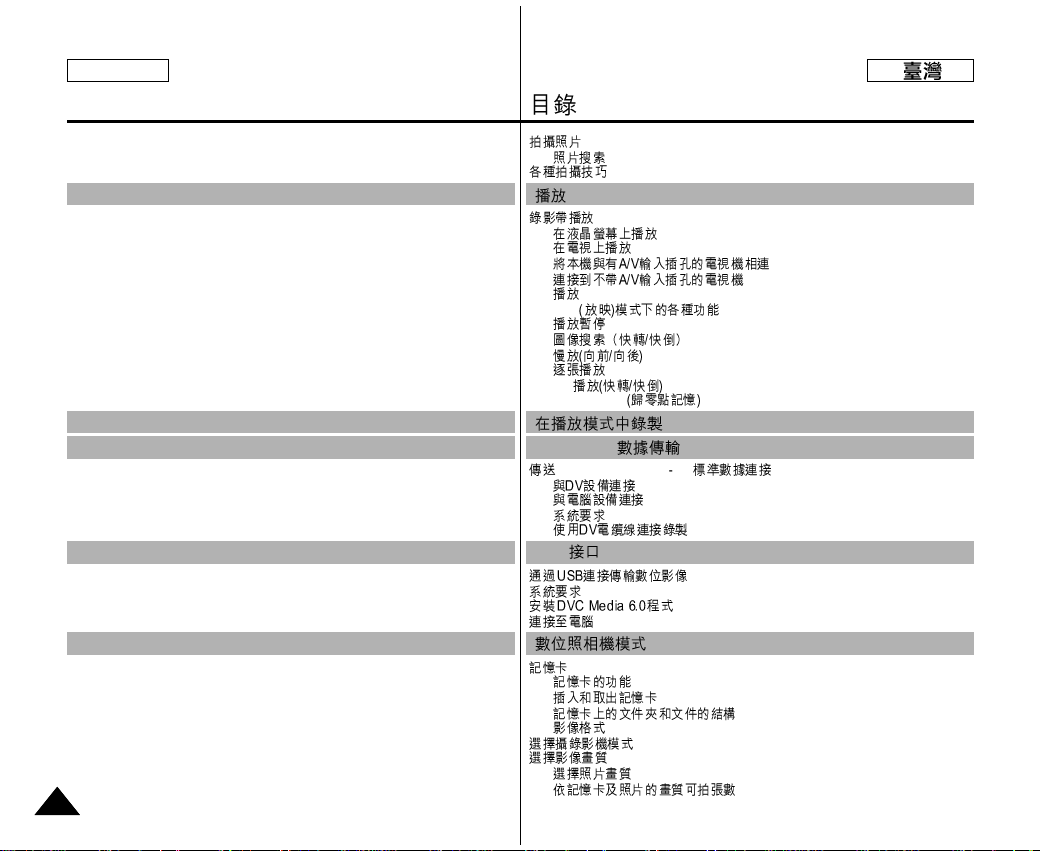
PHOTO Image Recording .............................................................................................. 68
Searching for a PHOTO picture .............................................................................. 68
Various Recording Techniques ....................................................................................... 69
Tape Playback ................................................................................................................ 70
Playback on the LCD .............................................................................................. 70
Playback on a TV monitor ...................................................................................... 70
Connecting to a TV which has Audio/Video input jacks ........................................ 70
Connecting to a TV which has no Audio and Video input jacks ............................ 71
Playback .................................................................................................................. 71
Various Functions while in PLAYER mode .................................................................. 72
Playback pause ........................................................................................................ 72
Picture search (Forward/Reverse) ........................................................................... 72
Slow playback (Forward/Reverse) .......................................................................... 72
Frame advance (To play back frame by frame) ...................................................... 73
X2 Playback (Forward/Reverse ) ............................................................................ 73
ZERO MEMORY .......................................................................................................... 74
Transferring IEEE1394 (i.LINK)-DV standard data connections ................................. 76
Connecting to a DV device ..................................................................................... 76
Connecting to a PC ................................................................................................. 76
System requirements ............................................................................................... 76
Recording with a DV connection cable .................................................................. 77
Transferring a Digital Image through a USB Connection ............................................. 78
System Requirements ..................................................................................................... 78
Installing DVC Media 6.0 Program................................................................................ 79
Connecting to a PC ........................................................................................................ 80
MEMORY STICK........................................................................................................... 81
Memory Stick Functions.......................................................................................... 81
Inserting and ejecting the Memory Stick ................................................................ 82
Structure of folders and files on the Memory Stick ............................................... 83
Image Format .......................................................................................................... 83
Selecting the CAMCORDER mode ............................................................................... 83
Selecting the image quality ............................................................................................ 84
Select the photo quality .......................................................................................... 84
Number of images on the Memory Stick ................................................................ 84
................................................................................................................. 68
.......................................................................................................... 68
......................................................................................................... 69
............................................................................................................. 70
.......................................................................................... 70
.................................................................................................. 70
........................................................ 70
................................................................ 71
.................................................................................................................. 71
PLA YER
....................................................................... 72
.......................................................................................................... 72
................................................................................ 72
............................................................................................. 72
......................................................................................................... 73
X2
........................................................................................ 73
ZERO MEMORY
............................................................................. 74
IEEE 1394 (i.LINK) DV ........................................................ 76
................................................................................................. 76
.............................................................................................. 76
.......................................................................................................... 76
................................................................................. 77
................................................................................. 78
................................................................................................................. 78
...................................................................................... 79
............................................................................................................. 80
..................................................................................................................... 81
.................................................................................................. 81
.......................................................................................... 82
.................................................................. 83
.......................................................................................................... 83
................................................................................................. 83
......................................................................................................... 84
.................................................................................................. 84
.................................................................. 84
Playback ............................................................................. 70
Recording in PLAYER mode .............................................. 75
IEEE 1394 Data Transfer ................................................... 76
USB interface .................................................................... 78
Digital Still Camera mode.................................................... 81
..................................................................................... 70
................................................................ 75
IEEE 1394 ............................................................ 76
USB .............................................................................. 78
................................................................... 81
Page 5
Contents
55
ENGLISH
Specifications .................................................................... 108
INDEX................................................................................ 109
Selecting the recording image size ................................................................................. 85
Selecting the moving picture size................................................................................... 86
Recording images continuously...................................................................................... 87
Select the CONTINUOUS SHOT............................................................................ 87
Setting the File Number.................................................................................................. 88
Recording Still images to a Memory Stick in M.REC Mode ........................................ 89
Recording images to a Memory Stick .................................................................... 89
Recording an image from a cassette as a still image ............................................. 90
Copying still images from a cassette to Memory Stick .................................................. 91
MJPEG RECORDING ................................................................................................... 92
Saving the pictures captured by a camera as a moving picture file onto
MEMORY STICK ................................................................................................ 92
Viewing still images/moving pictures ............................................................................ 94
To view a Single image............................................................................................ 94
To view a slide show................................................................................................ 95
To view the Multi Display....................................................................................... 95
Marking still images for printing ................................................................................... 96
Protection from accidental erasure.................................................................................. 97
Deleting Still images/Moving pictures .......................................................................... 98
Formatting the Memory Stick ........................................................................................ 99
Attention .................................................................................................................. 99
Using the smart Shoe ................................................................................................... 100
Using the VL-S1FL Video Light/Flash (optional) ....................................................... 100
After finishing a recording ........................................................................................... 102
Cleaning and Maintaining the Camcorder.................................................................... 103
Cleaning the Video Heads ..................................................................................... 103
Using Y our Camcorder Abroad .................................................................................... 104
Power sources ........................................................................................................ 104
Color system .......................................................................................................... 104
Troubleshooting ............................................................................................................ 105
Self Diagnosis Display .......................................................................................... 105
Moisture Condensation ......................................................................................... 105
Self Diagnosis Display in M.REC, M.PLAYmode .............................................. 106
................................................................................................. 85
................................................................................................. 86
......................................................................................................... 87
.................................................................................................. 87
......................................................................................................... 88
Memory Stick ............................................................... 89
...................................................................................... 89
...................................................................... 90
..................................................................... 91
MPEG
.............................................................................................................. 92
..................................................... 92
/ ........................................................................................ 94
.......................................................................................... 94
.............................................................................. 95
.......................................................................................... 95
............................................................................................. 96
......................................................................................................... 97
/ ........................................................................................ 98
......................................................................................................... 99
.................................................................................................................. 99
....................................................................................................... 100
VL-S1FL / ( )................................................................... 100
........................................................................................................... 102
................................................................................... 103
........................................................................................................ 103
........................................................................................... 104
................................................................................................................ 104
........................................................................................................ 104
............................................................................................................... 105
................................................................................................ 105
................................................................................................................ 105
M.REC/M.PLAY ............ 106
Maintenance...................................................................... 102
Troubleshooting................................................................. 105
Smart Shoe (SCD99 only)................................................. 100
............................................................................ 108
................................................................................... 109
................................................................................... 102
............................................................................ 105
...................................................... 100
Page 6
1.
2.
■
3.
4.
5.
Notes and Safety Instructions
66
ENGLISH
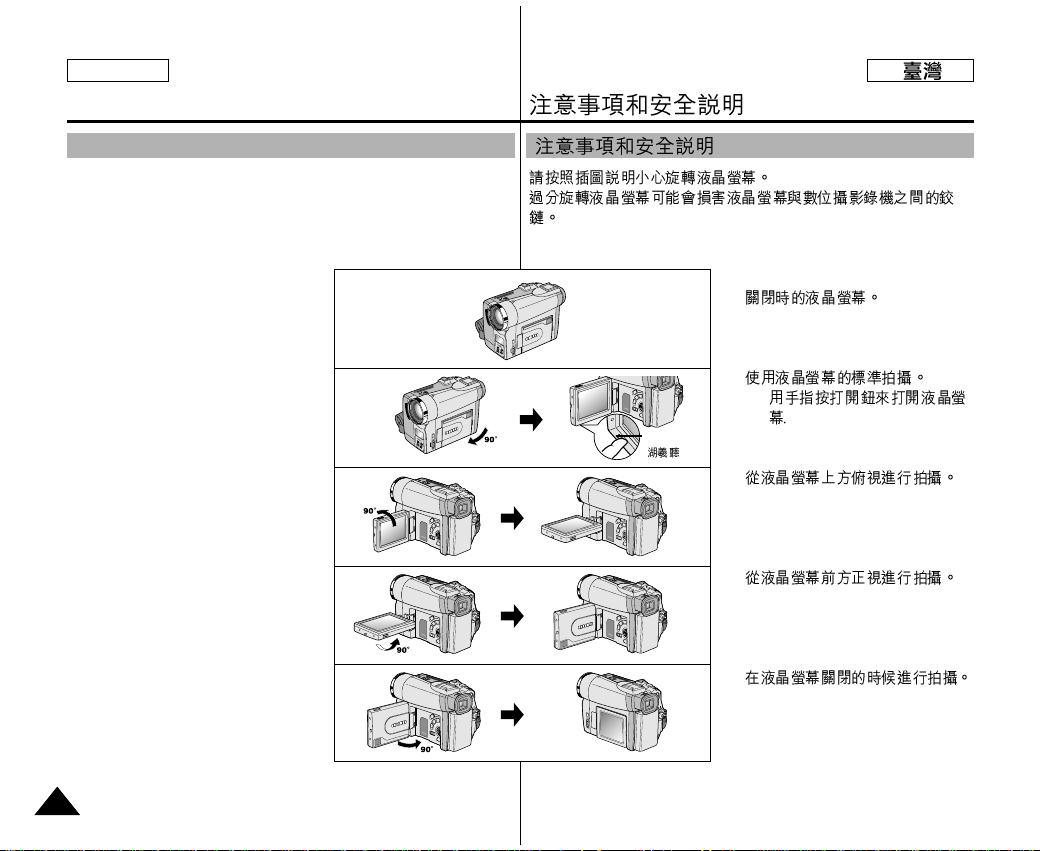
Notes regarding the rotation of the LCD screen
Please rotate the LCD screen carefully as illustrated.
Over rotation may cause damage to the inside of the hinge that connects the
LCD screen to the Camcorder.
1. LCD screen closed.
2. Standard recording using the LCD
screen.
■
A LCD Monitor is opened applying
a finger to LCD open knob.
3. Recording when looking at the LCD
screen from the top.
4. Recording when looking at the LCD
screen from the front.
5. Recording with the LCD screen closed.
1
2
3
4
5
LCD
Page 7

Notes and Safety Instructions
77
ENGLISH
Television programs, video tapes, DVD titles, films, and other program
materials may be copyrighted.
Unauthorized copying of copyrighted material may be against the law.
1. A sudden rise in atmospheric temperature may cause condensation to
form inside the camcorder.
for example:
- When you move the camcorder from a cold location to a warm location
(e.g. from outside to inside during winter.)
- When you move the camcorder from a cool location to a hot location
(e.g. from inside to outside during the summer.)
2. If the (DEW) protection feature is activated, leave the camcorder
for at least two hours in a dry, warm room with the cassette
compartment opened and the battery pack removed.
1. Do not leave the camcorder exposed to high temperature (above 60°C
or 140°F).
For example, in a parked car in the sun or exposed to direct sunlight.
2. Do not let the camcorder get wet.
Keep the camcorder away from rain, sea water, and any other form of
moisture. If the camcorder gets wet, it may get damaged.
Faults caused by ingress of fluids may not be possible to repair.
Notes regarding CAMCORDER
Notices regarding COPYRIGHT
Notes regarding moisture condensation
1.
-
-
2. DEW
1. °C °F
2.
Page 8
-
-
-
-
-
-
*
-
-
Notes and Safety Instructions
88
ENGLISH
- Make sure that the battery pack is fully charged
before starting to record.
- To preserve battery power, keep your camcorder
turned off when you are not operating it.
- If your camcorder is in CAM mode and it is left in
STBY mode without being operated for more than
5 minutes with a tape installed, it will automatically
turn itself off to protect against unnecessary battery
discharge.
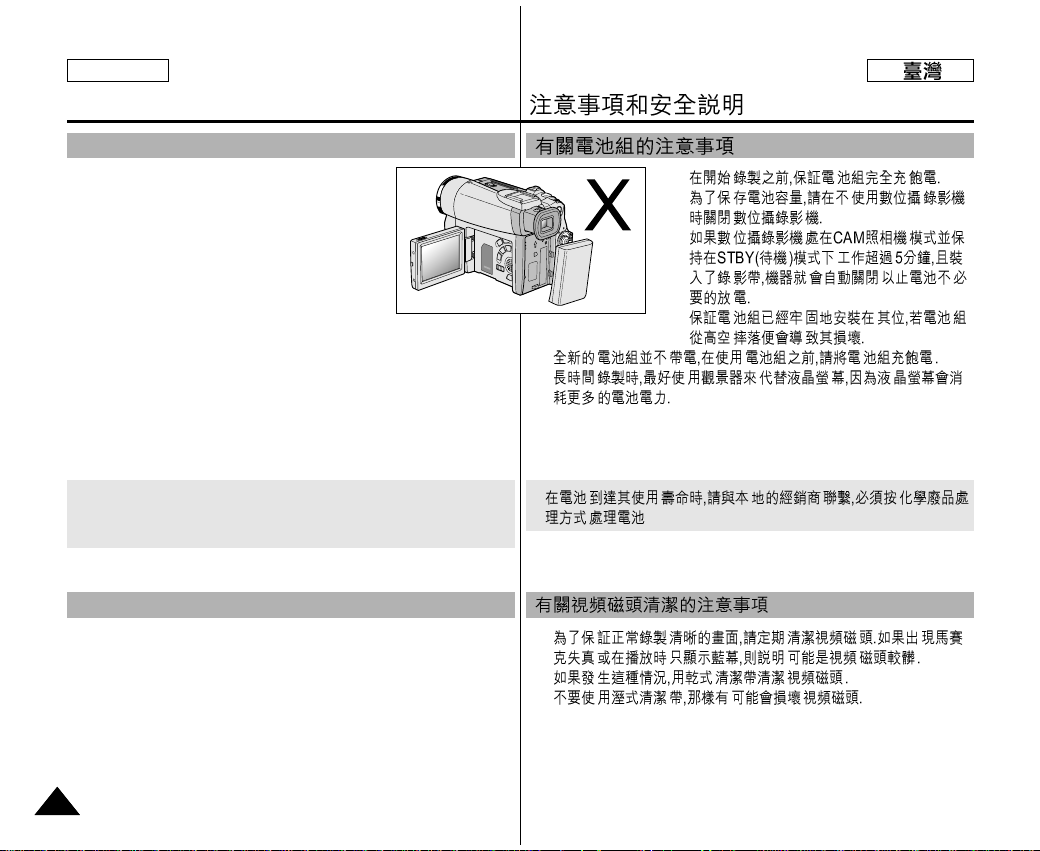
- Make sure that the battery pack is located correctly and firmly in place.
Dropping the battery pack may damage it.
- A brand new battery pack is not charged.
Before using the battery pack, you need to charge it completely.
- It is a good idea to use the viewfinder rather than the LCD when making
long recordings, because the LCD uses up more battery power.
* When the battery reaches the end of its life, please contact your local
dealer.
The batteries have to be dealt with as chemical waste.
- To ensure normal recording and a clear picture, clean the video heads
regularly.
If a square block-shape distorts playback, or only a blue screen is
displayed, the video heads may be dirty.
If this happens, clean the video heads with a dry type cleaning cassette.
- Do not use a wet-type cleaning cassette. It may damage the video heads.
Notes regarding the battery pack
Notes regarding the Video Head Cleaning
Page 9
-
1.
2.
3.
1.
2.
3.
-
-
Record Playback
Notes and Safety Instructions
99
ENGLISH
- Do not film with the camera lens pointing directly at the sun.
Direct sunlight can damage the CCD(Charge Coupled Device).
1. Do not position the camcorder such that the viewfinder is pointing
towards the sun. Direct sunlight can damage the inside of the
viewfinder. Be careful when placing the camcorder under sunlight or
near a window exposed to sunlight.
2. Do not pick up the camcorder using the viewfinder.
3. Excessive force when pulling the viewfinder out may damage it.
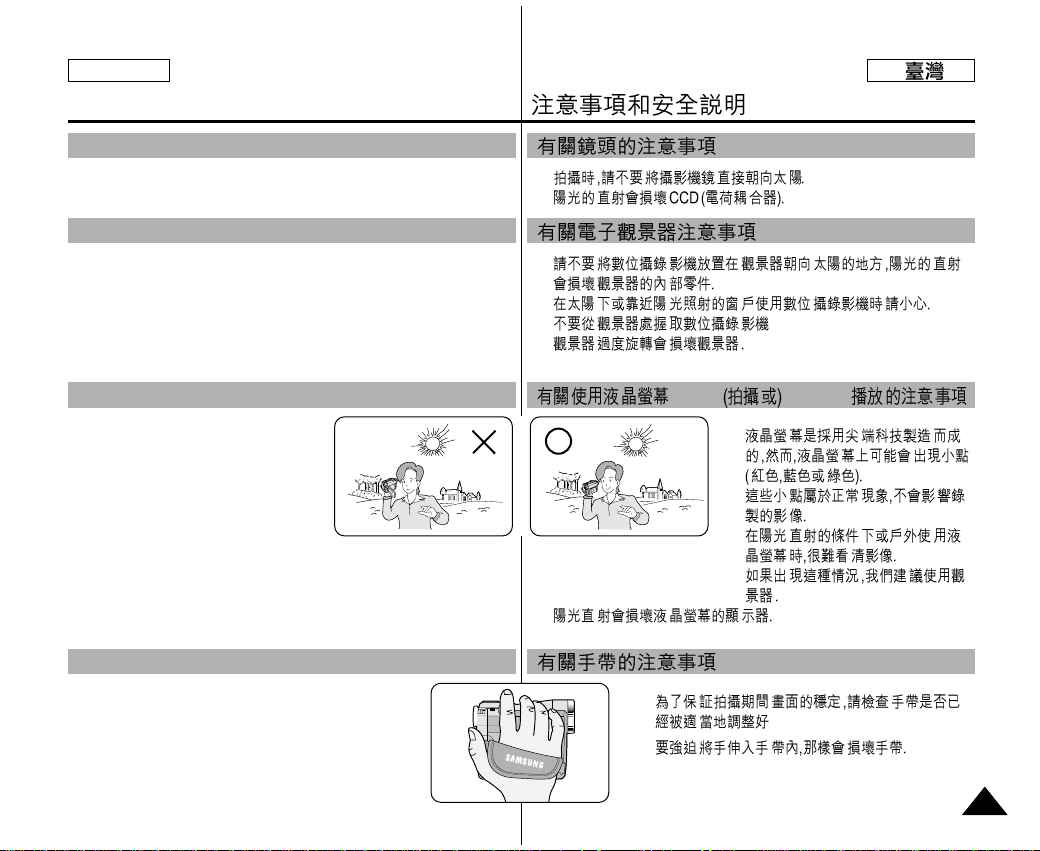
1. The LCD display has been manufactured
using high precision tech-nology.
However, there may be tiny dots (red,
blue or green in color) that appear on the
LCD display.
These dots are normal and do not affect
the recorded picture in any way.
2. When you use the LCD display under direct sunlight or outdoors,
it maybe difficult to see the picture clearly.
If this occurs, we recommend using the viewfinder.
3. Direct sunlight can damage the LCD monitor.
- To ensure a steady picture during filming, check that the
hand strap is properly adjusted.
- Do not force your hand into the hand strap as you could
damage it.
Note regarding the LENS
Notes regarding electronic viewfinder
Notes regarding ‘Record’ or ‘Playback’ using the LCD
Notes regarding the hand strap
Page 10
Notes and Safety Instructions
1010
ENGLISH
Precautions regarding the Lithium battery
1. The lithium battery maintains the clock function and user settings; even
if the battery pack or AC adapter is removed.
2. The lithium battery for the camcorder lasts about 6 months under
normal operation from time of installation.
3. When the lithium battery becomes weak or dead, the date/time indicator
will display “-- -” when you set the DATE/TIME to ON.
In this case, replace the lithium battery with a new one
(type CR2025).
4. There is a danger of explosion if battery is incorrectly replaced.
Replace only with the same or equivalent type.
Warning: Keep the LITHIUM BATTERY out of reach of children.
Should a battery be swallowed, consult a doctor
immediately.
1.
2.
3.
“---”
4.
Page 11
Getting to Know Your Camcorder
1111
ENGLISH
Features
• Digital data transfer function with IEEE1394
By incorporating the IEEE 1394 (i.LINK™ : i.LINK is a serial data transfer
protocol and inter connectivity system, used to transmit DV data) high speed data
transport port, both moving and still images can be transferred to a PC, making it
possible to produce or edit various images.
• USB interface for digital image data transfer
You can transfer still images/movies to a PC using the USB interface without an
add-on card.
• PHOTO
The PHOTO function lets you capture an object as a still along with sound, while in
Camera mode.
• 800x Digital zoom
Allows you to magnify an image up to 800 times its original size.
• Color TFT LCD
A high-resolution color TFT LCD gives you clean, sharp images as well as the
ability to review your recordings immediately.
• Electronic Image Stabilizer (EIS)
The EIS compensates for any handshake, reducing unstable images particularly at
high magnification.
• Various digital effects
The DSE (Digital Special Effects) allows you to give your films a special look by
adding various special effects.
• Back Light Compensation (BLC)
The BLC function compensates for the bright background behind a subject you're
recording.
• Program AE
The Program AE enables you to alter the shutter speed and aperture to suit the type
of scene/action to be filmed.
• Digital Still Camera function
Using Memory Stick, you can easily record and playback standard still images.
• MJPEG Recording
MJPEG recording makes it possible to record video onto a Memory Stick.
• Mega-pixel CCD
Your camcorder incorporates a 1.33mega-pixel CCD. High-resolution still images
can be recorded to a Memory Stick.
• Built-in Flash
You can take natural-looking flash pictures with appropriate illumination using the
built-in Flash.
• Smart Shoe (SCD99 only)
Allows the Samsung VL-S1FL Video Light/Flash or ZM-EC1 Gun Zoom Mic (both
optional) to be easily attached and powered by the camcorder’s own power source.
•
•
• PHOTO
PHOTO
• 800x
• Color TFT LCD
•
EIS
•
DSE Digital Special Effects
• BLC Back Light Compensation
BLC
• Program AE
Program AE
•
• MJPEG
MJPEG
• CCD
•
•
VL-S1FL
Page 12
1.
Getting to Know Your Camcorder
1212
ENGLISH
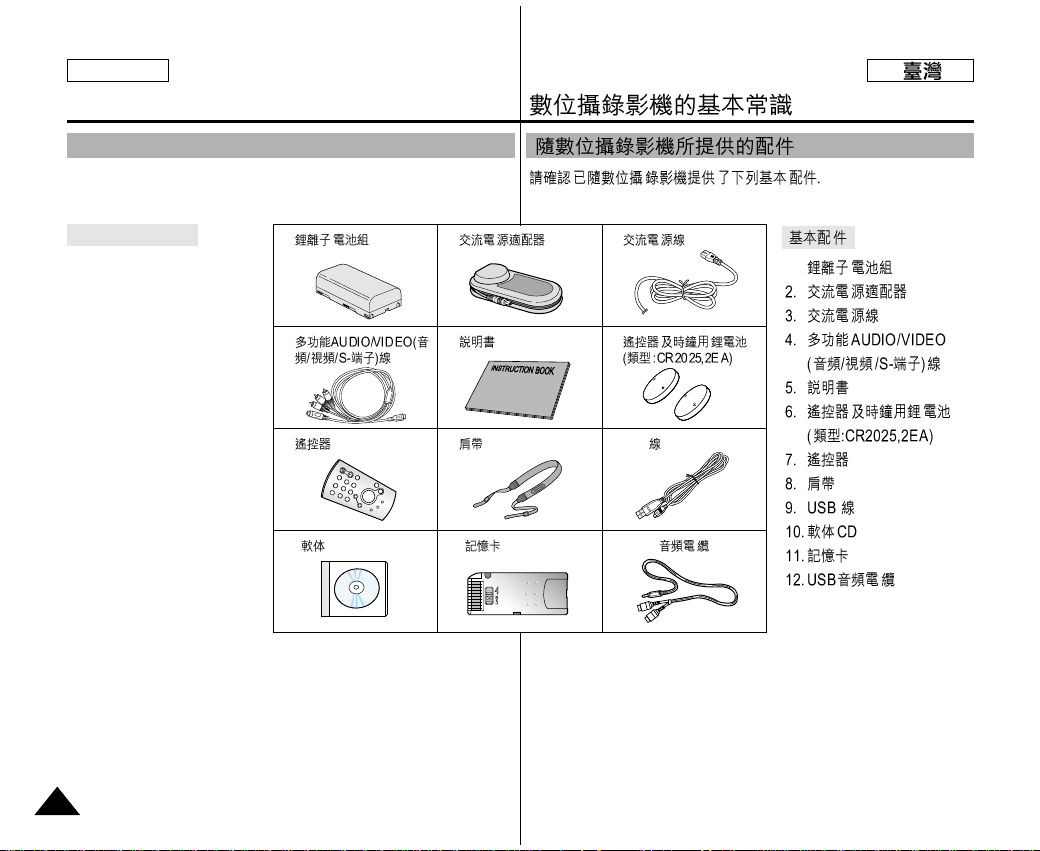
Make sure that the following basic accessories are supplied with your
digital video camera.
Basic Accessories
1. Lithium Ion Battery pack
2. AC Power Adapter
3. AC Cord
4. Multi-AV Cable
(AUDIO/VIDEO/S-VIDEO)
5. Instruction Book
6. Lithium batteries for
Remote Control and Clock.
(TYPE: CR2025, 2 EA)
7. Remote Control
8. Shoulder strap
9. USB cable
10. Software CD
11. Memory Stick
12. USB Audio Cable
Accessories Supplied with camcorder
1.
7.
10.
CD 11.
12. USB
8. 9. USB
4. 5. 6.
2. 3.
Page 13
Getting to Know Your Camcorder
1313
ENGLISH
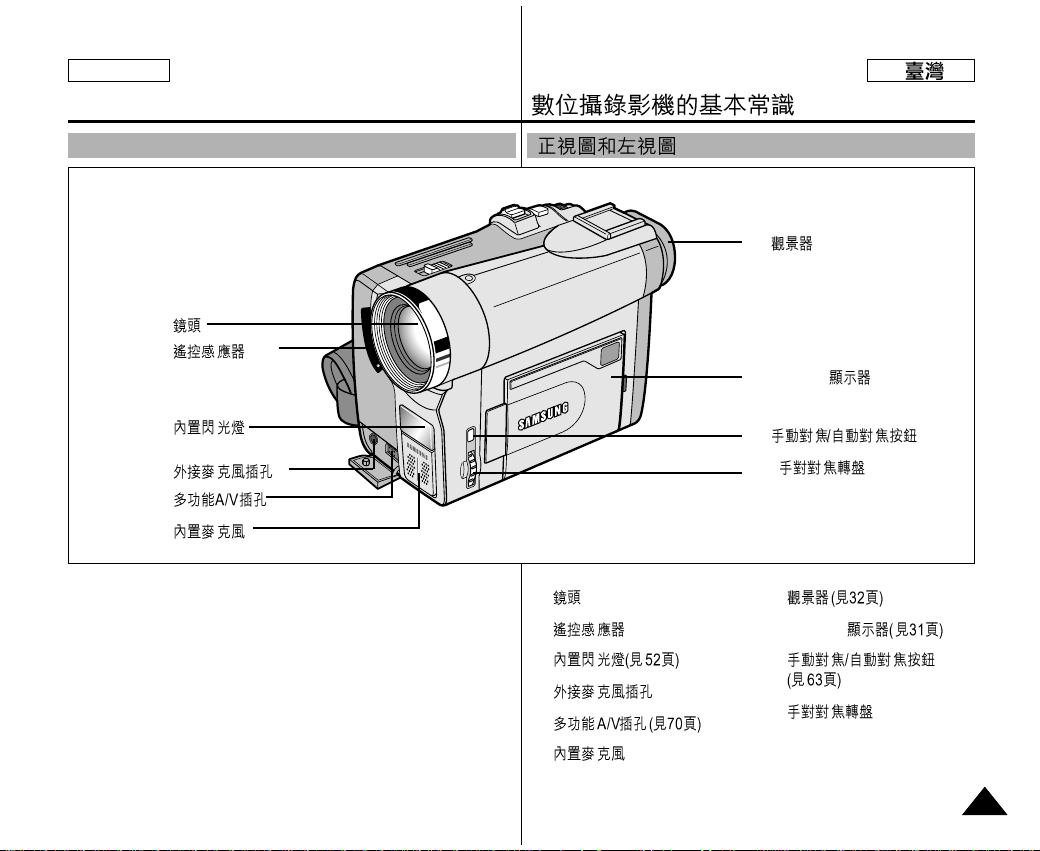
Front & Left View
1. Lens
2. Remote Sensor
3. Built-in Flash (see page 52)
4. External MIC in
5. Multi-AV Jack (see page 70)
6. Internal MIC
7. View Finder (see page 32)
8. TFT LCD Monitor
(see page 31)
9. MF/AF button (see page 63)
10.MF Dial
1.
2.
3.
4.
5.
6.
7.
8. TFT LCD
9.
10.
1.
2.
3.
4.
5.
6.
7.
8. TFT LCD
9.
10.
Page 14

Getting to Know Your Camcorder
1414
ENGLISH
Left Side View
2. EASY.Q button (CAM) /
MULTI DISP. (M.PLAY)
3. MEMORY MIX button
(see page 50)
4. DISPLAY button
(see page 19)
5. Speaker
6. Mode Switch (MEMORY
STICK/TAPE)
7. SLOW SHUTTER (CAM)
(see page 61) / S.SHOW
(M.PLAY) (see page 95)
1. Function buttons
PLAYER CAMERA M.PLAY
: (PLAY/STILL) FADE (see page 65) : (MJPEG PLAY/STILL)
: (STOP) BLC (see page 64) : (REW) REC SEARCH – REV (see page 94)
: (FF) REC SEARCH + FWD (see page 94)
2. EASY.Q( )
3.
4.
5.
6.
7.
1.
:
(PLAY/STILL) FADE (
)
MJPEG /
( ) )
:
(STOP) BLC (
)
( )
:
(REW) REC SEARCH
( )
(
)( )
:
FF REC SEARCH + ( )
(
( +)
2. EASY.Q(
3.
4.
1.
5.
7.
6.
Page 15
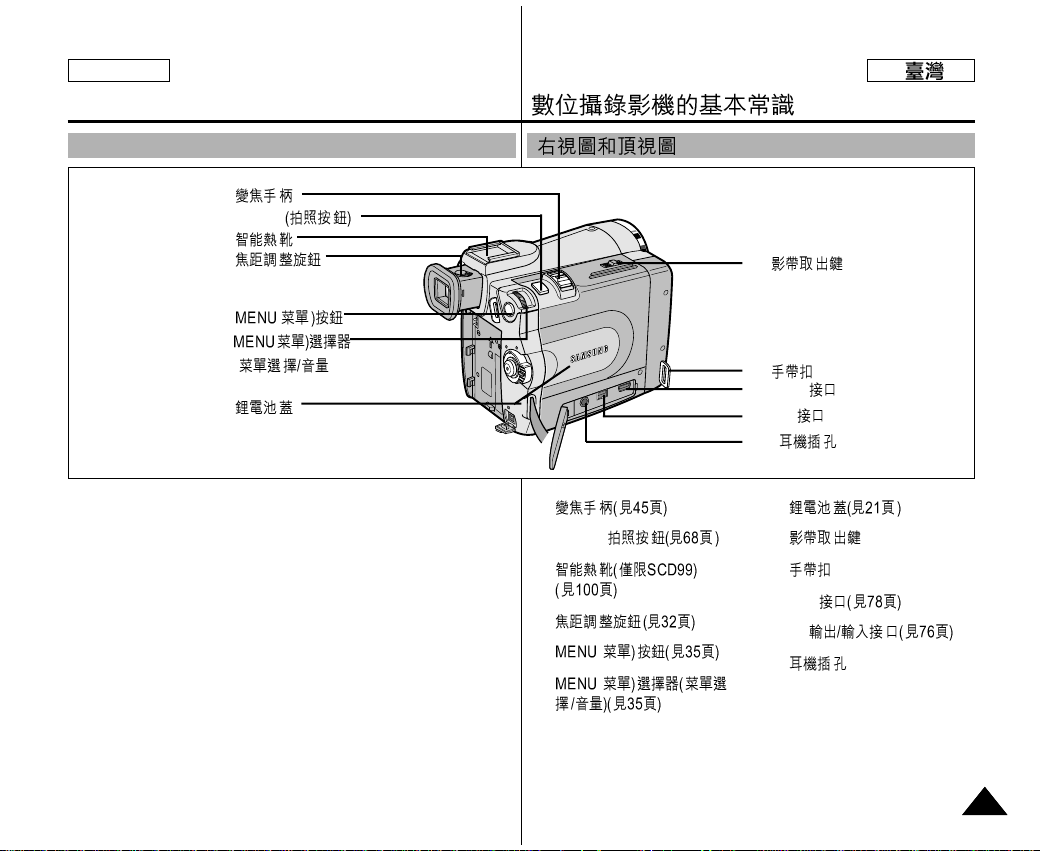
ENGLISH
1.
2. PHOTO
3.
4.
5. (
6.
( )
7.
Getting to Know Your Camcorder
1515
1. Zoom lever (see page 45)
2. PHOTO button
(see page 68)
3. Smart Shoe (see page 100)
(SCD99 only)
4. FOCUS Adjustment knob
(see page 32)
5. MENU button (see page 35)
6. MENU Selector
(MENU SELECT/VOLUME)
(see page 35)
7. Lithium Battery Cover
(see page 21)
8. TAPE EJECT
9. Hook for hand strap
10. USB Jack (see page 78)
11. DV in/out Jack
(see page 76)
12. EARPHONE Jack
1.
2. PHOTO
3.
4.
5. ( )
6.
(
7.
8.
9.
10. USB
11. DV
12.
Right & Top View
8.
9.
10. USB
11. DV
12.
Page 16

Getting to Know Your Camcorder
1616
ENGLISH
Rear & Bottom View
1. MENU button
2. Hook for shoulder strap
3. CAM indicator
4. PLAYER indicator
5. START/STOP button
6. Power Switch
(see page 28)
7. Charging indicator
8. DC Jack (see page 23)
9. Memory Stick Slot
(see page 82)
10.Tripod receptacle
11.Battery Release
1. MENU
3. CAM
4. PLAYER
5. START/STOP
6.
7.
8. DC((
10.
11.
2.
9.
1. MENU
2.
3. CAM
4. PLAYER
5. START/STOP
6.
7.
8. DC(
9.
10.
11.
Page 17
Getting to Know Your Camcorder
1717
ENGLISH
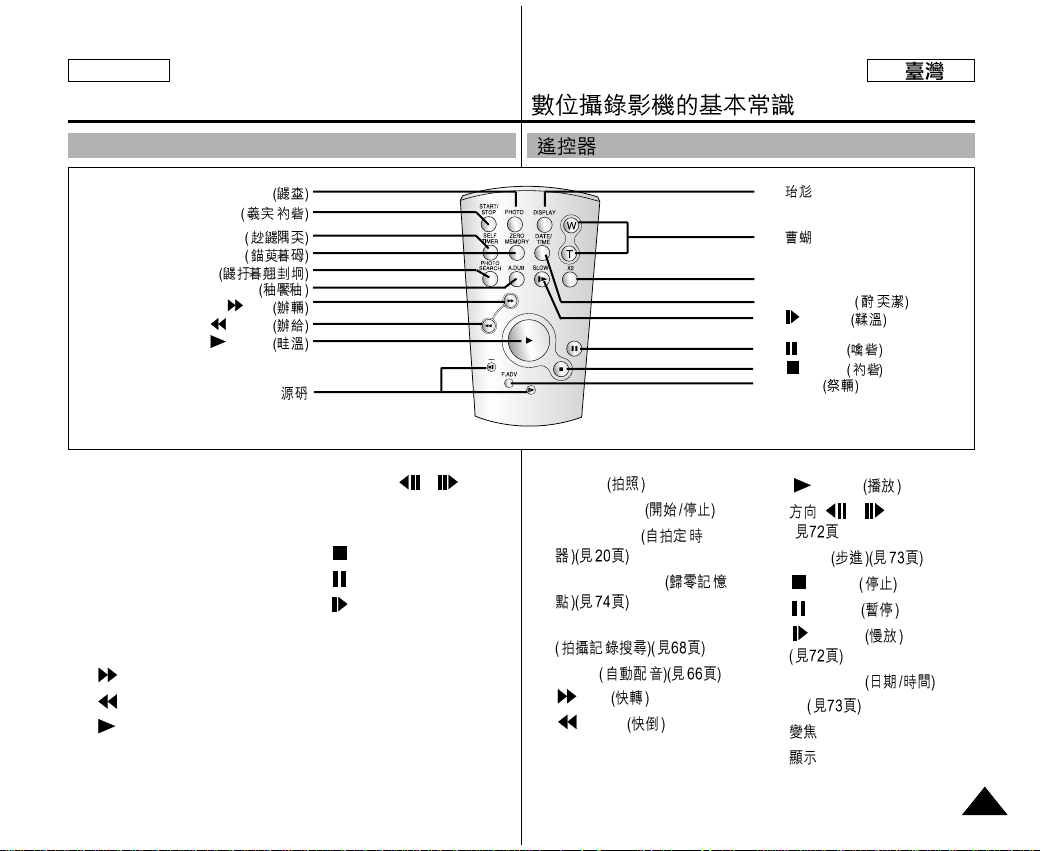
1. PHOTO
2. START/STOP
3. SELF TIMER (see page 20)
4. ZERO MEMORY
(see page 74)
5. PHOTO Search
(see page 68)
6. A.DUB (see page 66)
7. (FF)
8. (REW)
9. (PLAY)
10. Direction ( , )
(see page 72)
11. F. ADV (see page 73)
12. (STOP)
13. (STILL)
14. (SLOW) (see page 72)
15. DATE/TIME
16. X2 (see page 73)
17. Zoom
18. Display
Remote control
1. PHOTO
2. START/STOP /
3. SELF TIMER
4. ZERO MEMORY
5. PHOTO SEARCH
6. A.DUB
7. (FF)
8. (REW)
9. (PLAY)
10.
18.
17.
16. X2
15. DATA/TIME
/
14. (SLOW)
13. (STILL)
12. (STOP)
11. F.ADV
1. PHOTO
2. START/STOP
3. SELF TIMER
4. ZERO MEMORY
5. PHOTO SEARCH
6. A.DUB
7. (FF)
8. (REW)
9. (PLAY)
10. ( , )
( )
11. F.ADV
12. (STOP)
13. (STILL)
14. (SLOW)
15. DATA/TIME
16. X2
17.
18.
Page 18
OSD
1
2. Easy
3. DSE Digital Special Effects
4. Program AE
5. White Balance
6. BLC Back Light Compensation
7.
8.
9.
10.
11.
12. USB
13.
14. WIND CUT(
15.
16.
17. Remaining Tape
18. Tape Counter
19.
20.
21. PHOTO
22.
23. EIS
24.
25.
26. DV IN
27. DEW(
28. Message Line
29.
30.
Getting to Know Your Camcorder
1818
ENGLISH
OSD (On Screen Display in CAM and PLAYER modes)
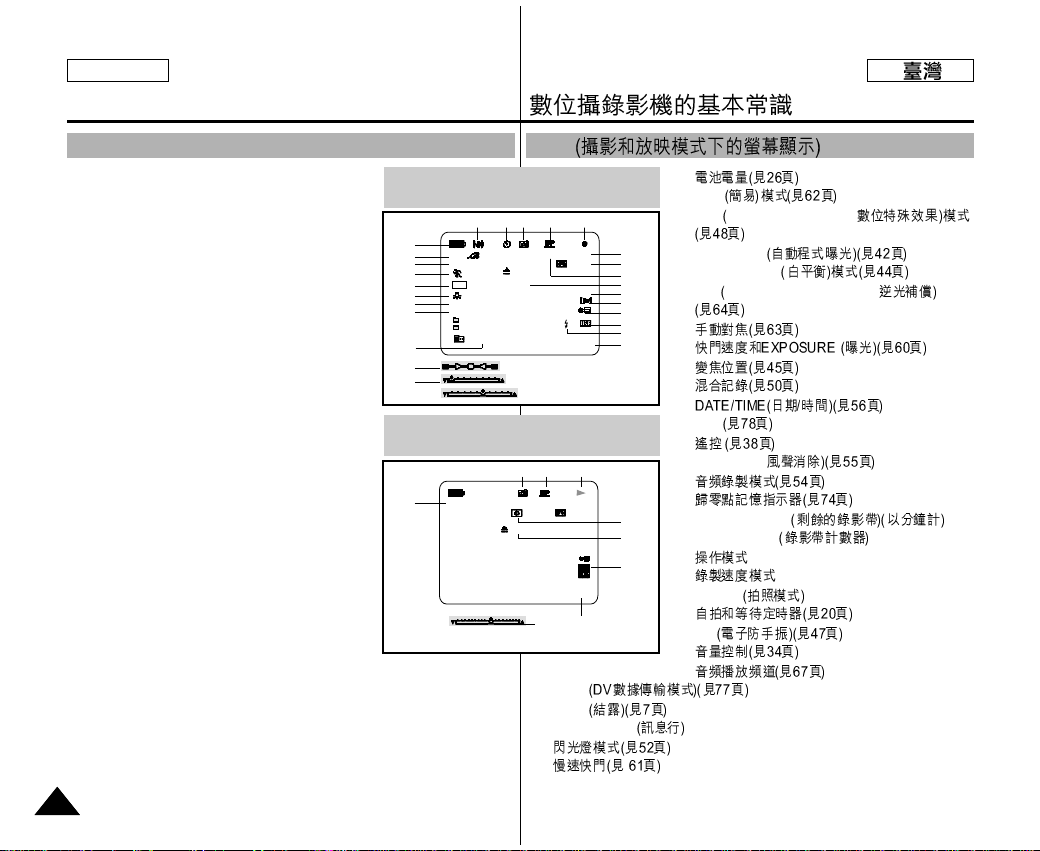
1. Battery level (see page 26)
2. Easy mode (see pages 62)
3. DSE (Digital Special Effects) mode
(see page 48)
4. Program AE (see page 42)
5. White Balance mode (see page 44)
6. BLC (Back Light Compensation)
(see page 64)
7. Manual focus (see page 63)
8. Shutter speed and EXPOSURE (see page 60)
9. Zoom position (see page 45)
10. Memory Mix (see page 50)
11. DATE/TIME (see page 56)
12. USB (see page 78)
13. WL. REMOTE (see page 38)
14. WIND CUT (see page 55)
15. Audio recording mode (see page 54)
16. Zero memory indicator (see page 74)
17. Remaining Tape (measured in minutes)
18. Tape Counter
19. Operating mode
20. Record speed mode
21. PHOTO mode
22. Self recording and waiting timer
(see page 20)
23. EIS (see page 47)
24. Volume control (see page 34)
25. Audio playback channel (see page 67)
26. DV IN(DV data transfer mode) (see page 77)
27. DEW (see page 7)
28. Message Line
29. FLASH mode (see page 52)
30. SLOW SHUTTER (see page 61)
OSD in CAM mode
1
2
3
4
6
5
10
7
30
9
8
23 22 21 20 19
18
17
16
15
14
13
12
29
11
28
OSD in PLAYER mode
25
28
27
21
20 19
26
24
11
EASY
MIRROR
BLC
M.OVERLAP
MF
SHUTTER
EXPOSURE
SLOW - 1/25
SOUND [ 2 ]
VOL. [ 1 1 ]
REC
M - 0 : 0 0 : 0 0
5 5 min
TAPE !
ZOOM
EXPOSURE
. . . C
1 6 bit
10 : 00 PM
J A N . 10 , 2 0 0 3
SHUTTER
M - 0 : 0 0 : 0 0
5 5 min
1 6 bit
DV
10 : 00 PM
J A N . 10 , 2 0 0 3
Page 19

A.
B.
-
C.
D.
E.
F.
G.
H.
I. MJPEG
J.
K.
L.
●
-
-
●
-
-
-
OSD
Getting to Know Your Camcorder
1919
ENGLISH
A. Folder number-file number (see page 83)
B. Image counter
- Current still image/Total number of recordable still
images.
C. CARD (MEMORY STICK) indicator
D. Image recording and loading indicator
E. Photo Quality (see page 84)
F. ERASE PROTECTION indicator (see page 97)
G. Print Mark (see page 96)
H. SLIDE SHOW (see page 95)
I. MJPEG SCREEN SIZE (see page 86)
J. Image Size (see page 85)
K. Continuous Shot (see page 87)
L. Remaining Memory (MJPEG)
Turning the OSD on/off (On Screen Display)
●
Turning OSD on/off
Press the DISPLAY button on the left side panel.
- Each press of the button toggles the OSD function on
and off.
- When you turn the OSD off,
In CAM mode: The STBY, REC, EASY.Q modes
are always displayed on the OSD,
even when the OSD is turned OFF. A key input will
be displayed for 3 seconds then turn off.
In PLAYER mode: When you press any Function
button, the function is displayed on the OSD for
3 seconds before it turns off.
●
Turning the DATE/TIME on/off
- The DATE/TIME is not affected when the OSD function is switched ON
or OFF.
- To turn the DATE/TIME on or off, access the menu and change the
DATE/TIME mode. (see page 56)
- You may also use the Quick Menu to turn the DATE/TIME ON or OFF.
(see page 58) (only in CAM/M.REC mode)
OSD (On Screen Display in M.REC/M.PLAY modes)
OSD in M.REC mode
OSD in M.PLAY mode
E
B
L
I
DC
FH
A
J
K
J
G
MF
SLIDE
1 0 0 - 0 0 0 1
0 0 1
MEMORY STICK !
SF
3 2 0 0 2 min
J A N . 10 , 2 0 0 3
J A N . 10 , 2 0 0 3
[2 2 / 2 0 0 ]
1280
1 2 : 0 0 A M
[2 2 / 2 4 0]
1280 X 960
1 2 : 0 0 A M
HS
Page 20
✤
-
-
✤
✤
1.
2.
3.
-
-
-
4.
Preparation
2020
ENGLISH
Battery Installation for the Remote Control
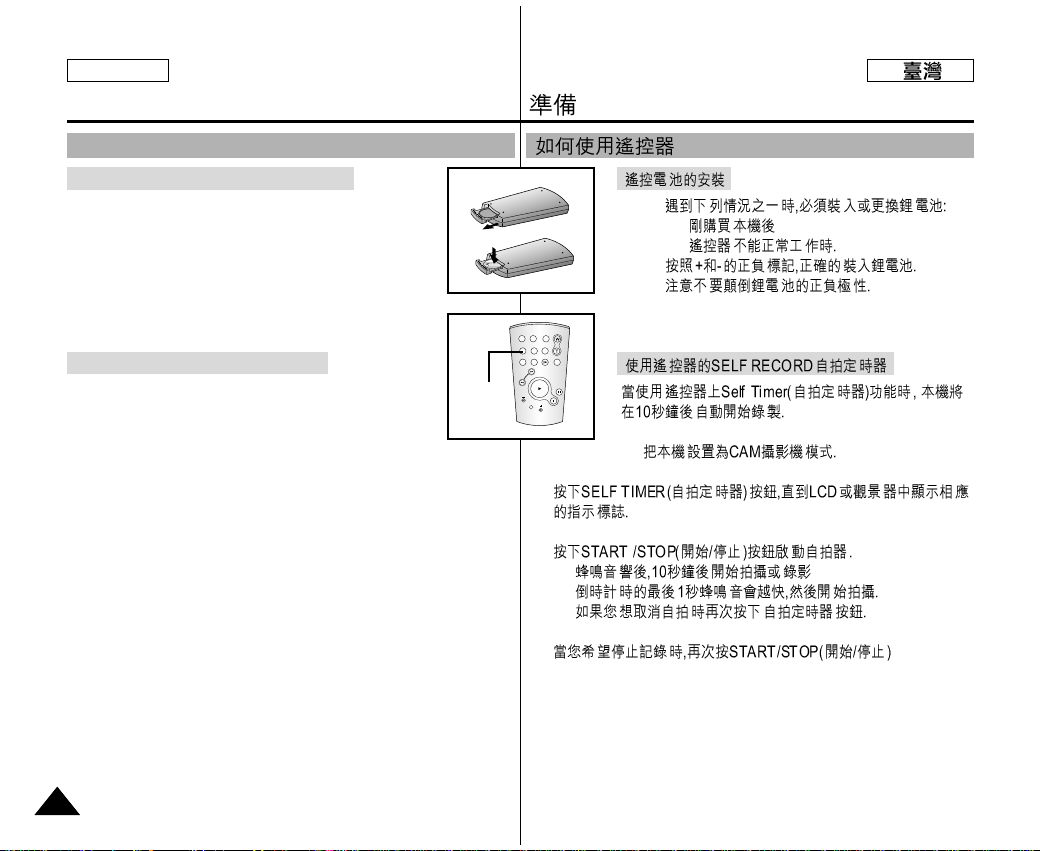
✤ You need to insert or replace the lithium battery when :
- You purchase the camcorder.
- The remote control doesn’t work.
✤ Ensure that you insert the lithium cell correctly,
following the + and - markings.
✤ Be careful not to reverse the polarity of the battery.
Self Record using the Remote Control
When you use the Self Timer function on the remote control,
the recording begins automatically in 10 seconds.
1. Set the camcorder to CAM mode.
2. Press the SELF TIMER button until the appropriate indicator is
displayed in the viewfinder.
3. Press the START/STOP button to start the timer.
- Self Timer starts counting down from 10 with a beep sound.
- In the last one second of the countdown, the beep sound gets faster,
then recording starts automatically.
- If you want to cancel the Self Timer function before recording,
press the SELF TIMER button.
4. Press START/STOP again when you wish to stop recording.
How to use the Remote Control
Self
Timer
START/
PHOTO DISPLAY
STOP
SELF
ZERO
DATE/
TIMER
MEMORY
TIME
PHOTO
SLOW
X2
A.DUB
SEARCH
F.ADV
Page 21
Preparation
2121
ENGLISH
✤ The lithium battery maintains the clock function and preset contents of
the memory; even if the battery pack or AC power adapter is removed.
✤ The lithium battery for the camcorder lasts about 6 months under
normal operation from the time of installation.
✤ When the lithium battery becomes weak or dead, the date/time indicator
will display “-- -” when you set the DATE/TIME to ON.
When this occurs, replace the lithium battery with CR2025 type.
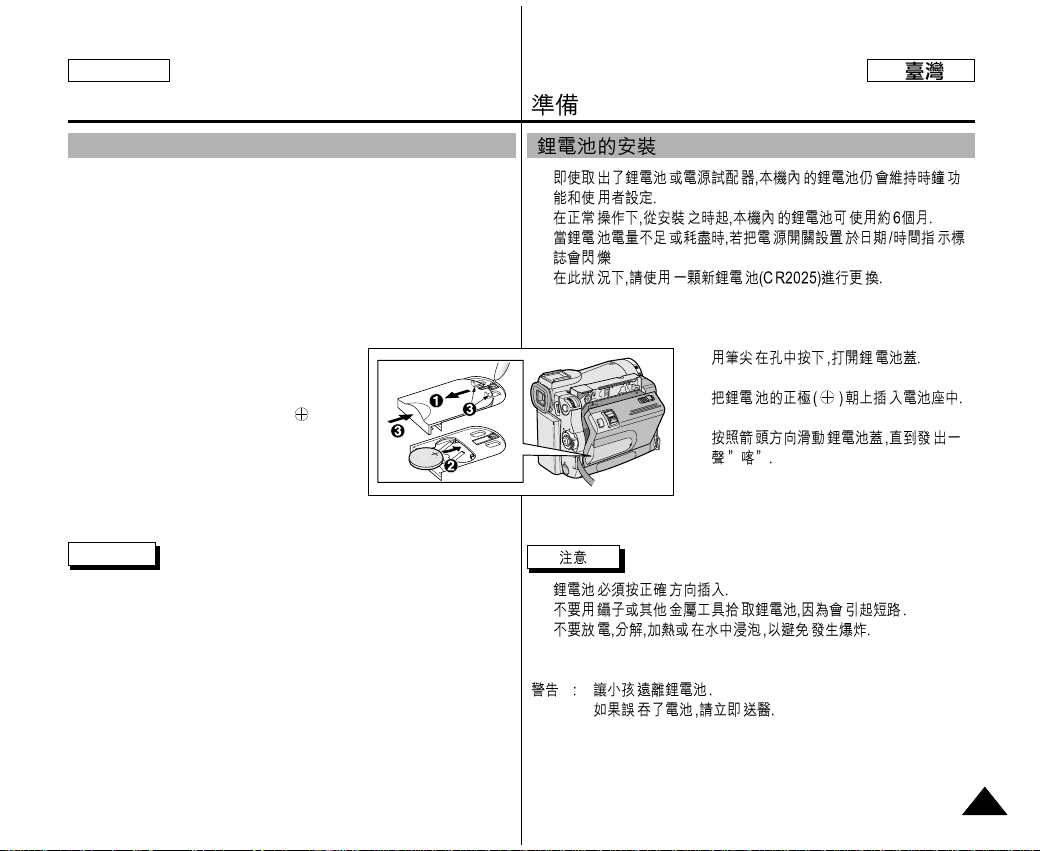
1. While pressing the hole with a pen, open the
lithium battery cover from the camcorder.
2. Insert the lithium battery with the side
facing upwards.
3. Slide the lithium battery cover in the direction
of the arrow until it clicks.
Notes
■
The lithium battery must be inserted in the correct direction.
■
Do not pick up the battery using tweezers or other metal tools - this will
cause a short circuit.
■
Do not recharge, disassemble, heat or immerse the battery in water, to
avoid the risk of explosion.
Warning: Keep the LITHIUM BATTERY out of the reach of the
children.
Should any battery be swallowed, consult a doctor
immediately.
Lithium Battery Installation
✤
✤
✤
“---”.
1.
2.
3.
■
■
■
Page 22

-
-
a.
b.
c.
1.
2.
Preparation
2222
ENGLISH
Adjusting the Hand Strap
It is very important to ensure that the Hand strap has been correctly
adjusted before you begin your recording.
The hand strap enables you to :
- Hold the camcorder in a stable, comfortable position.
- Press the Zoom and START/STOP button without having to change the
position of your hand.
Hand strap
a. Pull open the Hand Strap cover and release
the Hand Strap.
b. Adjust its length and stick it back onto the
Hand Strap cover.
c. Close the Hand Strap cover again.
Shoulder Strap
The Shoulder Strap enables you to carry
your camcorder around in complete safety.
1. Insert the end of strap into the Shoulder
Strap hook on the camcorder.
Insert the other end of strap into ring inside
hand strap.
2. Thread each end into the buckle, adjust the
length of the strap and then pull it tight in
the buckle.
12
Page 23
-
-
1.
2.
■
3.
4.
✤
✤
Preparation
2323
ENGLISH
Connecting a Power Source
There are two types of power source that can be connected to your
camcorder.
- The AC Power Adapter and AC cord : used for indoor recording.
- The Battery Pack : used for outdoor recording.
To use the AC Power adapter and DC Cable
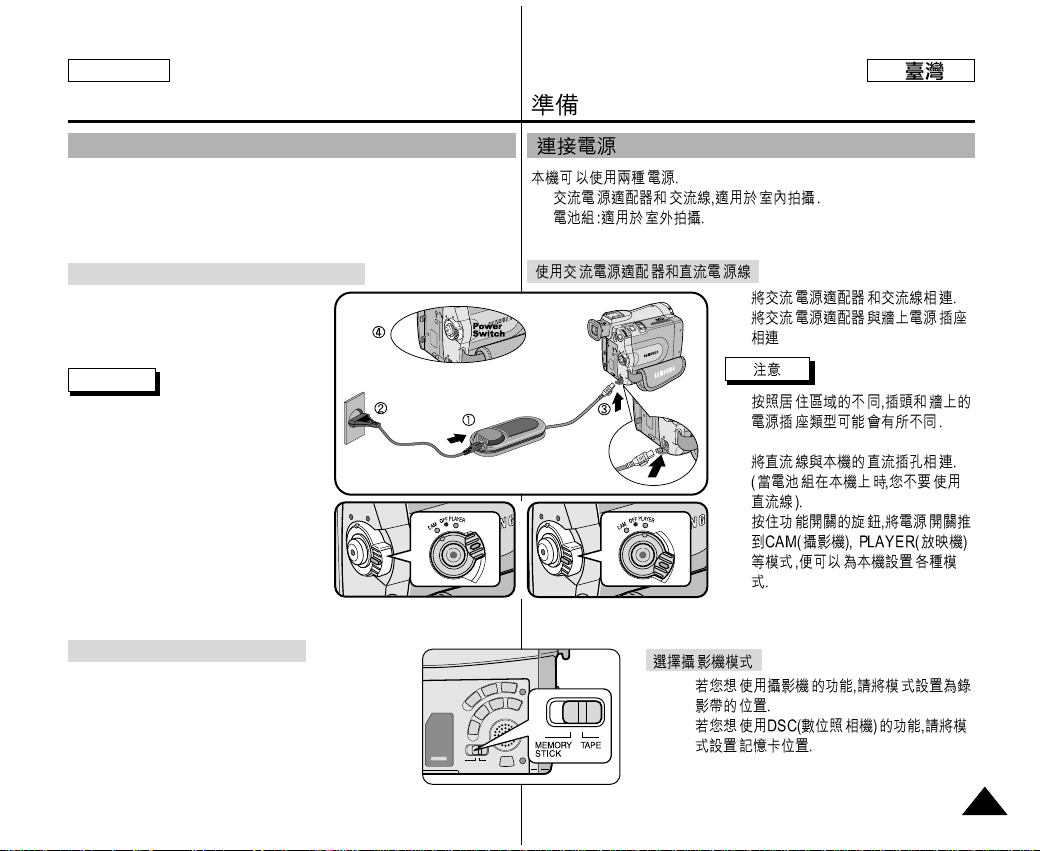
1. Connect the AC Power adapter to
the AC cord.
2. Connect the AC cord to a wall socket.
Note
■
The plug and wall socket type may differ
according to your resident country.
3. Connect the DC cable to the DC jack
socket of the camcorder. (When the
battery is attached on the set, you should
keep outside the projection of the DC
cable.)
4. Set the camcorder to each mode by
holding down the tab on the power
switch and turning it to the CAM or
PLAYER mode.
To select the CAMCORDER mode
✤ If you want to use this unit as a camcorder,
set the mode switch to TAPE position.
✤ If you want to use this unit as a DSC (Digital Still
Camera), set the mode switch to MEMORY STICK
position.
Page 24
✤
- .
-
1.
2.
3.
4.
5.
■
■
■
1 1 50%
1
2 50% ~ 75%
1
3 75% ~ 90%
90 ~ 100%
Preparation
2424
ENGLISH
Using the Lithium Ion Battery Pack
✤ The amount of continuous recording time available depends on :
- The type and capacity of the battery pack you are using.
- How often the Zoom function is used.
It is recommended that you have several batteries available.
Charging the Lithium Ion Battery Pack
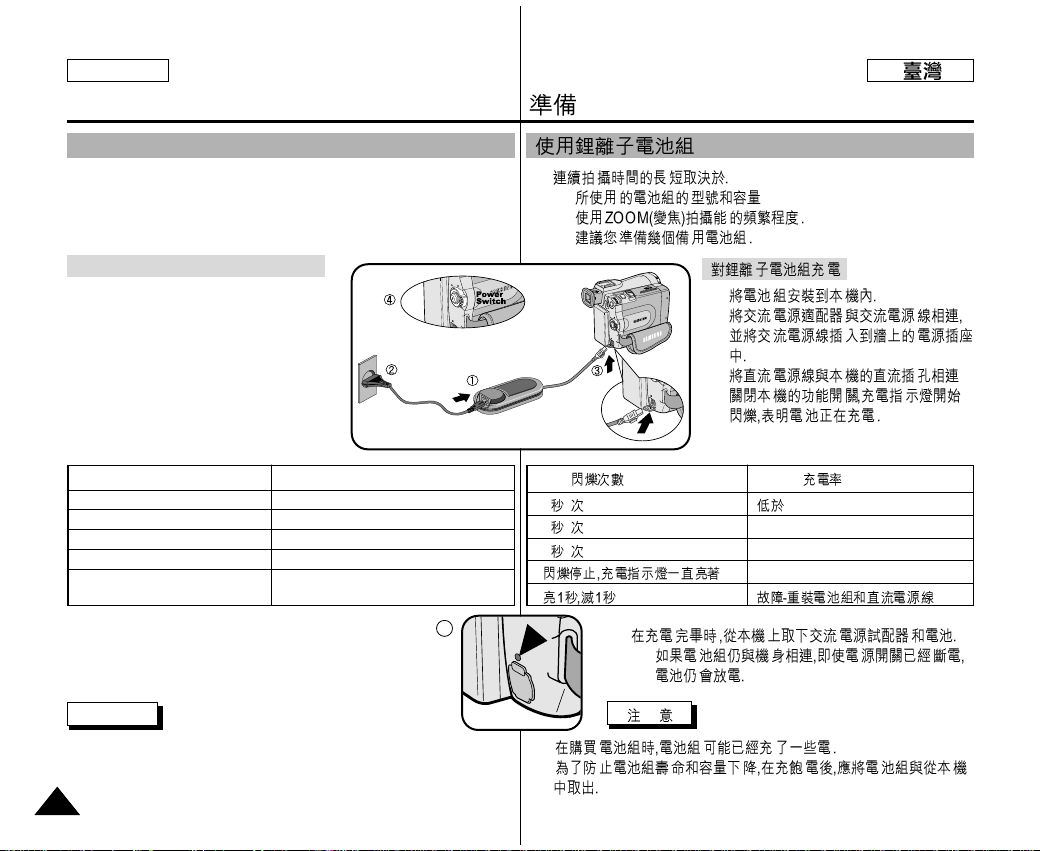
1. Attach the battery pack to the camcorder.
2. Connect the AC Power adapter to an AC
cord and connect the AC cord to a wall
socket.
3. Connect the DC cable to the DC jack
socket on the camcorder.
4. Turn the Camera power switch to off, and
the charging indicator will start to flash,
showing that the battery is charging.
5. When the battery is fully charged, disconnect the battery
pack and the AC Power adapter from the camcorder.
■
Even with the power switched off, the battery pack will
still discharge if it is left connected to the camcorder.
Notes
■
The battery pack may have some charge in it at the time of purchase.
■
To prevent reduction in the life and capacity of the battery pack, always
remove it from the camcorder after it is fully charged.
Blinking time Charging rate
Once per second Less than 50%
Twice per second 50% ~ 75%
Three times per second 75% ~ 90%
Blinking stops and stays on 90% ~ 100%
On for a second and Error - Reset the battery pack and
off for a second the DC cable
5
Page 25
Preparation
2525
ENGLISH
Using the Lithium Ion Battery Pack
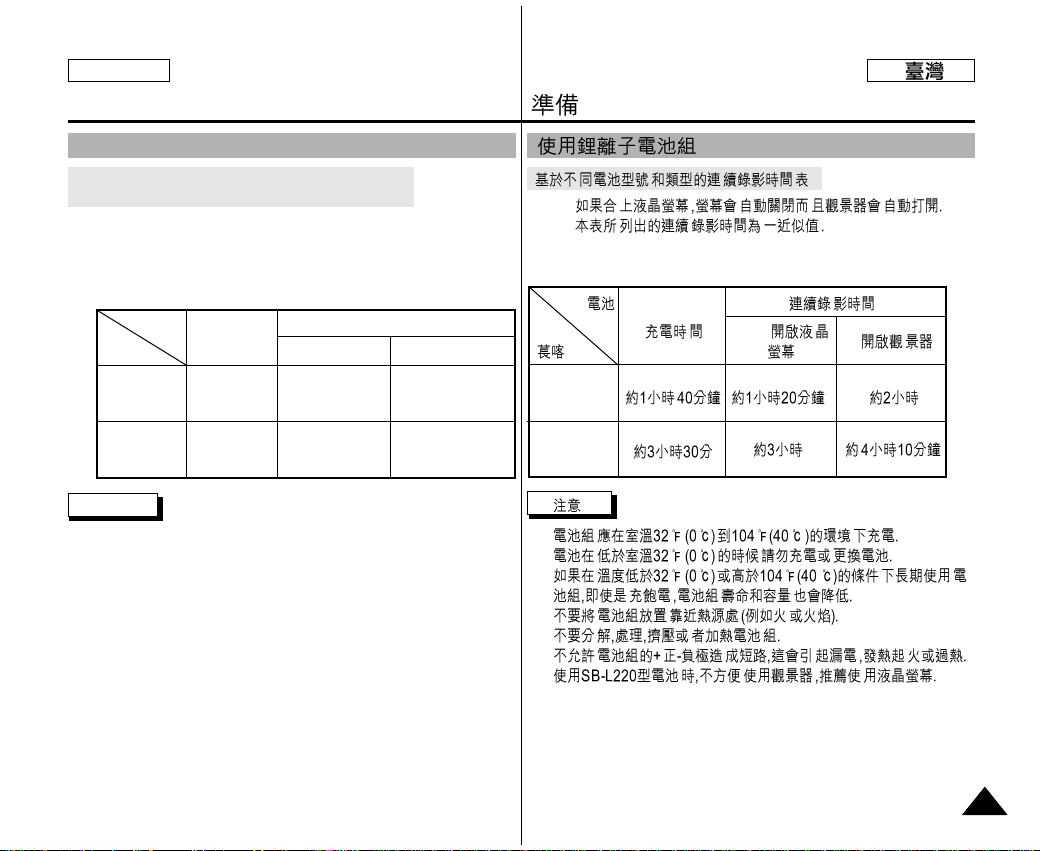
Table of continuous recording time based on model
and battery type.
✤ If you close the LCD screen, it switches off and the viewfinder
switches on automatically.
✤ The continuous recording times given in the table above are
approximations.
Actual recording time depends on usage.
Notes
■
The battery pack should be recharged in an environment of between
32°F (0°C) and 104°F (40°C).
■
The battery pack should never be charged in a room temperature that is
below 32°F (0°C).
■
The life and capacity of the battery pack will be reduced if it is used in
temperatures below 32°F (0°C) or left in temperatures above 104°F
(40°C) for a long period, even when it is fully recharged.
■
Do not put the battery pack near any heat source (fire or flames, for
example).
■
Do not disassemble, process, pressure, or heat the Battery Pack.
■
Do not allow the + and - terminals of the battery pack to be shortcircuited. It may cause leakage, heat generation, induce fire and
overheating.
■
When using SB-L220 Battery, use of Viewfinder is inconvenient.
The use of LCD Monitor is preferable.
Battery
SB-L110
SB-L220
Charging
time
Approx.
1hr 40min
Approx.
3hr 30min
LCD ON Viewfinder ON
Continuous recording time
Time
Approx.
1hr 20min
Approx.
3hr
Approx.
2hr
Approx.
4hr 10min
✤
✤
■
■
■
■
■
■
■
SB-L110
SB-L220
LCD(
Page 26
•
a.
b. 20~40%
c.
40~80%
d.
80~95%
e.
✤
✤
Preparation
2626
ENGLISH
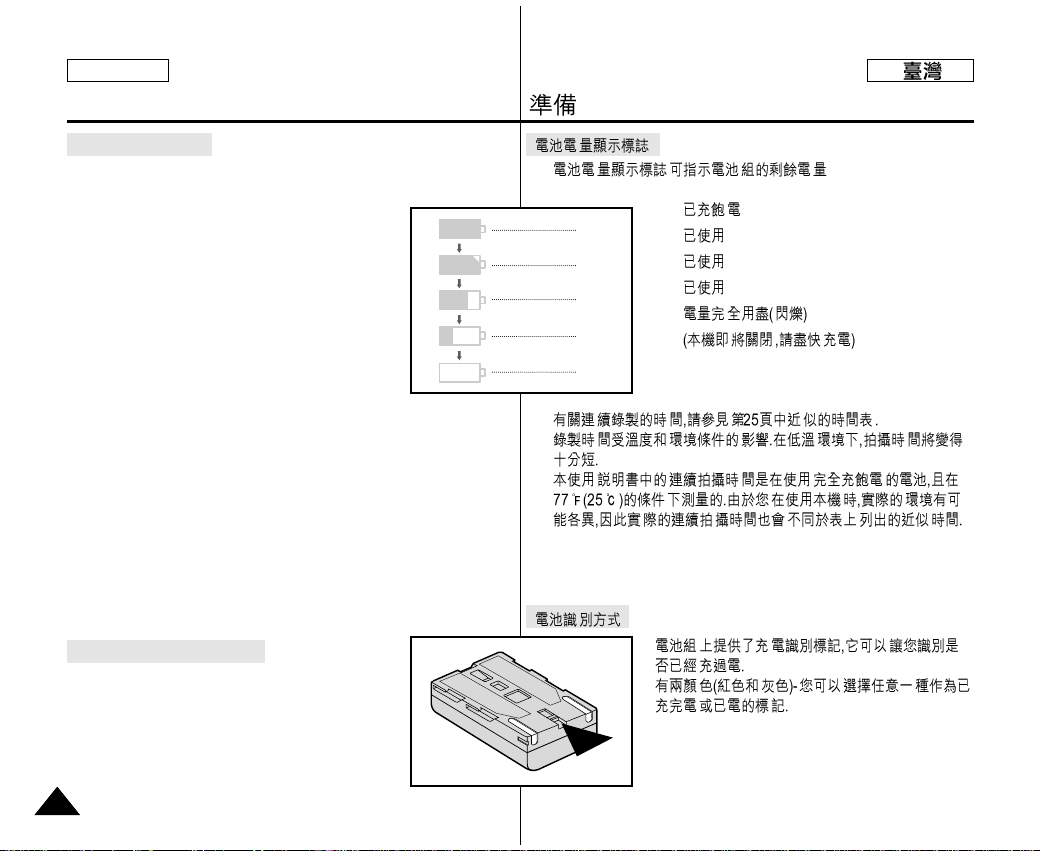
Battery level display
•
The battery level display indicates the amount of power
remaining in the battery pack.
a. Fully charged
b. 20~40% used
c. 40~80% used
d. 80~95% used
e. Completely used (flickers)
(The camcorder will turn off soon, change the
battery as soon as possible)
✤ Please refer to the table on page 25 for approximate continuous
recording times.
✤ The recording time is affected by environmental temperature and
conditions.
The recording time becomes very short in a cold environment.
The continuous recording times in the operating instructions are
measured using a fully charged battery pack at 77°F(25°C).
As the environmental temperature and conditions may differ when you
actually use the camcorder, the remaining battery time may not be the
same as the approximate continuous recording times given in these
instructions.
Tips for Battery Identification
A charge mark is provided on the battery pack to
help you remember whether it has been charged or not.
Two colors are provided (red and grey)-you may
choose which one indicates charged and which indicates
discharged.
a
b
c
d
e
Page 27
✤
✤
1.
-
2.
3.
-
4.
-
a.
b.
•
a.
b.
c.
d.
Preparation
2727
ENGLISH
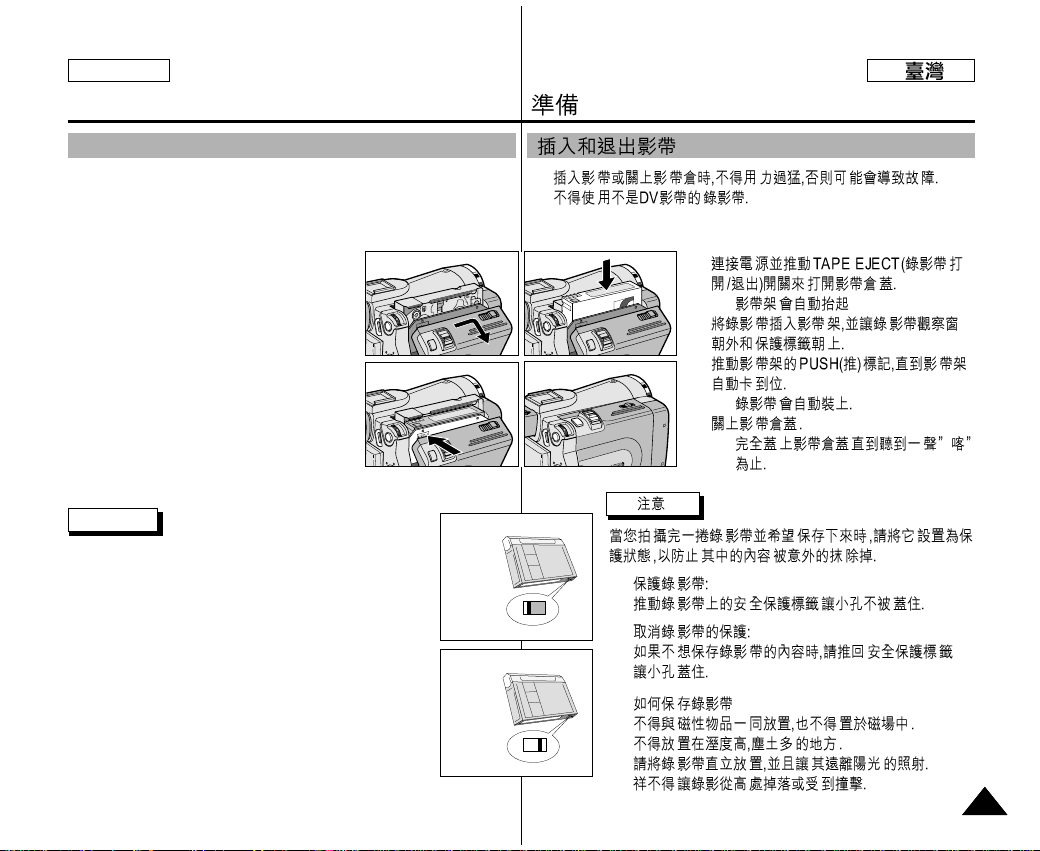
Inserting and Ejecting a Cassette
✤ When inserting a tape or closing a cassette holder, do not apply
excessive force.
This may cause a malfunction.
✤ Do not use any tapes other than Mini DV cassettes.
1. Connect a power source and slide the TAPE
EJECT switch and open the cassette door.
- The cassette holding mechanism rises
automatically.
2. Insert a tape into the cassette holder with the
tape window facing outward and
the protection tab toward the top.
3. Press the area labelled PUSH on the cassette
holding mechanism until it clicks into place.
- The cassette is loaded automatically.
4. Close the cassette door.
- Close the door completely until you can
hear a “click”.
Note
When you have recorded something that you wish to keep,
you can protect it so that it will not be accidentally erased.
a. Protecting a tape :
Push the safety tab on the cassette so that the hole is
uncovered.
b. Removing the tape protection :
If you no longer wish to keep the recording on the cassette,
push the write-protect tab back so that it covers the hole.
•
How to store a tape
a. Avoid places with magnets or magnetic interference.
b. Avoid humidity and dust prone places.
c. Keep the tape in an upright position and avoid storing it in
direct sunlight.
d. Avoid dropping or knocking your tapes.
a. SAVE
b. REC
1
3
2
4
push
Page 28
1.
■
2.
3.
■
■
■
■
■
4.
■
■
Basic Recording
2828
ENGLISH
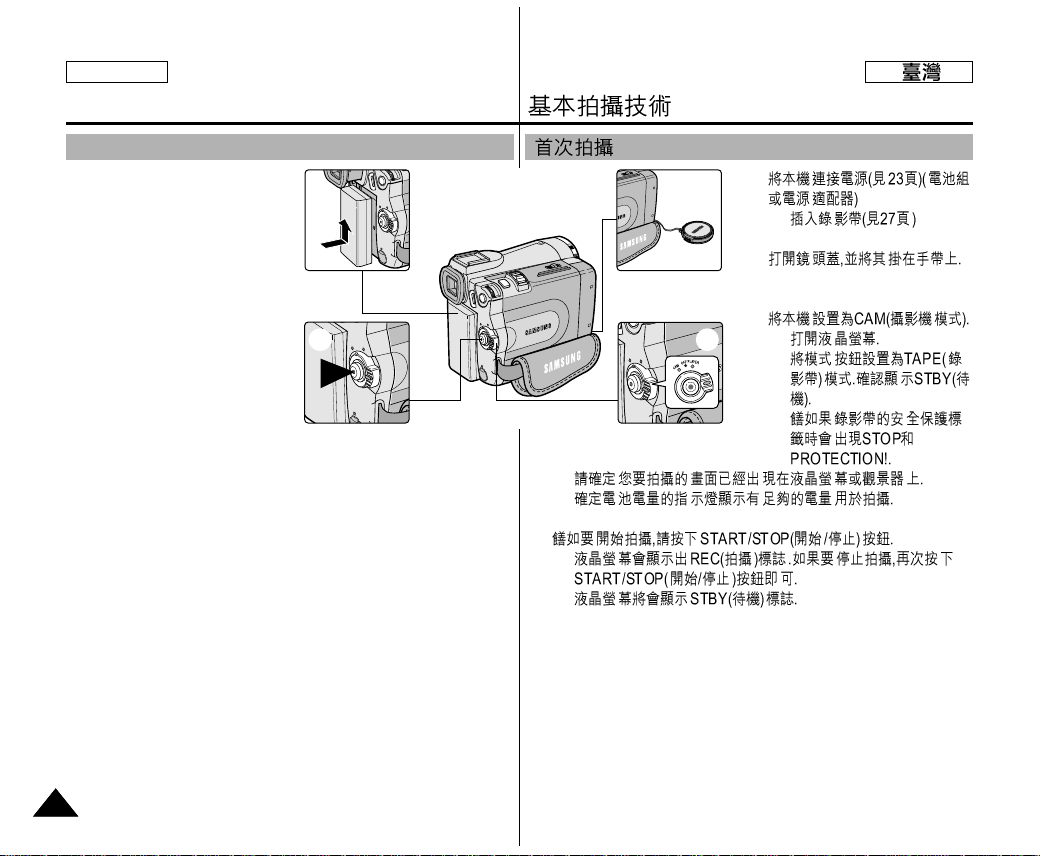
Making your First Recording
1. Connect a Power source to the
camcorder. (see page 23)
(A battery pack or a AC power
adapter)
■
Insert a cassette.
(see page 27)
2. Remove the LENS CAP.
3. Set the power switch to the
CAM position.
■
Open the LCD monitor.
■
Set the mode switch to the
TAPE position.
Make sure that STBY is displayed.
■
If the protection tab of the cassette is open, STOP and
PROTECTION! will be displayed.
■
Make sure the image you want to record appears in the LCD
monitor or viewfinder.
■
Make sure the battery level indicates that there is enough remaining
power for your expected recording time.
4. To start recording, press the START/STOP button.
■
REC is displayed in the LCD.
To stop recording, press the START/STOP button again.
■
STBY is displayed in the LCD.
4
3
2
1
Page 29
REC SEARCH
✤
--
--
✤
--
Basic Recording
2929
ENGLISH
When a cassette is loaded and the camcorder is left in the STBY mode for
more than 5 minutes without being used,
it will switch off automatically.
To use it again, push the START/STOP button or set the Power
switch to OFF and then back to CAM.
This Auto Power off feature is designed to save battery power.
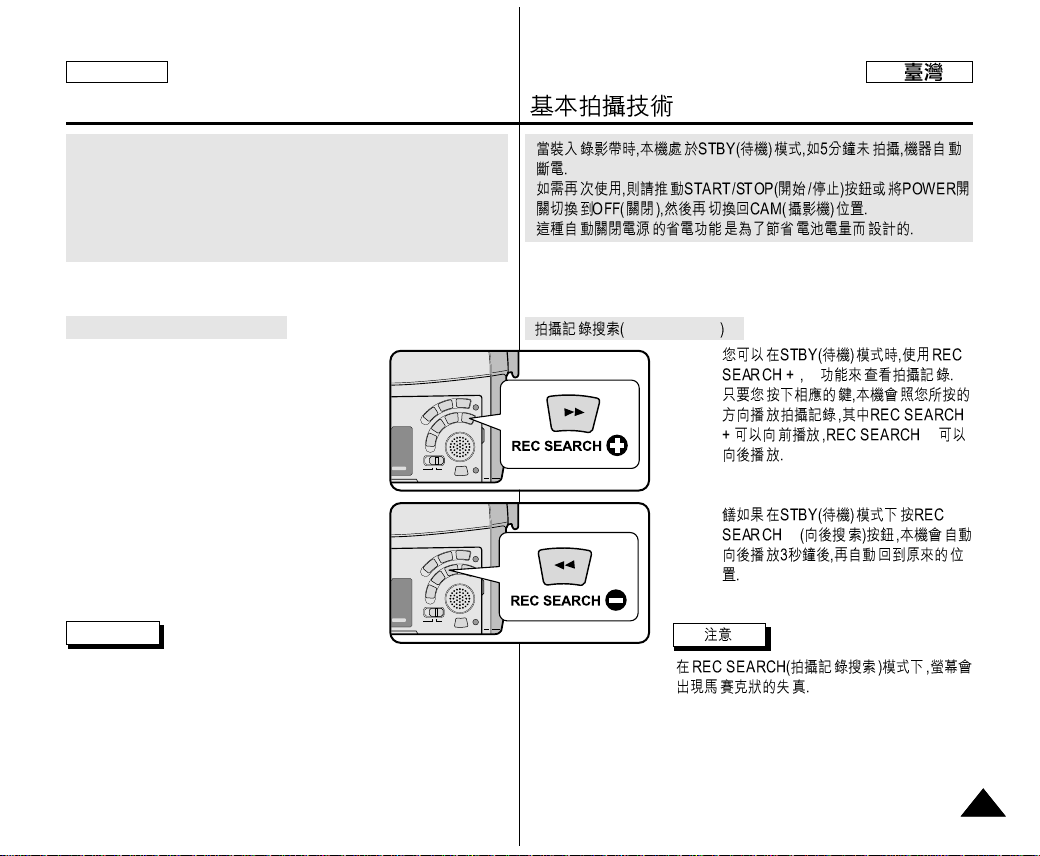
Record Search (REC SEARCH)
✤ You can view a recording using the
REC SEARCH +, -- function in STBY mode.
REC SEARCH -- enables you to
play the recording backwards and
REC SEARCH + enables you to play it
forwards, for as long as you keep each button
pressed down.
✤ If you press the REC SEARCH -- button in
STBY mode, your camcorder will play
in reverse for 3 seconds and return to the
original position automatically.
Note
Mosaic shaped picture distortion may appear on the screen while in Record
Search mode.
Page 30
■
■
1.
2.
3.
4.
5.
6.
1.
2.
3.
4.
5.
6.
7.
8.
Basic Recording
3030
ENGLISH
■
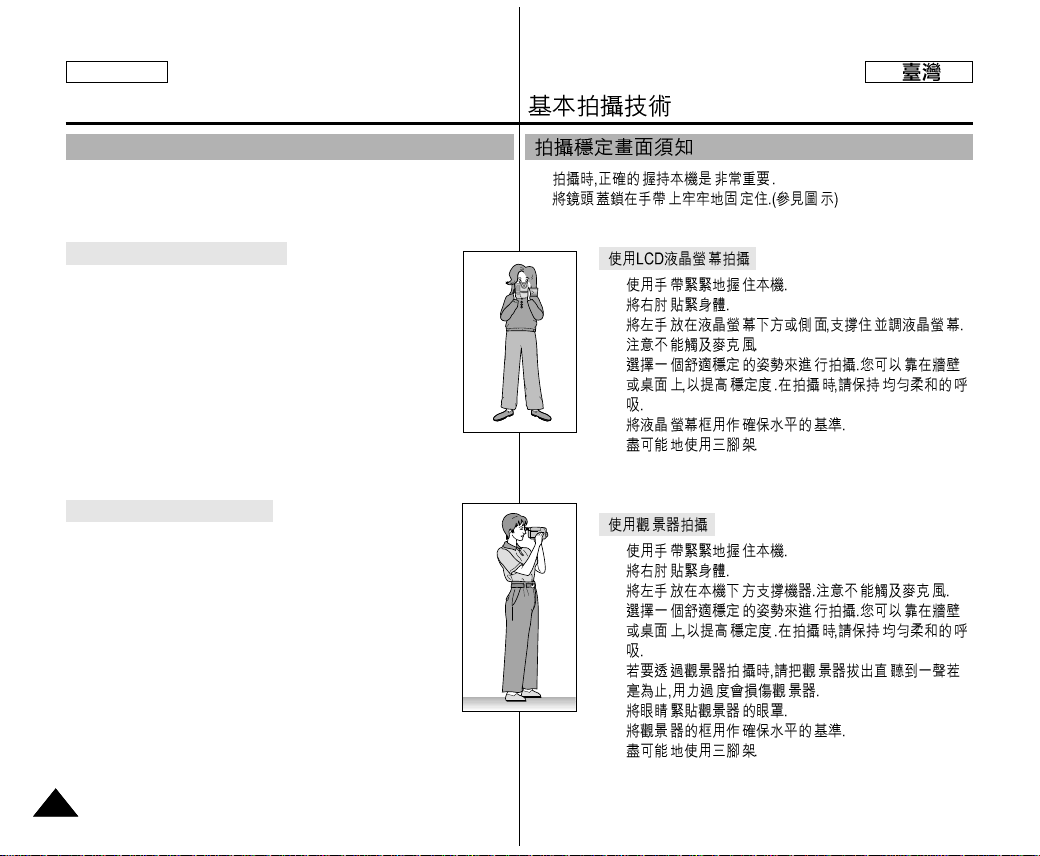
While recording, it is very important to hold the camcorder correctly.
■
Fix the LENS cap firmly by clipping it to the hand strap.
(refer to the figure)
Recording with the LCD monitor
1. Hold the camcorder firmly using the hand strap.
2. Place your right elbow against your side.
3. Place your left hand under or beside the LCD to support and
adjust it. Do not touch the built-in microphone.
4. Choose a comfortable, stable position for the shots that you
are taking.
You can lean against a wall or on a table for greater stability.
Do not forget to breathe gently.
5. Use the LCD frame as a guide to determine the horizontal
plane.
6. Whenever possible, use a tripod.
Recording with the Viewfinder
1. Hold the camcorder firmly using the hand strap.
2. Place your right elbow against your side.
3. Place your left hand under the camcorder to support it.
Be sure not to touch the built-in microphone.
4. Choose a comfortable, stable position for the shots that you
are taking. You can lean against a wall or on a table for
greater stability.
Do not forget to breathe gently.
5. To view an object through the viewfinder, pull it out until you
hear the ‘click’ sound.
Excessive force may cause damage to the viewfinder.
6. Place your eye firmly against the viewfinder eyecup.
7. Use the viewfinder frame as a guide to determine the horizontal plane.
8. Whenever possible, use a tripod.
Hints for Stable Image Recording
Page 31
✤
✤
■
BRIGHT SELECT
■
BRIGHT ADJUST
■
COLOR ADJUST
1.
■
2.
3.
4.
5.
6.
7.
Basic Recording
3131
ENGLISH
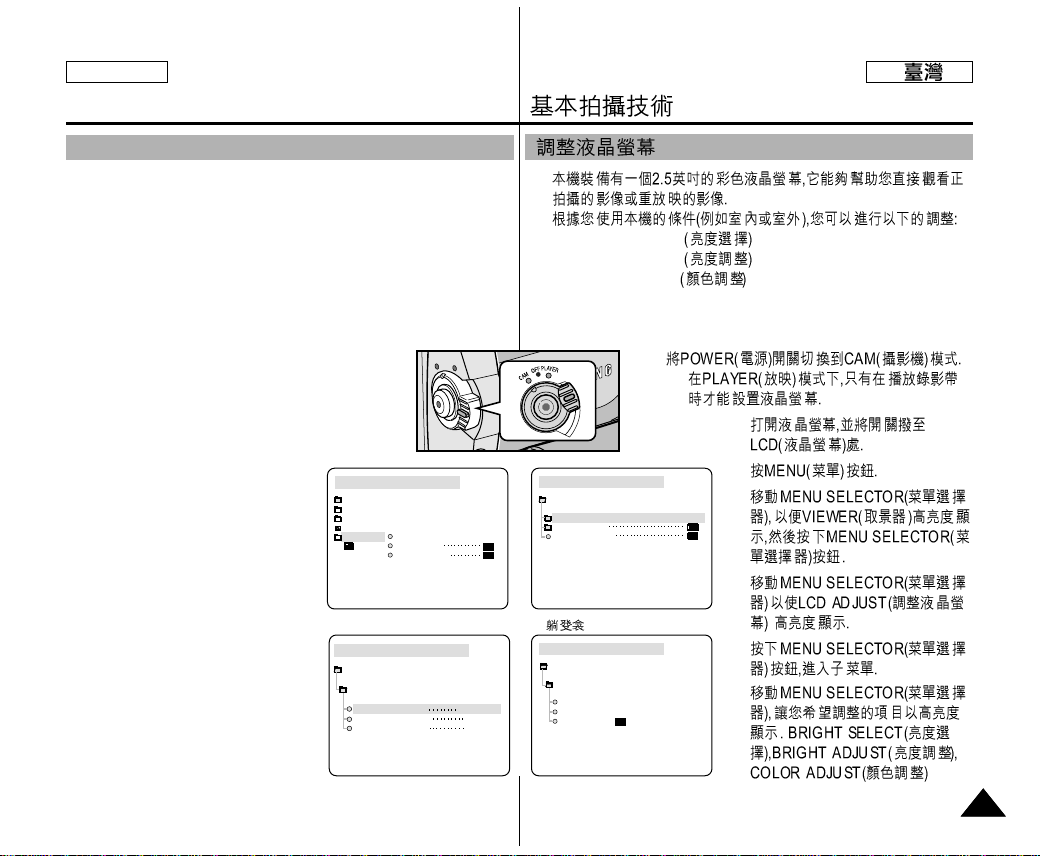
✤ Your camcorder is equipped with a 2.5 inch color Liquid Crystal
Display(LCD) screen, which enables you to view what you are
recording or playing back directly.
✤ Depending on the conditions under which you are using the camcorder
(indoors or outdoors for example), you can adjust ;
■
BRIGHT SELECT
■
BRIGHT ADJUST
■
COLOR ADJUST
1. Set the POWER switch to CAM position.
■
In the PLAYER mode, you may only setup the
LCD while the tape is playing.
2. Open the LCD screen, and the LCD switches on.
3. Press the MENU button.
4. Move the MENU SELECTOR so that
VIEWER is highlighted and then push
the MENU SELECTOR.
5. Move the MENU SELECTOR so that
LCD ADJUST is highlighted.
6. Push the MENU SELECTOR to
enter the sub-menu.
7. Move the MENU SELECTOR so
that it highlights the menu item you
want to adjust (BRIGHT SELECT,
BRIGHT ADJUST, COLOR ADJUST).
Adjusting the LCD
* SCD99
CAM MODE
VIEWER SET
LCD ADJUST
DATE / TIME
TV DISPLAY
CAM MODE
INITIAL
LCD ADJUST
DATE/TIME
TV DISPLAY
CAMERA
A/V
MEMORY
VIEWER
CAM MODE
LCD ADJUST
VIEWER SET
BRIGHT SELECT NORMAL
BRIGHT ADJUST [ 1 8 ]
COLOR ADJUST [ 1 8 ]
CAM MODE
BRIGHT SELECT
NORMAL
SUPER
BACK LIGHT
LCD ADJUST
Page 32
8.
■
-
■
■
9.
✤
✤
Basic Recording
3232
ENGLISH
8. Push the MENU SELECTOR button again.
■
You may select NORMAL, SUPER or BACK LIGHT
(SCD99 only) in the BRIGHT SELECT feature and push the
MENU SELECTOR to save the setting.
- When you use the LCD BACK LIGHT mode in a dark
location or indoors, viewing the image may be difficult.
(SCD99 only).
■
Use the MENU SELECTOR to adjust the value of BRIGHT
ADJUST and COLOR ADJUST.
■
You can set values for BRIGHT ADJUST between 00 ~ 35 and
COLOR ADJUST between 00 ~ 35.
9. Press the MENU button to finish the setting.
✤ The VIEWFINDER will not work when the LCD is open.
✤ In order to bring it into focus, pull the viewfinder forward until you
here a click.
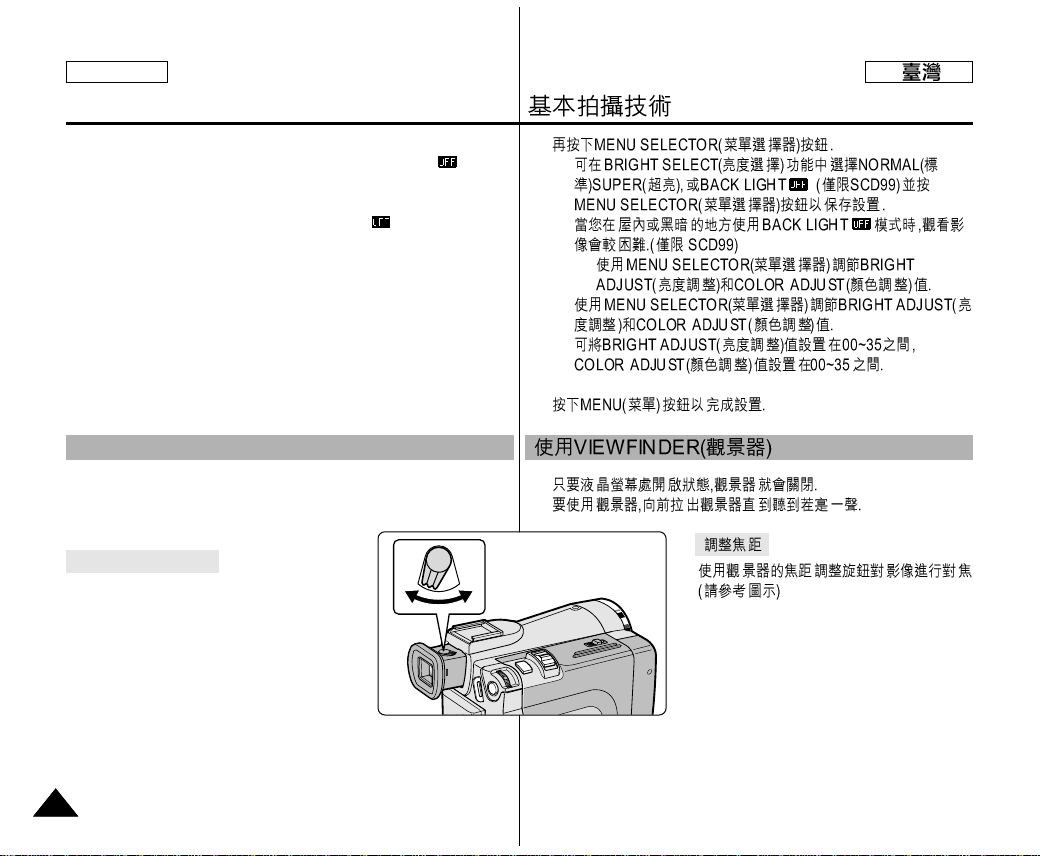
Adjusting the Focus
Use the focus adjustment knob of the
VIEWFINDER to focus the picture.
(refer to figure )
Using the VIEWFINDER
Page 33
✤
✤
1.
2.
■
3.
4.
5. REW
■
(STOP)( )
■
6. PLAY/STILL
■
■
■
■
Basic Recording
3333
ENGLISH
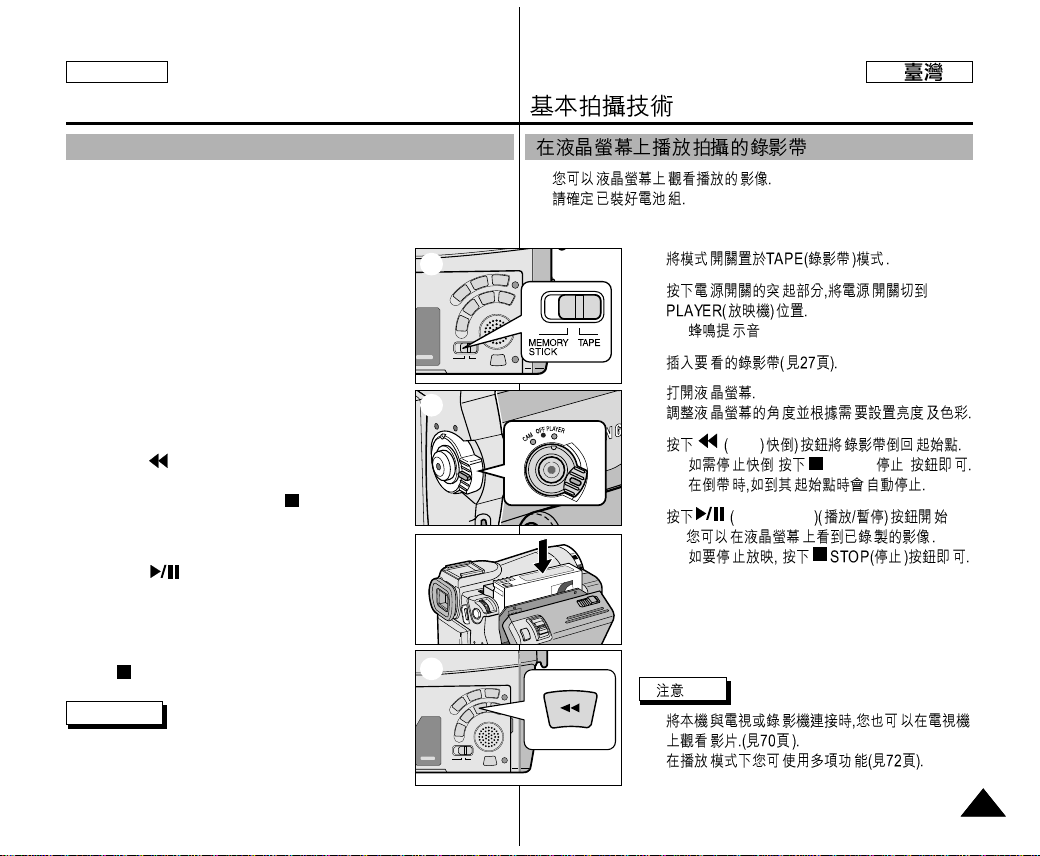
✤ You can monitor the playback picture on the LCD monitor.
✤ Make sure that the battery pack is in place.
1. Set the mode switch to TAPE.
2. Hold down the power switch tab and turn it to the
PLAYER position.
■
A confirmation sound beeps.
3. Insert the tape you wish to view. (see page 27)
4. Open the LCD screen.
Adjust the angle of the LCD screen and set the
brightness or color if necessary.
5. Press the (REW) button to rewind the tape to the
starting point.
■
To stop rewinding, press the (STOP) button.
■
The camcorder stops automatically after
rewinding is complete.
6. Press the (PLAY/STILL) button to start
playback.
■
You can view the picture you recorded on the
LCD.
■
To stop the PLAY operation, press the
(STOP) button.
Notes
■
You can also view the picture on a TV screen,
after connecting the camcorder to a TV or VCR.
(see page 70)
■
Various functions are available in playback mode. (see page 72)
Playing back a tape you have recorded on the LCD
2
1
3
5
Page 34
✤
✤
■
-
-
1.
2. (PLAY/STILL)
3.
■
■
■
■
■
■
Basic Recording
3434
ENGLISH
Adjusting the LCD during PLAY
✤ You can adjust the LCD during playback.
✤ The adjustment method is the same procedure as used in CAM
mode. (see page 31)
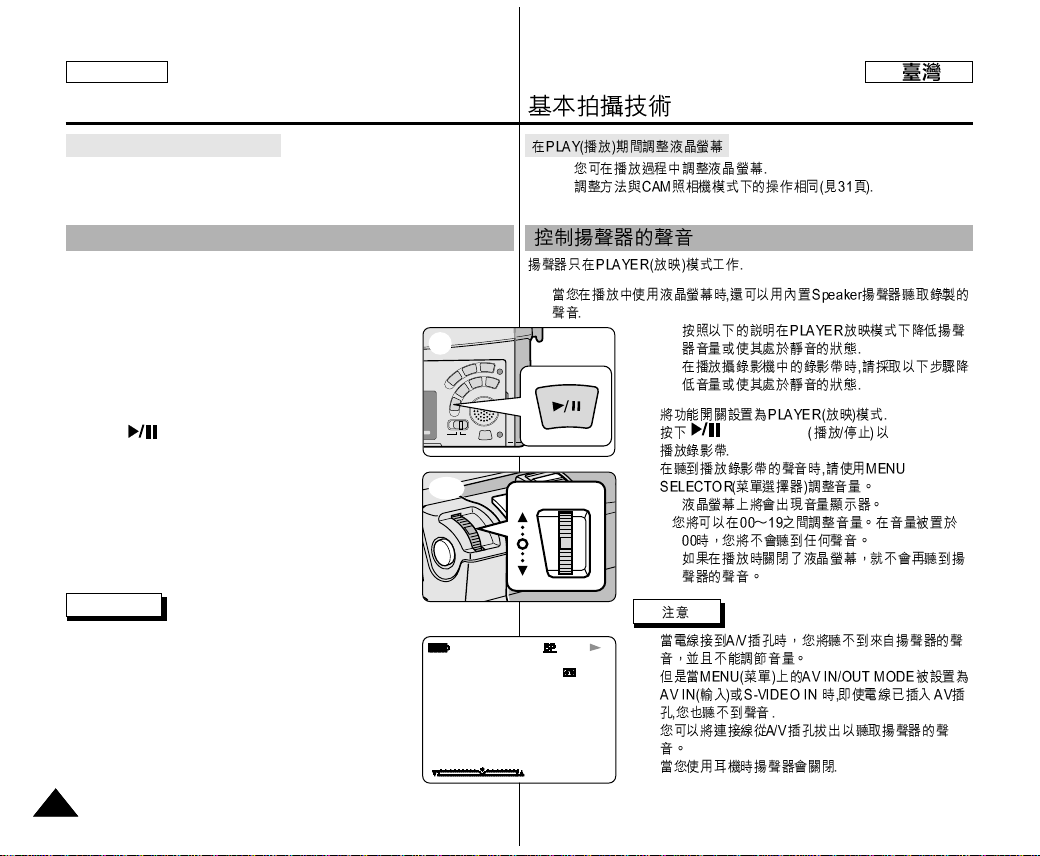
The Speaker works in PLAYER mode only.
■
When you use the LCD screen for playback, you can hear recorded
sound from the built-in Speaker.
- Follow the instructions below to decrease or mute
speaker volume in the PLAYER mode.
- Take the following steps to lower the volume or
mute the sound while playing a tape on the
camcorder.
1. Set the power switch to PLAYER mode.
2. Press (PLAY/STILL) to play the tape.
3. When you hear sounds once the tape is in play, use the
MENU SELECTOR to adjust the volume.
■
A volume level display will appear on the LCD.
Levels may be adjusted from anywhere between 00
to 19. You will not hear any sound when the volume
is set on 00.
■
If you close the LCD while playing,
you will not hear sound from the speaker.
Notes
■
When the cable is connected to the Multi AV jack,
you cannot hear sound from the speaker and cannot
adjust the volume.
■
If a cable is connected to the Multi AV jack, you can
hear sound from the speaker when AV IN/OUT MODE
on MENU is set to AV IN or S-VIDEO IN.
■
You can hear sound from speaker by removing the
connected cable from the Multi AV jack.
■
The speaker turns off when you use earphones.
Controlling Sound from the Speaker
0 : 2 3 : 4 7
5 5 min
1 0 : 0 0 A M
J A N . 10 , 2 0 0 3
VOL. [ 1 1 ]
<3-2>
VOLUME
2
3-1
Page 35
●
●
1.
2.
3
CAMERA PLAYER
Memory
REC
Memory
PLAY
CLOCK SET
WL.REMOTE
BEEP SOUND
SHUTTER SOUND
DEMONSTRATION
PROGRAM AE
WHT.BALANCE
D.ZOOM
EIS
DSE SELECT(
MEMORY MIX
FLASH SELECT
REC MODE
PHOTO SEARCH
PHOTO COPY
AUDIO MODE
AUDIO SELECT
WIND CUT
AV IN/OUT
PHOTO QUALITY
IMAGE SIZE
MJPEG SIZE MJPEG
CONTINUOUS SHOT
PRINT MARK
PROTECT
FILE NO.
DELETE
FORMAT
LCD ADJUST
DATE/TIME
TV DISPLAY
INITIAL
CAMERA
A/V
MEMORY
VIEWER
✔
✔
✔
✔
✔
✔
✔
✔
✔
✔
✔
✔
✔
✔
✔
✔
✔
✔
✔
✔
✔
✔
✔
✔
✔
✔
✔
✔
✔
✔
✔
✔
✔
✔
✔
✔
✔
✔
✔
✔
✔
✔
✔
✔
✔
✔
✔
✔
✔
✔
✔
✔
✔
✔
✔
✔
✔
✔
✔
✔
Advanced Recording
3535
ENGLISH
●
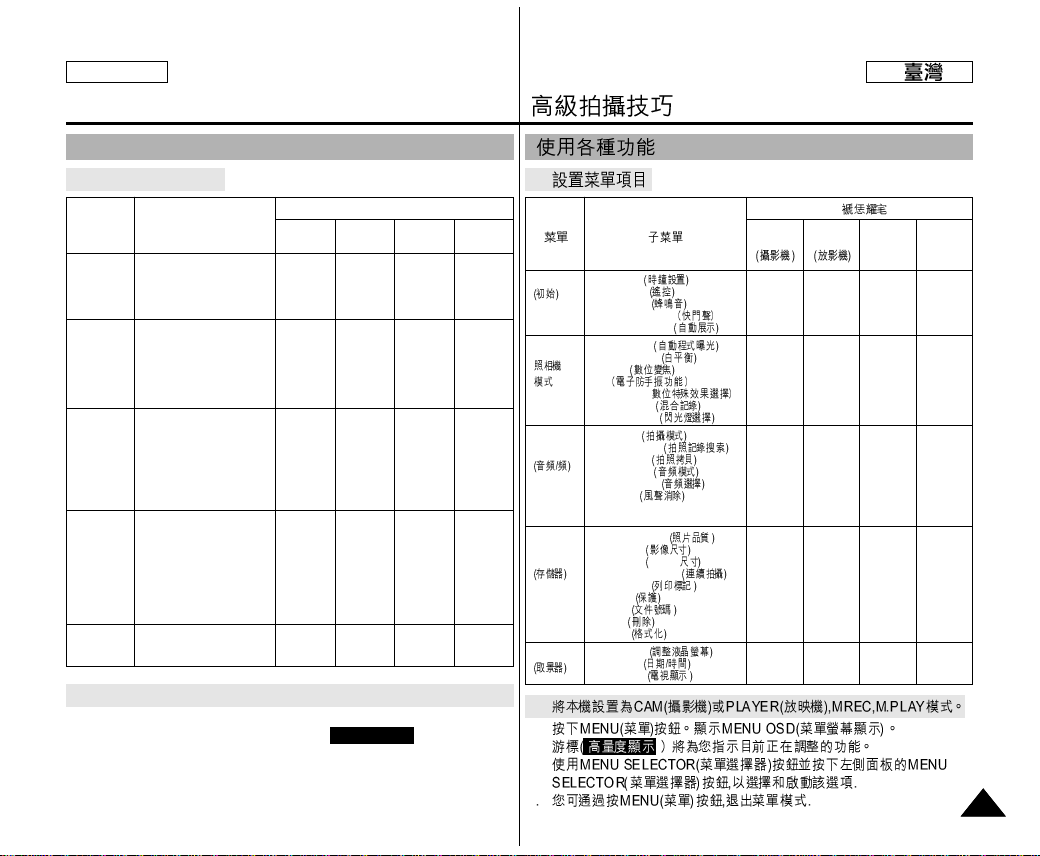
Setting menu items
●
Set the camcorder to CAM or PLAYER mode and M.REC or M.PLAY mode
1. Press the MENU button.
The MENU OSD is displayed. The cursor (
HIGHLIGHT
) indicates the
feature you are currently adjusting.
2. Use the MENU SELECTOR and push the MENU SELECTOR on the right
side panel to select and activate the item.
3. You can exit the menu mode by pressing the MENU button.
Use of various Functions
SUB MENU
Available mode
CAMERA PLAYER
Memory
REC.
Memory
PLAY
MENU
CLOCK SET
WL.REMOTE
BEEP SOUND
SHUTTER SOUND
DEMONSTRATION
PROGRAM AE
WHT. BALANCE
D. ZOOM
EIS
DSE SELECT
MEMORYMIX
FLASH SELECT
REC MODE
PHOTO SEARCH
PHOTO COPY
AUDIO MODE
AUDIO SELECT
WIND CUT
AV IN/OUT
PHOTO QUALITY
IMAGE SIZE
MJPEG SIZE
CONTINUOUS SHOT
PRINT MARK
PROTECT
FILE NO.
DELETE
FORMAT
LCD ADJUST
DATE/TIME
TV DISPLAY
INITIAL
CAMERA
A/V
MEMORY
VIEWER
✔
✔
✔
✔
✔
✔
✔
✔
✔
✔
✔
✔
✔
✔
✔
✔
✔
✔
✔
✔
✔
✔
✔
✔
✔
✔
✔
✔
✔
✔
✔
✔
✔
✔
✔
✔
✔
✔
✔
✔
✔
✔
✔
✔
✔
✔
✔
✔
✔
✔
✔
✔
✔
✔
✔
✔
✔
✔
✔
✔
Page 36
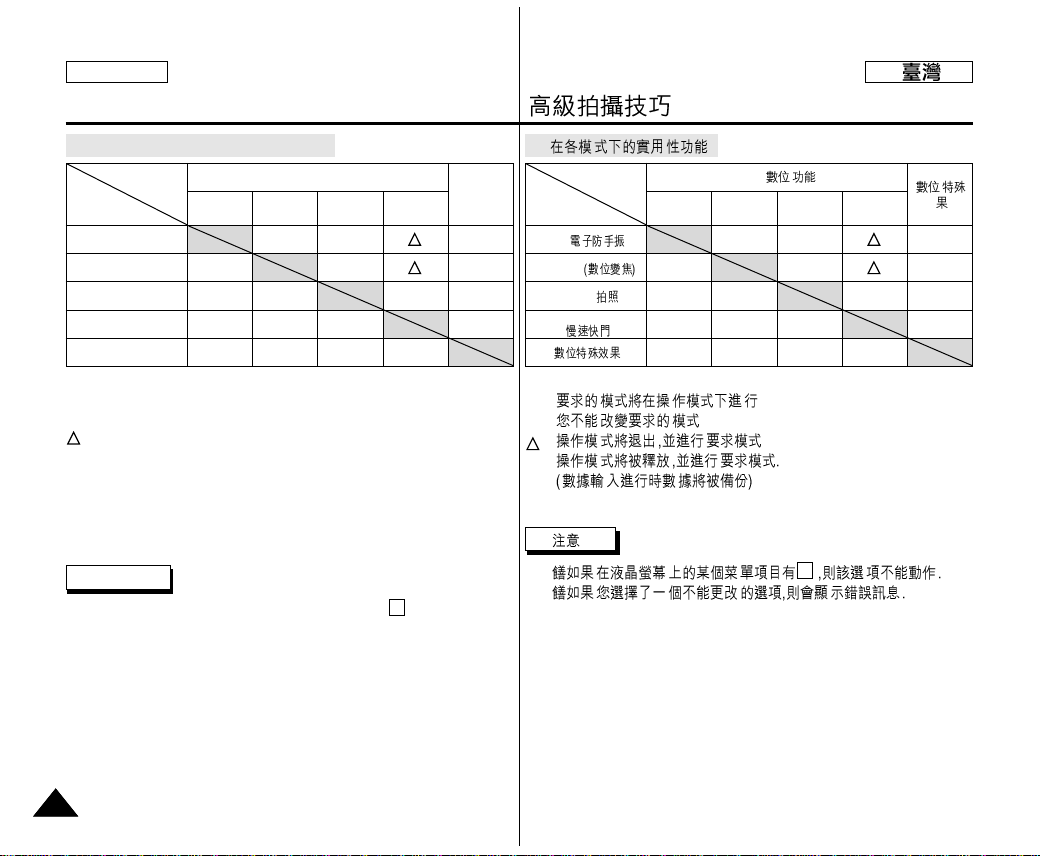
Advanced Recording
3636
ENGLISH
O : The requested function will work in this operating mode.
✕ : You can not change the requested mode.
: The operating function will be released and the requested one will
work.
* : The operating function will be released and the requested one will
work.
(the data during the operating mode will be backed up)
Notes
■
When a menu item on the LCD is marked with an , that item cannot
be activated.
■
When you select an item that cannot be changed, an error message will
be displayed.
●
Availability of functions in each mode
EIS
D.ZOOM
PHOTO
SLOW SHUTTER
Digital Special Effects
Digital functions
Requested
Mode
Operating
Mode
EIS D.ZOOM
PHOTO
(TAPE)
SLOW
SHUTTER
O
✕
✕
O
O
✕
✕
O
O
O
O
O
✕
✕
O
O
✕
✕
Digital
special
effects
*
EIS ( )
D.ZOOM
PHOTO( )
SLOW SHUTTER
(
)
EIS D.ZOOM
PHOTO
(TAPE)
SLOW
SHUTTER
O
✕
✕
O
O
✕
✕
O
O
O
O
O
✕
✕
O
O
✕
✕
*
X
O:
✕ :
:
*:
■
■
●
X
Page 37

●
CLOCK SET
✤
✤ DATE/TIME
1.
■
2.
3.
4.
■
5.
6.
■
7.
8.
■
9.
10.
■
11.
Advanced Recording
3737
ENGLISH
●
CLOCK SET
✤ CLOCK setup works in CAM, PLAYER, M.REC and M.PLAY
modes.
✤ The DATE/TIME is automatically recorded onto a tape.
Before recording, please set the DATE/TIME.
1. Press the MENU button.
■
The menu list will appear.
2. Move the MENU SELECTOR to highlight INITIAL and
push the MENU SELECTOR.
3. Use the MENU SELECTOR to select CLOCK SET from
the submenu.
4. Push the MENU SELECTOR to enter SETTING mode.
■
A blinking item indicates the item to be changed.
The year will blink first.
5. Using the MENU SELECTOR, change the year setting.
6. Push the MENU SELECTOR.
■
The month will blink.
7. Using the MENU SELECTOR, change the month
setting.
8. Push the MENU SELECTOR.
■
The day will blink.
9. You can set the day, hour and minute following the
same procedure for setting the year and month.
10. Push the MENU SELECTOR after setting the minutes.
■
The word COMPLETE! will appear, and a few
seconds later, the menu screen will automatically return to the sub
menu.
11. To exit, push the MENU button.
CAM MODE
INITIAL CLOCK SET
WL. REMOTE
BEEP SOUND
SHUT. SOUND
DEMO
CAMERA
A/V
MEMORY
VIEWER
CAM MODE
INITIAL SET
CLOCK SET
WL.REMOTE
DEMONSTRATION
SET TIME!
BEEP SOUND
SHUTTER SOUND
CAM MODE
INITIAL SET
CLOCK SET
1 0 : 0 0 A M
J A N . 1 , 2 0 0 3
Page 38

●
WL. REMOTE
✤
✤ WL. REMOTE
1.
■
2.
3.
4.
5.
■
Advanced Recording
3838
ENGLISH
●
WL. REMOTE
✤ The WL.REMOTE function works in CAM, PLAYER, M.REC,
M.PLAY modes.
✤ The WL.REMOTE option allows you to enable or disable the
remote control for use with the camcorder.
1. Press the MENU button.
■
The menu list will appear.
2. Move the MENU SELECTOR to highlight INITIAL and
push the MENU SELECTOR.
3. Use the MENU SELECTOR to select WL.REMOTE
from the submenu.
4. Push the MENU SELECTOR to enable or disable the
remote control.
The setting switches between ON/OFF each time you
push the MENU SELECTOR.
5. To exit, press the MENU button.
■
If you set the remote to OFF in the menu and try to use it, the
remote icon will blink for 3 seconds and disappear on the LCD.
CAM MODE
INITIAL CLOCK SET
WL. REMOTE
BEEP SOUND
SHUT. SOUND
DEMO
CAMERA
A/V
MEMORY
VIEWER
CAM MODE
INITIAL SET
CLOCK SET
WL.REMOTE
DEMONSTRATION
BEEP SOUND
SHUTTER SOUND
Page 39
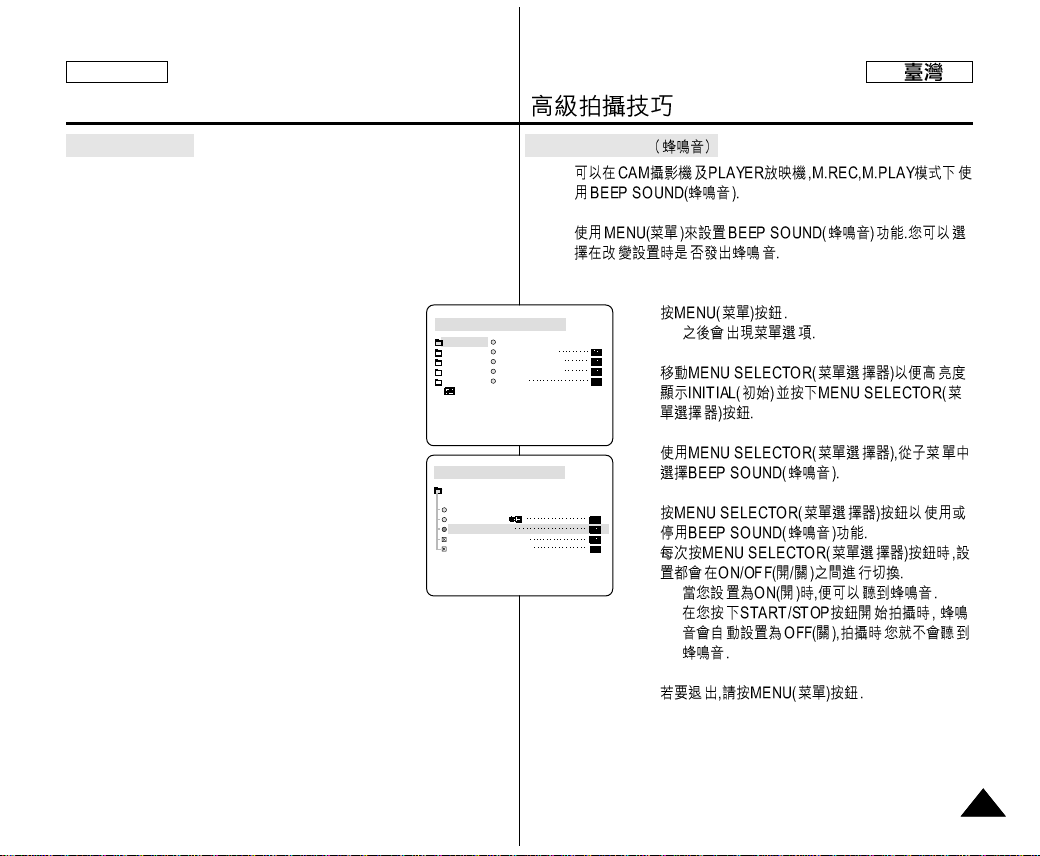
●
BEEP SOUND
✤
✤
1.
■
2.
3.
4.
■
■
5.
Advanced Recording
3939
ENGLISH
●
BEEP SOUND
✤ The BEEP SOUND function works in CAM, PLAYER, M.REC,
M.PLAY modes.
✤ Use the MENU to setup the BEEP SOUND function.
Select whether or not you want to hear a beep sound whenever you
change a setup value.
1. Press the MENU button.
■
The menu list will appear.
2. Move the MENU SELECTOR to highlight
INITIAL and push the MENU SELECTOR.
3. Use the MENU SELECTOR to select BEEP SOUND
from the submenu.
4. Push the MENU SELECTOR to enable or disable the
BEEP SOUND.
The setting switches between ON/OFF each time you
push the MENU SELECTOR.
■
You will hear a Beep Sound when you select the ON
setup.
■
When you press the START/STOP button to start recording, the
BEEP SOUND is automatically set to OFF so you can’t hear it any
longer.
5. To exit, press the MENU button.
CAM MODE
INITIAL CLOCK SET
WL.REMOTE
BEEP SOUND
SHUT SOUND
DEMO
CAMERA
A/V
MEMORY
VIEWER
CAM MODE
INITIAL SET
CLOCK SET
BEEP SOUND
SHUTTER SOUND
DEMONSTRATION
WL.REMOTE
Page 40
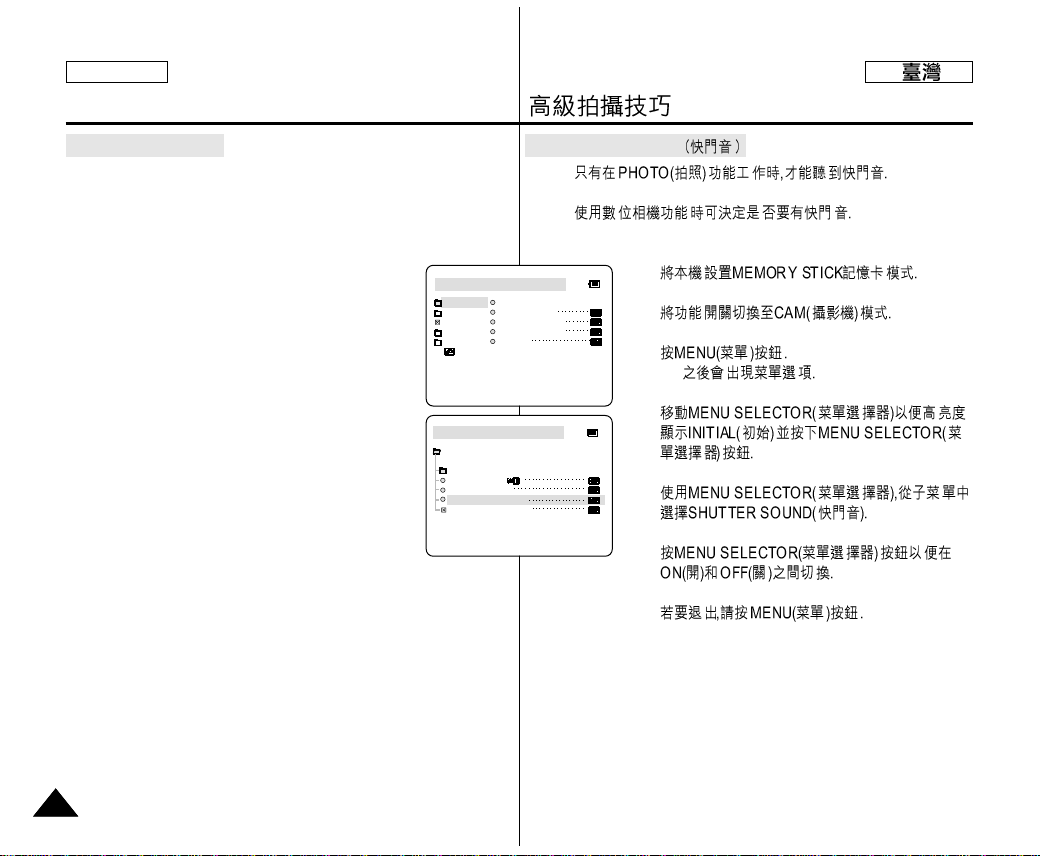
●
SHUTTER SOUND
✤
✤
1.
2.
3.
■
4.
5.
6.
7.
Advanced Recording
4040
ENGLISH
●
SHUTTER SOUND
✤ You can hear SHUTTER SOUND only when the PHOTO function
is working.
✤ Determines whether or not you wish to hear a SHUTTER SOUND
when using the DSC feature.
1. Set the mode switch to MEMORY STICK.
2. Set the power switch to CAM mode.
3. Press the MENU button.
■
The menu list will appear.
4. Move the MENU SELECTOR to highlight INITIAL and
push the MENU SELECTOR.
5. Use the MENU SELECTOR to select SHUTTER
SOUND from the submenu.
6. Push MENU SELECTOR to switch between ON and
OFF.
7. To exit, press the MENU button.
M.REC MODE
INITIAL CLOCK SET
WL.REMOTE
BEEP SOUND
SHUT.SOUND
DEMO
CAMERA
A/V
MEMORY
VIEWER
M.REC MODE
INITIAL SET
CLOCK SET
WL.REMOTE
BEEP SOUND
SHUTTER SOUND
DEMONSTRATION
Page 41
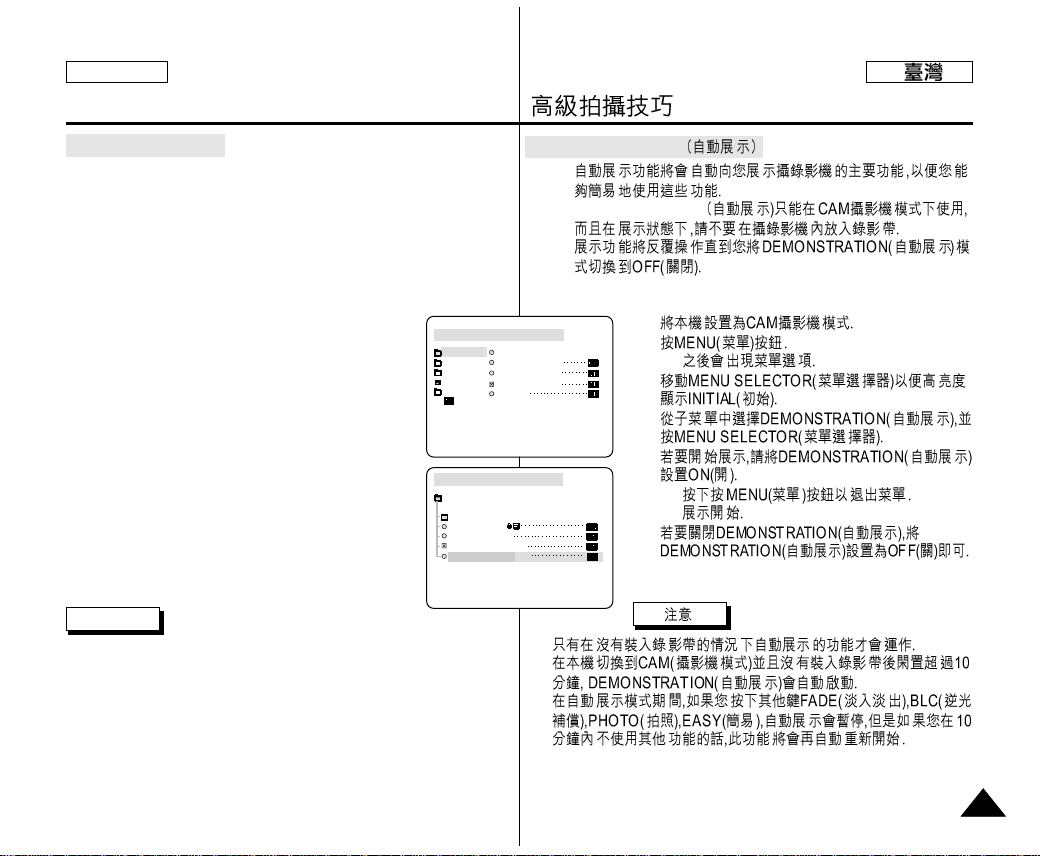
●
DEMONSTRATION
✤
✤ DEMONSTRATION
✤
1.
2.
■
3.
4.
5.
■
■
6.
■
■
■
Advanced Recording
4141
ENGLISH
●
DEMONSTRATION
✤ Demonstration automatically shows you the major functions that are
included with your camcorder so that you may use them more
easily.
✤ The DEMONSTRATION function may only be used in the CAM
mode without a tape inserted in the camcorder.
✤ The demonstration operates repeatedly until the
DEMONSTRATION mode switched OFF.
1. Set the camcorder to CAM mode.
2. Press the MENU button.
■
The menu list will appear.
3. Move the MENU SELECTOR to highlight INITIAL.
4. Select DEMONSTRATION from the submenu and
push the MENU SELECTOR.
5. To activate the DEMONSTRATION,
set DEMONSTRATION ON.
■
Press the MENU button to quit the menu.
■
The DEMONSTRATION will begin.
6. To end the DEMONSTRATION,
set the DEMONSTRATION to OFF.
Notes
■
The DEMONSTRATION function only works
without a TAPE installed.
■
The DEMONSTRATION mode is automatically activated when the
camcorder is left idle for more than 10 minutes after switching to the
CAM mode (no tape is inserted in the camcorder).
■
If you press other buttons (FADE, BLC, PHOTO, EASY) during the
DEMONSTRATION mode, the DEMONSTRATION stops temporarily
and resumes 10 minutes later if you do not operate any other functions.
CAM MODE
INITIAL CLOCK SET
WL. REMOTE
BEEP SOUND
SHUT. SOUND
DEMO
CAMERA
A/V
MEMORY
VIEWER
CAM MODE
INITIAL SET
CLOCK SET
WL.REMOTE
DEMONSTRATION
BEEP SOUND
SHUTTER SOUND
Page 42
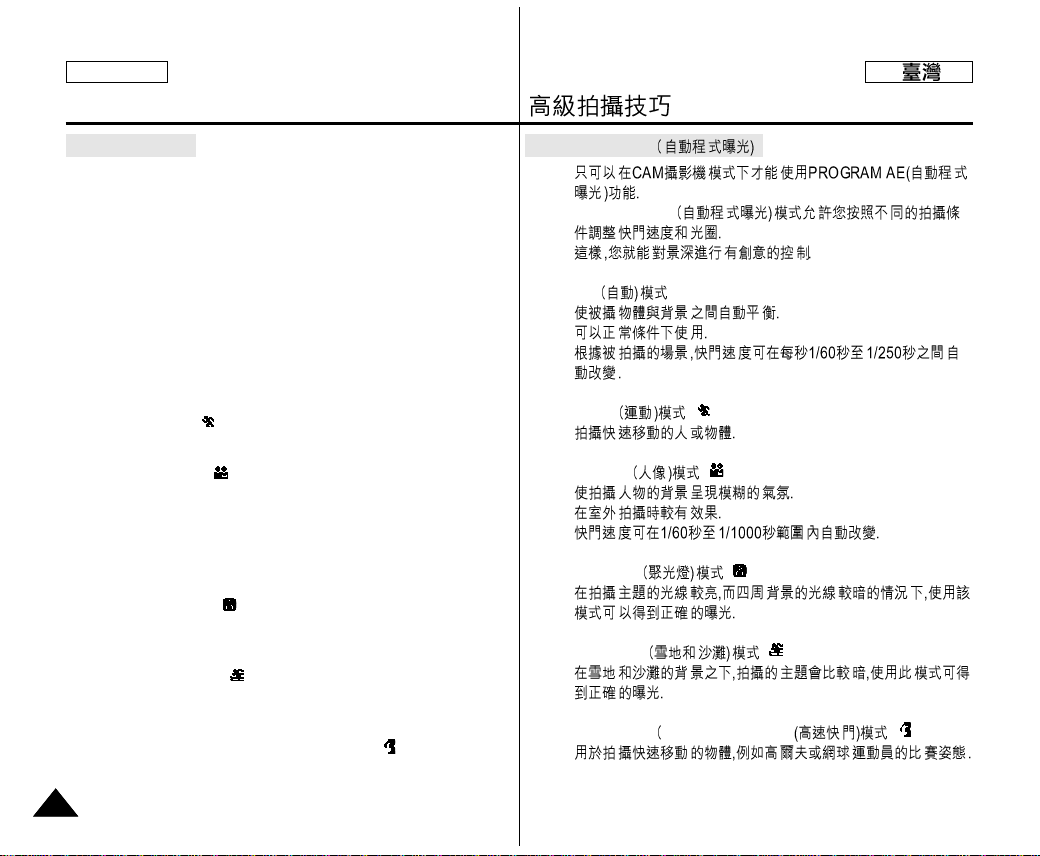
Advanced Recording
4242
ENGLISH
●
PROGRAM AE
✤ The PROGRAM AE(automatic exposure) function works in CAM
mode only.
✤ The PROGRAM AE mode allows you to adjust shutter speeds and
apertures to suit different recording conditions.
✤ They give you creative control over the depth of field.
■
AUTO mode
- Automatically balances the exposure between the subject and the
background.
- To be used in normal conditions.
- The shutter speed automatically varies from 1/60 to 1/250 per
second, depending on the scene.
■
SPORTS mode ( )
- For recording people or objects moving quickly.
■
PORTRAIT mode ( )
- For focusing on the background of the subject, when the
background is out of focus.
- The PORTRAIT mode is most effective when used outdoors.
- The shutter speed automatically varies from 1/60 to 1/1000 per
second.
■
SPOTLIGHT mode ( )
- For recording correctly when there is only light on the subject and
not the rest of the picture.
■
SAND/SNOW mode ( )
- For recording when people or objects are darker than the
background because of reflected light from sand or snow.
■
High S. SPEED (High Shutter Speed) mode ( )
- For recording fast-moving subjects such as players in golf or tennis
games.
●
PROGRAM AE
✤
✤ PROGRAM AE
✤
■
AUTO
-
-
-
■
SPORTS ()
-
■
PORTRAIT ()
-
-
-
■
SPOTLIGHT ()
-
■
SAND/SNOW ()
-
■
High S.SPEED High Shutter Speed) ()
-
Page 43
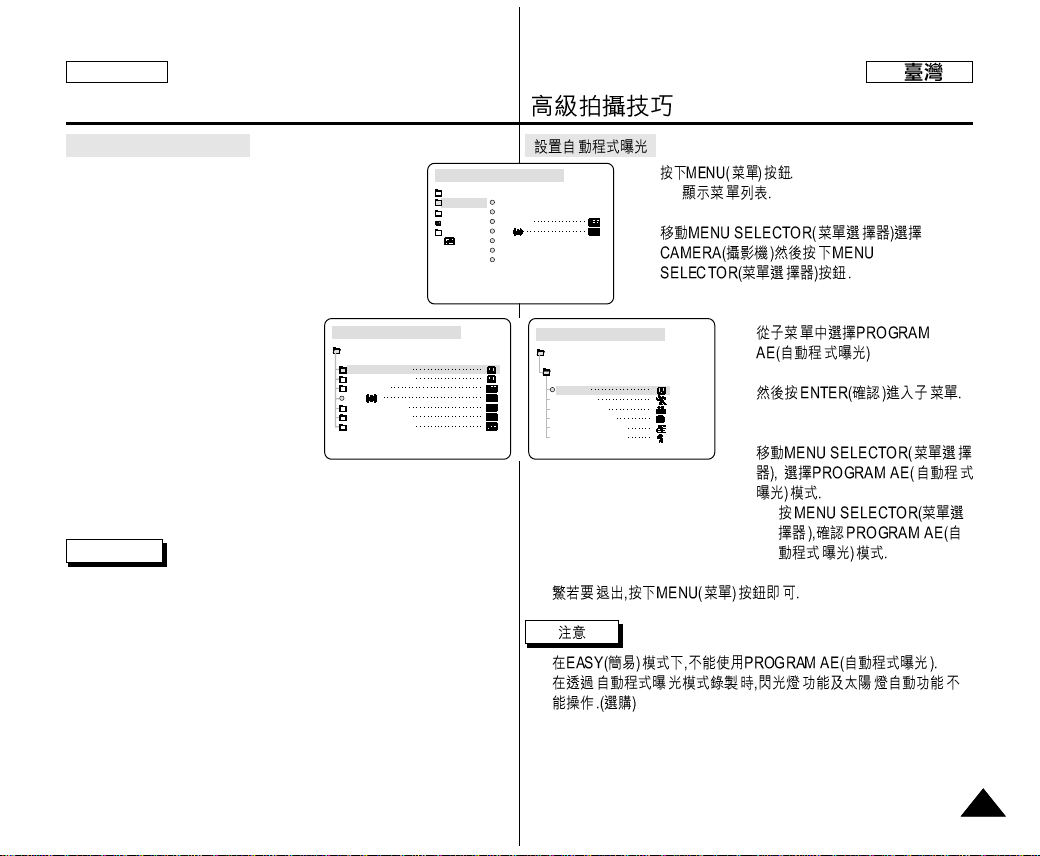
1.
■
2.
3.
4.
5.
■
6.
■
■
Advanced Recording
4343
ENGLISH
Setting the PROGRAM AE
1. Press the MENU button.
■
The menu list will appear.
2. Move the MENU SELECTOR to highlight CAMERA
and push the MENU SELECTOR.
3. Select PROGRAM AE from the submenu.
4. Push the MENU SELECTOR to enter
the sub-menu.
5. Using the MENU SELECTOR,
select the PROGRAM AE mode.
■
Push the MENU SELECTOR to
confirm the PROGRAM AE mode.
6. To exit, press the MENU button.
Notes
■
The P.AE function will not operate in EASY mode.
■
When recording with a PROGRAM AE mode, the Flash function and
Video Light Auto function (optional) do not work.
CAM MODE
PROGRAM AE
AUTO
SPORTS
PORTRAIT
SPOTLIGHT
SAND / SNOW
HIGH S. SPEED
CAMERA SET
CAM MODE
PROGRAM AE
WHT. BALANCE
D.ZOOM
EIS
DSE SELECT
MEMORY MIX
FLASH SELECT
CAMERA SET
CAM MODE
INITIAL
PROGRAM AE
WHT. BALANCE
D.ZOOM
EIS
DSE SELECT
MEMORY MIX
FLASH SELECT
CAMERA
A/V
MEMORY
VIEWER
Page 44
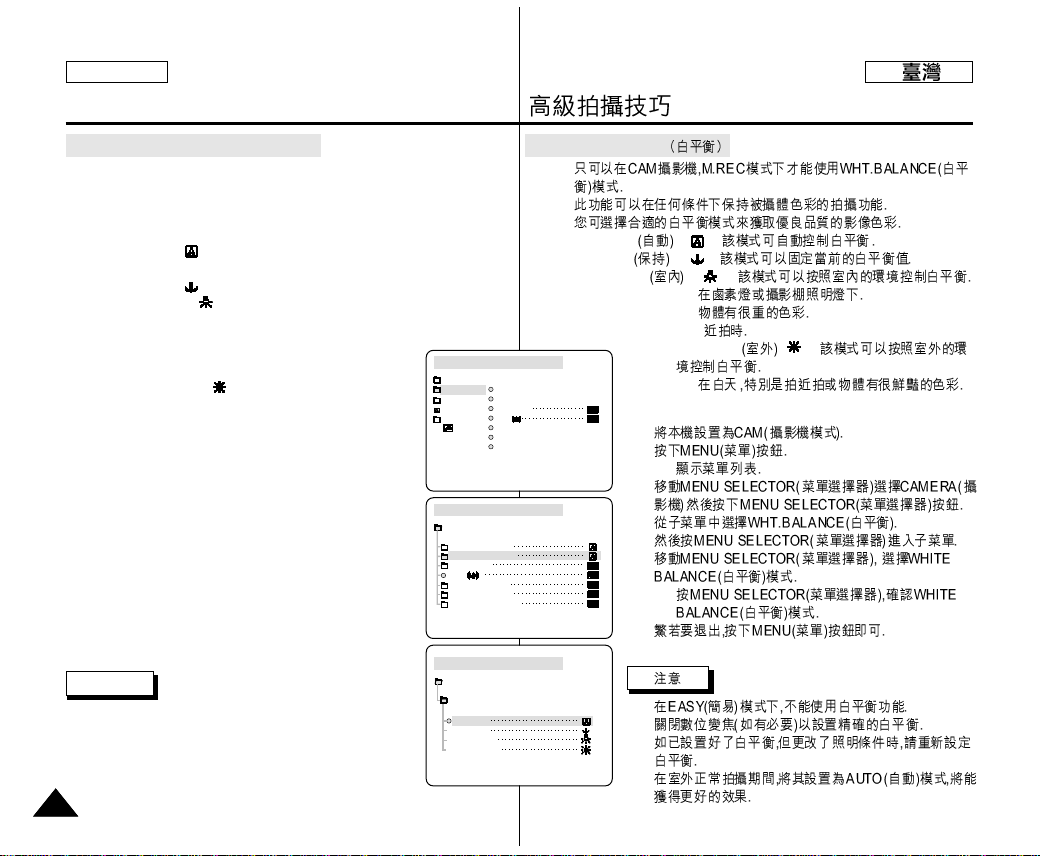
Advanced Recording
4444
ENGLISH
●
WHT. BALANCE (WHITE BALANCE)
✤ The WHITE BALANCE function works in CAM or M.REC mode only.
✤ The WHITE BALANCE is a recording function that preserves the
unique image color of the object in any recording condition.
✤ You may select the appropriate WHITE BALANCE mode to obtain
good quality image color.
■
AUTO ( ) : This mode is generally used to control the WHITE
BALANCE automatically.
■
HOLD ( ) :This fixes the current WHITE BALANCE value.
■
INDOOR ( ) : This controls the WHITE BALANCE according to
the indoor ambience.
- Under halogen or studio/video lighting
- Subject is of one dominant color
- Close ups
■
OUTDOOR ( ) : This controls the WHITE
BALANCE according to the outdoor ambient light.
- In daylight, especially for close ups and where
the subject is of one dominant color.
1. Set the camcorder to CAM mode.
2. Press the MENU button.
■
The menu list will appear.
3. Move the MENU SELECTOR to highlight CAMERA and
push the MENU SELECTOR.
4. Select WHT.BALANCE from the submenu.
5. Push the MENU SELECTOR to enter the sub-menu.
6. Using the MENU SELECTOR, select the WHITE
BALANCE mode.
■
Push the MENU SELECTOR to confirm the
WHITE BALANCE mode.
7. To exit, press the MENU button.
Notes
■
The WHT.BALANCE function will not operate in EASY
mode.
■
Turn the digital zoom off (if necessary) to set a more
accurate white balance.
■
Reset the white balance if lighting conditions change.
■
During normal outdoor recording, setting to AUTO may provide better
results.
●
WHITE BALANCE
✤
✤
✤
■
AUTO () :
■
HOLD () :
■
INDOOR () :
-
-
-
■
OUTDOOR () :
-
1.
2.
■
3.
4.
5.
6.
■
7.
■
■
■
■
CAM MODE
PROGRAM AE
WHT. BALANCE
D.ZOOM
EIS
DSE SELECT
MEMORY MIX
FLASH SELECT
CAMERA SET
CAM MODE
INITIAL
PROGRAM AE
WHT. BALANCE
D.ZOOM
EIS
DSE SELECT
MEMORY MIX
FLASH SELECT
CAMERA
A/V
MEMORY
VIEWER
CAM MODE
AUTO
HOLD
WHT. BALANCE
INDOOR
OUTDOOR
CAMERA SET
Page 45

✤
Zooming In and Out
✤
✤
✤
1.
2. T Telephoto
3. W Wide angle
Advanced Recording
4545
ENGLISH
Zooming In and Out with DIGITALZOOM
✤ Digital Zoom works in CAM mode only.
Zooming In and Out
✤ Zooming is a recording technique that lets you change the size of
the subject in a scene.
For more professional looking recordings, do not use the zoom
function too often.
✤ You can zoom using variable zoom speeds.
✤ Use these features for different shots. Please note that over-use of
the zoom feature can lead to unprofessional looking results and a
reduction of battery usage time.
1. Move the zoom lever slightly for
a gradual zoom, move it further for
a high-speed zoom.
Your zooming is monitored on the OSD.
2. T(Telephoto) side:
Subject appears closer.
3. W(Wide angle) side:
Subject appears
farther away.
Note
You can record a subject that is a minimum of 1 m (about 3.2 feet) away
from the lens surface in the TELE position, or about 10 mm (about 0.5
inch) away in the WIDE position.
TELE
WIDE
1-1 1-2
Page 46
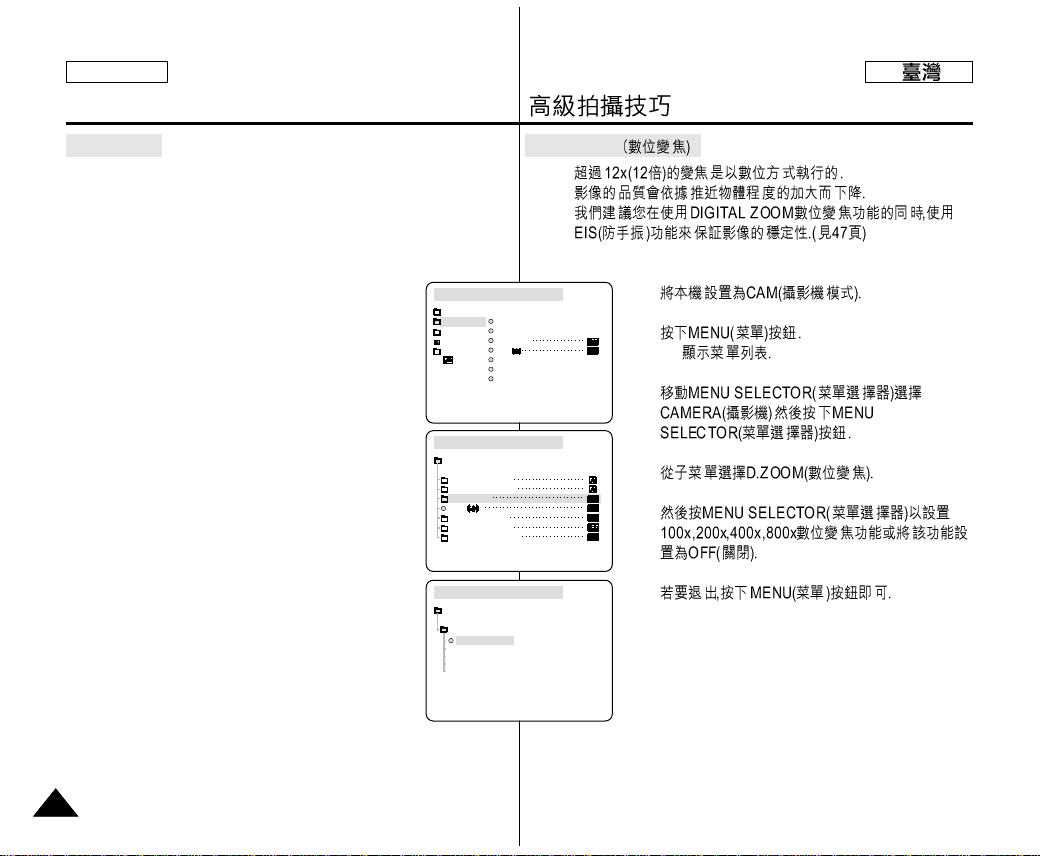
Digital Zoom
✤
✤
✤
1.
2.
■
3.
4.
5.
6.
Advanced Recording
4646
ENGLISH
Digital Zoom
✤ Zooming more than 12x is achieved digitally.
✤ The picture quality may deteriorate depending on how
much you zoom in on the subject.
✤ We recommend that you use the EIS feature with DIGITAL ZOOM
for picture stability. (see page 47)
1. Set the camcorder to CAM mode.
2. Press the MENU button.
■
The menu list will appear.
3. Move the MENU SELECTOR to CAMERA and push
the MENU SELECTOR.
4. Select D.ZOOM from the submenu.
5. Push the MENU SELECTOR to setup the 100x, 200x,
400x, 800x digital zoom function or to turn the feature
OFF.
6. To exit, press the MENU button.
CAM MODE
PROGRAM AE
WHT. BALANCE
D.ZOOM
EIS
DSE SELECT
MEMORY MIX
FLASH SELECT
CAMERA SET
CAM MODE
D . ZOOM
OFF
100x
200x
400x
800x
CAMERA SET
CAM MODE
INITIAL
PROGRAM AE
WHT. BALANCE
D.ZOOM
EIS
DSE SELECT
MEMORY MIX
FLASH SELECT
CAMERA
A/V
MEMORY
VIEWER
Page 47
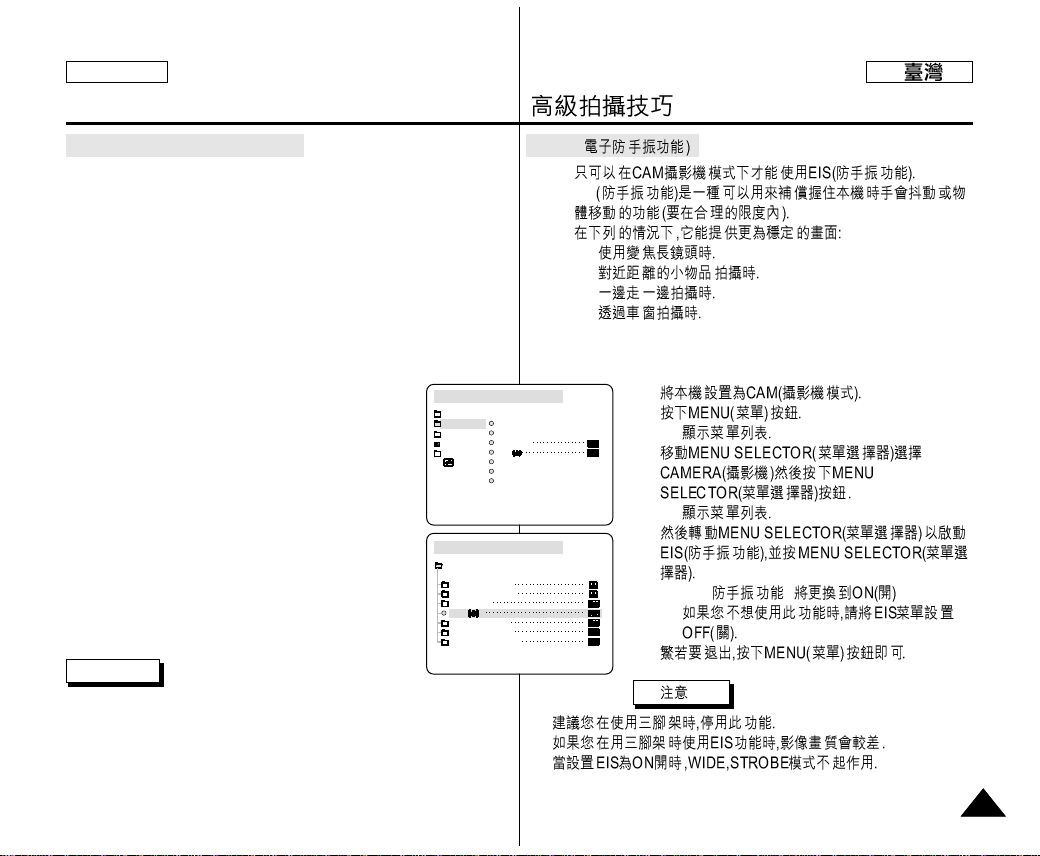
●
EIS (
✤
✤ EIS
✤
■
■
■
■
1.
2.
■
3.
■
4.
■
EIS ( )
■
5.
■
■
■
Advanced Recording
4747
ENGLISH
●
EIS (Electronic Image Stabilizer)
✤ The EIS function works in CAM mode only.
✤ EIS (Electronic Image Stabilizer) is a function that compensates for
any shaking or hand movement while holding the camcorder (within
reasonable limits).
✤ It provides more stable pictures when:
■
Recording with the zoom
■
Recording a small object close-up
■
Recording and walking at the same time
■
Recording through the window of a vehicle
1. Set the camcorder to CAM mode.
2. Press the MENU button.
■
The menu list will appear.
3. Move the MENU SELECTOR highlight to CAMERA
and push the MENU SELECTOR.
■
The sub menu list will appear.
4. Move the MENU SELECTOR to activate the EIS
function, push the MENU SELECTOR.
■
The EIS menu is changed to ON.
■
If you do not want to use the EIS function,
set the EIS menu to OFF.
5. To exit, press the MENU button.
Notes
■
It is recommended that you deactivate the shake compensation function
when using a tripod.
■
If you use the EIS function, the picture quality may deteriorate.
■
While setting the EIS to ON, the WIDE, STROBE(DSE function) mode
do not work.
CAM MODE
INITIAL
PROGRAM AE
WHT. BALANCE
D.ZOOM
EIS
DSE SELECT
MEMORY MIX
FLASH SELECT
CAMERA
A/V
MEMORY
VIEWER
CAM MODE
PROGRAM AE
WHT. BALANCE
D.ZOOM
EIS
DSE SELECT
MEMORY MIX
FLASH SELECT
CAMERA SET
Page 48
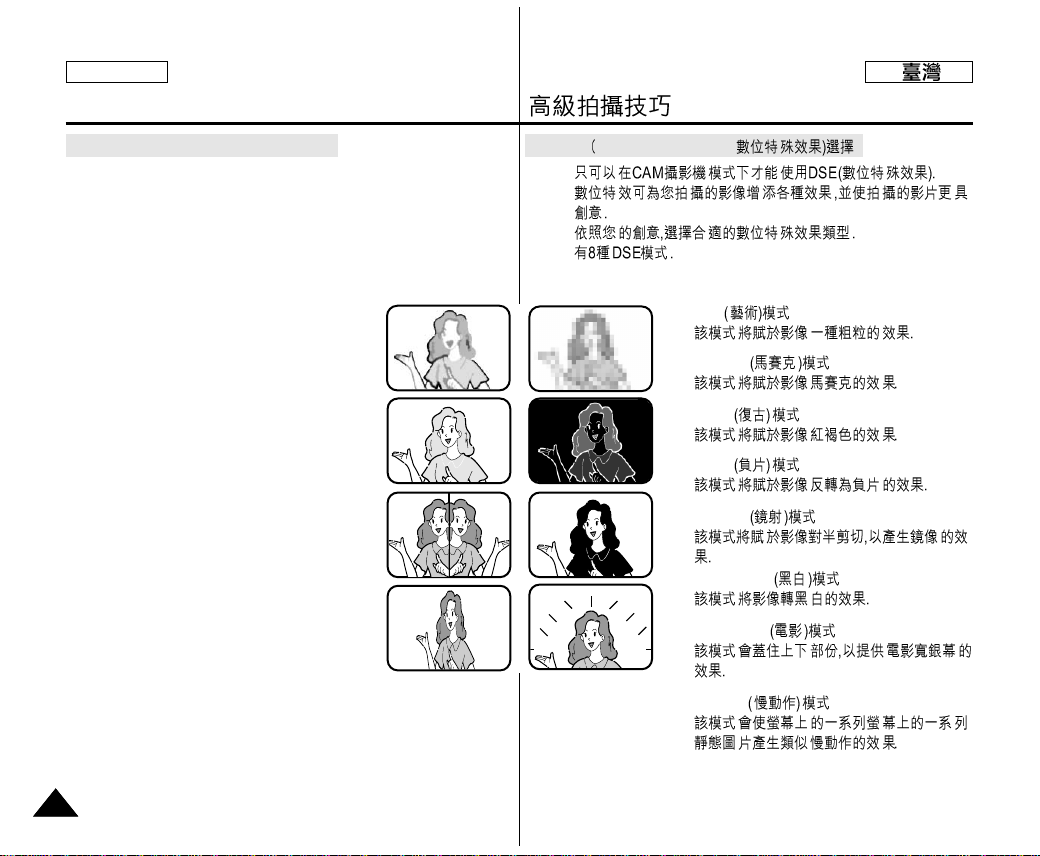
●
DSE Digital Special Effects
✤
✤
✤
✤
a. ART
b. MOSAIC
c. SEPIA
d. NEGA
e. MIRROR
f. BLK & WHT
g. WIDE [16:9]
h. STROBE
Advanced Recording
4848
ENGLISH
●
DSE(Digital Special Effects) SELECT
✤ The DSE function works in CAM mode only.
✤ The digital effects enable you to give a creative look to your
recording by adding various special effects.
✤ Select the appropriate digital effect for the type of picture that you
wish to record and the effect you wish to create.
✤ There are 8 DSE modes.
a. ART mode
This mode gives the images a coarse effect.
b. MOSAIC mode
This mode gives the images a mosaic effect.
c. SEPIA mode
This mode gives the images a reddish-brown
pigment.
d. NEGA mode
This mode reverses the colors of the images,
creating a negative image.
e. MIRROR mode
This mode cuts the picture in half, using a mirror
effect.
f. BLK & WHT mode
This mode changes the images to black and white.
g. WIDE [16:9] mode
Produce images in the WIDE [16:9] format for
Playback on wide screen TVs.
h. STROBE mode
This effect converts on-screen action to a series of still images, giving
an effect similar to slow-motion.
b
dc
e f
h
g
a
Page 49
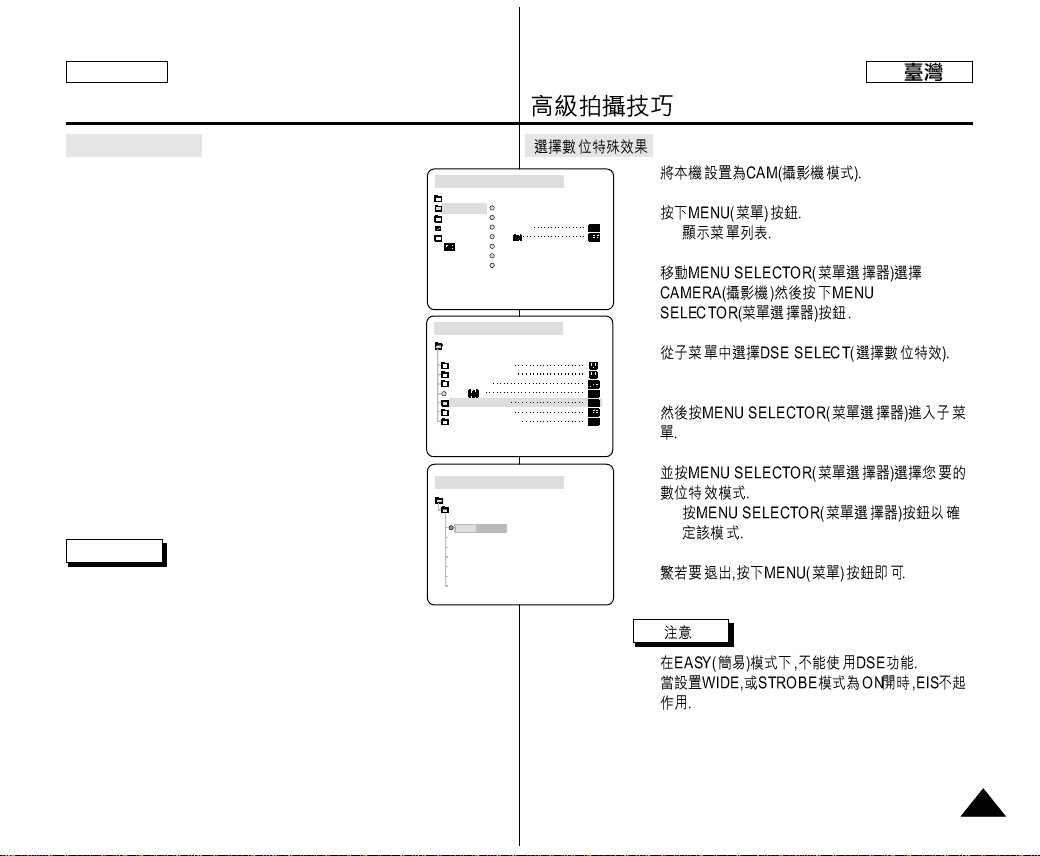
1.
2.
■
3.
4.
5.
6.
■
7.
■
■
Advanced Recording
4949
ENGLISH
Selecting an effect
1. Set the camcorder to CAM mode.
2. Press the MENU button.
■
The menu list will appear.
3. Move the MENU SELECTOR to highlight CAMERA
and push the MENU SELECTOR.
4. Select DSE SELECT from the submenu.
5. Push the MENU SELECTOR to enter the sub-menu.
6. Using MENU SELECTOR, select the DSE mode.
■
Push the MENU SELECTOR to confirm the DSE
mode.
7. To exit, press the MENU button.
Notes
■
The DSE function will not operate in EASY mode.
■
While setting the WIDE or STROBE to ON, the EIS
function does not work.
CAM MODE
PROGRAM AE
WHT. BALANCE
D.ZOOM
EIS
DSE SELECT
MEMORY MIX
FLASH SELECT
CAMERA SET
CAM MODE
INITIAL
PROGRAM AE
WHT. BALANCE
D.ZOOM
EIS
DSE SELECT
MEMORY MIX
FLASH SELECT
CAMERA
A/V
MEMORY
VIEWER
CAM MODE
DSE SELECT
OFF
ART
MOSAIC
SEPIA
CAMERA SET
NEGA
MIRROR
BLK&WHT
Page 50
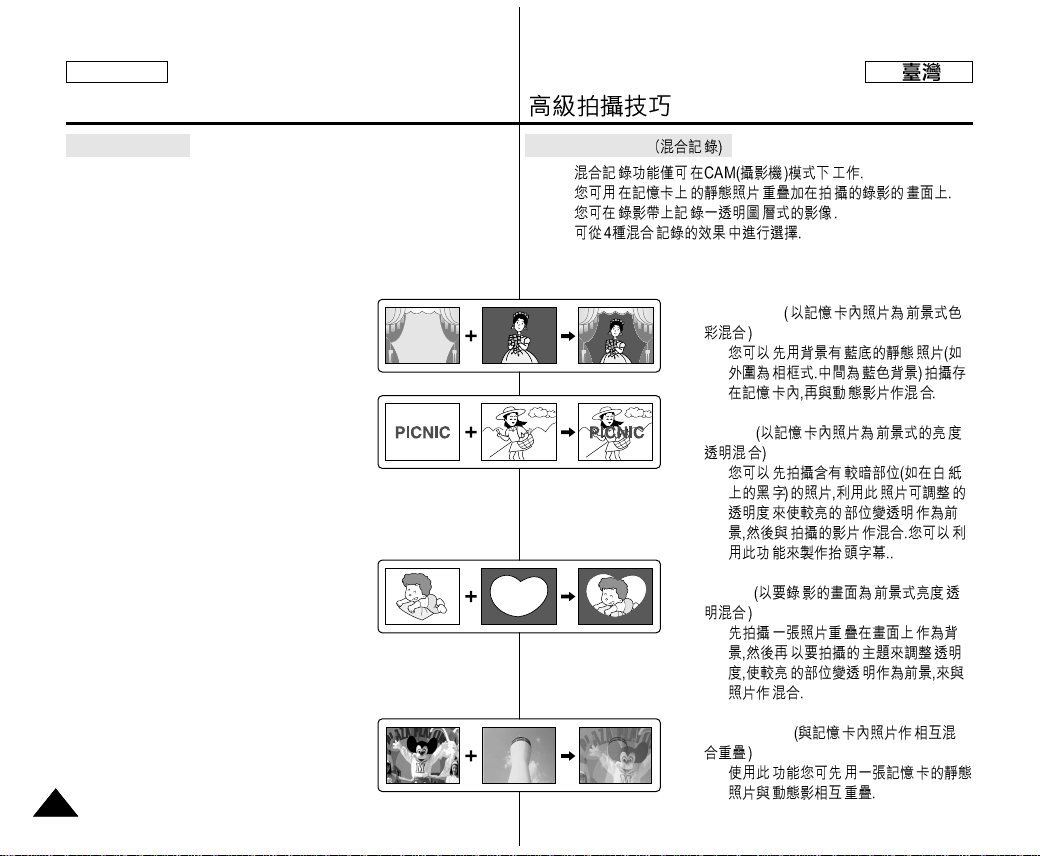
●
MEMORY MIX
✤
✤
✤
✤
■
M.CHROMA
-
■
M.LUMI
-
■
C.LUMI
-
■
M.OVER LAP
-
Advanced Recording
5050
ENGLISH
●
MEMORY MIX
✤ The MEMORY MIX function works in CAM mode only.
✤ You can superimpose a still image you have recorded on the
Memory Stick on top of the moving image you are recording.
✤ You can record the superimposed images on a tape.
✤ Select from 4 types of Memory Mix effects:
■
M. CHROMA (Memory chroma key)
- You can swap a blue area of a still image
such as a picture frame with a moving
image.
■
M.LUMI (Memory luminance key)
- You can swap a brighter area of a still image
such as a handwritten illustration or title
with a moving image.
Make your own title or illustration by drawing or writing on a white
piece of paper. Adjust the mix level in the light area of the still
image.
■
C. LUMI (Camera luminance key)
- Superimpose the currently recording image
on top of a still image, which becomes its
background.
Shoot the subject against a brighter background.
The brighter area of the moving image will be a swapped with a
still image.
■
M.OVER LAP (Memory overlap)
- You can make a moving image fade in on
top of a still image recorded on the Memory
Stick as the overlap function.
Page 51
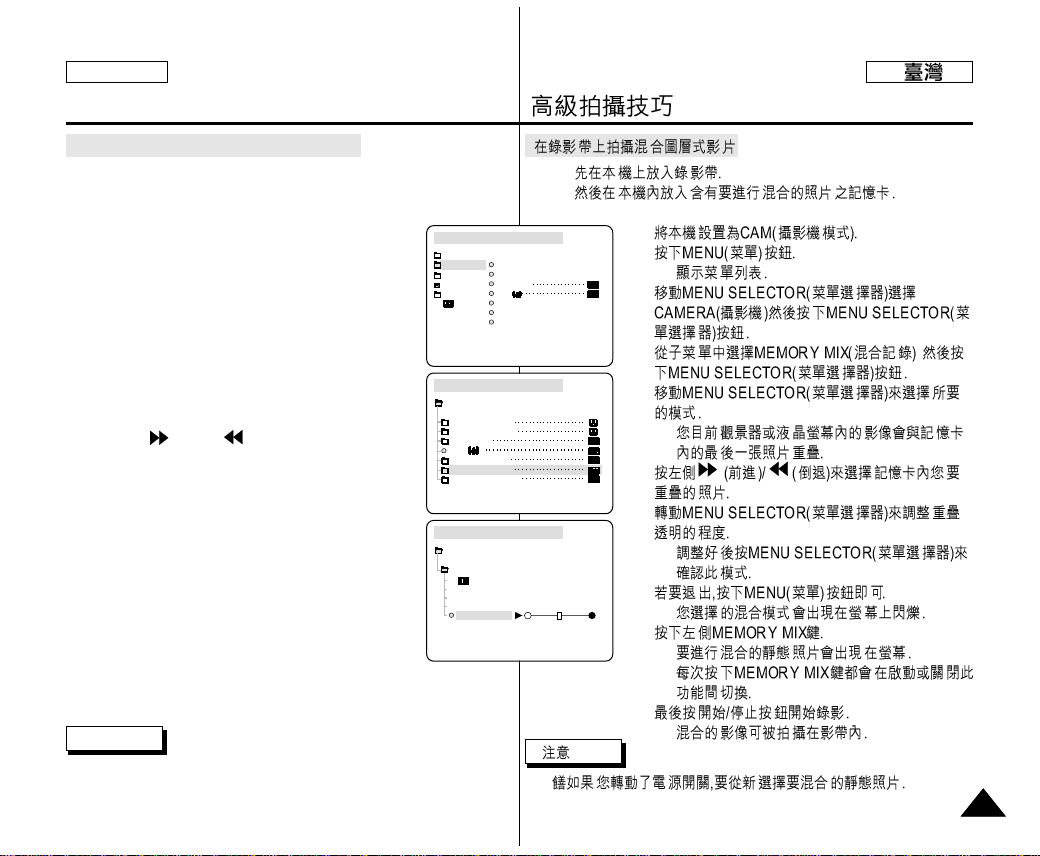
✤
✤
1.
2.
■
3.
4.
5.
■
6.
7.
■
8.
■
9.
■
■
10.
■
■
Advanced Recording
5151
ENGLISH
Recording Superimposed images on a tape
✤ Insert a tape for recording into your camcorder.
✤ Insert a Memory Stick is recorded still images into your camcorder.
1. Set the camcorder to CAM mode.
2. Press the MENU button.
■
The menu list will appear.
3. Move the MENU SELECTOR to highlight CAMERA
and push the MENU SELECTOR.
4. Select MEMORY MIX from the submenu and
push the MENU SELECTOR.
5. Move the MENU SELECTOR to select the desired
MEMORY MIX mode and push the
MENU SELECTOR.
■
Your currently recording image is combined with
the last recorded image.
6. Press the (FWD)/ (REV) buttons to select
the still image you want to superimpose.
7. Move the MENU SELECTOR to adjust the mix level
■
Push the MENU SELECTOR to confirm the
MEMORY MIX mode.
8. To exit, press the MENU button.
■
Your selected MEMORY MIX mode is flashed
in the display.
9. Press the MEMORY MIX button.
■
The still image is superimposed on the moving
image.
■
Each time you press the MEMORY MIX button,
your selection is activated (display lights
continuously) or de activated (display flashes)
10. Press the START/STOPbutton to start recording.
■
The superimposed images are recorded onto the tape.
Note
■
If you turn the position of the power switch, select your still image for
MEMORY MIX again.
CAM MODE
INITIAL
PROGRAM AE
WHT. BALANCE
D.ZOOM
EIS
DSE SELECT
MEMORY MIX
FLASH SELECT
CAMERA
A/V
MEMORY
VIEWER
CAM MODE
PROGRAM AE
WHT. BALANCE
D.ZOOM
EIS
DSE SELECT
MEMORY MIX
FLASH SELECT
CAMERA SET
CAM MODE
MEMORY MIX
M.CHROMA
M.LUMI
C.LUMI
M.OVERLAP
CAMERA SET [07/07]
STBY
Page 52
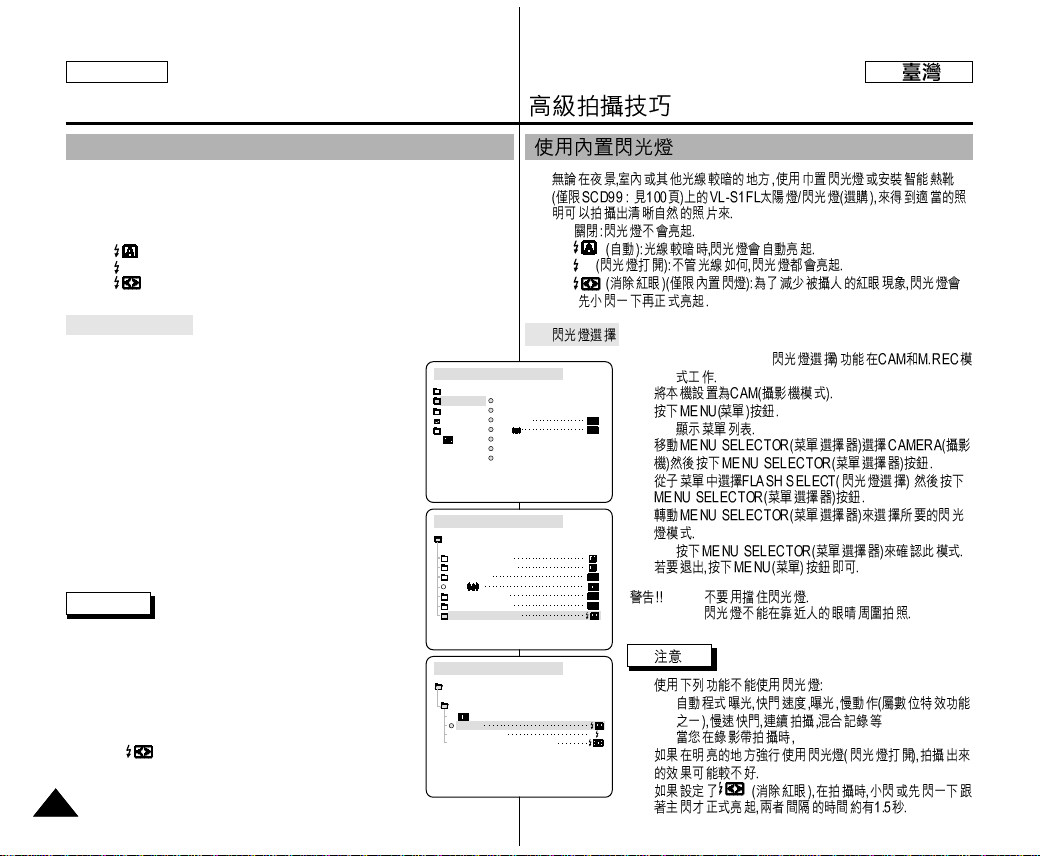
✤
■
■
■
■
●
✤ FLASH SELECT(
1.
2.
■
3.
4.
5.
■
6.
■
■
■
-
-
■
■
Advanced Recording
5252
ENGLISH
✤ You can take natural looking flash pictures with appropriate illumination using
the built-in flash or attaching the VL-S1FL video Light/ Flash (optional) to the
camcorder's Smart shoe (SCD99 only; see page 100), whether they are night
scenes, in doors or in other dark places.
■
OFF : The flash does not fire.
■
(Auto) : The flash comes on depending on the brightness of the subject.
■
(Flash on) : The flash comes on regardless of the brightness of the subject.
■
(Red-eye reduction auto: built-in flash only) : The flash pre-fires
automatically before the main firing to reduce the red-eye phenomenon.
●
FLASH SELECT
✤ The FLASH SELECT function works in CAM and M.REC mode.
1. Set the camcorder to CAM mode.
2. Press the MENU button.
■
The menu list will appear
3. Move the MENU SELECTOR to highlight CAMERA and
push the MENU SELECTOR.
4. Select FLASH SELECT from the submenu and push the
MENU SELECTOR.
5. Using the MENU SELECTOR, Select the FLASH SELECT
mode.
■
Push the MENU SELECTOR to confirm the FLASH
SELECT mode.
6. To exit, press the MENU button.
Warning!
■
Do not fire the flash with the flash bulb
covered with your hand.
■
Do not fire the flash close to people’s eyes.
Notes
■
While using the following functions, you cannot use the
FLASH function:
- PROGRAM AE, SHUTTER SPEED, EXPOSURE,
STROBE (DSE function), SLOW SHUTTER,
CONTINUOUS SHOT, MEMORY MIX
- When you are recording movies onto a tape.
■
If the flash is forced to fire (Flash on) in a bright location,
the effect of flash photography may sometimes not be obtained.
■
When (Red-eye reduction auto) is set, the flash fires
twice-once to perform red-eye reduction and the second flash
main firing for taking the photograph.
It takes about 1.5 second between the flash firing for red-eye
reduction and the main firing.
CAM MODE
INITIAL
PROGRAM AE
WHT. BALANCE
D.ZOOM
EIS
DSE SELECT
MEMORY MIX
FLASH SELECT
CAMERA
A/V
MEMORY
VIEWER
CAM MODE
PROGRAM AE
WHT. BALANCE
D.ZOOM
EIS
DSE SELECT
MEMORY MIX
FLASH SELECT
CAMERA SET
CAM MODE
FLASH SELECT
AUTO
FLASH ON
RED EYE REDUCTION
CAMERA SET
Using the Built - in Flash
Page 53
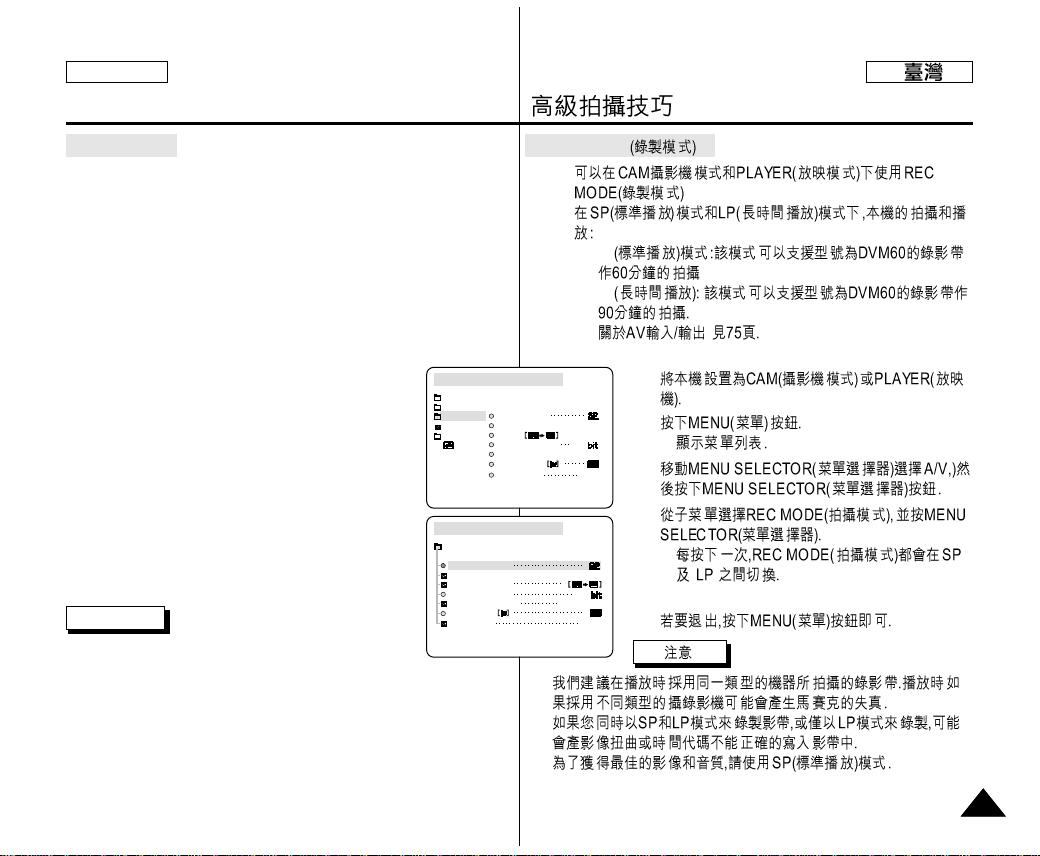
●
REC MODE
✤
✤
■
SP
■
LP
■
1.
2.
■
3.
4.
■
5.
■
■
■
Advanced Recording
5353
ENGLISH
●
REC MODE
✤ The REC MODE function works in both CAM and PLAYER
modes.
✤ This camcorder records and plays back in SP (standard play) mode
and in LP (long play) mode.
■
SP (standard play): This mode permits 60 minutes of recording
time with a DVM60 tape.
■
LP (long play): This mode permits 90 minutes of recording time
with a DVM60 tape.
■
See AV IN/OUT select on page 75.
1. Set the camcorder to CAM or PLAYER mode.
2. Press the MENU button.
■
The menu list will appear.
3. Move the MENU SELECTOR to highlight A/V and
push the MENU SELECTOR.
4. Select REC MODE from the submenu and push the
MENU SELECTOR.
■
The REC MODE toggles between SP and LP with
each press.
5. To exit, press the MENU button.
Notes
■
We recommend that you use this camcorder to play
back the tapes that you recorded on this camcorder.
Playing back a tape recorded in other equipment may produce mosaic
shaped distortion.
■
When you record a tape in SP and LP modes, or LP mode only, the
playback picture may be distorted or the time code
may not be written properly between scenes.
■
Record using SP mode for best picture and sound quality.
CAM MODE
INITIAL
WIND CUT
REC MODE
PHOTO SEARCH
AUDIO MODE 12
AV IN/OUT
OUT
AUDIO SELECT
CAMERA
A/V
MEMORY
VIEWER
COPY
CAM MODE
REC MODE
PHOTO SEARCH
PHOTO COPY
AUDIO MODE 12
SOUND[1]
AUDIO SELECT
WIND CUT
A / V SET
OUT
AV IN/OUT
Page 54
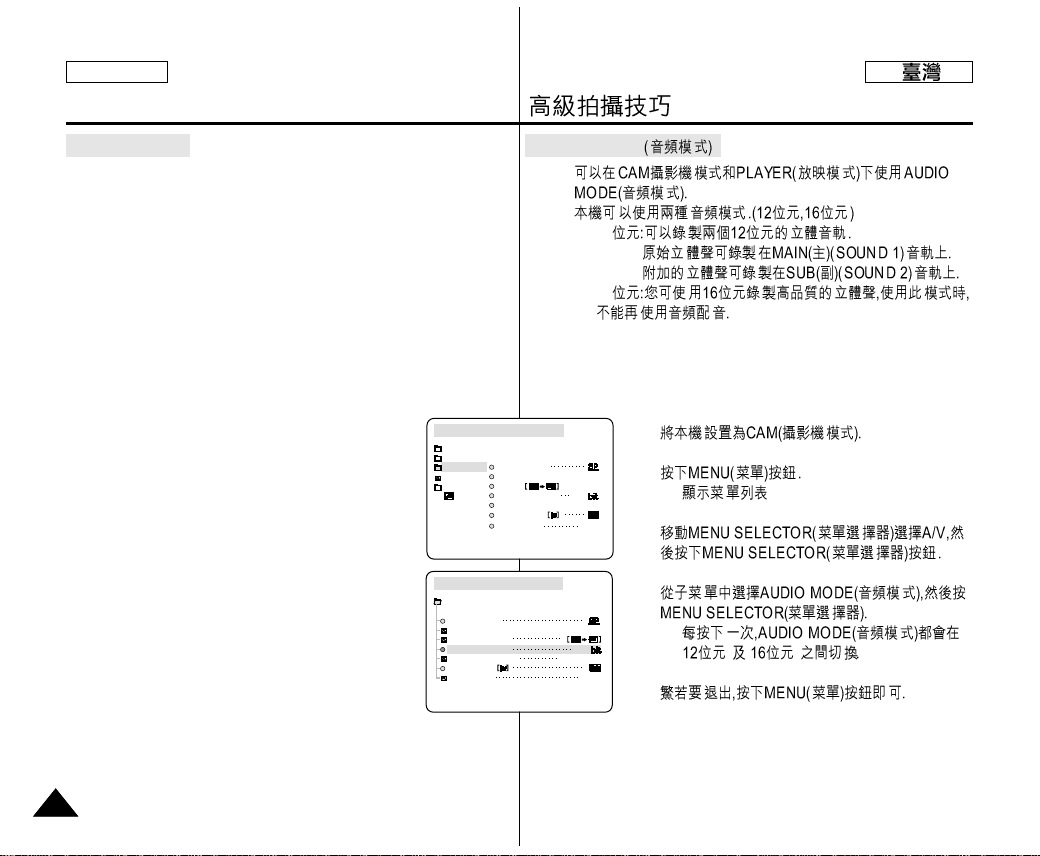
●
AUDIO MODE
✤
✤
■
12
■
16
1.
2.
■
3.
4.
■
5.
Advanced Recording
5454
ENGLISH
●
AUDIO MODE
✤ The AUDIO MODE function works in CAM and PLAYER modes.
✤ This camcorder records sound in two ways. (12bit, 16bit)
■
12bit : You can record two 12bit stereo sound tracks.
The original stereo sound can be recorded onto the
MAIN (SOUND1) track.
Additional stereo sound can be dubbed onto the SUB
(SOUND2) track.
■
16bit : You can record one high quality stereo sound using the
16bit recording mode.
Audio dubbing is not possible when using this mode.
1. Set the camcorder to CAM mode.
2. Press the MENU button.
■
The menu list will appear.
3. Move the MENU SELECTOR to highlight A/V and
push the MENU SELECTOR.
4. Select the AUDIO MODE from the menu and push
the MENU SELECTOR.
■
The AUDIO MODE toggles between 12bit-16bit
with each push.
5. To exit, press the MENU button.
CAM MODE
REC MODE
PHOTO SEARCH
PHOTO COPY
AUDIO MODE 12
SOUND[1]
AUDIO SELECT
WIND CUT
A / V SET
OUT
AV IN/OUT
CAM MODE
INITIAL
WIND CUT
REC MODE
PHOTO SEARCH
AUDIO MODE 12
AV IN/OUT
OUT
AUDIO SELECT
CAMERA
A/V
MEMORY
VIEWER
COPY
Page 55
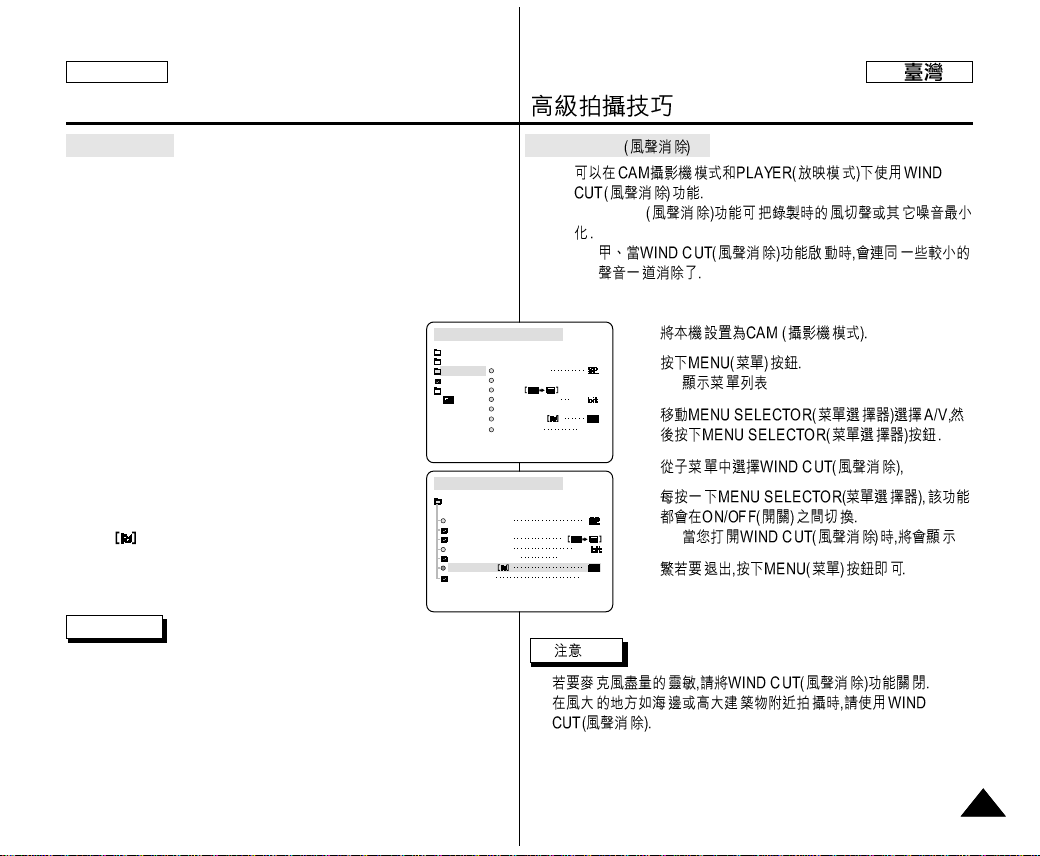
●
WIND CUT
✤
✤ WIND CUT
-
1.
2.
■
3.
4.
5.
■
6.
■
■
Advanced Recording
5555
ENGLISH
●
WIND CUT
✤ The WIND CUT function works in CAM and PLAYER modes.
✤ The WIND CUT function minimizes wind noise or other noise
while recording.
- When the wind cut is on, it is possible other low sounds will be
eliminated along with the sound of the wind.
1. Set the camcorder to CAM mode.
2. Press the MENU button.
■
The menu list will appear.
3. Move the MENU SELECTOR to highlight A/V and
push the MENU SELECTOR.
4. Select WIND CUT from submenu.
5. This feature toggles ON/OFF each time you push the
MENU SELECTOR.
■
is shown in the display when you turn the
WIND CUT on.
6. To exit, press the MENU button.
Notes
■
Make sure WIND CUT is set to off when you want the microphone to
be as sensitive as possible.
■
Use the WIND CUT when recording in windy places such as the beach
or near buildings.
CAM MODE
REC MODE
PHOTO SEARCH
PHOTO COPY
AUDIO MODE 12
SOUND[1]
AUDIO SELECT
WIND CUT
A / V SET
OUT
AV IN/OUT
CAM MODE
INITIAL
WIND CUT
REC MODE
PHOTO SEARCH
AUDIO MODE 12
AV IN/OUT
OUT
AUDIO SELECT
CAMERA
A/V
MEMORY
VIEWER
COPY
Page 56
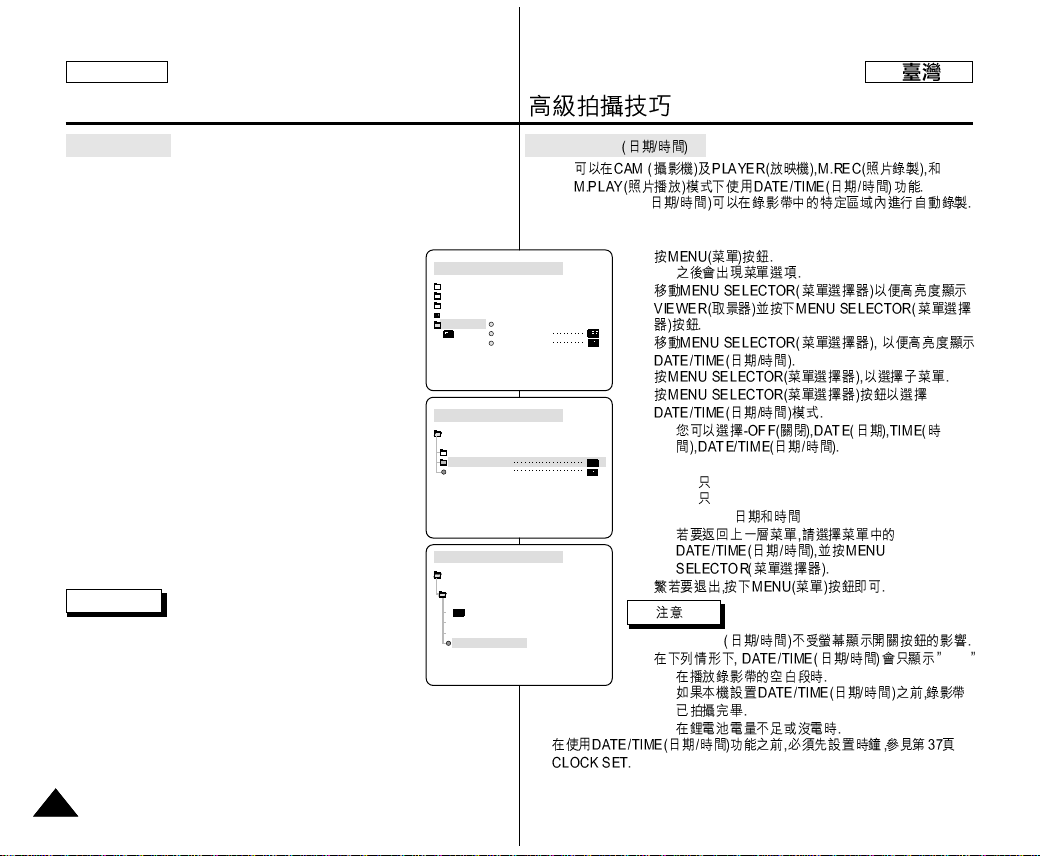
●
DATE/TIME
✤
✤ DATE/TIME(
1.
■
2.
3.
4.
5.
■
- OFF
- DATE
- TIME
-DATE TIME
■
6.
■
DATE/TIME
■
- - -
-
-
-
■
Advanced Recording
5656
ENGLISH
●
DATE/TIME
✤ The DATE/TIME function works in CAM, PLAYER, M.REC and
M.PLAY modes.
✤ The date and time are automatically recorded on a special data area of
the tape.
1. Press the MENU button.
■
The menu list will appear.
2. Move the MENU SELECTOR to highlight VIEWER and
push the MENU SELECTOR.
3. Move the MENU SELECTOR to highlight DATE/TIME.
4. Push the MENU SELECTOR to select the sub-menu.
5. Using the MENU SELECTOR, select the DATE/TIME
mode.
■
You can choose to display - the OFF, DATE, TIME,
DATE/TIME
- OFF
- DATE only
- TIME only
- DATE & TIME
■
To return to the previous menu, highlight the
DATE/TIME in the middle of the menu and push the
MENU SELECTOR.
6. To exit, press the MENU button.
Notes
■
The DATE/TIME is not affected by the OSD ON/OFF
(DISPLAY) button.
■
The DATE/TIME will read “- - -” in the following
conditions.
- During playback of a blank section of a tape.
- If the tape was recorded before setting the DATE/TIME in the Camera’s
memory.
- When the lithium battery becomes weak or dead.
■
Before you can use the DATE/TIME function, you must set the Clock.
See CLOCK SET on page 37.
CAM MODE
VIEWER SET
LCD ADJUST
DATE / TIME
TV DISPLAY
CAM MODE
INITIAL
LCD ADJUST
DATE / TIME
TV DISPLAY
CAMERA
A/V
MEMORY
VIEWER
CAM MODE
DATE / TIME
VIEWER SET
DATE
TIME
DATE&TIME
Page 57
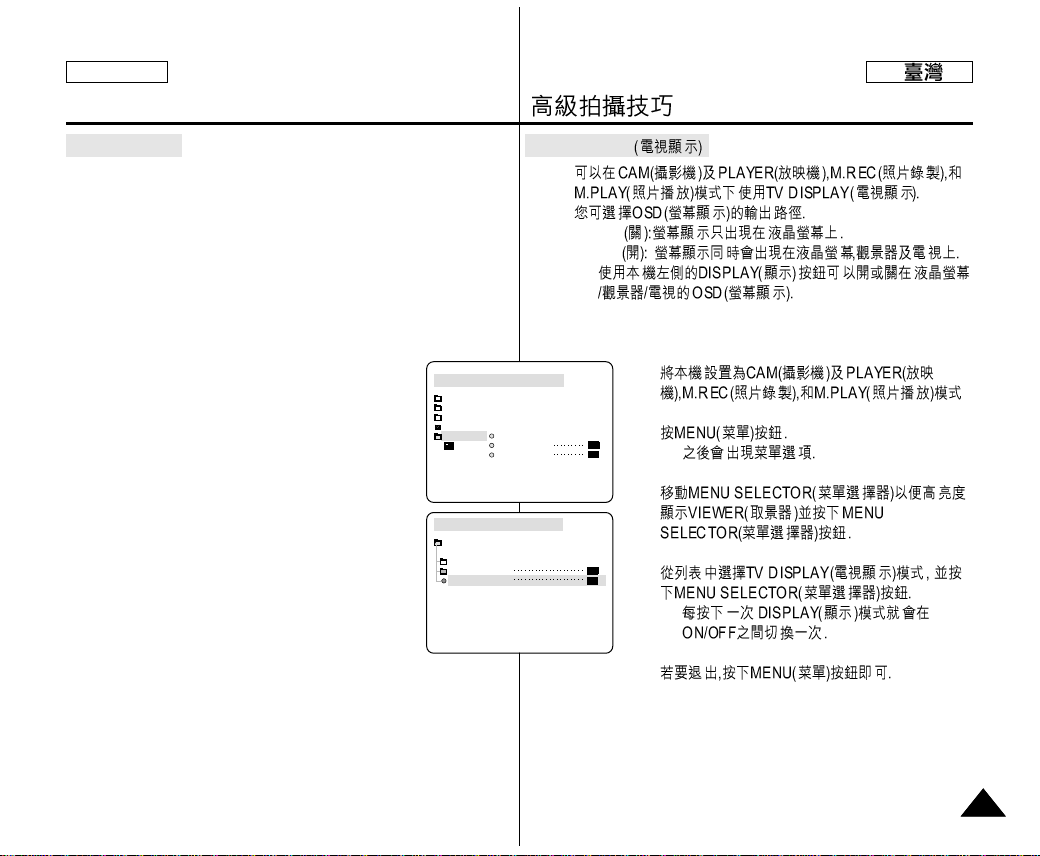
●
TV DISPLAY
✤
✤
■
OFF
■
ON
■
1.
2.
■
3.
4.
■
5.
Advanced Recording
5757
ENGLISH
●
TV DISPLAY
✤ The TV DISPLAYfunction works in CAM, PLAYER, M.REC and
M.PLAY modes.
✤ You can select the output path of the OSD (On Screen Display).
■
OFF: The OSD appears in the LCD screen only.
■
ON: The OSD appears in the LCD screen, View Finder and TV.
■
Use the DISPLAY button located at the left side of the
camcorder to turn ON/OFF all of the OSD displayed on the
LCD/View Finder/TV.
1. Set the camcorder to CAM, PLAYER, M.REC and
M.PLAY mode.
2. Press the MENU button.
■
The menu list will appear.
3. Move the MENU SELECTOR to highlight VIEWER
and push the MENU SELECTOR.
4. Select the TV DISPLAY mode in list, push the
MENU SELECTOR.
■
The DISPLAY mode switches between ON/OFF
with each push.
5. To exit, press the MENU button.
CAM MODE
VIEWER SET
LCD ADJUST
DATE / TIME
TV DISPLAY
CAM MODE
INITIAL
LCD ADJUST
DATE / TIME
TV DISPLAY
CAMERA
A/V
MEMORY
VIEWER
Page 58
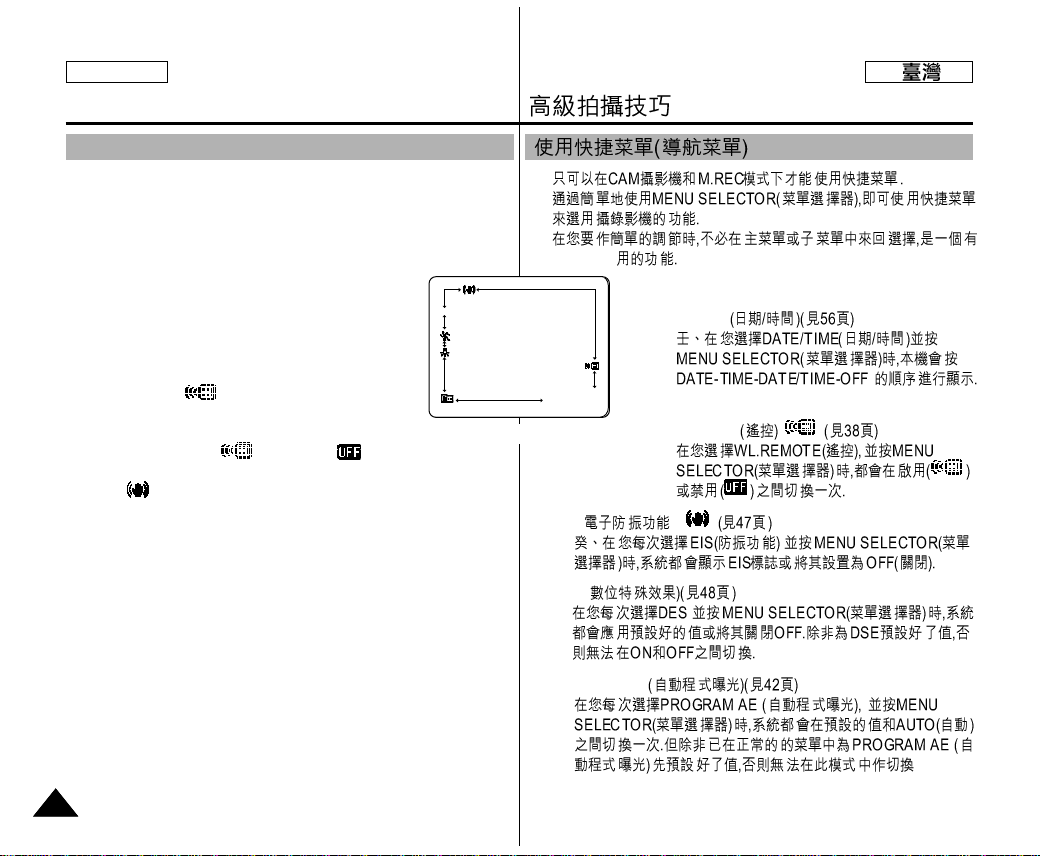
✤
✤
■
DATE/TIME
-
■
WL.REMOTE ()
-
■
EIS ( ) ( )
-
■
DSE (
-
■
PROGRAM AE
-
.
Advanced Recording
5858
ENGLISH
✤ Quick menu is available only in CAM and M.REC mode.
✤ Quick menu is used to adjust camera functions by simply using the
MENU SELECTOR button.
This feature is useful for when you want to make simple adjustments
without having to access menus and submenus.
■
DATE/TIME (see page 56)
- Each time you select DATE/TIME and push the
MENU SELECTOR, it will be displayed in order of
DATE - TIME - DATE/TIME - OFF.
■
WL.REMOTE( ) (see page 38)
- Each time you select WL.REMOTE and push the
MENU SELECTOR, the WL.REMOTE is switched
to either enabled ( ) or disabled ( ).
■
EIS ( ) (see page 47)
- Each time you select EIS and push the MENU SELECTOR,
the EIS icon is displayed or set to OFF.
■
DSE (Digital Special Effect) (see page 48)
- Each time you select DSE and push the MENU SELECTOR, the
DSE preset values are applied or set to OFF.
DSE values will not switch between On and Off if they have not
been preset in the menu.
■
PROGRAM AE (see page 42)
- Each time you select PROGRAM AE and push the MENU
SELECTOR, you can choose between the preset PROGRAM AE
values and AUTO. You can’t choose between Auto and PROGRAM
AE values if the values have not been preset in the regular menu.
Using Quick Menu(Navigation Menu)
(CAM mode)
MIRROR
1 0 : 0 0 A M
J A N . 10 , 2 0 0 3
Page 59
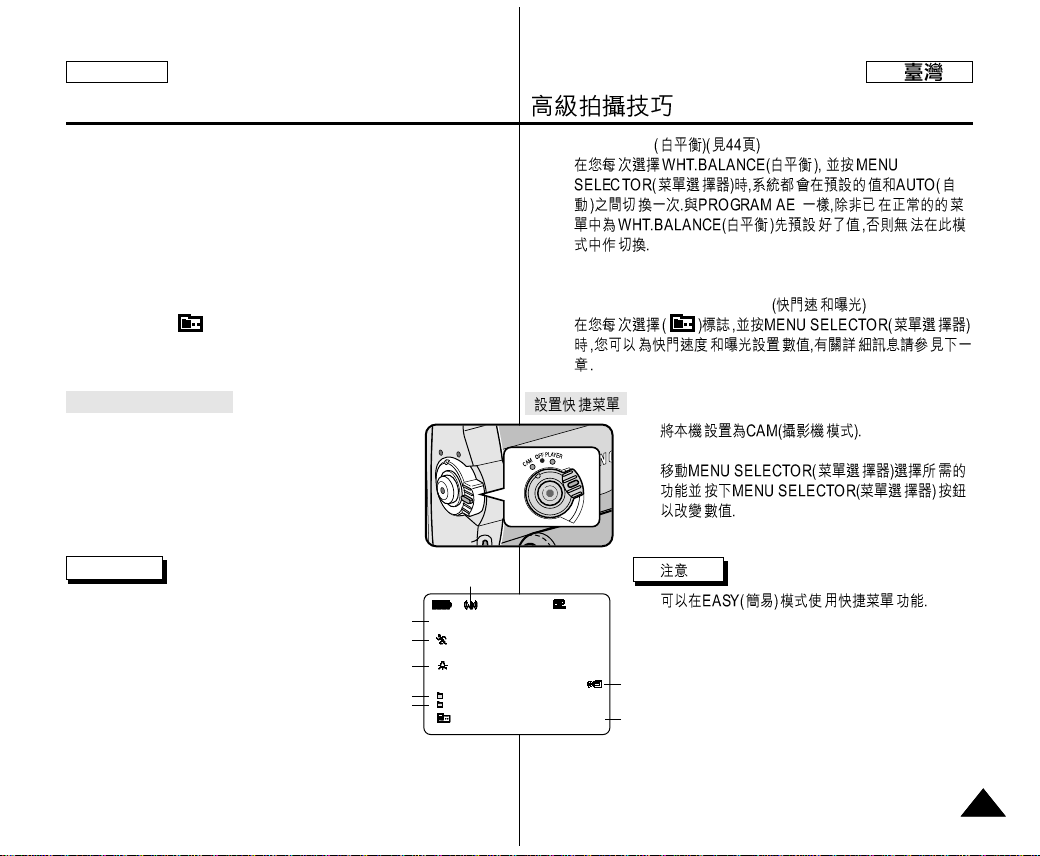
■
WHT.BALANCE
-
■
SHUTTER SPEED & EXPOSURE
-
1.
2.
■
Advanced Recording
5959
ENGLISH
■
WHT. BALANCE (see page 44)
- Each time you select WHT. BALANCE and push the MENU
SELECTOR, you can choose between preset WHT.BALANCE
values and AUTO.
As in PROGRAM AE, you can't choose between Auto and
WHT.BALANCE values it they have not been preset.
■
SHUTTER SPEED & EXPOSURE
- You can set values for SHUTTER SPEED and EXPOSURE by
selecting ( ) icon and pushing the MENU SELECTOR.
For more information, see the next chapter.
Setting the Quick menu
1. Set the camcorder to CAM mode.
2. Move the MENU SELECTOR to select a function you
want and then push
the MENU SELECTOR to change the values.
Note
■
Quick menu function will not
operate in EASY mode.
SHUTTER
EXPOSURE
0 : 0 0 : 0 0
1 0 : 0 0 A M
J A N . 1 0 , 2 0 0 3
STBY
MIRROR
WL.REMOTE
DSE
PROGRAM AE
WHT. BALANCE
SHUTTTER
EXPOSURE
EIS
DATE/TIME
Page 60
Advanced Recording
6060
ENGLISH
SHUTTER SPEED & EXPOSURE
✤ You can set SHUTTER SPEED and EXPOSURE in CAM/M.REC mode.
✤ SHUTTER SPEED and EXPOSURE values can only be set in the Quick
Menu.
✤ SHUTTER SPEED and EXPOSURE are automatically switched and/or
deactivated.
1. Set the power switch to CAM mode.
2. Move the MENU SELECTOR until you see icon( ) on, and then push
the MENU SELECTOR.
■
You see a screen on which you can select SHUTTER SPEED and
EXPOSURE.
■
Move the MENU SELECTOR to select the item you want and then
push the MENU SELECTOR.
■
SHUTTER SPEED can be set to 1/60, 1/100, 1/250, 1/500, 1/1000,
1/2000, 1/4000 or 1/10000.
■
Only SHUTTER SPEED up to 1/250 are available when using a
M.REC mode.
■
EXPOSURE can be set between 00 and 29.
3. To exit from the setting screen, select the icon( ) and push the MENU
SELECTOR.
Recommended Shutter speeds when recording
✤ Outdoor sports such as golf or tennis : 1/2000 or 1/4000.
✤ Moving cars or trains or other rapidly moving vehicles such as roller
coasters : 1/1000, 1/500 or 1/250
✤ Indoor sports such as basketball : 1/100
Notes
■
If you want to use the selected shutter speed and exposure value, you should
begin the recording with shutter speed and exposure adjustment screens
displayed on the LCD.
■
If you manually change the shutter speed and exposure value when Autoexposure option is selected, the manual changes will be applied first.
■
Image may not seem as smooth when a high shutter speed is set.
■
The camcorder returns to auto shutter setting and auto exposure setting when
you change to the EASY, SLOW SHUTTER modes.
■
When recording with a SHUTTER SPEED of 1/1000 or higher, make sure
the sun is not shining into the lens.
■
When recording with a SHUTTER SPEED or EXPOSURE, the Flash
function does not work.
✤
✤
✤
1.
2.
■
■
■
■
■
3.
✤
✤
✤
■
■
■
■
■
■
Page 61
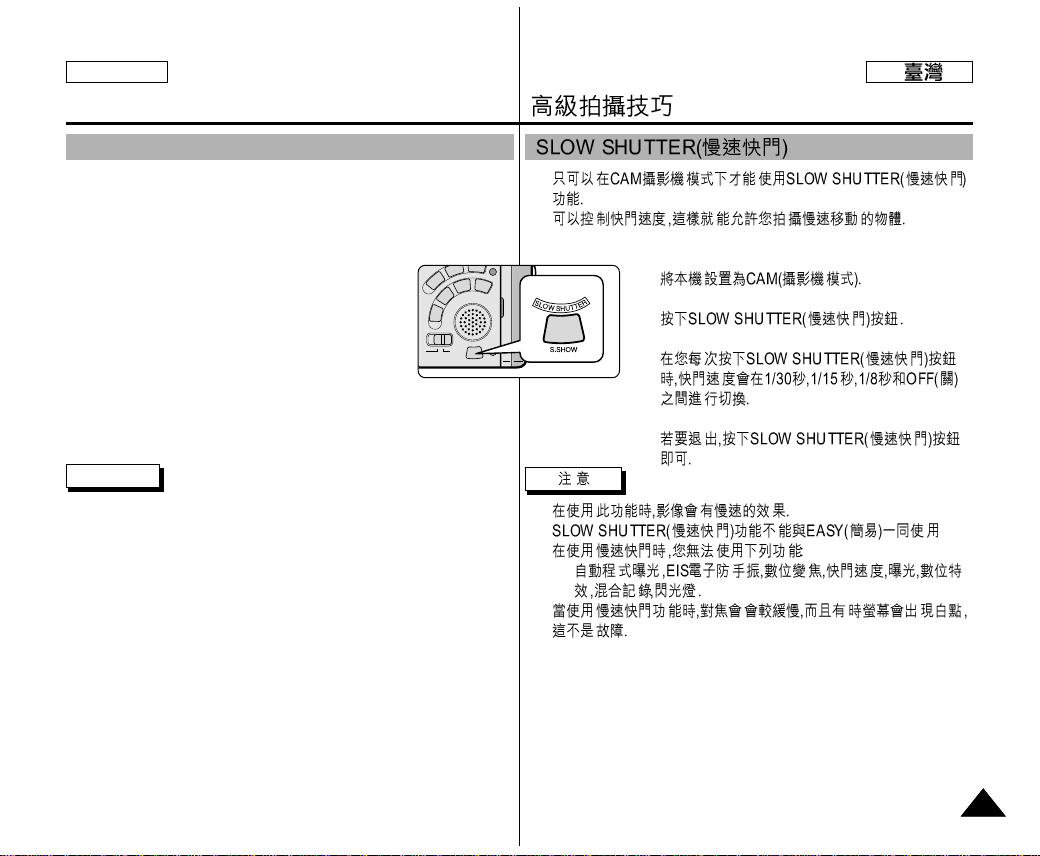
Advanced Recording
6161
ENGLISH
✤ The SLOW SHUTTER function works in CAM mode only.
✤ The shutter speed can be controlled, allowing you to record slow
moving objects.
1. Set the power switch to CAM mode.
2. Press the SLOW SHUTTER button.
3. Each time you press the SLOW SHUTTER button,
SHUTTER SPEED is changed to 1/30, 1/15, 1/8, off.
4. To exit, press the SLOW SHUTTER button.
Notes
■
When using "SLOW SHUTTER" the image takes on a slow motion like
effect.
■
The SLOW SHUTTER function will not operate in EASY mode.
■
While using the SLOW SHUTTER function, you cannot use the
following functions:
- PROGRAM AE, EIS, Digital Zoom, SHUTTER SPEED,
EXPOSURE, DSE, MEMORY MIX, Flash
■
When using “SLOW SHUTTER” function, the focus is adjusted slowly
and sometimes the white dots will appear on the screen, this is not a
fault.
SLOW SHUTTER (Low Shutter Speed)
✤
✤
1.
2.
3.
4.
■
■
■
-
■
Page 62
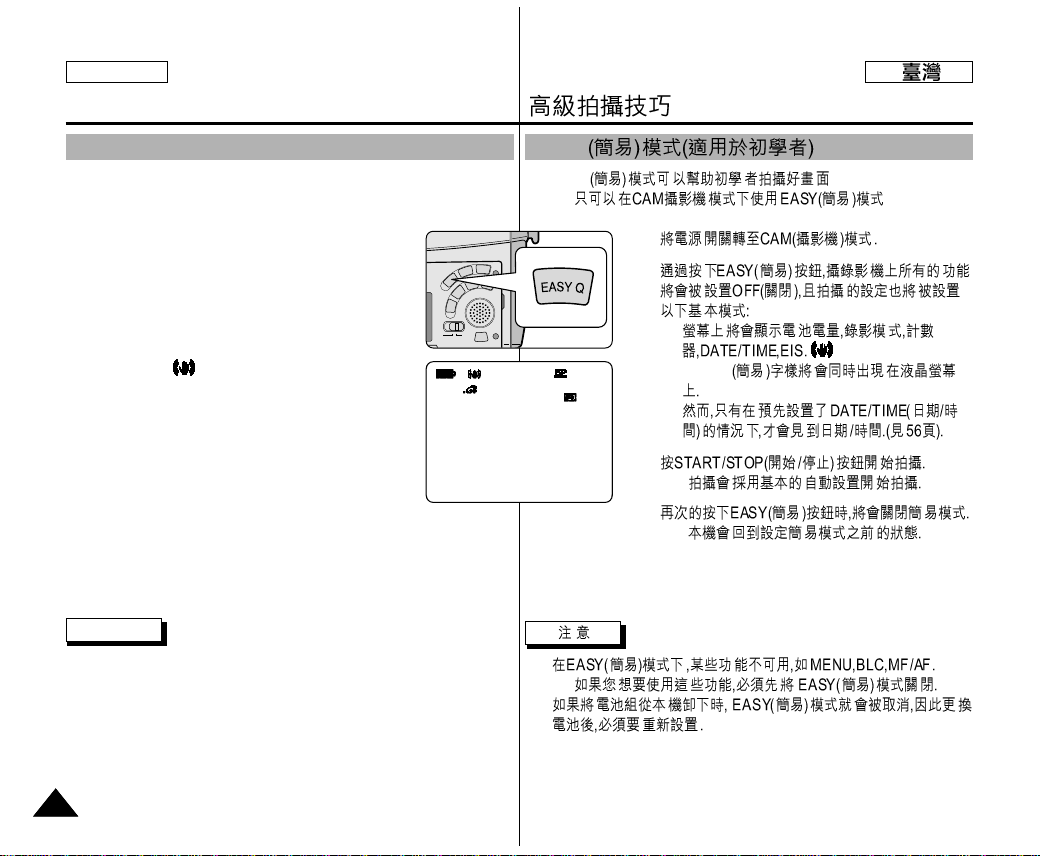
✤ EASY
■
1.
2.
■
■
EASY.Q
3.
■
4.
■
■
-
■
EASY
Advanced Recording
6262
ENGLISH
✤ The EASY mode allows a beginner to easily make good guality video
recordings.
■
The EASY mode only operates in CAM mode.
1. Set the power switch to CAM mode.
2. By pressing the EASY button, all functions on the
camera will be set to off and the recording settings will
be set to the following basic modes:
■
Battery level, recording mode, counter, DATE/TIME,
and EIS ( ) will be displayed.
■
The word “EASY.Q” will appear on the LCD at the
same time.
However, the DATE/TIME will only be seen if it has
been previously set. (see page 56)
3. Press START/STOP to start recording.
■
Recording will begin using the basic automatic
settings.
4. Pressing the EASY button again turns the EASY mode off.
■
The camera will return to the settings that were set prior to
activating EASY mode.
Notes
■
In EASY mode, certain functions are not available, such as MENU,
BLC, MF/AF.
- If you want to use these functions, you must first switch the EASY
mode off.
■
The EASY mode settings are deleted when the battery pack is removed
from the camcorder and therefore must be reset when a battery pack has
been replaced.
EASY Mode (for Beginners)
0 : 0 0 : 0 0
1 0 : 0 0 A M
J A N . 1 0 , 2 0 0 3
STBY
EASY
5 5 min
Page 63
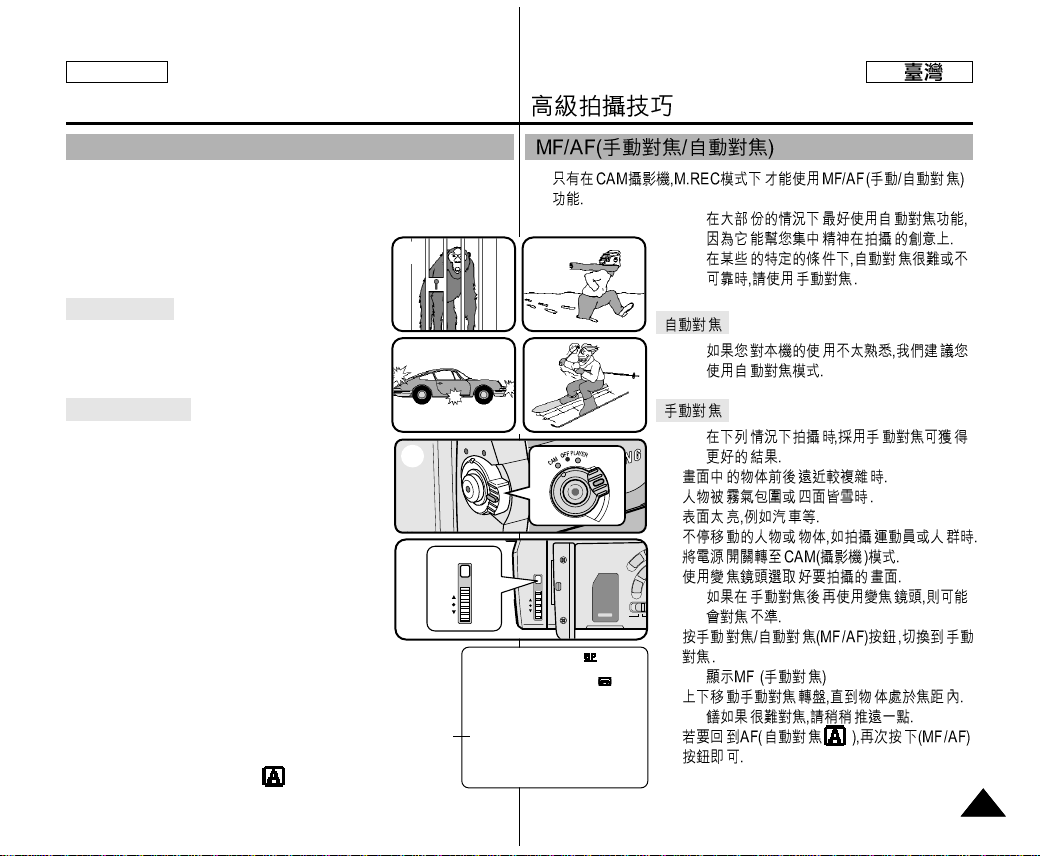
✤
✤
✤
✤
✤
a.
b.
c.
d.
1.
2.
■
3.
■
4.
■
5.
Advanced Recording
6363
ENGLISH
✤ The MF/AF function works in CAM, M.REC mode only.
✤ In most situations, it is better to use the automatic focus feature, as it
enables you to concentrate on the creative side of your recording.
✤ Manual focusing may be necessary under certain
conditions that make automatic
focusing difficult and/or unreliable.
Auto Focusing
✤ If you are inexperienced in the use of
camcorders, we recommend that you make use
of Auto Focus.
Manual Focusing
✤ In the following cases you may obtain better
results by adjusting the focus manually.
a. A picture containing several objects, some
close to the camcorder, others further away.
b. A person enveloped in fog or surrounded by snow.
c. Very shiny or glossy surfaces like a car.
d. People or objects moving constantly or quickly like
an athlete or a crowd.
1. Set the power switch to CAM mode.
2. Frame the picture with the zoom control.
■
If you use the zoom after manual focusing, the
picture may go out of focus.
3. Press the MF/AF button to switch to manual focus.
■
M. FOCUS(MF) appears in the display.
4. Turn the MF dial up or down until the object
is in focus.
■
Zoom out a little if focusing is difficult.
5. To return to AF(Auto Focus: ), press the MF/AF button
again.
MF/AF (Manual Focus/Auto Focus)
MF/AF
1
a
c
b
d
2
MF
0 : 0 0 : 0 0
5 3 min
1 0 : 0 0 A M
J U N . 8 , 2 0 0 3
STBY
3
M. FOCUS
Page 64
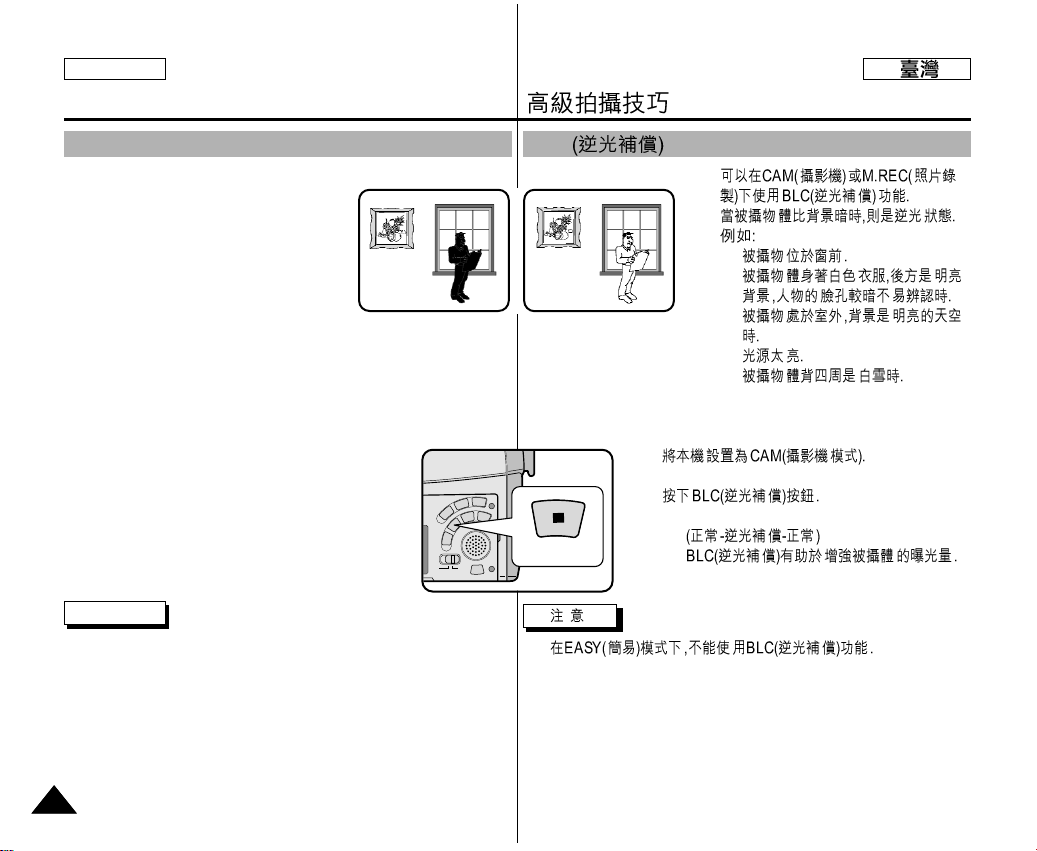
✤
✤
■
■
■
■
■
1.
2.
■
Normal - BLC - Normal
■
■
BLC
Advanced Recording
6464
ENGLISH
✤ BLC works in CAM/M.REC mode.
✤ Back lighting exists when the subject is
darker than the background:
■
The subject is in front of a window.
■
The person to be recorded is wearing
white or shiny clothes and
is placed against a bright background;
the person’s face is too dark to
distinguish his/her features.
■
The subject is outdoors and the background is overcast.
■
The light sources are too bright.
■
The subject is against a snowy background.
1. Set the power switch to CAM mode.
2. Press the BLC button.
■
Normal - BLC - Normal
■
BLC enhances the subject.
Note
■
The BLC function will not operate in EASY mode.
* BLC on* BLC off
BLC (Back Light Compensation)
BLC
Page 65
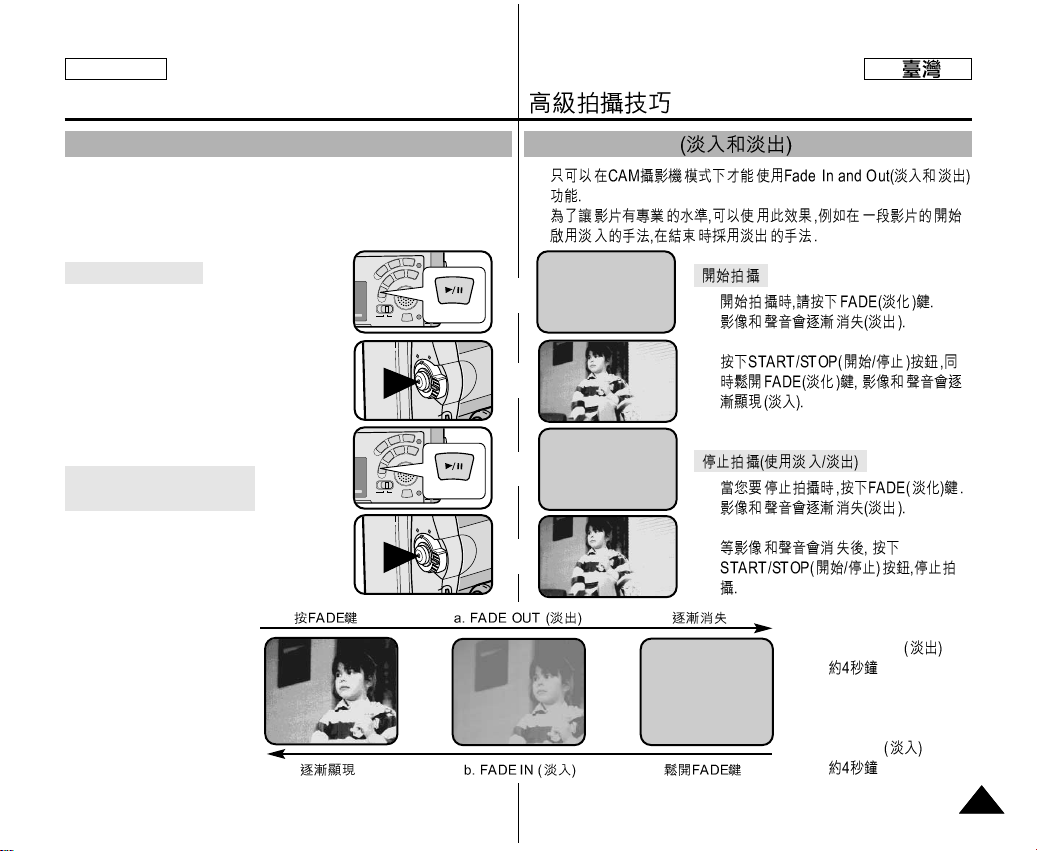
✤
✤
1.
2.
3.
4.
a. FADE OUT
b. FADE IN
Fade In and Out
Advanced Recording
6565
ENGLISH
✤ The FADE function works in CAM mode only.
✤ You can give your recordings a professional look by using special
effects such as fading in at the beginning of a sequence or fading out at
the end of a sequence.
To Start Recording
1. Before recording, hold down the FADE
button.
The picture and sound gradually disappear
(fade out).
2. Press the START/STOP button and at the
same time release the FADE button.
Recording starts and the picture and sound
gradually appear (fade in).
To Stop Recording
(use FADE IN / FADE OUT)
3. When you wish to stop recording, hold
down the FADE button. The picture and
sound gradually disappear (fade out).
4. When the picture has disappeared,
press the START/STOP
button to stop recording.
a. FADE OUT
(Approx. 4 seconds)
b. FADE IN
(Approx. 4 seconds)
Fade In and Out
FADE
FADE
REC
0:00:15
REC
0:00:15
STBY
0:00:20
STBY
0:00:00
➔
➔
➔
➔
➔
➔
➔
➔
Page 66
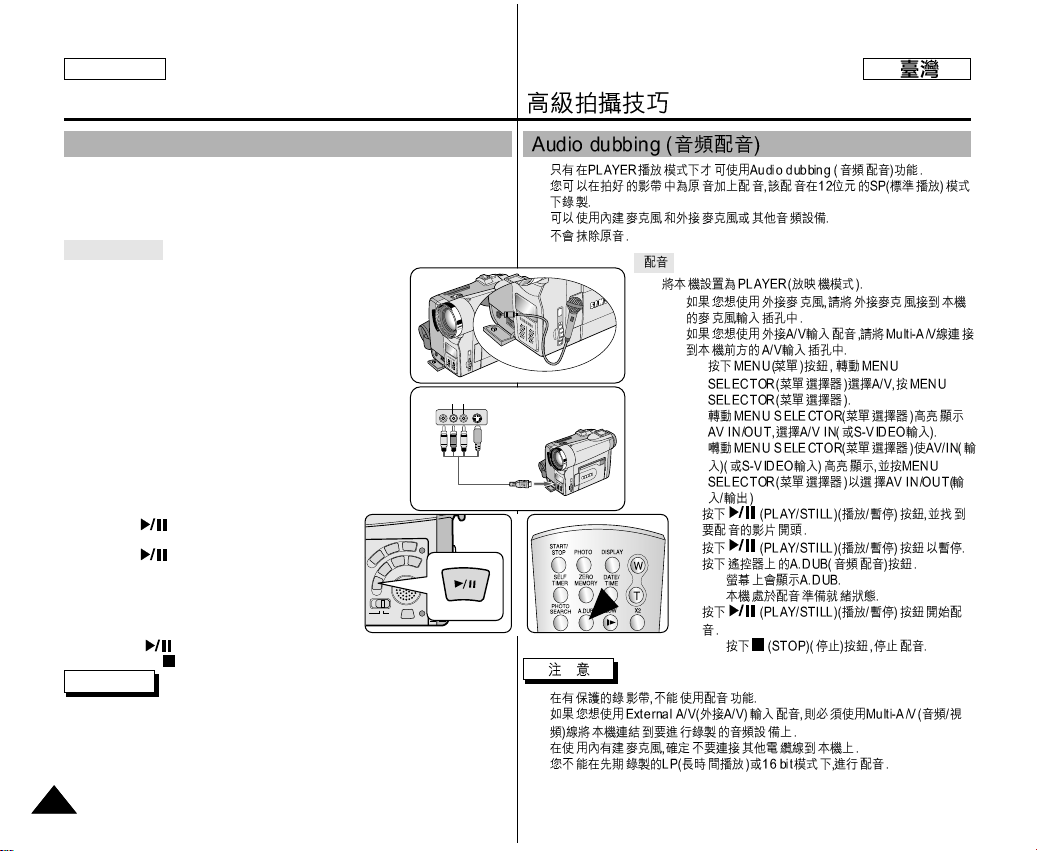
✤
✤
✤
✤
1.
■
■
-
-
-
2.
3.
4.
■
■
5.
■
■
■
■
■
Advanced Recording
6666
ENGLISH
✤ The AUDIO DUBBING function only works in PLAYER Mode.
✤ You can add sound to the original sound on a pre-recorded tape, recorded in SP
mode with 12bit sound.
✤ Use the internal and external microphones or other audio equipment.
✤ The original sound will not be erased.
Dubbing sound
1. Set the camcorder to PLAYER mode.
■
If you want to use an external microphone, connect the
microphone to the external MIC input jack on the
camcorder.
■
When you wish to dub using the External A/V input,
connect the Multi-AV cable to the camcorder by inserting
the Multi-AV cable into the Multi-AV Jack at the front
side of the camcorder.
- Press the MENU button, move the MENU
SELECTOR to highlight A/V and push the MENU
SELECTOR.
- Move the MENU SELECTOR to highlight AV
IN/OUT and push the MENU SELECTOR to select
AV IN/OUT.
- Move the MENU SELECTOR to highlight AV IN
(or S-VIDEO IN) and push the MENU SELECTOR
to select AV IN (or S-VIDEO IN).
2. Press the (PLAY/STILL) button and find the
timeframe of the scene to be dubbed.
3. Press the (PLAY/STILL) button to pause the
scene.
4. Press the A.DUB button on the Remote Control.
■
A.DUB will be displayed on the LCD.
■
The camcorder is in a ready-to-dub state for
dubbing.
5. Press the (PLAY/STILL) button to start dubbing.
■
Press the (STOP) button to stop the dubbing.
Notes
■
You can not use the audio dubbing function while playing a write protected video
tape.
■
When you wish to dub using the External A/V input, you must connect the Multi-AV
cable to the audio system from which you wish to record.
■
When adding sound using the built-in microphone, make sure not to connect any
cables to the camcorder.
■
You can not dub sound on a pre-recorded tape in LP mode or 16 bit mode.
Audio dubbing
AV IN
Audio (R)
Audio (L)
Page 67
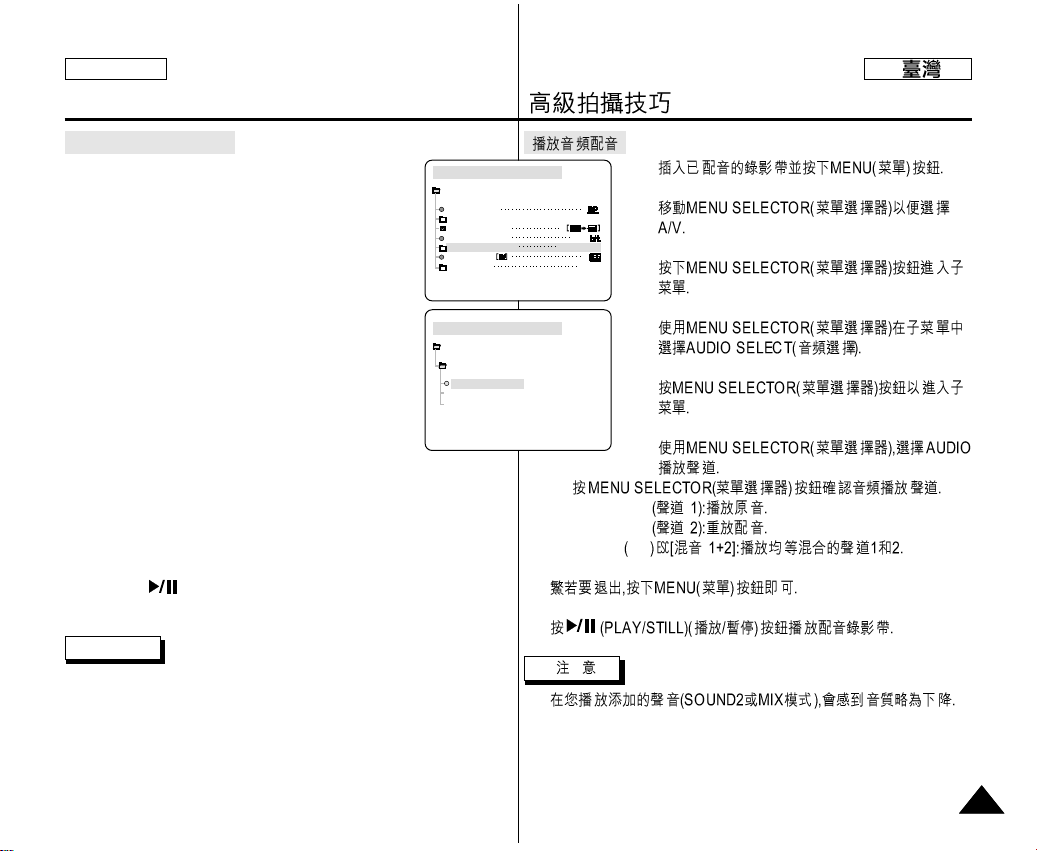
Advanced Recording
6767
ENGLISH
Dubbed audio Playback
1. Insert the dubbed tape and press MENU button.
2. Move the MENU SELECTOR to highlight A/V.
3. Push the MENU SELECTOR to enter the sub-menu.
4. Use the MENU SELECTOR to select AUDIO SELECT
from the submenu.
5. Push the MENU SELECTOR to enter the sub-menu.
6. Using the MENU SELECTOR, select the AUDIO
playback channel.
■
Push the MENU SELECTOR to confirm the audio
playback channel.
- SOUND1 : play the original sound.
- SOUND2 : play the dubbed sound.
- MIX(1+2) : play back SOUND1 and 2 equally mixed.
7. To exit, press the MENU button.
8. Press the (PLAY/STILL) button to playback the dubbed tape.
Note
■
When you playback added sound (SOUND2 or MIX mode), you may
experience loss of sound quality.
1.
2.
3.
4.
5.
6.
■
- SOUND1
- SOUND2
- MIX 1+2
7.
8.
■
PLAYER MODE
A / V SET
AUDIO SELECT
SOUND [ 1 ]
SOUND [ 2 ]
MIX [ 1 + 2 ]
PLAYER MODE
REC MODE
PHOTO SEARCH
PHOTO COPY
AUDIO MODE 12
SOUND[1]
AUDIO SELECT
WIND CUT
A / V SET
OUT
AV IN/OUT
Page 68
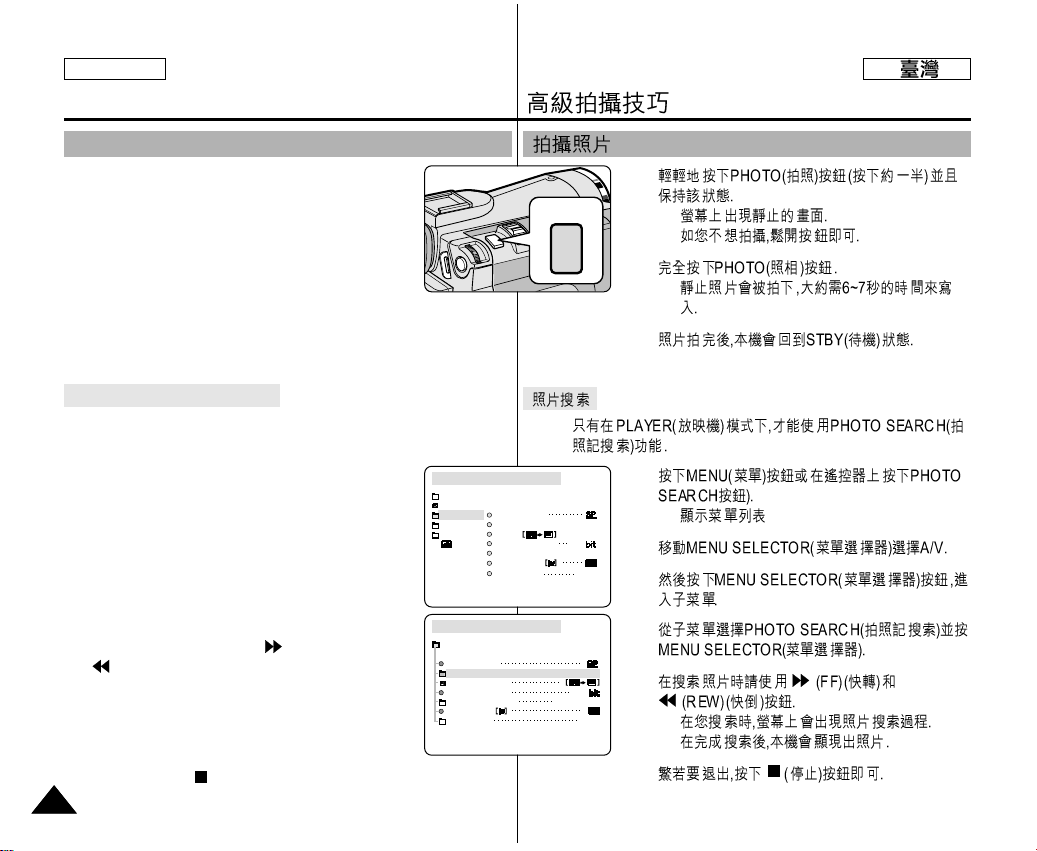
1.
■
■
2.
■
3.
✤
1.
■
2.
3.
4.
5.
■
■
6.
Advanced Recording
6868
ENGLISH
1. Press the PHOTO button lightly (about halfway down)
and hold it.
■
The still picture appears on the LCD monitor.
■
If you do not wish to record, release the button.
2. Press the PHOTO button fully down.
■
The still picture is recorded for about 6~7 seconds.
3. After the PHOTO has been recorded, the camcorder returns to STBY
mode.
Searching for a PHOTO picture
✤ The PHOTO SEARCH works in PLAYER mode only.
1. Press the MENU button. (or press the PHOTO SEARCH
button on the remote control.)
■
The MENU list will appear.
2. Move the MENU SELECTOR to highlight A/V.
3. Push the MENU SELECTOR to enter the sub-menu.
4. Select PHOTO SEARCH from the sub-menu and push
the MENU SELECTOR.
5. Search the PHOTO using the (FF) and
(REW) buttons.
■
The PHOTO search process appears on the LCD
while you are searching.
■
After completing the search, the camcorder displays
the still image.
6. To exit, press the (STOP) button.
PLAYER MODE
INITIAL
WIND CUT
REC MODE
PHOTO SEARCH
COPY
AUDIO MODE 12
AUDIO SELECT
CAMERA
A/V
MEMORY
VIEWER
AV IN/OUT
OUT
PLAYER MODE
REC MODE
PHOTO SEARCH
PHOTO COPY
AUDIO MODE 12
SOUND[1]
AUDIO SELECT
WIND CUT
A / V SET
OUT
AV IN/OUT
PHOTO Image Recording
PHOTO
Page 69
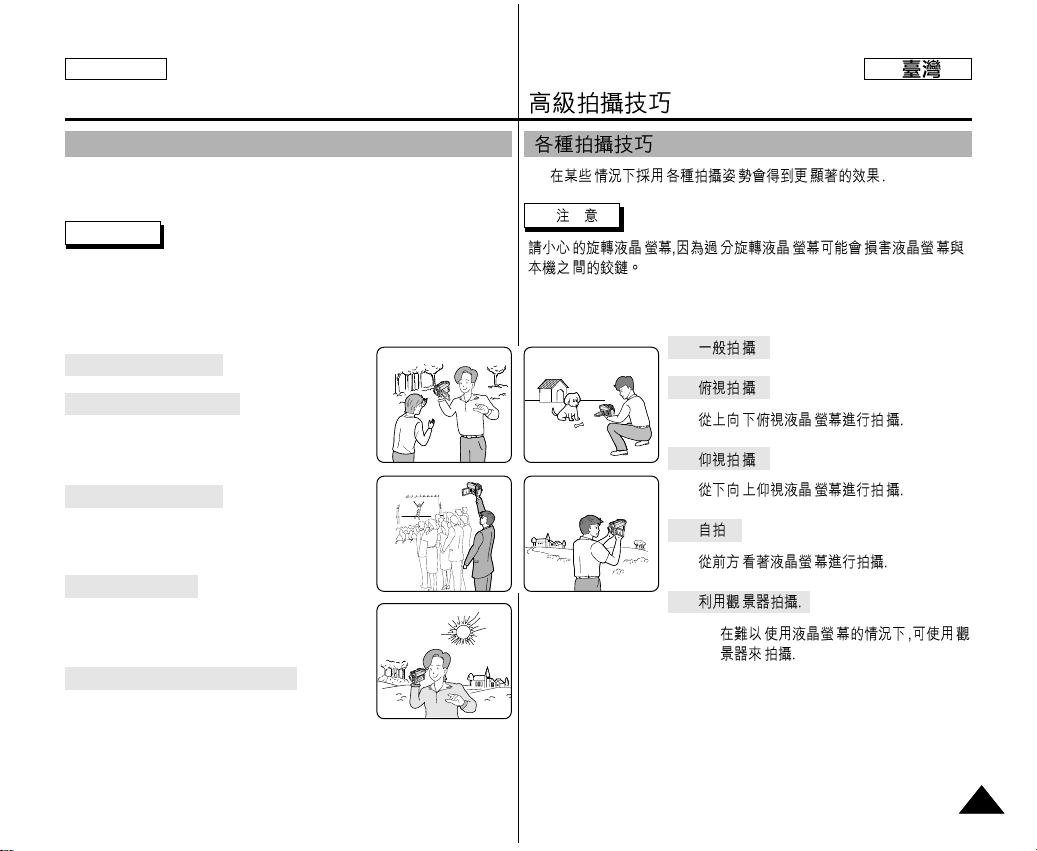
✤
1.
2.
3.
4.
5.
■
Advanced Recording
6969
ENGLISH
✤ In some situations different recording techniques may be required for
more dramatic results.
Note
Please rotate the LCD screen carefully as excessive rotation may cause
damage to the inside of the hinge that connects the LCD screen to the
Camcorder.
1. General recording.
2. Downward recording.
Making a recording with a top view of the
LCD screen.
3. Upward recording.
Making a recording viewing the LCD screen
from below.
4. Self recording.
Making a recording viewing the LCD screen
from the front.
5. Recording with the Viewfinder.
■
In circumstances where it is difficult to
use the LCD monitor, the viewfinder can
be used as a convenient alternative.
1 2
3
5
4
Various Recording Techniques
Page 70

✤
✤
✤
✤
1.
■
■
■
-
2.
3.
■
4.
■
■
■
Playback
7070
ENGLISH
✤ The playback function works in PLAYER mode only.
Playback on the LCD
✤ It is practical to view a tape using the LCD when in a car or
outdoors.
Playback on a TV monitor
✤ To play back a tape, the television must have a compatible color
system.
✤ We recommend that you use the AC Power Adapter as the power
source for the camcorder.
Connecting to a TV which has Audio/Video input jacks
1. Connect the camcorder and TV with the MultiAV cable.
■
The yellow plug : Video
■
The white plug : Audio(L)
■
The red plug : Audio(R) - STEREO only
- If you connect to a monaural TV or VCR,
connect the yellow plug (Video) to the
video input of the TV or VCR and the
white plug (Audio L) to the audio input
of the TV or VCR.
2. Set the power switch on the camcorder to PLAYER mode.
3. Turn on the TV and set the TV/VIDEO selector on the TV to VIDEO.
■
Refer to the TV or VCR user ’s manual.
4. Play the tape back.
Notes
■
You may use the S-VIDEO plug to obtain better quality pictures if you
have an S-VIDEO connector on your TV.
■
If you use a S-VIDEO plug, you will need to connect an audio cable.
■
If you connect the cable to the Multi-AV Jack, you will not hear sound
from the speakers.
Tape Playback
Camcorder
A/V OUT
Video input-
Yellow
Audio input
(left)-White
Audio input
(right)-Red
TV
S-VIDEO input
Page 71
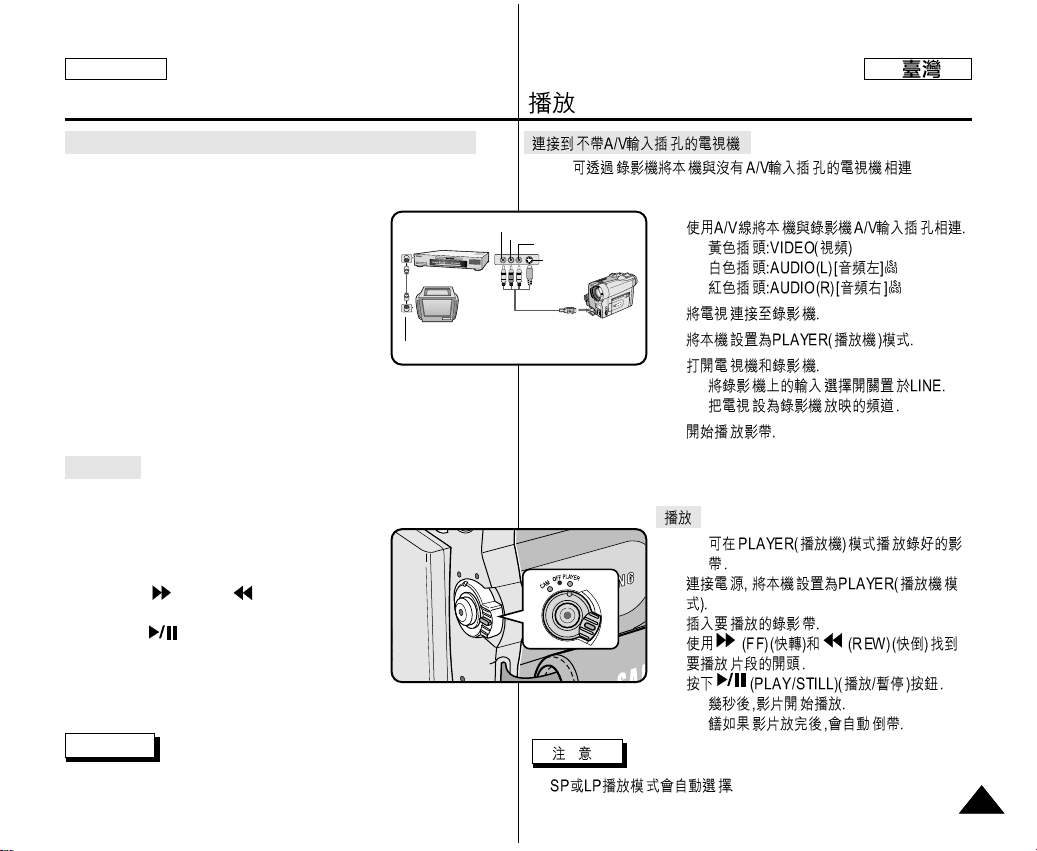
Playback
7171
ENGLISH
Connecting to a TV which has no Audio and Video input jacks
✤ You can connect your camcorder to a TV through a VCR.
1. Connect the camcorder and VCR with the MultiAV cable.
■
The yellow plug : Video
■
The white plug : Audio(L) - Mono
■
The red plug : Audio(R)
2. Connect a TV to the VCR.
3. Set the power switch on the camcorder to
PLAYER mode.
4. Turn on both the TV and VCR.
■
Set the input selector on the VCR to LINE.
■
Select the channel reserved for your VCR on the TV set.
5. Play the tape back.
Playback
✤ You can play the recorded tape in PLAYER mode.
1. Connect a power source and set the power switch
to PLAYER mode.
2. Insert the tape you wish to play back.
3. Using the (FF) and (REW) buttons,
find the first position you wish to play back.
4. Press the (PLAY/STILL) button.
■
The images you recorded will appear
on the TV after a few seconds.
■
If a tape reaches its end while being played back, the tape will
rewind automatically.
Note
■
The playback mode (SP/LP) is selected automatically.
✤
1.
■
■
■
2.
3.
4.
■
■
5.
✤
1.
2.
3.
4.
■
■
■
ANTENNA
S-VIDEO
A/V OUT
TV
VCR
CAMCORDER
VIDEO
AUDIO(L)
AUDIO(R)
Page 72
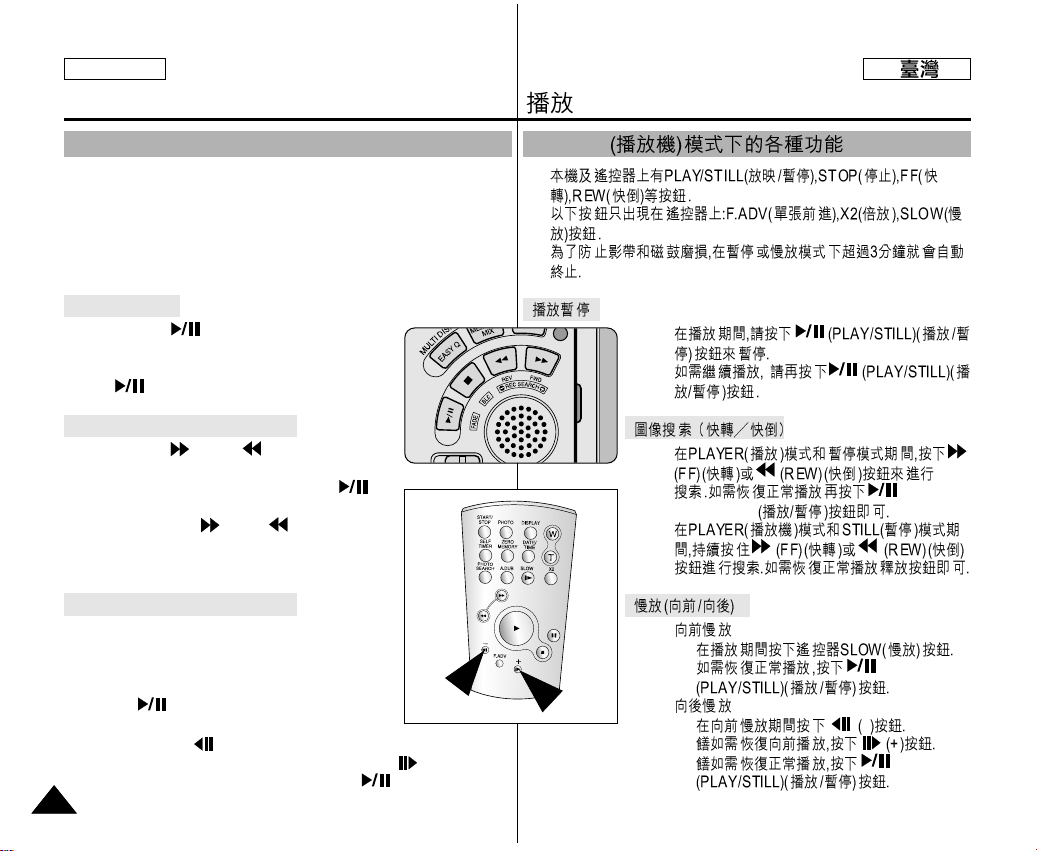
✤
✤
✤
✤
✤
✤
PLAY/STILL
✤
✤
■
■
✤
■
_
■
■
PLAYER
Playback
7272
ENGLISH
✤ The PLAY/STILL, STOP, FF, REW buttons are located on the
camcorder and the Remote Control.
✤ The F.ADV(Frame advance), X2, SLOW buttons are located on the
Remote Control only.
✤ To prevent tape and head-drum wear, your camcorder will automatically
stop if it is left in STILL or SLOW modes for more than 3 minutes.
Playback pause
✤ Press the (PLAY/STILL) button during
Playback.
✤ To resume playback, press the
(PLAY/STILL) button.
Picture search (Forward/Reverse)
✤ Press the (FF) or (REW) buttons once
during Playback or Still mode.
To resume normal playback, press the
(PLAY/STILL) button.
✤ Keep pressing (FF) or (REW) buttons
during Playback or Still mode.
To resume normal playback, release the button.
Slow playback (Forward/Reverse)
✤ Forward Slow Playback
■
Press the SLOW button on the remote control
during Playback.
■
To resume normal playback, press the
(PLAY/STILL) button.
✤ Reverse Slow Playback
■
Press the (_) button during Forward Slow Play back.
■
To resume forward slow playback, press the (+) button.
■
To resume normal playback, press the (PLAY/STILL)
button.
Various Functions while in PLAYER mode
Page 73
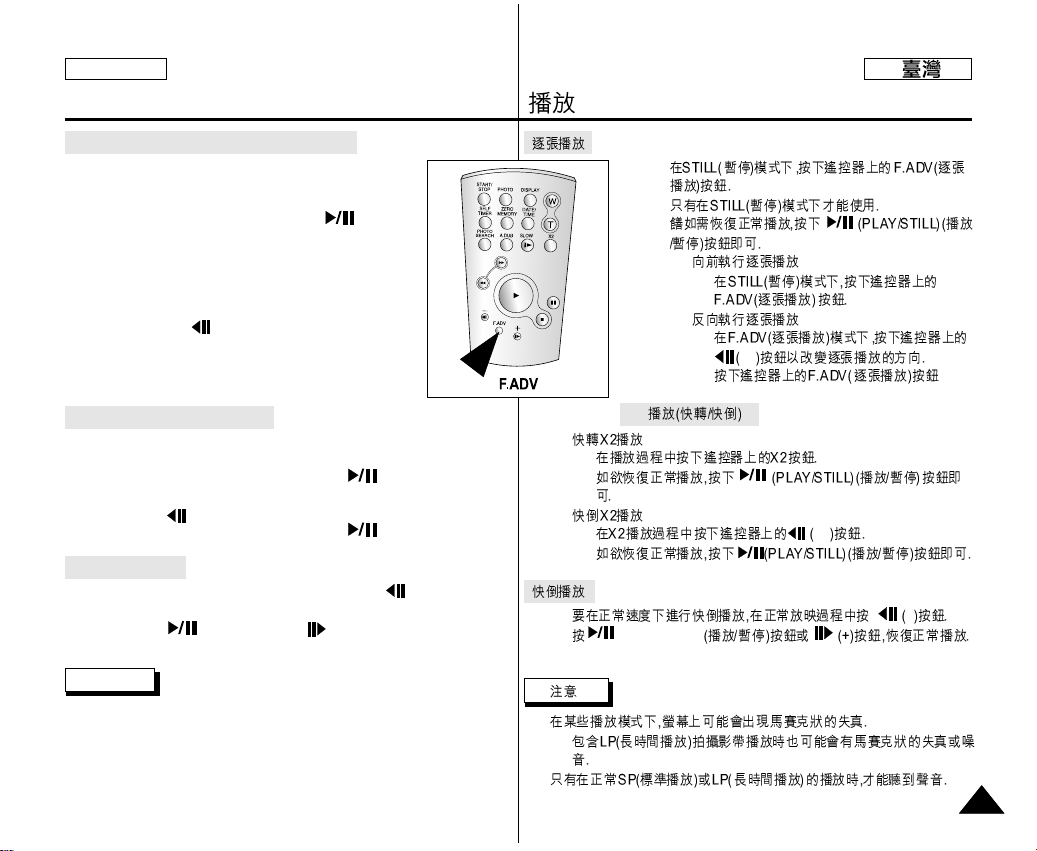
●
●
✤
■
✤
■
_
■
X2
✤
■
■
✤
■
_
■
✤
_
✤ (PLAY/STILL)
■
-
■
Playback
7373
ENGLISH
Frame advance (To play back frame by frame)
●
Press the F.ADVbutton on the Remote Control while in
Still mode.
The F.ADVfunction works in still mode only.
●
To resume normal playback, press the
(PLAY/STILL) button.
✤ Forward frame advance
■
Press the F.ADVbutton on the remote control in
Still mode.
✤ Reverse frame advance
■
Press (_) the button on the remote control
to change the direction in
F.ADVmode.
■
Press the F.ADVbutton on the remote control.
X2 Playback (Forward/Reverse )
✤ Forward X2 Playback
■
Press the X2 button on the Remote Control during Playback.
■
To resume normal playback, press the (PLAY/STILL) button.
✤ Reverse X2 Playback
■
Press (_) the button during during Forward X2 Playback
■
To resume normal playback, press the (PLAY/STILL) button.
Reverse playback
✤ To playback in reverse at normal speed, press the (_) button during
normal forward playback.
✤ Press the (PLAY/STILL) or (+) button to return to normal
forward playback.
Notes
■
Mosaic shaped distortion may appear on the screen while in some of the
various playback modes.
- Mosaic shaped distortion or noise may be experienced when you play
back tapes recorded in LP which contain various playback functions.
■
Sound will only be heard during normal SP or LP playback.
Page 74
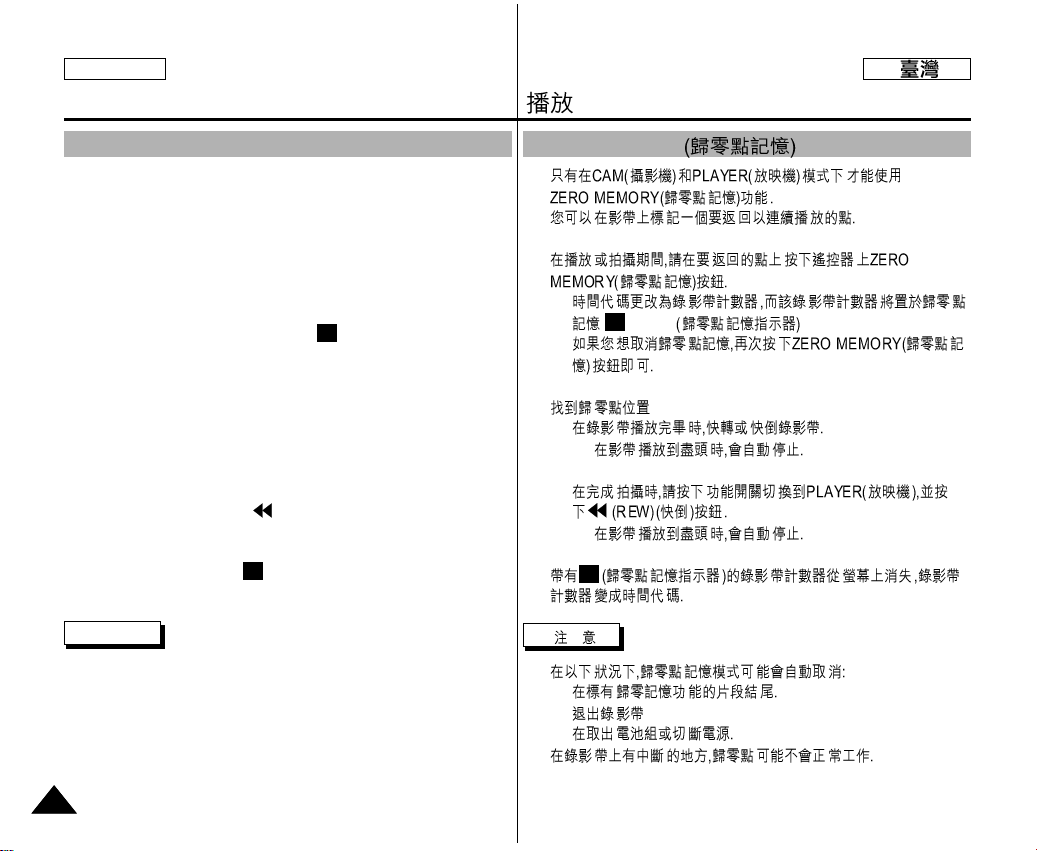
Playback
7474
ENGLISH
✤ The ZERO MEMORY function works in both CAM and PLAYER
modes.
✤ You can mark a point on a tape that you want to return to following
playback.
1. Press the ZERO MEMORY button on the remote control during
playback or before recording at the point you wish to return to.
■
The time code is changed to a tape counter that is set to zero and
stored in a memory with the count 0:00:00 (Zero memory
indicator).
■
If you want to cancel the zero memory function, press the ZERO
MEMORY button again.
2. Finding the zero position.
■
When you have finished playback, fast forward or rewind the tape.
- The tape stops automatically when it reaches the zero position.
■
When you have finished recording, press the power switch on the
PLAYER and press the (REW) button.
- The tape stops automatically when it reaches the zero position.
3. The tape counter with the (Zero memory indicator) disappears from
the display and the tape counter changes to the time code.
Notes
■
In the following situations, ZERO MEMORY mode may be cancelled
automatically:
- At the end of the section marked with the ZERO MEMORY
function.
- When the tape is ejected.
- When you remove the battery pack or power supply.
■
The zero memory may not function correctly where there is a break
between recordings on the tape.
M
M
ZERO MEMORY
✤
✤
1.
■
0:00:00
■
2.
■
-
■
-
3.
■
-
-
-
■
M
M
ZERO MEMORY
Page 75
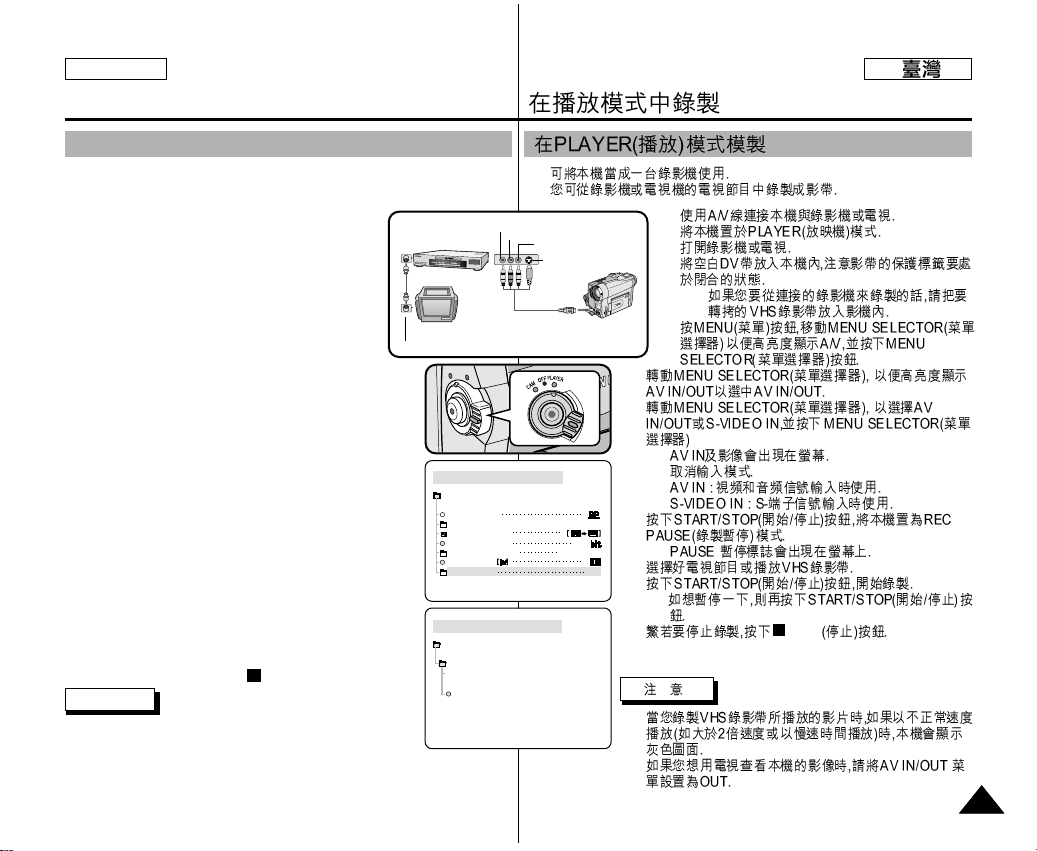
✤
✤
1.
2.
3.
4.
■
5.
6.
7.
■
■
■
■
8.
■
9.
10.
■
11.
STOP
■
■
Recording in PLAYER mode
7575
ENGLISH
✤ You can use this camcorder as a recorder.
✤ You can record a tape from VCR or TV.
1. Connect the camcorder and VCR or TV with the
Multi-AV cable.
2. Set the power switch of the camcorder to PLAYER
mode.
3. Turn on the VCR or TV.
4. Insert the blank tape with protection tab closed into
the camcorder.
■
If you want to record from a connected VCR,
insert a recorded VHS tape into the VCR.
5. Push the MENU button, move the MENU
SELECTOR to highlight A/V and
push the MENU SELECTOR.
6. Move the MENU SELECTOR to highlight AV IN/OUT and
push the MENU SELECTOR to select AV IN/OUT.
7. Move the MENU SELECTOR to highlight AV IN or
S-VIDEO IN and push the MENU SELECTOR.
■
“AV IN” and picture appear on the LCD monitor.
■
OUT : Releases the INPUT mode
■
AV IN : When signals are received from the
Audio/Video input jacks
■
S-VIDEO IN : When signals are received from the the
S-video (S-Jack plug) and Audio inputs
8. Press the START/STOP button to set the camcorder to
REC PAUSE mode.
■
“PAUSE” on the LCD monitor.
9. Select the TV program or playback the VHS tape.
10. Press START/STOP button to start recording.
■
If you want to pause recording for a while,
press the START/STOP button again.
11. To stop recording, press the (STOP) button.
Notes
■
When you record the images being played back on analog
VCR, if they are not being played back in normal speed,
(for example, more than double speed or slow playback), only gray image
appears on the camcorder.
■
If you want to see the camcorder picture with a TV, set AV IN/OUT menu to
OUT.
Recording in PLAYER mode
PLAYER MODE
REC MODE
PHOTO SEARCH
PHOTO COPY
AUDIO MODE 12
SOUND[1]
AUDIO SELECT
WIND CUT
A / V SET
AV IN/OUT
OUT
PLAYER MODE
A / V SET
S-VIDEO IN
AV IN/OUT
OUT
AV IN
ANTENNA
S-VIDEO
A/V OUT
TV
VCR
CAMCORDER
VIDEO
AUDIO(L)
AUDIO(R)
Page 76
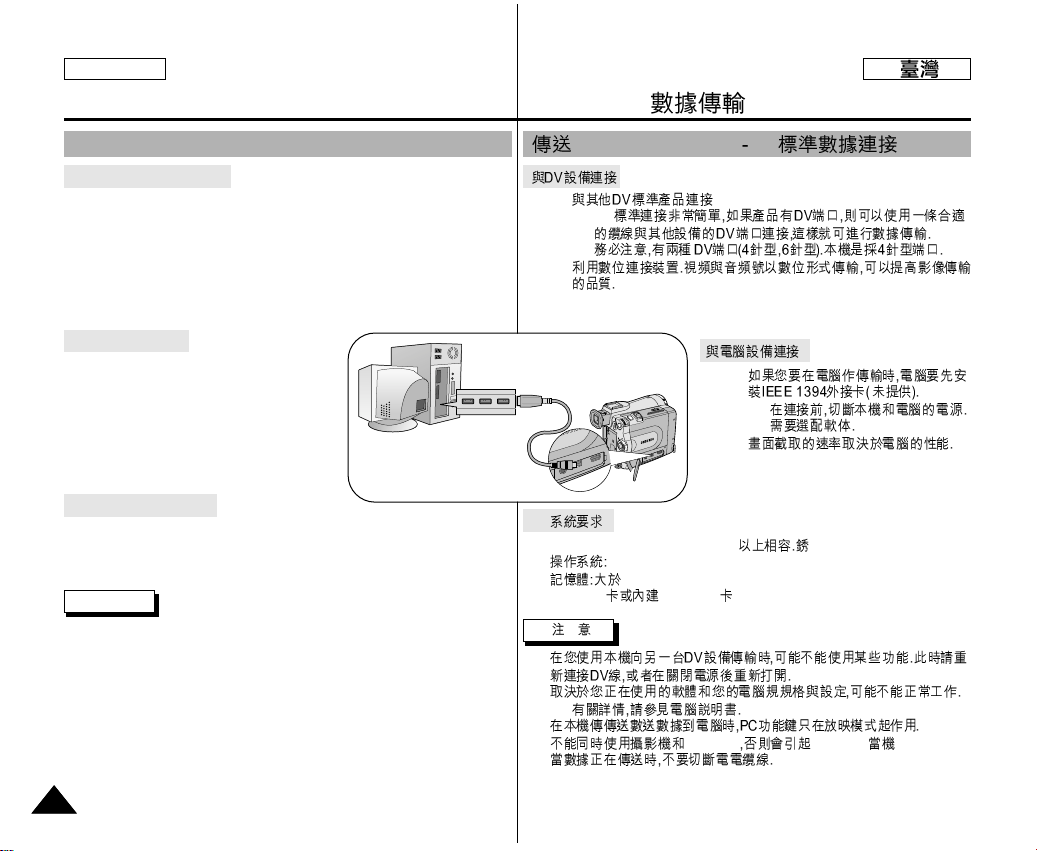
✤
■
DV
!!!
✤
✤
■
■
✤
●
■
CPU Intel®Pentium III™ 450Mhz
■
Windows®98SE, ME, 2000, XP, Mac OS (9.1~10.2)
■
64 MB RAM
■
IEEE1394 IEEE 1394
■
■
-
■
■
IEEE1394 IEEE1394
■
IEEE 1394 (i.LINK) DV
IEEE 1394
IEEE 1394 Data Transfer
7676
ENGLISH
Connecting to a DV device
✤ Connecting with other DV standard products.
■
A standard DV connection is quite simple.
If a product has a DV port, you can transfer data by connecting to the
DV port using the correct cable.
!!! Please be careful since there are two types of DV ports, (4pin, 6pin).
This camcorder has a 4pin terminal.
✤ With a digital connection, video and audio signals are transmitted in digital
format, allowing high quality images to be transferred.
Connecting to a PC
✤ If you want to transmit data to a PC, you
must install a IEEE 1394 add-on card onto
the PC. (Not supplied)
■
Turn off the power of both the camcorder
and the PC before connecting.
■
Optional software necessary.
✤ The frame rate recorded for video capturing
is dependent on the capacity of the PC.
●
System requirements
■
CPU : faster Intel®Pentium III™ 450Mhz compatible.
■
Operating system : Windows®98SE, ME, 2000, XP, Mac OS (9.1~10.2)
■
Main memory : more than 64 MB RAM
■
IEEE1394 add-on card or built in IEEE1394 card
Notes
■
When you transmit data from the camcorder to another DV device, some
functions may not work. If this occurs, please reconnect the DV cable or turn the
power OFF and ON again.
■
Operation may not work correctly, depending on the software you are using, and
the specifications of your PC and its settings.
- See your PC instruction manual for details.
■
When you transmit data from the camcorder to PC, PC function button is
available in PLAYER mode only.
■
Do not use the camcorder and IEEE1394 together as this will cause IEEE1394 to
shut off.
■
Do not disconnect the DV cable while data is being transferred to the PC.
Transferring IEEE1394 (i.LINK)-DV standard data connections
Page 77
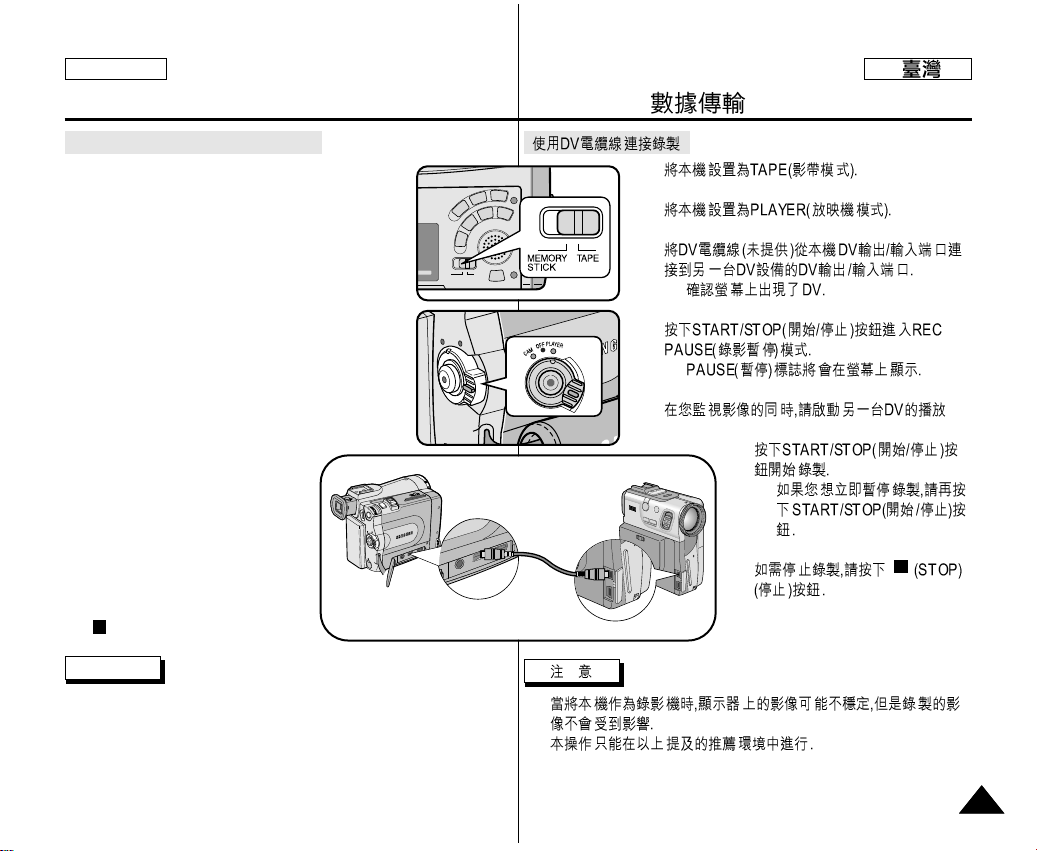
1.
2.
3.
■
4.
■
5.
6.
■
7.
■
■
IEEE 1394
IEEE 1394 Data Transfer
7777
ENGLISH
Recording with a DV connection cable
1. Set the mode switch to TAPE.
2. Set the power switch to PLAYER mode.
3. Connect the DV cable (not supplied) from the DV
IN/OUT port of the camcorder to the
DV IN/OUT port of the other DV device.
■
Make sure that DV appears on the screen.
4. Press the START/STOP button to begin REC PAUSE
mode.
■
PAUSE is displayed on the OSD.
5. Start playback on the other DV device while you
monitor the picture.
6. Press the START/STOP button to start
recording.
■
If you want to pause recording
momentarily, press the
START/STOP button again.
7. To stop recording, press the
(STOP) button.
Notes
■
When using this camcorder as a recorder, the pictures that appear on a
monitor may seem uneven, however recorded pictures will not be
affected.
■
Operation is not guaranteed for all the recommended computer
environments mentioned above.
Page 78
●
✤
✤
✤
■
CPU Intel®Pentium II™ 400MHz
■
Windows®98SE/ME/2000/XP
■
64MB RAM
■
■
65,000
■
■
■
Intel®Pentium II™
■
Windows®Microsoft
®
■
■
USB
USB interface
7878
ENGLISH
●
Transferring a Digital Image through a USB Connection
✤ You can easily transfer still images/movies from a camera, tape to a
PC without additional add-on cards via a USB connection.
✤ You can transfer an image to a PC via a USB connection.
✤ If you transfer data to a PC, you need to install the software (Driver,
Editing software) supplied with the camcorder.
System Requirements
■
CPU : Intel®Pentium II™ 400MHz processor
compatible or better
■
Operating system : Windows®98SE/ME/
2000/XP
■
RAM : 64 MB or more
■
CD-ROM: 4x CD-ROM drive
■
VIDEO : 65,000-color or better video display
card
■
Available USB port
■
Hard Disc : 4GB (8GB recommended)
Notes
■
Intel®Pentium II™ is a trademark of the Intel Corporation.
■
Windows®is a registered trademark of the Microsoft®Corporation.
■
All other brands and names are property of their respective owners.
■
Operations are not guaranteed for all of the recommended computer
environments mentioned above.
Page 79
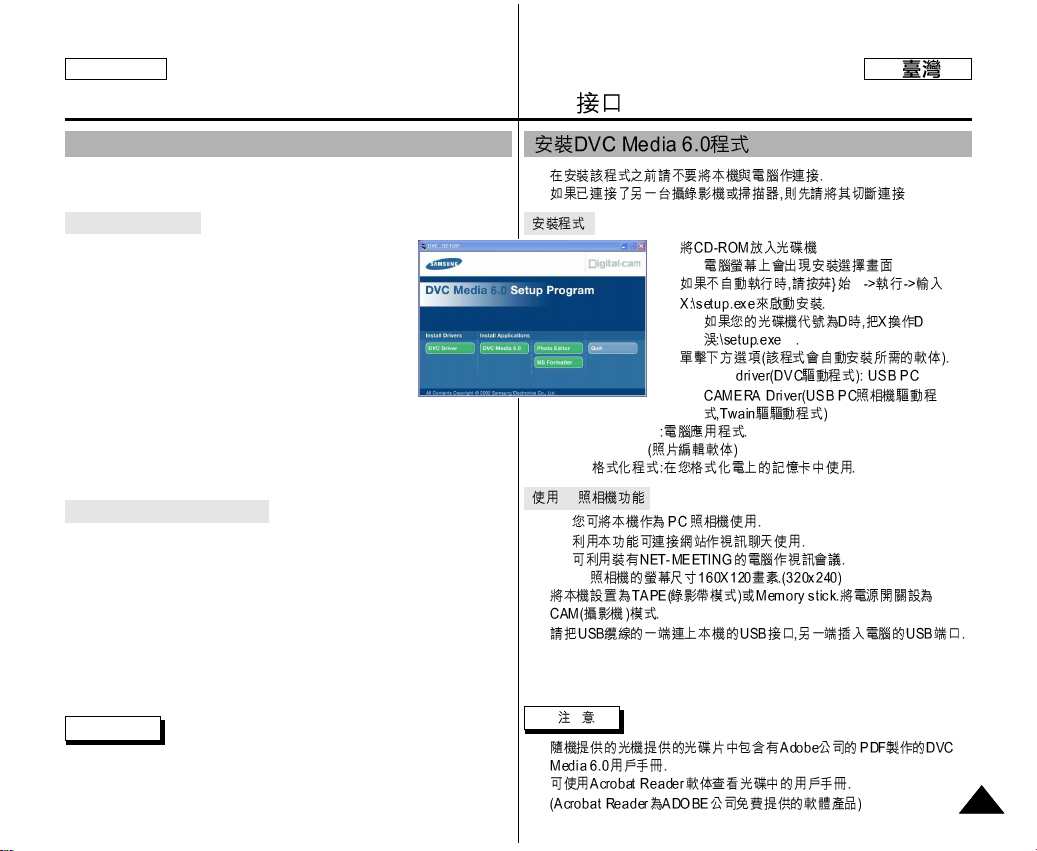
✤
✤
1.
-
2.
-
3.
■
DVC
■
DVC Media 6.0
■
Photo Edition
■
MS
PC
✤
✤
✤
✤ PC
1.
2.
■
USB
USB interface
7979
ENGLISH
Installing DVC Media 6.0 Program
✤ Do not connect the camcorder to PC before installing the program.
✤ If another camera or scanner is connected, please disconnect it in advance.
Program installation
1. Insert the software CD into CD-ROM drive.
-
Installation selection screen appears in the
monitor.
2. If the installation selection screen does not appear after
inserting the CD click “Run” on the Windows “Start”
menu and execute SETUP.EXE file to begin installation.
-
When CD-ROM drive is set to “D:drive”,
type “D:\setup.exe” and press Enter.
3. Click one of the icons listed below to install the
selected software. (The program automatically check and
install the driver which the PC is needed)
■
DVC Driver: USB PC CAMERA Driver (Capture driver, Twain driver)
■
DVC Media 6.0: PC Application program
■
Photo Edition: Editing Software
■
MS Formatter: Using when you format Memory Stick on your PC
Using the “PC camera” function
✤ You can use this camcorder as a PC CAMERA.
It is possible to use your camcorder with Web sites that require video &
chat functions.
✤ When you connect to a Web site that can provide video and chat
functions, you can use your camcorder for such functions.
✤ Using the camcorder with PC installed Net-meeting program, you can
conduct video conference.
✤ The screen size of PC CAMERA is 160
✕
120 Pixel. (320 ✕240)
1. Set the mode switch to Tape or Memory Stick, set the power switch to CAM.
2. Connect one end of the USB cable to the USB jack on the camcorder and the
other end to the USB connector on your computer.
Notes
■
DVC Media 6.0 User’s Manual is included on the accompanying CD in
Adobe’s Portable Document Format (PDF). The user’s manual can be
viewed using Acrobat Reader software, which is also included on the CD.
(The Acrobat Reader is a freeware product of adobe systems, Inc.)
1.
Page 80
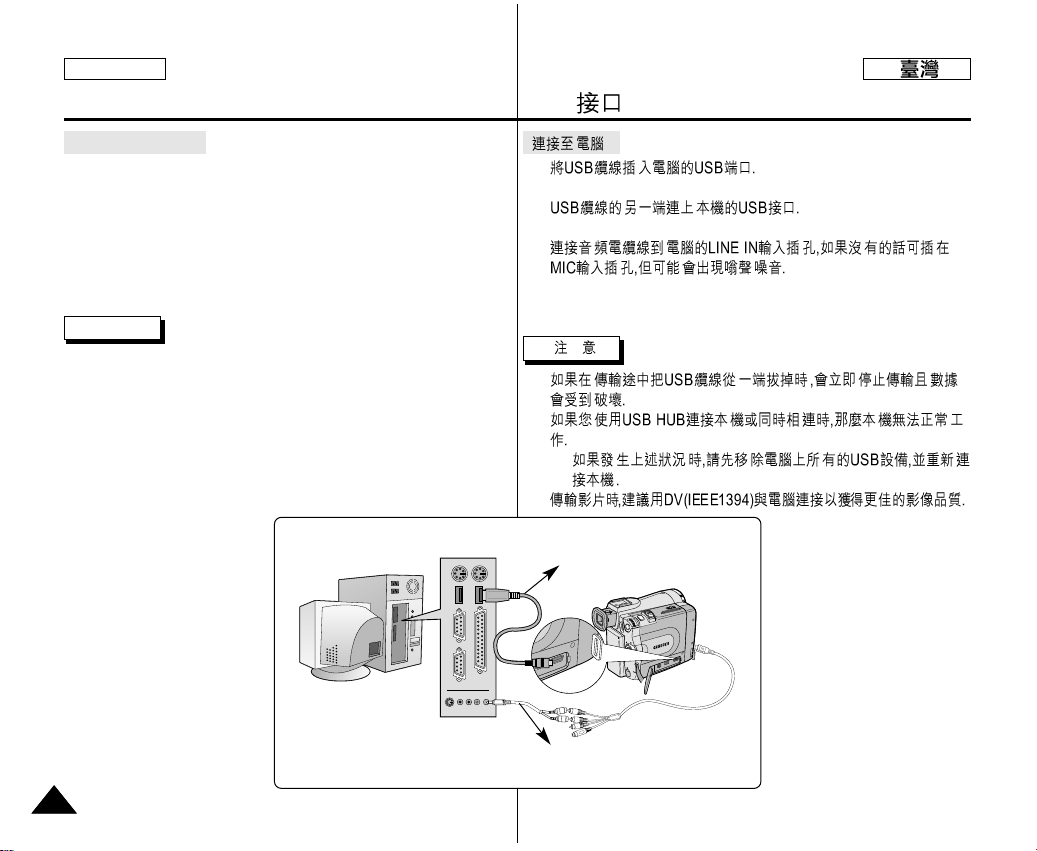
Connecting to a PC
1. Connect a USB cable to the USB port on the PC.
2. Connect the other end of the USB cable into the proper terminal on the
camcorder. (USB jack)
3. Connect the audio cable to the Line input jack of the PC.
If the PC has no Line input jack, connect the audio cable to the MIC
input jack. There is a possibility you’ll here some audio noise if you use
the MIC jack.
Notes
■
If you disconnect the USB cable from the PC or the camcorder while
transferring, the data transmission will stop and the data may be
corrupted.
■
If you connect the USB cable to a PC via a USB HUB or
simultaneously connect the USB cable along with other USB devices,
the camcorder may not work properly.
- If this occurs, remove all USB devices from the PC and reconnect
the camcorder.
■
DV(IEEE1394) connection is
encouraged with PC for
transmission of more vivid
image quality at the time of
moving picture transmission.
1.
2.
3.
■
■
-
■
USB
USB interface
8080
ENGLISH
USB Cable
USB AUDIO Cable
Page 81
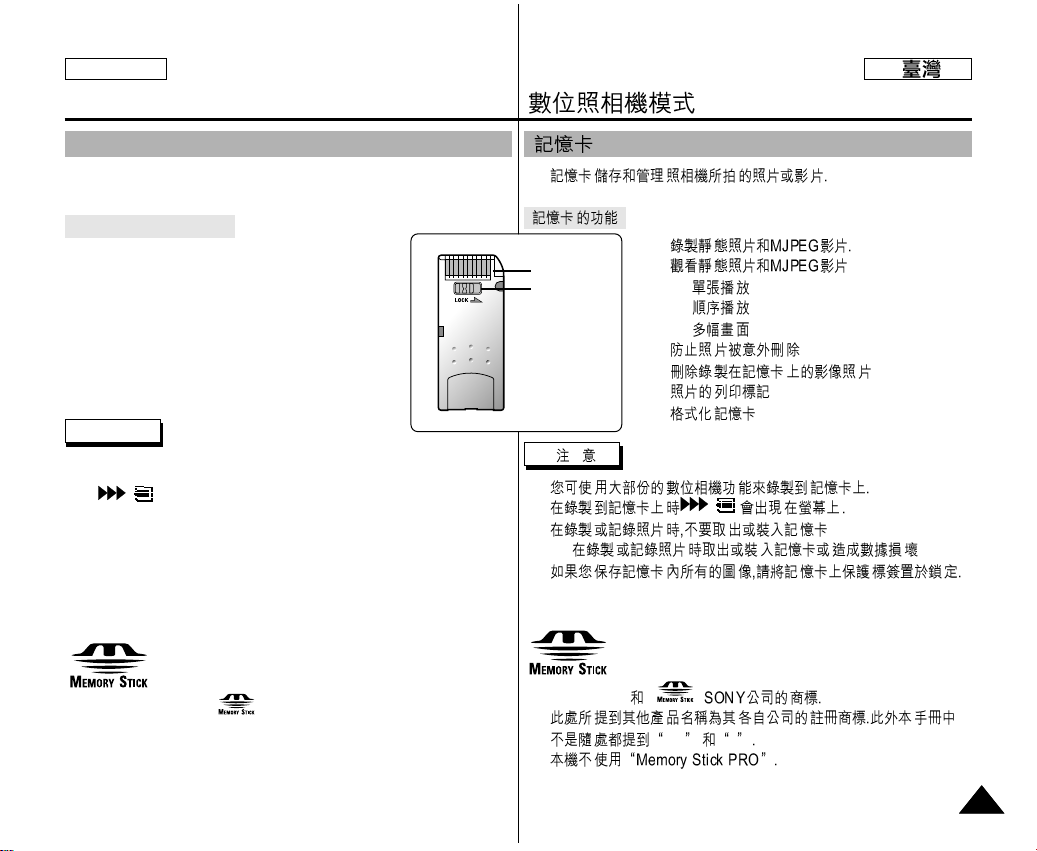
✤
✤
✤
■
■
■
✤
✤
✤
✤
■
■
■
-
■
●
Memory stick
●
™
®
●
Digital Still Camera mode
8181
ENGLISH
✤ The Memory Stick stores and manages still images or moving images
recorded by the camera.
Memory Stick Functions
✤ Recording still images and MJPEG movie
✤ Viewing still images and MJPEG movie
■
Single
■
Slide show
■
Multi display
✤ Protecting images against accidental erasure
✤ Deleting images recorded on a Memory Stick
✤ Print marking still images
✤ Formatting a Memory Stick
Notes
■
You can use most of the camera’s functions when recording to the
Memory Stick.
■
“ ” appears on the screen while recording to the Memory
Stick.
■
While recording or loading an image, do not eject or insert the Memory
Stick.
- Inserting or ejecting a Memory Stick while recording or loading an
image can cause data corruption.
■
If you want to save all images on the Memory Stick, set the write
protect tab on the Memory Stick to LOCK.
●
“Memory Stick” and are trademarks of Sony Corporation.
●
All other product names mentioned herein may be the trademarks or
registered trademarks of their respective companies.
Furthermore, “™”and “®” are not mentioned in each case in this
manual.
●
“Memory Stick PRO” can not be used with this unit.
MEMORY STICK
TM
TM
Terminal
Protection
tab
TM
TM
Page 82

●
1.
2.
●
1.
2.
3.
✤
■
-
■
■
■
■
■
■
■
■
Digital Still Camera mode
8282
ENGLISH
Inserting and ejecting the Memory Stick
●
Inserting the Memory Stick
1. Turn the Power switch to OFF.
2. Insert the Memory Stick into the Memory Stick
slot located beneath the camcorder,
in the direction of the arrow.
●
Ejecting the Memory Stick
1. Turn the Power switch to OFF.
2. Push the Memory Stick, it will move out of the
camcorder automatically.
3. Pull out the Memory Stick.
✤ Do not attempt to pull the Memory Stick out
without first pushing it in.
Notes
■
If you set the camcorder to M.PLAY mode, the last
recorded image appears.
- If there are no recorded images on the Memory
Stick, “NO STORED IMAGE!” will display on the
screen.
■
Do not turn the power off while recording, loading, erasing or
formatting.
■
Please turn the power off before you insert or eject the Memory Stick.
You could lose data on the Memory Stick.
■
Do not allow metal substances to come in contact with the terminals of
the Memory Stick.
■
Do not bend, drop or apply strong shock to Memory Stick.
■
After pulling the Memory Stick out from the camcorder, please keep
the Memory Stick in a soft case to prevent static shock.
■
The stored contents may be changed or lost as a result of misuse, static
electricity, electric noise or repair.
Save important images separately.
■
Samsung is not responsible for data loss due to misuse.
■
If the USB cable is connected to the camcorder, the (FWD),
(REV), , S.SHOW, MULTI-DISPLAY buttons
are not available in M.PLAY mode.
Page 83
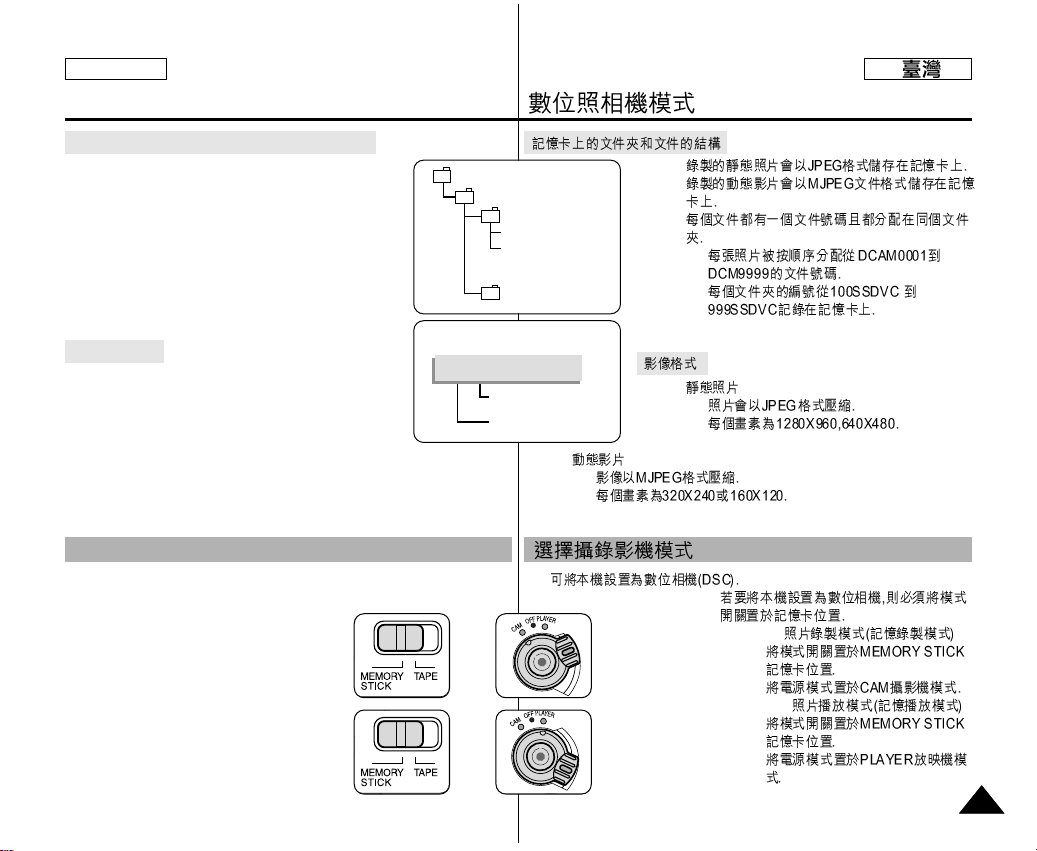
✤
✤
✤
■
■
✤
■
■
✤
■
■
✤
✤
■
M.REC
1.
2.
■
M.PLAY
1.
2.
Digital Still Camera mode
8383
ENGLISH
Structure of folders and files on the Memory Stick
✤ The still images that you recorded are saved in JPEG
file format on the Memory Stick.
✤ The moving images that you recorded are saved
in MJPEG file format on the Memory Stick.
✤ Each file has a file number and all files are assigned to
a folder.
■
A file number from DCAM0001 to DCAM9999 is
sequentially assigned to each recorded image.
■
Each folder is numbered from 100SSDVC to
999SSDVC and recorded on the Memory Stick.
Image Format
✤ Still image
■
Images are compressed in JPEG (Joint
Photographic Experts Group) format.
■
The number of pixels are 1280 ✕960,
640
✕
480 in each mode.
✤ Moving Image
■
Images are compressed in MJPEG (Motion Joint Photographic
Experts Group) format.
■
The number of pixels are 320 ✕240, 160 ✕120 in each mode.
✤ You can use this camcorder as a Digital Still Camera (DSC).
✤ You have to set the mode switch to MEMORY STICK
position to use this camcorder as a Digital Still
Camera.
■
M.REC mode (Memory RECORD mode)
1. Set the mode switch to MEMORY
STICK.
2. Set the power switch to CAM.
■
M.PLAY mode (Memory PLAYBACK
mode)
1. Set the mode switch to MEMORY
STICK.
2. Set the power switch to PLAYER.
DCIM
100 SSDVC
DCAM 0001
DCAM 0002
101SSDVC
.
.
.
.
File number
Folder number
000-0000
*M. PLAY
Selecting the CAMCORDER mode
+
: M.REC
mode
+
: M.PLAY
mode
Page 84
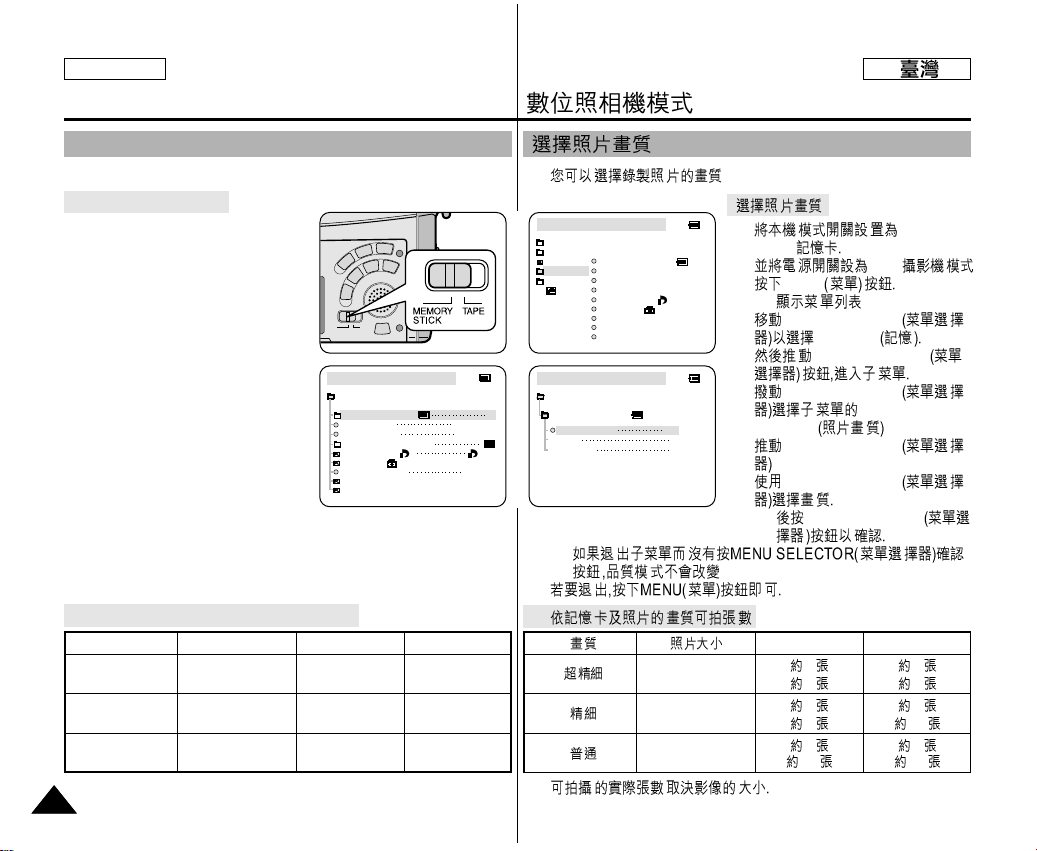
✤
1. MEMORY
STICK
2. CAM
3. MENU
■
4. MENU SELECTOR
MEMORY
5. MENU SELECTOR
6. MENU SELECTOR
PHOTO
QUALITY
7. MENU SELECTOR
8.
MENU SELECTOR
■
MENU SELECTOR
■
9.
●
-
8MB 16MB
1280 ✕960 12 24
640✕480 49 99
1280✕960 24 49
640✕ 480 99 199
1280✕960 49 99
640 ✕ 480 199 399
Digital Still Camera mode
8484
ENGLISH
✤ You can select the quality of a still image to be recorded.
Select the photo quality
1. Set the mode switch to MEMORY
STICK.
2. Set the power switch to the CAM
mode.
3. Press the MENU button.
■
The menu list will appear.
4. Move the MENU SELECTOR to
highlight MEMORY.
5. Push the MENU SELECTOR to enter
the sub-menu.
6. Move the MENU SELECTOR to
highlight PHOTO QUALITY in the
submenu.
7. Push the MENU SELECTOR.
8. Using the MENU SELECTOR, select
the image quality.
■
Push the MENU SELECTOR to
confirm the image quality.
■
If you exit the sub-menu without pushing the
MENU SELECTOR, the quality mode is not changed.
9. To exit, press the MENU button.
●
Number of images on the Memory Stick
- The actual number that you can record varies depending on the image
size.
QUALITY Still Image Size 8MB 16MB
SUPER FINE
1280
✕
960 Approx.12 Approx.24
640✕480 Approx.49 Approx.99
FINE
1280
✕
960 Approx.24 Approx.49
640✕480 Approx.99 Approx.199
NORMAL
1280
✕
960 Approx.49 Approx.99
640✕480 Approx.199 Approx.399
M.REC MODE
INITIAL
PRINT MARK
PROTECT
PHOTO QUALITY
FILE NO.
DELETE
FORMAT
IMAGE SIZE
MJPEG SIZE
CONTINUOUS SHOT
CAMERA
A/V
MEMORY
VIEWER
M.REC MODE
MEMORY SET
PRINT MARK
PROTECT
PHOTO QUALITY
FILE NUMBER
DELETE
FORMAT
IMAGE SIZE
MJPEG SIZE
F
320X240
1280X960
000
SERIES
CONTINUOUS SHOT
M.REC MODE
NORMAL
SUPER FINE SF
F
N
FINE
MEMORY SET
PHOTO QUALITY
Selecting the image quality
Page 85
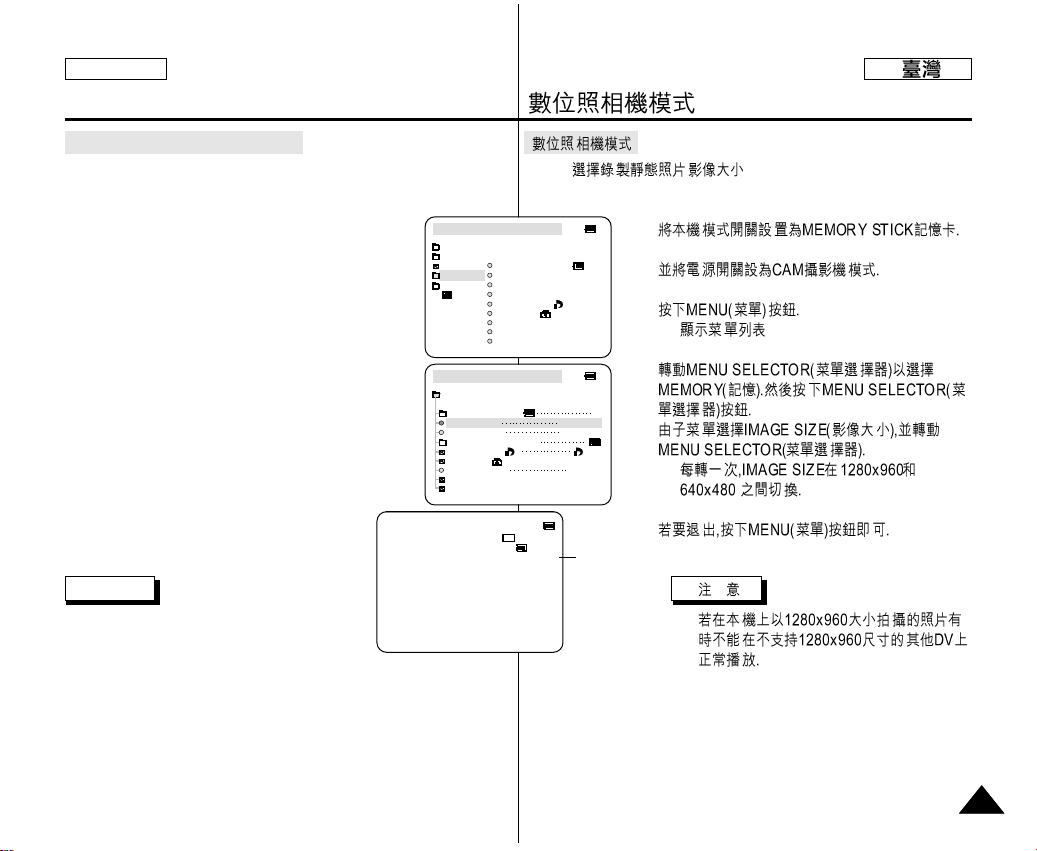
✤
1.
2.
3.
■
4.
5.
■
6.
■
Digital Still Camera mode
8585
ENGLISH
Selecting the recording image size
✤ Select the image size of still image to be recorded.
1. Set the mode switch to MEMORY STICK.
2. Set the power switch to the CAM mode.
3. Press the MENU button.
■
The menu list will appear
4. Use the MENU SELECTOR to highlight MEMORYand
push the MENU SELECTOR.
5. Select IMAGE SIZE from the submenu and push the
MENU SELECTOR.
■
The IMAGE SIZE toggles between 1280 ✕960 and
640 ✕480 with each push.
6. To exit the menu, press the MENU button.
Note
■
Still images that are recorded at an image size
of 1280 ✕960 on your camcorder, may not
playback properly on other digital devices as the
device may not support recordings made with this image size.
M.REC MODE
INITIAL
PRINT MARK
PROTECT
PHOTO QUALITY
FILE NO.
DELETE
FORMAT
IMAGE SIZE
MJPEG SIZE
CONTINUOUS SHOT
CAMERA
A/V
MEMORY
VIEWER
M.REC MODE
MEMORY SET
PRINT MARK
PROTECT
PHOTO QUALITY
FILE NUMBER
DELETE
FORMAT
IMAGE SIZE
MJPEG SIZE
F
320X240
1280X960
000
SERIES
CONTINUOUS SHOT
[ 1 0 / 1 4 ]
3 2 0 0 0 min
1280
F
Image Size
Page 86
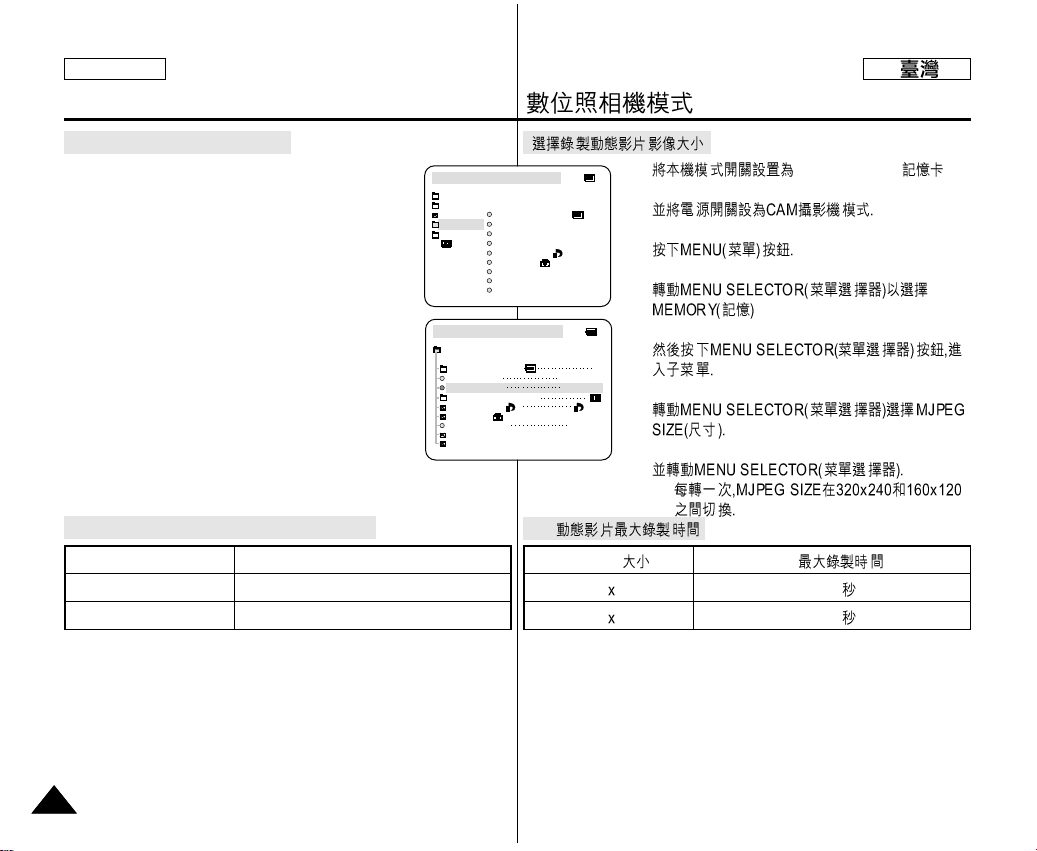
1. MEMORY STICK
2.
3.
4.
5.
6.
7.
■
●
MJPEG
320 240 15
160 120 60
Digital Still Camera mode
8686
ENGLISH
Selecting the moving picture size
1. Set the mode switch to MEMORY STICK position.
2. Set the power switch to CAM mode.
3. Press the MENU button.
4. Move the MENU SELECTOR to highlight MEMORY.
5. Push the MENU SELECTOR to enter the sub-menu.
6. Move the MENU SELECTOR to highlight MJPEG
SIZE.
7. Push the MENU SELECTOR button.
■
The MJPEG SIZE toggles between 320 ✕240 160 ✕120 with each push.
Maximum recording time of moving picture
M.REC MODE
INITIAL
PRINT MARK
PROTECT
PHOTO QUALITY
FILE NO.
DELETE
FORMAT
IMAGE SIZE
MJPEG SIZE
CONTINUOUS SHOT
CAMERA
A/V
MEMORY
VIEWER
M.REC MODE
MEMORY SET
PRINT MARK
PROTECT
PHOTO QUALITY
FILE NUMBER
DELETE
FORMAT
IMAGE SIZE
MJPEG SIZE
F
320X240
1280X960
000
SERIES
CONTINUOUS SHOT
MJPEG SIZE Maximum recording time
320
✕
240 15 seconds
160
✕
120 60 seconds
Page 87
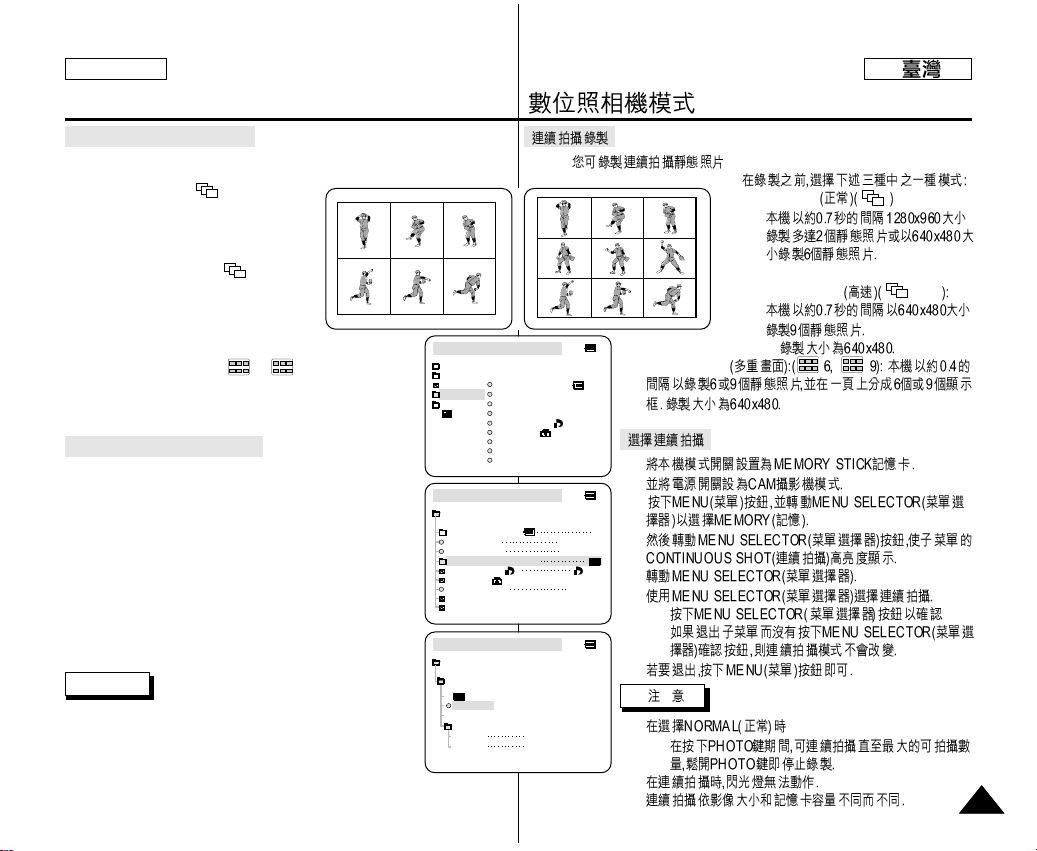
✤
✤
■
NORMAL
■
HIGH SPEED
-
■
MULTI SCENE
1.
2.
3.
4.
5.
6.
■
■
7.
■
-
■
■
HS
Digital Still Camera mode
8787
ENGLISH
Recording images continuously
✤ You can record still images continuously.
✤ Select one of the three modes described below before recording.
■
NORMAL( ) : Your camcorder
records up to 2 still images in
1280
✕
960 size or 6 still images in
640
✕
480 size at about 0.7sec
intervals.
■
HIGH SPEED ( ) :
Your camcorder records up to 9 still
images in 640
✕
480 size at about
0.07sec intervals.
- Recording image size is
640
✕
480 only.
■
MULTI SCENE ( 6, 9): Your camcorder
records 6 or 9 still images at about 0.4sec intervals and
displays the images on a single page divided into six or
nine boxes. Still images are recorded in 640
✕
480 size.
Select the CONTINUOUS SHOT
1. Set the mode switch to MEMORY STICK.
2. Set the power switch to the CAM mode.
3. Press the MENU button and move the MENU SELECTOR to
highlight MEMORY.
4. Move the MENU SELECTOR to highlight CONTINUOUS
SHOT in the submenu.
5. Push the MENU SELECTOR.
6. Using the MENU SELECTOR, select the continuous shot.
■
Push the MENU SELECTOR to confirm the continuous
shot.
■
If you exit the sub-menu without pushing the MENU
SELECTOR, the continuous shot mode is not changed.
7. To exit, press the MENU button.
Notes
■
When selecting NORMAL
- Recording continues up to the maximum number of still
images whilst pressing PHOTO button fully down.
Release PHOTO button to STOP recording.
■
During recording images continuously, the flash does not work.
■
The number of images you can record continuously varies depending on the
image size and the capacity of the Memory stick.
M.REC MODE
INITIAL
PRINT MARK
PROTECT
PHOTO QUALITY
FILE NO.
DELETE
FORMAT
IMAGE SIZE
MJPEG SIZE
CONTINUOUS SHOT
CAMERA
A/V
MEMORY
VIEWER
M.REC MODE
MEMORY SET
PRINT MARK
PROTECT
PHOTO QUALITY
FILE NUMBER
DELETE
FORMAT
IMAGE SIZE
MJPEG SIZE
F
320X240
1280X960
000
SERIES
CONTINUOUS SHOT
M.REC MODE
HIGH SPEED
MULTI SCENE
SPLIT
SPLIT
6
NORMAL
MEMORY SET
9
CONTINUOUS SHOT
HS
Page 88
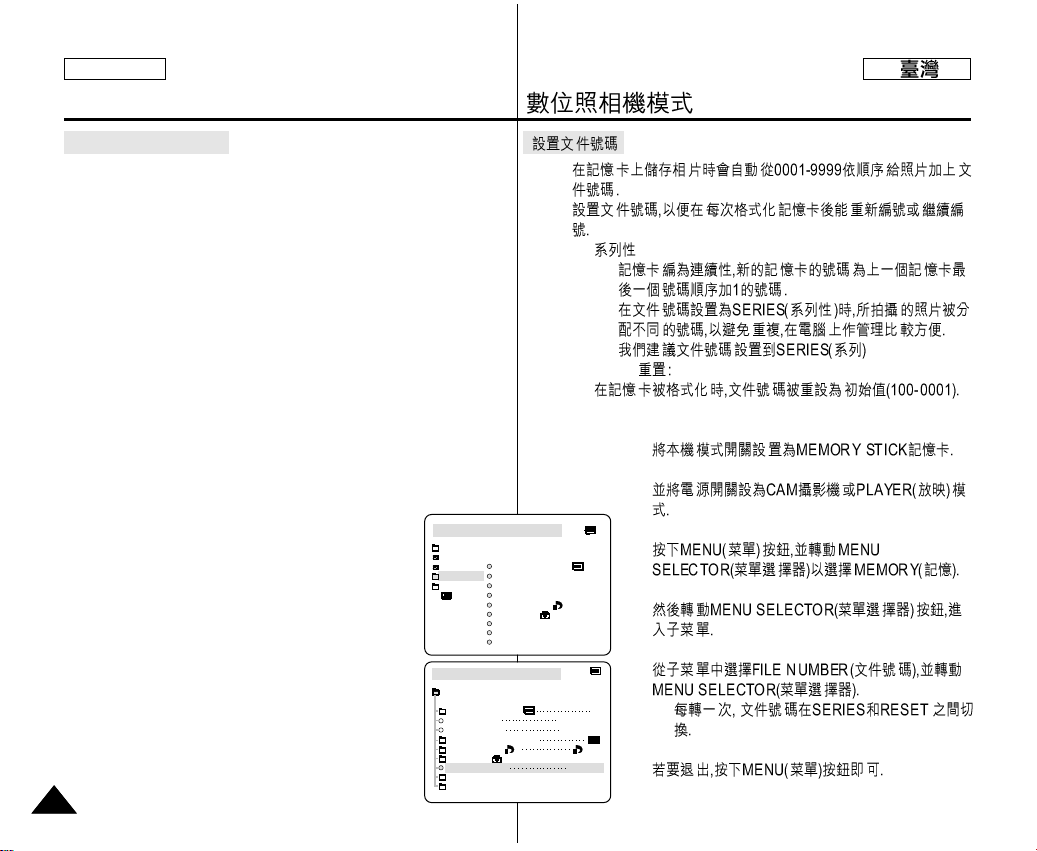
✤
✤
■
(SERIES)
-
-
-
■
RESET
1.
2.
3.
4.
5.
■
6.
Digital Still Camera mode
8888
ENGLISH
Setting the File Number
✤ The images you take are automatically assigned file numbers from
0001 to 9999.
✤ Set the image file numbers so that they reset each time a Memory
Stick is formatted, or so that they count up continuously.
■
SERIES
- Numbering is continuous between the Memory Sticks, so
that the first file number assigned on a new Memory Stick is
1 more than the last file number assigned on the previous
Memory Stick.
- When the file number are set to SERIES, each image taken
is assigned a different number, avoiding duplication of
numbers. This is convenient when you want to manage your
images on a PC.
- We recommend keeping the file numbers set to SERIES.
■
RESET
When the Memory Stick is formatted, the file number resets to
its default value (100-0001).
If the Memory Stick already contains files, the
next available number is assigned.
1. Set the mode switch to MEMORY STICK position.
2. Set the power switch to CAM or PLAYER mode.
3. Press the MENU button and move the MENU
SELECTOR to highlight MEMORY.
4. Push the MENU SELECTOR to enter submenu.
5. Select FILE NUMBER from the sub-menu and push the
MENU SELECTOR.
■
The FILE NUMBER toggles between SERIES and
RESET with each push.
6. To exit, press the MENU button.
M.PLAY MODE
MEMORY SET
PRINT MARK
PROTECT
PHOTO QUALITY
FILE NUMBER
DELETE
FORMAT
IMAGE SIZE
MJPEG SIZE
F
320X240
1280X960
000
SERIES
CONTINUOUS SHOT
M.PLAY MODE
INITIAL
PRINT MARK
PROTECT
PHOTO QUALITY
FILE NO.
DELETE
FORMAT
IMAGE SIZE
MJPEG SIZE
CONTINUOUS SHOT
CAMERA
A/V
MEMORY
VIEWER
Page 89
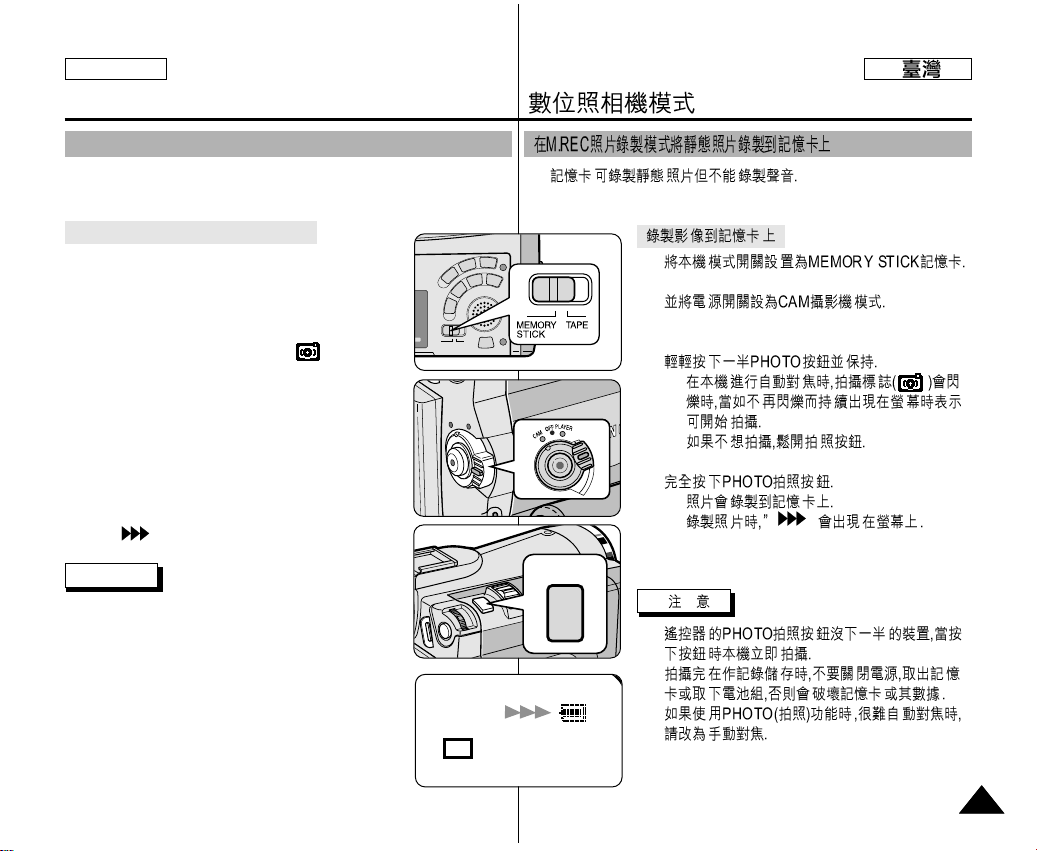
✤
1.
2.
3.
■
■
4.
■
■
”
■
■
■
Digital Still Camera mode
8989
ENGLISH
✤ Audio cannot be recorded with still images onto the Memory Stick.
Recording images to a Memory Stick
1. Set the mode switch to MEMORY STICK.
2. Set the power switch to CAM.
3. Press the PHOTO button lightly (about halfway down)
and hold it.
■
During autofocus photo mark ( ) flashes in the
display as the camcorder adjusts the focus and is
continuously displayed when the camcorder is
ready to take the still image.
■
If you do not wish to record, release the pressure
from the button.
4. Press the PHOTO button fully down.
■
The still image is recorded to the Memory Stick.
■
While the camcorder is recording the still image,
“ ” appears on the screen.
Notes
■
The remote controller’s PHOTO button has no halfway
setting.
Press the button fully and the camcorder immediately
takes the image.
■
Do not turn the power off, eject a Memory Stick or
remove the battery pack during recording.
The Memory Stick or its data may be damaged.
■
If focusing is difficult with the autofocus mode when
using the PHOTO function, focus manually.
[ 0 9 / 2 4 ]
F
Recording Still images to a Memory Stick in M.REC Mode.
PHOTO
Page 90
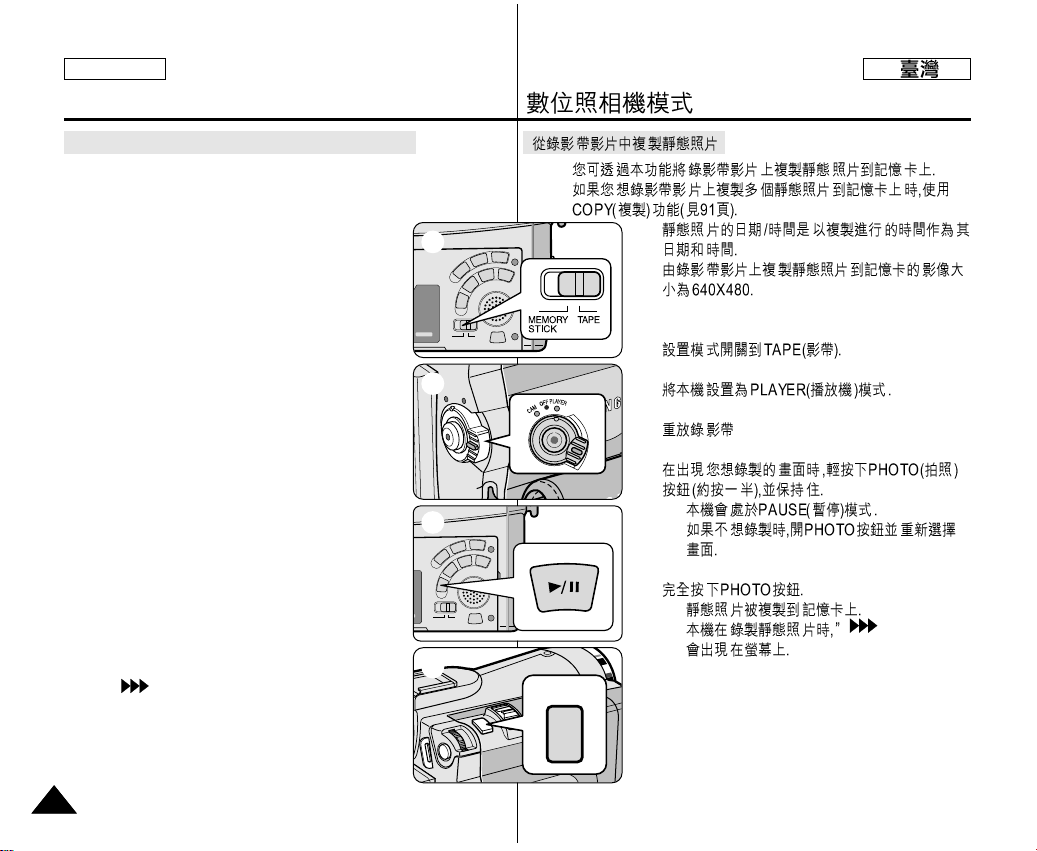
✤
✤
✤
✤
1.
2.
3.
4.
■
■
5.
■
■
”
Digital Still Camera mode
9090
ENGLISH
Recording an image from a cassette as a still image.
✤ You can record a still image from a cassette onto a Memory Stick.
✤ If you want to recorded multiple still images from a cassette to a
Memory Stick, use the COPY function. (see page 91)
✤ The still images date/time will reflect the date and
time the copies are made.
✤ The image size of a still image recorded from
cassette onto a Memory Stick will be
640
✕
480.
1. Set the mode switch to TAPE.
2. Set the power switch to PLAYER mode.
3. Play back the cassette.
4. Press the PHOTO button lightly (about halfway down),
when the image you want to record appears.
The camcorder is set to playback pause (STILL)
mode.
■
If you do not wish to record, release the PHOTO
button, select the image again.
5. Press the PHOTO button fully down.
■
The still image is recorded to the Memory Stick.
■
While the camcorder is recording the still image,
“ ” appears on the screen.
PHOTO
1
2
3
4
Page 91
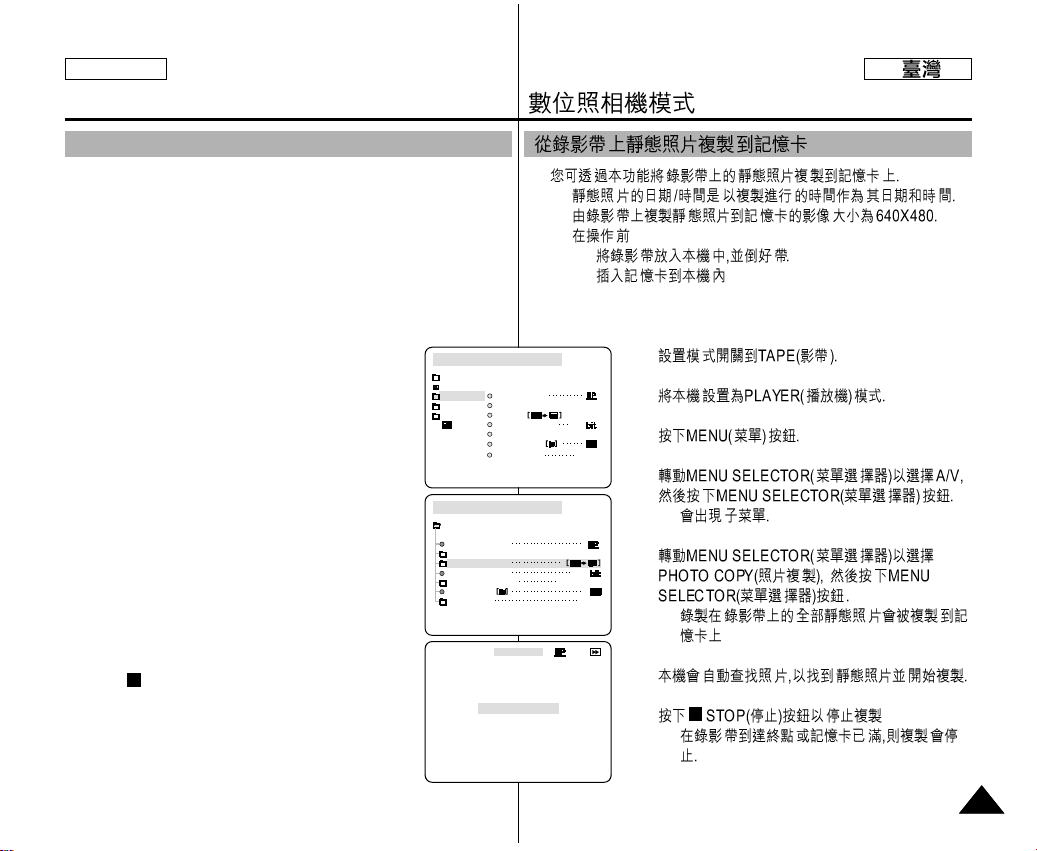
✤
■
■
■
-
-
1.
2.
3.
4.
■
5.
■
6.
7.
■
Digital Still Camera mode
9191
ENGLISH
✤ You can copy still images recorded with PHOTO function on a cassette
onto a Memory Stick.
■
The still images date/time will reflect the date and time the copies
are made.
■
The image size of a still image copied from tape to Memory Stick
will be 640 ✕480.
■
Before operation
- Insert a recorded tape into your camcorder and rewind the tape.
- Insert a Memory Stick into your camcorder.
1. Set the mode switch to TAPE.
2. Set the power switch to the PLAYER mode.
3. Press the MENU button.
4. Move the MENU SELECTOR to highlight A/V and push
the MENU SELECTOR.
■
The submenu will appear.
5. Move the MENU SELECTOR to highlight PHOTO
COPY and push the MENU SELECTOR.
■
All still images that recorded on a cassette will be
copied to a Memory Stick.
6. The camcorder automatically performs the photo search
to find still images and copying starts.
7. Press (STOP) button to stop copying.
■
Copying stops when the cassette is finished or
Memory Stick is full.
PLAYER MODE
REC MODE
PHOTO SEARCH
PHOTO COPY
AUDIO MODE 12
SOUND[1]
AUDIO SELECT
WIND CUT
A / V SET
OUT
AV IN/OUT
PLAYER MODE
INITIAL
WIND CUT
REC MODE
PHOTO SEARCH
COPY
AUDIO MODE 12
AUDIO SELECT
CAMERA
A/V
MEMORY
VIEWER
AV IN/OUT
OUT
Copying still images from a cassette to Memory Stick
[ 1 5 / 4 4 ]
640
PHOTO COPY
NOW SEARCH ...
0 : 1 0 : 3 5 : 0 2
Page 92
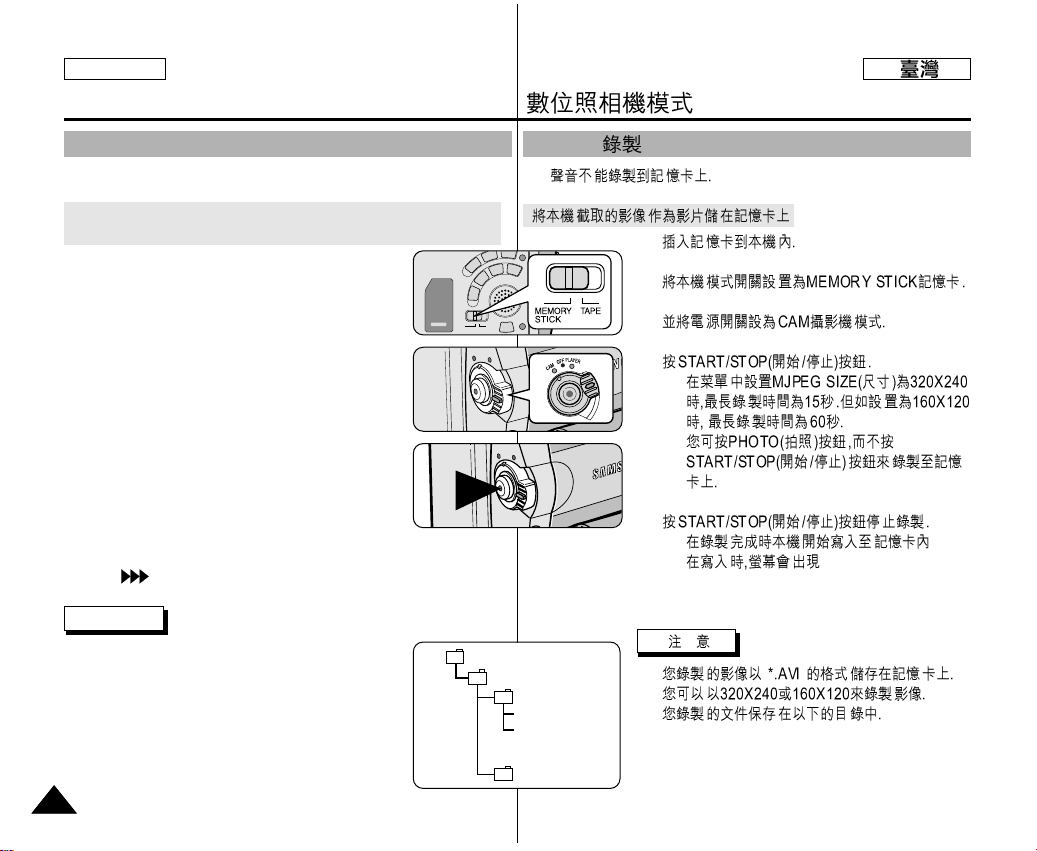
✤
1.
2.
3.
4.
■
■
5.
■
■
■
■
■
MJPEG
Digital Still Camera mode
9292
ENGLISH
✤ Audio cannot be recorded onto the Memory Stick.
Saving the pictures captured by a camera as a moving picture file
onto MEMORY STICK
1. Insert the MEMORY STICK into your camcorder.
2. Set the mode switch to MEMORY STICK position.
3. Set the power switch to CAM mode.
4. Press the START/STOP button.
■
When MJPEG SIZE in the menu setting is set to
320✕240, the maximum recording time is
15 seconds. however, when MJPEG SIZE in the
menu settings is set to 160✕120, the maximum
recording time is 60 seconds.
■
You can record a camera still image onto the
memory stick by pressing the Photo button instead
of the START/STOP button.
5. Press the START/STOP button to stop the recording.
■
The camcorder starts to write the moving picture to
the Memory Stick when recording is finished.
■
While the camcorder is writing the moving picture,
“ ” appears on the screen.
Notes
■
The moving picture images that you recorded are
saved in *.avi file format on the Memory Stick.
■
You can record the moving picture images as
320✕240 pixel or 160✕120 pixel.
■
The file that you recorded are saved in a following
folder.
MJPEG RECORDING
DCIM
100 SSDVC
DCAM 0001
DCAM 0002
101SSDVC
.
.
.
.
Page 93
Digital Still Camera mode
9393
ENGLISH
■
The moving picture images on a Memory Stick are smaller size and
lower definition than one on Tape.
■
There could be any broken or mosaic pictures while playing the MJPEG
moving picture images, but it is not malfunction.
■
You can transfer MJPEG file to PC through DVC Media 6.0 using USB
port on your PC.
And then, play MJPEG file with a moving picture player program like a
Microsoft Windows Media Player.
(DVC Media 6.0 is included in the CD that is supplied).
■
The following functions are not allowed in M.REC Mode.
- EIS (Electronic Image Stabilizer), Digital Zoom, Fade, Program AE,
Digital Effect, Slow Shutter
■
While you record in Memory Stick, do not turn the power off,
eject a Memory Stick or remove the battery pack.
The Memory Stick or its data maybe damaged.
■
Moving images recorded on the Memory Stick may not play on other
manufacturer's camcorders.
■
The MJPEG file recorded by another camcorder might not be allowed
to play by this camcorder.
■
■
MJPEG
■
Microsoft Windows Media Player.
■
M.REC
- EIS
■
■
■
Page 94
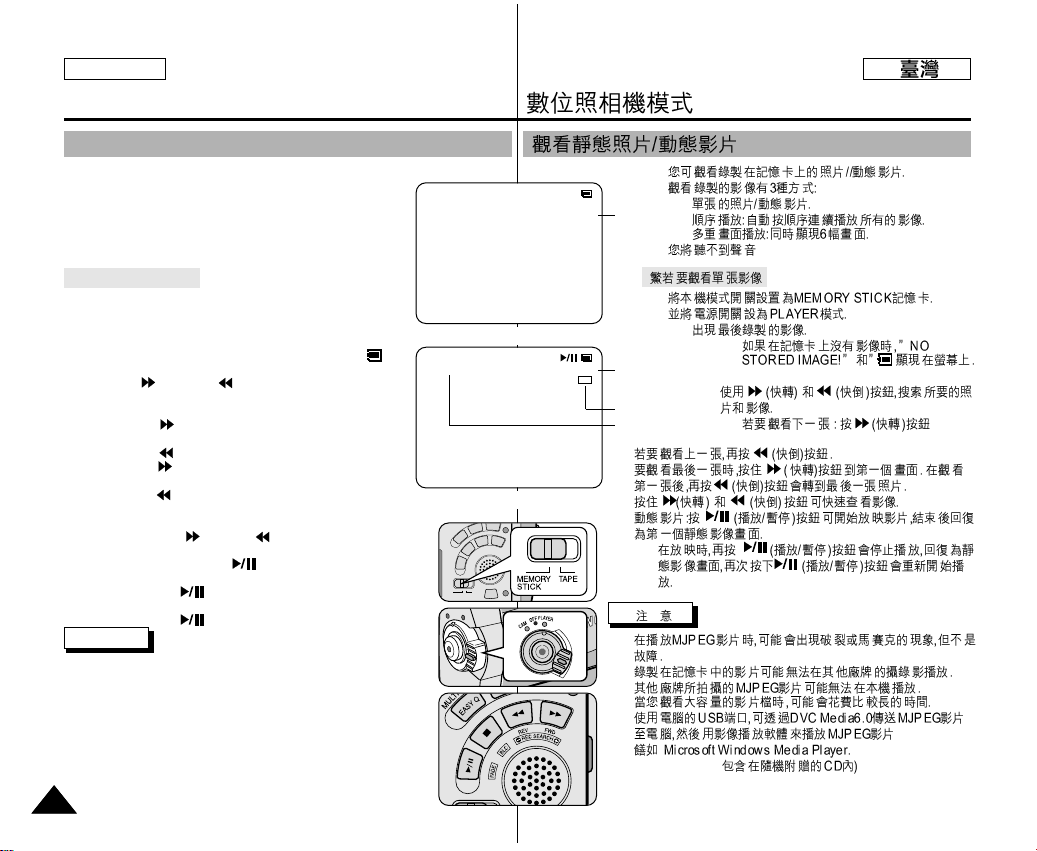
9494
ENGLISH
Digital Still Camera mode
✤ You can playback and view still images/moving pictures recorded on the Memory Stick.
✤ There are 3 ways to view recorded images.
■
Single images/Moving pictures
■
Slide show : To view all images automatically and in
consecutive order.
■
Multi display : To view 6 images at once.
✤ You cannot hear the sound.
To view a Single image
1. Set the mode switch to MEMORY STICK.
2. Set the power switch to PLAYER mode.
■
The last still image/moving picture recorded apears in the display.
- If there are no recorded still images/moving pictures on
the Memory Stick, NO STORED IMAGE! and will
display on the screen.
3. Using the (FWD) and (REV) buttons, search for the
desired still images/moving pictures.
■
To view the next still image/moving picture:
press the (FWD) button.
■
To view the previous still image/moving picture:
press the (REV) button.
■
Pressing (FWD) when you are on the last still image/
moving picture will take you to the first still image and
pressing (REV) when you are on the first still
image/moving picture will take you to the last still
image/moving picture.
■
Keep pressing (FWD) or (REV) to search for an still
image/moving picture quickly.
■
Moving picture: Pressing (PLAY/STILL) plays back the moving
picture and will show first scene as a still image when playback ends.
- Pressing (PLAY/STILL) during playback will stop the
moving picture and the scene is shown as a still image.
Pressing (PLAY/STILL) again will restart the playback.
Notes
■
There could be some broken or mosaic pictures displayed while playing
the MJPEG moving pictures. This is not a fault.
■
It is possible that moving pictures that you recorded in the Memory
Stick might not playback in other brands of camcorder.
■
The MJPEG file recorded by another camcorder might not playback in
this camcorder.
■
Memory Stick with large file sizes may take additional time to replay.
■
You can transfer MJPEG file to PC through DVC Media 6.0 using USB
port on your PC. And then, play MJPEG file with a moving picture
player program like a Microsoft Windows Media Player.
(DVC Media 6.0 is included in the CD supplied)
Viewing Still images/Moving pictures
✤
✤
■
■
■
✤
1.
2.
■
-
3.
■
■
■
■
■
-
■
■
■
■
■
(DVD Media 6.0
1280 X 960
[0 4 / 0 6]
1 0 0 - 0 0 0 4
Image
Size
320
MJPEG
0 0 / 1 5 secDCAM0002.AVI
Playback time/
Time of
recorded picture
MJPEG Size
File number
still image
moving picture
Page 95
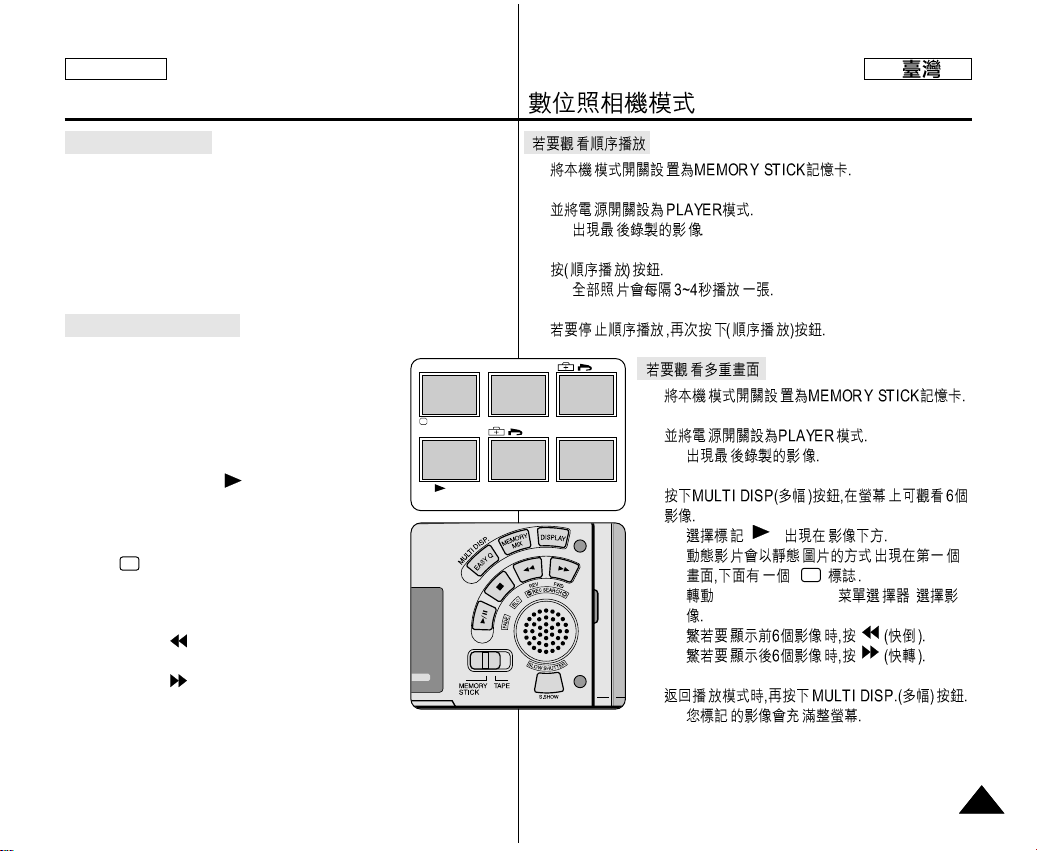
9595
ENGLISH
1.
2.
■
3.
■
4.
1.
2.
■
3.
■
()
■
( )
■
MENU SELECTOR( )
■
■
4.
■
Digital Still Camera mode
To view a slide show
1. Set the mode switch to MEMORY STICK.
2. Set the power switch to PLAYER mode.
■
The last recorded still image/moving picture appears
3. Press the S.SHOW button.
■
All images will be played back consecutively for 3~4 seconds each.
4. To stop the slide show, press the S.SHOW button again.
To view the Multi Display
1. Set the mode switch to MEMORY STICK.
2. Set the power switch to PLAYER mode.
■
The last recorded still image/moving picture
appears.
3. To view six stored still image/moving picture on
single screen, press the MULTI DISP. button.
■
A selection mark ( ) appears under the still
image/moving picture.
■
Moving pictures will be displayed with the first
scene as a still image, indicated by a picture mark
( ).
■
Move the MENU SELECTOR to select a still
image/moving picture.
■
To display the previous six images,
press the (REV).
■
To display the next six images,
press the (FWD).
4. To return to single playback mode, press the
MULTI DISP. button again.
■
The still image/moving picture you have marked fills the whole
display.
19 20 21
22 23 24
[24/24]100-0025
Page 96
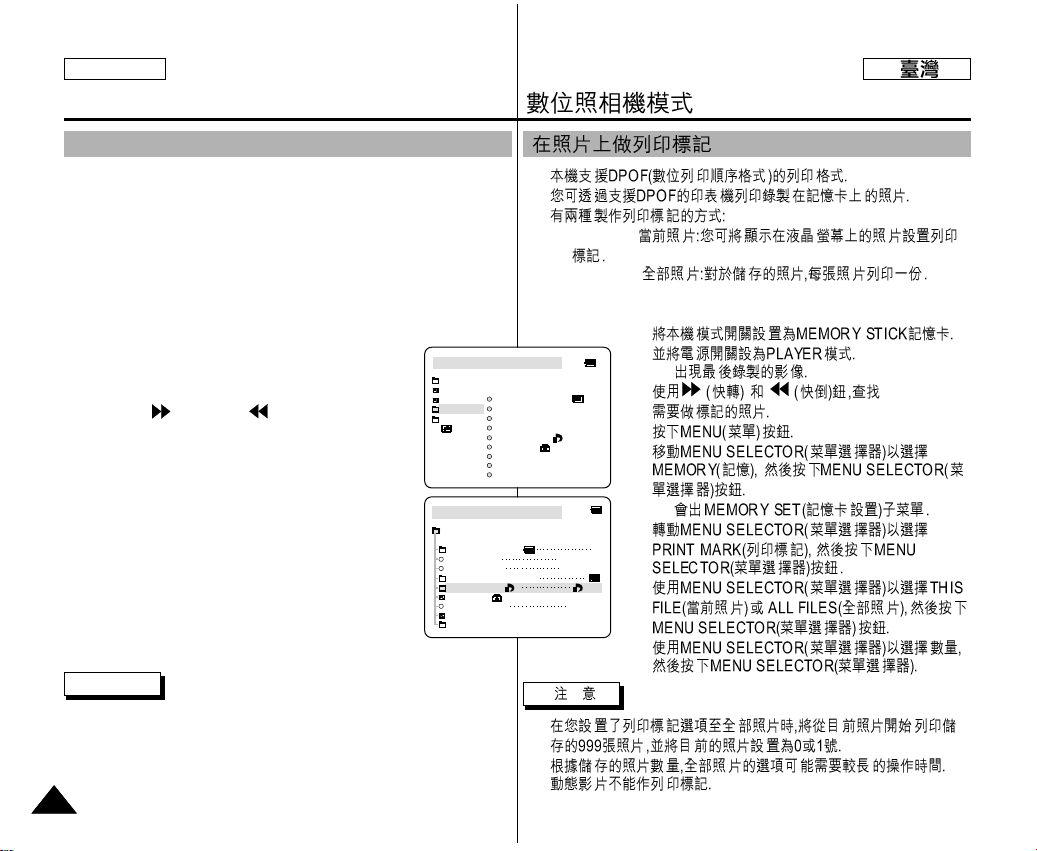
9696
ENGLISH
✤
✤
✤
■
THIS FILE
■
ALL FILES
1.
2.
■
3.
4.
5.
■
6.
7.
8.
■
■
■
Digital Still Camera mode
✤ This camcorder supports the DPOF (Digital Print Order Format) print
format.
✤ You can automatically print still images recorded on a Memory Stick
with a printer supporting DPOF.
✤ There are 2 ways to make a PRINT MARK.
■
THIS FILE: You can set a print mark on the photo image displayed
on the LCD.
■
ALL FILES: To print 1 copy each of all of the stored still images.
1. Set the mode switch to MEMORY STICK.
2. Set the power switch to PLAYER.
■
The last recorded image appears.
3. Using the (FWD) and (REV) buttons,
search for the still image that you want to mark.
4. Press the MENU button.
5. Move the MENU SELECTOR to highlight
MEMORY and push the MENU SELECTOR.
■
The MEMORY SET submenu will appear.
6. Move the MENU SELECTOR to highlight PRINT
MARK, push the MENU SELECTOR.
7. Use the MENU SELECTOR to select either
THIS FILE or ALL FILES and push the MENU
SELECTOR.
8. Use the MENU SELECTOR to select the quantity and
push the MENU SELECTOR.
Notes
■
When you setup the PRINT MARK option to ALL FILES, 999 files
from the current file are set to 1 or 0.
■
The ALL FILES option may require extended operation time depending
on the number of stored still images.
■
You cannot write print marks on moving pictures.
Marking still images for printing
M.PLAY MODE
MEMORY SET
PRINT MARK
PROTECT
PHOTO QUALITY
FILE NUMBER
DELETE
FORMAT
IMAGE SIZE
MJPEG SIZE
F
320X240
1280X960
000
SERIES
CONTINUOUS SHOT
M.PLAY MODE
INITIAL
PRINT MARK
PROTECT
PHOTO QUALITY
FILE NO.
DELETE
FORMAT
IMAGE SIZE
MJPEG SIZE
CONTINUOUS SHOT
CAMERA
A/V
MEMORY
VIEWER
Page 97
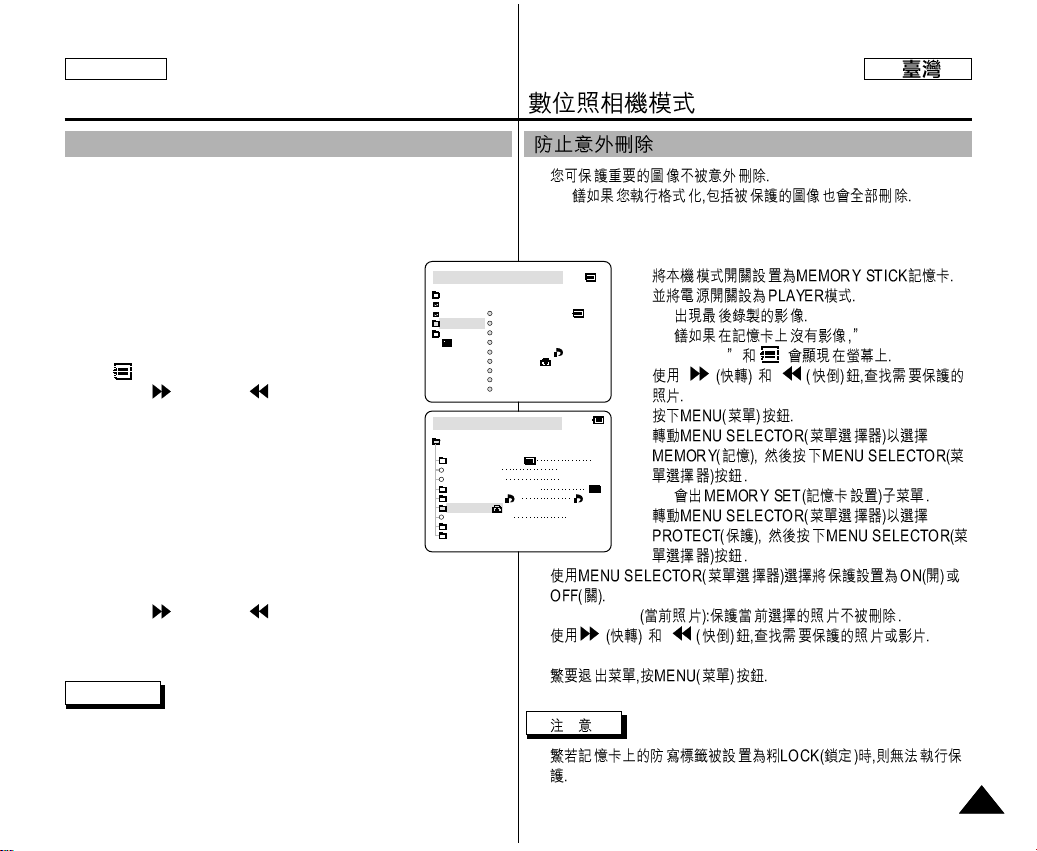
9797
ENGLISH
✤
■
1.
2.
■
■
NO STORED
IMAGE!
3.
4.
5.
■
6.
7.
.
■
THIS FILE
8.
9.
■
Digital Still Camera mode
✤ You can protect important still images/moving pictures from accidental
erasure.
■
If you execute FORMAT, all still images/moving pictures including
protected images will be erased.
1. Set the mode switch to MEMORY STICK.
2. Set the power switch to PLAYER.
■
The last recorded still image/moving picture appears.
■
If there are no recorded still images/moving pictures
on the Memory Stick, NO STORED IMAGE! and
will display on the screen.
3. Using the (FWD) and (REV) buttons,
search for the still image/moving picture that you want
to protect.
4. Press the MENU button.
5. Move the MENU SELECTOR to highlight MEMORY
and push the MENU SELECTOR.
■
The submenu of MEMORY SET will appear.
6. Move the MENU SELECTOR to highlight PROTECT
and push the MENU SELECTOR.
7. Push the MENU SELECTOR to set PROTECT to ON or OFF.
■
THIS FILE : protects the currently selected file from erasure.
8. Using the (FWD) and (REV) buttons, search for the still
image/moving picture that you wish to protect.
9. To exit the menu, press the MENU button.
Note
■
If the write protect tab on the Memory Stick is set to LOCK,
you cannot carry out image protection.
Protection from accidental erasure
M.PLAY MODE
MEMORY SET
PRINT MARK
PROTECT
PHOTO QUALITY
FILE NUMBER
DELETE
FORMAT
IMAGE SIZE
MJPEG SIZE
F
320X240
1280X960
000
SERIES
CONTINUOUS SHOT
M.PLAY MODE
INITIAL
PRINT MARK
PROTECT
PHOTO QUALITY
FILE NO.
DELETE
FORMAT
IMAGE SIZE
MJPEG SIZE
CONTINUOUS SHOT
CAMERA
A/V
MEMORY
VIEWER
Page 98
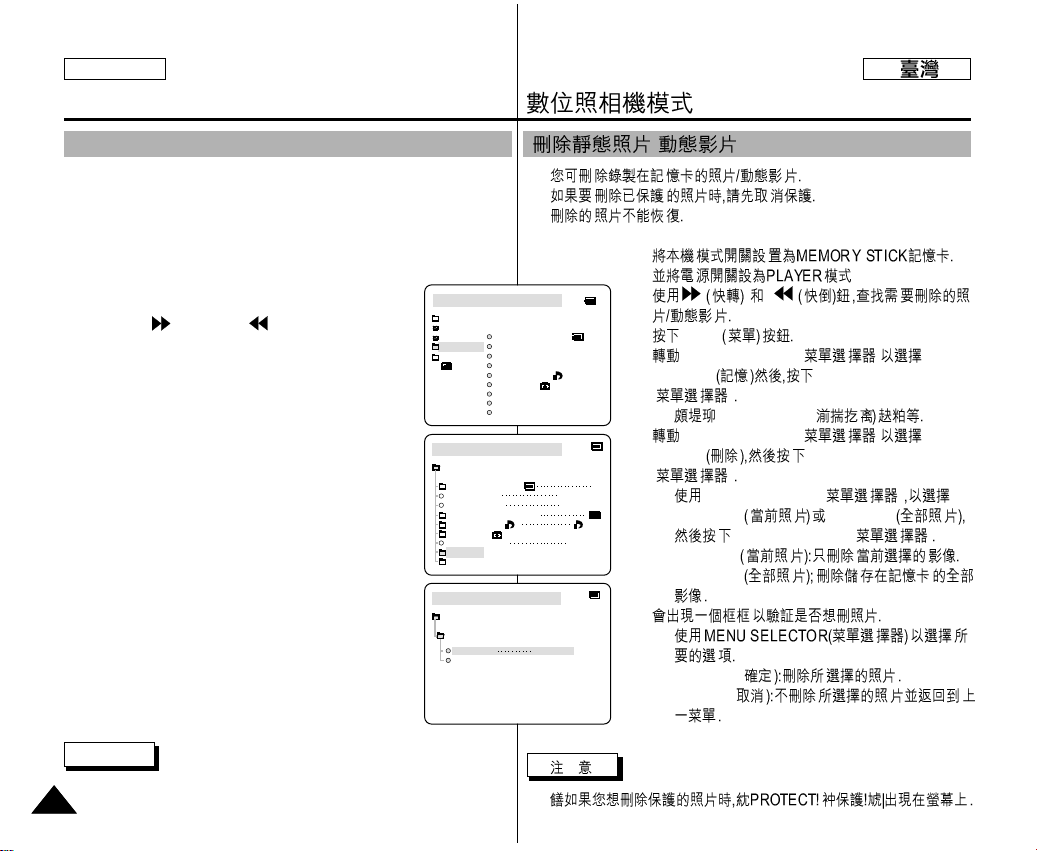
9898
ENGLISH
✤
✤
✤
1.
2.
3.
4. MENU
5. MENU SELECTOR( )
MEMORY MENU SELECTOR
( )
■
MEMORY SET(
6. MENU SELECTOR( )
DELETE MENU SELECTOR
( )
■
MENU SELECTOR( )
THIS FILE ALL FILES
MENU SELECTOR( )
■
THIS FILE
■
ALL FILES
7.
■
■
EXECUTE(
■
CANCEL(
■
Digital Still Camera mode
✤ You can erase the still images/moving pictures recorded on the Memory
Stick.
✤ If you want to delete protected still images/moving pictures, you must
first deactivate the image protection.
✤ An image which has been deleted cannot be recovered.
1. Set the mode switch to MEMORY STICK.
2. Set the power switch to PLAYER.
3. Using the (FWD) and (REV) buttons, search for
the still image/moving picture that you want to delete.
4. Press the MENU button.
5. Move the MENU SELECTOR to highlight MEMORY
and push the MENU SELECTOR.
■
The MEMORY SET submenu will appear.
6. Move the MENU SELECTOR to highlight DELETE and
push the MENU SELECTOR.
■
Using the MENU SELECTOR, select either
THIS FILE or ALL FILES and push the MENU
SELECTOR.
■
THIS FILE: deletes only the file currently selected.
■
ALL FILES : deletes all files stored in the Memory
Stick.
7. A box will appear to verify whether you wish to delete
the still image/moving picture.
■
Using the MENU SELECTOR, select the item.
■
EXECUTE : deletes the selected still images/
moving pictures.
■
CANCEL : does not delete the selected still
images/moving pictures and returns to the previous
menu.
Note
■
If you try to delete a protected image, “PROTECT!” appears on the
screen.
Deleting Still images/Moving pictures
/
M.PLAY MODE
MEMORY SET
PRINT MARK
PROTECT
PHOTO QUALITY
FILE NUMBER
DELETE
FORMAT
IMAGE SIZE
MJPEG SIZE
F
320X240
1280X960
000
SERIES
CONTINUOUS SHOT
M.PLAY MODE
THIS FILE CANCLE
ALL FILES
MEMORY SET
DELETE
M.PLAY MODE
INITIAL
PRINT MARK
PROTECT
PHOTO QUALITY
FILE NO.
DELETE
FORMAT
IMAGE SIZE
MJPEG SIZE
CONTINUOUS SHOT
CAMERA
A/V
MEMORY
VIEWER
Page 99
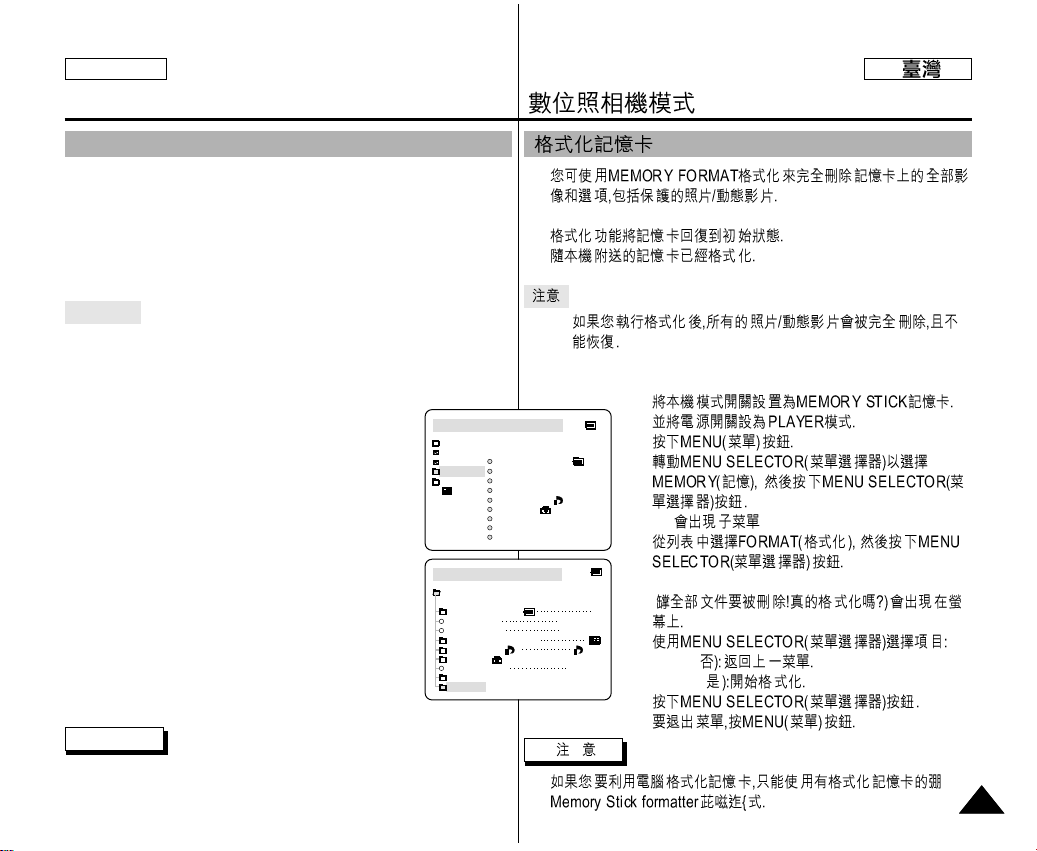
9999
ENGLISH
✤
✤
✤
✤
1.
2.
3.
4.
■
5.
6. ALL FILES ARE DELETED! FORMAT REALLY?
(
7.
■
NO(
■
YES(
8.
9.
■
Digital Still Camera mode
✤ You can use the MEMORY FORMAT functions to completely delete all
still images/moving pictures and options on the Memory Stick,
including protected still images/moving pictures.
✤ The format function restores the Memory Stick to its initial state.
✤ The Memory Stick supplied with this camcorder has been formatted
already.
Attention
✤ If you execute the MEMORY FORMAT function, all still
images/moving pictures will be erased completely and erased still
images/moving pictures cannot be recovered.
1. Set the mode switch to MEMORY STICK.
2. Set the power switch to PLAYER mode.
3. Press the MENU button.
4. Move the MENU SELECTOR to highlight MEMORY
and push the MENU SELECTOR.
■
The sub menu will appear.
5. Select FORMAT from the list and push the MENU
SELECTOR.
6. “ALL FILES ARE DELETED! FORMAT REALLY?”
appears on the screen.
7. Using the MENU SELECTOR, select the item.
■
NO : To return to previous menu
■
YES : To start formatting.
8. Push the MENU SELECTOR.
9. To exit the menu, push the MENU button.
Note
■
If you want to format the Memory Stick on your PC, use only the
“Memory Stick formatter” supplied with the software CD.
Formatting the Memory Stick
M.PLAY MODE
MEMORY SET
PRINT MARK
PROTECT
PHOTO QUALITY
FILE NUMBER
DELETE
FORMAT
IMAGE SIZE
MJPEG SIZE
F
320X240
1280X960
000
SERIES
CONTINUOUS SHOT
M.PLAY MODE
INITIAL
PRINT MARK
PROTECT
PHOTO QUALITY
FILE NO.
DELETE
FORMAT
IMAGE SIZE
MJPEG SIZE
CONTINUOUS SHOT
CAMERA
A/V
MEMORY
VIEWER
Page 100
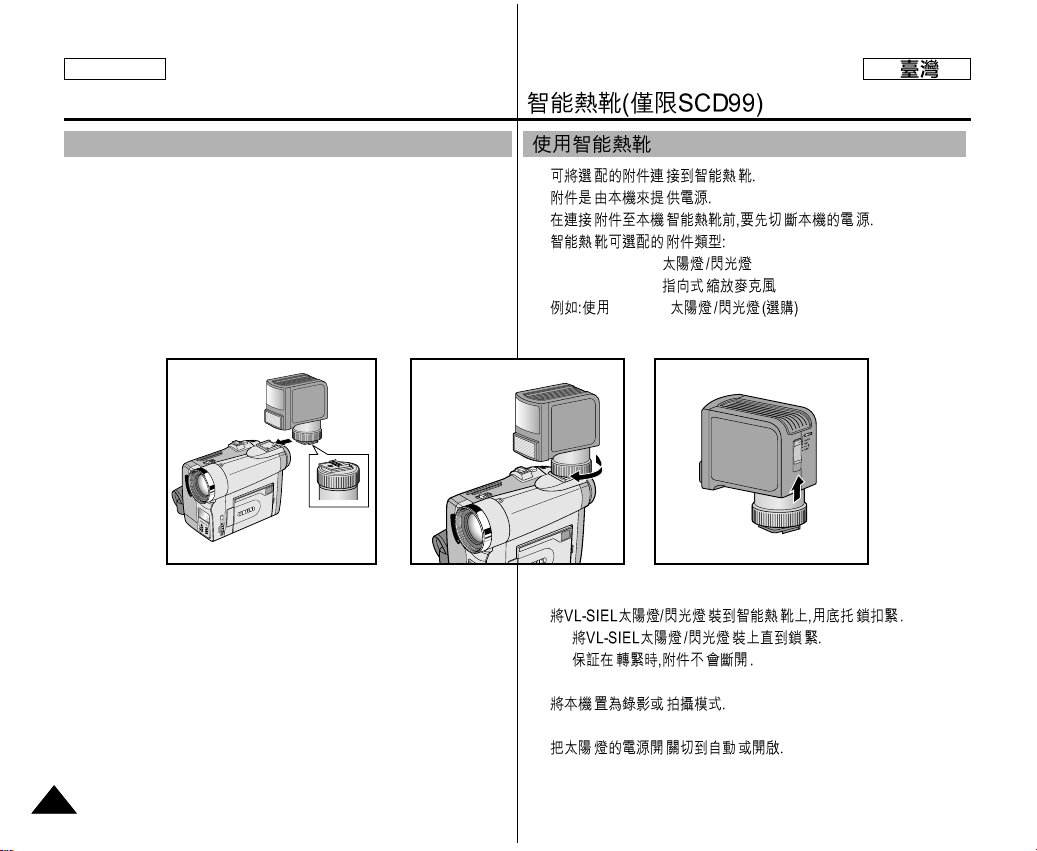
100
100
ENGLISH
✤
✤
✤
✤
■
VL-S1FL
■
ZM-EC1
VL-S1FL
1.
■
■
2.
3.
Smart Shoe (SCD99 only)
100
Using the Smart
✤ You can use to attach an optional accessory to the camcorder’s Smart
Shoe.
✤ The accessory is powered by the camcorder’s power supply.
✤ Turn the camcorder’s power off before attaching/removing the
accessory to the Smart Shoe.
✤ Types of optional accessories for Smart Shoe.
■
VL-S1FL Video Light/Flash
■
ZM-EC1 Gun Zoom Mic
ex) Using the VL-S1FL Video Light/Flash(optional)
1. Slide the VL-S1FL(Video Light/Flash) onto the Smart Shoe and tighten
with shoe lock.
■
Slide the VL-S1FL onto the camcorder until it clicks securely into
place.
■
Make sure that the accessory does not come disconnected when
turning the shoe lock.
2. Set the camcorder to CAM or M.REC mode.
3. Move the Video Light’s power switch to AUTO or ON.
 Loading...