

Page 1
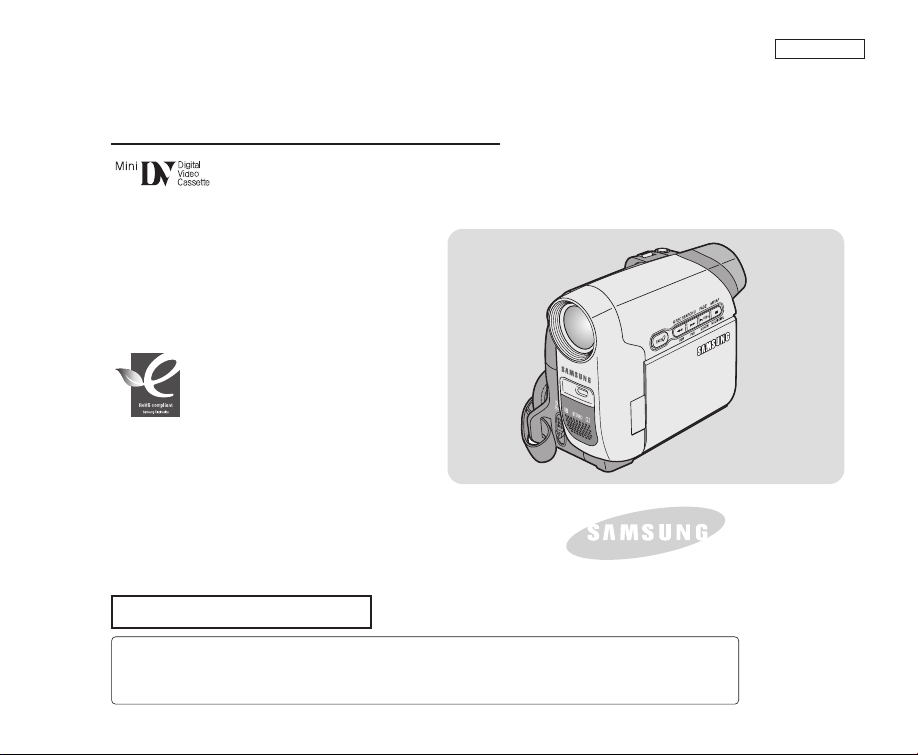
Digital Video Camcorder
SC-D263/D362/D363/D364/D365/D366
AF Auto Focus
CCD Charge Coupled Device
LCD Liquid Crystal Display
RoHS compliant
Our product complies with “The
Restriction Of the use of certain
Hazardous Substances in electrical and
use the 6 hazardous materials- Cadmium(Cd), Lead
(Pb), Mercury (Hg), Hexavalent Chromium (Cr
Brominated Biphenyls (PBBs), Poly Brominated
Diphenyl Ethers(PBDEs)- in our products.
Owner’s Instruction Book
Before operating the unit, please read this Instruction
Book thoroughly, and retain it for future reference.
electronic equipment”, and we do not
US PATENT 4415844
+6
), Poly
ENGLISH
Use only approved battery packs.
Otherwise, there is a danger of overheating, fire or explosion.
Samsung is not responsible for problems occurring due to using unapproved batteries.
Page 2

ENGLISH
Notices and Safety Instructions
Safety Instructions
Shock Hazard Marking and Associated Graphical Symbols
CAUTION
RISK OF ELECTRIC SHOCK
DO NOT OPEN
Explanation of Safety Related Symbols
1. Read these instructions.
2. Keep these instructions.
3. Heed all warnings.
4. Follow all instructions.
5. Do not use this apparatus near water.
6. Clean only with dry cloth.
7. Do not block any ventilation openings. Install in accordance
with the manufacturer’s instructions.
8. Do not install near any heat sources such as radiators, heat
registers, stoves, or other apparatus (including amplifiers)
that produce heat.
9. Do not defeat the safety purpose of the polarized or
grounding type plug. A polarized plug has two blades with
one wider than the other. A grounding type plug has two
blades and a third grounding prong. The wide blade or the
third prong are provided for your safety. If the provided plug
does not fit into your outlet. Consult an electrician for
replacement of the obsolete outlet.
CAUTION
RISK OF ELECTRIC SHOCK
DO NOT OPEN
CAUTION: TO REDUCE THE RISK OF
ELECTRIC SHOCK, DO NOT REMOVE
COVER (OR BACK).
NO USER-SERVICEABLE PARTS
INSIDE, REFER SERVICING TO
QUALIFIED SERVICE PERSONNEL.
WARNING - To Reduce The Risk Of Fire Or Electric Shock, Do Not Expose This
This symbol is intended to alert the user to the presence of
uninsulated “dangerous voltage” within the product’s enclosure
that may be of sufficient magnitude to constitute a risk of electric
shock to persons.
This symbol is intended to alert the user to the presence of
important operating and maintenance (servicing) instructions in
the literature accompanying the appliance.
Apparatus To Rain Or Moisture.
10. Protect the power cord from being walked on or pinched
particularly at plugs, convenience receptacles, and the point
where they exit from the apparatus.
11. Only use attachments/accessories specified by the
manufacturer.
12. Use only with the cart, stand, tripod, bracket, or table
specified by the manufacturer, or sold with
the apparatus. When a cart is used, use
caution when moving the cart/apparatus
combination to avoid injury from tip-over.
13. Unplug this apparatus during lightning storms or when
unused for long periods of time.
14. Refer all servicing to qualified service personnel. Servicing is
required when the apparatus has been damaged in any way,
such as power-supply cord or plug is damaged, moistened
does not operate normally, or has been dropped.
Page 3

Notices and Safety Instructions
GROUNDING CONDUCTORS
(NEC SECTION 810-21)
GROUND CLAMPS
POWER SERVICE GROUNDING
ELECTRODE SYSTEM
(NEC ART 250, PART H)
NEC NATIONAL ELECTRICAL CODE
ELECTRIC
SERVICE
EQUIPMENT
GROUND
CLAMP
ANTENNA
LEAD IN
WIRE
ANTENNA
DISCHARGE UNIT
(NEC SECTION 810-20)
ENGLISH
15. The apparatus should not be exposed to dripping or
splashing. No objects filled with liquids, such as vases,
should be placed on the apparatus.
16. VENTILATION:
Slots and openings in the cabinet are provided for ventilation to
ensure reliable operation of the CAMCORDER and to protect it
from overheating. These openings must not be blocked or
covered. Never place your CAMCORDER on a bed, sofa, rug,
or other similar surface: on or near a radiator or heat register.
This CAMCORDER should not be placed in a built-in installation
such as a bookcase or rack unless proper ventilation is provided
or the manufacturer’s instructions have been adhered to.
17. POWER SOURCES:
The CAMCORDER should be operated only from the type of
power source indicated on the label.
If you are not sure of the type of power supply at your home,
consult your appliance dealer or local power company.
A CAMCORDER is intended to be operated from battery power,
or other sources, refer to the operating instructions.
18. GROUNDING OR POLARIZATION:
This CAMCORDER may be equipped with either a polarized
2-wire AC line plug (a plug having one blade wider than the other)
or a 3-wire grounding type plug, a plug having a third (grounding)
pin. If you are unable to insert the plug fully into the outlet, try
reversing the plug. If the plug still fails to fit, contact your
electrician to replace your outlet. Do not defeat the safety purpose
of the polarized plug.
19. POWER-CORD PROTECTION:
Power-supply cords should be routed so that they are not likely to
be walked on or pinched by items placed upon or against them,
paying particular attention to cords or plugs, convenient
receptacles, and the point where they exit from the unit.
20. OUTDOOR ANTENNA GROUNDING:
If an outside antenna or cable system is connected to the
CAMCORDER, be sure the antenna or cable system is grounded
to provide some protection against voltage surges and built-up
static charges, Section 810 of the National Electrical Code,
ANSI/NFPA No. 70-1984, provides information with respect to
proper grounding of the mast and supporting structure, grounding
of the lead-in wire and supporting structure, grounding of the mast
and supporting structure, grounding of the lead-in wire to an
antenna discharge unit, size of grounding to conductors, location
of antenna-discharge unit, connection to grounding electrodes
and requirements for the grounding electrode.
See figure below.
Page 4

ENGLISH
Notices and Safety Instructions
21. LIGHTNING:
For added protection of this CAMCORDER during a lightning
storm or when it is left unattended and unused for long periods of
time, unplug it from the wall outlet and disconnect the antenna or
cable system.
This will prevent damage to the CAMCORDER due to lightning
and power-line surges.
22. POWER LINES:
An outside antenna system should not be located in the vicinity of
overhead power lines or other electric light or power circuits where
it can fall into such power lines or circuits. When installing an
outside antenna system, extreme care should be taken to keep
from touching such power lines or circuits as contact with them
might be fatal.
23. OVERLOADING:
Do not overload wall outlets and extension cords as this can result
in a risk of fire or electric shock.
24. OBJECTS AND LIQUIDS:
Never push objects of any kind into this CAMCORDER through
openings as they may touch dangerous voltage points or short out
a part that could result in a fire or electric shock.
Never spill liquids of any kind onto the CAMCORDER. Should
spillage occur, unplug unit and have it checked by a technician
before use.
25. SERVICING:
Do not attempt to service this CAMCORDER yourself. Opening or
removing covers may expose you to dangerous voltage or other
hazards.
Refer all servicing to qualified service personnel.
26. DAMAGE REQUIRING SERVICE:
Unplug this CAMCORDER from the wall outlet and refer servicing
to qualified service personnel under the following conditions:
a. When the power-supply cord or plug is damaged.
b. If any liquid has been spilled onto, or objects have fallen into
the CAMCORDER.
c. If the CAMCORDER has been exposed to rain or water.
d. If the CAMCORDER does not operate normally by following the
operating instructions, adjust only those controls that are
covered by the operating instructions. Improper adjustment of
other controls may result in damage and will often require
extensive work by a qualified technician to restore the
CAMCORDER to its normal operation.
e. If the CAMCORDER has been dropped or the cabinet has been
damaged.
f. When the CAMCORDER exhibits a distinct change in
performance, this indicates a need for service.
27. REPLACEMENT PARTS:
When replacement parts are required, be sure the service
technician has used replacement parts specified by the
manufacturer and having the same characteristics as the original
part.
Unauthorized substitutions may result in fire, electric shock or
other hazards.
28. SAFETY CHECK:
Upon completion of any service or repairs to this CAMCORDER,
ask the service technician to perform safety checks to determine
that the CAMCORDER is in safe operating order.
Page 5
Notices and Safety Instructions
ENGLISH
29. To prevent damage which may result in fire or shock hazard, do not
expose this appliance to rain or moisture.
30. If this power supply is used at 240V ac, a suitable plug adapter
should be used.
USER INSTALLER CAUTION:
Your authority to operate this FCC certified equipment could be voided
if you make changes or modifications not expressly approved by this
party responsible for compliance to part 15 FCC rules.
NOTE:
Hg LAMP(S) INSIDE THIS PRODUCT CONTAIN
MERCURY AND MUST BE RECYCLED OR
DISPOSED OF ACCORDING TO LOCAL, STATE OR
FEDERAL LAWS. For details see lamprecycle.org,
eiae.org, or call 1-800-Samsung (7267864)
NOTE: This equipment has been tested and found to comply with
the limits for a Class B digital device, pursuant to part 15 of the
FCC Rules. These limits are designed to provide reasonable
protection against harmful interference in a residential installation.
This equipment generates, uses and can radiate radio frequency
energy and, if not installed and used in accordance with the
instructions, may cause harmful interference to radio
communications. However, there is no guarantee that interference
will not occur in a particular installation. If this equipment does
cause harmful interference to radio or television reception, which
can be determined by turning the equipment off and on, the user is
encouraged to try to correct the interference by one or more of the
following measures:
- Reorient or relocate the receiving antenna.
- Increase the separation between the equipment and receiver.
- Connect the equipment into an outlet on a circuit different from
that to which the receiver is connected.
- Consult the dealer or an experienced radio/TV technician for help
and for additional suggestions.
The user may find the following booklet prepared by the Federal
Communications Commission helpful : “How to Identify and
Resolve Radio-TV Interference Problems.”
This Booklet is available from the U.S. Government Printing
Office, Washington, D.C. 20402, Stock No. 004-000-00345-4.
FCC Warning
The user is cautioned that changes or modifications not expressly
approved by the manufacturer could void the user’s authority to
operate the equipment.
FCC ID : A3L05DRAGON2
This device complies with Part 15 of FCC Rules.
Operation is subject to the following two conditions;
(1) This device may not cause harmful interference, and
(2) This device must accept any interference received,
including interference that may cause undesired operation.
Page 6

ENGLISH
Contents
Notes and Safety Instructions..............................................5
Getting to Know Your Camcorder ......................................7
Features ....................................................................................7
Accessories Supplied with Camcorder ....................................8
Front & Left View ......................................................................9
Left Side View..........................................................................10
Right & Top View ....................................................................11
Rear & Bottom View ................................................................12
Remote Control (SC-D364/D366 only) ..................................13
Preparation ........................................................................14
Using the Hand Strap & Lens Cover ......................................14
Lithium Battery Installation ......................................................15
Using the Lithium Ion Battery Pack ........................................16
Connecting a Power Source ..................................................19
About the Operating Modes ....................................................19
Using the QUICK MENU ........................................................20
OSD (On Screen Display) in Camera/Player Modes ............21
OSD (On Screen Display) in M.Cam/M.Player Modes
(SC-D363/D364/D365/D366 only) ..........................................22
Turning the OSD (On Screen Display) On/Off ......................22
Initial Setting : System Menu Setting ................................23
Setting the Clock (Clock Set) ................................................23
Setting the Wireless Remote Control Acceptance
(Remote) (SC-D364/D366 only) ............................................24
Setting the Beep Sound (Beep Sound) ................................25
22
Setting the Shutter Sound (Shutter Sound)
(SC-D363/D364/D365/D366 only) ..........................................26
Selecting the OSD Language (Language) ............................27
Viewing the Demonstration (Demonstration) ........................28
Initial Setting : Display Menu Setting ................................29
Adjusting the LCD Screen (LCD Bright/ LCD Color) ..........29
Displaying the Date/Time (Date/Time) ..................................30
Setting the TV Display (TV Display) ......................................31
Basic Recording ................................................................32
Using the Viewfinder................................................................32
Inserting / Ejecting a Cassette ................................................32
Various Recording Techniques................................................33
Making your First Recording ..................................................34
Recording with Ease for Beginners (EASY.Q Mode) ............35
Reviewing and Searching a Recording (REC SEARCH) ........36
Searching a quickly for a desired scene
(Setting the Zero Memory) (SC-D364/D366 only) ..............37
Self Record using the Remote Control
(Setting the Self Timer) (SC-D364/D366 only) ....................38
Zooming In and Out ................................................................39
Using the Tele Macro ..............................................................39
Using the Fade In and Out ......................................................40
Using Back Light Compensation Mode (BLC) ......................41
Using the COLOR NITE (COLOR NITE)................................42
Using the LIGHT (SC-D362/D364/D365/D366 only) ..............43
Page 7

Contents
ENGLISH
Advanced Recording..........................................................44
Selecting the Record Mode & Audio Mode ............................44
Cutting Off Wind Noise (WindCut Plus) ................................45
Selecting the Real Stereo Function ........................................46
Setting the Shutter Speed & Exposure ..................................47
Auto Focus / Manual Focus ....................................................48
Programed Automatic Exposure Modes (Program AE) ........49
Setting the White Balance ......................................................51
Applying Visual Effects ............................................................52
Setting the 16:9 Wide mode....................................................54
Setting the Digital Image Stabilizer (DIS) ..............................55
Zooming In and Out with Digital Zoom (Digital Zoom) ........56
Still Image Recording ..............................................................57
Searching for a still image ..................................................57
Playback ............................................................................58
Playing Back a Tape You have recorded on the LCD Screen..58
Various Functions while in Player Mode ................................59
Zooming during Playback (PB ZOOM) ..................................61
Audio Dubbing (SC-D364/D366 only) ....................................62
Dubbed Audio Playback ..........................................................63
Tape Playback ........................................................................64
Audio Effect ............................................................................66
Setting the AV In/Out (SC-D365/D366 only) ..........................67
Digital Still Camera Mode (SC-D363/D364/D365 /D366 only) ..68
Using a Memory Card (Usable Memory Card) (not supplied)
....68
Memory Card Functions......................................................68
Inserting a Memory Card ....................................................68
Ejecting a Memory Card ....................................................68
Structure of Folders and Files on the Memory Card ..............69
Selecting the Memory Type (SC-D366 only) ..........................70
Selecting the Photo Quality ....................................................71
Setting the File Number ..........................................................72
Taking a Photo Image (JPEG) on the Memory Card..............73
Viewing Photo Images (JPEG) ..............................................74
To view a Single Image ......................................................74
To view a Slide Show ........................................................74
To view the Multi Display ..................................................74
Protection from accidental Erasure ........................................75
Deleting Photo Images and Moving Images ..........................76
Formatting a Memory Card ....................................................78
Recording Moving Images (MPEG) on a Memory Card ..........79
Playing Moving Images (MPEG) on a Memory Card
(M.Play Select) ......................................................................80
Recording Still Images from a Cassette ................................81
Copying Still Images from a Cassette to a Memory Card
(Photo Copy) ..........................................................................82
Copying Files from a Memory Card to the Built-in
Memory (Copy to) (SC-D366 only) ........................................83
Marking Images for Printing (Print Mark) ..............................84
Removing the Print Mark ....................................................84
PictBridgeTM(SC-D363/D364/D365/D366 only) ..............85
Printing Your Pictures – Using the PictBridge
TM
......................85
33
Page 8

ENGLISH
Contents
Connecting To a Printer ......................................................85
Selecting Images ................................................................86
Setting the Number of Prints ..............................................86
Setting the Date/Time Imprint Option ..................................86
Printing Images ..................................................................86
Canceling the Printing ........................................................86
IEEE 1394 Data Transfer ....................................................87
Transferring IEEE1394 (i.LINK)-DV Standard Data
Connections ............................................................................87
Connecting to a DV Device (DVD Recorder, Camcorder, etc.) ..87
Connecting to a PC ............................................................87
System Requirements..........................................................87
Recording with a DV Connection Cable ..............................88
USB Interface (SC-D362/D363/D364/D365/D366 only) ..89
Using USB Interface (SC-D362/D363/D364/D365/D366 only)
Transferring a Digital Image through a USB Connection ........89
USB Connection Speed depending on the System ................89
System Requirements..........................................................89
Selecting the USB Device (USB Connect)
(SC-D363/D364/D365/D366 only) ..........................................90
Installing DV Media PRO Program ........................................91
Connecting to a PC ................................................................92
Disconnecting the USB Cable ............................................92
Using the PC Camera Function............................................93
Using the USB Streaming Function ....................................94
....89
Using the Removable Disk Function
(SC-D363/D364/D365/D366 only) ......................................94
Maintenance ......................................................................95
After Finishing a Recording ....................................................95
Usable Cassette Tapes ..........................................................95
Cleaning and Maintaining the Camcorder ..............................96
Using Your Camcorder Abroad ..............................................97
Troubleshooting ......................................................98
Troubleshooting ......................................................................98
Self Diagnosis Display ........................................................98
Self Diagnosis Display in M.Cam/M.Player Modes
(SC-D363/D364/D365/D366 only) ....................................99
Setting menu items................................................................101
Specifications ...................................................... 103
Index .................................................................... 104
Warranty (SEA users only) ....................................105
44
Page 9
Notes and Safety Instructions
COLOR NITE
M
ENU
Notes regarding the Rotation of the LCD Screen
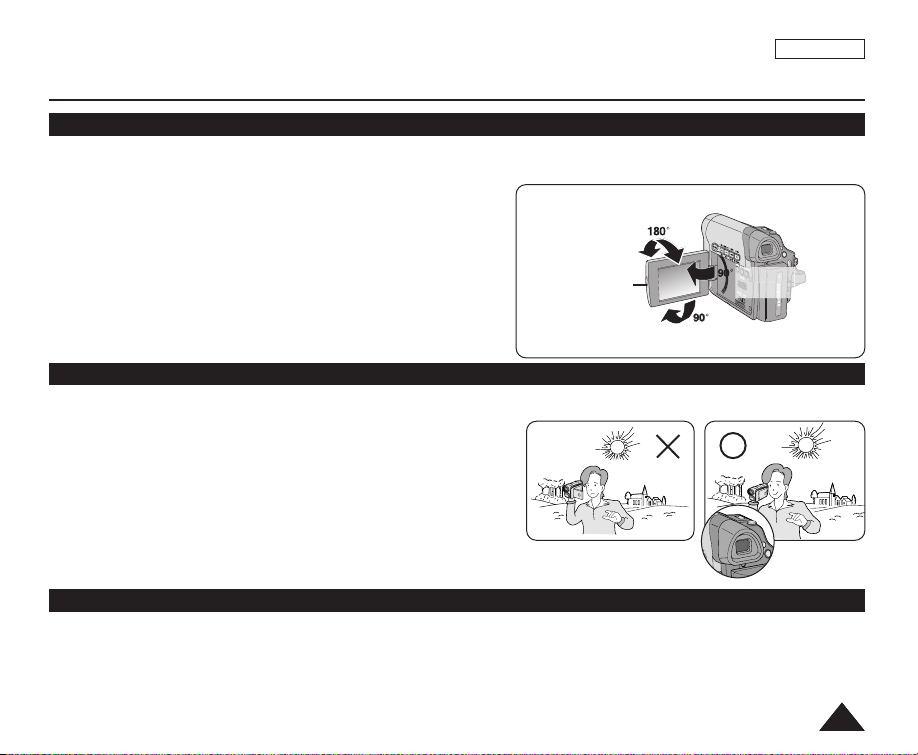
Please rotate the LCD Screen carefully as illustrated.
Over rotation may cause damage to the inside of the hinge that connects the LCD Screen to the Camcorder.
ENGLISH
1. Open the LCD Screen 90 degrees to the Camcorder
with your finger.
180 degrees (max.)
2. Rotate it to the best angle to record or play.
■
If you rotate the LCD Screen 180 degrees so it is facing
forward, you can close the LCD Screen with the facing out.
■
This is convenient during playback operations.
LCD Open Knob
[Note]
Refer to page 29 to adjust brightness and color of the LCD Screen.
Notes regarding the LCD Screen, Viewfinder, Lens
1. Direct sunlight can damage the LCD Screen, the inside of the Viewfinder or the Lens.
Take pictures of the sun only in low light conditions, such as at dusk.
2. The LCD Screen has been manufactured
using high precision technology.
However, there may be tiny dots (red, blue or green in color) that
appear on the LCD Screen. These dots are normal and do not
affect the recorded picture in any way.
3. Do not pick up the Camcorder by holding the Viewfinder, LCD
Screen or Battery Pack.
4. Applying excessive force to the Viewfinder may damage it.
Notes regarding the Video Head Cleaning
■
To ensure normal recording and a clear picture, clean the video heads regularly.
If a square block-shape distorts playback, or only a blue screen is displayed, the video heads may be dirty.
If this happens, clean the video heads with a dry type cleaning cassette.
■
Do not use a wet-type cleaning cassette. It may damage the video heads.
90 degrees
to the Camcorder
90 degrees (max.)
55
Page 10

ENGLISH
Notes and Safety Instructions
Notes regarding Camcorder
■
Do not leave the Camcorder exposed to high temperatures (above 60 °C or 140 °F).
For example, in a parked car in the sun or exposed to direct sunlight.
■
Do not let the Camcorder get wet. Keep the Camcorder away from rain, sea water, and any other form of moisture.
If the Camcorder gets wet, it may get damaged. Sometimes a malfunction due to exposure to liquids cannot be
repaired.
■
A sudden rise in atmospheric temperature may cause condensation to form inside the Camcorder.
- When you move the Camcorder from a cold location to a warm location (e.g. from outside to inside during the winter.)
- When you move the Camcorder from a cool location to a hot location (e.g. from inside to outside during the summer.)
■
If the (DEW) protection feature is activated, leave the Camcorder for at least two hours in a dry, warm room with
the cassette compartment opened and the Battery Pack removed.
Notices regarding Copyright
Television programs, video tapes, DVD titles, films, and other program materials may be copyrighted.
Unauthorized copying of copyrighted material may be against the law.
All the trade names and registered trademarks mentioned in this manual or other documentation provided with your
Samsung product are trademarks or registered trademarks of their respective holders.
Servicing & Replacement Parts
■
Do not attempt to service this Camcorder yourself.
■
Opening or removing covers may expose you to dangerous voltage or other hazards.
■
Refer all servicing to qualified service personnel.
■
When replacement parts are required, be sure the service technician has used replacement parts specified by the
manufacturer and having the same characteristics as the original part.
■
Unauthorized substitutions may result in fire, electric shock or other hazards.
66
Page 11

Getting to Know Your Camcorder
Features
■
Digital Data Transfer Function
with IEEE1394
By incorporating the IEEE 1394
(i.LINK™: i.LINK is a serial data
transfer protocol and
interconnectivity system, used to
transmit DV data) high speed data
transport port, both moving and
photo images can be transferred
to a PC, making it possible to
produce or edit various images.
■
USB Interface for Digital Image
Data Transfer (SC-D362/D363/
D364/D365/D366 only)
You can transfer images to a PC
using the USB interface without an
add-on card.
■
PHOTO
The PHOTO function lets you
capture an object as a still, while in
<Camera mode>.
■
1200x Digital Zoom
Allows you to magnify an image up
to 1200 times its original size.
■
Audio Enhancement
Provides more powerful sound by
with the Real Stereo and Audio
Effect features.
■
Color TFT LCD
A high-resolution color TFT LCD
gives you clean, sharp images as
well as the ability to review your
recordings immediately. A highresolution color TFT LCD of 230K
pixels supports 16:9 aspect ratio.
(SC-D365/D366).
■
Digital Image Stabilizer (DIS)
The DIS compensates for any
handshake, reducing unstable
images particularly at high
magnification.
■
Various Visual Effects
The Visual Effects allow you to
give your films a special look by
adding various special effects.
■
Back Light Compensation (BLC)
The BLC function compensates for
a bright background behind a
subject you're recording.
■
Program AE
The Program AE enables you to
alter the shutter speed and
aperture to suit the type of
scene/action to be filmed.
ENGLISH
■
High Power Zoom Lens
Power Zoom lens allows users to
magnify the subject clearly up to
x33 (x30 for SC-D263/D363).
■
Digital Still Camera Function
(SC-D363/D364/D365/D366 only)
- Using Memory Card, you can
easily record and playback
standard photo images.
- You can transfer standard photo
images on the Memory Card to
your PC using the USB interface.
■
Moving Image Recording
(SC-D363/D364/D365/D366 only)
Moving image recording makes it
possible to record video onto a
Memory Card.
■
Multi Memory Card Slot
(SC-D365/D366 only)
Multi Memory Card slot is able to
use Memory Stick (Duo),
Memory Stick PRO, MMC and SD.
■
Built-in Memory (SC-D366 only)
You can use digital still camera
functions without a separate
external Memory Card by using the
built-in memory installed in your
Camcorder. (SC-D366: 32MB)
77
Page 12
ENGLISH
Getting to Know Your Camcorder
Accessories Supplied with Camcorder
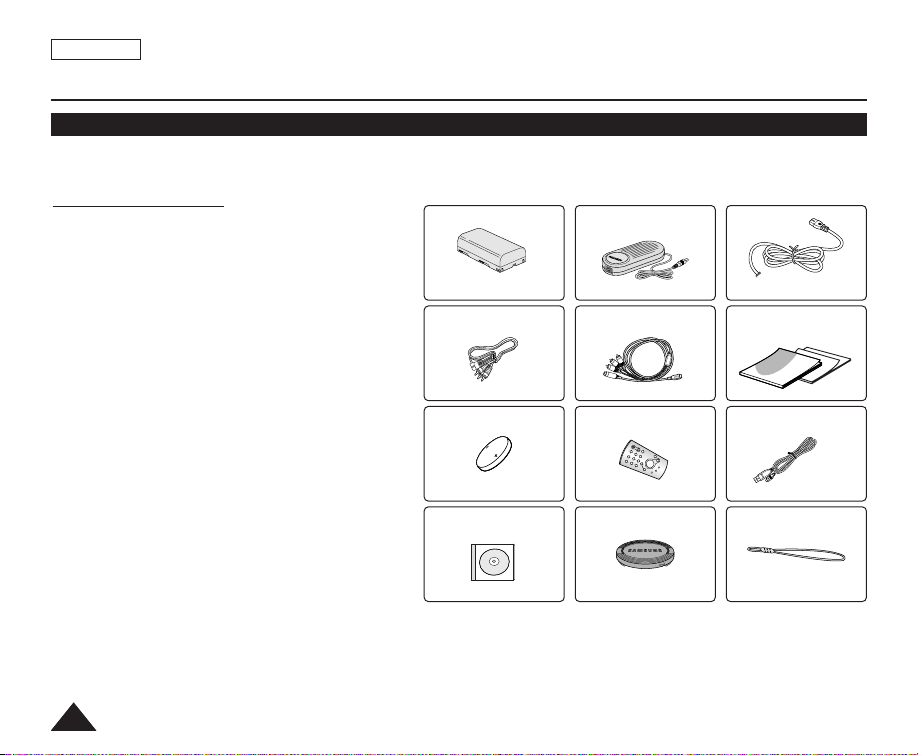
Make sure that the following basic accessories are supplied with your digital video camera.
Basic Accessories
1. Lithium Ion Battery Pack
2. AC Power Adapter (AA-E8 TYPE)
3. AC Cord
4. Audio/Video Cable (SC-D263/D363)
5. Multi Cable (SC-D362/D364/D365/D366)
6. Instruction Book/Quick Guide
7. Lithium Battery for Remote Control
(SC-D364/D366 only) or Clock.
(TYPE: CR2025)
8. Remote Control (SC-D364/D366 only)
9. USB Cable (SC-D362/D363/D364/D365/D366 only)
10. Software CD (SC-D362/D363/D364/D365/D366 only)
11. Lens Cover
12. Lens Cover Strap
88
1. Lithium Ion Battery Pack
AD43-00136A
4. Audio/Video Cable
(SC-D263/D363)
AD39-00001A AD39-00119A
7. Lithium Battery (CR2025)
AD43-10130H
10. Software CD (SC-D362
/D363/D364/D365/D366)
AD46-00082A
2. AC Power Adapter
(AA-E8 TYPE)
5. Multi Cable (SC-D362
/D364/D365/D366)
8. Remote Control
(SC-D364/D366)
11. Lens Cover 12. Lens Cover Strap
AD44-00090A
AD59-00085A
AD97-10686A
3. AC Cord
AD39-00076A
6. Instruction Book/
Quick Guide
9. USB Cable (SC-D362
/D363/D364/D365/D366)
AD39-00073A
AD72-00049A
Page 13
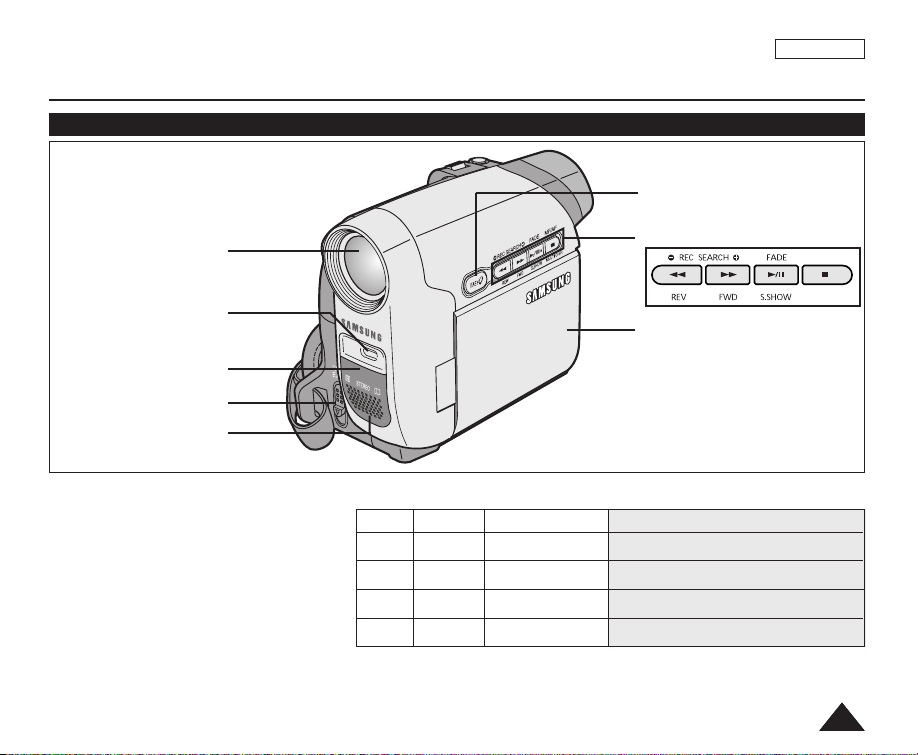
Getting to Know Your Camcorder
MF/AF
MULTI DISP.
Front & Left View
ENGLISH
6. EASY.Q Button
1. Lens
2. LIGHT
(SC-D362/D364/D365
/D366 only)
3. Remote Sensor
(SC-D364/D366 only)
4. TAPE EJECT
5. Internal MIC
1. Lens
2. LIGHT ➥page 43
(SC-D362/D364/D365/D366 only)
3. Remote Sensor
(SC-D364/D366 only)
4. TAPE EJECT
5. Internal MIC
6. EASY.Q Button ➥page 35
7. Function Buttons
8. TFT LCD Screen
7. Function Buttons
Button <Player> <Camera> <M.Player> (SC-D363/D364/D365/D366 only)
œœœœ
REW REC SEARCH – REV
√√√√
√√
■ STOP MF/AF MULTI DISP. (MULTI DISPLAY)
FF REC SEARCH + FWD
/❙❙ PLAY/STILL FADE S.SHOW (SLIDE SHOW)
8. TFT LCD Screen
99
Page 14
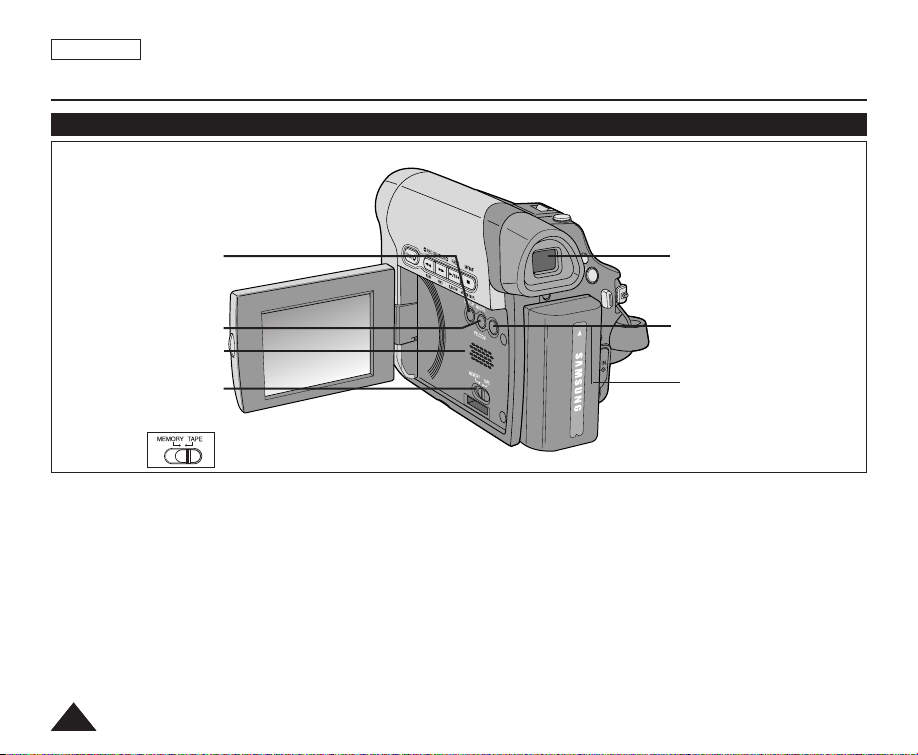
ENGLISH
COLOR NITE
LIGHT
MENU
Getting to Know Your Camcorder
Left Side View
1. DISPLAY
2. MACRO/PB ZOOM
3. Speaker
4. Mode Switch
(SC-D363/D364/D365/D366 only)
(MEMORY/TAPE)
1. DISPLAY ➥page 21
2. MACRO/PB ZOOM ➥page 39 / ➥page 61
3. Speaker
4. Mode Switch (MEMORY/TAPE)
(SC-D363/D364/D365/D366 only)
1010
5. Viewfinder
6. COLOR NITE ➥page 42
LIGHT (SC-D362/D364/D365/D366) ➥page 43
5. Viewfinder
6. COLOR NITE
LIGHT
(SC-D362/D364/D365/D366)
Page 15

Getting to Know Your Camcorder
Right & Top View
1. Zoom Lever
(VOL/Menu Dial)
2. PHOTO Button
3. QUICK MENU Button
4. MENU Button
5. Start/Stop Button
6. Power Switch
QUICK
MENU
ENGLISH
8. Jack Cover
AV/ S
USB
DV
MIC
P
L
A
Y
E
R
A
R
E
M
A
C
9. Jacks (See below)
10. Cassette Door
7. DC Jack
1. Zoom Lever (VOL/Menu Dial)
2. PHOTO Button ➥page 57
3. QUICK MENU Button
4. MENU Button
5. Start/Stop Button
6. Power Switch (CAMERA or PLAYER)
7. DC Jack
8. Jack Cover
9. Jacks
10. Cassette Door
11. Hand Strap Hook
Jacks
SC-D263
SC-D363
SC-
D362/D364/
D365/D366
11. Hand Strap Hook
IEEE1394 AV
External
MIC
External
IEEE1394 USB AV
MIC
External
IEEE1394 USB Multi
MIC
Cable
Cable
Cable
1111
Page 16

ENGLISH
BATTERY
RELEASE
Getting to Know Your Camcorder
Rear & Bottom View
QUICK
MENU
MENU
1. Lithium Battery Cover
3. Memory Card Slot
(SC-D363/D364/D365/D366 only)
2. Charging Indicator
1. Lithium Battery Cover
2. Charging Indicator
3. Memory Card Slot
(SC-D363/D364/D365/D366 only)
4. Tripod Receptacle
5. Battery Release
1212
CHG
4. Tripod Receptacle
5. Battery Release
Memory Card Slot (Usable Memory Card)
SC-D363/D364
SD/MMC
SC-D365/D366
Memory Stick
Memory Stick PRO
SD/MMC
Page 17

Getting to Know Your Camcorder
Remote Control (SC-D364/D366 only)
ENGLISH
1. PHOTO
2. START/STOP
3. SELF TIMER
4. ZERO MEMORY
5. PHOTO SEARCH
œœ
10.
❙❙ / ❙❙
6. A.DUB
√√√√
7.
œœœœ
8.
(REW)
√√
9.
(PLAY)
√√
(Direction)
(FF)
1. PHOTO Button ➥page 57
2. START/STOP Button
3. SELF TIMER Button ➥page 38
4. ZERO MEMORY Button ➥page 37
5. PHOTO SEARCH Button
6. A.DUB Button ➥page 62
√√√√
7.
(FF) Button
œœœœ
8.
(REW) Button
√√
9.
(PLAY) Button
18. DISPLAY
17. W/T (Zoom)
16. X2
15. DATE/TIME
14. SLOW(
13.
12. ■ (STOP)
11. F. ADV
œœ
√√
❙❙/ ❙❙
10.
(Direction) Button ➥page 59
11. F. ADV Button ➥page 60
12.
■ (STOP) Button
13.
❙❙
(STILL) Button
14. SLOW (
√√
❙
) Button
15. DATE/TIME Button
16. X2 Button ➥page 60
17. W/T (Zoom) Button
18. DISPLAY Button
❙❙
(STILL)
√√
❙
)
1313
Page 18
ENGLISH
Preparation
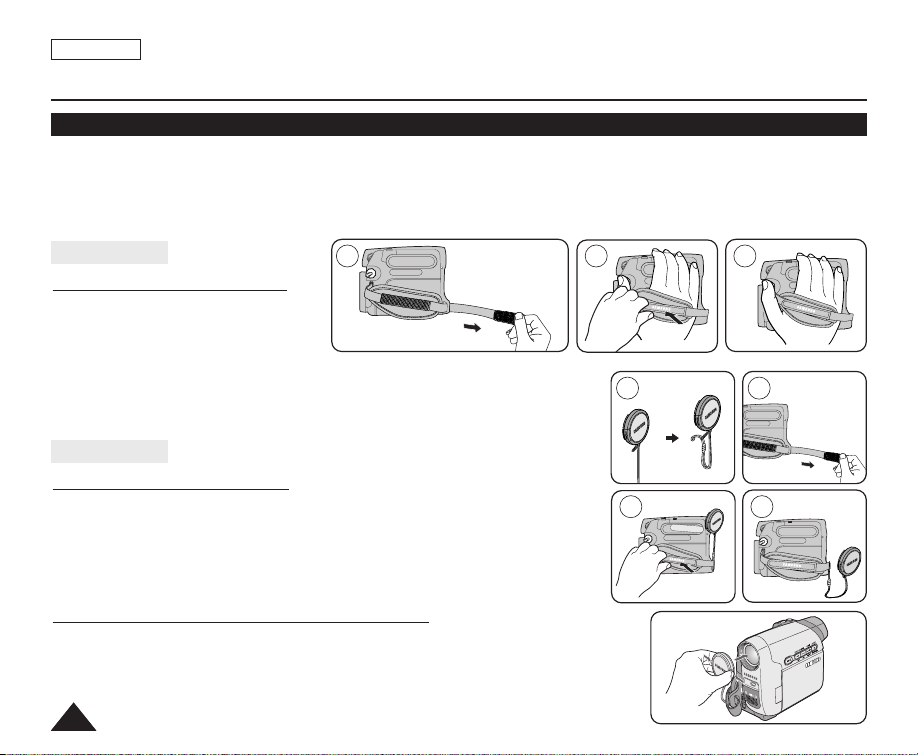
Using the Hand Strap & Lens Cover
It is very important to ensure that the Hand Strap has been correctly adjusted before you begin your recording.
The Hand Strap enables you to:
- Hold the Camcorder in a stable, comfortable position.
- Press the [Zoom] and [Start/Stop] button without having to change the position of your hand.
Hand Strap
1 2 3
Adjusting the Hand Strap
1. Insert the Hand Strap into the Hand
Strap Hook on the front side of
the Camcorder and pull its end
through the hook.
2. Insert your hand into the Hand Strap and adjust its length for your convenience.
3. Close the Hand Strap.
Lens Cover
Attaching the Lens Cover
1. Hook up the Lens Cover with the Lens Cover Strap as illustrated.
2. Hook up the Lens Cover Strap to the Hand Strap, and adjust it following
the steps as described for the Hand Strap.
3. Close the Hand Strap.
Installing the Lens Cover after Operation
Press buttons on both sides of the Lens Cover, then attach it to the Camcorder Lens.
1414
1 2
2 3
Page 19

ENGLISH
MENU
CHG
QUICK
MENU
Preparation
Lithium Battery Installation
Lithium Battery Installation for the Internal Clock
1. Remove the Battery Pack from the rear of the Camcorder.
2. Open the Lithium Battery Cover on the rear of the Camcorder.
3. Position the Lithium Battery in the Lithium Battery Holder, with the positive
( ) terminal face up.
Be careful not to reverse the polarity of the Battery.
4. Close the Lithium Battery Cover.
Lithium Battery Installation for the Remote Control (SC-D364/D366 only)
1. Pull out the Lithium Battery Holder toward the direction of the arrow.
2. Position the Lithium Battery in the Lithium Battery Holder, with the positive
( ) terminal face up.
3. Reinsert the Lithium Battery Holder.
Precaution regarding the Lithium Battery
1. The Lithium Battery maintains the clock function and preset contents of the memory; even if the Battery Pack or
AC Power adapter is removed.
2. The Lithium Battery for the Camcorder lasts about 6 months under normal operation from time of installation.
3. When the Lithium Battery becomes weak or dead, the date/time indicator will display <12:00 AM JAN.1,2006> when
you set the <Date/Time> to <On>.
When this occurs, replace the Lithium Battery with a new one (type CR2025).
4. There is a danger of explosion if Battery is incorrectly replaced.
Replace only with the same or equivalent type.
Warning: Keep the Lithium Battery out of reach of children. Should a battery be swallowed, consult a doctor
immediately.
1515
Page 20
ENGLISH
Preparation
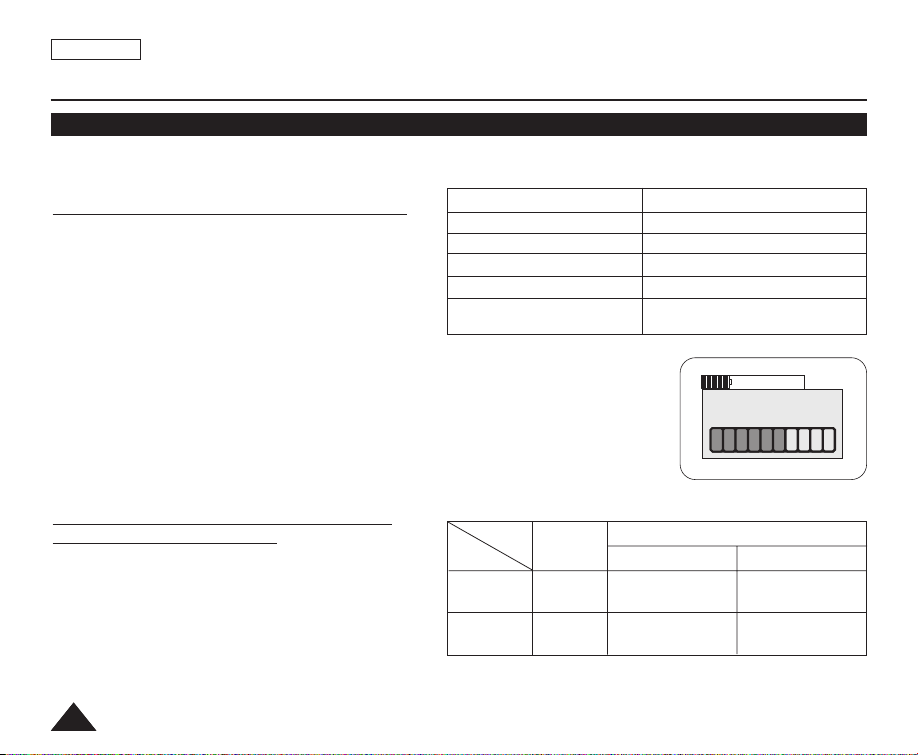
Using the Lithium Ion Battery Pack
✤ Use SB-LSM80 or SB-LSM160 Battery Pack only.
✤ The Battery Pack may be charged a little at the time of purchase.
Charging the Lithium Ion Battery Pack
1. Turn the [Power] switch to [Off].
2. Attach the Battery Pack to the Camcorder.
3. Connect the AC Power Adapter to an AC Cord and
connect the AC Cord to a wall socket.
4. Connect the DC cable to the DC jack on the
Camcorder. The charging indicator will start to blink,
showing that the Battery is charging.
5. Press and hold the DISPLAY button while charging and the charging status will be
displayed on the LCD for 7 seconds.
■
As indicated the battery level is given as reference data for the user, it is the
approximate estimation. It may differ from Battery capacity and temperature.
6. When the Battery is fully charged, disconnect the Battery Pack and the AC Power Adapter
from the Camcorder.
Even with the Power switched Off, the Battery Pack will still discharge.
Blinking time Charging rate
Once per second Less than 50%
Twice per second 50% ~ 75%
Three times per second 75% ~ 90%
Blinking stops and stays on 90% ~ 100%
On for a second and Error - Reset the Battery Pack and
off for a second the DC Cable
Battery Info
BBaatt tteerryy cchh aa rrgg eedd
0% 50% 100%
Charging/Recording Times based on
Model and Battery Type.
✤ If you close the LCD Screen, it switches off and
the Viewfinder switches on automatically.
✤ The continuous recording times given in the table
to the right are approximations.
Actual recording time depends on usage.
✤ The continuous recording times in the operating
Time
Battery
SB-LSM80
(AD43-00136A)
SB-LSM160
(Option)
Charging
time
Approx.
1hr 20min
Approx.
3hr
Recording time
LCD On Viewfinder On
Approx.
1hr 20min
Approx.
2hr 40min
instructions are measured using a fully charged Battery Pack at 77 °F (25 °C).
✤ Even when the Power switched Off, the Battery Pack will still discharge if it is left attached to the device.
1616
Approx.
1hr 30min
Approx.
3hr
Page 21

ENGLISH
Preparation
The amount of continuous recording time available depends on;
- The type and capacity of the Battery Pack you are using.
- Ambient temperature.
- How often the Zoom function is used.
- Type of use (Camcorder/Camera/With LCD Screen etc.).
It is recommended that you have several batteries available.
Battery Level Display
The battery level display indicates the amount of power remaining in the Battery Pack.
a. Fully charged b. 20~40% used
c. 40~80% used d. 80~95% used
e. Completely used (Blinking)
(The Camcorder will turn off soon, change the battery as soon as possible.)
Battery Pack Management
■
The Battery Pack should be recharged in an environment between 32 °F (0 °C) and 104 °F (40 °C).
■
The life and capacity of the Battery Pack will be reduced if it is used in temperatures below 32 °F (0 °C) or
left in temperatures above 104 °F (40 °C) for a long period of time, even when it is fully recharged.
■
Do not put the Battery Pack near any heat source (i.e. fire or a heater).
■
Do not disassemble, apply pressure to, or heat the Battery Pack.
■
Do not allow the + and – terminals of the Battery Pack to be short-circuited. It may cause leakage, heat generation,
induce overheating or fire.
(Blinking)
1717
Page 22

ENGLISH
Preparation
Notes regarding the Battery Pack
■
Please refer to the Table on page 16 for approximate continuous recording time.
■
The recording time is affected by temperature and environmental conditions.
■
The recording time shortens dramatically in a cold environment. As the environmental temperature and conditions vary.
■
The continuous recording times in the operating instructions are measured using a fully charged Battery Pack at 77 °F
(25 °C). The remaining battery time may differ from the approximate continuous recording times given in the
instructions.
■
It is recommended you use the original Battery Pack that is available at SAMSUNG retailer.
When the Battery reaches the end of its life, please contact your local dealer.
The batteries have to be dealt with as chemical waste.
■
Make sure that the Battery Pack is fully charged before starting to record.
■
A brand new Battery Pack is not charged. Before using the Battery Pack, you need to charge it completely.
■
Fully discharging a Lithium Ion Battery damages the internal cells.
The Battery Pack may be prone to leakage when fully discharged.
■
To preserve battery power, keep your Camcorder turned off when you are not operating it.
■
If your Camcorder is in <Camera> mode, and it is left in <STBY> mode without being operated for more than 5
minutes with a tape inserted, it will automatically turn itself off to protect against unnecessary battery discharge.
■
Make sure that the Battery Pack is fitted firmly into place.
Do not drop the Battery Pack. Dropping the Battery Pack may damage it.
1818
Page 23
Preparation
Q
U
IC
K
M
E
N
U
P
L
A
Y
E
R
C
A
M
E
R
A
C
A
M
E
R
A
P
L
A
Y
E
R
C
A
M
E
R
A
P
L
A
Y
E
R
C
A
M
E
R
A
P
L
A
Y
E
R
C
A
M
E
R
A
P
L
A
Y
E
R
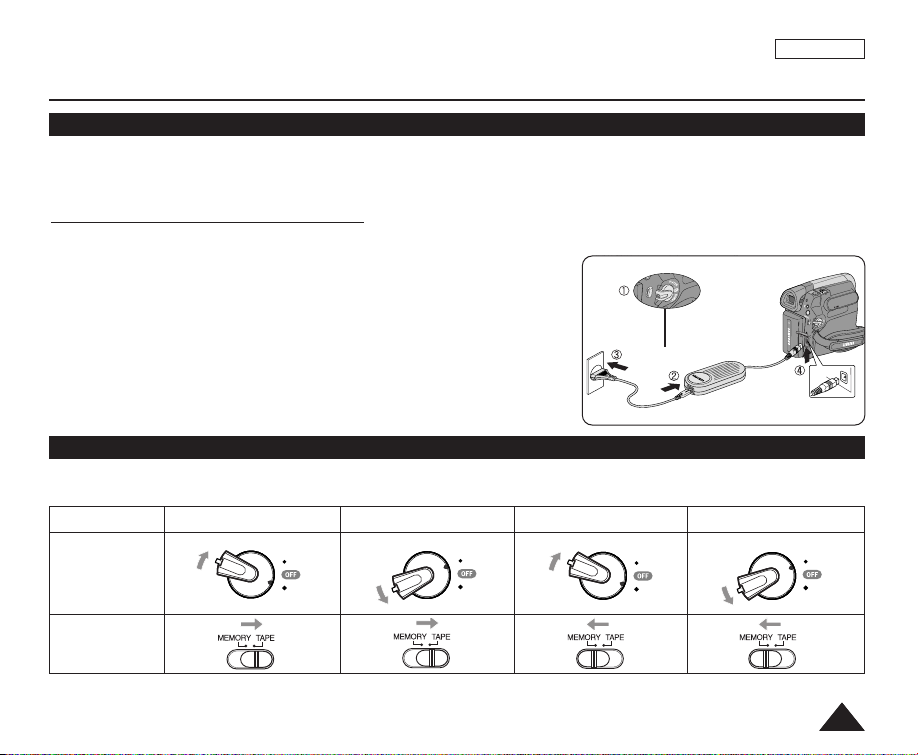
Connecting a Power Source
✤
There are two types of power source that can be connected to your Camcorder.
- The AC Power adapter and AC Cord: used for indoor recording.
- The Battery Pack: used for outdoor recording.
Using a Household Power Source
Connect to a household power source to use the Camcorder without worrying
about the battery power. You can keep the Battery Pack attached; the battery
power will not be consumed.
1. Turn the [Power] switch to [OFF].
2. Connect the AC Power adapter (AA-E8 Type) to the AC Cord.
3. Connect the AC Cord to a wall socket.
The plug and wall socket type may differ according to your resident country.
4. Connect the DC cable to the DC jack of the Camcorder.
5. Set the Camcorder to each mode by holding down the tab on the [Power]
switch and turning it to the [CAMERA] or [PLAYER] mode.
About the Operating Modes
✤
The operating modes are determined by the position of the [Power] switch and the [Mode] switch.
✤
Set the Operation Mode by adjusting [Power] switch and [Mode] switch before operating any functions.
Mode Name
[Power] Switch
<Camera Mode>
<M.Cam Mode><Player Mode>
Power Switch
<M.Player Mode>
ENGLISH
[Mode] Switch
(SC-D363/D364/
D365/D366 only)
[Note]
■
The <M.Cam> and the <M.Player> Modes are only enabled on SC-D363/ D364/ D365/ D366.
1919
Page 24
ENGLISH
Preparation
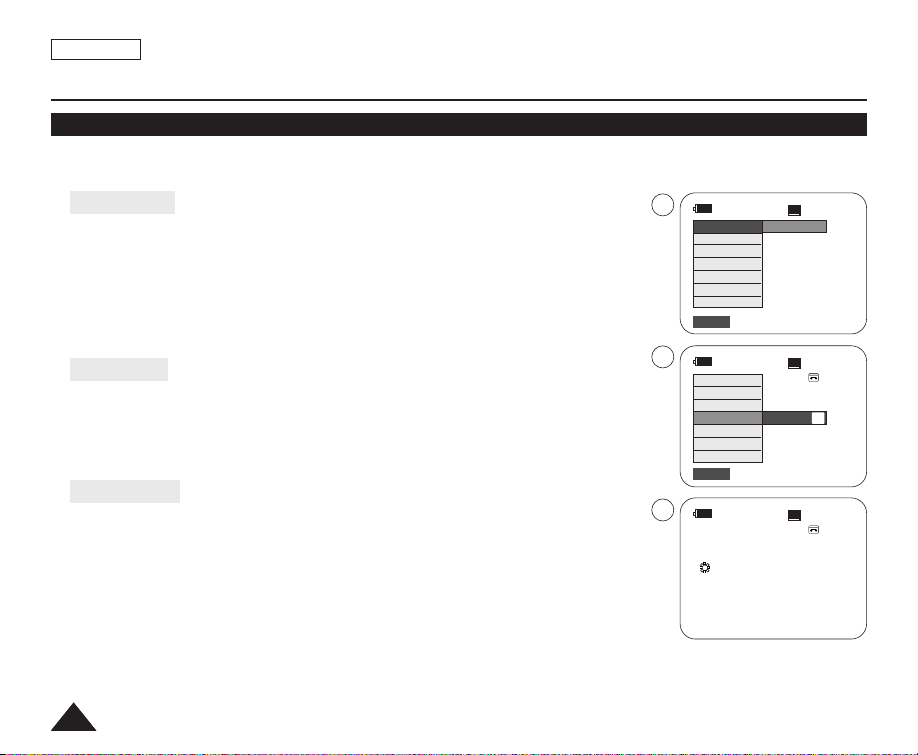
Using the QUICK MENU
✤
QUICK MENU is used to access Camcorder functions by using the [QUICK MENU] button.
✤
QUICK MENU provides easier access to frequently used menus without using the [MENU] button.
✤
Functions available using the QUICK MENU are as below:
Camera Mode
■
Setting the Digital Image Stabilizer (DIS) ➥page 55
■
Programed Automatic Exposure Modes (Program AE) ➥page 49
■
Setting the 16:9 Wide ➥page 54
■
Setting the White Balance (White Balance) ➥page 51
■
Setting the Shutter Speed (Shutter)- Only can be operated by using the QUICK MENU
➥page 47
■
Setting the Exposure (Exposure)- Only can be operated by using the QUICK MENU
➥page 47
■
Setting the Back Light Compensation (BLC) ➥page 41
M.Cam Mode
■
Setting the Memory Type (Memory Type) ➥page 70
■
Setting the White Balance (White Balance) ➥page 51
■
Setting the Photo Quality (Photo Quality) ➥page 71
■
Setting the Exposure (Exposure)- Only can be operated by using the QUICK MENU
➥page 47
■
Setting the Back Light Compensation (BLC) ➥page 41
M.Player Mode
■
Setting the Memory Type (Memory Type) ➥page 70
■
Playing the Moving Images (MPEG) on the Memory Card (M. Play Select) ➥page 80
■
Deleting Photo Images and Moving Images (Delete) ➥page 76
■
Protection from accidental Erasure (Protect) ➥page 75
■
Marking Images for Printing (Print Mark) ➥page 84
For example: Setting the White Balance
1. Press the [QUICK MENU] button.
The quick menu list will appear.
2. Move the [Zoom] lever up or down to select <White Balance>, then press the [OK] button.
3. Move the [Zoom] lever up or down to select desired mode (Auto, Indoor, Outdoor or Custom
WB), then press the [OK] button.
4. To exit, press the [QUICK MENU] button.
2020
1
2
4
DIS
Program AE
16:9 Wide
White Balance
Shutter
Exposure
BLC
Q.MENU
DIS
Program AE
16:9 Wide
White Balance
Shutter
Exposure
BLC
Q.MENU
Exit
Exit
STBY
STBY
STBY
Off
Auto
SP
SP
…
†
SP
œ
<When the Outdoor option was selected>
A
0:00:10
60min
0:00:10
60min
0:00:10
60min
Page 25

Preparation
OSD (On Screen Display) in Camera/Player Modes
1. Battery Level ➥page 17
2. Visual Effects Mode ➥page 52
3. EASY.Q ➥page 35
4. DIS ➥page 55
5. Program AE ➥page 49
6. White Balance Mode ➥page 51
7. Shutter Speed ➥page 47
8. Exposure ➥page 47
9. Manual Focus ➥page 48
10. Date/Time ➥page 30
11. Zoom Position ➥page 39
12. COLOR NITE ➥pages 42
13. USB ➥page 92
(SC-D362/D363/D364/D365
/D366 only)
14. Remote ➥page 24
(SC-D364/D366 only)
15. WindCut Plus ➥page 45
16. BLC (Back Light
Compensation) ➥page 41
17. LIGHT ➥page 43
(SC-D362/D364/D365/D366
only)
18. Real Stereo ➥page 46
19. Audio Mode ➥page 44
20. Remaining Tape
(measured in minutes)
21. Tape Counter
22. Zero Memory ➥page 37
(SC-D364/D366 only)
23. Record Speed Mode ➥page 44
24. Operating Mode
25. Self Timer ➥page 38
(SC-D364/D366 only)
26. Photo image
27. Tele Macro ➥page 39
28. Dubbed Audio Playback
➥page 63
29. DEW ➥page 6
30. Warning Indicator ➥page 98
31. Message Line ➥page 98
32. Volume Control ➥page 58
33. DV IN (DV data transfer mode)
➥page 87
34. AV IN ➥page 67
(SC-D365/D366 only)
35. Audio Dubbing ➥page 62
(SC-D364/D366 only)
OSD in Camera Mode
26
27
1
Art
2
3
4
5
6
7
S. 1/60
8
[29]
9
12:00 AM JAN.1,2006
10
W T
11
7
S. 1/60
8
[29]
OSD in Player Mode
35
28
29
30
31
†
[10]
32
12:00 AM JAN.1,2006
10Sec
†
†
25
STBY
No Tape !
No Tape !
ENGLISH
23 2224
SP
0:00:11
S
Color N.1/30
9
…
…
SP
√
0:00:00:10
…
14min
16BIt
14minSound[2]
16BIt
AV In
21
20
19
18
17
16
15
14
13
12
34
33
2121
Page 26
ENGLISH
Preparation
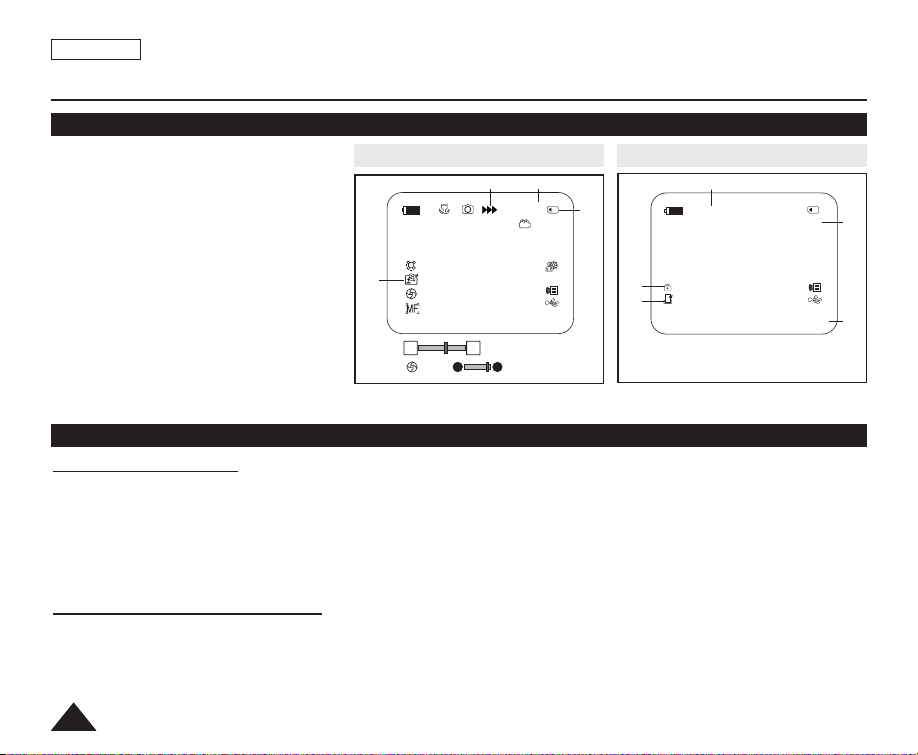
OSD (On Screen Display) in M.Cam/M.Player Modes (SC-D363/D364/D365/D366 only)
1. Photo Quality ➥page 71
2. CARD (Memory Card) Indicator
3. Image Counter (Total number of
recordable photo images)
4. Image Recording and Loading
Indicator
5. Erase Protection Indicator ➥page 75
6. Print Mark ➥page 84
7. Folder Number-File Number
➥page 72
8. JPEG Image Size
9. Slide Show ➥page 74
Turning the OSD (On Screen Display) On/Off
Turning OSD On/Off
Press the [DISPLAY] button on the left side control panel.
■
Each press of the button toggles the OSD function on and off.
■
When you turn the OSD off,
- In <Camera Mode>: The STBY, REC modes are always displayed on the screen, even when the OSD is turned off.
- In <Player Mode>: When you press any Function Button, it is displayed on the OSD for 3 seconds before it turns off.
Turning the Date/Time On/Off
To turn the Date/Time on or off, access the menu and change the <Date/Time> mode. ➥page 30
OSD in M.Cam Mode OSD in M.Player Mode
1
12:00 AM JAN.1,2006
W T
[29]
[29]
No Memory Card !
…
†
34
46
3 min
2
5
6
9
Slide
No Memory Card !
001
12:00 AM JAN.1,2006 100-0002
2/46
800X600
8
7
2222
Page 27

ENGLISH
Initial Setting : System Menu Setting
Setting the Clock (Clock Set)
✤ Clock setup works in <Camera>/<Player>/<M.Cam>/<M.Player> modes. ➥page 19
✤ The Date/Time is automatically recorded onto a tape. Before recording, please set the <Date/Time>. ➥page 30
1. Set the [Power] switch to [CAMERA] or [PLAYER].
2. Set the [Mode] switch to [TAPE] or [MEMORY].
(SC-D363/D364/D365/D366 only)
3. Press the [MENU] button.
■
The menu list will appear.
4. Move the [Zoom] lever up or down to select <System>, then press the [OK] button.
5. Move the [Zoom] lever up or down to select <Clock Set>, then press the [OK] button.
■
The year will be highlighted first.
6. Move the [Zoom] lever up or down to set current Year, then press the [OK] button.
■
The month will be highlighted.
7. You can set the month, day, hour and minute following the same procedure
after setting the year.
8. Press the [OK] button after setting the minutes.
■
A message <Complete !> is displayed.
■
To adjust the clock, select the Year, Month, Day, Hour or Min by pressing the [OK]
button, then move the [Zoom] lever up or down to set respective values.
9. To exit, press the [MENU] button.
[ Notes ]
■
After the Lithium Battery loses its charge (after about 6 months), the date/time appears
on the screen as <12:00 AM JAN.1,2006>.
■
You can set the year up to 2037.
■
If the Lithium Battery is not installed, any inputted data will not be backed up.
4
Camera Mode
√System
Clock Set
Remote
Beep Sound
Language
Demonstration
Move Select Exit
5
Camera Mode
Back
Clock Set
Remote
Beep Sound
Language
Demonstration
Adjust Select Exit
8
Camera Mode
Back
Clock Set
Remote
Beep Sound
Language
Demonstration
Move Select Exit
√On
√On
√English
√On
Complete !
MENUOKZOOM
…
JAN 1 2006
†
12 : 00 AM
MENUOKZOOM
JAN 1 2006
12 : 00 AM
MENUOKZOOM
2323
Page 28

ENGLISH
P
L
A
Y
E
R
C
A
M
E
R
A
C
A
M
E
R
A
P
L
A
Y
E
R
Initial Setting : System Menu Setting
Setting the Wireless Remote Control Acceptance (Remote) (SC-D364/D366 only)
✤ The Remote function works in <Camera>/<Player>/<M.Cam>/<M.Player> modes. ➥page 19
✤ The Remote function allows you to enable or disable the remote control for use with the Camcorder.
1. Set the [Power] switch to [CAMERA] or [PLAYER].
2. Set the [Mode] switch to [TAPE] or [MEMORY].
3. Press the [MENU] button.
■
The menu list will appear.
4. Move the [Zoom] lever up or down to select <System>, then press the [OK] button.
5. Move the [Zoom] lever up or down to select <Remote>, then press the [OK] button.
6. Move the [Zoom] lever up or down to select <On> or <Off>, then press the [OK] button.
7. To exit, press the [MENU] button.
[ Note ]
If you set the <Remote> to <Off> in the menu and try to use it, the remote control icon
( ) will blink for 3 seconds on the LCD Screen and then disappear.
2424
1
4
Camera Mode
√System
Clock Set
Remote
Beep Sound
Language
Demonstration
Move Select Exit
6
Camera Mode
Back
Clock Set
Remote
Beep Sound
Language
Demonstration
Move Select Exit
√On
√On
√English
√On
Off
On
MENUOKZOOM
MENUOKZOOM
Page 29
Initial Setting : System Menu Setting
P
L
A
Y
E
R
C
A
M
E
R
A
C
A
M
E
R
A
P
L
A
Y
E
R
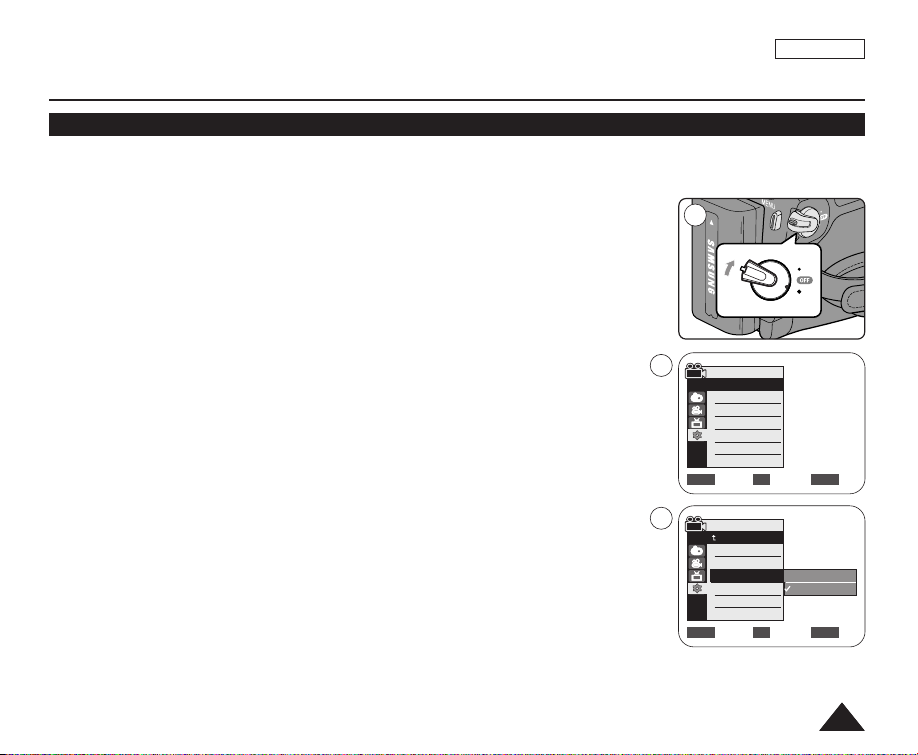
Setting the Beep Sound (Beep Sound)
✤ The Beep Sound function works in <Camera>/<Player>/<M.Cam>/<M.Player> modes. ➥page 19
✤ You can turn the Beep Sound on or off, when on, each press of a button sounds a beep.
ENGLISH
1. Set the [Power] switch to [CAMERA] or [PLAYER].
2. Set the [Mode] switch to [TAPE] or [MEMORY]. (SC-D363/D364/D365/D366 only)
3. Press the [MENU] button.
■
The menu list will appear.
4. Move the [Zoom] lever up or down to select <System>, then press the [OK] button.
5. Move the [Zoom] lever up or down to select <Beep Sound>, then press the [OK]
button.
6. Move the [Zoom] lever up or down to select <On> or <Off>, then press the [OK] button.
7. To exit, press the [MENU] button.
1
4
Camera Mode
√System
Clock Set
Remote
Beep Sound
Language
Demonstration
Move Select Exit
6
Camera Mode
Back
Clock Set
Remote
Beep Sound
Language
Demonstration
Move Select Exit
√On
√On
√English
√On
Off
On
MENUOKZOOM
MENUOKZOOM
2525
Page 30

ENGLISH
C
A
M
E
R
A
C
A
M
E
R
A
P
L
A
Y
E
R
P
L
A
Y
E
R
Initial Setting : System Menu Setting
Setting the Shutter Sound (Shutter Sound) (SC-D363/D364/D365 /D366 only)
✤ The Shutter Sound function works in both <Player> and <M.Cam> modes. ➥page 19
✤ You can turn the Shutter Sound on or off, when on, with each press of the [PHOTO] button the Shutter will sound.
1. Set the [Power] switch to [CAMERA] or [PLAYER].
2. If the [Power] switch is set to [CAMERA], set the [Mode] switch to [MEMORY].
If the [Power] switch is set to [PLAYER], set the [Mode] switch to [TAPE].
3. Press the [MENU] button.
■
The menu list will appear.
4. Move the [Zoom] lever up or down to select <System>, then press the [OK] button.
5. Move the [Zoom] lever up or down to select <Shutter Sound>, then press the [OK]
button.
6. Move the [Zoom] lever up or down to select <On> or <Off>, then press the [OK] button.
7. To exit, press the [MENU] button.
2626
1
4
Player Mode
√System
Clock Set
Remote
Beep Sound
Shutter Sound
Language
Move Select Exit
6
Player Mode
Back
Clock Set
Remote
Beep Sound
Shutter Sound
Language
Move Select Exit
√On
√On
√On
√English
Off
On
MENUOKZOOM
MENUOKZOOM
Page 31
Initial Setting : System Menu Setting
P
L
A
Y
E
R
C
A
M
E
R
A
C
A
M
E
R
A
P
L
A
Y
E
R
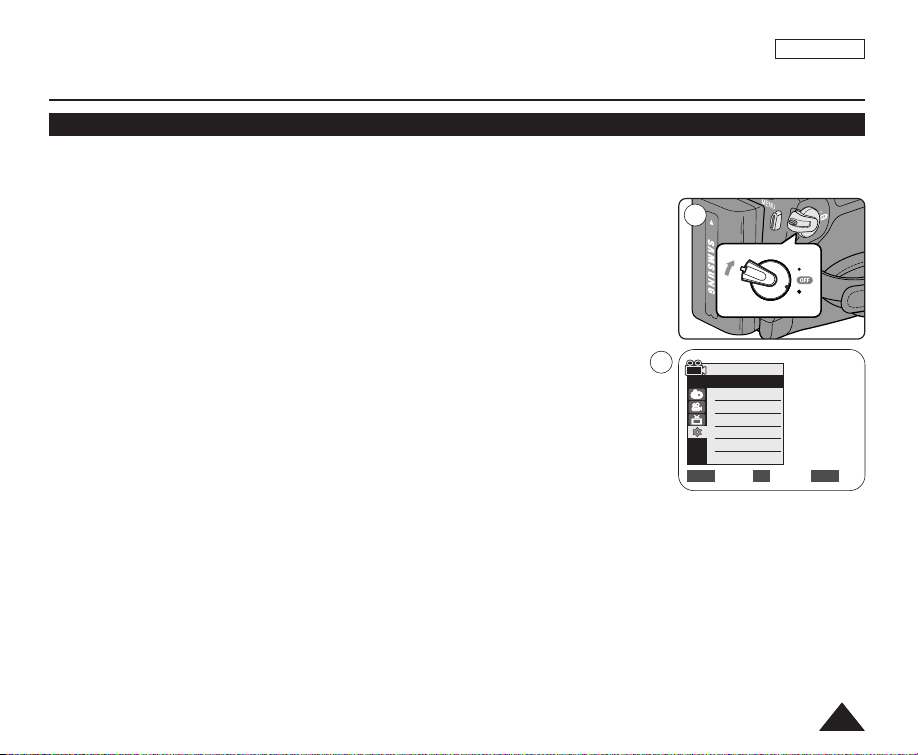
Selecting the OSD Language (Language)
✤ The Language function works in <Camera>/<Player>/<M.Cam>/<M.Player> modes. ➥page 19
✤ You can select the desired language to display the menu screen and the messages.
ENGLISH
1. Set the [Power] switch to [CAMERA] or [PLAYER].
2. Set the [Mode] switch to [TAPE] or [MEMORY]. (SC-D363/D364/D365/D366 only)
3. Press the [MENU] button.
■
The menu list will appear.
4. Move the [Zoom] lever up or down to select <System>, then press the [OK] button.
5. Move the [Zoom] lever up or down to select <Language>, then press the [OK]
button.
■
The available language options are listed.
6. Move the [Zoom] lever up or down to select desired OSD language, then press the [OK]
button.
■
The OSD language is refreshed in the selected language.
7. To exit, press the [MENU] button.
[ Note ]
The word <Language> in the menu is always indicated in English.
1
4
Camera Mode
√System
Clock Set
Remote
Beep Sound
Language
Demonstration
Move Select Exit
√On
√On
√English
√On
MENUOKZOOM
2727
Page 32
ENGLISH
P
L
A
Y
E
R
C
A
M
E
R
A
C
A
M
E
R
A
P
L
A
Y
E
R
Initial Setting : System Menu Setting
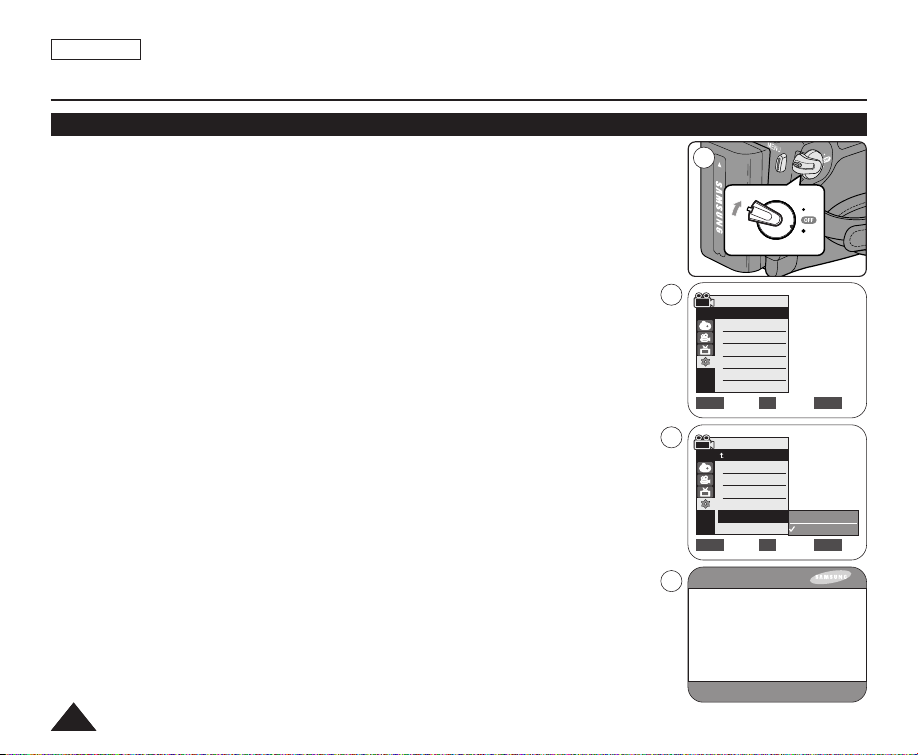
Viewing the Demonstration (Demonstration)
✤ The Demonstration function may only be used in the <Camera> mode without a tape
inserted in the Camcorder. ➥page 19
✤ Before you begin: Make sure that there is no tape inserted in the Camcorder. ➥page 32
✤ Demonstration automatically shows you the major functions that are included with your
Camcorder so that you may use them more easily.
✤ The Demonstration operates repeatedly until the Demonstration mode is switched Off.
1. Set the [Power] switch to [CAMERA].
2. Set the [Mode] switch to [TAPE]. (SC-D363/D364/D365/D366 only)
3. Press the [MENU] button.
■
The menu list will appear.
4. Move the [Zoom] lever up or down to select <System>, then press the [OK] button.
5. Move the [Zoom] lever up or down to select <Demonstration>, then press the
[OK] button.
6. Move the [Zoom] lever up or down to select <On>, then press the [OK] button.
7. Press the [MENU] button.
■
The Demonstration will begin.
8. To quit the Demonstration, press the [MENU] button.
[ Notes ]
■
The Demonstration function is automatically activated when the Camcorder is left idle for
more than 10 minutes after switching to the <Camera> mode (if no tape is inserted in the
Camcorder).
■
If you press other buttons (FADE, MF/AF, PHOTO, EASY.Q) during the Demonstration
mode, the demonstration stops temporarily and resumes 10 minutes later if you do not
operate any other functions.
2828
1
4
Camera Mode
√System
Clock Set
Remote
Beep Sound
Language
Demonstration
Move Select Exit
6
Camera Mode
Back
Clock Set
Remote
Beep Sound
Language
Demonstration
Move Select Exit
SAMSUNG Camcorder is...
7
√On
√On
√English
√On
Off
On
Demonstration
MENUOKZOOM
MENUOKZOOM
Page 33
ENGLISH
QUICK
MENU
P
L
A
Y
E
R
C
A
M
E
R
A
M
E
R
A
P
L
A
Y
E
R
P
L
A
Y
E
R
C
A
M
E
R
A
C
A
M
E
R
A
P
L
A
Y
E
R
Initial Setting : Display Menu Setting
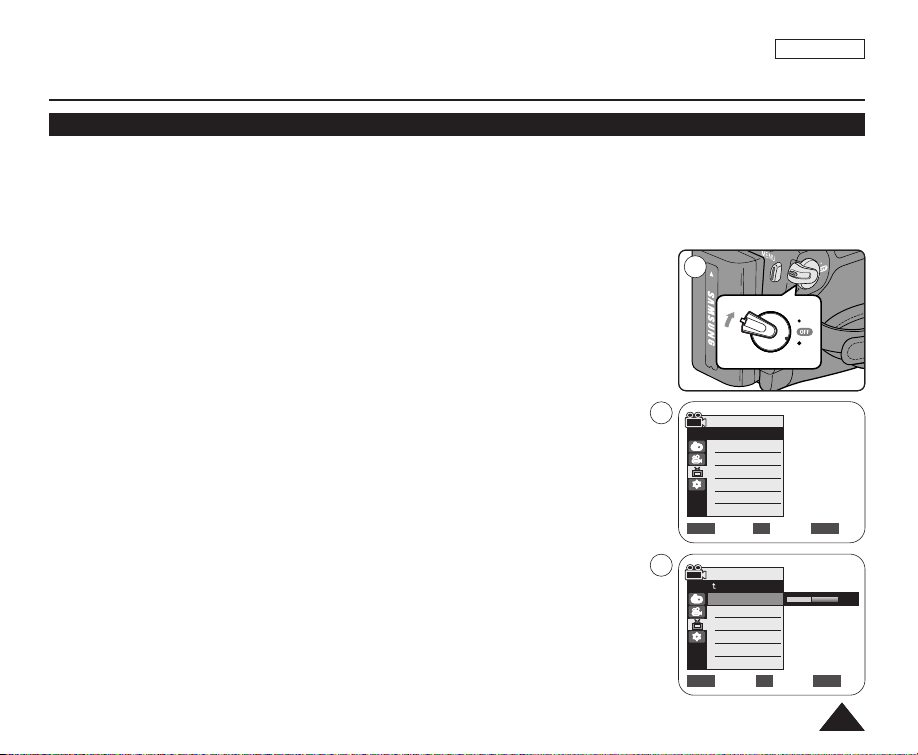
Adjusting the LCD Screen (LCD Bright/ LCD Color)
✤ Adjusting the LCD Screen works in <Camera>/<Player>/<M.Cam>/<M.Player> modes. ➥page 19
✤ Your Camcorder is equipped with a 2.5 inch (SC-D263/D362/D363/D364) / 2.7 inch wide (SC-D365/D366) color Liquid
Crystal Display (LCD) Screen, which enables you to view what you are recording or playing back directly.
✤ Depending on the conditions under which you are using the Camcorder (indoors or outdoors for example), you can
adjust;
- <LCD Bright>
- <LCD Color>
1. Set the [Power] switch to [CAMERA] or [PLAYER].
2. Set the [Mode] switch to [TAPE] or [MEMORY]. (SC-D363/D364/D365/D366 only)
3. Press the [MENU] button.
■
The menu list will appear.
4. Move the [Zoom] lever up or down to select <Display>, then press the [OK] button.
5. Move the [Zoom] lever up or down to select the item you want to adjust (LCD Bright or
LCD Color), then press the [OK] button.
1
4
Camera Mode
√Display
LCD Bright
LCD Color
Date/Time
TV Display
√Off
√On
6. Move the [Zoom] lever up or down to adjust the value of the selected item
(LCD Bright or LCD Color), then press the [OK] button.
■
You can set values for <LCD Bright> and <LCD Color> between <0> ~ <35>.
7. To exit, press the [MENU] button.
■
Adjusting the LCD Screen does not affect the brightness and color of the image to
be recorded.
Move Select Exit
6
Camera Mode
Back
LCD Bright
LCD Color
Date/Time
TV Display
Adjust Select Exit
MENUOKZOOM
[18]
MENUOKZOOM
2929
Page 34
ENGLISH
P
L
A
Y
E
R
C
A
M
E
R
A
C
A
M
E
R
A
P
L
A
Y
E
R
Initial Setting : Display Menu Setting
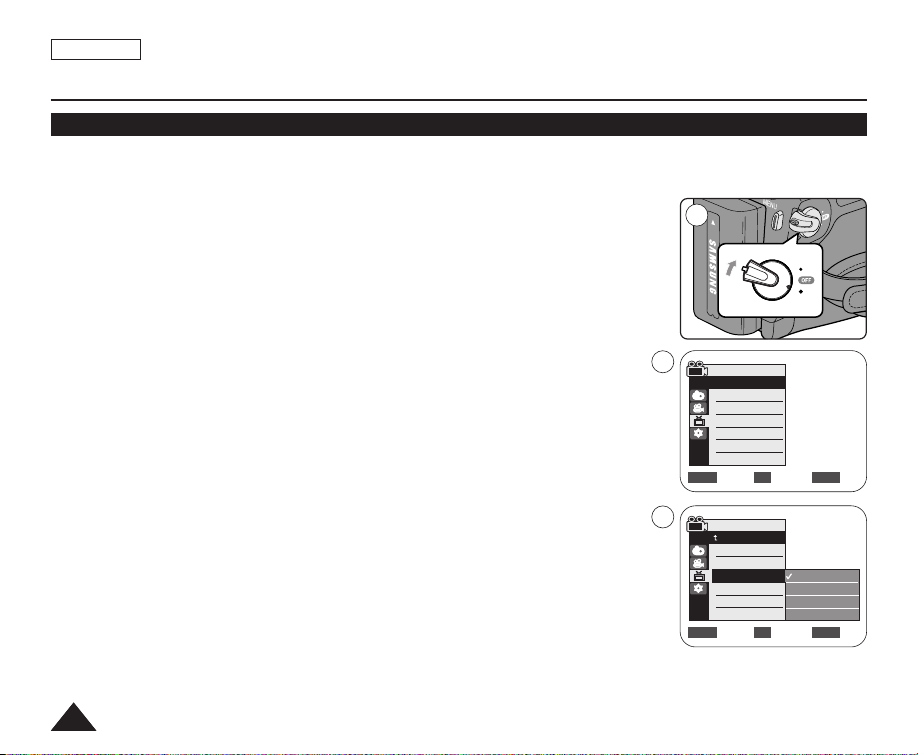
Displaying the Date/Time (Date/Time)
✤ The Date/Time function works in <Camera>/<Player>/<M.Cam>/<M.Player> modes. ➥page 19
✤ The date and time are automatically recorded on a special data area of the tape.
1. Set the [Power] switch to [CAMERA] or [PLAYER].
2. Set the [Mode] switch to [TAPE] or [MEMORY]. (SC-D363/D364/D365/D366 only)
3. Press the [MENU] button.
■
The menu list will appear.
4. Move the [Zoom] lever up or down to select <Display>, then press the [OK] button.
5. Move the [Zoom] lever up or down to select <Date/Time>, then press the [OK]
button.
6. Move the [Zoom] lever up or down to select the display type of the Date/Time, then press
the [OK] button.
■
Display type of the Date/Time: <Off>, <Date>, <Time>, <Date&Time>.
7. To exit, press the [MENU] button.
[ Notes ]
■
The Date/Time will read <12:00 AM JAN.1,2006> in the following conditions.
- During playback of a blank section of a tape.
- If the tape was recorded before setting the <Date/Time> in the Camcorder.
- When the Lithium Battery becomes weak or dead.
■
Before you use the <Date/Time> function, you must set the clock. ➥page 23
3030
1
4
Camera Mode
√Display
LCD Bright
LCD Color
Date/Time
TV Display
Move Select Exit
6
Camera Mode
Back
LCD Bright
LCD Color
Date/Time
TV Display
Move Select Exit
√Off
√On
Off
Date
Time
Date&Time
MENUOKZOOM
MENUOKZOOM
Page 35
Initial Setting : Display Menu Setting
P
L
A
Y
E
R
C
A
M
E
R
A
C
A
M
E
R
A
P
L
A
Y
E
R
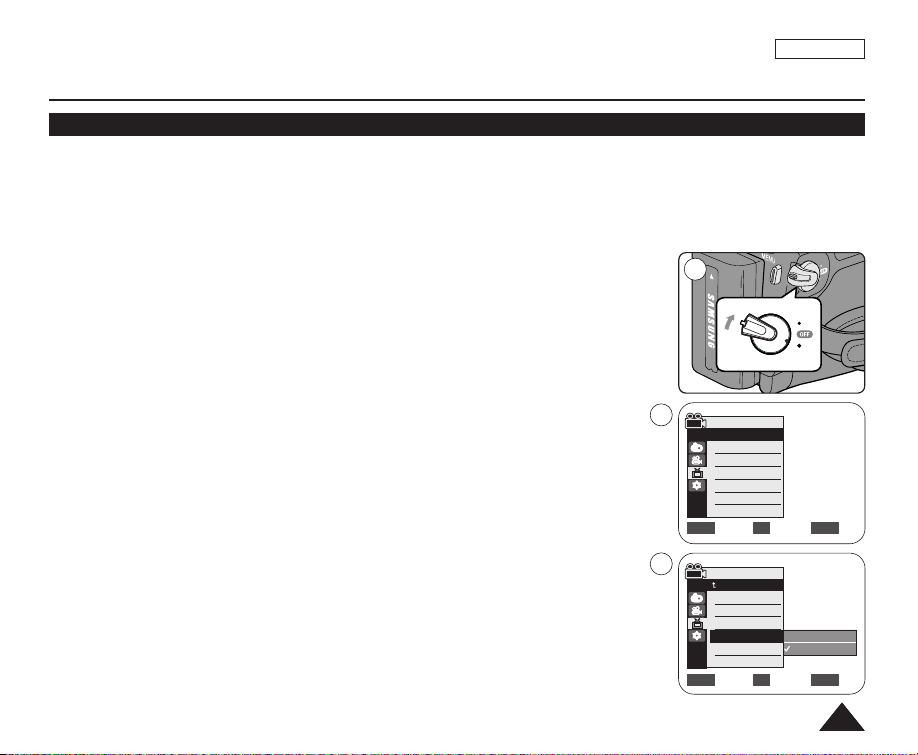
Setting the TV Display (TV Display)
✤ The TV Display function works in <Camera>/<Player>/<M.Cam>/<M.Player> modes. ➥page 19
✤ You can select the output path of the OSD (On Screen Display).
- <Off>: The OSD appears in the LCD Screen and Viewfinder only.
- <On>: The OSD appears in the LCD Screen, Viewfinder and TV. (Connecting to a TV ➥page 64, 65)
- Use the [DISPLAY] button to turn the OSD on/off on the LCD Screen/Viewfinder/TV.
ENGLISH
1. Set the [Power] switch to [CAMERA] or [PLAYER].
2. Set the [Mode] switch to [TAPE] or [MEMORY]. (SC-D363/D364/D365/D366 only)
3. Press the [MENU] button.
■
The menu list will appear.
4. Move the [Zoom] lever up or down to select <Display>, then press the [OK] button.
5. Move the [Zoom] lever up or down to select <TV Display>, then press the [OK]
button.
6. To activate TV Display function, move the [Zoom] lever up or down to select
<On> or <Off>, then press the [OK] button.
7. To exit, press the [MENU] button.
1
4
Camera Mode
√Display
LCD Bright
LCD Color
Date/Time
TV Display
Move Select Exit
6
Camera Mode
Back
LCD Bright
LCD Color
Date/Time
TV Display
Move Select Exit
√Off
√On
Off
On
MENUOKZOOM
MENUOKZOOM
3131
Page 36
ENGLISH
QUICK
MENU
Basic Recording
Using the Viewfinder
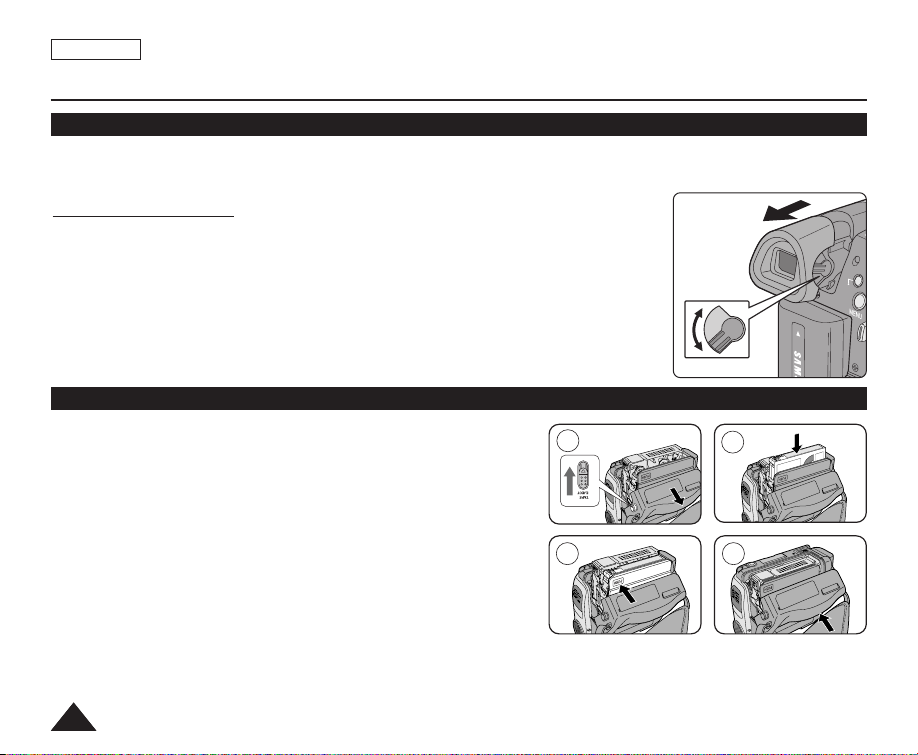
✤ In the [PLAYER] mode, the Viewfinder will work when the LCD Screen is closed.
✤ In the [CAMERA] mode, the Viewfinder will work when the LCD Screen is closed or rotated counterclockwise 180°.
Adjusting the Focus
The focus adjustment knob of the Viewfinder enables individuals with vision problems to
see clearer images.
1. Close the LCD Screen and pull out the Viewfinder.
2. Use the Focus adjustment Knob of the Viewfinder to focus the picture.
[ Note ]
■
Viewing the sun or any strong light source through the Viewfinder for a prolonged period
may be harmful, or cause temporary impairment.
Inserting / Ejecting a Cassette
✤ When inserting a tape or closing the cassette compartment, do not
apply excessive force.
As it may cause a malfunction.
✤ Do not use any tape other than Mini DV cassettes.
1. Connect a power source and slide the [TAPE EJECT] switch.
■
The cassette door opens automatically.
2. Insert a tape into the cassette compartment with the tape window
facing outward and the protection tab toward the top.
(Inserting a Cassette)
■
Remove the cassette tape, which is automatically ejected by pulling
the cassette out. (Ejecting a Cassette)
3. Press the area marked [PUSH] on the cassette door until it clicks into
place.
■
The cassette is loaded automatically.
4. Close the cassette door.
3232
1
3
2
4
Page 37
Basic Recording
D
C
I
N
D
C
IN
DC
I
N
D
C
I
N
D
C
I
N
D
C
I
N
Various Recording Techniques
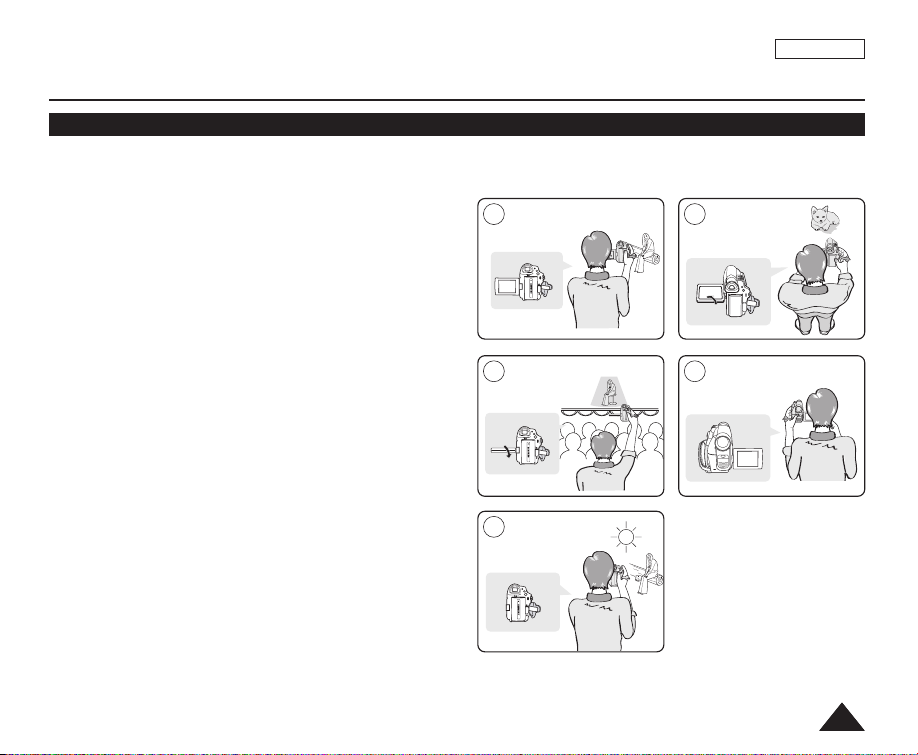
✤ In some situations different recording techniques may be required.
ENGLISH
1. General recording.
2. Downward recording.
Making a recording with a top view of the LCD Screen.
3. Upward recording.
Making a recording viewing the LCD Screen from below.
4. Self recording.
Making a recording viewing the LCD Screen from the front.
5. Recording with the Viewfinder.
In circumstances where it is difficult to use the LCD Screen,
the Viewfinder can be used as a convenient alternative.
[ Note ]
Please rotate the LCD Screen carefully as excessive rotation
may cause damage to the inside of the hinge that connects
the LCD Screen to the Camcorder.
1 2
3 4
5
3333
Page 38
ENGLISH
QUICK
MENU
P
L
A
Y
E
R
C
A
M
E
R
A
QUICK
MENU
P
L
A
Y
E
R
C
A
M
E
R
A
P
L
A
Y
E
R
C
A
M
E
R
A
Basic Recording
Making your First Recording
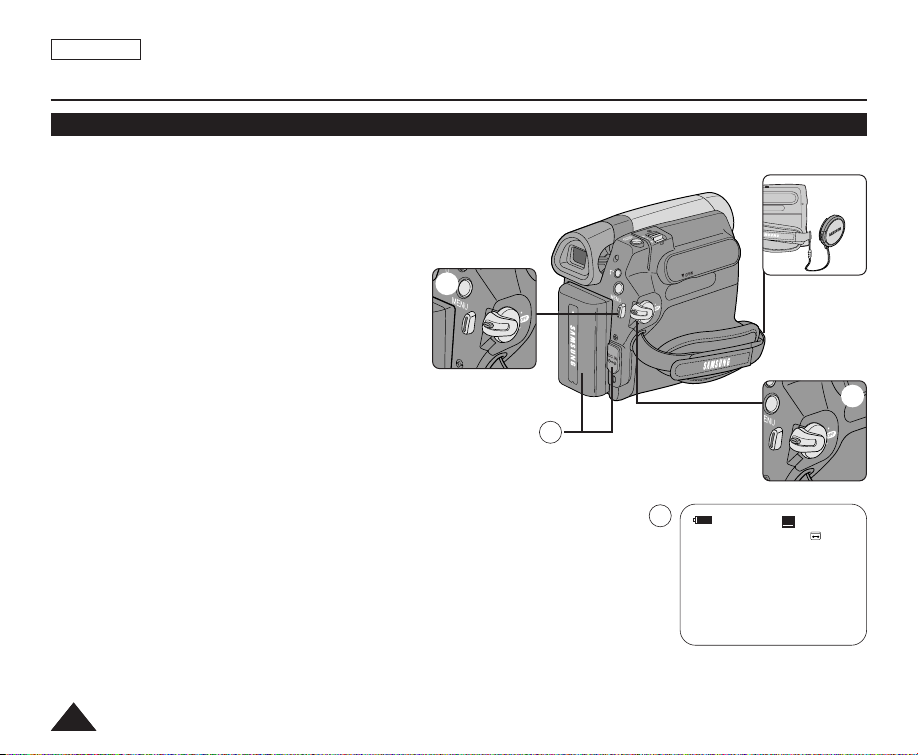
1. Connect a power source to the Camcorder. ➥page 19
(A Battery pack or a AC Power adapter)
Insert a cassette. ➥page 32
2. Remove the Lens Cover.
3. Set the [Power] switch to [CAMERA].
■
Open the LCD Screen.
■
Set the [Mode] switch to [TAPE].
(SC-D363/D364/D365/D366 only)
Make sure that <STBY> is displayed.
■
If the write protection tab of the cassette is open
(set to save), <STOP> and <Protection!> will be
displayed. Release the write protection tab to
record.
■
Make sure the image you want to record appears
on the LCD Screen or Viewfinder.
■
Make sure the Battery Level indicates that there
is enough remaining power for your expected
recording time.
■
You can select the Record Mode of your choice. ➥pages 44, 45, 46
4. To start recording, press the [Start/Stop] button.
■
<REC●> is displayed on the LCD Screen.
To stop recording, press the [Start/Stop] button again.
■
<STBY> is displayed on the LCD Screen.
[ Note ]
Detach the Battery Pack when you are finished recording to prevent unnecessary battery power consumption.
3434
4
√
1
4
REC
2
3
√
SP
√
0:00:10
60min
●
Page 39
Basic Recording
C
O
LO
R
N
IT
E
LIGHT
P
L
A
Y
E
R
C
A
M
E
R
A
C
A
M
E
R
A
P
L
A
Y
E
R
Recording with Ease for Beginners (EASY.Q Mode)
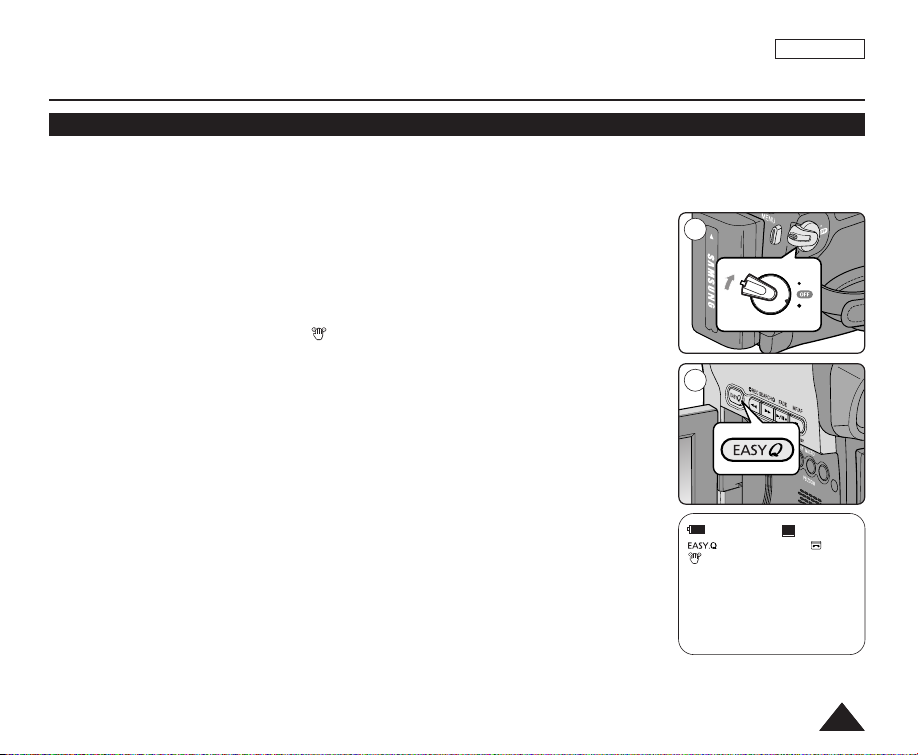
✤ The EASY.Q function works only in <Camera> mode. ➥page 19
✤ The EASY.Q function allows a beginner to easily make good recordings.
ENGLISH
1. Set the [Power] switch to [CAMERA].
2. Set the [Mode] switch to [TAPE]. (SC-D363/D364/D365/D366 only)
3. By pressing the [EASY.Q] button, all functions on the Camcorder will be set to off and the
recording settings will be set to the following basic modes:
■
The words <EASY.Q> and <DIS ( )> are displayed at the same time.
4. Press the [Start/Stop] button to start recording.
■
Recording will begin using the basic automatic settings.
5. Press the [EASY.Q] button again in the STBY mode and then turn the EASY.Q mode off.
■
The EASY.Q function will not turn off while you are recording.
■
The Camcorder will return to the settings that were set prior to activating EASY.Q mode.
[ Notes ]
■
In EASY.Q mode, certain functions are not available, such as Menu, BLC, Manual focus.
If you want to use these functions, you must first turn the EASY.Q mode off.
■
The EASY.Q mode settings are deleted when the Battery Pack is removed from the
Camcorder and must be reset when the Battery Pack is replaced.
■
Taking a still image using the [PHOTO] button while EASY.Q is set releases the DIS
function.
■
Digital Zoom, COLOR NITE or Visual Effect is not available in the EASY.Q mode.
■
16:9 Wide is not available in the EASY.Q mode. (SC-D263/D362/D363/D364 only)
1
3
√
SP
STBY
0:00:10
60min
3535
Page 40
ENGLISH
C
O
LO
R
N
ITE
LIGHT
C
O
LO
R N
ITE
LIGH
T
Basic Recording
Reviewing and Searching a Recording (REC SEARCH)
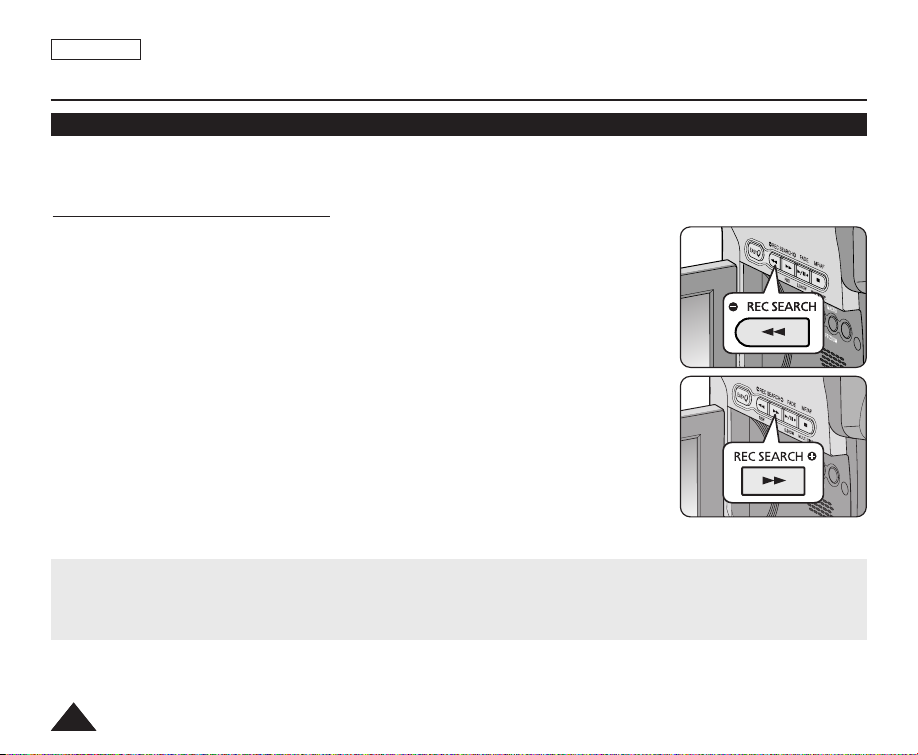
✤ The REC SEARCH function works only in <Camera> mode. ➥page 19
✤ Used to review previously recorded images or to find a point to record a new image in the STBY mode.
Record Search (REC SEARCH)
1. Set to STBY mode by pressing [Start/Stop] button.
2. [REC SEARCH -] enables you to play the recording backwards and
[REC SEARCH +] enables you to play it forwards, as long as you keep each button
pressed down.
■
If you press the [REC SEARCH -] button in STBY mode, your Camcorder will play
in reverse for 3 seconds and return to the original position automatically.
[ Notes ]
■
Mosaic shaped distortion may appear on the screen while in Record Search mode.
■
Pressing [Start/Stop] button after REC SEARCH will overwrite the images recorded after
that point.
When a cassette is loaded and the Camcorder is left in the STBY mode for more than 5 minutes without being used,
it will switch off automatically.
To use it again, press the [Start/Stop] button or set the [Power] switch to [Off] and then back to [CAMERA].
This auto power off feature is designed to save Battery power.
3636
Page 41
Basic Recording
P
L
A
Y
E
R
C
A
M
E
R
A
C
A
M
E
R
A
P
L
A
Y
E
R
Searching a quickly for a desired scene (Setting the ZERO MEMORY) (SC-D364/D366 only)
✤ The ZERO MEMORY function works in both <Camera> and <Player> modes. ➥page 19
✤ You can mark a point on a tape that you want to return to following playback.
ENGLISH
1. Set the [Power] switch to [CAMERA] or [PLAYER].
1
2. Set the [Mode] switch to [TAPE].
3. Press the [ZERO MEMORY] button on the remote control before the recording or during
playback at the point where you wish to return.
■
The time code is changed to a tape counter that is set to ZERO MEMORY with the
< 0:00:00> (ZERO MEMORY indicator).
■
If you want to cancel the ZERO MEMORY function, press the [ZERO MEMORY] button
again.
4. Finding the zero position.
■
When you have finished playback, fast forward or rewind the tape in stop mode.
The tape stops automatically when it reaches the zero position.
■
When you have finished recording, set the [Power] switch to [PLAYER] and press
œœœœ
the [
(REW)] button.
œ
The tape stops automatically when it reaches the zero position.
5. The tape counter with the <>(ZERO MEMORY indicator) disappears from the display and the tape counter is
changed to the time code.
[ Notes ]
■
In the following situations, ZERO MEMORY mode may be canceled automatically:
- At the end of the section marked with the ZERO MEMORY function.
- When the tape is ejected.
- When you remove the Battery Pack or power supply.
■
The ZERO MEMORY may not function correctly where there is a break between recordings on the tape.
3737
Page 42
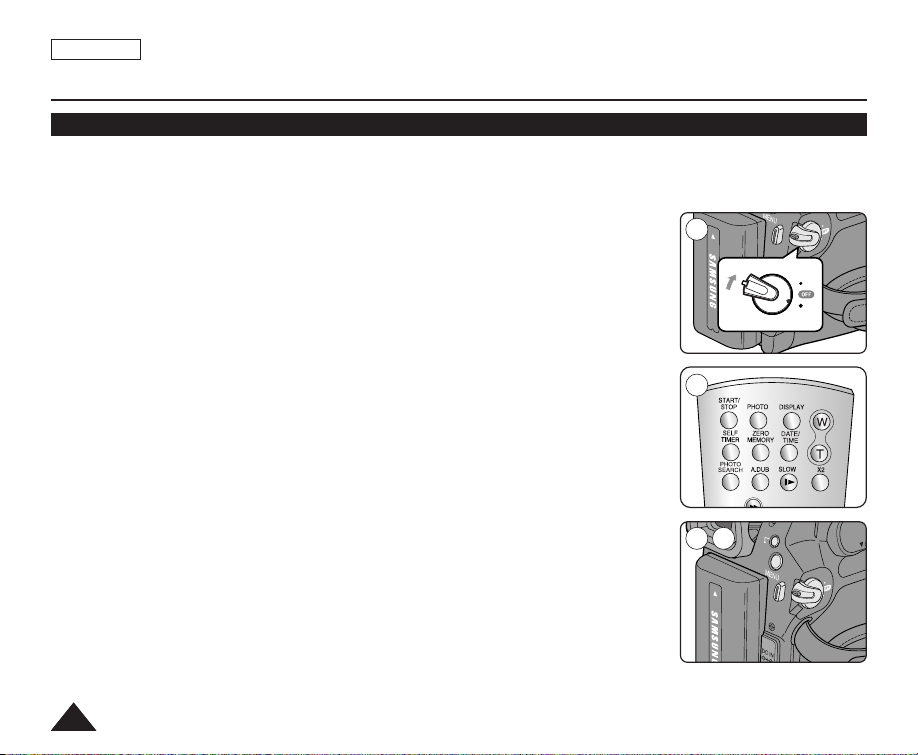
ENGLISH
P
L
A
Y
E
R
C
A
M
E
R
A
C
A
M
E
R
A
P
L
A
Y
E
R
QUICK
MENU
P
L
A
Y
E
R
C
A
M
E
R
A
Basic Recording
Self Record using the Remote Control (Setting the Self Timer) (SC-D364/D366 only)
✤ The SELF TIMER function works only in <Camera> mode. ➥page 19
✤ When you use the SELF TIMER function on the remote control, the recording begins automatically in 10 seconds.
1. Set the [Power] switch to [CAMERA].
2. Set the [Mode] switch to [TAPE].
3. Press the [SELF TIMER] button until the appropriate indicator is displayed.
4. Press the [Start/Stop] button to start the timer.
■
SELF TIMER starts counting down from 10 with a beep sound.
■
In the last one second of the countdown, the beep sound gets faster, then recording
starts automatically.
■
If you want to cancel the SELF TIMER function before recording, press the
[SELF TIMER] button.
5. Press the [Start/Stop] button again when you wish to stop recording.
[ Notes ]
■
Do not obstruct the remote control sensor by putting obstacles between the remote
control and Camcorder.
■
The remote control range is 4 ~5m (13 ~17 ft).
■
The effective remote control angle is up to 30 degrees left /right from the center line.
■
Using a tripod is recommended for delayed recording.
3838
1
3
œ
4 5
œ
Page 43
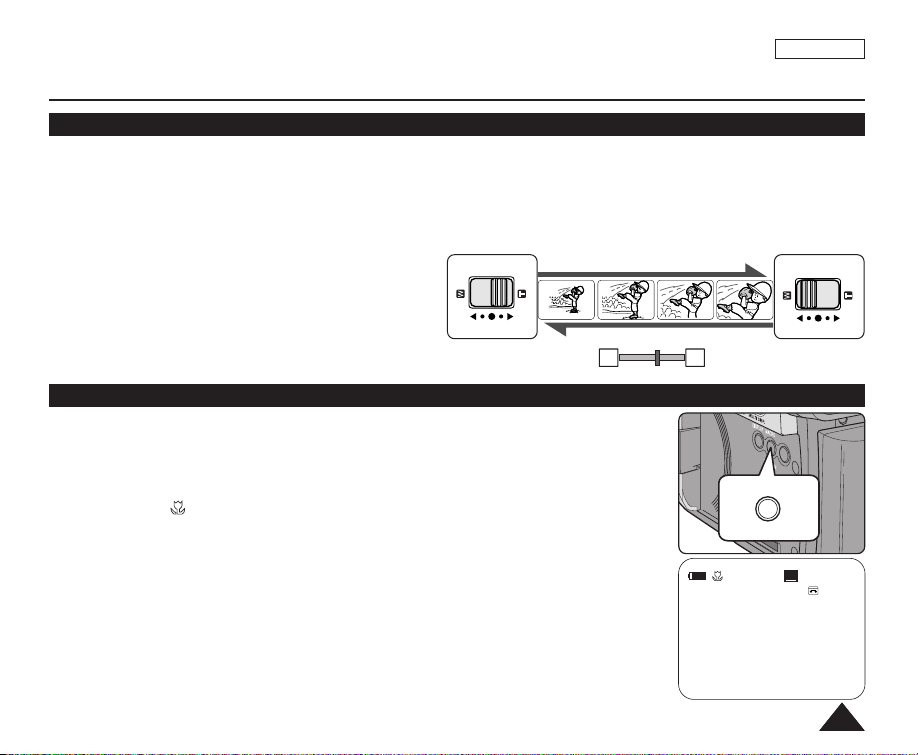
ENGLISH
C
O
LO
R
N
IT
E
LIG
HT
MACRO
PB ZOOM
Basic Recording
Zooming In and Out
✤ The Zoom function works in both <Camera> and <M.Cam> modes. ➥page 19
✤ Zooming is a recording technique that lets you change the size of the subject in a scene.
✤ You can zoom using variable zoom speeds.
✤ Use these features for different shots. Please note that over-use of the Zoom feature can lead to unprofessional looking
results and a reduction of battery usage time.
1. Move the [Zoom] lever slightly for a gradual zoom,
move it further for a high-speed zoom.
■
Your zooming is monitored on the OSD.
2. [T] (Telephoto) side: Subject appears closer.
3. [W] (Wide angle) side: Subject appears farther away.
■
You can record a subject that is about 10mm (about
0.5 inch) away from the lens surface in the Wide position.
W T
Using the Tele Macro
✤ Tele Macro function works in both <Camera> and <M.Cam> mode. ➥page 19
✤ Effective focal distance in Tele Macro mode is 50 Cm (19.7 inches) ~ 100 Cm
(39.4 inches).
1. Press the [MACRO/PB ZOOM] button.
■
Tele Macro ( ) icon is displayed.
2. If you want to cancel the Tele Macro function, press the [MACRO/PB ZOOM] button
again.
[ Notes ]
■
When recording in Tele Macro mode, the focus speed may be slow.
■
When you operate the Zoom function in the Tele Macro mode, the recording subject may
be out of focus.
■
■
■
■
Use a tripod to prevent hand shake in the Tele Macro mode.
Avoid shadows when recording in the Tele Macro mode.
As the distance to the subject decreases, focusing area narrows.
When you can not get proper focus, use the [Zoom] lever.
TELE
WIDE
œ
STBY
SP
0:39:40
25min
3939
Page 44
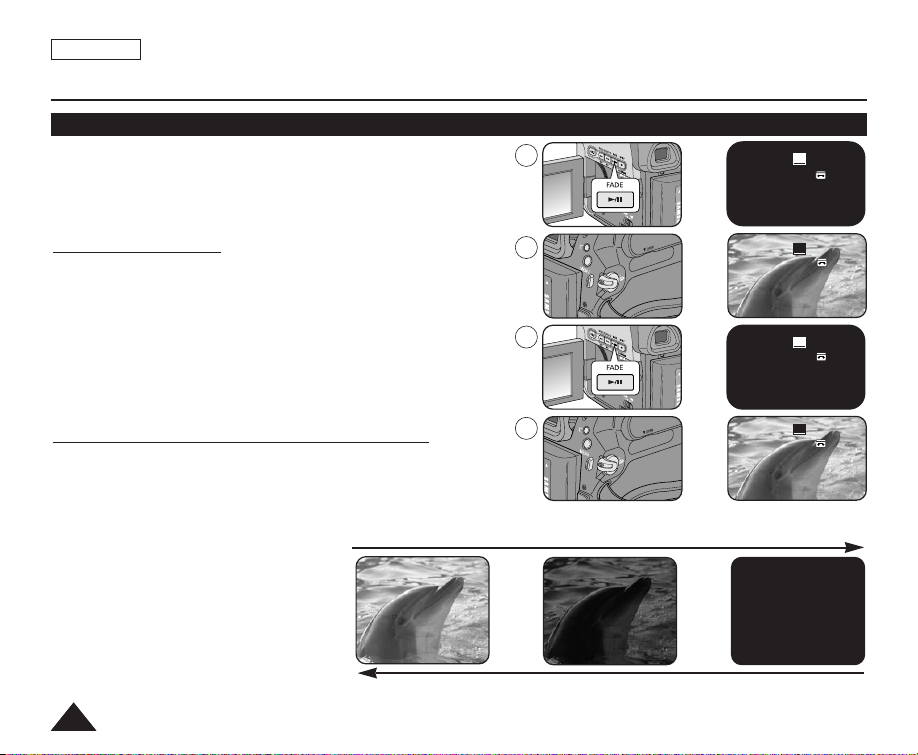
ENGLISH
QUICK
MENU
P
L
A
Y
E
R
C
A
M
E
R
A
QUICK
MENU
P
L
A
Y
E
R
C
A
M
E
R
A
Basic Recording
Using the Fade In and Out
✤ The Fade function works only in <Camera> mode. ➥page 19
✤ You can give your recording a professional look by using special
effects such as fade in at the beginning of a sequence or fade out at
the end of a sequence.
3
➔
➔
STBY
SP
0:00:05
60min
To Start Recording
1. Set the [Power] switch to [CAMERA].
2. Set the [Mode] switch to [TAPE]. (SC-D363/D364/D365/D366 only)
3. Before recording, press and hold the [FADE] button.
■
The picture and sound gradually disappear (fade out).
4. Press the [Start/Stop] button and at the same time release the
[FADE] button.
■
Recording starts and the picture and sound gradually appear
(fade in).
To Stop Recording (use Fade In/Fade Out)
5. When you wish to stop recording, press and hold the [FADE] button.
■
The picture and sound gradually disappear (fade out).
6. When the picture has disappeared, press the [Start/Stop] button to
stop recording.
a. Fade Out
Press and hold the [FADE] button
(Approx. 4 seconds)
b. Fade In
(Approx. 4 seconds)
4040
Gradual appearance b. Fade In Release the [FADE] button
4
√
➔
➔
5
➔
➔
6
√
a. Fade Out Gradual disappearance
➔
➔
REC
REC
STBY
SP
●
0:00:20
60min
SP
●
0:00:25
60min
SP
0:00:30
60min
Page 45
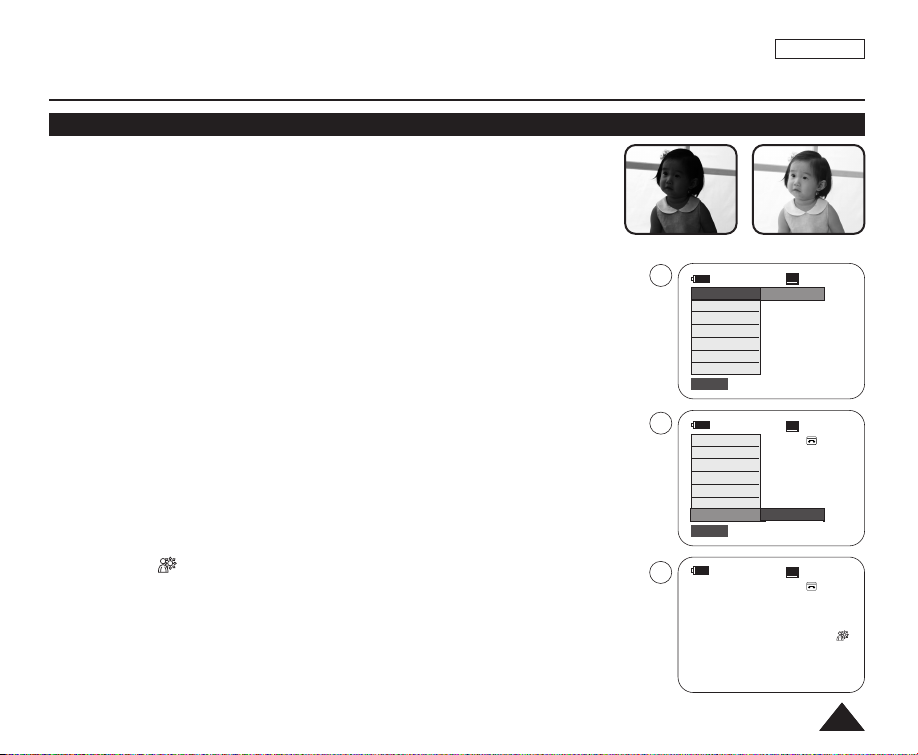
Basic Recording
Using Back Light Compensation Mode (BLC)
✤ BLC works in both <Camera> and <M.Cam> modes. ➥page 19
✤ Back lighting exists when the subject is darker than the background:
- The subject is in front of a window.
- The person to be recorded is wearing white or shiny clothes and
is placed against a bright background; the person’s face is too dark to
distinguish his/her features.
- The subject is outdoors and the background is overcast.
- The light sources are too bright.
- The subject is against a snowy background.
1. Set the [Power] switch to [CAMERA].
2. Set the [Mode] switch to [TAPE] or [MEMORY]. (SC-D363/D364/D365/D366 only)
3
DIS
Program AE
16:9 Wide
White Balance
Shutter
Exposure
BLC
Q.MENU
Exit
ENGLISH
<BLC On><BLC Off>
STBY
Off
SP
0:00:10
60min
3. Press the [QUICK MENU] button.
■
Quick menu list will appear.
4. Move the [Zoom] lever up or down to select BLC, then press the [OK] button.
5. Move the [Zoom] lever up or down to select On, then press the [OK] button.
6. To exit, press the [QUICK MENU] button.
■
BLC icon ( ) will be displayed.
[ Note ]
■
The BLC function will not operate in EASY.Q mode.
4
6
DIS
Program AE
16:9 Wide
White Balance
Shutter
Exposure
BLC
Q.MENU
Exit
STBY
STBY
SP
0:00:10
60min
…
On
†
SP
0:00:10
60min
œ
4141
Page 46
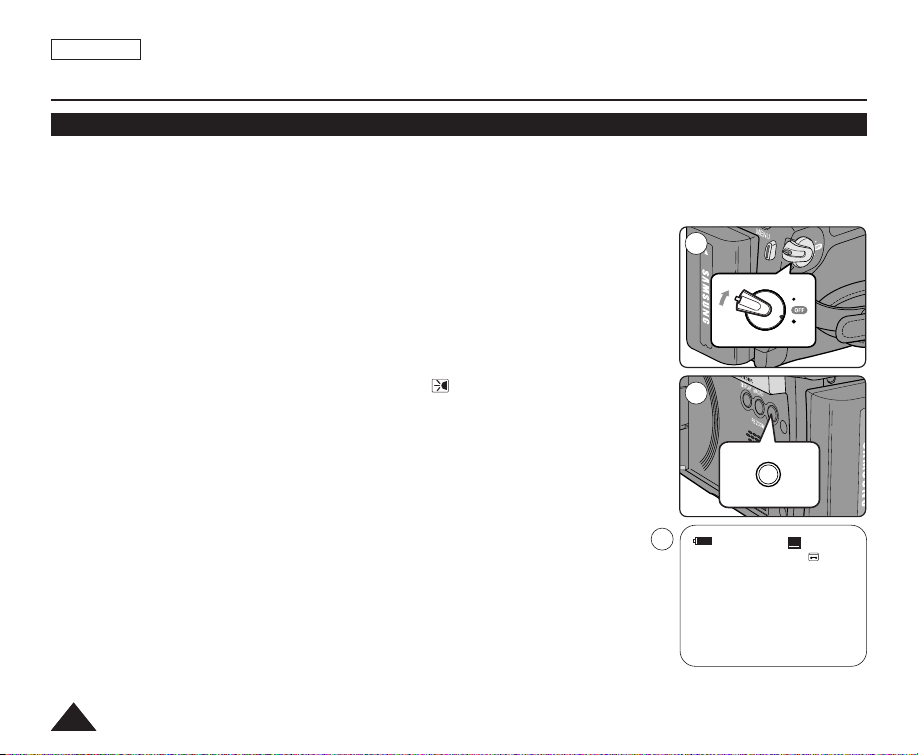
ENGLISH
C
O
L
O
R
N
ITE
LIGHT
LIGHT
COLOR NITE
P
L
A
Y
E
R
C
A
M
E
R
A
C
A
M
E
R
A
P
L
A
Y
E
R
Basic Recording
Using the COLOR NITE (COLOR NITE)
✤ COLOR NITE function works only in <Camera> mode. ➥page 19
✤ You can take a shot of an object in slow motion by controlling the shutter speed, or a brighter image in dark places
without a compromise in colors.
1. Set the [Power] switch to [CAMERA].
2. Set the [Mode] switch to [TAPE]. (SC-D363/D364/D365/D366 only)
3. Press the [COLOR NITE] button.
4. Each time you press the [COLOR NITE] button, shutter speed is changed to;
√ <Color N. 1/30>, <Color N. 1/15> and <OFF>. (SC-D263/D363)
√ <Color N. 1/30>, <Color N. 1/15>, <Color N. 1/15( )> and <OFF>.
(SC-D362/D364/D365/D366)
[ Notes ]
■
COLOR NITE will not turn on or off while you are recording.
■
When using COLOR NITE, the image takes on a slow motion like effect.
■
When using COLOR NITE, the focus adjusts slowly and white dots may appear on the
screen. This is not a defect.
■
COLOR NITE is not available while DIS, Photo image recording or EASY.Q is in use.
■
Digital Zoom, Photo image recording,16:9 Wide, Emboss2, Pastel2, Mirror or Mosaic is
not available in the COLOR NITE mode.
■
If DIS or EASY.Q is set, COLOR NITE mode will be released.
4242
1
3
4
STBY
SP
Color N.1/30
0:00:10
60min
œ
Page 47
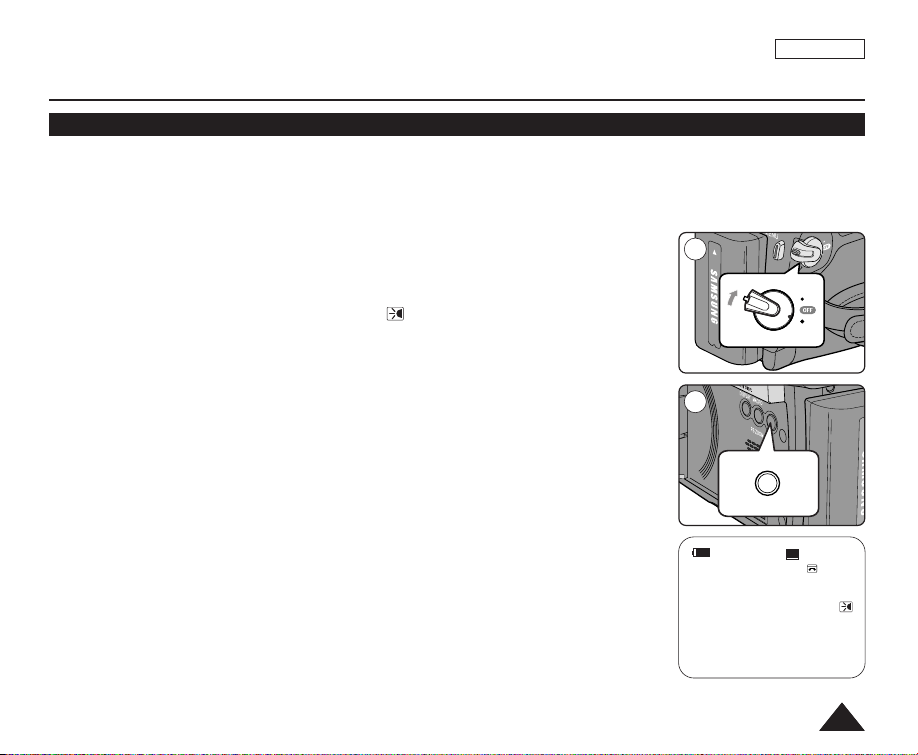
Basic Recording
C
O
LO
R
N
IT
E
LIGHT
LIGHT
COLOR NITE
P
L
A
Y
E
R
C
A
M
E
R
A
C
A
M
E
R
A
P
L
A
Y
E
R
Using the LIGHT (SC-D362/D364/D365/D366 only)
✤ LIGHT function works only in <Camera> mode. ➥page 19
✤ The LIGHT enables you to record a subjects in dark places without sacrificing color.
✤ The LIGHT can be used with the COLOR NITE function only.
ENGLISH
1. Set the [Power] switch to [CAMERA].
2. Set the [Mode] switch to [TAPE]. (SC-D363/D364/D365/D366 only)
3. Press the [LIGHT] button until <Color N. 1/15 ( )> appears.
[ Notes ]
■
The LIGHT will not turn on or off while you are recording.
■
The range of the LIGHT is limited. (up to 6.6ft (2m))
[ Danger ]
■
The LIGHT can become extremely hot.
■
Do not touch it while in operation or soon after turning it off, otherwise serious injury may
result.
■
Do not place the Camcorder into the carrying case immediately after using the LIGHT,
since it remains extremely hot for some time.
■
Do not use near flammable or explosive materials.
1
3
SP
STBY
0:00:10
60min
œ
Color N. 1/15
4343
Page 48
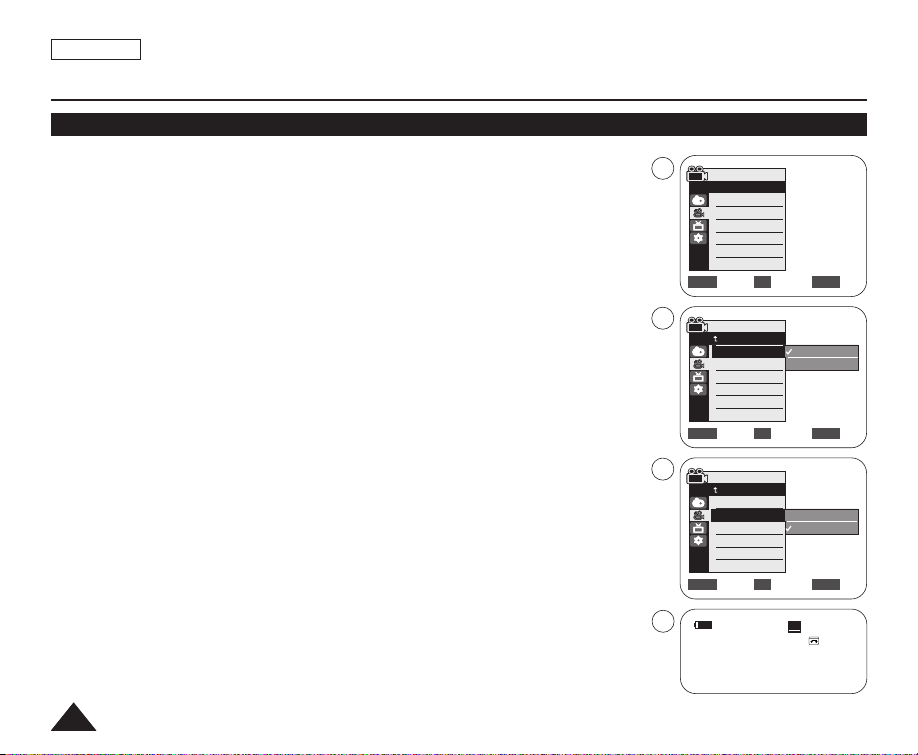
ENGLISH
Advanced Recording
Selecting the Record Mode & Audio Mode
✤ The Record Mode function works in both <Camera> and <Player> (DV IN or AV IN
(SC-D365/D366)) modes. ➥page 19
✤ This Camcorder records and plays back in SP (standard play) mode and in LP (long play)
mode.
-
<SP> (standard play): This mode permits 60 minutes of recording time with a DVM60 tape.
- <LP> (long play): This mode permits 90 minutes of recording time with a DVM60 tape.
✤ The Audio Mode function works in both <Camera> and <Player> modes. ➥page 19
✤ This Camcorder records sound in two ways. (12Bit, 16Bit)
- <12Bit>: You can record two 12Bit stereo sound tracks.
- <16Bit>: You can record one high quality stereo sound using 16Bit recording mode.
1. Set the [Power] switch to [CAMERA] or [PLAYER].
2. Set the [Mode] switch to [TAPE]. (SC-D363/D364/D365/D366 only)
3. Press the [MENU] button.
4.
Move the [Zoom] lever up or down to select <Record>, then press the [OK] button.
5. Move the [Zoom] lever up or down to select <Rec Mode> or <Audio Mode>, then press the
[OK] button.
6. Move the [Zoom] lever up or down to select desired record mode or audio mode,
then press the [OK] button.
■
Record mode can be set to <SP> or <LP>.
■
Audio mode can be set to <12Bit> or <16Bit>.
7. To exit, press the [MENU] button. The selected icon is displayed.
■
When <12Bit> is selected, no <12Bit> indication is displayed.
[ Notes ]
■
We recommend that you use this Camcorder to play back any tapes recorded on this Camcorder.
Playing back a tape recorded in other equipment may produce mosaic shaped distortion.
■
When you record a tape in SP and LP modes, or LP mode only, the playback picture may be
distorted or the time code may not be written properly if there is a gap between scenes.
■
Record using SP mode for best picture and sound quality.
[ Caution ]
■
To edit audio on your camcorder, you must set 12Bit for the Audio Mode and SP for the Rec Mode.
4444
The original stereo sound can be recorded onto the Main (Sound1) track.
Additional stereo sound can be dubbed onto the Sub (Sound2) track.
Audio dubbing is not possible when using this mode.
4
Camera Mode
√Record
Rec Mode
Audio Mode
WindCut Plus
Real Stereo
Move Select Exit
6
Camera Mode
Back
Rec Mode
Audio Mode
WindCut Plus
Real Stereo
Move Select Exit
6
Camera Mode
Back
Rec Mode
Audio Mode
WindCut Plus
Real Stereo
Move Select Exit
7
STBY
√SP
√12Bit
√Off
√Off
œ
SP
LP
12Bit
16Bit
SP
MENUOKZOOM
MENUOKZOOM
MENUOKZOOM
0:00:10
60min
œ
16Bit
Page 49
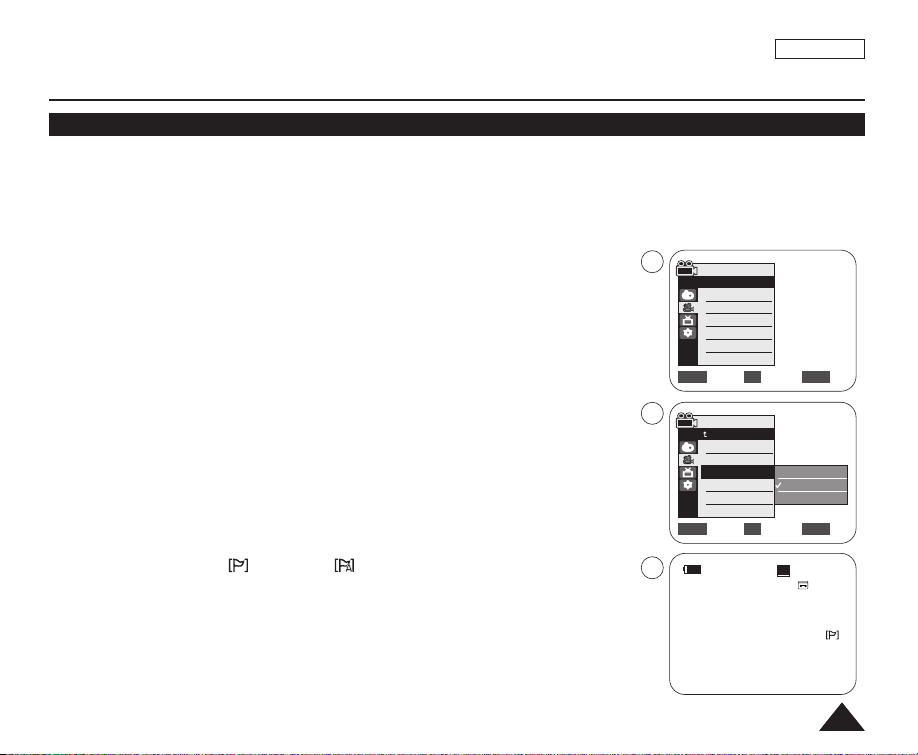
Advanced Recording
Cutting Off Wind Noise (WindCut Plus)
✤ The WindCut Plus function works in both <Camera> and <Player> (Audio dubbing) modes. ➥page 19
✤ Use the WindCut Plus when recording in windy places such as the beach or near buildings.
✤ The WindCut Plus function minimizes wind or other noises while recording.
- When the WindCut Plus is on, some low pitched tones are eliminated along with the sound of the wind.
ENGLISH
1. Set the [Power] switch to [CAMERA] or [PLAYER].
4
2. Set the [Mode] switch to [TAPE]. (SC-D363/D364/D365/D366 only)
3. Press the [MENU] button.
4. Move the [Zoom] lever up or down to select <Record>, then press the [OK] button.
5. Move the [Zoom] lever up or down to select <WindCut Plus>, then press the [OK]
button.
6
6. To activate the WindCut Plus function, move the [Zoom] lever up or down to select <On>
or <Auto> then press the [OK] button.
■
<On>: Removes the low pitched wind noise.
■
<Auto>: Minimizes the wind noise while preserving voices.
7. To exit, press the [MENU] button.
■
WindCut Plus (<On> or <Auto> ) icon is displayed.
[ Notes ]
■
Make sure WindCut Plus is set to off when you want the microphone to be as sensitive
7
as possible.
■
WindCut Plus function is not available in USB Streaming mode.
(SC-D362/D363/D364/D365/D366 only)
Camera Mode
√Record
Rec Mode
Audio Mode
WindCut Plus
Real Stereo
Move Select Exit
Camera Mode
Back
Rec Mode
Audio Mode
WindCut Plus
Real Stereo
Move Select Exit
STBY
√SP
√12Bit
√Off
√Off
Off
On
Auto
SP
MENUOKZOOM
MENUOKZOOM
0:00:10
60min
œ
4545
Page 50
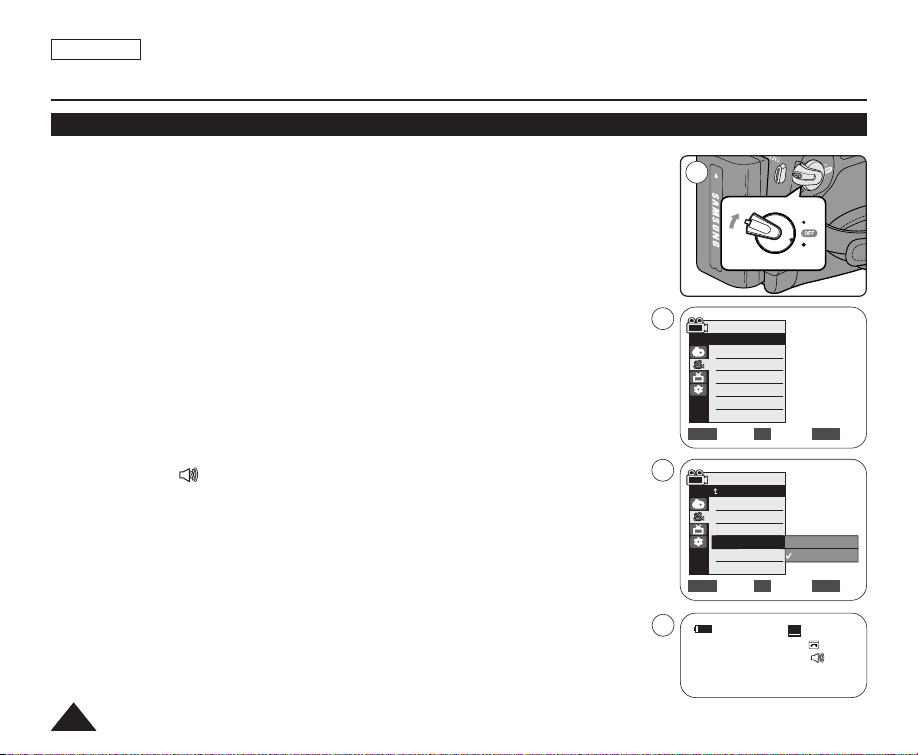
ENGLISH
P
L
A
Y
E
R
C
A
M
E
R
A
C
A
M
E
R
A
P
L
A
Y
E
R
Advanced Recording
Selecting the Real Stereo Function
✤ The Real Stereo function works only in <Camera> mode. ➥page 19
✤ Real Stereo enhances the left and right input signals when using the Internal or External
MICs.
1. Set the [Power] switch to [CAMERA].
2. Set the [Mode] switch to [TAPE]. (SC-D363/D364/D365/D366 only)
3. Press the [MENU] button.
4. Move the [Zoom] lever up or down to select <Record>, then press the [OK] button.
5. Move the [Zoom] lever up or down to select <Real Stereo>, then press the [OK] button.
6. To activate the Real Stereo function, move the [Zoom] lever up or down to select <On>,
then press the [OK] button.
7. To exit, press the [MENU] button.
■
Real Stereo ( ) icon is displayed.
4646
S
4
6
7
1
Camera Mode
√Record
Rec Mode
Audio Mode
WindCut Plus
Real Stereo
Move Select Exit
Camera Mode
Back
Rec Mode
Audio Mode
WindCut Plus
Real Stereo
Move Select Exit
STBY
√SP
√12Bit
√Off
√Off
SP
Off
On
œ
MENUOKZOOM
MENUOKZOOM
S
0:00:10
60min
Page 51
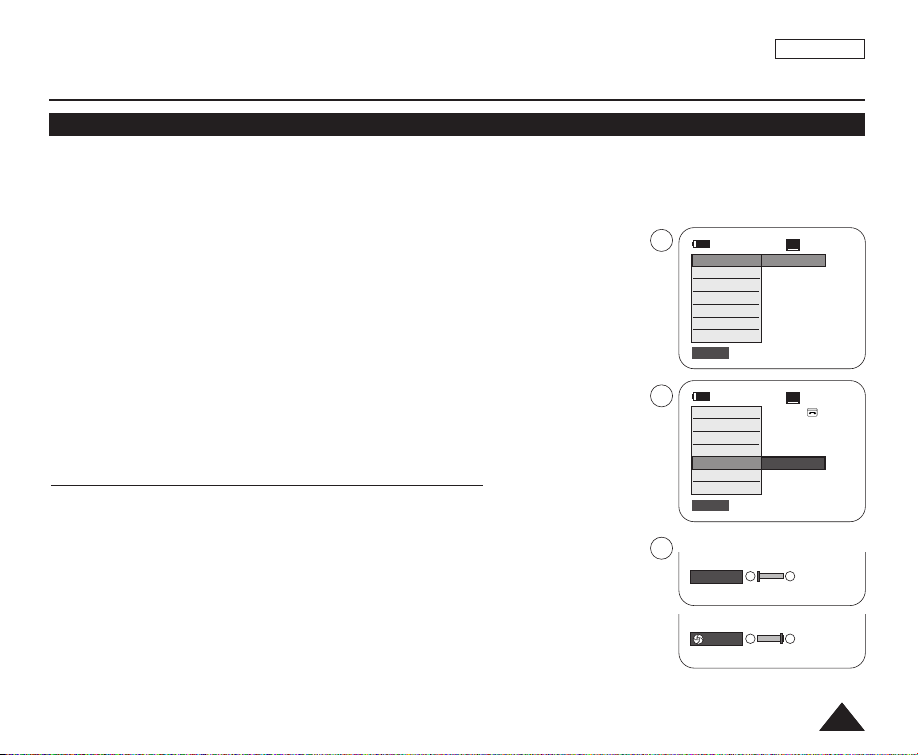
Advanced Recording
Setting the Shutter Speed & Exposure
✤ The Shutter Speed function works only in <Camera> mode. ➥page 19
✤ The Exposure function works in both <Camera> and <M.Cam> modes. ➥page 19
✤ The Shutter Speed and Exposure functions can be set in the QUICK MENU.
1. Set the [Power] switch to [CAMERA].
2. Set the [Mode] switch to [TAPE]. (SC-D363/D364/D365/D366 only)
3. Press the [QUICK MENU] button.
■
Quick menu list will appear.
4. Move the [Zoom] lever up or down to select <Shutter> or <Exposure>, then press the
[OK] button.
5. Move the [Zoom] lever up or down to select <Manual>, then press the [OK] button.
6. Move the [Zoom] lever up or down to select desired shutter speed or exposure, then press
the [OK] button.
■
Shutter speed can be set to <1/60>, <1/100>, <1/250>, <1/500>, <1/1000>, <1/2000>,
<1/4000> or <1/10000>.
■
Exposure value can be set between <00> and <29>.
7. To exit, press the [QUICK MENU] button.
■
Selected settings are displayed.
Recommended Shutter Speeds when Recording
✤ Outdoor sports such as golf or tennis: <1/2000> or <1/4000>
✤ Moving cars or trains or other rapidly moving vehicles such as roller coasters: <1/1000>,
<1/500> or <1/250>
✤ Indoor sports such as basketball: <1/100>
[ Notes ]
■
If you manually change the Shutter Speed and the Exposure value when Program AE
option is selected, manual changes are applied first.
■
The image may not seem as smooth when a high Shutter Speed is set.
■
The Camcorder returns to the auto shutter and auto exposure settings when you change to
the EASY.Q mode.
■
When recording with a Shutter Speed of 1/1000 or higher, make sure the sun is not shining into the lens.
3
5
6
DIS
Program AE
16:9 Wide
White Balance
Shutter
Exposure
BLC
Q.MENU
DIS
Program AE
16:9 Wide
White Balance
Shutter
Exposure
BLC
Q.MENU
S. 1/60
[29]
Exit
Exit
STBY
Off
STBY
Manual
†
†
ENGLISH
SP
0:00:10
60min
SP
0:00:10
60min
…
†
…
…
4747
Page 52
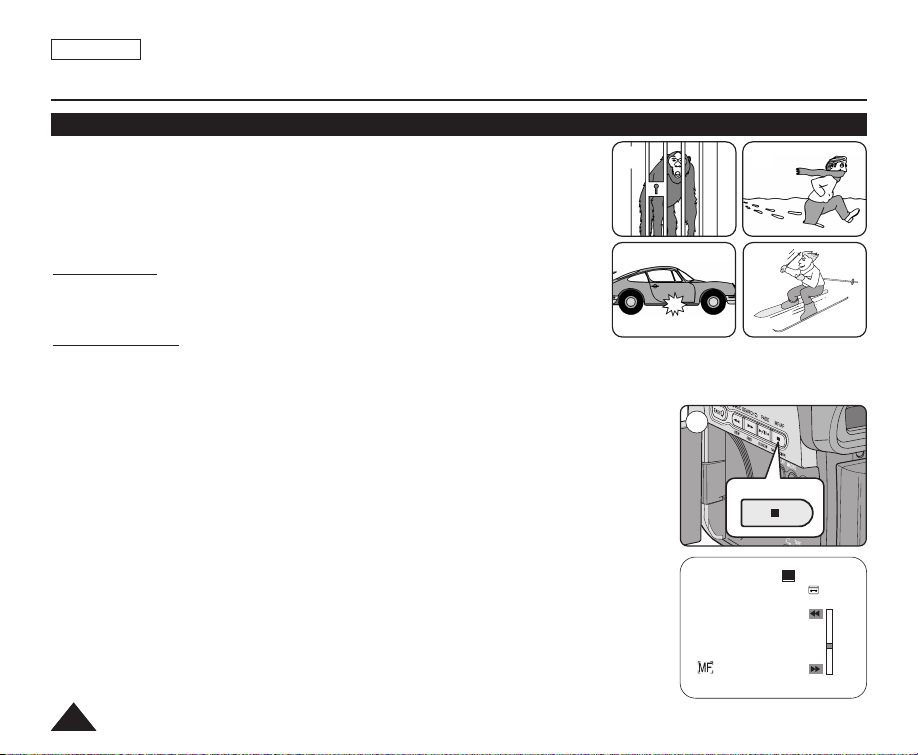
ENGLISH
COLOR NITE
LIGHT
MF/AF
Advanced Recording
Auto Focus / Manual Focus
✤ The Auto Focus/Manual Focus function works in both <Camera> and <M.Cam>
modes. ➥page 19
✤ In most situations, it is better to use the automatic focus feature, as it enables
you to concentrate on the creative side of your recording.
✤ Manual focusing may be necessary under certain conditions that make
automatic focusing difficult or unreliable.
Auto Focus
✤ If you are inexperienced in the use of Camcorders, we recommend that you
make use of Auto Focus.
Manual Focus
✤ In the following situations, you may obtain better results by adjusting the focus manually.
a. A picture containing several objects, some close to the Camcorder, others further away.
b. A person enveloped in fog or surrounded by snow.
c. Very shiny or glossy surfaces like a car.
d. People or objects moving constantly or quickly like an athlete or a crowd.
1. Set the [Power] switch to [CAMERA].
2. Set the [Mode] switch to [TAPE] or [MEMORY]. (SC-D363/D364/D365/D366 only)
3. Press the [MF/AF] button.
■
The [MF] icon and the [MF/AF] status bar will be displayed on the LCD.
4. Focus with the [REV(
œœœœ
)] and [FWD(
√√√√
)] buttons.
[ Note ]
Manual Focus is not available in the EASY.Q mode.
a
c
b
d
3
SP
STBY
0:00:10
60min
4848
Page 53
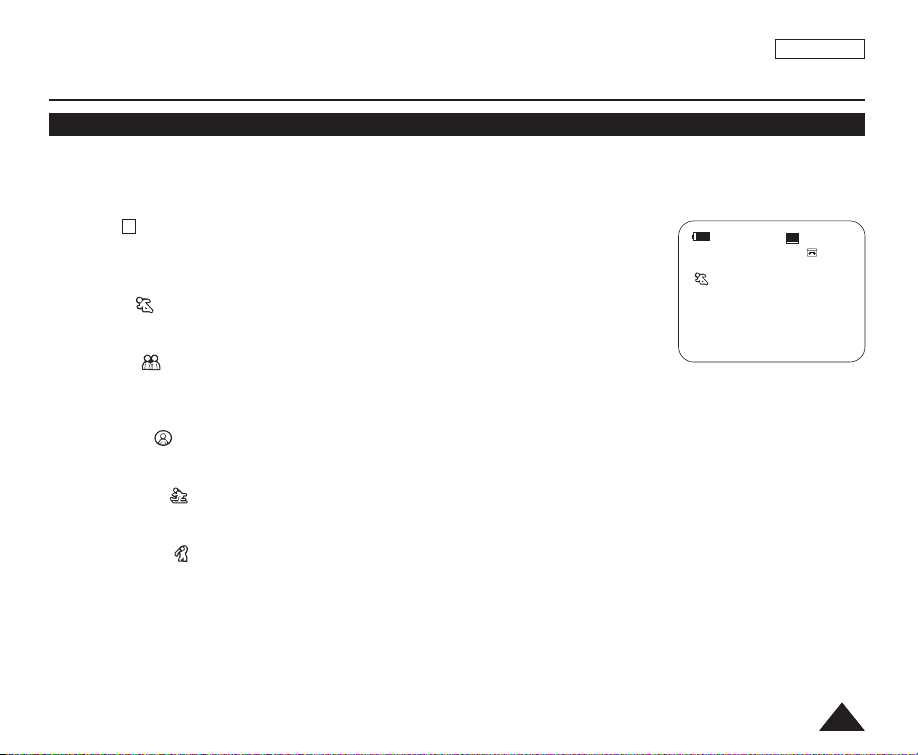
ENGLISH
Advanced Recording
Programed Automatic Exposure Modes (Program AE)
✤ The Program AE function works only in <Camera> mode. ➥page 19
✤ The Program AE mode allows you to adjust shutter speeds and apertures to suit different recording conditions.
✤ They give you creative control over the depth of field.
■
■
A
<Auto ( )> mode
- Auto balance between the subject and the background.
- To be used in normal conditions.
<Sports ( )> mode
STBY
œ
For recording people or objects moving quickly.
■
<Portrait ()> mode
- For focusing on the background of the subject, when the background is out of focus.
- The Portrait mode is most effective when used outdoors.
■
<Spotlight ( )> mode
For recording correctly when there is only light on the subject and not the rest of the picture.
■
<Sand/Snow ( )> mode
For recording when people or objects are darker than the background because of reflected light from sand or snow.
■
<High Speed ( )> (High Shutter Speed) mode
For recording fast-moving subjects such as players in golf or tennis games.
SP
0:00:10
60min
4949
Page 54
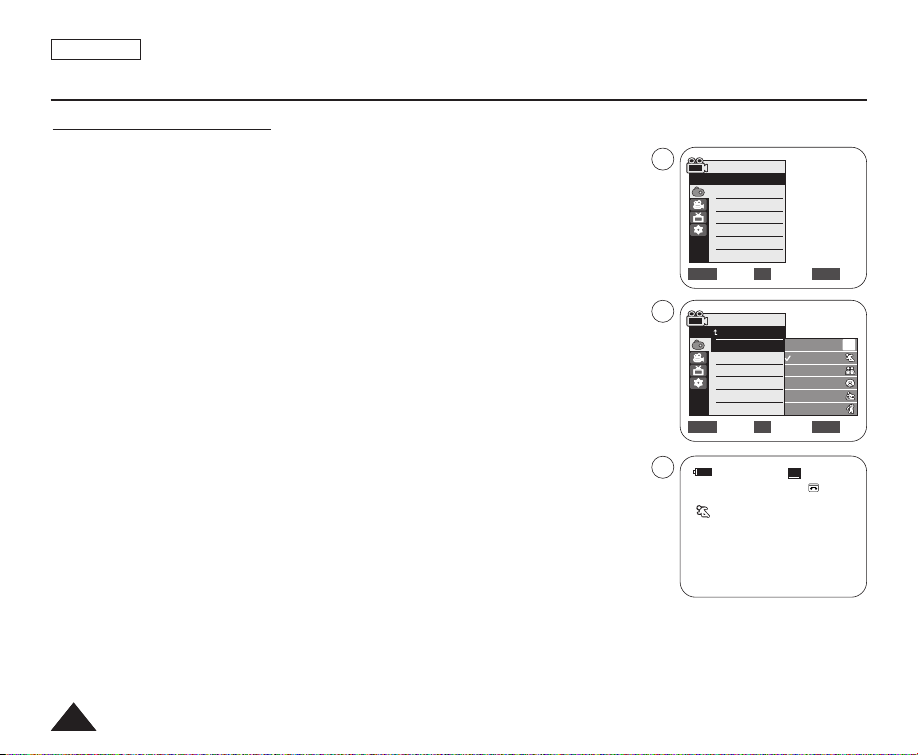
ENGLISH
Advanced Recording
Setting the Program AE
1. Set the [Power] switch to [CAMERA].
2. Set the [Mode] switch to [TAPE]. (SC-D363/D364/D365/D366 only)
3. Press the [MENU] button.
■
The menu list will appear.
4. Move the [Zoom] lever up or down to select <Camera>, then press the [OK] button.
5. Move the [Zoom] lever up or down to select <Program AE>, then press the [OK]
button.
■
The available options are listed.
6. Move the [Zoom] lever up or down to select desired program AE option, then press the
[OK] button.
7. To exit, press the [MENU] button.
■
The icon of the selected mode is displayed.
■
When the <Auto> mode is selected, no icon is displayed.
[ Notes ]
■
Direct accessing the Program AE function is available simply using the [QUICK MENU]
button.
➥
■
The Program AE function will not operate in EASY.Q mode.
page 20
4
Camera Mode
√Camera
Program AE
White Balance
Visual Effect
16:9 Wide
DIS
Digital Zoom
Move Select Exit
6
Camera Mode
Back
Program AE
White Balance
Visual Effect
16:9 Wide
DIS
Digital Zoom
Move Select Exit
7
STBY
√Auto
√Auto
√Off
√Off
√Off
√Off
Auto
Sports
Portrait
Spotlight
Sand/Snow
High Speed
SP
MENUOKZOOM
MENUOKZOOM
0:00:10
60min
A
œ
5050
Page 55
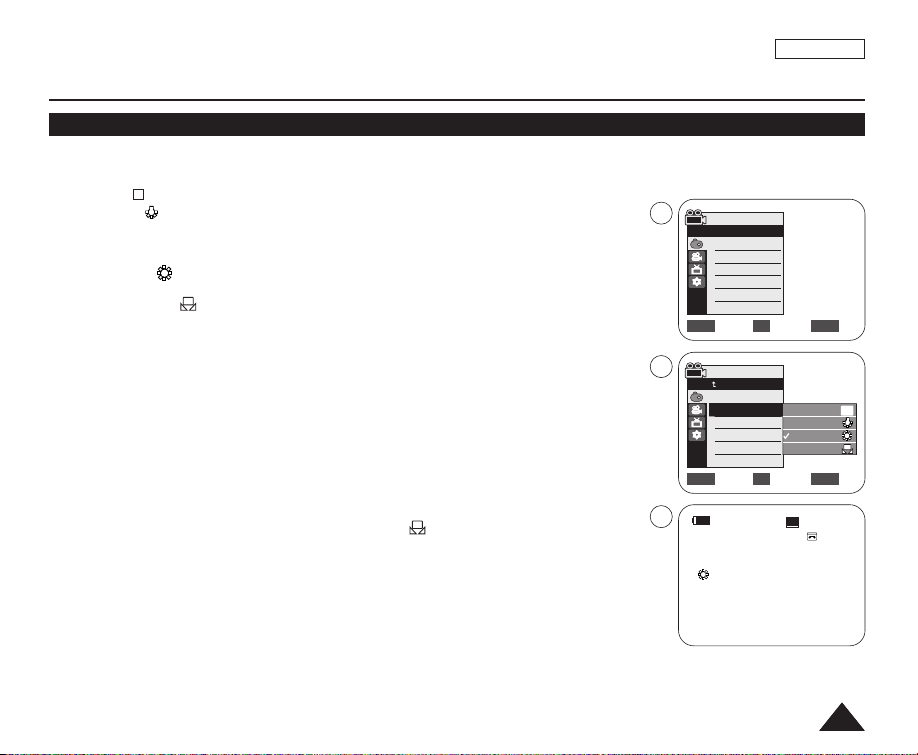
Advanced Recording
c
c
c
Setting the White Balance
✤ The White Balance function works in both <Camera> and <M.Cam> modes. (SC-D363/D364/D365/D366 only) ➥page 19
✤ The White Balance is a recording function that preserves the unique image color of the object in any recording condition.
✤ You may select the appropriate White Balance mode to obtain good quality image color.
■
■
■
■
1. Set the [Power] switch to [CAMERA].
2. Set the [Mode] switch to [TAPE] or [MEMORY]. (SC-D363/D364/D365/D366 only)
3. Press the [MENU] button.
■
4. Move the [Zoom] lever up or down to select <Camera>, then press the [OK] button.
5. Move the [Zoom] lever up or down to select <White Balance>, then press the [OK] button.
6. Move the [Zoom] lever up or down to select desired mode (Auto, Indoor, Outdoor or Custom WB),
then press the [OK] button.
■
7. To exit, press the [MENU] button.
■
[ Notes ]
■
You can directly access the White Balance function using the [QUICK MENU] button. ➥page 20
■
The White Balance function will not operate in EASY.Q mode.
■
Turn the Digital Zoom off (if necessary) to set a more accurate white balance.
■
Reset the white balance if lighting conditions change.
■
During normal outdoor recording, setting to Auto may provide better results.
■
Buttons other than EASY.Q, [MENU] and [OK] will not work during setting the Custom WB.
■
Pressing the [MENU] button while setting the Custom WB will cancel the Custom WB setting and sets the White Balance to Auto.
A
<Auto ( )> : This mode is generally used to control the White Balance automatically.
<Indoor ( )> : This controls the White Balance according to the indoor ambience.
- Under halogen or studio/video lighting
- Subject is of one dominant color
- Close up
<Outdoor ( )> : This controls the White Balance according to the outdoor ambience.
- In daylight, especially for close up and where the subject is of one dominant color.
<Custom WB ( )> : You can adjust the white balance as you wish based on the shooting
environment.
The menu list will appear.
To explain about the Custom WB:
- Select Custom WB and press the OK button. (“set white balance” will appear and blinks on the
screen.)
- Place the white object under the desired lighting then press the OK button.
(The OSD will disappear and the Custom WB icon ( ) will be displayed.)
When the <Auto> mode is selected, no icon is displayed.
4
6
7
ENGLISH
Camera Mode
√Camera
Program AE
White Balance
Visual Effect
16:9 Wide
DIS
Digital Zoom
Move Select Exit
Camera Mode
Back
Program AE
White Balance
Visual Effect
16:9 Wide
DIS
Digital Zoom
Move Select Exit
STBY
√Auto
√Auto
√Off
√Off
√Off
√Off
Auto
Indoor
Outdoor
Custom WB
SP
MENUOKZOOM
MENUOKZOOM
0:00:10
A
60min
œ
<When the Outdoor option was selected>
5151
Page 56
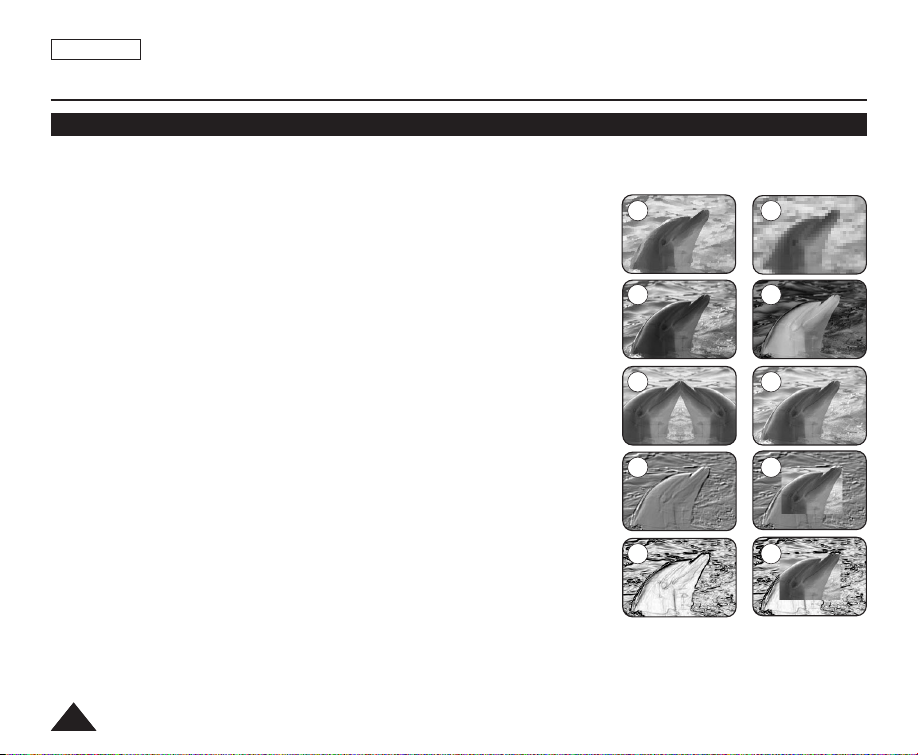
ENGLISH
Advanced Recording
Applying Visual Effects
✤ The Visual Effect function works only in <Camera> mode. ➥page 19
✤ The Visual Effects enable you to give a creative look to your recording.
✤ Select the appropriate Visual Effect for the type of picture that you wish to
record and the effect you wish to create. There are 10 Visual Effect modes.
1. <Art> mode
This mode gives the images a coarse effect.
2. <Mosaic> mode
This mode gives the images a mosaic effect.
3. <Sepia> mode
This mode gives the images a reddish-brown pigment.
4. <Negative> mode
This mode reverses the colors, creating a negative image.
5. <Mirror> mode
This mode cuts the picture in half, using a mirror effect.
6. <BLK&WHT> mode
This mode changes the images to black and white.
7. <Emboss1> mode
This mode creates a 3D effect (embossing).
8. <Emboss2> mode
This mode creates a 3D effect (embossing) on surrounding area of an image.
9. <Pastel1> mode
This mode applies a pale pastel drawing effect to an image.
10. <Pastel2> mode
This mode applies a pale pastel drawing effect to surrounding area of an image.
1 2
3 4
5 6
7 8
9 10
5252
Page 57
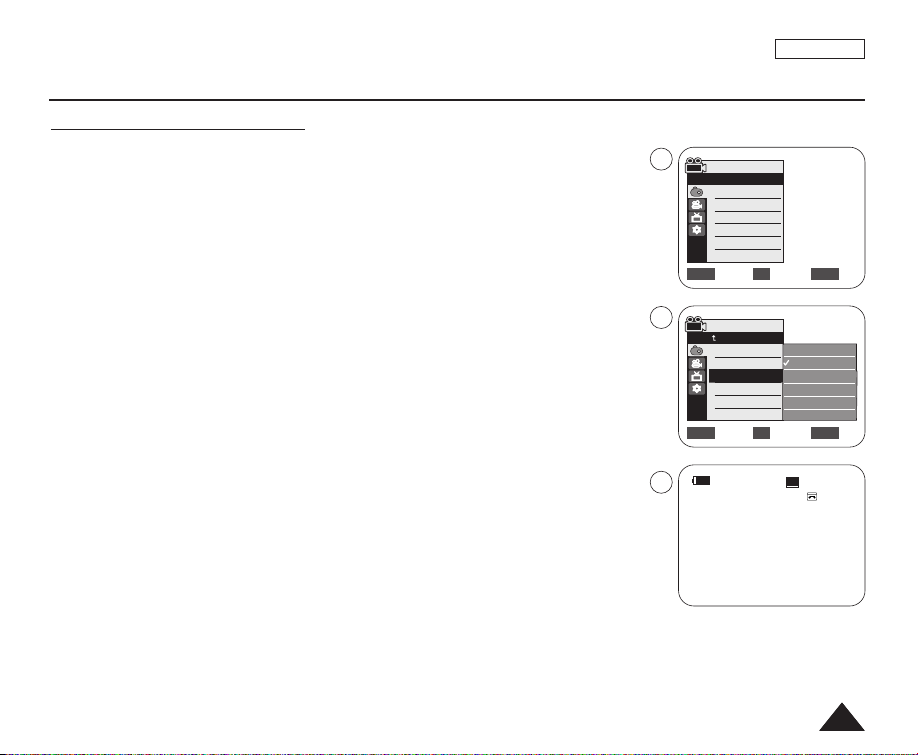
Advanced Recording
Selecting the Visual Effects
1. Set the [Power] switch to [CAMERA].
2. Set the [Mode] switch to [TAPE]. (SC-D363/D364/D365/D366 only)
3. Press the [MENU] button.
■
The menu list will appear.
4. Move the [Zoom] lever up or down to select <Camera>, then press the [OK] button.
5. Move the [Zoom] lever up or down to select <Visual Effect>, then press the [OK] button.
6. Move the [Zoom] lever up or down to select the desired Visual Effect option, then press
the [OK] button.
■
The display mode is set to the selected mode.
7. To exit, press the [MENU] button.
[ Notes ]
■
The Pastel2, Emboss2, Mirror or Mosaic mode is not available while DIS or COLOR NITE
is in use.
■
Visual Effect modes are not available while EASY.Q is in use.
■
Once DIS, EASY.Q or COLOR NITE is set, Emboss2, Pastel2, Mirror or Mosaic mode will
be released.
■
Emboss2, Pastel2, Mirror or Mosaic mode is not available in the 16:9 Wide mode.
(SC-D263/D362/D363/D364 only)
■
Digital Zoom is not available in the Emboss2, Pastel2, Mirror or Mosaic mode.
■
Visual Effect modes other than Emboss2, Pastel2, Mirror or Mosaic mode is available
while DIS is in use.
4
6
7
ENGLISH
Camera Mode
√Camera
Program AE
White Balance
Visual Effect
16:9 Wide
DIS
Digital Zoom
Move Select Exit
Camera Mode
Back
Program AE
White Balance
Visual Effect
16:9 Wide
DIS
Digital Zoom
Move Select Exit
AA rrtt
œ
STBY
√Auto
√Auto
√Off
√Off
√Off
√Off
Off
Art
Mosaic
Sepia
Negative
Mirror
SP
MENUOKZOOM
▼
MENUOKZOOM
0:00:10
60min
5353
Page 58
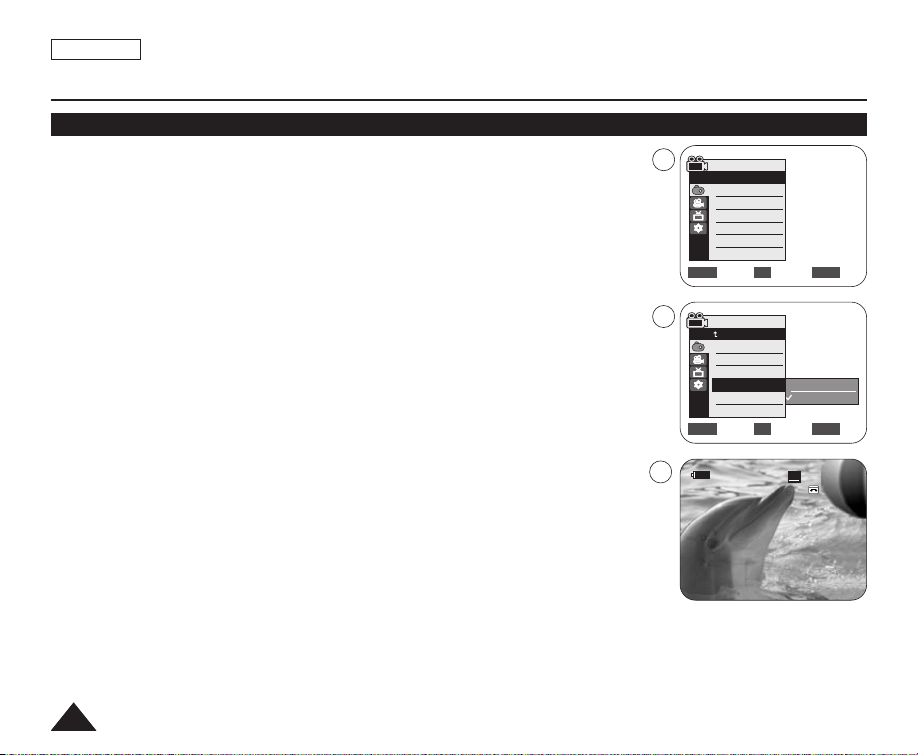
ENGLISH
Advanced Recording
Setting the 16:9 Wide mode
✤ The 16:9 Wide function works only in <Camera> mode. ➥page 19
✤ Select to record a picture to be played back on a 16:9 Wide TV.
✤ Recordings in 16:9 Wide will play back naturally only when the TV supports 16:9 aspect
ratio.
1. Set the [Power] switch to [CAMERA].
2. Set the [Mode] switch to [TAPE]. (SC-D363/D364/D365/D366 only)
4
Camera Mode
√Camera
Program AE
White Balance
Visual Effect
16:9 Wide
DIS
Digital Zoom
Move Select Exit
√Auto
√Auto
√Off
√Off
√Off
√Off
MENUOKZOOM
3. Press the [MENU] button.
■
The menu list will appear.
4. Move the [Zoom] lever up or down to select <Camera>, then press the [OK] button.
5. Move the [Zoom] lever up or down to select <16:9 Wide>, then press the [OK] button.
6. To activate the 16:9 Wide function, move the [Zoom] lever up or down to select <On>,
then press the [OK] button.
■
If you do not want to use the 16:9 Wide function, set the <16:9 Wide> menu to
<Off>.
7. To exit, press the [MENU] button. The selected icon is displayed.
[ Notes ]
■
You can directly access the 16:9 Wide function using the [QUICK MENU] button.
➥
page 20
■
The 16:9 Wide mode is not available while Visual Effect, DIS or EASY. Q is in use.
(SC-D263/D362/D363/D364 only)
■
Once COLOR NITE is set, 16:9 Wide mode will be released.
■
Digital Zoom is not available in the 16:9 Wide mode.
■
Still image recording is not available in the 16:9 Wide mode.
5454
6
Camera Mode
Back
Program AE
White Balance
Visual Effect
16:9 Wide
DIS
Digital Zoom
Move Select Exit
7
1166:: 99 WWiidd ee
œ
STBY
Off
On
MENUOKZOOM
SP
0:00:10
60min
Page 59
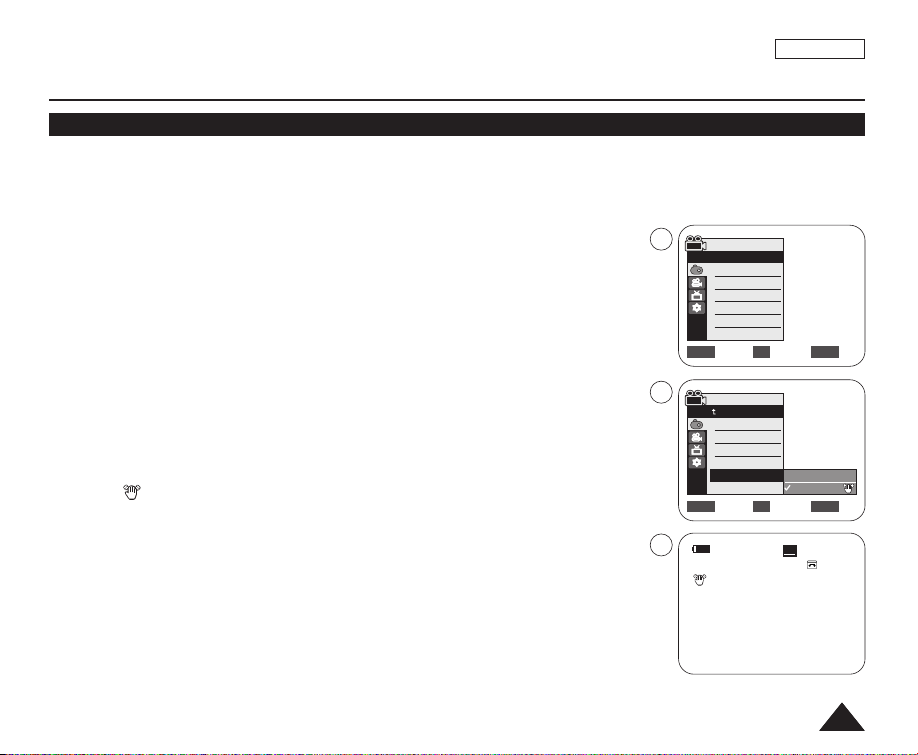
ENGLISH
Advanced Recording
Setting the Digital Image Stabilizer (DIS)
✤ The DIS function works only in <Camera> mode. ➥page 19
✤ DIS (Digital Image Stabilizer) is a function that compensates for any shaking or hand movement while holding the
Camcorder (within reasonable limits).
✤ It provides more stable pictures when:
- Recording with the zoom (DIS is not available in Digital Zoom mode.)
- Recording a small object close-up
- Recording and walking at the same time
- Recording through the window of a vehicle
1. Set the [Power] switch to [CAMERA].
2. Set the [Mode] switch to [TAPE]. (SC-D363/D364/D365/D366 only)
3. Press the [MENU] button.
■
The menu list will appear.
4. Move the [Zoom] lever up or down to select <Camera>, then press the [OK] button.
5. Move the [Zoom] lever up or down to select <DIS>, then press the [OK] button.
6. To activate the DIS function, move the [Zoom] lever up or down to select <On>, then
press the [OK] button.
■
If you do not want to use the DIS function, set the <DIS> menu to <Off>.
7. To exit, press the [MENU] button.
■
DIS ( ) icon is displayed.
[ Notes ]
■
You can directly access the DIS function using the [QUICK MENU] button. ➥page 20
■
Digital Zoom, COLOR NITE, Emboss2, Pastel2, Mirror or Mosaic is not available in the
DIS mode.
■
16:9 Wide mode is not available in the DIS mode. (SC-D263/D362/D363/D364 only)
■
When you press the [PHOTO] button while the DIS function is enabled, the DIS will be
released shortly and resume automatically after the still image recording.
■
It is recommended that you deactivate the DIS function when using a tripod.
■
If you use the DIS function, the picture quality may deteriorate.
■
EASY.Q mode automatically sets the <DIS> to <On>.
4
Camera Mode
√Camera
Program AE
White Balance
Visual Effect
16:9 Wide
DIS
Digital Zoom
Move Select Exit
6
Camera Mode
Back
Program AE
White Balance
Visual Effect
16:9 Wide
DIS
Digital Zoom
Move Select Exit
7
STBY
√Auto
√Auto
√Off
√Off
√Off
√Off
Off
On
SP
œ
MENUOKZOOM
MENUOKZOOM
0:00:10
60min
5555
Page 60
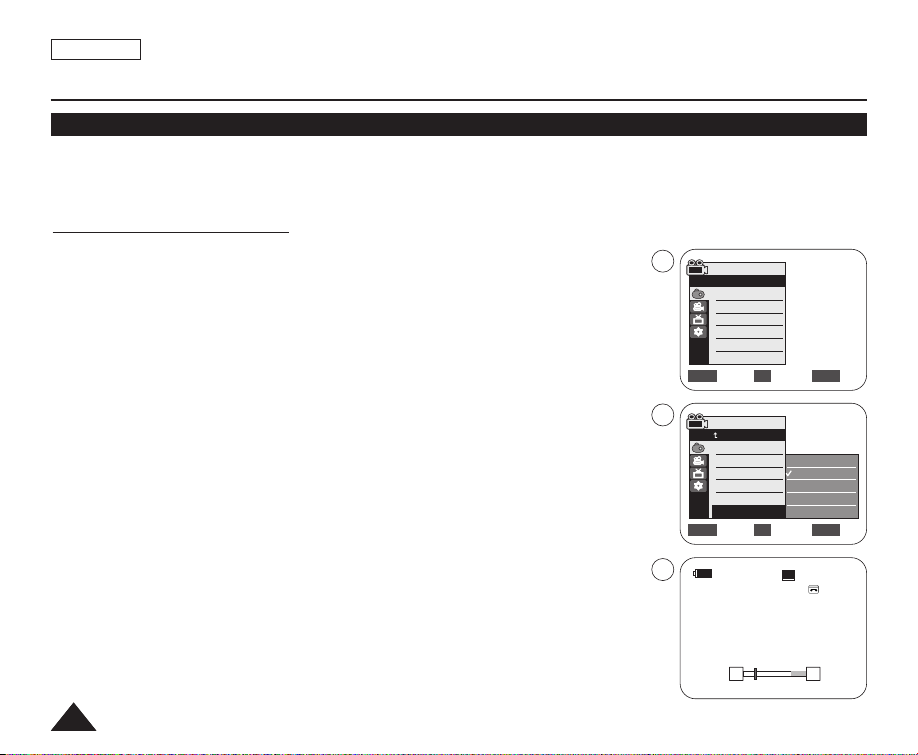
ENGLISH
Advanced Recording
Zooming In and Out with Digital Zoom (Digital Zoom)
✤ Maximum Digital Zoom works only in <Camera> mode. ➥page 19
✤ Zooming more than 33x (30x ; SC-D263/D363) is achieved digitally, up to 1200x when combined with optical zoom.
✤ The picture quality may deteriorate depending on how much you digitally zoom in on the subject.
Selecting the Digital Zoom
1. Set the [Power] switch to [CAMERA].
2. Set the [Mode] switch to [TAPE]. (SC-D363/D364/D365/D366 only)
3. Press the [MENU] button.
■
The menu list will appear.
4. Move the [Zoom] lever up or down to select <Camera>, then press the [OK] button.
5. Move the [Zoom] lever up or down to select <Digital Zoom>, then press the [OK]
button.
6. Move the [Zoom] lever up or down to select desired zoom value (Off, 100x, 200x, 400x or
1200x), then press the [OK] button.
7. To exit, press the [MENU] button.
■
Move the [Zoom] lever up or down to use the Digital Zoom.
■
The Digital Zoom indicator appears.
[ Notes ]
■
Maximum Digital zooming may result in lower picture quality.
■
Digital Zoom is not available while DIS, EASY.Q, still image recording, COLOR NITE, 16:9
Wide, Emboss2, Pastel2, Mirror or Mosaic is in use.
■
Once still image recording, COLOR NITE, 16:9 Wide, Emboss2, Pastel2, Mirror or Mosaic
is set, Digital Zoom mode will be released. (The Digital Zoom mode will be backed up.)
■
Once DIS or EASY.Q is set, Digital Zoom mode will be released.
4
Camera Mode
√Camera
Program AE
White Balance
Visual Effect
16:9 Wide
DIS
Digital Zoom
Move Select Exit
6
Camera Mode
Back
Program AE
White Balance
Visual Effect
16:9 Wide
DIS
Digital Zoom
Move Select Exit
7
√Auto
√Auto
√Off
√Off
√Off
√Off
Off
100x
200x
400x
1200x
SP
STBY
W T
MENUOKZOOM
MENUOKZOOM
0:00:10
œ
60min
5656
Page 61
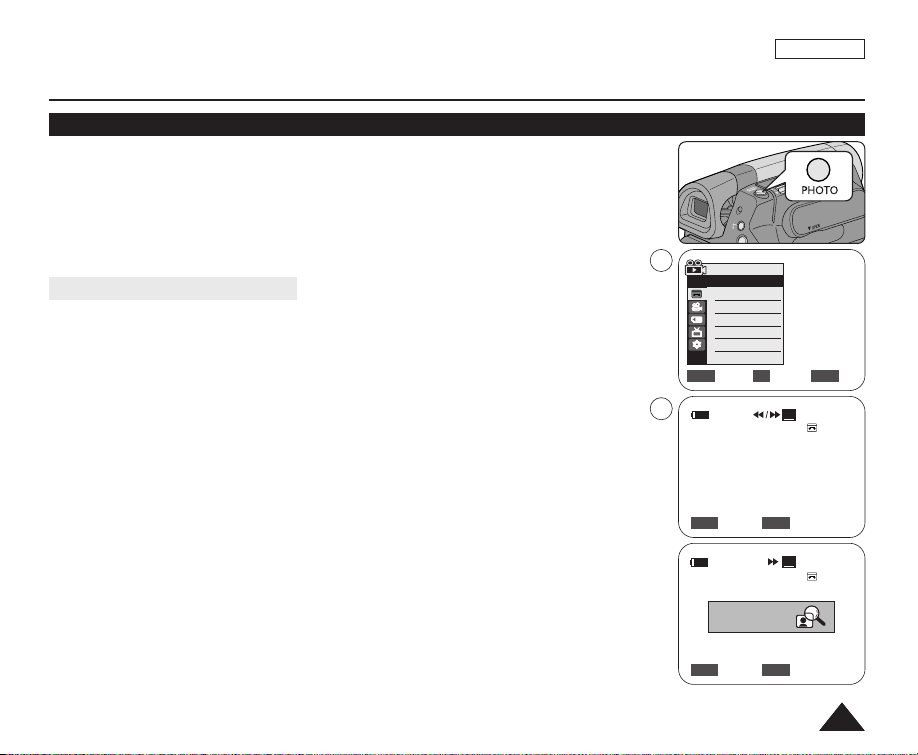
Advanced Recording
QUICK
MENU
OK
Still Image Recording
✤ Still image recording works only in <Camera> mode. ➥page 19
✤ A tape must be inserted as Still Images are recorded on a tape.
1. Set the [Power] switch to [CAMERA].
2. Set the [Mode] switch to [TAPE]. (SC-D363/D364/D365/D366 only)
3. Press the [PHOTO] button.
■
The still image is recorded for about 6~7 seconds.
4. After the still image has been recorded, the Camcorder returns to its previous mode.
Searching for a still image
✤ The Photo Search works only in <Player> mode. ➥page 19
1. Set the [Power] switch to [PLAYER].
2. Set the [Mode] switch to [TAPE]. (SC-D363/D364/D365/D366 only)
3. Press the [MENU] button.
■
The menu list will appear.
4. Move the [Zoom] lever up or down to select <Tape>, then press the [OK] button.
5. Move the [Zoom] lever up or down to select <Photo Search>, then press the [OK] button.
■
œœ /√√ will flash on the LCD.
6. Press the [
■
■
■
7. To exit, press the [■ (STOP)] or [MENU] button.
[ Notes ]
■
Still image recording is not available while recording.
■
You can use still image recording by using the [PHOTO] button on the remote control.
Pressing the [PHOTO] button on the remote control records the still image with automatic
focusing. (SC-D364/D366 only)
■
Still image recording is not available while COLOR NITE or 16:9 Wide is in use.
■
DIS, Digital Zoom, COLOR NITE, Visual Effect are not available when still image recording.
■
Still image recording while EASY.Q, DIS or Digital Zoom mode is in use will release the current
mode. (After a still image is taken, the mode will return automatically.)
œœœœ/√√√√
(REW/FF)] buttons to search the still image.
The photo search process appears while you are searching.
After completing the search, the Camcorder displays the still image.
When there are no still images recorded on the tape, it will be fully rewound or forwarded.
4
6
ENGLISH
Player Mode
√Tape
Photo Search
Photo Copy
Audio Select
Audio Effect
Move Select Exit
Photo Search
œœœœ /√√√√
Search Exit
Photo Search
Photo searching...
œœœœ /√√√√
Search Exit
MENU
MENU
√Sound[1]
√Off
SP
SP
MENUOKZOOM
0:41:56:10
25min
0:44:38:03
25min
5757
Page 62
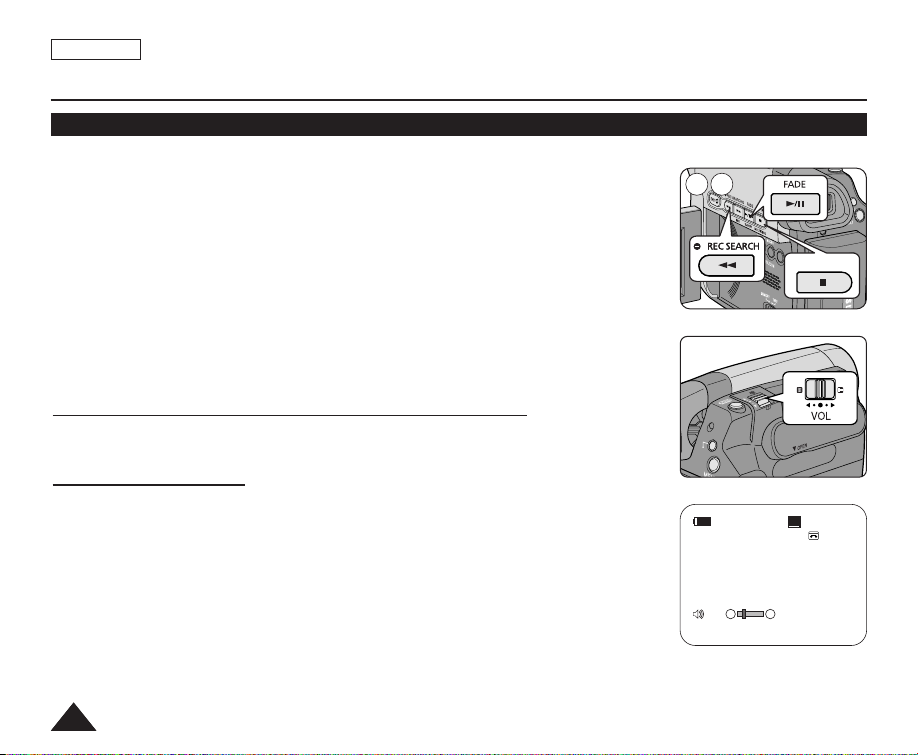
ENGLISH
COLOR NITE
LIGHT
STOP
P
QUICK
MENU
Playback
Playing Back a Tape You have recorded on the LCD Screen
✤ The Playback function and speaker works only in <Player> mode. ➥page 19
✤ You can monitor the playback picture on the LCD Screen.
1. Set the [Power] switch to [PLAYER].
2. Set the [Mode] switch to [TAPE]. (SC-D363/D364/D365/D366 only)
3. Insert the tape you wish to view.
4. Open the LCD Screen.
■
Adjust the angle of the LCD Screen and set the brightness or color if necessary.
œœœœ
[
(REW)]
5. Press the
■
To stop rewinding, press the
■
The Camcorder stops automatically after rewinding is complete.
6. Press the
■
■
[√√/■■(PLAY/STILL)]button to start playback.
You can view the picture you recorded on the LCD Screen.
To stop the play operation, press the
button to rewind the tape to the starting point.
Adjusting the LCD Bright/LCD Color during Playback
✤ You can adjust the LCD Bright/LCD Color during playback.
✤ The adjustment method is the same procedure as used in <Camera> mode.
Adjusting the Volume
✤ When you use the LCD Screen for playback, you can hear recorded sound from the built-
in Speaker.
- Take the following steps to lower the volume or mute the sound while playing a tape on
the Camcorder.
✤ When sound is heard once the tape is in play, use the [Zoom] lever to adjust the volume.
■
A volume level display will appear on the LCD Screen.
■
Levels may be adjusted from anywhere between <00> to <19>.
■
If you close the LCD Screen while playing, you will not hear sound from the speaker.
✤ When the AV cable is connected to the Camcorder, you cannot hear sound from the Built-
In Speaker and cannot adjust the volume.
✤ Volume control is disabled while PB Zoom is in use.
5858
➥
page 32
[■ (STOP)]
[■ (STOP)]
button.
button.
➥
page 29
5 6
[05]
SP
0:46:00:11
√
†
60min
…
Page 63
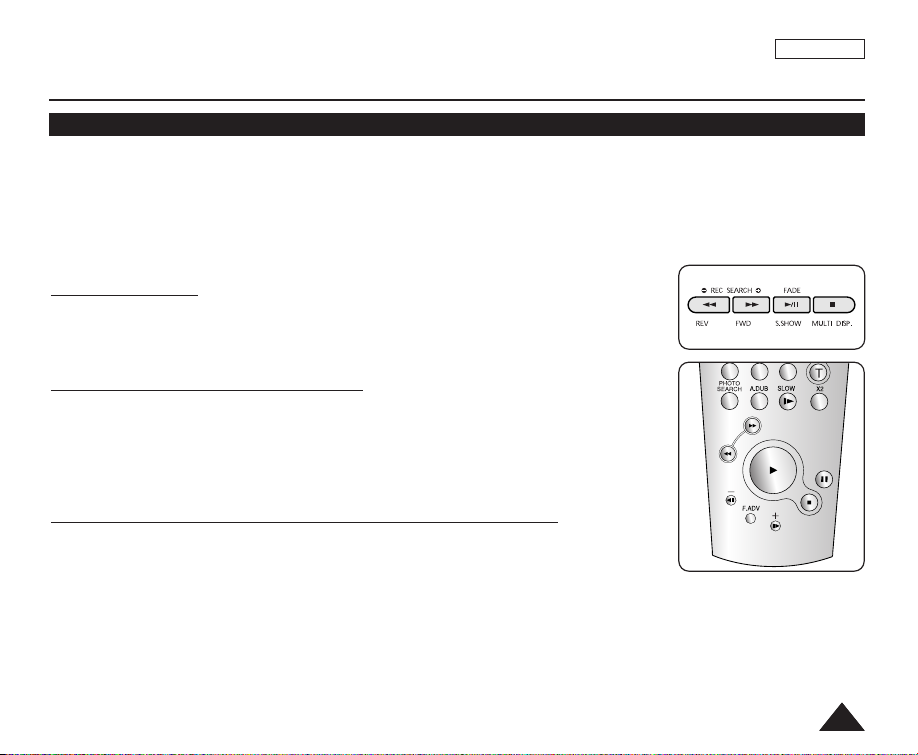
ENGLISH
MF/AF
Playback
Various Functions while in Player Mode
✤ This function works only in <Player> mode. ➥page 19
✤ The [PLAY], [STILL], [STOP], [FF], and [REW] buttons are located on the Camcorder and the remote control.
(SC-D364/D366 only)
✤ The [F.ADV] (Frame advance), [X2], and [SLOW] buttons are located on the remote control only. (SC-D364/D366 only)
✤ To prevent tape and head-drum wear, your Camcorder will automatically stop if it is left in still or slow modes for
more than 3 minutes.
Playback Pause
■
Press the
■
To resume playback, press the
Picture Search (Forward/Reverse)
■
Press the
To resume normal playback, press the
■
Keep pressing
To resume normal playback, release the button.
[√√/■■(PLAY/STILL)]button during playback.
[√√/■■(PLAY/STILL)] button.
[
œœœœ
(REW)]/[
√√√√
(FF)]
buttons during playback or still mode.
[√√/■■(PLAY/STILL)]button.
[
œœœœ
(REW)]/ [
√√√√
(FF)]
buttons during playback or still mode.
œ
Slow Playback (Forward/Reverse) (SC-D364/D366 only)
■
Forward Slow Playback
- Press the [SLOW] button on the remote control during playback.
- To resume normal playback, press the
■
Reverse Slow Playback
- Press the [
œœ
❙❙
(-)] button during forward slow play back.
- To resume forward slow playback, press the
- To resume normal playback, press the
[√√/■■(PLAY/STILL)]button.
√√
[
❙❙
(+)] button.
[√√/■■(PLAY/STILL)]button.
œ
œ
<SC-D364/D366 only>
5959
Page 64
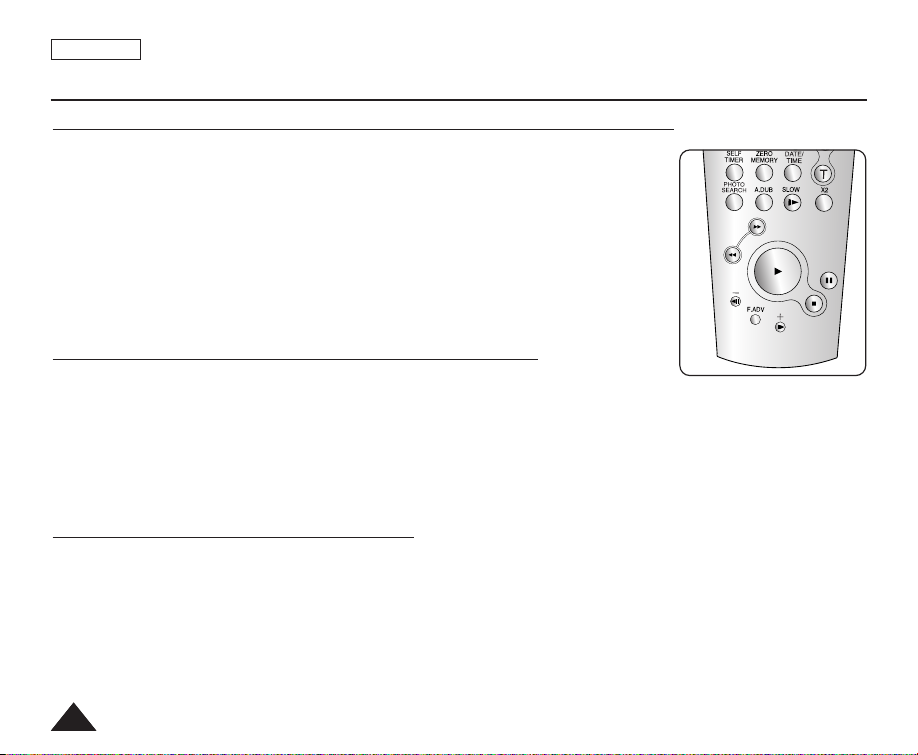
ENGLISH
Playback
Frame Advance (To play back frame by frame) (SC-D364/D366 only)
■
Press the [F.ADV] button on the remote control while in still mode.
- Video sequence advances frame by frame each time you press the [F.ADV] button.
- The F.ADV function works in still mode only.
■
To resume normal playback, press the
- Forward frame advance.
Press the [F.ADV] button on the remote control in still mode.
- Reverse frame advance
œœ
❙❙
Press the [
(-)] button on the remote control to change the direction in F.ADV mode.
Press the [F.ADV] button on the remote control.
X2 Playback (Forward/Reverse) (SC-D364/D366 only)
■
Forward X2 Playback
- Press the [X2] button on the remote control during playback.
- To resume normal playback, press the
■
Reverse X2 Playback
- Press the [
œœ
❙❙
(-)] button during forward X2 playback.
- To resume normal playback, press the
Reverse Playback (SC-D364/D366 only)
■
To playback in reverse at normal speed, press the [
■
Press the
[ Notes ]
■
Mosaic shaped distortion may appear on the screen while in some of the various playback modes. Mosaic shaped
[√√/■■(PLAY/STILL)]or
distortion or noise may be experienced when you play back tapes recorded in LP which contain various playback
functions.
■
Sound will only be heard during normal SP or LP playback.
[√√/■■(PLAY/STILL)]button.
[√√/■■(PLAY/STILL)]button.
[√√/■■(PLAY/STILL)]button.
œœ
❙❙
√√
[
❙❙
(+)] button to return to normal forward playback.
(-)] button during normal forward playback.
œ
<SC-D364/D366 only>
œ
6060
Page 65
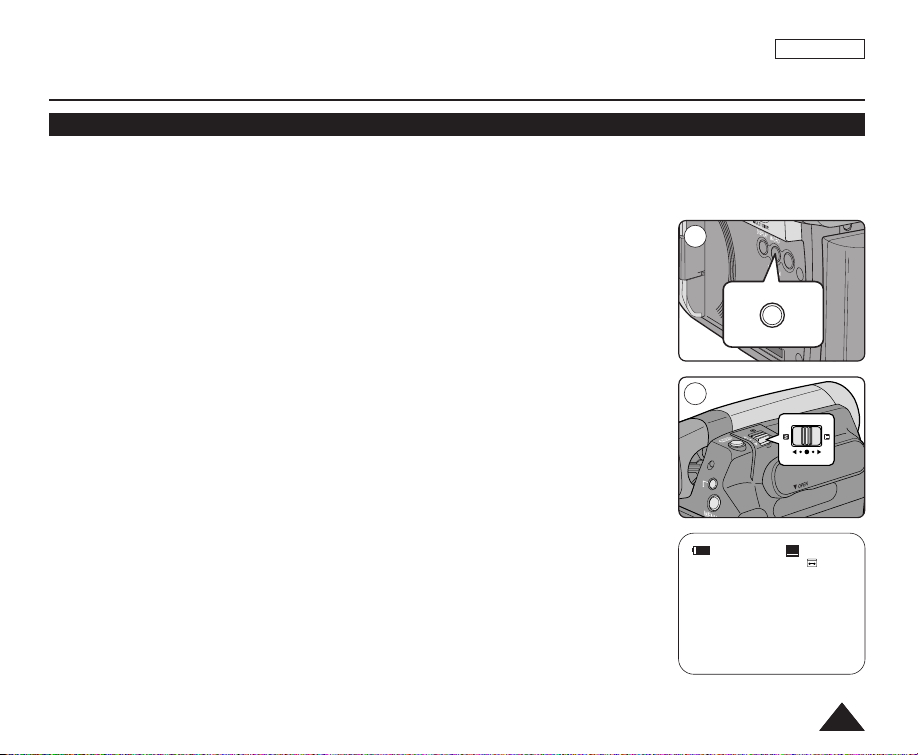
Playback
C
O
LO
R
N
IT
E
LIG
HT
MACRO
PB ZOOM
P
L
A
Y
QUICK
MENU
Zooming during Playback (PB ZOOM)
✤ The PB Zoom function works in <Player> mode. ➥page 19
✤ The PB Zoom function enables you to magnify the playback or still image.
1. Set the [Power] switch to [PLAYER].
2. Set the [Mode] switch to [TAPE]. (SC-D363/D364/D365/D366 only)
3. Press the [PB ZOOM] button in playback or still mode.
4. The image is magnified starting from the center of the image.
5. You can zoom in from 1.2x to 8.0x by moving the [Zoom] lever.
■
Zoom ratio is not displayed.
6. To cancel the PB Zoom function, press the [PB ZOOM] or
[ Notes ]
■
The PB Zoom function enlarges the center of the screen only.
■
You cannot apply the PB Zoom function to pictures which are being input from
an external video source.
■
The PB Zoom image cannot be imported to your PC from the Camcorder’s DV jack.
■
The PB Zoom images cannot be exported to a PC.
■
Volume control is disabled while PB Zoom is in use.
[■ (STOP)]
button.
ENGLISH
3
5
SP
PB Zoom
1.2X
0:46:00:11
√
60min
6161
Page 66
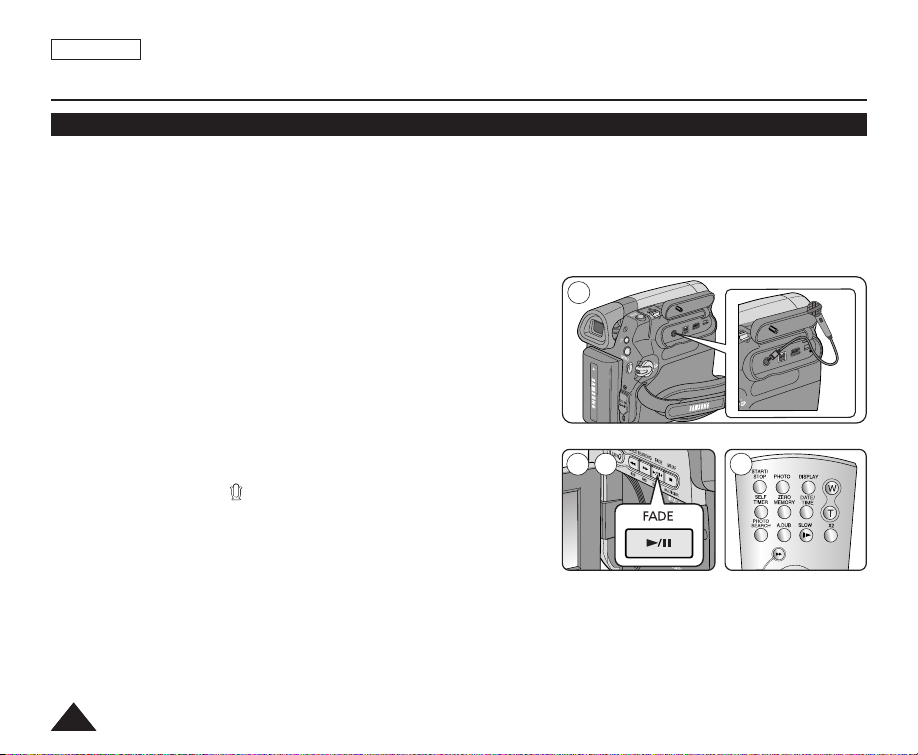
ENGLISH
P
L
A
Y
E
R
C
A
M
E
R
A
QUICK
MENU
MIC
DV
U
S
B
AV/ S
Playback
Audio Dubbing (SC-D364/D366 only)
✤ The Audio Dubbing function works only in <Player> mode. ➥page 19
✤ You can not dub sound on a pre-recorded tape in LP or 16 bit mode.
✤ You can add sound to the original sound on a pre-recorded tape recorded in SP mode with 12bit sound.
✤ Use the internal or an external microphone(not supplied) or other audio equipment.
✤ The original sound will not be erased.
1. Set the [Power] switch to [PLAYER].
■
If you want to use an external microphone, connect the microphone
to the external MIC input jack on the Camcorder.
2. Set the [Mode] switch to [TAPE].
1
3. Press the
[√√/■■(PLAY/STILL)] button and find the time frame of the
scene to be dubbed.
4. Press the
5. Press the [A.DUB] button on the remote control.
■
■
6. Press the
■
[√√/■■(PLAY/STILL)] button to pause the scene.
Audio Dubbing icon ( ) is displayed.
The Camcorder is ready for dubbing.
[√√/■■(PLAY/STILL)] button to start dubbing.
Press the
[■ (STOP)]
button to stop the dubbing.
3 4 5
[ Notes ]
■
You can not use the Audio Dubbing function while playing a write protected video tape.
■
To utilize an external MIC or sound source, connect a microphone to the MIC jack or use the Multi-AV Cable (or AV
JACK; SC-D263/D363 only) to connect external sound source input.
■
To dub an external sound source, set the <AV In/Out> function to <AV In> (SC-D365/D366 only).
➥page 67
6262
√
Page 67
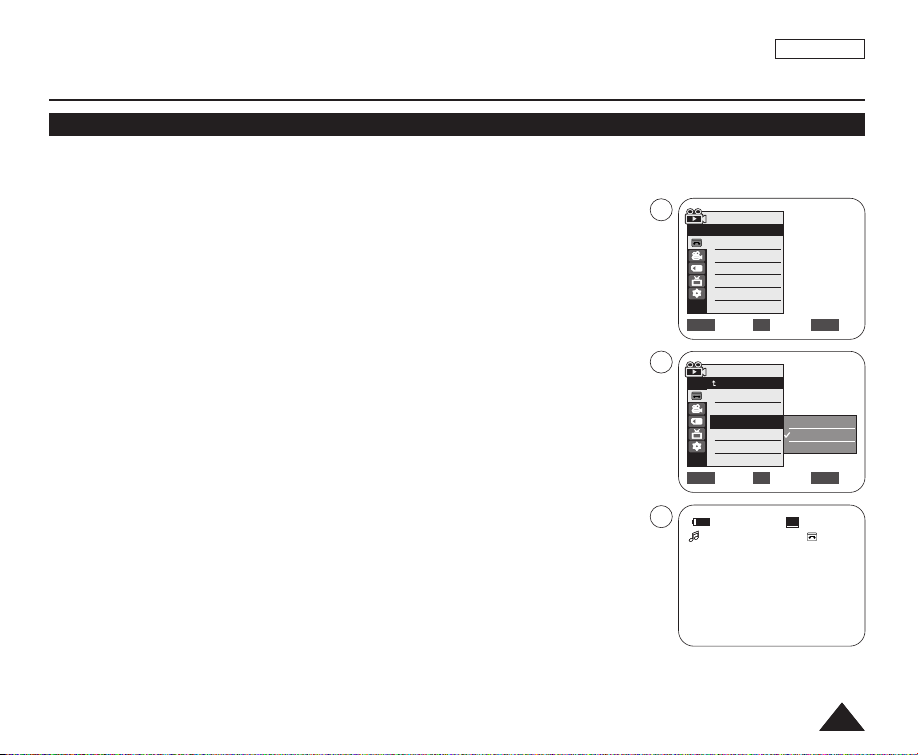
Playback
Dubbed Audio Playback
✤ The dubbed Audio Playback function works only in <Player> mode. ➥page 19
ENGLISH
1. Set the [Power] switch to [PLAYER].
2. Set the [Mode] switch to [TAPE]. (SC-D363/D364/D365/D366 only)
3. Insert the dubbed tape and press the [MENU] button.
4. Move the [Zoom] lever up or down to select <Tape>, then press the [OK] button.
5. Move the [Zoom] lever up or down to select <Audio Select>, then press the [OK]
button.
6. Move the [Zoom] lever up or down to select the audio playback channel,
then press the [OK] button.
■
<Sound[1]>: play the original sound.
■
<Sound[2]>: play the dubbed sound.
■
<MIX[1+2]>: play back Sound 1 and 2 equally mixed.
7. To exit, press the [MENU] button.
8. Press the
[√√/■■(PLAY/STILL)] button to playback the dubbed tape.
[ Note ]
When you play back added sound (Sound [2] or MIX[1+2]), you may experience a loss of
sound quality.
4
Player Mode
√Tape
Photo Search
Photo Copy
Audio Select
Audio Effect
Move Select Exit
6
Player Mode
Back
Photo Search
Photo Copy
Audio Select
Audio Effect
Move Select Exit
8
Sound[2]
√Sound[1]
√Off
MENUOKZOOM
Sound[1]
Sound[2]
MIX[1+2]
MENUOKZOOM
SP
0:01:53:10
√
20min
6363
Page 68
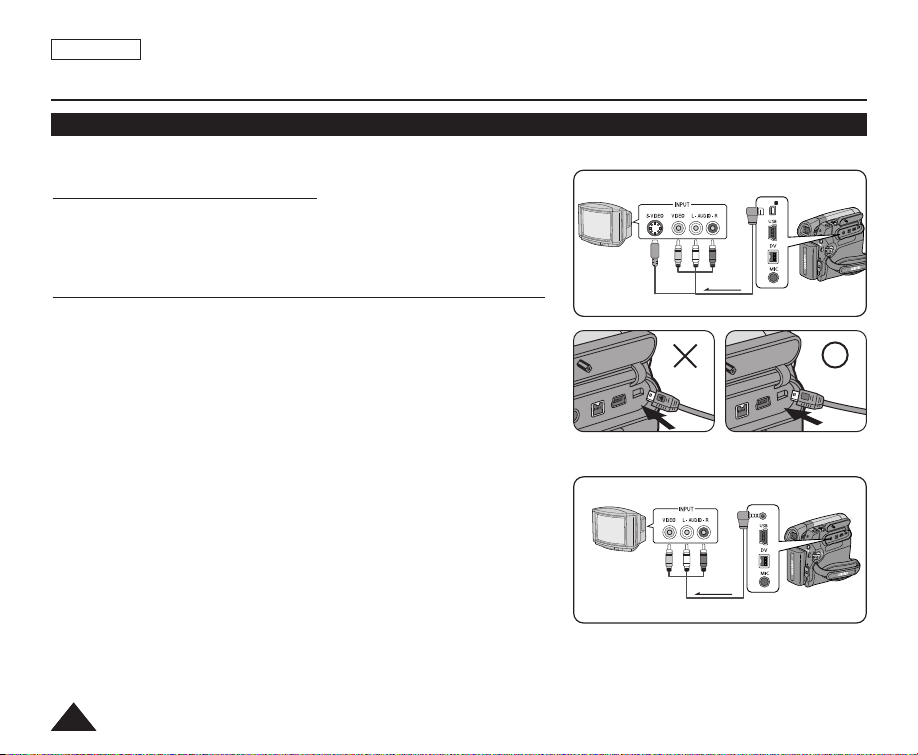
ENGLISH
P
L
A
Y
E
R
C
A
M
E
R
A
Q
U
I
C
K
M
E
N
U
AV/ S
P
L
A
Y
E
R
C
A
M
E
R
A
Q
U
I
C
K
M
E
N
U
AV
Playback
Tape Playback
✤ The Playback function works only in <Player> mode. ➥page 19
Multi Cable (SC-D362/
Signal flow
Multi Cable
Signal flow
AV Cable
D364/D365/D366)
AV Cable
(SC-D263/D363)
Camcorder
Playing back on a TV Monitor
TV
✤ To play back a tape, the television must be NTSC compatible. ➥page 97
✤ We recommend that you use the AC Power adapter as the power source
for the Camcorder.
Connecting to a TV which has Audio/Video Input Jacks
1. Connect the Camcorder to your TV with the Audio/Video Cable or Multi
Cable.
■
The yellow jack: Video
■
The white jack: Audio(L)-mono , The red jack: Audio(R)
■
If you connect to a monaural TV, connect the yellow jack (Video) to the
video input of the TV and the white jack (Audio L) to the audio input of the
TV.
2. Set the [Power] switch to [PLAYER].
3. Set the [Mode] switch to [TAPE]. (SC-D363/D364/D365/D366 only)
4. Turn on the TV and set the TV/VIDEO selector on the TV to Video.
■
Refer to the TV user’s manual.
5. Play the tape. ➥page 63
✤
Connect the Multi AV/S jack with the triangle mark
facing down. (SC-D362/D364/D365/D366 only)
TV
[ Notes ]
■
You may use an S-Video connector on the cable to obtain better quality
pictures if you have a S-Video connector on your TV.
(SC-D362/D364/D365/D366 only)
■
Even if you use an S-Video connector, you need to connect an audio
cable. (SC-D362/D364/D365/D366 only)
■
If you connect the cable to the Audio/Video jack or AV/S jack, you will not hear sound from the Camcorder's speaker.
■
If only a mono audio input is available on the TV set, use the audio cable with the white jack (Audio L).
6464
Camcorder
Page 69
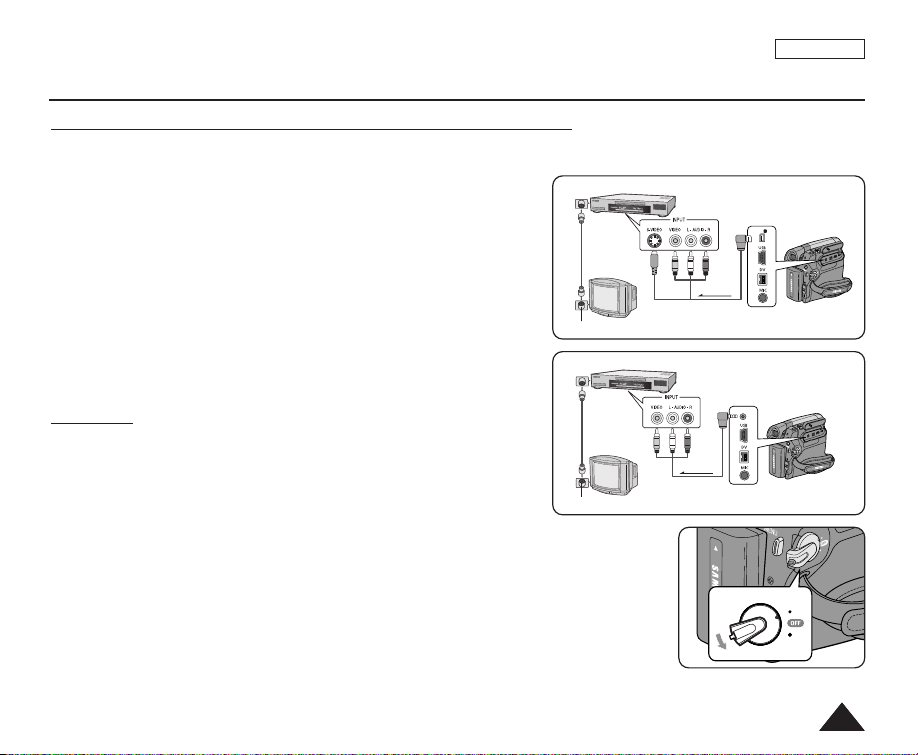
Playback
P
L
A
Y
E
R
C
A
M
E
R
A
Q
U
IC
K
M
E
N
U
AV/ S
C
A
M
E
R
A
C
A
M
E
R
A
P
L
A
Y
E
R
P
L
A
Y
E
R
P
L
A
Y
E
R
C
A
M
E
R
A
Q
U
IC
K
M
E
N
U
AV
Connecting to a TV which has no Audio/Video Input Jacks
✤ You can connect your Camcorder to a TV through a VCR.
ENGLISH
1. Connect the Camcorder to your VCR with the Audio/Video Cable or
Multi Cable.
■
The yellow jack: Video
■
The white jack: Audio(L) - Mono
■
The red jack: Audio(R)
VCR
2. Connect a TV to the VCR.
3. Set the [Power] switch to [PLAYER].
4. Set the [Mode] switch to [TAPE]. (SC-D363/D364/D365/D366 only)
5. Turn on both the TV and VCR.
■
Set the input selector on the VCR to Line.
■
Select the channel reserved for your VCR on the TV set.
6. Play the tape.
Antenna
VCR
Playback
1. Connect a power source and set the [Power] switch to [PLAYER].
2. Set the [Mode] switch to [TAPE]. (SC-D363/D364/D365/D366 only)
3. Insert the tape you wish to play back.
4. Using the
[
œœœœ
(REW)]/[
to play back.
5. Press the
■
■
[ Notes ]
■
The playback mode (SP/LP) is selected automatically.
■
If the VCR has an S-Video input terminal, you may use the S-Video connector for better
quality. (SC-D362/D364/D365/D366 only)
■
The S-Video connector transmits video only. Connect audio cables for sound.
■
If only a mono audio input is available on the TV set, use the audio cable with the white
jack (Audio L).
[√√/■■(PLAY/STILL)]button.
The images you recorded will appear on the TV after a few seconds.
If a tape reaches its end while being played back, the tape will rewind automatically.
√√√√
(FF)]
buttons, find the first position you wish
Antenna
Multi Cable
(SC-D362/D364/
D365/D366)
Camcorder
TV
TV
Signal flow
Multi Cable
Signal flow
AV Cable
AV Cable
(SC-D263/D363)
Camcorder
6565
Page 70
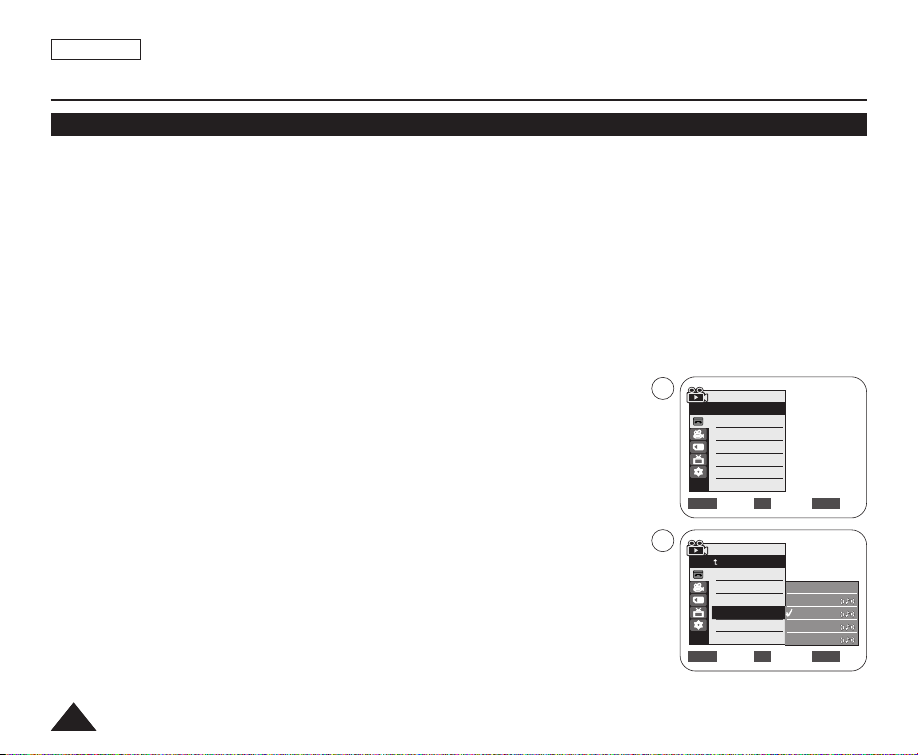
ENGLISH
VV
VV
MM
VV
MM
WW
VV
MM
WW
EE
Playback
Audio Effect
✤ Audio Effect function works only in <Player> mode. ➥page 19
✤ Audio Effect provides various playback effects to audio signals stored on a tape.
1. Set the [Power] switch to [PLAYER].
2. Set the [Mode] switch to [TAPE]. (SC-D363/D364/D365/D366 only)
3. Insert the dubbed tape and press the [MENU] button.
4. Move the [Zoom] lever up or down to select <Tape>, then press the [OK] button.
5. Move the [Zoom] lever up or down to select <Audio Effect>, then press the [OK] button.
6. Move the [Zoom] lever up or down to select the audio effect channel, then press the
[OK] button.
■
<Voice>: Highlights the human voice.
■
<Music>: Highlights the sound by enhancing the bass and treble.
■
<Wide>: Magnifies the stereo effect by enhancing the left and right sounds.
■
<Echo>: Gives an echo effect.
7. To exit, press the [MENU] button.
[ Notes ]
■
It is recommended to use stereo type output devices (TV, speakers) for better audio
effects.
■
The Audio Effect function is transmittable.
■
Audio Effect function is not available in USB Streaming mode.
(SC-D362/D363/D364/D365/D366 only)
6666
4
Player Mode
√Tape
Photo Search
Photo Copy
Audio Select
Audio Effect
Move Select Exit
6
Player Mode
Back
Photo Search
Photo Copy
Audio Select
Audio Effect
Move Select Exit
√Sound[1]
√Off
MENUOKZOOM
Off
Voice
Music
Wide
Echo
MENUOKZOOM
Page 71
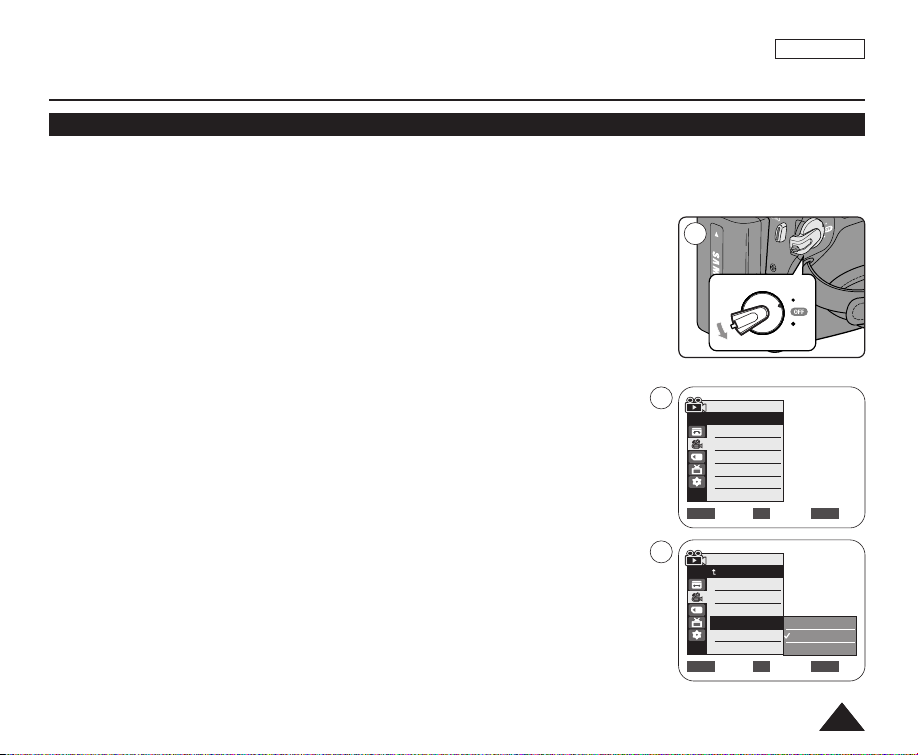
Playback
C
A
M
E
R
A
C
A
M
E
R
A
P
L
A
Y
E
R
A
Y
E
R
Setting the AV In/Out (SC-D365/D366 only)
✤ AV In/Out function works only in <Player> mode. ➥page 19
✤ AV In/Out setting enables you to record signals from external sources and display it on LCD Screen.
Also, you can send your video or image to external devices to record or play back.
ENGLISH
1. Connect the Camcorder to your VCR or TV with the Multi-AV Cable. ➥pages 64~65
2. Set the [Power] switch to [PLAYER].
3. Set the [Mode] switch to [TAPE]. (SC-D363/D364/D365/D366 only)
4. Turn on the VCR or TV.
5. Insert the blank tape with protection tab closed into the Camcorder.
■
If you want to record from a connected VCR, insert a recorded VHS tape into the VCR.
6. Press the [MENU] button.
■
The menu list will appear.
7. Move the [Zoom] lever up or down to select <Record>, then press the [OK] button.
8. Move the [Zoom] lever up or down to select <AV In/Out>, then press the [OK]
button.
9. Move the [Zoom] lever up or down to select <AV In>, <S-Video In> then press the
[OK] button.
■
If you want to see the Camcorder picture with a TV, set <AV In/Out> menu to <Out>.
10. To exit, press the [MENU] button.
11. Press the [Start/Stop] button to set the Camcorder to REC PAUSE mode.
■
PAUSE appears.
12. Select the TV program or playback the VHS tape.
13. Press the [Start/Stop] button to start recording.
■
If you want to pause recording for a while, press the [Start/Stop] button again.
14. To stop recording, press the
[ Notes ]
■
When recording images from a VCR, playback must be at normal speed, or a gray image
will appear on the Camcorder.
■
If <AV In / Out> is set to <AV In> or <S-Video In>, the WindCut Plus will be released.
[■ (STOP)]
button.
2
7
Player Mode
√Record
Rec Mode
Audio Mode
WindCut Plus
AV In/Out
Move Select Exit
9
Player Mode
Back
Rec Mode
Audio Mode
WindCut Plus
AV In/Out
Move Select Exit
√SP
√12Bit
√Off
√Out
Out
AV In
S-Video In
MENUOKZOOM
MENUOKZOOM
6767
Page 72
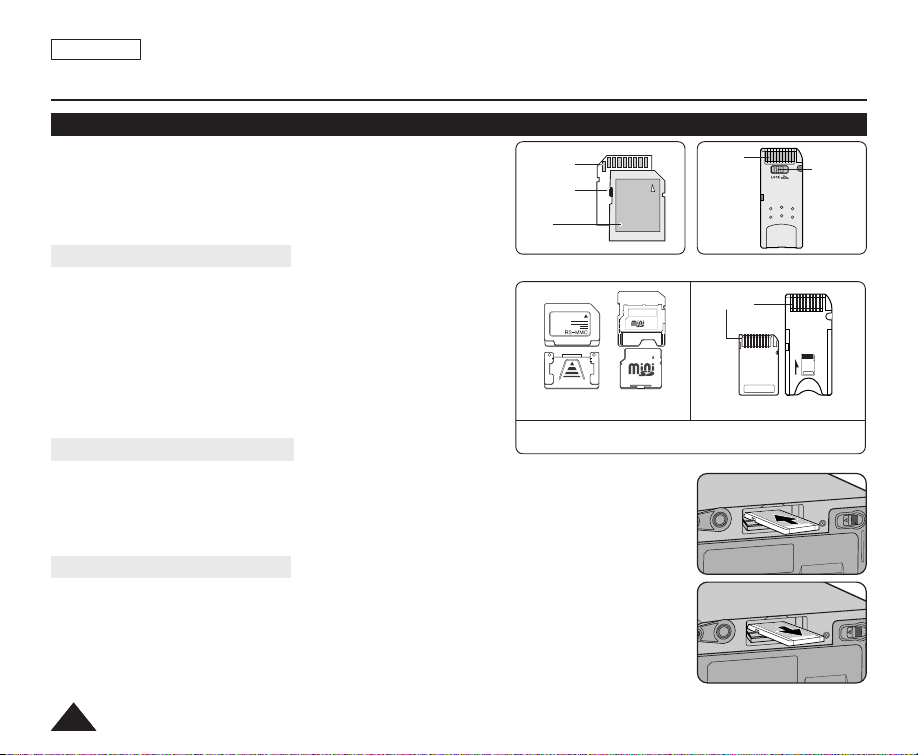
ENGLISH
M
M
C
S
D
BATTERY
RELEASE
M
M
C
S
D
BATTERY
RELEASE
Digital Still Camera Mode (SC-D363/D364/D365/D366 only)
Using a Memory Card (Usable Memory Card) (not supplied)
✤ The Memory Card stores and manages photo images recorded
by the Camcorder.
✤ Before inserting or ejecting the Memory Card, set the [Power]
switch to [OFF].
Terminals
Protection
Tab
Label
Terminals
Protection
Tab
Memory Card Functions
MMC/SD (SC-D363/D364/D365/D366)
✤ Recording/Viewing Photo Images
✤ Protecting Images from accidental erasure (except MMC)
✤ The Memory Stick Duo does not have a Protection Tab.
When using the Memory Stick Duo, be careful not to edit or
delete data by mistake.
✤ Deleting Photo Images stored in Memory Card
✤ Marking Photo Images with Print Information
✤ Formatting Memory Cards
Inserting a Memory Card
Memory Stick Duo, RS MMC or Mini SD should be inserted by using the
Adapter (not supplied).
1. Open the Memory Card Cover.
2. Insert the Memory Card.
3. Insert the Memory Card into the Slot until it softly clicks.
4. Close the Memory Card Cover.
Ejecting a Memory Card
1. Open the Memory Card Cover.
2. Slightly push the Memory Card inwards to pop it out.
3. Pull the Memory Card out of the slot and close the Memory Card Cover.
6868
RS MMC/Mini SD
(SC-D363/D364/D365/D366)
Memory Stick (PRO) (SC-D365/D366)
Terminals
Memory Stick Duo (SC-D365/D366)
Page 73
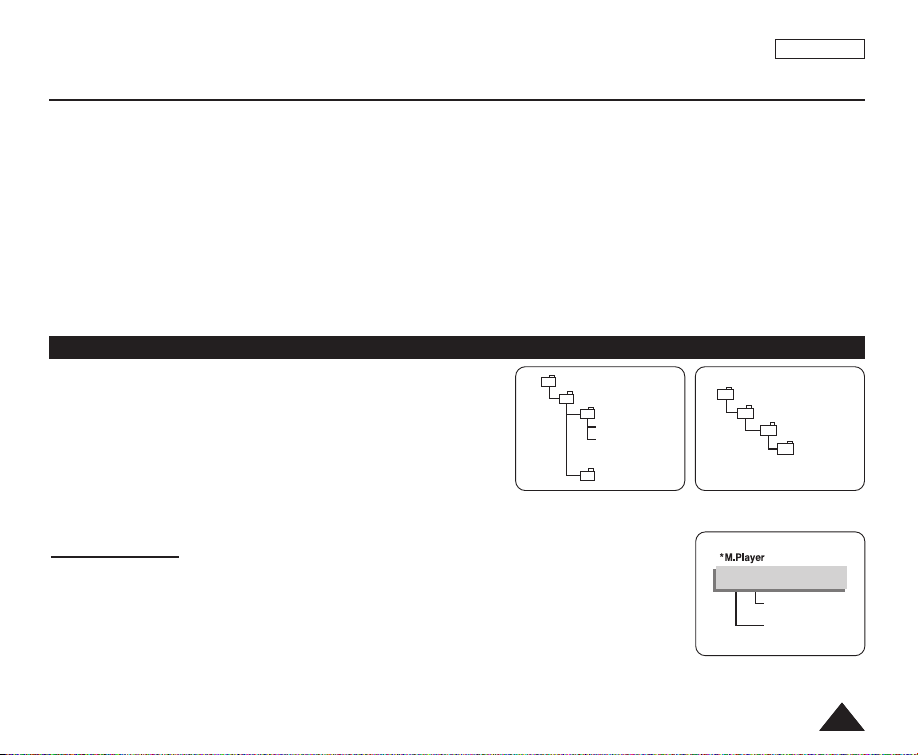
ENGLISH
DCIM
100 SSDVC
DCAM 0001
DCAM 0002
101SSDVC
.
.
.
.
MSAMSUNG
SSMOV
100SSMOV
File number
Folder number
000-0000
Digital Still Camera Mode (SC-D363/D364/D365/D366 only)
[ Notes ]
■
Do not apply excessive force when you insert/eject the Memory Card.
■
Do not turn the power off while recording, loading, erasing a photo image or formatting the Memory Card.
■
Please turn the power off before you insert or eject the Memory Card to avoid losing data.
■
Do not place the Memory Card near a strong electro-magnetic device.
■
Do not allow metal substances to come in contact with the terminals on the Memory Card.
■
Do not bend, drop or apply strong shock to Memory Card.
■
After pulling the Memory Card out from the camcorder, keep the Memory Cards in a soft case to prevent static shock.
■
The data stored on the Memory Card may be changed or lost as a result of misuse, static electricity, electric noise or
repair. Save important images separately. Samsung is not responsible for data loss due to misuse.
■
RS-MMC, Mini SD (SC-D363/D364/D365/D366) or Memory Stick Duo type (SC-D365/D366 only) should be inserted by
using the Adaptor (not supplied).
Structure of Folders and Files on the Memory Card
✤ The photo images that you recorded are saved in JPEG file
format on the Memory Card.
✤ The moving images that you recorded are saved in MPEG4 file
format on the Memory Card.
✤ Each file has a file number and all files are assigned to a folder.
- A file number from DCAM0001 is sequentially assigned to
each recorded image.
- Each folder is numbered from 100SSDVC and recorded on the
Memory Card.
Image Format
Photo Image
■
Images are compressed in JPEG (Joint Photographic Experts Group) format.
■
The picture size is 800x600 (Tape Capture 640x480).
<Photo Image> <Moving Image>
Moving Image
■
Images are compressed in MPEG 4(Moving Picture Experts Group) format.
■
The picture size is 720x480.
6969
Page 74
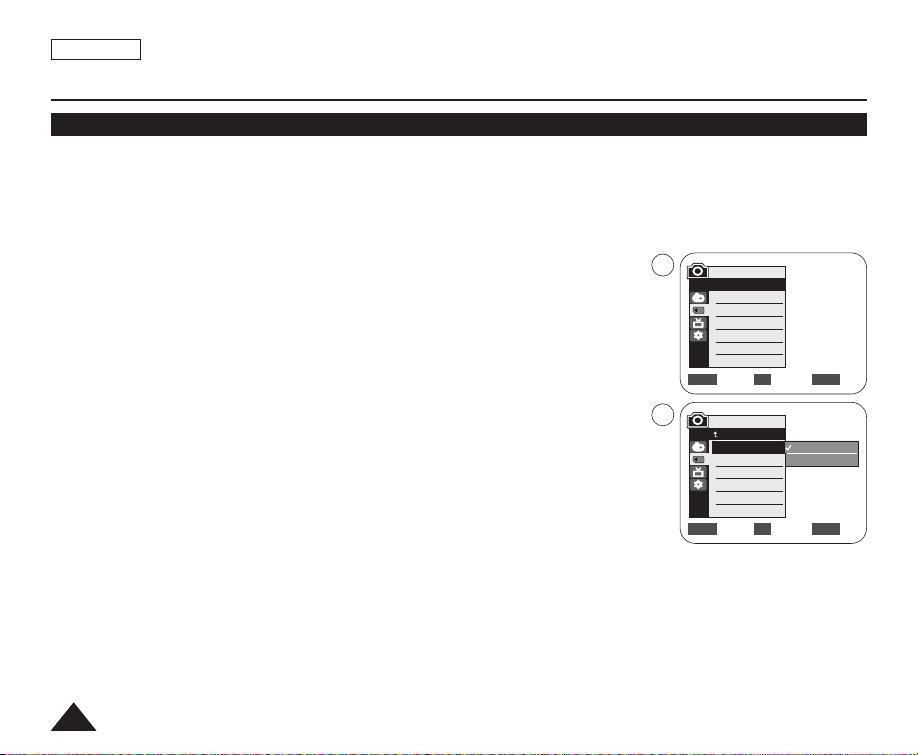
ENGLISH
Digital Still Camera Mode (SC-D363/D364/D365/D366 only)
Selecting the Memory Type (SC-D366 only)
✤ The Memory Type setting works in <Player>/<M.Cam>/<M.Player> modes. ➥page 19
(SC-D366: 32MB)
✤ Images can be stored and played back using the built-in memory (Int. Memory), or on a Memory Card.
Hence, set the memory type before storing and playing back images.
1. Set the [Power] switch to [CAMERA] or [PLAYER].
2. Set the [Mode] switch to [TAPE] or [MEMORY].
3. Press the [MENU] button.
■
The menu list will appear.
4. Move the [Zoom] lever up or down to select <Memory>, then press the [OK] button.
5. Move the [Zoom] lever up or down to select <Memory Type>, then press the [OK]
button.
6. Move the [Zoom] lever up or down to select <Int. Memory> or <Memory Card>,
then press the [OK] button.
7. To exit, press the [MENU] button.
[ Note ]
■
You can directly access the Memory Type function using the [QUICK MENU] button.
7070
4
6
➥page 20
M.Cam Mode
√Memory
Memory Type
Photo Quality
File No.
Move Select Exit
M.Cam Mode
Back
Memory Type
Photo Quality
File No.
Move Select Exit
√Memory Card
√Super Fine
√Series
MENUOKZOOM
Int. Memory
Memory Card
MENUOKZOOM
Page 75
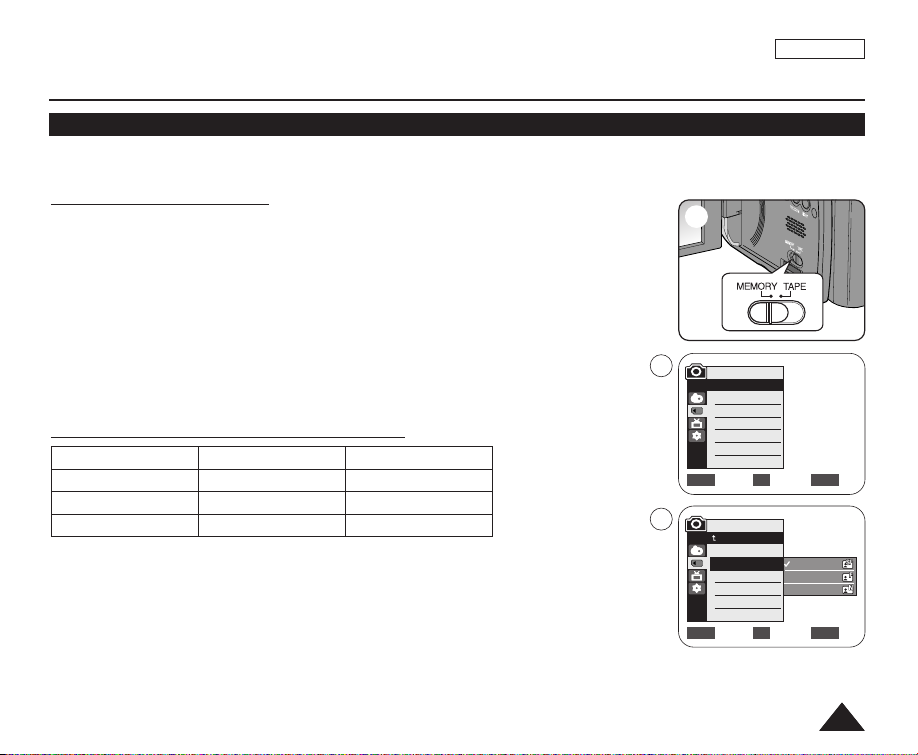
Digital Still Camera Mode (SC-D363/D364/D365/D366 only)
Selecting the Photo Quality
✤ Photo Quality function works in both <Player> and <M.Cam> modes. ➥page 19
✤ You can select the quality of a photo image to be recorded.
Select the Image Quality
1. Set the [Power] switch to [CAMERA] or [PLAYER].
2. If the [Power] switch is set to [CAMERA] mode, set the [Mode] switch to [MEMORY].
If the [Power] switch is set to [PLAYER] mode, set the [Mode] switch to [TAPE].
3. Press the [MENU] button.
■
The menu list will appear.
4. Move the [Zoom] lever up or down to select <Memory>, then press the [OK] button.
5. Move the [Zoom] lever up or down to select <Photo Quality>, then press the [OK] button.
6. Move the [Zoom] lever up or down to select desired image quality (Super Fine, Fine,
Normal), then press the [OK] button.
7. To exit, press the [MENU] button.
■
The selected icon is displayed.
Number of Images on the Memory Card
QUALITY 8MB 16MB
<Super Fine> Approx. 34 Approx. 68
<Fine> Approx. 45 Approx. 90
<Normal> Approx. 74 Approx. 148
The actual number of images that you can record varies depending on the nature of
the subject to be recorded.
[ Notes ]
■
You can directly access the Photo Quality function using the [QUICK MENU] button.
➥page 20
■
The above approximation is based on a 8MB Memory Card under normal recording conditions.
■
The number of images that can be stored on a Memory Card depends on various conditions.
■
Photo images (JPEG) can be stored in the Memory Card up to 20,000 files.
2
4
5
ENGLISH
M.Cam Mode
√Memory
Memory Type
Photo Quality
File No.
Move Select Exit
M.Cam Mode
Back
Memory Type
Photo Quality
File No.
Move Select Exit
√Memory Card
√Super Fine
√Series
MENUOKZOOM
Super Fine
Fine
Normal
MENUOKZOOM
7171
Page 76
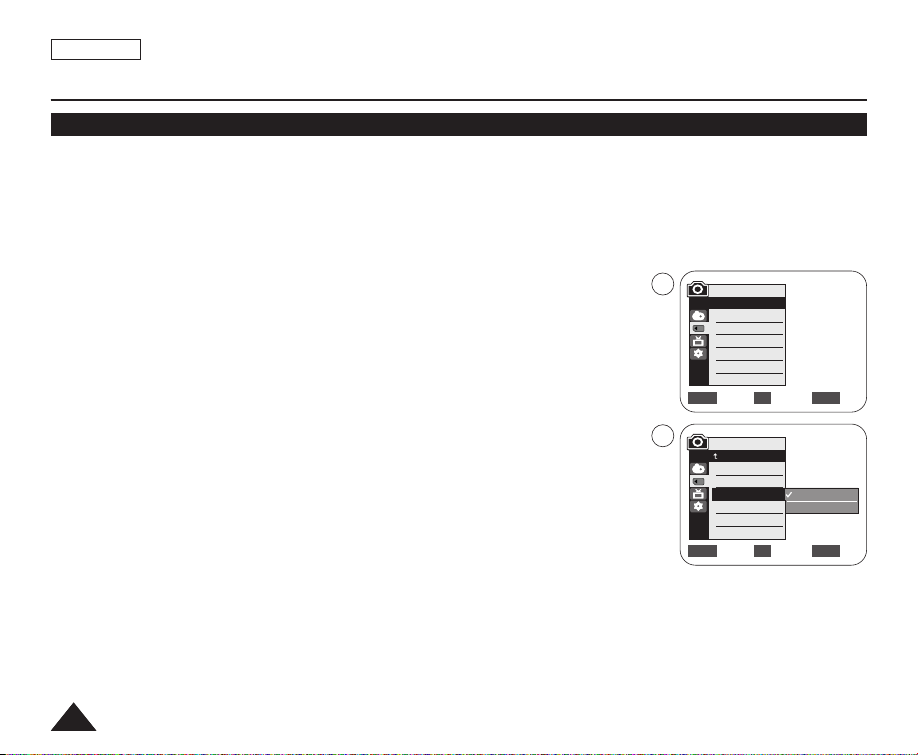
ENGLISH
Digital Still Camera Mode (SC-D363/D364/D365/D366 only)
Setting the File Number
✤ File Number setting works only in <M.Cam> mode. ➥page 19
✤ File Numbers are given to images in the order they were recorded when they are stored on the Memory Card.
✤ File numbers may be set as follows:
- <Series> : When there are existing files, the new image will be named as the next number in the sequence.
- <Reset> : When there are no files stored on the Memory Card, the file numbering starts from 0001.
1. Set the [Power] switch to the [CAMERA].
2. Set the [Mode] switch to [MEMORY].
3. Press the [MENU] button.
■
The menu list will appear.
4. Move the [Zoom] lever up or down to select <Memory>, then press the [OK] button.
5. Move the [Zoom] lever up or down to select <File No.>, then press the [OK] button.
6. Move the [Zoom] lever up or down to select desired option (Series or Reset), then press
the [OK] button.
7. To exit, press the [MENU] button.
7272
4
M.Cam Mode
√Memory
Memory Type
Photo Quality
File No.
Move Select Exit
6
M.Cam Mode
Back
Memory Type
Photo Quality
File No.
Move Select Exit
√Memory Card
√Super Fine
√Series
MENUOKZOOM
Series
Reset
MENUOKZOOM
Page 77
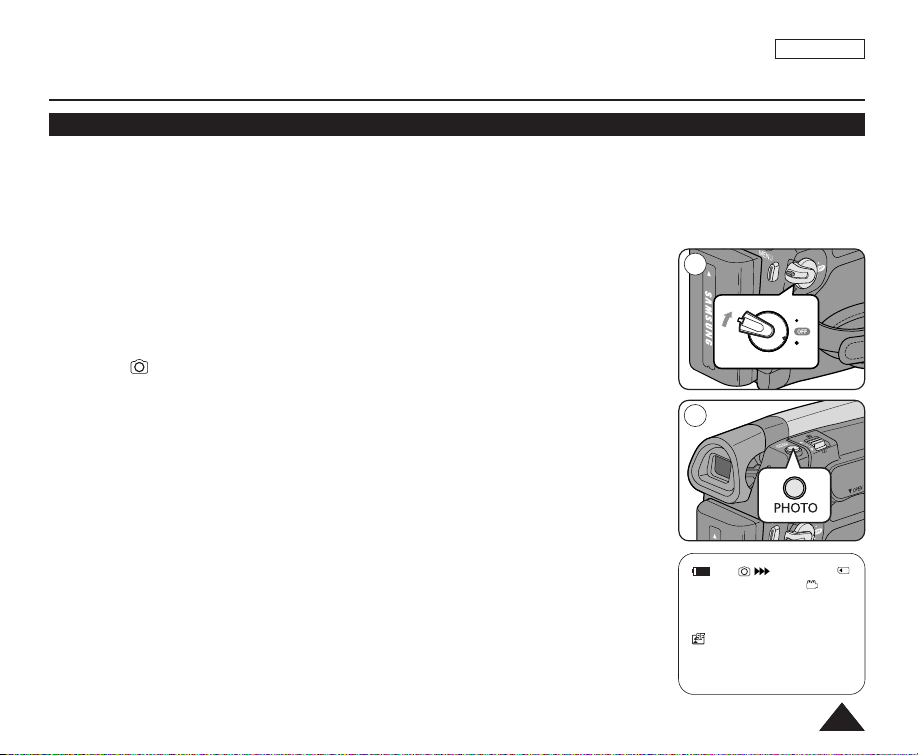
Digital Still Camera Mode (SC-D363/D364/D365/D366 only)
P
L
A
Y
E
R
C
A
M
E
R
A
C
A
M
E
R
A
P
L
A
Y
E
R
A
OK
Taking a Photo Image (JPEG) on the Memory Card
✤ You may take photo images while in <M.Cam> mode and store the images on the Memory Card. ➥page 19
✤ You can take photo images using the remote control.(SC-D364/D366 only)
✤ Audio will not be recorded with a photo image on to the Memory Card.
1. Set the [Power] switch to [CAMERA].
2. Set the [Mode] switch to [MEMORY].
3. After framing your object to record, fully press the [PHOTO] button to take the picture.
■
The picture is taken and saved into the Memory Card within a few seconds.
■
Taking another picture within this interval is not possible.
■
The <
> indicator appears during the time it takes to save the image.
√√√√√√
1
ENGLISH
[ Notes ]
■
Photo images are saved in the Memory Card in an 800x600 format.
■
The number of photo images that can be stored depends on the quality of the image.
3
46
1min
7373
Page 78
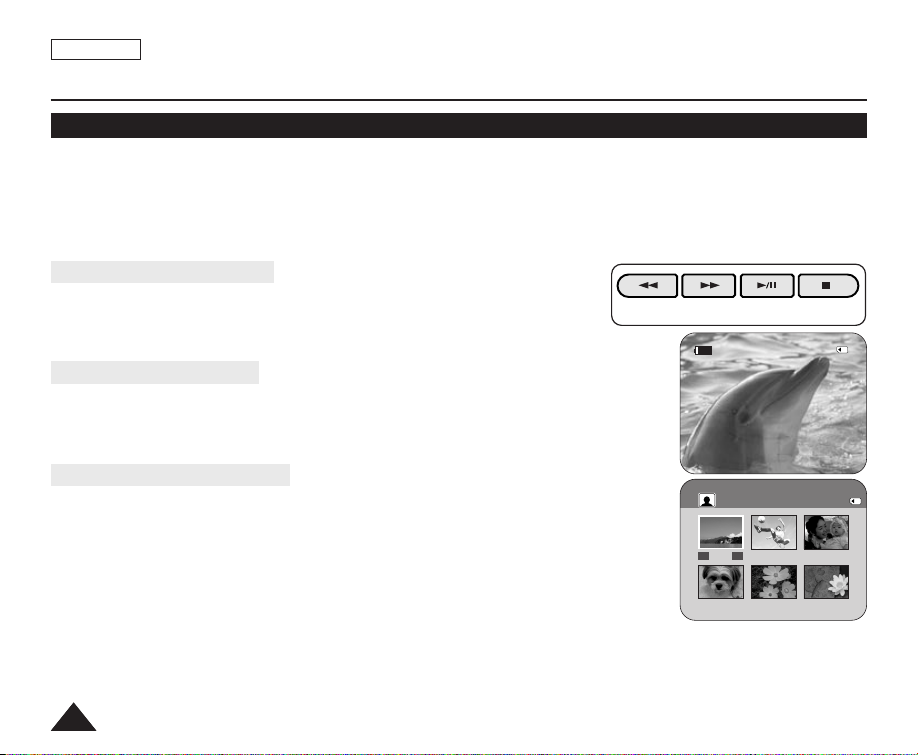
ENGLISH
REV FWD
S.SHOW MULTI DISP.
Digital Still Camera Mode (SC-D363/D364/D365/D366 only)
Viewing Photo Images (JPEG)
✤ This function works only in <M.Player> mode. ➥page 19
You can play back and view photo images recorded on the Memory Card.
✤ Be sure that the <M.Play Select> is set to <Photo> in the Menu. ➥page 80
1. Set the [Power] switch to [PLAYER].
2. Set the [Mode] switch to [MEMORY].
■
The last recorded image appears. If there are no recorded images on the Memory Card, <No image!> is displayed.
To view a Single Image
Using the [
To view a Slide Show
Press the
To stop the slide show, press the
To view the Multi Display
To view six stored images on single screen, press the
To return to single playback mode, press the
[ Notes ]
■
■
■
■
œœœœ/√√√√
■
To view the next image: press the [
■
To view the previous image: press the [
■
Keep pressing [
■
All images will be played back consecutively for 2~3 seconds each.
■
<Slide> is displayed. The Slide Show will start from the current picture.
(REV/FWD)] buttons, search for the desired photo image.
√√√√
(FWD)] button.
œœœœ
√√√√
(FWD)] or [
œœœœ
(REV)] button.
(REV)] to search for an image quickly.
[√√/■■(S.SHOW)]button.
[√√/■■(S.SHOW)] button again.
■
A selection mark [
■
Press the [
■
Selected picture is displayed in full screen.
œœœœ √√√√
œœœœ/√√√√
] appears under the image.
(REV/FWD)] button to select an image.
MULTI DISP.)]button.
[■ (
MULTI DISP.)]button again.
100-0007
œ
œœ
√√
[■ (
Any large sized image taken with another device will be displayed as a thumbnail image.
To display the previous six images, press and hold the [
To display the next six images, press the [
√√√√
(FWD)] button for about 3 seconds.
œœœœ
(REV)] button for about 3 seconds.
You can access <Delete>, <Delete All>, <Protect> or <Print Mark> functions in Multi Display view mode, using the
[QUICK MENU] button.
2/46Slide
800x600
100-0002
7/25
√
7474
Page 79
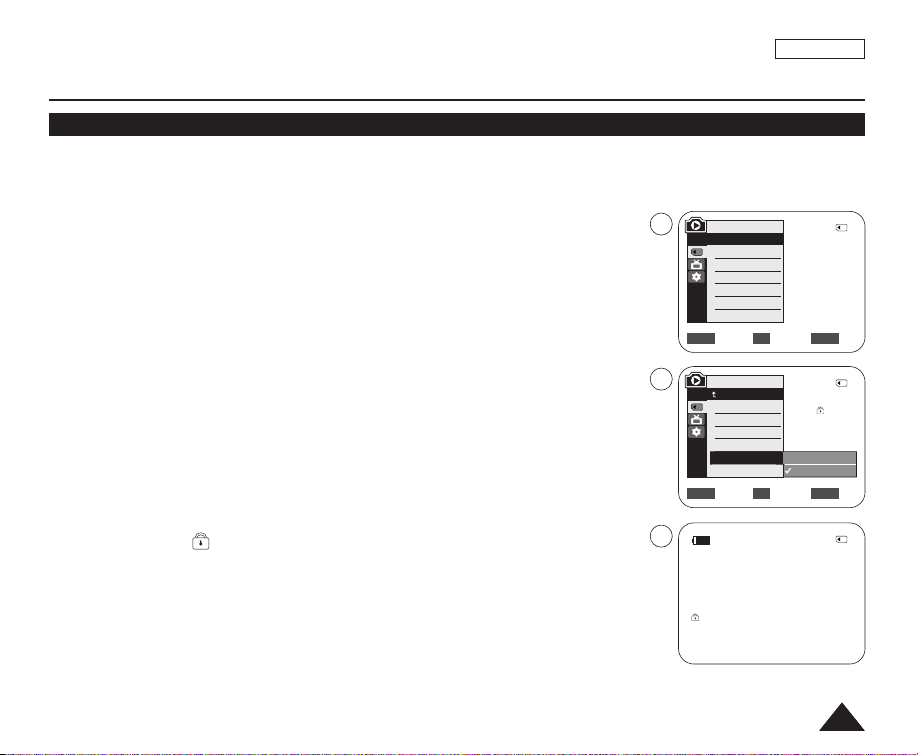
Digital Still Camera Mode (SC-D363/D364/D365/D366 only)
Protection from accidental Erasure
✤ The Protection function works only in <M.Player> mode. ➥page 19
✤ You can protect important images from accidental erasure.
If you format the Camcorder, all images including protected images will be erased.
1. Set the [Power] switch to [PLAYER].
2. Set the [Mode] switch to [MEMORY].
■
The last recorded image appears.
■
If there are no recorded images on the Memory Card, <No image!> is displayed.
3. Using the [
œœœœ/√√√√
(REV/FWD)] buttons, search for the photo image that you want to
protect.
4. Press the [MENU] button.
■
The menu list will appear.
5. Move the [Zoom] lever up or down to select <Memory>, then press the [OK] button.
6. Move the [Zoom] lever up or down to select <Protect>, then press the [OK] button.
7. Move the [Zoom] lever up or down to select <On>, then press the [OK] button.
8. To exit, press the [MENU] button.
■
The protection ( ) icon is displayed.
[ Notes ]
■
You can directly access the Protection function using the [QUICK MENU].
■
If the write protection tab on the Memory Card is set to LOCK, you cannot set image
➥page 20
protection.
5
7
8
ENGLISH
M.Player Mode
√Memory
Memory Type
M.Play Select
Delete
Delete All
Protect
Print Mark
†
Move Select Exit
M.Player Mode
Back
Memory Type
M.Play Select
Delete
Delete All
Protect
Print Mark
†
Move Select Exit
2/46
√Memory Card
√Photo
√Off
MENUOKZOOM
2/46
Off
On
MENUOKZOOM
2/46
800x600
√
100-0002
7575
Page 80
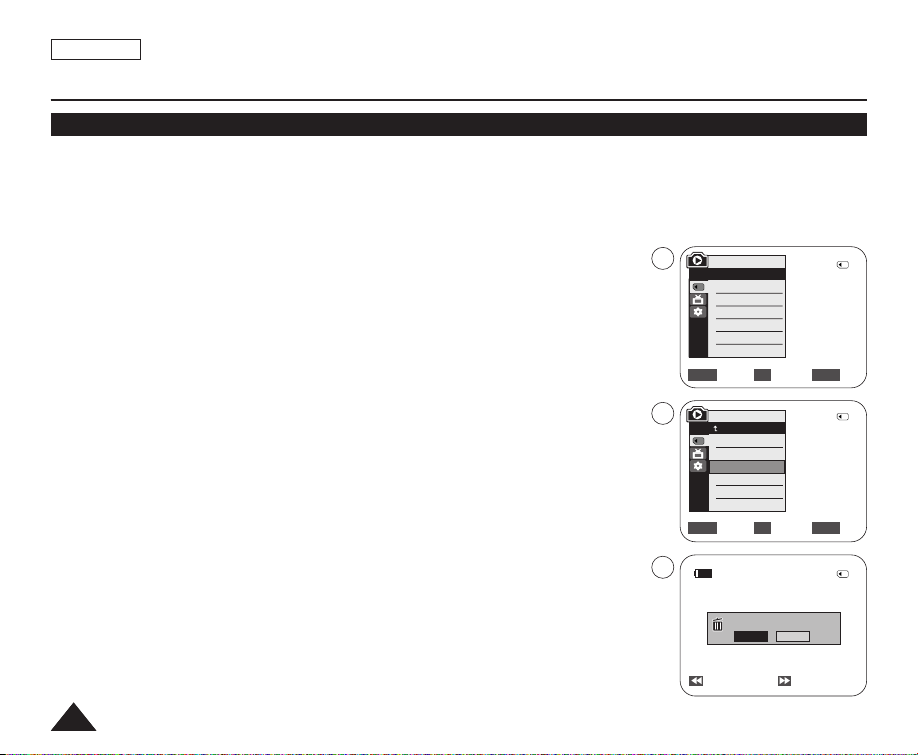
ENGLISH
Digital Still Camera Mode (SC-D363/D364/D365/D366 only)
Deleting Photo Images and Moving Images
✤ The Delete function works only in <M.Player> mode. ➥page 19
✤ You can erase the photo images and moving images recorded on the Memory Card.
✤ If you want to delete protected images, you must first deactivate the image protection.
✤ An image which has been deleted cannot be recovered.
1. Set the [Power] switch to [PLAYER].
2. Set the [Mode] switch to [MEMORY].
■
The last recorded image appears.
■
If there are no recorded images on the Memory Card, <No image!> is displayed.
3. Using the [
4. Press the [MENU] button.
■
œœœœ/√√√√
(REV/FWD)] buttons, search for the photo image that you want to delete.
The menu list will appear.
5. Move the [Zoom] lever up or down to select <Memory>, then press the [OK] button.
6. Move the [Zoom] lever up or down to select <Delete>, then press the [OK] button.
■
A message <Do you want to delete?> is displayed.
7. Move the [Zoom] lever up or down to select <Yes> or <No>, then press the [OK] button.
8. To exit, press the [MENU] button.
7676
5
6
7
M.Player Mode
√Memory
Memory Type
M.Play Select
Delete
Delete All
Protect
Print Mark
Move Select Exit
M.Player Mode
Back
Memory Type
M.Play Select
Delete
Delete All
Protect
Print Mark
Move Select Exit
Previous Next
√Memory Card
√Photo
√Off
†
†
Do you want to delete?
Yes
No
100-0002
2/46
MENUOKZOOM
2/46
MENUOKZOOM
2/46
800x600
Page 81
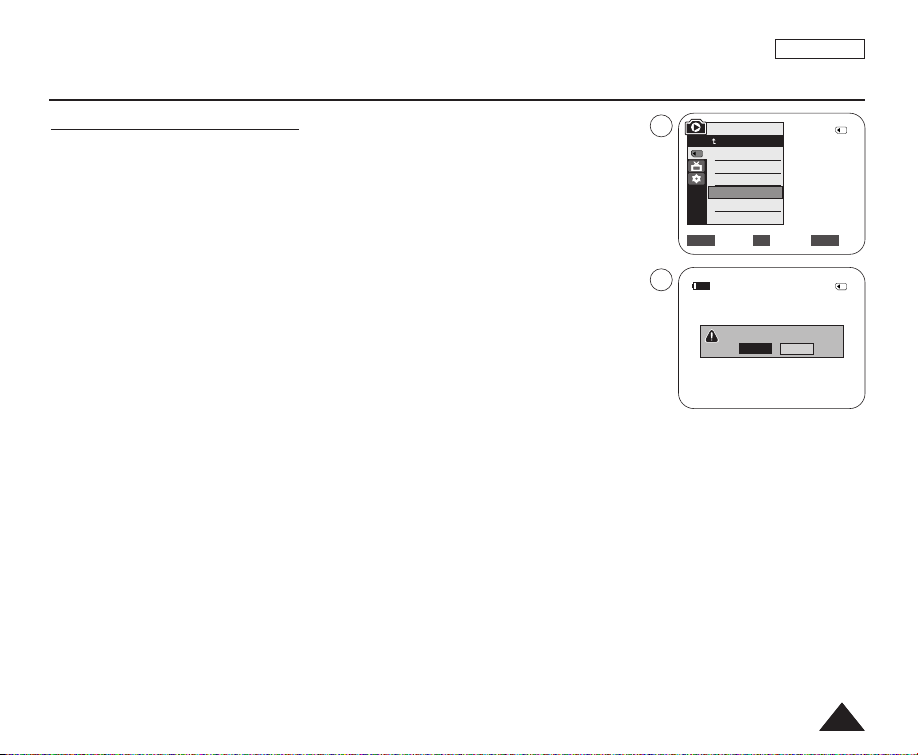
Digital Still Camera Mode (SC-D363/D364/D365/D366 only)
ENGLISH
Deleting All Images at Once
6. Move the [Zoom] lever up or down to select <Delete All>, then press the [OK] button.
■
A message <Do you want to delete all?> is displayed.
7. Move the [Zoom] lever up or down to select <Yes> or <No>, then press the [OK] button.
8. To exit, press the [MENU] button.
6
M.Player Mode
Back
Memory Type
M.Play Select
Delete
Delete All
Protect
Print Mark
†
Move Select Exit
7
Do you want to delete all?
Yes
[ Notes ]
■
You can directly access the Delete function using the [QUICK MENU]. ➥page 20
■
When there is no stored picture on the Memory Card, the message <No image!> will be displayed.
■
If an erroneous image file is found on the Memory Card, the message <Memory Card Error !> will be displayed.
It may be caused by copying images from different digital devices.
■
Formatting the Memory Card will delete all the stored images. ➥page 78
■
To protect important pictures from accidental deletion, activate the image protection. ➥page 75
■
Deleting all files using the <Delete All> menu may take a while.
To delete all files much faster, format the Memory Card after backing up the files into another storage device.
No
2/46
MENUOKZOOM
2/46
800x600
100-0002
7777
Page 82
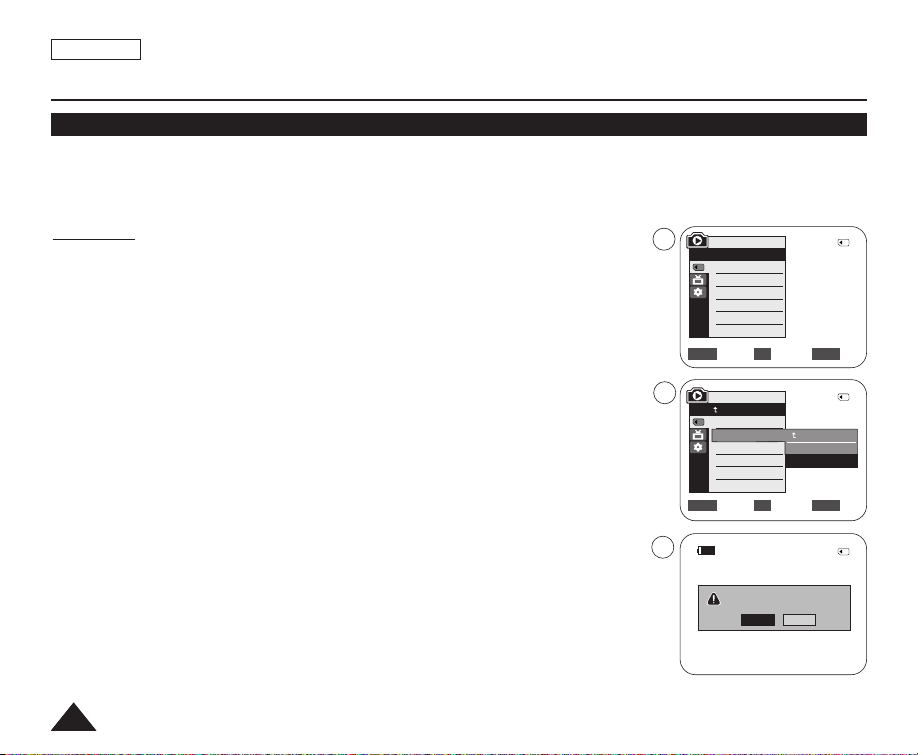
ENGLISH
Digital Still Camera Mode (SC-D363/D364/D365/D366 only)
Formatting a Memory Card
✤ The Format function works only in <M.Player> mode. ➥page 19
✤ You can use the Format functions to completely delete all images and options on the Memory Card, including protected
images.
✤ The Format function restores the Memory Card to its initial state.
Attention
✤ If you execute the Format function, all images will be erased completely and erased
images cannot be recovered.
1. Set the [Power] switch to [PLAYER].
2. Set the [Mode] switch to [MEMORY].
3. Press the [MENU] button.
■
The menu list will appear.
4. Move the [Zoom] lever up or down to select <Memory>, then press the [OK] button.
5. Move the [Zoom] lever up or down to select <Format>, then press the [OK] button.
6. Move the [Zoom] lever up or down to select desired option (Int. Memory or Memory
card), then press the [OK] button. (SC-D366 only)
■
If you select <Int. Memory> or <Memory Card>, a message <All files will be deleted !
Do you want to format?> is displayed.
7. Move the [Zoom] lever up or down to select <Yes>, then press the [OK] button.
■
<Complete!> is displayed when the format is completed.
8. To exit, press the [MENU] button.
[ Notes ]
■
If you execute the Format function, all photo images/moving images will be erased
completely and erased photo images/moving images cannot be recovered.
■
Formatting the Memory Card using a different device will cause Memory Card read errors.
■
Do not turn the power off in the middle of the formatting.
■
A Memory Card with the protection tab set to save will not be formatted. ➥page 68
■
Do not format the Memory Card on a PC. <Not formatted !> message may appear
if a Memory Card formatted on a PC is inserted.
4
M.Player Mode
√Memory
Memory Type
M.Play Select
Delete
Delete All
Protect
Print Mark
†
Move Select Exit
5
M.Player Mode
†
Back
Copy to
Format
Move Select Exit
7
All files will be deleted !
Do you want to format?
Yes
2/46
√Memory Card
√Photo
√Off
MENUOKZOOM
2/46
Back
Int. Memory
Memory Card
MENUOKZOOM
2/46
800x600
No
100-0002
7878
Page 83
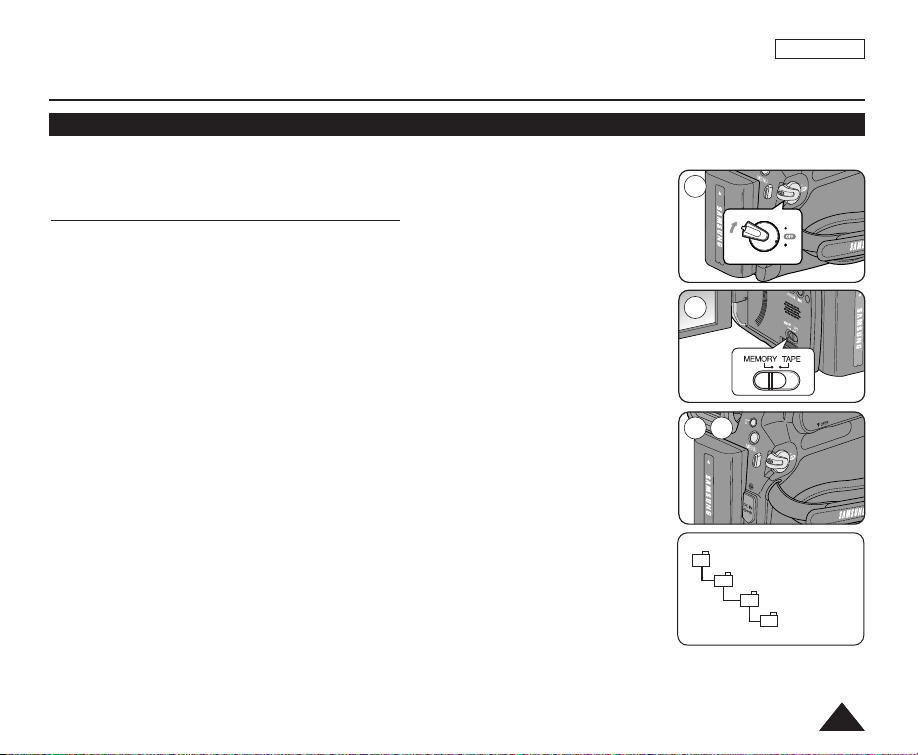
Digital Still Camera Mode (SC-D363/D364/D365/D366 only)
MSAMSUNG
SSMOV
100SSMOV
P
L
A
Y
E
R
C
A
M
E
R
A
C
A
M
E
R
A
P
L
A
Y
E
R
QUICK
MENU
P
L
A
Y
E
R
C
A
M
E
R
A
Recording Moving Images (MPEG) on a Memory Card
✤ You may record moving images while in <M.Cam> mode and store the images on a Memory Card. ➥page 19
✤ You can record moving images with audio on a Memory Card.
✤ The screen format of the moving image to be recorded is 720x480.
Saving Moving Images onto a Memory Card
1. Set the [Power] switch to [CAMERA].
2. Set the [Mode] switch to [MEMORY].
3. Press the [Start/Stop] button, the moving images are recorded on the Memory Card in MPEG4.
■
You can record a photo image on Memory Card by pressing the [PHOTO] button instead of
the [Start/Stop] button.
4. Press the [Start/Stop] button to stop the recording.
[ Notes ]
■
The camorder supports memory cards ranging up to 4GB and a movie can be recorded up to
2GB of file size.
■
MPEG files can be stored in the Memory Card up to 1,000 files.
■
[MENU] button and [OK] button are not available while recording a moving image.
To use [MENU] button and [OK] button, stop recording.
Recording a moving image is not available when a MENU or QUICK MENU is displayed
on the screen. To start recording, press the [MENU] button to make the menu disappear.
■
Before using the Recording a moving image function, check whether the Memory Card is
inserted into the Camcorder.
■
Moving images that you recorded are saved in *.avi (avi 1.0) file format on the Memory Card.
■
The files that you recorded are saved as shown in the folder to the right. (see illustration right)
■
The moving images on a Memory Card are a smaller size and lower definition than images on
tape.
■
The sound is recorded in mono.
■
The following functions are not allowed in <M.Cam> Mode.
DIS (Digital Image Stabilizer), Digital Zoom, Fade, Program AE, Visual Effect, Slow Shutter.
■
■
■
While recording on a Memory Card, don’t insert or eject the tape as it may record noise.
While recording on a Memory Card, don’t eject the Memory Card or it may break the data on the
Memory Card or Memory Card itself.
Turning the power off while accessing the Memory Card may damage the data stored on the Memory Card.
1
2
3 4
√
<Moving image>
ENGLISH
7979
Page 84
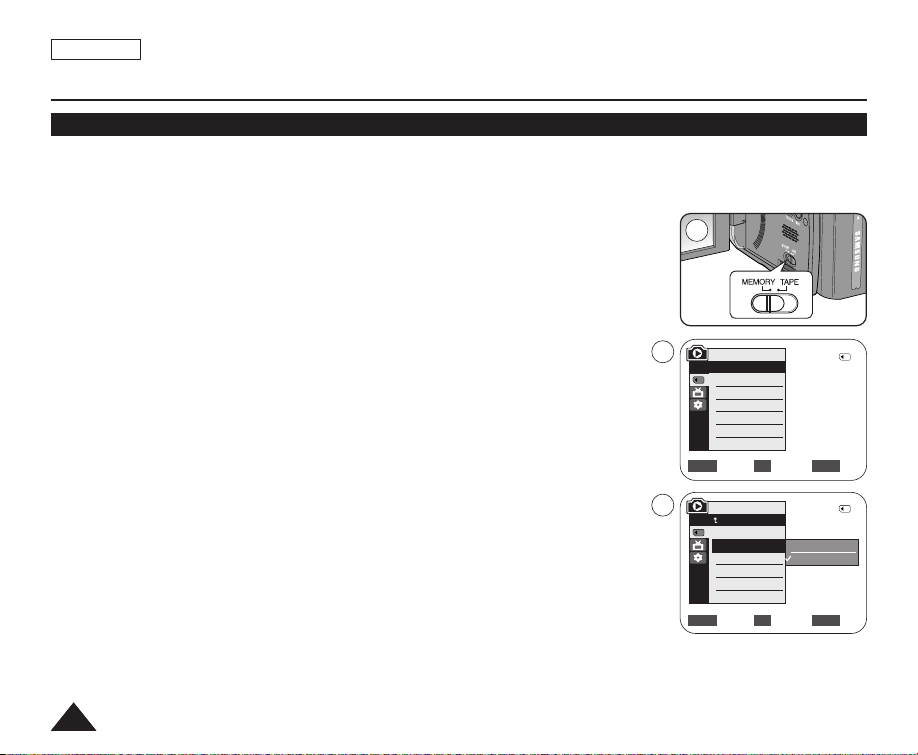
ENGLISH
Digital Still Camera Mode (SC-D363/D364/D365/D366 only)
Playing Moving Images (MPEG) on a Memory Card (M.Play Select)
✤ The Moving Images Playback function works only in <M. Player> mode. ➥page 19
✤ You can play the moving images on a Memory Card. Stereo audio is played back at the same time.
✤ The playback picture will be of higher quality if it is viewed on a PC than on a TV.
1. Set the [Power] switch to [PLAYER].
2. Set the [Mode] switch to [MEMORY].
3. Press the [MENU] button.
■
The menu list will appear.
4. Move the [Zoom] lever up or down to select <Memory>, then press the [OK] button.
5. Move the [Zoom] lever up or down to select <M.Play Select>, then press the [OK] button.
6. Move the [Zoom] lever up or down to select <Movie>, then press the [OK] button.
7. To exit the menu, press the [MENU] button.
8. Using the [
9. Press the [√√/■■(PLAY/STILL)] button.
■
■
œœœœ/√√√√
(REV/FWD)] buttons, search for the moving image that you want to play back.
The moving images recorded on the Memory Card will play back.
You can control playback using the [√√/■■(PLAY/STILL)], [
œœœœ/√√√√
(REV/FWD)], and
[■ (STOP)] buttons.
[ Notes ]
■
You can directly access the M.Play Select function using the [QUICK MENU] button. ➥page 20
■
[MENU] button and [OK] button are not available during moving image playback.
To use [MENU] button and [OK] button, stop playback.
Moving image playback is not available when a menu or Quick menu is displayed on the
screen. To start playback, press the [MENU] button to make it disappear.
■
There may be broken or mosaic pictures while playing the moving images, but it is not a malfunction.
■
The moving images that you recorded on the Memory Card may not play on other manufacturer ’s
equipment.
■
The moving images recorded by another Camcorder may not play on this Camcorder.
■
To play back moving images on a PC, the Video Codec (in the CD provided with the camcorder)
should be installed.
- You need Microsoft Windows Media Player Version 9 or higher in order to play moving images on
the Memory Card on your PC.
- You can download the Microsoft Windows Media Player with your desired language from the Microsoft Website,
“http://www.microsoft.com/windows/windowsmedia/download/default.asp”.
2
4
6
M.Player Mode
√Memory
Memory Type
M.Play Select
Delete
Delete All
Protect
Print Mark
†
Move Select Exit
M.Player Mode
Back
Memory Type
M.Play Select
Delete
Delete All
Protect
Print Mark
†
Move Select Exit
2/46
√Memory Card
√Photo
√Off
MENUOKZOOM
2/46
Photo
Movie
MENUOKZOOM
8080
Page 85
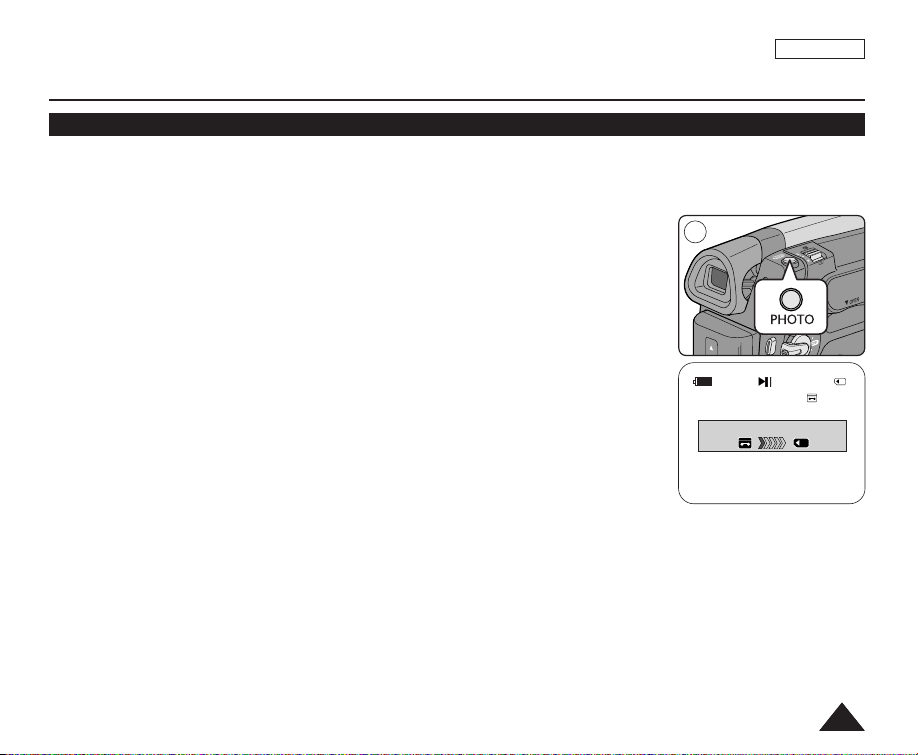
Digital Still Camera Mode (SC-D363/D364/D365/D366 only)
R
A
OK
Recording Still Images from a Cassette
✤ This function works only in <Player> mode. ➥page 19
✤ You can capture a frame on a tape and save it as a Photo on a Memory Card.
ENGLISH
1. Set the [Power] switch to [PLAYER].
2. Set the [Mode] switch to [TAPE].
3. Play back the cassette.
4. Press the [PHOTO] button.
■
The photo image is recorded on the Memory Card.
■
During the time it takes to save an image, the playback screen is paused and the OSD
is displayed. (see illustration to the right)
[ Notes ]
■
Photo images copied from the cassette to the Memory Card are saved in 640x480 format.
■
Number of images you can save varies depending on the image resolution.
4
2/46
25min
Now copying...
8181
Page 86
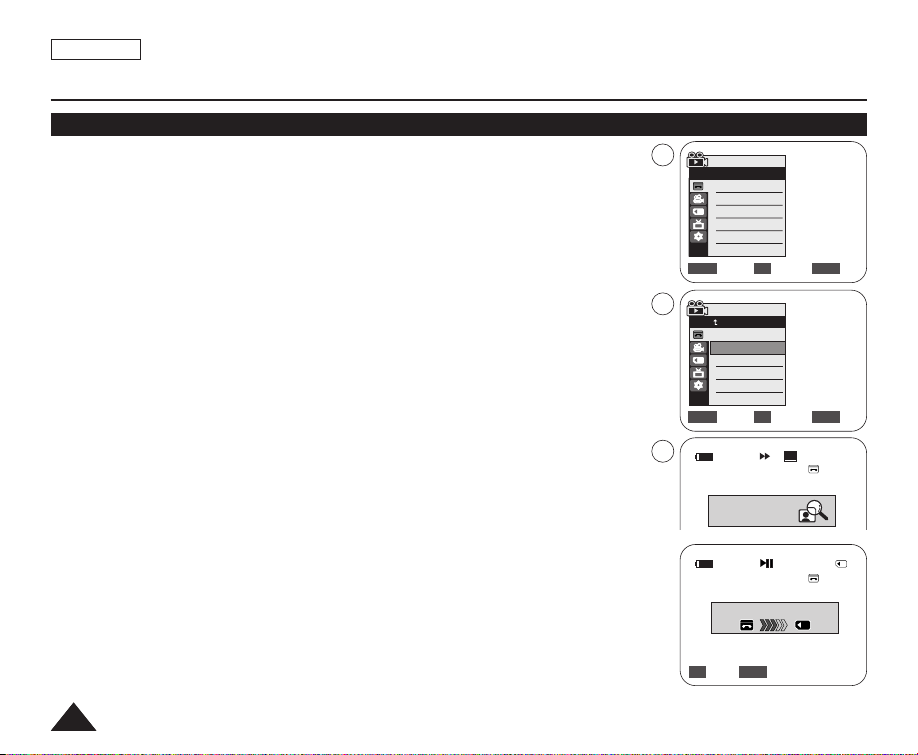
ENGLISH
Digital Still Camera Mode (SC-D363/D364/D365/D366 only)
Copying Still Images from a Cassette to a Memory Card (Photo Copy)
✤ The Photo Copy function works only in <Player> mode. ➥page 19
✤ You can copy all Still images recorded with the Photo function from the cassette to a
Memory Card.
✤ Rewind the tape to the desired point.
4
Player Mode
√Tape
Photo Search
Photo Copy
Audio Select
Audio Effect
√Sound[1]
√Off
1. Set the [Power] switch to [PLAYER].
2. Set the [Mode] switch to [TAPE].
3. Press the [MENU] button.
■
The menu list will appear.
4. Move the [Zoom] lever up or down to select <Tape>, then press the [OK] button.
5. Move the [Zoom] lever up or down to select <Photo Copy>, then press the [OK] button.
■
All still images that recorded on a cassette tape will be copied into a Memory Card.
6. The Camcorder automatically performs the still image search to find still images and
copy starts.
7. Press the
■
[■ (STOP)]
button to stop copying.
Copy stops when the cassette is finished or Memory Card is full.
[ Note ]
Still images copied from the cassette to the Memory Card are saved in 640x480 format.
8282
5
6
Move Select Exit
Player Mode
Back
Photo Search
Photo Copy
Audio Select
Audio Effect
Move Select Exit
Photo Copy
Photo searching...
Photo Copy
Now copying...
Photo Copy
Back Exit
SP
MENUOK
MENUOKZOOM
MENUOKZOOM
0:44:38:03
25min
2/46
25min
2/46
Page 87
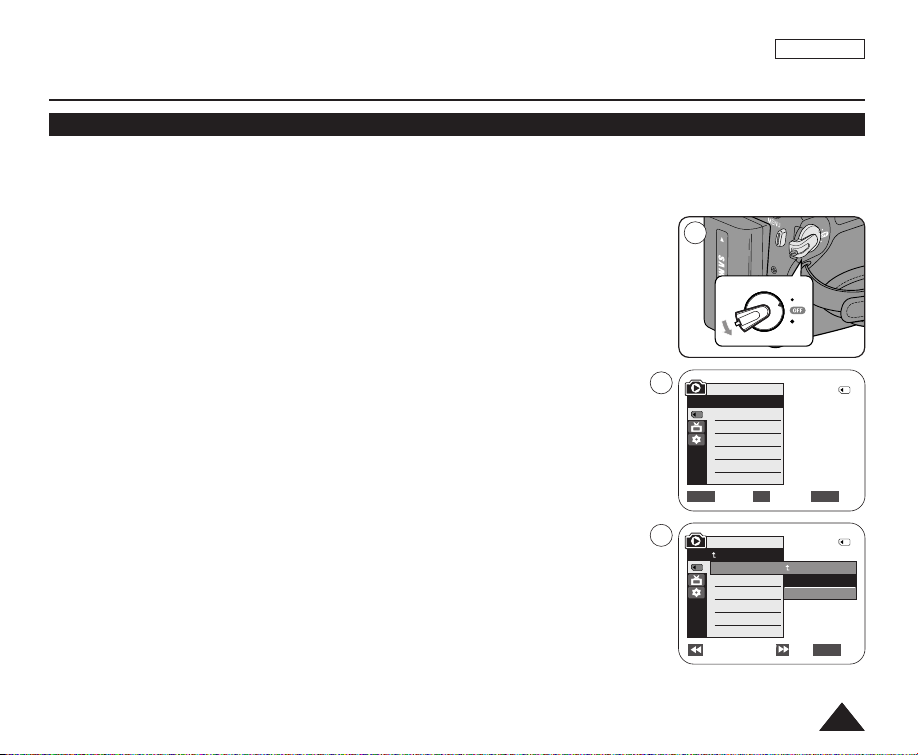
Digital Still Camera Mode (SC-D363/D364/D365/D366 only)
C
A
M
E
R
A
C
A
M
E
R
A
P
L
A
Y
E
R
P
L
A
Y
E
R
Copying Files from a Memory Card to the Built-in Memory (Copy to) (SC-D366 only)
✤ The Copy to function works only in <M.Player> mode. ➥page 19
✤ You can copy selected or all images stored in the Memory Card to the built-in memory.
ENGLISH
1. Set the [Power] switch to [PLAYER].
2. Set the [Mode] switch to [MEMORY].
3. Press the [MENU] button.
■
The menu list will appear.
4. Move the [Zoom] lever up or down to select <Memory>, then press the [OK] button.
5. Move the [Zoom] lever up or down to select <Copy to>, then press the [OK] button.
6. Move the [Zoom] lever up or down to select options (Back, This File or All Files), then
press [OK] button.
■
To go back to the previous mode, select <Back>.
■
If <This File> or <All Files> is selected, <Now copying…> is displayed and copying
starts.
7. To exit, press the [MENU] button.
1
4
M.Player Mode
√Memory
Memory Type
M.Play Select
Delete
Delete All
Protect
Print Mark
†
Move Select Exit
6
M.Player Mode
†
Back
Copy to
Format
Previous Next Exit
2/46
√Memory Card
√Photo
√Off
MENUOKZOOM
2/46
Back
This File
All Files
MENU
8383
Page 88
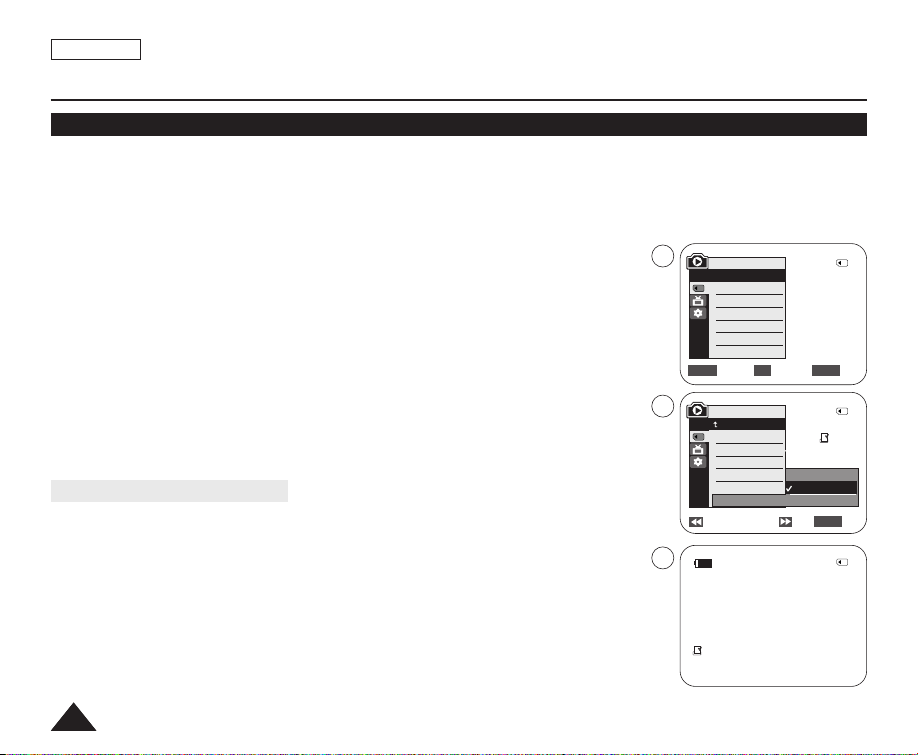
ENGLISH
Digital Still Camera Mode (SC-D363/D364/D365/D366 only)
Marking Images for Printing (Print Mark)
✤ The Print Mark function works only in <M.Player> mode. ➥page 19
✤ This Camcorder supports the DPOF (Digital Print Order Format) print format.
✤ You can automatically print images recorded on a Memory Card with a printer supporting DPOF.
✤ There are 2 ways to make a Print Mark.
- <This File> : You can set a print mark on the photo image displayed on the LCD Screen. It can be set up to 999.
- <All Files> : To print 1 copy each of all of the stored images.
1. Set the [Power] switch to [PLAYER].
2. Set the [Mode] switch to [MEMORY].
■
The last recorded image appears.
3. Using the [
4. Press the [MENU] button.
■
5.
Move the [Zoom] lever up or down to select <Memory>, then press the [OK] button.
œœœœ/√√√√
(REV/FWD)] buttons, search for the photo image that you want to mark.
The menu list will appear.
6. Move the [Zoom] lever up or down to select <Print Mark>, then press the [OK] button.
7. Move the [Zoom] lever up or down to select desired option (All Off, This File or All Files),
then press the [OK] button.
8. If you select <This File>, move the [Zoom] lever up or down to select the quantity, then
press the [OK] button.
9. To exit, press the [MENU] button.
Removing the Print Mark
To remove all Print Marks select <All Off>.
To remove individual file’s Print Mark, select the file and set <This File> to <000>.
[ Notes ]
■
You can directly access the Print Mark function using the [QUICK MENU] button.
➥page 20
■
If the Print Mark is set to <This File>, you can set the number of copies from <000> to <999>.
■
If the Print Mark is set to <All Files>, you can set the number of copies to <1>.
■
The <All Files> option may require extended operation time depending on the number of
stored images.
■
DPOF supported printers are commercially available.
■
Use the USB cable provided with the Camcorder.
8484
5
M.Player Mode
√Memory
Memory Type
M.Play Select
Delete
Delete All
Protect
Print Mark
Move Select Exit
7
M.Player Mode
Back
Memory Type
M.Play Select
Delete
Delete All
Protect
Print Mark
†
Previous Next Exit
9
√
002
2/46
√Memory Card
√Photo
√Off
MENUOKZOOM
2/46
All Off
This File 002
All Files
MENU
2/46
800x600
100-0002
002
†
†
Page 89
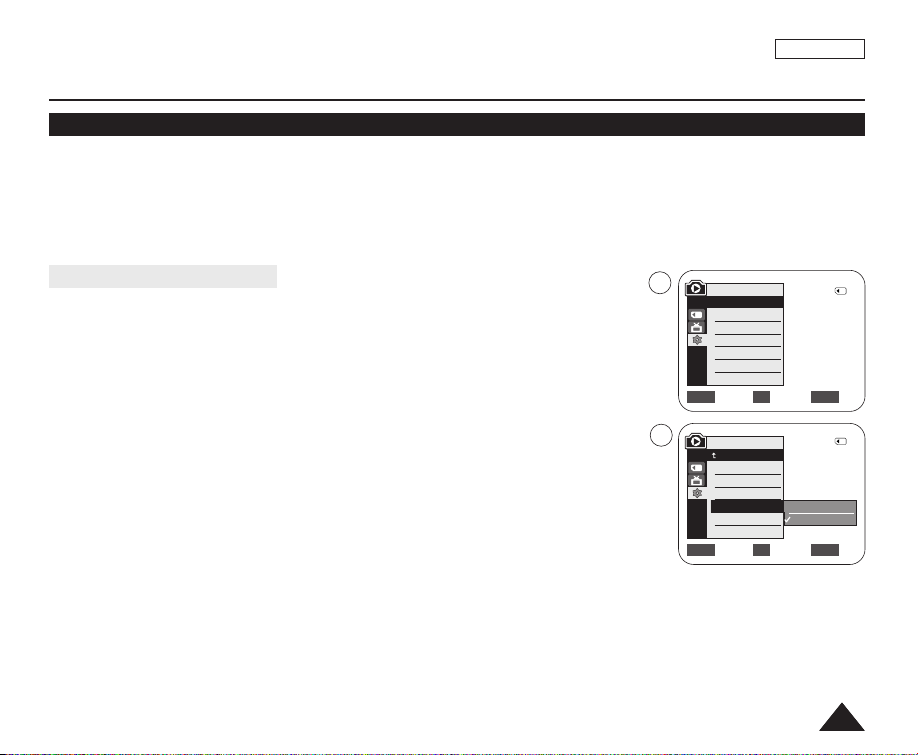
ENGLISH
PictBridgeTM(SC-D363/D364/D365/D366 only)
Printing Your Pictures – Using the PictBridge
✤ PictBridgeTMfunction works only in <M.Player> mode. ➥page 19
✤ By connecting the Camcorder to printers with PictBridge support (sold separately), you can send images from the
Memory Card directly to the printer with a few simple operations.
✤ With the PictBridge Support, you can control the printer directly through your Camcorder in order to print out stored
pictures. For direct printing of your stored pictures using the PictBridge function, you must connect your Camcorder to a
PictBridge printer using a USB cable.
TM
Connecting To a Printer
1. Turn your printer's power off.
■
Turn your Camcorder on by setting the [Power] switch to [PLAYER].
2. Set the [Mode] switch to [MEMORY].
3. Press the [MENU] button.
■
The menu list will appear.
4. Move the [Zoom] lever up or down to select <System>, then press the [OK] button.
5. Move the [Zoom] lever up or down to select <USB Connect>, then press the [OK]
button.
6. Move the [Zoom] lever up or down to select <Printer>, then press the [OK] button.
■
<Computer> : Connect to a computer.
■
<Printer> : Connect to a printer. (To use the PictBridge function, connect to a printer.)
7. Connect your Camcorder to the printer using the provided USB cable.
8. Turn your printer power on.
■
The PictBridge menu screen appears automatically after a short period.
■
The cursor highlights <Print>.
4
M.Player Mode
√System
Clock Set
Remote
Beep Sound
USB Connect
Language
Move Select Exit
6
M.Player Mode
Back
Clock Set
Remote
Beep Sound
USB Connect
Language
Move Select Exit
2/46
√On
√On
√Computer
√English
MENUOKZOOM
2/46
Computer
Printer
MENUOKZOOM
8585
Page 90
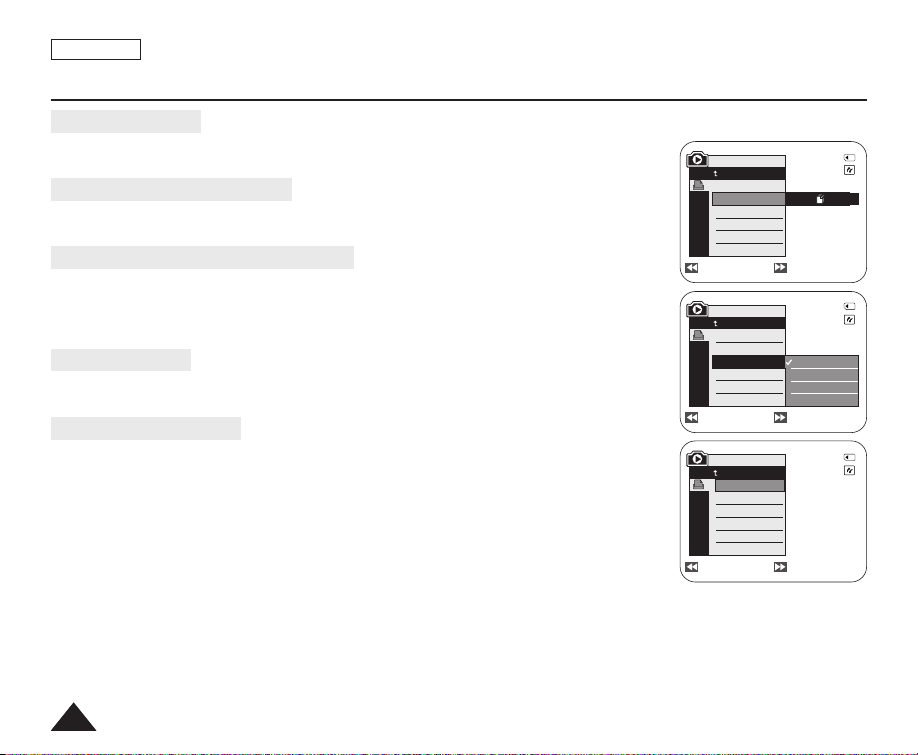
ENGLISH
PictBridgeTM(SC-D363/D364/D365/D366 only)
Selecting Images
1. In the <PictBridge> settings menu, press the
an image to print.
Setting the Number of Prints
2. Move the [Zoom] lever up or down to select <Copies>, then press the [OK] button.
3. Move the [Zoom] lever up or down to set the number of prints, then press the [OK] button.
Setting the Date/Time Imprint Option
4. Move the [Zoom] lever up or down to select <Date/Time>, then press the [OK] button.
5. Move the [Zoom] lever up or down to select the Date/Time display type, then press the [OK]
button.
■
Date/Time display type: <Off>, <Date>, <Time>, <Date&Time>
Printing Images
Move the [Zoom] lever up or down to select <Print>, then press the [OK] button,
and selected image files will be printed.
Canceling the Printing
To cancel the image printing, press [OK] button again.
The message “Cancel” appears and the image printing will be canceled.
[ Notes ]
■
The Date/Time Imprint Option may not supported by all printers. Check with your printer
manufacturer. The <Date/Time> menu cannot be setup if the printer does not support this option.
■
The PictBridgeTMis a registered trademark of CIPA (Camera & Imaging Products Association), an
image transfer standard developed by Canon, Fuji, HP, Olympus, Seiko Epson, and Sony.
■
PictBridge supporting printers are commercially available.
■
Use the USB cable provided with the Camcorder.
■
Use the AC power adapter for your Camcorder during PictBridge Direct Printing.
Turning your Camcorder off during printing might damage data on the Memory Card.
■
Printing photo images is supported. Moving images are not available for printing.
■
You can set various printing options depending on the printer.
■
Please refer to the user’s manual of the printer for details.
8686
œœœœ/√√√√
[
(REV/FWD)]
buttons to select
M.Player Mode
Back
Print
Copies
Date/Time
Previous Next
M.Player Mode
Back
Print
Copies
Date/Time
Previous Next
M.Player Mode
Back
Print
Copies
Date/Time
Previous Next
Num. 02
100-0002
2/46
Off
Date
Time
Date&Time
100-0002
2/46
100-0002
2/46
Page 91

ENGLISH
IEEE 1394 Data Transfer
Transferring IEEE1394 (i.LINK)-DV Standard Data Connections
Connecting to a DV Device (DVD Recorder, Camcorder, etc.)
■
Connecting to other standard DV products.
- A standard DV connection is quite simple.
- If a product has a DV jack, you can transfer data by connecting to the DV jack using the correct cable. (not supplied)
!!! Please be careful since there are two types of DV jacks (4pin, 6pin). This Camcorder has a 4pin jack.
■
With a digital connection, video and audio signals are transmitted in digital format, allowing high quality images
to be transferred.
Connecting to a PC
■
If you want to transmit data to a PC, you must install an IEEE 1394 add-on card into the PC. (not supplied)
■
The frame rate for moving images is dependent on the capacity of the PC.
System Requirements
■
CPU : faster Intel®Pentium III™ 450MHz compatible.
■
Operating system : Windows®98SE, ME, XP, Mac OS (9.1~10.4)
■
Main memory : more than 64 MB RAM
■
IEEE1394 add-on card or built in IEEE1394 card
[ Note ]
■
Operation is not guaranteed for all the recommended computer environments mentioned above.
8787
Page 92
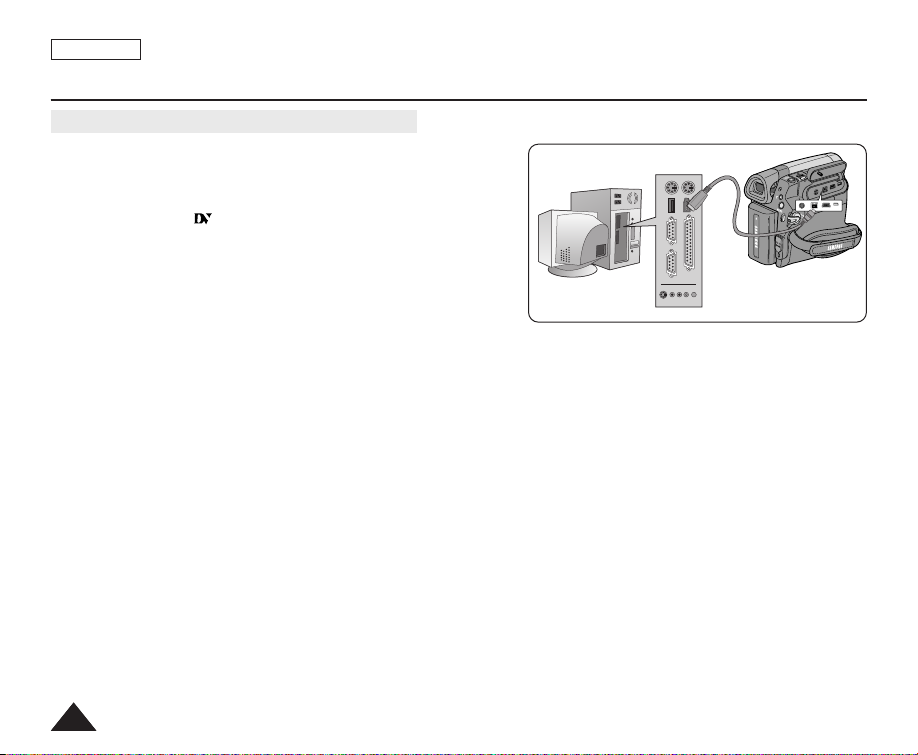
ENGLISH
P
L
A
Y
E
R
C
A
M
E
R
A
Q
U
I
C
K
M
E
N
U
IEEE 1394 Data Transfer
Recording with a DV Connection Cable
1. Set the [Power] switch to [PLAYER].
2. Set the [Mode] switch to [TAPE]. (SC-D363/D364/D365/D366 only)
3. Connect the DV cable (not supplied) from the DV jack of the
Camcorder to the DV jack of the other DV device.
■
Make sure that is displayed.
4. Press the [Start/Stop] button to begin REC PAUSE mode.
■
<PAUSE> is displayed.
5. Start playback on the other DV device while you monitor the picture.
6. Press the [Start/Stop] button to start recording.
■
If you want to pause recording momentarily, press the
[Start/Stop] button again.
7. To stop recording, press the
[ Notes ]
■
When you transmit data from the Camcorder to another DV device, some functions may not work.
If this occurs, please reconnect the DV cable or turn the power OFF and ON again.
■
When you transmit data from the Camcorder to PC, PC function button is not available in <M.Player> mode.
■
Do not use other DV device when using IEEE1394.
■
Do not connect the Camcorder to a PC using both DV and USB cables. It may not operate properly.
■
The IEEE1394 cable (DV cable)is sold separately.
■
Moving image software is commercially available.
■
Most DV enabled PCs have a 6 pin jack. In this case, a 6pin/4pin cable is required for the connection.
■
Most DV enabled Notebooks and Laptops have a 4 pin socket. Use a 4pin/4pin cable for the connection.
■
DIS and COLOR NITE features are not available when in DV (IEEE1394) mode.
If DV (IEEE1394) mode is set, DIS and COLOR NITE modes will be released.
■
When using this Camcorder as a recorder, the pictures that appear on a monitor may seem uneven,
however recorded pictures will not be affected.
[■ (STOP)]
button.
8888
Page 93
ENGLISH
USB Interface (SC-D362/D363/D364/D365/D366 only)
Using USB Interface (SC-D362/D363/D364/D365/D366 only)
Transferring a Digital Image through a USB Connection
✤ The Camcorder supports both USB 1.1 and 2.0 standards. (Depends on the PC specification)
✤ You can transfer a recorded file on a Memory Card to your PC via a USB connection. (SC-D363/D364/D365/D366 only)
✤ If you transfer data to a PC, you need to install the software (DV Driver, Video Codec, DirectX 9.0) supplied with the Camcorder.
USB Connection Speed depending on the System
High speed USB connection is supported by Microsoft (Windows) device drivers only.
■
Windows 98SE/ME - Full Speed USB
■
Windows 2000 - High speed USB on a system with Service Pack 4 or later installed.
■
Windows XP - High speed USB on a system with Service Pack 1 or later installed.
System Requirements
CPU Intel®Pentium III™, 600MHz Intel®Pentium 4™ , 2GHz
OS(Operating System) Win dows®98SE/ME Windows®2000/XP
Memory 128MB 512MB
HDD capacity 1GB or more 2GB or more
Resolution 1024 x 768 dots 24bit Color 1024 x 768 dots 24bit Color
USB USB1.1 USB2.0 High Speed
■
USB is not available for Macintosh systems.
[ Notes ]
■
USB 2.0 works for removable disk and USB streaming functions.
■
On a slower PC than recommended, movie playback may not be smooth or video editing may take a long time.
■
On a slower PC than recommended, movie playback may skip frames or operate unexpectedly.
■
Intel®Pentium III™ or Pentium 4™ is a trademark of the Intel Corporation.
■
Windows®is a registered trademark of the Microsoft®Corporation.
■
All other brands and names are property of their respective owners.
■
Operations are not guaranteed for all of the recommended computer environments mentioned above.
■
Do not connect the Camcorder to a PC using both DV and USB cables. It may not operate properly.
■
In <M.Cam> or <M.Player> mode, be sure that the Memory Card is inserted into Camcorder before connecting USB cable. If no Memory Card
or an unformatted Memory Card is inserted, PC will not recognize your Camcorder as a removable disk.
(SC-D363/D364/D365/D366 only)
■
USB Streaming requires Video Codec, DV Driver and DirectX 9.0.
■
If you disconnect the USB cable from the PC or the Camcorder during the data transfer, the data transfer will stop and the data may be
damaged.
■
If you connect the USB cable to a PC using a USB HUB or with other devices at the same time, it may cause conflict and may not work properly.
If this occurs, remove all other USB devices and try the connection again.
Minimum Recommended
Windows System
8989
Page 94
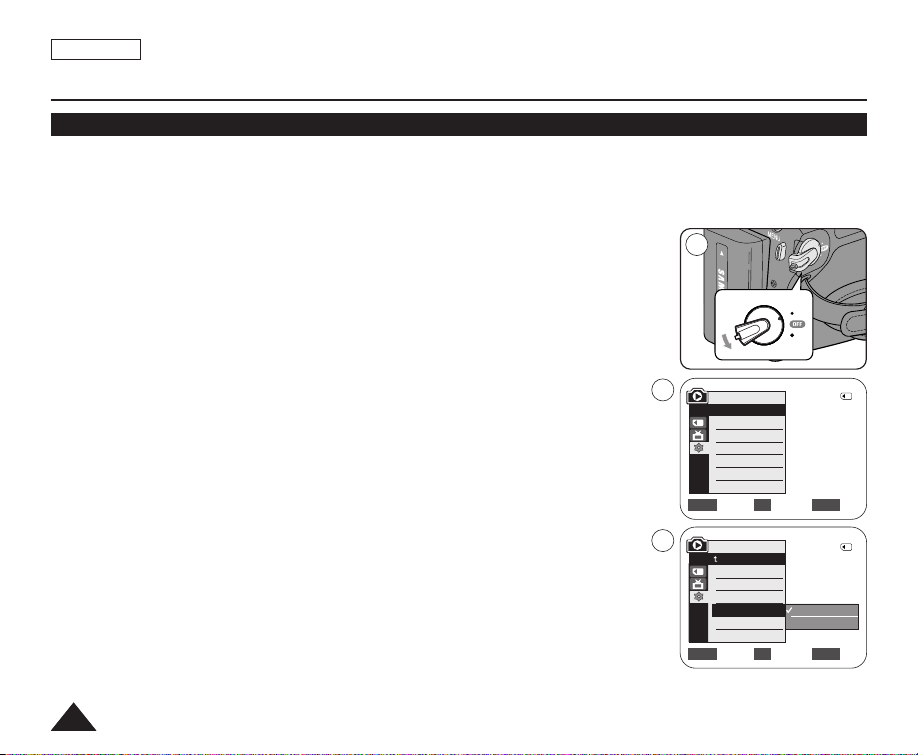
ENGLISH
C
A
M
E
R
A
C
A
M
E
R
A
P
L
A
Y
E
R
P
L
A
Y
E
R
USB Interface (SC-D362/D363/D364/D365/D366 only)
Selecting the USB Device (USB Connect) (SC-D363/D364/D365/D366 only)
✤ USB Connect function works only in <M.Player> mode. ➥page 19
✤ Using the USB cable, you can connect your Camcorder to a computer to copy your moving images and photo images
from the Memory Card (or built-in memory; SC-D366), or to a printer to print your images.
1. Set the [Power] switch to [PLAYER].
2. Set the [Mode] switch to [MEMORY].
3. Press the [MENU] button.
■
The menu list will appear.
4. Move the [Zoom] lever up or down to select <System>, then press the [OK] button.
1
5. Move the [Zoom] lever up or down to select <USB Connect>, then press the [OK]
button.
6. Move the [Zoom] lever up or down to select <Computer> or <Printer>, then press the
[OK] button.
■
You can select <Computer> to use the Camcorder as a PC Camera, USB Stream or
removable disk.
■
You can select <Printer> to use the Pictbridge feature. ➥page 84
7. To exit, press the [MENU] button.
9090
4
M.Player Mode
√System
Clock Set
Remote
Beep Sound
USB Connect
Language
Move Select Exit
6
M.Player Mode
Back
Clock Set
Remote
Beep Sound
USB Connect
Language
Move Select Exit
2/46
√On
√On
√Computer
√English
MENUOKZOOM
2/46
Computer
Printer
MENUOKZOOM
Page 95
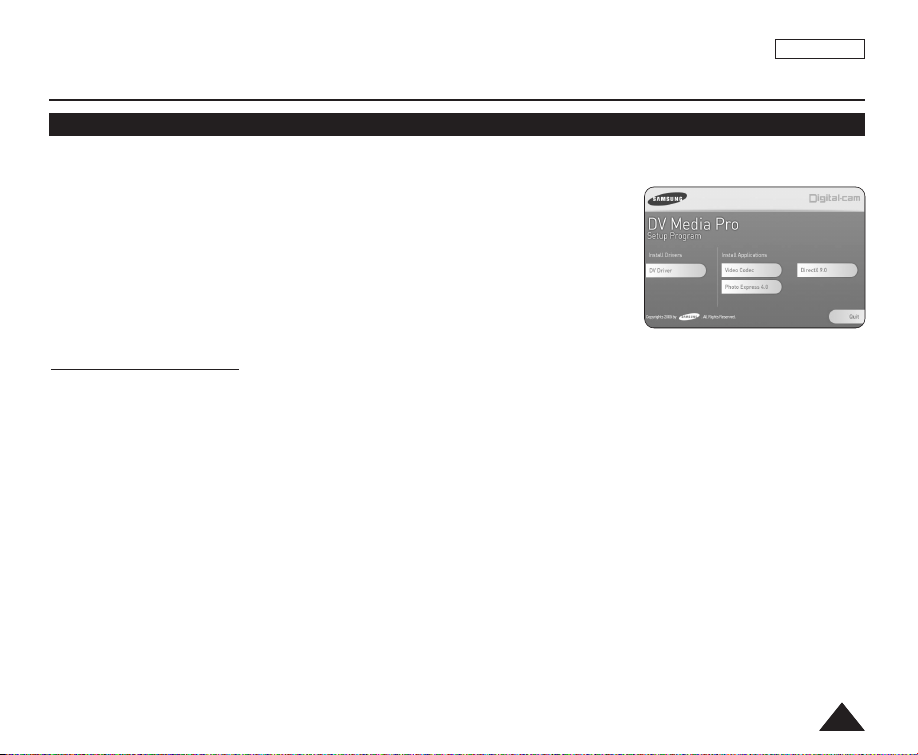
ENGLISH
ENGLISH
USB Interface (SC-D362/D363/D364/D365/D366 only)
Installing DV Media PRO Program
✤ To play back moving images recorded by the Camcorder or streaming data transferred through the USB connection on
a PC, the Video Codec program should be installed.
✤ Do not connect the Camcorder to PC before installing the program.
✤ If another Camcorder or scanner is connected, please disconnect it in advance.
✤ This explanation is based on Windows
✤ DV Media Pro User's Manual is included on the accompanying CD(D:/help/) in
Adobe's Portable Document Format (PDF) The user's manual can be viewed using
Acrobat Reader software, which is also included on the CD
(D:/Support/AcrobatReader/AcroReader51_ENU_full.exe).
(The Acrobat Reader is a freeware product of AdobeSystems,Inc.)
✤ DV Media Pro User’s Manual is in English.
Program Installation
1. Insert the software CD into the CD-ROM drive of your computer.
■
Installation selection screen appears.
2. If the installation selection screen does not appear after inserting the CD, click “Run” in the Windows “Start” menu and
execute Autorun.exe file to begin installation. When CD-ROM drive is set to “D:drive”, type “D:/autorun.exe” and press
Enter.
3. Click the icons listed below to install the selected software.
■
DV Driver Click
- USB removable Disk Driver (Windows
- USB PC CAMERA & STREAMING Driver (CAPTURE DRIVER)
- Connect a Camcorder to your PC to complete the DV Driver installation.
1) This function works only in Camera mode.
2) Connect the camcorder to the PC using the USB cable.
3) The SAMSUNG A/V Capture driver installation begins on the PC.
■
DirectX 9.0 Click
■
Video Codec Click
The Video Codec needs to be installed in order to play the moving images (stored in the Memory Card) on a PC or to
use the USB Streaming/PC Camera functions.
®
98SE OS.
®
98SE only) (SC-D363/D364/D365/D366 only)
9191
Page 96
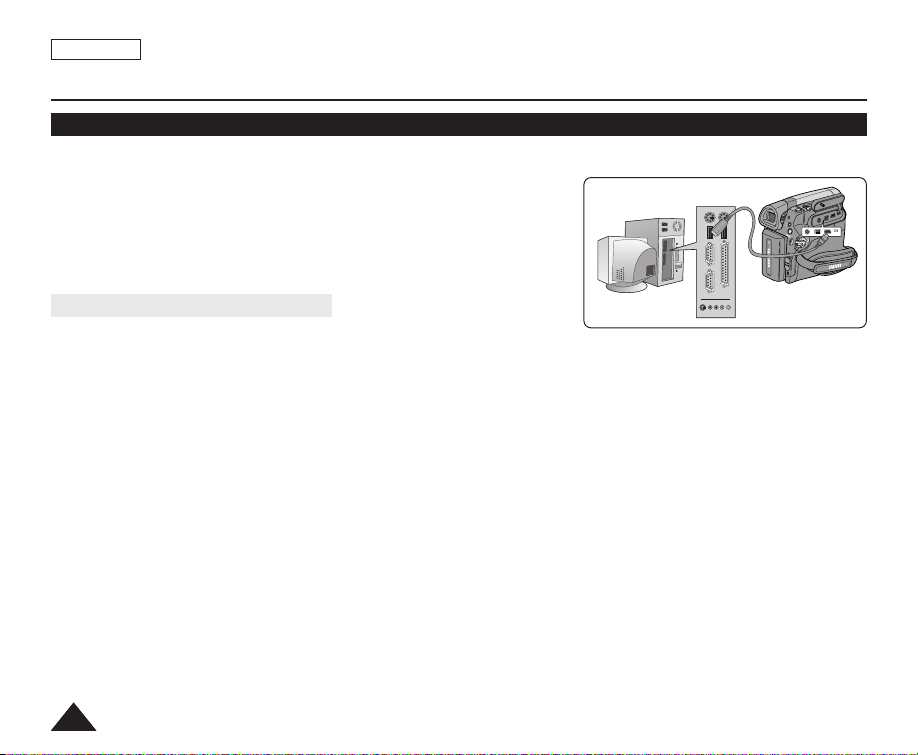
ENGLISH
P
L
A
Y
E
R
C
A
M
E
R
A
Q
UICK
M
ENU
USB Interface (SC-D362/D363/D364/D365/D366 only)
Connecting to a PC
1. Connect a USB cable to the USB jack on the PC.
■
If a USB cable is connected to the Camcorder's USB jack, the
Audio/Video Cable and Multi Cable are disabled.
2. Connect the other end of the USB cable into the USB jack on the
Camcorder. (USB jack)
■
If PC is connected with the USB to the Camcorder, only the [Power]
switch, [Mode] switch, [Zoom] lever can be operated.
Disconnecting the USB Cable
✤ After completing the data transmission, you must disconnect the cable in
the following way:
1. Select the removable disc icon and click the right mouse button to select <Eject>.
2. Select <Confirm> and disconnect the USB cable when the Windows Splash screen appears.
[ Notes ]
■
If you disconnect the USB cable from the PC or the Camcorder while transferring, the data transmission will stop and
the data may be damaged.
■
If you connect the USB cable to a PC via a USB HUB or simultaneously connect the USB cable along with other USB
devices, the Camcorder may not work properly. If this occurs, remove all USB devices from the PC and reconnect the
Camcorder.
9292
Page 97
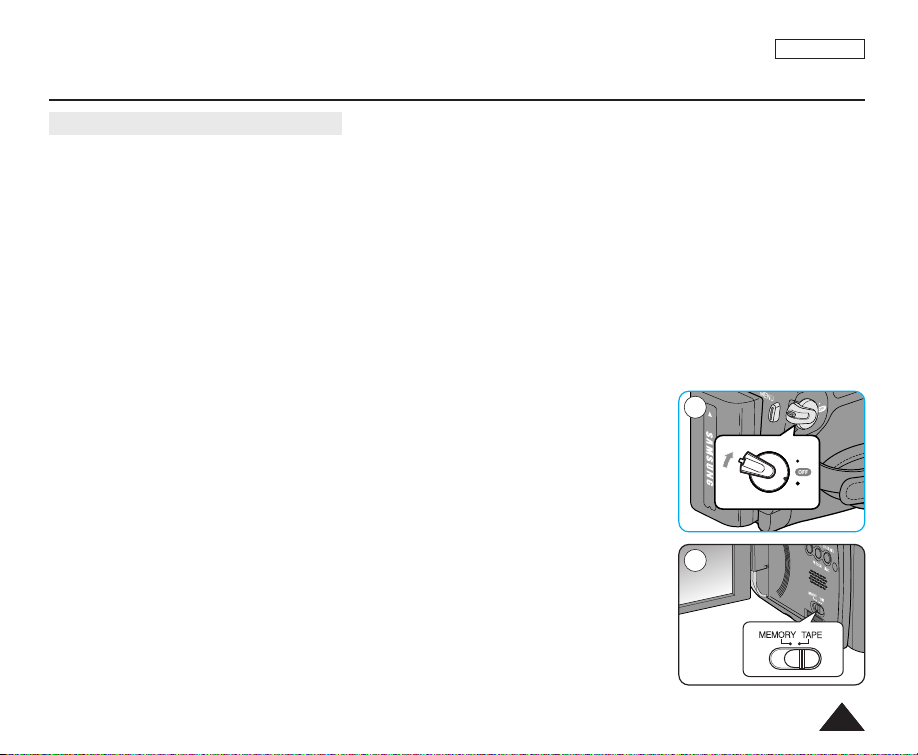
ENGLISH
P
L
A
Y
E
R
C
A
M
E
R
A
C
A
M
E
R
A
P
L
A
Y
E
R
USB Interface (SC-D362/D363/D364/D365/D366 only)
Using the PC Camera Function
✤ This function works only in <Camera> mode. ➥page 19
✤ To use the PC Camera function, DV Driver, Video Codec and DirectX 9.0 programs must be installed in the PC.
✤ When you connect to a Web site that provides video chatting functions, you can use your Camcorder to participate.
✤ When using this camcorder for video conferencing (such as Net Meeting), voice communication may not be supported
depending on the video conferencing software. In this case, connect an external microphone to the soundcard of the
PC to enable voice communication.
✤ Using the Camcorder with PC Net Meeting program installed, you can participate in video conference.
✤ The PC Camera's screen size (Transferred video frame rate for the PC Camera function is max 15 fps.)
- 640X480 (VGA) pixels for USB 2.0 connection.
✤ If PC is connected with the USB to the Camcorder, only the [Power] switch, [Mode] switch, [Zoom] lever can be
operated.
1. Set the [Power] switch to [CAMERA].
2. Set the [Mode] switch to [TAPE]. (SC-D363/D364/D365/D366 only)
3. Connect one end of the USB cable to the USB jack on the Camcorder and the other end
to the USB connector on your computer.
1
2
9393
Page 98

ENGLISH
USB Interface (SC-D362/D363/D364/D365/D366 only)
Using the USB Streaming Function
✤ This function works in both <Camera> and <Player> modes. ➥page 19
✤ To use USB streaming, the DV Driver, Video Codec and DirectX 9.0. programs must be installed in the PC.
✤ You can view Camcorder video on your PC using USB streaming.
✤ You can also store it as a moving image in the "avi" file format, or as a photo image in the "jpg" file format on a PC.
1. Set the [Power] switch to [CAMERA] or [PLAYER], set the [MODE] switch to [TAPE] (SC-D363/D364/D365/D366
only).
2. Connect one end of the USB cable to the USB jack on the Camcorder and the other end to the USB jack on your
computer.
3. Setup and execute Windows Movie Maker or the Ulead VIDEO Studio Software application provided on the CD.
■
For detailed instructions for Ulead VIDEO Studio use, refer to the program’s Help function.
■
Windows Movie Maker is used for WINDOWS ME and XP users. (C:/program files/Movie maker/moviemk.exe)
Using the removable Disk Function (SC-D363/D364/D365/D366 only)
✤ You can easily transfer data from a Memory Card to a PC without additional cards via a USB connection.
1. Set the [Power] switch to [CAMERA] or [PLAYER], set the [Mode] switch to [MEMORY].
2. Connect one end of the USB cable to the USB jack on the Camcorder and the other end to the USB jack on your
computer.
3. To verify whether the removable disk has been properly recognized, open Windows Explorer and locate the removable
disk.
9494
Page 99
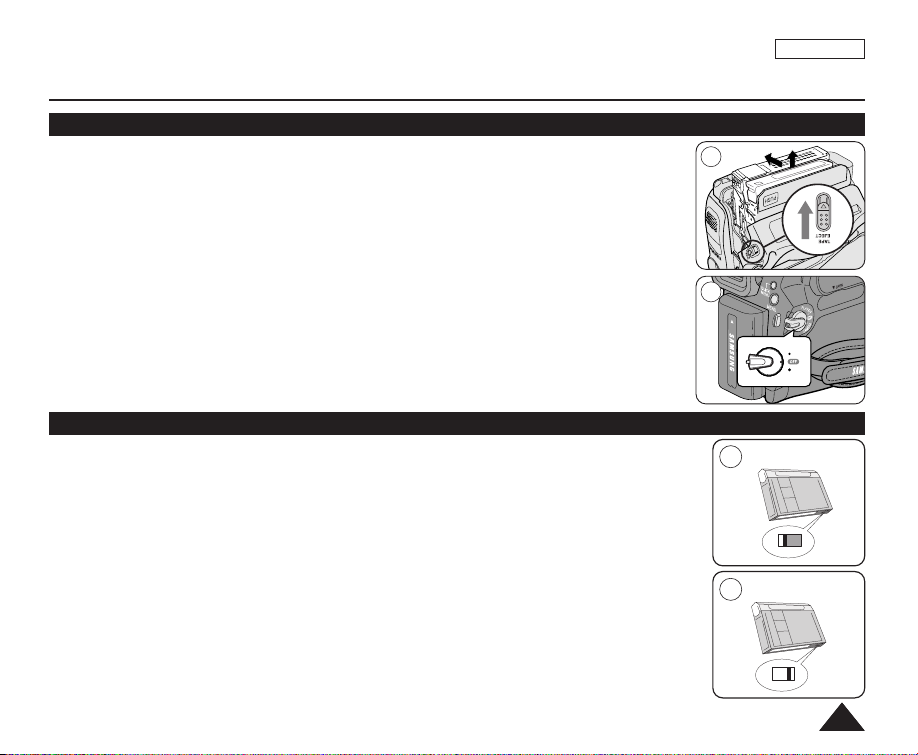
Maintenance
C
A
M
E
R
A
P
L
A
Y
E
R
After Finishing a Recording
✤ At the end of a recording you must remove the power source.
✤ When recording with a Battery Pack, leaving the pack on the Camcorder can reduce the life
span of the battery.
The Battery Pack should be release after recording is completed.
1. Open the Casstte door while sliding the [TAPE EJECT] switch in the direction or the arrow.
■
Pull the cassette compartment out automatically.
■
Please wait while the tape is completely ejected.
2. After removing the tape, close the door and store the Camcorder in a dust free environment.
Dust and other foreign materials can cause square-shaped noise or jerky images.
3. Set the [Power] switch to the [Off].
4. Disconnect the power source or remove the Battery Pack.
Press the [BATTERY RELEASE] button located on the bottom of the Camcorder and slide the
Battery Pack in the direction of the arrow.
Usable Cassette Tapes
When you have recorded something that you wish to keep, you can protect it so that it will not be
accidentally erased.
a. Protecting a tape: Push the safety tab on the cassette so that the hole is uncovered.
b. Removing the tape protection:
If you no longer wish to keep the recording on the cassette, push the safety tab back so that
it covers the hole.
ENGLISH
1
3
a
SAVE
How to store a tape
a. Avoid places with magnets or magnetic interference.
b. Avoid humidity and dust prone places.
c. Keep the tape in an upright position and avoid storing it in direct sunlight.
d. Avoid dropping or knocking your tapes.
b
REC
9595
Page 100
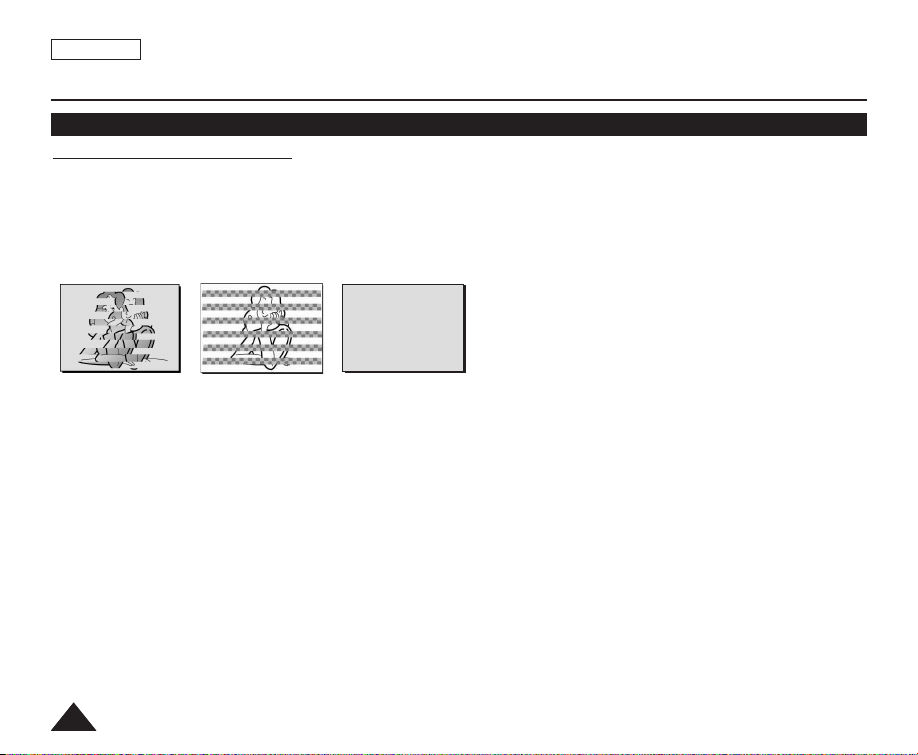
ENGLISH
Maintenance
Cleaning and Maintaining the Camcorder
Cleaning the Video Heads
To ensure normal recording and clear pictures, clean the video heads when the playback pictures display square blockshaped noise or distortion, or a blue screen appears.
1. This function works only in <Player> mode. ➥page 19
2. Set the [Mode] switch to [TAPE]. (SC-D363/D364/D365/D366 only)
(blue screen)
3. Insert a cleaning tape.
4. Press the
5. Press the
[ Notes ]
■
Check the quality of the picture using a videocassette.
- If the picture quality has not improved, repeat the operation.
■
Clean the video heads with a dry type cassette cleaner.
■
Some cleaning cassette products stop automatically. Refer to the cleaning cassette’s instructions for detailed
information. If the problem continues after the cleaning, consult your nearest Samsung dealer or Authorized Service
Center. (blue screen)
[√√/■■(PLAY/STILL)] button.
[■ (STOP)]
button after 10 seconds.
9696
 Loading...