


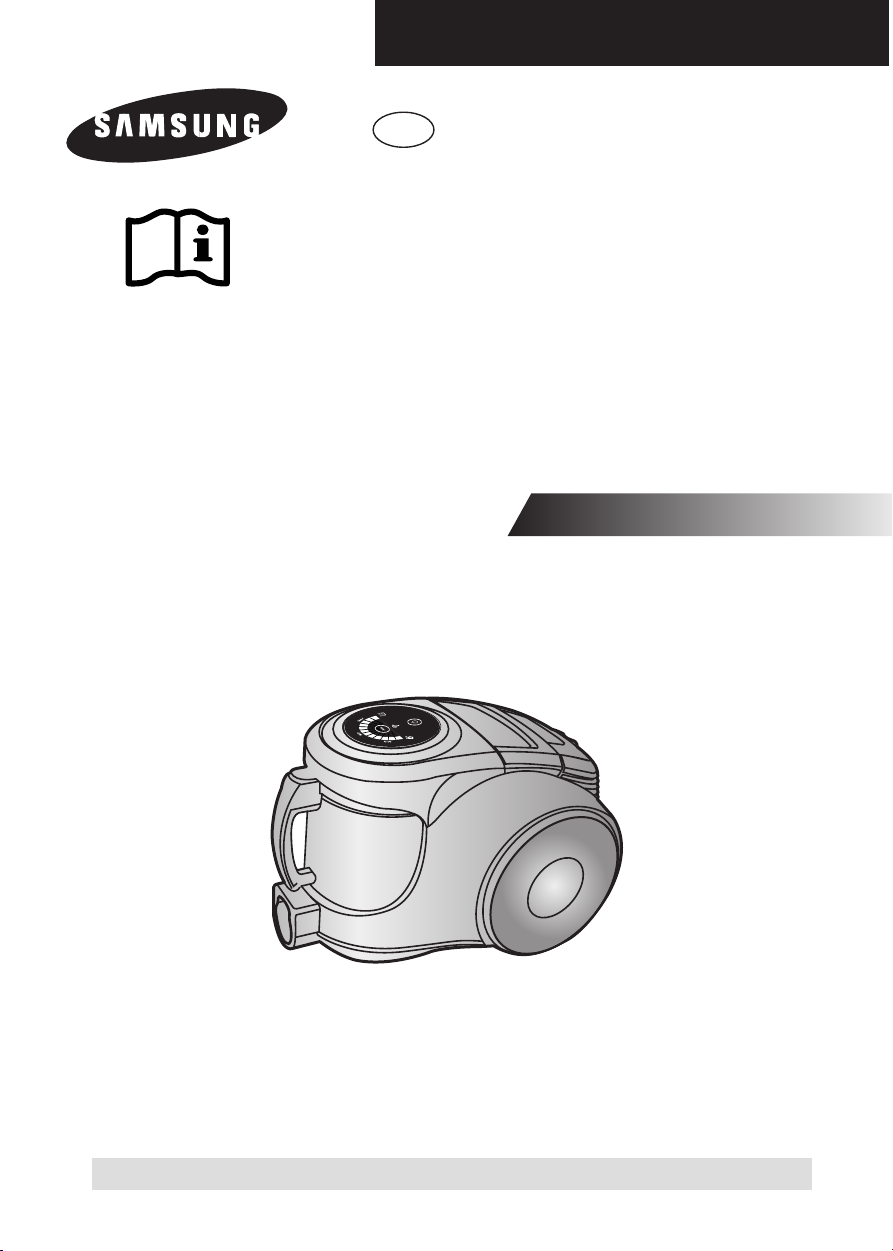
EN
Operating Instructions
VACUUM CLEANER
❈
Before operating this unit, please read the instructions carefully.
❈ Indoor use only.
Register your product at www.samsung.com/global/register

IMPORTANT SAFEGUARDS
1. Read all instructions carefully. Before switching on, make sure that the voltage of your
electricity supply is the same as that indicated on the rating plate on the bottom of the
cleaner.
2. WARNING : Do not use the vacuum cleaner when rug or floor is wet.
Do not use to suck up water.
3. Close supervision is necessary when any appliance is used by or near children. Do not
allow the vacuum cleaner to be used as a toy. Do not allow the vacuum cleaner to run
unattended at any time. Use the vacuum cleaner only for its intended use as described in
these instructions.
4. Do not use the vacuum cleaner without a dust bin. Empty the dust bin before it is full in
order to maintain the best efficiency.
5. Do not use the vacuum cleaner to pick up matches, live ashes or cigarette butts. Keep
the vacuum cleaner away from stoves and other heat sources. Heat can deform and
discolour the plastic parts of the unit.
6. Avoid picking up hard, sharp objects with the vacuum cleaner as they may damage the
cleaner parts. Do not stand on the hose assembly. Do not put weight on the hose. Do not
block the suction or the exhaust port.
7. Switch the vacuum cleaner off on the body of the machine before unplugging from the
electrical outlet. Disconnect the plug from the electrical outlet before changing the dust
bag or dust container. To avoid damage, please remove the plug by grasping the plug
itself, not by pulling on the cord.
8. This appliance is not intended for use by young persons or infirm persons without
supervision unless they are adequately supervised by a responsible person to ensure that
they can use the appliance safely.
Young children should be supervised to ensure that they do not play with the appliance.
9. The plug must be removed from the socket outlet before cleaning or maintaining the
appliance.
10. The use of an extension cord is not recommended.
11. If your vacuum cleaner is not operating correctly, switch off the power supply and consult
an authorized service agent.
12. If the supply cord is damaged, it must be replaced by the manufacturer or its service
agent or a similarly qualified person in order to avoid a hazard.
13. Don’t carry the vacuum cleaner by holding the hose.
Use the handle on the vacuum cleaner set.
EN-1
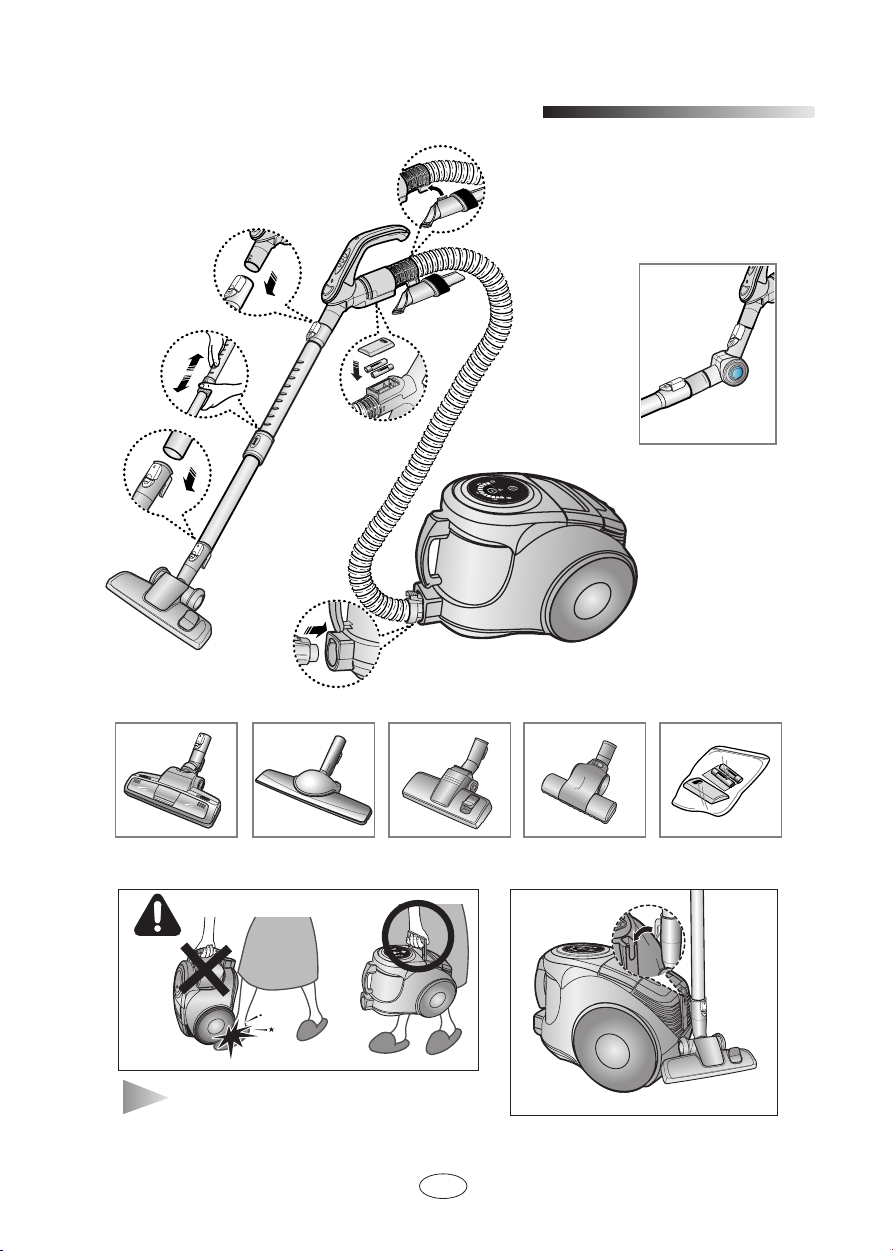
ASSEMBLING THE CLEANER
1
OPTION
OPTION
Features may vary according to model.
▼
CAUTION :
Please do not use dust bin handle
when carrying machine.
EN-2
For storage, park the floor nozzle.
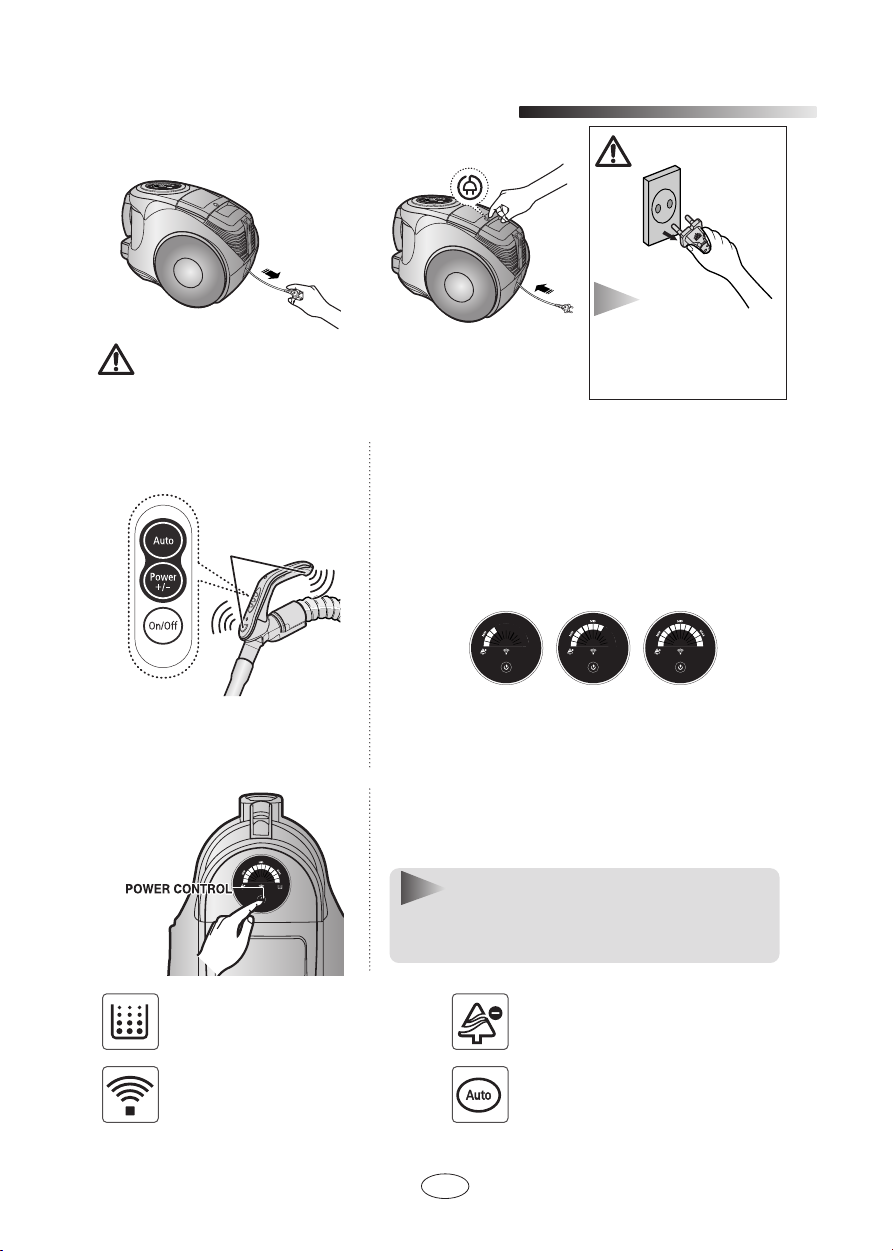
OPERATING THE CLEANER
2
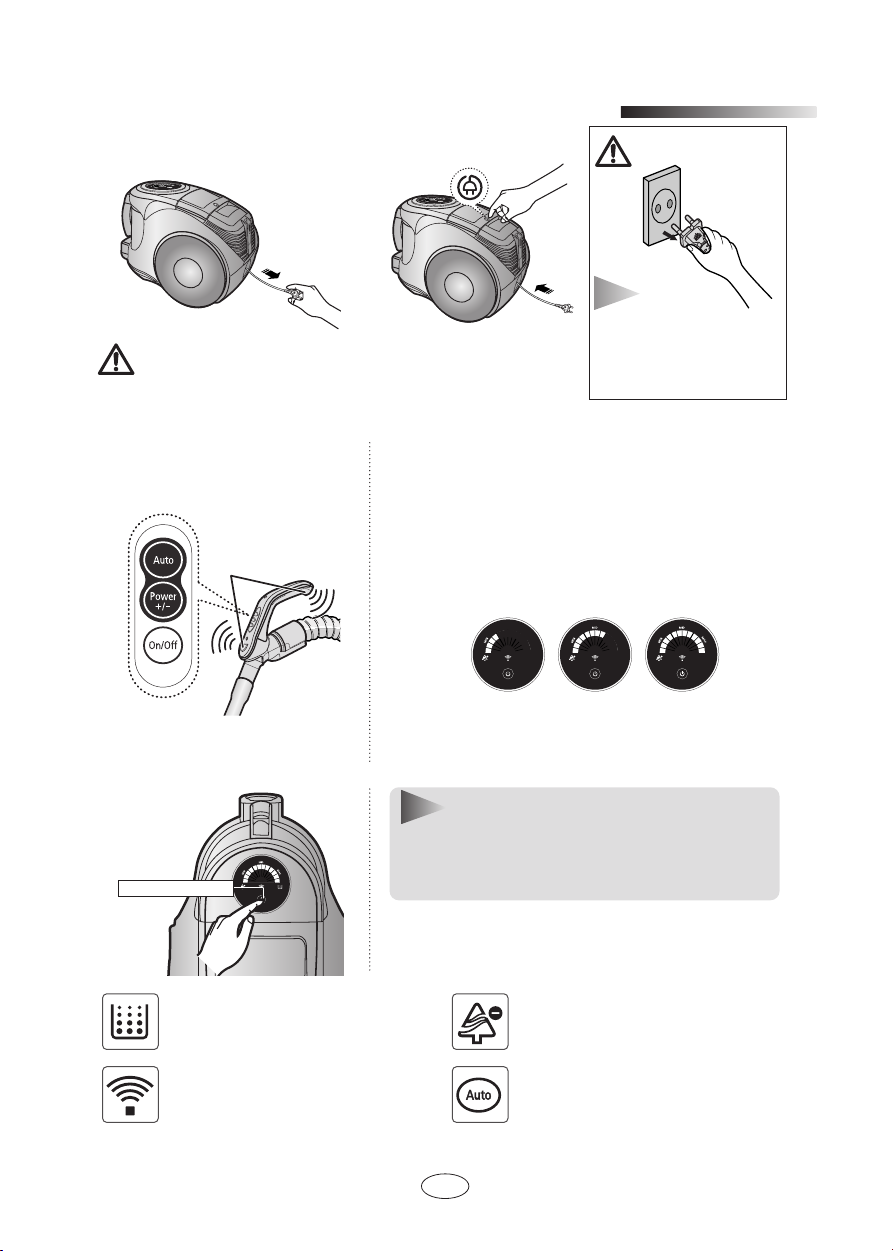
2-1 POWER CORD
Please make sure your
cable is fully extended
before use.
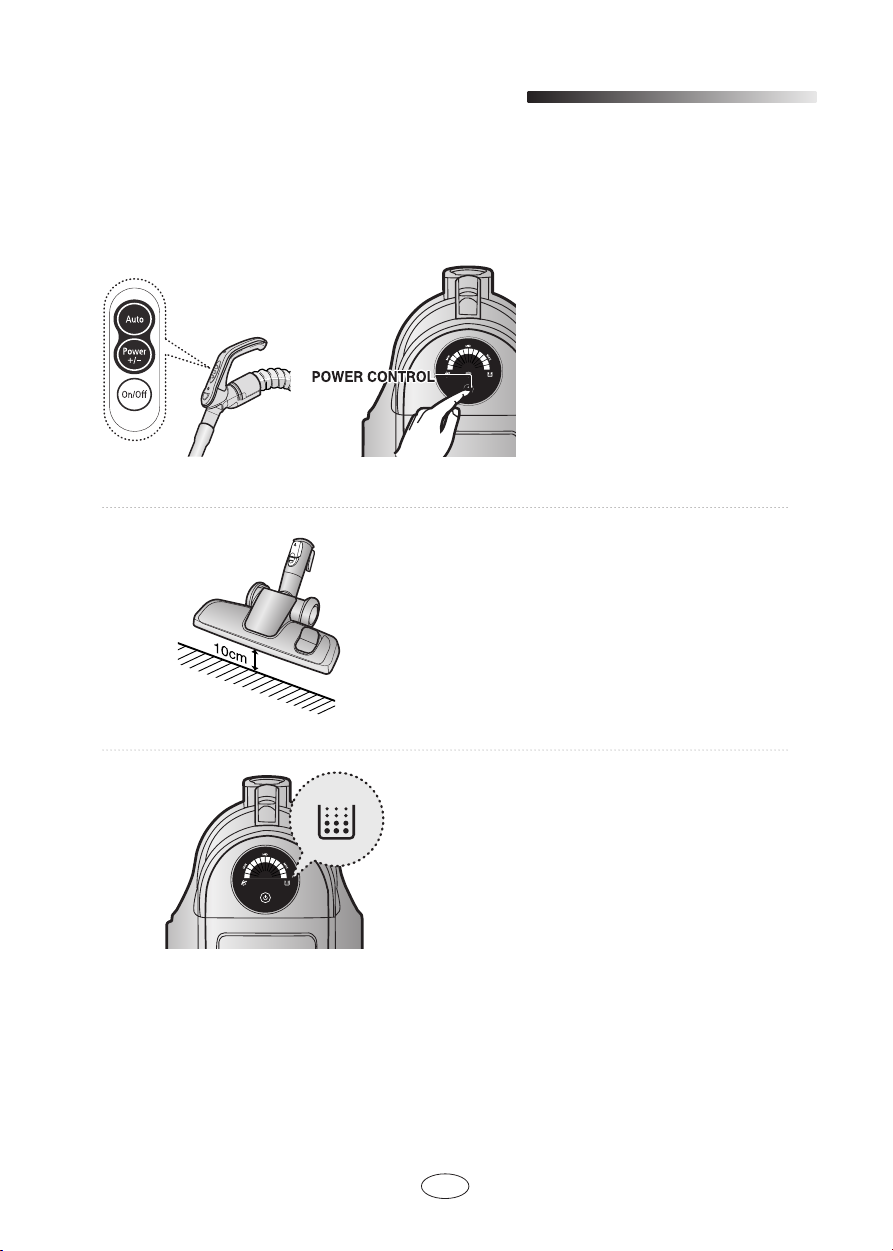
2-2 POWER CONTROL (INFRARED CONTROL)
1. Vacuum cleaner ON/OFF
- HOSE
SENDER
Press the ON/OFF button to operate the vacuum cleaner.
Press again to stop the vacuum cleaner.
2. Vacuum cleaner MODE (+/-)
Press the MODE button repeatedly to select the correct
mode.
(ON) MIN → MID → MAX
NOTE
When removing the
plug from the
electrical outlet, grasp
the plug, not the cord.
HANDLE CONTROL
[The cleaner is controlled by using
infrared signals.]
- BODY
The filter light is illuminated when the dust
pack requires checking or emptying.
An audio signal will also sound.
The IR light indicates the part that
receives the infra-red signal from the
handle control.
3. Using Auto mode
Press the Auto button to operate the vacuum
cleaner automatically.
Press the power control button repeatedly to select the
correct mode.
(ON(MAX) → OFF)
NOTE : If the remote handle control is not
working, the cleaner can be operated
using the control button on the body of
the machine.
This shows the generation of negative ions
when the vacuum cleaner is in operation.
This indicates that the automatic suction
mode is selected.
The level of suction is indicated by the
LED display.
EN-3

2-3 HOW TO USE AND MAINTAIN THE ACCESSORIES
Features may vary according to model.
▼
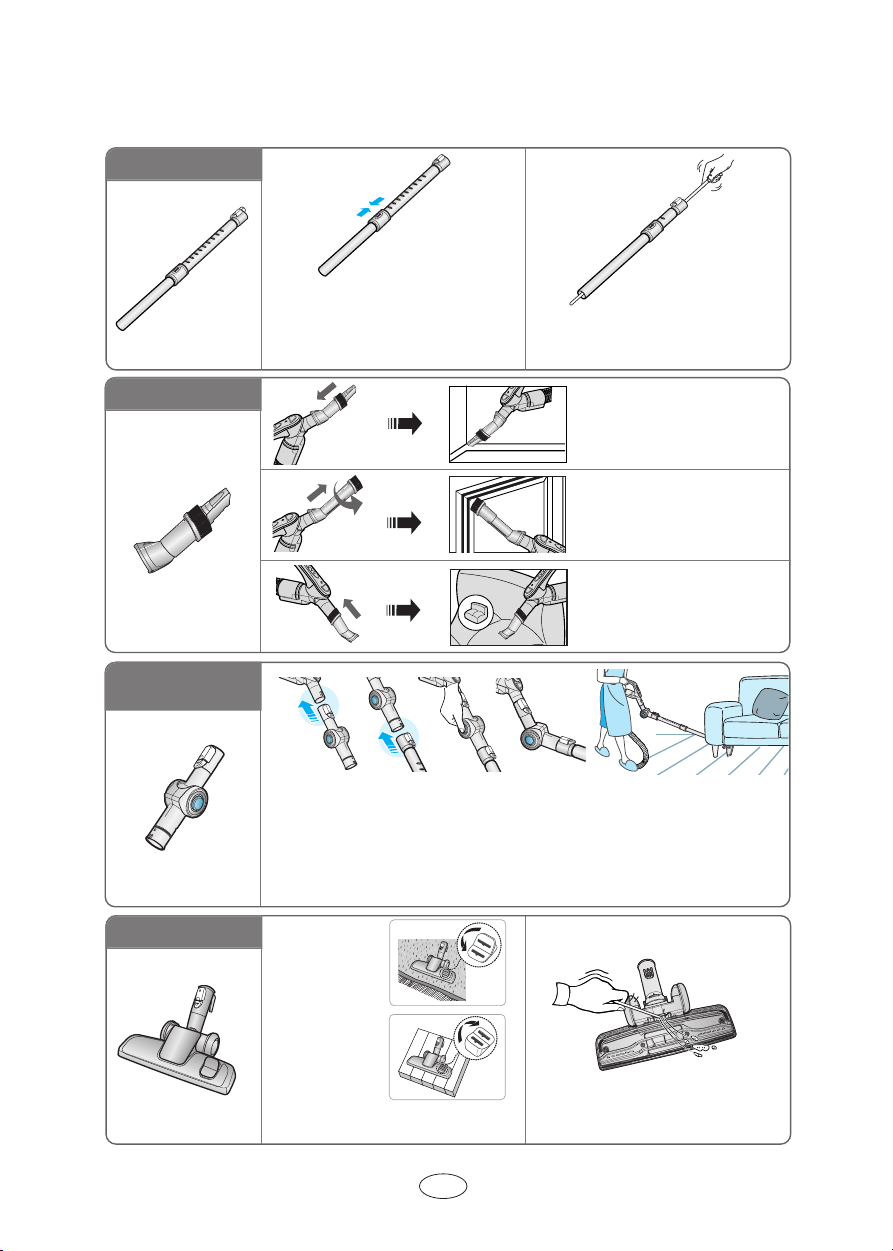
PIPE
Adjust the length of the telescopic pipe
by sliding the length control button located in the center of the telescopic pipe
back and forth.
To check for blockages, separate the telescopic pipe and adjust to shorten. This allows
for easier removal of waste clogging the tube.
ACCESSORY
ELBOW EXTENDING TUBE
1234 5
(OPTION)
1. Connect the elbow extending tube to connecting part for hose knob and
telescopic pipe.
2. Fit the telescopic pipe to the lower part of the elbow extending tube.
3. Press the PUSH button.
4. With the PUSH button pressed, the elbow extending tube is folded.
5. Using the elbow extending tube allows hard to reach areas (e.g. under
furniture)to be cleaned without having to kneel down.
OPTION
▲▲
▲ Carpet
Cleaning
Push the accessory on to
the end of the hose handle.
Pull out and turn the dusting brush for cleaning delicate areas.
To use the upholstery tool,
push the accessory on to
the end of the hose handle
in the opposite direction.
♣ Floor
Cleaning
Adjust the inlet lever according to the
floor surface.
EN-4
Remove waste matter completely if the
inlet is blocked.
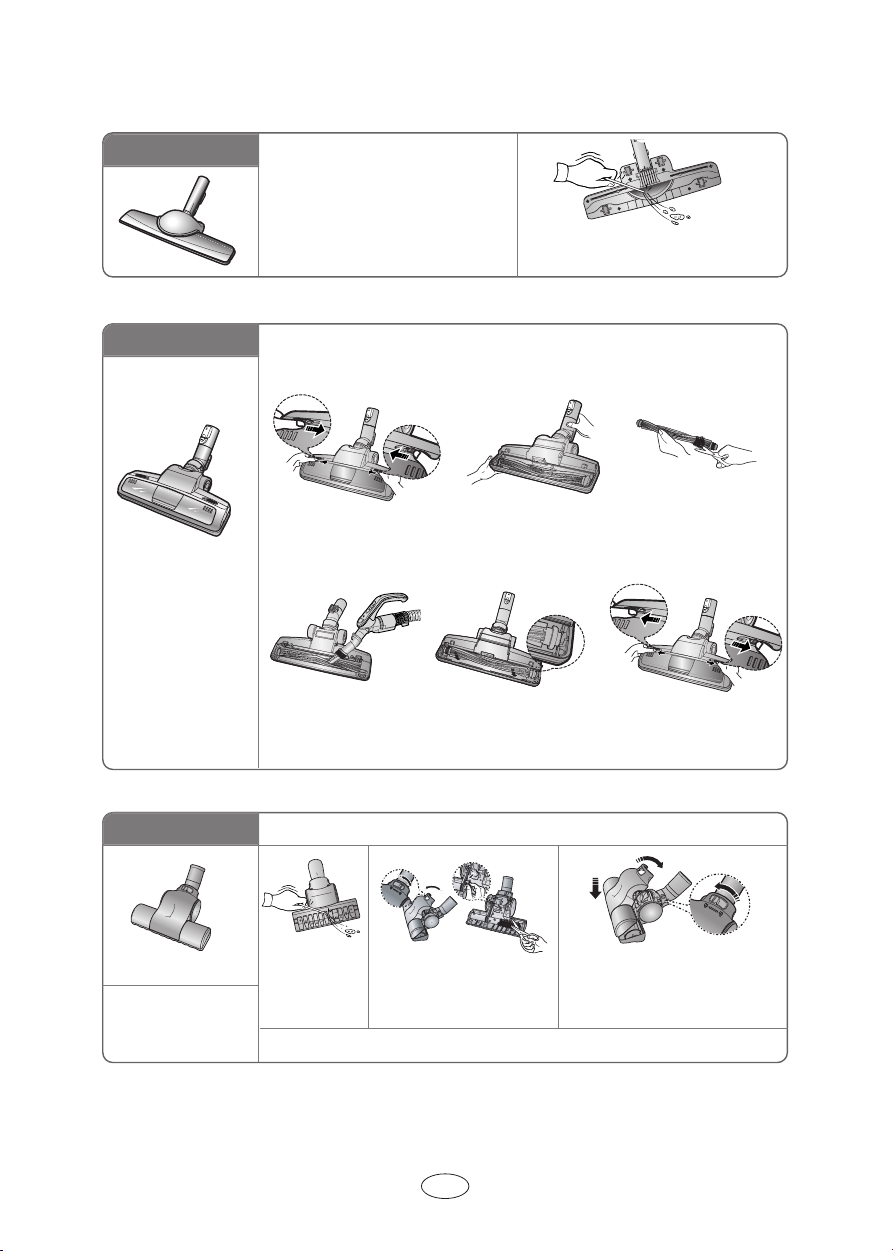
OPTION
Vacuum dust in wide area at once
Remove waste matter completely
if the inlet is blocked.
OPTION
For improved pick-
up of pet hair and
fibre on carpets
OPTION
Frequent vacuuming of hair or pet fur may cause a falling-off of the rotation due to
matters tangled around the drum. In this case, clean the drum with care.
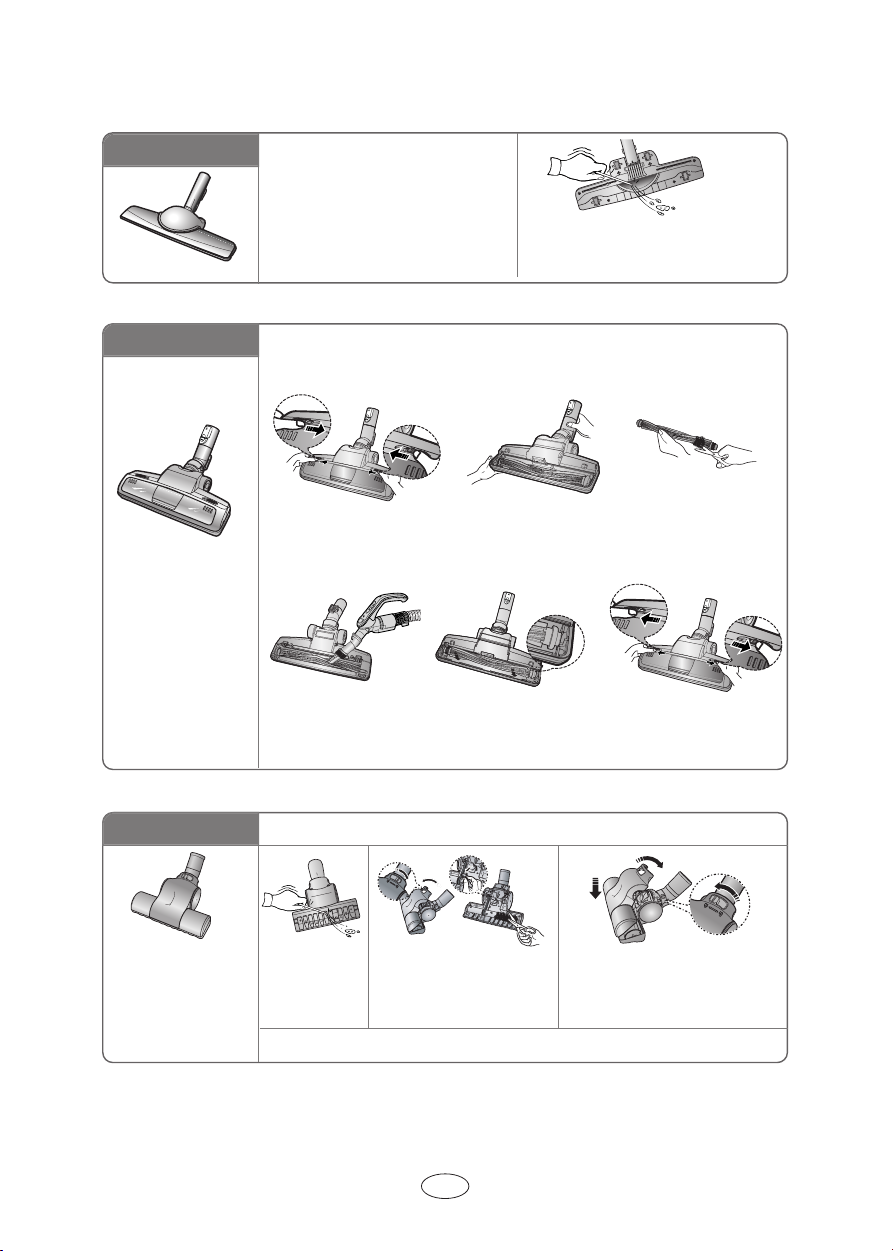
1 2 3
Push the Open button of
the transparent screen
cover to separate the cover.
4
Remove dust inside the
brush housing using a
dry duster or crevice tool.
Clogs on turbine keeps brush from turning, and in this case, take care of it.
Remove the brushbar
from the transparent
screen.
5
Insert brushbar into
rotating belt and
assemble.
Remove waste matter
such as dust and hair
tangled around the
brushbar using scissors.
6
Click the transparent
screen cover back into
place to reassemble.
Brush for blanket
For picking up pet hair
and fibre on upholstery
and bed linen.
Remove waste
matter completely when
inlet is blocked.
Warning : Use for bedclothes only. Be cautious not to damage brush during unclogging.
Turn the lock button to
‘UNLOCK’, and remove
waste matter.
EN-5
To reassemble, align the cover to the
front of the main body and close. After
closing the cover, ensure that the lock
button is turned to the ‘LOCK’ position.
CLICK
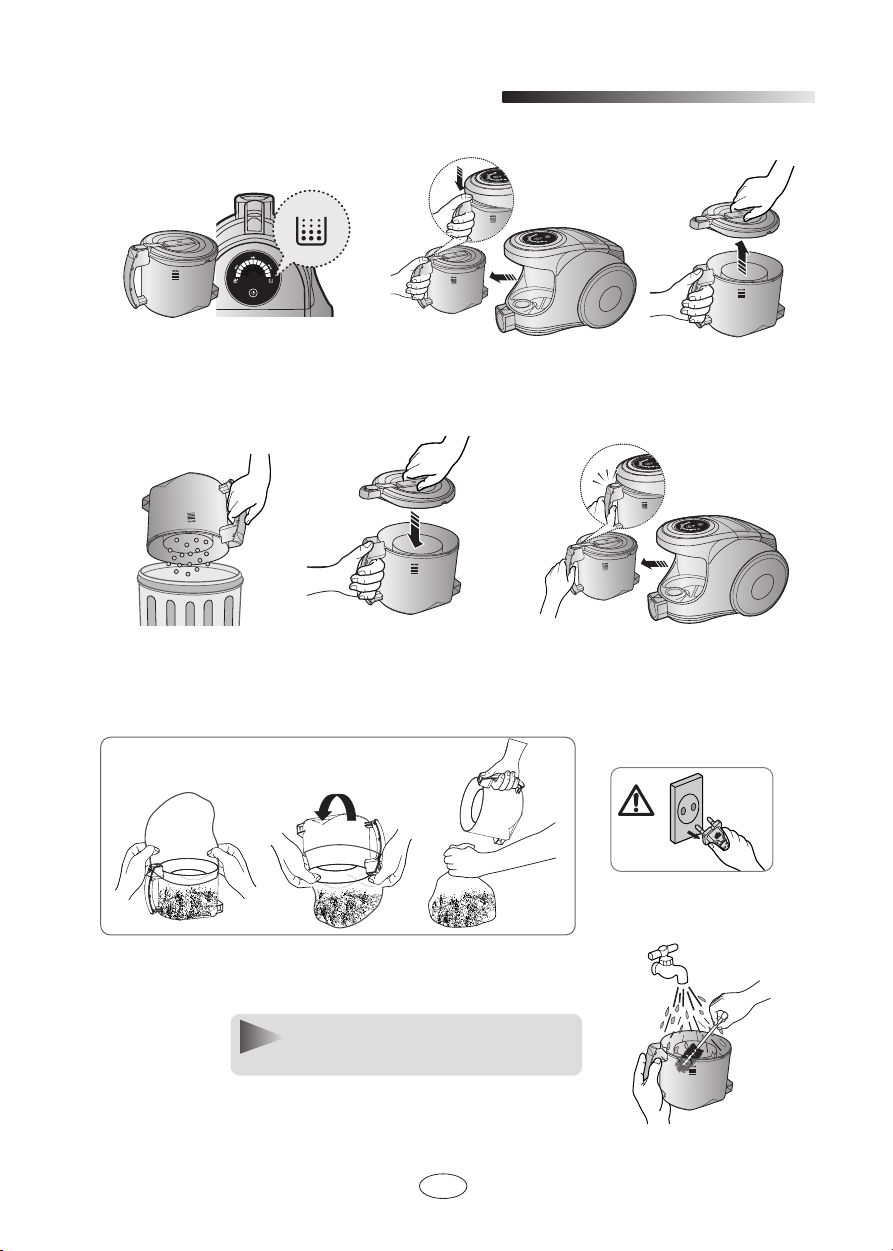
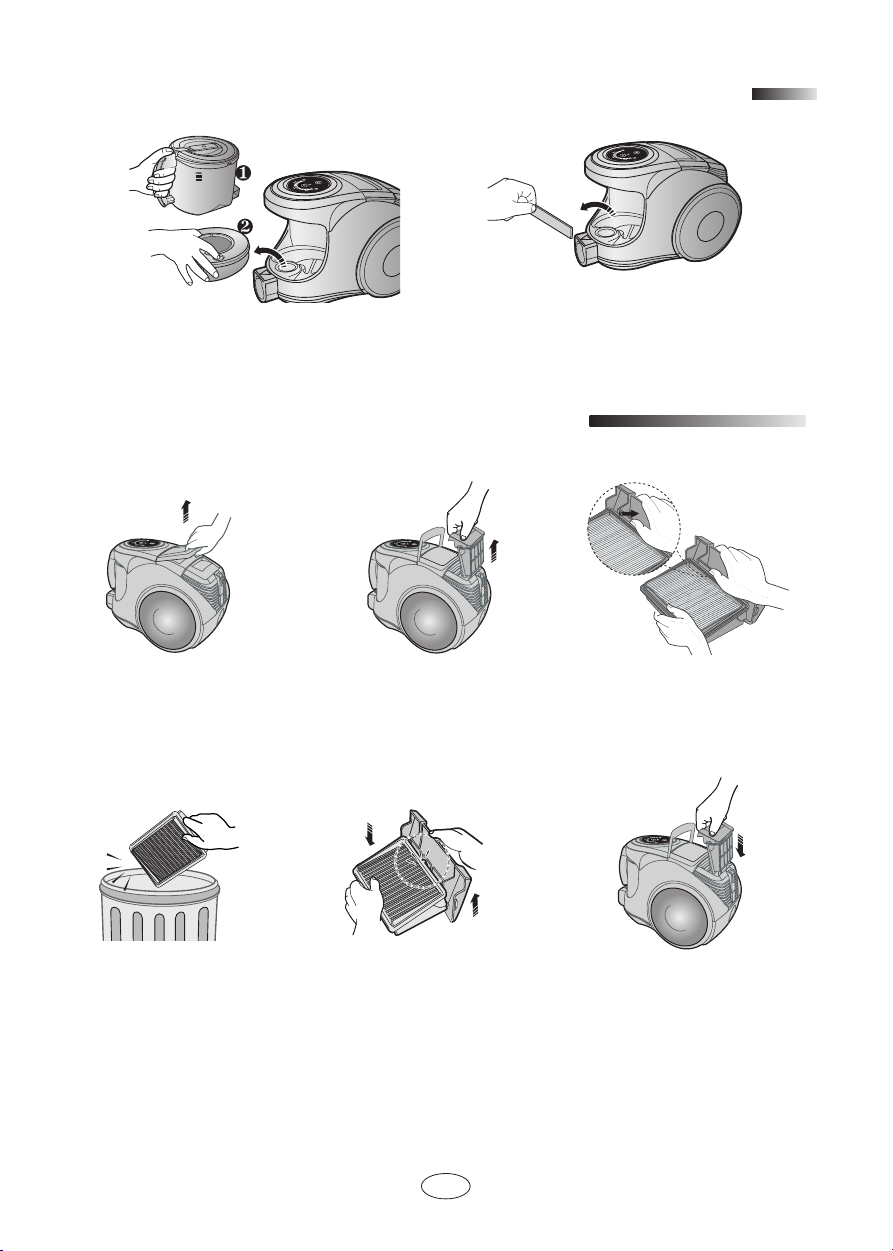
EMPTYING THE DUST BIN
3
1 2 3
Once dust reaches the dust full
mark, or once the filter check light
is on, empty the dust bin.
4 5
Throw away dust in
the bin.
- Empty into a plastic bag
(recommended for asthma/allergy sufferers)
Close the dust bin cover.
Take the dust bin out by
pressing the button.
Separate the dust
bin cover.
6
Before use, push the dust bin
into the main body of the vacuum cleaner until you hear
the "click" sound.
NOTE
You may rinse the dust bin with cold water
EN-6
CLEANING THE DUST PACK
4
4-1. WHEN TO CLEAN THE DUST PACK
- If suction is noticeably reduced during cleaning, please check the dust pack as indicated
below.
Suction is significantly weakened during cleaning.
Shaking sound of inlet stuck to the floor (soft mats, blankets, etc.) is heard.
Turn the vacuum power to 'MAX'
HANDLE CONTROL
If the filter check indicator turns red
with the inlet floating 10 cm above
flat floor, clean it.
EN-7
When the indicator light comes on,
please empty the Dust Pack(4-2) as
shown in the following illustrations.
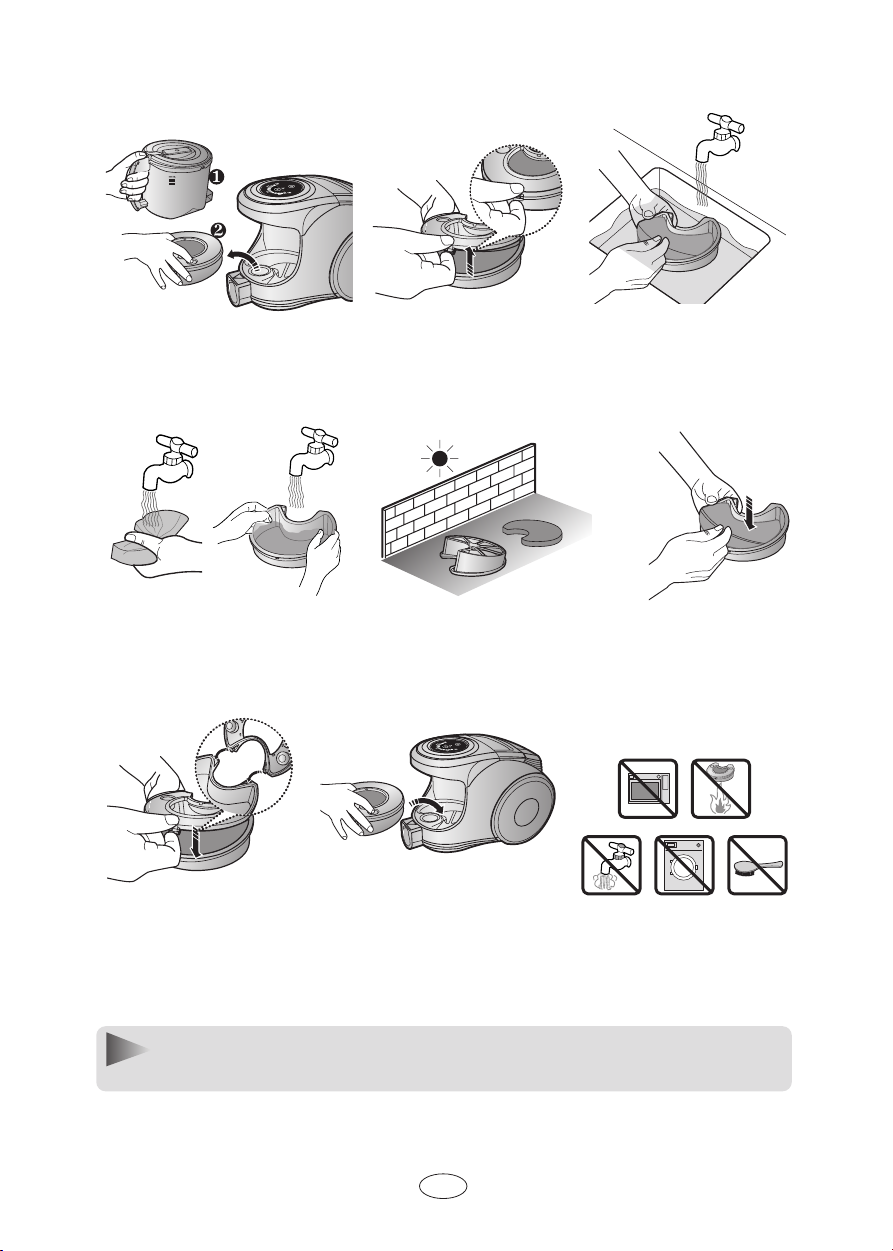
4-2 CLEANING THE DUST PACK
12
Remove the dust bin and dust
pack as shown.
Remove the fixed frame
of the dust pack cover.
4
Wash the sponge and the filter
of the dust pack with water.
Let the sponge and dust pack dry
in the shade for more than
12 hours.
3
Remove the sponge pad from
the dust pack.
65
Put the sponge into
the dust pack.
7 8
Before reassembly,
align the dust pack cover
and dust pack correctly.
NOTE :
Make sure the filter is completely dry before putting it back into the vacuum
cleaner. Allow 12 hours for it to dry.
Put the assembled dust pack
into the main body.
EN-8
CLICKCLICK
CLICK
CLEANING THE MOTOR PROTECTION FILTER
5
Remove the motor protection filter from
Take out both the dust bin and the
dust pack.
CLEANING THE OUTLET FILTER
6
the vacuum cleaner.
Shake and tap the dust from it and put
back in machine.
Lift the handle. Hold the handle of the
Dust off the outlet filter
by gently tapping.
outlet filter and lift
to remove.
Before reassembly,
align the outlet filter
cover and the outlet filter
correctly, and push the
outlet filter until you hear
a click sound.
EN-9
Remove the fixed
frame of the outlet filter
cover.
Push the outlet filter
into the main body
until you hear a click
sound.
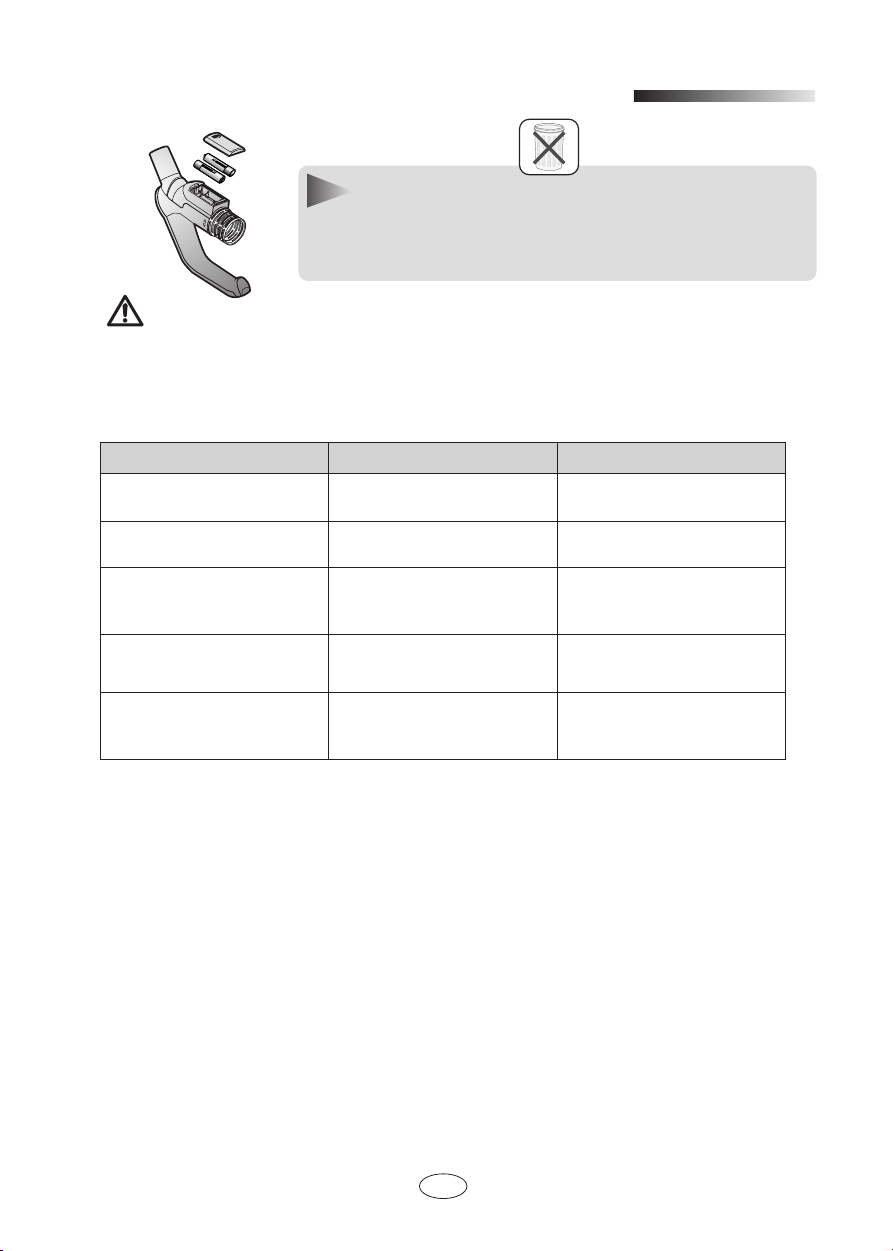
CHANGE THE BATTERY(OPTIONAL)
7
BATTERY TYPE : AA Size
NOTE
1. When the vacuum cleaner does not work, replace the batteries.
If the problem persists, please contact our authorized dealer.
2. Use 2 batteries of size AA.
WARNING
1. Never disassemble or recharge the batteries.
2. Never heat up the batteries or throw them into fire.
3. Do not reverse (+),(-) poles.
4. Dispose of the batteries properly.
- IF YOU HAVE A PROBLEM
PROBLEM CAUSE REMEDY 0
Motor does not start.
Suction force is gradually
decreasing.
Cord does not rewind fully. Check that the cord is not
Vacuum cleaner does not
pick up dirt.
Low or decreasing suction
This Vacuum cleaner is approved the following.
EMC Directive : 89/336/EEC, 92/31/EEC and 93/68/EEC
Low Voltage Safety Directive : 73/23/EEC and 93/68/EEC
No power supply.
Thermal cut-out.
Nozzle, suction hose or tube
is blocked.
twisted or wound unevenly.
Crack or hole in hose.
Filter is full of dust.
Check cable, plug and socket.
Leave to cool.
Check for blockage and
remove it.
Pull the cord out 2-3m and
push the cord rewind button.
Check hose and replace if
required.
Please check filter and, if
necessary, clean as illustrated in the instructions.
EN-10
DE
Bedienungsanleitung
STAUBSAUGER
❈
Bitte lesen Sie diese Anweisungen vor Benutzung des Geräts sorgfältig durch.
❈ Nur für Benutzung in Innenräumen.
Produkt registrieren und gewinnen unter www.samsung.com/global/register

WICHTIGE SICHERHEITSHINWEISE
1. Lesen Sie die Bedienungsanweisungen sorgfältig durch. Vergewissern Sie sich vor dem
Einschalten, dass Ihre Netzspannung der auf dem Typenschild auf der Unterseite des
Staubsaugers angeführten Netzspannung entspricht.
2. ACHTUNG: Benutzen Sie den Staubsauger nicht, wenn der Teppich oder Boden nass ist.
Benutzen Sie den Staubsauger nicht zum Aufsaugen von Wasser.
3. Die Benutzung des Geräts durch oder in der Nähe von Kindern darf nur unter strenger
Aufsicht erfolgen. Der Staubsauger ist kein Spielzeug. Lassen Sie den Staubsauger
niemals unbeaufsichtigt laufen. Benutzen Sie den Staubsauger nur für die in diesen
Anweisungen beschriebenen Zwecke.
4. Den Staubsauger nicht ohne staubbehälter benutzen. Den staubbehälter reinigen bevor
dieser ganz voll ist. Auf diese Weise verrichtet der Staubsauger immer zuverlässig seinen
Dienst.
5. Benutzen Sie den Staubsauger nicht zum Aufsaugen von Streichhölzern, heißer Asche
oder Zigarettenkippen. Halten Sie den Staubsauger von Öfen oder anderen
Wärmequellen fern. Wärme kann die Kunststoffteile des Geräts verformen und verfärben.
6. Vermeiden Sie das Aufsaugen harter, scharfkantiger Gegenstände mit dem Staubsauger,
das sie die Innenteile des Staubsaugers beschädigen können. Stellen Sie sich nicht auf
den Saugschlauch. Legen Sie kein Gewicht auf den Saugschlauch. Blockieren Sie nicht
den Ansaug- oder Austrittsteil.
7. Den Staubsauger ausschalten, bevor der Netzstecker gezogen wird. Den Stecker ziehen,
bevor Sie den Staubbeutel wechseln. Den Stecker immer am Stecker selbst aus der
Steckdose ziehen. Nicht am Kabel ziehen.
9. Vor der Reinigung oder Wartung des Gerätes muss dieses vom Stromanschluss entfernt
werden.
10. Von der Verwendung eines Verlängerungskabels wird abgeraten.
11. Arbeitet Ihr Staubsauger nicht korrekt, schalten Sie ihn aus, trennen sie ihn vom Netz
und wenden Sie sich an einen autorisierten Kundendienst.
12. Wenn das Stromkabel beschädigt ist, so muss es vom Hersteller, dessen
Servicepersonal oder einer ähnlich qualifizierten Person zur Vermeidung von Gefahren
ausgetauscht werden.
13. Den Staubsauger nicht durch Ziehen am Schlauch oder Rohr verlagern. Verwenden Sie
dazu den Griff am Staubsauger.
DE-1

MONTAGE DES STAUBSAUGERS
1
OPTION
OPTION
Funktionen können je nach Modell variieren.
▼
VORSICHT :
Staubsauger nicht am Griff des
hochheben, dazu ausschließlich den Tragegriff
benutzen!
staubbehälters
DE-2
Stellen Sie zur Lagerung die
Bodendüse entsprechend fest.
BEDIENUNG DES STAUBSAUGERS
2
2-1 NETZKABEL
HINWEIS
Ziehen Sie, wenn Sie den
Ziehen Sie das kabel vor
Gebrauch Vollständig heraus.
Stecker aus der Steckdose
ziehen, nicht an dem Kabel,
sondern immer an dem
Stecker.
2-2 LEISTUNGSREGELUNG (INFRAROT-KONTROLLE)
- AM HANDGRIFF
SENDER
1. Staubsauger EIN/AUS
Den Staubsauger durch Betätigung des Schalters
ON/OFF einschalten. Um den Staubsauger
auszuschalten, den Schalter erneut betätigen.
2. Automatische Saugkraftregulierung
Um die automatische Saugkraftregulierung
einzuschalten, drücken Sie bitte auf die Taste AUTO.
MIN → MID → MAX
- AM GERÄT
Leistungsregelung
Das Filterlicht leuchtet auf, wenn der
Staubbehälter kontrolliert oder geleert
werden muss. Zusätzlich ertönt auch ein
akustisches Signal.
Das Infrarotsymbol leuchtet auf, wenn
Signale von der Infrarotsteuerung am
Griff empfangen werden.
3. Leistungsregelung
Drücken Sie auf die Taste POWER +/- bis die
gewünschte Saugleistung eingestellt ist.
Hinweis: Wenn der Staubsauger über die
Kontrolle am Griff nicht funktioniert,
können Sie den Staubsauger über den
Kontrolle-Knopf am Hauptteil des
Gerätes bedienen.
Drücken Sie die Taste für die Leistungsregelung, um
das Gerät bei voller Leistung einzuschalten oder
auszuschalten.
DE-3
(ON(MAX) → OFF)
Zeigt während des Betriebs des
Staubsaugers die Bildung von negativen
Ionen an.
Dieses Symbol leuchtet auf, wenn die
automatische Saugkraftregulierung
eingestellt ist. Die Saugstärke wird am
LED Display angezeigt.
2-3 BENUTZUNG UND WARTUNG DES ZUBEHÖRS
Funktionen können je nach Modell variieren.
▼
ROHR
Sie können die Länge des
Teleskoprohrs anpassen indem Sie den
Knopf für die Änderung der Länge, der
sich in der Mitte des Teleskoprohrs
befindet, nach hinten bzw. nach vorne
Lösen und kürzen Sie das Teleskoprohr.
Entfernen Sie ggf. Schmutz, der sich im
Rohr gesammelt hat.
ZWISCHENSTÜCK
ELLBOGENGELENK
(OPTION)
OPTION
Führen Sie das
Zwischenstück in das
Ende des Griffs des
Schlauchs ein.
Die Abstaubbürste nach
außen ziehen und drehen.
Schieben Sie das
Zwischenstück in entgegengesetzter Richtung in das
Ende des Griffs des
Schlauchs.
1234 5
1. Das Ellbogengelenk mit dem Anschluss des Schlauchs und mit dem
Verlängerungsrohr verbinden.
2. Das Verlängerungsrohr in den unteren Teil des Ellbogengelenks einführen.
3. Den Knopf PUSH betätigen.
4.
Während Sie den Knopf PUSH gedrückt halten, können das Ellbogelenk abbiegen.
5. Mit Hilfe des Ellbogengelenks können Sie auch schwer erreichbare
Stellen (z.B. unter einer Bank) erreichen, ohne dass
Reinigung von
Kleidung und
Bodenbelägen
Universalbürste
Reinigung von
Fliesen und
Steinplatten
Passen Sie den Saugöffnungshebel an
die zu reinigende Fläche an.
DE-4
Ist die Saugöffnung verstopft, entfernen
Sie den Schmutz bzw. den Gegenstand,
der die Verstopfung verursacht.
OPTION
Parkettbürste
Weiche Kanten und Filzrollen schonen
auch empfindlichste Böden.
Ist die Saugöffnung verstopft, entfernen
Sie den Schmutz bzw. den Gegenstand,
der die Verstopfung verursacht.
OPTION
Tierhaarbürste :
Für verbesserte
Aufnahme von
Tierhaaren auf dem
Boden oder Teppich.
OPTION
Wenn Sie regelmäßig (Tier)Haare saugen, kann die Drehfunktion der Bürste durch Haare beeinträchtigt werden, die sich um die Trommel wickeln. In diesem Fall müssen Sie die Bürste reinigen.
1 2 3
Entfernen Sie mit Hilfe einer
Öffnen Sie die Klappe indem Sie
den Knopf zum Öffnen der Klappe
der durchsichtigen Blende drücken.
4
Entfernen Sie mit einem trockenen Staubtuch oder mit dem
Spaltsauger den Staub aus
dem Inneren der Bürste.
Schmutz auf der Turbine kann dazu führen, dass sich diese nicht mehr ordnungsgemäß dreht. In diesem Fall die Turbine reinigen.
Nehmen Sie die Trommel
aus dem durchsichtigen
Fenster heraus.
5
Führen Sie den Mechanismus der
Trommel in den Treibriemen der
Trommel ein und montieren die
Trommel wieder auf die Bürste.
Schere den Staub und die
Haare, die sich um die
Trommel gewickelt haben.
6
Schließlich drücken Sie auf
den Knopf Öffnen der Klappe
der durchsichtigen Blende.
Mini Turbobürste :
Zum einfachen
Entfernen von
Tierhaaren von Stoffen
und Möbelbezügen.
Wenn die Saugöffnung
verstopft ist, den vorhandenen Staub oder
Schmutz entfernen.
Achtung: nur für Bettwäsche. Achten Sie darauf, die Bürste beim Reinigen nicht zu beschädigen.
Wenn die Innenseite der Saugöffnung verstopft
ist, den Verriegelungsknopf auf UNLOCK stellen
und den ganzen Staub und Schmutz entfernen.
DE-5
Die Klappe wieder auf den vorderen Teil
aufsetzen und schließen. Nach dem
Schließen den Verriegelungsknopf
wieder auf LOCK stellen.
 Loading...